

Page 1
IMPORTANT INFORMATION AND GLOSSARY
INSTALLATION INSTRUCTIONS
for Pre-Hung Exterior Entry Doors (JII106)
Thank you for selecting JELD-WEN® products. Attached are
JELD-WEN’s recommended installation instructions for Exterior
Wood, Steel, and Fiberglass Pre-Hung Doors. Read these
instructions thoroughly before beginning. They are designed to
work in most existing applications; however, existing conditions
may require changes to these instructions. If changes are needed,
they are made at the installer’s risk. For installations other than
indicated in these instructions, contact a building professional.
Newer construction methods have led to an increase in air and water
tightness in buildings. This frequently leads to negative air pressure
inside the house, which can draw water through very small openings.
Our installation method seals the door to the weather barrier
(typically building wrap) and uses a sill pan to capture and drain
incidental storm water from under the door.
Not all exterior door types may be installed into every wall condition
in all areas. See our Appropriate Protection document for overhang
requirements and our Additional Requirements document for Fire
Doors at www.jeld-wen.com/resources. Consult your local building
code ofcial (or Authority having Jurisdiction) for applicable building
codes and regulations. Local building code requirements supersede
recommended installation instructions.
Please Note! Any exterior door installation where the sill is higher than
35 feet above ground level or into a wall condition not specically
addressed in these instructions must be designed by an architect or
structural engineer. Failure to install square, level and plumb and on a
at surface (without twist or warp) could result in denial of warranty
claims for operational or performance problems.
Note to Installer: Provide a copy of these instructions to the building
owner. By installing this product, you acknowledge the terms and
conditions of the limited warranty as part of the terms of the sale.
GLOSSARY
Backer Rod (backing material)
A material (e.g. foam rod), placed into a joint primarily to control the
depth of the sealant.
Buck
A wood framework attached to the masonry inside a window or a door
rough opening.
Door System/Pre-Hung Door
A pre-cut and assembled unit consisting of a door slab (prepared for the
locking or passage hardware) hung on hinges in a wood or metal frame.
Hinge Jamb
The side of the jamb on which the hinges of a door are installed.
Rough Opening
The framed opening in a wall where a door is to be installed.
Security Plate
A metal plate pre-installed into the frame of a pre-hung door. It is
designed to provide extra strength and stability from a forced entry
attempt by allowing the latch of the door to rest inside it when the
door is closed.
Shiplap
The layering method in which each layer overlaps the layer below it so
that water runs down the outside.
Shipping Strap
Small, metal or plastic clips that come attached to a door system.
These clips help keep a door slab closed and aligned before and during
installation.
Sidelight
A xed, usually rectangular window placed on either side of a door.
Sill Pan
A three-sided box made of sheet material. The door sill sits inside the sill
pan in the rough opening. It is designed to catch water that inltrates
into the rough opening and divert it to the outside.
Strike Jamb
The side of the jamb that makes contact with the latch on a door slab.
Please allow sufcient time to properly prepare the rough opening,
install the entry door, and ensure its proper operation.
Estimated Install
Time for New
Construction
First Time: 4.0 hr.
Experienced: 2.5 hr.
Professional: 1.5 hr.
12
11
10
9
8 4
7 5
6
1
2
3
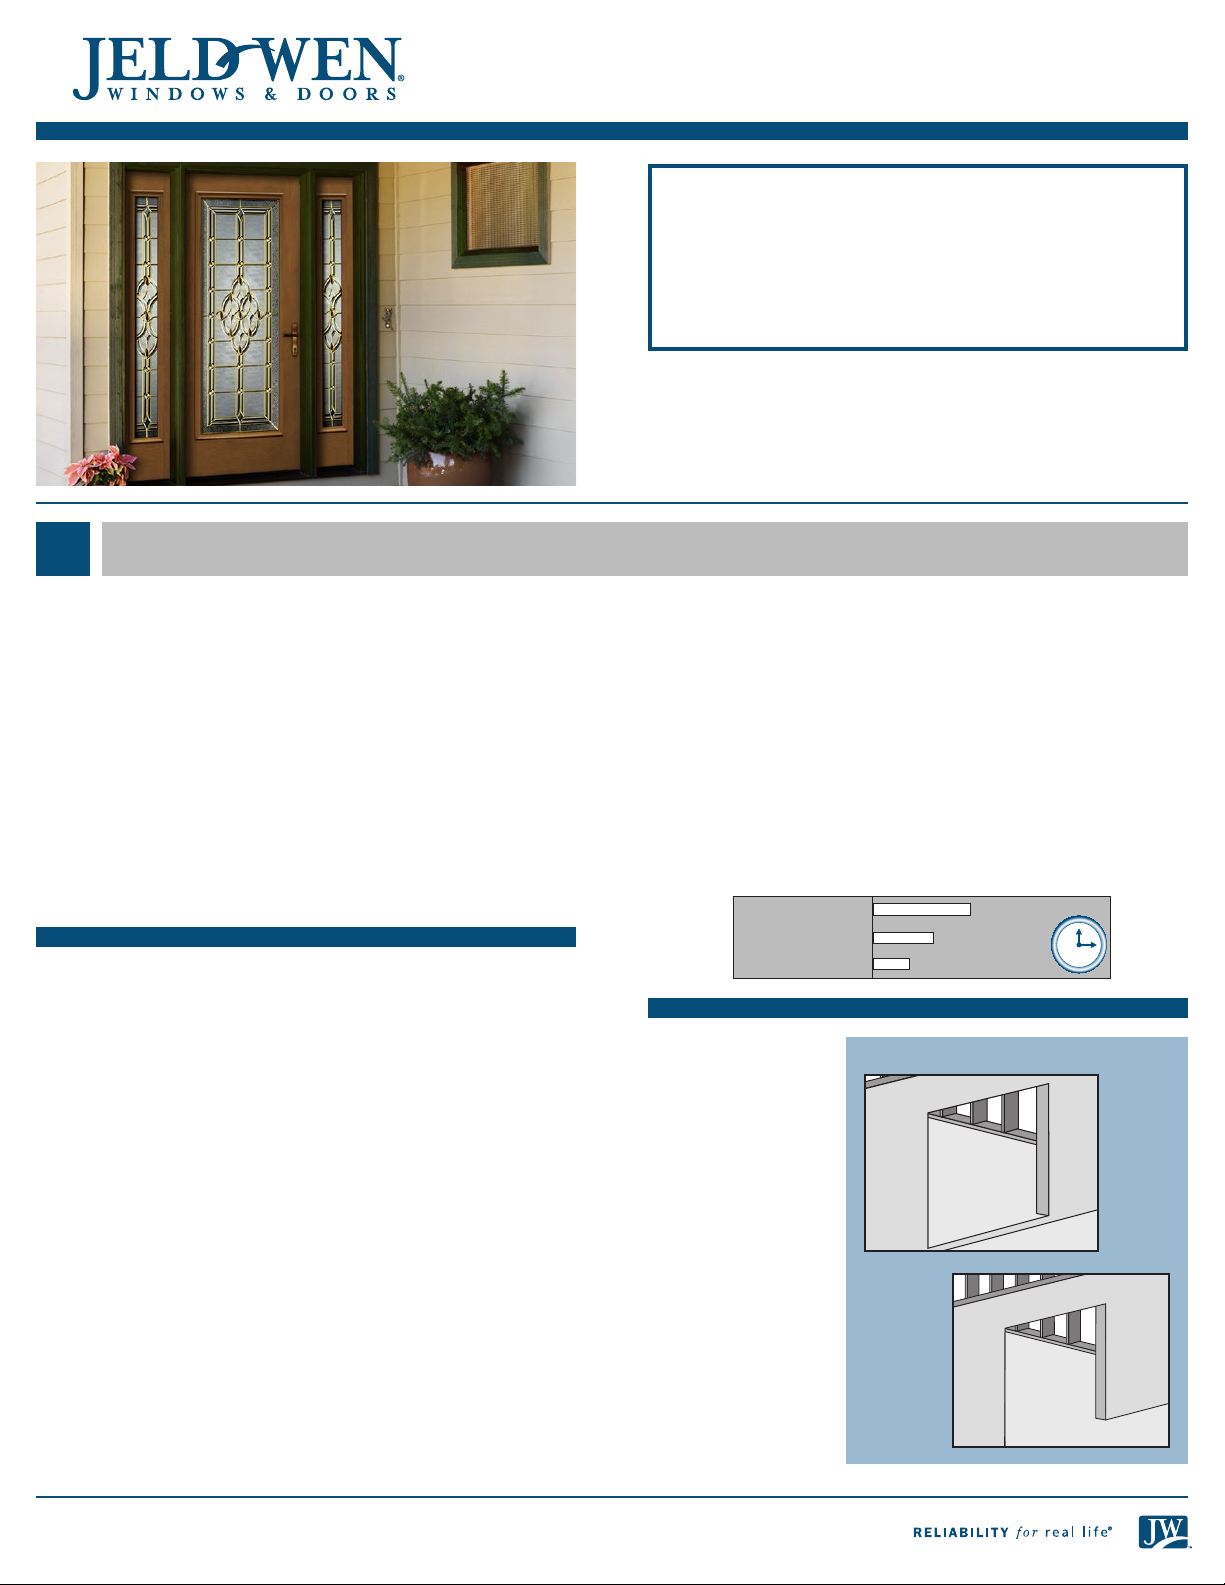
LANDINGS
These instructions
cover two sill
Step-Down Landing
conditions: the
step-down landing
and the continuous
slab landing. The
installation methods
vary slightly between
landing types.
Continuous
Slab
Landing
Page 2
ROUGH OPENINGS
INSTALLATION INSTRUCTIONS
for Pre-Hung Exterior Entry Doors (JII106)
This installation guide specically addresses masonry/block wall,
sheathed wall and open-stud construction.
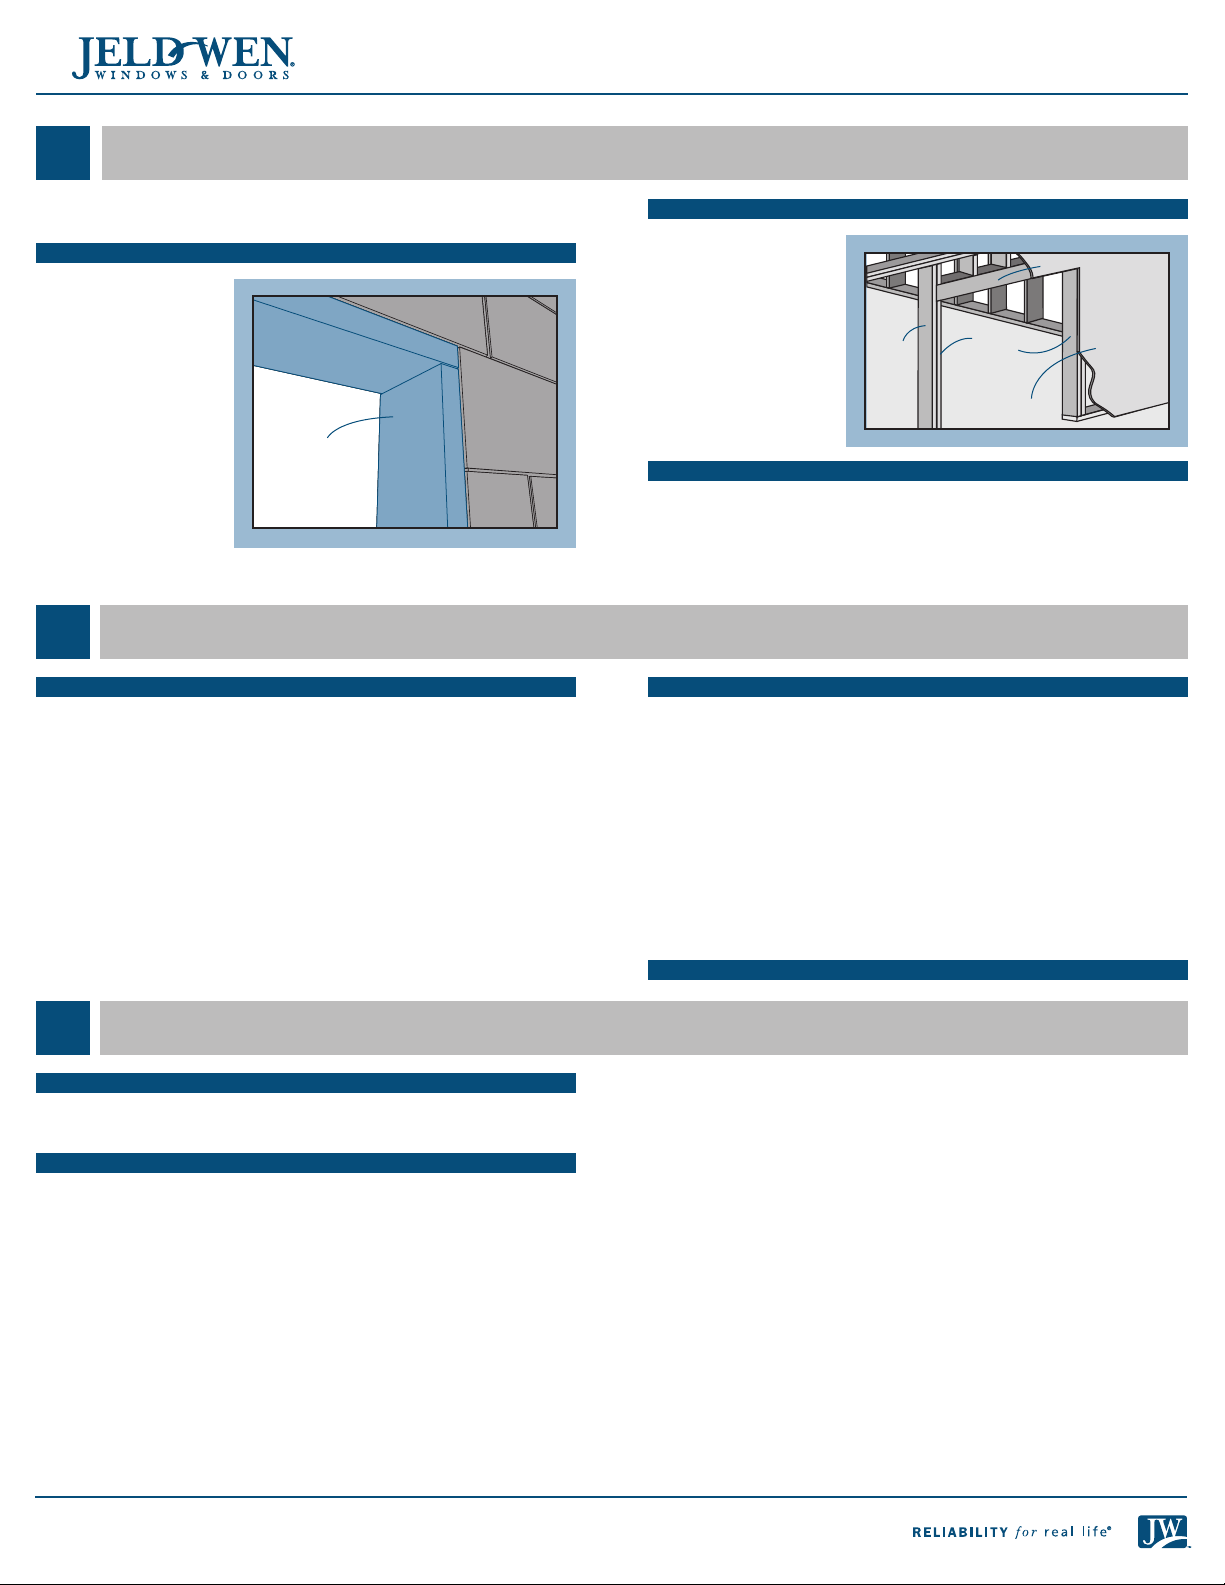
MASONRY/BLOCK WALL CONSTRUCTION
This installation
assumes that a
building professional
has already properly
fastened and sealed
a framework of studs
(often called a buck)
to the concrete/
masonry wall.
Buck
SAFETY AND HANDLING
SAFETY
• Read and fully understand ALL manufacturers’ instructions before
beginning. Failure to follow proper installation and nishing
instructions may result in the denial of warranty claims for
operational performance problems.
• Do not work alone. Two or more people are required. Use safe lifting
techniques.
• Use caution when handling glass. Broken or cracked glass can cause
serious injury.
• Wear protective gear (e.g. safety glasses, gloves, ear protection, etc.).
• Operate hand/power tools safely and follow manufacturer’s operating
instructions.
• Use caution when working at elevated heights.
FULLY SHEATHED WALL CONSTRUC TION
The wall framing is
covered by sheathing
and the door will be
mounted with the
exterior trim ush
against the sheathing.
This installation
assumes building wrap
is properly installed
prior to installation.
OPEN-STUD CONSTRUCTION
The wall framing needs to be completely surrounded by backing
support (non water-degradable, thin (max. 1/8" thick) sheet material
such as plywood or lauan) before installing building wrap and the
door. The door will be mounted with the exterior trim ush against the
applied backing support.
MATERIALS AND DOOR HANDLING
• Make sure the operating panel is secured prior to installation.
• Heed material manufacturer’s handling and application instructions.
• Protect adhesive surfaces from dirt, moisture, direct sunlight and
folding over onto themselves.
• Handle in vertical position; do not drag on oor.
• Do not put stress on joints, corners or frames.
• Store door in dry, well-ventilated area in vertical, leaning position to
allow air circulation; do not stack horizontally.
• Protect from exposure to direct sunlight during storage.
• Install only into vertical walls and when conditions and sheathing
are dry.
IF INJURY OCCURS, IMMEDIATELY SEEK MEDICAL ATTENTION!
King
stud
Trimmer
studs
Sill area
Sheathing
Header
MATERIALS AND TOOLS
PROVIDED MATERIALS
• 2 - #9 x 2 1/2" screws
• Foam weatherstrip wedges (corner seal pads)
NEEDED MATERIALS
Note! Follow all material manufacturers’ instructions for proper use
and compatibility. When using ashing, spray adhesive/primer, sealant
and foam products, we recommend using the same manufacturer and
verifying compatibility.
• Lockset
• 10d galvanized casing nails (if plan to stain) or #8 x 3" deck screws (if
plan to paint)
• Non-compressible or water degradable shims
• Pre-formed sill pan or sheet metal ashing/bendable vinyl sheeting
for sill pan
• Backer rod 1/8" larger than the widest portion of the gap (used in
conjunction with sealant bead).
• Sealant: We recommend OSI® QUAD® Max Sealant or equivalent. This
can be used in any application and can be painted or ordered in a
color matched product, if desired.
2
• Polyurethane low expansion Window and Door foam: We recommend
OSI® QUAD® Foam or equivalent).
• Plastic drain screen with crisscross or woven pattern (sold in 6" widths
to protect rain gutters) for step-down landings
• 3/8" staples for step-down landings
• Drip cap if required because of door location and exposure. Doors
with an adequate overhang (see our Appropriate Protection
document at www.jeld-wen.com/learn/resources/care-maintenance)
may not need a drip cap.
For installations into a Buck:
Liquid applied ashing (Protecto Wrap LWM 200 or equivalent)
For installations into a stud-framed wall:
• 4", 6", or 9" (as required by local code and window conguration)
wide self-adhesive ashing: We recommend OSI® QUAD® Butyl
Flashing Tape or equivalent.
Page 3
MATERIALS AND TOOLS - CONTINUED
NEEDED TOOLS
• Cutting shears (sill pan)
• Tape measure
• Utility knife
• Level (4 ft. minimum
recommended)
• J-roller
• Caulking gun
• Drill with bits
INSTALLATION INSTRUCTIONS
for Pre-Hung Exterior Entry Doors (JII106)
• Construction stapler
• Hammer
• Screwdrivers
• Nail set
• Square
• Pencil
• Pry bar
• Small punch or magnet
1
REMOVE PACKAGING
Remove shipping materials such as corner covers, shipping blocks
or pads. Remove any staples exposed on the frame, but leave glass
protective lms.
1. If the door
2. If the door is
REMOVE PACKAGING AND INSPECT DOOR
unit includes
packaging or a
skidboard under
the threshold
and bottom end
of the side jamb,
remove it. If the
door comes with
a security plate on
the outside of the
frame at the strike,
DO NOT remove
it. Install the door
with the security
plate attached.
fastened closed
with a duplex
nail or removable
plastic plug,
remove these
along with the
packaging and
crating.
Security plate
Skidboard
Note! If the door has
shipping straps, DO
NOT remove them
until instructed to do
so. These hold the
door system aligned
and closed during
installation.
INSPECT DOOR
• Cosmetic damage
• Product squareness (diagonal measurements must be within 1/4"
difference)
• Correct product (size, color, grid pattern, handing (side the hinges are
on), glazing, energy-efciency requirements, etc.)
If any of the above conditions represent a concern, or if you expect
environmental conditions to exceed the door's performance rating,
do not install the door. Contact your dealer or distributor for
recommendations.
Shipping strap
Shipping strap
3
Page 4

INSTALLATION INSTRUCTIONS
for Pre-Hung Exterior Entry Doors (JII106)
2
• Determine prior to
installation what the
INSPECT ROUGH OPENING
Verify Square, Level, and Plumb
actual nish oor
height will be and
adjust the rough
opening if needed
to accommodate a
taller unit height.
Most doors use a
1 3/8" high
A
C
E
threshold which
provides adequate
clearance in most
B
D
applications. This
ensures that the
door does not drag
on interior oors
after installation.
3
INSTALL SILL PAN
A sill pan can be ordered with some products (check with a salesperson),
found in building supply stores or online (search “sill pan”), or
fabricated on the jobsite (details below) with the proper tools and
materials.
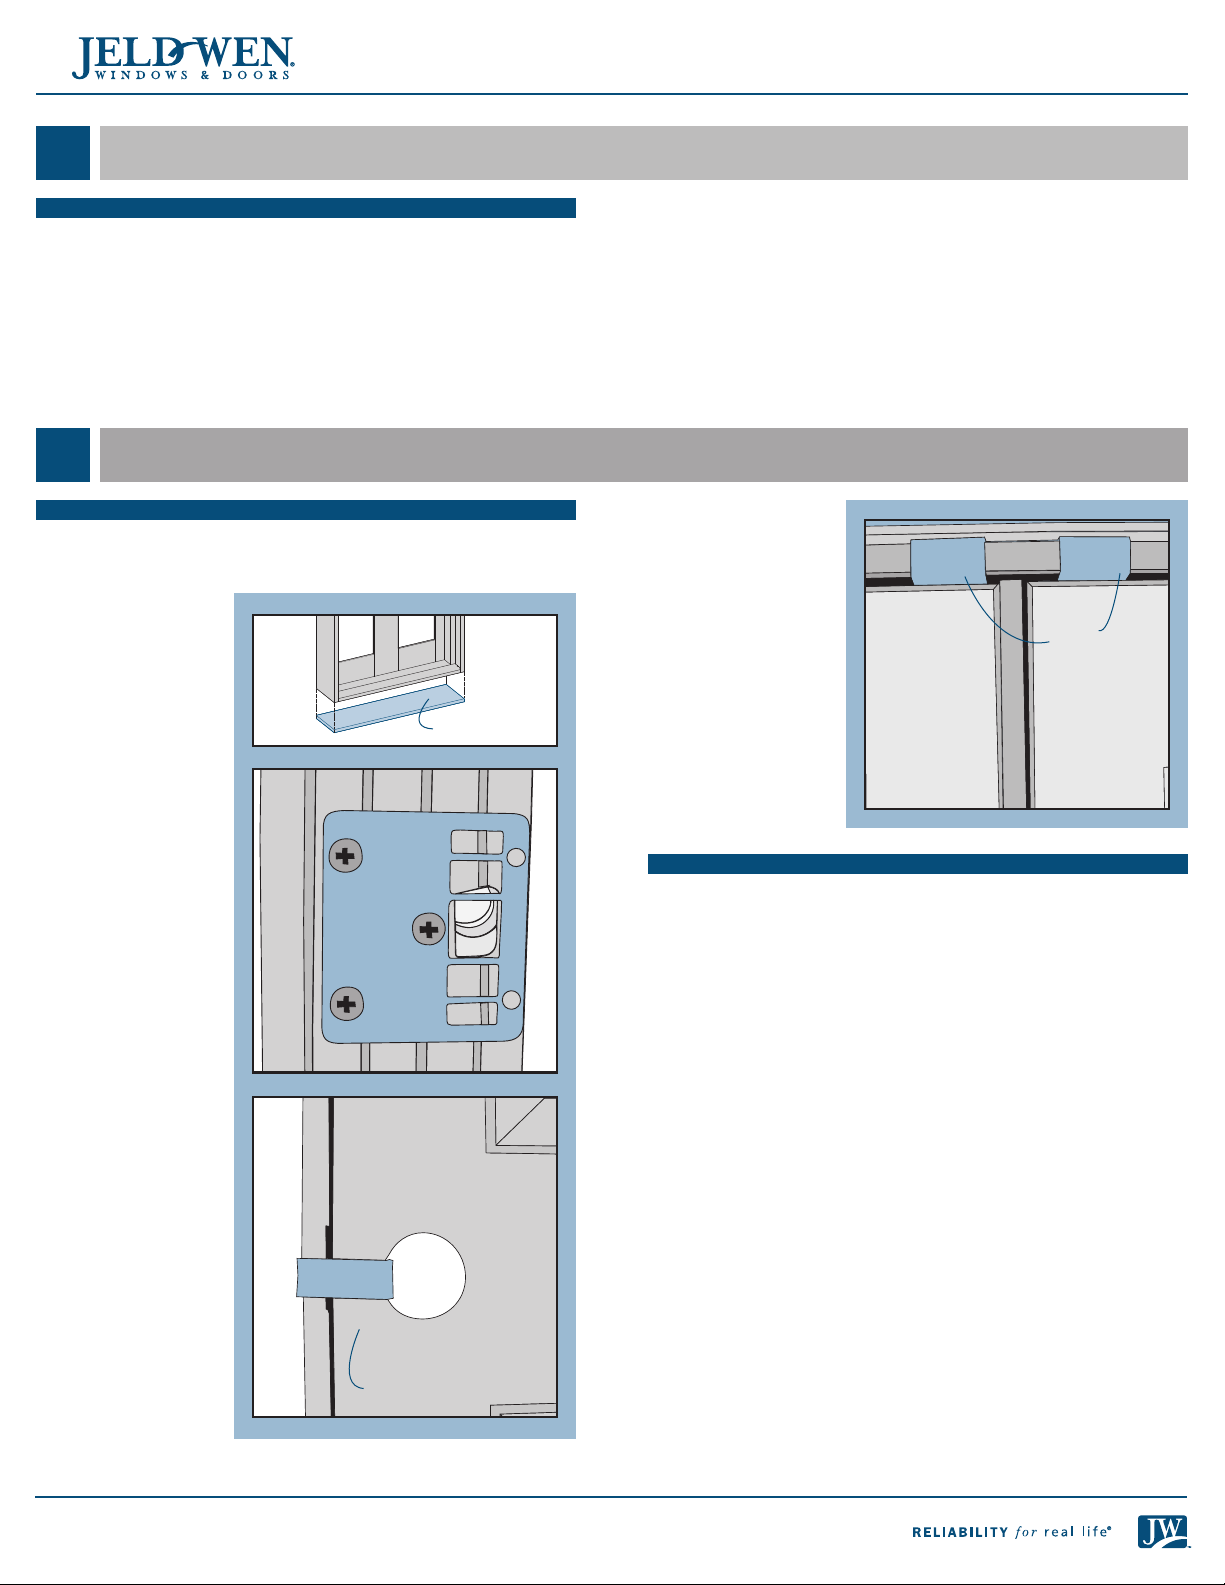
JOBSITE FABRICATED SILL PAN
1. Cut a piece of
sheet material to
the length shown.
2. Lightly crease
folding lines 1/2"
in from the two
short sides and one
long side.
3. Measure the
distance from the
back of the trim to
the interior edge
Length of rough opening sill plus 1"
Frame
width
+9/16"
Folding Line
1/2"
Interior
1/2"
of the frame and
add 9/16".
Measure
frame
width
4. Take this distance
from the back
edge and lightly
Fold sides and back up
crease a folding
line across the
sheet material.
5. For step-down
landings, cut 1/2"
in at this line on
both sides of the
Fold corner
forward
Fold front
ap down
sheet material.
• Verify the door is 1" narrower and 3/4"shorter (1/2" each smaller if
code requires) than the rough opening width/height. 90-minute re
doors should be 1 1/4" narrower and 5/8" shorter.
• Verify the rough opening is square. The (A) and (B) measurements
should be the same. Maximum allowable deviation from square is
1/4".
• Verify the rough opening is level and plumb (C). The maximum
allowable deviation is 1/8".
• The rough opening sill must not be crowned or sagged (D). A 5 degree
sloped sill is recommended.
• The exterior face of the rough opening must be in a single plane (E)
with less than 1/8" twist from corner to corner.
• Minimum double studs should be used at all wood framed rough
openings.
• The header must be supported by trimmer studs.
6. For continuous
slab, cut across the
folding line.
Continuous slab
7. Fold the three back
sides up to make a
3-sided box, and, for
step-down landings,
fold the front ap
down.
Step-down
INSTALL SILL PAN
1. Set the sill pan
in the rough
opening, aligning
the front edge (for
continuous slab) or
folded down edge
(for step down) with
the exterior of the
rough opening.
2. Mark a line across
the front and back
of the sill pan.
3. Apply three 3/8"
beads of sealant
between the lines.
4. Place the sill pan in
the rough opening.
Firmly press the sill
pan into the sealant
with a J-roller.
Sealant
4
Page 5

INSTALLATION INSTRUCTIONS
for Pre-Hung Exterior Entry Doors (JII106)
4
PREPARE BUCK
Note! This section applies to installations into a buck only. For
installations into a stud-framed wall, begin with section 5, “PREPARE
STUD-FRAMED WALL.”
1. Seal any joint larger than 1/16" in the buck and between the buck
and the concrete/masonry with sealant.
2. Cover the buck and the surrounding concrete/masonry at the head
and jambs and sill with liquid applied ashing as shown.
END of Buck Instructions, SKIP to section 6, “INSTALL DOOR.”
5
PREPARE STUD - FRAMED WALL
FOR RETROFIT INSTALLATIONS
After removing the old door, remove sufcient siding to expose at least
9" of intact building wrap. If damaged, apply new building wrap in a
shiplap manner. Verify header and trimmer studs are structurally sound.
PREPARE BUILDING WRAP
Verify these steps are allowed by the building wrap manufacturer.
1. Trim building wrap
ush with the
edges of the rough
opening.
2. If installing a drip
cap, (recommended
6"
because this
integrates the
building wrap and
45˚
drip cap to protect
the structure and
the product from
incidental water)
at the head, slit
building wrap 6"
at 45°. Tape up as
shown.
3. Trim the sides
sufciently to allow
the nailing n to be
mounted against
the sheathing.
4. Apply spray
adhesive/primer
to the sill pan and
surrounding area.
Follow manufacturer’s instructions for application methods.
5. Cut a piece of self-adhesive ashing the length of the sill and apply
over the sill pan as shown. The bottom of the sill pan should be
completely covered by the self-adhesive ashing. For step down
landings, fold ashing down as shown. For continuous slabs, trim
ush with rough opening.
Liquid applied
ashing
Sealant joints
6. Cut two pieces
of self-adhesive
6"
ashing 6" wide by
the sill pan width +
3" long.
a. For continuous
slab landings
only, cut out the
Sill pan
width
3"
Discard
(for
continuous
slab only)
inside corner.
b. Adhere the
pieces of
ashing to the
inside corners.
Stretch ashing
Sill pan
width
3"
3"
Step-Down
Landing
as needed to
cover corners
and lay at.
Sill pan
width
7. Smooth gaps or
bubbles beneath
self-adhesive
ashing with a
J-roller (remove
Continuous Slab
Landing
3"
3"
and replace if
necessary).
8. Seal back corners of
sill pan with sealant.
9. For step-down
landings only, cut
plastic drain screen
Sealant
1"
1/2"
to length of sill +
2" and staple 1/2"
below sill edge.
The drain screen
provides a path for
air to dry any incidental moisture in the rough opening.
End of Stud-Framed Wall Instructions, continue with section 6,
“INSTALL DOOR.”
5
Page 6

INSTALLATION INSTRUCTIONS
for Pre-Hung Exterior Entry Doors (JII106)
6
Warning! To avoid injury, use at least two people to install. Adequately
support the door until fully installed.
PREPARE DOOR
1. On the interior
side, apply a
continuous bead
of silicone sealant
where the exterior
trim meets the
door frame as
shown. Tool into a
llet shape.
2. Apply a 3/8"
continuous bead
of sealant across
the sill pan back
dam and over the
ashing joints as
shown.
INSTALL DOOR
WARNING! If installing fasteners through berglass components, we
recommend pre-drilling holes to keep the berglass from splitting.
Note! This section covers single door, double door, and doors with a
transom or a sidelight(s) already installed by the factory.
1. Remove any pre-hanging clips that are fastened to the outside of
the jamb that will be covered when the unit is placed in the rough
opening. Adequately support the slab to keep it from swinging
open during installation.
2. For units with
brickmould trim,
apply a 3/8" bead
of sealant to the
back of the trim
where it will contact
the structure. From
the outside, tilt the
entire pre-hung
door into the center
of the opening.
Make sure the sill
contacts the sealant
on the sill pan back
dam (upturned leg
on the interior).
INSTALL DOOR
Sealant
Sealant
3. Temporarily fasten
the door as follows.
For metal frames,
drive a nail or screw
through one lower
hole in the ange.
For doors without a
sidelight(s), secure
the hinge jamb
by placing one
10d casing nail (or
one #8 x 3" deck
screw) horizontally
centered in the
hinge jamb or
brickmould trim
20" from the top
and bottom (or
just above the
lower hinge) of the
door. Do not set
nails/screws. For
appearance reasons,
fasteners can be
driven behind (but not through) the weatherstrip if desired. Secure
sidelight(s) in a similar manner through the frame and into the wall.
4. From the inside, shim the jambs as follows: One shim on each end
of the sill (between jamb and sill, not under sill). Single/double units
at each hinge location and at the strike plate. Units with sidelights,
between the sidelight and wall in at least 3 places until the door is
square in the opening.
5. For doors with metal frames, secure with nails or screws through the
provided holes in the frame either above or below every oval slot.
For all other doors, temporarily fasten the latch jamb by placing one
10d casing nail (or one #8 x 3" deck screw) horizontally centered in
the latch jamb 16" from the top and bottom of the door. Do not set
nails/screws.
6. Verify the door unit is square, then securely fasten the hinge jamb
by setting the two nails or screws installed earlier. Add an additional
nail or screw centered between the rst two and one 4" from each
corner.
7. Remove any remaining pre-hanging clips. Be sure the door opens
freely and that the space between the door and the jamb is even
on all sides. Adjust if necessary by loosening or removing the strike
jamb fasteners and adjust until there is even contact between the
slab and weatherstrip. Secure all fasteners.
DOUBLE DOOR, SIDELIGHT OR TRANSOM INSTALL ATIONS
1. If installing a door with a sidelight(s), shim the head on both sides of
the joint where the sidelight joins the door jamb. Fasten next to the
shims and then remove shims.
2. Shim the head of double door units or units with sidelight(s) at the
center of each slab/sidelight. Fasten next to the shims and then
remove shims. Fasten a transom in a similar manner every 16".
20"
Shim locations
20"
16"
Fastener
16"
6
Page 7

INSTALLATION INSTRUCTIONS
for Pre-Hung Exterior Entry Doors (JII106)
6
INSTALL DOOR - CONTINUED
3. From the inside of
doors with sidelights
installed on a wood
oor, pre-drill for #8
screws and ll the
holes with sealant.
Drive two #8 x 3"
deck screws through
each door jamb and
sidelight into the
oor in the locations
shown.
4. Some double door
units may require
installing lock
bolts at the top
and bottom of the
Box unit shown
Sidelight
frame
Interior
Door
frame
inactive panel. Follow
the instructions
that come with the
product if available.
Otherwise, locate the
center point of each
lock bolt, drill 3/8" bolt holes and install keeper plates.
FINISH INSTALLATION
1. Re-check for smooth door operation and even spacing between the
door and jamb. Secure the strike jamb evenly between the rst two
already in place with two more 10d casing nails (or #8 x 3" deck
screws) behind the weatherstrip.
Note! Steps 2 and 3 apply only to units with hinge jamb(s) against the
rough opening.
2. Install two provided
#9 x 2 1/2" wood
screws in the top
Fastening for Top Hinge Only
Weatherstrip
hinge through the
two holes closest to
the weatherstrip,
driving them through
the hinge jamb and
into the studs. If
necessary, remove
Install screws
the screws already in
the hinges to insert
these longer screws.
3. If installing a door
with a metal frame,
on the exterior, slide
the “L” shaped head
piece into the inner
section and center
it in the opening.
Install the jamb
pieces making sure
they are tight against
the head piece and
rough opening.
Secure with fasteners
through the provided
holes.
4. If installing a door
with a metal frame
and adjustable
Weatherstrip
T-Strike, place A
over B and place
in the bore in the
Deadbolt
cover plate
frame. Install screws
but do not tighten.
Close door and
push B inward until
the door slightly
compresses the
A B
weatherstrip. Open
door and tighten
screws.
5. At the sill, pull
the weatherstrip
up slightly and
apply a bead of
Wedge
sealant (behind the
weatherstrip) at the
intersection of the
Sealant
jambs, brickmoulds,
thresholds and
oor as shown.
The included foam
wedges are used
to complete the
weatherstrip seal at
each bottom corner
between the jamb and operating slab(s) when closed. Position the
thick edge behind the weatherstrip, remove the backing paper and
adhere to the jamb as shown.
6. Install drip cap if required or desired. Fold the building wrap
(previously taped up) down over the drip cap and seal the cut ends
with self-adhesive ashing or building wrap tape.
7. For metal frames,
apply casing to both
sides. Mark the
locations of the oval
slots in the frame
onto the casing and
secure casing with
fasteners through
the oval slots.
For snap on steel
casing, refer to the
instructions with the
clips.
8. Apply sealant
around the outside
of the door unit
between the siding
and brickmould,
between the
brickmould and the
jamb and between
the jamb sides and
the threshold. Apply
a discontinuous
bead of sealant
(1/2" gap every 1')
along the front side
of the threshold.
7
Page 8

INSTALLATION INSTRUCTIONS
for Pre-Hung Exterior Entry Doors (JII106)
6
FINISH INSTALLATION - CONTINUED
9. Create a continuous air seal on the interior between the rough opening
and the door frame with low expansion foam.
10. Ensure sealant on back dam of the sill pan fully seals to the inside
face of the sill. Apply more sealant as necessary.
11. On the exterior of step down landings, install support trim
underneath the sill where it extends past the landing. Position trim
snugly against the bottom of the sill toe/nose.
7
INSTALL DOOR - CONTINUED
COMPLETE INSTALLATION
FIRE DOOR HINGES
Do not remove or paint over any re labels. Please see our separate
document for additional requirements for installing re-rated doors at
www.jeld-wen.com/resources. Automatically closing hinges are required
on re doors and when allowed to close by themselves from 18", should
close and latch securely. If it does not, adjust the spring as follows:
1. With the door closed,
insert the provided
hex wrench so that
it can be rotated
clockwise. Hold in
place and remove
tension pin with
a small punch or
magnet.
2. Rotate hex wrench
clockwise 1/4 turn
and re-insert tension
pin loosely into
tension hole.
3. Remove hex wrench and try closing force.
4. Repeat steps until closing force is adequate but do not rotate past 3
holes on 180o openings or 4 holes on 90o openings.
Tension
pin
Tension
hole
Clockwise
1. If installing a re door, verify the correct seal (weatherstrip) is
installed in the frame and conforms to local codes.
2. Fill any nail/screw holes and sand smooth.
3. Finish all six sides of the door slab as well as the frame.
4. Install exterior wall surface within seven days of installation.
5. Install lockset hardware per supplied instructions.
Please visit jeld-wen.com for nishing instructions, warranty and care and maintenance information.
6. Remove protective lm (if applicable) on glass after all construction is
complete or within one year.
7. Protect recently installed units from damage from plaster, paint, etc.
by covering the unit with plastic.
8. Install any interior trim as desired.
9. Sealant joints will need to be inspected at least once a year and
repaired as necessary.
Thank you for choosing
©2014 JELD-WEN, inc.; This publication and its contents are owned by JELD-WEN, inc. and are protected under the U.S. Copyright Act and other
intellectual property laws. All trademarks, service marks, logos and the like (whether registered or unregistered) are owned or controlled by JELD-WEN,
inc. or others. Unauthorized use or duplication of JELD-WEN intellectual property is prohibited.
JELD-WEN reserves the right to change product specications without notice. Please check our website, jeld-wen.com, for current information.
8
(05/14)
 Loading...