

Page 1
INSTALLATION INSTRUCTIONS
for Custom Swinging Screens (JII036)
Determine if the unit is a single unit entry door or double unit and if it is a
wood or aluminum clad frame. For primed or clad units, determine which
door screen will be mounted on the active side of the opening. The active
side is the door screen which will be used for passage through the door
unit while the passive side is left closed.
NEEDED TOOLS & MATERIALS
•#2 Phillips
screwdriver
•#3 Phillips long bit
•Hacksaw or le
•Pencil
•Regular slotted
screwdriver
•Power drill with bits
•Level
•Tape measure
•Utility knife or
scissors
•Masking tape
•Washers
•Glue stick
Note! Do not over tighten screws and strip out mounting screw holes.
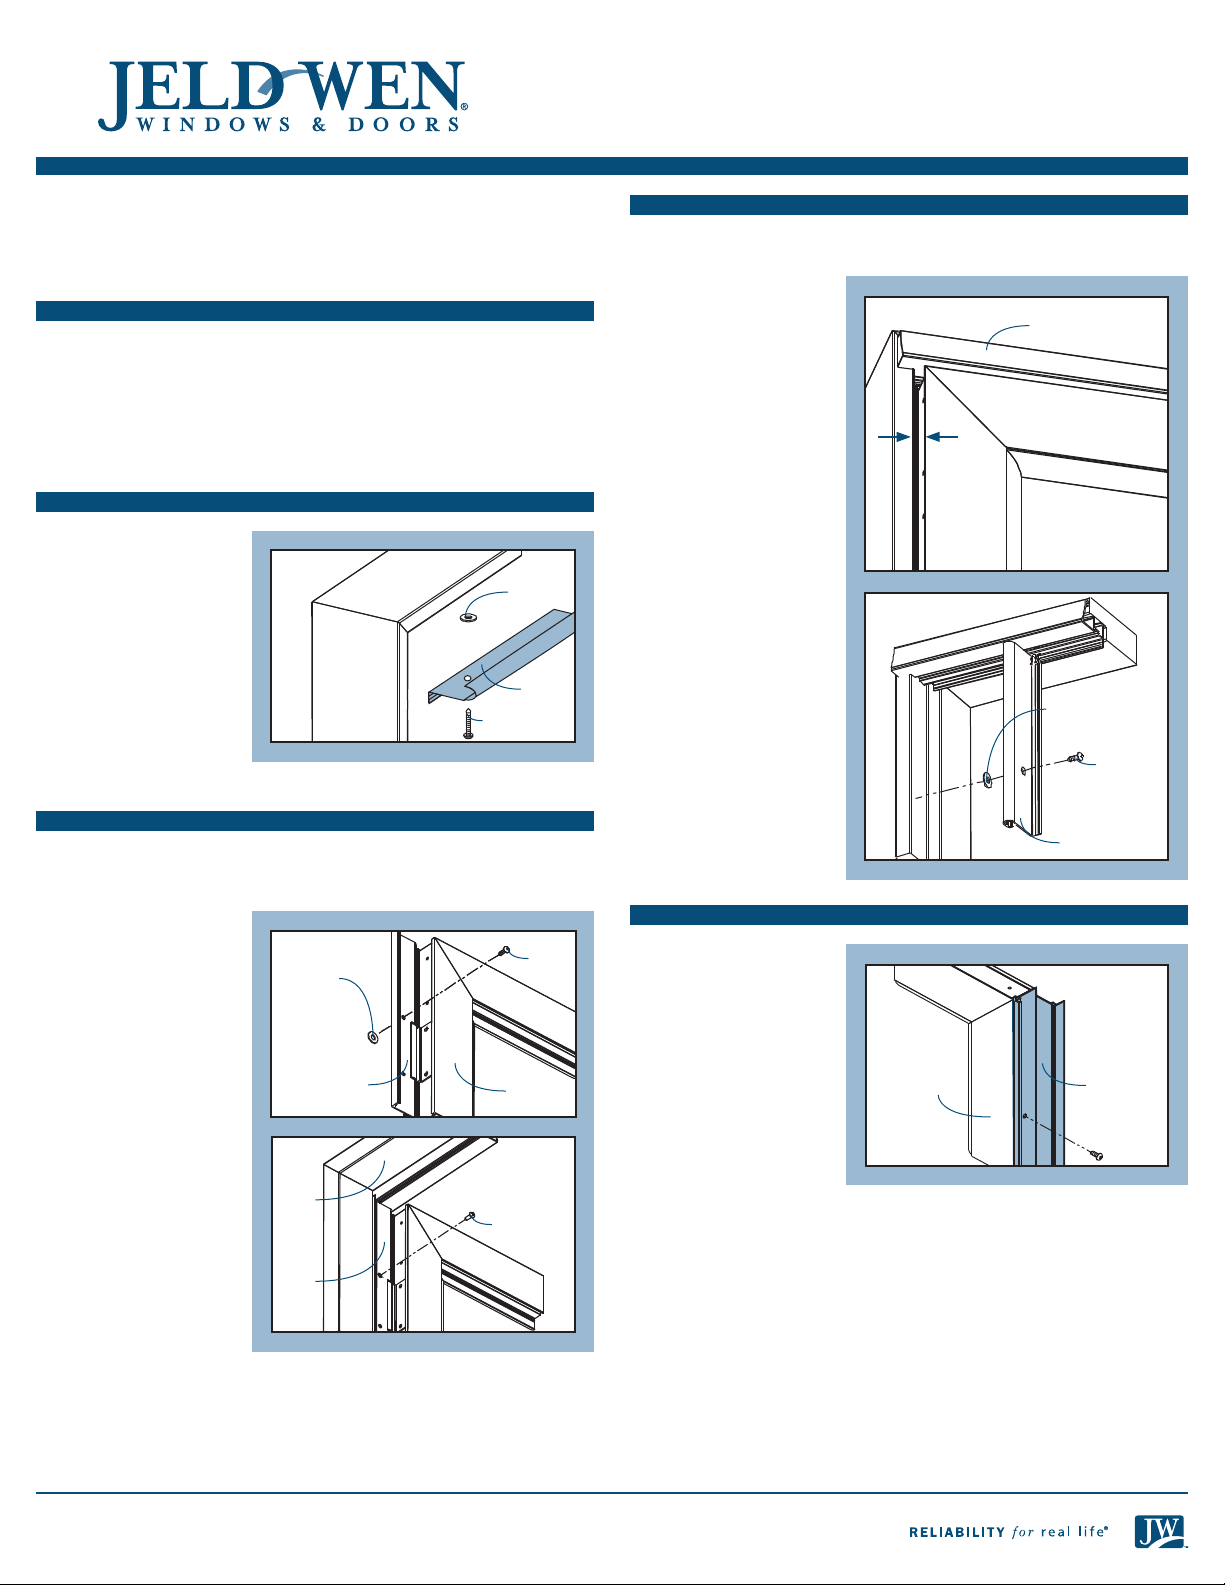
HEAD Z-BAR INSTALLATION
Verify the head is straight
and level. If not, washers
can be placed behind
z-bar mounting holes as
necessary. Use a glue stick
Head
Optional
washer
to hold washers in place.
Center the head z-bar
between the door jambs.
Drive one of the supplied
#8 x 1" self-tapping
Phillips at-head screws
Jamb
Head
Z-Bar
#8 x 1" screw
through the pre-punched
hole in one end. Continue
driving screws through the rest of the holes.
HINGE SIDE Z-BAR INSTALLATION
1. Verify door hinge side jambs are straight and plumb. If not, washers can
be placed behind z-bar mounting holes as necessary. Use a glue stick to
hold washers to the z-bar.
2. Pivot z-bar 90° open
from screen assembly
and place into door
frame. While holding
z-bar against door
Optional
washer
#8 x 1"
screw
jamb, lift screen
assembly up until snug
against the head z-bar.
3. Using the supplied #8 x
1" self -tapping Phillips
Hinge
Z-Bar
Screen
assembly
at-head screws,
position a screw in the
top of the uppermost
pre-punched hole and
drive until secure.
Continue down, driving
screws through the
remaining pre-punched
holes.
Door
frame
Hinge
Z-Bar
#8 x 1"
screw
4. If installing double
screens, repeat steps for
the other screen.
5. Close the screen
assembly(ies) and check for uniform gap between the door screen
assembly and head z-bar. For double units check for uniform 1/2" to
9/16" gap between the two screens. If necessary, remove and add or
remove washers as needed and reinstall.
LATCH SIDE Z-BAR INSTALLATION
Note! Applies to single entry units only, double screen units skip this step
and will install an astragal in the next step.
1. Close the screen
assembly and check
for a uniform gap of
1/8" - 1/4" between the
Door
frame
screen latch stile and
the door frame. Place
washers behind the
z-bar mounting holes
if needed. Use a glue
stick to hold washers in
place.
1/8" - 1/4"
gap
Screen
assembly
2. Re-open the screen
assembly approximately
90° and place the latch
side z-bar against the
door frame latch side
jamb and up against
the underside of the
Head
head z-bar. Install in
the same manner as the
hinge side. Close the
door screen assembly
and re-check for a
Optional
washer
uniform gap between
the screen perimeter
and the latch side z-bar.
#8 x 1"
screw
If necessary, remove
and add or remove
washers as needed and
Jamb
Z-Bar
reinstall.
DOUBLE UNIT ASTRAGAL INSTALLATION
1. Align the astragal on
the passive screen
side stile with the top
of the screen frame
and against the inside
ange.
2. Hold in place and drive
one of the supplied
Passive
screen
side stile
Astragal
#8 x 1" self-tapping
Phillips at-head screws
through the top hole
and into the screen
frame.
3. Hold the astragal against the inside ange and install the remaining
screws. If the bottom end of the astragal rubs on the door sill, remove
and trim as needed.
Page 2
INSTALLATION INSTRUCTIONS
for Custom Swinging Screens (JII036)
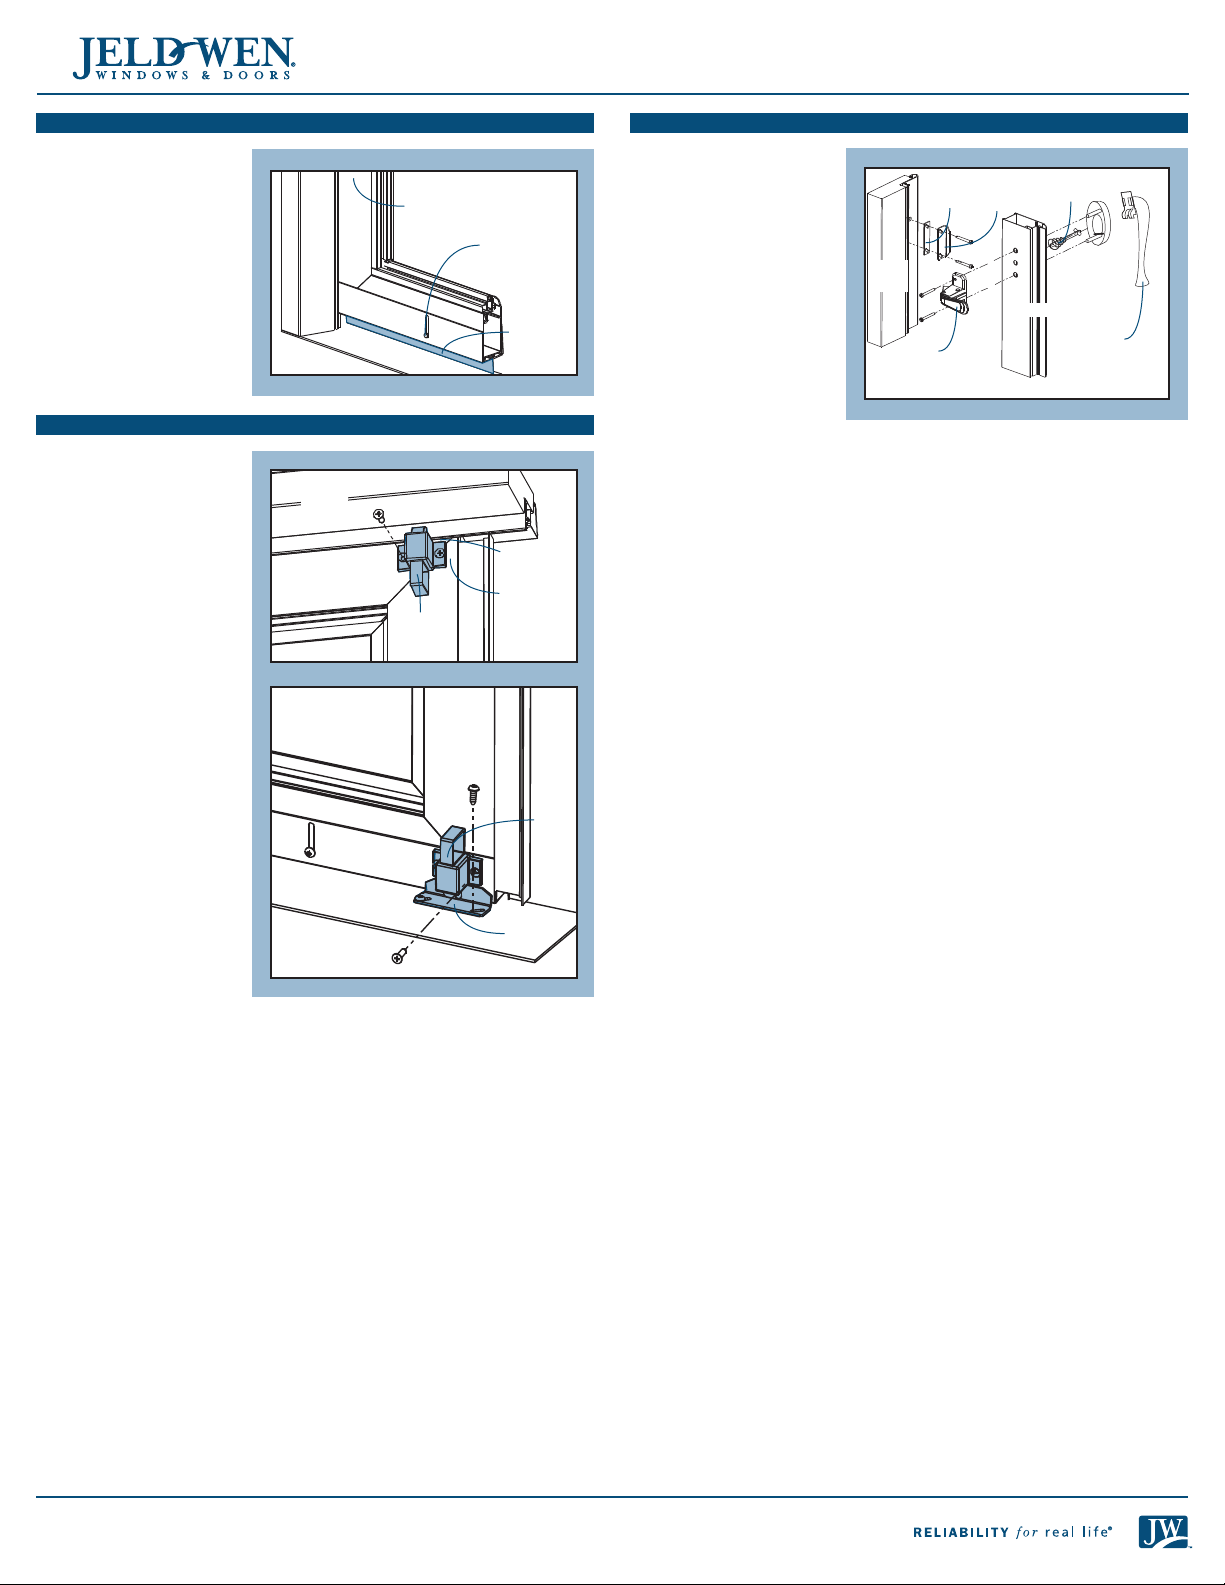
SILL EXPANDER ADJUSTMENT
Using a utility knife, trim
the exible ap so that
it will just touch at both
ends when the screen
assembly is closed. The
exible ap should just
Screen
assembly
Adjustment
screw
touch the door sill. If
adjustment is necessary,
loosen the adjustment
screws slightly and move
up or down as necessary.
Sill
Flexible
ap
Retighten screws.
PASSIVE SCREEN ASTRAGAL SLIDE BOLT INSTALLATION
1. Position a slide bolt on
the screen assembly top
rail 3/8" from the edge
of the screen stile and
1/16" below the bottom
of the head z-bar. Mark
screw hole locations
and drill 7/64" pilot
holes where marked.
Secure with two screws.
Door
frame
Screen
assembly
Slide
bolt
1/16"
gap
3/8"
gap
2. Place the strike plate on
the door sill ush with
the edge of the screen
stile and against the
inside face of the sill
expander. Mark screw
hole locations using the
slot ends furthest from
the sill expander and
drill 7/64"pilot holes
where marked. Install
strike plate screws but
do not tighten.
3. Position a slide bolt
on the sill expander
Sill
expander
Door sill
Slide
bolt
Strike
plate
3/8" from the edge of
the screen stile and
1/16" above the top of
the strike plate and mark screw locations. Drill 7/64"pilot holes where
marked and attach the slide bolt. Pull the strike plate in against the
slide bolt tip and tighten screws.
4. Cut foam pad 3/8" square and apply just below the slide bolt to provide
a cushion between the screen and the strike plate.
SINGLE & DOUBLE ACTIVE SCREEN HANDLE & STRIKE INSTALLATION
1. Seat the spindle and
spring into the outside
handle. Reverse feed
the handle through the
Strike
shim
Strike
plate
Spring and
spindle
backside of the housing
and ensure the handle
is properly seated.
2. From the exterior, seat
the outside handle
and spindle through
the pre-drilled holes
(spindle will seat
Door
jamb
Push
button
latch
Screen
Outside
handle
through the middle
hole). Support the
handle until screws are inserted in next step.
3. From the interior, align the inside handle and spindle so that the spindle
seats into the hole located in the middle of the inside handle set. Ensure
the inside handle will seat ush against the screen door. Insert machine
screws and tighten until the outside handle and inside handle are
secured.
4. For a single door, position the latch strike plate (and strike shims if
required) onto the door jamb at the approximate vertical center line of
the inside handle. Mark and drill two 7/64" pilot holes in the center of
the screw slots and install with two screws. Close the screen assembly
and check for proper operation and engagement. If necessary, adjust
shims behind the strike plate.
5. For passive screen handle installation on a French screen, follow steps
1 - 3 above.
2
Page 3

INSTALLATION INSTRUCTIONS
for Custom Swinging Screens (JII036)
DOOR CLOSER INSTALLATION
1. For single entry and
double active door
screen only, with the
screen assembly closed,
place the jamb bracket
on the hinge side 1/4"
from the inside face of
the screen and locate
it vertically on the
Hold-open
bracket
Short pin
Long pin
Adjustment
screw
Jamb
bracket
approximate center of
the screen frame top
rail.
2. Mark the screw hole
locations and drill
Screen
rail
Screen
bracket
1/8" pilot holes where
marked. Install using
#10 x 1" black screws.
3. Slide the hold-open
bracket onto the closer rod over the lugs until against the closer tube.
Align the closer rod hole with the jamb bracket hole and attach with
the short pin. Attach the screen bracket to the closer tube FRONT hole
with the long grooved connecting pin.
4. Close and latch the screen assembly. Hold the door closer level and the
screen bracket against the screen assembly, mark through the center of
the slots and drill two 1/8" pilot holes through only the inside surface.
Attach the bracket to the screen assembly with #10 x 1/2" short black
screws. Reattach the closer to the screen bracket in the REAR hole of the
closer tube (if the screen includes an optional glass panel to interchange
with the screen panel, install the pin in front hole for best operation).
5. Open the screen assembly and move the hold-open bracket back of the
lugs on the closer rod. Closing speed may be changed by turning the
adjustment screw clockwise to slow the speed and counter-clockwise to
increase the speed.
SCREEN PANEL REMOVAL (FOR STORAGE OR INTERCHANGING PAN EL S)
1. With the screen
assembly closed, press
outward on the top
end of one side panel
retainer strip and
Screen
assembly
gently pull the top end
out and away toward
the center of the
screen panel (it may be
necessary to insert a
slotted screwdriver or
Retainer
strip
other at tool between
the screen frame and
the retainer strip).
Work the strip out a
few inches at a time to
keep from buckling it.
2. Repeat the process on the opposite side, top and bottom retainer strips.
3. Remove the screen panel.
4. Install the optional storm panel by reversing the removal instructions.
5. To reinstall the screen panel, position the panel with the screen spline
facing into the house and install the top and bottom retainer strips rst,
then sides. Center each in the door frame rail and begin at one end and
press into the rail all the way across a few inches at a time.
Please visit jeld-wen.com for warranty and care and maintenance information.
Thank you for choosing
©2012 JELD-WEN, inc.; This publication and its contents are owned by JELD-WEN, inc. and are protected under the U.S. Copyright Act and other intellectual
property laws. All trademarks, service marks, logos and the like (whether registered or unregistered) are owned or controlled by JELD-WEN, inc. or others.
Unauthorized use or duplication of JELD-WEN intellectual property is prohibited.
JELD-WEN reserves the right to change product specications without notice. Please check our web site, jeld-wen.com, for current information.
3
(08/12)
 Loading...