

Page 1
IMPORTANT INFORMATION AND GLOSSARY
INSTALLATION INSTRUCTIONS
for Custom and Premium Pocket Windows (JII022)
Thank you for selecting JELD-WEN products. Attached are
JELD-WEN’s recommended installation instructions for pocket
(replacement) double-hung, casement, awning, picture or transom
windows, designed to be installed into an existing window frame.
Pocket windows may be installed from either the exterior or
interior. Exterior detail work is needed in both installation types.
Read these installation instructions thoroughly before beginning. They
are designed to work in most existing applications. However, existing
conditions may require changes to these instructions. If changes are
needed, they are made at the installer’s risk. For installations other than
indicated in these instructions, contact a building professional.
Not all windows can be installed into every wall condition in all areas.
Consult your local building department for applicable building codes
and regulations (particularly regarding minimum egress requirements).
Local building code requirements supersede recommended installation
instructions.
The installation of a pocket window will not eliminate installation or
maintenance problems with an existing window. Problems such as wood
decay and water leaks around the existing frame must be investigated
and xed prior to installing a pocket window.
Please Note! Installation such that the window sill is higher than 35
feet above ground level or any window installation into a condition
not specically addressed in these instructions must be designed by an
architect or structural engineer.
Failure to install into a square, level and plumb condition could result in
denial of warranty claims for operational or performance problems.
Note to Installer: Provide a copy of these instructions to the building
owner.
By installing this product, you acknowledge the terms and conditions of
the limited product warranty as part of the terms of the sale.
The exterior trim (casing) around the existing window opening may
be painted a color of your choice. However, optional color matched
cladding to cover this trim is available for purchase and professional
installation. Discuss with your dealer.
Estimated Install
Time for New
Construction
Professional: 1.5 hr.
First Time: 4.0 hr.
Experienced: 2.5 hr.
12
11
10
9
8 4
7 5
6
1
2
3
GLOSSARY
Backer Rod (backing material)
A material (e.g. foam rod), placed into a joint primarily to control the
depth of the sealant.
Butt Joint
The joint of two square edges united without overlapping.
Check Rail
In a double-hung window, the bottom rail of the upper sash (upper
checkrail) and the upper rail of the lower sash, where the lock is
mounted (lower checkrail).
Clad
Pre-painted formed metal covering the exterior surface(s) of some
wood windows.
Double-Hung Window Balance System
A system of ropes and pulleys (older) or springs (newer) used to
counter-balance the weight of a sash.
Miter Joint
Joint made by joining two parts with 45° angles, to form a corner at a 90° angle.
Pilot Hole
A drilled hole that is no larger than the body of the screw (minus the
threads).
Sash
An assembly comprised of stiles (vertical pieces), rails (horizontal pieces)
and the window’s glass.
Transom
Typically a xed/picture window mounted above another window or door.
SAFETY AND HANDLING
SAFETY
• Read and fully understand ALL manufacturers’ instructions before
beginning.
• Do not work alone. Two or more people are required. Use safe lifting
techniques.
• Use caution when handling glass. Broken or cracked glass can cause
serious injury.
• Wear protective gear (e.g. safety glasses, gloves, ear protection, etc.).
• Operate hand/power tools safely and follow manufacturer’s operating
instructions.
• Use caution when working at elevated heights.
• Windows in older homes may be painted with lead-based paint. Take
precautions to minimize exposure to lead-based paints if removal
of existing sashes disturbs the paint. Your regional EPA (www.epa.
gov/lead) or Consumer Product Safety Commission ofces provide
information regarding regulations and lead protection.
IF INJURY OCCURS, IMMEDIATELY SEEK MEDICAL ATTENTION!
WINDOW HANDLING
• Handle in vertical position; do not carry at or drag on oor.
• Store window in dry, well-ventilated area in vertical, leaning position;
do not stack horizontally.
Page 2
INSTALLATION INSTRUCTIONS
for Custom and Premium Pocket Windows (JII022)
INCLUDED PARTS, NEEDED MATERIALS AND TOOLS
PARTS INCLUDED
• 6 - 12 #8 x 3" installation screws (not all may be needed for any given
installation)
• 1 – jamb jack screw packet (includes 2 - #8 x 2" screws and instructions
for operating double-hung windows only)
• 1 – shim packet; 2 – shim packets for non-operating units
• Vinyl jambliner hole plugs if applicable (does not apply to Custom)
• Clad exterior cover strips (optional, based on order and product type)
• 1 – 14° aluminum sill adapter (all Premium clad products)
• 1 – Wood sill adapter. Premium wood double-hung only, will have a
14° and 10° adapter; Custom products will have a 0°, 8° or 14° adapter
or sill nose based on product order details.
NEEDED MATERIALS
• Sealant: We recommend OSI® QUAD® Max Sealant or equivalent. This
can be used in any application and can be painted or ordered in a
color matched product, if desired.
1
REMOVE PACKAGING AND INSPECT WINDOW
REMOVE PACKAGING
Remove packaging materials such as corner covers, shipping blocks
or pads.
INSPECT WINDOW
• Cosmetic damage
• Included parts
• Correct product (size, color, grid pattern, glass type, energy-efciency
requirements, etc.)
If any of the above represents a concern, BEFORE installing, contact
your dealer or distributor for recommendations.
CONFIRM MEASUREMENTS
• Conrm the
replacement unit
Replacement Window
will t properly.
Measure the height
Width
and width of the
replacement unit.
• Check existing frame
measurements.
Measure the width
between the side
jambs at the top,
middle and bottom
(remove jambliner if
necessary). Measure
the height between
the head and sill at
Height
Measuring
Locations
Head
the left side, middle
and right side. Note
measurements
to compare with
replacement unit in
next step.
• Polyurethane low expansion Window and Door foam: We recommend
OSI® QUAD® Foam or equivalent).
• Backer rod 1/8" larger than the widest portion of the gap (used in
conjunction with sealant bead).
• Wood trim pieces, milled on site to t on exterior side of window
between replacement window and existing window frame
• 4d exterior nish nails
NEEDED TOOLS
• Tape measure
• Level
• Hammer
• Utility knife
• Screwdrivers (driver with #2
• Putty knife
• Drill with bits
• Reciprocating saw (for exterior
install)
• Caulk gun
Phillips and at blade)
Unless the unit was
ordered as ”build to
specied dimension“
ensure that:
Height Measurement
Exterior blindstop
Head jamb
• The replacement
unit is 1/2" narrower
than the smallest
existing frame width
measurement.
• The replacement
unit (with applied
sill adapter)is at least
1/4" shorter than
the smallest existing
Measure
directly
behind
sill stop
Sill
Interior
trim stop
Head
parting
stop
Sill stop
frame height
measurement.
• The existing
frame jamb depth
(“pocket”) must be
3 1/4" or greater
Width Measurement
Interior trim stop
Jamb depth
Stool
Wood
side jamb
for all windows
except the Premium
casement, which
Parting stop
requires at least a 4"
pocket.
Note! These
instructions assume
Exterior blindstop
an installation from
the exterior (most
common). Alternate
instruction steps for
installation from the interior are shown in italic type.
Sill
2
Page 3

INSTALLATION INSTRUCTIONS
for Custom and Premium Pocket Windows (JII022)
2
REMOVE EXISTING SASH AND PREPARE OPENING
EXTERIOR/INTERIOR INSTALLATION
For non-operating
units, remove and
dispose of wood stops
Exterior Install
Head
and sash or glass.
Exterior Installation:
Remove or cut exterior
blindstops at head and
sides ush with jambs.
Do not remove
interior trim stops or
sill stop.
Interior Installation:
Remove or cut any
interior trim stops
at head or sides
ush with jambs.
Interior trim stops
may be reused if not
damaged.
Do not remove
interior sill stop or
exterior blindstops at
head and sides.
Remove
blindstops
Interior Install
Jamb
Remove
trim stops
Head
Exterior/Interior
Installation:
Apply 100%
polyurethane sealant
to sill/sill stop and sill/
jamb joints.
Interior Installation:
Also apply a 1/4"
bead of sealant
to interior side of
exterior blindstops
on sides and head.
Both Installs/Exterior View
Sill/
sill stop
joint
Sill/jamb joint
Interior Install
Exterior
blind
stop
Exterior
blind
stop
Exterior/Interior
Installation:
For operating units,
remove and dispose
of existing sash,
balance system (e.g.,
cut balance cords and
unscrew pulleys), head
and jamb parting
stops.
Do not remove
sill stop
Both Installs/Interior View
Remove old
balance system
Both Installs/Exterior View
Remove
parting stops
3
Page 4

INSTALLATION INSTRUCTIONS
for Custom and Premium Pocket Windows (JII022)
3
INSTALL WINDOW AND SEAL
Exterior/Interior
Installation:
1. Operating Double
hung windows will
have installation holes
pre-drilled through the
jamb liners. Remove
screen from the
Premium operating
casement windows.
For all other products,
remove the interior
trim or sash stop to
gain access to fastener
holes.
2. Slide replacement
window into the
opening until tight
against existing trim
stops. Be sure to hold
window in place until
fully secured.
Exterior Installation:
For custom doublehung windows only,
position sill adapter
all the way to the
interior. For custom
Casement/Awning/
Picture windows, tack
sill adapter 1 7/32" from
the interior and set
window into place.
Interior Installation:
For custom doublehung windows only, lift
window and slide sill
adapter underneath sill
positioned all the way to
the interior.
Both Installations:
3. Drill a pilot hole
through the lower
right installation hole
in the double hung
vinyl jambliner or in
interior wood stop
installation hole on
Premium casement,
Premium awning, or
xed windows. Install
one of the installation
screws, but do not
fully tighten.
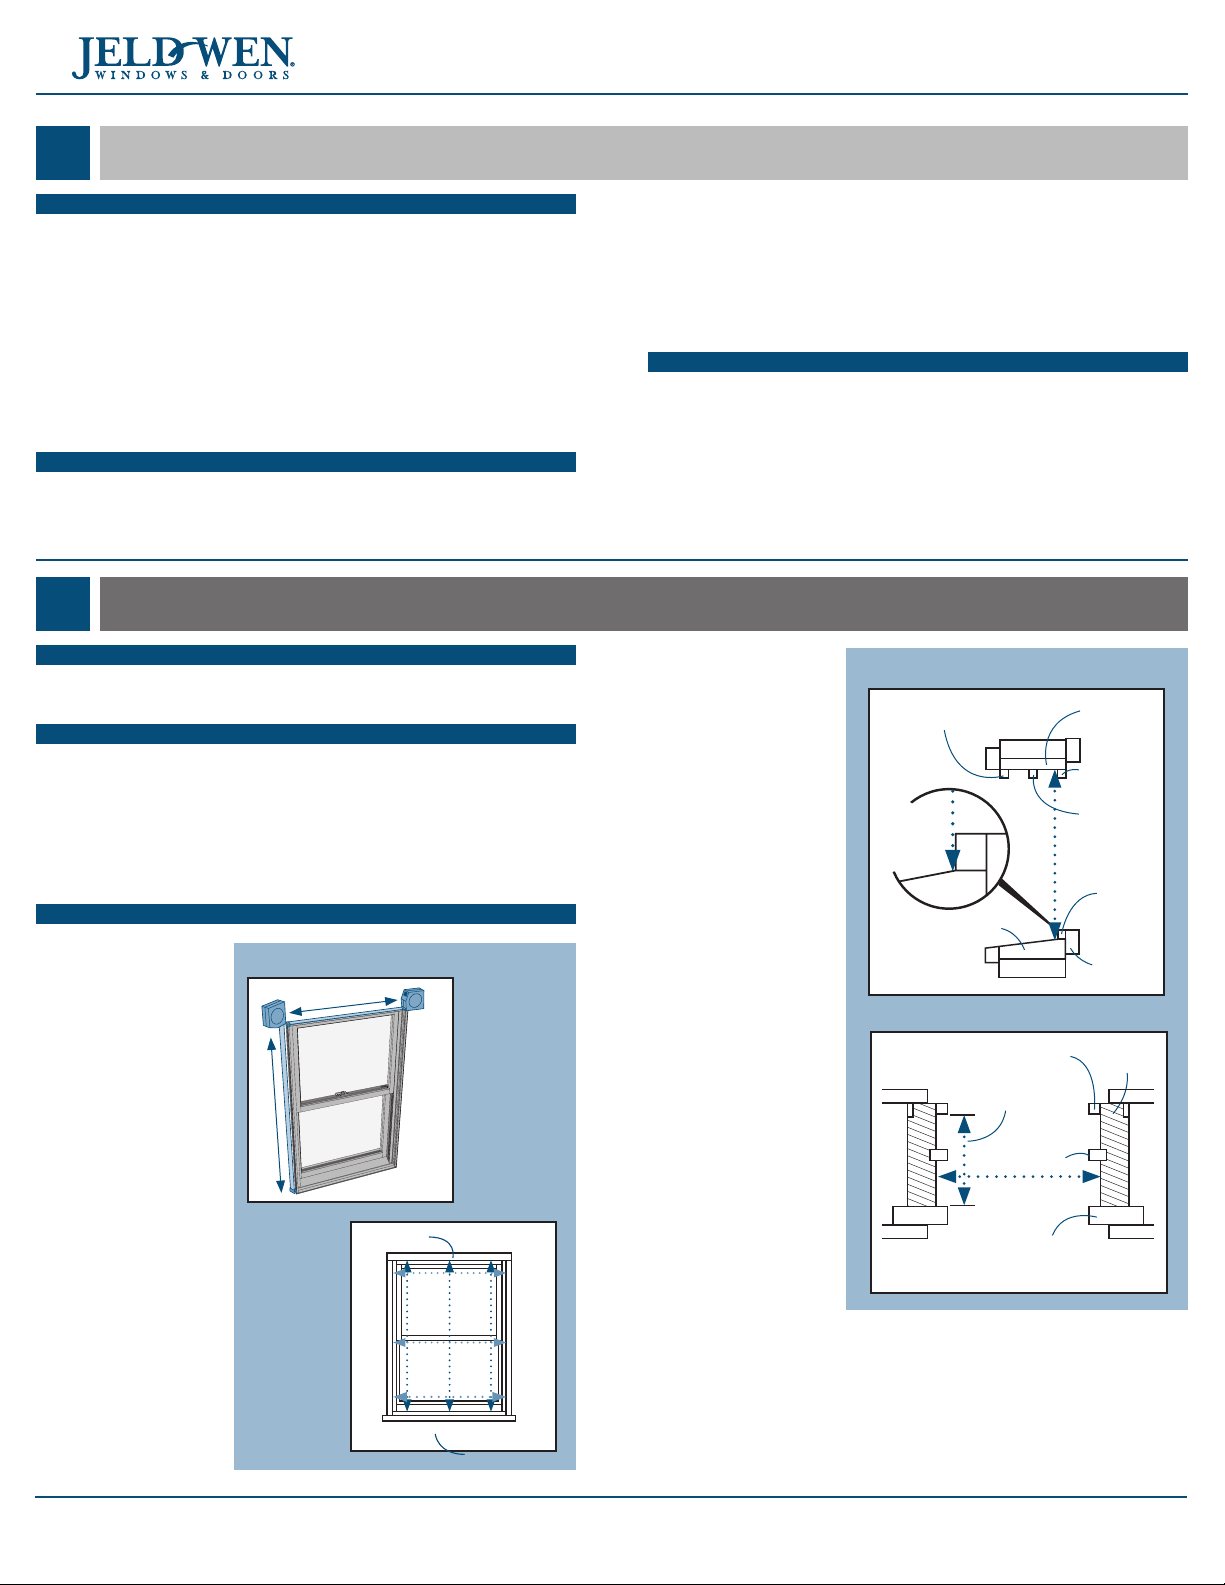
4. Shim unit and verify
window is square,
level, and plumb.
Exterior Install
3
1
2
Interior
Install
Interior
trim stop
Interior Install
Shims
Exterior blind stop
Exterior
Install
Shims
5. For Custom Casement/
Awning/Picture
Both Installs/Exterior View
windows only, gently
pry out and remove
the interior trim
(screen stops, operator
cover etc.) from the
head, sill, and sides for
access to installation
holes. Drill pilot holes
into existing frame
through pre-drilled
installation holes
in the replacement
window jambs.
6. Install screws in every
Both Installs/Interior View
pre-drilled hole and
tighten all screws
appropriately. Reapply all previously
removed interior
trim and sash stops.
Premium double-hung
operating units are
Remove
band
supplied with colormatched vinyl caps. For
casement windows,
natural wood caps
are available through
dealers. Install caps into
the installation holes as
(Shims not
shown for clarity)
desired.
7. On double hung
Jamb Jack
operating windows,
remove the band
securing the jambs
at the check rail and
remove the lower
sash.
8. On double hung
operating units only,
jamb jack hardware
is mounted in the
middle installation
holes to allow
for some jamb
adjustment. Install
jamb jack screws until
Turn clockwise to
rst click and adjust
as needed
captured (rst ‘click’),
the screw may then be
screwed in or out to
adjust the jamb as needed. Replace lower sash.
Screws
Screws
Verify
square,
level, &
plumb
4
Page 5

INSTALLATION INSTRUCTIONS
for Custom and Premium Pocket Windows (JII022)
3
INSTALL WINDOW AND SEAL - CONTINUED
Exterior Installation:
On the exterior, insulate
between the existing
frame and replacement
window frame with low
expansion foam. Seal
with backer rod and
sealant at only the head
and side jambs.
Interior Installation:
On the interior, insulate
between the existing
frame and pocket
window frame with
low expansion foam.
Seal with backer rod
and sealant all the way
around the window.
Exterior View
Gap
Backer
rod
Backer rod
Sealant
joint
Exterior Installation:
• Metal clad double-hung,
xed and casement
windows, installer must
supply and mill four wood
trim pieces to t on the
exterior front between
Milled
wood
trim
replacement window
frame and existing frame.
Tack into place.
• Wood double-hung and
xed windows, installer
must supply and mill
three (for head and side
jambs only) to t on the
exterior front between
replacement window
frame and existing
frame. Tack into place.
• For all wood products, if
not previously installed,
tack the provided sill
adapter into place
between the jamb trim
pieces (cut to length if
necessary).
Sill
Milled
wood trim
Interior Installation:
• For Premium clad
products, installer must supply and mill a wood sill piece. For all wood
products, tack the provided sill adapter into place between the jamb
trim pieces (cut to length if necessary).
• Reuse previously removed interior trim, or mill new pieces to cover
interior joint between replacement window frame and existing frame.
Tack into place.
4
COMPLETE INSTALLATION
Note! If the existing exterior trim (casing) is to be wrapped with color-
matched aluminum cladding, this cladding MUST be professionally
installed prior to the installation of the clad exterior cover strips. The
following instructions are for a simple butt joint application. A miter
joint application is feasible at the installer’s risk; be sure to allow for a
weep gap.
1. On metal clad
double-hung and
Both Installs/Exterior View
casement windows,
cut and apply clad
exterior cover strips.
1/16"
1/8"
1/16"
Clad exterior
cover strips
1/16"
Weep
gap
1/16"
1/16"
Existing
trim
1/8"
a. Measure the
distance between
Head Detail End View
the existing side
jamb trim pieces
and subtract 1/8".
Cut the head clad
exterior cover
strip to length.
Clad exterior
cover strip
Milled
wood trim
Center and tap
the head strip
into the accessory
groove.
b. Cut two side
jamb clad exterior
Accessory
groove
cover strips,
leaving a 1/8"
weep gap at the
sill. Tap the strips into the accessory groove.
c. Cut the sill clad exterior cover strip (for Premium windows only,
a 14° sill adaptor may be used in place of cladding strip) to t
between the two side jamb strips, leaving a 1/16" gap above the
sill. Tap into the accessory groove.
5
Page 6

INSTALLATION INSTRUCTIONS
for Custom and Premium Pocket Windows (JII022)
4
COMPLETE INSTALLATION - CONTINUED
Exterior Installation:
Seal the interior
joint between the
existing frame and
the replacement
window with 100%
polyurethane sealant.
Interior Installation:
Skip this step.
Exterior Install ONLY/Interior View
Seal
interior
joint
Exterior/Interior
Installation:
Both Installs/Exterior View
Use 100% clear
silicone sealant
(color matched
Wood
trim
Clad cover
strip
polyurethane sealant
may be used on
metal clad), to seal
the exterior joints.
Joints
to be
sealed
Seal any metalto-metal cladding
joints if applicable.
Do not seal the 1/8"
weep gap on the sill
Weep
gap
Sill
ends. When sealing
between the existing
sill and the sill
adapter on a wood product, leave 1" weep gaps on both ends.
AFTER INSTALLATION
Finish any exposed wood surfaces. Metal-clad aluminum does not
require additional nishing.
Please visit jeld-wen.com for warranty, nishing instructions and care
and maintenance information.
Thank you for choosing
©2014 JELD-WEN, inc.; This publication and its contents are owned by JELD-WEN, inc. and are protected under the U.S. Copyright Act and other intellectual property laws. All trademarks, service marks,
logos and the like (whether registered or unregistered) are owned or controlled by JELD-WEN, inc. or others. Unauthorized use or duplication of JELD-WEN intellectual property is prohibited.
JELD-WEN reserves the right to change product specications without notice. Please check our website, jeld-wen.com, for current information.
(05/14)
6
 Loading...