

Page 1

FINISHING AND REFINISHING INSTRUCTIONS
for Interior and Exterior Door Slabs and Systems (JCM004)
Read all instructions thoroughly before beginning. This is a guideline
for painting and nishing exterior and interior doors. JELD-WEN cannot
evaluate all available paints, stains, or application requirements. Consult
a paint professional or a local paint department/store for coatings
best suited to the project. Select top quality nishes and follow all
manufacturers' instructions.
Finish all six surfaces (both sides and edges) of the door slab, including
cutouts for hardware (if hinges are installed on an interior door slab,
do not remove them), as well as the frame and the brickmould or other
trim to ensure proper protection from the elements. The sweep on the
bottom of exterior doors needs to be sealed on both ends with exterior
silicone sealant and should not be painted or stained. The sweep should
not be removed as paint or stain application to the rail underneath is not
recommended. Failure to nish the door slab as instructed may result in
the denial of warranty claims for operational or performance problems.
IMPORTANT!
• Steel and berglass door slabs MUST be nished within thirty (30)
days of purchase.
• Factory primed wood doors (molded, ush, custom carved, stile and
rail) MUST be nished within fourteen (14) days of purchase.
• Raw, un-primed wood doors (molded, ush, custom carved, stile and
rail) MUST be nished within SEVEN (7) days of purchase.
• Finish wood frames in the same manner as the slab.
• Vinyl components do not require nishing.
• Renish products when the nish cracks, splits or becomes dull.
NEEDED MATERIALS AND TOOLS
When preparing to nish doors, consider the materials and tools required for
the entire project. Listed below are some common items needed to properly
nish doors. Not all materials and tools will be required for every job.
Needed Materials and Tools:
• Safety glasses and rubber
gloves
• Screwdrivers
• Power drill
• Hammer
• Punch
• Utility knife
• Plastic putty knife
• Hand block sander
• Foam brush
• Paint brush
• Sprayer
• Vinegar and water
• Denatured alcohol
• Wood block
BASIC FINISHING RECOMMENDATIONS
• Wear safety glasses for eye protection, and rubber gloves to prevent
soiling the door with oil from hands.
• Masking tape
• Sandpaper - 150-220 grit or
ner
• Pre-stain conditioner if
staining wood
• Clean rags
• Cheesecloth
• Polyurethane
• Stain Kit (Fiberglass Doors)
• Paint or stain (see instructions
for each door type for specic
recommendations)
• Paint thinner or mineral spirits
(for clean up)
• Tack cloth
• 0000 Steel wool
BASIC FINISHING RECOMMENDATIONS - CONTINUED
• Allow doors to acclimate to local conditions for at least 24 hours
before nishing.
• Remove all hardware (except hinges from an interior door slab) and
mask off glass, weatherstrip, and the door sweep (on the bottom of
exterior slabs).
• Finish in dust free area away from direct sunlight.
• Finishing is easier if the slab is in a horizontal, at position on a
padded surface. This is not required and the slab may be nished in
any position, however, do not stand an exterior slab on the sweep
(the weatherstrip on the bottom of the door) as damage may result.
• If nishing an exterior slab, seal both ends of the sweep (weatherstrip
on the bottom) with an exterior grade silicone.
• If nishing a slab with a glass insert, inspect for sealant that may have
squeezed out onto the glass or door. Carefully score excess sealant (do not
scratch glass) with a utility knife (stainless steel blade) and remove with a
plastic putty knife.
• If nishing a slab with a glass insert, follow the glass manufacturer's
instructions on the glass insert frame label.
• Door must be clean and dry before nishing.
• Test your nish prior to application in a discreet location.
• Apply nish materials in multiple light coats instead of fewer heavy coats.
• If painting grained or textured doors, too many coats will diminish
the wood grain texture.
CHOOSE FINISHING MATERIALS
• If the door is exposed to direct sunlight, dark colored nishes may
fade or deteriorate quickly and increase maintenance. See our
Appropriate Protection document at www.jeld-wen.com in the
Product Support section under Care and Maintenance for more
information on color choice.
• Use a good quality primer and paint, or wood sealer and stain.
We recommend using one manufacturer's products to ensure
compatibility. Follow all manufacturers’ application instructions.
• If choosing an oil or solvent based paint, consult with a paint
professional on the best product (usually quick drying) for the job.
• If staining berglass doors, for the best results, we recommend using our
Stain Kit. If not possible, use only a professional quality, heavy body or
highly viscous exterior gel stain. Note: Once Architectural berglass doors
are stained, it is very difcult to change the color. Always test the color
in an inconspicuous area to determine if the color is acceptable before
staining the entire door.
• Use only exterior solid color stains on wood surfaces exposed to
sunlight because their high concentration of pigments protects wood
against damage. The natural wood color and grain is obstructed,
but the wood texture is retained. These stains provide minimum
protection against water or dirt protection, so a polyurethane top
coat must be used.
• Finish with coatings that are resistant to water, wear, heat, solvents
and chemicals. Without these characteristics, the nished product
may deteriorate, compromising its integrity.
• Use a topcoat containing UV inhibitor. Use exterior nishing products
on all exterior surfaces as well as for interior surfaces still exposed to
sunlight to provide extra protection and durability.
The information contained herein is provided solely for informational and/or educational purposes. JELD-WEN disclaims any and all liability associated with the use and/or
provision of this information. Any reliance upon the information or advice is at the risk of the party so relying.
©2014 JELD-WEN, inc.; This publication and its contents are owned by JELD-WEN, inc. and are protected under the U.S. Copyright Act and other intellectual
property laws. All trademarks, service marks, logos and the like (whether registered or unregistered) are owned or controlled by JELD-WEN, inc. or others.
Unauthorized use or duplication of JELD-WEN intellectual property is prohibited.
JELD-WEN reserves the right to change product specications without notice. Please check our website, jeld-wen.com, for current information.
(08/14)
Page 2
FINISHING AND REFINISHING INSTRUCTIONS
for Interior and Exterior Door Slabs and Systems (JCM004)
PREPARE THE DOOR
If renishing a previously nished door slab, use the following recommendations for the product you have. The achieved result will depend on the skill
of the person doing the renishing. We recommend seeking the help of a skilled professional if unsure. After preparing the previous nish, follow the
nishing instructions in the following sections.
Doors that were Painted Doors that were Stained
Steel and
Smooth Pro
Fiberglass
Wood
(Authentic
Wood
Custom
Carved and
Molded)
Architectural
and
Design Pro
Fiberglass,
FiberLast and
Finishield
Steel
1. Scuff sand with 150 grit sandpaper or ner or buff the surface
of the door thoroughly with 0000 steel wool until the entire
surface is dulled and even. Feather out areas where the previous
nish is cracked or peeling by removing all loose material and
sanding outward until the surface is uniformly level.
2. Remove all loose debris with tack cloth (available in store paint
sections) and re-prime bare areas with a good quality waterbased primer appropriate for the substrate. Re-priming the
entire door will provide the best surface for the new top coat.
1. Scuff sand with 150 grit sandpaper or ner or buff the surface of the door thoroughly with 0000 steel wool until the entire surface
is dulled and even. Feather out areas where the previous nish is cracked or peeling by removing all loose material and sanding
outward until the surface is uniformly level.
2. Remove all loose debris with tack cloth (available in store paint sections) and re-prime bare areas with a good quality water-based
primer appropriate for the substrate. Re-priming the entire door will provide the best surface for the new top coat.
3. Doors that were stained will need to be stripped and/or sanded to bare wood and then can be re-stained and top coated or painted.
1. Do not attempt to remove the nish with paint stripper, solvents or other chemicals, instead, buff the surface of the door thoroughly
with 0000 steel wool until the entire surface is dulled and even.
2. Remove all loose debris with tack cloth (available in store paint sections).
3. Doors that were stained can be re-top coated with clear nish or painted if a color change is desired.
4. For Fiberglass doors, refer to the stain kit instructions for renishing.
N/A
PREVIOUSLY UNFINISHED PRODUCTS
• If the door slab has a glass insert, install the provided screw covers
over the screw heads around the glass insert.
• Clean the door with a clean, lint-free cloth, removing all dust and
foreign debris. For light cleaning, a one part vinegar to ten parts
water mixture can be used. For tough dirt removal, use denatured
alcohol making sure all residue is removed by turning the cloth
often while cleaning. Allow the door to dry thoroughly. DO NOT USE
SANDPAPER OR LACQUER THINNER ON ARCHITECTURAL OR DESIGN/
SMOOTH PRO FIBERGLASS, OR FINISHIELD® DOORS.
For Wood Doors Only:
• Before applying rst nishing coat, lightly block sand with the grain
all surfaces by hand with 220 grit sandpaper or ner. Remove all
handling marks, raise grain, scuffs, burnishes and other undesirable
blemishes. For doors with wood veneers, veneers are very thin and
it can be easy to sand through the veneer. Do not sand veneers any
more than necessary.
• Stile and rail doors have wood panels that can oat. If necessary,
adjust panels before nishing by carefully realigning with a wood
block and hammer.
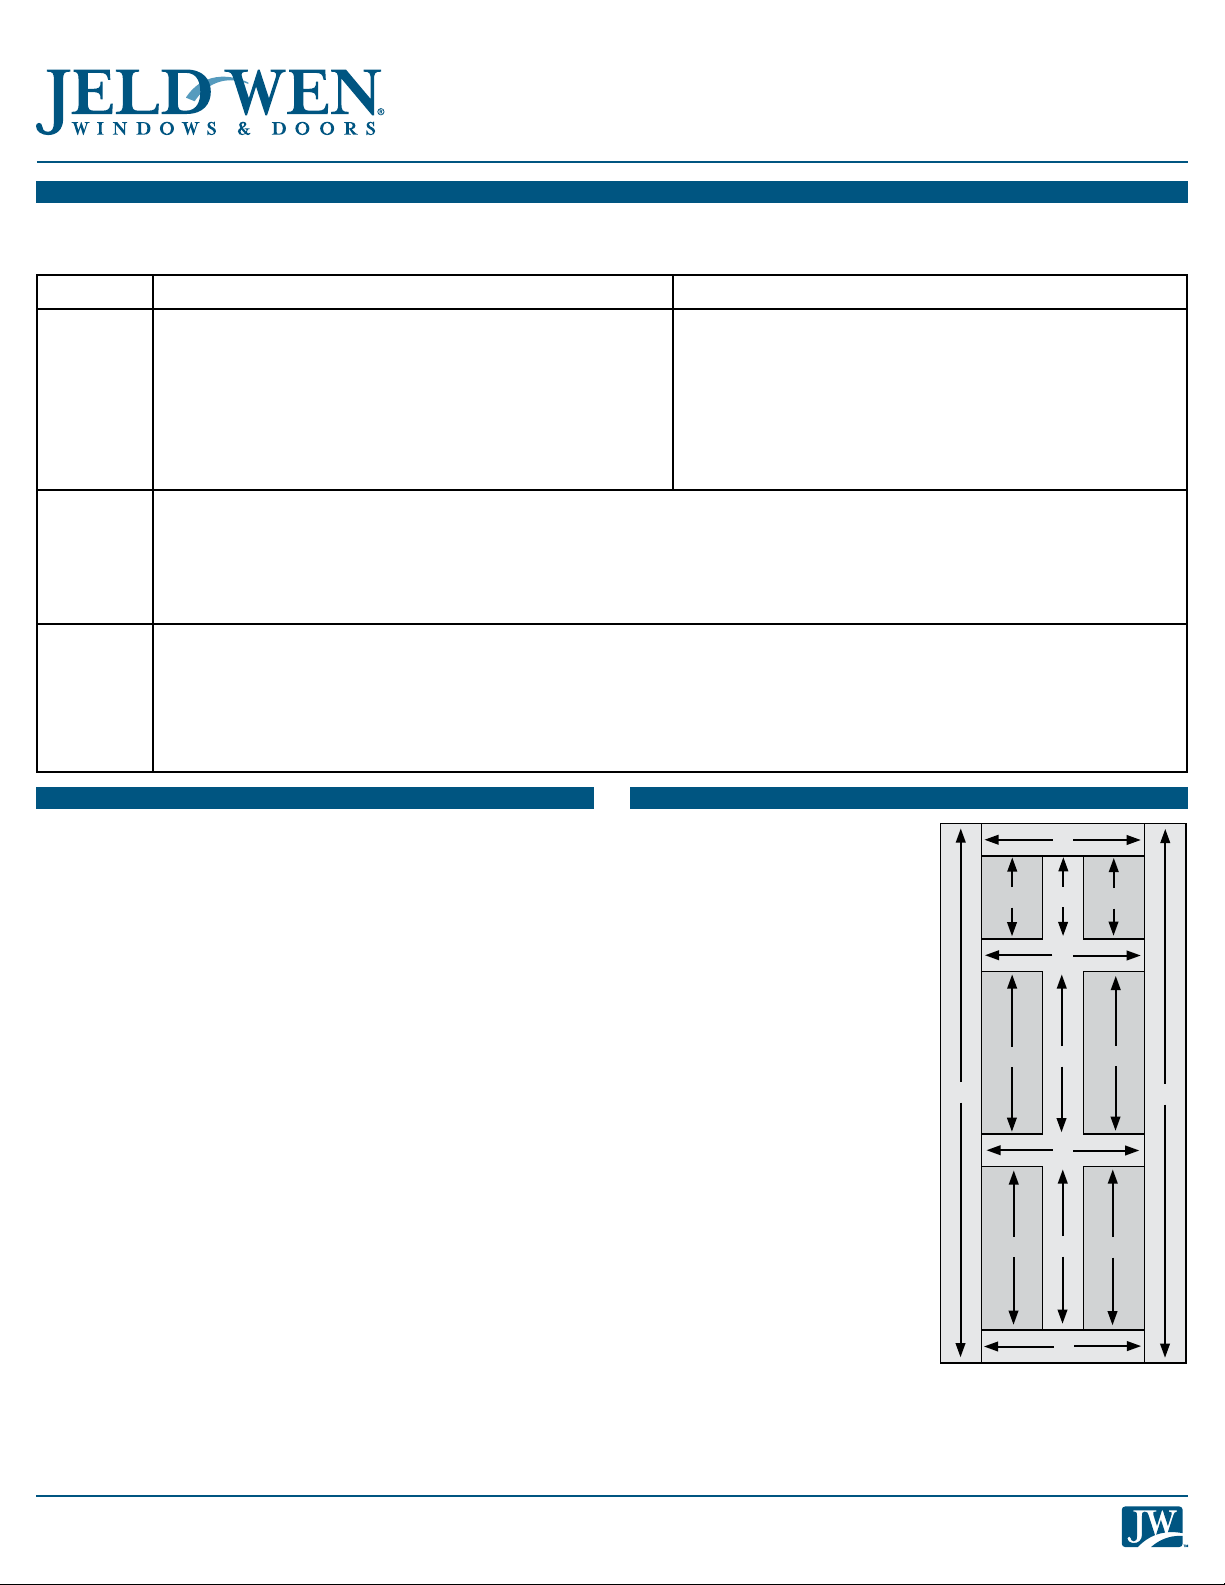
FINISH THE DOOR
Use the table below to nd your
product and desired nish and follow
the instructions in the corresponding
box. The illustration to the right shows
the recommended order to apply
nishing materials to the door by any
method except spraying. Finishing
materials should be rst applied, in
the direction of the arrows, to the
door panels (1), then to the vertical
members, or stiles (2), horizontal
members, or rails (3) and nally to the
outer stiles (4). This method has been
tested to yield the best results. You
may, however, use any method that
you choose.
3
2
1
1
4
1
1
3
1
2
4
3
2
1
3
2
Page 3

FINISHING AND REFINISHING INSTRUCTIONS
for Interior and Exterior Door Slabs and Systems (JCM004)
Doors to be Painted Doors to be Stained
Wood
(Authentic
Wood
Custom
Carved and
Molded)
Steel 1. Clean the door with a clean, lint-free cloth, removing all dust and
Grained
Fiberglass
(Design Pro)
1. Clean the door with a clean, lint-free cloth, removing all dust and
foreign debris. For light cleaning, a one part vinegar to ten parts
water mixture can be used. For tough dirt removal, use denatured
alcohol making sure all residue is removed by turning the cloth
often while cleaning. Allow the door to dry thoroughly.
2. Seal an un-primed door slab with a good quality water-based primer.
3. Paint all sides of the door, jamb and molding with a good-quality
exterior water-based 100% acrylic latex or solvent-based paint.
Interior door or trim paint may be used on interior doors and
interior surfaces of exterior doors. Spray applications work best.
To simulate a traditional stile and rail door look when using a
paintbrush, paint the panels rst, then across all the rails from
one edge of the door to the other. Then paint the stiles from the
top of the door to the bottom. The door can also be rolled for a
stipple look. For best results, apply multiple light coats.
foreign debris. For light cleaning, a one part vinegar to ten parts
water mixture can be used. For tough dirt removal, use denatured
alcohol making sure all residue is removed by turning the cloth
often while cleaning. Allow the door to dry thoroughly.
2. Lightly scuff and sand the door face and back (to improve paint
adhesion) and wipe the door clean with denatured alcohol. If
the door jamb and molding are primed, clean with a damp cloth
and allow to dry. Lightly sand any rough areas and re-clean.
3. Paint all sides of the door, jamb and molding with a good-quality
exterior water-based 100% acrylic latex or solvent-based paint.
Interior door or trim paint may be used on interior doors and
interior surfaces of exterior doors. Spray applications work best.
To simulate a traditional stile and rail door look when using a
paintbrush, paint the panels rst, then across all the rails from
one edge of the door to the other. Then paint the stiles from the
top of the door to the bottom. The door can also be rolled for a
stipple look. For best results, apply multiple light coats.
1. Clean the door with a clean, lint-free cloth, removing all dust
and foreign debris with isopropyl alcohol making sure all residue
is removed by turning the cloth often while cleaning. Allow the
door to dry thoroughly. DO NOT USE SANDPAPER OR LACQUER
THINNER ON DESIGN PRO FIBERGLASS DOORS.
2. Paint all sides of the door, jamb and molding with a good-quality
exterior water-based 100% acrylic latex or solvent-based paint.
Interior door or trim paint may be used on interior doors and
interior surfaces of exterior doors. Spray applications work best.
To simulate a traditional stile and rail door look when using a
paintbrush, paint the panels rst, then across all the rails from
one edge of the door to the other. Then paint the stiles from the
top of the door to the bottom. The door can also be rolled for a
stipple look. For best results, apply multiple light coats.
1. Clean the door with a clean, lint-free cloth, removing all dust and
foreign debris. For light cleaning, a one part vinegar to ten parts
water mixture can be used. For tough dirt removal, use denatured
alcohol making sure all residue is removed by turning the cloth
often while cleaning. Allow the door to dry thoroughly.
2. For un-primed units to be stained, we recommend applying
a pre-stain wood conditioner prior to staining to promote a
uniform appearance and avoid sharp color contrasts or a blotchy
appearance.
3. To add color after pre-stain conditioner, use an exterior oil-based
stain for the next coat.
4. Top coats may be an oil-based or water-based clear polyurethane
nish. A marine-grade varnish is recommended on all exterior
doors.
N/A
1. Clean the door with a clean, lint-free cloth, removing all dust and
foreign debris. For light cleaning, a one part vinegar to ten parts
water mixture can be used. For tough dirt removal, use isopropyl
alcohol making sure all residue is removed by turning the cloth
often while cleaning. Allow the door to dry thoroughly.
2. For the best results, we recommend using our Stain Kit and included
instructions. If not possible, use only a professional quality, heavy body
or highly viscous exterior gel stain. Apply an even amount of stain with
a foam brush or lint free cloth in the direction of the wood grain.
3. Work the stain into the surface grain using a circular or cross grain
motion before nally wiping the stain in the direction of the grain.
For best results, apply stain to one section of the door at a time,
starting with the embossed panels rst and proceeding with the
at sections.
4. Before stain dries completely, wipe the surface in the direction of the
grain with a clean cheesecloth or rag to remove any excess stain. Tip:
Use a dry, soft natural bristle brush to feather out lap marks and
blend stain. Blot brush on a dry cloth and feather stain until desired
color is reached.
5. If a darker appearance is desired, apply a second coat after the
rst coat dries. Follow the manufacturer’s instructions to apply and
wipe the stain with a brush or rag. After one side is stained and
has completely dried, repeat staining process on the remaining
unstained sides of the door.
6. Allow stain to dry per manufacturer’s recommendations (may take
up to 48 hours). Spray on at least one coat of clear exterior grade
polyurethane. THE FIRST COAT MUST BE SPRAYED ON. Additional
coats may be sprayed or brushed on. Repeat process on the
remaining unnished sides of the door.
3
Page 4

Smooth
Fiberglass
(Smooth
Pro)
Architectural
Fiberglass
FINISHING AND REFINISHING INSTRUCTIONS
for Interior and Exterior Door Slabs and Systems (JCM004)
Doors to be Painted Doors to be Stained
1. Clean the door with a clean, lint-free cloth, removing all dust and
foreign debris with isopropyl alcohol making sure all residue is
removed by turning the cloth often while cleaning. Allow the
door to dry thoroughly. DO NOT USE SANDPAPER OR LACQUER
THINNER ON SMOOTH PRO FIBERGLASS DOORS.
2. Paint all sides of the door, jamb and molding with a good-quality
exterior water-based 100% acrylic latex or solvent-based paint.
Interior door or trim paint may be used on interior doors and
interior surfaces of exterior doors. Spray applications work best.
To simulate a traditional stile and rail door look when using a
paintbrush, paint the panels rst, then across all the rails from
one edge of the door to the other. Then paint the stiles from the
top of the door to the bottom. The door can also be rolled for a
stipple look. For best results, apply multiple light coats.
1. Clean the door with a clean, lint-free cloth, removing all dust
and foreign debris. For light cleaning, a one part vinegar to
ten parts water mixture can be used. For tough dirt removal,
use
isopropyl alcohol making sure all residue is removed by
turning the cloth often while cleaning. Allow the door to dry
thoroughly. DO NOT USE SANDPAPER OR LACQUER THINNER ON
ARCHITECTURAL FIBERGLASS DOORS.
2. Prime the door slab with a good quality water-based primer.
3. Paint all sides of the door, jamb and molding with a good-quality
exterior water-based 100% acrylic latex or solvent-based paint.
Interior door or trim paint may be used on interior doors and
interior surfaces of exterior doors. Spray applications work best.
To simulate a traditional stile and rail door look when using a
paintbrush, paint the panels rst, then across all the rails from
one edge of the door to the other. Then paint the stiles from the
top of the door to the bottom. The door can also be rolled for a
stipple look. For best results, apply multiple light coats.
N/A
1. Clean the door with a clean, lint-free cloth, removing all dust
and foreign debris. For light cleaning, a one part vinegar to
ten parts water mixture can be used. For tough dirt removal,
use isopropyl alcohol making sure all residue is removed by
turning the cloth often while cleaning. Allow the door to dry
thoroughly.
2. For the best results, we recommend using our Stain Kit and included
instructions. If not possible, use only a professional quality, heavy body
or highly viscous exterior gel stain. Apply an even amount of stain with
a foam brush or lint free cloth in the direction of the wood grain.
3. Work the stain into the surface grain using a circular or cross
grain motion before nally wiping the stain in the direction
of the grain. For best results, apply stain to one section of the
door at a time, starting with the embossed panels rst and
proceeding with the at sections.
4. Before stain dries completely, wipe the surface in the direction of
the grain with a clean cheesecloth or rag to remove any excess
stain. Tip: Use a dry, soft natural bristle brush to feather out lap
marks and blend stain. Blot brush on a dry cloth and feather
stain until desired color is reached.
5. If a darker appearance is desired, apply a second coat after
the rst coat dries. Follow the manufacturer’s instructions to
apply and wipe the stain with a brush or rag. After one side is
stained and has completely dried, repeat staining process on the
remaining unstained sides of the door.
6. Allow stain to dry per manufacturer’s recommendations (may
take up to 48 hours). Spray on at least one coat of clear exterior
grade polyurethane. THE FIRST COAT MUST BE SPRAYED ON.
Additional coats may be sprayed or brushed on. Repeat process
on the remaining unnished sides of the door.
Please visit jeld-wen.com or call us at 1-800-535-3936 for specic product information, warranty and
care and maintenance information.
Thank you for choosing
4
 Loading...