

S58J-T-R2 6/09
UTILITY
Jeep®Wrangler All-Weather Umbrella Stroller
Instruction Sheet
Instrucciones para carriola Jeep
®
Wrangler
All-Weather
Feuillet d'Instructions pour Poussette
pour Jeep
®
WranglerAll-Weather
TRANSPORT
COVERAGE
2
Avoid serious injury from falling or sliding out. Always use Restraint System. Your child's
safety depends on you. Proper stroller use cannot be assured unless you follow these
instructions. DO NOT USE STROLLER UNTIL YOU READ AND UNDERSTAND THESE
INSTRUCTIONS.
IMPORTANT SAFETY INFORMATION:
How to Keep Your Child Safe While Using this Stroller
• Assembly by Adult Required.
• NEVER LEAVE YOUR CHILD UNATTENDED WHILE IN STROLLER. Accidents can
happen quickly while your back is turned. You must always keep your child in
view while your child is in the stroller, even when sleeping. Do not use this
product as a bed. Your child may become tangled in straps or pads and suffocate.
• Always use restraint system to keep child from standing up of falling out of
the stroller.
• Always lock the stroller open before allowing your child in or near the
stroller. This prevents injuries caused by stroller collapsing.
•
Only use this stroller with children who weigh less than 35 lbs. (15.8 kg) or are
less than 40” (1 meter) tall. Use by larger children may damage the stroller, or
cause a hazardous unstable condition to exist.
• Only use this stroller when child can sit up unassisted or only use product
in recline position (select models).
• Always set the wheel brakes when stroller is not moving, especially on an
incline. This prevents the stroller from rolling away.
What to Avoid While Using this Stroller
• Always balance the weight of the stroller evenly. To prevent the stroller from
becoming unstable or tipping:
• Do not place parcels or accessory items on the stroller canopy, seat, or over the
handle.
• Do not put more than 3 lbs. (1.36 kg) in the cargo bags or rear storage bag
(select models).
• Do not allow children to play with or hang onto the stroller.
• Never use this stroller on stairways or escalators.
• Make sure children are clear of any moving parts if you adjust the stroller,
otherwise they may be injured.
• This is not an exercise stroller! Do not use this product while running, jogging,
in-line skating or participating in other athletic activities.
•
DO NOT use any infant car seats with this product. Serious injury could occur.
• Take care when folding and unfolding to prevent finger pinching.
• Product may become unstable if a parcel bag, other than the one recommended
by the manufacturer is used.
WARNING
Continued on next page
3
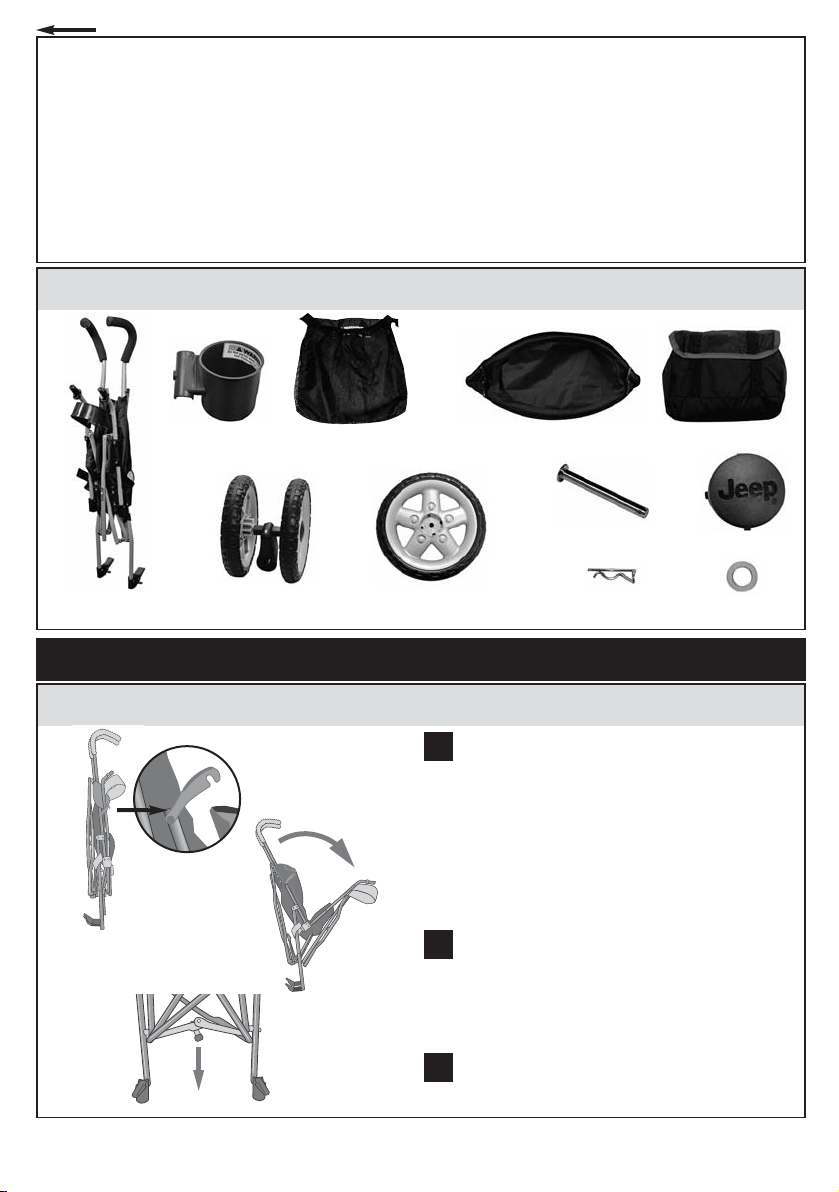
To Open Stroller
Release clip on side of stroller.
Push front of stroller downward.
Press down folding bar in back of stroller to lock
stroller.
Parts List
2
3
HOW TO ASSEMBLE YOUR STROLLER
1
Stroller Frame
Storage Bag
(Select Models)
Canopy
Front Wheels (2)
1
3
Rear Wheels (4)
Cup Holder
(Select Models)
Cargo Bags (2)
Cotter Pins (2) Washers (6)
Hub Caps (4)
Axles (2)
• DO NOT allow children to climb into stroller unassisted. Stroller may tip over and
injure child.
• Only use replacement parts supplied by the manufacturer.
2
4
5
6
7
8
9
7
To Assemble Front Wheels
If stroller arrives to you with the wheels off, follow the instructions below.
With tab on front wheel facing away from stroller,
place wheel on stroller until it locks onto stroller.
Repeat for other front wheel.
NOTE: To remove, squeeze tab
and pull wheel off.
1
4
1
Tab
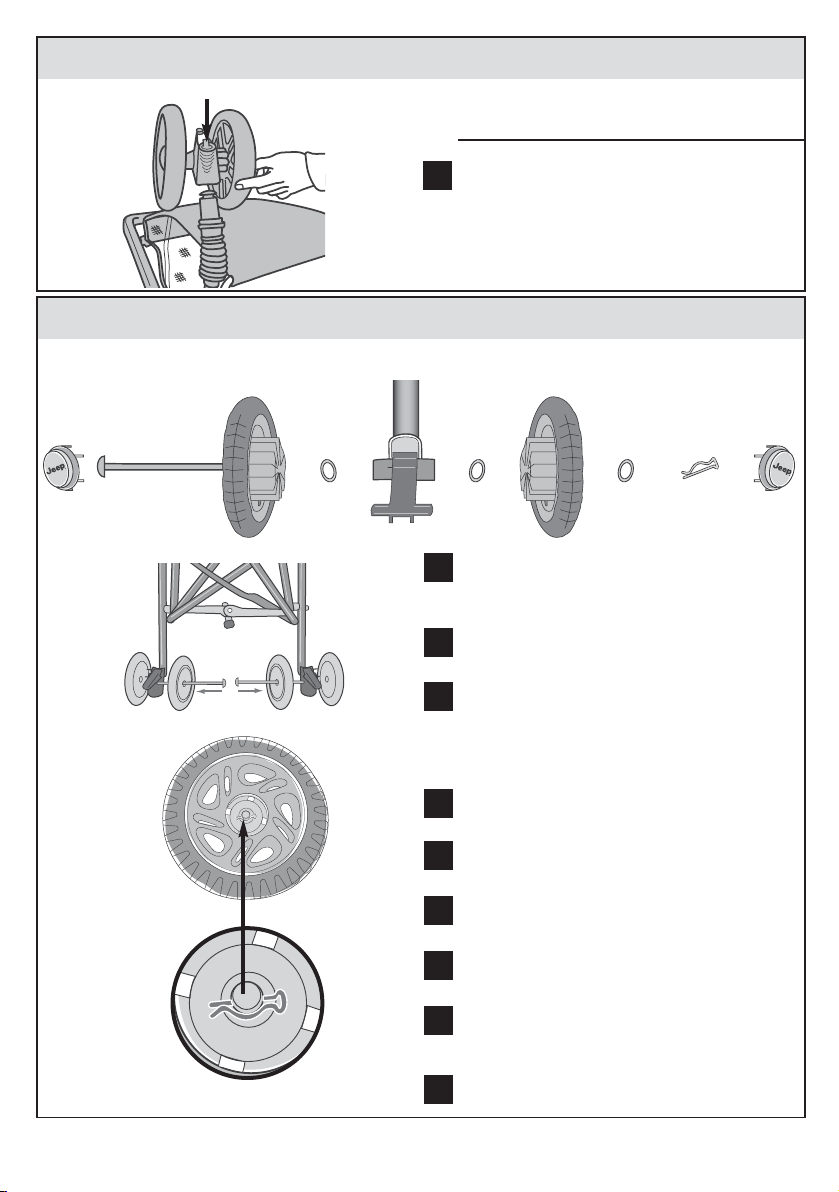
To Assemble Rear Wheels
For the right rear wheel assembly, slide the wheel
onto the axle.
Slide first washer onto axle.
Insert axle with washer and wheel into right rear
wheel assembly as shown. Make sure axle is
inserted into rear wheel assembly from the inside
wheel.
Slide second washer onto axle.
Slide other wheel onto axle.
Slide third washer onto axle.
Fit straight part of cotter pin through hole on axle.
Line up tabs in each of the hub caps with slots in
the wheel, snap hub caps into place.
Repeat for left side.
1
3
Wheel
RIGHT REAR WHEEL ASSEMBLY
Axle
Wheel
Washer Washer Washer
Cotter Pin
Hub Cap
2
3
Hub Cap
5
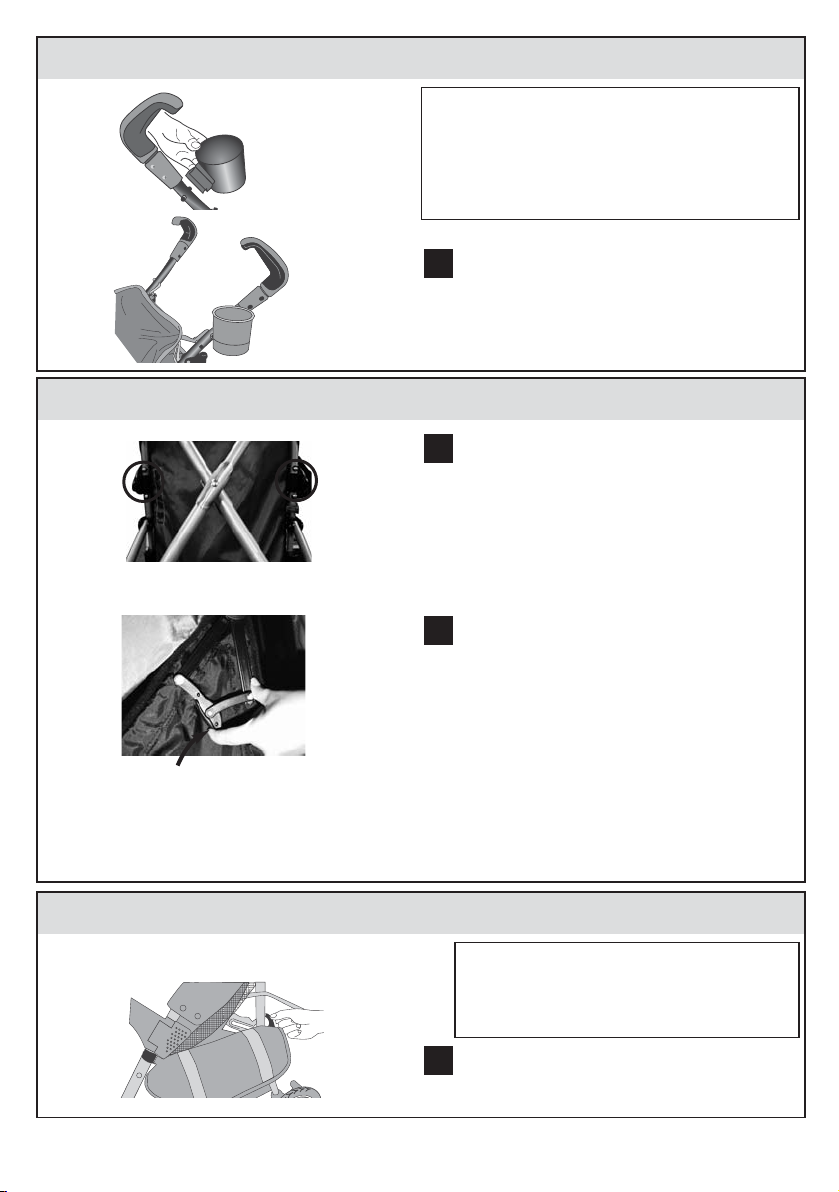
To Attach Cup Holder (select models)
Attach cup holder to left handle by lining hole
over pin and snap into place.
TO CLEAN: Top rack dishwasher safe.
1
1
WARNING
Do not place more than 1 lb (0.45 kg) in this cup
holder to avoid tipping!
Do not place hot liquids in this cup holder.
Hot liquids can burn your child.
To Attach Canopy
To attach canopy, align canopy clips in-between
both screws on back of stroller.
To lock canopy open, push up on both side
hinges located on inside of canopy. To fold, push
down to release hinges.
1
1
2
2
To Attach Cargo Bags
To attach cargo bags, wrap velcro around frame
of stroller as shown. Repeat for other side.
1
WARNING
Do not put more than 3 lbs (1.36 kg) in this
cargo bag.
6
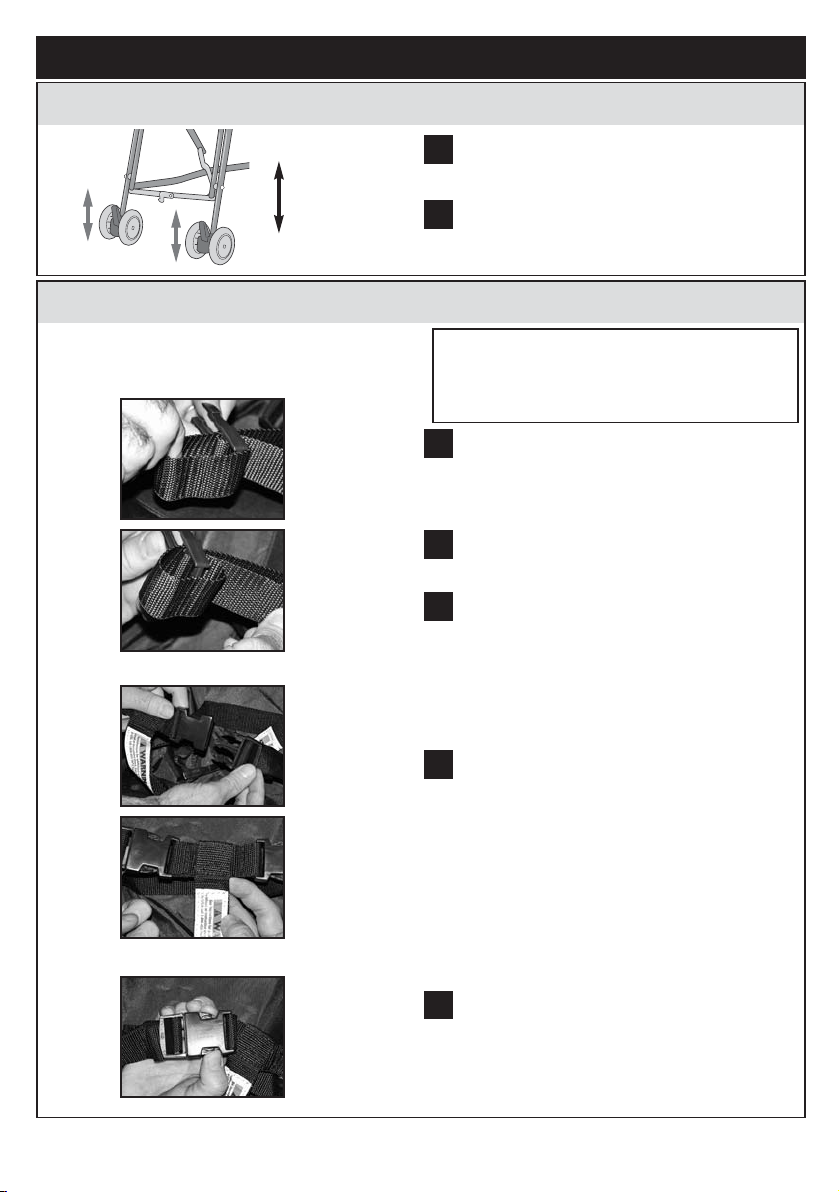
To Secure Child In Stroller
Lock both foot brakes to keep stroller from
rolling.
Place crotch strap between child’s legs.
Adjust restraint system to fit snugly around
child’s waist.
To fasten restraint system buckles - push together. Be sure both buckles are
fastened to secure child safely.
To unsnap restraint system buckles - press tabs
to release.
1
HOW TO PROPERLY USE YOUR NEW STROLLER
3
WARNING
Avoid serious injury from falling or sliding out.
Always use restraint system.
2
3
4
5
To Operate Brakes
1
Push both levers down to lock.
Pull both levers up to unlock.
2
Unlock
Lock
4
5
7
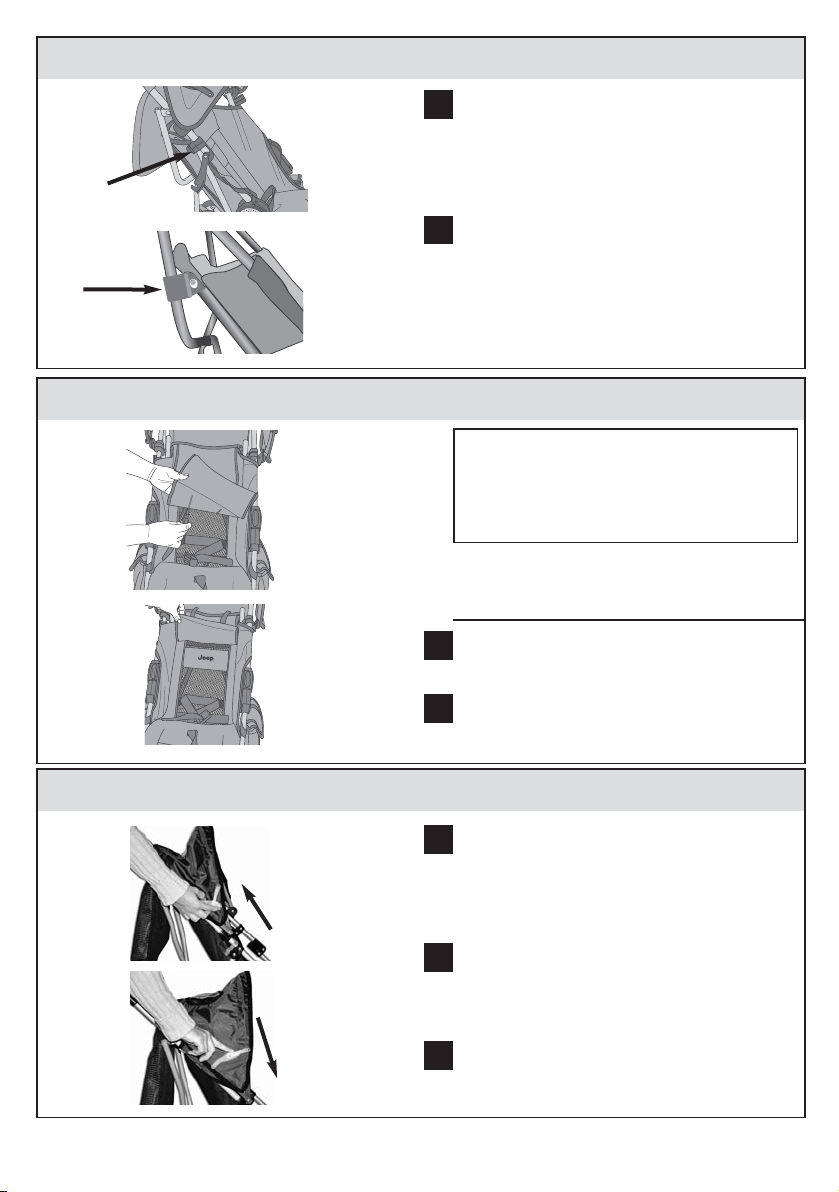
To Recline Seat
(select models)
1
Unhook clips from both sides of stroller.
Attach clips to lower bar.
To Roll-Up All-Weather Seat Pad
1
1
To keep child cool during hot weather, roll up
seat pad for better air circulation. During cold
weather, roll down.
Unthread buckles from seat pad as shown.
Roll up seat pad and fasten Velcro at top of seat
as shown.
2
2
1
2
2
WARNING
SUFFOCATION HAZARD! Do not use Roll-Up
seat pad as a blanket or weather cover.
Clips
To Adjust Canopy
1
1
To lock canopy open, push up on both side
hinges.
To close, push hinges down.
To adjust canopy to block sun or wind, gently
push canopy forward to desired position.
2
3
2
4
5
4
5
CARE & MAINTENANCE
•
To keep your stroller running smoothly and avoid squeaking wheels use a silicone
or graphite based lubricant. It is important to get it into the axle and the wheel
assembly.
• Clean metal parts with a damp cloth and wipe dry.
• Clean woven fabric or vinyl parts with mild soap and water solution.
• Dry wet stroller with a soft cloth to prevent rusting.
• When storing stroller, never stack other items on top of it; this may damage the stroller.
• Periodically check for worn parts, loose screws, torn materials or stitching.
• Replace any damaged parts immediately.
• Cupholder is top rack dishwasher safe.
8
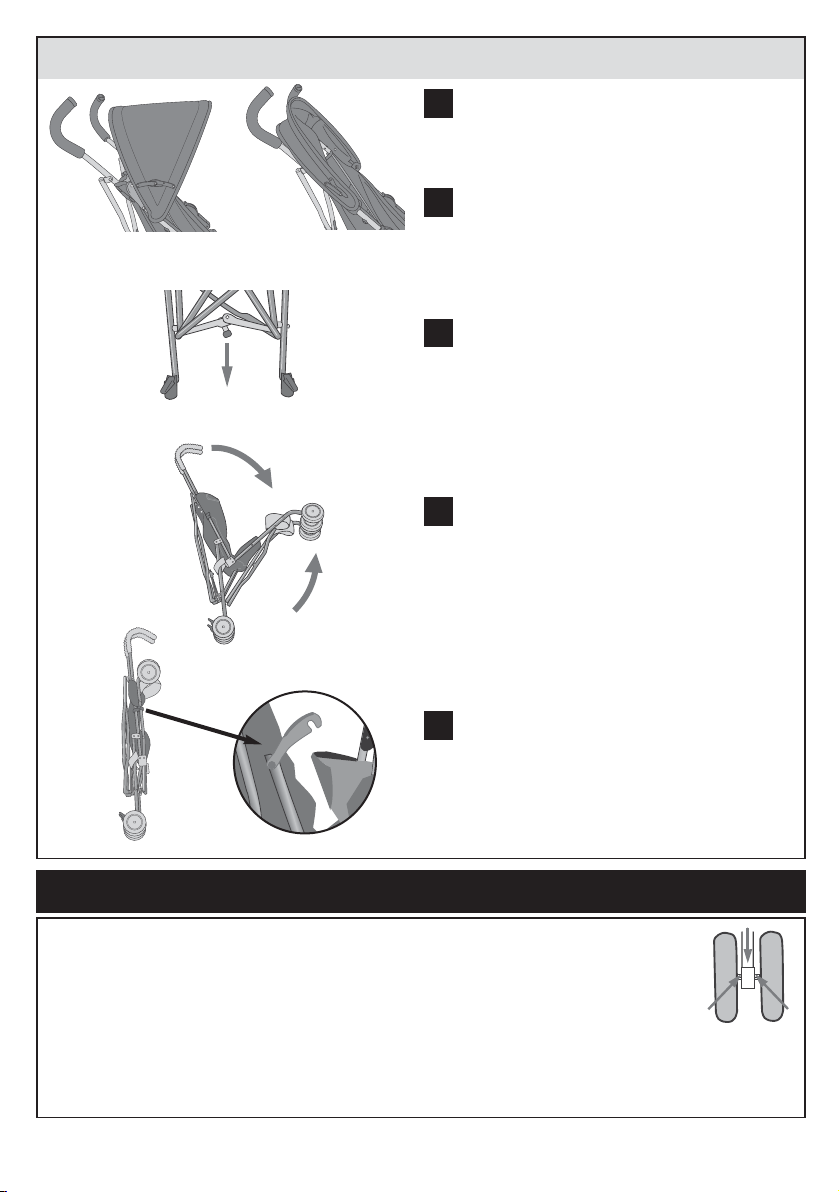
To Fold Stroller
1
BEFORE FOLDING: Lock brakes.
Close canopy.
Use foot to pull up metal brace. Lift knob up at
the same time to fold stroller.
Push handlebars forward and squeeze stroller
together.
Lock clip on side of stroller.
2
3
3
2
9
PERSONAL RECORD CARD
Once in a while, we are less than perfect and one of our products reaches a customer with a problem. In
most cases, we can solve your problem with replacement parts. Please contact us before you return one of
our products to the store. Once a product is returned, it cannot be resold. The materials and the energy used
to make it are wasted.
Please fill in the information in the space provided and attach a copy of your purchase receipt. You will need
this information to obtain warranty service.
You can find the Model Number and Date of Manufacture on a sticker located on the rear stroller leg, or sewn
on the back of the seat.
Please direct any comments, questions or replacement part requests to:
Kolcraft®Enterprises, Inc. Consumer Service Department
10832 NC Highway 211East
Aberdeen, NC 28315
1-800-453-7673 in U.S. & Canada, 1-910-944-9345 outside U.S. & Canada
Eastern Standard Time, 8 am-6:45 pm Monday - Thursday, 8 am-3:30 pm Friday
fax: 910-944-3490
e-mail: customerservice@kolcraft.com
Model / Style Number: _________________________
Date of Manufacture:___________________________
Date of Purchase: ______________________________
Jeep®is a registered trademark of Chrysler LLC and is used under license by Kolcraft®.
© Chrysler LLC 2009.
Kolcraft®warrants this product to be free of defects in materials and workmanship, as follows:
For a period of
ONE YEAR from the date of purchase, Kolcraft will repair or replace, at its option, the defective product. If you
have a problem or are not satisfied with this product, please contact the Consumer Service Department at
Kolcraft.
REPAIR OR REPLACEMENT AS PROVIDED UNDER THIS WARRANTY IS THE EXCLUSIVE REMEDY OF THE CONSUMER. KOLCRAFT SHALL NOT BE LIABLE FOR ANY INCIDENTAL OR CONSEQUENTIAL DAMAGES FOR BREACH
OF ANY EXPRESS OR IMPLIED WARRANTY ON THIS PRODUCT, EXCEPT TO THE EXTENT REQUIRED BY APPLICABLE LAW. ANY IMPLIED WARRANTY OF MERCHANTABILITY OR FITNESS FOR A PARTICULAR PURPOSE ON THIS
PRODUCT IS LIMITED TO THE DURATION OF THIS WARRANTY.
Some states do not allow the exclusion or limitation of warranties set forth above, so the above exclusions may
not apply to you. This warranty gives you specific legal rights, and you may also have other rights which vary
from state to state. We sincerely thank you for your purchase of this Kolcraft product.
To obtain warranty service, please call Kolcraft’s Consumer Service Department at 1-800-453-7673 in U.S. and
Canada, 1-910-944-9345 outside U.S. and Canada or contact us via email at customerservice@kolcraft.com
If the product is returned to Kolcraft’s Consumer Service Department for repair or replacement, it must be
shipped prepaid and adequately insured.
For further information visit www.kolcraft.com
Recall WEBSITE
: HELP KEEP YOUR CHILD SAFE. Check www.recall.gov to see if any products you use with your
child or any of your child's toys have been recalled.
LIMITED WARRANTY
Turn to page 27 to see a list of replacement parts

10
ADVERTENCIA
Evite daños serios causados por caídas o al deslizarse del asiento. Siempre use el sistema de
cinturones. La seguridad de su hijo/a depende de usted. No se puede asegurar un uso
apropiado de la carriola a menos que usted siga estas instrucciones. NO USE LA CARRIOLA
HASTA QUE USTED HAYA LEIDO Y COMPRENDIDO ESTAS INSTRUCCIONES.
INFORMACIÓN IMPORTANTE DE SEGURIDAD:
Cómo mantener a su hijo seguro mientras utiliza ésta carriola
• Ensamblado por un adulto es necesario.
•
NUNCA DEJE A SU NIÑO SOLO EN LA CARRIOLA. Pueden ocurrir accidentes
repentinamente mientras usted se encuentra de espaldas. Debe mantener a su niño
siempre a la vista mientras esté en la carriola, aunque esté durmiendo. No utilice esté
producto como cama. Su niño pudiera quedar atrapado entre las correas o sofocarse
con los colchoncitos.
•
Siempre use el sistema de sujeción para evitar que su niño se pare en
la carriola o se caiga.
•
Siempre asegure la carriola en posición desplegada antes de permitir que su
niño se acerque a se monte en ella. Esto evitará lesiones causadas al cerrarse
súbitamente la carriola.
• El uso de esta carriola es sólo para niños que pesen menos de 15,8 kg (35
libras) o midan menos de 40” (1 metro). La carriola puede sufrir daños o se
puede producir una situación peligrosa de inestabilidad si se usa para niños más
pesados.
• El uso de esta carriola es sólo para cuando el niño se pueda sentarse sin
ayuda o use solo en la posicion reclinable (modelos selectos).
•
Siempre ponga los frenos de las ruedas cuando la carriola no esté en
movimiento, especialmente cuando está en una superficie inclinada. Esto evitará
que la carriola ruede accidentalmente.
Qué debe evitar mientras utiliza ésta carriola
•
Siempre mantenga el peso de la carriola repartido por igual. Para evitar que la
carriola esté inestable o se voltée:
• No coloque paquetes ni accesorios sobre la sombrilla, los asientos o la manija.
• No ponga objetos que pesen más de 3 libras (1.36 kg) en las bolsas de carga o en la
bolsa de almacenaje trasera (modelos selectos).
•
No permita que los niños jueguen con la carriola o se cuelguen de ella.
•
Nunca utilice esta carriola en escaleras o escaleras automáticas.
•
Si necesitara ajustar la carriola, asegúrese de que los niños no estén en contacto con
las piezas móviles, de lo contrario podrían lesionarse.
•
¡Esta carriola no está diseñada para hacer ejercicio! No debe ser utilizada para correr,
trotar, patinar o participar en otras actividades atléticas.
•
NO USE ningún asiento de automóvil para niños con esta carriola. Puede ocurrir
una lesion seria.
• Tome cuidado cuando este doblando o desdoblando para prevenir pellizcos
a los dedos.
Continuación en la página siguiente

11
Para abrir carriola
Suelte la traba del costado de la carriola.
Empuje la parte delantera de la carriola hacia
abajo.
Para asegurar la carriola, presione hacia abajo la
barra de doblar.
Lista de piezas
2
3
CÓMO ENSAMBLAR SU CARRIOLA
1
Estructura de la
carriola
Sombrilla
Ruedas delanteras
(2)
1
3
Ruedas traseras (4)
Carga vaso
(modelos selectos)
Pasadores (2) Arandelas (6)
Tapón del cubos
(4)
Ejes (2)
• El producto puede hacerse inestable si una bolsa de paquete, otra de la que es
recomedada por el fabricante es usada.
• No permita que el niño se suba por sí solo en la carriola. La carriola se puede
voltear y el niño puede lesionarse.
• Use únicamente piezas de reemplazo del fabricante.
Bolsa para
almacenar
(modelos selectos)
Bolsas de carga (2)
2

12
4
5
6
7
8
9
7
Para ensamblar las ruedas delanteras
Si recibe la carriola sin las ruedas puestas, siga
las siguientes instrucciones.
Con la lengüeta de la unidad de la rueda orientada en sentido opuesto a la carriola, coloque la
rueda en la carriola hasta que se encaje en la
carriola.
Repetir para la otra rueda delantera.
NOTA: Para quitar, apriete la lengüeta y saque
las ruedas.
1
1
Lengüeta
Para ensamblar las ruedas traseras
Para el lado derecho del ensamblaje de las ruedas
traseras, coloque la rueda en el eje.
Deslice la primera sobre el eje.
Inserte el eje con la arandela y la rueda en el lado
derecho del ensamblaje de las ruedas traseras tal
como se muestra. Asegúrese que el eje se coloque
en el ensamblaje de las ruedas traseras desde la
parte interna de la rueda.
Coloque la segunda arandela sobre el eje.
Coloque la otra rueda en el eje.
Coloque la trecera arandela en el eje.
Inserte la parte recta del pasador por el agujero
del eje.
Alinée las lengüetas de cada uno de los tapones
protectores con las ranuras de la rueda y presione hasta que queden bien asegurados.
Repita estos mismos pasos en el lado izquierdo.
1
3
Rueda
UNIDAD DE RUEDAS TRASERAS EL DERECHO
Eje
Rueda
Arandela Arandela Arandela
Pasadora
Tapones
Protectores
2
3
Tapones
Protectores

13
Para conectar el carga vaso (modelos selectos)
Para conectar el carga de vasos a la manija izquierda, coloque el agujero sobre el poste y abróchelo.
PARA LIMPIARLO: Se puede colocar en la rejilla
superior del lavaplatos automático.
1
1
ADVERTENCIA
No ponga más de 0.45 kg (1 libra) de peso en el soporte
de vaso para evitar volcaduras. No coloque liquidos
calientes en el carga de vaso. Liquidos calientes pueden
quemar a su niño.
Para unir la sombrilla
Para ajustar la sombrilla alinea los clips de la
sombrilla entre los dos tornillos de el trasero de
la carriola.
Para asegurar la sombrilla abierta, empuje hacia
arriba en las bisagras de ambos lados dentro del
sombrilla. Para plegar, empuje hacia abajo para
liberar las bisagras.
1
1
2
2
Instalación de las bolsas de carga
Para instalar las bolsas de carga envolver el velcro
a la armazón de la carriola, como se muestra.
Repita para el otro lado.
1
ADVERTENCIA
No ponga más de 1.36 kg (3 libras) de peso en cada
bolsa de carga.

14
Para asegurar al niño en la carriola
Asegure los dos frenos de pie para evitar que la
carriola ruede accidentalmente.
Coloque la correa de la entrepierna entre las
piernas del niño.
Ajuste adecuadamente el sistema de cinturones
alrededor de la cintura del niño.
Para abrochar la hebilla del sistema de
cinturones ensártela en el otro extremo del
cinturón. Asegure que las dos hebillas estén
abrochados para asegurar el niño.
Para desabrochar la hebilla del sistema de
cinturones, presione las lengüetas.
1
CÓMO USAR SU NUEVO CARRIOLA CORRECTAMENTE
3
2
3
4
5
Para usar los frenos
1
Empuje ambos niveladores hacia abajo para trabarlos.
Jale hacia arriba ambos niveladores para destrabarlos.
2
Quitar
Poner
4
5
ADVERTENCIA
Evite daños serios causados por caídas o al
deslizarse del asiento. Use siempre el sistema
de cinturónes.

15
Para reclinar la carriola (modelos selectos)
1
Desenganche los broches de los lados de la
carriola.
Asegure los broches en el tubo de abajo.
Para enrollar la almohadilla del asiento para todo clima
1
1
Para mantener el niño fresco en el tiempo
caliente enrolle la almohadilla del asiento para
mejor circulación de aire. Durante el tiempo frio,
desenróllela.
Desate las hebillas del asiento como se muestra.
Enrolle el asiento y ate el Velcro en la parte de
arriba del asiento como se muestra.
2
2
1
2
2
Broches
Para ajustar la sombrilla
1
1
Para ajustar la sombrilla abierta, jale las
bisagras hacia arriba en ambos lados.
Para cerrar, empuje las bisagras hacia abajo.
Para ajustar la sombrilla para bloquear el sol o el
viento, abra gradualmente la sombrilla hasta la
posición deseada.
2
3
2
ADVERTENCIA
¡PELIGRO DE ASFIXIA! No utilice la almohadilla
del asiento enrollable como una manta o
cubierta para el clima.

16
4
5
4
5
CUIDADO & MANTENINIENTO
• Utilice un lubricante ligero con silicona o grafito para que su carriola se deslice suavemente y
para evitar que las ruedas rechinen. Es importante el aceitar eje y las ruedas.
• Limpie las partes de metal con un trapo húmedo y luego séquelas.
• Limpie la tela tejida o las partes de vinilo con jabón suave y agua.
• Seque la carriola con un trapo suave cuando se haya mojado para evitar de
que se oxide.
• Cuando guarde la carriola, nunca ponga otros objetos encima de ella, ya que esto podría dañarla.
• Revise periódicamente para ver si tiene partes gastadas, tornillos flojos, materiales rotos o partes descosidas.
• Cambie inmediatamente cualquier parte dañada.
• Soporte de vasos se puede colocar en la rejillas superior del lavaplatos automático.
Para plegar la carriola
1
ANTES DE PLEGAR: Ponga los frenos.
Cierre la sombrilla.
Empuje la palanca roja hacia la izquierda y
levántela hacia arriba.
Empuje las manijas hacia adelante y pliegue la
carriola.
Asegure la traba al costado de la carriola.
2
3
3
2

17
TARJETA DE REGISTRO PERSONAL
Ocasionalmente no logramos la perfección y uno de nuestros productos presenta algún problema al llegar al cliente.
En la mayor parte de los casos podemos resolver el problema con piezas de reemplazo. Sírvase ponerse en contacto con nosotros antes de devolver uno de nuestros productos a la tienda. Una vez que se devuelve un producto, no
se pude volver a vender. Se desperdician los materiales y la energía que se usó en su fabricación.
Por favor escriba la información en el espacio provisto y adjunte una copia de su recibo de compra. Usted necesitará esta información para obtener los servicios incluidos en la garantía.
Usted puede encontrar el número del modelo y la fecha de fabricación en una etiqueta situada en la parte trasera
de la pata de la carriola o cocido en la parte posterior del asiento.
Favor de remitir cualquier comentario, preguntas o pedidos de piezas de respuesto a:
Kolcraft
®
Enterprises, Inc. Consumer Service Department
10832 NC Highway 211East
1-800-453-7673 en los Estados Unidos y en Canada, 1-910-944-9345 fuera de los Estados Unidos y Canada tiempo
estándar del este, 8 am-6:45 pm Lunes - Jueves, 8 am-3:30 pm Viernes
fax: 910-944-3490
correo electrónico: customerservice@kolcraft.com
Número de Modelo/Estilo: _______________________
Fecha de fabricación:____________________________
Fecha de compra: ______________________________
Jeep®es una marca registrada de Chrysler LLC y es utilizada, bajo licencia por Kolcraft®.
© Chrysler LLC 2009.
Kolcraft®garantiza que este producto estará libre de defectos en materiales y fabricación de la siguiente manera: Por un período de UN AÑO después de la fecha de compra, Kolcraft reparará o reemplazará, a su opción, el
producto defectuoso. Si usted tiene un problema o no está satisfecho con este producto, por favor diríjase al
Departamento de Servicio al Consumidor de Kolcraft.
LA REPARACIÓN O EL REEMPLAZO SEGÚN SE DISPONE EN ESTA GARANTÍA ES EL REMEDIO EXCLUSIVO DE CONSUMIDOR. KOLCRAFT NO SE HARÁ RESPONSABLE DE NINGÚN DAÑO INCIDENTAL O EMERGENTE POR VIOLACIÓN
DE CUALQUIER GARANTÍA EXPRESA O IMPLÍCITA DE ESTE PRODUCTO, SALVO EN LA MEDIDA REQUERIDA POR LA
LEY APLICABLE. CUALQUIER GARANTÍA IMPLÍCITA DE COMERCIABILIDAD O IDONEIDAD PARA UN FIN EN PARTICULAR DE ESTE PRODUCTO ESTÁ LIMITADA EN DURACIÓN AL TÉRMINO DE ESTA GARANTÍA.
Algunos estados no permiten la exclusión o limitación de garantías según se dispone anteriormente, de manera
que es posible que las antedichas exclusiones no sean aplicables a usted. Esta garantía le otorga derechos
legales específicos y es posible que también disponga de otros derechos, los cuales pueden variar de un estado
a otro. Le agradecemos sinceramente por haber comprado este producto Kolcraft.
Para obtener servicio de garantía, llame al Departamento de Servicio al Consumidor de Kolcraft al 1-800-453-7673 en
Estados Unidos y Canada; fuera de Estados Unidos y Canada: 1-910-944-9345 o envianos un mensaje por correo
electrónico a customerservice@kolcraft.com.
Si el producto se devuelve al Departamento de Servicio al Consumidor de Kolcraft para ser arreglado o reemplazado, debe mandarse con el flete pagado y debidamente asegurado.
Para mayor información visítenos en www.kolcraft.com
SITIO DE WEB DE HACER VOLVER: MANTENGA A SU HIJO SEGURO. Compruebe www.recall.gov para ver si
cualquiera de los productos que utiliza con su hijo o cualquiera de sus juguetes han sido retirados.
GARANTÍA LIMITADA
Diríjase a la página 27 para ver una
lista de piezas de repuesto

18
Pour éviter que l’enfant ne se blesse grièvement en tombant ou en glissant, toujours utiliser
la ceinture de sécurité. La sécurité de votre enfant dépend de vous. Suivez ces instructions
afin d’utiliser la poussette de facon convenable. N’UTILISER LA POUSSETTE QU’APRES AVOIR
LU ET COMPRIS CES INSTRUCTIONS.
INFORMATIONS IMPORTANTES SUR LA SÉCURITÉ:
Comment garantir la sécurité de votre enfant avec cette poussette
• Doit être assemblé par un adulte.
•
NE JAMAIS LAISSER UN ENFANT SANS SURVEILLANCE DANS LA POUSSETTE.
Les accidents arrivent vite lorsque vous avez le dos tourné. Garder toujours
l’enfant à portée de vue lorsqu’il se trouve dans la poussette, même s’il dort. Ne
pas utiliser ce produit comm un lit. L’enfant risque de s’asphyxier avec les
coussins et de s’étrangler avec les attaches.
• Toujours attacher l’enfant pour éviter qu’il ne se lève et ne tombe
de la poussette.
• Toujours s’assurer de la stabilité de la poussette avant d’autoriser l’enfant à
y monter ou à en descendre. Cela évitera à la poussette de basculer et de
tomber, et de blesser l’enfant.
•
N’utiliser cette poussette qu’avec des enfants de moins de 35 livres (15,8 kg)
ou mesurant moins de 40 pounces (1 mètre) par siège. L’utilisation par des
enfants dépassant ce poids peut endommager la poussette et créer de dangereux
risques de déséquilibre.
• Only use this stroller when child can sit up unassisted or only use product
in recline position (select models).
• Toujours verrouiller les roues lorsque la poussette est immobilisée,
particulièrement lorsqu’elle se trouve en pente. Cela évitera de perdre le
contrôle de la poussette.
Que faut-il éviter avec cette poussette
• Toujours équilibrer le poids de la poussette de façon égale. Pour
éviter que la poussette ne devienne instable ou ne bascule:
• Ne pas placer de paquets ou autre chose de ce genre sur la capote, le siège ou
autour de la poignée de la poussette.
• Ne pas mettre plus de 1,36 kg (soit 3 livres) dans les sacoches ou le panier
arrière (modèles sélectionnés).
• Ne pas permettre aux enfants de jouer avec la poussette ou de se
suspendre à la poignée.
•
Ne jamais utiliser cette poussette dans un escalier ou un escalier roulant.
• Veillez à tenir les enfants éloignés de toute pièce mobile quand vous réglez a
poussette, afin d’éviter qu’ils ne se blessent.
• Ne pas utiliser cette poussette lorsque vous faites vos exercices! Ne pas
utiliser lorsque vous courrez, faites du jogging, du patin en ligne ou toutes autres
activités athlétiques.
• N’UTILISER AUCUN siège auto nourrisson avec ce produit. Risque de
blessures graves.
MISE EN GARDE
Voir page suivante

19
Pour déplier la poussette
Dégrafer l’attache latérale de
verrouillage.
Poussez l’avant de la poussette
vers le bas.
Poussez la barre de pliage vers le bas afin de
verrouiller la poussette.
Liste de pièces
2
3
COMMENT ASSEMBLER VOTRE POUSSETTE
1
Cadre de la pous-
sette
Capote
Roue avant (2)
1
3
Roues arrière (4)
Porte-boisson
(modèles sélectionnés)
Sacoches (2)
Goupilles (2) Rondelles (6)
Chapeau de
moyeu (4)
Essieux (2)
• Pour éviter que l’enfant ne se coince les doigts, faire attention au
moment de déplier ou de plier la poussette.
• Cet article peut se déstabiliser en cas d'utilisation d'un sac autre
que celui recommandé par le fabricant.
• Ne pas
laisser les enfants monter dans la poussette sans surveillance.
Elle risque
de basculer et d’entraîner des accidents.
• N’utiliser que des pièces de rechange fournies par le fabricant.
Sac de rangement
(modèles sélectionnés)
2

20
4
5
6
7
8
9
7
Pour assembler les roues avant
Si la poussette arrive avec les roues demontées,
suivez les instructions cidessous.
Avec la languette sur la roue orientée du côté
opposé à la roue, placez la roue sur la poussette
jusqu’à ce qu’elle se verrouille en place. Répétez
l’opération pour l’autre roue avant.
REMARQUE: Pour retirer la roue, pressez la
languette et enlevez la roue.
1
1
Languette
Pour assembler les roues arrière
Pour assembler la roue arrière droite, faire glisser
la roue sur l’essieu.
Faire glisser la première rondelle sur l’essieu.
Insérer l’essieu, la rondelle et la roue dans
l’assemblage de la roue arrière droite, selon
l’illustration. Vérifiez que l’essieu est bien inséré
dans l’assemblage de la roue depuis la roue
interne.
Faire glisser la deuxième rondelle sur l’
essieu
.
Faire glisser
l’autre roue sur l’
essieu
.
Faire glisser
la troisième rondelle sur l’essieu
.
Enfiler la partie plate de la goupille dans l’orifice
sur l’essieu.
Aligner les languettes de chaque chapeau de
moyeu avec les fentes de la roue. Insérer les chapeaux de moyeu en place.
Répéter l’opération pour le côté gauche.
1
3
Roue
ASSEMBLAGE DE LA ROUE ARRIERE DROITE
Essieu
Roue
Rondelle Rondelle Rondelle
Goupille
Chapeau de
moyeu
2
3
Chapeau de
moyeu

21
Pour attacher le porte-boisson
(modèles sélectionnés)
Pour attacher le porte-boisson à la poignée
gauche, aligner l’orifice au-dessus de l’onglet et
enclencher.
NETTOYAGE: Va dans le panier supérieur du
lave-vaisselle.
1
1
MISE EN GARDE
Ne pas placer plus de 454 g (1 livre) dans ce porteboisson, pour éviter de renverser!
Ne pas placer de liquides chauds dans ce porte-boisson. Ceux-ci peuvent brûler votre enfant.
Pour attacher la capote
Pour fixer la capote, aligner les agrafes de la
capote entre les deux vis à l’arrière de la poussette.
Pour verrouiller la capote en position ouverte,
appuyer sur les deux charnières latérales se
trouvant à l’intérieur de la capote. Pour la plier,
pousser vers le haut pour déverrouiller les
charnières.
1
1
2
2
Pour attacher les sacoches
Pour attacher les sacoches, enclenchez les deux
pinces sur le cadre de la poussette, selon
l’illustration. Répétez l’opération de l’autre côté.
1
MISE EN GARDE
Ne pas mettre plus de 1,36 kg (soit 3 livres) dans
chaque sacoche.

22
Pour attacher l’enfant dans la poussette
Verrouiller les deux freins à pied pour éviter de
perdre le contrôle de la poussette.
Placer la sangle de l’entre-jambes de l’enfant.
Ajuster la ceinture de façon à ce qu’elle maintienne parfaitement l’enfant au niveau de la taille.
Pour fermer les boucles de la ceinture de sécurité, les attacher ensemble. S’assurer que les
deux boucles sont bien fermées pour garantir la
sécurité de l’enfant.
Pour libérer les boucles de la ceinture de sécurité
- appuyer sur les attaches.
1
INSTRUCTIONS POUR UNE UTILISATION CORRECTE DE VOTRE NOUVELLE POUSSETTE
3
MISE EN GARDE
Pour éviter que l’enfant ne se blesse
grièvement en tombant ou en glissant, toujours
utiliser la ceinture.
2
3
4
5
Pour utiliser les freins
1
Appuyer sur les leviers des deux roues arrière
pour verrouiller.
Remonter les leviers pour déverrouiller.
2
Déverrouiller
Verrouiller
4
5

23
Pour incliner le siège (modèles sélectionnés)
1
Libérer les pinces de chaque côté de la poussette.
Attacher les pinces à la barre inférieure.
Relever le revêtement tous-climats
1
1
Pour garder l’enfant aéré quand il fait chaud,
relever le revêtement de siège pour une meilleure
circulation de l’air. Le dérouler à nouveau quand le
temps se rafraîchit.
Délier les boucles du revêtement de siège comme
sur le schéma ci-contre.
Replier le revêtement vers le haut et attacher la
bande velcro en haut du siège.
2
2
1
2
2
MISE EN GARDE
DANGER DE SUFFOCATION ! Ne pas utiliser le
revêtement de siège amovible comme couverture
ou protection contre les intempéries.
Pinces
Pour ajuster la capote
1
1
Pour ouvrir la capote, tirer les charnières
latérales vers le haut.
Pour refermer, abaisser charnières.
Pour une protection contre le soleil ou le vent,
ajuster la capote en la poussant délicatement
vers la position désirée.
2
3
2

24
4
5
4
5
ENTRETIEN & NETTOYAGE
• Pour prolonger le bon fonctionnement de votre poussette et éviter des grincements
de roues, utiliser un lubrifiant à base de silicone ou de graphite léger. Il est
important d’huiler l’essieu et l’assemblage des roues.
• Nettoyer les parties métalliques avec un chiffon humide et les essuyer.
• Nettoyer le tissu ou les parties en vinyle avec un détergent doux et une solution
aqueuse.
• Sécher la poussette encore humide à l’aide d’un chiffon non corrosif pour éviter
qu’elle ne rouille.
• Ne rien empiler sur la poussette lorsqu’elle n’est pas utilisée ; cela pour-rait l’endommager.
• Contrôler régulièrement la poussette pour voir si des pièces sont usées, des vis desserrées, ou
si le tissu ou la couture sont déchirés.
• Remplacer immédiatement les pièces endommagées.
• Le porte-boisson peut être mis au lave-vaisselle sur le plateau supérieur.
Pour plier la poussette
1
AVANT DE PLIER: Verrouiller les freins.
Rabattre la capote.
Utilisez le pied pour tirer l’entretoise de métal
vers le haut. Soulevez le bouton vers le haut tout
en repliant la poussette.
Pousser le guidon vers l’avant et replier la
poussette.
Verrouillez la pince sur le côté de la
poussette.
2
3
3
2

25
Jeep®est une marque déposée de la Chrysler LLC et est utilisé sous licence par Kolcraft®.
© Chrysler LLC 2009.
Kolcraft®garantit cet article contre tout défaut de fabrication, selon les décrets suivants: Kolcraft s’engage à
réparer ou remplacer, à sa convenance, l’article défectueux pendant UN AN à partir de la date d’achat. Si vous
avez un problème ou n’êtes pas entièrement satisfait de cet article, veuillez contacter le Service à la Clientèle
de Kolcraft.
COMME CETTE GARANTIE LE STIPULE, LE CONSOMMATEUR NE PEUT PRETENDRE QU’A LA REPARATION OU AU REMPLACEMENT DE L’ARTICLE. KOLCRAFT NE SERA TENU RESPONSABLE D’AUCUN DOMMAGE INDIRECT OU ACCESSOIRE
POUR RUPTURE DE GARANTIE EXPRESSE OU TACITE CONCERNANT CET ARTICLE, EN RESTANT TOUTEFOIS DANS LES
LIMITES DE LA LOI EN VIGUEUR. TOUTE GARANTIE TACITE DE COMMERCIALISATION OU D’UTILISATION ADEQUATE DE
CET ARTICLE EST LIMITEE A LA DUREE DE CETTE GARANTIE.
Certains états interdisent l’exclusion ou la limitation des garanties présentées ci-dessus ; dans ce cas-là, ces exclusions ne vous concernent pas. Cette garantie vous donne des droits légaux particuliers. Vous pouvez également
bénéficier d’autres droits qui peuvent varier selon les états. Nous vous remercions sincèrement d’avoir acheté
cet article Kolcraft.
Pour tous services de garantie, merci de contacter le Service à la Clientèle de Kolcraft au 1-800-4537673 pour Etats-Unis et le Canada et au1-910-944-9345 en dehors des Etats-Unis et du Canada, ou par courrier électronique à customerservice@kolcraft.com.
En cas de retour de cet article au Service à la Clientèle de Kolcraft pour une réparation ou un remplacement,
envoyez-le en port payé et suffisamment assuré.
Pour davantage de renseignements, visitez le site www.kolcraft.com
SITE WEB DE RAPPEL DE PRODUITS : GARANTISSEZ LA SÉCURITÉ DE VOTRE ENFANT. Consultez le site
www.recall.gov afin de déterminer si les produits utilisés pour l'enfant ou les jouets ont été rappelés.
GARANTIE LIMITÉE
FICHE DE RENSEIGNEMENTS PERSONNELS
Il arrive parfois qu’un de nos articles soit défectueux et pose un problème au consommateur. Dans la plupart
des cas, nous pouvons résoudre votre problème en effectuant un remplacement des pièces défectueuses.
Contactez-nous avant de retourner un de nos articles au magasin. Une fois retourné, l’article ne peut être revendu. Les matériaux et l’énergie utilisés pour sa fabrication ont alors été gaspillés.
Nous vous encourageons à noter les renseignements nécessaires dans l’espace prévu à cet effet et à y joindre
une copie de votre ticket de caisse. Vous aurez besoin de ces renseignements pour bénéficier du service de
garantie.
Vous trouverez le numéro de modèle et la date de fabrication sur un autocollant situé proche du montant arrière ou
cousu à l’arrière du siège.
Prière d'envoyer vos commentaires, questions ou demandes d'échange de pièce à:
Kolcraft®Enterprises, Inc. Consumer Service Department
10832 NC Highway 211East
Aberdeen, NC 28315
1-800-453-7673 aux États-Unis et au Canada, 1-910-944-9345 à l'extérieur des États-Unis et du Canada.
Heure de New York, de 8h00 à 18h45 du lundi au jeudi, de 8h00 à 15h30 le vendredi
fax: 910-944-3490
courriel: customerservice@kolcraft.com
Numéro du modèle: _________________________
Date de fabrication:______________________________
Date d’achat: _________________________________
Lisez en page 27 la liste de pièces de
remplacement

Select Model replacement parts • Seleccione las piezas de repuesto del Modelo
• Choisissez les pièces de remplacement du Modèle
Circle the Part You Need
REPLACEMENT PARTS LIST / LISTA DE PIEZAS DE REPUESTO /
LISTE DES PIÈCES DE RECHANGE
Replacement parts may look slightly different than what is
shown below.
Encerclez la pièce dont vous
avez besoin
Les pièces de rechange peuvent différer légèrement des illustrations.
Marque con un círculo el
repuesto que necesita
Las piezas de recambio se pueden ver ligeramente diferentes
de como se muestran abajo.
27
$7.00
Storage Bag
Bolsa para almacenar
Sac de rangement
$9.00
Canopy
Sombrilla
Capote
$9.00
Front Wheel
Rueda delantera
Roue avant
$7.00
Rear Wheel
Rueda trasera
Roue arrière
$5.00
Cup Holder
Carga vaso
Porte-boisson
$8.00
Cargo Bag
Bolsa de carga
Sacoches
$20.00
Seat Pad
Colchón para el asiento
Revêtement de siège
Free / Gratis / Libre
Washers, Cotter Pins, Axles &
Hub Caps
Arandela, pasador, Eje y
tapón del cubo
Rondelle, goupilles, essieux
et chapeau de moyeu

28
REPLACEMENT PARTS ORDER FORM / FORMULARIO PARA ORDENAR PIEZAS
DE REPUESTO / FORMULAIRE DE COMMANDE POUR PIÈCES DE RECHANGE
Model Number -
No de modelo- Numéro du modèle
Date of Manufacture -
Fecha de fabricación- Date de fabrication
Total:
Shipping & Handling* -
Gastos de envío* - Port et manutention* :
$5.00
*$15.00 outside the continental U.S.
*U.S. $15,00 para fuera de continente de EE.UU
*$15 dollars US pour les clients résidant hors de la partie continentale des É.-U.
Sales Tax** -
Impuestos
** -
T.V.A.*
* :
**NC Residents Only 7%
**Residentes de North Carolina nomas 7%
** 7% pour les résidents de la Caroline du Nord uniquement.
Total Due
-
Total a pagar - Total à régler
:
❑
Check or money order (in US dollar) enclosed (payable to Kolcraft Enterprises, Inc.)
Cheque o giro adjunto (a nombre de Kolcraft Enterprises, Inc.)
Chèque ou mandat postal (montant en dollar US) inclus
(à l'ordre de Kolcraft Enterprises, Inc.)
❑
Charge to credit card
Cobrar a la tarjeta de crédito- Débiter cette carte de crédit
❑ Visa ❑ Mastercard
Account# -
Cuenta No - N° compte
:
3 Digit Security Code -
3 numeros de código de dígito de seguridad -
Code de sécurité à 3 chiffres
Expiration Date
- Fecha de vencimiento- Date d'expiration
: /
Signature -
Firma
:
Ship to -
Enviar a- Destinataire
:
Name - Nombre - Nom
Address - Dirección - Adresse
City, State, Zip - Ciudad, Estado, Código postal - Ville, Province, Code postal
( )
Telephone - Teléfono - Téléphone
Email Address - Correo electrónico - Adresse courriel
•Complete the following form. Your model number and date of manufacture must be
included on the form to ensure proper replacement parts.
•Complete el siguiente formulario. Debe incluir en el formulario el número de su modelo y fecha de fabricación para asegurarse de que obtenga las piezas de repuesto adecuadas.
•Remplissez le formulaire suivant. Votre numéro de modèle et la date de fabrication
doivent être inclus dans le formulaire pour garantir un échange de pièce approprié.
 Loading...