

Page 1

Owner’s Manual Supplement
Uconnect® 6.5A/6.5AN
Page 2

SECTION PAGE
SAFETY GUIDELINES .........................................................3
1
INTRODUCTION .............................................................7
2
ALL ABOUT UCONNECT® ACCESS .............................................11
3
RADIO MODE . . . . . . . . . . . . . . . . . . . . . . . . . . . . . . . . . . . . . . . . . . . . . . . . . . . . . . . . . . . . . . 159
4
MEDIA MODE . . . . . . . . . . . . . . . . . . . . . . . . . . . . . . . . . . . . . . . . . . . . . . . . . . . . . . . . . . . . . . 175
5
UCONNECT® PHONE . . . . . . . . . . . . . . . . . . . . . . . . . . . . . . . . . . . . . . . . . . . . . . . . . . . . . . . . 181
6
UCONNECT® 6.5A/6.5AN VOICE RECOGNITION QUICK TIPS . . . . . . . . . . . . . . . . . . . . . . . 209
7
NAVIGATION . . . . . . . . . . . . . . . . . . . . . . . . . . . . . . . . . . . . . . . . . . . . . . . . . . . . . . . . . . . . . . 219
8
TABLE OF CONTENTS
1
2
3
4
5
6
7
8
Page 3

Page 4

SAFETY GUIDELINES
CONTENTS
! SAFETY GUIDELINES .....................4
1
Page 5
4SAFETYGUIDELINES
SAFETY GUIDELINES
WARNING!
ALWAYS drive safely with your hands on the steering wheel. You have full responsibility and assume
all risks related to the use of the Uconnect® features
and applications in this vehicle. Only use Uconnect®
when it is safe to do so. Failure to do so may result in
an accident involving serious injury or death.
Ensure that all persons read this manual carefully before
using the system. It contains instructions on how to use
the system in a safe and effective manner.
Please read and follow these safety precautions. Failure
to do so may result in injury or property damage.
• Glance at the screen only when safe to do so. If
prolonged viewing of the screen is necessary, park in a
safe location and set the parking brake.
• Stop use immediately if a problem occurs. Failure to
do so may cause injury or damage to the product.
Return it to your authorized dealer to repair.
• Ensure that the volume level of the system is set to a
level that still allows you to hear outside traffic and
emergency vehicles.
Safe Usage Of The Uconnect® System
• Read all instructions in this manual carefully before
using your system to ensure proper usage!
• Your system is a sophisticated electronic device. Do
not let young children use your system.
• Permanent hearing loss may occur if you play your
music or the system at loud volumes. Exercise caution
when setting the volume on your system.
Page 6

• Keep drinks, rain, and other sources of moisture away
from your system. Besides damage to your system,
moisture can cause electric shocks as with any electronic device.
NOTE: Many features of this system are speed dependent. For your own safety, it is not possible to use some
of the touchscreen features while the vehicle is in motion.
Touchscreen
• Do NOT attach any object to the touchscreen, doing
so can result in damage to the touchscreen.
SAFETY GUIDELINES 5
• If necessary, use a lint-free cloth dampened with a
cleaning solution, such as isopropyl alcohol, or an
isopropyl alcohol and water solution ratio of 50:50. Be
sure to follow the solvent manufacturer’s precautions
and directions.
FCC Declaration
This device complies with Part 15 of the FCC Rules and
with Industry Canada license-exempt RSS standard(s).
Operation is subject to the following two conditions:
1. This device may not cause harmful interference.
1
• Do not touch the screen with any hard or sharp objects
(pen, USB stick, jewelry, etc.) which could scratch the
touchscreen surface!
• Do not spray any liquid or caustic chemicals directly
on the screen! Use a clean and dry micro fiber lens
cleaning cloth in order to clean the touchscreen.
2. This device must accept any interference received,
including interference that may cause undesired operation.
Page 7

6SAFETYGUIDELINES
NOTE: This equipment has been tested and found to
comply with the limits for a Class B digital device,
pursuant to Part 15 of the FCC Rules. These limits are
designed to provide reasonable protection against harmful interference in a residential installation. This equipment generates, uses and can radiate radio frequency
energy and, if not installed and used in accordance with
the instructions, may cause harmful interference to radio
communications. However, there is no guarantee that
interference will not occur in a particular installation.
If this equipment does cause harmful interference to
radio or television reception, which can be determined by
turning the equipment off and on, the user is encouraged
to try to correct the interference by one or more of the
following measures: - Increase the separation between
the equipment and receiver. - Consult the dealer or an
experienced radio technician for help.
Safety Information
Exposure to Radio Frequency Radiation
The radiated output power of the this internal wireless radio
is far below the FCC radio frequency exposure limits.
Nevertheless, the wireless radio shall be used in such a
manner that the radio is eight inches (20 cm) or further from
the human body.
The internal wireless radio operates within guidelines found
in radio frequency safety standards and recommendations,
which reflect the consensus of the scientific community.
The radio manufacturer believes the internal wireless radio
is safe for use by consumers. The level of energy emitted is
far less than the electromagnetic energy emitted by wireless
devices such as mobile phones. However, the use of wireless
radios may be restricted in some situations or environments,
such as aboard airplanes. If you are unsure of restrictions,
you are encouraged to ask for authorization before turning
on the wireless radio.
Page 8

INTRODUCTION
CONTENTS
! Uconnect® 6.5A/6.5AN SYSTEM .............8
2
Page 9
8INTRODUCTION
Uconnect® 6.5A/6.5AN SYSTEM
Page 10

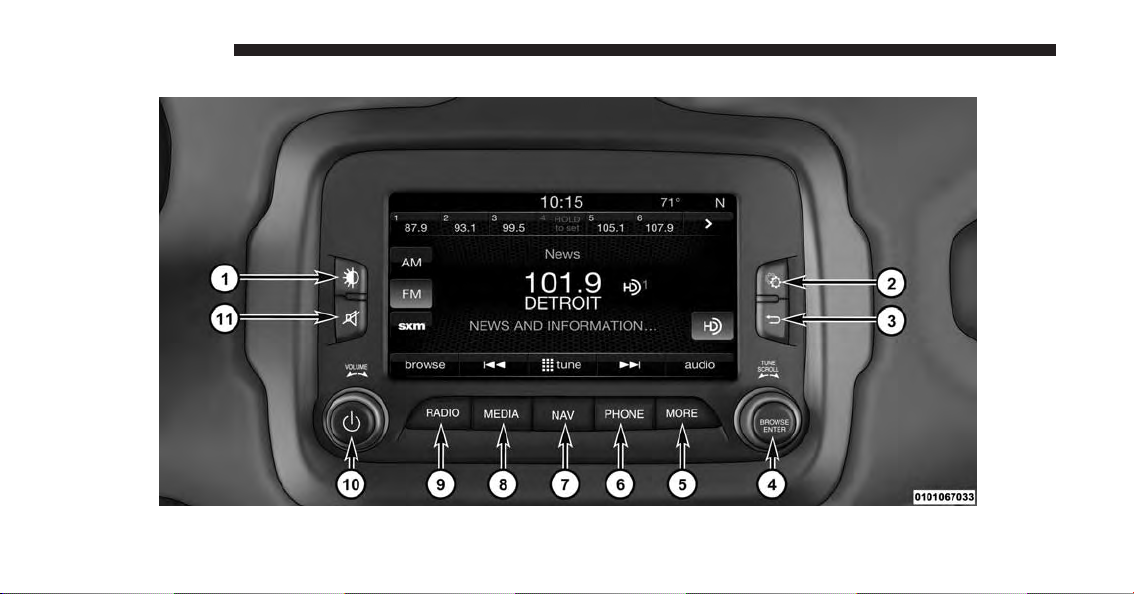
1 — DISPLAY ON/OFF
INTRODUCTION 9
5 — MORE
Push the DISPLAY ON/OFF button located on the faceplate to turn the display ON or OFF.
2 — SETTINGS
Push the SETTINGS button located on the touchscreen to
display the list of available settings.
3 — BACK
Push the BACK button to return to a previous menu or
screen.
4 — ENTER/BROWSE & TUNE/SCROLL
Push the ENTER/BROWSE button to accept a highlighted selection on the screen. Rotate the TUNE/
SCROLL rotary knob to scroll through a list or tune a
radio station.
Push the MORE button located on the faceplate to access
additional options such as:
• Trip
• Settings
• Clock
• APPS
6 — PHONE
Push the PHONE button to access the Uconnect® Phone
feature.
7—NAV
Push the NAV button located on the faceplate to activate
the Navigation feature.
2
Page 11

10 INTRODUCTION
8 — MEDIA
10 — ON/VOLUME
Pushing the MEDIA button will allow you to switch to
Media Mode (USB/iPOD®, AUX, Bluetooth®).
9 — RADIO
Push the RADIO button located on the faceplate to enter
Radio Mode. The different tuner modes; AM, FM and
SXM (If Equipped) can be selected by pushing the
corresponding buttons in the Radio Mode.
Rotate the rotary knob to adjust the Volume. Push the
ON/VOLUME button to turn on the system. Push the
ON/VOLUME button a second time to turn off the
system.
11 — MUTE
Push the MUTE button for activation/deactivation of the
volume.
Page 12

ALL ABOUT Uconnect® ACCESS
CONTENTS
! INTRODUCTION TO Uconnect® ACCESS .....13
▫ What Is Uconnect® Access? ...............13
▫ Included Trial Period For New Vehicles .......17
▫ Features And Packages ..................18
! GETTING STARTED WITH Uconnect® ACCESS. .19
▫ Registration ..........................19
▫ Set Up Your Uconnect® Payment Account .....26
▫ Download the Uconnect® Access App .......30
▫ Set up Via Mobile ......................35
▫ Purchasing Apps And WiFi Hotspot For Your
Vehicle ..............................38
▫ Using Mopar Owner Connect..............45
! USING Uconnect® ACCESS ................49
▫ Getting Started With Apps ................49
▫ 9-1-1 Call ............................50
▫ Roadside Assistance Call .................56
▫ Yelp®...............................58
▫ Theft Alarm Notification .................68
▫ Stolen Vehicle Assistance .................71
3
Page 13

12 ALL ABOUT Uconnect® ACCESS
▫ WiFi Hotspot .........................73
▫ Voice Texting .........................81
▫ Remote Door Lock/Unlock ...............90
▫ Remote Vehicle Start ....................96
▫ Remote Horn And Lights ................102
▫ Via Mobile Apps ......................107
! MAINTAIN MY Uconnect® ACCESS
ACCOUNT ...........................141
▫ Reinstalling An App ...................141
▫ How To Remove My Uconnect® Access
Account ............................144
▫ Adding Vehicles To My Uconnect® Access
Account ............................148
! Uconnect® CARE & FAQs .................148
▫ Uconnect® Care Business Hours:...........148
▫ Safety Guidelines......................153
▫ Safe Usage Of The Uconnect® Access System . .154
! DEVICE CONNECTION AND AUDIO TIPS
WITH Uconnect® .......................157
Page 14

INTRODUCTION TO Uconnect® ACCESS
To unlock the full potential of Uconnect® Access in your
vehicle, you first need to register with Uconnect® Access.
What Is Uconnect® Access?
Uconnect® Access enhances your ownership and driving
experience by connecting your vehicle with a 3G cellular
connection. Uconnect® Access is available only on
equipped vehicles purchased within the continental United
States, Alaska and Hawaii. Services can only be used where
coverage is available, see coverage map for details.
For a complete list of Uconnect® Access services, please
DriveUconnect.com
visit
.
ALL ABOUT Uconnect® ACCESS 13
Uconnect® Access provides:
• The ability to remotely lock/unlock your doors and
start your vehicle (if equipped) from virtually anywhere, with the Uconnect® Access App, the Mopar
Owner Connect website (
and Uconnect® Care.
• The functionality to turn your vehicle into a WiFi
Hotspot on demand.
• Theft Alarm Notification via text or email.
• Yelp® to help find great places, businesses and other
locations when you need them.
• Voice Texting so you can compose, send and receive
text messages with your voice while keeping your
hands on the wheel.
Before you drive, familiarize yourself with the easy-touse Uconnect® System.
moparownerconnect.com
)
3
Page 15

14 ALL ABOUT Uconnect® ACCESS
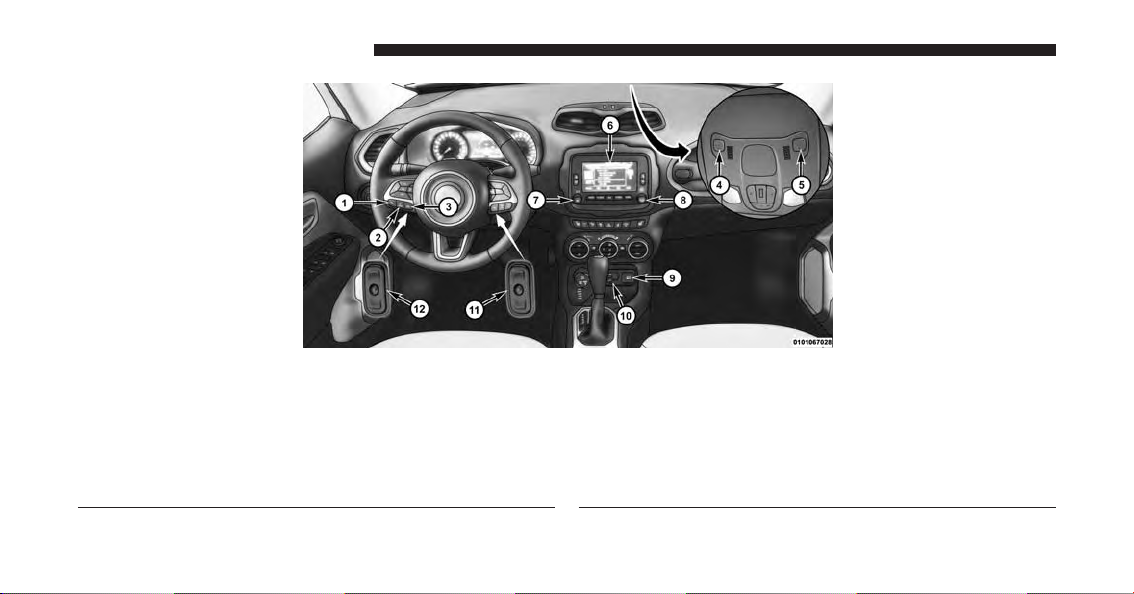
1. The ASSIST And 9-1-1 Buttons On The Overhead
Console
The ASSIST Button is used for contacting Roadside
Assistance, Vehicle Care and Uconnect® Care. The
9-1-1 button connects you directly to emergency services.
2. The Uconnect® “Apps” Button
This is where you can begin registration for
Uconnect® Access, find the apps and purchase WiFi
Hotspot on demand.
3. The Uconnect® Voice Command And Uconnect®
Phone Buttons On Your Steering Wheel
The buttons let you use your voice to give commands,
make phone calls, send and receive text messages
hands-free, enter navigation destinations and control
your radio and media devices.
1—PushToInitiateOrToAnswerAPhoneCall,SendOr
Receive A Text
2—PushToBeginRadio,Media,Navigation,AppsAndClimate
Functions
3— Push To End Call
Page 16
WARNING!
ALWAYS drive safely with your hands on the
steering wheel. You have full responsibility and
assume all risks related to the use of the
Uconnect® features and applications in this vehicle. Only use Uconnect® when it is safe to do so.
Failure to do so may result in an accident involving serious injury or death.
ALL ABOUT Uconnect® ACCESS 15
3
Page 17
16 ALL ABOUT Uconnect® ACCESS
1—Uconnect®PhoneButton
2—Uconnect®VoiceCommandButton
3—Uconnect®PhoneHangUpButton
4 — 9-1-1 Button
5—ASSISTButton
6 — Uconnect® Access 6.5AN Radio
7—Volume/MuteButton
8—TuneorScrollKnob/BrowseorEnterButton
9—FrontPowerOutlet
10 —
11 — Steering Wheel Audio Controls (Right Rear Surface of
Steering Wheel)
12 — Steering Wheel Audio Controls (Left Rear Surface of
Steering Wheel)
NOTE: Jeep Renegade interior shown, your vehicle may vary.
Media Hub-may include USB port, SD Card and Audio Jack
Page 18

Included Trial Period For New Vehicles
Your new vehicle may come with an included trial period
for use of the Uconnect® Access Services starting at the
date of vehicle purchase*. To activate the trial, you must
ALL ABOUT Uconnect® ACCESS 17
first register with Uconnect® Access. Once registered,
Uconnect® Access customers can purchase additional
services and Apps over the lifetime of their vehicle
ownership.
Included Trial on New Vehicles ONLY
Radio Uconnect® 6.5A Uconnect® 6.5AN
Radio Sales Code RA3 RA4
Trial Period Six months of the Advantage Package
* Select 2014 and 2015 Model Year New Vehicle market
12 months of the Advantage Package
3
Page 19
18 ALL ABOUT Uconnect® ACCESS
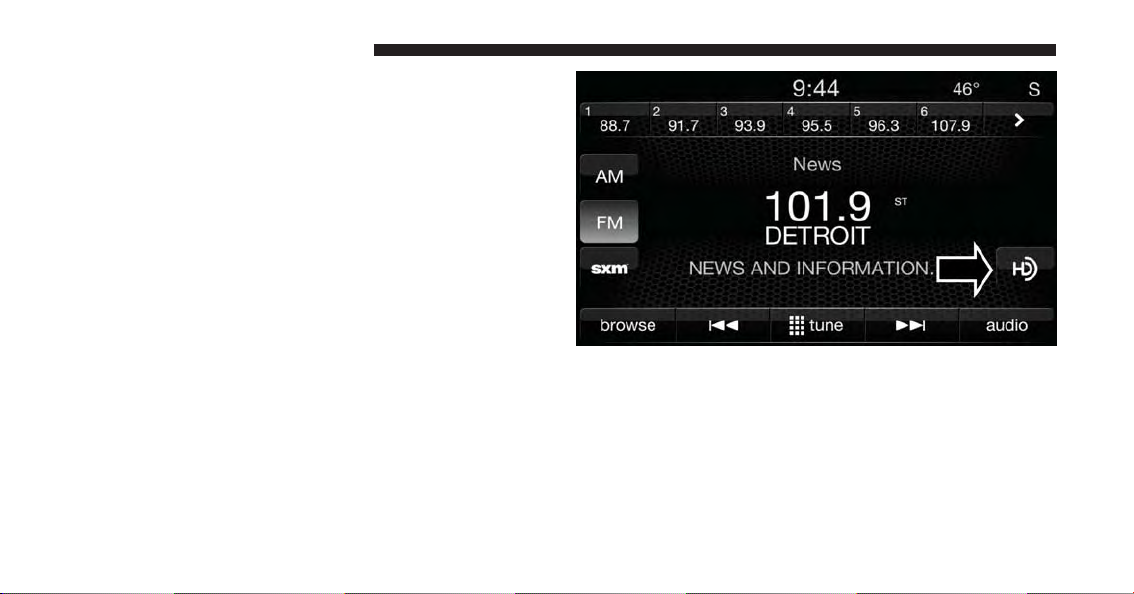
There are a few quick ways for you to identify your radio.
For a more complete description, please refer to the User
Guide in your glove box or visit
DriveUconnect.com
.
• Both the Uconnect® 6.5A and Uconnect® 6.5AN feature a large 6.5 inch full color touchscreen.
• Only the Uconnect® 6.5AN will have the HD Radio
icon when listening to FM or AM stations. The icon
will be lit when it is receiving an HD Radio signal (not
all stations currently broadcast an HD Radio signal).
Features And Packages
After the trial period, you can subscribe to continue your service
by visiting the Uconnect® Store located within the Mopar
Owner Connect website (
moparownerconnect.com
). If you
need assistance, you can also call Uconnect® Care at
855-792-4241. For the latest information on packages and
pricing information, visit
DriveUconnect.com
.
Page 20
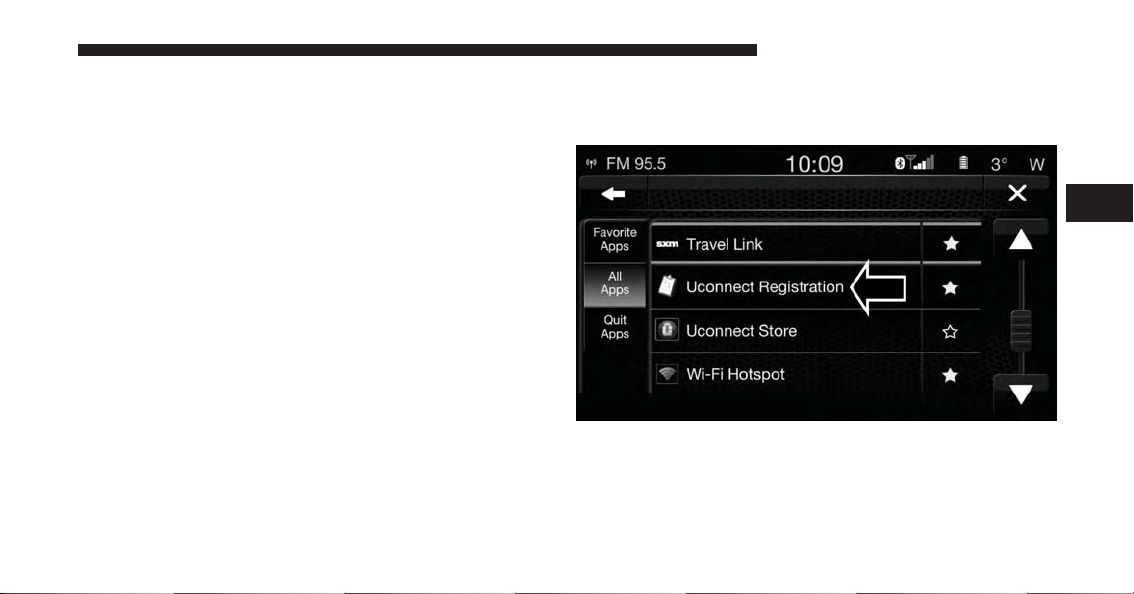
GETTING STARTED WITH Uconnect® ACCESS
Registration
To unlock the full potential of Uconnect® Access in your
vehicle, you first need to register with Uconnect® Access.
1. From the parked vehicle with the radio touchscreen
powered on, press the “MORE” button and select
“APPS.”
NOTE: Should you require assistance anytime during
the registration process, call Uconnect® Care at
1-855-792-4241.
ALL ABOUT Uconnect® ACCESS 19
2. Press “Register” on the reminder screen or select the
“Uconnect® Registration” button on the touchscreen
which appears in the “Favorites Tab” on the Apps list.
3
Page 21
20 ALL ABOUT Uconnect® ACCESS
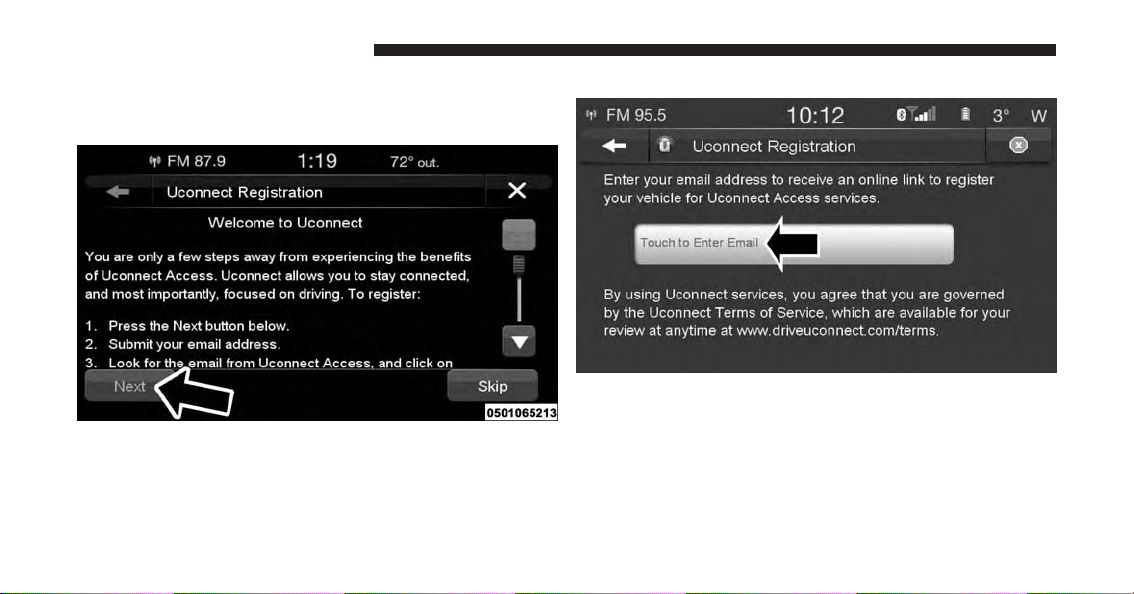
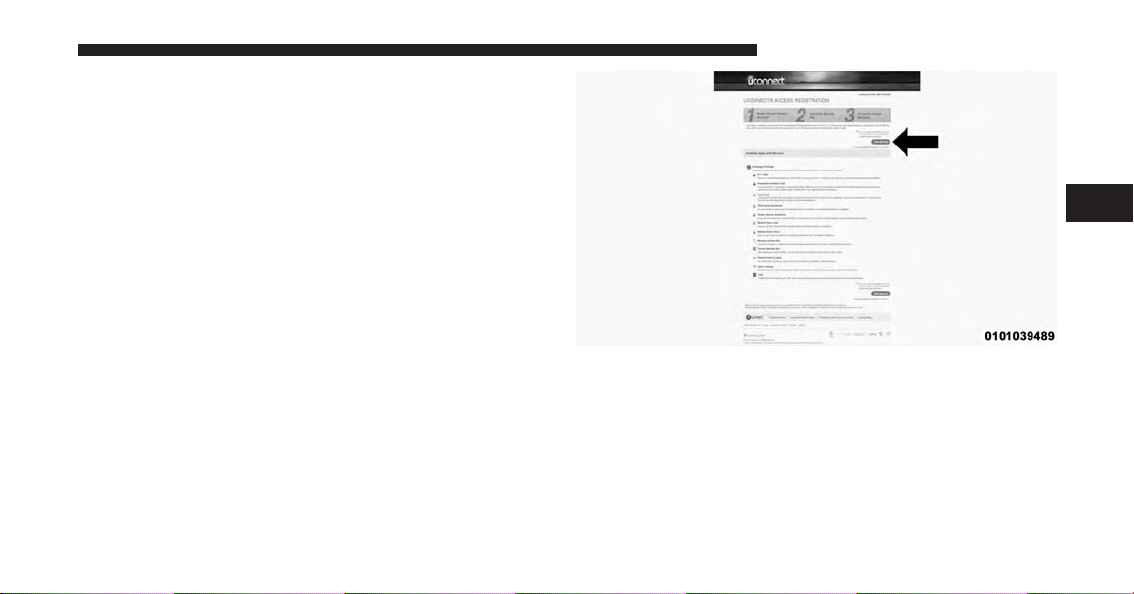
3. The Uconnect® Access Registration App will open
and display step-by-step instructions to start your
registration.
4. Enter your email address into the radio touchscreen.
Page 22
5. This message will display on the touchscreen indicating your email submission was accepted. In a few
minutes, you will receive an email which will allow
you to register your vehicle for Uconnect® Access. You
should open this email and begin your Uconnect®
Access registration within 72 hours.
ALL ABOUT Uconnect® ACCESS 21
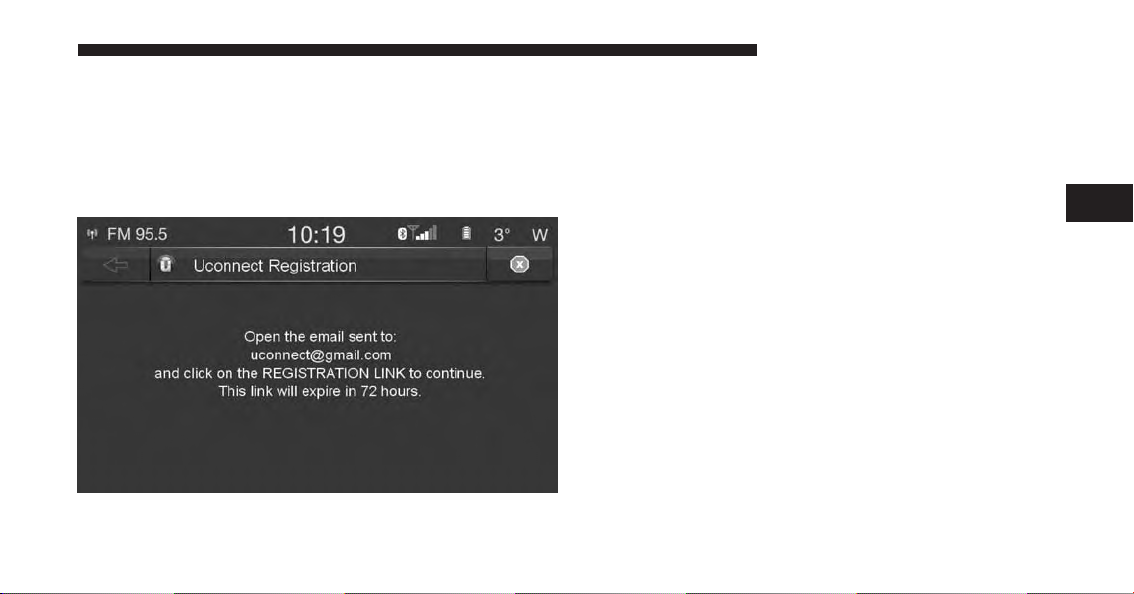
6. Check for an email from Uconnect® Access that contains your personalized registration link. If you don’t
see it, check your spam or junk mail folder. Open the
email and click on the link to continue registering.
NOTE: For security reasons, this link is valid for 72 hours
from the time you submitted your email address into the
radio touchscreen. If the link has expired, simply re-enter
your email address into the Uconnect® Registration App
on the radio touchscreen to receive another link. The
secured registration link will take you through the
Uconnect® Access registration process step by step.
3
Page 23

22 ALL ABOUT Uconnect® ACCESS
Page 24

For additional registration assistance while in the vehicle,
turn the ignition on and push the ASSIST button to
contact Uconnect® Care.
7. To unlock the full potential of Uconnect® Access in
your vehicle, you will need to create or validate an
existing Mopar Owner Connect account (previously
Owner Center). Uconnect® along with Mopar Owner
Connect have joined forces to create one destination to
manage all of your vehicle needs — from managing
your Uconnect® Access account to tracking service
history and finding recommended accessories for your
vehicle. If you already have a Mopar Owner Connect
account, log in to the website with your existing
username and password. For assistance with this web
based registration process, call Uconnect® Care at
1-855-792-4241.
ALL ABOUT Uconnect® ACCESS 23
3
Page 25

24 ALL ABOUT Uconnect® ACCESS
Page 26
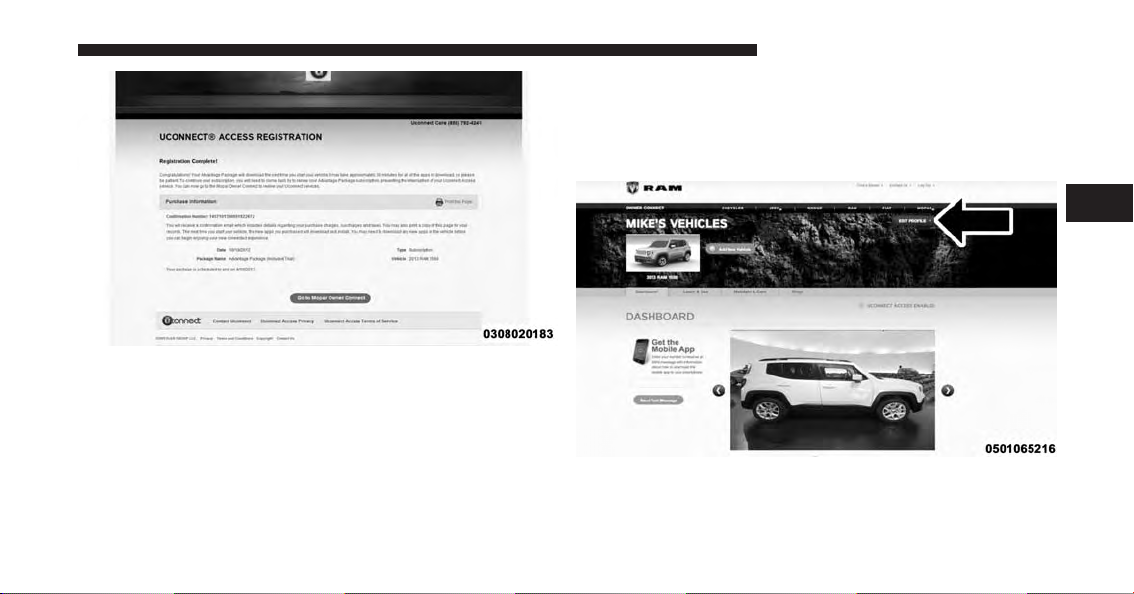
8. Once you are logged in to your Mopar Owner Connect
account, you will create a personal Uconnect® Security PIN. The Uconnect Security PIN will be required
to authenticate you when accessing your account via
Uconnect® Care or performing any remote services
such as Remote Door Lock/Unlock, Remote Horn &
Lights, or Remote Vehicle Start.
9. If your vehicle qualifies for a trial package it will be
presented. Simply agree to the Uconnect® Terms of
Service (checkbox) and then select the “Start Service”
button.
ALL ABOUT Uconnect® ACCESS 25
3
Page 27

26 ALL ABOUT Uconnect® ACCESS
At this point your vehicle is registered with Uconnect®
Access. Apps will be downloaded the next time you start
your vehicle. If the Apps have not appeared after 24
hours, please contact Uconnect® Care. The recommended
next steps are to:
• Download the Uconnect® Access App (allows you to
utilize services such as Remote Door Unlock and Via
Mobile).
• Set up your Uconnect® Payment Account (provides
the option to purchase WiFi Hotspot and renew your
subscription).
• Set up your Via Mobile profile on Mopar Owner
Connect website (if equipped).
Set Up Your Uconnect® Payment Account
Setting up your Uconnect® Payment Account allows you
to make purchases from your vehicle (such as WiFi
Hotspot) and can be used to ensure uninterrupted service
at the end of the included trial period. Your Uconnect®
Payment Account is optional, but we recommend it so
that you can enjoy the full benefits of the system.
Setting up your Uconnect® Payment Account during
registration
1. Setting up your Uconnect® Access Payment Account
is completely optional. After you have selected a
package and accepted the Terms of Service, you will
be asked to set up your Uconnect® Payment Account
as an optional step. Please enter the required information, and then click on the Create Uconnect® Payment
Account button. As part of this step, you will have
created a Uconnect® Payment PIN which you will use
anytime you make purchases in the Uconnect® Store.
Page 28
Setting up AFTER registration and Managing your
Uconnect® Payment Account
If you didn’t set up your Uconnect® Payment Account
when you registered, or you want to make changes later
on, just go to
account.
moparownerconnect.com
to manage your
ALL ABOUT Uconnect® ACCESS 27
1. Log In to Mopar Owner Connect with your
username/email and password.
2. In the upper-right corner of the screen, click on the
“Edit Profile” button.
3
Page 29

28 ALL ABOUT Uconnect® ACCESS
3. On the left side of the next screen, click on the tab
called “Uconnect® Payment Account”. It will take you
to a page where you can manage your payment
options, including:
• Adding or editing your credit card information for
payment
• Editing your billing address
• Reviewing your current subscriptions to packages
and Apps
• Changing your Uconnect® Payment PIN, or your
Security Question
• Viewing transaction history of purchases from the
Uconnect® Store
Page 30

ALL ABOUT Uconnect® ACCESS 29
3
Page 31

30 ALL ABOUT Uconnect® ACCESS
Download the Uconnect® Access App
The Uconnect® Access smartphone app allows you to
remotely lock or unlock your doors, start your engine (if
equipped) and activate your horn and lights from virtually anywhere. The smartphone app also features Via
Mobile (if equipped) which uses your smartphone’s data
plan to access your personal Pandora®, iHeartRadio,
Slacker Radio and Aha™ accounts and control them
using your vehicle touchscreen.
The Uconnect® Access app is only compatible with
select iPhone® and Android smartphones. Visit
UconnectPhone.com
to confirm that your smartphone is
compatible with Uconnect®.
Page 32

ALL ABOUT Uconnect® ACCESS 31
Why do I need the Uconnect® Access App?
Unlike your key fob, the Uconnect® Access app on your
smartphone can send commands to your vehicle from
any distance so long as your phone and vehicle are both
in cellular range. The Uconnect® Security PIN that was
set up during registration is required for remote services.
• Lock or unlock your car doors from virtually any
location
• Start your car to warm it up, or cool it down, before
you get inside
3
Once you’ve confirmed your smartphone is compatible,
Android and iPhone® users should visit their respective
app store and search for “Uconnect® Access”.
• Sound your horn and flash your lights to find your
vehicle in a crowded parking lot
• Contact Customer Care or Roadside Assistance with
the push of a button on your smartphone
Page 33

32 ALL ABOUT Uconnect® ACCESS
• Use Via Mobile to access your personal Pandora®,
iHeartRadio, Slacker Radio and Aha™ from the vehicle and control them using your vehicle touchscreen
Page 34

ALL ABOUT Uconnect® ACCESS 33
To download the app to your smartphone, go to your
respective app store and search for “Uconnect® Access”
(there is no charge to download and install the app to
your smartphone).
3
Page 35

34 ALL ABOUT Uconnect® ACCESS
Requirements
• Vehicle must be properly equipped with the
Uconnect® Access System
• Your smartphone must be compatible with the
Uconnect® Access App
• Vehicle must be in range of a usable and authorized
cellular signal
• Your smartphone sending the command must be in
cellular range to send the command
• Vehicle must be registered with Uconnect® Access and
have an active subscription that includes the applicable feature or App
• Owner must have a compatible smartphone and
download the Uconnect® Access App
• The vehicle must be properly equipped with factoryinstalled features that enable remote commands. (i.e.
Remote Door Lock/Unlock, Remote Start/Stop and
Remote Horns and Lights)
• Vehicle must be in the 48 contiguous states and Alaska,
where cellular coverage is available
FAQs
1. How much does the Uconnect® Access App cost?
Uconnect® does not charge for the App, however to
utilize the Remote Services (e.g., Remote Door Lock/
Unlock) a subscription or trial is required to the
Advantage Package.
Will my vehicle be safe if I lose my smartphone?
2.
People
sometimes lose their phone, which is why security
measures have been engineered into the Uconnect®
Access App. Asking for your username/email, password and Uconnect® Security PIN help to ensure that
nobody can get into your vehicle if they happen to
find your smartphone.
Page 36

3.
Why can’t all phones use the Uconnect® Access App?
The Uconnect® Access App has been designed to
work on most smartphones with the Apple and Android operating systems. Visit
to confirm that your smartphone is compatible with
Uconnect®.
4. How do I know how much data is being used when
I’m using Via Mobile? Uconnect® Access Via Mobile
uses your smartphone’s existing data plan to stream
content. Data usage varies by phone/device, content
(e.g. videos), high quality audio and several other
factors. Please refer to your device carrier for specific
details.
UconnectPhone.com
ALL ABOUT Uconnect® ACCESS 35
Set up Via Mobile
After registration, link your app accounts to your Via
Mobile Profile on Mopar Owner Connect. If you already
have an account with these apps, click “set up” to enter
your information. If you do not have an account, you can
create one.
3
Page 37

36 ALL ABOUT Uconnect® ACCESS
NOTE:
If you’ve already registered with Uconnect® Access, but have not set up your Via Mobile apps, you can
come back to this page at any time by logging in to
moparownerconnect.com
. Click on “Via Mobile Pro-
file.”
Determine if Your Vehicle is Via Mobile-enabled
To see if your Uconnect® 6.5A or 6.5AN system is
equipped with Via Mobile Apps, press the “Apps” button, then press the “All Apps” button on the left side of
the touchscreen. If you see Aha™, iHeartRadio,
Pandora® or Slacker Radio then your system is capable
of playing Via Mobile Apps (registration required).
Earlier vehicles with Uconnect® 6.5A or 6.5AN may
qualify for a software upgrade to enable Via Mobile
Apps. You can call Uconnect® Care at 855-792-4241 or
DriveUconnect.com/features/via-mobile/
visit
.
• Click on Help & Support > Select your Brand > System
Updates
Using Via Mobile
Launch the Uconnect® Access app on your connected
smartphone and log in with your Mopar Owner Connect
Username/Email and password. From the vehicle touchscreen select an app from the apps list. To launch an app
using voice recognition, press the button on the steering
wheel and say, “launch app name Via Mobile.”
Connect Smartphone to the Vehicle Touchscreen
The Uconnect® Access app is compatible with select iPhone®
and Android smartphones. Visit
UconnectPhone.com
to
confirm that your smartphone is compatible with
Uconnect®. Once you’ve confirmed your smartphone is
compatible, pair it to Uconnect® using the Bluetooth (BT)
Hands Free Profile to use Via Mobile apps.
NOTE: When connecting multiple devices, Via Mobile
audio will stream using the BT Hands Free Profile, not
the Media (A2DP) profile. If using an iPhone®, a USB
cable may also be used for the data connection.
Page 38

Data Usage
Uconnect® Access Via Mobile uses your smartphone’s
existing data plan to stream content. Data usage varies by
phone/device, content, high quality audio and several
other factors. Please refer to your device carrier for
specific details.
Connection Status
The Via Mobile button provides a status indication of the
smartphone connection for Via Mobile app use. Under
“Settings” in the Uconnect® Access app on your smartphone, confirm that Via Mobile data has been turned on.
• Green indicates the data connection is ready
• Blue indicates the data connection is established
ALL ABOUT Uconnect® ACCESS 37
• Yellow indicates a Bluetooth connection error
• Red indicates a user account problem or network
connection error
3
Page 39

38 ALL ABOUT Uconnect® ACCESS
Purchasing Apps And WiFi Hotspot For Your Vehicle
Apps and WiFi Hotspot can be purchased from the
Uconnect® Store from within your vehicle, and online at the
Mopar Owner Connect website
moparownerconnect.com
You must first register and set up a Uconnect® Payment
account.
.
Page 40

Purchasing Apps And WiFi Hotspot From Within Your
Vehicle:
1. With the vehicle parked and the radio powered on,
press the “MORE” button and select “APPS.”
ALL ABOUT Uconnect® ACCESS 39
3. From the Uconnect® Store, select the service you wish
to purchase.
2. To launch the Uconnect® Store, select Apps > All
Apps > Uconnect® Store.
3
Page 41

40 ALL ABOUT Uconnect® ACCESS
4. This will launch the selected service or package into
purchase mode along with providing additional information. The purchase process begins when you press
the “Buy” button on the touchscreen.
5. The Uconnect® Store will display a “Purchase Overview” message confirming the financial details for the
App you are about to purchase. Press the “Purchase”
button on the touchscreen to continue.
Page 42
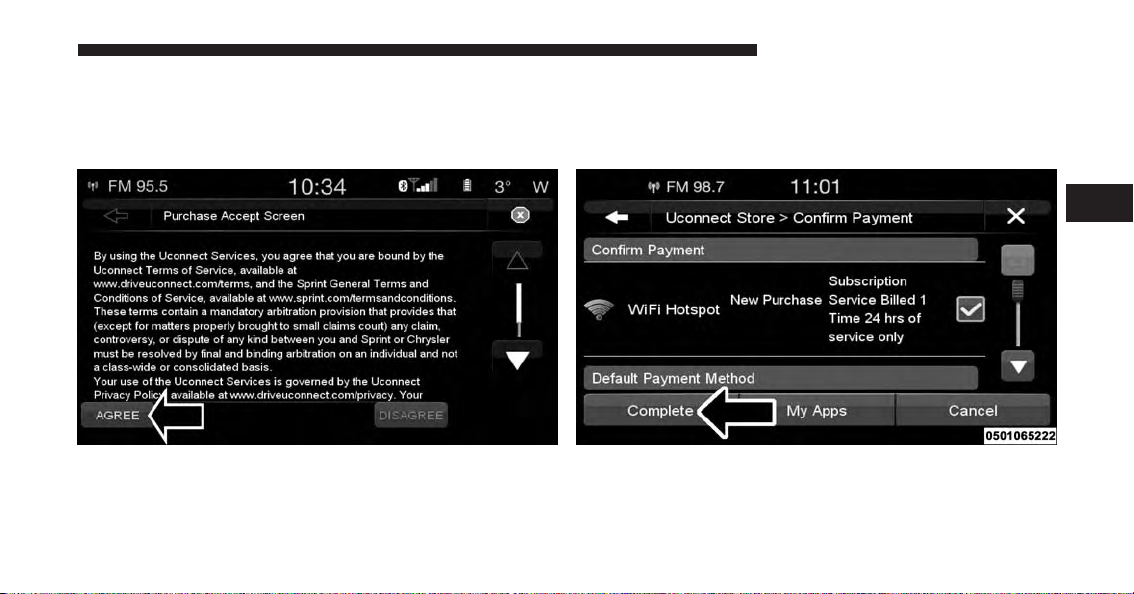
6. The User must select “AGREE” to complete the purchase. “DISAGREE” will cancel the purchase and
re-direct customers back to the Uconnect® Store landing page.
ALL ABOUT Uconnect® ACCESS 41
7. The Uconnect® Store will ask you to “Confirm Payment” using your default payment method on file in
your Uconnect® Payment Account. Press the “Complete” button on the touchscreen to continue.
3
Page 43

42 ALL ABOUT Uconnect® ACCESS
8. The Uconnect® Payment Account will then ask for
your “Payment PIN.” After entering this four digit
PIN, press the “Continue” button on the touchscreen
to make the purchase.
9. You will receive a confirmation message that your
purchase has been submitted. Press “OK” to end the
process.
NOTE: Purchased Apps and services can take up to 30
minutes to download, depending on your vehicle’s cellular coverage at time of purchase. If your download
takes more than 30 minutes, please contact Uconnect®
Care by pushing the ASSIST button on the rear view
mirror.
Page 44
Purchasing Apps Online From Mopar Owner Connect
Website
You can also purchase Apps or renew your subscription
to a package from the Mopar Owner Connect website.
Log In to the Mopar Owner Connect website
moparownerconnect.com
and password, and click on the “Store” tab.
1. Log In to Mopar Owner Connect with your
username/email and password.
2. Click on the tab that says “Shop.”
with your username/email
ALL ABOUT Uconnect® ACCESS 43
3
Page 45
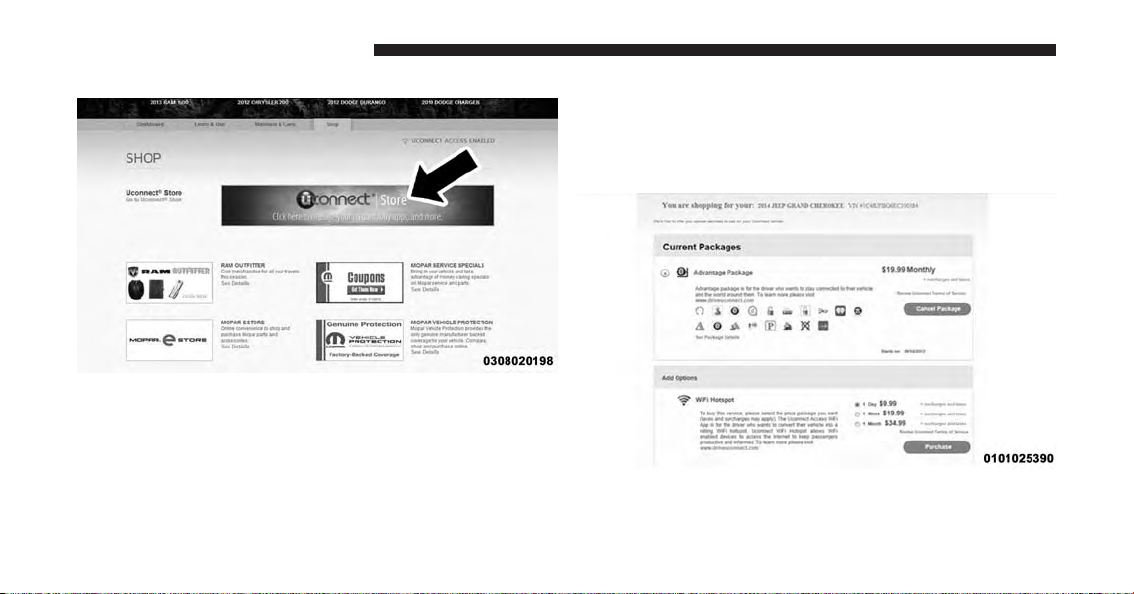
44 ALL ABOUT Uconnect® ACCESS
3. Click on the link to the Uconnect® Store. 4. You can now browse through the various packages,
features and Apps available for your vehicle. Look
through your options, read the details, and if you find
something you want for your vehicle click on the
“Purchase” button.
Page 46
Using Mopar Owner Connect
The Mopar Owner Connect website
moparownerconnect.com
information you need, all in one place. You can track your
service history, find recommended accessories for your
vehicle, watch videos about your vehicle’s features, and
easily access your user guides and manuals. It is also
where you can manage your Uconnect® Access account.
This section will familiarize you with the key elements of
the website that will help you get the most of your
Uconnect® Access system.
provides you with all the
ALL ABOUT Uconnect® ACCESS 45
3
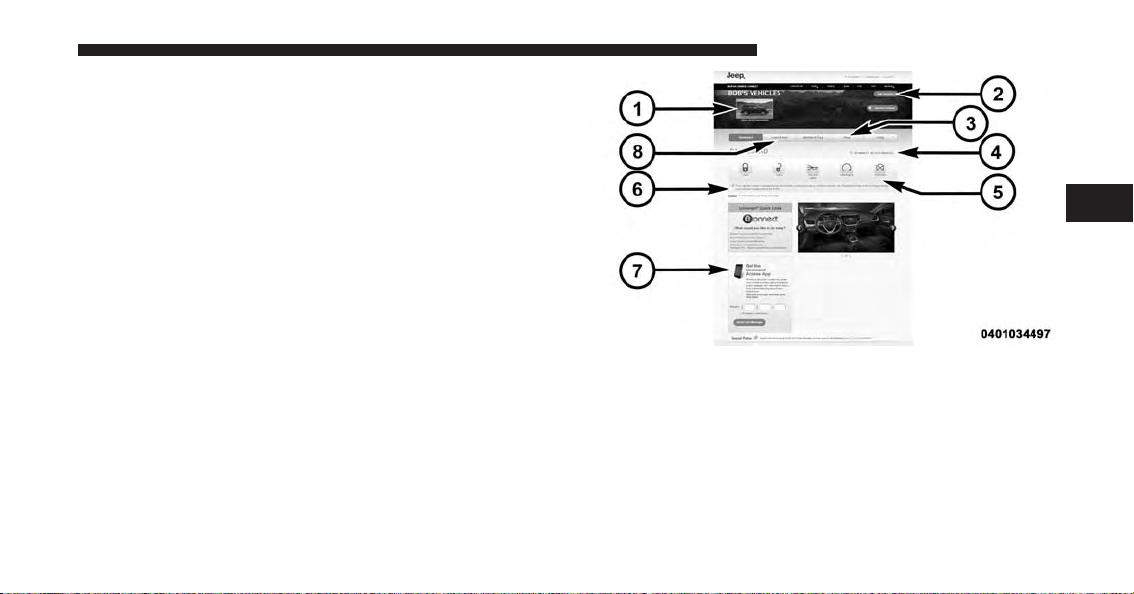
1. Your Vehicle(s):
Images are placed here to represent the Chrysler
Group vehicles (Chrysler, Jeep, Dodge, Ram, SRT and
FIAT) you own. If a vehicle you own is not shown
here, click on the “Add New Vehicle” button. Likewise, if a vehicle is shown that you no longer own
click on the “Edit Profile” to manage your account.
Page 47

46 ALL ABOUT Uconnect® ACCESS
2. Edit Profile:
To manage the details of your Uconnect® Access
account, such as your contact information, password
and PIN, click on the “Edit Profile” button to access
the details of your account.
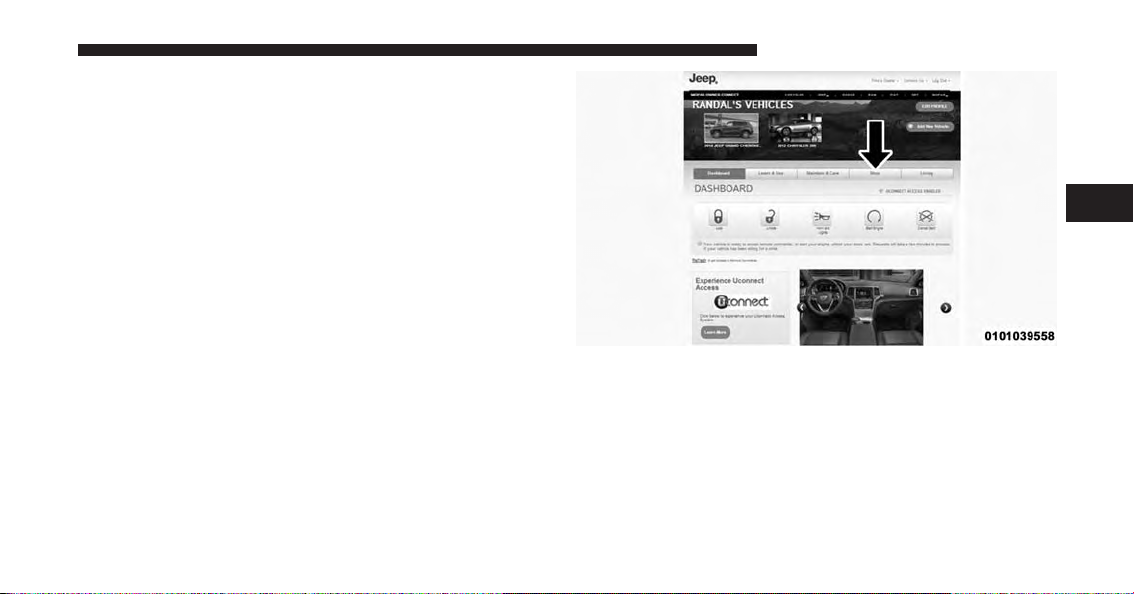
3. Shop:
To purchase a WiFi hotspot and renew your subscription to a package, click on the “Shop” tab, then go to
the Uconnect® Store to make your purchase.
5. Remote Services:
For vehicles with an active Uconnect Access subscription, press one of these icons and enter your four-digit
Uconnect® Security PIN to command your vehicle to
remotely start, lock/unlock doors or sound the horn
and lights.
6. Subscription Status:
Refer to this section to quickly see if you are currently
subscribed to remote services.
4. Connected Vehicle:
This statement will indicate which vehicle’s you own
that are equipped with the Uconnect® Access system.
Other vehicles you own may not have Uconnect®
Access and will indicate that it is a non-Uconnect®
Access Vehicle.
7. Uconnect® Access App:
This is where you can enter the mobile phone number
for your compatible smartphone to download the
Uconnect® Access App. Phone compatibility can be
verified at
UconnectPhone.com
. For more details, see
the section labeled Download the Uconnect® Access
App.
Page 48

8. Learn & Use:
Click on the “Learn & Use” tab to find user guides and
other information about your vehicle. More specifically, there is a dedicated Uconnect® Access tab in this
section to learn all about your connected vehicle
capabilities.
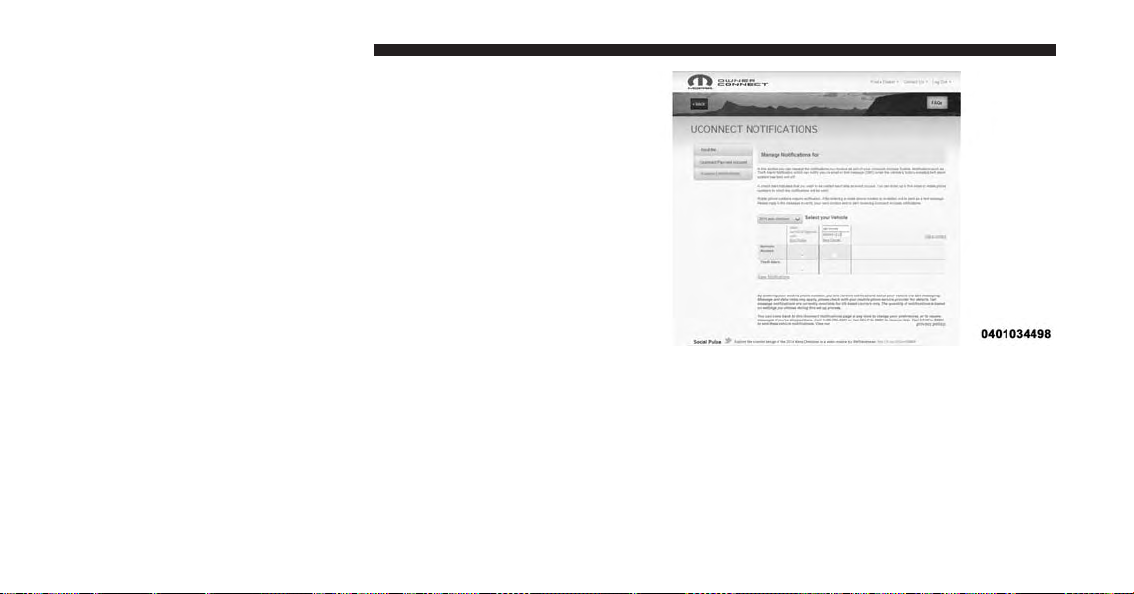
Editing Your Notifications
Notifications are an important element of your
Uconnect® Access Account. For example, any time you
use your remote services (such as Remote Door Unlock),
or if your theft alarm is set off, you can elect to receive a
text message and/or email to notify you of the event. To
set up the notifications, please follow these instructions.
NOTE: Standard text message rates apply.
ALL ABOUT Uconnect® ACCESS 47
To get the Uconnect Access App from the Mopar Owner
Connect website:
1. Log on to
username/email and password you used when registering your Uconnect® Access system.
NOTE: If you forgot your username or password, links
are provided on the website to help you retrieve them.
2. Once logged in you will find yourself on the Dashboard. Click the “Edit Profile” button in the upperright corner of the page.
3. Click the Uconnect® Notifications tab on the left side
of the page.
4. If you have more than one vehicle with Uconnect®
Access, please select which vehicle you want to manage notifications for using the drop down menu.
moparownerconnect.com
using the
3
Page 49
48 ALL ABOUT Uconnect® ACCESS
5. You can enter up to five mobile phone and/or email
addresses to your notifications, and you can customize
which ones receive the types of messages.
6. If you add a mobile phone number, you will receive a
confirmation text message asking to confirm and
receive vehicle notifications. If you are OK with this,
reply to the text message saying “yes” (message and
data rates may apply, please see your mobile phone
provider for details). If you have questions, text
“HELP” in your reply.
Page 50

USING Uconnect® ACCESS
Getting Started With Apps
Applications (Apps for short) in your Uconnect® Access
system are designed to deliver the features and services
that you want. There are two basic categories:
• Built-In Apps — uses the built-in Cellular Network on
your Uconnect® 6.5A or 6.5AN radio.
• Uconnect® Access via Mobile (if equipped) — uses
the Uconnect® Access app and your smartphone’s
data plan to access your personal Pandora®, iHeartRadio, Aha™ by HARMAN and Slacker accounts from
the vehicle and control them using the vehicle touchscreen. Customer’s data plan charges will apply.
Get started with your Uconnect® Access Apps by pressing
the Uconnect® “Apps” button on the menu bar at the
bottom right corner of the in-vehicle touchscreen. Available
Apps and features are organized by the tabs on the left of
the screen.
ALL ABOUT Uconnect® ACCESS 49
• Favorite Apps — this is the default screen when you
first press the “Apps” button on the touchscreen, and
is a good place to put the Apps you use most frequently. To make an App a “favorite,” press the
“Settings” button on the touchscreen to the right of the
App and select “Make a favorite.”
• All Apps — all of your available Apps will reside in
the “All Apps” folder.
• Quit Apps — press this tab to see which Apps are
currently running.
NOTE: Most Uconnect® Access features do not require
that you have a compatible Smartphone. The Uconnect®
Access features work using the built-in cellular connection. Only Voice Texting the Uconnect® Access App and
Via Mobile Apps require a compatible smartphone to
work with your Uconnect® Access system.
3
Page 51

50 ALL ABOUT Uconnect® ACCESS
9-1-1 Call
Access To Emergency Services At The Push Of A Button
Uconnect® Access In-Vehicle Assistance Features
With Uconnect® Access, your vehicle has on-board assistance features located in the overhead console designed
to enhance your driving experience if you should ever
need assistance or support.
Description
9-1-1 Call is a feature that, at the push of a button, can
contact emergency services. It’s a convenient way to get
in contact with a 9-1-1 operator in the event of an
emergency. When the connection between the vehicle
and a 9-1-1 operator is made, your vehicle will automatically transmit location information to the 9-1-1 operator.
Page 52

How It Works
1. Push the “9-1-1” Call button; the indicator light will
turn green indicating a call has been placed.
NOTE: In case the “9-1-1” Call button is accidentally
pushed, there is a 10 second delay before the 9-1-1 call is
placed. The system will verbally alert you that a call is
about to be made. To cancel the 9-1-1 Call connection,
push the “9-1-1” Call button or press the “Cancellation”
button on the Phone touchscreen.
2. Once a connection between the vehicle and a 9-1-1
operator is made, the 9-1-1 Call system will transmit
the following important vehicle information to a 9-1-1
operator:
• Indication that the occupant placed a 9-1-1 Call.
• The vehicle brand.
• The last known GPS coordinates of the vehicle.
ALL ABOUT Uconnect® ACCESS 51
3. You should be able to speak with the 9-1-1 operator
through the vehicle audio system to determine if
additional help is needed.
If a connection is made between a 9-1-1 operator and
your vehicle, you understand and agree that 9-1-1 operators may, like any other 9-1-1 call, record conversations
and sounds in and near your vehicle upon connection.
9-1-1 Call System Limitations
Vehicles sold in Canada and Mexico DO NOT have 9-1-1
Call system capabilities. 9-1-1 or other emergency line
operators in Canada and Mexico may not answer or
respond to 9-1-1 system calls. If the 9-1-1 Call system
detects a malfunction, any of the following may occur at
the time the malfunction is detected.
• The 9-1-1 light will continuously be illuminated red.
• The screen will display the following message “Vehicle
phone requires service. Please contact your dealer.”
3
Page 53

52 ALL ABOUT Uconnect® ACCESS
• An In-Vehicle Audio message will state “Vehicle phone
requires service. Please contact your dealer.”
Even if the 9-1-1 Call system is fully functional, factors
beyond Chrysler Group LLC’s control may prevent or
stop 9-1-1 Call system operation. These include, but are
not limited to, the following factors:
• The ignition key has been removed from the ignition
and the delayed accessories mode is active.
• The ignition key is in OFF position.
• The vehicle’s electrical systems are not intact.
• The 9-1-1 Call system software and/or hardware is
damaged during a crash.
• The vehicle battery loses power or becomes disconnected during a vehicle crash.
• Wireless and/or Global Positioning Satellite signals
are unavailable or obstructed.
• Equipment malfunction at the 9-1-1 operator facility.
• Operator error by the 9-1-1 operator.
• Wireless network congestion.
• Weather.
• Buildings, structures, geographic terrain, or tunnels.
Page 54

If your vehicle loses battery power for any reason (including during or after an accident) the 9-1-1 Call System,
among other vehicle systems, will not operate.
ALL ABOUT Uconnect® ACCESS 53
Requirements
• This feature is available only on vehicles sold in the
US.
• Vehicle must be properly equipped with the
Uconnect® Access System.
• Vehicle must be in range of a usable and authorized
cellular signal.
• Vehicle must be powered in the ON/RUN or ACC
(Accessory) position with a properly functioning electrical system.
3
Page 55

54 ALL ABOUT Uconnect® ACCESS
WARNING!
• Never place anything on or near the vehicle’s
wireless and GPS antennas. You could prevent
wireless and GPS signal reception, which can prevent your vehicle from placing an emergency call.
Wireless and GPS signal reception is required for
the 9-1-1 Call system to function properly.
• Ignoring the Rearview Mirror light could mean you
will not have 9-1-1 Call services. If the Rearview
Mirror light is illuminated, have an authorized
dealer service the 9-1-1 Call system immediately.
(Continued)
WARNING! (Continued)
• The Occupant Restraint Controller (ORC) turns on
the Air Bag Warning Light on the instrument panel
if a malfunction in any part of the air bag system is
detected. If the Air Bag Warning Light is illuminated, the air bag system may not be working
properly and the 9-1-1 system may not be able to
send a signal to a 9-1-1 operator. If the Air Bag
Warning Light is illuminated, have an authorized
dealer service your vehicle immediately.
• If anyone in the vehicle could be in danger (e.g.,
fire or smoke is visible, dangerous road conditions
or location), do not wait for voice contact from a
9-1-1 operator. All occupants should exit the vehicle
immediately and move to a safe location.
(Continued)
Page 56
WARNING! (Continued)
•
The 9-1-1 Call system is embedded into the vehicle’s
electrical system. Do not add any aftermarket electrical equipment to the vehicle’s electrical system.
This may prevent your vehicle from sending a signal
to initiate an emergency call. To avoid interference
that can cause the 9-1-1 Call system to fail, never add
aftermarket equipment (e.g., two-way mobile radio,
CB radio, data recorder, etc.) to your vehicle’s electrical system or modify the antennas on your vehicle. IF
YOUR VEHICLE LOSES POWER FOR ANY REASON (INCLUDING DURING OR AFTER AN ACCIDENT) THE UCONNECT® FEATURES, APPS
AND SERVICES AMONG OTHERS WILL NOT
OPERATE.
ALL ABOUT Uconnect® ACCESS 55
FAQs
1. What Happens If I Accidentally Push The 9-1-1
Button? You have 10 seconds after pushing the 9-1-1
button to cancel the call. To cancel the call, either push
the “9-1-1” button again, or press the “cancel” button
on the in-vehicle touchscreen.
2. What Type Of Information Is Sent When I Call 9-1-1
From My Vehicle? Certain vehicle information, such
as make and model, is transmitted along with last
known GPS location. Also note that 9-1-1 operators
may record conversations and sounds within your
vehicle once a connection is made, and that by using
the service you consent to having this information
shared.
3. When Could I Use The 9-1-1 Button? You can use the
9-1-1 button to make a call if you or someone else
needs emergency assistance.
3
Page 57

56 ALL ABOUT Uconnect® ACCESS
Roadside Assistance Call
Easy Call To Roadside Assistance 24/7 Using Assist
Button
Uconnect® Access In-Vehicle Assistance Features
With Uconnect® Access, your vehicle has on-board assistance features designed to enhance your driving experience if you should ever need assistance or support.
Description
Vehicles equipped with the Uconnect® Access system
feature will contain an ASSIST button. Once the vehicle
has been registered and is subscribed to the Advantage
Package, the ASSIST button can connect you directly to
one of three important care centers for support.
• Roadside Assistance — If you get a flat tire, or need a
tow, you’ll be connected to someone who can help
anytime. Additional fees may apply. (see the Disclaimers section below for more detail).
• Uconnect® Care — In vehicle support for Uconnect®
Access System, Apps, and Features.
Page 58

• Vehicle Care — Total support for your Chrysler Group
vehicle.
How It Works
You or someone in the vehicle simply presses the ASSIST
button located in the overhead console and you will be
presented with your ASSIST options. Make your selection by pressing the screen.
ALL ABOUT Uconnect® ACCESS 57
Requirements
• This feature is available only on vehicles sold in the
US.
• Vehicle must be properly equipped with the
Uconnect® Access System.
• Vehicle must be in range of a usable and authorized
cellular signal.
• Vehicle must be registered with Uconnect® Access and
have an active subscription that includes the applicable feature or App.
• Vehicle must be powered in the ON/RUN or ACC
(Accessory) position with a properly functioning electrical system.
3
Page 59

58 ALL ABOUT Uconnect® ACCESS
Disclaimers
If Roadside Assistance is provided to your vehicle, you
agree to be responsible for any additional roadside
assistance service costs that you may incur. In order to
provide Uconnect® Services to you, we may record and
monitor your conversations with Roadside Assistance,
Uconnect® Care or Vehicle Care, whether such conversations are initiated through the Uconnect® Services in
your vehicle, or via a landline or mobile telephone, and
may share information obtained through such recording
and monitoring in accordance with regulatory requirements. You acknowledge, agree and consent to any
recording, monitoring or sharing of information obtained
through any such call recordings.
FAQs
1. What Is The Phone Number For Roadside Assis-
tance? The phone number is 800-521-2779.
NOTE: Some Apps are suspended while an Assist call is
active
If I Am Subscribed To Uconnect® Access, Does It
2.
Cover Towing Or Other Expenses Incurred By Using
Chrysler Roadside Assistance?
No, however your new
vehicle may include Roadside Assistance services.
Yelp®
Looking for a burrito joint that is open? A boutique to
buy a new pair of jeans? Yelp® is here to help. Use Yelp®
to search for places to eat, shop, relax and play.
Page 60

Description
Yelp® is a familiar, widely used website and mobile app
that connects people to great local businesses. Now with
Uconnect® Access, Yelp® has been adapted for your
vehicle, and on the go capability. Yelp® gives you the
ability to search for a Point of Interest (POI) or desired
destination using either pre-defined search categories, or
custom searches, using keywords like “tacos.” Searching
can be done by voice recognition or by using the touchscreen keypad.
Here is what Yelp® can do for you while you are on the
road:
• Deliver a list of up to 20 results, prioritizing by best
match, by distance or rating.
• Provide up-to-date search listings (pulling the latest
information from the cloud).
ALL ABOUT Uconnect® ACCESS 59
• The live and local search engine will scan 12 categories
and millions of POIs to provide drivers with a local
guide for real word-of-mouth recommendations.
• With one press, select from the list to find location
address, phone number, user ratings, hours of operation (if available) and price ratings (if available).
• The ability to call the selected POI directly (a phone
must be paired via Bluetooth®), or have the address
immediately sent to the navigation system for routing
(if equipped).
3
Page 61
60 ALL ABOUT Uconnect® ACCESS
How It Works
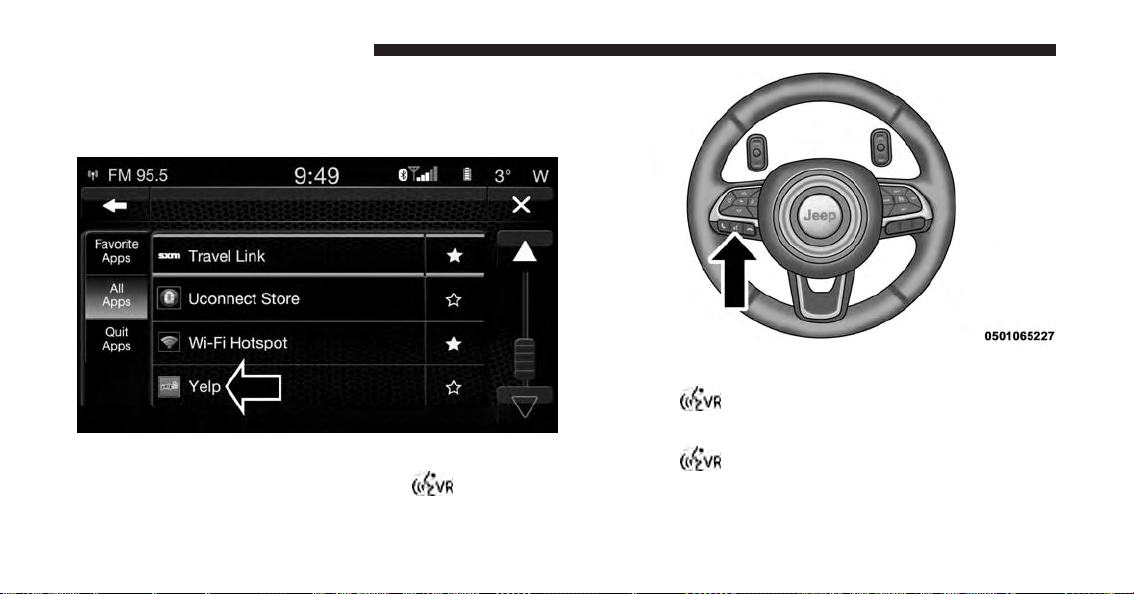
1. Using the touchscreen, launch Yelp® by pressing
Apps > All Apps > Yelp®.
Give It A Try!
OR
Using voice recognition, push the
say “Launch Yelp®.”
button and
1. Push the
“Launch Yelp®.”
2. Push the
“Yelp® Search.”
button on the steering wheel and say
button on the steering wheel and say
Page 62

3. Uconnect® will prompt you to say something like,
“car wash.” After the beep, say “restaurants.”
ALL ABOUT Uconnect® ACCESS 61
6. Navigate to the location by pressing “Go Now” (if
equipped with navigation).
4. The Uconnect® system will link out to the cloud to do
your Yelp® search, and depending on your search
request, this may take up to 30 seconds.
5. Using the touchscreen, select a restaurant from the list
of search results.
Action Touchscreen
Open Yelp® Apps > All Apps >
Yelp®
Create a Custom Search
Press inside the #search#
field. Using the keypad,
type what you are looking
for.
NOTE: Save your destination to Favorites. To find it
again go to Nav > Where to > Favorites.
Voice Command
(VR button on steering
wheel)
#Launch Yelp®# Say #Launch Yelp®#
–
Give It A Try!
Type #Sushi#
3
Page 63

62 ALL ABOUT Uconnect® ACCESS
Voice Command
Action Touchscreen
(VR button on steering
Give It A Try!
wheel)
Initiate a search for a
Select <Search Category> #Yelp® Search# Say #Yelp® Search#
nearby POI
Find nearest Restaurants Select Restaurants #Restaurants# Say #Restaurants#
Find nearest Nightlife Select Nightlife #Nightlife# Say #Nightlife#
Find nearest Coffee Select Coffee #Coffee# Say #Coffee#
Find nearest Entertainment
Select Entertainment #Entertainment# Say #Entertainment#
Find nearest Gas Select Gas #Gas# Say #Gas#
Find nearest Hotels Select Hotels Hotels# Say #Hotels#
Find nearest Banks Select Banks #Banks# Say #Banks#
Find nearest Parking Select Parking #Parking# Say #Parking#
Find nearest Shopping Select Shopping #Shopping# Say #Shopping#
Find nearest Drugstores Select Drugstores #Drugstores# Say #Drugstores#
Find nearest Urgent Care Select Urgent Care #Urgent Care# Say #Urgent Care#
Page 64

ALL ABOUT Uconnect® ACCESS 63
Voice Command
Action Touchscreen
Find nearest Hospitals Select Hospitals #Hospitals# Say #Hospitals#
Select a POI Select <POI> from the
list
Add a Custom Search
Category
Delete a Custom Category
Sort search results by Best
Match, Rating or Distance
Route to a POI
(if equipped)
Call a POI
(via Bluetooth®)
Press the star to add it – Press the star
Press the star to remove it
Press Best Match, Rating,
or Distance
Press Go Now – Press Go Now
Press <phone number> – Press <phone number>
(VR button on steering
wheel)
– Select <POI>
– Press the star (there is a
– Press Rating
Give It A Try!
confirmation pop-up)
3
Page 65

64 ALL ABOUT Uconnect® ACCESS
How To Add And Delete Search Categories
Yelp® provides the ability to save custom search categories by first initiating
the search, then pressing the star. To
delete a search category, select it, and
press the star. A confirmation prompt
will appear to confirm. Create up to 36
custom search categories!
Requirements
• Vehicle must be properly equipped with the
Uconnect® Access System.
• Vehicle must be in range of a usable and authorized
cellular signal (indicated by the signal strength bars on
the “Apps” button on the bottom right hand side of the
touchscreen).
• Vehicle must be registered with Uconnect® Access and
have an active subscription that includes the applicable feature or App.
• Vehicle must be powered in the ON/RUN or ACC
(Accessory) position with a properly functioning electrical system.
• Vehicle must have onboard navigation to use Go Now.
• Mobile device must be paired with Bluetooth® and
connected to call a POI directly.
Page 66

Safety Information
WARNING!
• ALWAYS drive safely with your hands on the
steering wheel. You have full responsibility and
assume all risks related to the use of the Uconnect®
features and applications in this vehicle. Only use
Uconnect® when it is safe to do so. Failure to do so
may result in an accident involving serious injury
or death.
Tips And Shortcuts
• To improve your search results, use single search terms
like “coffee” rather than multiple words, which may
deliver mixed results, for example, “home improvement and gardening stores.”
• Press the “microphone” on the touchscreen to use
voice commands.
ALL ABOUT Uconnect® ACCESS 65
• If you wish to cancel a search request, press “Cancel.”
• To learn more about a listing, press the line that
appears on the display details such as the address,
phone number and hours of operation (if applicable).
• Sort results by Best Match, Rating or Distance (default
is Best Match).
• The Rating tab will re-sort your search based on
ratings submitted by everyday users to Yelp®’s online
database.
• Distance will sort by the closest POI near you.
• To bypass the voice prompts push the
second time to barge in and state your desired
command.
• To exit Yelp®, press the “X” (close) button in the upper
right corner of the touchscreen.
button a
3
Page 67

66 ALL ABOUT Uconnect® ACCESS
FAQs
Is there a Help menu within the Yelp® App?
1.
No, but
you may push the ASSIST button and select
Uconnect® Care to ask for help.
2. Will Yelp® allow me to route directly to my desired
search result? Yes, by selecting Go Now. A factory or
dealer-installed Uconnect® navigation system is required.
3. Will Yelp® allow me to make a phone call to my
desired search result? Yes. Mobile phone must be
paired and connected.
4. How many search results does Yelp® generate at a
time? Maximum of 20 listings.
5. How do I select my final desired location? Make your
final selection by pressing the desired POI name in
your search result list. Voice recognition is not supported for the final POI selection.
6. Can I conduct a search using a phone number? The
ability to search Yelp® by phone number is not
currently available.
7. Why don’t I see the Yelp® App on my in-vehicle
touchscreen? The vehicle must be registered with
Uconnect® Access and have an active subscription
that includes the applicable feature or App. The App
may take several minutes to download after completing registration for the first time.
Page 68

8. What is the difference between Yelp® and onboard
navigation? Both experiences are slightly different,
but may yield the same results. For example, while
both the onboard navigation system and Yelp® conveniently provide pre-defined search categories,
Yelp® gives the customer the ability to create their
own custom search category, such as “Guitar shops.”
In addition, the customer may be able to view a POI on
a map before routing there when using the onboard
navigation system. Both onboard navigation and
Yelp® provide phone numbers when they are available, but Yelp® provides the customer with user
ratings and hours of operation (when available). Since
Yelp® pulls its data from the cloud, the customer will
always get the most up-to-date information. Finally,
Yelp® requires that the vehicle be in range of a usable
and authorized cellular signal.
ALL ABOUT Uconnect® ACCESS 67
9. Why doesn’t Yelp® recognize my Voice Command
search request? To Search Yelp®, Uconnect® must
establish a connection to the Yelp® cloud-based service, using the built in 3G connection in your
Uconnect® Access system. Be sure to wait until AFTER the beep, before you speak your search request.
Your voice command might not be fully captured if
there is a misrecognition, resulting in inaccurate results. You will see visual cues highlighted in green,
which says “Listening” to let you know it’s your turn
to say a command.
10. How come I don’t see the same results when I use
Yelp® on my smart phone? This is because Yelp® is
only returning locations that have been rated by
Yelp® users. Un-rated locations do not show up in
the search results. This is an enhancement that will be
coming soon.
3
Page 69

68 ALL ABOUT Uconnect® ACCESS
11. Can I use Yelp® to search for places based on my
end destination, instead of just places around me?
Yes, you can say “Pizza in Chicago,” and add it as a
stop on your road trip.
Theft Alarm Notification
Notifies you via email or text message (SMS) when the
vehicle’s factory-installed theft alarm system has been
set-off.
Description
The Theft Alarm Notification feature notifies you via
email or text message (SMS) when the vehicle’s factoryinstalled theft alarm system has been set-off. You’ve
probably seen this before, a vehicle’s alarm goes off in a
parking lot or out on the street, and the owner is nowhere
to be found. With Theft Alarm Notification your vehicle
will alert you of the situation.
Should you receive a notification that your theft alarm
has been set-off, please react with caution. There are a
number of reasons why your alarm may have been
triggered, one of which could be that your vehicle was
stolen. If so, please see the details of the Stolen Vehicle
Assistance service below.
How It Works
Theft Alarm Notification can send you an email or text
message (SMS) should the alarm go off. The following
instructions will help you manage your notifications.
1. Log on to the Mopar Owner Connect website
moparownerconnect.com
(
) using the username and
password you used when registering your Uconnect®
Access system.
• If you forgot your username or password, links are
provided on the website to help you retrieve them.
Page 70

2. Once logged in you will find yourself on the Dashboard. Click on the “Edit Profile” button in the upperright corner of the page.
3. Click on the “Notifications” tab on the left side of the
page.
4. If you have more than one vehicle with Uconnect®
Access, please select which vehicle you want to manage notifications for using the drop down menu.
5. You can enter up to five mobile phone and/or email
addresses to your notifications, and you can customize
which ones receive the types of messages.
6. You will receive a confirmation text message, asking to
confirm and receive vehicle notifications. If you are ok
with this, reply to the text message saying “yes”
(message and data rates may apply, please see your
mobile phone provider for details). If you have questions, text “HELP” in your reply.
ALL ABOUT Uconnect® ACCESS 69
7. You’re all set. Should your theft alarm go off, a
notification(s) will be sent to the number(s) and/or
email(s) you provided.
Requirements
• Vehicle must be properly equipped with the
Uconnect® Access System and a factory installed Theft
Alarm system.
• Vehicle must be in range of a usable and authorized 3G
cellular signal.
• Vehicle must be registered with Uconnect® Access and
have an active subscription that includes the applicable feature or App.
• Owner must properly set-up notification to have the
Theft Alarm Notification sent to an appropriate mobile
phone or email account.
3
Page 71
70 ALL ABOUT Uconnect® ACCESS
CAUTION!
In the event your theft alarm is activated, use
caution and evaluate the situation from a safe
distance. If any unauthorized or suspicious person
is near or inside of your vehicle, immediately
contact the police. Do not do anything that could
jeopardize your safety or the safety of those
around you.
FAQs
1. What do I do if my Theft Alarm goes off? In the event
your theft alarm is activated, use caution and evaluate
the situation from a safe distance. If any unauthorized
or suspicious person is near or inside of your vehicle,
immediately contact the police. Do not do anything
that could jeopardize your safety or the safety of those
around you.
2. How can I change where I receive notifications? You
can manage your notifications by going to the Mopar
Owner Connect website (
moparownerconnect.com
and log in with your username and password. Once
there, you can click on “Edit Profile”, then the “Notifications” tab.
3. Can I receive a text message (SMS) when my Theft
Alarm goes off? Yes. Text messages are a convenient
and quick way to receive notifications. You can manage your notifications by going to the Mopar Owner
Connect website (
moparownerconnect.com
) and log
in with your username and password. Once there, you
can click on “Edit Profile”, then the “Notifications” tab
to add, remove and edit your notification options.
)
Page 72

Stolen Vehicle Assistance
If your vehicle is ever stolen, this App (with your
permission) can provide its location to the law enforcement to help them track it down.
Description
If your vehicle is stolen, contact local law enforcement
immediately to file a stolen vehicle report. Once this report
has been filed with law enforcement and you have also
notified Uconnect® Care that you have filed the report,
Uconnect® Care can help locate your vehicle. The
Uconnect® Care Agent will ask for the stolen vehicle report
number issued by local law enforcement. Then, using GPS
technology and the built-in wireless connection within
your vehicle, the Uconnect® Care Agent will be able to
locate the stolen vehicle and work with law enforcement to
help recover it. (Vehicle must be within the United States,
have network coverage and must be registered with
Uconnect® Access with an active subscription that includes
the applicable feature).
ALL ABOUT Uconnect® ACCESS 71
Stolen Vehicle Assistance is a secure process that can only
be done with your permission. Law enforcement gets
involved only after you file a stolen vehicle report with
them.
How It Works
1. If your vehicle is stolen, contact local law enforcement
as soon as possible. They will work with you to file a
stolen vehicle report.
2. Next, inform Uconnect® Care that your vehicle has
been stolen. Uconnect® Care can be reached by calling
855-792-4241. The Uconnect® Care Agent will ask for
the stolen vehicle report number (as issued by your
local law enforcement).
If you have downloaded the Uconnect® Access App,
you can push the “Operator” button on your smartphone and select “Uconnect® Care” to make the call.
3
Page 73

72 ALL ABOUT Uconnect® ACCESS
3. Uconnect® Care will authenticate that you are the
owner of the vehicle and contact the law enforcement
with whom you filed the stolen vehicle report.
4. Uconnect® Care will work with your local law enforcement to track and attempt to recover the vehicle.
You will be contacted by law enforcement if your
vehicle is recovered. While the investigation is ongoing, you should also contact your insurance company
to inform it of the situation.
Requirements
Vehicle must be properly equipped with the Uconnect®
•
Access System.
Disclaimers
• No security system is invincible, and vehicle thieves
may develop ways to prevent your vehicle from being
located.
FAQs
1.
What do if my vehicle is stolen?
First, call local law
enforcement as soon as possible. They will work with
you to file a stolen vehicle report. Then call Uconnect®
Care at 855-792-4241 and inform Uconnect® Care that
your vehicle has been stolen and that you have filed a
stolen vehicle report with law enforcement. Uconnect®
Care will help you through the process.
• Vehicle must be in range of a usable and authorized
cellular signal.
• Vehicle must be registered with Uconnect® Access and
have an active subscription that includes the applicable feature or App.
2. Can someone track my vehicle? To ensure your
privacy, and the privacy of others using your vehicle,
you must involve local law enforcement to have
Uconnect® locate your vehicle. This helps to ensure
Page 74

that someone is not tracking your vehicle for purposes
other than at your request to locate it in the event it is
stolen.
3. How will I know if my vehicle is recovered? After
you provide the Uconnect® Care Agent with the
stolen vehicle report, the agent will work together
with law enforcement to try to locate your vehicle. If
your vehicle is recovered, you will be contacted by law
enforcement.
4. Can Uconnect® Access lower my insurance rates?
Some insurance providers offer lower rates on vehicles
equipped with systems that can deter auto theft. When
shopping for insurance, be sure to inform your insurance provider of your Uconnect® Access system (Stolen Vehicle Assistance requires a subscription), to find
out if your insurance provider offers a lower rate if
your vehicle is equipped with Uconnect® access and
you have an active subscription.
ALL ABOUT Uconnect® ACCESS 73
WiFi Hotspot
Create A 3G WiFi Hotspot For Use In
Your Vehicle
3
Description
WiFi Hotspot is on-demand WiFi + 3G connectivity that’s
built-in and ready to go whenever you are. Once your
vehicle is registered for Uconnect® Access, you can
purchase a WiFi Hotspot subscription at the Uconnect®
Store. After you’ve made your purchase, turn on your
signal and connect your devices.
Page 75

74 ALL ABOUT Uconnect® ACCESS
WARNING!
• Do Not use the WiFi Hotspot while operating the
vehicle. Only use the WiFi Hotspot when it is safe
to do so.
• Driving while distracted can result in loss of vehicle control, accident and injury.
• Enables all your passengers to be simultaneously
connected to the web.
• Connect several devices at one time.
• Any WiFi-enabled device — such as a laptop or any
other portable enabled media can connect over your
private in-vehicle network.
• A high-speed, secured connection lets anyone on your
private network access the Web — great for working
and relaxing
How It Works
The WiFi Hotspot feature provides the vehicle passengers
with an internet access hot spot in the vehicle, using the
radio as an access point. The hot spot will allow WiFi
enabled in-vehicle devices (such as a laptop or any other
portable enabled media device) to wirelessly connect to
the internet.
Give it a Try!
1. Purchase a subscription to the WiFi Hotspot feature
for a day, a week, or a month. You can buy WiFi
Hotspot in one of two ways:
• From your in-vehicle touchscreen (Apps > All
Apps > Uconnect® Store)
• From the Mopar Owner Connect website
moparownerconnect.com
(
) > Shop > Uconnect®
Store.
Page 76
NOTE:
on the Mopar Owner Connect website and establish a
Uconnect® Payment PIN to purchase WiFi Hotspot.
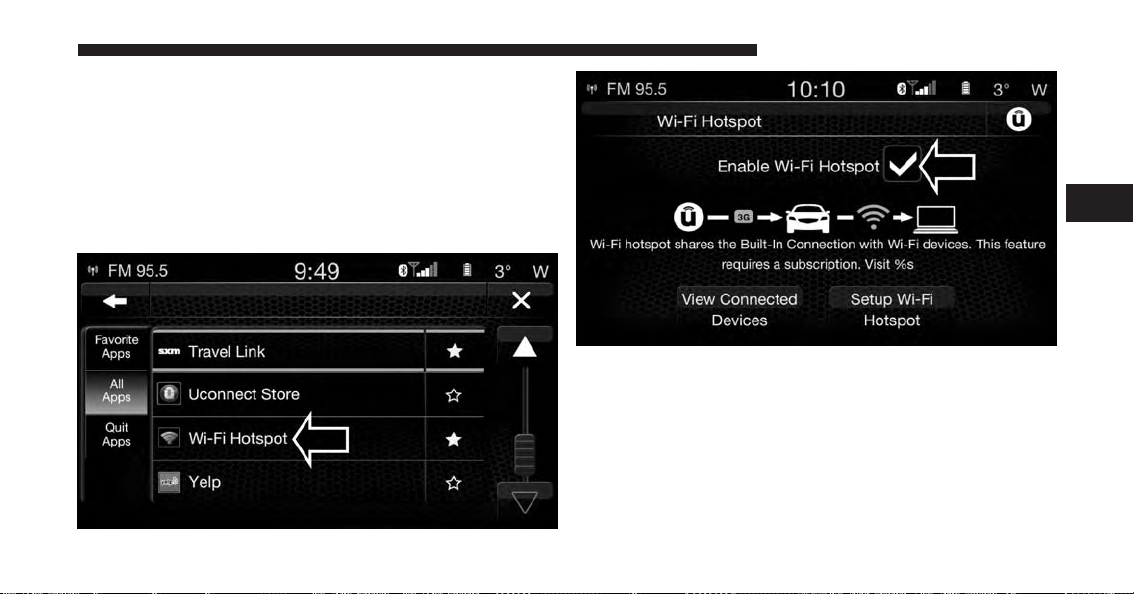
2. After purchasing WiFi Hotspot, it will be enabled/
You must set up your Uconnect® Payment Account
turned on in your vehicle. The WiFi Hotspot App can
be found on your in-vehicle touchscreen by selecting
Apps > All Apps > WiFi Hotspot.
ALL ABOUT Uconnect® ACCESS 75
3
Page 77

76 ALL ABOUT Uconnect® ACCESS
3. WiFi Hotspot should be turned on after purchasing a
subscription. To disable WiFi Hotspot, simply press to
uncheck the box to the right of the App (this feature is
available while the vehicle is in motion).
Optional: Give your hot spot a unique name by
pressing Hotspot Name (key pad is not available
while vehicle is in motion).
4. From your in-vehicle touchscreen, select the appropriate in-vehicle network and the desired security level
setting. Each security level has different pass phrase
Page 78

constraints. Change the security level setting by selecting the checkbox for any of the following security
settings.
• WPA2/WPA — “WiFi Protected Access” – This is the
default security and can be changed by pressing
WiFi Hotspot > View/Edit Pass phrase.
• WEP — “Wired Equivalent Privacy” – Pass phrase
must be 13 characters long.
• None — No security, will not prompt you for a pass
phrase, when you attempt to connect to WiFi
Hotspot.
5. From your Wi-Fi enabled device (laptop, tablet, etc.)
• Search for and select the Uconnect® hotspot in the
settings of your device
• Type the network security key (this is called “pass
phrase” and is found in Apps > All Apps > WiFi
Hotspot > View/Edit Pass phrase)
• Click OK
ALL ABOUT Uconnect® ACCESS 77
You are now connected!
NOTE: Refer to your device’s owner ’s manual for specific information related to your device.
3
Page 79

78 ALL ABOUT Uconnect® ACCESS
Requirements
• Vehicle must be properly equipped with the
Uconnect® 6.5A or 6.5AN.
• Vehicle must be registered with Uconnect® Access and
have an active WiFi Hotspot subscription ( WiFi Outpost will be turned off if there is no active
subscription).
• Vehicle must be in the ON/RUN or ACC (Accessory)
position and have a properly operating electrical system for any of the in-vehicle Uconnect® features to
function.
Disclaimers
• Factors affecting the performance of WiFi Hotspot
include: cellular network signal strength and quality,
time of day, number of channels used by the service
provider, type of connection, number of clients using
WiFi Hotspot and client device.
• Vehicle must be in active and usable range of authorized 3G wireless signal (802.11G, 54 Mbps).
• WiFi Hotspot does not enable direct communication
between multiple in-vehicle devices.
Page 80
• While the vehicle is in motion it is possible to enable or
disable the WiFi Hotspot. Simply press to check or
uncheck the box to the right of the App.
• For your own safety, it is not possible to use some of
the touchscreen features while the vehicle is in motion.
The key pad is not available while the vehicle is in
motion.
CAUTION!
ALWAYS drive safely with your hands on the wheel.
You have full responsibility and assume all risks
related to the use of the Uconnect® features and
applications in this vehicle. Only use Uconnect®
when it is safe to do so. Failure to do so may result in
an accident involving serious injury or death.
ALL ABOUT Uconnect® ACCESS 79
Tips And Shortcuts
• Give your WiFi Hotspot a unique name by pressing
“Hotspot Name” within the WiFi Hotspot App.
• To view a list of connected devices, press “View
Connected Devices” within the WiFi Hotspot App
when the hot spot is turned on.
• If WiFi Hotspot Off is shown, then WiFi is not activated (must be On for connectivity to be enabled.)
• If Enable WiFi Hotspot is unchecked, then WiFi is not
activated.
• To quickly enable or disable WiFi Hotspot, press to
check or uncheck the box to the right of the App.
3
Page 81

80 ALL ABOUT Uconnect® ACCESS
FAQs
1. How do I know if I have a good signal strength?
There is a signal strength indicator on the Apps button
of the radio touchscreen.
2. What do I do if the WiFi Hotspot connection drops
while I’m driving? The connection will be automatic
when you enter an area with cellular coverage. Factors
affecting the performance of WiFi Hotspot include:
cellular network signal strength and quality, time of
day, number of channels used by the service provider,
type of connection, number of client using WiFi
Hotspot, client device.
3. What is the factory default security setting? WPA2/
WPA
4. What if I want to create a custom password for my
connection? Select either WPA2/WPA or the WEP
setting and create a pass phrase by pressing Apps >
All Apps > WiFi Hotspot > View/Edit Pass phrase.
5. I do not see the connection on my wireless laptop or
phone, what should I do? Refer to your device’s
owner’s manual for specific information related to
your device.
6. Are there any data constraints with WiFi Hotspot?
WiFi Hotspot must be purchased in either one day, one
week or one month durations.
Page 82

Voice Texting
Add Free-Form Voice Texts To Your Voice Text Reply
Feature
Description
This Voice Texting enhances the Voice Text Reply feature
built into your Uconnect® Access 6.5A and 6.5AN radio.
While Voice Text Reply provides 18 pre-defined messages
you can send, Voice Texting lets you create and send
nearly any message you want. Just speak your message
as if you were talking to the recipient, and the Uconnect®
Access voice-texting technology will convert your voice
into a text message.
Voice Texting and Voice Text Reply features are compatible with many newer Android and Blackberry phones.
Before using, determine if your phone has been tested to
support Bluetooth® “Message Access Profile (MAP)” at
ALL ABOUT Uconnect® ACCESS 81
UconnectPhone.com
phones do not currently support Bluetooth® MAP. Ensure MAP is ON and incoming message notification is
enabled.
How It Works
Set Up Your Phone To Work With Voice Texting
After pairing your phone to the vehicle using Bluetooth®
UconnectPhone.com
(see
the menu bar of the radio to see the main Phone screen.
A minute or so after a compatible MAP enabled phone
has been Bluetooth® connected to the vehicle; the “messaging” button on the touchscreen will change from gray
to white. This is an indicator that Voice Texting will work
with your phone. Outgoing voice texts may not be
possible. The phone may allow incoming texts only.
. iPhone® and some other smart-
), push the “phone” button on
3
Page 83

82 ALL ABOUT Uconnect® ACCESS
Determine if your phone has been tested to support
Bluetooth® “Message Access Profile” (MAP) at
UconnectPhone.com
. (Your phone may support Voice
Texting even if not found on this website. Check with
your phone manufacturer to see if it supports MAP
protocol.)
NOTE: If phone supports MAP, then ensure MAP is on
and incoming message notification is enabled, (see
UconnectPhone.com
for phone specific instructions).
Generic Phone Setup Instructions (your phone’s setup
process may be similar):
Follow the steps below to see if your phone can set up to
work with Voice Texting.
1. On your phone select “Settings” (or the equivalent on
your phone)
2. Select Wireless/Bluetooth® settings
3. Ensure Bluetooth® is on (box checked)
4. Select Bluetooth® settings
5. Select Advanced setting
6. Ensure Message Access service is on (box checked)
7. Select Message Access settings
Page 84

8. Check the box for SMS
9. Hit the back button twice to return to the Bluetooth®
settings screen
10. Check the box for Discoverable
If a Bluetooth® authorization window appears showing
your phone requesting permissions, check the box for
Always and press Accept.
Sending A New Text Message From Radio
1. Push
2. Say “Send text message.”
3. The system will respond “Say the phone number or
the full name and the phone type of the contact that
you want to send a message to.”
4. Dictate message (“I will be home at eight.”)
on the steering wheel.
ALL ABOUT Uconnect® ACCESS 83
5. When finished dictating, wait for prompt and say
“Send.”
Dictate A Free-Form Reply To A Message From Radio
(Voice Text Reply)
1. Say “Reply to message n”
n = the number of the message
OR
Press “Reply” after viewing message
OR
Push the phone button and say “Reply.”
2. The system will say “Please say the message you want
to send.” (“I will be home at eight.”)
3. Say the message you want to send up to 160 characters
of text.
3
Page 85

84 ALL ABOUT Uconnect® ACCESS
4. The system will repeat the message you dictated and
state available commands. If your message was too
long, the system will respond with “Your message was
too long. Your message was truncated.” Say “Send,” or
“Start Over” or “Continue.”
5. Say “Continue”
OR
Say “Start over”
OR
Say “Repeat”
OR
Say “Send”
OR
Say “Cancel.”
To Reply To A Message With A Pre-Formatted Response (Voice Text Reply)
NOTE: This function only operates while the vehicle is
not in motion.
1. Press “View” next to the message
2. Press “Reply”
Page 86

3. Select the pre-formatted response by pressing it
(“I can’t talk right now”)
4. Press “Send”
Viewing Or Listening To Incoming Messages
To Listen to a Message from Radio
1. Push the #Phone# button on the steering wheel. Say
$Listen to message$
OR
Press the #Listen# button on the touchscreen.
ALL ABOUT Uconnect® ACCESS 85
Viewing Your Messages
1. Push the “Phone” button on the steering wheel.
3
Page 87
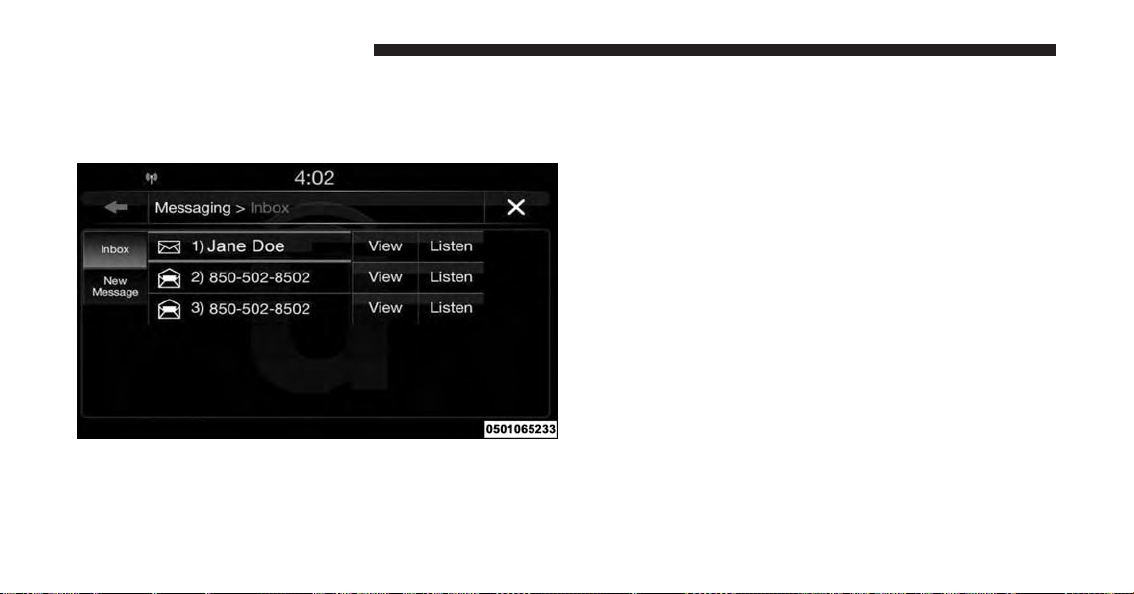
86 ALL ABOUT Uconnect® ACCESS
2. Say “View message.”
OR
Press “View” on the in-vehicle touchscreen.
Contact names or phone numbers of the message
sender appears in a list along with View and Listen
buttons on the touchscreen.
Viewing A Specific Message
1. Press “View” next to the contact name/phone number
of the message you want to be displayed.
OR
Say “Show message n”
n = the number of the message
Listening To A Message
1. Press “Listen” on the touchscreen or push the “Phone”
button on the steering wheel and say “Listen,” the
Uconnect® system will read the received text message
over the vehicle audio system.
Page 88

Barge-In
Barge-in is a feature that enables a user to say a valid
command without waiting for the system to finish speaking.
When the system is “speaking” you can push the
on the steering wheel and say a valid command.
For example, if the system is explaining all of the options
available after dictating a text message, at any time the
user can press #Listen# on touchscreen or push the
#Phone# button on the steering wheel and say #Listen.#
Requirements
(MAP may not be compatible with Apple iPhones® (pre
•
iOS 6). Apple iOS 6 supports receiving text messages,
but does not support sending text messages).
• Available on vehicles sold in the United States with a
Uconnect® 6.5A (sales code RA3) or Uconnect® 6.5AN
(sales code RA4) radio equipped with Uconnect®
Access.
button
ALL ABOUT Uconnect® ACCESS 87
• Vehicle must be registered with an active Uconnect®
Access Advantage trial or paid subscription for free
form text response to work.
• Vehicle and phone must be in range of the cellular
network.
• Customer must have a properly paired and connected
cellular device with Bluetooth® Message Access Profile (MAP) enabled. Voice Texting is compatible with
many newer BlackBerry and Android mobile devices.
Apple iOS 5 and earlier does not support MAP so
iPhones will not send free form text messages. Apple
iOS 6 supports receiving, not sending text messages.
To check if your device has been tested to be compatible please visit
UconnectPhone.com
.
3
Page 89

88 ALL ABOUT Uconnect® ACCESS
Disclaimers
• Not all Voice Texting features may be available on your
phone.
• Your MAP supported phone must be paired and
connected to a compatible Uconnect® radio.
• You must have an active cellular connection and be
within cellular range to voice text.
• Chrysler Uconnect® and its affiliates are not responsible for errant text messages.
• Vehicle must be registered with an active Uconnect®
Access trial or paid subscription.
WARNING!
ALWAYS drive safely with your hands on the
steering wheel. You have full responsibility and
assume all risks related to the use of the
Uconnect® features and applications in this vehicle. Only use Uconnect® when it is safe to do so.
Failure to do so may result in an accident involving serious injury or death.
FAQs
1. Can I still voice text if my phone is not listed? We are
constantly testing phones and updating our compatibility database. If your phone is not listed, you may
still be able to pair and connect your MAP supported
phone to a compatible Uconnect® radio to see if all or
most voice texting functions work. Check your phone
manufacturer if MAP is supported on your phone.
Page 90

2. Can I use voice texting while in my other Chrysler
vehicle? The Voice Texting free text response feature is
available only on Uconnect® 6.5A (sales code RA3) or
Uconnect® 6.5AN (sales code RA4) radios. Other
Chrysler vehicles do support hands free texting, but
only with fixed responses.
3. My “Messaging” button on the touchscreen is White,
but I can only use pre-formatted responses. The Voice
Texting free-form voice response requires a subscription to the Uconnect® Access Advantage package.
(Some phones will support pre-formatted responses,
but not free-form. Refer to
further details.)
4. Do I have to “train” my Uconnect® radio to my
voice? Chrysler uses the latest voice recognition engine that provides good recognition without required
training. This makes it easier for a passenger to also
use the system.
UconnectPhone.com
for
ALL ABOUT Uconnect® ACCESS 89
5. Can a passenger voice text? Yes, however, voice
recognition microphones are optimized for the driver,
so the system may have difficulty hearing the passenger; also, the system will use the currently connected
phone, so be sure your passenger isn’t sending texts to
the wrong recipient.
6. Does Voice Texting work with accents? Speech isn’t
perfect. Technology isn’t perfect. While Chrysler
strives to use the latest voice recognition engine, the
technology may have difficulty with strong accents.
7. Can I voice text my car? The Voice Texting feature
allows you to listen to, and reply to text messages
(SMS) sent to your portable cellular mobile phone by
voice while in your vehicle.
8. How many pre-formatted replies are there? You can
respond with a set of up to 18 preset outgoing
messages such as #I’ll call you later.” Refer to “Voice
Texting” section of this supplement.
3
Page 91

90 ALL ABOUT Uconnect® ACCESS
9. Can I use abbreviations and emoticons? Of course!
Just say the name of the most popular emoticon or
abbreviation, e.g. smiley, frown, wink, & LOL.
10. Can I use Text Messaging if the “messaging” button
doesn’t turn white? Only MAP compatible phones
will work with Text Messaging. If your phone is
compatible, the “messaging” light will turn white,
after the phone is Bluetooth® connected, and you
will then be able to do hands free Text Messaging.
The system will respond with “Sorry, I didn’t understand you” if you push the steering wheel “Phone”
button and say a voice command for Text Messaging,
when the button isn’t active (“white”).
Remote Door Lock/Unlock
Lock Or Unlock Your Vehicle From Virtually Anywhere
Using Your Computer Or Smartphone App.
Description
The Remote Door Lock/Unlock feature provides you the
ability to lock or unlock the door on your vehicle,
without the keys and from virtually any distance. You
can send a request to your vehicle in one of three ways:
• Using the Uconnect® Access App from a compatible
smartphone
• From the Mopar® Owner Connect website
moparownerconnect.com
(
)
• Contacting Uconnect® Care
If you want, you can set up notifications for your account
to receive an email or text (SMS) message every time a
command is sent to lock or unlock your doors.
Page 92
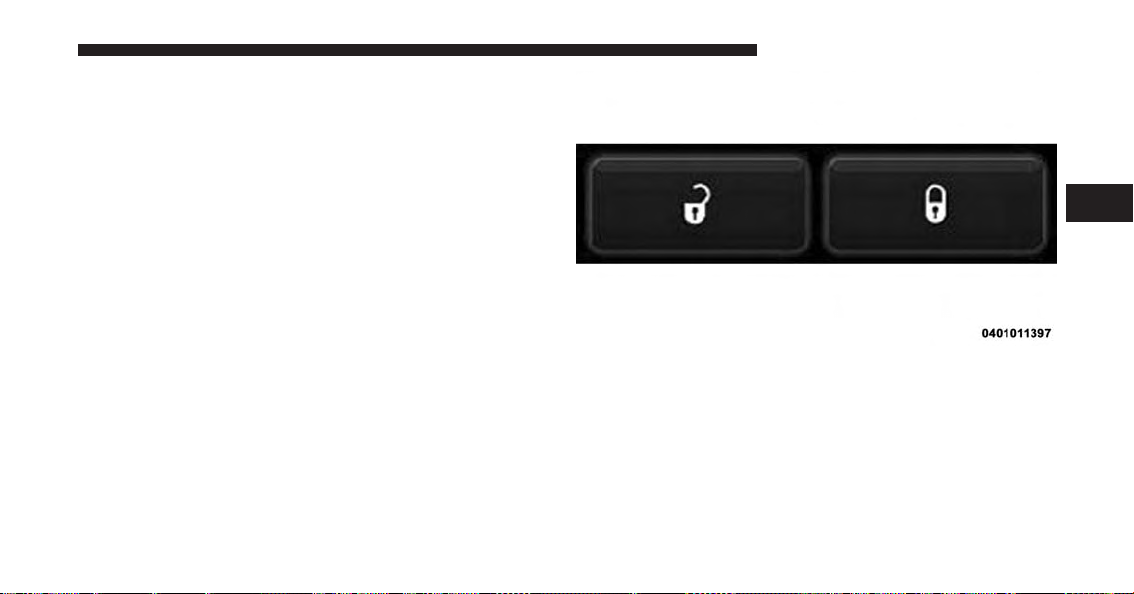
How It Works
Uconnect® Access App:
1. Download the Uconnect® Access App to a compatible
smartphone and login using your username and password.
2. To lock the doors, push the button with the closed lock
icon; to unlock the driver’s door push the button with
the open lock icon.
ALL ABOUT Uconnect® ACCESS 91
3
3. A pop-up screen will appear asking for your
Uconnect® Security PIN (this is the same 4- digit code
established when your registered your Uconnect®
Access system). Enter the Uconnect® Security PIN on
the keypad and press “OK.”
Page 93

92 ALL ABOUT Uconnect® ACCESS
4. The Uconnect® Access App will confirm if your
command was sent (or not). Press “OK” to close the
pop-up screen.
5. It will take a little while for the command to go
through to your vehicle. The time it takes depends on
a number of technical conditions.
6. A message will appear on the screen to let you know
if the command was received by your vehicle.
Mopar® Owner Connect website:
1. Log on to the Mopar® Owner Connect website
moparownerconnect.com
(
) using the username and
password you used when registering your Uconnect®
Access system.
NOTE: If you forgot your username or password, links
are provided on the website to help you retrieve them.
2. If you have more than one vehicle registered
into the Mopar® Owner Connect website
(
moparownerconnect.com
), select the vehicle you
want to send the command by clicking on its image
along the top.
3. Beneath the image of a vehicle like yours, you will see
a row of icons. To lock the doors, click on the closed
lock icon; to unlock the driver’s door click on the
“open lock icon.”
Page 94

ALL ABOUT Uconnect® ACCESS 93
Uconnect® Care:
1. If you need to unlock the doors of your vehicle,
contact Uconnect® Care by calling 855-792-4241.
NOTE: The Uconnect® Care agents are trained to help
you with unlocking of your door (for example, in an
accidental lock-out). All other Remote Services should be
performed via the Mopar® Owner Connect website
moparownerconnect.com)
(
Access App on your compatible smartphone.
or through the Uconnect®
3
4. You will then be asked to enter your Uconnect®
Security PIN (this is the same 4-digit code established
when your registered your Uconnect® Access system).
Please enter your Uconnect® Security PIN.
5. A message will appear on the screen to let you know
if the command was received by your vehicle.
CAUTION!
Must be registered with Uconnect® access and
have a current subscription.
2. For security purposes, the Uconnect® Care agent will
verify your identity by asking for your 4-digit
Uconnect® Security PIN.
Page 95

94 ALL ABOUT Uconnect® ACCESS
3. After providing your Uconnect® Security PIN, you
can ask them to lock or unlock your vehicle. The agent
will send a command to your vehicle to get the task
done.
Give It A Try!
• Your request will typically take about to 3 minutes to
process. If your vehicle has been parked for a while it
can take up to 30 minutes for the request to reach your
vehicle and perform the task.
Requirements
• Download the Uconnect® Access App to your smartphone.
• Enter the username and password that you
established for the Mopar® Owner Connect website
moparownerconnect.com
(
) during registration of
your new vehicle.
• If logging in for the first time, you will be asked to
agree to the Terms of Service.
• Push the button to unlock your vehicle’s door, you will
then be asked to enter your Uconnect® Security PIN.
• Vehicle must be properly equipped with the
Uconnect® Access System.
• Vehicle must be in range of a usable and authorized
cellular signal.
• Vehicle must be registered with Uconnect® Access and
have an active subscription that includes the applicable feature or App.
• If using the Uconnect® Access App to command your
vehicle, your smartphone must be compatible and in
range of a cellular signal.
Page 96

• An ignition cycle is required for some remote commands such as Remote Vehicle Start and Remote Door
Lock/Unlock if following a Remote Horn and Lights
activation.
FAQs
1. How long does it take to unlock or lock the door?
Depending on various conditions, it can take three
minutes or more for the request to get through to your
vehicle, although Uconnect® is always striving to
improve performance.
2. Which is faster, my Key Fob or the Uconnect® Access
App? Your Key Fob will lock/unlock the door quicker,
however its range is limited and it can sometimes get
misplaced or locked in the vehicle. Your Uconnect®
Access App comes in handy for these and other
situations.
ALL ABOUT Uconnect® ACCESS 95
3. Will my vehicle be safe if I lose my smartphone?
People sometimes lose their phone, which is why
security measures have been engineered into the
Uconnect® Access App. Asking for your username,
password and Uconnect® Security PIN help to ensure
that nobody can get into your vehicle if they happen to
find your smartphone.
4. Why can’t all phones use the Uconnect® Access
App? The Uconnect® Access App has been designed
to work on most smartphones with the Apple and
Android operating systems. The capabilities of these
smartphone allows us to remotely command your
vehicle. Other operating systems may be supported in
the future.
3
Page 97

96 ALL ABOUT Uconnect® ACCESS
5. Why is the Uconnect® Access App running slow?
The Uconnect® Access App relies on the cellular
connection from your smartphone to send commands
to your vehicle. If your smartphone is in an area with
below average coverage, it will take longer to log in
and send commands.
Remote Vehicle Start
Use Your Computer Or Smartphone App To Start The
Engine And Warm-Up Or Cool-Down The Vehicle
From Almost Anywhere.
Description
The Remote Vehicle Start feature provides you with the
ability to start the engine on your vehicle, without the
keys and from virtually any distance. Once started, the
pre-set climate controls in your vehicle can warm-up or
cool-down the interior before you have to get in. You can
send a request to your vehicle in one of two ways:
• Using the Uconnect® Access App from a compatible
smartphone.
• From the Mopar Owner Connect website
(
moparownerconnect.com
).
You can also send a command to turn-off an engine that
has been remote started. After 15 minutes if you have not
entered your vehicle with the key, the engine will shut off
automatically.
This remote function requires your vehicle to be
equipped with a factory-installed Remote Start system.
If you want, you can set-up notifications for your account
to receive an email or text (SMS) message every time a
command is sent to remote start or cancel a remote start.
Page 98

How It Works
Uconnect® Access App:
1. Download the Uconnect® Access App to a compatible
smartphone and login using your username and password.
2. To start the engine, press the “circular arrow”, to
turn-off an engine that has been remote started press
the “cancel” button.
ALL ABOUT Uconnect® ACCESS 97
3
3. A pop-up screen will appear asking for your
Uconnect® Security PIN (this is the same 4- digit code
established when your registered your Uconnect®
Access system). Enter the Uconnect® Security PIN on
the keypad and press “OK.”
Page 99

98 ALL ABOUT Uconnect® ACCESS
4. The Uconnect® Access App will confirm if your
command was sent (or not). Press “OK” to close the
pop-up screen.
5. It will take a little while for the command to go
through to your vehicle. The time it takes depends on
a number of technical conditions.
NOTE: If you forgot your username or password, links
are provided on the website to help you retrieve them.
2.
If you have more than one vehicle registered into the Mopar
Owner Connect website (
moparownerconnect.com
), select the vehicle you want to send the command by
clicking on its image along the top.
6. A message will appear on the screen to let you know
if the command was received by your vehicle.
Mopar Owner Connect website:
1. Log on to the Mopar Owner Connect website
moparownerconnect.com
(
) using the username and
password you used when registering your Uconnect®
Access system.
3. Beneath the image of a vehicle like yours, you will see
a row of icons. To start the engine, press the “circular
arrow”, to turn-off an engine that has been remote
started press the “cancel” button.
Page 100

4. You will then be asked to enter your Uconnect®
Security PIN (this is the same 4-digit code established
when your registered your Uconnect® Access system).
Please enter your Uconnect® Security PIN.
5. A message will appear on the screen to let you know
if the command was received by your vehicle.
ALL ABOUT Uconnect® ACCESS 99
Uconnect® Care:
1. If you need to unlock the doors of your vehicle,
contact Uconnect® Care by calling 855-792-4241.
NOTE: The Uconnect® Care Agents are trained to help
you with unlocking of your door (for example, in an
accidental lock-out). All other Remote Services should be
performed via the Mopar Owner Connect website
moparownerconnect.com)
(
Access App on your compatible smartphone.
2. For security purposes, the Uconnect® Care Agent will
verify your identity by asking for your 4-digit
Uconnect® Security PIN.
3. After providing your Uconnect® Security PIN, you
can ask them to lock or unlock your vehicle. The agent
will send a command to your vehicle to get the task
done.
or through the Uconnect®
3
 Loading...