


2009
QUICK
REFERENCE
GUIDE
PATRIOT

vehicle features
FUEL CAP:
LOOSE GAS CAP MESSAGE
• If a “gas cap” message (shown as gASCAP) appears, tighten the gas cap
until a “clicking” sound is heard.
• Press the odometer reset button to turn the message off.
• If the message continues to appear for more than three days after
tightening the gas cap, see your dealer.
TIRE PRESSURE MONITORING
SYSTEM (TPMS):
• A Tire Pressure Monitoring Light and a “low tire” message will display in
your instrument cluster along with an audible chime if one or more of your
vehicle’s four road tires are signicantly under-inated.
• Check the ination pressure of each tire and inate to the recommended
pressure for your vehicle. The tire pressures recommended for your
vehicle are found on the “Tire and Loading Information” label located on
the driver’s side door opening. The TPMS light should not be used as a tire
pressure gauge when adjusting your tire pressure.
• It is recommended that you check the tire pressure in the morning
when tires are cool; inate each tire to the recommended pressure for
your vehicle. The light will turn off after your vehicle’s tire pressures are
properly inated and the pressure has been recognized. The vehicle may
need to be driven for up to 20 minutes above 15 mph (25 km/h) before the
light will turn off.
• Temperature changes can affect tire pressure, causing the TPMS light
to turn on. Tire pressures will also increase as the vehicle is driven - this
is normal and you should not adjust for this increased pressure.
• Driving on under-inated tires reduces your vehicle’s fuel efciency and
tire tread life. If a spare tire is in use on the vehicle, the TPMS light may
turn on. Refer to your Owner’s Manual.
OIL CHANGE INDICATOR:
MESSAGE
• If an “oil change” message (shown as CHAngE Oil or Oil Change Required)
appears and a single chime sounds, it is time for your next
required oil change.
RESETTING LIGHT AFTER SERVICING
• Turn the ignition switch to the ON/RUN position (do not start engine).
• Fully depress the accelerator pedal three times within 10 seconds.
• Turn the ignition switch to the OFF/LOCK position.

Press Air Recirc.
Button
Press A/C
Button
Press Rear Win dow
Defroster Button
CLIMATE CONTROLS:
AIR RECIRCULATION / MAX A/C
• For window defogging, turn the recirculation button off.
• Recirculation is not allowed in defrost, oor, defrost/oor (mix) modes.
• For maximum cooling, rotate the Temperature Control to the MAX
A/C position.
DRIVER SEAT ADJUSTMENT:
FORWARD/REARWARD
• Lift up on the adjusting bar located at the front of the seat near the oor
and release at the desired position.
RECLINER
• Lean forward before lifting the lever, located on the outboard side of the
seat, then lean back to desired position and release the handle.
HEIGHT ADJUSTMENT
• Ratchet the front lever, located on the outboard side of the seat,
upward to raise the seat height. Ratchet the lever downward to lower
the seat height.
Rotate Mode Control Rotate Blower Control Rotate Temp Control
Forward/Rearward
Height Adjustment
Recliner
Lumbar
12V POWER OUTLET:
• A 12 volt (13 amp) DC power outlet is located in the instrument panel.
• This outlet is designed to power one device at a time. Do not use
aftermarket outlet splitters to power multiple devices.
• The power outlet will shut down if the 12 volt (13 amp) power rating is
exceeded. This will require replacing the fuse protecting the system.
Refer to your Owner’s Manual.
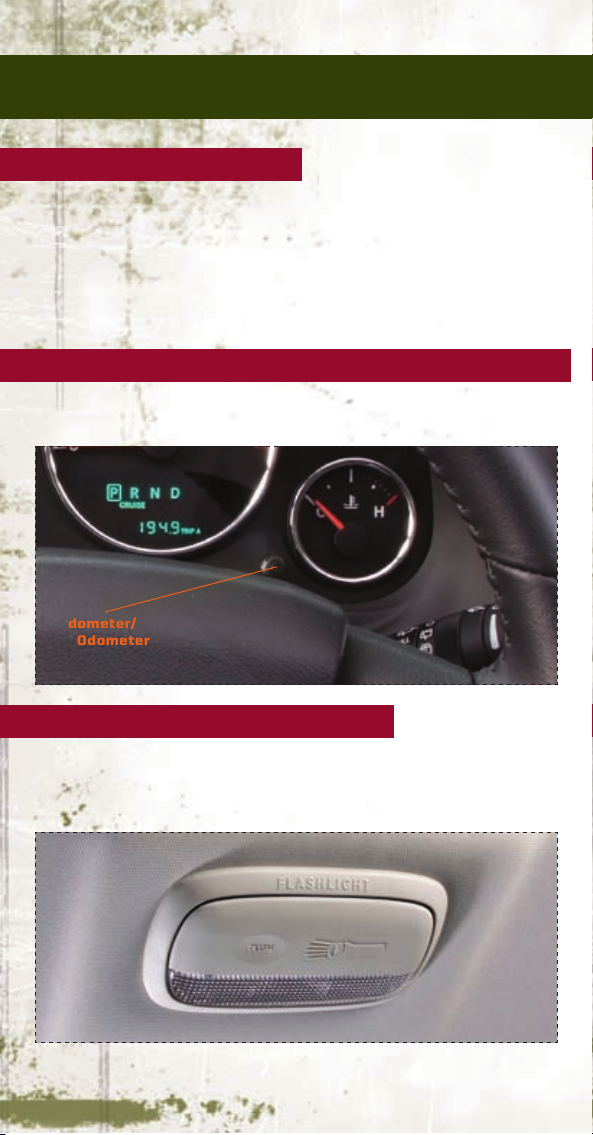
ODOMETER/TRIP ODOMETER RESET BUTTON:
• Press the button to toggle between the odometer, trip odometers and
outside temperature (select models only).
RECHARGEABLE FLASHLIGHT:
• The ashlight is located in the headliner above the rear cargo area.
Press the ashlight to release.
• Press the switch once for high, twice for low and a third time for OFF.
Odometer/
Trip Odom ete r
Reset Button

CLOCK SETTING:
NON-TOUCH-SCREEN RADIOS
• Press and hold the TIME button until the hours blink; turn the
TUNE/SCROLL control knob to set the hours.
• Press the TUNE/SCROLL control knob until the minutes begin to blink;
turn the TUNE/SCROLL control knob to set the minutes.
• Press the TUNE/SCROLL control knob to save the time change.
TOUCH-SCREEN RADIO
• Turn the radio ON.
• Touch the screen where the time is displayed.
• Touch the screen where “User Clock” is displayed (Navigation radio only).
• To adjust the hours, touch either the hour forward button or the hour
backward button.
• To adjust the minutes, touch either the minute forward button or the
minute backward button.
• To save the new time setting, touch the screen where the word “Save”
is displayed.
REAR FOLD FLAT SEATS:
• Pull the strap located on the outboard side of the seatback forward
to fold the seat at.
115V POWER OUTLET:
• A 115 volt (150 watt) AC power outlet is located on the front of the
center console just below the center arm rest.
Pull Forward
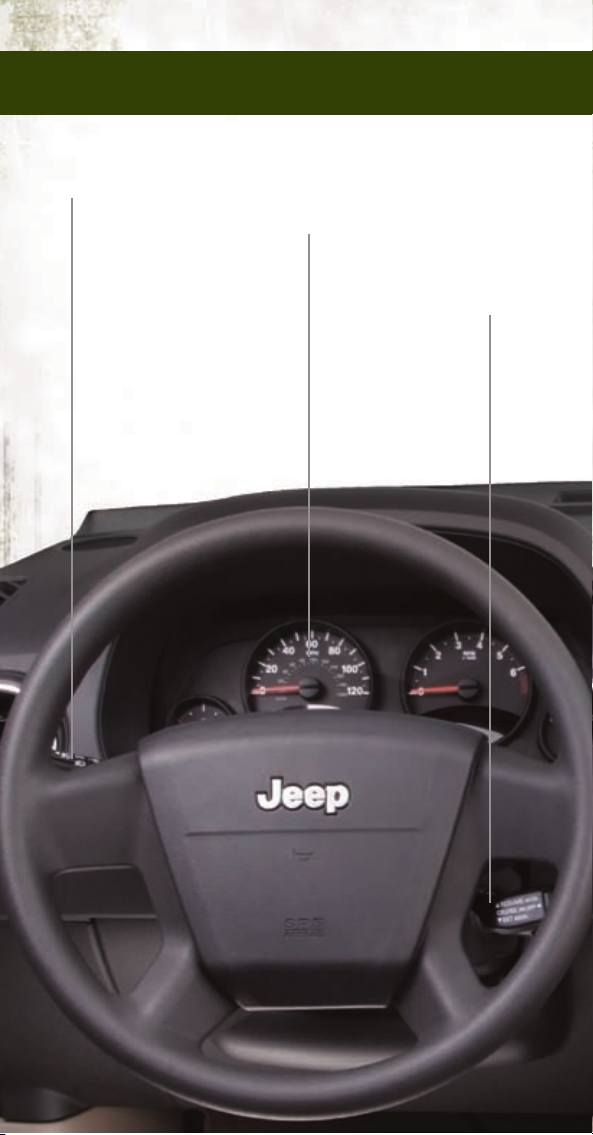
instrument panel
TURN SIGNAL/
LIGHTS LEVER
SPEED
CONTROL
LEVER
INSTRUMENT
CLUSTER

AUDIO SYSTEM
(TOUCH-SCREEN
RADIO SHOWN)
CLIMATE
CONTROLS
LOWER
SWITCH PANEL
Heated Se at
Switches
ESP Switch
Hazard Warning
Flasher Switch
WIPER/
WASHER
LEVER
12V P OWER
OUTLET

KEY FOB:
LOCKING AND UNLOCKING THE DOORS/LIFTGATE
• Press the LOCK button once to lock all doors and liftgate.
• Press the UNLOCK button once to unlock the driver’s door only and
twice within ve seconds to unlock all the doors and liftgate.
• All doors can be programmed to unlock on the rst press of the
UNLOCK button.
• Refer to the Owner’s Manual for programming.
PANIC ALARM
• Press the button once to turn the panic alarm on.
• Wait approximately three seconds and press the button a second time to
turn the panic alarm off.
CONTINUOUSLY VARIABLE
AUTOMATIC TRANSMISSION (CVT):
• While conventional automatic transmissions typically have 4, 5 or 6
speeds, the Continuously Variable Transmission has an innite number
of speeds. This allows it to adjust to exactly the right ratio to optimize
performance and fuel economy.
• Under hard acceleration you may hear more engine noise than with a
conventional transmission. The CVT may also occasionally feel like it is
“shifting.” These characteristics are perfectly normal and contribute to the
CVT’s efciency.
Lock
Unlock

TURN SIGNAL/LIGHTS LEVER:
HEADLIGHTS/PARKING LIGHTS
• Rotate the end of the lever to the rst detent for parking lights and to the
second detent for headlights.
INSTRUMENT PANEL DIMMER
• Rotate the dimmer control to the extreme bottom position to fully dim the
instrument panel lights and prevent the interior lights from illuminating
when a door is opened.
• Rotate the center portion of the lever up to increase the brightness of the
instrument panel lights when the parking lights or headlights are on.
• Rotate the center portion of the lever upward to the next detent position
to fully brighten the odometer and radio when the parking lights or
headlights are on. Refer to your Multimedia or Navigation User Manual
for radio display dimming.
• Rotate the center portion of the lever upward to the last detent position to
turn on the interior lighting.
HIGH BEAM OPERATION
• Push the lever forward to activate the high beams.
FOG LIGHTS
• Pull out the end of the lever. Fog lights only operate with parking lights or
low beam headlights.
Lights
Fog Lights
Dimmer
Push Lever for
High Beams

vehicle features
SPEED CONTROL LEVER:
CRUISE ON/OFF
• Press the ON/OFF button to activate the Speed Control.
• CRUISE will appear on the instrument cluster to indicate the Speed
Control is on.
• Press the ON/OFF button a second time to turn the system off.
SET
• With Speed Control on, press down and release the lever to set a
desired speed.
ACCEL/DECEL
• Press and hold the lever up to accelerate or down to decelerate the
vehicle; release the lever to save the new set speed.
• Once a speed is set, tapping the lever up or down will increase or
decrease the set speed approximately 1 mph (2 km/h).
CANCEL
• Pull the lever toward you, push the clutch pedal, or apply the brakes to
cancel the set speed and maintain the set speed memory.
• Press the ON/OFF button to turn the system off and erase the set
speed memory.
RESUME
• To resume a previously selected speed in memory, press the lever up
and release.
Press
ON/OFF
Button

WIPER/WASHER LEVER:
FRONT WIPERS
Intermittent, Low and High Operation
• Rotate the end of the lever to the rst detent position for one of ve
intermittent settings, the second detent for low wiper operation and
the third detent for high wiper operation.
Mist
• Pull down on the lever and release when a single wipe is desired.
Washer Operation
• Pull the lever toward you and hold for as long as spray is desired.
REAR WIPER
Wiper Operation
• Rotate the center portion of the lever forward to the rst detent for rear
wiper operation.
Washer Operation
• Rotate the center portion of the lever past the rst detent to activate the
rear washer.
WIND BUFFETING:
• Wind buffeting can be described as a helicopter-type percussion sound.
If buffeting occurs with the rear windows open, adjust the front and rear
windows together.
• If buffeting occurs with the sunroof open, adjust the sunroof opening,
or adjust any window. This will minimize the buffeting.
Front Washer
(pull toward
driver)
Front WipersRear Wiper/Washer
Mist (down)

This guide has been prepared to help you get quickly acquainted with
your new Jeep and to provide a convenient reference source for common
questions. However, it is not a substitute for your Owner’s Manual.
For complete operational instructions, maintenance procedures and
important safety messages, please consult your Owner’s Manual,
Navigation Radio User Manual, Multimedia User Manual and other
Warning Labels in your vehicle.
Not all features shown in this guide may apply to your vehicle.
For additional information on accessories to help personalize your
vehicle, visit mopar.com or your local Jeep dealer.
81-316-0974
Patriot
Second Printing
Quick Reference Guide
www.JEEP.com
MOPAR ACCESSORIES:
The following highlights just some of the Authentic Jeep Accessories by
Mopar that are available for your Jeep Patriot.
EXTERIOR:
• Air Deectors • Splash Guards • Front End Cover
• Vehicle Cover
INTERIOR:
• Door Sill Guards • Slush Floor Mats • Premium Carpet
Floor Mats
• Pedal Kit • Shift Knob
ELECTRONICS:
• Rear Seat Video • uconnect™ web
(WiFi)
• SIRIUS Satellite
Radio
• Heated Seats • Ambient Footwell
Lighting
• iPod
®
Adapter
CARRIERS:
• Roof-Mount Carriers • Trailering
Accessories
To see the full line of accessories, stop by your Jeep dealer or
visit
mopar.com.
 Loading...