

Page 1
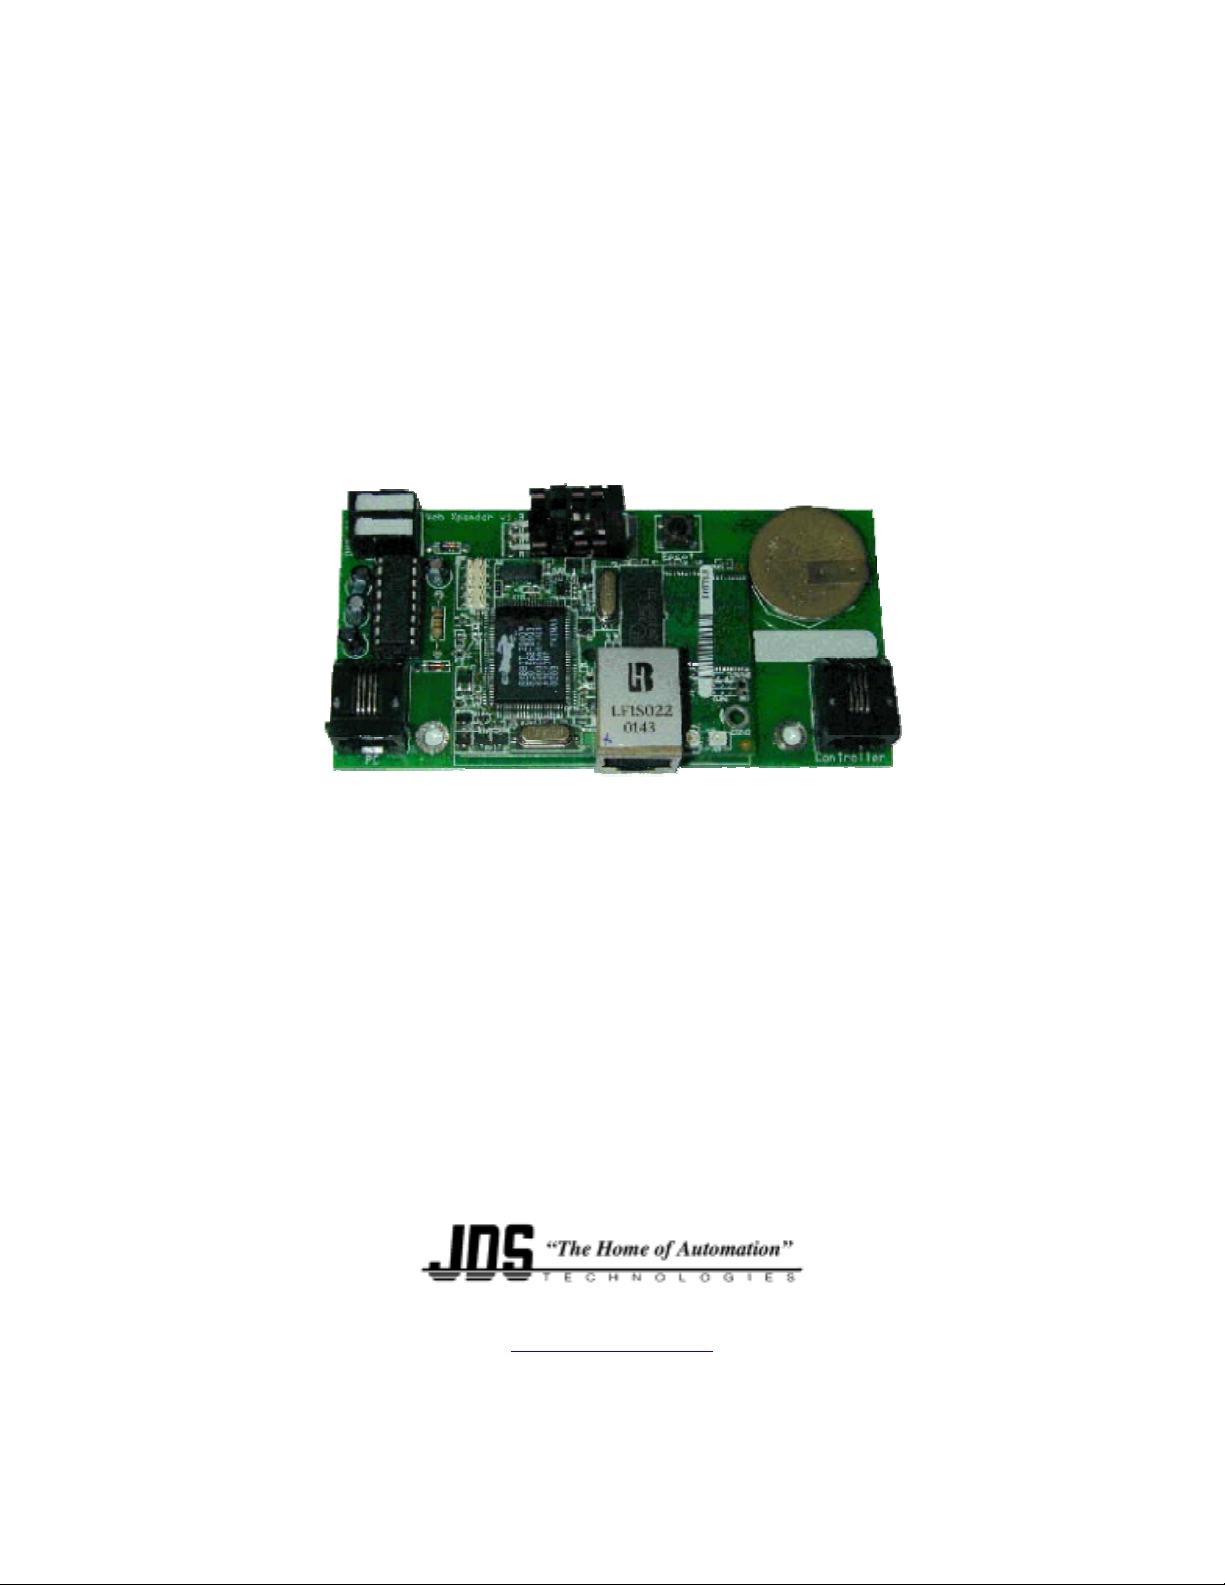
Web Xpander
Installation and Operation
Manual
12200 Thatcher Court, Poway, CA 92064
TEL 858-486-8787 FAX 858-486-8789
ONLINEJDS@AOL.COM
www.jdstechnologies.com
Document Rev 1.4
February 2004
Page 2
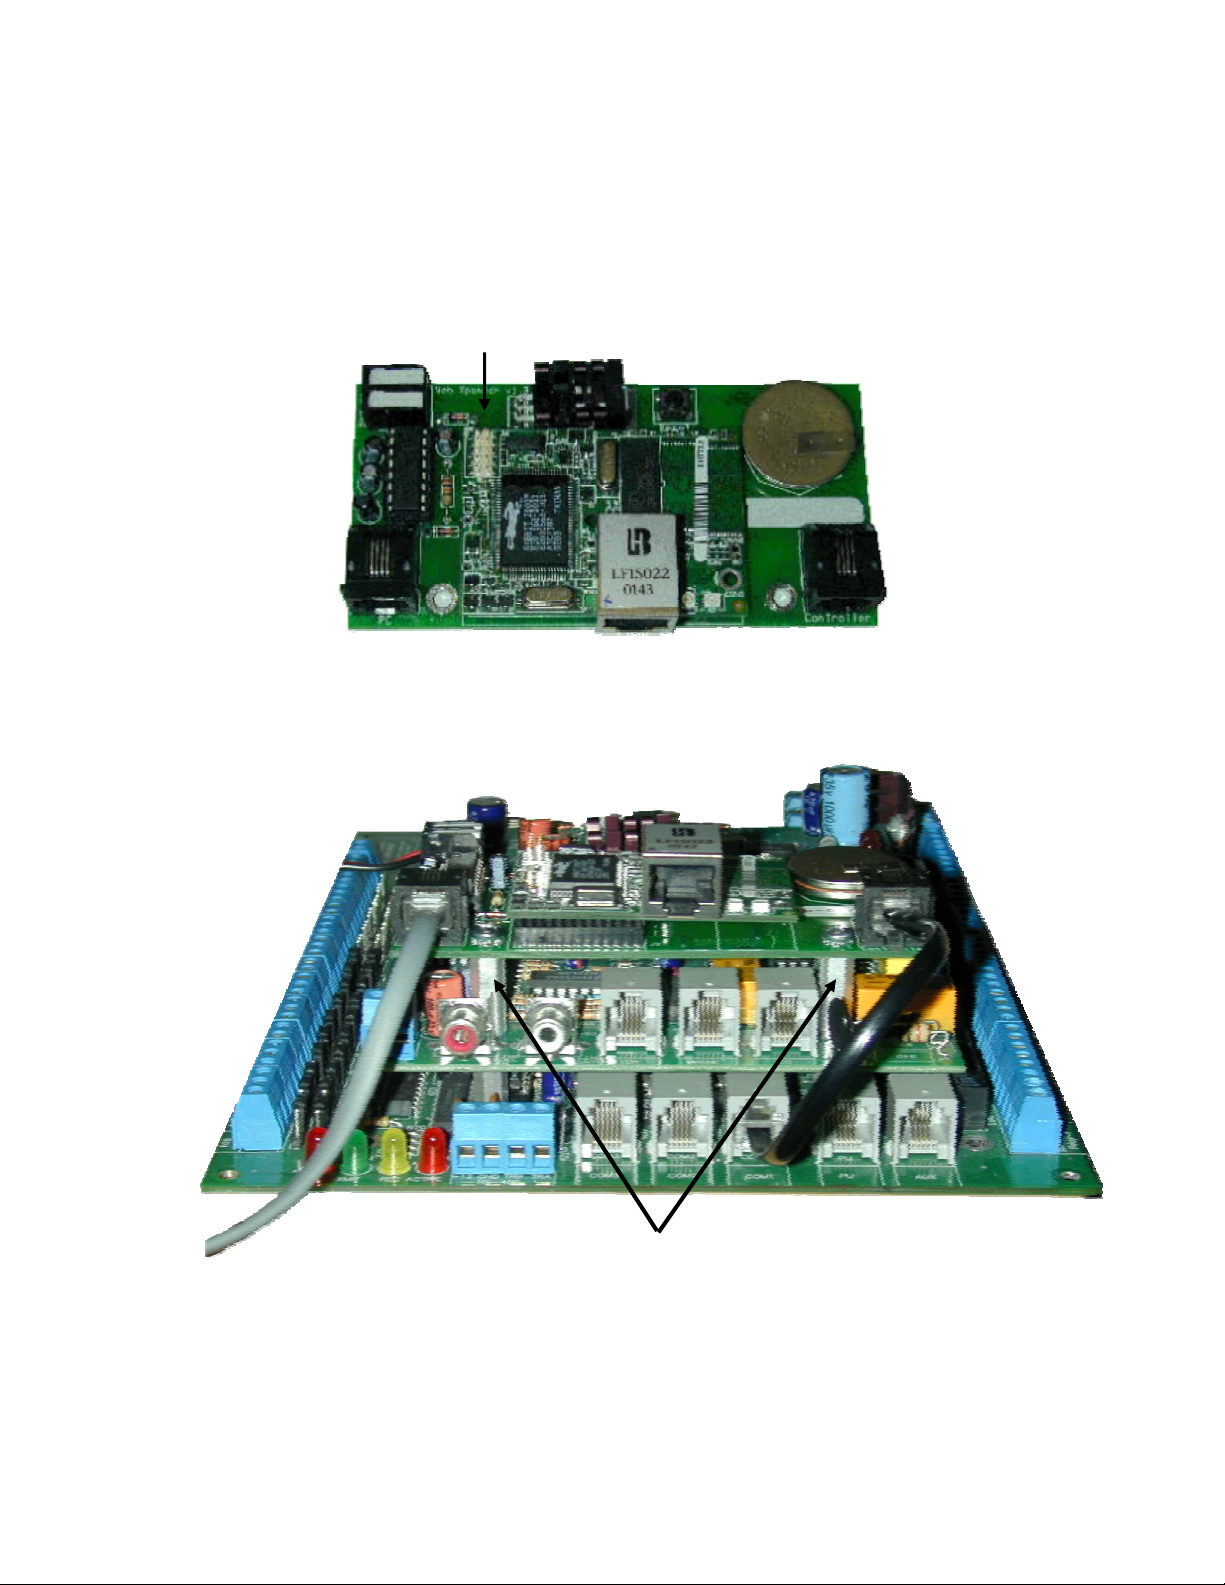
12VDC Power Input
Web Xpander
Programming
Connector
Reset
Button
RS-232 Input from PC
Ethernet port to
Network Router
RS-232 Output to
Controller (Stargate)
-
Page 3

Welcome to Web Xpander
Web Xpander is a serial (RS-232) to ethernet module with embedded web pages that
allow monitoring and control of STARGATE via the internet and/or local area network
(for downloading schedules see Appendix E). Web Xpander can also be used with
STARGATE-Lite, TimeCommander-Plus, TimeCommander, CommStar and HomeBase
controllers.
What’s Included
• One Web Xpander circuit board
• One short modular data cable
• One each Red/Black power wires
• Two M/F standoffs (circuit board support posts)
• Two F/F standoffs (circuit board support posts)
• Four screws
• One CDROM with support documentation and software
What You Need
• STARGATE, WinEVM and modular data cable
• Home network – see “Network Connection” below
• Windows 95 or newer operating system (95/98/ME/NT/2000/XP)
• Web Browser – Microsoft Internet Explorer 5.0 or greater
Installing the Web Xpander
The Web Xpander is designed to attach directly to STARGATE’s Telephone/Voice
Board or to the main motherboard (STARGATE-Lite).
1. Unplug the STARGATE power transformer from the AC outlet
2. If you are using a 12V backup battery, disconnect the battery from the STARGATE
“BATTERY +12V” and “BATTERY GND” terminals.
Mounting to STARGATE’s Telephone/Voice Board
3a. Remove the two screws from the Telephone/Voice board at the end nearest the phone
jacks. Using the supplied two standoffs that have screw holes on the top and exposed
threads on the bottom, attach the standoffs to the Telephone/Voice board as shown in
the photo. (Continue with step 4)
Page 4

Mounting to STARGATE-Lite (no Telephone/Voice Board)
3b. Using the supplied two standoffs that have screw holes on both sides, and two of the
supplied screws, attach the standoffs to the STARGATE main circuit board in the two
holes just behind the row of serial ports as shown in the photo.
4. Place the Web Xpander on top of the standoffs with the network and serial jacks
facing the same direction as the STARGATE jacks and attach with two screws as
shown in the photo.
5. Connect the supplied red and black pair of wires from the “Aux 12V” terminals to the
corresponding terminals on the Web Xpander board. Use the red wire for +12 and the
black wire for ground.
6. Remove the data cable from the STARGATE jack labeled COM1 (the other end is
connected to your PC/WinEVM) and plug this end into the jack on the Web Xpander
labeled “PC”.
7. Plug one end of the short black data cable into the STARGATE jack labeled COM1
8. Plug the other end of the short black data cable into the black telephone type jack on
the Web Xpander labeled “Controller”.
8. If you are using a 12V backup battery, re-connect the battery to the STARGATE
9. Plug the STARGATE power transformer into an AC outlet
Network Connection
The Web Xpander can be connected to a network in many ways. The most common
methods are:
• Direct connection to a single PC using a cross-over cable
• Connection to a network hub which is connected to one or more PCs
• Connection to a Cable/DSL Router which provides internet access to both the Web
Xpander and PCs on the local network (Ideal Configuration).
1. Direct Connection to a Single PC
This method is applicable in situations where you simply want to communicate with the
Web Xpander from a web browser on a local PC. To connect to the Web Xpander in this
manner you will need a crossover network cable. This cable is very similar in function
to a null-modem cable used when connecting two PCs together using their serial ports. A
standard ethernet network cable is wired differently and will not work in this
configuration.
2. Connection to a Network Hub
This method is common in both large and small networked environments. Connect the
Web Xpander to the hub using a standard RJ-45 network cable. Connect any other
computers to the hub, also using standard network cables. The Web Xpander will be
accessible (once configured) by other computers connected via the hub.
Page 5

3. Connection to a Cable/DSL Router
This is the most ideal situation in that it allows you to access your STARGATE via the
Web Xpander from your home network as well as anywhere on the internet once you’ve
configured both the Web Xpander and your router. In most cases, the router will also act
as a DHCP server and provide the initial network settings for the Web Xpander.
Network Configuration
Every device on a TCP/IP network must have a unique IP address. IP addresses are
always numeric and in the format xxx.xxx.xxx.xxx. The default Web Xpander IP address
is “192.168.0.5” (if no DHCP server was found). Most home cable/dsl routers default to
“192.168.0.1” for the router and dynamically assign addresses (using DHCP) to PCs
starting from “192.168.0.100”.
When you first power up the Web Xpander (and after either a power loss or by pressing
the small reset button) it will attempt to retrieve its network settings using DHCP unless
you have disabled this feature.
DHCP stands for Dynamic Host Configuration Protocol. The principle is that a device
that knows nothing about its own network settings sends out a broadcast saying, in effect,
tell me what to do. The DHCP server is listening for these broadcasts, and responds with
information containing the settings that device should have. Typically the information
returned contains IP address, netmask, gateway and DNS settings. Most home
Cable/DSL routers support DHCP “out of the box.”
After you’ve connected the Web Xpander and applied power to the STARGATE, run
WinEVM on your PC. After WinEVM starts, click the MegaController button. A
properly functioning MegaController dialog indicates that the data cables are correctly
installed between the PC and the Web Xpander, and between the Web Xpander and the
controller.
Page 6
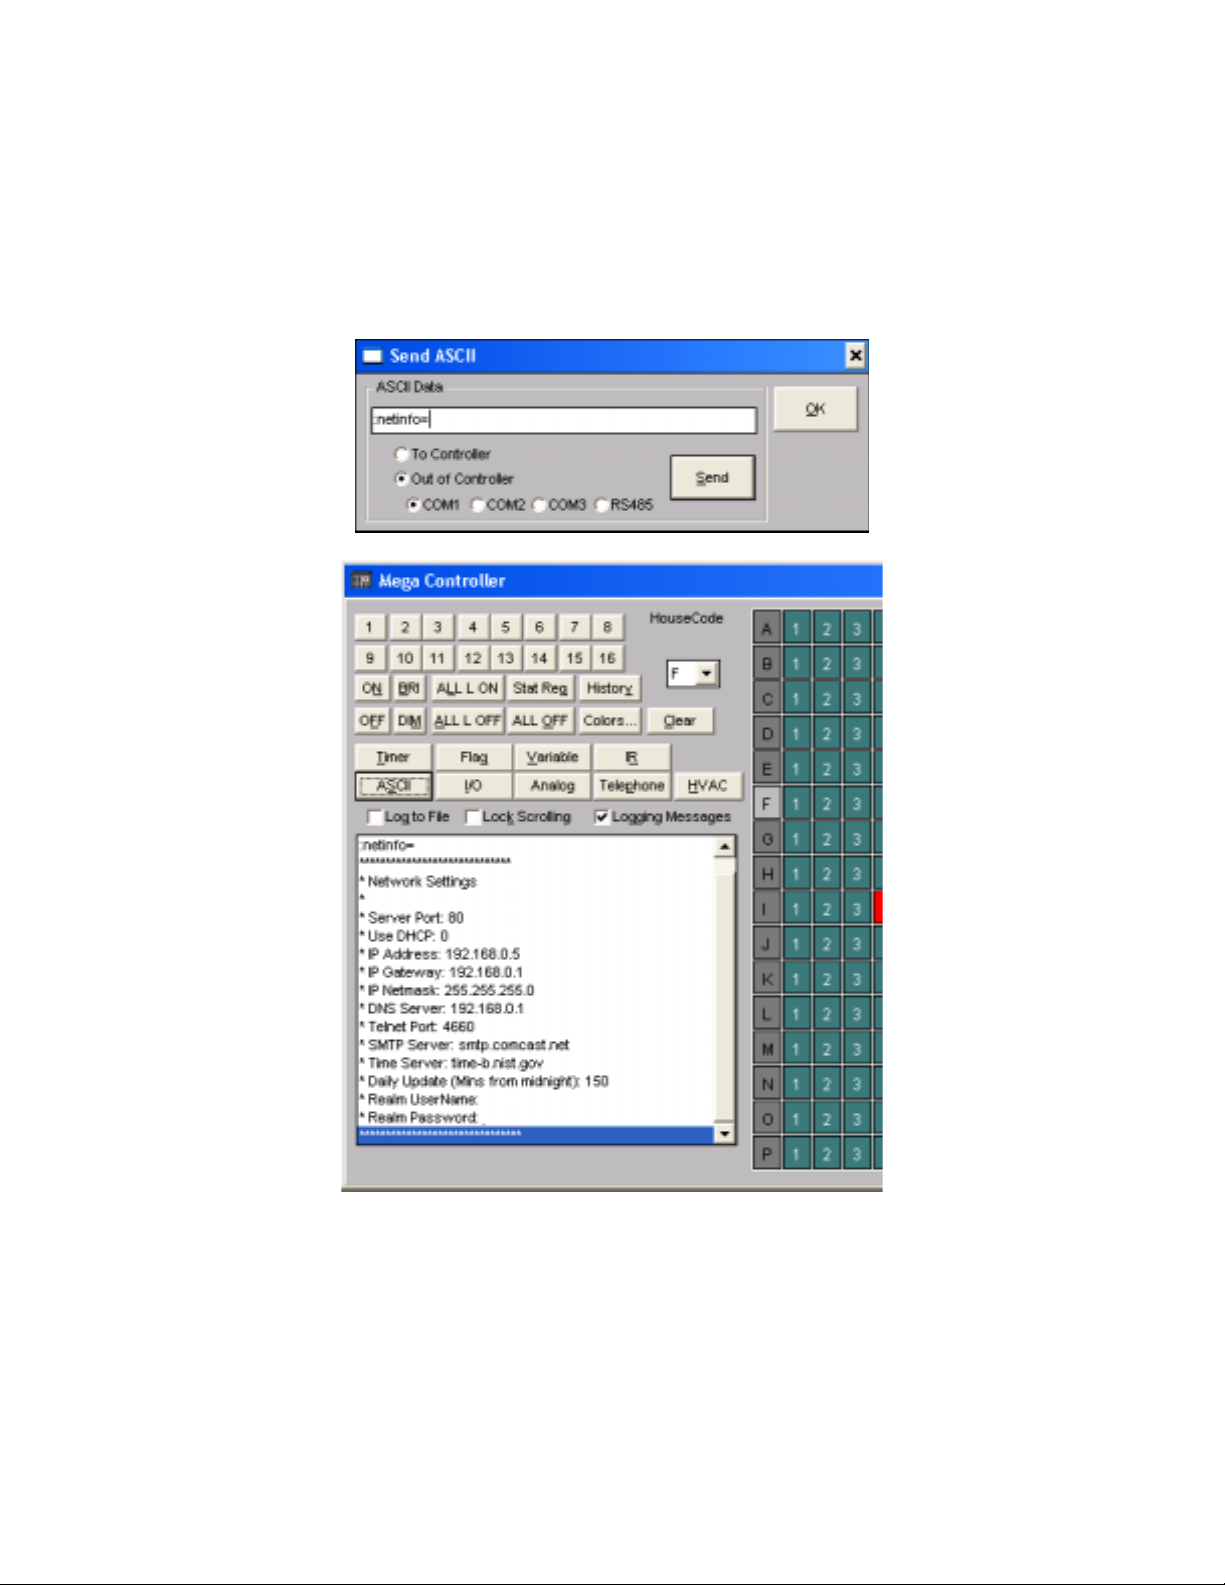
Viewing Current Network Settings
You can use the “:netinfo=” command to view the current network settings of the Web
Xpander using WinEVM. From the MegaController screen, click ASCII and send the
command “:netinfo=” (no quotes) out of the controller to COM1. The network
settings should appear in the MegaController log window.
If your PC and Web Xpander are connected through a Cable/DSL router and your PC and
router are already configured to use addresses in the range displayed, open a web browser
and type “http://” followed by the IP Address displayed. (example: http://192.168.0.5) in
the address bar and press Enter. If everything is configured properly, you should be
prompted for a username and password to access the Web Xpander. The default
username and password are both “webx”.
Page 7
If your Web Xpander is connected using network configurations 1 or 2 (above) you may
need to manually set the IP address of the PC or the Web Xpander.
Manually Configuring Web Xpander Network Settings
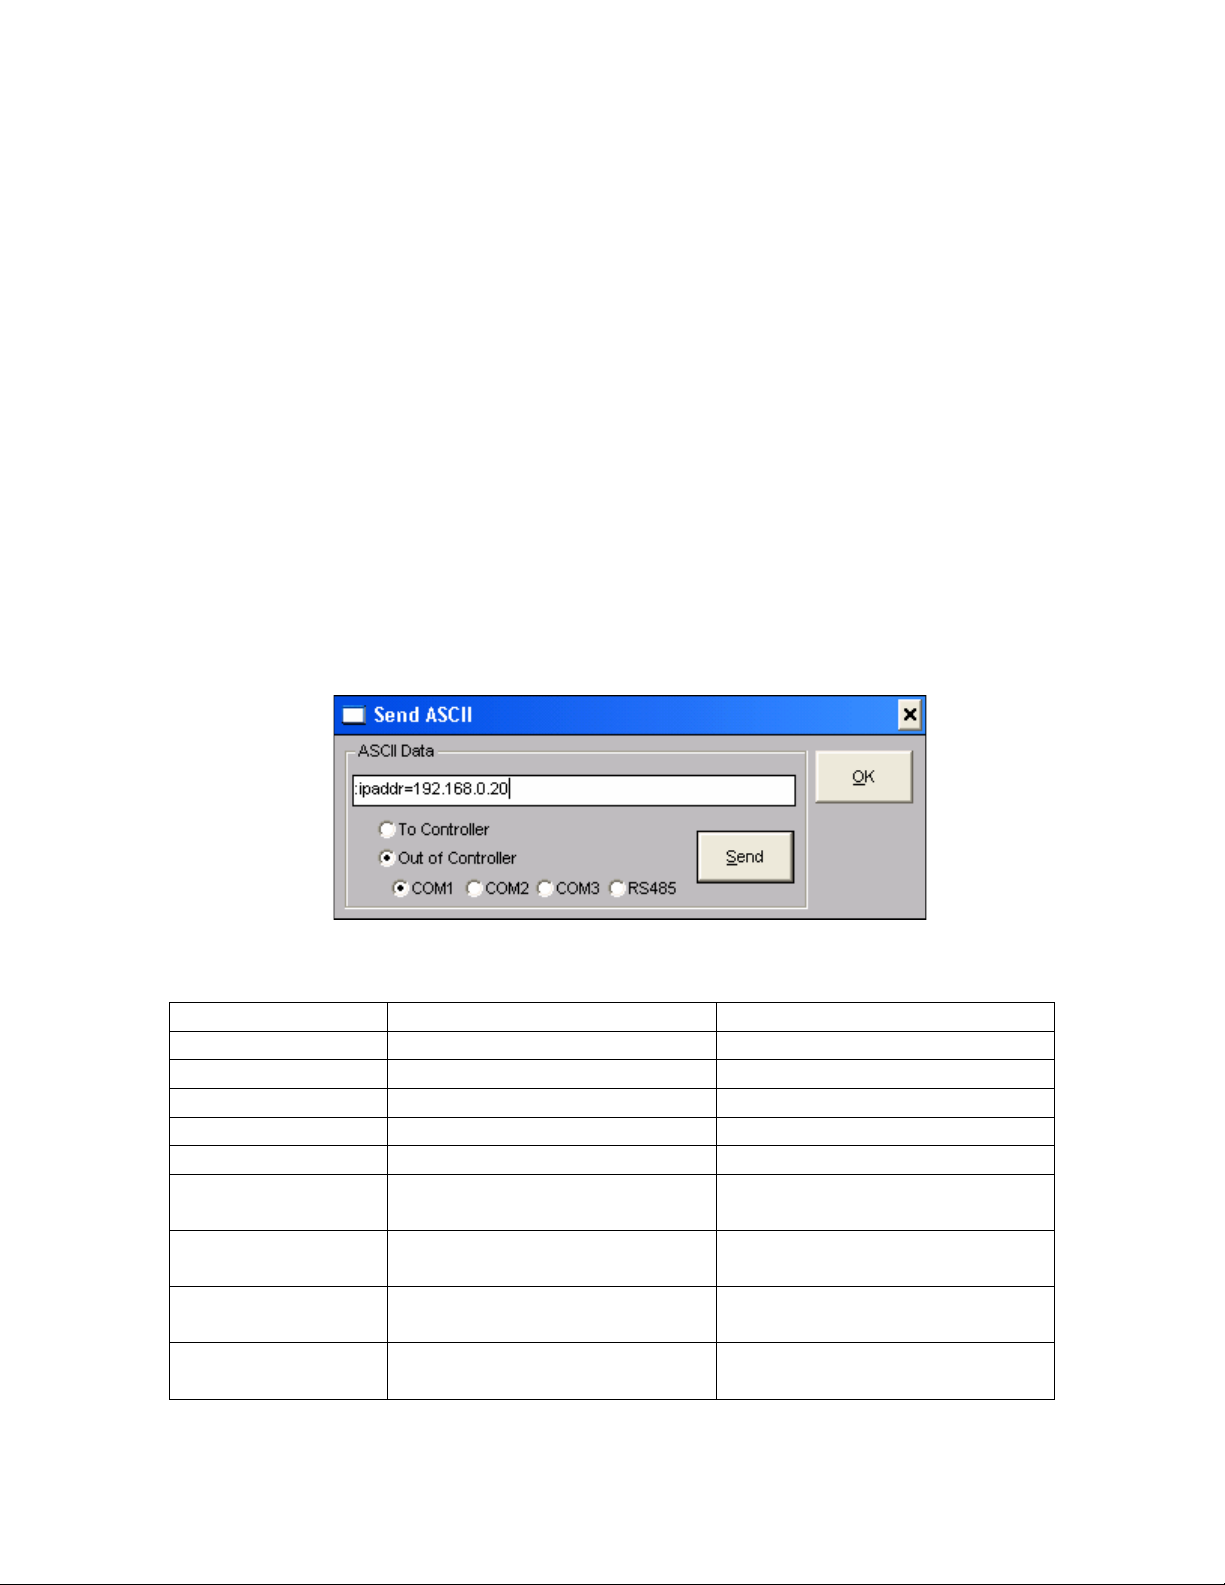
You can send commands to the Web Xpander via the STARGATE by using the “ASCII”
button on the MegaController in WinEVM.
1. Start WinEVM
2. Click the MegaController icon
3. Click the ASCII button
4. Select “Out of Controller” and “Com1”
5. Type one or more of the following network configuration commands to configure
your Web Xpander to function on your network
Note: Once you can access the Web Xpander via the web (Internet Explorer) all of
these settings are accessible from the “Settings” button.
A full listing of Web Xpander commands is available in Appendix A
Click “Send” to
issue ASCII data.
Click “OK” to close.
“Send ASCII” dialog accessed by clicking ASCII from
the WinEVM MegaController
Command Description Example
:ipaddr=
:ipmask=
:ipgate=
:dns=
:dhcp=
:smtp=
:user=
:pass=
:webport=
Sets the IP Address
Sets the Netmask
Sets the Gateway Address
Sets the DNS Address
Enabled/Disables DHCP
Sets the outgoing (SMTP) mail
server name
Sets the user name required for
access
Sets the password required for
access
Sets the port (default = 80) for
the web server
:ipaddr=192.168.0.20
:ipmask=255.255.255.0
:ipgate=192.168.0.1
:dns=192.168.0.1
:dhcp=1 or :dhcp=0
:smtp=smtp.comcast.net
:user=myname
:pass=mypass
:webport=80
Page 8
:telnet=
:reset=
:factory=
:netinfo=
The Web Xpander must be reset (either with the :reset= command or by pressing the
reset button on the Web Xpander circuit board) for these changes to take effect.
Sets the port (default = 23) for
telnet (Ethernet to Serial)
Resets the Web Xpander
Sets network values to factory
presets (must be followed by
:reset=)
Displays network settings
:telnet=23
:reset=
:factory=
:netinfo=
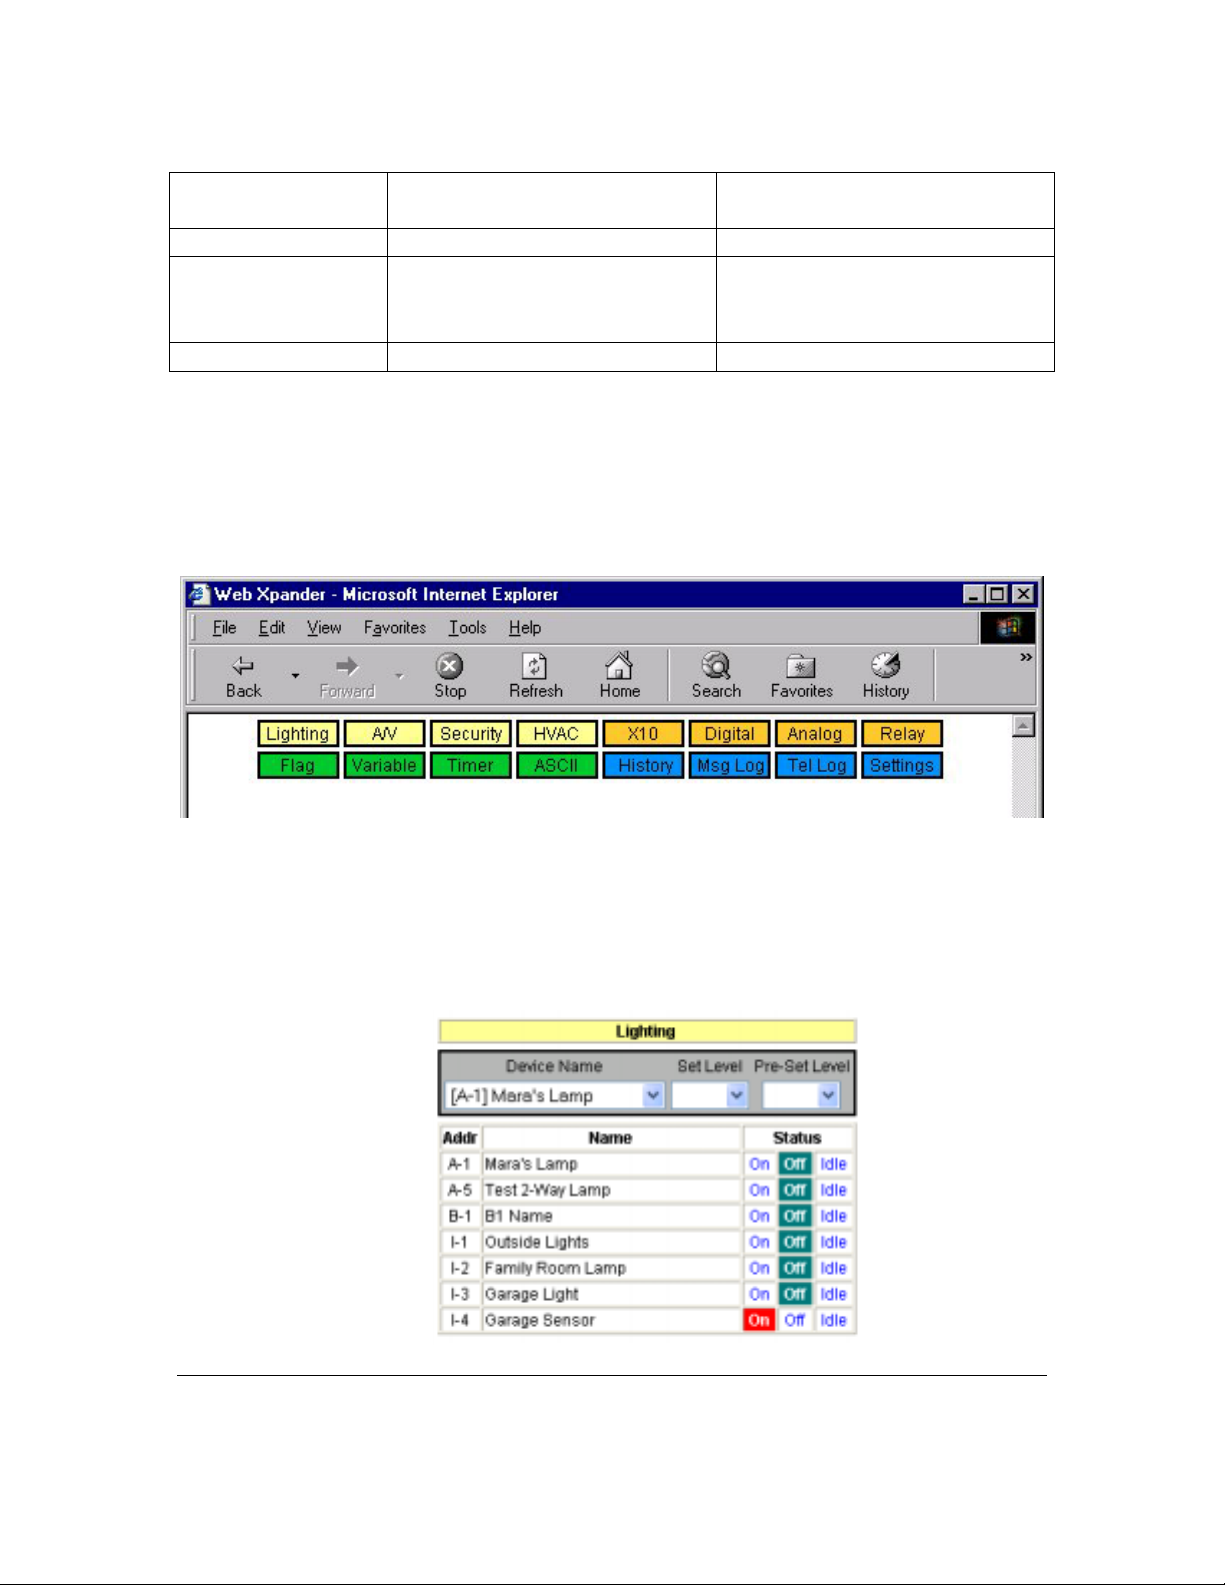
Web Pages
When you access the Web Xpander with a web browser (Internet Explorer 5.0 or greater
recommended) you’ll see the main menu. The main menu consists of 16 buttons grouped
in to four functional areas. Clicking on each button will display a web page particular to
the button selected.
LIGHTING
Single click “On”, “Off”
or “Idle” to change status.
Click device Name then
select Set Level or Preset
Level to adjust brightness.
Page 9
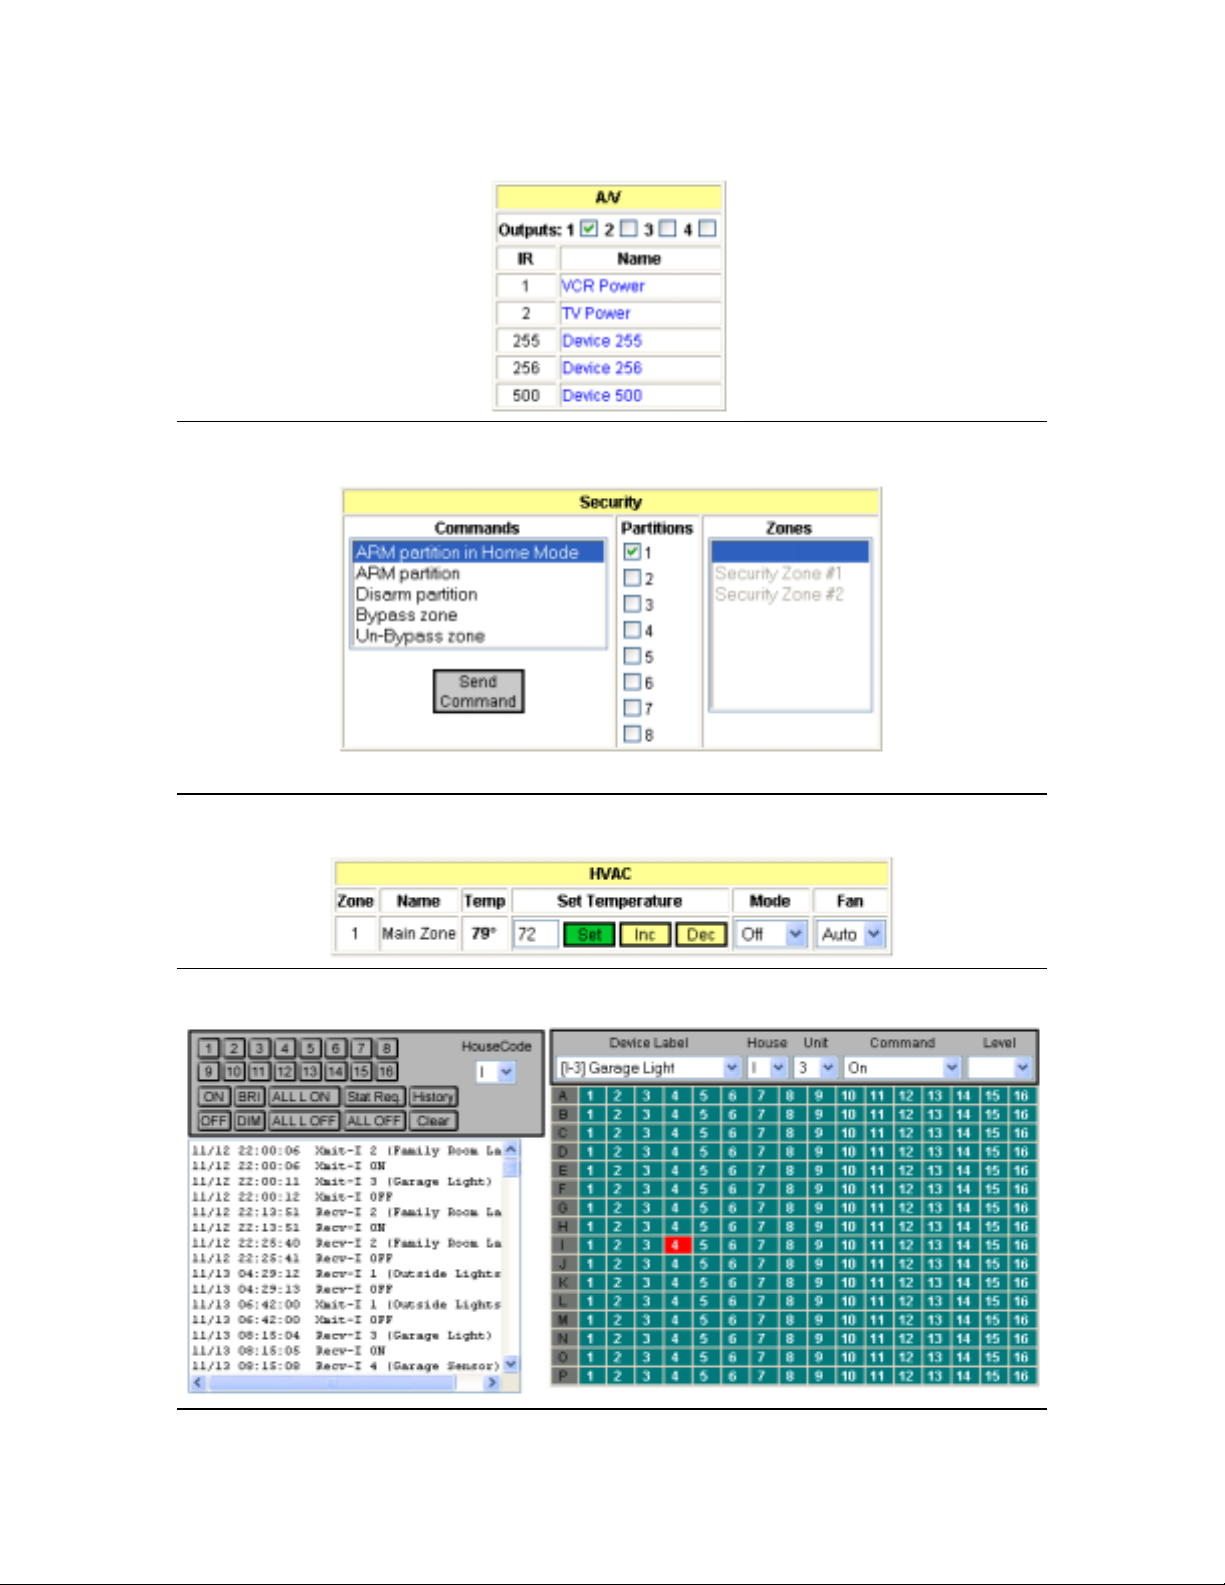
A/V
SECURITY
Select Output then
single click on the Name
to send IR command.
Select security Command
and Partition or Zone then
click “Send Command.”
HVAC
X10
Type in or click Inc/Dec
to adjust Set Temperature
then click “Set” to apply.
Page 10
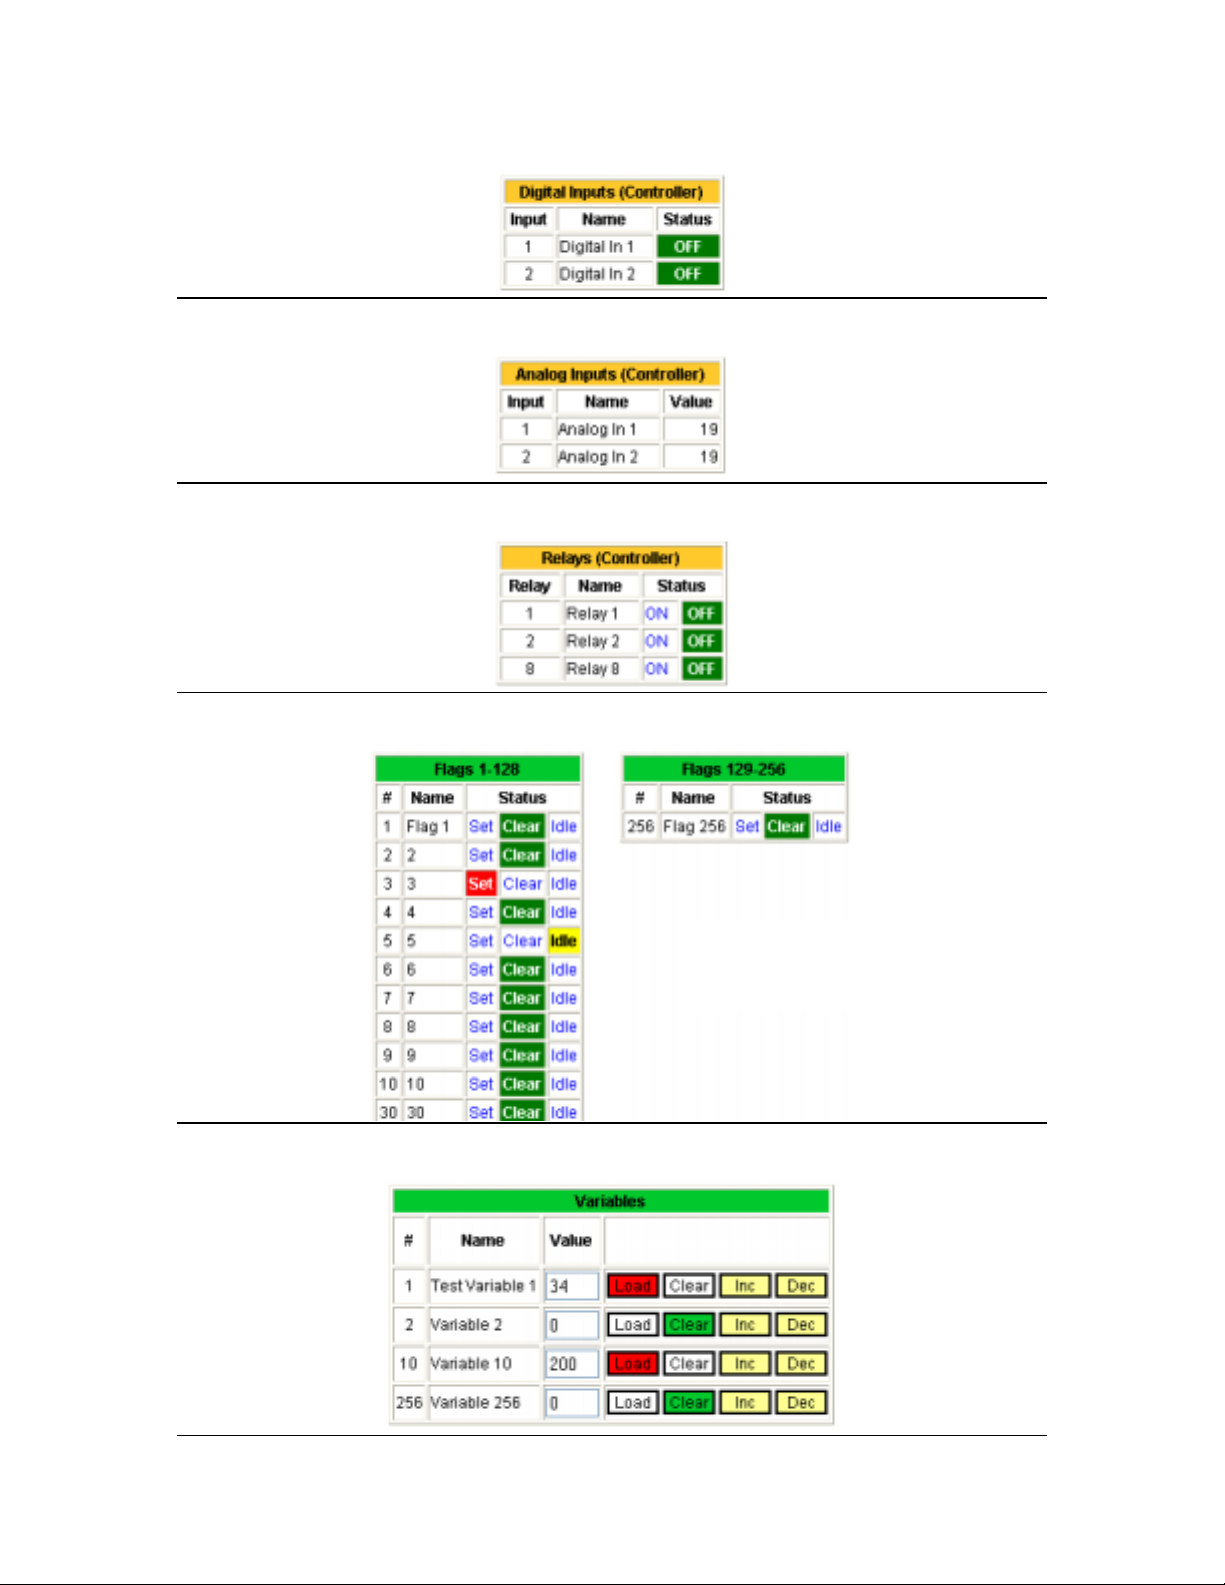
DIGITAL
g
ANALOG
RELAY
FLAG
Single click “On” or “Off” to
change the status of a relay.
VARIABLE
Single click “Set”, “Clear” or
“Idle” to change status of a flag.
Type in or click Inc/Dec to
adjust variable value then
click “Load” to apply.
Green “Clear” button
indicates a value of zero.
Red “Load” button indicates
a value
reater than zero.
Page 11
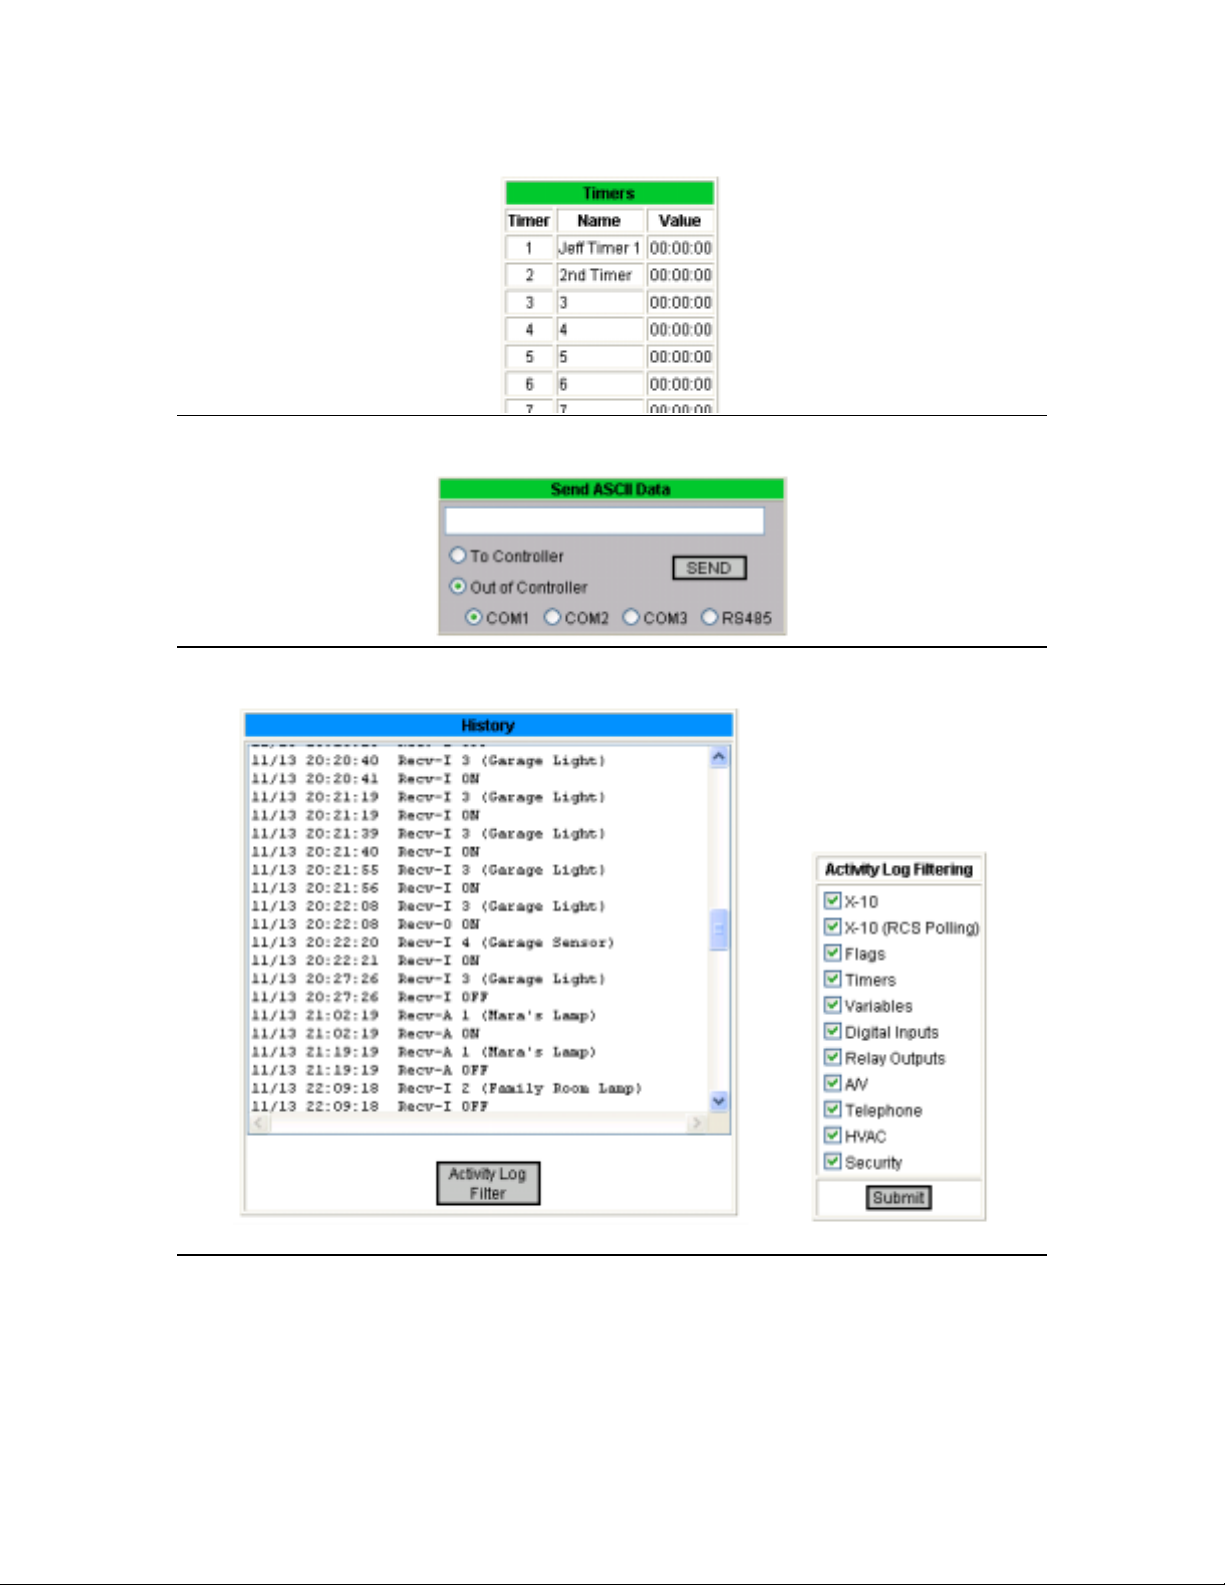
TIMER
ASCII
HISTORY
Click “Send” to
issue ASCII data.
Page 12

MSG LOG
TEL LOG
Page 13

SETTINGS
Auto Page Refresh
The Lighting, HVAC, X10, Digital, Analog, Relay, Flag, Variable, Timer, History, Msg
Log and Tel Log menus each have a drop-down box at the bottom. Selecting a refresh
interval from this box will cause the selected page to automatically reload its contents
from the Web Xpander. To disable auto-refresh for a given page, select “Manual
Refresh” from the list. Each page can have its own refresh interval.
Page 14

Web Xpander Labeler
The Web Xpander Labeler is a Windows utility that reads your device names from
WinEVM and imports them into the Web Xpander. To install, run WebXlabel.exe
located on the CD-ROM (the latest version is always available on the JDS Technologies
web site). After you’ve used this tool to import your custom labels, your defined device
names will appear on the web pages. The Web Xpander only shows data for devices that
you have named/labeled in WinEVM or have manually defined in the Labeler tool.
Configuration
• Click "Options", "Configuration" to view or change the Network Settings. The
Network Settings are used to send the labels to the Web Xpander via the network
if you update your labels and after a firmware update.
Importing and Sending Device Labels
• Click the "Import from WinEVM" button to begin the process.
• When prompted, select the "DEVICE.DBF" file from your WinEVM directory.
The labels you have defined in WinEVM will then be imported into the Web
Xpander Labeler.
• Click "Send to Web Xpander" to send these labels to the Web Xpander using the
network settings you have specified.
View / Edit Device Labels
• Click "Options", "Advanced" to view or edit the imported labels prior to sending
them to the Web Xpander.
Load Default Labels
• Click "File", "Load Default Labels" to load a pre-defined set of default labels.
These labels are generic labels and have no relation to your WinEVM settings.
Page 15

Appendix A – Web Xpander Commands
Command Description Example
:reset=
:factory=
:ipaddr=
:ipmask=
:ipgate=
:dns=
:dhcp=
:smtp=
:user=
:pass=
:webport=
:telnet=
:time=
:daily=
:netinfo=
:mailto=
:mailfrom=
:mailsubject=
:mailbody=
:mailsend=
Resets the Web Xpander
Load factory default
values (follow with
:reset= to restart
with these values)
Sets the IP Address
Sets the Netmask
Sets the Gateway Addr.
Sets the DNS Address
Enabled/Disables DHCP
Sets the outgoing
(SMTP) mail server
Sets the user name
required for access
Sets the password
required for access
Sets the port (default =
80) for the web server
Sets the port (default =
23) for
telnet (Ethernet to
Serial)
Sets the internet Time
server for time
synchronization
Sets the daily time sync
in number of minutes
from midnight
Displays network
settings
Sets a email recipient –
Can be sent up to 5
times per message to
indicate up to 5
recipients
Sets the email sender
Sets the email subject
Sets one or more lines of
email text.
This command can be
sent multiple times up to
500 characters total.
Sends the email
:reset=
:factory=
(then optionally) :reset=
:ipaddr=192.168.0.20
:ipmask=255.255.255.0
:ipgate=192.168.0.1
:dns=192.168.0.1
:dhcp=1
:smtp=smtp.comcast.net
:user=myname
:pass=mypass
:webport=80
:telnet=23
:time=time-b.nist.gov
:daily=210
(i.e. 3:30am)
:netinfo=
:mailto=myemail@yahoo.com
:mailto=someone@hotmail.com
:mailfrom=myhouse@home.com
:mailsubject=Test Email
:mailbody=Motion Sensor 1
Activated
:mailsend=
Page 16

:debug=
:disable=
:status=
Enables or disables
debug information to be
sent back through
COM1 to WinEVM
Used to disable the Web
Xpander during
schedule downloads or
firmware updates.
See Appendix J
Enables or disables the
Web Xpander
maintaining its own
internal status of all
STARGATE devices.
Used for Pocket WebX.
:debug=on
:debug=off
(default is off)
:disable=on
:disable=off
:status=on
:status=off
Off by default,
automatically switched to
On when Pocket WebX is
enabled
Page 17

Appendix B – Sending Email with the Web Xpander
Sending email with the Web Xpander is accomplished by sending ASCII commands from
the controller (i.e. STARGATE) to the Web Xpander’s serial port. The example below
demonstrates sending an email when the alarm is disarmed.
EVENT: Send Email When Alarm Disarmed
If
Partition Not ARMED [Partition 1] TRANSITION
Then
ASCII-Out: ':mailto=mycellphone@yahoo.com' [COM1]
ASCII-Out: ':mailfrom=myhouse@home.com' [COM1]
ASCII-Out: ':mailsubject=Security' [COM1]
ASCII-Out: ':mailbody=Alarm System Disarmed' [COM1]
ASCII-Out: ':mailsend=' [COM1]
End
SMTP Authentication
Some outgoing (SMTP) mail servers require username/password authentication before
they will accept outgoing mail. If your mail server requires authentication, access the
“Settings” page of the web interface and specify a username/password in the fields
labeled “Mail Server User Name” and “Mail Server Password”.
If these fields are filled in, SMTP authentication will be used (even if your mail server
does not require or can not accept authentication). If SMTP authentication is not required
you must leave these fields blank.
Page 18

Appendix C – Managing a Dynamic Home Internet Address
Accessing the Web Xpander from the internet (i.e. outside your home network) requires
router specific settings and configuration. Once you’ve properly routed incoming
connections on port 80, for example, to the Web Xpander you need to know the IP
address of your cable modem or DSL modem to connect to your location from the
internet.
One easy way to determine your IP address is to start a web browser on an internet
enabled PC within your home network and visit: http://www.WhatIsMyIP.com/
If your IP address is static, i.e. it never changes, you’ll just use that address to access
resources on your home network. If your IP address is dynamic, i.e. it changes
periodically, there are a few options available for tracking it.
One free service available is http://www.no-ip.com. No-IP will allow you to create a
domain name (i.e. http://TheSmiths.no-ip.com) which will automatically redirect to your
home IP address. If you have a static IP address, you just register that address with NoIP and choose a domain name. If your home IP address changes, No-IP offers a free
software utility that runs on an internet connected PC in your home and periodically
updates No-IP with your dynamic IP address. Once this is established, you can use your
created domain name to access your home from any internet connected PC.
Visit http://www.No-IP.com for more information.
Page 19

Appendix D – Ethernet to Serial Bridge Functionality
The Web Xpander provides a method of sending/receiving serial data to/from the
STARGATE via the Ethernet port using Telnet. Telnet is a terminal emulation program
for TCP/IP networks. A telnet application comes with Microsoft Windows but you can
also download other versions from the internet such as MochaSoft Telnet
(http://www.mochasoft.dk).
The Web Xpander listens for incoming connections on a configurable port. The default
telnet port is 23 but this can be changed on the Settings page.
To begin a telnet session, click “Start”, “Run” and type “telnet 192.168.0.5” (replacing
192.168.0.5 with the IP address of your Web Xpander. You should then be prompted for
username and password which are the same as for the web pages. After entering a
correct username/password you can type STARGATE commands (i.e. ##%07).
Commands you type will be sent to the serial port of the STARGATE, and data received
from the STARGATE will be sent via the network back to you.
Page 20

Appendix E – Downloading WinEVM Schedules over a Network Connection
WinEVM has been successfully run over a network connection to the STARGATE using
a product called COM/IP, distributed by PC Micro Systems.
http://www.pcmicro.com/comip/
and/or local area network.
COM/IP creates a virtual serial port / modem on your PC that when “dialed” is actually
making a connection over the network. Once configured, you can use the WinEVM
“Dial PC Modem” function to connect to the STARGATE via the Web Xpander.
WinEVM communicates through the virtual modem port created by COM/IP and
functions as if you are connected to a STARGATE over a modem connection. All
features, including schedule downloads, are possible in this configuration.
Configuring COM/IP and WinEVM
1. Download and install a 30-day trial version of COM/IP from
http://www.pcmicro.com/comip/
2. Follow the installation instructions provided with the product to create a single
com port (COM1, COM2, COM3 or COM4)
3. Start WinEVM and open the Dial PC Modem dialog box
4. Type anything you wish for the “Name:” and type the IP address of your Web
Xpander in the “Number:” box. This is the IP address COM/IP will connect to.
5. If you’ve selected a Telnet port other than the default 23, you must place that
value in brackets [] after the IP address. For example: 192.168.0.5[300]
. This allows downloading of schedules via the internet
6. Click the Modem Setup button and specify the COM port you selected in the
COM/IP configuration.
7. Click OK to return to the “Dial PC Modem” window.
Page 21

8. ** You must temporarily disable the username/password checking for remote
access before connecting. Open the Settings page in your web browser and click
the “Start” button next to “5 min Direct Access”. This will disable the
username/password prompt for 5 minutes so you can connect with COM/IP and
WinEVM.
9. Return to WinEVM and click “Start” in the Dial PC Modem window to connect
to the STARGATE via the Web Xpander.
10. Double-Click the COM/IP icon in the system tray (next to the clock) if necessary
to display the COM/IP Port Monitor and select the Trace Window to diagnose
connection problems.
Page 22

Appendix F – Performing a Firmware Update on the Web Xpander
** Note: This applies only to firmware versions prior to v1.6 July 16, 2003
(See Appendix G for updating firmware versions 1.6 and later)
The firmware is the software that runs embedded within the Web Xpander. Periodically,
a new version of the firmware may be made available either to address issues found in a
prior version or to provide new features and functionality.
To perform a firmware update on the Web Xpander, the following items are required:
• Rabbit Programming Ribbon Cable – Available from Rabbit Semiconductor.
See the JDS Technologies web site (on the Web Xpander Download page) for
more information.
• Rabbit Firmware Utility (RFU) – Available on the Web Xpander CDROM and
the JDS Technologies web site (on the Web Xpander Download page).
• Latest Web Xpander Firmware – Available on the JDS Technologies web site
(on the Web Xpander Download page).
• Latest Web Xpander Labeler - Available on the JDS Technologies web site (on
the Web Xpander Download page).
In preparation for the firmware update, make sure you have successfully installed both
the Firmware Utility and the latest version of the Web Xpander Labeler application.
Both of these applications will appear on your Start menu in the Web Xpander folder.
The Web Xpander firmware is transferred via the Rabbit Programming ribbon cable.
One end of this cable has a 9-pin serial connector (DB9) which connects to your PC com
port. It may be easiest to temporarily replace the cable that is used by WinEVM with the
programming cable. The other end of the cable has two 10-pin connectors, one marked
“PROG” and the other “DIAG”. Connect the end marked “PROG” to the Web Xpander
Rabbit sub-assembly board as shown in the figure on the next page.
*** IMPORTANT ***
It is very important to properly connect this cable to the Web Xpander. One side of the
cable is marked with a red stripe. This stripe indicates Pin 1 and must align with the
correct pin on the Rabbit sub-assembly board. Looking at the Web Xpander, you’ll
notice a smaller circuit board (the Rabbit sub-assembly board) that contains the ethernet
connector. In the corner of this board, you’ll see a 10-pin connector (2 rows of 5 pins).
The pin closest to the corner of this sub-assembly is marked with a white triangle to
indicate Pin 1. Carefully attach the programming cable making sure that all 10 pins slide
smoothly into the connector.
Page 23

10-pin
programming
connector
Using the Rabbit Field Utility
1. Start the Rabbit Field Utility located on the Start menu in the Web
Xpander folder (labeled WebX Firmware Utility)
2. Select S
3. Select “Use S
you have attached the programming cable to.
4. Uncheck both check boxes labeled “Enable Processor Detection” and
“Use USB to Serial Converter”
5. Click OK to save these changes and return to the main window.
etup, Communications from the main menu
Properly attached Rabbit
Programming Cable
erial Connection”, Baud Rate: 115200, and the COM port
Page 24

Firmware Utility Communications Options
6. From the main menu, select F
ile, Load Flash Image
7. Click the
downloaded from the JDS Technologies web site.
8. Click the “OK” button to begin the transfer. Do not do anything else
with your computer or switch to another window until the transfer is
complete.
9. When the transfer is complete, carefully remove the programming cable
from the Web Xpander and press the Reset button located above the
battery. The green Link light should go off briefly and then turn on again
during the reset.
Transferring Web Pages to the Web Xpander
Depending on the firmware version, one or more web pages might need to be transferred
from your PC into the Web Xpander’s memory. This transfer is accomplished with the
latest Web Xpander Labeler application.
1. Start the Web Xpander Labeler application located on the Start Menu in the Web
Xpander folder (labeled WebX Labeler).
2. Display the configuration information by selecting O
the main menu if this information is not currently displayed.
3. Verify the correct settings for your installation. Web Page transfer as well as
label updates always occur over the network.
4. Click “Test Connection” to verify network connectivity between your PC and the
Web Xpander. (You should have already verified that you can view the web
pages from your browser)
button next to File Location and locate the firmware you
ptions, Configuration from
Page 25

5. Select File, Transfer Web Page(s) from the main menu to transfer the web page(s)
into the Web Xpander’s battery backed memory. This step is only necessary one
time after a new firmware is loaded.
6. Proceed with transferring your device labels to the Web Xpander as described in
the Web Xpander Labeler section of this document.
Page 26

Appendix G – Firmware Upgrades with the Network Download Utility
The Web Xpander Network Download Utility is used to transfer firmware updates to the
Web Xpander via the network (i.e. LAN) and is only available on firmware v1.6
July 16, 2003 and later.
Firmware updates are provided on the JDS Technologies web site
(http://www.jdstechnologies.com
firmware releases.
Before starting the Network Download Utility be sure your Web Xpander is functioning
properly and can be accessed from the internet browser on your PC (i.e. Internet
Explorer).
When you start the Utility, you should see your Web Xpander appear in the region
labeled "Board List/Status:". If not, try clicking the "Search" button.
Once your Web Xpander has been identified, click the "..." button to select the WebX
.bin file you've downloaded from the JDS web site (i.e. webx_072403.bin).
Click "Download" to begin the transfer. At the end of a successful transfer, the "Status
Log:" should show:
Searching for boards.
File is encrypted.
Sent RAM Loader Size to target!
Download Complete :)
Sent RAM Loader Run command to target!
Searching for boards (looking for RAM loader)
Sent ping to 192.168.0.101
RAM Loader found.
Download Complete :)
Sent Reboot command to target!
Board is rebooting.
At this point, the Web Xpander is rebooting and you should wait about 10-15 seconds
and then proceed with re-transferring your device labels to the Web Xpander as
described in the Web Xpander Labeler section of this document.
Advanced
If you are attempting to update the firmware of a Web Xpander not on your local LAN
(i.e. through the internet) you'll need to use the "Manual IP" function.
Click the "Manual IP" button and enter the IP address of the Web Xpander (as you would
enter in your web browser to access the remote Web Xpander). The Download Utility
communicates using UDP on Port 2000 so this port must be "open" between the host
(your PC) and the Web Xpander.
) to introduce new features or to fix problems in earlier
Page 27

Appendix H – Internet Time Synchronization
The Web Xpander can be configured to automatically synchronize your STARGATE's
internal clock daily via the internet to maintain an accurate time setting.
There are several different protocols commonly used for internet time syncing including
DAYTIME, TIME, and NTP. See
for a more detailed description of the different protocols.
The Web Xpander uses the "DAYTIME" Protocol (RFC-867) over TCP port 13. A
time server that supports this protocol via TCP on port 13 should work with the Web
Xpander. A list of compatible time servers can be found at:
http://www.boulder.nist.gov/timefreq/service/time-servers.html
The Web Xpander will attempt to connect to the specified time server at or just after the
time specified on the “Settings” page. Connections are always made on the half hour (i.e.
3:30am). If the minute portion of the time received from the time server is between 15
and 45 (i.e. 3:15am – 3:45am) the Web Xpander will set both its own internal clock and
the STARGATE clock to this adjusted value. To account for different time zones, only
the minute portion of the time is examined and updated.
The “Settings” page of the Web Xpander shows the date and time of the last successful
time update.
http://www.boulder.nist.gov/timefreq/service/its.htm
Page 28

Appendix I – Advanced WebXpander URL Commands
One method of sending commands via the WebX web server interface is by simulating
the functionality of the existing web pages. For example, you can simulate the
clicking of "Light A-1 ON" from the lighting page by opening:
http://192.168.0.5/mega_x10.cgi?var1=lighting&var2=A&var3=1&var4=On&var5=0
Almost all commands issued through the web pages are visible in the "webxdebug" mode
accessible via telnet. Telnet to your Web Xpander, type your username/password, then
type "webxdebug" to enter debug mode. Then open a web page and click the action
you are interested in. In the telnet window you'll see the traffic between the STARGATE
and Web Xpander as well as the URL that was generated by the web page
(i.e. xxxx.cgi?var1=xx&var2=xx&var3=xx...)
A new feature present in firmware version 1.3 is the sendcommand.cgi and
sendcommand2.cgi functions. These functions were created to make access from the
PocketPC, a custom PC app, or a possible future Flash interface easier. They allow you
to specify a command to send to the STARGATE and they return the resulting
data from the STARGATE without any HTML (just clear ascii).
They are used as follows:
http://192.168.0.5/sendcommand.cgi?var1=<command>&var2=<stop
condition>&var3=<stop param>
ex: sendcommand.cgi?var1=%23%23%2507&var2=str&var3=%23%230
ex: sendcommand.cgi?var1=%23%23%2520&var2=time&var3=1500
The only choices for <stop condition> are "str" or "time". "str" instructs the WebX to
wait until the STARGATE returns the value in var3 to signal the end of data. "time"
instructs the WebX to wait for var3 number of milliseconds of silence to signal the end of
data.
NOTE: The URL must be URL encoded to handle the # and % symbols. The above
examples are sending the commands ##%07 and ##%20 respectively and the first
example waits for the string ##0.
Improper use of these commands can hang the STARGATE and/or the WebX (although
both devices will reset themselves under certain conditions.)
The second command, sendcommand2.cgi, is a variation on the first one with the addition
of &var4=<username>&var5=<password>. This method avoids the browser
authentication and relies on the username/password passed to the .cgi for
authentication. In fact, calls to sendcommand.cgi currently redirect automatically to
sendcommand2.cgi and automatically add the username/password to the end.
Page 29

Appendix J – Disabling the Web Xpander for Schedule Downloads and
STARGATE Firmware Updates
To disable the Web Xpander (prior to downloading), send the ASCII string
:disable=on "out of controller COM1."
For convenience, add an event to send the ASCII string in response to an X-10 ON
command. The MegaController log will display ":disable=on" followed by "Web
Xpander Disabled."
To re-enable the Web Xpander (after downloading), send the ASCII string
:disable=off "out of controller COM1."
For convenience, add an event to automatically send the ASCII string after the First Pass
Through Schedule followed by the X-10 OFF command. The MegaController log will
display ":disable=off" followed by "Web Xpander Enabled. Rebooting...".
If you already have a First Pass Through Schedule event in use, place the ASCII string
and X-10 OFF command at the end of the event.
EXAMPLE:
EVENT: DISABLE WEBX
If
XSEQ:( D-14 D-ON ) Received within 3 seconds
Then
ASCII-Out:':disable=on' [COM1]
End
EVENT: ENABLE WEBX
If
First pass through schedule
Then
ASCII-Out:':disable=off' [COM1]
X10: D-14 WebX Disable OFF
End
Page 30

Appendix K – Web Xpander Firmware Release History
v1.0 26-Nov-2002 - Initial Release
v1.1 1-Mar-2003
• Reduced the size of HTML pages by removing spaces and tabs to conserve
memory
• Changed SetDirect.cgi form method from POST to GET
• Cancel 5-minute direct access window after successful connection
• "Cook" Telnet input (strip non-text telnet command codes)
• Streamlined the Ethernet/Serial PassThru functionality
(Both Serial to Ethernet and Ethernet to Serial)
• Remove STDIO redirection to Serial Port A
(Use telnet for debugging purposes)
• Send SMTP debug info to Telnet (if in debug mode)
• Only reboot when a change of settings require it (i.e. IP Address)
• Added "Reset Web Xpander" link on Settings page
• Bypass Telnet login prompts if username and password are empty
• Internet time sync will not occur earlier than scheduled
• Internet time sync will set STARGATE clock on the minute (i.e. 0 seconds)
since you can't specify seconds in the STARGATE "set time" function
• Up to 5 :mailto=xxx supported
• Corrected handling of PreSet DIM Commands (Extended Code vs non-Ext)
• Added FTP to add files to XMEM RAM (battery backed)
• Moved mega_x10.shml into XMEM RAM (battery backed)
• Added ":factory=" to reset to factory settings
• Fixed DHCP lease expiration problem
• Added "checksum" command to telnet debug console to calculate and display
Flash memory checksum
• Moved "Last Successful Time Sync" to XMEM (saved during reset)
• Corrected issues with controlling and monitoring 8 Channel Relay Xpanders
• Moved device label storage to a "file" that can be FTPed into the Web Xpander
v1.2 15-Apr-2003
• Added web page for custom application interaction
sendcommand.cgi : Sends command to STARGATE and returns results
as plain text via HTTP
sendcommand.cgi?var1=<command>&var2=<stop condition>&var3=<stop
param>
The choices for var2 are “time” or “str”.
Page 31

Example 1:
sendcommand.cgi?var1=%23%23%2507&var2=str&var3=%23%230
%23 is the URL-encoded character ‘#’ and %25 is the URL-encoded character
‘%’. Most characters other than numbers and letters must be URL-encoded for
transmission via HTTP.
Example 1 (above) sends the command ##%07 and waits for the string ##0
Example 2:
sendcommand.cgi?var1=%23%23%2520&var2=time&var3=1500
Example 2 sends the command ##%20 (x10 status) and waits 1.5 seconds
(1500 ms) for the command to complete.
• Fixed Internet Time Sync Daylight Savings problem
v1.3 13-May-2003
• Added option to disable time sync on WebX Settings page (as default)
• Added additional checking in internet time sync to ensure time is set correctly
• Added additional web page for custom application interaction
sendcommand2.cgi : Sends command to STARGATE and returns results
This page is not protected through browser security (i.e.
username/password popup) but requires the username/password be passed
on the URL to make it easier to use from other systems (i.e. custom
interfaces) that may have trouble with browser authentication
sendcommand2.cgi?var1=<command>&var2=<stop condition>&var3=<stop
param>&var4=username&var5=password
Examples:
sendcommand2.cgi?var1=%23%23%2507&var2=str&var3=%23%230&var4=
webx&var5=webx (send ##%20, wait for string ##0)
sendcommand2.cgi?var1=%23%23%2507&var2=time&var3=1500&var4=
webx&var5=webx (send ##%07, wait for 1.5 sec)
• A/V Page doesn't disappear and refresh after each command is sent
• Widths of text areas in Message Log, Telephone Log, and History pages were
made wider
v1.3b 15-May-2003
• Bug in determining PreSet Dim and Extended Code commands fixed
Page 32

v1.3c 11-Jun-2003
• Removed sending CR to clear buffer before each command. Fixed problem
reading time from TimeCommander+.
v1.3d 17-Jun-2003
• Corrected a condition where some X-10 commands were not being shown in the
history window
v1.4 30-Jun-2003
• Updated to support new HVAC command format (STARGATE firmware 3.05d)
v1.5 7-Jul-2003
• Switched to new compiler
• Compressed web pages for storage in internal memory
• Modified sendcommand.cgi and sendcommand2.cgi to be more efficient
• Properly save and use updated SMTP server. Fixes a bug where a new
SMTP server would not take effect until a reboot
v1.6 16-Jul-2003
• Added ability to update firmware via Network!!
• Added SMTP Authentication
v1.6a 24-Jul-2003
• Added additional option for SendCommand and SendCommand2 to allow
for a result prefix (i.e. result=xxxx)
ex: sendcommand2.cgi?var1=%23%23%2507&var2=str&var3=%23%230&
var4=webx&var5=webx&var6=result
• Added additional TCP/IP socket buffer (to correct email or time sync failing due
to no available sockets)
v1.6b 28-Jul-2003
• Changed the way dynamic network settings are applied (gateway and name
servers sometimes were not being set properly)
• Added more diagnostics around internet time sync code (and retry on failure)
• Added 'timesync' command to force internet time sync when issued from
debug mode (i.e. telnet to WebX, log in, type webxdebug, then type timesync)
• Removed "Please Wait..." popup windows
v1.6c 30-Jul-2003
• Fix in Dynamic HTML "Please Wait..." code to correct bug in Mozilla
Page 33

v1.6d 3-Aug-2003
• Modified DHCP routines. WebX was correctly reading IP address but incorrectly
reading and storing Gateway and DNS info.
• Also read SMTP Mail server via DHCP if provided
v1.6e 8-Aug-2003
• Modified DHCP routines to try to solve remaining issues.
v1.6f 21-Aug-2003
• Adjusted TCP socket handling to prevent "hung" sockets
v1.6g 3-Sep-2003
• Corrected DHCP issue where Gateway was being misread
v1.7 9-Sep-2003
• Added support for Pocket WebX Access and Registration
v1.8d 19-Oct-2003
• Local caching of device status started (X10, Flags, Relays, Variables)
• "Bounce" network before time sync and periodically to clear any hung network
sockets
• New WebX Labeler sends device type (Lamp, Lamp-ExCode, Appliance, etc.)
so internal status can be set properly after 'All Lights On', 'All Lights Off',
'All Units Off' commands
• Track time of last WebX activity and automatically reboot every 24 hours but not
within 15 minutes of last command
v1.8e 24-Oct-2003
• Adding more cleanup and optimization around timesync and general networking
• Added status messages to Com1 which can be monitored in the WinEVM
MegaController window
v1.8f 3-Nov-2003
• Pocket WebX Support (Fixed Relay status)
• Added Digital and Analog status
v1.8g 10-Nov-2003
• Fixed SMTP bug where LF was used instead of CR,LF
• Disabled periodic network "bounce" and only reset network on failed TimeSync
or Email
• Pocket WebX Support for All Lights On, All Lights Off
v1.9 21-Nov-2003
• Added FTP timeout to reset FTP server if connection is unexpectedly lost
• Made device status available over HTTP as well as FTP
Page 34

v1.9b 24-Nov-2003
• Added serial command :debug=on and :debug=off to toggle sending debug
information to MegaController of WinEVM (defaults to debug=off)
v1.9c 4-Dec-2003
• Reduced timeout for Pocket WebX Commands
• Updated Pocket WebX Registration process
• Added additional option "num" (used in place of either 'str' or 'time') to
sendcommand2.cgi to wait for <num> lines of response
( Used in cases where the Stargate doesn't respond with ##0 )
v1.9d 5-Dec-2003
• Corrected error in Digital Input status
v1.9e 7-Dec-2003
• Added ability to refresh internal Flag, Variable and Analog status
Details of all future Web Xpander firmware releases can be found on:
http://www.WebXpander.net/Firmware_Revs.asp
 Loading...