

Page 1
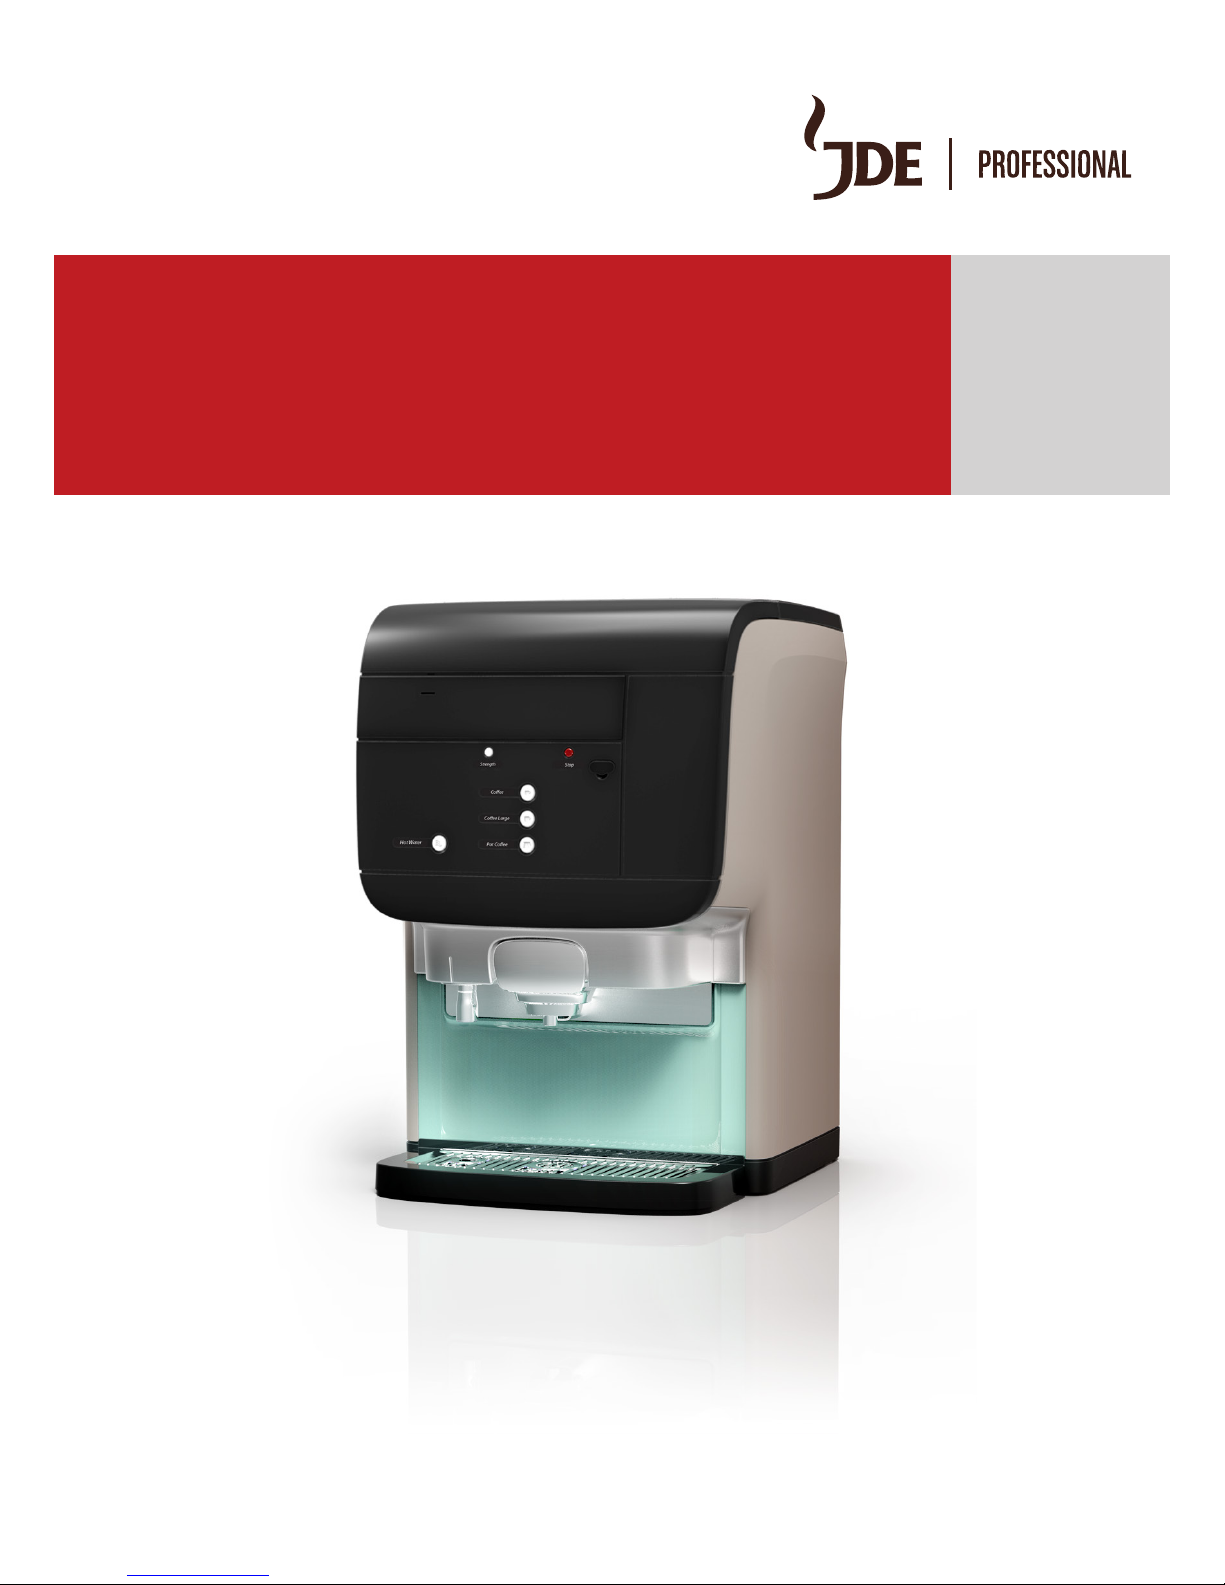
EXCELLENCE COMPACT BLACK
User Manual
PN: 6165350_01
Date: 2017-03-07
Page 2

Page 3

3
User manual
Content
1- Safety instructions .......................................................................................................................................5
2- Technical specifications ............................................................................................................................... 7
2.1 Specifications ..................................................................................................................................................................................... 7
2.2 Dimensions ......................................................................................................................................................................................... 8
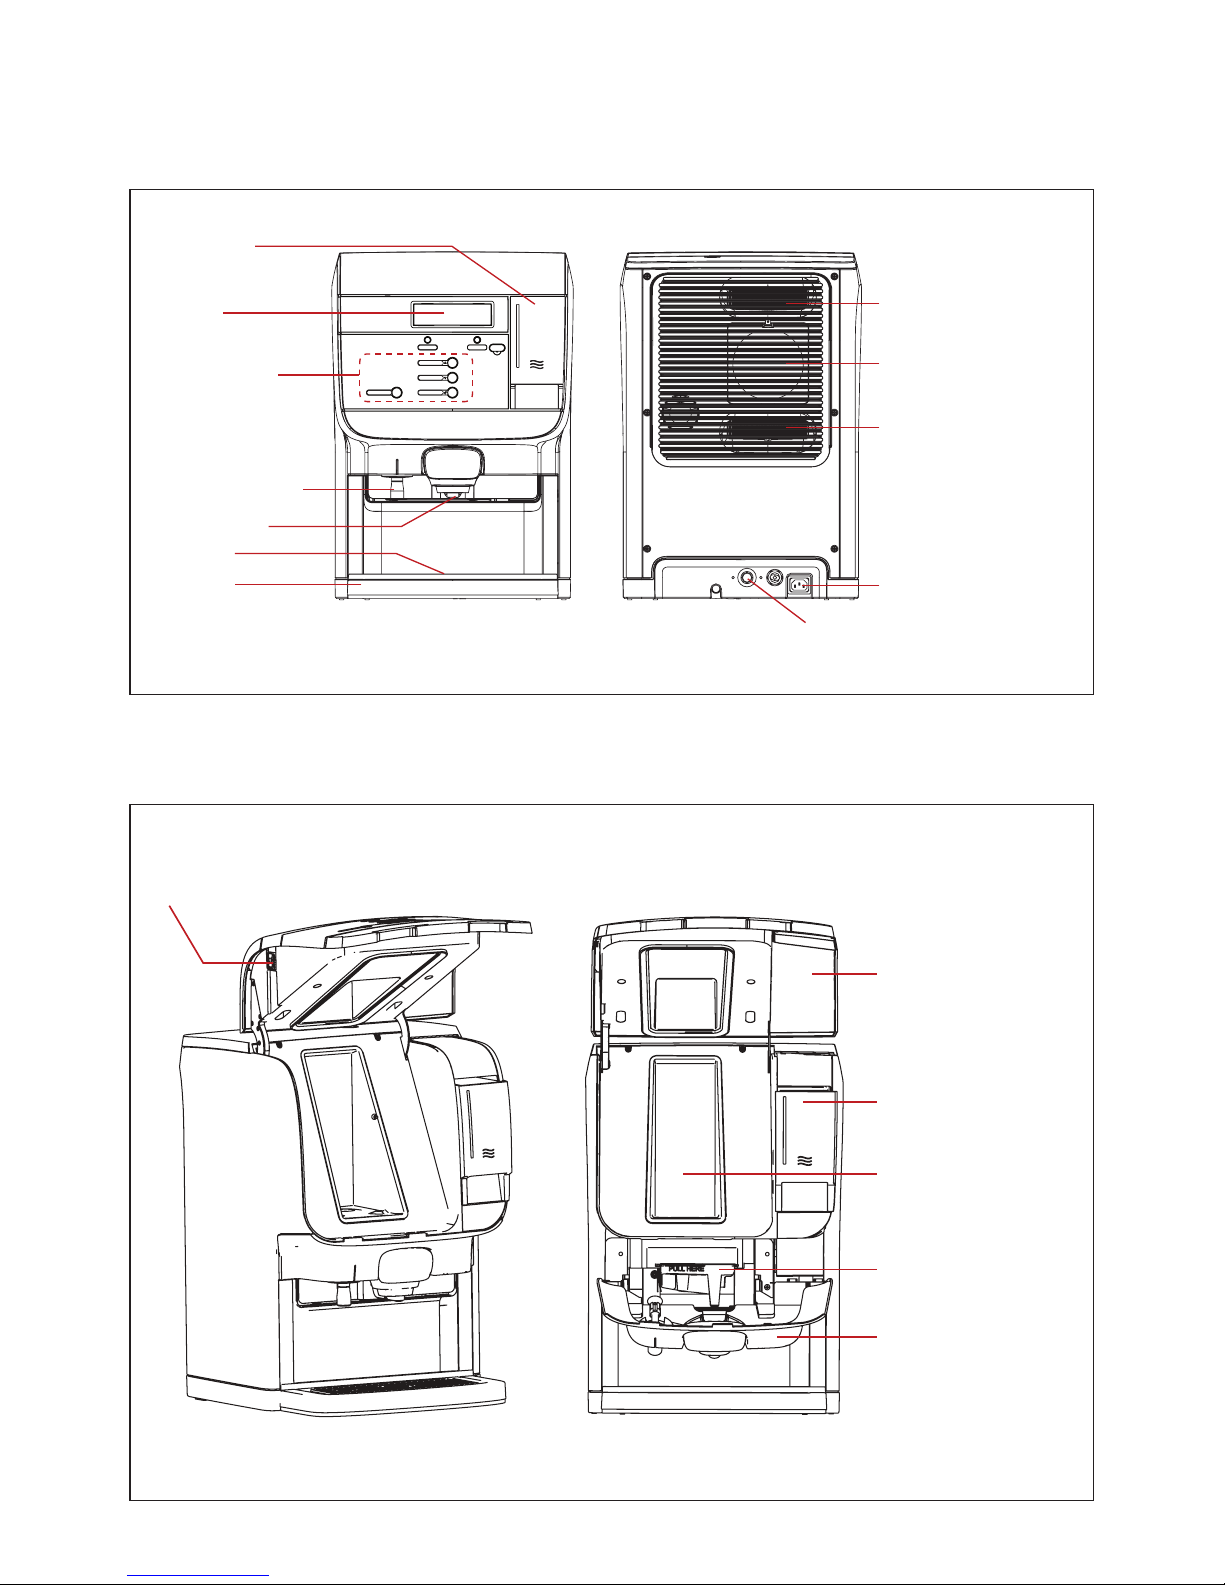
3- Part overview description ...........................................................................................................................9
3.1 Front view ........................................................................................................................................................................................... 9
3.2 Interior view ....................................................................................................................................................................................... 9
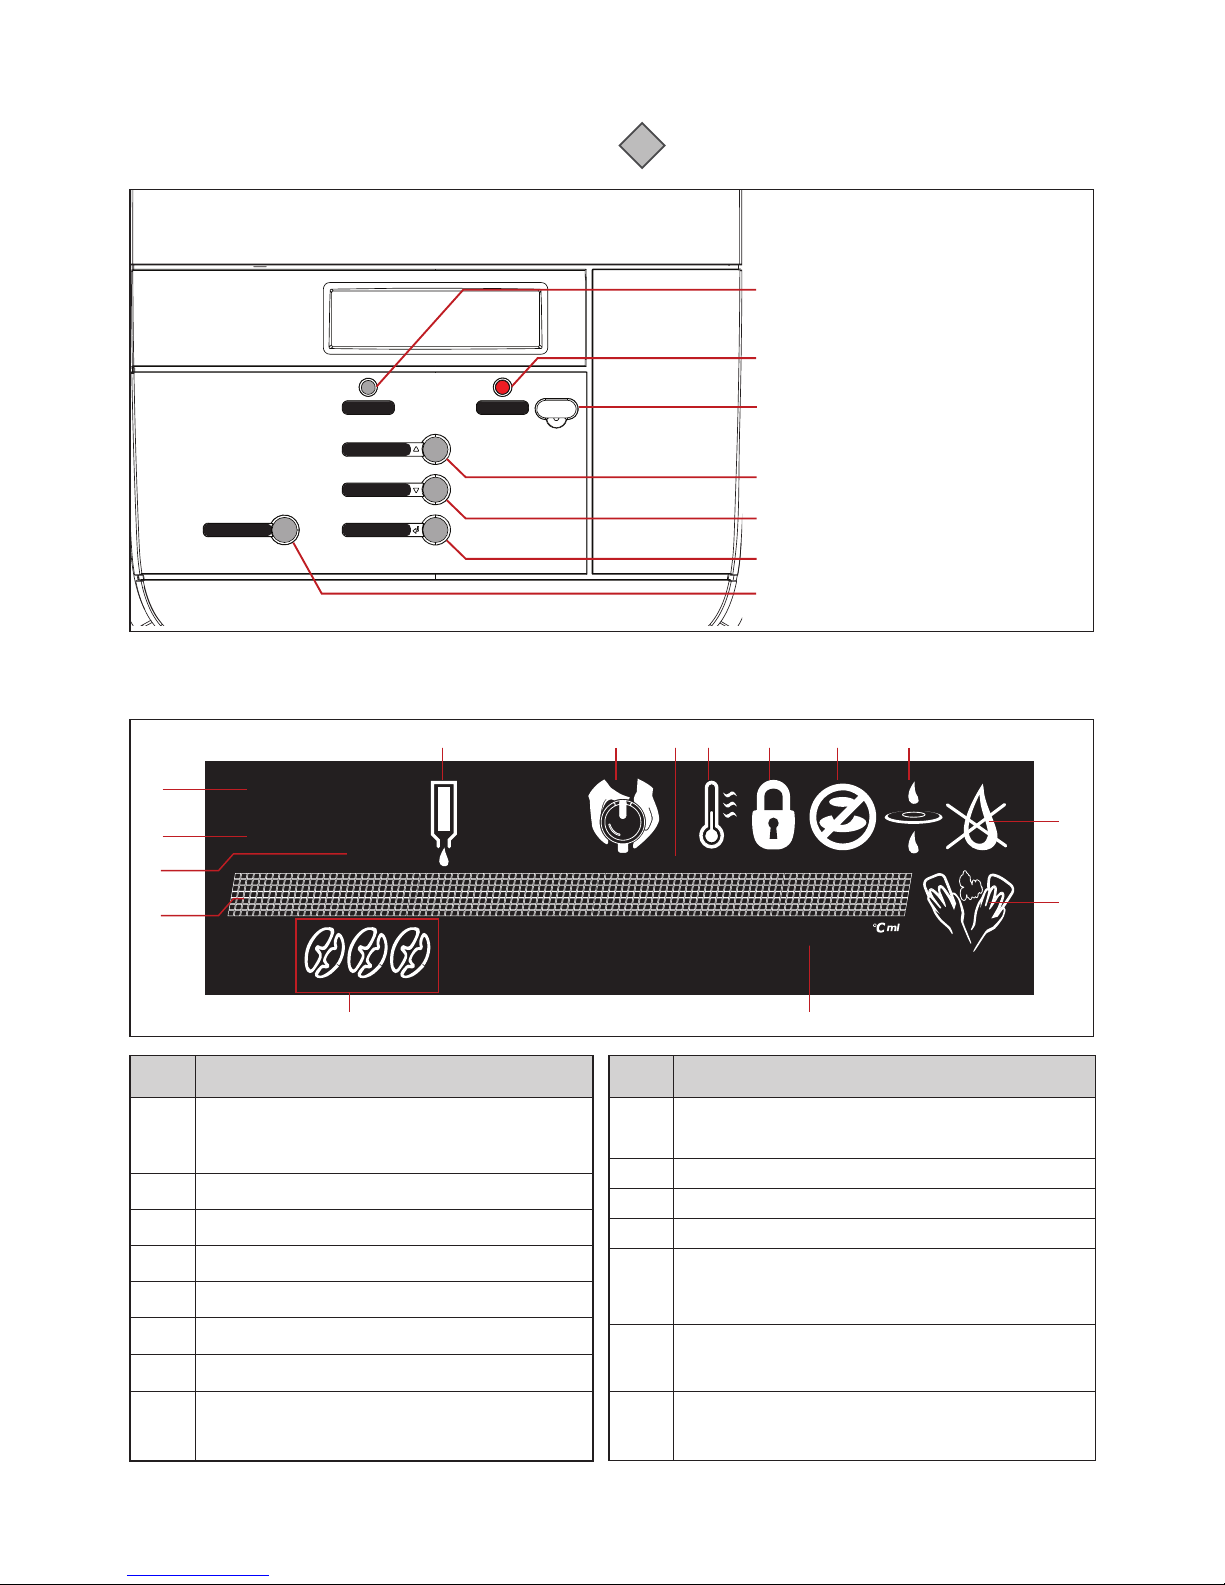
3.3 Button functions .............................................................................................................................................................................10
3.4 Display overview ............................................................................................................................................................................10
4- Dispenser start up & storage .....................................................................................................................11
4.1 Dispenser start-up ..........................................................................................................................................................................11
4.2 Dispenser storage ..........................................................................................................................................................................11
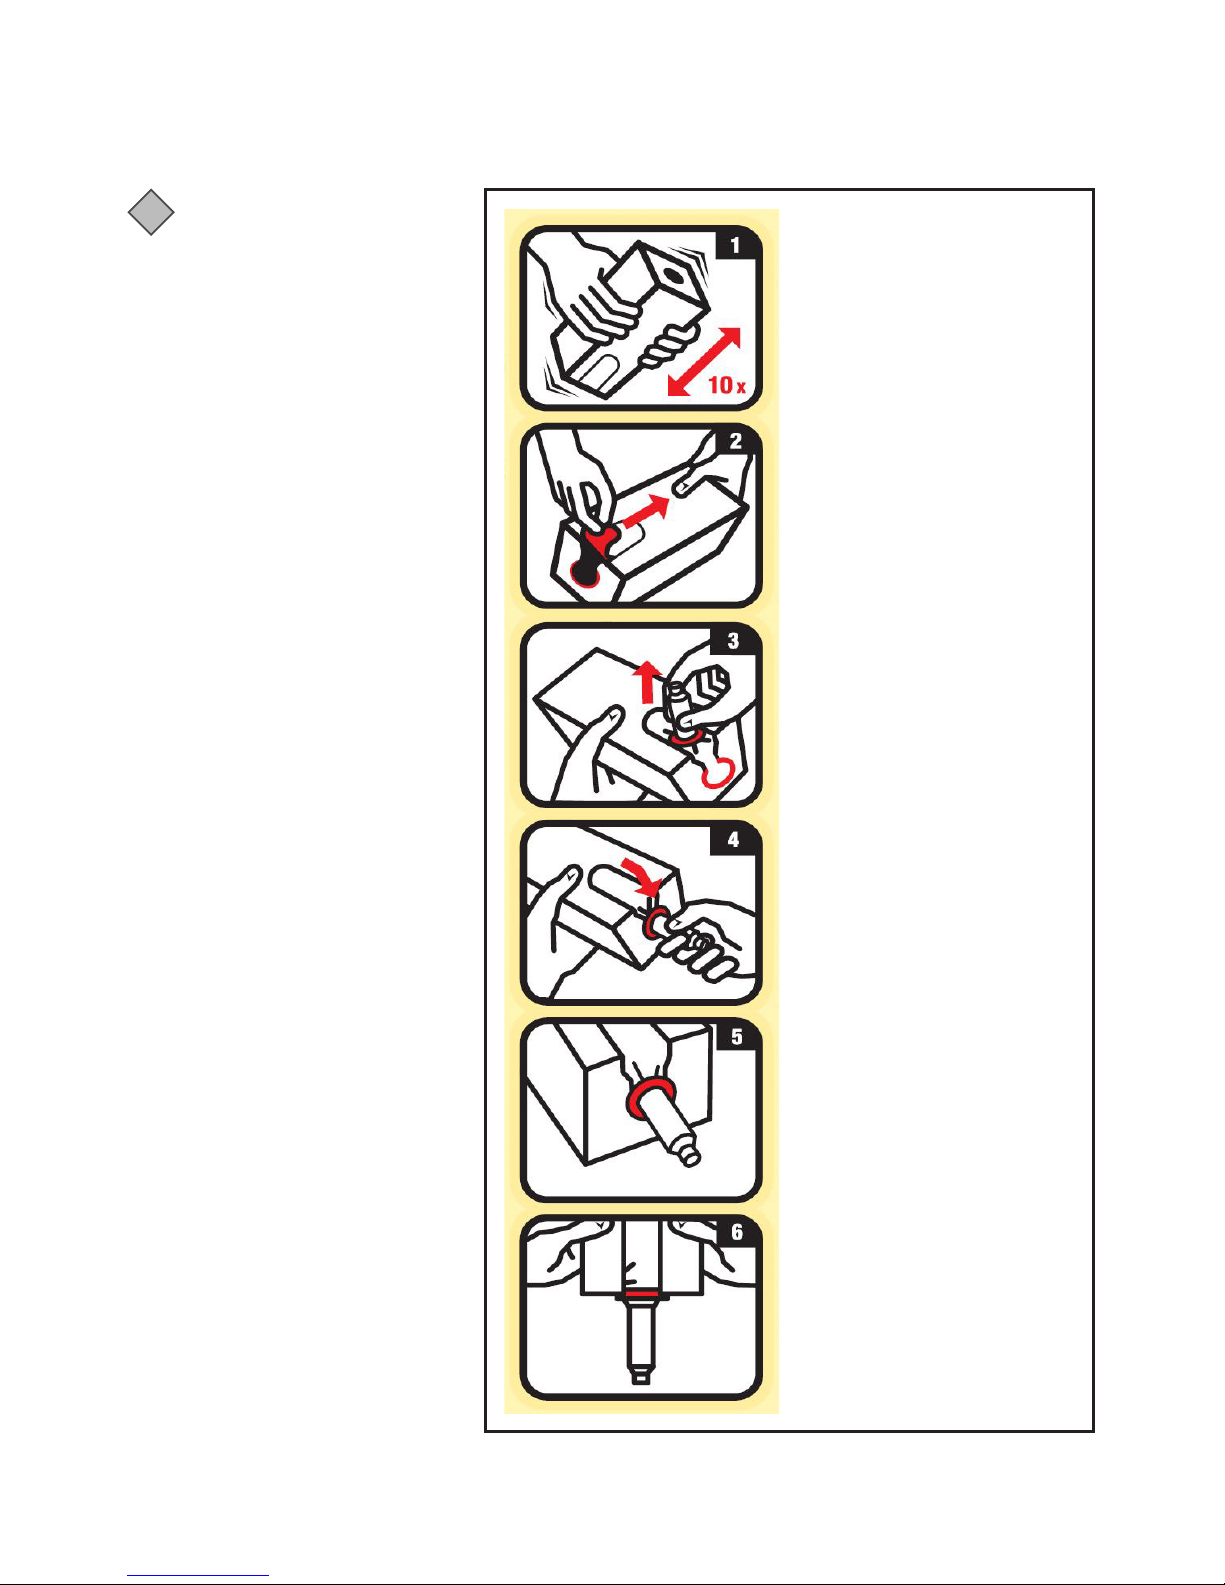
5- Product pack handling ...............................................................................................................................12
6- Daily operation ...........................................................................................................................................13
6.1 Dispensing a cup of coffee or hot water ................................................................................................................................13
6.2 Dispensing a pot of coffee (some options not available in all markets) ....................................................................13
6.3 Drink delivery with pre-selections ...........................................................................................................................................14
6.4 Product pack replacement..........................................................................................................................................................14
6.5 Filling water tank ............................................................................................................................................................................15
7- Cleaning ......................................................................................................................................................16
7.1 Navigation buttons ........................................................................................................................................................................16
7.2 Cleaning procedures .....................................................................................................................................................................16
7.3 Exterior cleaning .............................................................................................................................................................................16
7.4 Flushing .............................................................................................................................................................................................17
7.5 Cleaning the doser opening and cooler box........................................................................................................................18
7.6 Removing and cleaning the mixing tray................................................................................................................................19
7.7 Replacing product pack and flushing the outlet ................................................................................................................20
7.8 Cleaning the foam air filter .........................................................................................................................................................21
7.9 Cleaning the water tank ...............................................................................................................................................................22
8- USER PROGRAMMING ................................................................................................................................23
8.1 Activating the operator mode ..................................................................................................................................................23
8.2 Operator mode controls .............................................................................................................................................................23
8.3 COUNTERS .......................................................................................................................................................................................23
8.4 STRENGTH ........................................................................................................................................................................................24
8.5 DATE/TIME .......................................................................................................................................................................................24
8.6 CLEANING DAYS ............................................................................................................................................................................24
8.61 Determining cleaning days ......................................................................................................................................................24
8.62 Setting “Clean” days....................................................................................................................................................................25
8.63 Set days for “Flush” ......................................................................................................................................................................25
8.7 ECO SETTINGS .................................................................................................................................................................................26
Page 4

4
User manual
Content
8.71 ENABLED/DISABLED ECO mode ............................................................................................................................................26
8.72 Setting the ECO start and stop times ...................................................................................................................................26
8.73 Setting the ECO boiler temperature .....................................................................................................................................27
8.8 TELEPHONE# ...................................................................................................................................................................................27
8.81 ENABLED/DISABLED telephone numbers ..........................................................................................................................27
8.82 Set telephone numbers .............................................................................................................................................................27
8.9 Language ..........................................................................................................................................................................................28
9- Troubleshooting .........................................................................................................................................29
Page 5
5
User manual
1- Safety instructions
The following general safety precautions apply to the operation and maintenance of the dispenser and must
always be observed. Non-compliance with these instructions or any other safety precautions mentioned in
this manual could impair the dispenser’s safety features and lead to potentially dangerous situations and
dispenser damage for which the manufacturer cannot be held responsible.
Installation, service and programming of the dispenser is restricted to authorized and trained service
technicians.
Hazard intensity levels-
There are three different levels of hazard intensity, identified by the signal words DANGER, WARNING and
CAUTION. Observe these statements to ensure safety and prevent injury and product damage.
The level of hazard is determined by the following definitions:
Caution:
Alerts against unsafe practices. Observe these warnings to ensure food safety, to prevent minor
personal injury, and/or damage to the dispenser.
Warning:
Indicates a potentially hazardous situation which, if not avoided, could result in serious injury or even
death.
Danger:
INDICATES AN IMMINENTLY HAZARDOUS SITUATION WHICH, IF NOT AVOIDED, WILL RESULT
IN SERIOUS INJURY OR EVEN DEATH.
Note:
Gives additional information which may be helpful during the service procedures or operation of the
dispenser.
i
1.1 Introduction
1.2 General
• Operation, filling and cleaning of the dispenser is restricted to authorized and trained persons. Take care
that new staff reads the operator manual carefully before operating the dispenser, and understands the
safety and hygiene aspects involved. For quick reference a printed cleaning instruction label or quick
reference guide is included.
• You may only use the dispenser according to the instructions in this operator manual for the delivery
of drinks. The manufacturer is not liable for any damage or injury resulting from improper use of the
dispenser or from non-compliance with the procedures described in this operator manual.
• This dispenser can be used by children aged 8 years and above and persons with reduced physical,
sensory or mental capabilities, or lack of experience and knowledge, if they have been given supervision
or instruction concerning use of the appliance in a safe way and understand the hazards involved.
• Children should be supervised to ensure they do not play with the dispenser.
• Cleaning and user maintenance shall not be made by children.
• Installation, relocation (fixed water/drain version), service and programming of the dispenser is restricted
to authorized service technicians. The service area is restricted to persons having knowledge and practical
Page 6

6
User manual
experience of the appliance; in particular as far as safety and hygiene are concerned.
• This dispenser is not suitable for installation where a pressure washer may be used.
• This dispenser must not be cleaned by a pressure washer.
• This dispenser is not suitable for outdoor use.
• Protect the dispenser against running water, splashes, spray or steam, heat and heavy dust.
• The liquids delivered by the dispenser are hot!
• Avoid scalding!
• Keep hands and other body parts away from the dispenser while drinks are being dispensed and during
the rinsing program.
• Do not place cups, pots, or containers filled with hot liquids on top of the dispenser.
• There is a risk of being scalded if the cups/pots/containers fall over, take care when handling them.
• Keep sufficient space around the dispenser to get away easily in case of hot liquid splashes.
• Never touch the power supply or power supply plug when your hands and/or the power cord or plug are
wet.
• If the power cord of the dispenser is damaged, unplug the power cord and contact your system supplier
for replacement.
• The dispenser is designed for indoor installation on a stable flat surface such as a table or a counter. Shield
the dispenser from direct sunlight, frost and rain.
• Make sure that there is sufficient space around the dispenser for ventilation, and the front/back/sides are
accessible for service.
• Only use water hoses and connections in compliance with local regulations.
• Connect the dispenser to the drinking water line in compliance with local regulations. In case of cold
drink options, test the quality of the water supply to ensure delivery of safe cold drinks according to local
regulations.
• When connected to a wall outlet power supply, use a grounded safety plug socket in compliance with
local regulations. Ensure that the electric circuit is protected by means of a ground fault current safety
switch and that the power supply plug remains accessible after installation.
• Always store and transport the dispenser in the original packaging.
• Before storing or transporting the dispenser, remove the product packs and place them in a refrigerator,
and empty powdered product container and clean (if so equipped)
• Do not leave product packs in the dispenser if you plan to store the dispenser.
• Clean the dispenser.
• Contact your supplier so that an authorized and trained service technician can drain the water from the
boiler and protect the dispenser against freezing damage.
Caution:
The dispenser must not be subjected to freezing temperatures during operation, storage or
transport.
1.3 Transport and storage
1- Safety instruction
Page 7
7
User manual
2- Technical specications
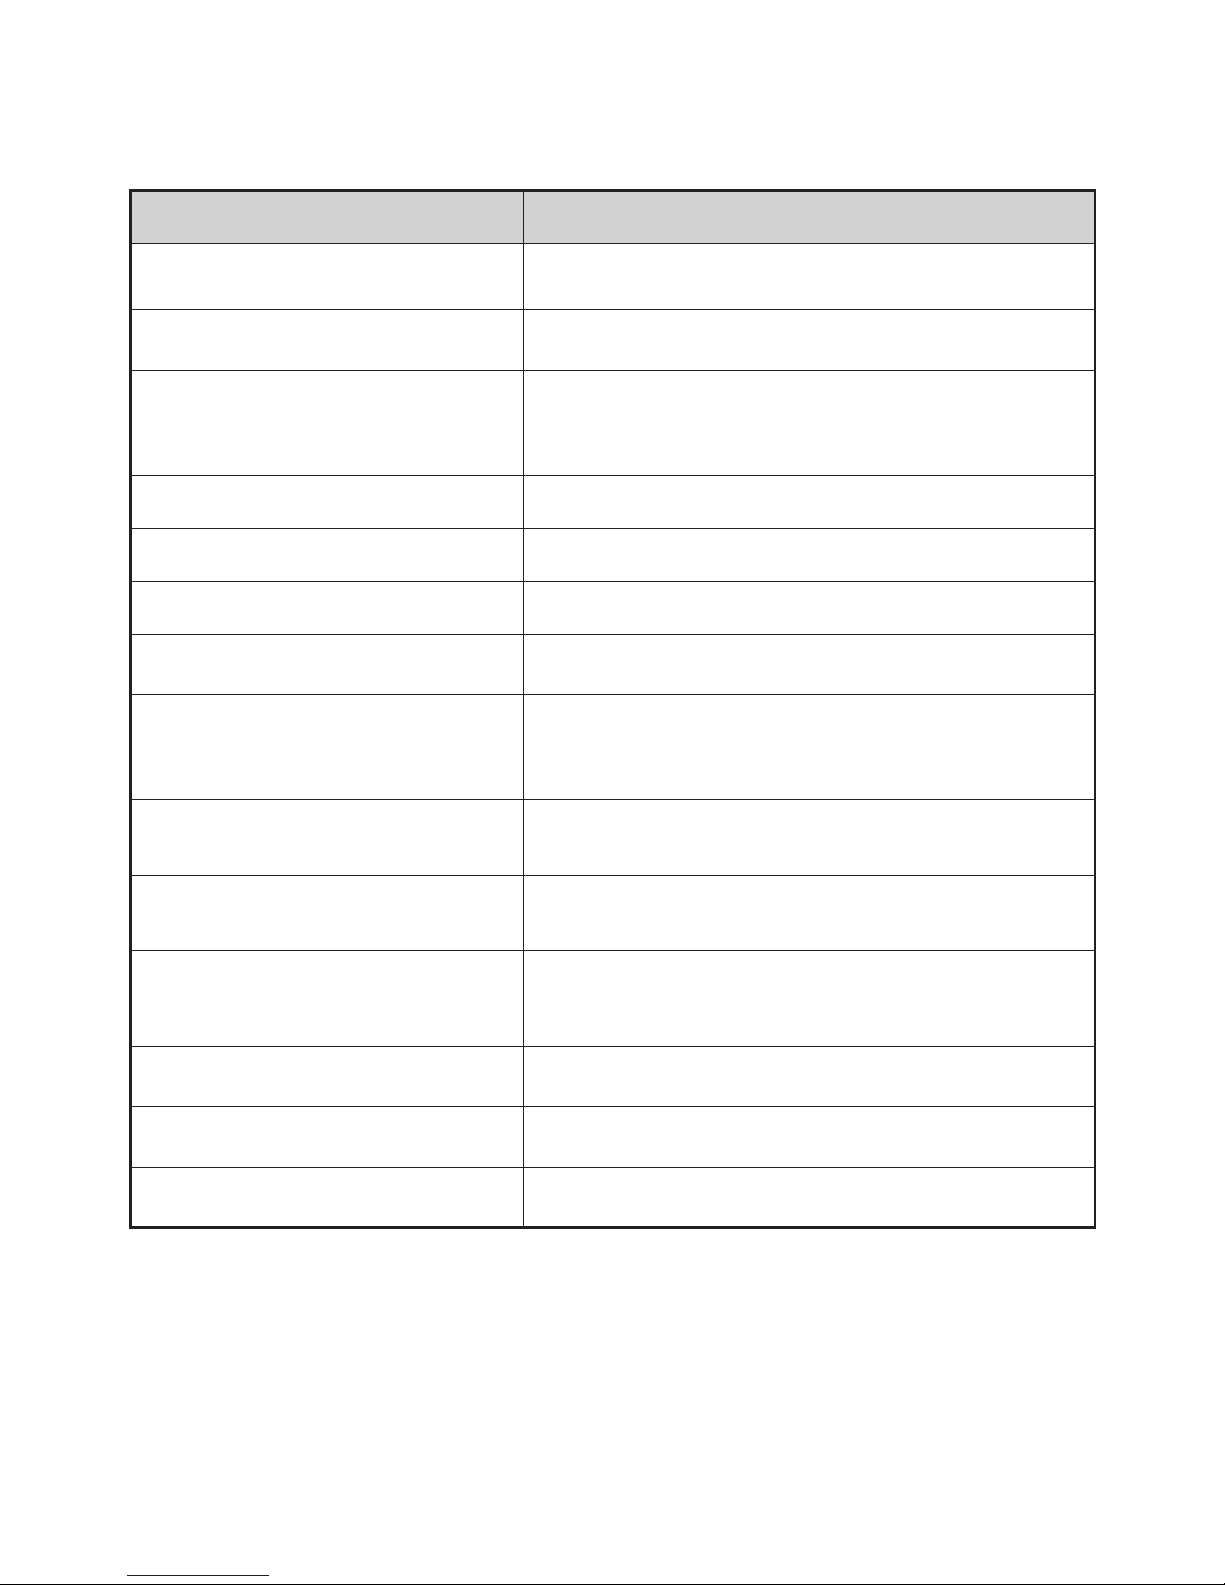
2.1 Specications
Facts Description
Weight
24 Kg (Empty) - 24.1Kg (Operational, non-water tank version)
25.6Kg (Operational with filled water tank)
Cup Volume: Factory setting = 125ml adjustable ±10%
Pot
Factory Setting = 900ml adjustable ±10%
Dispensing time: 110 seconds ±10%
Max height: 160ml
Interval between pots 160 seconds (230 V)
Power supply 230V, 50/60Hz
Power consumption 2.1kW - 230V
Capacity 140 cups per hour (±18.75L per hour)
Storage and operating environment
Temperature: 1 - 34ºC
Humidity: Up to 80%
Cooling compartment
Capacity: 1 x 1.25L packs
Temperature : 2ºC – 5ºC
Boiler
Volume: 1.2L
Temperature: Adjustable from 83 – 97 ºC
Standard water connection
1/2” or 3/8” supply line with 3/4” BSP connection,
potable water supply line with stop valve.
Removable water tank volume: 3L
Dynamic water pressure Min.: 0.08 MPa at 10L/min
Static water pressure Max: 1.0 MPa
Maximum noise level < 49 dB(A)
Page 8
8
User manual
2- Technical specications
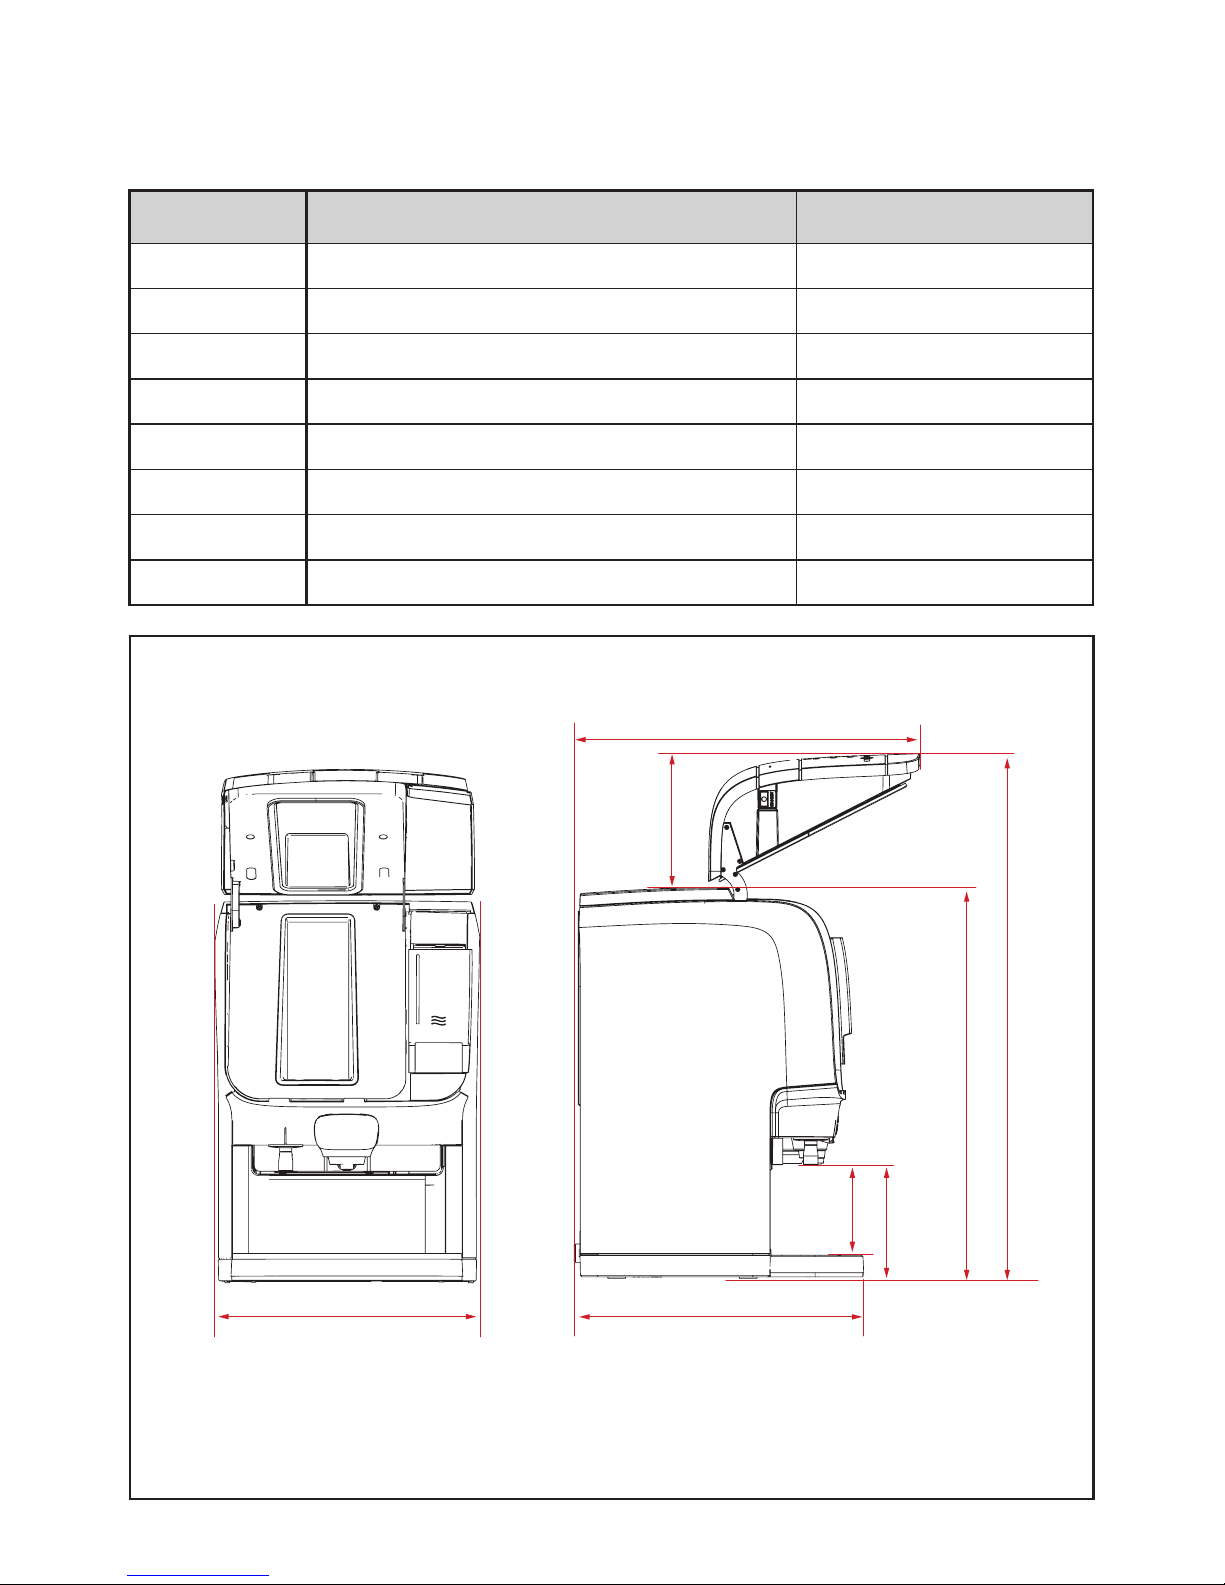
2.2 Dimensions
Position Description Millimeters
A Dispenser width 390
B Dispenser depth 426
C Dispenser depth with door open 500
D Dispenser height 562
E Dispenser height with door open 755
F Distance from top of dispenser to front of open door 193
G Clearance with drip tray in place 130
H Clearance with drip tray removed 165
A
C
B
D E
F
G H
Page 9
9
User manual
3- Part overview description
3.1 Front view
Hot water
Coee
Coee large
Pot coee
StopStrength
Drink buttons
Display
Water tank
(Option)
Water tank
(Option)
Removable ventilation
cover
Air ventilation
Air ventilation
Main power socket
Water connection 3/4” BSP
Hot water outlet
Drink outlets
Cup tray
Drip tray
3.2 Interior view
Standby /
Lock dispenser button
Dispenser door
Cooling compartment
Water treatment panel
Mixing tray
Page 10
10
User manual
08008.0.0
SUN MON TUE WED THU FRI SAT
OPERATOR MODE
SERVICE MODE
DECALC
ECO
Hot water
Coee large
StopStrength
Coee
Pot coee
3- Part overview description
3.3 Button functions
Stop/Operator mode: Back
USB key port (for Operator mode)
Standard Coffee/Operator mode: Up
Large Coffee/Operator mode: Down
Pot Coffee/Operator mode: Enter
Hot Water
Strength selection
3.4 Display overview
54
1
6 7 1098
11
12
1514
13
2
3
POS
Description
1
Operator/service mode
The USB operator / service stick is inserted or
WBSD is connected
2 Descaling is needed
3 Energy saving mode is activated
4 Product pack is empty
5 Cup animation
6 Date
7 Low temperature, boiler is heating up
8
Lock symbol
The dispenser is locked and cannot dispense
drinks
POS Description
9
Delivery blocked
The dispenser is locked and cannot dispense drinks
10 Replace the water filter
11 Internal water tank is empty, refill the tank
12 The dispenser needs to be cleaned
13
Message bar
Line messages are displayed to guide you through
the cleaning, programming steps, or in case of errors
14
Volume strength
Mild, regular or strong drink to be dispensed
15
Info-field
Displays cooling compartment temp, time, etc.
Note:
Some options are not available in all markets.
i
Page 11
11
User manual
4- Dispenser start up & storage
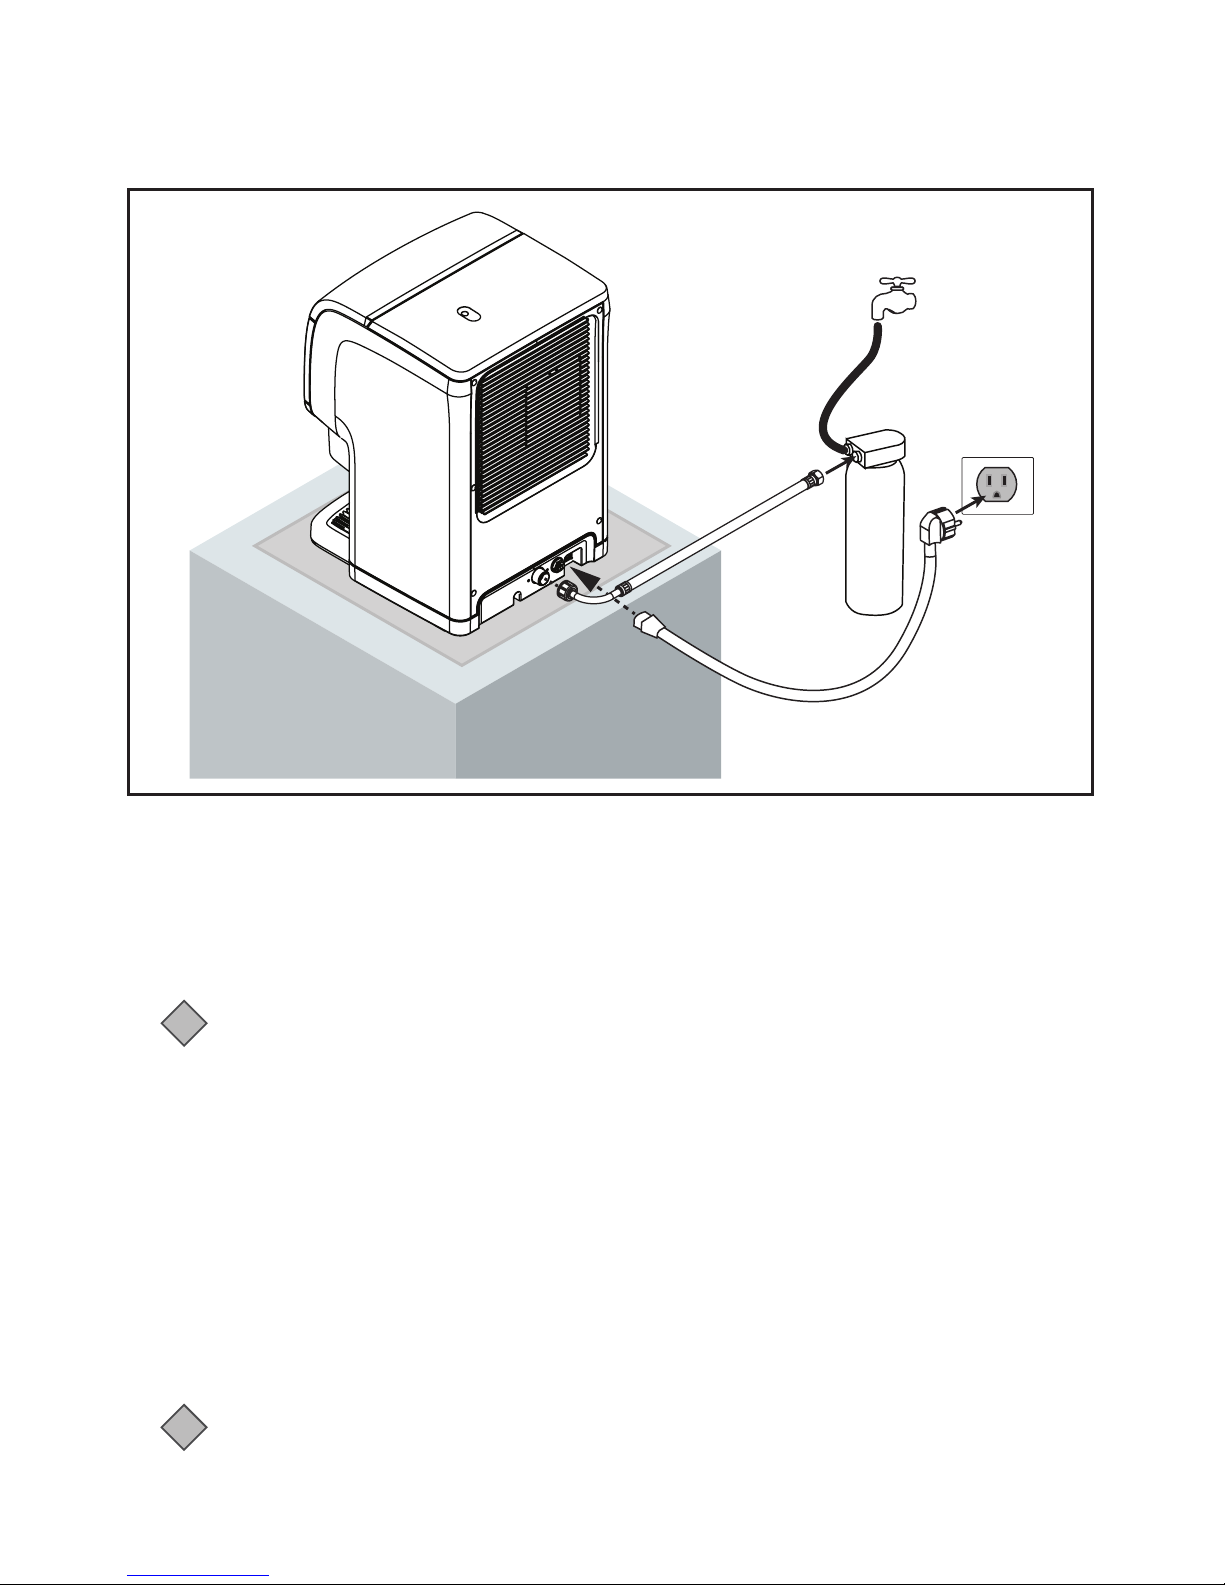
4.1 Dispenser start-up
4.2 Dispenser storage
A
A
B
B
D
C
• Place the dispenser on a flat horizontal surface designed to support the operational weight of the
dispenser.
• Connect the water inlet hose (A to A), and then open the water tap/filter (B to B). Check for leaks.
• Connect the power cord (C to C), and insert the power plug in the wall socket (D to D), the dispenser will
start automatically, fill up and heat the boiler, and begin to chill the cooling compartment. Drink delivery
will be blocked until the water in the boiler has reached the correct temperature.
Take the following preparations when the dispenser will not to be used for a long period (e.g.- holidays):
• Remove the product pack and check the expiry date, if they will soon expire they should be disposed of.
• Store opened product pack in a refrigerator until you switch the dispenser back on and it has cooled down
again. If the expiry date has passed, the packs should be disposed of.
• Clean and flush the dispenser.
• Disconnect the power plug from the socket.
• Close the water tap.
Note:
It may take 24 hours or more for the cooling compartment to cool down completely.
Note:
If the dispenser has been shut down for a longer period, the date and time must be reset so the
programmed cleaning cycles and ECO settings are reactivated.
i
i
D
C
Page 12
12
User manual
5- Product pack handling
Note:
• Always observe basic and
personal hygiene, wash
hands before handling
product packs.
• Use only food-grade
cleaning agents for the
drink dispenser. Clean the
dispenser’s exterior parts
with a soft, clean, damp
cloth.
• Use only fresh drinking
water.
• Wash hands first, shake pack
at least 10 times, remove
plastic film.
• Take dosing tube out of pack.
• Red ring on dosing tube
must cover red circle on
outside of pack, check that
dosing tube is straight and
correcly positioned.
• Pull perforated strip back
from pack.
• Pull dosing tube towards red
ring on pack.
• Reverse pack and place pack
in dispenser.
i
Page 13
13
User manual
Hot water
Coee
Coee large
Pot coee
StopStrength
Hot water
Coee
Coee large
Pot coee
StopStrength
6- Daily operation
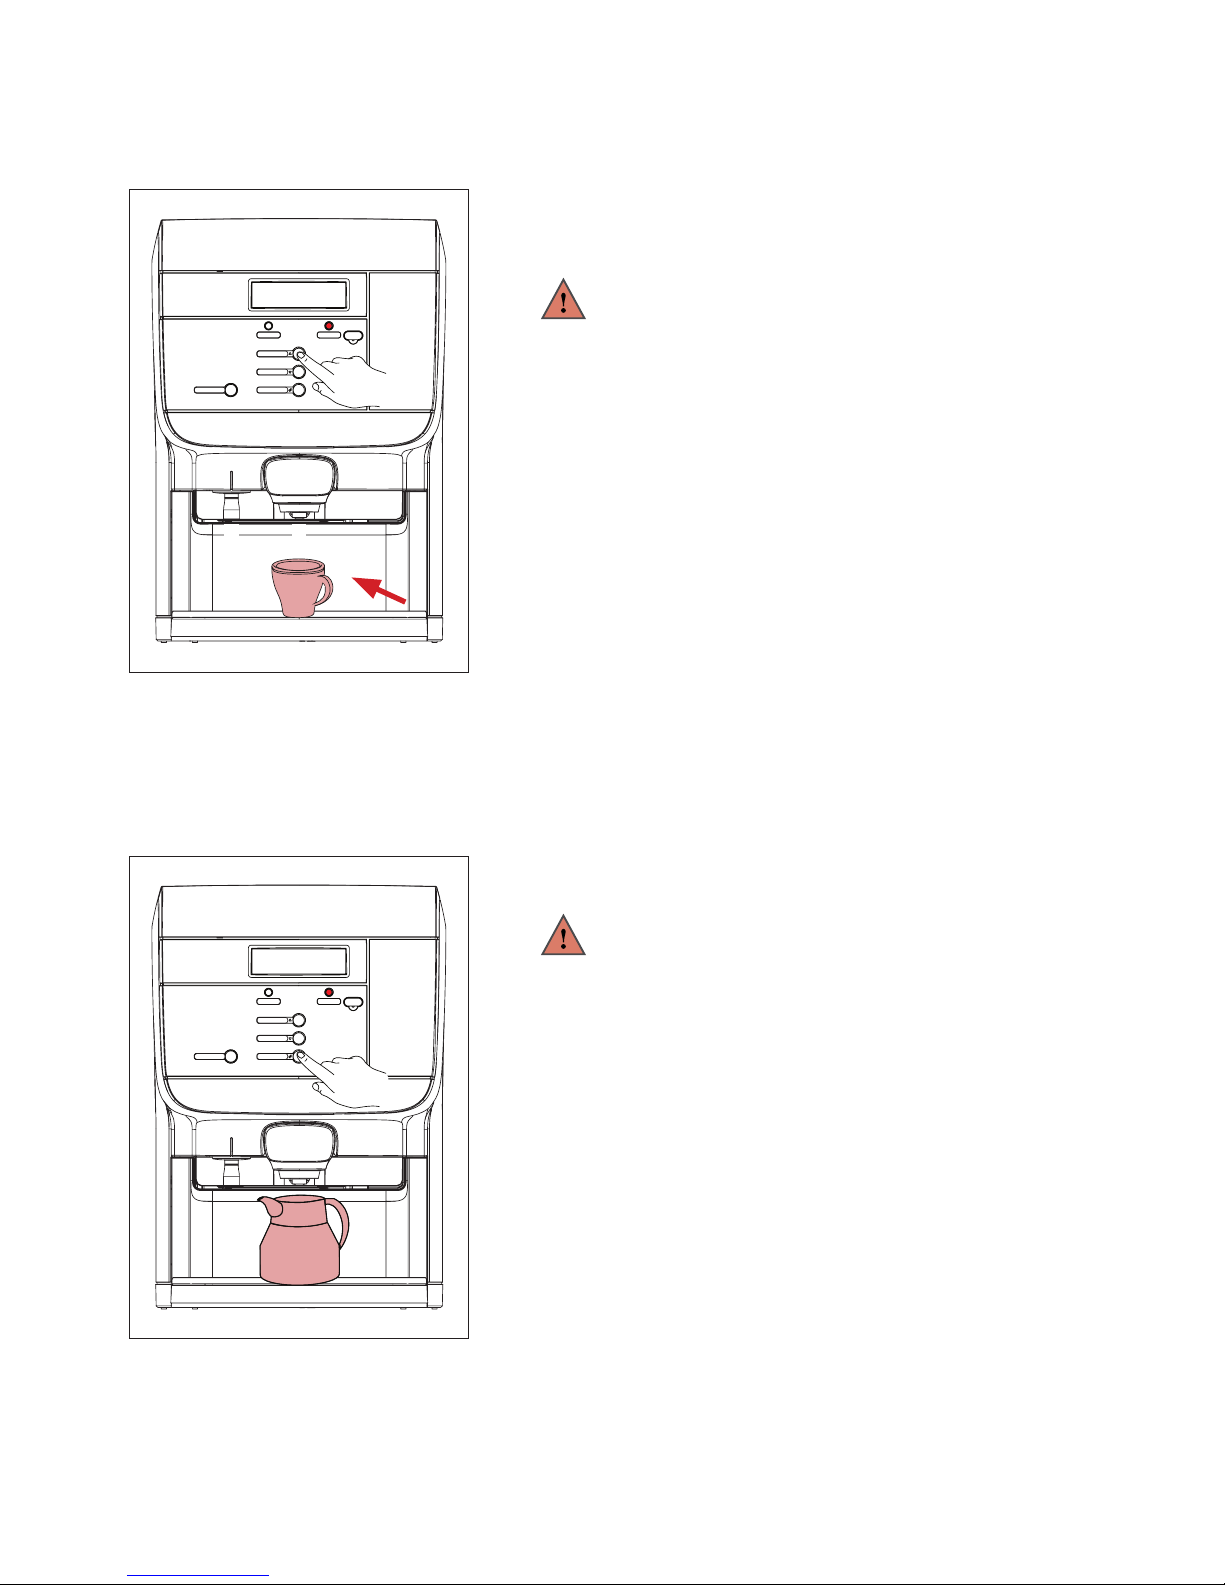
6.1 Dispensing a cup of coffee or hot water
6.2 Dispensing a pot of coffee (
some options not available in all markets)
• Place a cup on the drip tray under the middle outlet for a coffee
(A) or under the left outlet for hot water (B).
• Press the coffee button or hot water button for a cup of drink.
Warning:
- The drinks dispensed are hot! Avoid scalding!
- Keep hands and other body parts away from the
dispenser while drinks are being delivered.
- Never leave children unsupervised near the
dispenser.
• When programmed for portioned flow, the dispenser will
dispense coffee or hot water from one or the other of the
outlets, depending on drink selection, and stops automatically
after one cup has been dispensed.
• When programmed for free flow, simply press and hold the
coffee or hot water button until the dispenser has dispensed
the desired amount of coffee or hot water.
• Press the STOP button at any time to cancel drink delivery.
• Place a pot under the middle (coffee) outlet and press the pot
coffee button.
Warning:
- The drinks dispensed are hot! Avoid scalding!
- Keep hands and other body parts away from the
dispenser while drinks are being delivered.
- Never leave children unsupervised near the
dispenser.
• The dispenser will dispense coffee continuously from the
middle outlet and stop when the preset amount has been
delivered.
• Press the STOP button at any time to cancel drink delivery.
• You can also press the STOP button if you want to dispense
any amount less than the preset amount.
• Your supplier can change the standard pot volume setting on
request.
AB
Page 14
14
User manual
6- Daily operation
6.3 Drink delivery with pre-selections
Strength pre-selection
Your dispenser supports pre-selection options. The service technician may activate pre-selection options
during installation. When the pre-selection button is pressed, the following pre-selections can be activated.
• Strength (mild, regular or strong drinks)
• Place your cup.
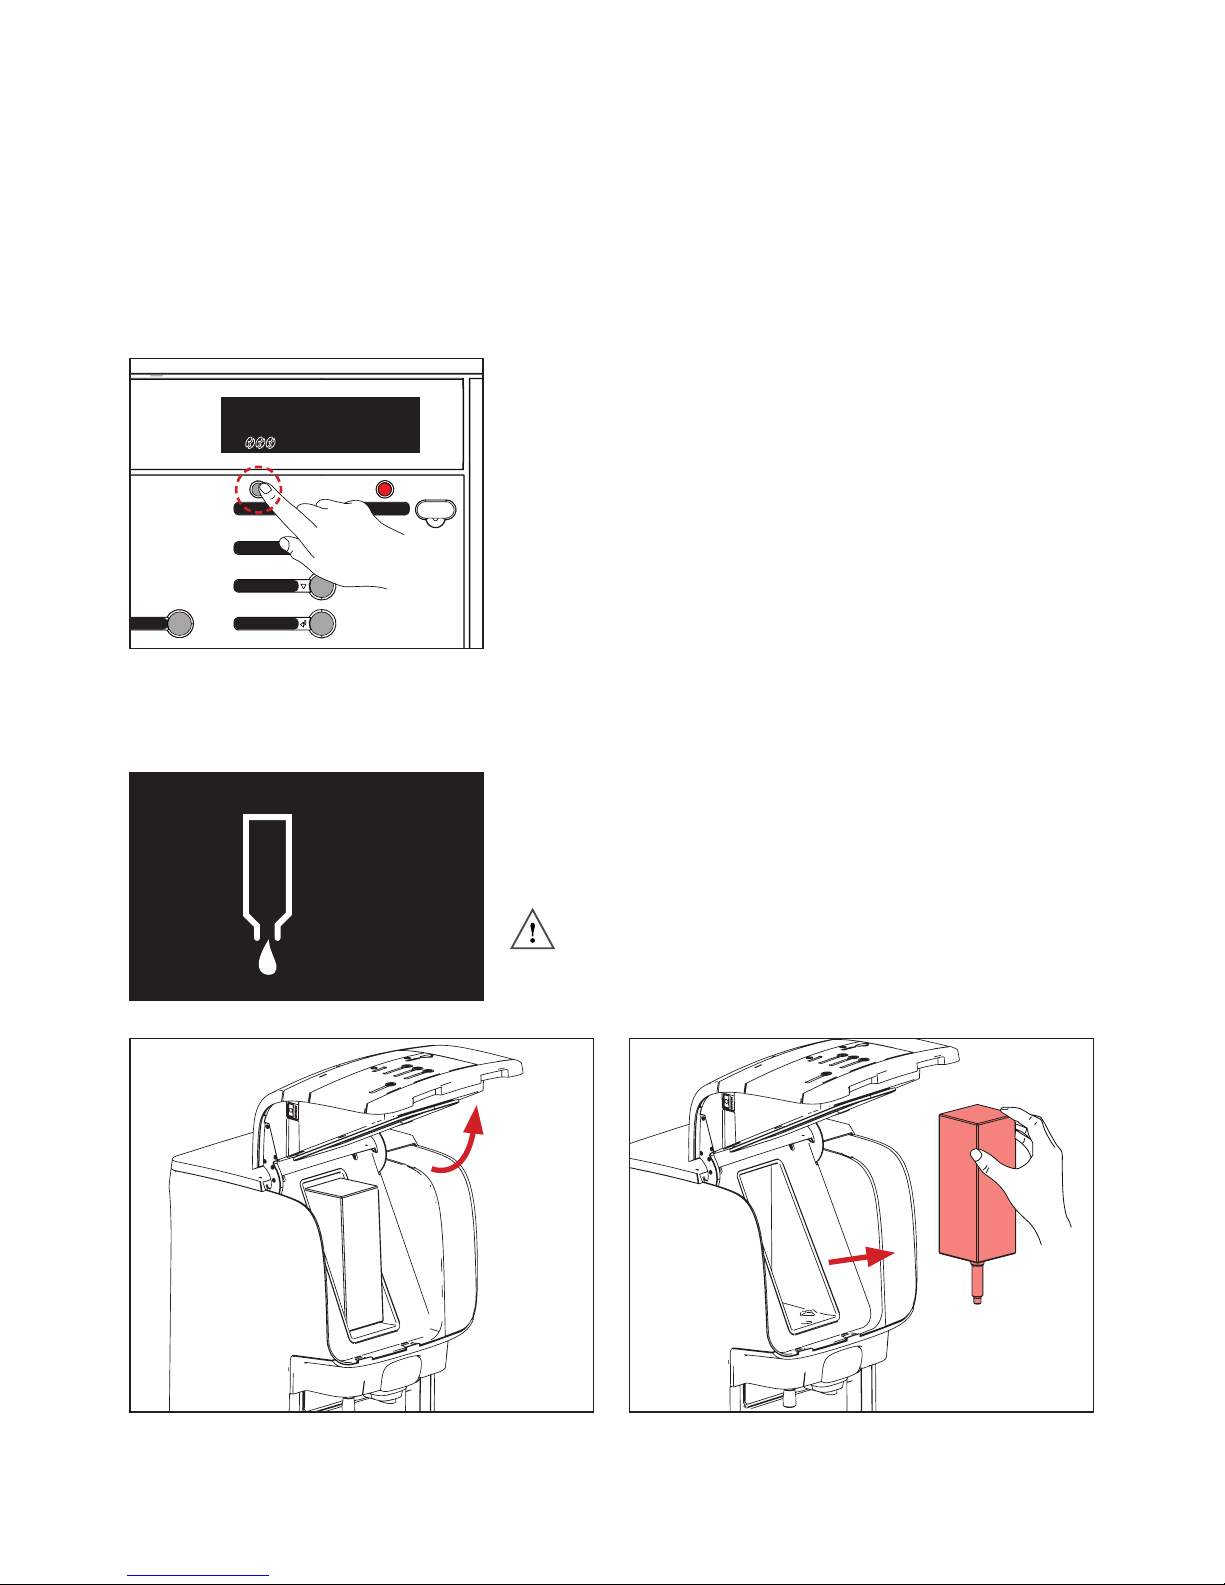
• Press the pre-selection STRENGTH button until you reach your
desired setting. The bean icon will change between mild (one
bean, regular (two beans) and strong (three beans).
• Press the desired drink button. Your drink will be delivered with
the selected strength.
r
Coee large
StopStrength
Coee
Pot coee
6.4 Product pack replacement
The display shows an icon when the product pack is empty.
Follow the instructions below to replace the product pack.
1. Open the dispenser door to access the cooling
compartment and product packs.
2. Remove the empty product pack and replace with
a new one.
Caution:
Never use a frozen or damaged product pack. Do not use
a product pack if the “Best before” date has expired.
Page 15
15
User manual
6- Daily operation
6.5 Filling water tank
Only for dispensers fitted with water tank option.
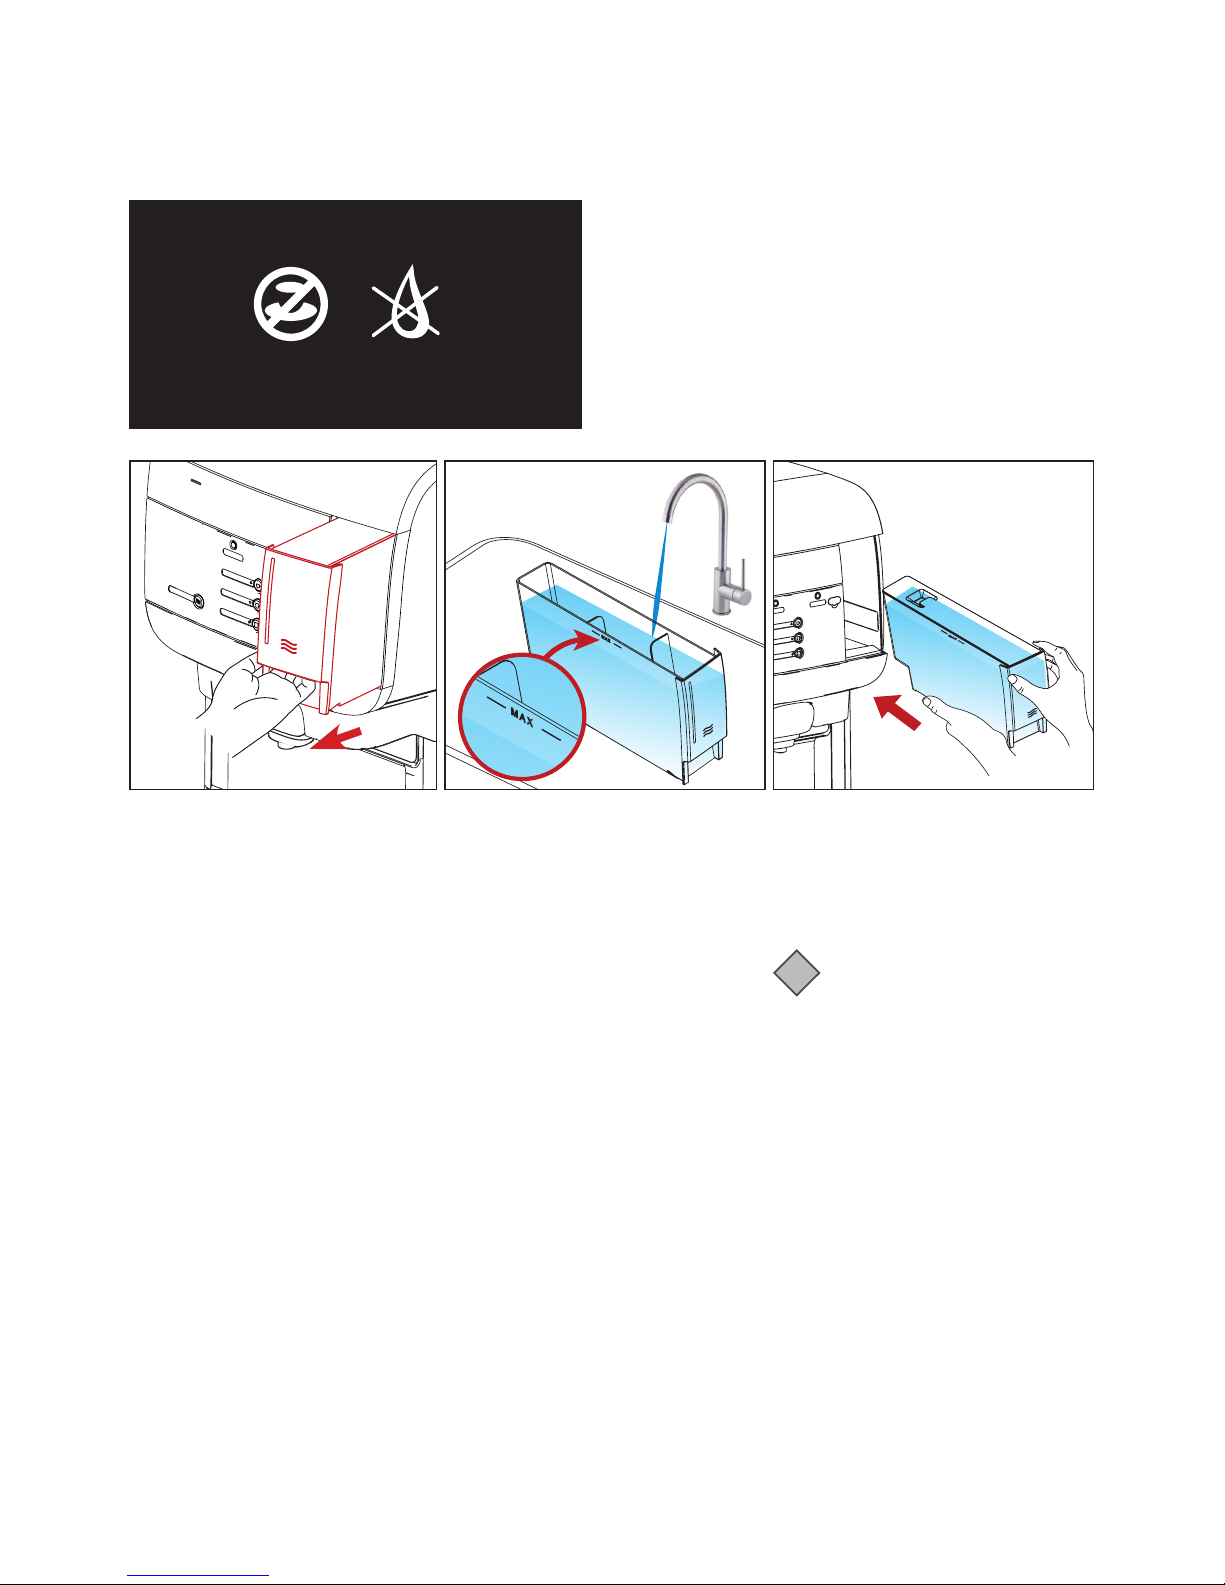
The display shows an icon when the internal water
tank is empty (A). In this state the dispenser will
also be blocked from dispensing drinks (B), it will
be unlocked once the tank is refilled.
Please follow the instruction to refill the water
tank.
1. Grab the tank in the handle at
the front. Push slightly up while
pulling the tank straight out.
2. Fill up the tank to the MAX
indication (3L) with fresh and
cold tap water.
3. Put the water tank back into the
dispenser. Push the tank all the
way in until it hooks in place at
the front.
REFILL WATER TANK
B
A
Note:
When replacing the water
tank into the dispenser, make
sure it is inserted fully into the
machine and that the display
shows normal functionality.
i
Page 16
16
User manual
7- Cleaning
7.1 Navigation buttons
7.2 Cleaning procedures
7.3 Exterior cleaning
Coee large
StopStrength
Coee
Pot coee
A
B
C
D
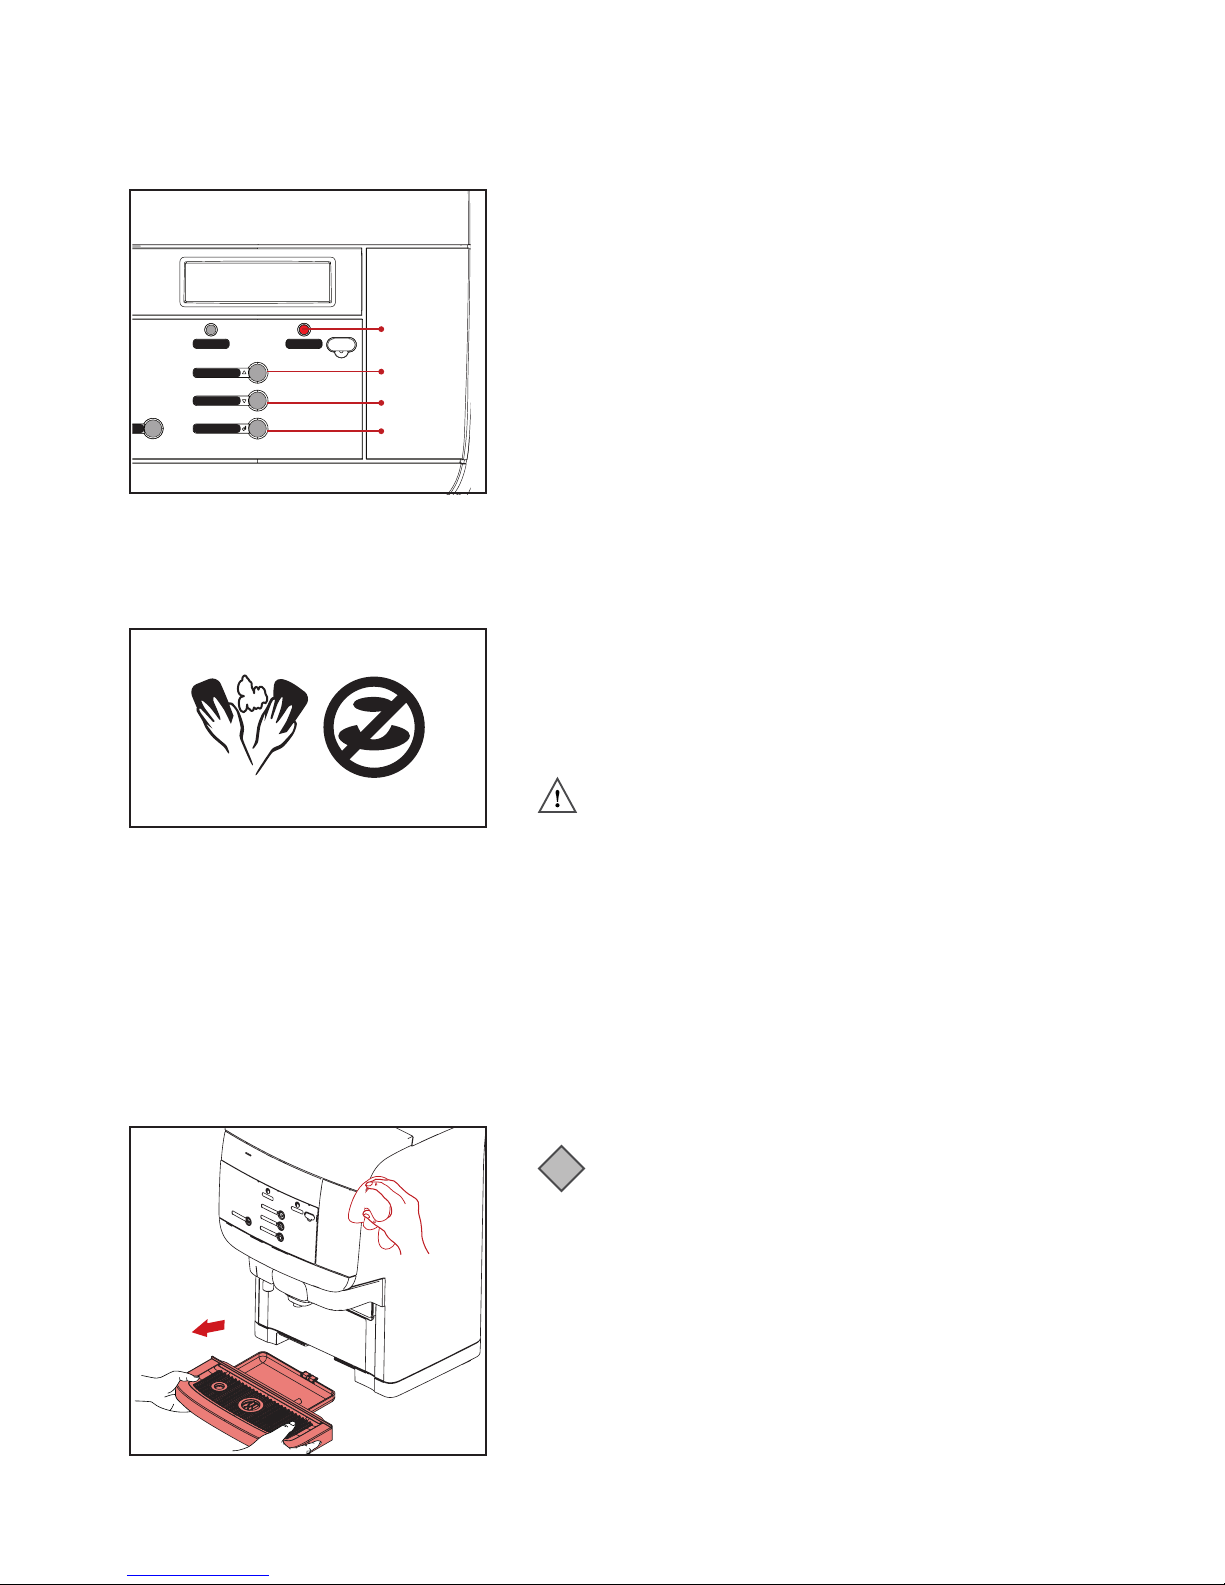
In operator and cleaning mode, 4 UI buttons are used to enter
the cleaning mode and navigate the menus.
A Stop = BACK
B Drink button top right = UP
C Drink button middle right = DOWN
D Drink button bottom right = ENTER
There are two different cleaning programs:
• “Flushing” the drink outlets.
• “Cleaning” the cooling compartment and the drink outlets.
Your Service provider can select the weekdays for “Flushing”
and “Cleaning” programs in the operator menu under
CLEANING DAYS.
Caution:
It is mandatory to run the “Flushing” program at least
once a week to guarantee food safety.
A B
When to clean the dispenser
Run the cleaning program when the cleaning icon (A) appears in the display.
If the dispenser is not cleaned and/or flushed within 24 hours, the drink delivery will be blocked and the
delivery blocked icon (B) will appear in the display.
The cleaning program must run to completion before the dispenser will resume drink delivery.
i
Note:
It is advised to clean the exterior of the dispenser daily.
To prevent accidentally dispensing drinks while cleaning
the areas around the buttons you can lock the drink
dispensing features by opening the door and pressing
the “Standby” button. Afterward, press “Standby” again
to return to normal dispensing functions.
1. Remove the drip tray and empty it if needed, clean the drip
tray with a cloth or brush under warm running water.
2. Clean the exterior of the dispenser with a damp, clean cloth.
Page 17
17
User manual
7- Cleaning
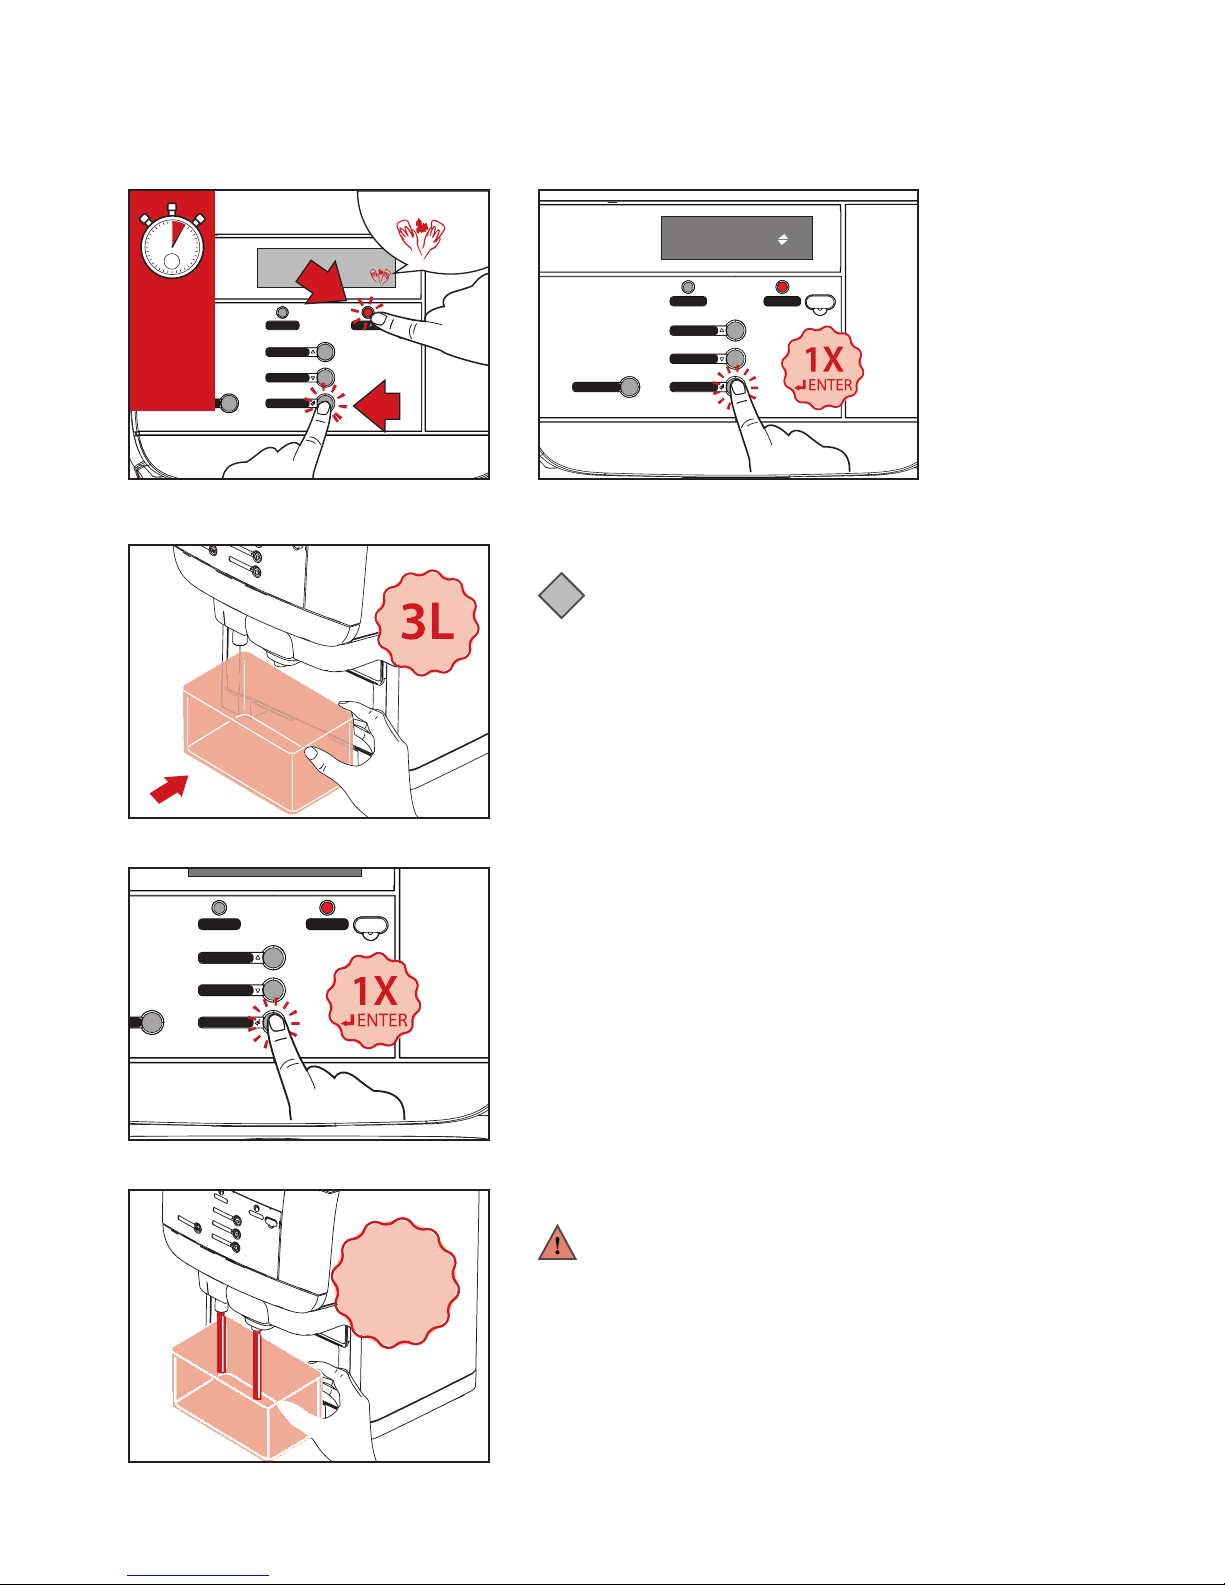
7.4 Flushing
Hot water
Coee large
StopStrength
Coee
Pot coee
+B
A
A+B:
2-3
sec
Coee large
StopStrength
Coee
Pot coee
Hot
liquids!
i
Note:
You can flush the dispenser at any time by using the
procedure described below.
1. Press and hold STOP (A) and ENTER (B) buttons
simultaneously for 2-3 seconds to enter the flushing mode
(See Fig.1).
2. The display will show FLUSHING, press ENTER to continue.
(See Fig.2) The display will show:
PLACE BIN MIN 1L PRESS ENTER TO CONFIRM
3. Place a 3 liter container (See Fig.3) under the drink outlets,
then press ENTER (See Fig.4).
4. The dispenser will begin flushing automatically (See Fig.5).
CAUTION HOT LIQUIDS will shown on the display. When
flushing is finished, the dispenser is now ready for normal
dispensing again.
Warning:
The flushing water is very hot! Avoid scalding! Keep
hands and other body parts away from the dispenser
during the flushing process. Never let children perform
the flushing procedures.
Fig.1
Fig.3
Fig.4
Fig.5
Hot water
Coee large
StopStrength
Coee
Pot coee
Fig.2
FLUSHING
Page 18
18
User manual
7- Cleaning
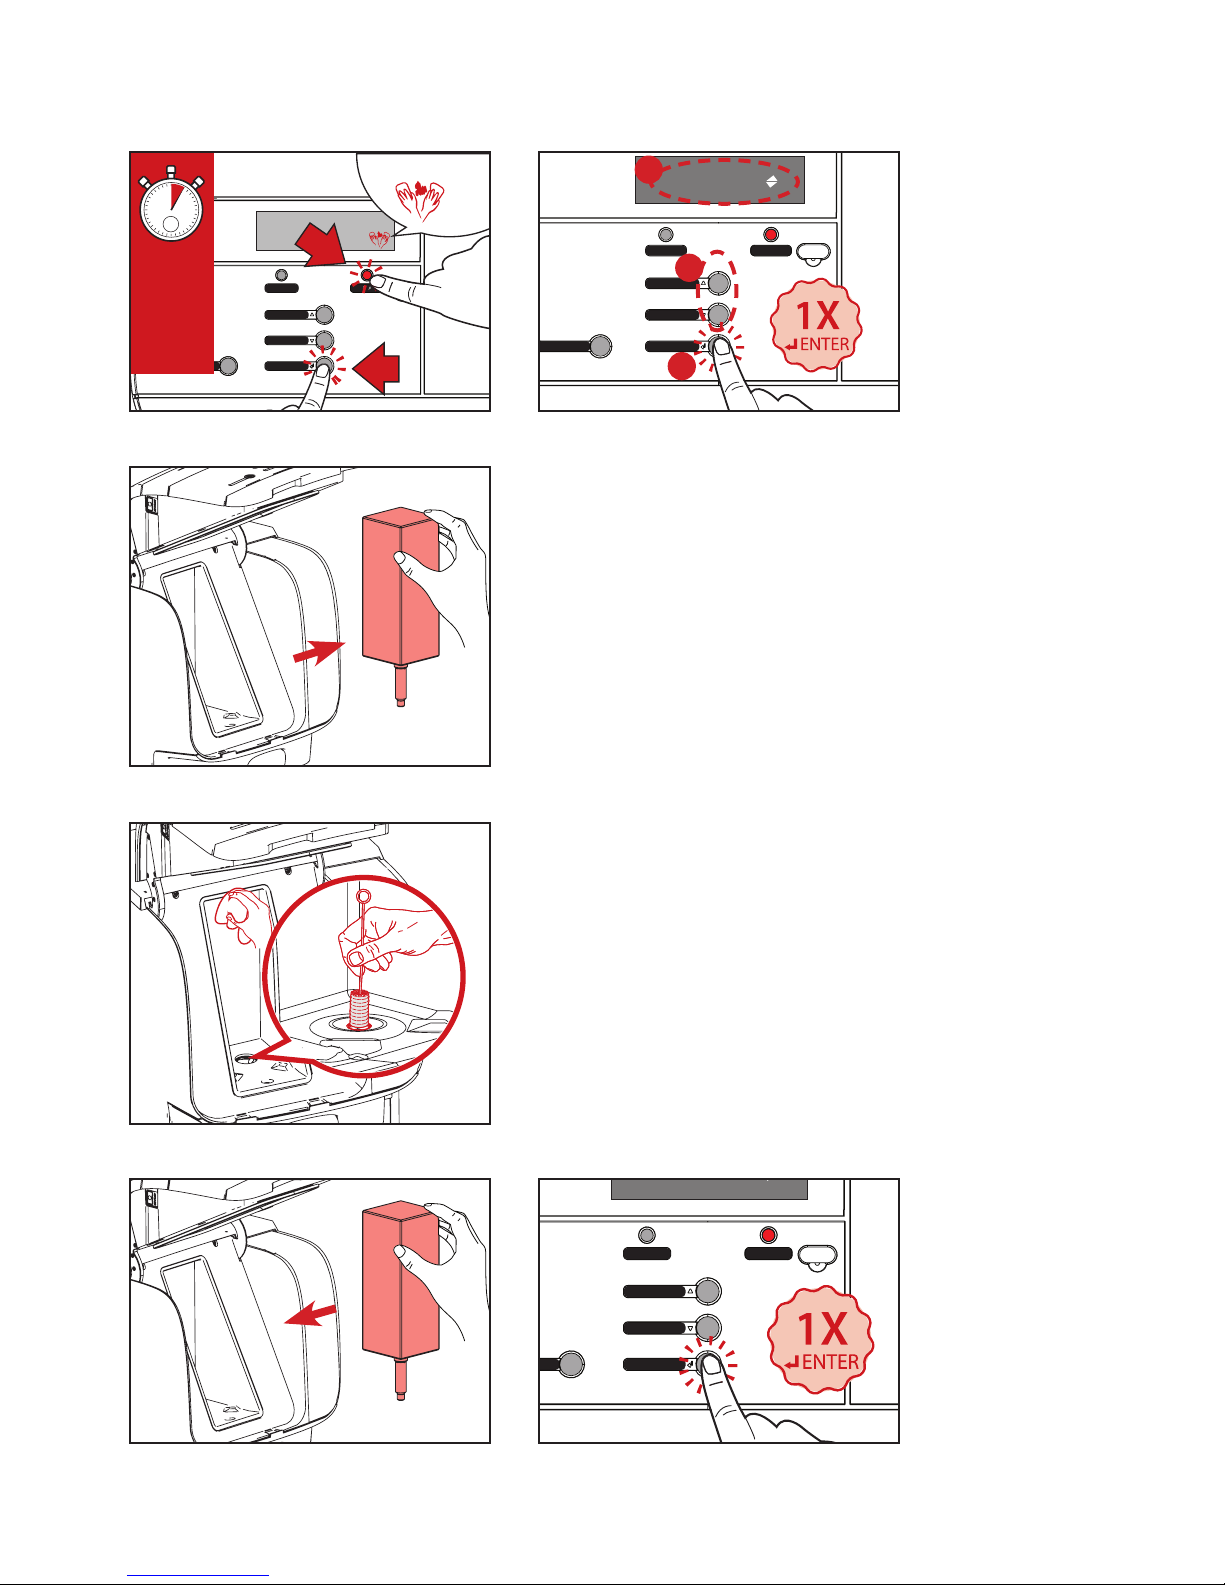
7.5 Cleaning the doser opening and cooler box
1. Press and hold STOP (A) and ENTER (B) buttons
simultaneously for 2-3 seconds to enter the cleaning mode
(See Fig.1).
2. The display will show FLUSHING, press UP or DOWN (A)
until the display shows CLEANING (B), then press ENTER (C)
to continue (See Fig. 2). The display will show:
REMOVE PRODUCT PACKS CLEAN COOLING BOX
3. Open the dispenser door and remove the product pack (See
Fig.3). When the pack has been removed the display will
show CLEAN COOLING BOX PRESS ENTER TO CONFIRM
4. Clean the doser opening with a brush and the interior of the
cooling compartment with a clean, damp cloth and dry with
a clean cloth or paper towel (See Fig.4). Then replace the
product pack (See Fig.5).
5. Press ENTER to continue the cleaning procedure (See Fig.6).
The display will show:
REMOVE AND CLEAN MIXING TRAY (Proceed to next page).
Hot water
Coee large
StopStrength
Coee
Pot coee
+B
A
A+B:
2-3
sec
Hot water
Coee large
StopStrength
Coee
Pot coee
Coee large
StopStrength
Coee
Pot coee
Fig.1 Fig.2
Fig.5 Fig.6
Fig.3
Fig.4
B
C
A
CLEANING
Page 19
19
User manual
A
B
B
A
20 min
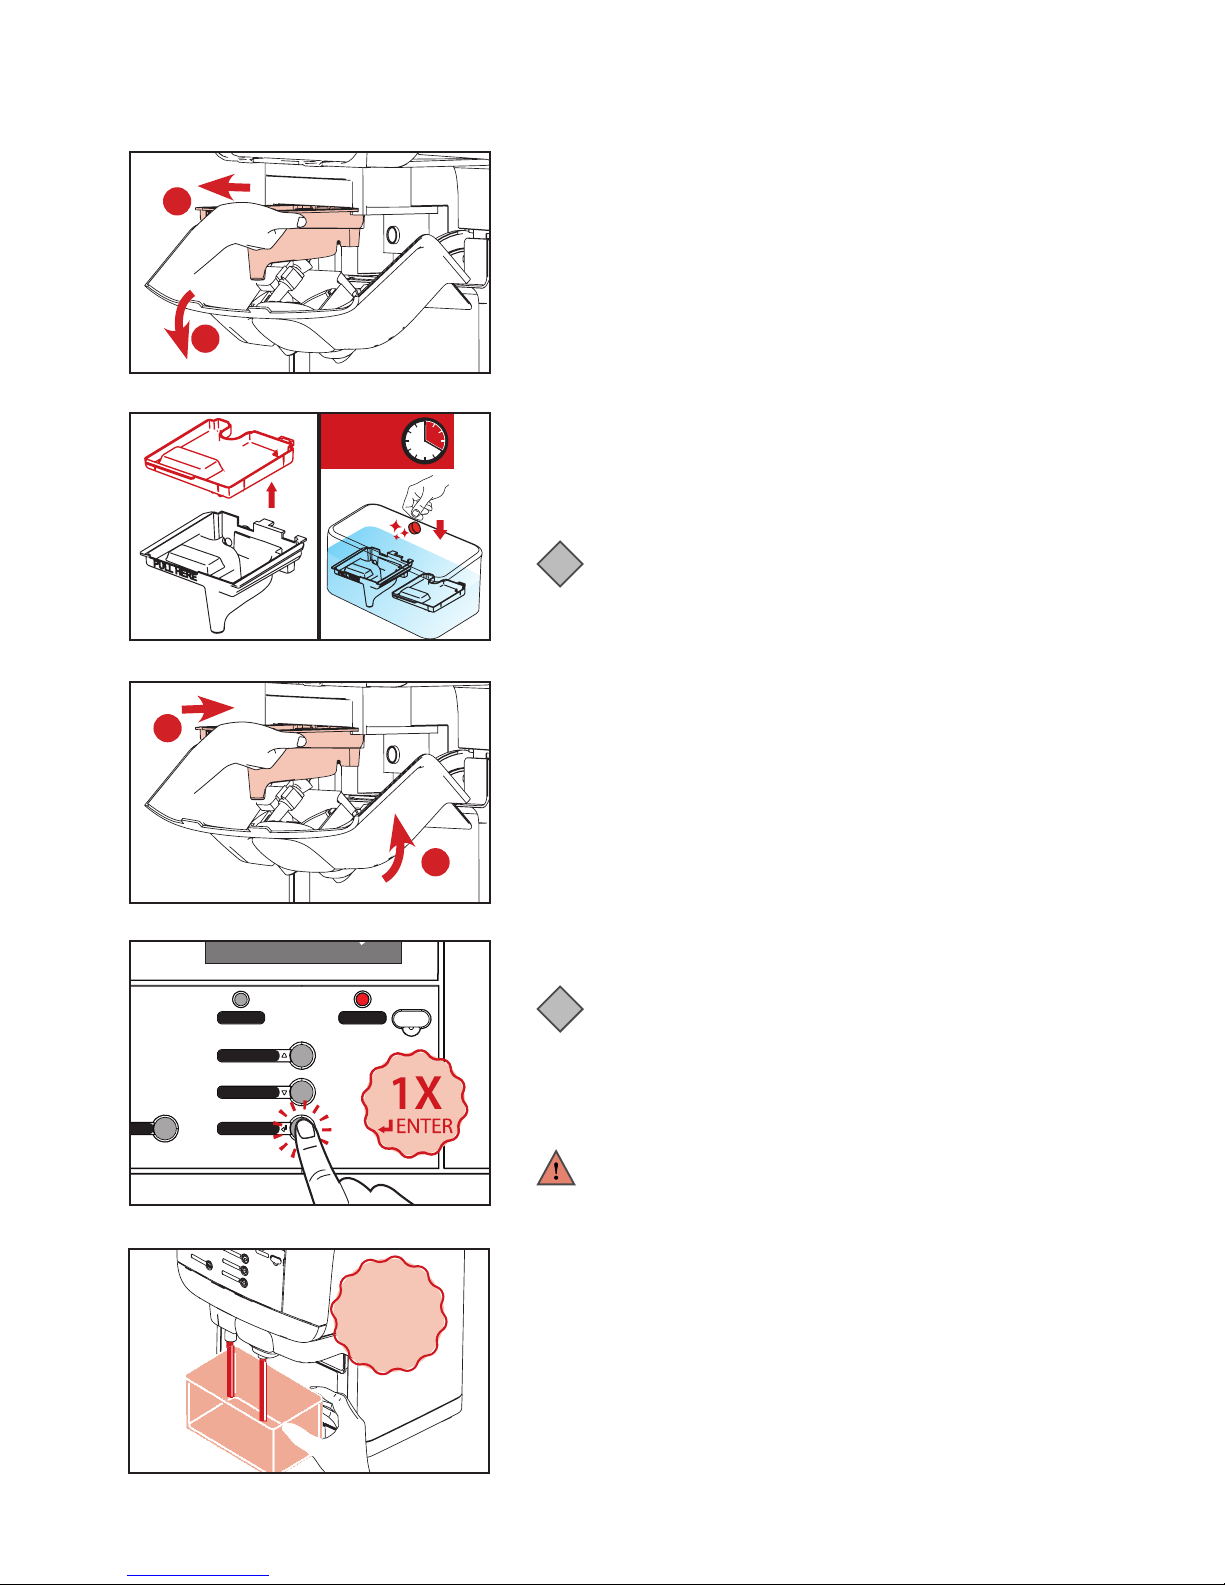
7.6 Removing and cleaning the mixing tray
Fig.1
Fig.2
Coee large
StopStrength
Coee
Pot coee
Fig.4
1. The display will show: REMOVE AND CLEAN MIXING TRAY
2. Follow the steps below:
A. Open the water treatment panel. There will be an
audible beep.
B. Pull the mixing tray straight out. There will be another
audible beep. (See Fig.1)
3. Remove the mixing tray cover by simply pulling it straight
up. Place the mixing tray parts in a bin with locally approved
food-grade cleaning agent and hot water and soak for
approximately 20 minutes. Rinse with clean water and dry
before replacing. (See Fig.2)
i
Note:
Comply with the safety instructions and cleaning
instructions on the cleaning agent packaging.
Optionally, the mixing tray can be washed in a
dishwasher.
4. The display will show: REINSTALL MIXING TRAY, slide
the cleaned mixing tray back into its original position (A).
and close the water treatment panel (B) (See Fig.3).
5. Press ENTER to begin flushing (See Fig. 4). The display will
show: PLACE BIN MIN 1L PRESS ENTER TO CONFIRM
6. Place a 3 liter container (See Fig.5) under the drink
outlets, then press ENTER (See Fig.4). When final flushing is
finished, the dispenser is now ready for normal dispensing
again.
i
Note:
There is a sensor that detects if the mixing tray is in
the correct position. It is not possible to continue the
cleaning process until the mixing tray is installed in the
correct position.
Warning:
The flushing water is very hot! Avoid scalding! Keep
hands and other body parts away from the dispenser
during the flushing process. Never let children perform
the cleaning procedures.
Fig.3
7- Cleaning
Hot
liquids!
Fig.5
Page 20
20
User manual
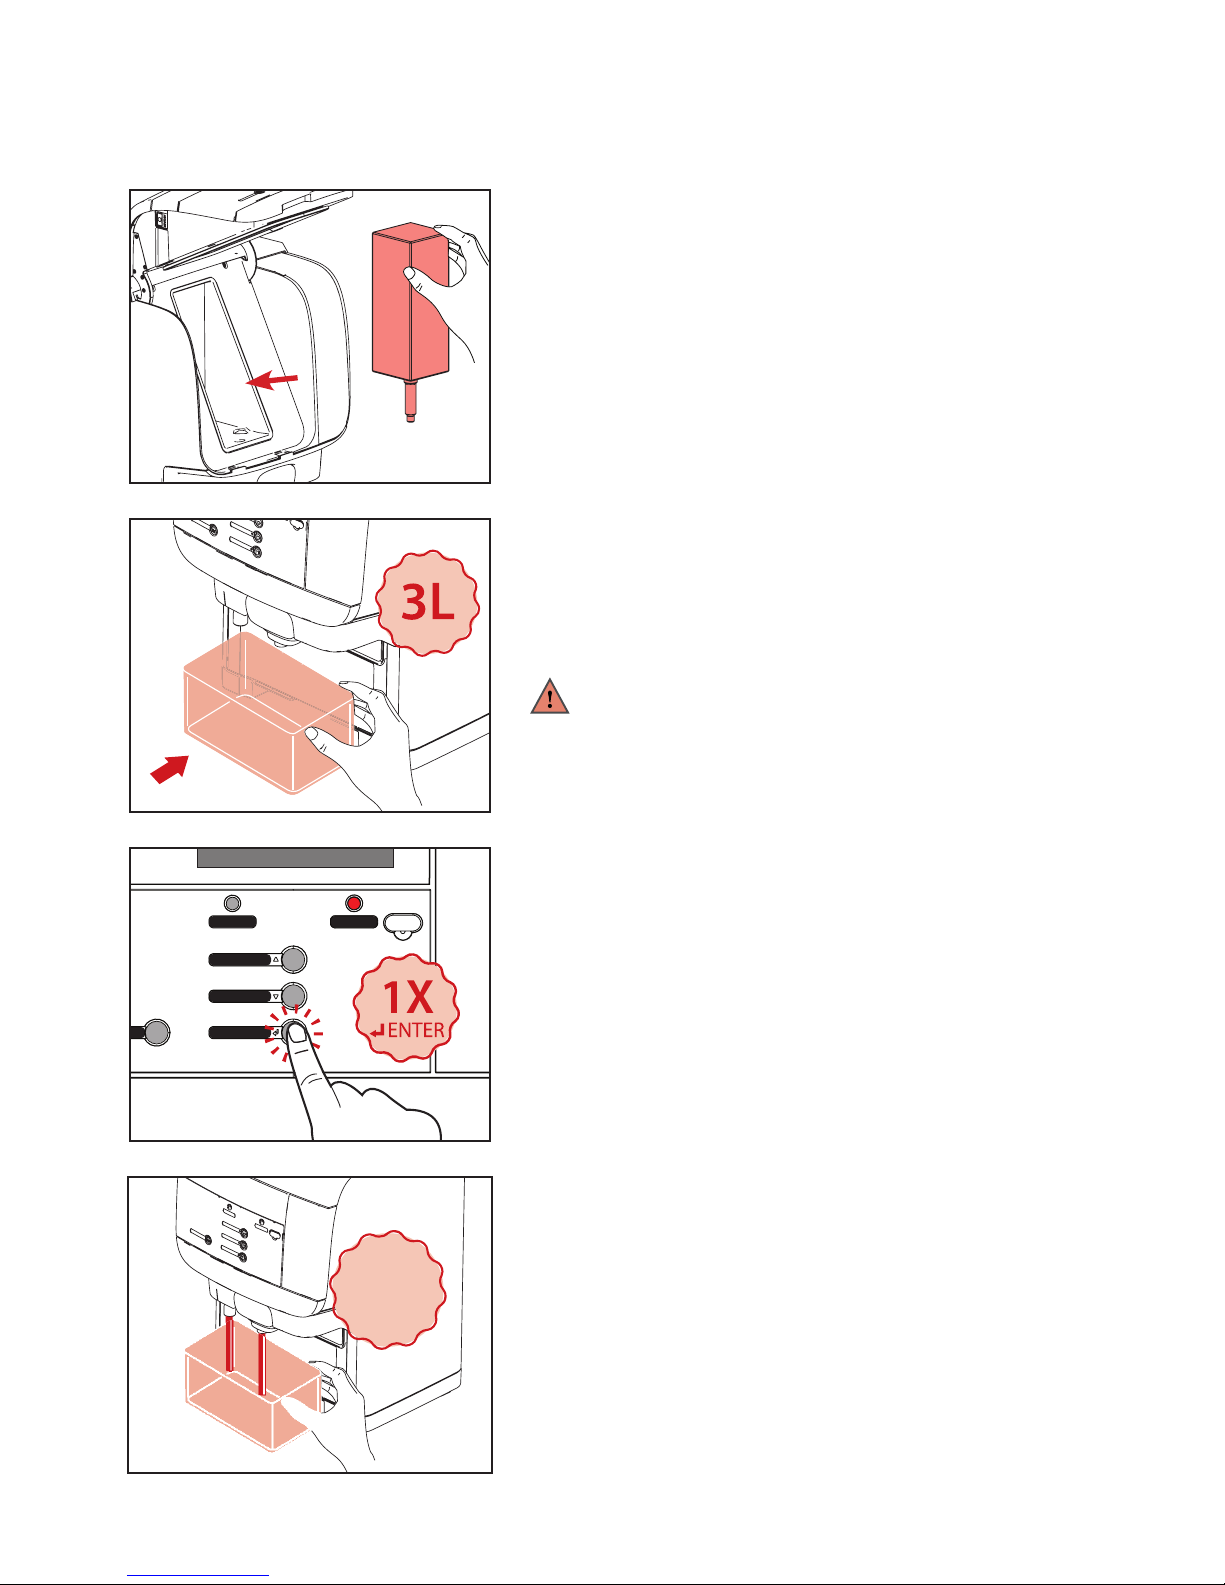
1. When the pack is removed, the display will show:
PLACE BACK PRODUCT PACK
Reinstall the product pack if it has not passed the expiry date.
If expired, replace with a new product pack (See Fig. 1).
2. When the pack has been placed in the cooling compartment,
the display will automatically continue and show: PLACE BIN
MIN 1L PRESS ENTER TO CONFIRM
3. Remove the drip tray and place a 3 liter container (See Fig.2)
under the outlets, then press ENTER .
4. Press ENTER to begin flushing the drink outlets (See Fig 3-4).
CAUTION HOT LIQUIDS is shown in the display.
When done, dispose of the flushed water and replace the
drip tray. The dispenser is ready for use.
Warning:
The water being dispensed is hot! Avoid scalding! Keep
hands and other body parts away from the dispenser
during the flushing process. Never let children perform the
cleaning procedures.
7- Cleaning
7.7 Replacing product pack and ushing the outlet
Coee large
StopStrength
Coee
Pot coee
Hot
liquids!
Fig.1
Fig.2
Fig.3
Fig.4
Page 21
21
User manual
7- Cleaning
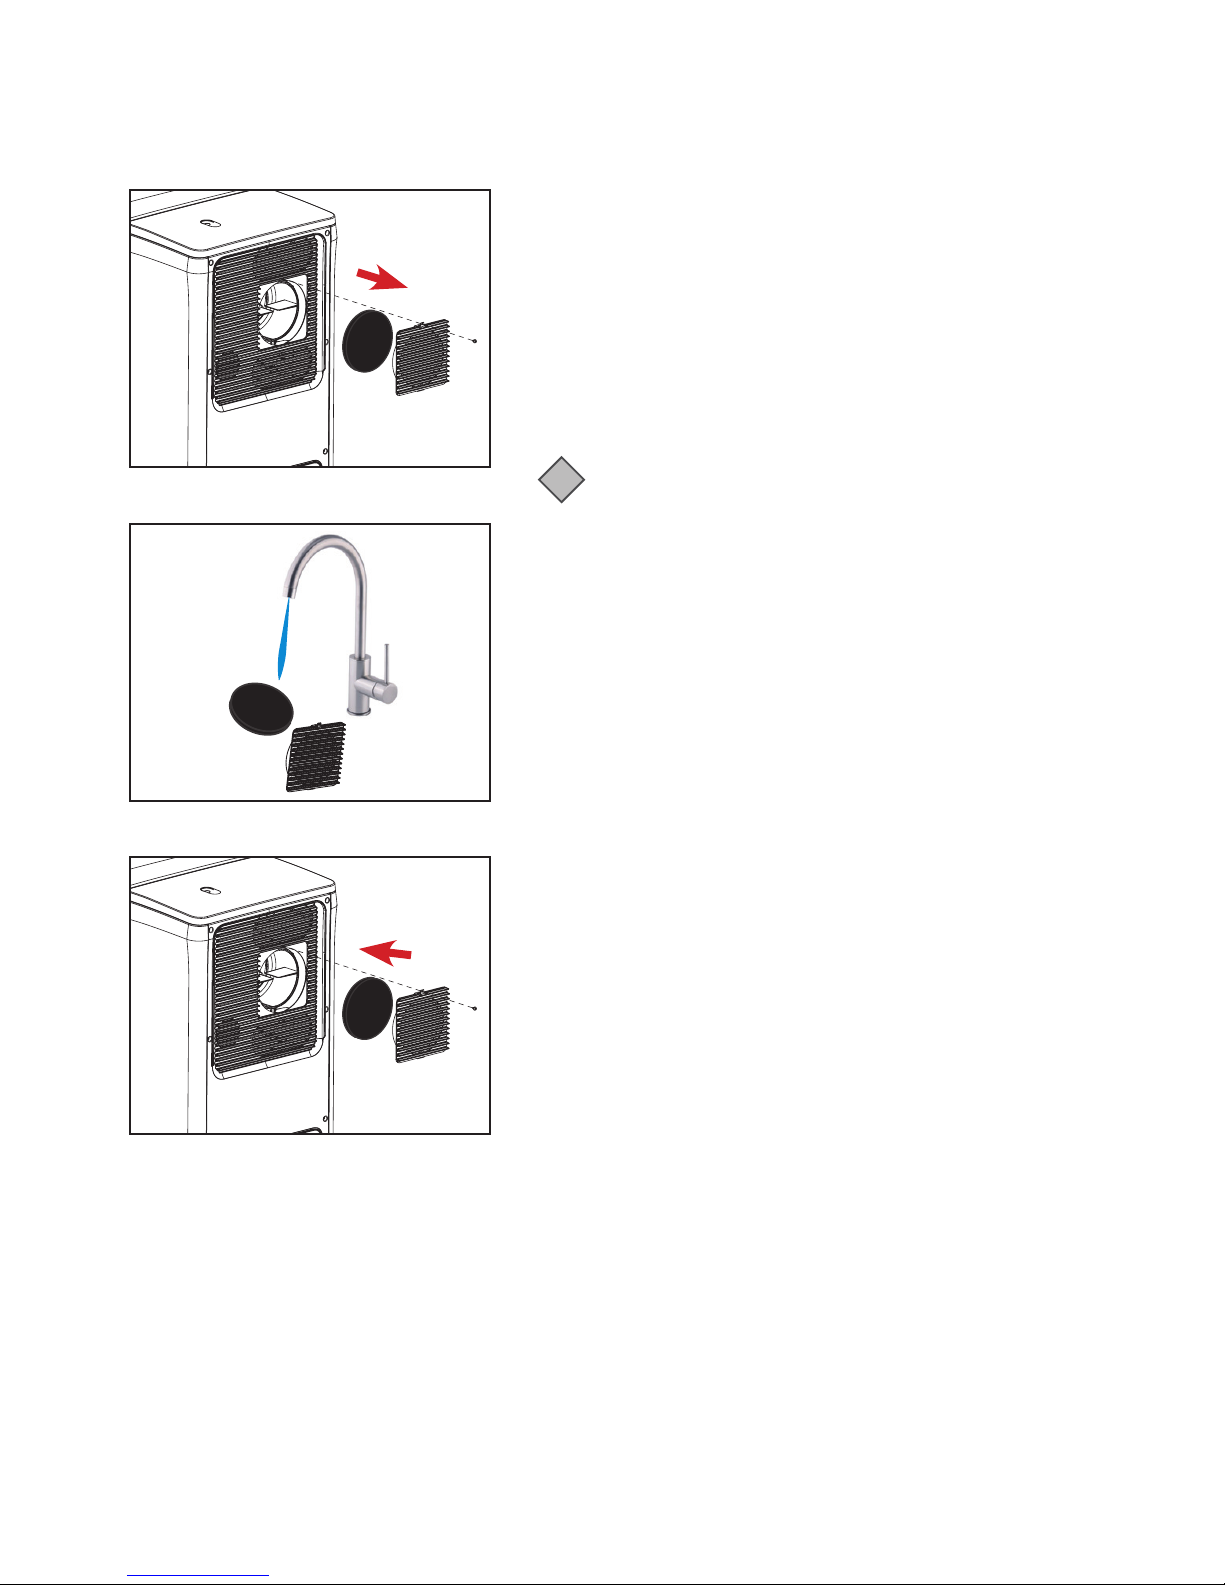
7.8 Cleaning the foam air filter
1. Remove the fixing screw and open the removable
ventilation cover to access the foam air filter. (See Fig.1)
2. Rinse the air filter and cover with warm water to remove any
accumulated dust. Squeeze excess water out of the foam air
filter and dry the cover with a towel to prevent water getting
into the air inlet. (See Fig.2)
3. Replace the air filter and ventilation cover and reinstall the
fixing screw. Do not overtighten the screw. (See Fig.3)
i
Note:
The air filter should be cleaned once per month under
normal conditions, or twice per month in extremely
dusty conditions.
Fig.1
Fig.2
Fig.3
Page 22
22
User manual
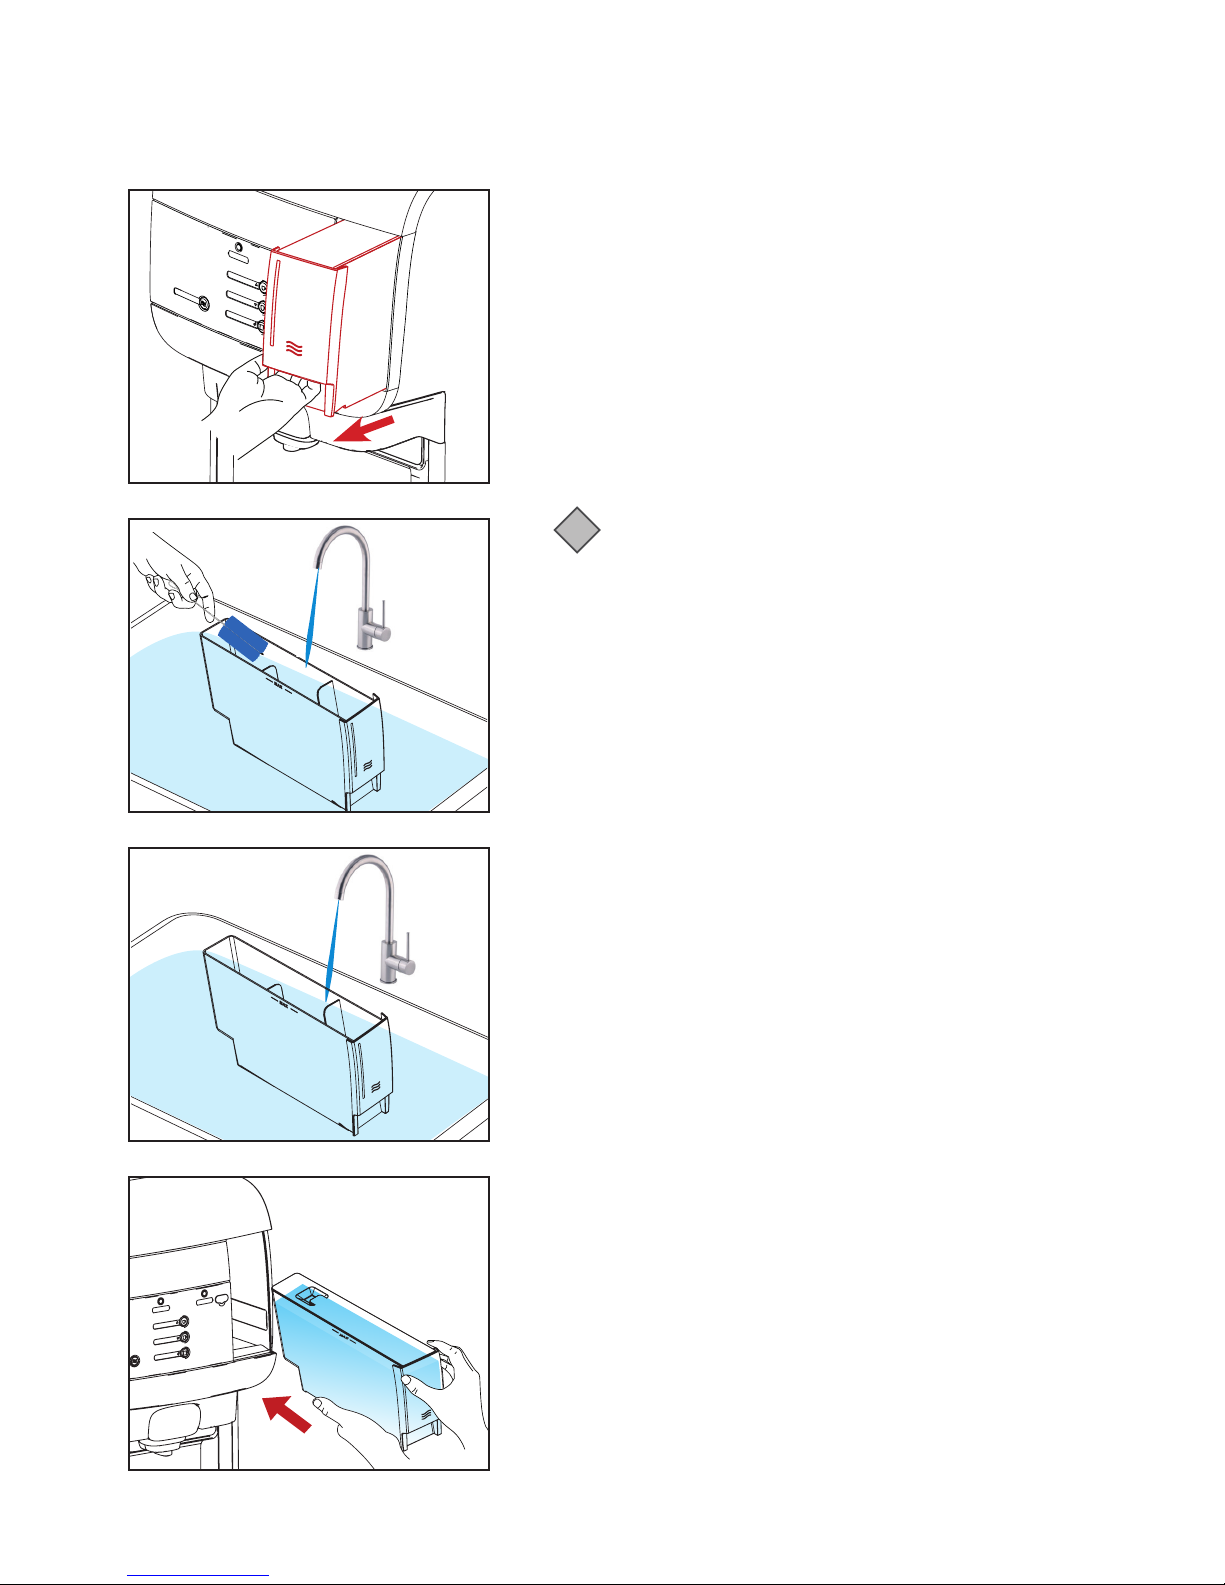
1. Remove the water tank by lifting slightly, then pulling
straight out. (See Fig.1)
2. Wash the water tank with clean water, 20-40°C . A food-safe
cleaning agent may be used as needed. (See Fig.2)
3. Rinse the water tank thoroughly with clean water, 20-40°C.
(See Fig.3)
4. Refill the water tank to the MAX level with fresh, clean water
and replace it in the dispenser. (See Fig.4)
7- Cleaning
7.9 Cleaning the water tank
20-40°C
20-40°C
Fig.1
Fig.2
Fig.3
Fig.4
Note:
When replacing the water
tank into the dispenser, make
sure it is inserted fully into the
machine and that the display
shows normal functionality.
i
Page 23
23
User manual
8.1 Activating the operator mode
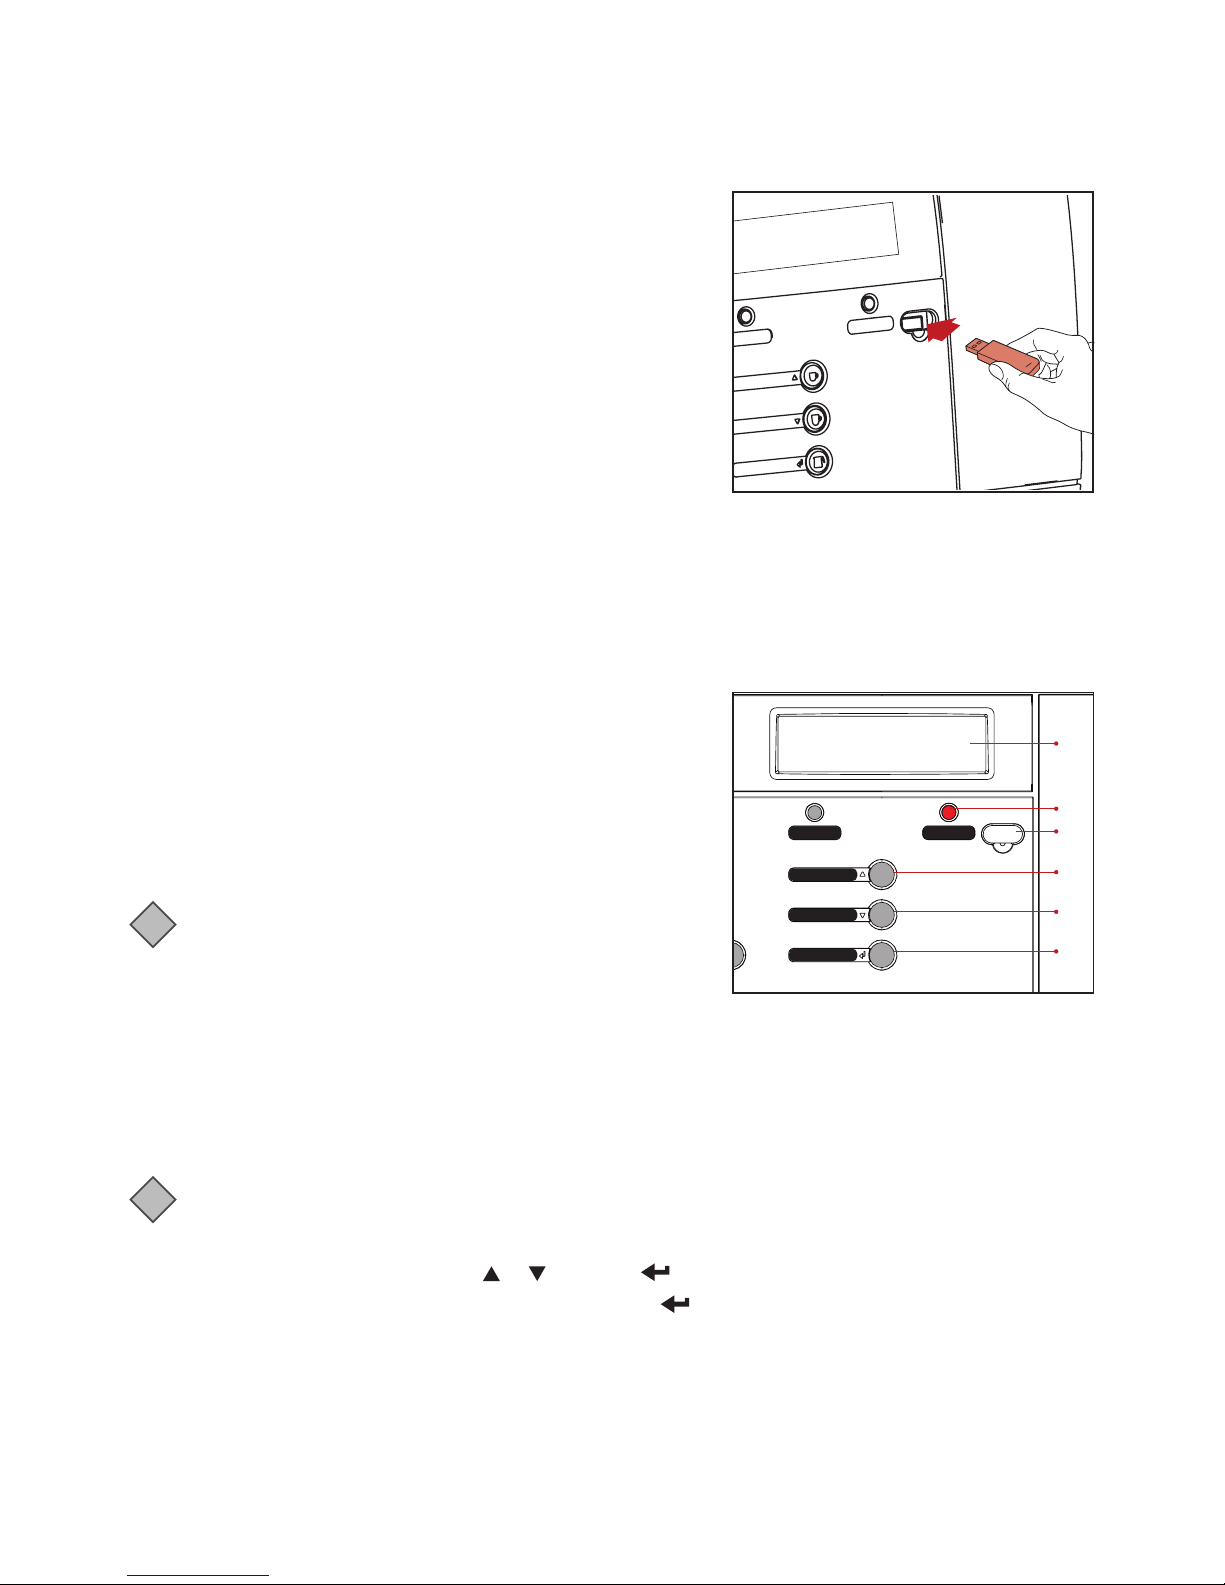
Remove the cover and insert the supplied operator USB key.
This immediately starts the operator mode.
The first menu item (COUNTERS) is displayed.
The following menus are available:
• COUNTERS - read counters
• STRENGTH - change drink strength
• DATE / TIME - set date and time
• CLEANING DAYS - set weekdays for cleaning and flushing
• ECO SETTINGS - energy saving mode settings
• TELEPHONE # - ENABLE/DISABLE and set telephone numbers for service and operator.
• LANGUAGE - Choose the operating language to be used by the machine.
Please note that some menu items might be disabled by the service technician. Contact your Cafitesse
systems supplier if you need your settings altered.
8.2 Operator mode controls
1. STOP (Back) button - Go to previous menu
2. Scroll up or increase value
3. Scroll down or decrease value
4. Enter menu
5. Display
6. Port for USB key
i
Note:
Dispenser programming is not available in all markets.
Some menus may be disabled depending on dispenser
configuration.
8- USER PROGRAMMING
Coee large
StopStrength
Coee
Pot coee
1
6
2
3
4
5
8.3 COUNTERS
In the COUNTERS menu, you have various possibilities to read out the drink counters:
• TOTAL COUNTERS - Counter that is not possible to reset.
• RES COUNTERS - Counter that is possible to reset.
i
Note:
Press STOP button to go back one level within the COUNTERS menu.
1. Select the COUNTERS menu by using
or and press to access it.
2. Select either TOTAL COUNTERS or RES COUNTERS , press to access it.
3. The display will show TOT MACHINE COUNTER alternating with PRESS DRINK BUTTON.
In the small number field below the text row the total amount of drinks dispensed by the dispenser is
shown.
4. To see counter for each button individually, press the desired drink button. Ex. if you press a button it will
show TOT DRINK 1 and then display the number of drinks for that button in the small number field.
5. To go back press STOP button, then you can select a different drink to view.
Page 24
24
User manual
8- USER PROGRAMMING
8.4 STRENGTH
In the STRENGTH menu, you can change the drink strength for all available drinks at once in the range of
+10% to -10%.
1. Select the STRENGTH menu by using or and press to access it.
The following message appears on the display:
STRENGTH: + X %
2. Increase or decrease the drink strength using or .
3. Confirm the required value with . The new cup strength will be accepted immediately.
i
Note:
If you would like to modify the drink strength again, press .
8.5 DATE/TIME
You can set the date and time in the DATE/TIME menu.
The time setting needs to be adjusted at the start and end of daylight saving time.
You can change the drink strength for all available drinks at once in the range of +10% to -10%.
1. Select the DATE/TIME menu by using or and press to access it.
The date and time settings are shown on the display. The month setting is flashing.
2. Use and to select the correct value.
3. Press to go to the next field.
4. Repeat steps 1 and 2 for all fields:
MONTH → DAY → YEAR → HOURS → MINUTES
5. When all fields are set you will see the time.
i
Note:
If the dispenser has been shut down for longer periods, the date and time must be set again.
8.6 CLEANING DAYS
You can set the days that you want to clean or flush the dispenser in the CLEANING DAYS menu. Select the
CLEANING DAYS menu by using or and press to access it.
There are two submenus:
• CLEAN - set “CLEAN” days
• FLUSH - set “FLUSH” days
Caution:
It is mandatory to run the “Cleaning” program at least once a week to guarantee food safety.
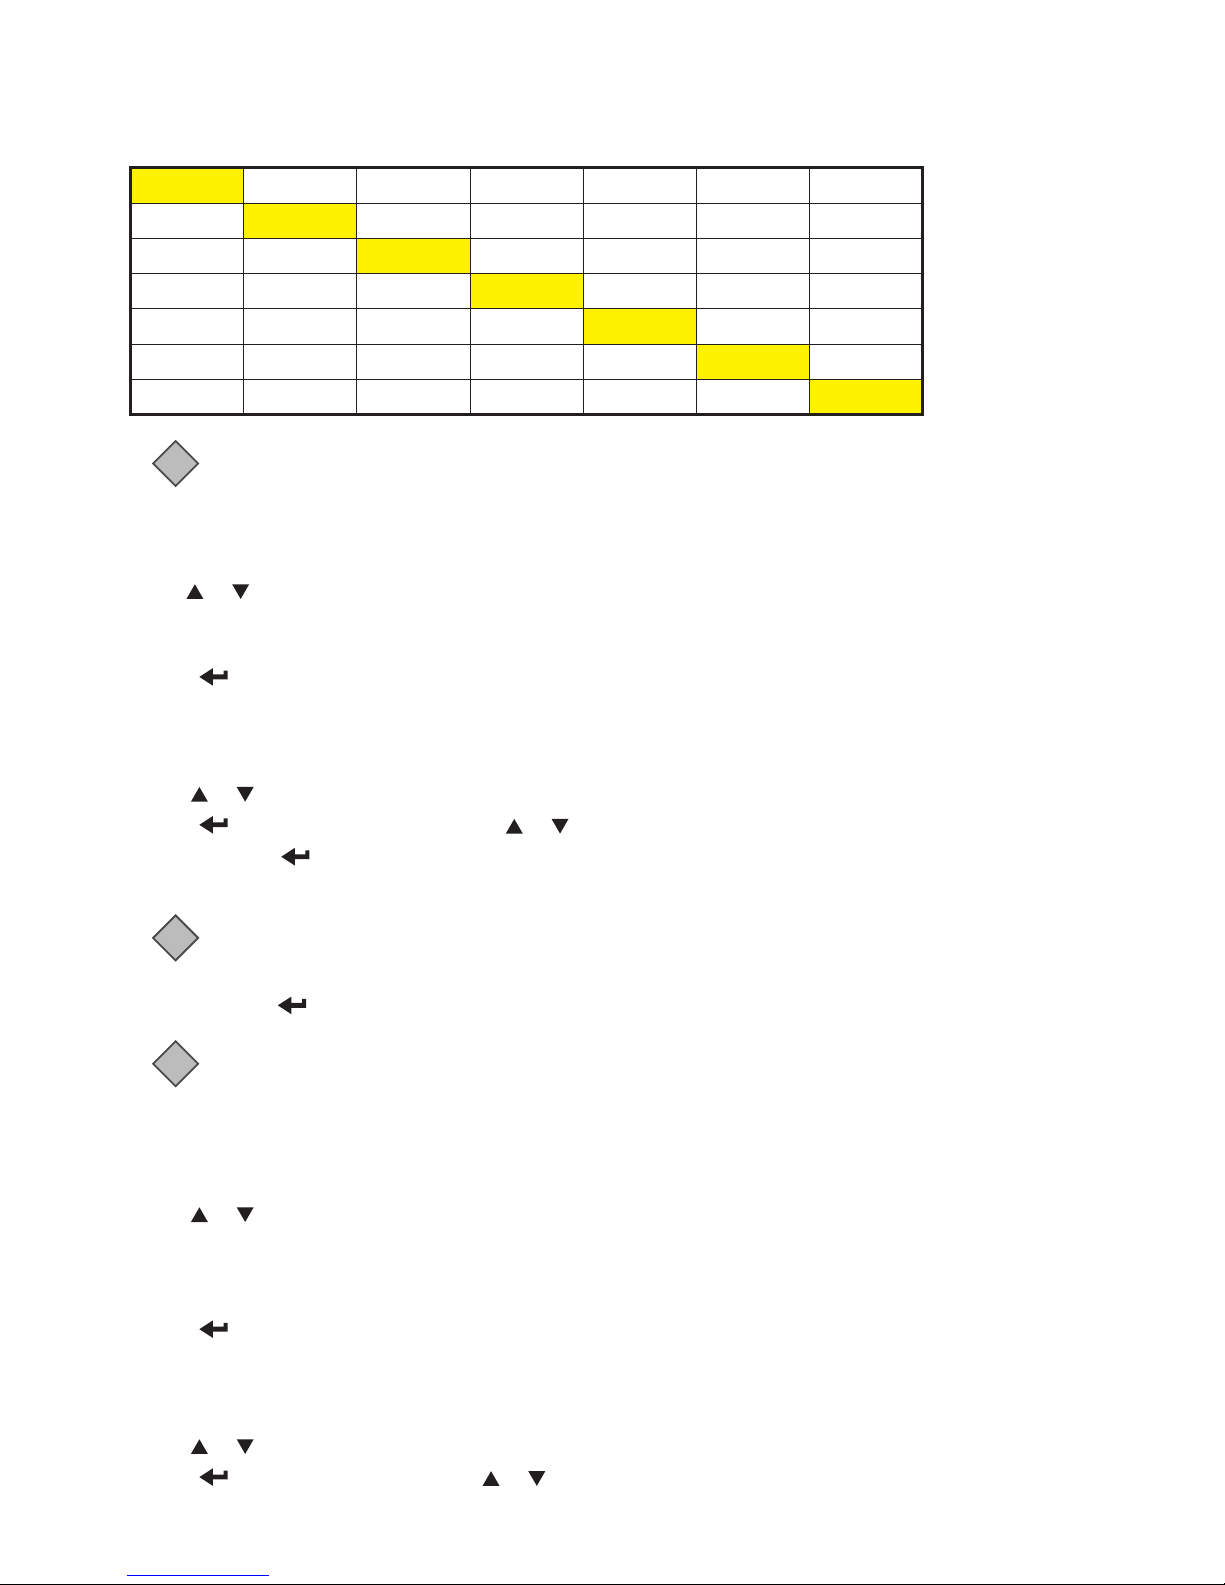
8.61 Determining cleaning days
The dispenser only needs to run the “Cleaning” program once a week. You can select any day you prefer.
You must select at least one day with a maximum interval of 6 days in between. The table below indicates
which days can be combined (Yellow = Cleaning).
Page 25
25
User manual
8- USER PROGRAMMING
i
Note:
You can always set more cleaning and/or flushing days than the minimum required number of days.
Sun Mon Tue Wed Thu Fri Sat
Sun Mon Tue Wed Thu Fri Sat
Sun Mon Tue Wed Thu Fri Sat
Sun Mon Tue Wed Thu Fri Sat
Sun Mon Tue Wed Thu Fri Sat
Sun Mon Tue Wed Thu Fri Sat
Sun Mon Tue Wed Thu Fri Sat
8.62 Setting “Clean” days
1. Use or to select the CLEAN submenu. The icon indicates the active day(s) for cleaning:
SUN MON TUE WED THU FRI SAT
CLEAN
2. Press to enter the submenu.
The cleaning icon is displayed, it is set on SUN (Sunday) by default:
SUN MON TUE WED THU FRI SAT
CL. SET:
3. Use or to select the preferred cleaning day.
4. Press to access the selected day, use or to select CL.SET (cleaning set) or CL.OFF (cleaning off) for
that day. Press to confirm the selections.
The cleaning icon will appear under the activated cleaning day(s).
i
Note:
Several days for cleaning can be set in sequence.
5. Press STOP or
to go back one level within the CLEANING DAYS menu.
i
Note:
If you set a faulty combination of days, the dispenser will automatically return to default cleaning on
Monday and Thursday.
8.63 Set days for “Flush”
1. Use or to select the FLUSH submenu.
The icon indicates the active day(s) for flushing:
SUN MON TUE WED THU FRI SAT
FLUSH:
2. Press to enter the submenu.
The flushing icon is displayed, it is set on SUN (Sunday) by default:
SUN MON TUE WED THU FRI SAT
FL. SET:
3. Use or to move the icon to the day you would like to select or deselect for flushing.
4. Press access the selected day, use or to select FL.SET (flushing set) or FL.OFF (flushing off) for
Page 26

26
User manual
8- USER PROGRAMMING
that day. Press to confirm the selections.
The flushing icon will appear under the activated flushing day(s).
i
Note:
Several days for flushing can be set in sequence.
5. Press STOP to go back one level within the CLEANING DAYS menu.
8.7 ECO SETTINGS
You can reduce power consumption by using the menu ECO SETTING. These settings only apply to periods
during which the dispenser is not used. Select the ECO SETTINGS menu by using or and press to
access it. There are submenus as below:
• ECO ENABLED/DISABLED
• ECO TEMP
• ECO MONDAY
• ECO TUESDAY
• ECO WEDNESDAY
• ECO THIRSDAY
• ECO FRIDAY
• ECO SATURDAY
• ECO SUNDAY
i
Note:
- When the energy saving mode is activated, the ECO icon is shown on the display.
- The dispenser will become active again when any button is pressed. If this function is enabled it will
also show ECO WAKEUP, alternating with PRESS DRINK BUTTON in the display.
Your Cafitesse system supplier can disable this function if you do not want the dispenser to be used
while in ECO mode.
8.71 ENABLED/DISABLED ECO mode
1. Use or to select the ECO ENABLED/DISABLED submenu and press to access it. The status is
flashing on the display.
2. Use or to select ENABLED or DISABLED.
3. Press to confirm the selected status.
4. Press STOP or to go back one level within the ECO SETTINGS menu.
i
Note:
By default the ECO mode is enabled between 20:00 & 07:00 hours.
8.72 Setting the ECO start and stop times
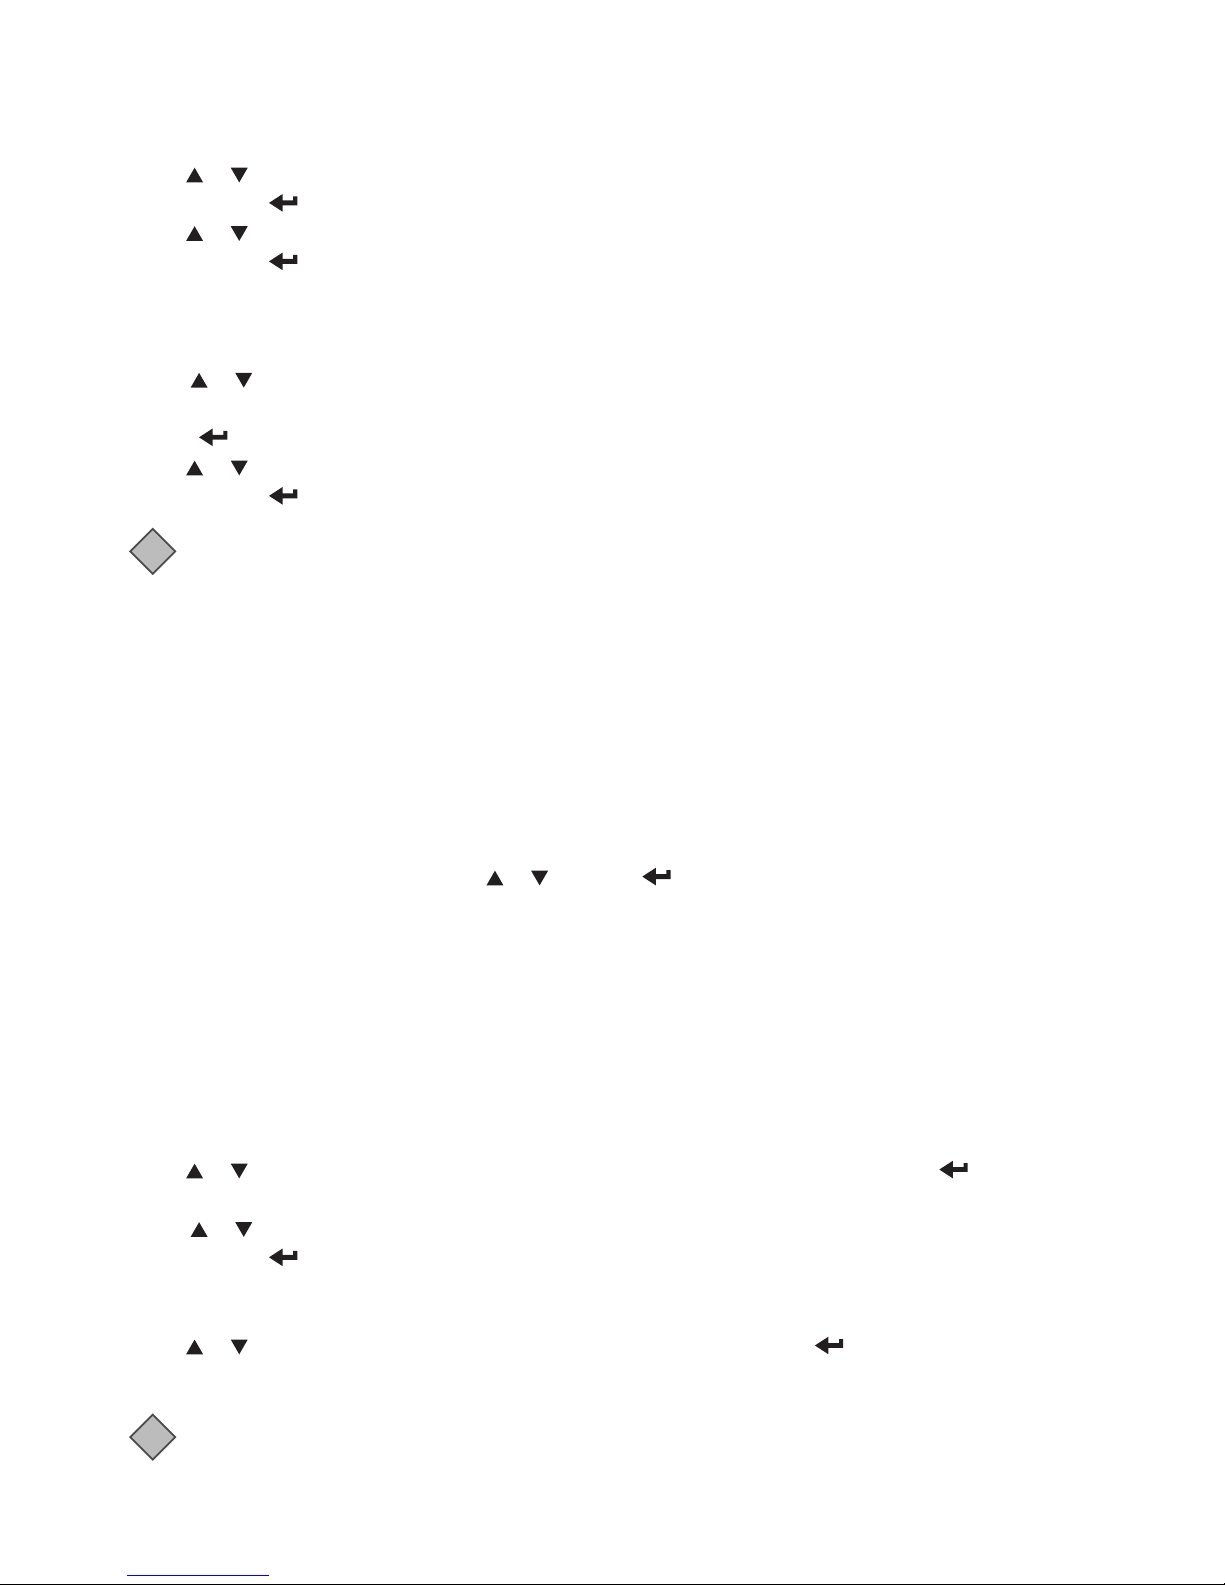
1. Use or to select the submenu from ECO MONDAY to ECO SUNDAY you want.
2. Press to enter the submenu. The current day of the week is shown on the display.
3. Use or to select the ECO START or ECO STOP submenu. The current ECO time is shown on the display.
4. Press to enter the submenu. The option hour setting flashes and is active.
Page 27
27
User manual
8- USER PROGRAMMING
5. Use or to set the desired time (hours).
6. Confirm with . The option minutes setting flashes and is active.
7. Use or to set the desired time (minutes).
8. Confirm with . The new ECO time is shown on the display.
8.73 Setting the ECO boiler temperature
1. Use or to select the ECO TEMP submenu. The current ECO boiler temperature is shown on the display
(default = 63.0°C).
2. Press to enter the submenu. The temperature setting is flashing.
3. Use or to select the desired temperature.
4. Confirm with . The new ECO boiler temperature is shown on the display.
i
Note:
The lower the ECO boiler temperature is set, the longer it takes for the dispenser to become fully
functional again after exiting ECO mode.
8.8 TELEPHONE#
You can set the telephone numbers of operator and service in this menu. You can also select whether the
numbers should be displayed in case of:
• Cleaning is required (operator)
• A product pack is empty (operator)
• A malfunction is detected (service)
Select the TELEPHONE # menu by using or and press to access it. The status is shown in the display:
OPERATOR NR: 0123456789 by default.
There are four submenus:
• SHOW OPERATOR NR
• SHOW SERVICE NR
• SET OPERATOR NR
• SET SERVICE NR
8.81 ENABLED/DISABLED telephone numbers
1. Use or to select the SHOW OPERATOR NR or SHOW SERVICE NR submenu and press . The display
shows: Y (yes) or N (no)
2. Use or to select Y to activate the number display or N to deactivate the number display.
3. Confirm with . The new setting will then be shown continuously on the display.
8.82 Set telephone numbers
1. Use or to select the OPERATOR NR or SERVICE NR submenu and press . The display shows the
telephone number. The first digit is flashing: O: 0123456789
i
Note:
O = operator, S = service
Page 28

28
User manual
8- USER PROGRAMMING
2. Use or to change the first digit.
3. Confirm with . When confirmed the second digit starts flashing.
4. Repeat steps 2 and 3 until all 10 digits are set. The new telephone number will be shown on the display.
8.9 Language
1. Use or to select the LANGUAGE submenu and press to access it. The status is flashing on the
display.
2. Use or to select language to be used for the machine.
3. Press to confirm the selected status.
4. Press STOP or to go back previous menu.
Page 29
29
User manual
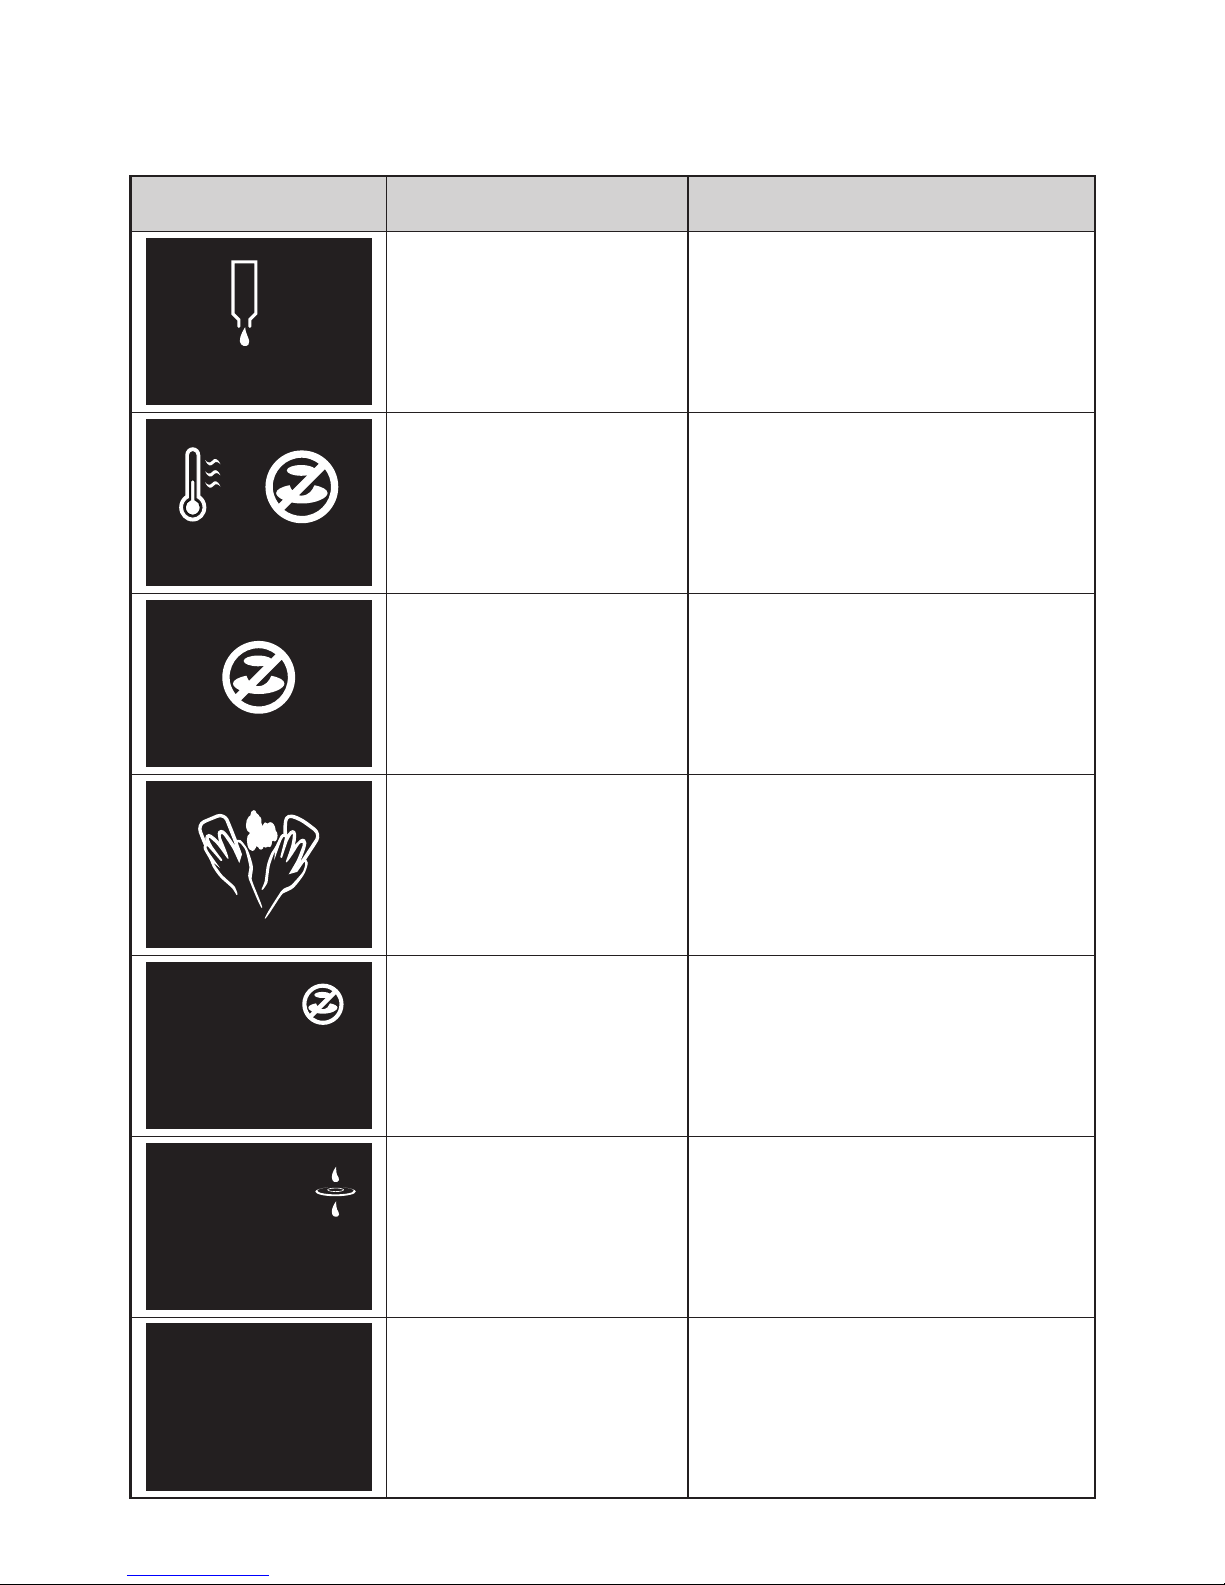
Symbol Cause Action
REFILL PRODUCT
The product pack is:
1. Empty
2. Incorrectly positioned
3. Not present
•
Replace the empty product pack.
• Check whether the product pack is inserted
correctly.
• Insert a product pack.
• Call the operator when the number is shown
on the display.
BOILER HEATING UP
The water in the boiler
has not yet reached the
required temperature.
The drink delivery of the dispenser is blocked
until the water reaches the correct temperature.
The drink delivery is
blocked because the
Standby/Clear-Error button
on the dispenser was
pressed.
Press the standby / Clear-Error button again to
unlock the dispenser.
The dispenser must be
cleaned.
Run the “Cleaning” program within 8 hours. Call
the operator if the phone number is shown on
the display.
CLEANING OVERDUE
The drink delivery is
blocked because the
dispenser was not cleaned
as scheduled.
Run the “Cleaning” program immediately. Call
the operator if the phone number is shown on
the display.
CHANGE WATER FILTER
The water filter of the
dispenser must be replaced
Contact service to replace the water filter.
ECO
ECO WAKEUP /
PRESS DRINK BUTTON
The drink delivery is
blocked because the energy
saving mode is switched on.
The ECO mode will end automatically at the
set time.
9- Troubleshooting
Page 30
30
User manual
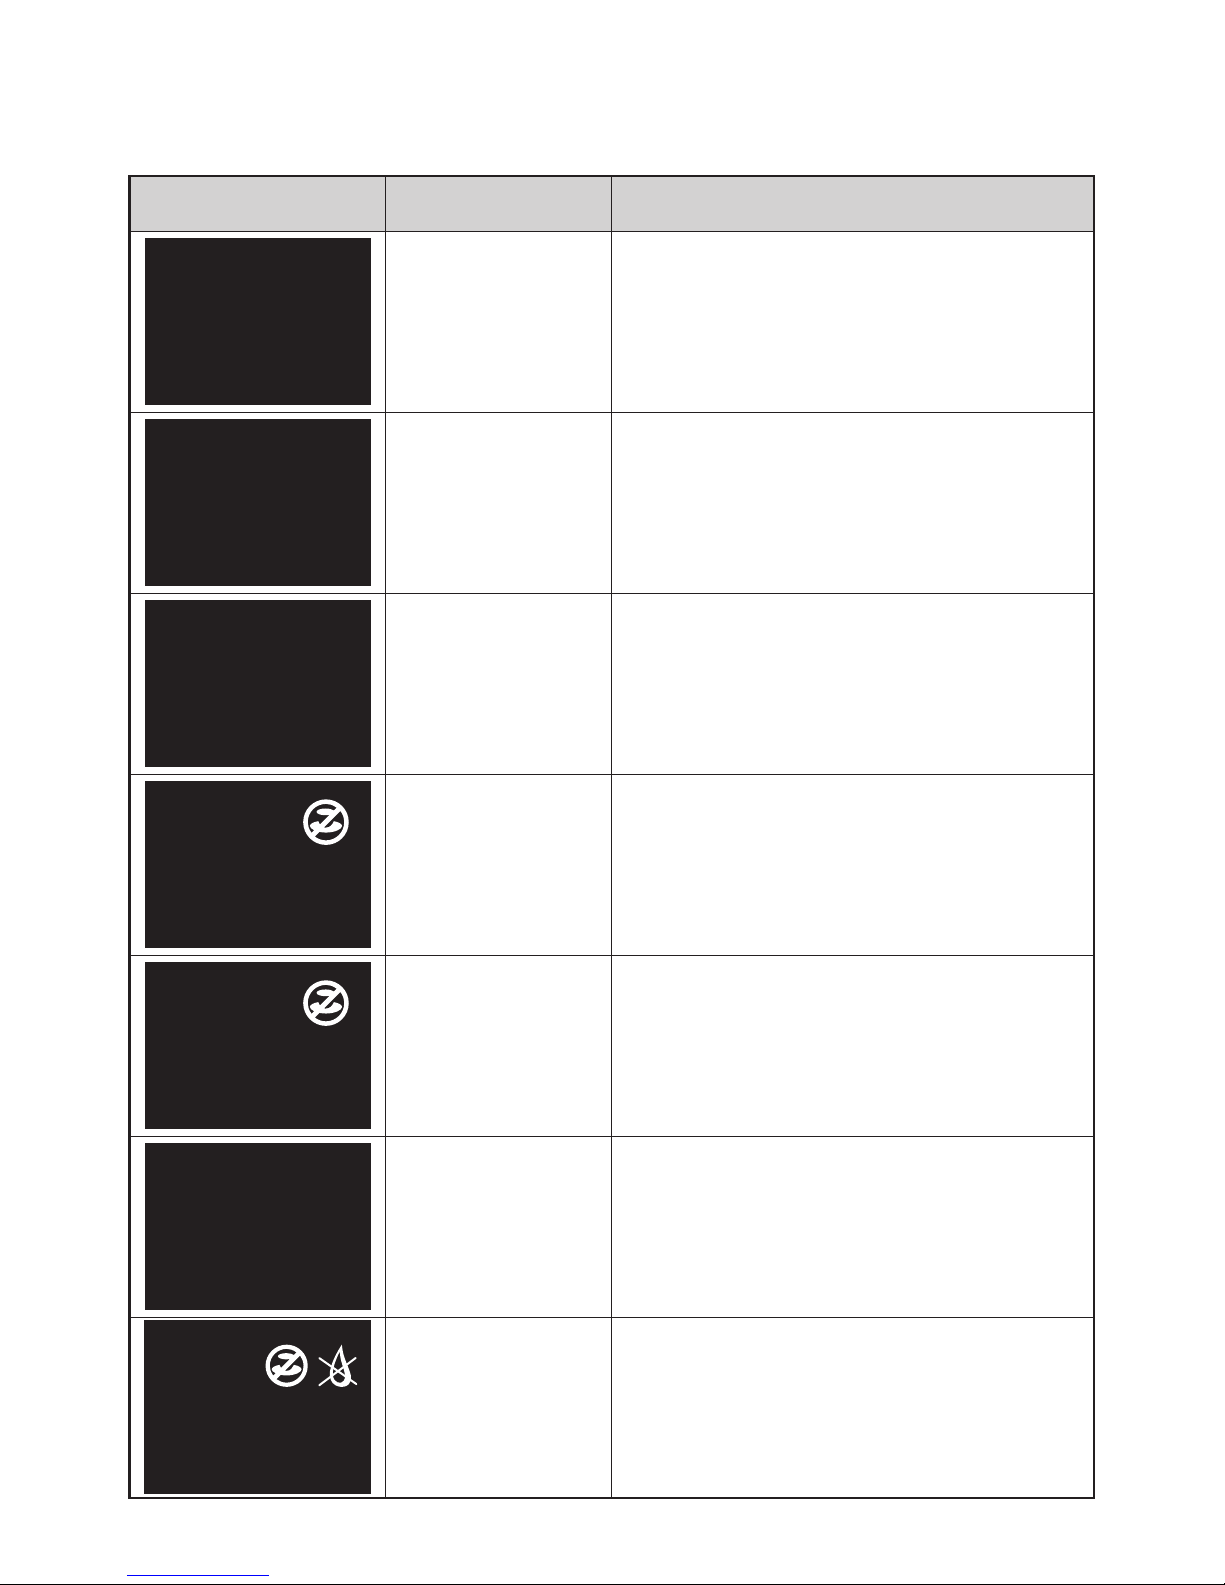
Symbol Cause Action
E17/ E18
Water system error
•
Check if the water supply line to the dispenser is
blocked / pinched and confirm that the water tap is
opened completely.
• Press and hold the LOCK/CLEAR button for 5 seconds
to restart the dispenser.
• Possible leak inside the dispenser.
• Contact service if the error remains.
E19
Possible internal
water leak detected
Water is reaching the dispenser, but the boiler is not
detected to be filling up, possible leak or sensor failure.
Close the water supply at the tap or empty the water tank
and turn off the dispenser at the main power switch, then
contact service for inspection and repairs.
E30
Cooling error
•
Check the ventilation area behind the dispenser and
the ambient temperature of the dispenser, and clean
the air filter / ventilation grid, if necessary.
• Press and hold the LOCK/Clear switch for 5 seconds to
restart the dispenser.
• Contact service if the error remains.
WATER TREATMENT /
PANEL REMOVED
Water treatment
panel is not
detected
•
Check if the water treatment panel is incorrectly placed
/ missing.
• Contact service if the error remains.
MIXING TRAY REMOVED
Mixing tray not
detected
•
Check if the mixing tray is incorrectly placed / missing.
• Contact service if the error remains.
DRIPTRAY FULL
Drip tray is full of
water
•
Remove the drip tray and empty it of waste water.
REFILL WATER TANK
Internal water tank
is empty
•
Remove the internal water tank and fill it with fresh tap
water, place it back in to the dispenser; the warning
will disappear automatically.
9- Troubleshooting
Page 31

Page 32

Produced by Crem International (Shanghai) Co., Ltd.
Address: Building 5, No 521-551 KangYi Road, Pudong New Area, Shanghai, China
www.creminternational.com
 Loading...