

Page 1
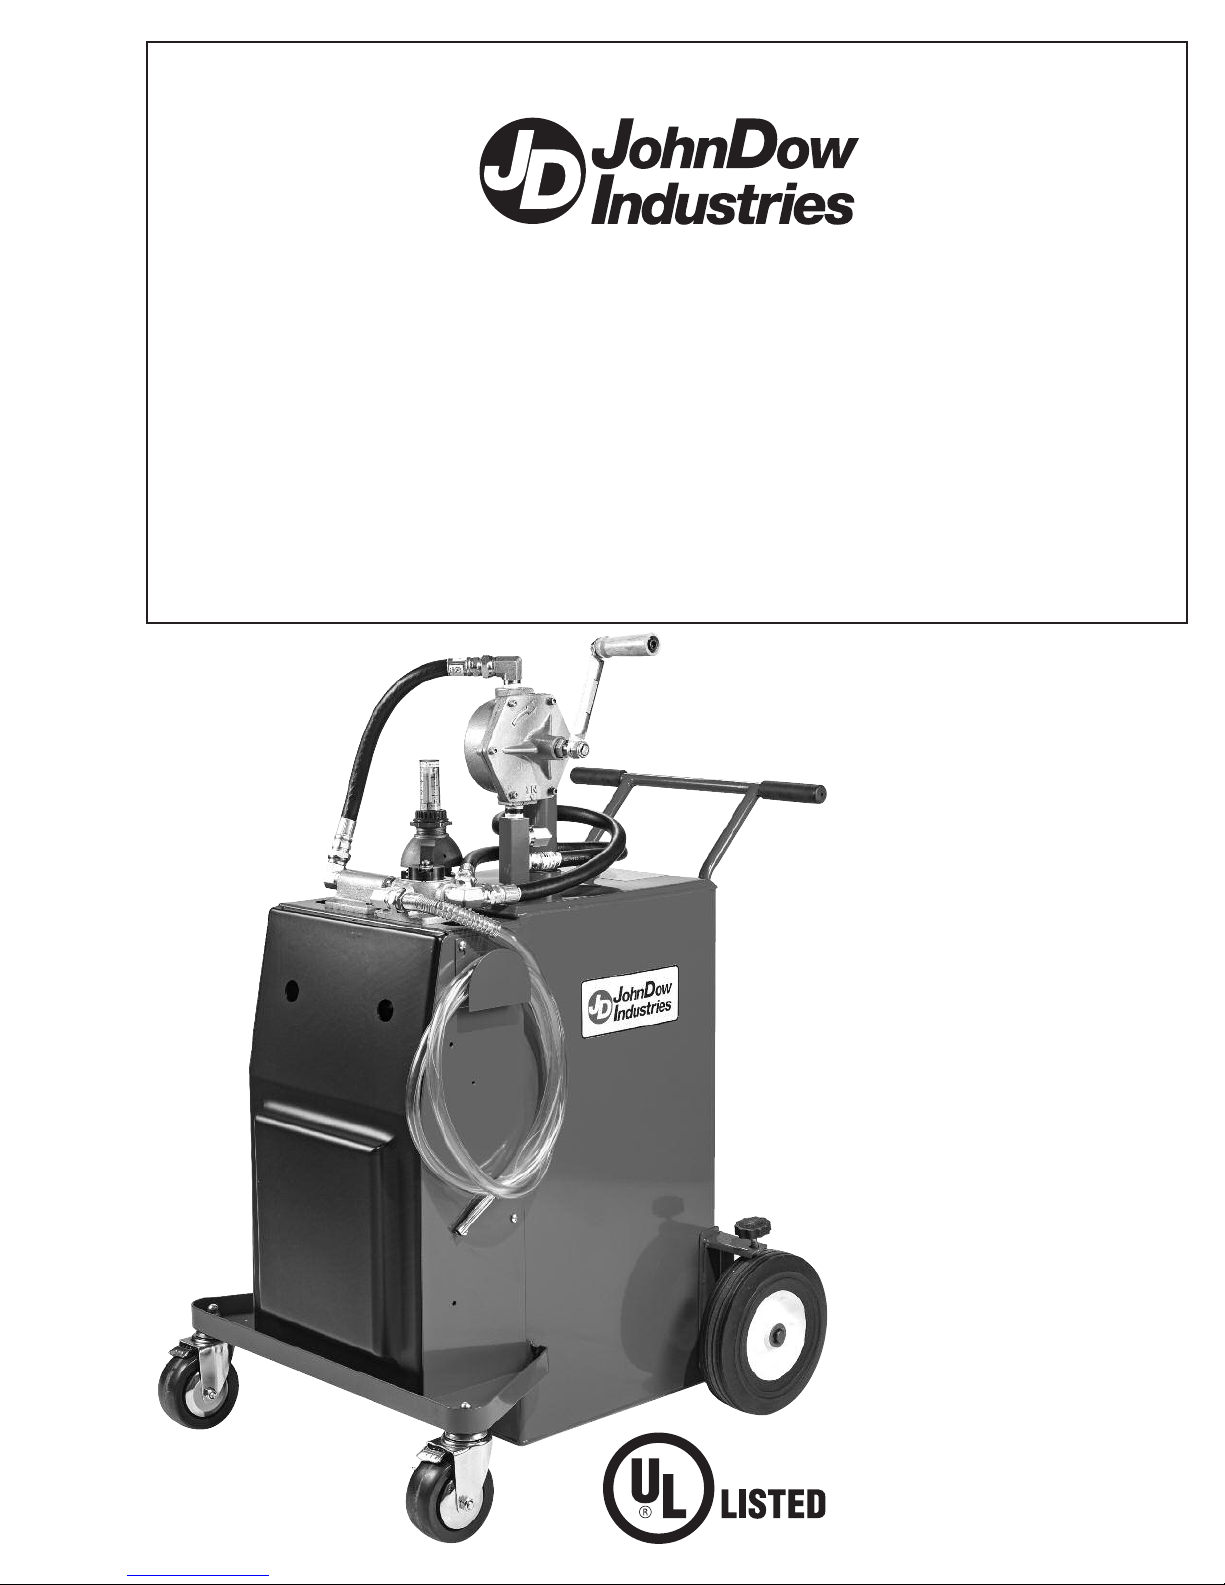
Pro 30 Gas Caddy
™
Model FC-P30-UL
Operator’s Manual
Contents Page
Safety & Warning Instructions 2
General Product Description 3
Assembly 3
Operation 4
Storage 4
Product Specifications 4
Replacement Parts & Accessories 5
Troubleshooting 6
Notes 7
JohnDow Industries, Inc.
151 Snyder Ave.
Barberton, OH 44203
REV 9/6/17
Page 2
OPERATOR’S MANUAL FC-P30-UL
INSTRUCTIONS PERTAINING TO THE RISK OR INJURY TO PERSONS.
IMPORTANT SAFETY INSTRUCTIONS. SAVE THESE INSTRUCTIONS.
READ THIS MANUAL CAREFULLY BEFORE INSTALLING,
OPERATING OR SERVICING THIS EQUIPMENT
It is the responsibility of the employer to place this information in the
hands of the operator. Keep for future reference.
DANGER
1. Gasoline and other fuels are extremely flammable. Keep away from heat sparks and open flames as an explosion will result
in severe personal injury.
2. Gasoline vapors can explode. Harmful or fatal is swallowed. Avoid breathing fuel vapors.
3. Attach ground wire and bond containers or equipment that are being pumped from and into nuetralize the potential charge
between them
4. Ground all containers for extra safety by connecting the containers to a metal pipe or rod that is buried underground.
5. This product is an atmospheric tank. DO NOT modify this tank or its components. All components and design features have
been tested and approved for use for handling flammable fuels.
6. DO NOT use funnels when transferring fuel through the fill tube.
7. Avoid excess agiation, shaking, splashing or high-flow rates as these can increase the risks of static charge build up.
8. DO NOT use electronics or mobile communication devices such as mobile phones while dispensing or handling fuel.
9. DO NOT smoke near or while using this gas caddy.
10. This product is intended for fuel transfer only and is NOT to be used to transport fuel in any vehicle or trailer.
WARNING
1. Obtain Material Safety Data Sheets on fuels being handled. Always wear required proper personal protection equipment
and clothing.
2. DO NOT tips or operate on incline surfaces.
3. Keep both hands on the handles when maneuving to maintain control.
4. When using this product precautions should always be followed, including the following:
a. Read all instructions before using this product.
b. To reduce the risk of injury, close supervision is necessary.
c. Keep out of reach of children.
d. DO NOT put fingers or hands into openings or into the pump.
5. Ensure that all fittings and threaded hose and pipe connections are tightened and leak free.
Indicates an imminently hazardous situation which, if not avoided, will result in death or
serious injury.
Indicates a potentially hazardous situation which, if not avoided, mayh result in death or
serious injury.
CAUTION
1. Be certain all operators of the equipment have been trained for safe working practices and understand its limitations.
2. Use Caddy for “one type of fuel ONLY” to avoid possible damage to vehicle.
3. Use care when maneuving to prevent injury or loss of control. Seek assistance to avoid strain or injury when required.
4. Not for prolonged storage of fuel.
5. Monitor flow rate and fill levels to prevent overflows and spills. DO NOT overfill containers, drums or tanks.
6. Always empty the pump and hose after use by lifting the hose and turning the handle in the opposite direction of the arrow
to empty all remaining liquids back into the caddy.
Indicates a potentially hazardous situation which if not, avoided, may result in minor or
moderate personal injury. It may also warn of unsafe practices.
2.
Page 3
OPERATOR’S MANUAL FC-P30-UL
GENERAL PRODUCT DESCRIPTION
The Gas Caddy is designed and approved to safely transfer
fuel to and from a vehicle. It may be used to safely store fuel
during vehicle service. It is approved for use with unleaded
asoline, diesel, kerosene, and E85 (ethanol) fuels.
g
The direction of flow is controlled by a 4-way valve to assure
that fuel is filtered in both directions. Caution: Turning the
pump in the opposite direction will pump the fuel, but this
will cause contaminates inside the filter to be introduced
into the fuel stream. Always use the valve to control the
direction of flow.
The FC-P30 comes standard with a 10 micron filter for use
with gasoline. Other filters are available for other fuels. Select
the correct filter for the intended application. Proper filter
selection is critical to achieving maximum pumping efficiency
and to properly remove contaminates from the fuel.
Refer to the table shown in REPLACEMENT PARTS AND
ACCESSORIES if you intend to pump different fuels.
Fuel Type
Unleaded Gasoline 10 micron
Diesel and Kerosene 30 micron
E85 Ethanol 1 micron
Filter Type
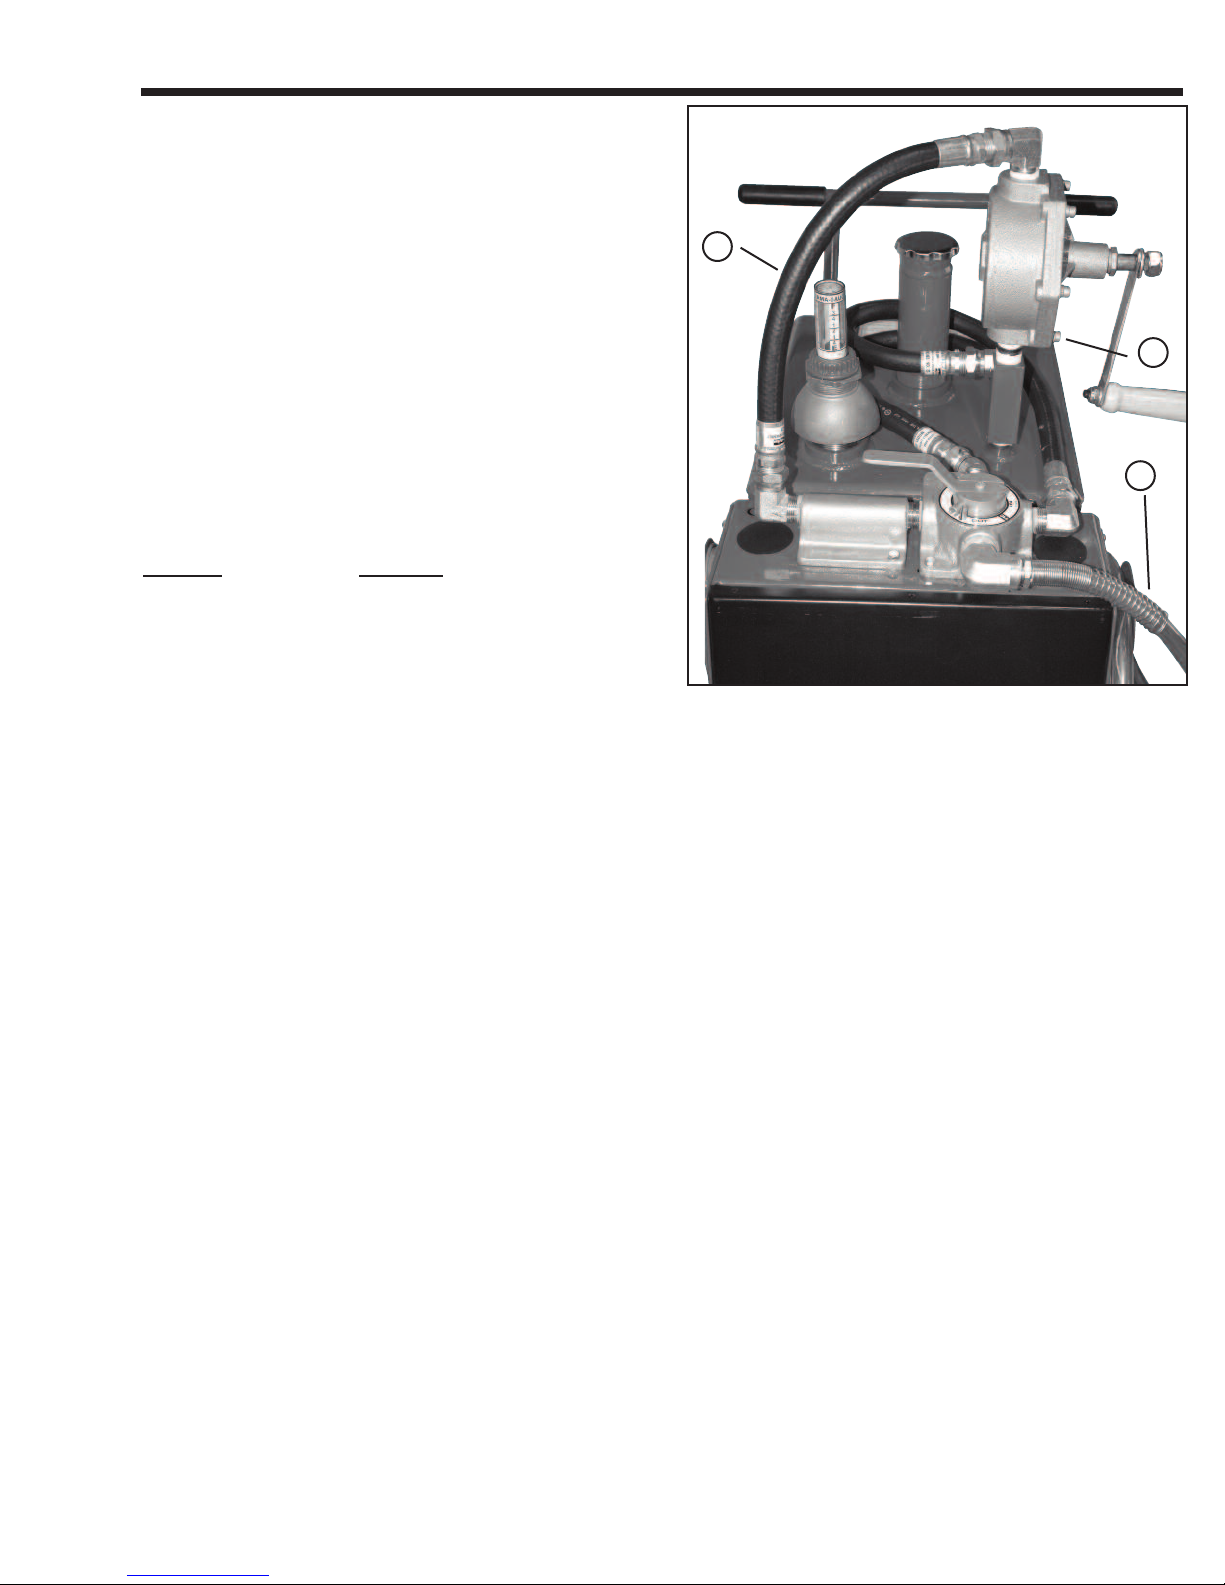
B
C
A
ASSEMBLY
Tools and Supplies (not included):
• TPFE tape • 1-1/2 inch open end wrench
• 1-1/16 inch open end wrench
• 1-1/4 inch open end wrench.
1. Wrap 2 inch NPT thread on fill tube 4-6 wraps with PTFE
tape wrapping clockwise.
2. Assemble pump “A” onto tank by threading the “IN” side the
pump onto the 3/4 close nipple. Hold the manifold with a
1-1/2 inch adjustable wrench to prevent turning. Turn pump
until threads tighten with the final turn positioning the pump.
3. Position the handle to the left side of the tank as shown in
Figure 1.
4. Assemble the pressure hose “B” to the 90° swivel fitting on
top of the pump and to the 90° swivel fitting on the filter
support. Place a 1-1/16 inch open end wrench on the hose
and tighten the swivel using a 1-1/14 inch open end wrench.
Tighten securely to prevent leaks. Note: when tight the swivel will not rotate.
5. Assemble the discharge hose “C” by threading the 3/4 NPT
fitting into 90° fitting located on the front of the valve assembly. Pace a 1-1/16 inch wrench on the hose and tighten.
Tighten with wrench.
6. Coil and hang the discharge hose on the hose hanger
bracket on the side of the tank.
7. Thread the 2 inch fill pipe and cap assembly onto the fitting
in the center of the tank. Tighten snugly by hand until secure.
Fig. 1
10. Remove tape from top of fuel gauge and install plastic
indicator cap and plastic nut onto float assembly. Align
indicator mark to point diagonally across tank so that float is
free to move full range. Tighten nut by hand to secure cap
and fuel gage.
3.
Page 4
OPERATOR’S MANUAL FC-P30-UL
OPERATION
PUMPING FROM VEHICLE TO GAS CADDY
1. Position the Gas Caddy near the vehicle and lock the front
casters brakes.
2. Attach the ground wire clamp to the vehicle to a known
ground surface.
3. Place the hose inside the fill pipe of the vehicle fuel tank.
4. Align valve handle so that the point is to the “IN” to tank
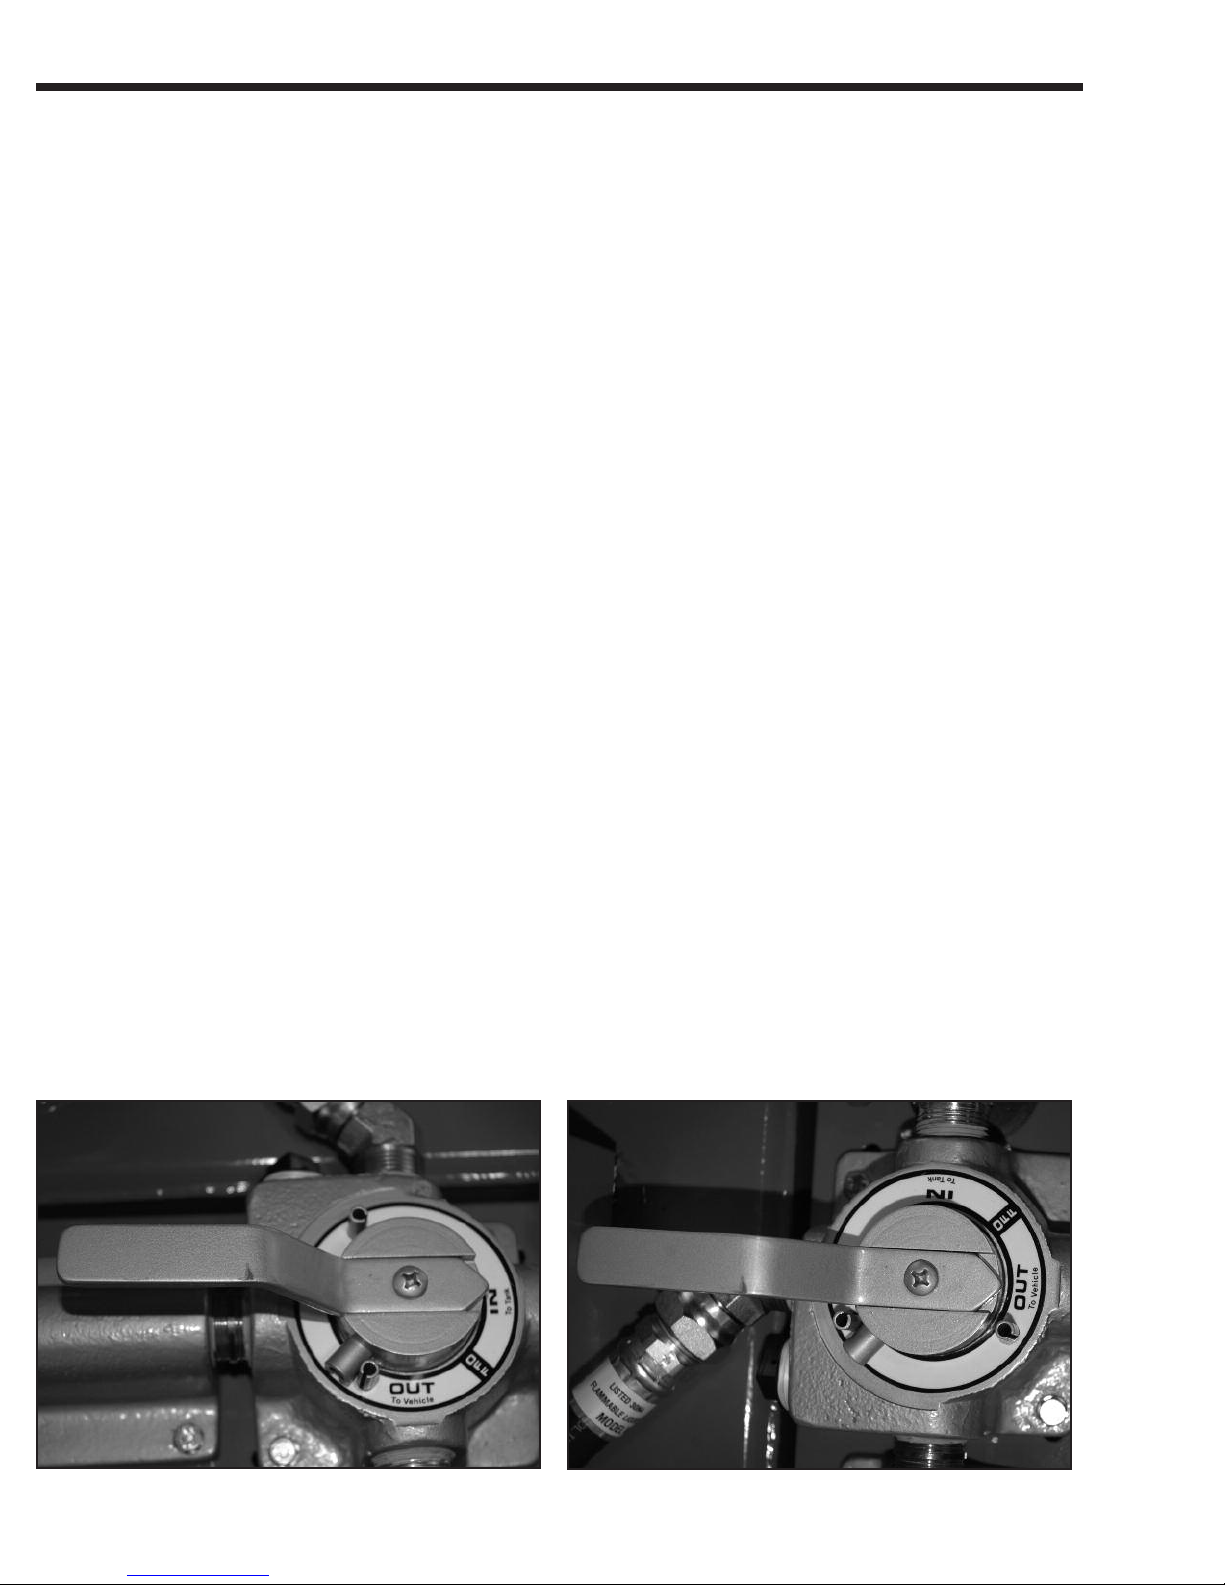
position. See figure 2.
5. Turn pump in the direction shown on the pump. Turn briskly
until pump primes and fluid is visibly flowing in the hose.
6. Continue to turn the pump handle to maintain flow to the Gas
Caddy.
7. Stop turning the handle when the desired amount has been
pumped.
8.Uncoil and raise the hose and turn the handle 4-8 turns to
return any remaining fuel in the system to the tank.
9.Coil and hang the hose on the hanger bracket.
10. Turn valve to the “OFF” position.
PUMPING FROM GAS CADDY TO VEHICLE
1. Position the Gas Caddy near the vehicle and lock the front
casters brakes.
2. Attach the ground wire clamp to the vehicle to a known
ground surface.
3. Place the hose inside the fill pipe of the vehicle fuel tank.
4. Align valve handle so that the point is position to the “OUT”
to vehicle position. (See Fig. 3)
5. Turn pump in direction shown on the pump. Turn briskly until
pump primes and fluid is visibility flowing in the hose.
6. Continue to turn the pump handle to maintain flow to the
vehicle.
7. Stop turning the handle when the desired amount has been
pumped.
8. Turn the valve to the “IN” to tank position.
9. Uncoil and raise the hose and turn the handle 4-8 turns to
return any remaining fuel in the system to the tank.
10. Coil and hang the hose on the hanger bracket.
11. Turn valve to the “OFF” position.
STORAGE
1. Always place the valve in the “OFF” position when not in
use.
2. Wrap and store the hose on the provided hose wrap bracket.
3. Wrap and store the ground wire on the provided wire wrap
bracket.
4. Locate the park the Gas Caddy on a flat level surface, away
from any potential ignition sources, away from any potential
hazards that may impact or damage the Gas Caddy.
5. Lock the wheel brakes.
6. Be certain that the fuel gage vent dome, indicator cap, fill
tube and fill tube cap are all present and secure. Replace
any missing parts immediately.
7. Do not turn the pump handle when not in use as this may
accidentally dispense fuel.
PRODUCT SPECIFICATIONS
Weight (empty): 154 lbs (69.5 kg)
Capacity: 30 gal (114 L)
Length: 31.25” (88.9 cm)
Width: 25.00” (63.5 cm)
Height: 46.00” (117.0 cm)
Approx. Flow: 5 gpm (19 L pm) @ 110 Rev/min
Fig. 2
Fig. 3
4.
Page 5
OPERATOR’S MANUAL FC-P30-UL
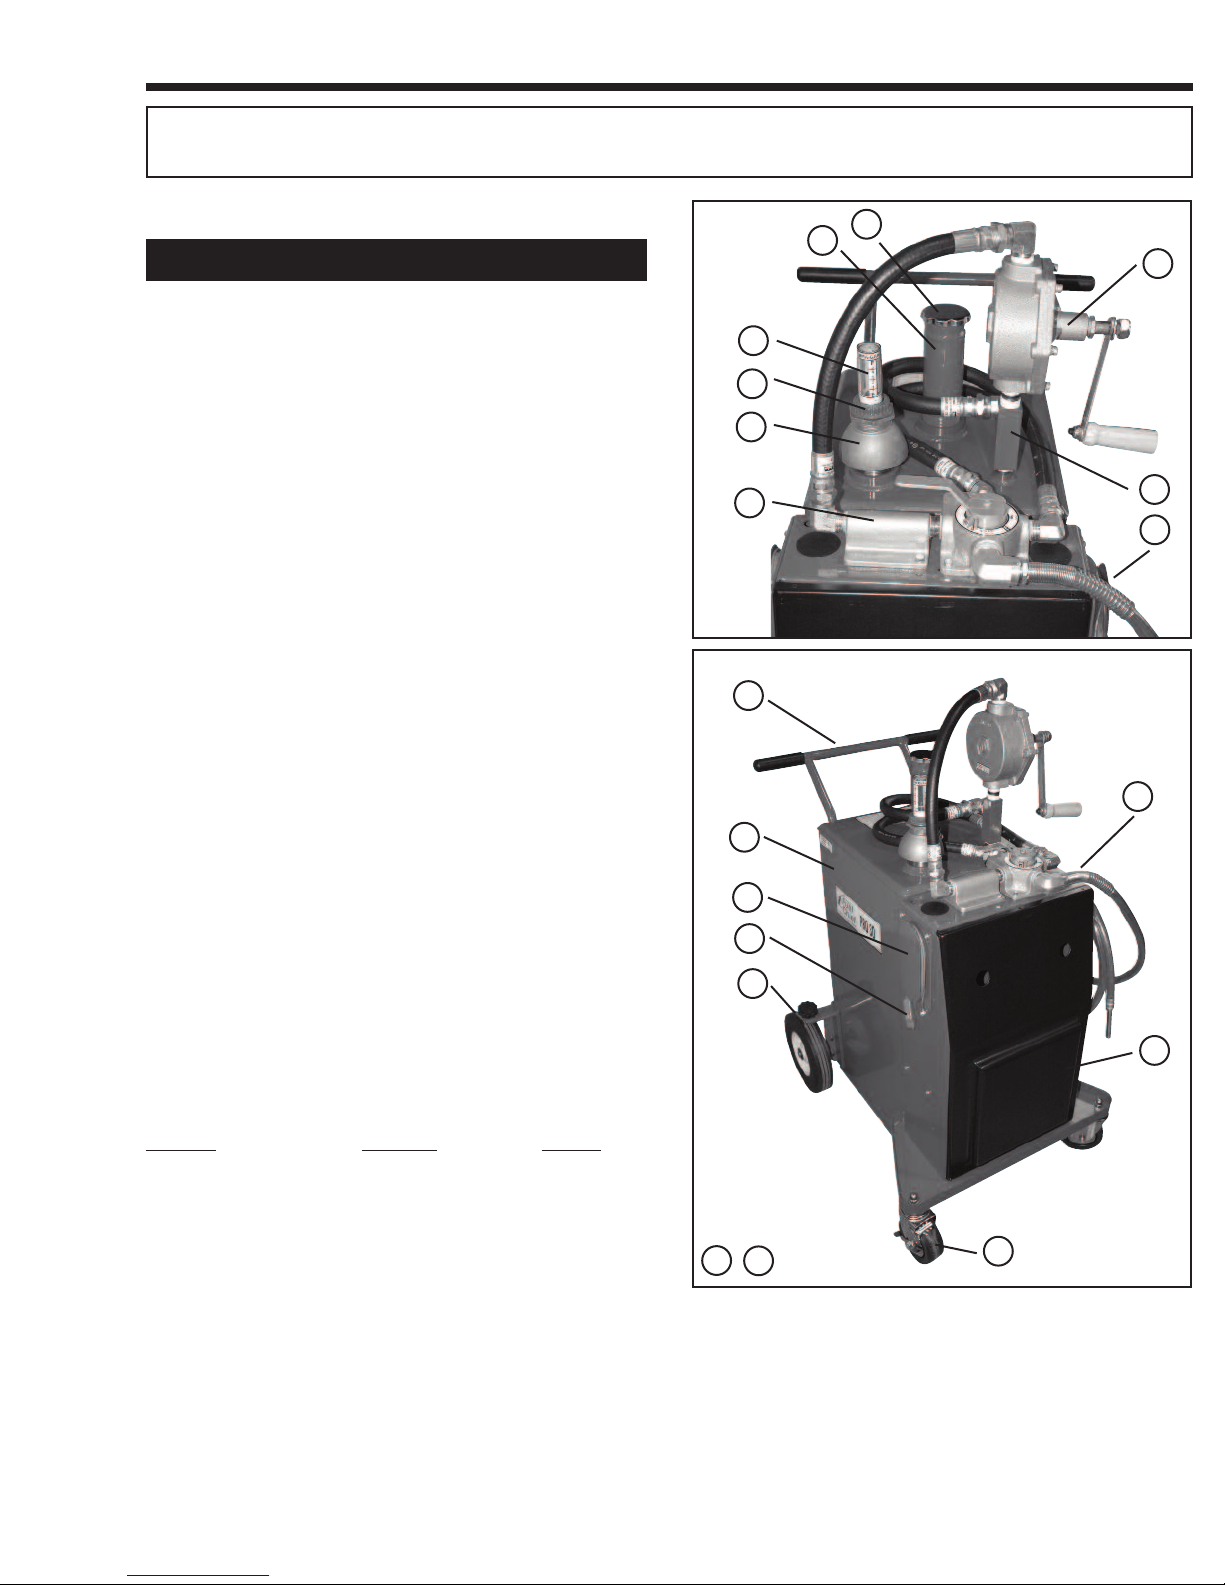
Replacement Parts & Accessories
REPLACEMENT PARTS:
Item Description Qty Part No.
1 Tank 1 _____
2 Handle 1 30GC-02C
3 Cover 1 30GC-49-UL
4 Wheel (10”) 2 30GC-06-UL
5 Caster (5”) 2 30GC-48
6 Fuel Gage (cap/nut) 1 30GC-FGK
7 Fuel Gage (complete) 1 FC-P30-FG
8 Vent 1 30GC-08-VENT
9 Fill Tube 1 30GC-09-01
10 Fill Cap 1 30GC-09-02
11 Hose Assembly 1 80-593-NI
12 Ground Strap 1 80-572
13 Valve/Filter Support Asm. 1 30GC-30/31
14 Manifold 1 30GC-22A
15 Hose Kit (3 Hoses) 1 FC-P30-HK
16 Rotary Pump 1 JDI-35-UL
17 Contents Decal Set 1 FC-CON
18 Hose Bracket 1 30GC-46
19 Ground Wire Bracket 1 30GC-47
13
1
10
9
16
7
6
8
14
18
2
11
REPLACEMENT FILTERS
Fuel Type Filter Type Part No.
Unleaded Gasoline 10 micron 10M-FF
Diesel/Kerosene 30 micron 30M-FF
E85 Ethanol 1 micron 1M-FF
Note: Coat the O-ring seal with oil or grease before assembly. Hand tighten by
turning approximately 1/2 turn after rubber seal contacts the filter support. Do
not over-tighten.
15
19
12
4
17
Not Shown
3
5
5.
Page 6
OPERATOR’S MANUAL FC-P30-UL
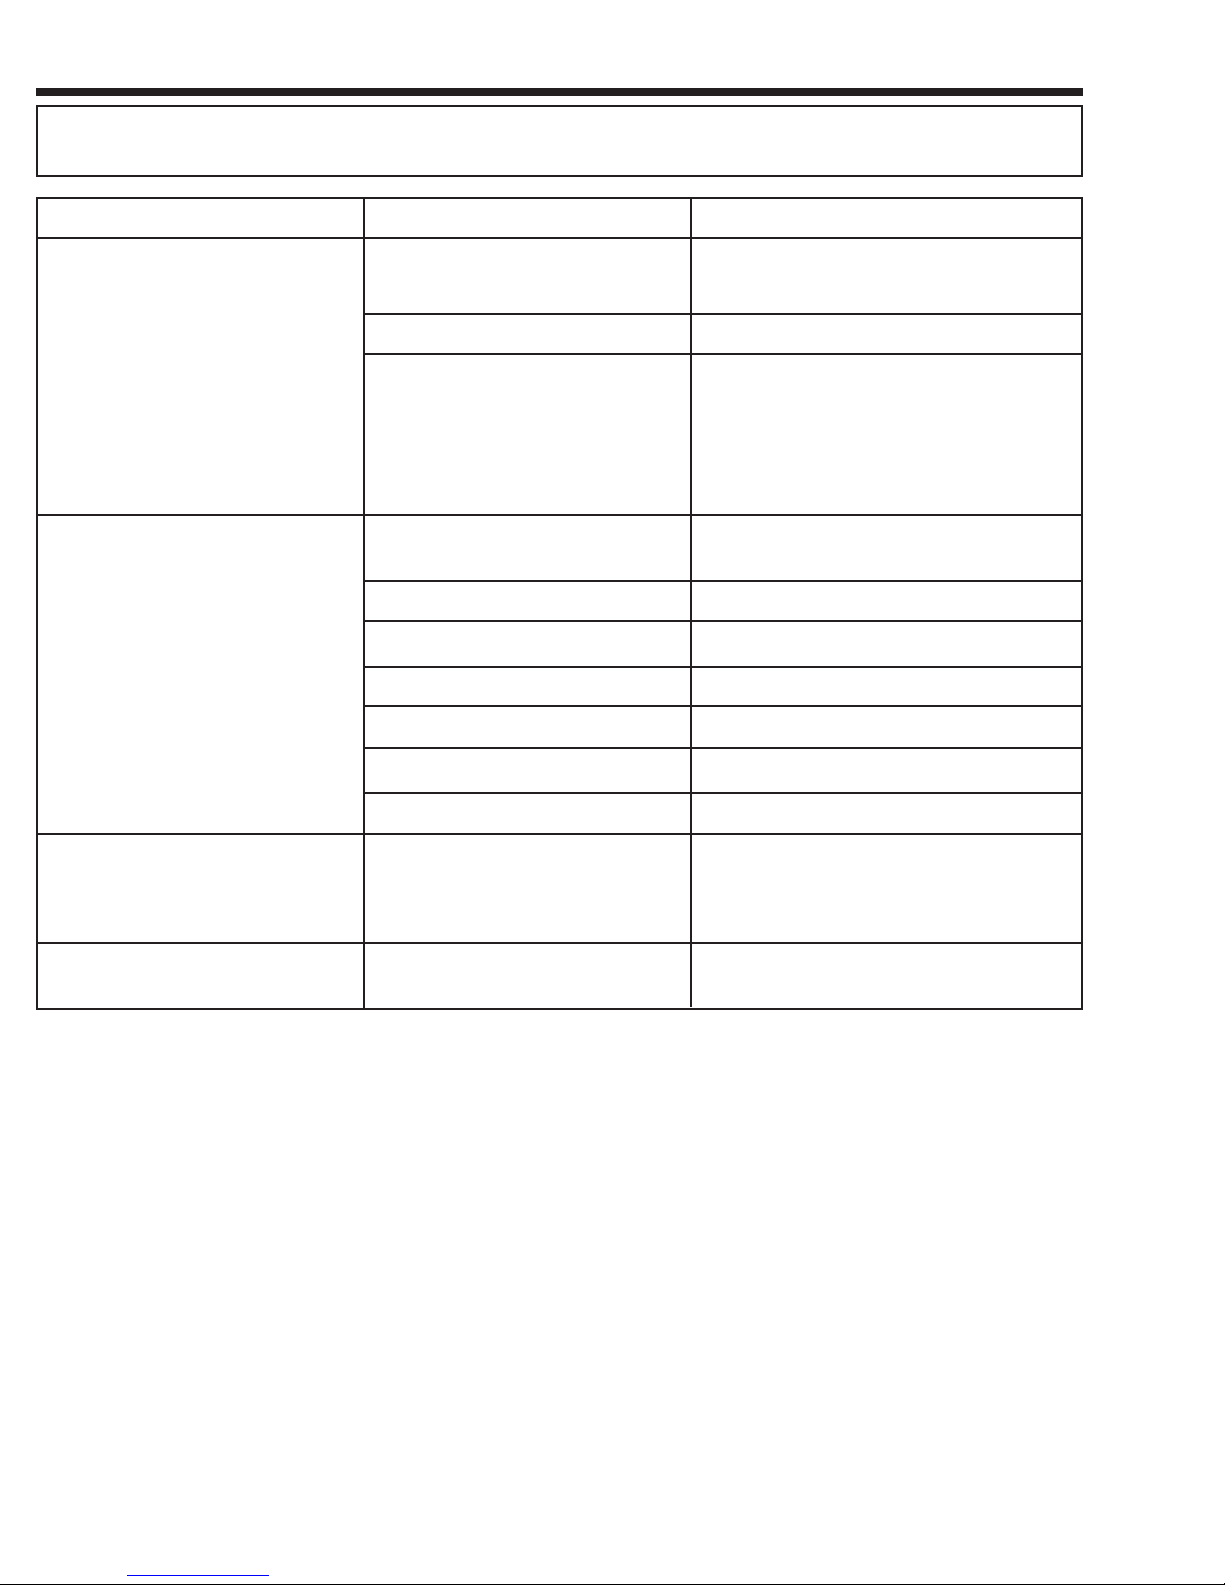
TROUBLESHOOTING
CONDITION POSSIBLE CAUSE
Pump is hard to turn or poor flow Filter is incorrect size for type of
fuel
Filter is clogged Replace filter
Inside of pump is dry or rusted from
extended periods of non-use
Pump is difficult to prime Hose not submerged in fuel when
trying to prime
Loose filter Inspect and tighten
Leak at fittings or pump mount
Leak in hose fittings
Damaged, kinked, or cracked hose
Vane sticking
SOLUTION
Replace with correct size filter 1 micron for
85. 10 micron for gasoline, 30 micron for
E
diesel/kerosene
Remove pump out hose by loosening the 90°
elbow swivel fitting on top of pump. Spray
WD-40 or other light oil into the pump out
port. At the same time, turn handle in the
opposite direction of the arrow to lubricate
the pump. Must turn opposite direction of
arrow to prevent pumping fuel from tank.
Check hose and reposition hose in vehicle
fuel tank
Check fittings and tighten as required.
Check fittings and tighten
Replace with hose assembly
Check vanes for contamination
Excessive vane wear
Fuel level gauge does not work Float positioned diagonally across
tank
Ground wire is damaged or will not
clamp
Damaged
Check vanes for excessive wear and replace
Remove red plastic nut and indicator cap.
Remove float mechanism and position so that
float is position across tank. Replace cap and
nut.
Replace
6.
Page 7
OPERATOR’S MANUAL FC-P30-UL
NOTES
7.
Page 8
™
For Service Assistance
Phone Toll Free 1-800-433-0708
 Loading...