

Page 1
1
Instruction Manual
Jupiter 2
jcmseating.co.uk
jcmseating.co.uk
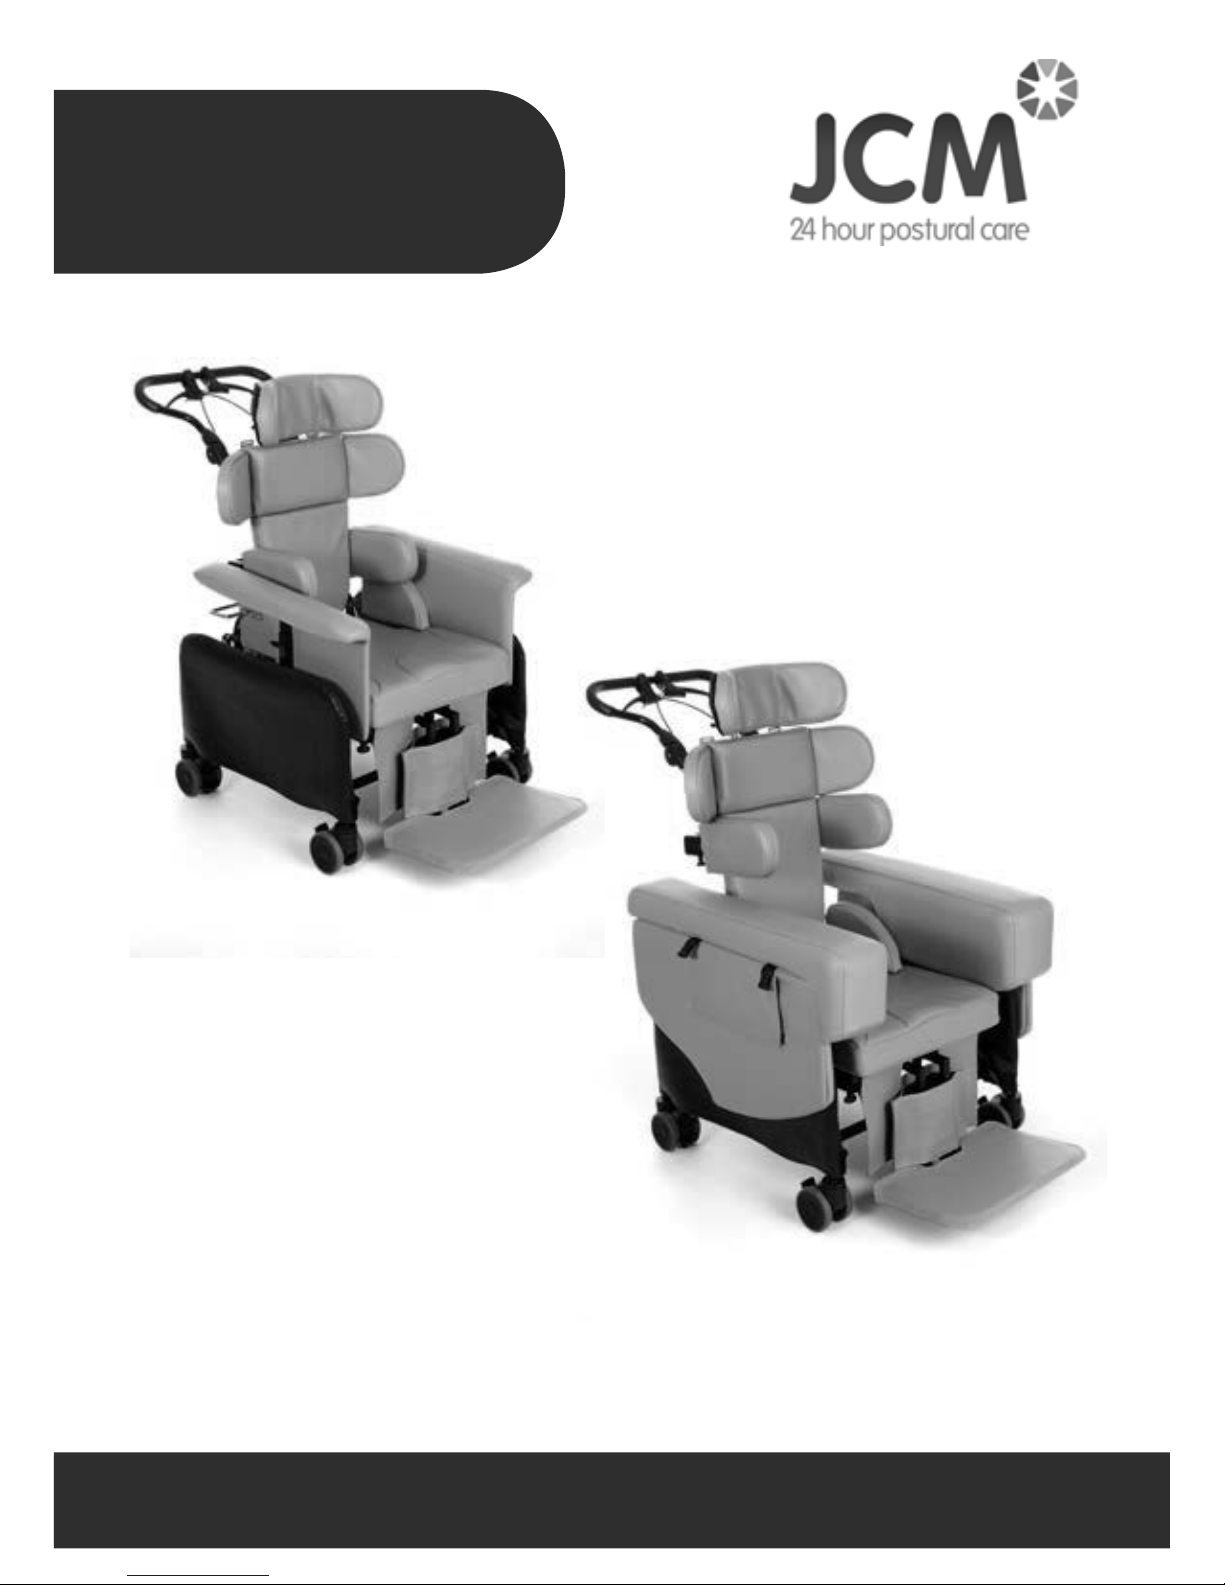
Standard
Deluxe
Page 2

2
Contents
Introduction 3
Measurements & Useful Info 4
Seating System Components 5/6
Important Safety Advice 7
Important Safety Advice - General guidance for use 8
Important Safety Advice - Accessories 9
Important - Chest Harness Adjustment 10
Important - Lap Strap Safety 11
Lap strap fixing points 12
Adjusting Tilt / Prone 13
Push Handle Adjustment 13
Chair Height Adjustment 14
Head Rest Adjustment / Replacement 15
Arm Rest Adjustment 16
Applying / Releasing Brakes 17
Back Height Adjustment 17
Lateral Support Positioning 18
Hip Pad Adjustment 18
Pommel Positioning 19
Footplate Adjustment 20
Leg Rest Adjustment 20
Seat Depth Adjustment 21
Product Labelling 21
Cleaning & Care 22
General Maintenance 22
Servicing via Approved Repairer 23
Service Record Log 24
Warranty 25
Inspecting & Reissuing of Equipment 26
Inspecting & Reissuing of Equipment 27
Page 3
3
Introduction
The Jupiter is designed to provide comfort and postural support. The system
is available in two types Standard and Deluxe to accommodate children from
as young as three years through to adult.
This instruction manual contains very important information about the Jupiter
seating system, how to use it safely and obtain the best results from it. Please
read all the information contained in this manual before using the chair and
retain for future reference. Ensure everyone using the equipment is aware of
the contents of this manual and understands how to use the equipment safely.
These instructions provide guidance on the adjustments for professionals,
but they also give information on how the equipment should be safely used,
maintained, checked, and correctly assembled by anyone who uses the seating
system.
In every case the equipment should be supplied via qualified professionals who
will have adjusted
the equipment, checked its compliance and tested it appropriately.
The seating system should only ever be adjusted by qualified professionals
and persons that are suitably trained. For further information please do not
hesitate to contact us - all contact details are on the back cover of the manual.
The Jupiter 2 is designed, manufactured and CE marked to EN12182
Thank you for purchasing our product, we hope
you enjoy your new seating system.
Page 4

4
Measurements & Useful Info
Jupiter Size 1 Size 2 Standard Size 2 Deluxe Size 3
Number of sizes 1 1 1 1
Age Range 3yrs - 9yrs 8yrs-13yrs 8yrs-13yrs 12yrs-Adult
Chassis Footprint Width 570 660 740 730
Overall Footprint Length 510 710 800 730
Min Max Min Max Min Max Min Max
Overall Height 1070 1265 1160 1365 1160 1365 1090 1165
Seat Depth Single Seat 240 340 360 530 360 530 380 520
Seat Depth Split Seat 240 375 360 530 360 530 N/A
Seat Height (std 100mm Castor) 395 470 425 500 425 500 520 595
Optional Castor Stem Fitted 435 510 N/A N/A N/A
Seat to Top of Back 340 460 470 650 470 650 410 520
Seat Width 360 440 440 450
Seat Width Between Hip Pads 260 360 195 380 195 380 N/A
Seat Width Between Hip Pads
(Optional Hardware)
170 360 N/A N/A N/A
Thigh Giudes Adj.
(30mm per side increments)
300 360 320 440 320 440 N/A
Width Betw
een Trunk Lateral
Supports
170 360 230 340 230 340 N/A
Width Between Trunk Lateral
Supports (Optional Hardware)
N/A 160 270 160 270 N/A
Seat to Footplate 220 370 210 350 210 350 450 525
Footplate Angle -10˚ 15˚ 0˚ 60˚ 0˚ 60˚ 0˚ 35˚
Armrest height from seat 120 230 150 340 160 380 200 380
Armrest Angle 0˚ 36˚ N/A N/A N/A
Armrest height from Floor 600 795 590 780 600 820 690 870
Push Handle Height 850 1050 550 1050 550 1050 1040 1115
Tilt in Space -5˚ 35˚ 0˚ 15˚ 0˚ 15˚ 0˚ 25˚
Back Angle Recline -5˚ 25˚ -5˚ 35˚ -5˚ 35˚ 0˚ 25˚
Leg Rest Elevation -10˚ + 90˚ N/A N/A 0˚ 90˚
Base Footprint W610 x L550 W650 x L680 W650 x L680 W730 x L700
Ground Clearance
(100mm Castor Fitted)
145 220 140 215 140 215 155 230
User W
eight 60kg 80kg 80kg 100kg
Approx. Weight of Seat 36kg 52kg 52kg 73kg
Page 5
5
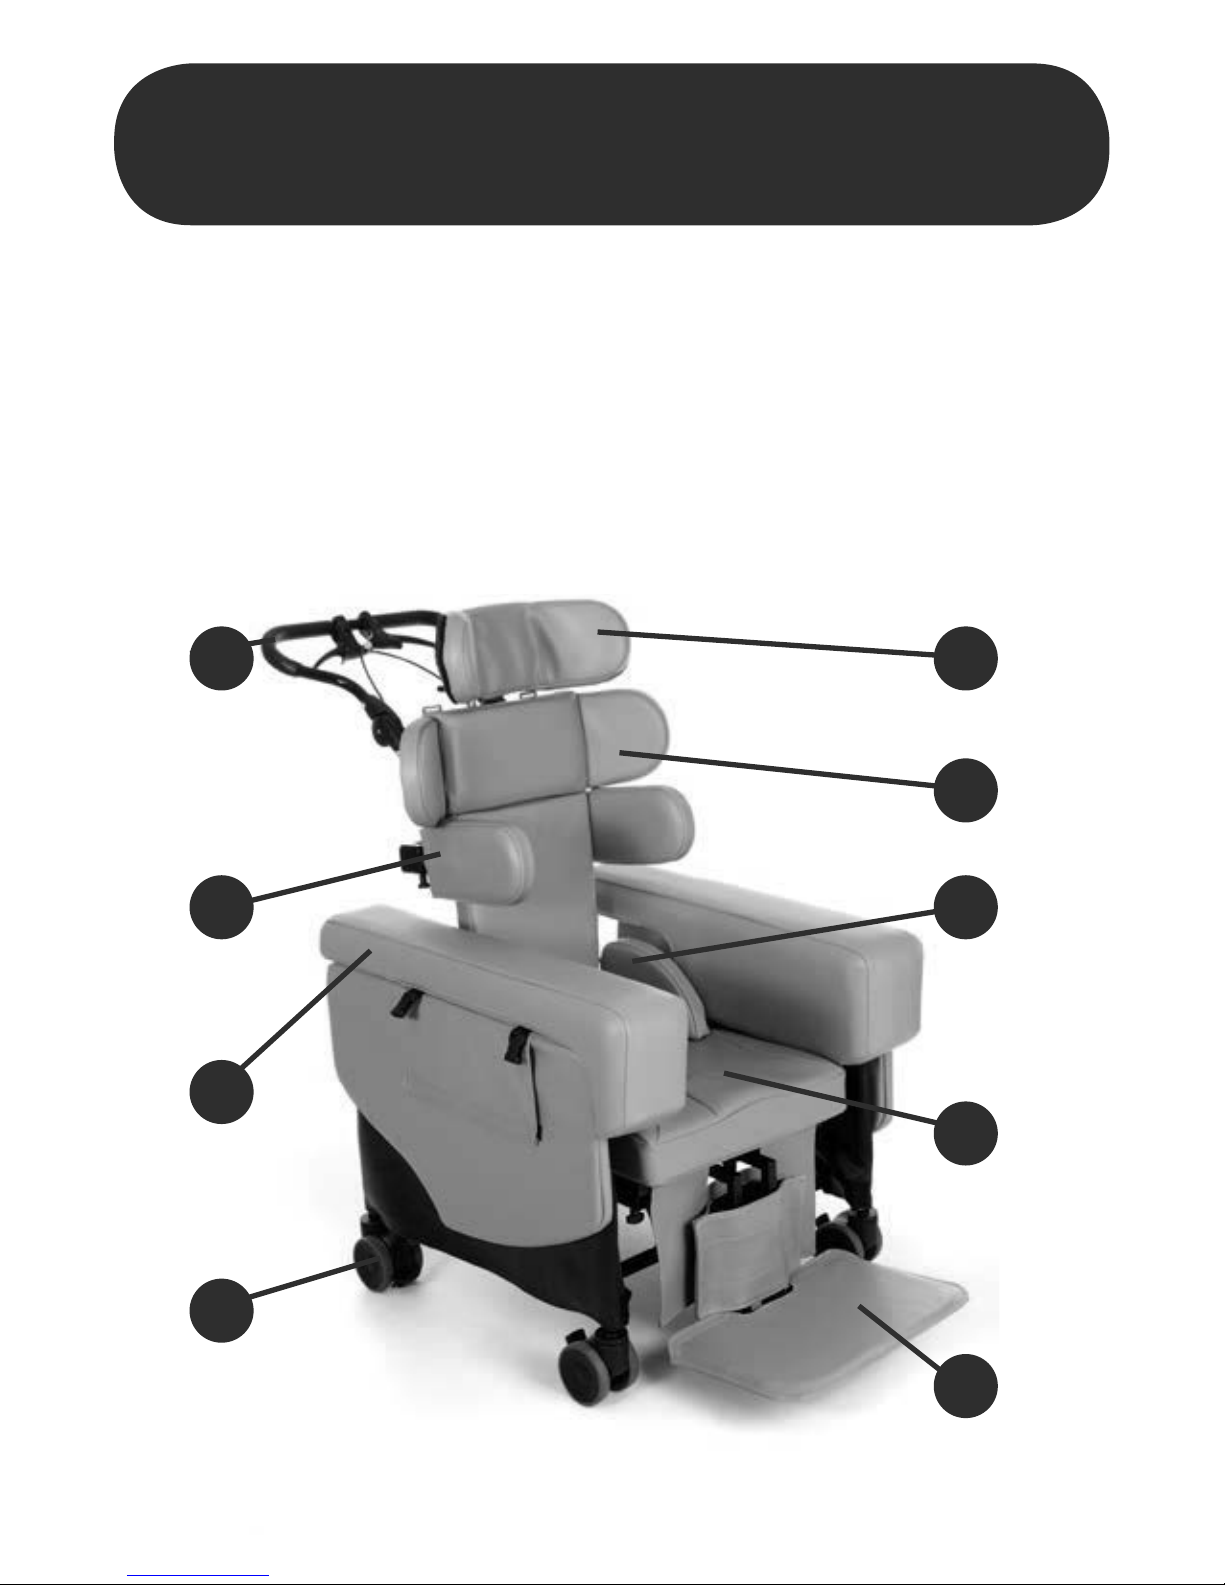
Seating System Components
(Deluxe)
A Push Handle
B Headrest
C Shoulder Protraction Pads
D Lateral Supports
E Hip Pads
F Contoured Seat
G Footrest
H Castors
I Adjustable Arm Rest - Deluxe
A
D E
F
G
I
B
C
H
Page 6
6
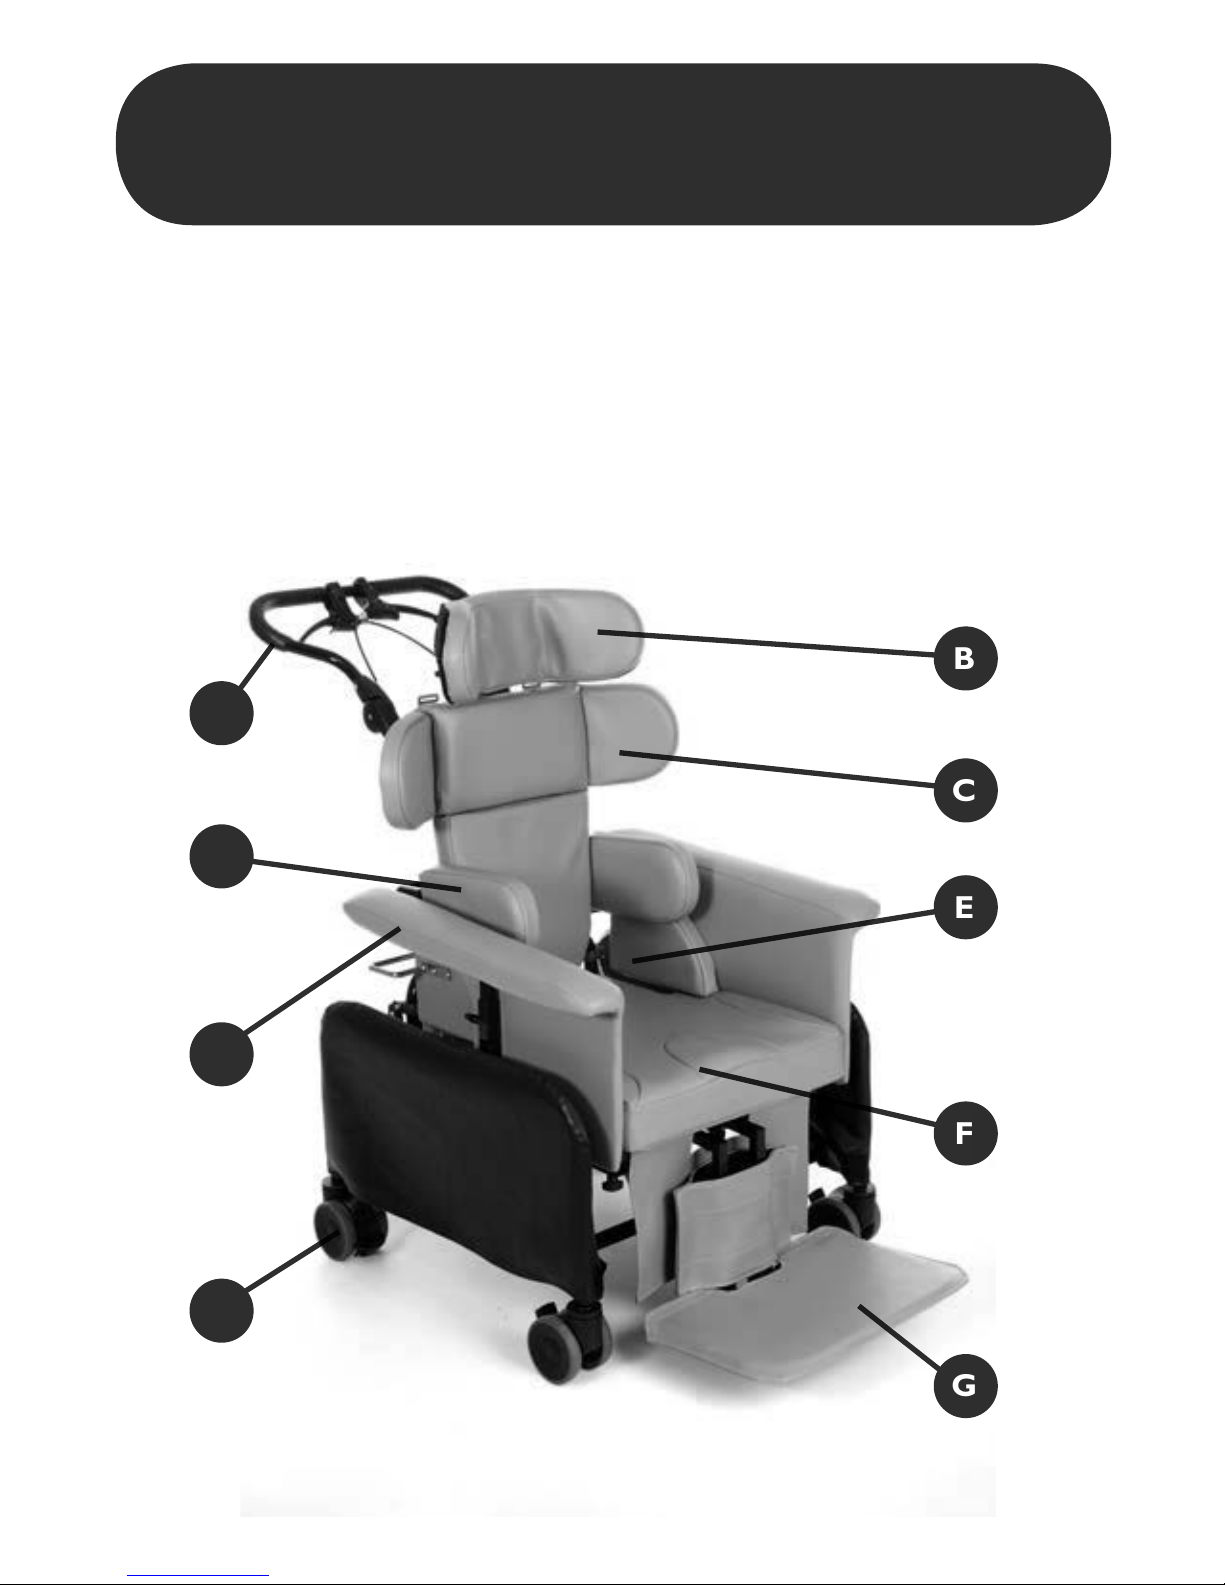
A Push Handle
B Headrest
C Shoulder Protraction Pads
D Lateral Supports
E Hip Pads
F Contoured Seat
G Footrest
H Castors
I Adjustable Arm Rest - Std
A
E
F
G
B
C
H
I
D
Seating System Components
(Standard)
Page 7

7
Important Safety Advice
We at JCM are committed to producing products of the highest standard. All
of our products fulfil the essential safety and environmental requirements as
defined in the European Directives. However, improper use of the products will
potentially put the users at risk and therefore JCM strongly suggest that the
following information is strictly adhered to at all times.
Throughout the manual there are important points to note
identified by the symbol:
• Ensure all adjustment mechanisms are secure and in place before operation. If it is likely that the
hand-wheels will be repeatedly loosened, JCM can supply allen key bolts as an alternative. We
strongly recommend this if there is a danger from those in the vicinity of the user.
• After completing any alterations ENSURE all nuts, bolts, knobs, hand wheels and other fixingsare
securely tightened and in position, and that they are regularly checked as part of the
• Maintenance of the chair. Never over adjust or over tighten moving parts.
• All postural support straps and harnesses should be in place and properly adjusted to the user, prior
to usage of any kind (see pages 10 & 11).
• The Jupiter seating system is designed for Indoor use and should always be positioned on a level, flat
floor. The Jupiter chair can be moved between one working area and another for safety ALWAYS
return the Seat to a neutral position, (level the seat, ensure the back is upright etc.) After the
chair has been moved and during use the chair should be placed in a static position with the brakes
applied.
• Seating system such as the Jupiter are designed to be used inside, however it is acceptable to take
the Jupiter externally for a brief period if transferring the chair from one indoor area to another.
• Heavy items on the tray will aect stability. The fitting of anything other than the standard JCM tray
may substantially aect the stability of the seating system and should therefore be checked before
issue.
• If at any time it is noted that areas of the user’s skin remain reddened after being out of the seating
system for around 10 minutes, urgently contact the qualified professional who performed the
handover of the equipment. This may be a sign of excessive pressure being exerted by the seating.
This might occur in the initial use of a new seat where further adjustment may be required, where
the user has been badly placed, grown or where an underlying medical problem exists. Review may
be necessary in such cases.
• Keep all products away from excessive sources of heat, cigarettes and naked flames.
• If you suspect that the system may be faulty, cease use of the equipment straight away and
• Immediately contact the organization who supplied the system. ( JCM’s contact information can be
found on the back cover).
• The equipment will be labelled with important information. NEVER REMOVE these information
labels or allow them to be defaced, overlaid or altered.
• All modifications, adjustments, reconditioning, repairs, disposal, and servicing of the seating unit
must ONLY be carried out by the agencies who supplied the equipment (see pages 24 - 25)
• The Jupiter size 1, 2 & 3 is designed to be used indoors. For maximum stability the intended use
conditions are indoors on flat surfaces.
!
!
Page 8

8
All JCM seating systems should only be size adjusted by qualified professionals or suitably
trained individuals.
• The Jupiter seating system is intended to be used on a level flat floor only
• The Jupiter seating system can be moved from one working area to another but before moving:
- The seat back should be returned to the vertical or slightly reclined position.
- The seat tilt should be returned to the horizontal position.
- Heavy items on the tray and hanging items from the push handle may aect stability and should be
removed whilst moving the seating system whenever possible
• The Jupiter Seating system is intended for indoor use only although it is acceptable to take the base
externally if transferring from one indoor area to another (Note: this is subject to your own risk
assessment (slope angles, thresholds, surface roughness should be considered).
- If the Jupiter seating system is to be moved down a slope then to avoid tipping forward or running
away then the base must be reversed down.
- If the Jupiter Seating system is to be moved over a threshold then to avoid tipping the base must be
reversed over the threshold.
• After moving and during use, the seating system should be in a static position with the brakes applied.
• Whenever the user transfers themselves or is assisted to transfer forward out of the seat the brakes
must be applied and an assistant must hold the push handle to avoid forward tipping.
• When re-issuing equipment, it is the customer’s responsibility to ensure that the equipment being
supplied is appropriate for the needs of the user taking age, weight, ability, diagnosis, growth and any
other factors into account. JCM are happy by appointment to assist with review or re-assessment of
any client against intended equipment provision.
• Periodic Re-Assessment.
- Many of the features of JCM products are designed to be adjustable.
- Healthcare providers/prescribers should consider the need for periodic (re) assessment of users and
their equipment to ensure that the settings of any adjustable features or the complete product where
changes in the user, e.g. growth or other changes, or the intended use are still eective.
• Please note the stability is aected by the following, all of which should be considered during use
and when undertaking a risk assessment:
- User weight
- Seat depth
- Recline angle
- Seat tilt angle
- Seat height
- Environment (slopes and thresholds).
If you have any concerns regarding stability of your chair then please contact JCM.
Important Safety Advice
!
Page 9

9
Important Safety Advice
(Accessories)
Multi adjustable head support
Wings on the head support are ideally set at 45 degrees. Do NOT
bring the wings in tight to the head. Ensure that the head support
is set in such a way that the child cannot loop their head around
the wings and get stuck.
Flexi-supports and lateral supports
Ensure the straps do not infringe on any feeding tubes the child
may have.
Pommel
Should only be fixed when the user is wearing shoes or boots.
Tr ay
Do NOT use the tray as a way of securing children in a chair always
ensure that the lap strap and any other straps supplied are used.
Ensure that the tray clips are secure on both sides of the tray. If the
tray is damaged, ensure that this will not be a hazard to the user.
Never leave hot items on the tray while children are unattended.
!
Page 10

10
Important - Chest
Harness Adjustment
GREAT CARE should be taken when fitting a chest harness and the
following points should always be followed:
• The straps on the harness should never be allowed to move
close to or in any way cause an obstruction to the child’s neck.
• The straps should never be fitted too tightly and should be clear
from any obstruction.
• The sternum straps (A) on the chest harness should always be
adjusted prior to use to ensure that it is no higher than the
middle of the user’s chest.
• A lap strap (B) should always be fitted if a harness is being used
to ensure the child cannot slide down onto the sternum strap.
• Always ensure that the belts oer your child both comfort and
support. If the child’s clothing has been adjusted (i.e. a jumper
removed) the straps should be re-adjusted accordingly.
Fixing onto chair
• The Jupiter comes with guide plates for the top straps which
are located either side of the upper back (A). The webbing
strap should be fed through these guides and then adjusted and
secured in place using the cam buckle clasps directly beneath the
guide plates.
• The straps at the bottom of the harness should be fed through,
adjusted for fit and then locked using the Cam Buckle Clasp (B)
located on the hip pad rail.
Fastening of belts
• Feed the fabric belt through the buckle on the strap.
• The belts should be pulled through enough to suitably support
your child whilst still being comfortable.
• When this has been achieved the buckle should be snapped
closed to secure the strap in place
The same precautions highlighted here should be adhered to when
using any form of trunk supports or flexi supports with straps.
!
!
If there is any possible chance of the child getting the straps caught
around their neck, REMOVE THE HARNESS IMMEDIATELY.
A
A
B
B
Page 11

11
Important
Lap Strap Safety
Incorrect fitting of lap straps can put the user at serious risk. When using lap
straps we recommend the following points should always be adhered to:
Lap Strap Fitting
• The angle that the hip belt is attached to
the seating system has a direct eect on
the angle of pull on the pelvis.
Considerations:
• A 60° angle of attachment to the seat rail
positions the hip belt anterior and inferior
to the ASIS, which reduces the tendency of
the client with a posterior pelvic tilt to slip
underneath the belt.
• A higher angle of attachment of the primary
straps encourages a posterior pelvic tilt,
which assists in positioning clients with an
anterior pelvic tilt.
• The secondary straps of a 4-point hip belt
are attached to the seat post between 45°
and 90° to hold the primary padded strap
in place and to prevent the belt from riding
into the abdomen or twisting.
• The angle of attachment may have to be
compromised in order to accommodate
such situations as wounds in the pelvic
area, unstable hip joints or gastric tubes.
Tightening the belt
• Keep belt tightened at adjustment straps
during fitting and daily use to ensure
correct pad placement. For padded hip
belts the pads are to be touching when
correctly tightened. For non-padded hip
belts the Adjustment strap at the buckle
should be approximately 3” (76mm) long.
Education of the care giver is essential for
correct hip belt positioning.
Sizing
• Measure hip width to determine the belt
size required. The suggested method for
measuring hip width is from trochanter to
trochanter. If this is not possible, measure
from ASIS to ASIS and add a couple of
inches. The correct belt size for the
individual has padding that covers all of the
bony prominences.
• Always check that the child’s pelvis is
symmetrical and positioned securely at
the back of the seat.
• Always ensure that the lap straps and
chest harness hold the child securely
and are comfortable. Ensure they
provide a snug fit, a simple rule of thumb
is to allow two fingers to be inserted
between the belt and the child’s body.
• Never leave a child in a chair unattended
without the lap strap being fastened.
• A lap strap should always be fitted if a
harness is being used.
• When altering the angle between the
seat and the back of the chair always
re-adjust the chest harness and lap
strap accordingly to ensure all safety
recommendations are followed.
!
Page 12

12
Lap Strap Fixing Points
Harness and Lap Strap Positioning
This diagram shows the recommended positioning of the chest harness and lap straps:
Ensure all belt straps are secured over the lock bar (C) and clamp is closed down in its locked position
(B) & (A).
All straps & harnesses
must be securely fitted to
the back of the chair.
The cross strap on the
chest harness must be
fitted no higher than the
sternum (mid chest).
Four-point lap strap
Chest Harness Fitting
Primary Lap Strap
Fitting
Secondary Lap Strap Fitting
AB
C A
Page 13

13
Adjustment Tilt / Prone
Push Handle Adjustment
The chair has been designed to oer a substantial variation of positioning and support, which
the Tilt / Prone angle and back recline mechanism can help to demonstrate. The chair can be
positioned at any point within this range to suit any situation.
Tilt / Prone Angle
• Pulling and holding lever (A) inwards whilst controlling the chair by the Push handle enables
you to alter the seats tilt / prone angle.
• Pulling and holding lever (B) inwards whilst controlling the chair by the Push handle
enables you to alter the seats back recline angle.
• Once a suitable position has been achieved, the lever should be released to lock the chair
in position.
• Push Buttons and hold in. The angle of the
push handle can then be altered which has the
secondary function of adjusting the handle height.
When the required position has been achieved
release buttons ensuring the mechanism “clicks”
into place.
• This may also be used for folding the handle away.
A
B
Page 14

14
Chair Height Adjustment
The height of the chair can be adjusted
by removing pin (A) from the chair leg
and pulling the castor away from the
frame. This will reveal extra holes in
the chrome work (B), which enable
the chair to sit at dierent heights.
When a suitable height has been
achieved re-align the relevant hole and
re-insert the pin to lock the caster leg
into the chair frame. The C ring that
the pin is attached to (C) will lock the
pin into place.
Repeat this process for all four legs.
Always ensure that all four legs are set
at identical height – this will ensure the
chair is level.
A
C
B
Page 15

15
Head Rest Adjustment /
Replacement
Head Rest Height / Replacement
• Turning hand wheel (A) anti-clockwise enables
you to adjust the height of the head rest by
moving it up or down. Re-tighten the hand
wheel to secure into place.
Head Rest Forward / Rearward & Angle
Adjustment.
• Turn levers (B) anti-clockwise to move the
head rest forwards and backwards, allowing
the required head rest angle and position to
be achieved.
• Re-tighten the levers (B) to secure into place.
Head Rest Lateral Wing Adjustment
• To Increase or decrease the angle of the
Head rest lateral wing, turn lever (C) anticlockwise. Rotate the Headrest lateral wing
(D) by pushing forward or backwards until the
required position has been achieved.
• Re-tighten the lever (C) to secure into place.
A
B
C
D
Page 16

16
Arm Rest Adjustment
Arm rest width adjustment Deluxe model only.
• Un-tighten bolts (B) Adjust the arm by
either: pulling it outwards, away from
the seat frame to expand the seat
width or pushing it inwards towards
the frame to narrow the seat width.
• Once a suitable position has been
achieved tighten screws (B) Securely.
Arm Rest Height Adjustment
Un-tighten bolts (A) Adjust the arm by
pulling it Upwards, downwards Once
a suitable position has been achieved
tighten screws (A)
A
A
A
B
Page 17

17
• Turning both levers (A) anti-clockwise
releases the lock and allows height adjust of
the back rest. Lift up to increase the height
or push down to lower the height.
• The height of the back should be adjusted to
fit the size of child and seat them in comfort.
• Once a suitable position has been found the
levers should be re-tightened by turning clock
wise ensuring they are tight.
Shoulder Protraction Pad
• Turn soft touch hand wheel (B) anti-clockwise
to loosen and Swing-away.
• Re-tighten clockwise to secure.
A
B
Back Height Adjustment
Applying / Releasing Brakes
Applying Brakes
Depress lever (A) with your foot. To secure the chair
in place you should suppress all the brakes fitted to
the wheels on the base.
Releasing Brakes
To release the brakes you should flick the levers up
using the top of your foot. When all brakes are released
the chair will be free to travel in any direction.
A
Page 18

18
Lateral Support Width & Height
• Using the 4mm Allen Key T bar supplied, turn
bolts (A) 1/2 a turn anti-clockwise to release
the lateral support.
• Move the lateral support in, out, up or down
until the required position has been achieved.
• Once the required position has been achieved,
turn bolts (A) clockwise until tight. Ensure
the Lateral support is secure and positioned
correctly for the users’ needs and comfort.
• Pull out locking pin (B) to disengage the lateral
support. Hold the locking pin out and move
the lateral pad in an outward direction to swing
away.
• Repeat in reverse to swing the Lateral support
back into position, ensuring the locking pin
clicks securely into place.
• Ensure the Lateral support is secure and
positioned correctly for the users’ needs and
comfort.
• Turn hand wheel (C) anti-clockwise to release
the friction lock.
• The hip pad can be moved in, out and can be
angled up or down as required.
• Once the required position has been achieved,
turn hand wheel (C) clockwise until tight.
• Ensure the Pelvic Support is secure and positioned
correctly for the users’ needs and comfort.
A
Lateral Support Adjustment
Hip Pad Adjustment
B
C
Page 19

19
Horizontal Positioning
• Turn lever (A) anti-clockwise to adjust the height positioning of the pommel.
(The pommel can be completely removed from the frame using this method
and then re-inserted once the child is seated.)
• Turn the lever clockwise to fix the pommel securely into place.
Vertical Positioning
• Turn lever (B) anti-clockwise to adjust the vertical positioning of the
pommel.
• Once a suitable position has been achieved re-tighten the lever by turning
it clockwise.
Pommel Positioning
A
B
Page 20

20
Vertical position of footplate
• Turn levers (A) anti-clockwise to
adjust the vertical position.
• Extended the footplate to suit the
child and provide suitable support
and comfort.
• Re-tighten the levers to secure into
place.
Footplate angle
• The footplate can be flipped out of
the way by pushing it up towards
the frame. Lever (B) shown acts as a
stop to position the footplate at the
desired angle.
• Screw the lever clockwise to increase
angle, anti-clockwise to decrease.
Footplate extension
• Un-tighten levers (C) and pull down
the footplate to extend or pull
upwards to shorten.
• Re-tighten the levers to secure into
place.
Footplate Adjustment
A C
A
B
Page 21

21
• Turn bolts (A) anti-clockwise with the
5mm T bar Allen key provided.
• Move the backrest forward or
backwards until the required seat
depth has been achieved.
• Turn bolts (A) clockwise to tighten,
ensure the bolts are secure and tight.
Seat Depth Adjustment
A
• Located on the lower horizontal backrest rail.
• Lift back rest cushion to reveal.
Product Labelling
Page 22

22
We recommend the following points for successful cleaning of your equipment. (It is possible that some
surface wrinkling may occur following these processes)
Fabric Upholstery Care
Refer to JCMs fabric cleaning guide which can be found on their website www.jcmseating.co.uk
Do not use bleach, acidic, solvent, abrasive, biological or phenolic based cleaners.
Metal Framework
• If all upholstery is removed the metal framework can be cleaned with hot soapy water and detergent
or it can be steam cleaned. (Labelling may need to be replaced following steam cleaning).
• Ensure that the framework is thoroughly dried after cleaning.
• Always ensure that any moving or adjustable parts are re-lubricated.
General maintenance should be carried out by a competent, professional person who is well informed
on how to use the equipment (see warranty - page 25) if there is no such person available or a more
thorough check is needed, a service via an approved repairer (see opposite) should be booked. The
person who carries out the maintenance check or service should always fill out the service history log
record (page 24) in order to ensure the warranty remains valid.
As documented opposite, the degree of maintenance required is dependent on various factors relating
to the use of the product. In addition to the specific functional adjustment warnings specified in this
manual, it should be ensured that a thorough inspection of the following should be completed at no
greater than 6 month intervals:
Points listed here are generic across the JCM range and do not apply to all products.
Cleaning & Care
General Maintenance
!
Castors
Lift base and check each wheel to ensure it is not damaged, loose or worn.
Brakes
• Removing any grease or dirt that has built up on the wheels, check that the brakes stop the wheels
rotating.
•
Chec
k they are securely fixed in place & that there are no signs of damage or wear & tear.
Pushing Handles
• Ensure handles are functioning correctly.
• Check there are no signs of damage or wear and tear.
•
Ensur
e push handle grips are secure.
Seat Tilt in Space
Mechanism
• With the tilt lock released check for free movement with no signs of damage or wear to the mechanism,
lever or cables.
• Tighten the lock and ensure it holds the seat angle.
Seat / Backrest Upholsters
• Check the attachment points of the seat and backrest upholstery are tight.
• Check for worn covering. Rough worn upholstery can cause discomfort and would be dicult to
• keep hygienically clean, which may cause skin irritation.
Frame
With correct maintenance the
frame should provide at least
5 years trouble free use but,
depending on conditions of use,
wear will occur and a thorough
inspection is recommended.
• Check all metal parts to ensure there are no signs of damage or wear and tear, paying particular attention
to adjustable or moving parts.
•
Chec
k there are no signs of failure in joints and welds.
•
Chec
k tightness & security of all fixings, bolts, nuts, spring loaded pegs, & other fitments.
•
Chec
k for signs of fatigue wears, replace parts that show signs of wear or repeatedly becoming loose.
Fixtures
Check arm pads and headrest, replace if worn.
Page 23

23
What should be completed during a service?
A service is a comprehensive combination of inspection, maintenance and repair or replacement of
worn, faulty or missing components. The growth and any changes of the occupants needs since the
original assessment is taken into account when performing the service. This is in contrast to general
maintenance (opposite), where only straightforward checks, inspections and adjustments take place and
primary services are planned.
What happens if a fault is found?
If any faults are found that could prove to be a risk to either the user or the operator then all use of the
equipment should be ceased immediately until the product has been repaired.
Who should carry out the service?
It is stressed that only a JCM approved repairer or a person with competent training of a Class 1 medical
device should carry out this work.
Any modifications must not be carried out without prior agreement of JCM Seating Solutions Ltd. It
must be understood that unauthorised modifications may pose a risk to all users and attendants, as well
as potentially invalidate the warranty.
Any new parts required should be genuine JCM Seating Solutions Ltd. approved parts, fitted to JCM
specifications.
Frequency of Service
JCM recommend that a service of this product is completed once every 6 months as a minimum.
However, the frequency of inspection and service must be altered depending upon the severity of use. If
the system is used in any of the following ways then the use could be said to be fairly heavy and constant.
Therefore we would recommend the service interval be reduced to once every three months;
• Daily for around 8 to 10 hours.
• Weekly for at least 6 days out of 7.
• Monthly for at least 11 months a year.
• By an active user or somebody who is very active voluntarily or involuntarily.
• By a user who is above 80% of the maximum user weight recommended.
• Transported in a moving vehicle twice or more in a day.
If the usage exceeds the amount highlighted above it is possible that services every six weeks or less
might be needed.
How to book a service
JCM have specified technicians trained to service our products. If you would like JCM to service
your chair or for further information please contact us on 01733 405830.
Alternatively, contact the person who issued you with the product.
Servicing via Approved
Repairer
Page 24

24
This log is an important record of usage and care of the product. It is a primary tool in predicting the
need for further service and maintenance. It should be completed each time an inspection, service
or any other significant manipulation has taken place. JCM Seating Solutions Ltd. will require proof of
service for any warranty claims or orders.
Please contact JCM if additional log sheets are required.
Service Record Log
DAT E SERVICE PERFORMED ORGANISATION
PRINT NAME &
SIGN
SERIAL NUMBER
___________________
DATE DELIVERED
______/______/______
Page 25

25
Products manufactured by JCM are covered with a manufacturer’s 3 year warranty.
What it covers
The warranty covers all aspects of product failure due to faulty workmanship or
manufacturing.
Period of Cover
The period of the warranty runs for 3 years from the date that the product is
dispatched.
The Work JCM is obliged to Complete
JCM’s obligation under this warranty is to replace or repair any defective goods
within the period of the warranty free of charge.
What the Warranty Does Not Cover
• Items that are damaged or fail due to natural wear and tear, extreme usage, neglect
or misuse.
• Accidental damage, modifications or repairs carried out by a third party
unauthorized by JCM or non-professional healthcare representative.
Customer Responsibility
To ensure the warranty remains valid, customers are advised that servicing,
maintenance and re-issuing guidelines must be followed and documented as stated
in the manual.
JCM will require proof of service (see opposite) for any warranty claims or orders.
When making a claim JCM reserve the right to inspect the product and all necessary
documentation.
Only valid for products purchased after 1st April 2006. Applies only to products exclusively manufactured by JCM.
3 YEAR WARRANTY
Important
JCM Seating Solutions Ltd. will not be held responsible for any damage or injury caused by
incorrect use of this product. For any information or guidance on the use of this product please
call our oce who will put you through to your local representative or send you any additional
information you may require.
Tel: 01733 405830
!
Page 26

26
Inspecting & Reissuing of Equipment
Most JCM Seating Solutions Ltd. products are individually assessed for a client
prior to issue. They are handed over in a controlled way to ensure optimum fit and
specification, checks are completed and any additional individual verbal instructions
given. We therefore recommend the following points are adhered to prior to any reissue of equipment:
Cleaning
Follow a rigorous process of cleaning in
order to decontaminate the product and
eliminate the chance of cross infection.
Assessment of Fabrics / Foams
Carefully assess the condition of fabrics
and foams in the seating product, and have
these replaced partially or even completely
if need be. In severe cases if the chassis is
worn and the seating in poor condition
it may be necessary to have the product
re-furbished by the manufacturer. In very
severe cases if the chassis is badly worn and
the seating in very poor condition then the
product should be decommissioned and
disposed of.
Electrical and Electronic Equipment
Decomissioning
If your product is set up with an electrical
function you should always contact JCM
or your authorised representative for decomissioning information.
Appropriateness of Equipment
Check that the equipment supplied is
appropriate for the needs of the user
taking age, weight, ability, diagnosis, and
any other important factors into account.
For instance, JCM Seating Solutions Ltd.
products may not be suitable for persons
with severe challenging patterns of
behaviour. Also ensure safe specified limits
for use are not exceeded by the new user.
Your sales representative can advise on the
suitability of the equipment.
Manuals and Records
Ensure this instruction manual and any
additional manuals for the seating unit
are handed over to the new user with
the equipment and ensure the servicing
log history is up to date. Records on the
new user must be updated to maintain
traceability.
Inspection
The equipment should have a rigorous
inspection prior to the reissue, to
include the points covered in the six
monthly routine check, regardless of if
the checks were recently completed. The
equipment should be free of excessive
wear or distortion in any aspect of its main
construction or accessories.
Condition
Wheels, tyres and brakes must be in good
working condition, properly adjusted and
inflated as appropriate.
Page 27

27
Accessories
Check all accessories carefully for damage
and potential shortcomings which may
pose a risk to the user.
Function
Ensure that all the functions of the chair
are working correctly e.g. tilt in space,
height adjustment, back recline, folding
etc.
Fixings
Check that any knobs, hand wheels,
nuts, bolts, levers and fixings are in good
condition and fitted in place securely.
Modifications
Any special modifications, adaptations,
alterations or other such procedures
including added accessories may require
review. If they are found inappropriate,
remedial action (if considered safe and
practical) should be taken to reverse them
if possible.
Labelling
Any labelling specific to the previous user
should be removed and replaced with
labelling specific to the new user.
Adjustment
Adjustment of the equipment to the
new user must be carried out by suitably
qualified and experienced professionals.
These adjustments along with the other
appropriate checks and tests should be
completed with the owners knowledge
and agreement.
Hand Over
Competent handing over of the
equipment to the new user or attendant
must include proper training and
advice in safe use, particularly regarding
transportation issues.
Packaging
Always ensure that the chair is packaged
correctly before delivery.
Page 28

Q.A.90 (March 2016)
© 2016 JCM Seating all rights reserved.
www.jcmseating.co.uk
 Loading...