

JCG JHR-N916R, JHR-N926R User Manual

www.jcgcom.com
1
Intelligent Wireless Router
User Manual
Version: V1.0
Date: 2013.02.01
Copyright :
Copyright © 2013 Shenzhen Yichen Technology Development Co., Ltd.
All rights reserved.
JCG is a registered trademark of Shenzhen Yichen Technology Development Co., Ltd.
Without the express written permission from Shenzhen Yichen Technology Development
Co., Ltd., no organization or individual is allowed to imitate, duplicate, copy, translate or
use for other purposes. All other trademarks or registered trademarks in this document are
owned by their holders and protected by the relevant laws.
The product specifications and information mentioned in this manual are for reference
only, and no further notice will be provided for possible content update. For more detailed
product information, please visit our ofcial website: http://www.jcgcom.com.

www.jcgcom.com
2
Contents
Chapter I Introduction
1.1 Purpose and Denitions----------------------------------------------------------------------03
Chapter II Hardware Installation
2.1 Panel and Interfaces---------------------------------------------------------------------------04
2.2 System Requirements------------------------------------------------------------------------12
2.3 Installation Environment----------------------------------------------------------------------12
2.4 Hardware Installation Steps-----------------------------------------------------------------12
Chapter III Router Setup
3.1 Set up Network Correctly---------------------------------------------------------------------13
3.2 Quick Installation Guide----------------------------------------------------------------------17
3.3 Detailed Settings-------------------------------------------------------------------------------21
3.3.1Network Network Settings (Network)----------------------------------------------------21
3.3.2(WLAN) Wireless Settings (WLAN)------------------------------------------------------26
3.3.3NAT(NAT) NAT Settings (NAT)------------------------------------------------------------32
3.3.4(Firewall) Firewall Settings (Firewall)----------------------------------------------------34
3.3.5QOS(QOS) QOS Settings (QOS)--------------------------------------------------------35
3.3.6USB(USB) USB Settings (USB)----------------------------------------------------------37
3.3.7(Management) System Management (Management)-------------------------------41
3.3.8(Status System Status (Status)-----------------------------------------------------------46
Appendix I Products and Functional Specication FAQ-----------------------------------48
Appendix II Frequently Asked Questions (FAQ) --------------------------------------------50
Appendix III Statement----------------------------------------------------------------------70

www.jcgcom.com
3
Chapter I Introduction
Thank you for purchasing JCG 11N series WLAN router, which integrates the router, switch,
wireless access point with the rewall and adopts the most advanced MIMO (multiple input
multiple output) technology to increase the wireless transmission rate over 3 times of the
initial 802.11g standard. It supports 64/128-bit WEP encryption and the advanced encryption
and security features like WPA and WPA2. With the WPS encryption function, you can
easily set up the secure wireless network environment. And with the provided setup guide,
you can easily set up the router, remotely access and manage the router anytime anywhere
via the Internet. JCG 11N series WLAN router is a series of cost-effective products specially
designed for small–size enterprises, families and student’s dormitory to meet their needs for
wireless Internet access. It’s the best choice for you to enjoy the wireless Internet access
and the fun from wireless connectivity.
JCG 11N series WLAN router is simple to set up, which can be installed and set up using
the operation manual without professional assistance. Before you are ready to install and
use this product, please read the manual carefully for better understanding and use of the
full functionalities of this product.
1.1 Purpose and Denitions
This manual is used to help you familiarize with the JCG 11N series WLAN router and use it
properly. To avoid ambiguity, we dene the terms used in this manual as follows:
Router:
refers to JCG 11N series WLAN router, unless otherwise specied.
Modem:
network service access device. It can be xDSL, Cable Modem, GPON or EPON,
etc.
Computer/ host:
refers to desktop computer, laptop or all the network Client in a broader
sense.
NIC:
refers to the wired or wireless network interface card (NIC) for network connectivity.
ISP:
Internet service provider, refers to the company or organization providing Internet
services.
AP:
wireless network access point, it may refer to the wireless router providing wireless
network access services.
www.jcgcom.com
4
STA:
wireless client/station, refers to wireless client devices, such as laptop, mobile phone
and tablet PC etc.
Client:
wired or wireless client, including but not limited to computer, laptop, mobile phone
and tablet PC etc.
Chapter II Hardware Installation
2.1 Panel and Interfaces
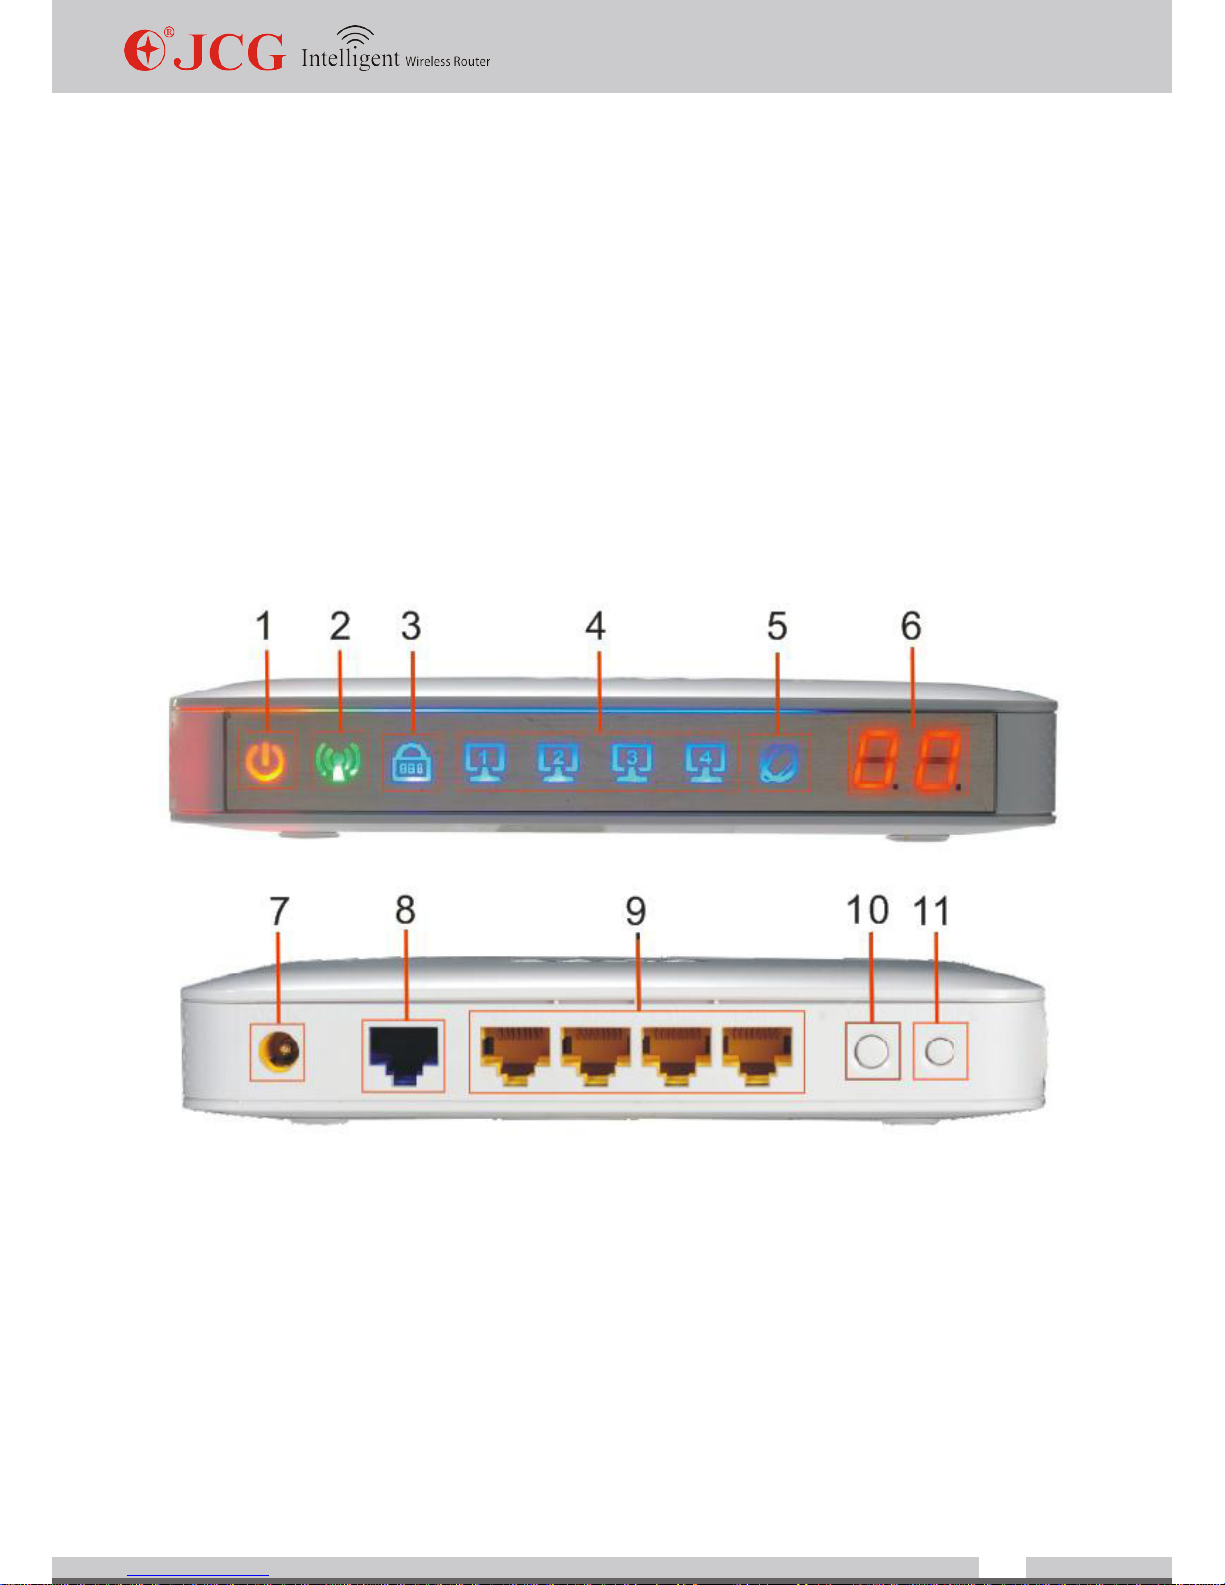
JHR-N916R/N926R/N926R+
1.Power LED
Off: powered off
On: powered on
2.Wireless status LED
Off: wireless radio off
On: wireless radio on
Blinking: wireless data transmitting

www.jcgcom.com
5
3.Security LED
Off: wireless network unsecured
On: wireless network secured
Blinking:Firmware Upgrading
4.LAN status LED
Off: LAN port unconnected
On: LAN port connected
Blinking: LAN data transmitting
5.WAN status indicator
Off: WAN port unconnected
On: WAN port connected
Blinking: WAN data transmitting
6.LED digital display
Digital display of online hosts
7.Power jack (DC IN)
Connect to power adapter
8.WAN (Internet) port
WAN port
9.LAN 1-4 ports
LAN ports
10.WLAN (wireless) button
1) Switch on/off the wireless network
2) Wireless radio power regulation (available on JHR-N926R/N926R+ only)
11.RST/WPS button
When the router is working, press this button for 1 second to start WPS progress; press this
button for more than 5 seconds to restore to factory settings.
www.jcgcom.com
6
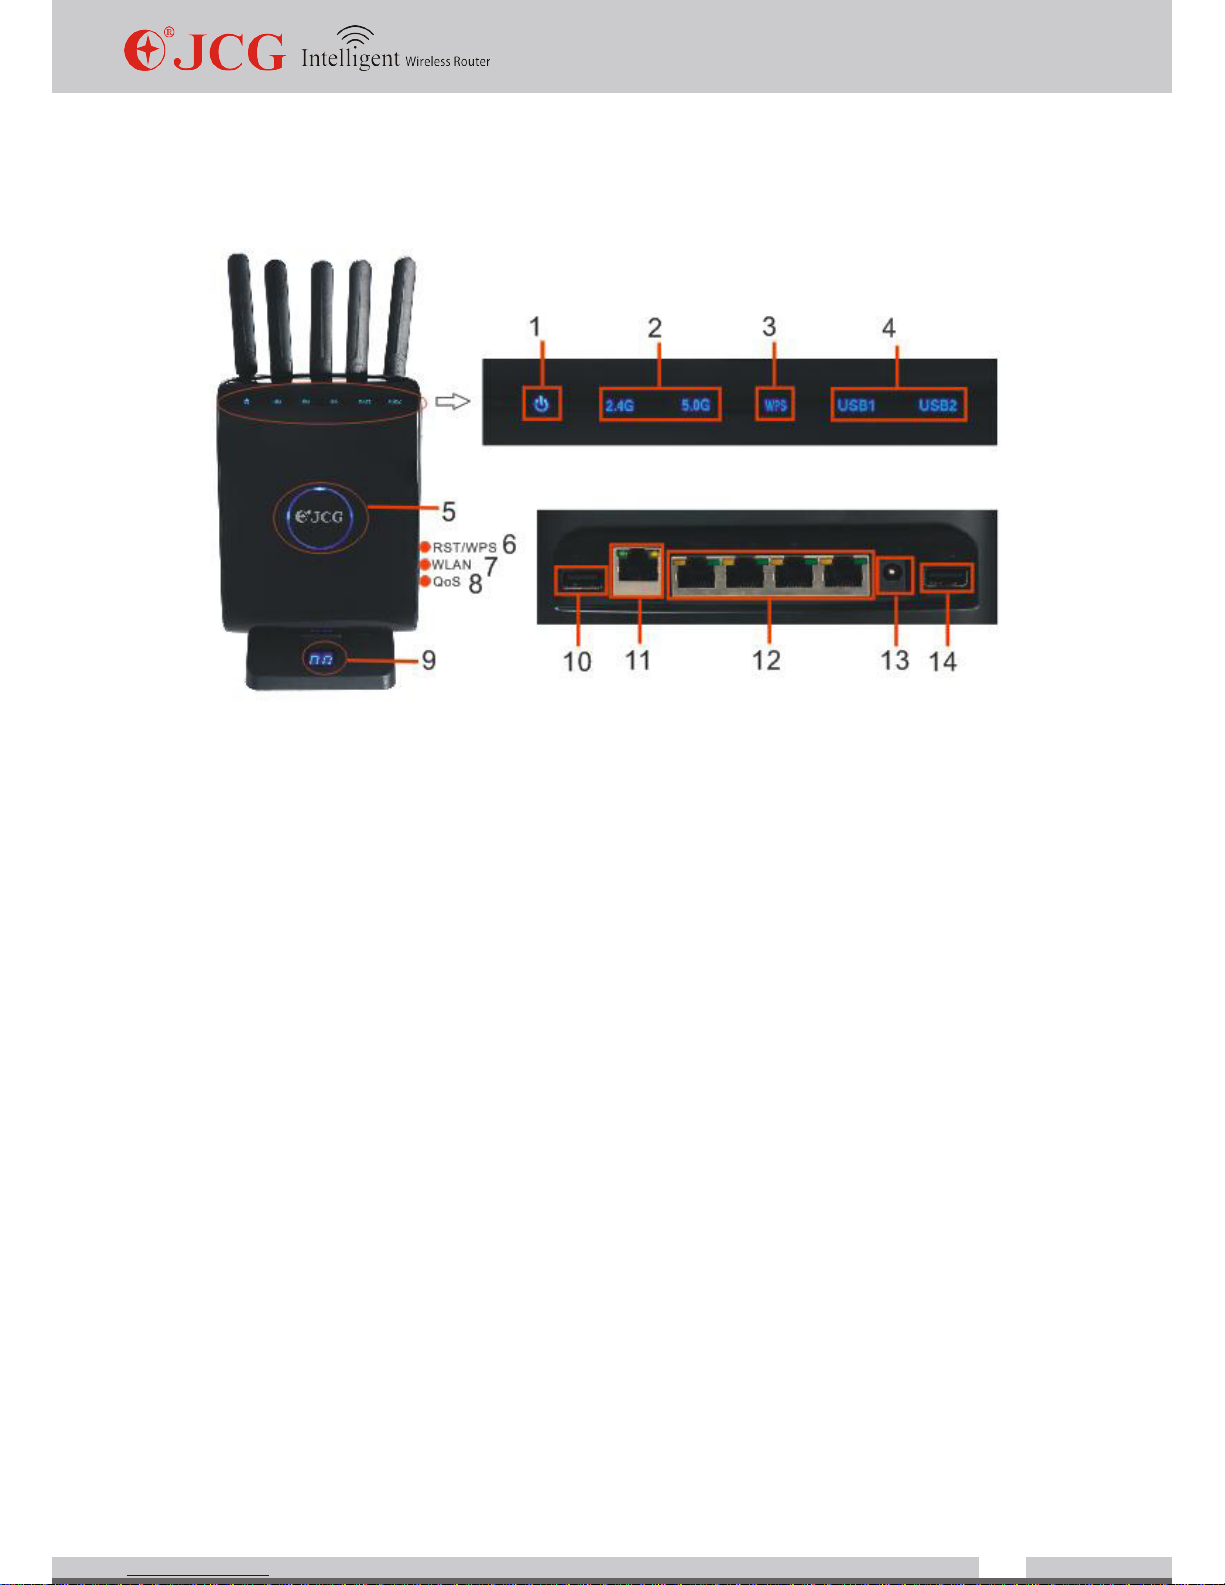
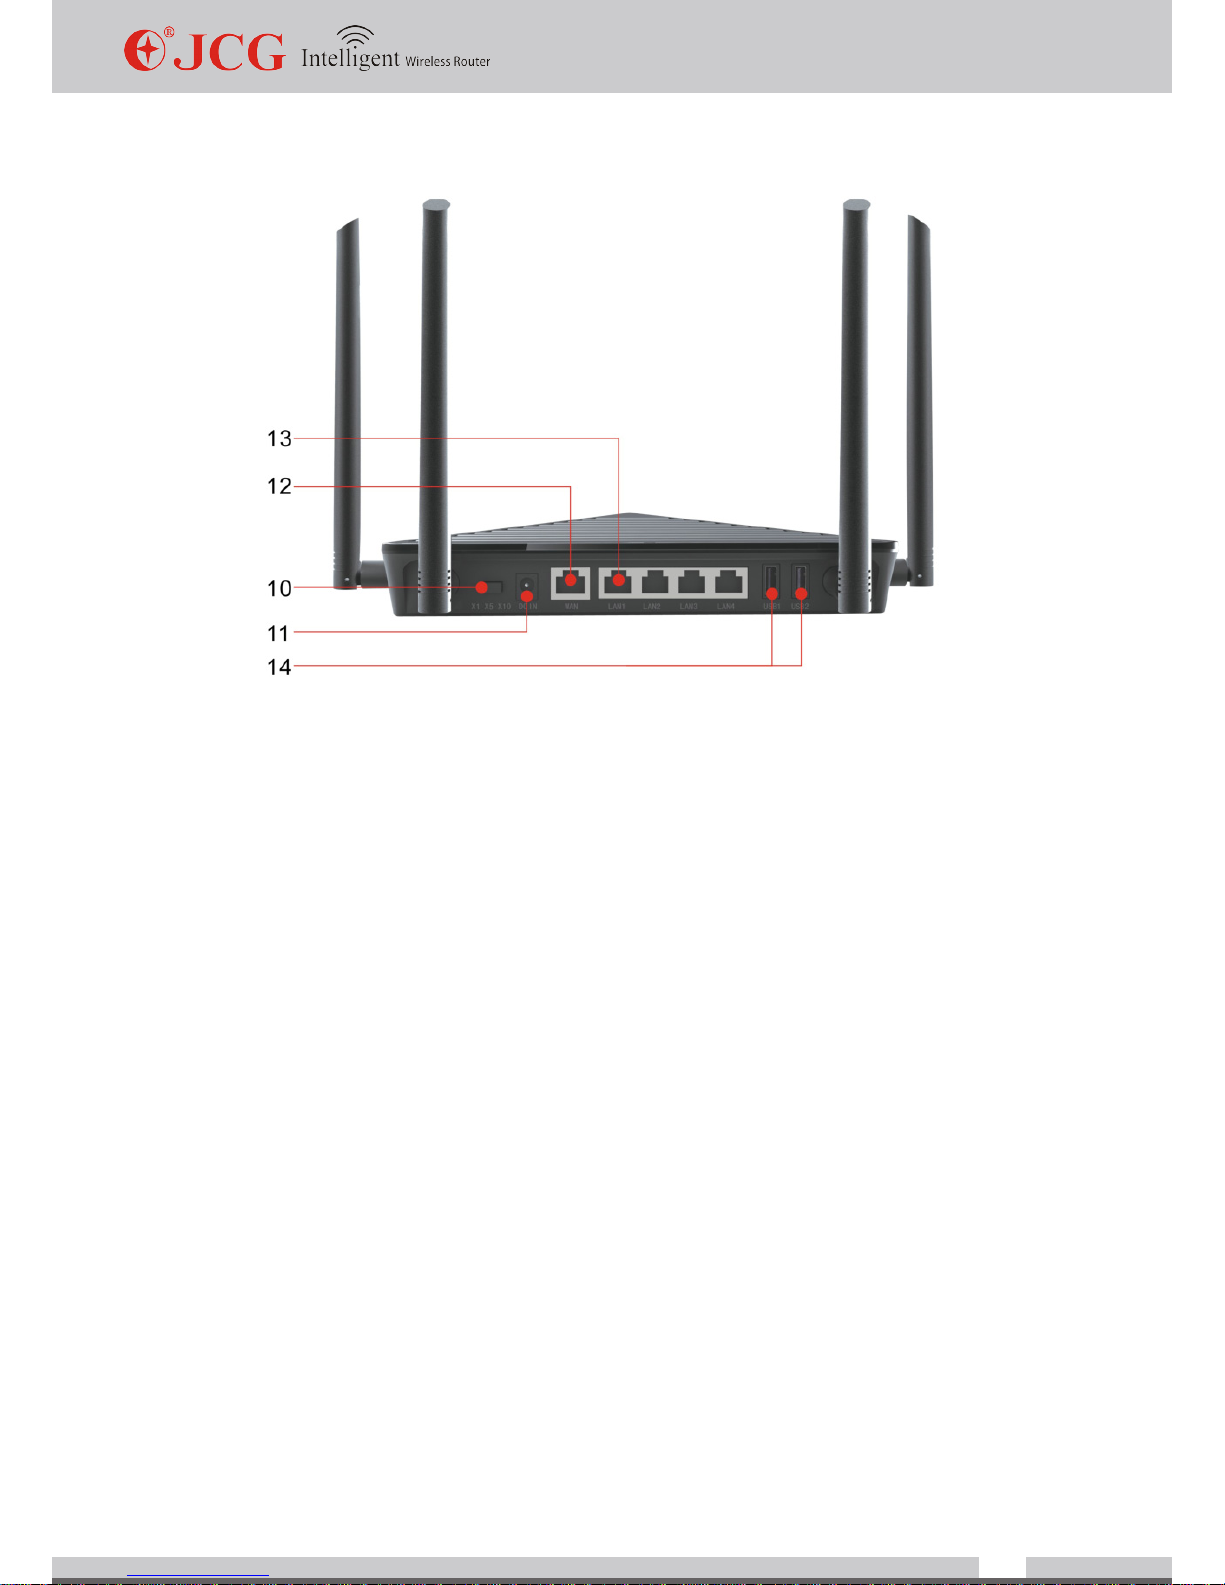
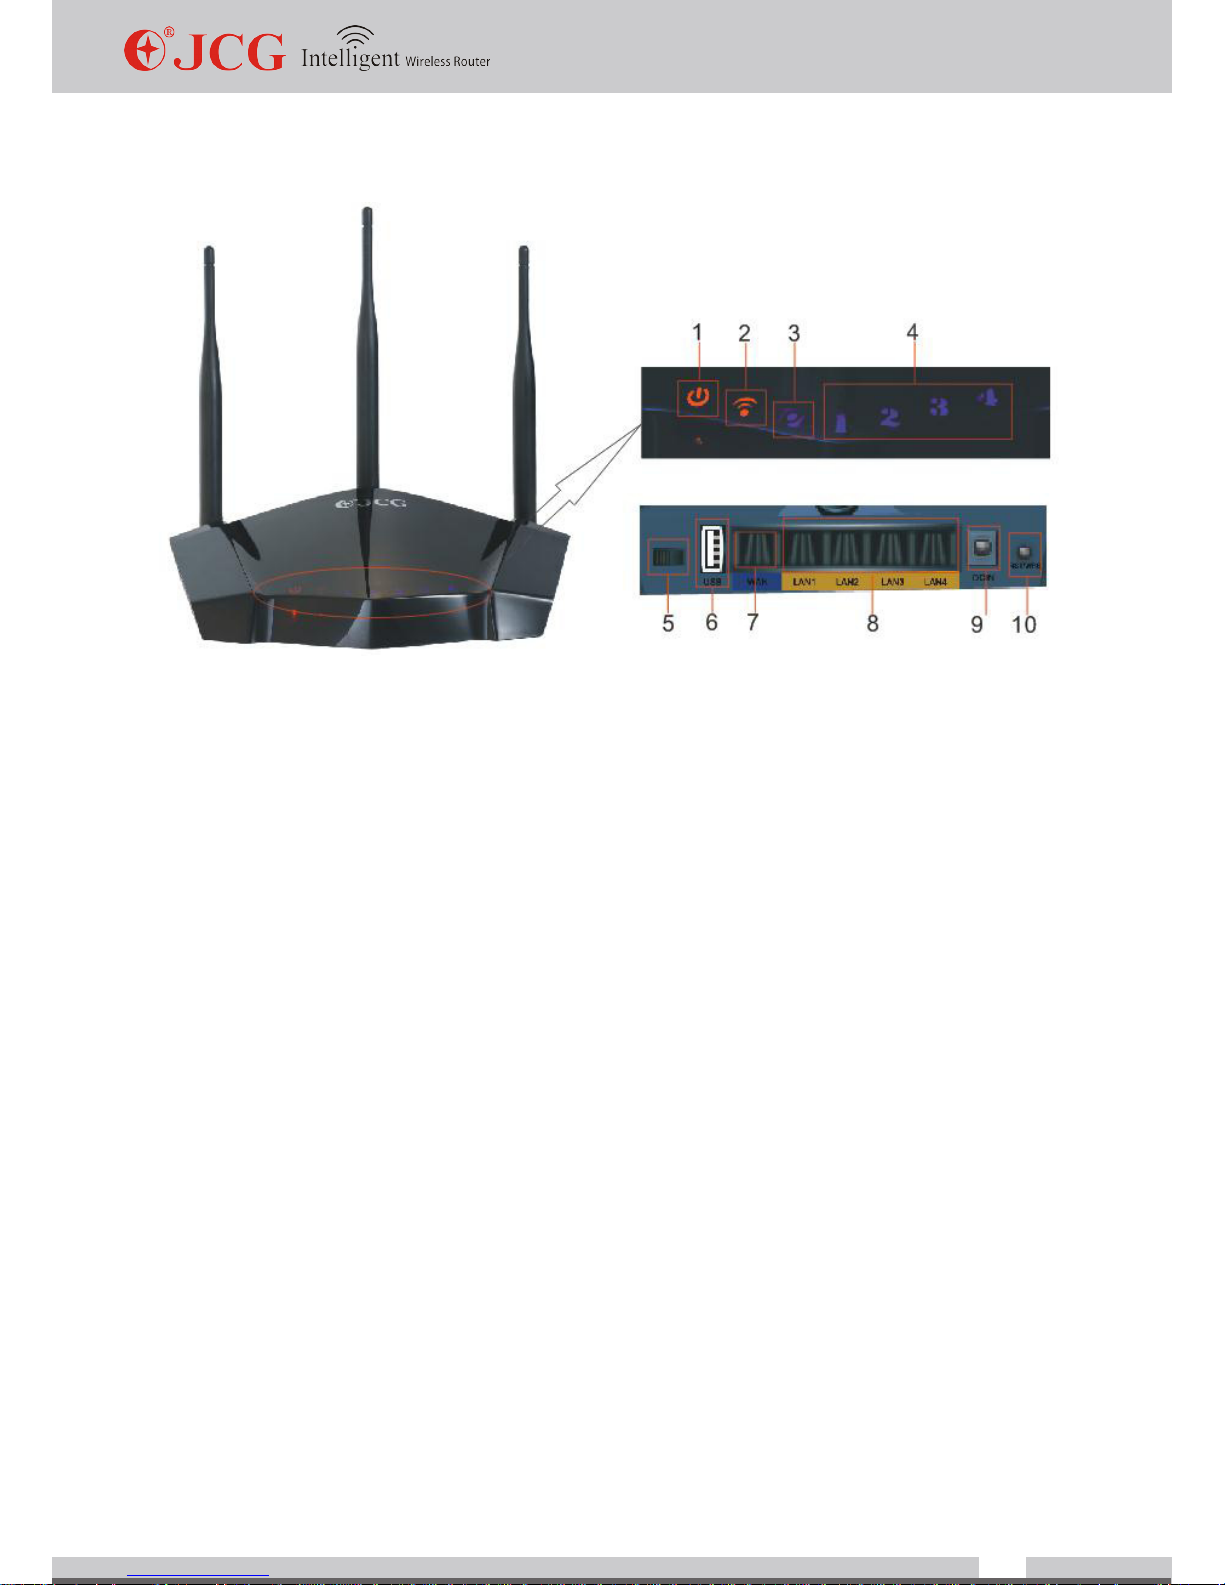
JHR-N936R
1.Power LED
Off: powered off
On: powered on
2.2.4G/5G wireless status LED
Off: wireless radio off
On: wireless radio on
3.WPS
Off: WPS idle or disabled
On: WPS connected successfully
Blinking:WPS in progress or rmware upgrading
4.USB status LED
Off: USB port unconnected
On: USB port connected
5.LED Sensor
Touch with a nger to switch on/off the status LED

www.jcgcom.com
7
6.RST/WPS button
When the router is working, press this button for 1 second to set encryption; press this
button for more than 5 seconds to restore to factory settings.
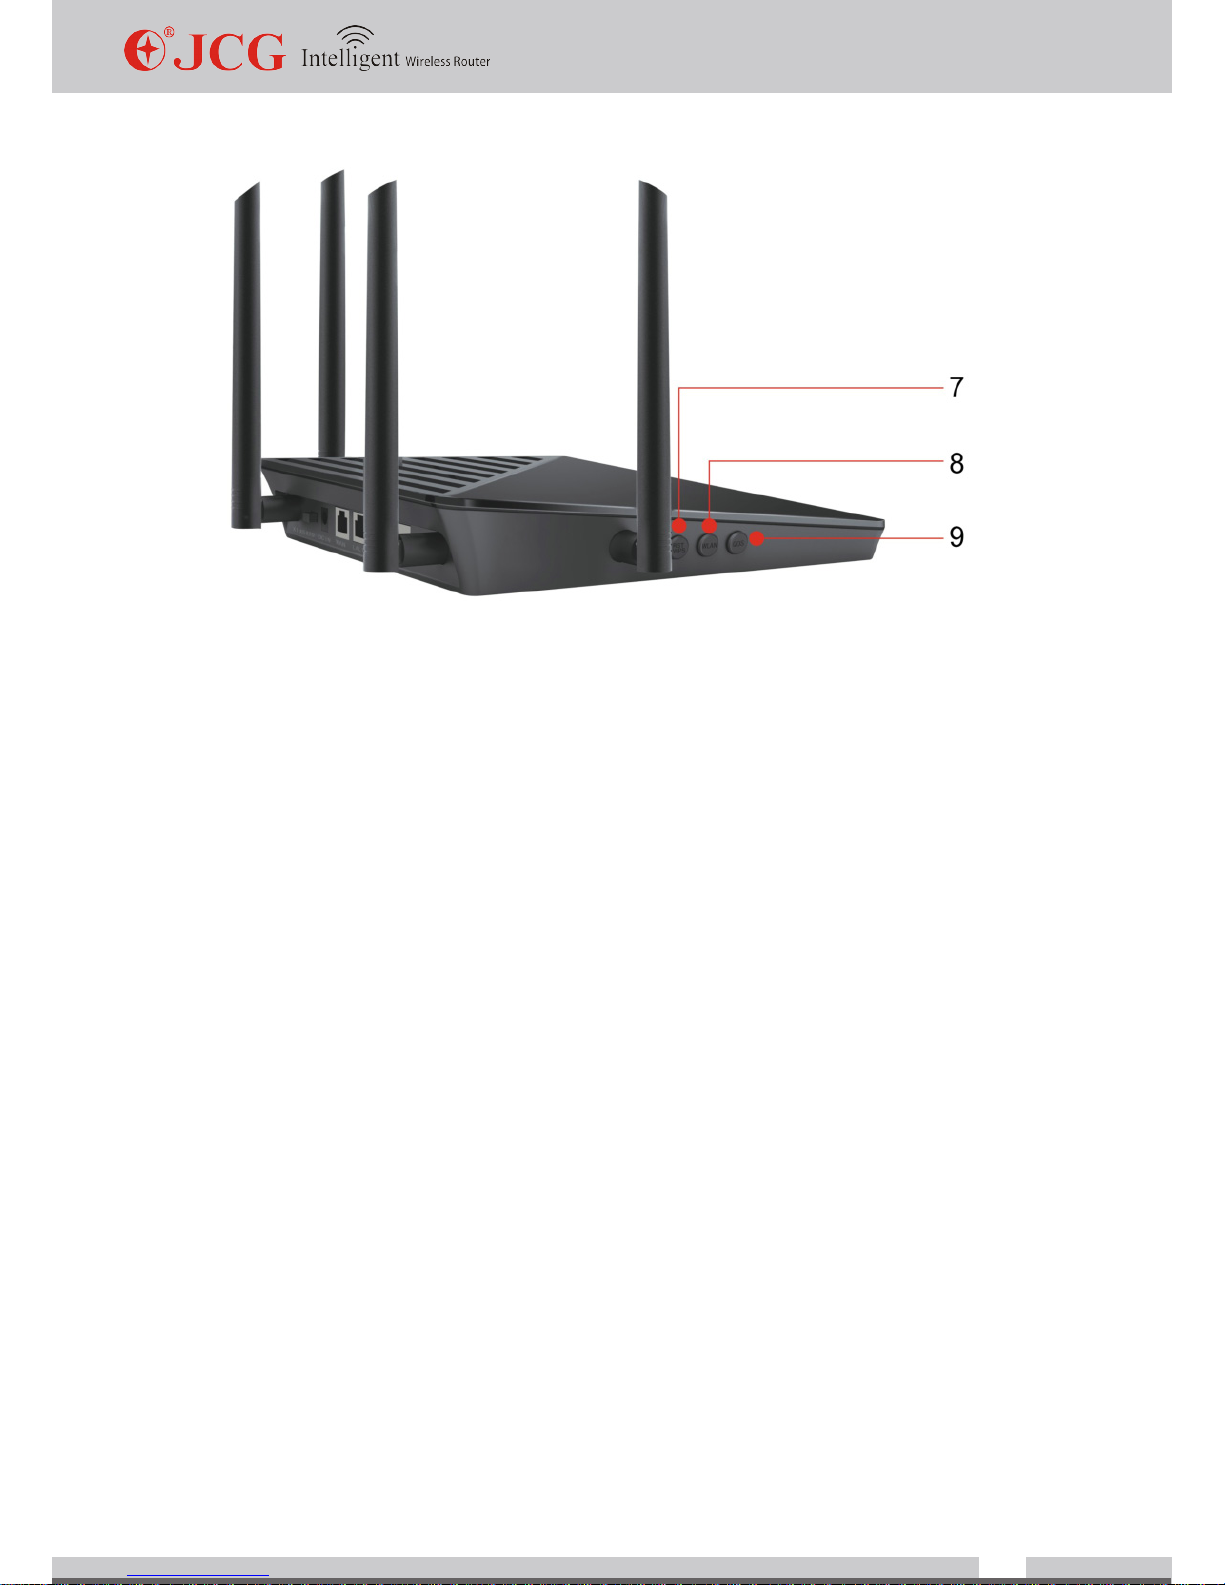
7.WLAN (wireless) button
Switch on/off the wireless network. Press this button for one second to switch on/off the 2.4G
wireless network; press this button for more than 5 seconds to switch on/off the 5G wireless
network.
8.QoS button
Shortly press on this button to limit the host’s maximum traffic. When the QoS is in
IP address limited traffic mode, limit the host to use the 1/10 of the maximum network
bandwidth; when the QoS is in priority mode, limit the host to the lowest priority; when the
IP connection limit is enabled, the maximum connection sessions of this host is limited to
10; shortly press this button once to switch the current limited host; press this button for
more than 5 seconds to release the bandwidth limitation on the host.
9.digital display
Digital number of online hosts
10.USB 2.0
Connect to USB device, such as USB hard disk, USB thumb driver or USB printer
11.WAN (Internet) port
WAN port
12.LAN 1-4 network interface
LAN port
13.Power jack (DC IN)
Connect to power adapter

www.jcgcom.com
8
JHR-N855R
1. Tags Sensor
Touch with a nger to switch on/off the status LED
2. Power LED
Off: powered off
On: powered on
3. USB status LED
Off: USB port unconnected
On: USB port connected
4. WPS
Off: WPS idle or disabled
On: WPS connected successfully
Blinking:WPS in progress or rmware upgrading
5.QOS
Off: QoS off
On: QoS on
6. 2.4G/5G wireless status LED
Off: wireless radio off
On: wireless radio on
Blinking: wireless data trafc is present
www.jcgcom.com
9
7. RST/WPS button
When the router is working, press this button for 1 second to set encryption; press this
button for more than 5 seconds to restore to factory settings.
8. WLAN (wireless) button
Switch on/off the wireless network. Press this button for one second to switch on/off the 2.4G
wireless network; press this button for more than 5 seconds to switch on/off the 5G wireless
network.
9. QoS button
Shortly press on this button to limit the host’s maximum traffic. When the QoS is in
IP address limited traffic mode, limit the host to use the 1/10 of the maximum network
bandwidth; when the QoS is in priority mode, limit the host to the lowest priority; when the
IP connection limit is enabled, the maximum connection sessions of this host is limited to
10; shortly press this button once to switch the current limited host; press this button for
more than 5 seconds to lease the bandwidth limitation on the host.
www.jcgcom.com
10
10. Power regulation button
Wireless radio power regulation (*1.*5.*10)
11. Power jack (DC IN)
Connect to power adapter
12. WAN (Internet) port
WAN port
13 LAN 1-4 network interface
LAN port
14. USB 2.0
Connect to USB device, such as USB hard disk, USB thumb driver or USB printer
www.jcgcom.com
11
JHR-N835R/N845R
1.Power LED
Off: powered off
On: powered on
2.Wireless status LED
Off: wireless radio off
On: wireless radio on
Blinking: wireless network data transmitting
3.LAN 1-4 network interface
Off: WAN port unconnected
On: WAN port connected
Blinking: WAN data transmitting
4.LAN status LED
Off: LAN port unconnected
On: LAN port connected
Blinking: LAN data transmitting
5.Power regulation button
Wireless radio power regulation (*1.*5.*10)

www.jcgcom.com
12
6.USB 2.0
Connect to USB device, such as USB hard disk, USB thumb driver or USB printer
7.WAN (Internet) port
WAN port
8.LAN 1-4 network interface
LAN port
9.Power jack (DC IN)
Connect to power adapter
10.RST/WPS button
When the router is working, press this button for 1 second to start WPS progress; press this
button for 5 seconds and the system will restore to factory settings.
2.2 System Requirements
Browser: Internet Explorer 6.0+, Firefox 2.0+, Opera 10.0+ and Safari 5.0+;
Operating system: Windows XP and above, Linux 2.4+, Mac OS X, iOS 4.0+ and Android
2.0+;
Broadband service or broadband access point;
Network Interface Card
Standard Ethernet cable
2.3 Installation Environment
Keep the router horizontal
Adjust the angle of the antenna to a suitable direction
Avoid placing the router near any heat source
Avoid placing the router in a humid environment
2.4 Hardware Installation Steps
1.Use the provided power adapter to connect to the router.
2.Use Ethernet cable to connect the broadband access point and the WAN port of the
router.
3.For wired connection, use Ethernet cable to connect the computer and the LAN port of
the router.

www.jcgcom.com
13
4. For wireless connection, please check whether the WIFI is enabled, scan and connect
to the in accordance with the wireless network name (SSID) with the key on the back of the
router.
Chapter III Router Setup
Correct setup on the router is required before using it normally. Here is the specific
guidance on how to carry out installation and set up the router.
3.1Set up Network Correctly (take Windows 7 as an example)
This step can be skipped if no special setup was done on your computer.
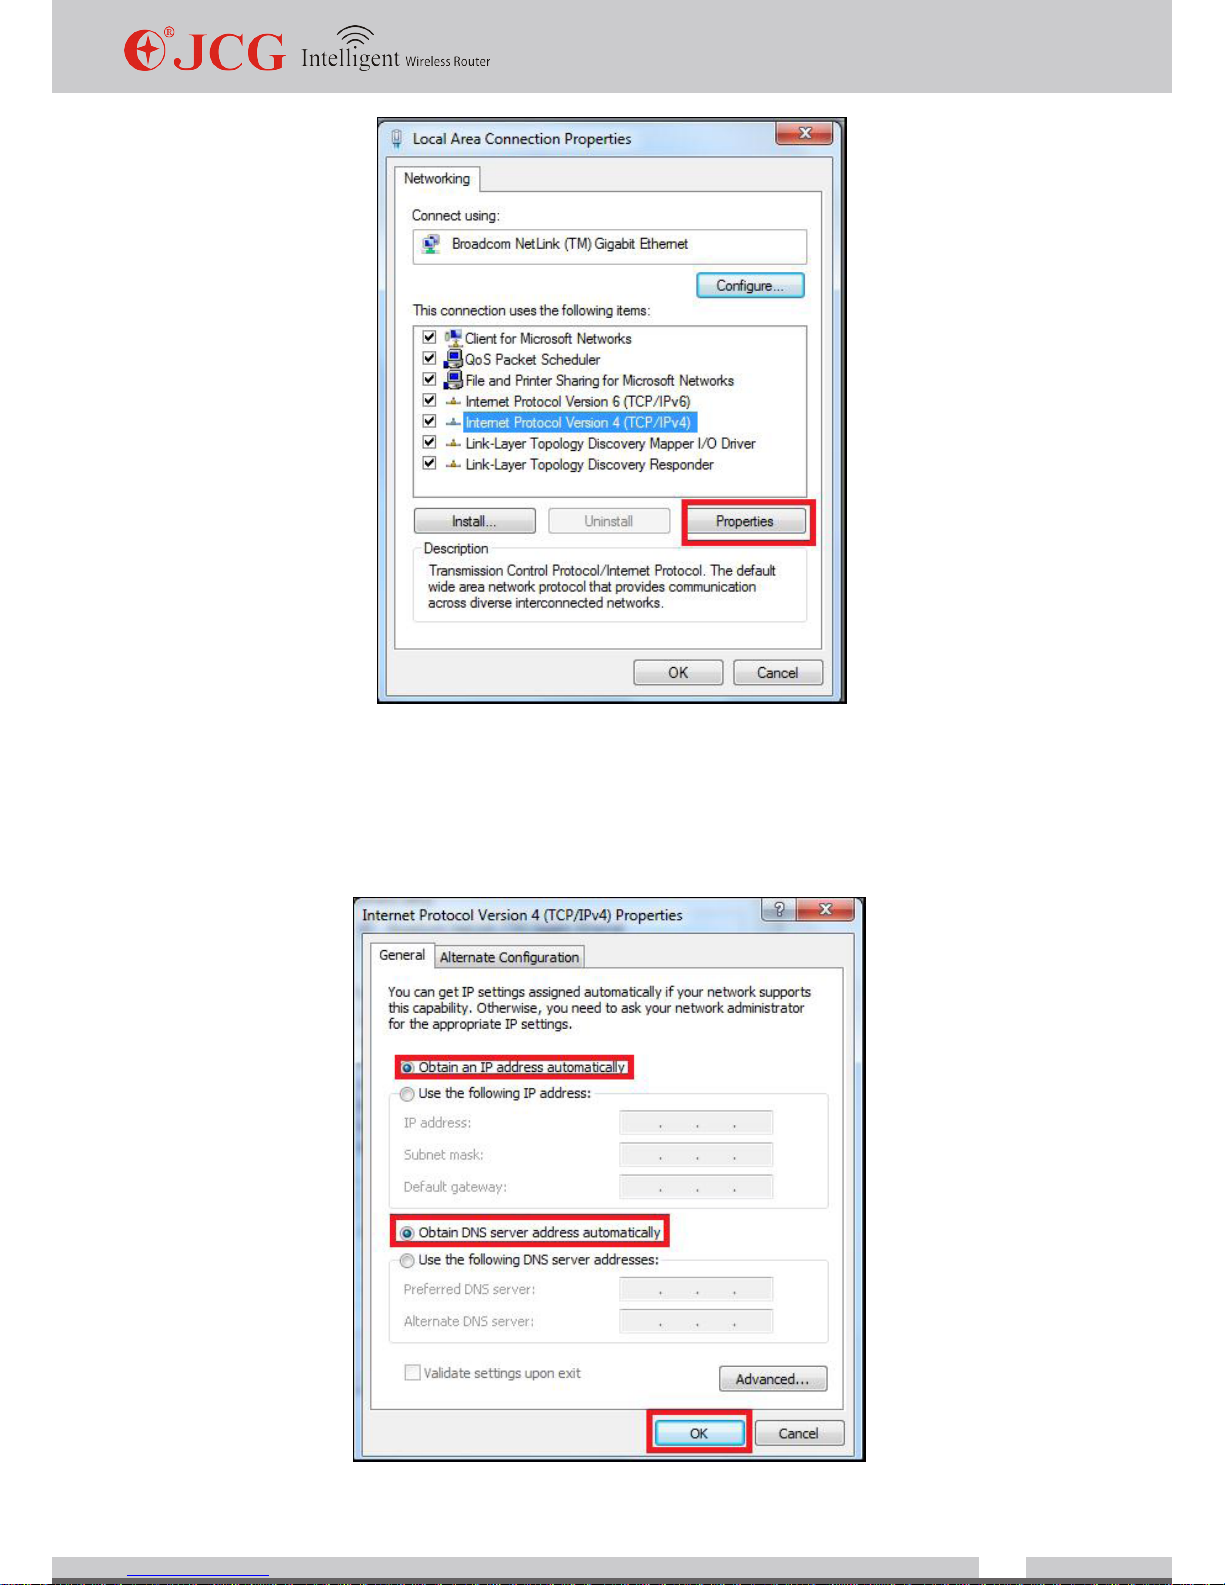
1) Click:" Start->Control Panel->Network and Internet->Network and Sharing Center-
>Change adapter settings->Local Area Connection” and select the connected network
card. Then right click “Local Area Connection” to select Properties
2) Select
Internet Protocol Version 4
(TCP/IPv4)and click
Properties
www.jcgcom.com
14
3) Select Obtain an IP address automatically, Obtain DNS Server address automatically and
click OK. Return back to the previous interface and click OK. The system will automatically
obtain the IP address and DNS.

www.jcgcom.com
15
We recommend setting up your network environment via automatically obtaining the IP
address. If xed IP address is required for network connection, select Use the following IP
address and input the corresponding IP address, subnet mask and default gateway. Also,
you can enter the corresponding DNS server on Preferred DNS server and Alternate DNS
server as needed. Please contact the network service provider or our customer service for
details.
Note:
The default IP address is in the range of 192.168.1.X (2≤X≤254), the subnet mask is
255.255.255.0 and the default gateway is 192.168.1.1
5) Use Ping to check whether the computer and the router are connected.
Click Start and enter “cmd” in the subsequent search box and then press Enter to enter the
interface as shown below.

www.jcgcom.com
16
Enter command: Ping 192.168.1.1, press Enter. If the following screen appears, the
computer and the router are successfully connected.
If the following interface appears on the screen, the device is not connected. Please re-
check the above steps.
www.jcgcom.com
17
3.2 Quick Setup Wizard
Setup Wizard can guide you to quickly complete the basic settings step by step. For more
advanced features, please refer to Detailed Settings.
1.Make sure the computer and the router have been correctly connected
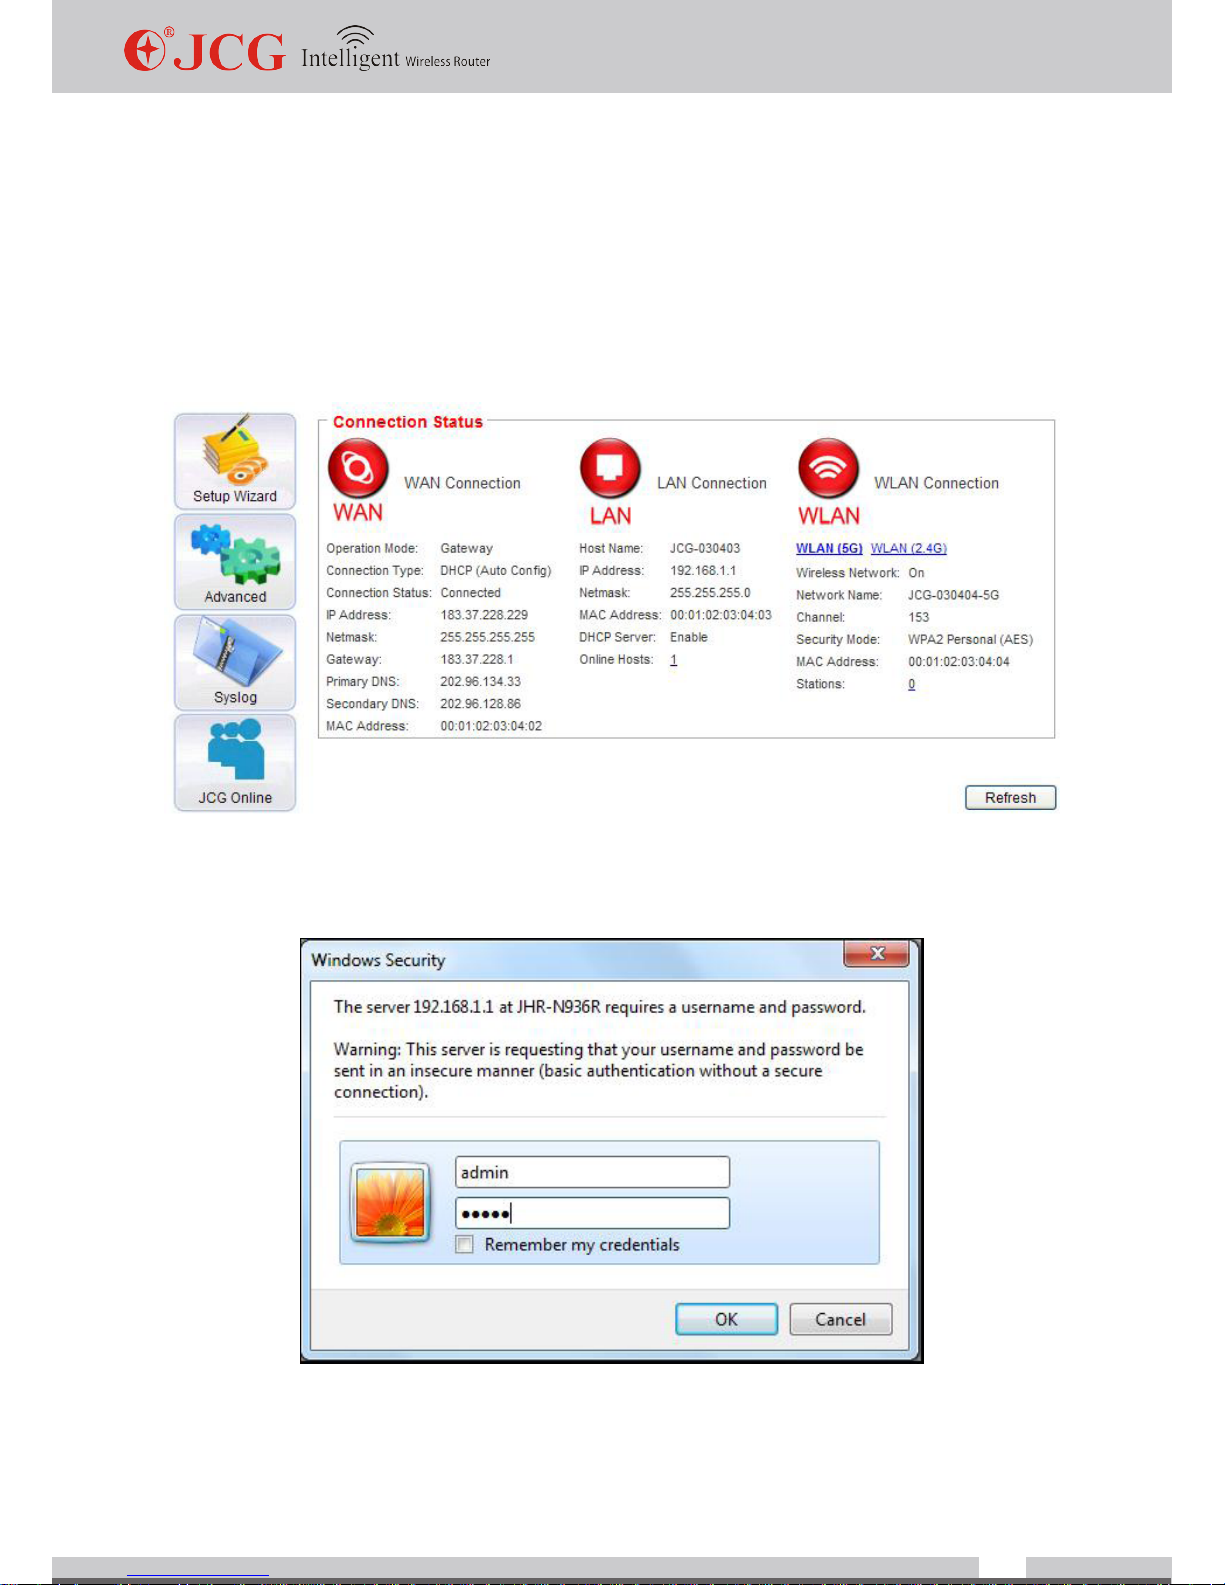
2.Open the browser, input and connect: http://192.168.1.1 on the address bar
3.Click setup wizard and input the username and password on the login screen (the default
username and the password are admin).

www.jcgcom.com
18
Note:
If you cannot access the router setup pages, please refer to FAQ for trouble shootings.
4. After logging in successfully, click Setup Wizard4. After logging in successfully, click
Setup Wizard
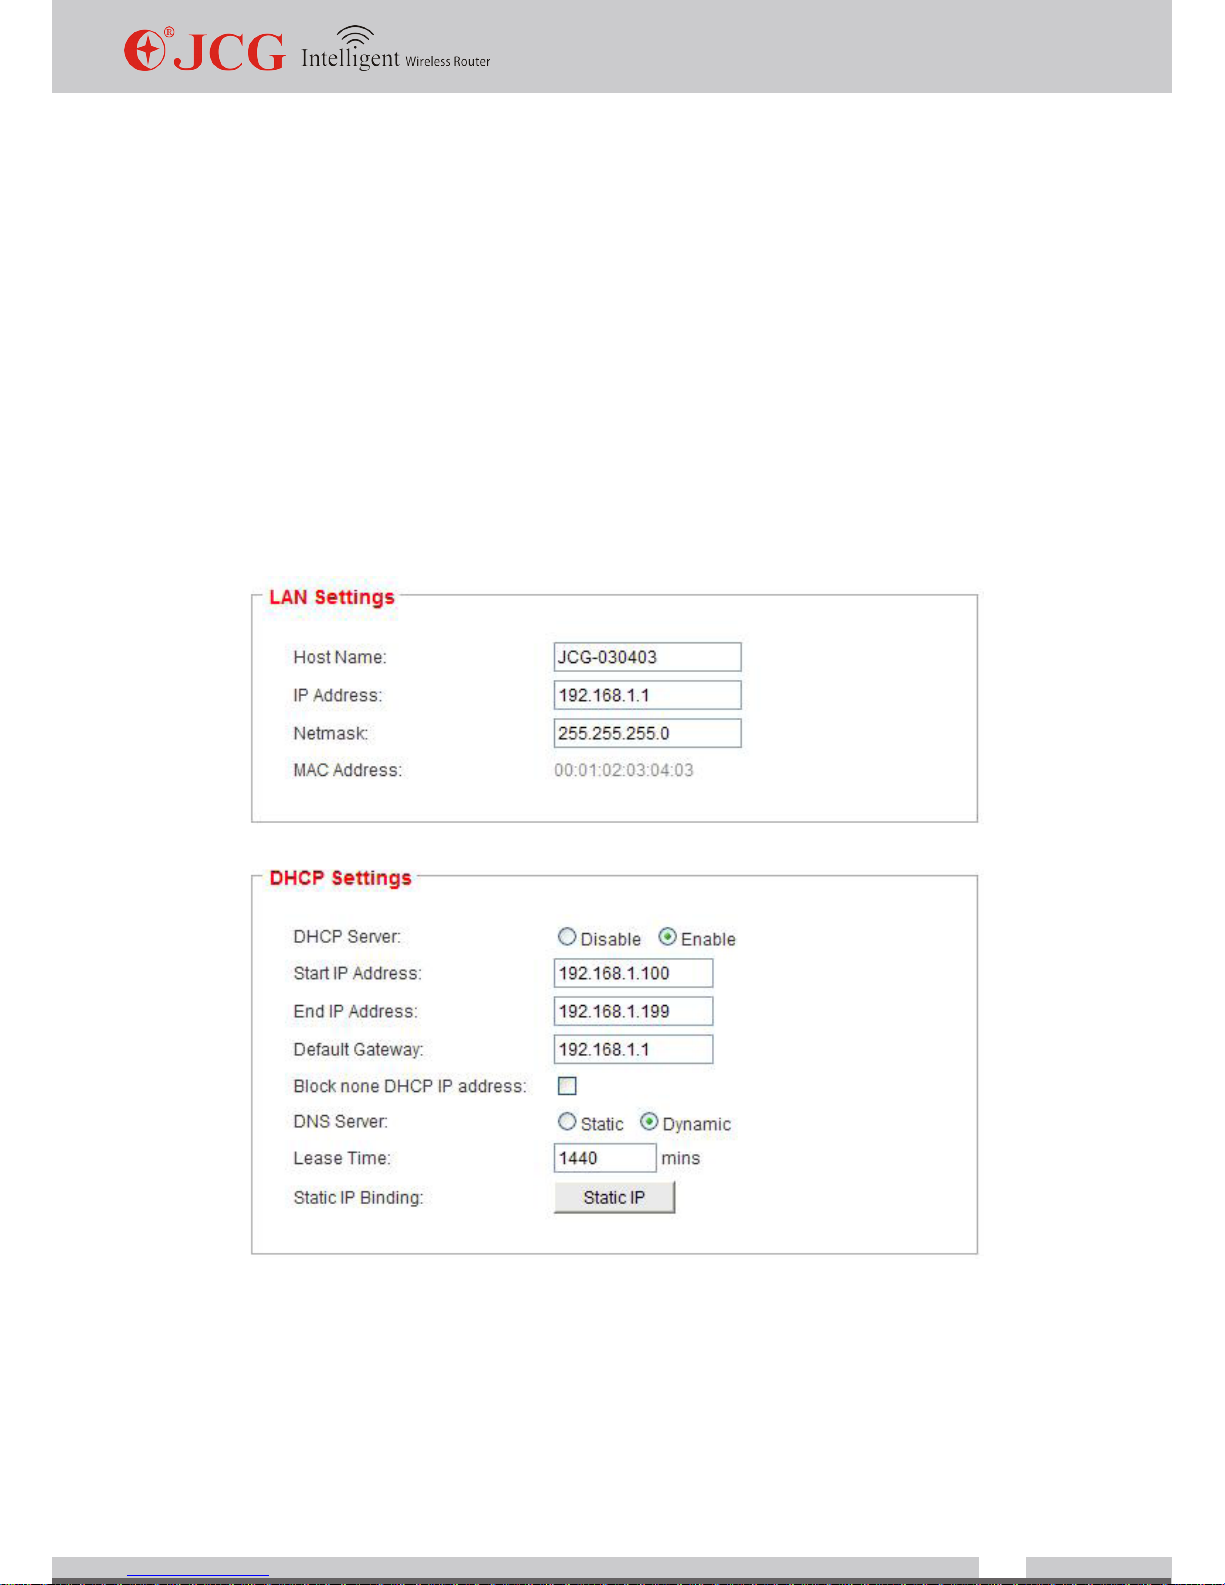
5.LAN settings
Set the LAN IP address.
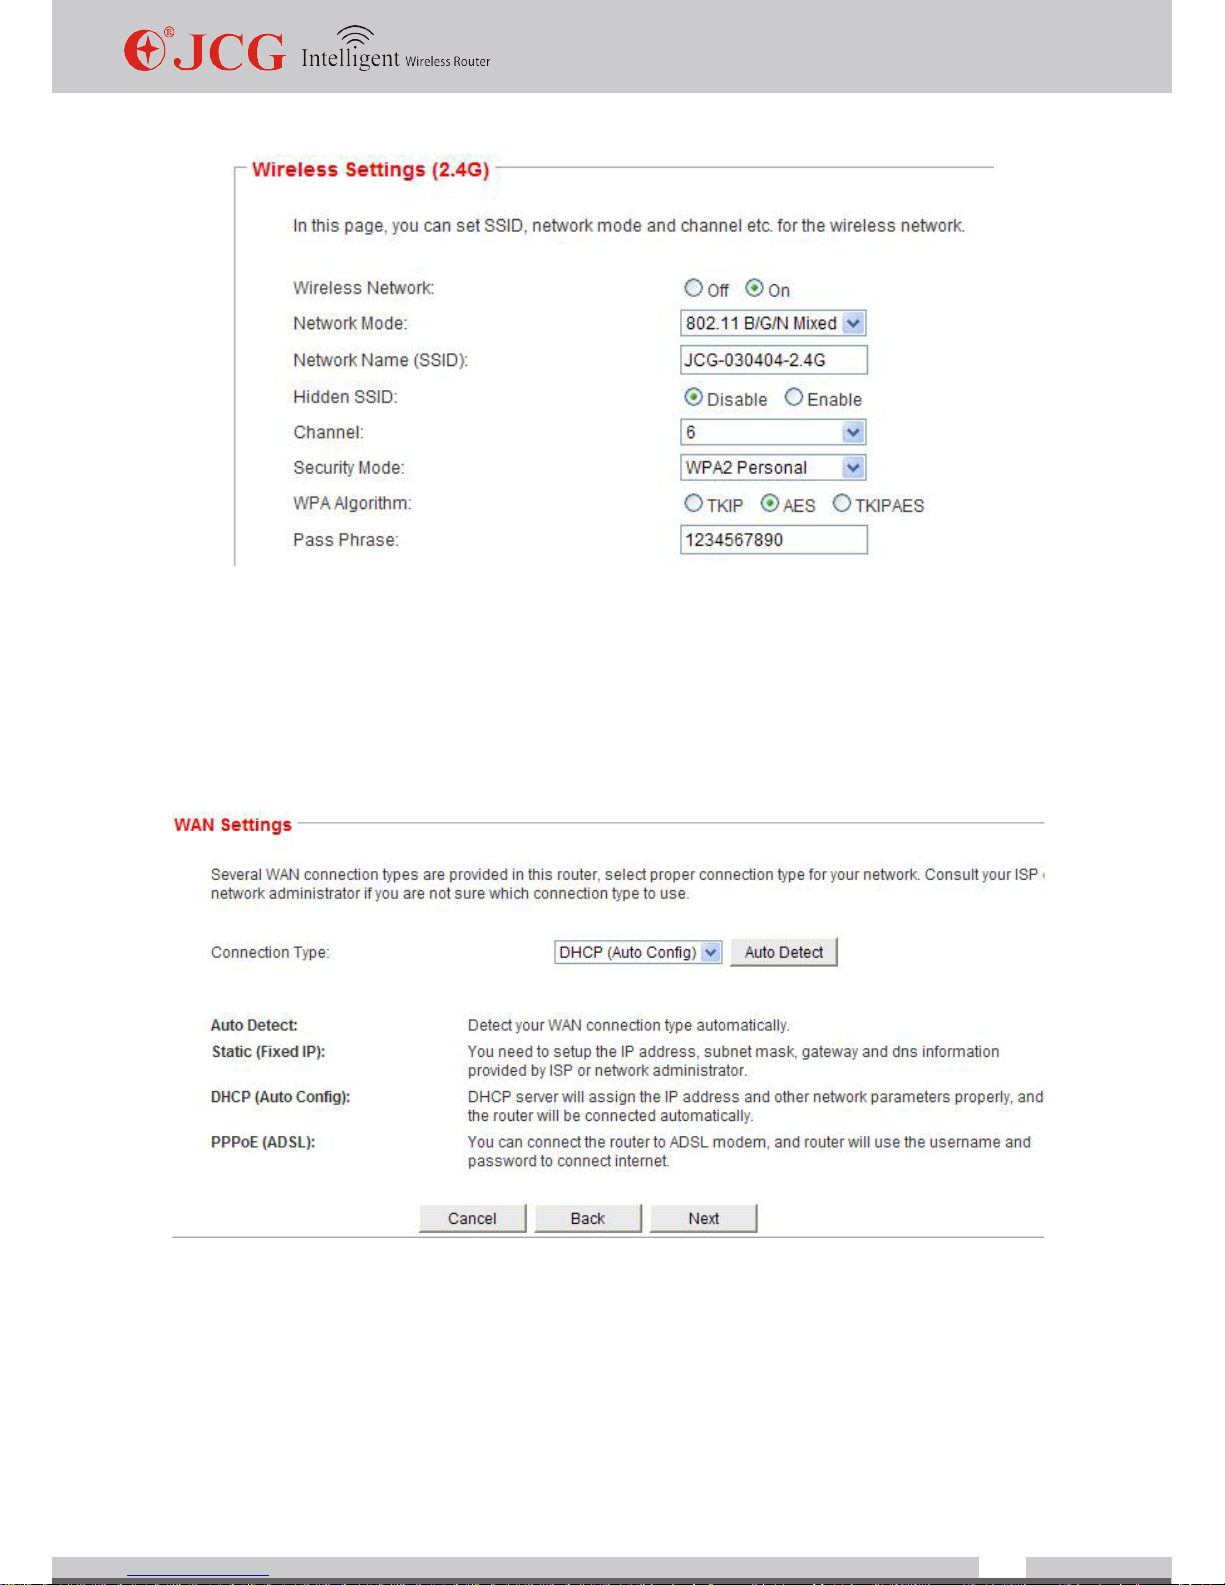
6.Wireless settings
Wireless settings allow you to perform the basic settings on the wireless network, such as
SSID and wireless channel, etc. After the settings, click Next.
If your router supports dual-band wireless network , such as JHR-N936R, the 2.4G and 5G
wireless network settings will appear separately, but setting parameters are basically the
same as those of 2.4G wireless network settings.
www.jcgcom.com
19
7.Click Next to set the WAN parameters. Here you can also set the connection types. The
router supports three common connection types: xed IP, obtaining IP automatically and
PPPoE dial-up.
If obtaining IP automatically is selected, the IP address does not need to set and the router
will obtain the network parameter automatically from the above node.
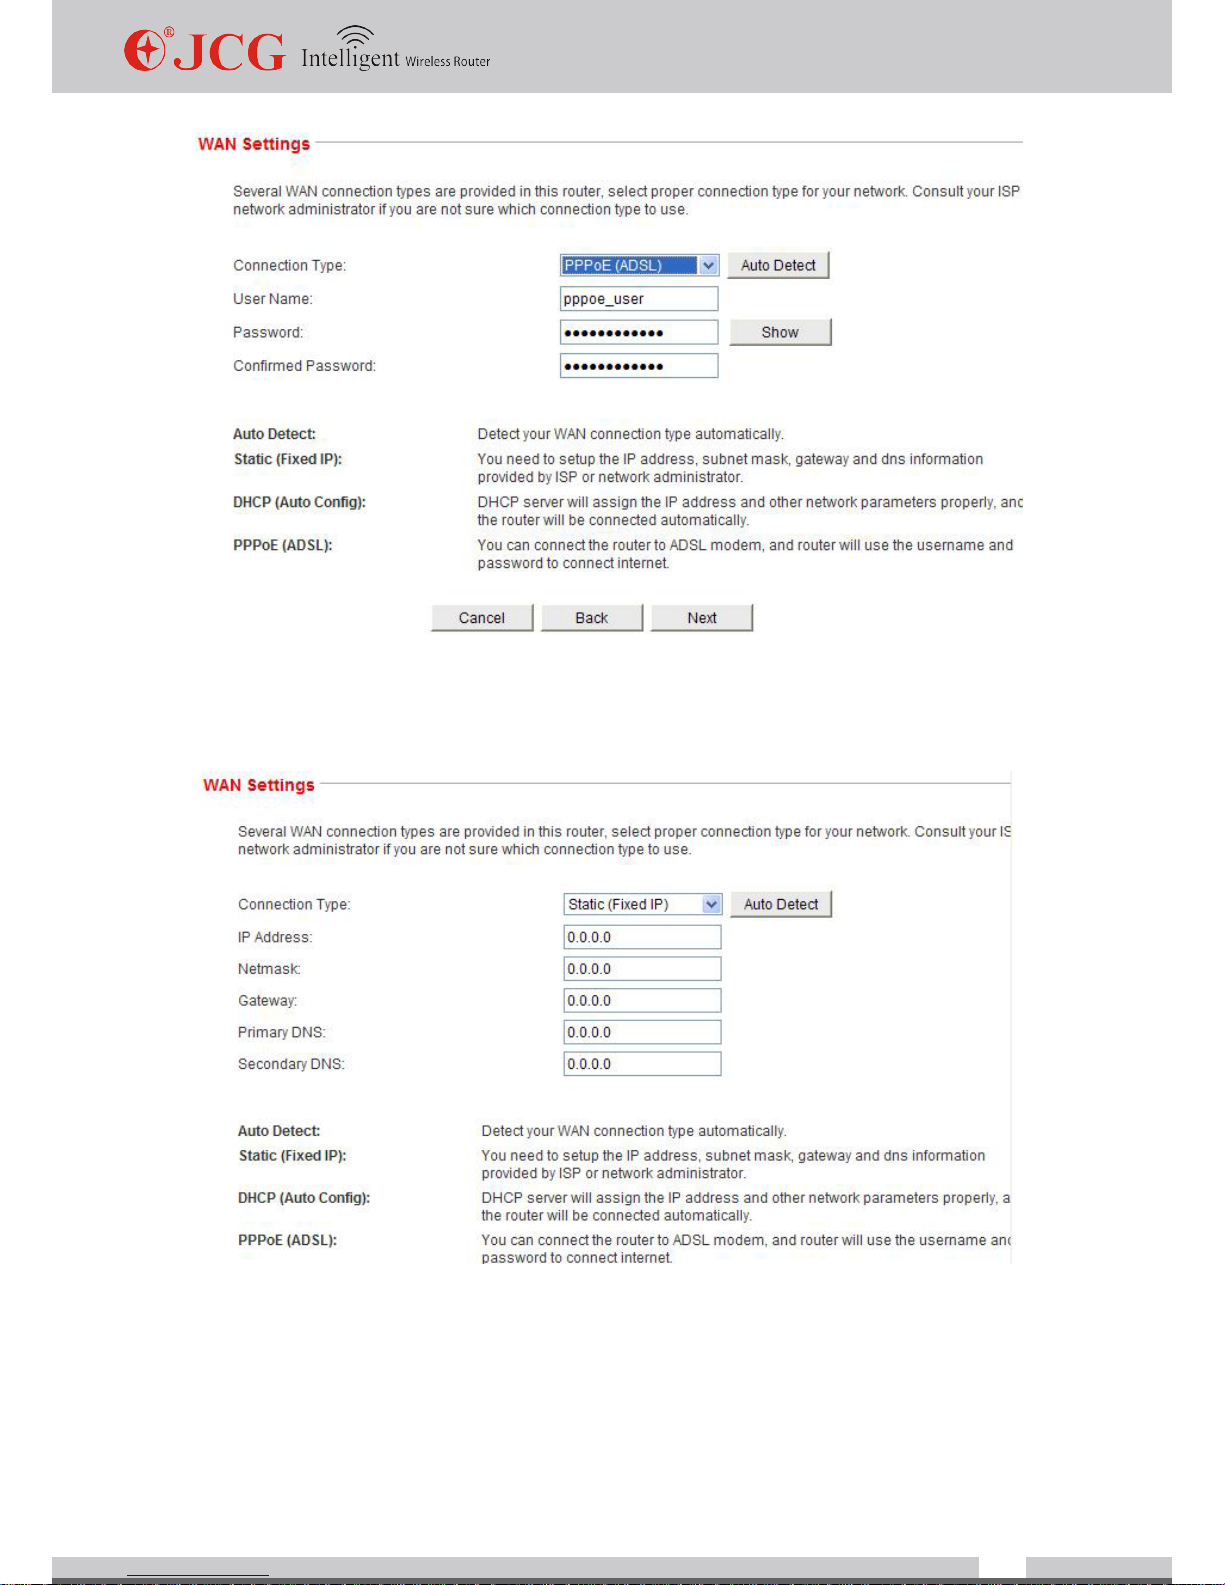
If PPPoE connection type is selected, the following page will appear, input the username
and the user password provided by the service provider.
www.jcgcom.com
20
If Static(Fixed IP) is selected, the following page will appear, input the xed IP address, net
mask, default gateway and DNS server, etc. provided by the service provider.
If you do not know which connection type to select, click Auto Detect and the router will
detect the WAN connection type automatically to facilitate the settings of router.
Click Next a few times until clicking Save/Apply to restart the router. (DO NOT turn off the
power during the restart process).
www.jcgcom.com
21
3.3 Detailed Settings
3.3.1 Network Settings
1. Quick settings:
You can set up the network connections and wireless network parameters in just one step,
and enjoy the fun of Internet surng.
2. LAN settings:
LAN settings allow you to set the IP address range, netmask allocated by the DHCP server
and the router IP address based on actual needs. If you do not know how to set, please
contact the network administrator or keep the default settings.
IP address—IP address of the router
Netmask- it controls the host number that can be accommodated by the network. Keep the
default settings if there are no special needs.
Start IP address —the start IP address offered by the DHCP.
End IP address—the end IP address offered by the DHCP.
www.jcgcom.com
22
Static specify [MAC: IP]—you can bind a xed IP address to the device with the specied
MAC address.
Note:
a. If the IP of LAN port is modied, please use the new address to access the router.
b. If the new IP address and the original IP address are not in the same network segment,
the rewall rules, NAT rules, static DHCP, ARP binding and QoS rules may require reset.
Therefore, it's better to set the LAN IP address before doing other settings.
c. If the DHCP server is disabled, you may need to manually set the IP address of the
computer before accessing the router setting pages.
3. WAN settings:
WAN settings allow you to select the suitable WAN connection type based on the network
environment, and set the necessary parameters specific to different connection types.
If you don't know the connection type and the parameters, please contact the network
administrator or ISP.
Static (fixed IP)—it allows you to set the fixed IP address allocated by the network
administrator or ISP. In this type, you are also required to set the Netmask, default gateway
and DNS correctly.
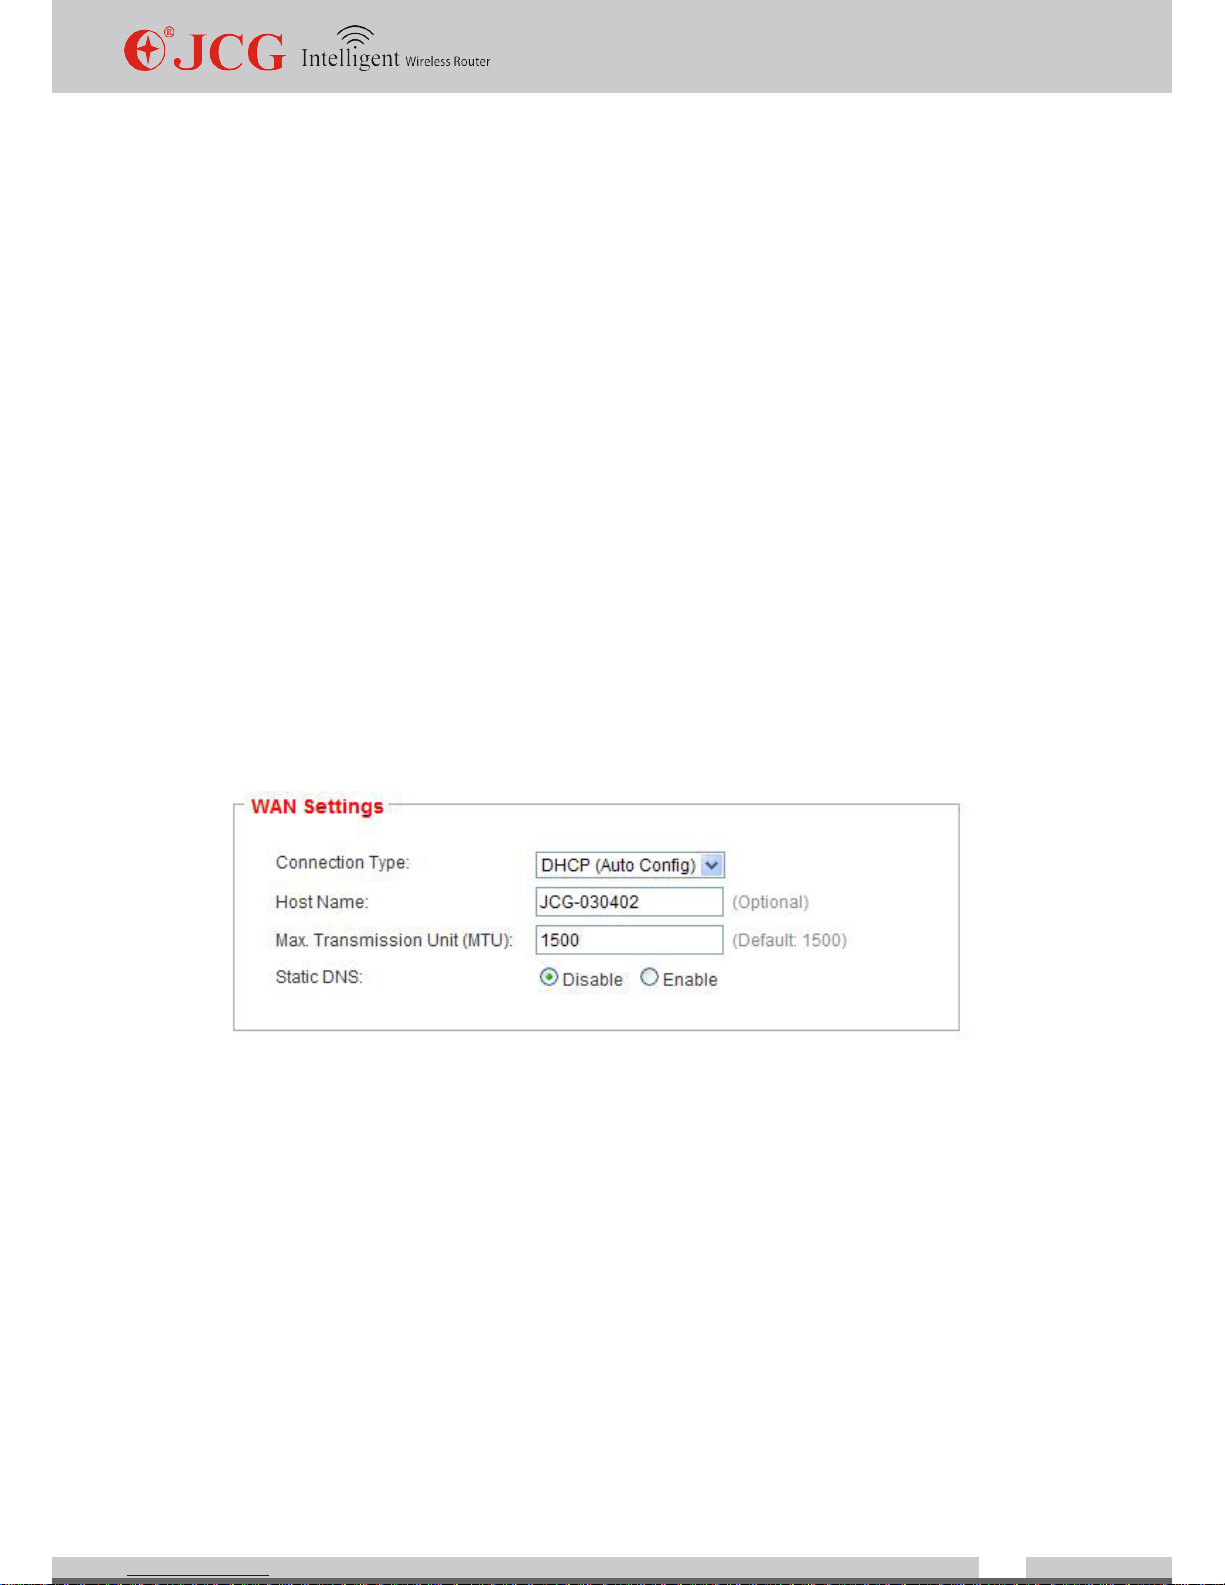
DHCP (automatically obtain IP)—it allows you to automatically obtain the IP address,
Netmask, DNS and other relevant information through the remote DHCP server and
connect automatically.
PPPoE dialing—it allows you to connect the router to the ADSL modem or to the device
requiring PPP dialing connection, and then access the Internet through PPPoE dialing.
PPTP/L2TP VPN* -- if the network type provided by the ISP is PPTP/L2TP, ISP will provide
the account and password. For the unclear parts during the detailed settings,
www.jcgcom.com
23
please contact the ISP provider.
MAC address Clone—it allows you to regard the MAC address of LAN card or the specied
MAC address as that of WAN. If your MAC address has been bound, MAC address Clone
may help you.
* Only some routers in some countries or regions support it.
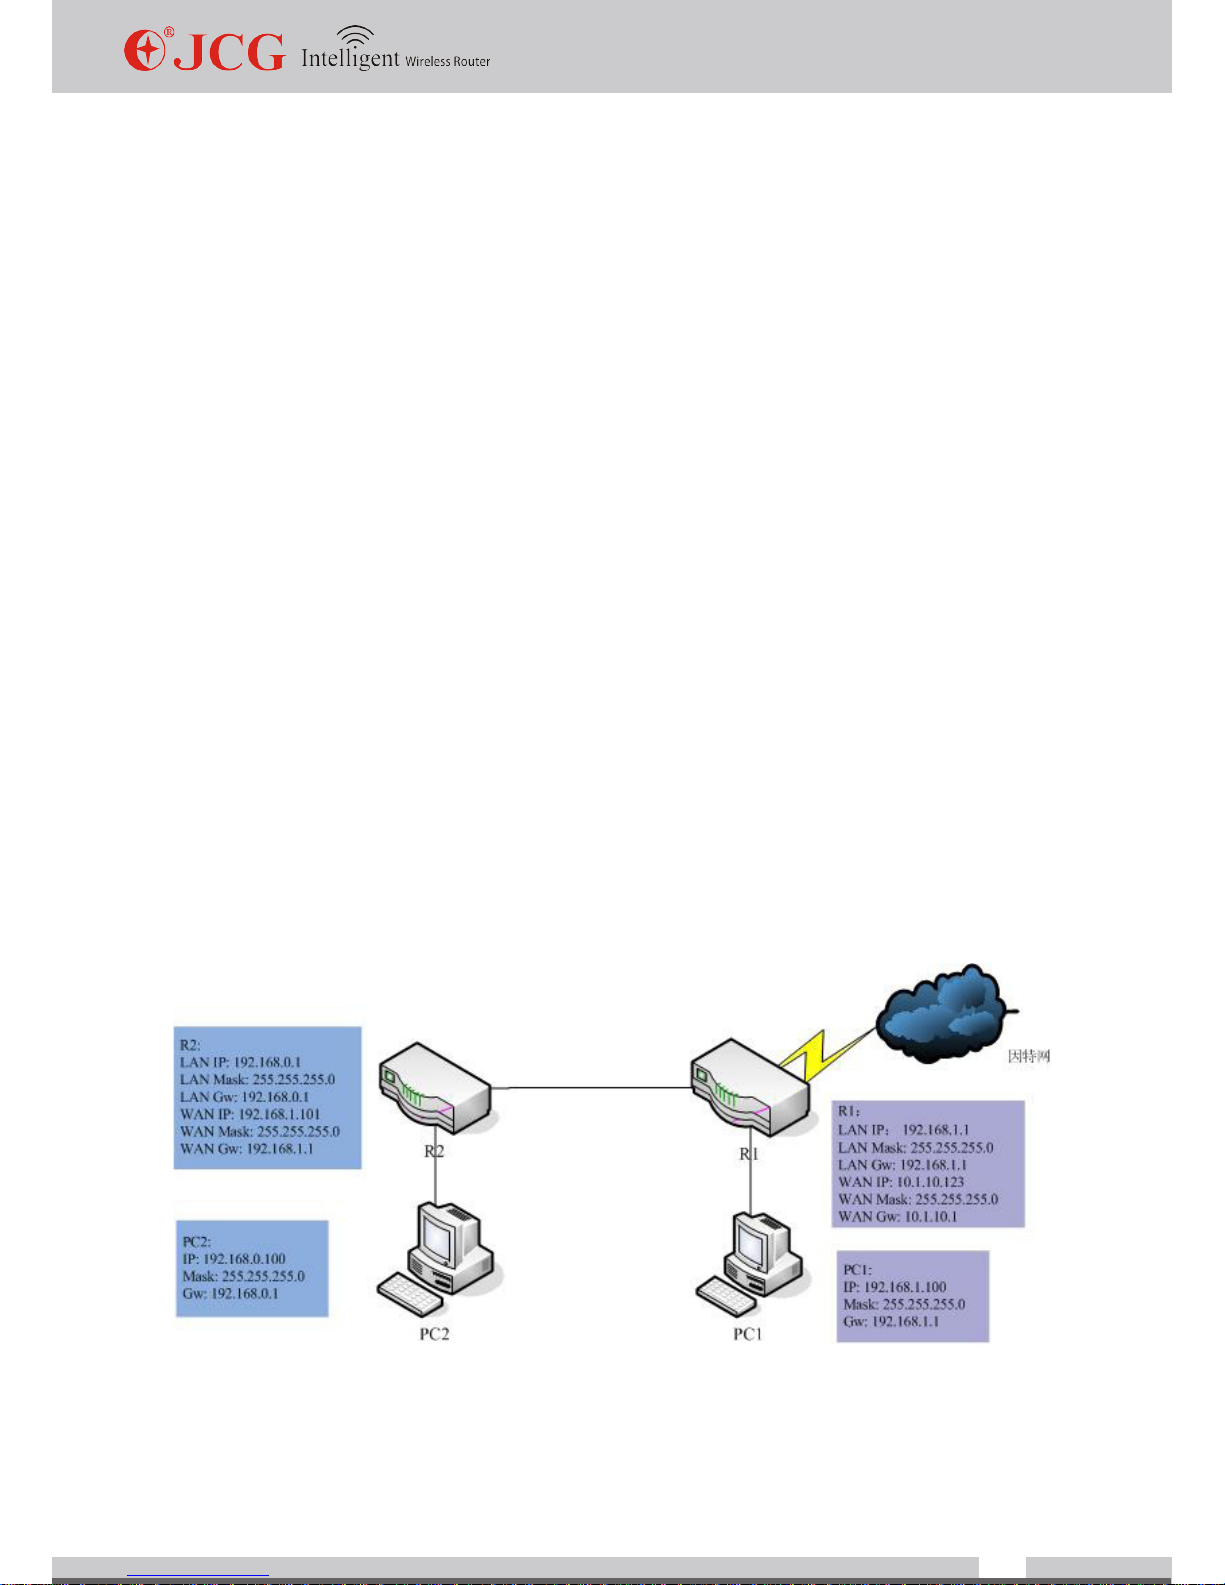
4. Routing settings:
Static router allows you to specify the forward routing for the special host or network. Then
any access to this host or network will not be forwarded through the default routing. This
situation applies to the LAN port with another router R2 connecting to this router R1.
For example: setting LAN network static routing: as shown in the gure, all of the internal
R2 LAN hosts can access the host internal the R1 LAN. But if the hosts of the R1 LAN
want to access that of R2 LAN, the static routing of R1 is required to be set as follows:
Dest. IP address: 192.168.0.1 (LAN address of R2)
Routing range: network
Netmask: 255.255.255.0 (netmask of R2)
Gateway IP address: 192.168.1.1 (WAN IP address of R2)
Network interface: LAN
After the setting, R1 internal host and R2 internal host should be able to communicate with
each other
 Loading...