

JCG JHR-AC865 User Manual

11AC Intelligent Wireless Router
OPERATION INSTRUCTION
STATEMENT
Copyright © 2013 Yichen (Shenzhen) Technology Development Co.,Ltd.
All rights reserved
JCG is the registered trademark of Yichen (Shenzhen) Technology Development Co.,Ltd.
Without explicit written permission of Yichen (Shenzhen) Technology Development Co.,Ltd.
, any organization and individual are forbidden to imitate, copy, reproduce, translate this
document or use it for other purposes. All other trademarks or registered trademarks
mentioned in this document are owned by their respective holders and are under protection
of the related laws.
The product specications and information mentioned in this manual are only for reference.
Any content update is subject to change without notice. For more detailed product
information, visit our ofce website
http://www.jcgcom.com
www.jcgcom.com
1

Contents
Chapter 1: Introduction
1.1 Purpose and conventions----------------------------------------------------------------------4
Chapter 2: Hardware installation
2.1 Description of panel indicator-----------------------------------------------------------------5
2.2 System requirements---------------------------------------------------------------------------7
2.3 Installation environment------------------------------------------------------------------------8
2.4 Installation environment------------------------------------------------------------------------8
Chapter 3: PC setup
3.1 Set correct network environment------------------------------------------------------------8
Chapter 4: Quick setup gude
Chapter 5: Operation mode
------------------------------------------------------
--------------------------------------------------------
12
13
Chapter 6: Wireless setup
6.1 Basic setup--------------------------------------------------------------------------------------16
6.2 Basic setup--------------------------------------------------------------------------------------17
6.3 Security setup-----------------------------------------------------------------------------------18
6.4 Access control-----------------------------------------------------------------------------------19
6.5 WDS setup---------------------------------------------------------------------------------------19
6.6 WPS setup---------------------------------------------------------------------------------------20
6.7 Green wireless----------------------------------------------------------------------------------21
Chapter 7: Network setup
7.1 LAN setup----------------------------------------------------------------------------------------22
7.2 WAN setup---------------------------------------------------------------------------------------23
www.jcgcom.com
2

Chapter 8: IPv6 setup
------------------------------------------------------------------
24
Chapter 9: Firewall setup
9.1 Port ltering--------------------------------------------------------------------------------------24
9.2 IP address ltering-----------------------------------------------------------------------------24
9.3 MAC address ltering-------------------------------------------------------------------------25
9.4 Port ltering--------------------------------------------------------------------------------------25
9.5 URL ltering--------------------------------------------------------------------------------------26
9.6 DMZ host-----------------------------------------------------------------------------------------26
9.7 VLAN----------------------------------------------------------------------------------------------26
Chapter 10: USB setup
10.1 User management----------------------------------------------------------------------------27
10.2 Disk management----------------------------------------------------------------------------28
10.3 File sharing-------------------------------------------------------------------------------------28
10.4 FTP sharing------------------------------------------------------------------------------------29
10.5 Media sharing---------------------------------------------------------------------------------30
10.6 iTunes sharing--------------------------------------------------------------------------------31
10.7 Print sharing-----------------------------------------------------------------------------------31
Chapter 11: QoS
Chapter 12: Routing setup
Chapter 13: System management
Chapter 14: FAQ
Chapter 15: Technical suppor t
---------------------------------------------------------------------------
-----------------------------------------------------------
---------------------------------------------
---------------------------------------------------------------------------
---------------------------------------------------
40
42
43
48
50
www.jcgcom.com
3

Chapter 1: Introduction
Thank for you to purchase JCG 11AC dual-frequency wireless broadband router. This
product integrates the functions of a router, switch, wireless access point and rewall and
adopts the most advanced 11AC wireless technology, so the wireless transmission rate is
improved by about 3 ti mes compared to old 802.11N standard. This product supports 64/128
bit WEP encr yption and advanced encr yption and securit y mechanism such as WPA and
WPA2. This product provides WPS one-key encryption function and enables a user to
easily establish a secure wireless network environment. A user can easily and quickly set
up a router via the setup wizard and can access and manage a router via Internet at any
time and place via remote management function. The JCG 11N wireless broadband router
is a series of products with higher performance/price ratio which are specially designed
to meet the wireless network access requirement of small-scale enterprises, homes and
student dormitory and is the best choice for you to experience wireless Internet surng and
enjoy the wireless network access happiness.
It is easy to set up JCG 11AC dual-frequency wireless broadband router without guide of
a profession. A user can easily install and setup a router according to the operation manual
before you are ready to use this product, please carefully read this manual to better know
and use all functions of this product.
1.1 Purpose and conventions
This manual can assist you to be familiar with and correctly use JCG wireless broadband
router. To avoid confusion, we give the following conventions on the terms used in this
manual.
Router: without special remark, it indicates the JCG wireless broadband router.
Modem: network service access device, including xDSL, Cable Modem, GPON and EPON.
Computer/host: It indicates single computer and portable PC and c an also indicate all
network clients.
Network adaptor: it indicates the wired or wireless network interface card (NIC) for network
connection.
ISP: The network service supplier indicates a company or organization which provides
network service.
AP: wireless network access point, it can also indicate the wireless router which provides
the wireless network access service.
STA: wireless network client, it indicates the wireless client such as portable PC, mobile
phone and tablet PC.
Client: wireless or wired client, including, not limited to, computer, por table PC, mobile
phone and tablet PC
www.jcgcom.com
4
Chapter 2: Hardware Connection
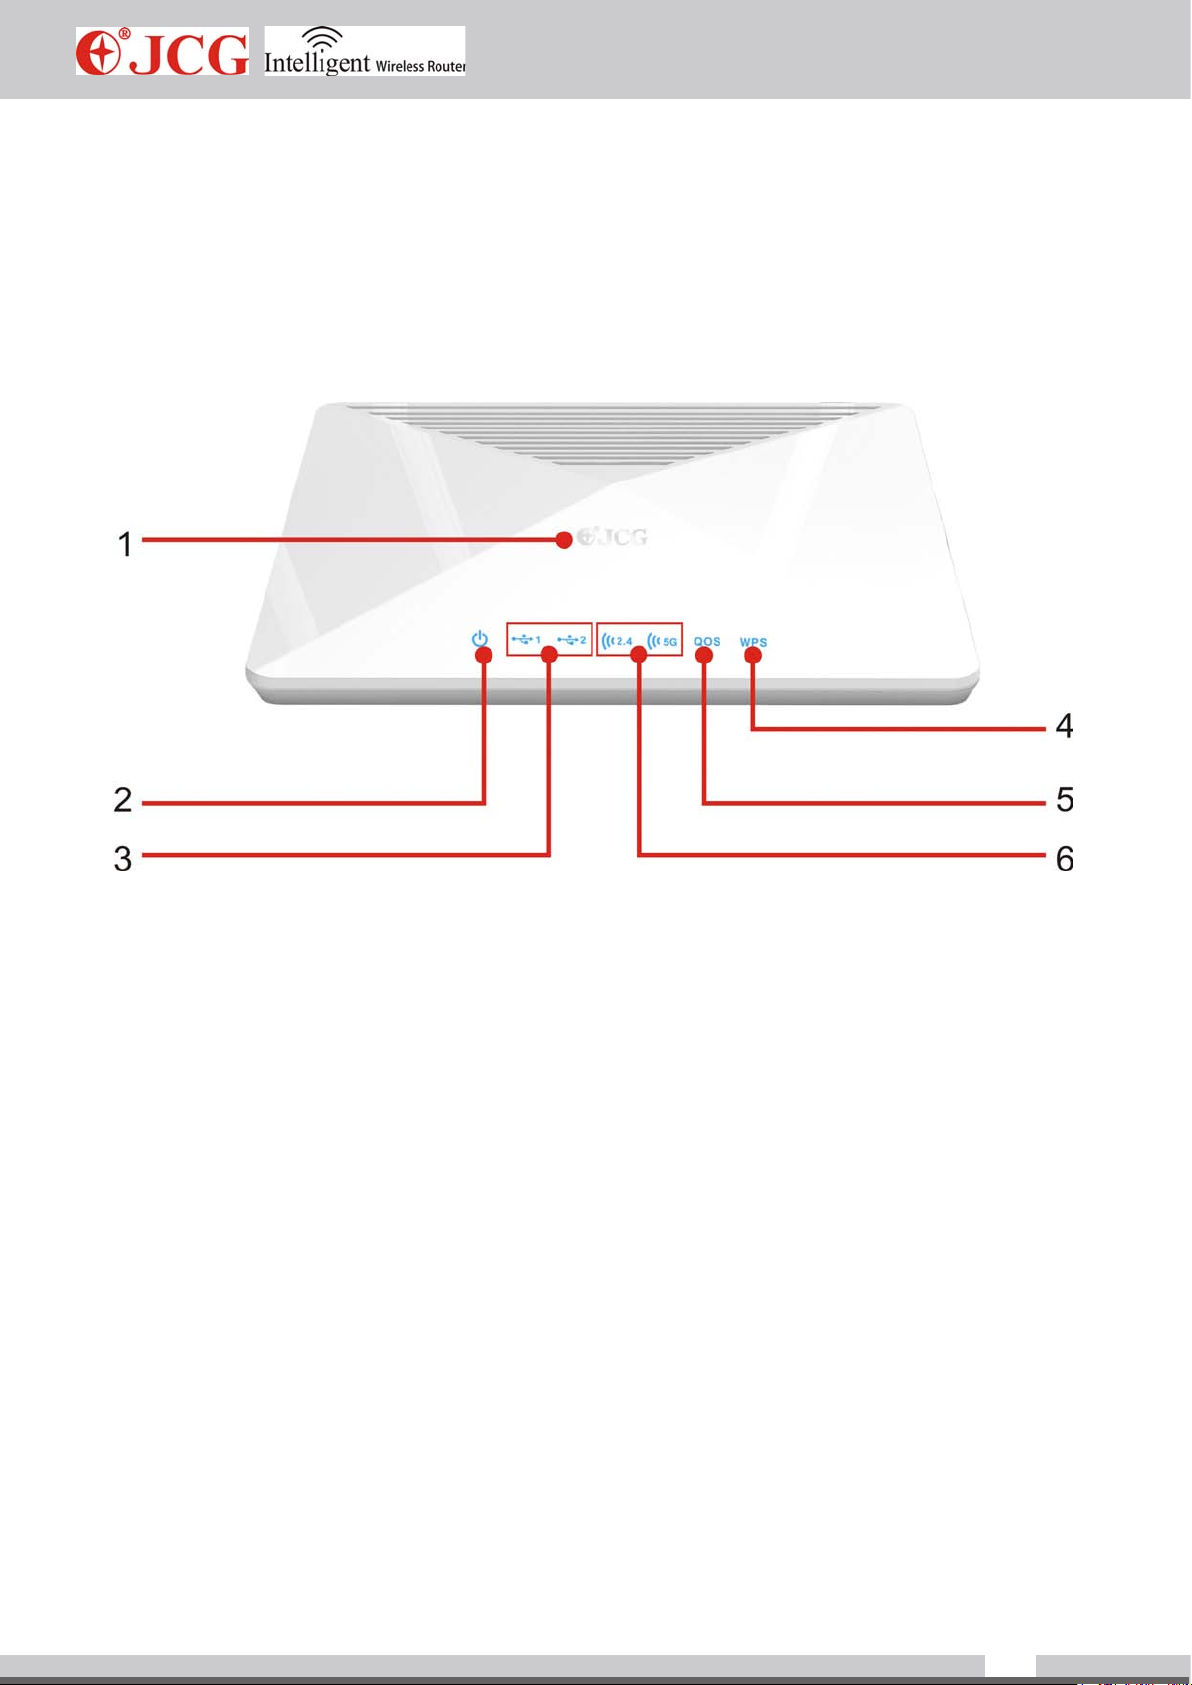
2.1 Description of Panel Indicator:
1. Touch sensing status indicator
To touch with a hand, an operator can turn on/off the status indicator.
2. Power indicator
Off: power off
Keep on: power on
3. USB status indicator
Off: USB port not connected
Off: USB port connected
www.jcgcom.com
5
4. WPS
Off: the wireless network not encrypted
Keep on: the wireless network encrypted
5. QoS
Off: QoS function not enabled
Keep on: QoS function enabled
6.2. 4G/5G wireless status indicator
Off: wireless network not enabled
Keep on: wireless network enabled
Flicker: wireless network data in transmission
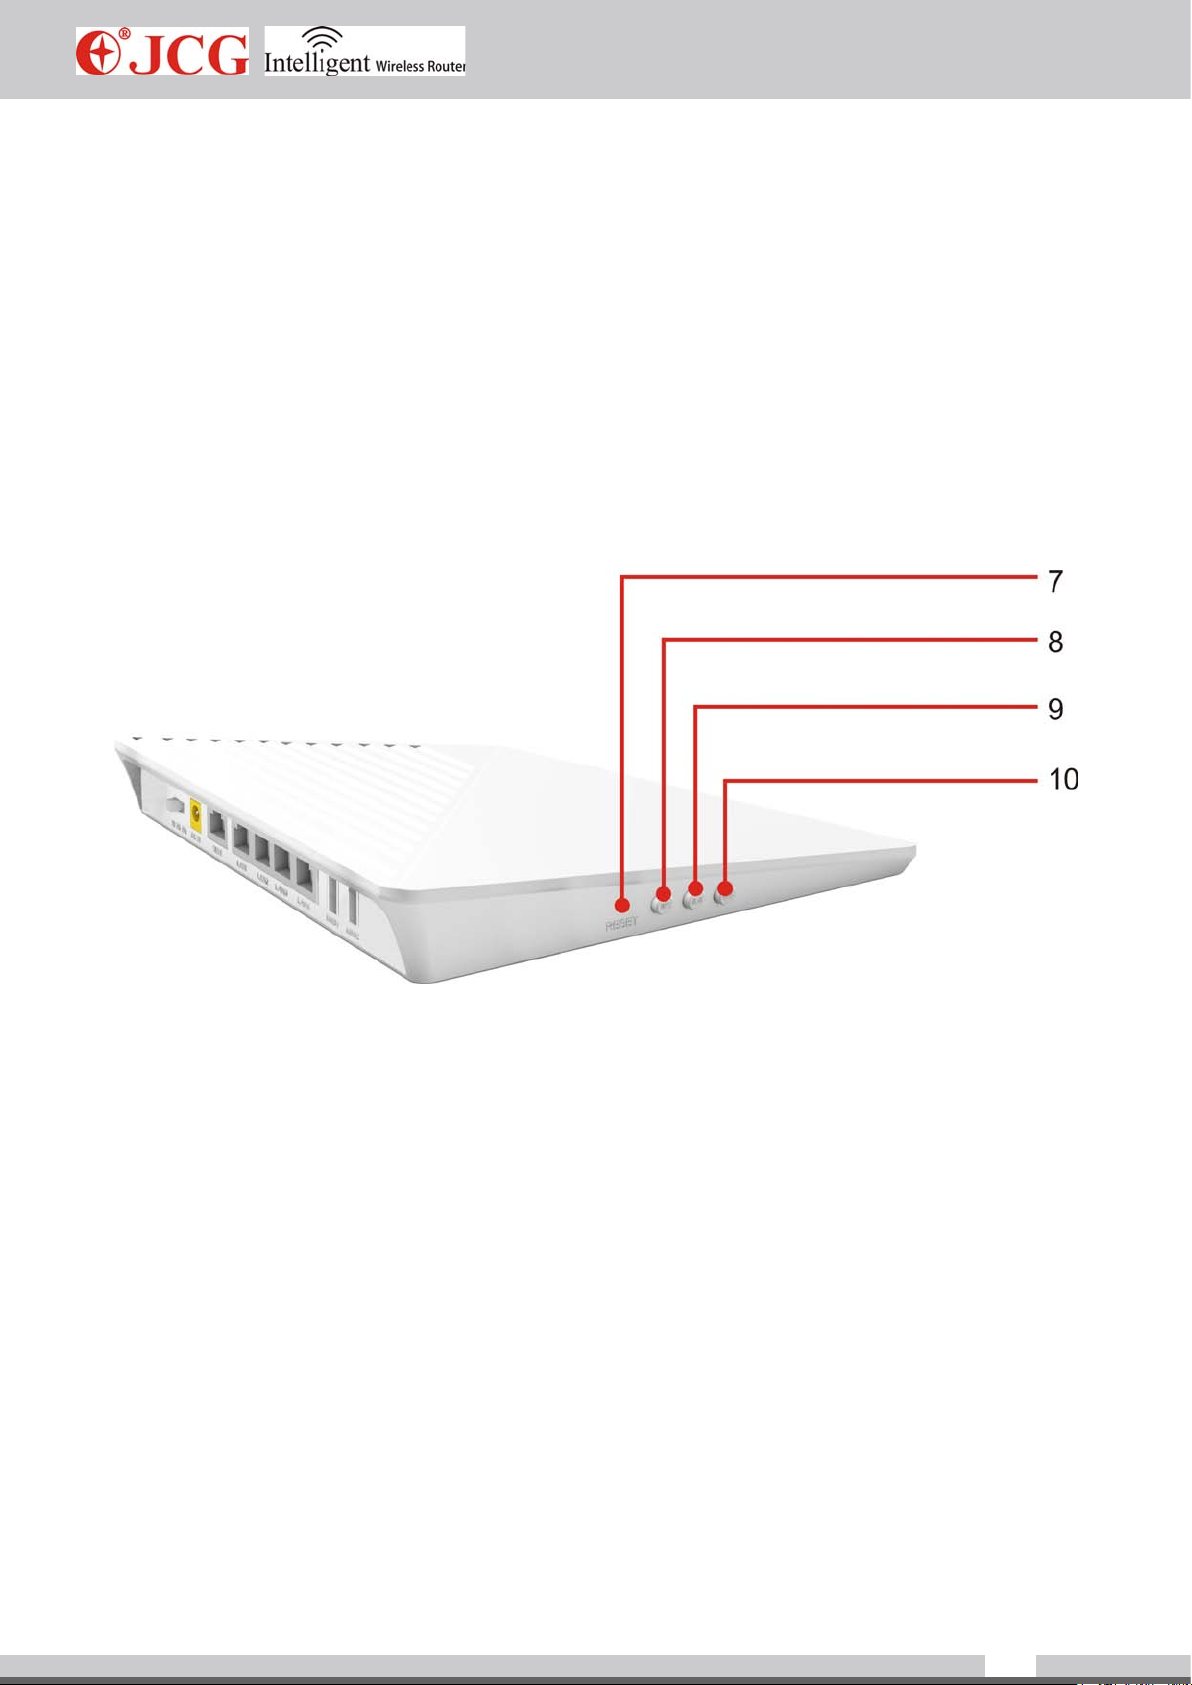
7. RESET button
To hold this button for over 5s, the device restores to factory setting.
8. WPS button
To click, 5G WPS process starts.
To hold for over 5s, 2.4G WPS process starts.
9. WLAN button
To hold it for 1 s, an operator can turn on/off 5G wireless network . To hold it for
over 5s, an operator can turn on/off 2.4G wireless network.
10. QoS button
QoS function button. To click it, an operator can enable QoS function. To hold it for 5s,
an operator can disable QoS function.
www.jcgcom.com
6
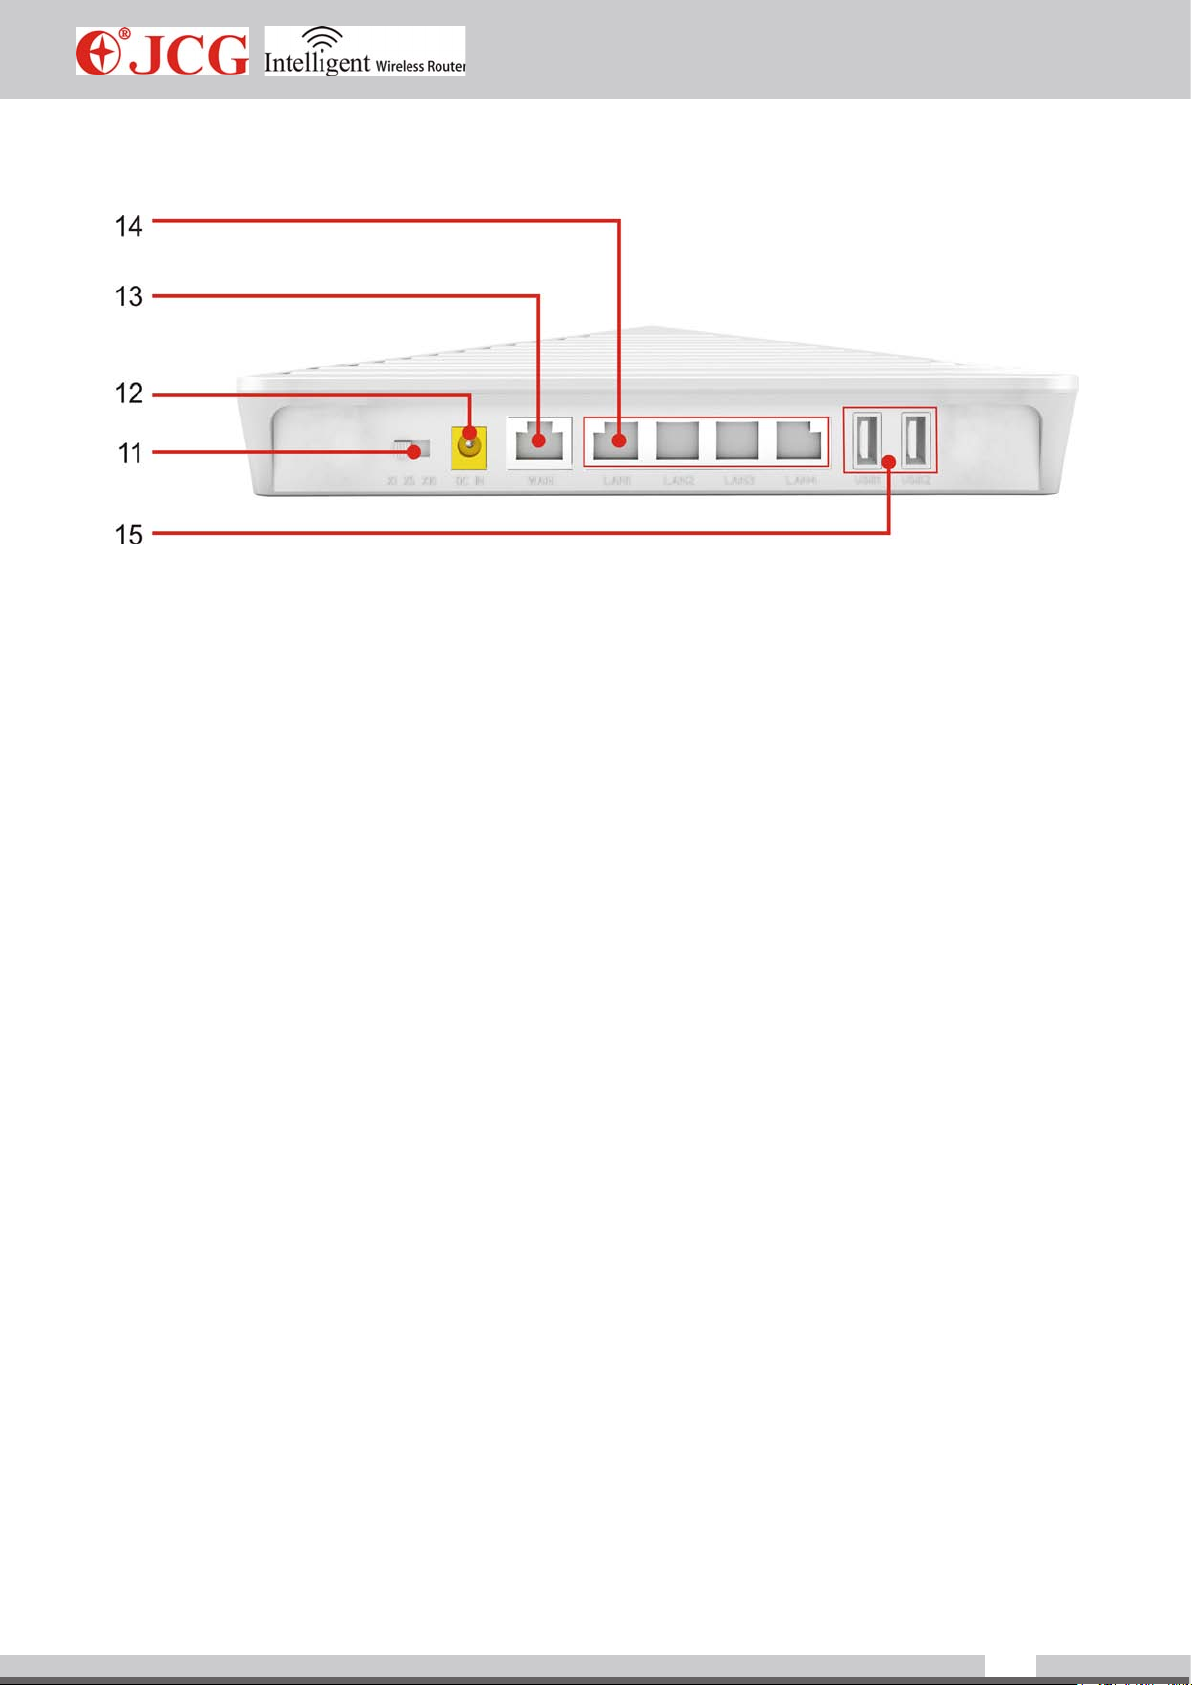
11. Power adjustment button
Radio power adjustment (x1.x5.x10)
12. Power (DC IN) interface
Power adaptor interface
13. WAN (Internet) interface
WAN connection interface
14. LAN 1-4 network interface
LAN connection interface
15. USB 2.0 interface
Connect USB device such as USB harddisk, USB ash memory or USB printer
2.2 System requirements
Browser: Internet Explorer 6.0+, Firefox 2.0+, Opera 10.0+ and Safari 5.0+
OS: Windows XP and higher, Linux 2.4+, Mac OS X, iOS 4.0+ and Android 2.0+.
Broadband service or broadband access point;
One network adaptor;
One standard network cable
www.jcgcom.com
7
2.3 Installation environment
Place the router horizontally
Adjust the antenna angle to a proper direction
Do not make the router close to the heating device
Do not place the router under a damp environment.
2.4 Hardware installation steps
Connect the router power with the accompanied power adaptor.
Connect the broadband interface and router WAN interface with a network cable.
For wired connection, connect the computer with the router LAN interface with a network
cable.
For wireless connection, please check whether your wireless network adaptor is enabled
and connect the wireless router according to the network name and password on the rear
of the router.
Chapter 3: Computer setup
To normally use this router, you should correctly set up the router. The following part guides
you how to check installation and set up the router.
1. Set up correct network environment (with Windows 7 system as one example)
If your computer has no special setup, this step is skipped.
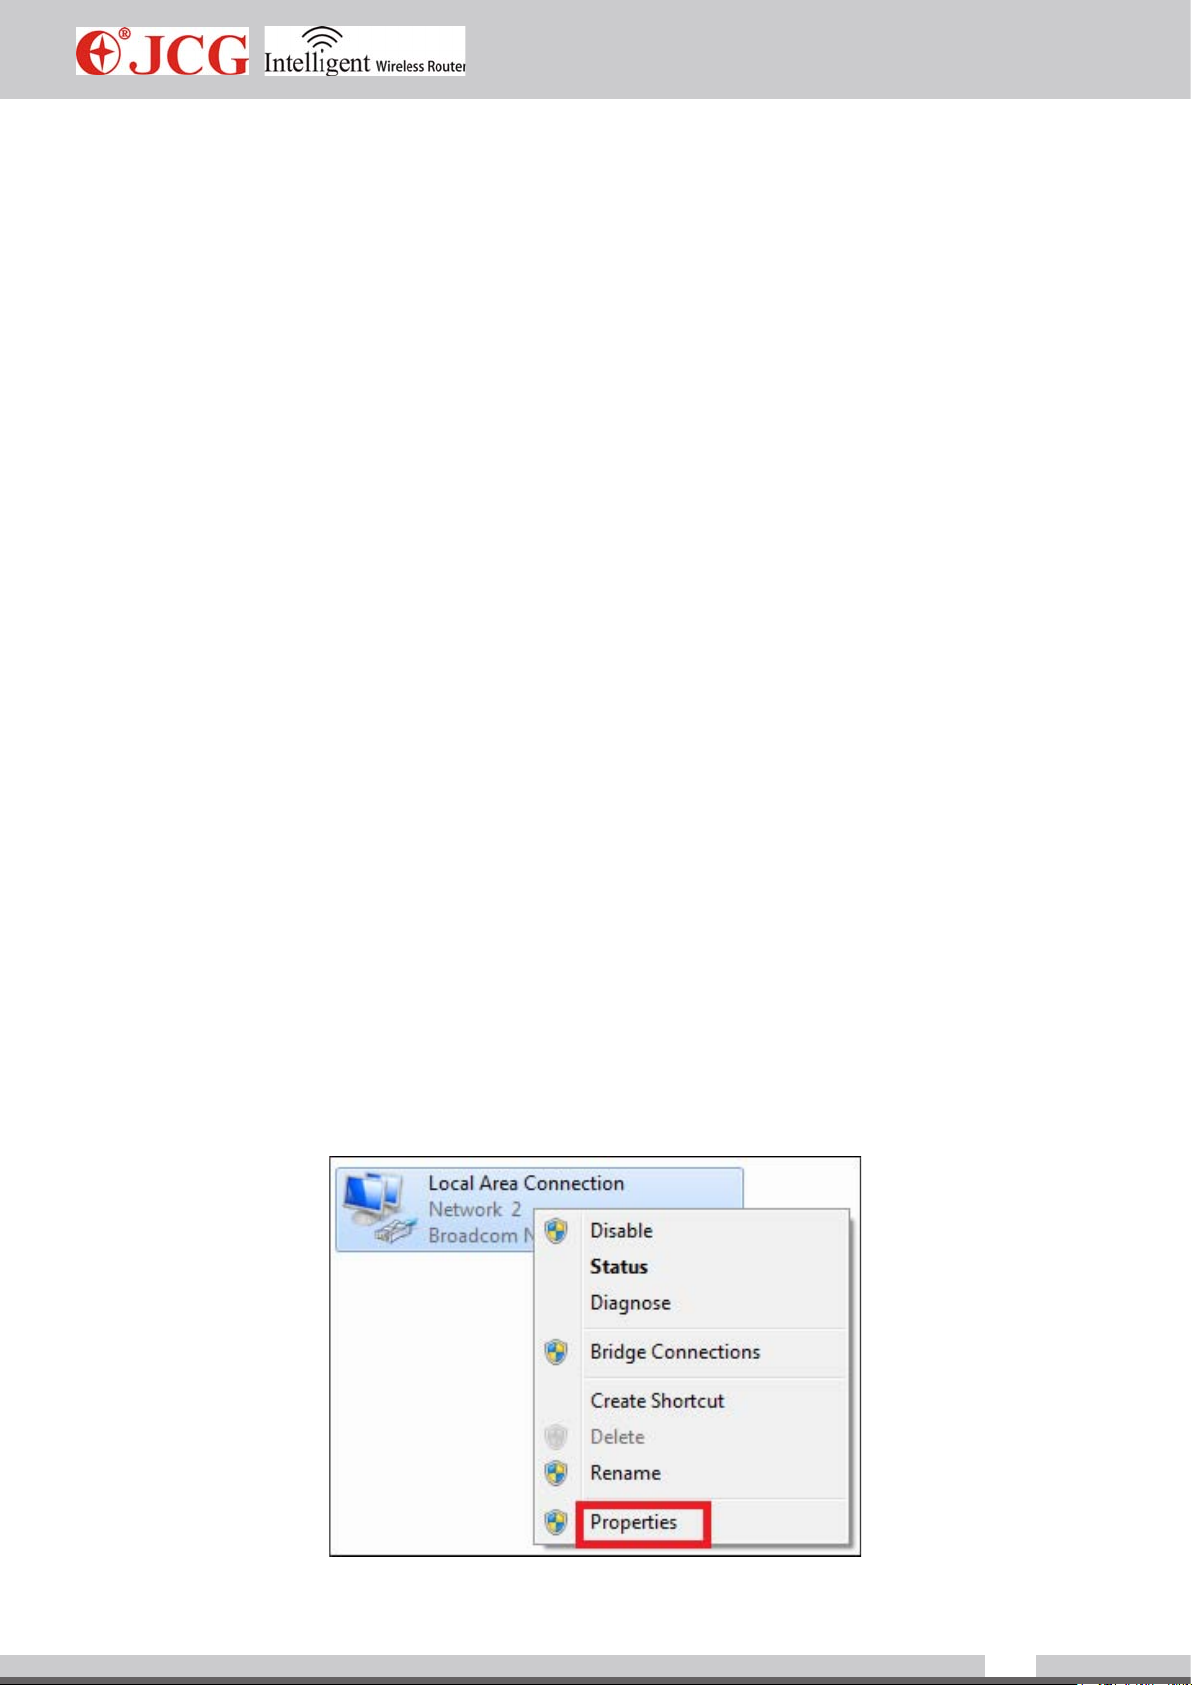
1) Click [Start]—[Control panel]—[network and Internet]—[Network and sharing
center]—[Change adaptor setup]—[Local connec tion]”, select connected network
adaptor, right click “Local connection” and select[Property].
www.jcgcom.com
8
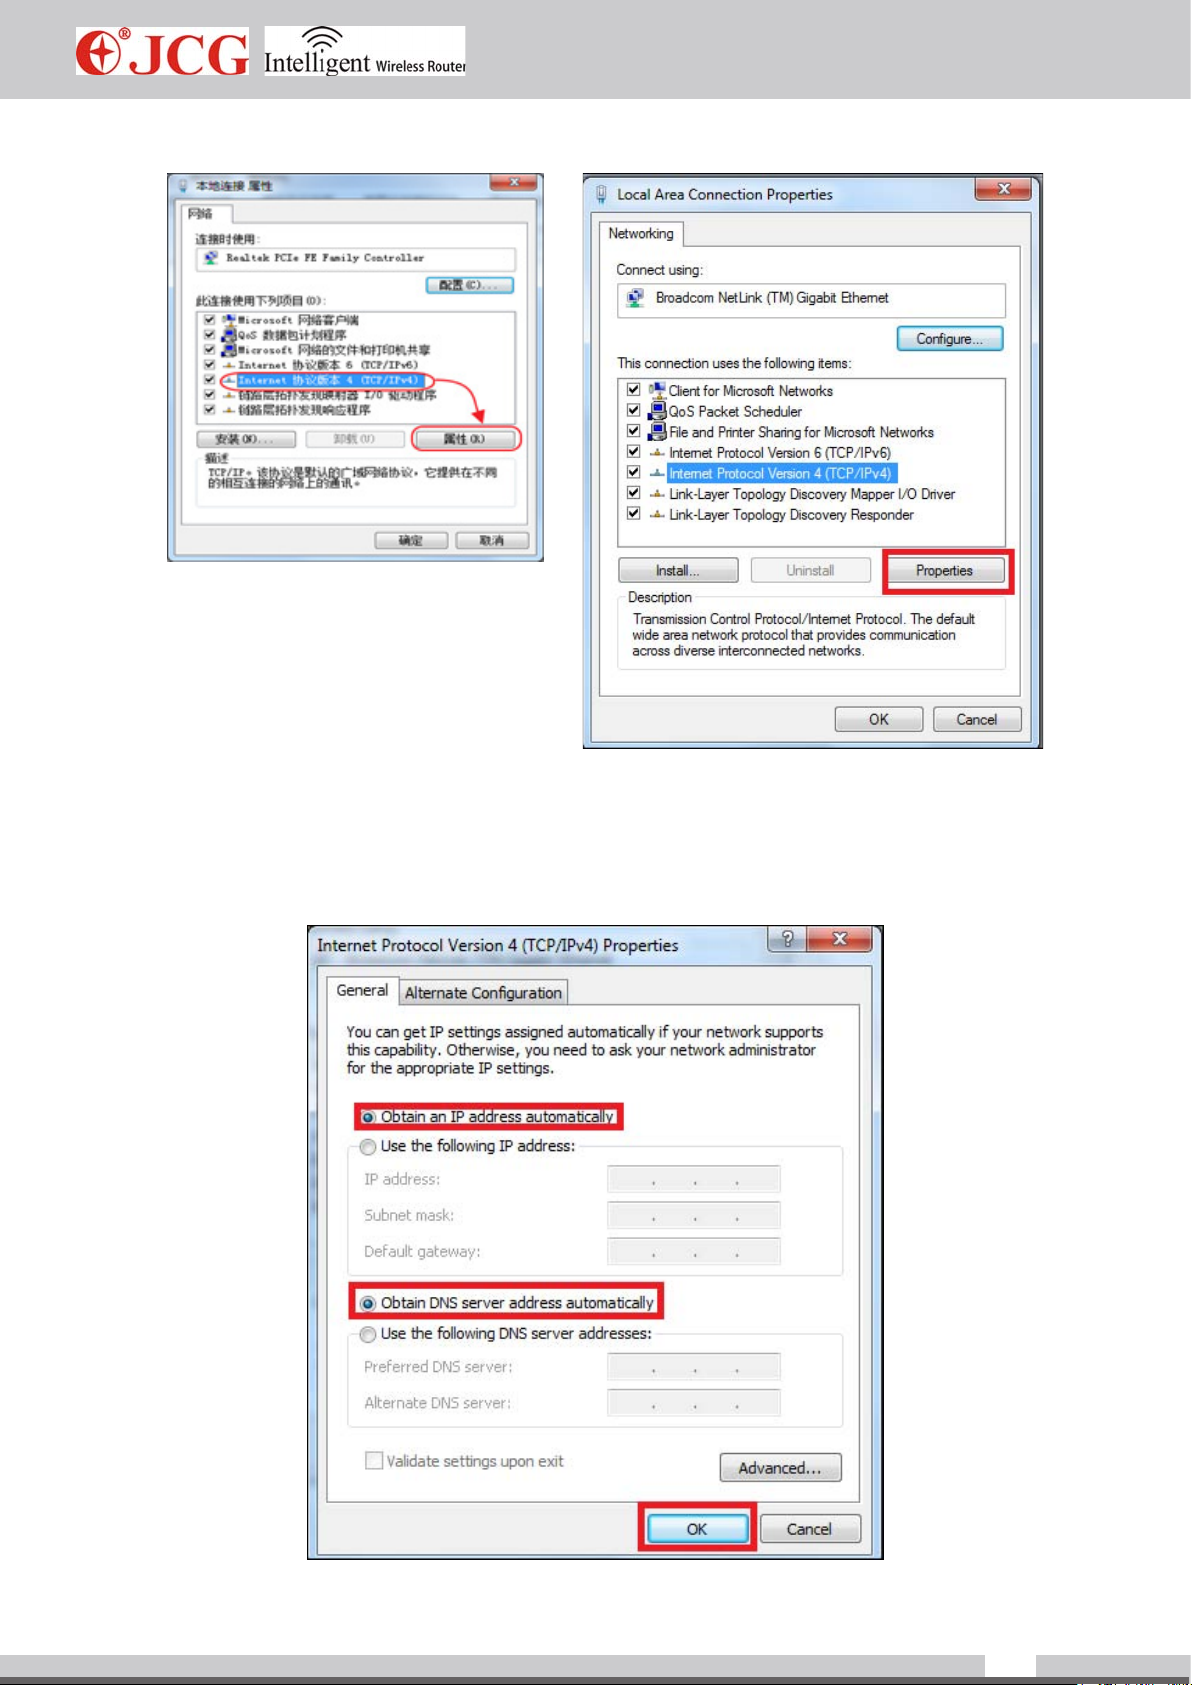
2) Select [Internet protocol version4(TCP/IPv4)] and click [Property]
3) Select [Automatically get IP address] and [Automatically get DNS server address],
click [OK], return to previous interface and click [OK]. The system will automatically get IP
address and DNS.
www.jcgcom.com
9
4) We recommend to set up your network to automatically get IP address. To connect the
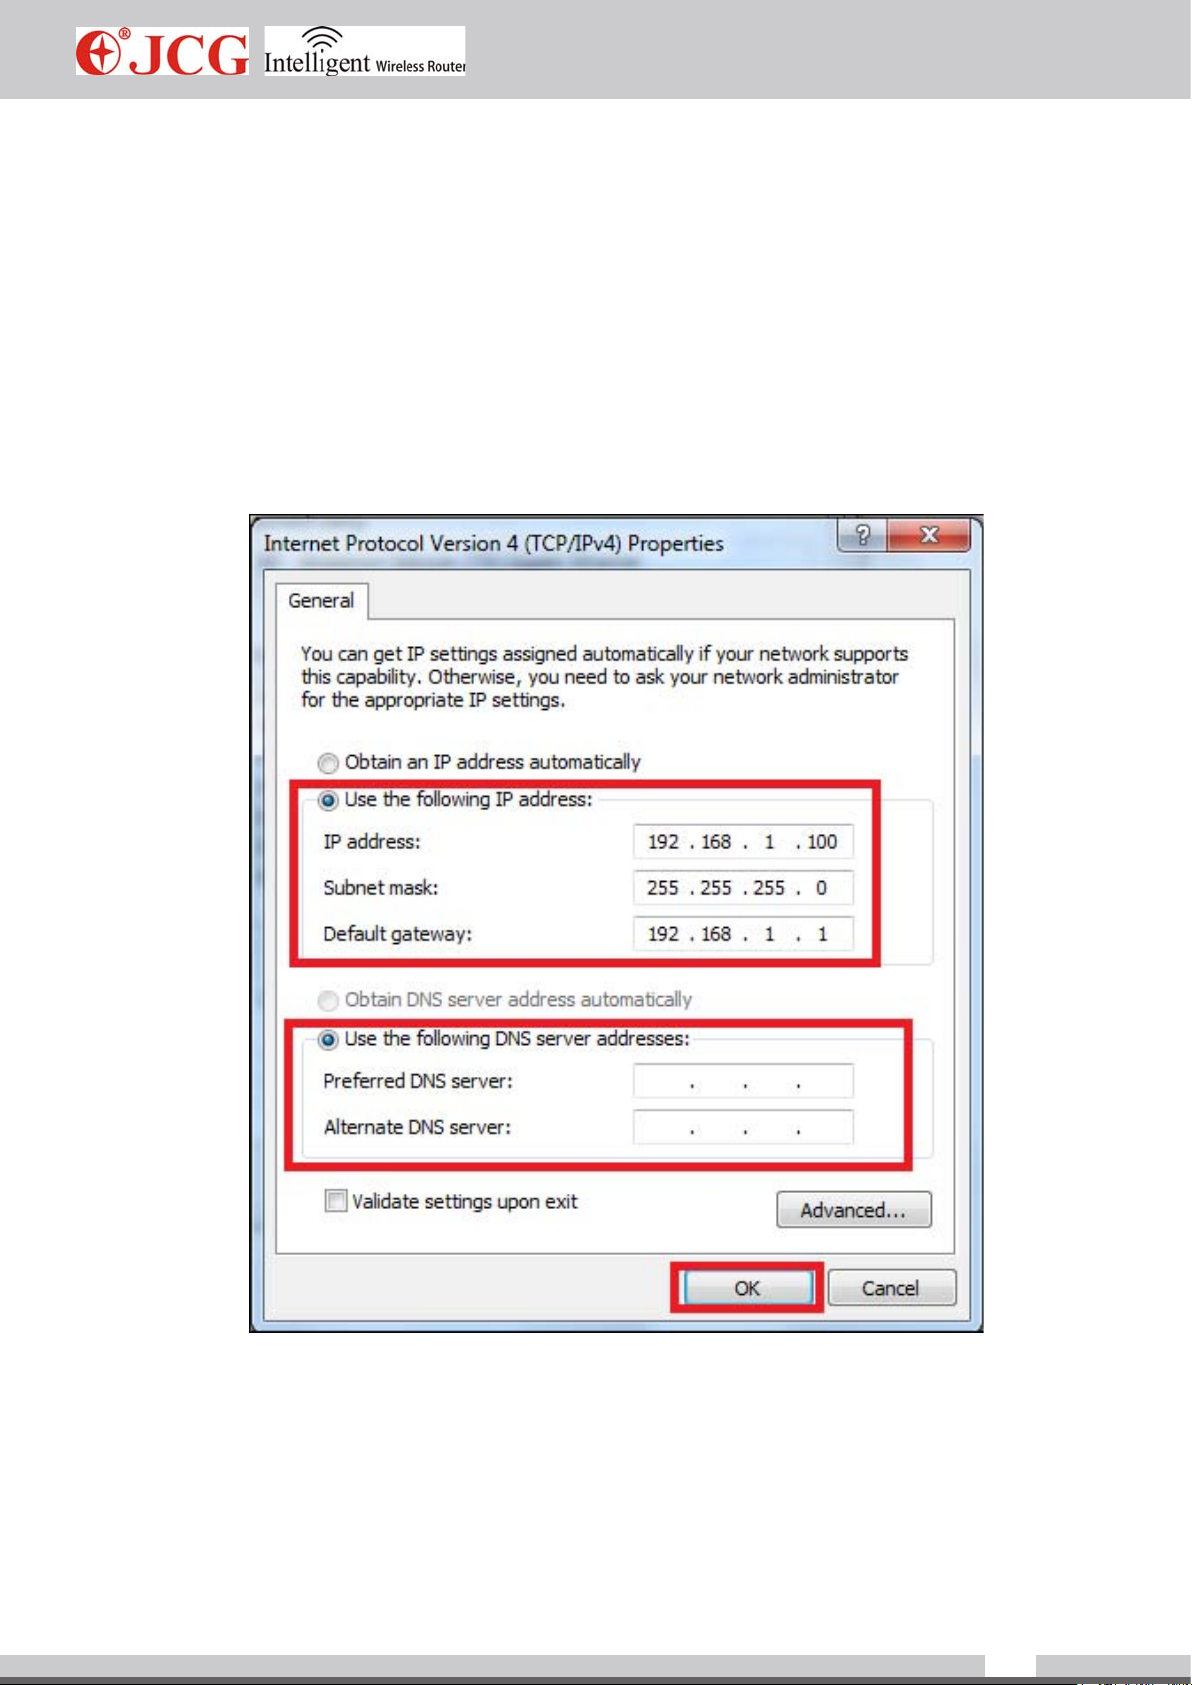
network with a xed IP address, an operator can select [Use the following IP address]
and input corresponding IP address, sub-network mask and default gateway. According to
the requirement, a user can ll the corresponding DNS server at [Preferential DNS server]
and [Spare DNS server]. For details, please consult your network supplier or customer
service man.
Note
The default IP address is within 192.168.1.X(2≤X≤254(. The sub-network mask is
255.255.255.0. The default gateway is 192.168.1.1.
5) Check whether a computer is connected with the router with Ping command.
To click [Start], a user can input “cmd” command in the followed search box and click
Enter, the following interface is shown.
www.jcgcom.com
10
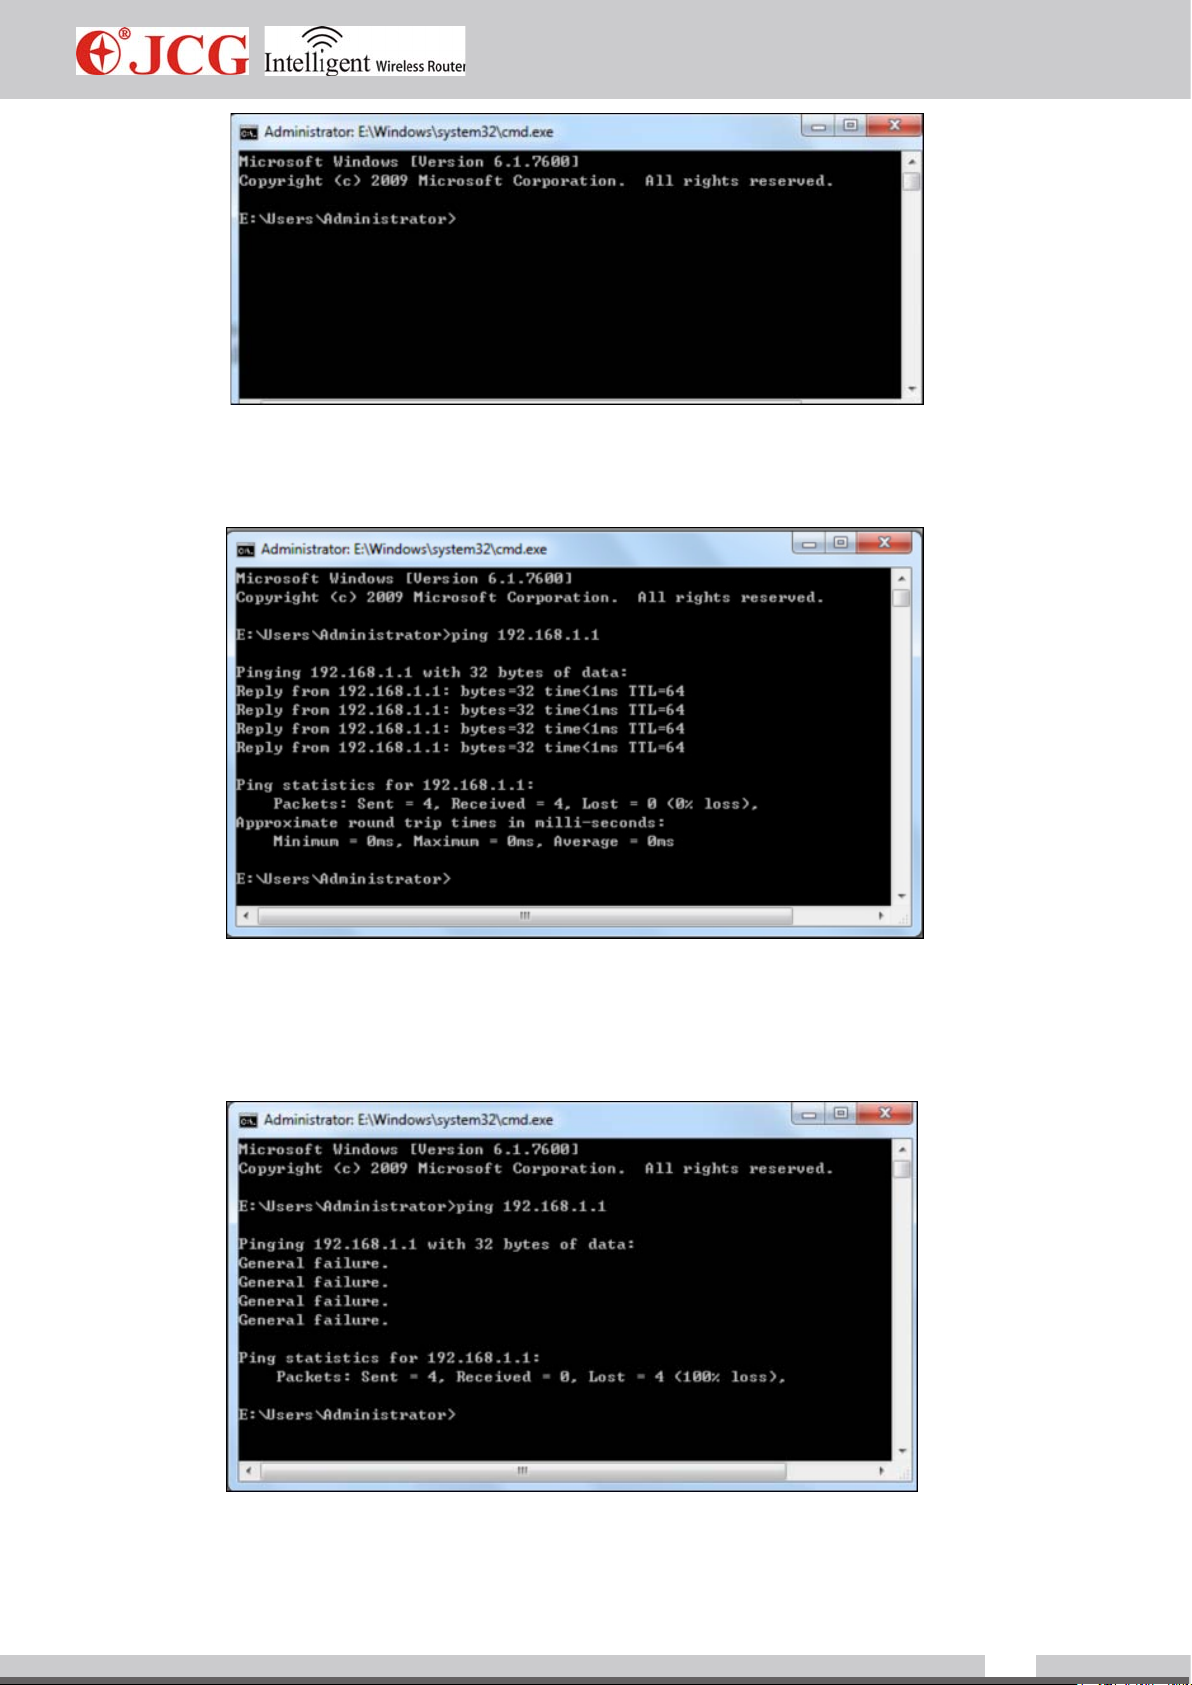
Input command: Ping 192.168.1.1 and click Enter. If the following screen is shown, it
indicates that the computer successfully connects the router.
If the following screen is shown, it indicates that the device is not ready, please recheck the
above steps.
www.jcgcom.com
11
Chapter 4: Quick Setup Wizard
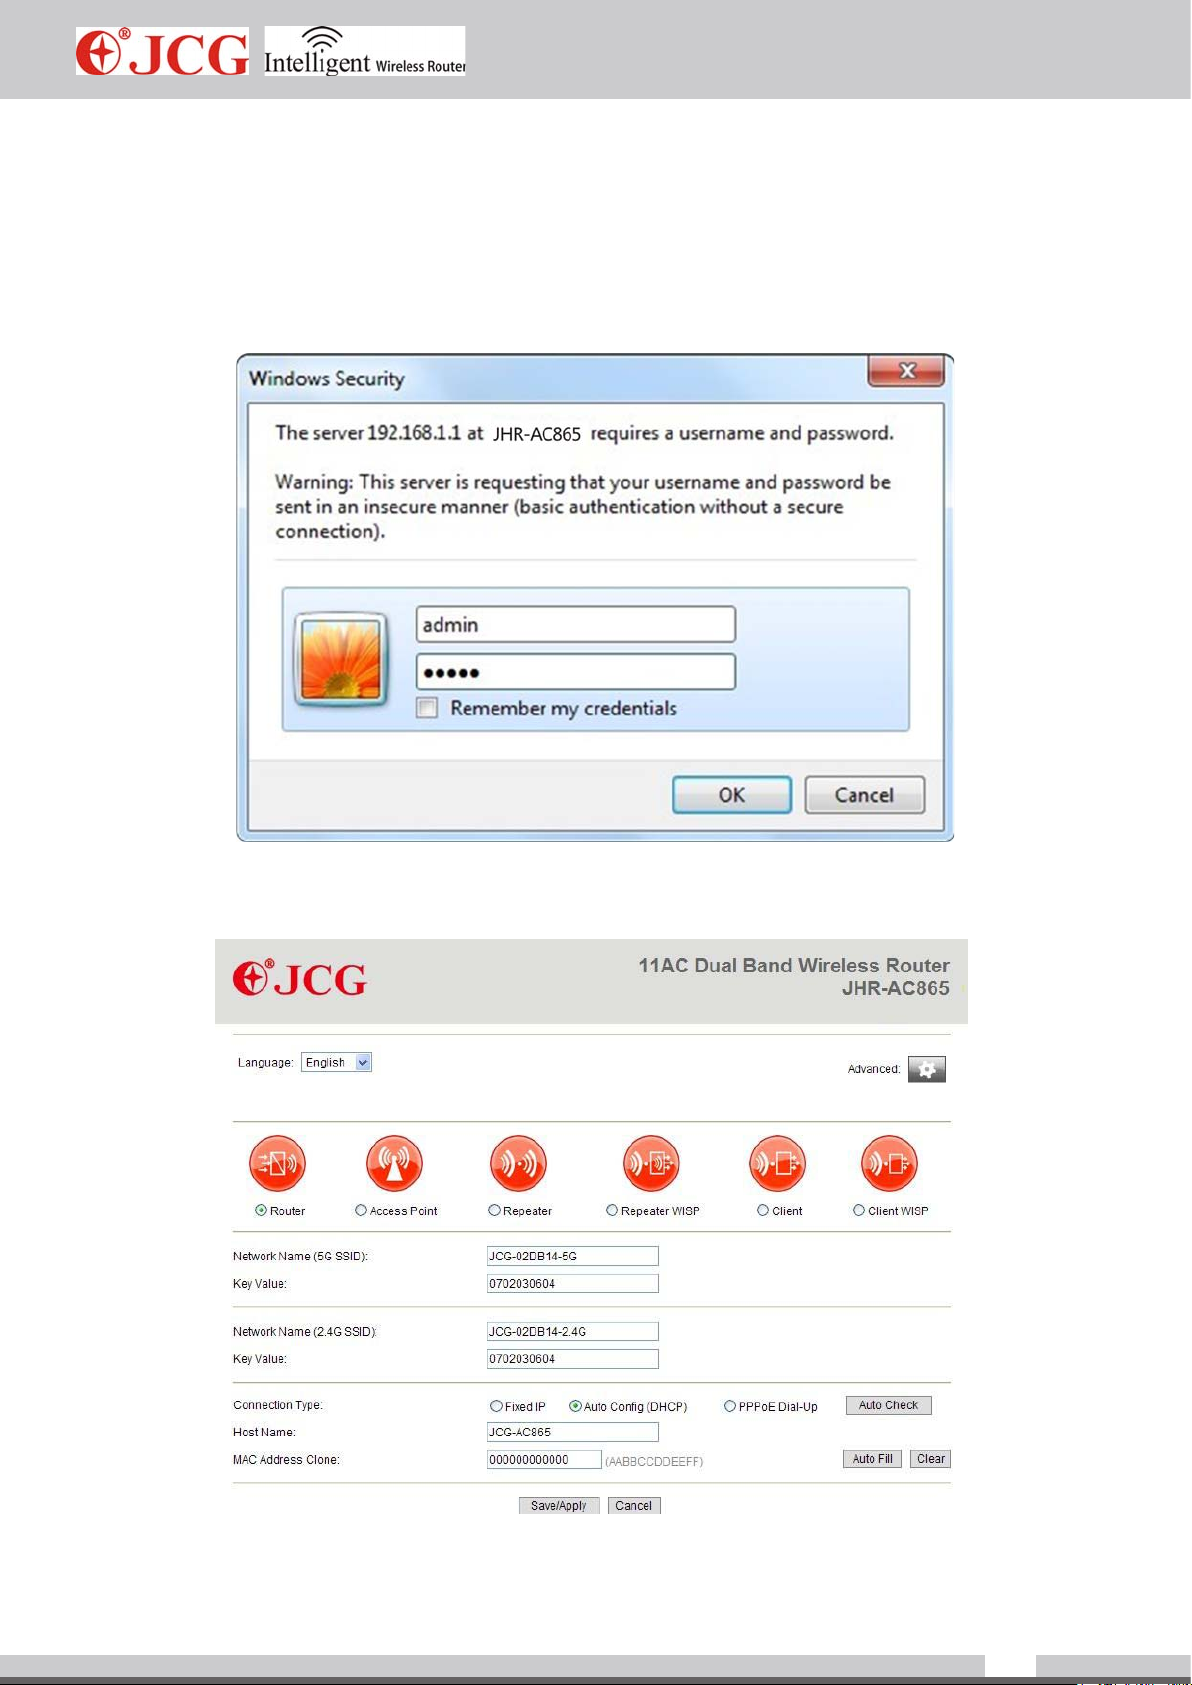
1. Open the web browser
2. Input 192.168.1.1 at the browser address column and click Enter. Input a user name
and password (the default is admin).
3. Enter the router interface.
www.jcgcom.com
12

4. Quickly set up the network (default routing mode)
Set the wireless name and wireless password of the 5G wireless network at the position 1.
Set the wirel e ss name and wireless password of the 2.4G wireless network at the position 2.
Set the network connection type of the WAN at the position 3 (the network connection
mode is identied as follows:)
Method 1: if you connect the Internet with a xed IP, please select “static IP address” and
input the information supplied by the broadband service supplier.
Method 2: if your broadband service supplier does not provide any parameter, please select
“Automatically get (DHCP)”.
Method 3: if your broadband service supplier provides one account password, please select
“PPPOE dialing” and input correct broadband account and password.
After setup, please click “Save/Apply” button.
Chapter 5: Operation Mode
Gateway mode – (router) under this mode, the rst Ethernet interface is used to connect
WAN as the WAN interface. Other Ethernet interfaces and wireless network interfaces are
www.jcgcom.com
13
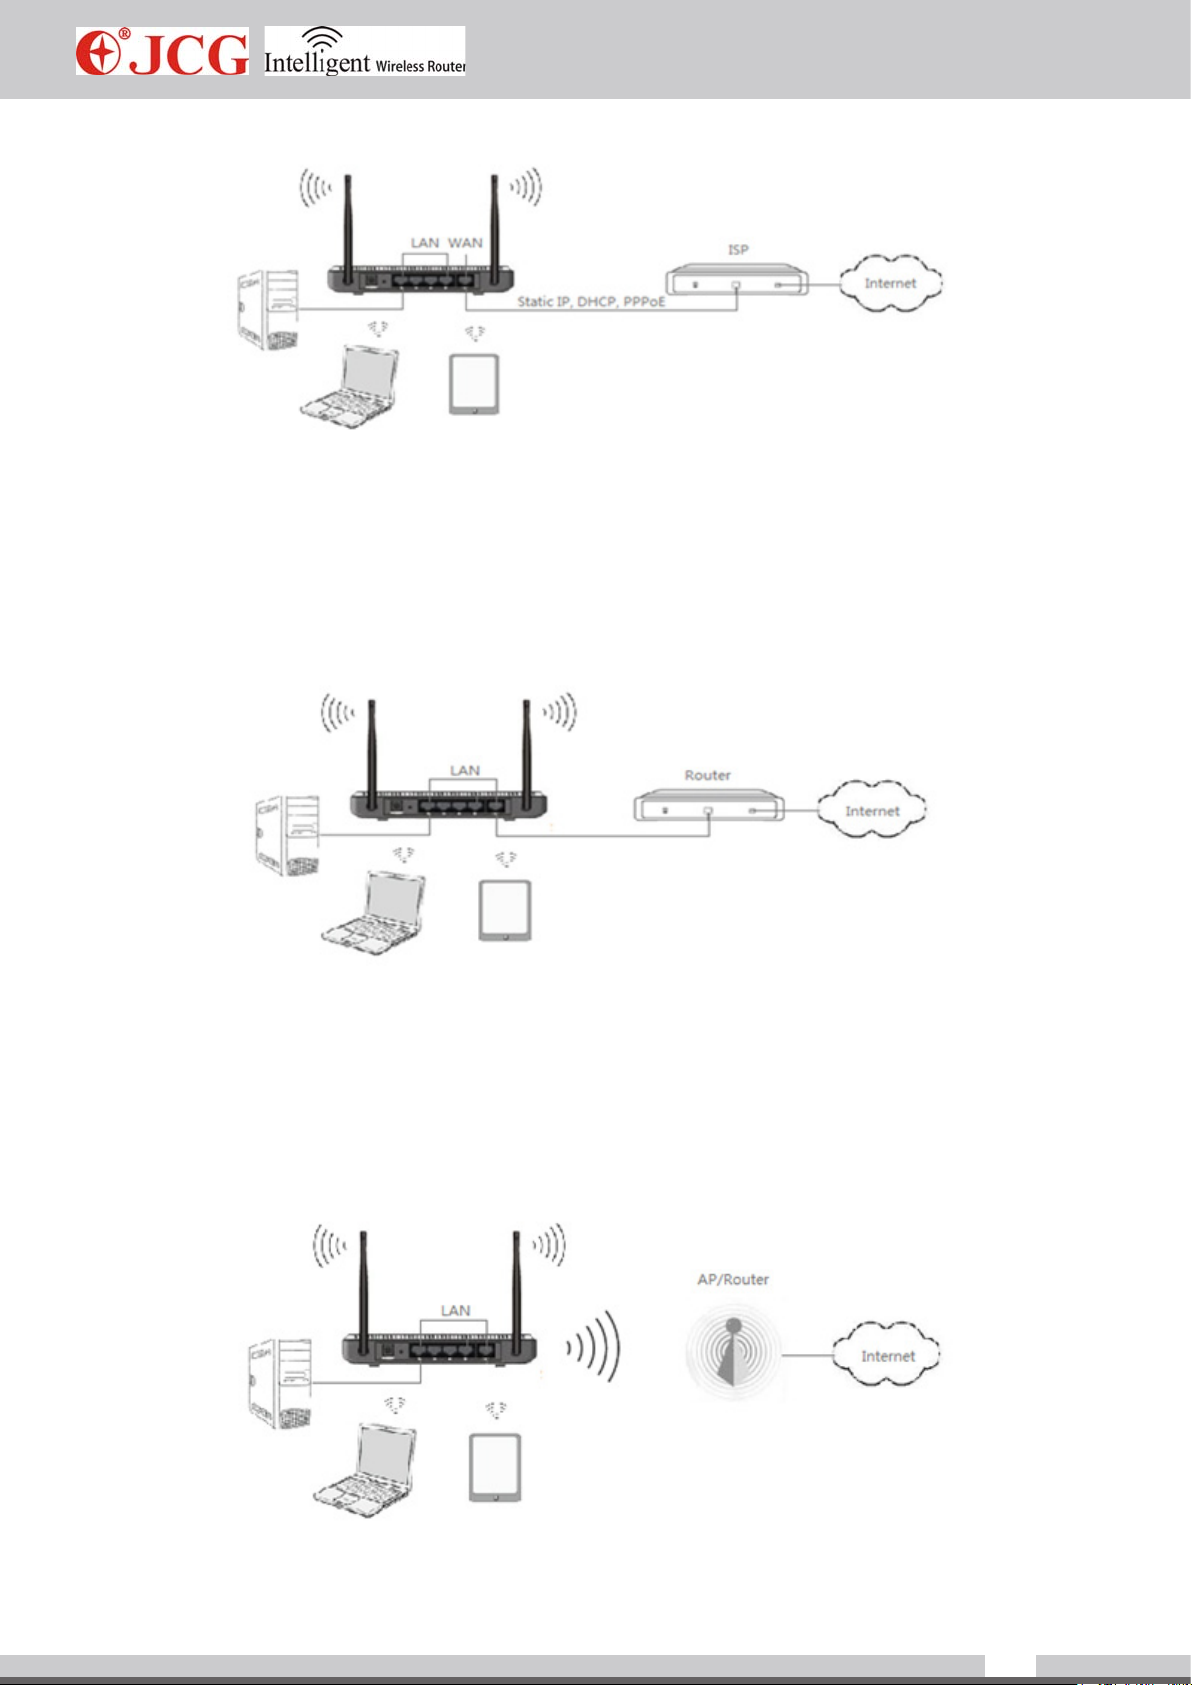
connected together via a bridge as the LAN interface.
Network bridge mode – (access point) under this mode, all Ethernet interfaces and wireless
network interfaces are connected tog ether via a bridge. They connect each other easily and
access the superior network via the Ethernet interface. The network bridge mode is also
called as AP mode.
Relay mode— (Client Repeater+AP) under this mode, the wireless network driver will
virtualize a wireless client interface to connect the remote AP. The basic wireless network
interface and all Ethernet interfaces will be connected via bridge as the LAN interface.
Under this mode, keep the working channel same as it of the upstream AP and set up
necessary
www.jcgcom.com
14

parameters for AP client.
Wireless ISP mode—(relay WISP) under this mode, all Ethernet interfaces act as the LAN
interface. The device connects the Internet via the wireless network interface. NAT is
enabled. All LAN hosts access the Internet with same WAN IP addresses via the wireless
network interface. You can select a wireless access point via scanning. Support multiple
network connection modes such as static IP address, DHCP and PPPoE dialing. Under
this mode, keep the working channel same as it of the upstream AP and set up necessary
parameters for AP client and WAN.
AP client mode—(Client) under this mode, the wireless network driver will virtualize a
wireless client interface to connect the remote AP. The basic wireless network interface and
all Ethernet interfaces will be connected via bridge as the LAN interface. Under this mode,
keep the working channel same as it of the upstream AP and set up necessary parameters
for AP client and WAN.
www.jcgcom.com
15
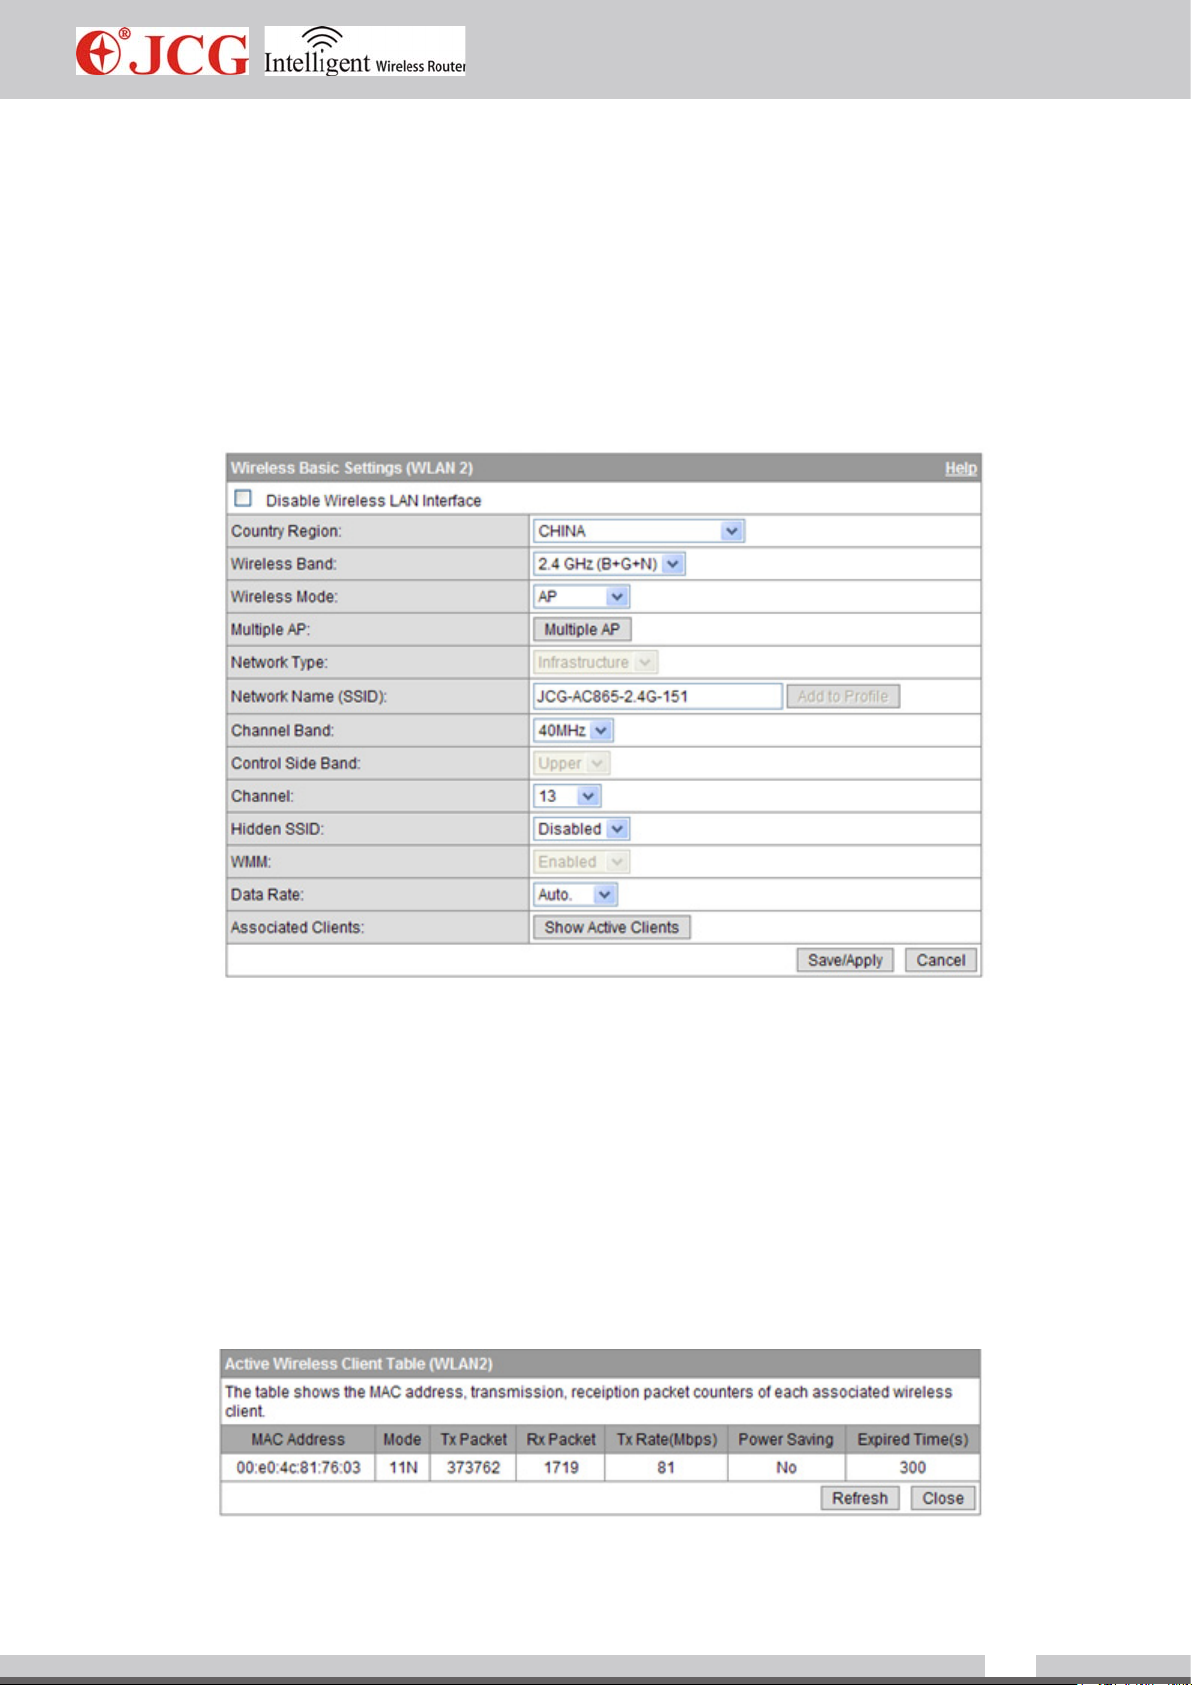
Chapter 6: Wireless Setup
To click the wireless setup main menu, the independent menu will display to set 5G and
2.4G wireless network parameters (WLAN1 represents 5G wireless network and WLAN2
represents 2.4G wireless network). The setup mode is basically same. Taking 2.4G wireless
setup as one example:
6.1 Basic setup
Basic setup: a user mainly sets up the basic parameters of the wireless network such as
wireless network mode, SSID, channel and frequency.
Name of wireless network (SSID)- wireless network identifier, which can distinguish
different wireless networks.
Hide SSID – hide the name of a wireless network, but the client can still manual input SSID
to connect the access point.
Connected client- to click the client, a user can know the information on the client
connected via the current 2.4G wireless network (shown as the following gure).
www.jcgcom.com
16
 Loading...