

JCG AC860 User Manual
AC860 1900Mbps High Power
Dual Band Gigabit Router
User Manual

JCG AC860 1900M DUAL BAND GIGABIT ROUTER
2 / 78
Package Contents
The following items should be found in your package:
JCG AC860 1900Mbps Wi-Fi Router
Power Supply Unit
Ethernet Cable
Quick Installation Guide
Note:
1. Make sure that the package contains the above items. If any of the listed items
are damaged or missing, please contact your distributor.
2. Operations in different systems are similar. Here we take Windows 10 as an
example.
Safety Information
If your router come with a power button, press the power button to shut off the
router. If there is no power button, you can only shut down the router completely by
disconnecting the power adapter from the power socket.
Don’t disassemble the product or repair it by yourself. You may face the risk of
electric shock and voiding the warranty. Please do contact us if you need any
assistance.
Keep your router away from water and wet locations.
This router must be operated with power supplies provided by manufacturer and in
the original packing of this router. If you have any questions, please feel free to
contact us.

JCG AC860 1900M DUAL BAND GIGABIT ROUTER
3 / 78
CONTENTS
CHAPTER 1 INTRODUCTION ..................................................................................... 7
1.1 OVERVIEW OF THE ROUTER ................................................................................................................ 7
1.2 MAIN FEATURES .................................................................................................................................. 7
1.3 PANEL LAYOUT .................................................................................................................................... 8
1.3.1 THE FRONT PANEL .................................................................................................................................8
1.3.2 THE REAR PANEL....................................................................................................................................9
CHAPTER 2 CONNECTING THE ROUTER ............................................................. 10
2.1 INSTALLATION ENVIRONMENT REQUIREMENTS ................................................................................ 10
2.2 CONNECTING THE ROUTER ................................................................................................................. 10
CHAPTER 3 QUICK SETUP ........................................................................................ 11
3.1 STATIC IP ................................................................................................................................................. 11
3.2 DHCP (AUTO CONFIG) ......................................................................................................................... 12
3.3 PPPOE ................................................................................................................................................... 12
CHAPTER 4 CONFIGURATION PAGE ..................................................................... 14
CHAPTER 5 STATUS ................................................................................................... 15
5.1 NETWORK STATUS ............................................................................................................................. 15
5.2 WIRELESS STATUS .............................................................................................................................. 16
5.3 CLIENTS ............................................................................................................................................... 17
CHAPTER 6 NETWORK .............................................................................................. 17
6.1 LAN ..................................................................................................................................................... 17
6.2 WAN ................................................................................................................................................... 18

JCG AC860 1900M DUAL BAND GIGABIT ROUTER
4 / 78
6.2.1 STATIC (FIXED IP) ................................................................................................................................ 18
6.2.2 DYNAMIC IP (AUTO CONFIG) ............................................................................................................ 19
6.2.3 PPPOE (DSL, PON) .............................................................................................................................. 20
6.3 MAC CLONE ...................................................................................................................................... 21
6.4 WIFI REPEATER ................................................................................................................................... 21
6.5 DDNS ................................................................................................................................................. 22
6.5.1 FREEDNS.AFRAID.ORG DDNS ................................................................................................................ 22
6.5.2 DYNDNS.ORG DDNS .............................................................................................................................. 23
6.5.3 WWW.NO-IP.COM DDNS ...................................................................................................................... 24
6.6 GUEST ACCESS ................................................................................................................................... 24
CHAPTER 7 2.4G WLAN ............................................................................................ 25
7.1 BASIC ................................................................................................................................................. 25
7.2 WPS .................................................................................................................................................. 26
CHAPTER 8 5G WLAN ................................................................................................ 27
8.1 BASIC ................................................................................................................................................... 27
8.2 WPS .................................................................................................................................................... 28
CHAPTER 9 SIGNAL .................................................................................................... 28
9.1 2.4G SIGNAL ...................................................................................................................................... 28
9.2 5G SIGNAL ......................................................................................................................................... 29
CHAPTER 10 USB ........................................................................................................ 30
10.1 DISK ................................................................................................................................................. 30
10.2 SAMBA SERVER .............................................................................................................................. 31
10.2.1 ACCESS TO THE USB STORAGE DEVICE ................................................................................................ 31
10.3 MEDIA SERVER ............................................................................................................................... 33

JCG AC860 1900M DUAL BAND GIGABIT ROUTER
5 / 78
10.4 PRINTER SERVER ............................................................................................................................ 34
CHAPTER 11 QOS ........................................................................................................ 40
CHAPTER 12 TRAFFIC ................................................................................................ 42
CHAPTER 13 MANAGEMENT .................................................................................. 43
13.1 MANAGEMENT ................................................................................................................................. 43
13.2 SYSTEM SETTING ............................................................................................................................. 45
13.3 TIME SETTING .................................................................................................................................. 45
CHAPTER 14 ADVANCED .......................................................................................... 46
14.1 NETWORK ........................................................................................................................................ 46
14.1.1 IPV6................................................................................................................................................... 47
14.1.2 ROUTING ........................................................................................................................................... 49
14.2 NAT .................................................................................................................................................. 51
14.2.1 SINGLE PORT FORWARDING ............................................................................................................ 51
14.2.2 MULTI. PORT FORWARDING ............................................................................................................ 53
14.2.3 DMZ (DE-MILITARIZED ZONE)........................................................................................................ 54
14.2.4 UPNP (UNIVERSAL PLUG AND PLAY) ............................................................................................. 55
14.3 FIREWALL ......................................................................................................................................... 55
14.3.1 FILTERING .......................................................................................................................................... 56
14.3.2 IP FILTERING ...................................................................................................................................... 56
14.3.3 MAC FILTERING ................................................................................................................................ 57
14.3.4 URL FILTERING ................................................................................................................................. 59
14.3.5 HOST FILTERING ................................................................................................................................ 60
14.3.6 SECURITY ........................................................................................................................................... 62
14.4 MANAGEMENT ................................................................................................................................ 63
14.4.1 TOOLS ............................................................................................................................................... 63
14.4.2 WOL (WAKE ON LAN) .................................................................................................................. 65
14.5 STATUS .............................................................................................................................................. 66
14.5.1 NETWORK ......................................................................................................................................... 66

JCG AC860 1900M DUAL BAND GIGABIT ROUTER
6 / 78
14.5.2 2.4G WIRELESS ................................................................................................................................ 66
14.5.3 5G WIRELESS .................................................................................................................................... 67
14.5.4 SYSLOG .............................................................................................................................................. 67
FAQ .................................................................................................................................. 68
APPENDIX A: CONVERT JCG ROUTER INTO AN ACCESS POINT ................. 71
APPENDIX B: CONFIGURE DHCP IN YOUR PC ................................................... 74
APPENDIX C: FIND THE IP ADDRESS OF YOUR PC .......................................... 76

JCG AC860 1900M DUAL BAND GIGABIT ROUTER
7 / 78
Chapter 1 Introduction
1.1 Overview of the router
JCG AC860 dual band router comes with the latest Wi-Fi standard 802.11ac, offering
combined data transfer speeds up to 1900Mbps with 1300Mbps over 5GHz band
and 600Mbps over 2.4Ghz band. Ultrafast and stable Wi-Fi speed, superior coverage
and reliable data sharing making it the best and reasonable choice for all your
network demands.
SUPERFAST WIFI WITH DEDICATED NETWORKS
Equipped with 1.4Ghz dual core processor which is able reach combined speeds up
to 1900Mbps. Simultaneous 1300Mbps 5GHz band and 600Mbps 2.4Ghz band meet
all your wireless expectations from online shopping, web browsing to smooth
gaming and 4K streaming.
FAR REACHING SIGNAL FOR SUPERIOR COVERAGE
6 high performance antennas with the latest connection technology ensures strong
wireless signal reach through walls. Brings impressive Wi-Fi speeds to every corner
and eliminate dead zones.
FULL GIGABIT WIRED CONNECTIONS
Quick and hassle-free installation provides you a better online experience in minutes.
Comes with 1 gigabit WAN port and 4 gigabit LAN port to provide 10 times faster
wired Ethernet connection speed.
USB 3.0 PORT FOR FAST SHARING
Take advantage of the USB 3.0 port to enjoy 10 times faster data transfer speed than
the traditional USB 2.0. Easily share music, image and your data stored on USB
storage. Utilize your own FTP server for secure file transfer and sharing
1.2 Main Features
Complies with IEEE 802.11ac.
One 10/100/1000 Mbps WAN Port,

JCG AC860 1900M DUAL BAND GIGABIT ROUTER
8 / 78
Four 10/100/1000 Mbps LAN Port
One USB 3.0 port
File sharing and print server
64/128-bits WEP, WPA / WPA2
Shares data and Internet access for users
Dynamic IP/Static IP/PPPoE/PPTP/ L2TP Internet access.
Simultaneous 2.4GHz and 5GHz deliver total speeds up to 1900Mbps
Supports UPnP, Dynamic DNS, Static Routing.
Built-in NAT and DHCP server supporting static IP address distributing.
Access control
Supports IPv6.
Supports firmware upgrade
1.3 Panel Layout
1.3.1 The Front Panel
JCG AC860 1900M DUAL BAND GIGABIT ROUTER
9 / 78
Name
Status
Indication
Power
On
The router is booted.
Off
The router is turned off.
Flashing
The router is booting or upgrading.
2.4G
On
2.4G wireless network is working.
Off
2.4G wireless network is disabled.
5G
On
5G wireless network is working.
Off
5G wireless network is disabled.
USB
On
USB flash drive is detected.
Off
No USB flash drive is connected.
Flashing
Identifying the USB flash drive.
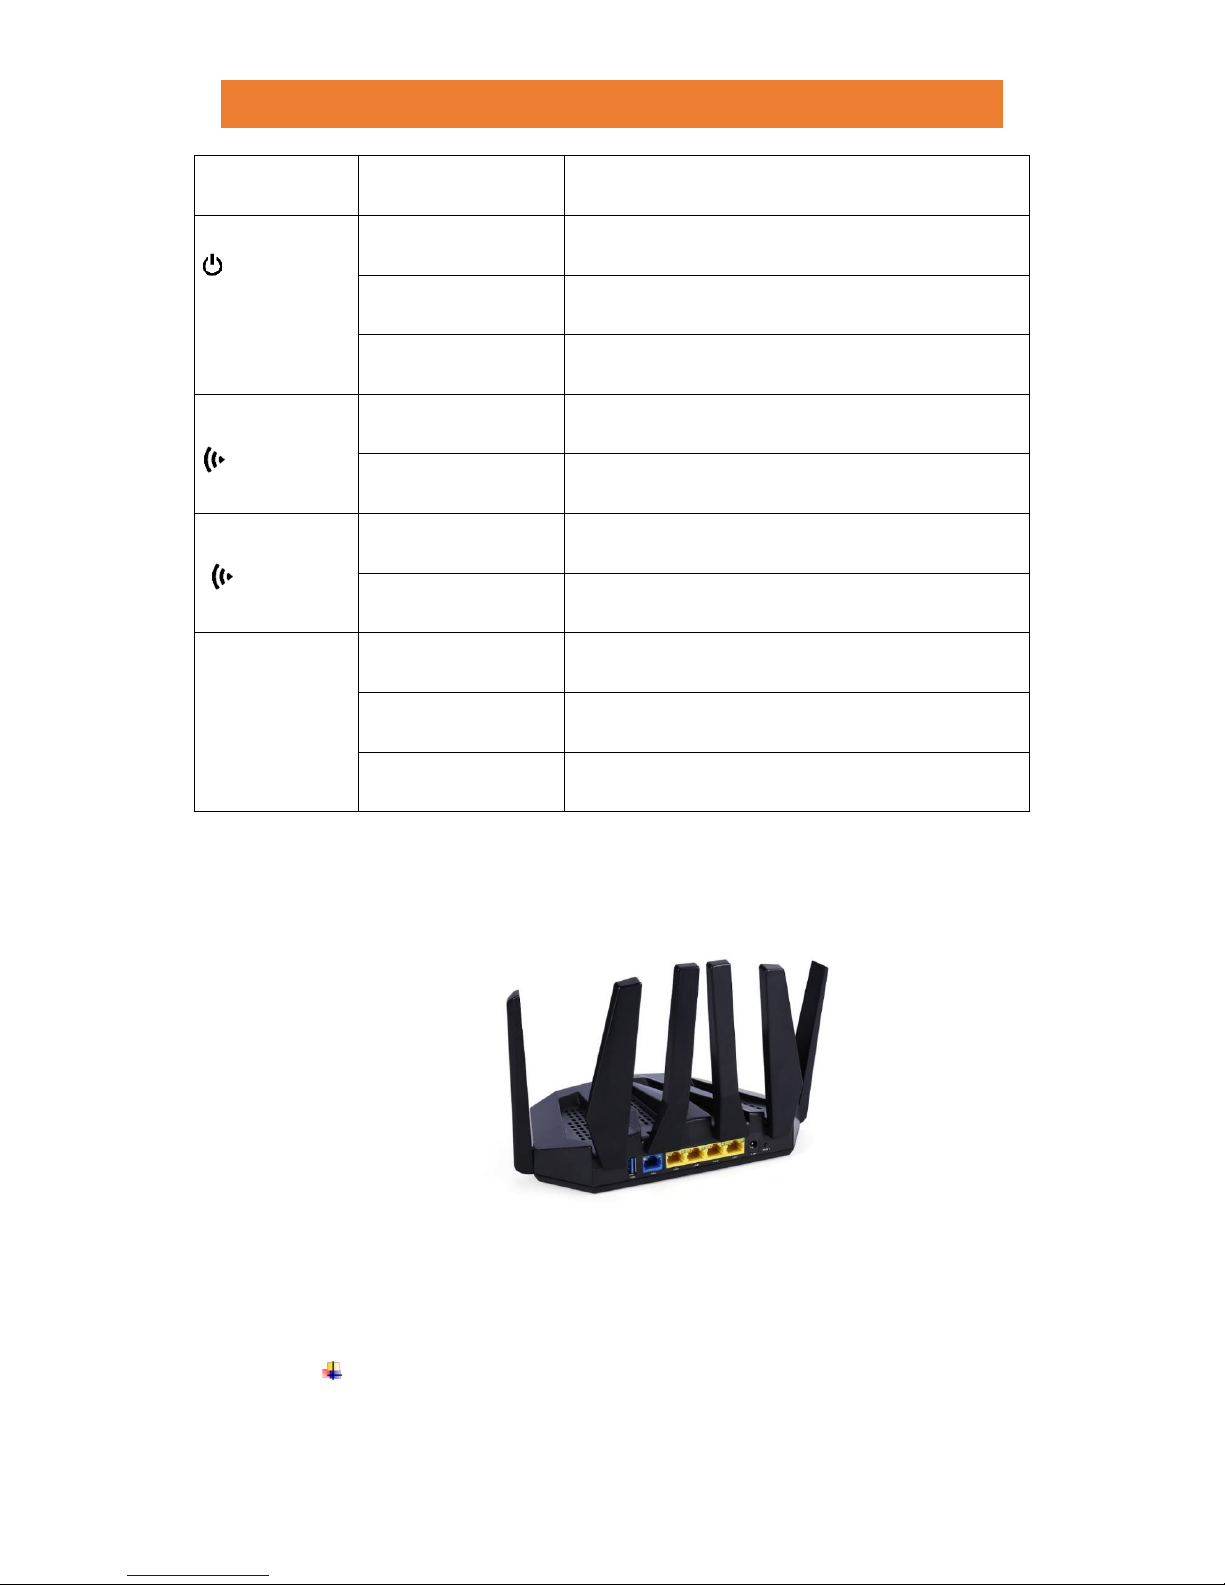
1.3.2 The Rear Panel
View from left to right:
USB 3.0 Port

JCG AC860 1900M DUAL BAND GIGABIT ROUTER
10 / 78
Gigabit WAN Port
LAN Port (1,2,3,4)
Power Socket
Reset Button
Chapter 2 Connecting the router
2.1 Installation Environment Requirements
Operating Temperature: 0℃~40℃ (32℉~104℉)
Operating Humidity: 10%~90%RH, Non-condensing
Keep the router far from any heater
Avoid direct irradiation of sunlight
Keep at least 2 inches (5 cm) of clear space around the router
2.2 Connecting the Router
There are 3 connection types to choose from: Static IP, DHCP, PPPoE. If you are unsure of
your connection method, please contact your Internet Service Provider. Please note that if
using the PPPOE option, you will have to enter a Username and Password (provided by
your Internet Service Provider) to gain access to the Internet.
JCG AC860 router supports easy setup which takes you less than 5 minutes, Netmask,
Gateway, Primary DNS or Secondary DNS are NOT required during the installation process.
Please follow the steps below to set up your router:
1. Connect the modem to the WAN port on your router with an Ethernet cable.
2. Turn on the modem.
3. Turn on the router.
4. Verify that the following LEDs are on and solid lit on your router.
Power, 2.4G, 5G
5. Check the rear of your router and make sure the 2 indicators of WAN port are blinking.
JCG AC860 1900M DUAL BAND GIGABIT ROUTER
11 / 78
Chapter 3 Quick Setup
1. Enable your PC to “obtain an IP address automatically”. If you are not sure how to do
this, please refer to Appendix B: Configure DHCP in your PC
2. Connect your computer to one of LAN ports on the rear of the router with an Ethernet
cable.
3. Open a web-browser (such as Microsoft Internet Explorer, Mozilla Firefox or Apple
Safari), and type in the default IP address h1wifi.com (or 192.168.1.1) in the address
bar, press Enter.
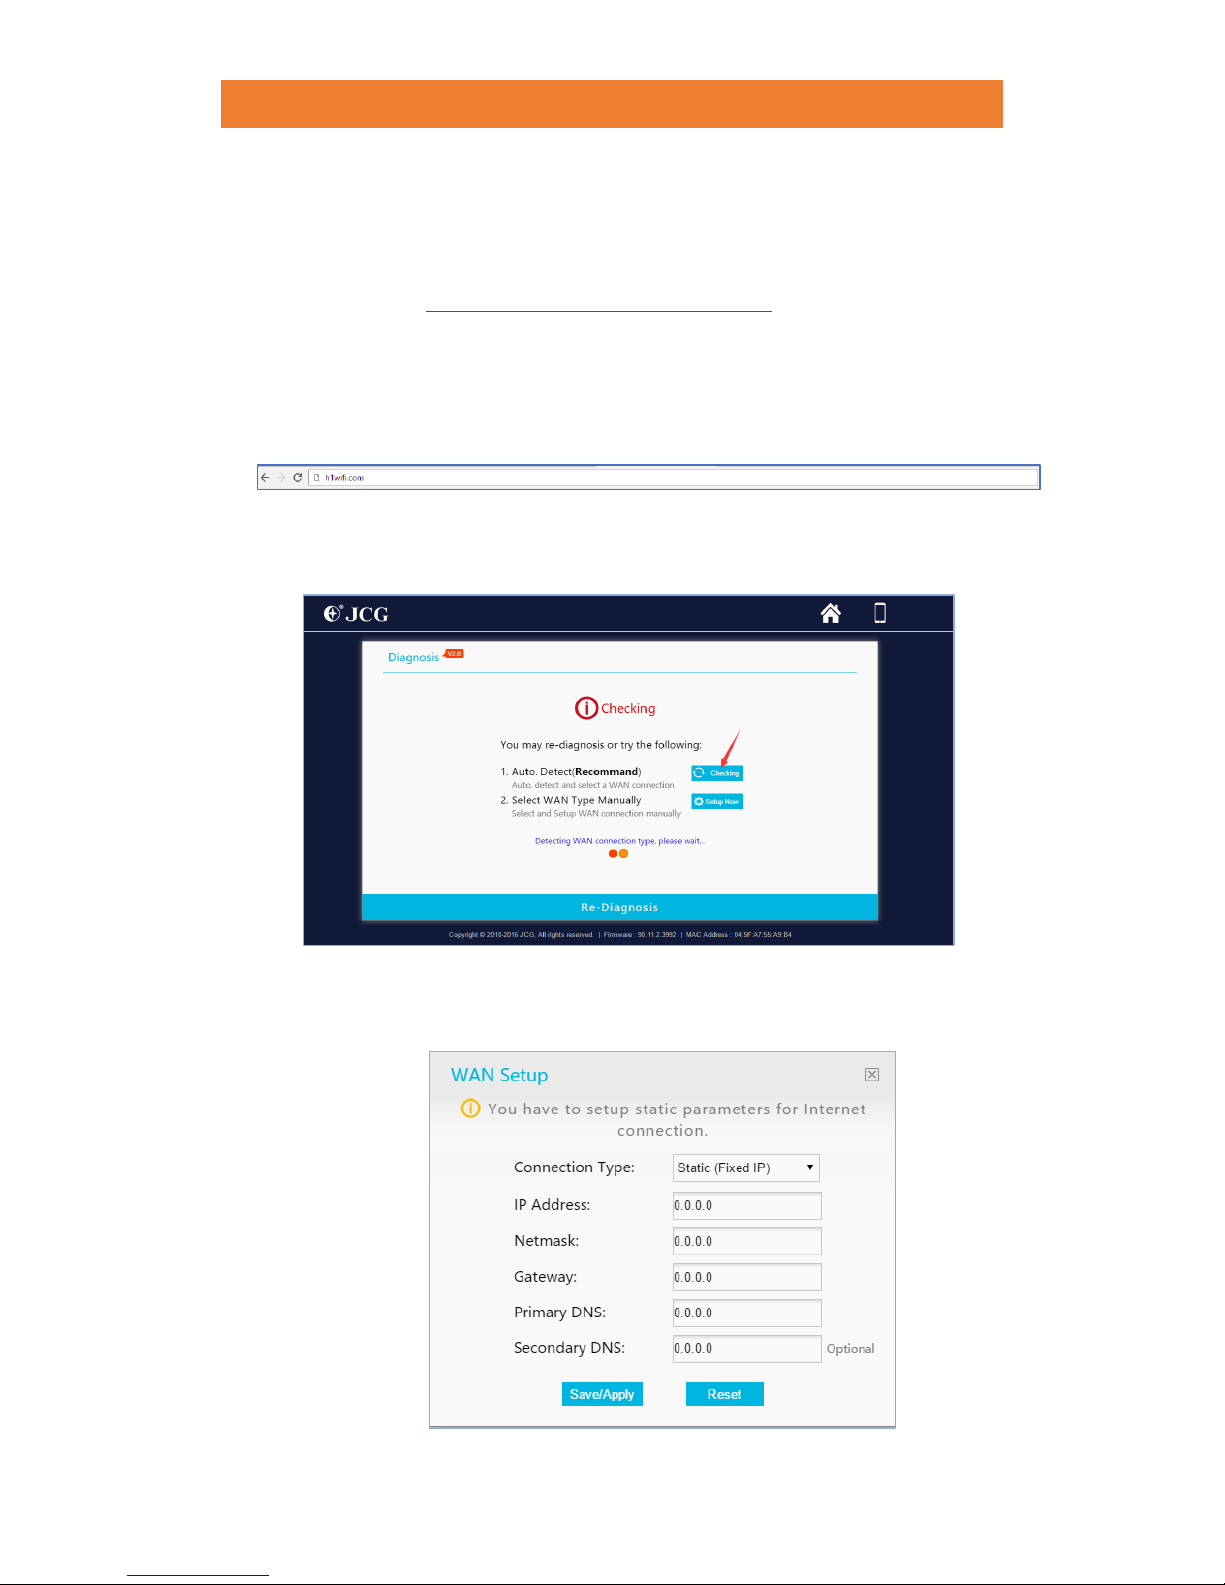
4. After a moment, the Quick Setup page will appear. Click “Auto Detect” and wait for
the router to figure out your connection type.
You may also choose “Setup Now” if you are sure about your WAN connection type.
3.1 Static IP
JCG AC860 1900M DUAL BAND GIGABIT ROUTER
12 / 78
IP Address - Enter the IP address into this field.
Netmask - Enter the subnet mask into this field. It is usually
255.255.255.0.
Gateway - Enter the gateway IP address into this field.
Primary DNS - Enter the DNS Server IP address into this field.
Secondary DNS (Optional) - If your ISP provides another DNS
server IP address, enter it into this field.
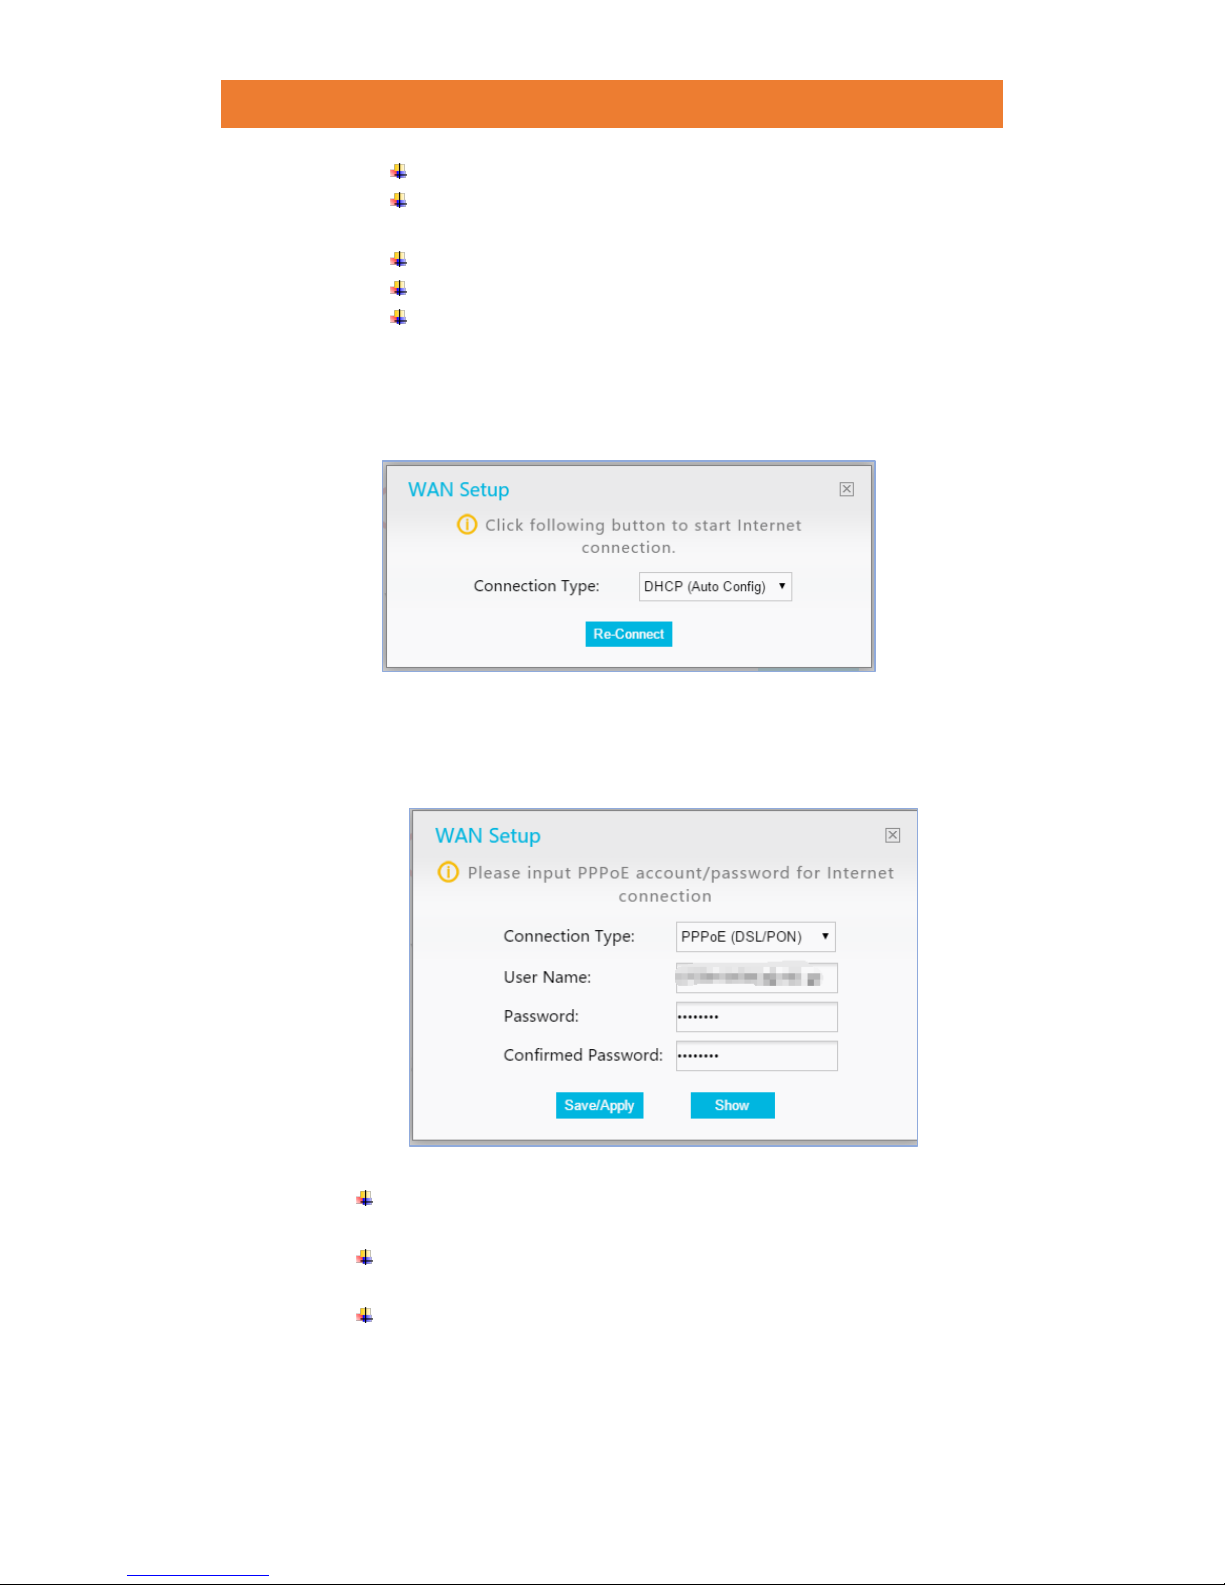
3.2 DHCP (Auto Config)
Click Re-Connect to continue.
3.3 PPPOE
Username - Enter the username provided by your ISP. This field is
case-sensitive.
Password - Enter the password provided by your ISP. This field is
case-sensitive.
Confirmed Password- Re-enter your password.
4 After finishing WAN Connection Type selection, click “Save/Apply” to be directed to
the confirmation page.
JCG AC860 1900M DUAL BAND GIGABIT ROUTER
13 / 78
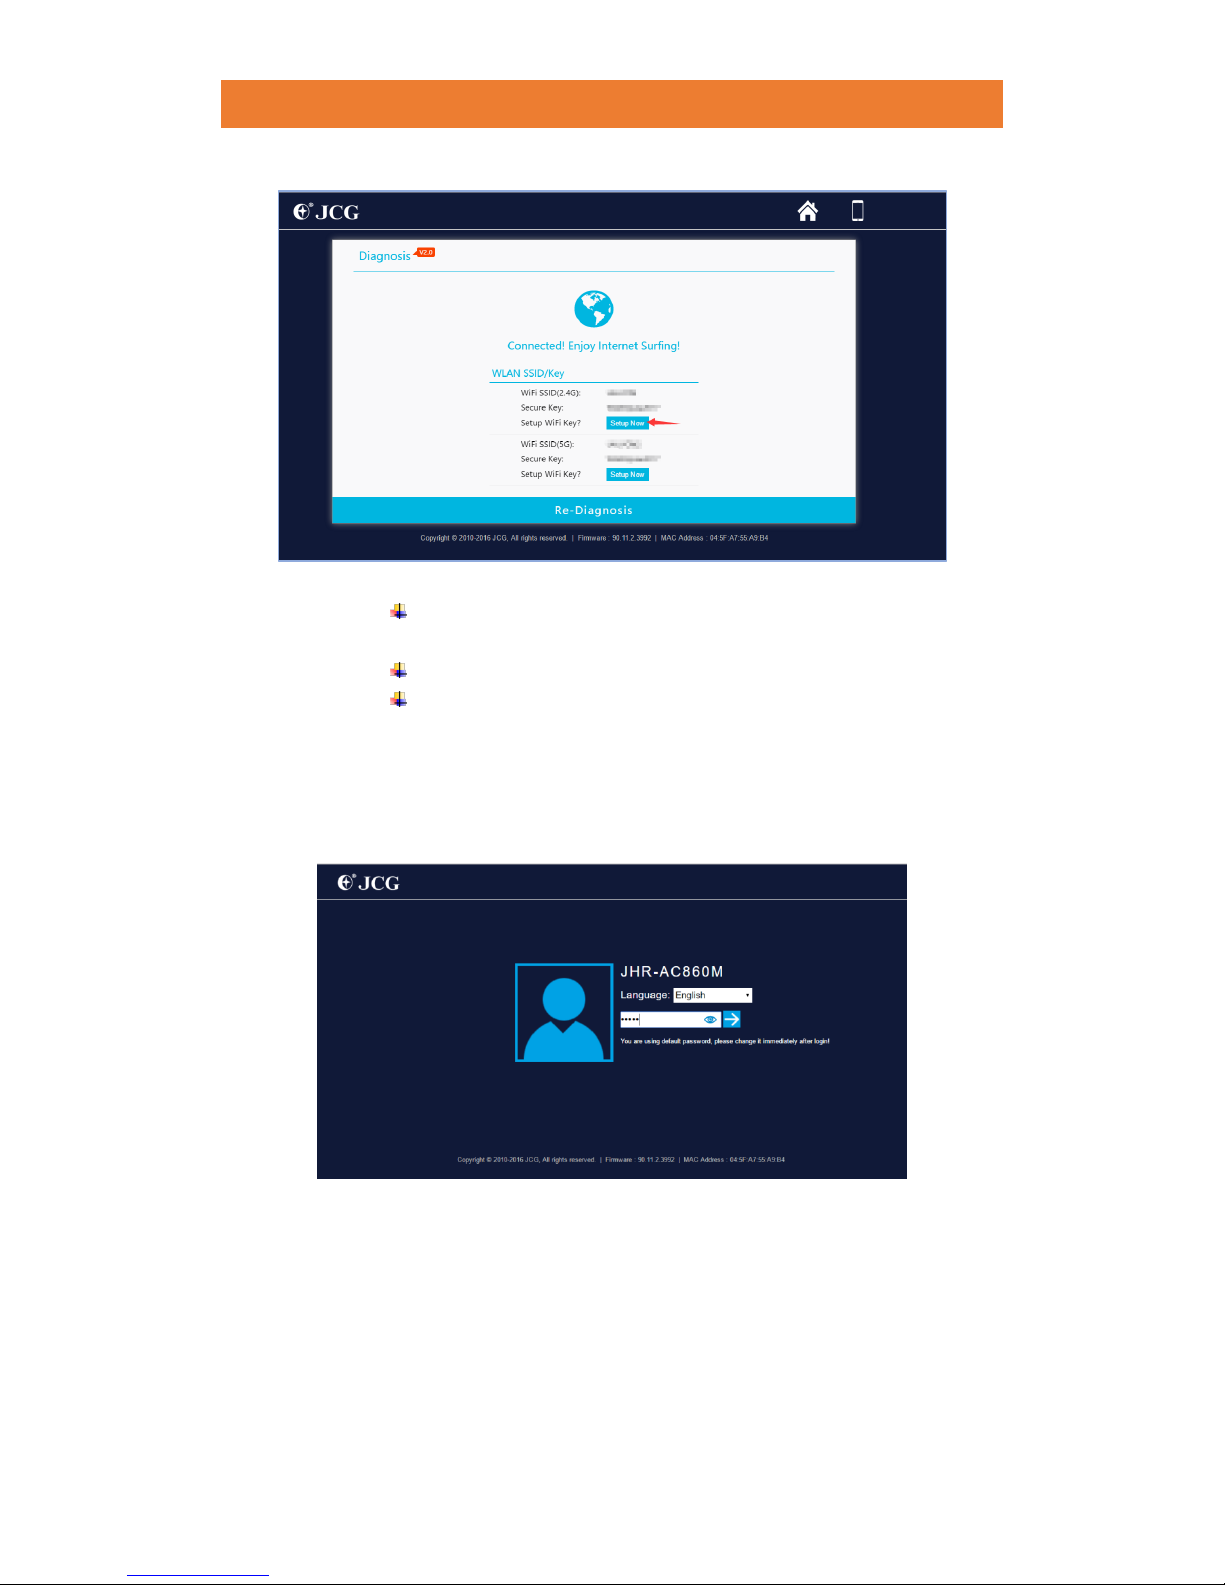
Wireless 2.4GHz/5GHz - Displays whether the wireless function is
enabled or not
Wi-Fi SSID – The default SSID of your wireless networks.
Secure Key - The default password for your wireless networks.
5 If you are willing to customize your SSID and password, click “Setup Now” to be
directed to the log in page. Enter “admin” in lower case as password and click the
blue arrow to be directed to the configuration page.
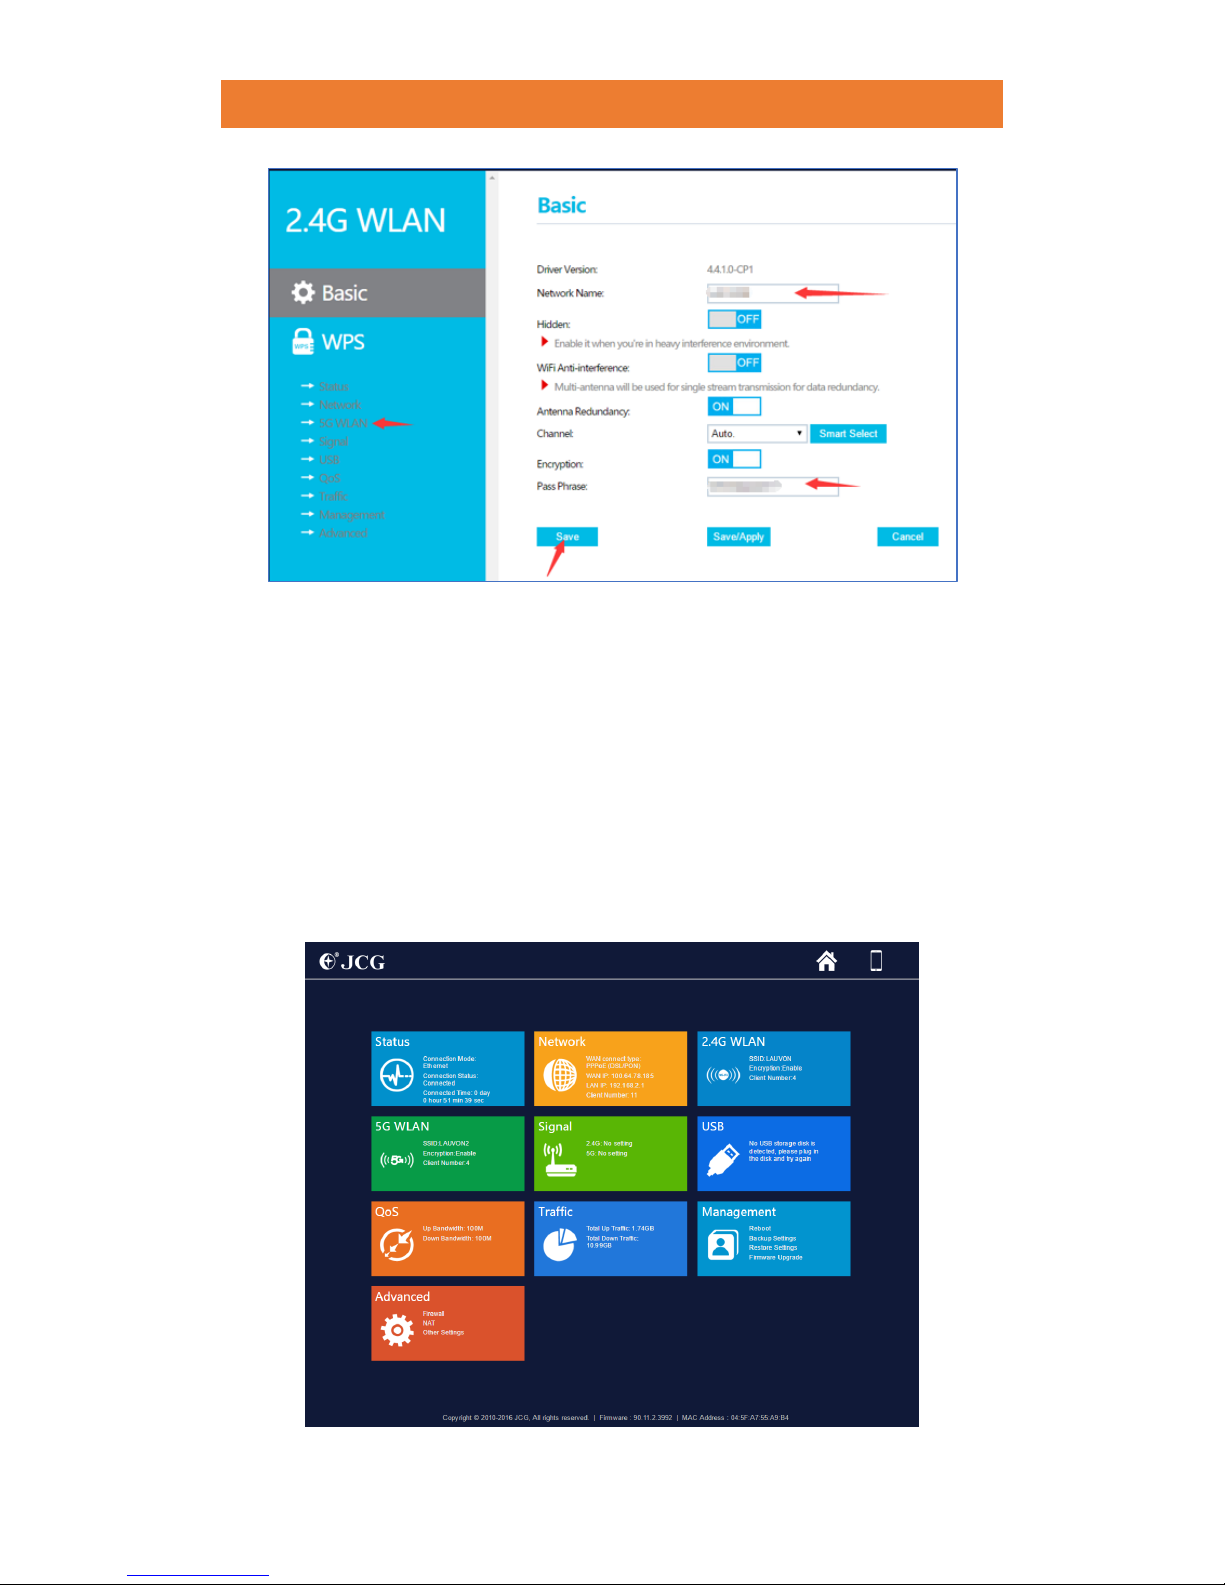
6 Customize your Network Name and Pass Phrase (password) for your 2.4G wireless
network. Click “Save” after finished, and choose “5G WLAN” from the left side menu,
repeat the same procedure and click “Save/Apply” after finished.
JCG AC860 1900M DUAL BAND GIGABIT ROUTER
14 / 78
7 Wait for the router to reboot.
8 Now you can enjoy total wireless speed up to 1900Mbps!
Chapter 4 Configuration Page
Home page provides a dashboard which lets you see the status of your Internet connection
and network at a glance. You can click any of the 10 sections to view and edit the detail
information.
JCG AC860 1900M DUAL BAND GIGABIT ROUTER
15 / 78
Status- View the connection mode, status, connection time for your internet. Click
to edit.
Network- View the WAN connection type, IP address, and total clients connected
to your network. Click to edit.
2.4G WLAN- View the SSID and number of wireless devices connected to your
network. Click to edit.
5G WLAN- View the SSID and number of wireless devices connected to your
network. Click to edit.
Signal- View the current signal settings for your router. Click to edit.
USB- View the information of the USB flash drive connected to your router. Click to
edit.
QoS- View the current bandwidth settings for your router. Click to edit.
Traffic- View the total traffic of your connected devices. Click to edit.
Management- Click to manage system settings for your router.
Advanced- Click to edit advanced network settings for your router.
Chapter 5 Status
Choose menu “Status”, and you can view or edit the network status, wireless status and
clients for your router.
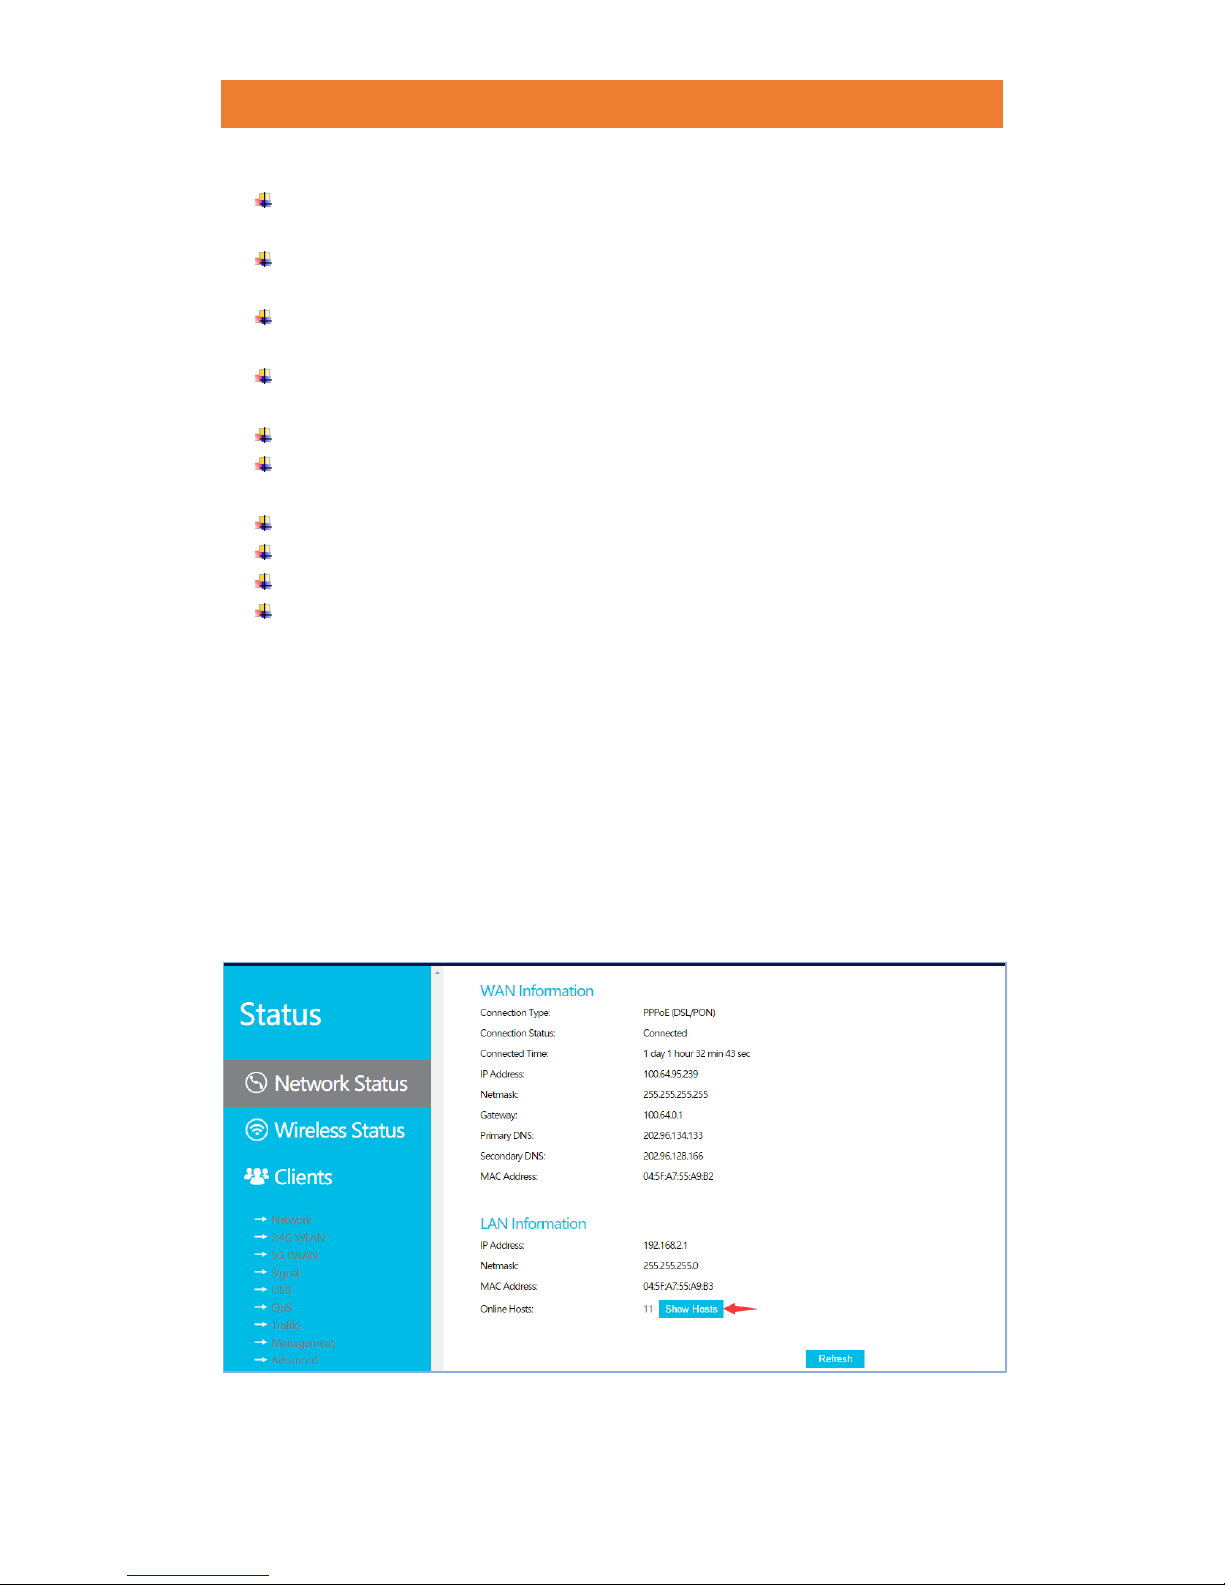
5.1 Network Status
Choose menu “Status → Network Status” to have a glance of your WAN and LAN IP
parameters assigned dynamically by your ISP. Click “Show hosts” to be directed to “Clients”
and manage all devices connected to your router.
JCG AC860 1900M DUAL BAND GIGABIT ROUTER
16 / 78
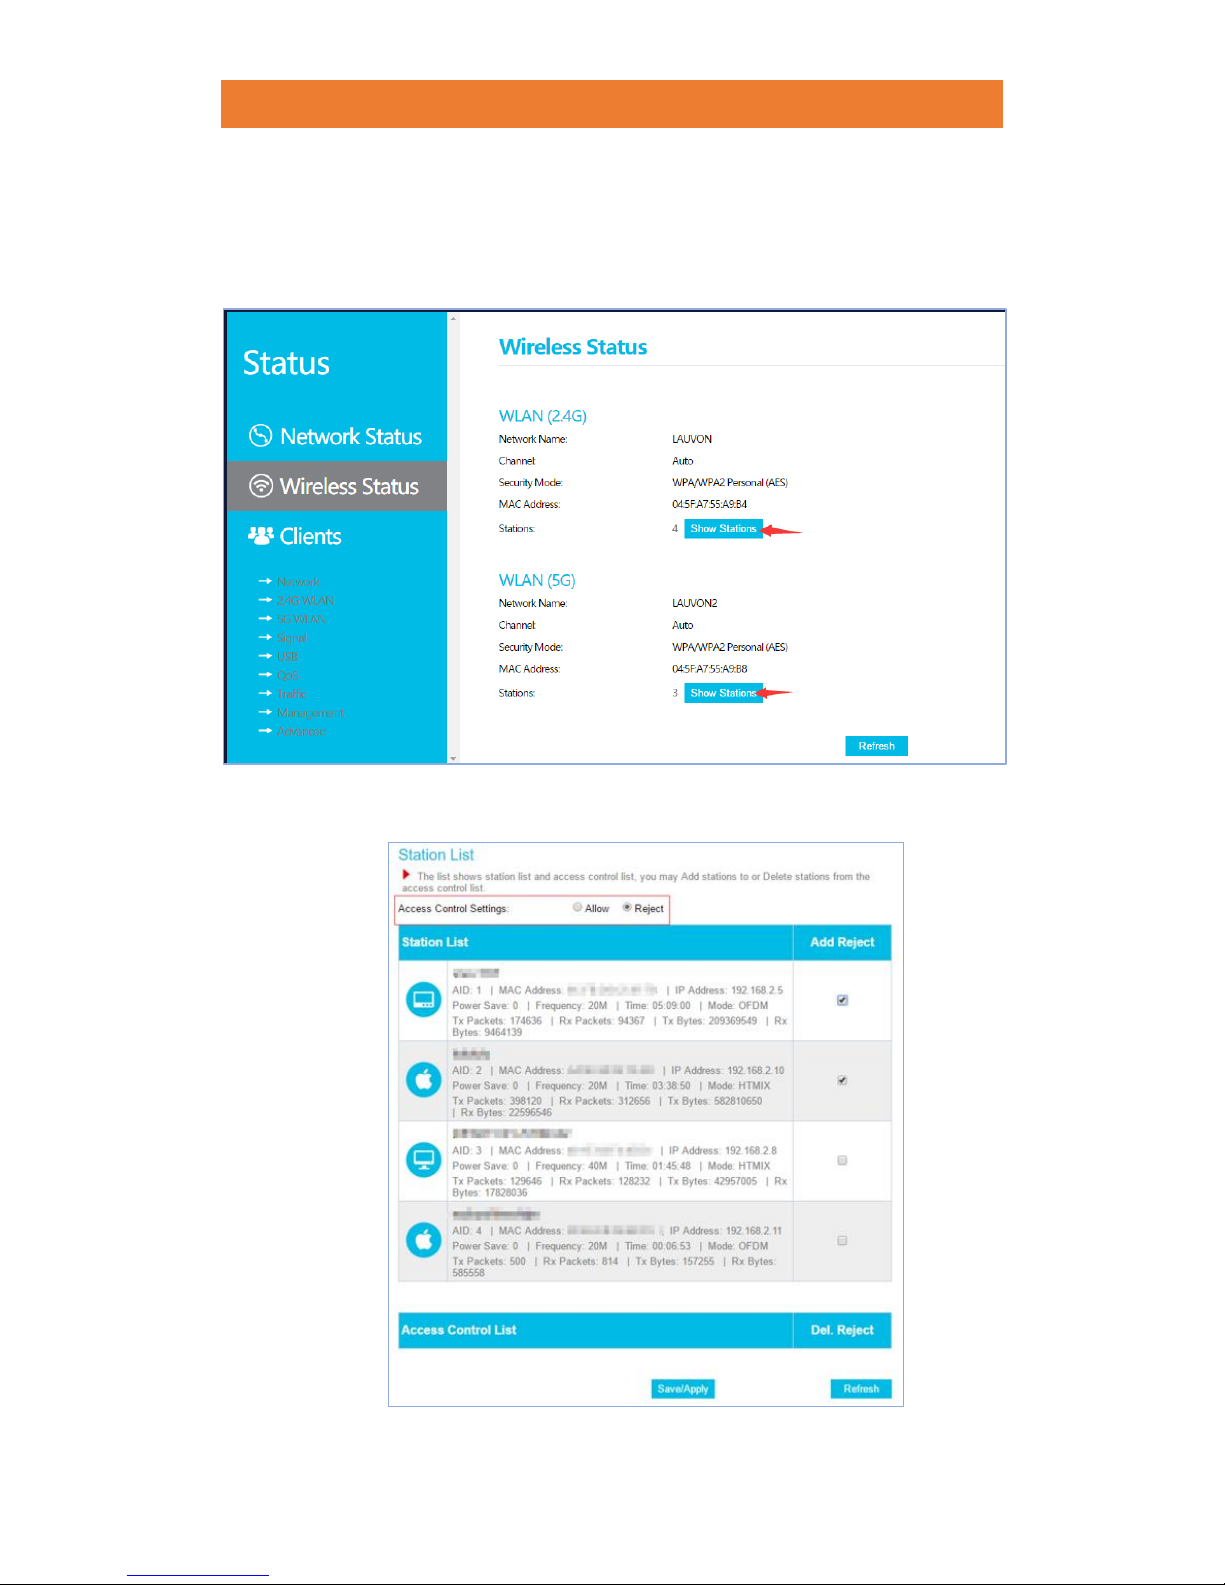
5.2 Wireless Status
1. View the Network name, security mode and MAC address for your wireless
networks. Click “Show stations” to check the devices that are connected to your
2.4G or 5G wireless network.
2. Select control settings “Allow” or “Reject”. Tick the box beside individual users to
allow or forbid them to connect to your router.
JCG AC860 1900M DUAL BAND GIGABIT ROUTER
17 / 78
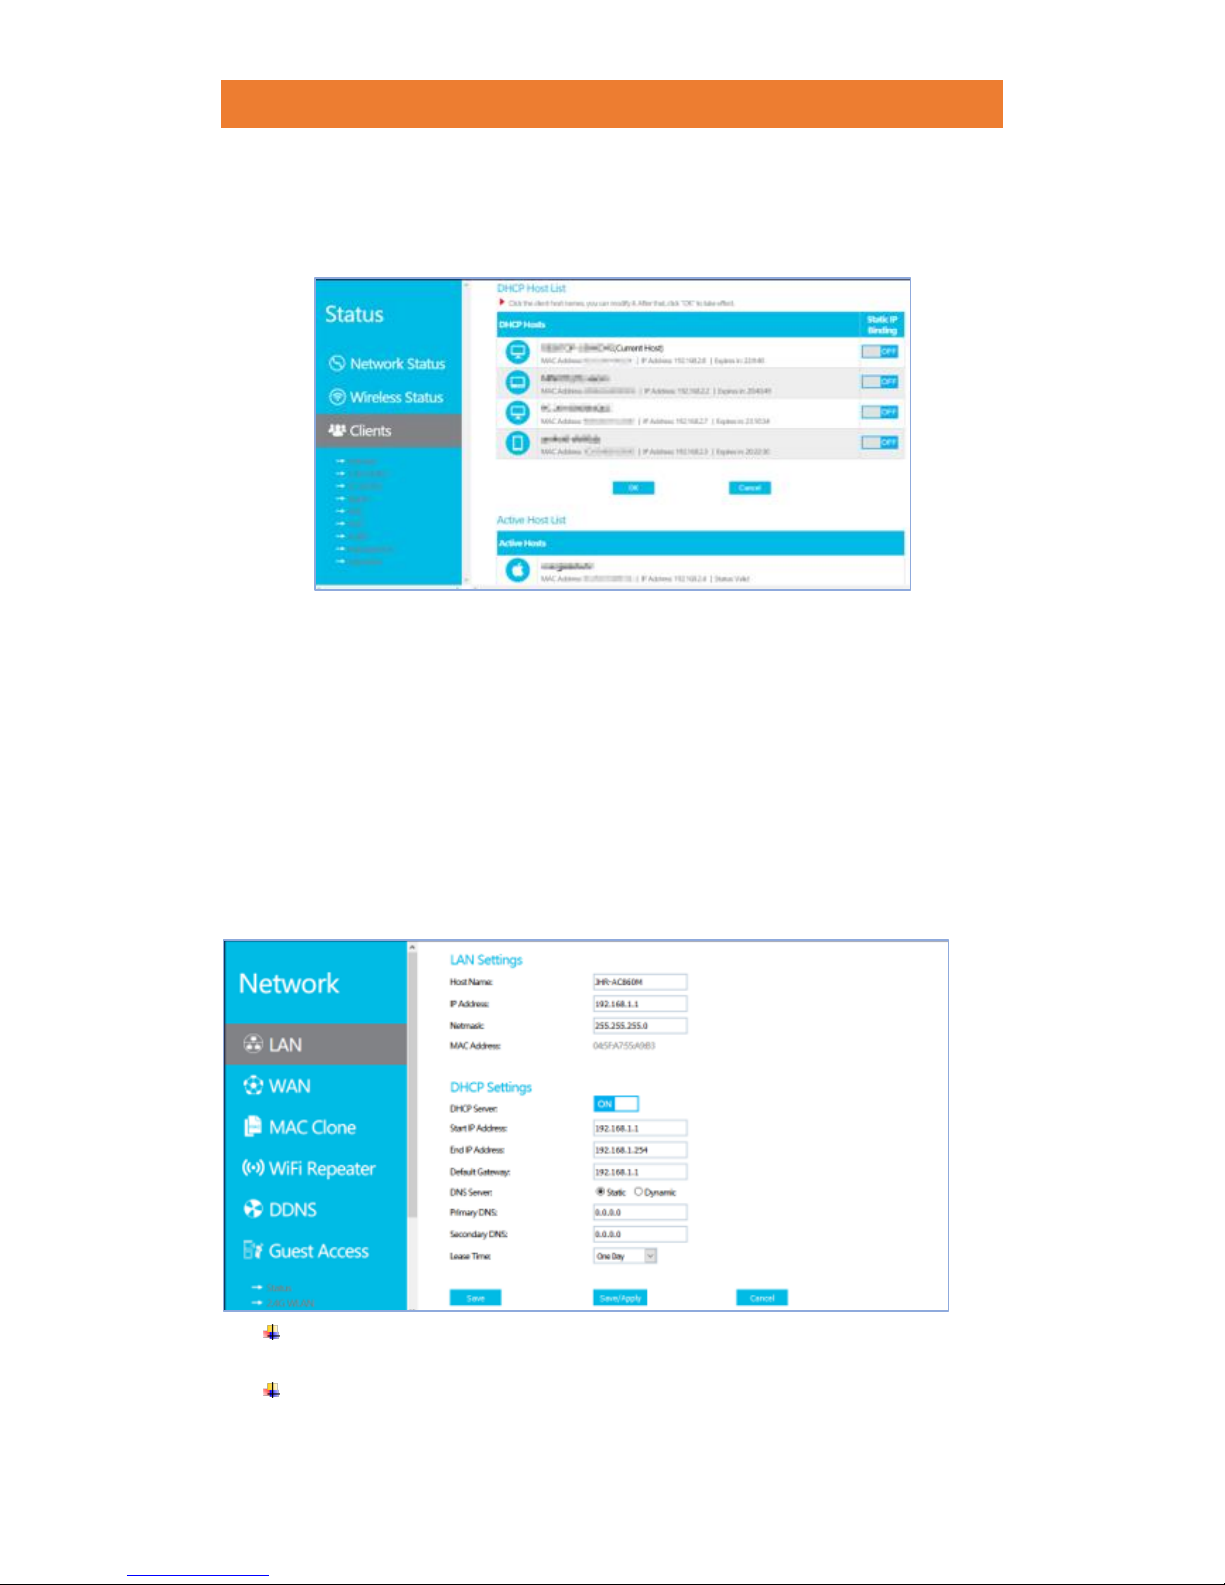
5.3 Clients
Have a glance of your DHCP host list and Active Host List. Enable “Static IP Binding” to
assign an IP address for a certain user.
Chapter 6 Network
Choose menu “Network”, and you can view or edit the network information, working mode
and guess access for your router.
6.1 LAN
Choose menu “Network→LAN” to configure the IP parameters of the LAN.
Host Name- Enter a name for the router. This is used by some who get an IP
address automatically from their ISP. For most users, this is not required.
IP Address- Enter the router's IP address, factory default: 192.168.1.1
(If you
change the IP Address of LAN, you must use the new IP Address to log in the

JCG AC860 1900M DUAL BAND GIGABIT ROUTER
18 / 78
router.)
Netmask- An address code that determines the size of the network. Normally
use 255.255.255.0 as default settings. For novice users, it is not recommended to
modify this setting.
MAC Address- The physical address of the router, as seen from the LAN. The
value can't be changed.
DHCP Server- Enable the DHCP server if you want the router to automatically
set the IP address for each computer. Select “Off” to manually assign an IP
address to each computer connected to the router.
Start IP Address- Enter the IP address to start assigning an IP address via DHCP,
factory default: 192.168.1.1.
End IP Address- Enter the IP address to end assigning an IP address via DHCP.
(The range of IP address assigned in your network must be within the range of
192.168.1.1 ~ 192.168.1.254.)
Default Gateway (Optional)- It is suggested to input the IP address of the
Ethernet port of the router. The default value is 192.168.1.1.
DNS Server (Optional)- Choose “Static” if you have the DNS IP address
provided by your ISP. This feature is set to “Dynamic” by default to enable these
entries to be automatically filled.
Primary DNS (Optional)- Input the DNS IP address provided by your ISP or
consult your ISP.
Secondary DNS (Optional)- Input the IP address of another DNS server if your ISP
provides two DNS servers.
Lease Time- Set the amount of time a network user will be allowed connection to
the router with their current dynamic IP Address. After the time is up, the user will
be automatically assigned a new dynamic IP address. The options of the time
range are 0.5 hour, 1 hour, 6 hours, 12 hours, 1 day, 1 week. The default value is 1
day.
6.2 WAN
Choose menu “Network→WAN” to configure the IP parameters of the WAN.
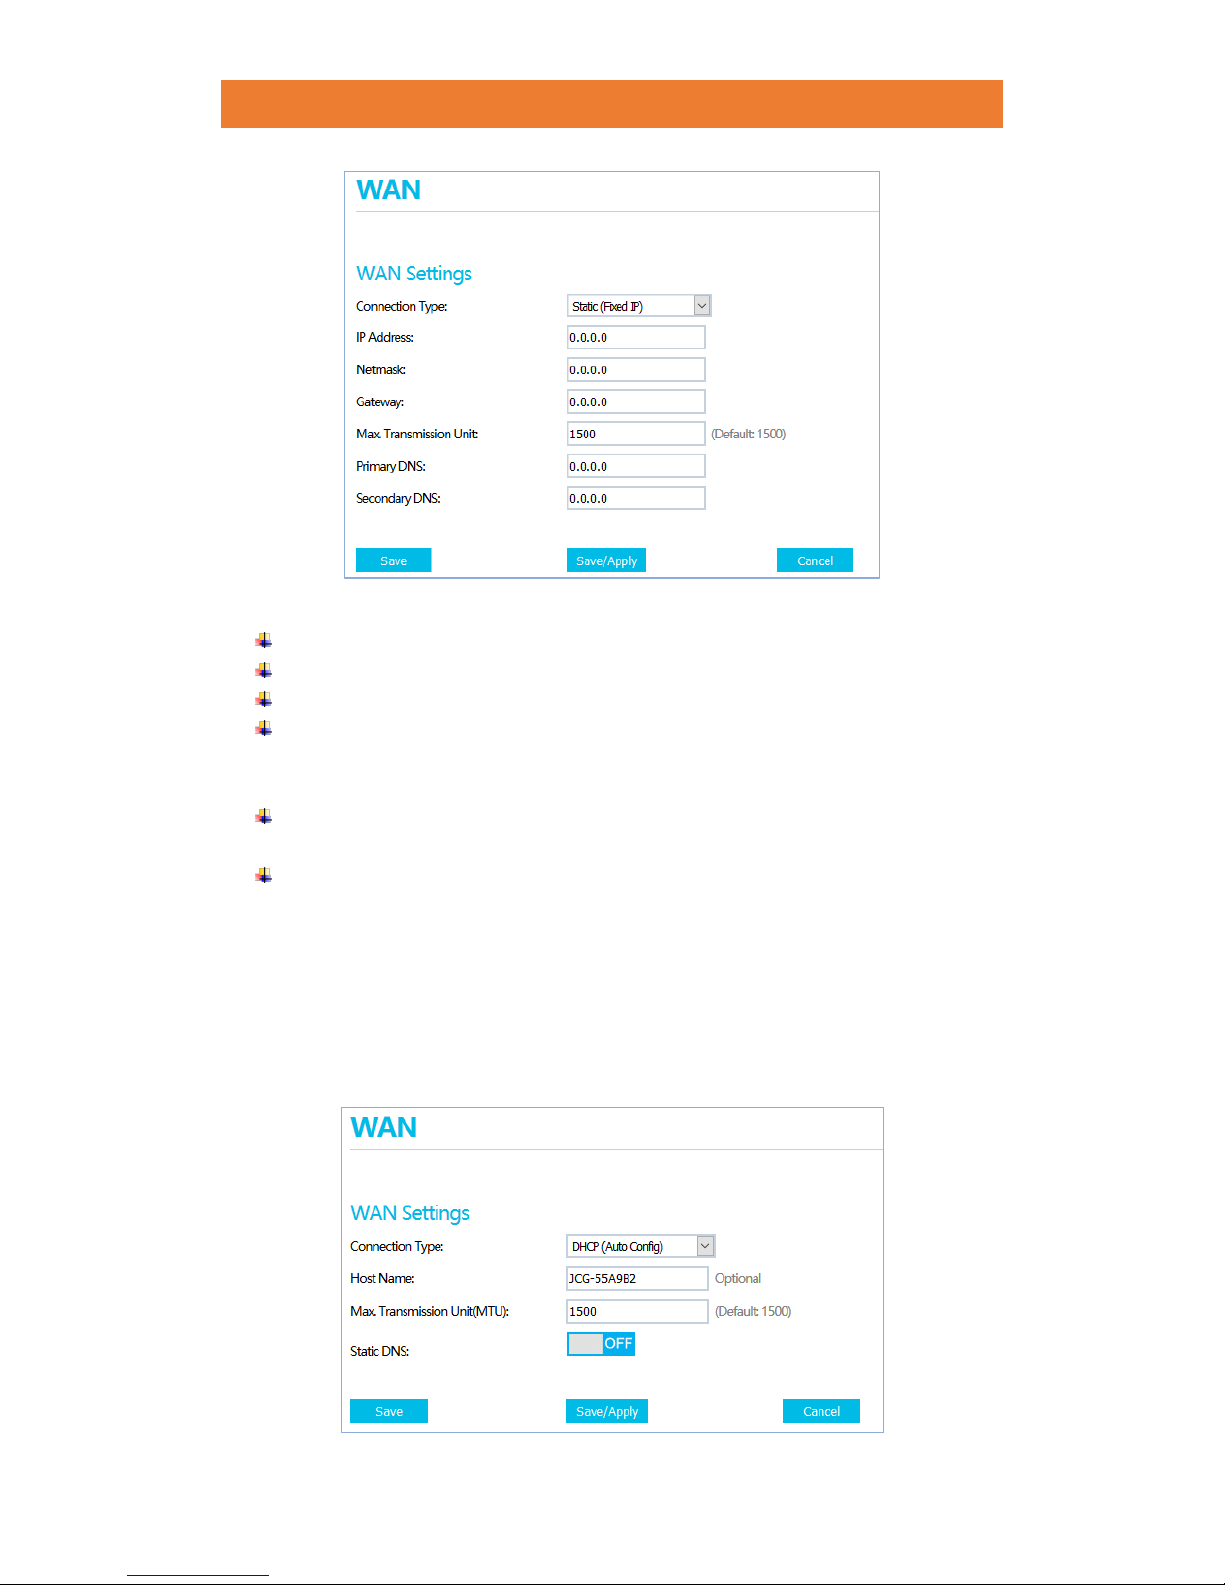
6.2.1 Static (Fixed IP)
If your ISP provides a static or fixed IP Address, Subnet Mask, Gateway and DNS setting,
select Static IP (Fixed IP).
JCG AC860 1900M DUAL BAND GIGABIT ROUTER
19 / 78
IP Address- Enter the IP address provided by your ISP.
Netmask- Enter the netmask provided by your ISP, usually is 255.255.255.0.
Gateway- Enter the gateway IP address provided by your ISP.
Max. Transmission Unit- The normal value for most Ethernet networks is 1500
Bytes. It is not recommended that you change the default MTU Size unless required
by your ISP.
Primary DNS (Optional)- Input the DNS IP address provided by your ISP or
consult your ISP.
Secondary DNS (Optional)- Input the IP address of another DNS server if your ISP
provides two DNS servers.
Click the “Save/Apply” button to save and apply your settings.
6.2.2 Dynamic IP (Auto Config)
If your ISP provides the DHCP service, please choose Dynamic IP (Auto Config) type,
and the router will automatically get IP parameters from your ISP.
JCG AC860 1900M DUAL BAND GIGABIT ROUTER
20 / 78
Host Name- Enter a host name for your router. Some ISPs may require this
information. This allows some users who get IP address automatically from their ISP.
For most users, this is not required.
Max. Transmission Unit- The normal value for most Ethernet networks is 1500
Bytes. It is not recommended that you change the default MTU Size unless required
by your ISP.
Static DNS- If your ISP gives you one or two DNS addresses, enable “Static DNS”
and enter the primary and secondary addresses into the correct fields. Otherwise,
disable the feature and the DNS servers will be assigned dynamically from your ISP.
Click the “Save/Apply” button to save and apply your settings.
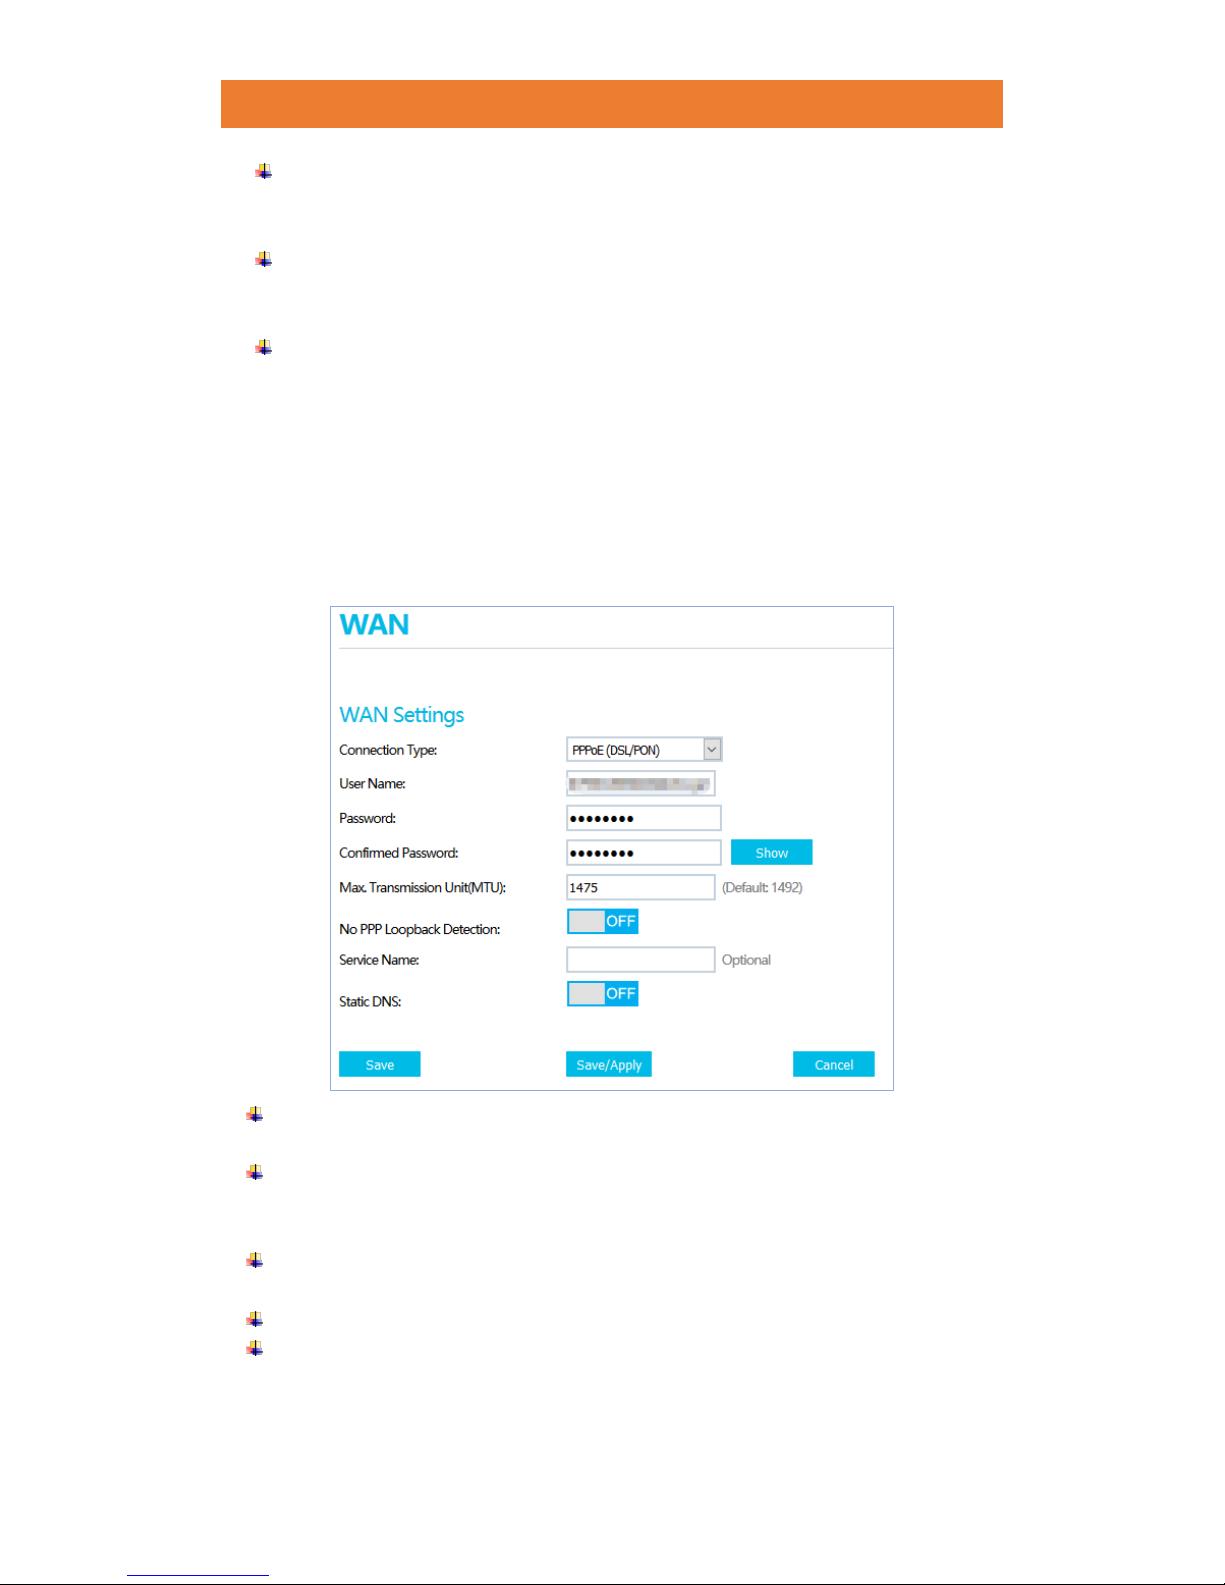
6.2.3 PPPoE (DSL, PON)
If your ISP provides a PPPoE connection, select PPPoE (DSL, PON) option.
User Name/Password/Confirmed Password- Enter the User Name and Password
provided by your ISP. These fields are case-sensitive.
Max. Transmission Unit- The normal value for most Ethernet networks is 1492 Bytes.
It is not recommended that you change the default MTU Size unless required by
your ISP.
No PPP Loopback Detection- With loopback detection feature enabled, the router
can detect loops using loopback detection packets.
Service Name (Optional)- Enter the Service Name provided by your ISP.
Static DNS- If your ISP gives you one or two DNS addresses, enable “Static DNS”
and enter the primary and secondary addresses into the correct fields. Otherwise,
disable the feature and the DNS servers will be assigned dynamically from your ISP.
JCG AC860 1900M DUAL BAND GIGABIT ROUTER
21 / 78
Click the “Save/Apply” button to save and apply your settings.
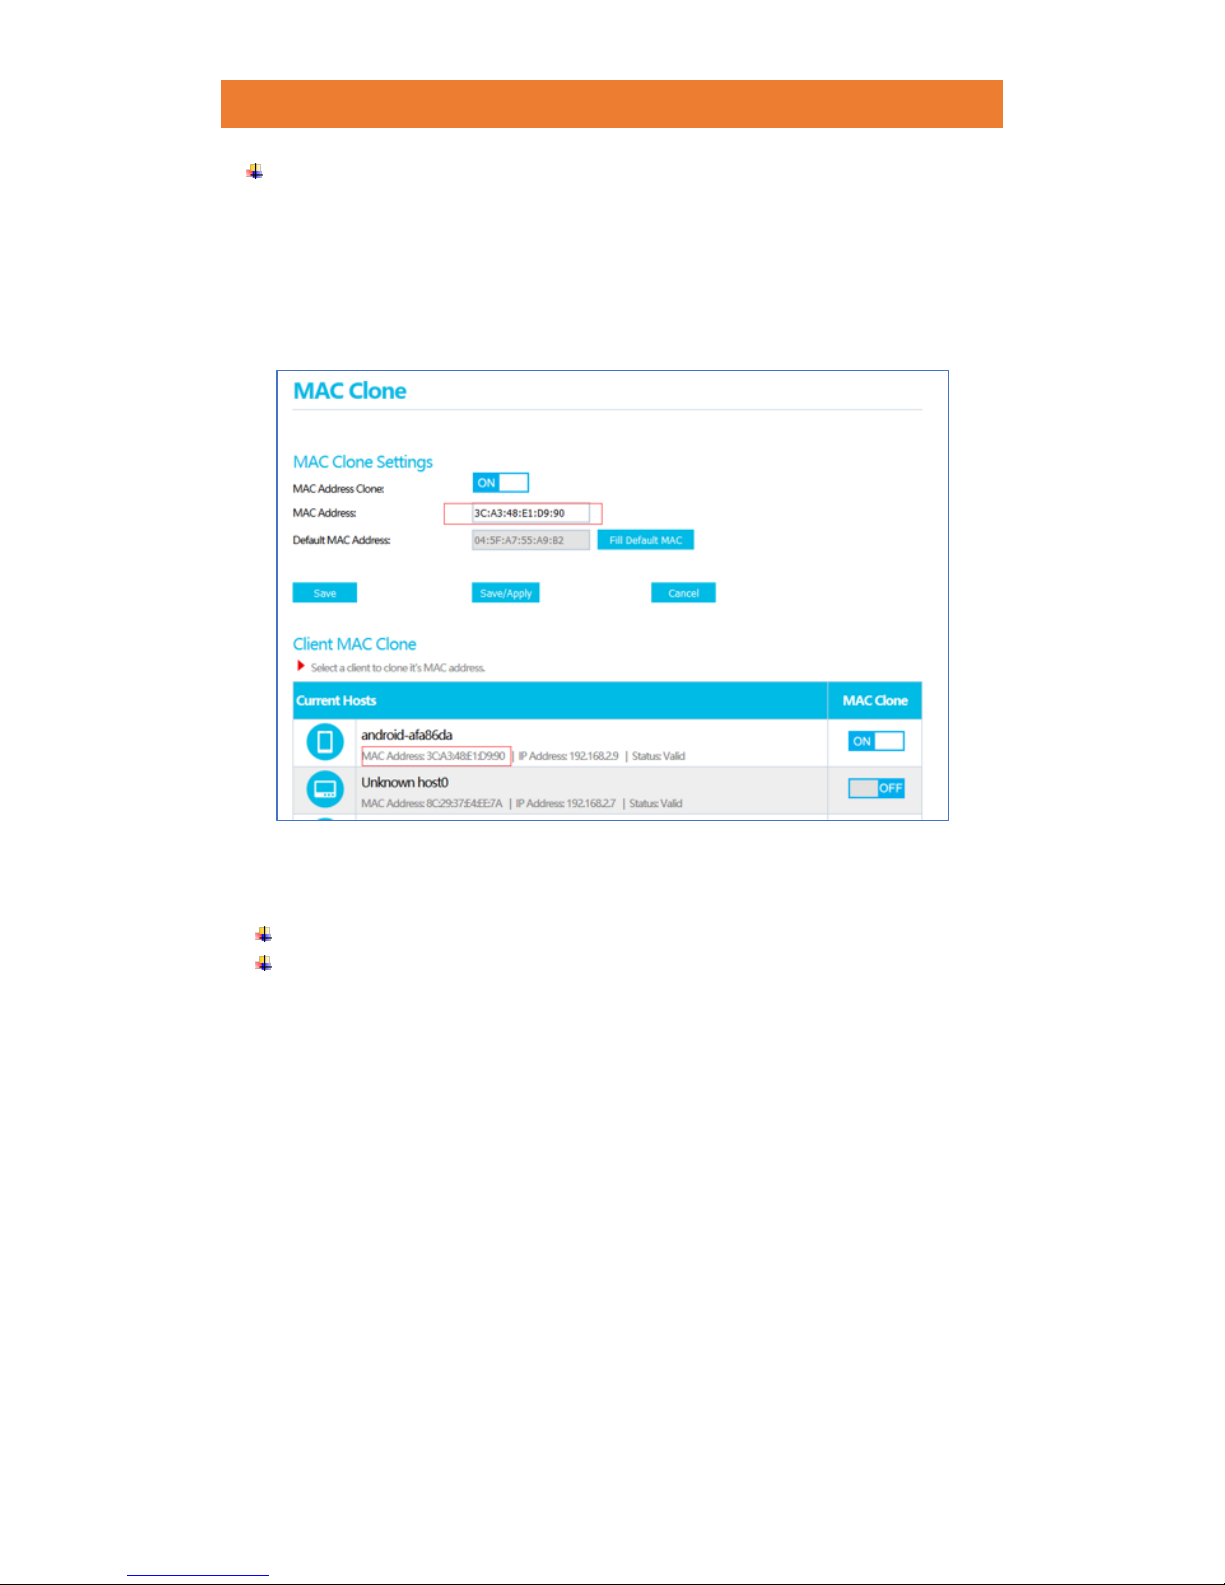
6.3 MAC Clone
Choose menu “Network→MAC Clone”, enable “MAC Clone Settings” to configure the
MAC address of the WAN.
Some ISPs require that you register the MAC Address of your adapter. Changes are rarely
needed here.
(Only the PC on your LAN can use the MAC Address Clone function.)
MAC Address- This field displays the current MAC address of the selected client.
Default MAC Address- This field displays the MAC address of the PC that is
managing the router. Click the “Fill Default MAC” button and this MAC address
will fill in the MAC Address field.
Click the “Save/Apply” button to save and apply your settings.
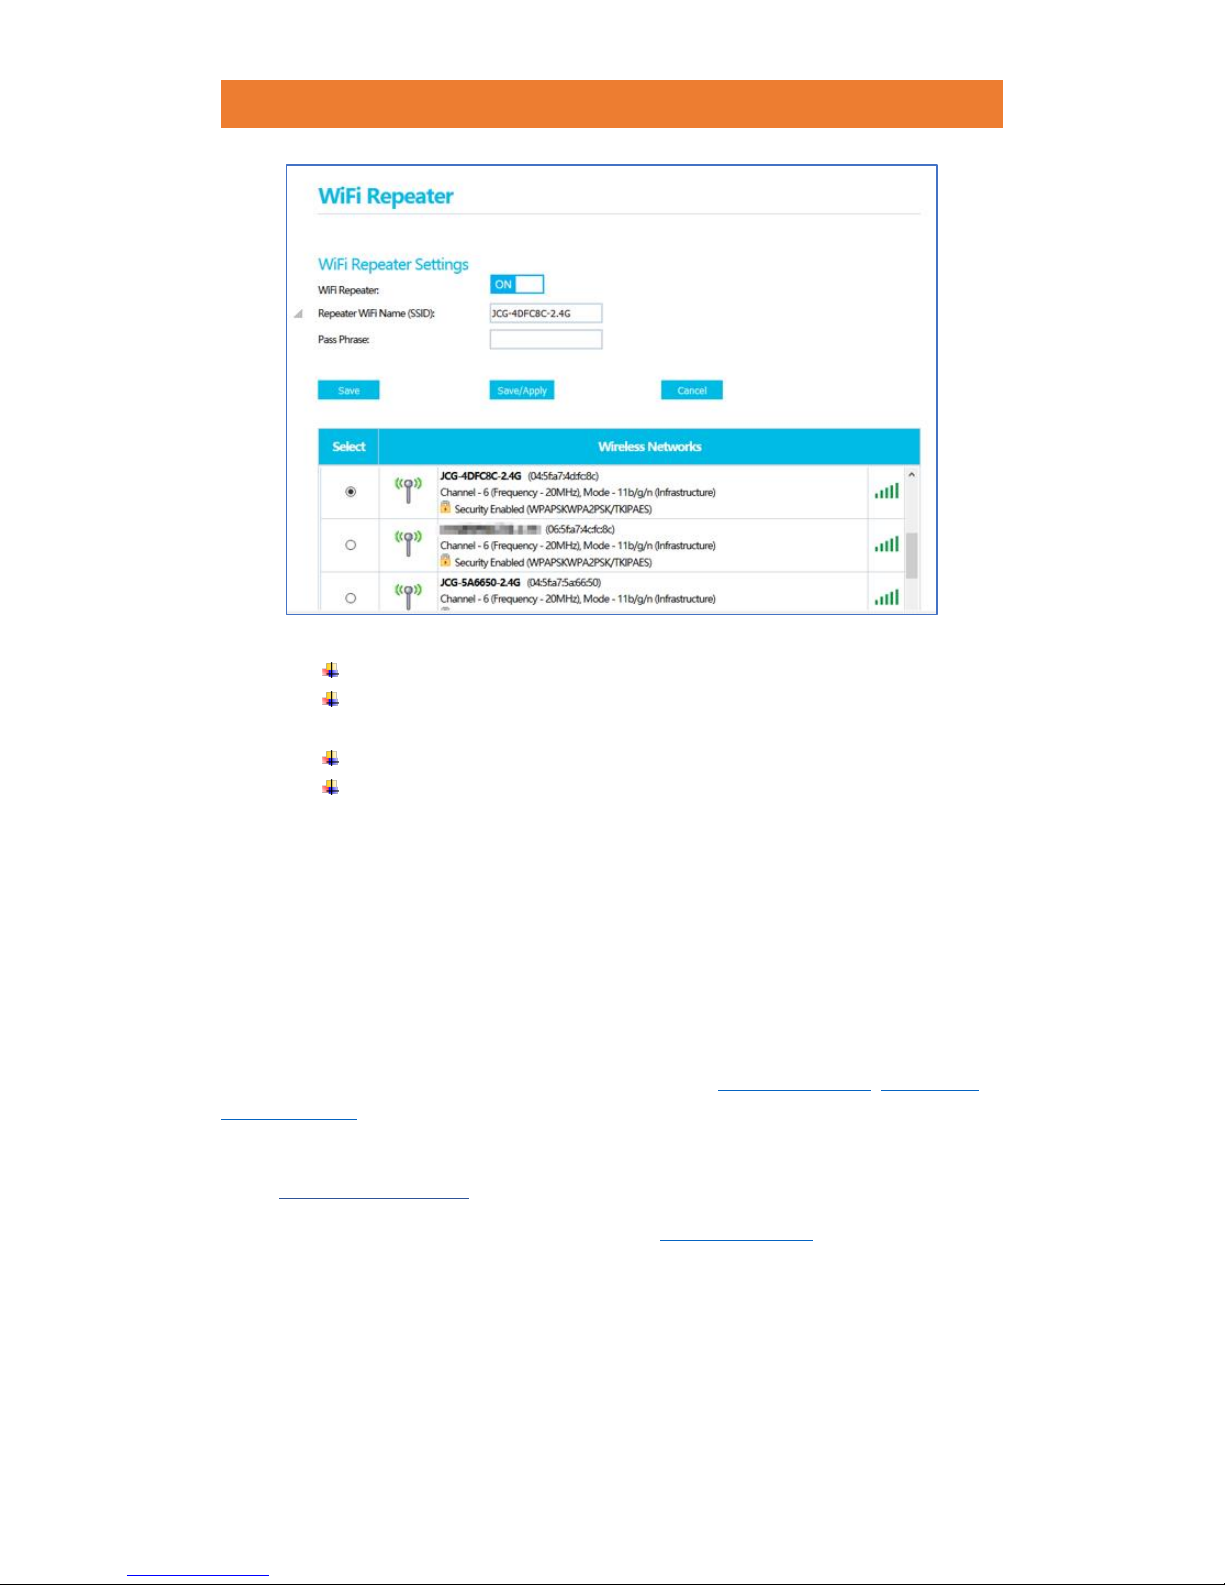
6.4 WiFi Repeater
Choose menu “Network→WiFi Repeater”, enable “MAC Clone Settings” to configure the
MAC address of the WAN.
(Please select networks that have at least 2 signal bars for better
performance.)
JCG AC860 1900M DUAL BAND GIGABIT ROUTER
22 / 78
WiFi Repeater- Enable this feature to use your router as a range extender.
Repeater WiFi Name (SSID)- Name of the selected existing wireless
network.
Pass Phrase-Enter password for the selected existing wireless network.
Click the “Save/Apply” button to save and apply your settings.
6.5 DDNS
Choose menu “Network→DDNS” to configure the Dynamic DNS function.
The router offers the DDNS (Dynamic Domain Name System) feature, which allows the
hosting of a website, FTP server, or e-mail server with a fixed domain name (named by
yourself) and a dynamic IP address, and then your friends can connect to your server by
entering your domain name no matter what your IP address is. Before using this feature,
you need to sign up for DDNS service providers such as freedns.afraid.org, dyndns.org or
www.no-ip.com . The Dynamic DNS client service provider will give you a password or key.
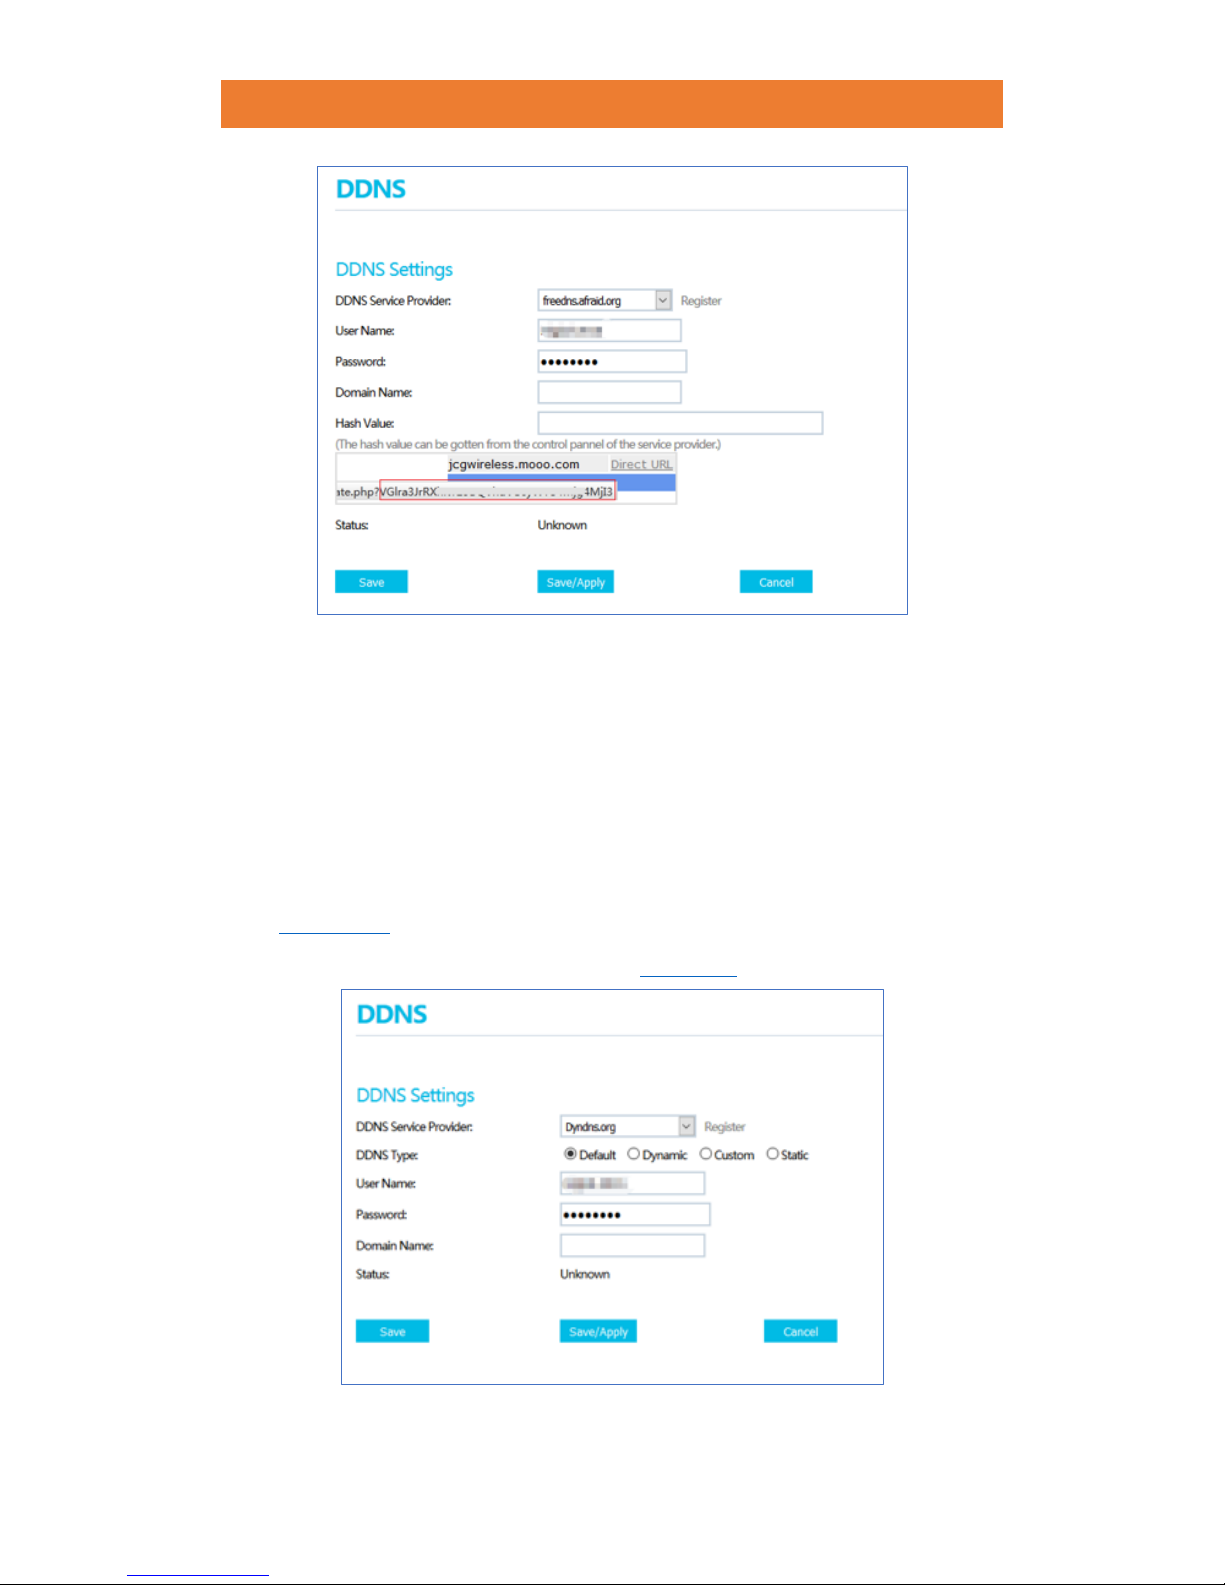
6.5.1 freedns.afraid.org DDNS
If the dynamic DNS Service Provider you select is freedns.afraid.org, the page will appear
as follow:
JCG AC860 1900M DUAL BAND GIGABIT ROUTER
23 / 78
To set up for DDNS, follow the instructions below:
1. Enter the User Name for your DDNS account.
2. Enter the Password for your DDNS account.
3. Enter the Domain Name you received from dynamic DNS service provider.
4. Enter the Hash Value that can be found from the control panel of dynamic DNS
service provider.
5. Click the “Save/Apply” button to save and apply your settings.
6.5.2 dyndns.org DDNS
If the dynamic DNS Service Provider you select is dyndns.org, the page will appear as follow:
JCG AC860 1900M DUAL BAND GIGABIT ROUTER
24 / 78
To set up for DDNS, follow the instructions below:
1. Select DDNS Type, please contact your service provider if you are not sure about
which type your DDNS is.
2. Enter the User Name for your DDNS account.
3. Enter the Password for your DDNS account.
4. Enter the Domain Name you received from dynamic DNS service provider.
5. Click the “Save/Apply” button to save and apply your settings.
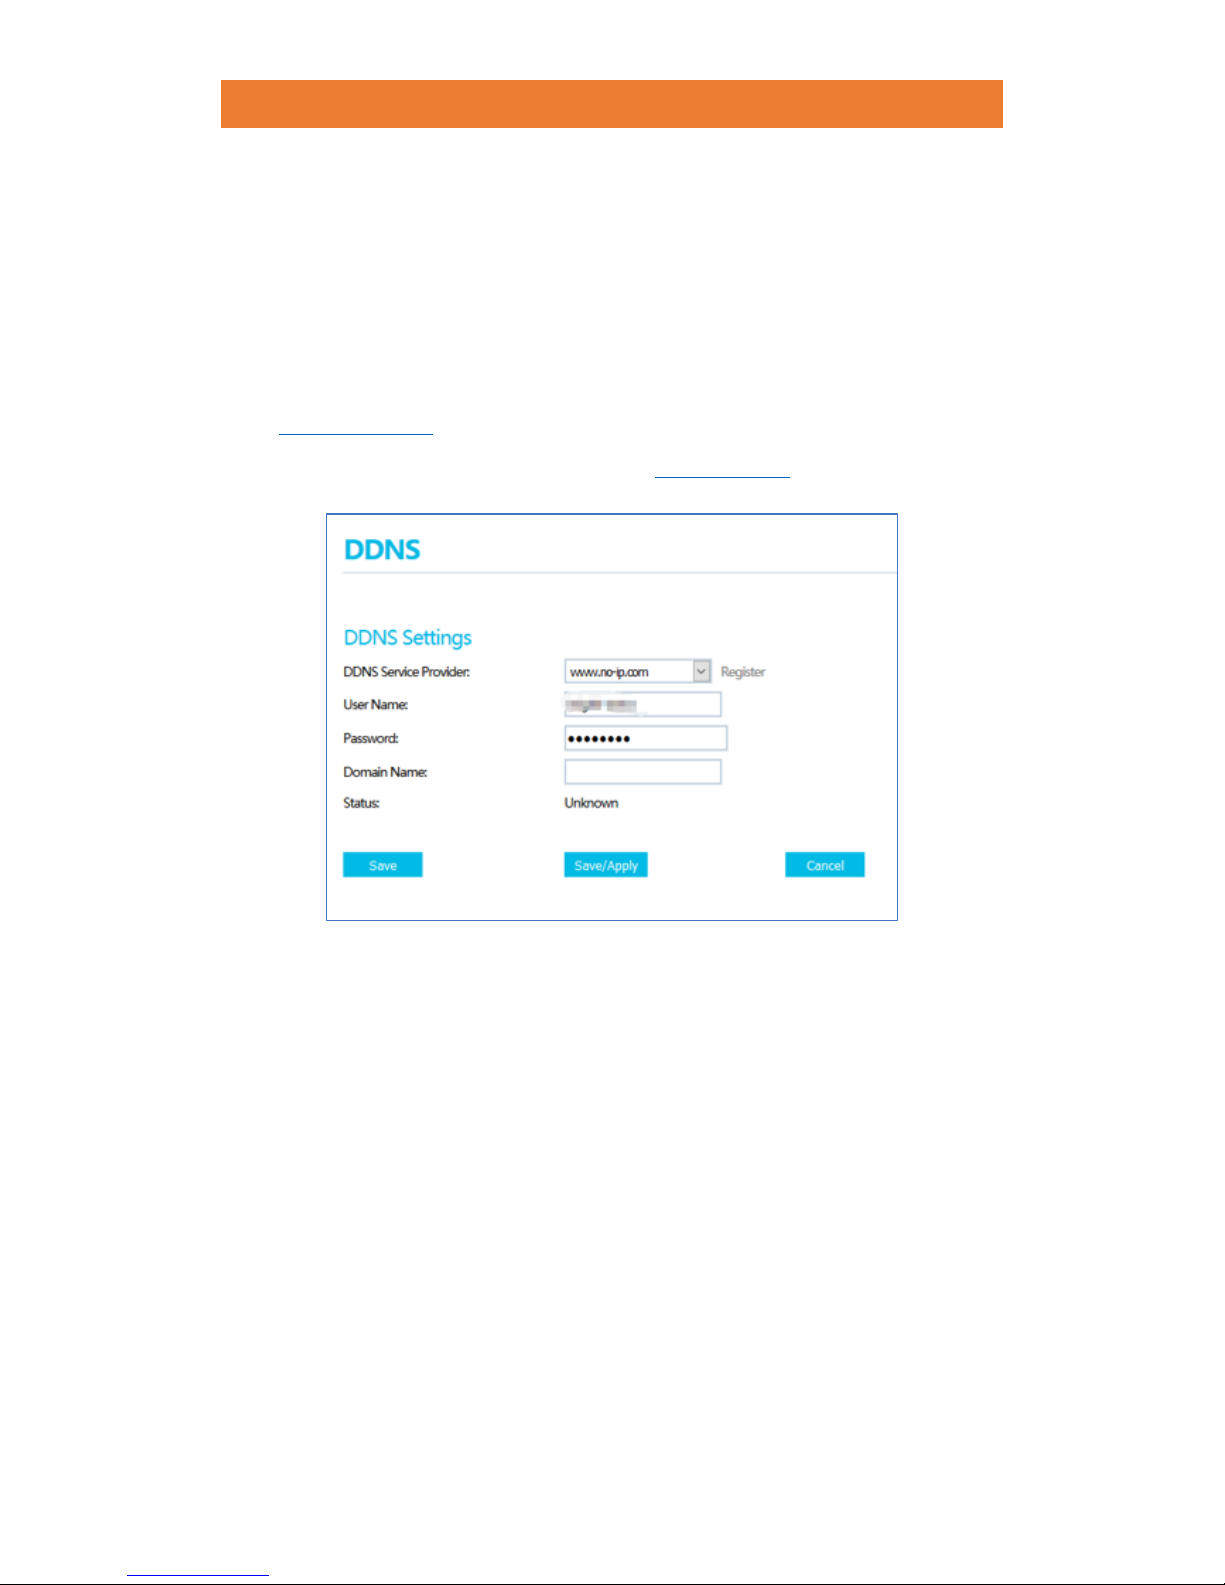
6.5.3 www.no-ip.com DDNS
If the dynamic DNS Service Provider you select is www.no-ip.com, the page will appear as
follow:
To set up for DDNS, follow the instructions below:
1. Enter the User Name for your DDNS account.
2. Enter the Password for your DDNS account.
3. Enter the Domain Name you received from dynamic DNS service provider.
4. Click the “Save/Apply” button to save and apply your settings.
6.6 Guest Access
Choose menu “Network→Guest Access” to configure a wireless network for the guest,
including 2.4GHz and 5GHz.
 Loading...