

Page 1
WWW.BEGLEC.COM
Operation Manual
Mode d'emploi
Gebruiksaanwijzing
Bedienungsanleitung
Manual de instrucciones
EN
FR
NL
DU
ES
Reproduction or publication of the content in any manner, without express permission of the publisher, is prohibited.
Copyright © 2006-2007 by BEGLEC cva.
Version: 1.4
Page 2
EN - DISPOSAL OF THE DEVICE
Dispose of the unit and used batteries in an environment friendly manner
according to your country regulations.
FR - DÉCLASSER L’APPAREIL
Débarrassez-vous de l’appareil et des piles usagées de manière écologique
Conformément aux dispositions légales de votre pays.
NL - VERWIJDEREN VAN HET APPARAAT
Verwijder het toestel en de gebruikte batterijen op een milieuvriendelijke
manier conform de in uw land geldende voorschriften.
DU - ENTSORGUNG DES GERÄTS
Entsorgen Sie das Gerät und die Batterien auf umweltfreundliche Art und
Weise gemäß den Vorschriften Ihres Landes.
ES - DESHACERSE DEL APARATO
Reciclar el aparato y pilas usadas de forma ecologica conforme a las
disposiciones legales de su pais.
PT - COMO DESFAZER-SE DA UNIDADE
Tente reciclar a unidade e as pilhas usadas respeitando o ambiente e em
conformidade com as normas vigentes no seu país.
Page 3
ENGLISH OPERATION MANUAL
Thank you for buying this JB Systems®product. To take full advantage of all possibilities and for your own
safety, pleaseread these operating instructions very carefully beforeyou start using this unit.
FEATURES
This unit is radio-interference suppressed. This product meets the requirementsofthe current European and
nationalguidelines.Conformityhas been established and the relevantstatements and documents have been
depositedby the manufacturer.
Thisdevice hasbeen designed to produce decorativeeffect lighting and is used in light show systems.
Stylish RGB LED-projectorcontaining91 high-power LEDs:
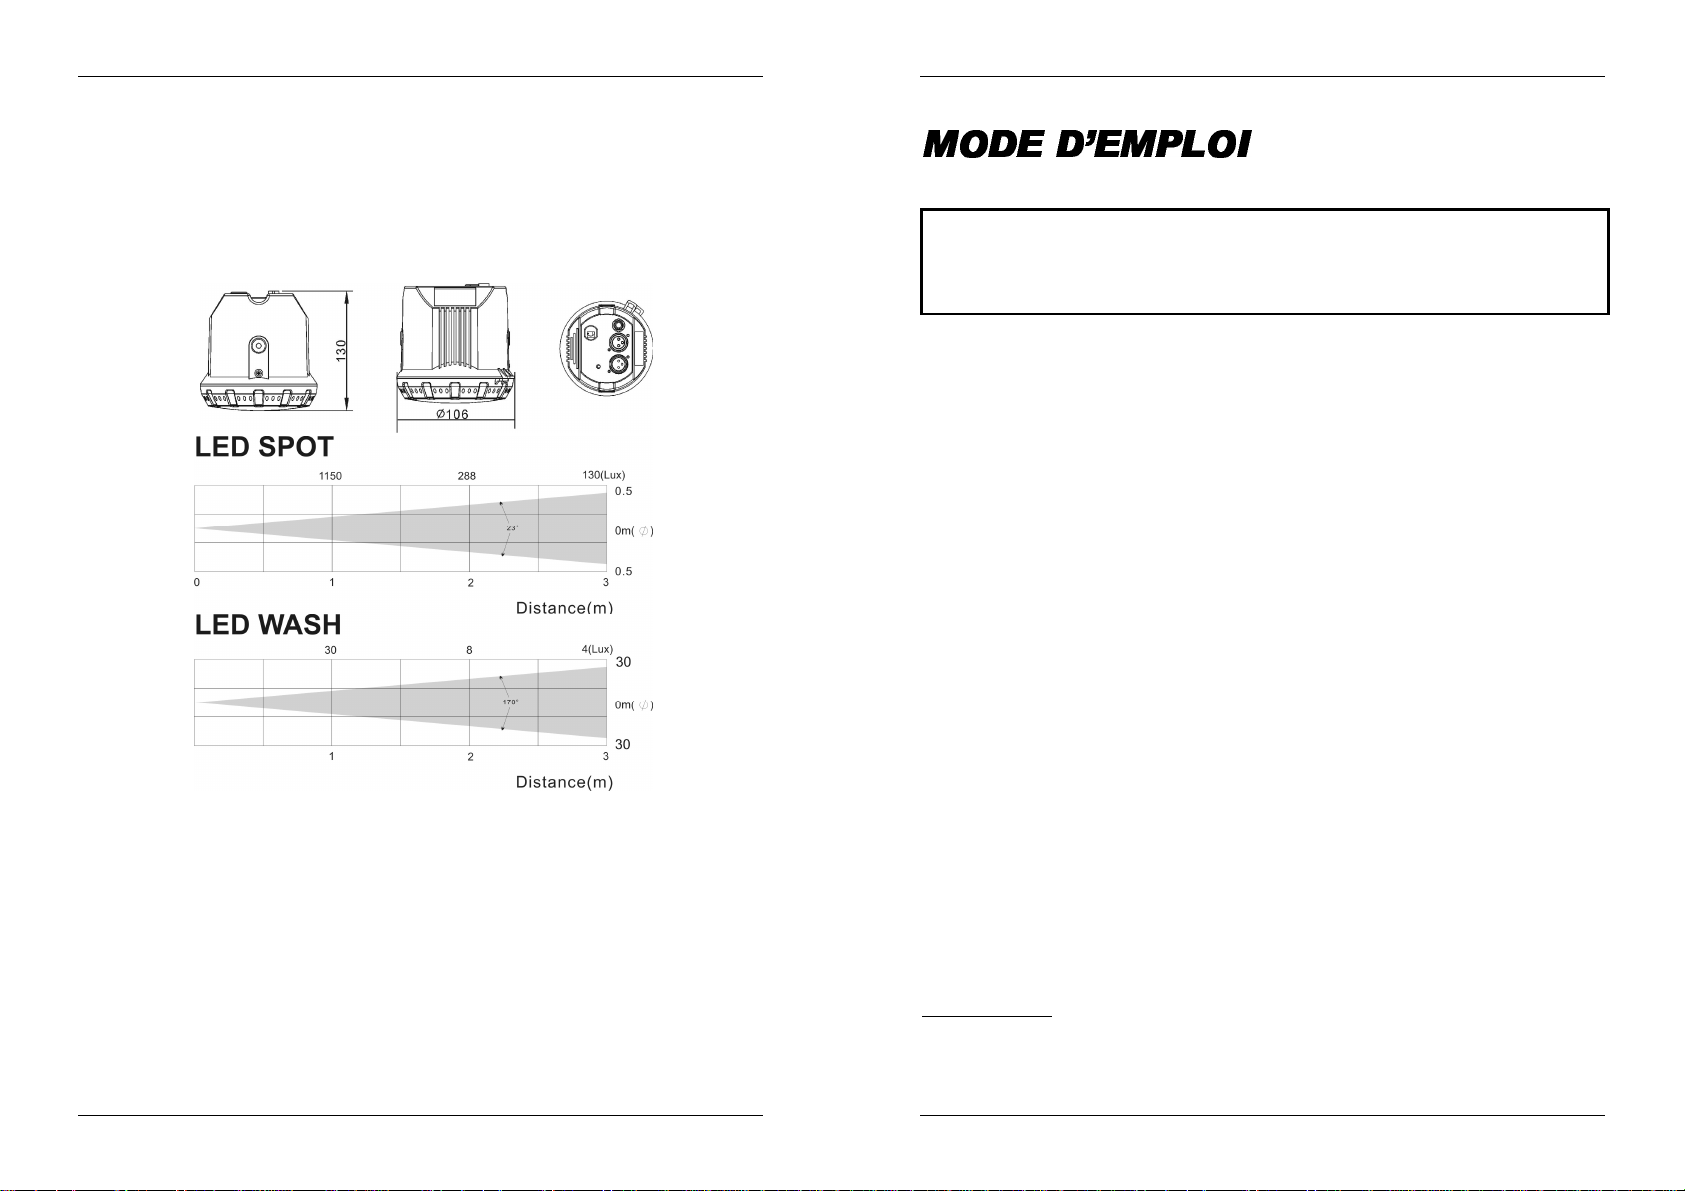
LED-SPOT : Beam angle= 15°
LED-WASH: Beam angle = 40°
Many applications possible:Discotheques, DJs, exhibition booths,homes, ...
Very smoothRGB colorchanges thanks to high freq. dimming electronics
Different working modes:
Completely standalone: automatic or beat synchronized color changes (optional CA-8 controller
possible)
Master/slave mode: up to 16 units can be used together for wonderful preprogrammed, music
synchronizedlightshows.(optionalCA-8 controllerpossible)
DMX-controlled (4channels: R, G, B + Dimmer/strobe) byany standard DMX-controller.
Used with LEDCON 01 remotecontrol
Innovative and extremely quick DMXaddressing:
Very easyDMX addressing ofindividualunits using any standard DMX-controller
Extremely fast DMX addressing ofseveral unitsat once (automaticaddress calculation)
Can be fixedto any surface, can also be fixed in ALU-truss using a standard clamp.
Long-lifeLED technology: >50.000 hours!
BEFORE USE
Before you start using this unit, pleasecheck if there’s no transportation damage. Should there be any, do
not usethe device and consult your dealerfirst.
Important:
for the user to strictly follow the safety instructionsand warnings in this user manual. Any damage caused
by mishandling is not subject to warranty. The dealer will not accept responsibility for any resulting defects
orproblems caused bydisregarding this user manual.
Keep this booklet in a safe place for future consultation. If you sell the fixture, be sure to add this user
manual.
Check the contents:
Check that the cartoncontains the following items:
Operatinginstructions
LED Projector (spot or wash type)
Hangingbracket
2 Knobs to fasten the hanging bracket
Base plate with nut
This device left our factory in perfect condition and well packaged. It is absolutely necessary
SAFETY INSTRUCTIONS:
CAUT ION
The lightning flash with arrowhead symbol within the equilateral triangle is intended to alert the use
or the presence of un-insulated “dangerous voltage” within the product’s enclosure that may be of
sufficient magnitude to constitute a risk of electric shock.
CAUTION: To reduce the risk of electric shock, do not remove the top cover.
No user-serviceable parts inside. Refer servicing to qualified service
personnelonly.
ENGLISH OPERATION MANUAL
The exclamation point within the equilateral triangle is intended to alert the user to the presence of
important operation and maintenance (servicing) instructions in the literature accompanying this
appliance.
This symbol means:indoor use only.
This symbol means: Readinstructions.
To protect the environment, pleasetry to recycle the packing materialas much as possible.
To preventfire orshock hazard, do not expose this appliance to rain or moisture.
To avoid condensation to be formed inside, allow the unit to adapt to the surrounding temperatures when
bringing it into a warm room after transport. Condense sometimes prevents the unit from working at full
performance or may even cause damages.
This unitis for indoor use only.
Don’t place metalobjects or spill liquid inside the unit. Electric shock or malfunction may result. If a foreign
object entersthe unit, immediately disconnect themains power.
Prevent use in dusty environmentsand clean the unitregularly.
Keep the unit away from children.
Inexperiencedpersons should not operatethis device.
Maximum save ambient temperatureis 40°C. Don’t use this unit at higher ambient temperatures.
Make sure the area below the installation place is free from unwanted persons during rigging, de-rigging
andservicing.
Always unplug the unitwhen it is not used for a longer timeor during servicing.
The electricalinstallation should be carried out by qualified personal only, according to the regulations for
electricaland mechanical safetyin your country.
Check that the available voltageis not higher than the one statedon the rear panel of the unit.
The power cord should always be in perfect condition: switch the unit immediately off when the power cord
is squashed or damaged.
Neverlet the power-cord come into contact with other cables!
This fixturemust be earthed toin order comply with safety regulations.
Don’t connect the unit to any dimmerpack.
Always use an appropriate and certified safety cable when installing the unit.
In order to prevent electric shock, do not open the cover. Apart from the mains fuse there are no user
serviceableparts inside.
Never
repair a fuse or bypass the fuse holder.
type and electricalspecifications!
In the event of serious operating problems, stop using the fixture and contactyour dealer immediately.
The housing and the lenses must be replacedif theyare visibly damaged.
Pleaseuse the originalpacking when the device is to be transported.
Due to safety reasonsit is prohibitedto make unauthorizedmodifications to the unit.
Important:
from epilepsy.
Never look directlyinto the light source! Don’t use the effectin the presence of persons suffering
Always
replace a damaged fuse with a fuse of the same
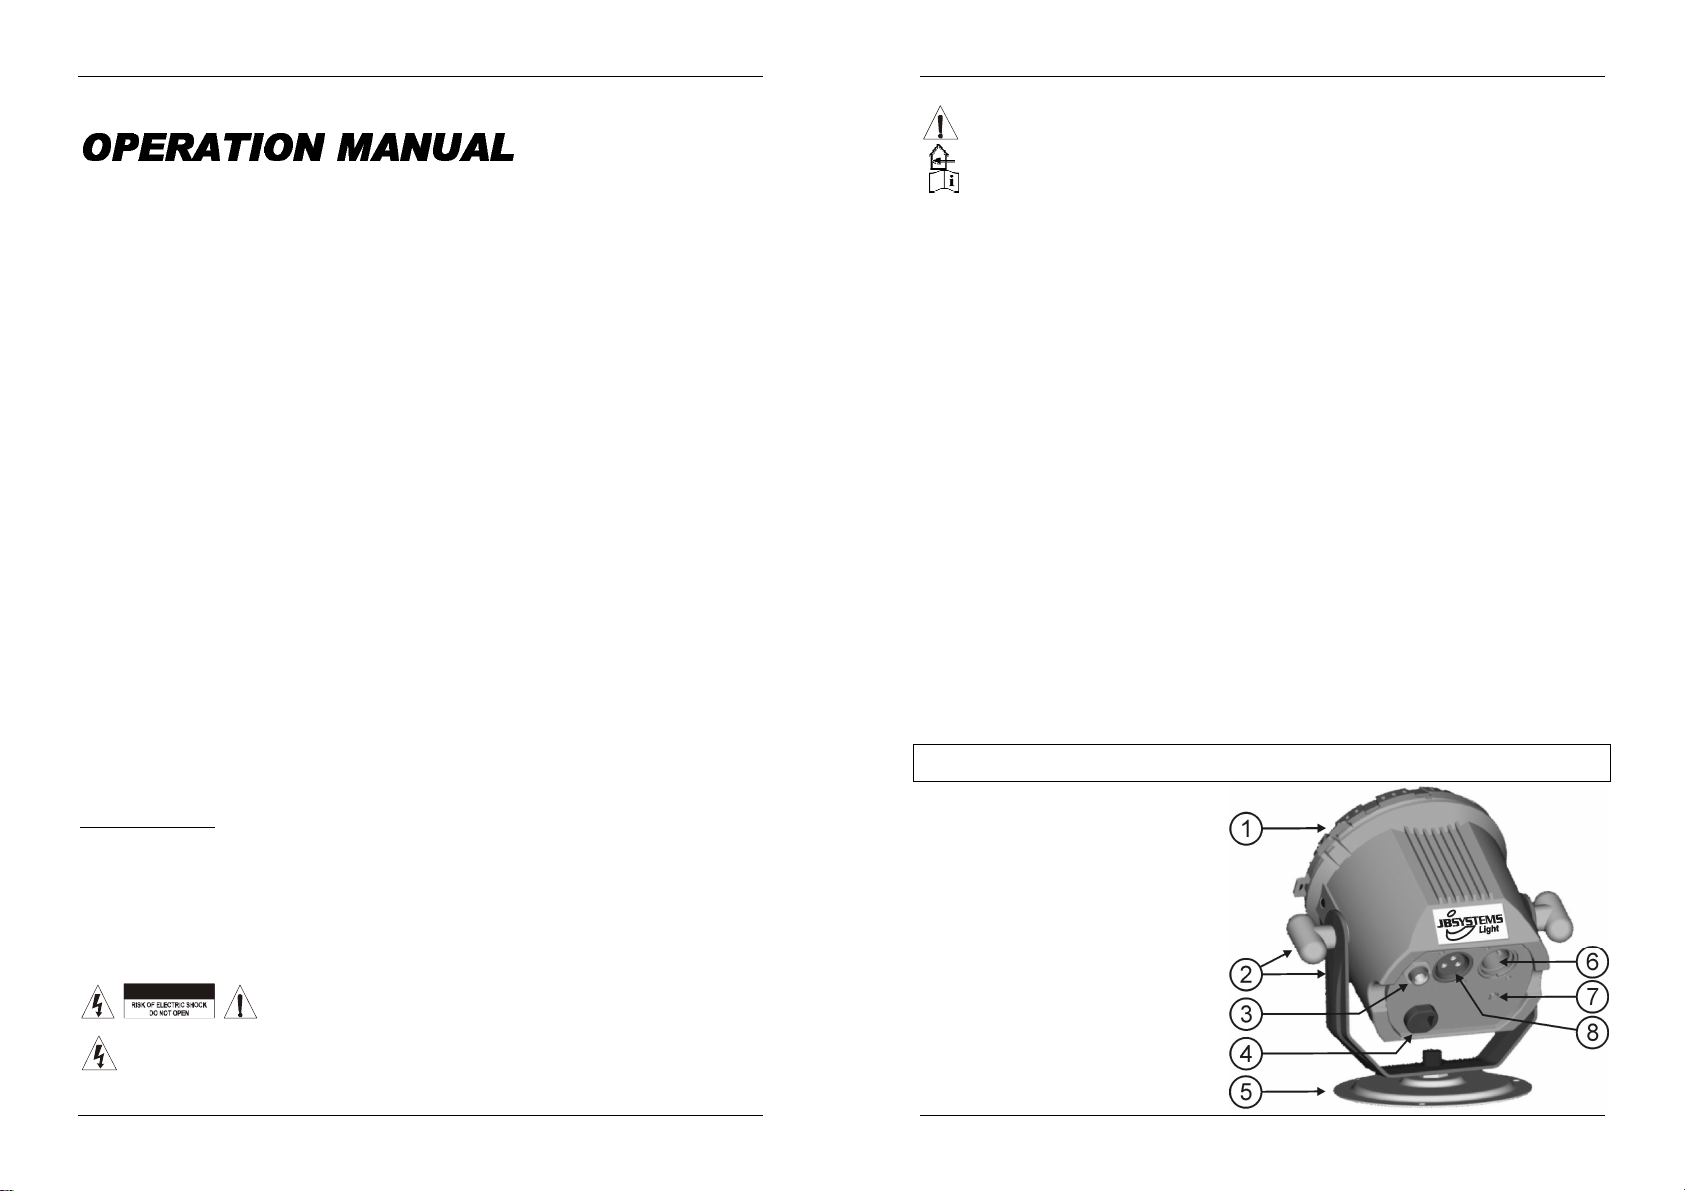
DESCRIPTION:
1. Plastic coverto protectthe LEDs
2. Hanging bracketwith knobs onboth sides
to fastenthe unit and a mounting hole to
fix amounting hook.
3. ¼” jack used to connect the optional CA-8
controller
4. Mainscable
5. Base plate
6. DMX-inputconnector
7. “AutoDMX-address”button
8. DMX-outputconnector
JB SYSTEMS
®
1/36 LED SPOT – LED WASH
JB SYSTEMS
®
2/36 LED SPOT – LED WASH
Page 4

ENGLISH OPERATION MANUAL
ENGLISH OPERATION MANUAL
ELECTRICAL INSTALLATION + ADDRESSING
Important: The electrical installation should be carried out by qualified personal only,
according to the regulations for electrical and mechanical safety in your country.
Electrical installationfor 1 standalone unit:
Just insert themains cable. The unit starts working immediately in stand-alone mode
Remark: You can connect a CA-8 remote controller to the unit if you want to have more control. Refer to
section “C”to learn how to do this.
Electrical installationfor twoor more unitsin master/slave:
Connect 2 to maximum 16 units together using good quality balanced microphone cables (like for
example JB Systems ref. 7-0063). The unit that has no cable connected to its DMX-input will react as
“master”,the others are the slaveunits.
Make sure that all units are connected to the mains.
Done!
Remark: You can connect a CA-8 remote controller to the master unit if you want to have more control
over the master/slave operation. You can also connect the LEDCON 01 remote controller, in this case all
units willrespondequally(all units havethe samecolor)
Electrical installation for two or more units in DMX-mode:
The DMX-protocol is a widely used
high speed signal to control intelligent
light equipment. You need to “daisy
chain” your DMX controller and all the
connected units with a good quality
balanced cable (ex. JB Systems ref.
7-0063).
To prevent strange behavior of the
light effects, due to interferences, you
must use a 90Ω to 40Ω terminator at the end of the chain. Never use Y-splitter
cables, this simplywon’t work!
Make sure that all units are connected to the mains.
Each light effect in the chain needs to have its proper starting address so it knows
which commands from the controller it has to decode. In the next section you will
learn how to set the DMX addresses.
How to settheDMX addresses:
There are 2 ways to set the DMX-address ofthe units
A. Setting individual DMX-addressesperprojector:
Make sure the DMX cables of all units areconnected.
Connectthe first unit to a universalDMX controller.
Connectall units to the mainsso they are switched on.
Set all DMX-channels on your DMX-controller to zero (value 000).
Set the DMX-channel, that you want to assign as DMX-start
address on you projector,tot maximum(value 255)
Press the “Auto DMX address” button(7) on the projector shortly.
If you want to set another projector to the same DMX-start
address,simplypress it’s “AutoDMX address” button(7) and it will
receivethe same address.
Done!
An exampleto make things clear:
We will set the DMX start address of a projector to 106:
Connect the projector to the DMX-controller as described above and make sure all is switched
on.
Set all DMX-channels on the controllerto zero (000)
Now setDMX-channel 106 tomaximum (255)
Press the “Auto DMX address” button(7) on the projector shortly.
Done! Your projectornowhas DMX address 106!
B. Automatic DMX-addressing, startingfromany givenstart address:
To save a lot of time (imagine the time it takes to set the DIP switches of 16 units…) you can set the
DMX addresses of all units in the DMX-chain just by the push of a button. No need to calculate the
starting address of each individual unit, this will be done for
you!
Make sure the DMX cables of all units areconnected.
Connectthe first unit to a universalDMX controller.
Connectall units to the mainsso they are switched on.
Set all DMX-channels on your DMX-controller to zero (value
000).
Set the DMX-channel, that you want to assign as DMX-start
address on you projector,tot maximum(value 255)
Press the “Auto DMX address” button(7) on the first projector in the chain for about 5seconds.
Done! The first projector in the chain will receive the DMX-start address you chose and it will
automatically calculate and program the DMX addresses ofall the other unitsin the DMX-chain!
An exampleto make things clear:
We want to set the DMX-addresses of 16 units, the DMX start address of the first projector must
be 202:
Connect all projectors to the DMX-controller as described above and make sure all are switched
on.
Set all DMX-channels on the controllerto zero (000)
Now setDMX-channel 202 tomaximum (255)
Press the “Auto DMX address” button (7) on the first projectorin the chain forabout 5seconds.
Done! The first projector in the chain will receive DMX-start address 202 and it will
automatically calculate and program the DMX addresses of all the other units in the DMX-chain!
This means that the 2ndprojector automatically receives address 206, the 3rdhas address 210,
…, untilthe 16thprojectorwho automatically receivesstart address 262.
You justprogrammed 16 projectors,this took you about 10seconds!!!
Remark: you can mix the units with other DMX-effects that don’t have the automatic DMXaddressing option. In that case you still have to set the DMX-addresses of these DMX-effects
manually!
OVERHEAD RIGGING
Important: The installation must be carried out by qualified service personal only. Improper
installation can result in serious injuries and/or damage to property. Overhead rigging requires
extensive experience! Working load limits should be respected, certified installation materials
shouldbe used, theinstalled device shouldbe inspected regularlyfor safety.
Make sure the area below the installation place is free from unwanted persons during rigging, de-rigging
andservicing.
The deviceshould be installed out of reach of peopleand outside areas where persons may walk by or be
seated.
Before rigging make sure that the installation area can hold a minimum point load of 10times the device’s
weight.
Always use a certified safety cable that can hold 12times the weight of the device when installing the unit.
This secondary safety attachment should be installed in a way that no part of the installation can drop
more than20cm if the main attachmentfails.
Thedevice should be well fixed; a free-swinging mountingis dangerous and maynot beconsidered!
The operator has to make sure that the safety-relating and machine-technical installationsare approvedby
an expert before using them forthe first time. The installations should be inspectedevery year by a skilled
person to besure that safety is still optimal.
3 different fixing methods are possible:
Fixed to ALU truss: use anoptional truss clamp.
Fixedto wall or ceiling: use 2 adapted screws to fix the base plate (5) to a wall orceiling.
On a horizontal surface:just fix the unit on the includedbase plate (5) and put it on a stable, horizontal
surface.
JB SYSTEMS
®
3/36 LED SPOT – LED WASH
JB SYSTEMS
®
4/36 LED SPOT – LED WASH
Page 5
ENGLISH OPERATION MANUAL
Placed on a horizontal
Fixed to wallor
Fixed to
ALU-truss
surface
ceiling
OPERATING INSTRUCTIONS
A. Standalone1unit:
Just connect the unit to the mains and put on somemusic. The unit starts working automatically to the
rhythm ofthe music.
Remark: You can connect a CA-8 remotecontroller to the unit if youwantto have morecontrol.
B. Twoor more unitsin master/slave setup:
Connect 2 to maximum 16 units together. Refer to the chapter “electrical installation” to learn how to
do this(don’t forget to address all unitsproperly!)
Connect all units to themains and put on some music. The units will start working automaticallyto the
rhythm ofthe music and show the internal chase programs.
Remark: You can connect a CA-8 remote controller to the master unit if you want to have more control
over the master/slave operation.
C. Connect theoptional CA-8 controller for more control:
The CA-8 controller can only be used in standalone or master/slave mode. Connect the controller to the
CA-8input of the first unit (master). Now you can control all the connected units:
When you use this LEDPROJECTORwith a CA-8 controller andyou select MANUAL mode (mode
LED = ON), the projector remindsthe last setting used with controller, even after disconnecting
the controller and/or the mains voltage.If you don’twant this,make sure to select another
working mode (mode LED must blink or off) before you unplugthe controller.
BUTTON ACTIONS
STANDBY Toblackoutall the fixtures
Strobe
1.Synchronousstrobe
FUNCTION
MODE
in white color
2.The same color
chase
3.Differentcolor
strobe
Sound 1
(LED OFF)
IMPORTANTREMARK:
9 Colorselect
WhiteRed
BluePurple
OrangeGreen
YellowMagenta
Cyan
Manual
(LED ON)
Color Chase
1. Thesame color
2. Differentcolor
3. One light chase
4. Twolights chase
5. Four lights chase
Sound 2
(LED slow blinking)
Color Fade
1. Fastspeed
2.Middle speed
3. Slow speed
Auto
(LED fast blinking)
ENGLISH OPERATION MANUAL
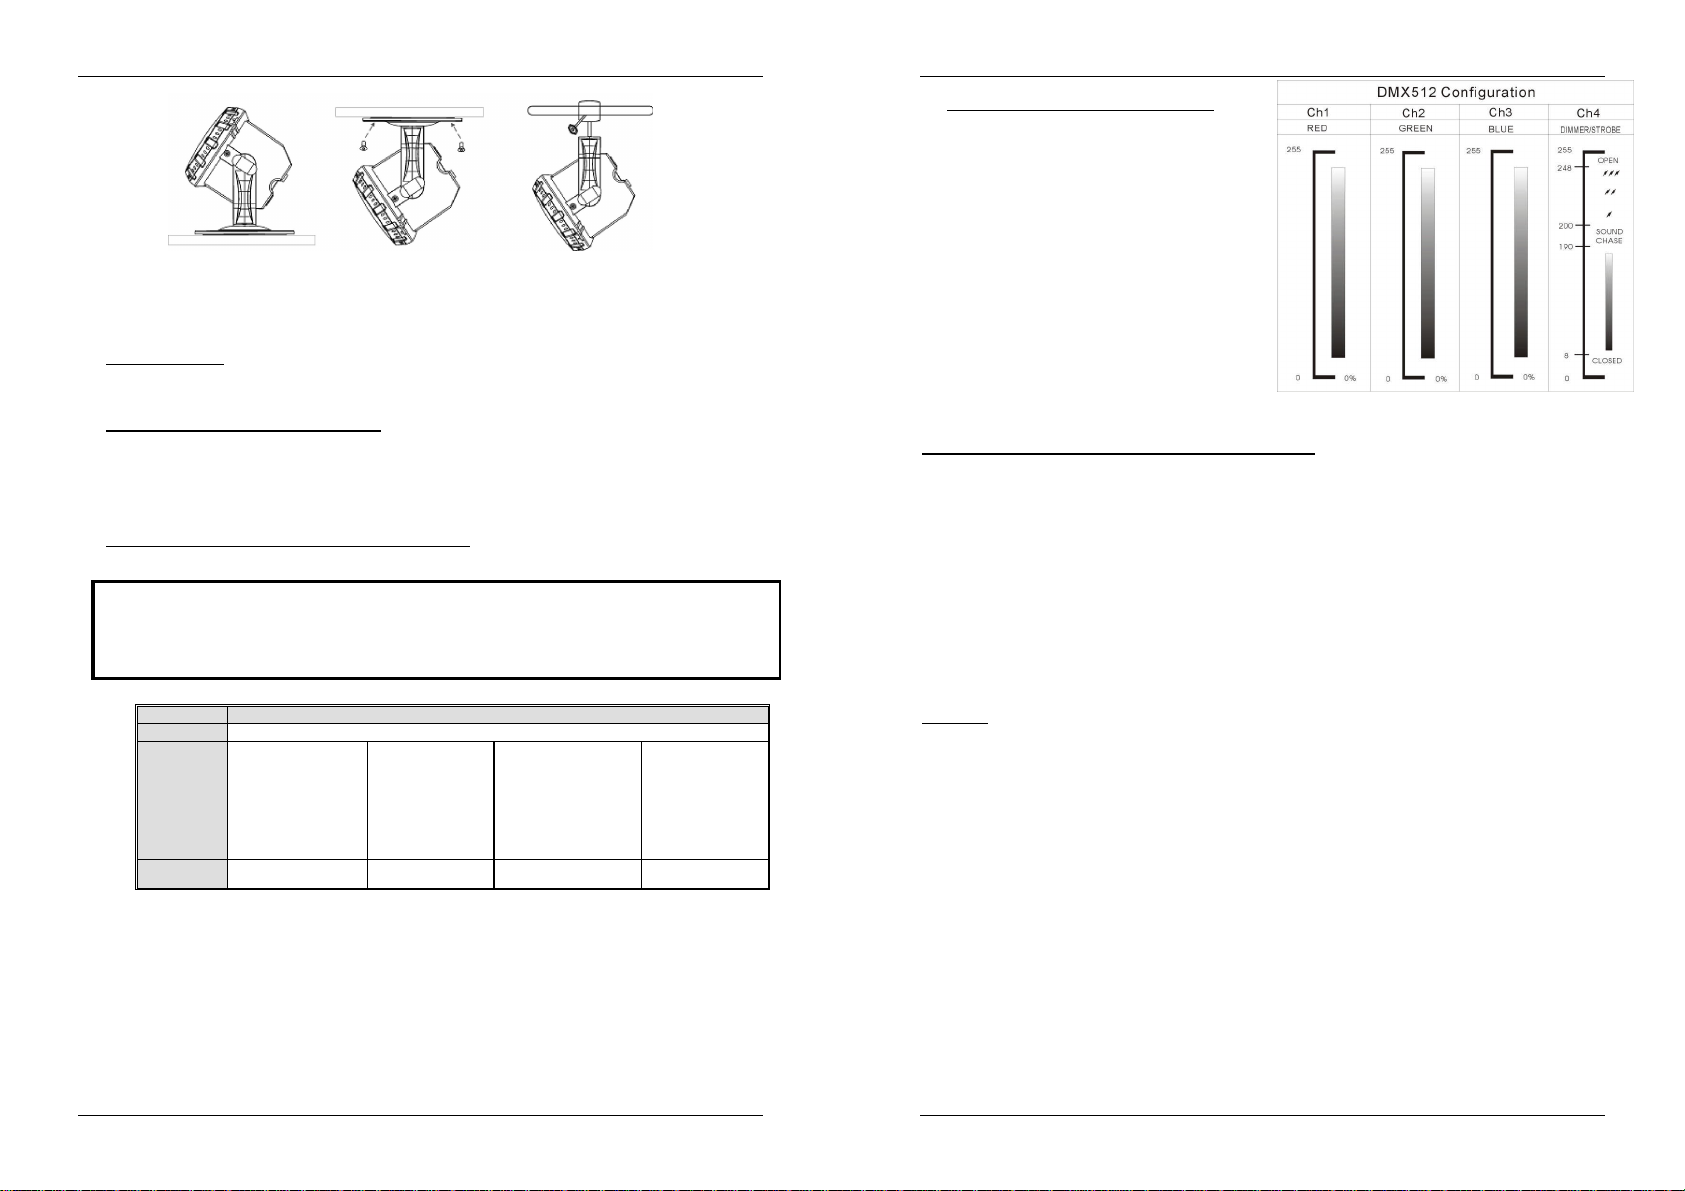
D. Controlledby universal DMX-controller:
Connect all units together. Refer to the chapter
“Electrical installation for two or more units in
DMX-mode” to learn how to do this (don’t forget
to addressall units properly!)
Connect all units to the mains and turn on the
DMX controller.
Since each unit has its own DMX-address, you
can controlthem individually.Remember that each
unit uses 4 DMX-channels as shown in the DMX
chart below:
MAINTENANCE
Make surethe area belowthe installationplace is freefrom unwanted persons during servicing.
Switch the unit off and unplugthemains cable.
During inspection the following points shouldbe checked:
All screws used for installing the device and any of its parts should be tightly fastened and may not be
corroded.
Housings, fixations and installations spots (ceiling, truss, suspensions) should be totally free from any
deformation.
Whenan optical part is visibly damaged due to cracks or deep scratches,it must be replaced.
The mains cables must be in impeccable condition and should be replaced immediately when even a
small problemis detected.
The interior of the device should be cleaned annuallyusing a vacuum cleaneror air-jet.
The cleaning of internal and external optics must be carried out periodically to optimize light output.
Cleaning frequency depends on the environmentin which the fixtureoperates: damp,smokyor particularly
dirtysurroundings can cause greater accumulation ofdirt on the unit’s optics.
Clean witha soft cloth using normal glasscleaning products.
Always dry the parts carefully.
Clean the external optics at least once every 30days.
Clean the internal optics at least every 90 days.
Attention: We strongly recommend internal cleaningto be carried out by qualifiedpersonnel!
JB SYSTEMS
®
5/36 LED SPOT – LED WASH
JB SYSTEMS
®
6/36 LED SPOT – LED WASH
Page 6
ENGLISH OPERATION MANUAL
SPECIFICATIONS
Mains Input: AC100V~240V50/60Hz
Fuse: 250V 2A slow blow(20mmglass)
SoundControl: Internalmicrophone
DMXconnections: XLR3pin
LEDs: 91 high powerLEDs (R31 + G30 + B30)
Beam angle: 15° for LED SPOT
Size: seedrawing below
Weight: 1kg
40° for LED WASH
FRANÇAIS MODE D’EMPLOI
Merci d’avoirchoisi ce produit JB Systems®. Pour votresécurité etpour une utilisation optimale de toutes les
possibilités de l’appareil, lisez attentivement cette notice avant utilisation.
EN VOUS INSCRIVANT POUR LA LETTRE D’INFORMATION VOUS SEREZ TOUJOURS
TENU AU COURANT DES DERNIERES NOUVELLES CONCERNANT NOS PRODUITS:
NOUVEAUTES,ACTIONS SPECIALES,JOURNEES PORTES OUVERTES, ETC.
SURFEZ SUR: WWW.BEGLEC.COM
CARACTERISTIQUES
Cet appareil ne produit pas d’interférences radio. Il répond aux exigences nationales et européennes. La
conformité a été établieet les déclarationset documents correspondants ont été déposés parle fabricant.
Cet appareil a été conçu pour la production d’effets lumière décoratifs et est utilisé dans des spectacles
lumineux.
Projecteur LEDRVB (RGB) stylé contenant 91 LEDs de hautepuissance:
LEDSPOT : angle de rayonnement = 15°
LED WASH: angle derayonnement = 40°
Beaucoup d’applicationspossible: Discothèques, DJs,expositions,maisons ...
Changementde couleurRGB très fluidegrâce à la haute fréquencede l’électronique du variateur
Différents modesde fonctionnement:
Fonctionne entièrement seul: automatique ou changement des couleurs synchronisé avec le rythme
(commandeà distance CA-8 enoption possible)
Mode maître/esclave:jusqu’à 16 appareils peuventêtres utilisés ensemble pour un superbe spectacle
lumière préprogrammé et synchronisé avec la musique. (commande à distance CA-8 en option
possible)
Contrôlé par DMX (4canaux: R, G, B + Variateur/stroboscope) par n’importe quel contrôleur DMX
standard.
Contrôlépar la commandeà distance LEDCON01.
Adressage DMX innovateur et extrêmement rapide:
Adressage DMX très facile desprojecteurs individuels par n’importequel contrôleur DMX standard!
Adressage DMX extrêmementrapide de plusieurs projecteurs(calcul automatiquedes adresses DMX)
Peut être fixé sur n’importe quellesurface, peut aussi être fixé sur la structure ALU en utilisant un crochet
standard.
Technologielongue duréede vie desLEDs: >50.000 heures!
You can download the latestversionof thisuser manual on our website: www.beglec.com
JB SYSTEMS
Every information is subject to change without prior notice
®
7/36 LED SPOT – LED WASH
AVANT UTILISATION
Avant d’utiliser cet appareil, assurez-vous de l’absence de dommage lié au transport. En cas
d’endommagement,n’utilisez pas l’appareiletcontactez levendeur.
Important:
l’utilisateur suive les instructions de sécurité et avertissements inclus dans ce manuel. La garantie ne
s’applique pas en cas de dommage lié à une utilisation incorrecte. Le vendeur ne prend pas la
responsabilité des défauts ou de tout problème résultant du fait de n’avoir pas tenu compte des mises en
garde dece manuel.
Conservez ce manuel dans un endroit sûr pour toute consultation future. Si vous vendez l’appareil,
assurez-vous d’y joindre ce manuel également.
Vérifiez le contenu:
Vérifiezsi l’emballage contient les articlessuivants:
Mode d'emploi
Projecteur LED (spotou wash)
Supportdesuspension
JB SYSTEMS
Cet appareil a quitté notre usine en parfaite condition et bien emballé. Il est primordial que
®
8/36 LED SPOT – LED WASH
Page 7

FRANÇAIS MODE D’EMPLOI
FRANÇAIS MODE D’EMPLOI
2 poignéespour serrerle supportde suspension
Socle avec écrou
INSTRUCTIONS DE SECURITE:
CAUTION
La flèche dans un triangle met l'utilisateur en garde contre la présence de haute tension sans
isolationdans l'appareilqui peut causerun risque d'électrocution.
Un point d'exclamation dans un triangle prévient dela présence d'instructions de fonctionnement et
de maintenancese trouvant dans le manuel, fourniavec l'appareil.
Ce symbolesignifie: uniquement pour usageà l'intérieur
Ce symbole signifie: Lire le mode d’emploi.
Afin de protéger l’environnement,merci de recyclerles emballages autant quepossible.
Afin d’éviter tout risque d’incendie ou de choc électrique, ne pas exposer cet appareil à la pluie ou
l’humidité.
Pour éviter la formation de condensation à l’intérieur de l’appareil, patientez quelquesminutes pourlaisser
l’appareil s’adapter à la température ambiante lorsqu’il arrive dans une pièce chauffée après le transport.
La condensation empêche l’unité de fonctionner en performance optimale et peut même causer des
dommages.
Cetteunité estdestinée à une utilisation à l’intérieur uniquement.
Ne pas insérer d’objet métallique ou verser un liquide dans l’appareil. Risque de choc électrique ou de
dysfonctionnement. Si un corps étranger est introduit dans l’unité, déconnectez immédiatement de la
sourced’alimentation.
Nepas utiliser dans un environnementpoussiéreuxet nettoyezl’unité régulièrement.
Nepas laisser l’unité à portée desenfants.
Lespersonnes non expérimentéesne doiventpas utiliser cetappareil.
Latempérature ambiantemaximum d’utilisation de l’appareil est de40°C. Ne pas l’utiliserau-delà de cette
température.
Assurez-vous que la zone au-dessous du lieu d’installation ne comporte pas de personnes indésirables
pendant le montage, le démontageet les opérations de maintenance.
Débrancheztoujours l’appareilsi vous nel’utilisez pasdemanière prolongée.
Les installations électriques ne peuvent être faites que par du personnel qualifié et conformément aux
régulations desécuritéélectrique et mécanique envigueurdans votrepays.
Assurez-vous que le voltage de la source d’alimentation de la zone dans laquelle vous vous trouvez ne
dépasse pascelui indiquéà l’arrière del’appareil.
Lecordon d’alimentation doit toujours être en condition parfaite. Mettezimmédiatementl’unitéhors tension
si le cordonest écrasé ou endommagé.
Nelaissez jamais le cordon d’alimentationentrer en contactavec d’autres câbles !
L’appareildoit être à la masse selon les règles de sécurités.
Nepas connecterl’unité àun variateur de lumière.
Utilisez toujoursles câbles appropriés et certifiés lorsque vous installezl’unité.
Pour éviter tout choc électrique, ne pas ouvrir l’appareil. En dehors du fusible principal, il n’y a pas de
pièces pouvantêtre changées parl’utilisateur à l’intérieur.
Nejamais réparer ou court-circuiter un fusible. Remplacez systématiquement unfusibleendommagépar
un fusible demême type etspécifications électriques !
En cas de problèmes de fonctionnement sérieux, arrêtez toute utilisation de l’appareil et contactez votre
revendeurimmédiatement.
Lacoque et les lentilles doivent être remplacéessi visiblementendommagées.
Utilisez l’emballaged’origine si l’appareil doit être transporté.
Pour des raisons de sécurité, il est interdit d’apporter toute modification à l’unité non spécifiquement
autoriséepar les partiesresponsables.
Important: Ne jamais fixer directement la source de lumière ! Ne pas utiliser d’effets en présence de
personnessouffrantd’épilepsie.
ATTENTION: afin de réduire le risque d’électrocution, n’enlevez jamais le
couvercle de l’appareil. Il n’y a aucune pièce à l’intérieur de l’appareil que
vous pouvez remplacervous-même. Confiezl’entretien uniquement à des
techniciensqualifiés.
DESCRIPTION:
1. Protection en plastique pour protéger les
LEDs
2. Support de suspension avec des poignées
sur les deux côtés pour serrer l’appareil et
un trou de fixationpour monter un crochet.
3. Prise ¼” utilisée pour connecter le
contrôleur CA-8optionnel
4. Câble d’alimentation secteur
5. Socle avecécrou
6. Connecteurd’entrée DMX
7. Bouton“Adressage DMX Auto”
8. Connecteurde sortie DMX
INSTALLATION ELECTRIQUE + ADRESSAGE
Important: L’installation électrique doit uniquement être effectué par du personnel qualifié,
selon la législation concernantles mesures de sécurité électriques et mécaniques envigueur
dans votre pays.
Installationélectrique pour 1 appareil en fonctionnement seul:
Installez simplementle câble secteur. L’appareil commenceraà fonctionner immédiatement enmode de
fonctionnement seul.
Remarque: vous pouvez brancher unecommande à distance CA-8 sur l’appareil si vous souhaitez avoir
plusde contrôle.Référez-vous à la section “C” pourapprendreà le faire.
Installationélectrique pourdeux ou plusieurs appareils en maître/esclave:
Branchez 2 ou 16 appareils au maximum ensembles en utilisant des câbles balancés de bonne qualité
pour le microphone (comme par exemple des câbles JB Systems 7-0063). L’appareil qui n’a pas de
câble branchésur son entrée-DMX réagiracomme “maître”, les autresseront les appareils esclaves.
Assurez-vous que les appareils sont tous branchés sur le secteur.
Et c’est terminé!
Remarque: vous pouvez brancher une commandeà distance CA-8 sur l’appareil maître (master) si vous
souhaitez avoir plus de contrôle sur le fonctionnement maître/esclave. Vous pouvez aussi connecter une
commande à distance « LEDCON 01 », tous les projecteurs réagiront de façon identique (tous ont la
mêmecouleur)
Installationélectrique deux appareils ou plus en mode DMX:
Le protocole DMX est un signal à
haute vitesse très utilisé pour
contrôler des équipements de
lumières intelligents. Vous devez
connecter en guirlande votre
contrôleur DMX et tous les appareils
avec un câble balancé de bonne
qualité (comme par exemple des
câbles JB Systemsréf. 7-0063).
Pour éviter des comportements étranges des effets de lumières dus aux
interférences, vous devez utiliser une résistance de bouclage de 90Ω à 40Ω au
bout de la guirlande. Ne jamais utiliser de séparateur de câbles en forme « Y »,
cela ne fonctionnera pas!
Assurez-vous que les appareils sonttous branchés sur le secteur.
Chaque effet de lumière dans la guirlande doit avoir sa propre adresse de départ afin de savoir quelle
est la commande du contrôleur il doit décoder. Dans la prochaine section, vous apprendrez à régler
l’adresseDMX.
JB SYSTEMS
®
9/36 LED SPOT – LED WASH
JB SYSTEMS
®
10/36 LED SPOT – LED WASH
Page 8

FRANÇAIS MODE D’EMPLOI
FRANÇAIS MODE D’EMPLOI
Commentrégler lesadresses DMX:
Ilexiste deuxfaçons de régler les adressesDMX des appareils.
A. Régler les adresses DMX par projecteur:
Assurez-vous que les câbles DMX de tous les appareils sont
branchés.
Connectez le premier appareilsur le contrôleur DMX.
Branchez tous les appareils sur le secteur pour qu’ils soient tous
allumés.
Mettez tous les canaux DMX de votre contrôleur DMX sur zéro.
(valeur000).
Mettez le canal DMX, que vous voulez assigner comme adresse
de départ sur le projecteur, sur maximum(valeur255)
Poussez brièvement lebouton “Adressage DMXauto” (7) du projecteur.
Si vous voulez mettre un autre projecteur sur la même adresse de départ, vous devez également
pousserle bouton “Adressage DMX auto” (7) de cet autre projecteur.
Fini!
Un exemplepour rendre les choses claires:
Sivous souhaitez mettrel’adresse dedépart d’un projecteur sur 106:
Connectezle projecteur sur le contrôleurDMX comme décritci-dessus et allumez l’ensemble.
Mettez tous les canaux DMXde votre contrôleurDMX sur zéro. (valeur 000).
Mettezle canal DMX 106 sur maximum(valeur 255)
Poussez brièvementle bouton “AdressageDMX auto”(7) duprojecteur.
Fini! l’adresse dedépartde notre projecteurest 106!
B. Régler automatiquementles adressesDMX de plusieurs projecteurs:
Pour gagner du temps (imaginez le temps qu’il vous faudra pour régler
les interrupteurs DIP des 16 appareils…) vous pouvez régler les
adresses DMX de tous les appareils dans la chaîne DMX juste en
appuyant sur un bouton. Pas besoin de calculer l’adresse de départ de
chaque appareil, cela sera fait à votre place!
Assurez-vous que les câbles DMX de tous les appareils sont
branchés.
Connectez le premier appareilsur le contrôleur DMX.
Branchez tous les appareils sur le secteur pour qu’ils soient tous
allumés.
Mettez tous les canaux DMXde votre contrôleur DMX sur zéro.(valeur 000).
Mettez le canal DMX, que vous voulez assigner comme adresse de départ sur le premier
projecteurde la chaîne, sur maximum (valeur255)
Poussez le bouton “Adressage DMX auto” (7) du premier projecteur de la chaîne pendant environ
5 secondes. (tousles projecteurs clignotes1x)
Fini! Le premier projecteur de la chaîne reçoit l’adresse de départ que vous avez choisi. Les
adresses de départ des autres projecteurs de la chaîne seront calculés et distribués
automatiquement !
Un exemplepour rendre les choses claires:
Nous voulons mettre les adresses DMX de 16 projecteurs. L’adresse de départ du premier
projecteur dela chaîne est fixésur 202.
Connectez lesprojecteurs sur le contrôleur DMXcommedécrit ci-dessus et allumezl’ensemble.
Mettez tous les canaux DMXde votre contrôleur DMX sur zéro.(valeur 000).
Mettezle canal DMX 202 sur maximum(valeur 255)
Poussez lebouton “AdressageDMX auto” (7) du premier projecteur pendant environ 5sec.
Fini! Le premier projecteur de la chaîne reçoit l’adresse 202. Les adresses de départ des
autres projecteurs de la chaîne seront calculés et distribués automatiquement: le deuxième
projecteur reçoit l’adresse 206, le troisième l’adresse 210, …, jusqu’au seizième projecteur qui
reçoitl’adresse 262.
Vousvenez de programmer16 projecteurs en10 secondes !!!
Remarque: vous pouvez mélanger les appareils ensemble avec d’autres effets DMX qui ne
possèdent pas l’option adressage DMX automatique. Dans ce cas, il vous restera à régler les
adresses DMXde ceseffets DMXmanuellement!
INSTALLATION EN HAUTEUR
Important: L’installation doit être faite par du personnel qualifié uniquement. Une installation
incorrecte peut causer des blessures sévères et/ou endommager l’appareil. L’installation en
hauteur exige de l’expérience ! Les limites de charge doivent être respectées, du matériel
d’installation certifié doit être utilisé, et l’appareil installé doit subir des inspections de sécurité
régulièrement.
Assurez-vous que la zone au-dessous du lieu d’installation ne comporte pas de personnes indésirables
lors del’installation, la désinstallationou la maintenance.
L’appareil doit être hors de portée du public et en dehors des zones de passage de personnes ou des
zones oùle publicest installé.
Avant l’installationassurez-vous que la zone d’installationsupporte un point localiséminimum de 10 fois le
poids del’appareil.
Utilisez systématiquement un câble de sécurité qui peut supporter 12 fois le poids de l’appareil lors de
l’installation. Ce câble de sécurité secondaire doit être installé de manière à ce qu’aucune partie de
l’appareilne puisse descendre de plus de 20cm si le support principal tombe.
L’appareil doit être bien fixé,un montage à balancement estdangereux etne devraitpas être considéré !
L’utilisateur doit s’assurer que les installations techniques et de sécurité sont bien approuvées par un
expert avant la première utilisation. Les installations doivent être inspectées chaque année par du
personnelqualifié pour assurerune sécurité optimale.
3 différentesméthodes de fixation sont possibles:
Fixéau truss ALU: utilisez un crochet adapté.
Fixation au mur ou plafond : 2 vis adaptés pour fixerle socle (5) sur un mur ou un plafond.
Sur une surface horizontale: fixez simplement l’appareil sur le socle fourni (5) et placez-le sur une
surface stable et horizontale.
Placé surune surface
horizontale
Fixation au mur ou
au plafond
Fixé surune structure
ALU
INSTRUCTIONS D’UTILISATION
A. 1 appareil en fonctionnementseul:
Branchez simplement l’appareil sur le secteur et mettez de la musique. L’appareil commencera à
fonctionnerautomatiquementau rythme dela musique.
Remarque: vous pouvez brancher unecommande à distanceCA-8 sur l’appareil si voussouhaitezavoir
plusde contrôle.
B. Deux ou plusieurs appareils enconfigurationmaître/esclave:
Branchez 2 ou maximum 16 appareils ensembles. Référez-vous au chapitre “installation électrique”
pour apprendre à brancher les appareils ensemble (n’oubliez pas d’adresser tous les appareils
ensemblecorrectement!)
Branchez tous les appareils sur le secteur et mettez de la musique. Les appareils commenceront à
fonctionner automatiquement au rythme de la musique et à indiquer les programmes internes
d’approched’asservissement.
Remarque:vous pouvez brancherune commande à distance CA-8 sur l’appareil maître(master) si vous
souhaitez avoirplus decontrôle surle fonctionnement maître/esclave.
C. Brancher le contrôleurCA-8 en option pour plus de contrôle:
Le contrôleur CA-8 peut uniquement être utilisé en fonctionnement autonome ou en mode
maître/esclave. Branchez le contrôleur sur l’entrée CA-8 du premier appareil (maître). Vous pouvez
maintenantcontrôlertous les appareils branchés:
JB SYSTEMS
®
11/36 LED SPOT – LED WASH
JB SYSTEMS
®
12/36 LED SPOT – LED WASH
Page 9

FRANÇAIS MODE D’EMPLOI
FRANÇAIS MODE D’EMPLOI
Si vousutilisez ce projecteur à LED avec un contrôleur CA-8 et choisissez lemode MANUEL
REMARQUE IMPORTANTE:
(mode LED est allumé), le projecteur garde le dernier mode d’utilisation enmémoire, même si
vous débranchezle contrôleur et/ou déconnectez le projecteurdu courant.Poureffacer le
dernier moded’utilisationen mémoirevous devez choisir un des autres modes (la LED
« mode » est éteinte ou clignote) avant de débrancher le contrôleur du projecteur.
BOUTON ACTIONS
STANDBY Pour mettre en obscurcissementtoutes lesfonctions
FONCTION
MODE
Strobe
1. Strobesynchronisé
enblanc
2. Chenillard strobe
avec lamême couleur
3. Chenillard strobe
avecdifférents
couleurs
Son 1
(LED OFF)
9 Sélectionde
couleurs
BlancRouge
BleuViolet
OrangeVert
JauneMagenta
Cyan
Manuel
(LED ON)
Chenillard en
couleurs
1. Même couleur
2.Différentescouleurs
3. Chenillardsur une
lumière
4. Chenillardsur deux
lumières
5. Chenillardsur
quatrelumières
Son 2
(LED clignote
lentement)
Fade (Fondu) des
couleurs
1. Vitesserapide
2. Vitessemoyenne
3.Vitesse lente
Auto
(LED clignote
rapidement)
D. Contrôlé par un contrôleur DMX universel:
Branchez tous les appareils ensemble.
Référez-vous au chapitre “installation
électrique pour deux ou plusieurs appareils en
mode DMX” pour apprendre à le faire
(n’oubliez pas d’adresser tous les appareils
correctement!)
Branchez tous les appareils sur le secteur et
allumezle contrôleur DMX.
Etant donné que chaque appareil à sa propre
adresse DMX, vous pouvez les contrôler
individuellement. Souvenez-vous que chaque
appareil utilise 4 canaux DMX comme indiqué
dans le tableauDMX ci-dessous:
Le nettoyage des lentilles optiques internes et externes et/oudes miroirs doitêtre effectué périodiquement
pour optimiser la production de lumière. La fréquence de nettoyage dépend de l’environnement dans
lequel l’appareil fonctionne: des environnements humides, enfumés ou particulièrement sales peuvent
entraînerune accumulationde saleté plus importantes sur les optiques de l’appareil.
Nettoyezà l’aide d’unchiffon doux avec desproduits de nettoyage pour verres normaux.
Séchez toujoursles partiessoigneusement.
Nettoyezles optiques externesou moins une fois tous les30 jours.
Nettoyezles optiques internes oumoins unefois tous les90 jours.
Attention: Nous vous recommandons fortement de faire exécuter le nettoyage interne par du
personnel qualifié !
SPECIFICATIONS
Entréesecteur: AC100V~240V50/60Hz
Fusible: 250V 2A coup lent (20mm verre)
Contrôle du son: Microphoneinterne
ConnexionsDMX: XLR3pin
LEDs: 91 LEDs hautepuissance (R31 + G30 + B30)
Angle de rayonnement: 15° pour LED SPOT
Taille: voir schéma ci-dessous
Poids: 1kg
40°pour LED WASH
MAINTENANCE
Assurez-vous que la zone au-dessous du lieu d’installation ne comporte pas de personnes indésirables
lors de lamaintenance
Eteignez l’appareil etdébranchez le câble secteur.
Pendantl’inspection,les points suivantsdoivent êtrevérifiés :
Toutes les vis utilisées pour l’installation de l’appareil ou de chacune de ses pièces doivent être bien
fixées et non corrodées.
Les niches, fixations et structures de support (plafond, poutres, suspensions) doivent être totalement
intactes,sans aucune déformation.
Lorsqu’une lentille optique est visiblement endommagée (fissure ou éraflures profondes), elle doit être
remplacée.
Lescâblesdoivent être enparfaite condition et doivent être remplacésimmédiatement en casde détection
d’un problème,mêmebénin.
L’intérieur del’appareil doit êtrenettoyé annuellementà l’aide d’un aspirateur ou jet d’air.
JB SYSTEMS
®
13/36 LED SPOT – LED WASH
Vouspouvez télécharger la dernière version de mode d’emploi sur notre site web: www.beglec.com
Chacune de ces informationspeutêtre modifiéesans avertissement préalable
JB SYSTEMS
®
14/36 LED SPOT – LED WASH
Page 10

NEDERLANDS HANDLEIDING
Hartelijk dank voor de aankoop van dit JB Systems®product. Om ten volle te kunnen profiteren van alle
mogelijkheden en voor uw eigen veiligheid, gelieve de aanwijzingen zeer zorgvuldig te lezen voor U begint
het apparaat te gebruiken.
DOOR U OP ONZE MAILINGLIJST IN TE SCHRIJVEN ONTVANGT U STEEDS DE
LAATSTE INFORMATIE OVER ONZE PRODUKTEN: NIEUWIGHEDEN,SPECIALE
ACTIES, OPENDEURDAGEN, ENZ.
SURF NAAR: WWW.BEGLEC.COM
KARAKTERISTIEKEN
In dit apparaat is radio-interferentie onderdrukt. Dit product voldoet aan de gangbare Europese en nationale
voorschriften. Het is vastgesteld dat het apparaat er zich aan houdt en de desbetreffende verklaringen en
documentenzijn door de fabrikant afgegeven.
Het toestel is ontworpen om decoratieve lichteffecten te produceren en kan eventueel worden gebruikt in
lichtshows.
Stijlvolle RGB LED-projectordie 91 LED’s met een hogeintensiteit bevat:
LED-SPOT : openingshoek= 15°
LED-WASH : openingshoek= 40°
Vele toepassingenmogelijk:Discotheken, DJ’s, tentoonstellingsstands, woningen, ...
Erg mooie,flikkervrije, RGB kleurveranderingen dankzijde hoge frequentie vande dimelektronica.
Verschillende werkmodi:
Compleet op zichzelf staand: automatische of ritmisch gesynchroniseerde kleurveranderingen
(optioneelis een CA-8 bediening mogelijk).
Master/slavemodus: tot 16 units kunnen tegelijk worden gebruikt voor prachtige
voorgeprogrammeerde lichtshows die op muziek gesynchroniseerd zijn (optioneel is een CA-8
bediening mogelijk).
DMX-modus (4kanalen:R, G, B + Dimmer/stroboscoop)met elke standaard DMX-bediening.
Aangestuurd door deLEDCON01 DMX-afstandsbediening.
Vernieuwende en extreem snelle DMX adressering:
Zeer makkelijke DMX adressering van individuele toestellen door het gebruik van elke standaard
DMX-controller
Extreemsnelle DMX adressering van verschillende toestellen tegelijk ( automaticaddress calculation )
Kan op elk oppervlak vast worden gemaakt, kan ook door middelvan een standaard klem aan ALU truss
worden vastgemaakt.
LEDtechnologie vooreenlange levensduur: >50.000 uren!
VOOR DE IN GEBRUIKNAME
Controleer voor het eerste gebruik van het apparaat of het tijdens het transport beschadigd werd. Mocht er
schadezijn, gebruik het dan niet,maarraadpleeg eerst uw dealer.
Belangrijk: Dit apparaat verliet de fabriek in uitstekende staat en goed verpakt. Het is erg belangrijk dat de
gebruiker de veiligheidsaanwijzingen en raadgevingen in deze gebruiksaanwijzing uiterst nauwkeurig volgt.
Elke schade veroorzaakt door verkeerd gebruik van het apparaat valt niet onder de garantie. De dealer
aanvaardt geen verantwoordelijkheid voor mankementenen problemen die komen doorhet veronachtzamen
van dezegebruiksaanwijzing.
Bewaar deze brochure op een veilige plaats om hemin de toekomst nogmaals te kunnenraadplegen. Indien
U het apparaatverkoopt, denktU er wel aan om de gebruiksaanwijzing bij te voegen.
Controleer deinhoud:
Controleerof de doos volgendeonderdelen bevat:
Handleiding
NEDERLANDS HANDLEIDING
LED Projector (spot of wash)
Ophangbeugel
2 knoppen om de ophangbeugel vast te maken
Basisplaatmet moer
VEILIGHEIDSVOORSCHRIFTEN:
CAUTION
De bliksempijl die zich in een gelijkbenige driehoek bevindtis bedoeld om u te wijzen op het gebruik
of de aanwezigheid van niet-geïsoleerde onderdelen met een “gevaarlijke spanning” in het toestel
die voldoende kracht heeftom een risicovan elektrocutiein te houden.
Het uitroeptekenbinnen de gelijkbenige driehoek is bedoeld om degebruiker erop te wijzen dat er in
de meegeleverde literatuur belangrijke gebruik en onderhoudsinstructies vermeld staan betreffende
dit onderdeel.
Dit symboolbetekent: het apparaat mag enkelbinnenhuis wordengebruikt.
Dit symboolbetekent: Leesde handleiding!
Om hetmilieu te beschermen, probeer zoveelmogelijkhet verpakkingsmateriaal te recycleren.
Stel dit apparaat niet bloot aan regen of vocht, dit om het risico op brand en elektrische schokken te
voorkomen.
Om de vorming van condensatie binnenin te voorkomen, laat het apparaataan de omgevingstemperatuur
wennen wanneer het, na het transport, naar een warm vertrek is overgebracht. Condensatie kan het
toestel soms verhinderen perfect te functioneren. Het kan soms zelfs schade aan het apparaat
toebrengen.
Gebruik dit apparaatuitsluitendbinnenshuis.
Plaats geen stukken metaal en mors geen vocht binnen in het toestel om elektrische schokken of storing
te vermijden. Indien een vreemd voorwerp in het apparaat geraakt, moet U het direct van het lichtnet
afkoppelen.
Zorg dat het toestelniet in een stoffigeomgeving wordt gebruikt en maak het regelmatig schoon.
Houdhet apparaatuit de buurt van kinderen.
Ditapparaat magniet door onervaren personen bediend worden.
De maximum veilige omgevingstemperatuur is 40°C. Gebruik het apparaat dus niet bij hogere
temperaturen.
Verzeker er U van dat er zich onder de plaats waar het toestel wordt geïnstalleerd geen ongewenste
personenbevinden tijdens het bevestigen en losmakenalsook bij hetonderhoud.
Trek altijd de stekker uit wanneer het apparaat gedurende langere tijd niet wordt gebruikt of alvorens de
lamp tevervangenof alvorens te beginnenmet de onderhoudsbeurt.
De elektrische installatie behoort uitsluitend uitgevoerd te worden door bevoegd personeel,volgens de in
uwland geldende regels betreffende elektrischeen mechanische veiligheid.
Controleer dat de beschikbare spanning niet hoger is dan die aangegeven op de achterzijde van het
toestel.
De elektrische kabel behoort altijd in uitstekende staat te zijn. Zet het apparaat onmiddellijk af als de
elektrischekabel gekneusdof beschadigd is.
Laatde elektrische draad nooit in contact komen metandere draden.
Volgens de veiligheidsvoorschriften moet deze installatie geaard worden.
Sluithet apparaat niet aan op een elektronische dimmer.
Gebruik altijd een geschikte en gekeurde veiligheidskabel bijhet installeren van het toestel.
Om elektrische schokken tevoorkomen, moetU debehuizing niet openen. Afgezienvan de zekering zitten
er geenonderdelen in die door de gebruikermoeten worden onderhouden.
Repareer
steeds
Ingeval van ernstige problemen met het bedienen van het toestel, stopt U onmiddellijk het gebruik ervan.
Contacteeruw dealer voor een eventuele reparatie.
Debehuizing en de lenzen moeten vervangen worden als ze zichtbaarbeschadigd zijn.
Gebruik best de originele verpakking als het toestel vervoerd moet worden.
nooit
een zekering en overbrug de zekeringhouder nooit. Vervang een beschadigde zekering
door een zekeringvan hetzelfde type en met dezelfde elektrischekenmerken.
WAARSCHUWING: Om het risico op elektrocutie zoveel mogelijk te
vermijden mag u nooit de behuizing verwijderen. Er bevinden zich geen
onderdelen in het toestel die u zelf kan herstellen. Laat de herstellingen
enkeluitvoeren door eenbevoegde technicus.
JB SYSTEMS
®
15/36 LED SPOT – LED WASH
JB SYSTEMS
®
16/36 LED SPOT – LED WASH
Page 11

NEDERLANDS HANDLEIDING
NEDERLANDS HANDLEIDING
Om veiligheidsredenen is het verboden om ongeautoriseerdemodificatiesaan het toestelaan te brengen.
Belangrijk: Kijk nooit rechtstreeks in de lichtbron. Gebruik het lichteffect niet in de tegenwoordigheid van
personen die lijdenaan epilepsie.
BESCHRIJVING:
1. Plasticbedekking om de LED’ste beschermen
2. Ophangbeugel metknoppen aan beidekanten
om de unit vast te makenen een
bevestigingsgatom eenbevestigingshaak te
monteren.
3. ¼” jack stekkerwordt gebruikt om de optionele
CA-8 bediening aante sluiten.
4. Stroomkabel
5. Basisplaat
6. DMX-ingangaansluiting
7. “AutoDMX-address” knop (automatischeDMX
adressering)
8. DMX-uitgangaansluiting
ELEKTRISCHE INSTALLATIE + ADRESSERING
Belangrijk: De elektrische installatie zou alleen uitgevoerd moeten worden door een bekwaam
persoon volgens de voorschriftenvoor elektrische en mechanische veiligheid in uw land.
Elektrische installatievooréén alleenstaandeunit:
Installeer gewoon de stroomkabel (zie punt A).
Opmerkingen: U kan een CA-8afstandsbediening aansluiten op de unit als u meer controle wilthebben.
Zie sectie“C” om te leren hoe dit te doen.
Elektrische installatievoortweeof meer unitsinmaster/slave:
Sluit 2 tot maximaal 16 units op elkaar aan, gebruik gebalanceerde microfoonkabels van een goede
kwaliteit (zoals bijvoorbeeld JB Systems ref. 7-0063). De unit die geen kabelaansluiting op z’n DMXingang heeft zal reagerenals “master”,de anderen zijn de slave-units.
Weet zekerdat alle units op het net zijn aangesloten.
Klaar!
Opmerkingen: U kan een CA-8 afstandsbediening aansluiten op de master unit als u meer controle wilt
over de master/slave werking. U kan eventueel ook een LEDCON 01 afstandsbediening aansluiten, alle
unitsreagerendanwel identiek(dezelfde kleuren).
Elektrischeinstallatie voor twee of meer units in DMX-modus:
Het DMX-protocol is een breed
gebruikt hogesnelheidssignaal om
lichtuitrustingen te bedienen. U moet
uw DMX bediening en alle units met
een gebalanceerde kabel van goede
kwaliteit (ex. JB Systems ref. 7-0063)
doorverbinden.
Om vreemd gedrag van de
lichteffecten, veroorzaakt door storing,
te voorkomen, moet u een afsluitweerstand van 90Ω tot 40Ω aan het eind van de
keten gebruiken.Gebruik nooit een Y-splitkabel, dit zal eenvoudig niet werken!
Weet zeker datalle units op het lichtnet zijn aangesloten.
Elk lichteffect in de keten heeft een eigen DMX startadres nodig zodat het weet
welke commando’s van de bediening het moet ontcijferen. In de volgende sectie
zal u leren hoe hetDMX adres in te stellen.
Hoe het DMXadres in te stellen:
Er zijn tweemanieren om deDMX adressen van de units in te stellen
A. HetDMX-adres individueelper projectorinstellen:
Wees er zeker van dat de DMX kabels van alle toestellen met
elkaarverbonden zijn.
Sluit het eerstetoestel aan op een universele DMX controller
Sluit alle toestellen aan op het net zodat ze allen aanslaan
Stel al uw DMX kanalen van uw DMX controller in op zero (
waarde000 )
Stel het DMX kanaal, dat u als DMX startadres wilt toewijzen
aan uw projector,in op hetmaximum ( waarde 255 )
Druk de “Auto DMX address” toets ( 7 ) op uwprojector kort in.
Wanneer u ook een andere projector op het zelfde DMX startadres wil instellen, dient u
simpelweg zijn “Auto DMX address” toets (7) in te drukken en dan zal deze hetzelfde adres
verkrijgen.
Klaar !
Een voorbeeldom de zaken te verduidelijken:
We zullen het DMXstartadres vaneen projectorinstellen op 106:
Sluit de projector aan op de DMX controller zoals hierboven beschreven en wees er zeker van
dat allesaangeschakeld is.
Stel alleDMX kanalen van de controller in op zero (000)
Stel nu het DMX kanaal106 in op het maximum(255)
Druk de “Auto DMX address” toets (7) van uw projectorkort in
Klaar uw projectorheeft nu als DMX startadres 106 !
B. AutomatischeDMX adressering,startend vanaf eenwillekeurigingegevenstartadres:
Om een hele hoop tijd te besparen ( beeldt uzelf in hoeveeltijd het
instellen van de Dip switches van 16 toestellen inneemt… ) kan u
de DMX adressen van alle toestellen in de DMX ketting duwen en
dit enkel door één toets in te drukken. U hoeft het startadres van
elk individueel toestel niet te berekenen, dit wordt voor u gedaan !
Wees er zeker van dat de DMX kabels van alle toestellen met
elkaarverbonden zijn.
Sluit het eerste toestel aan op een universeleDMX controller
Sluit alle toestellen aan op het net zodat ze allen aanslaan
Stel al uwDMX kanalen van uw DMX controllerin op zero ( waarde000 )
Stel het DMX kanaal, dat u als DMX startadres wilt toewijzen aan uw projector, in op het
maximum( waarde 255 )
Druk de “Auto DMX address” toets (7) in op uw eerste projector in de ketting gedurende
ongeveer5 seconden
Klaar ! De eerste projector in de ketting zal het DMX startadres ontvangen dat u gekozen
heeft en de DMX adressen van alle andere toestellen in de DMX ketting worden automatisch
berekenden geprogrammeerd!
Een voorbeeldom de zaken te verduidelijken:
We willen de DMX adressen van 16 toestellen instellen, het DMX startadres van het eerste toestel
moet202zijn
Sluit alle projectors aan op de DMX controller zoals hierboven beschreven en wees er zeker van
dat allesaangeschakeld is.
Stel alleDMX kanalen van de controller in op zero (000)
Stel nu het DMX kanaal202 in op het maximum(255)
Druk de “Auto DMX address” toets (7) van de eerste projector in de ketting in gedurende
ongeveer5 seconden.
Klaar ! De eerste projector in de ketting zal het DMX startadres 202 ontvangen en de DMX
adressen van alle andere toestellen in de DMX ketting worden automatisch berekend en
geprogrammeerd! Dit betekent dat de 2deprojectorautomatisch het adres 206 zal ontvangen, de
3deheeft het adres 210,…, tot en met de 16deprojector die automatisch het startadres 262 zal
ontvangen.
JB SYSTEMS
®
17/36 LED SPOT – LED WASH
JB SYSTEMS
®
18/36 LED SPOT – LED WASH
Page 12

NEDERLANDS HANDLEIDING
NEDERLANDS HANDLEIDING
U heeft net16 projectors geprogrammeerd en dit heeft slecht ongeveer 10 seconden geduurd !!!
Opmerking: U kan de toestellen mixen met andere DMX effecten die de automatische DMX
adressering optie niet hebben. In dat geval dient u de DMX adressen van deze DMX effecten nog
steeds manueel in te stellen
OPHANGEN VAN HET APPARAAT
Belangrijk: De installatie van het toestel mag uitsluitend door bekwaam onderhoudspersoneel
uitgevoerd worden. Onjuiste plaatsing kan ernstige letsels en/of schade aan eigendommen tot
gevolg hebben. Het ophangen vergt veel ervaring. U behoort de grenzen te respecteren aan de
werklast; erkende installeringmaterialen moeten worden gebruikt; de veiligheid van het
geïnstalleerde toestel moetregelmatigwordengecontroleerd.
Overtuig U ervan dat het gebied onder installatieplaats vrij is van ongewenste personen tijdens het
plaatsen,het weghalen en het onderhoud.
Het toestel moet worden geïnstalleerd buiten het bereik van iedereen en weg van plaatsen waar men mag
lopen en zitten.
Alvorens tot plaatsen over te gaan, moet men controleren dat de minimum puntbelasting van de
installatieplaats 10 keer het gewichtvan hettoestel bedraagt.
Gebruik bij het installerenvan het toestel altijd een gewaarmerkteveiligheidskabel die 12 keer het gewicht
van het toestel kan dragen. Deze bijkomende veiligheidsbevestiging moet zo worden aangebracht dat
geen deel vanhet toestel meerdan 20 cm vallen kan als de hoofdbeveiliging faalt.
Het apparaat moet goed worden vastgezet; aan een vrij zwaaiende montering mag zelfs niet gedacht
worden.
De gebruiker moet er zich van verzekeren dat de installaties met betrekking tot de veiligheid en de
technische mechaniek door een expert zijn goedgekeurd alvorens ze voor de eerstekeer te gebruiken. Elk
jaar moeten de installatiesworden gekeurd door een vakman om te controleren ofde veiligheid nog steeds
perfectis.
3 verschillende bevestigingsmethodeszijn mogelijk:
Bevestiging aan ALU truss: gebruik een optionele steunklem.
Muur- of plafondbevestiging: gebruik 2 aangepasteschroeven om de basisplaat(5) aan de muur of het
plafond tebevestigen.
Op een horizontaal oppervlak: bevestig de unit gewoon op de meegeleverde basisplaat (5) en zet het
op een stabiel, horizontaal oppervlak.
BEDIENINGSVOORSCHRIFTEN
A. Alleenstaande1unit:
Sluit de unit op het lichtnet aan en zet wat muziek aan. De unit zal automatisch starten op het ritme
van de muziek.
Opmerking:U kan een CA-8 afstandsbedieningaansluitenopde unit alsumeer controle wilthebben.
B. Twee ofmeer units inmaster/slave opstelling:
Sluit twee tot maximaal 16 units op elkaar aan. Zie het hoofdstuk “elektrische installatie” om te leren
hoe dit te doen (vergeet niet om alle unitsgoed te adresseren).
Sluit alle units op het lichtnet aan en zet wat muziek aan. De unit zal automatisch starten op het ritme
van de muzieken de interne looplichtprogramma’s laten zien.
Opmerking: U kan een CA-8 afstandsbediening aansluiten op dehoofdunitals u meer controle over de
master/slaveopstellingwilthebben.
C. Sluit de optionele CA-8 bedieningaan voormeer controle:
De CA-8 bediening kan alleen worden gebruikt in de alleenstaande of master/slave modus. Sluit de
bediening aan op deCA-8 ingang vande eersteunit (master). Nukan u alle aangesloten units bedienen:
Wanneer u deze LED PROJECTORgebruiktmet eenCA-8 controlleren u de MANUAL modus
(LED AAN)selecteertzal de projector de laatste instellingmet de controller opslaan,zelfs
wanneer u de controlleren/of de stroomtoevoer van de led projector hebt afgekoppeld.
Wanneer u dit nietwil,verzeker er u dan ervan naar een andere werkingsmodus over te gaan (
LED moet KNIPPERENof UITstaan) voordat u de controller ontkoppelt.
KNOP ACTIES
STAND-BY
FUNCTION
MODE
Om alle apparaten in blackout te zetten
Stroboscoop
1. Synchroonstroben
in witte kleur.
2. Strobe looplicht in
dezelfdekleur.
3. Strobe looplicht in
verschillendekleuren.
Geluid 1
(LED UIT)
BELANGRIJKEOPMERKING:
9Selecteerbare
kleuren
WitRood
BlauwPurper
OranjeGroen
GeelMagenta
Cyaan
Handmatig
(LED AAN)
Kleuren looplicht
1. Dezelfde kleur.
2.Verschillendekleur.
3. Looplichtmet één
lamp.
4. Looplicht met twee
lampen
5. Looplicht met vier
lampen.
Geluid 2
(LED knippert traag)
Kleurovergangen
1.Hogesnelheid.
2.Middelmatige
snelheid.
3. Lage snelheid
Automatisch
(LED knippert snel)
JB SYSTEMS
Op een horizontaal
oppervlakgeplaatst
®
plafond of
muurbevestiging
Bevestigdaan ALU
truss
19/36 LED SPOT – LED WASH
D. Bediend door een universele DMX-
bediening:
Sluit alle units op elkaar aan. Zie het
hoofdstuk “elektrische installatie voor
twee of meer units in DMX-modus” om
te leren hoe dit te doen (vergeet niet om
alle units goedte adresseren!)
Sluit alle units op het lichtnet aan en zet
de DMX-bedieningaan.
Omdat elke unit z’n eigen DMX-adres
heeftkan u ze individueel bedienen. Denk
eraan dat elke unit zoals in de DMX tabel
hieronder te zien is, vier DMX-kanalen
gebruikt:
JB SYSTEMS
®
20/36 LED SPOT – LED WASH
Page 13

NEDERLANDS HANDLEIDING
NEDERLANDS HANDLEIDING
ONDERHOUD
Overtuig U ervan dat het gebied onder de installatieplaats vrij is van ongewenste personen tijdens het
onderhoud.
Zet het toestel uit en trek de netstekkeruit het stopcontact.
Bij inspectie moeten de volgende punten worden gecontroleerd.
Alle schroeven gebruikt om het te toestel te installeren en al zijn onderdelen moeten goed vastgedraaid
zijn en mogen niet verroest zijn.
Behuizingen, vastzetstukken, installeringplaatsen (plafond, spanten, schokbrekers) mogen absoluut niet
verwrongenzijn.
Wanneer een optische lens klaarblijkelijk beschadigd is door barsten of diepe krassen, dan moet deze
vervangenworden.
De stroomkabels moeten in perfecte staat zijn en behoren vervangen te worden, wanneer er zelfs maar
een klein probleemontdekt werd.
Debinnenkantvan het toestelbehoort elk jaar gereinigdte worden met een stofzuiger ofeen luchtspuit.
Het schoonmaken van inwendige en uitwendige optische lenzen en/of spiegels moet regelmatig worden
uitgevoerd om een zo goed mogelijke lichtuitstraling te verkrijgen. Hoe vaak ze schoon moeten worden
gemaakt hangt af van de omgeving waar het toestel wordt gebruikt: een klamme, rokerige of bijzonder
vuile omgeving kan een grotereopeenhopingvan vuil veroorzaken op de optische uitrusting.
Reinig met een zachtedoek engebruiknormale glasreinigendeproducten.
Droog de onderdelenaltijdzorgvuldig af,
Reinig de uitwendigeoptische uitrusting minstens éénkeer permaand.
Reinig de inwendigeoptische uitrusting minstens omde 3 maanden.
Let op: We bevelen sterk aan dat het schoonmaken van de binnenkant wordt uitgevoerd door
vakbekwaampersoneel!!
SPECIFICATIES
Stroomvoorziening: wisselstroom 100 V~240 V50/60 Hz
Zekering: 250V 2A tragezekering (20 mm glas)
Geluidscontrole: Interne microfoon
DMXverbindingen: XLR met 3 pinnen
LED’s: 91 LED’s meteen hoge intensiteit (R31+ G30 + B30)
Straalhoek: 15° voorLED SPOT
Afmetingen: zie detekening hieronder
Gewicht: 1kg
40° voor LED WASH
JB SYSTEMS
U kan delaatste versievan deze handleiding downloadenvia Onze website: www.beglec.com
®
21/36 LED SPOT – LED WASH
JB SYSTEMS
Elke inlichtingkanveranderenzonder waarschuwing vooraf
®
22/36 LED SPOT – LED WASH
Page 14

DEUTSCH BEDIENUNGSANLEITUNG
DEUTSCH BEDIENUNGSANLEITUNG
Vielen Dank, dass Sie sich für den Erwerb dieses JBSystems®-Produkt entschieden haben. Bitte lesen sie
diese Bedienungsanleitung sorgfältig vor der Inbetriebnahme durch, zur vollen Ausschöpfung der
Möglichkeiten,die dieses Gerät bietetsowie,zu Ihrer eigenen Sicherheit.
EIGENSCHAFTEN
Das Gerät ist funkentstört und erfüllt die Anforderungen der europäischen und nationalen Bestimmungen.
Entsprechende Dokumentationliegt beimHerstellervor.
DasGerät istzur Erzeugung von dekorativemLicht sowieder Benutzung in Lightshowsbestimmt.
Stilvoller RGB LED-Scheinwerfermit 91Hochleistungs-LEDs:
LED-SPOT: Strahlungswinkel = 15°
LED-WASH:Strahlungswinkel = 40°
Viele mögliche Anwendungen:Diskotheken,DJs,Ausstellungsstände,Häuser,usw.
Sehr sanfte RGB-Farbänderungendank hochfrequenterDimmerelektronik
Unterschiedliche Arbeitsmodi:
Vollständig allein stehend: automatische oder taktsynchronisierte Farbänderungen (optionaler CA-8-
Controllermöglich)
Master/Slavemodus: Bis zu 16 Geräte können zusammen für wunderschöne, vorprogrammierte und
musiksynchronisierte Lightshows eingesetztwerden. (optionalerController CA-8 möglich)
DMX-gesteuert (4 Kanäle: R, G, B + Dimmer/Strobe) mit beliebigen Standard DMX-Controllern.
Ansteuerbar über LEDCON01 Controller
Neuartigeund extrem schnelleDMX-Adressierung:
Einfache DMX Adressierung mit jedem Standard DMX Controller
Sehr schnelleDMX Adressierungvon mehrerenEinheiten (automatischerAdressberechnung)
Kann auf jeder beliebigen Oberfläche befestigt werden, kann auch auf ALU-Trägern mit einer Standard
Klemme.
LanglebigeLED Technologie: >50.000Stunden!
VOR DER ERSTBENUTZUNG
Vor der Erstbenutzung bitte das Gerät zuerst auf Transportschäden überprüfen. Sollte das Gerät einen
Schaden aufweisen, Gerät bitte nicht benutzen, sondern unverzüglich mit ihrem Händler in Verbindung
setzen.
Wichtiger Hinweis:
dass der Benutzer sich streng an die Sicherheitshinweise und Warnungen in der Bedienungsanleitung
hält. Schäden durch unsachgemäße Handhabung sind von der Garantie ausgeschlossen. Der Händler
übernimmt keine Verantwortung für Schäden, die durch Nichtbeachtung der Bedienungsanleitung
hervorgerufen wurden.
Die Bedienungsanleitung, für zukünftiges Nachschlagen, bitte aufbewahren. Bei Verkauf oder sonstiger
Weitergabedes Gerätes,bitte Bedienungsanleitung beifügen.
Packungsinhaltprüfen:
Bitte überprüfenSie, dass die Packung folgende Einzelteileenthält:
Bedienungsanleitung
LEDScheinwerfer (Spotoder Wash)
HängenderHaltewinkel
2 Drehknöpfezur Befestigung deshängendenHaltewinkels
Sockel mit Überwurfmutter
Das Gerät hat das Werk unbeschädigt und gut verpackt verlassen. Es ist wichtig,
SICHERHEITSHINWEISE
CAUTION
Sie Reparaturen demqualifiziertenKundendienst.
Das Blitzsymbol im Dreieck weist den Benutzer darauf hin, das eine Berührungsgefahr mit nicht
isolierten Teilen im Geräteinneren, welche eine gefährliche Spannung führen, besteht. Die
Spannung ist so hoch,das hier die Gefahreines elektrischen Schlages besteht.
Das Ausrufezeichen im Dreieck weist den Benutzer auf wichtige Bedienungs- und
Wartungshinweise in denDokumenten hin, diedem Gerätbeiliegen.
DiesesSymbol bedeutet:Nur innerhalbvonRäumen verwenden.
Aus Umweltschutzgründen, Verpackungbitte wiederverwenden,oderrichtig trennen.
Zur Vermeidung von Stromschlag oder Feuer,Gerät bittenicht Regen oder Feuchtigkeitaussetzen.
Zur Vermeidung von Kondensation im Inneren des Geräts, bitte nach Transport in eine warmeUmgebung
Gerät nicht im Freienund in feuchten Räumenund Umgebungenverwenden.
Keine Metallgegenstände oder Flüssigkeiten ins Innere des Geräts gelangen lassen, Kurzschluss oder
Nichtin staubiger Umgebung verwenden undregelmäßigreinigen.
Für Kinder unerreichbar aufbewahren.
Unerfahrene Personensollen das Gerät nichtbedienen.
Umgebungstemperaturdarf40ºC nichtüberschreiten.
Sicherstellen, dass sich während des Auf- und Abbaus keine unbefugten Personen unterhalb des Geräts
Stets Netzstecker ziehen,wenn Gerät für längerenZeitraum nicht genutzt, oder es gewartetwird.
ElektrischeAnschlüssenur durch qualifiziertesFachpersonal überprüfenlassen.
Sicherstellen, dassNetzspannung mit Geräteaufkleberübereinstimmt.
Gerät nicht mitbeschädigtemNetzkabel betreiben.
Netzkabel nicht mitanderen Kabelnin Berührung kommenlassen!
Zur Einhaltung der Sicherheitsbestimmungen muss dasGerät geerdetsein.
Gerät nicht an einen Dimmeranschließen.
Ausschließlich vorschriftsmäßigeKabelzur Installationverwenden.
Gerät nicht öffnen. Abgesehenvon der Sicherung sind keine zu wartendenBauteile imGerät enthalten.
Sicherung
Bei Fehlfunktion,Gerät nicht benutzenund mit Händler in Verbindung setzen.
Bei sichtbarenBeschädigungenmüssen Gehäuseund Optik ersetztwerden.
Bei Transport bitte Originalverpackung verwenden,um Schäden am Gerät zu vermeiden.
Aus Sicherheitsgründen dürfenan dem Gerät keine unbefugten Veränderungen vorgenommenwerden.
WichtigerHinweis:
Raum befinden,die unter Epilepsieleiden.
DiesesSymbol bedeutet:Achtung!Bedienungsanleitung lesen!
einige Zeit zum Temperaturausgleich bringen. Kondensation kann zu Leistungsverlust des Gerätes oder
garBeschädigung führen.
Fehlfunktion können die Folge sein. Falls es doch einmal vorkommen sollte, bitte sofort Netzstecker
ziehen undvom Stromkreis trennen.
befinden.
niemals
reparieren oder überbrücken, sondern
Nicht direkt in die Lichtquelle blicken! Gerät nicht verwenden, wenn sich Personen im
ACHTUNG: Um sich nicht der Gefahr eines elektrischen Schlags
auszusetzen,entfernen Sie keines der Gehäuseteile. Im Geräte-inneren
befinden sich keine vomBenutzer reparierbarenTeile. Überlassen
immer
mit gleichartigerSicherung ersetzen!
JB SYSTEMS
®
23/36 LED SPOT – LED WASH
JB SYSTEMS
®
24/36 LED SPOT – LED WASH
Page 15

DEUTSCH BEDIENUNGSANLEITUNG
DEUTSCH BEDIENUNGSANLEITUNG
BESCHREIBUNG
1. Plastikabdeckungzum Schutzder LEDs
2. Hängender Haltewinkel mit Drehknöpfen auf
beiden Seiten zum Befestigen des Geräts
und ein Montageloch zum Befestigen eines
Montagehakens.
3. ¼ " Buchse zum Anschluss eines optionalen
CA-8-Controllers
4. Netzkabel
5. Sockel
6. DMX-Eingangsstecker
7. „AutoDMX-Adresse“-Taste
8. DMX-Ausgangsstecker
ELEKTRISCHE INSTALLATION + ADRESSIERUNG
Wichtig: Dieelektrische Installationsolltenur vonqualifiziertem Personaldurchgeführtwerden,
entsprechend den Vorschriftenzurelektrischen und mechanischen Sicherheit in Ihrem Land.
Elektrische Installationvon einem allein Stehenden Gerät:
Stecken Sieeinfach das Netzkabelein. Die Gerät fängt sofort an im allein Stehenden Modus zu arbeiten
Anmerkung: Sie können einen Fernsteuerungscontroller CA-8 an das Gerät anschließen, wenn Sie
zusätzlicheSteuerungsfunktionenhaben möchten.InAbschnitt„C“erfahren Siemehr darüber.
Elektrische Installationfürzwei oder mehrereGeräte imMaster/Slave-Modus:
Schließen Sie 2 bis max. 16 Geräte mit hochwertig abgeschirmten Mikrofonkabeln an (wie z.B. JB
Systems ref. 7-0063). Das Gerät, das keine Kabelverbindung an seinem DMX-Eingang besitzt, arbeitet
als „Master“,die anderen als Slave-Geräte.
VergewissernSie sich, dassalle Gerätean die Netzleitung angeschlossen wurden.
Fertig!
Anmerkung: Sie können einen Fernsteuerungscontroller CA-8 an das Gerät anschließen, wenn Sie
zusätzliche Steuerungsfunktionen haben möchten. Sie können auch den LEDCON 01 Controller
anschließen, indiesemFallmachen alle Einheiten dasgleiche (alle Einheiten habendie selbeFarbe)
Elektrische Installationvon zwei odermehreren Geräten im DMX-Modus:
Das DMX-Protokoll ist die am meisten
benutzte Hochgeschwindigkeits-
Signalübertragung, um intelligente
Lichtanlagen zu steuern. Sie müssen
Ihren DMX-Controller und alle
angeschlossenen Geräte mit einem
hochwertigen abgeschirmten Kabel
„verketten“ (z.B. JB Systems ref. 7-
0063).
Um ein merkwürdiges Verhalten der Lichteffekte durch Störungen zu verhindern,
müssen Sie die Kette mit einem 90Ω bis 40Ω Abschlusswiderstand am Ende
abschließen. BenutzenSie nie ein Y-Kabel!!!
VergewissernSie sich, dass alle Gerätean die Netzleitung angeschlossenwurden.
Jedes Gerät in der Kette benötigt eine korrekte Startadresse, damit es weiß,
welche Befehle es vom DMX-Controller dekodieren muss. Im folgenden Abschnitt erfahren Sie, wie man
die DMX-Adresseneinstellt.
Einstellen der DMX-Adressen:
Es gibt 2 Möglichkeitendie DMX-Adressen der Geräteeinzustellen.
A. Einstellender individuellenDMX-Adresse pro LED Strahler :
Stellen sie sicher, das alle Geräte mit einem DMX Kabel
verbundensind.
Schließen sie den ersten Strahler an einen universal DMX
Controlleran.
Verbinden Sie alle Einheiten mit den Netzleitungen, so dass sie
eingeschaltetsind.
Setzen sie alle DMX-Kanäle am DMX Controller auf Null (Wert
000).
Setzen Sie den DMX Kanal, den sie als DMX Anfangsadresse auf
IhrenLED Strahler zuteilen möchten, auf den maximalen Wert(Wert 255).
Drücken siekurz den “Auto DMX address” Taster (7) an demLED Strahler.
Wenn sie einen anderen angeschlossenen LED Strahler mit der selben DMX Adresse belegen
möchten, drücken sieeinfachauch den “Auto DMX address” Taster (7) an diesem Gerät.
Fertig!
Beispiel:
Wir möchtendie DMX Start Adresse eines LED Strahlers auf106 setzen:
Verbinden sie alle LED Strahler mit dem DMX Controllerwie beschrieben und stellen sie sicher,
das alle angeschaltet sind.
Setzensie alle DMX-Kanäleam DMX Controllerauf Null (Wert000).
Nun setzen sie den DMX-Kanal 106 auf Maximum(255)
Drücken sie kurz den “AutoDMX address” Taster (7) am Projektor.
Fertig! Der LED Strahler hat nun die DMXAdresse 106!
B. AutomatischeDMX-Adressierung,die mitjeder angegebenenAnfangsadresse beginnt:
Um viel Zeit zu sparen (stellen sie sich die Zeit vor, die sie für 16
Einheiten benötigen, um die DIP Schalter zu setzen....) können sie
die DMX Adressen aller Einheiten nur durch drücken eines Tasters
festlegen. Sie müssen keine Start Adresse für die Einheiten mehr
berechnen, dashaben wir für sie getan!
Stellen sie sicher, das alle Geräte mit einem DMX Kabel
verbundensind.
Schließen sie den ersten LED Strahler an einen universal DMX
Controlleran.
Verbinden Sie alleEinheiten mit den Netzleitungen, so dass sie eingeschaltetsind.
Setzen sie alle DMX-Kanäle am DMX Controller auf Null
(Wert000).
Setzen Sie den DMX Kanal, den sie als DMX Anfangsadresse auf Ihren ersten LED Strahler
zuteilen möchten,auf den maximalenWert (Wert255).
Drücken sie den “AutoDMX address” Taster(7) am ersten LED Strahlerfür 5 Sekunden.
Fertig! Der erste LED Strahler in dieser Kette hat nun die Startadresse die sie gewählt haben
und berechnet und programmiert nun die DMX Adressen der anderen LED Strahler in dieser
Kette.
Beispiel:
Wir möchtendie Adressen von 16 LED Strahler einstellen. Die erste Startadresse soll 202 sein:
Verbinden sie alle Projektoren mit dem DMX Controller wie beschrieben und stellen sie sicher,
das alle angeschaltetsind.
Setzen sie alle DMX-Kanäleam DMX Controllerauf Null (Wert000).
Nun setzen sie den DMX-Kanal 202 auf Maximum (Wert255)
Drücken sie den “Auto DMX address” Taster (7) am ersten Projektor in dieser Kette für 5
Sekunden
Fertig! Der erste LED Strahler in dieser Kette hat nun die Startadresse 202. Nun werden
automatisch die DMX Adressen der anderen 15 LED Strahler in dieser Kette berechnet und
programmiert! Das bedeutet, das der zweite LED Strahler automatisch die Startadresse 206,
der dritte die Adresse 210, …erhält. Das geht solange, bis der letzte (der 16) LED Strahler
automatischdie Startadresse 262 erhält. Nun sind die 16 LED Strahler programmiert,das dauert
nur ca. 10 Sekunden!!!
JB SYSTEMS
®
25/36 LED SPOT – LED WASH
JB SYSTEMS
®
26/36 LED SPOT – LED WASH
Page 16

DEUTSCH BEDIENUNGSANLEITUNG
DEUTSCH BEDIENUNGSANLEITUNG
ACHTUNG: Sie könnenauch diese LED Strahler mit anderen DMX Geräten verwenden, die nicht
diese Automatik Funktion haben. Dann müssen sie allerdings die DMX Adresse dieser Geräte
manuelleinstellen!
ÜBERKOPF-MONTAGE
Wichtig: Montage ausschließlich durch qualifiziertes Fachpersonal durchführen lassen.
Unvorschriftsmäßiger Einbau kann erhebliche Verletzungen und/oder Schäden verursachen.
Überkopf-Montage verlangt entsprechende Erfahrung! Belastungsgrenzen müssen beachtet
werden, geeignetes Installationsmaterial muß verwendet werden und das installierte Gerät muß in
regelmäßigenAbständenüberprüftwerden.
Sicherstellen, dass sich keine unbefugtenPersonen unterhalb des Geräts befinden, während es installiert
oder gewartet wird.
Gerät außerhalb der Reichweitevon Personen, und nicht in niedrigen Durchgängen oder in der Nähe von
Sitzgelegenheiteninstallieren.
Vor Montage sicherstellen, dass die gewählte Position wenigstens das 10-fache Gerätegewicht
aufnehmenkann.
Zur Aufhängung stets geeignetes Befestigungsmaterial verwenden, das das 12-fache Gerätegewicht
aushalten kann. Eine zweite Sicherungsaufhängung muß angebracht werden, die ein Absacken des
Geräts vonmehr als 20 cm verhindert,sollte die Befestigung brechen.
Gerät gut befestigen. Eine freischwingende Aufhängung ist gefährlich und sollte auf gar keinen Fall in
Betrachtgezogen werden!
Betreiber muß sicherstellen, dass die sicherheitsrelevanten und technischen Installationen vor Erstbetrieb
fachmännischvorgenommenworden sind.
Installationen sollten jährlich durch qualifiziertes Fachpersonal inspiziert werden, um jederzeit einen
sicherenBetrieb zugewährleisten.
3 unterschiedlicheBefestigungsmethoden sindmöglich:
Befestigung aneinem Träger: Benutzen Sieeine optionaleTrägerklemmplatte.
Deckenbefestigungoder Wandbefestigung:VerwendenSie 2 passende Schrauben, umden Sockel(5)
an einerWand oder an einer Decke zu befestigen.
Auf einer horizontalen Oberfläche: Befestigen Sie das Gerät auf dem mitgelieferten Sockel (5) und
stellen es aufeine stabile, horizontaleOberfläche.
Auf einer horizontalen
Oberflächebefestigt
Befestigungan der
Decke oderWand
Befestigungan einem
Träger (zB. ALU Truss)
C. Anschließendes optionalenFernbedienungscontroller CA-8 für mehrSteuerungsmöglichkeiten:
Der Fernbedienungs-Controller CA-8 kann nur im allein Stehenden oder Master/Slavemodus benutzt
werden. Schließen Sie den Controller an den Eingang des CA-8 des ersten Geräts an (Master). Jetzt
können Sie alle angeschlossenen Geräte steuern:
Wenn Siediesen LED Projektor miteinem CA-8 Controller nutzen und den MANUAL Mode
WichtigerHinweis:
(Mode LED = AN) gedrückthaben, erinnertsich der Projektor an die letzte Szene diemit
diesemCA-8 Controller abgelaufen ist, auch wenn Sie den Controller oder die
Spannungentfernen. WennSie das nicht möchten,stellen Sie sicher das Sie in einem
anderen Modus sind(dieMODELED muß blinken oder aus sein) bevor sie den Controller
entfernen.
TASTE AKTIONEN
BEREITSCHAFT
FUNKTION
MODUS
Strobe
1. SynchronerStrobe
in weißerFarbe
2. SynchronerStrobe
ingleichefarbe
3. SynchronerStrobe
inverschiedene
farben
Ton 1
(LED AUS)
BlackoutallerGeräte
Auswahl: 9
Farben
WeißRot
BlauPurpurrot
GelbMagenta
Cyan-blau
Manuell
(LED EIN)
OrangeGrün
Chasefarbe
1.Die gleiche Farbe
2.Unterschiedliche
Farbe
3. Eine Lampe Chase
4. Chasemit zwei
Lampen
5. Chasemit vier
Lampen
Ton 2
(LED blinkt langsam)
Farbfade
1. hohe
Geschwindigkeit
2.Mittlere
Geschwindigkeit
3. Langsam
Automatisch
(LED blinkt schnell)
D. Steuerung mit einem universellen DMX-
Controller:
Schließen Sie alle Geräte an. Lesen Sie den
Abschnitt „Elektrische Installation von zwei
oder mehreren Geräten im DMX-Modus“,
um zu erfahren, wie man die Geräte
anschließt (Vergessen nicht, alle Geräte
richtig zuadressieren!)
Schließen Sie alle Geräte an die Netzleitung
an undschalten den DMX-Controller ein.
Da jedes Gerät seine eigene DMX-Adresse
hat, kann es einzeln gesteuert werden.
VergessenSie nicht, dass jedes Gerät 4 DMXKanäle besitzt,s. DMX-Diagrammunten:
BEDIENUNGSANLEITUNG
A. Alleinstehendes Gerät:
Schließen Sie Ihr Gerät einfach an die Netzleitung an und schalten Musik ein. Das Gerät fängt
automatisch zum Rhythmus der Musik zu arbeiten an.
Anmerkung: Sie können einen Fernsteuerungscontroller CA-8 an das Gerät anschließen, wenn Sie
zusätzlicheSteuerungsfunktionenhabenmöchten.
B. Zwei oder mehr Gerätein der Master/Slaveeinstellung:
Schließen Sie 2 bis max. 16 Geräte zusammen an. Lesen Sie den Abschnitt „elektrische Installation“,
um zu erfahren, wie man die Geräte anschließt (Vergessen Sie nicht, alle Geräte richtig zu
adressieren!)
Schließen Sie Ihr Gerät einfach an die Netzleitung an und schalten Musik ein. Die Geräte fangen
automatischzum Rhythmus derMusik zu arbeitenan und spielen die internen Chaseprogramme ab.
Anmerkung: Sie können einen Fernsteuerungscontroller CA-8 an das Gerät anschließen, wenn Sie
zusätzlicheSteuerungsfunktionenhabenmöchten.
JB SYSTEMS
®
27/36 LED SPOT – LED WASH
WARTUNG UND INSTANDHALTUNG
Sicherstellen, dass sich keine unbefugten Personenunterhalb des Geräts befinden,während es gewartet
wird.
Gerät ausschalten und Netzsteckerziehen.
Während der Wartungsind folgende Punkte ganz besonderszu beachten:
Sämtliche Schrauben zur Installation und Befestigung jeglicher Teile müssen fest angezogen und rostfrei
sein.
Gehäuse, Befestigungsmaterialien und Aufhängungen (Decke, Balken, abgehängte Decken) dürfen keine
AnzeichenvonVerformungzeigen.
JB SYSTEMS
®
28/36 LED SPOT – LED WASH
Page 17

DEUTSCH BEDIENUNGSANLEITUNG
Ist die Optik sichtbar beschädigt (Sprünge oder tiefe Kratzer), dann müssen die entsprechenden Teile
ausgewechseltwerden.
Netzkabel muß stets in einwandfreiem Zustand sein und selbst bei kleinsten Beschädigungen erneuert
werden.
Gerät innen mindestens einmal proJahr mit Staubsaugeroder Airjetreinigen.
Reinigung der inneren und äußeren optischen Linsen und/oder Spiegel müssen in regelmäßigen
Abständen zur Beibehaltung einer optimalen Lichtausbeute vorgenommen werden. Reinigungsintervalle
hängen stark von der Umgebung ab: feuchte, verrauchte und besonders verschmutzte Umgebung führen
zu größererVerschmutzungauf den Linsen.
Mit weichem Tuch undgewöhnlichem Glasreinigersäubern.
Alle Teilestets gut abtrocknen.
ÄußereOptik mindestensalle 30 Tage säubern.
InnereOptik mindestens alle90 Tage säubern.
Achtung: Wir empfehlen dringend, Reinigung im Innern des Geräts nur von qualifiziertem Personal
durchführen zulassen!
SPEZIFIKATIONEN
Netzspannung: Wechselstrom100V~240V50/60Hz
Sicherung: 250V 2Aträge Sicherung (20mm Glas)
Klangregler: eingebautesMikrofon
DMX-Anschlüsse: XLR 3-polig
LED: 91Hochleistungs-LEDs(R31 + G30 + B30)
Strahlungswinkel: 15° für LED SPOT
Abmessungen: s.Abb. unten
Gewicht: 1kg
40° für LED WASH
SPANISH MANUAL DO UTILIZADOR
Gracias porla compra de este producto JB Systems®. Para sacar todo el rendimientode las posibilidades de
esteaparato y porsu propiaseguridad, por favor lea este manual de instruccionescon mucho cuidado antes
de utilizaresta unidad.
CARACTERÍSTICAS
Esta unidad no interfiere con señales de radio. Este producto cumple las exigencias de las directrices
actuales Europeas y nacionales. Se ha establecido conformidad y las declaraciones y documentos
relevantes se han depositado por el fabricante.
Este aparato ha sido diseñado para producir efecto de iluminación decorativa y se usa en sistemas de
iluminaciónde espectáculos.
EleganteproyectorLED RGB con 91 LED de alta potencia:
LED-SPOT: Ángulo deiluminación = 15°
LED-WASH:Ángulo de iluminación = 40°
Muchasposiblesaplicaciones: Discotecas, DJs, salas de exposición, casas,...
Cambios de color RGBmuy suaves gracias a electrónica de suavizado de alta frecuencia
Distintosmodosde funcionamiento:
Totalmente independiente: cambios de color automáticos o sincronizados con el ritmo (controlador
CA-8 opcional)
Modo maestro/esclavo: pueden usarse hasta 16 unidades conjuntamente para espectáculos
luminosospreprogramadosy sincronizados con música. (controlador CA-8 opcional)
Controlado por DMX (4 canales: R, G, B + suavizador/estroboscopio) con cualquier controlador de
estándarDMX.
Controlado porLEDCON01
DireccionamientoDMX innovador y extremadamente rápido:
DireccionamientoDMX muy facil porunidad con controlador DMXestándar
DirecciónamientoDMXrapidisimo paravarias unidades (cálculode dirección automático)
Puedefijarse a cualquier superficie,también puede fijarsecon ALUTRUSS con fijaciones estándar.
TecnologíaLEDde larga duración:>50.000 horas
TechnischeÄnderungen könnenauch ohne Vorankündigungvorgenommenwerden!
Sie könnensichdie neueste Version dieses Benutzerhandbuchesvon unserer Website
JB SYSTEMS
®
herunterladen: www.beglec.com
29/36 LED SPOT – LED WASH
ANTES DEL USO
Antes de utilizar esta unidad, por favor compruebe que no hay daños causados por el transporte. En caso
contrario,no utilice este aparato y consulte a su vendedor.
Importante:
necesariopor parte del usuarioseguir estrictamente las instrucciones de seguridad y advertencias de este
manual. Cualquier daño causado por manejo inadecuadono estará sujeto a la garantía. El vendedor no
aceptará responsabilidad por ningunos defectos o problemas que resulten de ignorar este manual del
usuario.
Mantenga este folleto en un lugar seguro para consultas futuras. Si vende esta instalación, asegúrese de
añadir este manual deusuario.
Para proteger el medio ambiente, por favor intente reciclar el material de empaquetado tanto como sea
posible.
Compruebeel contenido:
Compruebeque lacaja contienelos siguientesítems:
Instrucciones de manejo
Proyector LED (SPOT oWASH)
Soporte para colgar
2 roscas parafijar el soporte para colgar
Placabase con tuerca
JB SYSTEMS
Este aparato salio de la empresa en perfecto estado y bien empaquetado. Es absolutamente
®
30/36 LED SPOT – LED WASH
Page 18

SPANISH MANUAL DO UTILIZADOR
SPANISH MANUAL DO UTILIZADOR
INSTRUCCIONES DE SEGURIDAD:
CAUTION
El simbolo de un rayo en el interior de un triangulo alerta sobre la presencia o el uso de elementos
no isolados donde un voltaje peligroso constituye un riesgo grande para causar una eventual
electrocución.
El punto de exclamaciónen el interior de un triangulo alerta al usuario sobre la presencia de
importantesinstrucciones de operación y de mantenimientotenidas en cuenta en el manualde uso.
Este símbolosignifica: uso parael interiorsolamente.
Estesímbolo significa : Lealas instrucciones.
Afín de evitar todo riesgo de incendio o electrocución, no exponer el aparato a la lluvia o ambiente
humedo.
Para evitar fuego o riesgos dedescargas noexponga esteaparato a la lluvia o humedad.
Para evitar que se forme condensación en el interior, permita que la unidad se adapte a las temperaturas
circundantes cuando lalleve a una habitación cálida después detransporte. Condensación algunas veces
impide quela unidad funcione arendimiento plenoo puede inclusocausardaños.
Esta unidades sólo para uso interior.
No coloque objetos metálicos o derrame líquidos dentro de la unidad. Podría resultar descarga eléctrica o
mal funcionamiento. Si un objeto extraño entrara en la unidad, desconecte inmediatamente la fuente de
alimentación.
Evite su uso en ambientes polvorientosy limpie la unidad regularmente.
Mantenga la unidad alejadade los niños.
Personas sin experienciano deberían manejareste aparato.
Latemperatura máximade ambientees 40°C. No use esta unidada temperaturas máselevadas.
Asegúrese de que el área por debajo del sitio de instalación está libre de personas ajenas durante el
montaje,desmontaje y reparación.
Siempre desenchufe la unidad cuando no la use por un periodo de tiempo largo o antes de cambiar la
bombillao comenzar una reparación.
Lainstalación eléctrica debería ser llevada a cabo sólo por personal cualificado,acorde a las regulaciones
paraseguridad eléctrica y mecánica desu país.
Compruebeque elvoltaje disponibleno es superior al que aparece en el paneltrasero de la unidad.
El cable de alimentación debería estar siempre en perfectas condiciones: apague la unidad
inmediatamentecuando el cable de alimentación esté rotoo dañado.
¡Nunca deje el cable de alimentaciónentrar en contacto con otros cables!
Esta instalación debe ser conectadaa tierra para cumplircon las regulaciones de seguridad.
Noconecte launidad a ningún paquete dereducción deluz.
Siempreuse un cable de seguridad apropiado y certificadocuando instale la unidad.
Para prevenir descargas eléctricas, no abra la tapa. Aparte de la fusibles principales no hay partes que
puedan ser reparadas por el usuario en su interior.
Nunca
repare un fusible o haga un bypass al fusible. ¡
del mismo tipo y especificaciones eléctricas!
En el caso de problemas serios de manejo, deje de usar la instalación y contacte con su vendedor
inmediatamente.
Lacarcasa y las lentesdeben ser cambiadassi hay daño visible.
Por favor, use el empaquetado originalcuando el aparato deba ser transportado.
Debidoa motivos de seguridadestá prohibido hacer modificaciones sin autorizara la unidad.
Importante: ¡Nunca mire directamente a la fuente de luz! No use el efecto en presencia de personas que
sufran de epilepsia.
PRECAUCIÓN: Para reducir el riesgo de electrocución, no quite la
cubierta superior . Ninguna pieza usable adentro para el utilizador.
Dirijase unicamentea personal cualificado.
Siempre
sustituya el fusible dañadopor un fusible
DESCRIPCIÓN:
1. La cubiertade plástico protege los LED
2. El soporte paracolgar con roscas en
amboslados para ajustar la unidad yun
agujero demontaje para ajustar un gancho
de montaje.
3. Toma de ¼” usada para conectar el
controladoropcional CA-8
4. Cable de alimentación
5. Placa base
6. Conectorde entrada DMX
7. Botón “AutodireccionamientoDMX”
8. Conectorde salida DMX
INSTALACIÓN ELÉCTRICA + DIRECCIONAMIENTO
Importante: La instalación eléctrica debe ser realizada exclusivamente por personal
cualificado,según las normas de seguridadeléctrica y mecánica en vigor en su país.
Instalacióneléctrica para 1 unidadindependiente:
Introduzca el cable de alimentación. La unidad empezará a funcionar de inmediato en modo
independiente
Observación: Puede conectar un controlador remoto CA-8 a la unidad si desea tener más control.
Consulte lasección “C”para aprender ahacerlo.
Instalación eléctricopara dos omás unidades en modomaestro/esclavo:
Conecte de2 a un máximo de 16 unidades conjuntamente usando cables de micrófono balanceadosde
buena calidad (como, por ejemplo, JB Systems ref. 7-0063). La unidad que no tenga ningún cable
conectadoa la entradaDMX funcionará como “maestro”, y las demás como unidadesesclavas.
Asegúresede que todas las unidades estén conectadasa la corriente.
¡Hecho!
Observación: Puedeconectar uncontrolador remotoCA-8 a la unidad maestra sideseatener más control
delfuncionamientomaestro/esclavo.
Instalación eléctrica para dos o más unidadesen modoDMX:
El protocolo DMX es una señal de
alta velocidad muy utilizada para
controlar equipamiento de
iluminación inteligente. Necesita
“encadenar” su controlador DMX y
todas las unidades conectadas con
un cable balanceado de buena
calidad (ej. JB Systems ref. 7-0063).
Para evitar un funcionamiento
anormalde los efectos deluz debidos a interferencias, debe usarun terminal de 90Ω a 40Ω al final de la
cadena.No use nunca cables divisores enY, no funcionará.
Asegúresede que todas las unidades estén conectadasa la corriente.
Cada efecto de luz de la cadena necesita una dirección de inicio adecuada de
modo quesepa los comandos del controladorque debe descodificar.En la sección
siguiente aprenderáa establecerlas direcciones DMX.
Entrada DMX
Terminal: 40 ohmios 1/4V
Resistencia
90~40ohmios
JB SYSTEMS
®
31/36 LED SPOT – LED WASH
JB SYSTEMS
®
32/36 LED SPOT – LED WASH
Page 19

SPANISH MANUAL DO UTILIZADOR
SPANISH MANUAL DO UTILIZADOR
Cómoestablecer las direcciones DMX:
Hay 2 formasde establecer las direcciones DMX.
A. Ajuste individual de dirrecciones por foco:
Asegurarse que todas las unidades esténcableadas.
Conectar la primeraunidad a un controlador DMX universal.
Enchufar todas las unidades a la red.
Colocar todos los deslizantes de su controlador DMX en cero
(valor 000).
Posicionar el deslizante del canal DMX que desea como
dirección de arranqueal maximo(valor 255)
Pulsar brevemente el botón “Auto DMX address” (7) del
proyectorLED .
Si desea dar a otro proyector esta misma dirección, pulsar simplemente el botón ” Auto DMX
address” (7) y recibira la misma.
¡Hecho!
Un ejemplo para quequede claro:
Queremosdar la dirección DMXde arranque 106 al proyectorLED.
Conectar el proyector al controlador y asegurarse queestán encendidos.
Colocar todoslos canales DMXdelcontrolador encero (000).
Ajustar elcanal DMX106 al maximo(255).
Pulsar brevementeel botón “AutoDMX address” (7) del proyector LED.
¡Hecho! Su proyector lleva ahora la direcciónDMX 106.
B. DireccionamientoDMX automatico, a partir de cualquierdirección dearranque:
Para ahorrar mucho tiempo (imagine el tiempo que lleva colocar los interruptores DIP de 16
unidades…) usted puede fijar las direcciones DMX de todas las unidades en la cadena-DMX justo
pulsando un botón. Ninguna necesidad de calcular individualmente la dirección de arranque de
cadaunidad,
¡Cerciórarse de que TODOS LOS DIP-switches estén en
posición OFF!
Asegurarse que todas las unidades esténcableadas.
Conectar la primera unidad a un controlador DMX universal.
Enchufar todas las unidades a la red.
Colocar todos los deslizantes de su controlador DMX en cero
(valor 000).
Posicionar el deslizante del canal DMX que desea como
dirección de arranqueal maximo(valor 255)
Pulsar durante5 segundos el botón “AutoDMX adress” (7) del proyectorLED
¡Hecho! El primer proyectorde la cadena recibe ladireccion de arranque deseada y ya están
automáticamente calculadas y programadas las direcciones DMX de las otras unidades de la
cadena-DMX!
Un ejemplo para quequede claro:
Queremos dar la dirección de arranque para 16 unidades, la dirección de arranque del primer
proyectorsera 202:
Conectar todos los proyectoresal controlador DMXy asegurese que está todoencendido.
Colocar todoslos deslizantes de su controlador DMX en cero(000)
Ajustar elcanal DMX 202 al maximo(255)
Pulsar durante 5 segundos el botón “AutoDMX adress” (7) del proyectorLED
¡Hecho! El primer proyector de la cadena recibe la dirección de arranque 202 y ya están
automáticamente calculadasy programadas las direcciones de las otras unidades de la cadenaDMX! Asi el 2ndproyector recibe automáticamente la dirección 206, el 3rla dirección
210,...,hastael 16thproyectorque automáticamenterecibe la direcciónde arranque262.
Usted acabade programar 16 proyectores,¡estole costó 10 segundos!!!
Observación:usted puede mezclarlasunidadescon otros efectosDMXque no tenganla opción de
direccionamientoautomático. ¡Eneste caso usted tieneque ajustar las direcciones DMX deestos efectosDMXmanualmente!
APAREJADO SUPERIOR
Importante: La instalación debe ser llevada a cabo sólo por personal cualificado. Una instalación
impropiapodría resultar en serias heridas y/o daño a la propiedad. ¡El aparejadosuperior requiere
una larga experiencia! Los límites de las cargas de trabajo deben respetarse, materiales
certificados de instalación deben ser usados, el aparato instalado debería ser inspeccionado
regularmente por seguridad.
Asegúrese de que el área por debajo del sitio de instalación está libre de personas ajenas durante el
montaje,desmontaje y reparación.
El aparato debería ser instalado fuera del alcance de la gente y fuera de áreas donde personas puedan
caminar osentarse.
Antes del aparejado asegúrese de que el área de instalación puede soportar un mínimo punto de carga
de 10 veces el peso del aparato.
Siempre use un cable de seguridad certificado que pueda sostener 12 veces el peso del aparato. Este
añadido secundario de seguridad debería ser instalado de una forma que no hubiera parte de la
instalaciónque pudieracaer más de 20cmsi el añadido principalfalla.
El aparato debe ser bien fijado, ¡un montaje que se mueva con libertad es peligroso y no debe
considerarse!
El operador tiene que asegurarse de que las instalaciones relativas a seguridad, maquinaria y técnica
están aprobadas por un experto antes de usarlas la primera vez. Las instalaciones deberían ser
inspeccionadas cada año por una persona con conocimientos para asegurar que la seguridad es todavía
óptima.
Puedenrealizarse3 métodosde fijación posibles:
Fijación a techo: use una fijación para bastidor opcional.
Fijación a paredo bastidor: use 2 tornillos adaptadospara fijasla placa base (5) a una pared o techo.
En una superficie horizontal: fije la unidad sobre la placa base incluida (5) y póngala sobre una
superficie estable y horizontal.
Sobre unasuperficie
horizontal
Fijación a paredo
bastidor
Fijación a techo
INSTRUCCIONES DE USO
A. 1 unidadindependiente:
Conectela unidad a la corriente y ponga música. La unidad empezará a funcionarautomáticamenteal
ritmo dela música.
Observación:Puede conectarun controlador remotoCA-8 a launidad si desea más control.
B. Dos o más unidadesen configuración maestro/esclavo:
Conecte de 2 a un máximo de 16 unidades juntas. Consulte el capítulo “instalación eléctrica” para
aprendera hacerlo (no olvidedireccional adecuadamentetodas las unidades)
Conecte todas las unidades a la corriente y ponga música. Las unidades empezarán a funcionar
automáticamente alritmo de la música y mostrarán losprogramas de seguimiento internos.
Observación: Puede conectar un controlador remoto CA-8 a la unidad maestra si desea más control
sobreelfuncionamientomaestro/esclavo.
C. Conecte el controlador opcional CA-8 para más control:
El controlador CA-8 sólo puede usarse en modo independiente o maestro/esclavo. Conecte el
controladora laentrada CA-8 de la primera unidad (maestra).Ahora puede controlar todas las unidades
conectadas:
JB SYSTEMS
®
33/36 LED SPOT – LED WASH
JB SYSTEMS
®
34/36 LED SPOT – LED WASH
Page 20

SPANISH MANUAL DO UTILIZADOR
SPANISH MANUAL DO UTILIZADOR
Cuando utiliza este LED PROYECTOR con un controladorCA 8 y selecciona el modo
OBSERVACIÓN IMPORTANTE:
MANUAL( modo LED = ON ), el proyector guarda el último ajuste delcontrolador, aún
después de desconectar el controladoro la redeléctrica. Si usted no desea este,
asegúresedeseleccionar otro modo ( modo LED debe parpadearo apagado) antes de
reconectar elcontrolador.
BOTÓN ACCIONES
ESPERA Para apagar todaslas luces
FUNCIÓN
MODO
Estroboscopio
1.Estroboscopio
sincronizadoen
blanco
2.Mismoseguimiento
decolores
3.Estroboscopiode
distintocolor
Sonido 1
(LED APAGADO)
Selección de 9
colores
BlancoRojo
AzulPúrpura
NaranjaVerde
Amarillo
MagentaCian
Manual
(LED
ENCENDIDO)
D. Controlado por controlador DMX
universal:
Conecte todas las unidades juntas.
Consulte el capítulo “Instalación eléctrica
para dos o más unidades en modo DMX”
para aprender a hacerlo (no olvide
direccional adecuadamente todas las
unidades)
Conecte todas las unidades a la
corrientey encienda el controladorDMX.
Como cada unidad tiene su propia
dirección DMX, puede controlarlas
individualmente. Recuerde que cada
unidad usa 4 canales DMX, comose indica
en la tablaDMX siguiente:
Seguimientodecolor
1.Mismo color
2.Distintocolor
3. Seguimiento de una
luz
4. Seguimientode dos
luces
5. Seguimiento de
cuatroluces
Sonido 2
(LED parpadeo lento)
Fundidode color
1.Velocidad rápida
2.Velocidad media
3.Velocidad lenta
Auto
(LED parpadeo
rápido)
La limpieza de lentes y/o espejos internos y externos debe ser llevada a cabo periódicamente para
optimizar la salida de luz. La frecuencia de limpieza depende del ambiente en el cual la instalación está
funcionando: húmedo, con humo o con alrededores particularmente sucios puede causar una mayor
acumulación depolvo enlas ópticas de la unidad.
Limpie con un traposuave usando productos limpiadoresnormales decristal.
Seque siemprelas partescuidadosamente.
Limpie las ópticas externasal menos una vezcada 30 días.
Limpie las ópticas internas al menoscasa 90 días.
Atención: ¡Recomendamos con insistencia que la limpieza interna sea llevada a cabo por personal
cualificado!
ESPECIFICACIONES
Entrada de corriente: CA100V~240V50/60Hz
Fusible: 250V 2A caídalenta (cristal 20mm)
Control de sonido: Micrófonointerno
Conexiones DMX: XLR3pin
LED: 91 LED dealta potencia (R31+ G30 + B30)
Ángulo de iluminación: 15° paraLED FOCO
Tamaño: ver imagen siguiente
Peso: 1kg
40° paraLED BARRIDO
MANTENIMIENTO
Asegúrese de que el área por debajo del por debajo del sitio de instalación está libre de personas ajenas
durante lareparación.
Apague la unidad y desconecteel cable de alimentación.
Durante la inspección los siguientes puntosdeben ser comprobados:
Todoslos tornillos usados para la instalación del aparatoy cualquierade sus partes deben ser apretados
fuertemente y no pueden estarcorroídos.
Carcasas,fijacionesy puntos de instalación (techos, armaduras, suspensiones) deberán estar totalmente
libres de ningunadeformación.
Cuando una lente óptica esté visiblemente dañada debido a golpes o rayados profundos, debe ser
cambiada.
Los cables principales deben estar en una condición impecable y deben ser cambiados de inmediato
cuando inclusoun pequeñoproblema se detecte.
El interiordel aparato deberíaser limpiado anualmente usandouna aspiradora o máquina de aire.
JB SYSTEMS
®
35/36 LED SPOT – LED WASH
Puede descargarla últimaversión deeste manual de usuario en nuestro sitio web: www.beglec.com
Toda la información está sujeta a cambios sinprevioaviso
JB SYSTEMS
®
36/36 LED SPOT – LED WASH
 Loading...