

Page 1
Page 2
Page 3
ENGLISH OPERATION MANUAL
OPERATION MANUAL
Thank you for buying this JB Systems®product. To take full advantage of all possibilities and for your own
safety, please read these operating instructions very carefully before you start using this unit.
FEATURES
This unit is radio-interference suppressed. This product meets the requirements of the current European and
national guidelines. Conformity has been established and the relevant statements and documents have been
deposited by the manufacturer.
This device was designed to produce decorative effect lighting and is used in light show systems.
The professional “high power” version of the very famous LED W aterwave effect, based on a 50 Watt LED
This makes it suitable for use in bigger clubs and on stage.
Different working modes:
o
Standalone: no DMX-controller needed.
o
Master/slave: wonderful synchronized shows, no DMX-controller needed.
o
DMX: 3 channels (speed, color, dimmer)
Compatible with CA-8: wired remote for improved master/slave control
LED-display for easy navigation in the setup menu
High efficiency and low power consumption, only 80Watt
Mains IEC in/outputs for easy linking using optional IEC cables or combi cables
BEFORE USE
Before you start using this unit, please check if there’s no transportation damage. Should there be any, do
not use the device and consult your dealer first.
Important: This device left our factory in perfect condition and well packaged. It is absolutely necessary
for the user to strictly follow the safety instructions and warnings in this user manual. Any damage caused
by mishandling is not subject to warranty. The dealer will not accept responsibility for any resulting defects
or problems caused by disregarding this user manual.
Keep this booklet in a safe place for future consultation. If you sell the fixture, be sure to add this user
manual.
Check the contents:
Check that the carton contains the following items:
Operating instructions
Led Seawave 50W
Mains Cable
SAFETY INSTRUCTIONS:
CAUTION: To reduce the risk of electric shock, do not remove
the top cover. No user-serviceable parts inside. Refer servicing
to qualified service personnel only.
The lightning flash with arrowhead symbol within the equilateral triangle is intended to alert the
use or the presence of un-insulated “dangerous voltage” within the product’s enclosure that may
be of sufficient magnitude to constitute a risk of electric shock.
The exclamation point within the equilateral triangle is intended to alert the user to the presence
of important operation and maintenance (servicing) instructions in the literature accompanying
this appliance.
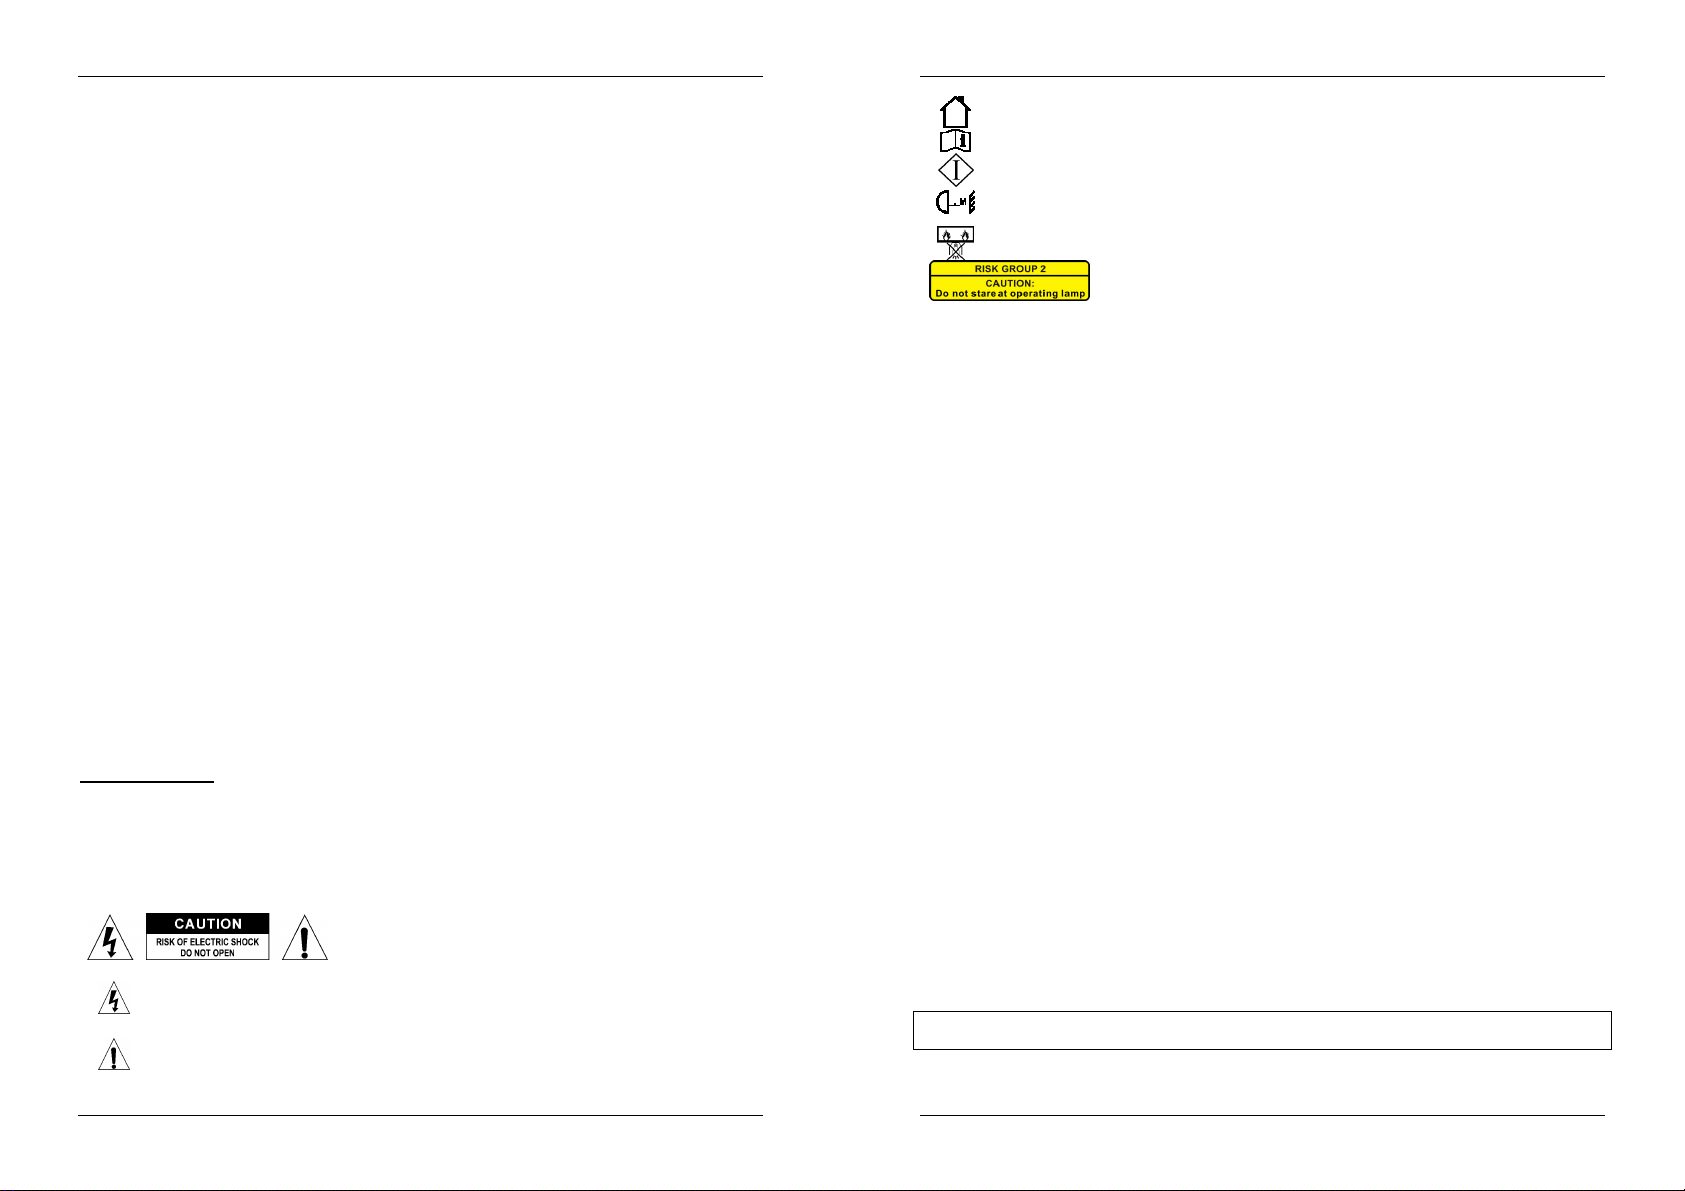
This symbol means: indoor use only
This symbol means: Read instructions
ENGLISH OPERATION MANUAL
This symbol means: Safety Class I appliance
This symbol determines: the minimum distance from lighted objects. The minimum distance
between light-output and the illuminated surface must be more than 1 meter
The device is not suitable for direct mounting on normally flammable surfaces. (suitable only for
mounting on non-combustible surfaces)
CAUTION: Do not stare at operating lamp.
May be harmful to the eyes.
To protect the environment, please try to recycle the packing material as much as possible.
To prevent fire or shock hazard, do not expose this appliance to rain or moisture.
To avoid condensation to be formed inside, allow the unit to adapt to the surrounding temperatures when
bringing it into a warm room after transport. Condense sometimes prevents the unit from working at full
performance or may even cause damages.
This unit is for indoor use only.
Don’t place metal objects or spill liquid inside the unit. Electric shock or malfunction may result. If a foreign
object enters the unit, immediately disconnect the mains power.
Locate the fixture in a well ventilated spot, away from any flammable materials and/or liquids. The fixture
must be fixed at least 50cm from surrounding walls.
Don’t cover any ventilation openings as this may result in overheating.
Prevent use in dusty environments and clean the unit regularly.
Keep the unit away from children.
Inexperienced persons should not operate this device.
Maximum safe ambient temperature is 40°C. Don’t use this unit at higher ambient temperatures.
Make sure the area below the installation place is free from unwanted persons during rigging, de-rigging
and servicing.
Allow the device about 10 minutes to cool down before to start servicing.
Always unplug the unit when it is not used for a longer time or before to start servicing.
The electrical installation should be carried out by qualified personal only, according to the regulations for
electrical and mechanical safety in your country.
Check that the available voltage is not higher than the one stated on the unit.
The power cord should always be in perfect condition. Switch the unit immediately off when the power cord
is squashed or damaged. It must be replaced by the manufacturer, its service agent or similarly qualified
persons in order to avoid a hazard.
Never let the power-cord come into contact with other cables!
This fixture must be earthed in order to comply with safety regulations.
Don’t connect the unit to any dimmer pack.
Always use an appropriate and certified safety cable when installing the unit.
In order to prevent electric shock, do not open the cover. There are no user serviceable parts inside.
Never repair a fuse or bypass the fuse holder. Always replace a damaged fuse with a fuse of the same
type and electrical specifications!
In the event of serious operating problems, stop using the fixture and contact your dealer immediately.
The housing and the lenses must be replaced if they are visibly damaged.
Please use the original packing when the device is to be transported.
Due to safety reasons it is prohibited to make unauthorized modifications to the unit.
Important: Never look directly into the light source! Don’t use the effect in the presence of persons suffering
from epilepsy.
OVERHEAD RIGGING
Important: The installation must be carried out by qualified service personal only. Improper
installation can result in serious injuries and/or damage to property. Overhead rigging requires
extensive experience! Working load limits should be respected, certified installation materials
should be used, the installed device should be inspected regularly for safety.
Make sure the area below the installation place is free from unwanted persons during rigging, de-rigging
and servicing.
Locate the fixture in a well ventilated spot, far away from any flammable materials and/or liquids. The
JB SYSTEMS
®
1/41 LED SEAWAVE 50W
JB SYSTEMS
®
2/41 LED SEAWAVE 50W
Page 4
ENGLISH OPERATION MANUAL
ENGLISH OPERATION MANUAL
fixture must be fixed at least 50cm from surrounding walls.
The device should be installed out of reach of people and outside areas where persons may walk by or be
seated.
Before rigging make sure that the installation area can hold a minimum point load of 10times the device’s
weight.
Always use a certified safety cable that can hold 12times the weight of the device when installing the unit.
This secondary safety attachment should be installed in a way that no part of the installation can drop
more than 20cm if the main attachment fails.
The device should be well fixed; a free-swinging mounting is dangerous and may not be considered!
Don’t cover any ventilation openings as this may result in overheating.
The operator has to make sure that the safety-relating and machine-technical installations are approved by
an expert before using them for the first time. The installations should be inspected every year by a skilled
person to be sure that safety is still optimal.
DESCRIPTION:
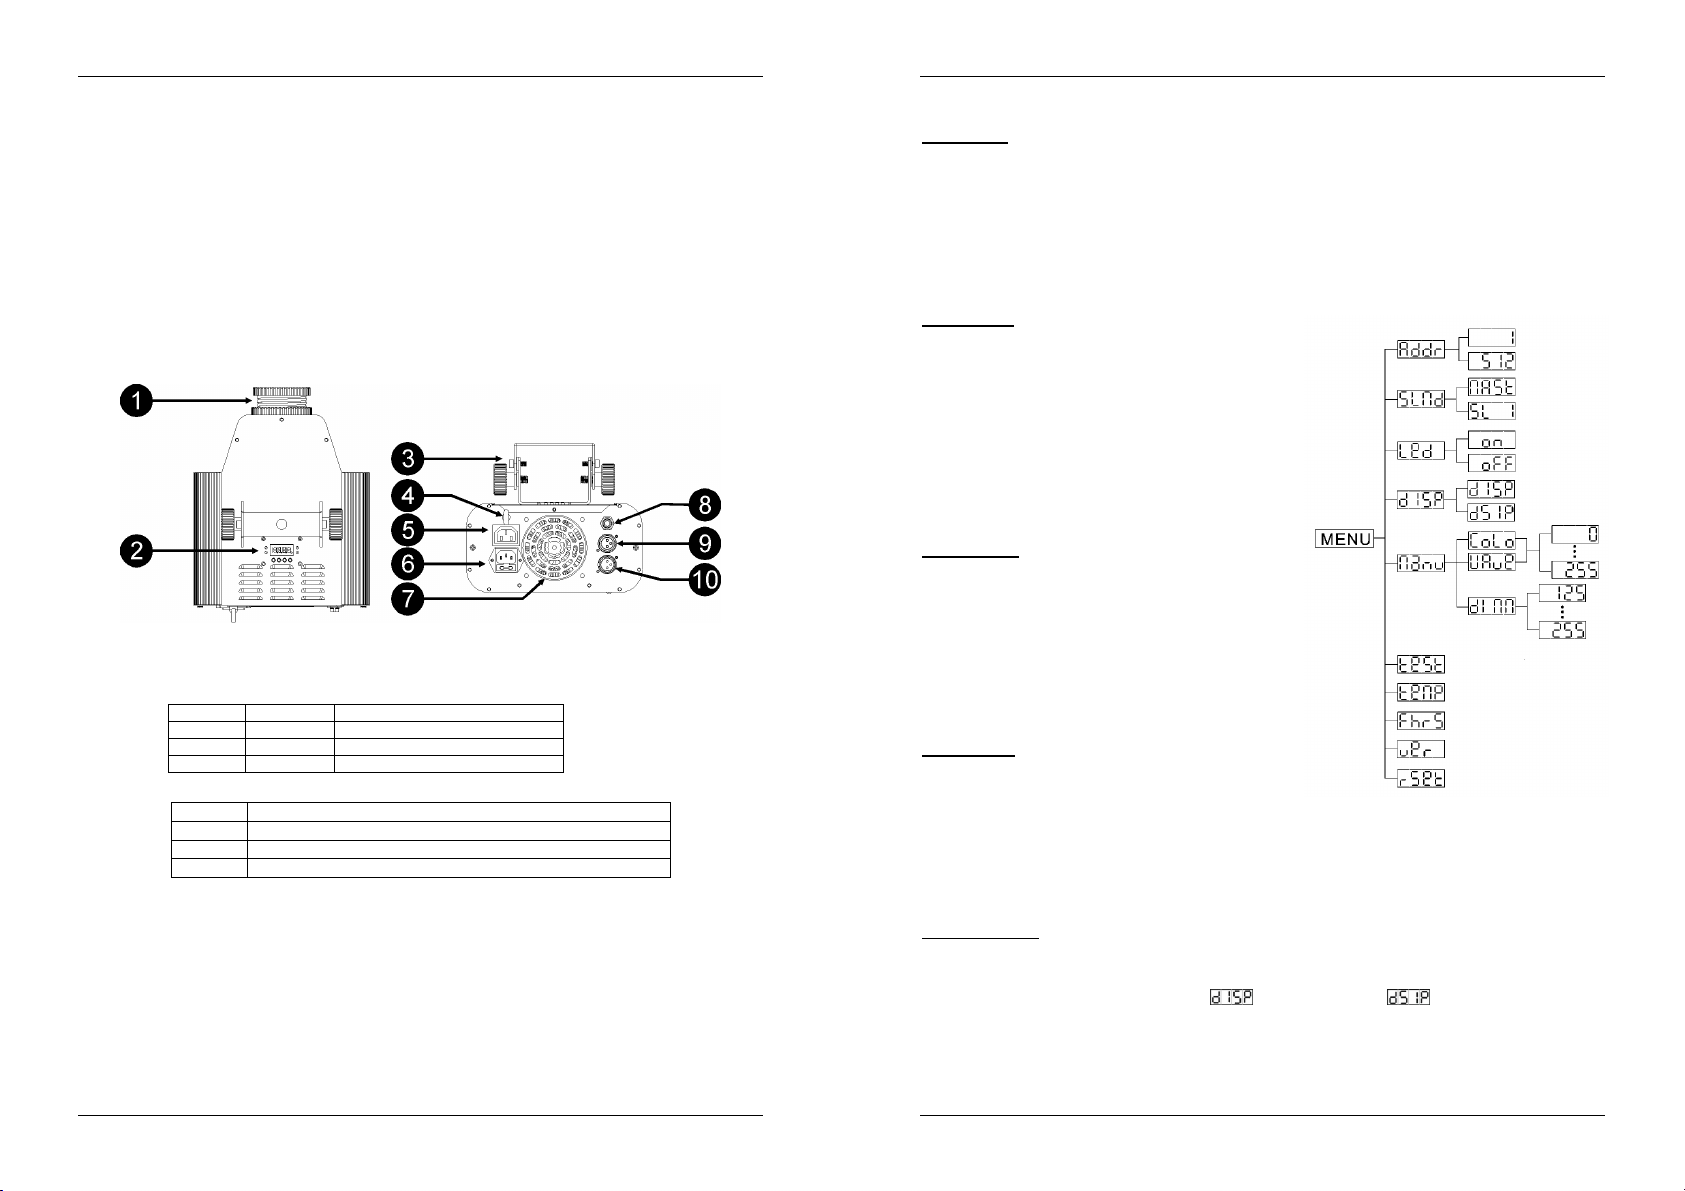
1. OPTICAL LENS: with manual focus adjustment
2. CONTROL PANEL:
a. DISPLAY: shows the various menus and the selected functions.
b. LEDS:
DMX On DMX input present
MASTER On Master mode
SLAVE On Slave mode
SOUND Flashing Sound activation
c. BUTTONS:
MENU To select the programming functions
DOWN To go backward in the selected functions or to decrease a value
UP To go forward in the selected functions or to increase a value
ENTER To confirm the selected functions
3. BRACKET: hanging bracket with 2 knobs on both sides to fasten the unit and a mounting hole to fix a
mounting hook.
4. SAFETY EYE: used to attach a safety cable when the unit is rigged (see paragraph “overhead rigging”)
5. MAINS OUTPUT:.
6. MAINS INPUT: with IEC socket and integrated fuse holder; connect the supplied mains cable here.
7. COOLING FAN:
8. WIRED REMOTE CONTROL INPUT: Used to connect a simple CA-8 hand controller while the unit is
used in standalone or master/slave mode.
9. DMX OUTPUT: 3pin female XLR-connector used to connect the effect with the next unit in the DMX
chain.
10. DMX INPUT: 3pin male XLR-connector used to connect the effect with the DMX controller or with the
previous unit in the DMX chain.
HOW TO SETUP:
MAIN MENU:
To select any of the functions, press the MENU button up to when the required one is shown on the
display or use the DOWN and UP buttons to browse the menu.
Select the function with the ENTER button (the display blinks).
Use DOWN and UP buttons to change the mode.
Once the required mode is selected, press the ENTER button to confirm.
To go back to the main menu without any change press the MENU button shortly. (The main menu is shown
in the chart.)
Press the MENU button for about 2 seconds if you want to exit the Menu and go back to the normal running
mode.
DMX Address
Used to set the starting address in a DMX setup.
Press the MENU button until “Addr” is shown on the
display.
Press the ENTER button, the display starts blinking.
Use DOWN and UP buttons to change the DMX512
address.
Once the correct address shows on the display, press
the ENTER button to save it.
(To go back to the main menu without any change press
the MENU button shortly.)
Press the MENU button for about 2 seconds if you want to
exit the Menu and go back to the normal running mode.
Working Mode
Used to set the unit in master or slave mode.
Press the MENU button until “SLMd” is shown on the
display.
Press the ENTER button, the display starts blinking.
Use DOWN and UP buttons to select ”MASt” (master
mode) or “SL I” (slave mode).
Once the correct mode is shown on the display, press
the ENTER button to confirm your choice.
Press the MENU button for about 2 seconds if you want to
exit the Menu and go back to the normal running mode.
Display on/off
Display on: display is always lit.
Display off: display is dark when not used.
Press the MENU button until the display shows “Led”.
Press the ENTER button, the display starts blinking.
Use DOWN and UP buttons to select “on” (display always lit) or “oFF” (display dark when not used).
Once the mode is selected, press the ENTER button to save it.
To go back to the main menu without any change press the MENU button shortly.
Press the MENU button for about 2 seconds if you want to exit the Menu and go back to the normal running
mode.
Display Inversion
Display normal: display is readable when the unit is on the floor.
Display inversion: display is readable when the unit is mounted upside down.
Press the MENU button until “dISP” is shown on the display. (normal display)
Press the ENTER button to toggle between (normal display) and (display inversion).
Press the MENU button for about 2 seconds if you want to exit the Menu and go back to the normal running
mode.
JB SYSTEMS
®
3/41 LED SEAWAVE 50W
JB SYSTEMS
®
4/41 LED SEAWAVE 50W
Page 5
ENGLISH OPERATION MANUAL
ENGLISH OPERATION MANUAL
Manual settings:
Used to set manually the desired projection mode when no external controller is used.
Press the MENU button until the display shows “Manu”.
Press the ENTER button, the display shows “CoLo”
Press the ENTER button if you want to set the color:
Use the DOWN and UP buttons to set the desired color (value from 0 to 255 according to
channel 3 of the DMX chart)
Press the ENTER button to confirm
Use the DOW N and UP buttons to go to “UAue”
Press the ENTER button if you want to set the rotation speed and direction:
Use the DOWN and UP buttons to set the desired rotation (value from 0 to 255 according to
channel 2 of the DMX chart)
Press the ENTER button to confirm
Use the DOW N and UP buttons to go to “diMM”
Press the ENTER button if you want to set the dimmer level:
Use the DOWN and UP buttons to set the desired light output level (value from 125 (low
output) to 255 (maximum output))
Press the ENTER button to confirm
Press the MENU button for about 2 seconds if you want to exit the Menu and start running the
programmed show.
Test
Press the MENU button until “teSt” is shown on the display.
Press the ENTER button: the display will start blinking while the unit will run all the possible functions.
Press the ENTER button or the MENU button to exit the TEST mode
Press the MENU button for about 2 seconds if you want to exit the Menu and go back to the normal running
mode.
Temperature:
Used to show the inner temperature of the unit.
Press the MENU button until “teMP” is shown on the display.
Press the ENTER button to show the temperature of the unit.
Press the MENU button for about 2 seconds if you want to exit the Menu and go back to the normal running
mode.
Fixture Hours
Used to show the number of working hours of the unit.
Press the MENU button until “FhrS” is shown on the display.
Press the ENTER button to show the number of working hours in the display.
Press the MENU button for about 2 seconds if you want to exit the Menu and go back to the normal running
mode.
Software version:
Used to show the software version of the unit.
Press the MENU button until “uer” is shown on the display.
Press the ENTER button to show the software version of the unit.
Press the MENU button for about 2 seconds if you want to exit the Menu and go back to the normal running
mode.
Reset:
Used to reset
Press the MENU button until “rSet” is shown on the display.
Press the ENTER button to start up the reset function.
“UAu” will be shown on the display while the unit is doing its reset. Please wait until “UAu” is not shown
anymore on the display.
ELECTRICAL INSTALLATION + ADDRESSING
Important: The electrical installation should be carried out by qualified personal only,
according to the regulations for electrical and mechanical safety in your country.
Electrical installation for 1 standalone unit:
Just insert the mains cable.
When there is no DMX cable connected to the DMX input, the unit will start working immediately in
stand-alone mode.
You can adapt the standalone mode to your own taste. Just make the desired settings in the main menu.
(see the previous chapter “how to set up / Main Menu / Manual Settings”)
Remark: You can connect a CA-8 remote controller to the unit if you want to have more control. Refer to
“how to operate the unit” to learn how to do this.
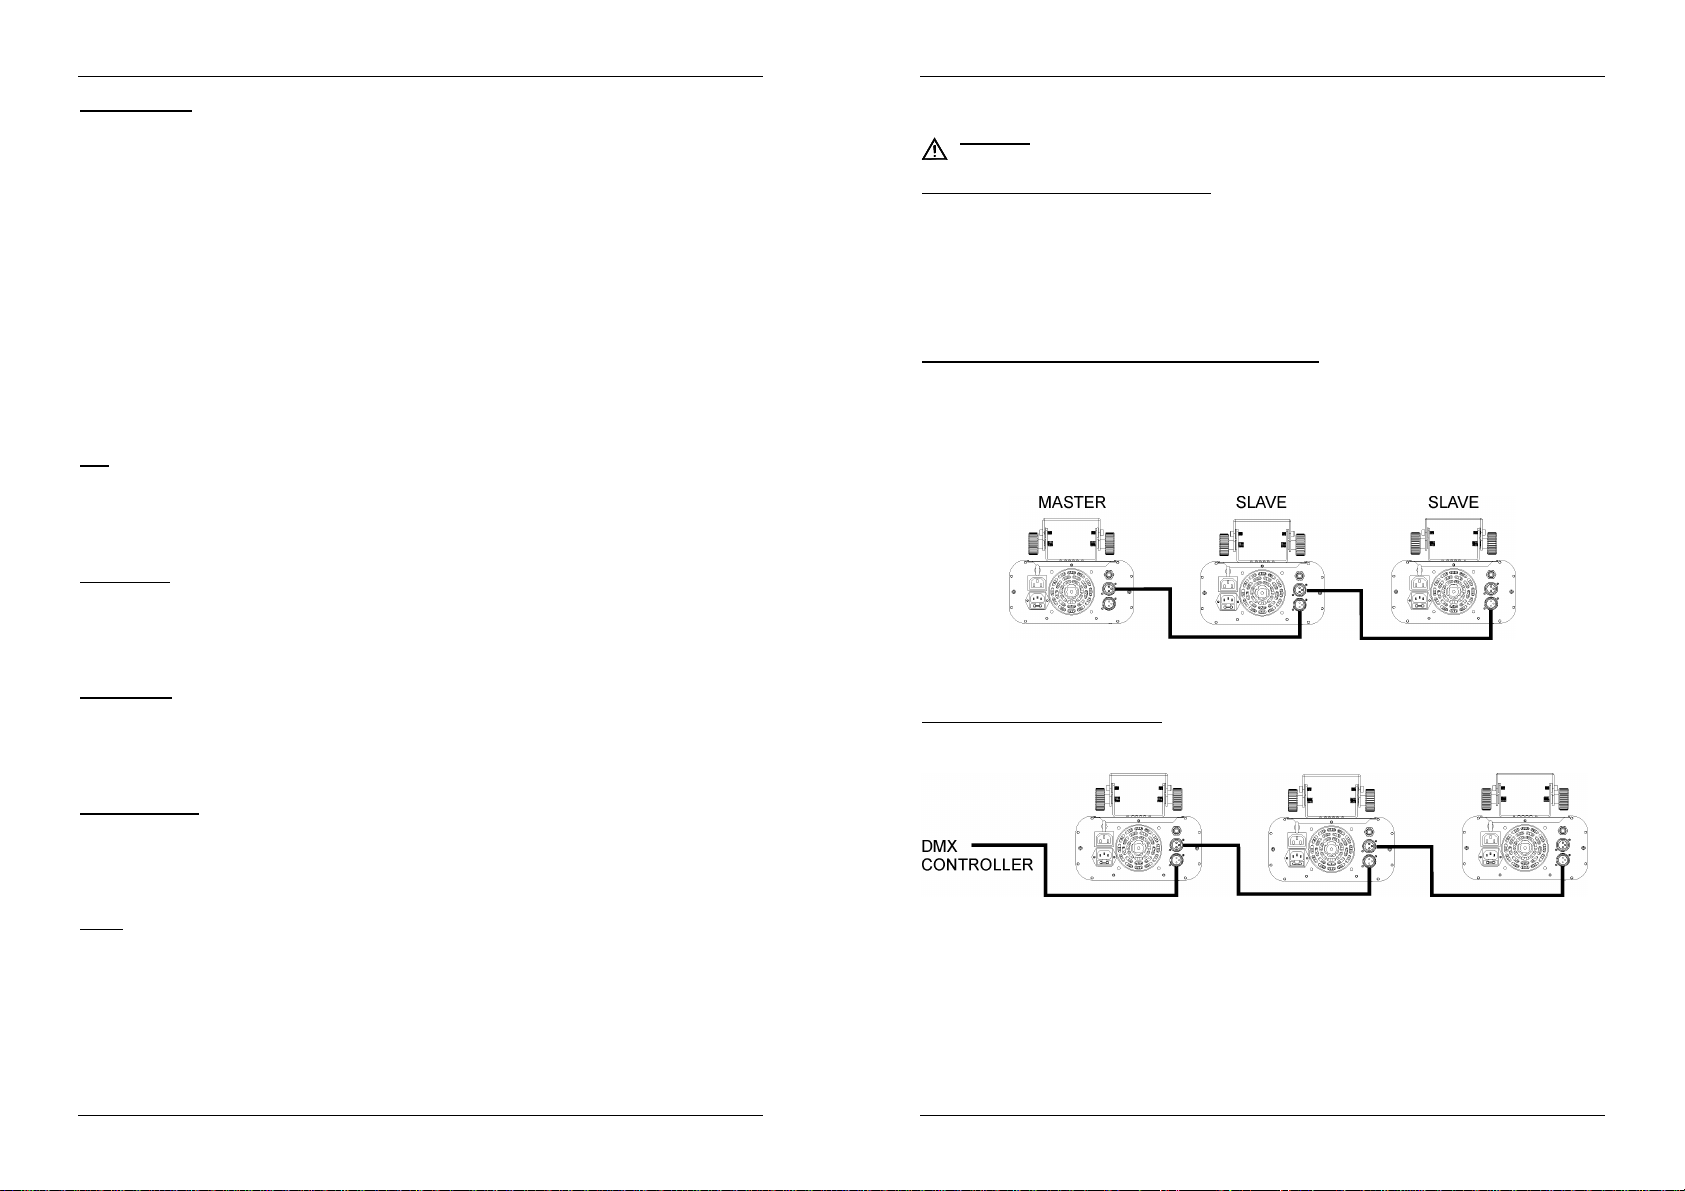
Electrical installation for two or more units in master/slave:
Connect several units together using good quality balanced microphone cables. The first unit of the
chain must have no DMX cable connected to its DMX input and must be set to master mode, the other
units must be set to slave mode (SL 1). See the previous chapter for more information.
Make sure that all units are connected to the mains.
Done!
You can adapt the standalone mode to your own taste. Just make the desired settings in the main menu
of the MASTER unit. (see the previous chapter “how to set up / Main Menu / Manual Settings”)
Remark: You can connect a CA-8 remote controller to the “Master” unit if you want to have more control.
Refer to “how to operate the unit” to learn how to do this.
Electrical installation in DMX-mode:
The DMX-protocol is a widely used high speed signal to control intelligent light equipment. You need to
“daisy chain” your DMX controller and all the connected units with a balanced cable of good quality.
Both XLR-3pin and XLR-5pin connectors are used, however XLR-3pin is more popular because these
cables are compatible with balanced audio cables.
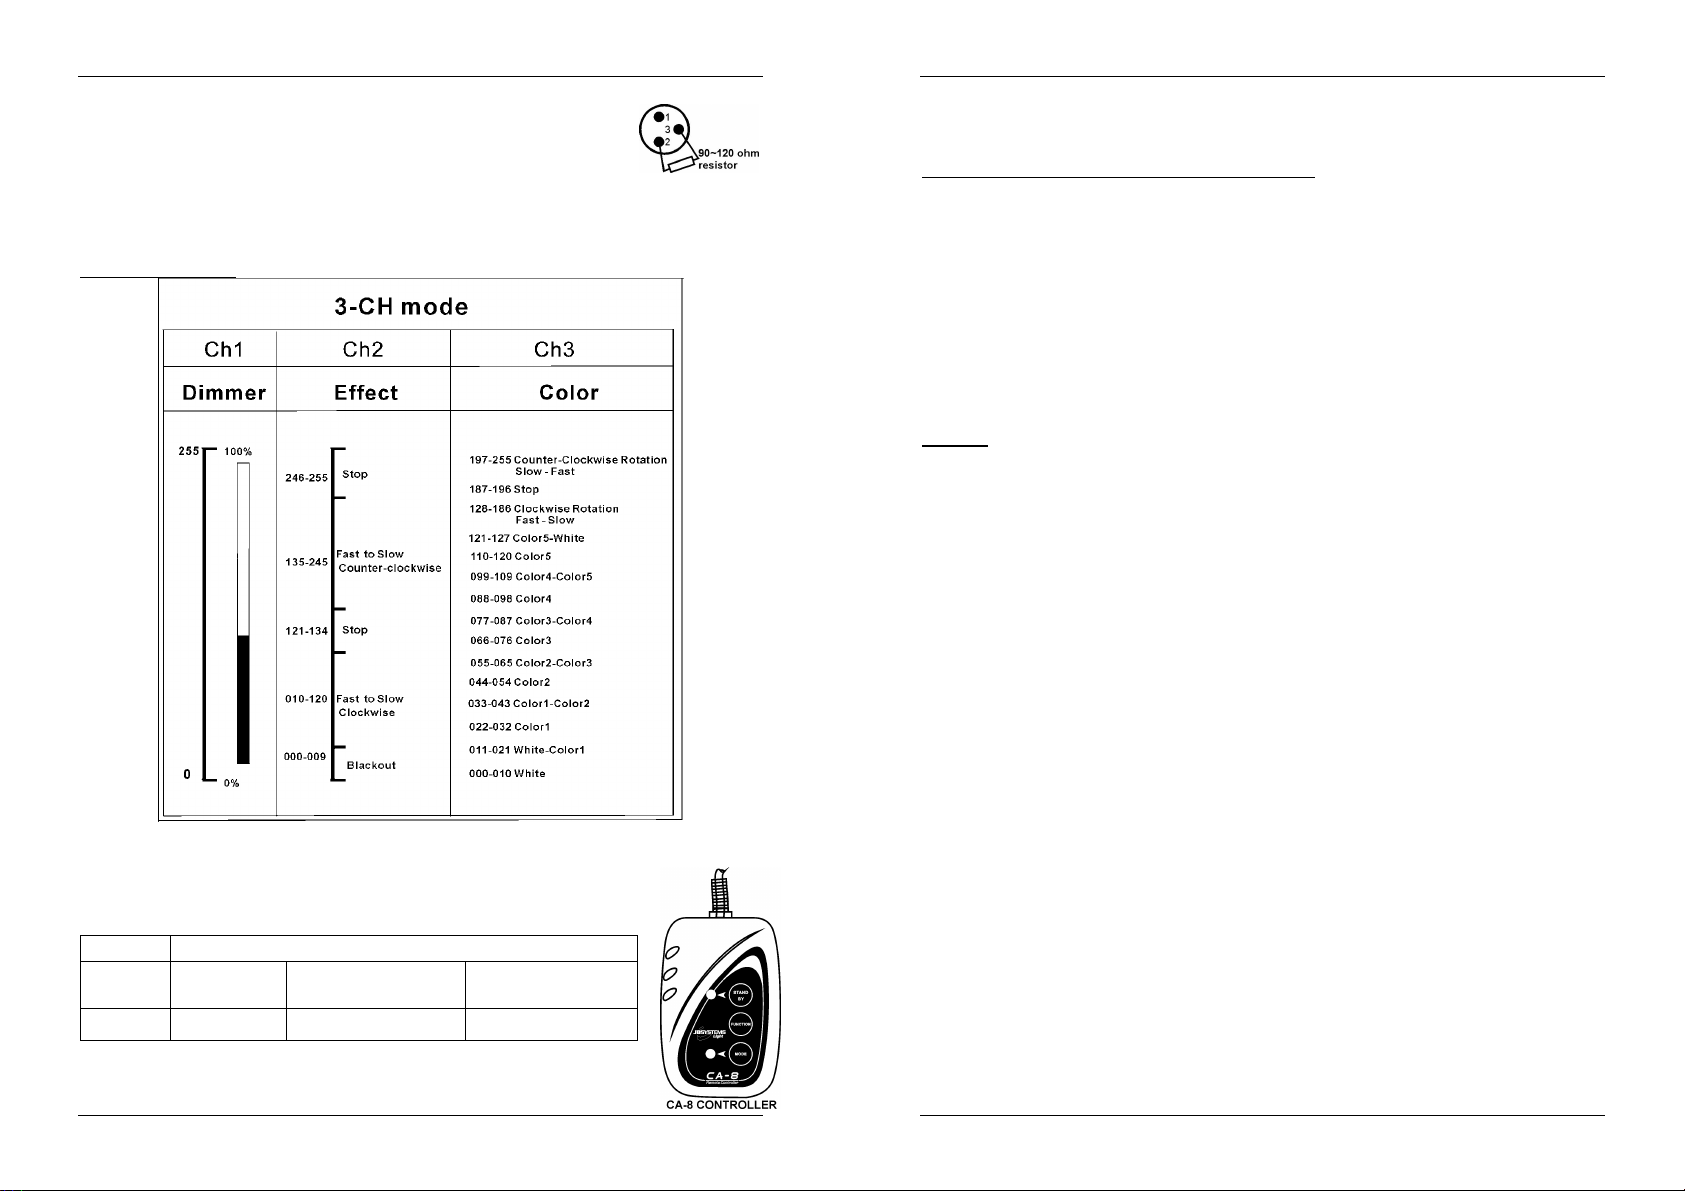
Pin layout XLR-3pin:
Pin layout XLR-5pin: Pin1 = GND ~ Pin2 = Negative signal (-) ~ Pin3 = Positive signal (+) ~ Pins4+5 not used.
Pin1 = GND ~ Pin2 = Negative signal (-) ~ Pin3 = Positive signal (+)
JB SYSTEMS
®
5/41 LED SEAWAVE 50W
JB SYSTEMS
®
6/41 LED SEAWAVE 50W
Page 6
ENGLISH OPERATION MANUAL
ENGLISH OPERATION MANUAL
To prevent strange behavior of the light effects, due to interferences, you must use
a 90Ω to 120Ω terminator at the end of the chain.
Never use Y-splitter cables, this simply won’t work!
Make sure that all units are connected to the mains.
Each light effect in the chain needs to have its proper starting address so it knows
which commands from the controller it has to decode.
Unfortunately it is impossible to tell you in this user manual which starting addresses you have to set
because this completely depends on the controller you will use… So please refer to the user manual of
your DMX-controller to find out which starting addresses you must set.
DMX-CONFIGURATION
MAINTENANCE
Make sure the area below the installation place is free from unwanted persons during servicing.
Switch off the unit, unplug the mains cable and wait until the unit has been cooled down.
During inspection the following points should be checked:
All screws used for installing the device and any of its parts should be tightly fastened and may not be
corroded.
Housings, fixations and installations spots (ceiling, truss, suspensions) should be totally free from any
deformation.
When an optical lens is visibly damaged due to cracks or deep scratches, it must be replaced.
The mains cables must be in impeccable condition and should be replaced immediately when even a
small problem is detected.
In order to protect the device from overheat the cooling fans (if any) and ventilation openings should be
cleaned monthly.
The interior of the device should be cleaned annually using a vacuum cleaner or air-jet.
The cleaning of internal and external optical lenses and/or mirrors must be carried out periodically to
optimize light output. Cleaning frequency depends on the environment in which the fixture operates: damp,
smoky or particularly dirty surroundings can cause greater accumulation of dirt on the unit’s optics.
Clean with a soft cloth using normal glass cleaning products.
Always dry the parts carefully.
Attention: We strongly recommend internal cleaning to be carried out by qualified personnel!
SPECIFICATIONS
Mains Input: AC 100-240V ~ 50/60Hz
Power consumption: 80 Watt
Fuse: 250V T6.3A slow blow (20mm glass)
DMX connections: 3pin XLR male / female
DMX channels used: 3 channels
Lamp: 50W LED
Size: 27.9 x 22.6 x 19.1 cm
Weight: 4 kg
You can download the latest version of this user manual on our website: www.beglec.com
The information might be modified without prior notice
OPERATE THE UNIT BY CA8
When used in standalone or master/slave mode we strongly advise you to use the CA-8
“Wired easy controller”.
Just connect the controller to the hack input of the first unit (Master unit).
STAND BY
FUNCTION
MODE
JB SYSTEMS
To blackout all the fixtures
Wave speed:1-3 Choose color : 1-12 Color speed:1-3
LED OFF LED ON LED blinking
®
7/41 LED SEAWAVE 50W
JB SYSTEMS
®
8/41 LED SEAWAVE 50W
Page 7
FRANÇAIS GUIDE D'UTILISATION
ATTENTION :
GUIDE D'UTILISATION
Nous vous remercions d'avoir acheté ce produit JB Systems®. Pour tirer pleinement profit de toutes les
possibilités et pour votre propre sécurité, lisez ces instructions très attentivement avant d'utiliser cet appareil.
CARACTÉRISTIQUES
Cet appareil ne produit pas d’interférences radio. Ce produit répond aux exigences des directives
européennes et nationales actuelles. La conformité a été établie et les déclarations et documents
correspondants ont été déposés par le fabricant.
Ce dispositif a été conçu pour produire un effet d'éclairage décoratif et est utilisé dans les systèmes de jeu
de lumière.
La version professionnelle "haute puissance" du LED effet vague d’eau très célèbre, utilise une LED 50
Watt
C’est pour cela qu’il est adapté à une utilisation dans des grands clubs et sur des scènes.
Différents modes de fonctionnement :
o
Autonome : aucun contrôleur DMX n’est nécessaire.
o
Maître/Esclave : shows magnifiques synchronisés, sans contrôleur DMX.
o
DMX : 3 canaux (vitesse, couleur, gradateur)
Compatible avec CA-8 : télécommande filaire pour un contrôle amélioré maître / esclave
Affichage LED pour faciliter la navigation du menu de configuration
Haut rendement et faible consommation d'énergie, uniquement 80 Watts
Connecteurs d'entrée/sorties aux normes CEI pour le raccordement facile des câbles optionnels CEI ou
combinés
AVANT UTILISATION
Avant d'utiliser cet appareil, vérifiez s'il n'a pas été endommagé durant le transport. En cas de dommages,
n'utilisez pas l'appareil et consultez immédiatement votre revendeur.
Important : Cet appareil est expédié de notre usine en parfait état et bien emballé. Il est absolument
nécessaire que l'utilisateur suive strictement les instructions et les avertissements de sécurité se trouvant
dans ce manuel. Tout dommage dû à une mauvaise manipulation n'est pas garanti. Le revendeur
n'accepte aucune responsabilité pour tous les défauts et problèmes dus au non respect de ce manuel.
Conservez ce manuel dans un endroit sûr pour toute consultation future. Si vous vendez l'appareil, veillez
à joindre ce manuel.
Vérifiez le contenu :
Vérifiez que le carton contient les éléments suivants :
Guide d'utilisation
LED vague de mer 50W
Câble d'alimentation secteur
INSTRUCTIONS DE SÉCURITÉ :
retirez pas le panneau supérieur. L'appareil ne contient aucun
composant réparable par l'utilisateur. Confiez toute réparation à
un personnel qualifié uniquement.
Le symbole de l'éclair à l'intérieur d'un triangle équilatéral, est destiné à alerter l'utilisateur de la
présence de pièces sous tension non isolées dans le boîtier de l'appareil, d'une magnitude
pouvant constituer un risque d'électrocution.
Le symbole du point d'exclamation dans un triangle sert à avertir l'utilisateur que d'importants
conseils de fonctionnement sont fournis dans la documentation
Pour réduire le risque de choc électrique, ne
FRANÇAIS GUIDE D'UTILISATION
Ce symbole signifie : pour usage intérieur uniquement.
Ce symbole signifie : Lisez les instructions
Ce symbole signifie : appareil de Classe de sécurité I
Ce symbole détermine : la distance minimale des objets éclairés. La distance minimale entre la
sortie de lumière et la surface éclairée doit être supérieure à un 1 mètre
Cet appareil n'est pas adapté pour un montage direct sur des surfaces normalement
inflammables. (Ne convient que pour le montage sur surfaces non combustibles)
ATTENTION : Ne fixez pas votre regard sur une lampe allumée.
Peut être nocif pour les yeux.
Pour protéger l'environnement, essayer de recycler autant que possible les matériaux d'emballage.
Pour éviter tout incendie ou électrocution, n'exposez pas cet appareil à la pluie ou l'humidité.
Pour éviter une formation de condensation interne, laissez l'appareil s'adapter à la température ambiante
quand vous la mettez dans une pièce chauffée après le transport. La condensation empêche parfois
l'appareil de fonctionner à plein rendement ou peut même causer des dommages.
Cet appareil est destiné à un usage intérieur seulement.
Ne placez pas d'objets métalliques et ne renversez pas de liquides à l'intérieur de l'appareil. Un choc
électrique ou un dysfonctionnement peut en résulter. Si un corps étranger pénètre dans l'appareil,
débranchez immédiatement l'alimentation secteur.
Fixez l'appareil dans un endroit bien aéré, loin de tout matériau et/ou liquide inflammable. Le luminaire doit
être fixé à au moins 50 cm des murs environnants.
Ne couvrez pas les ouvertures de ventilation, cela pourrait entraîner une surchauffe.
Evitez une utilisation dans des environnements poussiéreux et nettoyez l'appareil régulièrement.
Gardez l'appareil loin de la portée des enfants.
Les personnes inexpérimentées ne doivent pas utiliser cet appareil.
La température ambiante de fonctionnement maximale est de 40°C. N'utilisez pas cet appareil à des
températures ambiantes plus élevées.
Assurez-vous qu'aucune personne étrangère ne se trouve dans la zone en dessous de l'emplacement
d'installation durant le montage, le démontage et l'entretien.
Laissez environ 10 minutes à l'appareil pour refroidir avant de commencer l'entretien.
Débranchez toujours l'appareil lorsqu'il ne va pas être utilisé pendant une longue période ou avant de
commencer l'entretien.
L'installation électrique doit être effectuée par du personnel qualifié, conformément à la réglementation en
matière de sécurité électrique et mécanique dans votre pays.
Vérifiez que la tension secteur n'est pas supérieure à celle indiquée sur l'appareil.
Le cordon d'alimentation doit toujours être en parfait état. Eteignez immédiatement l'appareil dès le cordon
d'alimentation est écrasé ou endommagé. Il doit être remplacé par le fabricant, son agent de service ou
une personne de même qualification afin d'éviter tout danger.
Ne laissez jamais le cordon d'alimentation entrer en contact avec d'autres câbles !
Ce luminaire doit être mis à la terre pour être conforme réglementation en matière de sécurité.
Ne connectez pas l'appareil à aucun variateur de lumière.
Utilisez toujours un câble de sécurité approprié et certifié lors de l'installation de l'appareil.
Afin d'éviter un choc électrique, n'ouvrez aucun panneau. L'appareil ne contient aucun composant
réparable par l'utilisateur.
Ne réparez jamais un fusible et ne court-circuitez jamais le porte-fusible. Remplacez toujours un fusible
endommagé par un fusible du même type ayant les mêmes spécifications électriques !
En cas de sérieux problèmes de fonctionnement, cessez d'utiliser l'appareil et contactez immédiatement
votre revendeur.
Le boîtier et la lentille doivent être remplacés s'ils sont visiblement endommagés.
Utilisez l'emballage d'origine pour transporter l'appareil.
Pour des raisons de sécurité, il est interdit d'apporter des modifications non autorisées à l'appareil.
Important : Ne regardez jamais directement dans la source de lumière ! N'utilisez pas le jeu de lumière en
présence de personnes souffrant d'épilepsie.
JB SYSTEMS
®
9/41 LED SEAWAVE 50W
JB SYSTEMS
®
10/41 LED SEAWAVE 50W
Page 8

FRANÇAIS GUIDE D'UTILISATION
Pour retourner en arrière dans les fonctions sélectionnées ou pour
Pour aller en avant dans les fonctions sélectionnées ou pour
FRANÇAIS GUIDE D'UTILISATION
MONTAGE AU PLAFOND
Important : L'installation ne doit être effectuée que par un personnel qualifié. Une mauvaise
installation peut entraîner des blessures et/ou dommages graves. Un montage au plafond exige
une grande expérience ! Les limites de charge de fonctionnement doivent être respectées, des
matériels d'installation certifiés doivent être utilisés, l'appareil installé doit être inspecté
régulièrement pour vérifier les conditions de sécurité.
Assurez-vous qu'aucune personne étrangère ne se trouve dans la zone en dessous de l'emplacement
d'installation durant le montage, le démontage et l'entretien.
Fixez l'appareil dans un endroit bien aéré, loin de tout matériau et/ou liquide inflammable. Le luminaire doit
être fixé à au moins 50 cm des murs environnants.
L'appareil doit être installé hors de la portée des gens, loin des passages et des endroits où des
personnes peuvent s'asseoir.
Avant de soulever l'appareil, assurez-vous que le point de suspension peut supporter une charge d'au
moins 10 fois le poids de l'appareil.
Lors de l'installation de l'appareil, utilisez toujours un câble de sécurité certifié qui peut supporter 12 fois le
poids de l'appareil. Ce support de suspension de sécurité secondaire doit être installé de manière à ce
qu'aucune partie de l'installation ne puisse tomber de plus de 20 cm si le support principal lâche.
L'appareil doit être bien fixé, un montage balançant est dangereux et ne doit pas être entrepris !
Ne couvrez pas les ouvertures de ventilation, cela pourrait entraîner une surchauffe.
L'opérateur doit s'assurer que la sécurité relative à l'installation et les conditions techniques sont
approuvées par un expert avant d'utiliser l'appareil pour la première fois. Les installations doivent être
inspectées chaque année par une personne qualifiée pour être sûr que la sécurité est toujours optimale.
DESCRIPTION :
1. LENTILLES OPTIQUES : avec réglage manuel de la mise au point
2. PANNEAU DE COMMANDE :
a. Ecran : affiche les différents menus et les fonctions sélectionnées.
b. TEMOINS :
DMX : Activé Entrée DMX présente
MASTER Activé Mode Maître
SLAVE Activé Mode Esclave
SOUND Clignotant Activation sonore
c. TOUCHES :
MENU Pour sélectionner les fonctions de programmation
DOWN
UP
ENTER Pour confirmer les fonctions sélectionnées
diminuer la valeur
diminuer la valeur
3. SUPPORT : Support de suspension au mur avec 2 boutons sur les deux côtés pour attacher l'appareil et
un trou de montage pour un crochet de fixation.
4. ŒILLET DE SÉCURITÉ : utilisé pour attacher un câble de sécurité au cours du levage de l'appareil
(reportez-vous au paragraphe "Montage au plafond")
5. SORTIE SECTEUR :
6. TENSION D'ENTREE : Prise IEC avec porte-fusible ; branchez le câble d'alimentation secteur fourni
dans cette prise.
7. VENTILATEUR DE REFROIDISSEMENT :
8. ENTRÉE TELECOMMANDE FILAIRE : Utilisée pour connecter une simple télécommande CA-8 lorsque
l'appareil est utilisé en mode autonome ou maître/esclave.
9. SORTIE DMX : connecteur XLR 3 femelle pour connecter l’effet de l'unité suivante dans la chaîne DMX.
10. ENTREE DMX : connecteur XLR 3 mâle pour connecter l’effet de l'unité suivante au contrôleur DMX ou
avec l'unité précédente dans la chaîne DMX.
COMMENT CONFIGURER :
MENU PRINCIPAL :
Pour sélectionner l'une des fonctions, appuyez sur la touche MENU jusqu'à ce que la fonction souhaitée
s'affiche sur l'écran ou utilisez les touches DOWN/UP pour parcourir les menus.
Sélectionnez une fonction avec la touche ENTER (l'affichage se met à clignoter).
Utilisez les touches DOWN/UP pour changer de mode.
Une fois le mode désiré est sélectionné, appuyez sur la touche ENTER pour confirmer.
Pour retourner au menu principal sans aucun changement appuyez brièvement sur la touche MENU. ( Le
menu principal est affiché dans le graphique.)
Maintenez enfoncée la touche MENU pendant environ 2 secondes pour quitter le menu et retourner au
mode de fonctionnement normal.
Adresse DMX
Utilisée pour définir l'adresse de départ dans une
configuration DMX.
Appuyez sur la touche MENU jusqu'à ce que "Addr"
s'affiche à l'écran.
Appuyez sur la touche ENTER, l'affichage se met à
clignoter.
Utilisez les touches BAS( ) ( )DOWN et HAUT UP
pour changer l'adresse DMX512.
Une fois l'adresse correcte s'affiche à l'écran, appuyez
sur la touche ENTER pour l'enregistrer.
(Pour retourner au menu principal sans aucun
changement appuyez brièvement sur la touche MENU.)
Maintenez enfoncée la touche MENU pendant environ 2
secondes pour quitter le menu et retourner au mode de
fonctionnement normal.
Mode de fonctionnement
Utilisé pour mettre l'appareil en mode maître ou
esclave.
Appuyez sur la touche MENU jusqu'à ce que "SLMd"
s'affiche à l'écran.
Appuyez sur la touche ENTER, l'affichage se met à
clignoter.
Utilisez les touches DOWN et UP pour sélectionner
"MASt" (mode maître) ou "SL I" (mode esclave).
Une fois la bonne adresse apparaît à l'écran, appuyez
sur la touche ENTER pour confirmer.
Maintenez enfoncée la touche MENU pendant environ 2
secondes pour quitter le menu et retourner au mode de fonctionnement normal.
JB SYSTEMS
®
11/41 LED SEAWAVE 50W
JB SYSTEMS
®
12/41 LED SEAWAVE 50W
Page 9

FRANÇAIS GUIDE D'UTILISATION
FRANÇAIS GUIDE D'UTILISATION
Activer/désactiver l'affichage
Activer l'affichage : L'écran est toujours allumé.
Désactiver l'affichage : L'écran est noir lorsqu'il n'est pas utilisé.
Appuyez sur la touche MENU jusqu'à ce que "Led" s'affiche à l'écran.
Appuyez sur la touche ENTER, l'affichage se met à clignoter.
Utilisez les touches DOWN/UP pour sélectionner "On" (écran toujours allumé) ou "Off" (écran noir lorsqu'il
n'est pas utilisé).
Une fois le mode est sélectionné, appuyez sur la touche ENTER pour l'enregistrer.
Pour retourner au menu principal sans aucun changement appuyez brièvement sur la touche MENU.
Maintenez enfoncée la touche MENU pendant environ 2 secondes pour quitter le menu et retourner au
mode de fonctionnement normal.
Inversion de l'affichage
Affichage normal : L'écran est lisible lorsque l'appareil est au sol.
Inversion de l'affichage : l'affichage est lisible lorsque l'appareil est monté à l'envers.
Appuyez sur la touche MENU jusqu'à ce que "dISP" s'affiche à l'écran. (Affichage normal)
Appuyez sur la touche ENTER pour basculer entre (Affichage normal) et (inversion de
l'affichage).
Maintenez enfoncée la touche MENU pendant environ 2 secondes pour quitter le menu et retourner au
mode de fonctionnement normal.
Réglage manuel :
Utilisé pour régler manuellement le mode de projection lorsqu’aucun contrôleur externe n’est utilisé.
Appuyez sur la touche MENU jusqu'à ce que "Manu" s'affiche à l'écran.
Appuyez sur la touche ENTER, l'affichage se met à "CoLo".
Appuyez sur ENTER pour définir la couleur :
Utilisez les touches DOWN / UP pour définir la couleur (valeur de 0 à 255 selon le canal 3
du diagramme DMX)
Appuyez sur ENTER pour confirmer.
Utilisez les touches DOWN / UP pour atteindre à "UAue"
Appuyez sur la touche ENTER pour définir la vitesse de rotation et la direction :
Utilisez les touches DOWN / UP pour définir la rotation (valeur de 0 à 255 selon le canal 2
du diagramme DMX)
Appuyez sur ENTER pour confirmer.
Utilisez les touches DOW N / UP pour atteindre à "diMM"
Appuyez sur ENTER pour définir le niveau du rétroéclairage :
Utilisez les touches DOWN / UP pour définir le niveau du rétroéclairage (valeur de 125
(faible) à 255 (maximale))
Appuyez sur ENTER pour confirmer.
Appuyez sur la touche MENU pendant environ 2 secondes pour quitter le menu et lancer le show
programmé.
Test
Appuyez sur la touche MENU jusqu'à ce que "teSt" s'affiche à l'écran.
Appuyez sur la touche ENTER : L'écran se met à clignoter lorsque l'appareil exécute toutes les fonctions
possibles.
Appuyez sur la touche ENTER ou sur la touche MENU pour quitter le mode TEST
Maintenez enfoncée la touche MENU pendant environ 2 secondes pour quitter le menu et retourner au
mode de fonctionnement normal.
Température :
Utilisé pour afficher la température interne de l'appareil.
Appuyez sur la touche MENU jusqu'à ce que "teMP" s'affiche à l'écran.
Appuyez sur la touche ENTER pour afficher la température de l'appareil.
Maintenez enfoncée la touche MENU pendant environ 2 secondes pour quitter le menu et retourner au
mode de fonctionnement normal.
Heures de fonctionnement
Utilisé pour afficher le nombre d'heures de fonctionnement de l'appareil.
Appuyez sur la touche MENU jusqu'à ce que "FhrS" s'affiche à l'écran.
Appuyez sur la touche ENTER pour afficher le nombre d'heures de fonctionnement à l'écran.
Maintenez enfoncée la touche MENU pendant environ 2 secondes pour quitter le menu et retourner au
mode de fonctionnement normal.
Version du logiciel
Utilisé pour afficher la version du logiciel de l'appareil.
Appuyez sur la touche MENU jusqu'à ce que "uer" s'affiche à l'écran.
Appuyez sur la touche ENTER pour afficher la version du logiciel de l'appareil.
Maintenez enfoncée la touche MENU pendant environ 2 secondes pour quitter le menu et retourner au
mode de fonctionnement normal.
Réinitialiser :
Utilisé pour réinitialiser
Appuyez sur la touche MENU jusqu'à ce que "rSet" s'affiche à l'écran.
Appuyez sur la touche ENTER pour démarrer la fonction de réinitialisation.
"UAU" sera affiché à l'écran pendant la réinitialisation de l'appareil. Patientez jusqu'à ce que "UAU"
disparaisse de l'écran.
INSTALLATION ELECTRIQUE + ADRESSAGE
Important : L'installation électrique doit être effectuée par du personnel qualifié, conformément
à la réglementation en matière de sécurité électrique et mécanique dans votre pays.
Installation électrique d'une unité autonome :
Il suffit de brancher le cordon d'alimentation secteur.
Quand il n'y a pas de câble DMX connecté à l'entrée DMX, l'appareil démarre immédiatement en mode
autonome.
Vous pouvez adapter le mode autonome à votre propre goût. Il suffit de faire les réglages souhaités
dans le menu principal.(Reportez-vous au chapitre précédent « Configuration / Menu principal /
Réglages manuels »)
Remarque : Vous pouvez connecter une télécommande CA-8 à l'appareil si vous voulez avoir plus de
contrôle. Reportez-vous à "Comment utiliser l'appareil" pour apprendre comment faire cela.
Installation électrique de deux ou plusieurs unités en maître/esclave :
Connectez plusieurs unités entre elles en utilisant de bons câbles de qualité microphone symétrique. La
première unité de la chaîne ne doit pas avoir un câble DMX connecté à son entrée DMX et doit être en
mode maître, les autres unités doivent être en mode esclave (SL 1). Consultez le chapitre précédent
pour plus d'informations.
Assurez-vous que toutes les unités sont branchées au secteur.
C'est fait !
Vous pouvez adapter le mode autonome à votre propre goût. Il suffit de faire les réglages souhaités
dans le menu principal de l'unité MASTER . (Voir le chapitre précédent « Configuration / Main Menu /
Réglages manuels »)
Remarque : Vous pouvez connecter une télécommande CA-8 à l'unité “Master”si vous voulez avoir plus
de contrôle. Reportez-vous à "Comment utiliser l'appareil" pour apprendre comment faire cela.
JB SYSTEMS
®
13/41 LED SEAWAVE 50W
JB SYSTEMS
®
14/41 LED SEAWAVE 50W
Page 10

FRANÇAIS GUIDE D'UTILISATION
FRANÇAIS GUIDE D'UTILISATION
Installation électrique en mode DMX :
Le protocole DMX est largement utilisé pour contrôler des équipements lumineux intelligents au moyen
d'un signal de haute vitesse. Vous devez mettre en chaîne votre contrôleur DMX avec toutes les unités
connectées par un câble symétrique de bonne qualité.
Les deux connecteurs XLR 3 broches et XLR 5 broches sont utilisés, cependant le XLR 3 broches est
plus utilisé parce que ces câbles sont compatibles avec les câbles audio symétriques.
Disposition du XLR 3 broches : Broche 1 = terre ~ Broche 2 = signal négatif (-) ~ Broche 3 = signal
positif (+)
Disposition du XLR 5 broches : Broche 1 = terre ~ Broche 2 = signal négatif (-) ~ Broche 3 = signal
positif (+) ~ Broche 4+5 non utilisées.
Pour éviter un comportement anormal des effets de lumière, à cause des
interférences, vous devez utiliser un terminateur de 90Ω à 120Ω à la fin de la
chaîne.
N'utilisez jamais de séparateurs de câbles en Y, cela ne fonctionne pas !
Assurez-vous que toutes les unités sont branchées au secteur.
Chaque effet de lumière dans la chaîne doit avoir sa propre adresse de départ afin qu'il sache quelles
commandes du contrôleur à décoder.
Malheureusement il est impossible de vous dire dans ce manuel quelles adresses de départ vous devez
définir parce que cela dépend entièrement du contrôleur que vous allez utiliser. Reportez-vous alors au
manuel de votre contrôleur DMX pour savoir quelles adresses de départ vous devez définir.
CONFIGURATION DMX
CONTROLER L'APPAREIL VIA CA8
Lorsqu'il est utilisé en mode autonome ou maître/esclave, nous vous conseillons
fortement d'utiliser le "contrôleur filaire facile"
Connectez la télécommande au connecteur d'entrée de la première unité (maître).
STAND BY Pour éteindre tous les appareils
FUNCTION
MODE
Vitesse des
ondes : 1-3
LED ETEINTE LED ALLUMÉE LED clignotant
Choix de la couleur : 1-12
Vitesse de la couleur :
1-3
ENTRETIEN
Assurez-vous qu'aucune personne étrangère ne se trouve dans la zone en dessous de l'emplacement
d'installation durant l'entretien.
Eteignez l'appareil, débranchez le câble secteur et attendez que l'appareil refroidisse.
Lors de l'inspection les points suivants doivent être vérifiés :
Toutes les vis utilisées pour l'installation de l'appareil et chacune de ses composantes doivent être
solidement fixées et ne peuvent être rouillées.
Les boîtiers, les supports et les boutons d'installation (plafond, poutre, suspensions) ne doivent pas être
déformés.
Quand une lentille optique est visiblement endommagée en raison de fissures ou de rayures profondes,
elle doit être remplacée.
Les câbles d'alimentation doit être dans un état impeccable et doivent être remplacés immédiatement
même si un petit problème est détecté.
Afin de protéger l'appareil de toute surchauffe, les ventilateurs de rafraîchissement (le cas échéant) et les
ouvertures de ventilation doivent être nettoyés mensuellement.
L'intérieur de l'appareil doit être nettoyé une fois par an à l'aide d'un aspirateur ou d'un jet d'air.
Le nettoyage des lentilles optiques et/ou miroirs internes et externes doit être effectué périodiquement
pour optimiser le flux lumineux. La fréquence de nettoyage dépend de l'environnement dans lequel
l'appareil fonctionne : des environnements humides, enfumés ou particulièrement sales peuvent causer
l'accumulation de saleté sur l'optique de l'appareil.
Nettoyez avec un chiffon doux en utilisant des produits de nettoyage pour verre normal.
Séchez toujours les pièces soigneusement.
Attention : Nous vous conseillons fortement de faire effectuer le nettoyage interne par un personnel
qualifié !
JB SYSTEMS
SPÉCIFICATIONS
Tension d'entrée : 100V-240V CA 50/60Hz
Consommation : 80 Watts
Fusible : 250V T6,3A à action retardée (verre 20 mm)
Connexions DMX : XLR 3 broches mâle/femelle
Canaux DMX utilisés : 3 canaux
Lampe : 50W LED
Dimensions : 27,9 x 22,6 x 19,1 cm
Poids : 4 kg
Vous pouvez télécharger la dernière version de ce manuel sur notre site web : www.beglec.com
®
15/41 LED SEAWAVE 50W
JB SYSTEMS
Les informations peuvent être modifiées sans préavis
®
16/41 LED SEAWAVE 50W
Page 11

NEDERLANDS GEBRUIKSAANWIJZING
OPGELET:
GEBRUIKSAANWIJZING
Hartelijk dank voor de aankoop van dit JB Systems®product. Om ten volle van alle mogelijkheden te
profiteren en voor uw eigen veiligheid, lees deze gebruiksaanwijzing zorgvuldig voordat u met dit apparaat
start.
KENMERKEN
Dit apparaat is radio-interferentie onderdrukt. Dit product voldoet aan de eisen van de huidige Europese en
nationale richtlijnen. Overeenstemming is vastgesteld en de desbetreffende verklaringen en documenten zijn
door de fabrikant gedeponeerd.
Dit apparaat is ontworpen om decoratieve effectverlichting te produceren en wordt in lichtshowsystemen
gebruikt.
De professionele "high power"-versie van de zeer beroemde LED Waterwave-effect, gebaseerd op een 50
Watt LED
Dit maakt het geschikt voor gebruik in grotere clubs en op het podium.
Verschillende werkmodi:
o
Stand-alone: geen DMX-controller nodig.
o
Master/Slave: prachtige gesynchroniseerde shows, geen DMX-controller nodig.
o
DMX: 3 kanalen (snelheid, kleur, dimmer)
Compatibel met CA-8: bedrade afstandsbediening voor een betere master/slave-besturing
LED-display voor eenvoudige navigatie in het instellingenmenu
Hoge efficiëntie en laag energieverbruik, slechts 80 Watt
Lichtnet IEC-in/uitgangen voor het gemakkelijk linken via optionele IEC-kabels of combikabels
VÓÓR GEBRUIK
Voordat u met het gebruik van dit apparaat start, controleer of er geen transportschade aanwezig is. Mocht
er schade zijn, gebruik het apparaat niet en raadpleeg eerst uw dealer.
Belangrijk: Dit apparaat verliet de fabriek in perfecte staat en goed verpakt. Het is absoluut noodzakelijk
voor de gebruiker om de veiligheidsinstructies en waarschuwingen in deze handleiding strikt op te volgen.
Eventuele schade veroorzaakt door verkeerd gebruik valt niet onder de garantie. De dealer zal niet
aansprakelijk worden gesteld voor eventuele fouten of problemen veroorzaakt door het negeren van deze
handleiding.
Bewaar dit boekje op een veilige plaats voor toekomstige raadpleging. Als u de armatuur verkoopt, zorg
ervoor deze handleiding erbij te voegen.
Controleer de inhoud:
Controleer of de doos de volgende items bevat:
Gebruiksaanwijzing
LED Seawave 50 W
Netsnoer
VEILIGHEIDSINSTRUCTIES:
verkleinen, verwijder de bovenafdekking niet. Binnenin bevinden
zich geen onderdelen die door de gebruiker onderhouden
kunnen worden. Laat het onderhoud door gekwalificeerd
onderhoudspersoneel uitvoeren.
De bliksemschicht met pijl binnenin een gelijkzijdige driehoek is bedoeld om de gebruiker te
waarschuwen op de aanwezigheid van ongeïsoleerde “gevaarlijke voltage” binnen de behuizing
van het product dat van voldoende omvang is om een risico op elektrische schokken te vormen.
Om het risico voor elektrische schokken te
NEDERLANDS GEBRUIKSAANWIJZING
Het uitroepteken binnen een gelijkzijdige driehoek is bedoeld om de gebruiker te waarschuwen
op de aanwezigheid van belangrijke gebruiks- en onderhoudsinstructies in de documentatie die
met dit apparaat meekomen.
Dit symbool betekent: alleen gebruik binnenshuis.
Dit symbool betekent: Lees de instructies.
Dit symbool betekent: Veiligheidsklasse I apparaat.
Dit symbool betekent: de minimale afstand van de verlichte objecten. De minimale afstand
tussen de lichtbron en het verlichte oppervlak moet meer dan 1 meter zijn.
Het apparaat is niet geschikt voor directe montage op normaal brandbare oppervlakken. (Alleen
geschikt voor montage op onbrandbare oppervlakken.)
OPGELET: Kijk niet naar een werkende lamp.
Het kan schadelijk zijn voor de ogen.
Om het milieu te beschermen, probeer het verpakkingsmateriaal zoveel mogelijk te recyclen.
Om vuur of elektrische schokgevaar te voorkomen, stel dit apparaat niet bloot aan regen of vocht.
Om te voorkomen dat binnenin condensatie wordt gevormd, laat het apparaat aan de
omgevingstemperatuur aanpassen wanneer het na transport in een warme kamer wordt gebracht.
Condens verhindert soms het apparaat op volle capaciteit te werken of kan zelfs schade veroorzaken.
Dit apparaat is uitsluitend geschikt voor gebruik binnenshuis.
Plaats geen metalen voorwerpen of mors geen vloeistoffen in het toestel. Elektrische schokken of storing
kan het gevolg zijn. Als een vreemd voorwerp in het apparaat terechtkomt, trek onmiddellijk de stekker uit
het stopcontact.
Plaats de armatuur op een goed geventileerde plek, verwijderd van brandbare materialen en/of
vloeistoffen. De armatuur moet op minstens 50 cm vanaf de omringende muren worden bevestigd.
Bedek geen ventilatieopeningen, omdat het tot oververhitting kan leiden.
Voorkom het gebruik in stoffige omgevingen en maak het regelmatig schoon.
Houd het apparaat buiten bereik van kinderen.
Onervaren personen mogen dit apparaat niet bedienen.
De maximaal veilige omgevingstemperatuur is 40 °C. Gebruik deze unit niet bij hogere
omgevingstemperaturen.
Zorg ervoor dat het gebied onder de installatieplaats tijdens het takelen, onttakelen en onderhoud vrij is
van ongewenste personen.
Laat het apparaat ongeveer 10 minuten afkoelen alvorens met onderhoud te beginnen.
Ontkoppel altijd het apparaat wanneer het voor een langere tijd niet wordt gebruikt of alvorens het
onderhoud te beginnen.
De elektrische installatie dient alleen door gekwalificeerd personeel te worden uitgevoerd, in
overeenstemming met de voorschriften voor elektrische en mechanische veiligheid in uw land.
Controleer of de beschikbare spanning niet hoger is dan aangegeven op het apparaat.
Het netsnoer moet altijd in perfecte staat zijn. Schakel het apparaat onmiddellijk uit als het netsnoer wordt
platgedrukt of beschadigd. Als het netsnoer beschadigd is, moet deze door de fabrikant, zijn
vertegenwoordiger, of door een vergelijkbaar bevoegde persoon worden vervangen, om een gevaar te
voorkomen.
Laat het netsnoer nooit met andere kabels in contact komen!
Deze armatuur moet worden geaard om aan de veiligheidsvoorschriften te voldoen.
Sluit het apparaat niet aan op een dimmerpack.
Gebruik bij het installeren van het apparaat altijd een geschikte en gecertificeerde veiligheidskabel.
Om elektrische schokken te voorkomen, open de afdekking niet. Er zijn geen door de gebruiker te
repareren onderdelen binnenin het apparaat aanwezig.
Repareer nooit een zekering of sluit nooit de zekeringhouder kort. Vervang altijd een kapotte zekering
met een zekering van hetzelfde type en elektrische specificaties!
In het geval van ernstige problemen, stop met het gebruik van de armatuur en neem onmiddellijk contact
op met uw dealer.
De behuizing en de lenzen moeten vervangen worden als ze zichtbaar beschadigd zijn.
Gebruik de originele verpakking als het toestel vervoerd moet worden.
JB SYSTEMS
®
17/41 LED SEAWAVE 50W
JB SYSTEMS
®
18/41 LED SEAWAVE 50W
Page 12

NEDERLANDS GEBRUIKSAANWIJZING
Om achteruit in de geselecteerde functies te gaan of om een
Om vooruit in de geselecteerde functies te gaan of om een
NEDERLANDS GEBRUIKSAANWIJZING
Vanwege veiligheidsredenen is het verboden om ongeautoriseerde wijzigingen op het apparaat aan te
brengen.
Belangrijk: Kijk nooit rechtstreeks in de lichtbron! Gebruik het effect niet in de aanwezigheid van personen
die aan epilepsie lijden.
HIJSEN BOVEN PERSONEN
Belangrijk: De installatie moet alleen worden uitgevoerd door gekwalificeerd
onderhoudspersoneel. Onjuiste installatie kan tot ernstig letsel bij personen en schade aan
goederen leiden. Hijsen boven personen vereist veel ervaring! Werklastgrenzen moeten in acht
worden genomen, gecertificeerde installatiematerialen moeten worden gebruikt, het geïnstalleerde
apparaat moet regelmatig worden gecontroleerd op veiligheid.
Zorg ervoor dat het gebied onder de installatieplaats tijdens het takelen, onttakelen en onderhoud vrij is
van ongewenste personen.
Plaats de armatuur op een goed geventileerde plek, verwijderd van brandbare materialen en/of
vloeistoffen. De armatuur moet op minstens 50 cm vanaf de omringende muren worden bevestigd.
Het apparaat moet buiten het bereik van mensen en buiten de gebieden waar personen kunnen lopen of
zitten worden geïnstalleerd.
Alvorens te hijsen, controleer of de installatieplek een minimum puntbelasting van 10 keer het gewicht van
het apparaat kan dragen.
Gebruik bij het installeren van het apparaat altijd een gewaarmerkte veiligheidskabel die 12 keer het
gewicht van het apparaat kan dragen. Deze secundaire veiligheidsbevestiging dient op een zodanige wijze
te worden geïnstalleerd zodat geen enkel onderdeel van de installatie meer dan 20 cm kan vallen als de
hoofdbevestiging het begeeft.
Het apparaat moet goed worden bevestigd; een vrij pendelende montage is gevaarlijk en mag niet worden
overwogen!
Bedek geen ventilatieopeningen, omdat het tot oververhitting kan leiden.
De exploitant moet ervoor zorgen dat de veiligheidsgerelateerde en machinetechnische installaties door
een deskundige zijn goedgekeurd alvorens deze voor de eerste keer te gebruiken. De installaties moeten
ieder jaar door een vakman worden geïnspecteerd om er zeker van te zijn dat de veiligheid nog steeds
optimaal is.
BESCHRIJVING:
1. OPTISCHE LENS: met handmatige focusaanpassing
2. BEDIENINGSPANEEL:
a. DISPLAY: toont de verschillende menu's en de geselecteerde functies.
b. LED's:
DMX Aan DMX-ingang aanwezig
MASTER Aan Master-modus
SLAVE Aan Slave-modus
SOUND Knipperend Geluid activering
c. BUTTONS:
MENU Om de programmeerfuncties te selecteren
DOWN
UP
ENTER Om de geselecteerde functies te bevestigen
3. BRACKET: Ophangbeugel met 2 knoppen aan beide zijden om het apparaat te bevestigen en een
montagegat om een ophanghaak vast te haken.
4. SAFETY EYE: wordt gebruikt om een veiligheidskabel te bevestigen wanneer het apparaat is opgetuigd
(zie paragraaf “Hijsen boven personen”).
5. LICHTNETUITGANG:
6. Energievoorziening: met IEC-aansluiting en geïntegreerde zekeringhouder. sluit hier het bijgeleverde
netsnoer op aan.
7. KOELVENTILATOR:
8. BEKABELDE AFSTANDSBEDIENINGSINGANG: Wordt gebruikt om een eenvoudige CA-8-
handbediening aan te sluiten terwijl het apparaat in de stand-alone- of master/slave-modus wordt
gebruikt.
9. DMX-UITGANG: 3-pins vrouwelijke XLR-connector die gebruikt wordt om het effect met de volgende
eenheid in de DMX-keten te verbinden.
10. DMX-INGANG: 3-pins mannelijke XLR-connector die gebruikt wordt om het effect met de vorige eenheid
in de DMX-keten te verbinden.
waarde te verlagen
waarde te verhogen
HOE IN TE STELLEN:
HOOFDMENU:
Om een functie te selecteren, druk op en houd de “MENU”-knop ingedrukt totdat de gewenste functie op
de display wordt weergegeven of gebruik de “DOWN”- en “UP”-knoppen om het menu te bladeren.
Selecteer de functie met de “ENTER”-knop (de display knippert).
Gebruik de “DOWN”- en “UP”-knoppen om de modus te wijzigen.
Zodra de gewenste modus is geselecteerd, druk op de
“ENTER”-knop om te bevestigen.
Om zonder enige wijziging naar het hoofdmenu terug te
gaan, druk kort op de “MENU”-knop. ( Het hoofdmenu
wordt in het schema weergegeven.)
Druk op en houd de “MENU”-knop ongeveer 2 seconden
ingedrukt om het menu te verlaten en naar de normale
werkingsmodus terug te keren.
DMX-adres
Wordt gebruikt om het startadres in een DMX-setup
in te stellen.
Druk op en houd de “MENU”-knop ingedrukt totdat
“Addr” op de display wordt weergegeven.
Druk op de “ENTER”-knop, de display begint te
knipperen.
Gebruik de “DOWN”- en “UP”-knoppen om het
DMX512-adres te wijzigen.
Zodra het juiste adres op de display wordt
weergegeven, druk op de “ENTER”-knop om het op te
slaan.
( Om zonder enige wijziging naar het hoofdmenu terug
te gaan, druk kort op de “MENU”-knop.)
Druk op en houd de “MENU”-knop ongeveer 2 seconden
ingedrukt om het menu te verlaten en naar de normale
werkingsmodus terug te keren.
JB SYSTEMS
®
19/41 LED SEAWAVE 50W
JB SYSTEMS
®
20/41 LED SEAWAVE 50W
Page 13

NEDERLANDS GEBRUIKSAANWIJZING
NEDERLANDS GEBRUIKSAANWIJZING
Werkmodus
Wordt gebruikt om het apparaat in de master- of als slave-modus te schakelen.
Druk op en houd de “MENU”-knop ingedrukt totdat “SLMd” op de display wordt weergegeven.
Druk op de “ENTER”-knop, de display begint te knipperen.
Gebruik “DOWN”- en “UP”-knoppen om "MASt" (master-modus) of "SL I" (slave-modus) te selecteren.
Zodra de juiste modus op de display wordt weergegeven, druk op de “ENTER”-knop om uw keuze te
bevestigen.
Druk op en houd de “MENU”-knop ongeveer 2 seconden ingedrukt om het menu te verlaten en naar de
normale werkingsmodus terug te keren.
Display aan/uit
Display aan: display is altijd verlicht.
Display uit: display is donker wanneer deze niet gebruikt wordt.
Druk op en houd de “MENU”-knop ingedrukt totdat de display “Led” weergeeft.
Druk op de “ENTER”-knop, de display begint te knipperen.
Gebruik de “DOWN”- en “UP”-knoppen om “On” (display altijd verlicht) of “Off” (display donker wanneer
niet gebruikt wordt) te selecteren.
Zodra de modus is geselecteerd, druk op de “ENTER”-knop om het op te slaan.
Om zonder enige wijziging naar het hoofdmenu terug te gaan, druk kort op de “MENU”-knop.
Druk op en houd de “MENU”-knop ongeveer 2 seconden ingedrukt om het menu te verlaten en naar de
normale werkingsmodus terug te keren.
Weergave-inversie
Normale weergave: de weergave is leesbaar wanneer het apparaat op de vloer is geplaatst.
Weergave-inversie: de weergave is leesbaar wanneer het apparaat ondersteboven is gemonteerd.
Druk op en houd de “MENU”-knop ingedrukt totdat “dISP” op de display wordt weergegeven. (normale
weergave)
Druk op de “ENTER”-knop om tussen (normale weergave) en (weergave-inversie) te
schakelen.
Druk op en houd de “MENU”-knop ongeveer 2 seconden ingedrukt om het menu te verlaten en naar de
normale werkingsmodus terug te keren.
Handmatige instellingen:
Gebruikt om handmatig de gewenste projectiemodus in te stellen wanneer geen externe controller
wordt gebruikt.
Druk op en houd de “MENU”-knop ingedrukt totdat de display “Manu” weergeeft.
Druk op de “ENTER”-knop, de display begint te “CoLo”.
Druk op de “ENTER”-knop als u de kleur wilt instellen:
Gebruik de “DOWN”- and “UP”-knoppen om de gewenste kleur (waarde van 0 tot 255
volgens kanaal 3 van de DMX-grafiek) in te stellen
Druk op de “ENTER”-knop om te bevestigen.
Gebruik de “DOWN”- en “UP”-knoppen om naar “UAue” te gaan.
Druk op de “ENTER”-knop als u de rotatiesnelheid en richting wilt instellen:
Gebruik de “DOWN”- and “UP”-knoppen om de gewenste rotatie (waarde van 0 tot 255
volgens kanaal 2 van de DMX-grafiek) in te stellen
Druk op de “ENTER”-knop om te bevestigen.
Gebruik de “DOWN”- en “UP”-knoppen om naar “diMM” te gaan.
Druk op de “ENTER”-knop als u het dimmerniveau wilt instellen:
Gebruik de “DOW N”- en “UP”-knoppen om de gewenste lichtopbrengst (waarde van 125
(lage output) tot 255 (maximale output))
Druk op de “ENTER”-knop om te bevestigen.
Druk op en houd de “MENU”-knop ongeveer 2 seconden ingedrukt om het menu te verlaten en de
geprogrammeerde show te draaien.
Test
Druk op en houd de “MENU”-knop ingedrukt totdat “teSt” op de display wordt weergegeven.
Druk op de "ENTER"-knop, de display zal beginnen te knipperen terwijl het toestel alle mogelijke functies
zal uitvoeren.
Druk op de “ENTER”-knop of de “MENU”-knop om de TEST-modus af te sluiten
Druk op en houd de “MENU”-knop ongeveer 2 seconden ingedrukt om het menu te verlaten en naar de
normale werkingsmodus terug te keren.
Temperatuur:
Wordt gebruikt om de softwareversie van de eenheid weer te geven.
Druk op en houd de “MENU”-knop ingedrukt totdat “teMP” op de display wordt weergegeven.
Druk op de “ENTER”-knop om de softwareversie van de unit weer te geven.
Druk op en houd de “MENU”-knop ongeveer 2 seconden ingedrukt om het menu te verlaten en naar de
normale werkingsmodus terug te keren.
Uren van de armatuur
Wordt gebruikt om het aantal bedrijfsuren van het apparaat te tonen.
Druk op en houd de “MENU”-knop ingedrukt totdat “FhrS” op de display wordt weergegeven.
Druk op de “ENTER”-knop om het aantal bedrijfsuren in de display weer te geven.
Druk op en houd de “MENU”-knop ongeveer 2 seconden ingedrukt om het menu te verlaten en naar de
normale werkingsmodus terug te keren.
Softwareversie
Wordt gebruikt om de softwareversie van de unit weer te geven.
Druk op en houd de “MENU”-knop ingedrukt totdat “uer” op de display wordt weergegeven.
Druk op de “ENTER”-knop om de softwareversie van de unit weer te geven.
Druk op en houd de “MENU”-knop ongeveer 2 seconden ingedrukt om het menu te verlaten en naar de
normale werkingsmodus terug te keren.
Resetten
Wordt gebruikt om te resetten
Druk op en houd de “MENU”-knop ingedrukt totdat “rSet” op de display wordt weergegeven.
Druk op de “ENTER”-knop om de reset-functie op te starten.
Terwijl de eenheid het resetten uitvoert, wordt "UAu" op de display getoond. Wacht tot “UAu” niet meer op
de display wordt weergegeven.
ELEKTRISCHE INSTALLATIE + ADRESSERING
Belangrijk: De elektrische installatie dient alleen door gekwalificeerd personeel te worden
uitgevoerd, in overeenstemming met de voorschriften voor elektrische en mechanische
veiligheid in uw land.
Elektrische installatie voor 1 stand-alone apparaat:
Steek gewoon de voedingskabel erin.
Wanneer er geen DMX-kabel op de DMX-ingang is aangesloten, zal de eenheid onmiddellijk in de stand-
alone-modus beginnen te werken.
U kunt de stand-alone-modus naar uw eigen voorkeur aanpassen. Maak gewoon de gewenste
instellingen in het hoofdmenu. (zie het vorige hoofdstuk "HOE IN TE STELLEN / HOOFDMENU /
Handmatige instellingen")
Opmerking: U kunt een CA-8-afstandsbediening op de unit aansluiten als u meer controle wilt hebben.
Raadpleeg “hoe het apparaat te bedienen” om te leren hoe dit te doen.
Elektrische installatie voor twee of meer apparaten in master/slave:
Koppel meerdere eenheden met goede kwaliteit gebalanceerde microfoonkabels aan elkaar. De eerste
eenheid van de keten mag geen DMX-kabel op zijn DMX-ingang aangesloten hebben en moet op de
master-modus worden ingesteld, de andere eenheden moeten op slave-modus (SL 1) worden ingesteld.
Zie het vorige hoofdstuk voor meer informatie.
Zorg ervoor dat alle apparaten op het lichtnet zijn aangesloten.
Klaar!
U kunt de stand-alone-modus naar uw eigen voorkeur aanpassen. Maak gewoon de gewenste
instellingen in het hoofdmenu van de MASTER-eenheid. (zie het vorige hoofdstuk "HOE IN TE
STELLEN / HOOFDMENU / Handmatige instellingen")
JB SYSTEMS
®
21/41 LED SEAWAVE 50W
JB SYSTEMS
®
22/41 LED SEAWAVE 50W
Page 14

NEDERLANDS GEBRUIKSAANWIJZING
Opmerking: U kunt een CA-8-afstandsbediening op de “Master” unit aansluiten als u meer controle wilt
hebben. Raadpleeg “hoe het apparaat te bedienen” om te leren hoe dit te doen.
Elektrische installatie in de DMX-modus:
De DMX-protocol is een veel gebruikte hoge snelheidsignaal om intelligent lichtapparatuur te bedienen.
U moet uw DMX-controller in “daisychain” koppelen en alle aangesloten apparaten met een goede
kwaliteit gebalanceerde kabel linken.
Zowel XLR-3-pins en XLR-5-pins connectors worden gebruikt, maar de XLR-3-pins is populairder omdat
deze kabels compatibel met gebalanceerde audiokabels zijn.
Pinbezetting XLR-3-pins: Pin1 = GND ~ Pin2 = Negatief signaal (-) ~ Pin3 = Positief signaal (+)
Pinbezetting XLR-5-pins: Pin1 = GND ~ Pin2 = Negatief signaal (-) ~ Pin3 = Positief signaal (+) ~
Pinnen 4+5 niet gebruikt.
Om vreemd gedrag van de lichteffecten als gevolg van storingen te voorkomen,
moet u een 90 Ω tot 120 Ω terminator aan het eind van de keten gebruiken.
Gebruik nooit Y-splitter-kabels, dit zal gewoon niet werken!
Zorg ervoor dat alle apparaten op het lichtnet zijn aangesloten.
Elk lichteffect in de keten heeft een goed startadres nodig, zodat het weet welke
commando’s van de controller het moet decoderen.
Helaas is het onmogelijk om u in deze handleiding te vertellen welke startadressen u moet instellen,
omdat dit volledig afhangt van de controller die u zult gebruiken. Dus raadpleeg de
gebruikershandleiding van uw DMX-controller om te achterhalen welke startadressen u moet instellen.
NEDERLANDS GEBRUIKSAANWIJZING
DMX-CONFIGURATIE
BEDIEN HET APPARAAT VIA DE CA8
Bij gebruik in standalone- of master/slave-modus raden wij u aan de CA-8 “Bekabelde
gemakkelijke bediening”.
Sluit de controller aan op de stekkeringang van de eerste eenheid (Master-eenheid).
STAND BY Om alle armaturen naar black-out te schakelen
JB SYSTEMS
FUNCTION Wave-snelheid: 1-3 Kies kleur: 1-12 Kleursnelheid: 1-3
MODE LED UIT LED AAN LED knippert
ONDERHOUD
Zorg ervoor dat het gebied onder de installatieplaats tijdens het takelen, onttakelen en onderhoud vrij is
van ongewenste personen.
Schakel het apparaat uit, ontkoppel het netsnoer en wacht totdat het apparaat is afgekoeld.
Tijdens de inspectie moeten de volgende punten worden gecontroleerd:
Alle schroeven gebruikt voor het installeren van het apparaat of onderdelen van het apparaat, moeten
stevig worden bevestigd en mogen niet gecorrodeerd zijn.
Behuizingen, bevestigingen en installatieplaatsen (plafond, dragers, ophangingen) moeten volledig vrij van
vervorming zijn.
Wanneer een optische lens zichtbaar door scheuren of diepe krassen is beschadigd, moet het worden
vervangen.
De netsnoeren moeten in perfecte conditie zijn en onmiddellijk worden vervangen wanneer zelfs een klein
probleem wordt gedetecteerd.
®
23/41 LED SEAWAVE 50W
JB SYSTEMS
®
24/41 LED SEAWAVE 50W
Page 15

NEDERLANDS GEBRUIKSAANWIJZING
ACHTUNG:
Om het apparaat tegen oververhitting te beschermen moeten de ventilatoren (indien aanwezig) en
ventilatieopeningen maandelijks worden gereinigd.
Het interieur van het apparaat moeten jaarlijks met een stofzuiger of luchtstraal worden gereinigd.
Het reinigen van de interne en externe optische lenzen en/of spiegels moet regelmatig worden uitgevoerd
om de lichtopbrengst te optimaliseren. De frequentie van reiniging hangt af van de omgeving waarin de
armatuur werkt: een vochtige, rokerige of bijzonder vuile omgeving kan leiden tot een grotere opeenhoping
van vuil op de optiek van het apparaat.
Reinig met een zachte doek met behulp van normale reinigingsmiddelen voor glas.
Droog de onderdelen altijd zorgvuldig.
Opgelet: Wij raden nadrukkelijk aan om het inwendig reinigen door gekwalificeerd personeel uit te
laten voeren!
SPECIFICATIES
Energievoorziening: AC 100-240 V 50/60 Hz
Energieverbruik: 80 Watt
Zekering: 250 V, T6,3 A traag (20 mm glas)
DMX-aansluitingen: 3-pins XLR mannelijk/vrouwelijk
Gebruikte DMX-kanalen: 3 kanalen
Lamp: 50 W LED
Afmetingen: 27,9 x 22,6 x 19,1 cm
Gewicht: 4 kg
De informatie kan zonder voorafgaande kennisgeving worden gewijzigd
U kunt de nieuwste versie van deze handleiding van onze website downloaden: www.beglec.com
DEUTSCH BEDIENUNGSANLEITUNG
BEDIENUNGSANLEITUNG
Vielen Dank für den Kauf dieses JBSystems®-Produkts. Bitte lesen Sie bitte diese Bedienungshinweise
sorgfältig vor der Inbetriebnahme durch, um alle Möglichkeiten des Geräts voll zu nutzen sowie zu Ihrer
eigenen Sicherheit.
EIGENSCHAFTEN
Dieses Gerät ist entstört. Das Gerät entspricht den aktuellen europäischen Anforderungen und nationalen
Richtlinien. Die Konformität wurde nachgewiesen und die entsprechenden Erklärungen und Unterlagen
liegen beim Hersteller vor.
Dieses Gerät wird zur Erzeugung von dekorativen Beleuchtungseffekten in Lichtshows eingesetzt.
Die professionelle „Hochleistungs“-Version des sehr berühmten LED Wasserwellen-Effekts, basierend auf
einer LED mit 50 Watt.
Sie ist für den Einsatz in größeren Clubs und auf der Bühne geeignet.
Verschiedene Betriebsmodi:
o
Einzelbetrieb: kein DMX-Controller erforderlich.
o
Master/Slave: wunderbare synchronisierte Shows, kein DMX-Controller erforderlich.
o
DMX: 3 Kanäle (Geschwindigkeit, Farbe, Dimmer).
Mit CA-8 kompatibel: Kabelgebundene Fernsteuerung für eine verbesserte Master/Slave-Steuerung.
LED-Display für einfache Navigation im Setup-Menü.
Hoher W irkungsgrad und niedriger Stromverbrauch, nur 80 W att.
IEC-Stromversorgungs-Ein/Ausgänge zum einfachen Durchschleifen mittels optional erhältlicher IEC- oder
Kombi-Kabel.
VOR DER ERSTBENUTZUNG
Vor der Erstbenutzung bitte das Gerät zuerst auf Transportschäden überprüfen. Sollte das Gerät einen
Schade aufweisen, benutzen Sie es nicht, sondern wenn Sie sich unverzüglich an Ihren Händler.
Wichtiger Hinweis: Dieses Gerät hat das Werk unbeschädigt und gut verpackt verlassen. Es ist wichtig,
dass der Benutzer sich streng an die Sicherheitshinweise und Warnungen in der Bedienungsanleitung
hält. Schäden durch unsachgemäße Handhabung sind von der Garantie ausgeschlossen. Der Händler
übernimmt keine Verantwortung für Schäden, die durch Nichtbeachtung der Bedienungsanleitung
hervorgerufen wurden.
Die Bedienungsanleitung zum zukünftigen Nachschlagen bitte an einem sicheren Ort aufbewahren. Bei
Verkauf oder sonstiger Weitergabe des Geräts bitte die Bedienungsanleitung beifügen.
Packungsinhalt prüfen:
Bitte überprüfen Sie, ob die Verpackung folgende Artikel enthält:
Bedienungsanleitung
LED Seawave 50W
Netzkabel
JB SYSTEMS
SICHERHEITSHINWEISE
Schlags auszusetzen, entfernen Sie keines der Gehäuseteile. Im
Geräteinneren befinden sich keine vom Benutzer wartbaren
Teile. Überlassen Sie Reparatur- und Wartungsarbeiten dem
Das Blitzsymbol innerhalb eines gleichseitigen Dreiecks warnt den Benutzer vor nicht isolierter
„gefährlicher Spannung“ im Innern des Produktgehäuses, die so stark sein kann, dass für
Personen die Gefahr von Stromschlägen besteht.
Das Ausrufezeichen im Dreieck weist den Benutzer auf wichtige Bedienungs-und
Wartungshinweise in den Dokumenten hin, die dem Gerät beiliegen.
®
25/41 LED SEAWAVE 50W
JB SYSTEMS
®
qualifizierten Kundendienst.
26/41 LED SEAWAVE 50W
Um sich nicht der Gefahr eines elektrischen
Page 16

DEUTSCH BEDIENUNGSANLEITUNG
Geht in ausgewählten Funktionen rückwärts oder verringert einen
Geht in ausgewählten Funktionen vorwärts oder erhöht einen
DEUTSCH BEDIENUNGSANLEITUNG
Dieses Symbol bedeutet: Nur für den Einsatz im Innenbereich.
Dieses Symbol bedeutet: Die Bedienungsanleitung lesen.
Dieses Symbol bedeutet: Das Gerät besitzt Schutzklasse I.
Dieses Symbol legt fest: Den minimalen Abstand von beleuchteten Objekten. Der minimale
Abstand zwischen Projektor und dem beleuchteten Objekt muss mehr als 1 Meter betragen.
Das Gerät eignet sich nicht für die direkte Montage auf gängigen entflammbaren Oberflächen.
(Nur für die Montage auf nichtbrennbare Oberflächen geeignet)
ACHTUNG: Nicht direkt in die Lichtquelle blicken.
Das kann für die Augen schädlich sein.
Aus Umweltschutzgründen Verpackung bitte wiederverwenden oder richtig trennen.
Zur Vermeidung von Feuer und Stromschlag Gerät weder Regen noch Feuchtigkeit aussetzen.
Zur Vermeidung von Kondensation im Inneren des Geräts bitte nach dem Transport in eine warme
Umgebung einige Zeit zum Temperaturausgleich ausgeschaltet stehen lassen. Kondensation kann zu
Leistungsverlust des Geräts oder gar Beschädigung führen.
Nur für den Einsatz im Innenbereich.
Keine Metallgegenstände oder Flüssigkeiten ins Innere des Geräts gelangen lassen. Ein Kurzschluss oder
eine Fehlfunktion können die Folge sein. Falls es doch einmal vorkommen sollte, bitte sofort den
Netzstecker ziehen und vom Stromkreis trennen.
Das Gerät nur an einem gut belüfteten Ort und entfernt von entflammbaren Materialien oder Flüssigkeiten
aufstellen. Der Mindestabstand an allen Seiten muss mindestens 50cm betragen.
Die Ventilationsöffnungen nicht abdecken, da Überhitzungsgefahr.
Nicht in staubiger Umgebung verwenden und regelmäßig reinigen.
Für Kinder unerreichbar aufbewahren.
Unerfahrene Personen dürfen das Gerät nicht bedienen.
Umgebungstemperatur darf 40°C nicht überschreiten. Das Gerät bei höheren Raumtemperaturen nicht
verwenden.
Stellen Sie sicher, dass sich während des Auf- oder Abbaus und der Wartung keine unbefugten Personen
unterhalb des Geräts befinden.
Lassen Sie das Gerät etwa 10 Minuten abkühlen, bevor Sie mit der Wartung beginnen.
Stets den Netzstecker ziehen, wenn das Gerät für einen längeren Zeitraum nicht genutzt oder es gewartet
wird.
Die elektrische Installation darf nur von qualifiziertem Personal, unter Beachtung der Vorschriften zur
elektrischen und mechanischen Sicherheit in Ihrem Land durchgeführt werden.
Stellen Sie sicher, dass Netzspannung mit Geräteaufkleber übereinstimmt.
Das Gerät nicht mit einem beschädigten Netzkabel in Betrieb nehmen. Wenn das Netzkabel quetscht oder
beschädigt wurde, schalten Sie das Gerät sofort aus. Im Falle von Beschädigungen muss das Netzkabel
vom Hersteller, einem autorisierten Kundendienstmitarbeiter oder einer ähnlich qualifizierten Person
ersetzt werden, um Gefährdungen zu vermeiden.
Lassen Sie das Netzkabel niemals mit anderen Kabeln in Berührung kommen!
Zur Einhaltung der Sicherheitsbestimmungen muss das Gerät geerdet sein.
Das Gerät nicht an einen Dimmer anschließen.
Ausschließlich vorschriftsmäßige Kabel zur Installation verwenden.
Zur Vorbeugung gegen elektrische Schläge keine Abdeckungen entfernen. Im Geräteinneren befinden
sich keine zu wartenden Teile.
Eine Sicherung niemals reparieren oder überbrücken. Eine durchgebrannte Sicherung stets durch eine
gleichwertige Sicherung ersetzen!
Bei Fehlfunktion das Gerät nicht benutzen und sich mit dem Händler in Verbindung setzen.
Bei sichtbaren Beschädigungen müssen Gehäuse und Optik ersetzt werden.
Bei Transport bitte die Originalverpackung verwenden, um Schäden am Gerät zu vermeiden.
Aus Sicherheitsgründen dürfen an dem Gerät keine unbefugten Veränderungen vorgenommen werden.
Wichtiger Hinweis: Nicht direkt in die Lichtquelle blicken! Das Gerät nicht verwenden, wenn sich Personen
im Raum befinden, die unter Epilepsie leiden.
ÜBERKOPF-MONTAGE
Wichtiger Hinweis: Die Montage ausschließlich durch qualifiziertes Fachpersonal durchführen
lassen. Unvorschriftsmäßiger Einbau kann erhebliche Verletzungen und/oder Schäden
verursachen. Die Überkopf-Montage setzt die entsprechende Erfahrung voraus! Die
Belastungsgrenzen müssen beachtet, geeignetes Installationsmaterial muss verwendet und das
installierte Gerät muss in regelmäßigen Abständen überprüft werden.
Stellen Sie sicher, dass sich während des Auf- oder Abbaus und der Wartung keine unbefugten Personen
unterhalb des Geräts befinden.
Das Gerät nur an einem gut belüfteten Ort und entfernt von entflammbaren Materialien und/oder
Flüssigkeiten aufstellen. Der Mindestabstand an allen Seiten muss mindestens 50cm betragen.
Das Gerät außerhalb der Reichweite von Personen und nicht in niedrigen Durchgängen oder in der Nähe
von Sitzgelegenheiten installieren.
Vor Montage sicherstellen, dass die gewählte Position wenigstens das 10-fache Gerätegewicht
aufnehmen kann.
Zur Aufhängung stets geeignetes Befestigungsmaterial verwenden, das das 12-fache Gerätegewicht
aushalten kann. Eine zweite Sicherungsaufhängung muss angebracht werden, die ein Absacken des
Geräts von mehr als 20 cm verhindert, sollte die Befestigung brechen.
Das Gerät gut befestigen. Eine freischwingende Aufhängung ist gefährlich und sollte auf gar keinen Fall in
Betracht gezogen werden!
Die Ventilationsöffnungen nicht abdecken, da Überhitzungsgefahr.
Der Betreiber muss sicherstellen, dass die sicherheitsrelevanten und technischen Installationen vor
Erstbetrieb fachmännisch vorgenommen worden sind. Installationen sollten jährlich durch qualifiziertes
Fachpersonal überprüft werden, um jederzeit einen sicheren Betrieb zu gewährleisten.
BESCHREIBUNG:
1. OBJEKTIV: mit manueller Fokuseinstellung.
2. BEDIENFELD:
a. ANZEIGE: Zeigt die verschiedenen Menüs und die gewählten Funktionen an.
b. LEDS
DMX Ein DMX Eingang vorhanden
MASTER Ein Mastermodus
SLAVE Ein Slavemodus
SOUND Blinkend Musik-Aktivierung
c. TASTEN
MENU Auswahl der Programmier-Funktionen
DOWN
UP
ENTER Ausgewählte Funktionen bestätigen
Wert.
Wert.
JB SYSTEMS
®
27/41 LED SEAWAVE 50W
JB SYSTEMS
®
28/41 LED SEAWAVE 50W
Page 17

DEUTSCH BEDIENUNGSANLEITUNG
DEUTSCH BEDIENUNGSANLEITUNG
3. HALTERUNG: Halter mit zwei Knöpfen auf jeder Seite zur Befestigung des Geräts und einer Öffnung,
um eine Montagevorrichtung zu befestigen.
4. SICHERHEITSAUGE: zur Anbringung eines Sicherheitskabels bei Überkopfmontage (s. Abschnitt
„Überkopfmontage“)
5. NETZAUSGANG:
6. NETZSPANNUNG: Netzanschluss mit IEC-Buchse mit integrierter Sicherung zum Anschluss des
Netzkabels.
7. LÜFTER:
8. EINGABE FERNSTEUERUNG, KABEL: Zum Anschließen einer einfachen CA-8 Handsteuerung
während sich das Gerät im Einzelbetrieb oder im Master/Slave-Modus befindet.
9. DMX Ausgang: Die 3-polige XLR-Buchse verbindet den LASER mit der nächsten Einheit in der DMX-
Kette.
10. DMX EINGANG: Der 3-poliger XLR-Stecker verbindet den Effekt mit dem DMX-Controller oder der
vorherigen Einheit in der DMX-Kette.
EINSTELLUNGSANLEITUNG:
HAUPTMENÜ:
Drücken Sie zur Auswahl der Funktionen die Taste MENU bis die gewünschte Funktion angezeigt wird
oder ändern Sie den ausgewählten Punkt mit den Tasten DOWN und UP.
Drücken Sie zur Auswahl einer Funktion die Taste ENTER (Anzeige beginnt zu blinken).
Zur Modusänderung verwenden Sie bitte die Tasten DOWN und UP.
Wenn der gewünschte Modus eingestellt ist, bestätigen Sie diesen mit ENTER.
Bei kurzem Betätigen der Taste MENU können Sie zum Hauptmenü zurückzukehren, ohne eine Änderung
vorzunehmen. Das Hauptmenü ist in der Übersicht abgebildet.
Drücken Sie die MENU-Taste für etwa 2 Sekunden, um das Menü zu verlassen und zum normalen
Betriebsmodus zurückzukehren.
DMX-Adresse
Zur Einstellung der Startadresse in einem DMX-Setup.
Drücken Sie die Taste MENU bis „Addr“ auf dem
Display angezeigt wird.
Drücken Sie die ENTER Taste. Das Display beginnt nun
zu blinken.
Ändern Sie die DMX512-Adresse nun mit den Tasten
DOWN und UP.
Wenn Sie die korrekte Adresse eingestellt haben,
speichern Sie Ihre Auswahl mit ENTER.
Bei kurzem Betätigen der Taste MENU können Sie zum
Hauptmenü zurückzukehren, ohne eine Änderung
vorzunehmen.
Drücken Sie die MENU-Taste für etwa 2 Sekunden, um
das Menü zu verlassen und zum normalen Betriebsmodus
zurückzukehren.
Betriebsmodus
Einstellen des Geräts in den Master- oder SlaveModus.
Drücken Sie die Taste MENU, bis „SLMd“ auf dem
Display angezeigt wird.
Drücken Sie die ENTER Taste. Das Display beginnt nun
zu blinken.
Wählen Sie mit den Tasten DOWN (Abwärts) und UP
(Aufwärts) die Option „MASt“ (Master-Modus) oder „SL
I“ (Slave-Modus).
Sobald die richtige Adresse im Display angezeigt wird,
bestätigen Sie mit ENTER.
Drücken Sie die MENU-Taste für etwa 2 Sekunden, um das Menü zu verlassen und zum normalen
Betriebsmodus zurückzukehren.
Display EIN/AUS
Display ein: Display ist jederzeit beleuchtet.
Display aus: Display bleibt, wenn es nicht benutzt wird, dunkel.
Drücken Sie die Taste MENU, bis „Led“ auf dem Display angezeigt wird.
Drücken Sie die ENTER Taste. Das Display beginnt nun zu blinken.
Wählen Sie über die Tasten DOW N und UP entweder „yes“ (Display EIN) oder „no“ (Display AUS) aus.
Wenn der gewünschte Modus eingestellt ist, speichern Sie diesen mit ENTER.
Bei kurzem Betätigen der Taste MENU können Sie zum Hauptmenü zurückzukehren, ohne eine Änderung
vorzunehmen.
Drücken Sie die MENU-Taste für etwa 2 Sekunden, um das Menü zu verlassen und zum normalen
Betriebsmodus zurückzukehren.
Display-Umkehrung
Display „Normal“: Display zeigt normale Anzeige vom Boden aus.
Display-Umkehrung: Das Display ist lesbar, wenn das Gerät auf dem Kopf stehend installiert wurde.
Drücken Sie die Taste MENU, bis „dISP“ auf dem Display angezeigt wird. (Normales Display)
Wechseln Sie mit der Taste ENTER zwischen (Normales Display) und (Display-
Umkehrung).
Drücken Sie die MENU-Taste für etwa 2 Sekunden, um das Menü zu verlassen und zum normalen
Betriebsmodus zurückzukehren.
Manuelle Einstellungen:
Manuelles Festlegen der gewünschten Projektion, wenn kein externer Controller verwendet wird.
Drücken Sie die Taste MENU, bis „Manu“ auf dem Display angezeigt wird.
Drücken Sie die ENTER Taste, das Display zeigt „CoLo“
Drücken Sie ENTER, wenn Sie die Farbe einstellen möchten:
Stellen Sie mit den Tasten DOWN (Abwärts) und UP (Aufwärts) die gewünschten Farbe ein
(Wert von 0 bis 255 entsprechend zu Kanal 3 der DMX-Tabelle).
Bestätigen Sie mit ENTER.
Gehen Sie mit DOWN (Abwärts) und UP (Aufwärts) zur Option „U Aue “.
Drücken Sie ENTER, wenn Sie die Drehgeschwindigkeit und die Richtung einstellen möchten:
Stellen Sie mit DOWN (Abwärts) und UP (Aufwärts) die gewünschten Drehung ein (Wert von
0 bis 255 entsprechend zu Kanal 2 der DMX-Tabelle).
Bestätigen Sie mit ENTER.
Gehen Sie mit DOWN (Abwärts) und UP (Aufwärts) zur Option „diMM“.
Drücken Sie ENTER, wenn Sie die Dimmerstufe einstellen möchten:
Stellen Sie mit DOWN (Abwärts) und UP (Aufwärts) das gewünschte Helligkeitsniveau ein
(Wert von 125 (niedrige Leistung) bis 255 (maximale Leistung)).
Bestätigen Sie mit ENTER.
Drücken Sie MENU für etwa 2 Sekunden, wenn Sie das Menü verlassen und die programmierte Show
starten möchten.
Test
Drücken Sie die Taste MENU, bis „teSt“ auf dem Display angezeigt wird.
Drücken Sie ENTER. Das Display blinkt, während die Einheit alle Funktionen durchläuft.
Drücken Sie ENTER oder , um den TEST-Modus zu beenden.
Drücken Sie die MENU-Taste für etwa 2 Sekunden, um das Menü zu verlassen und zum normalen
Betriebsmodus zurückzukehren.
Temperatur:
Anzeige der internen Temperatur des Geräts.
Drücken Sie die Taste MENU, bis „teMP“ auf dem Display angezeigt wird.
Zeigen Sie mit ENTER die Temperatur des Geräts an.
Drücken Sie die MENU-Taste für etwa 2 Sekunden, um das Menü zu verlassen und zum normalen
Betriebsmodus zurückzukehren.
Betriebsstunden
Zeigt die Betriebszeit des Geräts an.
Drücken Sie die Taste MENU bis „FhrS“ auf dem Display angezeigt wird.
JB SYSTEMS
®
29/41 LED SEAWAVE 50W
JB SYSTEMS
®
30/41 LED SEAWAVE 50W
Page 18

DEUTSCH BEDIENUNGSANLEITUNG
Zur Anzeige der Betriebsstunden drücken Sie bitte die Taste ENTER.
Drücken Sie die MENU-Taste für etwa 2 Sekunden, um das Menü zu verlassen und zum normalen
Betriebsmodus zurückzukehren.
Software-Version
Anzeigen der Software-Version des Geräts.
Drücken Sie die Taste MENU bis „uer“ auf dem Display angezeigt wird.
Drücken Sie ENTER, um die Software-Version des Geräts anzuzeigen.
Drücken Sie die MENU-Taste für etwa 2 Sekunden, um das Menü zu verlassen und zum normalen
Betriebsmodus zurückzukehren.
Reset
Rücksetzen
Drücken Sie die Taste MENU bis „rSet“ auf dem Display angezeigt wird.
Drücken Sie ENTER, um die Rücksetzfunktion aufzurufen.
Während das Gerät rückgesetzt wird, erscheint „UAu“ auf dem Display. Bitte warten Sie, bis „UAu“ nicht
mehr auf dem Display angezeigt wird.
ELEKTROINSTALLATION + ADRESSIERUNG
Wichtiger Hinweis: Die elektrische Installation darf nur von qualifiziertem Personal, unter
Beachtung der Vorschriften zur elektrischen und mechanischen Sicherheit in Ihrem Land
durchgeführt werden.
Montage einer Einzeleinheit:
Stecken Sie einfach den Netzstecker in eine Steckdose.
Wenn an den DMX-Eingang kein DMX-Kabel angeschlossen wurde, startet die Einheit sofort im Stand-
Alone-Modus.
Sie können den Stand-Alone-Modus nach ihrem eigenen Geschmack anpassen. Nehmen Sie einfach die
gewünschten Einstellungen im Hauptmenü vor. (siehe vorheriges Kapitel „Einrichten / Hauptmenü /
Manuelle Einstellungen“).
Hinweis: Sie können eine CA-8 Fernbedienung an das Gerät anschließen, wenn Sie weitere
Steuerungsmöglichkeiten verwenden möchten. Weitere Informationen hierzu finden Sie im Abschnitt
„Verwendung“.
Die elektrische Installation für zwei oder mehr Geräte in Master/Slave-Modus:
Verbinden Sie mehre Einheiten mittels hochwertiger symmetrischer XLR Mikrofonkabel. An den DMX-
Eingang der ersten Einheit der Kette darf kein DMX-Kabel angeschlossen werden und sie muss auf den
Master-Modus eingestellt sein. Die anderen Einheiten müssen auf den Slave-Modus (SL 1) eingestellt
sein. Siehe für weitere Informationen das vorangehende Kapitel.
Stellen Sie sicher, dass alle Geräte ans Netz angeschlossen sind.
Fertig!
Sie können den Stand-Alone-Modus nach ihrem eigenen Geschmack anpassen. Nehmen Sie einfach die
gewünschten Einstellungen im Hauptmenü der MASTER-Einheit vor. (siehe vorheriges Kapitel „Einrichten
/ Hauptmenü / Manuelle Einstellungen“).
DEUTSCH BEDIENUNGSANLEITUNG
Es werden sowohl 3-polige als auch 5-polige-XLR-Stecker benutzt, allerdings ist der 3-polige XLR-
Stecker gängiger, da diese Kabel mit symmetrischen Audiokabeln kompatibel sind.
Stiftanordnung 3-poliger XLR-Stecker: Pin1 = GND ~ Pin2 = Negatives Signal (-) ~ Pin3 = Positives
Signal (+).
Stiftanordnung 5-poliger XLR-Stecker: Pin1 = GND ~ Pin2 = Negatives Signal (-) ~ Pin3 = Positives
Signal (+) ~ Pins 4+ 5 nicht benutzt.
Um durch Interferenzen verursachte Fehlfunktionen der Lichteffekte zu vermeiden,
müssen Sie die Kette mit einem 90Ω bis 120Ω Abschlusswiderstand abschließen.
Verwenden Sie niemals Y-Splitter-Kabel, das funktioniert einfach nicht!
Stellen Sie sicher, dass alle Geräte ans Netz angeschlossen sind.
Jeder Lichteffekt in der Kette muss seine eigene Startadresse haben, damit er
erkennt, welche Befehle des Controllers er entschlüsseln muss.
Leider ist es unmöglich, Ihnen hier schon die richtigen Adressen mitzuteilen, denn die Startadressen, die
für Ihre Anlage einzustellen sind, hängen vom Controller ab, den Sie benutzen. Schauen Sie deswegen
bitte im Handbuch Ihres DMX-Controllers nach, welche Startadressen Sie einstellen müssen.
DMX-KONFIGURATION
Hinweis: Sie können an die „Master“-Einheit eine CA-8 Fernsteuerung anschließen, wenn Sie weitere
Steuerungsmöglichkeiten benötigen. Weitere Informationen hierzu finden Sie im Abschnitt „Verwendung“.
Die elektrische Installation im DMX-Modus:
Das DMX-Protokoll ist ein gängiges Hochgeschwindigkeitssignal, um intelligente Lichtsysteme zu
steuern. Sie müssen Ihren DMX-Controller und alle angeschlossenen Geräte mit einem hochwertigen
symmetrischen Kabel hintereinander schalten (Daisy Chain).
JB SYSTEMS
®
31/41 LED SEAWAVE 50W
JB SYSTEMS
®
32/41 LED SEAWAVE 50W
Page 19

DEUTSCH BEDIENUNGSANLEITUNG
PRECAUCIÓN:
DAS GERÄT MITELS DER CA8 BEDIENEN
Im Einzel- und Master/Slave-Modus ist es sehr empfehlenswert, ein CA-8 “KabelController” oder RF-8SET “Funk-Controller” zu verwenden.
Schließen Sie einfach die Fernsteuerung an den Buchseneingang der ersten Einheit
(Master-Einheit) an.
STANDBY
FUNKTION
MODUS LED AUS LED LEUCHTET LED blinkt
Blackout aller Geräte
Wellengeschwindig
keit:1-3
Farbe wählen: 1-12
Geschwindigkeit des
Farbwechsels:1-3
WARTUNG
Stellen Sie sicher, dass sich keine unbefugten Personen unterhalb des Geräts befinden, während es
gewartet wird.
Schalten Sie das Gerät aus, ziehen Sie den Netzstecker und warten Sie, bis es sich abgekühlt hat.
Während der Wartung sind folgende Punkte ganz besonders zu beachten:
Sämtliche Schrauben zur Installation und Befestigung jeglicher Teile müssen fest angezogen und rostfrei
sein.
Gehäuse, Befestigungsmaterialien und Aufhängungen (Decke, Balken, abgehängte Decken) dürfen keine
Anzeichen von Verformung aufweisen.
Wenn die Optik sichtbar beschädigt ist (Sprünge oder tiefe Kratzer), dann müssen die entsprechenden
Teile ausgetauscht werden.
Das Netzkabel muss stets in einwandfreiem Zustand sein und selbst bei kleinsten Beschädigungen
erneuert werden.
Zur Vermeidung von Überhitzung müssen die Ventilatoren (sofern vorhanden) und Lüftungsschlitze
monatlich gereinigt werden.
Das Geräteinnere mindestens einmal pro Jahr mit einem Staubsauger oder einer Luftdüse reinigen.
Die Reinigung der inneren und äußeren optischen Linsen und/oder Spiegel muss in regelmäßigen
Abständen zur Beibehaltung einer optimalen Lichtausbeute vorgenommen werden. Die
Reinigungsintervalle hängen stark von der Umgebung ab: Feuchte, verrauchte und besonders
verschmutzte Umgebung führen zu größerer Verschmutzung auf den Linsen.
Mit einem weichem Tuch und gewöhnlichem Glasreiniger säubern.
Alle Teile stets gut abtrocknen.
Achtung: Wir empfehlen dringend, die Reinigung des Geräteinneren nur von qualifiziertem Personal
durchführen zu lassen!
TECHNISCHE DATEN
Netzspannung: AC 100-240V, 50/60Hz
Leistungsaufnahme: 80 Watt
Sicherung: 250 V T6,3A langsam (20 mm Glas)
DMX-Anschlüsse: 3-poliger XLR-Stecker/Buchse
Benutzte DMX-Kanäle: 3 Kanäle
Lichtquelle: 50W LED
Abmessungen: 27,9 x 22,6 x 19,1 cm
Gewicht: 4 kg
Technische Änderungen können auch ohne Vorankündigung vorgenommen werden
Sie können sich die neueste Version dieses Benutzerhandbuches von unserer Website
herunterladen: www.beglec.com
ESPAÑOL MANUAL DE INSTRUCCIONES
MANUAL DE INSTRUCCIONES
Gracias por comprar este producto JB Systems®. Para aprovechar al máximo todas las posibilidades y para
su propia seguridad, lea cuidadosamente este manual de instrucciones antes de comenzar a utilizar la
unidad.
CARACTERÍSTICAS
Esta unidad tiene supresión de radio interferencia. Este producto cumple con todas las exigencias de las
pautas actuales, tanto europeas como nacionales. Dicha conformidad ha sido establecida y los dictámenes
y documentos han sido consignados por el fabricante.
Este dispositivo fue diseñado para producir efectos de iluminación decorativa y se utiliza en sistemas de
espectáculos de iluminación.
Es la versión profesional de "alta potencia" del famoso efecto LED W aterwave, basado en un LED de 50
vatios.
Esto hace que sea ideal para su uso en grandes clubes y en el escenario.
Varios modos de funcionamiento:
o
Modo autónomo: no es necesario un controlador DMX.
o
Maestro/esclavo: programas perfectamente sincronizados, controlador DMX innecesario.
o DMX: 3 canales (velocidad, color, potenciómetro)
Compatible con CA-8: cableado remoto para un control maestro/esclavo mejorado
Pantalla LED para una fácil navegación por el menú de configuración
Alta eficiencia y bajo consumo de energía, sólo 80 vatios
Entradas/salidas de alimentación para facilitar la vinculación con cables opcionales IEC o cables combi
ANTES DEL USO
Antes de comenzar a utilizar esta unidad, compruebe si no ha sufrido daños durante el transporte. Si
hubiera alguno, no utilice el dispositivo y consulte primero con su concesionario.
Importante: Este dispositivo salió de nuestra fábrica en perfectas condiciones y bien embalado. Es
absolutamente necesario que se obedezcan al pie de la letra las instrucciones y advertencias de
seguridad que aparecen en este manual de usuario. Cualquier daño causado por una mala manipulación
no estará protegido por la garantía. El concesionario no aceptará ninguna responsabilidad por defectos o
problemas resultantes causados por no obedecer lo indicado en este manual de usuario.
Mantenga este folleto en un lugar seguro para futuras consultas. Si vende este equipo, asegúrese de
incluir este manual de usuario.
Compruebe el contenido:
Verifique que la caja contenga los elementos siguientes:
Instrucciones de operación
Led Seawave a 50 vatios
Cable de alimentación
INSTRUCCIONES DE SEGURIDAD:
retire la cubierta superior. Dentro no hay componentes que
requieran de servicio por parte del usuario. Para todo tipo de
servicio refiérase solamente a personal cualificado.
El símbolo de relámpago con punta de flecha dentro de un triángulo equilátero advierte al
usuario de la presencia de una “tensión peligrosa” no aislada dentro de la carcasa del sistema
que puede ser de una magnitud suficiente como para constituir un riesgo de descarga eléctrica.
El signo de admiración dentro de un triángulo equilátero advierte al usuario de la presencia de
instrucciones importantes relacionadas con la operación y el mantenimiento en la literatura que
se entrega junto con el equipo.
Este símbolo significa: solamente para uso en interiores
Este símbolo significa: Lea las instrucciones
Para reducir el riesgo de descarga eléctrica, no
JB SYSTEMS
®
33/41 LED SEAWAVE 50W
JB SYSTEMS
®
34/41 LED SEAWAVE 50W
Page 20

ESPAÑOL MANUAL DE INSTRUCCIONES
Para ir hacia atrás en las funciones seleccionadas o para disminuir
Para avanzar en las funciones seleccionadas o para aumentar el
ESPAÑOL MANUAL DE INSTRUCCIONES
Este símbolo significa: Equipo eléctrico de seguridad Clase
Este símbolo determina: la distancia mínima desde objetos iluminados. La distancia mínima
entre la salida de luz y la superficie iluminada debe ser mayor de 1 metro
El dispositivo no es adecuado para el montaje directo sobre superficies normalmente
inflamables. (Es adecuado solamente para el montaje sobre superficies no combustibles)
PRECAUCIÓN: No mire a las lámparas cuando estén encendidas.
Pueden dañar la vista.
Para proteger el medio ambiente, intente reciclar el material del embalaje en la mayor medida posible.
Para evitar el riesgo de incendio o de descarga eléctrica, no exponga este electrodoméstico a la lluvia ni a
la humedad.
Para evitar que se forme condensación en el interior del equipo, permita que la unidad se adapte a la
temperatura ambiental cuando se lleve a una habitación cálida después del transporte. La condensación
impide a veces que la unidad trabaje a plena capacidad e incluso puede causar daños.
Esta unidad es solamente para uso en interiores.
No coloque objetos metálicos ni derrame líquidos dentro de la unidad. Puede dar como resultado una
descarga eléctrica o un mal funcionamiento. Si un objeto extraño se introduce dentro de la unidad,
desconecte de inmediato la alimentación eléctrica.
Ubique el accesorio en un punto bien ventilado, lejos de materiales y/o líquidos inflamables. El accesorio
debe fijarse por lo menos a 50 cm de las paredes circundantes.
No cubra ninguna abertura de ventilación ya que esto puede provocar sobrecalentamiento.
Evite emplearlo en ambientes polvorientos; limpie la unidad con regularidad.
Mantenga la unidad lejos de los niños.
Este equipo no debe ser utilizado personas inexpertas.
La temperatura ambiente máxima segura es de 40ºC. No utilice esta unidad a temperaturas ambiente
mayores que ésta.
Asegúrese de que el área que se encuentra bajo el lugar de instalación esté libre de personas no
autorizadas durante su elevación, descenso y reparación.
Deje transcurrir alrededor de 10 minutos para que el dispositivo se enfríe antes de comenzar a darle
servicio.
Siempre desenchufe la unidad cuando no se vaya a utilizar durante un período de tiempo prolongado o
cuando se le vaya a dar servicio.
La instalación eléctrica debe realizarla solamente personal cualificado, de acuerdo con las regulaciones
para la seguridad eléctrica y mecánica de su país.
Compruebe que la tensión disponible sea la indicada en la unidad.
El cable de alimentación debe estar siempre en perfectas condiciones. Apague de inmediato la unidad
cuando el cable de alimentación esté aplastado o dañado. Si el cable de alimentación está dañado, debe
ser sustituido por el fabricante, por su representante de servicio o por una persona de cualificación similar
para evitar un accidente.
¡Nunca permita que el cable de alimentación haga contacto con otros cables!
Este accesorio debe conectarse a tierra para cumplir con las regulaciones de seguridad.
No conecte la unidad a un dispositivo de atenuación.
Cuando instale la unidad utilice siempre un cable de seguridad apropiado y certificado.
Para evitar descargas eléctricas, no abra la cubierta. Dentro no hay componentes que requieran de
servicio por parte del usuario.
Nunca repare un fusible ni haga una derivación en el portafusibles. ¡Sustituya siempre un fusible dañado
por otro que sea del mismo tipo y que tenga las mismas especificaciones eléctricas!
En el caso de que haya serios problemas de funcionamiento, detenga el uso del accesorio y contacte
inmediatamente con su concesionario.
La carcasa y las lentes deben sustituirse si están visiblemente dañadas.
Utilice el embalaje original cuando haya que transportar el dispositivo.
Debido a razones de seguridad, está prohibido realizar modificaciones no autorizadas a la unidad.
Importante: ¡Nunca mire directamente a la fuente de luz! No utilice el efecto en presencia de personas que
padezcan de epilepsia.
ELEVACIÓN SOBRE CABEZA
Importante: La instalación debe efectuarla solamente personal de servicio cualificado. Una
instalación no adecuada puede dar como resultado lesiones serias y/o daños a la propiedad. ¡La
elevación sobre cabeza requiere una experiencia extensa! Deben respetarse los límites de carga
de trabajo, deben utilizarse materiales de instalación certificados, el dispositivo instalado debe
inspeccionarse con regularidad por motivos de seguridad.
Asegúrese de que el área que se encuentra bajo el lugar de instalación esté libre de personas no
autorizadas durante su elevación, descenso y reparación.
Ubique el accesorio en un punto bien ventilado, lejos de materiales y/o líquidos inflamables. El accesorio
debe fijarse por lo menos a 50 cm de las paredes circundantes.
El dispositivo debe instalarse fuera del alcance de las personas y fuera de las áreas donde haya paso de
personas o donde estas permanezcan sentadas.
Antes de efectuar la elevación, asegúrese de que el área de instalación pueda sostener una carga puntual
mínima de 10 veces el peso del dispositivo.
Cuando instale la unidad, utilice siempre un cable de elevación certificado que pueda sostener 12 veces
el peso del dispositivo. Esta segunda fijación de seguridad debe instalarse de forma que ninguna parte de
la instalación pueda caer más de 20 cm si la fijación principal falla.
El dispositivo debe fijarse bien, ¡un montaje de libre oscilación es peligroso y no debe considerarse!
No cubra ninguna abertura de ventilación ya que esto puede provocar sobrecalentamiento.
El operador tiene que estar seguro de que las instalaciones relacionadas con la seguridad y con la técnica
de la máquina sean aprobadas por un experto antes de utilizarlas por primera vez. Las instalaciones
deben inspeccionarse anualmente por una persona con experiencia para asegurarse de que la seguridad
es óptima.
DESCRIPCIÓN:
1. LENTE ÓPTICA: con ajuste de enfoque manual
2. PANEL DE CONTROL:
a. VISUALIZADOR: muestra los diferentes menús y las funciones seleccionadas.
b. LEDS
DMX Encendido Entrada DMX presente
MASTER Encendido Modo maestro
SLAVE Encendido Slave Mode (Modo Esclavo)
SOUND Parpadeo Activación por sonido
c. BOTONES:
MENU Para seleccionar las funciones de programación
DOWN
UP
ENTER Para confirmar las funciones seleccionadas
el valor
valor
JB SYSTEMS
®
35/41 LED SEAWAVE 50W
JB SYSTEMS
®
36/41 LED SEAWAVE 50W
Page 21

ESPAÑOL MANUAL DE INSTRUCCIONES
ESPAÑOL MANUAL DE INSTRUCCIONES
3. BRACKET: Soporte para colgar con 2 perillas en ambos lados para fijar la unidad y un agujero de
montaje para fijar un gancho de montaje.
4. SAFETY EYE: utilizado para fijar un cable de seguridad cuando la unidad está izada (consulte el párrafo
"elevación sobre cabeza")
5. SALIDA DE ALIMENTACIÓN:
6. ALIMENTACIÓN: Conector IEC con porta-fusible incorporados. Conecte aquí el cable de alimentación
suministrado.
7. VENTILADOR DE REFRIGERACIÓN:
8. ENTRADA DEL MANDO A DISTANCIA CABLEADO: Utilizado para conectar un controlador manual
CA-8 sencillo mientras que la unidad se utiliza en modo autónomo o en el modo maestro/esclavo.
9. Salida DMX: Conector hembra XLR de 3 pines utilizado para conectar el efecto con la siguiente unidad
de la cadena DMX..
10. Entrada DMX: Conector hembra XLR de 3 pines utilizado para conectar el efecto con el controlador
DMX o con la unidad anterior en la cadena DMX.
CÓMO CONFIGURARLO:
MENÚ PRINCIPAL:
Para seleccionar cualquiera de las funciones, presione el botón MENU hasta que la opción requerida se
muestre en el visualizador o utilice los botones DOWN y UP para navegar por el menú.
Seleccione la función con el botón ENTER (el visualizador parpadea).
Utilice los botones DOWN o UP para cambiar el modo.
Una vez seleccionado el modo requerido, presione el botón ENTER para confirmar.
Para regresar al menú principal sin efectuar ningún cambio, pulse brevemente el botón MENU. (El menú
principal se muestra en el diagrama.)
Pulse el botón MENU durante unos 2 segundos para salir del menú y regresar al modo de funcionamiento
normal.
DMX Address (Dirección DMX)
Se utiliza para establecer la dirección de inicio en una configuración DMX.
Presione el botón MENU hasta que se muestre en el
visualizador "Addr".
Pulse el botón ENTER, la pantalla comienza a
parpadear.
Utilice los botones ABAJO y ARRIBA para cambiar la
dirección DMX512.
Una vez que se muestre en el visualizador la
dirección correcta, presione el botón ENTER para
guardarla.
(Para regresar al menú principal sin efectuar ningún
cambio, pulse brevemente el botón MENU.)
Pulse el botón MENU durante unos 2 segundos para
salir del menú y regresar al modo de funcionamiento
normal.
Modo de funcionamiento
Se utiliza para configurar la unidad como maestro o
esclavo.
Presione el botón MENU hasta que se muestre en el
visualizador "SLMd".
Pulse el botón ENTER, la pantalla comienza a
parpadear.
Utilice los botones de DOWN y UP para seleccionar
"MASt" (modo maestro) o "SL I" (modo esclavo).
Una vez aparezca en la pantalla la dirección
correcta, pulse el botón ENTER para confirmar.
Pulse el botón MENU durante unos 2 segundos para
salir del menú y regresar al modo de funcionamiento
normal.
Display on/off (Visualizador activado/desactivado)
Display on: el visualizador siempre está iluminado.
Display off: el visualizador está oscuro cuando no se utiliza.
Presione el botón MENU hasta que se muestre en el visualizador "Led".
Pulse el botón ENTER, la pantalla comienza a parpadear.
Utilice los botones DOWN y UP para seleccionar "On" (visualizador siempre iluminado) u "Off"
(visualizador oscuro cuando no se utiliza).
Una vez seleccionado el modo, presione el botón ENTER para guardarlo.
Para regresar al menú principal sin efectuar ningún cambio, pulse brevemente el botón MENU.
Pulse el botón MENU durante unos 2 segundos para salir del menú y regresar al modo de funcionamiento
normal.
Display Inversion (Inversión de la pantalla)
Visualizador normal: el visualizador se puede leer cuando la unidad está sobre el suelo.
Display inversion (Inversión de la pantalla): la pantalla se puede leer cuando la unidad está montada
en forma invertida.
Presione el botón MENU hasta que se muestre en el visualizador "dISP". (visualizador normal)
Presione el botón ENTER para alternar entre (visualizador normal) y (inversión del
visualizador)
Pulse el botón MENU durante unos 2 segundos para salir del menú y regresar al modo de funcionamiento
normal.
Ajustes manuales:
Se utiliza para ajustar manualmente el modo de proyección deseado cuando no se utiliza un
controlador externo.
Presione el botón MENU hasta que se muestre en el visualizador "Manu".
Pulse el botón ENTER, la pantalla comienza "CoLo".
Pulse el botón ENTER si desea establecer el color:
Use los botones DOWN y UP para seleccionar el color deseado (valor de 0 a 255 según el
canal 3 de la tabla DMX)
Presione el botón ENTER para confirmar
Utilice los botones DOW N y UP para ir a "UAue"
Pulse el botón ENTER si desea establecer la velocidad de rotación y dirección:
Use los botones DOWN y UP para ajustar la rotación deseada (valor de 0 a 255 según el
canal 2 de la tabla DMX)
Presione el botón ENTER para confirmar
Utilice los botones DOW N y UP para ir a "dIMM"
Pulse el botón ENTER si desea establecer el nivel de atenuación:
Use los botones DOWN y UP para ajustar el nivel de salida de luz deseado (valor de 125
(baja producción) y 255 (salida máxima)
Presione el botón ENTER para confirmar
Pulse el botón MENU durante unos 2 segundos si desea salir del menú y comenzar a cargar el evento
programado.
Test (Prueba)
Presione el botón MENU hasta que se muestre en el visualizador "teSt".
Pulse el botón ENTER:la pantalla empieza a parpadear cuando la unidad va a ejecutar todas las
funciones posibles.
Pulse el botón ENTER o el botón MENU para salir del modo TEST
Pulse el botón MENU durante unos 2 segundos para salir del menú y regresar al modo de funcionamiento
normal.
Temperatura:
Se utiliza para mostrar la temperatura del interior de la unidad.
Presione el botón MENU hasta que se muestre en el visualizador "teMP".
Pulse el botón ENTER para mostrar la temperatura de la unidad.
Pulse el botón MENU durante unos 2 segundos para salir del menú y regresar al modo de funcionamiento
normal.
JB SYSTEMS
®
37/41 LED SEAWAVE 50W
JB SYSTEMS
®
38/41 LED SEAWAVE 50W
Page 22

ESPAÑOL MANUAL DE INSTRUCCIONES
ESPAÑOL MANUAL DE INSTRUCCIONES
Fixture Hours (Horas de la unidad)
Se utiliza para mostrar la cantidad de horas de trabajo de la unidad.
Presione el botón MENU hasta que se muestre en el visualizador "FhrS".
Pulse el botón ENTER para mostrar la cantidad de horas de trabajo en la pantalla.
Pulse el botón MENU durante unos 2 segundos para salir del menú y regresar al modo de funcionamiento
normal.
Software version (Versión de Software)
Se utiliza para visualizar la versión del software de la unidad.
Presione el botón MENU hasta que se muestre en el visualizador "uer".
Pulse el botón ENTER para visualizar la versión del software de la unidad.
Pulse el botón MENU durante unos 2 segundos para salir del menú y regresar al modo de funcionamiento
normal.
Reset (Reiniciar)
Se usa para reiniciar
Presione el botón MENU hasta que se muestre en el visualizador "rSet".
Pulse el botón ENTER para iniciar la función de reinicio.
"Uau" se mostrará en la pantalla mientras la unidad está realizando su reinicio. Por favor, espere hasta
que "Uau" deje de mostrarse en la pantalla.
INSTALACIÓN ELÉCTRICA + DIRECCIONAMIENTO
Importante: La instalación eléctrica debe realizarla solamente personal cualificado, de
acuerdo con las regulaciones para la seguridad eléctrica y mecánica de su país.
Instalación eléctrica para 1 unidad autónoma:
Simplemente inserte el cable de alimentación.
Cuando no haya un cable DMX conectado a la entrada DMX, la unidad comenzará a operar
inmediatamente en modo autónomo.
Puede adaptar el modo autónomo a su propio gusto. Tan sólo haga los ajustes que desee en el menú
principal. (Ver el capítulo anterior, "cómo configurar / Menú principal / Configuración manual")
Observación: Puede conectar a la unidad un mando a distancia CA-8 si desea tener un mayor control.
Consulte "cómo operar la unidad" para aprender cómo hacerlo.
Instalación eléctrica para dos o más unidades en el modo maestro/esclavo:
Conecte varias unidades entre sí mediante cables micrófono equilibrados de buena calidad. La primera
unidad de la cadena no debe tener ningún cable DMX conectado a su entrada DMX y se debe
establecer en el modo maestro, las otras unidades se debe nestablecer en modo esclavo (SL 1). Vea el
capítulo anterior para más información.
Asegúrese de que todas las unidades estén conectadas a la alimentación.
¡Hecho!
Puede adaptar el modo autónomo a su propio gusto. Tan sólo haga los ajustes que desee en el menú
principal de la unidad principal. (Ver el capítulo anterior, "cómo configurar / Menú principal /
Configuración manual")
Instalación eléctrica en modo DMX:
El protocolo DMX es una señal de alta velocidad ampliamente utilizada para controlar equipamiento de
iluminación inteligente. Tiene que conectar su controlador DMX y todas las unidades conectadas en
configuración "daisy chain" con un cable balanceado de buena calidad.
Se utilizan tanto conectores XLR de 3 pines como XLR de 5 pines; no obstante, el XLR de 3 pines es
más popular porque estos cables son compatibles con cables de audio balanceados.
Distribución de pines para el XLR-3: Pin 1 = TIERRA ~ Pin 2 = Señal negativa (-) ~ Pin 3 = Señal
positiva (+)
Distribución de pines para el XLR-5: Pin 1 = TIERRA ~ Pin 2 = Señal negativa (-) ~ Pin 3 = Señal
positiva (+) ~ Pin 4 y 5 no se utilizan.
Para evitar un comportamiento extraρo de los efectos de luces debido a
interferencias, debe utilizar un terminador de 90Ω a 120Ω al final de la cadena.
Nunca utilice cables repartidores Y, ¡esto simplemente no funcionará!
Asegúrese de que todas las unidades estén conectadas a la alimentación.
Cada dispositivo de efectos de luces de la cadena tiene que tener su propia
dirección de inicio, de manera que sepa cuáles comandos procedentes del controlador tiene que
decodificar.
Desafortunadamente, es imposible decirle en este manual de usuario cuáles direcciones de inicio tiene
que establecer, porque esto depende completamente del controlador que utilice. De manera que
consulte el manual de usuario de su controlador DMX para averiguar cuáles direcciones de inicio debe
establecer.
CONFIGURACIÓN DMX
Observación: Se puede conectar un controlador CA-8 a distancia a la unidad "principal" si se desea tener
más control. Consulte "cómo operar la unidad" para aprender cómo hacerlo.
JB SYSTEMS
®
39/41 LED SEAWAVE 50W
JB SYSTEMS
®
40/41 LED SEAWAVE 50W
Page 23

ESPAÑOL MANUAL DE INSTRUCCIONES
HACER FUNCIONAR LA UNIDAD CON CA8
Cuando se utilice en los modos autónomo o maestro/esclavo, recomendamos
enfáticamente utlizar el CA-8 "Wired easy controller".
Simplemente conecte el controlador al conector de entrada de la primera unidad
(unidad Maestro).
En espera.
FUNCIÓN
MODO
Suprimir todos los accesorios
Velocidad de onda
:1-3
LED APAGADO LED ENCENDIDO LED parpadeando
Elegir color: 1-12 Velocidad del color: 1-3
MANTENIMIENTO
Asegúrese de que el área que se encuentra bajo el lugar de instalación esté libre de personas no
autorizadas durante el mantenimiento.
Apague la unidad, desenchufe el cable de alimentación y espere hasta que se enfríe.
Durante la inspección deben revisarse los puntos siguientes:
Todos los tornillos utilizados para la instalación del dispositivo y cualquiera de sus componentes deben
estar bien apretados y no pueden estar corroídos.
Los alojamientos, fijaciones y puntos de instalación (techo, tensores, suspensiones) deben estar
totalmente libres de cualquier deformación.
Cuando una lente óptica está visiblemente dañada debido a grietas o arañazos profundos, debe
sustituirse.
Los cables de alimentación deben estar en condiciones impecables y deben sustituirse inmediatamente
incluso si se detecta un problema pequeño.
Para proteger el dispositivo contra el sobrecalentamiento, los ventiladores de enfriamiento (si hay alguno)
y las aberturas de ventilación deben limpiarse mensualmente.
El interior del dispositivo debe limpiarse anualmente utilizando una aspiradora o un chorro de aire.
La limpieza de las lentes ópticas y/o espejos internos y externos debe efectuarse periódicamente para
optimizar la salida de la luz. La frecuencia de la limpieza depende del ambiente en el cual opere el
accesorio: los ambientes húmedos, con humo, o particularmente sucios, pueden causar una mayor
acumulación de suciedad en los elementos ópticos de la unidad.
Límpielo con un paño suave utilizando productos normales para la limpieza del vidrio.
Siempre seque cuidadosamente las piezas.
Atención: ¡Recomendamos enfáticamente que la limpieza se lleve a cabo por personal cualificado!
ESPECIFICACIONES
Alimentación: CA 100-240V, 50/60Hz
Consumo de potencia: 80 Vatios
Fusible: 250V T6,3A retardado (cristal 20mm)
Conexiones DMX: XLR 3 pines macho / hembra
Canales DMX utilizados: 3 canales
Lámpara: 50W LED
Tamaño: 27,9 x 22,6 x 19,1 cm
Peso: 4 kg
Puede descargar la versión más reciente de este manual de usuario en nuestro sitio Web:
La información podría modificarse sin aviso previo
www.beglec.com
JB SYSTEMS
®
41/41 LED SEAWAVE 50W
 Loading...