

Page 1
Page 2

Page 3
ENGLISH USER MANUAL
JB SYSTEMS® 1/44 LED MARVEL
OPERATION MANUAL
Thank you for buying this JB Systems® product. To take full advantage of all possibilities and for your own
safety, please read these operating instructions very carefully before you start using this unit.
FEATURES
This unit is radio-interference suppressed. This product meets the requirements of the current European and
national guidelines. Conformity has been established and the relevant statements and documents have been
deposited by the manufacturer.
This device was designed to produce decorative effect lighting and is used in light show systems.
Thanks to its very nice and elegant design this LED projector fits in any interior (living room, bedroom, bar,
lounge, restaurant, …)
On top of that it’s also perfect example of multi-functionality:
Can be used as sound activated “party light” (internal programs & chases)
The perfect “atmosphere” creator (slowly changing color fades)
Small but effective wall washer (color your walls!)
Several units can be controlled by a DMX-controller for synchronized operation.
It contains 6 individually controllable LED-panels for a maximum variety and impact of the effects.
A total of 216 leds (72 red + 72green + 72blue) guarantee excellent light output and good color mixing.
Static or sound activated programs (internal mic) with different modes
One unit can be used in standalone or several units can be connected together in master/slave to obtain
wonderful synchronized effects!
IR-remote control included
DMX-control possible: 21channels for full RGB control + chase presets with adjustable speed.
Multifunctional base:
Just put it on a table or horizontal surface
Fix it against a wall and point the unit in any direction
Power input: 12Vdc, separate low voltage adapter included
BEFORE USE
Before you start using this unit, please check if there’s no transportation damage. Should there be any, do
not use the device and consult your dealer first.
Important: This device left our factory in perfect condition and well packaged. It is absolutely necessary
for the user to strictly follow the safety instructions and warnings in this user manual. Any damage caused
by mishandling is not subject to warranty. The dealer will not accept responsibility for any resulting defects
or problems caused by disregarding this user manual.
Keep this booklet in a safe place for future consultation. If you sell the fixture, be sure to add this user
manual.
Check the contents:
Check that the carton contains the following items:
Operating instructions
LED MARVEL
Mounting tripod
External 12Vdc power supply
Infrared (IR) remote control
Page 4
ENGLISH USER MANUAL
JB SYSTEMS® 2/44 LED MARVEL
SAFETY INSTRUCTIONS:
To protect the environment, please try to recycle the packing material as much as possible.
To prevent fire or shock hazard, do not expose this appliance to rain or moisture.
To avoid condensation to be formed inside, allow the unit to adapt to the surrounding temperatures when
bringing it into a warm room after transport. Condense sometimes prevents the unit from working at full
performance or may even cause damages.
This unit is for indoor use only.
Don’t place metal objects or spill liquid inside the unit. Electric shock or malfunction may result. If a fore ign
object enters the unit, immediately disconnect the mains power.
Locate the fixture in a well ventilated spot, away from any flammable materials and/or liquids.
Don’t cover any ventilation openings as this may result in overheating.
Prevent use in dusty environments and clean the unit regularly.
Keep the unit away from children.
Inexperienced persons should not operate this device.
Maximum safe ambient temperature is 35°C. Don’t use this unit at higher ambient temperatures.
Make sure the area below the installation place is free from unwanted persons during rigging, de-rigging
and servicing.
Always unplug the unit when it is not used for a longer time or before to start servicing.
Check that the available voltage is not higher than the one stated on the unit.
The power cord should always be in perfect condition. Switch the unit immediately off when the power cord
is squashed or damaged. It must be replaced by the manufacturer, its service agent or similarly qualified
persons in order to avoid a hazard.
Never let the power-cord come into contact with other cables!
In order to avoid a hazard, the unit shall only be used with the AC-adaptor delivered with it. If the AC-
adaptor is damaged, a same model adaptor shall be used only.
Don’t connect the unit to any dimmer pack.
Always use an appropriate and certified safety cable when installing the unit.
In order to prevent electric shock, do not open the cover. There are no user serviceable parts inside.
In the event of serious operating problems, stop using the fixture and contact your dealer immediately.
The housing and the lenses must be replaced if they are visibly damaged.
Please use the original packing when the device is to be transported.
Due to safety reasons it is prohibited to make unauthorized modifications to the unit.
Important: Never look directly into the light source! Don’t use the effect in the presence of persons suffering
from epilepsy.
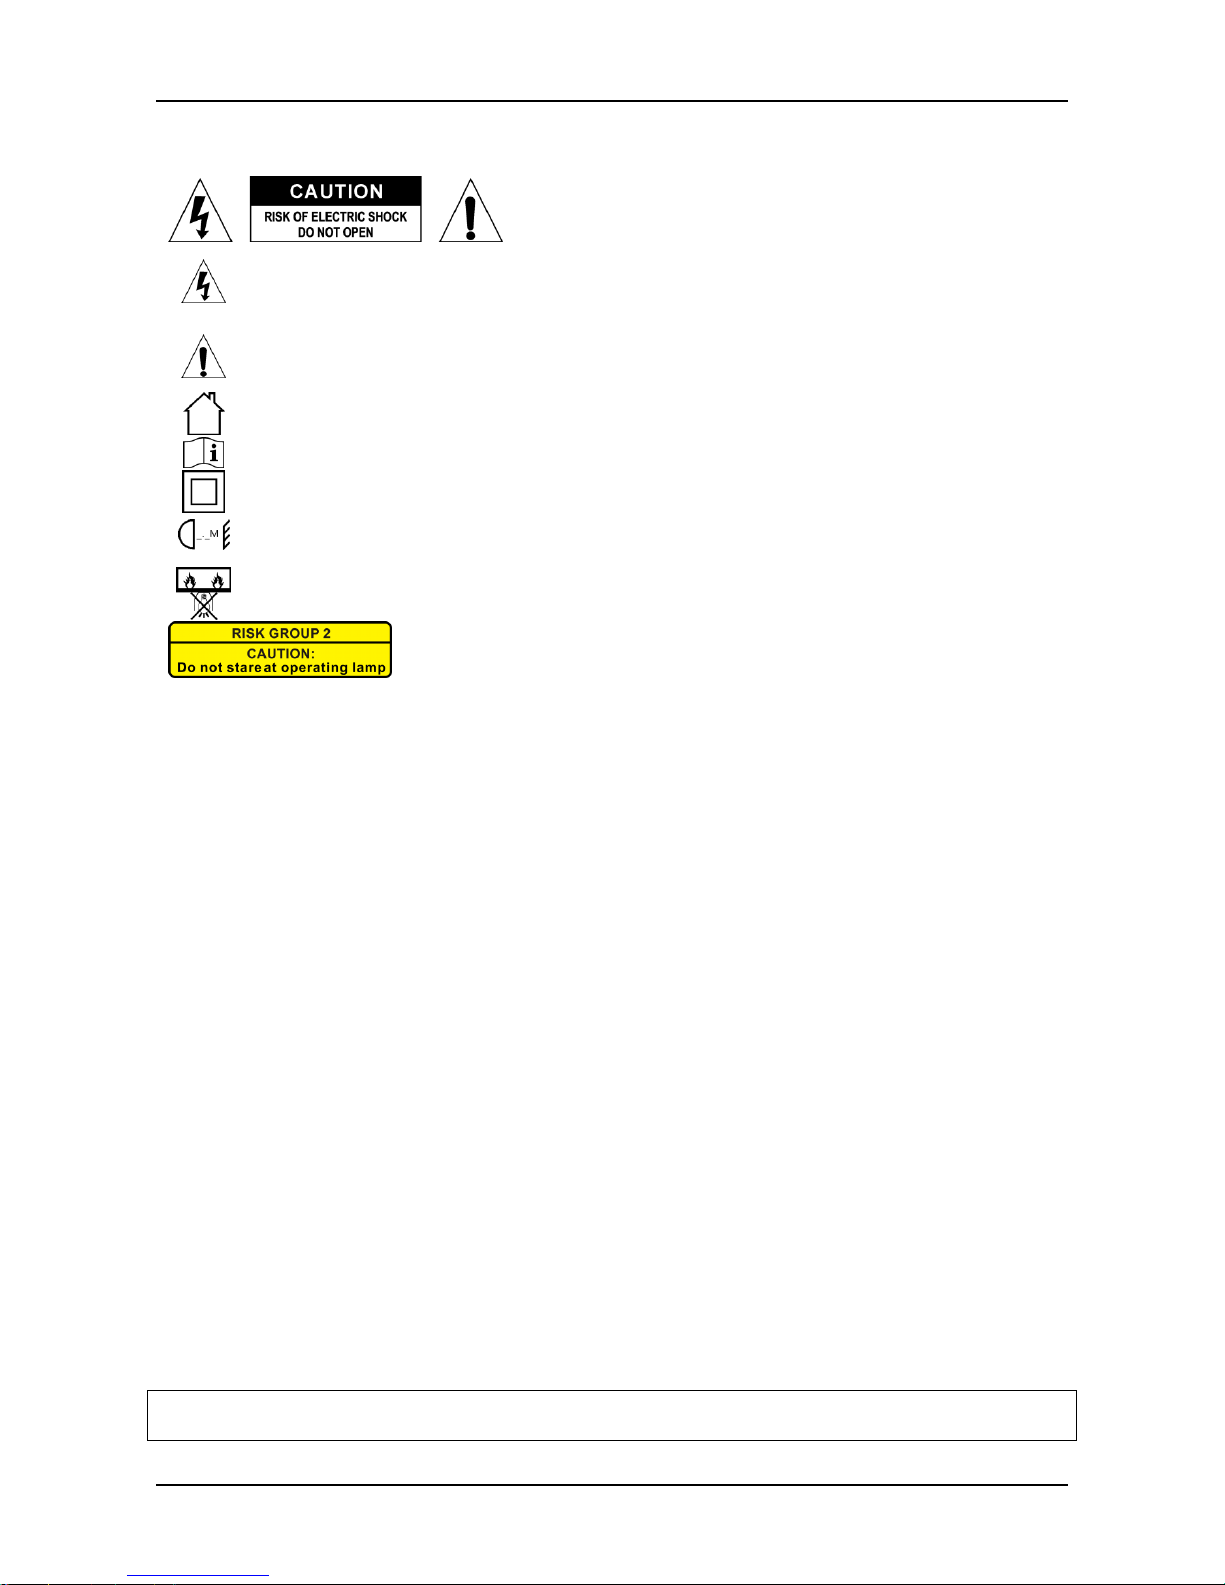
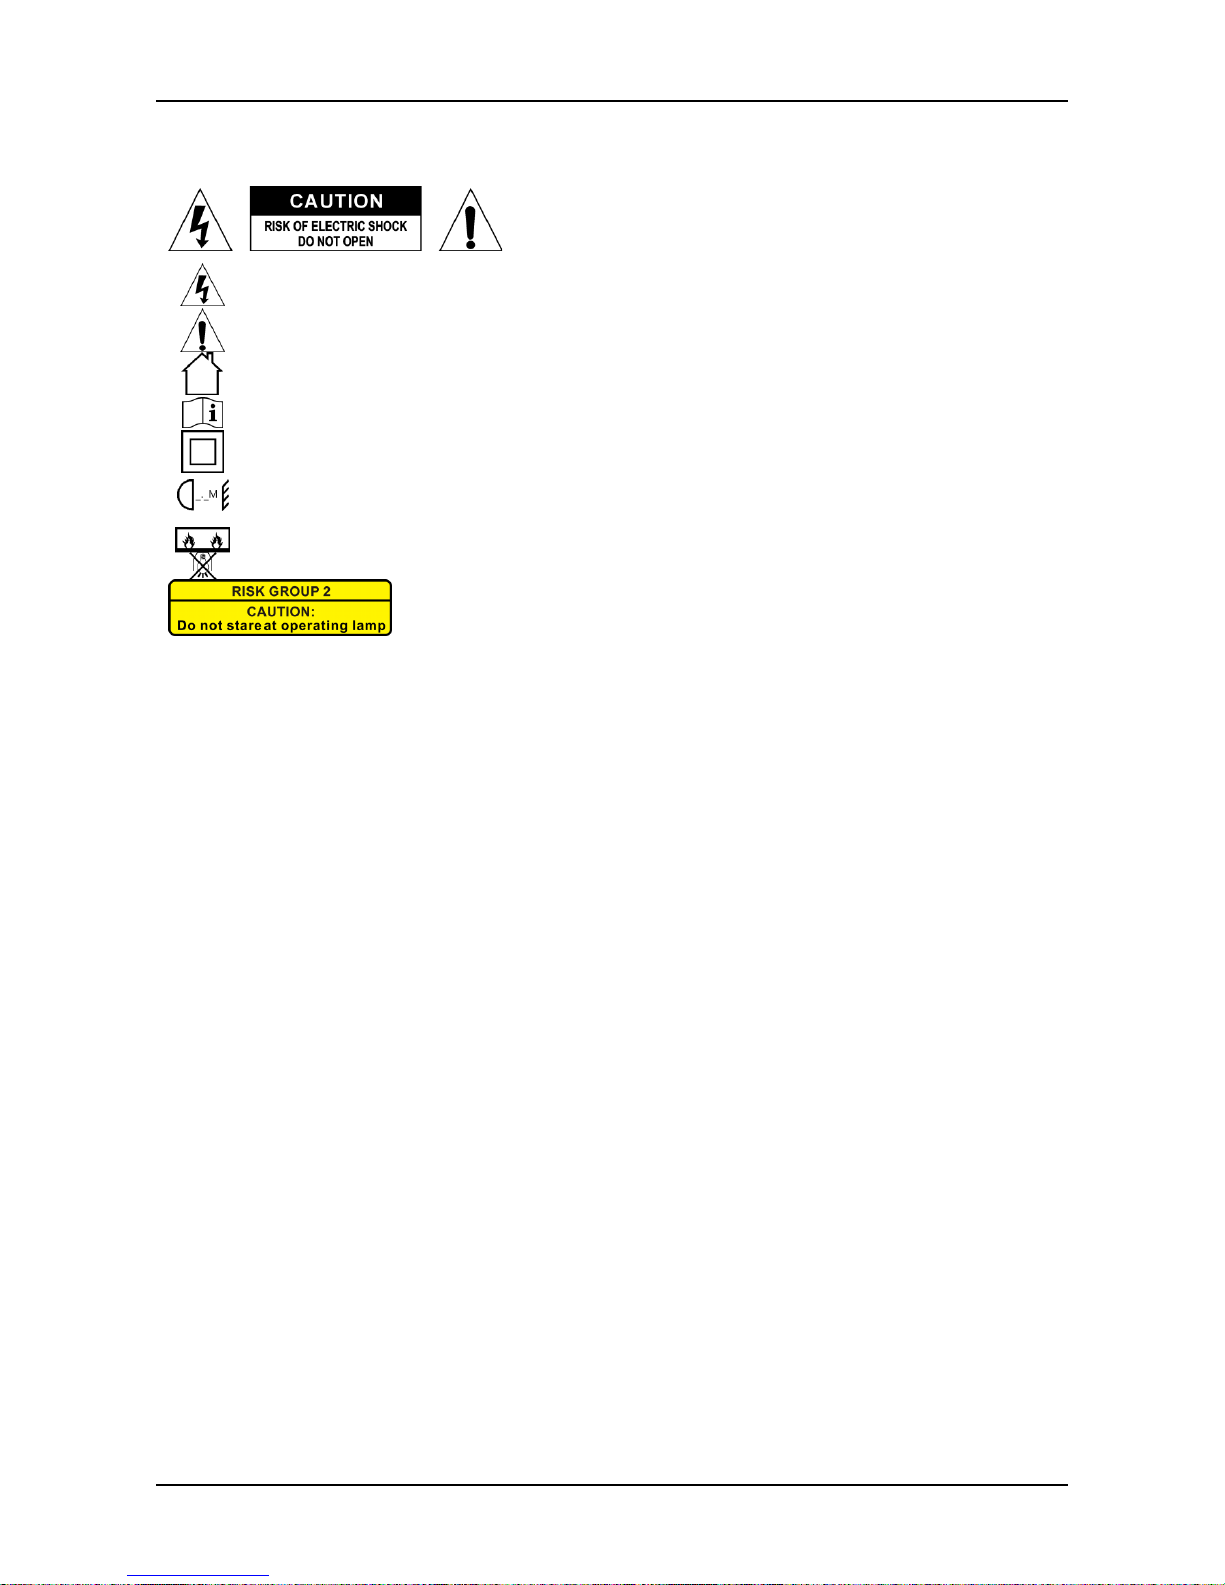
CAUTION: To reduce the risk of electric shock, do not remove
the top cover. No user-serviceable parts inside. Refer servicing
to qualified service personnel only.
The lightning flash with arrowhead symbol within the equilateral triangle is intended to alert the
use or the presence of un-insulated “dangerous voltage” within the product’s enclosure that may
be of sufficient magnitude to constitute a risk of electric shock.
The exclamation point within the equilateral triangle is intended to alert the user to the presence
of important operation and maintenance (servicing) instructions in the literature accompanying
this appliance.
This symbol means: indoor use only
This symbol means: Read instructions
This symbol means: Safety Class II appliance
This symbol determines: the minimum distance from lighted objects. The minimum distance
between light-output and the illuminated surface must be more than x meters
The device is not suitable for direct mounting on normally flammable surfaces. (suitable only for
mounting on non-combustible surfaces)
CAUTION: Do not stare at operating lamp.
May be harmful to the eyes.
Page 5
ENGLISH USER MANUAL
JB SYSTEMS® 3/44 LED MARVEL
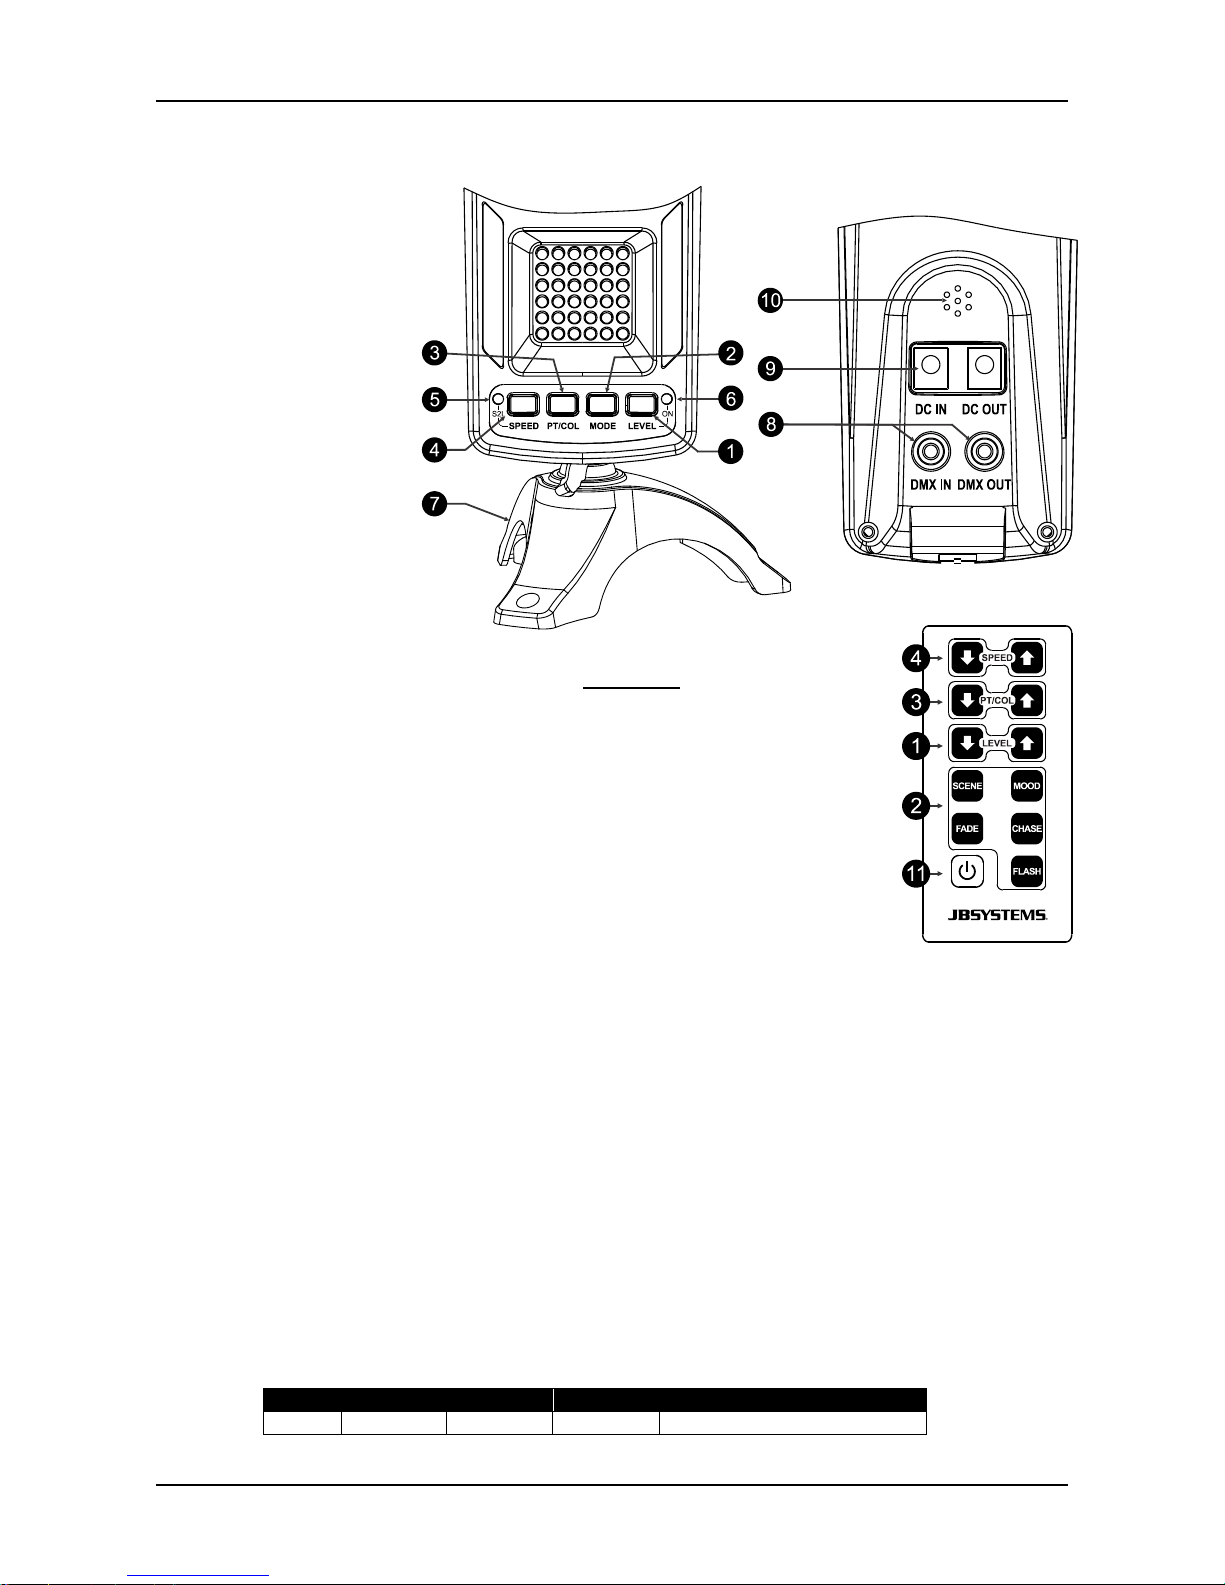
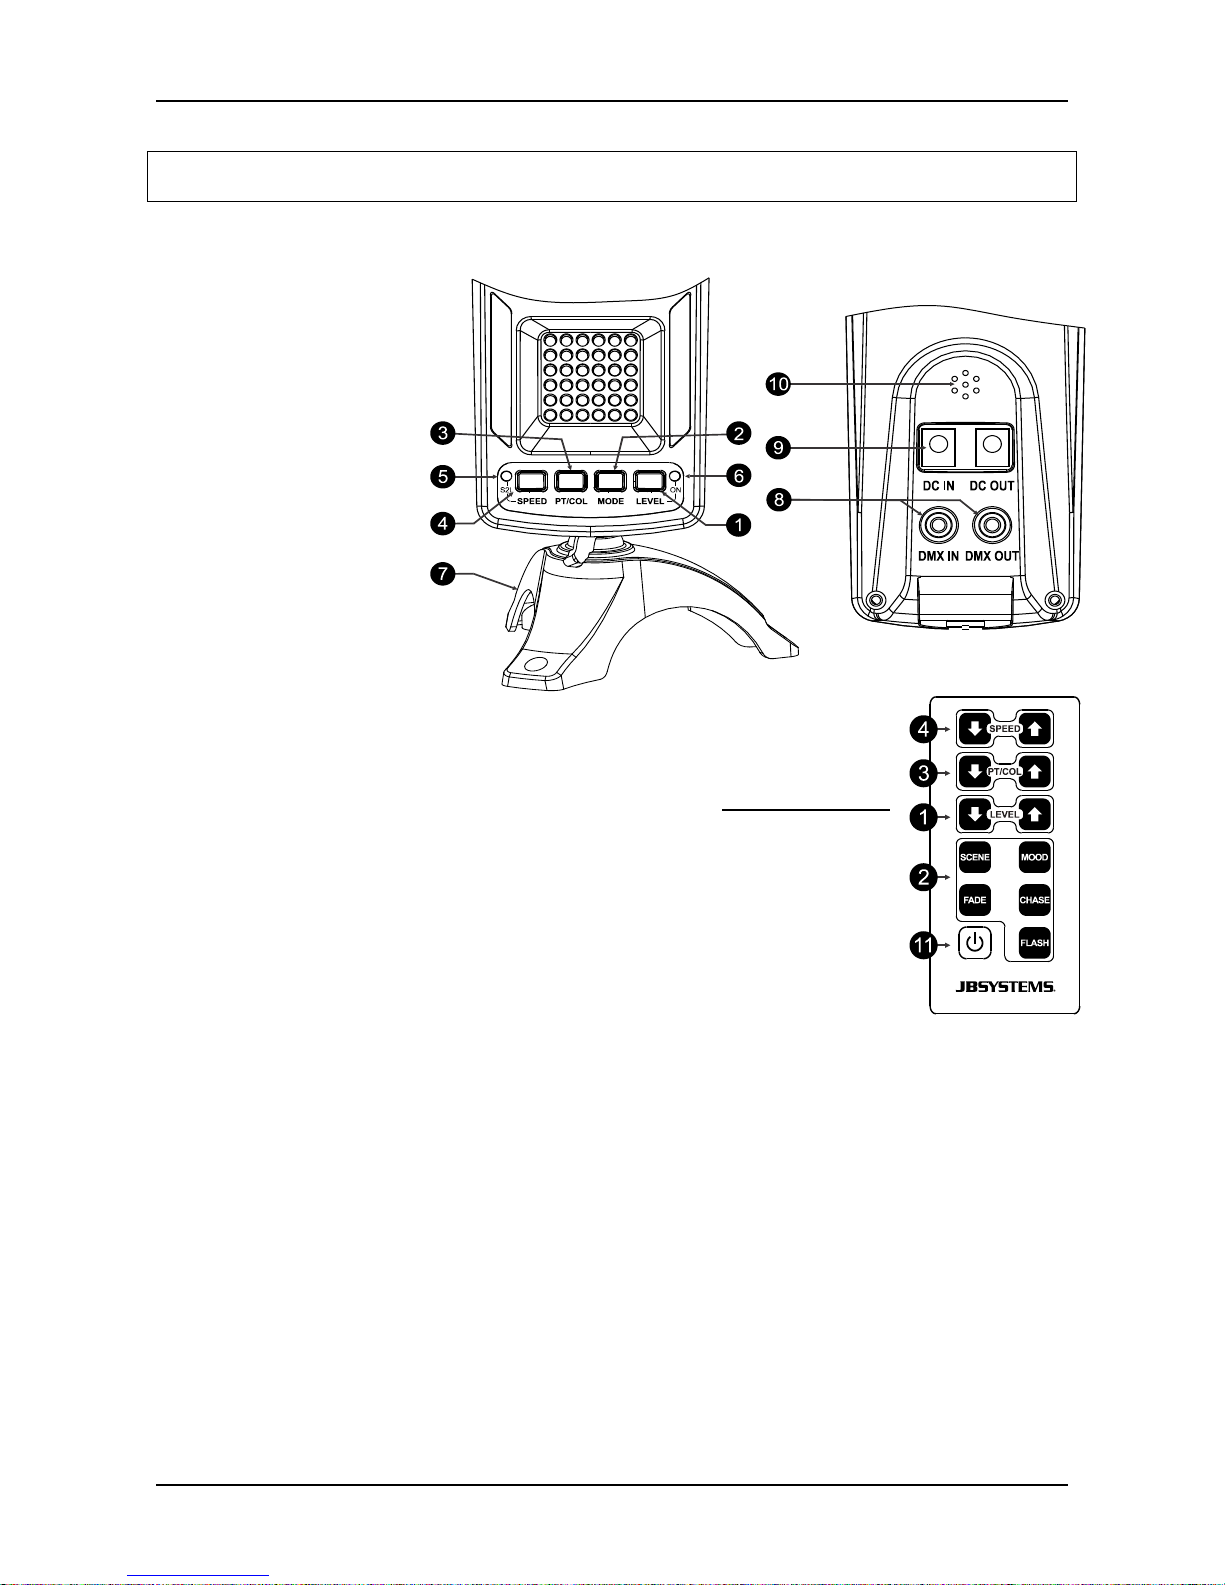
DESCRIPTION + OPERATION:
1. LEVEL (DIMMER) button
2. MODE button
3. PT/COL button
4. SPEED button
5. S2L (Sound to Light) led
6. ON/OFF indicator
7. Base
8. DMX in/out connectors
9. Power adapter in/out
10. Microphone
Upon the user’s choice, the
unit can work in stand-alone
automatic modes, or with
fixed colors, or it may be
controlled by the included IR
remote control or external
DMX-controllers.
This chapter refers to
standalone operation and
operation with the IR remote
control. Please see chapter “Synchronization and DMX control” for digital remote
control. For standalone operation, make sure that NO CABLE is plugged into the rear
“DMX IN” socket.
The user interface elements provide the following functions:
1. LEVEL button
By consecutively pressing this key on the main units itself, it allows the sequential
choice of 4 different brightness levels: 0%(off)/25/50/75/100%. The same levels are
available by means of the remote control; however the LEVEL up/down keys on the
remote control only allow to choose the 25/50/75/100% levels, while the blackout
function (0%) is directly available via the remote controls on/off key.
2. MODE button
By consecutively pressing this key on the main units itself, it allows the sequential choice of 5 different
operating modes:
CHASE: different chase patterns that can be selected with the PT/COL button – more details below.
FADE: fading between the 6 panels, different patterns can be selected with the PT/COL button –
more details below.
MOOD: all 6 panels fade from one color to another, different color cycles can be selected with the
PT/COL button – more details below.
SCENE: all 6 panels show the same color, 12 different colors can be selected with the PT/COL
button – more details below.
FLASH (STROBE): different patterns in white RGB each can be selected with the PT/COL button –
more details below.
Note: when using the IR remote, the 5 modes can be chosen directly by designated keys.
3. PT/COL button
This key changes – depending on the chosen MODE – either the color, or the pattern + color. The
choices in accordance to the chosen mode are:
In CHASE Mode: 5 pattern presets with switching transition in two color combinations each can be
chosen by consecutively pressing the PT/COL key on the unit itself or the PT/COL up/down keys on the
remote control:
Preset
Colour 1
Color 2
Color 3
Pattern
01
Red
Blue
Green
3C-16-Zip-updown
Page 6
ENGLISH USER MANUAL
JB SYSTEMS® 4/44 LED MARVEL
02
Pink
Turquoise
Lime
3C-16-Zip-updown
03
Red
Green
Blue
3C-22-Crossing
04
Pink
Turquoise
Lime
3C-22-Crossing
05
Red
Green
Blue
3C-22-ContractExpand
06
Pink
Turquoise
Lime
3C-22-ContractExpand
07
Red
Green
Blue
3C-22-PingPong
08
Pink
Turquoise
Lime
3C-22-PingPong
09
Red
Green
Blue
3C-33-Fork
10
Pink
Turquoise
Lime
3C-33-Fork
11
Sequence
Sequence
Sequence
Patterns 1/3/5/7/9/2/4/6/8/10
In FADE Mode: 5 pattern presets with fading transition in two color combinations each can be chosen by
consecutively pressing the PT/COL key on the unit itself or the PT/COL up/down keys on the remote
control:
Preset
Colour 1
Color 2
Color 3
Pattern
01
Red
Blue
Green
3C-16-Zip-updown
02
Pink
Turquoise
Lime
3C-16-Zip-updown
03
Red
Green
Blue
3C-22-Crossing
04
Pink
Turquoise
Lime
3C-22-Crossing
05
Red
Green
Blue
3C-22-ContractExpand
06
Pink
Turquoise
Lime
3C-22-ContractExpand
07
Red
Green
Blue
3C-22-PingPong
08
Pink
Turquoise
Lime
3C-22-PingPong
09
Red
Green
Blue
3C-33-Fork
10
Pink
Turquoise
Lime
3C-33-Fork
11
Sequence
Sequence
Sequence
Patterns 1/3/5/7/9/2/4/6/8/10
In MOOD Mode: 10 color cycle presets can be chosen by consecutively pressing the PT/COL key on the
unit itself or the PT/COL up/down keys on the remote control:
Preset
Colour 1
Color 2
Color 3
Pattern
01
Red
Blue
-
2C_6Change
02
Pink
Lime
-
2C_6Change
03
Green
Red - 2C_6Change
04
Lime
Turquoise
2C_6Change
05
Blue
Green
2C_6Change
06
Pink
Turquoise
2C_6Change
07
Red
Blue
Green
3C_6Change
08
Red
Green
Blue
3C_6Change
09
Red
Blue
Green
2C_Burst
10
Pink
Turquoise
Lime
2C_Burst
11
Random
Random
Random
Random Roll
Note: Other than in CHASE and FADE mode, in MOOD mode, all 6 segments are active, and show the
same color in the first 8 presets (mixed color presets 9/10/11).
In SCENE Mode: 12 color presets can be chosen by consecutively pressing the PT/COL key on the unit
itself or the PT/COL up/down keys on the remote control:
Preset
Colour
01
Red
02
Green
03
Blue
04
Yellow*
05
Pink*
06
Turquoise*
07
Lime
08
Orange
09
Marine
10
Frog
11
Lavender
Page 7

ENGLISH USER MANUAL
JB SYSTEMS® 5/44 LED MARVEL
12
Candy
13
White (50% Level)
Note: there is no “color off” status in SCENE mode.
In FLASH (STROBE) Mode: 5 strobe pattern presets can be chosen by consecutively pressing the
PT/COL key on the unit itself or the PT/COL up/down keys on the remote control:
Preset
Preset Name
Description
01
Strobe-All6RGB-SEQ
All 6 Segments strobe alternating with a 4-Flash cycle in red,
green, blue with 16 Hz
02
Strobe-All6PTL-SEQ
All 6 Segments strobe alternating with a 4-Flash cycle in
pink, turquoise, lime with 16 Hz
03
Strobe-222RGB-SEQ
Segments 1+4 / 2+5 / 3+6 flash sequentially while in every
step the currently active segments keep strobing for 4
Flashes before the the next segments take over. The flash
color cycles through R/G/B
04
Strobe-222-PTLSEQ
Segments 1+4 / 2+5 / 3+6 flash sequentially while in every
step the currently active segments keep strobing for 4
Flashes before the the next segments take over. The flash
color cycles through P/T/L
4. SPEED button
By consecutively pressing this key on the main units itself, or by using the SPEED up/down keys on the
remote control, it allows the sequential choice of various speed settings, depending on which MODE the
unit operates in:
In CHASE mode: 1Hz / 2Hz / 4Hz fixed / S2L (with LED indicator)
In FADE mode: speed 0.25Hz fixed/ 0.5Hz fixed / 1Hz / 2Hz fixed
In MOOD mode: speed 0.05Hz fixed / 0.25Hz fixed/ 0.5Hz fixed / 1Hz fixed
In SCENE mode: no speed choice (this button disabled)
In FLASH (STROBE) mode: the strobe speed can bet set in 4 levels.
Note: the chosen speed setting will be stored for every mode, so once returning to the mode, the
previously chose speed will be recalled.
5. S2L (SOUND TO LIGHT) indicator
In chase mode you can use the SPEED-button select different speeds or you can choose to run the
patterns to the rhythm of the music, in this last mode the SOUND TO LIGHT indicator is lit.
6. ON/OFF indicator
Indicates if the LED Marvel is connected to the mains or not.
7. BASE
Used to mount the LED Marvel in many different ways: see the chapter “How to install” for more
information.
8. DMX in/out connectors
You can use the LED Marvel standalone, in master/slave or you can control it using an external DMXcontroller. Please check the chapter “How to connect” for more information.
9. Power adapter in/out
Used to connect the power adapter, you can connect 1 more LED Marvel on the same power adapter.
However the included power adapter does not support this. In short we suggest NOT using the power
adapter output.
10. Microphone
The internal microphone picks up the music so the chases can run to the rhythm of the music.
11. STANDBY (ON/OFF) button
Only available on the remote: sets the output in blackout mode (off). This has the same effect as setting
the level (button 1)
Page 8
ENGLISH USER MANUAL
JB SYSTEMS® 6/44 LED MARVEL
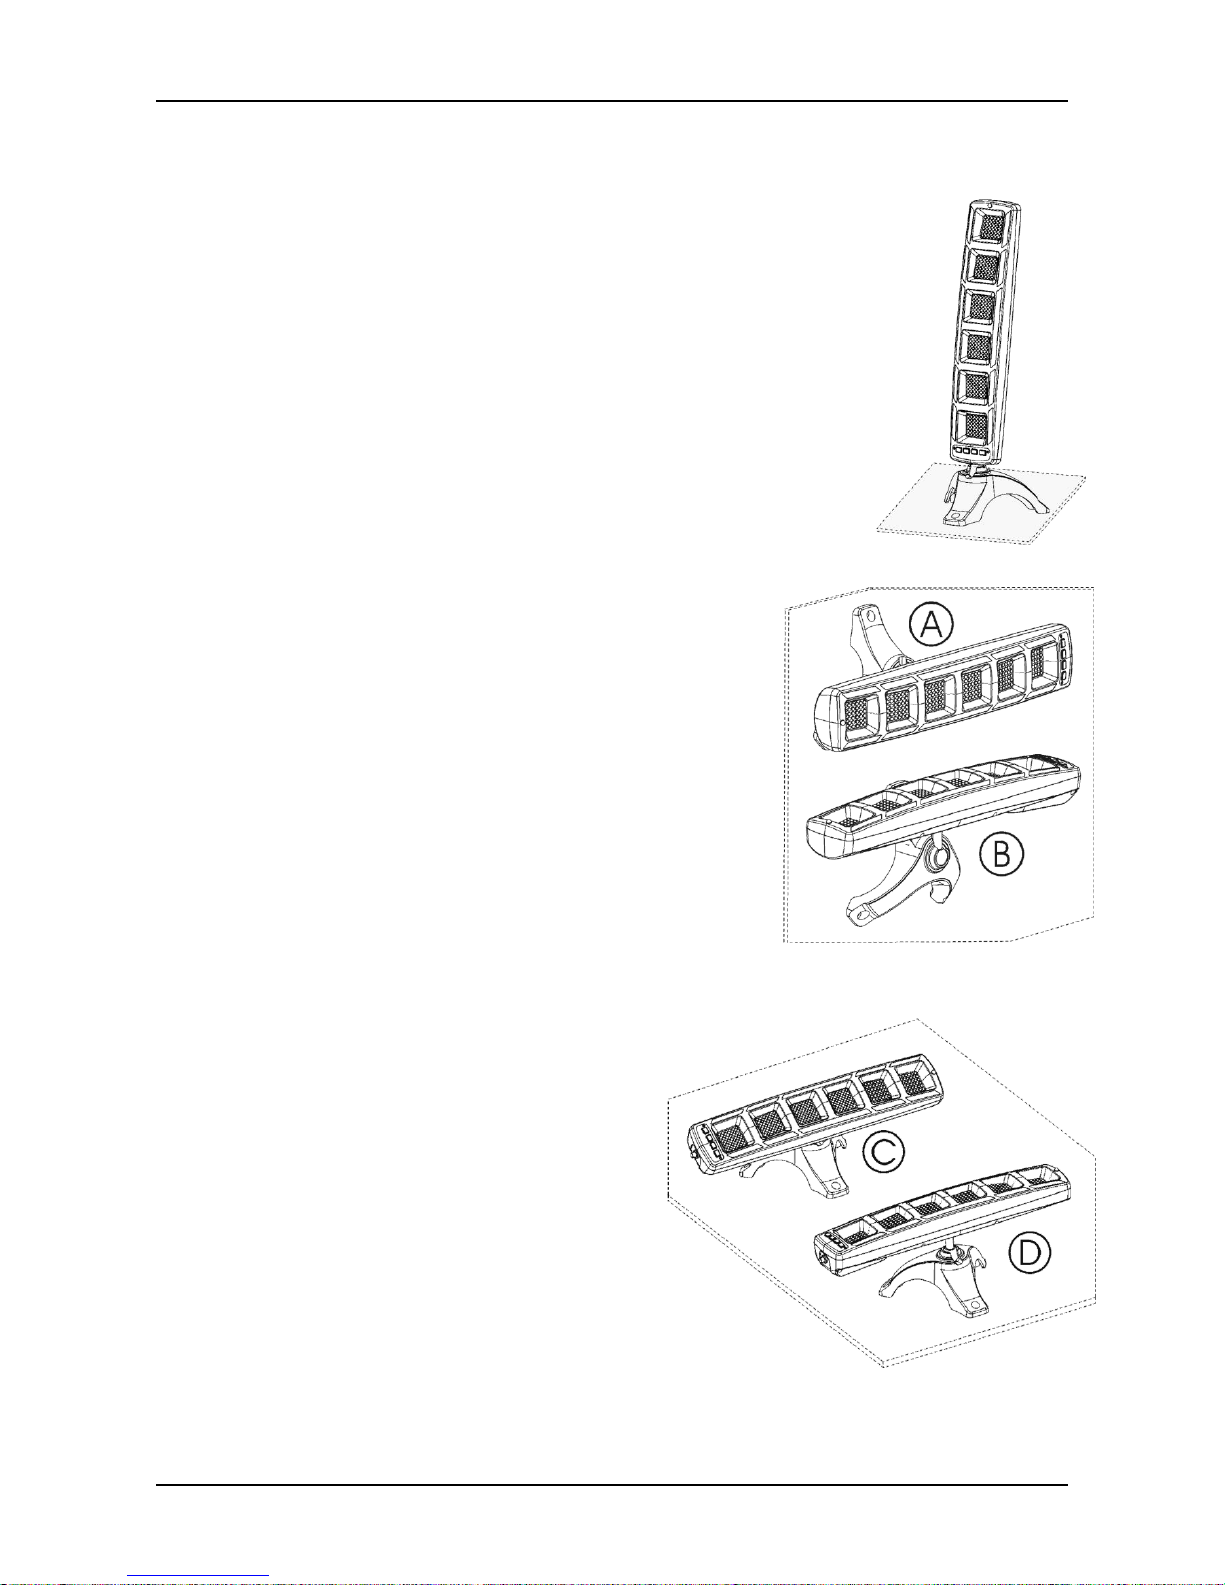
HOW TO INSTALL
The LED Marvel can be mounted in many different ways, you can choose one of these methods:
Table-Top operation: Mostly for “party” use!
Mount the included tripod to the bottom thread insert of the main unit.
Place the unit in a secure position where it can neither be touched by anyone or
could possibly become an objective for anyone to stumble.
If necessary or possible, fix the tripod with three screws (not included) to the
supporting surface.
Make sure the location and position secures safe distance from a spectator’s
direct eyesight.
For proper sound-to-light operation, leave the rear of the unit unobstructed.
Choose an angle that provides safe standing so that the unit cannot accidently flip
over. Make sure the two longer tripod legs direct to the back of the unit.
Connect the power supply and place the power supply in a location where nobody
can accidently stumble over the power supply or the cable.
Make sure to comply with cooling requirements of the used power supply if any.
Wall-mounted operation: Mostly used to color a wall while being mounted on that wall, see drawings A & B.
Mount the included tripod to the rear thread insert of the main unit.
Place the unit in a secure position where it can neither be touched by
anyone or could possibly become an objective for anyone to stumble
or bang his/her head on it.
Fix the tripod with three screws (not included) to the supporting
surface. Make sure the supporting surface can safely carry the weight
of the unit, which can be assumed when the surface can carry 10
times the unit’s weight as a point load.
Make sure the location and position secures safe distance from a
spectator’s direct eyesight.
For proper sound-to-light operation, leave the rear of the unit
unobstructed.
Connect the power supply and place the power supply in a location
where nobody can accidently stumble over the power supply or the
cable.
Make sure to comply with cooling requirements of the used power
supply if any.
Floor-mounted operation: Mostly used to color a wall while standing on the floor or hanging on the ceiling,
see drawings C & D.
Mount the included tripod to the rear thread insert of the
main unit.
Place the unit in a secure position where it can neither
be touched by anyone or could possibly become an
objective for anyone to stumble.
If necessary or possible, fix the tripod with three screws
(not included) to the supporting surface.
Make sure the location and position secures safe
distance from a spectator’s direct eyesight.
For proper sound-to-light operation, leave the rear of the
unit unobstructed.
Choose an angle that provides safe standing so that the
unit cannot accidently flip over.
Connect the power supply and place the power supply in
a location where nobody can accidently stumble over
the power supply or the cable.
Make sure to comply with cooling requirements of the used power supply if any.
Page 9

ENGLISH USER MANUAL
JB SYSTEMS® 7/44 LED MARVEL
HOW TO CONNECT
Standalone use:
Just connect the supplied Power adapter to the DC in (9) connector on the back of the unit.
Before using the IR-remote you should remove the protective plastic sleeve from the battery compartment.
Electrical installation for two or more units in Master/slave or DMX-mode:
The LED Marvel is equipped with a digital control interface connection which allows several units to be
synchronized. Since this digital control interface is based on the DMX512 protocol, it can also be used to
remotely control one or a chain of LED Marvel by means of an external DMX-512 controller. For space
reasons, the control interface however uses a 3.5mm jack connection (instead of the commonly used XLR
type), which means external DMX control requires a custom-made XLR-to-3.5jack cable (not supplied). A
further restriction is that the DMX start address cannot be set on the LED Marvel and is fixed to 001. The
interconnection between two units for synchronization requires a normal 3.5mm stereo jack/jack cable (not
included). The last unit in a chain shall be equipped with a proper 120 Ohm termination resistor equipped
3.5mm stereo jack-plug as shown in below drawing.
Cable connections for Master/slave:
You can connect several units together using an
optional good quality cable with 3.5mm stereo jack on
both sides.
The first unit in the chain will be the master: on this unit
you should press the buttons or use the IR-remote
control.
If you should use long cables the operation of the
slaves could become unreliable. In that case you should
use the 120ohm termination (see previous page) on the
DMX-output of last unit in the line.
Cable connections for DMX-operation:
You can connect several units to the output of any
DMX-controller using an optional good quality
conversion cable with 3.5mm stereo jack on one side
and XLR-connector on the other side. (see previous
page)
Keep in mind that you cannot choose the start address
of the units: the start address is always 001!
If you should use long cables the operation of the
slaves could become unreliable. In that case you should
use the 120ohm termination (see previous page) on the
DMX-output of last unit in the line.
Page 10
ENGLISH USER MANUAL
JB SYSTEMS® 8/44 LED MARVEL
While using an external DMX controller the 21CH DMX-chart can be used:
Channels 1 to 18 can be used to individually control the red, green and blue colors for the 6 panels, see
the chart for the exact information.
Channel 19 is the master dimmer for the 6 panels, see the chart for the exact information.
Channel 20 can be used to recall internal patterns, above DMX-value 247 channels 1 to 19 become active.
Channel 21 is used to set the speed of the internal patterns.
DMX channel
Value Range
Function
CH1
000-255
Panel1 (from top) R level – only active if CH20 >248
CH2
000-255
Panel1 (from top) G level – only active if CH20 >248
CH3
000-255
Panel1 (from top) B level – only active if CH20 >248
CH4
000-255
Panel2 (from top) R level – only active if CH20 >248
CH5
000-255
Panel2 (from top) G level – only active if CH20 >248
CH6
000-255
Panel2 (from top) B level – only active if CH20 >248
CH7
000-255
Panel3 (from top) R level – only active if CH20 >248
CH8
000-255
Panel3 (from top) G level – only active if CH20 >248
CH9
000-255
Panel3 (from top) B level – only active if CH20 >248
CH10
000-255
Panel4 (from top) R level – only active if CH20 >248
CH11
000-255
Panel4 (from top) G level – only active if CH20 >248
CH12
000-255
Panel4 (from top) B level – only active if CH20 >248
CH13
000-255
Panel5 (from top) R level – only active if CH20 >248
CH14
000-255
Panel5 (from top) G level – only active if CH20 >248
CH15
000-255
Panel5 (from top) B level – only active if CH20 >248
CH16
000-255
Panel6 (from top) R level – only active if CH20 >248
CH17
000-255
Panel6 (from top) G level – only active if CH20 >248
CH18
000-255
Panel6 (from top) B level – only active if CH20 >248
CH19
000-255
Master Dimmer CH1-CH18 – only active if CH20 >248
CH20
000-247
Preset Play Mode; value changes preset
248-255
DMX control mode, enables CH1-CH19
CH21
000-255
Preset Play Speed setting – only active if CH20 >247
MAINTENANCE
This device does not need regular maintenance. It is protected by an internal fuse located on the power
supply PCB. If this fuse fails, this usually indicates an internal fault requiring servicing by a qualified
engineer. The fuse shall only be replaced by a fuse of same specification, and the replacement has to be
made by qualified personnel obeying applicable safety rules.
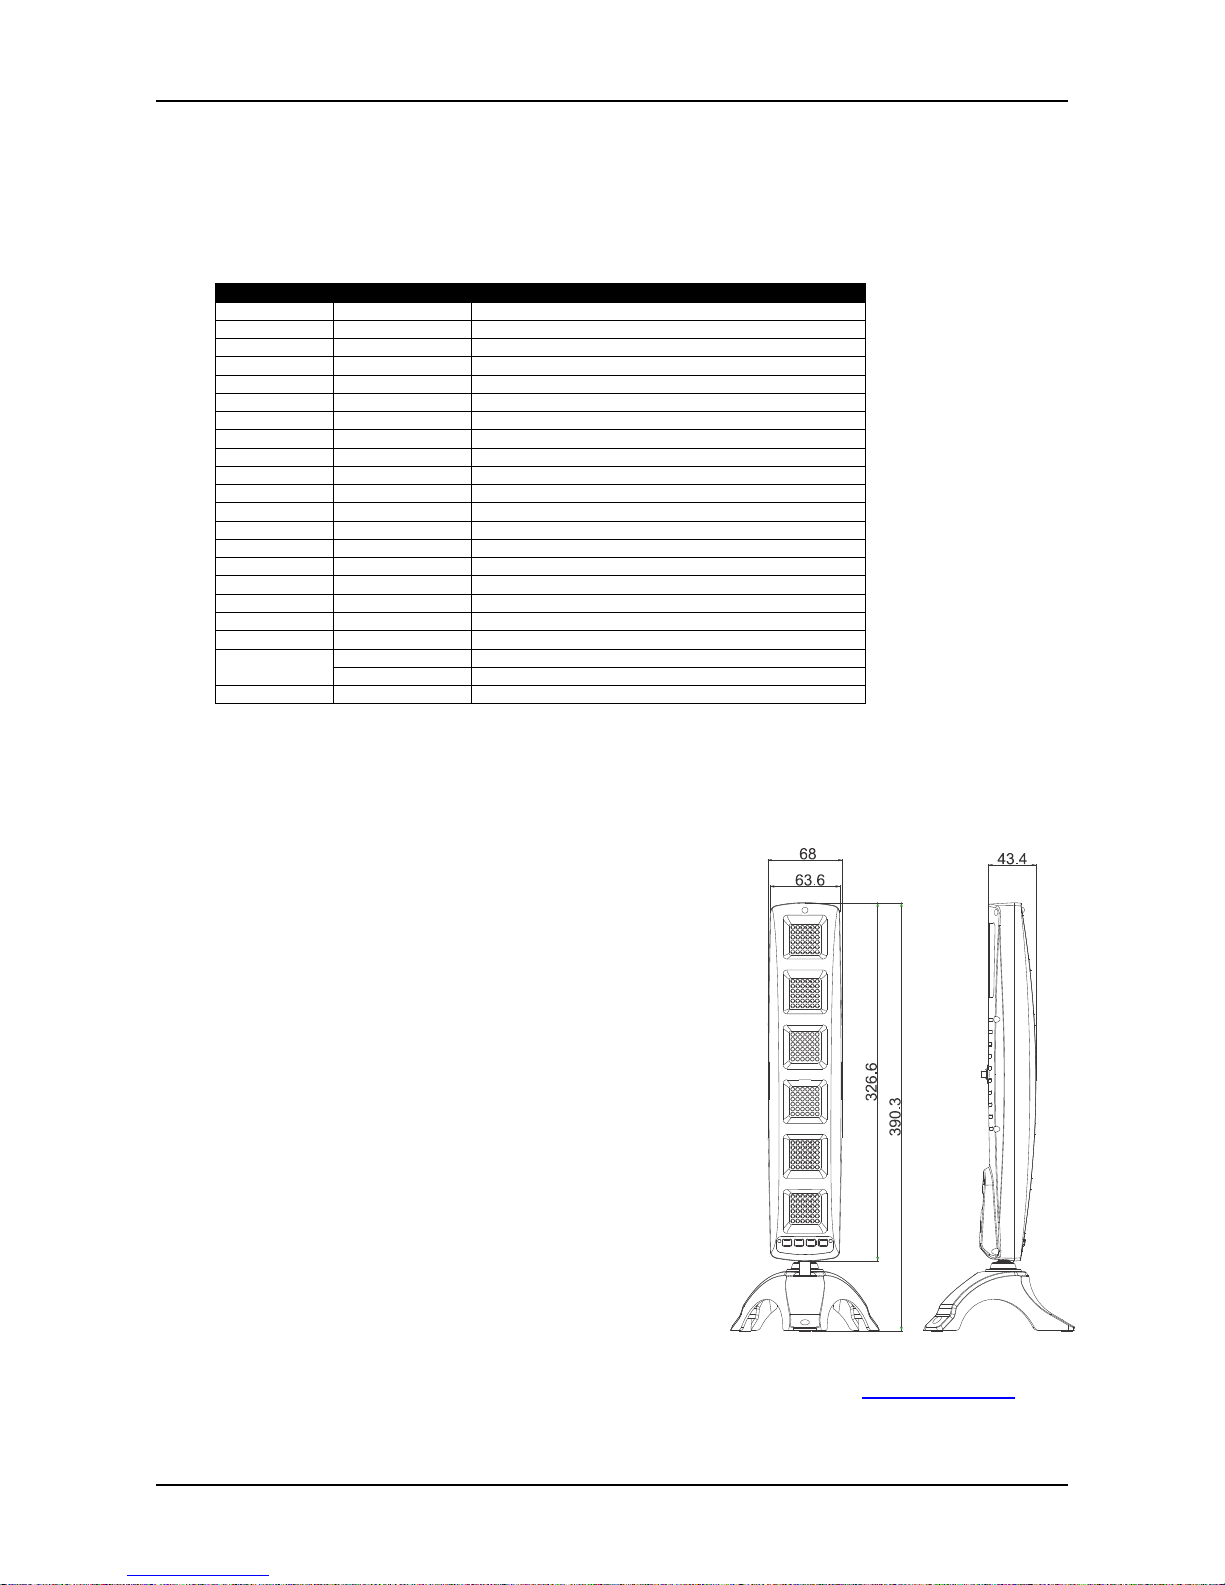
SPECIFICATIONS
Mains Input: 12Vdc / 1A
Power Adapter: AC 90V ~ 250V, 50/60Hz to 12Vdc / 1A
Power consumption: max. 12 Watt
Sound Control: Internal microphone
DMX connections: 3,5mm stereo jack female
DMX channels used: 21 channels
LEDs: 216pcs (72 red + 72 green + 72 blue)
Size: see drawing
Weight: 0,48kg
The information might be modified without prior notice
You can download the latest version of this user manual on our website: www.beglec.com
Page 11

FRANÇAIS GUIDE D’UTILISATION
JB SYSTEMS® 9/44 LED MARVEL
GUIDE D'UTILISATION
Nous vous remercions d'avoir acheté ce produit JB Systems® Pour tirer pleinement profit de toutes les
possibilités et pour votre propre sécurité, lisez ces instructions très attentivement avant d'utiliser cet appareil.
CARACTÉRISTIQUES
Cet appareil ne produit pas d’interférences radio. Ce produit répond aux exigences des directives
européennes et nationales actuelles. La conformité a été établie et les déclarations et documents
correspondants ont été déposés par le fabricant.
Ce dispositif a été conçu pour produire un effet d'éclairage décoratif et est utilisé dans les systèmes de jeu
de lumière.
Le design très élégant de ce projecteur à LED lui permet d'aller avec tout type d'intérieur (salon, chambre,
bar, salle d'attente, restaurant etc.)
En plus, il est également un exemple parfait de multifonctionnalité :
Il peut être utilisé comme "jeu de lumière" activé par le son (programmes internes et chenillards
(allumant des lampes de couleurs à tour de rôle))
Le créateur parfait "d'ambiance" (changent lent des fondus de couleur)
Un lèche-mur petit mais efficace (colorez vos murs !)
Plusieurs appareils peuvent être commandés de façon synchronisée par un contrôleur DMX.
Il comprend 6 panneaux à LED contrôlables individuellement donnant des effets avec le maximum de
variété et d'impact.
Les 216 LEDs (72 rouges, 72 vertes et 72 bleues) assurent un excellent flux lumineux et un bon mixage
des couleurs.
Des programmes statiques ou activés par le son (micro interne) avec différents modes
Une unité peut être utilisée seule de façon autonome ou plusieurs unités peuvent être connectées
ensemble en mode maître / esclave pour obtenir des effets magnifiques synchronisés !
Télécommande IR incluse
Contrôle par DMX possible : 21 canaux assurant un contrôle total RGB + chenillards préréglés à vitesse
réglable.
Socle multifonction :
Il suffit de le poser sur une table ou sur une surface horizontale
Le diriger contre un mur et l'orienter dans n'importe quelle direction
Alimentation d'entrée : 12V CC, adaptateur basse tension inclus
AVANT UTILISATION
Avant d'utiliser cet appareil, vérifiez s'il n'a pas été endommagé durant le transport. En cas de dommages,
n'utilisez pas l'appareil et consultez immédiatement votre revendeur.
Important : Cet appareil est expédié de notre usine en parfait état et bien emballé. Il est absolument
nécessaire que l'utilisateur suive strictement les instructions et les avertissements de sécurité se trouvant
dans ce manuel. Tout dommage dû à une mauvaise manipulation n'est pas garanti. Le revendeur
n'accepte aucune responsabilité pour tous les défauts et problèmes dus au non-respect de ce manuel.
Conservez ce manuel dans un endroit sûr pour toute consultation future. Si vous vendez l'appareil, veillez
à joindre ce manuel.
Vérifiez le contenu :
Vérifiez que le carton contient les éléments suivants :
Guide d'utilisation
LED MARVEL
Trépied
Alimentation externe 12V CC
Télécommande à infrarouge (IR)
Page 12
FRANÇAIS GUIDE D’UTILISATION
JB SYSTEMS® 10/44 LED MARVEL
INSTRUCTIONS DE SECURITE:
Afin de protéger l’environnement, merci de recycler les emballages autant que possible.
Pour éviter tout incendie ou électrocution, n'exposez pas cet appareil à la pluie ou l'humidité.
Pour éviter une formation de condensation interne, laissez l'appareil s'adapter à la température ambiante
quand vous la mettez dans une pièce chauffée après le transport. La condensation empêche parfois
l'appareil de fonctionner à plein rendement ou peut même causer des dommages.
Cet appareil est destiné à un usage intérieur seulement.
Ne placez pas d'objets métalliques et ne renversez pas de liquides à l'intérieur de l'appareil. Un choc
électrique ou un dysfonctionnement peut en résulter. Si un corps étranger pénètre dans l'appareil,
débranchez immédiatement l'alimentation secteur.
Fixez l'appareil dans un endroit bien aéré, loin de tout matériau et/ou liquide inflammable.
Ne couvrez pas les ouvertures de ventilation, cela pourrait entraîner une surchauffe.
Evitez une utilisation dans des environnements poussiéreux et nettoyez l'appareil régulièrement.
Gardez l'appareil loin de la portée des enfants.
Les personnes inexpérimentées ne doivent pas utiliser cet appareil.
La température ambiante de fonctionnement maximale est de 35°C. N'utilisez pas cet appareil à des
températures ambiantes plus élevées.
Assurez-vous qu'aucune personne étrangère ne se trouve dans la zone en dessous de l'emplacement
d'installation durant le montage, le démontage et l'entretien.
Débranchez toujours l'appareil lorsqu'il ne va pas être utilisé pendant une longue période ou avant de
commencer l'entretien.
Vérifiez que la tension secteur n'est pas supérieure à celle indiquée sur l'appareil.
Le cordon d'alimentation doit toujours être en parfait état. Eteignez immédiatement l'appareil dès le cordon
d'alimentation est écrasé ou endommagé. Il doit être remplacé par le fabricant, son agent de service ou
une personne de même qualification afin d'éviter tout danger.
Ne laissez jamais le cordon d'alimentation entrer en contact avec d'autres câbles !
Pour éviter tout danger, l'appareil ne doit être utilisé qu'avec l'adaptateur secteur fourni. Si l'adaptateur
secteur est endommagé, vous ne devez utiliser qu'un adaptateur de même modèle.
Ne connectez pas l'appareil à aucun variateur de lumière.
Utilisez toujours un câble de sécurité approprié et certifié lors de l'installation de l'appareil.
Afin d'éviter un choc électrique, n'ouvrez aucun panneau. L'appareil ne contient aucun composant
réparable par l'utilisateur.
En cas de sérieux problèmes de fonctionnement, cessez d'utiliser l'appareil et contactez immédiatement
votre revendeur.
Le boîtier et la lentille doivent être remplacés s'ils sont visiblement endommagés.
Utilisez l'emballage d'origine pour transporter l'appareil.
ATTENTION: afin de réduire le risque d’électrocution, n’enlevez
jamais le couvercle de l’appareil. Il n’y a aucune pièce à
l’intérieur de l’appareil que vous puissiez remplacer vous-même.
Confiez l’entretien uniquement à des techniciens qualifiés.
La flèche dans un triangle met l'utilisateur en garde contre la présence de haute tension sans
isolation dans l'appareil, ce qui peut causer un risque d'électrocution.
Un point d'exclamation dans un triangle prévient de la présence d'instructions relatives au
fonctionnement et à la maintenance se trouvant dans le manuel fourni avec l'appareil.
Ce symbole signifie: uniquement pour usage à l'intérieur.
Ce symbole signifie : Lire le mode d’emploi.
Ce symbole signifie: appareil construit selon les normes de sécurité classe II
Ce symbole représente la distance de recul minimum à respecter, c'est-à-dire, la distance
minimum entre le projecteur et la surface à éclairer. Cette distance doit être de plus de x mètre.
L’appareil n'est pas adapté pour le montage direct sur des surfaces normalement inflammables.
(Ne convient que pour le montage sur des surfaces non-combustibles)
CAUTION: Ne pas fixer le faisceau du regard.
Peut être dangereux pour les yeux.
Page 13
FRANÇAIS GUIDE D’UTILISATION
JB SYSTEMS® 11/44 LED MARVEL
Pour des raisons de sécurité, il est interdit d'apporter des modifications non autorisées à l'appareil.
Important : Ne regardez jamais directement dans la source de lumière ! N'utilisez pas le jeu de lumière en
présence de personnes souffrant d'épilepsie.
DESCRIPTION ET UTILISATION :
1. Bouton LEVEL (niveau)
(Rétroéclairage)
2. Touche MODE
3. Bouton PT / COL
4. Touche SPEED (vitesse)
5. LED S2L (lumière activée
par le son)
6. Voyant de fonctionnement
7. SOCLE
8. Connecteurs d'entrée /
sortie DMX
9. Entrée / sortie adaptateur
secteur
10. Microphone
L'utilisateur peut faire
fonctionner l'appareil en mode
autonome automatique, avec
des couleurs fixes, contrôlé
par la télécommande IR
incluse ou par les contrôleurs DMX externes.
Ce chapitre se réfère au fonctionnement autonome et l'utilisation avec la télécommande
IR. Pour la télécommande numérique reportez-vous au chapitre "Synchronisation et
contrôle DMX". Pour un fonctionnement autonome, assurez-vous QU'AUCUN CABLE
n'est branché à la prise arrière "DMX IN".
Les éléments d'interface utilisateur offrent les fonctions suivantes :
1. bouton LEVEL (niveau)
En appuyant plusieurs fois sur ce bouton des unités principales, on peut choisir de
façon séquentielle 4 niveaux différents de luminosité : 0% (obscurité) / 25 / 50 / 75 /
100%. Les mêmes niveaux peuvent être contrôlés par la télécommande, cependant
les boutons LEVEL vers le haut / bas de la télécommande ne permettent de choisir
que les niveaux 25 / 50 / 75 / 100%, alors que la fonction obscurité (0%) n'est
disponible que via les boutons marche / arrêt de la télécommande.
2. Bouton MODE
En appuyant plusieurs fois sur ce bouton des unités principales, on peut choisir de façon séquentielle 5
niveaux différents de fonctionnement :
CHASE (chenillard) : différents motifs de chenillards peuvent être sélectionnés avec le bouton PT /
COL - plus de détails ci-après.
FADE (fondu) : fondu entre les 6 panneaux, différents motifs peuvent être sélectionnés avec le
bouton PT / COL - plus de détails ci-après.
MOOD (ambiance) : tous les 6 panneaux passent d'un fondu de couleur à l'autre, les différents
cycles de couleurs peuvent être sélectionnés avec le bouton PT / COL - plus de détails ci-après.
SCENE : tous les 6 panneaux affichent la même couleur, les différents 12 couleurs peuvent être
sélectionnées avec le bouton PT / COL - plus de détails ci-après.
FLASH (STROBE) (CLIGNOTANT (STROBIQUE)) : différents motifs en blanc RVB chacun pouvant
être sélectionné avec le bouton TP / COL - plus de détails ci-après.
Remarque : lorsque vous utilisez la télécommande IR, les 5 modes peuvent être sélectionnés
directement par les boutons appropriés.
Page 14
FRANÇAIS GUIDE D’UTILISATION
JB SYSTEMS® 12/44 LED MARVEL
3. Bouton PT / COL
Ce bouton change la couleur ou le motif + la couleur en fonction du mode sélectionné. Voici les choix en
fonction du mode sélectionné :
En mode CHASE : 5 motifs préréglés avec transition de commutation en deux combinaisons de couleurs
chacun peuvent être sélectionnés en appuyant sur le bouton TP / COL de l'appareil ou les boutons PT /
COL vers le haut / bas de la télécommande :
Préréglage
Couleur
1
Couleur
2
Couleur
3
Motif
01
Rouge
Bleu
Vert
3C-16-Zip-updown
(Ouverture/fermeture)
02
Rose
Turquoise
Vert citron
3C-16-Zip-updown
(Ouverture/fermeture)
03
Rouge
Vert
Bleu
3C-22-Crossing (Croisement)
04
Rose
Turquoise
Vert citron
3C-22-Crossing (Croisement)
05
Rouge
Vert
Bleu
3C-22-ContractExpand
(Expansion de contact)
06
Rose
Turquoise
Vert citron
3C-22-ContractExpand
(Expansion de contact)
07
Rouge
Vert
Bleu
3C-22-PingPong
08
Rose
Turquoise
Vert citron
3C-22-PingPong
09
Rouge
Vert
Bleu
3C-33-Fork (Fourchette)
10
Rose
Turquoise
Vert citron
3C-33-Fork (Fourchette)
11
Séquence
Séquence
Séquence
Motifs 1 / 3 / 5 / 7 / 9 / 2 / 4 /
6 / 8 / 10
En mode FADE (fondu) : 5 motifs préréglés avec transition de fondu en combinaison de deux couleurs
chacun peuvent être sélectionnés en appuyant sur le bouton TP / COL de l'appareil ou les boutons PT /
COL vers le haut / bas de la télécommande :
Préréglage
Couleur
1
Couleur
2
Couleur
3
Motif
01
Rouge
Bleu
Vert
3C-16-Zip-updown
(Ouverture/fermeture)
02
Rose
Turquoise
Vert citron
3C-16-Zip-updown
(Ouverture/fermeture)
03
Rouge
Vert
Bleu
3C-22-Crossing (Croisement)
04
Rose
Turquoise
Vert citron
3C-22-Crossing (Croisement)
05
Rouge
Vert
Bleu
3C-22-ContractExpand
(Expansion de contact)
06
Rose
Turquoise
Vert citron
Expansion de contact 3C-22
07
Rouge
Vert
Bleu
3C-22-PingPong
08
Rose
Turquoise
Vert citron
3C-22-PingPong
09
Rouge
Vert
Bleu
3C-33-Fork (Fourchette)
10
Rose
Turquoise
Vert citron
3C-33-Fork
11
Séquence
Séquence
Séquence
Motifs 1 / 3 / 5 / 7 / 9 / 2 / 4 /
6 / 8 / 10
En mode MOOD (ambiance) : 10 préréglages de cycles de couleurs pouvant être sélectionnés
consécutivement par le bouton TP / COL de l'appareil ou les boutons PT / COL vers le haut / bas de la
télécommande :
Préréglage
Couleur
1
Couleur 2
Couleur 3
Motif
01
Rouge
Bleu
-
2C_6Change
(Changement)
02
Rose
Vert citron
-
2C_6Change
(Changement)
03
Vert
Rouge
-
2C_6Change
(Changement)
Page 15
FRANÇAIS GUIDE D’UTILISATION
JB SYSTEMS® 13/44 LED MARVEL
04
Vert
citron
Turquoise
2C_6Change
(Changement)
05
Bleu
Vert 2C_6Change
(Changement)
06
Rose
Turquoise
2C_6Change
(Changement)
07
Rouge
Bleu
Vert
3C_6Change
(Changement)
08
Rouge
Vert
Bleu
3C_6Change
(Changement)
09
Rouge
Bleu
Vert
2C_Burst (rafale)
10
Rose
Turquoise
Vert citron
2C_Burst (rafale)
11
Aléatoire
Aléatoire
Aléatoire
Roulement aléatoire
Remarque : En dehors des modes CHASE et FADE (fondu), en mode MOOD (ambiance) les 6
segments sont actifs et affichent la même couleur dans les 8 premiers préréglages (préréglages de
couleurs mélangées 9 / 10 / 11).
En mode SCENE : 12 préréglages de couleurs pouvant être sélectionnés consécutivement par le bouton
TP / COL de l'appareil ou les boutons PT / COL vers le haut / bas de la télécommande :
Préréglage
Couleur
01
Rouge
02
Vert
03
Bleu
04
Jaune*
05
Rose*
06
Turquoise*
07
Vert citron
08
Orange
09
Bleu marine
10
Vert grenouille
11
Lavande
12
Rose bonbon
13
Blanc (à 50%)
Remarque : il n'y a pas d'état "pas de couleur" en mode SCENE.
En mode FLASH (STROBE) (CLIGNOTANT (STROBIQUE)) : 5 préréglages de motifs stroboscopiques
pouvant être sélectionnés consécutivement par le bouton TP / COL de l'appareil ou les boutons PT / COL
vers le haut / bas de la télécommande :
Préréglage
Nom du
préréglage
DESCRIPTION :
01
Strobe-All6RGB-SEQ
Les 6 segments stroboscopiques changent selon un cycle de
4 clignotements rouge, vert et bleu à 16 Hz
02
Strobe-All6PTL-SEQ
Les 6 segments stroboscopiques changent selon un cycle de
4 clignotements rose, turquoise et vert citron à 16 Hz
03
Strobe-222RGB-SEQ
Les segments 1+4 / 2+5 / 3+6 clignotent de façon
séquentielle et dans chaque étape, les segments
actuellement actifs restent en mode stroboscopique avec 4
clignotements avant que les segments suivants ne prennent
le relais. Le cycle de couleurs est Rouge / Vert / Bleu
04
Strobe-222-PTLSEQ
Les segments 1+4 / 2+5 / 3+6 clignotent de façon
séquentielle et dans chaque étape, les segments
actuellement actifs restent en mode stroboscopique avec 4
clignotements avant que les segments suivants ne prennent
le relais. Le cycle de couleurs est Rose / Turquoise/ Vert
citron
Page 16

FRANÇAIS GUIDE D’UTILISATION
JB SYSTEMS® 14/44 LED MARVEL
4. Touche SPEED (vitesse)
On peut sélectionner différentes vitesses, selon le mode de fonctionnement de l'appareil, en appuyant
plusieurs fois sur ce bouton situé sur l'appareil ou en utilisant les boutons SPEED vers le haut / bas de la
télécommande :
En mode CHASE : fixe à 1Hz / 2Hz / 4Hz, S2L (avec voyant LED)
En mode FADE (fondu) : vitesse fixe à 0,25 Hz / 0,5 Hz / 1 Hz / 2 Hz
En mode MOOD (ambiance) : vitesse fixe à 0,05 Hz / 0,25 Hz / 0,5 Hz / 1 Hz
En mode SCENE : pas de sélection de vitesse (ce bouton est désactivé)
En mode FLASH (STROBE) (CLIGNOTANT (STROBIQUE)) : il y a 4 niveaux de vitesse
stroboscopique.
Remarque : la vitesse sélectionnée est mémorisée pour chaque mode, ainsi à chaque retour à un mode
donné, sa vitesse sera rappelée.
5. Voyant S2L (lumière activée par le son)
En mode CHASE, le bouton SPEED peut être utilisé pour sélectionner différentes vitesses ou on peut
laisser les motifs s'exécuter au rythme de la musique, dans ce cas le voyant S2L (lumière activée par le
son) sera allumé.
6. Voyant de fonctionnement
Indique si le jeu de lumière Marvel LED est connecté au secteur ou pas.
7. SOCLE
Sert à installer le jeu de lumière Marvel LED de différentes façons : pour plus d'informations reportezvous au chapitre "Méthodes d'installation".
8. Connecteurs d'entrée / sortie DMX
Le jeu de lumière Marvel LED peut être utilisé en mode autonome, maître / esclave ou le contrôler par un
contrôleur DMX externe. pour plus d'informations reportez-vous au chapitre "Modes de connexion".
9. Entrée / sortie adaptateur secteur
Utilisé pour brancher l'adaptateur secteur ; vous pouvez brancher plusieurs jeux de lumière Marvel LED
au même adaptateur secteur. L'adaptateur secteur fourni est destiné pour un seul jeu de lumière. En bref,
nous recommandons de ne pas utiliser la sortie de l'adaptateur secteur.
10. Microphone
Le microphone interne détecte les sons de manière que les lampes de couleurs s'allument à tour de rôle
(chenillards) au rythme de la musique.
11. Bouton VEILLE (Marche/arrêt)
Il ne se trouve que sur la télécommande : il permet d'obtenir l'obscurité totale. Cela a le même effet que
le réglage du niveau (bouton 1)
MÉTHODES D'INSTALLATION
Le jeu de lumière LED Marvel peut être installé de différentes méthodes :
Utilisation sur une table Surtout pour les "fêtes" !
Fixez le trépied inclus au filetage situé en bas de l'unité principale.
Placez l'appareil dans un emplacement sans risque d'être manipulé ou
susceptible d'être renversé par quelqu'un.
Si nécessaire, fixez si possible le trépied avec trois vis (non incluses) à la
surface d'appui.
Veillez à ce que l'emplacement et la position assurent une distance ne pouvant
nuire aux yeux des personnes présentes.
N'obstruez pas l'arrière de l'unité pour garantir un bon fonctionnement "lumière
activée par le son".
Veillez à ce que l'angle d'inclinaison de l'appareil ne permet pas un
renversement accidentel de ce dernier. Veillez à ce que les deux longs pieds
du trépied soient à l'arrière de l'appareil.
Branchez l'appareil à la source d'alimentation tout en veillant à ce que cette
Page 17

FRANÇAIS GUIDE D’UTILISATION
JB SYSTEMS® 15/44 LED MARVEL
dernière soit dans un endroit où personne ne risque de trébucher accidentellement dessus ou sur le câble.
Veillez à respecter les exigences de refroidissement de la source d'alimentation utilisée.
Accrochage à un mur : Méthode utilisée surtout pour colorer un mur
tout en étant accrochée au mur, voir dessins A et B.
Fixez le trépied inclus au filetage situé à l'arrière de l'unité
principale.
Placez l'appareil dans un emplacement sans risque d'être
manipulé ou susceptible de heurter la tête de quelqu'un.
Si nécessaire, fixez si possible le trépied avec trois vis (non
incluses) à la surface d'appui. Assurez-vous que la surface d'appui
peut supporter le poids de l'appareil, qui est supposé supporter 10
fois le poids de l'appareil en tant que charge ponctuelle.
Veillez à ce que l'emplacement et la position assurent une
distance ne pouvant nuire aux yeux des personnes présentes.
N'obstruez pas l'arrière de l'unité pour garantir un bon
fonctionnement "lumière activée par le son".
Branchez l'appareil à la source d'alimentation tout en veillant à ce
que cette dernière soit dans un endroit où personne ne risque de
trébucher accidentellement dessus ou sur le câble.
Veillez à respecter les exigences de refroidissement de la source d'alimentation utilisée.
Fixation au sol : Il est surtout utilisé pour colorer un
mur tout en étant fixé au sol ou accroché au plafond,
voir dessins C et D.
Fixez le trépied inclus au filetage situé à l'arrière de
l'unité principale.
Placez l'appareil dans un emplacement sans risque
d'être manipulé ou susceptible d'être renversé par
quelqu'un.
Si nécessaire, fixez si possible le trépied avec trois
vis (non incluses) à la surface d'appui.
Veillez à ce que l'emplacement et la position
assurent une distance ne pouvant nuire aux yeux des
personnes présentes.
N'obstruez pas l'arrière de l'unité pour garantir un
bon fonctionnement "lumière activée par le son".
Veillez à ce que l'angle d'inclinaison de l'appareil ne
permet pas un renversement accidentel de ce dernier.
Branchez l'appareil à la source d'alimentation tout en veillant à ce que cette dernière soit dans un endroit
où personne ne risque de trébucher accidentellement dessus ou sur le câble.
Veillez à respecter les exigences de refroidissement de la source d'alimentation utilisée.
METHODE DE CONNEXION
Utilisation autonome :
Il suffit de brancher l'adaptateur d'alimentation fourni à la prise d'entrée de courant continu (9) située à
l'arrière de l'appareil.
Avant d'utiliser la télécommande IR, vous devez retirer la gaine de protection en plastique du compartiment
des piles.
Installation électrique de deux unités ou plus en mode Maître/Esclave contrôlées par DMX :
Le jeu de lumière LED Marvel est équipé d'une interface de connexion à commande numérique qui permet
de synchroniser plusieurs unités. Etant basée sur le protocole DMX512 cette interface de contrôle
numérique peut également être utilisée pour contrôler à distance une unité ou une chaîne d'unités Marvel
DEL au moyen d'un contrôleur DMX-512 extérieur. Pour des raisons d'encombrement, l'interface de
commande utilise un jack de connexion 3,5 mm (au lieu du type XLR couramment utilisé) ; ainsi le contrôleur
DMX externe nécessite un câble XLR-3,5 (non fourni). Une autre restriction impose que l'adresse DMX de
début ne peut pas être définie sur le LED Marvel ; elle est fixée à 001. L'interconnexion entre deux unités
Page 18

FRANÇAIS GUIDE D’UTILISATION
JB SYSTEMS® 16/44 LED MARVEL
pour la synchronisation nécessite un câble à jack 3,5 mm stéréo normal / jack (non fourni). La dernière unité
de la chaîne doit être équipée d'une résistance de terminaison de 120 Ohm appropriée équipée d'un jackfiche stéréo 3,5 mm comme illustré dans le dessin ci-dessous.
Branchement des câbles pour le maître / esclave :
Vous pouvez connecter plusieurs unités entre elles à
l'aide d'un câble de bonne qualité (en option) équipé d'un
jack stéréo 3,5 mm aux deux extrémités.
La première unité de la chaîne est le maître : vous devez
appuyer sur les boutons sur cette unité ou utiliser la
télécommande IR.
Le fonctionnement risque de ne pas être efficace en cas
d'utilisation de longs câbles pour connecter les esclaves.
Dans ce cas, vous devez utiliser la terminaison 120ohm
(voir page précédente) à la sortie DMX de la dernière
unité de la chaîne.
Branchement des câbles pour l'utilisation DMX :
Vous pouvez connecter plusieurs unités à la sortie de
tout contrôleur DMX en utilisant un câble de conversion
de bonne qualité (en option) équipé d'un jack stéréo 3,5
mm à une extrémité et un connecteur XLR à l'autre. (Voir
page précédente)
N'oubliez pas que vous ne pouvez pas fixer l'adresse de
début des unités : l'adresse de début est toujours 001 !
Le fonctionnement risque de ne pas être efficace en cas
d'utilisation de longs câbles pour connecter les esclaves.
Dans ce cas, vous devez utiliser la terminaison 120ohm
(voir page précédente) à la sortie DMX de la dernière
unité de la chaîne.
Vous pouvez vous servir de la table DMX 21 Canaux en cas d'utilisation d'un contrôleur DMX externe :
Les canaux 1 à 18 peuvent être utilisés pour contrôler individuellement les couleurs rouge, vert et bleu des
6 panneaux, reportez-vous à la table pour avoir des informations exactes.
Le canal 19 est le gradateur maître des 6 panneaux, reportez-vous à la table pour avoir des informations
exactes.
Le canal 20 peut être utilisé pour rappeler les motifs internes, au-dessus de la valeur DMX 247, les
canaux 1 à 19 sont activés.
Le canal 21 permet de régler la vitesse des motifs internes.
Canaux DMX
Plage de
valeurs
Fonction
C1
000-255
Panneau 1 (à partir du haut) niveau du Rouge - n'est actif que si C20 > 248
C2
000-255
Panneau 1 (à partir du haut) niveau du Vert - n'est actif que si C20 > 248
C3
000-255
Panneau 1 (à partir du haut) niveau du Bleu - n'est actif que si C20 > 248
Page 19

FRANÇAIS GUIDE D’UTILISATION
JB SYSTEMS® 17/44 LED MARVEL
C4
000-255
Panneau 2 (à partir du haut) niveau du Rouge - n'est actif que si C20 > 248
C5
000-255
Panneau 2 (à partir du haut) niveau du Vert - n'est actif que si C20 > 248
C6
000-255
Panneau 2 (à partir du haut) niveau du Bleu - n'est actif que si C20 > 248
C7
000-255
Panneau 3 (à partir du haut) niveau du Rouge - n'est actif que si C20 > 248
C8
000-255
Panel3 (from top) G level – only active if CH20 >248
C9
000-255
Panneau 3 (à partir du haut) niveau du Bleu - n'est actif que si C20 > 248
C10
000-255
Panneau 4 (à partir du haut) niveau du Rouge - n'est actif que si C20 > 248
C11
000-255
Panneau 4 (à partir du haut) niveau du Vert - n'est actif que si C20 > 248
C12
000-255
Panneau 4 (à partir du haut) niveau du Bleu - n'est actif que si C20 > 248
C13
000-255
Panneau 5 (à partir du haut) niveau du Rouge - n'est actif que si C20 > 248
C14
000-255
Panneau 5 (à partir du haut) niveau du Vert - n'est actif que si C20 > 248
C15
000-255
Panneau 5 (à partir du haut) niveau du Bleu - n'est actif que si C20 > 248
C16
000-255
Panneau 6 (à partir du haut) niveau du Rouge - n'est actif que si C20 > 248
C17
000-255
Panneau 6 (à partir du haut) niveau du Vert - n'est actif que si C20 > 248
C18
000-255
Panneau 6 (à partir du haut) niveau du Bleu - n'est actif que si C20 > 248
C19
000-255
Gradateur maître C1-C18 - C20 n'est actif que si C20 > 248
C20
000-247
Mode de lecture préréglé ; la valeur change le préréglage
248-255
Mode de contrôle DMX, active C1-C19
C21
000-255
Réglage de la vitesse de lecture préréglée - n'est actif que si C20 > 247
ENTRETIEN
Cet appareil ne nécessite pas d'entretien régulier. Il est protégé par un fusible interne situé sur la carte
d'alimentation. Si le fusible est grillé, cela indique généralement un défaut interne nécessitant une réparation
par un technicien qualifié. Le fusible ne doit être remplacé que par un fusible de même calibre par un
technicien qualifié respectant les règles de sécurité en vigueur.
SPÉCIFICATIONS
Tension d'entrée : 12V CC / 1A
Adaptateur secteur : 90V~250VAC, 50/60Hz vers 12VCC/1A
Consommation : max. 12 Watt
Réglage du son : Microphone interne
Connexions DMX : jack femelle stéréo 3,5mm
Canaux DMX utilisés : 21 canaux
Témoins : 216 LEDs (72 rouges, 72 vertes et 72
bleues)
Dimensions : Voir schéma
Poids : 0.48kg
Les informations peuvent être modifiées sans préavis
Vous pouvez télécharger la dernière version de ce manuel sur notre site web : www.beglec.com
Page 20

NEDERLANDS GEBRUIKSAANWIJZING
JB SYSTEMS® 18/44 LED MARVEL
GEBRUIKSAANWIJZING
Hartelijk dank voor de aankoop van dit JB Systems® product. Om ten volle van alle mogelijkheden te
profiteren en voor uw eigen veiligheid, lees deze gebruiksaanwijzing zorgvuldig voordat u met dit apparaat
start.
KENMERKEN
Dit apparaat is radio-interferentie onderdrukt. Dit product voldoet aan de eisen van de huidige Europese en
nationale richtlijnen. Overeenstemming is bereikt en de desbetreffende verklaringen en documenten zijn
door de fabrikant gedeponeerd.
Dit apparaat is ontworpen om decoratieve effectverlichting te produceren en wordt in lichtshowsystemen
gebruikt.
Dankzij het heel mooie en elegante ontwerp, past deze LED-projector in elk interieur (woonkamer,
slaapkamer, bar, lounge, restaurant, …),
Bovendien is het ook een perfect voorbeeld van multifunctionaliteit:
Het kan als geluidgeactiveerd “feestlicht” (interne programma's & chases) worden gebruikt;
De perfecte “sfeer” schepper (langzaam veranderende kleurvervagingen);
Kleine, maar effectieve muur-washer (kleur uw muren!);
Meerdere eenheden kunnen met een DMX-controller worden bestuurd voor gesynchroniseerde
werking.
Het bevat 6 individueel instelbare LED-panelen voor een maximale variatie en de impact van de effecten.
Een totaal van 216 LED’s (72 rode + 72 groene + 72 blauwe) garanderen een uitstekende lichtopbrengst
en een goede kleurmenging.
Statische of geluidgeactiveerde programma's (interne microfoon) met verschillende modi.
Één eenheid kan zelfstandig worden gebruikt of verschillende eenheden kunnen samen in master/slave
worden aangesloten om prachtige gesynchroniseerde effecten te verkrijgen!
IR-afstandsbediening meegeleverd
DMX-besturing mogelijk: 21 kanalen voor volledige RGB-besturing + Chase-voorinstellingen met regelbare
snelheid.
Multifunctionele voet:
Zet het gewoon op een tafel of horizontaal oppervlak
Bevestig het tegen een muur en wijs de eenheid in de gewenste richting
Voedingsingang: 12 VDC, afzonderlijke laagspanningadapter inbegrepen
VÓÓR GEBRUIK
Voordat u met het gebruik van dit apparaat start, controleer of er geen transportschade aanwezig is. Mocht
er schade zijn, gebruik het apparaat niet en raadpleeg eerst uw dealer.
Belangrijk: Dit apparaat verliet de fabriek in perfecte staat en goed verpakt. Het is absoluut noodzakelijk
voor de gebruiker om de veiligheidsinstructies en waarschuwingen in deze handleiding strikt op te volgen.
Eventuele schade veroorzaakt door verkeerd gebruik valt niet onder de garantie. De dealer zal niet
aansprakelijk worden gesteld voor eventuele fouten of problemen veroorzaakt door het negeren van deze
handleiding.
Bewaar dit boekje op een veilige plaats voor toekomstige raadpleging. Als u de armatuur verkoopt, zorg
ervoor deze handleiding erbij te voegen.
Controleer de inhoud:
Controleer of de doos de volgende items bevat:
Gebruiksaanwijzing
LED MARVEL
Montagevoet
Externe 12 VDC voeding
Infrarood (IR) afstandsbediening:
Page 21

NEDERLANDS GEBRUIKSAANWIJZING
JB SYSTEMS® 19/44 LED MARVEL
VEILIGHEIDSVOORSCHRIFTEN:
Bescherm het milieu, probeer zoveel mogelijk het verpakkingsmateriaal te recycleren.
Om vuur of elektrische schokgevaar te voorkomen, stel dit apparaat niet bloot aan regen of vocht.
Om te voorkomen dat binnenin condensatie wordt gevormd, laat het apparaat aan de
omgevingstemperatuur aanpassen wanneer het na transport in een warme kamer wordt gebracht.
Condens verhindert soms het apparaat op volle capaciteit te werken of kan zelfs schade veroorzaken.
Dit apparaat is uitsluitend geschikt voor gebruik binnenshuis.
Plaats geen metalen voorwerpen op of mors geen vloeistoffen in het toestel. Elektrische schokken of
storing kan het gevolg zijn. Als een vreemd voorwerp in het apparaat terechtkomt, trek onmiddellijk de
stekker uit het stopcontact.
Plaats de armatuur op een goed geventileerde plek, verwijderd van brandbare materialen en/of
vloeistoffen.
Bedek geen ventilatieopeningen, omdat het tot oververhitting kan leiden.
Voorkom het gebruik in stoffige omgevingen en maak het regelmatig schoon.
Houd het apparaat buiten bereik van kinderen.
Onervaren personen mogen dit apparaat niet bedienen.
De maximaal veilige omgevingstemperatuur is 35°C. Gebruik deze eenheid niet bij hogere
omgevingstemperaturen.
Zorg ervoor dat het gebied onder de installatieplaats tijdens het takelen, onttakelen en onderhoud vrij is
van ongewenste personen.
Ontkoppel altijd het apparaat wanneer het voor een langere tijd niet wordt gebruikt of alvorens het
onderhoud te beginnen.
Controleer of de beschikbare spanning niet hoger is dan aangegeven op het apparaat.
Het netsnoer moet altijd in perfecte staat zijn. Schakel het apparaat onmiddellijk uit als het netsnoer wordt
platgedrukt of beschadigd. Als het netsnoer beschadigd is, moet deze door de fabrikant, zijn
vertegenwoordiger, of door een vergelijkbaar bevoegde persoon worden vervangen, om een gevaar te
voorkomen.
Laat het netsnoer nooit met andere kabels in contact komen!
Om gevaar te voorkomen, mag het apparaat alleen met de meegeleverde AC-adapter worden gebruikt.
Als de AC-adapter is beschadigd, mag alleen een zelfde model adapter worden gebruikt.
Sluit het apparaat niet aan op een dimmerpack.
Gebruik bij het installeren van het apparaat altijd een geschikte en gecertificeerde veiligheidskabel.
Om elektrische schokken te voorkomen, open de afdekking niet. Er zijn geen door de gebruiker te
repareren onderdelen binnenin het apparaat aanwezig.
WAARSCHUWING: Om het risico op elektrocutie zoveel
mogelijk te vermijden mag u nooit de behuizing verwijderen. Er
bevinden zich geen onderdelen in het toestel die u zelf kan
herstellen. Laat de herstellingen enkel uitvoeren door een
bevoegde technicus.
De bliksempijl die zich in een gelijkbenige driehoek bevindt is bedoeld om u te wijzen op het
gebruik of de aanwezigheid van niet-geïsoleerde onderdelen met een “gevaarlijke spanning” in
het toestel die voldoende kracht heeft om een risico van elektrocutie in te houden.
Het uitroepteken binnen de gelijkbenige driehoek is bedoeld om de gebruiker erop te wijzen dat
er in de meegeleverde literatuur belangrijke gebruik en onderhoudsinstructies vermeld staan
betreffende dit onderdeel.
Dit symbool betekent: het apparaat mag enkel binnenhuis worden gebruikt.
Dit symbool betekent: Lees de handleiding!
Dit symbool betekent: Klasse II apparaten
Dit symbool bepaalt: de minimumafstand van te belichten voorwerpen. De minimumafstand
tussen projector en het verlichte voorwerp moet meer dan x meters zijn.
Het apparaat is niet geschikt voor directe montage op normaal brandbare oppervlakken. (Alleen
geschikt voor montage op niet-brandbare oppervlakken)
CAUTION: Niet naar de werken de lamp staren.
Kan gevaarlijk zijn voor de ogen.
Page 22

NEDERLANDS GEBRUIKSAANWIJZING
JB SYSTEMS® 20/44 LED MARVEL
In het geval van ernstige problemen, stop met het gebruik van de armatuur en neem onmiddellijk contact
op met uw dealer.
De behuizing en de lenzen moeten vervangen worden als ze zichtbaar beschadigd zijn.
Gebruik de originele verpakking als het toestel vervoerd moet worden.
Vanwege veiligheidsredenen is het verboden om ongeautoriseerde wijzigingen op het apparaat aan te
brengen.
Belangrijk: Kijk nooit rechtstreeks in de lichtbron! Gebruik het effect niet in de aanwezigheid van personen
die aan epilepsie lijden.
BESCHRIJVING + BEDIENING:
1. NIVEAU (DIMMER)-toets
2. MODUS-toets
3. PT/COL-toets
4. SNELHEID-toets
5. S2L (geluid-naar-licht)-LED
6. AAN/UIT-LED
7. Voet
8. DMX in/uit-aansluitingen
9. Voedingadapter in-/uitgang
10. Microfoon
Bij het kiezen van de gebruiker,
kan de eenheid in de zelfstandige
automatische modus of met vaste
kleuren werken, of het kan via de
meegeleverde IRafstandsbediening of externe
DMX-controllers worden bediend.
Dit hoofdstuk verwijst naar
zelfstandig gebruik en bediening met de IR-afstandsbediening. Zie hoofdstuk
“Synchronisatie en DMX-besturing” voor digitale afstandsbediening. Voor zelfstandig
gebruik, zorg ervoor dat GEEN KABEL op de “DMX IN”-aansluiting op de achterkant is
aangesloten.
De elementen van de gebruikersinterface bieden de volgende functies:
1. NIVEAU-toets
Door achtereenvolgens op deze toets op de hoofdeenheden zelf te drukken, staat
het de opeenvolgende keuze van 4 verschillende helderheidniveaus toe: 0%
(uit)/25/50/75/100%. Dezelfde niveaus zijn via de afstandsbediening beschikbaar;
maar de “NIVEAU omhoog/omlaag”-toetsen op de afstandsbediening staan alleen
toe om de niveaus 25/50/75/100% te kiezen, terwijl de blackout-functie (0%) direct
via de aan/uit-toets van de afstandsbediening beschikbaar is.
2. MODUS-toets
Door achtereenvolgens op deze toets op de hoofdeenheden zelf te drukken, staat het de opeenvolgende
keuze van 5 verschillende bedrijfsmodi toe:
CHASE: verschillende chase-patronen die met de “PT/COL”-toets kunnen worden geselecteerd –
meer details hieronder.
FADE: vervagen tussen de 6 panelen, verschillende patronen kunnen met de “PT/COL”-toets
worden geselecteerd – meer details hieronder.
MOOD: alle 6 panelen vervagen van de ene naar de andere kleur, andere kleurcycli kunnen met de
“PT/COL”-toets worden geselecteerd – meer details hieronder.
SCENE: alle 6 panelen tonen dezelfde kleur, 12 verschillende kleuren kunnen met de “PT/COL”-
toets worden geselecteerd – meer details hieronder.
FLASH (STROBE): verschillende patronen in wit RGB elk kunnen elk met de “PT/COL”-toets
worden geselecteerd – meer details hieronder.
Page 23

NEDERLANDS GEBRUIKSAANWIJZING
JB SYSTEMS® 21/44 LED MARVEL
Opmerking: wanneer u de IR-afstandsbediening gebruikt, kunnen de 5 modi rechtstreeks via de daartoe
aangewezen toetsen gekozen worden.
3. PT/COL-toets
Deze toets verandert – afhankelijk van de gekozen MODUS – de kleur of het patroon + kleur. De keuzes
in overeenstemming met de gekozen modus zijn:
In de CHASE-modus: 5 patroon voorinstellingen met wisselovergang in twee kleurcombinaties, elk kan
worden gekozen door achtereenvolgens op de “PT/COL”-toets op de eenheid zelf of de “PT/COL
omhoog/omlaag”-toetsen op de afstandsbediening te drukken:
Voorinstelling
Kleur 1
Kleur 2
Kleur 3
Patroon
01
Rood
Blauw
Groen
3C-16-Zip-updown
02
Roze
Turkoois
Limoen
3C-16-Zip-updown
03
Rood
Groen
Blauw
3C-22-Crossing
04
Roze
Turkoois
Limoen
3C-22-Crossing
05
Rood
Groen
Blauw
3C-22-ContractExpand
06
Roze
Turkoois
Limoen
3C-22-ContractExpand
07
Rood
Groen
Blauw
3C-22-PingPong
08
Roze
Turkoois
Limoen
3C-22-PingPong
09
Rood
Groen
Blauw
3C-33-Fork
10
Roze
Turkoois
Limoen
3C-33-Fork
11
Reeks
Reeks
Reeks
Patronen 1/3/5/7/9/2/4/6/8/10
In de FADE-modus: 5 patronen voorinstellingen met vervagingovergang in twee kleurcombinaties, elk
kan worden gekozen door achtereenvolgens op de “PT/COL”-toets op de eenheid zelf of de “PT/COL
omhoog/omlaag”-toetsen op de afstandsbediening te drukken:
Voorinstelling
Kleur 1
Kleur 2
Kleur 3
Patroon
01
Rood
Blauw
Groen
3C-16-Zip-updown
02
Roze
Turkoois
Limoen
3C-16-Zip-updown
03
Rood
Groen
Blauw
3C-22-Crossing
04
Roze
Turkoois
Limoen
3C-22-Crossing
05
Rood
Groen
Blauw
3C-22-ContractExpand
06
Roze
Turkoois
Limoen
3C-22-ContractExpand
07
Rood
Groen
Blauw
3C-22-PingPong
08
Roze
Turkoois
Limoen
3C-22-PingPong
09
Rood
Groen
Blauw
3C-33-Fork
10
Roze
Turkoois
Limoen
3C-33-Fork
11
Reeks
Reeks
Reeks
Patronen 1/3/5/7/9/2/4/6/8/10
In de MOOD-modus: 10 kleuren cycli voorinstellingen kunnen worden gekozen door achtereenvolgens
op de “PT/COL”-toets op de eenheid zelf of de “PT/COL omhoog/omlaag”-toetsen op de
afstandsbediening te drukken:
Voorinstelling
Kleur 1
Kleur 2
Kleur 3
Patroon
01
Rood
Blauw
-
2C_6Change
02
Roze
Limoen
-
2C_6Change
03
Groen
Rood
-
2C_6Change
04
Limoen
Turkoois
2C_6Change
05
Blauw
Groen
2C_6Change
06
Roze
Turkoois
2C_6Change
07
Rood
Blauw
Groen
3C_6Change
08
Rood
Groen
Blauw
3C_6Change
09
Rood
Blauw
Groen
2C_Burst
10
Roze
Turkoois
Limoen
2C_Burst
11
Willekeurig
Willekeurig
Willekeurig
Willekeurige rol
Opmerking: Anders dan in de CHASE- en FADE-modus, zijn in de MOOD-modus alle 6 segmenten
actief en geven dezelfde kleur in de eerste 8 voorinstellingen weer (gemengde kleur voorinstellingen
9/10/11).
Page 24

NEDERLANDS GEBRUIKSAANWIJZING
JB SYSTEMS® 22/44 LED MARVEL
In de SCENE-modus: 12 kleuren voorinstellingen kunnen worden gekozen door achtereenvolgens op de
“PT/COL”-toets op de eenheid zelf of de “PT/COL omhoog/omlaag”-toetsen op de afstandsbediening te
drukken:
Voorinstelling
Kleur
01
Rood
02
Groen
03
Blauw
04
Geel*
05
Roze*
06
Turkoois*
07
Limoen
08
Oranje
09
Marine
10
Kikker
11
Lavendel
12
Suikergoed
13
Wit (50% niveau)
Opmerking: Er is geen “kleur uit”-stand in de SCENE-modus.
In de FLASH (STROBE)-modus: 5 stroboscooppatronen voorinstellingen kunnen worden gekozen door
achtereenvolgens op de “PT/COL”-toets op de eenheid zelf of de “PT/COL omhoog/omlaag”-toetsen op
de afstandsbediening te drukken:
Voorinstelling
Naam
voorinstelling
Beschrijving
01
Strobe-All6RGB-SEQ
Alle 6 stroboscoopsegmenten wisselen met een 4flitscyclus in het rood, groen en blauw met 16 Hz
02
Strobe-All6PTL-SEQ
Alle 6 stroboscoopsegmenten wisselen met een 4flitscyclus in het roze, turkoois en limoen met 16 Hz
03
Strobe-222RGB-SEQ
Segmenten 1+4/2+5/3+6 flitsen opeenvolgend terwijl in
elke stap de momenteel actieve segmenten voor 4 flitsen
blijven knipperen voordat de volgende segmenten het
overnemen. De flitskleur doorloopt R/G/B
(rood/groen/blauw)
04
Strobe-222PTL-SEQ
Segmenten 1+4/2+5/3+6 flitsen opeenvolgend terwijl in
elke stap de momenteel actieve segmenten voor 4 flitsen
blijven knipperen voordat de volgende segmenten het
overnemen. De flash kleur doorloopt P/T/L
(roze/turkoois/limoen)
4. SNELHEID-toets
Door achtereenvolgens op deze toets op de hoofdeenheden zelf te drukken of door de “SNELHEID
omhoog/omlaag”-toetsen op de afstandsbediening te gebruiken, maakt het de sequentiële keuze van
diverse snelheidsinstellingen mogelijk, afhankelijk in welke modus de eenheid actief is:
In de CHASE-modus: 1 Hz/2 Hz/4 Hz vast/S2L (met LED indicatie)
In de FADE-modus: snelheid 0,25 Hz vast/0,5 Hz vast/1 Hz/2 Hz vast
In de MOOD-modus: snelheid 0,05 Hz vast/0,25 Hz vast/0,5 Hz vast/1 Hz vast
In de SCENE-modus: geen snelheidkeuze (deze knop is uitgeschakeld)
In de FLASH (STROBE)-modus: de flitssnelheid kan op 4 niveaus worden ingesteld.
Opmerking: de gekozen snelheidsinstelling zal voor elke modus worden opgeslagen, dus zodra naar de
modus wordt teruggegaan, zal de eerder gekozen snelheid worden herinnerd.
5. S2L (GELUID-NAAR-LICHT)-LED
In de chase-modus kunt u de SNELHEID-toets gebruiken om de verschillende snelheden te selecteren of
u kunt ervoor kiezen om de patronen op het ritme van de muziek uit te voeren, in deze laatste modus
brandt de GELUID-NAAR-LICHT-LED.
6. AAN/UIT-LED
Geeft aan of de LED Marvel op het lichtnet is aangesloten.
Page 25

NEDERLANDS GEBRUIKSAANWIJZING
JB SYSTEMS® 23/44 LED MARVEL
7. VOET
Wordt gebruikt om de LED Marvel op veel verschillende manieren te monteren: zie het hoofdstuk “HOE
TE MONTEREN” voor meer informatie.
8. DMX in/uit-aansluitingen
U kunt de LED Marvel zelfstandig of in master/slave gebruiken, of u kunt het met een externe DMXcontroller besturen. Zie het hoofdstuk “HOE AAN TE SLUITEN” voor meer informatie.
9. Voedingadapter in-/uitgang
Wordt gebruikt voor het aansluiten van de voedingsadapter, u kunt 1 extra LED Marvel op dezelfde
adapter aansluiten. Echter ondersteunt de meegeleverde adapter dit niet. Kortom, we raden aan om de
adapteruitgang NIET te gebruiken.
10. Microfoon
De interne microfoon registreert de muziek, zodat de chases op het ritme van de muziek kunnen draaien.
11. STANDBY (AAN/UIT)-toets:
Alleen beschikbaar op de afstandsbediening: hiermee stelt u de uitgang in de blackout-modus (uit) in. Dit
heeft hetzelfde effect als het instellen van het niveau (toets 1)
HOE TE MONTEREN
De LED Marvel kan op veel verschillende manieren worden gemonteerd, u kunt één van deze methoden
kiezen:
Tafelblad gebruik: Meestal voor gebruik bij “feesten”!
Monteer het meegeleverde statief op de schroefdraadaansluiting aan de
onderkant van het apparaat.
Plaats het apparaat op een veilige plek waar het door niemand kan worden
aangeraakt of eventueel voor iemand een oorzaak kan worden om over te
struikelen.
Indien noodzakelijk of mogelijk, bevestig het statief met drie schroeven (niet
meegeleverd) tegen het steunvlak.
Zorg ervoor dat de locatie en plek zich op een veilige afstand uit het zichtveld
van de toeschouwer bevindt.
Voor een juiste geluid-naar-licht-werking, laat de achterzijde van het apparaat
vrij.
Kies een hoek die een veilige stand biedt, zodat de eenheid niet per ongeluk kan
omvallen. Zorg ervoor dat de twee langere poten van het statief naar de
achterkant van de eenheid wijzen.
Sluit de voeding aan en plaats de voeding op een locatie waar niemand per
ongeluk over de voeding of de kabel kan struikelen.
Zorg ervoor dat u aan de koelbehoefte van de gebruikte voeding voldoet, indien aanwezig.
Wandgemonteerd gebruik: Wordt meestal gebruikt om een muur te
kleuren terwijl het tegen die muur is gemonteerd, zie de tekeningen A
& B.
Monteer het meegeleverde statief op de schroefdraadaansluiting
aan de achterkant van het apparaat.
Plaats het apparaat op een veilige plek waar het door niemand kan
worden aangeraakt of eventueel voor iemand een oorzaak kan
worden om over te struikelen of haar/zijn hoofd er tegen kan stoten.
Bevestig het statief met drie schroeven (niet meegeleverd) tegen het
steunvlak. Zorg ervoor dat het steunvlak het gewicht van de eenheid
veilig kan dragen, wat kan worden aangenomen wanneer het vlak
10 keer het gewicht van de eenheid als een puntbelasting kan
dragen.
Zorg ervoor dat de locatie en plek zich op een veilige afstand uit het
zichtveld van de toeschouwer bevindt.
Voor een juiste geluid-naar-licht-werking, laat de achterzijde van het
Page 26

NEDERLANDS GEBRUIKSAANWIJZING
JB SYSTEMS® 24/44 LED MARVEL
apparaat vrij.
Sluit de voeding aan en plaats de voeding op een locatie waar niemand per ongeluk over de voeding of de
kabel kan struikelen.
Zorg ervoor dat u aan de koelbehoefte van de gebruikte voeding voldoet, indien aanwezig.
Vloergemonteerd gebruik: Wordt meestal gebruikt om
een muur te kleuren terwijl het op de vloer staat of tegen
het plafond hangt, zie de tekeningen C & D
Monteer het meegeleverde statief op de
schroefdraadaansluiting aan de achterkant van het
apparaat.
Plaats het apparaat op een veilige plek waar het door
niemand kan worden aangeraakt of eventueel voor
iemand een oorzaak kan worden om over te
struikelen.
Indien noodzakelijk of mogelijk, bevestig het statief
met drie schroeven (niet meegeleverd) tegen het
steunvlak.
Zorg ervoor dat de locatie en plek zich op een veilige
afstand uit het zichtveld van de toeschouwer bevindt.
Voor een juiste geluid-naar-licht-werking, laat de
achterzijde van het apparaat vrij.
Kies een hoek die een veilige stand biedt, zodat de eenheid niet per ongeluk kan omvallen.
Sluit de voeding aan en plaats de voeding op een locatie waar niemand per ongeluk over de voeding of de
kabel kan struikelen.
Zorg ervoor dat u aan de koelbehoefte van de gebruikte voeding voldoet, indien aanwezig.
HOE AAN TE SLUITEN
Zelfstandig gebruik:
Sluit gewoon de meegeleverde voedingsadapter aan op de DC IN-aansluiting (9) op de achterkant van de
eenheid.
Voordat u de IR-afstandsbediening gebruikt moet u de beschermende plastic hoes uit het
batterijcompartiment verwijderen.
Elektrische installatie voor twee of meer apparaten in master/slave- of DMX-modus:
De LED Marvel is met een interfaceaansluiting voor digitale besturing uitgerust waarmee verschillende
eenheden kunnen worden gesynchroniseerd. Omdat deze interfaceaansluiting voor digitale besturing
gebaseerd is op het DMX512-protocol, kan het ook worden gebruikt om op afstand één of een keten van
LED Marvels te bedienen door middel van een externe DMX-512-controller. Omwille van de ruimte, gebruikt
de besturingsinterface echter een 3,5 mm busaansluiting (in plaats van de vaak gebruikte XLR-type), wat
inhoudt dat de externe DMX-controller een op maat gemaakte XLR-naar-3,5bus-kabel (niet meegeleverd)
vereist. Een verdere beperking is dat het DMX-startadres op de LED Marvel niet kan worden ingesteld en op
001 vast ingesteld is. De koppeling tussen de twee eenheden voor synchronisatie vereist een normale 3,5
mm stereo stekker/stekker-kabel (niet meegeleverd). Het laatste apparaat in een keten moet met een juiste
120 Ω beëindiging op een 3,5 mm stereo busstekker zijn uitgerust, zoals afgebeeld in onderstaande
tekening.
Page 27

NEDERLANDS GEBRUIKSAANWIJZING
JB SYSTEMS® 25/44 LED MARVEL
Kabelaansluitingen voor Master/Slave:
U kunt verschillende eenheden samen aansluiten met
behulp van een optionele goede kwaliteitskabel met een
3,5 mm stereostekker aan beide zijden.
Het eerste apparaat in de keten zal de master zijn: op
deze eenheid moet u op de toetsen drukken of de IRafstandsbediening gebruiken.
Als u lange kabels gebruikt kan de werking van de
slaves onbetrouwbaar worden. In dat geval moet u de
120 Ω beëindiging (zie vorige pagina) gebruiken op de
DMX-uitgang van de laatste eenheid in de lijn.
Kabelaansluitingen voor DMX-bediening:
U kunt verschillende eenheden aansluiten op de uitgang
van elke DMX-controller met een optionele goede
kwaliteit conversiekabel met een 3,5 mm stereostekker
aan de ene kant en de XLR-connector aan de andere
kant. (zie vorige pagina)
Houd in gedachten dat u het startadres van de
eenheden niet kunt kiezen: het startadres is altijd 001!
Als u lange kabels gebruikt kan de werking van de
slaves onbetrouwbaar worden. In dat geval moet u de
120 Ω beëindiging (zie vorige pagina) gebruiken op de
DMX-uitgang van de laatste eenheid in de lijn.
Tijdens het gebruik van een externe DMX-controller kan de 21 kanalen DMX-grafiek worden gebruikt:
De kanalen 1 tot en met 18 kunnen worden gebruikt om individueel de rode, groene en blauwe kleuren
voor de 6 panelen te besturen, zie de grafiek voor de exacte informatie.
Kanaal 19 is de hoofddimmer voor de 6 panelen, zie de grafiek voor de exacte informatie.
Kanaal 20 kan worden gebruikt om interne patronen te onthouden, boven DMX-waarde 247 worden de
kanalen 1 tot en met 19 actief.
Kanaal 21 wordt gebruikt om de snelheid van de interne patronen in te stellen.
DMX-kanaal
Waardebereik
FUNCTIE
CH1
000-255
Paneel 1 (van boven) R-niveau – alleen actief als CH20 > 248
CH2
000-255
Paneel 1 (van boven) G-niveau – alleen actief als CH20 > 248
CH3
000-255
Paneel 1 (van boven) B-niveau – alleen actief als CH20 > 248
CH4
000-255
Paneel 2 (van boven) R-niveau – alleen actief als CH20 > 248
CH5
000-255
Paneel 2 (van boven) G-niveau – alleen actief als CH20 > 248
CH6
000-255
Paneel 2 (van boven) B-niveau – alleen actief als CH20 > 248
CH7
000-255
Paneel 3 (van boven) R-niveau – alleen actief als CH20 > 248
CH8
000-255
Paneel 3 (van boven) G-niveau – alleen actief als CH20 > 248
CH9
000-255
Paneel 3 (van boven) B-niveau – alleen actief als CH20 > 248
CH10
000-255
Paneel 4 (van boven) R-niveau – alleen actief als CH20 > 248
CH11
000-255
Paneel 4 (van boven) G-niveau – alleen actief als CH20 > 248
CH12
000-255
Paneel 4 (van boven) B-niveau – alleen actief als CH20 > 248
CH13
000-255
Paneel 5 (van boven) R-niveau – alleen actief als CH20 > 248
CH14
000-255
Paneel 5 (van boven) G-niveau – alleen actief als CH20 > 248
CH15
000-255
Paneel 5 (van boven) B-niveau – alleen actief als CH20 > 248
CH16
000-255
Paneel 6 (van boven) R-niveau – alleen actief als CH20 > 248
CH17
000-255
Paneel 6 (van boven) G-niveau – alleen actief als CH20 > 248
CH18
000-255
Paneel 6 (van boven) B-niveau – alleen actief als CH20 > 248
CH19
000-255
Hoofddimmer CH1-CH18 – slechts actief als CH20 > 248
CH20
000-247
Voorinstelling afspeelmodus; waardewijzigingen voorinstellingen
248-255
DMX-besturingsmodus, schakelt CH1-CH19 in
CH21
000-255
Voorinstelling afspeelsnelheidsinstelling – alleen actief als CH20 > 247
Page 28

NEDERLANDS GEBRUIKSAANWIJZING
JB SYSTEMS® 26/44 LED MARVEL
ONDERHOUD
Dit apparaat heeft geen regelmatig onderhoud nodig. Het wordt beschermd door een interne zekering te
vinden op de printplaat van de voeding. Als deze zekering faalt, duidt dit meestal op een interne fout
waarvoor onderhoud door een gekwalificeerde technicus is vereist. De zekering mag alleen worden
vervangen door een zekering met dezelfde specificatie, en de vervanging moet door gekwalificeerd
personeel in overeenstemming met de veiligheidsvoorschriften worden uitgevoerd.
SPECIFICATIES
Energievoorziening: 12 VDC/1 A
Voedingsadaptor: AC 90 ~ 250 V, 50/60 Hz tot 12 VDC/1 A
Energieverbruik: max. 12 Watt
Geluidbesturing: Ingebouwde microfoon
DMX-aansluitingen: 3,5 mm stereostekker, vrouwelijk
Gebruikte DMX-kanalen: 21 kanalen
LED's: 216 stuks (72R + 72GR + 72BL)
Afmetingen: zie tekening
Gewicht: 0,48 kg
De informatie kan zonder voorafgaande kennisgeving worden gewijzigd
U kunt de nieuwste versie van deze handleiding van onze website downloaden: www.beglec.com
Page 29

DEUTSCH BEDIENUNGSANLEITUNG
JB SYSTEMS® 27/44 LED MARVEL
BEDIENUNGSANLEITUNG
Vielen Dank, dass Sie sich für dieses Produkt von JB Systems® entschieden haben. Bitte lesen Sie bitte
diese Bedienungshinweise sorgfältig vor der Inbetriebnahme durch, um alle Möglichkeiten des Geräts voll zu
nutzen sowie zu Ihrer eigenen Sicherheit.
EIGENSCHAFTEN
Dieses Gerät ist entstört. Das Gerät entspricht den aktuellen europäischen Anforderungen und nationalen
Richtlinien. Die Konformität wurde nachgewiesen und die entsprechenden Erklärungen und Unterlagen
liegen beim Hersteller vor.
Dieses Gerät wird zur Erzeugung von dekorativen Beleuchtungseffekten in Lichtshows eingesetzt.
Dank seines sehr schönen und eleganten Designs passt dieser LED-Projektor zu jedem Interieur
(Wohnzimmer, Schlafzimmer, Bar, Lounge, Restaurant...)
Außerdem ist er auch ein Musterbeispiel für die Multifunktionalität:
Kann als mit dem Klang aktiviertes "Partylicht" (interne Programme und Leitungskanäle) verwendet
werden.
Gestalter der perfekten "Atmosphäre" (langsam verändernde Farbe verblasst)
Ein kleiner, aber effektiver Wandstrahler (streichen Sie ihre Wände!)
Mehrere Geräte können durch einen DMX-Controller für synchronisierten Betrieb gesteuert werden.
Sie enthält 6 einzeln steuerbare LED-Panels für eine maximale Vielfalt und Auswirkung der Effekte.
Insgesamt 216 LEDs (72 rot + 72 grün + 72 blau) garantieren eine exzellente Lichtleistung und gute
Farbmischung.
Statische oder musikgesteuerte Programme (internes Mikrofon) mit verschiedenen Modi
Ein Gerät kann in Einzelgeräten oder mehreren Geräten verwendet werden und zusammen an den Master
/ Slave angeschlossen werden, um wundervoll synchronisierte Effekte zu erzielen!
IR-Fernbedienung enthalten
DMX-Steuerung möglich: 21 Kanäle für die volle RGB-Steuerung + Leitungskanal-Vorgaben mit
einstellbarer Geschwindigkeit.
Multifunktionale Basis:
Setzen Sie sie einfach auf einen Tisch oder horizontale Fläche
Befestigen Sie es an eine Wand und richten Sie das Gerät in irgendeine Richtung
Leistungsaufnahme 12Vdc, ein separater Niederspannungs-Adapter enthalten
VOR DER ERSTBENUTZUNG
Vor der Erstbenutzung bitte das Gerät zuerst auf Transportschäden überprüfen. Sollte das Gerät einen
Schaden aufweisen, benutzen Sie es nicht, sondern wenden Sie sich unverzüglich an Ihren Händler.
Wichtiger Hinweis: Dieses Gerät hat das Werk unbeschädigt und gut verpackt verlassen. Es ist wichtig,
dass der Benutzer sich streng an die Sicherheitshinweise und Warnungen in der Bedienungsanleitung
hält. Schäden durch unsachgemäße Handhabung sind von der Garantie ausgeschlossen. Der Händler
übernimmt keine Verantwortung für Schäden, die durch Nichtbeachtung der Bedienungsanleitung
hervorgerufen wurden.
Die Bedienungsanleitung zum zukünftigen Nachschlagen bitte an einem sicheren Ort aufbewahren. Bei
Verkauf oder sonstiger Weitergabe des Geräts bitte die Bedienungsanleitung beifügen.
Packungsinhalt prüfen:
Bitte überprüfen Sie, ob die Verpackung folgende Artikel enthält:
Bedienungsanleitung
LED MARVEL
Dreibeinstativ
Externe 12V Spannungsversorgung
Infrarote (IR) Fernbedienung
Page 30

DEUTSCH BEDIENUNGSANLEITUNG
JB SYSTEMS® 28/44 LED MARVEL
SICHERHEITSHINWEISE
Aus Umweltschutzgründen Verpackung bitte wiederverwenden oder richtig trennen.
Zur Vermeidung von Feuer und Stromschlag Gerät weder Regen noch Feuchtigkeit aussetzen.
Zur Vermeidung von Kondensation im Inneren des Geräts bitte nach dem Transport in eine warme
Umgebung einige Zeit zum Temperaturausgleich ausgeschaltet stehen lassen. Kondensation kann zu
Leistungsverlust des Geräts oder gar Beschädigung führen.
Nur für den Einsatz im Innenbereich.
Keine Metallgegenstände oder Flüssigkeiten ins Innere des Geräts gelangen lassen. Ein Kurzschluss oder
eine Fehlfunktion können die Folge sein. Falls es doch einmal vorkommen sollte, bitte sofort den
Netzstecker ziehen und vom Stromkreis trennen.
Das Gerät nur an einem gut belüfteten Ort und entfernt von entflammbaren Materialien oder Flüssigkeiten
aufstellen.
Die Ventilationsöffnungen nicht abdecken, da Überhitzungsgefahr.
Nicht in staubiger Umgebung verwenden und regelmäßig reinigen.
Für Kinder unerreichbar aufbewahren.
Unerfahrene Personen dürfen das Gerät nicht bedienen.
Umgebungstemperatur darf 35°C nicht überschreiten. Das Gerät bei höheren Raumtemperaturen nicht
verwenden.
Stellen Sie sicher, dass sich während des Auf- oder Abbaus und der Wartung keine unbefugten Personen
unterhalb des Geräts befinden.
Stets den Netzstecker ziehen, wenn das Gerät für einen längeren Zeitraum nicht genutzt oder es gewartet
wird.
Stellen Sie sicher, dass Netzspannung mit Geräteaufkleber übereinstimmt.
Das Gerät nicht mit einem beschädigten Netzkabel in Betrieb nehmen. Wenn das Netzkabel quetscht oder
beschädigt wurde, schalten Sie das Gerät sofort aus. Im Falle von Beschädigungen muss das Netzkabel
vom Hersteller, einem autorisierten Kundendienstmitarbeiter oder einer ähnlich qualifizierten Person
ersetzt werden, um Gefährdungen zu vermeiden.
Lassen Sie das Netzkabel niemals mit anderen Kabeln in Berührung kommen!
Benutzen Sie nur das mitgelieferte Netzteil. Ein beschädigtes Netzteil muss durch ein Netzteil mit gleichen
Spezifikationen ausgetauscht werden.
Das Gerät nicht an einen Dimmer anschließen.
Ausschließlich vorschriftsmäßige Kabel zur Installation verwenden.
Zur Vorbeugung gegen elektrische Schläge keine Abdeckungen entfernen. Im Geräteinneren befinden
sich keine zu wartenden Teile.
Bei Fehlfunktion das Gerät nicht benutzen und sich mit dem Händler in Verbindung setzen.
ACHTUNG: Um sich nicht der Gefahr eines elektrischen
Schlags auszusetzen, entfernen Sie keines der Gehäuseteile.
Im Geräteinneren befinden sich keine vom Benutzer
reparierbaren Teile. Überlassen Sie Reparaturen dem
qualifizierten Kundendienst.
Das Blitzsymbol im Dreieck weist den Benutzer darauf hin, dass eine Berührungsgefahr mit
nicht isolierten Teilen im Geräteinneren, die eine gefährliche Spannung führen, besteht. Die
Spannung ist so hoch, das hier die Gefahr eines elektrischen Schlages besteht.
Das Ausrufezeichen im Dreieck weist den Benutzer auf wichtige Bedienungs- und
Wartungshinweise in den Dokumenten hin, die dem Gerät beiliegen.
Dieses Symbol bedeutet: Nur innerhalb von Räumen verwenden.
Dieses Symbol bedeutet: Achtung! Bedienungsanleitung lesen!
Dieses Symbol bedeutet: Klasse II Klassifizierung
Dieses Symbol gibt an: der minimale Abstand von beleuchteten Gegenständen. Der minimale
Abstand zwischen Projektor und dem belichteten Gegenstand muss mehr als x Meter betragen.
Das Gerät eignet sich nicht für die direkte Montage auf normal entflammbaren Oberflächen.
(Geeignet nur für die Montage auf nicht brennbaren Oberflächen)
VORSICHT: Nicht in den LED-Lichtstrahl blinken.
Kann schädlich für die Augen sein.
Page 31

DEUTSCH BEDIENUNGSANLEITUNG
JB SYSTEMS® 29/44 LED MARVEL
Bei sichtbaren Beschädigungen müssen Gehäuse und Optik ersetzt werden.
Bei Transport bitte die Originalverpackung verwenden, um Schäden am Gerät zu vermeiden.
Aus Sicherheitsgründen dürfen an dem Gerät keine unbefugten Veränderungen vorgenommen werden.
Wichtiger Hinweis: Nicht direkt in die Lichtquelle blicken! Das Gerät nicht verwenden, wenn sich Personen
im Raum befinden, die unter Epilepsie leiden.
BESCHREIBUNG + BETRIEB:
1. LEVEL (DIMMER)-Taste
2. MODE-Taste
3. PT / COL-Taste
4. SPEED-Taste
5. S2L (Sound-to-Light)-LED
6. EIN / AUS-Anzeige
7. Basis
8. DMX ein / aus-Anschlüsse
9. Netzteil ein / aus
10. Mikrofon
Nach Wahl des Benutzers kann
das Gerät im einzelnen
Automatikbetrieb oder mit festen
Farben arbeiten, oder es kann
mit der mitgelieferten IRFernbedienung oder dem
externen DMX-Controller
gesteuert werden.
Dieses Kapitel bezieht sich auf den Einzelbetrieb und den Betrieb mit der IRFernbedienung. Siehe Kapitel "Synchronisation und DMX-Steuerung" für digitale
Fernbedienung. Für den Einzelbetrieb stellen Sie sicher, dass KEIN KABEL in die
hintere “DMX IN”-Buchse gesteckt wird.
Die Elemente der Benutzeroberfläche bieten die folgenden Funktionen:
1. LEVEL-Taste
Durch Drücken dieser Taste nacheinander auf den wichtigsten Geräten, ermöglicht
es die sequenzielle Auswahl aus 4 verschiedenen Helligkeitsstufen: 0% (aus) / 25 /
50 / 75 / 100%. Die gleichen Stufen stehen mit der Fernbedienung zur Verfügung,
aber die LEVEL auf / ab-Tasten auf der Fernbedienung erlauben nur die Auswahl
der Stufen 25/50/75/100%, während die Blackout-Funktion (0%) direkt per ein / ausTaste der Fernbedienung zur Verfügung steht.
2. MODE-Taste
Durch Drücken dieser Taste nacheinander auf den wichtigsten Geräten, ermöglicht es die sequentielle
Auswahl aus 5 verschiedenen Betriebsarten:
CHASE: verschiedene Lichtmuster, die mit der PT / COL-Taste gewählt werden können – siehe
weitere Informationen unten.
FADE: Abnutzung zwischen den 6 Panels, verschiedene Muster können mit dem PT / COL-Taste
gewählt werden – siehe weitere Informationen unten.
MOOD: alle 6 Panels verblassen von einer Farbe zur anderen, Farbzyklen können mit der PT / COL-
Taste gewählt werden – siehe weitere Informationen unten.
SCENE: alle 6 Panels zeigen die gleiche Farbe, 12 verschiedene Farben können mit der PT / COL-
Taste gewählt werden – siehe weitere Informationen unten.
FLASH (STROBE): verschiedene Muster im weißen RGB können jeweils mit der PT / COL-Taste
gewählt werden – siehe weitere Informationen unten.
Hinweis: bei Verwendung der IR-Fernbedienung können die 5 Modi direkt mit bestimmten Tasten
gewählt werden.
Page 32

DEUTSCH BEDIENUNGSANLEITUNG
JB SYSTEMS® 30/44 LED MARVEL
3. PT / COL-Taste
Diese Taste ändert - abhängig von dem gewählten MODUS - entweder die Farbe oder das Muster +
Farbe. Die Auswahlmöglichkeiten in Übereinstimmung mit dem gewählten Modus sind:
Im CHASE-Modus: 5 Mustervorgaben mit dem Schaltübergang in zwei Farbkombinationen, die jeweils
durch fortlaufendes Drücken der PT / COL-Taste auf dem Gerät selbst oder der PT / COL auf / ab-Tasten
auf der Fernbedienung ausgewählt werden können:
Vorgabe
Farbe 1
Farbe 2
Farbe 3
Muster
01
Rot
Blau
Grün
3C-16-Zip-AufAb
02
Rosa
Türkis
Kalkfarbe
3C-16-Zip-AufAb
03
Rot
Grün
Blau
3C-22-Kreuzung
04
Rosa
Türkis
Kalkfarbe
3C-22-Kreuzung
05
Rot
Grün
Blau
3C-22-Vertragserweiterung
06
Rosa
Türkis
Kalkfarbe
3C-22-Vertragserweiterung
07
Rot
Grün
Blau
3C-22-PingPong
08
Rosa
Türkis
Kalkfarbe
3C-22-PingPong
09
Rot
Grün
Blau
3C-33-Abzweigung
10
Rosa
Türkis
Kalkfarbe
3C-33-Abzweigung
11
Sequenz
Sequenz
Sequenz
Muster 1 / 3 / 5 / 7 / 9 / 2 / 4 / 6 / 8 / 10
Im FADE-Modus: 5 Mustervorgaben mit dem Überblendungsübergang in zwei Farbkombinationen, die
jeweils durch fortlaufendes Drücken der PT / COL-Taste auf dem Gerät selbst oder der PT / COL auf /
ab-Tasten auf der Fernbedienung ausgewählt werden können:
Vorgabe
Farbe 1
Farbe 2
Farbe 3
Muster
01
Rot
Blau
Grün
3C-16-Zip-AufAb
02
Rosa
Türkis
Kalkfarbe
3C-16-Zip-AufAb
03
Rot
Grün
Blau
3C-22-Abzweigung
04
Rosa
Türkis
Kalkfarbe
3C-22-Abzweigung
05
Rot
Grün
Blau
3C-22-Vertragserweiterung
06
Rosa
Türkis
Kalkfarbe
3C-22-Vertragserweiterung
07
Rot
Grün
Blau
3C-22-PingPong
08
Rosa
Türkis
Kalkfarbe
3C-22-PingPong
09
Rot
Grün
Blau
3C-33-Abzweigung
10
Rosa
Türkis
Kalkfarbe
3C-33-Abzweigung
11
Sequenz
Sequenz
Sequenz
Muster 1 / 3 / 5 / 7 / 9 / 2 / 4 / 6 / 8 / 10
Im MOOD-Modus: 10 Farbzyklus-Vorgaben können jeweils durch fortlaufendes Drücken der PT / COLTaste auf dem Gerät selbst oder der PT / COL auf / ab-Tasten auf der Fernbedienung ausgewählt
werden:
Vorgabe
Farbe 1
Farbe 2
Farbe 3
Muster
01
Rot
Blau
-
2C_6Wechseln
02
Rosa
Kalkfarbe
-
2C_6Wechseln
03
Grün
Rot - 2C_6Wechseln
04
Kalkfarbe
Türkis
2C_6Wechseln
05
Blau
Grün
2C_6Wechseln
06
Rosa
Türkis
2C_6Wechseln
07
Rot
Blau
Grün
3C_6Wechseln
08
Rot
Grün
Blau
3C_6Wechseln
09
Rot
Blau
Grün
2C_Kennung
10
Rosa
Türkis
Kalkfarbe
2C_Kennung
11
Zufall
Zufall
Zufall
Zufällige Rolle
Hinweis: Anders als im CHASE und FADE-Modus, sind alle 6 Segmente im MOOD-Modus aktiv, und sie
zeigen die gleiche Farbe in den ersten 8 Vorgaben (Mischfarbe Vorgaben 9 / 10 / 11).
Im SCENE-Modus: 12 Farbvorgaben können jeweils durch fortlaufendes Drücken der PT / COL-Taste
auf dem Gerät selbst oder der PT / COL auf / ab-Tasten auf der Fernbedienung ausgewählt werden:
Vorgabe
Farbe
01
Rot
02
Grün
Page 33

DEUTSCH BEDIENUNGSANLEITUNG
JB SYSTEMS® 31/44 LED MARVEL
03
Blau
04
Gelb*
05
Rosa*
06
Türkis*
07
Kalkfarbe
08
Orange
09
Marine
10
Frosch
11
Lavendel
12
Kandis
13
Weiß (50% Level)
Hinweis: es gibt keine "Farbe aus"-Status im SCENE-Modus.
Im FLASH (STROBE)-Modus: 5 Stroboskop-Mustervorgaben können jeweils durch fortlaufendes
Drücken der PT / COL-Taste auf dem Gerät selbst oder der PT / COL auf / ab-Tasten auf der
Fernbedienung ausgewählt werden:
Vorgabe
Vorgabe Name
Beschreibung
01
StroboskopAll6-RGB-SEQ
Alle 6 Segmente des abwechselnden Stroboskops mit einem
4-Flash-Zyklus in rot, grün, blau mit 16 Hz
02
StroboskopAll6-PTL-SEQ
Alle 6 Segmente des abwechselnden Stroboskops mit einem
4-Flash-Zyklus in rosa, Türkis, Kalkfarbe mit 16 Hz
03
Stroboskop222-RGB-SEQ
Segmente 1 +4 / 2 +5 / 3 +6 Flash fortlaufend, während bei
jedem Schritt die aktuell aktiven Segmente für 4 Flashes
regelmäßig wiederholt werden, bevor die nächsten
Segmente übernommen werden. Die Flash-Farbe läuft durch
R / G / B.
04
Stroboskop222-PTL-SEQ
Segmente 1 +4 / 2 +5 / 3 +6 Flash fortlaufend, während bei
jedem Schritt die aktuell aktiven Segmente für 4 Flashes
regelmäßig wiederholt werden, bevor die nächsten
Segmente übernommen werden. Die Flash-Farbe läuft durch
R / G / B. P / T / L
4. SPEED-Taste
Durch fortlaufendes Drücken dieser Taste auf die wichtigsten Geräte oder mit Hilfe der SPEED auf / abTasten auf der Fernbedienung, ermöglicht es die sequentielle Auswahl der verschiedenen
Geschwindigkeiten, je nachdem in welchem MODUS das Gerät funktioniert:
Im CHASE-Modus: 1Hz / 2Hz / 4Hz fest / S2L (mit LED-Anzeige)
Im FADE-Modus: Geschwindigkeit 0,25Hz fest / 0,5Hz fest / 1Hz / 2Hz fest
Im MOOD-Modus:Geschwindigkeit 0,05Hz fest / 0,25Hz fest / 0,5Hz fest / 1Hz fest
Im SCENE-Modus: keine Geschwindigkeitswahl (diese Taste ist deaktiviert)
Im FLASH (STROBE)-Modus: die Strobe-Geschwindigkeit kann in 4 Stufen eingestellt werden.
Hinweis: Die gewählten Geschwindigkeitseinstellungen werden für jeden Modus gespeichert; sobald Sie
zum Modus zurückkehren, wird die zuvor gewählte Geschwindigkeit aufgerufen.
5. S2L (SOUND-TO-LIGHT)-Anzeige
In Chase-Modus können Sie mit der SPEED-Taste verschiedene Geschwindigkeiten wählen oder Sie
können wählen, die Muster im Rhythmus der Musik laufen zu lassen; in diesem letzten Modus leuchtet
die SOUND TO LIGHT-Anzeige.
6. EIN / AUS-Anzeige
Sie zeigt an, ob die LED Marvel an das Stromnetz angeschlossen ist oder nicht.
7. BASIS
Sie wird verwendet, um die LED Marvel auf viele verschiedene Arten zu montieren: siehe Kapitel
"Installation" für weitere Informationen.
8. DMX ein / aus-Anschlüsse
Sie können die LED Marvel selbständig, im Master / Slave verwenden oder Sie können sie mit einem
externen DMX-Controller steuern. Bitte überprüfen Sie das Kapitel "Wie kann man anschließen" für
weitere Informationen.
Page 34

DEUTSCH BEDIENUNGSANLEITUNG
JB SYSTEMS® 32/44 LED MARVEL
9. Netzteil ein / aus
Es wird verwendet, um das Netzteil anzuschließen; Sie können 1 LED Marvel mehr an das gleiche
Netzteil anschließen. Doch das mitgelieferte Netzteil unterstützt dies nicht. Kurz gesagt, wir schlagen vor,
den Netzteil-Ausgang NICHT zu verwenden.
10. Mikrofon
Das interne Mikrofon nimmt die Musik, so dass das Licht in dem Rhythmus der Musik ausgeführt werden
kann
11. STANDBY (EIN / AUS)-Taste
Sie ist nur auf der Fernbedienung verfügbar: setzt den Ausgang in den Blackout-Modus (aus). Dies hat
den gleichen Effekt wie die Höheneinstellung (Taste 1)
WIE KANN MAN INSTALLIEREN
Die LED Marvel können auf viele verschiedene Arten montiert werden, Sie können eine der folgenden
Methoden wählen:
Tischplattenbetrieb: Vor allem für "Party" Gebrauch!
Montieren Sie das mitgelieferte Stativ auf den Gewindeeinsatz-Boden des
Hauptgerätes.
Stellen Sie das Gerät in eine sichere Position, wo es weder von niemandem
berührt werden kann oder möglicherweise kein Gegenstand zum Stolpern
werden kann.
Falls es erforderlich oder möglich ist, fixieren Sie das Stativ mit drei Schrauben
(nicht enthalten) auf die Auflagefläche.
Achten Sie darauf, dass die Lage und Position bzw. sichere Entfernung vom
direkten Sehvermögen eines Zuschauers gesichert wird.
Für die richtige Sound-to-Light-Funktion, lassen Sie die Rückseite des Gerätes
ungehindert sein.
Wählen Sie einen Winkel, der sicheren Stand bietet, so dass das Gerät nicht
versehentlich umgedreht wird. Stellen Sie sicher, dass die zwei längeren
Stativbeine direkt auf der Rückseite des Gerätes sind.
Schließen Sie das Netzteil an und legen Sie die Stromversorgung an einem Ort,
wo niemand versehentlich über das Netzteil oder das Kabel stolpern kann.
Achten Sie darauf, den Kühlbedarf des verwendeten Netzteils, wenn es vorhanden ist, zu erfüllen.
Wandbetrieb Er wird meist verwendet, um eine Wand zu färben, während er an der Wand montiert ist, siehe
die Zeichnungen A und B.
Montieren Sie das mitgelieferte Stativ auf Gewindeeinsatz-Rückseite
des Hauptgerätes.
Stellen Sie das Gerät in eine sichere Position, wo es weder von
niemandem berührt werden kann oder möglicherweise kein
Gegenstand zum Stolpern werden kann, und wo niemand seinen /
ihren Kopf auf es stoßen kann.
Befestigen Sie das Stativ mit drei Schrauben (nicht enthalten) auf die
Auflagefläche. Stellen Sie sicher, dass die Stützfläche das Gewicht
des Gerätes sicher tragen kann, das vorausgesetzt wird, wenn die
Oberfläche 10 Mal das Gewicht des Gerätes als eine Punktlast
tragen kann.
Achten Sie darauf, dass die Lage und Position bzw. sichere
Entfernung vom direkten Sehvermögen eines Zuschauers gesichert
wird.
Für die richtige Sound-to-Light-Funktion, lassen Sie die Rückseite
des Gerätes ungehindert sein.
Schließen Sie das Netzteil an und legen Sie die Stromversorgung an einem Ort, wo niemand
versehentlich über das Netzteil oder das Kabel stolpern kann.
Achten Sie darauf, den Kühlbedarf des verwendeten Netzteils, wenn es vorhanden ist, zu erfüllen.
Page 35

DEUTSCH BEDIENUNGSANLEITUNG
JB SYSTEMS® 33/44 LED MARVEL
Aufgeständerter Betrieb: Er wird meist verwendet, um eine Wand zu färben, während er auf dem Boden
steht oder hängend an der Decke hängt, siehe die Zeichnungen C und D.
Montieren Sie das mitgelieferte Stativ auf
Gewindeeinsatz-Rückseite des Hauptgerätes.
Stellen Sie das Gerät in eine sichere Position, wo es
weder von niemandem berührt werden kann oder
möglicherweise kein Gegenstand zum Stolpern
werden kann.
Falls es erforderlich oder möglich ist, fixieren Sie das
Stativ mit drei Schrauben (nicht enthalten) auf die
Auflagefläche.
Achten Sie darauf, dass die Lage und Position bzw.
sichere Entfernung vom direkten Sehvermögen eines
Zuschauers gesichert wird.
Für die richtige Sound-to-Light-Funktion, lassen Sie
die Rückseite des Gerätes ungehindert sein.
Wählen Sie einen Winkel, der sicheren Stand bietet,
so dass das Gerät nicht versehentlich umgedreht
wird
Schließen Sie das Netzteil an und legen Sie die Stromversorgung an einem Ort, wo niemand
versehentlich über das Netzteil oder das Kabel stolpern kann.
Achten Sie darauf, den Kühlbedarf des verwendeten Netzteils, wenn es vorhanden ist, zu erfüllen.
WIE KANN MAN ANSCHLIEßEN
Die selbständige Verwendung:
Schließen Sie einfach das mitgelieferte Netzteil an den DC ein (9)-Anschluss auf der Rückseite des Gerätes
an. Bevor Sie die IR-Fernbedienung verwenden, sollen Sie die schützende Plastikhülle aus dem Batteriefach
entfernen.
Elektrische Installation für zwei oder mehrere Geräte im Master / Slave- oder DMX-Modus:
Die LED Marvel ist mit einer digitalen Schnittstellenverbindung für die Steuerung ausgestattet, die Ihnen
ermöglicht, mehrere Geräte zu synchronisieren. Da diese digitale Steuerschnittstelle auf dem DMX512
Protokoll basiert ist, kann sie auch zur Fernsteuerung einer oder einer Kette von LED Marvel mittels eines
externen DMX-512-Controllers verwendet werden. Aus Platzgründen verwendet die Steuerschnittstelle
jedoch einen 3,5 mm-Klinkenanschluss (statt des üblichen XLR-Typs), was bedeutet, dass externe DMXSteuerung eine kundenspezifische XLR-zum-3,5 Klinkenkabel erfordert (nicht enthalten). Eine weitere
Einschränkung ist, dass die DMX-Startadresse nicht auf die LED Marvel eingestellt werden kann, und wird
auf 001 festgelegt. Die Verbindung zwischen zwei Geräten für die Synchronisation benötigt einen normalen
3,5 mm Stereo-Klinke / Klinkenkabel (nicht enthalten). Das letzte Gerät in der Kette wird mit einem
geeigneten 120 Ohm Abschlusswiderstand des 3,5mm Stereo-Klinkensteckers ausgestattet, wie unten in der
Zeichnung dargestellt wird.
Page 36

DEUTSCH BEDIENUNGSANLEITUNG
JB SYSTEMS® 34/44 LED MARVEL
Kabelanschlüsse für Master / Slave:
Sie können mehrere Geräte unter Verwendung eines
optionalen, hochwertigen Kabels mit 3,5-mm-StereoKlinkenstecker auf beiden Seiten miteinander verbinden.
Das erste Gerät in der Kette wird Master sein: auf
diesem Gerät sollen Sie die Tasten drücken oder die IRFernbedienung verwenden.
Wenn Sie die langen Kabel verwenden, konnte der
Betrieb der Slaves unzuverlässig sein. In diesem Fall
sollten Sie den 120 Ohm Abschluss (siehe vorherige
Seite) auf dem DMX-Ausgang des letzten Gerätes in der
Leitung verwenden.
Kabelanschlüsse für den DMX-Betrieb:
Sie können mehrere Geräte an den Ausgang jedes
DMX-Controllers unter Verwendung eines optionalen,
hochwertigen Adapterkabels mit der 3,5 mm StereoKlinke auf der einen Seite und dem XLR-Stecker auf der
anderen Seite anschließen. (siehe vorherige Seite)
Denken Sie daran, dass Sie die Startadresse der Geräte
nicht wählen können: die Start-Adresse ist immer 001!
Wenn Sie die langen Kabel verwenden, konnte der
Betrieb der Slaves unzuverlässig sein. In diesem Fall
sollten Sie den 120 Ohm Abschluss (siehe vorherige
Seite) auf dem DMX-Ausgang des letzten Gerätes in der
Leitung verwenden.
Bei Verwendung eines externen DMX-Controllers kann das 21CH DMX-Diagramm verwendet werden:
Die Kanäle 1 bis 18 werden verwendet, um die roten, grünen und blauen Farben für die sechs Panels
individuell zu steuern, siehe das Diagramm für die genauen Angaben.
Der Kanal 19 ist der Master-Dimmer für die 6 Panels, siehe das Diagramm für die genauen Angaben.
Der Kanal 20 kann verwendet werden, um interne Strukturen aufzurufen, über DMX-Wert 247 werden
Kanäle 1 bis 19 aktiv.
Der Kanal 21 wird verwendet, um die Geschwindigkeit der inneren Muster festzulegen.
DMX-Kanal
Wertebereich
Function
CH1
000-255
Panel1 (von oben) R-Ebene – nur aktiv, wenn CH20 >248
CH2
000-255
Panel1 (von oben) G-Ebene – nur aktiv, wenn CH20 >248
CH3
000-255
Panel1 (von oben) B-Ebene – nur aktiv, wenn CH20 >248
CH4
000-255
Panel2 (von oben) R-Ebene – nur aktiv, wenn CH20 >248
CH5
000-255
Panel2 (von oben) G-Ebene – nur aktiv, wenn CH20 >248
CH6
000-255
Panel2 (von oben) B-Ebene – nur aktiv, wenn CH20 >248
CH7
000-255
Panel3 (von oben) R-Ebene – nur aktiv, wenn CH20 >248
CH8
000-255
Panel3 (von oben) G-Ebene – nur aktiv, wenn CH20 >248
CH9
000-255
Panel3 (von oben) B-Ebene – nur aktiv, wenn CH20 >248
CH10
000-255
Panel4 (von oben) R-Ebene – nur aktiv, wenn CH20 >248
CH11
000-255
Panel4 (von oben) G-Ebene – nur aktiv, wenn CH20 >248
CH12
000-255
Panel4 (von oben) B-Ebene – nur aktiv, wenn CH20 >248
CH13
000-255
Panel5 (von oben) R-Ebene – nur aktiv, wenn CH20 >248
CH14
000-255
Panel5 (von oben) G-Ebene – nur aktiv, wenn CH20 >248
CH15
000-255
Panel5 (von oben) B-Ebene – nur aktiv, wenn CH20 >248
CH16
000-255
Panel6 (von oben) R-Ebene – nur aktiv, wenn CH20 >248
CH17
000-255
Panel6 (von oben) G-Ebene – nur aktiv, wenn CH20 >248
CH18
000-255
Panel6 (von oben) B-Ebene – nur aktiv, wenn CH20 >248
CH19
000-255
Master-Dimmer CH1-CH18 – nur aktiv, wenn CH20 >248
CH20
000-247
Spielmodus-Vorgabe; Wertänderungen voreingestellt
248-255
DMX-Steuerungsmodus, aktiviert CH1-CH19
CH21
000-255
Einstellung der Spielgeschwindigkeit-Vorgabe - nur aktiv, wenn CH20> 247
Page 37

DEUTSCH BEDIENUNGSANLEITUNG
JB SYSTEMS® 35/44 LED MARVEL
WARTUNG
Dieses Gerät benötigt keine regelmäßige Wartung. Es wird durch eine interne Sicherung der
Stromversorgung PCB abgesichert. Wenn diese Sicherung ausfällt, zeigt dies gewöhnlich einen internen
Fehler und erfordert Wartung durch einen qualifizierten Techniker. Die Sicherung darf nur durch eine
Sicherung gleicher Ausführung ersetzt werden, und der Austausch muss durch qualifiziertes Personal nach
geltenden Sicherheitsvorschriften vorgenommen werden.
TECHNISCHE DATEN
Netzspannung: 12Vdc / 1A
Netzteil: AC 90V ~ 250V, 50 / 60Hz - 12Vdc / 1A
Leistungsaufnahme: max. 12 Watt
Klangregler: Eingebautes Mikrofon
DMX-Anschlüsse: 3.5mm Stereo-Klinke Buchse
Benutzte DMX-Kanäle: 21 Kanäle
LEDs: 216 St. (72 rot + 72 grün + 72 blau)
Abmessungen: Siehe Zeichnung
Gewicht: 0.48kg
Technische Änderungen können auch ohne Vorankündigung vorgenommen werden
Sie können die neueste Version dieser Bedienungsanleitung von unserer Website www.beglec.com
herunterladen.
Page 38

ESPAÑOL MANUAL DE INSTRUCCIONES
JB SYSTEMS® 36 / 44 LED MARVEL
MANUAL DE INSTRUCCIONES
Gracias por comprar este producto de JB Systems®. Para aprovechar al máximo todas las posibilidades y
para su propia seguridad, lea cuidadosamente este manual de instrucciones antes de comenzar a utilizar la
unidad.
CARACTERÍSTICAS
Esta unidad tiene supresión de radio interferencia. Este producto cumple con todas las exigencias de las
pautas actuales, tanto europeas como nacionales. Dicha conformidad ha sido establecida y los dictámenes
y documentos han sido consignados por el fabricante.
Este dispositivo fue diseñado para producir efectos de iluminación decorativa y se utiliza en sistemas de
espectáculos de iluminación.
Gracias a su diseño bonito y elegante este proyector LED se ajusta a cualquier interior (sala de estar,
dormitorio, bar, salones, restaurantes, …)
Y por encima de todo es también un ejemplo perfecto de multifuncionalidad:
Se puede usar como “luz de fiesta” activada por sonido (programas y guías internas)
El creador del “ambiente” perfecto (cambia lentamente las sombras de colores)
Reflector pequeño pero efectivo (¡da color a sus paredes!)
Se pueden controlar varias unidades mediante un controlador DMX para un funcionamiento
sincronizado.
Contiene 6 paneles Led controlables individualmente para una máxima variedad e impacto de los efectos.
Un total de 216 LED (72 rojos + 72 verdes + 72 azules) garantizan una emisión de luz excelente y una
buena mezcla de color.
Programas activados de sonido o estáticos (micrófono interno) con diferentes modos
Se puede usar una unidad de forma individual o se pueden conectar juntas varias unidades en modo
master / esclavo para obtener maravillosos efectos sincronizados.
Mando a distancia por infrarrojos incluido
Posible control DMX: 21 canales para un control RGB completo + presintoniza de guías con velocidad
ajustable.
Base multifuncional:
Simplemente colóquelo sobre la mesa o una superficie horizontal
Fíjelo contra una pared y apunte la unidad a cualquier dirección
Entrada de alimentación: 12V CC, adaptador de voltaje bajo separado incluido
ANTES DEL USO
Antes de comenzar a utilizar esta unidad, compruebe si no ha sufrido daños durante el transporte. Si
hubiera alguno, no utilice el dispositivo y consulte primero con su concesionario.
Importante: Este dispositivo salió de nuestra fábrica en perfectas condiciones y bien embalado. Es
absolutamente necesario que se obedezcan al pie de la letra las instrucciones y advertencias de
seguridad que aparecen en este manual de usuario. Cualquier daño causado por una mala manipulación
no estará protegido por la garantía. El concesionario no aceptará ninguna responsabilidad por defectos o
problemas resultantes causados por no obedecer lo indicado en este manual de usuario.
Mantenga este folleto en un lugar seguro para futuras consultas. Si vende este equipo, asegúrese de
incluir este manual de usuario.
Compruebe el contenido:
Verifique que la caja contenga los elementos siguientes:
Instrucciones de operación
LED MARVEL
Trípode de montaje
Alimentación externa CC de 12V
Mando a distancia por infrarrojos (IR)
Page 39

ESPAÑOL MANUAL DE INSTRUCCIONES
JB SYSTEMS® 37 / 44 LED MARVEL
INSTRUCCIONES DE SEGURIDAD:
Afín de evitar todo riesgo de incendio o electrocución, no exponer el aparato a la lluvia o ambiente
humedo.
Para evitar el riesgo de incendio o de descarga eléctrica, no exponga este electrodoméstico a la lluvia ni a
la humedad.
Para evitar que se forme condensación en el interior del equipo, permita que la unidad se adapte a la
temperatura ambiental cuando se lleve a una habitación cálida después del transporte. La condensación
impide a veces que la unidad trabaje a plena capacidad e incluso puede causar daños.
Esta unidad es solamente para uso en interiores.
No coloque objetos metálicos ni derrame líquidos dentro de la unidad. Puede dar como resultado una
descarga eléctrica o un mal funcionamiento. Si un objeto extraño se introduce dentro de la unidad,
desconecte de inmediato la alimentación eléctrica.
Ubique el accesorio en un punto bien ventilado, lejos de materiales y/o líquidos inflamables.
No cubra ninguna abertura de ventilación ya que esto puede provocar sobrecalentamiento.
Evite emplearlo en ambientes polvorientos; limpie la unidad con regularidad.
Mantenga la unidad lejos de los niños.
Este equipo no debe ser utilizado personas inexpertas.
La temperatura ambiente máxima segura es de35ºC. No utilice esta unidad a temperaturas ambiente
mayores que ésta.
Asegúrese de que el área que se encuentra bajo el lugar de instalación esté libre de personas no
autorizadas durante su elevación, descenso y reparación.
Siempre desenchufe la unidad cuando no se vaya a utilizar durante un período de tiempo prolongado o
cuando se le vaya a dar servicio.
Compruebe que la tensión disponible sea la indicada en la unidad.
El cable de alimentación debe estar siempre en perfectas condiciones. Apague de inmediato la unidad
cuando el cable de alimentación esté aplastado o dañado. Si el cable de alimentación está dañado, debe
ser sustituido por el fabricante, por su representante de servicio o por una persona de cualificación similar
para evitar un accidente.
¡Nunca permita que el cable de alimentación haga contacto con otros cables!
Con el fin de evitar un peligro, la unidad sólo deberá ser utilizada con el adaptador de CA incluido con ella.
Si el adaptador CA está dañado, sólo debe utilizar un adaptador del mismo modelo.
No conecte la unidad a un dispositivo de atenuación.
Cuando instale la unidad utilice siempre un cable de seguridad apropiado y certificado.
Para evitar descargas eléctricas, no abra la cubierta. Dentro no hay componentes que requieran de
servicio por parte del usuario.
PRECAUCIÓN: Para reducir el riesgo de electrocución, no
quite la cubierta superior . Ninguna pieza usable adentro para
el utilizador. Dirijase unicamente a personal cualificado.
El simbolo de un rayo en el interior de un triangulo alerta sobre la presencia o el uso de
elementos no isolados donde un voltaje peligroso constituye un riesgo grande para causar una
eventual electrocución.
El punto de exclamación en el interior de un triangulo alerta al usuario sobre la presencia de
importantes instrucciones de operación y de mantenimiento tenidas en cuenta en el manual de
uso.
Este símbolo significa : uso para el interior solamente.
Este símbolo significa : Lea las instrucciones.
Este símbolo significa: Aplicaciones de la clase II
Este símbolo se determina: la distancia mínima de objetos iluminado. La distancia mínima entre
el proyector y el objeto iluminado debe ser más de 1 metro.
El dispositivo no es adecuado para el montaje directo sobre superficies normalmente
inflamables. (Apto sólo para el montaje en superficies no inflamables)
Precaución radiación por diodos emisores de luz (LED)
No mirrar fijamente el rayo luminos.
Page 40

ESPAÑOL MANUAL DE INSTRUCCIONES
JB SYSTEMS® 38 / 44 LED MARVEL
En el caso de que haya serios problemas de funcionamiento, detenga el uso del accesorio y contacte
inmediatamente con su concesionario.
La carcasa y las lentes deben sustituirse si están visiblemente dañadas.
Utilice el embalaje original cuando haya que transportar el dispositivo.
Debido a razones de seguridad, está prohibido realizar modificaciones no autorizadas a la unidad.
Importante: ¡Nunca mire directamente a la fuente de luz! No utilice el efecto en presencia de personas que
padezcan de epilepsia.
DESCRIPCIÓN + FUNCIONAMIENTO:
1. Botón NIVEL
(POTENCIÓMETRO)
2. Botón MODO
3. Botón PT / COL
4. Botón VELOCIDAD
5. LED S2L (Sonido a luz)
6. Indicador ON / OFF
7. Base
8. Conectores entrada /
salida DMX i
9. Entrada / Salida de
adaptador alimentación
10. Micrófono
A elección del usuario, la
unidad puede funcionar en
modo individual automático o
con colores fijos o puede
controlarse con el mando a
distancia por infrarrojos
incluido o por los
controladores DMX externos.
Esta capítulo hace referencia al funcionamiento individual y al funcionamiento con el
mando a distancia por infrarrojos. Rogamos vea el capítulo “Sincronización y control
DMX” para obtener información del mando a distancia digital. para el funcionamiento
individual, asegúrese que NINGÚN CABLE está conectado a la toma “DMX IN”
trasera.
Los elementos de la interfaz de usuario ofrecen las siguientes funciones:
1. Botón de NIVEL
Pulsar consecutivamente esta tecla en la misma unidad principal, permite la
elección secuencial de 4 niveles de brillo diferentes: 0% (off) / 25 / 50 / 75 / 100%.
Los mismos niveles están disponibles por medio del mando a distancia; no obstante
las teclas LEVEL up / down del mando a distancia sólo permiten elegir los niveles
25 / 50 / 75 / 100%, mientras que la función de apagón (0%) está directamente
disponible mediante la tecla del mando a distancia on / off.
2. Botón MODO
Pulsar consecutivamente esta tecla en la misma unidad principal, permite la elección secuencial de 5
modos de funcionamiento diferentes:
GUÍA: modelo de guía diferentes que pueden seleccionarse con el botón PT / COL – más detalles
abajo.
ATENUACIÓN: se puede seleccionar la atenuación entre los 6 paneles con diferentes modelos con
el botón PT / COL – más detalles abajo.
AMBIENTAL: se puede seleccionar el cambio de los 6 paneles de un color a otro con el botón PT /
COL – más detalles abajo.
ESCENA: se pueden seleccionar los 6 paneles que se muestran del mismo color, o de 12 colores
diferentes con el botón PT / COL – más detalles abajo.
Page 41

ESPAÑOL MANUAL DE INSTRUCCIONES
JB SYSTEMS® 39 / 44 LED MARVEL
FLASH (LUZ ESTROBOSCÓPICA): se pueden seleccionar modelos diferentes en RGB blanco
cada uno con el botón PT / COL – más detalles abajo.
Nota: cuando use el mando a distancia por infrarrojos se pueden elegir los 5 modos directamente
mediante la tecla señalada.
3. Botón PT / COL
Esta tecla cambia – dependiendo del MODO elegido – bien el color o el modelo de color +. Las
elecciones según el modo elegido son:
En modo GUÍA: Se puede elegir 5 modelos presintonizados con transición de cambio en dos
combinaciones de colores cada uno pulsando la tecla PT / COL consecutivamente en la misma unidad o
las teclas PT / COL up / down en el mando a distancia:
Presintonía
Color 1
Color 2
Color 3
Modelo
01
Rojo
Azul
Verde
3C-16-Zip arriba abajo
02
Rosa
Turquesa
Lima
3C-16-Zip arriba abajo
03
Rojo
Verde
Azul
3C-22 Cruzado
04
Rosa
Turquesa
Lima
3C-22 Cruzado
05
Rojo
Verde
Azul
3C-22 Contraer Expandir
06
Rosa
Turquesa
Lima
3C-22 Contraer Expandir
07
Rojo
Verde
Azul
3C-22 Ping Pong
08
Rosa
Turquesa
Lima
3C-22 Ping Pong
09
Rojo
Verde
Azul
3C-33 Bifurcación
10
Rosa
Turquesa
Lima
3C-33 Bifurcación
11
Secuencia
Secuencia
Secuencia
Modelos 1 / 3 / 5 / 7 / 9 / 2 / 4 / 6 / 8 / 10
En modo ATENUACIÓN: Se pueden seleccionar 5 modelos presintonizados con transición de
atenuación en dos combinaciones de pulsando la tecla PT / COL consecutivamente en la misma unidad
o las teclas PT / COL up / down del mando a distancia:
Presintonía
Color 1
Color 2
Color 3
Modelo
01
Rojo
Azul
Verde
3C-16-Zip arriba abajo
02
Rosa
Turquesa
Lima
3C-16-Zip arriba abajo
03
Rojo
Verde
Azul
3C-22 Cruzado
04
Rosa
Turquesa
Lima
3C-22 Cruzado
05
Rojo
Verde
Azul
3C-22 Contraer Expandir
06
Rosa
Turquesa
Lima
3C-22 Contraer Expandir
07
Rojo
Verde
Azul
3C-22 Ping Pong
08
Rosa
Turquesa
Lima
3C-22 Ping Pong
09
Rojo
Verde
Azul
3C-33 Bifurcación
10
Rosa
Turquesa
Lima
3C-33 Bifurcación
11
Secuencia
Secuencia
Secuencia
Modelos 1 / 3 / 5 / 7 / 9 / 2 / 4 / 6 / 8 / 10
En modo AMBIENTAL: Se pueden seleccionar 10 presintonías de ciclos de color pulsando la tecla PT /
COL consecutivamente en la misma unidad o las teclas PT / COL up / down del mando a distancia:
Presintonía
Color 1
Color 2
Color 3
Modelo
01
Rojo
Azul
-
2C_6 Cambio
02
Rosa
Lima
-
2C_6 Cambio
03
Verde
Rojo
-
2C_6 Cambio
04
Lima
Turquesa
2C_6 Cambio
05
Azul
Verde
2C_6 Cambio
06
Rosa
Turquesa
2C_6 Cambio
07
Rojo
Azul
Verde
3C_6 Cambio
08
Rojo
Verde
Azul
3C_6 Cambio
09
Rojo
Azul
Verde
2C_Explosión
10
Rosa
Turquesa
Lima
2C_Explosión
11
Aleatorio
Aleatorio
Aleatorio
Rueda aleatoria
Nota: Excepto en modo GUÍA y ATENUACIÓN, en modo AMBIENTE, los 6 segmentos están activos y
muestran el mismo color en las primeras 8 presintonías (presintoniza de colores mezclado 9 / 10 / 11).
Page 42

ESPAÑOL MANUAL DE INSTRUCCIONES
JB SYSTEMS® 40 / 44 LED MARVEL
En modo ESCENA: Se pueden elegir 12 presintonías de colores pulsando de forma consecutiva la tecla
PT / COL en la misma unidad o las teclas PT / COL up / down en el mando a distancia:
Presintonía
Color
01
Rojo
02
Verde
03
Azul
04
Amarillo*
05
Rosa*
06
Turquesa*
07
Lima
08
Naranja
09
Marino
10
Rana
11
Lavanda
12
Caramelo
13
Blanco (50% de nivel)
Nota: No hay estado de color “apagado” en modo ESCENA.
En modo FLASH (LUZ ESTROBOSCÓPICA): Se pueden seleccionar 5 modelos de luz estroboscópica
pulsando de forma consecutiva la tecla PT / COL en la misma unidad o las teclas PT / COL up / down en
el mando a distancia:
Presintonía
Nombre de la
presintonía
Descripción
01
Luz
estroboscópica
-All6-RGB-SEQ
Los 6 segmentos presentan luz estroboscópica alternando
con un ciclo de 4 flashes de color rojo, verde, azul con 16
Hz
02
Luz
estroboscópica
-All6-PTL-SEQ
Los 6 segmentos presentan luz estroboscópica alternando
con un ciclo de 4 flashes de color rosa, turquesa, lima con
16 Hz
03
Luz
estroboscópica
-222-RGB-SEQ
Los segmentos 1+4 / 2+5 / 3+6 parpadean de forma
secuencia mientras que en cada paso los segmentos
activos actualmente mantienen la luz estroboscópica
durante 4 Flashes antes de que se asuman los siguientes
segmentos. El color del flash tiene un ciclo a través de R /
G / B
04
Luz
estroboscópica
-222-PTL-SEQ
Los segmentos 1+4 / 2+5 / 3+6 parpadean de forma
secuencia mientras que en cada paso los segmentos
activos actualmente mantienen la luz estroboscópica
durante 4 Flashes antes de que se asuman los siguientes
segmentos. El color del flash tiene un ciclo a través de P / T
/ L
4. Botón VELOCIDAD
Al pulsar de forma consecutiva esta tecla en la misma unidad principal o usando las teclas SPEED up /
down del mando a distancia, permite la elección secuencial de varias configuraciones de velocidad,
dependiendo del MODO en el que opere la unidad:
En modo GUÍA: 1Hz / 2Hz / 4Hz fija / S2L (con indicador LED )
En modo ATENUACIÓN: velocidad de 0.25Hz fija / 0.5Hz fija / 1Hz / 2Hz fija
En modo AMBIENTAL: velocidad de 0.05Hz fija / 0.25Hz fija / 0.5Hz fija / 1Hz fijad
En modo ESCENA: no hay elección de velocidad (este botón está deshabilitado)
En modo FLASH (LUZ ESTROBOSCÓPICA) : se puede fijar la velocidad de la luz estroboscópica
en 4 niveles.
Nota: La configuración de velocidad escogida se guardará para cada modo, por lo que una vez que se
vuelva al modo, el velocidad previamente elegida se recordará.
5. Indicador S2L (SONIDO A LUZ)
En modo guía, puede usar el botón VELOCIDAD para seleccionar diferentes velocidades o puede elegir
poner en funcionamiento los modelos según el ritmo de la música; en este último modo, se enciende en
indicador SONIDO A LUZ.
Page 43

ESPAÑOL MANUAL DE INSTRUCCIONES
JB SYSTEMS® 41 / 44 LED MARVEL
6. Indicador ON / OFF
Indica si el LED Marvel está conectado a la corriente eléctrica o no.
7. BASE
Se usa para montar el LED Marvel de muchas formas diferentes: véase el capítulo "Instalación” para
obtener más información.
8. Conectores entrada / salida DMX i
Puede usar el LED Marvel en modo master / esclavo o puede controlarlo usando un controlador externo
DMX. Por favor, compruebe el capítulo “Conexión” para obtener más información.
9. Entrada / Salida de adaptador alimentación
Usada para conectar el adaptador de alimentación, puede conectar 1 o más LED Marvel con el mismo
adaptador de alimentación. No obstante, el adaptador de alimentación no es compatible con esto. En
resumen, sugerimos NO usar la salida del adaptador de alimentación.
10. Micrófono
El micrófono interno recoge la música con lo que las guías pueden funcionar al ritmo de la música.
11. Botón STANDBY (ON / OFF)
Sólo está disponible en el mando a distancia: fija la salida en modo oscuridad (off). Tiene el mismo efecto
que fijar el nivel (botón 1)
INSTALACIÓN
El LED Marvel puede montarse de formas muy diferentes; puede elegir uno de los métodos siguientes:
Funcionamiento en la parte superior de una mesa: ¡Principalmente para su uso
en “fiestas”!
Monte el trípode que se incluye hasta la inserción más baja de la tosca de la
unidad principal.
Coloque la unidad en una posición segura donde bien nadie la pueda tocar o se
pueda convertir en un objetivo para que alguien tropiece con ella.
Si es necesario o posible, fije el trípode con tres tornillos (no incluidos) a la
superficie de soporte.
Asegúrese que la ubicación y posición asegura una distancia prudencial para la
vista directa del espectador.
Para un buen funcionamiento de sonido y luz, deje la parte posterior de la unidad
sin obstruir.
Elija un ángulo que proporcione una colocación segura de forma que la unidad
no pueda darse la vuelta de forma accidental. Asegúrese que las patas más
largas del trípode se dirijan a la parte posterior de la unidad.
Conecte la alimentación y coloque la alimentación en una ubicación donde nadie
pueda tropezarse de forma accidental sobre la alimentación o el cable.
Asegúrese de cumplir con los requerimientos de refrigeración de la
alimentación si los hubiere.
Funcionamiento montado en pared: Usado principalmente para
colorear una pared mientras se monta en esa pared, véase los dibujos
A y B.
Monte el trípode que se incluye en la inserción posterior de rosca de
la unidad principal.
Coloque la unidad en una posición donde ni la pueda tocar nadie o
se convierta en un objetivo para que ninguna persona se tropiece o
se golpee la cabeza con él.
Fije el trípode con tres tornillos (no incluidos) a la superficie de
soporte. Asegúrese que la superficie de soporte puede soportar con
seguridad el peso de la unidad, que puede calcularse cuando la
Page 44

ESPAÑOL MANUAL DE INSTRUCCIONES
JB SYSTEMS® 42 / 44 LED MARVEL
superficie puede soportar 10 veces el peso de la unidad como un punto de carga.
Asegúrese que la ubicación y posición asegura una distancia prudencial para la vista directa del
espectador.
Para un buen funcionamiento de sonido y luz, deje la parte posterior de la unidad sin obstruir.
Conecte la alimentación y coloque la alimentación en una ubicación donde nadie pueda tropezarse de
forma accidental sobre la alimentación o el cable.
Asegúrese de cumplir con los requerimientos de refrigeración de la alimentación si los hubiere.
Funcionamiento con montaje en el suelo: Usado
principalmente para dar color a una pared mientras se
encuentra en el suelo o colgado del techo, véase
dibujos C y D.
Monte el trípode que se incluye en la inserción
posterior de rosca de la unidad principal.
Coloque la unidad en una posición segura donde
bien nadie la pueda tocar o se pueda convertir en un
objetivo para que alguien tropiece con ella.
Si es necesario o posible, fije el trípode con tres
tornillos (no incluidos) a la superficie de soporte.
Asegúrese que la ubicación y posición asegura una
distancia prudencial para la vista directa del
espectador.
Para un buen funcionamiento de sonido y luz, deje la
parte posterior de la unidad sin obstruir.
Elija un ángulo que proporcione una colocación
segura de forma que la unidad no pueda darse la vuelta de forma accidental.
Conecte la alimentación y coloque la alimentación en una ubicación donde nadie pueda tropezarse de
forma accidental sobre la alimentación o el cable.
Asegúrese de cumplir con los requerimientos de refrigeración de la alimentación si los hubiere.
CONEXIÓN
Uso individual:
Simplemente conecte el adaptador de alimentación que se adjunta a la entrada del conector CC (9) situado
en la parte posterior de la unidad.
Antes de usar el mando a distancia por infrarrojos, debe eliminar la camisa protectora de plástico del
compartimento de las pilas.
Instalación eléctrica de dos o más unidades en modo master / esclavo o en modo DMX:
El LED Marvel está equipado con una conexión de la interfaz de control digital que se permite que se
sincronicen varias unidades. Como esta interfaz del control digital se basa en el protocolo DMX512 se
puede usar también para controlar a distancia o con una cadena LED Marvel por medio de un controlador
DMX-512 externo. Por razones de espacio, la interfaz del controlador, no obstante, usa una conexión de
toma de 3.5 mm (en lugar del tipo XLR habitualmente usado), lo que indica que un control DMX externo
requiere un XLR personalizado para una toma de cable de 3.5 mm (no se adjunta). Una restricción más es
que no se puede fijar la dirección de inicio DMX no puede fijarse en el LED Marvel y se fija en 001. La
interconexión entre dos unidades para la sincronización requiere una toma estéreo normal / cable de toma
de 3.5mm (no incluido). La
última unidad de la cadena
está equipada con un resistor
de terminación de 120
Ohmios equipado con un
enchufe toma estéreo de
3.5mm tal y como se muestre
en el dibujo que aparece
abajo.
Page 45

ESPAÑOL MANUAL DE INSTRUCCIONES
JB SYSTEMS® 43 / 44 LED MARVEL
Conexión de cables para Master / esclavo:
Puede conectar varias unidades conjuntamente usando
un cable opcional de gran calidad con una toma estéreo
de 3.5 mm a ambos lados.
La primera unidad de la cadena será el master: en esta
unidad debe pulsar los botones o usar el mando a
distancia por infrarrojos.
En caso de que use cables largos, el funcionamiento de
los esclavos no será fiable. En ese caso debe usar una
terminación de 120 ohmios (véase la página anterior)
en la salida DMX de la última unidad de la línea.
Conexión de cables para funcionamiento con DMX:
Puede conectar varias unidades a la salida de cualquier
controlador DMX usando un cable de conversión de
gran calidad con una toma estéreo de 3.5 mm en un
extremo y el conector XLR en el otro extremo. (véase la
página anterior)
Tenga en cuenta que no puede elegir la dirección de
inicio de las unidades: ¡la dirección de inicio es siempre
001!
En caso de que use cables largos, el funcionamiento de
los esclavos no será fiable. En ese caso debe usar una
terminación de 120 ohmios (véase la página anterior)
en la salida DMX de la última unidad de la línea.
Al usar un controlador externo DMX se puede usar el cuadro DMX de 21 canales:
Los canales 1 al 18 pueden usarse para controlar de forma individual los colores rojo, verde y azul de los
6 paneles; véase el cuadro para obtener la información exacta.
El canal 19 es el potenciómetro master de los 6 paneles; véase el cuadro para obtener la información
exacta.
El canal 20 puede utilizarse para recordar los modelos internos; por encima del valor DMX 247 los
canales 1 al 19 se convierten en activos.
El canal 21 se usa para fijar la velocidad de los modelos internos.
Canal DMX
Gama de
valores
Función
CH1
000-255
Panel 1 (desde la parte superior) Nivel R – sólo activo si CH20 >248
CH2
000-255
Panel 1 (desde la parte superior) Nivel G – sólo activo si CH20 >248
CH3
000-255
Panel 1 (desde la parte superior) Nivel B – sólo activo si CH20 >248
CN4
000-255
Panel 2 (desde la parte superior) Nivel R – sólo activo si CH20 >248
CH5
000-255
Panel 2 (desde la parte superior) Nivel G – sólo activo si CH20 >248
CH6
000-255
Panel 2 (desde la parte superior) Nivel B – sólo activo si CH20 >248
CH7
000-255
Panel 3 (desde la parte superior) Nivel R – sólo activo si CH20 >248
CH8
000-255
Panel 3 (desde la parte superior) Nivel G – sólo activo si CH20 >248
CH9
000-255
Panel 3 (desde la parte superior) Nivel B – sólo activo si CH20 >248
CH10
000-255
Panel 4 (desde la parte superior) Nivel R – sólo activo si CH20 >248
CH11
000-255
Panel 4 (desde la parte superior) Nivel G – sólo activo si CH20 >248
CH12
000-255
Panel 4 (desde la parte superior) Nivel B – sólo activo si CH20 >248
CH13
000-255
Panel 5 (desde la parte superior) Nivel R – sólo activo si CH20 >248
CH14
000-255
Panel 5 (desde la parte superior) Nivel G – sólo activo si CH20 >248
CH 15
000-255
Panel 5 (desde la parte superior) Nivel B – sólo activo si CH20 >248
CH16
000-255
Panel 6 (desde la parte superior) Nivel R – sólo activo si CH20 >248
CH 17
000-255
Panel 6 (desde la parte superior) Nivel G – sólo activo si CH20 >248
CH 18
000-255
Panel 6 (desde la parte superior) Nivel B – sólo activo si CH20 >248
CH 19
000-255
Potenciómetro Master CH1-CH18 – sólo activo si CH20 >248
CH 20
000-247
Modo de reproducción presintonizado; el valor cambia la presintonía
248-255
Modo de control DMX activa CH1-CH19
CH 21
000-255
Configuración de velocidad de reproducción presintonizada – sólo activo si CH20 >247
Page 46

ESPAÑOL MANUAL DE INSTRUCCIONES
JB SYSTEMS® 44 / 44 LED MARVEL
MANTENIMIENTO
Este dispositivo no requiere mantenimiento regular. Está protegido por un fusible interno situado en la
alimentación PCB. En caso de que falle este fusible, esto normalmente indica que el fallo interno requiere
mantenimiento por un ingeniero cualificado. Este fusible sólo puede sustituirse por un fusible de las mismas
especificaciones, y la sustitución debe realizarla personal cualificado que cumpla con las normas de
seguridad aplicables.
ESPECIFICACIONES
Alimentación: 12V CC / 1A
Adaptador de alimentación: CA90V~250V, 50/60Hz a 12VCC / 1A
Consumo de potencia: máx. 12 Vatios
Control por Sonido: Micrófono interno
Conexiones DMX: Toma hembra estéreo de 3.5mm
Canales DMX utilizados: 21 canales
LED: 216pcs (72R + 72V + 72A)
Tamaño: ver dibujo
Peso: 0.48kg
La información podría modificarse sin aviso previo
Puede descargar la última versión de este manual de usuario en nuestro sitio Web: www.beglec.com
Page 47

Page 48

 Loading...