

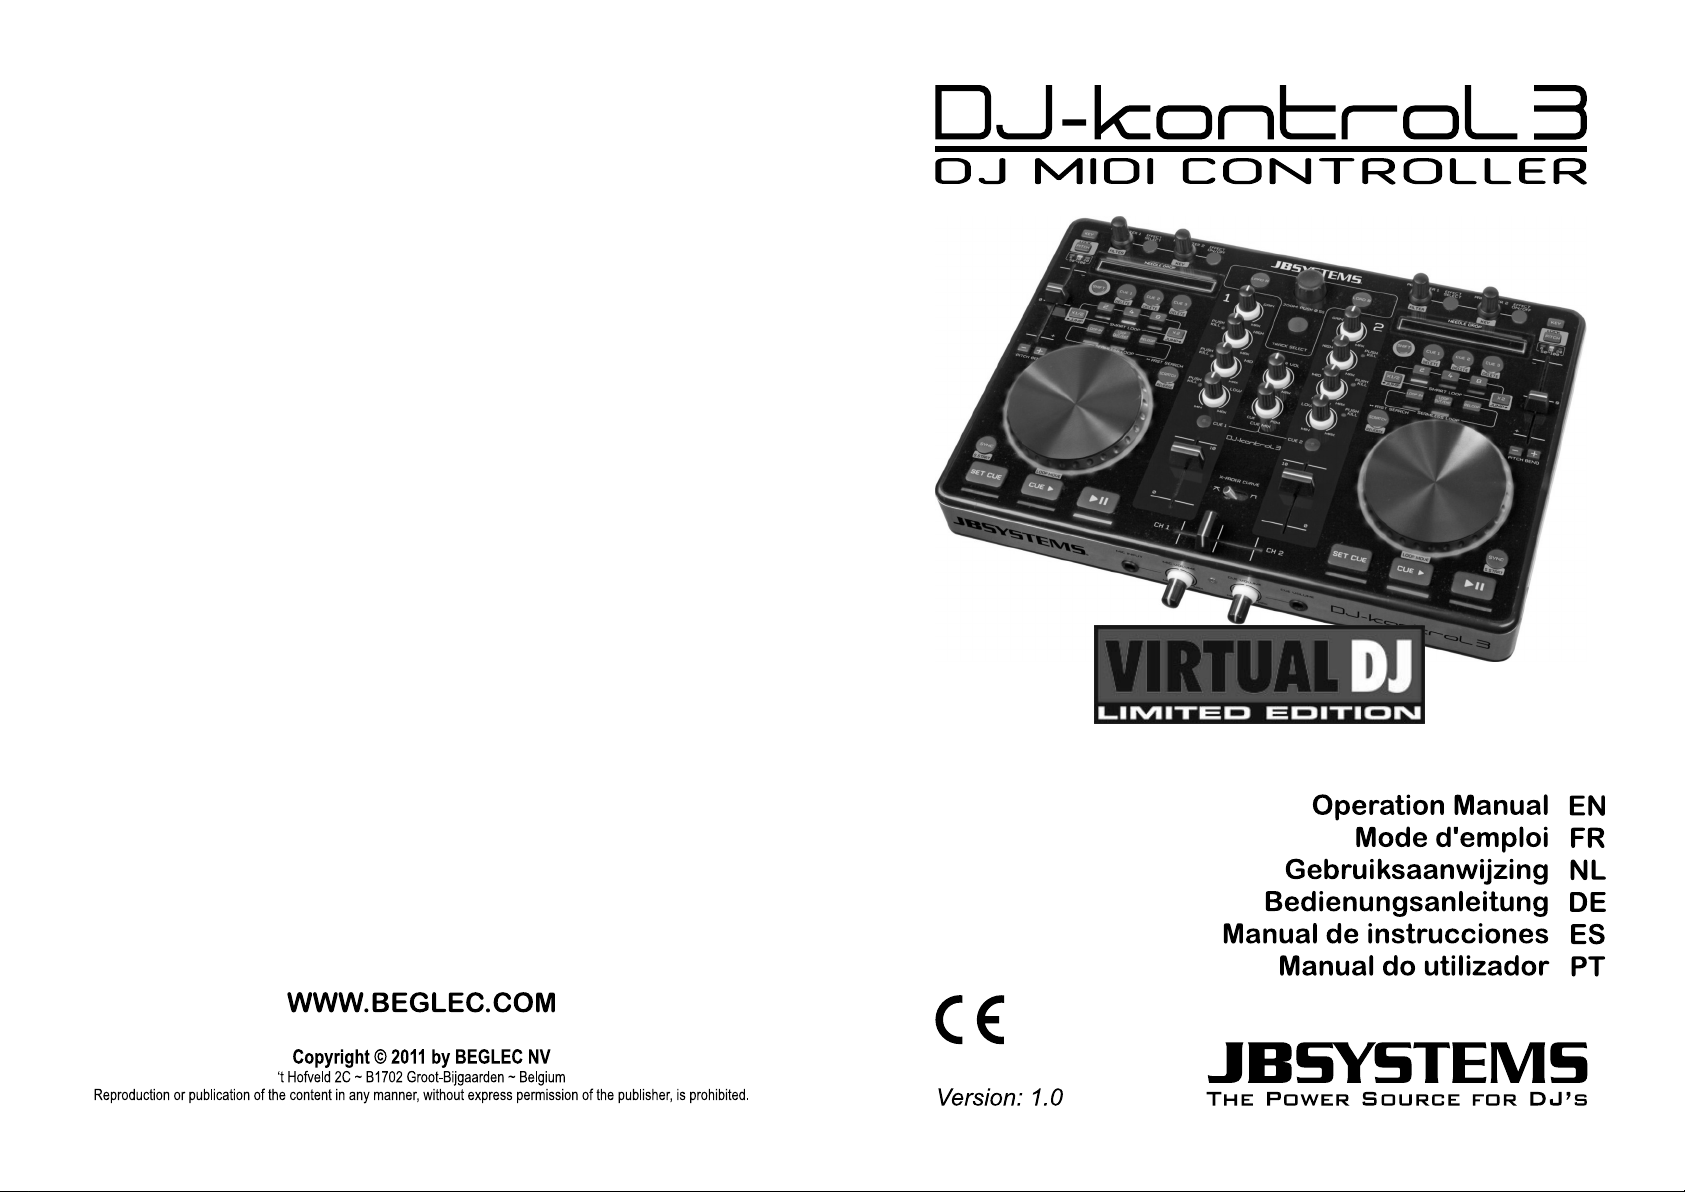
Page 1
Page 2

EN - DISPOSAL OF THE DEVICE
Dispose of the unit and used batteries in an environment friendly manner
according to your country regulations.
FR - DÉCLASSER L’APPAREIL
Débarrassez-vous de l’appareil et des piles usagées de manière écologique
Conformément aux dispositions légales de votre pays.
NL - VERWIJDEREN VAN HET APPARAAT
Verwijder het toestel en de gebruikte batterijen op een milieuvriendelijke
manier conform de in uw land geldende voorschriften.
DU - ENTSORGUNG DES GERÄTS
Entsorgen Sie das Gerät und die Batterien auf umweltfreundliche Art und
Weise gemäß den Vorschriften Ihres Landes.
ES - DESHACERSE DEL APARATO
Reciclar el aparato y pilas usadas de forma ecologica conforme a las
disposiciones legales de su pais.
PT - COMO DESFAZER-SE DA UNIDADE
Tente reciclar a unidade e as pilhas usadas respeitando o ambiente e em
conformidade com as normas vigentes no seu país.
Page 3
ENGLISH USER MANUAL
ENGLISH USER MANUAL
OPERATION MANUAL
Thank you for buying this JB Systems®product. To take full advantage of all possibilities, please read these
operating instructions very carefully.
FEATURES
This unit is radio-interference suppressed. This appliance meets the requirements of the current European
and national guidelines. Conformity has been established and the relevant statements and documents have
been deposited by the manufacturer.
Professional 2channel MIDI controller for DJs (mobile, clubs, studio …)
Sturdy aluminum housing with high glossy polycarbonate top surface and stylish white/blue lighting.
Comes bundled with the latest version of VirtualDJ LE, the ultimate DJ-software that can even mix video
clips!
Thanks to standard MIDI-communication this controller can also be used with any MIDI DJ-software you
can imagine!
Most of the buttons are backlit: easy to use in dark venues.
Can be used on any modern laptop or PC, running Windows® XP/Vista/7 or Mac® OSX
Built-in 24Bit/192kHz premium quality sound card for excellent sound performance!
High resolution, touch sensitive scratch wheels with blue backlight
Needle drop sensors for ultrafast searching inside tracks.
2 Channel mixer:
3band equalizer with push kill function
DJ-mic input and PFL headphones output
Crossfader with curve adjustment.
Balanced XLR-masters (+ unbalanced cinch)
Easy plug & play installation: no extra drivers or computer skills needed!
Fully optimized for use with VirtualDJ software:
“1-click” beat matching, automatic beat loops, instant beat detection, ...
Beat synced samplers, very accurate master tempo, 3 cue points per track, , …
Video mixing: creative mixing of video clips, including video effects!
Plays MP3, AIFF, OGG, WAV, CDA, WMA, and many more …
Fully iTunes compatible
Upgrade to VirtualDJ PRO at a discounted price!
5V power adapter included for increased working stability.
BEFORE USE
Before you start using this unit, please check if there’s no transportation damage. Should there be any, do
not use the device and consult your dealer first.
Important: This device left our factory in perfect condition and well packaged. It is absolutely necessary
for the user to strictly follow the safety instructions and warnings in this user manual. Any damage caused
by mishandling is not subject to warranty. The dealer will not accept responsibility for any resulting defects
or problems caused by disregarding this user manual.
Keep this booklet in a safe place for future consultation. If you sell the fixture, be sure to add this user
manual.
To protect the environment, please try to recycle the packing material as much as possible.
Check the contents:
Check that the carton contains the following items:
USB Midi Controller
USB Cable
Software CD-ROM (including user manuals)
License code for VirtualDJ LE
5Vdc-Power adapter
SAFETY INSTRUCTIONS:
CAUTION
The lightning flash with arrowhead symbol within the equilateral triangle is intended to alert the
use or the presence of un-insulated “dangerous voltage” within the product’s enclosure that may
be of sufficient magnitude to constitute a risk of electric shock.
The exclamation point within the equilateral triangle is intended to alert the user to the presence of
important operation and maintenance (servicing) instructions in the literature accompanying this
appliance.
This symbol means: indoor use only
This symbol means: Read instructions
This symbol means: Safety Class III appliance
To prevent fire or shock hazard, do not expose this appliance to rain or moisture.
To avoid condensation to be formed inside, allow the unit to adapt to the surrounding temperatures when
bringing it into a warm room after transport. Condense sometimes prevents the unit from working at full
performance or may even cause damages.
This unit is for indoor use only.
Don’t place metal objects or spill liquid inside the unit. No objects filled with liquids, such as vases, shall be
placed on this appliance. Electric shock or malfunction may result. If a foreign object enters the unit,
immediately disconnect the mains power.
No naked flame sources, such as lighted candles, should be placed on the appliance.
Don’t cover any ventilation openings as this may result in overheating.
Prevent use in dusty environments and clean the unit regularly.
Keep the unit away from children.
Inexperienced persons should not operate this device.
Maximum save ambient temperature is 40°C. Don’t use this unit at higher ambient temperatures.
Minimum distances around the apparatus for sufficient ventilation is 5cm.
Always unplug the unit when it is not used for a longer time or before you start servicing.
In the event of serious operating problems, stop using the appliance and contact your dealer immediately.
Please use the original packing when the device is to be transported.
Due to safety reasons it is prohibited to make unauthorized modifications to the unit.
INSTALLATION GUIDELINES:
Install the unit in a well-ventilated location where it will not be exposed to high temperatures or humidity.
Placing and using the unit for long periods near heat-generating sources such as amplifiers, spotlights, etc.
will affect its performance and may even damage the unit.
When installed in a booth or flight case, please make sure to have good ventilation to improve heat
evacuation of the unit.
To avoid condensation to be formed inside, allow the unit to adapt to the surrounding temperatures when
bringing it into a warm room after transport. Condense sometimes prevents the unit from working at full
performance.
CLEANING THE APPLIANCE:
Clean by wiping with a polished cloth slightly dipped with water. Avoid getting water inside the unit. Do not
use volatile liquids such as benzene or thinner which will damage the unit.
CAUTION: To reduce the risk of electric shock, do not
remove the top cover. No user-serviceable parts inside.
Refer servicing to qualified service personnel only.
JB SYSTEMS
®
1/54 DJ-KONTROL 3
JB SYSTEMS
®
2/54 DJ-KONTROL 3
Page 4
ENGLISH USER MANUAL
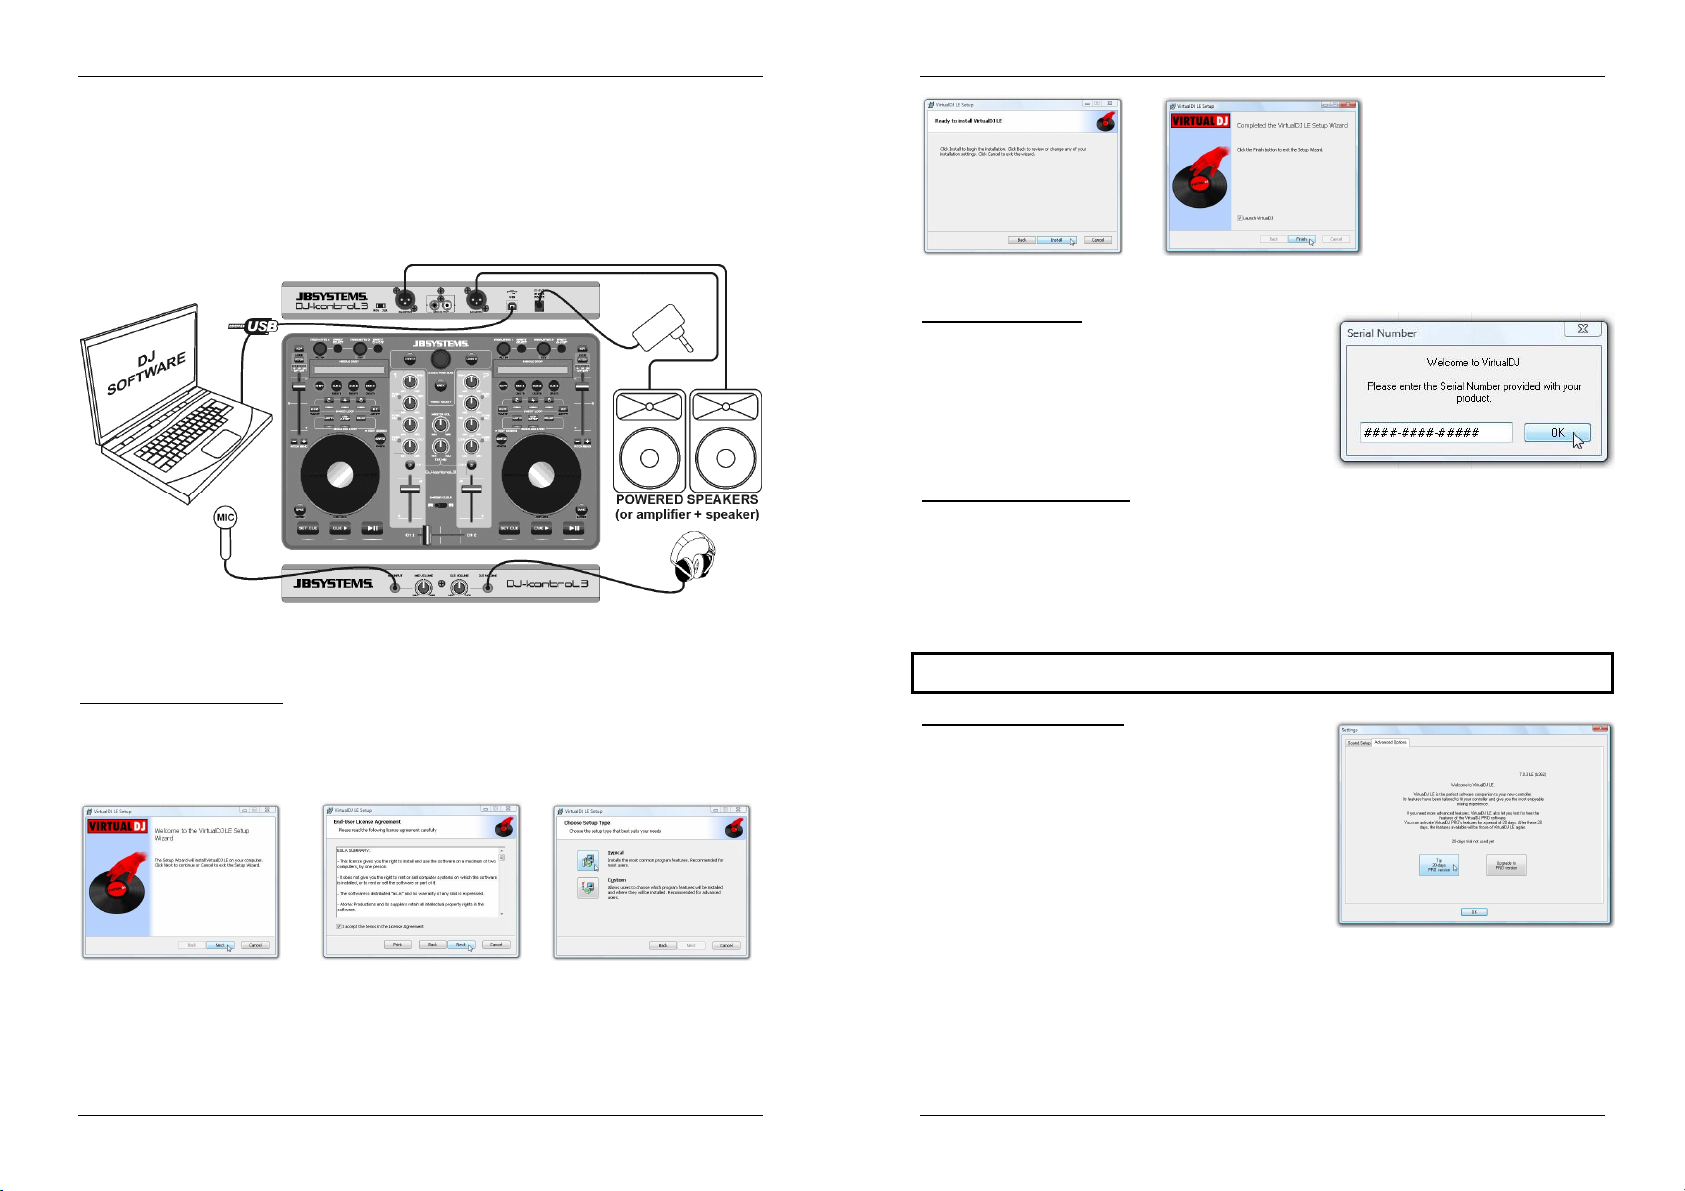
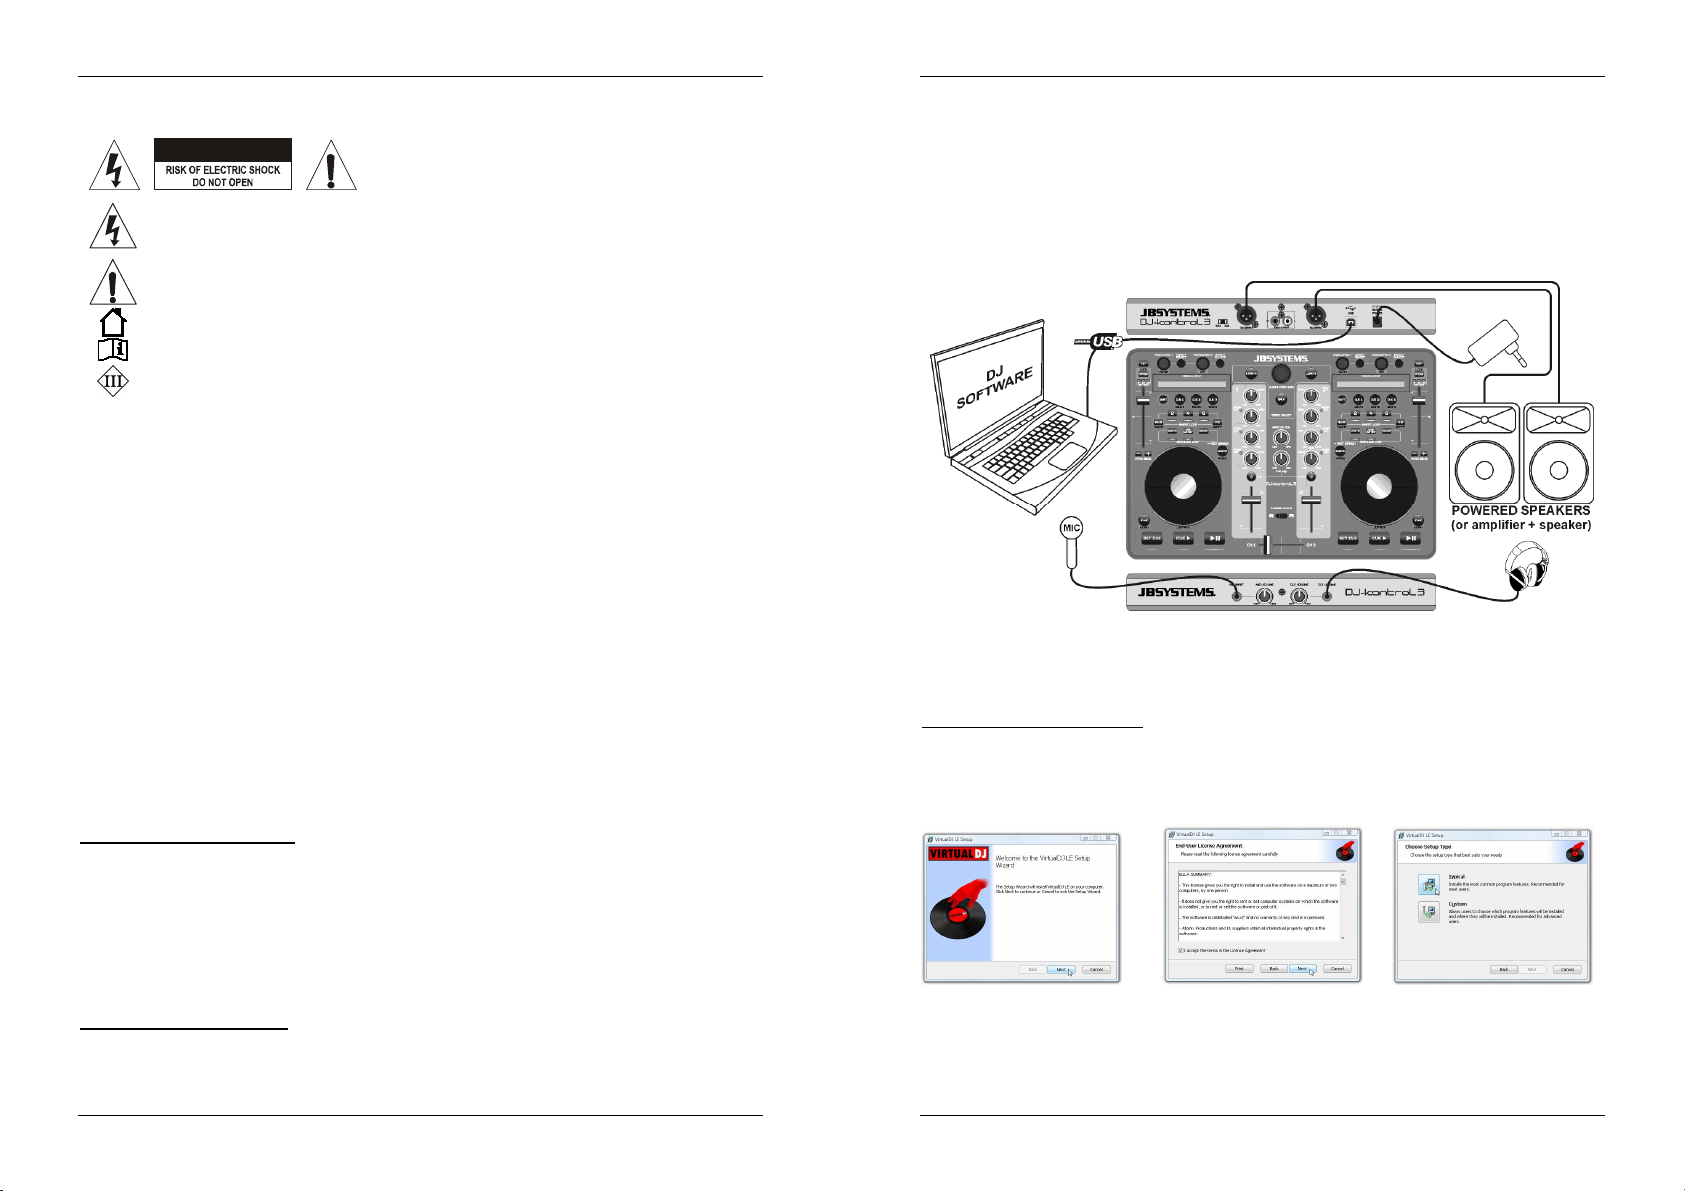
CONNECTIONS
Please follow the connection diagram below to connect the “DJ-KONTROL3”:
Use the supplied USB-cable to connect the controller, via the USB-connector (45), to your computer.
Connect the cinch outputs (46) or XLR outputs (47) to your audio amplifier or powered speakers.
Put the output selector in the desired position.
Connect your microphone (if any) to the mic input (11) on the front panel of the controller.
Connect your headphones to the headphones output (16) on the front panel on the controller.
Use the supplied 5Vdc adapter to connect the DC-input (49) of the controller to the mains.
ENGLISH USER MANUAL
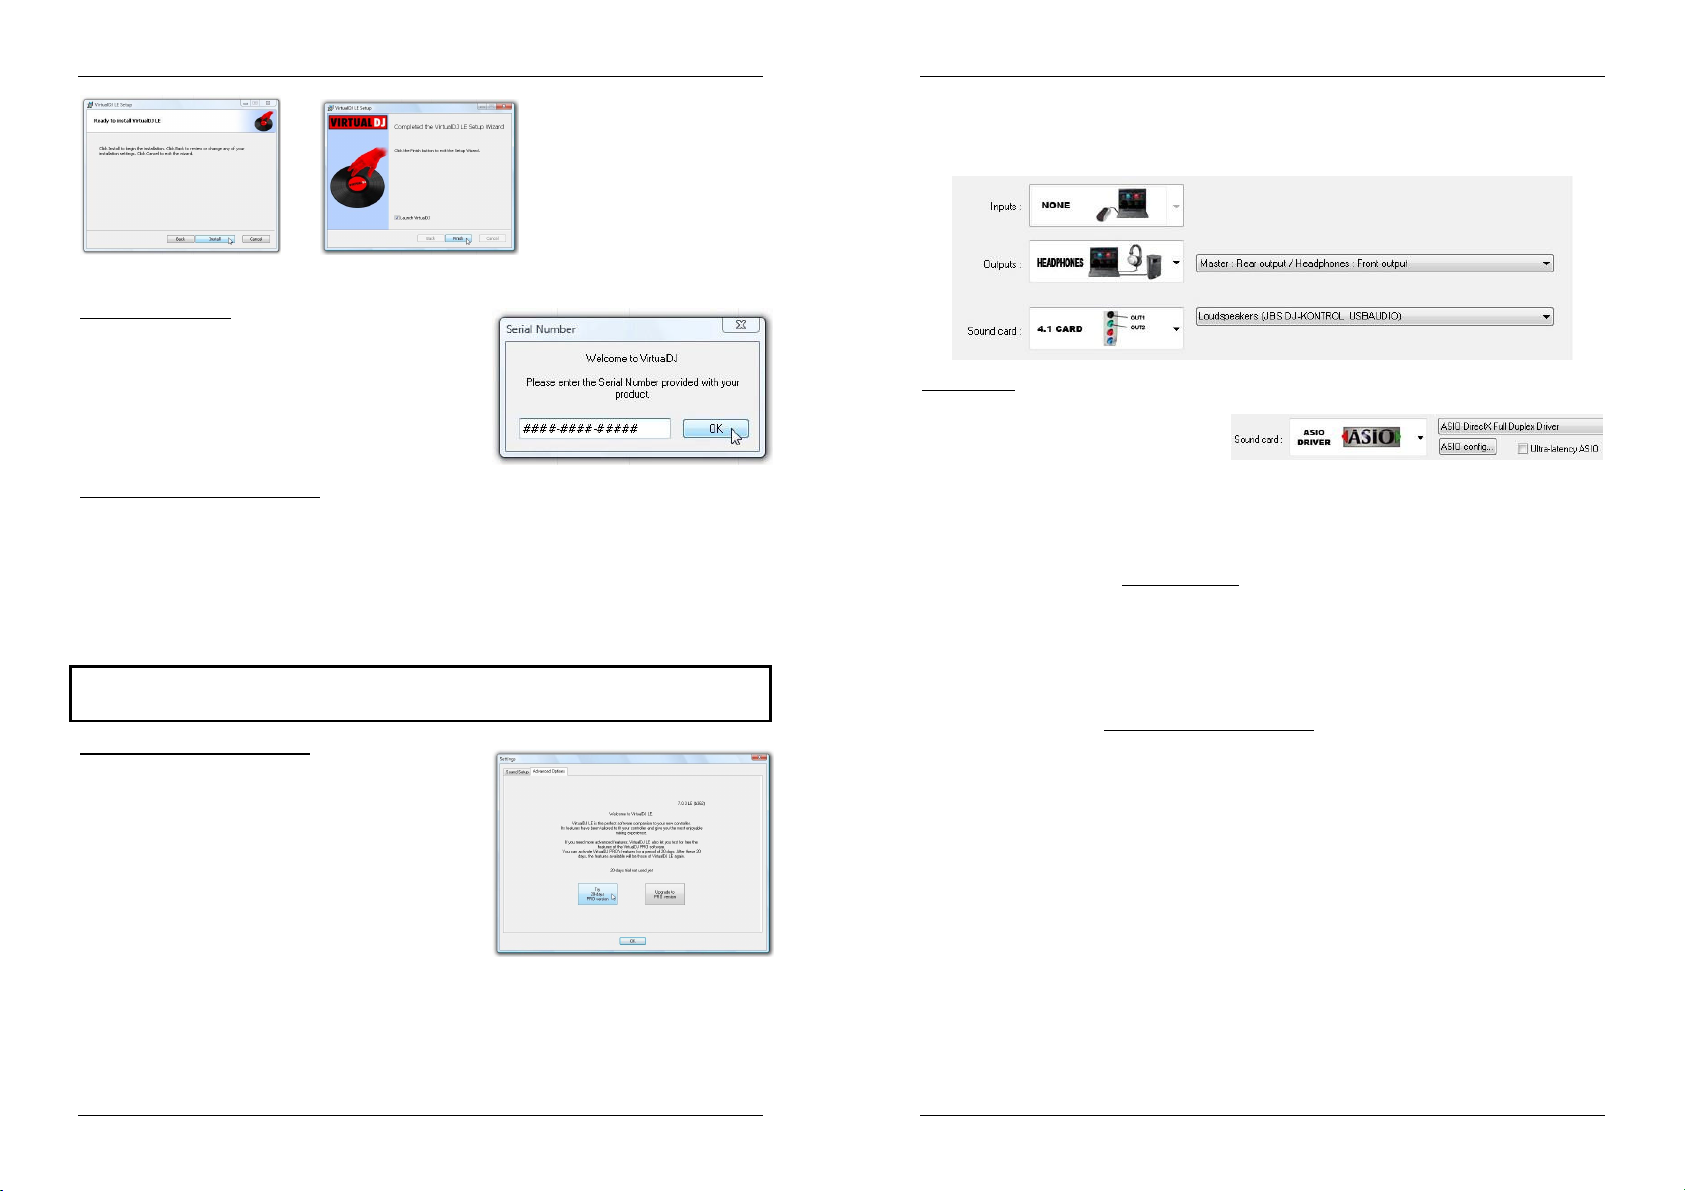
Press the “INSTALL” button Press the “FINISH” button.
Now connect the DJ-KONTROL3 controller with the supplied USB-cable.
Activating the software:
The first time you start VirtualDJ, the software asks for a serial
number: key-in the license code that came with your product.
As soon as you have entered the license key, VirtualDJ will
start working in LE-mode.
See the chapter CONFIGURING VIRTUALDJ to learn how to setup the audio routing in the software.
INSTALLING VIRTUALDJ
Installation on your computer:
Remark: The installation procedure below is explained for Windows. However, apart from some small
differences, the procedure under MAC OS is very similar.
Insert the CD-ROM in your computer: normally the installation should start automatically. If the installation
does not start automatically, browse the CD-ROM and double click the “install_virtualdj_le_v7.0.X.exe” file
(install_virtualdj_le_v7.0.X.pkg for MAC users). File name can be slightly different) Follow the instructions on
the screen:
Click the “NEXT” button Read and accept the agreement” Choose “Typical” installation.
Software support and updates:
!!! IMPORTANT !!!
VirtualDJ frequently adds new features and improvements to their software so we recommend you to
visit their website (www.virtualdj.com) and register your software: on the VirtualDJ website choose
the DOWNLOAD-menu and go to “Software updates”. Create a new user account and register your
software (with the “license code” used to unlock the software).
You can now check on a regular basis if there are new versions and download these!
Also you can consult the tutorials and participate in the user forums!
IMPORTANT: Please note that JB Systems only covers the support for the hardware (the controller).
The support of VirtualDJ is exclusively covered by the developers at : www.virtualdj.com!
Upgrading to the PRO-version
After a while using VirtualDJ you will learn about the various
interesting features inside the PRO-version of the program. As
a user of the LE-version you can try the PRO-version for free
during 20days, if you like it (we are sure you will ) you can
buy the upgrade at a discount price. Check the config menu for
more information.
JB SYSTEMS
®
3/54 DJ-KONTROL 3
JB SYSTEMS
®
4/54 DJ-KONTROL 3
Page 5
ENGLISH USER MANUAL
ENGLISH USER MANUAL
CONFIGURING VIRTUALDJ
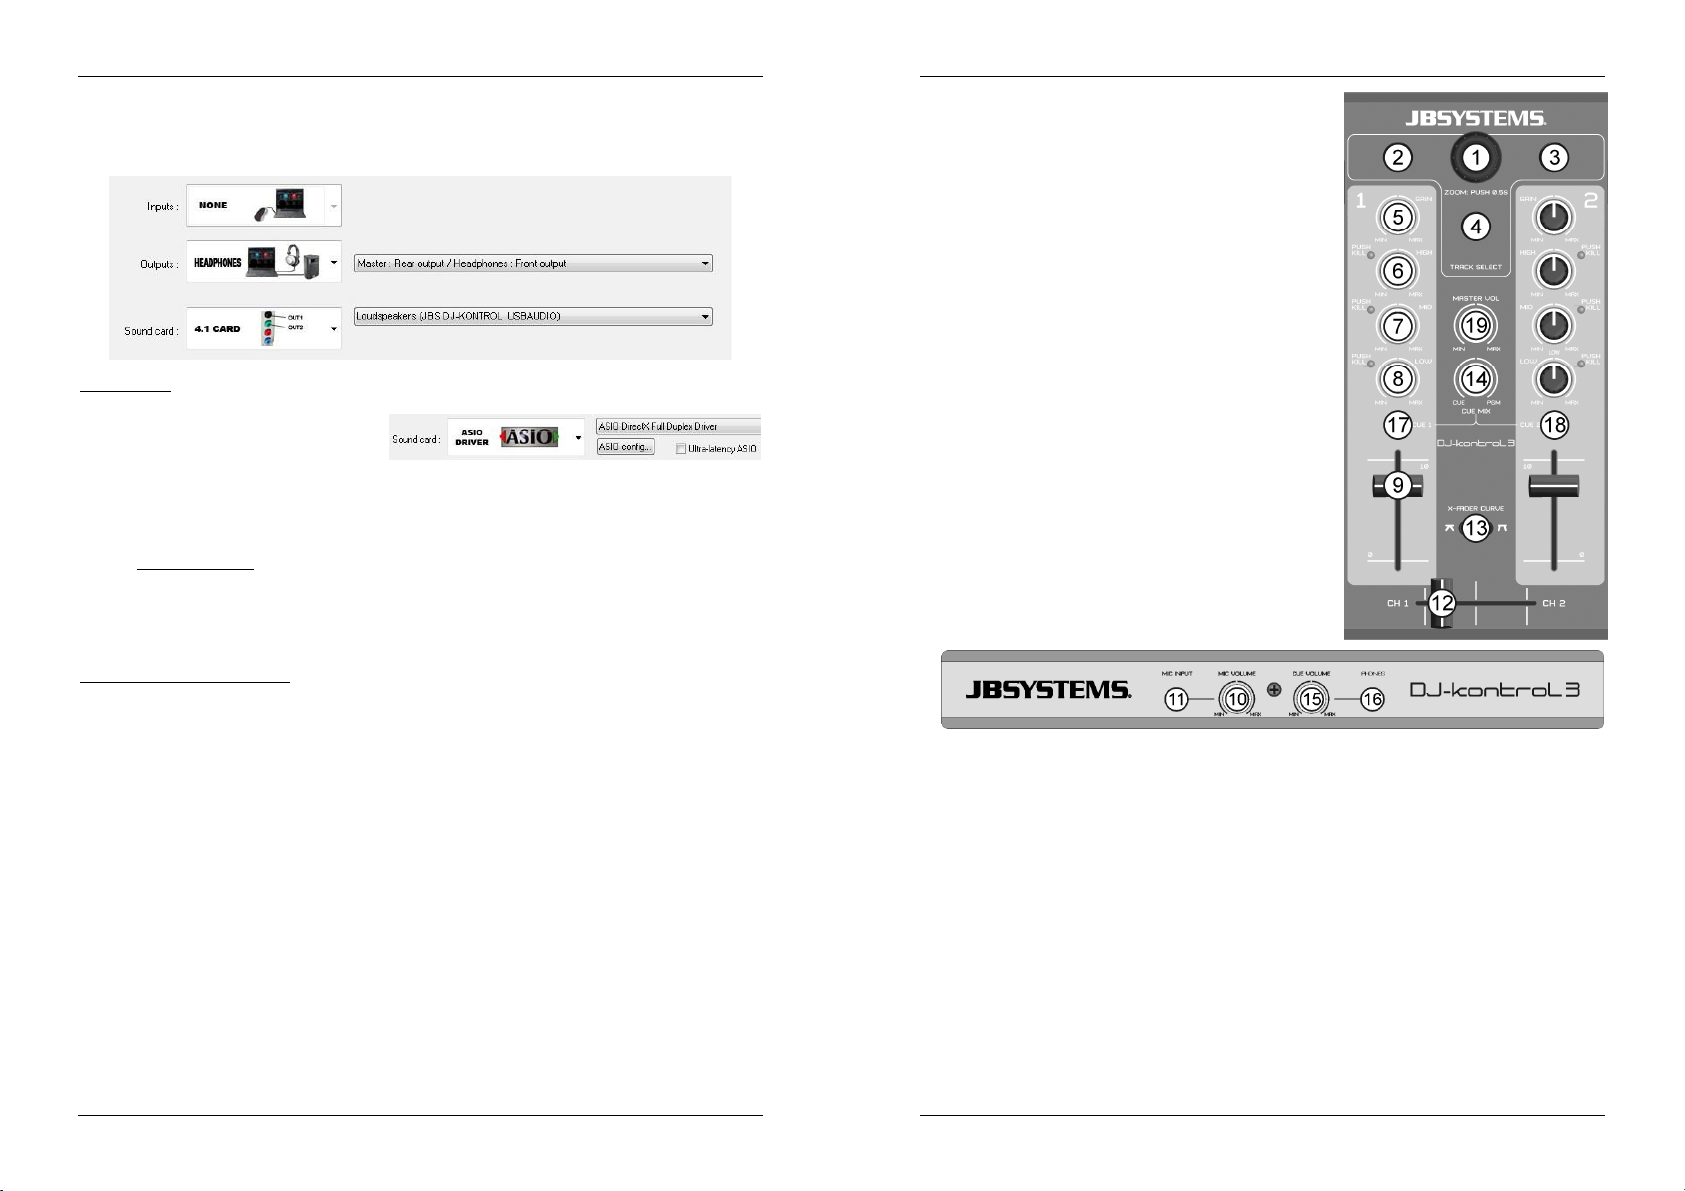
Setting up the DJ-KONTROL3 in VirtualDJ LE is very simple: simply follow the same setup as shown below:
The master output is sent to the rear speaker outputs and the PFL-signal (headphones) is sent to the front
speaker outputs of the internal soundcard.
ASIO-drivers:
If you absolutely want to have extremely low latency (delay), you can also experiment with ASIO-drivers if
you like: in that case you can select “ASIOdriver” for the soundcard. Since this is out of
the scope of this manual, we will not explain
the configuration of the ASIO-drivers here.
USING OTHER DJ-SOFTWARE
Since this controller is designed as a MIDI-compatible device, you can use it to control any Midi DJ-software.
Of course this means that you will need special MIDI-mapping files for these products. Please check our
website (www.jbsystems.be): we will provide MIDI-mapping files for some other DJ-software free of charge.
VIRTUALDJ TUTORIALS
In the next chapter we give you a brief overview of the functions in VirtualDJ LE that comes with your
controller. VirtualDJ is a very intuitive program so you will easily learn it while trying all possibilities. If you
want to learn more, please check the VirtualDJ website for video tutorials and extra user guides:
www.virtualdj.com/wiki/index.html .
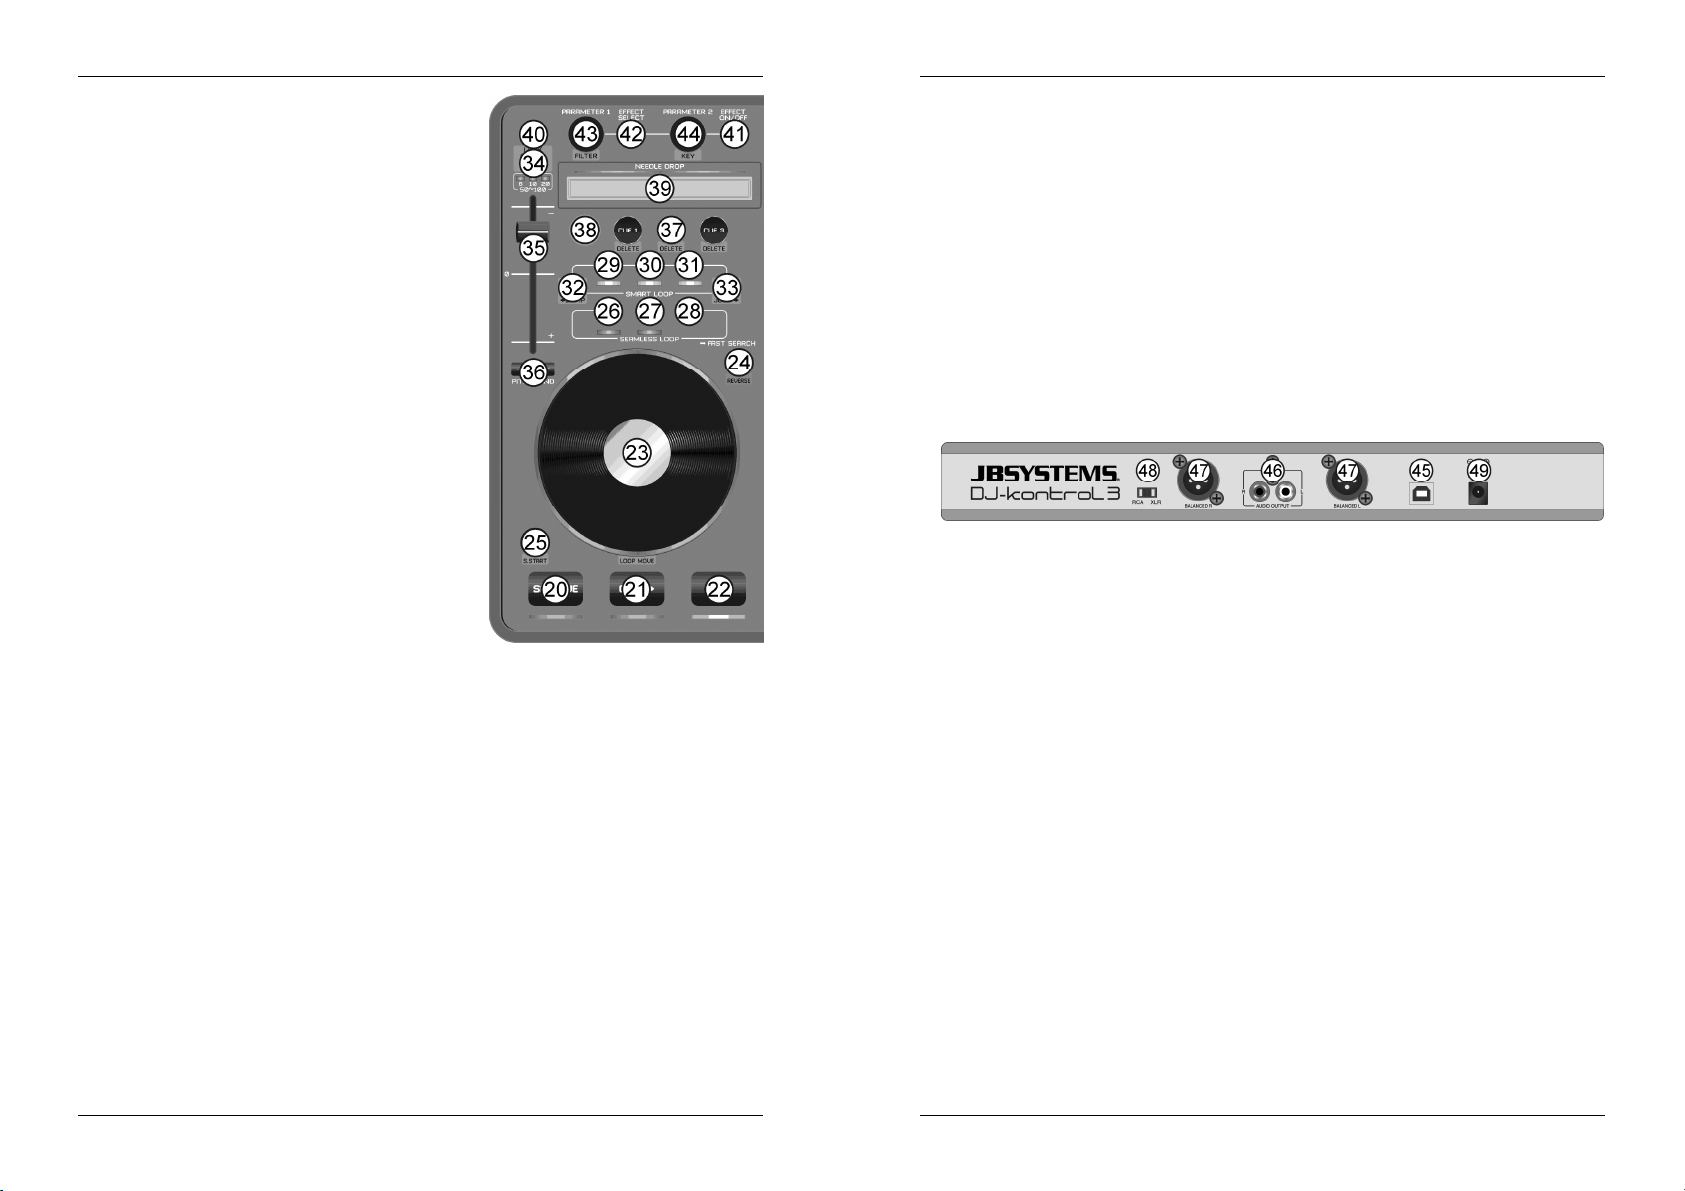
FUNCTIONS (MIXER)
1. TRACK SELECT knob: turn this knob to scroll up or down in
the folders, browser or music library.
Press shortly: to select the folder or file.
Press for 0,5sec: to enlarge/shrink (zoom) the browser.
2. LOAD A button: press this button to load the selected track
to player A (left side) of the software.
3. LOAD B button: press this button to load the selected track
to player B (right side) of the software.
4. BACK button: this button allows you to return to a higher
level in the folder/browser structure.
5. GAIN knob: turn this knob to adjust the gain of the
corresponding channel.
6. HIGH knob: used to adjust the high frequencies of the
corresponding channel. Press the knob to toggle the KILLfunction on/off.
7. MIDDLE knob: used to adjust the middle frequencies of the
corresponding channel. Press the knob to toggle the KILLfunction on/off.
8. LOW knob: used to adjust the low frequencies of the
corresponding channel. Press the knob to toggle the KILLfunction on/off.
9. CHANNEL FADER: adjusts the volume of the corresponding
audio channel.
10. MIC VOLUME: used to adjust the sensitivity of the DJ-
microphone.
11. MIC INPUT: 6.3mm input jack to connect your DJ
microphone.
12. CROSSFADER: with this fader you can mix over between
both channels. The crossfader only works when you move
the channel faders (9) of both channels to the desired level!
13. CROSSFADER CURVE: used to choose a soft or hard curve
for the crossover. This depends on your personal taste.
JB SYSTEMS
14. CUE MIX: With this knob you can mix the input channels to the headphone output:
Put the knob in the extreme left position to hear the PFL signals of the players.
Put the knob in the extreme right position to hear the mixed master output signal.
Put the knob in any other position to hear a mix of the two signals.
This option makes it possible to check your mix before you put it on the master output.
15. CUE VOLUME knob: used to control the output level of the headphone channel.
16. PHONES OUTPUT: connect your headphones here for monitoring of your tracks.
17. CUE SELECT button left: press this button to monitor player1 while the channel fader is closed.
18. CUE SELECT button right: press this button to monitor player2 while the channel fader is closed.
19. MASTER VOL knob: used to set the volume of the master output.
FUNCTIONS (PLAYERS)
20. SET CUE button: sets the track at the desired location. It also sets the audio to the last set cue
position. Keep the button pressed to preview the cue point until the button is released.
21. CUE PLAY button: starts playing the track from the last set cue position.
22. PLAY PAUSE button: used to start/stop playback of the loaded track.
23. JOG WHEEL: its function depends on the selected play mode:
In pause mode: the wheel allows you to set a cue point or starting point very precisely.
In play mode: the wheel acts as pitch bend.
®
5/54 DJ-KONTROL 3
JB SYSTEMS
®
6/54 DJ-KONTROL 3
Page 6
ENGLISH USER MANUAL
ENGLISH USER MANUAL
In loop mode: press SHIFT-button (38) while turning
the JOG-wheel to move the position of the playing loop.
Scratch button (24) lit: with the scratch function
enabled, the wheel allows you to scratch the track much
like a vinyl record. To increase the vinyl feeling, the jog
wheel is touch sensitive: this means that playback will
stop as soon as you put your hand on the wheel.
Scratch button (24) blinking: turn the wheel to
browse/search the entire track at high speed.
24. SCRATCH button: different functions are possible:
Press shortly: to toggle between browse mode (button
not lit) and scratch mode (button lit) for the jog wheel
(23).
Press for 0,5sec: to activate/de-activate the high speed
browse/search function for the jog wheel (23). While
activated you can search the entire track at very high
speed.
25. SYNC button: used to synchronize the loaded track
automatically to the track playing on the other deck.
Pressing the SYNC-button together with the SHIFT-button
(38) allows you start your track immediately in sync with
the track playing on the other deck. (also named “syncstart”)
26. LOOP IN button: different functions available:
No loop is playing: press the LOOP IN button to set the
intro point of a manual loop.
A loop is playing: press the LOOP IN button to
retrigger the playing loop (stutter effect).
27. LOOP OUT button: different functions available:
No loop is playing: press the LOOP OUT button to set
the end point of a manual loop, the loop starts playing
immediately.
A loop is playing: press the LOOP OUT button to leave
the playing loop.
28. RELOOP button: while the loop is playing, press the RELOOP button to re-start the loop immediately
(stutter effect). When no loop is playing: press the RELOOP button to enter the last played loop again.
29. SMART LOOP 2/1: press this button to create an automatic 2/1-beat smart loop.
30. SMART LOOP 4/1: press this button to create an automatic 4/1-beat smart loop.
31. SMART LOOP 8/1: press this button to create an automatic 8/1-beat smart loop.
32. LOOP CUT/JUMP button: two different functions available:
LOOP CUT: press this button to cut the length of the playing loop in two.
LOOP JUMP: press this button while the SHIFT-button (38) is pressed to let the playing loop move
(or jump) 2beats back in the track.
33. LOOP DOUBLE/JUMP button: two different functions available:
LOOP DOUBLE: press this button to double the length of the playing loop.
LOOP JUMP: press this button while the SHIFT-button (38) is pressed to let the playing loop move
(or jump) 2beats forward in the track.
34. PITCH button: two different functions available:
Press PITCH button: used to change the range of the pitch fader: 6, 10, 20, 50 or 100%.
Press PITCH+SHIFT button: switches the speed lock function on/off. When speed lock is on, the
speed faders of both players are locked: they move together.
35. SPEED FADER: used to change the playback speed of the playing track.
36. PITCH BEND buttons: The speed rises while the “+ button” is pressed and returns to the original pitch
when the button is released. The speed drops when the “– button” is pressed and returns to the original
pitch when the button is released. These buttons can be used to manually synchronize the beats of 2
tracks.
37. HOT CUE buttons: used to set 3 different hot cue points.
Store a cue point: when no cue point is stored, the button is dark press the CUE-button to store
the desired cue point. (cue points are automatically re-called when you load the track again)
Play from a cue point: when a cue point is stored, the button is lit press the CUE-button to start
playback immediately from the stored cue point.
Delete a cue point: press the CUE+SHIFT buttons together the stored cue point will be deleted.
38. SHIFT button: used to activate “extra functions” on some buttons. The extra functions are usually
written in the grey zone of the buttons.
39. NEEDLE DROP: a special tool to search the loaded track amazingly fast. Just put your finger on the
location where you want the player to jump to, just as in the old days where you dropped the needle on
your vinyl record.
40. KEY LOCK button: (Master tempo) activates the pitch lock function. This function allows you to make
adjustments to a tracks speed using the SPEED fader (35) without altering the tonal pitch.
41. EFFECT ON/OFF button: used to switch the selected effect on/off.
42. EFFECT SELECT button: used to select one of the available effects.
43. PARAMETER1 knob: different functions available:
Turn PARAMETER knob: adjust the parameter 1 of the selected effect.
Turn PARAMETER knob while SHIFT is pressed: to adjust the frequency of the filter effect.
44. PARAMETER2 knob: different functions available:
Turn PARAMETER knob: adjust the parameter 2 of the selected effect.
Turn PARAMETER knob while SHIFT is pressed: to adjust the tonal pitch of the music.
FUNCTIONS (REAR)
45. USB connection: B-type USB-connector. Please use the supplied USB cable to connect the controller
to your computer.
Remark: if you are using a USB hub, make sure it is a powered hub. Otherwise you may experience
unexpected problems.
46. UNBALANCED MASTER output: unbalanced cinch/RCA stereo output, used to connect your audio
amplifier. You can use this output if the signal cables to your amplifier are not longer than 2m or 3m.
47. BALANCED MASTER output: balanced XLR stereo output, used to connect your audio amplifier or
amplified loudspeakers. A balanced signal connection is less sensitive to all kinds of interferences
coming from all kinds of sources. Use this output if your amplifier or powered loudspeakers have
balanced inputs (XLR) and the length of the signal cables exceeds 3m.
48. RCA/XLR switch: used to selected the desired master output (RCA or XLR)
49. POWER ADAPTER input: used to connect the supplied 5Vdc power adapter.
Remark: the controller will also work without the power adapter, however in this case power is drawn
from the USB-port of your computer. In some cases, especially on portable computers, the provided
power is not enough. Please use the supplied power adapter to avoid instability under certain conditions.
JB SYSTEMS
®
7/54 DJ-KONTROL 3
JB SYSTEMS
®
8/54 DJ-KONTROL 3
Page 7
ENGLISH USER MANUAL
FRANÇAIS GUIDE D’UTILISATION
SPECIFICATIONS
DJ-KONTROL3
Power: via supplied power adapter, 5Vdc, 1A
Audio interface: 24Bit / 192kHz
Dimensions: 320(W) x 240(D) x 65(H) mm
Weight: 1,42kg
PC PLATFORM - MINIMUM SYSTEM REQUIREMENTS
Intel®Pentium®4 or AMD Athlon™ XP
1024 x 768 video resolution
DirectX compatible Soundcard
512MB RAM
50MB free on the hard drive
PC PLATFORM – MINIMUM RECOMENDED SYSTEM REQUIREMENTS
Intel®Core™ 2 or AMD Athlon™ X2
1280 x 1024 resolution
Multi-channel DirectX compatible Soundcard
1GB RAM
200MB free on the hard drive
MAC PLATFORM - MINIMUM SYSTEM REQUIREMENTS
Intel®processor
Mac OS X v10.5
1024 x 768 resolution
CoreAudio compatible Soundcard
1GB RAM
50MB free on the hard drive
MAC PLATFORM - MINIMUM SYSTEM REQUIREMENTS
Intel®processor
Latest Mac OS X v10.6.x
1440 x 900 resolution
Multi-channel CoreAudio compatible Soundcard
2GB RAM
200MB free on the hard drive
Every information is subject to change without prior notice
You can download the latest version of this user manual on our website: www.beglec.com
GUIDE D’UTILISATION
Nous vous remercions d'avoir acheté ce produit JB Systems®. Lisez ce guide d'utilisation très attentivement
pour tirer pleinement profit de toutes les possibilités de l'appareil.
CARACTÉRISTIQUES
Cet appareil ne produit pas d’interférences radio. Cet appareil répond aux exigences des directives
européennes et nationales en vigueur. La conformité a été établie et les déclarations et documents
correspondants ont été déposés par le fabricant.
Contrôleur MIDI 2 canaux pour DJ professionnels (itinérants, les clubs, studios...)
Boîtier en aluminium robuste avec surface supérieure très brillante en polycarbonate et un éclairage
élégant blanc/bleu.
Livré avec la dernière version de VirtualDJ LE, le premier logiciel DJ qui peut même mixer des clips vidéo !
Grâce à la norme de communication MIDI, ce contrôleur peut être utilisé avec n'importe quel logiciel MIDI
pour DJ disponible !
La plupart des boutons sont rétroéclairés : facile à utiliser dans l'obscurité.
Peut être utilisé sur n'importe quel portable ou un PC récent fonctionnant sous Windows® XP/Vista/7 ou
Mac® OSX
Carte son 24bit/192kHz intégrée de meilleure qualité pour d'excellentes performances sonores !
Haute résolution, molettes de scratch tactiles avec rétroéclairage bleu
Capteurs de position d'aiguille «Needle Drop» pour une recherche ultra-rapide dans les pistes.
Mixeur 2 canaux :
Egaliseur 3 bandes avec bouton push kill
Entrée micro DJ et sortie casque PFL
Crossfader avec réglage de courbe.
Sorties master en XLR symétriques (+ cinch asymétrique)
Installation facile grâce à la technologie plug & play : Aucun pilote ou compétences informatiques
supplémentaire ne sont nécessaires !
Entièrement optimisé pour une utilisation avec le logiciel VirtualDJ :
Beat matching (synchronisation des beats), beat loops automatiques, détection des beats instantanée,
etc. par la pression sur une seule touche
Echantillonneurs de beats synchronisés, master tempo très précis, 3 points de repère par piste ...
Mixage vidéo : Mixage de clips vidéo et effets vidéo créatifs !
Compatible avec les fichiers MP3, AIFF, OGG, WAV, CDA, WMA, etc.
Entièrement compatible avec iTunes
Mise à niveau vers VirtualDJ PRO à un prix discompté !
Adaptateur 5V inclus pour une meilleure stabilité de fonctionnement.
AVANT utilisation
Avant d'utiliser cet appareil, vérifiez s'il n'a pas été endommagé durant le transport. En cas de dommages,
n'utilisez pas l'appareil et consultez immédiatement votre revendeur.
Important : Cet appareil est expédié de notre usine en parfait état et bien emballé. Il est absolument
nécessaire que l'utilisateur suive strictement les instructions et les avertissements de sécurité se trouvant
dans ce manuel. Tout dommage dû à une mauvaise manipulation n'est pas garanti. Le revendeur
n'accepte aucune responsabilité pour tous les défauts et problèmes dus au non respect de ce manuel.
Conservez ce manuel dans un endroit sûr pour toute consultation future. Si vous vendez l'appareil, veillez
à joindre ce manuel.
Pour protéger l'environnement, essayer de recycler autant que possible les matériaux d'emballage.
Vérifiez le contenu :
Vérifiez que le carton contient les éléments suivants :
Contrôleur Midi USB
Câble USB
CD de logiciel (contient également les manuels d'utilisation)
Code de licence pour VirtualDJ LE
Adaptateur 5V CC
JB SYSTEMS
®
9/54 DJ-KONTROL 3
JB SYSTEMS
®
10/54 DJ-KONTROL 3
Page 8
FRANÇAIS GUIDE D’UTILISATION
FRANÇAIS GUIDE D’UTILISATION
INSTRUCTIONS DE SÉCURITÉ :
CAUTION
Le symbole de l'éclair à l'intérieur d'un triangle équilatéral, est destiné à alerter l'utilisateur de la
présence de pièces sous tension non isolées dans le boîtier de l'appareil, d'une magnitude
pouvant constituer un risque d'électrocution.
Le symbole du point d'exclamation dans un triangle sert à avertir l'utilisateur que d'importants
conseils de fonctionnement sont fournis dans la documentation
Ce symbole signifie : pour usage intérieur uniquement.
Ce symbole signifie : Lisez les instructions
Ce symbole signifie : Appareil de classe de sécurité III
Pour éviter tout incendie ou électrocution, n'exposez pas cet appareil à la pluie ou l'humidité.
Pour éviter une formation de condensation interne, laissez l'appareil s'adapter à la température ambiante
quand vous la mettez dans une pièce chauffée après le transport. La condensation empêche parfois
l'appareil de fonctionner à plein rendement ou peut même causer des dommages.
Cet appareil est destiné à un usage intérieur seulement.
Ne placez pas d'objets métalliques et ne renversez pas de liquides à l'intérieur de l'appareil. Aucun objet
rempli de liquide, tel que des vases, ne doit être placé au dessus de l'appareil. Un choc électrique ou un
dysfonctionnement peut en résulter. Si un corps étranger pénètre dans l'appareil, débranchez
immédiatement l'alimentation secteur.
Aucune source de flamme nue, telle que des bougies allumées, ne doit être placée au dessus de
l'appareil.
Ne couvrez pas les ouvertures de ventilation, cela pourrait entraîner une surchauffe.
Evitez une utilisation dans des environnements poussiéreux et nettoyez l'appareil régulièrement.
Gardez l'appareil loin de la portée des enfants.
Les personnes inexpérimentées ne doivent pas utiliser cet appareil.
La température ambiante de fonctionnement maximale est de 40°C. N'utilisez pas cet appareil à des
températures ambiantes plus élevées.
Il faut laisser au moins 5cm autour de l'appareil pour assurer une aération suffisante.
Débranchez toujours l'appareil lorsqu'il ne va pas être utilisé pendant une longue période et avant chaque
entretien.
En cas de sérieux problèmes de fonctionnement, cessez d'utiliser l'appareil et contactez immédiatement
votre revendeur.
Utilisez l'emballage d'origine pour transporter l'appareil.
Pour des raisons de sécurité, il est interdit d'apporter des modifications non autorisées à l'appareil.
DIRECTIVES D'INSTALLATION :
Installez l'appareil dans un endroit bien aéré non exposé à des températures et taux d'humidité élevés.
En plaçant et en utilisant l'appareil pendant de longues périodes à proximité de sources générant de la
chaleur telles que amplificateurs, projecteurs, etc. l'appareil risque d'être endommagé et ses performances
dégradées.
Lorsqu'il est installé dans une cabine de prise de son ou mallette de transport, assurez-vous d'avoir une
bonne ventilation pour améliorer l'évacuation de la chaleur de l'unité.
Pour éviter une formation de condensation interne, laissez l'appareil s'adapter à la température ambiante
quand vous la mettez dans une pièce chauffée après le transport. Une formation de condensation peut
parfois empêcher l'appareil de fonctionner à plein rendement.
NETTOYAGE DE L'APPAREIL :
Nettoyez l'appareil à l'aide d'un chiffon légèrement humidifié. Évitez que l'eau ne pénètre à l'intérieur de
l'appareil. N'utilisez pas de liquides volatils tels que benzène ou diluant qui endommagent l'appareil.
ATTENTION : Pour réduire le risque de choc électrique, ne
retirez pas le panneau supérieur. L'appareil ne contient
aucun composant réparable par l'utilisateur. Confiez toute
réparation à un personnel qualifié uniquement.
CONNEXIONS
Veuillez suivre le schéma de câblage ci-dessous pour connecter le "DJ-KONTROL3" :
Utilisez le câble USB fourni pour connecter le contrôleur, via le connecteur USB (45) à votre ordinateur.
Connectez les sorties cinch (46) ou sorties XLR (47) à votre amplificateur audio ou à des enceintes
amplifiées.
Mettez le sélecteur de sortie dans la position désirée.
Connectez votre micro (le cas échéant) à l'entrée micro (11) du panneau avant du contrôleur.
Connectez vos écouteurs à la sortie casque (16) du panneau avant du contrôleur.
Utilisez l'adaptateur 5V CC fourni pour connecter entrée DC (49) du contrôleur au secteur.
Consultez le chapitre CONFIGURATION DE VIRTUALDJ pour apprendre à configurer le routage audio dans
le logiciel.
INSTALLING VIRTUALDJ
Installation sur votre ordinateur :
Remarque : La procédure d'installation ci-dessous est pour Windows. Cependant, à part quelques petites
différences, cette procédure est très similaire pour MAC OS.
Insérez le CD-ROM dans votre ordinateur : normalement l'installation devrait démarrer automatiquement. Si
l'installation ne démarre pas automatiquement, parcourez le CD et double cliquez sur le fichier
"install_virtualdj_le_v7.0.X.exe" (install_virtualdj_le_v7.0.X.pkg pour MAC). Le nom de fichier peut être
légèrement différent) ; suivez les instructions à l'écran :
Cliquez sur le bouton “NEXT” Lisez et acceptez les conditions du contrat de licence logiciel Choisissez installation
"Typical".
JB SYSTEMS
®
11/54 DJ-KONTROL 3
JB SYSTEMS
®
12/54 DJ-KONTROL 3
Page 9
FRANÇAIS GUIDE D’UTILISATION
FRANÇAIS GUIDE D’UTILISATION
CONFIGURATION DE VIRTUALDJ
La configuration de DJ-KONTROL3 dans VirtualDJ LE est très simple : il suffit de suivre la même
configuration, comme indiqué ci-dessous : La sortie principale est envoyée aux sorties enceintes arrière et le
signal PFL (casque) est envoyé aux sorties enceintes avant de la carte son interne.
Cliquez sur le bouton “INSTALL”. Cliquez sur le bouton “FINISH”.
Connectez à présent le contrôleur DJ-KONTROL3 avec le câble USB fourni.
Activation du logiciel :
La première fois que vous lancez VirtualDJ, le logiciel vous
demande un numéro de série : entrez le code de licence fourni
avec votre produit. Dès que vous aurez entré la clé de licence,
VirtualDJ devient opérationnel en mode LE.
Support et mises à jour du logiciel :
VirtualDJ ajoute fréquemment de nouvelles fonctionnalités et des améliorations à leur logiciel, c'est
pour cette raison que nous vous conseillons de visiter leur site web (www.virtualdj.com) et
enregistrer votre logiciel : sur le site web de VirtualDJ choisissez le menu TELECHARGEMENTS et
allez à "Mises à jour du logiciel". Créez un nouveau compte utilisateur et enregistrez votre logiciel
(avec le "code de licence" utilisé pour déverrouiller le logiciel).
Vous pouvez maintenant vérifier régulièrement si il ya des nouvelles versions et les télécharger !
Vous pouvez également consulter les tutoriels et participer à des forums !
IMPORTANT : Il convient de noter que JB Systems ne couvre que le support pour le matériel (le contrôleur).
Le support de VirtualDJ est exclusivement couvert par les développeurs sur le site web :
www.virtualdj.com!
Mise à niveau vers la version PRO
Après un certain temps d'utilisation de VirtualDJ, vous
apprendrez différentes fonctionnalités intéressantes de la
version PRO. En tant qu'utilisateur de la version LE, vous
pouvez essayer la version PRO gratuitement pendant 20 jours,
et si vous la trouvez intéressante (nous sommes que vous allez
l'aimer) vous pouvez acheter la mise à niveau à un prix
discompté. Allez au menu configuration pour plus
d'informations.
!!! IMPORTANT !!!
Pilotes ASIO :
Si vous voulez absolument avoir une latence extrêmement faible (retard), vous pouvez également essayer
avec les pilotes ASIO si vous le souhaitez :
dans ce cas, vous pouvez sélectionner “ASIOdriver” pour la carte son. Etant donné que ceci
sort du cadre de ce manuel, nous n'allons pas
expliquer ici la configuration des pilotes.
UTILISATION D'AUTRES LOGICIELS DJ
Etant donné que ce contrôleur est un dispositif compatible MIDI, vous pouvez l'utiliser pour contrôler tout
logiciel DJ Midi. Il va de même que vous aurez besoin de fichiers de mappage MIDI particuliers pour ces
produits. Visitez notre site web (www.jbsystems.be) : nous fournissons gratuitement des fichiers de mappage
MIDI pour certains autres logiciels DJ.
TUTORIELS VIRTUAL DJ
Dans le chapitre suivant, nous allons vous donner un bref aperçu des fonctions de VirtualDJ LE fourni avec
votre contrôleur.
VirtualDJ est un logiciel très intuitif donc vous pourrez facilement l'apprendre, tout en essayant toutes les
possibilités. Pour en savoir plus, visitez le site VirtualDJ pour accéder à des tutoriels vidéo et guides
d'utilisation supplémentaire : www.virtualdj.com/wiki/index.html.
JB SYSTEMS
®
13/54 DJ-KONTROL 3
JB SYSTEMS
®
14/54 DJ-KONTROL 3
Page 10

FRANÇAIS GUIDE D’UTILISATION
FRANÇAIS GUIDE D’UTILISATION
FONCTIONS (MIXER)
1. Bouton TRACK SELECT : tournez ce bouton pour faire
défiler vers le haut ou le bas dans les dossiers, l'explorateur
ou la bibliothèque audio.
Appuyez brièvement : pour sélectionner un dossier ou un
fichier.
Appuyez pendant 0,5 seconde : pour agrandir/rétrécir
(zoom) l'explorateur.
2. Touche LOAD A : appuyez sur cette touche pour charger la
piste sélectionnée sur le lecteur A (côté gauche) du logiciel.
3. Touche LOAD B : appuyez sur cette touche pour charger la
piste sélectionnée sur le lecteur B (côté droit) du logiciel.
4. Touche Précédent : cette touche permet de retourner à un
niveau supérieur dans la structure des dossiers/explorateur.
5. Bouton GAIN : tournez ce bouton pour régler le gain du
canal correspondant.
6. Bouton HIGH : utilisé pour régler les hautes fréquences du
canal correspondant. Appuyez sur le bouton pour
activer/désactiver la fonction KILL.
7. Bouton MIDDLE : utilisé pour régler les moyennes
fréquences du canal correspondant. Appuyez sur le bouton
pour activer/désactiver la fonction KILL.
8. Bouton LOW : utilisé pour régler les basses fréquences du
canal correspondant. Appuyez sur le bouton pour
activer/désactiver la fonction KILL.
9. FADER DE CANAL : pour régler le volume du canal audio
correspondant.
10. VOLUME MICRO : sert à régler la sensibilité du micro DJ.
11. Entrée Micro : Connecteur d’entrée 6,3 mm pour connecter
votre micro DJ.
12. CROSSFADER : ce fader permet de mixer deux canaux. Le
crossfader ne fonctionne que lorsque vous déplacez le fader
de canal (9) des deux canaux au niveau souhaité !
13. COURBE DU CROSSFADER : permet de choisir une courbe douce ou aigue pour le crossover. Cela
dépend de votre goût personnel.
14. CUE MIX : ce bouton permet de mixer les canaux d'entrée à la sortie casque :
Positionnez le bouton à l'extrême gauche pour entendre les signaux PFL des lecteurs.
Positionnez le bouton à l'extrême droite pour entendre le signal de sortie principal mixé.
Positionnez le bouton à un endroit quelconque pour entendre un mixage des deux signaux.
Cette option permet de vérifier votre mix avant de le mettre sur la sortie master.
15. Bouton CUE VOLUME : utilisé pour contrôler le niveau de sortie du canal casque.
16. Sortie phono : pour connecter vos écouteurs pour le contrôle de vos pistes.
17. Touche gauche CUE SELECT : appuyez sur cette touche pour contrôler le lecteur 1 pendant que le
fader du canal est fermé.
18. Touche droite CUE SELECT : appuyez sur cette touche pour contrôler le lecteur 2 pendant que le fader
du canal est fermé.
19. Bouton volume principal : permet de régler le volume de la sortie principale.
FONCTIONS (LECTEURS)
20. Touche SET CUE : permet de se positionner à endroit désiré de la piste. Il permet également de
positionner l'audio au niveau du dernier point de repère. Maintenez appuyé le bouton pour prévisualiser
le point de repère jusqu'à ce que le bouton soit relâché.
21. Touche CUE PLAY : permet de démarrer la lecture de la piste à partir du dernier point de repère.
22. Touche Lecture/Pause : permet de démarrer/arrêter la lecture de la piste chargée.
23. Molette : son rôle dépend du mode de lecture choisi :
En mode pause : la molette permet de définir un point de repère ou point de départ avec une très
grande précision.
En mode lecture : la molette agit comme un pitch bend.
Mode entrée de boucle : appuyez sur la touche SHIFT
(38) tout en tournant la molette pour déplacer la position
de lecture de la boucle.
Touche Scratch (24) allumée : avec la fonction scratch
activée, la molette vous permet de scratcher la piste un
peu comme un disque vinyle. Pour augmenter la
sensibilité du vinyle, la molette est sensible au toucher :
cela signifie que la lecture s'arrête dès que vous mettez
votre main sur la molette.
Touche Scratch (24) clignotante : tournez la molette
pour parcourir/recherche toute la piste à haute vitesse.
24. Touche SCRATCH : différentes fonctions sont possibles :
Appuyez brièvement : pour basculer entre le mode de
navigation (touche non allumée) et le mode scratch
(touche allumée) pour la molette (23).
Appuyez pendant 0,5 seconde : pour
activer/désactiver la fonction de la molette
parcourir/rechercher à haute vitesse (23). Si activé, vous
pouvez rechercher toute la piste à très haute vitesse.
25. Touche SYNC : permet de synchroniser la piste chargée
automatiquement avec la piste en cours de lecture sur
l'autre platine. En appuyant sur la touche SYNC avec la
touche SHIFT (38) vous pouvez commencer
immédiatement la synchronisation de votre piste avec la
piste en cours de lecture sur l'autre platine. (Également
appelé "sync-start")
26. Touche LOOP IN (entrée de boucle) : différentes
fonctions disponibles :
Lorsqu'aucune boucle n'est pas en lecture : appuyer
sur la touche LOOP IN pour définir le point d'entrée
d'une boucle manuelle.
Boucle est en lecture : appuyez sur la touche LOOP IN
pour déclencher la boucle en lecture (effet cadencé).
27. Touche LOOP OUT (Sortie de boucle) : différentes
fonctions disponibles :
Lorsqu'aucune boucle n'est pas en lecture : appuyez sur la touche LOOP OUT pour définir le point
de fin d'une boucle manuelle, la boucle démarre immédiatement la lecture.
Boucle est en lecture : appuyez sur la touche LOOP OUT pour quitter la boucle en lecture.
28. Touche RELOOP : en cours de lecture de boucle, appuyez sur la touche RELOOP pour relancer
immédiatement la boucle (effet bégaiement). Lorsqu'aucune boucle n'est en lecture : appuyez sur la
touche RELOOP pour accéder à nouveau à la dernière boucle lue.
29. SMART LOOP 2/1 : appuyez sur cette touche pour créer une boucle automatique intelligente de 2/1-
beat.
30. SMART LOOP 4/1 : appuyez sur cette touche pour créer une boucle automatique intelligente de 4/1-
beat.
31. SMART LOOP 8/1 : appuyez sur cette touche pour créer une boucle automatique intelligente de 8/1-
beat.
32. Touche LOOP CUT/ JUMP : deux fonctions différentes disponibles :
LOOP CUT : appuyez sur cette touche pour couper la longueur de la boucle en lecture en deux.
LOOP JUMP : appuyez sur cette touche en même temps que SHIFT (38) pour laisser la boucle en
lecture se déplacer (ou sauter) en arrière de 2 beats dans la piste.
33. Touche LOOP DOUBLE/JUMP : deux fonctions différentes disponibles :
LOOP DOUBLE : appuyez sur cette touche pour doubler la longueur de la boucle en lecture.
LOOP JUMP : appuyez sur cette touche en même temps que SHIFT (38) pour laisser la boucle en
lecture se déplacer (ou sauter) vers l’avant de 2 beats dans la piste.
34. Touche PITCH : deux fonctions différentes disponibles :
JB SYSTEMS
®
15/54 DJ-KONTROL 3
JB SYSTEMS
®
16/54 DJ-KONTROL 3
Page 11

FRANÇAIS GUIDE D’UTILISATION
FRANÇAIS GUIDE D’UTILISATION
Appuyez sur la touche PITCH : permet de changer la plage du pitch fader : 6, 10, 20, 50 ou 100%.
Appuyez sur PITCH+SHIFT: permet d'activer/désactiver la fonction Verrouillage de vitesse. Lorsque
le verrouillage de vitesse est activé, les faders de vitesse des deux lecteurs sont verrouillés : ils se
déplacent ensemble.
35. FADER DE VITESSE : utilisé pour changer la vitesse de lecture de la piste en cours.
36. Touches PITCH BEND : La vitesse augmente lorsque la touche "+" est enfoncée et retourne à la
vitesse initiale lorsque la touche est relâchée. La vitesse diminue lorsque la touche "-" est enfoncée et
retourne à la vitesse initiale lorsque la touche est relâchée. Ces touches peuvent être utilisées pour
synchroniser manuellement les beats de deux pistes.
37. Touches HOT CUE : permettent de définir trois différents points de repère chauds.
Mémoriser un point de repère : Lorsqu'aucun point de repère n'est mémorisé, la touche est sombre
appuyez sur la touche pour mémoriser le point de repère désiré. (Les points de repère sont
automatiquement rappelés lorsque vous chargez à nouveau la piste)
Lecture à partir d'un point de repère : Lorsqu'un point de repère est mémorisé, la touche est
allumée appuyez sur la touche CUE pour démarrer la lecture immédiatement du point de repère
mémorisé.
Supprimer un point de repère : appuyez sur les touches CUE + SHIFT le point de repère
mémorisé sera supprimé.
38. Touche Shift : permet d'activer des "fonctions supplémentaires" sur certaines touches. Les fonctions
supplémentaires sont généralement inscrites dans la zone grise sous les touches.
39. NEEDLE DROP : un outil spécial pour rechercher la piste chargée de façon ultra rapide. Il suffit de
mettre le doigt sur l'emplacement où vous souhaitez lire, tout comme dans le bon vieux temps où vous
faisiez abaisser l'aiguille sur votre disque vinyle.
40. Touche KEY LOCK (verrouillage des touches) : (Master Tempo) active la fonction de verrouillage du
pitch. Cette fonction vous permet de faire des réglages de vitesse de pistes à l'aide du fader SPEED
(35), sans modifier la hauteur tonale.
41. Touche EFFECT ON/OFF (activer/désactiver l'effet) : permet d'activer/désactiver l'effet sélectionné.
42. touche EFFET SELECT (sélection d'effet) : permet de sélectionner l'un des effets disponibles.
43. Bouton PARAMETER1 : différentes fonctions disponibles :
Tournez le bouton PARAMETER : pour ajuster le paramètre 1 de l'effet sélectionné.
Tournez le bouton PARAMETER pendant que la touche SHIFT est appuyée : pour ajuster la
fréquence de l'effet de filtre.
44. Bouton PARAMETER2 : différentes fonctions disponibles :
Tournez le bouton PARAMETER : pour ajuster le paramètre 2 de l'effet sélectionné.
Tournez le bouton PARAMETER pendant que la touche SHIFT est appuyée : pour ajuster la
hauteur tonale de la musique.
FONCTIONS (panneau arrière)
SPÉCIFICATIONS
DJ-KONTROL3
Alimentation : par l'adaptateur secteur fourni, 5V CC, 1A
Interface audio : 24Bit/192kHz
Dimensions : 320(L) x 240(l) x 65(H) mm
Poids : 1,42kg
PLATE-FORME PC - CONFIGURATION MINIMALE REQUISE
Intel®Pentium®4 ou AMD Athlon™ XP
Résolution 1024 x 768
Carte son compatible DirectX
512 Mo de RAM
50Mo disponibles sur le disque dur
PLATE-FORME PC - CONFIGURATION MINIMALE RECOMMANDEE
Intel®Core™ 2 ou AMD Athlon™ X2
Résolution 1280 x 1024
Carte son multicanal compatible DirectX
1GB RAM
200Mo disponibles sur le disque dur
PLATEFORME MAC - CONFIGURATION MINIMALE REQUISE
Intel®processor
Mac OS X v10.5
Résolution 1024 x 768
Carte son compatible CoreAudio
1GB RAM
50Mo disponibles sur le disque dur
PLATEFORME MAC - CONFIGURATION MINIMALE REQUISE
Intel®processor
Dernier Mac OS X 10.6.x
Résolution 1440 x 900
Carte son multicanal compatible CoreAudio
2GB RAM
200Mo disponibles sur le disque dur
45. Connecteur USB : Connecteur USB de type B. Veillez à utiliser le câble USB fourni pour connecter le
contrôleur à votre ordinateur.
Remarque : si vous utilisez un concentrateur USB, assurez-vous qu'il soit un concentrateur alimenté.
Dans le cas contraire, vous pouvez rencontrer des problèmes inattendus.
46. Sortie principale asymétrique : sortie stéréo cinch/RCA asymétrique, utilisé pour connecter un
amplificateur audio. Vous pouvez utiliser cette sortie si les câbles du signal vers votre amplificateur n’ont
pas une longueur supérieure à 2 ou 3m.
47. Sortie principale symétrique : sortie stéréo XLR symétrique, utilisée pour connecter votre amplificateur
audio ou des enceintes amplifiées. Une connexion de signal symétrique est moins sensible à tous les
types d'interférences issues de tout type de source. Utilisez cette sortie si votre amplificateur ou
enceintes amplifiées ont des entrées symétriques (XLR) et la longueur des câbles de signal dépasse les
3m.
48. Commutateur RCA/XLR : utilisé pour sélectionner la sortie principale souhaitée (RCA ou XLR)
49. Entrée adaptateur d'alimentation : sert à connecter l'adaptateur secteur 5V CC fourni.
Remarque : le contrôleur peut également fonctionner sans l'adaptateur secteur s'il est alimenté par le
port USB de votre ordinateur. Dans certains cas, en particulier avec les ordinateurs portables, la
puissance fournie n'est pas suffisante. Utilisez l'adaptateur secteur fourni pour éviter l'instabilité dans
certaines conditions.
JB SYSTEMS
®
17/54 DJ-KONTROL 3
Vous pouvez télécharger la dernière version de ce manuel sur notre site web : www.beglec.com
JB SYSTEMS
Toutes les informations peuvent être modifiées sans préavis
®
18/54 DJ-KONTROL 3
Page 12

NEDERLANDS GEBRUIKSHANDLEIDING
NEDERLANDS GEBRUIKSHANDLEIDING
GEBRUIKSAANWIJZING
Hartelijk dank voor de aankoop van dit JB Systems®product . Om volledig van alle mogelijkheden te
profiteren, lees deze handleiding zeer zorgvuldig.
KENMERKEN
Dit apparaat is radio-interferentie onderdrukt . Dit product voldoet aan de eisen van de huidige Europese en
nationale richtlijnen. Overeenstemming is vastgesteld en de desbetreffende verklaringen en documenten zijn
door de fabrikant gedeponeerd.
Professionele 2-kanaals MIDI controller voor DJ’s (mobiel, clubs, studio …)
Stevige aluminium behuizing met hoogglanzend polycarbonaat bovenoppervlak en stijlvolle witte/blauwe
verlichting.
Gebundeld met de nieuwste versie van VirtualDJ LE, de ultieme DJ-software die zelfs videoclips kan
mixen!
Dankzij de standaard MIDI-communicatie kan deze controller tevens met elke MIDI DJ-software worden
gebruikt die u kunt bedenken!
De meeste knoppen zijn verlicht: gemakkelijk te gebruiken in donkere zalen.
Kan gebruikt worden op elke moderne laptop of PC, die onder W indows® XP/Vista/7 en Mac® OSX draait
Ingebouwde 24-bit/192 kHz premium kwaliteit geluidskaart voor een uitstekende geluidsprestatie!
Hoge resolutie, aanrakingsgevoelige scratchwielen met blauwe achtergrondverlichting
“Needle Drop” positiesensoren voor een ultrasnelle zoekfunctie binnen tracks.
2-Kanaals mixer:
3-bands equalizer met push-kill functie
DJ-mic ingang en PFL hoofdtelefoonuitgang
Crossfader met regelbare curve.
Gebalanceerde XLR-masters (+ ongebalanceerde tulp)
Eenvoudige plug & play-installatie: geen extra drivers of computervaardigheden nodig!
Volledig geoptimaliseerd voor gebruik met Virtual DJ-software:
"1-click" beat matching, automatische beat loops, instant beat-detectie, ...
Beat gesynchroniseerde samplers, zeer nauwkeurig hoofdtempo, 3 cue-punten per track, ...
Video mengen: creatief mengen van videoclips, inclusief video-effecten!
Speelt MP3, AIFF, OGG, WAV, CDA, W MA, en nog veel meer...
Volledig compatibel met iTunes
Opwaarderen naar VirtualDJ PRO tegen een gereduceerde prijs!
5 V voeding meegeleverd voor extra werkstabiliteit.
VÓÓR GEBRUIK
Voordat u met het gebruik van dit apparaat start, controleer of er geen transportschade aanwezig is. Mocht
er schade zijn, gebruik het apparaat niet en raadpleeg eerst uw dealer.
Belangrijk: Dit apparaat verliet de fabriek in perfecte staat en goed verpakt. Het is absoluut noodzakelijk
voor de gebruiker om de veiligheidsinstructies en waarschuwingen in deze handleiding strikt op te volgen.
Eventuele schade veroorzaakt door verkeerd gebruik valt niet onder de garantie. De dealer zal niet
aansprakelijk worden gesteld voor eventuele fouten of problemen veroorzaakt door het negeren van deze
handleiding.
Bewaar dit boekje op een veilige plaats voor toekomstige raadpleging. Als u de armatuur verkoopt, zorg
ervoor deze handleiding erbij te voegen.
Om het milieu te beschermen, probeer het verpakkingsmateriaal zoveel mogelijk te recyclen.
Controleer de inhoud:
Controleer of de doos de volgende items bevat:
USB Midi Controller
USB-kabel
Software CD-rom (inclusief gebruikershandleidingen)
Licentie code voor VirtualDJ LE
5 VDC voedingadapter
VEILIGHEIDSINSTRUCTIES:
OPGELET: Om het risico voor elektrische schokken te
CAUTION
De bliksemschicht met pijl binnenin een gelijkzijdige driehoek is bedoeld om de gebruiker te
waarschuwen op de aanwezigheid van ongeïsoleerde “gevaarlijke voltage” binnen de behuizing
van het product dat van voldoende omvang is om een risico op elektrische schokken te vormen.
Het uitroepteken binnen een gelijkzijdige driehoek is bedoeld om de gebruiker te waarschuwen op
de aanwezigheid van belangrijke gebruiks- en onderhoudsinstructies in de documentatie die met
dit apparaat meekomen.
Dit symbool betekent: alleen gebruik binnenshuis.
Dit symbool betekent: Lees de instructies.
Dit symbool betekent: Veiligheidsklasse III apparaat.
Om vuur of elektrische schokgevaar te voorkomen, stel dit apparaat niet bloot aan regen of vocht.
Om te voorkomen dat binnenin condensatie wordt gevormd, laat het apparaat aan de
omgevingstemperatuur aanpassen wanneer het na transport in een warme kamer wordt gebracht.
Condens verhindert soms het apparaat op volle capaciteit te werken of kan zelfs schade veroorzaken.
Dit apparaat is uitsluitend geschikt voor gebruik binnenshuis.
Plaats geen metalen voorwerpen of mors geen vloeistoffen in het toestel. Geen objecten gevuld met
vloeistoffen, zoals vazen, mogen op dit apparaat worden geplaatst. Elektrische schokken of storing kan het
gevolg zijn. Als een vreemd voorwerp in het apparaat terechtkomt, trek onmiddellijk de stekker uit het
stopcontact.
Plaats geen voorwerpen met open vuur, zoals brandende kaarsen, op het apparaat.
Bedek geen ventilatieopeningen, omdat het tot oververhitting kan leiden.
Voorkom het gebruik in stoffige omgevingen en maak het regelmatig schoon.
Houd het apparaat buiten bereik van kinderen.
Onervaren personen mogen dit apparaat niet bedienen.
De maximaal veilige omgevingstemperatuur is 40 °C. Gebruik dit apparaat niet bij hogere
omgevingstemperaturen.
Houd minimaal 5 cm afstand rond het apparaat vrij voor voldoende ventilatie
Ontkoppel altijd het apparaat wanneer het voor een langere tijd niet wordt gebruikt of alvorens het
onderhoud te beginnen.
In het geval van ernstige problemen, stop met het gebruik van het apparaat en neem onmiddellijk contact
op met uw dealer.
Gebruik de originele verpakking als het toestel vervoerd moet worden.
Vanwege veiligheidsredenen is het verboden om ongeautoriseerde wijzigingen op het apparaat aan te
brengen.
RICHTLIJNEN VOOR DE INSTALLATIE:
Installeer het apparaat op een goed geventileerde plek waar het niet wordt blootgesteld aan hoge
temperaturen of vochtigheid.
Het voor langere tijd plaatsen en gebruiken van het apparaat in de buurt van warmtebronnen zoals
versterkers, spots, enz., zal invloed hebben op de prestaties en kan zelfs het apparaat beschadigen.
Bij installatie in een cabine of flightcase, zorg voor een goede ventilatie om de afvoer van warmte van het
apparaat te verbeteren.
Om te voorkomen dat binnenin condensatie wordt gevormd, laat het apparaat aan de
omgevingstemperatuur aanpassen wanneer het na transport in een warme kamer wordt gebracht.
Condens verhindert soms het apparaat op volle capaciteit te werken of kan zelfs schade veroorzaken.
HET APPARAAT REINIGEN:
Schoonmaken met een licht vochtige poetsdoek. Zorg ervoor dat geen water in het apparaat terechtkomt.
Gebruik geen vluchtige vloeistoffen zoals benzeen of thinner, die zullen het apparaat beschadigen.
verkleinen, verwijder de bovenafdekking niet. Binnenin
bevinden zich geen onderdelen die door de gebruiker
onderhouden kunnen worden. Laat het onderhoud door
gekwalificeerd onderhoudspersoneel uitvoeren.
JB SYSTEMS
®
19/54 DJ-KONTROL 3
JB SYSTEMS
®
20/54 DJ-KONTROL 3
Page 13

NEDERLANDS GEBRUIKSHANDLEIDING
AANSLUITINGEN
Volg het onderstaande aansluitschema om de “DJ-KONTROL3” aan te sluiten:
Gebruik de meegeleverde USB-kabel om de controller via de USB-aansluiting (45) op uw computer aan te
sluiten.
Sluit de tulpuitgangen (46) of XLR-uitgangen (47) aan op uw audioversterker of aangedreven luidsprekers.
Stel de uitgangschakelaar in op de gewenste positie.
Sluit de microfoon (indien aanwezig) op de microfooningang (11) op het voorpaneel van de controller aan.
Sluit uw hoofdtelefoon aan op de hoofdtelefoonuitgang (16) op het voorpaneel op de controller.
Gebruik de meegeleverde 5 VDC adapter om de DC-ingang (49) van de controller op het lichtnet aan te
sluiten.
NEDERLANDS GEBRUIKSHANDLEIDING
Druk op de "INSTALL"-knop Druk op de “FINISH”-knop
Sluit nu de “DJ-KONTROL3”-controller aan met de meegeleverde USB-kabel.
Activeren van de software:
De eerste keer dat u met VirtualDJ begint, vraagt de software
om een serienummer: toets de licentiecode in die met uw
product mee kwam. Zodra u de licentiecode hebt ingevoerd, zal
VirtualDJ in de LE-mode gaan werken.
Zie het hoofdstuk “DE VIRTUALDJ CONFIGUREREN” om te leren hoe u de audio-routing in de software
moet instellen.
VIRTUALDJ INSTALLEREN
Installeren op uw computer:
Opmerking: De onderstaande installatieprocedure wordt uitgelegd voor Windows. Echter, afgezien van
enkele kleine verschillen, is de procedure onder MAC OS zeer vergelijkbaar.
Plaats de CD-rom in uw computer: normaal gesproken zou de installatie automatisch moeten starten. Als de
installatie niet automatisch wordt gestart, blader de CD-rom en dubbelklik op het
"install_virtualdj_le_v7.0.X.exe"-bestand (install_virtualdj_le_v7.0.X.pkg voor MAC gebruikers). De
bestandsnaam kan iets afwijken. Volg de instructies op het scherm:
Klik op de "NEXT"-knop Lees en accepteer de overeenkomst Kies "Typical" installatie.
Softwareondersteuning en updates:
!!! BELANGRIJK!!!
VirtualDJ voegt regelmatig nieuwe functies en verbeteringen aan hun software toe, dus we raden u
aan om hun website te bezoeken (www.virtualdj.com) en uw software te registreren: kies op de
VirtuaDJ website het “DOWNLOAD”-menu en ga naar "Software updates". Maak een nieuw
gebruikersaccount en registreer uw software (gebruik de "licentiecode" om de software te
ontgrendelen).
U kunt nu op een regelmatige basis controleren of er nieuwe versies zijn en deze downloaden!
Ook kunt u de tutorials raadplegen en deelnemen in de gebruikersforums!
BELANGRIJK: Houd er rekening mee dat JB Systems alleen de ondersteuning voor de hardware (de
controller) biedt.
De ondersteuning van VirtualDJ wordt uitsluitend door de ontwikkelaars verzorgd, op: www.virtualdj.com!
Opwaarderen naar de PRO-versie
Na een tijdje VirtualDJ te hebben gebruikt, leert u over de
diverse interessante functies in de PRO-versie van het
programma. Als een gebruiker van de LE-versie kunt u de
PRO-versie 20 dagen lang gratis proberen, als het u bevalt (we
zijn daar zeker van) kunt u de upgrade tegen een
gereduceerde prijs kopen. Controleer het configuratiemenu
voor meer informatie.
JB SYSTEMS
®
21/54 DJ-KONTROL 3
JB SYSTEMS
®
22/54 DJ-KONTROL 3
Page 14

NEDERLANDS GEBRUIKSHANDLEIDING
NEDERLANDS GEBRUIKSHANDLEIDING
VIRTUALDJ CONFIGUREREN
Het instellen van de DJ-KONTROL3 in VirtualDJ LE is heel eenvoudig: volg gewoon dezelfde set-up als
hieronder getoond: Het hoofdsignaal wordt naar de achter-luidsprekeruitgangen gestuurd en het PFL-signaal
(hoofdtelefoon) wordt naar de voor-luidsprekeruitgangen van uw interne geluidskaart gestuurd.
ASIO-drivers:
Als u echt extreem lage latentie (vertraging) wilt hebben, kunt u ook met ASIO-drivers experimenteren als u
wilt: in dat geval kunt u "ASIO-driver" voor de
geluidskaart selecteren. Aangezien dit buiten
het bereik van deze handleiding valt, zullen we
hier niet de configuratie van de ASIO-drivers
uitleggen.
GEBRUIK VAN ANDERE DJ-SOFTWARE
Omdat deze controller als een MIDI-compatibel apparaat is ontworpen, kunt u het gebruiken om elke Midi
DJ-software te bedienen. Uiteraard betekent dit dat u speciale MIDI-bestanden voor deze producten nodig
hebt. Kijk op onze website (www.jbsystems.be): we leveren gratis MIDI-bestanden voor een aantal andere
DJ-softwareproducten.
VIRTUALDJ HANDLEIDINGEN
In het volgende hoofdstuk geven wij u een kort overzicht van de functies in VirtualDJ LE die met de controller
wordt geleverd. VirtualDJ is een zeer intuïtief programma, dus zult u het tijdens het proberen van alle
mogelijkheden eenvoudig leren. Als u meer wilt weten, kijk op de VirtualDJ website voor video tutorials en
extra handleidingen: www.virtualdj.com/wiki/index.html .
FUNCTIES (MIXER)
1. “TRACK SELECT”-knop: Draai aan deze knop om in de
mappen, browser of muziekbibliotheek naar boven of naar
beneden te scrollen.
Druk kort: om de map of het bestand te selecteren.
Houd voor 0,5 seconde ingedrukt: om de browser te
vergroten/verkleinen (zoomen).
2. “LAAD A”-knop: druk op deze knop om de geselecteerde
track naar speler A (links) van de software te laden.
3. “LAAD B”-knop: druk op deze knop om de geselecteerde
track naar speler B (rechterzijde) van de software te laden.
4. “TERUG”-knop met deze knop kunt u naar een hoger
niveau in de map/browser-structuur terugkeren.
5. “GAIN”-knop: draai aan deze knop om de versterking van
het corresponderende kanaal aan te passen.
6. “HIGH”-knop: wordt gebruikt om de hoge frequenties van
het corresponderende kanaal aan te passen. Druk op de
knop om de KILL-functie in/uit te schakelen.
7. “MIDDLE”-knop: wordt gebruikt om de middenfrequenties
van het corresponderende kanaal aan te passen. Druk op de
knop om de KILL-functie in/uit te schakelen.
8. “LOW”-knop: wordt gebruikt om de lage frequenties van het
corresponderende kanaal aan te passen. Druk op de knop
om de KILL-functie in/uit te schakelen.
9. KANAAL-FADER: past het volume van het
corresponderende audiokanaal aan.
10. MIC-VOLUME: wordt gebruikt om de gevoeligheid van de
interne DJ-microfoon in te stellen
11. MIC-INGANG: 6,3mm ingang om uw DJ microfoon aan te
sluiten.
12. CROSSFADER: met deze fader kunt u tussen beide kanalen
over mixen. De crossfader werkt alleen wanneer u de
kanaal-faders (9) van beide kanalen naar het gewenste
niveau verplaatst!
13. CROSSFADER KROMME: gebruikt om een zachte of harde kromme voor de crossover te kiezen, dit
hangt af van uw eigen smaak.
JB SYSTEMS
14. CUE-MIX: Met deze knop kunt u de ingangskanalen naar de hoofdtelefoonuitgang mixen:
Zet de knop in de uiterste linker positie om de PFL-signalen van de spelers te horen.
Zet de knop in de uiterste rechter positie om het gemixte hoofduitgangsignaal te horen.
Zet de knop in een andere positie om een mix van de twee signalen te horen.
Deze optie maakt het mogelijk om u mix te controleren voordat u het op de hoofduitgang zet.
15. “CUE-VOLUME”-knop: wordt gebruikt om het uitgangsniveau van het hoofdtelefoonkanaal te bedienen.
16. HOOFDTELEFOONUITGANG: sluit hier uw hoofdtelefoon op aan voor het controleren van uw tracks.
17. CUE SELECTIE-knop links: druk op deze knop om Player1 te controleren terwijl de kanaal-fader is
gesloten.
18. CUE SELECTIE-knop rechts: druk op deze knop om player2 te controleren terwijl de kanaal-fader is
gesloten.
19. HOOFD VOL-KNOP: wordt gebruikt om de gevoeligheid van de interne microfoon in te stellen
FUNCTIES (SPELERS)
20. “INSTEL CUE"-knop: stelt de track op de gewenste locatie in. Het stelt ook de audio op de laatst
ingestelde cue-positie in. Houd de knop ingedrukt om het cue-punt vooraf te bekijken totdat de knop
wordt losgelaten.
®
23/54 DJ-KONTROL 3
JB SYSTEMS
®
24/54 DJ-KONTROL 3
Page 15

NEDERLANDS GEBRUIKSHANDLEIDING
NEDERLANDS GEBRUIKSHANDLEIDING
21. “CUE AFSPELEN”-knop: begint het afspelen van de track vanaf de laatst ingestelde cue-positie.
22. “AFSPELEN/PAUZE”-knop: wordt gebruikt het afspelen van de geladen track te starten/stoppen.
23. “JOG”-WIEL: de functie is afhankelijk van de geselecteerde afspeelmodus:
In de pauzemodus: het wiel stelt u in staat om zeer nauwkeurig een cue-punt of beginpunt in te
stellen.
In de afspeelmodus: het wiel fungeert als een
toonhoogtekromme.
In de loop-modus: druk op “SHIFT”-knop (38), tijdens
het draaien van het jogwiel om de positie van de
spelende loop te verplaatsen.
“Scratch”-knop (24) verlicht: met de scratch-functie
ingeschakeld, kunt u het wiel op de track krassen net als
bij een vinylplaat. Ter verhoging van het vinylgevoel, is
het jogwiel aanrakingsgevoelig: dit betekent dat het
afspelen zal stoppen zodra u uw hand op het wiel
plaatst.
De “Scratch”-knop (24) knippert: draai aan het wiel
om de hele track op hoge snelheid te bladeren/zoeken.
24. “SCRATCH”-knop: verschillende functies zijn mogelijk:
Druk kort: om voor het jog-wiel (23) tussen de
bladermodus (knop niet verlicht) en de scratch-modus
(knop brandt) te schakelen.
Houd voor 0,5 seconde ingedrukt: om de hoge
snelheid blader/zoek-functie voor het jog-wiel (23) te
activeren/de-activeren. Terwijl geactiveerd kunt u de
gehele track op zeer hoge snelheid zoeken.
25. “SYNC”-knop: wordt gebruikt om de geladen track
automatisch te synchroniseren met de track afspelende op
het andere deck. Door op de “SYNC”-knop in combinatie
met de “SHIFT”-knop (38) te drukken kunt u meteen uw
track starten synchroon met de track op het andere deck.
(Ook wel "sync-start" genoemd)
26. “LOOP IN”-knop: verschillende functies beschikbaar:
Wanneer geen loop speelt: druk op de “LOOP IN”-
knop om het intropunt van een handmatige loop in te
stellen.
Een loop wordt afgespeeld: druk op de “LOOP IN”-
knop om de spelende lus (stottereffect) opnieuw te
activeren.
27. “LOOP OUT”-knop: verschillende functies beschikbaar:
Wanneer geen loop speelt: druk op de “LOOP OUT”-
knop om het eindpunt van een handmatige loop in te
stellen, de loop begint direct af te spelen.
Een loop wordt afgespeeld: druk op de “LOOP OUT”-knop om de spelende loop te verlaten.
28. “RELOOP”-knop: terwijl de loop wordt gespeeld, druk op de “RELOOP”-knop om de loop (stottereffect)
onmiddellijk opnieuw te starten. Wanneer geen loop wordt afgespeeld: druk op de “RELOOP”-knop om
de laatst afgespeelde loop opnieuw te openen.
29. SMART LOOP 2/1: druk op deze toets om een automatische 2/1-beat smart loop te creëren.
30. SMART LOOP 4/1: druk op deze toets om een automatische 4/1-beat smart loop te creëren.
31. SMART LOOP 8/1: druk op deze toets om een automatische 8/1-beat smart loop te creëren.
32. LOOP CUT/JUMP toets: twee verschillende functies beschikbaar:
LOOP CUT: druk op deze toets om de lengte van de afspeelloop in twee te snijden.
LOOP JUMP: druk op deze toets terwijl u de SHIFT-toets (38) ingedrukt houdt om de afspeelloop 2
beats terug in de track te laten bewegen (of springen).
33. LOOP DOUBLE/JUMP toets: twee verschillende functies beschikbaar:
LOOP DOUBLE: druk op deze toets om de lengte van de afspeelloop te verdubbelen.
LOOP JUMP : druk op deze toets terwijl u de SHIFT-toets (38) ingedrukt houdt om de afspeelloop 2
beats vooruit in de track te laten bewegen (of springen).
34. PITCH toets: twee verschillende functies beschikbaar:
Druk op de PITCH toets: wordt gebruikt om het bereik van de pitch-fader te wijzigen: 6, 10, 20, 50 of
100%.
Druk op de PITCH+SHIFT toets: schakelt de “snelheidvergrendeling”-functie aan/uit. Wanneer de
snelheidvergrendeling is ingeschakeld, worden de snelheidfaders van beide spelers vergrendeld: ze
bewegen samen.
35. SPEED-FADER: wordt gebruikt om de afspeelsnelheid van de spelende track te wijzigen.
36. “PITCH BEND”-knoppen: De snelheid neemt toe, terwijl de "+”-knop wordt ingedrukt en keert naar de
oorspronkelijke toonhoogte terug wanneer de knop wordt losgelaten. De snelheid neemt af, terwijl de “-”knop wordt ingedrukt en keert naar de oorspronkelijke toonhoogte terug wanneer de knop wordt
losgelaten. Deze knoppen kunnen worden gebruikt om handmatig het ritme van 2 tracks te
synchroniseren.
37. “HOT CUE”-knoppen: wordt gebruikt om 3 verschillende “hot cue”-punten in te stellen.
Een cue-punt opslaan: als er geen cue-punt is opgeslagen, is de knop donker druk op de “CUE”-
knop om het gewenste cue-punt op te slaan. (cue-punten worden automatisch opnieuw opgeroepen
wanneer u de track opnieuw laad)
Afspelen vanaf een cue-punt: wanneer een cuepunt is opgeslagen, is de knop verlicht à druk op
de “CUE”-knop om het afspelen direct vanaf het opgeslagen cue-punt te starten.
Een cue-punt verwijderen: druk tegelijk op de “CUE”- en “SHIFT”-knoppen à de opgeslagen cue-
punt zal worden verwijderd.
38. “SHIFT”-knop: wordt gebruikt om "extra functies" op een aantal knoppen te activeren. De extra functies
zijn meestal in de grijze zone onder de knoppen geschreven.
39. NAALDVAL: een speciaal instrument om enorm snel door de geladen track te zoeken. U hoeft uw
vinger slechts op de locatie te drukken waar de speler naar toe moet springen, net zoals het eerst was
waar u de naald op uw langspeelplaat laat vallen.
40. “TOETSVERGRENDELING”-knop (Hoofdtempo) activeert de “toonhoogtevergrendeling”-functie. Met
deze functie kunt u met behulp van de snelheidfader (35) aanpassingen aan een tracksnelheid
aanbrengen zonder de toonhoogte te veranderen.
41. “EFFECT AAN/UIT”-knop: wordt gebruikt om het geselecteerde effect aan/uit te schakelen.
42. EFFECT SELECTIE-knop wordt gebruikt om een van de beschikbare effecten te selecteren.
43. PARAMETER1-knop: verschillende functies beschikbaar:
Draai aan de “PARAMETER”-knop: pas parameter 1 van het geselecteerde effect aan.
Draai aan de “PARAMETER”-knop, terwijl “SHIFT” wordt ingedrukt: om de frequentie van het
filtereffect aan te passen.
44. PARAMETER2-knop: verschillende functies beschikbaar:
Draai aan de “PARAMETER”-knop: pas parameter 2 van het geselecteerde effect aan.
Draai aan de “PARAMETER”-knop, terwijl “SHIFT” wordt ingedrukt: om de toonhoogte van de
muziek aan te passen.
FUNCTIES (ACHTERKANT)
45. USB-aansluiting: B-type USB-connector. Gebruik de meegeleverde USB-kabel om de controller op uw
computer aan te sluiten.
Opmerking: als u een USB-hub gebruikt, zorg ervoor dat het een gevoede hub is. Anders kunt u
onverwachte problemen ervaren.
46. ONGEBALANCEERDE MASTER uitgang: ongebalanceerde tulp/RCA stereo uitgang, gebruikt voor uw
audioversterker. U kunt deze uitgang gebruiken als de signaalkabels naar uw versterker niet langer zijn
dan 2m of 3m.
47. GEBALANCEERDE MASTER uitgang: gebalanceerde XLR stereo uitgang, gebruikt voor aansluiting
van uw audioversterker of versterkte luidsprekers. Een gebalanceerd signaal is minder gevoelog voor
alle soorten interferentie vanaf verschillende bronnen. Gebruik deze uitgang als uw versterker of
aangedreven luidsprekers gebalanceerde ingangen (XLR) hebben en de lengte van de signaalkabels
langer is dan 3m.
48. RCA/XLR schakelaar: gebruikt om de gewenste master uitgang (RCA of XLR) te selecteren.
49. VOEDINGSADAPTOR-ingang wordt gebruikt om de meegeleverde 5Vdc voedingsadapter aan te
sluiten.
Opmerking: de controller zal ook zonder de adapter werken, maar in dit geval vindt de voeding via de
USB-poort van uw computer plaats. In sommige gevallen, vooral op draagbare computers, is de
geleverde voeding niet voldoende. Gebruik de meegeleverde voedingsadapter om onder bepaalde
omstandigheden instabiliteit te voorkomen.
JB SYSTEMS
®
25/54 DJ-KONTROL 3
JB SYSTEMS
®
26/54 DJ-KONTROL 3
Page 16
NEDERLANDS GEBRUIKSHANDLEIDING
DEUTSCH BEDIENUNGSANLEITUNG
SPECIFICATIES
DJ-KONTROL3
Voeding: via de meegeleverde voedingadapter, 5 VDC, 1A
Audio-interface: 24 bit/192 kHz
Afmetingen: 320(L) x 240(B) x 65(H) mm
Gewicht: 1,42kg
PC-PLATFORM - MINIMALE SYSTEEMVEREISTEN
Intel®Pentium®4 of AMD Athlon™ XP
1024 x 768 videoresolutie
DirectX-compatibele geluidskaart
512 MB RAM
50 MB vrij ruimte op de harde schijf
PC-PLATFORM - MINIMALE AANBEVOLEN SYSTEEMVEREISTEN
Intel®Core™ 2 of AMD Athlon™ X2
1280 x 1024 resolutie
Multi-kanaal DirectX-compatibele geluidskaart
1GB RAM
200 MB vrij ruimte op de harde schijf
MAC-PLATFORM - MINIMALE SYSTEEMVEREISTEN
Intel®processor
Mac OS X v10.5
1024 x 768 resolutie
CoreAudio compatibele geluidskaart
1GB RAM
50 MB vrij ruimte op de harde schijf
MAC-PLATFORM - MINIMALE SYSTEEMVEREISTEN
Intel®processor
Nieuwste Mac OS X v10.6.x
1440 x 900 resolutie
Multi-kanaal CoreAudio compatibele geluidskaart
2GB RAM
200 MB vrij ruimte op de harde schijf
Alle informatie is onderhevig aan verandering zonder voorafgaande kennisgeving.
U kunt de nieuwste versie van deze handleiding van onze website downloaden: www.beglec.com
BEDIENUNGSANLEITUNG
Vielen Dank für den Kauf dieses JBSystems®-Produkts. Bitte lesen Sie diese Bedienungsanleitung
aufmerksam durch, um alle Möglichkeiten des Systems voll ausnutzen zu können.
EIGENSCHAFTEN
Dieses Gerät ist entstört. Das Gerät entspricht den aktuellen europäischen Anforderungen und nationalen
Richtlinien. Die Konformität wurde nachgewiesen und die entsprechenden Erklärungen und Unterlagen
liegen beim Hersteller vor.
Professioneller 2-Kanal MIDI-Controller für DJs (Fahrzeuge, Clubs, Studios usw.)
Robustes Aluminium-Gehäuse mit der Oberseite aus Hochglanz-Polycarbonat und modischer weiß/blauer
Beleuchtung.
Zusammen mit der neuesten Version von VirtualDJ LE, der ultimativen DJ-Software, die auch Videoclips
mischen kann!
Dank der Standard MIDI-Kommunikation kann dieser Controller mit jeder anderen MIDI DJ-Software
benutzt werden!
Die meisten Tasten sind hintergrundbeleuchtet: einfache Benutzung an dunklen Veranstaltungsorten.
Kann auf jedem modernen PC oder Laptop mit Windows ® XP/Vista/7 oder Mac ® OSX genutzt werden.
Eingebaute hochwertige 24Bit/192kHz Soundkarte für ausgezeichnete Klangqualität!
Hochauflösende, berührungsempfindliche Scratch-Räder mit blauer Hintergrundbeleuchtung
Needle-Drop-Sensoren für ultraschnelle Suche in Tracks.
2-Kanal-Mixer:
3-Band Equalizer mit Push Kill-Funktion.
DJ-Mikrofoneingang und PFL-Kopfhörerausgang.
Crossfader mit einstellbarer Kurvenanpassung.
Symmetrische XLR-Master (+ unsymmetrischer Cinch).
Einfache Plug & Play-Installation: Keine zusätzlichen Treiber oder Computerkenntnisse erforderlich!
Vollständig für die Benutzung mit der VirtualDJ-Software optimiert:
„1-Klick“ Taktabgleich, automatische Taktschleifen, sofortige Takterkennung, ...
Taktsynchronisations-Sampler, sehr genaues Master-Tempo, 3 Cuepunkte je Track, …
Videomischung: Kreatives Mischen von Videoclips, einschließlich Videoeffekte!
Wiedergabe von MP3, AIFF, OGG, WAV, CDA, WMA und vielen weiteren Formaten.
Vollständig mit iTunes kompatibel
Aktualisierung zu VirtualDJ PRO zum Sonderpreis!
5V-Netzadapter für verbesserte Betriebsstabilität mitgeliefert.
VOR DER ERSTBENUTZUNG
Vor der Erstbenutzung bitte das Gerät zuerst auf Transportschäden überprüfen. Sollte das Gerät einen
Schade aufweisen, benutzen Sie es nicht, sondern wenn Sie sich unverzüglich an Ihren Händler.
Wichtiger Hinweis: Dieses Gerät hat das Werk unbeschädigt und gut verpackt verlassen. Es ist wichtig,
dass der Benutzer sich streng an die Sicherheitshinweise und Warnungen in der Bedienungsanleitung
hält. Schäden durch unsachgemäße Handhabung sind von der Garantie ausgeschlossen. Der Händler
übernimmt keine Verantwortung für Schäden, die durch Nichtbeachtung der Bedienungsanleitung
hervorgerufen wurden.
Die Bedienungsanleitung zum zukünftigen Nachschlagen bitte an einem sicheren Ort aufbewahren. Bei
Verkauf oder sonstiger Weitergabe des Geräts bitte die Bedienungsanleitung beifügen.
Aus Umweltschutzgründen Verpackung bitte wiederverwenden oder richtig trennen.
Packungsinhalt prüfen:
Bitte überprüfen Sie, ob die Verpackung folgende Artikel enthält:
USB-MIDI-Controller
USB-Kabel
Software CD-ROM (einschließlich Bedienungsanleitungen)
Lizenz-Code für VirtualDJ LE
5V Netzadapter
.
JB SYSTEMS
®
27/54 DJ-KONTROL 3
JB SYSTEMS
®
28/54 DJ-KONTROL 3
Page 17

DEUTSCH BEDIENUNGSANLEITUNG
DEUTSCH BEDIENUNGSANLEITUNG
SICHERHEITSHINWEISE
ACHTUNG: Um sich nicht der Gefahr eines elektrischen
CAUTION
Das Blitzsymbol innerhalb eines gleichseitigen Dreiecks warnt den Benutzer vor nicht isolierter
„gefährlicher Spannung“ im Innern des Produktgehäuses, die so stark sein kann, dass für
Personen die Gefahr von Stromschlägen besteht.
Das Ausrufezeichen im Dreieck weist den Benutzer auf wichtige Bedienungs-und
Wartungshinweise in den Dokumenten hin, die dem Gerät beiliegen.
Dieses Symbol bedeutet: Nur für den Einsatz im Innenbereich.
Dieses Symbol bedeutet: Die Bedienungsanleitung lesen.
Dieses Symbol bedeutet: Das Gerät besitzt Schutzklasse III.
Zur Vermeidung von Feuer und Stromschlag Gerät weder Regen noch Feuchtigkeit aussetzen.
Zur Vermeidung von Kondensation im Inneren des Geräts bitte nach dem Transport in eine warme
Umgebung einige Zeit zum Temperaturausgleich ausgeschaltet stehen lassen. Kondensation kann zu
Leistungsverlust des Geräts oder gar Beschädigung führen.
Nur für den Einsatz im Innenbereich.
Keine Metallgegenstände oder Flüssigkeiten ins Innere des Geräts gelangen lassen. Stellen Sie keine mit
Flüssigkeiten gefüllten Gegenstände (wie Vasen) auf dem Gerät ab. Ein Kurzschluss oder eine
Fehlfunktion können die Folge sein. Falls es doch einmal vorkommen sollte, bitte sofort den Netzstecker
ziehen und vom Stromkreis trennen.
Stellen Sie keine offenen Flammen (wie brennende Kerzen) auf dem Gerät ab.
Die Ventilationsöffnungen nicht abdecken, da Überhitzungsgefahr.
Nicht in staubiger Umgebung verwenden und regelmäßig reinigen.
Für Kinder unerreichbar aufbewahren.
Unerfahrene Personen dürfen das Gerät nicht bedienen.
Die Umgebungstemperatur darf 40 °C nicht übersteigen. Verwenden Sie dieses Gerät nicht bei höheren
Umgebungstemperaturen.
Lassen Sie rings um das Gerät wenigstens 5 cm Abstand für ausreichende Belüftung.
Stets den Netzstecker ziehen, wenn das Gerät für einen längeren Zeitraum nicht genutzt oder es gewartet
wird.
Bei erheblichen Problemen mit dem Gerät stellen Sie die Benutzung ein und wenden Sie sich an Ihren
Fachhändler.
Bei Transport bitte die Originalverpackung verwenden, um Schäden am Gerät zu vermeiden.
Aus Sicherheitsgründen dürfen an dem Gerät keine unbefugten Veränderungen vorgenommen werden.
INSTALLATIONSANLEITUNG:
Installieren Sie das Gerät in gut belüfteter Umgebung, in der es keinen hohen Temperaturen oder
Feuchtigkeit ausgesetzt ist.
Ist das Gerät über einen längeren Zeitraum Wärmequellen (wie Verstärker, Spotlights) ausgesetzt, so wird
dadurch die Leistung beeinträchtigt und Schäden am Gerät sind möglich.
Bei Installation in einer Kabine oder einem Flightcase achten Sie bitte auf gute Belüftung.
Zur Vermeidung von Kondensation im Inneren des Geräts bitte nach dem Transport in eine warme
Umgebung einige Zeit zum Temperaturausgleich ausgeschaltet stehen lassen. Kondensation kann zu
Leistungsverlust führen.
REINIGUNG:
Wischen Sie das Gerät mit einem weichen und leicht angefeuchteten Tuch ab. Achten Sie darauf, dass
keine Flüssigkeiten in das Gerät eindringen. Benutzen Sie keine Lösungsmittel zum Reinigen, damit
beschädigen Sie das Gerät.
Schlags auszusetzen, entfernen Sie keines der
Gehäuseteile. Im Geräteinneren befinden sich keine vom
Benutzer wartbaren Teile. Überlassen Sie Reparatur- und
Wartungsarbeiten dem qualifizierten Kundendienst.
ANSCHLÜSSE
Bitte befolgen Sie den Anschlussplan unten, um den „DJ-KONTROL3“ anzuschließen:
Schließen Sie den Controller mit dem mitgelieferten USB-Kabel über den USB-Stecker (45) an Ihrem
Computer an.
Verbinden Sie die Cinch- (46) oder XLR-Ausgänge (47) mit Ihrem Audio-Verstärker oder
Aktivlautsprechern.
Stellen Sie den Ausgangswahlschalter in die gewünschte Position.
Schließen Sie Ihr Mikrofon (falls vorhanden) an den Mikrofon-Eingang (11) auf der Vorderseite des
Controllers an.
Schließen Sie Ihre Kopfhörer an den Kopfhörer-Ausgang (16) auf der Vorderseite des Controllers an.
Schließen Sie den mitgelieferten 5V DC Netzadapter am DC-Eingang (49) des Controllers an und stecken
Sie ihn in eine Steckdose.
Siehe Abschnitt VIRTUALDJ KONFIGURIEREN für Einzelheiten zur Einstellung das Audio-Routing in der
Software.
INSTALLATION VON VIRTUALDJ
Installation auf Ihrem Computer:
Hinweis: Die Installation wird nachstehend für Windows beschrieben. Abgesehen von einigen kleineren
Unterschieden ist der Vorgang jedoch für MAC OS nahezu gleich.
Legen Sie die CD-ROM in Ihren Computer ein: Gewöhnlich startet die Installation automatisch. Ist das nicht
der Fall, so durchsuchen Sie die CD-ROM und doppelklicken Sie die Datei „install_virtualdj_le_v7.0.X.exe“
(install_virtualdj_le_v7.0.X.pkg für MAC). Der Dateiname kann leicht abweichen. Folgen Sie den
Bildschirmhinweisen:
Klicken Sie „NEXT“. Lesen und akzeptieren Sie die Wählen Sie „Typical“ Installation.
JB SYSTEMS
®
29/54 DJ-KONTROL 3
JB SYSTEMS
®
30/54 DJ-KONTROL 3
Page 18

DEUTSCH BEDIENUNGSANLEITUNG
DEUTSCH BEDIENUNGSANLEITUNG
KONFIGURATION VON VIRTUALDJ
Das Einrichten des DJ-KONTROL3 in VirtualDJ LE ist sehr einfach: Gehen Sie einfach wie unten dargestellt
vor: Der Master-Ausgang wird an die hinteren Lautsprecher-Ausgänge und das PFL-Signal (Kopfhörer) wird
an die vorderen Lautsprecher-Ausgänge der integrierten Soundkarte gesendet.
Klicken Sie „INSTALL“. Klicken Sie „FINISH“.
Schließen Sie jetzt den DJ-KONTROL3 Controller mit dem mitgelieferten USB-Kabel an.
Software aktivieren:
Wenn Sie VirtualDJ das erste Mal starten, erfragt die Software
die Seriennummer: Geben Sie den Lizenzcode des Produkts
ein. Nach der Eingabe des Lizenzcodes startet VirtualDJ im LEModus.
Software-Support und Aktualisierungen:
!!! WICHTIG !!!
VirtualDJ fügt gelegentlich neue Funktionen und Verbesserungen der Software hinzu, daher
empfehlen wir, die Website (www.virtualdj.com) zu besuchen und Ihre Software zu registrieren:
Wählen Sie auf der VirtualDJ Website das Menü DOWNLOAD und navigieren Sie zu „Software
Updates“. Erstellen Sie ein Benutzerkonto und registrieren Sie Ihre Software (mit dem Lizenzcode,
um die Software freizugeben).
Sie können nun regelmäßig nachsehen, ob neue Versionen zur Verfügung stehen und diese herunterladen!
Sie können sich ebenfalls an Tutorien und Benutzerforen beteiligen!
Wichtiger Hinweis: Bitte beachten Sie, dass JB Systems nur Support für die Hardware (Controller) bietet.
Support von VirtualDJ erfolgt ausschließlich durch die Entwickler bei: www.virtualdj.com!
Zur PRO-Version erweitern
Nach einer bestimmten Nutzungsdauer von VirtualDJ lernen
Sie mehr über die verschiedenen interessanten Funktionen der
PRO-Version des Programms. Als Benutzer der LE-Version
können Sie die PRO-Version kostenlos für 20 Tage
ausprobieren. Wenn sie Ihnen gefällt (und davon sind wir
überzeugt ), können Sie die Erweiterung zum Sonderpreis
erwerben. Im Konfigurationsmenü finden Sie weitere
Informationen.
ASIO-Treiber:
Benötigen Sie absolut geringe Latenz (Verzögerung), dann können Sie ebenfalls mit ASIO-Treibern
experimentieren: in diesem Fall wählen Sie
„ASIO-driver“ für die Soundkarte. Da dies
außerhalb des Umfangs dieser
Bedienungsanleitung ist, können wir die
Konfiguration der ASIO-Treiber hier nicht näher beschreiben.
ANDERE DJ-SOFTWARE BENUTZEN
Da dieser Controller als ein MIDI-kompatibles Gerät konzipiert ist, können Sie hiermit jegliche MIDI DJSoftware steuern. Natürlich benötigen Sie besondere MIDI-Mappingdateien für diese Produkte. Bitte
besuchen Sie unsere Website (www.jbsystems.be): Wir stellen MIDI-Mapping-Dateien für andere DJSoftware kostenlos zur Verfügung.
VIRTUALDJ-TUTORIEN
Im nächsten Abschnitt geben wir Ihnen einen kurzen Überblick über die Funktionen in VirtualDJ LE für Ihren
Controller. VirtualDJ ist ein intuitives Programm, daher erlernen Sie es, während Sie seine Möglichkeiten
ausprobieren. Für weitere Informationen besuchen Sie bitte die VirtualDJ Website für Video-Tutorien und
zusätzliche Bedienungshinweise: www.virtualdj.com/wiki/index.html .
JB SYSTEMS
®
31/54 DJ-KONTROL 3
JB SYSTEMS
®
32/54 DJ-KONTROL 3
Page 19

DEUTSCH BEDIENUNGSANLEITUNG
DEUTSCH BEDIENUNGSANLEITUNG
FUNKTIONEN (MISCHPULT)
1. TRACK SELECT: Mit Drehung des Reglers scrollen Sie
aufwärts oder abwärts durch Ordner, Browser oder die
Musikbibliothek.
Kurz drücken: Ordner oder Datei wählen.
Für 0,5 Sekunden gedrückt halten: Browser
vergrößern/verkleinern (Zoom).
2. A LADEN: Mit dieser Taste laden Sie den gewählten Track
auf Player A (links) der Software.
3. B LADEN: Mit dieser Taste laden Sie den gewählten Track
auf Player B (rechts) der Software.
4. ZURÜCK: Mit dieser Taste kehren Sie eine Ebene in der
Ordner-/Browserstruktur zurück.
5. GAIN: Drehen Sie diesen Regler zur Einstellung der
Verstärkung des entsprechenden Kanals.
6. HIGH: Drehen Sie diesen Regler zur Einstellung der hohen
Frequenzen des entsprechenden Kanals. Drücken Sie den
Regler, um die KILL-Funktion ein- oder auszuschalten.
7. MIDDLE: Drehen Sie diesen Regler zur Einstellung der
mittleren Frequenzen des entsprechenden Kanals. Drücken
Sie den Regler, um die KILL-Funktion ein- oder
auszuschalten.
8. LOW: Drehen Sie diesen Regler zur Einstellung der tiefen
Frequenzen des entsprechenden Kanals. Drücken Sie den
Regler, um die KILL-Funktion ein- oder auszuschalten.
9. KANALFADER: Dieser Schieberegler stellt die Lautstärke
des entsprechenden Audiokanals ein.
10. MIC-LAUTSTÄRKE: Anpassen der Empfindlichkeit des DJ-
Mikrofons.
11. MIC-EINGANG: 6,3 mm Eingangsbuchse zum Anschluss
Ihres DJ-Mikrofons.
12. CROSSFADER: Mit diesem Schieberegler mischen Sie die
beiden Kanäle. Der Crossfader funktioniert nur, wenn Sie die
Kanalfader (9) beider Kanäle auf den gewünschten Pegel eingestellt haben!
13. CROSSFADER CURVE: Wird zur Auswahl einer weichen oder harten Kurve für den Crossover
verwendet. Dies hängt von Ihrem persönlichen Geschmack ab.
14. CUE MIX: Mit diesem Regler mischen Sie die Eingangskanäle für den Kopfhörerausgang:
Mit dem Regler ganz nach links gedreht hören Sie die PFL-Signale der Player.
Mit dem Regler ganz nach rechts gedreht hören Sie das gemischte Masterausgangssignal.
Mit dem Regler in anderer Stellung hören Sie eine Mischung beider Signale.
Mit dieser Option können Sie Ihren Mix überprüfen, bevor Sie ihn an den Masterausgang übertragen.
15. CUE LAUTSTÄRKE: Dieser Regler steuert den Ausgangspegel des Kopfhörerkanals.
16. KOPFHÖRER-AUSGANG: Anschluss von Kopfhörern für die Überwachung Ihrer Tracks.
17. Linke CUE-AUSWAHL-Taste: Drücken Sie diese Taste, um Player1 zu überwachen, während der
Kanal-Fader heruntergeregelt ist.
18. Rechte CUE-AUSWAHL-Taste: Drücken Sie diese Taste, um Player2 zu überwachen, während der
Kanal-Fader heruntergeregelt ist.
19. MASTER-Lautstärkeregler: Anpassen der Lautstärke des Master-Ausgangs.
FUNKTIONEN (PLAYER)
20. SET CUE: Stellt den Track an der gewünschten Stelle ein. Stellt ebenfalls das Audio auf die zuletzt
eingestellte Cue-Position ein. Halten Sie die Taste gedrückt, um den Cue-Point anzuzeigen.
21. CUE PLAY: Startet die W iedergabe des Tracks ab der zuletzt eingestellten Cue-Position.
22. PLAY PAUSE: W iedergabe des geladenen Tracks starten/unterbrechen.
23. JOG WHEEL: Die Funktion ist vom gewählten Wiedergabemodus abhängig:
Im Pausemodus: Mit dem Jogwheel stellen Sie einen Cue-Point oder Startpunkt sehr genau ein.
Im Wiedergabemodus: Das Jogwheel hat die
Pitchbend-Funktion.
Im Loop-Modus: Drücken Sie beim Drehen des
Jograds die SHIFT-Taste (38), um die Position der
Wiedergabeschleife zu verschieben.
Scratchtaste (24) leuchtet: Mit aktivierter
Scratchfunktion können Sie den Track fast wie eine
Schallplatte scratchen. Zur Verbessern des VinylFeelings ist das Jograd berührungsempfindlich: Dies
bedeutet, dass die Wiedergabe angehalten wird, sobald
Sie Ihre Hand auf das Rad legen.
Scratchtaste (24) blinkt: Drehen Sie das Jogwheel zur
Suche mit hoher Geschwindigkeit durch den Track.
24. SCRATCH: Es stehen unterschiedliche Funktionen zur
Verfügung:
Kurz drücken: Umschalten des Jogwheels (23)
zwischen Browsermodus (Taste leuchtet nicht) und
Scratchmodus (Taste leuchtet).
Für 0,5 Sekunden gedrückt halten:
Aktivierung/Deaktivierung der schnellen Suchfunktion
mit dem Jogwheel (23). Während der Aktivierung
durchsuchen Sie den gesamten Track mit hoher
Geschwindigkeit.
25. SYNC: Automatische Synchronisation des geladenen
Track zum spielenden Track auf dem anderen Deck.
Gleichzeitiges Drücken von SYNC und SHIFT (38) startet
Ihren Track sofort synchronisiert mit dem spielenden Track
auf dem anderen Deck („Sync-Start“).
26. LOOP IN: Es stehen verschiedene Funktionen zur
Verfügung:
Es wird keine Loop wiedergegeben: Drücken Sie
LOOP IN, um den Anfangspunkt einer manuellen
Schleife einzustellen.
Eine Schleife abgespielt wird: Drücken Sie die LOOP
IN-Taste, um die wiedergegebene Loop erneut
auszulösen (Stotter-Effekt).
27. LOOP OUT: Es stehen verschiedene Funktionen zur Verfügung:
Es wird keine Loop wiedergegeben: Drücken Sie die LOOP OUT-Taste, um den Endpunkt einer
manuellen Loop zu setzen. Die W iedergabe der Schleife beginnt sofort.
Eine Schleife abgespielt wird: Drücken Sie die LOOP OUT-Taste, um die Wiedergabe- Loop zu
verlassen.
28. RELOOP: Während der Wiedergabe einer Schleife drücken Sie RELOOP, um die Schleife sofort erneut
zu starten (Stottereffekt). Wird keine Schleife wiedergegeben: Drücken Sie RELOOP, um die zuletzt
gespielte Schleife erneut aufzurufen.
29. SMART LOOP 2/1: Drücken Sie diese Taste, um eine automatische 2/1-Beat Smart Loop zu erstellen.
30. SMART LOOP 4/1: Drücken Sie diese Taste, um eine automatische 4/1-Beat Smart Loop zu erstellen.
31. SMART LOOP 8/1: Drücken Sie diese Taste, um eine automatische 8/1-Beat Smart Loop zu erstellen.
32. LOOP CUT/JUMP-Taste: Es stehen zwei unterschiedliche Funktionen zur Verfügung:
LOOP CUT: Drücken Sie diese Taste, um die Länge der Wiedergabeschleife in zwei Teile aufzuteilen.
LOOP JUMP: Drücken Sie diese Taste gleichzeitig mit der SHIFT-Taste (38), um die
Wiedergabeschleife um 2 Beats im Track zurück zu bewegen (oder zurück zu springen).
33. LOOP DOUBLE/JUMP Taste: Es stehen zwei unterschiedliche Funktionen zur Verfügung:
LOOP DOUBLE: Drücken Sie diese Taste, um die Länge der Wiedergabeschleife zu verdoppeln.
LOOP JUMP: Drücken Sie diese Taste gleichzeitig mit der SHIFT-Taste (38), um die
Wiedergabeschleife 2 Beats im Track vorwärts zu bewegen (oder vorwärts zu springen).
34. PITCH: Es stehen zwei unterschiedliche Funktionen zur Verfügung:
PITCH-Taste drücken: Änderung des Bereichs des Pitchfaders: 6, 10, 20, 50 oder 100 %.
JB SYSTEMS
®
33/54 DJ-KONTROL 3
JB SYSTEMS
®
34/54 DJ-KONTROL 3
Page 20

DEUTSCH BEDIENUNGSANLEITUNG
DEUTSCH BEDIENUNGSANLEITUNG
PITCH+SHIFT-Taste drücken: Schaltet die Speed-Lock-Funktion ein/aus. Bei aktiviertem Speed-
Lock sind die Geschwindigkeitsfader beider Player fest miteinander verbunden und bewegen sich
zusammen.
35. GESCHWINDIGKEITSFADER: Änderung der Wiedergabegeschwindigkeit des spielenden Tracks.
36. PITCHBEND: Mit Tastendruck auf „+“ erhöht sich die Geschwindigkeit und kehrt beim Loslassen der
Taste zum Original-Pitch zurück. Mit Tastendruck auf „-“ verringert sich die Geschwindigkeit und kehrt
beim Loslassen der Taste zum Original-Pitch zurück. Diese Tasten können zur manuellen
Synchronisation der Takte von 2 Tracks benutzt werden.
37. HOT CUE: Einstellen von 3 verschiedenen Hot-Cue-Points auf dreierlei Weise.
Cue-Point speichern: Ist kein Cue-Point gespeichert, leuchtet die Taste nicht drücken Sie CUE
zur Speichern des gewünschten Cue-Points (Cue-Points werden wieder automatisch aufgerufen,
wenn Sie den Track erneut laden).
Ab Cue-Point wiedergeben: Ist ein Cue-Point gespeichert, leuchtet die Taste drücken Sie CUE
zum Start der sofortigen Wiedergabe ab dem gespeicherten Cue-Point.
Cue-Point löschen: Drücken Sie gleichzeitig CUE und SHIFT der gespeicherte Cue-Point wird
gelöscht.
38. SHIFT: Aktivierung der „Zweitfunktionen“ einiger Tasten. Die Zweitfunktion ist im grauen Bereich
unterhalb der Tasten aufgedruckt.
39. NEEDLE DROP: Ein spezielles Werkzeug, um den geladenen Track verblüffend schnell zu suchen.
Legen Sie Ihren Finger einfach auf die Stelle, zu der der Player springen soll, so wie in den alten Zeiten,
in denen man die Nadel auf der Vinyl-Schallplatte absetzte.
40. TONARTSPERRE: (Master-Tempo) aktiviert die Pitch-Lock-Funktion. Diese Funktion ermöglicht die
Einstellung der Geschwindigkeit eines Tracks mit dem Geschwindigkeitsfader (35), ohne die Tonhöhe zu
verändern.
41. EFFEKT EIN/AUS: Schaltet den gewünschten Effekt ein/aus.
42. EFFEKT-AUSWAHL-Taste: Auswahl eines der verfügbaren Effekte.
43. PARAMETER1-Regler: Es stehen verschiedene Funktionen zur Verfügung:
PARAMETER-Regler drehen: Stellt Parameter 1 des gewählten Effekts ein.
PARAMETER-Regler drehen und gleichzeitig SHIFT-Taste drücken: Stellt die Frequenz des Filter-
Effekts ein.
44. PARAMETER2-Regler: Es stehen verschiedene Funktionen zur Verfügung:
PARAMETER-Regler drehen: Stellt Parameter 2 des gewählten Effekts ein.
PARAMETER-Regler drehen und gleichzeitig SHIFT-Taste drücken: Stellt die Tonhöhe der Musik
ein.
FUNKTIONEN (RÜCKSEITE)
TECHNISCHE DATEN
DJ-KONTROL3
Spannungsversorgung: über mitgelieferten Netzadapter, 5V DC, 1A
Audio-Schnittstelle: 24 Bit / 192 kHz
Abmessungen: 320 (B) x 240 (T) x 65 (H) mm
Gewicht: 1,42kg
PC-PLATTFORM – MINDEST-SYSTEMANFORDERUNGEN
Intel®Pentium®4 oder AMD Athlon™ XP
1024 x 768 Auflösung
DirectX kompatible Soundkarte
1GB RAM
50MB freie Kapazität Festplatte
PC-PLATTFORM – EMPFOHLENE SYSTEMANFORDERUNGEN
Intel®Core™ 2 oder AMD Athlon™ X2
1280 x 1024 Auflösung
Mehrkanal DirectX kompatible Soundkarte
1GB RAM
200MB freie Kapazität Festplatte
MAC-PLATTFORM – EMPFOHLENE SYSTEMANFORDERUNGEN
Intel®Prozessor
Mac OS X v10.5
1024 x 768 Auflösung
CoreAudio kompatible Soundkarte
1GB RAM
50MB freie Kapazität Festplatte
MAC-PLATTFORM – EMPFOHLENE SYSTEMANFORDERUNGEN
Intel®Prozessor
Latest Mac OS X v10.6.x
1440 x 900 Auflösung
Mehrkanal CoreAudio kompatible Soundkarte
2GB RAM
200MB freie Kapazität Festplatte
45. USB-Port: B-Typ USB-Port. Bitte benutzen Sie das mitgelieferte USB-Kabel zum Anschluss des
Controllers an Ihrem Computer.
Hinweis: Wenn Sie einen USB-Hub verwenden, achten Sie darauf, dass der Hub eine eigene
Stromversorgung besitzt. Ansonsten kann es zu unerwarteten Problemen kommen.
46. UNSYMMETRISCHER MASTER-Ausgang: Unsymmetrischer Cinch/RCA-Stereoausgang für den
Anschluss Ihres Audioverstärkers. Sie können diesen Ausgang verwenden, wenn das Signalkabel zum
Verstärker nicht länger als 2 oder 3 m ist.
47. SYMMETRISCHER MASTER-Ausgang: Symmetrischer XLR-Stereoausgang zum Anschluss Ihres
Audioverstärkers oder von Aktiv-Lautsprechern. Ein symmetrischer Signalanschluss ist weniger anfällig
für Störungen, die von beliebigen Störquellen kommen können. Verwenden Sie diesen Ausgang, wenn
Ihr Verstärker oder aktiver Lautsprecher symmetrische Eingänge (XLR) besitzt und die Länge der
Signalkabel 3 m übersteigt.
48. RCA/XLR-Schalter: Ermöglicht die Auswahl des gewünschten Master-Ausgangs (RCA oder XLR).
49. NETZADAPTER-Eingang: Zum Anschluss des mitgelieferten 5 V-Netzadapters.
Hinweis: Der Controller funktioniert auch ohne Netzteil, aber in diesem F all erfolgt die Stromversorgung
vom USB-Port Ihres Computers. In einigen Fällen, insbesondere bei tragbaren Computern, reicht die
Leistung nicht aus. Bitte benutzen Sie den mitgelieferten Netzadapter, um bei bestimmten Bedingungen
Instabilitäten zu vermeiden.
JB SYSTEMS
®
35/54 DJ-KONTROL 3
Sie können sich die neueste Version dieses Benutzerhandbuches von unserer Website
JB SYSTEMS
Diese Angaben können sich ohne gesonderten Hinweis ändern.
herunterladen: www.beglec.com.
®
36/54 DJ-KONTROL 3
Page 21

ESPAÑOL MANUAL DE USUARIO
ESPAÑOL MANUAL DE USUARIO
MANUAL DE INSTRUCCIONES
Gracias por comprar este producto JB Systems®. Para aprovechar todas sus posibilidades, por favor lea
muy detenidamente estas instrucciones de uso.
CARACTERÍSTICAS
Esta unidad tiene supresión de radio interferencia. Este aparato cumple los requisitos de las directivas
europeas y nacionales vigentes. Dicha conformidad ha sido establecida y los dictámenes y documentos han
sido consignados por el fabricante.
Controlador MIDI profesional de 2 canales para DJs (móvil, clubes, estudio…)
Resistente carcasa de aluminio con una superficie superior de policarbonato muy brillante y una elegante
iluminación blanca/azul.
Combinado con la última versión de VirtualDJ LE, el software de DJ definitivo ¡que puede mezclar incluso
videoclips!
Gracias a la comunicación MIDI estándar, este controlador también ¡puede utilizarse con cualquier
software de DJ que pueda imaginar!
La mayoría de los botones están retroiluminados: fácil de utilizar en locales oscuros.
Puede utilizarse en cualquier portátil o PC moderno que funcione bajo Windows® XP/Vista/7 y Mac® OSX
Tarjeta se sonido integrada de 24 Bit/192kHz, de calidad superior ¡para un excelente rendimiento del
sonido!
Ruedas de scratch sensibles al tacto de alta resolución con retroiluminación azul.
Sensores de caída de aguja para una búsqueda ultrarrápida dentro de las pistas.
Mezcladora de 2 canales:
Ecualizador de 3 bandas con función “push-kill”
Entrada de micrófono DJ y salida de auriculares PFL
Crossfader con ajuste de curva.
Salidas maestras XLR balanceadas (+ salida Cinch no balanceada)
Sencilla instalación plug & play: no necesita controladores ni habilidades informáticas especiales.
Completamente optimizado para su uso con el software VirtualDJ:
igualación de compases con “1-clic”, bucles de compases automáticos, detección instantánea del
ritmo,…
Samplers de ritmo sincronizados, tempo maestro muy preciso, 3 puntos cue por pista, …
Mezcla de vídeo: Mezcla creativa de videoclips, ¡incluyendo efectos de vídeo!
Reproduce MP3, AIFF, OGG, W AV, CDA, WMA, y muchos más…
Totalmente compatible con iTunes.
¡Actualícelo a VirtualDJ PRO con descuento en el precio!
Adaptador de corriente de 5V incluido, para una mayor estabilidad de funcionamiento.
ANTES DEL USO
Antes de comenzar a utilizar esta unidad, compruebe si no ha sufrido daños durante el transporte. Si
hubiera alguno, no utilice el dispositivo y consulte primero con su concesionario.
Importante: Este dispositivo salió de nuestra fábrica en perfectas condiciones y bien embalado. Es
absolutamente necesario que se obedezcan al pie de la letra las instrucciones y advertencias de
seguridad que aparecen en este manual de usuario. Cualquier daño causado por una mala manipulación
no estará protegido por la garantía. El concesionario no aceptará ninguna responsabilidad por defectos o
problemas resultantes causados por no obedecer lo indicado en este manual de usuario.
Mantenga este folleto en un lugar seguro para futuras consultas. Si vende este equipo, asegúrese de
incluir este manual de usuario.
Para proteger el medio ambiente, intente reciclar el material del embalaje en la mayor medida posible.
Compruebe el contenido:
Verifique que la caja contenga los elementos siguientes:
Controlador MIDI USB
Cable USB
CD-ROM del Software (incluye manuales de usuario)
Código de licencia para VirtualDJ LE
Adaptador de corriente de 5V CC
INSTRUCCIONES DE SEGURIDAD:
PRECAUCIÓN: Para reducir el riesgo de descarga
CAUTION
El símbolo de relámpago con punta de flecha dentro de un triángulo equilátero advierte al usuario
de la presencia de una “tensión peligrosa” no aislada dentro de la carcasa del sistema que puede
ser de una magnitud suficiente como para constituir un riesgo de descarga eléctrica.
El signo de admiración dentro de un triángulo equilátero advierte al usuario de la presencia de
instrucciones importantes relacionadas con la operación y el mantenimiento en la literatura que se
entrega junto con el equipo.
Este símbolo significa: solamente para uso en interiores
Este símbolo significa: Lea las instrucciones
Este símbolo significa: Aparato de Seguridad de Clase III
Para evitar el riesgo de incendio o de descarga eléctrica, no exponga este electrodoméstico a la lluvia ni a
la humedad.
Para evitar que se forme condensación en el interior del equipo, permita que la unidad se adapte a la
temperatura ambiental cuando se lleve a una habitación cálida después del transporte. La condensación
impide a veces que la unidad trabaje a plena capacidad e incluso puede causar daños.
Esta unidad es solamente para uso en interiores.
No coloque objetos metálicos ni derrame líquidos dentro de la unidad. No deben colocarse objetos llenos
de líquido, como jarrones, sobre este aparato. Puede dar como resultado una descarga eléctrica o un mal
funcionamiento. Si un objeto extraño se introduce dentro de la unidad, desconecte de inmediato la
alimentación eléctrica.
No deben colocarse fuentes de llama, como velas encendidas, sobre este aparato.
No cubra ninguna abertura de ventilación ya que esto puede provocar sobrecalentamiento.
Evite emplearlo en ambientes polvorientos; limpie la unidad con regularidad.
Mantenga la unidad lejos de los niños.
Este equipo no debe ser utilizado personas inexpertas.
La temperatura ambiente máxima segura es de 40ºC. No utilice esta unidad a temperaturas ambiente
mayores que ésta.
La distancia mínima alrededor del aparato para permitir suficiente ventilación es de 5 cm.
Siempre desenchufe la unidad cuando no se vaya a utilizar durante un período de tiempo prolongado o
cuando se le vaya a dar servicio.
En el caso de que haya serios problemas de funcionamiento, detenga el uso del accesorio y contacte
inmediatamente con su concesionario.
Utilice el embalaje original cuando haya que transportar el dispositivo.
Debido a razones de seguridad, está prohibido realizar modificaciones no autorizadas a la unidad.
GUÍA DE INSTALACIÓN:
Instale la unidad en un lugar bien ventilado en el que no esté expuesta a altas temperaturas ni a
humedad.
Colocar y utilizar durante períodos largos esta unidad junto a fuentes de calor, como amplificadores,
focos, etc., afectará a su rendimiento e incluso podría dañar la unidad.
Cuando se instale dentro de una cabina o maletín, por favor, asegúrese de que tenga buena ventilación
para mejorar la evacuación de calor de la unidad.
Para evitar que se forme condensación en el interior del equipo, permita que la unidad se adapte a la
temperatura ambiental cuando se lleve a una habitación cálida después del transporte. A veces, la
condensación impide que la unidad funcione a pleno rendimiento.
LIMPIAR EL APARATO:
Límpielo utilizando un paño ligeramente humedecido con agua. Evite la entrada de agua en el interior de la
unidad. No utilice líquidos volátiles, como benceno o disolventes, que dañarían la unidad.
eléctrica, no retire la cubierta superior. Dentro no hay
componentes que requieran de servicio por parte del
usuario. Para todo tipo de servicio refiérase solamente a
personal cualificado.
JB SYSTEMS
®
37/54 DJ-KONTROL 3
JB SYSTEMS
®
38/54 DJ-KONTROL 3
Page 22

ESPAÑOL MANUAL DE USUARIO
CONEXIONES
Por favor, siga el siguiente diagrama de conexión para conectar el "DJ-KONTROL3”:
Utilice el cable USB suministrado para conectar el controlador a su ordenador, mediante el conector USB
(45).
Conecte las salidas Cinch (46) o las salidas XLR (47) a su amplificador de sonido o altavoces
alimentados.
Ponga el selector de salida en la posición deseada.
Conecte el micrófono (en su caso) a la entrada de micrófono (11) del panel frontal del controlador.
Conecte sus auriculares a la salida de auriculares (16) del panel frontal del controlador.
Utilice el adaptador de corriente de 5V CC suministrado, para conectar la entrada de CC (49) del
controlador a la alimentación.
ESPAÑOL MANUAL DE USUARIO
Pulse el botón “INSTALL” Pulse el botón “FINISH”.
Ahora conecte el controlador DJ-KONTROL 3 con el cable USB proporcionado.
Activar el software:
La primera vez que ejecute VirtualDJ, el software le pedirá un
número de serie: teclee el código de licencia que viene con su
producto. Tan pronto como haya introducido la clave de
licencia, VirtualDJ comenzará a funcionar en modo LE.
Vea el capítulo CONFIGURAR VIRTUALDJ para aprender cómo configurar el enrutamiento del audio en el
software.
INSTALAR VIRTUALDJ
Instalación en su ordenador:
Observación: El siguiente procedimiento de instalación está explicado para Windows. Sin embargo, aparte
de algunas pequeñas diferencias, el procedimiento para la instalación en MAC OS es muy parecido.
Inserte el CD-ROM en su ordenador: normalmente, la instalación debería comenzar automáticamente. Si la
instalación no comienza de forma automática, explore el CD-ROM y haga doble clic en el archivo
“install_virtualdj_le_v7.0.X.exe” (install_virtualdj_le_v7.0.X.pkg para usuarios de MAC). (El nombre del
archivo puede ser ligeramente distinto) Siga las instrucciones en pantalla:
Haga clic en el botón “NEXT” Lea y acepte el acuerdo Escoja la instalación “Typical”.
Soporte de software y actualizaciones:
!!! ¡¡¡IMPORTANTE!!!
VirtualDJ añade con frecuencia nuevas funciones y mejoras a su software, por lo que le
recomendamos que visite su sitio web (www.virtualdj.com) y registre su software: en el sitio web de
VirtualDJ escoja el menú DESCARGAS y vaya a “Actualizaciones de Software”. Cree una nueva
cuenta de usuario y registre su software (con el “código de licencia” utilizado para desbloquear el
software).
Ahora usted puede comprobar regularmente si hay nuevas versiones ¡y descargarlas!
También puede consultar los tutoriales y participar en los foros de usuarios.
Importante: Por favor, tenga en cuenta que JB Systems sólo cubre la asistencia del hardware (el
controlador).
El soporte de VirtualDJ es cubierto exclusivamente por los desarrolladores en: www.virtualdj.com!
Actualizarlo a la versión PRO
Tras un tiempo utilizando VirtualDJ, aprenderá sobre las
distintas e interesantes funciones incluidas en la versión PRO
del programa. Como usuario de la versión LE, usted puede
probar gratis la versión PRO durante 20 días, y, si le gusta
(estamos seguros de que sí ), puede comprar la actualización
a un precio reducido. Revise el menú de configuración para
más información.
JB SYSTEMS
®
39/54 DJ-KONTROL 3
JB SYSTEMS
®
40/54 DJ-KONTROL 3
Page 23

ESPAÑOL MANUAL DE USUARIO
ESPAÑOL MANUAL DE USUARIO
CONFIGURAR VIRTUALDJ
Configurar el DJ-KONTROL3 en VirtualDJ LE es muy sencillo: simplemente siga la misma configuración que
aparece a continuación: La salida maestra se envía a las salidas de altavoz posterior, y la señal PFL
(auriculares) se envía a las salidas de altavoz frontal de la tarjeta de sonido interna.
Drivers ASIO:
Si definitivamente desea tener una latencia (retardo) extremadamente baja, puede experimentar también
con los drivers ASIO: en ese caso puede
seleccionar “ASIO-driver” para la tarjeta de
sonido. Como esto está fuera del ámbito de
este manual, no explicaremos aquí la
configuración de los drivers ASIO.
UTILIZAR OTROS SOFTWARE DE DJ
Dado que este controlador está diseñado como dispositivo compatible con MIDI, puede utilizarlo para
controlar cualquier software MIDI de DJ. Por supuesto, esto significa que necesitará archivos especiales de
asignación MIDI para estos productos. Por favor, consulte nuestro sitio web (www.jbsystems.be): le
proporcionaremos sin ningún coste archivos de asignación MIDI para otros softwares de DJ.
TUTORIALES DE VIRTUALDJ
En el siguiente capítulo le daremos una breve descripción general de las funciones de VirtualDJ LE, que se
incluye con su controlador. Virtual-DJ es un programa muy intuitivo, así que aprenderá fácilmente a utilizarlo
mientras prueba todas sus posibilidades. Si quiere aprender más, por favor, consulte el sitio web de VirtualDJ para tutoriales en vídeo y guías de usuario extra: www.virtualdj.com/wiki/index.html .
FUNCIONES (MEZCLADOR)
1. Mando TRACK SELECT: gire este mando para desplazarse
hacia arriba o hacia abajo por las carpetas, explorador, o
librería de música.
Pulse brevemente: para seleccionar una carpeta o
archivo.
Pulse durante 0’5 seg: para aumentar/reducir (hacer
zoom) el explorador.
2. Botón CARGAR A: pulse este botón para cargar la pista
seleccionada en el reproductor A (lado izquierdo) del
software.
3. Botón CARGAR B: pulse este botón para cargar la pista
seleccionada en el reproductor B (lado derecho) del
software.
4. Botón ATRÁS: este botón le permite regresar a un nivel
superior en la estructura de carpetas/explorador.
5. Mando GAIN: gire este mando para ajustar la ganancia del
canal correspondiente.
6. Mando HIGH: se utiliza para ajustar las altas frecuencias del
canal correspondiente. Pulse el mando para
activar/desactivar la función KILL.
7. Mando MIDDLE: se utiliza para ajustar las frecuencias
medias del canal correspondiente. Pulse el mando para
activar/desactivar la función KILL.
8. Mando LOW: se utiliza para ajustar las bajas frecuencias del
canal correspondiente. Pulse el mando para
activar/desactivar la función KILL.
9. FADER del CANAL: ajusta el volumen del canal de audio
correspondiente.
10. VOLUMEN DEL MICRÓFONO: se utiliza para ajustar la
sensibilidad del micrófono de DJ.
11. ENTRADA DE MICRÓFONO: Jack de entrada de 6.3mm
para conectar su micrófono DJ.
12. CROSSFADER: con este fader puede mezclar entre sí
ambos canales. El crossfader sólo funciona cuando mueve los faders de canal (9) de ambos canales, al
nivel deseado.
13. CURVA DE CROSSFADER: se utiliza para escoger una curva suave o pronunciada para el crossfader.
Esto depende de sus gustos personales.
JB SYSTEMS
14. MEZCLA CUE: Con este mando, puede mezclar los canales de entrada a la salida de auriculares:
Ponga el mando en el extremo de la izquierda para escuchar las señales PFL de los reproductores.
Ponga el mando en el extremo de la derecha para escuchar la señal de salida maestra mezclada.
Ponga el mando en cualquier otra posición para escuchar una mezcla de las dos señales.
Esta opción hace posible comprobar su mezcla antes de ponerla en la salida maestra.
15. Control de VOLUMEN CUE: se utiliza para controlar el nivel de salida del canal de auriculares.
16. SALIDA DE AURICULARES: conecte aquí sus auriculares para monitorizar sus pistas.
17. SELECCIONAR CUE botón izquierdo: pulse este botón para monitorizar el reproductor 1 mientras el
fader del canal está cerrado.
18. SELECCIONAR CUE botón derecho: pulse este botón para monitorizar el reproductor 2 mientras el
fader del canal está cerrado.
19. Mando de VOLUMEN MAESTRO: se utiliza para ajustar el volumen de la salida maestra.
FUNCIONES (REPRODUCTORES)
20. Botón Establecer CUE: pone la pista en la ubicación deseada. También pone el audio en la última
posición cue establecida. Mantenga pulsado el botón para previsualizar el punto cue hasta que suelte el
botón.
®
41/54 DJ-KONTROL 3
JB SYSTEMS
®
42/54 DJ-KONTROL 3
Page 24

ESPAÑOL MANUAL DE USUARIO
ESPAÑOL MANUAL DE USUARIO
21. Botón REPRODUCIR CUE: comienza a reproducir la pista desde la última posición cue establecida.
22. Botón REPRODUCIR PAUSA: se utiliza para comenzar/detener la reproducción de la pista cargada.
23. JOG WHEEL (rueda de desplazamiento): su función depende del modo de reproducción
seleccionado:
En modo pausa: la rueda le permite establecer un punto cue o punto de comienzo con mucha
precisión.
En modo reproducción: la rueda actúa como pitch
bend.
En modo bucle (loop): pulse el botón SHIFT (38)
mientras gira la Rueda de Desplazamiento para
desplazar la posición del bucle en reproducción.
Botón Scratch (24) iluminado: con la función Scratch
activada, la rueda le permite scratchear la pista como
con un disco de vinilo. Para aumentar la sensación de
vinilo, la Rueda de Desplazamiento es sensible al tacto:
esto significa que la reproducción se detendrá en cuanto
ponga su mano sobre la rueda.
Botón Scratch (24) parpadeando: gire la rueda para
navegar/buscar por toda la pista a gran velocidad.
24. Botón SCRATCH: son posibles varias funciones:
Pulse brevemente: para alternar entre el modo
navegación (botón no iluminado) y el modo scratch
(botón iluminado), para la rueda de desplazamiento
(23).
Pulse durante 0’5 seg: para activar/desactivar la
función de navegación/búsqueda rápida para la rueda
de desplazamiento (23). Mientras está activada, puede
buscar por toda la pista a una velocidad muy alta.
25. Botón SYNC: se utiliza para sincronizar automáticamente
la pista cargada, con la pista en reproducción de la otra
bandeja. Pulsar el botón SYNC junto con el botón SHIFT
(38) le permite comenzar su pista inmediatamente,
sincronizada con la pista reproduciéndose en la otra
bandeja. (también llamado “comienzo sincronizado”)
26. Botón de Entrada de Bucle (LOOP IN): hay disponibles
varias funciones:
No se está reproduciendo un bucle: pulse el botón de
LOOP IN para establecer el punto de entrada de un
bucle manual.
Se está reproduciendo un bucle: pulse el botón LOOP
IN para volver a lanzar el bucle en reproducción (efecto
tartamudeo).
27. Botón de Salida de Bucle (LOOP OUT): hay disponibles varias funciones:
No se está reproduciendo un bucle: pulse el botón de LOOP OUT para establecer el punto de fin
de un bucle manual, el bucle comienza a reproducirse de inmediato.
Se está reproduciendo un bucle: pulse el botón de LOOP OUT para abandonar el bucle en
reproducción.
28. Botón RELOOP (repetición de bucle): mientras se está reproduciendo el bucle, pulse el botón
RELOOP para volver a iniciar el bucle inmediatamente (efecto tartamudeo). Cuando no se está
reproduciendo un bucle: pulse el botón RELOOP para volver a entrar en el último bucle reproducido.
29. BUCLE INTELIGENTE 2/1: pulse este botón para crear un bucle inteligente automático de compás 2/1.
30. BUCLE INTELIGENTE 4/1: pulse este botón para crear un bucle inteligente automático de compás 4/1.
31. BUCLE INTELIGENTE 8/1: pulse este botón para crear un bucle inteligente automático de compás 8/1.
32. Botón CORTAR BUCLE/SALTAR: hay disponibles dos funciones distintas:
CORTAR BUCLE: pulse este botón para cortar en dos la longitud del bucle en reproducción.
SALTAR BUCLE: pulse este botón mientras está pulsado el botón SHIFT (38) para que el bucle
en reproducción se desplace (o salte) hacia atrás 2 compases en la pista.
33. Botón DOBLE BUCLE/SALTAR: hay disponibles dos funciones distintas:
DOBLE BUCLE: pulse este botón para duplicar la longitud del bucle en reproducción.
SALTAR BUCLE: pulse este botón mientras está pulsado el botón SHIFT (38) para que el bucle en
reproducción se desplace (o salte) hacia delante 2 compases en la pista.
34. Botón PITCH: hay disponibles dos funciones distintas:
Pulsar el Botón PITCH: se usa para cambiar el rango del pitch fader: 6, 10, 20, 50 o 100%.
Pulsar los botones PITCH+SHIFT: activa/desactiva la función de bloqueo de velocidad. Cuando el
bloqueo de velocidad está activo, los faders de velocidad de ambos reproductores están bloqueados:
se mueven a la vez.
35. FADER de Velocidad: se utiliza para cambiar la velocidad de reproducción de la pista en reproducción.
36. Botones de PITCH BEND: La velocidad aumenta mientras el “botón +” está pulsado, y vuelve al pitch
original cuando el botón se suelta. La velocidad disminuye mientras el “botón -” está pulsado, y vuelve al
pitch original cuando el botón se suelta. Estos botones pueden utilizarse para sincronizar manualmente
los compases de 2 pistas.
37. Botones HOT CUE: se utiliza para establecer 3 puntos Hot Cue distintos.
Almacenar un punto cue: cuando no hay almacenado ningún punto cue, el botón está apagado
pulse el botón CUE para guardar el punto cue deseado. (los puntos cue se recuerdan
automáticamente cuando vuelve a cargar el tema)
Reproducir desde un punto cue: cuando hay un punto cue almacenado, el botón está iluminado
pulse el botón CUE para reproducir inmediatamente desde el punto cue almacenado.
Eliminar un punto cue: pulse a la vez los botones CUE+SHIFT el punto cue almacenado será
eliminado.
38. Botón SHIFT: se utiliza para activar “funciones extra” en algunos botones. Las funciones extra
normalmente están escritas en la zona gris bajo los botones.
39. CAÍDA DE AGUJA: una herramienta especial para buscar en la pista cargada con una sombrosa
rapidez. Simplemente ponga su dedo en la posición a la que quiera que salte el reproductor,
exactamente igual que hacía antes, cuando dejaba caer la aguja sobre su disco de vinilo.
40. Botón de BLOQUEO de CLAVE: activa la función de bloqueo de pitch. Esta función le permite realizar
ajustes a la velocidad de la pista utilizando el fader de Velocidad (35) sin alterar el pitch tonal.
41. Botón Activar/Desactivar EFECTO: se utiliza para encender/apagar la unidad.
42. Botón SELECCIONAR EFECTO: se utiliza para seleccionar uno de los efectos disponibles.
43. Mando PARÁMETRO 1: hay disponibles varias funciones:
Gire el mando PARÁMETRO: ajusta el parámetro 1 del efecto seleccionado.
Gire el mando PARÁMETRO mientras pulsa SHIFT: ajusta la frecuencia del efecto de filtro.
44. Mando PARÁMETRO 2: hay disponibles varias funciones:
Gire el mando PARÁMETRO: ajusta el parámetro 2 del efecto seleccionado.
Gire el mando PARÁMETRO mientras pulsa SHIFT: ajusta el pitch tonal de la música.
FUNCIONES (POSTERIOR)
45. Conexión USB: Conector USB de tipo B. Por favor utilice el cable USB suministrado para conectar el
controlador a su ordenador.
Observación: si está utilizando un hub USB, asegúrese de que sea un hub alimentado. En caso
contrario, podría experimentar problemas inesperados.
46. Salida M AESTRA DESBALANCEADA: Salida estéreo no balanceada Cinch/RCA, utilizada para
conectar su amplificador de audio. Puede utilizar esta salida si los cables de señal de su amplificador no
superan los 2 o 3 metros de longitud.
47. Salida M AESTRA BALANCEADA: salida estéreo XLR balanceada, utilizada para conectar su
amplificador de sonido o sus altavoces amplificados. Una conexión de señal balanceada es menos
sensible a cualquier tipo de interferencia que llegue de cualquier tipo de fuente. Utilice esta salida si su
amplificador o sus altavoces alimentados tienen entradas balanceadas (XLR) y la longitud de los cables
de señal superan los 3 metros.
48. Interruptor RCA/XLR: se utiliza para seleccionar la salida maestra deseada (RCA o XLR)
49. Entrada del ADAPTADOR DE CORRIENTE: se utiliza para conectar el adaptador de 5V CC
suministrado.
Observación: El controlador también funcionará sin el adaptador, pero en este caso la energía se
recibe del puerto USB de su ordenador. En algunos casos, especialmente con los ordenadores
portátiles, la energía suministrada no es suficiente. Por favor, utilice el adaptador de corriente
suministrado para prevenir la inestabilidad en ciertas condiciones.
JB SYSTEMS
®
43/54 DJ-KONTROL 3
JB SYSTEMS
®
44/54 DJ-KONTROL 3
Page 25

ESPAÑOL MANUAL DE USUARIO
PORTUGUÊS MANUAL DE INSTRUÇÕES
ESPECIFICACIONES
DJ-KONTROL3
Alimentación mediante el adaptador de corriente 5V CC 1A suministrado
Interfaz de Audio 24Bit / 192kHz
Dimensiones: 320(An) x 240(P) x 65(Al) mm
Peso: 1,42kg
PLATAFORMA DE PC – REQUISITOS MÍNIMOS DEL SISTEMA
Intel®Pentium®4 o AMD Athlon™ XP
Resolución de vídeo de 1024 x 768
Tarjeta de sonido compatible con DirectX
512MB RAM
50MB de espacio libre en el disco duro
PLATAFORMA DE PC – REQUISITOS MÍNIMOS DEL SISTEMA RECOMENDADOS
Intel®Core™ 2 o AMD Athlon™ X2
Resolución de 1280 x 1024
Tarjeta de sonido multi-canal compatible con DirectX
1GB RAM
200MB de espacio libre en el disco duro
PLATAFORMA MAC – REQUISITOS MÍNIMOS DEL SISTEMA
Procesador Intel
Mac OS X v10.5
Resolución de 1024 x 768
Tarjeta de sonido compatible con Core Audio
1GB RAM
50MB de espacio libre en el disco duro
PLATAFORMA MAC – REQUISITOS MÍNIMOS DEL SISTEMA
Procesador Intel
Último Mac OS X v10.6.x
Resolución de 1440 x 900
Tarjeta de sonido multi-canal compatible con Core Audio
2GB RAM
200MB de espacio libre en el disco duro
Puede descargar la versión más reciente de este manual de usuario en nuestro sitio Web:
®
®
Esta información está sujeta a cambios sin notificación previa.
www.beglec.com
MANUAL DE INSTRUÇÕES
Agradecemos-lhe por haver adquirido este produto da JB Systems®. Para aproveitar todas as
possibilidades, leia este manual de instruções com atenção.
FUNÇÕES
Este aparelho é suprimido por interferência de rádio. Este aparelho preenche os requerimentos das
diretrizes europeias e nacionais atuais. A conformidade foi estabelecida, e os documentos e declarações
necessários foram depositados pelo fabricante.
Controlador profissional de MIDI em 2 canais para DJs (para discotecas, bares, estúdios, ...).
Envoltório resistente de alumínio com superfície superior de policarbonato cintilante e iluminação
branca/azul.
Integrado com a última versão do VirtualDJ LE, o software-DJ mais moderno pode inclusive fazer mistura
de vídeo clips!
Graças à comunicação MIDI standard este controlador pode também ser usado com qualquer software DJ
MIDI que possa imaginar!
A maioria dos botões possui iluminação de fundo: utilização fácil em ambientes escuros!
Pode ser usado em qualquer computador portátil moderno ou PC, que possua Windows® XP/Vista/7 or
Mac® OSX
Cartão de som integrado de 24Bit/192kHz, de qualidade premium para um excelente desempenho de
som!
Alta resolução, rodas tácteis sensíveis ao risco com retroiluminação
Sensores em formato de agulha para busca ultra rápida nas faixas.
Mixador em 2 canais.
Equalizador em 3 faixas com função de interromper imediatamente.
Entrada para microfone do DJ e saída para auscultadores PFL.
Crossfader com ajuste de curvas.
XLR-masters balanceados (+ função de retirar o balanço).
Instalação fácil, basta conectar e utilizar: não são necessários controladores extra ou muitos
conhecimentos informáticos!
Totalmente optimizado para utilizar com software VirtualDJ:
Máquina de batida através dum clique, loops de batidas automáticos, detecção instantânea de batida,
...
Amostragem sincronizada de batidas, tempo principal bastante preciso, 3 pontos de entrada por faixa,
...
Mixagem de vídeo: mistura criativa de vídeo clips, incluindo efeitos de vídeo!
Reproduz MP3, AIFF, OGG, W AV, CDA, W MA e muitos mais...
Totalmente compatível com iTunes
Atualize para o VirtualDJ PRO com desconto!
adaptador de alimentação de 5V incluído para uma maior estabilidade de funcionamento.
ANTES DE UTILIZAR
Antes de começar a utilizar este aparelho, verifique se não sofreu danos durante o transporte. Se houver
sofrido, não utilize o aparelho, e consulte o seu revendedor primeiramente.
Importante: este aparelho saiu da fábrica em condições perfeitas e bem embalado. É absolutamente
necessário que o utilizador siga rigorosamente as instruções de segurança e os avisos contidos neste
manual. Danos causados por manuseio incorreto não estão sujeitos à garantia. O revendedor não
aceitará responsabilidade por defeitos ou problemas resultantes da falta de atenção a este manual de
instruções.
Guarde este manual em local seguro para referência futura. Se for vendê-lo, inclua este manual de
instruções no pacote.
Para proteger o meio ambiente, tente reciclar o material da embalagem o máximo possível.
Verifique o conteúdo:
Verifique se os seguintes itens estão presentes na embalagem:
Controlo Midi USB
Cabo USB
CD-ROM do software (incluindo manuais do utilizador)
Código de licença para VirtualDJ LE
Adaptador de alimentação 5V dc
JB SYSTEMS
®
45/54 DJ-KONTROL 3
JB SYSTEMS
®
46/54 DJ-KONTROL 3
Page 26

PORTUGUÊS MANUAL DE INSTRUÇÕES
PORTUGUÊS MANUAL DE INSTRUÇÕES
INSTRUÇÕES DE SEGURANÇA:
CAUTION
O símbolo do raio com uma ponta de seta dentro dum triângulo equilátero serve para alertar o
utilizador acerca da presença de “tensão perigosa” não isolada dentro do envoltório do produto,
que pode ser de magnitude suficiente para constituir risco de eletrocussão.
O ponto de exclamação dentro do triângulo equilátero serve para alertar o utilizador acerca da
presença de instruções importantes de operação e manutenção (reparos) na literatura que
acompanha o aparelho.
Este símbolo significa: utilização somente em ambientes internos
Este símbolo significa: leia as instruções
Este símbolo significa: aparelho de Classe III de segurança
Para evitar incêndios e eletrocussões, não exponha este aparelho a chuvas ou humidade.
Para evitar a formação de condensação dentro do aparelho, deixe que se adapte à temperatura ambiente
quando levá-lo a um cómodo quente após o transporte. A condensação, às vezes, evita que o aparelho
funcione com desempenho máximo, e pode até mesmo causar danos.
Este aparelho deve ser utilizado somente em ambientes internos.
Não coloque objetos metálicos e nem derrame líquidos dentro do aparelho. Não coloque objetos cheios
de líquidos, como vasos de plantas, sobre o aparelho. Isto pode resultar em eletrocussão ou defeitos. Se
um objeto externo entrar no aparelho, desconecte imediatamente a ficha elétrica.
Nenhuma fonte de chama aberta, como velas acesas, deve ser colocada sobre o aparelho.
Não cubra as fendas de ventilação, pois isto pode causar sobreaquecimento.
Evite utilizar o produto em ambientes empoeirados, e limpe-o regularmente.
Mantenha o aparelho fora do alcance das crianças.
Pessoas inexperientes não devem utilizar este produto.
A temperatura ambiente máxima é de 40°C. Não utilize este produto a temperaturas mais elevadas.
As distâncias mínimas em volta do aparelho para ventilação suficiente são de 5cm.
Desconecte sempre o aparelho quando for ficar fora de utilização por um longo período, ou antes de
consertá-lo.
Caso haja problemas graves de operação, interrompa a utilização do aparelho e entre em contacto com o
seu revendedor imediatamente.
Utilize a embalagem original para transportar o aparelho.
Por motivos de segurança, é proibido fazer modificações não autorizadas no aparelho.
GUIAS DE INSTALAÇÃO:
Instale o aparelho em local bem ventilado, onde não fique exposto a temperaturas ou humidade altas.
Colocar e utilizar o aparelho por muito tempo perto de fontes de calor, como amplificadores, holofotes,
etc., afetará o seu desempenho e pode até mesmo danificá-lo.
Se instalado numa cabina ou estojo, garanta que haja ventilação suficiente para melhorar a evacuação de
calor do aparelho.
Para evitar a formação de condensação dentro do aparelho, deixe que se adapte à temperatura ambiente
quando levá-lo a um cómodo quente após o transporte. A condensação, às vezes, evita que o aparelho
funcione com desempenho máximo, e pode até mesmo causar danos.
LIMPEZA DO APARELHO:
Limpe o aparelho passando um pano polido levemente humedecido com água. Evite que entre água no
aparelho. Não utilize líquidos voláteis, como benzina ou removedores de tinta, pois o aparelho pode ser
danificado.
CUIDADO: para reduzir o risco de eletrocussão, não
remova a tampa superior. Não há partes reparáveis pelo
utilizador dentro do aparelho. Leve o aparelho a um técnico
qualificado para manutenção.
CONEXÕES
Deve seguir o esquema de ligações abaixo para ligar o "DJ-KONTROL3".
Usar o cabo USB fornecido para ligar o controlador ao seu computador , através do conector USB (45).
Conectar as saídas de Cinch (46) ou as saídas XLR (47) ao seu amplificador de áudio ou altifalantes com
alimentação própria.
Colocar o seletor de saídas na posição desejada.
Ligar o seu microfone (se existir) à entrada de microfone (11) no painel frontal do controlador.
Ligar os seus auscultadores à saída de auscultadores (16) no painel frontal do controlador.
Usar o adaptador 5Vdc fornecido para ligar a entrada DC (49) do controlador à corrente eléctrica.
Veja o capítulo CONFIGUR AR O VIRTUALDJ para saber como configurar a condução de áudio no
software.
INSTALAÇÃO DO VIRTUALDJ
Instalação no seu computador:
Observação: o procedimento de instalação abaixo é explicado para Windows. Porém, apesar de algumas
diferenças pequenas, o procedimento para MAC OS é bastante similar.
Insira o CD-ROM no seu computador: normalmente, a instalação deve iniciar automaticamente. Se a
instalação não for iniciada automaticamente, navegue pelo CD-ROM e clique duas vezes no ficheiro
“install_virtualdj_le_v7.0.X.exe” (install_virtualdj_le_v7.0.X.pkg para utilizadores de MAC). O nome do
ficheiro pode ser um pouco diferente. Siga as instruções no ecrã:
Clique no botão “NEXT” Ler e aceitar o acordo Escolha a instalação “Typical”.
JB SYSTEMS
®
47/54 DJ-KONTROL 3
JB SYSTEMS
®
48/54 DJ-KONTROL 3
Page 27

PORTUGUÊS MANUAL DE INSTRUÇÕES
PORTUGUÊS MANUAL DE INSTRUÇÕES
CONFIGURAÇÃO DO VIRTUALDJ
A configuração do DJ-KONTROL3 no VirtualDJ LE é muito simples: basta seguir a mesma configuração que
a seguir se indica: A saída principal é enviada para as saídas traseiras da coluna e o sinal-PFL
(auscultadores) é enviado para as saídas frontais da coluna do cartão de som interno.
Clique no botão “INSTALL” Prima o botão “FINISH”.
De seguida, ligar o controlo DJ-KONTROL 3 com o cabo USB fornecido.
Ativar o software:
Quando o VirtualDJ é utilizado pela primeira vez, o programa
pede um número de série: insira o código de licença que veio
com o seu produto. Assim que o número de licença for
inserido, o VirtualDJ começará a funcionar no modo LE.
Suporte e atualização do software:
!!! IMPORTANTE !!!
A VirtualDJ frequentemente adiciona novas funções e melhorias a seu software e, portanto,
recomendamos que visite sua página (www.virtualdj.com) e registe o seu software: no sítio da
VirtualDJ, selecione o menu DOWNLOAD e vá até “Atualizações de software”. Crie uma nova conta
de utilizador e registe o seu software (com o “código de licença” utilizado para desbloquear o
software).
Agora, será possível verificar regularmente se há novas versões, e então descarregá-las!
Será possível também consultar os tutoriais e participar dos fóruns de utilizadores!
IMPORTANTE: lembre-se de que a JB Systems cobre somente o suporte para o hardware (o controlo).
O suporte do VirtualDJ é coberto exclusivamente por seus criadores em: www.virtualdj.com!
Atualizar para a versão PRO
Após utilizar o VirtualDJ por um tempo, o utilizador aprenderá
as várias funções interessantes contidas na versão PRO do
programa. Como utilizador da versão LE, será possível
experimentar a versão PRO gratuitamente por 20 dias e, se
gostar (estamos seguros de que irá ), é possível comprar a
atualização com desconto. Verifique o menu de configurações
para obter mais informações.
Dispositivos ASIO:
Se realmente pretender um tempo de espera (atraso) extremamente reduzido, é possível experimentar os
dispositivos ASIO: neste caso, selecione a
opção “ASIO-driver” como placa de som. Por
estar fora do escopo deste manual, não
explicaremos aqui a configuração dos
dispositivos ASIO.
UTILIZAR OUTROS PROGRAMAS DE DJ
Já que este controlo é um aparelho compatível com MIDI, é possível utilizá-lo para controlar qualquer
software de Midi para DJs. É claro que isto significa que será necessário obter ficheiros de mapeamento de
MIDI especiais para estes produtos. Verifique o nosso sítio (www.jbsystems.be): oferecemos ficheiros de
mapeamento de MIDI para outros programas de DJ gratuitamente.
TUTORIAIS DO VIRTUALDJ
No próximo capítulo, dar-lhe-emos uma breve vista geral das funções no VirtualDJ LE que vem com o seu
controlo. O Virtual-DJ é um programa bastante intuitivo, de modo que o utilizador pode aprender como
utilizá-lo à medida que experimenta todas as possibilidades. Se quiser aprender mais, verifique o sítio do
VirtualDJ para obter tutoriais de vídeo e outros guias para utilizadores: www.virtualdj.com/wiki/index.html .
JB SYSTEMS
®
49/54 DJ-KONTROL 3
JB SYSTEMS
®
50/54 DJ-KONTROL 3
Page 28

PORTUGUÊS MANUAL DE INSTRUÇÕES
PORTUGUÊS MANUAL DE INSTRUÇÕES
FUNÇÕES (MIXADOR)
1. Botão TRACK SELECT: gire este botão para navegar para
cima e para baixo nos diretórios, navegador ou biblioteca de
música.
Prima brevemente: para selecionar o diretório ou ficheiro.
Prima por 0,5seg: para aumentar/diminuir (zoom) o
navegador.
2. Botão CARREGAR A: prima este botão para carregar a
faixa selecionada para o reprodutor A (esquerdo) do
software.
3. Botão CARREGAR B: prima este botão para carregar a
faixa selecionada para o reprodutor B (direito) do software.
4. Botão VOLTAR: este botão permite-lhe retornar ao nível
anterior na estrutura de diretórios/navegador.
5. Botão GAIN: gire este botão para ajustar o ganho do canal
correspondente.
6. Botão HIGH: utilizado para ajustar as frequências altas do
canal correspondente. Prima para activar/desactivar a
função KILL.
7. Botão MIDDLE: utilizado para ajustar as frequências médias
do canal correspondente. Prima para activar/desactivar a
função KILL.
8. Botão LOW: utilizado para ajustar as frequências baixas do
canal correspondente. Prima para activar/desactivar a
função KILL.
9. VOLUME DO CANAL: ajusta o volume do canal de áudio
correspondente.
10. VOLUME MIC: usado para ajustar a sensibilidade do
microfone-DJ.
11. ENTRADA MIC: entrada de 6.3mm para conexão com um
microfone de DJ.
12. VOLUME CRUZADO: com este controlo, é possível misturar
ambos os canais. O volume cruzado funciona somente se os
controlos de volume (9) de ambos os canais forem
colocados no nível desejado!
13. CURVA DO CROSSFADER: utilizada para seleccionar uma curva suave ou brusca para a função de
crossover. Isto depende do gosto pessoal do utilizador.
14. MIXAR ENTRADA: com este botão, é possível misturar os canais de entrada com a saída para
auscultadores:
Coloque o botão na posição da extremidade esquerda para ouvir os sinais PFL dos reprodutores.
Coloque o botão na posição da extremidade direita para ouvir o sinal de saída principal mixado.
Coloque o botão em qualquer outra posição para ouvir uma mistura dos dois sinais.
Esta opção possibilita a verificação de seu remix antes que seja colocado na saída principal.
15. Botão ENTRADA DE VOLUME: utilizado para controlar o nível de saída do canal dos auscultadores.
16. SAÍDA AUSCULTADORES: ligar os seus auscultadores aqui para monitorização das suas faixas.
17. Botão esquerdo de SELECÇÃO DE ORDEM DE FAIXA: premir este botão para monitorizar o leitor1
enquanto o volume do canal é fechado.
18. Botão direito de SELECÇÃO DE ORDEM DE FAIXA: premir este botão para monitorizar o leitor2
enquanto o volume do canal é fechado.
19. Botão PRINCIPAL DE VOLUME: usado para definir o volume da saída principal.
FUNÇÕES (REPRODUTORES)
20. Botão AJUSTAR ENTRADA: coloca a faixa na posição desejada. Também ajusta o áudio de acordo
com a última posição de entrada definida. Mantenha o botão premido para manter o ponto de entrada
até que o botão seja solto.
21. Botão REPRODUZIR ENTRADA: iniciar a reprodução de faixas a partir da última posição de entrada
definida.
22. Botão PAUSAR REPRODUÇÃO: utilizado para iniciar/parar a reprodução da faixa carregada.
23. RODA DE SACUDIR: sua função depende do modo de reprodução selecionado:
No modo pausado: a roda permite-lhe definir um ponto de entrada ou inicial com precisão.
No modo de reprodução: a roda age como alterador
de tom.
No modo laço: premir o botão-ALTERNAR (38)
enquanto roda a j para mover para a posição do laço a
reproduzir.
Botão de arranhar (24) aceso: com a função de
arranhar ativada, a roda permite-lhe arranhar a faixa
exatamente como um disco de vinil. Para aumentar a
sensação de vinil, a roda de deslocamento é sensível ao
toque: isto significa que a reprodução parará assim que
colocar a sua mão sobre a roda.
Botão de arranhar (24) a piscar: gire a roda para
navegar/procurar uma faixa inteira em alta velocidade.
24. Botão ARRANHAR: diferentes funções fazem-se
possíveis:
Prima brevemente: para alterar entre os modos de
navegação (botão apagado) e de arranhar (botão
aceso) para a roda de sacudir (23).
Prima por 0,5seg: para ativar/desativar a função de
navegar/procurar em alta velocidade da roda de sacudir
(23). Se ativada, é possível procurar uma faixa inteira
em alta velocidade.
25. Botão SINCRONIZAR: utilizado para sincronizar a faixa
carregada automaticamente com a faixa em reprodução
no outro deck. Prima o botão SINCRONIZAR junto com o
botão SHIFT (38) para iniciar a sua faixa imediatamente
em sincronia com a faixa em reprodução no outro deck
(também chamado de “início sincronizado).
26. Botão INICIAR LOOP: várias funções disponíveis:
Não está a ser reproduzido nenhum loop: prima o
botão INICIAR LOOP para ajustar o ponto inicial dum
loop manual.
Durante a reprodução dum loop: premir o botão
LOOP IN para voltar a activar o loop em reprodução
(efeito alternância).
27. Botão TERMINAR LOOP: várias funções disponíveis:
Não está a ser reproduzido nenhum loop: premir o botão LOOP OUT para definir o ponto final de
um loop manual, o loop começará a ser reproduzido de imediato.
Durante a reprodução dum loop: premir o botão LOOP OUT para abandonar o loop em reprodução.
28. Botão RELOOP: enquanto o loop está a ser reproduzido, premir o botão RELOOP para reiniciar o loop
de imediato (efeito alternância). Se não houver um loop em reprodução: prima o botão RELOOP para
entrar novamente no último loop reproduzido.
29. LOOP INTELIGENTE 2/1: prima este botão para criar um loop inteligente automático em 2/1 batidas.
30. LOOP INTELIGENTE 4/1: prima este botão para criar um loop inteligente automático em 4/1 batidas.
31. LOOP INTELIGENTE 8/1: prima este botão para criar um loop inteligente automático em 8/1 batidas.
32. Botão CORTAR LOOP / SALTAR: há duas funções disponíveis:
CORTAR LOOP: prima este botão para cortar a duração do loop em reprodução pela metade.
LOOP SALTAR: prima este botão em conjunto com o botão ALTERNAR (38) para que o loop em
reprodução mova-se (ou salte) 2 batidas para trás na faixa.
33. Botão DUPLICAR LOOP /SALTAR: há duas funções disponíveis:
DUPLICAR LOOP: prima este botão para duplicar a duração do loop em reprodução.
SALTAR LOOP : prima este botão em conjunto com o botão ALTERNAR (38) para que o loop em
reprodução mova-se (ou salte) 2 batidas à frente na faixa.
34. Botão TOM: há duas funções disponíveis:
JB SYSTEMS
®
51/54 DJ-KONTROL 3
JB SYSTEMS
®
52/54 DJ-KONTROL 3
Page 29

PORTUGUÊS MANUAL DE INSTRUÇÕES
PORTUGUÊS MANUAL DE INSTRUÇÕES
Prima o botão TOM: utilizado para alterar o raio do controlo de tom: 6, 10, 20, 50 ou 100%.
Prima o botão TOM+ALTERNAR: ativa/desativa a função de trava de velocidade. Se a trava de
velocidade estiver ativada, os controlos de volume de ambos os reprodutores ficarão bloqueados:
mover-se-ão em conjunto.
35. CONTROLO DE VELOCIDADE: utilizado para alterar a velocidade de reprodução da faixa a ser
reproduzida.
36. Botões de ALTERAR TOM: a velocidade aumentará se o botão + for premido, e retornará à original
quando o botão for solto. A velocidade diminuirá se o botão – for premido, e retornará à original quando
o botão for solto. Estes botões podem ser utilizados para sincronizar manualmente as batidas de ambas
as faixas.
37. Botões de ENTRADA ATIVA: utilizados para ajustar 3 pontos de entrada ativa diferentes.
Armazenar um ponto de entrada: se não houver pontos de entrada salvos, o botão ficará apagado
prima o botão ENTRADA para armazenar o ponto de entrada desejado (os pontos de entrada são
trazidos de volta automaticamente quando a faixa é carregada novamente).
Reproduzir a partir dum ponto de entrada: quando há um ponto de entrada armazenado, o botão
ficará aceso prima o botão ENTRADA para iniciar a reprodução imediatamente a partir do ponto de
entrada armazenado.
Excluir um ponto de entrada: prima os botões ENTRADA+SHIFT juntos o ponto de entrada
armazenado será excluído.
38. Botão SHIFT: utilizado para ativar as “funções extras” de alguns botões. As funções extras estão, em
geral, descritas na zona acinzentada sob os botões.
39. ABAIXAR AGULHA: trata-se duma ferramenta especial para procurar dentro da faixa em reprodução a
uma velocidade incrivelmente alta. Basta colocar o dedo no local aonde deseja que o aparelho salte,
exatamente como nos velhos tempos, em que a agulha era colocada sobre o disco.
40. Botão BLOQUEAR TOM: (Tempo principal) ativa a função de bloquear tom. Esta função permite-lhe
fazer ajustes à velocidade duma faixa utilizando o controlo de VELOCIDADE (35) sem alterar o tom.
41. Botão de LIGAR/DESLIGAR EFEITO: usado para mudar o efeito seleccionado em ligar/desligar.
42. Botão SELECCIONAR EFEITO: utilizado para selecionar um dos efeitos disponíveis.
43. Botão PARÂMETRO1: várias funções disponíveis:
Gire o botão de PARÂMETRO: ajustar o parâmetro 1 do efeito seleccionado.
Gire o botão de PARÂMETRO enquanto preme SHIFT: para ajustar a frequência do efeito de filtro.
44. Botão PARÂMETRO2: várias funções disponíveis:
Gire o botão de PARÂMETRO: ajustar o parâmetro 2 do efeito seleccionado.
Gire o botão de PARÂMETRO enquanto preme SHIFT: para ajustar o tom tonal da música.
FUNÇÕES (PARTE DE TRÁS)
45. Conexão USB: conector USB tipo B. Utilize o cabo USB fornecido para conectar o controlo ao seu
computador.
Observação: se estiver a utilizar um hub USB, certifique-se de que esteja ligado à fonte de
alimentação. Do contrário, podem ocorrer problemas inesperados.
46. Saída MESTRE NÃO BALANCEADA: saída estéreo de Cinch não balanceado/RCA, utilizada para
conexão com o seu amplificador de áudio. Utilize esta saída se os cabos do seu amplificador forem
mais curtos que 2 ou 3m.
47. Saída MESTRE BALANCEADA: saída estéreo XLR balanceada, utilizada para conexão com o seu
amplificador de áudio ou auscultadores de amplificação. Uma conexão com sinal balanceado é menos
sensível a todos os tipos de interferência provenientes de todos os tipos de fonte. Utilize esta saída se o
seu amplificador ou os seus altifalantes com alimentação própria possuírem entradas balanceadas
(XLR), e se o comprimento dos cabos de conexão for maior que 3m.
48. Chave RCA/XLR: utilizada para seleção da saída mestre desejada (RCA or XLR)
49. Entrada ADAPTADOR ALIMENTAÇÃO: usada para ligar o adaptador de alimentação fornecido de
5Vdc.
Observação: o controlador também funcionará sem o adaptador de alimentação, no entanto neste caso
a alimentação é recebida a partir da porta USB do seu computador. Nalguns casos, principalmente em
computadores portáteis, a alimentação fornecida não é suficiente. Deve usar o adaptador de
alimentação fornecido para evitar instabilidade em determinadas condições.
ESPECIFICAÇÕES
DJ-KONTROL3
Alimentação: através de adaptador de corrente fornecido de 5Vdc, 1A
Interface de áudio: 24Bit / 192kHz
Dimensões: 320(C) x 240(L) x 65(A) mm
Peso: 1,42kg
PLATAFORMA PC - REQUERIMENTOS MÍNIMOS DO SISTEMA
Intel®Pentium®4 ou AMD Athlon™ XP
1024 x 768 de resolução de vídeo
Placa de som compatível com DirectX
512MB RAM
50MB livres no disco rígido
PLATAFORMA PC - REQUERIMENTOS MÍNIMOS RECOMENDADOS DO SISTEMA
Intel®Core™ 2 ou AMD Athlon™ X2
1280 x 1024 de resolução
Placa de som compatível com DirectX em vários canais
1GB RAM
200MB livres no disco rígido
PLATAFORMA MAC - REQUERIMENTOS MÍNIMOS RECOMENDADOS DO SISTEMA
Processador Intel
Mac OS X v10.5
1024 x 768 de resolução
Placa de som compatível com CoreAudio
1GB RAM
50MB livres no disco rígido
PLATAFORMA MAC - REQUERIMENTOS MÍNIMOS RECOMENDADOS DO SISTEMA
Processador Intel
Mac OS X v10.6.x mais recente
1440 x 900 de resolução
Placa de som compatível com CoreAudio em vários canais
2GB RAM
200MB livres no disco rígido
Descarregue a versão mais recente do manual de instruções no nosso sítio: www.beglec.com
®
®
Todas as informações estão sujeitas a alteração sem aviso prévio
JB SYSTEMS
®
53/54 DJ-KONTROL 3
JB SYSTEMS
®
54/54 DJ-KONTROL 3
 Loading...