

Page 1
Page 2
Page 3

ENGLISH USER MANUAL
OPERATION MANUAL
Thank you for buying this JB SYSTEMS® product. To take full advantage of all possibilities and for your own
safety, please read these operating instructions very carefully before you start using this unit.
FEATURES
This unit is radio-interference suppressed. This product meets the requirements of the current European and
national guidelines. Conformity has been established and the relevant statements and documents have been
deposited by the manufacturer. This device was designed to produce decorative effect lighting and is used in
light show systems.
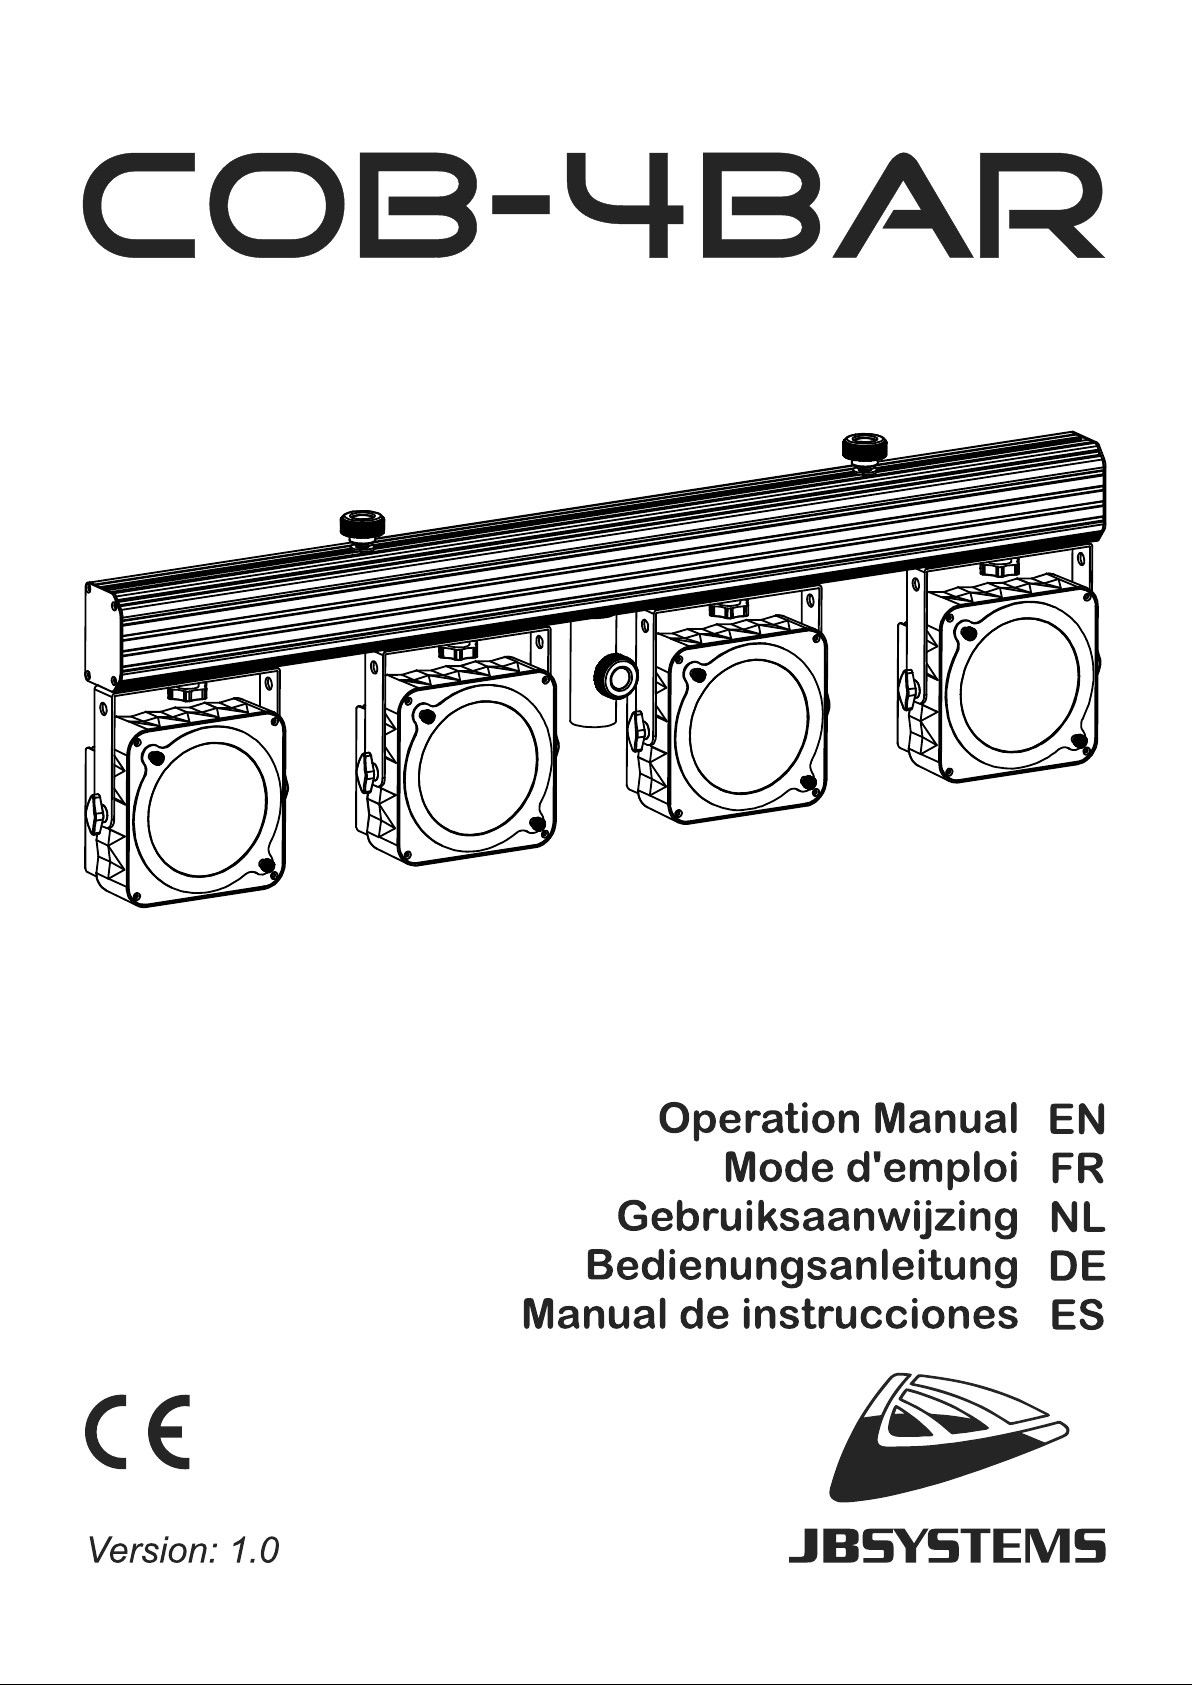
Stylish and compact powered 4BAR containing 4 energy saving COB LED-projectors
NO separate LEDs: each projector contains a 36W COB LED with perfect color mixing and the look of a
traditional lamp !
Exceptional high light output (exceeding the output of traditional PAR56 300W lamps !)
IR-remote controller included: no difficult controllers needed, perfect for DJs !
Equipped with 2 extra mains sockets, each with remote on/off control: any (LED) effect up to 500W can be
connected !
Different working modes:
Standalone with IR-remote: automatic / beat synchronized color patterns + on/off control of 2
(optional) effect lights
Master/slave mode: several bars can be used together for wonderful preprogrammed, music
synchronized lightshows.
Controlled by our famous LEDCON-02 Mk2 or the optional “COB-4BAR FOOTCONTROL” remote.
DMX-controlled: different channel modes with program selection and individual RGB control.
LED-Projector beam angles = 15° with lens / 100° without lens
Perfect for mobile applications: only 1m long and weighs only 8kg !
Many applications possible: Discotheques, DJs, rental companies, ...
0-100% dimming and ultra-fast strobe function (no additional strobes needed!)
Excellent built-in programs for wonderful, ever changing, light shows!
Optional foot controller available: perfect for small music bands!
Backlit alphanumeric 2x 16character LCD-display for easy menu navigation.
Standard 27mm TV-spigot included.
A light but strong case for easy transport is included with the 4BAR.
BEFORE USE
Before you start using this unit, please check if there’s no transportation damage. Should there be any, do
not use the device and consult your dealer first.
Important: This device left our factory in perfect condition and well packaged. It is absolutely necessary
for the user to strictly follow the safety instructions and warnings in this user manual. Any damage caused
by mishandling is not subject to warranty. The dealer will not accept responsibility for any resulting defects
or problems caused by disregarding this user manual.
Keep this booklet in a safe place for future consultation. If you sell the fixture, be sure to add this user
manual.
Check the contents:
Check that the packing contains the following items:
Operating instructions
COB-4BAR
Wireless remote control
Power Cable
Flight-Case
2 spare IEC plugs for the extra effect power outputs
JB SYSTEMS® 1/74 COB-4BAR
Page 4

ENGLISH USER MANUAL
CAUTION: To reduce the risk of electric shock, do not remove
the top cover. No user-serviceable parts inside. Refer servicing
to qualified service personnel only.
The lightning flash with arrowhead symbol within the equilateral triangle is intended to alert the
use or the presence of un-insulated “dangerous voltage” within the product’s enclosure that may
be of sufficient magnitude to constitute a risk of electric shock.
The exclamation point within the equilateral triangle is intended to alert the user to the presence
of important operation and maintenance (servicing) instructions in the literature accompanying
this appliance.
This symbol means: indoor use only
This symbol means: Read instructions
This symbol means: Safety Class I appliance
This symbol determines: the minimum distance from lighted objects. The minimum distance
between light-output and the illuminated surface must be more than x meters
The device is not suitable for direct mounting on normally flammable surfaces. (suitable only for
mounting on non-combustible surfaces)
CAUTION: Do not stare at operating lamp.
May be harmful to the eyes.
SAFETY INSTRUCTIONS:
To protect the environment, please try to recycle the packing material as much as possible.
To prevent fire or shock hazard, do not expose this appliance to rain or moisture.
To avoid condensation to be formed inside, allow the unit to adapt to the surrounding temperatures when
bringing it into a warm room after transport. Condense sometimes prevents the unit from working at full
performance or may even cause damages.
This unit is for indoor use only.
Don’t place metal objects or spill liquid inside the unit. Electric shock or malfunction may result. If a foreign
object enters the unit, immediately disconnect the mains power.
Locate the fixture in a well ventilated spot, away from any flammable materials and/or liquids. The fixture
must be fixed at least 50cm from surrounding walls.
Don’t cover any ventilation openings as this may result in overheating.
Prevent use in dusty environments and clean the unit regularly.
Keep the unit away from children.
Inexperienced persons should not operate this device.
Maximum safe ambient temperature is 40°C. Don’t use this unit at higher ambient temperatures.
Make sure the area below the installation place is free from unwanted persons during rigging, de-rigging
and servicing.
Allow the device about 10 minutes to cool down before to start servicing.
Always unplug the unit when it is not used for a longer time or before to start servicing.
The electrical installation should be carried out by qualified personal only, according to the regulations for
electrical and mechanical safety in your country.
Check that the available voltage is not higher than the one stated on the unit.
The power cord should always be in perfect condition. Switch the unit immediately off when the power cord
is squashed or damaged. It must be replaced by the manufacturer, its service agent or similarly qualified
persons in order to avoid a hazard.
Never let the power-cord come into contact with other cables!
This fixture must be earthed in order to comply with safety regulations.
Don’t connect the unit to any dimmer pack.
Always use an appropriate and certified safety cable when installing the unit.
In order to prevent electric shock, do not open the cover. There are no user serviceable parts inside.
Never repair a fuse or bypass the fuse holder. Always replace a damaged fuse with a fuse of the same
type and electrical specifications!
In the event of serious operating problems, stop using the fixture and contact your dealer immediately.
The housing and the lenses must be replaced if they are visibly damaged.
JB SYSTEMS® 2/74 COB-4BAR
Page 5
ENGLISH USER MANUAL
Please use the original packing when the device is to be transported.
Due to safety reasons it is prohibited to make unauthorized modifications to the unit.
Important: Never look directly into the light source! Don’t use the effect in the presence of persons suffering
from epilepsy.
DESCRIPTION:
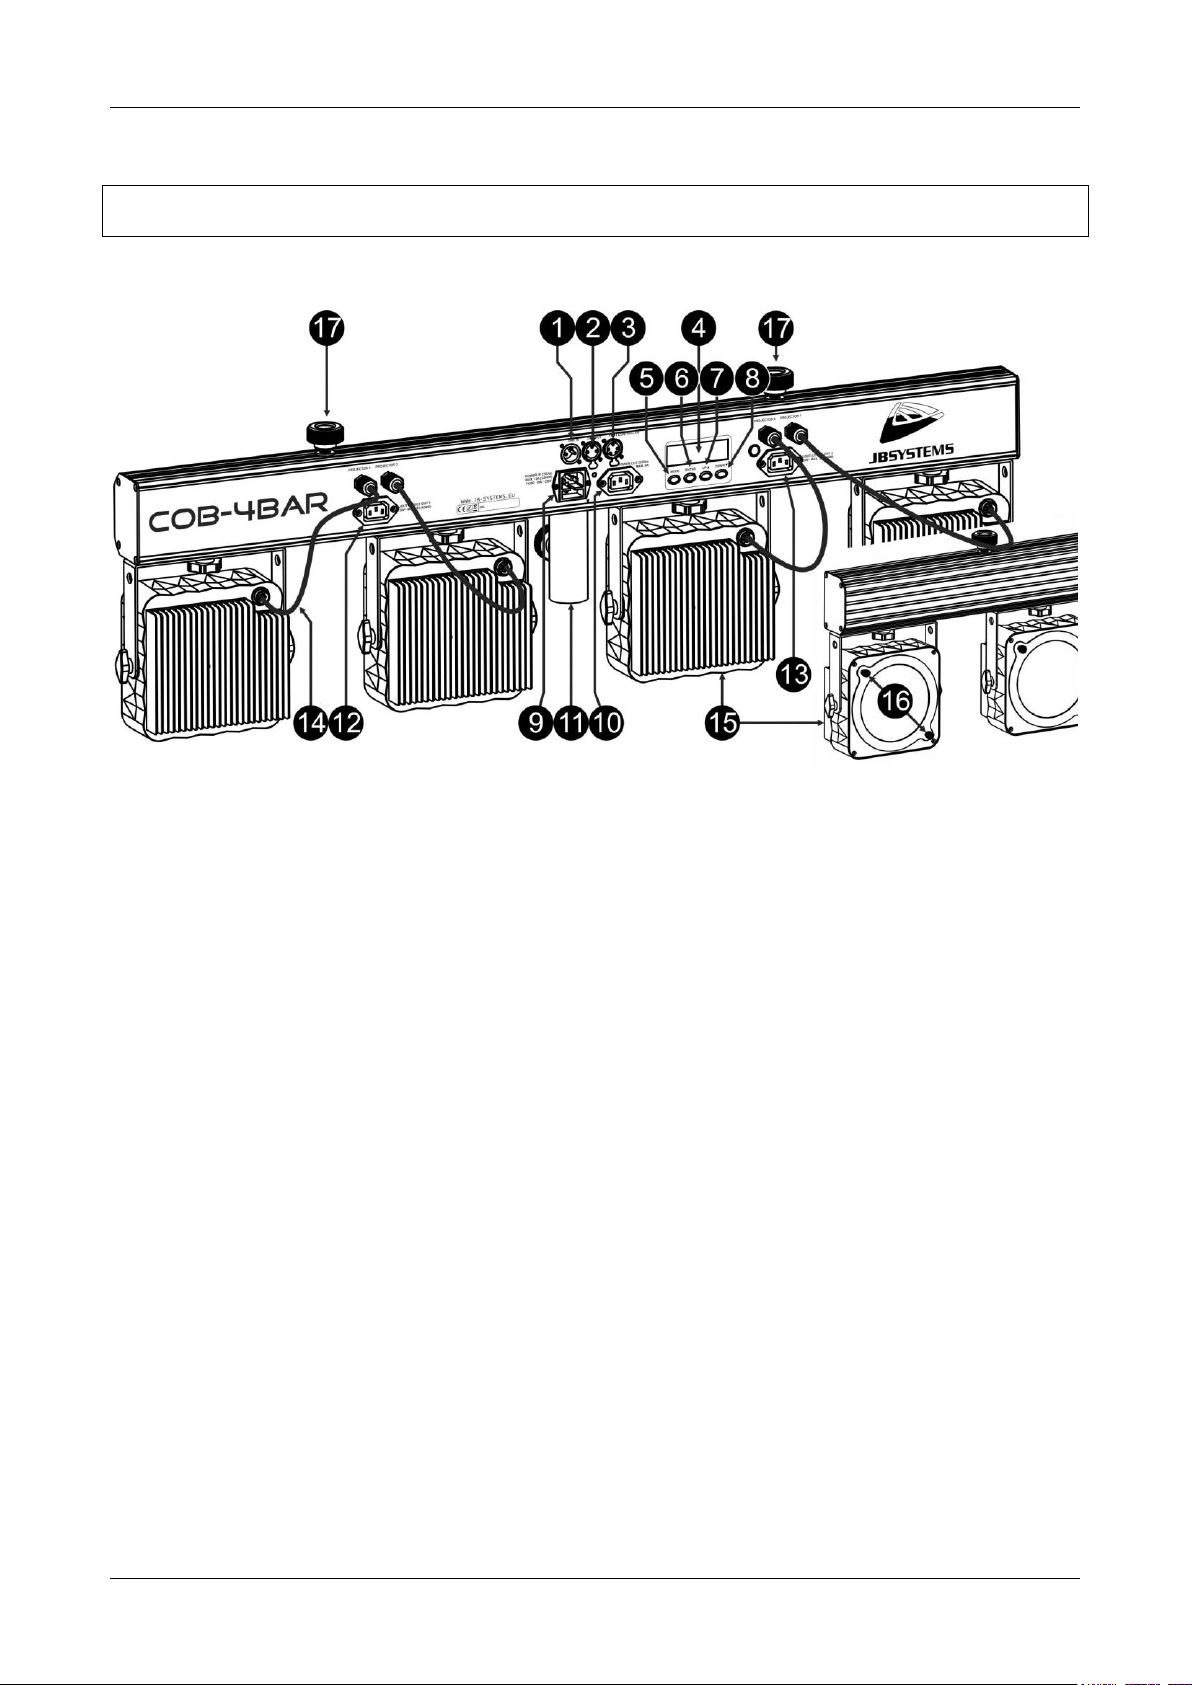
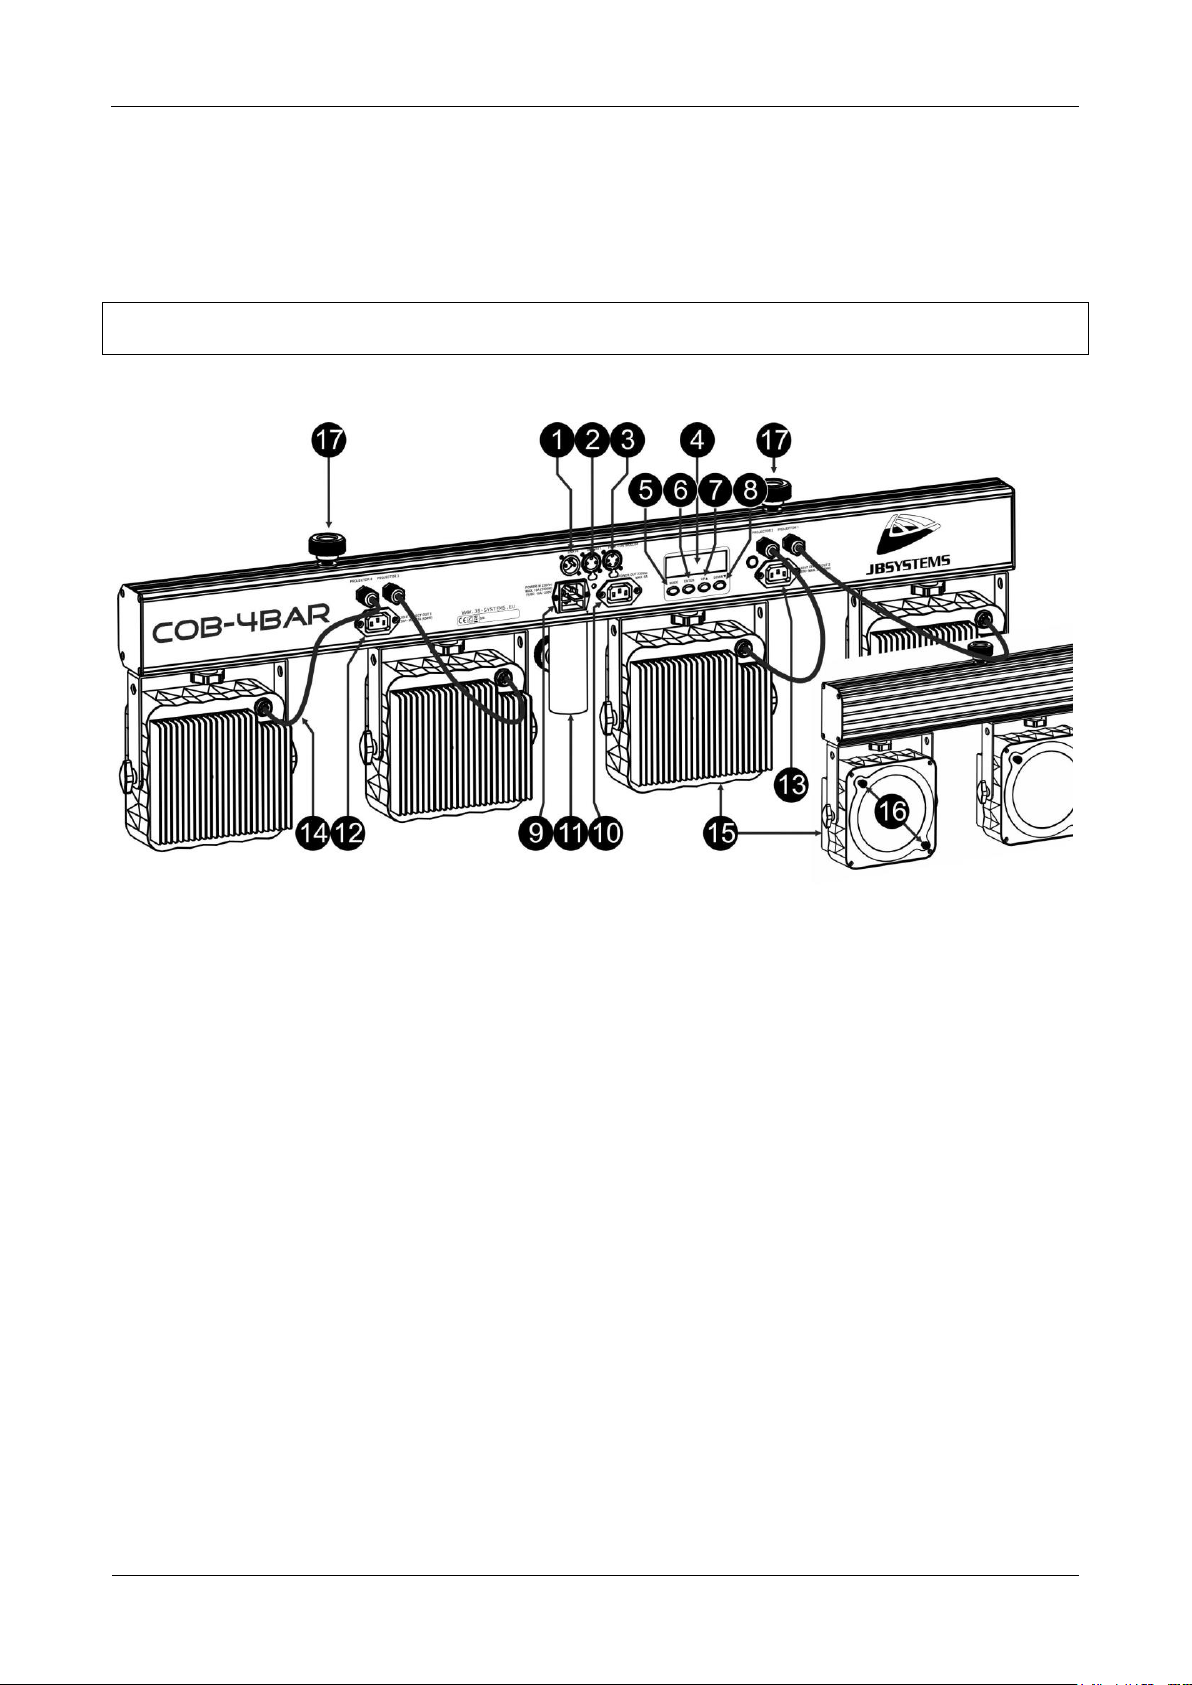
1. DMX INPUT: 3pin male XLR-connector used to connect the COB-4BAR with the DMX controller or with
the previous unit in the DMX chain.
2. DMX OUTPUT: 3pin female XLR-connector used to connect the COB-4BAR with the next unit in the
DMX chain.
3. FOOT CONTROLLER INPUT: here you can connect the optional foot controller
4. DISPLAY shows the various menus and the selected functions.
5. MODE button: used to browse the different functions in the menu
6. ENTER button: used to confirm your choice or to enter the setup mode of a function.
7. UP button: to increase the values shown on the display.
8. DOWN button: to lower the values shown on the display.
9. Mains input: with IEC socket and integrated fuse holder, connect the supplied mains cable here..
10. Mains output with IEC socket: you can use a special IEC power cable to connect this output with the
mains input of the next bar or projector for easier linking.
Important note: the total maximum load may NOT exceed 10A (±2300 Watt) !
11. 35mm STAND ADAPTER: used to put the 4bar easily on top of a light stand
12. Extra Power Output 1: this output can be used to power an extra light effect or projector. In the menu of
the 4BAR you can choose if the power should be continuously ON or if it should be possible to switch the
power ON/OFF via DMX / wireless control / foot switch.
Important note: the maximum load may NOT exceed 3A (±690 Watt) !
13. Extra Power Output 2: this output can be used to power an extra light effect or projector. In the menu of
the 4BAR you can choose if the power should be continuously ON or if it should be possible to switch the
power ON/OFF via DMX / wireless control / foot switch.
Important note: the maximum load may NOT exceed 3A (±690 Watt) !
14. Special cables with power signal for the passive COB panels
15. Passive COB panels: each containing 1 RGB COB led producing colorful sharp 15° beams.
16. Removable 15° lens: each of the COB panels is equipped with a 15° lens that can be removed by
unscrewing the 2 screws that keep it in place. Without the lens the projectors have a beam angle of 100°
which makes the unit perfect as wash projector for all kinds of applications.
17. Sliding mechanism: can be used to add an extra small light effect or projector. You can also fix 2
(optional) mounting clamps on the sliding mechanism to easily mount the bar in your truss.
JB SYSTEMS® 3/74 COB-4BAR
Page 6
ENGLISH USER MANUAL
OVERHEAD RIGGING
Important: The installation must be carried out by qualified service personal only. Improper
installation can result in serious injuries and/or damage to property. Overhead rigging requires
extensive experience! Working load limits should be respected, certified installation materials
should be used, the installed device should be inspected regularly for safety.
Make sure the area below the installation place is free from unwanted persons during rigging, de-rigging
and servicing.
The device should be installed out of reach of people and outside areas where persons may walk by or be
seated.
Before rigging make sure that the installation area can hold a minimum point load of 10times the device’s
weight.
Always use a certified safety cable that can hold 12times the weight of the device when installing the unit.
This secondary safety attachment should be installed in a way that no part of the installation can drop
more than 20cm if the main attachment fails.
The device should be well fixed; a free-swinging mounting is dangerous and may not be considered!
Don’t cover any ventilation openings as this may result in overheating.
The operator has to make sure that the safety-relating and machine-technical installations are approved by
an expert before using them for the first time. The installations should be inspected every year by a skilled
person to be sure that safety is still optimal.
ELECTRICAL INSTALLATION
Important: The electrical installation should be carried out by qualified personal only,
according to the regulations for electrical and mechanical safety in your country.
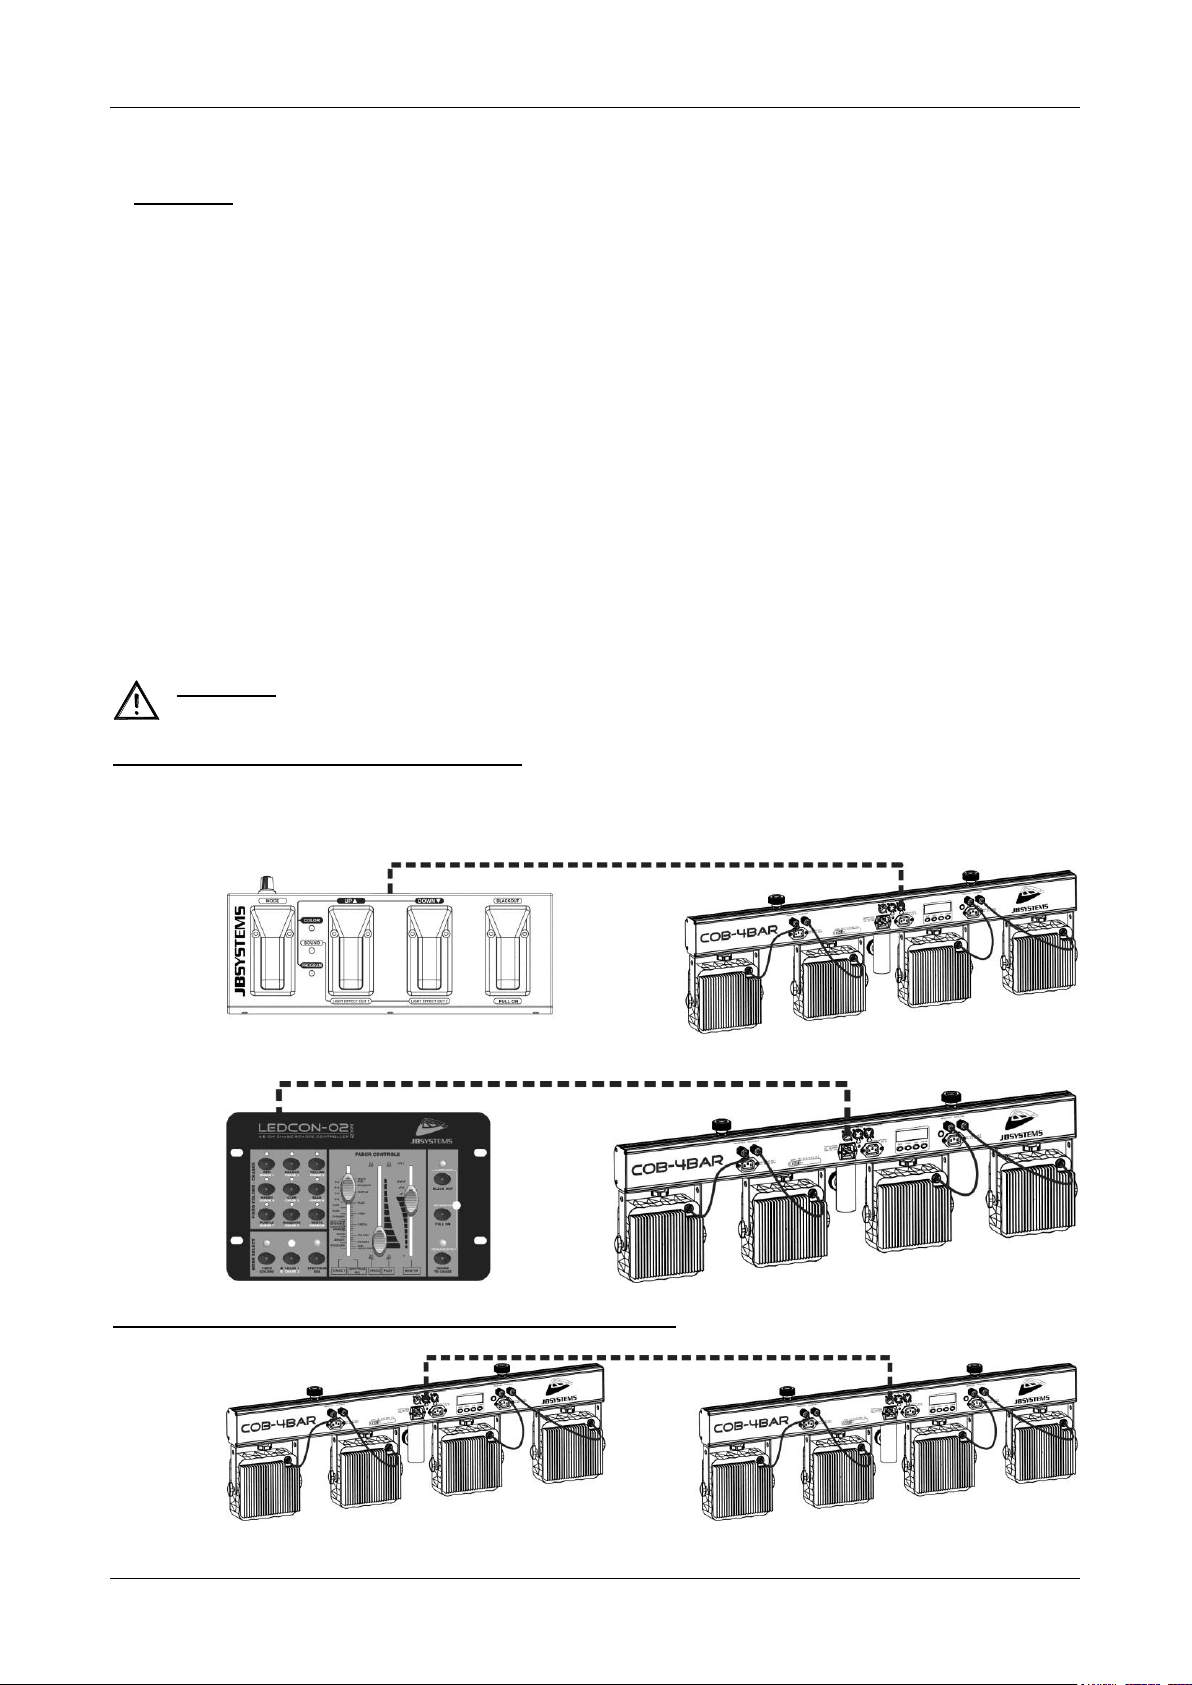
Electrical installation for 1 standalone unit:
Insert the mains cable. The unit starts working immediately in the last selected mode.
Refer to chapter HOW TO SETUP to learn how to switch between the different working modes.
If you like, you can control the unit using the optionally available:
COB-4BAR FOOTCONTROL: foot controller, perfect for music bands etc.
LEDCON-02 Mk2: (must be Mk2 version!) perfect for use by DJs!
See chapters HOW TO SETUP and OPERATING INSTRUCTIONS for more information.
Electrical installation for two or more units in master/slave:
JB SYSTEMS® 4/74 COB-4BAR
Page 7
ENGLISH USER MANUAL
Connect several units together using good quality balanced microphone cables. The unit that has no
cable connected to its DMX-input is the “master”, the others are the slave units.
Make sure that all units are connected to the mains.
Refer to chapter HOW TO SETUP for more information.
Done!
Note: of course you can always add a foot controller or LEDCON-02 Mk2 to the master for more control.
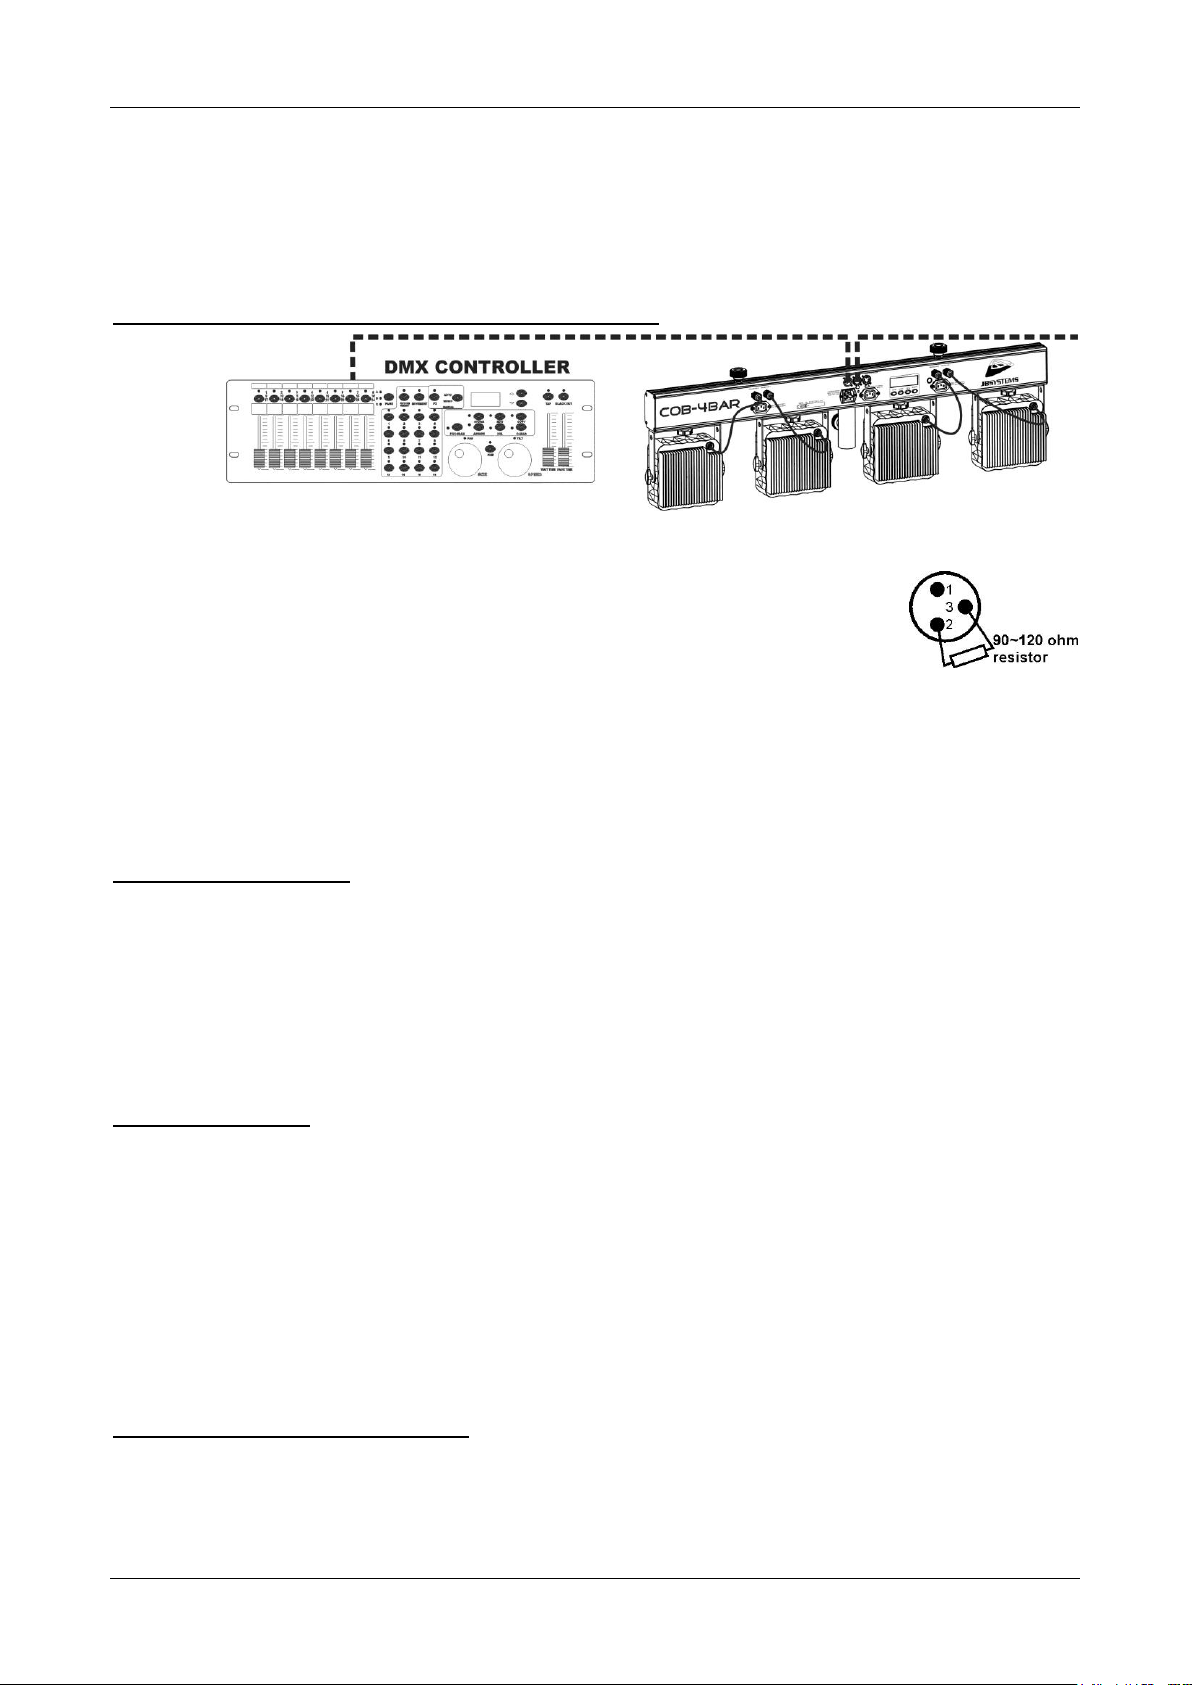
Electrical installation for two or more units in DMX-mode:
The DMX-protocol is a widely used high speed signal to control intelligent light equipment. You need to
“daisy chain” your DMX controller and all the connected units with a good quality
balanced cable.
To prevent strange behavior of the light effects, due to interferences, you must use
a 90Ω to 120Ω terminator at the end of the chain. Never use Y-splitter cables, this
simply won’t work!
Make sure that all units are connected to the mains.
Each light effect in the chain needs to have its proper start address so it knows which commands from
the controller it has to decode. In the section HOW TO SETUP you will learn how to set the DMX
addresses. If for example you use the 4 channel DMX mode, a possible address setup could be: unit1 =
001 ~ unit2 = 005 ~ unit3 = 009 ~ unit4 = 013 ~ etc.
HOW TO SETUP:
DMX512 Address Setting
Used to set the start address in a DMX setup.
Press the MODE button until DMX MODE is shown on the display.
Press the ENTER button to enter the configuration mode
Use the DOWN and UP buttons to change the DMX address.
Once the correct address is shown on the display, press the ENTER button to confirm.
The channel mode will now start to blink on the display (03, 05, 06, 08, 12, 17 or 18 Channels)
Use the DOWN and UP buttons if you would like to change the channel mode
Press the ENTER button to confirm
DMX Channel Mode
The unit has 7 different DMX channel modes. With this function you can choose the DMX mode you
want to use. Refer to the DMX-charts to see the differences.
Press the MODE button until DMX MODE is shown on the display.
Press the ENTER button to enter the configuration mode
The DMX address will start blinking on the display
Use the DOWN and UP buttons if you want to change this DMX start address.
Press the ENTER button to confirm.
The channel mode will now start blinking on the display (03, 05, 06, 08, 12, 17 or 18)
Use the DOWN and UP buttons if you would like to change the channel mode
Press the ENTER button to confirm
Note: see
SLAVE MODE + FOOT CONTROLLER
Used to set the unit in slave mode when you want to have synchronized effects with the master unit.
(when the first unit is running it’s automatic programs or is set in a fixed color)
Used when you want to control the bar with the optional foot controller
Press the MODE button until SLAVE is shown on the display.
JB SYSTEMS® 5/74 COB-4BAR
Page 8
ENGLISH USER MANUAL
Press the ENTER button to confirm.
IMPORTANT: If you want to use the automatic modes and make the settings directly on the bar, you
need to deactivate the IR remote control receiver in the bar. (IR ACTIVE = OFF)
SOUND MODE
Used to set the parameters for the automatic Sound Mode.
Press the MODE button until SOUND MODE is shown on the display.
Press the ENTER button to enter the configuration mode
The value of the sensitivity (SENS) will start blinking on the display
Use DOWN and UP buttons to change the sensitivity of the build-in microphone (00 = minimal sensitivity,
31 = maximal sensitivity).
Press the ENTER button to confirm.
The value of the frequency (FQN) will start blinking on the display
Use DOWN and UP buttons to change the number of times each automatic program should be repeated
before to go automatically to the next automatic program.
Press the ENTER button to confirm.
IMPORTANT: Don’t forget the bar is equipped with a master dimmer. If the output seems to be too
low or if there is no light output at all, please check the MASTER DIM setting !
STATIC COLOR MODE:
Used to set a static color for the projectors.
Press the MODE button until 01.STATIC or xx.EFFECT (number 02 to 14 followed by EFFECT) is shown
on the display.
Press the ENTER button to enter the configuration mode
The actual mode (static or effect mode) is blinking on the display
If necessary, use the DOWN and UP buttons to select 01.STATIC
Press the ENTER button to enter the configuration mode for the static colors
Use DOWN and UP buttons to select COLOR_CW (cold white), COLOR_WW (warm white) or COLOR
SET (to compose your own color).
If you have chosen COLOR_CW or COLOR_WW : just press the ENTER button to confirm your choice
If you have chosen COLOR SET: press the ENTER button to access the manual color settings
RED is blinking on the display: use the DOWN and UP buttons to set the intensity of the red color
(000 = minimum, 255 = maximum)
Press the ENTER button to confirm and to go to the next color
GREEN is blinking on the display: use the DOWN and UP buttons to set the intensity of the green
color (000 = minimum, 255 = maximum)
Press the ENTER button to confirm and to go to the next color
BLUE is blinking on the display: use the DOWN and UP buttons to set the intensity of the blue
color (000 = minimum, 255 = maximum)
Press the ENTER button to confirm
IMPORTANT: Don’t forget the bar is equipped with a master dimmer. If the output seems to be too
low or if there is no light output at all, please check the MASTER DIM setting !
SLOW COLOR FADE MODE:
Used to let the projectors slowly fade from one color into another.
Press the MODE button until 01.STATIC or xx.EFFECT (number 02 to 14 followed by EFFECT) is shown
on the display.
Press the ENTER button to enter the configuration mode
The actual mode (static or effect mode) is blinking on the display
Use the DOWN and UP buttons to select 02.EFFECT (fading from one color into another) or
04.EFFECT (each color fading on and off)
Press the ENTER button to confirm
Speed starts blinking on the display: Use the DOWN and UP buttons to set the desired running speed (00
= slow, 99 = maximum speed)
Press the ENTER button to confirm
Flash starts blinking on the display: Use the DOWN and UP buttons to set the desired speed for the
stroboscopic effect (00 = off, 99 = maximum speed)
Press the ENTER button to confirm
JB SYSTEMS® 6/74 COB-4BAR
Page 9

ENGLISH USER MANUAL
IMPORTANT: Don’t forget the bar is equipped with a master dimmer. If the output seems to be too
low or if there is no light output at all, please check the MASTER DIM setting !
AUTOMATIC CHASE MODE:
Used to set the automatic Chase Mode so colors will change automatically at a constant speed.
Press the MODE button until 01.STATIC or xx.EFFECT (number 02 to 14 followed by EFFECT) is shown
on the display.
Press the ENTER button to enter the configuration mode
The actual mode (static or effect mode) is blinking on the display
Use the DOWN and UP buttons to select one of the 11 chase modes (03, 05, 06, 07, 08, 09, 10, 11, 12, 13
or 14.EFFECT).
Press the ENTER button to confirm
Speed starts blinking on the display: Use the DOWN and UP buttons to set the desired running speed (00
= slow, 99 = maximum speed)
Press the ENTER button to confirm
Flash starts blinking on the display: Use the DOWN and UP buttons to set the desired speed for the
stroboscopic effect (00 = off, 99 = maximum speed)
Press the ENTER button to confirm.
Remark: if you have selected 13.EFFECT or 14.EFFECT, you can choose 2 colors for your chase program:
C1 will blink on the display
Use the DOWN and UP buttons to and UP buttons to select the first color of your chase program.
Press the ENTER button to confirm
C2 will now blink on the display
Use the DOWN and UP buttons to and UP buttons to select the second color of your chase program.
Press the ENTER button to confirm
IMPORTANT: Don’t forget the bar is equipped with a master dimmer. If the output seems to be too
low or if there is no light output at all, please check the MASTER DIM setting !
AUTO RUN:
Used to start the automatic Random Chase Mode. The bar will play each individual chase program at
random. The speed and strobe speed that you have set for each individual chase program will be
used during this show. (see previous description: AUTOMATIC CHASE MODE)
Press the MODE button until AUTO RUN is shown on the display.
Press the ENTER button to enter the configuration mode
FQN will start blinking on the display.
Use the DOWN and UP buttons to change the number of times each program should be repeated before
to go automatically to the next automatic program. (01 to 99 times)
Press the ENTER button to confirm
FLOW INVERT
Used to invert the flow direction of the automatic chases. This can be useful when you use several
bars together in master / slave mode
Press the MODE button until FLOW INVERT is shown on the display.
Press the ENTER button to enter the configuration mode
Use the DOWN and UP buttons to select ON (flow is inverted) or OFF (flow is not inverted)
Press the ENTER button to confirm
MASTER DIM
This is the general master dimmer for ALL the build-in effect of the 4BAR.
Press the MODE button until MASTER DIM is shown on the display.
Press the ENTER button to enter the configuration mode
Use the DOWN and UP buttons to change the general dimmer level of the 4BAR
Press the ENTER button to confirm
If you would have the impression the 4BAR is not working, please check if this MASTER DIMMER is
not set to zero or to a too low level !
JB SYSTEMS® 7/74 COB-4BAR
Page 10
ENGLISH USER MANUAL
IR ACTIVE
Activate this function If you want to control the 4BAR with the small wireless remote control.
Always deactivate this function when you don’t want to use the wireless remote control.
Press the MODE button until IR ACTIVE is shown on the display.
Press the ENTER button to enter the configuration mode
Use the DOWN and UP buttons to select ON (wireless controller can be used) or OFF (cannot be
controlled via the wireless remote controller)
Press the ENTER button to confirm
IMPORTANT: If you don’t want to use the wireless remote controller, you need to deactivate the IR
remote control receiver in the bar. (IR ACTIVE = OFF)
LIGHT EFFECT OUT (only when controlled via DMX)
With this option you can decide if the 2 extra power outputs for extra light effect (12) and (13) can be
turned ON/OFF via DMX or if the power needs always to be ON
Press the MODE button until LIGHT EFFECT OUT is shown on the display.
Press the ENTER button to enter the configuration mode
Use the DOWN and UP buttons to select DMX CONTROL ON (the power outputs can be switched on or
off via DMX) or DMX CONTROL OFF (the power outputs are continuously ON)
Press the ENTER button to confirm
OPERATING INSTRUCTIONS
A. Standalone 1unit:
Just connect the projector to the mains.
Select one of the automatic, sound or static color modes
Refer to chapter HOW TO SETUP to learn how to make the settings.
B. Two or more units in master/slave setup:
Connect the units together. Refer to the chapter “electrical installation” to learn how to do this.
Select one of the automatic, sound or static color modes on the master (the first COB-4BAR in the
DMX chain)
Set all the other bars in SLAVE mode
The projectors will now follow the program of the master COB-4BAR so they all work synchronously.
C. Controlled by the wireless remote controller:
To be able to use the wireless remote control, you need to enable this option in the 4BAR:
Press the MODE button until IR ACTIVE is shown on the display.
Press the ENTER button to be able to change the setting
Use the DOWN and UP buttons to enable or to disable the remote control option (ON = remote control
enabled, OFF = remote control disabled).
Press the ENTER button to confirm
Press the MODE button until SLAVE & FOOT CONTROL is shown
on the display.
Press the ENTER button to confirm
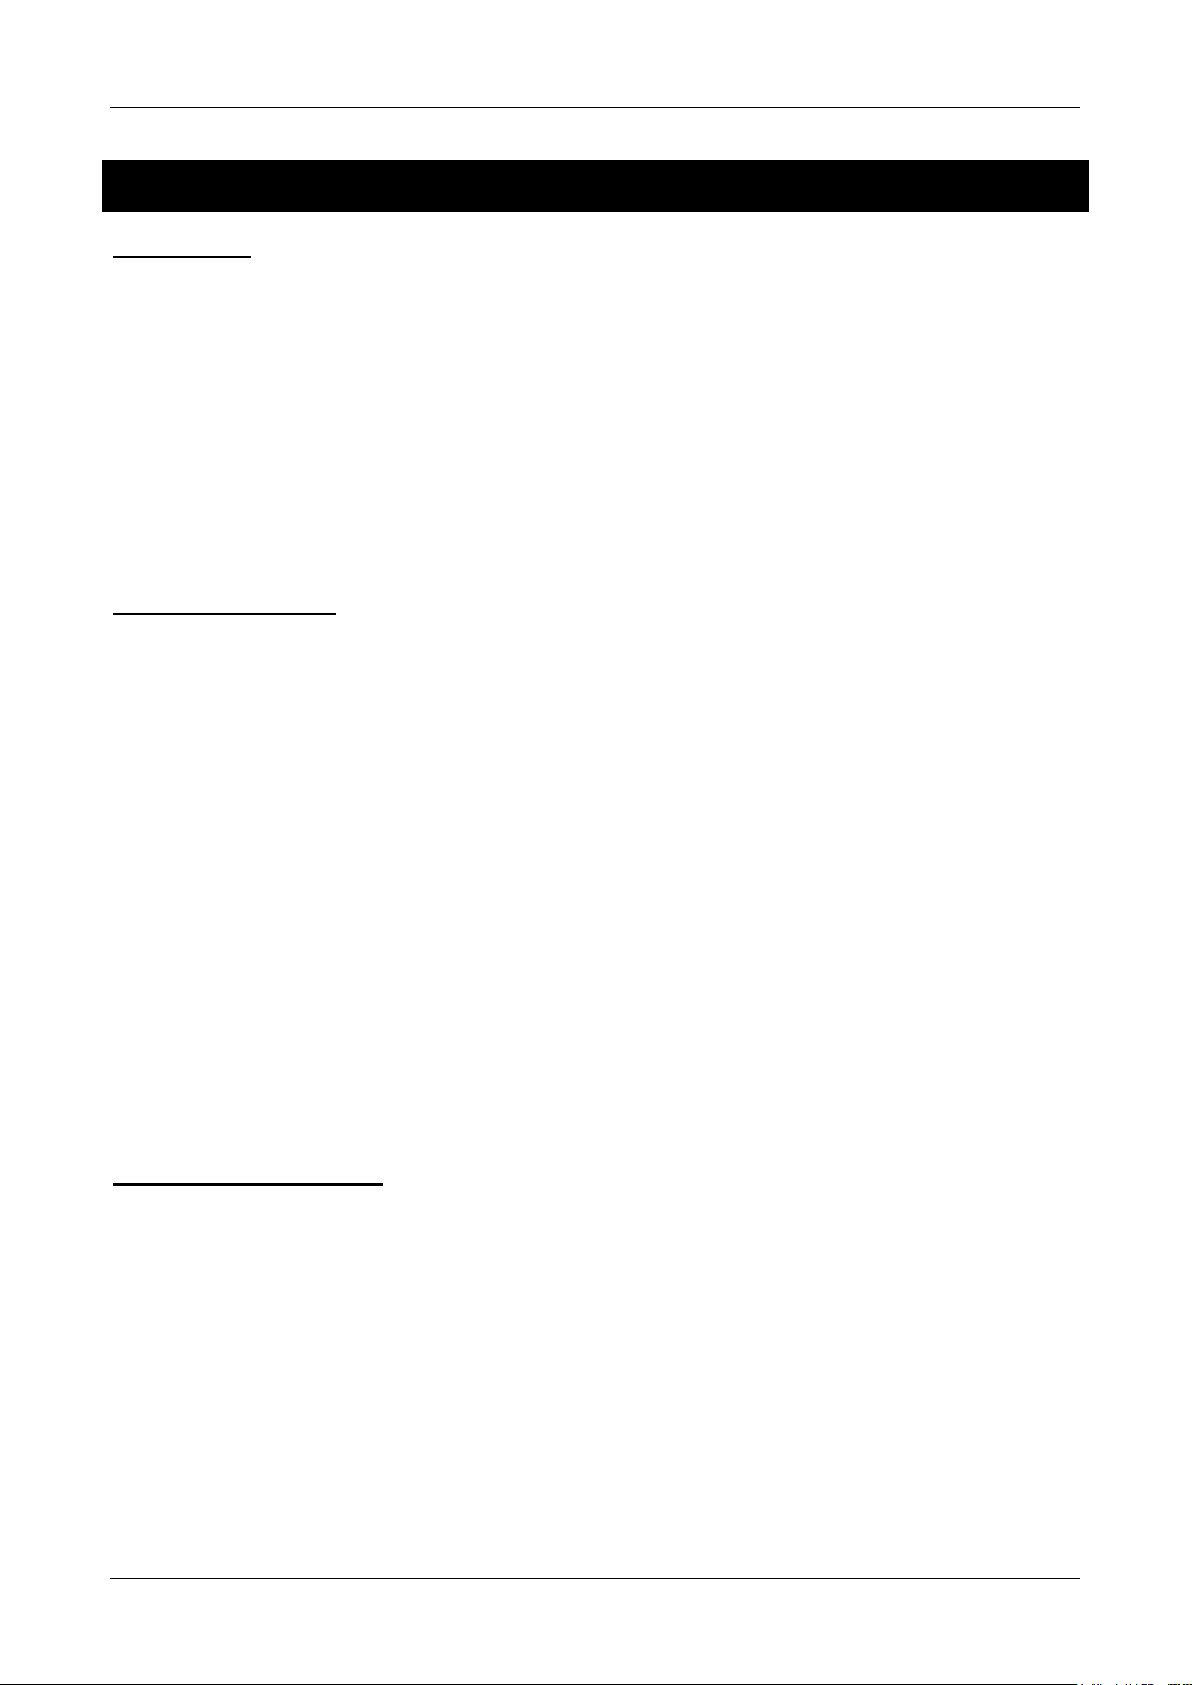
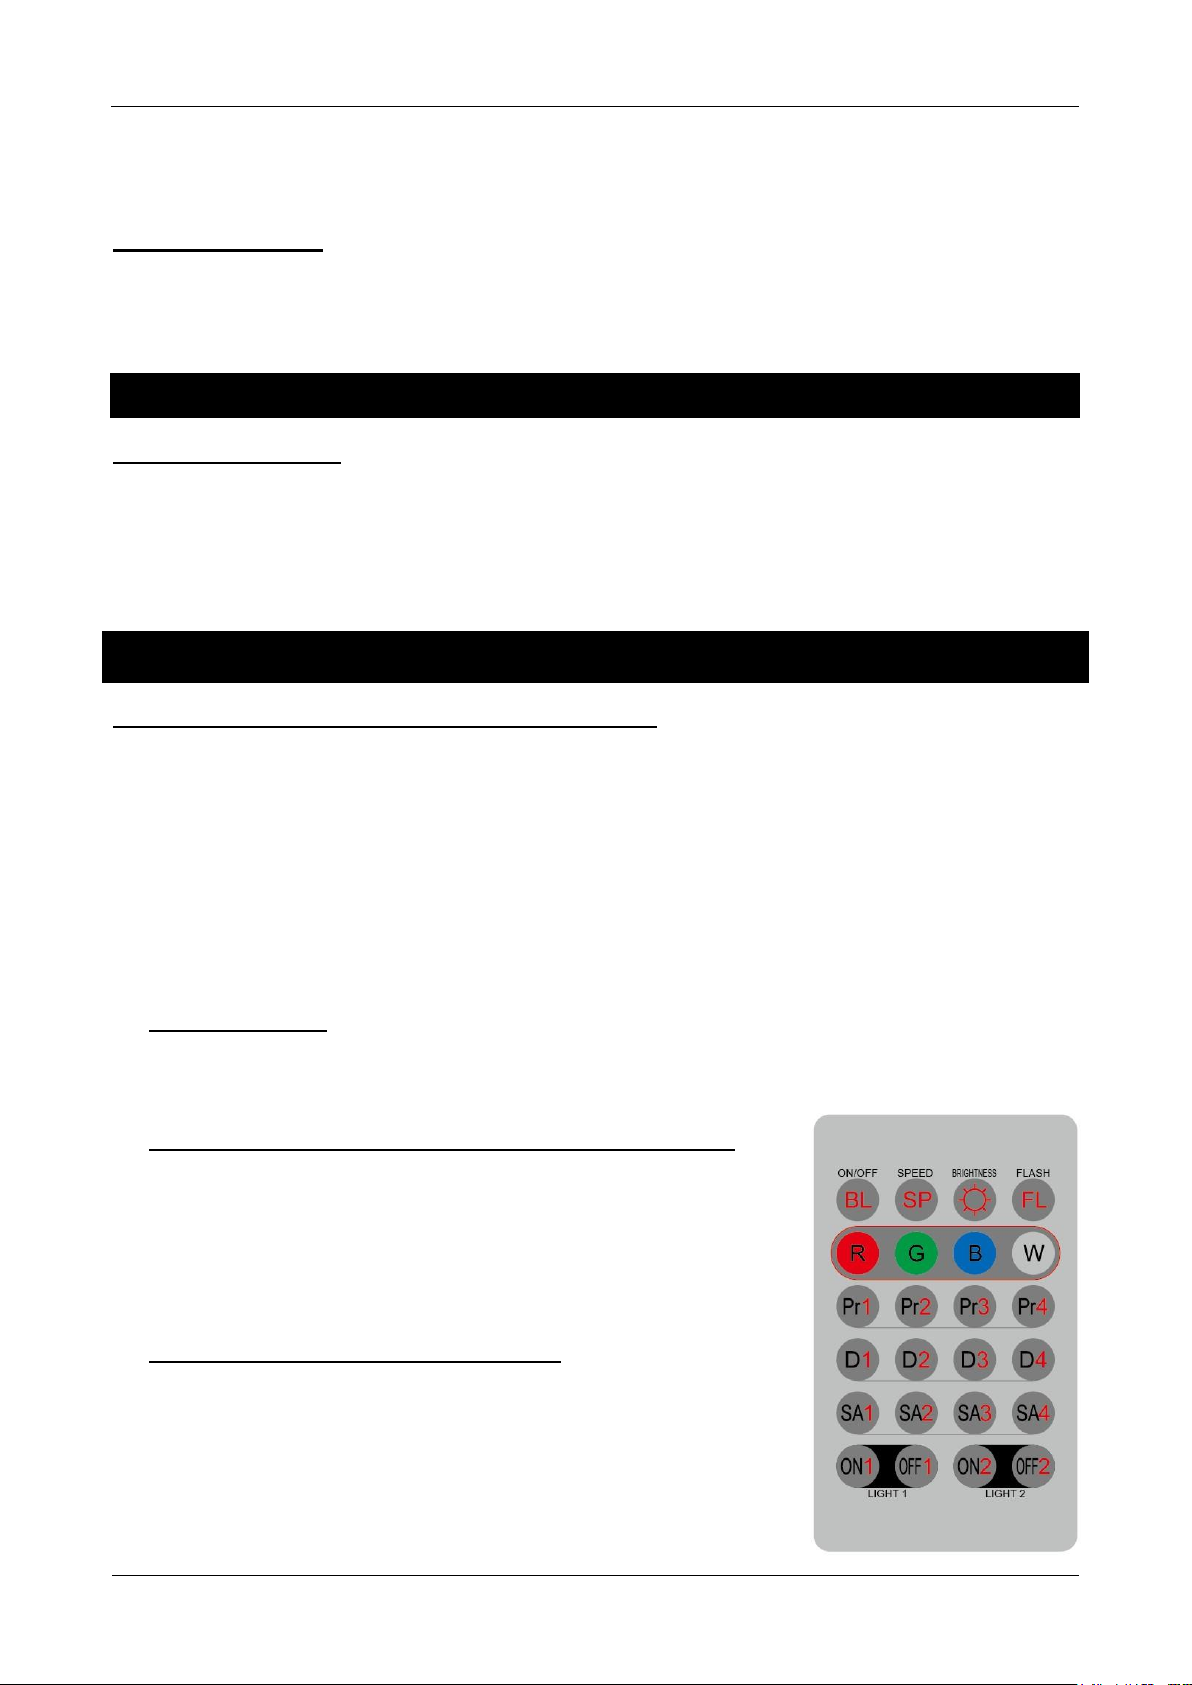
Functions:
BL: is used to switch the LEDs off/on
SP: is used to set the running speed when you are using the color
change or the color fade modes. Press this button several times to
select one of the 4 preprogrammed speeds. (Slow, medium, fast, off)
BRIGHTNESS (Master Dimmer): is used to set the General
brightness of your projectors. Press this button several times to select
one of the 4 preprogrammed brightness levels. (50%, 75%, 100%,
off)
FL: is used to activate the strobe (Flashing) mode. Press this button
several times to select one of the 4 preprogrammed flash
frequencies. (Slow, medium, fast, off)
R is used to set the intensity of the Red LED source. Press this button
several times to select one of the 4 preprogrammed brightness levels.
JB SYSTEMS® 8/74 COB-4BAR
Page 11
ENGLISH USER MANUAL
(50%, 75%, 100%, off). Don’t forget that the brightness is also influenced by the master dimmer ! (=
BRIGHTNESS button)
G is used to set the intensity of the Green LED source. Press this button several times to select one of
the 4 preprogrammed brightness levels. (50%, 75%, 100%, off). Don’t forget that the brightness is also
influenced by the master dimmer ! (= BRIGHTNESS button)
B is used to set the intensity of the Blue LED source Press this button several times to select one of
the 4 preprogrammed brightness levels. (50%, 75%, 100%, off). Don’t forget that the brightness is also
influenced by the master dimmer ! (= BRIGHTNESS button)
W is used to set the intensity of the White color (Red + Green + Blue together) Press this button
several times to select one of the 4 preprogrammed brightness levels. (50%, 75%, 100%, off). Don’t
forget that the brightness is also influenced by the master dimmer ! (= BRIGHTNESS button)
Pr1, Pr2, Pr3, Pr4: These buttons are used to run the built-in color chase programs. Brightness, speed
and flash rate can be adjusted with the buttons BRIGHTNESS, SP and FL
D1, D2, D3, D4: These buttons are used to run the built-in color fade programs. Brightness, speed and
flash rate can be adjusted with the buttons BRIGHTNESS, SP and FL
SA1, SA2, SA3, SA4: These buttons are used to run the built-in sound controlled chase programs.
Brightness and flash rate can be adjusted with the buttons BRIGHTNESS and FL
Note: Maximum distance between the wireless remote and the fixture = +/- 10m
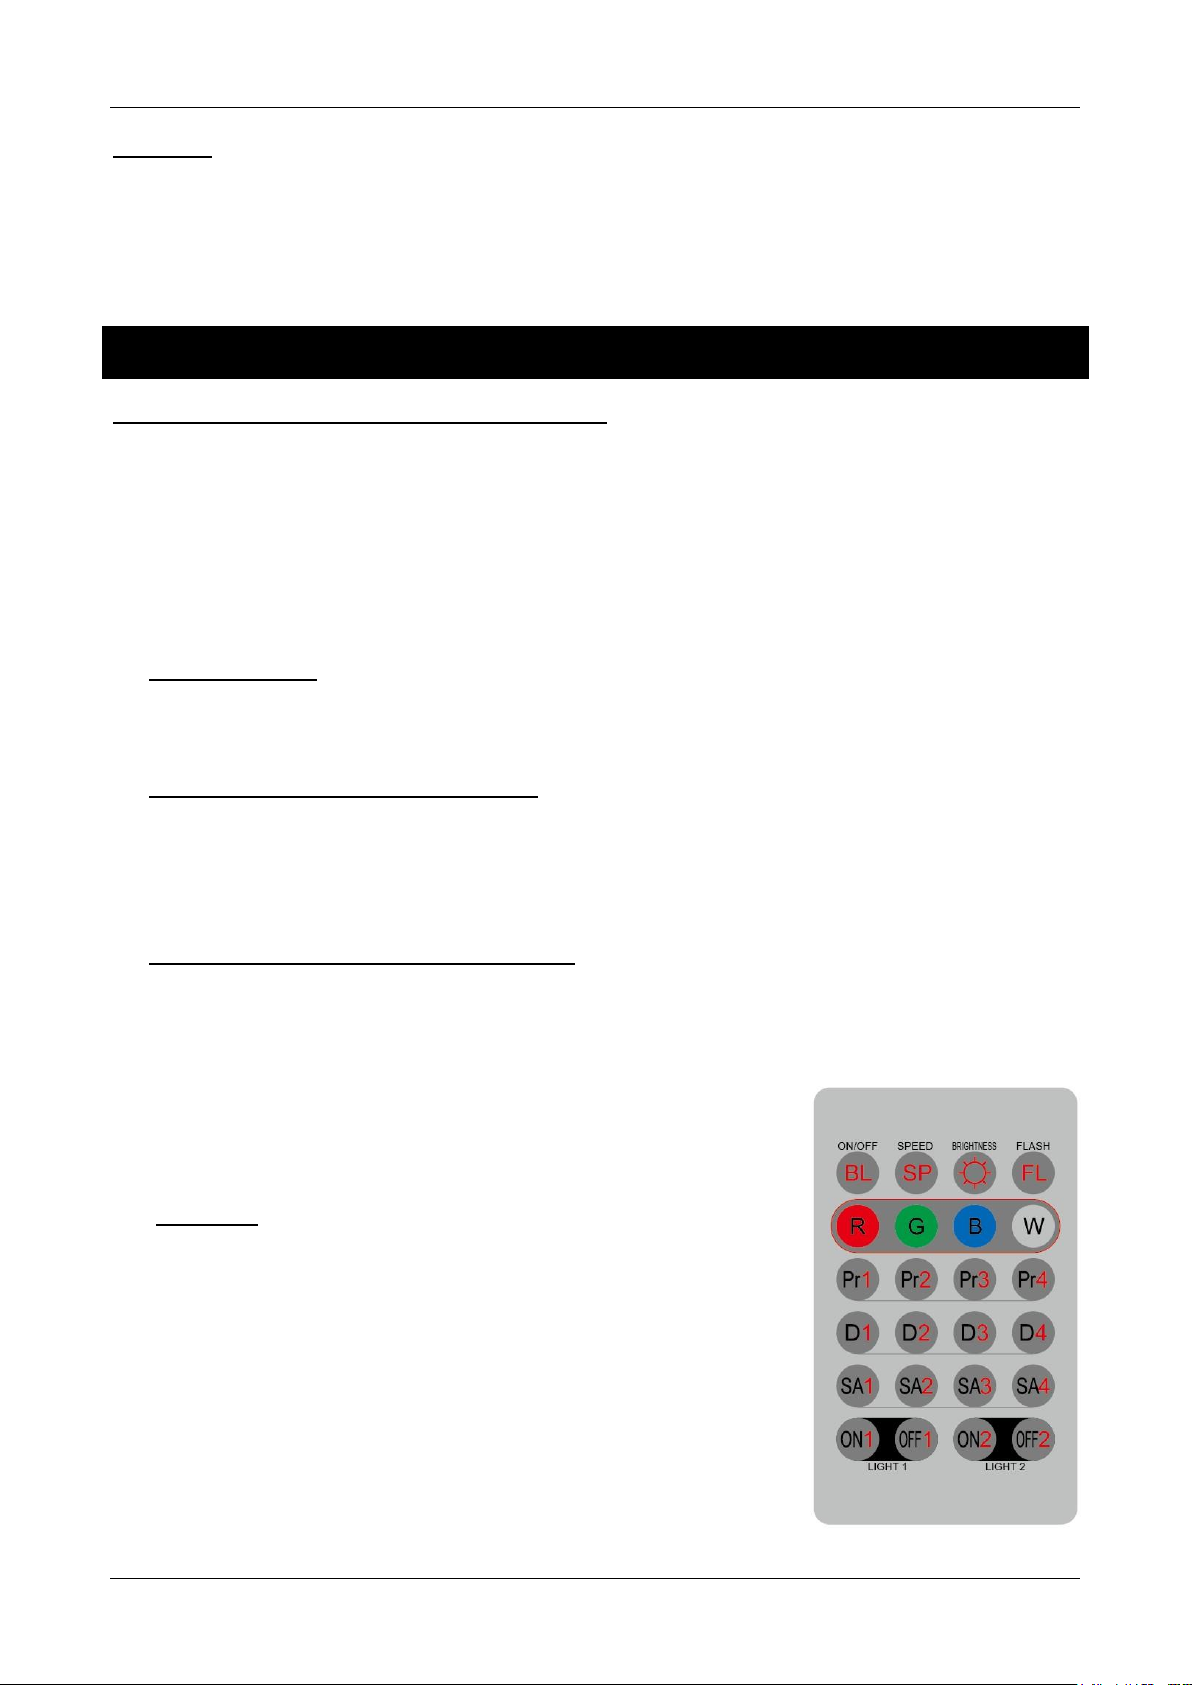
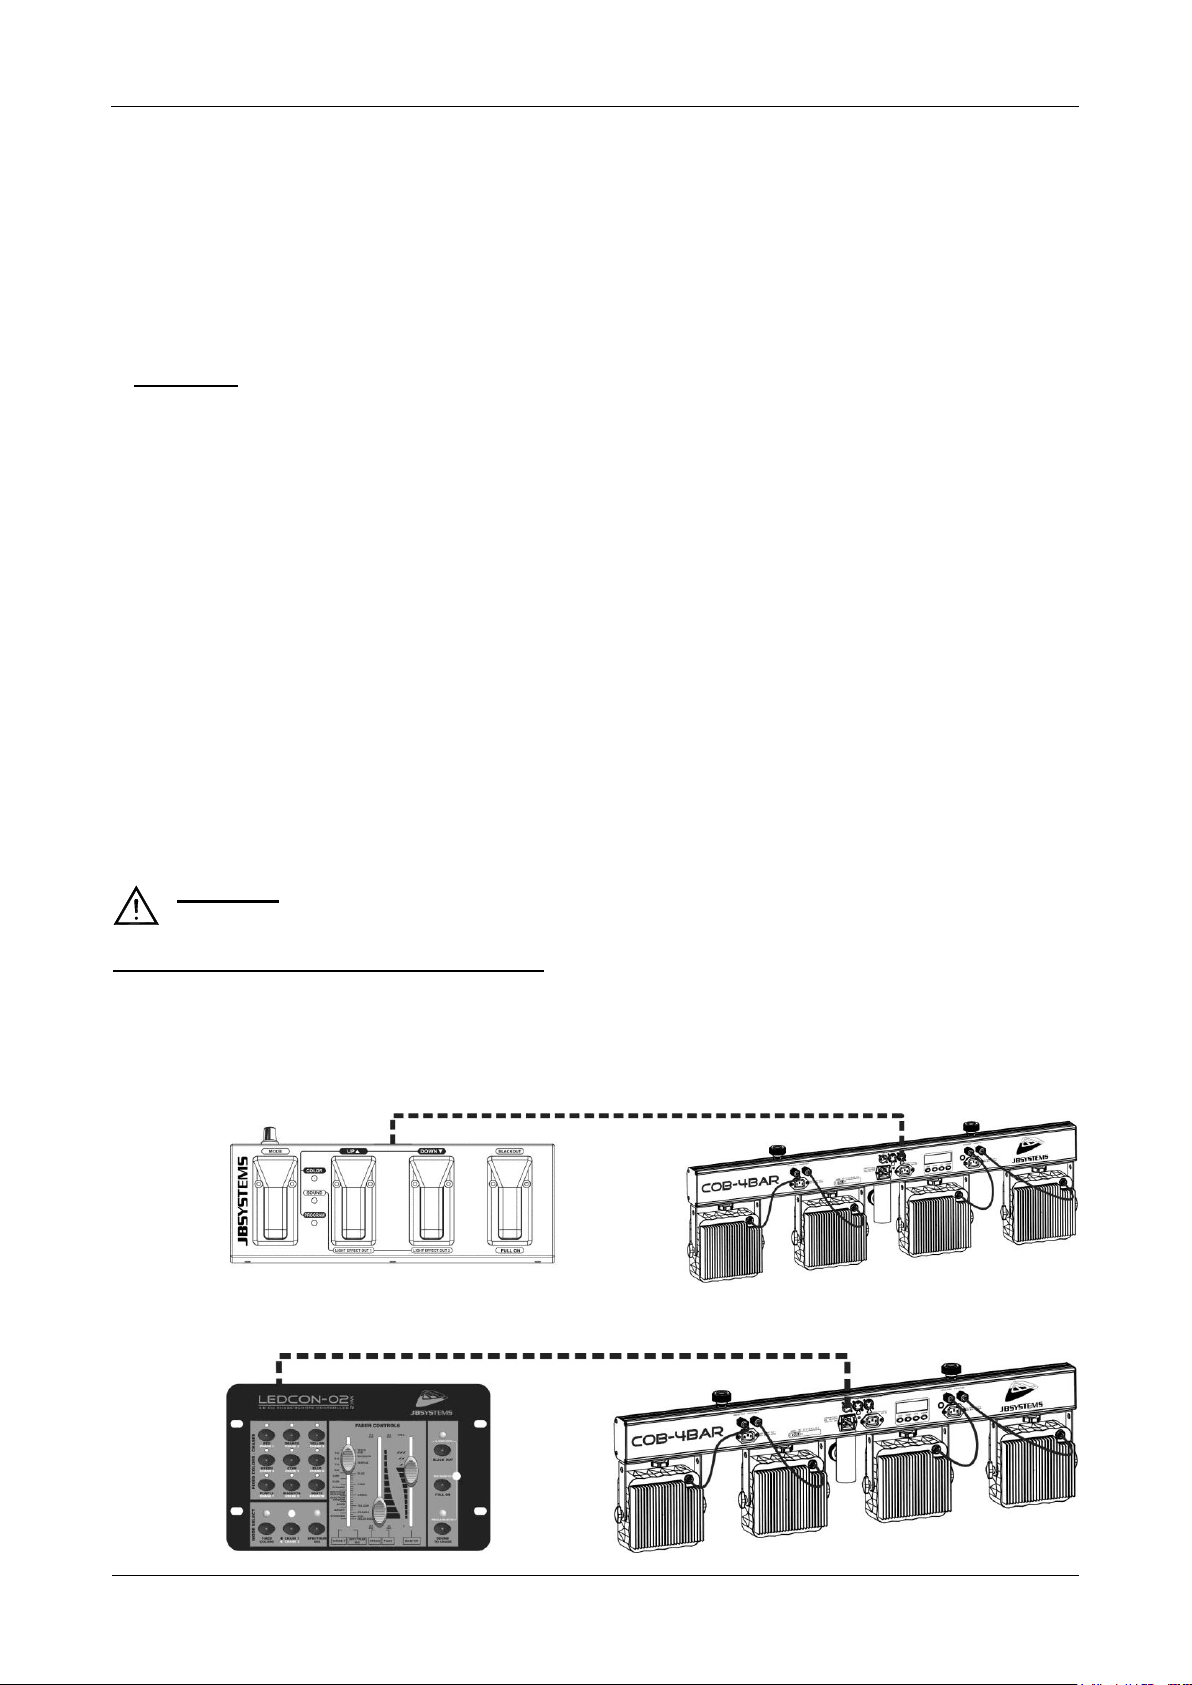
D. Controlled by the LEDCON-02 Mk2:
Follow the steps below to control the bar using the LEDCON-02 Mk2
Press the MODE button until DMX MODE is shown on the display.
Select the 18CH DMX mode and set the DMX address to 001.
Press the MODE button until LED EFFECT OUT is shown on
the display and choose: DMX CONTROL OFF (important!)
Set the LEDCON-02 Mk2 to 4CH mode (switch on the back of
the controller)
For instructions on how to use the LEDCON-02 Mk2: please
check the user manual of this controller.
Important notes:
The COB-4BAR is only compatible with LEDCON-02 Mk2,
not with the LEDCON-02 !
While used with the LEDCON-02 Mk2, the 2 power outputs (12+13) cannot be controlled, they will
be on all the time!
Infra red control must be switched off (IR ACTIVE = OFF)
E. Controlled by the optional foot controller:
To be able to use the foot controller, you need to enable this option in the 4BAR:
Press the MODE button until SLAVE & FOOT CONTROL is shown on the display.
Press the ENTER button to confirm.
General description of the foot controller:
ROTARY Knob: is used to set the
sensitivity of the build-in microphone
for the sound controlled mode.
MODE Switch: is used to select one
of the 3 different working modes:
COLOR, SOUND, PROGRAM
UP & DOWN Switches: are used to
select the different program options
BLACKOUT Switch: is used to
switch the LEDs off/on or to select
the Full On function.
Modes & Functions :
Press the MODE pedal to select the different working modes.
COLOR Mode (Red LED is lit): in this mode you can select different static colors
UP & DOWN pedals: can be used to select one of the different static colors.
JB SYSTEMS® 9/74 COB-4BAR
Page 12
ENGLISH USER MANUAL
Channel:
Name
Value:
Function:
1
Red
000-255
Dimmer (0-100%)
2
Green
000-255
Dimmer (0-100%)
3
Blue
000-255
Dimmer (0-100%)
Channel:
Name
Value:
Function:
1
Red
000-255
Dimmer (0-100%)
2
Green
000-255
Dimmer (0-100%)
3
Blue
000-255
Dimmer (0-100%)
4
Extra Power output 1
000-127
Power OFF
128-255
Power ON
5
Extra Power output 2
000-127
Power OFF
128-255
Power ON
Channel:
Name
Value:
Function:
1
Red 1
000-255
Dimmer Projector 1 & 2 (0-100%)
2
Green 1
000-255
Dimmer Projector 1 & 2 (0-100%)
3
Blue 1
000-255
Dimmer Projector 1 & 2 (0-100%)
4
Red 2
000-255
Dimmer Projector 3 & 4 (0-100%)
5
Green 2
000-255
Dimmer Projector 3 & 4 (0-100%)
6
Blue 2
000-255
Dimmer Projector 3 & 4 (0-100%)
BLACKOUT pedal: press this pedal shortly to put the bar in blackout (the red, the green and the
yellow LEDs on the pedal board are lit). If you press this pedal for about 3 seconds, the bar will go
in Full On mode (all the projectors at full power in white color)
SOUND Mode (Green LED is lit): in this mode you can select different sound controlled chases (don’t
forget to set the sensitivity of the build-in microphone via the rotary knob on the pedal board)
UP & DOWN pedals: can be used to select one of the different sound modes.
BLACKOUT pedal: press this pedal shortly to put the bar in blackout (the red, the green and the
yellow LEDs on the pedal board are lit). If you press this pedal for about 3 seconds, the bar will
return to COLOR Mode in Full On mode (all the projectors at full power in white color)
SOUND Mode (Yellow LED is lit): in this mode you can select different automatic chase modes
UP & DOWN pedals: can be used to select one of the different automatic chase modes.
BLACKOUT pedal: press this pedal shortly to put the bar in blackout (the red, the green and the
yellow LEDs on the pedal board are lit). If you press this pedal for about 3 seconds, the bar will
return to COLOR Mode in Full On mode (all the projectors at full power in white color)
Extra Function:
The UP & DOWN pedals can also be used to switch on/off the 2 power outputs for the additional
fixtures. Press the UP pedal for about 3 seconds to switch on/off power output 1. Press the DOWN
pedal for about 3 seconds to switch on/off power output 2.
F. Controlled by a universal DMX-controller:
Connect all units together. Refer to the chapter “Electrical installation for two or more units in DMX-
mode” to learn how to do this (don’t forget to address all units properly!)
Connect all units to the mains and turn on the DMX controller.
Since each unit has its own DMX-address, you can control them individually. Remember that each unit
uses 3, 5, 6, 8, 12, 16, 17 or 18 DMX Channels, depending on the DMX-mode you have selected in the
menu. See the different DMX charts below:
DMX Chart for the 3 channel DMX-Mode
DMX Chart for the 5 channel DMX-Mode
DMX Chart for the 6 channel DMX-Mode
JB SYSTEMS® 10/74 COB-4BAR
Page 13
ENGLISH USER MANUAL
Channel:
Name
Value:
Function:
1
Dimmer
000-255
Master Dimmer (0-100%)
2
Strobe
000-007
No Strobe
008-037
Random Strobe
038-067
Sound Strobe
068-255
Strobe Speed (slow to fast)
3
Automatic Color mode
000-007
No automatic mode
008-247
Color Fade speed (slow to fast)
248-255
Sound Chase 4 Red
000-255
Dimmer (0-100%)
5
Green
000-255
Dimmer (0-100%)
6
Blue
000-255
Dimmer (0-100%)
7
Extra Power output 1
000-127
Power OFF
128-255
Power ON
8
Extra Power output 2
000-127
Power OFF
128-255
Power ON
Channel:
Name
Value:
Function:
1
Red 1
000-255
Dimmer Projector 1 (0-100%)
2
Green 1
000-255
Dimmer Projector 1 (0-100%)
3
Blue 1
000-255
Dimmer Projector 1 (0-100%)
4
Red 2
000-255
Dimmer Projector 2 (0-100%)
5
Green 2
000-255
Dimmer Projector 2 (0-100%)
6
Blue 2
000-255
Dimmer Projector 2 (0-100%)
7
Red 3
000-255
Dimmer Projector 3 (0-100%)
8
Green 3
000-255
Dimmer Projector 3 (0-100%)
9
Blue 3
000-255
Dimmer Projector 3 (0-100%)
10
Red 4
000-255
Dimmer Projector 4 (0-100%)
11
Green 4
000-255
Dimmer Projector 4 (0-100%)
12
Blue 4
000-255
Dimmer Projector 4 (0-100%)
Channel:
Name
Value:
Function:
1
Color Macro’s
&
Automatic Color Modes
000-015
OFF
016-023
Red
024-031
Green
032-039
Blue
040-047
Red + Green
048-055
Green + Blue
056-063
Red + Blue
064-071
White
072-079
Color 1
080-087
Color 2
088-095
Color 3
096-103
Color 4
104-111
Color 5
112-119
Color 6
120-127
Color 7
128-135
Color 8
136-143
Color Fade
144-151
Color Chase 1
DMX Chart for the 8 channel DMX-Mode
DMX Chart for the 12 channel DMX-Mode
DMX Chart for the 17 channel DMX-Mode
JB SYSTEMS® 11/74 COB-4BAR
Page 14
ENGLISH USER MANUAL
152-159
Color Chase 2
160-167
Color Chase 3
168-175
Color Chase 4
176-183
Color Chase 5
184-191
Color Chase 6
192-199
Color Chase 7
200-207
Color Chase 8
208-215
Color Chase 9
216-223
Color Chase 10
224-231
Color Chase 11
232-239
Color Chase 12
244-255
Sound Active
Channel 1 = 000 to 015
2
Dimmer
000-255
Master Dimmer (0-100%)
3
Strobe
000-255
Strobe Speed (slow to fast)
4
Red 1
000-255
Dimmer Projector 1 (0-100%)
5
Green 1
000-255
Dimmer Projector 1 (0-100%)
6
Blue 1
000-255
Dimmer Projector 1 (0-100%)
7
Red 2
000-255
Dimmer Projector 2 (0-100%)
8
Green 2
000-255
Dimmer Projector 2 (0-100%)
9
Blue 2
000-255
Dimmer Projector 2 (0-100%)
10
Red 3
000-255
Dimmer Projector 3 (0-100%)
11
Green 3
000-255
Dimmer Projector 3 (0-100%)
12
Blue 3
000-255
Dimmer Projector 3 (0-100%)
13
Red 4
000-255
Dimmer Projector 4 (0-100%)
14
Green 4
000-255
Dimmer Projector 4 (0-100%)
15
Blue 4
000-255
Dimmer Projector 4 (0-100%)
16
Extra Power output 1
000-127
Power OFF
128-255
Power ON
17
Extra Power output 2
000-127
Power OFF
128-255
Power ON
Channel 1 = 016 to 135
2
Dimmer
000-255
Master Dimmer (0-100%)
3
Strobe
000-255
Strobe Speed (slow to fast)
4 to 15 - -
Not Used
16
Extra Power output 1
000-127
Power OFF
128-255
Power ON
17
Extra Power output 2
000-127
Power OFF
128-255
Power ON
Channel 1 = 136 to 223
2
Speed
000-255
Effect Speed (from slow to fast)
3
Strobe
000-255
Strobe Speed (slow to fast)
4 to 15 - -
Not Used
16
Extra Power output 1
000-127
Power OFF
128-255
Power ON
17
Extra Power output 2
000-127
Power OFF
128-255
Power ON
Channel 1 = 224 to 239
2
Speed
000-255
Effect Speed (from slow to fast)
3
Strobe
000-255
Strobe Speed (slow to fast)
4
Effect color 1
000-255
Select one of the 8 colors
5
Effect color 2
000-255
Select one of the 8 colors
6 to 15 - -
Not Used
16
Extra Power output 1
000-127
Power OFF
JB SYSTEMS® 12/74 COB-4BAR
Page 15
ENGLISH USER MANUAL
128-255
Power ON
17
Extra Power output 2
000-127
Power OFF
128-255
Power ON
Channel 1 = 240 to 255
2
Sound
000-255
Sensitivity (from low to high)
3 to 15 - -
Not Used
16
Extra Power output 1
000-127
Power OFF
128-255
Power ON
17
Extra Power output 2
000-127
Power OFF
128-255
Power ON
Channel:
Value:
Function:
1
Red (projector 1)
000-255
Dimmer (0-100%)
2
Green (projector 1)
000-255
Dimmer (0-100%)
3
Blue (projector 1)
000-255
Dimmer (0-100%)
4
Dim
Strobe
Music Mode
(projector 1)
000-007
Blackout
008-190
Master Dimmer (0-100%)
191-200
Automatic Sound controlled Mode
201-247
Strobe speed (slow to fast)
248-255
Maximum Master dimmer level
5
Red (projector 2)
000-255
Dimmer (0-100%)
6
Green (projector 2)
000-255
Dimmer (0-100%)
7
Blue (projector 2)
000-255
Dimmer (0-100%)
8
Dim
Strobe
Music Mode
(projector 2)
000-007
Blackout
008-190
Master Dimmer (0-100%)
191-200
Automatic Sound controlled Mode
201-247
Strobe speed (slow to fast)
248-255
Maximum Master dimmer level
9
Red (projector 3)
000-255
Dimmer (0-100%)
10
Green (projector 3)
000-255
Dimmer (0-100%)
11
Blue (projector 3)
000-255
Dimmer (0-100%)
12
Dim
Strobe
Music Mode
(projector 3)
000-007
Blackout
008-190
Master Dimmer (0-100%)
191-200
Automatic Sound controlled Mode
201-247
Strobe speed (slow to fast)
248-255
Maximum Master dimmer level
13
Red (projector 4)
000-255
Dimmer (0-100%)
14
Green (projector 4)
000-255
Dimmer (0-100%)
15
Blue (projector 4)
000-255
Dimmer (0-100%)
16
Dim
Strobe
Music Mode
(projector 4)
000-007
Blackout
008-190
Master Dimmer (0-100%)
191-200
Automatic Sound controlled Mode
201-247
Strobe speed (slow to fast)
248-255
Maximum Master dimmer level
17
Extra Power output 1
000-127
Power OFF
128-255
Power ON
18
Extra Power output 2
000-127
Power OFF
128-255
Power ON
DMX Chart for the 18 channel DMX-Mode
To be selected while using the LEDCON-02 Mk2 controller, see previous pages for more information.
JB SYSTEMS® 13/74 COB-4BAR
Page 16
ENGLISH USER MANUAL
MAINTENANCE
Make sure the area below the installation place is free from unwanted persons during servicing.
Switch off the unit, unplug the mains cable and wait until the unit has been cooled down.
During inspection the following points should be checked:
All screws used for installing the device and any of its parts should be tightly fastened and may not be
corroded.
Housings, fixations and installations spots (ceiling, truss, suspensions) should be totally free from any
deformation.
When an optical lens is visibly damaged due to cracks or deep scratches, it must be replaced.
The mains cables must be in impeccable condition and should be replaced immediately when even a
small problem is detected.
In order to protect the device from overheat the cooling fans (if any) and ventilation openings should be
cleaned monthly.
The interior of the device should be cleaned annually using a vacuum cleaner or air-jet.
The cleaning of internal and external optical lenses and/or mirrors must be carried out periodically to
optimize light output. Cleaning frequency depends on the environment in which the fixture operates: damp,
smoky or particularly dirty surroundings can cause greater accumulation of dirt on the unit’s optics.
Clean with a soft cloth using normal glass cleaning products.
Always dry the parts carefully.
Attention: We strongly recommend internal cleaning to be carried out by qualified personnel!
SPECIFICATIONS
Mains Input: 100-250Vac, 50/60Hz
Power consumption: 120 Watts
Fuse: 250V 2A slow blow (20mm glass)
Extra Mains outputs: 250V 3A max. / output
Sound Control: Internal microphone
DMX connections: XLR 3pin
DMX modes: 3, 5, 6, 8, 12, 17 and 18 DMX Channels
LED Source: 4x 36W TRI COB LED
Beam angle with lens: 15°
Beam angle without lens: 100°
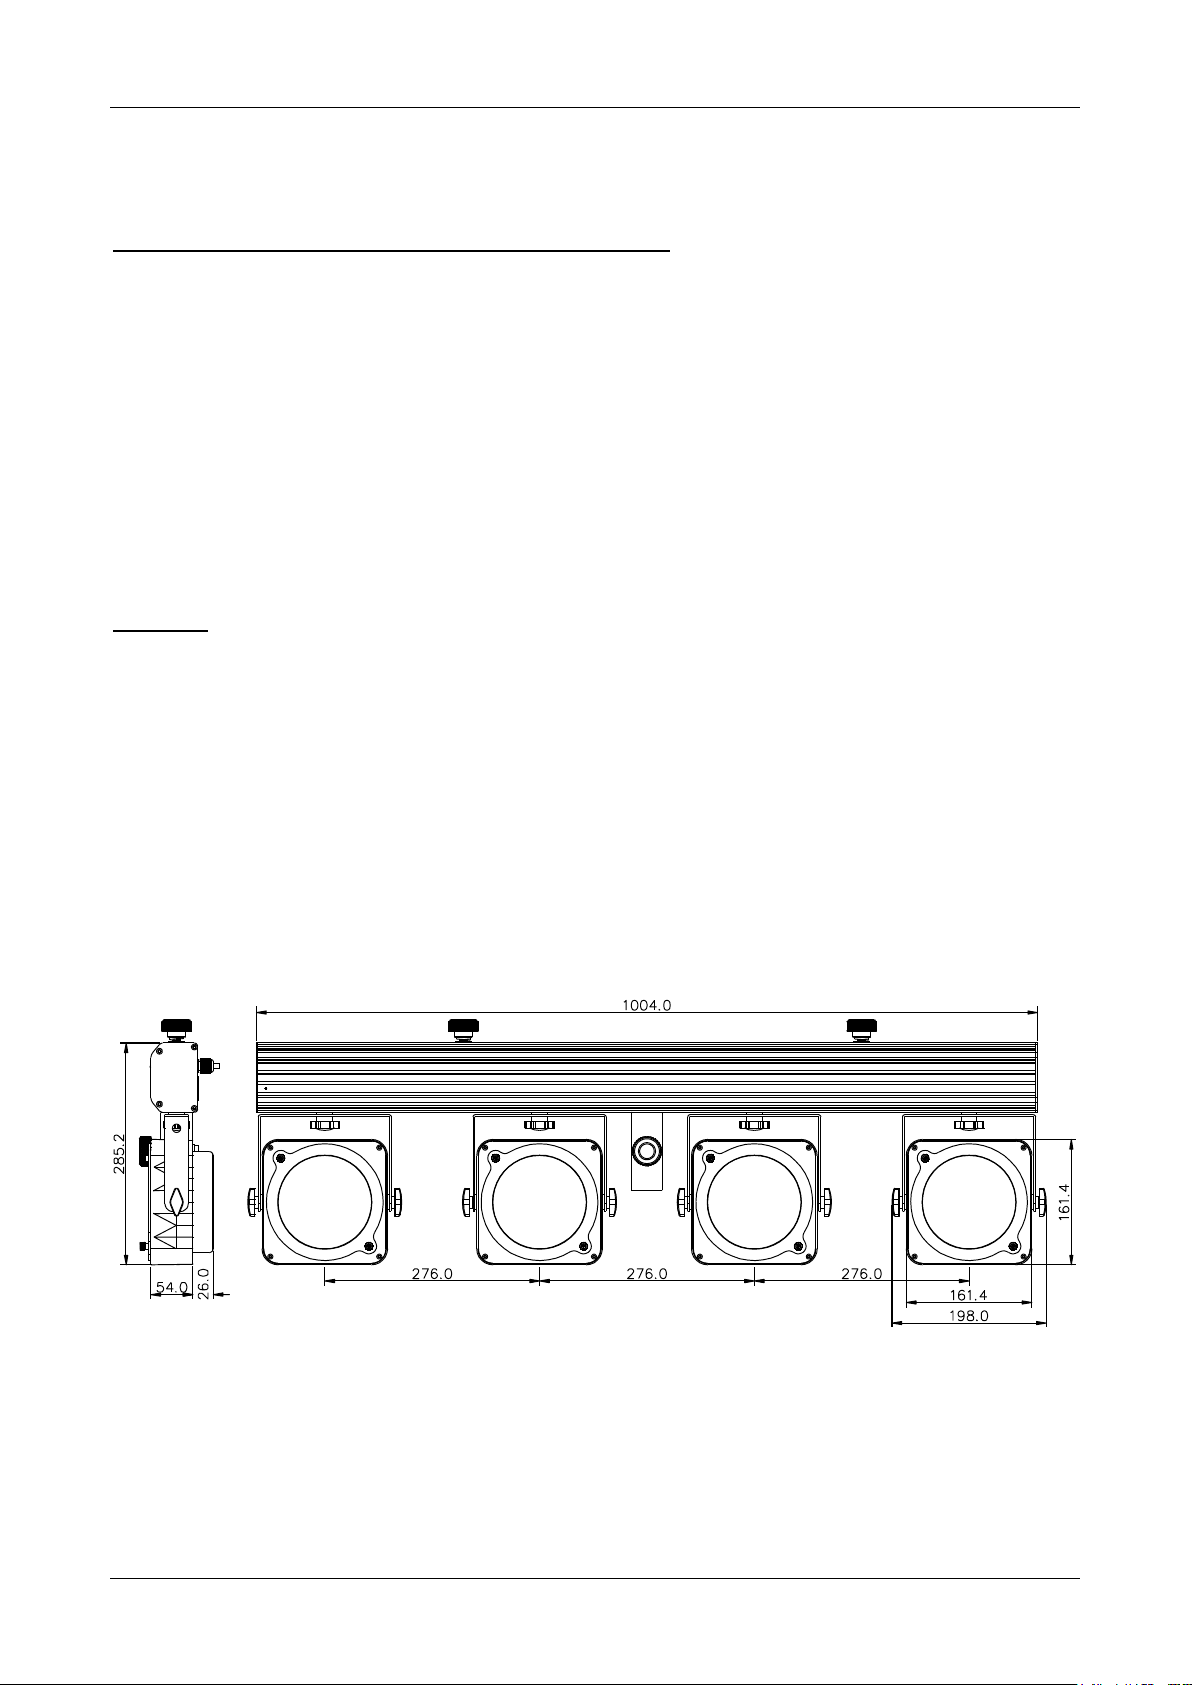
Size: 1000x82x320mm
Weight of the 4bar (without case): 7.6 kg
Every information is subject to change without prior notice
You can download the latest version of this user manual on our website: www.jb-systems.eu
JB SYSTEMS® 14/74 COB-4BAR
Page 17

FRANÇAIS
GUIDE D'UTILISATION
JB SYSTEMS®
15/74
COB-4BAR
GUIDE D'UTILISATION
Nous vous remercions d'avoir acheté ce produit JB Systems®. Pour tirer pleinement profit de toutes les
possibilités du produit et pour votre propre sécurité, lisez ces instructions très attentivement avant d'utiliser
cet appareil.
CARACTÉRISTIQUES
Cet appareil ne produit pas d'interférences radio. Ce produit répond aux exigences des directives
européennes et nationales actuelles. La conformité a été établie et les déclarations et documents
correspondants ont été déposés par le fabricant. Cet appareil a été conçu pour produire un effet d'éclairage
décoratif et est utilisé dans les systèmes de jeu de lumière.
Cette barre active, élégante et compacte, dispose de 4 projecteurs COB à économie d'énergie.
Aucune LED à part : chaque projecteur est équipé d'une LED COB 36W qui garantit un assortiment de
couleur parfait et qui est semblable à une ampoule traditionnelle !
Intensité lumineuse exceptionnelle (dépassant les ampoules PAR56 300 W traditionnelles !)
Télécommande infrarouge incluse : aucun contrôleur complexe nécessaire, parfait pour les DJ !
Munie de 2 sorties secteur IEC, chacun avec une mise en marche/arrêt télécommandée : possibilité de
connecter tout effet (à LEDs) jusqu'à 500 W !
Différents modes de fonctionnement :
Autonome avec télécommande infrarouge : programmes de couleurs synchronisées automatiques
ou selon le rythme + commande marche/arrêt de 2 jeux de lumière (facultatifs)
Mode maître/esclave : plusieurs barres peuvent être connectées les unes aux autres pour obtenir de
merveilleux spectacles de lumière synchronisée avec la musique et préprogrammée.
Commandé par notre fameux contrôleur LEDCON-02 Mk2 ou la « COB-4BAR FOOTCONTROL »,
pédale de commande en option.
Commandé par DMX : différents modes de canaux avec sélection de programmes et commande
RVB individuelle.
Angles du faisceau des projecteurs à LED = 15° avec lentille ou 100° sans lentille
Parfait pour les applications mobiles : juste 1m de long et un poids de 8kg seulement !
Plusieurs utilisations possibles : Discothèques, DJ, compagnies de location, etc.
Fonctions de gradation 0-100% et stroboscope ultrarapide (pas besoin de stroboscopes
supplémentaires !)
D'excellents programmes intégrés offrant de fabuleux jeux de lumière en perpétuels changements !
Pédale de commande facultative : parfait pour les petits groupes musicaux !
Écran LCD rétro éclairé : 2x 16 caractères alphanumériques pour la navigation dans les menus.
Adaptateur 35mm pour installation sur pied inclus.
Un coffret léger mais résistant pour faciliter le transport est inclus avec la barre.
AVANT UTILISATION
Avant d'utiliser cet appareil, vérifiez s'il n'a pas été endommagé durant le transport. En cas de dommages,
n'utilisez pas l'appareil et consultez immédiatement votre revendeur.
Important : Cet appareil est expédié de notre usine en parfait état et bien emballé. Il est absolument
nécessaire que l'utilisateur suive strictement les instructions et les avertissements de sécurité se trouvant
dans ce manuel. Tout dommage dû à une mauvaise manipulation n'est pas garanti. Le revendeur
n'accepte aucune responsabilité pour tous les défauts et problèmes dus au non-respect de ce manuel.
Conservez ce manuel dans un endroit sûr pour toute consultation future. Si vous vendez l'appareil,
assurez-vous de joindre ce manuel.
Vérifiez le contenu :
Vérifiez que l'emballage contient les éléments suivants :
Instructions d'utilisation
COB-4BAR
Télécommande sans fil
Cordon d'alimentation
Mallette de transport
2 connecteurs IEC de rechange pour les sorties d'alimentation d'effet supplémentaire
Page 18
FRANÇAIS
GUIDE D'UTILISATION
JB SYSTEMS®
16/74
COB-4BAR
ATTENTION : Pour réduire le risque de choc électrique, ne
retirez pas le panneau supérieur. L'appareil ne contient aucun
composant réparable par l'utilisateur. Confiez toute réparation à
un personnel qualifié uniquement.
Le symbole de l'éclair à l'intérieur d'un triangle équilatéral, est destiné à alerter l'utilisateur de la
présence de « tensions dangereuses » non isolées à l'intérieur de l'appareil, d'une magnitude
pouvant constituer un risque d'électrocution.
Le symbole du point d'exclamation dans un triangle équilatéral sert à avertir l'utilisateur que
d'importants conseils d'utilisation et de maintenance sont fournis dans la documentation
accompagnant l'appareil.
Ce symbole signifie : pour usage intérieur uniquement
Ce symbole signifie : Lisez les instructions
Ce symbole signifie : Appareil de Classe de sécurité I
Ce symbole détermine : la distance minimale requise avec les objets éclairés. La distance
minimale entre la sortie de lumière et la surface éclairée doit être supérieure à un « x » mètre
Cet appareil n'est pas adapté pour un montage direct sur des surfaces normalement
inflammables. (ne convient que pour le montage sur surfaces non combustibles)
ATTENTION : Ne fixez pas votre regard sur une lampe allumée.
Peut être nocif pour les yeux.
INSTRUCTIONS DE SÉCURITÉ :
Pour protéger l'environnement, essayez de recycler autant que possible les matériaux d'emballage.
Pour éviter tout incendie ou électrocution, n'exposez pas cet appareil à la pluie ou à l'humidité.
Pour éviter une formation de condensation interne, laissez l'appareil s'adapter à la température ambiante
quand vous le mettez dans une pièce chaude après le transport. La condensation empêche parfois
l'appareil de fonctionner à plein rendement ou peut même causer des dommages.
Cet appareil est destiné à un usage intérieur seulement.
Ne placez pas d'objets métalliques et ne renversez pas de liquides à l'intérieur de l'appareil. Un choc
électrique ou un dysfonctionnement peut en résulter. Si un corps étranger pénètre dans l'appareil,
débranchez immédiatement le cordon d'alimentation de la prise secteur.
Placez l'appareil dans un endroit bien aéré, loin de tout matériau et/ou liquide inflammable. L'appareil doit
être fixé à au moins 50 cm des murs environnants.
Ne couvrez pas les ouvertures de ventilation, cela pourrait entraîner une surchauffe.
Évitez une utilisation dans des environnements poussiéreux et nettoyez l'appareil régulièrement.
Gardez l'appareil loin de la portée des enfants.
Les personnes inexpérimentées ne doivent pas utiliser cet appareil.
La température ambiante de fonctionnement maximale est de 40°C. N'utilisez pas cet appareil à des
températures ambiantes plus élevées.
Assurez-vous qu'aucune personne étrangère ne se trouve dans la zone en dessous de l'emplacement
d'installation durant le montage, le démontage et l'entretien.
Laissez environ 10 minutes à l'appareil pour refroidir avant de commencer l'entretien.
Débranchez toujours l'appareil lorsqu'il ne va pas être utilisé pendant une longue période ou avant de
commencer l'entretien.
L'installation électrique doit être effectuée par du personnel qualifié, conformément à la réglementation en
matière de sécurité électrique et mécanique dans votre pays.
Vérifiez que la tension secteur n'est pas supérieure à celle indiquée sur l'appareil.
Le cordon d'alimentation doit toujours être en parfait état. Éteignez immédiatement l'appareil dès que le
cordon d'alimentation est écrasé ou endommagé. Il doit être remplacé par le fabricant, son agent de
service ou une personne de même qualification afin d'éviter tout danger.
Ne laissez jamais le cordon d'alimentation entrer en contact avec d'autres câbles !
Ce luminaire doit être mis à la terre pour être conforme à la réglementation en matière de sécurité.
Ne connectez pas l'appareil à un variateur de lumière.
Utilisez toujours un câble de sécurité approprié et certifié lors de l'installation de l'appareil.
Afin d'éviter un choc électrique, n'ouvrez aucun panneau. L'appareil ne contient aucun composant
réparable par l'utilisateur.
Page 19
FRANÇAIS
GUIDE D'UTILISATION
JB SYSTEMS®
17/74
COB-4BAR
Ne réparez jamais un fusible et ne court-circuitez jamais le porte-fusible. Remplacez toujours un fusible
endommagé par un fusible du même type ayant les mêmes spécifications électriques !
En cas de sérieux problèmes de fonctionnement, cessez d'utiliser l'appareil et contactez immédiatement
votre revendeur.
Le boîtier et l'objectif doivent être remplacés s'ils sont visiblement endommagés.
Utilisez l'emballage d'origine pour transporter l'appareil.
Pour des raisons de sécurité, il est interdit d'apporter des modifications non autorisées à l'appareil.
Important : Ne regardez jamais directement la source de lumière ! N'utilisez pas le jeu de lumière en
présence de personnes souffrant d'épilepsie.
DESCRIPTION :
1. ENTRÉE DMX : connecteur XLR 3 broches mâle pour connecter la barre COB-4BAR au contrôleur DMX
ou à l'unité précédente dans la chaîne DMX.
2. SORTIE DMX : connecteur XLR 3 broches femelle pour connecter la barre COB-4BAR à l'unité suivante
dans la chaîne DMX.
3. ENTRÉE CONTRÔLEUR À PÉDALE : ici, vous pouvez connecter la pédale de commande facultative
4. L'écran affiche les différents menus et les fonctions sélectionnés.
5. Touche MODE : pour parcourir les différentes fonctions du menu
6. Touche ENTER : pour confirmer votre choix ou pour accéder au mode configuration d'une fonction.
7. Touche HAUT : pour augmenter les valeurs affichées à l'écran.
8. Touche BAS : pour diminuer les valeurs affichées à l'écran.
9. Entrée d'alimentation secteur : prise CEI avec porte-fusible ; branchez le câble d'alimentation secteur
fourni dans cette prise.
10. Sortie d'alimentation secteur avec prise CEI : vous pouvez utiliser un câble d'alimentation CEI spécial
pour connecter cette sortie avec l'entrée d'alimentation secteur de la barre ou du projecteur suivant pour
une interconnexion plus simple.
Remarque importante : la charge maximale totale ne doit pas dépasser 10 A (±2300 watts) !
11. Adaptateur de support 35mm : Permet de monter facilement la barre 4BAR au sommet d'un pied
d'éclairage
12. Sortie 1 d'alimentation supplémentaire : cette sortie permet d'alimenter un jeu de lumière ou
projecteur supplémentaire. Dans le menu de la 4BAR, il vous sera possible de choisir entre une
alimentation en continu ou une alimentation commandée par DMX/pédale de commande/télécommande.
Remarque importante : la charge maximale ne doit pas dépasser 3 A (±690 watts) !
13. Sortie 2 d'alimentation supplémentaire : cette sortie permet d'alimenter un jeu de lumière ou
projecteur supplémentaire. Dans le menu de la 4BAR, il vous sera possible de choisir entre une
alimentation en continu ou une alimentation commandée par DMX/pédale de commande/télécommande.
Remarque importante : la charge maximale ne doit pas dépasser 3 A (±690 watts) !
14. Câbles spéciaux avec signal d'alimentation pour les panneaux à COB passifs
15. Panneaux à COB passifs : chacun disposant de 1 LED COB RVB capable de produire un faisceau
coloré étroit de 15°.
Page 20
FRANÇAIS
GUIDE D'UTILISATION
JB SYSTEMS®
18/74
COB-4BAR
16. Lentille de 15° démontable : chacun des panneaux COB est équipé d'une lentille de 15° qui se
démonte en dévissant les 2 vis qui la maintiennent en place. Sans la lentille, les projecteurs ont un
faisceau d'un angle de 100° qui rend l'unité parfaite comme projecteur de balayage pour toutes sortes
d'applications.
17. Mécanisme coulissant : permet d'ajouter un petit jeu de lumière ou projecteur supplémentaire. Vous
pouvez aussi fixer 2 brides de fixation (en option) sur le mécanisme coulissant pour monter facilement la
barre dans votre poutre.
MONTAGE AU PLAFOND
Important : L'installation ne doit être effectuée que par un personnel qualifié. Une mauvaise
installation peut entraîner des blessures et/ou des dommages graves. Un montage au plafond
exige une grande expérience ! Les limites de charge de fonctionnement doivent être respectées,
des matériels d'installation certifiés doivent être utilisés, l'appareil installé doit être inspecté
régulièrement pour vérifier les conditions de sécurité.
Assurez-vous qu'aucune personne étrangère ne se trouve dans la zone en dessous de l'emplacement
d'installation durant le montage, le démontage et l'entretien.
L'appareil doit être installé hors de portée des personnes, loin des passages et des endroits où des
personnes peuvent aller et venir, et s'asseoir.
Avant de soulever l'appareil, assurez-vous que le point de suspension peut supporter une charge d'au
moins 10 fois le poids de l'appareil.
Lors de l'installation de l'appareil, utilisez toujours un câble de sécurité certifié qui peut supporter 12 fois le
poids de l'appareil. Ce support de suspension de sécurité secondaire doit être installé de manière à ce
qu'aucune partie de l'installation ne puisse tomber de plus de 20 cm si le support principal lâche.
L'appareil doit être bien fixé, un montage balançant est dangereux et ne doit pas être envisagé !
Ne couvrez pas les ouvertures de ventilation, cela pourrait entraîner une surchauffe.
L'opérateur doit s'assurer que la sécurité relative à l'installation et les conditions techniques sont
approuvées par un expert avant d'utiliser l'appareil pour la première fois. Les installations doivent être
inspectées chaque année par une personne qualifiée pour être sûr que la sécurité est toujours optimale.
INSTALLATION ÉLECTRIQUE
Important : L'installation électrique doit être effectuée par du personnel qualifié, conformément
à la réglementation en matière de sécurité électrique et mécanique dans votre pays.
Installation électrique d'une unité autonome :
Insérez le câble d'alimentation secteur. L'appareil démarre immédiatement avec le dernier mode sélectionné.
Reportez-vous au chapitre COMMENT CONFIGURER pour apprendre comment basculer entre les
différents modes de fonctionnement.
Si vous le souhaitez, il est possible de commander l'unité à l'aide d'une des options disponibles :
PÉDALE DE COMMANDE COD-4BAR : pédale de commande, parfaite pour les groupes de
musique, etc.
LEDCON-02 Mk2 : (obligatoirement modèle Mk2 !) d'utilisation parfaite pour les DJ !
Voir les chapitres COMMENT CONFIGURER et INSTRUCTIONS D'UTILISATION pour plus
d'informations.
Page 21

FRANÇAIS
GUIDE D'UTILISATION
JB SYSTEMS®
19/74
COB-4BAR
Installation électrique de deux ou plusieurs unités en maître / esclave :
Connectez plusieurs unités entre elles en utilisant de bons câbles de qualité microphone symétrique.
L'unité qui n'a pas de câble connecté à son entrée DMX est l'unité maître, les autres sont les unités
esclave.
Assurez-vous que toutes les unités sont branchées au secteur.
Reportez-vous au chapitre COMMENT CONFIGURER pour plus d'informations.
C'est fait !
Remarque : Bien sûr, la pédale de commande ou le contrôleur LEDCON-02 Mk2 peuvent être utilisés en
plus du maître pour plus de contrôle.
Installation électrique de deux ou plusieurs unités en mode DMX :
Le protocole DMX est largement utilisé pour contrôler des équipements lumineux multifonctions au
moyen d'un signal à haute vitesse. Vous devez mettre en chaîne votre contrôleur DMX avec toutes les
unités connectées par un câble symétrique de bonne qualité.
Pour éviter un comportement anormal des effets de lumière, à cause des
interférences, vous devez utiliser un terminateur de 90 Ω à 120 Ω à la fin de la
chaîne. N'utilisez jamais de séparateurs de câbles en Y, cela ne fonctionne pas !
Assurez-vous que toutes les unités sont branchées au secteur.
Chaque effet de lumière dans la chaîne doit avoir sa propre adresse de départ afin qu'il sache quelles
commandes du contrôleur à décoder. Dans la section COMMENT CONFIGURER vous apprendrez
comment configurer les adresses DMX. Si par exemple vous utilisez le mode DMX 4 canaux, un réglage
de l'adresse possible pourrait être : unité1 = 001 ~ unité2 = 005 ~ unité3 = 009 ~ unité4 = 013 ~ etc.
COMMENT CONFIGURER :
Configuration de l'adresse DMX512
Permet de définir l'adresse de début dans une configuration DMX.
Appuyez sur la touche MODE jusqu'à ce que DMX MODE s'affiche à l'écran.
Appuyez sur la touche ENTER pour entrer en mode de configuration
Utilisez les touches BAS et HAUT pour changer l'adresse DMX.
Une fois que la bonne adresse apparaît à l'écran, appuyez sur la touche ENTER pour confirmer.
Le mode canal se met à présent à clignoter sur l'écran (03, 05, 06, 08, 12, 17 ou 18 canaux)
Utilisez les touches BAS et HAUT si vous souhaitez modifier le mode canal.
Appuyez sur ENTER pour confirmer.
Mode canal DMX
L'unité offre 7 différents modes canal DMX. Cette fonction permet de sélectionner le mode DMX à
utiliser. Reportez-vous au tableau DMX pour voir les différences.
Appuyez sur la touche MODE jusqu'à ce que DMX MODE s'affiche à l'écran.
Appuyez sur la touche ENTER pour entrer en mode de configuration
L'adresse DMX se met à clignoter sur l'écran.
Utilisez les touches BAS et HAUT si vous souhaitez modifier l'adresse de début DMX.
Appuyez sur ENTER pour confirmer.
Le mode canal se met à présent à clignoter sur l'écran (03, 05, 06, 08, 12, 17 ou 18)
Page 22
FRANÇAIS
GUIDE D'UTILISATION
JB SYSTEMS®
20/74
COB-4BAR
Utilisez les touches BAS et HAUT si vous souhaitez modifier le mode canal.
Appuyez sur ENTER pour confirmer.
Remarque : Voir
MODE ESCLAVE + PÉDALE DE COMMANDE
Permet de mettre l'unité en mode esclave quand vous voulez avoir des effets synchronisés avec
l'unité maître. (Lors de l'exécution des programmes automatiques ou si une couleur fixe est définie
sur la première unité) Permet de commander la barre avec la pédale en option
Appuyez sur la touche MODE jusqu'à ce que SLAVE s'affiche à l'écran.
Appuyez sur ENTER pour confirmer.
IMPORTANT : Si vous souhaitez utiliser les modes automatiques et définir directement les réglages
sur la barre, vous devez désactiver le récepteur de la télécommande infrarouge dans la barre.
(réglage « IR ACTIVE » sur « OFF »)
MODE AUDIO
Permet de définir les paramètres pour le mode sonore automatique.
Appuyez sur la touche MODE jusqu'à ce que SOUND MODE s'affiche à l'écran.
Appuyez sur la touche ENTER pour entrer en mode de configuration
La valeur de la sensibilité (SENS) se met à clignoter sur l'écran
Utilisez les touches BAS et HAUT pour modifier la sensibilité du microphone intégré (00 = sensibilité
minimale, 31 = sensibilité maximale).
Appuyez sur ENTER pour confirmer.
La valeur de la fréquence (FQN) se met à clignoter sur l'écran
Utilisez les touches BAS ET HAUT pour modifier le nombre de fois que chaque programme automatique
doit se répéter avant de passer directement au programme automatique suivant.
Appuyez sur ENTER pour confirmer.
IMPORTANT : N'oubliez pas que la barre dispose d'un gradateur maître. Si la sortie semble trop
faible ou s'il n'y a aucune sortie de lumière, veuillez vérifier le réglage du GRADATEUR MAÎTRE !
MODE COULEUR FIXE :
Permet de définir une couleur fixe pour le projecteur.
Appuyez sur la touche MODE jusqu'à ce que le texte « 01.STATIC » ou « xx.EFFECT » (numéro 02 à 14
suivi de « EFFECT ») s'affiche sur l'écran.
Appuyez sur la touche ENTER pour entrer en mode de configuration
Le mode actuel (statique ou mode effet) se met à clignoter sur l'écran
Si nécessaire, utilisez les touches BAS et HAUT pour sélectionner « 01.STATIC »
Appuyez sur la touche ENTER pour entrer en mode de configuration des couleurs fixes
Utilisez les touches BAS et HAUT pour sélectionner « COLOR_CW » (blanc froid), « COLOR_WW »
(blanc chaud) ou COLOR SET (pour composer votre propre couleur).
Si vous avez choisi « COLOR_CW » ou « COLOR_WW » : appuyez simplement sur la touche ENTER
pour confirmer votre sélection
Si vous avez choisi « COLOR SET » : appuyez sur la touche ENTER pour accéder au réglage manuel de
couleur
« RED » se met à clignoter sur l'écran : utilisez les touches BAS et HAUT pour définir l'intensité de
la couleur rouge (000 = minimum, 255 = maximum)
Appuyez la touche ENTER pour confirmer et passer à la couleur suivante
« GREEN » se met à clignoter sur l'écran : utilisez les touches BAS et HAUT pour définir l'intensité
de la couleur verte (000 = minimum, 255 = maximum)
Appuyez la touche ENTER pour confirmer et passer à la couleur suivante
« BLUE » se met à clignoter sur l'écran : utilisez les touches BAS et HAUT pour définir l'intensité
de la couleur bleue (000 = minimum, 255 = maximum)
Appuyez sur ENTER pour confirmer.
IMPORTANT : N'oubliez pas que la barre dispose d'un gradateur maître. Si la sortie semble trop
faible ou s'il n'y a aucune sortie de lumière, veuillez vérifier le réglage du GRADATEUR MAÎTRE !
MODE DÉGRADÉ DE COULEUR LENT :
Permet de passer lentement d'une couleur à une autre sur les projecteurs.
Appuyez sur la touche MODE jusqu'à ce que le texte « 01.STATIC » ou « xx.EFFECT » (numéro 02 à 14
suivi de « EFFECT ») s'affiche sur l'écran.
Appuyez sur la touche ENTER pour entrer en mode de configuration
Page 23

FRANÇAIS
GUIDE D'UTILISATION
JB SYSTEMS®
21/74
COB-4BAR
Le mode actuel (statique ou mode effet) se met à clignoter sur l'écran
Utilisez les touches BAS et HAUT pour sélectionner « 02.EFFECT » (variation progressive d'une
couleur à une autre) ou « 04.EFFECT » (chaque couleur s'éteint ou s'allume progressivement)
Appuyez sur ENTER pour confirmer.
La vitesse se met à clignoter sur l'écran : Utilisez les touches BAS et HAUT pour définir la vitesse
d'exécution souhaitée (00 = lente, 99 = vitesse maximale)
Appuyez sur ENTER pour confirmer.
La fréquence des flashes se met à clignoter sur l'écran : Utilisez les touches BAS et HAUT pour définir la
vitesse souhaitées de l'effet stroboscopique (00 = lente, 99 = vitesse maximale)
Appuyez sur ENTER pour confirmer.
IMPORTANT : N'oubliez pas que la barre dispose d'un gradateur maître. Si la sortie semble trop
faible ou s'il n'y a aucune sortie de lumière, veuillez vérifier le réglage du GRADATEUR MAÎTRE !
MODE ENTRELACEMENT AUTOMATIQUE :
Utilisé pour définir le mode d'entrelacement automatique de façon à ce que les couleurs changent à
une vitesse constante.
Appuyez sur la touche MODE jusqu'à ce que le texte « 01.STATIC » ou « xx.EFFECT » (numéro 02 à 14
suivi de « EFFECT ») s'affiche sur l'écran.
Appuyez sur la touche ENTER pour entrer en mode de configuration
Le mode actuel (statique ou mode effet) se met à clignoter sur l'écran
Utilisez les touches BAS et HAUT pour sélectionner l'un des 11 modes d'entrelacement (03, 05, 06, 07,
08, 09, 10, 11, 12, 13 ou 14.EFFECT).
Appuyez sur ENTER pour confirmer.
La vitesse se met à clignoter sur l'écran : Utilisez les touches BAS et HAUT pour définir la vitesse
d'exécution souhaitée (00 = lente, 99 = vitesse maximale)
Appuyez sur ENTER pour confirmer.
La fréquence des flashes se met à clignoter sur l'écran : Utilisez les touches BAS et HAUT pour définir la
vitesse souhaitées de l'effet stroboscopique (00 = lente, 99 = vitesse maximale)
Appuyez sur ENTER pour confirmer.
Remarque : Si vous avez sélectionné « 13.EFFECT » ou « 14.EFFECT », vous serez en mesure de choisir
2 couleurs pour le programme d'entrelacement :
Le message « C1 » clignote sur l'écran
Utilisez les touches BAS et HAUT pour sélectionner la première couleur de votre programme
d'entrelacement.
Appuyez sur ENTER pour confirmer.
Le message « C2 » clignote sur l'écran
Utilisez les touches BAS et HAUT pour sélectionner la seconde couleur de votre programme
d'entrelacement.
Appuyez sur ENTER pour confirmer.
IMPORTANT : N'oubliez pas que la barre dispose d'un gradateur maître. Si la sortie semble trop
faible ou s'il n'y a aucune sortie de lumière, veuillez vérifier le réglage du GRADATEUR MAÎTRE !
EXÉCUTION AUTOMATIQUE :
Permet de lancer le mode d'entrelacement aléatoire automatique. La barre reproduira chaque
programme d'entrelacement un par un de façon aléatoire. La vitesse et la fréquence de l'effet
stroboscopique définie pour chacun des programmes d'entrelacement seront utilisées pendant le
spectacle. (voir description précédente : MODE ENTRELACEMENT AUTOMATIQUE)
Appuyez sur la touche MODE jusqu'à ce que AUTO RUN s'affiche à l'écran.
Appuyez sur la touche ENTER pour entrer en mode de configuration
Le message « FQN » se met à clignoter sur l'écran.
Utilisez les touches BAS ET HAUT pour modifier le nombre de fois que chaque programme doit se répéter
avant de passer directement au programme automatique suivant. (de 01 à 99 fois)
Appuyez sur ENTER pour confirmer.
INVERSION DU FLUX
Permet d'inverser la direction du flux des entrelacements automatiques. Cette option est très utile
lors de l'utilisation de plusieurs barres en mode maître/esclave
Appuyez sur la touche MODE jusqu'à ce que FLOW INVERT s'affiche à l'écran.
Appuyez sur la touche ENTER pour entrer en mode de configuration
Page 24
FRANÇAIS
GUIDE D'UTILISATION
JB SYSTEMS®
22/74
COB-4BAR
Utilisez les touches BAS et HAUT pour sélectionner « ON » (le flux est inversé) ou « OFF » (le flux n'est
pas inversé)
Appuyez sur ENTER pour confirmer.
GRADATEUR MAÎTRE
C'est le gradateur maître pour TOUS les effets intégrés de la 4BAR.
Appuyez sur la touche MODE jusqu'à ce que MASTER DIM s'affiche à l'écran.
Appuyez sur la touche ENTER pour entrer en mode de configuration
Utilisez les touches BAS et HAUT pour modifier le niveau général du gradateur de la 4BAR
Appuyez sur ENTER pour confirmer.
Si vous avez l'impression que la 4BAR ne semble pas fonctionner, veuillez vérifier que la valeur
MASTER DIMMER n'est pas réglé à zéro ou à un niveau trop faible !
ACTIVER INFRAROUGE
Activez cette fonction si vous souhaitez contrôler la 4BAR avec la petite télécommande sans fil.
Désactivez toujours cette fonction si vous n'envisagez pas d'utiliser la télécommande.
Appuyez sur la touche MODE jusqu'à ce que IR ACTIVE s'affiche à l'écran.
Appuyez sur la touche ENTER pour entrer en mode de configuration
Utilisez les touches HAUT et BAS pour sélectionner « ON » (la télécommande sera utilisée) ou « OFF »
(la télécommande n'est pas utilisée)
Appuyez sur ENTER pour confirmer.
IMPORTANT : Si vous n'envisagez pas d'utiliser la télécommande, vous devez désactiver le
récepteur de la télécommande infrarouge dans la barre. (réglage « IR ACTIVE » sur « OFF »)
SORTIE JEU DE LUMIÈRE (uniquement en contrôle DMX)
Avec cette option, il est possible de décider si les 2 sorties supplémentaires d'alimentation pour des
jeux de lumière additionnels (12) et (13) sont à activer/désactiver par DMX ou si l'alimentation est
délivrée en continu
Appuyez sur la touche MODE jusqu'à ce que LIGHT EFFECT OUT s'affiche à l'écran.
Appuyez sur la touche ENTER pour entrer en mode de configuration
Utilisez les touches BAS et HAUT pour sélectionner « DMX CONTROL ON » (les sorties d'alimentation
sont activées ou désactivées par DMX) ou « DMX CONTROL OFF » (les sorties d'alimentation sont
toujours alimentées)
Appuyez sur ENTER pour confirmer.
INSTRUCTIONS D'UTILISATION
A. 1 unité autonome :
Il suffit de brancher le projecteur à l'alimentation secteur.
Sélectionnez l'un des modes de couleur automatique, sonore ou fixe
Reportez-vous au chapitre COMMENT CONFIGURER pour apprendre à configurer ces paramètres.
B. Configuration de deux ou plusieurs unités en maître/esclave :
Connectez ensemble toutes les unités. Reportez-vous au chapitre
« Installation électrique » pour apprendre comment faire cela.
Sélectionnez l'un des modes de couleur automatique, sonore ou fixe
sur le maître (la première barre COB-4BAR de la chaîne DMX)
Réglez toutes les autres barres en mode ESCLAVE
Les projecteurs vont se synchroniser au programme du COB-4BAR
master.
C. Commandés par la télécommande sans fil :
Pour pouvoir utiliser la télécommande, vous devez activer cette
option dans la 4BAR :
Appuyez sur la touche MODE jusqu'à ce que IR ACTIVE s'affiche à
l'écran.
Appuyez sur la touche ENTER pour pouvoir modifier le réglage
Utilisez les touches BAS et HAUT pour activer ou désactiver la
télécommande (ON = télécommande activée, OFF = télécommande
désactivée).
Page 25

FRANÇAIS
GUIDE D'UTILISATION
JB SYSTEMS®
23/74
COB-4BAR
Appuyez sur ENTER pour confirmer.
Appuyez sur la touche MODE jusqu'à ce que SLAVE & FOOT CONTROL s'affiche à l'écran.
Appuyez sur ENTER pour confirmer.
Fonctions :
BL : permet d'éteindre/allumer toutes les LEDs
SP : permet de définir la vitesse d'exécution lors de l'utilisation des modes de changement de couleur
ou de dégradé de couleurs. Appuyez sur cette touche plusieurs fois pour sélectionner l'une des 4
vitesses préprogrammées. (lente, moyenne, rapide, off)
BRIGHTNESS (Gradateur principal) : Permet de définir la luminosité générale de vos projecteurs.
Appuyez sur cette touche plusieurs fois pour sélectionner l'un des 4 niveaux de luminosité
préprogrammés. (50%, 75%, 100%, off)
FL : permet d'activer le mode stroboscopique (flash lumineux). Appuyez sur cette touche plusieurs fois
pour sélectionner l'une des 4 fréquences de clignotement préprogrammées. (lente, moyenne, rapide,
off)
R est utilisé pour définir l'intensité de la source lumineuse rouge. Appuyez sur cette touche plusieurs
fois pour sélectionner l'un des 4 niveaux de luminosité préprogrammés. (50%, 75%, 100%, off).
N'oubliez pas que la luminosité est affectée aussi par le gradateur principal ! (= touche BRIGHTNESS)
G est utilisé pour définir l'intensité de la source lumineuse verte. Appuyez sur cette touche plusieurs
fois pour sélectionner l'un des 4 niveaux de luminosité préprogrammés. (50%, 75%, 100%, off).
N'oubliez pas que la luminosité est affectée aussi par le gradateur principal ! (= touche BRIGHTNESS)
B est utilisé pour définir l'intensité de la source lumineuse bleue. Appuyez sur cette touche plusieurs
fois pour sélectionner l'un des 4 niveaux de luminosité préprogrammés. (50%, 75%, 100%, off).
N'oubliez pas que la luminosité est affectée aussi par le gradateur principal ! (= touche BRIGHTNESS)
W est utilisé pour définir l'intensité de la source lumineuse blanche. Appuyez sur cette touche
plusieurs fois pour sélectionner l'un des 4 niveaux de luminosité préprogrammés. (50%, 75%, 100%,
off). N'oubliez pas que la luminosité est affectée aussi par le gradateur principal ! (= touche
BRIGHTNESS)
Pr1, Pr2, Pr3, Pr4 : Ces touches sont utilisées pour exécuter les programmes intégrés
d'entrelacement de couleur. La luminosité, la vitesse et la fréquence des flashes sont réglables avec
les touches BRIGHTNESS, SP et FL
D1, D2, D3, D4 : Ces touches sont utilisées pour exécuter les programmes intégrés de dégradé de
couleur. La luminosité, la vitesse et la fréquence des flashes sont réglables avec les touches
BRIGHTNESS, SP et FL
SA1, SA2, SA3, SA4 : Ces touches sont utilisées pour exécuter les programmes d'entrelacement par
commande sonore. La luminosité et la fréquence des flashes sont réglables avec les touches
BRIGHTNESS et FL
Remarque : Distance maximale entre la télécommande et le luminaire = +/- 10 m
D. Commandé par le contrôleur LEDCON-02 Mk2 :
Effectuez les opérations ci-dessous pour commander la barre à l'aide du contrôleur LEDCON-02
Mk2
Appuyez sur la touche MODE jusqu'à ce que DMX MODE s'affiche à l'écran.
Sélectionnez le mode DMX 18 canaux et définissez l'adresse
DMX à 001.
Appuyez sur la touche MODE jusqu'à ce que le texte « LED
EFFECT OUT » s'affiche sur l'écran puis choisissez : DMX
CONTROL OFF (important !)
Réglez le contrôleur LEDCON-02 Mk2 en mode 4 canaux
(commutateur sur l'arrière du contrôleur)
Pour les instructions d'utilisation du LEDCON-02 Mk2 : veuillez
consulter le mode d'emploi de ce contrôleur.
Remarques importantes :
La barre COB-4BAR est compatible uniquement avec le contrôleur LEDCON-02 Mk2, pas avec le
contrôleur LEDCON-02 !
Alors que vous utilisez le contrôleur LEDCON-02 Mk2, les 2 sorties d'alimentation (12 + 13) ne
sont pas commutables, elles sont alimentées tout le temps !
La fonction infrarouge doit être desactivé : (IR ACTIVE = OFF)
Page 26

FRANÇAIS
GUIDE D'UTILISATION
JB SYSTEMS®
24/74
COB-4BAR
E. Commandés par la pédale en option :
Pour pouvoir utiliser la pédale de commande, vous devez activer cette option dans la 4BAR :
Appuyez sur la touche MODE jusqu'à ce que SLAVE & FOOT CONTROL s'affiche à l'écran.
Appuyez sur ENTER pour confirmer.
Description générale de la pédale de commande :
MOLETTE : Permet de régler la
sensibilité du microphone intégré
pour le mode de commande sonore.
Commutateur MODE : Permet de
sélectionner l'un des 3 modes de
fonctionnement : COLOR, SOUND,
PROGRAM
Commutateurs UP (HAUT) et
DOWN (BAS) : Permet la sélection
des différentes options de
programme
Commutateur BLACKOUT (TOUT
ÉTEINT) : Permet d'éteindre ou d'allumer les LEDs ou pour sélectionner la fonction « Full On » (Tout
allumé).
Modes et fonctions :
Appuyez sur la pédale MODE pour sélectionner les différents modes de fonctionnement.
Mode COULEUR (le voyant rouge est allumé) : dans ce mode, vous serez en mesure de sélectionner
les différentes couleurs fixes
Pédales HAUT et BAS : permet de sélectionner l'une des différentes couleurs fixes.
Pédale TOUT ÉTEINT : appuyez brièvement sur cette pédale pour éteindre la barre (les voyants
rouge, vert et jaune de la pédale s'allument). Si vous appuyez sur la pédale pendant environ 3
secondes, la barre passe en mode « Tout allumé » (tous les projecteurs sont de couleur blanches
et à pleine intensité)
Mode SONORE (le voyant vert est allumé) : dans ce mode, vous pouvez sélectionner les différents
entrelacements à commande sonore (n'oubliez pas de régler la sensibilité du microphone intégré avec
la molette de la pédale)
Pédales HAUT et BAS : permet de sélectionner l'un des différents modes sonores.
Pédale TOUT ÉTEINT : appuyez brièvement sur cette pédale pour éteindre la barre (les voyants
rouge, vert et jaune de la pédale s'allument). Si vous appuyez sur la pédale pendant environ 3
secondes, la barre revient en mode COULEUR dans le mode « Tout allumé » (tous les projecteurs
sont de couleur blanches et à pleine intensité)
Mode SONORE (le voyant jaune est allumé) : dans ce mode, vous serez en mesure de sélectionner
les différents modes d'entrelacement automatique
Pédales HAUT et BAS : permet de sélectionner l'un des différents modes d'entrelacement
automatique.
Pédale TOUT ÉTEINT : appuyez brièvement sur cette pédale pour éteindre la barre (les voyants
rouge, vert et jaune de la pédale s'allument). Si vous appuyez sur la pédale pendant environ 3
secondes, la barre revient en mode COULEUR dans le mode « Tout allumé » (tous les projecteurs
sont de couleur blanches et à pleine intensité)
Fonction supplémentaire :
Les pédales HAUT et BAS sont aussi utilisables pour activer ou désactiver les 2 sorties d'alimentation
des luminaires additionnels. Appuyez sur la pédale HAUT pendant environ 3 secondes pour
activer/désactiver la sortie 1. Appuyez sur la pédale BAS pendant environ 3 secondes pour
activer/désactiver la sortie 2.
F. Commandé par le contrôleur DMX universel :
Connectez ensemble toutes les unités. Reportez-vous au chapitre « Installation électrique pour deux
ou plusieurs unités en mode DMX » pour les opérations à suivre (n'oubliez pas d'adresser toutes les
unités correctement !)
Branchez toutes les unités au secteur et allumez le contrôleur DMX.
Étant donné que chaque unité possède sa propre adresse DMX, vous pouvez les contrôler
individuellement. N'oubliez pas que chaque unité utilise 3, 5, 6, 8, 12, 16, 17 ou 18 canaux DMX, selon
le mode DMX sélectionné dans le menu. Reportez-vous aux différents tableaux DMX ci-dessous :
Page 27

FRANÇAIS
GUIDE D'UTILISATION
JB SYSTEMS®
25/74
COB-4BAR
Canal :
Nom
Valeur :
Fonction :
1
Rouge
000-255
Gradateur (0-100%)
2
Vert
000-255
Gradateur (0-100%)
3
Bleu
000-255
Gradateur (0-100%)
Canal :
Nom
Valeur :
Fonction :
1
Rouge
000-255
Gradateur (0-100%)
2
Vert
000-255
Gradateur (0-100%)
3
Bleu
000-255
Gradateur (0-100%)
4
Sortie 1 d'alimentation
supplémentaire
000-127
Hors tension
128-255
Sous tension
5
Sortie 2 d'alimentation
supplémentaire
000-127
Hors tension
128-255
Sous tension
Canal :
Nom
Valeur :
Fonction :
1
Rouge 1
000-255
Gradateur de projecteurs 1 et 2 (0-100%)
2
Vert 1
000-255
Gradateur de projecteurs 1 et 2 (0-100%)
3
Bleu 1
000-255
Gradateur de projecteurs 1 et 2 (0-100%)
4
Rouge 2
000-255
Gradateur de projecteurs 3 et 4 (0-100%)
5
Vert 2
000-255
Gradateur de projecteurs 3 et 4 (0-100%)
6
Bleu 2
000-255
Gradateur de projecteurs 3 et 4 (0-100%)
Canal :
Nom
Valeur :
Fonction :
1
Gradateur
000-255
Gradateur maître (0-100%)
2
Effet stroboscopique
000-007
Pas d'effet stroboscopique
008-037
Effet stroboscopique aléatoire
038-067
Son et lumière
068-255
Vitesse d'effet stroboscopique (lente à rapide)
3
Mode couleur
automatique
000-007
Aucun mode automatique
008-247
Vitesse du dégradé de couleur (lente à rapide)
248-255
Entrelacement sonore
4
Rouge
000-255
Gradateur (0-100%)
5
Vert
000-255
Gradateur (0-100%)
6
Bleu
000-255
Gradateur (0-100%)
7
Sortie 1 d'alimentation
supplémentaire
000-127
Hors tension
128-255
Sous tension
8
Sortie 2 d'alimentation
supplémentaire
000-127
Hors tension
128-255
Sous tension
Canal :
Nom
Valeur :
Fonction :
1
Rouge 1
000-255
Gradateur de projecteur 1 (0-100%)
2
Vert 1
000-255
Gradateur de projecteur 1 (0-100%)
3
Bleu 1
000-255
Gradateur de projecteur 1 (0-100%)
4
Rouge 2
000-255
Gradateur de projecteur 2 (0-100%)
5
Vert 2
000-255
Gradateur de projecteur 2 (0-100%)
6
Bleu 2
000-255
Gradateur de projecteur 2 (0-100%)
7
Rouge 3
000-255
Gradateur de projecteur 3 (0-100%)
8
Vert 3
000-255
Gradateur de projecteur 3 (0-100%)
9
Bleu 3
000-255
Gradateur de projecteur 3 (0-100%)
Tableau DMX pour le mode DMX 3 canaux
Tableau DMX pour le mode DMX 5 canaux
Tableau DMX pour le mode DMX 6 canaux
Tableau DMX pour le mode DMX 8 canaux
Tableau DMX pour le mode DMX 12 canaux
Page 28

FRANÇAIS
GUIDE D'UTILISATION
JB SYSTEMS®
26/74
COB-4BAR
10
Rouge 4
000-255
Gradateur de projecteur 4 (0-100%)
11
Vert 4
000-255
Gradateur de projecteur 4 (0-100%)
12
Bleu 4
000-255
Gradateur de projecteur 4 (0-100%)
Canal :
Nom
Valeur :
Fonction :
1
Modes de couleur
automatique et de
macro-couleur
000-015
Désactivé
016-023
Rouge
024-031
Vert
032-039
Bleu
040-047
Rouge + Vert
048-055
Vert + Bleu
056-063
Rouge + Bleu
064-071
Blanche
072-079
Couleur 1
080-087
Couleur 2
088-095
Couleur 3
096-103
Couleur 4
104-111
Couleur 5
112-119
Couleur 6
120-127
Couleur 7
128-135
Couleur 8
136-143
Dégradé de couleur
144-151
Entrelacement de couleur 1
152-159
Entrelacement de couleur 2
160-167
Entrelacement de couleur 3
168-175
Entrelacement de couleur 4
176-183
Entrelacement de couleur 5
184-191
Entrelacement de couleur 6
192-199
Entrelacement de couleur 7
200-207
Entrelacement de couleur 8
208-215
Entrelacement de couleur 9
216-223
Entrelacement de couleur 10
224-231
Entrelacement de couleur 11
232-239
Entrelacement de couleur 12
244-255
Son actif
Canal 1 = 000 à 015
2
Gradateur
000-255
Gradateur maître (0-100%)
3
Effet stroboscopique
000-255
Vitesse d'effet stroboscopique (lente à rapide)
4
Rouge 1
000-255
Gradateur de projecteur 1 (0-100%)
5
Vert 1
000-255
Gradateur de projecteur 1 (0-100%)
6
Bleu 1
000-255
Gradateur de projecteur 1 (0-100%)
7
Rouge 2
000-255
Gradateur de projecteur 2 (0-100%)
8
Vert 2
000-255
Gradateur de projecteur 2 (0-100%)
9
Bleu 2
000-255
Gradateur de projecteur 2 (0-100%)
10
Rouge 3
000-255
Gradateur de projecteur 3 (0-100%)
11
Vert 3
000-255
Gradateur de projecteur 3 (0-100%)
12
Bleu 3
000-255
Gradateur de projecteur 3 (0-100%)
13
Rouge 4
000-255
Gradateur de projecteur 4 (0-100%)
14
Vert 4
000-255
Gradateur de projecteur 4 (0-100%)
15
Bleu 4
000-255
Gradateur de projecteur 4 (0-100%)
16
Sortie 1 d'alimentation
supplémentaire
000-127
Hors tension
128-255
Sous tension
17
Sortie 2 d'alimentation
supplémentaire
000-127
Hors tension
128-255
Sous tension
Tableau DMX pour le mode DMX 17 canaux
Page 29

FRANÇAIS
GUIDE D'UTILISATION
JB SYSTEMS®
27/74
COB-4BAR
Canal 1 = 016 à 135
2
Gradateur
000-255
Gradateur maître (0-100%)
3
Effet stroboscopique
000-255
Vitesse d'effet stroboscopique (lente à rapide)
4 à 15 - -
Non utilisé
16
Sortie 1 d'alimentation
supplémentaire
000-127
Hors tension
128-255
Sous tension
17
Sortie 2 d'alimentation
supplémentaire
000-127
Hors tension
128-255
Sous tension
Canal 1 = 136 à 223
2
Vitesse
000-255
Vitesse d'effet stroboscopique (de lente à rapide)
3
Effet stroboscopique
000-255
Vitesse d'effet stroboscopique (lente à rapide)
4 à 15 - -
Non utilisé
16
Sortie 1 d'alimentation
supplémentaire
000-127
Hors tension
128-255
Sous tension
17
Sortie 2 d'alimentation
supplémentaire
000-127
Hors tension
128-255
Sous tension
Canal 1 = 224 à 239
2
Vitesse
000-255
Vitesse d'effet stroboscopique (de lente à rapide)
3
Effet stroboscopique
000-255
Vitesse d'effet stroboscopique (lente à rapide)
4
Couleur d'effet 1
000-255
Sélectionnez l'une des 8 couleurs.
5
Couleur d'effet 2
000-255
Sélectionnez l'une des 8 couleurs.
6 à 15 - -
Non utilisé
16
Sortie 1 d'alimentation
supplémentaire
000-127
Hors tension
128-255
Sous tension
17
Sortie 2 d'alimentation
supplémentaire
000-127
Hors tension
128-255
Sous tension
Canal 1 = 240 à 255
2
Son
000-255
Sensibilité (de faible à élevé)
3 à 15 - -
Non utilisé
16
Sortie 1 d'alimentation
supplémentaire
000-127
Hors tension
128-255
Sous tension
17
Sortie 2 d'alimentation
supplémentaire
000-127
Hors tension
128-255
Sous tension
Canal :
Valeur :
Fonction :
1
Rouge (projecteur 1)
000-255
Gradateur (0-100%)
2
Vert (projecteur 1)
000-255
Gradateur (0-100%)
3
Bleu (projecteur 1)
000-255
Gradateur (0-100%)
4
Gradateur
Effet stroboscopique
Mode musique
(projecteur 1)
000-007
Blackout
008-190
Gradateur maître (0-100%)
191-200
Mode automatique à commande sonore
201-247
Vitesse d'effet stroboscopique (lente à rapide)
248-255
Niveau du gradateur maître maximum
5
Rouge (projecteur 2)
000-255
Gradateur (0-100%)
6
Vert (projecteur 2)
000-255
Gradateur (0-100%)
7
Bleu (projecteur 2)
000-255
Gradateur (0-100%)
8
Gradateur
Effet stroboscopique
Mode musique
(projecteur 2)
000-007
Blackout
008-190
Gradateur maître (0-100%)
191-200
Mode automatique à commande sonore
201-247
Vitesse d'effet stroboscopique (lente à rapide)
248-255
Niveau du gradateur maître maximum
9
Rouge (projecteur 3)
000-255
Gradateur (0-100%)
Tableau DMX pour le mode DMX 18 canaux
À sélectionner lors de l'utilisation du contrôleur LEDCON-02 Mk2, voir page précédente pour plus
d'informations.
Page 30

FRANÇAIS
GUIDE D'UTILISATION
JB SYSTEMS®
28/74
COB-4BAR
10
Vert (projecteur 3)
000-255
Gradateur (0-100%)
11
Bleu (projecteur 3)
000-255
Gradateur (0-100%)
12
Gradateur
Effet stroboscopique
Mode musique
(projecteur 3)
000-007
Blackout
008-190
Gradateur maître (0-100%)
191-200
Mode automatique à commande sonore
201-247
Vitesse d'effet stroboscopique (lente à rapide)
248-255
Niveau du gradateur maître maximum
13
Rouge (projecteur 4)
000-255
Gradateur (0-100%)
14
Vert (projecteur 4)
000-255
Gradateur (0-100%)
15
Bleu (projecteur 4)
000-255
Gradateur (0-100%)
16
Gradateur
Effet stroboscopique
Mode musique
(projecteur 4)
000-007
Blackout
008-190
Gradateur maître (0-100%)
191-200
Mode automatique à commande sonore
201-247
Vitesse d'effet stroboscopique (lente à rapide)
248-255
Niveau du gradateur maître maximum
17
Sortie 1 d'alimentation
supplémentaire
000-127
Hors tension
128-255
Sous tension
18
Sortie 2 d'alimentation
supplémentaire
000-127
Hors tension
128-255
Sous tension
ENTRETIEN
Assurez-vous qu'aucune personne étrangère ne se trouve dans la zone en dessous de l'emplacement
d'installation durant l'entretien.
Éteignez l'appareil, débranchez le câble d'alimentation secteur et attendez que l'appareil refroidisse.
Lors de l'inspection les points suivants doivent être vérifiés :
Toutes les vis utilisées pour l'installation de l'appareil et chacune de ses composantes doivent être
solidement fixées et ne peuvent être rouillées.
Les boîtiers, les supports et les boutons d'installation (plafond, poutre, suspensions) ne doivent pas être
déformés.
Quand une lentille optique est visiblement endommagée en raison de fissures ou de rayures profondes,
elle doit être remplacée.
Les câbles d'alimentation doivent être dans un état impeccable et doivent être remplacés immédiatement
même si un petit problème est détecté.
Afin de protéger l'appareil de toute surchauffe, les ventilateurs de rafraîchissement (le cas échéant) et les
ouvertures de ventilation doivent être nettoyés mensuellement.
L'intérieur de l'appareil doit être nettoyé une fois par an à l'aide d'un aspirateur ou d'un jet d'air.
Le nettoyage des lentilles optiques et/ou miroirs internes et externes doit être effectué périodiquement
pour optimiser le flux lumineux. La fréquence de nettoyage dépend de l'environnement dans lequel le
projecteur est utilisé : des environnements humides, enfumés ou particulièrement sales peuvent causer
l'accumulation de saleté sur l'optique de l'appareil.
Nettoyez avec un chiffon doux en utilisant des produits de nettoyage pour verre normal.
Séchez toujours les pièces soigneusement.
Attention : Nous vous conseillons fortement de faire effectuer le nettoyage interne par un personnel
qualifié !
Page 31

FRANÇAIS
GUIDE D'UTILISATION
JB SYSTEMS®
29/74
COB-4BAR
Entrée d'alimentation secteur :
100-250 V CA, 50/60 Hz
Consommation :
120 watts
Fusible :
250 V 2 A à action retardée (verre 20mm)
Sorties d'alimentation secteur supplémentaire :
250 V 3 A max./sortie
Commande sonore :
Microphone interne
Connexions DMX :
XLR 3 broches
Modes DMX :
3, 5, 6, 8, 12, 17 et 18 canaux DMX
Source lumineuse à LED :
4x LEDs 36W TRI COB
Angle de projection avec lentille :
15°
Angle de projection sans lentille :
100°
Dimensions :
1000 x 82 x 320mm
Poids de la barre (sans le boîtier) :
7,6 kg
SPÉCIFICATIONS
Toutes les informations peuvent être modifiées sans préavis
Vous pouvez télécharger la dernière version de ce manuel sur notre site web : www.jb-systems.eu
Page 32

NEDERLANDS
GEBRUIKSAANWIJZING
JB SYSTEMS®
30/74
COB-4BAR
GEBRUIKSAANWIJZING
Hartelijk dank voor de aankoop van dit JB Systems® product. Lees voordat u dit apparaat in gebruik neemt
deze gebruiksaanwijzing zorgvuldig door, om ten volle te kunnen profiteren van alle mogelijkheden en voor
uw eigen veiligheid.
EIGENSCHAPPEN
Dit apparaat is voorzien van onderdrukking van radiostoring. Dit product voldoet aan de eisen van de huidige
Europese en nationale richtlijnen. De conformiteit werd vastgesteld en de desbetreffende verklaringen en
documenten zijn door de fabrikant gedeponeerd. Dit apparaat is ontworpen om decoratieve effectverlichting
te produceren en wordt in lichtshowsystemen gebruikt.
Deze stijlvolle en compacte, actieve 4BAR bevat 4 energiebesparende COB LED-projectors.
GEEN aparte LED's: ieder projector bevat een 36 W COB LED, die eruit ziet als een traditionele lamp en
perfect is voor het mengen van de kleuren!
Uitzonderlijk hoge lichtopbrengst (overtreft de opbrengst van traditionele PAR56 300 W lampen!).
IR-afstandsbediening inbegrepen: geen moeilijke controllers nodig. Perfect voor DJ’s!
Voorzien van 2 extra 230V contactdozen, die ieder op afstand kunnen worden in-/uitgeschakeld: hierop
kan ieder willekeurig (LED) effect van maximaal 500 W worden aangesloten!
Verschillende werkmodi:
Stand-alone met IR-afstandsbediening: automatisch / op de maat gesynchroniseerde kleurpatronen
+ in-/uitschakelen van 2 (optionele) lichteffecten.
Master/slave-modus: er kunnen verschillende balken tegelijk worden gebruikt voor fantastisch
geprogrammeerde, met de muziek gesynchroniseerde lichtshows.
Wordt geregeld door onze befaamde LEDCON-02 Mk2 of de optionele afstandsbediening “COB-
4BAR FOOTCONTROL”.
DMX-gestuurd: verschillende kanaalmodi met programmakeuze en individuele RGB-regeling.
LED-projector lichtbundels: 15° met lens / 100° zonder lens
Perfect voor mobiele toepassingen: slechts 1 m lang met een gewicht van slechts 8 kg!
Vele toepassingen mogelijk: Discotheken, DJ's, verhuurbedrijven, ...
0-100% dimmen en ultrasnelle stroboscoopfunctie (geen extra stroboscopen nodig!)
Voortreffelijke ingebouwde programma's voor prachtige gevarieerde lichtshows!
Optionele voetbediening beschikbaar: perfect voor kleine bands!
Alfanumeriek 2x16 karakters LCD-scherm met achtergrondlicht voor eenvoudige menunavigatie.
Standaard 35mm adapter voor statiefmontage inbegrepen.
De 4BAR wordt geleverd met een lichte maar sterke case om hem gemakkelijk te kunnen vervoeren.
VÓÓR GEBRUIK
Controleer het apparaat op transportschade voordat u het in gebruik neemt. Als er schade is, gebruik het
apparaat dan niet en raadpleeg eerst uw dealer.
Belangrijk: Dit apparaat verliet de fabriek in perfecte staat en goed verpakt. Het is absoluut noodzakelijk
dat de gebruiker de veiligheidsinstructies en waarschuwingen in deze gebruiksaanwijzing strikt opvolgt.
Eventuele schade veroorzaakt door verkeerde behandeling valt niet onder de garantie. De dealer neemt
geen verantwoording voor eventuele fouten of problemen die worden veroorzaakt door het niet naleven
van deze handleiding.
Bewaar dit boekje op een veilige plaats om het in de toekomst te kunnen raadplegen. Als u het armatuur
verkoopt, voeg dan deze gebruiksaanwijzing bij.
Controleer de inhoud:
Controleer of de verpakking de volgende artikelen bevat:
Gebruiksaanwijzing
COB-4BAR
Draadloze afstandsbediening
Netsnoer
Flightcase
2 reserve IEC-stekkers voor de voedingsuitgangen voor extra effecten.
Page 33

NEDERLANDS
GEBRUIKSAANWIJZING
JB SYSTEMS®
31/74
COB-4BAR
LET OP: Verwijder de bovenste afdekking niet, om het risico op
elektrische schokken te verminderen. Er bevinden zich geen door
de gebruiker te repareren onderdelen in het apparaat. Laat het
onderhoud alleen door gekwalificeerd onderhoudspersoneel
uitvoeren.
De bliksemschicht met pijlpunt in een gelijkzijdige driehoek is bedoeld om de gebruiker te
waarschuwen voor de aanwezigheid van ongeïsoleerde “gevaarlijke spanning” binnen de
behuizing van het product, die van voldoende omvang is om een risico op elektrische schokken
te vormen.
Het uitroepteken in een gelijkzijdige driehoek is bedoeld om de gebruiker te waarschuwen voor
de aanwezigheid van belangrijke gebruiks- en onderhouds- (reparatie)aanwijzingen in de
documentatie die bij dit apparaat is gevoegd.
Dit symbool betekent: alleen gebruik binnenshuis
Dit symbool betekent: Lees de instructies
Dit symbool betekent: Veiligheidsklasse I apparaat
Dit symbool bepaalt: de minimale afstand tot verlichte objecten. De minimale afstand tussen de
lichtbron en het verlichte oppervlak moet meer dan x meter bedragen.
Het apparaat is niet geschikt voor directe montage op normaal brandbare oppervlakken. (alleen
geschikt voor montage op onbrandbare oppervlakken)
LET OP: Kijk niet naar een werkende lamp.
Dit kan schadelijk zijn voor de ogen.
VEILIGHEIDSINSTRUCTIES:
Probeer ter bescherming van het milieu het verpakkingsmateriaal zoveel mogelijk te recyclen.
Stel dit apparaat niet bloot aan regen of vocht bloot ter voorkoming van risico op brand of elektrische schokken.
Als het apparaat na transport in een warme ruimte wordt gebracht, wacht dan tot het is aangepast aan de
omgevingstemperatuur, om te voorkomen dat er binnen het apparaat condens wordt gevormd. Condens
kan soms verhinderen dat het apparaat op volle capaciteit werkt of kan zelfs schade veroorzaken.
Dit apparaat is uitsluitend geschikt voor gebruik binnenshuis.
Zorg ervoor dat er geen metalen voorwerpen of vloeistoffen in het toestel terechtkomen. Dit kan
elektrische schokken of storing veroorzaken. Als er voorwerpen van buitenaf in het apparaat
terechtkomen, haal dan onmiddellijk de stekker uit het stopcontact.
Plaats het armatuur op een goed geventileerde plek, uit de buurt van brandbare materialen en/of
vloeistoffen. Het armatuur moet op minstens 50 cm vanaf omringende muren worden bevestigd.
Bedek geen ventilatieopeningen, omdat dit tot oververhitting kan leiden.
Voorkom het gebruik in stoffige omgevingen en maak het apparaat regelmatig schoon.
Houd het apparaat buiten het bereik van kinderen.
Onervaren personen mogen dit apparaat niet bedienen.
De maximale veilige omgevingstemperatuur is 40°C. Gebruik dit apparaat niet bij hogere omgevingstemperaturen.
Zorg ervoor dat er zich tijdens takelen, onttakelen en onderhoud geen ongewenste personen bevinden in
het gebied onder de installatieplaats.
Laat het apparaat ongeveer 10 minuten afkoelen voordat u er onderhoud aan pleegt.
Ontkoppel altijd het apparaat wanneer het voor een langere tijd niet wordt gebruikt of voordat er
onderhoud aan wordt gepleegd.
De elektrische installatie dient alleen door gekwalificeerd personeel en in overeenstemming met de
voorschriften voor elektrische en mechanische veiligheid in uw land te worden uitgevoerd.
Controleer of de beschikbare spanning niet hoger is dan op het apparaat is aangegeven.
Het netsnoer moet altijd in perfecte staat zijn. Schakel het apparaat onmiddellijk uit als het netsnoer is
geplet of beschadigd. Het moet door de fabrikant, zijn vertegenwoordiger, of door een vergelijkbaar
bevoegde persoon worden vervangen, om gevaar te voorkomen.
Laat het netsnoer nooit met andere kabels in contact komen!
Dit armatuur moet worden geaard om aan de veiligheidsvoorschriften te voldoen.
Sluit het apparaat niet aan op een dimmerpack.
Gebruik bij het installeren van het apparaat altijd een geschikte en gecertificeerde veiligheidskabel.
Open de afdekking niet, om elektrische schokken te voorkomen. Er bevinden zich geen door de gebruiker
te repareren onderdelen in het apparaat.
Page 34

NEDERLANDS
GEBRUIKSAANWIJZING
JB SYSTEMS®
32/74
COB-4BAR
Repareer nooit een zekering of overbrug nooit de zekeringhouder. Vervang altijd een kapotte zekering
met een zekering van hetzelfde type en met dezelfde elektrische specificaties!
Stop in geval van ernstige problemen met de werking het gebruik van het armatuur en neem onmiddellijk
contact op met uw dealer.
De behuizing en de lenzen moeten worden vervangen als ze zichtbaar zijn beschadigd.
Gebruik de originele verpakking als het toestel vervoerd moet worden.
Het is om veiligheidsredenen verboden om ongeautoriseerde wijzigingen aan het apparaat aan te
brengen.
Belangrijk: Kijk nooit rechtstreeks in de lichtbron! Gebruik het effect niet in aanwezigheid van personen die
aan epilepsie lijden.
BESCHRIJVING:
1. DMX-INGANG: 3-pens mannelijke XLR-connector die gebruikt wordt om de COB-4BAR op het volgende
apparaat in de DMX-keten aan te sluiten.
2. DMX-UITGANG: 3-pens vrouwelijke XLR-connector die gebruikt wordt om de COB-4BAR op het
volgende apparaat in de DMX-keten aan te sluiten.
3. INGANG VOETBEDIENING: Hier kunt u de optionele voetbediening op aansluiten.
4. DISPLAYtoont de verschillende menu's en de geselecteerde functies.
5. Toets MODUS: wordt gebruikt om de verschillende functies in het menu te doorlopen.
6. ENTER-knop: wordt gebruikt om uw keuze te bevestigen of de instellingsmodus van een functie te
openen.
7. Toets OP: Voor het verhogen van de op het scherm weergegeven waardenhet scherm.
8. Toets NEER: Voor het verlagen van de op het scherm weergegeven waarden.het scherm.
9. Lichtnetaansluiting: met IEC-aansluiting en geïntegreerde zekeringhouder., Sluit hier het
meegeleverde netsnoer op aan.
10. Lichtnetuitgang met IEC-contactdoos: U kunt gebruik maken van een speciaal IEC-netsnoer om deze
uitgang aan te sluiten op de voedingsingang van de volgende balk of projector voor gemakkelijker
doorkoppelen.
Belangrijke opmerking: de totale maximale belasting mag NIET meer bedragen dan 10 A (±2300
Watt)!
11. 35mm STATIEFADAPTER: wordt gebruikt om de 4bar gemakkelijk bovenop een lichtstatief te kunnen
zetten.
12. Extra uitgang voor stroomvoorziening 1: deze uitgang kan worden gebruikt om een extra lichteffect of
projector van stroom te voorzien. U kunt in het menu van de 4BAR kiezen of de stroomvoorziening
constant AAN dient te zijn of dat het mogelijk is om de stroomvoorziening in/uit te schakelen via
DMX/draadloze bediening/voetschakelaar.
Belangrijke opmerking: de maximale belasting mag NIET meer bedragen dan 3 A (±690 Watt)!
13. Extra uitgang voor stroomvoorziening 2: deze uitgang kan worden gebruikt om een extra lichteffect of
projector van stroom te voorzien. U kunt in het menu van de 4BAR kiezen of de stroomvoorziening
constant AAN dient te zijn of dat het mogelijk is om de stroomvoorziening in/uit te schakelen via
DMX/draadloze bediening/voetschakelaar.
Page 35

NEDERLANDS
GEBRUIKSAANWIJZING
JB SYSTEMS®
33/74
COB-4BAR
Belangrijke opmerking: de maximale belasting mag NIET meer bedragen dan 3 A (±690 Watt)!
14. Speciale kabels met signaal voor de stroomvoorziening van de passieve COB-panelen.
15. Passieve COB-panelen: ieder van hen bevat 1 RGB COB LED die kleurrijke scherpe bundels van 15°
produceren.
16. Verwijderbare 15° lens: Ieder van de COB-panelen is voorzien van een 15° lens die kan worden
verwijderd door de 2 bevestigingsschroeven los te draaien. Zonder de lens hebben de projectors een
bundelhoek van 100°, waardoor het apparaat perfect als wash projector voor allerlei soorten toepassingen.
17. Schuifmechanisme: kan worden gebruikt om een extra klein lichteffect of projector toe te voegen. U
kunt ook 2 (optionele) bevestigingsklemmen op het schuifmechanisme monteren om de balk gemakkelijk
aan de truss te kunnen bevestigen.
HOOG HIJSEN
Belangrijk: De installatie mag alleen door gekwalificeerd onderhoudspersoneel worden uitgevoerd.
Onjuiste installatie kan leiden tot ernstig letsel en/of schade aan goederen. Hoog hijsen vereist
veel ervaring! Belastingslimieten dienen in acht te worden genomen; er dienen gecertificeerde
installatiematerialen te worden gebruikt; het geïnstalleerde apparaat dient regelmatig te worden
gecontroleerd op veiligheid.
Zorg ervoor dat er zich tijdens takelen, onttakelen en onderhoud geen ongewenste personen bevinden in
het gebied onder de installatieplaats.
Het apparaat dient buiten het bereik van mensen en buiten de gebieden waar personen kunnen lopen of
zitten te worden geïnstalleerd.
Controleer voor het hijsen of de installatieplek een minimale puntbelasting van 10 keer het gewicht van het
apparaat kan dragen.
Gebruik bij het installeren van het apparaat altijd een gecertificeerde veiligheidskabel die 12 keer het
gewicht van het apparaat kan dragen. Deze secundaire veiligheidsbevestiging dient op een zodanige
wijze te worden geïnstalleerd zodat geen enkel onderdeel van de installatie meer dan 20 cm kan vallen als
de hoofdbevestiging het begeeft.
Het apparaat dient goed te worden bevestigd; een vrij slingerende montage is gevaarlijk en mag niet
worden overwogen!
Bedek geen ventilatieopeningen, omdat dit tot oververhitting kan leiden.
De exploitant moet ervoor zorgen dat de veiligheidgerelateerde en machinetechnische installaties door
een deskundige zijn goedgekeurd voordat deze voor de eerste keer in gebruik worden genomen. De
installaties dienen ieder jaar door een vakman te worden geïnspecteerd om er zeker van te zijn dat de
veiligheid nog steeds optimaal is.
ELEKTRISCHE INSTALLATIE
Belangrijk: De elektrische installatie dient alleen door gekwalificeerd personeel en in
overeenstemming met de voorschriften voor elektrische en mechanische veiligheid in uw land
te worden uitgevoerd.
Elektrische installatie voor 1 stand-alone apparaat:
Sluite het netsnoer aan. Het apparaat begint onmiddellijk te werken in de laatste geselecteerde modus.
Zie het hoofdstuk “HOE IN TE STELLEN” om te leren hoe u tussen de verschillende werkmodi kunt
schakelen.
U kunt indien gewenst het apparaat bedienen met de optioneel verkrijgbare:
COB-4BAR FOOTBEDIENING: voetbediening, perfect voor muziekbands enz.
Page 36

NEDERLANDS
GEBRUIKSAANWIJZING
JB SYSTEMS®
34/74
COB-4BAR
LEDCON-02 Mk2: (moet de Mk2-versie zijn!) perfect voor gebruik door DJ's!
Zie voor meer informatie de hoofdstukken INSTALLATIE en GEBRUIKSAANWIJZING.
Elektrische installatie voor twee of meer apparaten in master/slave:
Sluit meerdere eenheden met hoogwaardige gebalanceerde microfoonkabels op elkaar aan. Het apparaat
waarop geen kabel is aangesloten op de DMX-ingang is de “master”, de andere zijn de slave-apparaten.
Zorg ervoor dat alle apparaten op het lichtnet zijn aangesloten.
Zie het hoofdstuk “HOE IN TE STELLEN” voor meer informatie.
Klaar!
Opmerking: U kunt voor meer controle natuurlijk altijd een voetpedaal of LEDCON-02 Mk2 aan de master
toevoegen.
Elektrische installatie voor twee of meer eenheden in de DMX-modus:
Het DMX-protocol is een veel gebruikt hogesnelheidssignaal om intelligente lichtapparatuur te bedienen.
U moet uw DMX-controller en alle aangesloten apparaten met een hoogwaardige gebalanceerde kabel
aan elkaar koppelen.
Ter voorkoming van vreemd gedrag van de lichteffecten als gevolg van storingen,
dient er aan het eind van de keten een 90Ω tot 120Ω terminator te worden gebruikt.
Gebruik nooit Y-splitter-kabels, dit zal gewoon niet werken!
Zorg ervoor dat alle apparaten op het lichtnet zijn aangesloten.
Elk lichteffect in de keten heeft een goed startadres nodig, zodat het weet welke commando’s van de
controller het moet decoderen. In de paragraaf “HOE IN TE STELLEN” leert u hoe de DMX-adressen
moet instellen. Als u bijvoorbeeld de 4-kanaals DMX-modus gebruikt, kan dit een mogelijke
adresinstelling zijn: eenheid1 = 001 ~ eenheid2 = 005 ~ eenheid3 = 009 ~ eenheid4 = 013 ~ enz.
HOE IN TE STELLEN:
Instellen DMX512-adres
Wordt gebruikt om het startadres in een DMX-setup in te stellen.
Druk op de MODE-toets totdat er DMX MODE op het scherm verschijnt.
Druk de toets ENTER om naar de configuratiemodus te gaan.
Gebruik de toetsen NEER- en OP om het DMX-adres te wijzigen.
Druk zodra het juiste adres op het scherm wordt weergegeven de toets ENTER om te bevestigen.
De kanaalmodus op het scherm begint nu te knipperen (03, 05, 06, 08, 12, 17 of 18 kanalen).
Gebruik de toetsen NEER en OP als u de kanaalmodus wilt wijzigen.
Druk op de toets ENTER om te bevestigen.
Page 37

NEDERLANDS
GEBRUIKSAANWIJZING
JB SYSTEMS®
35/74
COB-4BAR
DMX-kanaalmodus
De eenheid heeft 7 verschillende DMX-kanaalmodi. U kunt met deze functie de te gebruiken DMXmodus selecteren. Raadpleeg de DMX-tabel om de verschillen te zien.
Druk op de MODE-toets totdat er DMX MODE op het scherm verschijnt.
Druk de toets ENTER om naar de configuratiemodus te gaan.
Het DMX-adres op het scherm begint te knipperen.
Gebruik de toetsen NEER en OP als u het DMX startadres wilt wijzigen.
Druk op de toets ENTER om te bevestigen.
De op het scherm begint nu te knipperen (03, 05, 06, 08, 12, 17 of 18).
Gebruik de toetsen NEER en OP als u de kanaalmodus wilt wijzigen.
Druk op de toets ENTER om te bevestigen.
Opmerking: zie
SLAVE-STAND + VOETBEDIENING
Wordt gebruikt om het apparaat in te stellen in slave-modus wanneer u de effecten wilt
synchroniseren met het master-apparaat. (als het eerste toestel zijn automatische programma's
uitvoert of is ingesteld op een vaste kleur).
Wordt gebruikt wanneer u de balk wilt bedienen met de optionele voetbediening.
Druk op de toets MODE totdat er SLAVE op het scherm verschijnt.
Druk op de toets ENTER om te bevestigen.
BELANGRIJK: Als u gebruik wilt maken van de automatische standen en de instellingen direct op de
balk wilt maken, dan dient u de ontvanger voor de IR-afstandsbediening in de balk uit te schakelen.
(IR Actief = UIT)
GELUIDMODUS
Wordt gebruikt om parameters voor de automatische geluidsmodus in te stellen.
Druk op de toets MODE totdat er SOUND MODE op het scherm verschijnt.
Druk de toets ENTER om naar de configuratiemodus te gaan.
De waarde van de gevoeligheid (SENS) op het scherm begint te knipperen.
Gebruik de toetsen NEER- en OP-knoppen om de gevoeligheid van de ingebouwde microfoon te wijzigen
(00 = minimale gevoeligheid, 31 = maximale gevoeligheid).
Druk op de toets ENTER om te bevestigen.
De waarde van de frequentie (FQN) op het scherm begint te knipperen.
Gebruik de toetsen NEER en OP om het aantal keren dat ieder automatisch programma dient te worden
herhaald voordat automatisch naar het volgende automatische programma wordt overgeschakeld.
Druk op de toets ENTER om te bevestigen.
BELANGRIJK: Vergeet niet dat de balk is voorzien van een master dimmer. Als de uitvoer te laag lijkt
te zijn of er komt helemaal geen licht uit, controleer dan de instelling van de MASTER DIMMER!
STATISCHE KLEUR-STAND:
Wordt gebruikt om een statische kleur voor de projector in te stellen.
Druk de toets MODE totdat er 01.STATIC of xx.EFFECT (nummer 02 t/m 14 gevolgd door EFFECT) op
het scherm wordt weergegeven.
Druk de toets ENTER om naar de configuratiemodus te gaan.
De feitelijke modus (statische of effectsmodus) op het scherm knippert.
Gebruik indien nodig de toetsen NEER en OP om 01.STATIC te selecteren.
Druk de toets ENTER om naar de configuratiemodus voor de statische kleuren te gaan.
Gebruik de toetsen NEER en OP om COLOR_CW (koud wit), COLOR_WW (warm wit) of COLOR SET
(voor het samenstellen van uw eigen kleur) in te stellen.
Als u COLOR_CW of COLOR_WW: hebt geselecteerd, druk dan gewoon de toets ENTER om uw keuze
te bevestigen.
Als u COLOR SET: hebt geselecteerd, druk dan de toets ENTER om naar de handmatige kleurinstellingen
te gaan.
Er knippert RED op het scherm: gebruik de toetsen NEER en OP om de intensiteit van de rode
kleur in te stellen (000 = minimum, 255 = maximum).
Druk de toets ENTER om te bevestigen en naar de volgende kleur te gaan.
Er knippert GREEN op het scherm: gebruik de toetsen NEER en OP om de intensiteit van de
groene kleur in te stellen (000 = minimum, 255 = maximum).
Druk de toets ENTER om te bevestigen en naar de volgende kleur te gaan.
Page 38

NEDERLANDS
GEBRUIKSAANWIJZING
JB SYSTEMS®
36/74
COB-4BAR
Er knippert BLUE op het scherm: gebruik de toetsen NEER en OP om de intensiteit van de blauwe
kleur in te stellen (000 = minimum, 255 = maximum).
Druk op de toets ENTER om te bevestigen.
BELANGRIJK: Vergeet niet dat de balk is voorzien van een master dimmer. Als de uitvoer te laag lijkt
te zijn of er komt helemaal geen licht uit, controleer dan de instelling van de MASTER DIMMER!
MODUS TRAAG KLEURFADEN:
Wordt gebruikt om de projectors langzaam van de ene kleur naar de andere te laten faden.
Druk de toets MODE totdat er 01.STATIC of xx.EFFECT (nummer 02 t/m 14 gevolgd door EFFECT) op
het scherm wordt weergegeven.
Druk de toets ENTER om naar de configuratiemodus te gaan.
De feitelijke modus (statische of effectsmodus) op het scherm knippert.
Gebruik de toetsen NEER en OP om 02.EFFECT (faden van een kleur naar een andere) of 04.EFFECT
(iedere kleur fade in en uit) te selecteren.
Druk op de toets ENTER om te bevestigen.
De snelheid op het scherm begint te knipperen: Gebruik de toetsen NEER en OP om de gewenste
snelheid in te stellen (00 = uit, 99 = maximale snelheid)
Druk op de toets ENTER om te bevestigen.
Op het scherm begint Flits te knipperen: Gebruik de toetsen NEER en OP om de gewenste snelheid voor
het stroboscopische effect in te stellen (00 = uit, 99 = maximale snelheid)
Druk op de toets ENTER om te bevestigen.
BELANGRIJK: Vergeet niet dat de balk is voorzien van een master dimmer. Als de uitvoer te laag lijkt
te zijn of er komt helemaal geen licht uit, controleer dan de instelling van de MASTER DIMMER!
AUTOMATISCHE CHASE MODUS:
Wordt gebruikt om de automatische chase modus in te stellen, zodat de kleuren automatisch met een
constante snelheid wijzigen.
Druk de toets MODE totdat er 01.STATIC of xx.EFFECT (nummer 02 t/m 14 gevolgd door EFFECT) op
het scherm wordt weergegeven.
Druk de toets ENTER om naar de configuratiemodus te gaan.
De feitelijke modus (statische of effectsmodus) op het scherm knippert.
Gebruik de toetsen NEER en OP om een van de 11 chase modi (03, 05, 06, 07, 08, 09, 10, 11, 12, 13 of
14.EFFECT) te selecteren.
Druk op de toets ENTER om te bevestigen.
De snelheid op het scherm begint te knipperen: Gebruik de toetsen NEER en OP om de gewenste
snelheid in te stellen (00 = uit, 99 = maximale snelheid)
Druk op de toets ENTER om te bevestigen.
Op het scherm begint Flits te knipperen: Gebruik de toetsen NEER en OP om de gewenste snelheid voor
het stroboscopische effect in te stellen (00 = uit, 99 = maximale snelheid)
Druk op de toets ENTER om te bevestigen.
Opmerking: Als u 13.EFFECT of 14.EFFECT hebt geselecteerd kunt u 2 kleuren voor uw chaseprogramma
kiezen:
Op het scherm knippert C1.
Gebruik de toetsen NEER en OP om de eerste kleur van het chaseprogramma te selecteren.
Druk op de toets ENTER om te bevestigen.
Nu knippert C2 op het scherm.
Gebruik de toetsen NEER en OP om de tweede kleur van het chaseprogramma te selecteren.
Druk op de toets ENTER om te bevestigen.
BELANGRIJK: Vergeet niet dat de balk is voorzien van een master dimmer. Als de uitvoer te laag lijkt
te zijn of er komt helemaal geen licht uit, controleer dan de instelling van de MASTER DIMMER!
AUTOMATISCH UITVOEREN:
Wordt gebruikt om de automatische willekeurige chase modus te starten. De balk doorloopt
willekeurig ieder individueel chaseprogramma. De snelheid en stroboscoopsnelheid die u voor ieder
individueel chaseprogramma hebt ingesteld worden tijdens deze show gebruikt. (zie vorige
omschrijving: AUTOMATISCHE CHASE MODUS)
Druk op de toets MODE totdat er AUTO RUN op het scherm verschijnt.
Druk de toets ENTER om naar de configuratiemodus te gaan.
Op het scherm begint FQN te knipperen.
Page 39

NEDERLANDS
GEBRUIKSAANWIJZING
JB SYSTEMS®
37/74
COB-4BAR
Gebruik de toetsen NEER en OP om het aantal keren dat ieder programma dient te worden herhaald
voordat automatisch naar het volgende automatische wordt overgeschakeld. (01 t/m 99 keer)
Druk op de toets ENTER om te bevestigen.
OMGEKEERDE FLOW
Wordt gebruikt om de flowrichting van de automatische chase modi om te keren. Dit kan nuttig zijn
als u verschillende balken gelijktijdig in master/slave-stand gebruikt.
Druk op de toets MODE totdat er FLOW INVERT op het scherm verschijnt.
Druk de toets ENTER om naar de configuratiemodus te gaan.
Gebruik de toetsen NEER en OP om ON (stroming wordt omgekeerd) of OFF (stroming wordt niet
omgekeerd) te selecteren.
Druk op de toets ENTER om te bevestigen.
MASTER DIM
Dit is de algemene master dimmer voor ALLE ingebouwde effecten van de 4BAR.
Druk op de toets MODE totdat er MASTER DIM op het scherm verschijnt.
Druk de toets ENTER om naar de configuratiemodus te gaan.
Gebruik de toetsen NEER en OP om het algemene dimmerniveau van de 4BAR te wijzigen.
Druk op de toets ENTER om te bevestigen.
Als u de indruk hebt dat de 4BAR nier werkt, controleer dan of de MASTER DIMMER niet op een te
laag niveau of op nul is gesteld!
IR ACTIEF
Activeer deze functie als u de 4BAR met de kleine draadloze afstandsbediening wilt bedienen. Als u
geen gebruik wilt maken van de draadloze afstandsbediening, schakel dan altijd deze functie uit.
Druk op de toets MODE totdat er IR ACTIVE op het scherm verschijnt.
Druk de toets ENTER om naar de configuratiemodus te gaan.
Gebruik de toetsen NEER en OP om ON (de draadloze afstandsbediening kan worden gebruikt) of OFF
(kan niet worden bediend d.m.v. de draadloze afstandsbediening) te selecteren.
Druk op de toets ENTER om te bevestigen.
BELANGRIJK: Als u geen gebruik wilt maken van de draadloze afstandsbediening, dan dient u de
ontvanger voor de IR-afstandsbediening in de balk uit te schakelen. (IR Actief = UIT)
LICHTEFFECT UIT (alleen wanneer bediend via DMX)
Met deze optie kunt u beslissen of de 2 extra voedingsuitgangen voor extra lichteffecten (12) en (13)
via de DMX kunnen worden in-/uitgeschakeld of dat de stroomvoorziening altijd AAN dient te zijn.
Druk op de toets MODE totdat er LIGHT EFFECT OUT op het scherm verschijnt.
Druk de toets ENTER om naar de configuratiemodus te gaan.
Gebruik de toetsen NEER en OP om DMX CONTROL ON (de voedingsuitgangen kunnen via DMX
worden in- of uitgeschakeld) of DMX CONTROL OFF (de voedingsuitgangen zijn constant AAN) te selecteren.
Druk op de toets ENTER om te bevestigen.
GEBRUIKSAANWIJZING
A. Stand-alone 1 apparaat:
Sluit eenvoudig de projector op het lichtnet aan.
Selecteer een van de automatische, geluids- of statische standen.
Lees de sectie HOE IN TE STELLEN voor meer informatie over deze instellingen.
B. Twee of meer eenheden in master/slave instellen:
Sluit alle eenheden op elkaar aan. Raadpleeg het hoofdstuk “elektrische installatie” om te leren hoe dit
te doen.
Selecteer een van de automatische, geluids- of statische standen op de master (de eerste COB-4BAR
in de DMX-keten).
Stel alle andere balken in op SLAVE-stand.
De projectors zullen nu de programmering van de master-COB-4BAR volgen en dus allemaal
synchroon werken.
Page 40

NEDERLANDS
GEBRUIKSAANWIJZING
JB SYSTEMS®
38/74
COB-4BAR
C. Wordt bediend door de draadloze afstandsbediening:
Om de draadloze afstandsbediening te kunnen gebruiken, dient u deze optie in de 4BAR in te
schakelen:
Druk op de toets MODE totdat er IR ACTIVE op het scherm verschijnt.
Druk de toets ENTER om de instelling te kunnen wijzigen.
Gebruik de toetsen NEER en OP om de optie voor afstandsbediening in of uit te schakelen (ON =
afstandsbediening ingeschakeld, OFF = afstandsbediening uitgeschakeld) te selecteren.
Druk op de toets ENTER om te bevestigen.
Druk op de MODE-toets totdat er SLAVE & FOOT CONTROL op het
scherm verschijnt.
Druk op de toets ENTER om te bevestigen.
Functies:
BL: wordt gebruikt om de LED's in/uit te schakelen.
SP: wordt gebruikt om de snelheid in te stellen bij gebruik van de
standen kleur wijzigen of kleur faden. Druk herhaaldelijk op deze
toets om een van de 4 voorgeprogrammeerde snelheiden te
selecteren. (traag, middelmatig, snel, uit)
HELDERHEID (master dimmer): wordt gebruikt om de algemene
helderheid van de projectors in te stellen. Druk herhaaldelijk op deze
toets om een van de 4 voorgeprogrammeerde niveaus voor de
helderheid te selecteren. (50%, 75%, 100%, uit).
FL: wordt gebruikt om de stroboscoopstand (flitsen) te activeren. Druk
herhaaldelijk op deze toets om een van de 4 voorgeprogrammeerde
flitsfrequenties te selecteren. (traag, middelmatig, snel, uit)
R wordt gebruikt om de intensiteit van de rode LED-bron in te stellen.
Druk herhaaldelijk op deze toets om een van de 4
voorgeprogrammeerde niveaus voor de helderheid te selecteren. (50%, 75%, 100%, uit). Vergeet niet
dat de helderheid ook door de master dimmer wordt beïnvloed! (= toets voor HELDERHEID)
G wordt gebruikt om de intensiteit van de groene LED-bron in te stellen. Druk herhaaldelijk op deze
toets om een van de 4 voorgeprogrammeerde niveaus voor de helderheid te selecteren. (50%, 75%,
100%, uit). Vergeet niet dat de helderheid ook door de master dimmer wordt beïnvloed! (= toets voor
HELDERHEID)
B wordt gebruikt om de intensiteit van de blauwe LED-bron in te stellen. Druk herhaaldelijk op deze
toets om een van de 4 voorgeprogrammeerde helderheidsniveaus te selecteren. (50%, 75%, 100%,
uit). Vergeet niet dat de helderheid ook door de master dimmer wordt beïnvloed! (= toets voor
HELDERHEID)
W wordt gebruikt om de intensiteit van de witte kleur (rood + groen + blauw samen) in te stellen. Druk
herhaaldelijk op deze toets om een van de 4 voorgeprogrammeerde helderheidsniveaus te selecteren.
(50%, 75%, 100%, uit). Vergeet niet dat de helderheid ook door de master dimmer wordt beïnvloed! (=
toets voor HELDERHEID)
Pr1, Pr2, Pr3, Pr4: Deze toetsen worden gebruikt om de geïntegreerde kleuren chaseprogramma's uit
te voeren. Helderheid, snelheid en flitssnelheid kunnen met de knoppen BRIGHTNESS, SP en FL
worden aangepast.
D1, D2, D3, D4: Deze toetsen worden gebruikt om de geïntegreerde programma's voor faden van de
kleuren uit te voeren. Helderheid, snelheid en flitssnelheid kunnen met de knoppen BRIGHTNESS, SP
en FL worden aangepast.
SA1, SA2, SA3, SA4: Deze toetsen worden gebruikt om de geïntegreerde geluidsgestuurde
chaseprogramma's uit te voeren. Helderheid en flitssnelheid kunnen met de knoppen BRIGHTNESS
en FL worden aangepast.
Opmerking: (de maximale afstand tussen de draadloze
afstandsbediening en het armatuur = +/- 10 m)
D. Bediend door de LEDCON-02 Mk2:
Volg onderstaande stappen om de balk te bedienen met
gebruikmaking van de LEDCON-02 Mk2.
Druk op de MODE-toets totdat er DMX MODE op het scherm
verschijnt.
Selecteer de stand 18KAN DMX en stel het DMX-adres in op
001.
Page 41

NEDERLANDS
GEBRUIKSAANWIJZING
JB SYSTEMS®
39/74
COB-4BAR
Druk de toets MODE totdat er LED EFFECT OUT of op het scherm wordt weergegeven en selecteer:
DMX BEDIENING UIT (belangrijk!)
Stel de LEDCON-02 Mk2 in op de 4KAN-stand (schakelaar aan de achterkant van de controller)
Raadpleeg voor aanwijzingen voor het gebruik van de LEDCON-02 Mk2 de gebruiksaanwijzing van
deze controller.
Belangrijke opmerking:
De COB-4BAR is uitsluitend compatibel met de LEDCON-02 Mk2, niet met de LEDCON-02!
Als de voedingsuitgangen (12 en 13) worden gebruikt in combinatie met de LEDCON-02 Mk2,
kunnen zij niet worden in-/uitgeschakeld maar zijn ze altijd aan!
De infrarood functie moet uitgeschakeld zijn: (IR ACTIVE = OFF)
E. Bediend door de optionele voetbediening:
Om de voetbediening te kunnen gebruiken, dient u deze optie in de 4BAR in te schakelen:
Druk op de MODE-toets totdat er SLAVE & FOOT CONTROL op het scherm verschijnt.
Druk op de toets ENTER om te bevestigen.
Algemene beschrijving van de voetbediening:
Draaiknop:wordt gebruikt voor het
instellen van de gevoeligheid van de
ingebouwde microfoon voor de stand
met geluidsaansturing .
Standenschakelaar: wordt gebruikt
om een van de 3 verschillende
werkmodi te selecteren: KLEUR,
GELUID, PROGRAMMA
Schakelaars OP en NEER: worden
gebruikt om de verschillende
programmaopties te selecteren.
BLACK-OUT-schakelaar: wordt gebruikt om de LED's in/uit te schakelen or om de functie Volledig
aan te selecteren.
Standen en functies:
Trap op het pedaal MODE om de verschillende werkmodi te selecteren.
GELUID-stand (rode LED brandt): in deze stand kunt u verschillende automatisch statische kleuren
selecteren.
Pedalen OP en NEER: kunnen worden gebruikt om een van de verschillende statische kleuren te
selecteren.
BLACK-OUT-pedaal: Druk kort op dit pedaal om de balk in black-out te zetten (de rode, groene en
gele LED's op het paneel van het padaal branden). Als u ongeveer 3 seconden op dit pedaal trapt
keert de balk terug naar de stand Volledig aan (alle projectors op vol vermogen in de kleur wit).
GELUID-stand (Groene LED brandt): in deze stand kunt u verschillende geluidsgestuurde chase modi
selecteren (vergeet niet om de gevoeligheid van de ingebouwde microfoon in te stellen met de
draaiknop op het paneel van het pedaal).
Pedalen OP en NEER: kunnen worden gebruikt om een van de verschillende geluidsmodusen te
selecteren.
BLACK-OUT-pedaal: Druk kort op dit pedaal om de balk in black-out te zetten (de rode, groene en
gele LED's op het paneel van het padaal branden). Als u ongeveer 3 seconden op dit pedaal trapt
keert de balk terug naar de KLEUR-stand in de stand Volledig aan (alle projectors op vol vermogen
in de kleur wit).
GELUID-stand (gele LED brandt): in deze stand kunt u verschillende automatisch chase modi
selecteren.
Pedalen OP en NEER: kunnen worden gebruikt om een van de verschillende automatische chase
modi te selecteren.
BLACK-OUT-pedaal: Druk kort op dit pedaal om de balk in black-out te zetten (de rode, groene en
gele LED's op het paneel van het padaal branden). Als u ongeveer 3 seconden op dit pedaal trapt
keert de balk terug naar de KLEUR-stand in de stand Volledig aan (alle projectors op vol vermogen
in de kleur wit).
Extra functie:
De pedalen OP en NEER kunnen ook worden gebruikt om de 2 voedingsuitgangen voor de aanvullende
armaturen in/uit te schakelen. Houd het pedaal NEER gedurende ongeveer 3 seconden ingedrukt om
Page 42

NEDERLANDS
GEBRUIKSAANWIJZING
JB SYSTEMS®
40/74
COB-4BAR
Kanaal:
Naam
Waarde:
Functie:
1
Rood
000-255
Dimmer (0-100%)
2
Groen
000-255
Dimmer (0-100%)
3
Blauw
000-255
Dimmer (0-100%)
Kanaal:
Naam
Waarde:
Functie:
1
Rood
000-255
Dimmer (0-100%)
2
Groen
000-255
Dimmer (0-100%)
3
Blauw
000-255
Dimmer (0-100%)
4
Extra voedingsuitgang 1
000-127
Voeding UIT
128-255
Voeding AAN
5
Extra voedingsuitgang 2
000-127
Voeding UIT
128-255
Voeding AAN
Kanaal:
Naam
Waarde:
Functie:
1
Rood 1
000-255
Dimmer projector 1 en 2 (0-100%)
2
Groen 1
000-255
Dimmer projector 1 en 2 (0-100%)
3
Blauw 1
000-255
Dimmer projector 1 en 2 (0-100%)
4
Rood 2
000-255
Dimmer projector 3 en 4 (0-100%)
5
Groen 2
000-255
Dimmer projector 3 en 4 (0-100%)
6
Blauw 2
000-255
Dimmer projector 3 en 4 (0-100%)
Kanaal:
Naam
Waarde:
Functie:
1
Dimmer
000-255
Master-Dimmer (0-100%)
2
Stroboscoop
000-007
Geen stroboscoop
008-037
Willekeurige stroboscoop
038-067
Geluid-stroboscoop
068-255
Snelheid stroboscoop (traag tot snel)
3
Automatische kleurstand.
000-007
Geen automatische stand
008-247
Snelheid kleurfaden (traag tot snel)
248-255
Geluid chase 4 Rood
000-255
Dimmer (0-100%)
5
Groen
000-255
Dimmer (0-100%)
6
Blauw
000-255
Dimmer (0-100%)
7
Extra voedingsuitgang 1
000-127
Voeding UIT
128-255
Voeding AAN
8
Extra voedingsuitgang 2
000-127
Voeding UIT
128-255
Voeding AAN
voedingsuitgang 1 in/uit te schakelen. Houd het pedaal NEER gedurende ongeveer 3 seconden
ingedrukt om voedingsuitgang 2 in/uit te schakelen.
F. Wordt aangestuurd via de universele DMX-controller:
Sluit alle eenheden op elkaar aan. Raadpleeg het hoofdstuk “Elektrische installatie voor twee of meer
apparaten in de DMX-modus” om te leren hoe dit te doen (vergeet niet om alle eenheden juist te
adresseren!)
Sluit alle units op het lichtnet aan en zet de DMX-controller aan.
Aangezien elke eenheid een eigen DMX-adres heeft, kunt u ze individueel bedienen. Vergeet niet dat
elke eenheid 3, 5, 6, 8, 12, 16, 17 of 18 DMX-kanalen gebruikt, ongeacht de DMX-modus die u in het
menu hebt geselecteerd. Zie de verschillende onderstaande DMX-tabellen:
DMX-tabel voor de 3-kanaals DMX-modus
DMX-tabel voor de 5-kanaals DMX-modus
DMX-tabel voor de 6-kanaals DMX-modus
DMX-tabel voor de 8-kanaals DMX-modus
Page 43

NEDERLANDS
GEBRUIKSAANWIJZING
JB SYSTEMS®
41/74
COB-4BAR
Kanaal:
Naam
Waarde:
Functie:
1
Rood 1
000-255
Dimmer projector 1 (0-100%)
2
Groen 1
000-255
Dimmer projector 1 (0-100%)
3
Blauw 1
000-255
Dimmer projector 1 (0-100%)
4
Rood 2
000-255
Dimmer projector 2 (0-100%)
5
Groen 2
000-255
Dimmer projector 2 (0-100%)
6
Blauw 2
000-255
Dimmer projector 2 (0-100%)
7
Rood 3
000-255
Dimmer projector 3 (0-100%)
8
Groen 3
000-255
Dimmer projector 3 (0-100%)
9
Blauw 3
000-255
Dimmer projector 3 (0-100%)
10
Rood 4
000-255
Dimmer projector 4 (0-100%)
11
Groen 4
000-255
Dimmer projector 4 (0-100%)
12
Blauw 4
000-255
Dimmer projector 4 (0-100%)
Kanaal:
Naam
Waarde:
Functie:
1
Kleurenmacro's en
automatische
kleurstanden.
000-015
UIT
016-023
Rood
024-031
Groen
032-039
Blauw
040-047
Rood + Groen
048-055
Groen + Blauw
056-063
Rood + Blauw
064-071
Wit
072-079
Kleur 1
080-087
Kleur 2
088-095
Kleur 3
096-103
Kleur 4
104-111
Kleur 5
112-119
Kleur 6
120-127
Kleur 7
128-135
Kleur 8
136-143
Kleurfaden:
144-151
Kleur chase modus 1
152-159
Kleur chase modus 2
160-167
Kleur chase modus 3
168-175
Kleur chase modus 4
176-183
Kleur chase modus 5
184-191
Kleur chase modus 6
192-199
Kleur chase modus 7
200-207
Kleur chase modus 8
208-215
Kleur chase modus 9
216-223
Kleur chase modus 10
224-231
Kleur chase modus 11
232-239
Kleur chase modus 12
244-255
Geluid actief
Kanaal 1 = 000 tot 015
2
Dimmer
000-255
Master-Dimmer (0-100%)
3
Stroboscoop
000-255
Snelheid stroboscoop (traag tot snel)
4
Rood 1
000-255
Dimmer projector 1 (0-100%)
5
Groen 1
000-255
Dimmer projector 1 (0-100%)
6
Blauw 1
000-255
Dimmer projector 1 (0-100%)
7
Rood 2
000-255
Dimmer projector 2 (0-100%)
8
Groen 2
000-255
Dimmer projector 2 (0-100%)
9
Blauw 2
000-255
Dimmer projector 2 (0-100%)
10
Rood 3
000-255
Dimmer projector 3 (0-100%)
DMX-tabel voor de 12-kanaals DMX-modus
DMX-tabel voor de 17-kanaals DMX-modus
Page 44

NEDERLANDS
GEBRUIKSAANWIJZING
JB SYSTEMS®
42/74
COB-4BAR
11
Groen 3
000-255
Dimmer projector 3 (0-100%)
12
Blauw 3
000-255
Dimmer projector 3 (0-100%)
13
Rood 4
000-255
Dimmer projector 4 (0-100%)
14
Groen 4
000-255
Dimmer projector 4 (0-100%)
15
Blauw 4
000-255
Dimmer projector 4 (0-100%)
16
Extra voedingsuitgang 1
000-127
Voeding UIT
128-255
Voeding AAN
17
Extra voedingsuitgang 2
000-127
Voeding UIT
128-255
Voeding AAN
Kanaal 1 = 016 tot 135
2
Dimmer
000-255
Master-Dimmer (0-100%)
3
Stroboscoop
000-255
Snelheid stroboscoop (traag tot snel)
4 tot 15 - -
Niet gebruikt
16
Extra voedingsuitgang 1
000-127
Voeding UIT
128-255
Voeding AAN
17
Extra voedingsuitgang 2
000-127
Voeding UIT
128-255
Voeding AAN
Kanaal 1 = 136 tot 223
2
Snelheid
000-255
Effectsnelheid (van traag naar snel)
3
Stroboscoop
000-255
Snelheid stroboscoop (traag tot snel)
4 tot 15 - -
Niet gebruikt
16
Extra voedingsuitgang 1
000-127
Voeding UIT
128-255
Voeding AAN
17
Extra voedingsuitgang 2
000-127
Voeding UIT
128-255
Voeding AAN
Kanaal 1 = 224 tot 239
2
Snelheid
000-255
Effectsnelheid (van traag naar snel)
3
Stroboscoop
000-255
Snelheid stroboscoop (traag tot snel)
4
Effect kleur 1
000-255
Selecteer één van de 8 kleuren.
5
Effect kleur 2
000-255
Selecteer één van de 8 kleuren.
6 tot 15 - -
Niet gebruikt
16
Extra voedingsuitgang 1
000-127
Voeding UIT
128-255
Voeding AAN
17
Extra voedingsuitgang 2
000-127
Voeding UIT
128-255
Voeding AAN
Kanaal 1 = 240 tot 255
2
Geluid
000-255
Gevoeligheid (van laag naar hoog)
3 tot 15 - -
Niet gebruikt
16
Extra voedingsuitgang 1
000-127
Voeding UIT
128-255
Voeding AAN
17
Extra voedingsuitgang 2
000-127
Voeding UIT
128-255
Voeding AAN
Kanaal:
Waarde:
Functie:
1
Rood (projector 1)
000-255
Dimmer (0-100%)
2
Groen (projector 1)
000-255
Dimmer (0-100%)
3
Blauw (projector 1)
000-255
Dimmer (0-100%)
4
Dimmen
Stroboscoop
Muziekstand
(projector 1)
000-007
Black-out
008-190
Master-Dimmer (0-100%)
191-200
Automatische geluidsgestuurde
stand
201-247
Snelheid stroboscoop (traag tot snel)
248-255
Maximaal niveau master dimmer
DMX-tabel voor de 18-kanaals DMX-modus
Zie de vorige pagina voor meer informatie over de selectie bij gebruik van de LEDCON-02 Mk2
controller.
Page 45

NEDERLANDS
GEBRUIKSAANWIJZING
JB SYSTEMS®
43/74
COB-4BAR
5
Rood (projector 2)
000-255
Dimmer (0-100%)
6
Groen (projector 2)
000-255
Dimmer (0-100%)
7
Blauw (projector 2)
000-255
Dimmer (0-100%)
8
Dimmen
Stroboscoop
Muziekstand
(projector 2)
000-007
Black-out
008-190
Master-Dimmer (0-100%)
191-200
Automatische geluidsgestuurde
stand
201-247
Snelheid stroboscoop (traag tot snel)
248-255
Maximaal niveau master dimmer
9
Rood (projector 3)
000-255
Dimmer (0-100%)
10
Groen (projector 3)
000-255
Dimmer (0-100%)
11
Blauw (projector 3)
000-255
Dimmer (0-100%)
12
Dimmen
Stroboscoop
Muziekstand
(projector 3)
000-007
Black-out
008-190
Master-Dimmer (0-100%)
191-200
Automatische geluidsgestuurde
stand
201-247
Snelheid stroboscoop (traag tot snel)
248-255
Maximaal niveau master dimmer
13
Rood (projector 4)
000-255
Dimmer (0-100%)
14
Groen (projector 4)
000-255
Dimmer (0-100%)
15
Blauw (projector 4)
000-255
Dimmer (0-100%)
16
Dimmen
Stroboscoop
Muziekstand
(projector 4)
000-007
Black-out
008-190
Master-Dimmer (0-100%)
191-200
Automatische geluidsgestuurde
stand
201-247
Snelheid stroboscoop (traag tot snel)
248-255
Maximaal niveau master dimmer
17
Extra voedingsuitgang 1
000-127
Voeding UIT
128-255
Voeding AAN
18
Extra voedingsuitgang 2
000-127
Voeding UIT
128-255
Voeding AAN
ONDERHOUD
Zorg ervoor dat het gebied onder de installatieplaats tijdens takelen, onttakelen en onderhoud vrij is van
ongewenste personen.
Schakel het apparaat uit, ontkoppel het netsnoer en wacht totdat het apparaat is afgekoeld.
Tijdens de inspectie dienen de volgende punten te worden gecontroleerd:
Alle schroeven die zijn gebruikt voor het installeren van het apparaat of onderdelen van het apparaat
dienen goed te zijn vastgedraad en mogen niet gecorrodeerd zijn.
Behuizingen, bevestigingen en installatieplaatsen (plafond, truss, ophangingen) dienen volledig vrij te zijn
van vervorming.
Wanneer een optische lens zichtbaar is beschadigd als gevolg vanscheuren of diepe krassen, moet hij
worden vervangen.
De netsnoeren moeten in perfecte conditie zijn en dienen onmiddellijk te worden vervangen wanneer er
ook maar een klein probleem wordt ontdekt.
Om het apparaat tegen oververhitting te beschermen dienen de ventilatoren (indien aanwezig) en
ventilatieopeningen maandelijks te worden gereinigd.
Het interieur van het apparaat dient jaarlijks met een stofzuiger of luchtspuit te worden gereinigd.
Het reinigen van de interne en externe optische lenzen en/of spiegels moet periodiek worden uitgevoerd
om de lichtopbrengst te optimaliseren. De frequentie van reiniging hangt af van de omgeving waarin de
armatuur werkt: een vochtige, rokerige of bijzonder vuile omgeving kan leiden tot een grotere opeenhoping
van vuil op de optiek van het apparaat.
Reinig met een zachte doek met behulp van normale reinigingsmiddelen voor glas.
Droog de onderdelen altijd zorgvuldig.
Opgelet: Wij raden nadrukkelijk aan om het inwendig reinigen door gekwalificeerd personeel uit te
laten voeren!
Page 46

NEDERLANDS
GEBRUIKSAANWIJZING
JB SYSTEMS®
44/74
COB-4BAR
Lichtnetaansluiting:
100-250 V wisselspanning, 50/60 Hz
Opgenomen vermogen:
120 Watt
Zekering:
250 V 2 A trage zekering (20mm glas)
Extra lichtnetuitgangen:
maximaal 250 V 3 A/uitgang
Geluidsaansturing:
Ingebouwde microfoon
DMX-aansluitingen:
XLR 3-pens
DMX-modus:
3, 5, 6, 8, 12, 17 en 18 DMX-kanalen.
LED-bron:
4 x 36 W TRI COB LED
Hoek van de bundel met lens:
15°
Hoek van de bundel zonder lens:
100°
Afmetingen:
1000 x 82 x 320 mm
Gewicht van de 4bar (zonder case):
7,6 kg
SPECIFICATIES
Alle informatie is onderhevig aan verandering zonder voorafgaande kennisgeving.
U kunt de nieuwste versie van deze handleiding downloaden van onze website: www.jb-systems.eu
Page 47

DEUTSCH
BEDIENUNGSANLEITUNG
JB SYSTEMS®
45/74
COB-4BAR
BEDIENUNGSANLEITUNG
Vielen Dank, dass Sie sich für dieses Produkt von JB SYSTEMS® entschieden haben. Bitte lesen Sie diese
Bedienungshinweise vor der Inbetriebnahme sorgfältig durch, um alle Möglichkeiten des Geräts voll nutzen
zu können, sowie zu Ihrer eigenen Sicherheit.
EIGENSCHAFTEN
Dieses Gerät ist funkentstört. Das Gerät entspricht den aktuellen europäischen Anforderungen und
nationalen Leitlinien. Die Konformität wurde nachgewiesen und die entsprechenden Erklärungen und
Unterlagen liegen beim Hersteller vor. Dieses Gerät wird zur Erzeugung von dekorativen
Beleuchtungseffekten in Lichtshows eingesetzt.
Eleganter und kompakter leistungsstarker 4BAR mit 4 energiesparenden COB-LED-Scheinwerfern.
KEINE separaten LEDs: Jeder Scheinwerfer besitzt eine 36W COB LED mit perfekter Farbmischung und
dem Aussehen einer herkömmlichen Lampe!
Außergewöhnlich hohe Lichtleistung (überschreitet die Lichtleistung von traditionellen PAR56 300W
Lampen!)
IR-Fernbedienung im Lieferumfang enthalten: Keine schweren Controller erforderlich, ideal für DJs!
Mit 2 Netzsteckdosen ausgestattet, jede mit Ein/Aus-Fernbedienung: Es kann jeder (LED) Effekt mit bis zu
500 W angeschlossen werden!
Verschiedene Betriebsmodi:
Standalone-Gerät mit IR-Fernbedienung: Automatische / Takt-synchronisierte Farbmuster +
Ein/Aus-Steuerung von 2 (optionalen) Beleuchtungseffekten.
Master/Slave-Modus: Für wunderschöne vorprogrammierte und musik-synchronisierte Lichtshows
können mehrere 4BARs zusammen verwendet werden.
Steuerung über unseren bekannten LEDCON-02 Mk2 oder die optionale Fusssteuerung „COB-4BAR
FOOTCONTROL“.
DMX-gesteuert: Unterschiedliche Kanalmodi mit Programmwahl und einzelner RGB-Steuerung.
LED-Scheinwerfer Strahlwinkel ist 15° mit Objektiv oder 100° ohne Objektiv.
Ideal für mobile Anwendungen: Nur 1 m lang und wiegt nur 8 kg!
Viele Anwendungsmöglichkeiten: Discotheken, DJs, Messestände, ...
0-100% Dimmen und ultra-schnelle Strobe-Funktion (keine zusätzlichen Strobes erforderlich!)
Hervorragende integrierte Programme für wunderschöne, abwechslungsreiche Lightshows!
Optionale Fußsteuerung verfügbar: Ideal für kleine Bands!
Alphanumerischen 2x 16 Zeichen LCD-Display mit Hintergrundbeleuchtung für einfache Menüführung.
Einschließlich Standard 35mm Adapter, geeignet für unsere Stative mit 35mm Aufnahme.
Zum Lieferumfang des 4BAR gehört ein leichter, aber stabiler Transportkoffer.
VOR GEBRAUCH
Vor der Erstbenutzung bitte das Gerät zuerst auf Transportschäden überprüfen. Sollte das Gerät einen
Schaden aufweisen, benutzen Sie es nicht, sondern wenden Sie sich unverzüglich an Ihren Händler.
Wichtiger Hinweis: Dieses Gerät hat das Werk unbeschädigt und gut verpackt verlassen. Es ist wichtig,
dass der Benutzer sich streng an die Sicherheitshinweise und Warnungen in der Bedienungsanleitung
hält. Schäden durch unsachgemäße Handhabung sind von der Garantie ausgeschlossen. Der Händler
übernimmt keine Verantwortung für Schäden, die durch Nichtbeachtung der Bedienungsanleitung
entstanden sind.
Die Bedienungsanleitung zum zukünftigen Nachschlagen bitte an einem sicheren Ort aufbewahren. Bei
Verkauf oder sonstiger Weitergabe des Geräts bitte die Bedienungsanleitung beifügen.
Packungsinhalt prüfen:
Bitte überprüfen Sie, ob die Verpackung folgende Artikel enthält:
Bedienungsanleitung
COB-4BAR
Drahtlose Fernbedienung
Netzkabel
Flightcase
2 Reserve-IEC-Stecker für zusätzliche Effekt-Leistungsausgänge
Page 48

DEUTSCH
BEDIENUNGSANLEITUNG
JB SYSTEMS®
46/74
COB-4BAR
ACHTUNG: Um sich nicht der Gefahr eines elektrischen
Schlags auszusetzen, entfernen Sie nicht die obere Abdeckung.
Im Geräteinneren befinden sich keine vom Benutzer wartbaren
Teile. Überlassen Sie Reparatur- und Wartungsarbeiten dem
qualifizierten Kundendienst.
Das Blitzsymbol innerhalb eines gleichseitigen Dreiecks warnt den Benutzer vor nicht isolierter
„gefährlicher Spannung“ im Innern des Produktgehäuses, die so stark sein kann, dass für
Personen die Gefahr von Stromschlägen besteht.
Das Ausrufezeichen im Dreieck weist den Benutzer auf wichtige Bedienungs- und
Wartungshinweise in den Dokumenten hin, die dem Gerät beiliegen.
Dieses Symbol bedeutet: Nur im Innenbereich
Dieses Symbol bedeutet: Die Bedienungsanleitung lesen
Dieses Symbol bedeutet: Das Gerät besitzt Schutzklasse I
Dieses Symbol legt fest: Den minimalen Abstand von beleuchteten Objekten. Der minimale
Abstand zwischen Projektor und dem beleuchteten Objekt muss mehr als x Meter betragen.
Das Gerät eignet sich nicht für die direkte Montage auf gängigen entflammbaren Oberflächen.
(Nur für die Montage auf nicht-brennbaren Oberflächen geeignet)
ACHTUNG: Nicht direkt in die Lichtquelle blicken.
Das kann für die Augen schädlich sein.
SICHERHEITSHINWEISE:
Aus Umweltschutzgründen die Verpackung bitte wiederverwenden oder richtig trennen.
Zur Vermeidung von Feuer und Stromschlag das Gerät weder Regen noch Feuchtigkeit aussetzen.
Zur Vermeidung von Kondensation im Inneren des Geräts bitte nach dem Transport in einer warmen
Umgebung einige Zeit zum Temperaturausgleich ausgeschaltet stehen lassen. Kondensation kann zu
Leistungsverlust des Geräts oder gar Beschädigungen führen.
Nur für den Einsatz im Innenbereich.
Keine Metallgegenstände oder Flüssigkeiten ins Innere des Geräts gelangen lassen. Ein Kurzschluss oder
eine Fehlfunktion können die Folge sein. Falls es doch einmal vorkommen sollte, bitte sofort den
Netzstecker ziehen und vom Stromkreis trennen.
Das Gerät nur an einem gut belüfteten Ort und entfernt von entflammbaren Materialien oder Flüssigkeiten
aufstellen. Der Scheinwerfer muss mindestens 50 cm von allen umgebenden Wänden entfernt montiert
werden.
Die Ventilationsöffnungen nicht abdecken, Überhitzungsgefahr!
Nicht in staubiger Umgebung verwenden und regelmäßig reinigen.
Für Kinder unerreichbar aufbewahren.
Unerfahrene Personen dürfen das Gerät nicht bedienen.
Umgebungstemperatur darf 40°C nicht überschreiten. Das Gerät bei höheren Raumtemperaturen nicht
verwenden.
Stellen Sie sicher, dass sich während des Auf- oder Abbaus und der Wartung keine unbefugten Personen
unterhalb des Geräts befinden.
Lassen Sie das Gerät etwa 10 Minuten abkühlen, bevor Sie mit der Wartung beginnen.
Stets den Netzstecker ziehen, wenn das Gerät für einen längeren Zeitraum nicht genutzt oder es gewartet
wird.
Die elektrische Installation darf nur von qualifiziertem Personal, unter Beachtung der Vorschriften zur
elektrischen und mechanischen Sicherheit in Ihrem Land durchgeführt werden.
Stellen Sie sicher, dass Netzspannung mit Geräteaufkleber übereinstimmt.
Das Gerät nicht mit einem beschädigten Netzkabel in Betrieb nehmen. Wenn das Netzkabel gequetscht
oder beschädigt wurde, schalten Sie das Gerät sofort aus. Im Falle von Beschädigungen muss das
Netzkabel vom Hersteller, einem autorisierten Kundendienstmitarbeiter oder einer ähnlich qualifizierten
Person ersetzt werden, um Gefährdungen zu vermeiden.
Lassen Sie das Netzkabel niemals mit anderen Kabeln in Berührung kommen!
Zur Einhaltung der Sicherheitsbestimmungen muss das Gerät geerdet sein.
Das Gerät nicht an einen Dimmer anschließen.
Ausschließlich vorschriftsmäßige Kabel zur Installation verwenden.
Zur Vorbeugung gegen elektrische Schläge keine Abdeckungen entfernen. Im Geräteinneren befinden
sich keine zu wartenden Teile.
Page 49

DEUTSCH
BEDIENUNGSANLEITUNG
JB SYSTEMS®
47/74
COB-4BAR
Eine Sicherung niemals reparieren oder überbrücken. Stets tauschen Sie eine beschädigte Sicherung
gegen eine Sicherung gleichen Typs und gleicher Spezifikationen aus!
Bei Fehlfunktion das Gerät nicht benutzen und sich mit dem Händler in Verbindung setzen.
Bei sichtbaren Beschädigungen müssen Gehäuse und Optik ersetzt werden.
Bei Transport bitte die Originalverpackung verwenden, um Schäden am Gerät zu vermeiden.
Aus Sicherheitsgründen dürfen an dem Gerät keine unbefugten Veränderungen vorgenommen werden.
Wichtiger Hinweis: Nicht direkt in die Lichtquelle blicken! Das Gerät nicht verwenden, wenn sich Personen
im Raum befinden, die unter Epilepsie leiden.
BESCHREIBUNG:
1. DMX EINGANG: Die 3-polige XLR-Steckerbuchse verbindet den COB-4BAR mit der nächsten Einheit
der DMX-Kette.
2. DMX AUSGANG: Die 3-polige XLR-Buchse verbindet den COB-4BAR mit der nächsten Einheit der
DMX-Kette.
3. FUßSTEUERUNGSEINGANG: Anschluss der optionalen Fußsteuerung.
4. DISPLAY zeigt die Menüs und gewählte Funktionen an.
5. MODUS: Scrollen in den verschiedenen Funktionen im Menü.
6. ENTER-taste: Bestätigen Ihrer Auswahl oder um den Setupmodus einer Funktion aufzurufen.
7. AUFWÄRTS-Taste: Erhöhen der auf dem Display angezeigten Werte.
8. ABWÄRTS-Taste: Verringern der auf dem Display angezeigten Werte.
9. Netzspannung: netzanschluss mit IEC-Buchse mit integrierter Sicherung zum Anschluss des
Netzkabels.
10. Netzausgang mit IEC-Anschlussbuchse: Sie können mit einem speziellen IEC-Stromkabel diesen
Ausgang einfacher mit dem Netzeingang des nächsten BARs oder Scheinwerfers verbinden.
Wichtiger Hinweis: Der maximale Gesamtstrom darf 10 A (±2300 Watt) nicht überschreiten!
11. 35mm STATIV-ADAPTER: Zum einfachen Aufsetzen des 4BAR auf ein Stativ.
12. Zusatz-Leistungsausgang 1: Dieser Ausgang kann als Stromversorgung für einen zusätzlichen
Lichteffekt oder Scheinwerfer verwendet werden. Im Menü des 4BAR können Sie wählen, ob die
Stromversorgung ständig eingeschaltet ist oder ab sie über DMX/drahtlose Fernsteuerung/Trittschalter
ein- oder ausgeschaltet werden soll.
Wichtiger Hinweis: Der maximale Gesamtstrom darf 3 A (±690 Watt) NICHT überschreiten!
13. Zusatz-Leistungsausgang 2: Dieser Ausgang kann als Stromversorgung für einen zusätzlichen
Lichteffekt oder Scheinwerfer verwendet werden. Im Menü des 4BAR können Sie wählen, ob die
Stromversorgung ständig eingeschaltet ist oder ab sie über DMX/drahtlose Fernsteuerung/Trittschalter
ein- oder ausgeschaltet werden soll.
Wichtiger Hinweis: Der maximale Gesamtstrom darf 3 A (±690 Watt) NICHT überschreiten!
14. Spezialkabel mit Stromversorgungssignal für passive COB-Felder.
15. Passive COB-Felder: Jedes enthält 1 RGB COB, die farbige,scharfe 15° Strahlen erzeugt.
16. Abnehmbares 15°-Objektiv: Jedes der COB-Felder mit einem 15°-Objektiv ausgestattet, das durch
Lösen der 2 Schrauben entfernt werden kann, die es an der richtigen Position halten. Ohne Objektive
Page 50

DEUTSCH
BEDIENUNGSANLEITUNG
JB SYSTEMS®
48/74
COB-4BAR
haben die Scheinwerfer einen Strahlwinkel von 100°, was das Gerät für die unterschiedlichste
Anwendungen als Wash-Scheinwerfer interessant macht.
17. Schiebemechanismus: Kann zum Hinzufügen eines kleinen Zusatz-Lichteffekts oder Scheinwerfers
verwendet werden. Sie können auch 2 (optionale) Montageklemmen auf dem Schiebemechanismus
befestigen, um den BAR einfach an Ihrem Träger zu montieren.
ÜBERKOPF-MONTAGE
Wichtiger Hinweis: Die Montage ausschließlich durch qualifiziertes Fachpersonal durchführen
lassen. Unvorschriftsmäßiger Einbau kann erhebliche Verletzungen und/oder Schäden
verursachen. Die Überkopf-Montage setzt die entsprechende Erfahrung voraus! Die
Belastungsgrenzen müssen beachtet, geeignetes Installationsmaterial muss verwendet und das
installierte Gerät muss in regelmäßigen Abständen überprüft werden.
Stellen Sie sicher, dass sich während des Auf- oder Abbaus und der Wartung keine unbefugten Personen
unterhalb des Geräts befinden.
Das Gerät außerhalb der Reichweite von Personen und nicht in niedrigen Durchgängen oder in der Nähe
von Sitzgelegenheiten installieren.
Vor Montage sicherstellen, dass die gewählte Position wenigstens das 10-fache Gerätegewicht
aufnehmen kann.
Zur Aufhängung stets geeignetes Befestigungsmaterial verwenden, welches das 12-fache Gerätegewicht
aushalten kann. Eine zweite Sicherungsaufhängung muss angebracht werden, die ein Absacken des
Geräts von mehr als 20 cm verhindert, sollte die Befestigung brechen.
Das Gerät gut befestigen. Eine freischwingende Aufhängung ist gefährlich und sollte auf gar keinen Fall in
Betracht gezogen werden!
Die Ventilationsöffnungen nicht abdecken, Überhitzungsgefahr!
Der Betreiber muss sicherstellen, dass die sicherheitsrelevanten und technischen Installationen vor
Erstbetrieb fachmännisch vorgenommen worden sind. Installationen sollten jährlich durch qualifiziertes
Fachpersonal überprüft werden, um jederzeit einen sicheren Betrieb zu gewährleisten.
ELEKTRISCHE INSTALLATION
Wichtiger Hinweis: Die elektrische Installation darf nur von qualifiziertem Personal, unter
Beachtung der Vorschriften zur elektrischen und mechanischen Sicherheit in Ihrem Land
durchgeführt werden.
Montage einer Einzeleinheit:
Stecken Sie einfach den Netzstecker in eine Steckdose. Die Einheit startet sofort im zuletzt gewählten
Modus.
Schlagen Sie im Kapitel EINRICHTUNGSANLEITUNG nach, wie man zwischen den unterschiedlichen
Betriebsarten wechselt.
Sie können das Gerät über das folgende optionale Zubehör steuern:
COB-4BAR FUSSSTEUERUNG: Fußsteuerung, ideal für Bands usw.
LEDCON-02 Mk2: (Muss Mk2-Version sein!) Ideal für DJs!
Siehe Kapitel EINRICHTUNGSANLEITUNG und BETRIEBSANLEITUNGEN für weitere Informationen.
Page 51

DEUTSCH
BEDIENUNGSANLEITUNG
JB SYSTEMS®
49/74
COB-4BAR
Elektrische Installation von zwei oder weiteren Geräten im Master/Slave-Betrieb:
Verbinden Sie mehre Einheiten mittels hochwertiger symmetrischer XLR Mikrofonkabel. Das Gerät, bei
dem am DMX-Eingang kein Kabel angeschlossen wurde, ist der „Master“, die übrigen sind die „Slave“Einheiten.
Stellen Sie sicher, dass alle Geräte an die Netzversorgung angeschlossen sind.
Schlagen Sie im Kapitel „EINSTELLUNGSANLEITUNG“ für weitere Informationen nach.
Fertig!
Hinweis: Selbstverständlich können Sie am Master stets eine Fußsteuerung oder einen LEDCON-02 Mk2
für mehr Kontrolle zusätzlich anschließen.
Elektrische Installation von zwei oder weiteren Einheiten im DMX-Modus:
Das DMX-Protokoll ist ein weit verbreitetes Hochgeschwindigkeits-Signal zur Steuerung von intelligenten
Beleuchtungssystemen. Sie müssen Ihren DMX-Controller und alle angeschlossenen Geräte mit einem
hochwertigen symmetrischen Kabel hintereinander schalten (Daisy Chain).
Zur Verhinderung von unerwünschten Lichteffekten durch Störungen muss ein 90Ω
bis 120Ω Abschlusswiderstand verwendet werden. Verwenden Sie niemals Y-
Splitter-Kabel, das funktioniert einfach nicht!
Stellen Sie sicher, dass alle Geräte an die Netzversorgung angeschlossen sind.
Jeder Lichteffekt in der Kette muss seine eigene Startadresse haben, damit er erkennt, welche Befehle
des Controllers er entschlüsseln muss. In Abschnitt „EINSTELLUNGSANLEITUNG“ erfahren Sie, wie
man die DMX-Adressen einstellt. Wenn Sie beispielsweise den 4-Kanal DMX-Modus verwenden, lautet
eine mögliche Adresseneinrichtung: Einheit1 = 001, Einheit2 = 005, Einheit3 = 009, Einheit4 = 013 usw.
EINRICHTUNGSANLEITUNG:
DMX512 Adresseinstellung
Einstellen der Startadresse in der DMX-Einrichtung.
Drücken Sie die MODE-Taste, bis DMX MODE auf dem Display angezeigt wird.
Rufen Sie mit der „ENTER“-Taste den Konfigurationsmodus auf.
Ändern Sie die DMX-Adresse nun mit den Tasten ABWÄRTS und AUFWÄRTS.
Sobald die richtige Adresse im Display angezeigt wird, bestätigen Sie mit ENTER.
Auf dem Display fängt der Kanalmodus jetzt an zu blinken (03, 05, 06, 08, 12, 17 oder 18 Kanäle).
Verwenden Sie zum Ändern des Kanalmodus die AUF- bzw. ABWÄRTS-Taste.
Bestätigen Sie mit ENTER.
DMX-Kanalmodus
Das Gerät verfügt über 7 verschiedene DMX-Kanalmodi. Mit dieser Funktion können Sie den DMXModus wählen, den Sie verwenden möchten. Schlagen Sie in der DMX-Tabelle für die Unterschiede
nach.
Drücken Sie die MODE-Taste, bis DMX MODE auf dem Display angezeigt wird.
Rufen Sie mit der „ENTER“-Taste den Konfigurationsmodus auf.
Auf dem Display fängt die DMX-Adresse an zu blinken.
Verwenden Sie zum Ändern der DMX-Startadresse die AUF- oder ABWÄRTS-Taste.
Bestätigen Sie mit ENTER.
Page 52

DEUTSCH
BEDIENUNGSANLEITUNG
JB SYSTEMS®
50/74
COB-4BAR
Auf dem Display fängt jetzt der Kanalmodus an zu blinken (03, 05, 06, 08, 12, 17 oder 18).
Verwenden Sie zum Ändern des Kanalmodus die AUF- bzw. ABWÄRTS-Taste.
Bestätigen Sie mit ENTER.
Hinweis: Siehe
SLAVE-MODUS + FUSSSTEUERUNG
Einstellen der Einheit in den Slave-Modus, wenn Sie mit der Master-Einheit synchronisierte Effekte
benötigen. (Wenn die automatischen Programme der ersten Einheit laufen oder diese auf eine feste
Farbe eingestellt ist)
Kontrolle der BAR mit der optionalen Fußsteuerung.
Drücken Sie die Taste MODE, bis SLAVE auf dem Display angezeigt wird.
Bestätigen Sie mit ENTER.
WICHTIGER HINWEIS: Wenn Sie die automatischen Modi nutzen und die Einstellungen direkt am
BAR vornehmen möchten, müssen Sie den IR-Fernbedienungsempfänger an der BAR deaktivieren.
(IR ACTIVE = OFF)
Modus „SOUND“
Einstellen der Parameter des automatischen Musikmodus.
Drücken Sie die MODE-Taste, bis SOUND MODE auf dem Display angezeigt wird.
Rufen Sie mit der „ENTER“-Taste den Konfigurationsmodus auf.
Der Empfindlichkeitswert (SENS) beginnt auf dem Display zu blinken.
Ändern Sie mit den Tasten ABWÄRTS und AUFWÄRTS die Empfindlichkeit des integrierten Mikrofons (00
= minimale Empfindlichkeit, 31 = maximale Empfindlichkeit).
Bestätigen Sie mit ENTER.
Der Frequenzwert (FQN) beginnt auf dem Display zu blinken.
Ändern Sie mit der AUF- bzw. ABWÄRTS-Taste die Anzahl, wie oft jedes automatische Programm
wiederholt werden soll, bevor automatisch mit nächsten automatischen Programm weiter gemacht wird.
Bestätigen Sie mit ENTER.
WICHTIGER HINWEIS: Denken Sie daran, dass der BAR mit einem Master-Dimmer ausgestattet ist.
Wenn die Ausgangsleistung scheinbar zu niedrig ist oder wenn überhaupt keine Lichtausgabe
erfolgt, überprüfen Sie die Einstellung des Master-Dimmers!
STATISCHER FARBMODUS:
Dient zum Festlegen einer fest eingestellten Farbe für den Projektor.
Drücken Sie die MODE-Taste, bis 01.STATIC oder xx.EFFECT (Ziffern 02 bis 14 gefolgt vom EFFECT)
auf dem Display angezeigt wird.
Rufen Sie mit der „ENTER“-Taste den Konfigurationsmodus auf.
Auf dem Display blinkt der aktuelle Modus (statischer oder Effektmodus).
Falls notwendig, wählen Sie mit der AUF- bzw. ABWÄRTS-Taste die Option 01.STATIC.
Rufen Sie mit der ENTER-Taste den Konfigurationsmodus für fest eingestellten Farben auf.
Wählen Sie mit der AUF- bzw. ABWÄRTS-Taste die Option COLOR_CW (Kaltweiß), COLOR_WW
(Warmweiß) oder COLOR SET (Erstellen der eigenen Farbe).
Wenn Sie COLOR_CW oder COLOR_WW gewählt haben: Bestätigen Sie Ihre Auswahl einfach mit der
ENTER-Taste.
Wenn Sie COLOR SET gewählt haben: Rufen Sie mit der ENTER-Taste die manuellen Farbeinstellungen
auf.
Auf dem Display blinkt RED: Stellen Sie mit der AUF- bzw. ABWÄRTS-Taste die Intensität der
Farbe Rot (000 = Minimum, 255 = Maximum) ein.
Bestätigen Sie mit der ENTER-Taste und gehen Sie zur nächsten Farbe.
Auf dem Display blinkt GREEN: Stellen Sie mit der AUF- bzw. ABWÄRTS-Taste die Intensität der
Farbe Grün (000 = Minimum, 255 = Maximum) ein.
Bestätigen Sie mit der ENTER-Taste und gehen Sie zur nächsten Farbe.
Auf dem Display blinkt BLUE: Stellen Sie mit der AUF- bzw. ABWÄRTS-Taste die Intensität der
Farbe Blau (000 = Minimum, 255 = Maximum) ein.
Bestätigen Sie mit ENTER.
WICHTIGER HINWEIS: Denken Sie daran, dass der BAR mit einem Master-Dimmer ausgestattet ist.
Wenn die Ausgangsleistung scheinbar zu niedrig ist oder wenn überhaupt keine Lichtausgabe
erfolgt, überprüfen Sie die Einstellung des Master-Dimmers!
Page 53

DEUTSCH
BEDIENUNGSANLEITUNG
JB SYSTEMS®
51/74
COB-4BAR
LANGSAMER FARBFADE-MODUS:
Lässt die Scheinwerfer langsam von einer Farbe zu einer anderen überblenden.
Drücken Sie die MODE-Taste, bis 01.STATIC oder xx.EFFECT (Ziffern 02 bis 14 gefolgt vom EFFECT)
auf dem Display angezeigt wird.
Rufen Sie mit der „ENTER“-Taste den Konfigurationsmodus auf.
Auf dem Display blinkt der aktuelle Modus (statischer oder Effektmodus).
Wählen Sie mit der AUF- bzw. ABWÄRTS-Taste die Option 02.EFFECT (überblenden von einer Farbe
zu einer anderen) oder 04.EFFECT (jedes Farbüberblenden ein- oder ausschalten).
Bestätigen Sie mit ENTER.
Auf dem Display fängt die Geschwindigkeit an zu blinken: Stellen Sie mit den Tasten AB- bzw.
AUFWÄRTS die gewünschte Laufgeschwindigkeit (00 = langsam, 99 = maximale Geschwindigkeit) ein.
Bestätigen Sie mit ENTER.
Auf dem Display fängt der Blitz an zu blinken: Stellen Sie mit den Tasten AB- bzw. AUFWÄRTS die
gewünschte Geschwindigkeit für den Stroboskopeffekt (00 = langsam, 99 = maximale Geschwindigkeit)
ein.
Bestätigen Sie mit ENTER.
WICHTIGER HINWEIS: Denken Sie daran, dass der BAR mit einem Master-Dimmer ausgestattet ist.
Wenn die Ausgangsleistung scheinbar zu niedrig ist oder wenn überhaupt keine Lichtausgabe
erfolgt, überprüfen Sie die Einstellung des Master-Dimmers!
AUTOMATISCHER CHASEMODUS:
Dient zum Einstellen der automatischen Chasemodus, so dass sich die Farben automatisch mit einer
konstanten Geschwindigkeit ändern.
Drücken Sie die MODE-Taste, bis 01.STATIC oder xx.EFFECT (Ziffern 02 bis 14 gefolgt vom EFFECT)
auf dem Display angezeigt wird.
Rufen Sie mit der „ENTER“-Taste den Konfigurationsmodus auf.
Auf dem Display blinkt der aktuelle Modus (statischer oder Effektmodus).
Wählen Sie mit den Tasten AB- bzw. AUFWÄRTS einen der 11 Chasemodi aus (03, 05, 06, 07, 08, 09,
10, 11, 12, 13 oder 14.EFFECT).
Bestätigen Sie mit ENTER.
Auf dem Display fängt die Geschwindigkeit an zu blinken: Stellen Sie mit den Tasten AB- bzw.
AUFWÄRTS die gewünschte Laufgeschwindigkeit (00 = langsam, 99 = maximale Geschwindigkeit) ein.
Bestätigen Sie mit ENTER.
Auf dem Display fängt der Blitz an zu blinken: Stellen Sie mit den Tasten AB- bzw. AUFWÄRTS die
gewünschte Geschwindigkeit für den Stroboskopeffekt (00 = langsam, 99 = maximale Geschwindigkeit)
ein.
Bestätigen Sie mit ENTER.
Hinweis: Wenn Sie 13.EFFECT oder 14.EFFECT ausgewählt haben, können Sie 2 Farben für Ihr
Chaseprogramm wählen:
Auf dem Display blinkt C1.
Wählen Sie mit den Tasten AB- bzw. AUFWÄRTS die erste Farbe Ihres Chaseprogramms aus.
Bestätigen Sie mit ENTER.
Auf dem Display blinkt jetzt C2.
Wählen Sie mit den Tasten AB- bzw. AUFWÄRTS die zweite Farbe Ihres Chaseprogramms aus.
Bestätigen Sie mit ENTER.
WICHTIGER HINWEIS: Denken Sie daran, dass der BAR mit einem Master-Dimmer ausgestattet ist.
Wenn die Ausgangsleistung scheinbar zu niedrig ist oder wenn überhaupt keine Lichtausgabe
erfolgt, überprüfen Sie die Einstellung des Master-Dimmers!
AUTO-RUN:
Startet den automatischen, zufallsgesteuerten Chasemodus. Der BAR gibt jedes einzelne
Chaseprogramm zufällig wieder. Die Geschwindigkeit und die Stroboskopgeschwindigkeit, die Sie
für jedes einzelne Chaseprogramm eingestellt haben, werden während dieser Show verwendet.
(Siehe vorherige Beschreibung: AUTOMATISCHER CHASEMODUS)
Drücken Sie die MODE-Taste, bis AUTO RUN auf dem Display gezeigt wird.
Rufen Sie mit der „ENTER“-Taste den Konfigurationsmodus auf.
Auf dem Display fängt FQN an zu blinken.
Ändern Sie mit der AUF- bzw. ABWÄRTS-Taste die Anzahl, wie oft jedes Programm wiederholt werden
soll, bevor automatisch mit nächsten automatischen Programm weiter gemacht wird. (01 bis 99 Mal)
Bestätigen Sie mit ENTER.
Page 54

DEUTSCH
BEDIENUNGSANLEITUNG
JB SYSTEMS®
52/74
COB-4BAR
FLIEßENDER INVERT
Invertiert die Laufrichtung der automatischen Chaser. Dies kann nützlich sein, wenn Sie mehrere
BARs zusammen im Master/Slave-Modus verwenden.
Drücken Sie die Taste MODE, bis FLOW INVERT auf dem Display angezeigt wird.
Rufen Sie mit der „ENTER“-Taste den Konfigurationsmodus auf.
Wählen Sie mit den Tasten AB- bzw. AUFWÄRTS die Option ON (Lauf ist invertiert) oder OFF (Lauf ist
nicht invertiert) aus.
Bestätigen Sie mit ENTER.
MASTER-DIMMER
Dies ist der allgemeine Master-Dimmer für ALLE integrierten Effekte des 4BAR.
Drücken Sie die MODE-Taste, bis MASTER DIM auf dem Display angezeigt wird.
Rufen Sie mit der „ENTER“-Taste den Konfigurationsmodus auf.
Ändern Sie mit den Tasten AB- bzw. AUFWÄRTS das Niveau des allgemeinen Master-Dimmers des
4BAR.
Bestätigen Sie mit ENTER.
Wenn der 4BAR scheinbar nicht funktioniert, überprüfen Sie, ob der MASTER DIMMER auf Null oder
auf ein zu niedriges Niveau eingestellt ist!
IR AKTIV
Aktivieren Sie diese Funktion, wenn Sie den 4BAR mit der kleinen drahtlosen Fernbedienung steuern
möchten.
Deaktivieren Sie stets diese Funktion, wenn Sie die drahtlose Fernbedienung nicht benutzen möchten.
Drücken Sie die MODE-Taste, bis IR ACTIVE auf dem Display angezeigt wird.
Rufen Sie mit der „ENTER“-Taste den Konfigurationsmodus auf.
Wählen Sie mit den Tasten AB- bzw. AUFWÄRTS die Option ON (drahtloses Fernbedienung kann benutzt
werden) oder OFF (keine Steuerung über die drahtlose Fernbedienung).
Bestätigen Sie mit ENTER.
WICHTIGER HINWEIS: Wenn Sie die drahtlose Fernbedienung nicht benutzen möchten, müssen Sie
den IR-Fernbedienungsempfänger an der BAR deaktivieren. (IR ACTIVE = OFF) (IR AKTIV = AUS)
LICHTEFFEKT-AUSGANG (nur wenn über DMX gesteuert)
Mit dieser Option können Sie entscheiden, ob die 2 Zusatz-Stromversorgungsausgänge für die
zusätzlichen Lichteffekte (12) und (13) über DMX ein- oder ausgeschaltet werden können oder ober
die Stromversorgung immer eingeschaltet ist.
Drücken Sie die MODE-Taste, bis LIGHT EFFECT OUT auf dem Display angezeigt wird.
Rufen Sie mit der „ENTER“-Taste den Konfigurationsmodus auf.
Wählen Sie mit den Tasten AB- bzw. AUFWÄRTS die Option DMX CONTROL ON (die
Stromversorgungsausgänge können über DMX ein- oder ausgeschaltet werden) oder DMX CONTROL
OFF (die Stromversorgungsausgänge sind immer eingeschaltet).
Bestätigen Sie mit ENTER.
BEDIENUNGSANLEITUNG
A. Standalone 1 Gerät:
Schließen Sie einfach den Projektor an eine Steckdose an.
Wählen Sie einen der automatischen, Musikgesteuerten oder statischen Farbmodi.
Schlagen Sie im Kapitel EINRICHTUNGSANLEITUNG nach, wie man diese Einstellungen vornimmt.
B. Zwei oder weitere Geräte in der Master/Slave-Einstellung:
Schließen Sie alle Geräte zusammen. Im Kapitel „Elektrische Installation“ erfahren Sie mehr darüber.
Wählen Sie einen der automatischen Modi (ShMd / ChaS) oder wählen Sie eine feste Farbe (CoLo)
am Master (der erste COB-4BAR in der DMX-Kette)
Stellen Sie alle anderen BARS in den SLAVE-Modus.
Die Projektoren folgen jetzt dem Programm des Master-COB-4BAR, so dass alle synchron arbeiten.
Page 55

DEUTSCH
BEDIENUNGSANLEITUNG
JB SYSTEMS®
53/74
COB-4BAR
C. Steuerung über die drahtlose Fernbedienung:
Um die drahtlose Fernbedienung nutzen zu können, müssen Sie diese Option am 4BAR
aktivieren:
Drücken Sie die MODE-Taste, bis IR ACTIVE auf dem Display angezeigt wird.
Drücken Sie die ENTER-Taste, um die Einstellung zu ändern.
Aktivieren bzw. deaktivieren Sie die Fernbedienungsoption mit der Taste AB- bzw. AUFWÄRTS (ON =
Fernbedienung aktiviert, OFF = Fernbedienung deaktiviert).
Bestätigen Sie mit ENTER.
Drücken Sie die MODE-Taste, bis SLAVE & FOOT CONTROL auf
dem Display angezeigt wird.
Bestätigen Sie mit ENTER.
Funktionen:
BL: Schaltet die LEDs ein oder aus.
SP: Stellt die Laufgeschwindigkeit bei Verwendung der Farbwechsel-
oder der Farbfader-Modi ein. Drücken Sie mehrmals diese Taste, um
eine der 4 vorprogrammierten Geschwindigkeiten auszuwählen.
(Langsam, Medium, Schnell, Aus)
HELLIGKEIT (Master-Dimmer): Stellt die allgemeine Helligkeit Ihrer
Scheinwerfer ein. Drücken Sie mehrmals diese Taste, um eines der 4
vorprogrammierten Helligkeitsniveaus auszuwählen. (50 %, 75 %,
100 %, Aus)
FL: Aktiviert den Stroboskop (Blitz)-Modus. Drücken Sie mehrmals
diese Taste, um eine der 4 vorprogrammierten Blitzfrequenz
auszuwählen. (Langsam, Medium, Schnell, Aus)
Mit R wird die Intensität der roten LED eingestellt. Drücken Sie
mehrmals diese Taste, um eines der 4 vorprogrammierten
Helligkeitsniveaus auszuwählen. (50 %, 75 %, 100 %, Aus). Denken Sie daran, dass die Helligkeit
auch vom Master-Dimmer beeinflusst wird! (= HELLIGKEIT-Taste)
Mit G wird die Intensität der grünen LED eingestellt. Drücken Sie mehrmals diese Taste, um eines der
4 vorprogrammierten Helligkeitsniveaus auszuwählen. (50 %, 75 %, 100 %, Aus). Denken Sie daran,
dass die Helligkeit auch vom Master-Dimmer beeinflusst wird! (= HELLIGKEIT-Taste)
Mit B wird die Intensität der blauen LED eingestellt. Drücken Sie mehrmals diese Taste, um eines der
4 vorprogrammierten Helligkeitsniveaus auszuwählen. (50 %, 75 %, 100 %, Aus). Denken Sie daran,
dass die Helligkeit auch vom Master-Dimmer beeinflusst wird! (= HELLIGKEIT-Taste)
Mit W wird die Intensität der weißen LED (Rot + Grün + Blau) eingestellt. Drücken Sie mehrmals diese
Taste, um eines der 4 vorprogrammierten Helligkeitsniveaus auszuwählen. (50 %, 75 %, 100 %, Aus).
Denken Sie daran, dass die Helligkeit auch vom Master-Dimmer beeinflusst wird! (= HELLIGKEITTaste)
Pr1, Pr2, Pr3, Pr4: Mit diesen Tasten werden die integrierten Farbradprogramme gestartet. Mit den
Tasten BRIGHTNESS, SP und FL werden Helligkeit, Geschwindigkeit und Blitzfrequenz eingestellt.
D1, D2, D3, D4: Mit diesen Tasten werden die integrierten Farbfadeprogramme gestartet. Mit den
Tasten BRIGHTNESS, SP und FL werden Helligkeit, Geschwindigkeit und Blitzfrequenz eingestellt.
SA1, SA2, SA3, SA4: Mit diesen Tasten werden die integrierten, musikgesteuerten Chaseprogramme
gestartet. Mit den Tasten BRIGHTNESS und FL werden Helligkeit und Blitzfrequenz eingestellt.
Hinweis: Die maximale Entfernung zwischen drahtloser Fernbedienung und dem Gerät = +/- 10m
D. Steuerung mittels LEDCON-02 Mk2:
Befolgen Sie die Schritte unten, um den BAR über die LEDCON-02 Mk2 zu steuern.
Drücken Sie die MODE-Taste, bis DMX MODE auf dem Display angezeigt wird.
Wählen Sie den 18CH DMX-Modus und stellen Sie die DMX-
Adresse auf 001 ein.
Drücken Sie MODE, bis LED EFFECT OUT im Display
angezeigt wird. DMX-STEUERUNG AUS (wichtig)!
Stellen Sie den LEDCON-02 Mk2 in den 4CH Modus (Schalter
auf der Rückseite des Controllers)
Anweisungen zum Gebrauch des LEDCON-02 Mk2: Lesen Sie
das Benutzerhandbuch dieses Controllers.
Wichtiger Hinweis:
Der COB-4BAR ist nur mit dem LEDCON-02 Mk2
kompatibel, nicht mit dem LEDCON-02!
Page 56

DEUTSCH
BEDIENUNGSANLEITUNG
JB SYSTEMS®
54/74
COB-4BAR
Beim Gebrauch mit dem LEDCON-02 Mk2 können die 2 Leistungsausgänge (12 + 13) nicht
gesteuert werden. Sie sind ständig eingeschaltet!
IR-Fernbedienungsempfänger an der BAR deaktivieren. (IR ACTIVE = OFF)
E. Steuerung über die optionale Fußsteuerung:
Um die Fußsteuerung nutzen zu können, müssen Sie diese Option am 4BAR aktivieren:
Drücken Sie die MODE-Taste, bis SLAVE & FOOT CONTROL auf dem Display angezeigt wird.
Bestätigen Sie mit ENTER.
Allgemeine Beschreibung der Fußsteuerung:
DREHKNOPF:Stellt die Empfindlichkeit
des integrierten Mikrofons für den
musikgesteuerten Modus ein.
MODUS-Schalter: Wählt eine der 3
unterschiedlichen Betriebsarten aus:
COLOR, SOUND, PROGRAM
Tasten AB- und AUFWÄRTS: Auswahl
unterschiedlicher Programmoptionen.
BLACKOUT-Schalter: Schaltet die
LEDS ein bzw. aus oder wählt die
Funktion Vollständig eingeschaltet.
Modi & Funktionen:
Wählen Sie mit dem MODE-Pedal unterschiedliche Betriebsarten aus.
FARB-Modus (Rote LED leuchtet): In diesem Modus können Sie verschiedene fest eingestellte Farben
auswählen.
AB- & AUFWÄRTS-Pedale: Auswahl einer der verschiedenen fest eingestellten Farben.
BLACKOUT-Pedal: Stellen Sie mit diesem Pedal den BAR in den Blackout-Modus (Die roten,
grünen und die gelben LEDs auf der Pedaleinheit leuchten). Wenn Sie dieses Pedal für ungefähr 3
Sekunden gedrückt halten, geht der BAR in den vollständig eingeschalteten Modus (alle
Scheinwerfer leuchten bei voller Leistung weiß auf).
MUSIK-Modus (Die grüne LED leuchtet): In diesem Modus können Sie verschiedene musikgesteuerte
Chaser wählen (Denken Sie daran, die Empfindlichkeit des integrierten Mikrofons mit dem Drehknopf
auf der Pedaleinheit einzustellen).
AB- & AUFWÄRTS-Pedale: Auswahl eines der verschiedenen Klangmodi.
BLACKOUT-Pedal: Stellen Sie mit diesem Pedal den BAR in den Blackout-Modus (Die roten,
grünen und die gelben LEDs auf der Pedaleinheit leuchten). Wenn Sie dieses Pedal für ungefähr 3
Sekunden gedrückt halten, geht der BAR im vollständig eingeschalteten Modus in den FARBModus (alle Scheinwerfer leuchten bei voller Leistung weiß auf).
MUSIK-Modus (Die gelbe LED leuchtet): In diesem Modus können Sie verschiedene automatische
Chase-Modi wählen.
AB- & AUFWÄRTS-Pedale: Auswahl eines der verschiedenen Chase-Modi.
BLACKOUT-Pedal: Stellen Sie mit diesem Pedal den BAR in den Blackout-Modus (Die roten,
grünen und die gelben LEDs auf der Pedaleinheit leuchten). Wenn Sie dieses Pedal für ungefähr 3
Sekunden gedrückt halten, geht der BAR im vollständig eingeschalteten Modus in den FARBModus (alle Scheinwerfer leuchten bei voller Leistung weiß auf).
Zusätzliche Funktion:
Die AB- & AUFWÄRTS-Pedale können auch zum Ein- oder Ausschalten der 2
Stromversorgungsausgänge für Zusatzgeräte verwendet werden. Halten Sie das AUFWÄRTS-Pedal für
ungefähr 3 Sekunden gedrückt, um Stromversorgungsausgang 1 ein- oder auszuschalten. Halten Sie
das AUFWÄRTS-Pedal für ungefähr 3 Sekunden gedrückt, um Stromversorgungsausgang 2 ein- oder
auszuschalten.
F. Steuerung mittels Universal-DMX-Controller:
Schließen Sie alle Geräte zusammen. Im Kapitel „Elektrische Installation von zwei oder weiteren
Einheiten im DMX-Modus“ erfahren Sie mehr darüber (vergessen Sie nicht, alle Geräte richtig zu
adressieren!)
Anschließend schließen Sie alle Geräte an die Stromversorgung an und schalten Sie den DMX-
Controller ein.
Da jedes Gerät eine eigene DMX-Adresse besitzt, können Sie die Geräte einzeln steuern. Denken Sie
daran, dass jede Einheit 3, 5, 6, 8, 12, 16, 17 oder 18 DMX-Kanäle verwendet, abhängig vom DMX-
Page 57

DEUTSCH
BEDIENUNGSANLEITUNG
JB SYSTEMS®
55/74
COB-4BAR
Kanal:
Name
Wert:
Funktion:
1
Rot
000-255
Dimmer (0-100%)
2
Grün
000-255
Dimmer (0-100%)
3
Blau
000-255
Dimmer (0-100%)
Kanal:
Name
Wert:
Funktion:
1
Rot
000-255
Dimmer (0-100%)
2
Grün
000-255
Dimmer (0-100%)
3
Blau
000-255
Dimmer (0-100%)
4
Zusatz-
Stromversorgungsausgang 1
000-127
AUSSCHALTEN
128-255
EINGESCHALTET
5
Zusatz-
Stromversorgungsausgang 2
000-127
AUSSCHALTEN
128-255
EINGESCHALTET
Kanal:
Name
Wert:
Funktion:
1
Rot 1
000-255
Dimmer Scheinwerfer 1 & 2 (0-100 %)
2
Grün 1
000-255
Dimmer Scheinwerfer 1 & 2 (0-100 %)
3
Blau 1
000-255
Dimmer Scheinwerfer 1 & 2 (0-100 %)
4
Rot 2
000-255
Dimmer Scheinwerfer 3 & 4 (0-100 %)
5
Grün 2
000-255
Dimmer Scheinwerfer 3 & 4 (0-100 %)
6
Blau 2
000-255
Dimmer Scheinwerfer 3 & 4 (0-100 %)
Kanal:
Name
Wert:
Funktion:
1
Dimmer
000-255
Master-Dimmer (0-100%)
2
Stroboskop
000-007
Kein Stroboskopeffekt
008-037
Zufallsstrobe
038-067
Musik Stroboskop
068-255
Stroboskop-Geschwindigkeit (langsam bis
schnell)
3
Automatischer Farbmodus
000-007
Kein automatischer Modus
008-247
Geschwindigkeit des Farbfaders (langsam
bis schnell)
248-255
Sound-Chase
4
Rot
000-255
Dimmer (0-100%)
5
Grün
000-255
Dimmer (0-100%)
6
Blau
000-255
Dimmer (0-100%)
7
Zusatz-
Stromversorgungsausgang 1
000-127
AUSSCHALTEN
128-255
EINGESCHALTET
8
Zusatz-
Stromversorgungsausgang 2
000-127
AUSSCHALTEN
128-255
EINGESCHALTET
Kanal:
Name
Wert:
Funktion:
1
Rot 1
000-255
Dimmer Scheinwerfer 1 (0-100 %)
2
Grün 1
000-255
Dimmer Scheinwerfer 1 (0-100 %)
3
Blau 1
000-255
Dimmer Scheinwerfer 1 (0-100 %)
4
Rot 2
000-255
Dimmer Scheinwerfer 2 (0-100 %)
5
Grün 2
000-255
Dimmer Scheinwerfer 2 (0-100 %)
6
Blau 2
000-255
Dimmer Scheinwerfer 2 (0-100 %)
7
Rot 3
000-255
Dimmer Scheinwerfer 3 (0-100 %)
Modus, den Sie in diesem Menü gewählt haben. Siehe die folgenden unterschiedlichen DMX-Tabellen:
DMX-Tabelle für den 3 Kanal DMX-Modus
DMX-Tabelle für den 5 Kanal DMX-Modus
DMX-Tabelle für den 6 Kanal DMX-Modus
DMX-Tabelle für den 8 Kanal DMX-Modus
DMX-Tabelle für den 12 Kanal DMX-Modus
Page 58

DEUTSCH
BEDIENUNGSANLEITUNG
JB SYSTEMS®
56/74
COB-4BAR
8
Grün 3
000-255
Dimmer Scheinwerfer 3 (0-100 %)
9
Blau 3
000-255
Dimmer Scheinwerfer 3 (0-100 %)
10
Rot 4
000-255
Dimmer Scheinwerfer 4 (0-100 %)
11
Grün 4
000-255
Dimmer Scheinwerfer 4 (0-100 %)
12
Blau 4
000-255
Dimmer Scheinwerfer 4 (0-100 %)
Kanal:
Name
Wert:
Funktion:
1
Farbmakros & automatische
Farbmodi
000-015
AUS
016-023
Rot
024-031
Grün
032-039
Blau
040-047
Rot + Grün
048-055
Grün + Blau
056-063
Rot + Blau
064-071
Weiß
072-079
Farbe 1
080-087
Farbe 2
088-095
Farbe 3
096-103
Farbe 4
104-111
Farbe 5
112-119
Farbe 6
120-127
Farbe 7
128-135
Farbe 8
136-143
Farbfade
144-151
Farbrad 1
152-159
Farbrad 2
160-167
Farbrad 3
168-175
Farbrad 4
176-183
Farbrad 5
184-191
Farbrad 6
192-199
Farbrad 7
200-207
Farbrad 8
208-215
Farbrad 9
216-223
Farbrad 10
224-231
Farbrad 11
232-239
Farbrad 12
244-255
Musikgesteuert
Kanal 1 = 000 bis 015
2
Dimmer
000-255
Master-Dimmer (0-100%)
3
Stroboskop
000-255
Stroboskop-Geschwindigkeit (langsam
bis schnell) 4 Rot 1
000-255
Dimmer Scheinwerfer 1 (0-100 %)
5
Grün 1
000-255
Dimmer Scheinwerfer 1 (0-100 %)
6
Blau 1
000-255
Dimmer Scheinwerfer 1 (0-100 %)
7
Rot 2
000-255
Dimmer Scheinwerfer 2 (0-100 %)
8
Grün 2
000-255
Dimmer Scheinwerfer 2 (0-100 %)
9
Blau 2
000-255
Dimmer Scheinwerfer 2 (0-100 %)
10
Rot 3
000-255
Dimmer Scheinwerfer 3 (0-100 %)
11
Grün 3
000-255
Dimmer Scheinwerfer 3 (0-100 %)
12
Blau 3
000-255
Dimmer Scheinwerfer 3 (0-100 %)
13
Rot 4
000-255
Dimmer Scheinwerfer 4 (0-100 %)
14
Grün 4
000-255
Dimmer Scheinwerfer 4 (0-100 %)
15
Blau 4
000-255
Dimmer Scheinwerfer 4 (0-100 %)
16
Zusatz-
Stromversorgungsausgang 1
000-127
AUSSCHALTEN
128-255
EINGESCHALTET
17
Zusatz-
Stromversorgungsausgang 2
000-127
AUSSCHALTEN
128-255
EINGESCHALTET
DMX-Tabelle für den 17 Kanal DMX-Modus
Page 59

DEUTSCH
BEDIENUNGSANLEITUNG
JB SYSTEMS®
57/74
COB-4BAR
Kanal 1 = 016 bis 135
2
Dimmer
000-255
Master-Dimmer (0-100%)
3
Stroboskop
000-255
Stroboskop-Geschwindigkeit (langsam
bis schnell)
4 bis 15 - -
Nicht verwendet
16
Zusatz-
Stromversorgungsausgang 1
000-127
AUSSCHALTEN
128-255
EINGESCHALTET
17
Zusatz-
Stromversorgungsausgang 2
000-127
AUSSCHALTEN
128-255
EINGESCHALTET
Kanal 1 = 136 bis 223
2
Geschwindigkeit
000-255
Effektgeschwindigkeit (von langsam bis
schnell)
3
Stroboskop
000-255
Stroboskop-Geschwindigkeit (langsam
bis schnell)
4 bis 15 - -
Nicht verwendet
16
Zusatz-
Stromversorgungsausgang 1
000-127
AUSSCHALTEN
128-255
EINGESCHALTET
17
Zusatz-
Stromversorgungsausgang 2
000-127
AUSSCHALTEN
128-255
EINGESCHALTET
Kanal 1 = 224 bis 239
2
Geschwindigkeit
000-255
Effektgeschwindigkeit (von langsam bis
schnell)
3
Stroboskop
000-255
Stroboskop-Geschwindigkeit (langsam
bis schnell) 4 Effektfarbe 1
000-255
Wählen Sie eine von 8 Farben aus
5
Effektfarbe 2
000-255
Wählen Sie eine von 8 Farben aus
6 bis 15 - -
Nicht verwendet
16
Zusatz-
Stromversorgungsausgang 1
000-127
AUSSCHALTEN
128-255
EINGESCHALTET
17
Zusatz-
Stromversorgungsausgang 2
000-127
AUSSCHALTEN
128-255
EINGESCHALTET
Kanal 1 = 240 bis 255
2
Musik
000-255
Empfindlichkeit (von niedrig bis hoch)
3 bis 15 - -
Nicht verwendet
16
Zusatz-
Stromversorgungsausgang 1
000-127
AUSSCHALTEN
128-255
EINGESCHALTET
17
Zusatz-
Stromversorgungsausgang 2
000-127
AUSSCHALTEN
128-255
EINGESCHALTET
Kanal:
Wert:
Funktion:
1
Rot (Scheinwerfer 1)
000-255
Dimmer (0-100%)
2
Grün (Scheinwerfer 1)
000-255
Dimmer (0-100%)
3
Blau (Scheinwerfer 1)
000-255
Dimmer (0-100%)
4
Dimmer
Stroboskop
Musikmodus
(Scheinwerfer 1)
000-007
Blackout
008-190
Master-Dimmer (0-100%)
191-200
Automatischer musikgesteuerter Modus
201-247
Stroboskop-Geschwindigkeit (langsam
bis schnell)
248-255
Maximales Master-Dimmerniveau
5
Rot (Scheinwerfer 2)
000-255
Dimmer (0-100%)
6
Grün (Scheinwerfer 2)
000-255
Dimmer (0-100%)
7
Blau (Scheinwerfer 2)
000-255
Dimmer (0-100%)
8
Dimmer
000-007
Blackout
DMX-Tabelle für den 18 Kanal DMX-Modus
Beim Gebrauch des LEDCON-02 Mk2 Controllers einschalten, für weitere Informationen siehe vorherige
Seiten.
Page 60

DEUTSCH
BEDIENUNGSANLEITUNG
JB SYSTEMS®
58/74
COB-4BAR
Stroboskop
Musikmodus
(Scheinwerfer 2)
008-190
Master-Dimmer (0-100%)
191-200
Automatischer musikgesteuerter Modus
201-247
Stroboskop-Geschwindigkeit (langsam
bis schnell)
248-255
Maximales Master-Dimmerniveau
9
Rot (Scheinwerfer 3)
000-255
Dimmer (0-100%)
10
Grün (Scheinwerfer 3)
000-255
Dimmer (0-100%)
11
Blau (Scheinwerfer 3)
000-255
Dimmer (0-100%)
12
Dimmer
Stroboskop
Musikmodus
(Scheinwerfer 3)
000-007
Blackout
008-190
Master-Dimmer (0-100%)
191-200
Automatischer musikgesteuerter Modus
201-247
Stroboskop-Geschwindigkeit (langsam
bis schnell)
248-255
Maximales Master-Dimmerniveau
13
Rot (Scheinwerfer 4)
000-255
Dimmer (0-100%)
14
Grün (Scheinwerfer 4)
000-255
Dimmer (0-100%)
15
Blau (Scheinwerfer 4)
000-255
Dimmer (0-100%)
16
Dimmer
Stroboskop
Musikmodus
(Scheinwerfer 4)
000-007
Blackout
008-190
Master-Dimmer (0-100%)
191-200
Automatischer musikgesteuerter Modus
201-247
Stroboskop-Geschwindigkeit (langsam
bis schnell)
248-255
Maximales Master-Dimmerniveau
17
Zusatz-
Stromversorgungsausgang 1
000-127
AUSSCHALTEN
128-255
EINGESCHALTET
18
Zusatz-
Stromversorgungsausgang 2
000-127
AUSSCHALTEN
128-255
EINGESCHALTET
PFLEGE
Stellen Sie sicher, dass sich keine unbefugten Personen unterhalb des Geräts befinden, während es
gewartet wird.
Schalten Sie das Gerät aus, ziehen Sie den Netzstecker und warten Sie, bis es sich abgekühlt hat.
Während der Wartung sind folgende Punkte ganz besonders zu beachten:
Sämtliche Schrauben zur Installation und Befestigung der gesamten Teile müssen fest angezogen und
rostfrei sein.
Gehäuse, Befestigungsmaterialien und Aufhängungen (Decke, Balken, abgehängte Decken) dürfen keine
Anzeichen von Verformung aufweisen.
Ist die Optik sichtbar beschädigt (Sprünge oder tiefe Kratzer), dann müssen die entsprechenden Teile
ausgetauscht werden.
Das Netzkabel muss stets in einwandfreiem Zustand sein und selbst bei kleinsten Beschädigungen
erneuert werden.
Zur Vermeidung von Überhitzung müssen die Ventilatoren (sofern vorhanden) und Lüftungsschlitze
monatlich gereinigt werden.
Das Geräteinnere mindestens einmal pro Jahr mit einem Staubsauger oder einer Luftdüse reinigen.
Die Reinigung der inneren und äußeren optischen Linsen und/oder Spiegel muss in regelmäßigen
Abständen zur Beibehaltung einer optimalen Lichtausbeute vorgenommen werden. Die
Reinigungsintervalle hängen stark von der Umgebung ab, in welcher das Gerät eingesetzt sind: feuchte,
verrauchte oder besonders verschmutzte Umgebungen führen zu einer stärkeren Verschmutzung der
Geräteoptik.
Mit einem weichem Tuch und gewöhnlichem Glasreiniger säubern.
Alle Teile stets gut abtrocknen.
Achtung: Wir empfehlen dringend, die Reinigung des Geräteinneren nur von qualifiziertem Personal
durchführen zu lassen!
Page 61

DEUTSCH
BEDIENUNGSANLEITUNG
JB SYSTEMS®
59/74
COB-4BAR
Netzspannung:
100-250 VAC, 50/60 Hz
Leistungsaufnahme:
120 Watts
Sicherung:
250 V, 2 A, träge (20 mm Glas)
Zusatz-Stromversorgungsausgänge:
250 V, 3 A max. Ausgangsstrom
Musiksteuerung:
Eingebautes Mikrofon
DMX-Anschlüsse:
XLR 3-polig
DMX-modus:
3, 5, 6, 8, 12, 17 und 18 DMX-Kanäle
LED-Quelle:
4 x 36 W TRI COB LED
Strahlwinkel mit Objektiv:
15°
Strahlwinkel ohne Objektiv:
100°
Abmessungen:
1000 x 82 x 320 mm
Gewicht des 4Bar (ohne Koffer):
7,6 kg
TECHNISCHE DATEN
Diese Angaben können sich ohne vorherige Ankündigung geändert werden
Sie können sich die neueste Version dieses Benutzerhandbuches von unserer Website
herunterladen: www.jb-systems.eu
Page 62

ESPAÑOL
MANUAL DEL USUARIO
JB SYSTEMS®
60/74
COB-4BAR
MANUAL DE INSTRUCCIONES
Gracias por comprar este producto de JB SYSTEMS®. Para aprovechar al máximo todas las posibilidades y
por su propia seguridad, lea detenidamente este manual de instrucciones antes de comenzar a utilizar la
unidad.
CARACTERÍSTICAS
Esta unidad tiene supresión de radio interferencia. Este producto cumple con los requisitos de las normas
actuales, tanto europeas como nacionales a tal respecto. Dicha conformidad ha sido establecida y las
declaraciones y documentos relevantes han sido depositados por el fabricante. Este dispositivo fue
diseñado para producir efectos de iluminación decorativa y se utiliza en sistemas de espectáculos de
iluminación.
El elegante y compacto 4BAR contiene 4 proyectores LED COB con ahorro de energía.
¡SIN LEDs separados: Cada proyector contiene un LED COB de 36W que asegura una perfecta mezcla
de color y con el diseño de un foco tradicional!
Excepcional potencia de salida de luz (¡superando la salida de las lámparas tradicionalesPAR56 de
300W!)
¡Mando a distancia IR incluido: sin necesidad de controladores complicados, perfecto para DJs!
Equipado con 2 conectores eléctricos extra, cada uno con control de encendido/apagado a distancia;
¡puede conectar cualquier efecto de hasta 500W!
Varios modos de funcionamiento:
Independiente con control a distancia IR: Patrones de color automáticos/sincronizados con la
música + control de encendido/apagado de 2 efectos de luces (opcionales)
Modo maestro/esclavo: se pueden usar varias barras de luces simultáneamente para maravillosos
espectáculos de luces preprogramados y sincronizados con la música.
Controlado mediante nuestro famoso mando a distancia LEDCON-02 Mk2 o con el pedal de control
“COB-4BAR FOOTCONTROL” opcional.
Controlado por DMX: diferentes modos de canales con selección de programas y control RGB (Rojo-
Verde-Azul) individual.
Ángulo del haz del proyector-LED = 15° con lentes/100° sin lentes
Perfecto para aplicaciones móviles: ¡tan solo 1 metro de largo y 8kg de peso!
Muchas aplicaciones posibles: Discotecas, DJs, empresas de alquiler de equipos, ...
Función estrobocópica ultra rápida y atenuación 0-100% (¡sin necesidad de estrobos adicionales!)
¡Excelentes programas integrados para maravillosos espectáculos de luces en continuo cambio!
Controlador de pedal opcional disponible: ¡perfecto para pequeños grupos de música!
2 pantallas LCD alfanuméricas de 16 caracteres con retroiluminación para una sencilla navegación por los
menús.
Adaptator de 35mm incluida (Conviene para nuestros soportes con sección superior ø35mm)
Con el 4BAR se incluye una ligera pero robusta maleta para facilitar su transporte.
ANTES DE USAR
Antes de comenzar a utilizar esta unidad, compruebe si no ha sufrido daños durante el transporte. Si
hubiera alguno, no utilice el dispositivo y consulte primero con su distribuidor.
Importante: Este dispositivo salió de nuestra fábrica en perfectas condiciones y bien embalado. Es
absolutamente necesario que el usuario cumpla al pie de la letra las instrucciones y advertencias de
seguridad que aparecen en este manual de usuario. Cualquier daño causado por una mala manipulación
no estará cubierto por la garantía. El distribuidor no aceptará ninguna responsabilidad por defectos o
problemas resultantes causados por no obedecer lo indicado en este manual de usuario.
Mantenga este manual en un lugar seguro para futuras consultas. Si vende este proyector, asegúrese de
incluir este manual de usuario.
Compruebe el contenido:
Compruebe que el paquete contiene los siguientes elementos:
Manual de instrucciones
COB-4BAR
Mando a distancia inalámbrico
Page 63

ESPAÑOL
MANUAL DEL USUARIO
JB SYSTEMS®
61/74
COB-4BAR
PRECUACIÓN: Para reducir el riesgo de descarga eléctrica, no
retire la cubierta superior. Dentro no hay componentes que
puedan ser reparados por el usuario. Dirija cualquier reparación
o mantenimiento solamente a personal cualificado.
El símbolo de relámpago con punta de flecha dentro de un triángulo equilátero advierte al
usuario de la presencia de “tensiones peligrosas” no aisladas dentro de la carcasa del producto
que pueden ser de una magnitud suficiente como para constituir un riesgo de descarga eléctrica.
El signo de admiración dentro de un triángulo equilátero advierte al usuario de la presencia de
instrucciones importantes relacionadas con la operación y el mantenimiento (reparación) en la
literatura que se entrega junto con el equipo.
Este símbolo significa: sólo para uso en interiores.
Este símbolo significa: lea las instrucciones
Este símbolo significa: Equipo eléctrico Con Clasificación de seguridad I
Este símbolo determina: la distancia mínima desde los objetos iluminados. La distancia mínima
entre la salida de luz y la superficie iluminada debe ser mayor de “x” metros
El dispositivo no es adecuado para el montaje directo sobre superficies normalmente
inflamables. (apto solamente para el montaje sobre superficies no combustibles)
PRECUACIÓN: No mire a las lámparas cuando estén encendidas.
Pueden dañar la vista.
Cable de alimentación
Maleta de transporte
2 conectores IEC adicionales para la alimentación de efectos extra
INSTRUCCIONES DE SEGURIDAD:
Para proteger el medio ambiente, intente reciclar el material del embalaje en la mayor medida posible.
Para evitar el riesgo de incendio o de descarga eléctrica, no exponga este aparato a la lluvia ni a la
humedad.
Para evitar que se forme condensación en el interior del equipo, permita que la unidad se adapte a la
temperatura del entorno cuando la lleve a una habitación cálida después del transporte. La condensación
impide a veces que la unidad trabaje a plena capacidad e incluso puede causar averías.
Esta unidad es solamente para uso en interiores.
No coloque objetos metálicos ni derrame líquidos dentro de la unidad. Puede provocar una descarga
eléctrica o un mal funcionamiento. Si un objeto extraño entra en la unidad, desconecte de inmediato la
alimentación eléctrica.
Coloque el proyector en un lugar bien ventilado, lejos de materiales y/o líquidos inflamables. El proyector
debe estar fijo con al menos 50cm de separación de las paredes de su alrededor.
No tape ninguna abertura de ventilación ya que esto puede provocar sobrecalentamiento.
Evite su uso en ambientes polvorientos y limpie la unidad con regularidad.
Mantenga la unidad lejos de los niños.
Este equipo no debe ser utilizado personas inexpertas.
La temperatura ambiente máxima segura es de 40°C. No utilice esta unidad a temperaturas ambiente más
altas.
Asegúrese de que el área que se encuentra bajo el lugar de instalación esté libre de personas no
autorizadas durante la subida, bajada y reparación del aparato.
Deje enfriar el dispositivo unos 10 minutos antes de realizar cualquier mantenimiento o reparación.
Siempre desenchufe la unidad cuando no se vaya a utilizar durante un período de tiempo prolongado o
cuando vaya a realizar labores de mantenimiento o reparación.
La instalación eléctrica debe realizarla solamente personal cualificado, de acuerdo con la normativa sobre
seguridad eléctrica y mecánica de su país.
Compruebe que la tensión disponible no sea superior a la indicada en la unidad.
El cable de alimentación debe estar siempre en perfectas condiciones. Apague de inmediato la unidad
cuando el cable de alimentación esté aplastado o dañado. Deberá ser sustituido por el fabricante, por su
representante de servicio técnico o por una persona de cualificación similar para evitar riesgos.
¡Nunca permita que el cable de alimentación haga contacto con otros cables!
Este proyector debe tener conexión a tierra para cumplir con las normas de seguridad.
No conecte la unidad a un dispositivo de atenuación.
Page 64

ESPAÑOL
MANUAL DEL USUARIO
JB SYSTEMS®
62/74
COB-4BAR
Cuando instale la unidad asegúrela siempre con un cable de seguridad apropiado y certificado.
Para evitar descargas eléctricas, no abra la cubierta. Dentro no hay componentes que puedan ser
reparados por el usuario.
Nunca repare un fusible ni puentee el porta-fusible. ¡Siempre sustituya un fusible dañado por otro del
mismo tipo y las mismas especificaciones eléctricas!
En el caso de que tenga serios problemas de funcionamiento, deje de usar el aparato y contacte
inmediatamente con su distribuidor.
La carcasa y las lentes deben sustituirse si están visiblemente dañadas.
Utilice el embalaje original cuando necesite transportar el dispositivo.
Por razones de seguridad, está prohibido realizar modificaciones no autorizadas a la unidad.
Importante: ¡Nunca mire directamente a la fuente de luz! No use efectos de luz en presencia de personas
que padezcan de epilepsia.
DESCRIPCIÓN:
1. ENTRADA DMX: conector macho XLR de 3 pines empleado para conectar el COB-4BAR con el
controlador DMX o con la unidad anterior de la cadena DMX.
2. SALIDA DMX: conector hembra XLR de 3 pines empleado para conectar el COB-4BAR con la siguiente
unidad de la cadena DMX.
3. ENTRADA DEL CONTROLADOR POR PEDAL: Aquí puede conectar el pedal de control opcional
4. PANTALLA muestra los diferentes menús y las funciones seleccionadas.
5. Botón MODE: se utiliza para navegar por las diferentes funciones del menú.
6. Botón ENTER: se utiliza para confirmar su elección o para entrar al modo de configuración de una
función.
7. Botón ARRIBA: para aumentar los valores mostrados en pantalla.
8. Botón ABAJO: para disminuir los valores mostrados en pantalla.
9. Entrada de alimentación: conector IEC y portafusibles integrado; conecte aquí el cable de
alimentación suministrado.
10. Salida de alimentación con conector IEC: puede usar un cable de alimentación IEC especial para
conectar esta salida a la entrada de alimentación de la siguiente barra de proyectores o al siguiente
proyector para un encadenamiento más sencillo.
Nota importante: ¡la carga máxima total NO puede superar los 10A (±2300 W)!
11. Adaptador para soporte de 35mm: Se usa para colocar el 4BAR en la parte superior de un soporte
para luces
12. Salida de alimentación adicional 1: esta salida se puede usar para alimentar un proyector o un equipo
de efecto de luces adicional. En el menú del 4BAR puede elegir si la alimentación será de modo
continuo o será posible activarla/desactivarla usando un interruptor de control/pedal inalámbrico/DMX.
Nota importante: ¡La carga máxima total NO puede superar los 3A (±690 W)!
13. Salida de alimentación adicional 2: esta salida se puede usar para alimentar un proyector o un equipo
de efecto de luces adicional. En el menú del 4BAR puede elegir si la alimentación será de modo
continuo o será posible activarla/desactivarla usando un interruptor de control/pedal inalámbrico/DMX.
Page 65

ESPAÑOL
MANUAL DEL USUARIO
JB SYSTEMS®
63/74
COB-4BAR
Nota importante: ¡La carga máxima total NO puede superar los 3A (±690 W)!
14. Cables especiales con señal eléctrica para los paneles COB pasivos
15. Paneles pasivos COB: cada uno contiene 1 LED COB RGB (rojo-verde-azul) que genera coloridos
haces finos de 15°.
16. Lente de 15° desmontable: cada uno de los paneles COB está esquipado con una lente de 15° que se
puede desmontar desenroscando los 2 tornillos que la aguantan en su sitio. Sin la lente los proyectores
tienen un haz ancho de 100° que hace que la unidad sea perfecta como proyector para toda clase de
aplicaciones.
17. Mecanismo deslizante: Se puede usar para añadir un pequeño proyector o equipo de efecto de luces
adicional. También puede fijar 2 abrazaderas de montaje (opcionales) sobre el mecanismo deslizante
para facilitar el montaje de la barra en su bastidor.
MONTAJE EN ALTURA (SOBRE LA CABEZA)
Importante: La instalación debe efectuarla solamente personal de servicio cualificado. Una
instalación no adecuada puede dar como resultado lesiones serias y/o daños a la propiedad.
¡Colocar el dispositivo sobre un montaje en altura requiere una gran experiencia! Se deben
respetar los límites de carga de trabajo, utilizar materiales de instalación certificados y deberá
inspeccionar con regularidad el dispositivo instalado por motivos de seguridad.
Asegúrese de que el área que se encuentra bajo el lugar de instalación esté libre de personas no
autorizadas durante la subida, bajada y reparación del aparato.
El dispositivo debe instalarse fuera del alcance de las personas y fuera de las áreas donde las personas
puedan pasar o permanecer sentadas.
Antes de subir el proyector para su colocación, asegúrese de que el área de instalación pueda soportar
una carga puntual mínima de 10 veces el peso del dispositivo.
Cuando instale la unidad, use siempre un cable de izado certificado que pueda sostener 12 veces el peso
del dispositivo Esta segunda fijación de seguridad debe instalarse de forma que ninguna parte de la
instalación pueda caer más de 20 cm si la fijación principal falla.
El dispositivo debe fijarse bien, ¡un montaje que permita el balanceo es peligroso y no debe tenerse en
consideración!
No tape ninguna abertura de ventilación ya que esto puede provocar sobrecalentamiento.
El operador tiene que estar seguro de que las instalaciones técnicas de la máquina y las relacionadas con
la seguridad han sido aprobadas por un experto antes de utilizarlas por primera vez. Las instalaciones
deben inspeccionarse anualmente por una persona con experiencia para asegurarse de que la seguridad
es óptima.
INSTALACIÓN ELÉCTRICA
Importante: La instalación eléctrica debe realizarla solamente personal cualificado, de
acuerdo con la normativa sobre seguridad eléctrica y mecánica de su país.
Instalación eléctrica para 1 unidad independiente:
Enchufe el cable de alimentación. La unidad comienza a funcionar inmediatamente en el último modo
seleccionado.
Consulte el capítulo CÓMO CONFIGURARLO para aprender a cambiar entre los distintos modos de
funcionamiento.
Si lo desea, puede controlar la unidad usando las opciones disponibles:
Pedal de control COB-4BAR: Controlador de pedal, perfecto para grupos de música, etc.
Page 66

ESPAÑOL
MANUAL DEL USUARIO
JB SYSTEMS®
64/74
COB-4BAR
LEDCON-02 Mk2: (¡debe ser la versión Mk2!)¡perfecto para DJs!
Vea los capítulos INSTRUCCIONES DE FUNCIONAMIENTO y CÓMO CONFIGURARLO para
más información.
Instalación eléctrica para dos o más unidades en el modo maestro/esclavo (master/slave):
Conecte varias unidades entre sí mediante cables de micrófono balanceados de buena calidad. La
unidad que no tenga ningún cable conectado a su entrada DMX es la “maestra”, las demás son las
unidades esclavas.
Asegúrese de que todas las unidades estén conectadas a la red eléctrica.
Consulte el capítulo CÓMO CONFIGURARLO para más información.
¡Hecho!
Nota: por supuesto que siempre podrá añadir un pedal de control o un LEDCON-02 Mk2 a la unidad
maestra para mayor control.
Instalación eléctrica para dos o más unidades en modo DMX:
El protocolo DMX es una señal de alta velocidad ampliamente utilizada para controlar equipamiento de
iluminación inteligente. Tiene que encadenar el controlador DMX y todas las unidades conectadas con
un cable balanceado de buena calidad.
Para evitar un comportamiento extraño de los efectos de luces debido a
interferencias, debe utilizar una resistencia terminal de 90Ω a 120Ω al final de la
cadena. Nunca utilice cables derivadores, ¡esto simplemente no funcionará!
Asegúrese de que todas las unidades estén conectadas a la red eléctrica.
Cada dispositivo de efectos de luces de la cadena tiene que tener su propia dirección de inicio, de
manera que sepa qué comandos procedentes del controlador tiene que decodificar. En la sección
CÓMO CONFIGURARLO aprenderá cómo establecer las direcciones DMX. Si, por ejemplo, utiliza el
modo DMX de 4 canales, una posible configuración de direcciones sería: unidad1 = 001 ~ unidad2 =
005 ~ unidad3 = 009 ~ unidad4 = 013 ~ etc.
CÓMO CONFIGURARLO:
Configuración de la Dirección DMX512
Se utiliza para establecer la dirección de inicio en una configuración DMX.
Pulse el botón MODE hasta que aparezca en pantalla DMX MODE.
Pulse el botón ENTER para entrar en el modo de configuración
Utilice los botones ABAJO y ARRIBA para cambiar la dirección DMX.
Una vez aparezca en la pantalla la dirección correcta, pulse el botón ENTER para confirmar.
Page 67

ESPAÑOL
MANUAL DEL USUARIO
JB SYSTEMS®
65/74
COB-4BAR
El modo de canal empezará a parpadear en la pantalla (03, 05, 06, 08, 12, 17 o 18 canales)
Use los botones ABAJO y ARRIBA si desea cambiar el modo de canal.
Presione el botón ENTER para confirmar
Modo de canal DMX
La unidad dispone de 7 modos de canal DMX diferentes. Con esta función puede escoger el modo
DMX que desee utilizar. Consulte las tablas DMX para ver las diferencias.
Pulse el botón MODE hasta que aparezca en pantalla DMX MODE.
Pulse el botón ENTER para entrar en el modo de configuración
La dirección DMX empezará a parpadear en la pantalla
Use los botones ABAJO y ARRIBA si desea cambiar esta dirección inicial DMX.
Presione el botón ENTER para confirmar.
El modo de canal empezará a parpadear en la pantalla (03, 05, 06, 08, 12, 17 o 18)
Use los botones ABAJO y ARRIBA si desea cambiar el modo de canal.
Presione el botón ENTER para confirmar
Nota: vea
MODO ESCLAVO + PEDAL DE CONTROL
Se utiliza para establecer la unidad en modo esclavo cuando desee tener efectos sincronizados con
la unidad maestra. (cuando la primera unidad ejecuta sus programas automáticos o está configurada
en un color fijo)
Se usa cuando desea controlar la barra con el pedal de control opcional
Pulse el botón MODE hasta que aparezca en pantalla SLAVE.
Presione el botón ENTER para confirmar.
IMPORTANTE: Si desea usar los modos automáticos y hacer ajustes directamente sobre la barra,
necesitará desactivar el mando a distancia IR en la misma barra. (IR ACTIVE = OFF)
MODO DE SONIDO
Se usa para establecer los parámetros del Modo de Sonido automático.
Pulse el botón MODE hasta que aparezca en pantalla SOUND MODE.
Pulse el botón ENTER para entrar en el modo de configuración
El valor de la sensibilidad (SENS) empezará a parpadear en la pantalla
Utilice los botones ABAJO y ARRIBA para cambiar la sensibilidad del micrófono integrado (00 =
sensibilidad mínima, 31 = sensibilidad máxima).
Presione el botón ENTER para confirmar.
El valor de la frecuencia (FQN) empezará a parpadear en la pantalla
Use los botones ABAJO y ARRIBA para cambiar el número de veces que se debe repetir cada programa
automático antes de pasar al siguiente programa automático.
Presione el botón ENTER para confirmar.
IMPORTANTE: No olvide que la barra está equipada con un atenuador maestro. Si la salida parece
que está demasiado baja o que no aparece ninguna luz, ¡compruebe el ajuste del ATNUADOR MAESTRO!
MODO COLOR ESTÁTICO:
Se utiliza para establecer un color estático para el proyector.
Pulse el botón MODE varias veces hasta que 01.STATIC o xx.EFFECT (número del 02 al 14 seguido por
EFFECT) aparece en la pantalla.
Pulse el botón ENTER para entrar en el modo de configuración
El modo actual (estático o modo efecto) parpadeará en la pantalla
Si fuese necesario, use los botones ABAJO y ARRIBA para seleccionar 01.STATIC
Pulse el botón ENTER para entrar en el modo de configuración para los colores estáticos.
Use los botones DOWN y UP para seleccionar COLOR_CW (blanco frio), COLOR_WW (blanco cálido) o
COLOR SET (para componer su propio color).
Si ha seleccionado COLOR_CW o COLOR_WW: Solo tiene que pulsar el botón ENTER para confirmar
su elección.
Si ha elegido COLOR SET: presione el botón ENTER para accede a la configuración manual del color
RED parpadeará en la pantalla: use los botones ABAJO y ARIBA para ajustar la intensidad del
color rojo (000 = mínimo, 255 = máximo)
Pulse el botón ENTER para confirmar y pasar al siguiente color
GREEN parpadeará en la pantalla: use los botones ABAJO y ARIBA para ajustar la intensidad del
color verde (000 = mínimo, 255 = máximo)
Page 68

ESPAÑOL
MANUAL DEL USUARIO
JB SYSTEMS®
66/74
COB-4BAR
Pulse el botón ENTER para confirmar y pasar al siguiente color
BLUE parpadeará en la pantalla: use los botones ABAJO y ARIBA para ajustar la intensidad del
color azul (000 = mínimo, 255 = máximo)
Presione el botón ENTER para confirmar
IMPORTANTE: No olvide que la barra está equipada con un atenuador maestro. Si la salida parece
que está demasiado baja o que no aparece ninguna luz, ¡compruebe el ajuste del ATNUADOR MAESTRO!
MODO DE ATENUACIÓN LENTA DEL COLOR:
Se usa para permitir que los proyectores pasen lentamente de un color a otro.
Pulse el botón MODE varias veces hasta que 01.STATIC o xx.EFFECT (número del 02 al 14 seguido por
EFFECT) aparece en la pantalla.
Pulse el botón ENTER para entrar en el modo de configuración
El modo actual (estático o modo efecto) parpadeará en la pantalla
Use los botones ARRIBA y ABAJO para seleccionar 02.EFFECT (atenuación lenta de un color a otro) o
04.EFFECT (se activa o desactiva la atenuación de cada color)
Presione el botón ENTER para confirmar
La velocidad de atenuación parpadeará en la pantalla: Use los botones ABAJO y ARRIBA para establecer
la velocidad de ejecución que desee (00 = lenta, 99 = máx.)
Presione el botón ENTER para confirmar
La velocidad de destello parpadeará en la pantalla: Use los botones ABAJO y ARRIBA para establecer la
velocidad del efecto estroboscópico que desee (00 = desactivada, 99 = máx.)
Presione el botón ENTER para confirmar
IMPORTANTE: No olvide que la barra está equipada con un atenuador maestro. Si la salida parece
que está demasiado baja o que no aparece ninguna luz, ¡compruebe el ajuste del ATNUADOR
MAESTRO!
MODO DE SEGUIMIENTO AUTOMÁTICO:
Se usa para establecer el Modo de Seguimiento automático de manera que los colores cambiarán
automáticamente a una velocidad constante.
Pulse el botón MODE varias veces hasta que 01.STATIC o xx.EFFECT (número del 02 al 14 seguido por
EFFECT) aparece en la pantalla.
Pulse el botón ENTER para entrar en el modo de configuración
El modo actual (estático o modo efecto) parpadeará en la pantalla
Use los botones ABAJO y ARRIBA para seleccionar uno de los 11 modos de seguimiento (03, 05, 06, 07,
08, 09, 10, 11, 12, 13 o 14.EFFECT).
Presione el botón ENTER para confirmar
La velocidad de atenuación parpadeará en la pantalla: Use los botones ABAJO y ARRIBA para establecer
la velocidad de ejecución que desee (00 = lenta, 99 = máx.)
Presione el botón ENTER para confirmar
La velocidad de destello parpadeará en la pantalla: Use los botones ABAJO y ARRIBA para establecer la
velocidad del efecto estroboscópico que desee (00 = desactivada, 99 = máx.)
Presione el botón ENTER para confirmar.
Observación: Si ha seleccionado 13.EFFECT o 14.EFFECT, podrá elegir 2 colores para su programa de
seguimiento:
C1 parpadeará en la pantalla
Use los botones ABAJO y ARRIBA para seleccionar el primer color del programa se seguimiento:
Presione el botón ENTER para confirmar
C2 parpadeará ahora en la pantalla
Use los botones ABAJO y ARRIBA para seleccionar el segundo color del programa se seguimiento:
Presione el botón ENTER para confirmar
IMPORTANTE: No olvide que la barra está equipada con un atenuador maestro. Si la salida parece
que está demasiado baja o que no aparece ninguna luz, ¡compruebe el ajuste del ATNUADOR MAESTRO!
FUNCIONAMIENTO AUTOMÁTICO:
Se usa para iniciar el modo de seguimiento aleatorio automático. La barra ejecutará cada programa
de seguimiento individual aleatoriamente. Durante este espectáculo de luces se utilizarán la
velocidad de cambio y la velocidad del estrobo que haya establecido en cada programa individual.
(vea las descripción anterior: MODO DE SEGUIMIENTO AUTOMÁTICO)
Pulse el botón MODE hasta que aparezca en pantalla AUTO RUN.
Pulse el botón ENTER para entrar en el modo de configuración
Page 69

ESPAÑOL
MANUAL DEL USUARIO
JB SYSTEMS®
67/74
COB-4BAR
FQN empezará a parpadear en la pantalla.
Use los botones ABAJO y ARRIBA para cambiar el número de veces que se debe repetir cada programa
antes de pasar automáticamente al siguiente programa automático. (de 01 a 99 veces)
Presione el botón ENTER para confirmar
FLUJO INVERTIDO
Se usa para invertir el sentido del seguimiento automático. Esto puede ser útil cuando esté usando
varias barras en modo maestro/esclavo
Pulse el botón MODE hasta que aparezca en pantalla FLOW INVERT.
Pulse el botón ENTER para entrar en el modo de configuración
Use los botones ABAJO y ARRIBA para seleccionar ON (sentido invertido) u OFF (sin invertir el sentido)
Presione el botón ENTER para confirmar
ATENUACIÓN MAESTRA
Este es el atenuador maestro general para TODOS los efectos integrados en el 4BAR.
Pulse el botón MODE hasta que aparezca en pantalla MASTER DIM.
Pulse el botón ENTER para entrar en el modo de configuración
Use los botones ABAJO y ARRIBA para cambiar el nivel de atenuación general del 4BAR
Presione el botón ENTER para confirmar
¡Si tiene la impresión de que el 4BAR no está funcionando, por favor compruebe que el MASTER
DIMMER no está a cero o a un nivel demasiado bajo!
IR ACTIVO
Active esta función si desea controlar el 4BAR con el mando a distancia inalámbrico pequeño.
Tenga esta función desactivada cuando no desee usar el mando a distancia inalámbrico.
Pulse el botón MODE hasta que aparezca en pantalla IR ACTIVE.
Pulse el botón ENTER para entrar en el modo de configuración
Use los botones ABAJO y ARRIBA para seleccionar ON (puede utilizar el mando a distancia) u OFF (no
se puede controlar usando el mando a distancia)
Presione el botón ENTER para confirmar
IMPORTANTE: Si no desea usar el mando a distancia inalámbrico, tendrá que desactivar el receptor
del mando a distancia IR en la barra. (IR ACTIVE = OFF)
SALIDA DEL EFECTO DE LUZ (sólo cuando tenga el control DMX)
Con esta opción podrá decidir si las 2 salidas de alimentación para los efectos de luz adicionales
(12) y (13) se puedan ACTIVAR/DESACTIVAR o dejarlas siempre ACTIVADAS
Pulse el botón MODE hasta que aparezca en pantalla LIGHT EFFECT OUT.
Pulse el botón ENTER para entrar en el modo de configuración
Use los botones ABAJO y ARRIBA para seleccionar DMX CONTROL ON (las salidas de alimentación se
pueden activar o desactivar usando DMX) o DMX CONTROL OFF (las salidas de alimentación quedan
permanentemente ACTIVADAS)
Presione el botón ENTER para confirmar
MANUAL DE INSTRUCCIONES
A. 1 unidad independiente:
Simplemente conecte el proyector a la alimentación.
Seleccione uno de los modos de color estático, automático o de sonido.
Consulte el capítulo CÓMO CONFIGURARLO para aprender cómo realizar estos ajustes.
B. Dos o más unidades en configuración maestro/esclavo:
Conecte todas las unidades entre sí. Consulte el capítulo “instalación eléctrica” para aprender cómo
hacerlo.
Seleccione una de los modos de color estático, automático o de sonido en la unidad maestra (primer
COB-4BAR en la cadena MDX).
Configure todos los demás barras en modo SLAVE
Ahora los proyectores seguirán el programa del COB-4BAR maestro, de forma que funcionarán
sincronizados.
Page 70

ESPAÑOL
MANUAL DEL USUARIO
JB SYSTEMS®
68/74
COB-4BAR
C. Controlado por el mando a distancia inalámbrico:
Para poder usar el mando a distancia inalámbrico, necesitará tener esta opción activada en el
4BAR:
Pulse el botón MODE hasta que aparezca en pantalla IR ACTIVE.
Pulse el botón ENTER para ser capaz de cambiar la configuración
Use los botones ABAJO y ARRIBA para activar o desactivar la opción de control remoto (ON = control
remoto activado, OFF = control remoto desactivado).
Presione el botón ENTER para confirmar
Pulse el botón MODE hasta que aparezca en pantalla SLAVE &
FOOT CONTROL.
Presione el botón ENTER para confirmar
Funciones:
BL: se usa para encender/apagar los LEDs
SP: Se usa para establecer la velocidad de ejecución cuando esté
usando el cambio de color o los modos de atenuación de color. Pulse
este botón varias veces para seleccionar una de las cuatro
velocidades preprogramadas. (lenta, media, rápida, desactivada)
BRILLO (Atenuador maestro): Se usa para establecer el brillo
general de sus proyectores. Pulse este botón varias veces para
seleccionar una de los cuatro niveles de brillo preprogramados.
(50%, 75%, 100%, desactivado)
FL: se usa para activar el modo estrobo (destellante). Pulse este
botón varias veces para seleccionar una de las cuatro frecuencias de
destello preprogramadas. (lenta, media, rápida, desactivada)
R se usa para establecer la intensidad de la fuente LED roja. Pulse
este botón varias veces para seleccionar una de los cuatro niveles de
brillo preprogramados. (50%, 75%, 100%, desactivada). ¡No olvide que el brillo está influenciado
también por el atenuador maestro! (=botón BRIGHTNESS)
G se usa para establecer la intensidad de la fuente LED verde. Pulse este botón varias veces para
seleccionar una de los cuatro niveles de brillo preprogramados. (50%, 75%, 100%, desactivada). ¡No
olvide que el brillo está influenciado también por el atenuador maestro! (=botón BRIGHTNESS)
B se usa para establecer la intensidad de la fuente LED azul. Pulse este botón varias veces para
seleccionar una de los 4 niveles de brillo preprogramados. (50%, 75%, 100%, desactivada). ¡No olvide
que el brillo está influenciado también por el atenuador maestro! (=botón BRIGHTNESS)
W e usa para establecer la intensidad de la fuente LED blanca (Rojo + Verde + Azul juntos). Pulse
este botón varias veces para seleccionar una de los 4 niveles de brillo preprogramados. (50%, 75%,
100%, desactivada). ¡No olvide que el brillo está influenciado también por el atenuador maestro!
(=botón BRIGHTNESS)
Pr1, Pr2, Pr3, Pr4: Estos botones se usan para ejecutar los programas de seguimiento integrados.
Podrá ajustar el brillo, la velocidad de cambio de color y la velocidad del estroboscopio, con los
botones BRIGHTNESS, SP y FL
D1, D2, D3, D4: Estos botones se usan para ejecutar los programas de atenuación de color
integrados. Podrá ajustar el brillo, la velocidad de cambio de color y la velocidad del estroboscopio,
con los botones BRIGHTNESS, SP y FL
SA1, SA2, SA3, SA4: Estos botones se usan para ejecutar los programas de seguimiento del sonido
integrados. Podrá ajustar el brillo y la velocidad del estroboscopio, con los botones BRIGHTNESS y
FL
Nota: Distancia máxima entre el mando a distancia y el proyector = +/- 10m
D. Controlado por el mando LEDCON-02 Mk2:
Siga los pasos indicados a continuación para controlar la
barra usando el LEDCON-02 Mk2
Pulse el botón MODE hasta que aparezca en pantalla DMX
MODE.
Seleccione el modo DMX de 18 canales (18CH) y seleccione la
dirección DMX 001.
Pulse el botón MODE hasta que aparezca en pantalla LED
EFFECT OUT y elija: DESACTIVAR CONTORL DMX
(¡importante!)
Page 71

ESPAÑOL
MANUAL DEL USUARIO
JB SYSTEMS®
69/74
COB-4BAR
Configure el LEDCON-02 Mk2 en modo 4CH (interruptor en la parte trasera del controlador)
Para conocer las instrucciones de uso del LEDCON-02 Mk2: por favor, consulte el manual del usuario
de este controlador.
Notas importantes:
El COB-4BAR sólo es compatible con el LEDCON-02 Mk2, ¡no con el LEDCON-02!
Mientras utilice el LEDCON-02 Mk2, las 2 salidas de alimentación (12 + 13) no se podrán
controlar, ¡quedarán ACTIVADAS en todo momento!
desactivar el mando a distancia IR en la misma barra. (IR ACTIVE = OFF)
E. Controlados por el pedal de control opcional:
Para poder usar el pedal de control, necesitará tener esta opción activada en el 4BAR:
Pulse el botón MODE hasta que aparezca en pantalla SLAVE & FOOT CONTROL.
Presione el botón ENTER para confirmar.
Descripción general del pedal de control:
Control GIRATORIO: se usa para
establecer la sensibilidad del
micrófono integrado para el modo
controlado por sonido.
Interruptor MODO: se usa para
seleccionar uno de los 3 modos de
funcionamiento: COLOR, SOUND,
PROGRAM
Interruptores ARRIBA y ABAJO:
se usan para seleccionar las
diferentes opciones de programación
Interruptor de APAGADO: se usa
para encender/apagar los LEDs o para seleccionar la función todo encendido.
Modos y Funciones:
Pulse el pedal MODE para seleccionar los diferentes modos de funcionamiento.
Modo COLOR (se ilumina el LED rojo): en este modo podrá seleccionar diferentes colores fijos
Pedales ARRIBA y ABAJO: se pueden usar para seleccionar uno de los diferentes colores fijos.
Pedal de APAGADO: Presione brevemente este pedal para oscurecer la barra (los LEDs rojo,
verde y amarillo se iluminan en el panel del pedal). Si presiona este pedal más de 3 segundos, la
barra entrará en modo todo encendido (todos los proyectores a máxima potencia en color blanco)
Modo SONIDO (se ilumina el LED verde): en este modo podrá selecciona los diferentes seguimiento
controlados por sonido (no olvide ajustar la sensibilidad del micrófono integrado usando el control
giratorio en el panel del pedal)
Pedales ARRIBA y ABAJO: se pueden usar para seleccionar uno de los diferentes modos de
sonido.
Pedal de APAGADO: Presione brevemente este pedal para oscurecer la barra (los LEDs rojo,
verde y amarillo se iluminan en el panel del pedal). Si presiona este pedal más de 3 segundos, la
barra regresará a modo todo encendido (todos los proyectores a máxima potencia en color blanco)
Modo SONIDO (se ilumina el LED amarillo): en este modo podrá seleccionar diferentes modos de
seguimiento automático
Pedales ARRIBA y ABAJO: se pueden usar para seleccionar uno de los diferentes modos de
seguimiento automático.
Pedal de APAGADO: Presione brevemente este pedal para oscurecer la barra (los LEDs rojo,
verde y amarillo se iluminan en el panel del pedal). Si presiona este pedal más de 3 segundos, la
barra regresará a modo todo encendido (todos los proyectores a máxima potencia en color blanco)
Función adicional:
Los pedales ARRIBA y ABAJO también se pueden usar para activa/desactivar las 2 salidas de
alimentación para proyectores adicionales. Pulse el pedal ARRIBA durante 3 segundos para
activa/desactivar la salida de alimentación 1. Pulse el pedal ABAJO durante 3 segundos para
activa/desactivar la salida de alimentación 2.
Page 72

ESPAÑOL
MANUAL DEL USUARIO
JB SYSTEMS®
70/74
COB-4BAR
Canal:
Nombre
Valor:
Función:
1
Rojo
000-255
Atenuador (0-100%)
2
Verde
000-255
Atenuador (0-100%)
3
Azul
000-255
Atenuador (0-100%)
Canal:
Nombre
Valor:
Función:
1
Rojo
000-255
Atenuador (0-100%)
2
Verde
000-255
Atenuador (0-100%)
3
Azul
000-255
Atenuador (0-100%)
4
Salida de alimentación
adicional 1
000-127
Equipo apagado
128-255
Equipo Encendido
5
Salida de alimentación
adicional 2
000-127
Equipo apagado
128-255
Equipo Encendido
Canal:
Nombre
Valor:
Función:
1
Rojo 1
000-255
Proyector de atenuación 1 y 2 (0-100%)
2
Verde 1
000-255
Proyector de atenuación 1 y 2 (0-100%)
3
Azul 1
000-255
Proyector de atenuación 1 y 2 (0-100%)
4
Rojo 2
000-255
Proyector de atenuación 3 y 4 (0-100%)
5
Verde 2
000-255
Proyector de atenuación 3 y 4 (0-100%)
6
Azul 2
000-255
Proyector de atenuación 3 y 4 (0-100%)
Canal:
Nombre
Valor:
Función:
1
Atenuador
000-255
Atenuador maestro (0-100%)
2
Estrobo
000-007
Sin estrobo
008-037
Estrobo aleatorio
038-067
Estrobo por sonido
068-255
Velocidad estrobo (lento a rápido)
3
Modo color automático
000-007
Sin modo automático
008-247
Velocidad atenuación color (lento a rápido)
248-255
Seguimiento del sonido
4
Rojo
000-255
Atenuador (0-100%)
5
Verde
000-255
Atenuador (0-100%)
6
Azul
000-255
Atenuador (0-100%)
7
Salida de alimentación
adicional 1
000-127
Equipo apagado
128-255
Equipo Encendido
8
Salida de alimentación
adicional 2
000-127
Equipo apagado
128-255
Equipo Encendido
F. Controlado por un controlador universal DMX:
Conecte todas las unidades entre sí. Consulte el capítulo “Instalación eléctrica para dos o más
unidades en modo DMX” para aprender cómo hacerlo (¡no olvide direccionar correctamente todas las
unidades!)
Conecte todas las unidades a la alimentación y encienda el controlador DMX.
Como cada unidad tiene su propia dirección DMX, puede controlarlas individualmente. Recuerde que
cada unidad utiliza 3, 5, 6, 8, 12, 16, 17, o 18 canales DMX, dependiendo del modo DMX que haya
seleccionado en el menú. Vea a continuación las diferentes tablas DMX:
Tabla DMX para el modo DMX de 3 canales
Tabla DMX para el modo DMX de 5 canales
Tabla DMX para el modo DMX de 6 canales
Tabla DMX para el modo DMX de 8 canales
Page 73

ESPAÑOL
MANUAL DEL USUARIO
JB SYSTEMS®
71/74
COB-4BAR
Canal:
Nombre
Valor:
Función:
1
Rojo 1
000-255
Proyector de atenuación 1 (0-100%)
2
Verde 1
000-255
Proyector de atenuación 1 (0-100%)
3
Azul 1
000-255
Proyector de atenuación 1 (0-100%)
4
Rojo 2
000-255
Proyector de atenuación 2 (0-100%)
5
Verde 2
000-255
Proyector de atenuación 2 (0-100%)
6
Azul 2
000-255
Proyector de atenuación 2 (0-100%)
7
Rojo 3
000-255
Proyector de atenuación 3 (0-100%)
8
Verde 3
000-255
Proyector de atenuación 3 (0-100%)
9
Azul 3
000-255
Proyector de atenuación 3 (0-100%)
10
Rojo 4
000-255
Proyector de atenuación 4 (0-100%)
11
Verde 4
000-255
Proyector de atenuación 4 (0-100%)
12
Azul 4
000-255
Proyector de atenuación 4 (0-100%)
Canal:
Nombre
Valor:
Función:
1
Modos de color Macro y
Automático
000-015
DESACTIVADO
016-023
Rojo
024-031
Verde
032-039
Azul
040-047
Rojo + Verde
048-055
Verde + Azul
056-063
Rojo + Azul
064-071
Blanco
072-079
Color 1
080-087
Color 2
088-095
Color 3
096-103
Color 4
104-111
Color 5
112-119
Color 6
120-127
Color 7
128-135
Color 8
136-143
Atenuación del color
144-151
Seguimiento de color 1
152-159
Seguimiento de color 2
160-167
Seguimiento de color 3
168-175
Seguimiento de color 4
176-183
Seguimiento de color 5
184-191
Seguimiento de color 6
192-199
Seguimiento de color 7
200-207
Seguimiento de color 8
208-215
Seguimiento de color 9
216-223
Seguimiento de color 10
224-231
Seguimiento de color 11
232-239
Seguimiento de color 12
244-255
Sonido activo
Canal 1 = 000 a 015
2
Atenuador
000-255
Atenuador maestro (0-100%)
3
Estrobo
000-255
Velocidad estrobo (lento a rápido)
4
Rojo 1
000-255
Proyector de atenuación 1 (0-100%)
5
Verde 1
000-255
Proyector de atenuación 1 (0-100%)
6
Azul 1
000-255
Proyector de atenuación 1 (0-100%)
7
Rojo 2
000-255
Proyector de atenuación 2 (0-100%)
8
Verde 2
000-255
Proyector de atenuación 2 (0-100%)
9
Azul 2
000-255
Proyector de atenuación 2 (0-100%)
10
Rojo 3
000-255
Proyector de atenuación 3 (0-100%)
Tabla DMX para el modo DMX de 12 canales
Tabla DMX para el modo DMX de 17 canales
Page 74

ESPAÑOL
MANUAL DEL USUARIO
JB SYSTEMS®
72/74
COB-4BAR
11
Verde 3
000-255
Proyector de atenuación 3 (0-100%)
12
Azul 3
000-255
Proyector de atenuación 3 (0-100%)
13
Rojo 4
000-255
Proyector de atenuación 4 (0-100%)
14
Verde 4
000-255
Proyector de atenuación 4 (0-100%)
15
Azul 4
000-255
Proyector de atenuación 4 (0-100%)
16
Salida de alimentación
adicional 1
000-127
Equipo apagado
128-255
Equipo Encendido
17
Salida de alimentación
adicional 2
000-127
Equipo apagado
128-255
Equipo Encendido
Canal 1 = 016 a 135
2
Atenuador
000-255
Atenuador maestro (0-100%)
3
Estrobo
000-255
Velocidad estrobo (lento a rápido)
4 a 15 - -
No usado
16
Salida de alimentación
adicional 1
000-127
Equipo apagado
128-255
Equipo Encendido
17
Salida de alimentación
adicional 2
000-127
Equipo apagado
128-255
Equipo Encendido
Canal 1 = 136 a 223
2
Velocidad
000-255
Velocidad del efecto (lento a rápido)
3
Estrobo
000-255
Velocidad estrobo (lento a rápido)
4 a 15 - -
No usado
16
Salida de alimentación
adicional 1
000-127
Equipo apagado
128-255
Equipo Encendido
17
Salida de alimentación
adicional 2
000-127
Equipo apagado
128-255
Equipo Encendido
Canal 1 = 224 a 239
2
Velocidad
000-255
Velocidad del efecto (lento a rápido)
3
Estrobo
000-255
Velocidad estrobo (lento a rápido)
4
Color de efecto 1
000-255
Seleccione uno de los 8 colores
5
Color de efecto 2
000-255
Seleccione uno de los 8 colores
6. a 15. - -
No usado
16
Salida de alimentación
adicional 1
000-127
Equipo apagado
128-255
Equipo Encendido
17
Salida de alimentación
adicional 2
000-127
Equipo apagado
128-255
Equipo Encendido
Canal 1 = 240 a 255
2
Sonido
000-255
Sensibilidad (de baja a alta)
3. a 15. - -
No usado
16
Salida de alimentación
adicional 1
000-127
Equipo apagado
128-255
Equipo Encendido
17
Salida de alimentación
adicional 2
000-127
Equipo apagado
128-255
Equipo Encendido
Canal:
Valor:
Función:
1
Rojo (proyector 1)
000-255
Atenuador (0-100%)
2
Verde (proyector 1)
000-255
Atenuador (0-100%)
3
Azul (proyector 1)
000-255
Atenuador (0-100%)
4
Atenuación
Estrobo
Modo música
(proyector 1)
000-007
Apagado
008-190
Atenuador maestro (0-100%)
191-200
Modo automático controlado por sonido
201-247
Velocidad estrobo (lento a rápido)
248-255
Nivel máximo atenuador maestro
5
Rojo (proyector 2)
000-255
Atenuador (0-100%)
Tabla DMX para el modo DMX de 18 canales
Para seleccionar mientras esté usando el controlador MEDCON-02 Mk2, vea las páginas anteriores
para más información.
Page 75

ESPAÑOL
MANUAL DEL USUARIO
JB SYSTEMS®
73/74
COB-4BAR
6
Verde (proyector 2)
000-255
Atenuador (0-100%)
7
Azul (proyector 2)
000-255
Atenuador (0-100%)
8
Atenuación
Estrobo
Modo música
(proyector 2)
000-007
Apagado
008-190
Atenuador maestro (0-100%)
191-200
Modo automático controlado por sonido
201-247
Velocidad estrobo (lento a rápido)
248-255
Nivel máximo atenuador maestro
9
Rojo (proyector 3)
000-255
Atenuador (0-100%)
10
Verde (proyector 3)
000-255
Atenuador (0-100%)
11
Azul (proyector 3)
000-255
Atenuador (0-100%)
12
Atenuación
Estrobo
Modo música
(proyector 3)
000-007
Apagado
008-190
Atenuador maestro (0-100%)
191-200
Modo automático controlado por sonido
201-247
Velocidad estrobo (lento a rápido)
248-255
Nivel máximo atenuador maestro
13
Rojo (proyector 4)
000-255
Atenuador (0-100%)
14
Verde (proyector 4)
000-255
Atenuador (0-100%)
15
Azul (proyector 4)
000-255
Atenuador (0-100%)
16
Atenuación
Estrobo
Modo música
(proyector 4)
000-007
Apagado
008-190
Atenuador maestro (0-100%)
191-200
Modo automático controlado por sonido
201-247
Velocidad estrobo (lento a rápido)
248-255
Nivel máximo atenuador maestro
17
Salida de alimentación
adicional 1
000-127
Equipo apagado
128-255
Equipo Encendido
18
Salida de alimentación
adicional 2
000-127
Equipo apagado
128-255
Equipo Encendido
MANTENIMIENTO
Asegúrese de que el área debajo del lugar de instalación esté libre de personas no autorizadas cuando
realice mantenimiento/reparaciones.
Apague la unidad, desenchufe el cable de alimentación y espere hasta que se enfríe.
Durante la inspección deben revisarse los puntos siguientes:
Todos los tornillos utilizados para la instalación del dispositivo y cualquiera de sus componentes deben
estar bien apretados y no pueden tener corrosión.
Las carcasas, fijaciones y puntos de instalación (techo, refuerzos, suspensiones) deben estar totalmente
libres de cualquier deformación.
Cuando una lente óptica está visiblemente dañada debido a grietas o arañazos profundos, debe ser
sustituida.
Los cables de alimentación deben estar en condiciones impecables y deben sustituirse inmediatamente
incluso si se detecta un problema pequeño.
Para proteger el dispositivo contra el sobrecalentamiento, los ventiladores de enfriamiento (si hay alguno)
y las aberturas de ventilación deben limpiarse mensualmente.
El interior del dispositivo debe limpiarse anualmente utilizando una aspiradora o chorro de aire.
La limpieza de las lentes ópticas y/o espejos internos y externos debe efectuarse periódicamente para
optimizar la salida de la luz. La frecuencia de limpieza depende del entorno en el que opera el proyector:
ambientes húmedos, con humo o especialmente sucios pueden provocar una mayor acumulación de
suciedad en los componentes ópticos de la unidad.
Limpie usando un paño suave utilizando productos normales para la limpieza de cristales.
Siempre seque cuidadosamente las piezas.
Atención: ¡Recomendamos encarecidamente que la limpieza la efectúe personal cualificado!
Page 76

ESPAÑOL
MANUAL DEL USUARIO
JB SYSTEMS®
74/74
COB-4BAR
Entrada de alimentación:
100-250Vca, 50/60Hz
Consumo de potencia:
120W
Fusible:
250V 2A retardado (cristal 20mm)
Salidas de alimentación adicionales:
250V 3A máx. por salida
Control de sonido:
Micrófono interno
Conexiones DMX:
XLR de 3 pines
Modos DMX:
3, 5, 6, 8, 12, 17 y 18 canales DMX
Fuente LED:
4 fuentes TRI COB LED de 36W
Ángulo del haz con lente:
15°
Ángulo del haz sin lente:
100°
Tamaño:
1000x82x320mm
Pero de la barra 4BAR (sin la maleta):
7,6kg
ESPECIFICACIONES
Esta información está sujeta a cambios sin notificación previa
Puede descargar la versión más reciente de este manual de usuario en nuestro sitio
Web: www.jb-systems.eu
Page 77

Page 78

Page 79

Page 80

WWW.JB-SYSTEMS.EU
Copyright © 2014 by BEGLEC NV
‘t Hofveld 2C ~ B1702 Groot-Bijgaarden ~ Belgium
Reproduction or publication of the content in any manner, without express permission of the publisher, is prohibited.
 Loading...