

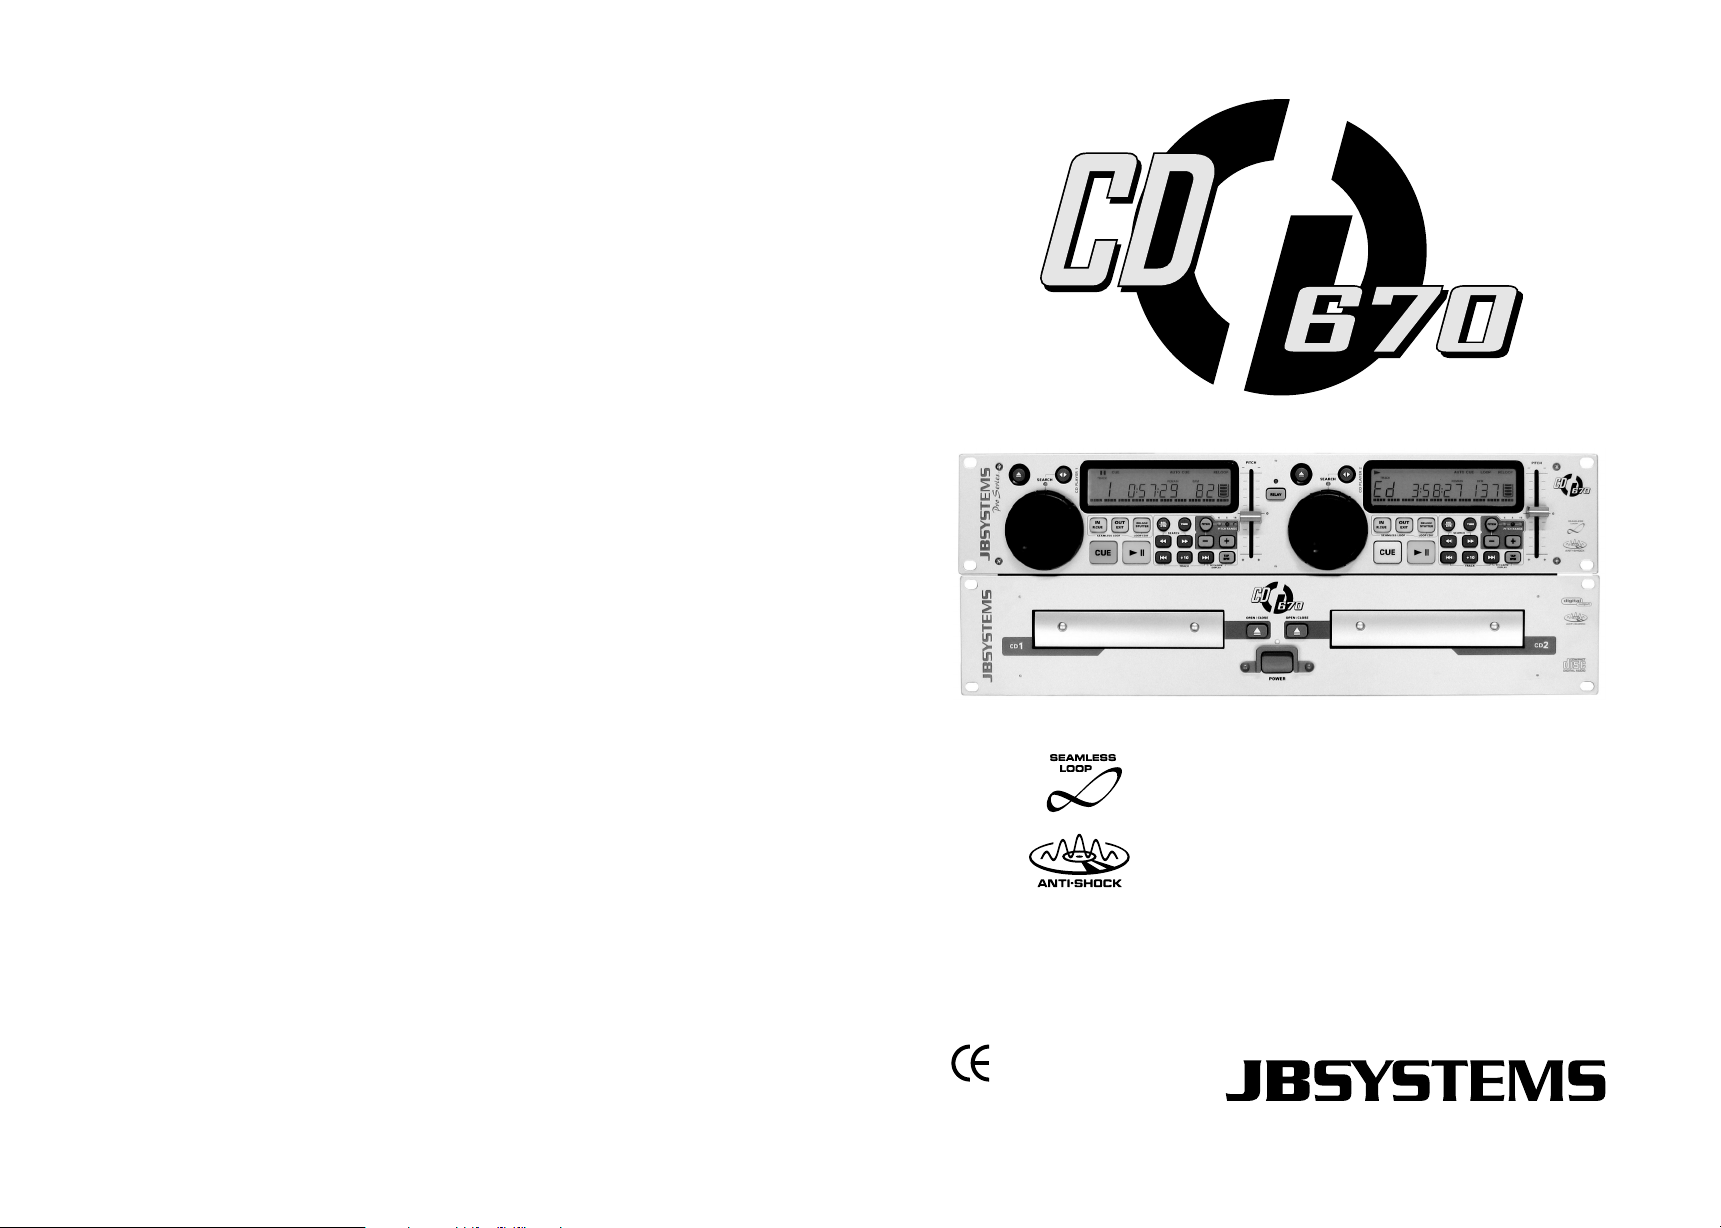
Page 1
WWW.BEGLEC.COM
Operation Manual
Mode d'emploi
Gebruiksaanwijzing
Bedienungsanleitung
Manual de instrucciones
Manual do utilizador
EN
FR
NL
DU
ES
PT
Reproduction or publication of the content in any manner, without express permission of the publisher, is prohibited.
Copyright © 2006-2007 by BEGLEC cva.
Version: 1.1
The Power Source for DJ’s
Page 2
EN - DISPOSAL OF THE DEVICE
Dispose of the unit and used batteries in an environment friendly manner
according to your country regulations.
FR - DÉCLASSER L’APPAREIL
Débarrassez-vous de l’appareil et des piles usagées de manière écologique
Conformément aux dispositions légales de votre pays.
NL - VERWIJDEREN VAN HET APPARAAT
Verwijder het toestel en de gebruikte batterijen op een milieuvriendelijke
manier conform de in uw land geldende voorschriften.
DU - ENTSORGUNG DES GERÄTS
Entsorgen Sie das Gerät und die Batterien auf umweltfreundliche Art und
Weise gemäß den Vorschriften Ihres Landes.
ES - DESHACERSE DEL APARATO
Reciclar el aparato y pilas usadas de forma ecologica conforme a las
disposiciones legales de su pais.
PT - COMO DESFAZER-SE DA UNIDADE
Tente reciclar a unidade e as pilhas usadas respeitando o ambiente e em
conformidade com as normas vigentes no seu país.
Page 3
ENGLISH OPERATION MANUAL
OPERATION MANUAL
Thank you for buying this JB Systems®product. To take full advantage of all possibilities,
please read these operating instructions very carefully.
FEATURES
This unit is radio-interference suppressed. This appliance meets the requirements of the
current European and national guidelines. Conformity has been established and the
relevant statements and documents have been deposited by the manufacturer.
Instant buffer start with cue stutter effect
Seamless loop with reloop and stutter effect
Real-time loop edit function
Full automatic beat counters with TAP function
Anti-shock memory, 20seconds
Auto cue function (-48dB)
Real-time cue (“Cue on the fly”)
Pitch control (3 ranges: +/- 4, 8, 16%)
Pitch bend on jog wheel and buttons for perfect mixes
Reads CD-DA, CD-R, CD-RW
Fader start/stop (back cue)
Big “super twist” LCD display for excellent readability
High quality illuminated buttons
Big dial wheels: 1/75sec frame search and pitch bend
Relay play: uninterrupted playback on 2 CDs
Single/continuous play
Selectable elapsed, remain and total remain time
S/PDIF digital output (RCA/cinch)
60 seconds transport protection
Sleep mode (saves the life span of the laser)
BEFORE USE
Before you start using this unit, please check if there’s no transportation damage. Should
there be any, do not use the device and consult your dealer first.
Important:
absolutely necessary for the user to strictly follow the safety instructions and warnings in
this user manual. Any damage caused by mishandling is not subject to warranty. The
dealer will not accept responsibility for any resulting defects or problems caused by
disregarding this user manual.
Keep this booklet in a safe place for future consultation. If you sell the fixture, be sure to
add this user manual.
To protect the environment, please try to recycle the packing material as much as
possible.
This device left our factory in perfect condition and well packaged. It is
ENGLISH OPERATION MANUAL
Check the contents:
Check that the carton contains the following items:
Main unit
Control unit
User manual
Mains cable
Pair of cinch cables
mini-DIN cable
Pair of fader start cables (mini-jack/mini-jack)
SAFETY INSTRUCTIONS:
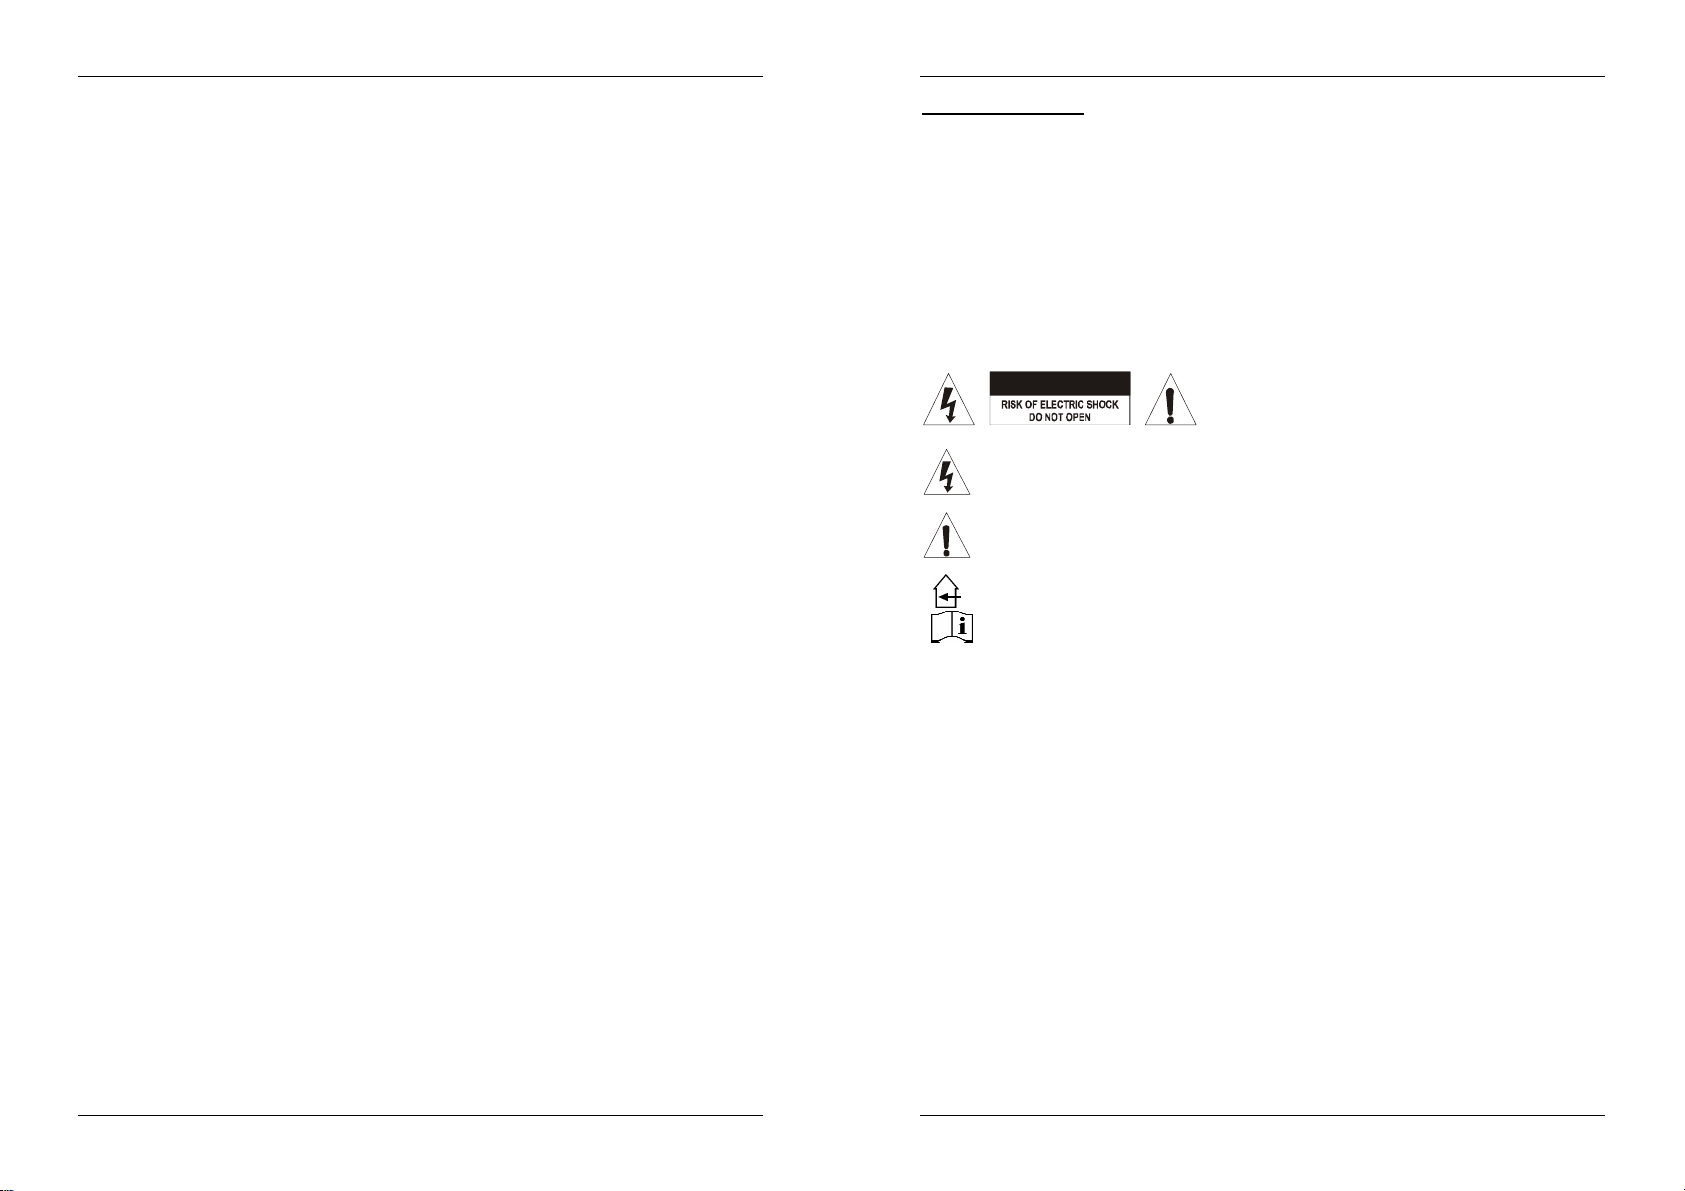
CAUTION
The lightning flash with arrowhead symbol within the equilateral triangle is
intended to alert the use or the presence of un-insulated “dangerous voltage”
within the product’s enclosure that may be of sufficient magnitude to constitute a
risk of electric shock.
The exclamation point within the equilateral triangle is intended to alert the user to
the presence of important operation and maintenance (servicing) instructions in
the literature accompanying this appliance.
This symbol means: indoor use only.
This symbol means: Read instructions.
To prevent fire or shock hazard, do not expose this appliance to rain or moisture.
To avoid condensation to be formed inside, allow the unit to adapt to the surrounding
temperatures when bringing it into a warm room after transport. Condense sometimes
prevents the unit from working at full performance or may even cause damages.
This unit is for indoor use only.
Don’t place metal objects or spill liquid inside the unit. No objects filled with liquids, such
as vases, shall be placed on this appliance. Electric shock or malfunction may result. If a
foreign object enters the unit, immediately disconnect the mains power.
No naked flame sources, such as lighted candles, should be placed on the appliance.
Don’t cover any ventilation openings as this may result in overheating.
Prevent use in dusty environments and clean the unit regularly.
Keep the unit away from children.
Inexperienced persons should not operate this device.
Maximum save ambient temperature is 45°C. Don’t use this unit at higher ambient
temperatures.
Minimum distances around the apparatus for sufficient ventilation is 2cm.
Always unplug the unit when it is not used for a longer time or before you start servicing.
The electrical installation should be carried out by qualified personal only, according to
the regulations for electrical and mechanical safety in your country.
Check that the available voltage is not higher than the one stated on the rear panel of the
unit.
CAUTION: To reduce the risk of electric shock, do
not remove the top cover. No user-serviceable parts
inside. Refer servicing to qualified service personnel
only.
JB SYSTEMS® 1/67 CD670
JB SYSTEMS® 2/67 CD670
Page 4

ENGLISH OPERATION MANUAL
ENGLISH OPERATION MANUAL
The socket inlet shall remain operable for disconnection from the mains.
The power cord should always be in perfect condition: switch the unit immediately off
when the power cord is squashed or damaged.
Never let the power-cord come into contact with other cables!
When the power switch is in OFF position, this unit is not completely disconnected from
the mains!
In order to prevent electric shock, do not open the cover. Apart from the mains fuse there
are no user serviceable parts inside.
Never
In the event of serious operating problems, stop using the appliance and contact your
Please use the original packing when the device is to be transported.
Due to safety reasons it is prohibited to make unauthorized modifications to the unit.
INSTALLATION GUIDELINES:
Placing and using the unit for long periods near heat-generating sources such as
Take care to minimize shocks and vibrations during transport.
The unit can be mounted in 19-inch racks. Attach the unit using the 4 screw holes on the
When installed in a booth or flight case, please make sure to have good ventilation to
To avoid condensation to be formed inside, allow the unit to adapt to the surrounding
Choose the place where you put your installation very carefully. Avoid presence of heat
The player will work normally when installed on a surface with max. 15° inclination.
Be very careful while handling CDs, do not touch them with wet or dirty hands.
Discs that are dirty must be cleaned with special designed cloth and cleaning products.
Do not use CDs that are badly damaged (scratched or deformed) they can damage your
To prevent fire or shock hazard, do not expose this appliance to rain or moisture.
In order to prevent electric shock, do not open the top cover. If a problem occurs, contact
Do not place metal objects or spill liquid inside the CD player. Electric shock or
This CD player uses the semiconductor laser. To allow you to enjoy music at a stable
The compact disc player should not be adjusted or repaired by anyone except properly
This unit may cause interference to radio and television reception.
CLEANING THE APPLIANCE:
Clean by wiping with a polished cloth slightly dipped with water. Avoid getting water inside
the unit. Do not use volatile liquids such as benzene or thinner which will damage the unit.
repair a fuse or bypass the fuse holder.
fuse of the same type and electrical specifications!
dealer immediately.
amplifiers, spotlights, etc. will affect its performance and may even damage the unit.
front panel. Be sure to use screws of the appropriate size. (screws not provided)
Take care to minimize shocks and vibrations during transport.
improve heat evacuation of the unit.
temperatures when bringing it into a warm room after transport. Condense sometimes
prevents the unit from working at full performance.
sources. Avoid places with vibrations or places that are dusty and humid.
appliance.
your dealer.
malfunction may result.
operation, it is recommended to use this in a room of 5°C – 35°C.
qualified service personnel.
Always
replace a damaged fuse with a
CONNECTIONS
Connect the mini-DIN cable between the control unit and the main unit (CD loader).
Use the supplied cinch cables to connect the audio outputs of the CD player with the CD
inputs of your mixing unit.
Also connect the 2 fader start cables if your audio mixer has fader start connections.
(Synq®or Pioneer®compatible)
Connect the mains cable.
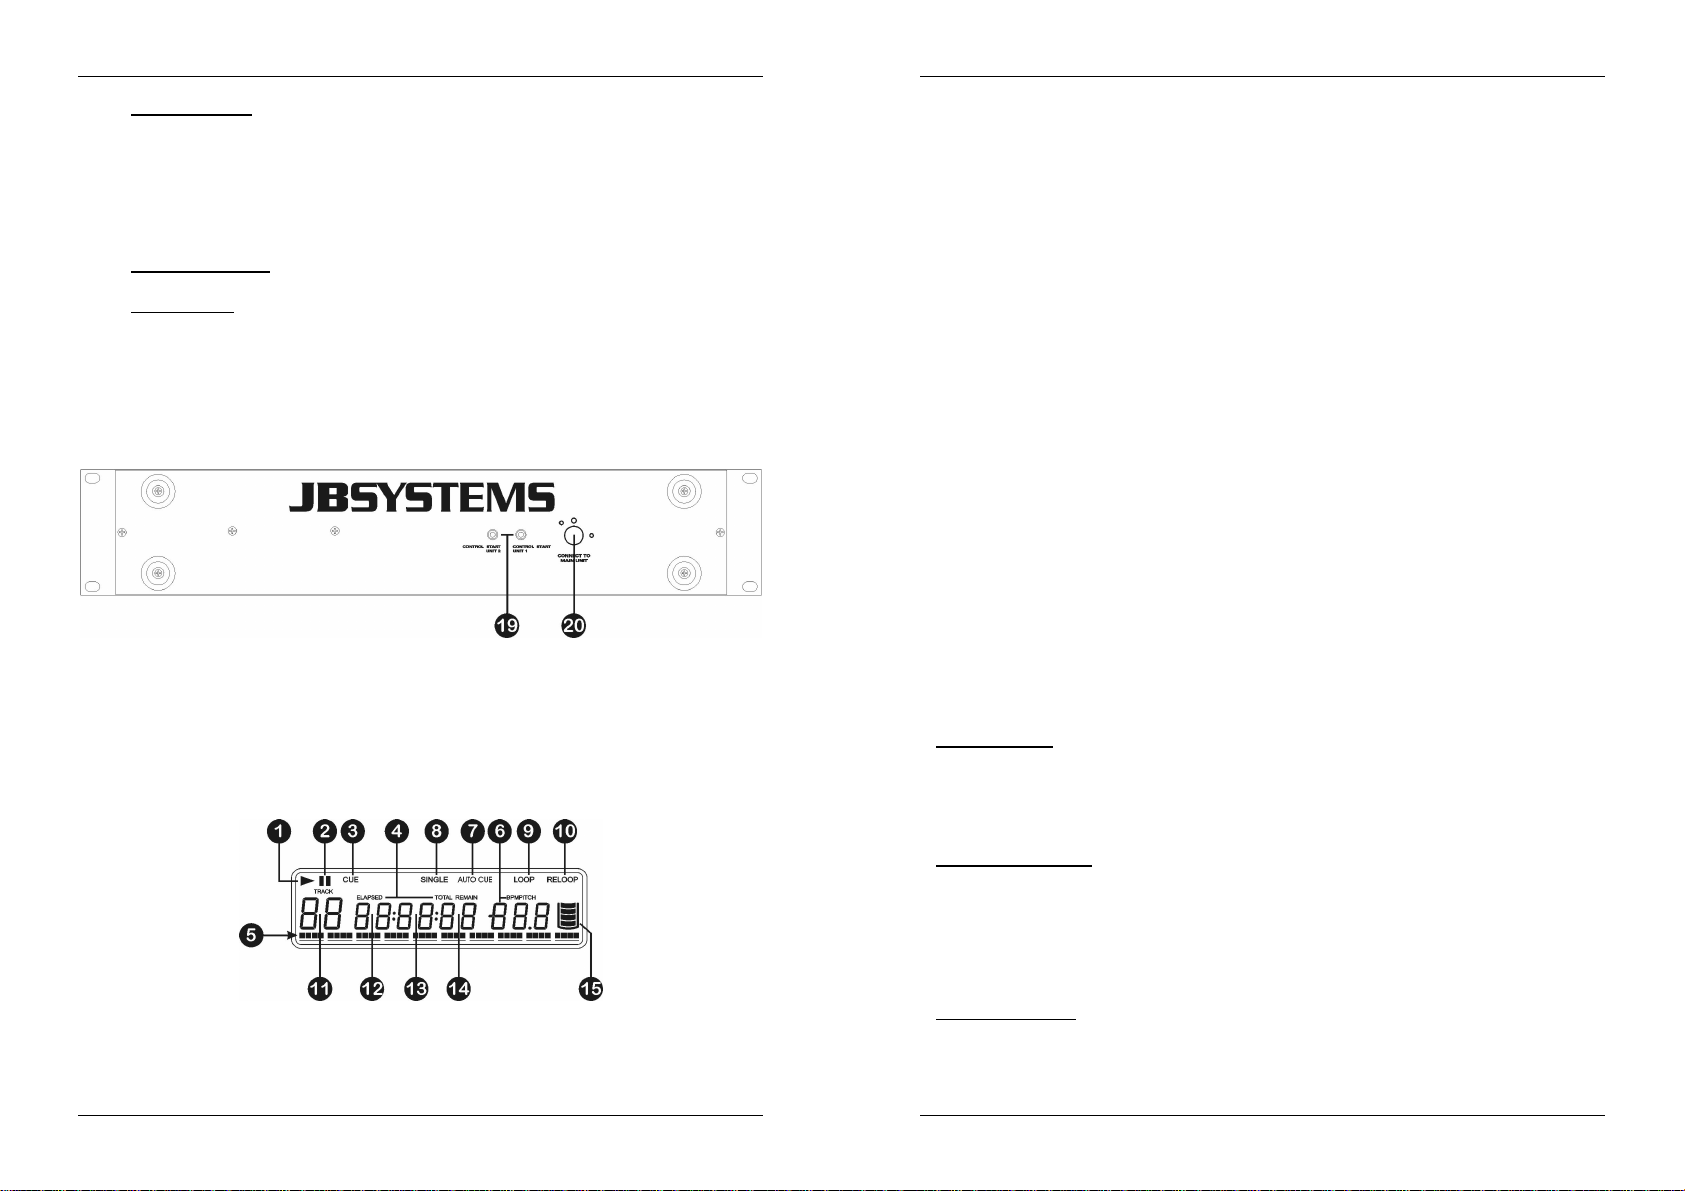
CONTROLS AND FUNCTIONS
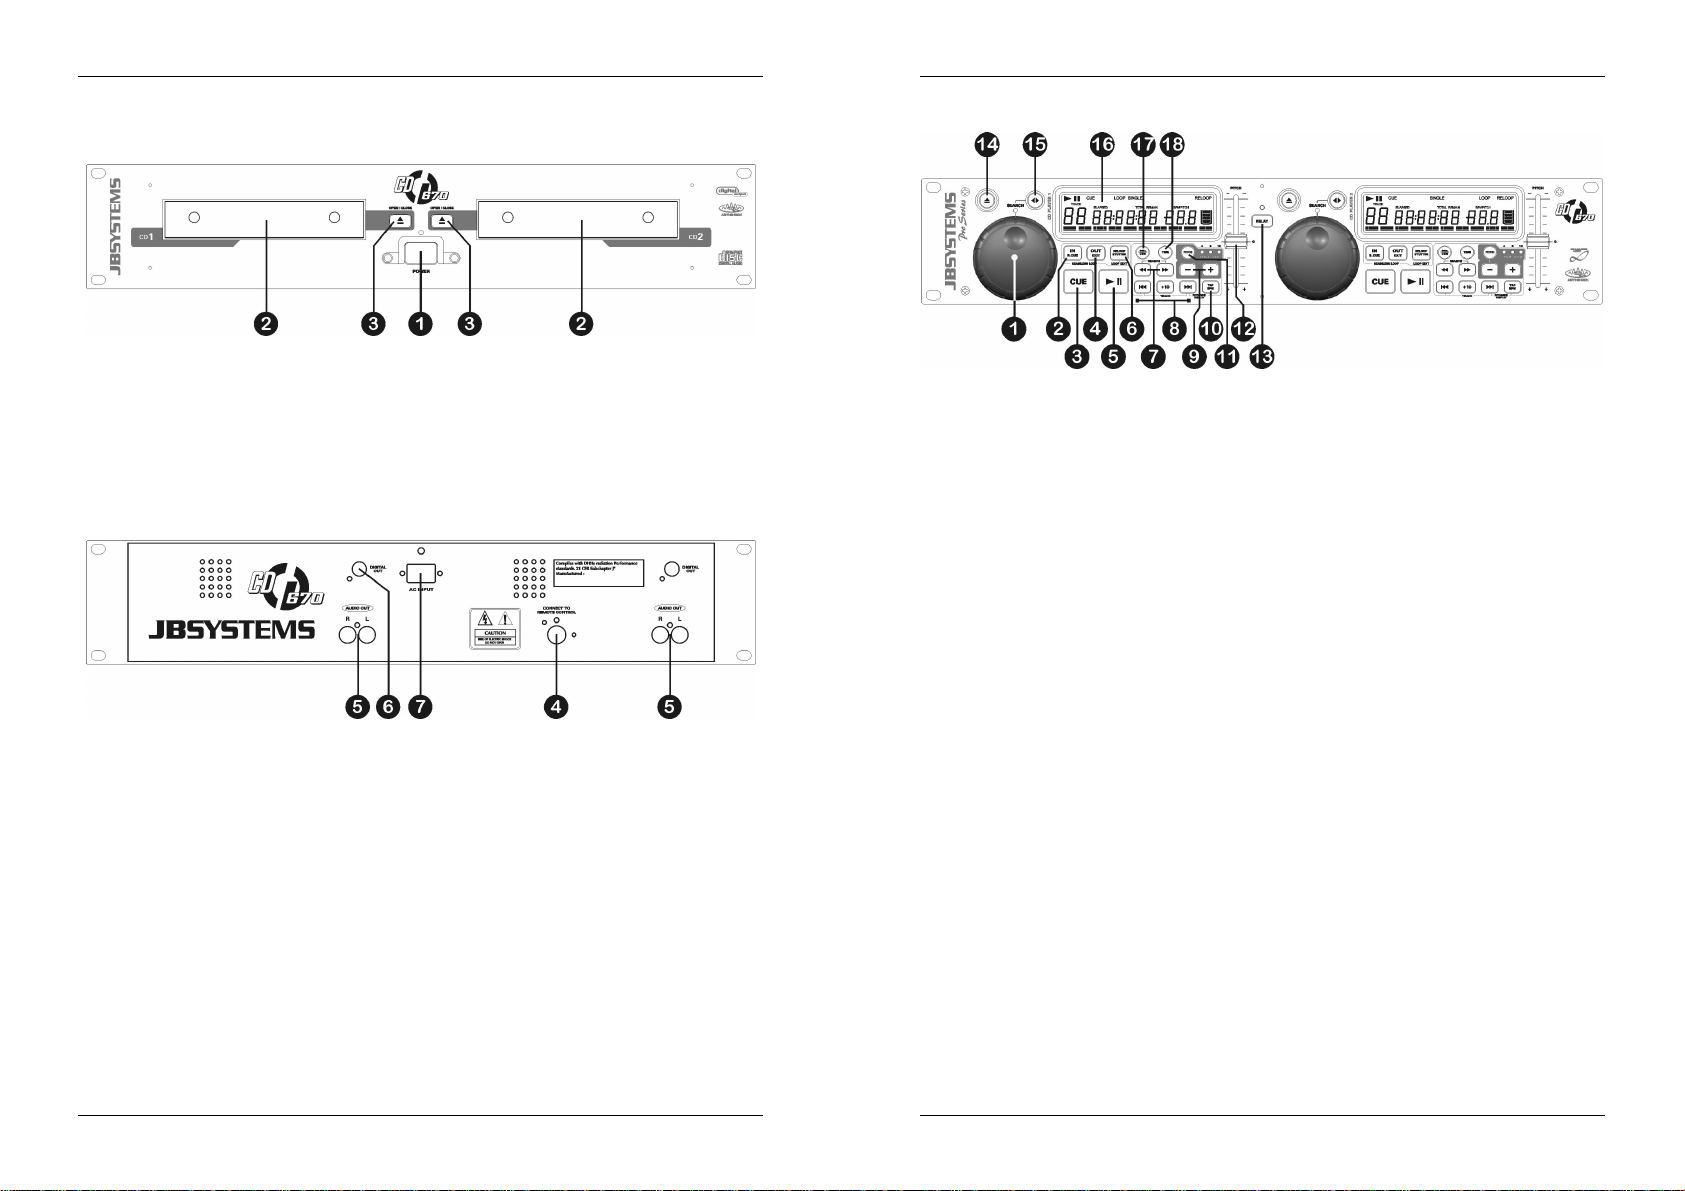
MAIN UNIT - FRONT
1. POWER (Power ON/OFF switch): When the power switch is pressed, the power turns
on and the blueled is lit.
2. DISC TRAY: Use the OPEN/CLOSE buttons to open disc tray and put the CD in place.
If the tray is not closed after 60sec. It will close automatically to prevent damage.
3. OPEN/CLOSE button: press this button to open and close the disc tray. These
buttons are disabled during playback.
MAIN UNIT - REAR:
4. Control connector: use the supplied mini-DIN cable to connect this output to the
control unit.
5. Audio outputs: Output for the audio signals from each player. Use the supplied
cinch/cinch cables to connect these outputs to the CD/line inputs of your mixing unit.
6. Digital out socket: Use this connector to connect the digital signal (S/PDIF format) to
the input of a digital amplifier or digital recorder (ex. Mini disc)
7. Mains input: connect the CD player to the 230V AC mains, using the supplied powercord.
JB SYSTEMS® 3/67 CD670
JB SYSTEMS® 4/67 CD670
Page 5

ENGLISH OPERATION MANUAL
ENGLISH OPERATION MANUAL
CONTROL UNIT:
1. JOG WHEEL: This jog wheel serves 4 functions depending on the mode you are
working in.
The jog wheel acts as a slow frame search (1/75sec) control when the CD is not
playing but either paused or set to a cue point. To set a new cue point, spin the
wheel then press PLAY or LOOP IN when you have determined the proper position.
Press CUE to return to the “CUE POINT”.
If the track is playing and the search function (15) is not active, the jog wheel
temporarily bends the pitch of the music up to +/-10% by rotating the wheel
clockwise to speed it up or counterclockwise to slow it down. The amount of pitch
change is determined by the speed of rotation.
If the search function (15) is active, you will be able to search at a higher speed
through the current track.
When the loop edit function is selected, you can use the jog wheel to edit the
endpoint of the loop.
2. R.CUE/LOOP IN button: Allows you to set the cue point without stopping the
playback (CUE ON THE FLY). This button also sets the beginning of a seamless loop.
When the button contains a cue point it lights up in green.
3. CUE button: Pressing the CUE button during playback provides an immediate return
to the position at which play was started. Playback starts immediately from the
programmed cue point for as long as the CUE button is pressed. The CD player jumps
back to the cue point as soon as the CUE button is released. Also with the unit in
pause mode (Play/Pause button blinks) the jog wheel is used to set a different start
point. By pressing "PLAY/PAUSE" or “R.CUE/LOOP” button followed by "CUE", you
can confirm this new cue point.
4. OUT/EXIT button: Used to set the endpoint when looping music. The player starts to
loop seamlessly until you press this button again to exit. When a loop is programmed
but not active you can also restart the loop. The point where you press the button will
be memorized as the new end point of the loop. In loop edit mode pressing the
OUT/EXIT button stops the loop editing and saves the new loop endpoint.
5. PLAY/PAUSE button: every time you press the PLAY/PAUSE button the CD player
changes from play to pause or from pause to play. The button blinks as long as the
player is set to pause.
6. RELOOP/STUTTER button: This button has 3 functions:
RELOOP: When a loop was programmed and you have hit the OUT/EXIT button,
press the reloop button to enter the loop again. To exit the loop press the OUT/EXIT
button. (intro and end points of the loop are unchanged)
STUTTER: When a loop is playing you can press this button to restart the loop at
once. You can also press this button when a track is not playing in loop. Every time
the RELOOP/STUTTER button is pressed, it will restart the music from the
preprogrammed cue point. The stutter effect adds extra creativity to your
performance.
ENTER EDIT LOOP MODE: When a loop is programmed (LOOP IN and OUT/EXIT
buttons are on) you can enter loop edit mode by pressing the RELOOP/STUTTER
button until the display shows “Ed”.
7. SEARCH buttons: These buttons are used to search at high speed inside a track.
8. TRACK SEARCH Buttons: These buttons are used to select the track to be played.
Forward skip & back skip. Press the +10 button to skip 10 tracks at once.
9. PITCH BEND buttons: The speed rises while the “+ button” is pressed and returns to
the original pitch when the button is released. The speed drops when the “– button” is
pressed and returns to the original pitch when the button is released. These buttons
can be used to synchronize the beats of 2 tracks.
10.TAP button: The CD670 has a full automatic BPM-counter. In some rare cases the
automatic beat counter doesn’t count as it should do (beats are out of the normal
range or there’s simply no beat to detect). In these cases you can help the beat
counter by manually tapping this button to the rhythm of the beat. When the CDplayer is in manual beat mode, the small “BPM” above the BPM-display blinks. When
you select another track the beat counter automatically switched back to automatic
mode. You can also manually switch back to the automatic mode by pressing the TAP
button until the display shows “Auto bPm”. (the small “BPM” above the BPM-display
stops blinking)
Switching between BPM and PITCH display: standard the display is set to BPM
mode but you can also set it to PITCH mode: press the “NEXT TRACK” button shortly
while you keep the TAP button pressed to toggle the 2 display modes.
11.PITCH button: This button is used to turn the speed function on and off. You can also
select 3 different pitch ranges (+/-4%, 8%, 16%): every time you press the “PITCH
BEND –“ button shortly while you keep the PITCH button pressed, you will change the
pitch range. (see pitch range LEDs)
12.PITCH slider: Press the PITCH button, so it is lit. The speed can be changed up to +/-
16% by moving the fader. The speed will not change when the pitch range LEDs, on
the right of the PITCH button are off.
13.RELAY button: When you switch the Relay function on, alternately a track will be
played from both CDs until the relay function is disengaged. You can always put a new
CD in the player that is waiting in standby mode. In this way you can create an endless
program. Perfect for use in pubs etc.
14.OPEN/CLOSE Button: Press to load or eject the disc. Each press will open or close
the disc tray on the transport.
NOTE: Thetray will not openwhenthe disc isplaying,first press thePLAY/PAUSE button.
15.SEARCH MODE button: press this button to toggle the function of the JOG
WHEEL(1) between fast search mode (the yellow LED is lit) and normal mode. The
fast search function is automatically turned off when the JOG WHEEL is not used for
more than 10seconds.
PLAY MODE: normally the JOG WHEEL is used as pitch bend tool to synchronize
the beats of the playing track to another track. When the fast search mode is turned
on, you can use the JOG WHEEL to search very quickly forward/backward inside
the current track.
JB SYSTEMS® 5/67 CD670
JB SYSTEMS® 6/67 CD670
Page 6
ENGLISH OPERATION MANUAL
ENGLISH OPERATION MANUAL
PAUSE MODE: normally the JOG WHEEL is used to search very precisely (1frame
precision) for the exact cue point. When the fast search mode is turned on, you can
use the JOG WHEEL to search very quickly forward/backward inside the current
track.
16.LCD DISPLAY: Shows all important information needed during playback. Refer to the
next chapter for more information.
17.SGL/CTN button: You can choose between “single track mode” and “continuous
play”.
Continuous play: the complete CD will be played without interruption. (mostly used
in pubs)
Single track: player stops at the end of each track and waits at the beginning of the
next track. (mostly used by deejays)
Push the SGL/CNT button for more than 1second to switch between normal and “auto
cue” mode. In “auto cue” mode the player waits at the first music note of each track.
This means that badly indexed CDs will not interfere with the instant start capabilities
of this CD player. This is a very useful feature for deejays!
18.TIME Button: The TIME button switches between elapsed playing time, remaining
time in a selection and total remaining time of the disc. (standard = remaining /track)
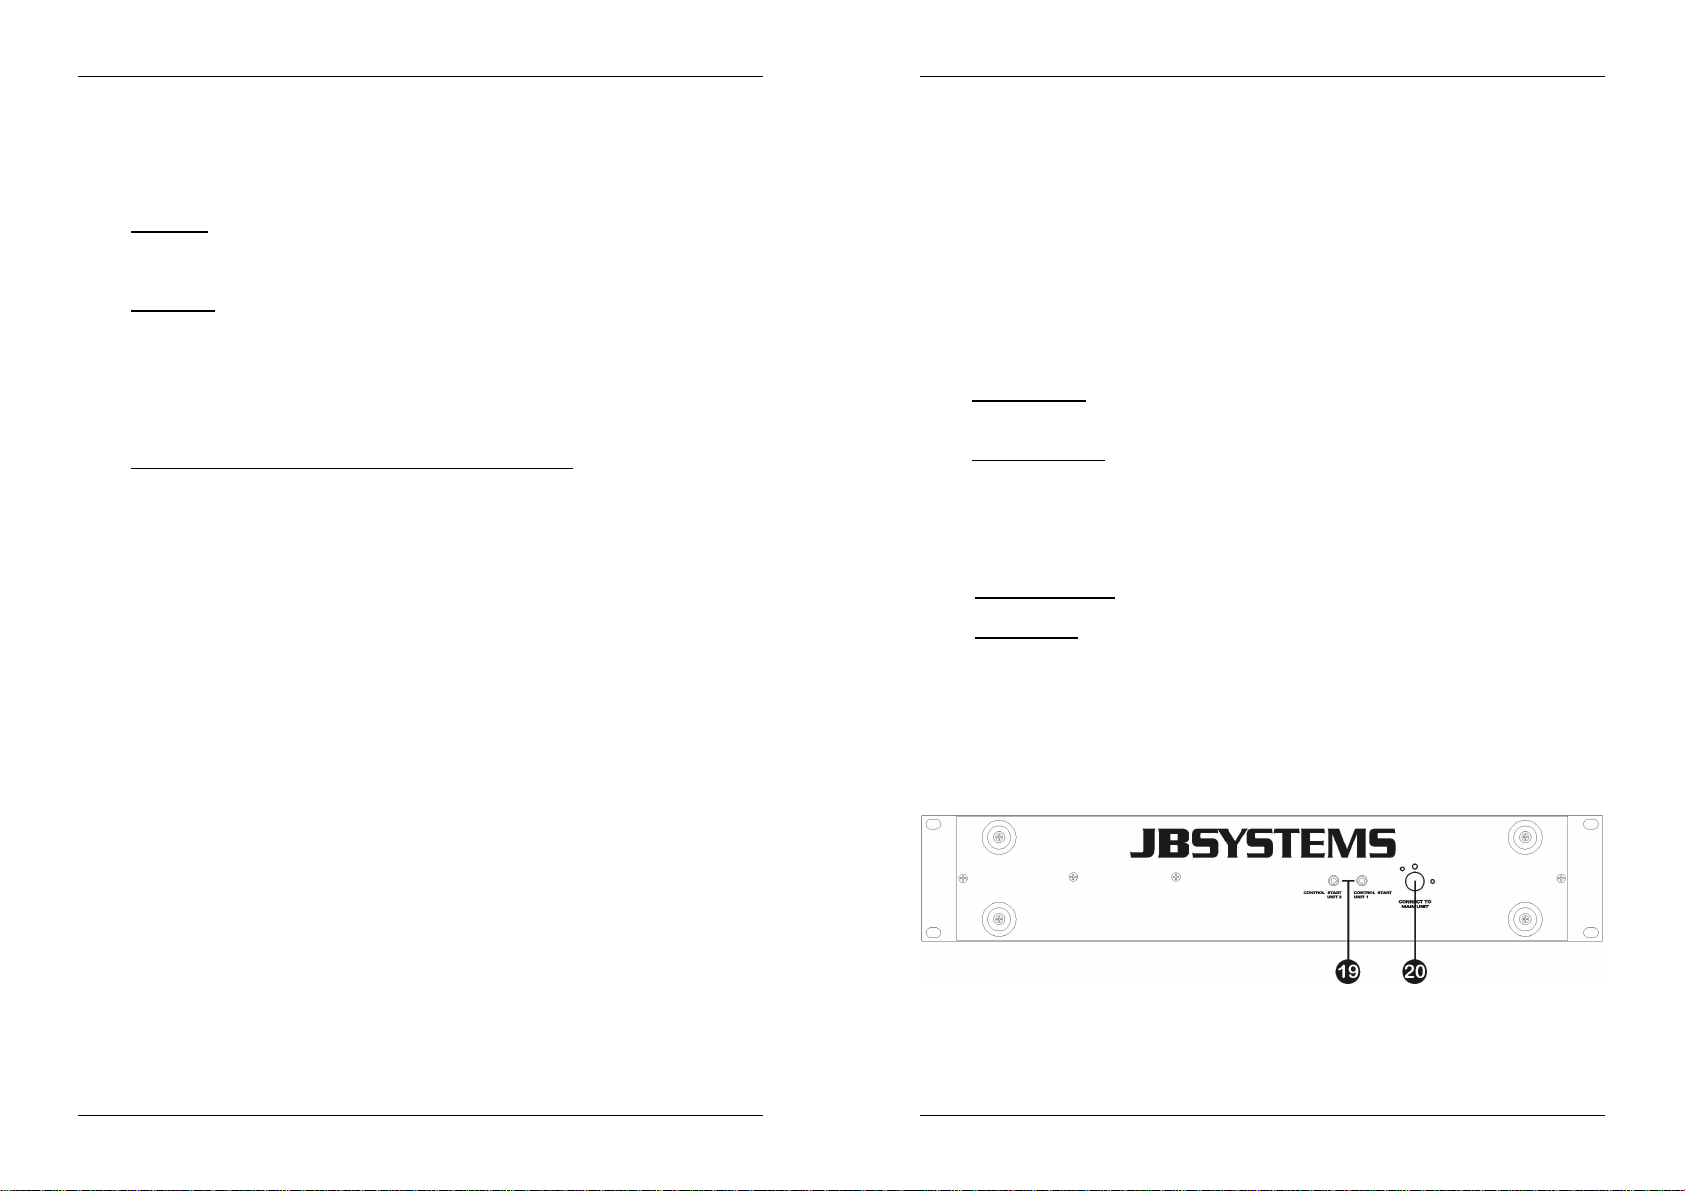
19.FADER START Sockets: If you are using a mixer with fader start function, connect
the player with the fader start of the mixer. Please note that these sockets must never
be connected with any voltage.
Attention: Thisremote controlis onlycompatiblewith certain(Synq®orPioneer®compatible)mixers.
20.CONTROL CONNECTOR: Connect the main unit here, using the supplied mini-DIN
cable.
LCD DISPLAY:
4. ELAPSED, TOTAL REMAIN: indicates that the time shown on the display is the track
elapsed, remaining or total remaining time.
5. TIME BAR: shows either time remaining or elapsed depending on the setting of the
TIME button. Starts flashing at the end of each track to alert the user to take action.
6. BPM/PITCH DISPLAY: (see PITCH button(11) and TAP button(10) to learn how to
switch between the 3 display modes)
BPM indicator ON: the automatic beat counter shows the number of Beats Per
Minute on the display.
BPM indicator BLINKING: the manual beat counter shows the number of Beats
Per Minute you manually “tapped” on the display.
PITCH indicator ON: The display shows the actual speed variation (in %)
compared to zero pitch.
7. AUTO CUE: appears when the “auto cue” function is active. See SGL/CTN-button(17).
8. SINGLE: appears when the unit is set to play just one track at a time. When it is not
shown, the CD plays continuously through all tracks. The function is controlled by the
SGL/CTN button(17).
9. LOOP: shows when a loop is playing.
10.RELOOP: shows when a loop is programmed so you can use the reloop button.
11.TRACK: Shows current track number.
12.MINUTE: Shows “minutes” time information of current track.
13.SECOND: Shows “seconds” time information of current track.
14.FRAME: Shows “frame” time information of current track. (1 frame = 1/75thsec.)
15.ANTI SHOCK AND BUFFER INDICATOR: Shows the status of the anti shock
memory.
HOW TO USE …
Most of the common functions are explained in the previous chapter “controls and
functions” In this chapter we talk about the functions that need a little more explanation.
SOME GENERAL FUNCTIONS:
SLEEP MODE:
The CD player automatically shuts off the transport and laser after about 15 minutes
(when in pause or cue mode). This extends the life of your motor drive and laser. During
sleep mode the display shows the word “SLEEP”. To wake up the player, just press the
cue or play button, the display turns to normal and is ready to receive instructions.
1. PLAY: appears while the unit is playing a CD.
2. PAUSE: appears while the player is in pause or cue mode.
3. CUE: appears when the CD-player wait at the cue point.
JB SYSTEMS® 7/67 CD670
RELAY FUNCTION:
First open the 2 faders of the CD inputs on your mixer. Press the RELAY button to
enable the relay function, the relay LED turns on. Put a disc in both players and start
playback on one of the units. Alternately a track will be played from both units until the
relay function is disengaged. You can always put a new CD in the player that is waiting
in pause. In this way you can create an endless program, perfect for use in pubs etc.
NOTE: byswitchingonthe relayfunctionyou automatically putbothplayers insinglemode.
PITCH BENDING:
This function is used to synchronize the beats of two tracks. This can be done in two
ways:
JB SYSTEMS® 8/67 CD670
Page 7

ENGLISH OPERATION MANUAL
ENGLISH OPERATION MANUAL
PITCH BEND buttons: The speed increases or decreases respectively as long as
the PITCH BEND+ or PITCH BEND- buttons are pressed.
JOG WHEEL: During play mode the JOG WHEEL will temporarily bend the pitch of
the music by turning the JOG WHEEL clockwise to speed up or counterclockwise to
slowdown. The rotation speed the JOG WHEEL determines the percent of pitch
bend.
PLAYING/RECORDING CD-R and CD-RW:
Apart from normal audio CD’s the CD670 can play both CD-R (CD recordable) and CDRW (CD rewriteable). Please note that you should always use the “disc at once” and
“track at once” disc writing options! Although the CD670 is capable of reading CD-R and
CD-RW recorded at higher speeds, we suggest not using recording speeds more than
x12 to increase readability. Always buy good quality brands for CD-R and CD-RW!
If the disc is multi session, it will only play the first session.
ABOUT LOOPS:
CREATE A LOOP:
While a track is playing, press R.CUE/LOOP IN button to program the starting point of
the loop. Now press the OUT/EXIT button to program the endpoint of the loop. The
seamless loop starts playing at once. (With some practice you will be able to create
perfect loops!) While the loop is playing, you can press the OUT/EXIT button again to
exit the loop and continue the rest of the track.
It is possible to program a new loop, even when the current loop is still playing. While the
loop is playing, simply press the R.CUE/LOOP IN button to set the starting point of the
new loop. Now enter the endpoint by pressing the OUT/EXIT button. Your new loop is
programmed and playing.
RESTART A LOOP:
This can be done in 3 ways:
When a loop is programmed and you left it by pressing the OUT/EXIT button, just
press RELOOP to restart the loop.
When a loop is programmed and you left it by pressing the OUT/EXIT button, just
press OUT/EXIT again to restart the loop. The point where you pressed OUT/EXIT is
now programmed as the new endpoint of the loop.
When the loop is still playing, press the RELOOP button to restart the loop
immediately. You can repeat this several times to create a “Stutter” effect.
SPECIFICATIONS
PowerSupply: AC 230 V, 50Hz
PowerConsumption: 21W
Outputlevel: 2,0Vrms +/0.5dB @ 1kHz, 0dB
Frequencyresponse: 20-20.000Hz(+/-0,4dB)
THD + noise (20kHz LPF): 0,01%@ 1kHz,0dB
S/N Ratio(IHF-A): >92dB@ 1kHz,0dB
Short accesstime(next track): <2sec
Long access time(track1 20): <4sec
Laser Pickup: Sony KSM-213CCM 3spot detection 780nm
Electronictracking: Full automatic digitaltracking.
Digitaloutput: 0,5Vpp +/-0,1 (load = 75Ω)
Operationtemperature: 5°C to 35°C
Humidity: 25 to 85%RH (non condensing)
Dimensions: Main unit 482(W) x 88,8(H) x 262,5(D)mm
Control unit 482(W) x 88,8(H) x94(D)mm
Weight: Main unit 5,0kg
Control unit 1,8kg
Every information issubject tochange withoutprior notice
You can download thelatest version of thisuser manualon our website: www.beglec.com
EDIT A LOOP:
When a loop is programmed, press the RELOOP/STUTTER button for about 2 seconds
to enter “loop edit” mode. While the loop is seamlessly playing, the display shows the
time information of the loop endpoint. Use the jog wheel to set the new loop endpoint. To
make things very easy you can hear your modifications to the loop endpoint
continuously. When the loop is perfect, press the LOOP OUT button to save the new
loop endpoint.
JB SYSTEMS® 9/67 CD670
JB SYSTEMS® 10/67 CD670
Page 8
FRANCAIS MODE D’EMPLOI
MODE D’EMPLOI
Nous vous remercions d’avoir acheté ce produit JB Systems®. Veuillez lire ce mode
d’emploi très attentivement afin de pouvoir exploiter toutes les possibilités de cet appareil.
CARACTERISTIQUES
Cet appareil ne produit pas d’interférences radio. Il répond aux exigences nationales et
européennes. La conformité a été établie et les déclarations et documents correspondants
ont été déposés par le fabricant.
Démarrage Memory Start ultrarapide comprenant la fonction « stutter »
Boucle parfaite avec reloop et fonction « stutter »
Fonction d’édition de boucle parfaite en temps réel!
Compteurs de tempo (beat counters) entièrement automatiques comprenant une
fonction TAP supplémentaire (battement manuel du tempo)
Mémoire Anti-choc de 20 secondes
Fonction Auto Cue (-48dB)
Programmation des points CUE en temps réel (“Cue volant”)
Portée variation Pitch: +/-4% +/-8% +/-16%
Pitch bend : changement temporaire de la vitesse à l’aide de touches et de la roue Jog
Wheel pour des mixages parfaits
Lecture de CD-DA, CD-R, CD-RW
Fader start, fader stop, (back cue),
Grands écrans LCD utilisant la technologie « super twist » pour une visibilité impeccable
Touches illuminées de bonne qualité
2 Grandes roues (jog wheels) pour la fonction « pitch bend » et une recherche ultra
précise d’un endroit sur le disque jusqu’à 1/75ème de seconde.
Relay Play (lecture alternative des 2 decks)
Lecture d’une seule plage où continue du CD
Choix entre l’affichage du temps écoulé, du temps restant de la plage ou du temps
restant du disque entier
Sortie S/PDIF digital audio RCA coaxiale
Transport Protection de 60 secondes
Fonction Sleep (prolonge la durée de vie du laser)
FRANCAIS MODE D’EMPLOI
AVANT L’UTILISATION
Quelques instructions importantes:
Avant d’utiliser cet appareil, assurez-vous de l’absence de dommage lié au transport. En
cas d’endommagement, n’utilisez pas l’appareil et contactez le vendeur.
Important:
primordial que l’utilisateur suive les instructions de sécurité et avertissements inclus dans
ce manuel. La garantie ne s’applique pas en cas de dommage lié à une utilisation
incorrecte. Le vendeur ne prend pas la responsabilité des défauts ou de tout problème
résultant du fait de n’avoir pas tenu compte des mises en garde de ce manuel.
Conservez ce manuel dans un endroit sûr pour toute consultation future. Si vous vendez
l’appareil, assurez-vous d’y joindre ce manuel également.
Afin de protéger l’environnement, merci de recycler les emballages autant que possible.
Vérifiez le contenu:
Vérifiez si la boite contient les articles suivants :
Lecteur CD
Panneau de contrôle
Mode d’emploi
Câble d’alimentation
Une paire de câbles aux raccords cinch
Câble mini-DIN
Une paire de câbles de démarrage « fader start » (mini-jack/mini-jack)
Cet appareil a quitté notre usine en parfaite condition et bien emballé. Il est
INSTRUCTIONS DE SECURITE:
CAUTION
l’appareil que vous pouvez remplacer vous-même. Confiez l’entretien uniquement
aux techniciens qualifiés.
La flèche dans un triangle met l'utilisateur en garde de la présence de haut
voltage sans isolation dans l'appareil qui peut causer un risque d'électrocution.
Un point d'exclamation dans un triangle prévient de la présence d'instructions de
fonctionnement et de maintenance se trouvant dans le manuel, fourni avec
l'appareil.
Ce symbole signifie : uniquement pour usage à l'intérieur
ATTENTION: afin de réduire le risque
d’électrocution, n’enlevez jamais le couvercle de
l’appareil. Il n’y a aucune pièce à l’intérieur de
JB SYSTEMS® 11/67 CD670
Ce symbole signifie : Lire le mode d’emploi.
Afin d’éviter tout risque d’incendie ou de choc électrique, ne pas exposer cet appareil à
la pluie ou l’humidité.
Pour éviter la formation de condensation à l’intérieur de l’appareil, patientez quelques
minutes pour laisser l’appareil s’adapter à la température ambiante lorsqu’il arrive dans
une pièce chauffée après le transport. La condensation empêche l’unité de fonctionner
en performance optimale et peut même causer des dommages.
Cette unité est destinée à une utilisation à l’intérieur uniquement.
JB SYSTEMS® 12/67 CD670
Page 9

FRANCAIS MODE D’EMPLOI
FRANCAIS MODE D’EMPLOI
Ne pas insérer d’objet métallique ou verser un liquide dans l’appareil. Aucun objet rempli
de liquides, tels que des vases, ne sera placé sur cet appareil. Risque de choc électrique
ou de dysfonctionnement. Si un corps étranger est introduit dans l’unité, déconnectez
immédiatement de la source d’alimentation.
Aucune source de flamme nue, telle que les bougies allumées, ne devrait être placée sur
l'appareil.
Ne pas couvrir les ouvertures de ventilation, un risque de surchauffe en résulterait.
Ne pas utiliser dans un environnement poussiéreux et nettoyez l’unité régulièrement.
Ne pas laisser l’unité à portée des enfants.
Les personnes non expérimentées ne doivent pas utiliser cet appareil.
La température ambiante maximum d’utilisation de l’appareil est de 45°C. Ne pas
l’utiliser au-delà de cette température.
La distance minimum autour del'appareil pour une ventilation suffisante est 2cm.
Débranchez toujours l’appareil si vous ne l’utilisez pas de manière prolongée ou avant
d’entreprendre des réparations.
Les installations électriques ne peuvent être faites que par du personnel qualifié et
conformément aux régulations de sécurité électrique et mécanique en vigueur dans
votre pays.
Assurez-vous que le voltage de la source d’alimentation de la zone dans laquelle vous
vous trouvez ne dépasse pas celui indiqué à l’arrière de l’appareil.
La prise sera toujours accessible pour que le cordon secteur puisse être enlevé à
chaque moment.
Le cordon d’alimentation doit toujours être en condition parfaite. Mettez immédiatement
l’unité hors tension si le cordon est écrasé ou endommagé.
Ne laissez jamais le cordon d’alimentation entrer en contact avec d’autres câbles !
Quand l’interrupteur principal est dans la position OFF, cet appareil n'est pas
complètement isolé du courant 230V!
Utilisez toujours les câbles appropriés et certifiés lorsque vous installez l’unité.
Pour éviter tout choc électrique, ne pas ouvrir l’appareil. En dehors du fusible principal, il
n’y a pas de pièces pouvant être changées par l’utilisateur à l’intérieur.
Ne jamais
fusible endommagé par un fusible de même type et spécifications électriques !
En cas de problèmes de fonctionnement sérieux, arrêtez toute utilisation de l’appareil et
contactez votre revendeur immédiatement.
Utilisez l’emballage d’origine si l’appareil doit être transporté.
Pour des raisons de sécurité, il est interdit d’apporter toute modification à l’unité non
spécifiquement autorisée par les parties responsables.
CONSEILS D’INSTALLATION:
Placer ou utiliser l’appareil pendant de longues périodes à proximité de sources de
chaleur tel des amplificateurs, des Spot’s, etc. peut entraver le bon fonctionnement de
l’appareil et peut même l’endommager.
L’appareil peut être monté dans des racks 19 pouces. Fixez l’appareil en utilisant les 4
trous à vis qui se trouvent dans le panneau frontal. Utilisez toujours des vis au diamètre
adapté. (les vis ne sont pas fournies avec l’appareil) Evitez au maximum les chocs et les
vibrations pendant le transport.
Si l’appareil est fixé dans un rack ou un flight case, faites attention à ce qu’il soit bien
ventilé, afin d’assurer l’évacuation de la chaleur de l’appareil.
réparer ou court-circuiter un fusible. Remplacez
systématiquement
un
Pour éviter la formation de condensation à l’intérieur de l’appareil, laissez le s’adapter à
la température ambiante si vous l’installez dans un endroit chaud après l’avoir transporté
à l’extérieur. La condensation peut parfois empêcher l’appareil de fonctionner
correctement.
Choisissez avec prudence l’endroit ou vous allez placer l’appareil. Evitez la présence de
sources de chaleur. Evitez des endroits assujettis aux vibrations, des endroits
poussiéreux ou humides.
L’appareil fonctionnera correctement si il est installé sur une surface avec une
inclinaison maximale de 15°.
Manipulez vos CD’s prudemment, ne les touchez pas avec des mains mouillées ou
sales.
Les disques poussiéreux doivent être nettoyés avec un chiffon et un produit prévus pour
cet usage.
N’utilisez jamais des CD’s qui sont fortement endommagés (griffés ou déformés) Ils
peuvent endommager votre lecteur.
Pour éviter des incendies ou l’électrocution, n’exposez jamais l’appareil à la pluie où a
l’humidité.
Pour éviter l’électrocution, n’ouvrez pas le couvercle de protection. Si un problème
surgit, contactez votre revendeur.
N’insérez jamais d’objets métalliques et ne renversez jamais de liquide dans l’appareil.
L’électrocution ou le mal fonctionnement peuvent en résulter.
Ce lecteur CD utilise des lasers semi-conducteurs. Pour vous permettre de profiter au
maximum de votre musique par un fonctionnement stable de l’appareil, il est
recommandé de l’utiliser dans une pièce chauffée entre 5°C et 35°C.
Le lecteur CD ne devrait être réglé ou réparé que par des personnes qualifiées du
service après vente
Cet appareil peut causer des interférences à la réception des radios ou télévisions
NETTOYAGE DU LECTEUR CD:
Nettoyez l’appareil à l’aide d’un chiffon doux, légèrement humide. Evitez d’introduire de
l’eau à l’intérieur de l’appareil. N’utilisez pas de produits volatiles tels le benzène ou le
thinner qui peuvent endommager l’appareil.
CONNECTIONS
Connectez le câble mini-DIN entre le lecteur CD (chargeur CD) et le panneau de
contrôle.
Utilisez les câbles cinch pour relier les sorties audio du lecteur CD aux entrés CD de
votre table de mixage.
Connectez également les 2 câbles “fader start” si votre table de mixage possède des
connecteurs « fader start ». (compatible Synq® ou Pioneer®)
Connectez le câble d’alimentation.
JB SYSTEMS® 13/67 CD670
JB SYSTEMS® 14/67 CD670
Page 10
FRANCAIS MODE D’EMPLOI
FRANCAIS MODE D’EMPLOI
CONTRÔLES ET FONCTIONS
LECTEUR – FACE AVANT:
1. Power (Interrupteur ON/OFF): Quand l’interrupteur est enfoncé, l’appareil est mis
sous tension et le led bleu est allumé.
2. Chargeur CD: Utilisez les touches OPEN/CLOSE pour ouvrir le chargeur et pour
installer le CD. Si le tiroir n’est pas refermé après 60sec il se fermera automatiquement
pour éviter d’être endommagé.
3. Touche OPEN/CLOSE: appuyez sur cette touche pour ouvrir ou fermer le chargeur
CD. Ces touches sont mises hors d’usage pendant la lecture.
LECTEUR – FACE ARRIÈRE:
4. Connecteur de contrôle: utilisez le câble mini-DIN fourni avec l’appareil pour relier
cette sortie au panneau de contrôle.
5. Sorties Audio: Sortie du signal audio de chaque lecteur CD. Utilisez les câbles
cinch/cinch fournis avec l’appareil pour relier ces sorties aux entrées CD/line de votre
table de mixage.
6. Connecteur Digital out: Utilisez ce connecteur pour relier le signal digital (format
S/PDIF) à l’entrée d’un amplificateur digital ou d’un enregistreur digital (p.ex. Mini disc)
7. Entrée secteur: connectez le lecteur CD au réseau 230V AC, en utilisant le câble
d’alimentation fourni avec l’appareil.
CONTRÔLEUR – FACE AVANT:
1. JOG WHEEL (LA ROUE JOG): Cette roue contrôle 4 fonctions, selon le mode dans
lequel vous travaillez.
La roue « jog » vous permet de rechercher lentement un “frame” (1/75sec) quand le
CD n’est pas en mode lecture, mais en pause ou sur un point « CUE ». Pour définir
un nouveau point “CUE”, tournez la roue puis appuyez sur PLAY ou sur
R.CUE/LOOP IN quand vous avez trouvé l’endroit exact pour installer le nouveau
point CUE. Appuyez sur CUE pour retourner au point “CUE”.
Pendant la lecture du CD (la fonction « recherche rapide»(15) n’est pas activée),
en tournant la roue dans le sens des aiguilles d’une montre, la roue “jog” augmente
temporairement la vitesse de lecture jusqu’à +/-10%. Tournez dans le sens inverse
des aiguilles d’une montre pour ralentir la vitesse de lecture temporairement. Le
changement de vitesse de lecture est déterminé par la vitesse de rotation de la
roue.
Quand la fonction « recherche rapide » (15) est activée, vous pouvez chercher à
grande vitesse dans laplage actuelle.
En mode « édition de boucle » vous utilisez la roue « jog » pour définir un nouveau
point de fin de boucle.
2. Touche R.CUE/LOOP IN: Vous permet de définir le point CUE sans arrêter la lecture
(CUE VOLANT). Cette touche définit également le début d’une boucle sans fin
(seamless loop) Quand la touche contient un point CUE, elle s’allumera en vert.
3. Touche CUE: Si vous appuyez sur la touche CUE pendant la lecture vous obtiendrez
un retour immédiat vers la position de départ de la lecture initiale. La lecture démarre
immédiatement à partir du point de départ programmé (CUE point) et continuera tant
que vous tenez cette touche enfoncée. Le lecteur CD retourne à nouveau au point de
départ « CUE point » dès que vous relâchez la touche CUE. Si le lecteur est en mode
pause (la touche Play/Pause clignote) la roue “jog wheel” peut être utilisée pour définir
un nouveau point de départ. En appuyant sur la touche "PLAY/PAUSE" ou
« R.CUE/LOOP IN » puis sur la touche "CUE", vous pouvez confirmer ce nouveau
point de départ.
4. Touche OUT/EXIT: est utilisée pour déterminer la fin de la boucle pendant la création
de « loops ». Le lecteur CD reproduira la boucle sans fin jusqu'à-ce que vous appuyez
a nouveau sur cette touche pour sortir de la boucle et continuer la lecture normale.
Quand une boucle est programmée mais pas activé vous pouvez également
redémarrer la boucle avec cette touche. L’endroit où vous appuyez sur la touche
pendant la lecture sera mémorisé comme nouveau point de sortie de la boucle.
Chaque fois que vous appuyez sur la touche OUT/EXIT pendant que vous êtes en
JB SYSTEMS® 15/67 CD670
JB SYSTEMS® 16/67 CD670
Page 11
FRANCAIS MODE D’EMPLOI
FRANCAIS MODE D’EMPLOI
mode d’édition de boucle, vous sortez du mode d’édition de boucle et vous sauvez en
même temps le nouveau point de sortie de boucle.
5. Touche PLAY/PAUSE: chaque fois que vous appuyez sur la touche PLAY/PAUSE le
lecteur CD passera du mode lecture au mode pause ou du mode pause au mode
lecture. La touche clignote aussi longtemps que le lecteur CD est en mode pause.
6. Touche RELOOP/STUTTER: Cette touche a 3 fonctions:
RELOOP: quand une boucle à été programmée et que vous avez appuyé sur la
touche OUT/EXIT, appuyez sur la touche reloop pour réactiver la boucle. Pour
sortir de la boucle appuyez sur la touche OUT/EXIT. (les points de départ et de
sortie de la boucle restent inchangés)
STUTTER: Quand une boucle est activée (en lecture) vous pouvez appuyer sur
cette touche pour redémarrer instantanément la boucle à partir de son point de
départ. Vous pouvez également appuyer sur cette touche quand une plage n’est
pas reproduite en boucle. Chaque fois que vous appuyez sur la touche
RELOOP/STUTTER, vous redémarrez la musique à partir de son point de départ
programmé.
L’effet “stutter” (bégaiement) vous permet d’ajouter une touche de créativité
supplémentaire à votre prestation.
ENTRER DANS LE MODE D’EDITION DE BOUCLE: quand une boucle est
programmée (les touches LOOP IN et OUT/EXIT sont allumées) vous pouvez
entrer dans le mode d’édition de boucle en appuyant sur la touche
RELOOP/STUTTER jusqu’à ce que “Ed” soit affiché à l’écran.
7. Touches SEARCH : utilisées pour chercher un point spécifique à une vitesse élevée.
8. Touches TRACK SEARCH: Ces touches sont utilisées pour sélectionner la plage du
CD qui doit être lue. Saut en avant & saut en arrière. Appuyez sur la touche +10 pour
sauter 10 plages à la fois.
9. Touches PITCH BEND: La vitesse augmente si vous appuyez sur la touche “+” et
retourne à sa vitesse initiale dès que vous la relâchez. La vitesse de lecture diminue si
vous appuyez sur la touche “– ” et retourne à sa vitesse initiale dès que vous la
relâchez. Ces touches peuvent être utilisées pour synchroniser le tempo des 2
lecteurs.
10. Touche TAP: Le CD670 possède un compteur automatique de BPM. Dans quelques
rares cas il se pourrait que le compteur automatique n’arrive pas à calculer le tempo
comme il devrait le faire (tempo irrégulier ou simplement pas de battement à détecter).
Dans ces cas vous pouvez aider le compteur de tempo en tapant manuellement sur
cette touche au rythme de la musique. Quand le compteur est en mode manuel le mot
« BPM » clignote, au-dessus de l’afficheur BPM. En choisissant une autre plage, le
compteur se mettra à nouveau en mode automatique. Vous pouvez aussi mettre vousmême le compteur en mode automatique: appuyez sur la touche « TAP » jusqu'à ce
que l’écran affiche « Auto bPm ». (le mot « BPM » ne clignotera plus)
Choisir entre affichage BPM et PITCH : normalement l’écran affiche le BPM mais
vous pouvez alterner entre l’affichage « PITCH » et « BPM » en appuyant sur la
touche « NEXT TRACK »(8) pendant que vous tenez la touche « TAP » enfoncée.
11. Touche PITCH : Cette touche est utilisée pour activer ou désactiver la fonction de
réglage de vitesse. Vous pouvez aussi choisir une des 3 échelles de variation de la
vitesse (+/-4%, 8%, 16%) : Appuyez sur la touche « PITCH BEND - » (9) pendant que
vous tenez la touche « PITCH » enfoncée. (regardez les LEDs « Pitch range» pour
vérifier quelle échelle de variation de vitesse vous avez sélectionnée)
12. Curseur PITCH: Appuyez sur la touche PITCH, pour l’allumer. La vitesse de lecture
peut être modifiée jusqu’à +/-16% en bougeant le curseur. La vitesse ne changera pas
si la touche PITCH est désactivée (LEDs « pitch range» sont éteints).
13. Touche RELAY: Si vous engagez la fonction Relay, une plage de chaque lecteur CD
sera reproduite alternativement, jusqu’à ce que cette fonction sera désengagée. Vous
pouvez toujours changer le CD dans le lecteur qui est en attente (stand-by). De cette
façon vous pouvez créer un programme sans fin. L’idéal pour l’utilisation dans les
tavernes, etc.
14. Touches OPEN/CLOSE: Appuyez sur ces touches pour éjecter ou charger un CD.
Chaque fois que vous appuyez sur cette touche le tiroir CD s’ouvrira ou se fermera.
REMARQUE: Le tiroir ne s’ouvrira pas si l’appareil est en train de lire le CD, appuyez d’abord sur la
touchePLAY/PAUSE pour arrêterla lecture.
15. Touche SEARCH MODE : appuyez sur cette touche pour changer la fonction de la
roue JOG en « recherche rapide » (le LED jaune sera allumé). La fonction s’arrête
automatiquement quand la roue JOG n’est pas utilisée pendant environ 10secondes.
MODE PLAY : normalement la roue JOG est utilisée pour synchroniser le rythme
(beat) de deux plages. Quand la fonction « recherche rapide » est allumée, vous
pouvez chercher très rapidement dans la plage.
MODE PAUSE : normalement la roue JOG est utilisée pour chercher très
précisément (précision : 1/75 seconde!) un point CUE. Quand la fonction
« recherche rapide » est allumée, vous pouvez chercher très rapidement dans la
plage.
16. Ecran LCD: Affiche toutes les informations importantes, nécessaires pendant la
lecture du CD. Voyez le chapitre suivant pour plus d’informations à ce sujet.
17. SGL/CTN: Vous pouvez choisir entre “single track mode” et “continuous play”.
Continuous play: Le CD complet sera reproduit sans interruption. (le plus souvent
utilisé dans les tavernes)
Single track: La lecture s’arrête à la fin de la plage et attends au début de la plage
suivante. (le plus souvent utilisé par les deejays)
Appuyez sur la touche SGL/CNT pendant plus d’une seconde pour passer du mode
normal au mode “auto CUE” ou inversement. En mode “auto CUE” le lecteur attendra
à la première note musicale de la plage. Ce qui veut dire que les CD’s mal indexés ne
poseront pas de problèmes aux capacités de démarrage instantané de ce lecteur CD.
Ceci est une caractéristique très utile pour les deejays!
18. Touche TIME: La touche TIME vous permet de choisir entre l’affichage du temps de
lecture écoulé (elapsed), le temps restant d’une plage (remaining/track) et le temps
total restant du disque (total remaining) (standard = remaining /track)
19. Prises FADER START: Si vous utilisez une table de mixage qui possède la fonction
fader start, connectez le lecteur CD au fader start de la table de mixage. Ne reliez
jamais ces connecteurs à une source de courant.
Attention: cette commande à distance est uniquement compatible avec certaines tables de mixage
(Synq®ou Pioneer®compatible).
JB SYSTEMS® 17/67 CD670
JB SYSTEMS® 18/67 CD670
Page 12

FRANCAIS MODE D’EMPLOI
FRANCAIS MODE D’EMPLOI
20. Connecteur CONTROL: Reliez cette sortie au lecteur CD en utilisant le câble miniDIN, fourni avec l’appareil.
ECRAN LCD:
1. PLAY: apparaît quand la lecture du CD est activée.
2. PAUSE: apparaît pendant que le lecteur est en mode pause ou CUE.
3. CUE: apparaît quand le lecteur est en attente au point CUE principal.
4. ELAPSED, TOTAL REMAIN: indique si le temps affiché à l’écran est le temps écoulé
(elapsed), le temps restant total du disque (total) ou le temps restant de la plage
(remain).
5. TIME BAR: montre soit le temps restant soit le temps écoulé, selon l’option choisie
avec la touche TIME. Cette barre se met à clignoter à la fin de chaque plage pour
prévenir l’utilisateur qu’il est grand temps de passer à l’action.
6. Ecran BPM/PITCH: 3 modes sont disponibles. Consultez les descriptions des touches
PITCH (11) et TAP (10) pour apprendre comment changer l’affichage:
Indicateur BPM allumé: les mesures du compteur automatique sont affichées.
Indicateur BPM clignote: le résultat de votre mesure manuel est affiché.
Indicateur pitch est allumé: la déviation de vitesse actuelle (en %) est affichée.
7. AUTO CUE: apparaît quand la fonction “auto CUE” est activée. voir touche
SGL/CTN(17).
8. SINGLE: apparaît quand l’appareil est réglé pour jouer uniquement une plage à la fois.
Quand Single n’est pas affiché, le CD sera lu entièrement sans interruption. La fonction
est controlée par la touche SGL/CTN(17).
9. LOOP : s’allume quand le lecteur joue une boucle.
10.RELOOP: s’allume quand une boucle est programmée et la touche RELOOP est donc
accessible.
11.TRACK: vous montre la plage en cours d’exécution.
12.MINUTE: Vous montre les “minutes” de la plage en cours d’exécution.
13.SECOND: Vous montre les “secondes” de la plage en cours d’exécution.
14.FRAME: vous montre le “frame” de la plage en cours d’exécution. (1 frame = 1/75
sec.)
15.INDICATEUR ANTI SHOCK ET BUFFER: affiche l’état actuel la mémoire tampon.
éme
UTILISATION …
La plupart des fonctions les plus utilisées sont expliquées dans le chapitre précédent
“contrôles et fonctions” Dans ce chapitre nous parlerons des fonctions qui nécessitent un
peu plus d’explications.
QUELQUES FONCTIONS:
SLEEP MODE:
Le lecteur CD éteint automatiquement le moteur du chargeur CD et le laser après
environ 15 minutes d’inutilisation (en mode pause ou CUE). Ceci prolonge la durée de
vie du moteur et du laser. Pendant le mode veille l’écran affiche le mot “SLEEP”. Pour
« réveiller » votre lecteur CD, appuyez juste sur la touche CUE ou PLAY, l’écran
retournera à son affichage normal et l’appareil est prêt à recevoir les instructions.
FONCTION RELAY:
Ouvrez d’abord les 2 curseurs de niveau des CD’s sur votre table de mixage. Appuyez
sur la touche RELAY pour activer la fonction, le LED Relay s’allume. Mettez un disque
dans chaque lecteur CD et commencez la lecture d’un des deux CD. Une plage de
chaque lecteur CD sera reproduite alternativement, jusqu’à ce que cette fonction sera
désengagée. Vous pouvez toujours changer le CD dans le lecteur qui est en attente
(stand-by). De cette façon vous pouvez créer un programme sans fin. L’idéal pour
l’utilisation dans des pubs, etc.
REMARQUE: en engageant la fonction Relay vous mettez automatiquement les deux lecteurs en mode
Single.
PITCH BENDING:
Cette fonction est utilisée pour synchroniser parfaitement les beats des 2 CD. Ceci peut
être fait de 2 façons:
Touches PITCH BEND: La vitesse augmente ou diminue tant que vous tenez les
touches PITCH BEND+ ou PITCH BEND- enfoncées.
JOG WHEEL: Pendant la lecture le JOG WHEEL changera temporairement la
vitesse. En tournant la roue dans le sens des aiguilles d’une montre la vitesse
augmentera. En tournant en sens inverse, la vitesse diminuera. La valeur du
changement de vitesse est déterminée par la vitesse de rotation de la roue.
LECTURE/ENREGISTREMENT DES CD-R et CD-RW:
A part les CD’s audio normaux, le CD670 peut également lire les CD-R (CD
enregistrable) et les CD-RW (CD réenregistrable). Remarquez que vous devriez toujours
utiliser l’option de gravure “disc at once” et “track at once”! malgré que le CD670 est
capable de lire des CD-R et des CD-RW enregistrés à grande vitesse, nous vous
conseillons de ne pas utiliser des vitesse d’enregistrement de plus de x12 afin
d’accroître la qualité de lecture. Utilisez toujours des CD-R et CD-RW de bonne qualité!
Si le disque est gravé avec l’option multi session, il ne jouera que la première session.
JB SYSTEMS® 19/67 CD670
JB SYSTEMS® 20/67 CD670
Page 13

FRANCAIS MODE D’EMPLOI
FRANCAIS MODE D’EMPLOI
A PROPOS DES BOUCLES (LOOPS):
CREER UNE BOUCLE DE FACON AUTOMATIQUE:
Assurez-vous que le compteur de tempo automatique est activé et que la lecture est
stable. Appuyez sur la touche AUTOLOOP au bon moment. Le CDX-2 calculera
automatiquement le point de fin de boucle et exécutera la lecture de la boucle de 4
temps instantanément.
Remarque: cette fonction ne peut fonctionner parfaitement que si la musique contient de battements
clairsetréguliers.
CRÉATION DE BOUCLES:
Pendant qu’une plage du CD est lue, appuyez sur la Touche R.CUE/LOOP IN pour
programmer le point de départ de la boucle. Appuyez ensuite sur la touche OUT/EXIT
pour programmer le point de fin de boucle. La boucle sans fin se met à jouer
immédiatement. (Avec un peu d’entraînement vous arriverez à créer des boucles
parfaites!) Pendant qu’une boucle est en cours de lecture, vous pouvez appuyer une
nouvelle fois sur la touche OUT/EXIT pour sortir de la boucle et continuer la lecture
normale.
Il est possible de créer une nouvelle boucle, même quand une boucle est toujours en
train de jouer. Pendant que la boucle joue, appuyez simplement sur la Touche
R.CUE/LOOP IN pour définir le point de départ d’une nouvelle boucle. Entrez ensuite le
point de la fin de la boucle en appuyant sur la touche OUT/EXIT. Votre nouvelle boucle
est enregistrée et reproduite.
REDÉMARRER UNE BOUCLE:
Ceci peut être fait de 3 façons:
Quand une boucle est programmée et que vous l’avez quittée en appuyant sur la
touche OUT/EXIT, appuyez juste sur la touche RELOOP pour redémarrer la lecture
de la boucle.
Quand une boucle est programmée et que vous l’avez quittée en appuyant sur la
touche OUT/EXIT, appuyez juste à nouveau sur la touche OUT/EXIT pour
redémarrer la boucle. L’endroit ou vous avez appuyé sur la touche OUT/EXIT est
maintenant programmé comme nouveau point de fin de boucle.
Quand une boucle est lue, appuyez sur la touche RELOOP pour redémarrer la
boucle immédiatement. Vous pouvez répéter cette action plusieurs fois de suite afin
de créer un effet de « bégaiement »
CARACTERISTIQUES TECHNIQUES
Alimentation: AC 230 V, 50Hz
Consommation: 21W
Niveau de sortie: 2,0Vrms +/-0,5dB @ 1kHz, 0dB
Réponse de fréquence: 20-20.000Hz (+/-0,4dB)
Distorsion Harmonique + bruit: 0.01% @ 1kHz, 0dB (20kHz LPF)
Rapport Signal/Bruit (IHF-A): >92dB @ 1kHz, 0dB
Temps d’accès court plage suivante: <2sec
Temps d’accès long (plage 1 20): <4sec
Laser Pick-up: Sony KSM-213CCM, détection 3spot 780nm
Tracking électronique: Full automatic digital tracking.
Sortie digitale : 0,5Vpp +/-0,1 (charge = 75Ω)
Température d’opération : 5°C à 35°C
Humidité : 25 à 85% HR (non condensé)
Dimensions: Lecteur 482(L) x 88,8 (H) x 262,5(P) mm
Contrôleur 482(L) x 88,8(H) x 94(P) mm
Poids: Lecteur 5,0kg
Contrôleur 1,8kg
Chacune deces informations peutêtre modifiée sans avertissement préalable.Vouspouvez
télécharger la dernière versionde cemode d’emploide notre siteWeb: www.beglec.com
ADAPTER UNE BOUCLE (LOOP EDIT):
Quand une boucle est programmée, appuyez sur la touche RELOOP/STUTTER
pendant environ 2 secondes pour entrer dans le mode d’édition de boucle “loop edit”.
Quand une boucle est lue, le cadran affiche l’information en temps du point de fin de
boucle. Utilisez la roue « jog » pour définir un nouveau point de fin de boucle. Pour vous
faciliter la tâche vous pouvez entendre vos modifications sur la fin de boucle
continuellement. Quand la boucle est parfaite, appuyez sur la touche LOOP OUT pour
enregistrer le nouveau point de fin de boucle.
JB SYSTEMS® 21/67 CD670
JB SYSTEMS® 22/67 CD670
Page 14

NEDERLANDS HANDLEIDING
GEBRUIKSAANWIJZING
Hartelijk dank voor de aankoop van dit JB Systems®product. Om ten volle te kunnen
profiteren van alle mogelijkheden en voor uw eigen veiligheid, gelieve de aanwijzingen
zeer zorgvuldig te lezen voor U begint het apparaat te gebruiken.
KARAKTERISTIEKEN
In dit apparaat is radio-interferentie onderdrukt. Dit product voldoet aan de gangbare
Europese en nationale voorschriften. Het is vastgesteld dat het apparaat er zich aan houdt
en de desbetreffende verklaringen en documenten zijn door de fabrikant afgegeven.
Instant buffer start met stutter effect
Naadloze loop met reloop en stutter effect
Real-time loop edit functie
Automatische beatcounters met TAP functie
Anti-shock geheugen, 20seconden
Auto cue functie (-48dB)
Direct programmeerbare cue (“Cue on the fly”)
Pitch control (3 schalen: +/- 4, 8, 16%) met pitch bend
Pitch bend functie via jog dial en toetsen
Leest CD-DA, CD-R, CD-RW
Fader start/stop (back cue)
Grote “super twist” LCD display voor perfecte afleesbaarheid
Verlichte toetsen van hoge kwaliteit
Grote “dial” knoppen voor pitch bend en zoeken tot op frame niveau (1/75sec)
Relay Play (beurtelings weergave van beide CD spelers)
Single/continuous play
Verschillende tijdsaanduidingen: verlopen, blijvende en totaal blijvende tijd.
S/PDIF digitale audio uitgangen (RCA/cinch)
CD-lade sluit automatisch na 60seconden
Automatische Sleep functie verlengt de levensduur van de laser
NEDERLANDS HANDLEIDING
EERSTE INGEBRUIKNAME
Belangrijke instructies:
Controleer voor het eerste gebruik van het apparaat of het tijdens het transport
beschadigd werd. Mocht er schade zijn, gebruik het dan niet, maar raadpleeg eerst uw
dealer.
Belangrijk:
erg belangrijk dat de gebruiker de veiligheidsaanwijzingen en raadgevingen in deze
gebruiksaanwijzing uiterst nauwkeurig volgt. Elke schade veroorzaakt door verkeerd
gebruik van het apparaat valt niet onder de garantie. De dealer aanvaardt geen
verantwoordelijkheid voor mankementen en problemen die komen door het
veronachtzamen van deze gebruiksaanwijzing.
Bewaar deze brochure op een veilige plaats om hem in de toekomst nogmaals te
kunnen raadplegen. Indien U het apparaat verkoopt, denkt U er wel aan om de
gebruiksaanwijzing bij te voegen.
Om het milieu te beschermen, probeer zoveel mogelijk het verpakkingsmateriaal te
recycleren.
Controleer de inhoud:
Kijk na of de verpakking volgende onderdelen bevat:
CD speler
Bedieningspaneel
Handleiding
Voedingskabel
Een paar cinch kabels
mini-DIN kabel
Een paar fader startkabels (mini-jack/mini-jack)
Dit apparaat verliet de fabriek in uitstekende staat en goed verpakt. Het is
VEILIGHEIDSVOORSCHRIFTEN:
CAUTION
Laat de herstellingen enkel uitvoeren door een bevoegde technicus.
De bliksempijl die zich in een gelijkbenige driehoek bevindt is bedoeld om u te
wijzen op het gebruik of de aanwezigheid van niet-geïsoleerde onderdelen met
een “gevaarlijke spanning” in het toestel die voldoende kracht heeft om een risico
van elektrocutie in te houden.
Het uitroepteken binnen de gelijkbenige driehoek is bedoeld om de gebruiker erop
te wijzen dat er in de meegeleverde literatuur belangrijke gebruik en
onderhoudsinstructies vermeld staan betreffende dit onderdeel.
WAARSCHUWING: Om het risico op elektrocutie
zoveel mogelijk te vermijden mag u nooit de
behuizing verwijderen. Er bevinden zich geen
onderdelen in het toestel die u zelf kan herstellen.
JB SYSTEMS® 23/67 CD670
Dit symbool betekent: het apparaat mag enkel binnenhuis worden gebruikt.
Dit symbool betekent: Lees de handleiding!
Stel dit apparaat niet bloot aan regen of vocht, dit om het risico op brand en elektrische
schokken te voorkomen.
JB SYSTEMS® 24/67 CD670
Page 15

NEDERLANDS HANDLEIDING
NEDERLANDS HANDLEIDING
Om de vorming van condensatie binnenin te voorkomen, laat het apparaat aan de
omgevingstemperatuur wennen wanneer het, na het transport, naar een warm vertrek is
overgebracht. Condensatie kan het toestel soms verhinderen perfect te functioneren. Het
kan soms zelfs schade aan het apparaat toebrengen.
Gebruik dit apparaat uitsluitend binnenshuis.
Plaats geen stukken metaal en mors geen vocht binnen in het toestel om elektrische
schokken of storing te vermijden. Objecten gevuld met water, zoals bvb. Vazen, mogen
op dit apparaat worden geplaatst. Indien er toch een vreemd voorwerp of water in het
apparaat geraakt, moet U het direct van het lichtnet afkoppelen.
Open vuur, zoals brandende kaarsen, mogen niet op het apparaat geplaatst worden.
Bedek geen enkele ventilatieopening om oververhitting te vermijden.
Zorg dat het toestel niet in een stoffige omgeving wordt gebruikt en maak het regelmatig
schoon.
Houd het apparaat uit de buurt van kinderen.
Dit apparaat mag niet door onervaren personen bediend worden.
De maximum veilige omgevingstemperatuur is 45°C. Gebruik het apparaat dus niet bij
hogere temperaturen.
De minimum afstand rondom dit apparaat om een goede koeling toe te laten is 2cm.
Trek altijd de stekker uit wanneer het apparaat gedurende langere tijd niet wordt gebruikt
of alvorens met de onderhoudsbeurt te beginnen.
De elektrische installatie behoort uitsluitend uitgevoerd te worden door bevoegd
personeel, volgens de in uw land geldende regels betreffende elektrische en
mechanische veiligheid.
Controleer dat de beschikbare spanning niet hoger is dan die aangegeven op de
achterzijde van het toestel.
Het stopcontact zal steeds vrij toegankelijk blijven zodat de stroomkabel op elk moment
kan worden uitgetrokken.
De elektrische kabel behoort altijd in uitstekende staat te zijn. Zet het apparaat
onmiddellijk af als de elektrische kabel gekneusd of beschadigd is.
Laat de elektrische draad nooit in contact komen met andere draden.
Als de netschakelaar zich in OFF (uit) positie bevindt dan is dit apparaat niet volledig van
het lichtnet gescheiden!
Om elektrische schokken te voorkomen, moet U de behuizing niet openen. Afgezien van
de zekering zitten er geen onderdelen in die door de gebruiker moeten worden
onderhouden.
Repareer nooit een zekering en overbrug de zekeringhouder nooit. Vervang een
beschadigde zekering
elektrische kenmerken.
Ingeval van ernstige problemen met het bedienen van het toestel, stopt U onmiddellijk
het gebruik ervan. Contacteer uw dealer voor een eventuele reparatie.
Gebruik best de originele verpakking als het toestel vervoerd moet worden.
Om veiligheidsredenen is het verboden om ongeautoriseerde modificaties aan het
toestel aan te brengen.
INSTALLATIEAANWIJZINGEN:
Het plaatsen en het gebruiken van het toestel tijdens lange periodes in de nabijheid van
warmtebronnen zoals versterkers, spot’s, enz. zullen de prestaties van het toestel
negatief beïnvloeden en kunnen het toestel zelfs beschadigen.
Het toestel kan in een 19-inch rack ingebouwd worden. Bevestig het toestel door middel
steeds
door een zekering van hetzelfde type en met dezelfde
van de 4 schroefsleuven die zich in de frontplaat bevinden. Gebruik enkel schroeven
van een gepast formaat. (schroeven zijn niet meegeleverd) Zorg ervoor dat het toestel
zo weinig mogelijk schokken en trillingen ondergaat tijdens het transport.
Wanneer het toestel ingebouwd is in een cabine of een flight case moet u er wel voor
zorgen dat het toestel goed geventileerd wordt, zodanig dat de warmte die het toestel
ontwikkeld goed geëvacueerd wordt.
Om condensvorming te voorkomen na het transport moet u het toestel de tijd laten om
zich aan te passen aan de omgevingstemperatuur, vooral als het toestel vanuit een
koele plaats naar een warmere ruimte overgeplaatst wordt. Condens verhindert soms
de goede werking van het toestel.
Wees voorzichtig in de keuze van de plaats waar u het toestel wilt installeren. Vermijdt
de nabijheid van warmtebronnen. Vermijd ondergronden die onderhevig zijn aan
trillingen of stoffige en vochtige plaatsen.
De CD speler werkt normaal op oppervlakken met een helling van maximum 15°.
Wees zeer voorzichtig met het manipuleren van CD’s, raak ze nooit aan met natte of
vuile handen.
Vuile CD’s moeten eerst gereinigd worden met een hiervoor speciaal ontworpen doek
en reinigingsproduct.
Gebruik nooit zwaar beschadigde CD’s (gekrast of vervormd) Zij kunnen uw toestel
beschadigen.
Om brand en elektrocutie te vermijden mag u dit toestel nooit blootstellen aan regen of
vocht.
Om elektrocutie te vermijden mag u nooit het deksel van het toestel openmaken. Wendt
u tot uw dealer als er zich een probleem voordoet.
Plaats nooit metalen voorwerpen of mors nooit vloeistoffen in het toestel. Elektrocutie
en een slechte werking kunnen hieruit resulteren.
Deze CD speler is uitgerust met een halfgeleidende laser. Om van uw muziek te
genieten dank zij een normale werking van het toestel is het aangeraden om uw toestel
te gebruiken in een ruimte met een temperatuur tussen 5°C en 35°C.
De CD speler mag door niemand geregeld of hersteld worden, uitgezonderd door een
ervaren technicus.
Dit toestel kan storingen veroorzaken bij radio en televisieontvangst.
REINIGEN VAN DE CD SPELER:
Reinig het toestel met een zacht, lichtjes bevochtigd doek. Vermijd water te morsen in het
toestel. Gebruik nooit vluchtige producten zoals benzeen of thinner, dit kan het toestel
beschadigen.
AANSLUITINGEN
Verbind de mini-DIN kabel tussen het bedieningspaneel en de CD speler (CD lader).
Gebruik de meegeleverde cinch kabels om de audio uitgangen van de CD speler te
verbinden met de CD ingangen van uw mengtafel.
Verbind eveneens de 2 fader start kabels indien uw audio mixer voorzien is van fader
start aansluitingen. (Synq®of Pioneer®compatibel)
Verbind de voedingskabel.
JB SYSTEMS® 25/67 CD670
JB SYSTEMS® 26/67 CD670
Page 16

NEDERLANDS HANDLEIDING
NEDERLANDS HANDLEIDING
FUNCTIES (BASIS)
1. Power (Power ON/OFF switch): Wanneer de voedingsschakelaar ingedrukt wordt
gaat het toestel aan en zal de blauwe Led oplichten.
2. Disc tray: Gebruik de OPEN/CLOSE toetsen om de CD lade te openen en een CD in
het toestel te plaatsen. Indien de lade niet gesloten wordt, zal deze na 60sec.
automatisch sluiten om schade te voorkomen.
3. OPEN/CLOSE toets: gebruik deze toets om de CD lade te openen of te sluiten. Deze
toetsen kunnen niet gebruikt worden tijdens het afspelen van een CD.
4. Control connector: gebruik de meegeleverde mini-DIN kabel om deze uitgang te
verbinden met het bedieningspaneel.
5. Audio uitgangen: Uitgang van het audio signaal van elk van de CD spelers. Gebruik
de meegeleverde cinch/cinch kabels om deze uitgangen te verbinden met de CD/line
ingangen van uw mengtafel.
6. Digitale uitgang: sluit dit digitale uitgangssignaal (S/PDIF formaat) eventueel aan op
een digitale versterker of een digitale recorder (vb. Mini disc)
7. Netaansluiting: Verbind de CD speler met het 230V AC net door middel van de
meegeleverde voedingskabel.
FUNCTIES (BEDIENING)
1. JOG WHEEL: Dit jog wiel heeft 4 functies, afhankelijk van de modus waarin u werkt.
Met het jog wiel kunt u traag de frames (1/75sec) opzoeken wanneer de CD niet
afgespeeld wordt maar in pauze of op een Cue punt staat. Om een nieuw Cue punt
in te stellen draait u aan het wiel tot u op de juiste plaats bent, daarna drukt u op de
PLAY of LOOP IN toets. Druk vervolgens op CUE om naar het ingegeven “CUE
PUNT” terug te keren .
Tijdens de weergave van een nummer (en zoekfunctie (toets 15) niet actief) kan
men met het jog wiel de snelheid van de weergave tijdelijk verhogen door het wiel
in wijzerzin te draaien of verlagen door het wiel in tegen wijzerzin te draaien tot +/10%. De waarde van de snelheidsverandering wordt bepaald door de snelheid van
de rotatie van het wiel.
Als de snelle zoekfunctie (15) actief is dan kan U tegen hoge snelheid in het huidige
nummer zoeken.
Als de loop edit functie actief is dan gebruikt U het jog wiel om het einde van de
loop opnieuw in te stellen.
2. R.CUE/LOOP IN toets: Laat u toe het Cue punt in te stellen zonder de weergave van
de CD te stoppen (CUE ON THE FLY). Deze toets bepaalt ook het beginpunt van een
naadloze Loop. Deze toets licht op zodra hij een cue punt bevat.
3. CUE toets: Als u op de CUE toets drukt tijdens de weergave, dan veroorzaakt dit een
onmiddellijke terugkeer naar de positie waar de weergave gestart werd. De weergave
start onmiddellijk vanaf het geprogrammeerde Cue punt, en duurt verder zolang de
CUE toets ingedrukt blijft. De CD speler springt terug naar het Cue punt zodra de CUE
toets losgelaten wordt. Wanneer het toestel in pauze modus staat (Play/Pause toets
knippert) kan het Jog wiel gebruikt worden om een ander startpunt te kiezen. Door de
PLAY/PAUSE of R.CUE/LOOP toets en nadien de "CUE" toets in te drukken kunt u dit
nieuwe Cue punt bevestigen.
4. OUT/EXIT toets: Wordt gebruikt om het eindpunt van een Loop te bepalen. De CD
speler start het afspelen van de naadloze Loop tot wanneer u terug op deze toets
drukt om de Loop te verlaten. Wanneer een Loop geprogrammeerd is maar niet
afgespeeld wordt kan men zo ook het aflezen van de Loop herstarten. De plaats in het
nummer waar u op deze toets gedrukt heeft zal opgeslagen worden als nieuw
eindpunt van de Loop. Als U in “loop edit” mode bent dan zal het indrukken van de
OUT/EXIT toets het bewerken van de loop beëindigen en wordt het nieuwe loop
eindpunt opgeslagen.
JB SYSTEMS® 27/67 CD670
JB SYSTEMS® 28/67 CD670
Page 17

NEDERLANDS HANDLEIDING
NEDERLANDS HANDLEIDING
5. PLAY/PAUSE toets: Telkens u op de PLAY/PAUSE toets drukt zal de CD speler
overgaan van afspelen naar pauze of van pauze naar afspelen. De toets knippert
zolang de CD speler in pauze staat.
6. RELOOP/STUTTER toets: Deze toets heeft 3 functies:
RELOOP: Als een Loop geprogrammeerd was en u hebt op de OUT/EXIT toets
gedrukt, druk dan op de Reloop toets om terug over te gaan naar het afspelen van
de Loop. Druk op de OUT/EXIT toets om de Loop terug te verlaten. (start en
eindpunt van de Loop blijven onveranderd)
STUTTER: Wanneer een Loop afgespeeld wordt kunt u op deze toets drukken om
de Loop onmiddellijk te herstarten. U kunt ook op deze toets drukken wanneer een
nummer geen loop afspeelt. Telkens u op de RELOOP/STUTTER toets drukt
herstart de muziek vanuit zijn geprogrammeerd Cue punt. Het stotter effect (stutter)
laat u toe extra creatief te zijn met uw prestatie.
EDIT LOOP FUNCTIE STARTEN: Als er een loop geprogrammeerd is (LOOP IN
en OUT/EXIT toetsen lichten op) dan kan U de “loop edit” functie starten door de
RELOOP/STUTTER toets in te drukken tot er op het scherm “Ed” verschijnt.
7. SEARCH toetsen: met deze toetsen kan U aan een hoge snelheid in het nummer
zoeken.
8. TRACK SEARCH toetsen: Deze toetsen worden gebruikt om een track te kiezen.
Forward skip & back skip (voorwaarts of achterwaarts springen). Druk op de +10 toets
om 10 tracks voorwaarts te springen.
9. PITCH BEND toetsen: De snelheid verhoogt wanneer men op de “+ toets” drukt en
keert weer naar zijn oorspronkelijke snelheid wanneer de toets losgelaten wordt. De
snelheid daalt wanneer men op de “– toets” drukt en keert weer naar zijn
oorspronkelijke snelheid wanneer de toets losgelaten wordt. Deze toetsen kunnen
gebruikt worden om de beats van 2 nummers op elkaar af te stellen.
10.TAP toets: De CD670 heeft een volledig automatische BPM-counter. In sommige
uitzonderlijke gevallen kan de automatische beat counter niet werken zoals het hoort
(onregelmatige beats of eenvoudigweg geen beats te bespeuren). In dit geval kunt u
de beat counter helpen door manueel op deze toets te tokkelen op het ritme van de
muziek. Als de beatcounter in manuele mode staat dan knippert de kleine “BPM”
boven de BPM-display. Bij het selecteren van een ander nummer zal de beatcounter
terug in automatische mode springen. U kan de beatcounter ook zelf terug in
automatische mode zetten door de TAP toets in te drukken tot het woord “Auto bPm”
op het scherm verschijnt. (de kleine “BPM” boven de BPM-display licht nu constant op)
Omschakelen tussen BPM en PITCH display: standaard staat het display in BPM
weergave. U kan echter ook kiezen voor het PITCH display: houd de TAP toets
ingedrukt terwijl U kort op de “NEXT TRACK” toets drukt. Op dezelfde wijze schakelt U
ook terug naar BPM display.
11.PITCH toets: wordt gebruikt om de snelheidsfunctie (pitch control) aan/uit te
schakelen. U kan ook 3 verschillende regelbereiken (+/-4%, 8%, 16%) instellen: houd
de PITCH toets ingedrukt, telkens als U de “PITCH BEND –“ toets (9) kort indrukt zal
het regelbereik veranderen. (kijk naar de “pitch range” leds)
12.PITCH schuifregelaar: Druk op de PITCH toets (11) zodat deze aan is. De snelheid
kan bijgeregeld worden tot +/-16% door de schuifregelaar te verzetten. De snelheid zal
niet veranderen als de PITCH leds uit zijn.
13.RELAY toets: wanneer u de Relay functie aanzet wordt er afwisselend een nummer
afgespeeld van beide CD spelers tot wanneer de Relay functie weer uitgeschakeld
wordt. U kunt steeds een nieuwe CD in de CD speler steken die wacht in de stand-by
modus. Zo kunt u een eindeloos programma creëren. Dit is perfect voor het gebruik in
taverne’s, enz.
14.OPEN/CLOSE toets: Druk op deze toets om een CD te laden of uit te werpen. Elke
druk op de toets zal de CD lade openen of sluiten.
OPMERKING: De CD lade kan niet geopend worden tijdens het afspelen van een CD. Druk eerst op
PLAY/PAUSEtoetsom hetafspelen te stoppen. .
15.SEARCH MODE toets: Met deze toets kan de functie van het JOG wiel(1) worden
omgeschakeld naar de “snel zoek” functie, de gele LED zal dan oplichten. Als het JOG
wiel 10seconden niet gebruikt wordt dan zal deze functie automatisch worden
uitgeschakeld.
PLAY MODUS: normaal wordt het JOG wiel als “pitch bend” gebruikt om de beats
van 2 tracks met elkaar te synchroniseren. Met de “snel zoek” functie kan U echter
zeer snel een bepaalde passage in een track opzoeken.
PAUZE MODUS: normaal wordt het JOG wiel gebruikt om erg precies (op frame
niveau) een exact punt op te zoeken. Met de “snel zoek” functie kan U echter zeer
snel een bepaalde passage in een track opzoeken.
16.LCD Display: toont alle belangrijke informatie tijdens het gebruik. Zie de volgende
paragraaf om hierover meer te vernemen.
17.SGL/CTN: U kunt kiezen tussen “single track mode” en “continuous play”.
Continuous play: de volledige CD zal afgespeeld worden zonder onderbreking.
(meestal gebruikt in taverne’s)
Single track: de CD speler stopt aan het einde van elk nummer en wacht aan het
begin van het volgende nummer. (meestal gebruikt door deejays)
Druk op de SGL/CNT toets gedurende meer dan 1seconde om over te schakelen van
de normale naar de “auto cue” modus (of omgekeerd). In “auto cue” modus zal de CD
speler wachten aan de eerste muzikale noot van elk nummer. Dit betekent dat slecht
geïndexeerde CD’s geen hindernis vormen voor de onmiddellijke startmogelijkheden
van deze CD speler. Dit is een zeer nuttige eigenschap voor deejays!
18.TIME toets: De TIME toets laat u toe over te schakelen naar het weergeven van de
reeds verstreken tijd, de resterende tijd van het nummer of de totaal resterende tijd
van de CD. (standaard = resterende tijd van het nummer)
19.FADER START aansluitingen: wanneer u een mengtafel hebt die uitgerust is met
een fader start functie, verbind dan de CD speler met de fader start aansluitingen van
de mixer. Let er wel op dat deze aansluitingen nooit verbonden worden met één of
andere spanning.
Opgelet: Deze afstandbediening isenkel verenigbaar met een bepaald typemixers (Synq®ofPioneer
compatibel.)
20.CONTROL CONNECTOR: Verbind deze aansluiting met de CD speler door middel
van de meegeleverde mini-DIN kabel.
®
JB SYSTEMS® 29/67 CD670
JB SYSTEMS® 30/67 CD670
Page 18

NEDERLANDS HANDLEIDING
NEDERLANDS HANDLEIDING
LCD DISPLAY:
1. PLAY: verschijnt tijdens het afspelen van een CD.
2. PAUSE: verschijnt wanneer de CD speler in pause of in cue modus staat.
3. CUE: verschijnt wanneer de CD speler op het Cue punt staat te wachten.
4. ELAPSED, TOTAL REMAIN: toont aan dat de tijd die weergegeven is op het scherm
de verstreken tijd (elapsed), de totaal resterende tijd van de CD (total) of de
resterende tijd van het nummer (remain) is.
5. TIME BAR: toont u ofwel de verstreken tijd, ofwel de resterende tijd, afhankelijk van
de keuze die gemaakt werd door middel van de TIME toets. De Time Bar begint te
flitsen aan het eind van elk nummer om de gebruiker te verwittigen dat het hoog tijd is
om tot de actie over te gaan.
6. BPM/PITCH UITLEZING: Er zijn 3 mogelijke modi. Kijk naar de beschrijving van de
PITCH (11) en TAP (10) toetsen om te vernemen hoe U de juiste uitlezing kiest:
BPM indicator AAN: de meting van de automatische beat counter wordt getoond.
BPM indicator KNIPPERT: de resultaten van de manuele BPM meting wordt
getoond.
PITCH indicator AAN: de actuele snelheidsafwijking (in %) wordt getoond.
7. AUTO CUE: verschijnt wanneer de “auto cue” functie geactiveerd is. Zie SGL/CTN
toets(17).
8. SINGLE: verschijnt wanneer men gekozen heeft om slechts één nummer te lezen.
Wanneer Single niet verschijnt, zal de CD speler de volledige CD lezen zonder
onderbreking. Deze functie wordt ingesteld door middel van de SGL/CTN toets(17).
9. LOOP: wordt getoond zodra een loop wordt afgespeeld
10.RELOOP: wordt getoond zodra er een loop geprogrammeerd is en de reloop toets kan
worden gebruikt.
11.TRACK: Toont u welk nummer van de CD afgespeeld wordt.
12.MINUTE: Geeft de tijdsinformatie van het lopende nummer weer in “minuten”.
13.SECOND: Geeft de tijdsinformatie van het lopende nummer weer in “seconden”.
14.FRAME: Geeft de tijdsinformatie van het lopende nummer weer in “frames”. (1 frame
= 1/75thsec.)
15.ANTI SHOCK EN BUFFER INDICATOR: toont de status van het buffergeheugen.
HOE GEBRUIKEN …
De meeste algemene functies worden uitgelegd in het voorgaande hoofdstuk “controle en
functies” In dit hoofdstuk spreken we over de functies die wat meer uitleg nodig hebben.
ENKELE ALGEMENE FUNCTIES:
SLEEP MODE:
De CD speler zet na 15 minuten inactiviteit automatisch de motor en de laser uit
(wanneer in pauze of in cue modus). Dit verlengt de levensduur van de motor en de
laser. Tijdens de Sleep Mode wordt het woord “SLEEP” weergegeven op het scherm.
Om de CD speler te doen “ontwaken” moet u enkel op de Cue of Play toets drukken, het
scherm keert terug naar zijn normale weergave en is klaar om de instructies te
ontvangen.
RELAY FUNCTIE:
Zet eerst beide schuifregelaars van de CD ingangen van uw mengtafel open. Druk op de
RELAY toets om de relay functie in te schakelen. De Relay Led gaat aan. Plaats een CD
in beide CD laders en begin de weergave van één van de twee CD’s. Er zal afwisselend
een nummer van elke CD afgespeeld worden tot de Relay functie uitgezet wordt. U kunt
steeds een nieuwe CD plaatsen in de Cd speler die in stand-by staat. Op deze manier
kunt u een eindeloos programma creëren, perfect voor het gebruik in taverne’s, enz.
OPMERKING: door de Relay functie aan te zetten schakelen beide spelers automatisch over naar de
Singlemodus.
TIJDELIJKE SNELHEIDSAANPASSING: (pitch bend)
Deze functie wordt gebruikt om de beats van twee nummers mooi te synchroniseren
zodat deze nadien naadloos in elkaar kunnen overgaan. Dit kan op 2 manieren
gebeuren:
PITCH BEND toetsen: tijdens het indrukken van de PITCH BEND+ of PITCH BEND-
toets wordt de afspeelsnelheid tijdelijk verhoogd of verlaagd.
JOG WIEL: Tijdens het afspelen kan men met het JOG wiel de snelheid tijdelijk
beïnvloeden. Door in wijzerzin te draaien zal de snelheid tijdelijk verhogen. Door in
tegen wijzerzin te draaien wordt de snelheid tijdelijk verlaagd. De draaisnelheid
bepaalt hoe groot de tijdelijke snelheidsafwijking zal zijn.
WEERGAVE/OPNEMEN VAN CD-R EN CD-RW:
Naast gewone audio CD’s kan de CD670 eveneens CD-R’s (CD recordable) en CDRW’s (CD rewriteable) lezen. Let er bij het branden van uw CD’s wel op steeds de opties
“disc at once” en “track at once” te gebruiken! Hoewel dit apparaat CD-R en CD-RW kan
aflezen die bij hoge snelheid geschreven werden, raden wij U toch aan om de snelheid
bij het branden te beperken tot x12 om een optimale afleesbaarheid te garanderen.
Eveneens raden wij U aan om enkel goede kwaliteit CDROMs van bekende merken te
gebruiken!
Als u een multi sessie CD maakt, dan zal enkel de eerste sessie gespeeld worden.
JB SYSTEMS® 31/67 CD670
JB SYSTEMS® 32/67 CD670
Page 19

NEDERLANDS HANDLEIDING
NEDERLANDS HANDLEIDING
LOOPS:
MAAK EEN LOOP (LUS):
Druk op de R.CUE/LOOP IN toets om het startpunt van de Loop te programmeren terwijl
de muziek afgespeeld wordt. Druk daarna op de OUT/EXIT toets om het eindpunt van
de Loop te programmeren. De weergave van de naadloze lus (seamless loop) start
onmiddellijk. (Met wat ervaring zult u perfecte Loops kunnen programmeren!) Tijdens het
afspelen van de Loop kunt u terug op de OUT/EXIT toets drukken om de loop te verlaten
en terug over te gaan naar de normale weergave van de rest van het nummer. Het is
mogelijk om een nieuwe Loop te programmeren, zelfs wanneer een Loop weergegeven
wordt. Druk terwijl de Loop speelt gewoon op de R.CUE/LOOP IN toets om het startpunt
van de nieuwe Loop te bepalen. Breng nu het eindpunt in door op de OUT/EXIT toets te
drukken. Uw nieuwe Loop is nu geprogrammeerd en wordt afgespeeld.
HERSTART EEN LOOP:
Dit kan gedaan worden op 3 manieren:
Wanneer een Loop geprogrammeerd is en u deze verlaten hebt door op de
OUT/EXIT toets te drukken, druk dan gewoon op de RELOOP toets om de Loop
opnieuw te starten.
Wanneer een Loop geprogrammeerd is en u deze verlaten hebt door op de
OUT/EXIT toets te drukken, druk dan gewoon terug op de OUT/EXIT toets om de
Loop opnieuw te starten. De plaats waar u op de OUT/EXIT toets gedrukt hebt is nu
geprogrammeerd als nieuw eindpunt van de Loop.
Wanneer de Loop wordt afgespeeld, druk dan op de RELOOP toets om de Loop
onmiddellijk terug te starten. U kunt dit verschillende keren na elkaar doen om een
«stotter» effect te creëren.
EEN LOOP BEWERKEN:
Wanneer er al een loop geprogrammeerd is, druk dan gedurende ongeveer 2 seconden
op de RELOOP/STUTTER toets om de loop te kunnen bewerken. Terwijl de loop
naadloos wordt weergegeven kunt u op het LCD scherm de tijdinformatie van het
eindpunt van de lus aflezen. Gebruik het jog wiel om een nieuw eindpunt voor de lus in
te stellen. Om dit te vergemakkelijken hoort u continu wat u precies aan het eindpunt
veranderde. Wanneer de loop perfect is, druk dan op de OUT/EXIT toets om het nieuwe
eindpunt van de loop op te slaan.
EIGENSCHAPPEN
Netvoeding: AC 230 V, 50Hz
Verbruik: 21W
Uitgangsspanning: 2,0Vrms +/-0,5dB @ 1kHz, 0dB
Frequentiebereik: 20-20.000Hz (+/-0.4dB)
THD + ruis: 0.01% @ 1kHz, 0dB
S/R verhouding (IHF-A): >92dB @ 1kHz, 0dB
Tijd tussen opeenvolgende tracks: <2sec
Tijd bij schakelen van track 1 20: <4sec
Laser Pickup: Sony KSM-213CCM 3spot detectie 780nm
Elektronische tracking: volautomatische digitale tracking.
Digitale uitgang: 0,5Vpp +/-0,1 (load = 75Ω)
Omgevingstemperatuur: 5°C tot 35°C
Vochtigheid: 25 tot 85% RV (niet condenserend)
Afmetingen: Basis 482(B) x 88,8(H) x 262,5(D) mm
Bedieningspaneel 482(B) x 88,8(H) x 94(D) mm
Gewicht: CD speler 5,0kg
Bedieningspaneel 1,8kg
Elke inlichting kan veranderen zonder waarschuwing vooraf
U kan delaatste versie van dezehandleidingdownloaden via
Onzewebsite: www.beglec.com
JB SYSTEMS® 33/67 CD670
JB SYSTEMS® 34/67 CD670
Page 20

DEUTSCH BEDIENUNGSANLEITUNG
BEDIENUNGSANLEITUNG
DEUTSCH BEDIENUNGSANLEITUNG
Die Bedienungsanleitung, für zukünftiges Nachschlagen, bitte aufbewahren. Bei Verkauf
oder sonstiger Weitergabe des Gerätes, bitte Bedienungsanleitung beifügen.
Aus Umweltschutzgründen, Verpackung bitte wiederverwenden, oder richtig trennen.
Vielen Dank, dass Sie sich für den Erwerb dieses JBSystems®-Produkt entschieden
haben. Bitte lesen sie diese Bedienungsanleitung sorgfältig vor der Inbetriebnahme durch,
zur vollen Ausschöpfung der Möglichkeiten, die dieses Gerät bietet sowie, zu Ihrer
eigenen Sicherheit.
EIGENSCHAFTEN
Das Gerät ist funkentstört und erfüllt die Anforderungen der europäischen und nationalen
Bestimmungen. Entsprechende Dokumentation liegt beim Hersteller vor.
Instant Memory Start mit mit Cue Stutter-Effekt
Nahtloser Loop und Stutter-Effekt
Echtzeit Loop Bearbeitungsfunktion
Vollautomatischer Beat Counter mit TAP-Funktion
Anti-Schock Speicher, 20 Sekunden
Auto-Cue Funktion (-48dB)
Echtzeit Cue („Cue on the fly”)
Geschwindigkeitsfunktion (3 Bereiche: +/- 4, 8, 16%)
Pitch-Bend auf Jog-Wheel und Tasten für perfekten Mix
Liest CD-DA, CD-R, CD-RW
Fader Start/Stop (Back Cue)
Großes „Super Twist” LCD Display für beste Lesbarkeit
Hochwertige beleuchtete Tasten
Große Drehknöpfe: 1/75sec Framesuche und Pitch-Bend
Relay Play: ununterbrochene Wiedergabe von 2 CD’s
Einzelne/kontinuierliche Wiedergabe
Auswahl vergangene, verbleibende und Gesamtspielzeit
S/PDIF Digitalausgang (RCA/Cinch)
60 Sekunden Transportschutz
Schlafmodus (zur Verlängerung der Nutzungsdauer des Lasers)
VOR DER ERSTBENUTZUNG
Wichtige Hinweise:
Vor der Erstbenutzung bitte das Gerät zuerst auf Transportschäden überprüfen. Sollte
das Gerät einen Schaden aufweisen, Gerät bitte nicht benutzen, sondern unverzüglich
mit ihrem Händler in Verbindung setzen.
Wichtiger Hinweis:
Es ist wichtig, dass der Benutzer sich streng an die Sicherheitshinweise und Warnungen
in der Bedienungsanleitung hält. Schäden durch unsachgemäße Handhabung sind von
der Garantie ausgeschlossen. Der Händler übernimmt keine Verantwortung für Schäden,
die durch Nichtbeachtung der Bedienungsanleitung hervorgerufen wurden.
Das Gerät hat das Werk unbeschädigt und gut verpackt verlassen.
Überprüfen Sie den Inhalt:
Folgende Teile müssen sich in der Geräteverpackung befinden:
Laufwerkseinheit
Steuereinheit
Bedienungsanleitung
Netzanschlusskabel
Paar Chinch-Kabel
Mini-DIN Kabel
Paar Fader-Start Kabel (Miniklinke/Miniklinke)
SICHERHEITSHINWEISE
CAUTION
reparierbaren Teile. Überlassen Sie Reparaturen dem qualifizierten
Kundendienst.
Das Blitzsymbol im Dreieck weist den Benutzer darauf hin, das eine
Berührungsgefahr mit nicht isolierten Teilen im Geräteinneren, welche eine
gefährliche Spannung führen, besteht. Die Spannung ist so hoch, das hier die
Gefahr eines elektrischen Schlages besteht.
Das Ausrufezeichen im Dreieck weist den Benutzer auf wichtige Bedienungs- und
Wartungshinweise in den Dokumenten hin, die dem Gerät beiliegen.
Dieses Symbol bedeutet: Nur innerhalb von Räumen verwenden.
Dieses Symbol bedeutet: Achtung! Bedienungsanleitung lesen!
Zur Vermeidung von Stromschlag oder Feuer, Gerät bitte nicht Regen oder Feuchtigkeit
aussetzen.
Zur Vermeidung von Kondensation im Inneren des Geräts, bitte nach Transport in eine
warme Umgebung einige Zeit zum Temperaturausgleich bringen. Kondensation kann zu
Leistungsverlust des Gerätes oder gar Beschädigung führen.
Gerät nicht im Freien und in feuchten Räumen und Umgebungen verwenden.
Keine Metallgegenstände oder Flüssigkeiten ins Innere des Geräts gelangen lassen.
Keine mit Flüssigkeit gefüllte Gegenstände z.B. Vasen, auf das Gerät stellen.
Kurzschluß oder Fehlfunktion können die Folge sein. Falls es doch einmal vorkommen
sollte, bitte sofort Netzstecker ziehen und vom Stromkreis trennen.
Offene Brandquellen, wie z.B. brennende Kerzen, sollten nicht auf das Gerät gestellt
werden.
Ventilationsöffnungen nicht abdecken, da Überhitzungsgefahr!
Nicht in staubiger Umgebung verwenden und regelmäßig reinigen.
Für Kinder unerreichbar aufbewahren.
Unerfahrene Personen sollen das Gerät nicht bedienen.
Umgebungstemperatur darf 45ºC nicht überschreiten.
ACHTUNG: Um sich nicht der Gefahr eines
elektrischen Schlags auszusetzen, entfernen Sie
keines der Gehäuseteile. Im Geräte-inneren
befinden sich keine vom Benutzer
JB SYSTEMS® 35/67 CD670
JB SYSTEMS® 36/67 CD670
Page 21

DEUTSCH BEDIENUNGSANLEITUNG
DEUTSCH BEDIENUNGSANLEITUNG
Minimalabstand um das Gerät für ausreichende Kühlung = 2cm.
Stets Netzstecker ziehen, wenn Gerät für längeren Zeitraum nicht genutzt, oder es
gewartet wird.
Elektrische Anschlüsse nur durch qualifiziertes Fachpersonal überprüfen lassen.
Sicherstellen, daß Netzspannung mit Geräteaufkleber übereinstimmt.
Die Netzsteckdose sollte immer gut erreichbar sein um das Gerät vom Netz zu trennen.
Gerät nicht mit beschädigtem Netzkabel betreiben.
Netzkabel nicht mit anderen Kabeln in Berührung kommen lassen!
Das Gerät ist nicht vollständig vom Netz getrennt wenn der Netzschalter sich in der AUS-
Stellung befinded.
Gerät nicht öffnen. Abgesehen vom tausch der Sicherung sind keine zu wartenden
Bauteile im Gerät enthalten.
Sicherung
Sicherung ersetzen!
Bei Fehlfunktion, Gerät nicht benutzen und mit Händler in Verbindung setzen.
Bei Transport bitte Originalverpackung verwenden, um Schäden am Gerät zu
vermeiden.
Aus Sicherheitsgründen dürfen an dem Gerät keine unbefugten Veränderungen
vorgenommen werden.
INSTALLATIONSANLEITUNG:
Plazieren und benutzen Sie das Gerät für eine längere Zeit neben sehr warmen Geräten
wie Verstärker, Lampen, etc., könnte die Funktion des Gerätes beeinträchtigt oder sogar
zerstört werden.
Das Gerät kann in 19“ Racks eingebaut werden. Benutzen Sie dafür die in der
Frontblende eingelassenen Löcher. Achten Sie darauf, Schrauben in der
entsprechenden Größe zu verwenden (Schrauben sind nicht im Lieferumfang enthalten).
Vermeiden Sie Vibrationen und Stöße während des Transports.
Stellen Sie das Gerät in einem gut belüfteten Raum auf, wo es nicht Feuchtigkeit und
hohen Temperaturen ausgesetzt wird.
Sollte das Gerät in einem Flightcase betrieben werden, achten Sie auf eine gute
Luftzirkulation
Wenn das Gerät aus einer kalten Umgebung an einem warmen Ort aufgestellt wird, kann
sich Kondenwasser bilden. Um Fehlfunktionen oder Zerstörung zu vermeiden, sollten
Sie das Gerät für ca. 1 Stunde vom Stromnetz trennen.
Der CD-Player arbeitet normal, wenn die maximale Neigung 15° nicht überschreitet.
Behandeln Sie Ihre CD’s sehr sorgfältig. Berühren Sie sie nicht mit nassen oder
schmutzigen Fingern.
Wählen Sie einen staubfreien, trockenen Ort zur Installation des CD-Players. Vermeiden
Sie starke Hitzequellen und Vibrationen.
Verschmutzte CD’s müssen mit einem speziellen Tuch und Reinigungsprodukten
gereinigt werden.
Verwenden Sie keine beschädigten CD’s (zerkratzt oder deformiert). Ihr Gerät kann
beschädigt werden.
Um Feuer oder elektrische Schläge vorzubeugen, setzen Sie dieses Gerät niemals
Nässe und Feuchtigkeit aus!
Um sich nicht der Gefahr eines elektrischen Schlags auszusetzen, entfernen Sie keines
der Gehäuseteile. Wenn ein Problem auftritt, wenden Sie sich an Ihren Händler.
niemals
reparieren oder überbrücken, sondern
immer
mit gleichartiger
Legen Sie keine Metallgegenstände oder Flüssigkeiten in den CD-Player! Die Folge
wären Fehlfunktionen und Beschädigungen des Gerätes
Dieser CD-Spieler benutzt einen Halbleiterlaser. Damit er ohne Probleme arbeiten kann,
sollte dieses Gerät in einem Zimmer mit einer Temperatur von 5° C - 35° C verwendet
werden.
Der CD-Player kann nur von qualifiziertem Fachpersonal eingestellt oder repariert
werden.
Dieses Gerät kann Interferenzen im Radio- und Fernsehempfang verursachen.
WARTUNG
Die Reinigung der Gerätes erfolgt mit einem leicht mit Wasser angefeuchteten Tuch.
Vermeiden Sie, dass Wasser in das Gerätinnere gelangt. Verwenden Sie keine
brennbaren Flüssigkeiten wie Benzin oder Verdünner, welche das Gerät beschädigen
würden.
ANSCHLÜSSE
Verbinden Sie das Mini-DIN Kabel zwischen der Steuereinheit und der Haupteinheit
(CD-Spieler.)
Verwenden Sie die mitgelieferten Chinchkabel, um den Audioausgang des CD-Spielers
mit den Eingängen Ihres Mischpultes zu verbinden.
Verbinden Sie auch die 2 Fader-Start Kabel, wenn Ihr Mischpult Fader-Start Anschlüsse
besitzt. (Synq® oder Pioneer® kompatibel)
Schließen Sie das Netzkabel an.
TASTEN UND FUNKTIONEN
HAUPTEINHEIT - VORDERSEITE:
1. Power (Netzschalter): Wenn der Netzschalter gedrückt ist, ist das Gerät
betriebsbereit und die blaue Kontroll-LED leuchtet.
2. CD-Schublade: Drücken Sie die OPEN/CLOSE Taste, um die CD-Schublade zu
öffnen und eine CD einzulegen.
3. OPEN/CLOSE Taste: Drücken Sie diesen Knopf, um die CD-Schublade zu öffnen
oder zu schließen. Diese Knöpfe sind während der Wiedergabe gesperrt. Eine offene
Schublade schließt automatisch nach 60 Sekunden, um Schaden zu verhindern.
JB SYSTEMS® 37/67 CD670
JB SYSTEMS® 38/67 CD670
Page 22

DEUTSCH BEDIENUNGSANLEITUNG
HAUPTEINHEIT - RÜCKSEITE:
4. Controller-Anschluss: Verwenden Sie das mitgelieferten Mini-DIN Kabel um diesen
Ausgang mit dem Steuergerät zu verbinden.
5. Audio Output: Analoger Audioausgang für jeden CD-Player. Nutzen Sie die
mitgelieferten Chinch-Kabel um Ihr Mischpult mit dem CD-Player zu verbinden.
6. Digitalausgang: Verwenden Sie diesen Anschluss, um das Digitalausgangssignal
(S/PDIF Format) mit einem digitalem Mischpult oder Recorder zu verbinden, (z.B.
MiniDisc, DAT o.ä.)
7. Netzbuchse: Verbinden Sie diese Buchse mit einer 230V~ Steckdose. Benutzen Sie
das mitgelieferte Netzkabel.
STEUEREINHEIT - VORDERSEITE:
1. JOG WHEEL (Innenring): Dieses Rad besitzt 4 verschiedene Funktionen.
Im Pausenmodus können Sie mit dem Jog/Wheel framegenau suchen (1/75 Sek.)
Um einen CUE Punkt zu setzen, drücken Sie PLAY oder LOOP IN, wenn Sie die
korrekte Position eingestellt haben. Drücken Sie CUE, um zum "CUE PUNKT"
zurückzukehren.
In Trackwiedergabe und deaktivierter Suchfunktion (15) beugt das Jog-Wheel die
Geschwindigkeit der Musik vorübergehend bis zu +/-10% durch Drehung des
Knopfes nach rechts zur Beschleunigung und nach links zur Verlangsamung. Die
Geschwindigkeitsveränderung wird durch die Drehgeschwindigkeit bestimmt.
Ist die Suchfunktion (15) aktiviert, dann können Sie den aktuellen Track mit höherer
Geschwindigkeit durchsuchen.
Bei Auswahl der Loop-Bearbeitungsfunktion können Sie mit dem Jog-Wheel den
Endpunkt der Loop bearbeiten.
DEUTSCH BEDIENUNGSANLEITUNG
2. R.CUE/LOOP IN Taste: Erlaubt Ihnen, ohne die Wiedergabe zu beenden, den CUE
Punkt zu setzen (CUE ON THE FLY). Diese Taste setzt auch den Anfang eines
nahtlosen Loop’s. Enthält die Taste einen Cue Punkt, dann leuchtet sie grün.
3. CUE Taste: Drücken Sie die CUE-Taste während der Wiedergabe, beginnt die
Wiedergabe sofort ab dem programmierten CUE Punkt, solange die CUE Taste
gedrückt ist. Sobald der CUE-Taste losgelassen wird, springt der Tonabnehmer an den
markierten CUE Punkt. Auch das Jog/Wheel kann im Pausenmodus (PLAY-/PAUSE
Taste blinkt) dazu verwendet werden, um einen anderen CUE Punkt zu suchen. Durch
Drücken der PLAY/PAUSE oder R.CUE/LOOP Taste und anschließend CUE können
Sie den neuen CUE Punkt übernehmen.
4. OUT/EXIT Taste: Mit dieser Taste setzen Sie den Endpunkt in einem Loop. Der Player
gibt nun diesen Loop solange wieder, bis Sie die Taste noch einmal drücken. Ist ein
Loop programmiert, aber nicht aktiv können Sie ihn neu starten. Der Punkt, wo Sie die
Taste drücken, wird als der Endpunkt gespeichert. Drücken Sie im Loop Edit Modus
die OUT/EXIT Taste, wird die Loop Bearbeitung gestoppt und sichert den neuen Loop
Endpunkt.
5. PLAY/PAUSE Taste: Jedes Mal, wenn Sie die PLAY/PAUSE Taste drücken, wechselt
der Player zwischen Wiedergabe und Pause oder Pause und Wiedergabe
6. RELOOP/STUTTER Taste: Diese Taste hat 3 Funktionen:
RELOOP: Wenn ein Loop programmiert worden ist und Sie die OUT/EXIT Taste
gedrückt haben, drücken Sie diese Taste um den Loop wieder zu beginnen. Um
den Loop zu verlassen drücken Sie die OUT/EXIT Taste (Start- und Endpunkt
werden nicht verändert)
STUTTER: Während der Loop Wiedergabe, drücken Sie diese Taste um direkt zum
Startpunkt des Loop’s zu gelangen. Dieser „Stotter“ Effekt gibt Ihnen die Möglichkeit
ihre Darbietung kreativ zu erweitern.
ENTER EDIT LOOP MODUS: Wenn eine Loop programmiert wird (LOOP IN und
OUT/EXIT Taster sind an) können Sie durch Drücken des RELOOP/STUTTER
Knopfes, bis das Display “Ed” zeigt, in den Loop-Ausgabe-Modus gelangen.
7. SEARCH Tasten: Mittels dieser Tasten können Sie innerhalb eines Tracks mit hoher
Geschwindigkeit suchen.
8. TRACK SEARCH Tasten: Mittels dieser Tasten können Sie einen bestimmten Titel auf
der CD auswählen (vorwärts bzw. rückwärts). Drücken Sie die +10 Taste um 10 Tracks
auf einmal zu überspringen.
9. PITCH BEND Tasten: Die Geschwindigkeit nimmt zu, während die "+ Taste" gedrückt
wird und kehrt zurück wenn der Knopf losgelassen wird. Die Geschwindigkeit fällt wenn
die "- Taste" gedrückt wird und kehrt zurück, wenn der Knopf losgelassen wird. Diese
Tasten können zum Synchronisieren von 2 Tracks genutzt werden
10.TAP Taste: Der CD670 besitzt einen automatischen BPM-Counter. In einigen seltenen
Fällen zählt der Beat Counter nicht so, wie er es tun sollte (Beat wird nicht als Beat
erkannt). In diesen Fällen können Sie im Rhythmus der Musik einfach mit “tappen“.
Befindet sich der CD-Player in manuellem Beatmodus, dann blinkt das kleine „BPM”
oberhalb des BPM-Displays. Bei Auswahl eines anderen Tracks schaltet der Beat
Counter zum Automatikmodus zurück. Sie können ebenfalls manuell zum
Automatikmodus zurückschalten, indem Sie die TAP-Taste drücken, bis im Display
„Auto bPm” angezeigt wird (das kleine „BPM” oberhalb des BPM-Displays hört auf zu
blinken).
Umschalten zwischen BPM und PITCH Display: Die Standardeinstellung des
Displays ist BPM-Modus, Sie können es jedoch auch auf PITCH-Modus einstellen:
JB SYSTEMS® 39/67 CD670
JB SYSTEMS® 40/67 CD670
Page 23

DEUTSCH BEDIENUNGSANLEITUNG
drücken Sie die „NEXT TRACK” Taste kurz, während Sie die TAP-Taste gedrückt
halten, zum Umschalten zwischen den beiden Modi.
11.PITCH Taste: Mit dieser Taste wird die Geschwindigkeitsfunktion ein- und
ausgeschaltet. Sie können ebenfalls zwischen 3 Pitchbereichen wählen (+/-4%, 8%,
16%): mit jedem kurzen Tastendruck auf „PITCH BEND –“, während Sie gleichzeitig
die PITCH-Taste gedrückt halten, ändern Sie den Pitchbereich (siehe Pitchbereich
LED’s).
12.GESCHWINIGKEITSFADER: Drücken Sie die PITCH Taste, so dass sie leuchtet. Die
Geschwindigkeit kann nun bis zu +/-16% durch Bewegen des Faders geändert werden.
Die Geschwindigkeit ändert sich nicht, sofern die Pitchbereich LED’s rechts von der
PITCH-Taste nicht leuchten.
13.RELAY Taste: Wenn Sie die Relay-Funktion einschalten, wird abwechselnd ein Lied
von Laufwerk A und ein Lied von Laufwerk B abgespielt, bis diese Funktion wieder
ausgeschaltet wird. Sie können in den CD-Player, der sich momentan im Wartemodus
befindet, eine neue CD einlegen. Auf diese Weise können Sie ein endloses Programm
entwickeln. Perfekte Funktion für den Einsatz in Gaststätten.
14. OPEN/CLOSE Taste: Drücken Sie diese Taste um die CD-Schublade zu öffnen oder
zu schliessen.
Bemerkung: Während derWiedergabe lässtsich dieCD-Schubladenichtöffnen! Drücken Siezuerst
die PLAY/PAUSETaste.
15. SEARCH MODE Taste: Tastendruck zur Umschaltung der Funktion des JOG
WHEELS (1) zwischen schnellem Suchmodus (das gelbe LED leuchtet) und
Normalmodus. Die Schnellsuchfunktion wird automatisch ausgeschaltet, wenn das
JOG WHEEL für mehr als 10 Sekunden nicht benutzt wird.
PLAY MODE: Normalerweise wird das JOG WHEEL als Pitch Bend Tool zur
Synchronisation des Rhythmus des spielenden Tracks mit einem anderen Track
benutzt. Ist der Schnellsuchmodus eingeschaltet, dann können Sie mit dem JOG
WHEEL sehr schnell innerhalb des aktuellen Tracks vorwärts/rückwärts suchen.
PAUSE MODE: Normalerweise wird das JOG WHEEL für eine sehr genaue Suche
(1 Frame Genauigkeit) für den genauen Cue Punkt benutzt. Ist der
Schnellsuchmodus eingeschaltet, dann können Sie mit dem JOG WHEEL sehr
schnell innerhalb des aktuellen Tracks vorwärts/rückwärts suchen.
16.LCD DISPLAY: Zeigt alle wichtigen Informationen an, die während des Playbacks
gebraucht werden. Beachten Sie das nächste Kapitel, um mehr Informationen zu
erhalten.
17.SGL/CTN: Sie können zwischen "Einzelwiedergabe" und "kontinuierlicher Wiedergabe"
wählen.
Einzelwiedergabe: Die Wiedergabe endet nach jedem Track und wartet am
Anfang des nächsten Tracks (Funktion wird meistens von DJ’s benutzt)
Kontinuierliche Wiedergabe: Die komplette CD wird ohne Unterbrechung
abgespielt (Funktion wird meistens von Gaststätten benutzt)
Drücken Sie die SGL/CNT Taste, für mehr als 1 Sekunde um zwischen „Normal“ und
„Auto CUE“ Modus umzuschalten. In "Auto CUE" Modus wartet der Spieler an der
Stelle wo die Musik beginnt. Dies ist ein sehr nützliches Merkmal für DJ’s!
18.TIME Taste: Mit der TIME Taste schalten Sie zwischen „noch zu spielende Zeit“ ,
“abgelaufener Zeit“ und „Totaler Zeit“ um.
STEUEREINHEIT – RÜCKSEITE:
DEUTSCH BEDIENUNGSANLEITUNG
19.FADER START Anschluss: Wenn Sie ein Mischpult mit Fader Start Funktion
verwenden, verbinden Sie den CD-Player mit den Fader Start Buchsen des
Mischpultes. Stellen Sie sicher, das keine Spannung auf diesen Ausgängen anliegt!
Bemerkung: Dieser Steuereinheit istnur kompatibelmit Synq®oder Pioneer® Mischpulten.
20.CONTROL Anschluss: Hier wird die Haupteinheit mit das mitgelieferte Mini-DIN Kabel
angeschlossen.
LCD-ANZEIGE:
1. PLAY: Leuchtet während der Wiedergabe einer CD.
2. PAUSE: Leuchtet während sich der Player im Pausen oder CUE Modus befindet.
3. CUE: Leuchtet während der Player am CUE Punkt wartet.
4. ELAPSED, TOTAL REMAIN: Angezeigte Zeit ist die laufende, abgelaufene oder
Gesamtzeit.
5. TIME BAR: Zeigt die vergangene oder aktuelle Zeit je nach Einstellung der TIME
Taste an. Wenn der Balken warnend blinken, ist der Track fast am Ende angelangt!
6. BPM/PITCH DISPLAY: Ihnen stehen 3 unterschiedliche Displaymodi zur Verfügung:
siehe Beschreibung PITCH-Taste (11) und TAP-Taste (10) zur Umschaltung zwischen
den 3 Displaymodi.
BPM Anzeige EIN: Der automatische Beat Counter zeigt die Anzahl der Beats pro
Minute im Display an.
BPM Anzeige BLINKT: Der manuelle Beat Counter zeigt die Anzahl der Beats pro
Minute, die Sie manuell „getapped” haben, im Display an.
PITCH Anzeige EIN: Das Display zeigt die tatsächliche Geschwindigkeits-
abweichung (in %) verglichen mit Zero Pitch.
7. AUTO CUE: Leuchtet, wenn die "AUTO CUE" Funktion aktiv ist.
8. SINGLE: Leuchtet wenn der Player nur ein Track abspielt. Leuchtet diese Anzeige
nicht, befindet sich das Gerät im kontinuierlichen Wiedergabemodus. Diese Funktion
wird über die SGL/CTN (17) Taste eingestellt.
9. LOOP: Anzeige, wenn einen Loop wiedergegeben wird.
JB SYSTEMS® 41/67 CD670
JB SYSTEMS® 42/67 CD670
Page 24

DEUTSCH BEDIENUNGSANLEITUNG
DEUTSCH BEDIENUNGSANLEITUNG
10.RELOOP: Anzeige, wenn einen Loop programmiert ist, damit Sie die Reloop-Taste
nutzen können.
11.TRACK: zeigt gegenwärtige Tracknummer.
12.MINUTE: zeigt "Minuten" Information vom gegenwärtigen Track.
13.SECOND: zeigt "Sekunden" Information vom gegenwärtigen Track.
14.FRAME: Zeigt den aktuellen Frame vom gegenwärtigen Track (1 Frame = 1/75 Sek.)
15.ANTI SHOCK UND BUFFER ANZEIGE: Statusanzeige des Anti-Schock Speichers.
WIE NUTZE ICH…
Die meisten gemeinsamen Funktionen sind im vorherigen Kapitel "Tasten und Funktionen"
beschrieben. In diesem Kapitel werden speziellere Funktionen erklärt.
EINIGE FUNKTIONEN:
SLEEP MODUS:
Befindet sich der CD-Player länger als 15 Minuten im Pausen- oder CUE Modus schaltet
der Player automatisch in den „Schlafmodus“. Dies verlängert die Lebensdauer des
Lasers sowie des Spindelmotors. Während des Schlafmodus zeigt die Anzeige das Wort
"SLEEP". Um den Player „aufzuwecken“, drücken Sie die PLAY oder CUE Taste.
RELAY Funktion:
Öffnen Sie die beiden Fader der CD-Eingänge an Ihrem Mischpult. Drücken Sie die
Relay-Taste, um die Relay Funktion zu aktivieren. Die Relay LED leuchtet. Legen Sie in
beiden Playern eine CD ein und starten Sie die Wiedergabe auf einem Player. Nun wird
abwechselnd ein Track vom ersten Laufwerk und danach vom anderen Laufwerk
wiedergeben. Sie können zwischendurch auch die CD entnehmen und eine andere CD
einlegen. So ist es möglich ein endloses Programm zu gestalten. Perfekt für den Einsatz
in Gaststätten.
Bemerkung: DurchEinschalten derRelay-Funktion schaltenbeidePlayerin den SINGLEMode.
Während der Wiedergabe drücken Sie die R.CUE/LOOP IN Taste. Dies ist der
Startpunkt des Loops. Nun drücken Sie die OUT/EXIT Taste um den Endpunkt zu
markieren. Der nahtlose Loop startet direkt und wird wiederholt (Mit ein wenig Übung
erhalten Sie perfekte Loops). Während der Wiedergabe des Loop’s können Sie die
OUT/EXIT Taste drücken, um den Loop zu verlassen und den Rest des Tracks
wiederzugeben. Es ist möglich während der Wiedergabe des Loop’s einen neuen Loop
zu erstellen. Dazu drücken Sie einfach die Taste R.CUE/LOOP IN um den neuen
Startpunkt zu markieren. Nun markieren Sie den Endpunkt mit der OUT/EXIT Taste. Ihr
neuer Loop ist programmiert und wird wiedergegeben.
RESTART DES LOOPS :
Dies kann auf 3 Arten geschehen:
Wenn ein Loop programmiert ist und Sie ihn durch Drücken der OUT/EXIT Taste
verlassen haben, drücken Sie die Taste RELOOP um den Loop neu zu starten.
Wenn ein Loop programmiert ist und Sie ihn durch Drücken der OUT/EXIT Taste
verlassen haben, drücken Sie die Taste OUT/EXIT noch einmal um den Loop neu zu
starten. Der nun markierte Punkt ist der neue Endpunkt des laufenden Loop’s.
Während der Wiedergabe des Loop’s drücken Sie die Taste RELOOP um den Loop
direkt wieder neu zu starten. Ideal um einen „Stotter“ Effekt zu kreieren.
EDITIEREN EINES LOOPS:
Wenn ein Loop programmiert wurde, drücken Sie den RELOOP/STUTTER Knopf über
2sec, um in den „Loop edit“ Mode zu gelangen. Während der Loop nahtlos abgespielt
wird zeigt das Display den Loop Endpunkt an. Nutzen Sie das große Drehrad um einen
neuen Loop Endpunkt zu setzen. Um das Setzen zu vereinfachen kann man den neu
gewählten Endpunkt dauerhaft hören. Wenn der Endpunkt gesetzt ist drücken Sie den
LOOP OUT Knopf um die Stellung zu speichern.
PITCH BENDING:
Verwenden Sie diese Funktion, um den Takt zweier Titel so perfekt wie möglich
anzugleichen. Hierfür gibt es 2 Möglichkeiten:
PITCH BEND Tasten: Wird die „PITCH BEND+” oder „PITCH BEND-“ Taste betätigt,
so erhöht bzw. verringert sich die Geschwindigkeit des wiedergegebenen Titels.
JOG WHEEL: Wird das „JOG WHEEL” im Uhrzeigersinn bewegt, so erhöht sich die
Geschwindigkeit des Titels. Bewegt man das „JOG WHEEL“ gegen den
Uhrzeigersinn wird die Geschwindigkeit verringert. Je schneller das „JOG
WHEEL“ bewegt wird, desto stärker ändert sich die Geschwindigkeit des Titels.
ABSPIELEN/AUFNEHMEN VON CD-R UND CD-RW:
Ausser normalen Audio CD’s kann der CD670 auch CD-R und CD-RW abspielen.
Bitte verwenden Sie beim brennen einer CD ausschliesslich den “disc at once” und
“track at once” Modus! Obwohl der CD670 in der Lage ist, CD-R und CD-RW zu lesen,
die mit höheren Geschwindigkeiten aufgenommen sind, empfehlen wir, keine
Aufnahmen, die mit mehr als 12facher Geschwindigkeit gebrannt wurden, zu
verwenden, um die Lesbarkeit zu verbessern. Kaufen Sie stets qualitativ hochwertige
CD-R und CD-RW!
Wenn die Disc eine Multi Session ist, wird nur die erste Session gespielt:
ERSTELLEN EINES LOOPS:
JB SYSTEMS® 43/67 CD670
JB SYSTEMS® 44/67 CD670
Page 25

DEUTSCH BEDIENUNGSANLEITUNG
TECHNISCHE DATEN
Stromzufuhr: AC 230 V, 50Hz
Leistungsaufnahme: 21W
Outputlevel: 2,0Vrms +/-0,5dB@ 1kHz,0dB
Frequenzbereich: 20-20.000Hz (+/-0,4dB)
THD + noise (20kHz LPF): 0,01%@ 1kHz,0dB
S/N Ratio(IHF-A): >92dB@ 1kHz,0dB
KürzesteZugriffszeit(next track): <2sec
LängsteZugriffszeit (track1 20): <4sec
Laser Pickup: Sony KSM-213CCM 3spot detection 780nm
Electronictracking: Vollautomatisches digital tracking.
Digitalausgang: 0,5Vpp +/-0,1 (Belastung = 75Ω)
Betriebstemperatur: 5°C bis 35°C
Luftfeuchtigkeit: 25 bis 85% relativeLuftfeuchtigkeit (nicht
Abmessungen: Haupteinheit: 482(B) x88,8 (H) x 262,5 (T) mm
Gewicht: Haupteinheit: 5,0 kg
TechnischeÄnderungen könnenauch ohneVorankündigungvorgenommenwerden!
Sie können sichdie neuesteVersion dieses Benutzerhandbuchesvon unserer Website
herunterladen: www.beglec.com
kondensierend)
Steuereinheit: 482 (B) x88,8 (H) x94(T) mm
Steuereinheit: 1,8 kg
ESPAÑOL MANUAL DE INSTRUCCIONES
MANUAL DE INSTRUCCIONES
Gracias por la compra de este producto JB Systems®. Para sacar todo el rendimiento de
las posibilidades de este aparato y por su propia seguridad, por favor lea este manual de
instrucciones con mucho cuidado antes de utilizar esta unidad.
CARACTERÍSTICAS
Esta unidad no interfiere con señales de radio. Este producto cumple las exigencias de las
directrices actuales Europeas y nacionales. Se ha establecido conformidad y las
declaraciones y documentos relevantes se han depositado por el fabricante.
Inicio rápido de buffer con efecto stutter (tartamudeo) de cue
Seamless loop (bucle sin fin) con reloop y efecto stutter
Función de edición de loop en tiempo real
Contadores de beat completamente automáticos con función TAP
Memoria antichoque, 20 segundos
Función Auto cue (-48dB)
Cue en tiempo real (“Cue al vuelo”)
Control de Pitch (3 rangos: +/- 4, 8, 16%)
Pitch bend en Jog wheel y botones para mezclas perfectas
Lee CD-DA, CD-R, CD-RW
Inicio/parada Fader (back cue)
Pantalla LCD de gran tamaño “super twist” para una lectura excelente
Botones iluminados de gran calidad
Ruedas de selección de gran tamaño: Búsqueda por frames 1/75 seg y Pitch bend
Relay play (reproducción alternada): reproducción ininterrumpida en 2 CDs
Reproducción continua/sencilla
Selección de tiempo transcurrido, restante y total
Salida digital S/PDIF (RCA/cinch)
Protección de transporte de 60 segundos
Modo "Sleep" (para alargar la vida del láser)
JB SYSTEMS® 45/67 CD670
ANTES DEL USO
Instrucciones importantes:
Antes de utilizar esta unidad, por favor compruebe que no hay daños causados por el
transporte. En caso contrario, no utilice este aparato y consulte a su vendedor.
Importante: Este aparato salió de la empresa en perfecto estado y bien empaquetado.
Es absolutamente necesario por parte del usuario seguir estrictamente las instrucciones
de seguridad y advertencias de este manual. Cualquier daño causado por manejo
inadecuado no estará sujeto a la garantía. El vendedor no aceptará responsabilidad por
ningún defecto o problemas que resulten de ignorar este manual del usuario.
JB SYSTEMS® 46/67 CD670
Page 26

ESPAÑOL MANUAL DE INSTRUCCIONES
ESPAÑOL MANUAL DE INSTRUCCIONES
Mantenga este folleto en un lugar seguro para consultas futuras. Si vende esta
instalación, asegúrese de añadir este manual de usuario.
Para proteger el medio ambiente, por favor intente reciclar el material de empaquetado
tanto como sea posible.
Verificar el contenido:
Verificar la presencia de las partes siguientes:
Manual de instrucciones
Unidad principal
Unidad de control
Cable de red
Dos cables cinch
Cable mini-DIN
Dos cables de inicio Fader (mini-jack/mini-jack)
PRECAUCIONES DE USO
CAUTION
mismo. Diríjase únicamente a personal cualificado.
El símbolo de un rayo en el interior de un triángulo alerta sobre la presencia o el
uso de elementos no isolados donde un voltaje peligroso constituye un riesgo
suficiente para causar una eventual electrocución.
El punto de exclamación en el interior de un triángulo, alerta el usuario sobre la
presencia de importantes instrucciones y/o del mantenimiento en el manual de
uso.
Este símbolo significa: Uso para el interior solamente.
Este símbolo significa: Lea las instrucciones.
Afín de evitar todo riesgo de incendio o electrocución, no exponer el aparato a la lluvia o
ambiente húmedo.
Para evitar que se forme condensación en el interior, permita que la unidad se adapte a
las temperaturas circundantes cuando la lleve a una habitación cálida después del
transporte. La condensación algunas veces impide que la unidad funcione a rendimiento
pleno o puede incluso causar daños.
Esta unidad es sólo para uso interior.
No coloque objetos metálicos o derrame líquidos dentro de la unidad. No colocar
recipientes llenos de líquidos, como floreros, encima del aparato. Podría resultar
descarga eléctrica o mal funcionamiento. Si un objeto extraño entrara en la unidad,
desconecte inmediatamente la fuente de alimentación.
No colocar fuentes de llamas, como velas, encima de la unidad.
No cubra ninguna apertura de ventilación ya que esto podría resultar en
sobrecalentamiento.
Evite su uso en ambientes polvorientos y limpie la unidad regularmente.
Mantenga la unidad alejada de los niños.
Personas sin experiencia no deberían manejar este aparato.
PRECAUCIÓN: Para reducir el riesgo de
electrocución no abra ninguna tapa. No existen
piezas en el interior que pueda cambiar usted
La temperatura máxima de ambiente es 45°C. No use esta unidad a temperaturas más
elevadas.
Las distancias mínimas alrededor del aparato para la suficiente ventilación son 2 cm.
Siempre desenchufe la unidad cuando no la use por un periodo de tiempo largo o antes
de cambiar la bombilla o comenzar una reparación.
La instalación eléctrica debería ser llevada a cabo sólo por personal cualificado, acorde
a las regulaciones para seguridad eléctrica y mecánica de su país.
Compruebe que el voltaje disponible no es superior al que aparece en el panel trasero
de la unidad.
Enchufe siempre accesible para desconectar la alimentación.
El cable de alimentación debería estar siempre en perfectas condiciones: apague la
unidad inmediatamente cuando el cable de alimentación esté roto o dañado.
¡Nunca deje el cable de alimentación entrar en contacto con otros cables!
¡Cuando el interruptor está en la posición de reposo, esta unidad no se desconecta
totalmente de la alimentación!
Para prevenir descargas eléctricas, no abra la tapa. Aparte de fusibles principales no
hay partes que puedan ser reparadas por el usuario en su interior.
Nunca
En el caso de problemas serios de manejo, deje de usar la instalación y contacte con su
Por favor, use el empaquetado original cuando el aparato deba ser transportado.
Debido a motivos de seguridad, está prohibido hacer modificaciones sin autorizar a la
CONSEJOS DE INSTALACIÓN:
Colocar y utilizar la unidad durante largos periodos de tiempo cerca de fuentes que
El aparato puede ser colocado en un rack de 19”. Fijar el aparato gracias a los 4
Evitar las vibraciones y los golpes durante el transporte.
Cuando esté instalada en una cabina o estuche de transporte, asegúrese de que exista
Para evitar que se forme condensación en el interior, deje que la unidad se adapte a la
Seleccione cuidadosamente el lugar donde vaya a realizar la instalación. Evite la
El reproductor funcionará normalmente cuando esté instalado en superficies con una
Tenga mucho cuidado cuando manipule los CDs, no los toque con las manos mojadas o
Los discos que estén sucios deben limpiarse con paños y productos de limpieza
No utilice CDs que presenten daños (rayados o deformados), puesto que pueden dañar
repare un fusible o haga un bypass al fusible. ¡
dañado por un fusible del mismo tipo y especificaciones eléctricas!
vendedor inmediatamente.
unidad.
generen calor tales como amplificadores, focos, etc. afectará a su rendimiento y podría
incluso dañarla.
agujeros para tornillos del panel frontal. Asegurarse de la dimensión correcta de los
tornillos (no provistos).
una buena ventilación para facilitar la evacuación de calor de la unidad.
temperatura exterior cuando la lleve a una habitación cálida después del transporte. La
condensación impide algunas veces que la unidad funcione a pleno rendimiento.
presencia de fuentes de calor. Evite los lugares con vibraciones o los lugares
polvorientos y húmedos.
inclinación máxima de 15°.
húmedas.
especialmente diseñados a tal efecto.
el aparato.
Siempre
sustituya el fusible
JB SYSTEMS® 47/67 CD670
JB SYSTEMS® 48/67 CD670
Page 27

ESPAÑOL MANUAL DE INSTRUCCIONES
Para evitar incendios o riesgos de descarga, no exponga la unidad a la lluvia o a la
humedad.
Para evitar descargas eléctricas, no abra la cubierta superior. Si ocurre un problema,
póngase en contacto con su distribuidor.
No coloque objetos metálicos ni derrame líquidos dentro del reproductor de CD. Se
pueden producir descargas eléctricas o fallos de funcionamiento.
Este reproductor de CD emplea un láser semiconductor. Para disfrutar de la música de
forma estable, se recomienda utilizar este reproductor en una habitación de entre 5°C y
35°C.
El reproductor de discos compactos no deberá ser ajustado ni reparado por nadie que
no sea personal de servicio cualificado.
Esta unidad puede provocar interferencias en la recepción de radio y televisión.
LIMPIEZA:
Limpiar con un trapo ligeramente húmedo. No dejar caerse agua en el interior de la
unidad. No utilizar productos abrasivos (alcohol,…) que puedan dañar la platina.
CONEXIONES
Conecte el cable mini-DIN entre la unidad de control y la unidad principal (cargador de
CD).
Utilice los cables cinch suministrados para conectar las salidas de audio del reproductor
de CD con las entradas de CD de su unidad de mezclas.
Conecte los 2 cables de inicio del fader si su mesa de mezclas de audio incluye
conexiones de inicio de fader. (Compatible con JB Systems®o Pioneer®)
Conecte el cable de red.
ESPAÑOL MANUAL DE INSTRUCCIONES
UNIDAD PRINCIPAL - PARTE TRASERA:
4. Conector Control: Utilice el cable mini-DIN suministrado para conectar esta salida a
la unidad de control.
5. Salidas Audio: Salida para las señales de audio para cada reproductor. Utilice los
cables cinch/cinch suministrados para conectar estas salidas a las entradas de
CD/línea de la unidad de mezclas.
6. Toma Digital out: Utilice este conector para conectar la señal digital (formato S/PDIF)
a la entrada de un amplificador digital o grabador digital(p. ej. Mini disc)
7. Mains input: Conecte el reproductor de CD a una red eléctrica de 230 V CA, mediante
el cable de alimentación suministrado.
UNIDAD DE CONTROL:
FUNCIONES
UNIDAD PRINCIPAL - PARTE FRONTAL
1. POWER (interruptor POWER ON/OFF): Cuando se pulsa el interruptor de
alimentación, se conecta la alimentación y el led azul se enciende.
2. DISC TRAY: Utilice los botones OPEN/CLOSE para abrir la bandeja de discos y
colocar el CD en su sitio.
3. Botón OPEN/CLOSE: Pulse este botón para abrir y cerrar la bandeja de discos. Estos
botones están desactivados durante la reproducción. Si la bandeja no se cierra
después de 60 segundos. Se cerrará automáticamente para evitar daños.
JB SYSTEMS® 49/67 CD670
1. JOG WHEEL: Esta rueda jog dispone de 4 funciones dependiendo de la modalidad en
la que esté trabajando.
La rueda jog actúa como un control de búsqueda de frames lentos (1/75 seg)
cuando el CD no se está reproduciendo pero se encuentra en pausa o con un
punto cue establecido. Para establecer un nuevo punto cue, gire la rueda y a
continuación, pulse PLAY o LOOP IN cuando haya determinado la posición
correcta. Pulse CUE para volver al “CUE POINT”.
Si la pista se está reproduciendo y la función de búsqueda (15) no está activa, jog
wheel curvará temporalmente el pitch de la música hasta un +/-10% girando la
rueda a la derecha para acelerarla o hacia la izquierda para aminorarla. La
magnitud de cambio de pitch se determina por la velocidad de giro.
Si la función de búsqueda (15) está activa, podrá buscar a una velocidad más alta
a través de la pista actual.
JB SYSTEMS® 50/67 CD670
Page 28

ESPAÑOL MANUAL DE INSTRUCCIONES
ESPAÑOL MANUAL DE INSTRUCCIONES
Cuando se selecciona la función de edición de loop, puede utilizar la rueda jog para
editar el punto final del loop.
2. Botón R.CUE/LOOP IN: Le permite ajustar el punto cue sin detener la reproducción
(CUE ON THE FLY). Este botón también ajusta el comienzo de un seamless loop.
Cuando el botón contiene un punto cue se enciende en verde.
3. CUE button: Al pulsar el botón CUE durante la reproducción, se consigue un regreso
inmediato a la posición en la que comenzó la reproducción. La reproducción comienza
inmediatamente desde el punto cue programado mientras se mantenga pulsado el
botón CUE. Este reproductor de CD salta hacia atrás hasta el punto cue tan pronto
como se suelte el botón CUE. Además con la unidad en la modalidad de pausa (el
botón Play/Pause parpadea) la rueda jog se utiliza para ajustar un punto de inicio
diferente. Pulsando el botón "PLAY/PAUSE" o “R.CUE/LOOP” seguido de "CUE",
podrá confirmar este nuevo punto cue.
4. Botón OUT/EXIT: Se utiliza para ajustar el punto final al ejecutar loops en la música.
El reproductor comienza a ejecutar un seamless loop hasta que se vuelve a pulsar el
botón para salir. Cuando hay un loop programado pero no está activo, también puede
reiniciar el loop. El punto donde pulse el botón se memorizará como nuevo punto final
del loop. En la modalidad de edición de loop al pulsar el botón OUT/EXIT se detiene la
edición de loop y se guarda el nuevo punto final del loop.
5. Botón PLAY/PAUSE: cada vez que se pulsa el botón PLAY/PAUSE, el reproductor
de CD pasa de reproducción a pausa o de pausa a reproducción. El botón parpadea
siempre que el reproductor esté establecido en pausa.
6. Botón RELOOP/STUTTER: Este botón consta de 3 funciones:
RELOOP: Cuando hay un loop programado y ha pulsado el botón OUT/EXIT, pulse
el botón reloop para volver a introducir el loop. Para salir del loop, pulse el botón
OUT/EXIT. (Los puntos de intro y final permanecen sin cambios).
STUTTER: Cuando se está reproduciendo un loop, puede pulsar este botón para
reiniciar el loop inmediatamente. También puede pulsar este botón cuando una
pista no se está reproduciendo en loop. Cada vez que se pulsa el botón
RELOOP/STUTTER, se reiniciará la música desde el punto cue programado. El
efecto stutter añade creatividad extra a su trabajo.
ENTER EDIT LOOP MODE: Cuando hay un loop programado (los botones LOOP
IN y OUT/EXIT están encendidos) puede introducir la modalidad de edición de loop
pulsando el botón RELOOP/STUTTER hasta que la pantalla muestre “Ed”.
7. Botones SEARCH: Estos botones se utilizan para buscar a alta velocidad dentro de
una pista.
8. Botones TRACK SEARCH: Estos botones se utilizan para seleccionar la pista que se
va a reproducir. Forward skip (hacia delante) & back skip (hacia atrás). Pulse el botón
+10 para saltar 10 pistas a la vez.
9. Botones PITCH BEND: La velocidad aumenta mientras esté pulsado el botón “+” y
regresa al pitch original cuando se suelta el botón. La velocidad disminuye mientras
esté pulsado el botón “–” y regresa al pitch original cuando se suelta el botón. Estos
botones pueden utilizarse para sincronizar los beats de 2 pistas.
10.Botón TAP: El modelo CD670 dispone de BMP-counter totalmente automático. En
algunos casos excepcionales el contador de beats automático no cuenta como lo
debería hacer (los beats están fuera del rango normal o simplemente no hay ningún
beat para detectar). En algunos casos puede ayudar al contador de beats golpeando
manualmente y con suavidad esté botón al ritmo del beat. Cuando el reproductor de
CD se encuentra en la modalidad de beat manual, el “BPM” pequeño encima de BPMdisplay parpadea. Cuando selecciona otra pista, el contador de beats regresa
automáticamente a la modalidad automática. También puede volver manualmente a la
modalidad automática pulsando el botón TAP hasta que la pantalla muestre “Auto
bPm”. (El “BPM” pequeño encima de BPM-display deja de parpadear).
Cambio entre pantalla BPM y pantalla PITCH: Por defecto, la pantalla está
establecida en modalidad BPM pero también puede establecerla en modalidad
PITCH: pulse brevemente el botón “NEXT TRACK” mientras mantiene pulsado el
botón TAP para alternar entre las dos modalidades de visualización.
11.Botón PITCH: Este botón se utiliza para encender o apagar la función de velocidad.
También puede seleccionar 3 rangos de pitch diferentes (+/-4%, 8%, 16%): cada vez
que pulse brevemente el botón “PITCH BEND –“ mientras mantiene pulsado el botón
PITCH, cambiará el rango de pitch. (Consulte los LEDs de rango de pitch).
12.Botón deslizante de PITCH: Pulse el botón PITCH, de forma que esté encendido. La
velocidad puede cambiarse hasta un +/-16% moviendo el fader. La velocidad no
cambiará cuando los LEDs de rango de pitch, a la derecha del botón PITCH estén
apagados.
13.Botón RELAY: Cuando activa la función Relay, se reproducirá alternativamente una
pista desde ambos CDs hasta que la función relay se desactive. Siempre puede
colocar un nuevo CD en el reproductor que esté esperando en standby. De esta
forma, puede crear un programa sin fin. Ideal para utilizar en pubs, etc.
14.Botón OPEN/CLOSE: Pulse este botón para cargar o expulsar el disco. Cada
pulsación abrirá o cerrará la bandeja de discos en el transporte.
NOTA:La bandeja no se abrirá cuando el disco se esté reproduciendo, pulse primero el botón
PLAY/PAUSE.
15.Botón SEARCH MODE: Pulse este botón para cambiar la función de JOG WHEEL
(1) entre la modalidad de búsqueda rápida (el LED amarillo está encendido) y la
modalidad normal. La función de búsqueda rápida se desactiva rápidamente cuando
JOG WHEEL no se utiliza durante más de 10 segundos.
PLAY MODE: Normalmente JOG WHEEL se utiliza como herramienta de pitch
bend para sincronizar los beats de la pista de reproducción a otra pista. Cuando la
modalidad de búsqueda rápida está activada, puede utilizar JOG WHEEL para
buscar rápidamente hacia delante o hacia atrás dentro de la pista actual.
PAUSE MODE: Normalmente JOG WHEEL se utiliza para buscar con mucha
precisión (precisión de 1 frame) para el punto cue exacto. Cuando la modalidad de
búsqueda rápida está activada, puede utilizar JOG WHEEL para buscar
rápidamente hacia delante o hacia atrás dentro de la pista actual.
16.PANTALLA LCD: Muestra toda la información importante necesaria durante la
reproducción. Consulte el capítulo siguiente para obtener más información.
17.Botón SGL/CTN: Puede seleccionar entre “single track mode” y “continuous play”.
Continuous play: Todo el CD se reproducirá sin interrupción. (Se utiliza
mayormente en pubs).
Single track: El reproductor se detiene al final de cada pista y espera al comienzo
de la siguiente pista. (Lo utilizan mayormente los DJs).
Pulse el botón SGL/CNT durante más de 1 segundo para cambiar entre modalidad
normal y “auto cue”. En la modalidad “auto cue” el reproductor espera a la primera
nota musical de cada pista. Esto significa que los CDs indexados incorrectamente no
interferirán con la capacidad de inicio instantáneo de este reproductor de CD. Esta es
una característica muy útil para los DJs.
18.Botón TIME: El botón TIME cambia entre el tiempo de reproducción transcurrido, el
tiempo restante en una selección y el tiempo restante del disco. (Por defecto =
restante /pista)
JB SYSTEMS® 51/67 CD670
JB SYSTEMS® 52/67 CD670
Page 29

ESPAÑOL MANUAL DE INSTRUCCIONES
19.Tomas FADER START: Si está utilizando una unidad de mezclas con función de
inicio de fader, conecte el reproductor al inicio de fader de la unidad de mezcla. Tenga
en cuenta que estas tomas nunca deberán conectarse con ningún voltaje.
Atención: Este mando a distancia sólo es compatible con algunas unidades de mezcla Synq®o
Pioneer®.
20.CONECTOR DE CONTROL: Conecte la unidad principal aquí, mediante el cable miniDIN suministrado.
PANTALLA LCD:
1. PLAY: Aparece mientras la unidad está reproduciendo un CD.
2. PAUSE: Aparece mientras la unidad está en modalidad de pausa o cue.
3. CUE: Aparece cuando el reproductor de CD espera en el punto cue.
4. ELAPSED, TOTAL REMAIN: Indica que el tiempo que se muestra en la pantalla es el
transcurrido, el restante o el total restante.
5. TIME BAR: Muestra el tiempo restante o transcurrido dependiendo del ajuste del
botón TIME. Comienza a parpadear al final de cada pista para avisar al usuario para
que emprenda una acción.
6. PANTALLA BPM/PITCH: Existen 3 modalidades de visualización posibles: consulte
las descripciones del botón PITCH (11) y el botón TAP (10) para aprender a cambiar
entre las 3 modalidades de visualización.
BPM indicator ON: El contador de beats automático muestra el número de beats
por minuto en la pantalla.
BPM indicator BLINKING: El contador de beats manual muestra el número de
beats por minuto que "golpea" manualmente en la pantalla.
PITCH indicator ON: La pantalla muestra la variación de pantalla actual (en %) en
comparación con el pitch cero.
7. AUTO CUE: Aparece cuando la función “auto cue” está activa. Consulte botón
SGL/CTN (17).
ESPAÑOL MANUAL DE INSTRUCCIONES
8. SINGLE: Aparece cuando la unidad está establecida para reproducir sólo una pista a
la vez. Cuando no se muestra, el CD se reproduce continuamente a través de todas
las pistas. La función es controlada por el botón SGL/CTN (17).
9. LOOP: Se muestra cuando se está reproduciendo un loop.
10.RELOOP: Se muestra cuando hay un loop programado, por lo que puede utilizar el
botón reloop.
11.TRACK: Muestra el número de pista actual.
12.MINUTE: Muestra la información de tiempo de la pista actual en “minutos”.
13.SECOND: Muestra la información de tiempo de la pista actual en “segundos”.
14.FRAME: Muestra la información de tiempo de la pista actual en “frames”. (1 frame =
1/75thseg.)
15.INDICADOR ANTI SHOCK Y BUFFER: Muestra el estado de la memoria anti shock.
UTILIZACIÓN
La mayoría de las funciones comunes se explican en el capítulo anterior “controles y
funciones”. En este capítulo se describen las funciones que necesitan información
ampliada.
ALGUNAS FUNCIONES GENERALES:
MODO SLEEP:
El reproductor de CD apaga automáticamente el transporte y el láser después de unos
15 minutos (cuando está en modalidad de pausa o cue). Esto prolonga la vida del motor
y del láser. Durante la modalidad sleep la pantalla muestra la palabra “SLEEP”. Para
reanudar el reproductor, pulse el botón cue o play, la pantalla se encenderá en
modalidad normal y estará preparada para recibir instrucciones.
FUNCIÓN RELAY:
Abra primero 2 faders de las entradas de CD en la unidad de mezclas. Pulse el botón
RELAY para activar la función relay, el LED de relay se enciende. Coloque un disco en
ambos reproductores e inicie la reproducción en una de las unidades. Se reproducirá
una pista de forma alternativa desde ambas unidades hasta que la función relay se
desactive. Siempre puede colocar un nuevo CD en el reproductor que esté esperando
en pausa. De esta forma puede crear un programa sin fin, ideal para pubs, etc.
NOTA: Cambiandoa funciónrelay estableceautomáticamenteambosreproductores enmodalidadsingle.
PITCH BENDING:
Esta función se utiliza para sincronizar los beats de dos pistas. Esto puede realizarse de
dos formas:
Botones PITCH BEND: La velocidad aumenta o disminuye respectivamente siempre
que se pulsen los botones PITCH BEND+ o PITCH BEND-.
JOG WHEEL: Durante el modo de reproducción JOG WHEEL curvará
temporalmente el pitch de la música girando JOG WHEEL a la derecha para acelerar
o a la izquierda para aminorar. La velocidad de giro de JOG WHEEL determina el
porcentaje de pitch bend.
JB SYSTEMS® 53/67 CD670
JB SYSTEMS® 54/67 CD670
Page 30

ESPAÑOL MANUAL DE INSTRUCCIONES
ESPAÑOL MANUAL DE INSTRUCCIONES
PLAYING/RECORDING CD-R y CD-RW:
Además de CDs de audio normales, el modelo CD670 puede reproducir CD-R (CD
grabable) y CD-RW (CD regrabable). Tenga en cuenta que siempre deberá utilizar las
opciones de escritura de discos “disc at once” y “track at once” Aunque el modelo
CD670 es capaz de leer CD-R y CD-RW grabados a alta velocidad, le recomendamos
que no utilice velocidades de grabación superiores a x12. Compre siempre CD-R y CDRW de buenas marcas.
Si el disco es de multisesión, sólo se reproducirá la primera sesión.
ACERCA DE LOS LOOPS:
CREAR UN LOOP:
Mientras se está reproduciendo una canción, pulse el botón R.CUE/LOOP IN para
programar el punto de inicio del loop. A continuación, pulse el botón OUT/EXIT para
programar el punto final del loop. El seamless loop comienza a reproducirse
inmediatamente. (Con algo de práctica será capaz de crear loops perfectos). Mientras
se está reproduciendo el loop, puede pulsar el botón OUT/EXIT otra vez para salir del
loop y continuar con el resto de la pista.
Es posible programar un nuevo loop, incluso cuando el loop actual se está todavía
reproduciendo. Mientras se está reproduciendo un loop, pulse el botón R.CUE/LOOP IN
para programar el punto de inicio del nuevo loop. A continuación, introduzca el punto
final pulsando el botón OUT/EXIT. El nuevo loop se ha programado y se reproduce.
REINICIAR UN LOOP:
Esto puede realizarse de 3 formas:
Cuando se programa un loop y lo deja pulsando el botón OUT/EXIT, pulse RELOOP
para reiniciar el loop.
Cuando se programa un loop y lo deja pulsando el botón OUT/EXIT, pulse OUT/EXIT
de nuevo para reiniciar el loop. El punto donde ha pulsado OUT/EXIT se ha
programado como el nuevo punto de loop.
Cuando el loop todavía se está reproduciendo, pulse el botón RELOOP para reiniciar
el loop inmediatamente. Puede repetir esto varias veces para crear un efecto
“Stutter”.
CARACTERÍSTICAS TÉCNICAS
Suministro dealimentación: CA 230 V, 50Hz
Consumo de energía: 21W
Nivel de salida: 2,0Vrms +/- 0.5dB@ 1kHz, 0dB
Respuesta de frecuencia: 20-20.000Hz (+/-0,4dB)
THD + ruido (20kHz LPF): 0,01%@ 1kHz, 0dB
RelaciónS/N(IHF-A): >92dB @ 1kHz, 0dB
Tiempo de acceso corto (siguiente pista): <2 seg
Tiempo de acceso largo (pista 1 20): <4 seg
Recepciónláser: Sony KSM-213CCM detección de3 puntos 780nm
Trackingelectrónico: Tracking digital completamente automático.
Salidadigital: 0,5Vpp +/-0,1 (carga = 75Ω)
Temperaturadefuncionamiento: 5°C a 35°C
Humedad: 25 a 85%HR(sin condensación)
Dimensiones: Unidadprincipal 482 (anchura) x 88,8 (altura) x
262,5 (profundidad) mm
Unidad de control 482 (anchura) x 88,8 (altura)
x 94 (profundidad) mm
Peso: Unidadprincipal 5,0 kg
Unidad de control 1,8 kg
Toda lainformación estásujeta a cambios sin previoaviso
Puede descargar laúltima versión deeste manualde usuarioennuestro sitio Web:www.beglec.com
EDITAR UN LOOP:
Cuando programe un loop, pulse el botón RELOOP/STUTTER durante 2 segundos para
entrar en la modalidad “loop edit”. Mientras el loop se está reproduciendo sin fin, la
pantalla muestra información de tiempo del punto final del loop. Utilice la jog wheel para
establecer un nuevo punto final de loop. Para simplificar, puede escuchar sus
modificaciones de punto final del loop continuamente. Cuando el loop sea perfecto,
pulse el botón LOOP OUT para guardar el nuevo punto final del loop.
JB SYSTEMS® 55/67 CD670
JB SYSTEMS® 56/67 CD670
Page 31

PORTUGUÊS MANUAL DO UTILIZADOR
MANUAL DO UTILIZADOR
PORTUGUÊS MANUAL DO UTILIZADOR
serão cobertos pela garantia. O revendedor não será responsável por quaisquer danos
ou problemas causados pelo incumprimento das instruções deste manual.
Guarde este manual num local seguro para consulta futura. Caso venda esta unidade,
forneça este manual.
Proteja o ambiente. Recicle o material desta embalagem.
Parabéns e obrigado por ter adquirido este produto JB SYSTEMS®. Por favor leia
atentamente este manual do utilizador de forma a saber como utilizar esta unidade
correctamente. Após ler este manual, guarde-o num lugar seguro de forma a poder
consultá-lo no futuro.
CARACTERÍSTICAS
Esta unidade está protegida contra interferências rádio. Este produto cumpre as
exigências impostas pelas presentes directivas nacionais e europeias. A conformidade
deste produto foi comprovada e as declarações e documentos relevantes foram
efectuados pelo fabricante.
Início instantâneo com efeito cue shutter
Loop contínuo com efeito reloop e stutter
Função de edição do loop em tempo real
Contadores de batida automáticos com função TAP
Memória anti shock de 20 segundos
Função Auto cue (-48dB)
Cue em tempo real (“Cue on the fly”)
Controlo de Pitch (3 valores: +/- 4, 8, 16%)
Ajuste de Pitch na Jog Wheel e em botões para misturas perfeitas
Reproduz CD-DA, CD-R, CD-RW
Fader start/stop (back cue)
Mostrador LCD grande e luminoso para uma excelente leitura de informação
Botões iluminados de alta qualidade
Rodas grandes de procura: procura por frame de 1/75 sec e ajuste de Pitch
Relay PLay: Reprodução de 2 CDs sem interrupção
Modo de leitura Contínuo/Simples
Tempo decorrido, restante e total seleccionáveis
Saída digital S/PDIF (RCA/cinch)
Protecção de transporte de 60 segundos
Modo Sleep (Prolonga o tempo de vida do laser)
ANTES DE UTILIZAR
Antes de utilizar esta unidade verifique se existem danos provocados durante o
transporte. Caso existam danos aparentes, não utilize a unidade e contacte o seu
revendedor.
Importante:
embalada. É imprescindível que o utilizador siga as instruções de segurança e avisos
descritos neste manual. Quaisquer danos provocados por utilização incorrecta não
Esta unidade deixou a nossa fábrica em perfeitas condições e devidamente
Verifique o conteúdo:
Certifique-se que a caixa contém os seguintes artigos:
Unidade CD670
Unidade de controlo
Manual do utilizador
Cabo de alimentação
2 Cabos rca
Cabo mini-DIN
2 Cabos fader start (mini-jack/mini-jack)
INSTRUÇÕES DE SEGURANÇA:
CAUTION
O símbolo composto por um triângulo equilátero com um relâmpago no interior
alerta para a presença de voltagem perigosa não isolada no interior do produto
que poderá constituir risco de choque eléctrico.
O símbolo composto por um triângulo equilátero com um ponto de exclamação
alerta o utilizador para a presença de instruções importantes de utilização e
manutenção do produto.
Este símbolo significa: utilização unicamente em espaços fechados.
Este símbolo significa: Leia instruções.
De modo a evitar risco de fogo ou choque eléctrico, não exponha este produto a chuva
ou humidade.
De forma a evitar a formação de condensação no interior da unidade, ao transportá-la
para ambiente quente aguarde algum tempo de modo a que haja uma ambientação à
temperatura. A condensação poderá afectar o desempenho da unidade ou até danificála.
Esta unidade destina-se unicamente a utilização em espaços fechados.
Não introduza objectos de metal nem verta líquidos no interior do produto, correrá risco
de choque eléctrico ou poderá danificar o produto. Caso algum objecto estranho entre
em contacto com o interior da unidade, desligue-a de imediato da corrente.
Não coloque chamas descobertas (tais como velas acesas) sobre a unidade.
Não cubra os orifícios de ventilação ou a unidade poderá sobreaquecer.
Evite locais com poeiras. Limpe a unidade regularmente.
Mantenha esta unidade fora do alcance das crianças.
Esta unidade deverá ser operada unicamente por pessoas experientes.
Temperatura ambiente de funcionamento máxima é de 45ºC. Não utilize esta unidade a
temperaturas ambientes mais elevadas.
ATENÇÃO: De forma a evitar o risco de choque
eléctrico, não remova peças da unidade. Não tente
fazer reparações. Contacte pessoal qualificado.
JB SYSTEMS
®
57/67 CD670
JB SYSTEMS
®
58/67 CD670
Page 32

PORTUGUÊS MANUAL DO UTILIZADOR
PORTUGUÊS MANUAL DO UTILIZADOR
As distâncias mínimas para a ventilação suficiente são 2cm.
Desligue sempre a unidade da corrente quando não a utilizar durante longos períodos
de tempo ou antes de efectuar manutenção.
A instalação eléctrica deve ser efectuada unicamente por pessoal qualificado,
cumprindo os regulamentos de segurança em instalações eléctricas e mecânicas do seu
país.
Certifique-se que a voltagem a utilizar não é superior à voltagem indicada no painel
traseiro da unidade.
A tomada de corrente deverá permanecer acessível para que a unidade possa ser
desligada da corrente.
O cabo de alimentação deverá estar sempre em perfeitas condições: desligue a unidade
e substitua imediatamente o cabo caso este apresente algum dano.
Nunca permita que este cabo entre em contacto com outros cabos!
Quando o interruptor de potência está na posição de desligado, esta unidade não está
desconectada completamente da corrente!
De forma a não correr risco de choque eléctrico não abra a cobertura da unidade. À
excepção do fusível, não existem peças que possam ser substituídas pelo utilizador.
Nunca repare um fusível nem tente operar a unidade sem fusível. Substitua sempre um
fusível danificado por outro com as mesmas características!
Em caso de problemas sérios de funcionamento, interrompa a utilização da unidade e
contacte imediatamente o seu revendedor.
Caso seja necessário transportar a unidade utilize a embalagem original.
Por motivos de segurança, são proibidas quaisquer alterações não autorizadas à
unidade.
GUIA DE INSTALAÇÃO:
Colocar ou utilizar a unidade durante longos períodos de tempo perto de fontes de calor,
tais como amplificadores, holofotes, etc., irá afectar o desempenho da unidade e poderá
até danificá-la.
Reduza ao mínimo o perigo de pancadas e vibrações durante o transporte da unidade.
Quando colocar a unidade numa cabine ou numa mala, certifique-se que há ventilação
de modo a permitir a evacuação do calor produzido pela unidade.
De forma a evitar a formação de condensação no interior da unidade, ao transportá-la
para ambiente quente aguarde algum tempo de modo a que haja uma ambientação à
temperatura. A condensação poderá afectar o desempenho da unidade.
Escolha com cuidado o local da instalação. Evite a presença de fontes de calor. Evite
locais onde há a presença de vibrações, poeira ou humidade.
O leitor irá funcionar normalmente quando colocado numa superfície com a inclinação
máxima de 15.
Tenha cuidado ao manusear CDs, não o faça com as mãos sujas ou molhadas.
Discos sujos deverão ser limpos com panos próprios e produtos de limpeza indicados.
Não utilize CDs danificados (riscados ou com deformações), poderão prejudicar a
unidade.
De modo a evitar risco de fogo ou choque eléctrico, não exponha este produto a chuva
ou humidade.
De forma a evitar o risco de choque eléctrico, não retire a cobertura da unidade. Caso
surja algum problema, contacte o seu revendedor.
Não introduza objectos de metal ou verta líquidos no interior do produto, correrá risco de
choque eléctrico ou poderá danificar o produto.
Este leitor de CD utiliza um laser semicondutor. De modo a desfrutar de música de uma
forma estável, utilize esta unidade num local com uma temperatura compreendida entre
os 5 C e 35C.
Este leitor de CDs só deverá ser alterado ou reparado por pessoal qualificado.
Esta unidade poderá causar interferência na recepção de rádio ou televisão.
Com adaptadores opcionais de 19” (informações adicionais mais adiante neste manual),
esta unidade pode ser montada em racks de 19”. Fixe a unidade utilizando os 4 orifícios
do painel frontal. Certifique-se que utiliza parafusos com a medida certa (os parafusos
não são fornecidos).
Evite pancadas e vibrações durante o transporte.
LIMPEZA DO APARELHO:
Utilize um pano limpo ligeiramente humedecido em água. Evite introduzir água dentro da
unidade. Não utilize líquidos voláteis como benzeno ou diluente, irá danificar a unidade.
LIGAÇÕES
Ligue o cabo mini-DIN entre a unidade de controlo e a unidade principal (leitor de CD).
Utilize os cabos rca fornecidos para ligar as saídas áudio do leitor de CD às entradas
CD da sua unidade de mistura.
Ligue também os cabos fader start se a sua unidade de mistura áudio tiver entradas
para fader start. (compatível com Synq® ou Pioneer®)
Ligue o cabo da Alimentação.
CONTROLOS E FUNÇÕES
UNIDADE PRINCIPAL – PAINEL FRONTAL:
1. Interruptor ON/OFF: Liga e desliga o leitor de CD. Quando a unidade está ligada, o
LED azul permanece aceso.
2. Gaveta CD: Pressione os botões OPEN/CLOSE para abrir a gaveta do CD e introduza
o CD.
3. Botão OPEN/CLOSE: Pressione para abrir e fechar a gaveta do CD. Estes Botões
são desactivados durante a reprodução. A gaveta fecha automaticamente após 60
segundos por razões de segurança.
JB SYSTEMS
®
59/67 CD670
JB SYSTEMS
®
60/67 CD670
Page 33

PORTUGUÊS MANUAL DO UTILIZADOR
PORTUGUÊS MANUAL DO UTILIZADOR
UNIDADE PRINCIPAL – PAINEL TRASEIRO:
4. Conector do CONTROLO: ligue este conector à unidade de controlo, através do cabo
mini-DIN fornecido.
5. Saídas ÁUDIO: Saída para os sinais áudio provenientes de cada leitor de CD. Utilize
os cabos rca/rca para ligar estas saídas às entradas CD/line da sua unidade de
mistura.
6. Conector SAÍDA DIGITAL: Utilize este conector para ligar o sinal digital (formato
S/PDIF) à entrada de um amplificador digital ou gravador digital (ex: Mini disc)
7. Fonte Alimentação: Use o cabo de alimentação fornecido para ligar o leitor de CD a
uma tomada de 230V AC.
UNIDADE DE CONTROLO – PAINEL FRONTAL:
1. JOG WHEEL (ANEL INTERIOR): O jog wheel tem 4 funções, dependendo do modo
que estiver a utilizar.
O jog wheel funciona como um controlo de busca de frame (1/75 seg) quando o CD
não esta a reproduzir mas também não está em pausa ou com ponto cue
estabelecido. Para estabelecer novo ponto cue, gire o jog wheel e de seguida
pressione PLAY ou LOOP IN quando tiver definido a posição certa. Pressione CUE
para regressar ao “CUE POINT” (Ponto Cue).
Durante a reprodução o jog wheel altera temporariamente o pitch da música até +/-
10%. Ao girar o jog na direcção dos ponteiros do relógio irá aumentar a velocidade,
ao girar no sentido contrário a velocidade irá diminuir. A variação de pitch será
determinada pela velocidade a que girar o jog.
Se a função Search (15) estiver activa, irá ser capaz de procurar a uma velocidade
superior atráves da faixa actual.
Quando a função loop edit estiver seleccionada, poderá usar o jog wheel para
editar o ponto final do loop.
2. Botão R.CUE/LOOP IN: Permite definir o ponto cue sem interromper a reprodução
(CUE ON THE FLY). Este botão também serve para definir o inicio de um loop
perfeito. Quando o botão contém um ponto cue fica aceso em verde.
3. Botão CUE: Ao pressionar o botão CUE durante a reprodução irá voltar
imediatamente à posição em que a reprodução foi iniciada. A reprodução começa
imediatamente a partir do ponto cue programado enquanto o botão CUE for
pressionado. O leitor de CD regressa ao ponto cue assim que o botão CUE é solto.
Colocando a unidade em modo pausa (o botão PLAY/PAUSE pisca), o jog wheel é
utilizado para estabelecer um ponto inicial diferente. Ao pressionar o botão
“PLAY/PAUSE” ou “R.CUE/LOOP” seguido do botão “CUE”, pode confirmar este novo
ponto cue.
4. Botão OUT/EXIT: Utilizado para estabelecer o final dos loops. O leitor dá início ao
loop perfeito até que este botão seja pressionado novamente para sair. Quando um
loop é programado mas não está activo, poderá também reiniciar o loop. O ponto em
que o botão é pressionado será memorizado como o novo final do loop. Quando o
leitor está em modo “loop edit”, pressione este botão para parar a edição do loop e
guardar o ponto final do loop.
5. Botão PLAY/PAUSE: Sempre que pressiona o botão PLAY/PAUSE, o leitor de CD
muda de play (reprodução) para pause (pausa) e vice-versa. O botão pisca enquanto
estiver em pause.
6. Botão RELOOP/STUTTER: Este botão tem 3 funções:
RELOOP: Se um loop tiver sido programado e tiver pressionado o botão
OUT/EXIT, pressione o botão reloop para voltar a aceder ao loop. Para sair do
loop pressione o botão OUT/EXIT. (Os pontos iniciais e finais permanecerão
inalterados)
STUTTER: Quando um loop está a ser reproduzido pode pressionar este botão
para reiniciar imediatamente o loop. Este botão pode também ser pressionado
quando uma faixa não está a ser reproduzida em loop. Sempre que o botão
RELOOP/STUTTER é pressionado, a música será reiniciada a partir do ponto cue
pré-programado. Este efeito adiciona criatividade extra ao seu desempenho.
ACEDER AO MODO LOOP EDIT: Quando um loop está programado (os botões
LOOP IN e OUT/EXIT estão pressionados), poderá aceder ao modo “loop edit”
pressionando o botão RELOOP/STUTTER até que o display mostre “Ed”.
7. Botões SEARCH: Estes botões são usados para procurar a alta velocidade na faixa.
8. Botões TRACK SEARCH: Estes botões são utilizados para seleccionar a faixa a
reproduzir. Forward skip (faixa seguinte) e back skip (faixa anterior). Pressione o botão
+10 para saltar 10 faixas de uma vez.
9. Botões PITCH BEND: A velocidade aumenta enquanto o botão “+” é pressionado e
volta à velocidade normal quando o botão é solto. A velocidade decresce quando o
botão “-”é pressionado e volta ao pitch original quando o botão é solto. Estes botões
podem ser utilizados para sincronizar as batidas de 2 faixas.
10.Botão TAP: O CD670 contém um contador de batidas (BPM) totalmente automático.
Em alguns casos raros o contador de batidas não consegue efectuar a contagem
correctamente (as batidas estão fora da escala normal ou simplesmente não existem
batidas). Nestas situações poderá auxiliar o contador de batidas manualmente
pressionando este botão ao ritmo da música. Quando o leitor está no modo manual de
batida, o “BPM” pequeno por cima do mostrador BPM pisca. Quando selecciona outra
faixa o contador de batida muda automaticamente para o modo automático. Também
JB SYSTEMS
®
61/67 CD670
JB SYSTEMS
®
62/67 CD670
Page 34

PORTUGUÊS MANUAL DO UTILIZADOR
pode mudar manualmente para o modo automático pressionando o botão TAP até que
o mostrador indique “Auto bPm”. (o pequeno “BPM” por cima do mostrador BPM deixa
de piscar)
Alternando o mostrador entre BPM e PITCH: Por norma o mostrador está no modo
BPM mas também pode colocá-lo em modo PITCH: pressione o botão “NEXT TRACK”
enquanto estiver pressionado o botão “TAP” para alternar entre os 2 modos.
11.Botão PITCH: Este botão é usado para ligar/desligar a função velocidade. Pode
também escolher entre 3 valores de pitch (+/-4%, 8%, 16%): cada vez que pressione o
botão “PITCH BEND –“ enquanto estiver pressionado o botão PITCH, irá mudar o
valor do pitch. (veja os LEDs do valor do pitch)
12.Cursor SPEED: Pressione o botão PITCH, para que se acenda. A velocidade pode
ser alterada até +/-16% movendo o cursor. A velocidade não será afectada quando os
LEDs do valor do pitch, á direita do botão PITCH estiverem desligados.
13.Botão RELAY: Quando a função Relay é activada, o leitor irá reproduzir
alternadamente uma faixa de cada deck até que a função seja desactivada. Poderá
em qualquer altura colocar um CD diferente no deck que estiver em standby e desta
forma poderá criar um programa interminável. Solução perfeita para utilização em
bares, etc.
14.Botão OPEN/CLOSE: Pressione para abrir e fechar a gaveta do CD na frente da
unidade principal.
NOTA: Agaveta nãoirá abrir durantea reprodução,pressione obotão PLAY/PAUSE.
15.Botão SEARCH: Pressione este botão para alternar a função do JOG WHEEL(1)
entre o modo de procura rápida ( o LED amarelo está aceso) e o modo normal. A
função procura rápida é automaticamente desligada quando o JOG WHEEL não for
usado durante mais de 10 segundos.
MODO PLAY: Normalmente o JOG WHEEL é usado como pitch bend para
sincronizar as batidas da faixa que está a tocar com outra faixa. Quando o modo de
procura rápida é ligado, pode usar o JOG WHEEL para procurar rapidamente para
a frente/trás na faixa actual.
MODO PAUSE: Normalmente o JOG WHEEL é usado para procurar com muita
precisão (precisão de 1 frame) pelo ponto cue exacto. Quando o modo de procura
rápida é ligado, pode usar o JOG WHEEL para procurar rapidamente para a
frente/trás na faixa actual.
16.DISPLAY LCD: Mostra toda a informação importante necessária durante a
reprodução. Consulte o próximo capítulo para obter mais informações.
17.Botão SGL/CTN: Este botão permite seleccionar entre “single track mode” e
“continuous play”.
Continuous play: O CD será reproduzido na sua totalidade sem interrupção.
(Geralmente utilizado em bares)
Single track: O leitor pára no fim de cada faixa e aguarda no início da faixa
seguinte. (Geralmente utilizado por deejays)
Pressione o botão SGL/CNT durante mais de 1 segundo para alternar modo normal e
“auto cue”. No modo “auto cue” o leitor irá aguardar na primeira nota musical de cada
faixa. Isto significa que os CDs mal indexados não irão interferir com as capacidades
de arranque rápido deste leitor de CD. Esta é uma característica muito útil para
deejays!
18.Botão TIME: O botão TIME alterna entre tempo decorrido, tempo restante numa
selecção, e tempo total restante num CD. (standard = restante/faixa)
PORTUGUÊS MANUAL DO UTILIZADOR
19.Conectores FADERSTART: Se utilizar uma mesa de mistura com a função fader
start, ligue o leitor ao fader start da mesa de mistura. Tenha em atenção que este
conector nunca deve ser ligado a qualquer tipo de voltagem.
Atenção:Este controlo remoto éapenascompatívelcom algumas mesasdemistura (compatíveis com
Synq® ou Pioneer®). Mesas de mistura cuja função fader start utilize um sinal ligado à terra não irão
funcionar.
20.Conector do CONTROLO: Ligue a unidade principal a este conector através do cabo
mini-DIN fornecido.
DISPLAY LED:
1. PLAY: Surge quando a unidade está a reproduzir um CD.
2. PAUSE: Surge quando o leitor está em modo pausa ou cue.
3. CUE: Aparece quando o leitor aguarda no ponto cue
4. ELAPSED, TOTAL REMAIN: Mostra que o tempo indicado no mostrador é o tempo
elapsed (decorrido), remaining (restante), ou total remain (total restante).
5. BARRA DO TEMPO: Mostra o tempo restante (remaining) ou decorrido (elapsed) de
acordo com a configuração do botão TIME. Começa a piscar no final de cada faixa
para alertar o utilizador para fazer algo.
6. MOSTRADOR BPM/PITCH: Existem 3 modos de indicação: veja as descrições do
botão PITCH (11) e do botão TAP (10) para aprender como alternar entre os 3 modos.
Indicador BPM ligado: o contador de batida automático indica no mostrador o
número de Batidas Por Minuto.
Indicador BPM a piscar: O contador de batida manual indica no mostrador o
número de Batidas Por Minuto que introduziu manualmente.
Indicador PITCH ligado: O mostrador indica a variação actual de velocidade (em
%) comparada com o valor de pitch 0.
7. AUTO CUE: Esta mensagem surge quando a função “auto cue” está activada.
Consulte a descrição do botão SGL/CTN (17).
8. SINGLE: Surge quando a unidade está definida para reproduzir apenas uma faixa de
cada vez. Quando esta mensagem não é mostrada, o CD será reproduzido
continuamente na sua totalidade. Esta função é controlada pelo botão SGL/CTN (17).
9. LOOP: Mostra quando está um loop em execução.
JB SYSTEMS
®
63/67 CD670
JB SYSTEMS
®
64/67 CD670
Page 35

PORTUGUÊS MANUAL DO UTILIZADOR
PORTUGUÊS MANUAL DO UTILIZADOR
10.RELOOP: Mostra quando um loop está definido para que possa usar o botão reloop.
11.TRACK: Indica o número da faixa.
12.MINUTE: Mostra informação sobre os minutos da faixa a ser reproduzida.
13.SECOND: Mostra informação sobre os segundos da faixa a ser reproduzida.
14.FRAME: Mostra informação sobre os frames da faixa a ser reproduzida. (1 frame =
1/75° seg.)
15.Indicador ANTI SHOCK e BUFFER: Mostra o estado da memória anti shock.
COMO UTILIZAR…
A maioria das funções normais foram explicadas no capítulo anterior “controlos e
funções”. Neste capítulo vamos abordar as funções que requerem mais algumas
explicações.
ALGUMAS FUNÇÕES GERAIS:
MODO SLEEP:
O leitor de CD desliga automaticamente o transporte e o laser após 15 minutos (quando
no modo pausa ou cue). Esta característica prolonga a vida do motor e do laser.
Durante o modo sleep o mostrador indica a palavra “SLEEP”. Para voltar a activar o
leitor, basta pressionar o botão cue ou play, o mostrador volta ao normal e fica pronto a
receber instruções.
FUNÇÃO RELAY:
Comece por abrir os dois faders das entradas de CD na sua mesa de mistura.
Pressione o botão RELAY para activar esta função – o LED relay acende-se. Coloque
um CD em cada deck e dê inicio à reprodução em um dos decks. Alternadamente será
reproduzida uma faixa de cada deck até que a função seja desactivada. Poderá em
qualquer altura colocar um CD diferente no deck que estiver em standby e desta forma
poderá criar um programa interminável. Solução perfeita para utilização em bares etc.
NOTA: Aoligarafunção relayos decksserão automaticamentecolocados emmodo single.
ALTERAÇÃO DE PITCH:
Esta função é utilizada para sincronizar na perfeição as batidas de duas faixas. Pode
ser feito de duas formas:
Botões PITCH BEND: A velocidade aumenta ou diminui respectivamente, enquanto
mantiver pressionados os botões PITCH BEND+ ou PITCH BEND-.
JOG WHEEL: Durante a reprodução o JOG WHEEL irá temporariamente alterar o
pitch da música, ao girar o jog no sentido dos ponteiros do relógio aumenta a
velocidade, ao girar no sentido contrário a velocidade diminui. A velocidade a que
girar o jog irá determinar a percentagem de alteração de pitch.
ACERCA DOS LOOPS:
CRIAR UM LOOP:
Enquanto uma faixa está a ser reproduzida, pressione o botão R.CUE/LOOP IN para
programar o ponto de partida do loop. Em seguida pressione o botão OUT/EXIT para
programar o fim do loop. O loop começa a ser reproduzido de imediato (com algum
treino será capaz de criar loops perfeitos!). Enquanto o loop estiver a ser reproduzido,
pode pressionar o botão OUT/EXIT novamente para sair do loop e continuar a
reproduzir o resto da faixa.
É possível programar um novo loop, mesmo durante a reprodução de outro loop.
Enquanto o loop está a ser reproduzido, basta pressionar o botão R.CUE/LOOP IN para
definir o ponto de partida do novo loop. Em seguida defina o final, pressionando o botão
OUT/EXIT. O novo loop está agora programado e a ser reproduzido.
REINICIAR UM LOOP:
Esta operação pode ser efectuada de 3 maneiras:
Se programou um loop e em seguida pressionou botão OUT/EXIT para sair, basta
apenas pressionar botão RELOOP para reiniciar o loop.
Se programou um loop e em seguida pressionou botão OUT/EXIT para sair, basta
apenas voltar a pressionar botão OUT/EXIT para reiniciar o loop. O ponto onde
pressionou botão OUT/EXIT é agora programado como o novo fim do loop.
Enquanto o loop está a ser reproduzido, pressione o botão RELOOP para reiniciar o
loop de imediato. Pode repetir este processo várias vezes para criar um efeito
“Stutter” (Repetição).
EDITAR UM LOOP:
Quando um loop está programado, pressione o botão RELOOP/STUTTER durante
cerca de 2 segundos para entrar no modo “loop edit”. Enquanto o loop esta a ser
reproduzido, o display indica a informação sobre o tempo relativamente ao final do loop.
Utilize a grande jog wheel para definir o novo ponto final do loop. De modo a facilitar a
operação é possível ouvir continuamente as modificações ao final do loop. Quando o
loop está perfeito, pressione o botão LOOP OUT para salvar o novo final do loop e sair
do loop.
REPRODUZIR/GRAVAR CD-R e CD-RW:
Além de reproduzir CDs normais de áudio, o CD670também reproduz CD-R (CD
gravável) e CR-RW (CD regravável). Lembre-se que deve utilizar sempre as opções de
gravação “disc at once” e “track at once” no seu gravador! Embora o CD670 tenha
capacidade para ler CD-Rs e CD-RWs gravados a alta velocidade, sugerimos que não
utilize velocidades de gravação superiores a 12x de forma a optimizar a capacidade de
leitura. Utilize sempre CD-Rs e CD-RWs de qualidade!
Se o CD for multi-sessão, o CDX-2 só irá reproduzir a primeira sessão:
JB SYSTEMS
®
65/67 CD670
JB SYSTEMS
®
66/67 CD670
Page 36

PORTUGUÊS MANUAL DO UTILIZADOR
ESPECIFICAÇÕES
Alimentação: AC 230 V, 50Hz
Consumo: 21W
Nível de Saída: 2,0Vrms +/- 0.5dB@ 1kHz,0dB
Respostadefrequência: 20-20.000Hz (+/-0,4dB)
THD + ruído (20kHz LPF): 0,01%@ 1kHz,0dB
RácioS/R (IHF-A): >92dB@ 1kHz,0dB
Tempo de acessocurto(próx. faixa): <2sec
Tempo de acessolongo (faixa 1 20): <4sec
Grupo Óptico: Sony KSM-213CCM 780nm, 3 pontos de detecção
Pesquisaelectrónica: Pesquisa digital totalmente automática.
Saídadigital: 0,5Vpp +/-0,1 (load = 75Ω)
Temperatura parauso: 5°C a 35°C
Humidade: 25 to 85% RH (sem condensação)
Dimensões: Unid. Principal 482(W) x 88,8(H) x 262,5(D)mm
Peso: Unid. Principal 5,0kg
Unid. Controlo 482(W) x 88,8(H) x94(D)mm
Unid. Controlo 1,8kg
Podefazer download daversão mais recente deste manual nonosso site:www.beglec.com
Estas informaçõesestão sujeitasa alterações sem avisoprévio
JB SYSTEMS
®
67/67 CD670
 Loading...