

Page 1
WWW.BEGLEC.COM
Copyright © 2004 by BEGLEC cva.
Reproduction or publication of the content in any manner, without express permission of the publisher, is prohibited.
Version: 1.1
The Power Source for DJ’s
Operation Manual
Mode d'emploi
Gebruiksaanwijzing
Bedienungsanleitung
Manual de instrucciones
EN
FR
NL
DU
ES
Page 2

DISPOSAL OF THE DEVICE
Dispose of the unit and used batteries in an environment friendly manner
according to your country regulations.
DÉCLASSER L’APPAREIL
Débarrassez-vous de l’appareil et des piles usagées de manière écologique
Conformément aux dispositions légales de votre pays.
VERWIJDEREN VAN HET APPARAAT
Verwijder het toestel en de gebruikte batterijen op een milieuvriendelijke
manier conform de in uw land geldende voorschriften.
ENTSORGUNG DES GERÄTS
Entsorgen Sie das Gerät und die Batterien auf umweltfreundliche Art und
Weise gemäß den Vorschriften Ihres Landes.
DESHACERSE DEL APARATO
Reciclar el aparato y pilas usadas de forma ecologica conforme a las
disposiciones legales de su pais.
Page 3
ENGLISH USER MANUAL
JB SYSTEMS® 1/52 CD200
OPERATION MANUAL
FEATURES
y Digital scratch effect via jog wheel
y 4 Hot Cue buttons can hold cue points and loops!
y Pitch Lock (Master Tempo)
y Anti-shock memory 10sec.
y Pitch ranges: +/-4% +/-8% +/-16% +/-100%
y Pitch bend on jog wheel and buttons for perfect mixes
y Up to 4 Seamless loops for every track with reloop/stutter
y Permanent memory for up to 2048 (512 x 4) Cue points and loops
y Real-time cue (“Cue on the fly”)
y Ultra fast memory start within 10msec
y Fader start, fader stop, (back cue),
y Auto cue function(-48dB)
y 1/75 Frame search
y 4 different speed scan
y Blue LCD display with pitch display and position marker
y Selectable elapsed, remain and total remain time display
y Jog wheel with special rubber surface
y Single/continuous play
y Relay play allows consecutive playback on two decks
y S/PDIF digital audio RCA coaxial
y 60 seconds Transport Protection
y Sleep mode (saves the life span of the laser)
BEFORE USE
Check the contents:
Check that the carton contains the following items:
y CD200 unit
y User manual
y 1 cinch/cinch cable
y 1 mono mini-DIN cable for fader start and relay play
ENGLISH USER MANUAL
JB SYSTEMS® 2/52 CD200
CAUTIONS REGARDING HANDLING
SAFETY INSTRUCTIONS:
CAUTION: To reduce the risk of electric
shock, do not remove any cover. No userserviceable parts inside. Refer servicing to
qualified service personnel only.
The lightning flash with arrowhead symbol within the equilateral triangle is
intended to alert the use or the presence of un-insulated “dangerous voltage”
within the product’s enclosure that may be of sufficient magnitude to
constitute a risk of electric shock.
The exclamation point within the equilateral triangle is intended to alert the
user to the presence of important operation and maintenance (servicing)
instructions in the literature accompanying this appliance.
To prevent fire or shock hazard, do not expose this appliance to rain or moisture.
Do not place metal objects or spill liquid inside the unit. Electric shock or malfunction
may result.
INSTALLATION GUIDELINES:
• Placing and using the unit for long periods near heat-generating sources such as
amplifiers, spotlights, etc. will affect its performance and may even damage the
unit.
• Take care to minimize shocks and vibrations during transport.
• When installed in a booth or flight case, please make sure to have good
ventilation to improve heat evacuation of the unit.
• To avoid condensation to be formed inside, allow the unit to adapt to the
surrounding temperatures when bringing it into a warm room after transport.
Condense sometimes prevents the unit from working at full performance.
• Choose the place where you put your installation very carefully. Avoid presence
of heat sources. Avoid places with vibrations or places that are dusty and humid.
• The player will work normally when installed on a surface with max. 15°
inclination.
• Be very careful while handling CDs, do not touch them with wet or dirty hands.
• Discs that are dirty must be cleaned with special designed cloth and cleaning
products.
• Do not use CDs that are badly damaged (scratched or deformed) they can
damage your appliance.
• To prevent fire or shock hazard, do not expose this appliance to rain or moisture.
• In order to prevent electric shock, do not open the top cover. If a problem occurs,
contact your dealer.
• Do not place metal objects or spill liquid inside the CD player. Electric shock or
malfunction may result.
• This CD player uses the semiconductor laser. To allow you to enjoy music at a
stable operation, it is recommended to use this in a room of 5°C – 35°C.
• The compact disc player should not be adjusted or repaired by anyone except
properly qualified service personnel.
• This unit may cause interference to radio and television reception.
CAUTION
Page 4

ENGLISH USER MANUAL
JB SYSTEMS® 3/52 CD200
CLEANING THE CD-PLAYER:
Clean by wiping with a polished cloth slightly dipped with water. Avoid getting water
inside the unit. Do not use volatile liquids such as benzene or thinner which will
damage the unit.
CONNECTIONS
• Use the supplied cinch cable to connect the audio output of the CD player with a
CD input on your mixing unit.
• Also connect the fader start cable if your audio mixer has fader start connections.
(Synq® or Pioneer® compatible)
• Connect the mains cable.
CONTROLS AND FUNCTIONS
ENGLISH USER MANUAL
JB SYSTEMS® 4/52 CD200
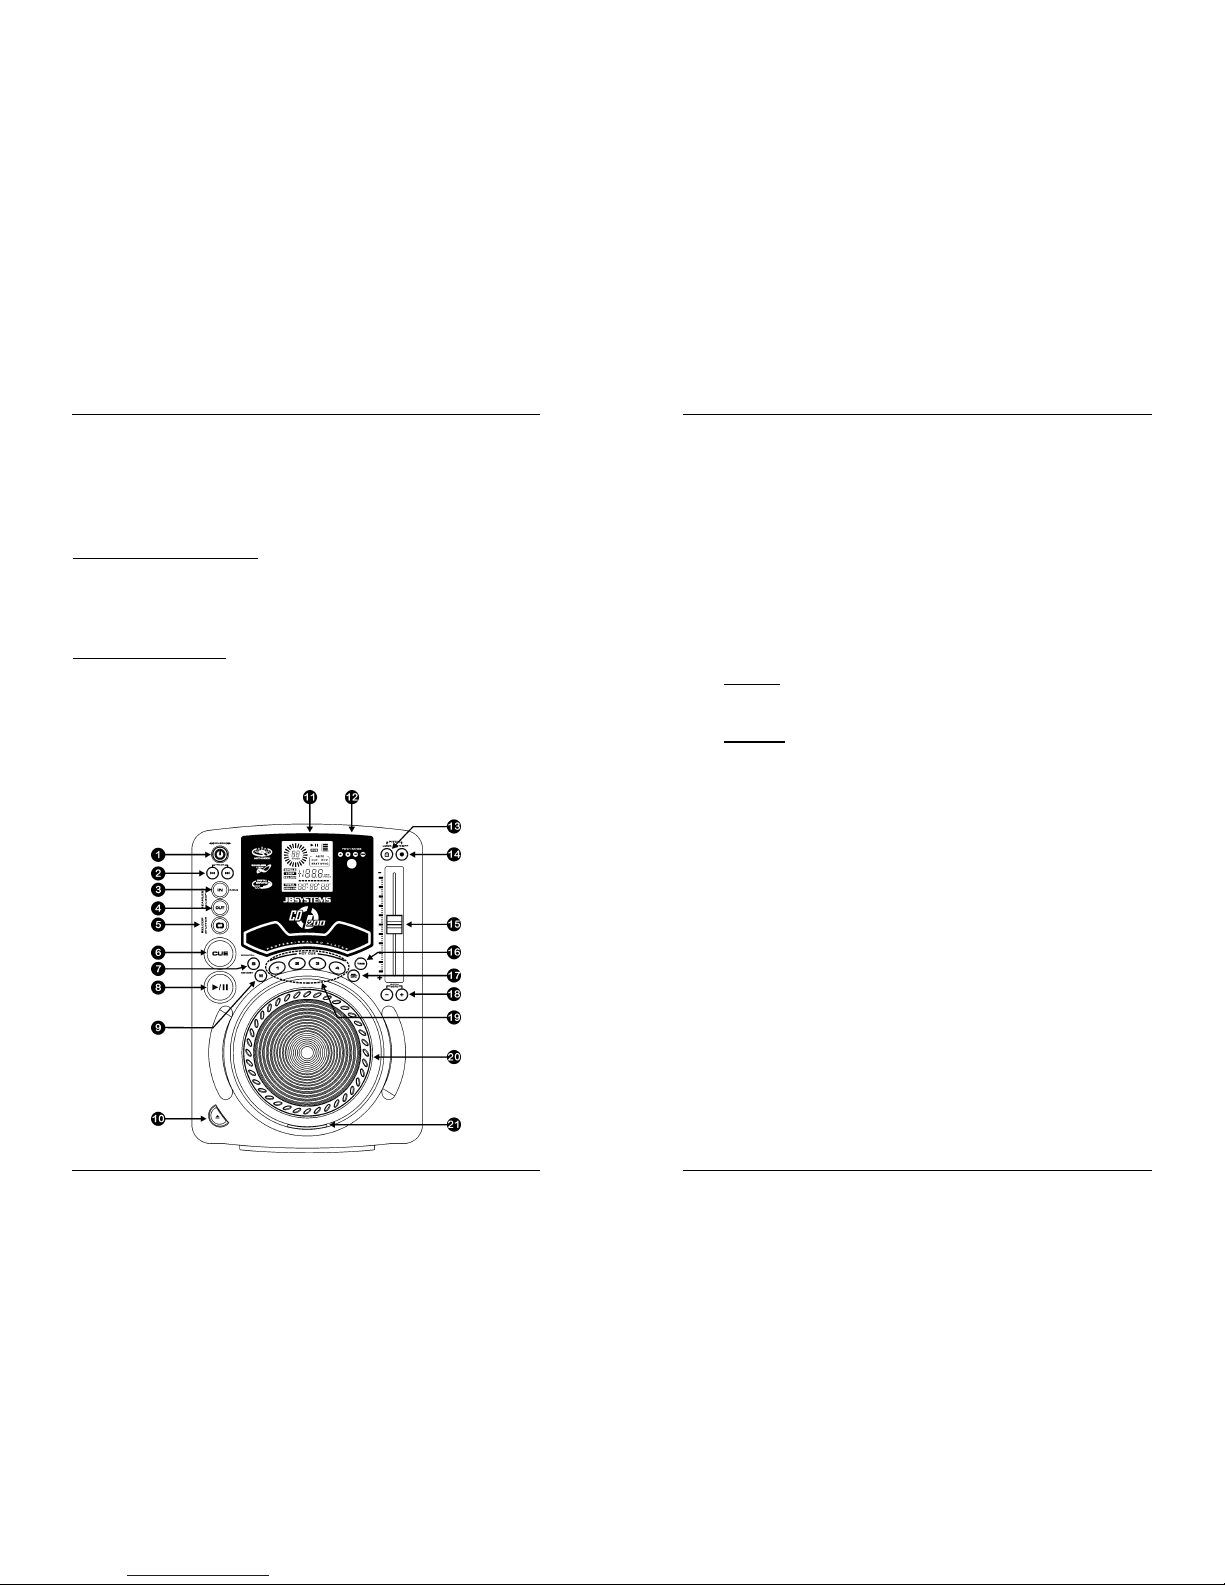
1. SEARCH Button: This button has 4 forward and 4 backward speed positions for
searching through songs. The more you turn the wheel in either direction the
faster you will search through the music.
2. TRACK SEARCH Buttons: These buttons are used to select the track to be
played. Forward skip & back skip.
3. IN/R.CUE button: Allows you to set the cue point without stopping the playback
(CUE ON THE FLY). This button also sets the beginning of a seamless loop.
When you play one of the hot cues(19), the starting point is also copied to this
button.
4. OUT/EXIT button: Used to set the endpoint when looping music. The player
starts to loop seamlessly until you press this button again to exit. When a loop is
programmed but not active you can also restart the loop. The point where you
press the button will be memorized as the new end point of the loop.
5. RELOOP/STUTTER button: This button has two functions:
• RELOOP:
If a loop has been programmed and you have hit the OUT/EXIT
button(4), press the reloop button to enter the loop again. To exit the loop
press the OUT/EXIT(4) button. (intro and end points of the loop are
unchanged)
• STUTTER:
When a loop is playing you can press this button to restart the
loop at once. Every time the RELOOP/STUTTER button is pressed, it will
restart the music from the preprogrammed starting point.
The stutter effect adds extra creativity to your performance.
6. CUE button: Pressing the CUE button during playback provides an immediate
return to the position where playback was started. Playback starts immediately
from the programmed cue point for as long as the CUE button is pressed. The
CD player jumps back to the cue point as soon as the CUE button is released.
Also with the unit in pause mode (Play/Pause LED blinks) the search and/or jog
wheel is used to set a different start point. By pressing "PLAY/PAUSE" button
then "CUE", you can confirm this new cue point.
7. SCRATCH button: Used to put the CD200 in scratch mode. This option gives
you the possibility to scratch any track on the CD in real time. You can use the
scratch function in both play and pause mode:
• In play mode: The music plays normally until you turn the big jog wheel(20).
While manipulating the jog wheel(20), the scratch effect is audible. Once the
jog wheel is stopped, the music continues playing from the point where you
stopped turning it.
• In pause mode: the music is paused for as long as the jog wheel(20) isn’t
moved. When you start manipulating the jog wheel(20), the scratch effect is
audible. Once the jog wheel is stopped, the music stops playing and waits in
pause mode.
NOTE: during scratch mode you can switch between play and pause mode by simply pressing the
PLAY/PAUSE button(8)
8. PLAY/PAUSE button: every time you press the PLAY/PAUSE button the CD
player changes from play to pause or from pause to play. The button blinks as
long as the player is set to pause.
9. MEMORY Button: is used to store cue points and loops to the Hot Cue buttons
and to the permanent cue memory:
• Storing to HOT CUE buttons: Press the MEMORY button shortly to
prepare the CD200 for storing a cue point or loop to one of the 4 HOT CUE
buttons.
Page 5
ENGLISH USER MANUAL
JB SYSTEMS® 5/52 CD200
• Storing to permanent memory: Press the MEMORY button until it starts
flashing. The contents of the HOT CUE buttons for this CD are stored to
permanent memory.
Look further in this manual for more information on how to use these functions.
10. OPEN/CLOSE button: press this button to open and close the disc tray in the
front of the CD200. This button is disabled during playback. If the tray is not
closed after 60sec. It will close automatically to prevent damage.
11. LCD DISPLAY: Shows all important information needed during playback. Refer
to the next chapter for more information.
12. PITCH RANGE Button: Every time you press this button, you will change the
scale of the speed slider(15). You can select +/-4%, +/-8%, +/-16% and +/-100%.
13. PITCH LOCK Button: (Master tempo) activates the Pitch Lock function. This
function allows you to make adjustments to a tracks speed using the pitch control
without altering its tonal pitch. This button turns red when the Pitch Lock is on.
NOTE: be informed that the pitch lock function has its limitations. From a certain speed deviation
(depends on the music style) the pitch lock won’t be able to keep the same pitch anymore. First
you will hear a small distortion that becomes more important at higher speed deviations. This is
not always a disadvantage: at very low speeds you can also use it as a special “distortion effect”!
14. SPEED Button: This button is used to turn the speed function on and off.
15. SPEED slider: Press the SPEED button(14), so it is lit. The speed can be
changed up to +/-100% by moving the fader. The speed will not change if the
SPEED button(14) is off. You can change the pitch range with the PITCH RANGE
button(12)
16. TIME Button: The TIME button switches between elapsed playing time,
remaining time in a selection and total remaining time of the disc. (standard =
remaining /track)
17. SGL/CTN Button: with this button you can choose between “single track mode”
and “continuous play”.
• Continuous play:
the complete CD will be played without interruption.
(mostly used in pubs)
• Single track:
player stops at the end of each track and waits at the beginning
of the next track. The player will wait at the first music note of each track. This
means that badly indexed CDs will not interfere with the instant start
capabilities of this CD player. This is a very useful feature for deejays!
18. PITCH BEND buttons: The speed rises while the “+ button” is pressed and
returns to the original pitch when the button is released. The speed drops when
the “– button” is pressed and returns to the original pitch when the button is
released. These buttons can be used to synchronize the beats of 2 tracks.
19. HOT CUE buttons: 4 programmable buttons where you can store ordinary cue
points and/or loops. You can program up to 4 cue points and/or loops divided
over all the tracks on your CD. Once you put another CD in the disc tray, the HOT
CUE memories are erased. Look further is this manual for more information on
how to program cue points etc.
20. BIG JOG WHEEL: This jog wheel serves 3 functions depending on the mode you
are working in.
• The jog wheel acts as a slow frame search (1/75sec) control when the CD is
not playing but either paused or set to a cue point. To set a new cue point, spin
the wheel then press PLAY(8) or LOOP IN(3) when you have determined the
proper position. Press CUE to return to the “CUE POINT”.
• If the track is playing, the jog wheel temporarily bends the pitch of the music up
to +/-100% by rotating the wheel clockwise to speed it up or counterclockwise
ENGLISH USER MANUAL
JB SYSTEMS® 6/52 CD200
to slow it down. The amount of pitch change is determined by the speed of
rotation. This is an alternative to the PITCH BEND buttons(18).
• In scratch mode the jog wheel is used to manipulate the playback of the music
in real time. As a result you can scratch the music on your CD the way you do
this with a normal analog vinyl record.
21. CD TRAY INDICATOR: is lit when the CD tray is open or prepares to open.
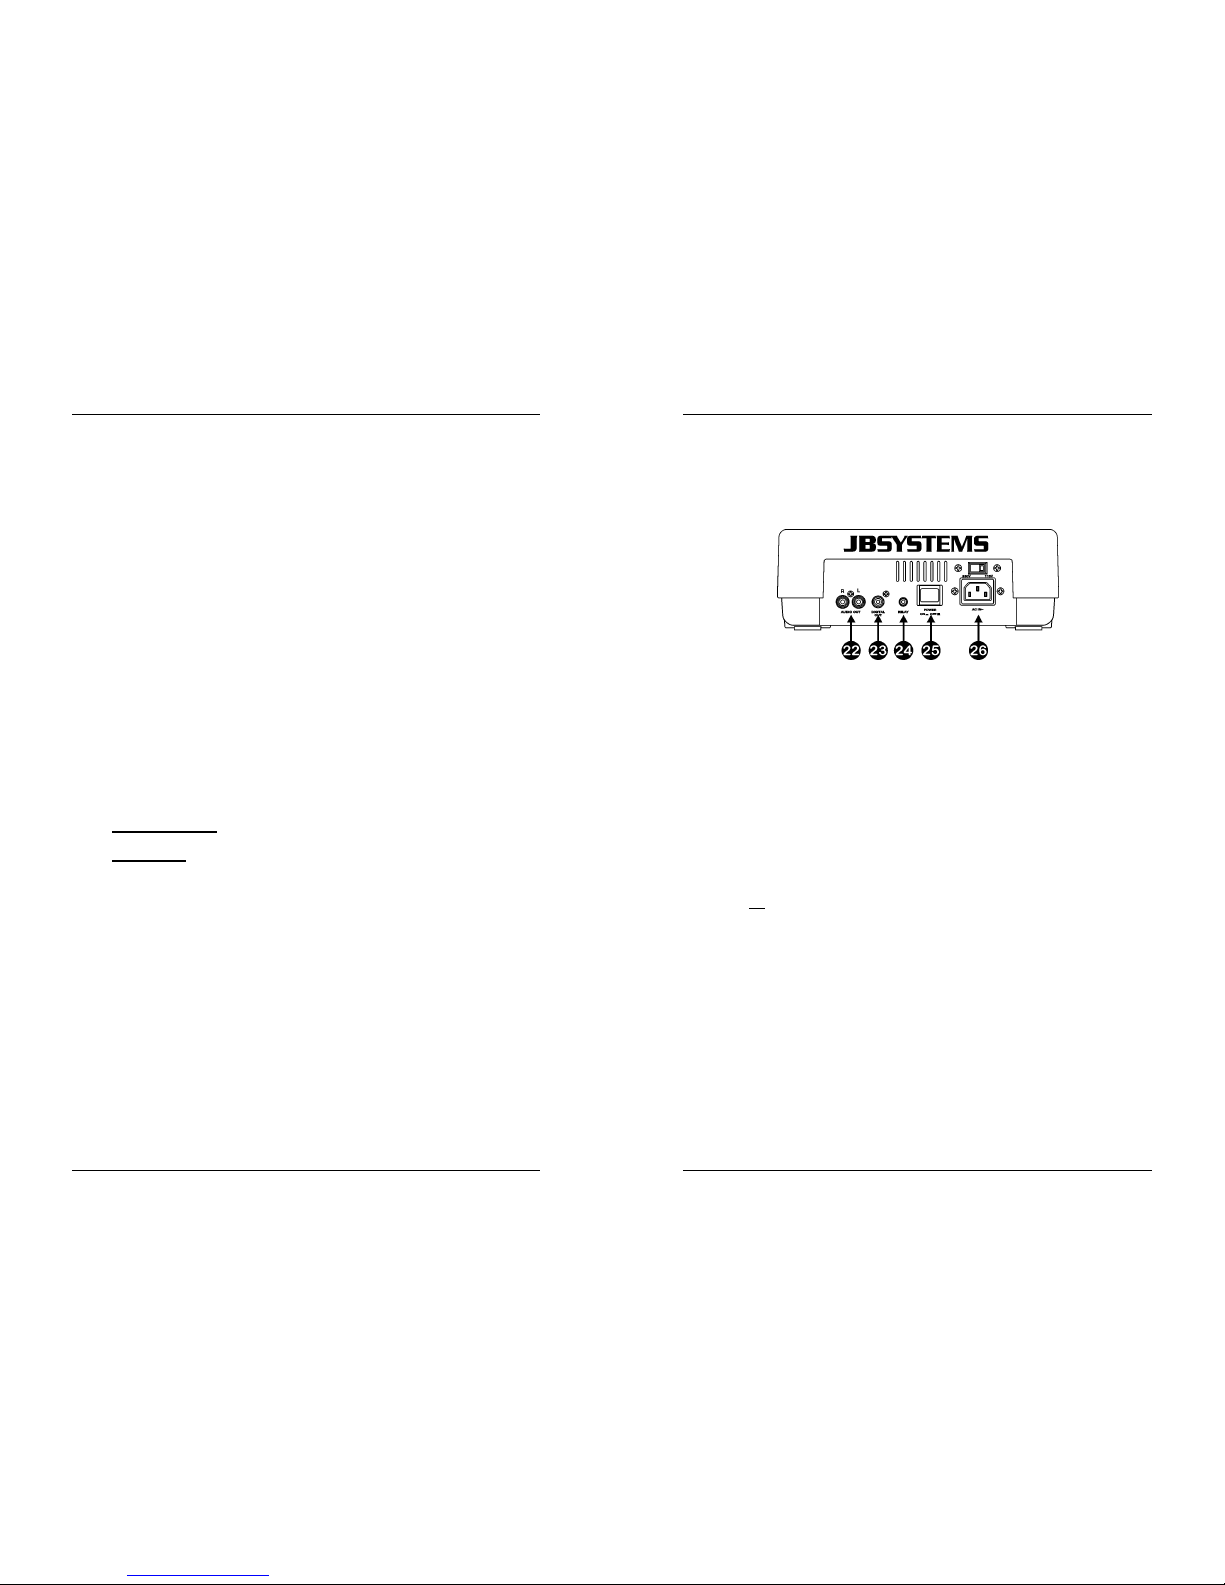
22. Audio output: Output for the audio signals from the CD-player. Use the supplied
cinch/cinch cable to connect this output to a CD/line input of your mixing unit.
23. Digital out socket: Use this connector to connect the digital signal (S/PDIF
format) to the input of a digital amplifier or digital recorder (ex. Mini disc)
24. RELAY Socket: you can use this connecter in two ways: you can use it with the
fader start option on certain mixers or you can connect two CD200 players
together to obtain the relay play function.
• Relay play: Use the supplied mono mini jack/jack cable to connect the
RELAY sockets of two CD200 players together. Look further in this manual
to learn how to perform the relay play function.
• Fader start: If you are using a mixer with fader start function, use the
supplied mono mini jack/jack cable to connect the player with the fader start
of the mixer. Please note that this socket must never be connected with any
voltage.
Attention: This remote control is only compatible with certain (Synq® or Pioneer®
compatible) mixers. Mixers with remote starts functioning with a signal switched to ground
will not
work.
25. POWER ON/OFF switch: switches the CD200 on and off.
26. MAINS INPUT: connect the CD player to the 230V AC mains, using the supplied
power-cord.
Page 6

ENGLISH USER MANUAL
JB SYSTEMS® 7/52 CD200
LCD DISPLAY
1. PLAY: appears while the unit is playing a CD.
2. PAUSE: appears while the player is in pause or cue mode.
3. ANTI SHOCK AND BUFFER INDICATOR: The memory status is represented on
the display by a bucket being filled up or emptied. The bucket itself represents
that the instant start function is available. If the bucket is flashing, the instant start
is not
available. Each segment within the bucket represents about 2.5 seconds of
anti shock protection.
4. CUE: appears when the master cue point is programmed.
5. PITCH DISPLAY: Shows the actual percentage of speed change, selected with
the SPEED slider(15).
6. TIME BAR: shows either time remaining or elapsed depending on the setting of
the TIME button(16). Starts flashing at the end of each track to alert the user to
take action.
7. FRAME: Shows “frame” time information of current track. (1 frame = 1/75
th
sec.)
8. SECOND: Shows “seconds” time information of current track.
9. MINUTE: Shows “minutes” time information of current track.
10. ELAPSED, TOTAL REMAIN: indicates that the time shown on the display is the
track elapsed, remaining or total remaining time.
11. RELOOP: appears when the CD has had a loop set previously. You can return to
the loop with the reloop button(5).
12. LOOP: shows when a loop is programmed. (repeating a particular area)
• LOOP Flashing: Loop is programmed and
currently playing.
• LOOP stays on: Loop is programmed but not
playing.
13. SINGLE: appears when the unit is set to play just one track at a time. When it is
not shown, the CD will play continuously through all tracks. The function is
controlled by the SGL/CTN button(17).
14. TRACK: Shows current track number.
15. VISUAL MARKER: indicates the play position in frames: a full rotation equals 96
frames. The marker moves clockwise in normal play mode and counter-clockwise
when the track plays backwards. In pause mode the marker stops moving.
ENGLISH USER MANUAL
JB SYSTEMS® 8/52 CD200
HOW TO USE …
Most of the common functions are explained in the previous chapter “controls and
functions” In this chapter we talk about the functions that need a little more
explanation.
• SLEEP MODE:
The CD player automatically shuts off the transport and laser after about 15
minutes (when in pause or cue mode). This extends the life of your motor drive and
laser. During sleep mode the display shows the word “SLEEP”. To wake up the
player, just press the cue or play button, the display turns to normal and is ready to
receive instructions.
• RELAY FUNCTION:
• First check if the special fader start cable connects the two CD200 players.
• Put a disc in both players.
• Open the 2 channel faders of the corresponding CD inputs on your mixer.
• Check if both players are in Single mode (the “single” indicator(13) on the display
appears). If one of the players is not in single mode, press its SGL/CNT
button(17) of that player.
• Begin playback on one of the two players.
• Alternately a track will be played from both players. You can always put a new CD
in the player that is waiting in pause. In this way you can create an endless
program, perfect for use in pubs etc.
Remove the relay cable if you don’t want to use the relay function anymore.
• CREATE A LOOP
:
While a track is playing, press IN/R.CUE button to program the starting point of the
loop. Now press the OUT/EXIT button to program the endpoint of the loop. The
seamless loop starts playing at once. (With some practice you will be able to create
perfect loops!) While the loop is playing, you can press the OUT/EXIT button again
to exit the loop and continue the rest of the track.
It is possible to program a new loop, even when the current loop is still playing.
While the loop is playing, simply press the IN/R.CUE button to set the starting point
of the new loop. Now enter the endpoint by pressing the OUT/EXIT button. Your
new loop is programmed and playing.
• RESTART A LOOP
:
This can be done in 3 ways:
• When a loop is programmed and you left it by pressing the OUT/EXIT button,
just press RELOOP to restart the loop.
• When a loop is programmed and you left it by pressing the OUT/EXIT button,
just press OUT/EXIT again to restart the loop. The point where you pressed
OUT/EXIT is now programmed as the new endpoint of the loop.
• When the loop is still playing, press the RELOOP button to restart the loop
immediately. You can repeat this several times to create a “Stutter” effect.
Page 7

ENGLISH USER MANUAL
JB SYSTEMS® 9/52 CD200
• EDIT A LOOP
:
When a loop is playing, press OUT/EXIT button to leave the loop. Press the
OUT/EXIT button again. The loop starts playing immediately and the new endpoint
is programmed.
• For a shorter loop: press the OUT/EXIT button quickly.
• For a longer loop: wait longer before pressing OUT/EXIT.
NOTE: You can store loops under the HOT CUE buttons. This means that you have up to 4 loops
per track to play with. In the next paragraph you learn how to store these loops.
• STORING A MASTER CUE POINT
:
There are 2 ways to set a master cue point:
• Press the IN/R.CUE button during normal playback to set the new cue point
(“CUE on the fly”).
• Put the player in pause and use the jog/shuttle wheel to search for the exact
location for the cue point. Once this location is found, press “IN/R. CUE” button
to set the new cue point. (or press PLAY/PAUSE button)
Once the cue point is programmed, just press the CUE button to recall it.
• STORING A SIMPLE CUE POINT TO THE “HOT CUE” BUTTONS
:
First press the MEMORY button(9) to make the unit enter hot cue memory mode
(MEMORY button is lit).
• Press one of the four HOT CUE buttons at the right moment during normal
playback: the HOT CUE button you just pressed turns to red colour to indicate
that the desired cue point is stored. (“Cue on the fly”).
• Put the player in pause and use the jog/shuttle wheel to search for the exact
location for the cue point. Once this location is found, press one of the four HOT
CUE buttons to set the new cue point: the HOT CUE button you just pressed
turns to red colour to indicate that the desired cue point is stored.
Once the cue point is programmed, just press the HOT CUE button to start
playback from the stored cue point.
• STORING A LOOP TO THE “HOT CUE” BUTTONS
:
This is very similar to storing a simple cue point. The only difference is that you
have to put the CD200 in loop mode first. When the loop is playing, you press the
MEMORY button to make the CD-player enter hot cue memory mode (MEMORY
button is lit). After this press one of the four HOT CUE buttons: the HOT CUE
button you just pressed turns to green colour to indicate that the loop, playing at
that moment, is stored. You can store up to 4 loops!
• STORING HOT CUE MEMORIES TO THE PERMANENT INTERNAL MEMORY:
For each CD you can store up to 4 cue points and loops to the internal permanent
memory. At a later time you can recall these cue points and loops when you insert
the same CD again. The CD200 can hold up to 2048 (512 x 4) Cue points and
loops. Writing the contents of the HOT CUE buttons to permanent memory is very
simple: just press the MEMORY button for about 2 seconds until the display shows
“SAVING”. That’s all!
NOTE: When you put another CD in the disc tray without first writing the current HOT CUE
memories to the internal permanent memory, they will be lost.
ENGLISH USER MANUAL
JB SYSTEMS® 10/52 CD200
• RECALLING HOT CUE MEMORIES FROM PERMANENT INTERNAL MEMORY:
If you have stored permanent cue points and loops for a CD, you can choose to
recall these while reloading that CD at a later time.
• RECALL: Before loading the CD, just press the MEMORY button until it starts
flashing and the display shows “RECALL”. Now press the OPEN/CLOSE button
to load the CD. It takes some seconds to load the HOT CUE buttons, during this
time the display shows “RECALL”. If no permanent cue points where found, the
CD200 stops the recall process automatically.
• DON’T RECALL: Just insert the CD as usual and start playback. The CD200
will ignore the permanent cue point information for this CD.
• DELETE THE “HOT CUE” BUTTONS:
This can be done in two ways:
• Simply program a new HOT CUE, the previous will be erased.
• Put another CD in the disc tray, the HOT CUES will be erased.
• DELETE THE ENTIRE INTERNAL CUE MEMORY:
Turn the SEARCH Button(1) to the left (counterclockwise) and keep it in that
position while switching the CD200 on: the permanent cue memory is cleared.
CAUTION: THIS ACTION IS IRRIVERSIBLE, ALL CUE POINTS/LOOPS WILL BE DELETED!!!
• PITCH BENDING:
This function is used to put the beats of two tracks in perfect sync. This can be
done in two ways:
• PITCH BEND buttons: The speed increases or decreases respectively as long
as the PITCH BEND+ or PITCH BEND- button is pressed.
• JOG WHEEL: During play mode the JOG WHEEL will temporarily bend the pitch
of the music by turning the JOG WHEEL clockwise to speed up or
counterclockwise to slowdown. The rotation speed the JOG WHEEL determines
the percent of pitch bend.
SPECIFICATIONS
Power Supply: AC 230 V, 50Hz
Power Consumption: 14W
Output level: 1.0Vrms @ 1kHz
Frequency response: 20-20.000Hz (+/-0.5dB)
THD + noise: 0.01% @ 1kHz, 0dB
S/N Ratio (IHF-A): >90dB @ 1kHz.
Short access time (next track): <1.9sec
Long access time (track 1 Æ 20): <3.6sec
Laser Pickup: 3spot detection 780nm
Electronic tracking: Full automatic digital tracking.
Dimensions: 348(W) x 246(D) x 106(H) mm
Weight: 3kg
Page 8

FRANCAIS MODE D’EMPLOI
JB SYSTEMS® 11/52 CD200
MODE D’EMPLOI
CARACTÉRISTIQUES
• Effet de Scratch digital à l’aide de la roue Jog Wheel
• 4 touches Hot Cue qui peuvent contenir des points Cue et des boucles (Loops)
• Verrouillage du Pitch (Master Tempo)
• Mémoire Anti-choc de 10sec.
• Pitch ranges (portée de la variation de vitesse): +/-4% +/-8% +/-16% +/-100%
• Pitch bend : changement temporaire de la vitesse à l’aide de touches et de la
roue Jog Wheel pour des mixages parfaits
• Jusqu’à 4 boucles sans fin pour chaque plage avec reloop/stutter
• Mémoire permanente pour jusqu’à 2048 (512 x 4) points Cue et boucles
• Programmation des points CUE en temps réel (“Cue volant”)
• Démarrage Memory Start ultrarapide en moins de 10msec
• Fader start, fader stop, (back cue),
• Fonction Auto Cue (-48dB)
• Recherche ultra précise d’un endroit sur le disque jusqu’à 1/75ème de seconde
• 4 vitesses de recherche
• Ecran LCD bleu comprenant l’affichage du pitch et un indicateur visuel de position
• Choix entre l’affichage du temps écoulé, du temps restant de la plage ou du
temps restant du disque entier
• Jog Wheel équipé d’une surface en caoutchouc spécial
• Lecture d’une seule plage où continue du CD
• Fonction Relay offrant la possibilité d’une lecture alternée automatique en utilisant
deux lecteurs CD
• Sortie S/PDIF digital audio RCA coaxiale
• Transport Protection de 60 secondes
• Fonction Sleep (prolonge la durée de vie du laser)
AVANT L’UTILISATION
Vérifiez si les pièces suivantes sont incluses dans l’emballage de votre appareil :
• Lecteur CD200
• Mode d’emploi
•
Câble d’alimentation
• Un câble aux raccords cinch
• Un câble de démarrage « fader start » (mono mini-jack/mini-jack)
FRANCAIS MODE D’EMPLOI
JB SYSTEMS® 12/52 CD200
PRÉCAUTIONS CONCERNANT L’UTILISATION
SÉCURITÉ:
CAUTION: Pour réduire le risque d’électrocution, n’enlevez aucun couvercle. Il n’y a
aucune pièce que vous pouvez remplacer
vous-même à l’intérieur de l’appareil.
Adressez vous uniquement aux techniciens
qualifiés pour des réparations éventuelles.
Le symbole d’éclair à tête de flèche dans un triangle est conçu pour vous
avertir de la présence ou de l’utilisation d’éléments non isolés à « voltage
dangereux » à l’intérieur de l’appareil qui peuvent être suffisamment
puissants pour causer une éventuelle électrocution.
Le point d’exclamation dans un triangle est conçu pour prévenir l’utilisateur
de la présence d’importantes instructions d’utilisation et/ou de maintenance
dans le mode d’emploi, concernant cette application.
Pour éviter des risques d’incendie ou d’électrocution, n’exposez jamais cet appareil à
la pluie ou à l’humidité.
N’insérez jamais d’objets métalliques et ne renversez jamais de liquide dans
l’appareil. L’électrocution ou le mal fonctionnement peuvent en résulter.
CONSEILS D’INSTALLATION:
• Placer ou utiliser l’appareil pendant de longues périodes à proximité de sources
de chaleur tel des amplificateurs, des Spot’s, etc. peut entraver le bon
fonctionnement de l’appareil et peut même l’endommager.
• Evitez au maximum les chocs et les vibrations pendant le transport.
• Si l’appareil est fixé dans un rack ou un flight case, faites attention à ce qu’il soit
bien ventilé, afin d’assurer l’évacuation de la chaleur de l’appareil.
• Pour éviter la formation de condensation à l’intérieur de l’appareil, laissez le
s’adapter à la température ambiante si vous l’installez dans un endroit chaud
après l’avoir transporté à l’extérieur. La condensation peut parfois empêcher
l’appareil de fonctionner correctement.
• Choisissez avec prudence l’endroit ou vous allez placer l’appareil. Evitez la
présence de sources de chaleur. Evitez des endroits assujettis aux vibrations,
des endroits poussiéreux ou humides.
• L’appareil fonctionnera correctement si il est installé sur une surface avec une
inclinaison maximale de 15°.
• Manipulez vos CD’s prudemment, ne les touchez pas avec des mains mouillées
ou sales.
• Les disques poussiéreux doivent être nettoyés avec un chiffon et un produit
prévus pour cet usage.
• N’utilisez jamais des CD’s qui sont fortement endommagés (griffés ou déformés)
Ils peuvent endommager votre lecteur.
• Pour éviter des incendies ou l’électrocution, n’exposez jamais l’appareil à la pluie
où a l’humidité.
• Pour éviter l’électrocution, n’ouvrez pas le couvercle de protection. Si un
problème surgit, contactez votre revendeur.
• N’insérez jamais d’objets métalliques et ne renversez jamais de liquide dans
l’appareil. L’électrocution ou le mal fonctionnement peuvent en résulter.
CAUTION
Page 9
FRANCAIS MODE D’EMPLOI
JB SYSTEMS® 13/52 CD200
• Ce lecteur CD utilise un laser semi-conducteur. Pour vous permettre de profiter
au maximum de votre musique par un fonctionnement stable de l’appareil, il est
recommandé de l’utiliser dans une pièce chauffée entre 5°C et 35°C.
• Le lecteur CD ne devrait être réglé ou réparé que par des personnes qualifiées du
service après vente
• Cet appareil peut causer des interférences à la réception des radios ou
télévisions
NETTOYAGE DU LECTEUR CD:
Nettoyez l’appareil à l’aide d’un chiffon doux, légèrement humide. Evitez d’introduire
de l’eau à l’intérieur de l’appareil. N’utilisez pas de produits volatiles tels le benzène
ou le thinner qui peuvent endommager l’appareil.
CONNECTIONS
CONNECTIONS DE BASE:
• Utilisez le câble cinch pour relier la sortie audio du lecteur CD à l’entrée CD de
votre table de mixage.
• Connectez également le câble “fader start” si votre table de mixage possède des
connecteurs « fader start ». (compatible Synq® SMX-1 ou Pioneer®)
• Connectez le câble d’alimentation.
CONTRÔLES ET FONCTIONS
FRANCAIS MODE D’EMPLOI
JB SYSTEMS® 14/52 CD200
1. Bouton SEARCH: Ce bouton possède 4 positions de vitesse avant et 4 positions
de vitesse arrière pour rechercher des passages sur votre CD. Au plus que vous
tournez le bouton dans une direction, au plus vite se fera la lecture de votre CD.
2. Touches TRACK SEARCH: Ces touches sont utilisées pour sélectionner la
plage du CD qui doit être lue. Saut en avant & saut en arrière.
3. Touche IN/R.CUE: Vous permet de définir le point CUE sans arrêter la lecture
(CUE VOLANT). Cette touche définit également le début d’une boucle sans fin
(seamless loop) Si vous utilisez une des touches hot CUE (19), le point de départ
sera également copié vers cette touche.
4. Touche OUT/EXIT: est utilisée pour déterminer la fin de la boucle pendant la
création de « loops ». Le lecteur CD reproduira la boucle sans fin jusqu'à-ce que
vous appuyez a nouveau sur cette touche pour sortir de la boucle et continuer la
lecture normale. Quand une boucle est programmée mais pas activé vous
pouvez également redémarrer la boucle avec cette touche. L’endroit où vous
appuyez sur la touche pendant la lecture sera mémorisé comme nouveau point
de sortie de la boucle.
5. Touche RELOOP/STUTTER: Cette touche a deux fonctions:
• RELOOP:
quand une boucle à été programmée et que vous avez appuyé sur
la touche OUT/EXIT (4), appuyez sur la touche reloop pour réactiver la
boucle. Pour sortir de la boucle appuyez sur la touche OUT/EXIT (4). (les
points de départ et de sortie de la boucle restent inchangés)
• STUTTER:
Quand une boucle est activée (en lecture) vous pouvez appuyer
sur cette touche pour redémarrer instantanément la boucle à partir de son
point de départ. Vous pouvez également appuyer sur cette touche quand une
plage n’est pas reproduite en boucle. Chaque fois que vous appuyez sur la
touche RELOOP/STUTTER, vous redémarrez la musique à partir de son
point de départ programmé.
L’effet “stutter” (bégaiement) vous permet d’ajouter une touche de créativité
supplémentaire à votre prestation.
6. Touche CUE: Si vous appuyez sur la touche CUE pendant la lecture vous
obtiendrez un retour immédiat vers la position de départ de la lecture initiale. La
lecture démarre immédiatement à partir du point de départ programmé (CUE
point) et continuera tant que vous tenez cette touche enfoncée. Le lecteur CD
retourne à nouveau au point de départ « CUE point » dès que vous relâchez la
touche CUE. Si le lecteur est en mode pause (le LED Play/Pause clignote) la
roue de recherche ou la roue “jog wheel” peuvent être utilisées pour définir un
nouveau point de départ. En appuyant sur la touche "PLAY/PAUSE" puis sur la
touche "CUE", vous pouvez confirmer ce nouveau point de départ. Le LED CUE
s’allumera aussi longtemps que la touche CUE sera tenue enfoncée, jusqu’à ce
que le CD soit retourné à sa position de départ.
7. Touche SCRATCH: est utilisée pour engager la fonction scratch du CD200.
Cette option vous offre la possibilité de scratcher n’importe quelle plage du CD en
temps réel. Vous pouvez utiliser la fonction scratch pendant la lecture du CD ou
en mode Pause:
• En mode play: La musique joue normalement jusqu’à ce que vous tournez
la grande roue Jog Wheel (20). Pendant que vous manipulez la roue (20),
l’effet scratch est audible. Dès que vous relâchez la roue, la musique
continue sa lecture normale à partir du point ou vous avez relâché la roue.
• En mode pause: la musique est en attente (pause) jusqu’à ce que vous
tournez la roue Jog Wheel (20). Pendant que vous manipulez la roue (20),
Page 10

FRANCAIS MODE D’EMPLOI
JB SYSTEMS® 15/52 CD200
l’effet scratch est audible. Dès que vous relâchez la roue, la musique
s’arrête et le lecteur se remet en mode pause.
REMARQUE: Pendant le scratch vous pouvez passer du mode pause au mode lecture ou
inversement en appuyant tout simplement sur la touche PLAY/PAUSE (8)
8. Touche PLAY/PAUSE: chaque fois que vous appuyez sur la touche
PLAY/PAUSE le lecteur CD passera du mode lecture au mode pause ou du
mode pause au mode lecture. La touche clignote aussi longtemps que le lecteur
CD est en mode pause.
9. Touche MEMORY: est utilisée pour enregistrer des points cue et des boucles
(Loops) dans les touches Hot Cue (19) ainsi que dans la mémoire permanente:
• Enregistrer dans les touches HOT CUE: Appuyez brièvement sur la
touche MEMORY pour préparer le CD200 à l’enregistrement d’un point cue
ou d’une boucle dans une des 4 touches HOT CUE.
• Enregistrement dans la mémoire permanente: Appuyez sur la touche
MEMORY jusqu’à ce que elle commence à clignoter. Le contenu des
touches HOT CUE pour ce CD est enregistré dans la mémoire permanente.
Voyez plus loin dans ce mode d’emploi pour avoir plus d’informations concernant
l’utilisation de cette touche.
10. Touche OPEN/CLOSE: appuyez sur cette touche pour ouvrir et fermer le
chargeur CD qui se trouve à l’avant du CD200. Cette touche ne fonctionne pas
durant la lecture d’un CD. Si le tiroir n’est pas refermé après 60sec. il se
refermera automatiquement afin d’éviter qu’il soit endommagé accidentellement.
11. Ecran LCD: Affiche toutes les informations importantes, nécessaires pendant la
lecture du CD. Voyez le chapitre suivant pour plus d’informations à ce sujet.
12. Touche PITCH RANGE: Chaque fois que vous appuyez sur cette touche, vous
changerez l’échelle du curseur de vitesse (15). Vous pouvez sélectionner +/-4%,
+/-8%, +/-16% et +/-100%.
13. Touche PITCH LOCK: (Master tempo) active la fonction Pitch Lock. Cette
fonction vous permet de faire des réglages de vitesse de lecture en utilisant Pitch
Control(15) sans en altérer le ton. Cette touche devient rouge quand la fonction
Pitch Lock est activée.
REMARQUE: Sachez que la fonction pitch lock à ses limites. A partir d’un certain niveau de
changement de vitesse (dépendant du style de musique) le pitch lock ne pourra plus garder la
même tonalité. Vous entendrez d’abord une petite distorsion qui deviendra plus importante selon
que vous augmentez encore le changement de vitesse. Ceci n’est pas toujours un inconvénient :
à de très basses vitesses vous pouvez également l’utiliser comme un effet spécial de distorsion !
14. Touche SPEED: Cette touche est utilisée pour activer ou désactiver la fonction
de réglage de vitesse.
15. Curseur SPEED: Appuyez sur la touche SPEED (15), pour l’allumer. La vitesse
de lecture peut être modifiée jusqu’à +/-100% en bougeant le curseur. La vitesse
ne changera pas si la touche SPEED (15) est désactivée (éteint). Vous pouvez
changer la portée du changement de vitesse avec la touche PITCH RANGE (12).
16. Touche TIME: La touche TIME vous permet de choisir entre l’affichage du temps
de lecture écoulé (elapsed), le temps restant d’une plage (remaining/track) et le
temps total restant du disque (total remaining) (standard = remaining /track)
17. SGL/CTN: Vous pouvez choisir entre “single track mode” et “continuous play”.
• Continuous play:
Le CD complet sera reproduit sans interruption. (le plus
souvent utilisé dans les tavernes)
• Single track:
La lecture s’arrête à la fin de la plage et attends au début de la
plage suivante. Le lecteur attendra à la première note musicale de la plage.
Ce qui veut dire que les CD’s mal indexés ne poseront pas de problèmes aux
FRANCAIS MODE D’EMPLOI
JB SYSTEMS® 16/52 CD200
capacités de démarrage instantané de ce lecteur CD. Ceci est une
caractéristique très utile pour les deejays!
18. Touches PITCH BEND: La vitesse augmente si vous appuyez sur la touche “+”
et retourne à sa vitesse initiale dès que vous la relâchez. La vitesse de lecture
diminue si vous appuyez sur la touche “–” et retourne à sa vitesse initiale dès que
vous la relâchez. Ces touches peuvent être utilisées pour synchroniser le tempo
des 2 lecteurs.
19. Touches HOT CUE: 4 touches programmables ou vous pouvez enregistrer des
points Cue et/ou des boucles. Vous pouvez programmer jusqu’à 4 points cue
et/ou boucles répartis sur toutes les pistes du CD. Dès que vous mettez un autre
CD dans l’appareil, les mémoires HOT CUE sont effacés. Voyez plus loin dans
ce mode d’emploi pour plus d’informations concernant la programmation des
points cue, etc.
20. JOG WHEEL: Cette roue contrôle 3 fonctions, selon le mode dans lequel vous
travaillez.
• Le « jog wheel » vous permet de rechercher lentement un “frame” (1/75sec)
quand le CD n’est pas en mode lecture, mais en pause ou sur un point
« CUE ». Pour définir un nouveau point “CUE”, tournez la roue puis appuyez
sur PLAY (8) ou sur LOOP IN (3) quand vous avez trouvé l’endroit exact pour
installer le nouveau point CUE. Appuyez sur CUE pour retourner au point
“CUE”.
• Pendant la lecture du CD, en tournant la roue dans le sens des aiguilles d’une
montre, le “jog wheel” augmente temporairement la vitesse de lecture jusqu’à
+/-100%. Tournez dans le sens inverse des aiguilles d’une montre pour
ralentir la vitesse de lecture temporairement. Le changement de vitesse de
lecture est déterminé par la vitesse de rotation de la roue. (ceci est une
alternative aux touches PITCH BEND (18)
• En mode scratch la roue Jog Wheel est utilisée pour manipuler la reproduction
de la musique en temps réel. De ce fait vous pouvez faire du scratch avec la
musique de votre CD en temps réel, comme si vous le faisiez avec un disque
vinyle analogique normal.
21. CD TRAY INDICATOR: est allumé quand le tiroir CD est ouvert ou vas être
ouvert.
22. Sortie Audio: Sortie du signal audio du lecteur CD. Utilisez le câble cinch/cinch
fourni avec l’appareil pour relier cette sortie aux entrées CD/line de votre table de
mixage.
23. Connecteur Digital out: Utilisez ce connecteur pour relier le signal digital
(format S/PDIF) à l’entrée d’un amplificateur digital ou d’un enregistreur digital
(p.ex. Mini disc)
Page 11

FRANCAIS MODE D’EMPLOI
JB SYSTEMS® 17/52 CD200
24. Connecteur RELAY: vous pouvez utiliser ce connecteur de 2 façons: vous
pouvez l’utiliser avec l’option fader start sur certaines tables de mixage ou vous
pouvez relier deux lecteurs CD200 ensemble pour obtenir la fonction de lecture
alternée.
• Relay play: utilisez le câble mono mini jack/jack qui est fourni avec
l’appareil pour relier les connecteurs RELAY de deux lecteurs CD200. Voyez
plus loin dans ce mode d’emploi pour apprendre comment utiliser cette
fonction.
• Fader start: Si vous utilisez une table de mixage qui possède la fonction
fader start, utilisez le câble mono mini jack/jack pour relier le lecteur CD
avec les connecteurs fader start de la table de mixage. Faites attention de
ne jamais raccorder ce connecteur à une source de courant.
Attention: cette commande à distance est uniquement compatible avec certaines tables de
mixage (Synq® ou Pioneer® compatible). Les tables de mixage avec fader start
fonctionnant par un signal relié à la terre ne conviennent PAS.
25. Interrupteur POWER ON/OFF: allume ou éteint le CD200.
26. Mains input: connectez le lecteur CD au réseau 230V AC, en utilisant le câble
d’alimentation fourni avec l’appareil.
ÉCRAN LCD
1. PLAY: apparaît quand la lecture du CD est activée.
2. PAUSE: apparaît pendant que le lecteur est en mode pause ou CUE.
3. INDICATEUR ANTI SHOCK ET BUFFER: L’état de la mémoire est représentée
sur l’écran par un seau qui se remplit ou se vide. Le seau en lui même précise
que la fonction Instant Start (démarrage instantané) est disponible. Si le seau
clignote, c’est que le démarrage instantané n’est pas
disponible. Chaque
segment dans le seau représente environ 2.5 secondes de protection anti shock.
4. CUE: apparaît quand le lecteur est en attente au point CUE principal.
5. PITCH DISPLAY: vous montre le pourcentage de changement de vitesse.
6. TIME BAR: vous montre soit le temps restant soit le temps écoulé, selon l’option
choisie avec la touche TIME (16). Cette barre se met à clignoter à la fin de
chaque plage pour prévenir l’utilisateur qu’il est grand temps de passer à l’action.
FRANCAIS MODE D’EMPLOI
JB SYSTEMS® 18/52 CD200
7. FRAME: vous montre le “frame” de la plage en cours d’exécution. (1 frame =
1/75
éme
sec.)
8. SECOND: Vous montre les “secondes” de la plage en cours d’exécution.
9. MINUTE: Vous montre les “minutes” de la plage en cours d’exécution.
10. ELAPSED, TOTAL REMAIN: indique si le temps affiché à l’écran est le temps
écoulé (elapsed), le temps restant total du disque (total) ou le temps restant de la
plage (remain).
11. RELOOP: apparaît quand une boucle à été programmée auparavant. Vous
pouvez retourner à la lecture de cette boucle en appuyant sur la touche reloop
(5).
12. LOOP: vous montre quand le CD joue une boucle.
• LOOP Clignote: une boucle est programmée et est lue.
• LOOP allumé: une boucle est programmée mais n’est pas reproduite.
16. SINGLE: apparaît quand l’appareil est réglé pour jouer uniquement une plage à
la fois. Quand Single n’est pas affiché, le CD sera lu entièrement sans
interruption. La fonction est contrôlée par la touche SGL/CTN (17).
17. TRACK: vous montre la plage en cours d’exécution.
18. INDICATEUR VISUEL: indique la position de lecture en frames: une rotation
complète représente 96 frames. L’indicateur évolue dans le sens des aiguilles
d’une montre pendant la lecture normale d’un CD et dans le sens inverse des
aiguilles d’une montre quand la lecture s’effectue à l’envers. En mode pause
l’indicateur est à l’arrêt.
UTILISATION …
La plupart des fonctions les plus utilisées sont expliquées dans le chapitre précédent
“contrôles et fonctions” Dans ce chapitre nous parlerons des fonctions qui
nécessitent un peu plus d’explications.
• SLEEP MODE:
Le lecteur CD éteint automatiquement le moteur du chargeur CD et le laser après
environ 15 minutes d’inutilisation (en mode pause ou CUE). Ceci prolonge la durée
de vie du moteur et du laser. Pendant le mode veille l’écran affiche le mot
“SLEEP”. Pour « réveiller » votre lecteur CD, appuyez juste sur la touche CUE(6)
ou PLAY(8), l’écran retournera à son affichage normal et l’appareil est prêt à
recevoir les instructions.
• FONCTION RELAY:
• Vérifiez d’abord si le câble spécial Fader Start relie les deux lecteurs CD200.
• Mettez un CD dans les deux lecteurs.
• Ouvrez les 2 curseurs des entrées CD sur votre table de mixage.
• Vérifiez si les deux lecteurs sont en mode Single (l’indicateur “single” (13)
apparaît sur l’écran). Si un des lecteurs n’est pas en mode Single, appuyez sur
la touche SGL/CNT (17) de l’appareil en question.
• Commencez la lecture sur un des deux lecteurs CD.
• Une plage de chaque CD sera reproduite alternativement. Vous pouvez toujours
mettre un nouveau CD dans l’appareil qui est en attente en mode Pause. De
cette façon vous pouvez créer un programme sans fin, l’idéal pour une
utilisation dans des tavernes, etc.
Page 12

FRANCAIS MODE D’EMPLOI
JB SYSTEMS® 19/52 CD200
Retirez le câble Relay si vous ne voulez plus utiliser la fonction Relay.
• CRÉATION DE BOUCLES
:
Pendant qu’une plage du CD est lue, appuyez sur la touche IN/R.CUE(3) pour
programmer le point de départ de la boucle. Appuyez ensuite sur la touche
OUT/EXIT pour programmer le point de fin de boucle. La boucle sans fin se met à
jouer immédiatement. (Avec un peu d’entraînement vous arriverez à créer des
boucles parfaites!) Pendant qu’une boucle est en cours de lecture, vous pouvez
appuyer une nouvelle fois sur la touche OUT/EXIT(4) pour sortir de la boucle et
continuer la lecture normale.
Il est possible de créer une nouvelle boucle, même quand une boucle est toujours
en train de jouer. Pendant que la boucle joue, appuyez simplement sur la touche
IN/R.CUE(3) pour définir le point de départ d’une nouvelle boucle. Entrez ensuite le
point de la fin de la boucle en appuyant sur la touche OUT/EXIT(4). Votre nouvelle
boucle est enregistrée et reproduite.
• REDÉMARRER UNE BOUCLE
:
Ceci peut être fait de 3 façons:
• Quand une boucle est programmée et que vous l’avez quittée en appuyant sur
la touche OUT/EXIT, appuyez juste sur la touche RELOOP pour redémarrer la
lecture de la boucle.
• Quand une boucle est programmée et que vous l’avez quittée en appuyant sur
la touche OUT/EXIT, appuyez juste à nouveau sur la touche OUT/EXIT pour
redémarrer la boucle. L’endroit ou vous avez appuyé sur la touche OUT/EXIT
est maintenant programmé comme nouveau point de fin de boucle.
• Quand une boucle est lue, appuyez sur la touche RELOOP pour redémarrer la
boucle immédiatement. Vous pouvez répéter cette action plusieurs fois de suite
afin de créer un effet de « bégaiement »
• ADAPTER UNE BOUCLE
:
Quand une boucle est lue, appuyez sur la touche OUT/EXIT pour quitter la boucle.
Appuyez une nouvelle fois sur la touche OUT/EXIT. La boucle recommence à jouer
immédiatement et un nouveau point de fin de boucle est programmé.
• Pour une boucle plus courte: appuyez rapidement sur la touche OUT/EXIT.
• Pour une boucle plus longue: attendez plus longtemps avant d’appuyer sur la
touche OUT/EXIT.
REMARQUE: Vous pouvez enregistrer des boucles dans les touches HOT CUE. De cette façon
vous avez jusqu’à 4 boucles à votre disposition par plage. Dans le chapitre suivant vous apprendrez
comment enregistrer ces boucles.
• ENREGISTRER UN « MASTER CUE POINT »
:
Il y a 2 façons pour programmer le point CUE principal:
• Appuyez sur la touche IN/R.CUE pendant la lecture normale pour définir un
nouveau point CUE (“CUE volant”).
• Mettez le lecteur en Pause et utilisez les roues jog/shuttle pour rechercher
l’endroit exact du nouveau point CUE. Si vous avez repéré l’endroit exact,
appuyez sur la touche “IN/R. CUE” pour enregistrer votre nouveau point CUE.
(ou appuyez sur la touche PLAY/PAUSE)
Une fois ce point CUE enregistré, appuyez juste sur la touche CUE pour le
rappeler.
FRANCAIS MODE D’EMPLOI
JB SYSTEMS® 20/52 CD200
• ENREGISTRER UN SIMPLE POINT CUE DANS LES TOUCHES “HOT CUE”
:
Appuyez d’abord sur la touche MEMORY(9) pour entrer dans le mode hot CUE
memory (la touche MEMORY s’allume).
• Appuyez sur une des quatre touches HOT CUE au bon moment pendant la
lecture normale d’une plage: la touche HOT CUE sur laquelle vous venez
d’appuyer devient rouge pour indiquer que le point CUE est enregistré.
• Mettez le lecteur CD en mode pause et utilisez les roues jog/shuttle pour
rechercher l’endroit exact du nouveau point CUE. Si vous avez repéré l’endroit
exact, appuyez sur une des quatre touches HOT CUE pour enregistrer le
nouveau point CUE: la touche HOT CUE sur laquelle vous venez d’appuyer
devient rouge pour indiquer que le point CUE est enregistré.
Dès que ce point CUE est enregistré, il suffit d’appuyer sur la touche HOT CUE
pour démarrer la lecture à partir du point CUE enregistré.
• ENREGISTRER UNE BOUCLE DANS LES TOUCHES “HOT CUE”
:
Ceci est pratiquement identique à l’enregistrement d’un point CUE. La seule
différence est que vous devez d’abord mettre le CD200 en mode boucle. Quand
une boucle est lue, appuyez sur la touche MEMORY pour entrer dans le mode Hot
Cue Memory (la touche MEMORY commence s’allume). Après cela, appuyez sur
une des quatre touches HOT CUE: la touche HOT CUE sur laquelle vous venez
d’appuyer devient vert pour indiquer que la boucle qui joue est enregistrée. Vous
pouvez enregistrer jusqu’à 4 boucles!
• ENREGISTRER LES HOT CUES DANS LA MEMOIRE PERMANENTE:
Pour chaque CD vous pouvez enregistrer jusqu’à 4 points cue et boucles dans la
mémoire permanente interne. Plus tard vous pourrez rappeler ces points cue et
ces boucles quand vous relirez le même CD. Le CD200 peut garder en mémoire
jusqu’à 2048 (512 x 4) points Cue et boucles. Enregistrer le contenu des touches
HOT CUE dans la mémoire permanente interne est très facile: appuyez pendant
environ 2 secondes sur la touche MEMORY jusqu’à ce qu’elle clignote. C’est tout!
REMARQUE: Si vous insérez un autre CD dans le chargeur sans d’abord enregistrer les points
HOT CUE actuels dans la mémoire permanente interne, ils seront perdus.
• RAPPELER DES MEMOIRES HOT CUE DE LA MEMOIRE PERMANENTE:
Si vous avez enregistrés des points cue et des boucles pour un CD, vous pouvez
les rappeler quand vous réinsérez le CD plus tard.
• RAPPELER: avant de charger le CD, appuyez sur la touche MEMORY jusqu’à
ce qu’elle commence à clignoter et que le cadran affiche “RECALL”. Appuyez
ensuite sur la touche OPEN/CLOSE pour charger le CD. Il faudra patienter
quelques secondes pendant le chargement des touches HOT CUE, pendant ce
temps le cadran affiche “RECALL”. Si l’appareil ne trouve pas de points cue, le
CD200 arrêtera automatiquement le processus de rappel.
• NE PAS RAPPELER: insérez le CD comme d’habitude et appuyez sur play. Le
CD200 ignorera les informations des points cue permanents pour ce CD.
• EFFACER LES POINTS HOT CUE:
Ceci peut être fait de 2 façons:
• Programmez un nouveau HOT CUE, le précédent sera effacé.
• Mettez un autre CD dans le chargeur, les points HOT CUE seront effacés.
Page 13

FRANCAIS MODE D’EMPLOI
JB SYSTEMS® 21/52 CD200
• EFFACER ENTIEREMENT LA MEMOIRE INTERNE:
Tournez le bouton SEARCH vers la gauche et gardez le dans cette position
pendant que vous allumez le CD200: la mémoire cue permanente sera effacée.
ATTENTION: CETTE ACTION EST IRREVERSIBLE, TOUS LES POINTS CUE / BOUCLES
SERONT EFFACES!!!
• PITCH BENDING:
Cette fonction est utilisée pour synchroniser parfaitement les beats des 2 CD. Ceci
peut être fait de 2 façons:
• Touches PITCH BEND : La vitesse augmente ou diminue tant que vous tenez
les touches PITCH BEND+ ou PITCH BEND- enfoncées.
• JOG WHEEL: Pendant la lecture le JOG WHEEL changera temporairement la
vitesse. En tournant la roue dans le sens des aiguilles d’une montre la vitesse
augmentera. En tournant en sens inverse, la vitesse diminuera. La valeur du
changement de vitesse est déterminée par la vitesse de rotation de la roue.
SPECIFICATIONS
Alimentation: AC 230 V, 50Hz
Consommation: 14W
Niveau de sortie: 1.0Vrms @ 1kHz
Réponse de fréquence: 20-20.000Hz (+/-0.5dB)
Distorsion Harmonique + bruit: 0.01% @ 1kHz, 0dB
Rapport Signal/Bruit (IHF-A): >90dB @ 1kHz.
Temps d’accès court plage suivante: <1.9sec
Temps d’accès long (plage 1 Æ 20): <3.6sec
Laser Pickup: 3spot detection 780nm
Tracking électronique: Full automatic digital tracking.
Dimensions: 348(W) x 246(D) x 106(H) mm
Poids: 3kg
NEDERLANDS HANDLEIDING
JB SYSTEMS® 22/52 CD200
HANDLEIDING
EIGENSCHAPPEN
y Digitaal scratch effect via jog wiel
y 4 Hot Cue toetsen voor het programmeren van cue punten en loops!
y Pitch Lock (Master Tempo)
y Anti-shock memory 10sec.
y 4 schalen voor de snelheidsregelaar: +/-4% +/-8% +/-16% +/-100%
y Pitch bend op het jog wiel en via toetsen (synchroniseren van de beats)
y Tot 4 naadloze loops voor 1 track met reloop/stutter
y Permanent geheugen voor max. 2048 (512 x 4) cuepunten en loops
y Direct programmeerbare cue (“Cue on the fly”)
y Ultra snelle memory start binnen 10msec
y Fader start, fader stop, (back cue),
y Auto cue functie(-48dB)
y Zoeken op frame niveau (1/75 seconde)
y Snel zoeken van een passage op 4 snelheden
y Blauw LCD scherm met snelheidsuitlezing en positiemarkering
y Verschillende tijdsaanduidingen: verlopen, blijvende en totaal blijvende tijd.
y Jog wiel met een speciale rubber bedekking
y Single/continuous play
y Relay play voor een eindeloze weergave op twee CD200 spelers.
y Digitale S/PDIF uitgang
y CD-lade sluit automatisch na 60seconden
y Sleep mode (verlengt de levensduur van de laser)
VÓÓR DE INGEBRUIKNAME
Controleer of de volgende onderdelen in de verpakking zitten:
• CD200 speler
• Handleiding
•
Voedingskabel
• Een cinch kabel
• Een mono mini-DIN kabel voor fader start en relay play
Page 14

NEDERLANDS HANDLEIDING
JB SYSTEMS® 23/52 CD200
WAARSCHUWINGEN BIJ HET GEBRUIK
VEILIGHEIDSVOORSCHRIFTEN:
WAARSCHUWING: Om het risico op
elektrocutie zoveel mogelijk te vermijden mag
u nooit de behuizing verwijderen. Er bevinden
zich geen onderdelen in het toestel die u zelf
kan herstellen. Laat de herstellingswerken enkel uitvoeren door een
bevoegde technicus.
De bliksempijl die zich in een gelijkbenige driehoek bevindt is bedoeld om u
te wijzen op het gebruik of de aanwezigheid van niet-geïsoleerde onderdelen
met een “gevaarlijke spanning” in het toestel die voldoende kracht heeft om een
risico van elektrocutie in te houden.
Het uitroepteken binnen de gelijkbenige driehoek is bedoeld om de gebruiker
erop te wijzen dat er in de meegeleverde literatuur belangrijke gebruik en
onderhoudsinstructies vermeld staan betreffende dit onderdeel.
Om brand en elektrocutie te vermijden mag u dit toestel nooit blootstellen aan regen
of vocht. Plaats nooit metalen voorwerpen of mors nooit vloeistoffen in het toestel.
Elektrocutie en een slechte werking kunnen hieruit resulteren.
INSTALLATIEAANWIJZINGEN:
• Het plaatsen en het gebruiken van het toestel tijdens lange periodes in de
nabijheid van warmtebronnen zoals versterkers, spot’s, enz. zullen de prestaties
van het toestel negatief beïnvloeden en kunnen het toestel zelfs beschadigen.
• Wanneer het toestel ingebouwd is in een cabine of een flight case moet u er wel
voor zorgen dat het toestel goed geventileerd wordt, zodanig dat de warmte die
het toestel ontwikkeld goed geëvacueerd wordt.
• Om condensvorming te voorkomen na het transport moet u het toestel de tijd
laten om zich aan te passen aan de omgevingstemperatuur, vooral als het toestel
vanuit een koele plaats naar een warmere ruimte overgeplaatst wordt. Condens
verhindert soms de goede werking van het toestel.
• Wees voorzichtig in de keuze van de plaats waar u het toestel wilt installeren.
Vermijdt de nabijheid van warmtebronnen. Vermijd ondergronden die onderhevig
zijn aan trillingen of stoffige en vochtige plaatsen.
• De CD speler werkt normaal op oppervlakken met een helling van maximum 15°.
• Wees zeer voorzichtig met het manipuleren van CD’s, raak ze nooit aan met natte
of vuile handen.
• Vuile CD’s moeten eerst gereinigd worden met een hiervoor speciaal ontworpen
doek en reinigingsproduct.
• Gebruik nooit zwaar beschadigde CD’s (gekrast of vervormd) Zij kunnen uw
toestel beschadigen.
• Om brand en elektrocutie te vermijden mag u dit toestel nooit blootstellen aan
regen of vocht.
• Om elektrocutie te vermijden mag u nooit het deksel van het toestel openmaken.
Wendt u tot uw dealer als er zich een probleem voordoet.
• Plaats nooit metalen voorwerpen of mors nooit vloeistoffen in het toestel.
Elektrocutie en een slechte werking kunnen hieruit resulteren.
• Deze CD speler is uitgerust met een halfgeleidende laser. Om van uw muziek te
genieten dank zij een normale werking van het toestel is het aangeraden om uw
toestel te gebruiken in een ruimte met een temperatuur tussen 5°C en 35°C.
CAUTION
NEDERLANDS HANDLEIDING
JB SYSTEMS® 24/52 CD200
• De CD speler mag door niemand geregeld of hersteld worden, uitgezonderd door
een ervaren technicus.
• Dit toestel kan storingen veroorzaken bij radio en televisieontvangst.
REINIGEN VAN DE CD SPELER:
Reinig het toestel met een zacht, lichtjes bevochtigd doek. Vermijd water te morsen
in het toestel. Gebruik nooit vluchtige producten zoals benzeen of thinner, dit kan het
toestel beschadigen.
AANSLUITINGEN
• Gebruik de meegeleverde cinch kabel om de audio uitgang van de CD speler te
verbinden met de CD ingangen van uw mengtafel.
• Verbind eveneens de fader start kabel indien uw audio mixer voorzien is van
fader start aansluitingen. (Synq® SMX-1 of Pioneer® compatibel)
• Verbind de voedingskabel.
CONTROLE EN FUNCTIES
Page 15

NEDERLANDS HANDLEIDING
JB SYSTEMS® 25/52 CD200
1. SEARCH knop: Deze knop heeft 4 voorwaartse en 4 achterwaartse
snelheidsposities voor het snel opzoeken van muziekfragmenten. Hoe verder u
de knop in elke richting draait, hoe vlugger u door de muziek heen gaat.
2. TRACK SEARCH Toetsen: Deze toetsen worden gebruikt om een bepaald
nummer op de CD te kiezen. Voorwaarts & achterwaarts verspringen.
3. IN/R.CUE toets: Laat u toe het Cue punt in te stellen zonder de weergave van de
CD te stoppen (CUE ON THE FLY). Deze toets bepaalt ook het beginpunt van
een naadloze Loop. Wanneer u op één van de hot cue(19) toetsen drukt wordt
het startpunt ook gekopieerd naar deze toets.
4. OUT/EXIT toets: Wordt gebruikt om het eindpunt van een Loop te bepalen. De
CD speler start het afspelen van de naadloze Loop tot wanneer u terug op deze
toets drukt om de Loop te verlaten. Wanneer een Loop geprogrammeerd is maar
niet afgespeeld wordt kan men zo ook het aflezen van de Loop herstarten. De
plaats in het nummer waar u op deze toets gedrukt heeft zal opgeslagen worden
als nieuw eindpunt van de Loop.
5. RELOOP/STUTTER toets: Deze toets heeft 2 functies:
• RELOOP:
Als een loop geprogrammeerd was en u hebt op de OUT/EXIT
toets (4) gedrukt, druk dan op de Reloop toets om de loop opnieuw te starten.
Druk op de OUT/EXIT(4) toets om de Loop terug te verlaten. (start en
eindpunt van de Loop blijven onveranderd)
• STUTTER:
Wanneer een loop afgespeeld wordt kunt u op deze toets drukken
om de loop onmiddellijk te herstarten. U kunt ook op deze toets drukken
wanneer een nummer geen loop afspeelt. Telkens u op de
RELOOP/STUTTER toets drukt herstart de muziek vanaf het
geprogrammeerd Cue punt.
Het stotter effect (stutter) laat u toe extra creatief te zijn.
6. CUE toets: Als u op de CUE toets drukt tijdens de weergave, dan veroorzaakt dit
een onmiddellijke terugkeer naar de positie waar de weergave gestart werd. De
weergave start onmiddellijk vanaf het geprogrammeerde Cue punt, en duurt
verder zolang de CUE toets ingedrukt blijft. De CD speler springt terug naar het
Cue punt zodra de CUE toets losgelaten wordt. Wanneer het toestel in pauze
modus staat (Play/Pause LED knippert) kan het Search en/of het Jog wiel
gebruikt worden om een ander startpunt te kiezen. Door op de "PLAY/PAUSE"
toets en nadien op de "CUE" toets te drukken kunt u dit nieuwe Cue punt
bevestigen.
7. SCRATCH toets: hiermee zet U de CD200 in scratch mode. U kan nu eender
welk nummer op de CD digitaal scratchen alsof het een vinyl plaat is. U kan de
scratch functie zowel in play als in pause gebruiken:
• In play mode: De muziek speelt normaal tot U het grote jog wiel(20)
beweegt. Het scratch effect is hoorbaar zolang U het jog wiel(20) snel
vooruit en achteruit beweegt. Zodra U het wiel niet meer beweegt speelt de
muziek verder vanaf het punt waar de laser zich op dat ogenblik bevindt.
• In pause mode: zolang het jog wiel(20) niet beweegt, hoort U niets. Zodra U
het jog wiel(20) snel voorwaarts en achterwaarts beweegt is het scratch
effect hoorbaar. Zodra U het jog wiel stopt zal de muziek stoppen en wacht
de speler in pauze.
TIP: tijdens de scratch mode kan U de PLAY/PAUSE toets(8) indrukken om tussen play en pause
om te schakelen.
8. PLAY/PAUSE toets: Telkens u op de PLAY/PAUSE toets drukt zal de CD speler
overgaan van afspelen naar pauze of van pauze naar afspelen. De toets knippert
zolang de CD speler in pauze staat.
NEDERLANDS HANDLEIDING
JB SYSTEMS® 26/52 CD200
9. MEMORY toets: wordt gebruikt om Cue punten en Loops op te slaan in de Hot
Cue toetsen(19) en het permanente cue geheugen:
• Opslagen in de HOT CUE toetsen: Druk heel even op de MEMORY toets
om de CD200 voor te bereiden voor het opslaan van een cue punt of een
Loop in één van de 4 HOT CUE toetsen.
• Opslagen in het permanente geheugen: Druk op de MEMORY toets tot
deze begint te knipperen. De inhoud van de HOT CUE toetsen voor deze
CD worden opgeslagen in het permanente geheugen.
Kijk verder in deze handleiding om te leren hoe U dit juist doet.
10. OPEN/CLOSE toets: gebruik deze toets om de CD lade vooraan de CD200 te
openen of te sluiten. Deze toets kan niet gebruikt worden tijdens het afspelen van
een CD. Indien de lade niet gesloten wordt, zal deze na 60sec. automatisch
sluiten om schade te voorkomen.
11. LCD scherm: toont alle belangrijke informatie tijdens het afspelen van een CD.
Verder in deze handleiding worden alle onderdelen van de display besproken.
12. PITCH RANGE toets: Telkens als U deze toest indrukt wordt de schaal van de
snelheidfader(15) aangepast. Volgende schalen zijn mogelijk: +/-4%, +/-8%, +/16% en +/-100%.
13. PITCH LOCK toets: (Master tempo) activeert de Pitch Lock functie. Deze functie
laat u toe de snelheid van een nummer te regelen door middel van de Pitch
Control schuifregelaar, zonder de toonhoogte te wijzigen. Deze toets wordt rood
wanneer de Pitch Lock ingeschakeld is.
TIP: U moet weten dat de pitch lock functie zijn technische grenzen heeft. Vanaf een bepaalde
snelheidsafwijking (afhankelijk van de muziekstijl) zal de pitch lock niet meer correct werken.
Eerst hoort U een kleine vervorming die steeds groter naarmate de snelheidsafwijking toeneemt.
Dit is daarom echter niet direct een: bij erg lage snelheden kan U deze vervorming perfect als een
soort “distortion effect” gebruiken!
14. SPEED toets: Deze toets wordt gebruikt om de snelheidsregeling aan te zetten
of uit te schakelen.
15. SPEED schuifregelaar: Druk op de SPEED toets(14), zodat deze aan is. De
snelheid kan bijgeregeld worden tot +/-100% door de schuifregelaar te verzetten.
De snelheid zal niet veranderen als de SPEED toets(14) uit staat. U kunt het
bereik van de snelheidsverandering instellen met de toets PITCH RANGE (12)
16. TIME toets: De TIME toets laat u toe over te schakelen naar het weergeven van
de reeds verstreken tijd, de resterende tijd van het nummer of de totaal
resterende tijd van de CD. (standaard = resterende tijd van het nummer)
17. SGL/CTN: U kunt kiezen tussen “single track mode” en “continuous play”.
• Continuous play:
de volledige CD zal afgespeeld worden zonder
onderbreking. (meestal gebruikt in taverne’s)
Single track:
de CD speler stopt aan het einde van elk nummer en wacht op de
eerste muzieknoot van het volgende nummer. Dit betekent dat slecht
geïndexeerde CD’s geen hindernis vormen voor de onmiddellijke startmogelijkheden van deze CD speler. Dit is een zeer nuttige eigenschap voor
deejays!
18. PITCH BEND toetsen: De snelheid verhoogt wanneer men op de “+ toets” drukt
en keert weer naar zijn oorspronkelijke snelheid wanneer de toets losgelaten
wordt. De snelheid daalt wanneer men op de “– toets” drukt en keert weer naar
zijn oorspronkelijke snelheid wanneer de toets losgelaten wordt.
19. HOT CUE toetsen: 4 programmeerbare toetsen waarin U zowel gewone cue
punten als loops kan opslaan. Verspreid over de CD kan U dus maximaal 4 loops
en/of cue punten programmeren die U onmiddellijk kan gebruiken. Wanneer U
Page 16

NEDERLANDS HANDLEIDING
JB SYSTEMS® 27/52 CD200
een andere CD in de speler stopt worden de HOT CUE toetsen automatisch
gewist. Kijk verder in deze handleiding om te leren hoe U de HOT CUE toetsen
gebruikt.
20. JOG WIEL: Dit grote wiel heeft 3 functies, afhankelijk van de modus waarin u
werkt.
• Met het jog wiel kunt u traag de frames (1/75sec) opzoeken wanneer de CD
niet afgespeeld wordt maar in pauze of op een Cue punt staat. Om een nieuw
Cue punt in te stellen draait u aan het wiel tot u op de juiste plaats bent,
daarna drukt u op de PLAY(8) of LOOP IN(3) toets. Druk vervolgens op
CUE(6) om naar het ingegeven “CUE PUNT” terug te keren .
• Tijdens de weergave van een nummer kan men met het jog wiel de snelheid
van de weergave tijdelijk verhogen door het wiel in wijzerzin te draaien of
verlagen door het wiel in tegen wijzerzin te draaien tot +/-100%. De waarde
van de snelheidsverandering wordt bepaald door de snelheid van de rotatie
van het wiel. (dit is een alternatief voor de PITCH BEND toetsen (18)
• In scratch mode gebruikt U dit wiel om het afspelen van de track te
beïnvloeden. Op deze manier kan U de muziek op de CD scratchen alsof het
een gewone vinyl plaat is.
21. CD LADE INDICATOR: licht op als de CD lade open is of zich klaar maakt om
zich te openen.
22. Audio output: audio uitgang van de CD speler. Gebruik de meegeleverde
cinch/cinch kabel om deze uitgang te verbinden met de CD/line ingang van uw
mengtafel.
23. Digital out socket: sluit dit digitale uitgangssignaal (S/PDIF formaat) eventueel
aan op een digitale versterker of een digitale recorder (vb. Mini disc)
24. RELAY Socket: U kan gebruikmaken van de compatible faderstart functie op
sommige mixers of U kan ook 2 CD200 spelers met elkaar verbinden om zo de
relay functie te activeren.
• Relay play: Verbind de relay aansluitingen van beide CD200 spelers met
elkaar door middle van het bijgeleverde mono mini jack/jack kabeltje. Verder
in deze handleiding wordt beschreven hoe U deze functie gebrukt.
• FADER START aansluitingen: wanneer u een mengtafel hebt die uitgerust
is met een fader start functie, verbind de CD speler dan met de fader start
aansluitingen van de mixer door middel van het bijgeleverde mono mini
jack/jack kabeltje. Let er wel op dat deze aansluitingen nooit verbonden
worden met één of andere spanning.
Opgelet: Deze afstandbediening is enkel verenigbaar met een bepaald type mixers (Synq®
of Pioneer® compatibel.) Mixers die beschikken over een start functie die werken met een
signaal dat verbonden wordt met de massa zullen niet werken.
25. POWER ON/OFF switch: schakelt de CD200 aan en uit.
NEDERLANDS HANDLEIDING
JB SYSTEMS® 28/52 CD200
26. Mains input: Verbind de CD speler met het 230V AC net door middel van de
meegeleverde voedingskabel.
LCD DISPLAY
1. PLAY: verschijnt tijdens het afspelen van een CD.
2. PAUSE: verschijnt wanneer de CD speler in pause of in cue modus staat.
3. ANTI SHOCK EN BUFFER INDICATOR: De staat van het geheugen wordt op
het scherm weergegeven door middel van een emmer die gevuld of leeggemaakt
wordt. De emmer zelf geeft aan dat de Instant Start functie beschikbaar is. Als de
emmer flitst is de Instant Start functie niet beschikbaar. Elk segment in de emmer
vertegenwoordigt ongeveer 2.5 seconden anti shock bescherming.
4. CUE: verschijnt wanneer de CD speler Stand-by staat aan het master cue punt.
5. PITCH DISPLAY: toont de actuele snelheidsafwijking zoals deze ingesteld werd
met de snelheidsfader(15).
6. TIME BAR: toont u ofwel de verstreken tijd, ofwel de resterende tijd, afhankelijk
van de keuze die gemaakt werd door middel van de TIME toets(16). De Time Bar
begint te knipperen aan het eind van elk nummer om de gebruiker te verwittigen
dat het hoog tijd is om tot de actie over te gaan.
7. FRAME: Geeft de tijdsinformatie van het lopende nummer weer in “frames”.
(1 frame = 1/75
th
sec.)
8. SECOND: Geeft de tijdsinformatie van het lopende nummer weer in “seconden”.
9. MINUTE: Geeft de tijdsinformatie van het lopende nummer weer in “minuten”.
10. ELAPSED, TOTAL REMAIN: toont aan dat de tijd die weergegeven is op het
scherm de verstreken tijd (elapsed), de totaal resterende tijd van de CD (total) of
de resterende tijd van het nummer (remain) is.
11. RELOOP: verschijnt wanneer er voordien al een Loop werd geprogrammeerd
voor de CD. U kunt terugkeren naar deze Loop door op de Reloop toets(5) te
drukken.
12. LOOP: wijst u erop dat een loop wordt uitgelezen.
• LOOP Flitst: een Loop is geprogrammeerd en
wordt afgespeeld.
• LOOP blijft aan: een Loop is geprogrammeerd maar wordt niet
afgespeeld.
Page 17

NEDERLANDS HANDLEIDING
JB SYSTEMS® 29/52 CD200
19. SINGLE: verschijnt wanneer men gekozen heeft om slechts één nummer te
lezen. Wanneer Single niet verschijnt, zal de CD speler de volledige CD lezen
zonder onderbreking. Deze functie wordt ingesteld door middel van de SGL/CTN
toets(17).
20. TRACK: Toont u welk nummer van de CD afgespeeld wordt.
21. POSITIE MARKERING: geeft de afspeelpositie in frames aan: een volledige
omwenteling op de display komt overeen met 96 frames. De markering beweegt
in wijzerzin bij het voorwaarts afspelen en in tegen wijzerzin bij het achterwaarts
afspelen van de muziek. In pauze stopt de markering.
HOE GEBRUIKEN …
De meeste algemene functies worden uitgelegd in het voorgaande hoofdstuk
“controle en functies” In dit hoofdstuk spreken we over de functies die wat meer
uitleg nodig hebben.
• SLEEP MODE:
De CD speler zet na 15 minuten inactiviteit automatisch de motor en de laser uit
(wanneer in pauze of in cue modus). Dit verlengt de levensduur van de motor en
de laser. Tijdens de Sleep Mode wordt het woord “SLEEP” weergegeven op het
scherm. Om de CD speler te doen “ontwaken” moet u enkel op de Cue of Play
toets drukken, het scherm keert terug naar zijn normale weergave en is klaar om
de instructies te ontvangen.
• RELAY FUNCTIE:
• Verbind beide CD200 spelers met door middel van het bijgeleverde faderstart
kabeltje.
• Laad een CD in beide CD200 spelers.
• Open de 2 schuiven van de ingangskanalen waar de CD200 spelers op de mixer
aangesloten zijn.
• Kijk of beide spelers in “single” mode staan. (de “single” indicator(13) op de
display is aan). Als de spelers niet in single mode staan, druk dan op de
SGL/CNT toets(17) tot het woord “single” op het scherm verschijnt.
• Start de weergave op één van de twee spelers.
• Afwisselend zal er van elke speler een track gespeeld worden. Bij de speler die in
pauze wacht kan U steeds de aanwezige CD door een andere vervangen. Zo kan
U een oneindige weergave creëren, perfect voor gebruik in pubs enz.
Verwijder de kabel als U de relay functie niet meer wenst te gebruiken.
• MAAK EEN LUS (LOOP)
:
Druk op de IN/R.CUE toets om het startpunt van de Loop te programmeren terwijl
de muziek afgespeeld wordt. Druk daarna op de OUT/EXIT toets om het eindpunt
van de Loop te programmeren. De weergave van de naadloze lus (seamless loop)
start onmiddellijk. (Met wat ervaring zult u perfecte Loops kunnen programmeren!)
Tijdens het afspelen van de Loop kunt u terug op de OUT/EXIT toets drukken om
de loop te verlaten en terug over te gaan naar de normale weergave van de rest
van het nummer
Het is mogelijk om een nieuwe Loop te programmeren, zelfs wanneer een Loop
weergegeven wordt. Druk terwijl de Loop speelt gewoon op de IN/R.CUE toets om
NEDERLANDS HANDLEIDING
JB SYSTEMS® 30/52 CD200
het startpunt van de nieuwe Loop te bepalen. Breng nu het eindpunt in door op de
OUT/EXIT toets te drukken. Uw nieuwe Loop is nu geprogrammeerd en wordt
afgespeeld.
• HERSTART EEN LOOP
:
Dit kan gedaan worden op 3 manieren:
• Wanneer een Loop geprogrammeerd is en u deze verlaten hebt door op de
OUT/EXIT toets te drukken, druk dan gewoon op de RELOOP toets om de Loop
opnieuw te starten.
• Wanneer een Loop geprogrammeerd is en u deze verlaten hebt door op de
OUT/EXIT toets te drukken, druk dan gewoon terug op de OUT/EXIT toets om
de Loop opnieuw te starten. De plaats waar u op de OUT/EXIT toets gedrukt
hebt is nu geprogrammeerd als nieuw eindpunt van de Loop.
• Wanneer de Loop wordt afgespeeld, druk dan op de RELOOP toets om de Loop
onmiddellijk terug te starten. U kunt dit verschillende keren na elkaar doen om
een «stotter» effect te creëren.
• BEWERK EEN LOOP
:
Druk op de OUT/EXIT om de loop te verlaten terwijl deze afgespeeld wordt. Druk
vervolgens opnieuw op de OUT/EXIT toets. De Loop start onmiddellijk en het
nieuwe eindpunt is geprogrammeerd.
• Voor een kortere Loop: druk snel op de OUT/EXIT toets.
• Voor een langere loop: wacht wat langer voor u op de OUT/EXIT toets drukt.
OPMERKING: U kunt de Loops opslagen in de HOT CUE toetsen. Dit betekent dat u tot 4 loops per
nummer kunt bespelen. In het volgende hoofdstuk kunt u leren hoe u deze Loops kunt opslaan.
• OPSLAAN VAN EEN MASTER CUE PUNT
:
Er zijn 2 manieren om een Master Cue punt te bepalen:
• Druk op de IN/R.CUE toets tijdens de normale weergave van een CD om het
nieuwe Cue punt te bepalen (“CUE on the fly”).
• Zet de CD speler in pauze stand en gebruik het jog/shuttle wiel om de exacte
plaats van het Cue punt te bepalen. Eenmaal u dit gevonden hebt, druk dan op
de “IN/R. CUE” toets om het nieuwe Cue punt te programmeren. (of druk op de
PLAY/PAUSE toets)
Als het Cue punt geprogrammeerd is, druk dan op de CUE toets om dit Cue punt
terug op te roepen.
• OPSLAAN VAN EEN GEWOON CUE PUNT IN DE “HOT CUE” TOETSEN
:
Druk eerst op de MEMORY(9) toets om de hot cue memory modus in te schakelen
(MEMORY toets licht op).
• Druk op één van de vier HOT CUE toetsen op het juiste moment tijdens de
normale weergave van het nummer: de HOT CUE toets die u net gebruikte
veranderd in een rode kleur om aan te wijzen dat het Cue punt is opgeslagen.
(“Cue on the fly”).
• Zet de CD speler in pauze stand om het jog/shuttle wiel te gebruiken voor het
exact opzoeken van het Cue punt. Eenmaal u dit gevonden hebt, druk dan op
één van de vier HOT CUE toetsen om het nieuwe Cue punt op te slagen: de
HOT CUE toets die u net gebruikte veranderd in een rode kleur om aan te
wijzen dat het Cue punt is opgeslagen.
Als het Cue punt geprogrammeerd is, druk dan op de HOT CUE toets om de
Page 18

NEDERLANDS HANDLEIDING
JB SYSTEMS® 31/52 CD200
weergave opnieuw te starten vanuit het opgeslagen Cue punt.
• OPSLAGEN VAN EEN LOOP IN DE “HOT CUE” TOETSEN
:
Dit is sterk vergelijkbaar met het opslaan van een gewoon Cue punt. Het enige
verschil is dat u de CD200 eerst in Loop modus moet zetten. Wanneer de Loop
wordt afgespeeld, druk dan op de MEMORY toets om de CD speler in de HOT
CUE modus te zetten.(MEMORY toets licht op). Druk daarna op één van de vier
HOT CUE toetsen: de HOT CUE toets die u net gebruikte verandert in een groene
kleur om aan te tonen dat de Loop die op dit moment speelt is opgeslagen. U kunt
tot 4 Loops per nummer opslaan!
• HOT CUE GEHEUGENS OPSLAGEN IN HET PERMANENTE GEHEUGEN:
Voor elke CD kunt u tot 4 Cuepunten en/of loops opslagen in het permanente
geheugen. Later kunt u deze cue punten en loops weer oproepen als u de zelfde
CD terug in het toestel plaatst. De CD200 kan tot 2048 (512 x 4) Cue punten en
loops onthouden. De inhoud van de HOT CUE toetsen naar het permanente
geheugen overbrengen is zeer eenvoudig: druk gewoon gedurende ongeveer 2
seconden op de MEMORY toets tot deze knippert. That’s all!
OPMERKING: Wanneer u een andere CD in de CD lader steekt zonder eerst de huidige HOT CUE
geheugens op te slagen in het interne permanente geheugen, dan zullen deze gegevens verloren
gaan.
• HOT CUES TERUG OPROEPEN UIT HET PERMANENTE GEHEUGEN:
Wanneer u permanente cue punten en loops opgeslagen hebt voor een CD, you
dan kunt u deze weer oproepen terwijl u uw CD opnieuw oplaadt.
• TERUG OPROEPEN: Druk op de MEMORY toets tot wanneer deze begint te
knipperen en “RECALL” op het scherm verschijnt, voor u de CD in het toestel
laadt. Druk daarna op de OPEN/CLOSE toets om de CD te laden. Het opladen
van de HOT CUE toetsen kan enkele seconden duren. Gedurende deze periode
toont het LCD scherm “RECALL”. Als er geen permanente Cue punten kunnen
gevonden worden, dan stopt de CD200 automatisch het oproepingsproces.
• NIET OPROEPEN: Laad de CD zoals gewoonlijk in de CD speler en start de
weergave. De CD200 zal de permanente Cue punt informatie negeren voor
deze CD.
• GEBUFFERDE CUE PUNTEN WISSEN:
Dit kan op 2 manieren:
• Programmeer gewoon een nieuwe HOT CUE, de oude wordt automatisch
gewist.
• Zodra U een andere CD in de Cd-speler legt, worden alle cue punten gewist.
• HET VOLLEDIGE PERMANENTE CUE GEHEUGEN WISSEN:
Draai de SEARCH knop(1) naar links (tegen wijzerzin) en behoud deze positie
terwijl u de CD200 aan zet: het permanente Cue geheugen is gewist.
WAARSCHUWING: DEZE ACTIE KAN NIET ONGEDAAN GEMAAKT WORDEN, ALLE CUE
PUNTEN/LOOPS ZIJN VOOR GOED GEWIST !!!
• TIJDELIJKE SNELHEIDSAANPASSING: (pitch bend)
Deze functie wordt gebruikt om de beats van twee nummers mooi te
synchroniseren zodat deze nadien naadloos in elkaar kunnen overgaan. Dit kan op
2 manieren gebeuren:
NEDERLANDS HANDLEIDING
JB SYSTEMS® 32/52 CD200
• PITCH BEND toetsen: tijdens het indrukken van de PITCH BEND+ of PITCH
BEND- toets wordt de afspeelsnelheid tijdelijk verhoogd of verlaagd.
• JOG WIEL: Tijdens het afspelen kan men met het JOG wiel de snelheid tijdelijk
beïnvloeden. Door in wijzerzin te draaien zal de snelheid tijdelijk verhogen. Door
in tegen wijzerzin te draaien wordt de snelheid tijdelijk verlaagd. De
draaisnelheid bepaalt hoe groot de tijdelijke snelheidsafwijking zal zijn.
TECHNISCHE GEGEVENS
Voeding: AC 230 V, 50Hz
Verbruik: 14W
Uitgangsniveau: 1.0Vrms @ 1kHz
frequentiebereik: 20-20.000Hz (+/-0.5dB)
THD + ruis: 0.01% @ 1kHz, 0dB
S/R verhouding (IHF-A): >90dB @ 1kHz.
Short access time (volgend nummer): <1.9sec
Long access time (track 1 Æ 20): <3.6sec
Laser Pickup: 3spot detection 780nm
Electronische tracking: volautomatische digitale tracking.
Afmetingen: 348(W) x 246(D) x 106(H) mm
Gewicht: 3kg
Page 19

BEDIENUNGSANLEITUNG DEUTSCH
JB SYSTEMS® 33/52 CD200
BEDIENUNGSANLEITUNG
BESONDERHEITEN
• Digitaler Scratch-Effekt mit Jog-Wheel
• 4 HOT CUE Multi-Farb Tasten können CUE’s und/oder Loops speichern.
• PitchLock (Mastertempo): Keine Beeinflussung der Tonhöhe bei Änderung der
Geschwindigkeit.
• Instant Memory Start mit Auto CUE (Wiedergabe ohne Zeitverzögerung)
• Pitch bis zu +/-100% (wählbar: +/-4% *+/-8% *+/-16% *+/-100%)
• 10 Sek. Anti-Shock Speicher
• Pitch-Bend Funktion für optimales mixen
• Bis zu 4 Loops für jeden Track mit reloop/stutter
• Permanenter Speicher für bis zu 2048 (512 x 4) Cue Punkte und Loops
• Echtzeit Cue (“Cue on the fly”)
• Ultra schneller Memory-Start innerhalb von 10msec
• Fader-Start, Fader-Stop, (Back Cue)
• Auto Cue Funktion(-48dB)
• 1/75 Frame search
• 4 verschiedene Geschwindigkeitsscannungen
• Blaues LCD Display mit Pitch-Display and Positionsanzeiger
• Wählbare Zeitanzeige ( Laufzeit, Ablaufzeit, Restzeit )
• Drehrad mit spezieller Gummioberfläche
• Single/continuous play
• Relay Play (Abwechselnde Wiedergabe zwischen zwei CD200)
• Soft Touch Tasten mit mehrfarbiger Hintergrundbeleuchtung
• Transport Schutz ( nach 60 sec. schließt das CD Fach automatisch )
• Automatische Sleepfunktion zur Verlängerung der Laserlebensdauer
• S/PDIF digitaler Audioausgang
VOR DEM GEBRAUCH
Überprüfen Sie, ob die folgenden Teile im Paket enthalten sind:
• CD200
• Bedienungsanleitung
• Netzanschlusskabel
• Chinch-Kabel
• Fader-Start Kabel (mono Miniklinke/Miniklinke)
BEDIENUNGSANLEITUNG DEUTSCH
JB SYSTEMS® 34/52 CD200
VORSICHTSMASSNAHMEN ZUR BEDIENUNG
Sicherheitsvorschriften:
ACHTUNG: Um sich nicht der Gefahr eines
elektrischen Schlags auszusetzen, entfernen
Sie keines der Gehäuseteile. Im Geräteinneren befinden sich keine vom Benutzer
reparierbaren Teile. Überlassen Sie Reparaturen dem qualifizierten Kundendienst.
Das Blitzsymbol im Dreieck weist den Benutzer darauf hin, das eine
Berührungsgefahr mit nicht isolierten Teilen im Geräteinneren, welche eine
gefährliche Spannung führen, besteht. Die Spannung ist so hoch, das hier
die Gefahr eines elektrischen Schlages besteht.
Das Ausrufezeichen im Dreieck weist den Benutzer auf wichtige
Bedienungs- und Wartungshinweise in den Dokumenten hin, die dem Gerät
beiliegen.
Um Feuer oder elektrische Schläge vorzubeugen, setzen Sie dieses Gerät niemals
Nässe und Feuchtigkeit aus! Stellen Sie keine Behälter mit Flüssigkeiten in der Nähe
des Gerätes ab. Es ist nicht wasserdicht und könnte beschädigt werden.
INSTALLATIONSANLEITUNG:
Plazieren und benutzen Sie das Gerät für eine längere Zeit neben sehr warmen
Geräten wie Verstärker, Lampen, etc., könnte die Funktion des Gerätes
beeinträchtigt oder sogar zerstört werden.
• Sollte das Gerät in einem Flightcase betrieben werden, achten Sie auf eine gute
Luftzirkulation.
• Wenn das Gerät aus einer kalten Umgebung an einem warmen Ort aufgestellt
wird, kann sich Kondenwasser bilden. Um Fehlfunktionen oder Zerstörung zu
vermeiden, sollten Sie das Gerät für ca. 1 Stunde vom Stromnetz trennen.
• Wählen Sie einen staubfreien, trockenen Ort zur Installation des CD-Players.
Vermeiden Sie starke Hitzequellen und Vibrationen.
• Der CD-Player arbeitet normal, wenn die maximale Neigung 15° nicht
überschreitet.
• Behandeln Sie Ihre CD’s sehr sorgfältig. Berühren Sie sie nicht mit nassen oder
schmutzigen Fingern.
• Verschmutzte CD’s müssen mit einem speziellen Tuch und Reinigungsprodukten
gereinigt werden.
• Verwenden Sie keine beschädigten CD’s (zerkratzt oder deformiert). Ihr Gerät
kann beschädigt werden.
• Um Feuer oder elektrische Schläge vorzubeugen, setzen Sie dieses Gerät
niemals Nässe und Feuchtigkeit aus!
• Um sich nicht der Gefahr eines elektrischen Schlags auszusetzen, entfernen Sie
keines der Gehäuseteile. Wenn ein Problem auftritt, wenden Sie sich an Ihren
Händler.
• Legen Sie keine Metallgegenstände oder Flüssigkeiten in den CD-Player! Die
Folge wären Fehlfunktionen und Beschädigungen des Gerätes
• Dieser CD-Spieler benutzt einen Halbleiterlaser. Damit er ohne Probleme
arbeiten kann, sollte dieses Gerät in einem Zimmer mit einer Temperatur von 5°C
- 35°C verwendet werden.
• Der CD-Player kann nur von qualifiziertem Fachpersonal eingestellt oder repariert
werden.
CAUTION
Page 20

BEDIENUNGSANLEITUNG DEUTSCH
JB SYSTEMS® 35/52 CD200
• Dieses Gerät kann Interferenzen im Radio- und Fernsehempfang verursachen.
REINIGUNG DES CD-PLAYERS:
Entfernen Sie Staub und Schmutz mit einem weichen, trockenen Tuch. Achten Sie
darauf, dass keine Flüssigkeit in das Geräteinnere gelangen kann. Benutzen Sie
keinen Verdünner, Benzin oder andere chemische Mittel. Die Oberfläche des
Gerätes könnte zerstört werden.
VERBINDUNGEN
• Benutzen Sie das mitgelieferte Chinch-Kabel, um den Audio-Output des CDSpielers mit einem CD-Input Ihrer Mischer-Einheit zu verbinden.
• Schließen Sie auch das Fader-Start-Kabel an, falls Ihr Audio-Mixer Fader-StartVerbinder hat. (Synq® oder Pioneer® kompatibel)
• Stecken Sie das Stromkabel ein.
TASTEN UND FUNKTIONEN
BEDIENUNGSANLEITUNG DEUTSCH
JB SYSTEMS® 36/52 CD200
1. SUCHRAD: Dieses Rad hat 4 Vorwärts und 4 Rückwärts Such-
geschwindigkeiten. Je mehr Sie das Rad in die entsprechende Richtung drehen,
desto schneller können Sie innerhalb eines Liedes suchen.
2. TRACK SEARCH TASTE: Mit diesen Tasten können Sie den gewünschten
Track anwählen
3. IN/R.CUE Taste: Erlaubt Ihnen, ohne die Wiedergabe zu beenden, den CUE
Punkt zu setzen (CUE ON THE FLY). Diese Taste setzt auch den Anfang eines
nahtlosen Loop’s. Wenn Sie einen der HOT CUE’s (19) abspielen, wird die
Ausgangsposition auch zu dieser Taste kopiert.
4. OUT/EXIT Taste: Mit dieser Taste setzen Sie den Endpunkt in einem Loop. Der
Player gibt nun diesen Loop solange wieder, bis Sie die Taste noch einmal
drücken. Ist ein Loop programmiert, aber nicht aktiv können Sie ihn neu starten.
Der Punkt, wo Sie die Taste drücken, wird als der Endpunkt gespeichert.
5. RELOOP/STUTTER Taste: Diese Taste hat zwei Funktionen:
• RELOOP:
Wenn ein Loop programmiert worden ist und Sie die OUT/EXIT
Taste (4) gedrückt haben, drücken Sie diese Taste um den Loop wieder zu
beginnen. Um den Loop zu verlassen drücken Sie die OUT/EXIT Taste (4)
(Start- und Endpunkt werden nicht verändert)
• STUTTER:
Während der Loop Wiedergabe, drücken Sie diese Taste um
direkt zum Startpunkt des Loop’s zu gelangen. Dieser „Stotter“ Effekt gibt
Ihnen die Möglichkeit ihre Darbietung kreativ zu erweitern.
6. CUE Taste: Drücken Sie die CUE-Taste während der Wiedergabe, beginnt die
Wiedergabe sofort ab dem programmierten CUE Punkt, solange die CUE Taste
gedrückt ist. Sobald der CUE-Taste losgelassen wird, springt der Tonabnehmer
an den markierten CUE Punkt. Auch das Jog/Wheel kann im Pausenmodus
(PLAY-/PAUSE LED blinkt) dazu verwendet werden, um einen anderen CUE
Punkt zu suchen. Durch Drücken der PLAY/PAUSE Taste und CUE können Sie
den neuen CUE Punkt übernehmen.
7. SCRATCH Knopf: Wird verwendet, um in den Scatch-Modus zu gelangen. Diese
Option gibt Ihnen die Möglichkeit, jeden Track auf der CD in Echtzeit zu
scratchen. Sie können die Scratch-Funktion sowohl im Play- als auch im PauseModus verwenden:
• Im Play-Modus: Die Musik spielt normal bis Sie das große Jog-Wheel(20)
drehen. Während der Justierung des Jog-Wheel(20) sind Scratch-Effekte
hörbar. Wenn das Rad nicht mehr bewegt wird, setzt die Musik an der Stelle
fort, an der Sie sie angehalten haben.
• Im Pause-Modus: Die Musik hält solange an, wie das Jog-Wheel(20) nicht
bewegt wird. Sobald Sie das Jog-Wheel(20) bewegen, sind Scratch-Effekte
hörbar. Wenn Sie das Rad anhalten, stoppt die Musik und verharrt im
Pause-Modus.
BEACHTEN SIE: Während dem Scratch-Modus können Sie zwischen dem Play- und dem
Pause-Modus wählen, indem Sie einfach den Play/Pause- Knopf(8) drücken.
8. PLAY/PAUSE Taste: Jedes Mal, wenn Sie die PLAY/PAUSE Taste drücken,
wechselt der Player zwischen Wiedergabe und Pause oder Pause und
Wiedergabe
9. MEMORY KNOPF: Wird verwendet, um Cue-Punkte und Loops in den Hot Cue
Knöpfen (19) und in den permanenten Cue Speicher zu speichern.
• Speichern der HOT CUE Schalter: Drücke den MEMORY Schalter kurz um
die Cue Punkte und Loops auf einem der 4 HOT CUE Schalter zu speichern.
Page 21

BEDIENUNGSANLEITUNG DEUTSCH
JB SYSTEMS® 37/52 CD200
• Speichern in den permanenten Speicher: Drücke den MEMORY Knopf
solange bis im LCD Display “SAVING“ blinkend erscheint. Der Inhalt der
HOT CUE Knöpfe für diese CD wurde somit permanent gespeichert.
• Beachten Sie weitere Hinweise in dieser Bedienungsanleitung, in der Sie
Informationen über den Gebrauch dieses Knopfes erhalten.
10. OPEN/CLOSE Knopf: Drücken Sie diesen Knopf, um das CD-Fach auf der
Vorderseite des CD200 zu öffnen und zu schließen. Während des Abspielens der
CD, ist die Schublade nicht zu öffnen. Falls das Fach nach 60 Sekunden nicht
geschlossen wird, schließt es automatisch, um Schäden vorzubeugen.
11. LCD DISPLAY: Zeigt alle wichtigen Informationen an, die während des
Playbacks gebraucht werden. Beachten Sie das nächste Kapitel, um mehr
Informationen zu erhalten.
12. PITCH RANGE Knopf: Jedesmal, wenn Sie diesen Knopf drücken, werden Sie
die Einteilung des Speed-Sliders (15) verändern. Sie können +/-4%, +/-8%, +/16% und +/-100% auswählen.
13. PITCH LOCK Taste: (MAIN TEMPO) Aktiviert die Pitch Lock Funktion. Diese
Funktion erlaubt Ihnen, die Geschwindigkeit zu ändern ohne die Tonhöhe zu
verändern. Diese Taste wird rot, wenn die Pitch Lock Funktion eingeschaltet ist.
BEACHTEN SIE: Die Pitch-Lock-Funktion hat ihre Grenzen. Ab einer bestimmten
Geschwindigkeitsabweichung (abhänig vom Musikstil) wird der Pitch-Lock nicht mehr in der Lage
sein, den gleichen Pitch zu halten. Zunächst werden Sie eine kleine Verzerrung hören, die bei
größeren Geschwindigkeitsabweichungen immer stärker wird. Dies muss nicht immer ein Nachteil
sein: bei sehr langsamer Geschwindigkeit können Sie es als speziellen „Verzerrungseffekt“
verwenden!
14. SPEED TASTE: Dieser Knopf wird verwendet, um die Geschwindigkeitsfunktion
ein- und auszuschalten.
15. GESCHWINIGKEITSFADER: Drücken Sie die SPEED Taste(14), so dass sie
leuchtet. Die Geschwindigkeit kann nun bis zu +/-100% durch Bewegen des
Faders geändert werden. Die Geschwindigkeit ändert sich nicht, wenn die
SPEED Taste (14) ausgeschaltet ist. Sie können den Pitch-Umfang mit dem
PITCH RANGE Knopf(12) verändern.
16. TIME Taste: Mit der TIME Taste schalten Sie zwischen „noch zu spielende Zeit“ ,
“abgelaufener Zeit“ und „Totaler Zeit“ um.
17. SGL/CTN: Sie können zwischen "Einzelwiedergabe" und "kontinuierlicher
Wiedergabe" wählen.
• Kontinuierliche Wiedergabe:
Die komplette CD wird ohne Unterbrechung
abgespielt (Funktion wird meistens von Gaststätten benutzt)
• Einzelwiedergabe:
Die Wiedergabe endet nach jedem Track und wartet am
Anfang des nächsten Tracks. Dies ist ein sehr nützliches Merkmal für DJ’s!
18. PITCH BEND Tasten: Die Geschwindigkeit nimmt zu, während die "+ Taste"
gedrückt wird und kehrt zurück wenn der Knopf losgelassen wird. Die
Geschwindigkeit fällt wenn die "- Taste" gedrückt wird und kehrt zurück, wenn der
Knopf losgelassen wird. Diese Tasten können zum Synchronisieren von 2 Tracks
genutzt werden.
19. HOT CUE Knöpfe: Vier programmierbare Knöpfe, auf denen Sie übliche CuePunkte und/oder Loops speichern können. Sie können bis zu vier Cue-Punkte
und/oder Loops verteilt über alle Tracks auf Iher CD programmieren. Wenn Sie
eine andere CD einlegen, sind die HOT CUE Memories ausgelöscht. Beachten
Sie weitere Hinweise in dieser Bedienungsanleitung, in der Sie Informationen
über die Programmierung von CUE-Punkten etc. zu erhalten.
20. BIG JOG WHEEL: Dieses Rad besitzt 3 verschiedene Funktionen:
BEDIENUNGSANLEITUNG DEUTSCH
JB SYSTEMS® 38/52 CD200
• Im Pausenmodus können Sie mit dem Jog/Wheel framegenau suchen (1/75
Sek.) Um einen CUE Punkt zu setzen, drücken Sie PLAY (8) oder LOOP IN
(3), wenn Sie die korrekte Position eingestellt haben. Drücken Sie CUE, um
zum "CUE PUNKT" zurückzukehren.
• Im Wiedergabe Modus können Sie die Geschwindigkeit bis zu +/-100%
beeinflussen. Durch Drehen im Uhrzeigersinn beschleunigen oder entgegen
den Uhrzeigersinn verlangsamen Sie die Geschwindigkeit. Das Maß der
Änderung wird von der Geschwindigkeit der Rotation bestimmt. (dies ist eine
Alternative zu den PITCH BEND Tasten (18)
• Im Scratch-Modus wird das Jog-Wheel dazu verwendet, den Playback der
Musik in Echtzeit zu justieren. Deshab können Sie die Musik auf Ihrer CD
genause scratchen, wie das mit den normalen analogen Vinyl-Platten der Fall
ist.
21. CD TRAY INDIKATOR: Erleuchtet, wenn das CD-Fach geöffnet ist oder am
öffnen ist.
22. AUDIO Output: Output für die Audio-Signale des CD-Players. Verwenden Sie
das beigefügte Cinch/Cinch-Kabel, um diesen Output mit einem CD/line-Input
Ihrer Mixer-Einheit zu verbinden.
23. Digitalausgang: Verwenden Sie diesen Anschluss, um das Digital
ausgangssignal (S/PDIF Format) mit einem digitalem Mischpult oder Recorder zu
verbinden, (z.B. MiniDisc, DAT o.ä.)
24. RELAY Eingang: Diesen Verbinder können Sie auf zwei Arten verwenden: Sie
könne ihn mit der Fader-Start-Option an bestimmten Mixern verwenden oder zwei
CD200-Player miteinander Verbinden, um die Relay-Play-Funktion zu erhalten.
• Relay Play: Verwenden Sie das beigefügte mono mini Klinke/Klinke-Kabel,
um die Relay-Eingänge zweier CD200-Player zu verbinden. Beachten Sie
des Weitern die Hinweise in dieser Bedienungsanleitung, um die Relay-PlayFunktion kennenzulernen.
• Fader Start: Falls Sie einen Mixer mit Fader-Start-Funktion gebrauchen,
verwenden Sie das beigefügte mono mini Klinke/Klinke-Kabel, um den
Player mit dem Fader-Start des Mixers zu verbinden. Bitte beachten Sie,
dass dieser Eingang niemals mit Spannung verbunden werden darf.
Achtung: Diese Remote-Konrolle ist nur mit bestimmten Mixern (Synq® oder Pioneer®
kompatibel) vereinbar.
25. POWER ON/OFF SCHALTER: Schaltet den CD200 ein und aus.
26. NETZBUCHSE: Verbinden Sie diese Buchse mit einer 230V~ Steckdose.
Benutzen Sie das mitgelieferte Netzkabel.
Page 22

BEDIENUNGSANLEITUNG DEUTSCH
JB SYSTEMS® 39/52 CD200
LCD DISPLAY
1. PLAY: Leuchtet während der Wiedergabe einer CD.
2. PAUSE: Leuchtet während sich der Player im Pausen oder CUE Modus befindet.
3. ANTI SHOCK und Speicher Anzeige: Der Speicherstatus wird auf der Anzeige
von einem vollen oder leeren Eimer dargestellt. Wenn der Eimer blinkt, ist der
Sofort-Start nicht
verfügbar. Jedes Segment innerhalb des Eimers stellt etwa 2.5
Sekunden des Anti-Shock Speichers dar.
4. CUE: Leuchtet während der Player am CUE Punkt wartet.
5. PITCH DISPLAY: Zeigt die aktuelle Prozentzahl der Geschwindigkeitsverän-
derung an, ausgelöst durch den SPEED-Slider(15).
6. TIME BAR: Zeigt die vergangene oder aktuelle Zeit je nach Einstellung der TIME
Taste (16). Wenn der Balken warnend blinken, ist der Track fast am Ende
angelangt!
7. FRAME: Zeigt den aktuellen Frame vom gegenwärtigen Track (1 Frame = 1/75
Sek.)
8. SECOND: zeigt "Sekunden" Information vom gegenwärtigen Track.
9. MINUTE: zeigt "Minuten" Information vom gegenwärtigen Track.
10. ELAPSED, TOTAL REMAIN: Angezeigte Zeit ist die laufende, abgelaufene oder
Gesamtzeit.
11. RELOOP: Leuchtet, wenn ein Loop programmiert ist. Sie können zum Loop
zurückkehren indem Sie die RELOOP Taste (5) drücken.
12. LOOP: Leuchtet, während der Wiedergabe eines Loop’s (das Wiederholen eines
besonderen Bereichs)
• LOOP blinkt: Loop ist programmiert und wird wiedergegeben.
• LOOP leuchtet: Loop ist programmiert, wird aber nicht
wiedergegeben.
22. SINGLE: Leuchtet wenn der Player nur ein Track abspielt. Leuchtet diese
Anzeige nicht, befindet sich das Gerät im kontinuierlichen Wiedergabemodus.
Diese Funktion wird über die SGL/CTN Taste (17) eingestellt.
23. TRACK: zeigt gegenwärtige Tracknummer.
24. VISUAL ANZEIGER: Zeigt die Play-Position in Kästchen an: eine volle Rotation
entspricht 96 Kästchen. Der Anzeiger läuft im normalen Play-Modus im
Uhrzeigersinn und gegen den Uhrzeigersinn, wenn der Track rückwärts läuft. Im
Pause-Modus stoppt der Anzeiger.
BEDIENUNGSANLEITUNG DEUTSCH
JB SYSTEMS® 40/52 CD200
FUNKTIONEN
Die meisten gemeinsamen Funktionen sind im vorherigen Kapitel "Tasten und
Funktionen" beschrieben. In diesem Kapitel werden speziellere Funktionen erklärt.
• SLEEP MODUS:
Befindet sich der CD-Player länger als 15 Minuten im Pausen- oder CUE Modus
schaltet der Player automatisch in den „Schlafmodus“. Dies verlängert die
Lebensdauer des Lasers sowie des Spindelmotors. Während des Schlafmodus
zeigt die Anzeige das Wort "SLEEP". Um den Player „aufzuwecken“, drücken Sie
die PLAY oder CUE Taste.
• RELAY FUNCTION:
• Überprüfen Sie zunächst, ob das spezielle Fader-Start-Kabel die beiden CD200-
Player verbindet.
• Legen Sie in beide Player eine CD ein.
• Öffnen Sie die zwei Kanal-Fader der korrespondierenden CD Inputs Ihres Mixers.
• Überprüfen Sie, ob beide Player im Single-Modus sind (der “single” Anzeiger(13)
erscheint auf dem Display). Falls einer der Player nicht im Single-Modus ist,
drücken Sie den SGL/CNT Knopf(17) dieses Players.
• Beginnen Sie mit dem Playback auf einem der beiden Player.
• Ein Track wird abwechselnd von beiden Playern gespielt. Sie können jederzeit
eine neue CD in den Player einlegen, der gerade im Pause-Modus ist. Dadurch
ist es möglich, ein endloses Programm zu gestalten, wie es ideal für Pubs usw.
ist.
Entfernen Sie das Relay-Kabel, wenn Sie die Relay-Funktion nicht mehr brauchen.
• ERSTELLEN EINES LOOPS:
Während der Wiedergabe drücken Sie die IN/R.CUE Taste. Dies ist der Startpunkt
des Loops. Nun drücken Sie die OUT/EXIT Taste um den Endpunkt zu markieren.
Der nahtlose Loop startet direkt und wird wiederholt (Mit ein wenig Übung erhalten
Sie perfekte Loops). Während der Wiedergabe des Loop’s können Sie die
OUT/EXIT Taste drücken, um den Loop zu verlassen und den Rest des Tracks
wiederzugeben. Es ist möglich während der Wiedergabe des Loop’s einen neuen
Loop zu erstellen. Dazu drücken Sie einfach die Taste IN/R.CUE um den neuen
Startpunkt zu markieren. Nun markieren Sie den Endpunkt mit der OUT/EXIT
Taste. Ihr neuer Loop ist programmiert und wird wiedergegeben.
• RESTART DES LOOPS
:
Dies kann auf 3 Arten geschehen:
• Wenn ein Loop programmiert ist und Sie ihn durch Drücken der OUT/EXIT
Taste verlassen haben, drücken Sie die Taste RELOOP um den Loop neu zu
starten.
• Wenn ein Loop programmiert ist und Sie ihn durch Drücken der OUT/EXIT
Taste verlassen haben, drücken Sie die Taste OUT/EXIT noch einmal um den
Loop neu zu starten. Der nun markierte Punkt ist der neue Endpunkt des
laufenden Loop’s.
• Während der Wiedergabe des Loop’s drücken Sie die Taste RELOOP um den
Loop direkt wieder neu zu starten. Ideal um einen „Stotter“ Effekt zu kreieren.
Page 23

BEDIENUNGSANLEITUNG DEUTSCH
JB SYSTEMS® 41/52 CD200
• EDITIEREN EINES LOOPS
:
Während der Wiedergabe eines Loop’s drücken Sie die OUT/EXIT Taste um den
Loop zu verlassen. Drücken Sie die Taste OUT/EXIT noch einmal um den Loop
neu zu starten. Der nun markierte Punkt ist der neue Endpunkt des laufenden
Loop’s
• Für einen kürzeren Loop: Drücken Sie schnell die OUT/EXIT Taste.
• Für einen längeren Loop: Warten Sie etwas länger bis zum Drücken der
OUT/EXIT Taste.
Bemerkung: Sie können Loops auch unter den HOT CUE Tasten speichern. Das bedeutet das Sie
bis zu 4 Loops wiedergeben können.
• Einen HOT CUE-Punkt speichern:
Es gibt 2 Arten, einen HOT CUE-Punkt zu setzen:
• Drücken Sie die IN/R.CUE Taste während der Wiedergabe um einen neuen
CUE-Punkt zu setzen ("CUE on the fly")
• Befinden Sie sich im PAUSE-Modus, können Sie mit Hilfe des JOG/Wheels
einen neuen CUE-Punkt suchen. Haben Sie die Stelle gefunden, drücken Sie
die IN/R.CUE Taste um den neuen CUE-Punkt zu setzen (oder PLAY/PAUSE
drücken)
Sobald der CUE-Punkt gesetzt ist, können Sie in über die CUE-Taste abrufen.
• Einen einfachen CUE-Punkt auf die "HOT CUE" Tasten speichern
:
Drücken Sie die MEMORY Taste, um in den HOT CUE Memory Modus zu
gelangen (MEMORY Taste leuchtet).
• Drücken Sie während der Wiedergabe einen der vier HOT CUE Tasten: Die
CUE-Taste, die Sie gerade drücken, leuchtet nun rot. Der CUE Punkt ist nun
gespeichert. ("CUE on the fly").
• Befinden Sie sich im PAUSE-Modus können Sie mit Hilfe des JOG/Wheels
einen neuen CUE-Punkt suchen. Haben Sie die Stelle gefunden, drücken Sie
einen der vier HOT CUE Tasten um den neuen CUE-Punkt zu setzen. Die CUETaste, die Sie gerade drücken, leuchtet nun rot. Der CUE Punkt ist nun
gespeichert.
Sobald der HOT CUE-Punkt gesetzt ist, können Sie in über die HOT CUE-Taste
abrufen.
• SPEICHERN EINES LOOPS auf den HOT CUE Tasten
:
Bringen Sie den CD200 in den Loop Modus. Während der Wiedergabe des Loop’s,
drücken Sie die MEMORY Taste, um in den Speichermodus zu gelangen (Die
MEMORY Taste leuchtet). Nachdem Sie eine der vier HOT CUE Tasten gedrückt
haben, wechselt die Farbe der betreffenden Taste auf grün. Der nun ablaufende
Loop ist gespeichert. Sie können bis zu 4 Loops pro Track speichern!
• ABLEGEN VON HOT CUES IN DEN PERMANENTEN INTERNEN SPEICHER
Für jede CD kann man bis zu 4 Cue Punkte in dem internen Speicher ablegen.
Sobald man die gleiche CD wieder einlegt kann man die zuvor gespeicherten Cue
Punkte und Loops der CD wieder aktivieren. Der CD200 kann bis zu 2048 (512 x 4)
Cue Punkte und Loops speichern. Schreiben des Inhaltes der HOT CUE Knöpfen
in den internen Speicher ist sehr einfach: Drücken Sie den MEMORY Knopf für ca.
2sec. Das ist alles!
BEACHTE: Wenn man eine andere CD in das Laufwerk einlegt ohne die davor erstellten HOT CUE
Punkte in den internen Speicher zu speichern, werden diese gelöscht
BEDIENUNGSANLEITUNG DEUTSCH
JB SYSTEMS® 42/52 CD200
• AUFRUFEN DER HOT CUES AUS DEM INTERNEN SPEICHER
• AUFRUFEN: Vor dem einsetzen der CD MEMORY Taste drücken bis zum
Blinken und das Display “RECALL” anzeigt. Nun drücken Sie den
OPEN/CLOSE Knopf zum Einsetzen der CD. Wenn das Gerät keine HOT CUE
Punkte finden kann stoppt der recall Prozess automatisch
• NICHT AUFRUFEN: Setzen Sie die CD ein und starten Sie playback. Das Gerät
ignoriert die erstellten Cue Punkte.
• LÖSCHEN DER HOT CUE PUNKTE:
Hier gibt es 2 Möglichkeiten:
• Speichern Sie einfach einen neuen „HOT CUE“-Punkt über den bestehenden.
• Beim Wechsel einer CD werden ebenfalls alle „HOT CUE“ Punkte gelöscht.
• LÖSCHEN DES INTERNEN CUE SPEICHERS
Drehen Sie den SEARCH Knopf(1) nach links und halten Sie diesen in der
Position. Nun schalten Sie das Gerät ein: Der permanente Speicher ist somit
gelöscht. Es erscheint im Display „clearALL“
VORSICHT: DIESE FUNKTION IST NICHT RÜCKGÄNGIG ZU MACHEN !!!
• PITCH BENDING:
Verwenden Sie diese Funktion, um den Takt zweier Titel so perfekt wie möglich
anzugleichen. Hierfür gibt es 2 Möglichkeiten:
• PITCH BEND Tasten: Wird die „PITCH BEND+” oder „PITCH BEND-“ Taste
betätigt, so erhöht bzw. verringert sich die Geschwindigkeit des
wiedergegebenen Titels.
• JOG WHEEL: Wird das „JOG WHEEL” im Uhrzeigersinn bewegt, so erhöht sich
die Geschwindigkeit des Titels. Bewegt man das „JOG WHEEL“ gegen den
Uhrzeigersinn wird die Geschwindigkeit verringert. Je schneller das „JOG
WHEEL“ bewegt wird, desto stärker ändert sich die Geschwindigkeit des Titels.
TECHNISCHE DATEN
Stromzufuhr: AC 230 V, 50Hz
Leistungsaufnahme: 14W
Output level: 1.0Vrms @ 1kHz
Frequenzbereich: 20-20.000Hz (+/-0.5dB)
THD + noise: 0.01% @ 1kHz, 0dB
S/N Ratio (IHF-A): >90dB @ 1kHz.
Kürzeste Zugriffszeit (next track): <1.9sec
Längste Zugriffszeit (track 1 Æ 20): <3.6sec
Laser Pickup: 3spot detection 780nm
Electronic tracking: Vollautomatisches digital tracking.
Abmessungen: 348(W) x 246(D) x 106(H) mm
Gewicht: 3kg
Page 24

MANUAL DE USUARIO ESPAÑOL
JB SYSTEMS® 43/52 CD200
MANUAL DE USUARIO
CARACTERISTICAS
y Efécto de scratching digital con rueda jog wheel
y 4 teclas Hot Cue que pueden guardar puntos Cue y bucles (Loop)
y Cerrojo del Pitch (Master Tempo)
y Memoria Anti-choque de 10segundos
y Pitch ranges (alcance de la variación de velocidad): +/-4% +/-8% +/-16% +/-
100%
y Pitch bend: cambio momentáneo de velocidad con teclas y rueda Jog Wheel
para mezclas perfectas
y Hasta 4 bucles sin fin para cada playa con reloop/stutter
y Programación de puntos CUE en tiempo real ("Cue volante")
y Arranque Memory Start ultra rápido en menos de 10ms
y Fader start, fader stop, (back cue),
y Función Auto Cue (-48dB)
y Busca muy precisa de un punto del disco hasta 1/75 de segundo
y 4 velocidades de busca
y Pantalla LCD azul que comprende el afichaje del pitch y un indicador visual de
posición
y Alternativa entre el afichaje del tiempo que corre, el tiempo que queda de la
playa o el tiempo que queda del disco entero
y Jog Wheel equipado cón una superficie de caucho especial
y Lectura de una sola playa o de todo el CD
y Función Relay que ofrece la posibilidad de una lectura alternada automática
utilizando dos lectores CD
y salida S/PDIF digitál audio RCA coaxial
y Transport Protection de 60 segundos
y Función Sleep (prolonga la duración de vida del lazer)
ANTES DE SU USO
Verifique que las siguientes partes estén incluidas en la caja con la unidad principal:
• CD200
• Manual de usuario
• Cable de electricidad
• Un cable con enlaces cinch
• Un câble de démarrage « fader start » (mono mini-jack/mini-jack)
MANUAL DE USUARIO ESPAÑOL
JB SYSTEMS® 44/52 CD200
PRECAUCIONES DE USO
INSTRUCCIONES DE SEGURIDAD:
PRECAUCION: Para reducir el riesgo de
choque eléctrico, no retire ninguna parte de la
unidad. No hay nada que reparar dentro de la
unidad. Sólo debe ser tocado por personal
cualificado
El símbolo del triángulo equilátero con un rayo en su interior alerta sobre la
presencia de voltaje peligroso sin dentro del producto el cual constituye un
riesgo.
El símbolo del triángulo equilátero con un signo de exclamación en su
interior alerta sobre la presencia de instrucciones importantes de operación
y del mantenimiento en la literatura que acompaña esta aplicación.
Para prevenir fuego o choque eléctrico, no exponga este aparato a la lluvia o
humedad.
No coloque objetos metálicos o que contengan líquidos dentro de la unidad. Un
choque eléctrico o problemas con el aparato pueden ser el resultado de hacerlo.
GUIA DE INSTALACIÓN:
• Poner y usar la unidad por largos períodos de tiempo cerca de fuentes que
emanen calor tales cómo amplificadores, luces, etc... podrían afectar el buen
funcionamiento pudiendo por ello dañar la unidad.
• Cuando lo instale en una cabina o rack móvil, por favor, asegúrese de que tiene
una correcta ventilación para mejorar la evacuación de calor de la unidad.
• Para evitar la condensación, permita que se adapten a los bruscos cambios de
temperatura las unidades cuándo se lleven a un lugar más cálido que su
temperatura exterior. Prevenga la condensación para conseguir un
funcionamiento óptimo.
• Elija el lugar donde va a poner la unidad cuidadosamente. Evite toda fuente de
calor. Evite lugares con vibración, polvo ó humedad.
• El reproductor podría trabajar normalmente con un ángulo de hasta 15º.
• Sea cuidadoso mientras maneja CD´s no los toque con las manos mojadas o
sucias.
• Los discos que estén sucios debería ser limpiados con un paño especialmente
diseñado para éstos fines y productos de limpieza no abrasivos.
• No use CD´s que estén dañados, (rallados o deformados) podrían dañar el
aparato.
• Para prevenir fuego o choque eléctrico, no exponga este aparato a la lluvia o
humedad.
• Para prevenir choques eléctricos, no abra la unidad. Si ocurre un problema,
contacte con su distribuidor.
• No coloque objetos metálicos o que contengan líquidos dentro de la unidad. Un
choque eléctrico o problemas con el aparato pueden ser el resultado de hacerlo.
• Este reproductor de CD utiliza un láser semiconductor. Para poder disfrutar de la
música con ésta unidad, mantenga la temperatura de la unidad entre 5°C – 35°C.
• Este reproductor de CD no debe ser ajustado ó reparado por nadie, excepto
personal cualificado.
• Esta unidad puede causar interferencias en la recepción de radio y televisión.
CAUTION
Page 25

MANUAL DE USUARIO ESPAÑOL
JB SYSTEMS® 45/52 CD200
LIMPIANDO SU REPRODUCTOR:
Limpie la unidad con un paño ligeramente humedecido en agua. Evite mojar la parte
interna. No use líquidos volátiles cómo benzina o disolventes que pueden dañar la
unidad.
CONEXIONES
CONEXIONES BÁSICAS:
• Utulizca el cable cinch para conectar la salida audio del lector CD con la entrada
CD de su mesa de mezcla
• Conecte también el cable "fader start" si su mesa de mezcla posee conectores
"fader start". (compatible Synq® SMX-1 o Pioneer®)
• Conecte el cable de electricidad
CONTROLES Y FUNCIONES
MANUAL DE USUARIO ESPAÑOL
JB SYSTEMS® 46/52 CD200
1. RUEDA DE BÚSQUEDA: Esta rueda tiene 4 posiciones de velocidad hacia
adelante y 4 hacia atrás para buscar cualquier punto de su canción elegida.
Cuánto más giro se le dé, más rápido buscará.
2. Botones TRACK SEARCH: Estos botones son utilizados para seleccionar la
pista que se va a reproducir. Hacia delante/hacia atrás.
3. Botón IN/R.CUE: Esto permite ajustar el punto de cue sin detener la
reproducción (PUNTO DE CUE AL VUELO). Este botón también sirve para
ajustar el comienzo de un loop perfecto. Cuando se reproduce desde uno de
éstos puntos CUE(19), el punto de comienzo queda marcado en éste botón.
4. Botón OUT/EXIT: Usado para ajustar el punto de cierre del loop. El reproductor
comienza el loop perfecto hasta que presione nuevamente el botón para salir de
él. Cuándo un loop ha sido programado pero no activado, se puede volver a
utilizar el loop. El punto desde donde se presione el botón será memorizado
cómo nuevo punto de cierre del loop.
5. Botón RELOOP/STUTTER : Este botón tiene dos funciones:
• RELOOP:
Si el loop ha sido programado y se ha tocado el botón OUT/EXIT
(4), presione el botón de reloop para volver nuevamente al loop. Para salir del
loop presione el botón OUT/EXIT(4). (Los puntos de inicio y final del loop
permanecen sin cambios)
• STUTTER:
Cuándo un loop se está reproduciendo presione éste botón para
que el loop comience de nuevo inmediatamente. Puede también presionar
este botón cuando una pista no está reproduciendo un loop. Cada vez que el
botón de RELOOP/STUTTER es presionado, la música recomenzará desde
el punto CUE pre-programado.
Este efecto proporciona creatividad al trabajo.
6. Botón CUE: Presionar el botón de CUE durante la reproducción hace que el
reproductor retorne al comienzo desde donde éste comenzó. La reproducción
comienza inmediatamente desde el punto CUE programado mientras se presiona
el botón. El reproductor de CD salta de nuevo al punto CUE tan pronto como se
presione el botón de CUE. Con la unidad en modo de pausa (Play/Pause LED
parpadeante) la búsqueda y/o la rueda jog es usada para buscar un nuevo punto
de comienzo. Presionando el botón “ PLAY/PAUSE “, presione el botón “ CUE “
para confirmar un nuevo punto de CUE. La luz de CUE tanto tiempo cómo el
botón de CUE esté presionado hasta que el CD ha retornado a la posición en la
que había comenzado.
7. TECLA SCRATCH: se usa para activar la función scratch del CD200. Esta
opción ofrece la posibilidad de scratch en cualquier playa del CD en tiempo real.
Puede utilizar ésta función mientras la lectura del CD o en modo Pausa:
• En modo play: la música toca normalmente hasta que gire la rueda Jog
Wheel (20). Mientras esté manipulando la rueda, se oíra el efecto scratch.
Cuando suelte la rueda, la música continuará normalmente desde el punto
en el que soltó la rueda.
• En modo pausa: la música está parada hasta que gire la rueda Jog Wheel
(20). Mientras esté manipulando la rueda (20), se oíra el efecto scratch.
Cuando suelte la rueda, la música se parará y el lector se pondrá de nuevo
en modo pausa
NOTA: durante el scratch puede pasar del modo pausa al modo play o inversamente
simplemente empujando la tecla PLAY/PAUSE (8)
8. Botón PLAY/PAUSE: Cada vez que presione el botón play/pause el reproductor
de CD cambia de reproducción a pausa ó viceversa. El botón parpadeará hasta
que el reproductor se ponga en modo de pausa.
Page 26

MANUAL DE USUARIO ESPAÑOL
JB SYSTEMS® 47/52 CD200
9. TECLA MEMORY: Se usa para guardar puntos Cue y bucles (Loops) en las
teclas Hot Cue (19). Mire más lejos en éste manual para mayor información
sobre la utilización de ésta tecla.
10. TECLA OPEN/CLOSE: Pulse ésta tecla para abrir y cerrar el cargador CD que
se encuentra alante del CD200. Esta tecla no funciona durante la lectura de un
CD. Si no está cerrado tras 60 segundos, se cierra automáticamente para evitar
estropearlo accidentalmente.
11. PANTALLA LCD: Indica todas las informaciones importantes, necesarias
durante la lectura del CD. Lea el siguiente capítulo para más información sobre el
téma.
12. TECLA PITCH RANGE: Cada vez que pulse ésta tecla cambiará la escala del
cursor de velocidad (15). Puede seleccionar +/-4%, +/-8%, +/-16% et +/-100%.
13. TECLA PITCH LOCK: (Master tempo) activa la función Pitch Lock. Permite
hacer regulaciones de velocidad de la lectura utilizando Pitch Control (15) sin
alterar el tono. Esta tecla se pone roja cuando la función Pitch Lock está
activada.
NOTA: sepa que la función pitch lock tiene sus límites. A partir de un cierto nivel de cambio de
velocidad (dependemente del estilo de música) el pitch lock no podra guardar el mismo tono.
Primero se oíra una pequeña distorción que se ampliará si aún aumenta el cambio de velocidad.
Esto no es siempre un incoveniente: a velocidades muy bajas tambien se puede utilizar como
efecto especial de distorción.
14. Botón SPEED (Botón de velocidad): Este botón es utilizado para activar o
desactivar la función de la velocidad.
15. SPEED (Deslizador de velocidad): Presione el botón SPEED(15), entonces
éste se iluminará. La velocidad puede cambiar hasta +/-100% moviendo el
deslizador . La velocidad no cambiará si el botón SPEED(15) está apagado.
Puede cambiar la amplitud del cambio de velocidad con la tecla PITCH RANGE
(12).
16. Botón TIME: El botón TIME permite cambiar entre tiempo tiempo transcurrido,
tiempo faltante de la pista y el faltante total del CD.
17. Botón SGL/CTN: Puede elegir entre reproducción de una sola pista y modo
continuo.
• Reproducción continua:
El CD complete puede ser reproducido sin
interrupciones. (mayormente utilizado en pubs)
• Single track
: la lectura sa para al final de la playa y espera al inicio de la
siguiente playa. El lector esperará en la primera nota musical de la playa. Lo
que quiere decir que los CD's con índice equivocado no serán un problema
para el arranque instantáneo de éste lector CD. Esta es una cracterística muy
útil para los deejays!
18. Botones PITCH BEND: La velocidad puede incrementarse temporalmente
manteniendo pulsado el botón “ + “ y volverá a su velocidad original una vez que
lo suelte. La velocidad puede disminuir temporalmente manteniendo pulsado el
botón “ - “ y volverá a su velocidad original una vez que lo suelte. Estos dos
botones pueden utilizarse para sincronizar los beats por minuto entre dos pistas.
También son utilizados para responder a algunas preguntas que en ocasiones
mostrará la pantalla.
19. TECLAS HOT CUE: 4 teclas programables que pueden guardar puntos Cue y/o
bucles. Puede programar hasta 4puntos Cue y/o bucles repartidos en todas las
pistas del CD. Cuando cambie de CD, las memorias HOT CUE se borrarán. Vaya
más lejos en el manual para más informacines sobre la programación de los
puntos Cue, etc.
MANUAL DE USUARIO ESPAÑOL
JB SYSTEMS® 48/52 CD200
20. RUEDA JOG: Esta rueda jog cumple tres funciones dependiendo del modo en el
que se esté trabajando
• La rueda jog actúa cómo un buscador lento (1/75sec) cuándo el CD está
detenido o pausado. Para ajustar un nuevo punto cue, de vuelta a la ruda,
presione el botón de arranque PLAY(8) o comienzo de loop LOOP IN(3)
cuando haya decidido la posición exacta. Presione el botón CUE para retornar
al punto de inicio elegido.
• Si la pista se está reproduciendo, la rueda jog funciona temporalmente cómo
empuje o frenada (Pitch Bend) de la música hasta +/-100% rotando la rueda
en el sentido de las agujas del reloj para acelerar ó en sentido contrario a las
agujas del reloj para frenar. La variación del cambio de velocidad está
determinada por la velocidad con la que usted rote a la rueda jog. (esta es
una alternativa a los botones PITCH BEND(18)
• En modo scratch la rueda Jog Wheel se utiliza para manipular la reproduction
de la música en tiempo real . De hecho puede hacer scratch con la música de
su CD en tiempo real, como si lo hiciese con un disco vinyl analógico normal.
21. CD TRAY INDICATOR: Está encendido cuando el lector está abierto o cuando
se va a abrir.
22. Salidas de audio: Salidas de audio para cada reproductor. Use el múltiple de
RCA para conectar la unidad de CD a su mesa de mezclas
23. Salida de audio digital: Use éste conector para conectar el reproductor (formato
S/PDIF) a la entrada de un amplificador digital o una unidad de grabación digital
(ej. Mini disc)
24. CONECTOR RELAY: Puede utilizar éste conector de 2 maneras: con la opción
fader start de ciertas mesas de mezcla o tambien pude conectar dos lectores
CD200 juntos para obtener la función de lectura alternada
• Relay play: Utilizca el cable mono mini jack/jack que viene con el aparato
para unir los conectores RELAY de dos lectores CD200. Vaya más lejos en
el manual para saber cómo utilizar ésta función.
• Fader startSi utiliza una mesa de mezcla que posee la función fader start,
utilizca el cable mono mini jack/jack para conectar el lector CD con los
conectores fader start de la mesa. Tenga cuidado de nunca conectar ese
conector con una fuente de alimentación.
Atención: éste mando es compatible únicamente con ciertas mesas de mezcla (Synq® ou
Pioneer® compatible). Las mesas de mezcla con fader start????????.?
25. Interruptor POWER ON/OFF: Enciende o apaga el CD200
26. Entrada de electricidad: Conecte el reproductor de CD a máximo AC 230V con
el cable provisto a tales efectos.
Page 27

MANUAL DE USUARIO ESPAÑOL
JB SYSTEMS® 49/52 CD200
ANTALLA DE CRISTAL DE CUARZO LÍQUIDO:
1. REPRODUCCIÓN: Aparece mientras la unidad está reproduciendo un CD.
2. PAUSA: Aparece mientras la unidad está en pausa o en modo CUE.
3. INDICADOR ANTIGOLPES Y BUFFER: El indicador de memoria está indicado
por un cargador que aparece lleno o vacío. El cargador en el momento en el que
es posible iniciar la reproducción. Si el cargador está parpadeando, el arranque
instantáneo NO
está disponible. Cada uno de los segmentos que se podrán
observar en el cargador representan 2.5 segundos de memoria antigolpes por
cada uno de ellos.
4. CUE: Aparece cuando el reproductor está esperando en el punto de cue
grabado.
5. PITCH DISPLAY: El porcentaje actual de la variación es mostrado.
6. BARRA DE TIEMPO: Muestra el tiempo transcurrido o remanente según se
ajuste con el botón TIME (16). Comenzará a parpadear al final de cada pista
alertando al usuario para que decida qué hacer al respecto.
7. MARCO (FRAME): Muestra información acerca de los marcos de la pista actual.
(1 frame = 1/75
th
sec.)
8. SEGUNDO: Muestra información acerca de los segundos de la pista actual.
9. MINUTO: Muestra información acerca de los minutos de la pista actual.
10. TRANSCURRIDO, REMANENTE TOTAL (ELAPSED, TOTAL REMAIN): Indica
el tiempo transcurrido, remanente total o el tiempo restante de una pista.
11. RELOOP: Aparece cuándo el CD tenía un loop que había sido hecho
previamente. Puede reutilizar el loop pulsando el botón de reloop(5).
12. LOOP: Mostrado cuando el CD está reproduciendo un loop. (repitiendo un área
determinada)
• LOOP Parpadeante: El loop está programado Y
se está reproduciendo.
• LOOP Fijo: El loop está programado pero NO
se está reproduciendo.
13. ÚNICO (SINGLE): Aparece cuando la unidad está ajustada para reproducir solo
una pista por vez. Cuando no es mostrado, el CD será reproducido de forma
continua sin detenerse en ninguna pista. Esta función está controlada por el
botón SGL/CTN (17).
14. PISTA (TRACK): Muestra el número de la pista actual.
MANUAL DE USUARIO ESPAÑOL
JB SYSTEMS® 50/52 CD200
15. INDICADOR VISUAL: indica la posición de lectura en frames: una rotación
completa representa 96frames. El indicador evoluciona en el sentido de las
agujas del reloj durante la lectura normal de un CD y en el sentido contrario
cuando la lectura se hace al revés. En modo pausa el indicador se para.
COMO USAR …
La mayoría de las funciones más comunes han sido explicadas en el capítulo
anterior de “ controles y funciones “ En éste capítulo hablaremos acerca de las
funciones que necesitan una pequeña explicación.
• MODO DESCANSO:
El reproductor de CD se apagará automáticamente, desactivando la bandeja de
transporte de CD y el lector láser después de 15 minutos sin uso. (cuando esté en
modo de pausa o CUE). Esto alarga notablemente el funcionamiento de la unidad.
Mientras se encuentre en éste modo, la pantalla mostrará la palabra “SLEEP”.
Para despertar al reproductor, presione el botón de reproducción PLAY ó CUE. La
pantalla volverá a mostrarse nuevamente con los mensaje o leyendas que
contenga.
• FONCTION RELAY:
• Averigue primero que el cable especial fader start esté conectado en los dos
lectores CD200.
• Meta un CD en los dos lectores.
• Abra los 2 cursores de las entradas CD de su mesa de mezcla.
• Averigue que los dos lectores estén en modo Single (el indicador "single" (13)
aparece en la pantalla). Si uno de los lectores no está en modo Single, apriete
sobre la tecla SGL/CNT (17) del aparato.
• Empiece la lectura sobre uno de los dos lectores CD.
• Una playa de cada CD será reproducida alternativamente. Siempre puede meter
un nuevo CD en el aparato que esté en modo pausa. Asi puede crear un
programa sin fin, lo ideal para una utilización en tabernas,etc.
Retire el cable Relay si ya no quiere utilizar la función Relay.
• CREANDO UN LOOP
:
Mientras una pista está reproduciéndose, presione el botón IN/R.CUE(3) para
programar el punto de comienzo del loop. Ahora presione el botón OUT/EXIT(4)
para programar el punto de salida del loop. El loop sin interrupciones comenzará a
sonar inmediatamente. (¡ Con un poco de práctica podrá crear loops perfectos !)
Mientras el loop se está reproduciendo, puede presionar el botón OUT/EXIT(4) de
Nuevo para salir del loop y continuar reproduciendo el resto de la pista.
Es possible programar un nuevo loop, incluso cuándo el loop está
reproduciéndose. Mientras se reproduce el loop, simplemente presione el botón
IN/R.CUE para ajustar el punto de comienzo del nuevo loop. Ahora juste el punto
de salida del nuevo loop presionando el botón OUT/EXIT(4). Su nuevo loop está
programado y sonando.
Page 28

MANUAL DE USUARIO ESPAÑOL
JB SYSTEMS® 51/52 CD200
• REINICIAR UN LOOP
:
Esto se puede hacer de tres maneras:
• Cuando un loop está programado y se ha salido de él pulsando el botón
OUT/EXIT, presione el botón RELOOP para reiniciar el loop.
• Cuando un loop está programado y se ha salido de él pulsando el botón
OUT/EXIT, presione el botón OUT/EXIT nuevamente para reestablecer el loop.
El punto que se ha marcado al presionar el botón OUT/EXIT es ahora el
programado cómo salida del loop.
• Cuándo el loop se está reproduciendo, presione el botón RELOOP para reiniciar
el loop de forma inmediata. Puede hacer ésto tantas veces cómo quiera para
conseguir un efecto de “ tartamudeo “.
• EDITANDO UN LOOP
:
Cuando un loop se está reproduciendo, presione el botón OUT/EXIT para salir del
loop. Presiónelo de nuevo. El loop comenzará a sonar inmediatamente y el nuevo
punto de salida del loop está programado.
• Para un loop corto: presione rápidamente el botón OUT/EXIT.
• Para un loop largo: espere un poco antes de presionar el botón OUT/EXIT.
NOTA: Puede almacenar loops con los botones HOT CUE .Con ellos debería tener 4 loops por
pista para reproducer. En el próximo parágrafo aprenderá cómo guarder éstos loops.
• ALMACENANDO UN PUNTO DE CUE MAESTRO
:
Hay dos maneras de hacerlo:
• Presione el botón IN/R.CUE durante la reproducción para ajustar un nuevo
punto de CUE (CUE al vuelo).
• Ponga el reproductor en pausa y utilice la rueda jog para buscar el lugar
exacto para su punto de cue. Una vez que lo ha encontrado, presione el botón
IN/R. CUE para ajustar un nuevo punto de CUE (o presione el botón de
REPRODUCCIÓN/PAUSA)
Una vez que el punto de CUE ha sido programado, presione el botón CUE para
volver a él.
• ALMACENANDO UN PUNTO DE CUE A UN BOTÓN “ HOT CUE “
:
Primero presione el botón de MEMORIA para poner a la unidad en modo de
memoria para los HOT CUE (la lecla MEMORY se enciende).
• Presione uno de los cuatro botones de HOT CUE en el momento conveniente
durante la reproducción: el botón de HOT CUE que ha presionado se tornará
de color rojo indicando que el punto deseado ha sido almacenado (CUE al
vuelo).
• Ponga el reproductor en pausa y utilice la rueda jog para buscar el lugar
exacto para su punto de cue. Una vez que lo ha encontrado, presione el botón
IN/R. CUE para ajustar un nuevo punto de CUE (o presione el botón de
REPRODUCCIÓN/PAUSA)
Una vez que el punto de CUE ha sido programado, presione el botón CUE para
volver a él.
MANUAL DE USUARIO ESPAÑOL
JB SYSTEMS® 52/52 CD200
• ALMACENANDO UN LOOP EN UN BOTÓN “ HOT CUE “
:
Es muy similar a almacenar un punto de cue. La única diferencia es que tiene que
poner el CDX-1 en modo loop. Cuando se está reproduciendo el loop, presione el
botón de MEMORIA para poner a la unidad en modo de memoria para los HOT
CUE (la tecla MEMORY se enciende). Después presione uno de los cuatro
botones HOT CUE: el que haya presionado se tornará de color anaranjado para
indicar que el loop que se está reproduciendo ha sido almacenado. Puede
almacenar hasta 4 loops por pista.
• BORRAR LOS PUNTOS HOT CUE:
Esto se puede hacer de 2 maneras:
• Programe un nuevo HOT CUE, el precedente se borrará.
• Meta otro CD en el cargador, los puntos HOT CUE se borrarán.
• PITCH BENDING:
Se utiliza ésta función para sincronizar perféctamente los beats de los dos CD.
Esto se puede hacer de 2 maneras:
• Teclas PITCH BEND: la velocidad aumenta o disminuye según esté apretando
las teclas PITCH BEND+ o PITCH BEND-.
• JOG WHEEL: durante la lectura la JOG WHEEL cambiará temporalmente la
velocidad. Girando la rueda en el sentido de las agujas del reloj aumenta la
velocidad. Girandola en el sentido contrario, la velocidad disminuye. El valor del
cambio de velocidad depende de la velocidad de rotación de la rueda.
ESPECIFICACIONES
Voltaje: AC 230 V, 50Hz
Consumo de potencia: 14W
Nivel de salida: 1.0Vrms @ 1kHz
Balanceo de canales: 0.5dB
Frecuencia de respuesta: 20-20000Hz (+/-0.5dB)
THD + ruido: 0.01% @ 1kHz, 0dB
S/N Radio (IHF-A): >90dB @ 1kHz.
Acceso de tiempo corto (next track): <1.9sec
Acceso de tiempo largo (track 1 Æ 20): <3.6sec
Encendido del láser: 3spot detection 780nm
Seguimiento electrónico: Full automatic digital tracking.
Dimensiones: 348(W) x 246(D) x 106(H) mm mm
Peso: 3Kgs
 Loading...