

Page 1
ENGLISH
KOREA
OPERATION MANUAL
사용자 설명서
본 기기는 순정 핸들리모컨 컨버터 기능이 내장되어 있습니다.
고객님 차량에 순정핸들리모컨이 있는 경우 순정 핸들 리모컨의 배선을 연결해주셔야 합니다.
기능 및 주요제원은 성능향상을 위해 변경될수 있으니, http://www.jbshop.kr/ 로 방문하셔서 최신 메뉴얼/
펌웨어를 확인해보시기 바랍니다.
Page 2

ENGLISH
02 EN
CONTENTS
Installation 3
Take out screw before installation 3
DIN Front-Mount (Method A) 3
Installing the unit 3
Removing the unit 4
DIN Rear-Mount (Method B) 5
Using the detachable front panel 5
Wiring Connection 6
Location of keys 7
Basic operation 8
Switching on/off the unit 8
Faceplate release 8
Sound adjustment 8
System setting 8
Loudness 9
Display information 8
Mute 9
Equalization 9
Liquid crystal display 9
Remote sensor 9
ESP function 9
Auxiliary input 9
Reset function 9
Radio operation 10
Switching to radio mode 10
Selecting the frequency band 10
Selecting station 10
Automatic memory storing&
program scanning 10
Station storing 10
Local/distant 10
Mono/stereo 10
MP3/WMA operation 11
Selecting tracks 11
Pausing playing 11
Previewing all tracks 11
Repeating the same track 11
Playing all tracks in random 11
Special function for MP3/WMA 11
BLUETOOTH 12
Bluetooth wireless technology 12
About G5BT 12
Pairing 12
Repairing 12
Making a call usingdial pad 13
Making a call using recent call 13
Transfer the call (Phone/G5) 13
Listening the music using Bluetooth 13
USB play operation 14
SD/MMC operation 14
ID3-tag / Clock 14
Remote control 15
Specification 16
Trouble shooting 17
Page 3
ENGLISH
03EN
INSTALLATION
- Choose the mounting location where the unit will not inter
fere with the normal driving function of the driver.
- Before finally installing the unit, connect the wiring tempo
rarily and make sure it is all connected up properly and the
unit and the system work properly.
- Use only the parts included with the unit to ensure proper
installation. The use of unauthorized parts can cause malfunctions.
- Consult with your nearest dealer if installation requires the
drilling of holes or other modifications of the vehicle.
- Install the unit where it does not get in the driver’s way and
cannot injure the passenger if there is a sudden stop, like
an emergency stop.
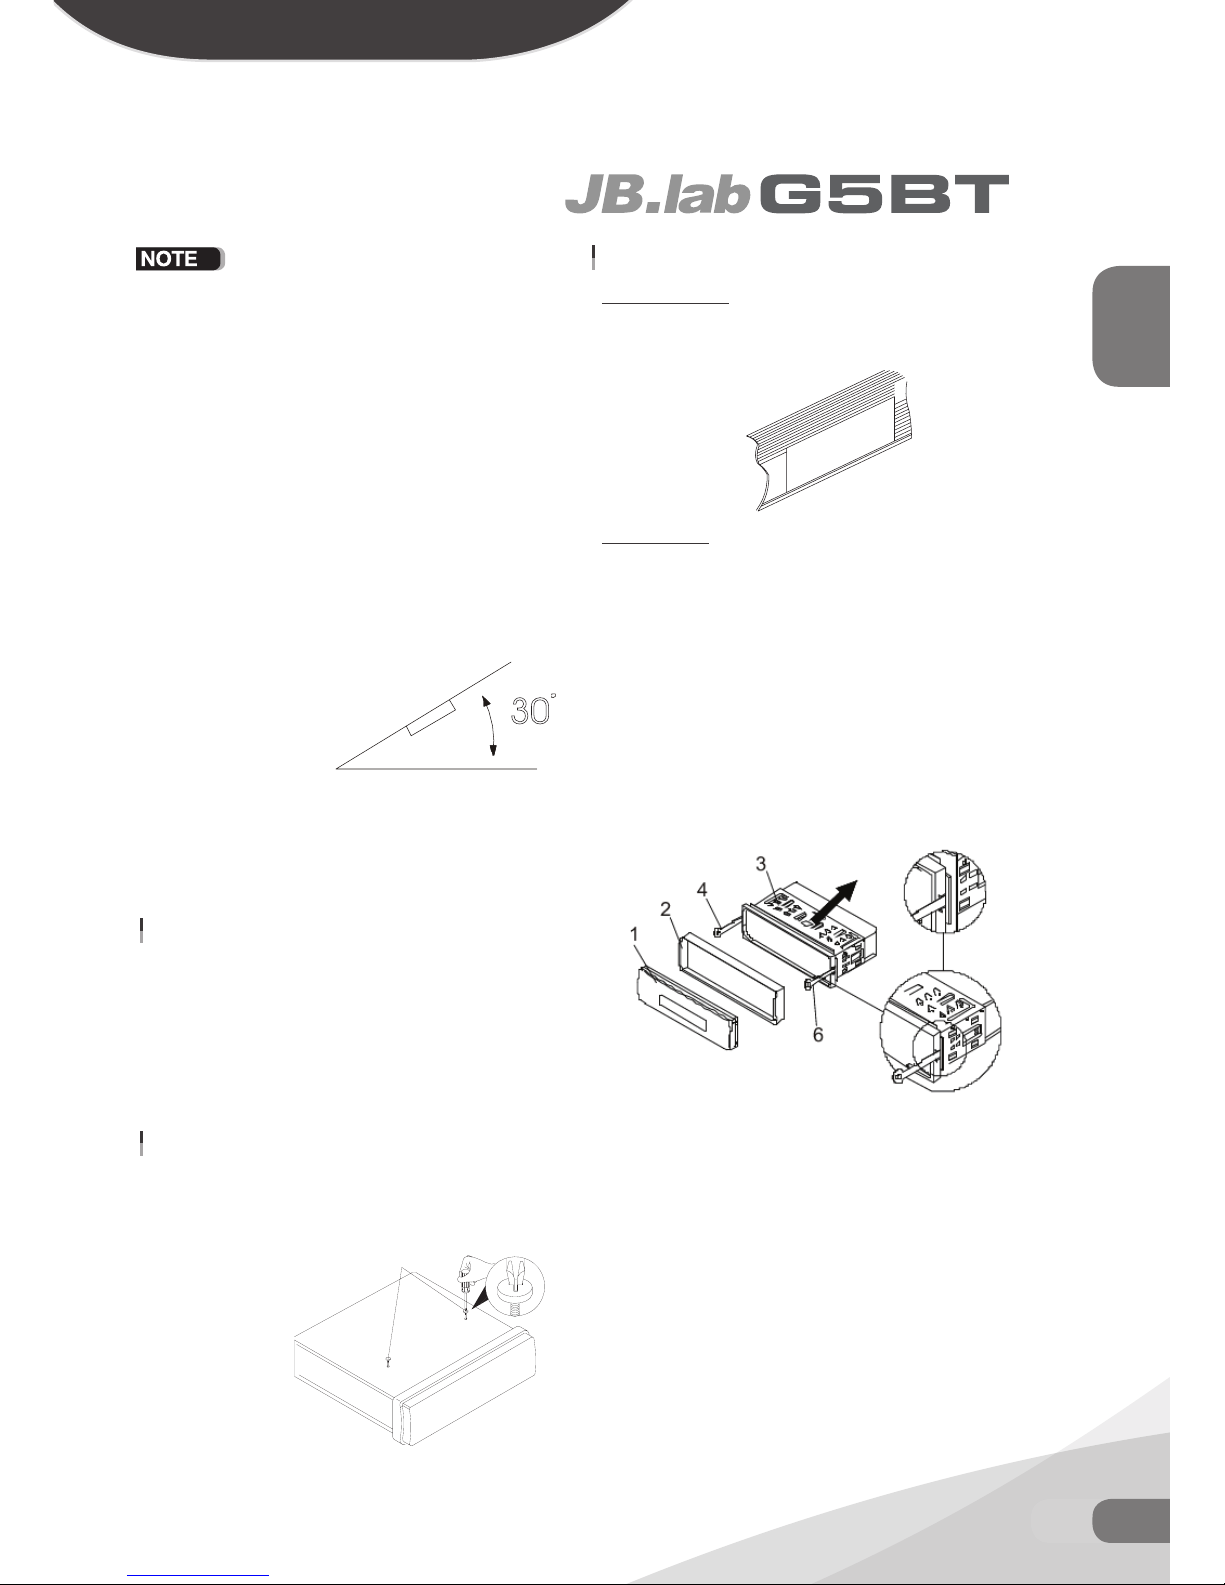
- If installation angle exceeds 30°from horizontal, the unit
might not give its optimum performance.
- Avoid installing the unit where it would be subject to high
temperature, such as from direct sunlight, or from hot air,
from the heater, or where it would be subject to dust, dirt or
excessive vibration.
DIN FRONT/REAR-MOUNT
This unit can be properly installed either from “Front”
(conventional DIN Front-mount) or “Rear” (DIN Rearmount installation, utilizing threaded screw holes at
the sides of the unit chassis). For details, refer to
thefollowing illustrated installation methods.
TAKE OUT SCREW BEFORE INSTALLATION (G7 model only)
Before install the unit, please remove the two screws.
DIN FRONT-MOUNT (Method A)
Installation Opening
This unit can be installed in any dashboard having
an opening as shown below:
Installing the unit
1. Make sure the ignition is turned off, and then disconnect the
cable from the vehicle battery’s negative (-) terminal.
2. Disconnect the wire harness and the antenna.
3. Press the release button on the front panel and remove the con
trol panel (see the steps of “to detach the front panel”).
4. Lift the top of the outer trim ring then pull it out to remove it.
5. The two supplied keys release tabs inside the unit’s sleeve so
you can remove it. Insert the keys as far as they will go (with the
notches facing up) into the appropriate slots at the middle left
and right sides of the unit. Then slide the sleeve off the back
of the unit.
6. Mount the sleeve by inserting the sleeve into the opening of
the dashboard and bend open the tabs located around the
sleeve with a screwdriver. Not all tabs will be able to make
contact, so examine which ones will be most effective. Bending open the appropriate tabs behind the dashboard to secure
the sleeve in place.
7. Reconnect the wire harness and the antenna and be careful not
to pinch any wires or cables.
8. Slide the unit into the sleeve until it locks into place.
9. To further secure the unit, use the supplied metal strap to secure
the back of the unit in place. Use the supplied hardware (Hex
30
Take out screw
before installation.
(1) Front Panel (2) Outer Trim Ring(3) Sleeve (4) L key (5) R key
Page 4
ENGLISH
04 EN
INSTALLATION
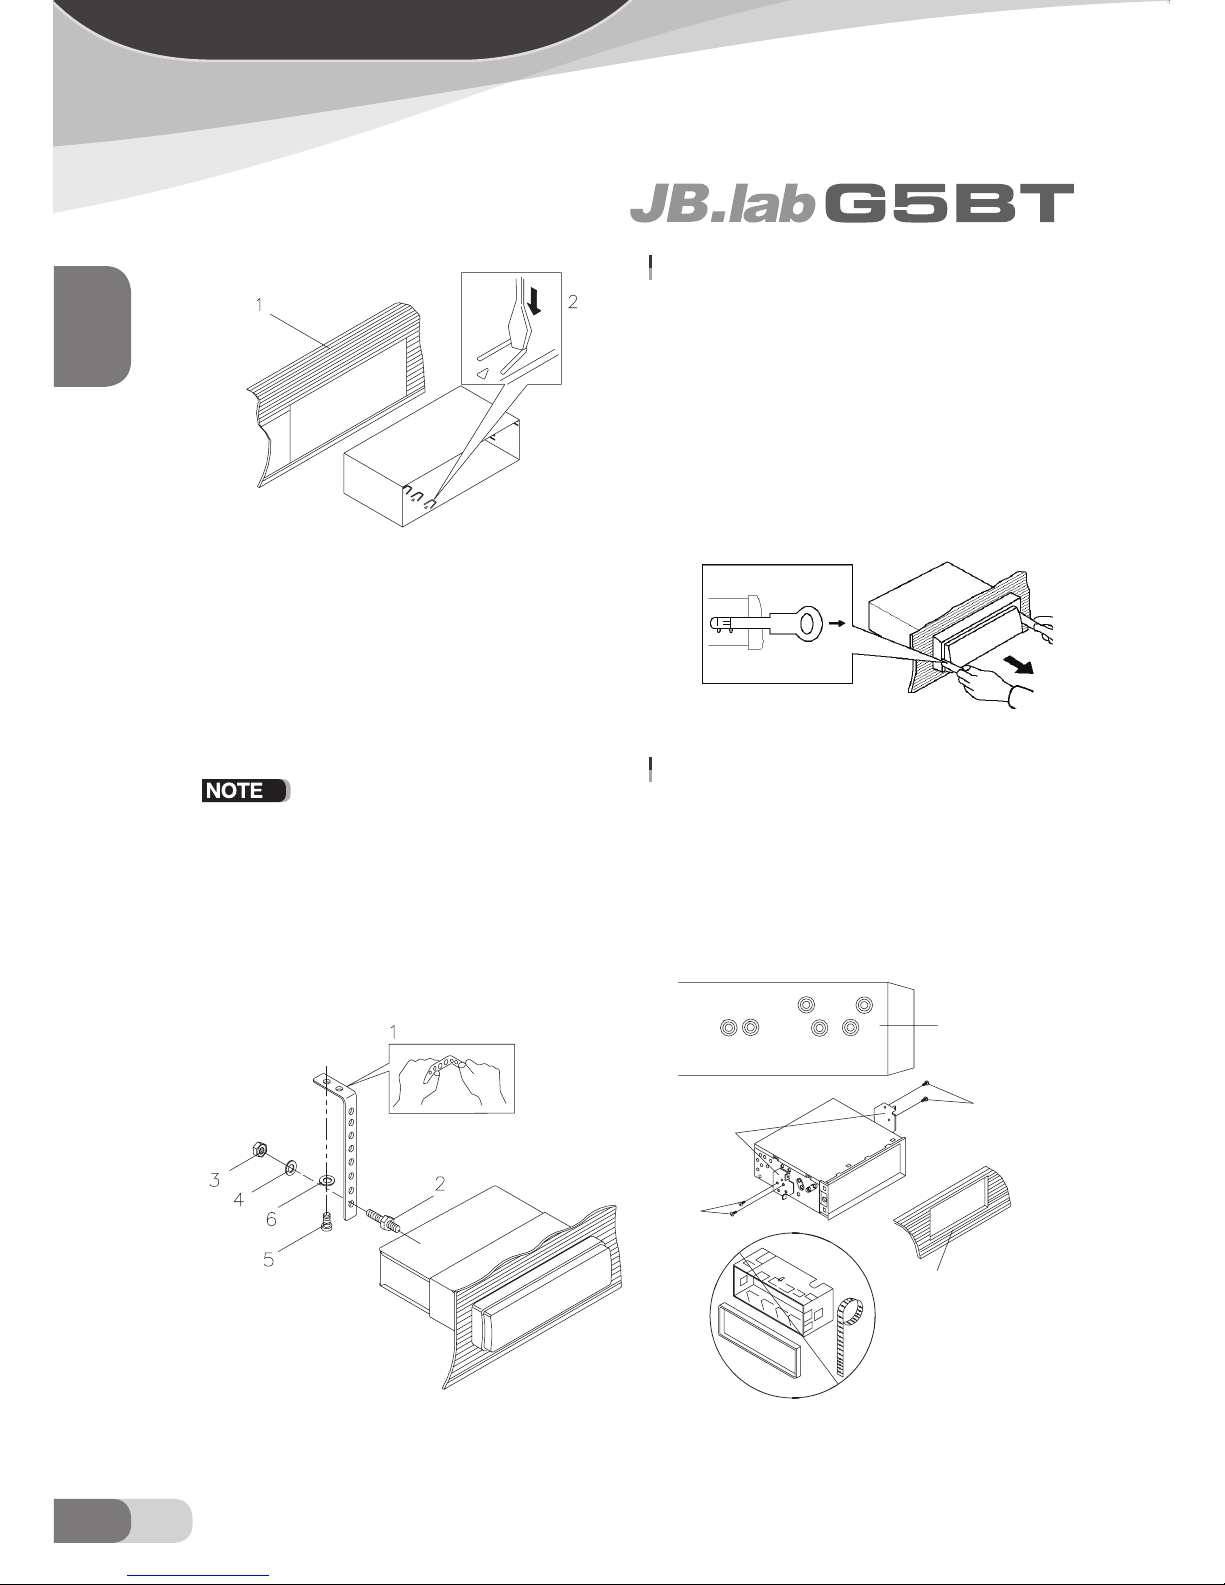
Nut (M5mm) and Spring Washer) to attach one end of the strap
to the mounting bolt on the back of the unit. If necessary, bend
the metal strap to fit your vehicle’s mounting area. Then use the
supplied hardware (Tapping Screw and Plain Washer) to attach
the other end of metal strap to a solid metal part of the vehicle
under the dashboard. This strap also helps ensure proper electrical grounding of the unit.
- to install the short threading terminal of the mounting bolt
to the back of the unit and the other long threading terminal
to the dashboard.
10. Reconnect the cable to the vehicle battery’s negative (-) ter
minal. Then replace the outer trim ring and install the unit’s
front panel (see the steps of “to install the front panel”).
REMOVING THE UNIT
1. Make sure the ignition is turned off, then disconnect the cable
from the vehicle battery’s negative (-) terminal.
2. Remove the metal strap attached the back of the unit (if at
tached).
3. Press the release button to remove the front panel.
4. Lift the top of the outer trim ring then pull it out to remove it.
5. Insert both of the supplied keys into the slots at the middle left
and right sides of the unit, then pull the unit out of the dash-
board.
DIN REAR-MOUNT (Method B)
If your vehicle is a Nissan, Toyota, follow these
mounting instructions. Use the screw holes marked
T (Toyota), N (Nissan) located on both sides of the
unit to fasten the unit to the factory radio mounting
brackets supplied with your vehicle.
(1) Dashboard (2) Taps
(1) Metal Strap (2) Mounting Bolt (3) Hex nut (4) Spring Washer
(5) Tapping Screw (6) Plain Washer
Side View showing
Screw Holes marked
T, N
Screw
Factory Radio
Mounting Bracket
Screw
Dashboard or Console
Page 5
ENGLISH
05EN
FRONT PANEL
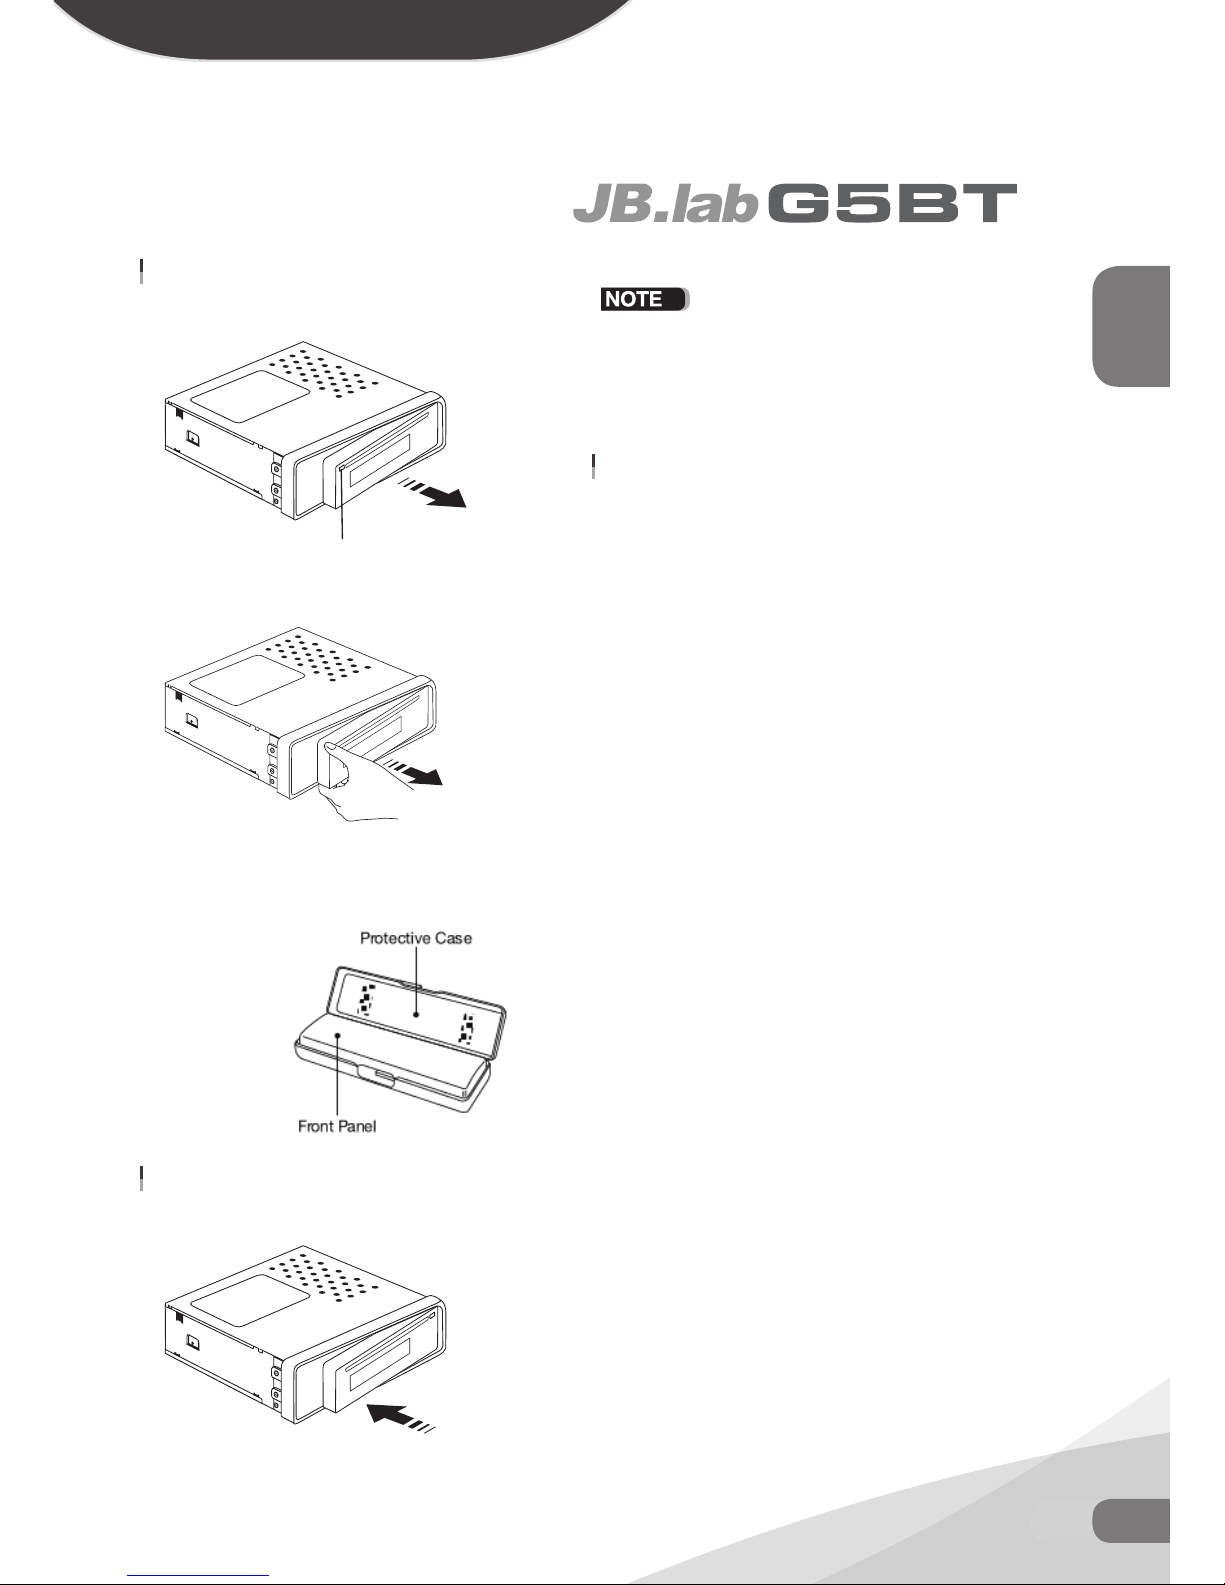
TO DETACH THE FRONT PANEL
1. Press the release button to release the panel from the left side
2. Grasp the left side of the panel and pull to remove it.
3. Immediately place the front panel in its protective case for safe
and clean storage.ㅇㅇㅇㅇ
TO INSTALL THE FRONT PANEL
1. Push the front panel into the main body. You should hear a
“Click”.
If the panel fails to lock into position properly, the function
of some controls may be impaired and some segments of
the display may not become illuminated. If this occurs, press
RELEASE and reinstall the front panel.
PRECAUTIONS WHEN HANDLING
1. Do not drop the front panel.
2. Do not put pressure on the display or control buttons when de
taching or re-installing the front panel.
3. Do not touch the contacts on the front panel or on the main unit
body. It may result in poor electrical contact.
4. If any dirt or foreign substances adhered on the contacts, they
can be removed with a clean and dry cloth.
5. Do not expose the front panel to high temperatures or direct
sunlight in anywhere.
6. Keep away any volatile agents (e.g. benzene, thinner, or insecti
cides) from touching the surface of the front panel.
7. Do not attempt to disassemble the front panel.
Release button
push panel into main unit until you hear a “click”
Page 6
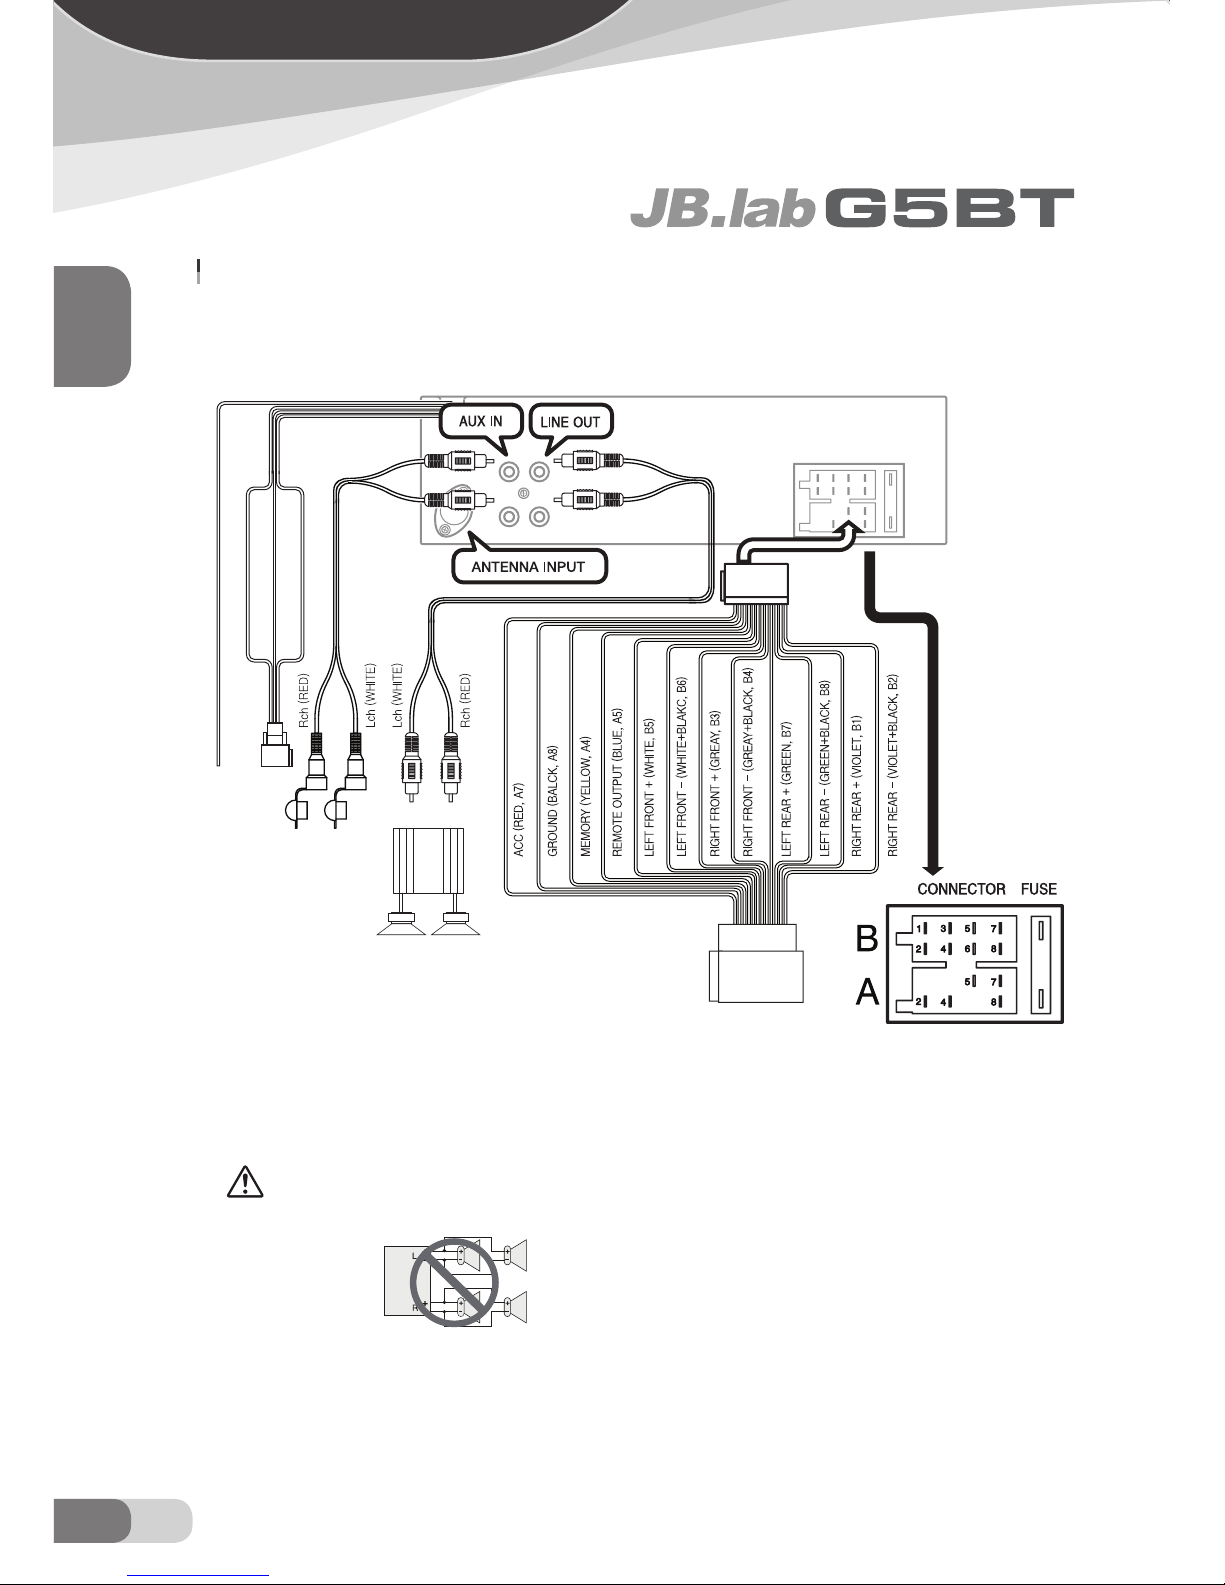
G5BT WIRING DIAGRAM
ENGLISH
06 EN
WIRING
Final Check
- Make use that all wires are properly connected and insulated.
- Make sure that the main unit is securely held in the mounting collar.
- Turn on the ignition to check the unit for proper operation.
- If you have difficulties, consult your nearest authorized professional installer for assistance.
CAUTION
Do not connect more than one speaker to one
set of speaker leads.
WHEEL GROUND (BLACK)
WHEEL KEY2 (BROWN)
WHEEL KEY1 (GREY)
AUTO ANTENNA (PINK)
AMP
Page 7
ENGLISH
07EN
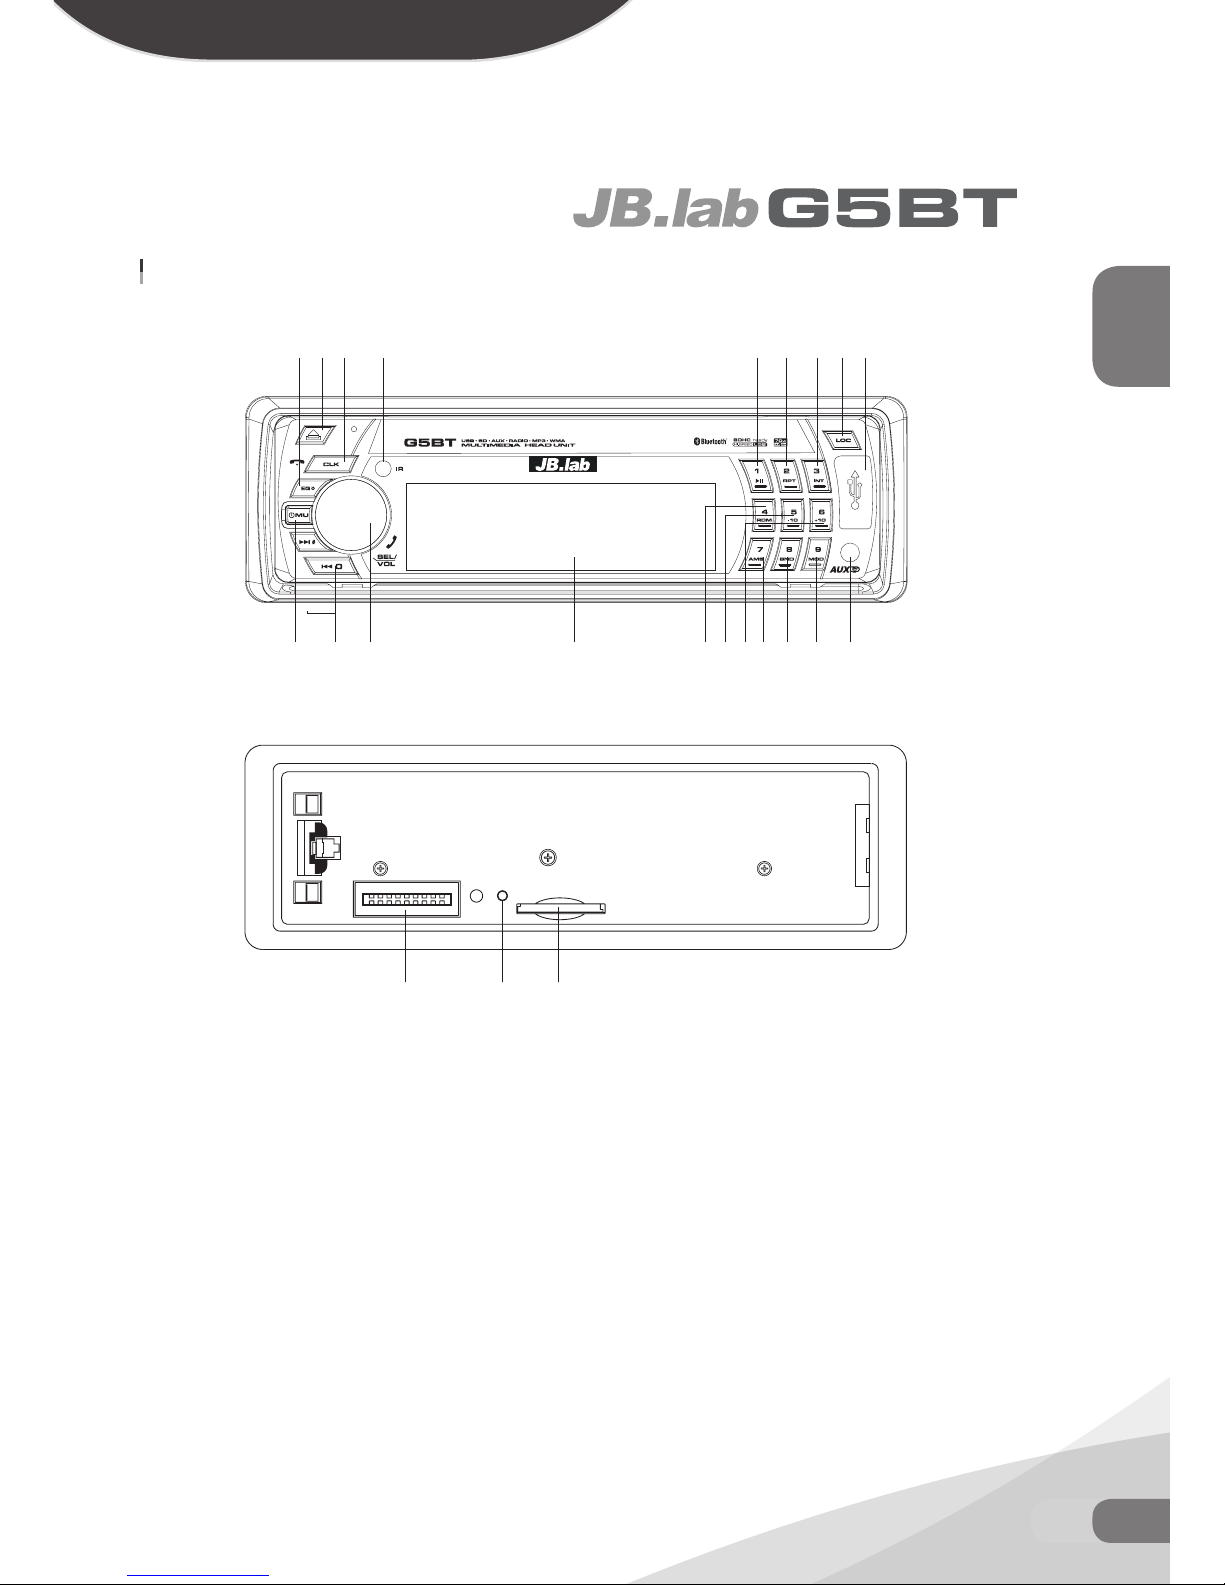
LOCATION OF KEYS
G5BT LOCATION OF KEYS
1. Tune seek, track down/up button, 0, #
2. Release button
3. Remote sensor
4. BAND/LOUD
5. MODE
6. Eject
7. Volume knob / SEL / Pick Up
8. 6, FOLDER +
9. 5, FOLDER -
10. 4, RDM
11. 1, Play/Pause
12. 3, INT
13. 2, RPT
14. PWR/MUTE
15. LCD
16. USB slot
17. Socket
18. SD / MMC slot
19. CLK/DISP / Hang up
20. AMS
21. LED
22. EQ,
*
23. AUX IN jack
24. Reset
17 24 18
222
14 1 7 15
19 3 11 13 12 6 16
10 9 8 20 234 5
Page 8
POWER ON/OFF/MUTE
Press POWER/MUTE(14)button or any keys to turn
on the unit, and long press it again to turn off the
unit.
Short press POWER/MUTE(14)to turn MUTE ON/
OFF,when it is ON,the MUTE will be flickering on the
LCD and no sound output.When short press again
it will be cancelled.
“IT’S TIME TO MEET JBLAB” When the unit is on, press and
hold POWER/MUTE button (14) to turn the unit off, and “GOOD
BYE” will be displayed on LCD until the unit is turned off.
MODE BUTTON
Press it to select USB(after inserting USB stick) ,
SD(after inserting MMC/SD card) and AUX1, AUX2
RADIO mode.
FACEPLATE RELEASE
Press button (2) to fold down the removable faceplate.
SEL BUTTON / ROTARY VOL KNOB
Shortly press SEL button (7) to enter AUDIO SETTING mode, use button / (1) to select the desired adjustment mode. The adjustment mode will
change in the following order:
BASS TREBLE BALANCE FADER LCD
CONTRAST
LCD DIMMER BEEP DEMO
24HOUR
AREA AUTO ANSWER AUTO
CONNECT
SPEAKERS STEERING WHEEL
CALIBRATION
1) VOLUME CONTROL
A. The volume level can be adjusted at any time by rotating the
VOL knob as select mode has been initially defaulted at volume
mode.
B. The volume level is also obtained by stepping through the SEL
button until the function VOL is displayed and then rotate the
VOL knob to adjust the sound level.
2) BASS CONTROL
A. Press the SEL button to select the bass mode until BAS ap
pears on the display.
B. Rotate the VOL knob to adjust the bass effect.
3) TREBLE CONTROL
A. Press the SEL button to select the treble mode until TRE ap
pears on the display.
B. Rotate the VOL knob to adjust the treble effect.
4) BALANCE CONTROL
A. Press the SEL button to select the balance mode until BAL ap
pears on the display.
B. Rotate the VOL knob to increase or decrease the sound level
of left or right speaker.
5) FADER CONTROL
A. Press the SEL button to select the fader mode until FAD ap
pears on the display.
B. Rotate the VOL knob to increase or decrease the sound level
of front or rear speaker.
6) CONTRAST
LEVEL (-10 ~ +10) / Use the volume knob (7) to adjust the LCD
contrast from -6 to +6.
7) LCD MODE
Normal/Reverse / To change the LCD display mode between
Normal or Reverse.
8) Dimmer (High/Middle/Low)
In this menu, use the volume knob (7) to change the brightness of
the backlight among: High, Middle and Low.
9) BEEP (ON/2ND/OFF)
The unit is equipped with 3 mode beep sound, After entering this
mode by pressing the SEL button, rotate the VOL knob to choose
one.
- Beep 2ND mode
The beep is only generated when an allotted double key is
pressed long(1 second).
- BEEP ON mode
The beep is generated when every key is pressed.
- BEEP OFF mode
The beep sound is disabled when a key is pressed.
ENGLISH
08 EN
BASIC
Page 9
10) DEMO(ON/OFF)
The unit has screen save function. You can set screen save mode
in this menu. If there is no operation for about 10 seconds, the unit
will enter screen save mode automatically.
11) 24HOUR
24 hour/12 hour To change the time display mode between
24 hour or 12 hour.
12) Area
USA/EUROPE/ASIA/LATIN Use the volume knob (7) to select
(USA/EUROPE/ASIA/LATIN)
13) Auto Answer
rotate vol knob, it will be switching “ON/OFF”
14) Auto Connect
rotate vol knob, it will be switching “ON/OFF”
15) Speakers
rotate vol knob, it will be switching “FRONT/ALL”
16) STEERING WHEEL CALIBRATION
A. Finish wiring connection by referencing the vehicle type&wiring
diagram.
B. Locate your car key on “ACC”
C. Press the volume dial and the “
” button. And select “STEER
ING WHEEL CALIBRATION”
D. Spin the volume dial and select the menu what you wanna set.
(You can see “PRESS SW BUTTON” on the LCD display)
E. Press the steering remote control button while 3 seconds what
you wanna use.
F. If You see “BUTTON STORED” on the LCD display, the setting
is finished.
- Most of the cars use “KEY 1” wiring, but some cars use “KEY
2” wiring.
LOUDNESS
Press BND button (4) for several seconds to reinforce the bass output. Press it for several seconds
again to release this function.
DISPLAY INFORMATION
Press DISP button (19) to change the display
mode.
EQUALIZATION
Press EQ button (22) to turn on equalization function and to select desired audio mode. There are
five different modes as below:
ㅇ FLATㅇ
CLASSICㅇ POP ROCK USER SET
- If EQ function is on, Bass &Treble modes do not available.
MUTE
Shortly press button (14) will mute the sound, press
it again will resume the sound.
REMOTE SENSOR
Point the remote control handset to the remote
sensor (3). Press the function keys on the handset
to control the system.
ESP FUNCTION
The unit can be shockproof about 30 seconds.
AUXILIARY INPUT(AUX1/AUX2)
The unit can be connected to a portable audio
player through the auxiliary input jack AUX IN (23)
on the front panel or AUX IN jack on the back of
the unit. After finishing the connection, you can
press MOD button (5) on the front panel to switch
the mode to AUX IN mode.
(AUX1 = Front / AUX2 = Rear)
RESET FUNCTION
Reset button (24) must be activated with either a
ballpoint pen or thin metal object. The reset button is to be activated for the following reasons:
- Initial installation of the unit when all wiring is completed.
- All the function buttons do not operate.
- Error symbol on the display.
If the unit doesn’t work after pressing the
reset button (24), please use a cotton swab
soaked in isopropyl alcohol to clean the
socket on the front panel.
ENGLISH
09EN
BASIC
Page 10
SWITCHING TO RADIO MODE
Press MOD button (5) shortly to select radio mode,
the radio mode appears in the display together with
the memory band and frequency.
SELECTING THE FREQUENCY BAND
At radio mode, press BND button (4) shortly to select the desired band.
The reception band will change in the following order:
FM1 FM2 FM3 AM1(MW)
AM1(MW)
SELECTING STATION
Press the / button (1) shortly to activate automatic seek function. Press for several seconds until
“MANUAL” appears on the display, the manual
tuning mode is now selected. If both buttons have
not been pressed for several seconds, it will return
to seek tuning mode and “AUTO” appears on the
display.
AUTOMATIC MEMORY STORING &
PROGRAM SCANNING
- Automatic memory storing
Long press AMS button(20) for several seconds,the radio
searches from the current frequency and checks the signal strength until one cycle search is finished. And then 6
strongest stations are stored into the corresponding preset
number button.
- Program scanning
Short press AMS button(20) to scan preset station. When
the field strength level is more than the threshold level of
stop level,the radio is holding at that preset number for
several seconds with release mute ,then searches again.
STATION STORING
Press any one of the preset buttons (8~13) to select a station, which had been stored in the memory.
Press this button for several seconds (until 2’nd
beeps come out), now the current station is stored
into the number button.
LOCAL/DISTANT
Press REMOTE Controller LOC button to select
between local and distant stations. Local setting for
reception of strong station, and a distant setting for
reception of weaker stations.
MONO/STEREO
Press REMOTE Controller ST button to select
mono or stereo mode. You can sometimes improve
reception of distant stations by selecting mono operation.
ENGLISH
10 EN
RADIO
Page 11
ENGLISH
11EN
MP3/WMA
SELECTING TRACKS
Press button (1) will skip to the previous/next track.
Track number will be showed on display.
Press button (1) will fast reverse/forward. USB/SD
play starts when you release the button.
PAUSING PLAYING
Press button (11) to pause MP3 player, and
“Pause” will appear on LCD. Press it again to re-
sume play, and “Pause” will disappear.
PREVIEWING ALL TRACKS
Press INT button (12) to play first several seconds
of each track on the current USB/SD, and “INT” will
appear on LCD. Press again to stop intro and listen
to track, “INT” will disappear. When playing MP3/
WMA USB/SD, press and hold INT button (12) will
play first several seconds of each track in the current folder, and “ INT” will appear, press it again
will exit this mode.
REPEATING THE SAME TRACK
Press RPT button (13) to continuously repeat the
same track, and “RPT” will appear on LCD. Press
it again to stop repeat, and “RPT” will disappear.
When playing MP3/WMA USB/SD, press and
hold RPT button (13) will repeat all the tracks in the
current folder. And “ RPT” will appear on LCD.
Press it again will exit this mode.
PLAYING ALL TRACKS IN RANDOM
Press RDM button (10) to play all tracks on USB/
SD in random order, and “RDM” will appear on
LCD. Press again to cancel the function, and
“RDM” will disappear. When playing MP3/WMA
USB/SD, press and hold RDM button (10) will play
all tracks (in the current folder) in random order. And
“ RDM” will appear on LCD. Press it again will
exit this mode.
SPECIAL FUNCTIONS FOR MP3/
WMA
1) SELECTING DIRECTORY UP/DOWN
During usb/sd operation,short press Number 6/+10 button
to move forward 10tracks, long press 6/+10 button to the
forward folder. short press Number 5/-10 button to move
back 10 tracks,long press 5/-10 button to the back folder.
2) SELECTING TRACKS
If you press the “AMS” button(20), LCD display show “SELECT FOLDER” and the folder list. Find the folder by spinning the volume dial(7), select the folder. Find the music file
by spinning the volume dial(7), select the file.
CLK
Briefly press CLK button(19) to display time,Long
press CLK button(19) to enter time setting(time
setting : long press clk button, after clk flashing
then press. or knob to set time)
CLK→FOLDER→ARTIST/SONGㅇNAME→SONG
NAME→ARTIST→ALBUM
Page 12
BLUETOOTH WIRELESS TECHNOLOGY
Bluetooth is a standard of close range wireless
technology that was drawn up by Ericsson, IBM,
Intel, Nokia and Toshiba. With Bluetooth technology, we can achieve the highest transmission rate
among mobile phones, computers, printers, PDAs
and other devices. The max transmission range of
class II is 10 meters while the max transmission
range of class I can reach up to 100 meters.
ABOUT G5BT
G5BT is a Bluetooth hands-free car kit. It supports
the following Bluetooth profiles : HFP, HSP, A2DP
and AVRCP.
Connect G5BT to AUX in jack of car audio system,
now you can make a call or play music. The handsfree car kit has the following features :
· Answer a call, end a call and reject a call
· Redial last number
· Call transfer between G5BT TALK and your mobile phone
· Microphone mute
· Music pause/play
Remark : Even though the paired device and the
hands-free car kit support the same Bluetooth profiles,
functions may vary due to specification differences of
the paired devices.
WHAT IS PAIRING?
Bluetooth devices need to be “paired” with each
other beforehand. One Bluetooth devices are
paired, there is no need for pairing again, except in
the following cases:
· Pairing information is deleted after repair, etc.
· This unit is paired with 8 or more devices. The unit can
be paired with up to 8 devices; if a new device is paired
after 8 devices have been paired, the device whose latest
connection time is the oldest among the 8 paired devices
is replaced by the new one.
· When recognition of the unit by the device to be connected is deleted.
PAIRING
The system supports Bluetooth function, the unit
can be connected with most Bluetooth Mobile
phone.
PARING is connecting mobile phone and the unit.
User connect mobile and the unit just once.
· For the different kind of mobile phone, refer to each of
mobile phone instruction.
· It is commended that the distance between the mobile
phone and the unit is within 1m
· When turn on G5, the unit is connected with bluetooth
device. If you want to connect another bluetooth device,
please disconnect the connecting bluetooth device and
connect new device.
1. Press the mode button and enter the Bluetooth
mode, “PAIRING MODE” will be displayed on LCD.
2. Turn on the Bluetooth function of your mobile
phone. (refer to each of mobile phone instruction)
3. “CAR KIT” should appear in the list on your mobile phone, please
select “CAR KIT” and then input password “0000”.
4. When successful paired, “BLUETOOTH READY”
will be displayed on LCD.
5. When pairing failed, you can connect the mobile
phone again.
6. In state of disconnection, press Volume button
for a long time, the bluetooth pairing information is
deleted.
RE-PARING
This unit is built-in auto-reconnection function. Every
time when you short press the PLAY BUTTON, the
unit display “BLUETOOTH READY” and reconnect with the mobile phone automatically (note: the
mobile phone must have been paired with the unit
before)
-If the mobile phone is out of range, the connection will
be lost, when you come back to the unit, reconnection is
necessary.
ENGLISH
12 EN
BLUETOOTH
Page 13
ENGLISH
13EN
BLUETOOTH
-When the mobile phone is out of range from the unit, and
there is an incoming call, when you come back to the unit,
and you want to transfer the audio to the unit, you need
to reconnection.
-When you press (Release) button the connection will be
break off. When you install the front panel, you need to
reconnection.
-If you turn off the mobile phone that has paired with the
unit, when you turn on the mobile phone, you need to re-
connection.
Making a call using dial pad
Press “ ” button of front panel for a long time.
The unit display “ENTER NUMBER”.
Press phone number using “0~9,#” button and
“
” button.
Making a call using recent call
Press button, “RECENT” is displayed on LCD
and starting with the very last dialed number. You
can use the volume knob to scan the numbers. And
you can shortly press “ ” button to make a call.
TRANSFER THE CALL (PHONE/G5)
If you want to make a call on mobile phone, during
the talking mode, press the “SEL” button for a long
time to transfer the phone call between the mobile
phone and the unit.
And “TRANSFER” will be displayed on the LCD for
several seconds.
Press the “SEL” button for a long time again to
transfer in reverse.
When playing music using A2DP, if you change the
bluetooth source to mobile phone, the sounds on
mobile phone.
At that time, change the bluetooth source to G5.
Listening the music using Bluetooth
(A2DP/AVRCP)
The unit supports Bluetooth streaming function.
User listen the music and sound through car speaker.
button on the front panel of the unit serves as
PAUSE/PLAY(It is up to the mobile phone the different mobile phone has the different define.)
button on the front panel of the unit
to choose the previous/next track. (It is up to the
mobile phone, the different mobile phone has the
different define.)
* Please make sure the mobile phone supports Bluetooth
A2DP(Advanced Audio Distribution Profile) / AVRCP(Audio
Video Remote Control Profile).
Page 14
USB PLAY
On the front panel of unit, there is a USB interface
(16), you can connect a USB driver through this in-
terface.
When you connect a USB driver through the interface, the unit will search the MP3/WMA files and
start to play it automatically. In other modes, you can
also press MOD button (5) to select USB mode.
When playing the MP3/WMA files in the device, the
operation is the same with the MP3 operation described above.
- The main unit can only support the standard USB memory.
- USB MP3 player is not a standard which means different brand
name or different models have their own standard. So our
product cannot support all MP3 players.
- When connecting an MP3 player and it has a normal battery
in the player (non-rechargeable battery), you should remove the
battery from the MP3 player then connect it to the USB interface. Otherwise, it may cause battery burst.
- When in USB play mode, be sure not to remove the USB driver
from the USB interface.
CAUTION !
When there are important files in the USB device, do
not connect it to the main unit to play. Because any
wrong operation may cause file loss. And our company
assumes no responsibility for this.
CLK
Briefly press CLK button(19) to display time,Long
press CLK button(19) to enter time setting(time
setting : long press clk button, after clk flashing
then press. or knob to set time)
CLK→FOLDER→ARTIST/SONGㅇNAME→SONG
NAME→ARTIST→ALBUM
SD/MMC OPERATION
The SD/MMC interface (18) is on the housing of
the unit. When you press the release button to fold
down the front panel, you will see the SD/MMC interface. When you insert a SD/MMC card in the
SD/MMC interface, the unit will search the MP3
files or WMA files in the card and start to play MP3
files or WMA files automatically. The operation is the
same with the MP3 operation described above. If in
other mode, you can also press MOD button (5) to
select SD/MMC mode. When there are important
files in the SD/MMC card, do not connect it to the
main unit to play.
ENGLISH
14
EN
USB & SD/MMC
Page 15
ENGLISH
15EN
REMOTE CONTROL
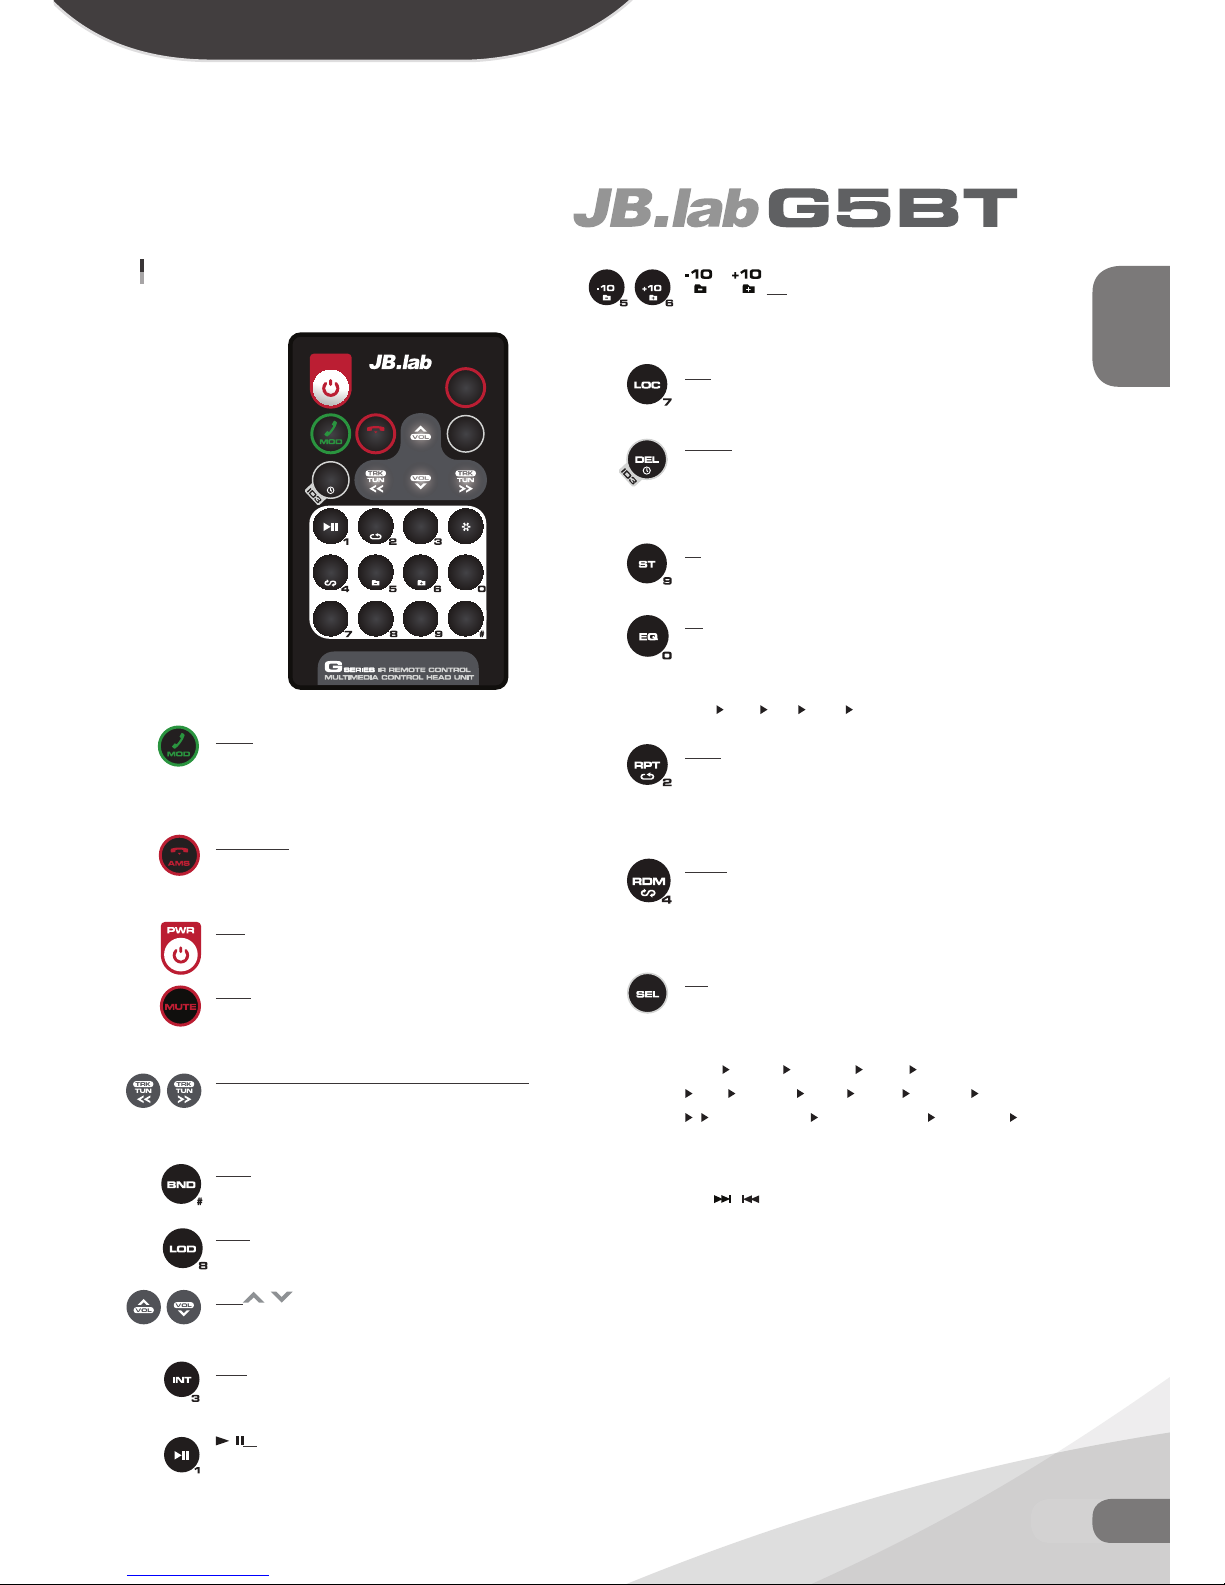
FUNCTION KEYS & CONTROL
MODE
Press it shortly to change the mode among Radio, USB, SD CARD,
AUX1, AUX2, BLUETOOTH. In Bluetooth mode, press it to answer
the incoming call.
AMS / HANG
In Bluetooth mode, press it to hung up the call or reject the incoming
call. Press it to scan tracks.
PWR
Press PWR to turn on/off the unit.
MUTE
Press MUT to mute the sound, shortly press it again to resume the
sound.
previous/next track, fast reverse / forward, tune down or up
Shortly press / to play the previous/next track. Press and hold / to
fast reverse / forward. In radio mode, press / to tune down or up.
BAND
In Radio mode, press BAND to select the desired band.
LOUD
Press LOUD to switch loudness function on or off.
VOL
Press it to decrease, increase the volume level.
INT, 3
Press it to scan tracks.
, 1
Press it to pause the playback, press it again will resume the playback.
5, 6
When playing MP3/WMA files, use it to select directory up-
ward, downward.
LOC
Press it to enter LOCAL/DISTANT function.
CLK/ID3
Press DISP to change the display information. When reading
MP3/WMA files, press it to display the corresponding informa-
tion, such as: folder, file, song title, artist and album.
ST
Press MON to change mono/stereo mode reception.
EQ
Shortly press EQ to turn on equalization function and to select
desired audio mode:
FLAT
CLAS POP ROCK USER SET
RPT, 2
Shortly press it yo continuously repeat the same track. When
playing MP3/WMA USB/SD press and hold it to repeat all the
tracks in the current folder.
RDM, 4
Shortly press it to play all tracks on USB/SD in random order.
When playing MP3/WMA USB/SD, press and hold it to play all
tracks (in the current folder) in random order.
SEL
Press SEL to enter setting mode, the adjustment mode will
change in the following order, such as:
BASS
TREBLE BALANCE FADER LCD CONTRAST
LCD DIMMER BEEP DEMO 24HOUR AREA
AUTO ANSWER AUTO CONNECT SPEAKERS
STEERING WHEEL CALIBRATION
Press SEL to enter SETTING mode. And you can Use TRK/
TUN
/ to adjust the to select the item, Find the music
file by spinning the volume button, select the file.
PWR
DEL
AMS
SEL
LOD STLOC
MUTE
EQ
INT
RPT
RDM
-10 +10
BND
Page 16
ENGLISH
16 EN
SPECIFIATION
SPECIFIATION
Power Sup ply Requirements : DC 12 Volts, Negative Ground
Chassis Dimensions : 178 (W) x 155 (D) x 50 (H)
Maximum Output Power 4 x 70 watts
Maximum Output Power 4-8 ohm
Weight 1.7Kg
RADIO
For 2 Bands
(Asia)
FM
Frequency Coverage 87.5 to 108 MHz
Sensitivity (S/N=30dB) 10 dBu
Frequency response 30Hz-15KHz
Image response ratio 50dB
Stereo separation 30 dB (1KHz)
IF response ration 70 dB
Signal/noise raio 60 dB
AM
Frequency Coverage 522 to 1602 kHz
Sensitivity (S/N=20dB) 30 dBu
Specifications and the design are subject to change without notice due to
improvements in technology
Page 17
ENGLISH
17EN
TROUBLE SHOOTING
TROUBLE SHOOTING
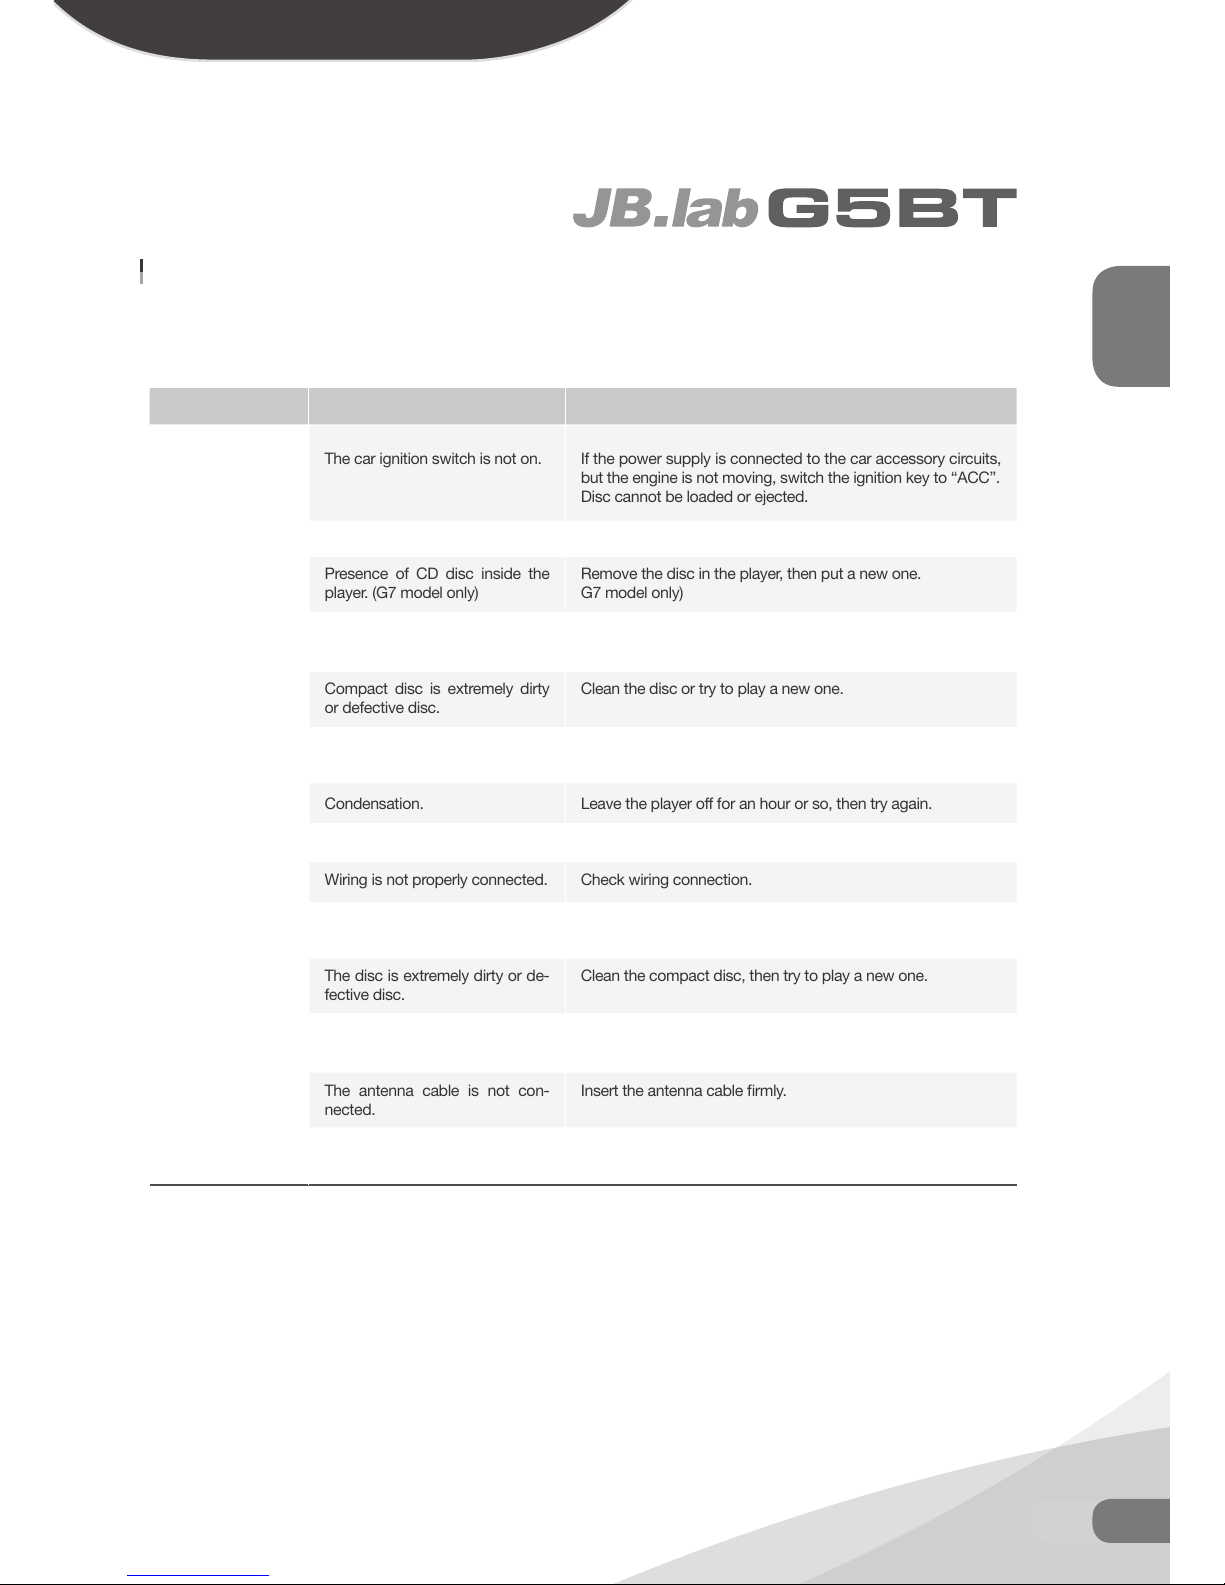
Before going through the checklist, check wiring connection. If any of the problems persist after checklist has
been made, consult your nearest service dealer.
SYMPTOM
No power.
Disc cannot be loaded or ejected.
No sound.
Sound skips.
The operation keys
do not work.
The radio does not
Work. The radio station automatic selection does not work.
CAUSE
The car ignition switch is not on.
The fuse is blown.
Presence of CD disc inside the
player. (G7 model only)
Inserting the disc in reverse direction.
Compact disc is extremely dirty
or defective disc.
Temperature inside the car is too
high.
Condensation.
Volume is in minimum.
Wiring is not properly connected.
The installation angle is more
than 30 degrees.
The disc is extremely dirty or de-
fective disc.
The built-in microcomputer is not
operating properly due to noise.
The antenna cable is not con-
nected.
The signals are too weak.
SOPLUTION
If the power supply is connected to the car accessory circuits,
but the engine is not moving, switch the ignition key to “ACC”.
Disc cannot be loaded or ejected.
Replace the fuse.
Remove the disc in the player, then put a new one.
G7 model only)
Insert the compact disc with the label facing upward.
Clean the disc or try to play a new one.
Cool off until the ambient temperature return to normal.
Leave the player off for an hour or so, then try again.
Adjust volume to a desired level.
Check wiring connection.
Adjust the installation angle less than 30 degrees.
Clean the compact disc, then try to play a new one.
Press the RESET button.
Front panel is not properly fixed into its place.
Insert the antenna cable firmly.
Select a station manually.
Page 18
KOREA
18 KO
목차
제품 설치전 준비 19
제품 설치전 준비 20
대쉬보드 후면 마운팅 방식 21
대쉬보드 전면 마운팅 방식 26
전면패널 탈부착 29
배선도 30
각 부분의 명칭 31
기본 조작법 32
전원 32
전면 패널 개방 32
모드 전환 32
대기화면/스크린세이버/대비/액정반전/밝기 32
지역/날짜/시간제/시간 설정 / 표시정보고정하기 32
음향 설정법 33
Bass/Treble/Balance/Fader/Beep/P-Volume 33
EQ / LOUD / 순정핸들리모컨 설정법 33
라디오 조작법 34
수동선국 34
Local/DX 34
주파수 검색, 저장 34
순정 핸들리모컨 배선연결방법 35
MP3/WMA 작동법 36
지원가능 미디어, 포멧, 폴더, 파일수 36
인코딩시 주의할 점 36
폴더/파일 인식 순서 37
폴더/파일 탐색 방법 37
미디어 작동법 38
SD 연결 및 분리 38
USB 연결 및 분리 38
재생/일시정지 38
트랙 이동 38
도입부재생/반복재생/무작위재생 38
폴더이동 39
재생 정보 보기 (ID-3Tag) 39
블루투스 40
블루투스 주의사항 40
블루투스 작동을 위한 준비 40
패어링 / 재연결 41
페어링소스전환 (iOS 운영체제) 42
페어링소스전환 (안드로이드 운영체제) 43
블루투스 설정 44
전화걸기 44
통화중 연결기기 전환 45
블루투스 기능을 이용한 음악감상/조작하기 45
외부입력 작동법 46
리모컨 사용법 47
스팩/초기화/리모컨 건전지 교체,관리 48
메모리(USB/SD)가 인식되지 않을시 49
디스크 제작시 유의사항 50
라디오 주파수 상식 51
리모컨 작동 유무 확인법 51
기존레벨메터 사용법 51
본 기기는 순정핸들리모컨 컨버터 기능이 내장되어 있습니다. 고객님 차량에 순정핸들리모
컨이 있는 경우 장착점에 필히 이부분은 말씀하셔서 순정핸들리모컨의 연결도 같이 받으
시기 바랍니다. 일부차종의 경우 컨버터연결에 대한 추가공임이 발생하실 수도 있습니다.
표시정보(제목/시계) 고정법 P.32
순정 핸들리모컨의 설정법 P.33
순정 핸들리모컨 배선 연결법 P.35
블루투스 연결(페어링) P.41
읽어주세요 !
Page 19
KOREA
19KO
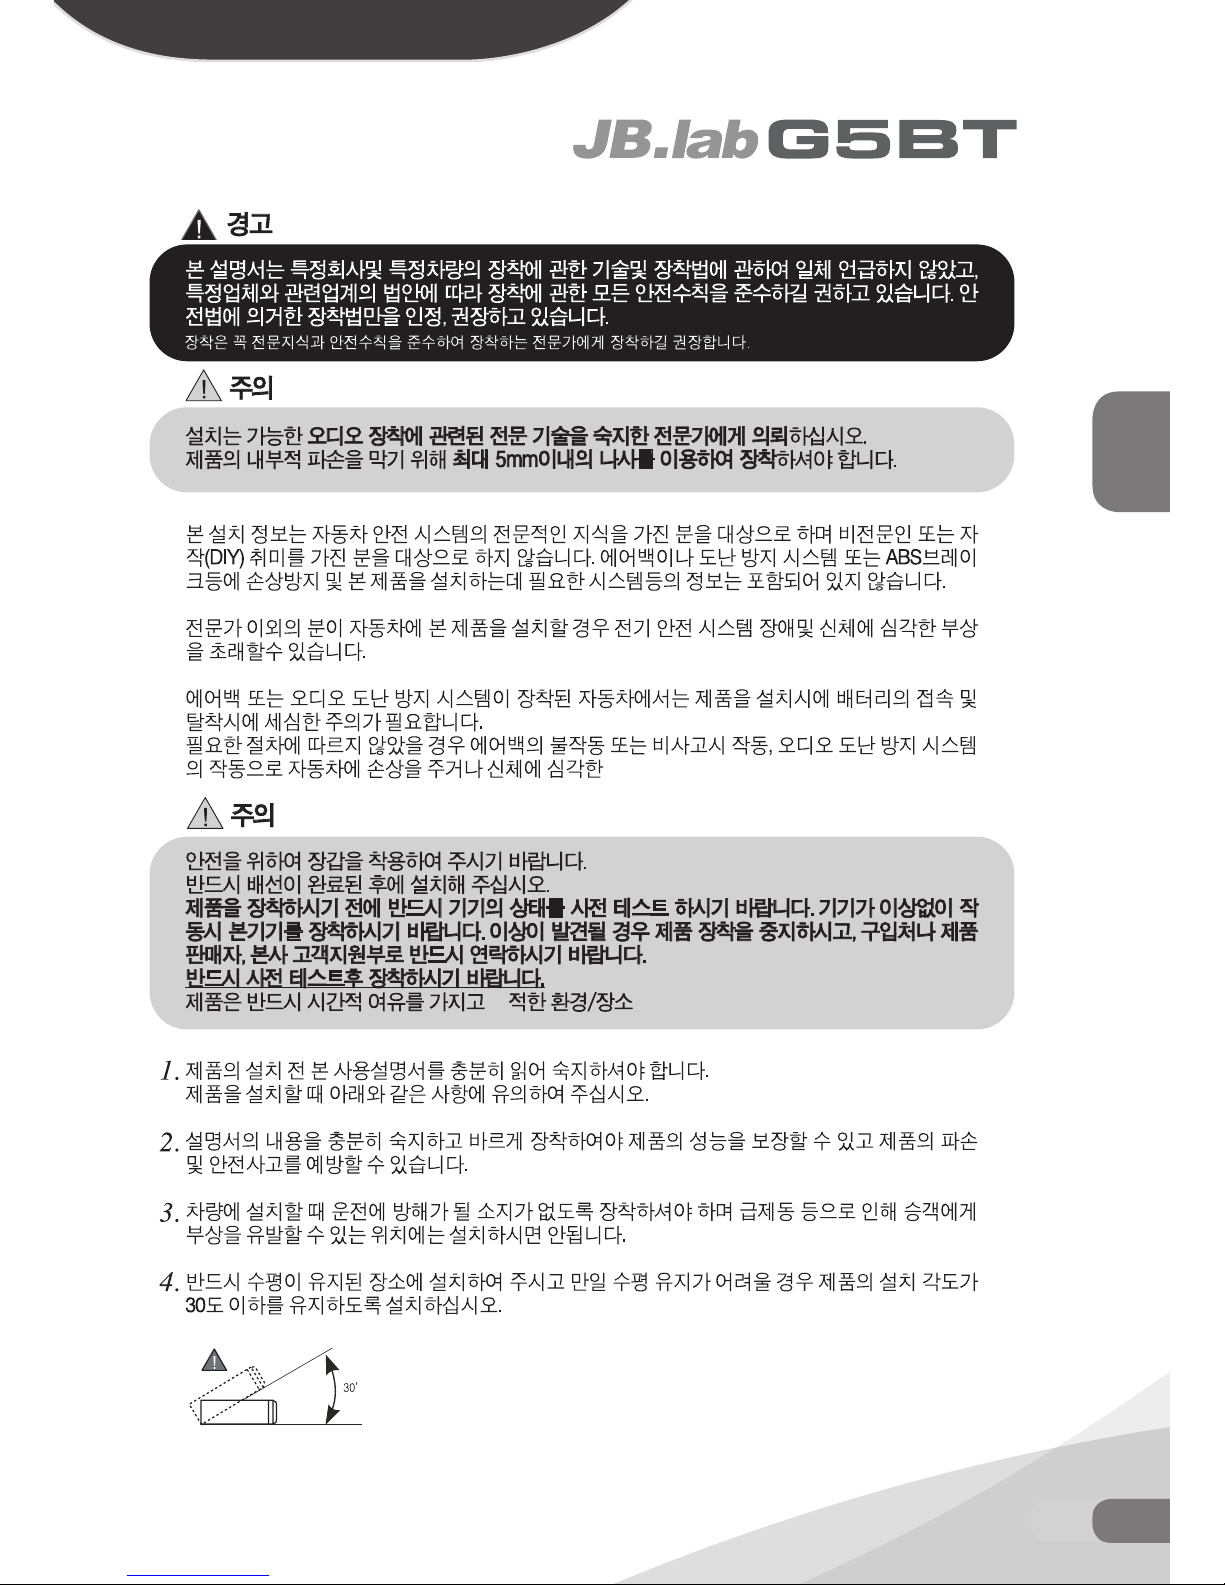
제품설치전준비
쾌
부상 및 사망을 초래할 수 있습니다.
에서 장착하시기 바랍니다.
Page 20
KOREA
20 KO
제품설치전준비
Page 21
21KO
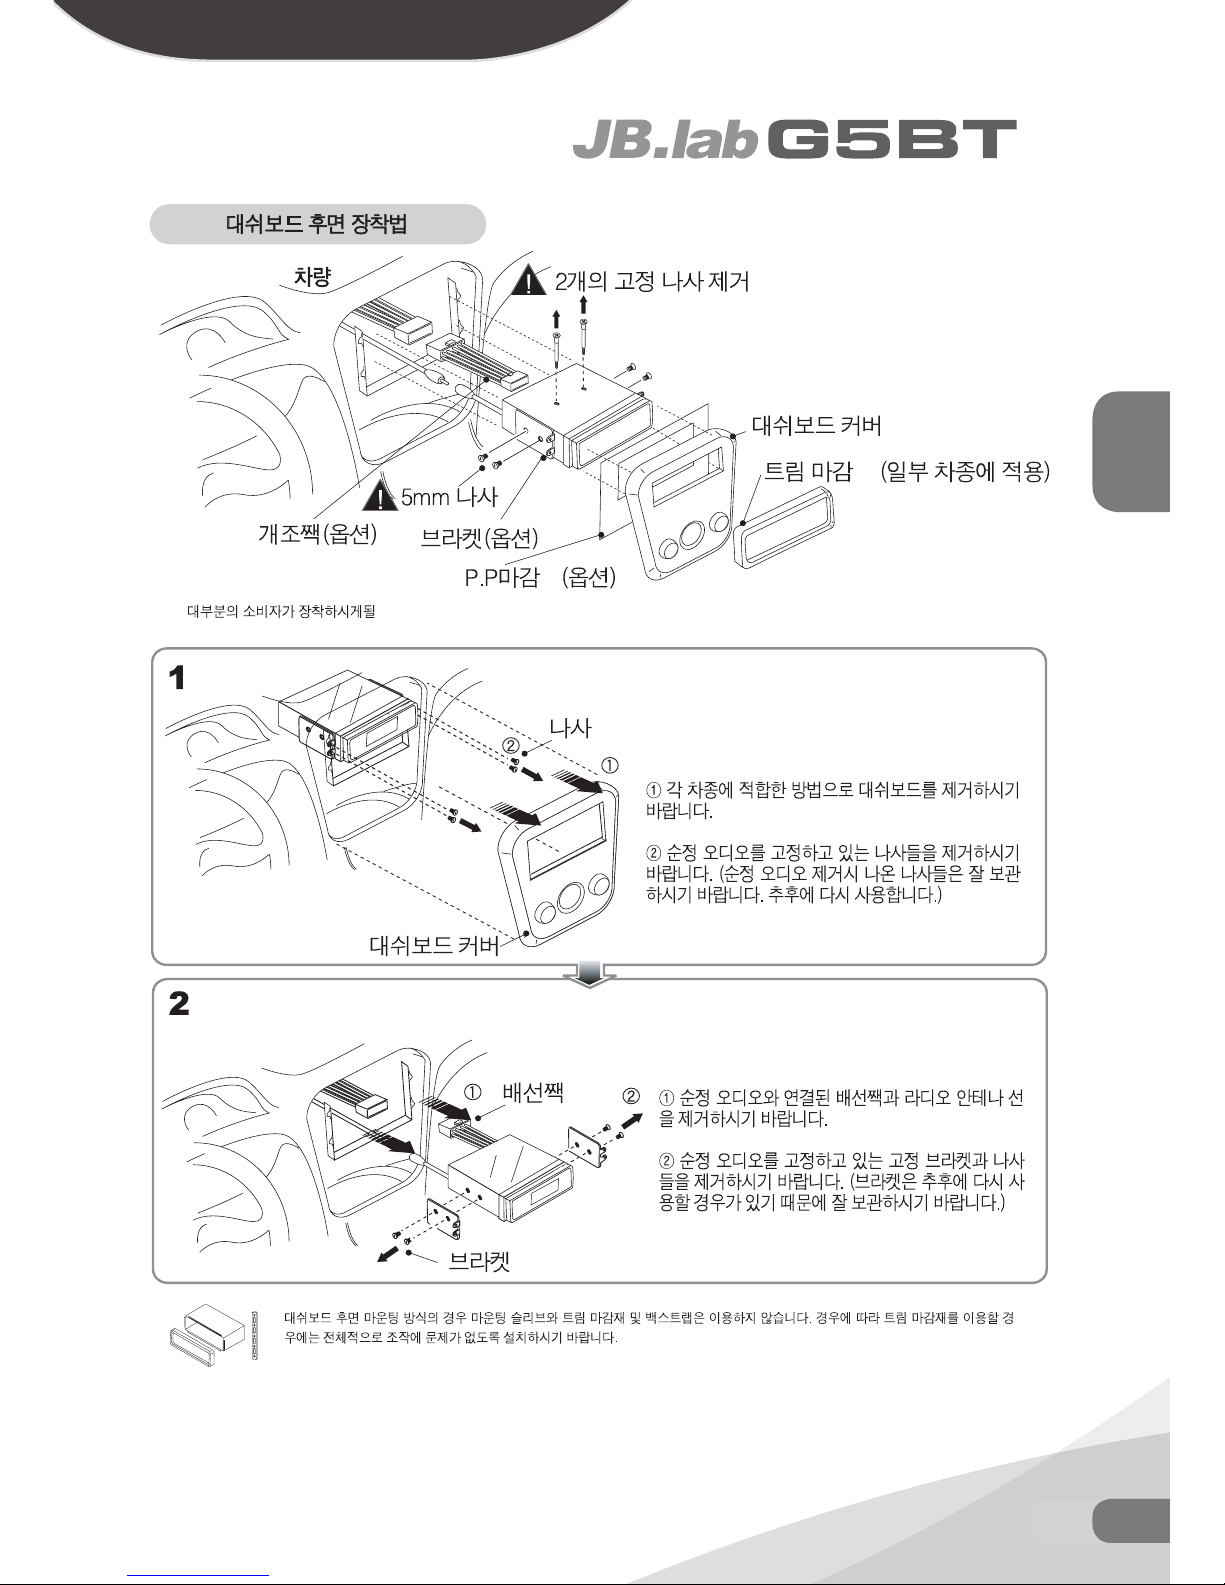
대쉬보드 후면 마운팅방식
KOREA
(G7 모델만 나사제거)
재
재
대부분의 차량에 적용되는 장착법으로, 소비자의 각 차종별 대쉬보드 탈거법을 알고있어야 장착이 가능합니다.
본 책자에서 차종별 대쉬보드 탈거법에 관하여 수록하지 못한 점 많은 양해바랍니다.
Page 22
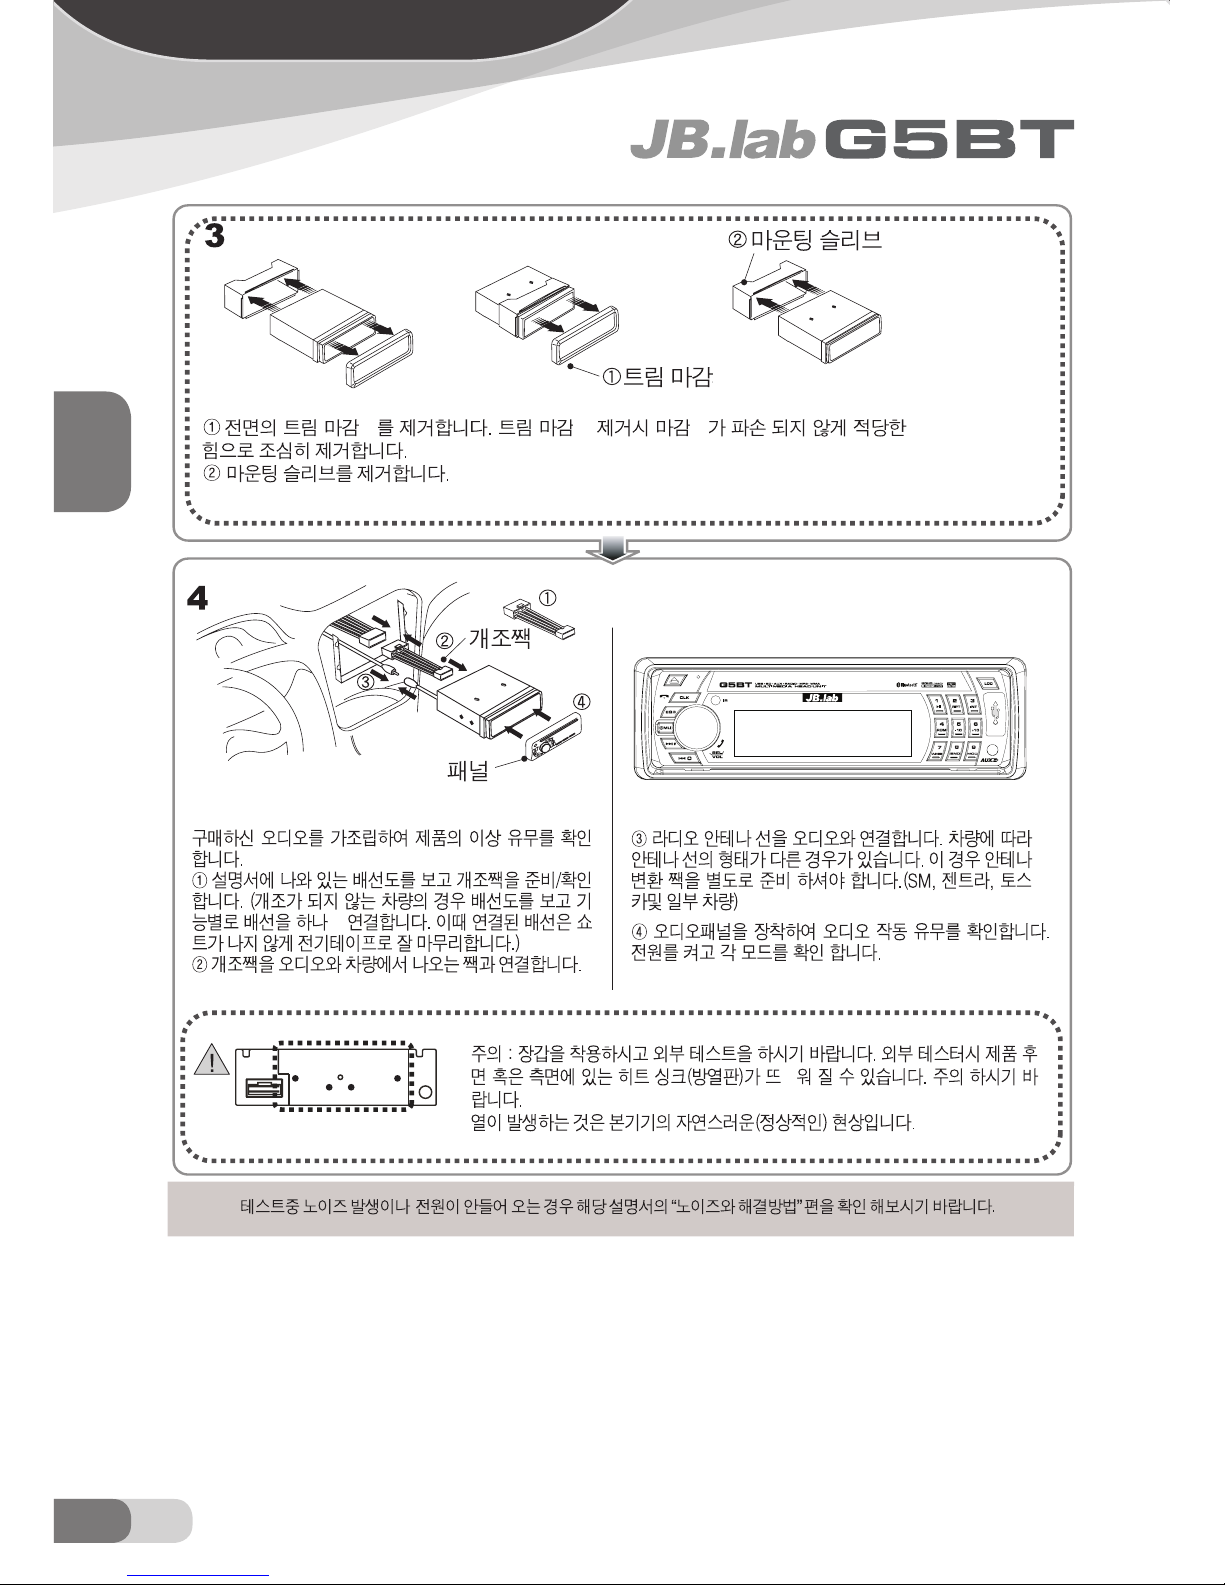
KOREA
22 KO
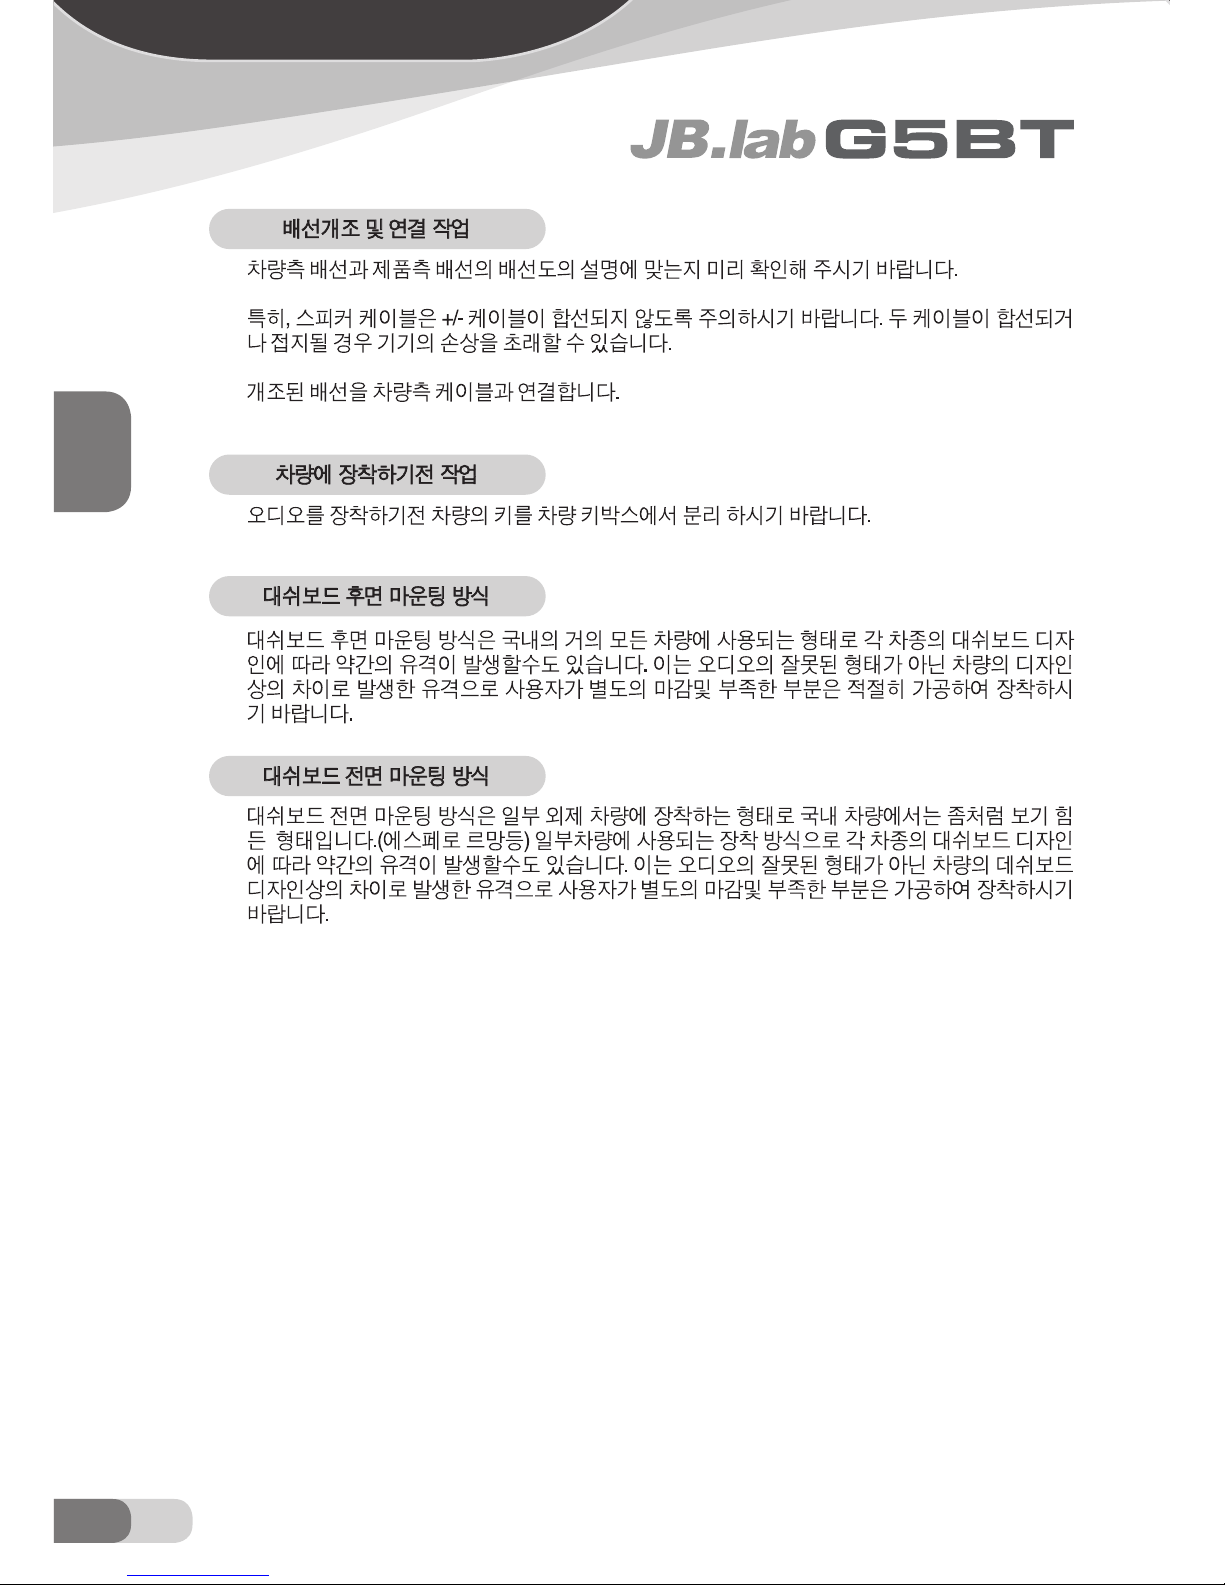
대쉬보드 후면 마운팅방식
씩
거
재
재 재 재
Page 23
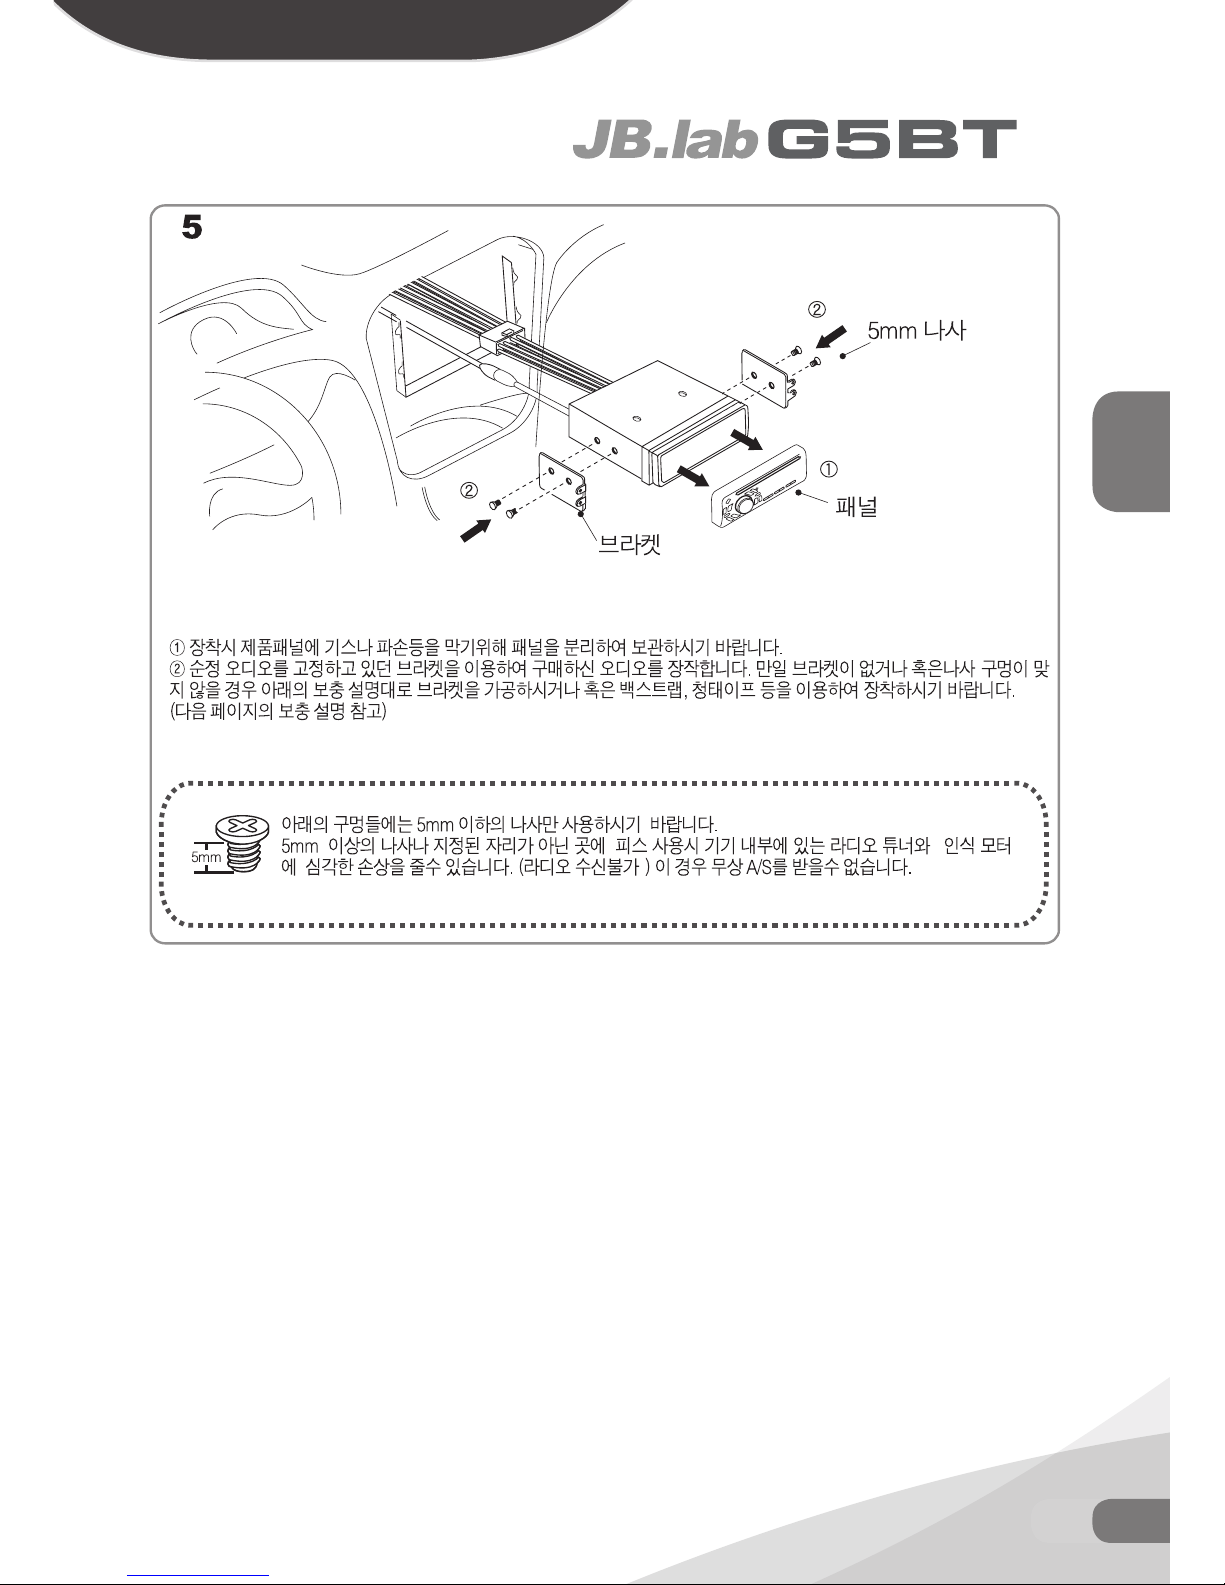
23KO
대쉬보드 후면 마운팅방식
KOREA
제품에 이상이 없다면 제품을 장착합니다.
Page 24
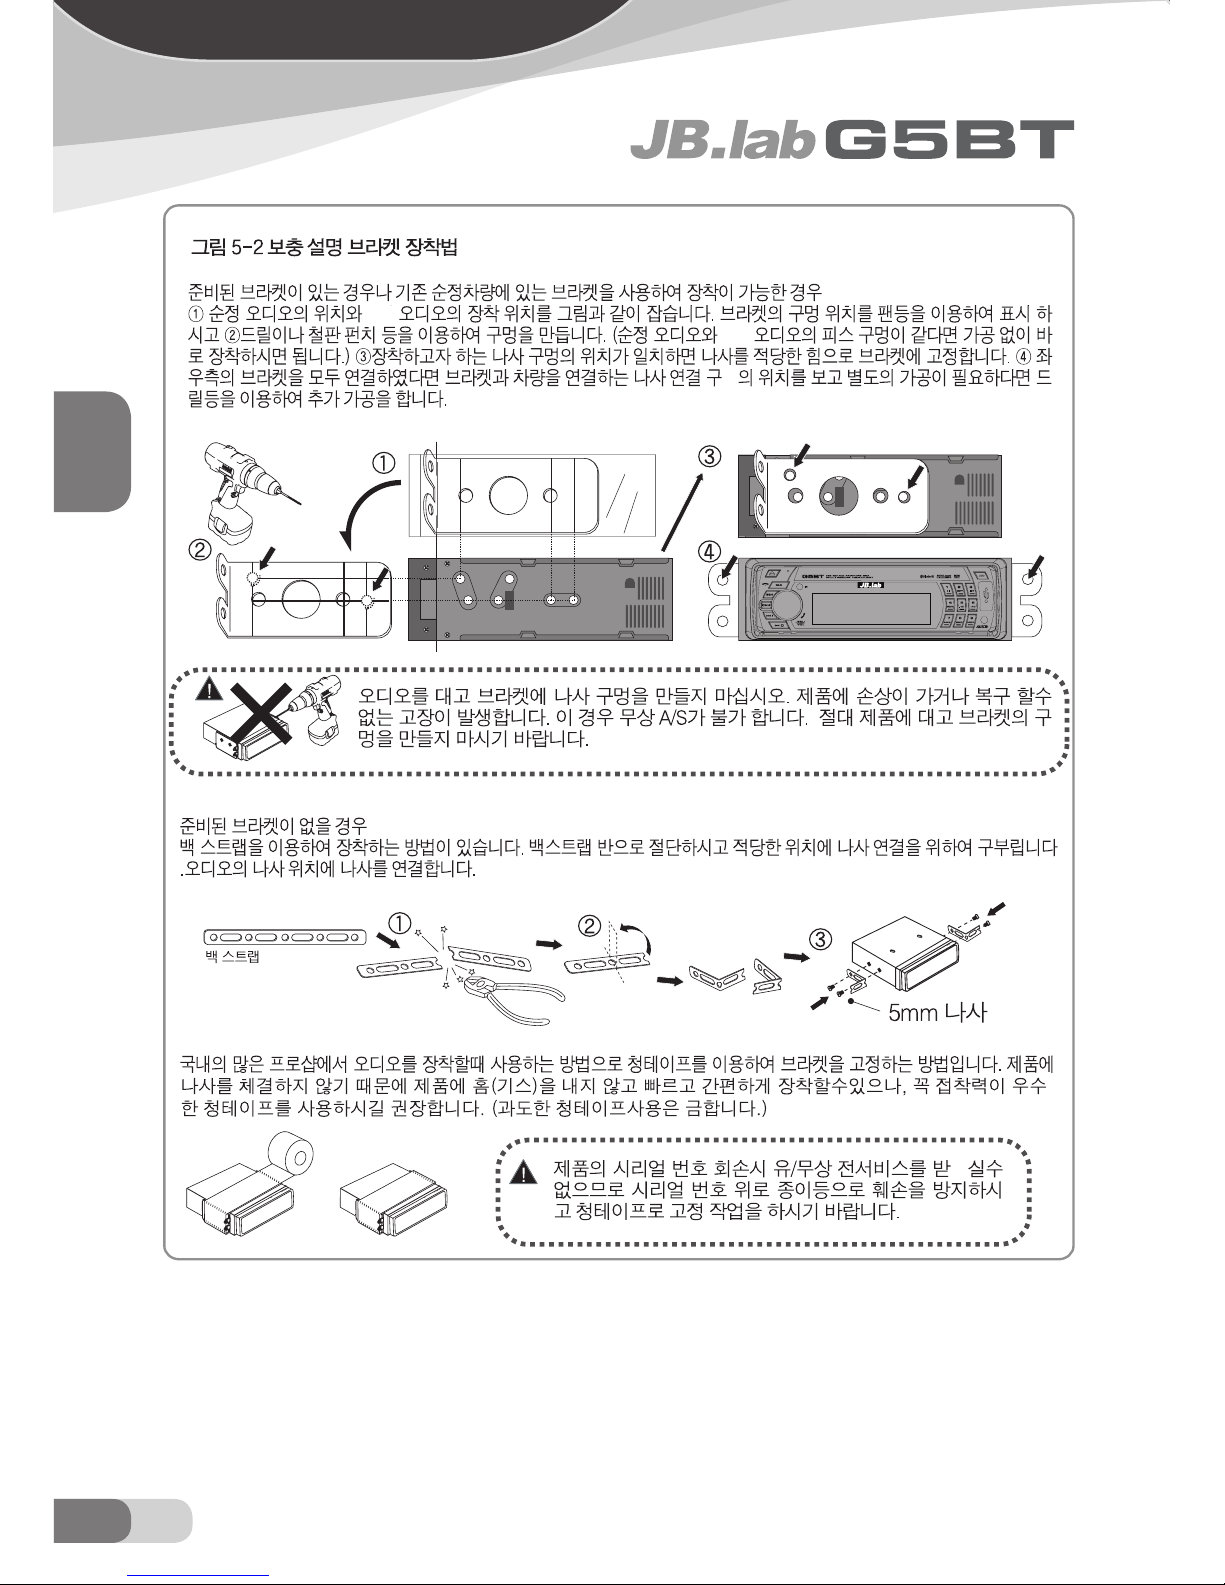
KOREA
24 KO
대쉬보드 후면 마운팅방식
G5
G5
으
멍
Page 25
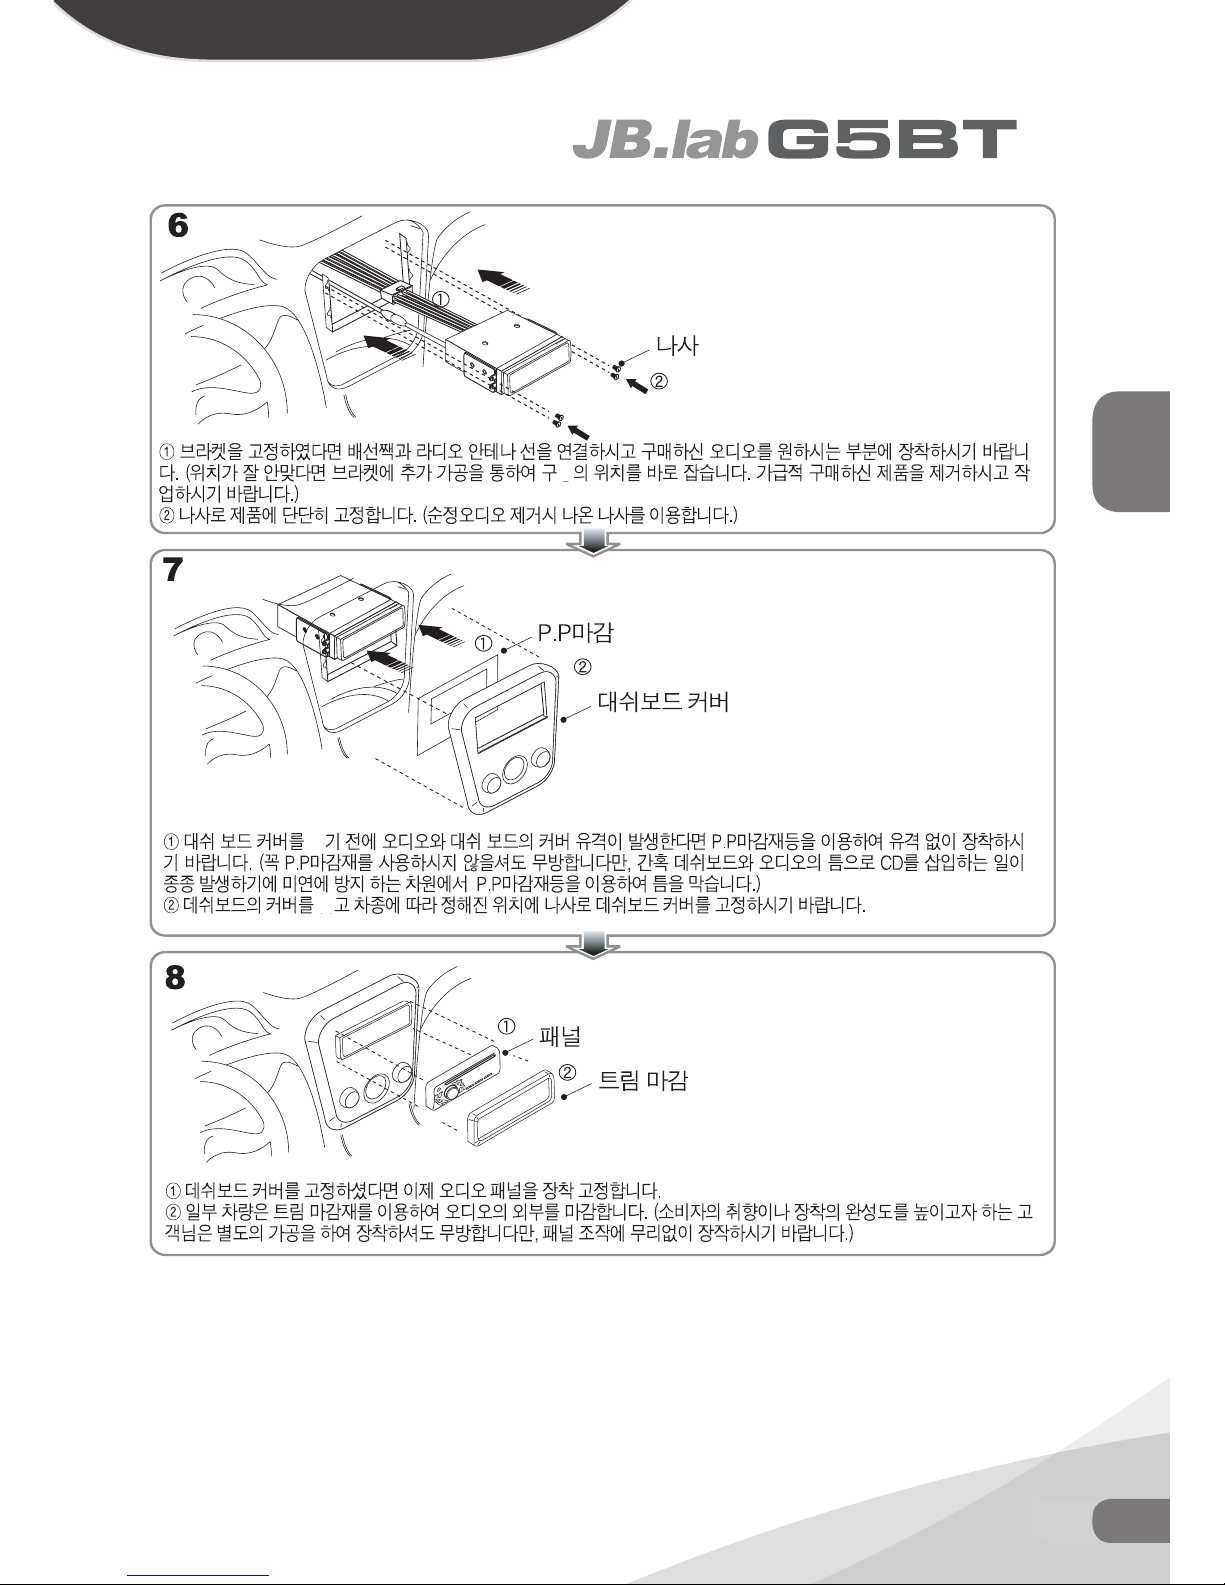
25KO
대쉬보드 후면 마운팅방식
KOREA
멍
덮
덮
재
재
Page 26
KOREA
26 KO
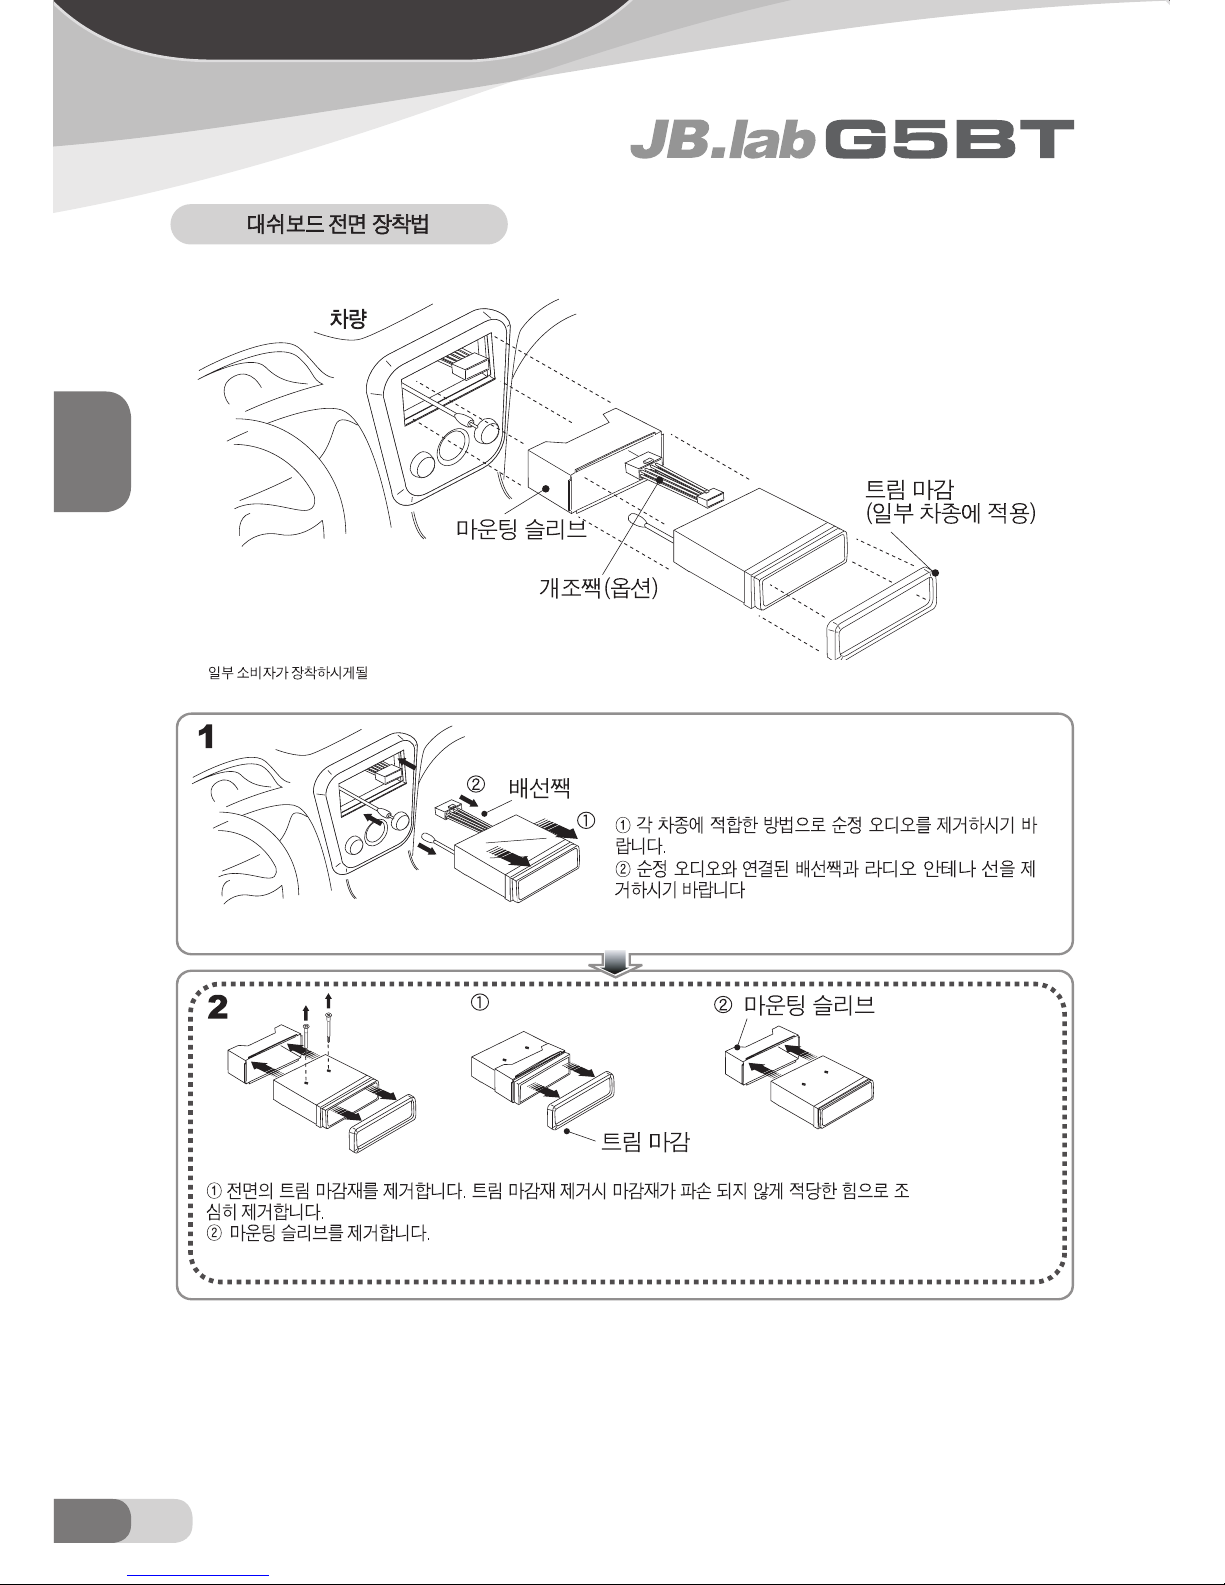
대쉬보드 전면 마운팅방식
재
재
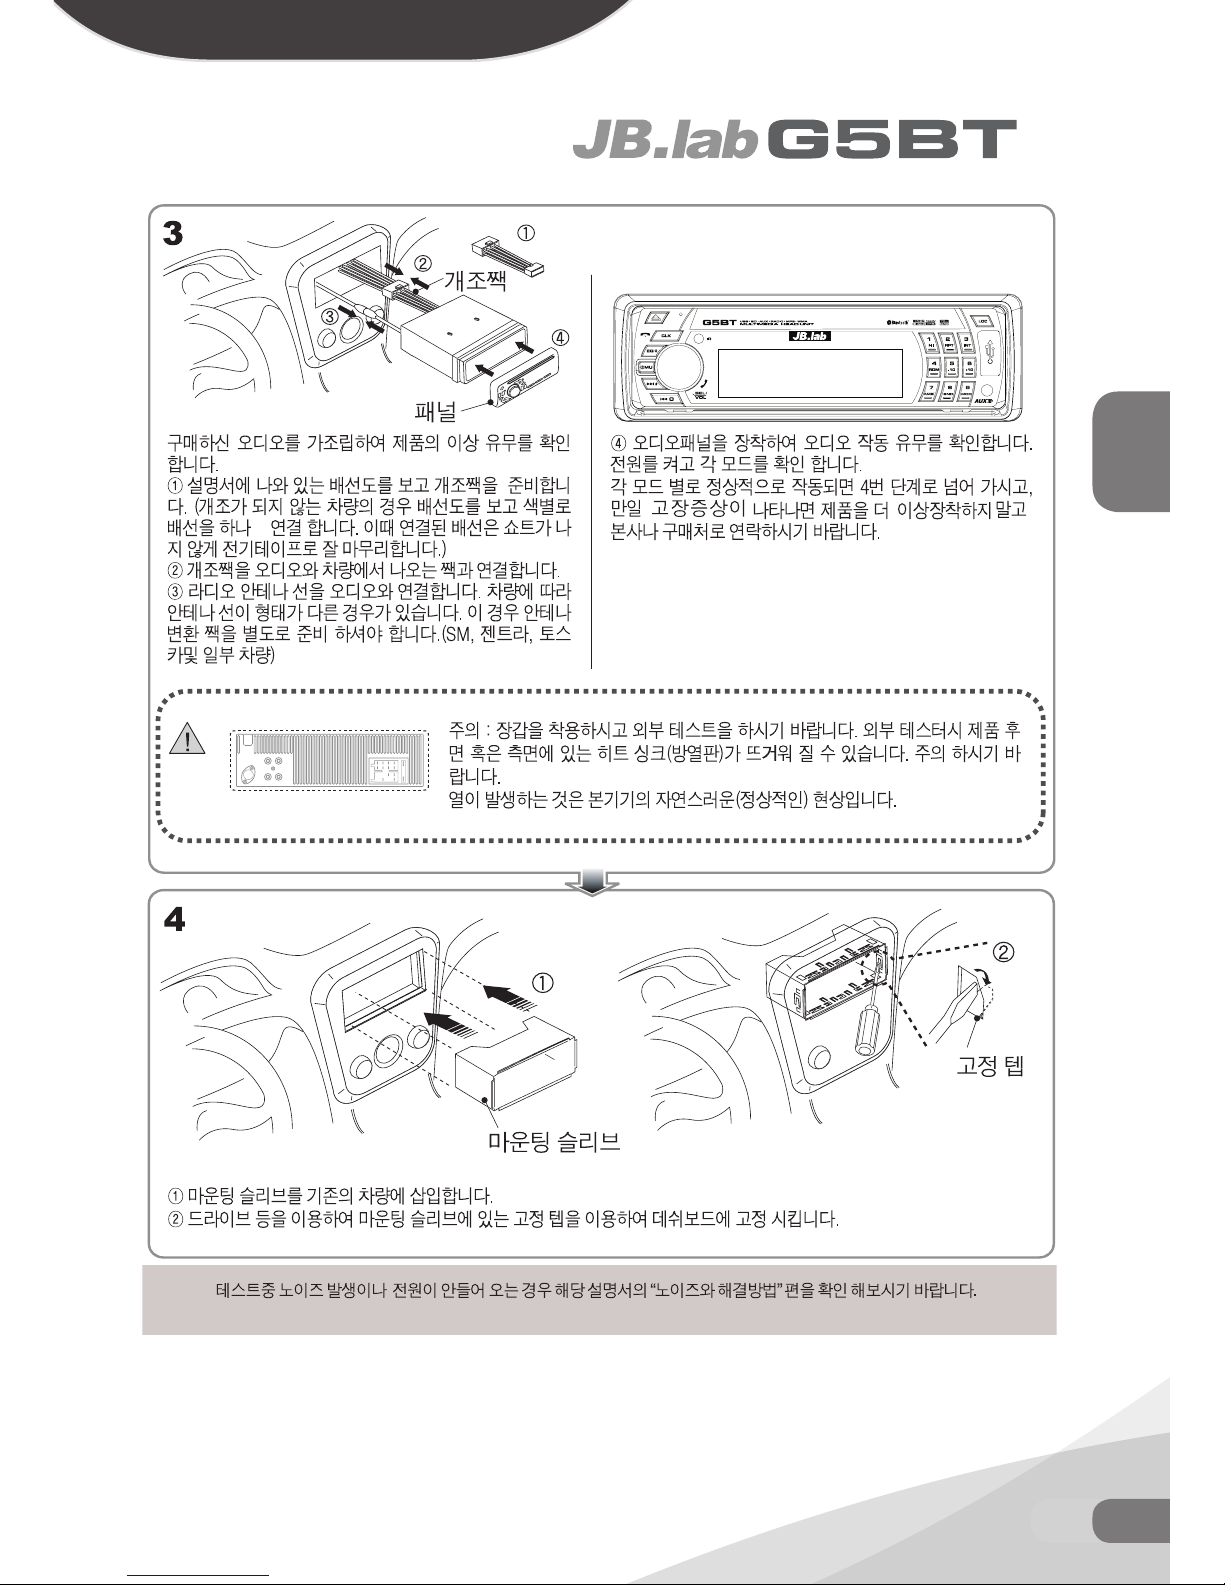
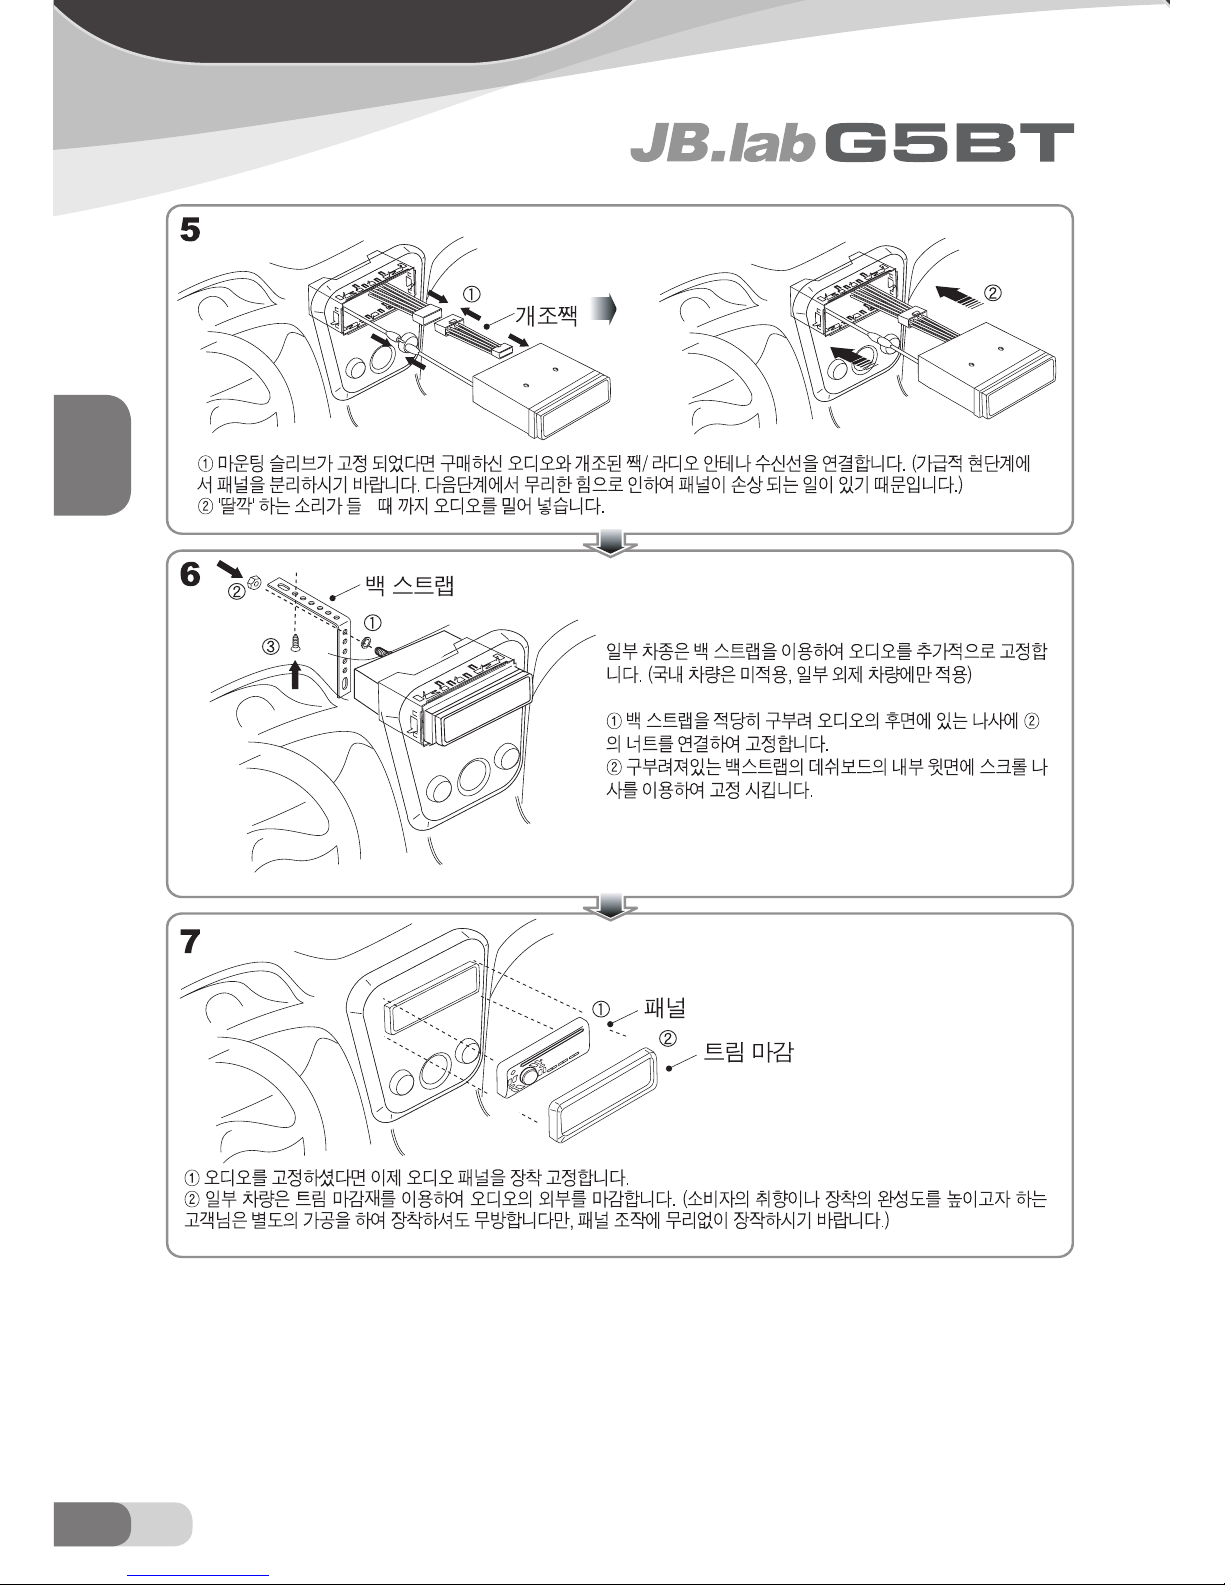
대부분의 차량에 적용되는 장착법으로, 소비자의 각 차종별 대쉬보드 탈거법을 알고있어야 장착이 가능합니다.
본 책자에서 차종별 대쉬보드 탈거법에 관하여 수록하지 못한 점 많은 양해바랍니다.
Page 27
27KO
대쉬보드 전면 마운팅방식
KOREA
씩
Page 28
KOREA
28 KO
대쉬보드 전면 마운팅방식
릴
재
Page 29
29KO
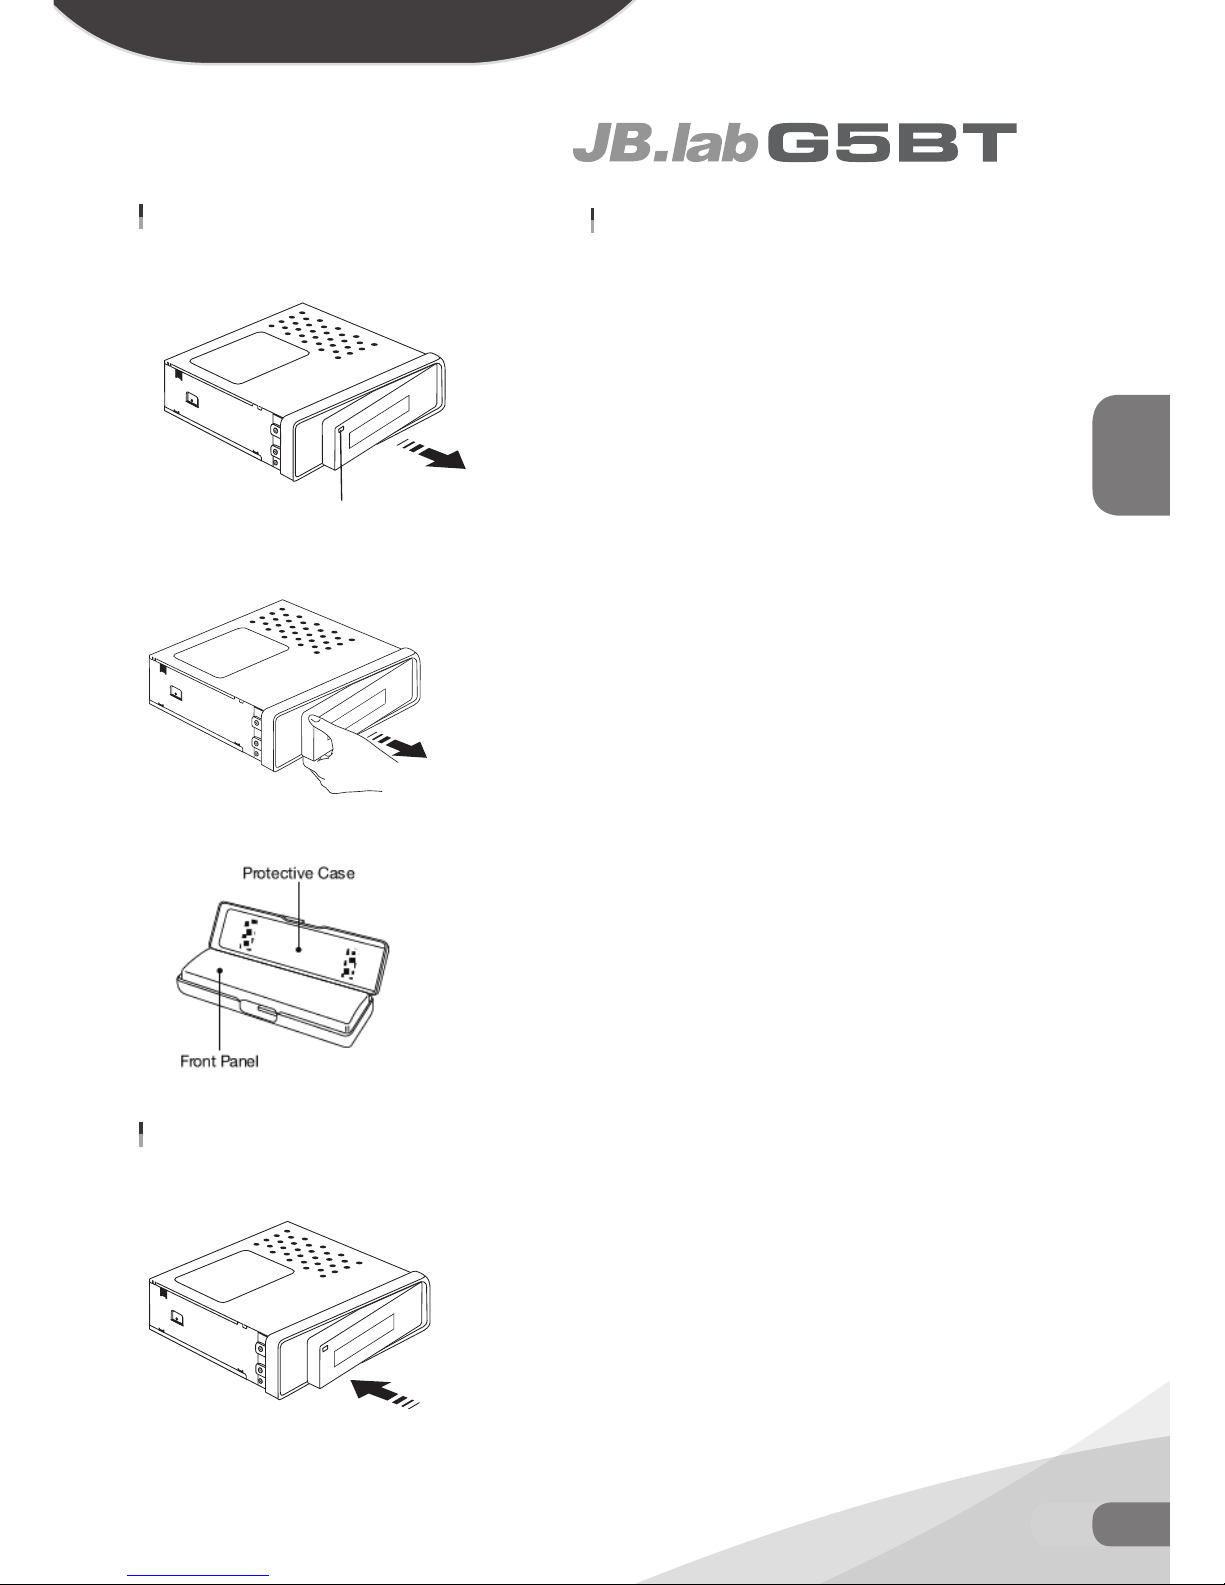
전면패널 탈부착
KOREA
전면 패널 분리
1. 릴리스 버튼을 누르면, 전면패널의 왼쪽이 밀려나오면서 열릴 것 입
니다.
2. 전면 패널 분리시 수평 위치에서 왼쪽면을 당겨 분리하시면 됩니다.
3. 전면 패널 분리후 제공된 케이스에 보관 하실 수 있습니다.
전면 패널 장착
1. 전면패널 장착시, 패널 오른쪽부위을 제자리에 밀어넣은후 왼쪽부
분을 딸깍소리가 날때까지 밀어 넣습니다.
취급시 주의 사항
1. 전면 패널에 충격을 주지 마세요.
2. 전면 패널 분리시 디스플레이나 버튼을 세게 누르지 마세요.
3. 전면 패널과 본체의 접속부를 만지면 전기 접촉이 불량해질 수 있으
므로 접속부를 만지지 마십시오.
4. 먼지 또는 이물이 접속부에 끼면 깨끗한 마른천으로 닦아 주십시오.
5. 자동차의 계기반 또는 고온이 되는 장소에 전면 패널 방치하지 마
십시오.
6. 전면 패널이 벤진, 신나 등 휘발성 물질에 닿지 않게 하세요.
7. 전면 패널의 분해를 하지 마십시오.
Page 30
KOREA
30 KO
배선도
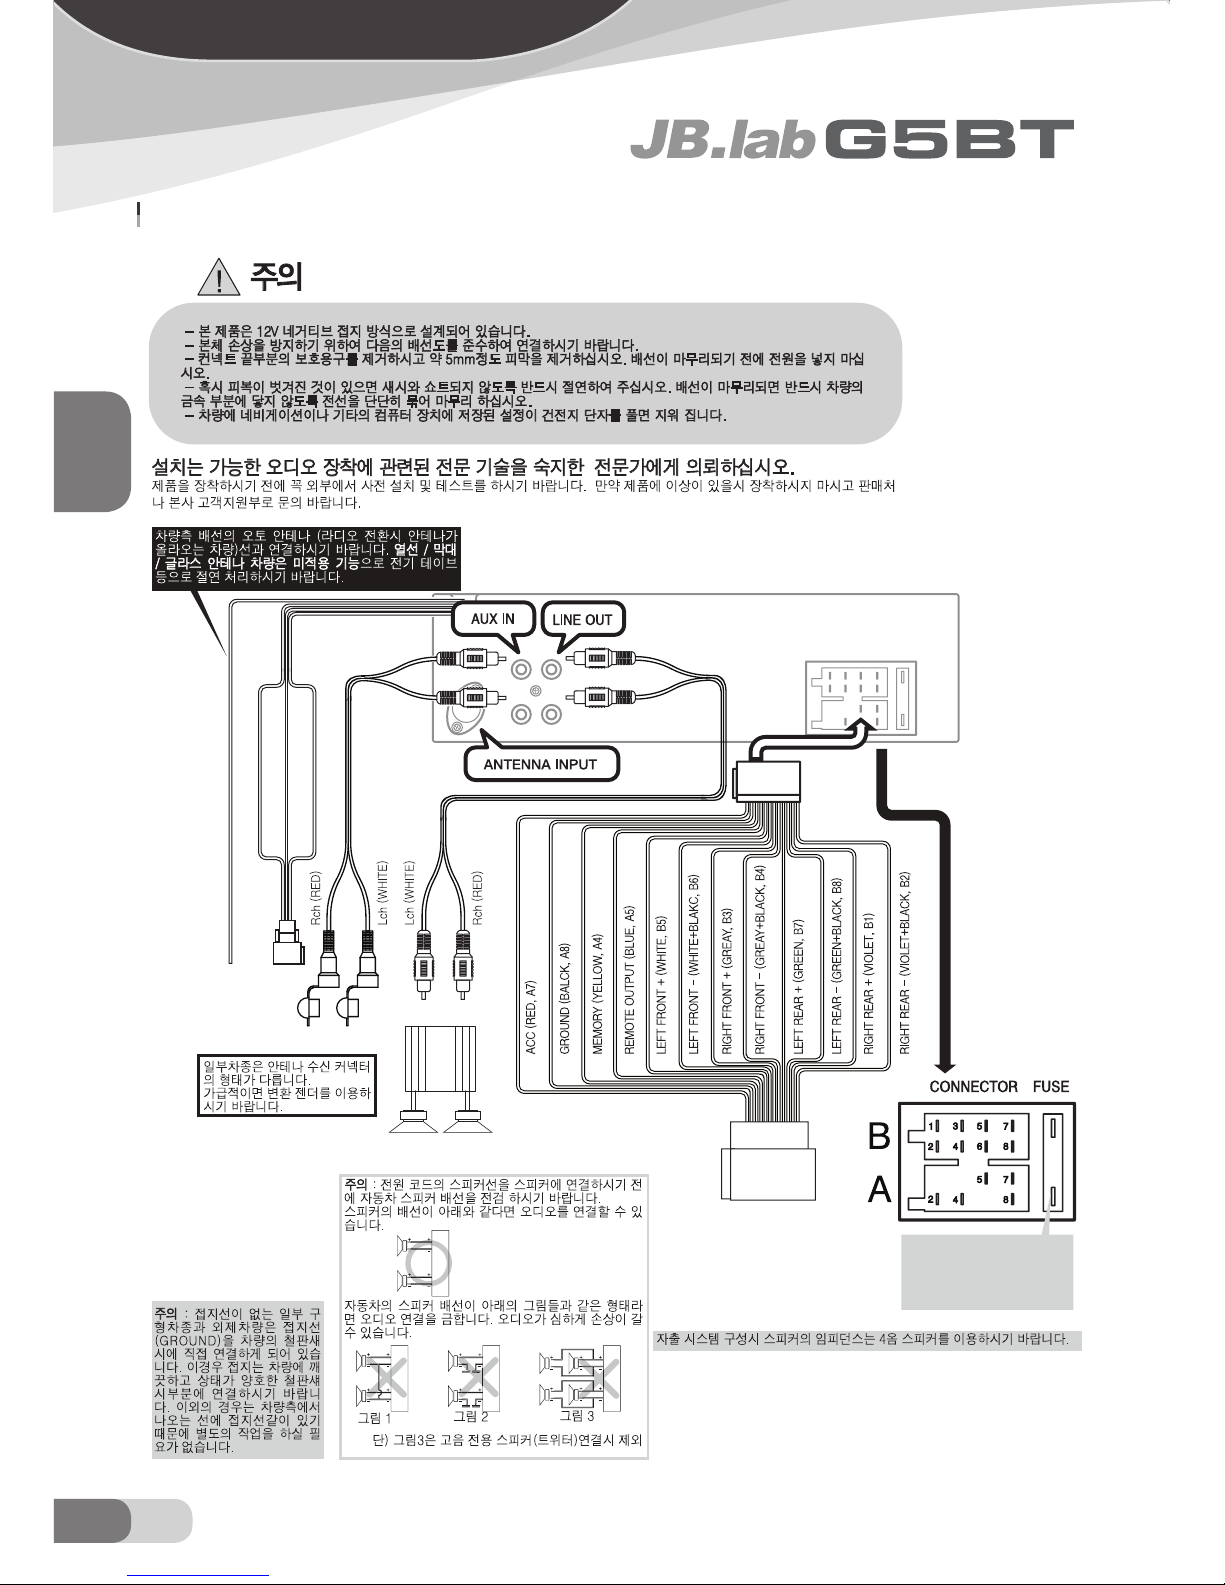
G5BT 배선도
WHEEL GROUND (BLACK)
WHEEL KEY2 (BROWN)
WHEEL KEY1 (GREY)
AUTO ANTENNA (PINK)
AMP
만일 휴즈가 자주 끊어지
면 본체 또는 배선이 잘못
된 형태로 연결되어 있기 때
문입니다.
Page 31
31KO
각 부분의 명칭
KOREA
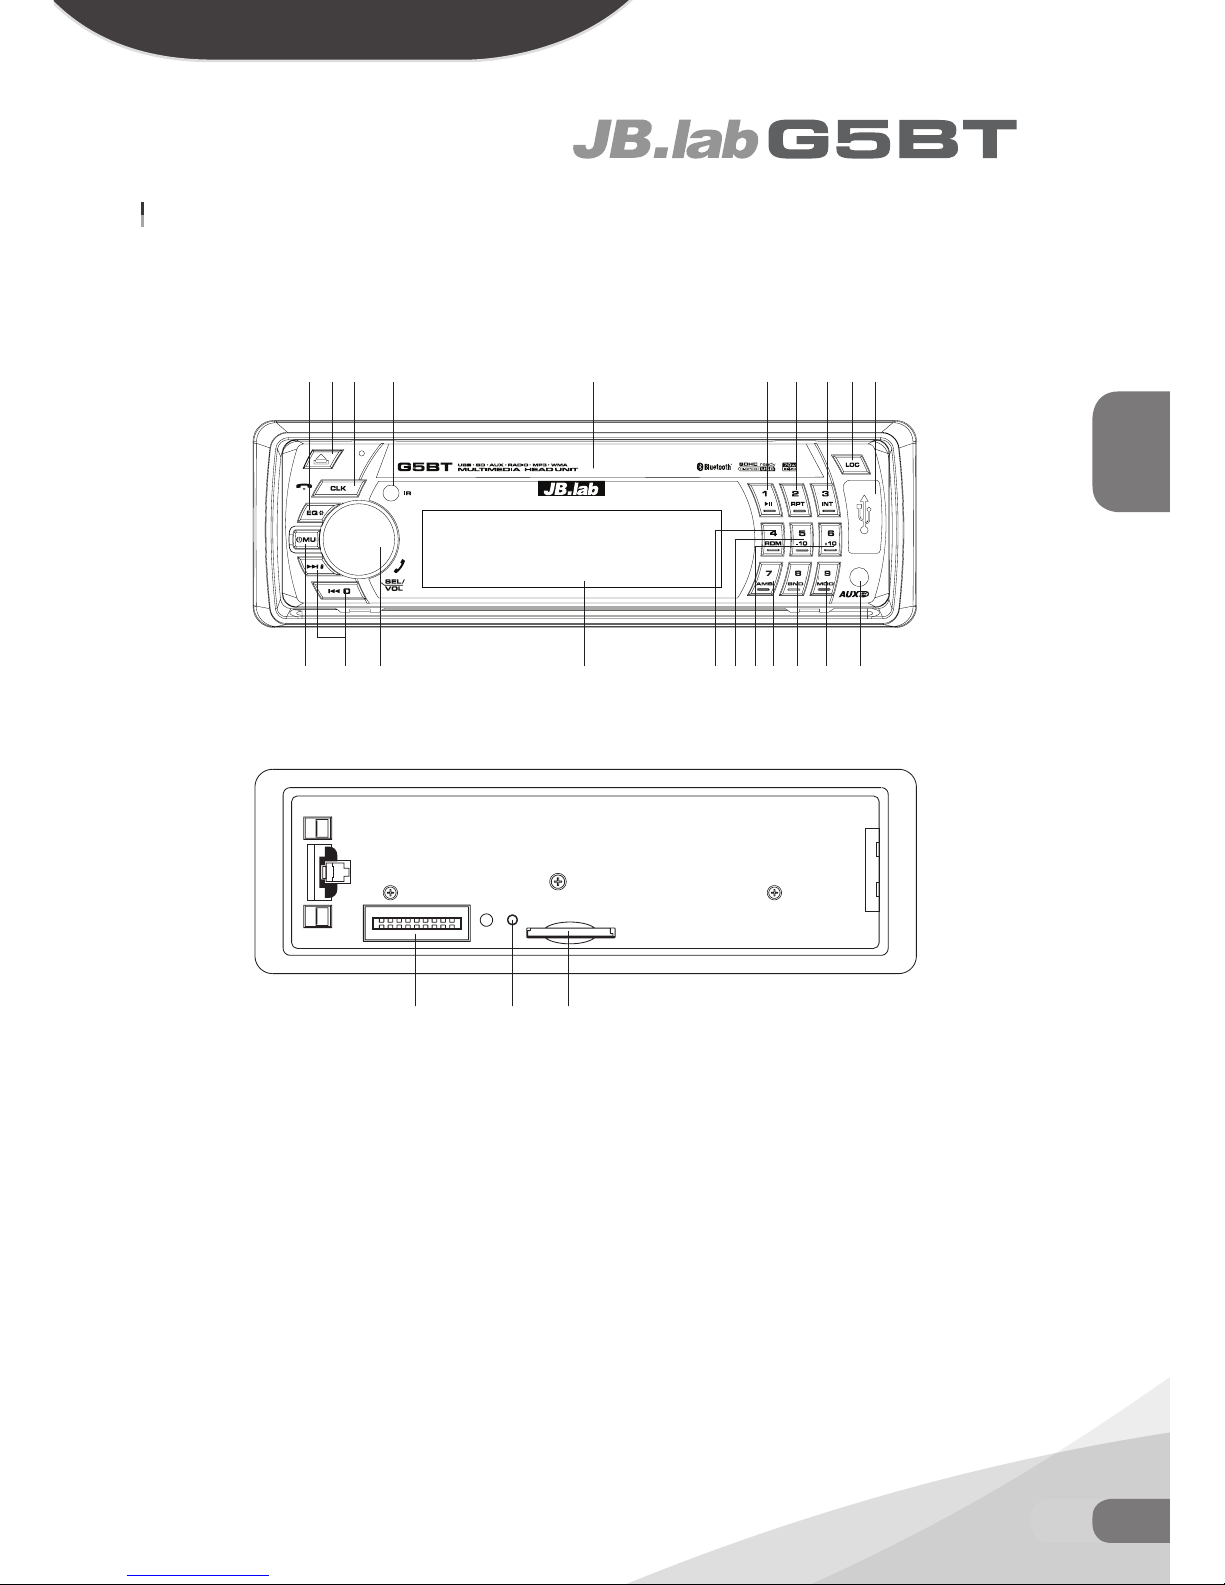
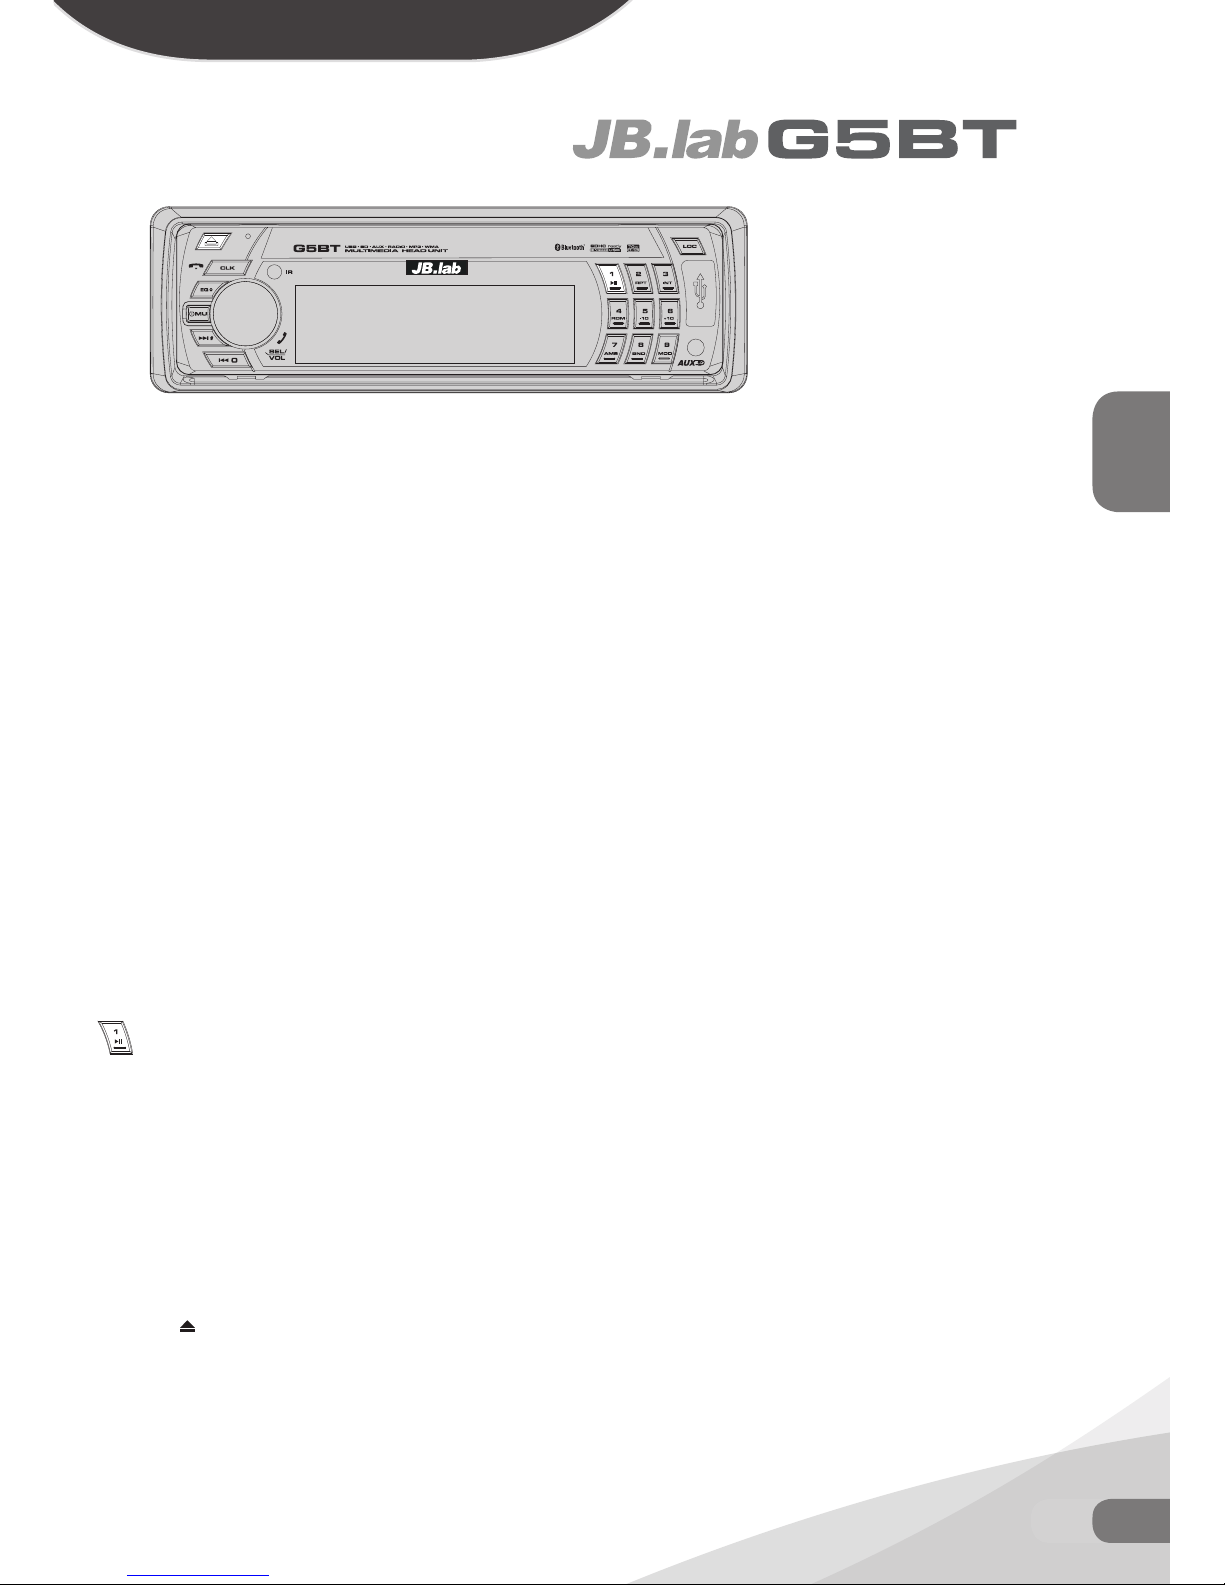
1. 이전트랙 / 다음트랙 / 빨리감기 / 되감기 / 주파수 변경
2. 패널 탈거
3. 리모컨 센서
4. BND / LOUD , 4
5. 모드변경, 5
6. LOC
7. 볼륨 / SELL / 발신 / 전화받기 / 메모리 리셋
8. FOLDER +, 6
9. FOLDER -, 5
10. 랜덤재생, 4
11. 재생, 일시정지, 1
12. 인트로 재생, 3
13. 반복재생, 2
14. 전원 / 음소거
15. LCD
16. USB 슬롯
17. 패널 접속단자
18. SD / MMC 슬롯
19. 시계보기 / 통화종료 / 수신거부
20. 주파수 탐색, 곡탐색. 7
21. 모노/스테레오
22. EQ
23. AUX 입력
24. 리셋
G5BT LOCATION OF KEYS
17 24 18
222
14 1 7 15
19 3 11 13 12 6 16
10 9 8 20 234 5
18
Page 32
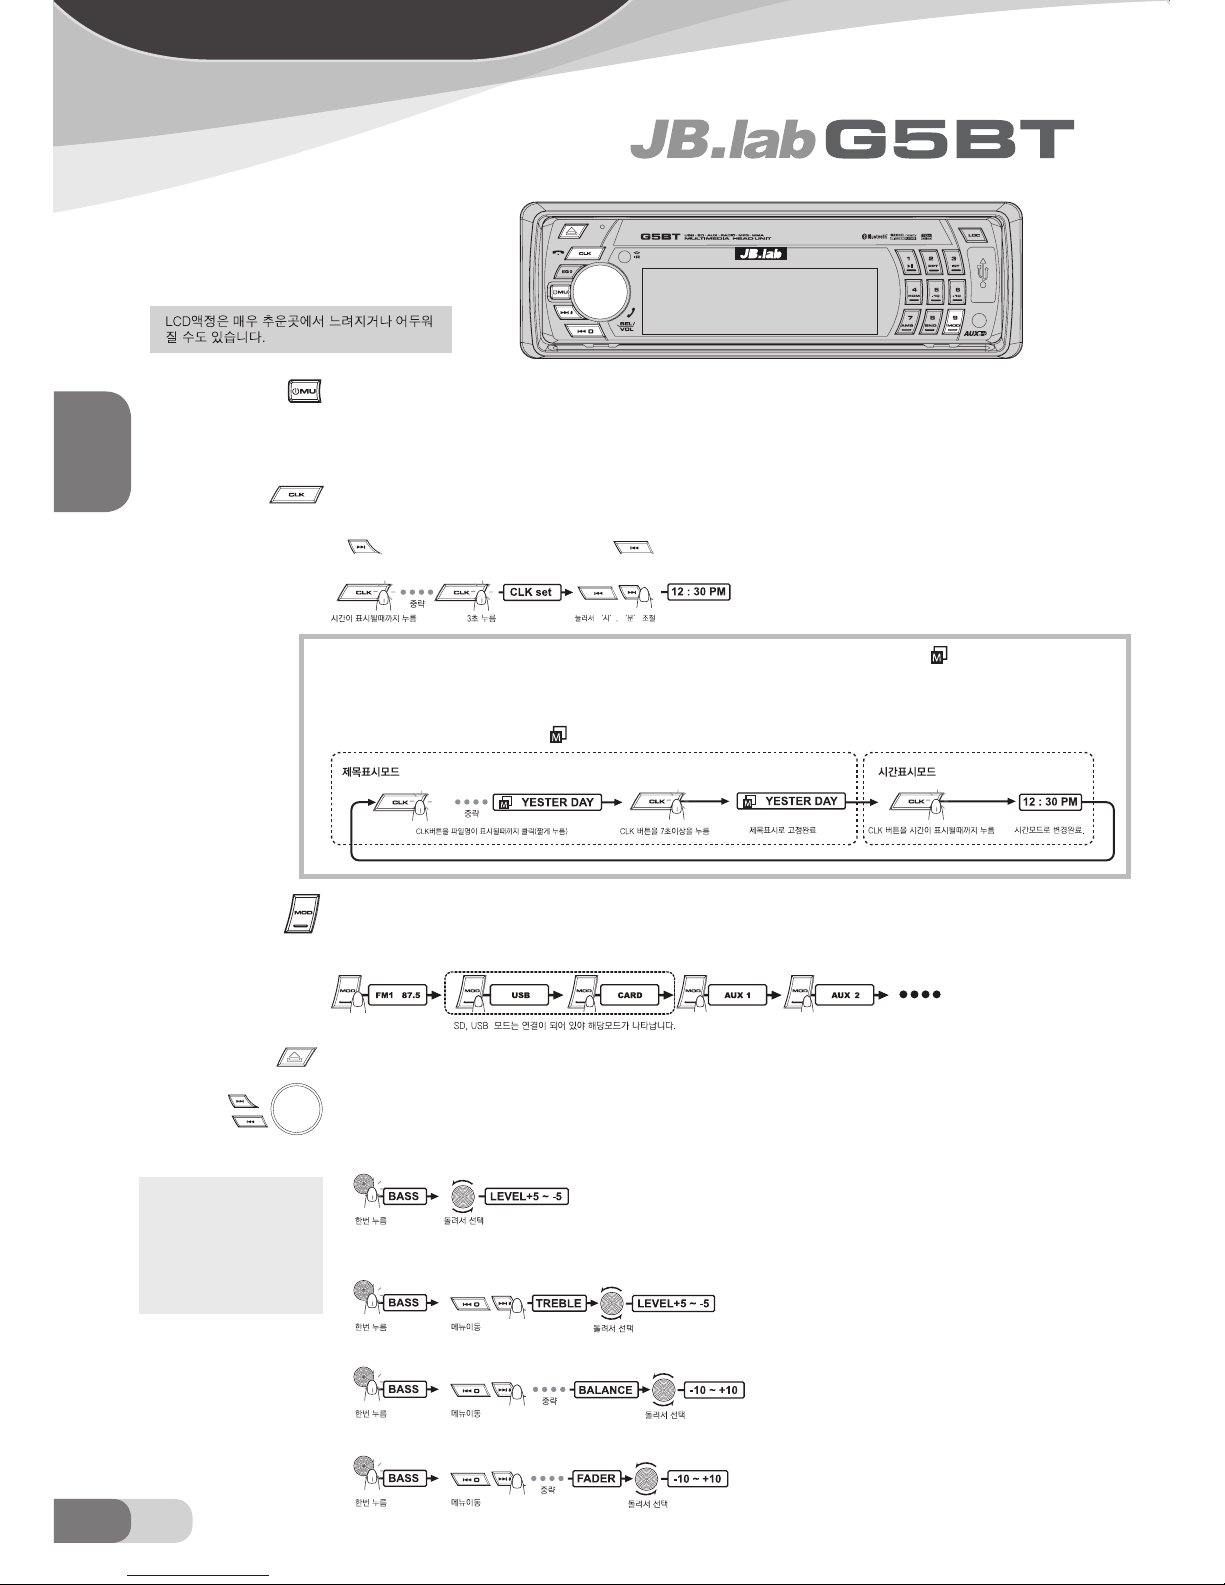
전원/음소거 버튼 : 전원이 꺼졌을 때 EJEC T, REL E ASE 버튼을 제외한 아무 버튼을 누르면 전원이 켜집니다.
전원이 켜졌을 때 전원버튼을 0.5초이상 길게 누른다면 전원이 꺼집니다. 또한 전원이 켜졌을 때 전원스위치를 눌러 음소거를 설
정/해제 하실수 있습니다
CLK 버튼 : 이버튼을 누르면 시계가 표시됩니다. 버튼을 계속 누르면 SD, USB 모드에서는 ID3-TAG가 표시 됩니다.
현재시각을 맞추려면 : CLK버튼을 눌러 시계를 표시한 후 CLK 버튼을 약 3초간 눌러 시계가 점멸되도록 합니다.
‘
’버튼을 누르면 ‘시’가 조절되고, ‘ ’ 버튼을 누르면 ‘분’이 조절 됩니다.
제목표시모드 / 시간모드 전환 : 제목표시로 고정하시려면 본체 또는리모컨의 CLK 버튼을 눌러 파일명 ( 아이콘)으로 변경하신
후, CLK 버튼을 약 8초이상을 누르시면 파일명으로 고정이 완료됩니다. 제목표시모드에서는 시간표시가 고정되지 않습니다. 제목표
시모드에서 시간모드로 변경하시려면, CLK버튼을 시간이 표시될때까지 길게 누르고 계시면 시간모드로 변경이 됩니다. 다시 제목표
시모드변경하시려면 CLK버튼을 눌러 (
아이콘)을 선택하신후 CLK버튼을 약 7초이상을 누르시면 제목표시모드로 변경이 됩니다.
모드전환 버튼 : 지금 재생중의 미디어를 변경할때 사용하는 키입니다.
기본적으로 기기 작동과 함께 RADIO가 가장 먼저 재생되고, RADIO → USB → SD → AUX 1 → AUX 2 순으로 재생되며 SD, USB
는 가장 마지막으로 넣은 미디어가 작동합니다. SD, USB는 기기에 연결되어야 모드에서 순서가 나타납니다.
RELEASE 버튼 : 이버튼을 누르면 전면 패널을 분리가 됩니다. 다시 장착하기 위해서는 패널의 우측부터 장착하시기 바랍니다.
시스템 설정 : 전면판넬 의 볼륨다이얼을 누르시면 SYSTEM SETTING 모드로 들어갑니다.
1. BASS (저음) : 재생되는 소리의 저음 강도를 조절합니다. 항목의 조절 범위는 +10 ~ -10 까지 입니다.
(저음 설정후 EQ 버튼을 눌러 내장 EQ 값으로 변경하면 설정하신 저음값은 취소되며, 내장 EQ 와 사용자 설정 BASS 값은 동시에 동작하지 않습니다.)
2. TREBLE (고음) : 재생되는 소리의 고음 강도를 조절합니다. 항목의 조절 범위는 +5 ~ - 5 까지 입니다.
(고음 설정 후 버튼을 눌러 내장 EQ 값으로 변경하시면 설정하신 고음값은 취소되며, 내장 EQ와 사용자 설정 TREBLE값은 동시에 동작하지 않습니다.)
3. BALANCE (좌,우 발란스) : 좌/우 음량 중심을 이동할 수 있습니다. 조절범위는 -5에서 +5 까지 이며, 0은 좌, 우 동일 입니다.
4. FADER (전,후 발란스) : 앞/뒤 음량 중심을 이동할 수 있습니다. 조절범위는 -10에서 +10까지 이며, 0은 앞, 뒤 동일 입니다.
KOREA
32 KO
기본조작법
패널 장착시 패널을 정확히 연
결하지 않을 경우 패널 접정불
량으로 인해 패널의 버튼이 정
상적으로 작동하지 않고 패널
의 조명이 정상적으로 들어오
지 않습니다. 이경우 패널을 정
확히 연결해주시기 바랍니다.
Page 33
33KO
기본조작법
KOREA
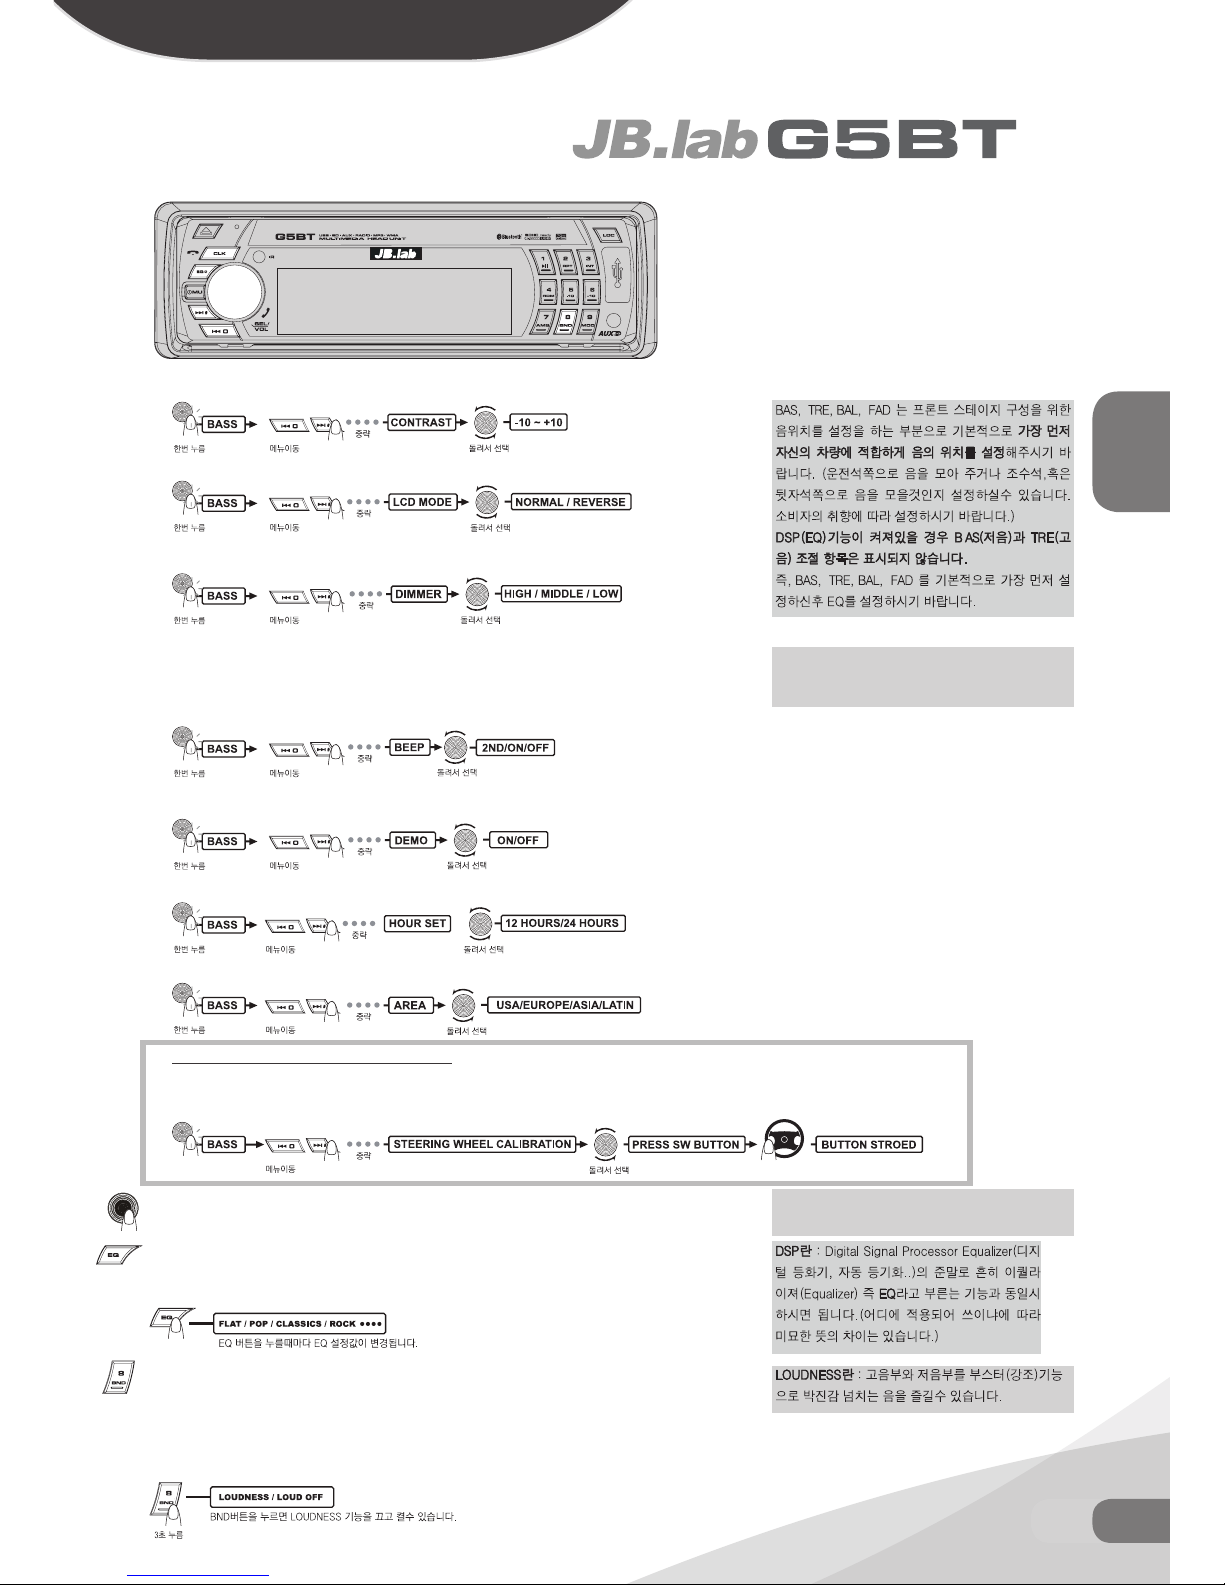
5. LCD CONTRAST (대비설정) : 볼륨다이얼을 사용하시면 LCD밝기를 -10에서 +10까지 조절하실수 있습니다.
6. LCD (표시모드) : LCD표시모드를 변경하기 위해 Normal(정상화면) 또는 Reverse(반전화면)을 선택하실 수 있습니다.
7. Dimmer(밝기설정) : 메뉴상에는 High(밝음)/Middle(보통)/Low(어두움) 라고 되어 있으며 볼륨다이얼을 사용하여 선
택하실 수 있습니다.
8. BEEP (비프음) : 기기 동작시 비프음을 들리는 비프음을 끄고 켤수 있습니다.
BEEP 2ND : 3초간 누르는 기능이 있는 버튼에서만 비프음을 들으실 수 있습니다.
BEEP ON : 기능을 작동할때마다 비프음을 들으실 수 있습니다.
BEEP OFF : 비프음을 끄는 기능입니다.
9. DEMO(화면보호기 ) : 화면보호기 설정이 활성화 되어 있다면, 약 30초동안 아무런 조작이 없다면 화면보호기가 동
작할것입니다.
10. 24 HOUR (시간제 설정) : 24시간제/12시간제 시간표시를 변경하실수 있습니다.
11. AREA(지역설정) : 볼륨다이얼을 돌리면 USA/EUROPE/ASIA/LATIN 중 선택하실 수 있습니다.
12. Steering Wheel Calibration (순정 핸들리모컨 설정) : 볼륨다이얼을 한번 누르면 “BASS”문구가 뜨며, 설정모
드로 진입이됩니다. 트랙이동버튼을“STEERING WHEEL CALIBRATION”라는 문구가 뜰때까지 눌러줍니다. 볼륨
다이얼을 좌/우로 돌려 설정하고자하는 버튼의 메뉴를 선택하신후, 차량 순정핸들리모컨의 버튼을 약 3-4초간 누르
시면, “BUTTON STORED” 라는 문구가 표시되며 저장이 완료됩니다.
음량 조절 다이얼 : 다이얼을 좌/우로 돌려 음량의 크기를 조절합니다. (0,1, 2,--- 49, 50 까지입니다.)
EQ 조절 : EQ 버튼을 누르실때마다 액정화면에 총 4가지의 FLAT, POP, ROCK, CLASSICS 내장 EQ 값
이 변경하실 수 있습니다. 내장 EQ 값과 사용자 설정 EQ (BASS, TREBLE)는 동시에 작동하지 않습니다.
BND/LOUD 버튼 : 라디오 모드에서 버튼을 짧게 누르면 밴드이동이 됩니다. (FM1, FM2, FM3, AM1, AM2)
BND/LOUD 버튼을 3초 정도 누르면 액정에 LOUD 마크가 들어오며 LOUDNESS 기능이 활성화 됩니
다. 다시 BND/LOUD 버튼을 3초 정도 누르면 기능이 비활성화 됩니다. LOUDNESS 기능은 고음 및 저
음 출력을 강조합니다.
순정 핸들리모컨 배선연결방법은 P.35
을 참고하시기 바랍니다.
AUTO ANSWER, AUTO CONNECT,
SPEAKERS 에 대한 설정은 page 44에 기
술되어 있습니다.
해당기능의 순정핸들의 버튼을 약 5초간 누름
볼륨다이얼을 한번 누름
“BUTTON STROED”출력되며 저장완료
Page 34
KOREA
34 KO
라디오조작법
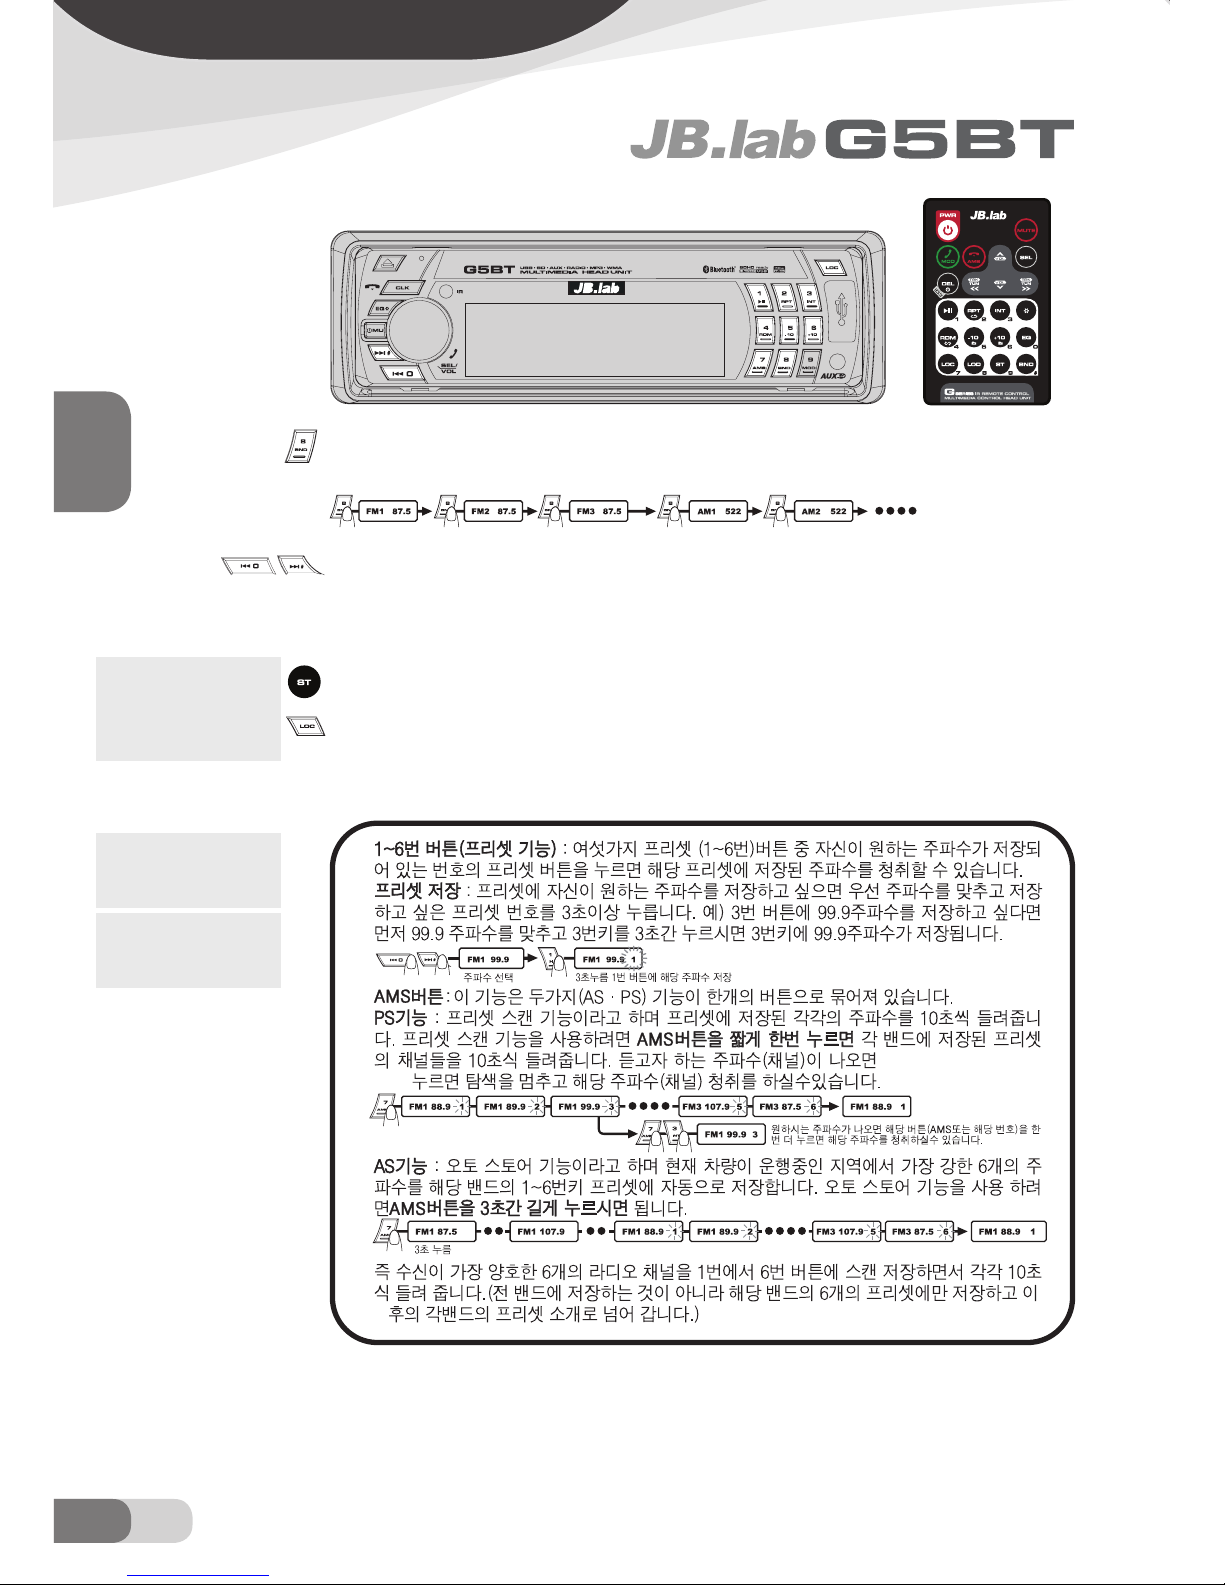
BND (밴드) 버튼 : BAND (밴드) 버튼을 짧게 누르면 FM 과 AM 밴드를 선택하여 선국할 수 있습니다. 각각 (FM 3개 밴드, AM 2개
밴드)의 선국 밴드는 6개의 프리셋 메모리를 가집니다.
자동/수동 선국 : 버튼을 짧게 누르면 자동으로 주파수를 찾아 멈춥니다. 버튼을 길게 누르면 화면에 “MANUAL” 이라 고 뜨
며, FM 주파수를 수동 탐색을 하실 수 있습니다. 수동 탐색 모드에서 약 5초 가량 버튼을 누르지 않으면 화면에 “AUTO” 라고
뜨며 다시 자동 탐색 모드로 전환이 됩니다.
모노/스테레오 전환 : 라디오 모드에서 리모컨의 ST버튼을 눌러 스테레오(STEREO) 혹은 모노(MONO)로 변환할 수 있습니다.
LOCAL/DX 전환 : 라디오 청취시 LOC 버튼을 누르면 LOCAL/DX 전환이 가능합니다. 강한 신호의 검색만 가능하도록 하는 것이
LOCAL 기능이며, DX 기능은 잡음이 있는 채널까지 검색하는 기능입니다. 화면상에 LOC 마크가 있으면 LOCAL 탐색모드이며,
LOC 마크가 없다면 DX 기능이 활성화중입니다.
FM 스테레오 라디오 청취중 잡음
이 많이 발생하여 수신하기 어려운
경우 MON 버튼을 눌러 스테레오
에서 모노로 전환하십시오. 음향
이 모노로 변하지만 수신 기능이
향상됩니다.
프리셋 저장을 하시면 기존에 저
장된 방송에 새로운 방송을 겹쳐
쓰기 때문에 기존의 방송은 사라
지게 됩니다.
주파수를 탐색하는데는 차량이 운
행중인 지역의 특성이나 안테나의
수신감도에 따라 수초에서 수분이
걸릴 수 있습니다.
나왔을때 AMS버튼을
Page 35
35KO
순정핸들리모컨 배선 연결방법
KOREA
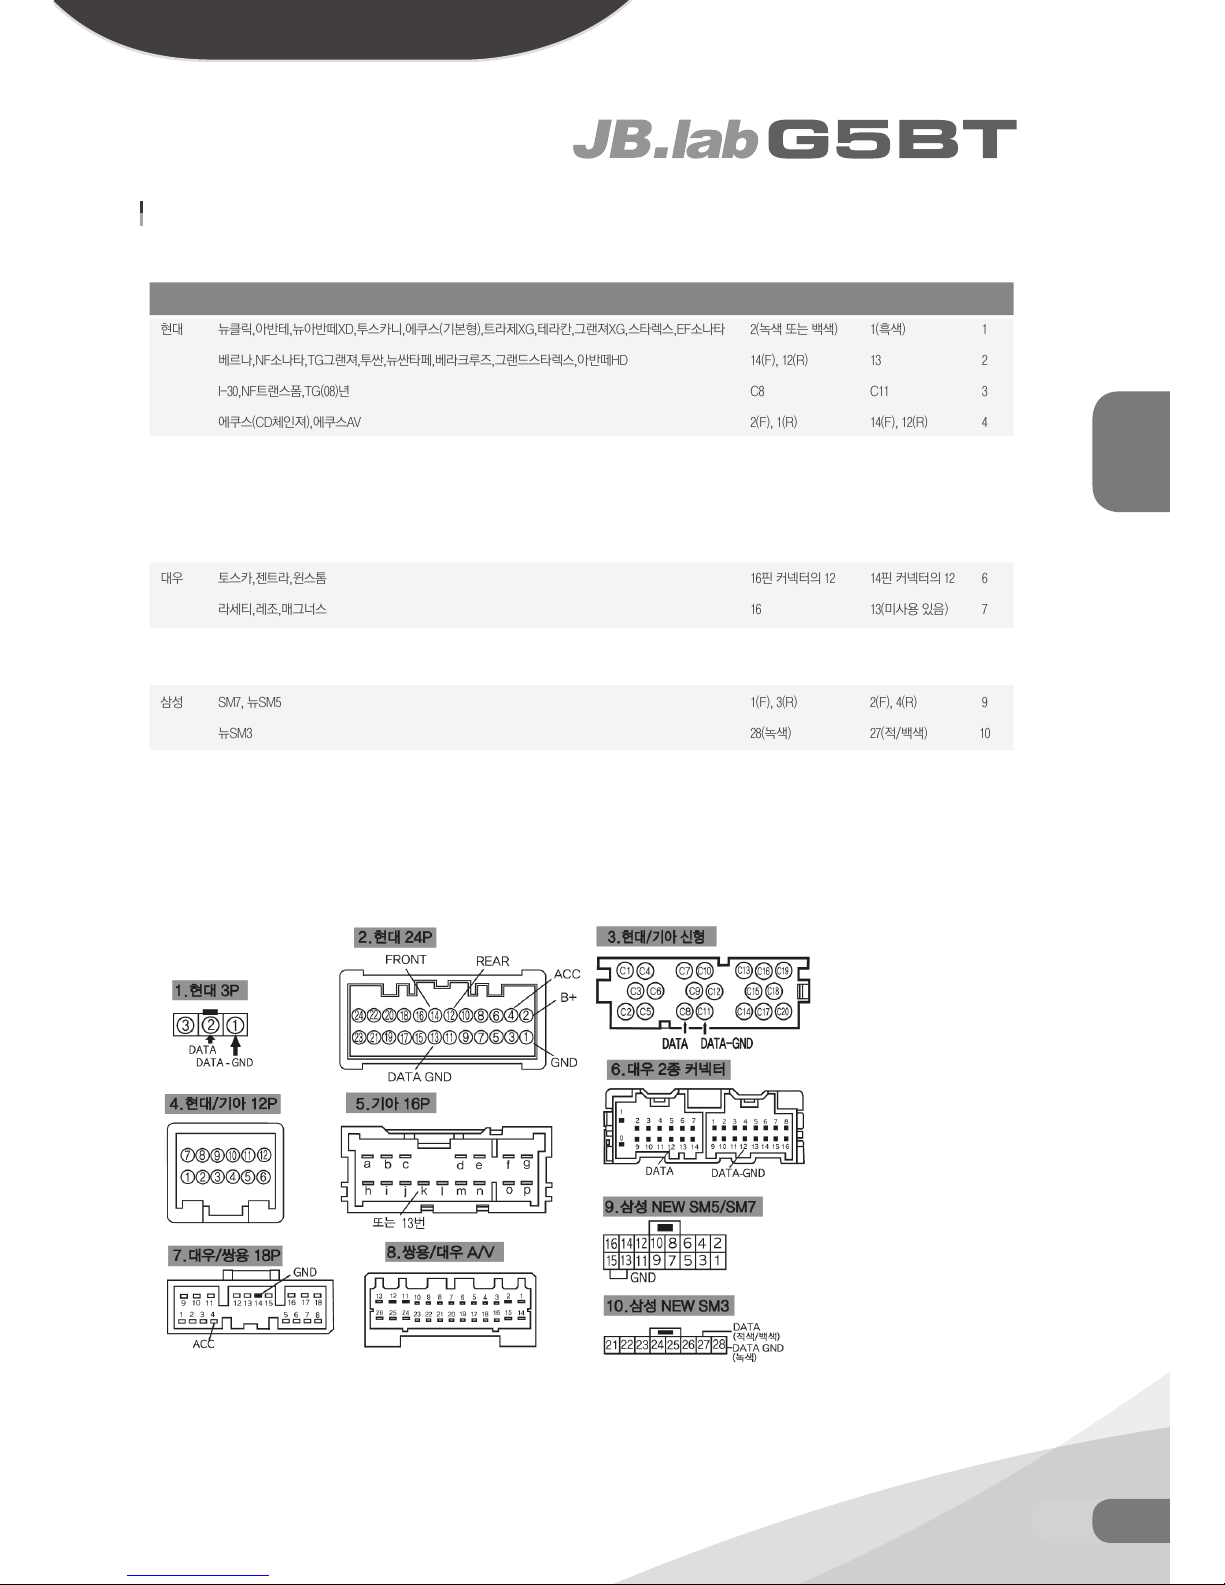
순정 핸들리모컨 배선 연결방법
1. 아래 도표에서 차량명에 맞는 DATA 핀 번호와 DATA GND(그라운드)핀 번호를 확인합니다.
회사
현대
기아
대우
쌍용
삼성
DATA
2(녹색 또는 백색)
14(F), 12(R)
C8
2(F), 1(R)
14(F), 12(R)
C8
2(F), 1(R)
11 또는 K
16핀 커넥터의 12
16
16
7(F), 8(R)
1(F), 3(R)
28(녹색)
DATA GND
1(흑색)
13
C11
14(F), 12(R)
13
C11
8(F), 7(R)
GND
14핀 커넥터의 12
13(미사용 있음)
13(미사용 있음)
20(F), 21(R)
2(F), 4(R)
27(적/백색)
타입
1
2
3
4
2
3
4
5
6
7
7
8
9
10
범위
뉴클릭,아반테,뉴아반떼XD,투스카니,에쿠스(기본형),트라제XG,테라칸,그랜져XG,스타렉스,EF소나타
베르나,NF소나타,TG그랜져,투싼,뉴싼타페,베라크루즈,그랜드스타렉스,아반떼HD
I-30,NF트랜스폼,TG(08)년
에쿠스(CD체인져),에쿠스AV
프라이드,로체,로체어드밴스,스포티지,그랜드카니발,뉴카랜스,뉴쏘렌토,뉴세라토
08스포티지,뉴모닝,모하비,그랜드카니발(08),로체이노베이션,뉴카랜스(08),뉴오피러스(08)
오피러스,뉴오피러스
세라토,카스타,쏘렌토,카니발,스팩트라,옵티마
토스카,젠트라,윈스톰
라세티,레조,매그너스
카이런,뉴카이런,렉스턴,렉스턴2,체어맨,로디우스,액티언
체어맨A/V(대우 A/V차량 포함)
SM7, 뉴SM5
뉴SM3
* F: FRONT(운전석). R : REAR(뒷자석) 입니다.
2. 아래 도표에서 순정오디오 커넥터의 타입을 확인하시고 찾으신 커넥터 타입에서 DATA핀 번화와 DATA GND(그라운
드)핀 번호의 위치를 확인합니다. (현대 3P과 동일한 타입의 커넥터의 경우 별도의 작업없이 연결가능하며, 다른타입의
경우 아래배선도를 참조하여 배선을 연결해주시기 바랍니다. 만약, 커넥터 작업완료후 리모컨이 동작하지 않는다면(현대
3P 타입포함 - 배선배열이 다른 현대3P타입도 있음 ) 배선도를 확인하신 후 연결해주시기 바랍니다.
3. 확인하신 핀의 위치에 G5 제품의 순정오디오 컨트롤 선을 DATA 핀에서 갈색(Key 2)선을 연결하시고 DATA GND(
그라운드) 핀에는 검정색(그라운드)선을 연결합니다.(참고. 설정시 설정이 되지 않는 경우 DATA핀에 연결되어진 갈색
(Key2)선을 DATA핀에서 제거하시고 회색(Key1)선을 DATA핀에 연결하여 주시면 설정가능합니다.)
Page 36
36 KO
KOREA
MP3/WMA작동법
Page 37
37KO
MP3/WMA작동법
KOREA
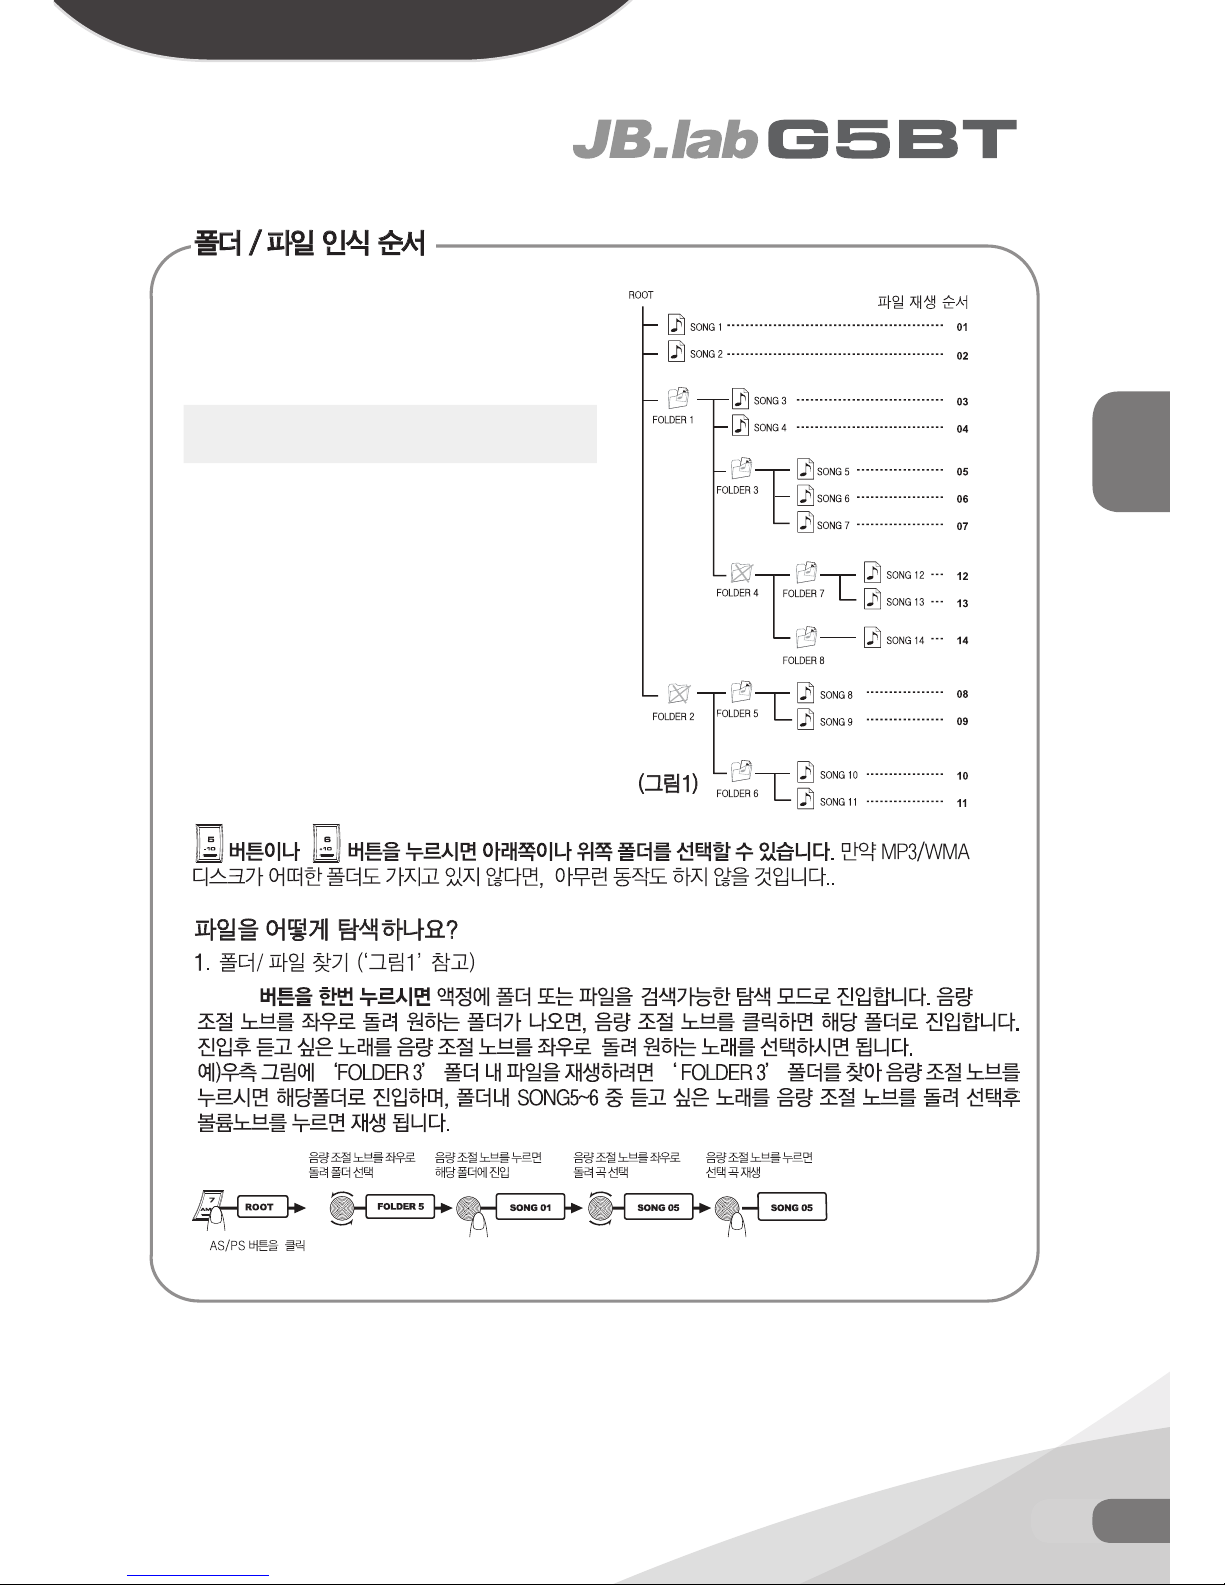
폴더 인식 순서는 ‘그림 1’ 처럼 ROOT - FOLDER
1 - FOLDER 3 - FOLDER 5 - FOLDER 6 - FOLDER
7 - FOLDER 8 순으로 인식합니다. MP3 파일이 들어
있는 폴더만 인식 합니다.
FOLDER 2, FOLDER 4는 MP3 파일이 없기 때문에
폴더 검색에서 표시 되지 않습니다.
파일 인식 순서는 ‘그림 1’처럼 01 - 11 까지
순차적으로 인식합니다. 상위 폴더순으로 파일을
인식합니다.
만일 파일의 순서등이 정상적으로 나오지 않는다면
ID3 태그의 정보를 모두 삭제하시기 바랍니다.
폴더 / 파일 순서는 기기가 지정합니다. 사용자가
임의로 파일 순서를 지정할 수 없습니다.
FOLDER 2, FOLDER 4는 MP3 파일이 없기 때문에
폴더
검색에서 표시 되지 않습니다.
AMS
Page 38
38 KO
미디어 작동법
KOREA
MODE (모드) 버튼 : 한번 누르실때 마다 RADIO → USB → SD → AUX 1 → AUX 2 순으로 전환됩
니다.
미디어 (USB/SD)를 삽입, 블루투스가 연결되지 않은 상태에서는 RADIO → AUX 로 표시 됩니다.
미디어(USB/SD) 삽입, 연결과 동시에 해당 미디어 모드로 바로 넘어갑니다. 즉 가장 마지막에 연결
한 미디어를 우선적으로 재생합니다.
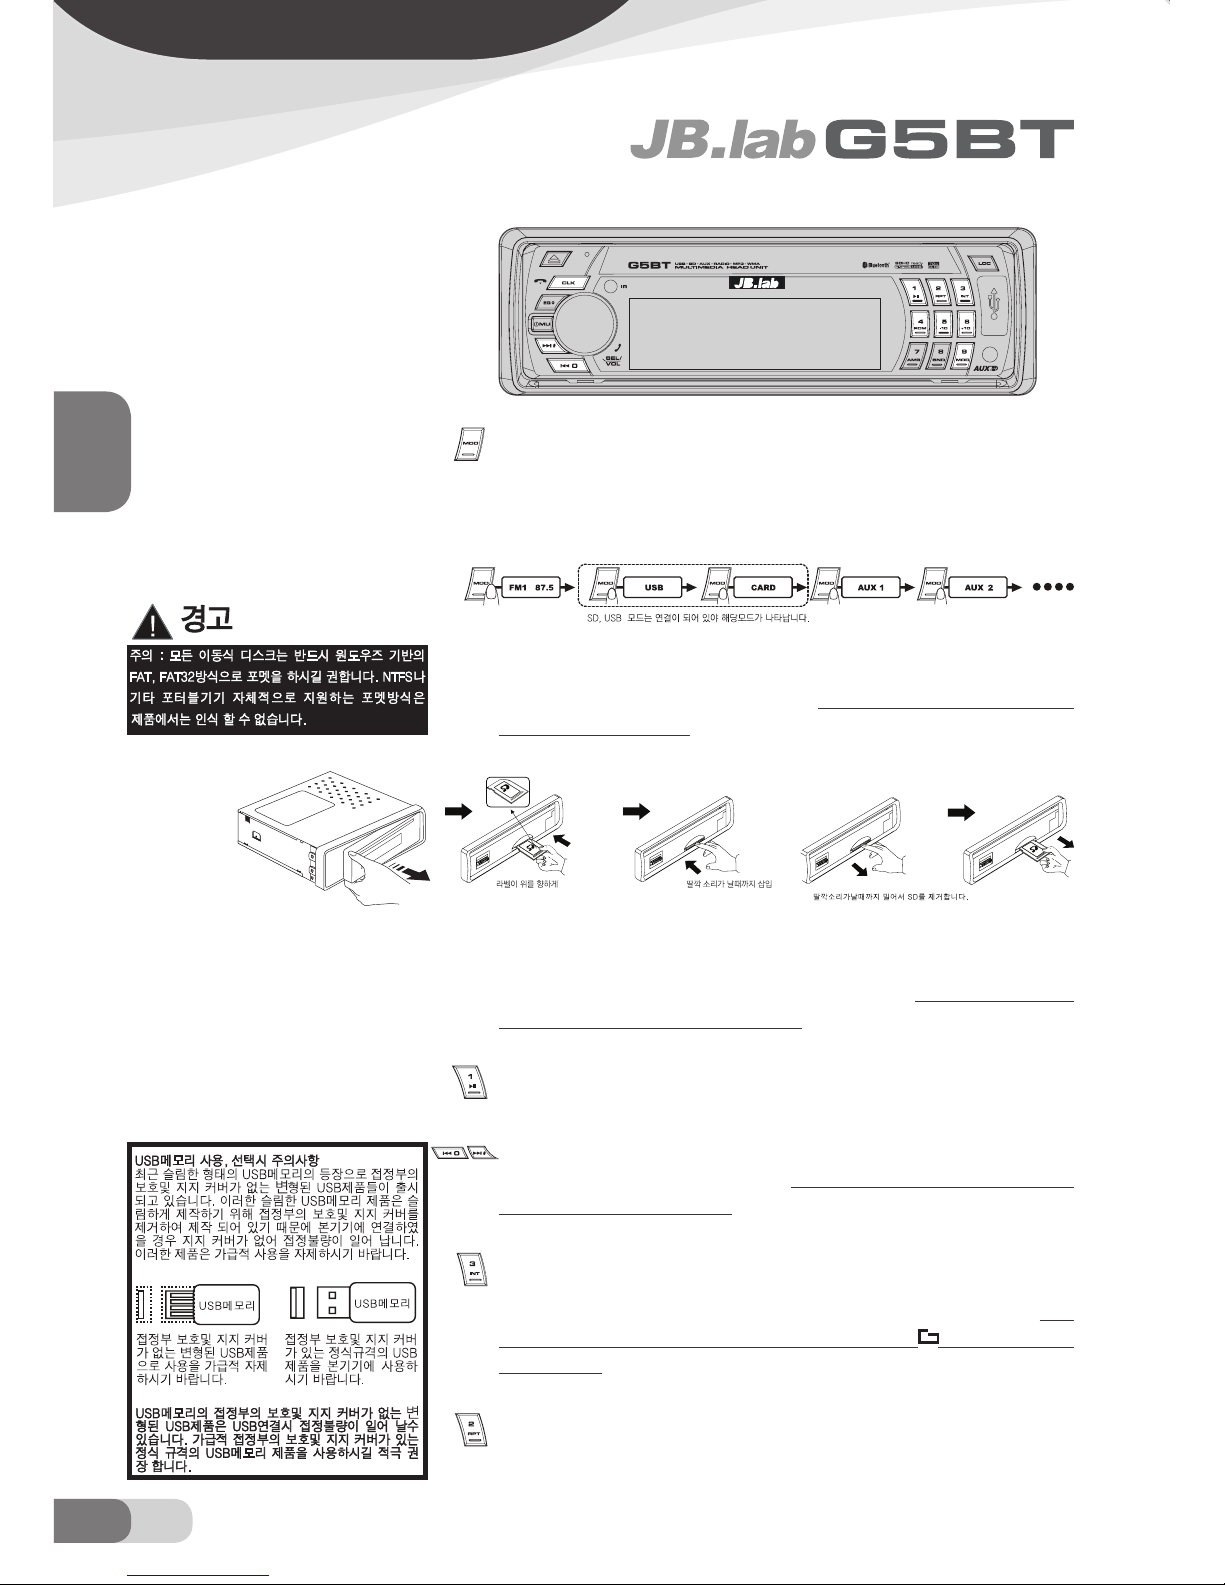
SD 연결 및 분리 : SD의 라벨면이 위로 향하도록 하여 SD를 ‘딸깍’하는 소리가 날때까지 삽입하
시면 자동으로 동작합니다. SD를 배출하기 위해서는 패널을 열고 SD를 ‘딸깍’하는 소리가 날때
까지 밀어 주시면 자동으로 SD가 배출 됩니다. 가급적 SD 분리시 오디오를 끄거나 다른 모드로 전
환후 SD를 제거하시기 바랍니다.
USB 연결 및 분리 : 메모리를 연결하면 액정에 ‘READING’라는 문구와 함께 USB 모드가 전환됩
니다. USB 메모리를 분리하면 다른 미디어(모드)로 전환됩니다. 가급적 USB 분리시 오디오를 끄거
나 다른 모드로 전환후 USB를 제거하시기 바랍니다.
PAUSE (일시정지) : 이 버튼을 한번 누르면 디스크의 재생이 일시적으로 정지됩니다. 다시 한번 버튼
을 누르면 디스크는 일시정지 되었던 부분부터 재생됩니다.
트랙이동 : 이전 트랙 / 다음 트랙 버튼을 한번 누르면 현재 재생되고 있는 곡의 이전 / 다음 곡을 자
동으로 재생합니다. 만일 현재 재생되고 있는 곡을 빨리 감기 / 되감기 하고 싶다면 이전 트랙 / 다음
트랙 버튼을 계속 누르고 있으면 됩니다.
INT (도입부) 재생 : INT버튼을 누르시면 현재 디스크상의 각 트랙의 도입부 몇초가 재생됩니다. 그리
고 “INT”메시지가 액정에 나타납니다. 다시한번 누르시면 도입부가 정지되고 트랙이 원래대로 재
생됩니다. “INT” 메시지는 사라집니다. 폴더가 있는 MP3/WMA 디스크가 재생되고 있을시 INT버
튼을 약 2초간 누르면 현재 재생중인 폴더안 곡들의 도입부만 재생되며“
INT”이란 메시지가 액
정에 나타납니다. 다시 한번 버튼을 누르면 폴더내 도입부 재생이 해지 됩니다.
RPT (반복) 재생 : 반복재생기능으로 RPT버튼을 누르면 액정에 “RPT”라고 나타나고 현재 재생되
고 있는 트랙은 계속적으로 반복되어집니다. 버튼을 다시 한번 누르면 현재 재생되는 트랙이 재생을
마쳤을 때 자동적으로 다음 트랙을 재생합니다.
<SD 탈거>
Page 39
39KOKO
미디어 작동법
KOREA
폴더가 있는 MP3/WMA 디스크가 재생되고 있을시 RPT버튼을 약2초간 누르면 현재 재생중인 폴더내의
트랙들만 반복재생하며 액정화면에 “
RPT”라 나타나며 폴더반복 재생됩니다.“ RPT”상태
에서 트랙이동 버튼을 누르시면 현재 재생되고 있는 폴더내에서만 이동이 가능합니다. 다시 RPT버튼을
누르시면 기능이 해제되고 미디어내의 트랙 순서대로 재생됩니다.
RDM (무작위) 재생 : RDM 버튼을 누르면 액정에 “ RDM ”이라 나타나며 현재 재생되는 미디어내의 트
랙 순서와 상관없이 무작위로 재생합니다. 버튼을 다시 누르시면 현재 재생되는 트랙이 재생을 마쳤을 때
순서대로 다음곡을 재생합니다. RDM 버튼을 약2초간 누르시면 액정에 “
RDM ”이라 나타나며 현
재 재생중인 폴더내의 곡들을 순서와 상관없이 무작위로 재생합니다. 버튼을 다시 한번 누르면 현재 재생
되는 트랙이 재생을 마쳤을 때 순서대로 다음 트랙을 재생합니다.
5번, 6번 (10곡 단위이동) :
버튼 이나 버튼을 누르시면 현재 재생중인 곡에서 10곡 이동/재생합니
다. 길게 누르시면 현재 재생중인 폴더에서 이전폴더/다음폴더로 이동 재생합니다.
ID 3-TAG : 재생시에 트랙 재생시간과 파일명을 번갈아 가며 보여주며, CLK 버튼을 누를때마다 앨범 →
트랙 순서 → 현재시간 → 현재 재생중인 폴더 → 타이틀 → 아티스트 순으로 MP3 파일의 ID3-Tag 정보
를 보여줍니다. (MP3 파일이 들어 있는 미디어에서만 적용되는 기능입니다. ) 만일 해당 음악 파일에 ID3
TAG기록이 모두 기록되어 있지 않고 부분적으로만 기록되어 있다면 기록 되어진 ID3 TAG 정보까지만
액정에 표시되고, 나머지 미 입력된 ID3 TAG 정보는 ‘ NO TITLE’, ‘NO ARTIST’, ‘NO ALBUM’
이라고 액정에 표시 될것 입니다.
G5
Page 40
블루투스
블루투스는 에릭슨·노키아·IBM·인텔·도시바 등 5개 업체가 지난 98년에 결성한 블
루투스 스페셜 그룹(SIG:Special Interest Group)에서 공동 개발한 근거리 무선 네트워킹
기술입니다. 블루투스 기술은 가정이나 사무실 내에 있는 노트북, 프린터, 스마트폰, 타블
릿PC 등 정보통신기기는 물론 각종 디지털 가전제품간의 통신에 물리적인 케이블없이 무
선 주파수를 이용, 고속으로 데이터를 주고받을 수 있습니다. 블루투스는 2.45㎓ 주파수를
이용해 클래스 별로 약 10~100m범위 안에서 각종 기기를 무선으로 연결해 주며, 본 기기
2는 클래스 II가 탑재된 기기로 최대 전송 범위는 10m입니다.
· 블루투스 기술이 사용된 스마트폰 등을 통해 무선으로 음악 즐기기 (장치에서 A2DP 를 지원해야합니다.)
· 블루투스 기술이 사용된 휴대폰을 통해 핸즈프리로 통화 (장치에서 HSP 를 지원해야합니다.)
· 블루투스 연결을 통해 음악 플레이어 기능에 대한 기본적인 리모컨 작동 (장치에서 AVRCP 를 지원해야 합니다.)
· 간섭이 적고 전력 소모가 낮고 고품질 오디오를 위한 블루투스
블루투스 프로필
이 장치가 지원하는 블루투스 프로필은 다음과 같습니다.
- HSP (Hands Free Profile)
- A2DP (Advanced Audio Distribution Profile)
- AVRCP (Audio/Video Remote Control Profile)
주의사항
- 블루투스 기능을 사용하려면 연결하려는 블루투스 장치에 본기기와 동일한 프로파일이 있어야 합니다. 또한 동일
한 프로파일이 있더라도 장치 사양에 따라 장치의 기능이 다를 수 있다는 점 주의하십시오.
- 블루투스 무선 기술의 특징으로 인해 전화 통화나 음악을 감상하는 동안에는 본 기기에서 재생되는 사운드가 블루
투스 장치에서 재생되는 사운드보다 약간 늦게 재생됩니다.
- 블루투스 장치 및 무선랜은 동일한 주파수를 사용하기 때문에 본기기를 무선랜 장치 근처에서 사용하는 경우 전파
간섭이 발생하여 통신 속도 저하, 노이즈 발생 또는 연결이 잘못될 수 있습니다.
- 연결되어 있는 장치가 위에서 언급한 Bluetooth 표준을 따르더라도 장치의 기능 또는 사양에 따라 일부장치가 연
결되지 않거나 작동하지 않을 수 있습니다.
블루투스 작동을 위한 준비
1. 블루투스 사용시 꼭 본인이 휴대하고 있는 휴대폰의 기종이 블루투스 기능을 지원하는지 알아보시기
바랍니다.
2. 각 휴대폰의 블루투스 성능에는 차이가 있을수도 있습니다.최고품질의 통화를 위해선 기기와 휴대폰간
의 거리를 3미터 이내로 하시길 권장 드립니다.그리고 휴대전화와 기기 사이에 어떠한 금속물질도 두지 마
시길 바랍니다.
3. 시중에 나와 있는 블루투스 오디오 플레이어의 종류가 워낙 많기 때문에, 본 기기를 이용해 블루투스 오디
오 플레이어를 작동하는 방법도 크게 다를 수 있습니다. 본 기기에서 플레이어를 사용할 때에는 블루투스 오
디오 플레이어와 함께 제공된 사용 설명서와 함께 본 설명서를 참조하시기 바랍니다.
4. 블루투스 무선 기술을 통해 본 기기에 연결된 휴대폰으로 통화를하는 경우, 본 기기에 연결된 블루투스 오
디오 플레이어의 노래 재생음이 소거 됩니다.
KOREA
40 KO
블루투스
주의 : 블루투스 기능을 사용하려면 연결하려는 블
루투스 장치에 본기기와 동일한 프로파일이 있어
야 합니다. 또한 동일한 프로파일이 있더라도 장치
사양에 따라 장치의 기능이 다를 수 있다는 점 주
의하십시오.
블루투스 무선 기술의 특징으로 인해 전화 통화나
음악을 감상하는 동안에는 본 기기에서 재생되는 사
운드가 블루투스 장치에서 재생되는 사운드보다 약
간 늦게 재생됩니다.
블루투스 장치 및 무선랜은 동일한 주파수를 사용하
기 때문에 본기기를 무선랜 장치 근처에서 사용하는
경우 전파 간섭이 발생하여 통신 속도 저하, 노이즈
발생 또는 연결이 잘못될 수 있습니다.
당사는 블루투스 통신 도중 정보노출에 대해 책임
을 지지 않습니다.
연결되어 있는 장치가 위에서 언급한 Bluetooth 표준
을 따르더라도 장치의 기능 또는 사양에 따라 일부장
치가 연결되지 않거나 작동하지 않을 수 있습니다.
Page 41
41KO
블루투스
KOREA
PAIRING
블루투스 장치끼리는 미리 “페어링”을 해주어야합니다.
페어링이란 블루투스 장치끼리 서로 연결하는 것을 의미합니다. 일단 블루투스 장치를 페어링
하면 다시 페어링 할 필요가 없습니다.
· 페어링 절차는 블루투스 장치에 마다 약간씩 차이가 있으니, 각 장치의 설명서를 참조하십시오.
· G5BT 와 블루투스 장치의 패어링은 반경 1m 이내에서 하십시오.
· G5BT 를 켜면, 자동으로 블루투스 장치와 연결됩니다. 만약 다른 블루투스 장치와의 연결을 원하실 때에는 현재
연결된 블루투스 장치의 블루투스 기능을 꺼주신후, 연결을 원하시는 장치와 패어링을 해주시면 됩니다.
1. 모드버튼을 눌러 BLUETOOTH 모드로 전환하시면, 액정상에 “PAIRING MODE”이란 문구가 나타납니다.
2. 휴대 전화에서 블루투스 설정을 선택하십시오.(휴대폰 제조사의 블루투스 작동설명서를 참조하시길 바랍니다.)
3. 휴대폰의 검색목록에서 “CAR KIT”을 선택해주시고 패스워드“0000”을 입력해주시기 바랍니다.
4. 연결에 성공하였다면“BLUETOOTH READY” 란 문장이 액정에 나타납니다.
5. 연결에 실패하였다면 몇초안에 다시 연결을 시도하실수 있습니다.
6. 블루투스 이전 연결정보 삭제는 블루투스 연결이 되지 않은상태에서 볼륨버튼을 길게 누르면 “MEMORY
RESET”이라고 출력되며 이전연결 정보가 삭제됩니다.
재연결
이 제품은 자동재연결 기능을 가지고 있습니다. 플레이 버튼을 짧게 누르실 때마다 자동으로
휴대전화와 연결이 될것입니다. (휴대전화는 반드시 그전에 기기와 연결되어있어야 합니다.)
플레이 버튼을 짧게 한번 누르면 “BLUETOOTH READY” 란 메시지가 액정화면에 나타나
며 자동으로 다시 연결하실수 있습니다. 그리고 연결이 성공하면 “DEVICE CONNECTED”
란 메시지가 액정화면에 나타납니다.
· 만약 휴대전화가 일정거리를 벗어났다면 그 기기연결은 실패합니다. 기기로의 연결이 필요합니다
· 휴대전화가 기기에서부터 일정범위 밖으로 벗어났을 때와 외부전화가 왔을 때,그리고 기기본체메뉴로 돌아갔을때와 기기
본체로의 오디오전송을 원하시면 휴대전화와의 재연결이 필요합니다.
·
(패널탈거)버튼을 누르면 전면패널이 탈착이되면서 연결이 해제될수도 있으므로 재연결을 해주시기 바랍니다.
· 만약 휴대전화가 기기와 연결이 된상태에서 전원이 꺼졌다면 전원을 다시켰을 때 기기와의 재연결이 필요합니다.
Page 42
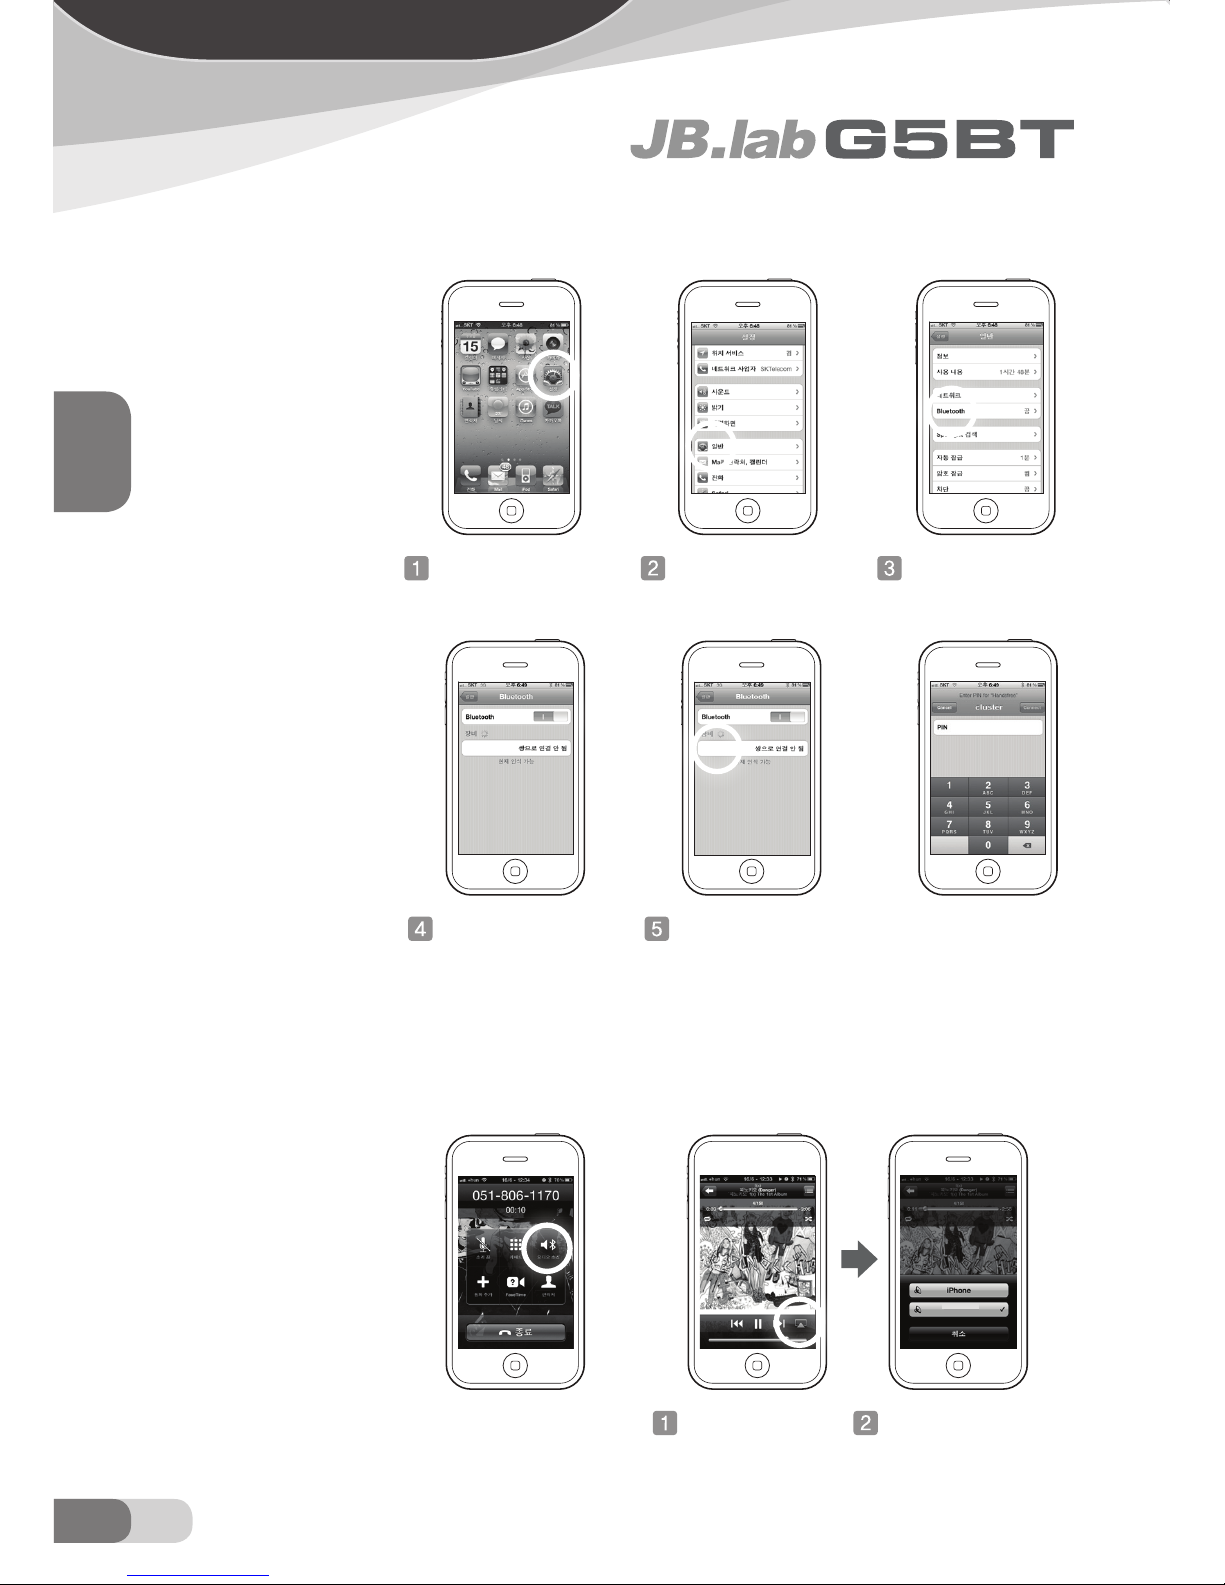
iOS 운영체제 (iPhone, iPod, iPad) 페어링하기
iOS를 사용하는 아이폰, 아이팟, 아
이패드 기기는 다음과 같은 방법으로
패어링을 하시면 됩니다.
아이폰의 “설정” 아이
콘을 선택합니다.
설정에서 “일반”을 선
택합니다.
일반에서 “Bluetooth”
를 선택합니다.
iOS 를 사용하는 기종에 따라 비밀번
호를 요청할수도 있습니다. 비밀번호
요청시 “0000”을 입력해주세요.
블루투스 기능을 켜면 장
비검색을 시작합니다.
검색된 리스트에서
“CAR KIT”를 선택하면
자동연결됩니다.
핀번호를 요청시 “0000”
을 입력하세요
KOREA
42 KO
페어링/소스전환
iOS 운영체제 (iPhone, iPod, iPad) 소스 전환하기
음원 재생 중 전화가 걸려오면 재생중
인 노래는 일시정지가 되며 통화 종료
후 자동으로 재생됩니다.
일부 블루투스 기기 또는 실행 프로그
램에 따라 자동재생이 되지 않을수도
있습니다.
*통화 종료후 음원이 연결된 블루투스 장
치가 아닌 휴대폰에서 나온다면 출력 소스
를 “CAR KIT”선택하십시오.
통화 오디오 소스를 선택시 미디어 재생 소스를 선택시
만약 본 기기가 아닌 폰
으로 통화를 원할시
“iPhone”을 선택하
십시오.
실행중인 프로그램 하단
의 소스선택 버튼을 선
택합니다.
음원 출력을 원하는 소스
를 선택합니다.
CAR KIT
CAR KIT
CAR KIT
Page 43
43KO
페어링/소스전환
KOREA
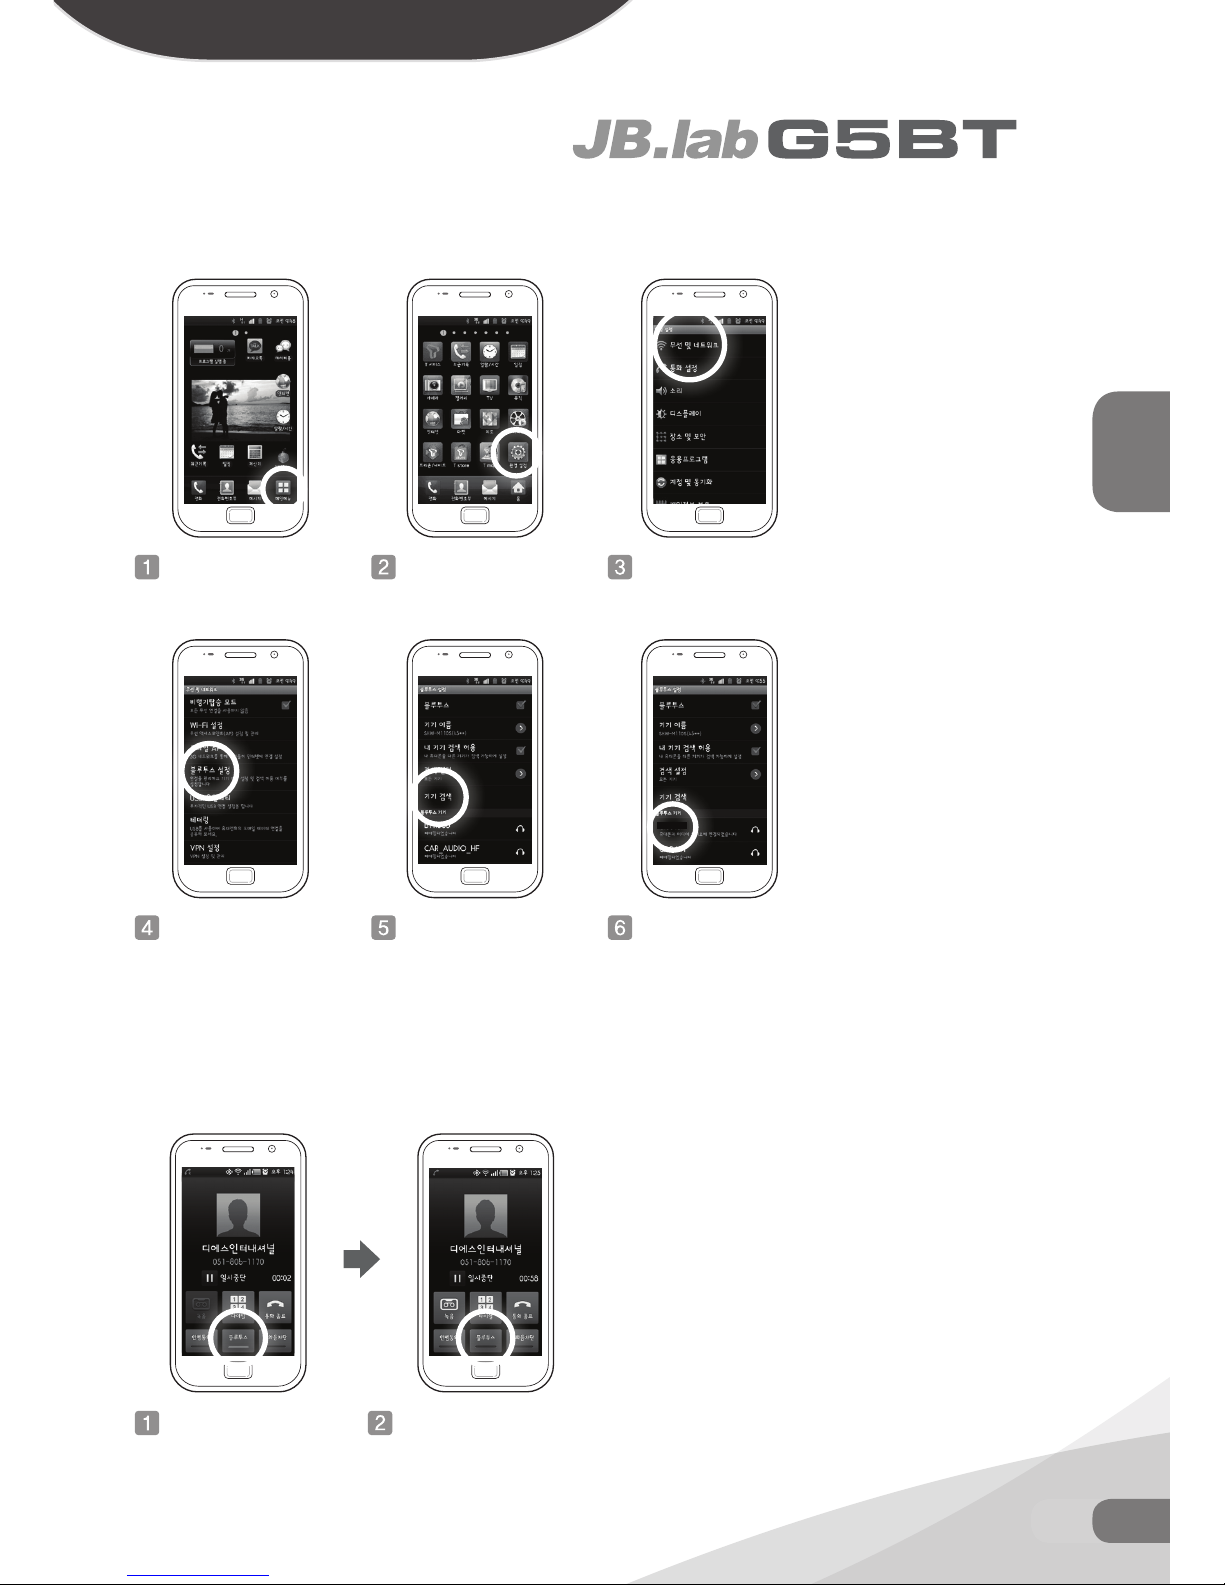
안드로이드 운영체제 (갤럭시S, 갤럭시탭, 베가, 옵티머스 등) 페어링하기
안드로이드 운영체제를 사용하는 갤
럭시s, 갤럭시탭, 베가, 옵티머스 등
기기는 다음과 같은 방법으로 페어링
을 하시면 됩니다.
바탕화면의“메인메뉴”
아이콘을 선택합니다.
메인메뉴에서 “환경설
정”을 선택합니다.
환경설정에서 “무선
및 네트워크”를 선택
합니다.
사용하는 기종에 따라 비밀번호를 요
청할수도 있습니다. 비밀번호 요청시
“0000”을 입력해주세요.
검색된 기기 목록에서
“CAR KIT”를 선택하면
연결됩니다.
무선 및 네크워크의“
블루투스 설정”을 선택
합니다.
블루투스 설정에서 “기
기 검색”을 선택합니다.
안드로이드 운영체제 (갤럭시S, 갤럭시탭, 베가, 옵티머스 등) 소스 전환하기
휴대폰으로 통화를 원할시에는 블루투
스탭을 비활성화 시켜주셔야 모바일폰
으로 통화가 가능합니다.
*통화시 소스전환은 모바일폰의 기종, 펌
웨어 버전, 블루투스 버전에 따라 달라지
므로 필요하지 않을 수 있습니다.
통화 오디오 소스를 선택시
만약 본 기기가 아닌 폰으
로 통화를 원할시 블루투
스 탭을 비활성화하세요.
블루투스 탭이 비활성되
면 모바일폰으로 통화가
가능합니다.
CAR KIT
Page 44
블루투스 설정
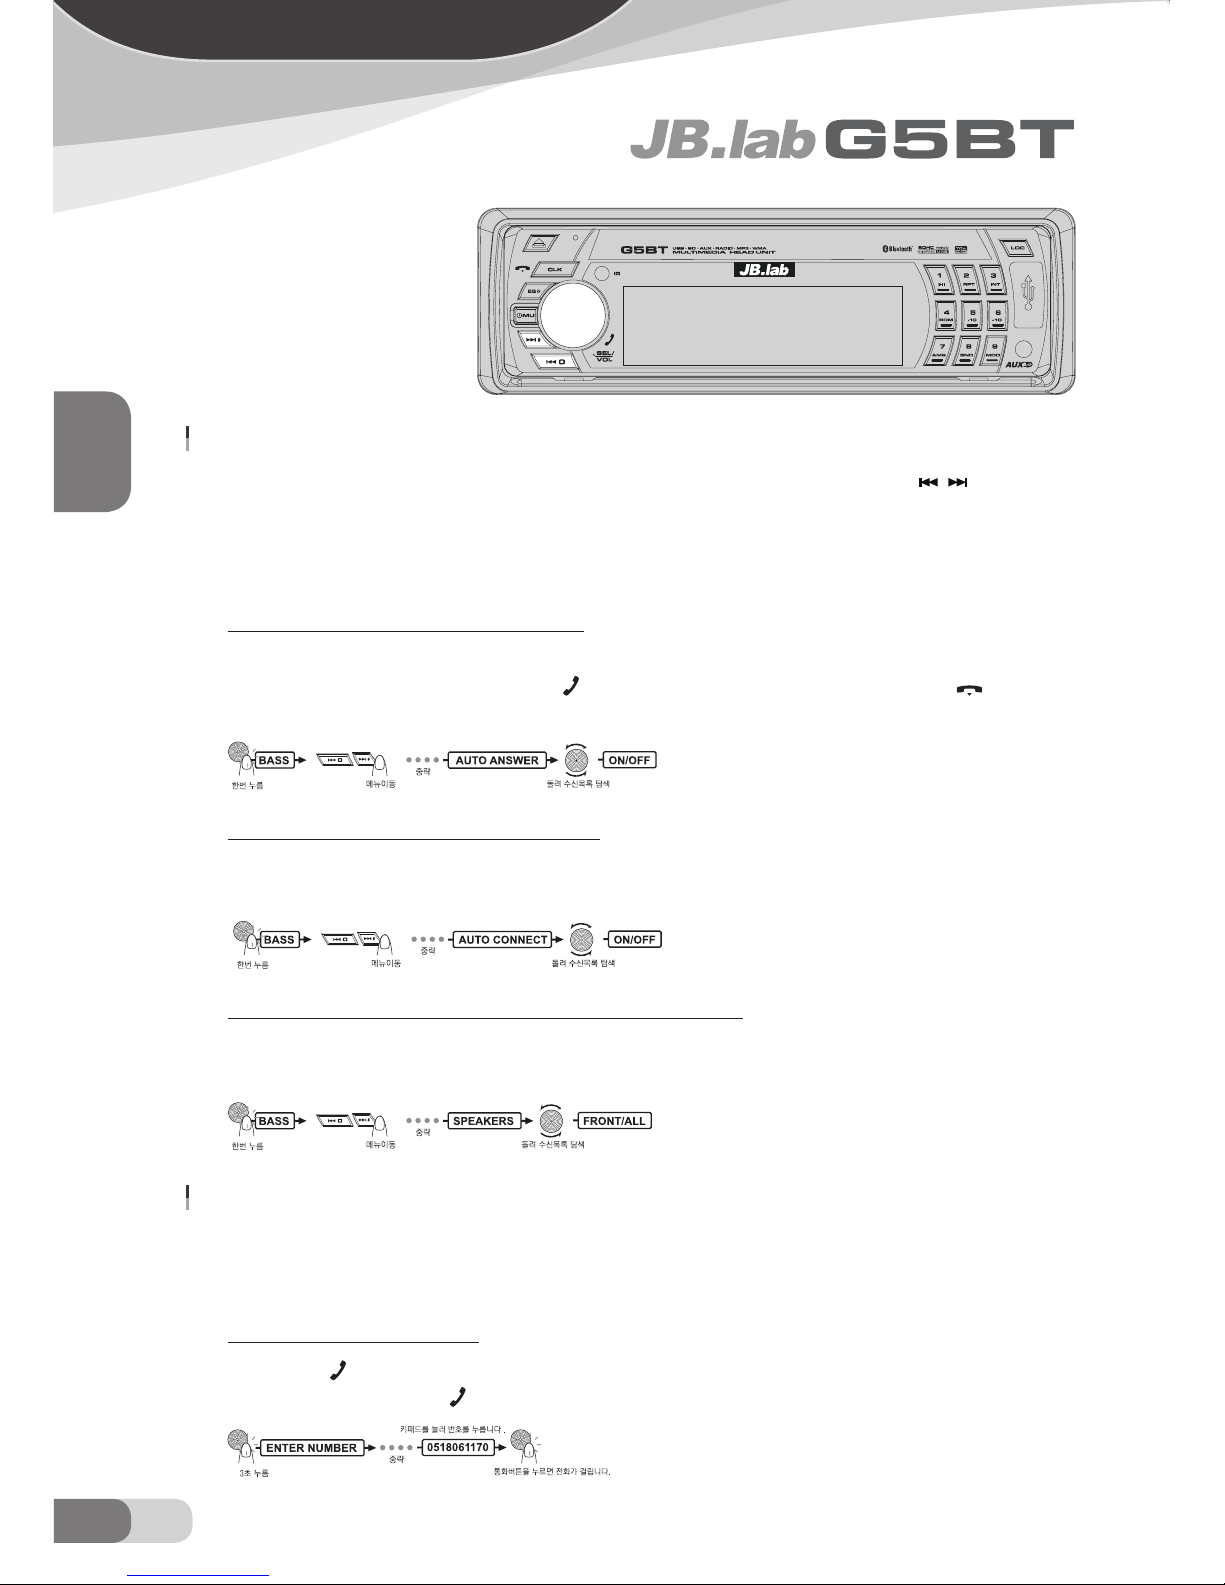
G5BT 전면판넬의 SEL 버튼을 짧게 누르시면 전화 관련 설정 메뉴로 들어갈수있습니다. 세부항목 이동은 를 누르면 해당
항목이 이동가능하며, 볼륨다이얼을 돌려 설정값을 변경하실 수 있습니다. SEL 버튼을 한번 더 누르시면 설정을 빠져나갑니다.
BASS → TREBLE ··· AUTO ANSWER (ON/OFF) → AUTO CONNECT (ON/OFF) → SPEAKERS (FRONT/ALL)
AUTO ANSWER (자동응답설정 - 끄고, 켜기)
자동응답 모드에서 전화수신시 약 5초이후 자동으로 통화 수락이되어 통화가 가능하도록 하는 기능입니다. 자동 응
답 모드가 비활성화되어 있다면 전화수신시“
”버튼을 누르시면 통화가 가능하며, 수신거부는“ ”버튼을 누
르시면 됩니다.
AUTO CONNECT (자동연결설정 - 끄고, 켜기)
연결된 블루투스 장치(스마트폰, 타블렛 PC 등) 가 유효반경내에 있을경우 자동으로 연결하는 기능입니다. 스마트폰
과 호환여부에 따라 수초의 시간이 걸릴수 있으며, 빠른 연결을 위해 G5BT의 플레이 버튼을 눌러주시기 바랍니다.
SPEAKERS (통화시 스피커 출력 선택 - 전방스피커, 모든스피커)
전화수신시 통화 출력을 전면스피커 또는 모든 스피커에서 선택하실 수 있습니다. FRONT 선택시 전면스피커에서만
통화 목소리가 출력되며 후방스피커에는 통화출력이 되지 않습니다.
전화 걸기
단축다이얼, 수신번호목록, 발신번호목록,부재중통화목록, 전화번호부(휴대전화), 전화번호부(SIM 카드) 에서의 전화발신
은 T-MENU 부분을 참고 하시길 바랍니다.
다이얼패드를 이용하여 전화걸기
전면 판넬의“
”버튼을 길게 누르시면“ENTER NUMBER”문구가 액정에 나타나며 숫자버튼 “0 ~ 9, *, #” 버튼
으로 전화번호를 입력하시고“
”버튼을 누르시면 전화를 거실 수가 있습니다.
KOREA
44 KO
블루투스
Page 45
45KO
블루투스
KOREA
최근 통화내역으로 전화걸기
전면 판넬의“
”버튼을 누르시면“RECENT”문구가 액정에 나타나며, 볼륨다이얼을 돌려 최근 통화내
역 10건을 확인하실 수 있습니다. 최근 통화내역 확인중“
”버튼을 누르시면 해당 번호로 전화를 거실 수가
있습니다.
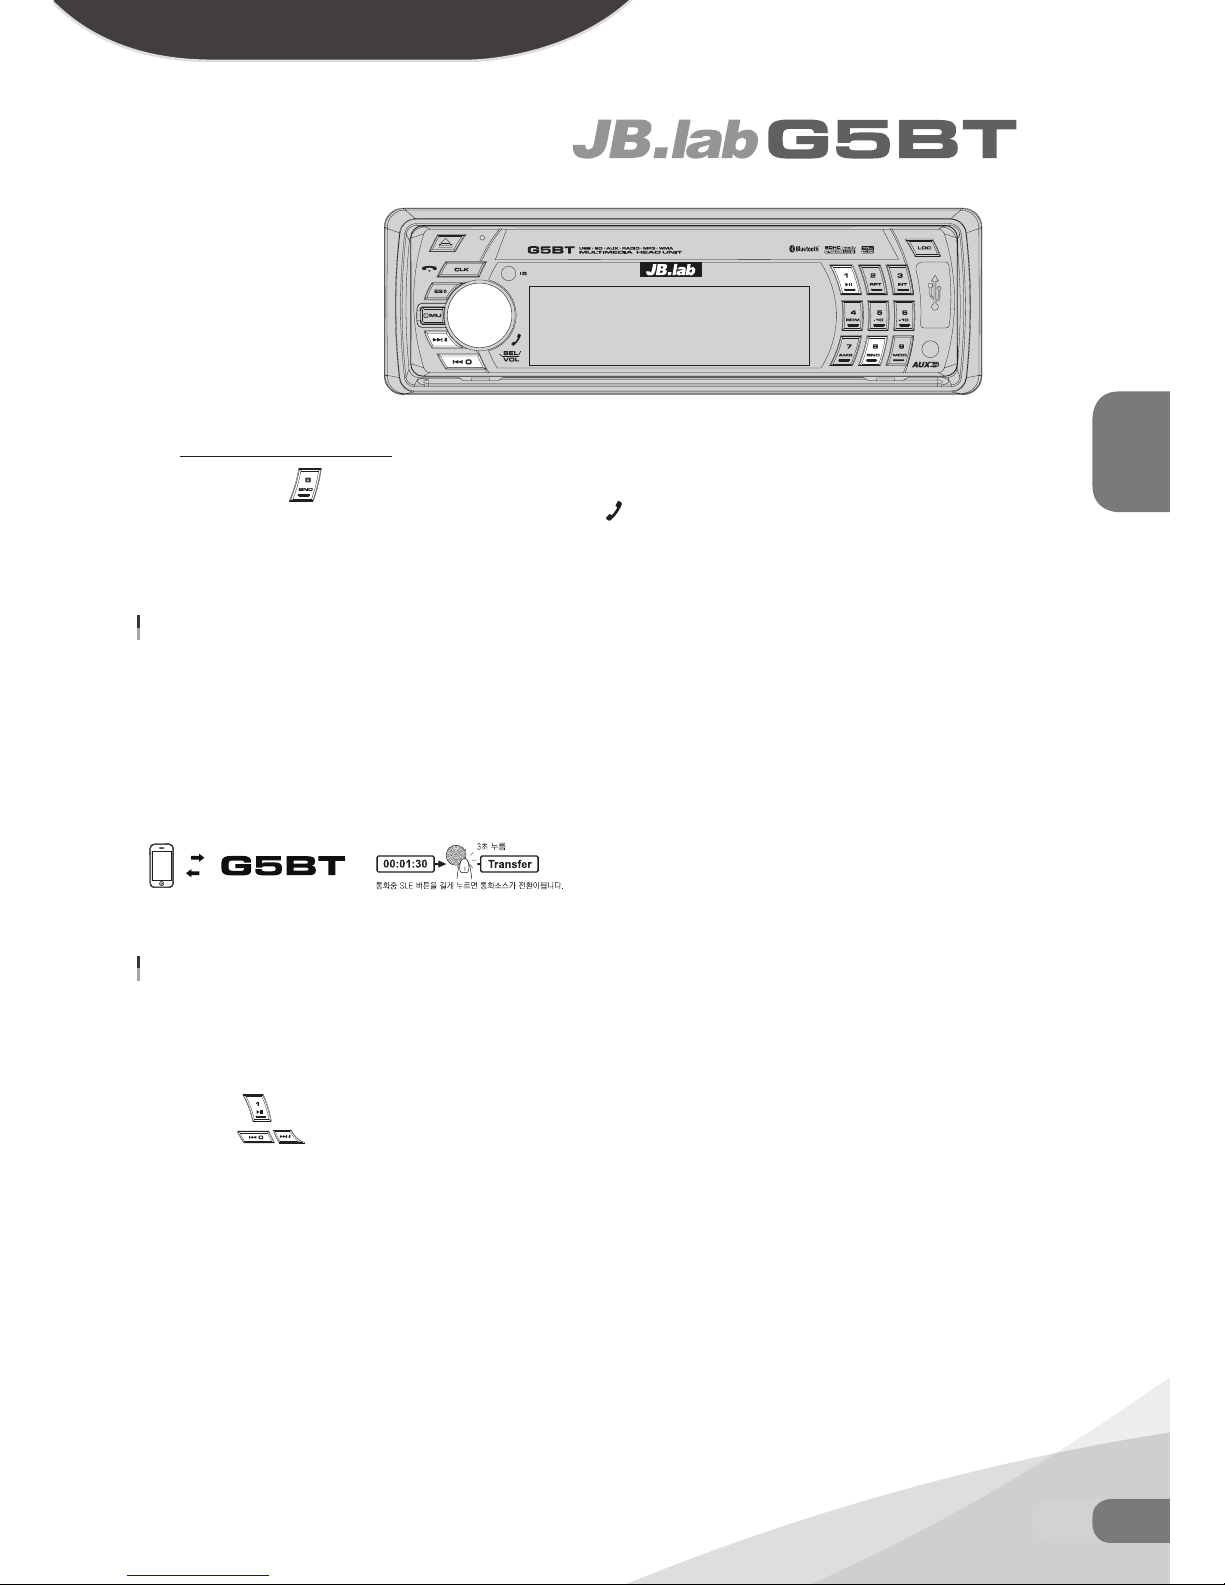
통화중 연결기기(G5BT ↔ 휴대폰)전환
차내에 동승자가 있어 통화를 휴대폰으로 받고 싶을시에는, 통화중“SEL”버튼을 길게 누르시면 휴대폰으로 통화
가능하며 액정상에 “TRANSFER”란 문구가 표시됩니다. 그 반대로 경우도“SEL”버튼을 길게 누르시면 전환이
가능하십니다.
A2DP 스트리밍 중에 전화가 걸려와 통화 가능 소스를 휴대폰으로 전환하셨다면 통화종료후 음악이 차내 스피커가
아닌 휴대폰에서 재생이 될수 있습니다. 이때는 기기의 출력소스를 G5BT 로 전환을 해주셔야 합니다. (소스전환하
기 P.42-43 참고)
블루투스 기능을 이용한 음악감상/조작하기(A2DP, AVRCP 기능)
블루투스 기술이 사용된 스마트폰, 타블릿PC와 연결이 되었을 때 연결된 기기에서 재생되는 소리(음악, 게임효과음,
영화 등)를 차량 스피커로 청취하실 수 있습니다.*
1
블루투스 연결을 통해 음악 플레이어 기능에 대한 기본적인 리모컨 작동이 가능합니다.*
2
전면판넬의 버튼은 제어버튼인 일시정지/재생과 같습니다.(연결된 기기에 따라서 기능이 다를수도 있습니다.)
전면판넬의
버튼을 사용하시면 이전트랙/다음트랙을 선택하실수 있습니다.(연결된 기기에 따라서 기능이
다를수도 있습니다.)
*1 연결된 블루투스 장치는 A2DP(Advanced Audio Distribution Profile)를 지원해야 합니다.
*
2
연결된 블루투스 장치는 AVRCP(Audio Video Remote Control Profile)를 지원해야 합니다.
Page 46
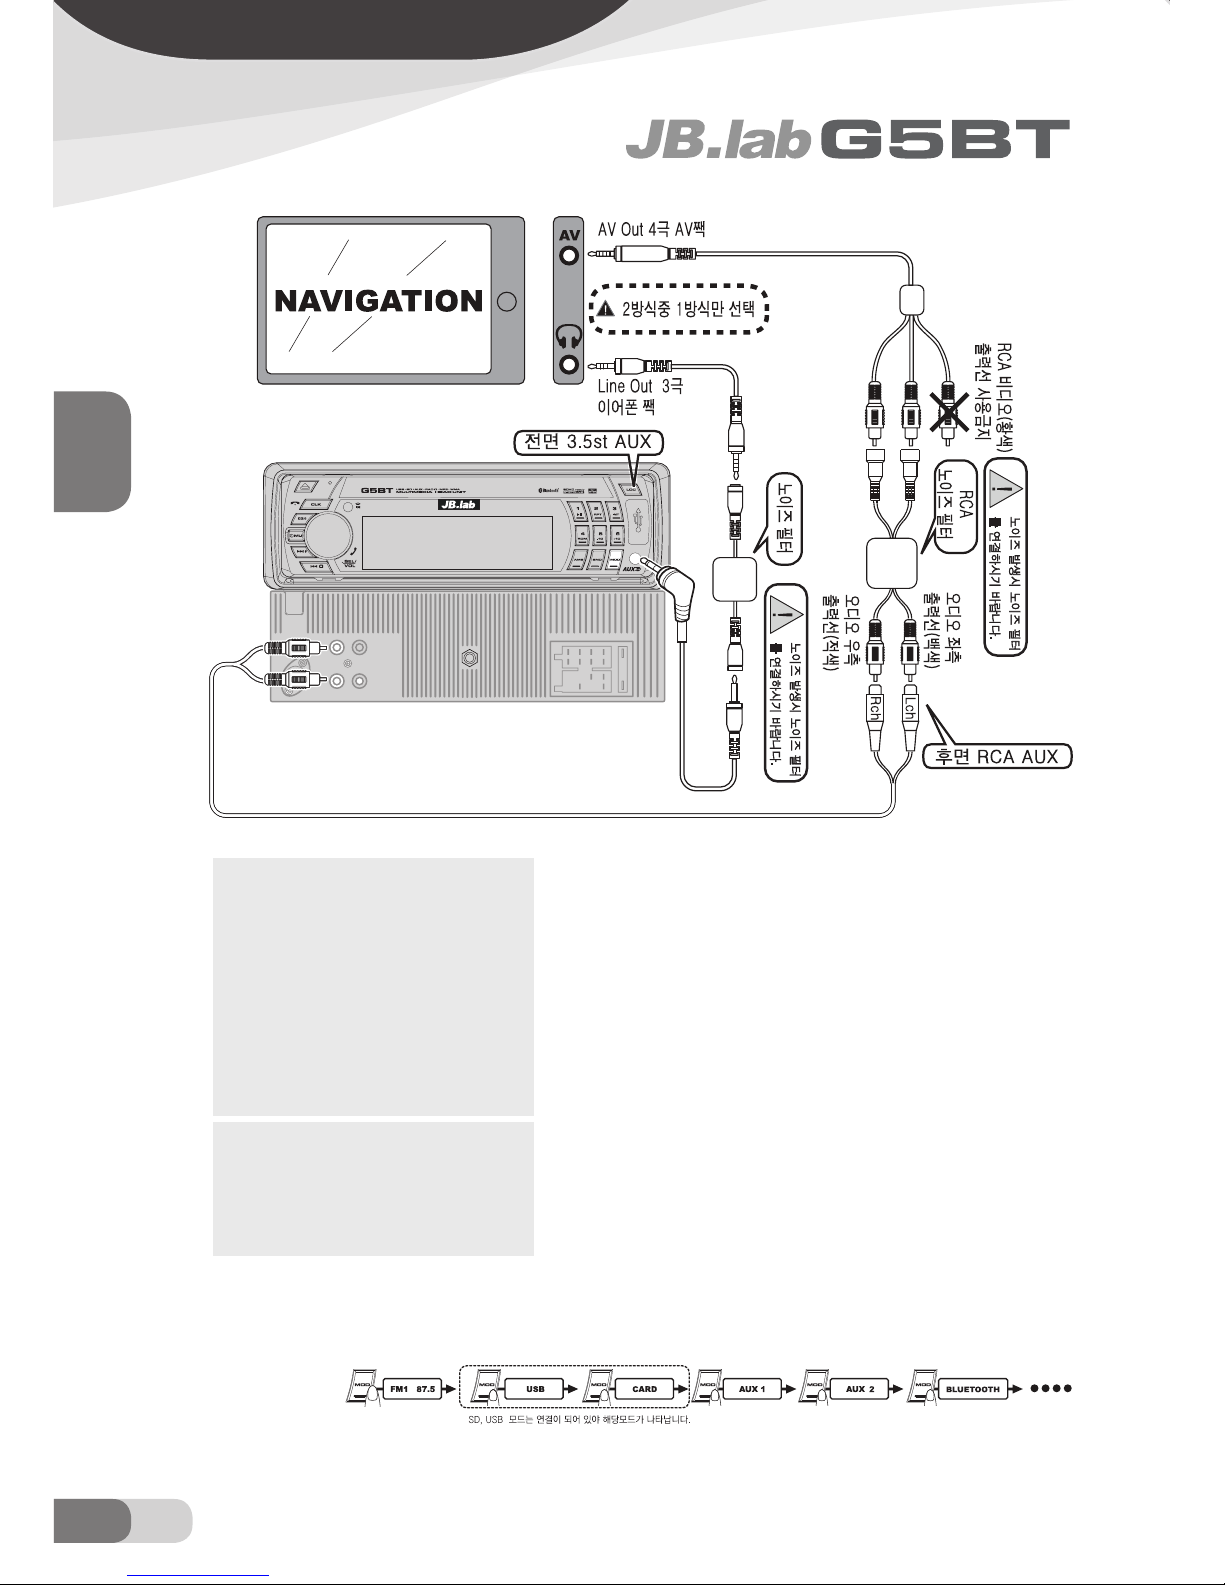
본 제품은 뒷면의 RCA 외부입력과 전면에 3.5 파이 3극 스테레오 외부입력부 두곳중 한
곳만 지원합니다.평소에는 네비게이션과 같은 고정적으로 사용하는 기기를 후면에 연결하
고, 전면은 스마트폰, 타블릿 PC 등과 같이 자주 연결, 해지 하는 포터블 기기위주로 사용
하시면 됩니다.
전면 AUX (AUX 1) : 3.5파이 3극 스테레오 짹(일반 이어폰짹)을 AUX에 사용하고 있습니다.
타블릿 PC, 스마트폰, 게임기, 노트북, 네비게이션 등의 음성 신호를 받아서 출력할 수 있고
AUX 단자가 전면에 있기 때문에 그 활용도가 뛰어납니다.
후면 AUX (AUX 2) : 일반 RCA 형태로 다양한 외부 기기의 음성을 출력할 수 있습니다. 네
비게이션, 게임기, 노트북, 타블릿 PC 등의 음성 신호를 받아서 출력할 수 있고, AUX 단자
가 후면에 있기 때문에 외부로 선이 보이지 않고 선처리를 할수 있기 때문에 깔끔하게 차량
내부로 연결 할 수 있습니다.
MODE 버튼 : 한번 누르실때마다 RADIO → USB → SD → AUX 1 → AUX 2 → BLUETOOTH
순으로 전환됩니다.
미디어(USB/SD)를 연결하지 않은 상태에서는 RADIO AUX 순서로 표시됩니다.
미디어(USB/SD)연결과 동시에 해당 미디어로 바로 넘어갑니다. 즉 가장 마지막에 연결한
미디어를 우선적으로 재생합니다.
외부기기의 음성 출력(AUX 모드)에도 볼륨조정, EQ, LOUD, 고음, 저음, 전후 좌우의 음향
설정을 적용하실 수 있습니다.
참고 : AUX를 통하여 잡음 등이 유입되신다면 크게 2가
지의 원인이 있습니다.
1번째의 경우는 해당 포터블기기의 음성 출력 볼테이
지가 너무 낮은 것입니다. 이는 포터블 기기의 특성상
이어폰에 더 최적화 되어 있기 때문입니다. 본 기기와
의 볼테이지 차이로 인하여 잡음이 증폭되면서 나타나
는 경우 입니다.
근본적으로 해결반안은 없으나 노이즈 필터를 추가 장착
하시면 어느정도는 완화 될 수는 있습니다.
2번째의 경우 시거짹으로 노이즈(전기)가 유입되는 경
우입니다.
근본적인 해결방안 없으나 시거잭이 아닌 직접적으로 전
선에 연결하시는 방법에 전원 노이즈 필터를 추가로 장
착하시면 상당히 완화 하실 수 있습니다.
주의 : 3.5파이 ST 3극짹의 제조사의 특징에 따라 극 배
열이 다른 경우도 있습니다. 배열이 다른 경우 본 기기와
연결이 불가합니다. 네비게이션, MP3 플레이어, 타블릿
PC 등을 AUX에 연결하시기 전에 볼륨조절을 하시여 큰
소리로 출력되지 않게 주의 하십시오.
소리가 너무 작은 경우 외부기기의 볼륨을 서서히 높
이시고 그 다음 본 기기의 볼륨을 올리시기 바랍니다.
46 KO
외부입력 작동법
KOREA
Page 47
47KOKO
리모컨 사용법
KOREA
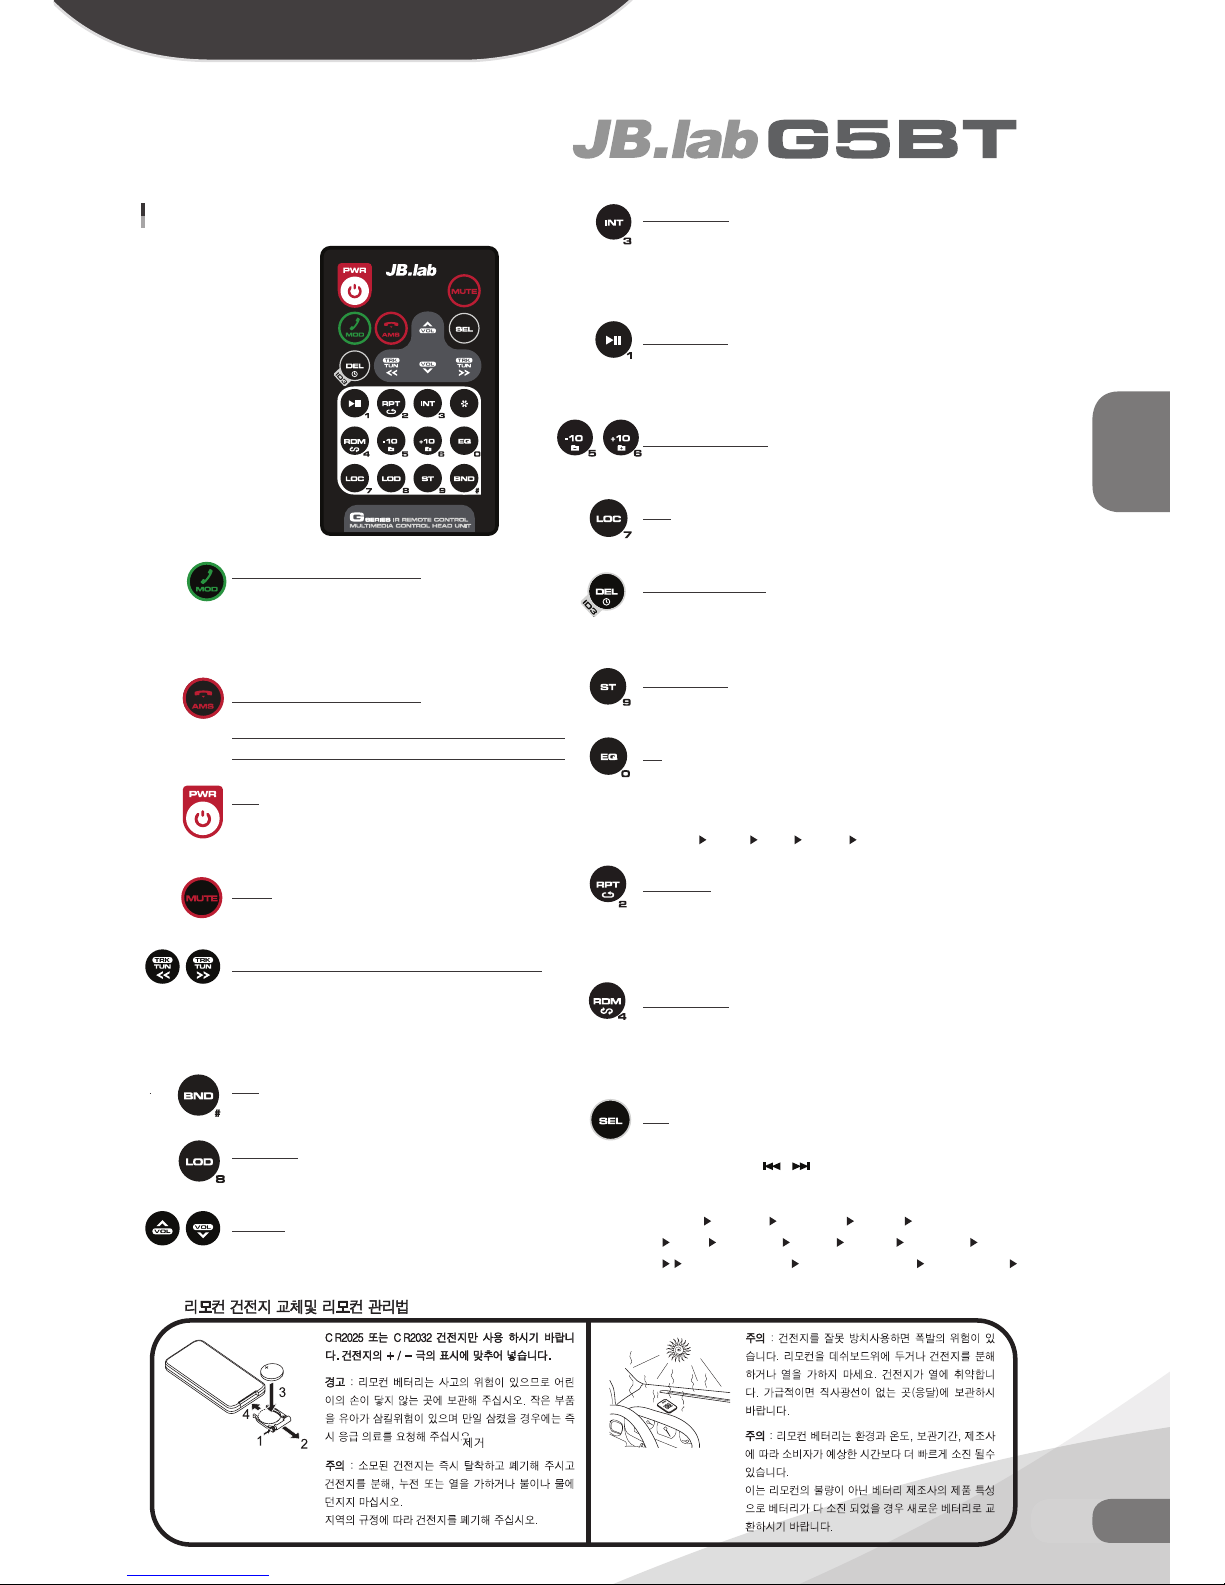
리모컨 사용법
모드전환 / 전화받기 / 전화발신
MOD 버튼을 짧게 누르면 RADIO, USB, SD CARD, AUX1 , AUX2
, BLUETOOTH 순으로 모드가 변경이 됩니다. 전화 수신시 전화를
받거나, 전화를 발신하실 수 있습니다.
폴더검색 / 전화끊기 / 수신거부
재생중인 미디어를 검색하실 수 있으며, 블루투스모드에서 이 버튼
을 누르시면 전화를 끊으시거나 수신전화를 거부하실수 있습니다 .
전원
기기가 꺼져있을시 누르면 전원이 켜지며, 켜져있을시 길게 누르
면 전원이 꺼집니다.
음소거
음소거 누르면 음소거가되며, 다시 한번 누르면 해제가 됩니다.
이전/다음 트랙, 빨리감기/되감기, 주파수 올림/내림
버튼을 짧게 누르시면 전트랙/다음트랙을 재생할수 있습니다.
버튼을 길게 누르시면 뒤로감기/앞으로감기가 가능합니다.
라디오 모드에서는 주파수 이동을 할수있습니다.
밴드
버튼을 누르시면 원하시는 주파수대역대를 찾으실수 있습니다.
라우드니스
버튼을 누르시면 LOUDNESS기능을 켜거나 끄실수 있습니다.
볼륨조절
음량을 증가, 감소 시키실수 있습니다.
도입부 재생, 3
MP3/WMA 파일 재생 시 버튼을 짧게 누르시면 디스크상의 모든 트랙의 도
입부만 재생됩니다. 버튼을 길게 누르시면 현재 폴더의 모든곡 들의 도입부
만 재생하실 수 있습니다.
재생/일시정지
재생이 일시정지됩니다. 다시한번 누르시면 재생이 다시 시작됩니다.
폴더이동 / 10곡 단윈
짧게 누르면 10 곡 단위이동 / 길게 누르면 폴더 이동을 합니다.
LOC
라디오 모드시 누르시면 LOCAL/DISTANT 전환을 합니다.
디스플레이 정보확인
표시 정보를 변경하실 수 있으며 MP3/WMA 파일을 읽는 중 일 때 이 버튼을
누르시면 시간 , 폴더, 노래제목,아티스트,앨범명을 확인하실 수 있습니다.
모노/스테레오
모노/스트레오 를 변경하실수 있습니다.
EQ
짧게 누르시면 이퀄라이져 기능을 켜실수 있으며 원하시는 음향모드를 선
택하실수 있습니다.
FLAT CLAS POP ROCK USER SET
반복재생, 2
이 버튼을 짧게 누르시면 같은 트랙이 연속적으로 재생됩니다. MP3/WMA
파일 재생시 이 버튼을 길게 누르시면 현재 폴더의 모든 곡들을 반복 재생
하실 수 있습니다.
무작위 재생, 4
이 버튼을 짧게 누르시면 디스크상의 모든 트랙이 임의로 재생됩니다. MP3/
WMA 파일 재생 시 이 버튼을 길게 누르시면 현재 폴더의 모든곡 들을 임의
로 재생하실 수 있습니다.
설정
SEL 버튼을 누르시면 설정 모드로 들어갈수 있으며 설정모드는 다음과 같
은 순서로 변경됩니다. / 버튼을 사용하여 해당항목을 선택하시고
버튼을 사용하시어 해당값을 정하실수 있습니다.
BASS TREBLE BALANCE FADER LCD CONTRAST
LCD DIMMER BEEP DEMO 24HOUR AREA
AUTO ANSWER AUTO CONNECT SPEAKERS
STEERING WHEEL CALIBRATION
Page 48
SPECIFIATION
GENERAL
Maximum Power output 4 x 70W
Suitable speaker impedance 4 - 8ohm
Wow and flutter Below measurable limits
Power Supply Requirements DC 12V, Negative Ground
Chassis Dimensions : 178 (W) x 155 (D) x 50 (H)
RADIO
For 2 Bands
(Asia)
FM
Frequency Coverage 87.5 to 108 MHz
Signal/noise ratio 60 dB
Usable sensitivity 10 dBu
Frequency response 30Hz - 15KHz
Image response ratio 50 dB
IF response ratio 70 dB
Stereo Separation >30dB(1KHz)
AM
Frequency Coverage 522 to 1620 kHz
Signal/noisse ratio 30 dBu
40 KO
스팩/초기화
KOREA
48 KO
스팩/초기화
KOREA
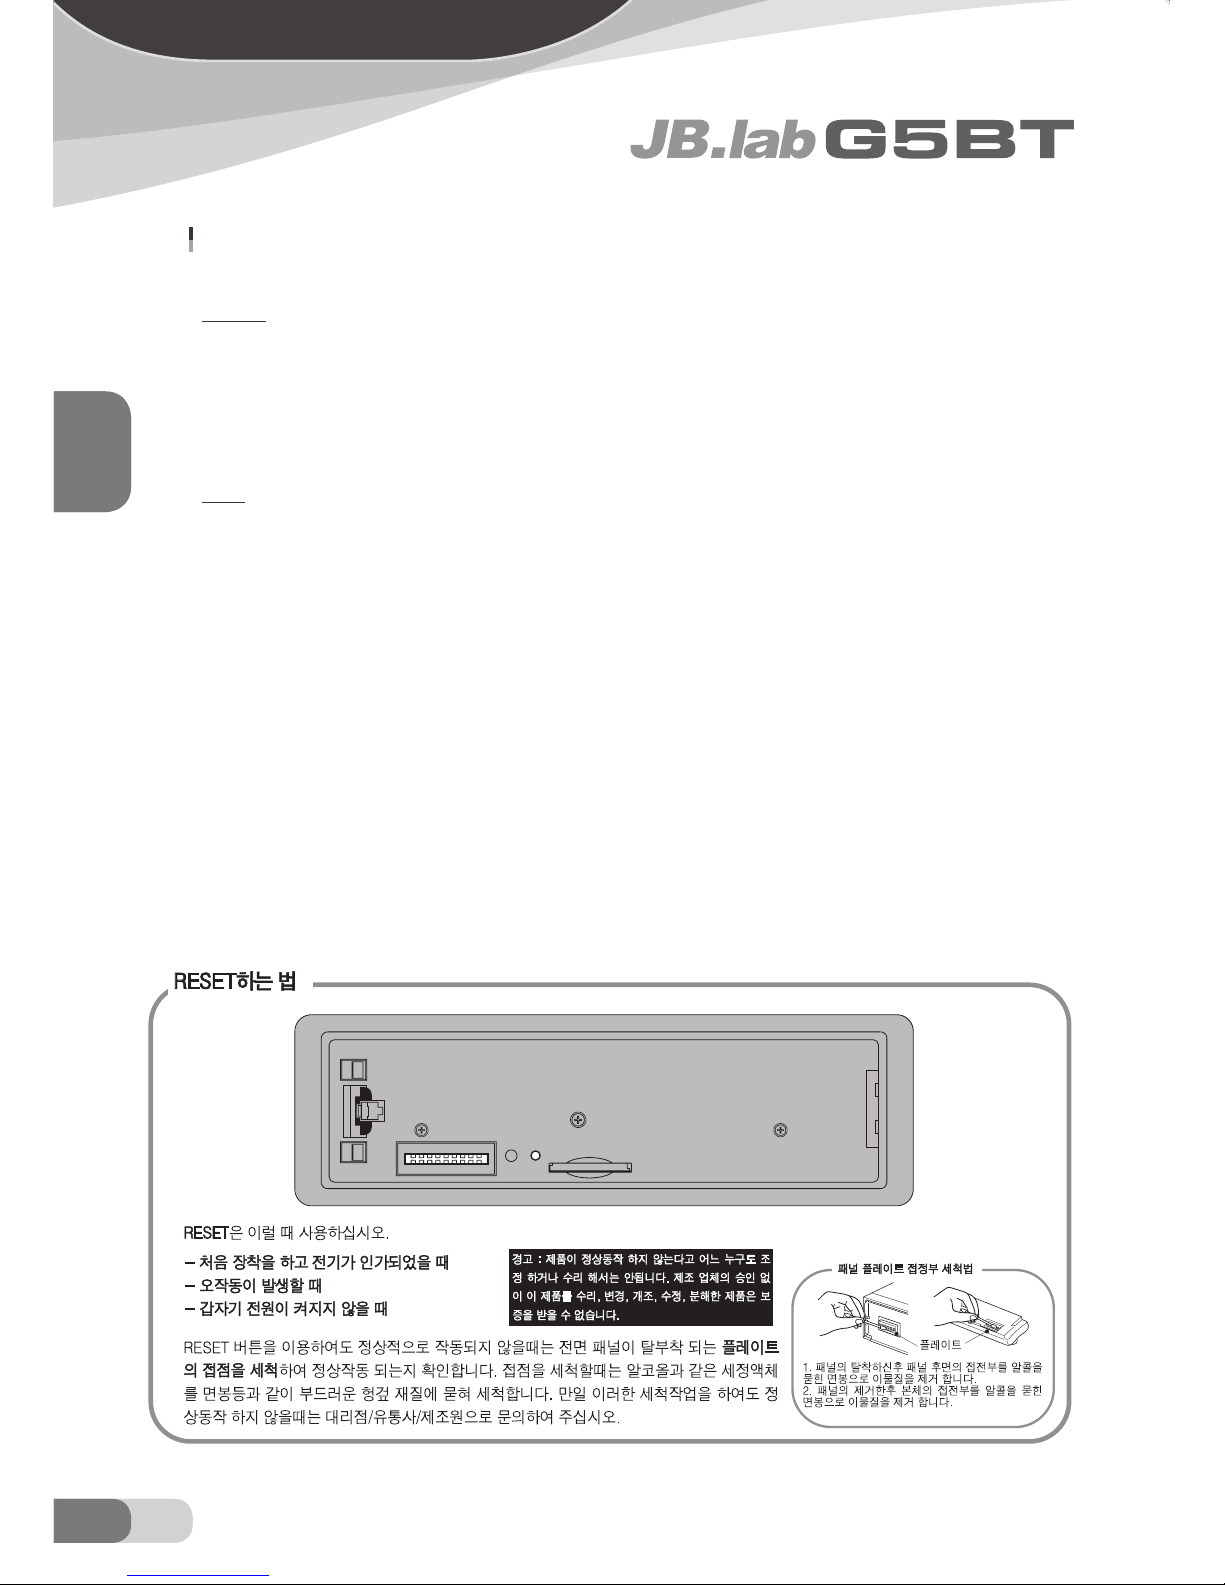
메뉴얼에 기재된 기능 및 주요제원은 예고없이 변경 될 수 있으며, 반품의 사유가 될 수 없습니다.
(메뉴얼과 기능이 다를시, 최신 메뉴얼을 “ht t p : / /www. jbshop . k r / ”에서 다운 받아 보시기 바랍니다.
Page 49
41KOKO
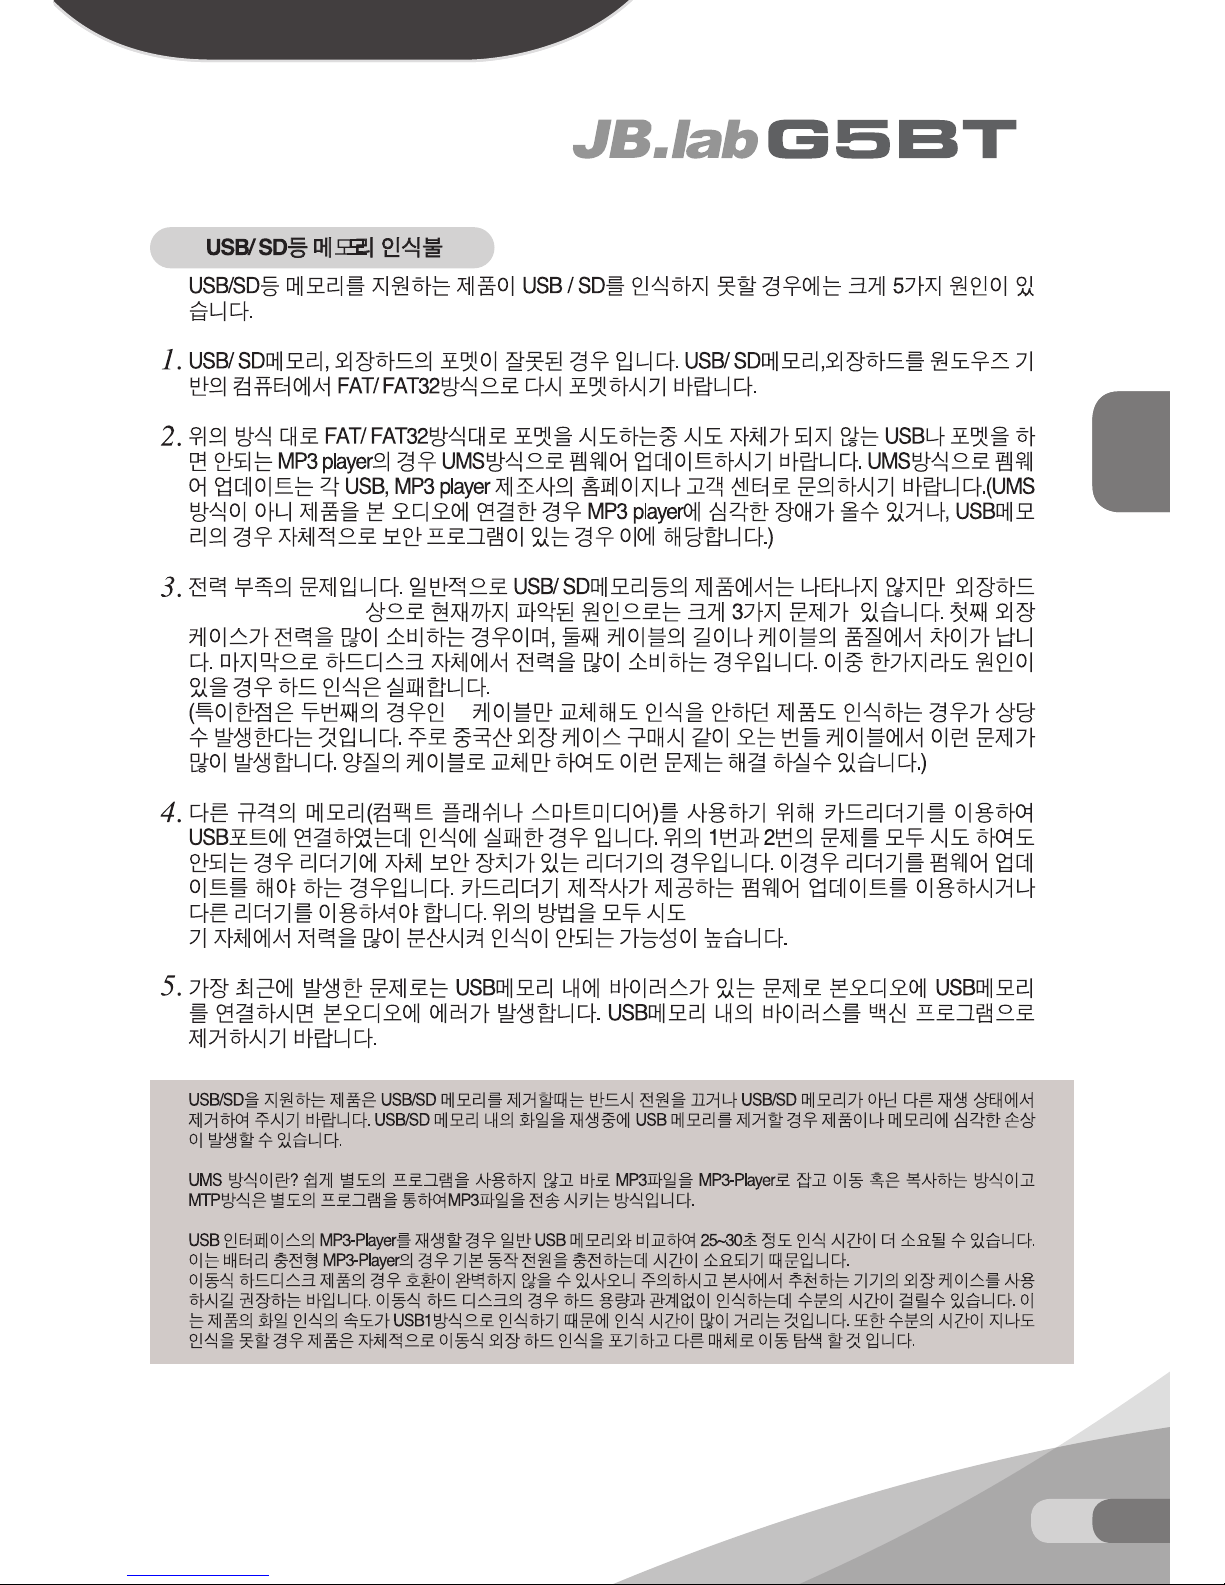
메모리 인식 실패시
KOREA
49KOKO
메모리 인식 실패시
KOREA
에서 주로 나타나는 현
데
하였는데, 문제가 해결되지 않는 경우 리더
Page 50
50 KO
디스크 제작시 유의사항
KOREA
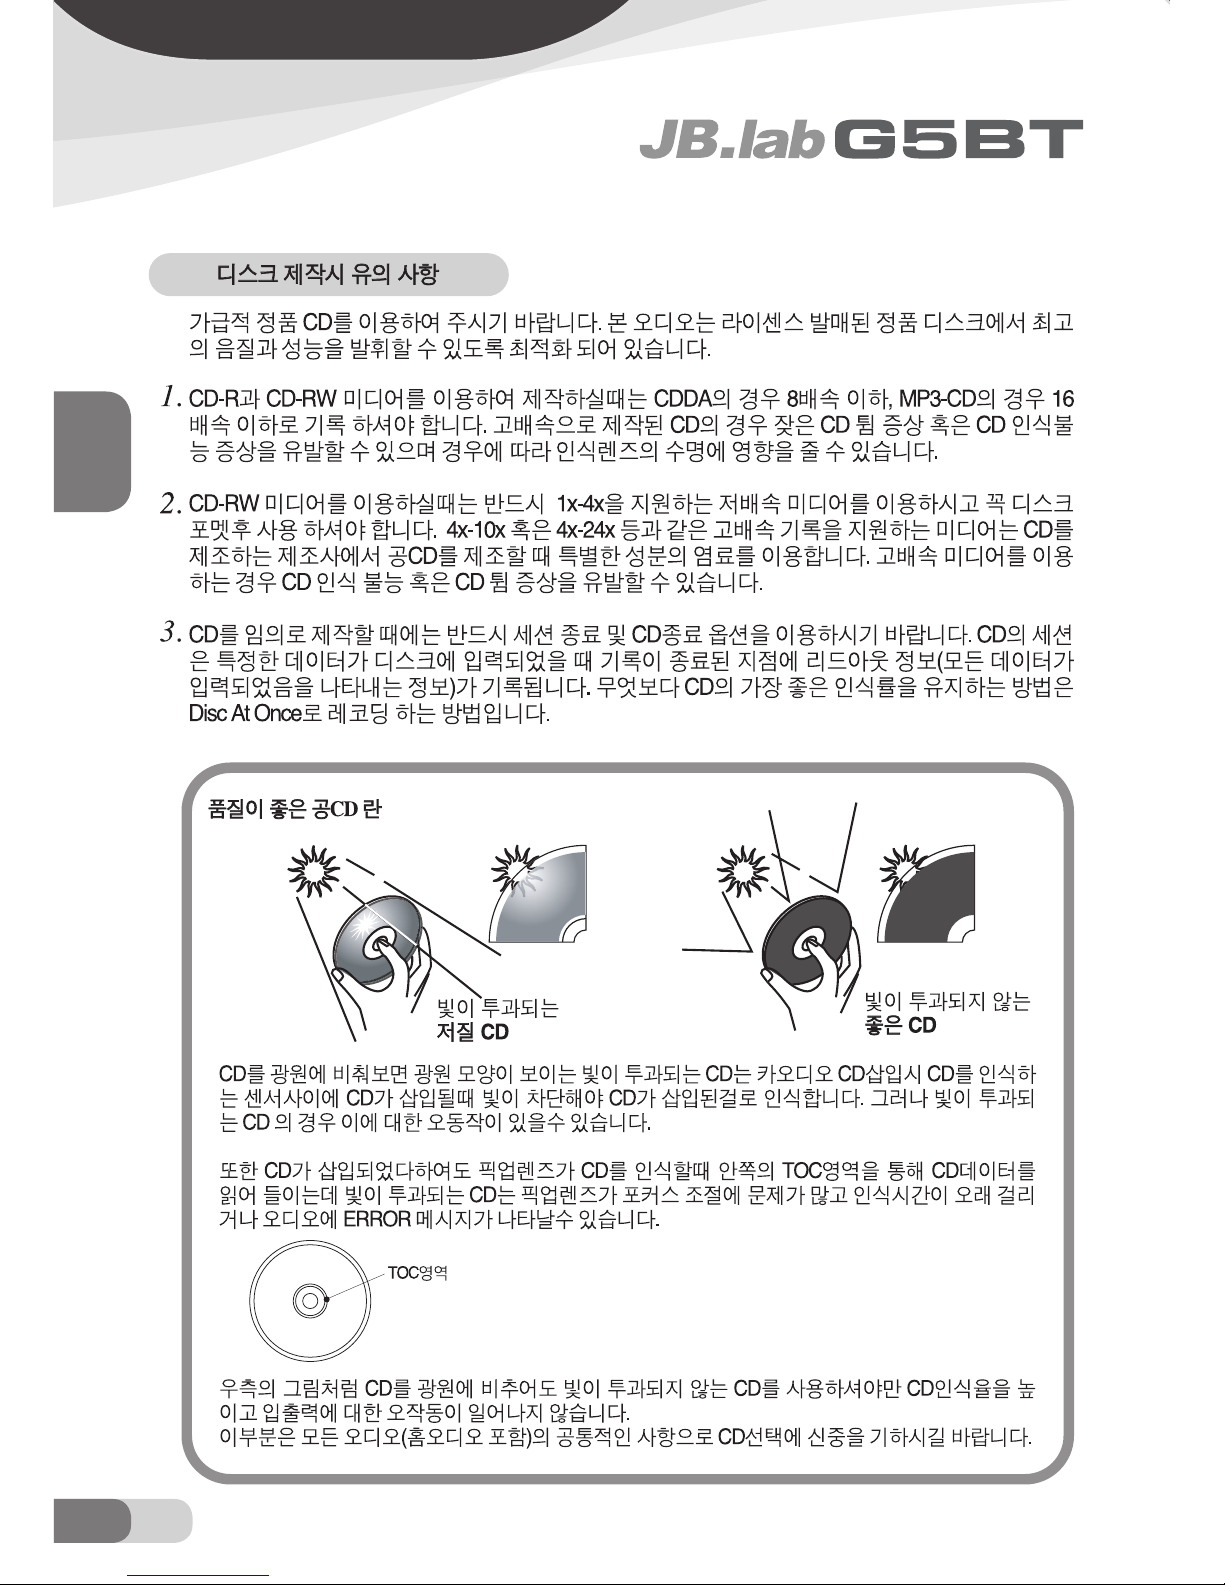
G7/G7BT 모델에만 적용되는 내용
Page 51
51KOKO
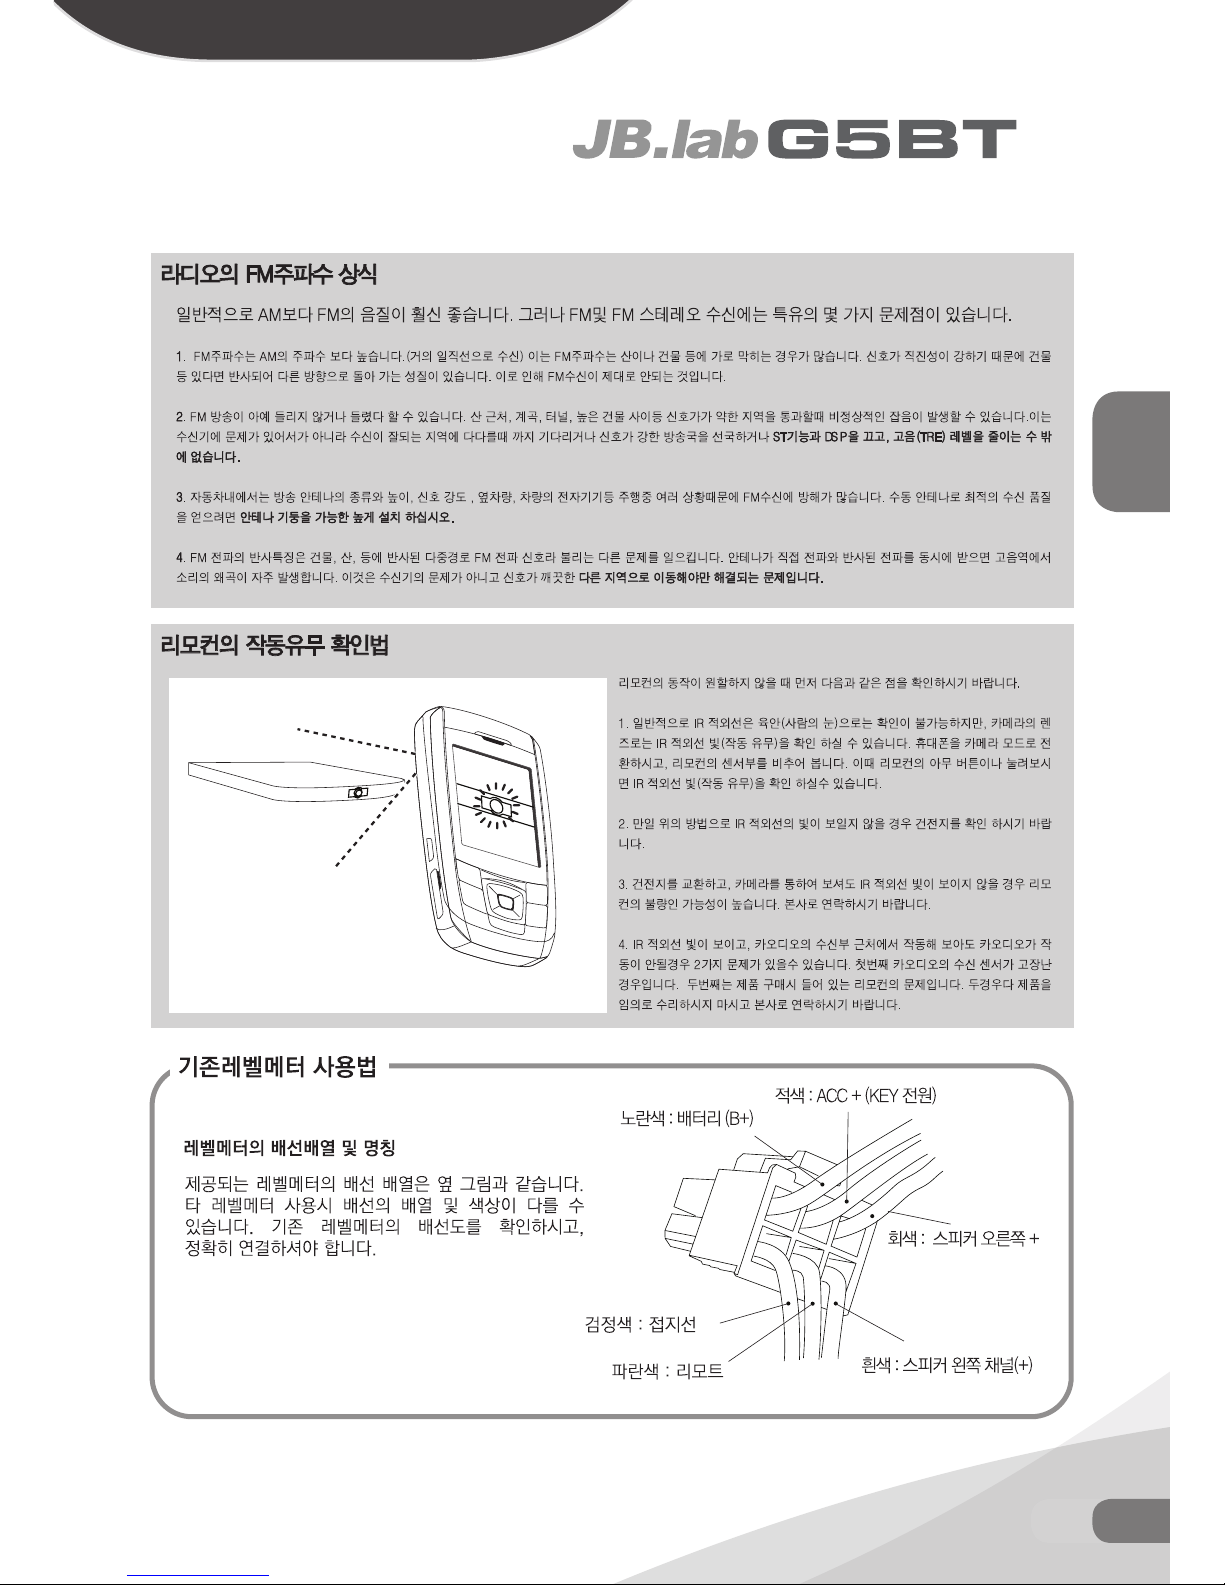
라디오/리모컨/레벨메터
KOREA
Page 52
Published by DS international Corporation.
copyright ⓒ DS interationnal Corporation All right reserved.
부산광역시 해운대구 우동 1470 에이스하이테크21 806호
제품문의 및 구입안내 : 051 - 806 -1170 (내선 1)
A/S 문의 : 051 - 806 -1170 (내선 4)
고객 지원 : http://www.jbshop.kr/
FAX : 051 - 806 - 1151
Corporation.
8th Floor, ACE HIGHTECH21 B/D, Digital Zone, Centurn City, 1470 U-dong, Haeundae-gu, Busan, Korea
 Loading...