

JBL Synthesis SSW-3 Owner's Manual
JBL® Synthesis SSW-3
IN-WALL SUBWOOFER
OWNER’S MANUAL

THANK YOU FOR CHOOSING JBL®
For more than 70 years, JBL has been involved in every aspect of music and film recording and reproduction, from live performances to
monitoring the recordings you play in your home, car or office.
We are confident that the JBL Synthesis loudspeaker you have chosen will provide every note of enjoyment that you expect – and that
when you think about purchasing additional audio equipment for your home, car or office, you will once again choose JBL.
Please take a moment to register your product on our website at www.jblsynthesis.com. This enables us to keep you posted on our latest
advancements, and helps us to better understand our customers and build products that meet their needs and expectations.
All features and specifications are subject to change without notice.
INCLUDED
1. 1 x SSW-3 Subwoofer
2. 1 x SSW-3BB back box
3. 1 x Grille
4. 1 x Scrim cloth for grille
5. 1 x Owner’s Manual
6. 2 x Centering Blocks (Pre-Mounted)
7. 1 x Spacer (For 0.625” Drywall)
8. 1 x Center Spacer (For 0.625” Drywall)
9. 20 x Screws (For Baffle Assembly)
10. 1 x lining material 6”x6”
11. 2 x Styrofoam blocks (For used as BB support)
12. 2 x Wood Screws M6 x 30mm (For filling-up screw holes when upper centering block is removed)
13. 10 x Polyurethane Bushings (For BB Mountin g to Wall Stud)
14. 10 x Flat Washers (For BB Mounting to Wall Stud)
15. 10 x ø5 x 90MM (For BB Mounting to Wall Stud)
PLACEMENT
Low-frequency sounds are normally omnidirectional, meaning the listener can’t tell where they are generated from. However, frequencies
between 75Hz and 150Hz can be localized, especially at higher volume levels. Positioning your subwoofer as recommended will provide
the most natural soundstage and imaging from your loudspeaker system.
It is generally recommended that you install your SSW-3 in-wall subwoofer along the same wall as the front loudspeakers. The SSW-3
subwoofer is not video-shielded and should not be placed near a video display. Installing the SSW-3 near a corner will tend to maximize
low-frequency output. Be cautious when installing in a corner, to avoid a “boomy” sound. Also take into consideration any unusual
features of the room, such as an alcove, which may tend to create a localized node that may affect bass response in that area of the room.
It is also recommended that the speaker is installed so that the bottom of the speaker is approximately 12” from the floor. Using the SSW3BB back box enclosure will ensure that the loudspeaker is installed at the ideal height. This is to help with the low-frequency loading
(bass reinforcement). This also helps hide the speaker in a less visible place. In special circumstances, it is acceptable to install the speaker
at any height on a wall.
Remember that these are just guidelines. Since every listening room is different, JBL strongly recommends experimenting with the positioning
of your subwoofer prior to cutting the wall to obtain the most pleasing results in your room. One technique that can help you find the ideal
subwoofer location is to temporarily borrow a stand-alone subwoofer and place it near the main listening location. Then move around the
room and determine where you hear the most pleasing bass performance. This would then be the ideal location for the subwoofer.
When using two SSW-3 in-wall subwoofer systems, you may need to be concerned about phase, as the sound waves may cancel each
other out. If the bass response seems low, try inverting the polarity on one subwoofer – i.e., connect the (+) terminal on the amplifier to
the (–) terminal on the speaker, and the (–) terminal on the amplifier to the (+) terminal on the speaker.
2
www.jblsynthesis.com
English
SPEAKER CONNECTIONS
Since the SSW-3 is a passive subwoofer, only speaker-level connections are available. The SSW-3 subwoofer is specically designed
for use in conjunction with the JBL® Synthesis SDA ampliers. It is optimized to oer the best dynamics and frequency response with
the use of the JBL SDA-4600 amplier, which is specially designed to use the proprietary SSW-3 tuning le and drive the signature
reactive load impedance of the SSW-3. When using a dierent SDA amplier with the SSW-3, contact your certied Synthesis installer
for correct adjustment and loading of the SSW-3 tuning le. The SSW-3 is capable of running o of one SDA-4600 amplier channel.
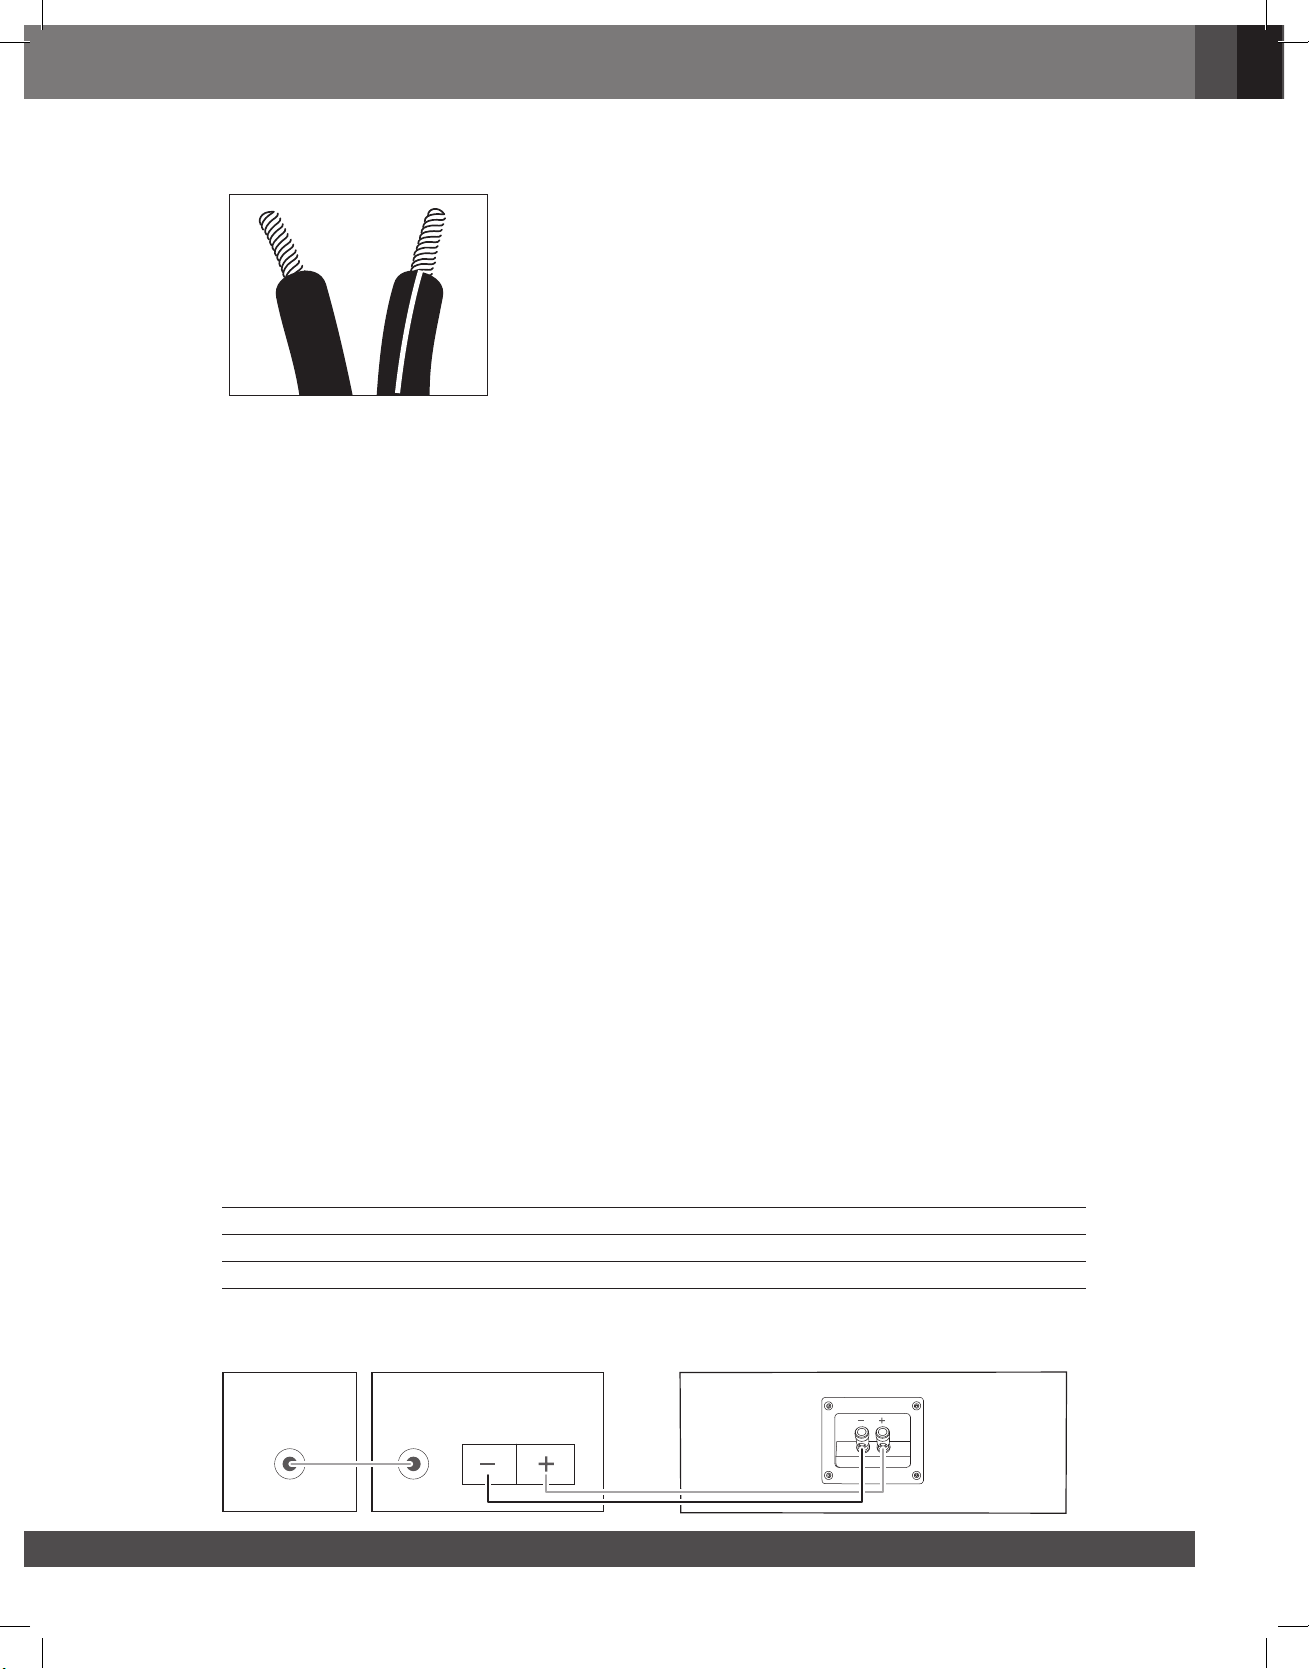
Speakers and electronics have corresponding (+) and (–) terminals. Most manufacturers of speakers and electronics, including JBL, use red
to denote the (+) terminal and black for the (–) terminal. It is important to connect both speakers identically: (+) on the speaker to (+) on
the amplifier, and (–) on the speaker to (–) on the amplifier. Wiring “out of phase” results in thin sound, weak bass, and a poor stereo image.
With the advent of multichannel surround sound systems, connecting all of the speakers in your system with the correct polarity remains
equally important in order to preserve the proper ambiance and directionality of the program material.
If two SSW-3 subwoofers are used, the wires for both speakers should be the same length. If one speaker is placed closer to the amplifier than
the other, hide the excess wire behind the wall. If the bass response seems low, there may be a phase problem, with the sound waves from
the two subwoofers canceling each other out. If the bass response seems low, try inverting the polarity on one subwoofer – i.e., connect
the (+) terminal on the amplifier to the (–) terminal on the speaker, and the (–) terminal on the amplifier to the (+) terminal on the speaker.
To connect the SSW-3 baffle, support the baffle on the lower baffle opening. See the “Installation Guide” section about applying the 0.625” spacer
to the back box opening. Locate the wire pair in the back box that terminate in the polarized locking connector. Dress this end of the wire to
go through any brace openings necessary so as to have a direct connection to the short wire leads from the baffle with the mating polarized
locking connector. Make sure that the wire path is such that when you rock the baffle onto the back box opening and install and tighten the
baffle mounting screws, that no wire is trapped between the baffle and the brace. Connect the polarized locking connector from back box wire
lead to the mating connector on the lead from the baffle. They should connect easily. If it feels like a force fit, re-examine the connector mating
and turn the connectors as necessary to make the correct attachment before plugging them together. Make sure you here a “click” sound from
the lock. As you rock the baffle back to install it, make sure to place the 6” x 6” piece of insulation material between the baffle and the attached
polarized locking connectors to make sure that they do not rattle against the baffle interior. If you have 5/8” wallboard and applied the 0.625”
spacer for the baffle perimeter, make sure to apply the 0.625” center spacer for the brace before settling in the baffle to screw it to the back box.
To use the push-type terminals on either end of the SSW-3 back box, depress the colored cap until the pass-through hole in the binding
post is revealed. While holding the cap down, insert the bare end of the wire, or a banana plug, into the passthrough hole. Release the cap
and tug gently on the wire to ensure that it is secure.
Note: We recommend that you run the wire first, then connect it to the back box, then install the back box, then install the baffle, and
finally connect the wire to your power amplifier.
Connect your main receiver or processor’s line-level subwoofer output to the line-level input on your subwoofer amplifier.
After you have installed the SSW-3BB back box enclosure as described in the next section, connect the other end of the wire from the
SSW-3 back box to the speaker output terminals on your subwoofer power amplifier, making sure to observe the correct polarity.
You may prefer to use two SSW-3 subwoofer systems in Stereo mode for improved performance and superior imaging. Use two mono
subwoofer amplifiers, each connected to either the left or right subwoofer output on your receiver/processor, or use a single two-channel
subwoofer amplifier and connect the left and right line-level subwoofer outputs on your receiver/processor to the corresponding inputs
on your amplifier. Then connect the positive and negative terminals for each channel to one SSW-3 subwoofer system.
Wire Length Recommended Size
Up to 20 ft. 16-gauge
Up to 30 ft. 12-gauge
Greater than 30 ft. 10-gauge
USING ONE SSW-3 SUBWOOFER IN MONO MODE
AmplierReceiver/Processor
Subwoofer
Out
Line-Level
Inputs
Speaker-Level
Outputs
Top/bottom of SSW-3BB back box
3
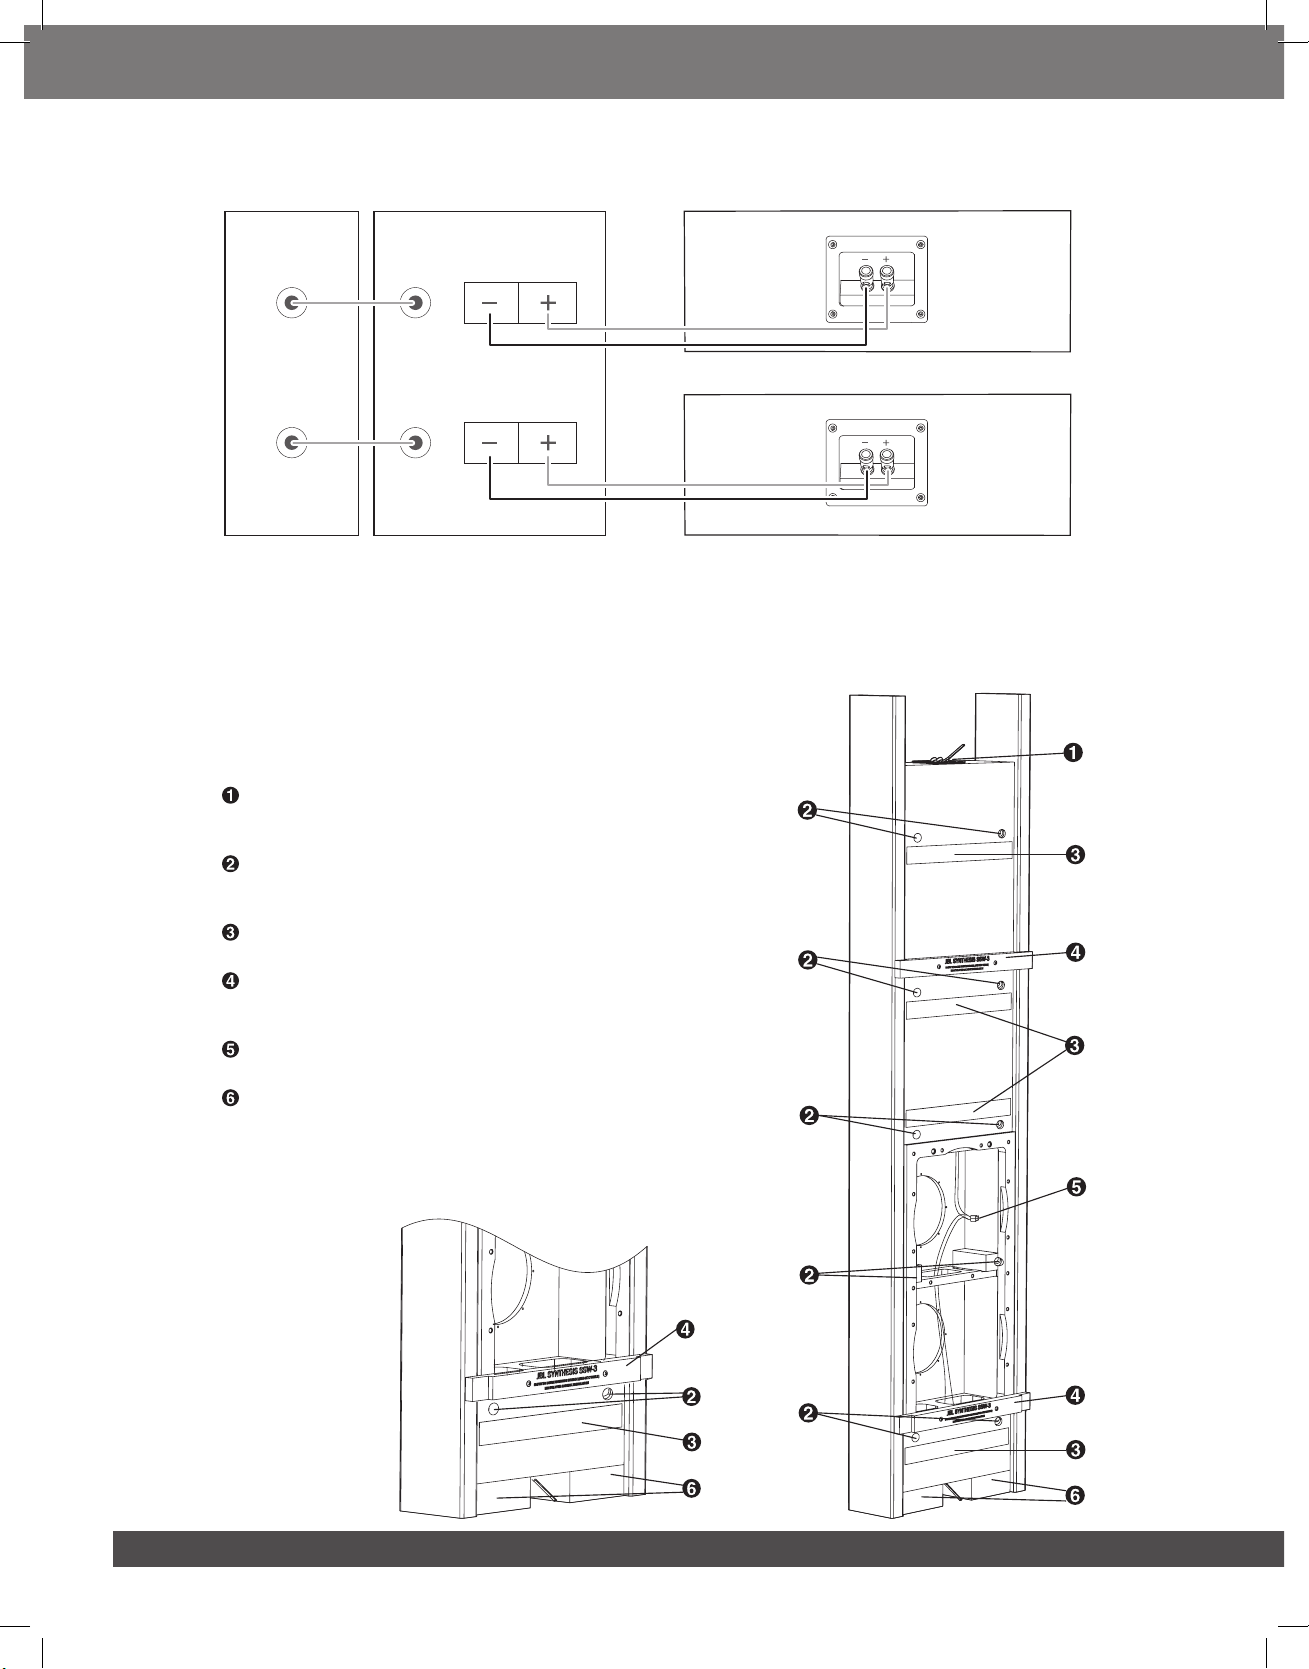
USING TWO SSW-3 SUBWOOFER IN STEREO MODE
Receiver/Processor Amplier
Left top/bottom of SSW-3BB back box
Subwoofer or
main Amp out
Left
Right
Line-Level
Inputs
Left
Right
Speaker-Level
Outputs
Left
Right top/bottom of SSW-3BB back box
Right
INSTALLATION GUIDE
A complete SSW-3 loudspeaker system includes the SSW-3 in-wall subwoofer and the SSW-3BB back box. These components are packaged
separately.
Installation requires access to the space between the wall studs. Therefore, in new-construction applications, the SSW-3BB back box is
installed before the wallboard.
For existing construction, carefully remove a section of wallboard that reveals the studs
on either side of the bay where the back box will be installed, enabling the board to be
screwed back onto the studs after installation is complete. Store the wallboard in a safe
place until the speaker installation is complete.
Terminal Cup: Connect the speaker wires from your subwoofer amplifier to these
terminals. You may also use the terminal cup located at the bottom of the back box.
The terminal cups are wired in parallel so either may be used.
Mounting Holes for Bushings: The SSW-3 uses a system of bushings to act as
springs that isolate the speaker from room and wall vibrations. Mount the bushings
in each of these holes.
Damping Pads: These pads are part of the isolation system to prevent unwanted
resonances. They should be left in place as is.
Centering Bars: Screw these bars onto the SSW-3BB back box using the included
flat-head screws. The bar ends butt against the studs to keep the back box depth
correct, and may be attached during installation.
Speaker Wires: Connect the polarized locking connector from back box wire lead
to the mating connector on the lead from the baffle.
Styrofoam Blocks: These blocks support the SSW-3BB back box and ensure that it
is mounted within the stud bay at the correct height for optimum performance.
They also help to isolate the speaker system from room resonances.
Detail A:
4
 Loading...