

Page 1
JBL® STUDIO 1 SERIES
loudspeakers
User GUide
Page 2
5
THANK YOU FOR CHOOSING THIS JBL® PRODUCT
For more than 60 years, JBL® engineers have been involved in every aspect of music and film recording and
reproduction, from live performances to the recordings you play on the go and in your home, car or office.
We’re confident that the JBL system you have chosen will provide every note of enjoyment you expect – and that when
you think about purchasing additional audio equipment for your home, car or office, you will once again choose JBL
products.
Please take a moment to register your new product on our Web site, www.jbl.com. Registering enables us to keep you
posted on our latest advancements and helps us to understand our customers and build products that meet their
needs.
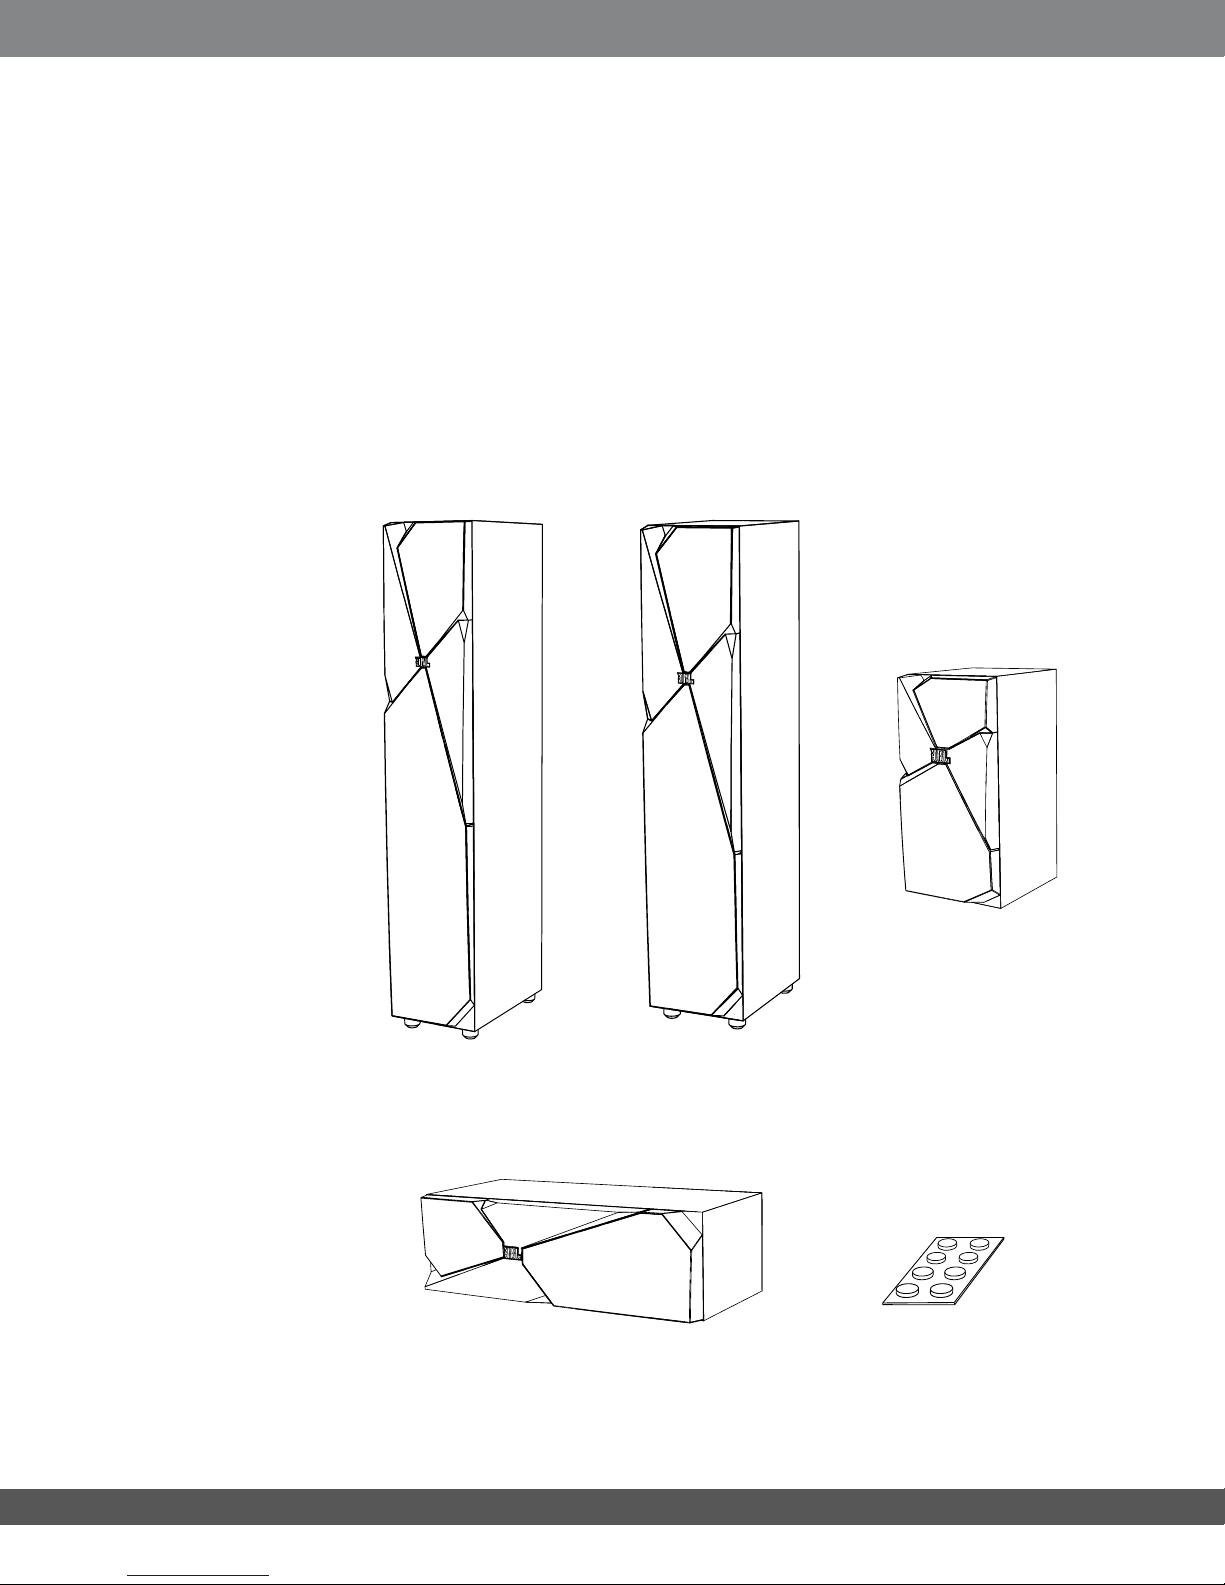
INCLUDED ITEMS
Each box contains one or two loudspeakers, depending on the model, as indicated below.
Studio 190
One Studio 190 speaker
Studio 180
One Studio 180 speaker
Studio 130
Two Studio 130 speakers
www.jbl.com
Studio 120c
One Studio 120c speaker
4
Card with adhesive rubber feet
(Studio 130 – two cards,
Studio 120c – only one card)
Page 3
PLACEMENT
STUDIO 190/STUDIO 180/STUDIO 130 LEFT AND RIGHT CHANNELS
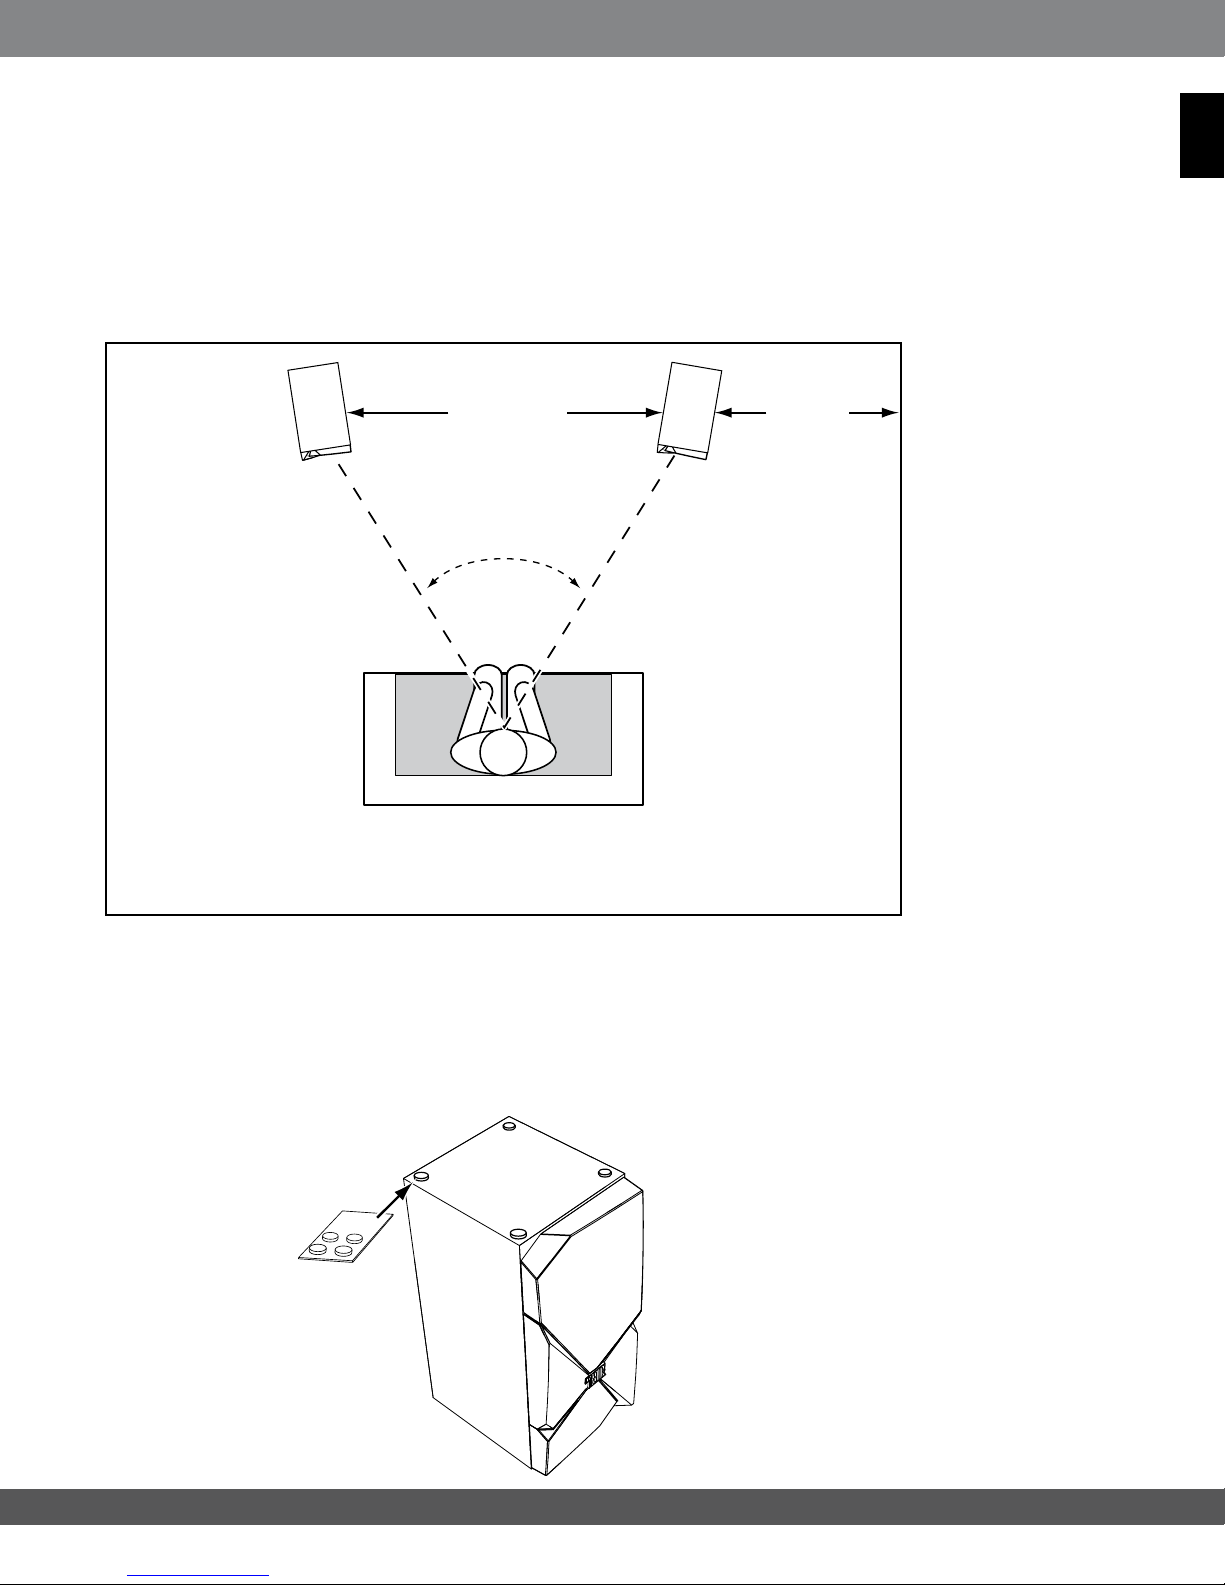
For best results, place the speakers 6 – 10 feet (1.8m – 3m) apart. Angling the speakers toward the listening position can
improve the stereo imaging. The speakers will produce the most accurate stereo soundstage when the angle between
the listener and the speakers is between 40 and 60 degrees.
ENGLISH
6 – 10 ft
(1.8m – 3m)
40° – 60°
>20 in
(>51cm)
Generally, bass output will increase as the speaker is moved closer to a wall or corner.
For best performance, we recommend that you place the speakers at least 20 inches (51cm) away from the side walls.
•
Position
Studio 130 shelf speakers so that their tweeters are approximately at ear level. Peel the adhesive rubber feet
from the card and apply them to the bottoms of the speakers.
Rubber
Feet
5
www.jbl.com
Page 4
7
STUDIO 120c
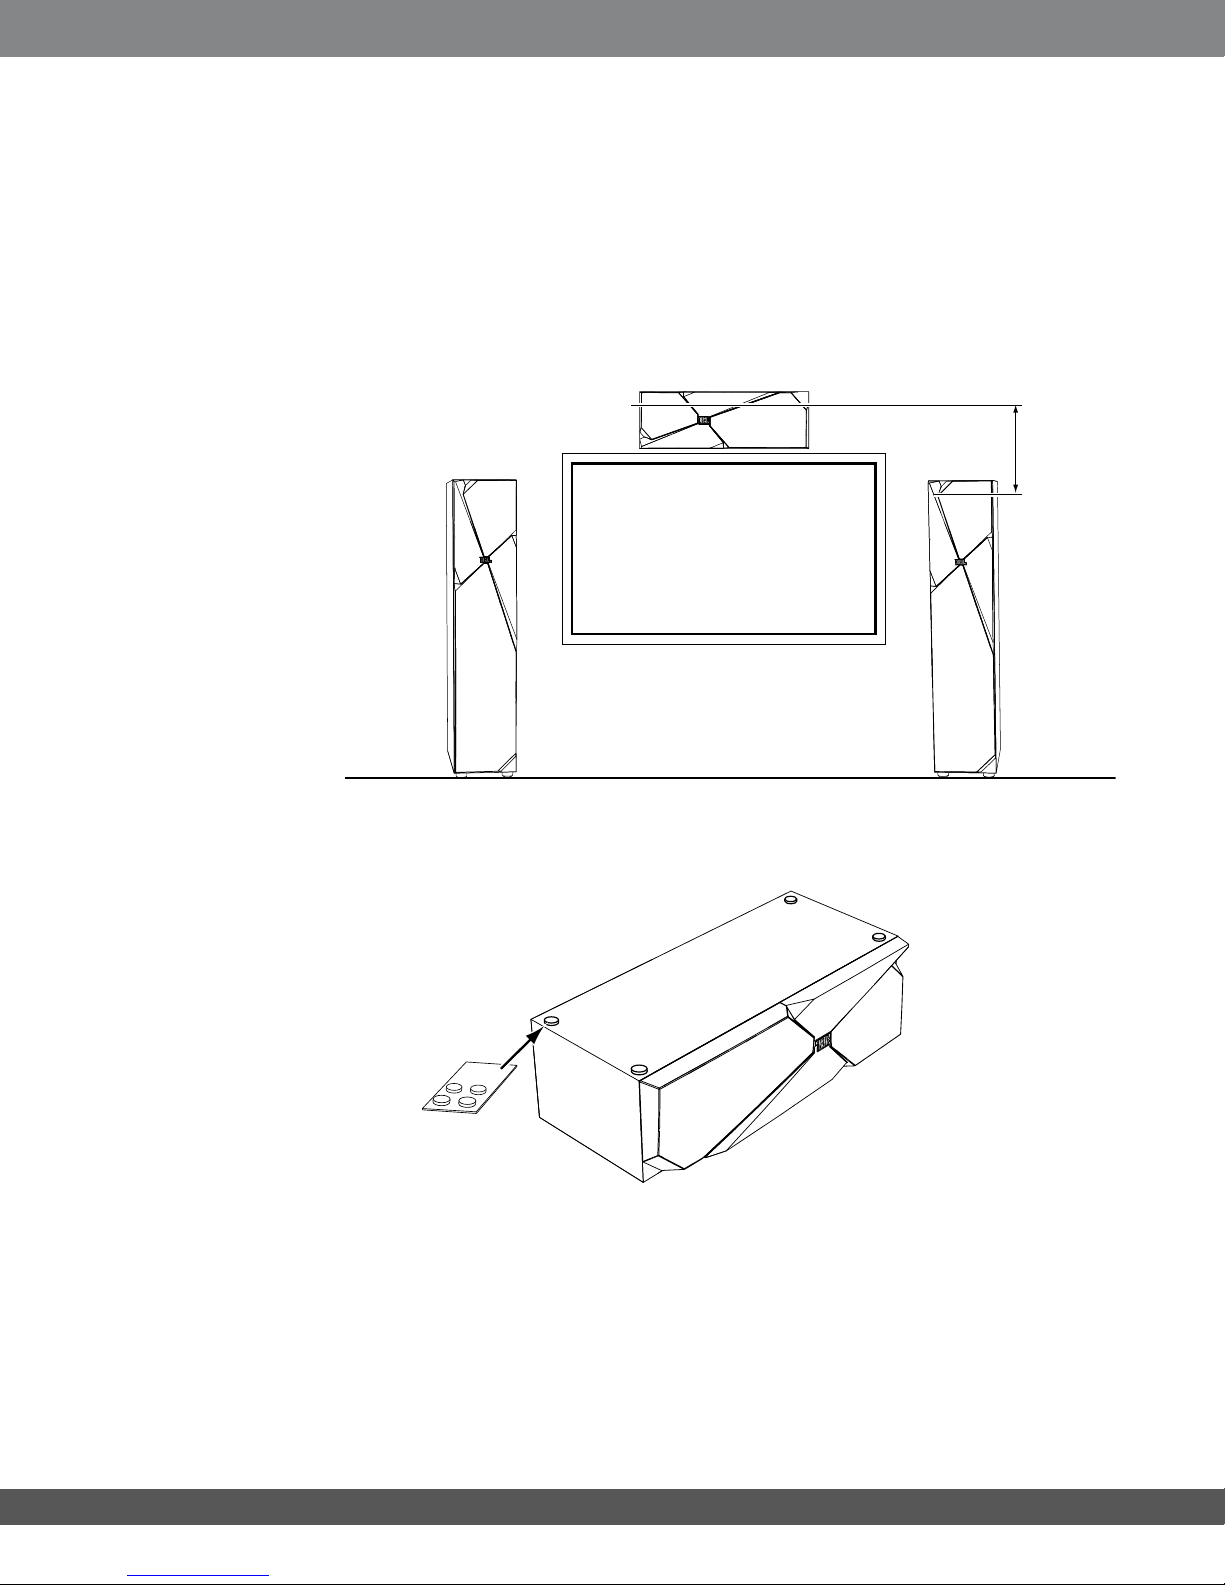
You should place the center speaker directly above or below the center of your TV screen. The speaker’s center should
be no more than 2 feet (61cm) above or below the tweeters of the front left and front right speakers. If your TV set is
deep enough, you can set the center speaker on top of the T V, with the speaker’s front edge even with the TV’s front
edge.
Studio 120c
Center Speaker
0 – 2ft
(0 – 61cm)
TV
Studio 190/18 0/130
Front Left Speaker
•
Peel the adhesive rubber feet from the card and apply them to the bottom of the speaker.
Rubber
Feet
Studio 190/18 0/130
Front Right Speaker
www.jbl.com
6
Page 5
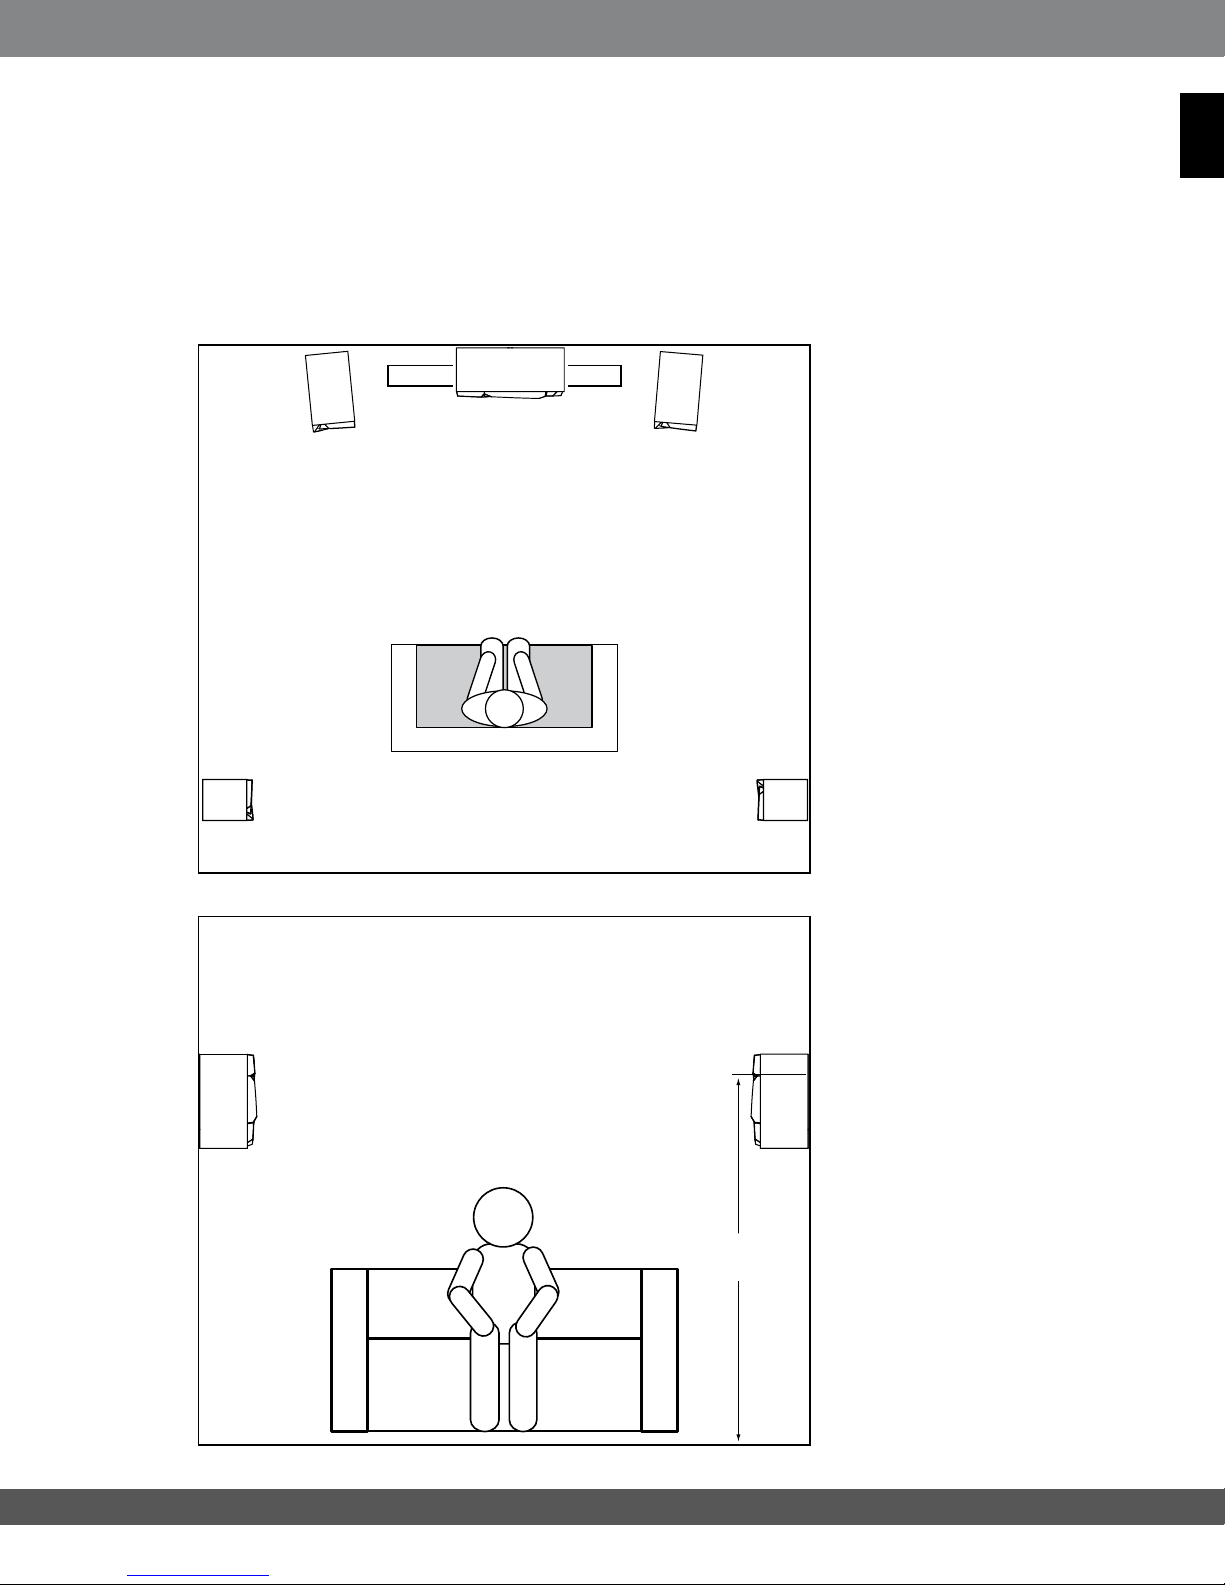
STUDIO 130 SURROUND CHANNELS 5.1CHANNEL SYSTEM
When you use Studio 130 speakers as surround-channel speakers in a 5.1-channel system, place them slightly behind
the listening position, facing each other. Ideally, they should be 5 – 6 feet (1.5m – 1.8m) above the floor. An alternate
location would be on a wall behind the listening position, facing forward. The surround speakers should not call
attention to themselves while they’re playing. Experiment with their placement until you hear a diffuse, ambient sound
accompanying the sounds that you hear from the front left, front right and center speakers.
ENGLISH
Studio
19 0/18 0/130
Front Left
Speaker
Studio 130
Surround Lef t
Side Speaker
TV
Studio 120c
Center Speaker
Studio
19 0/180/13 0
Front Right
Speaker
Studio 130
Surround Right
Side Speaker
Surround Right
Speaker
Surround Lef t
Speaker
5 – 6 ft
(1.5m – 1.8m)
7
www.jbl.com
Page 6
9
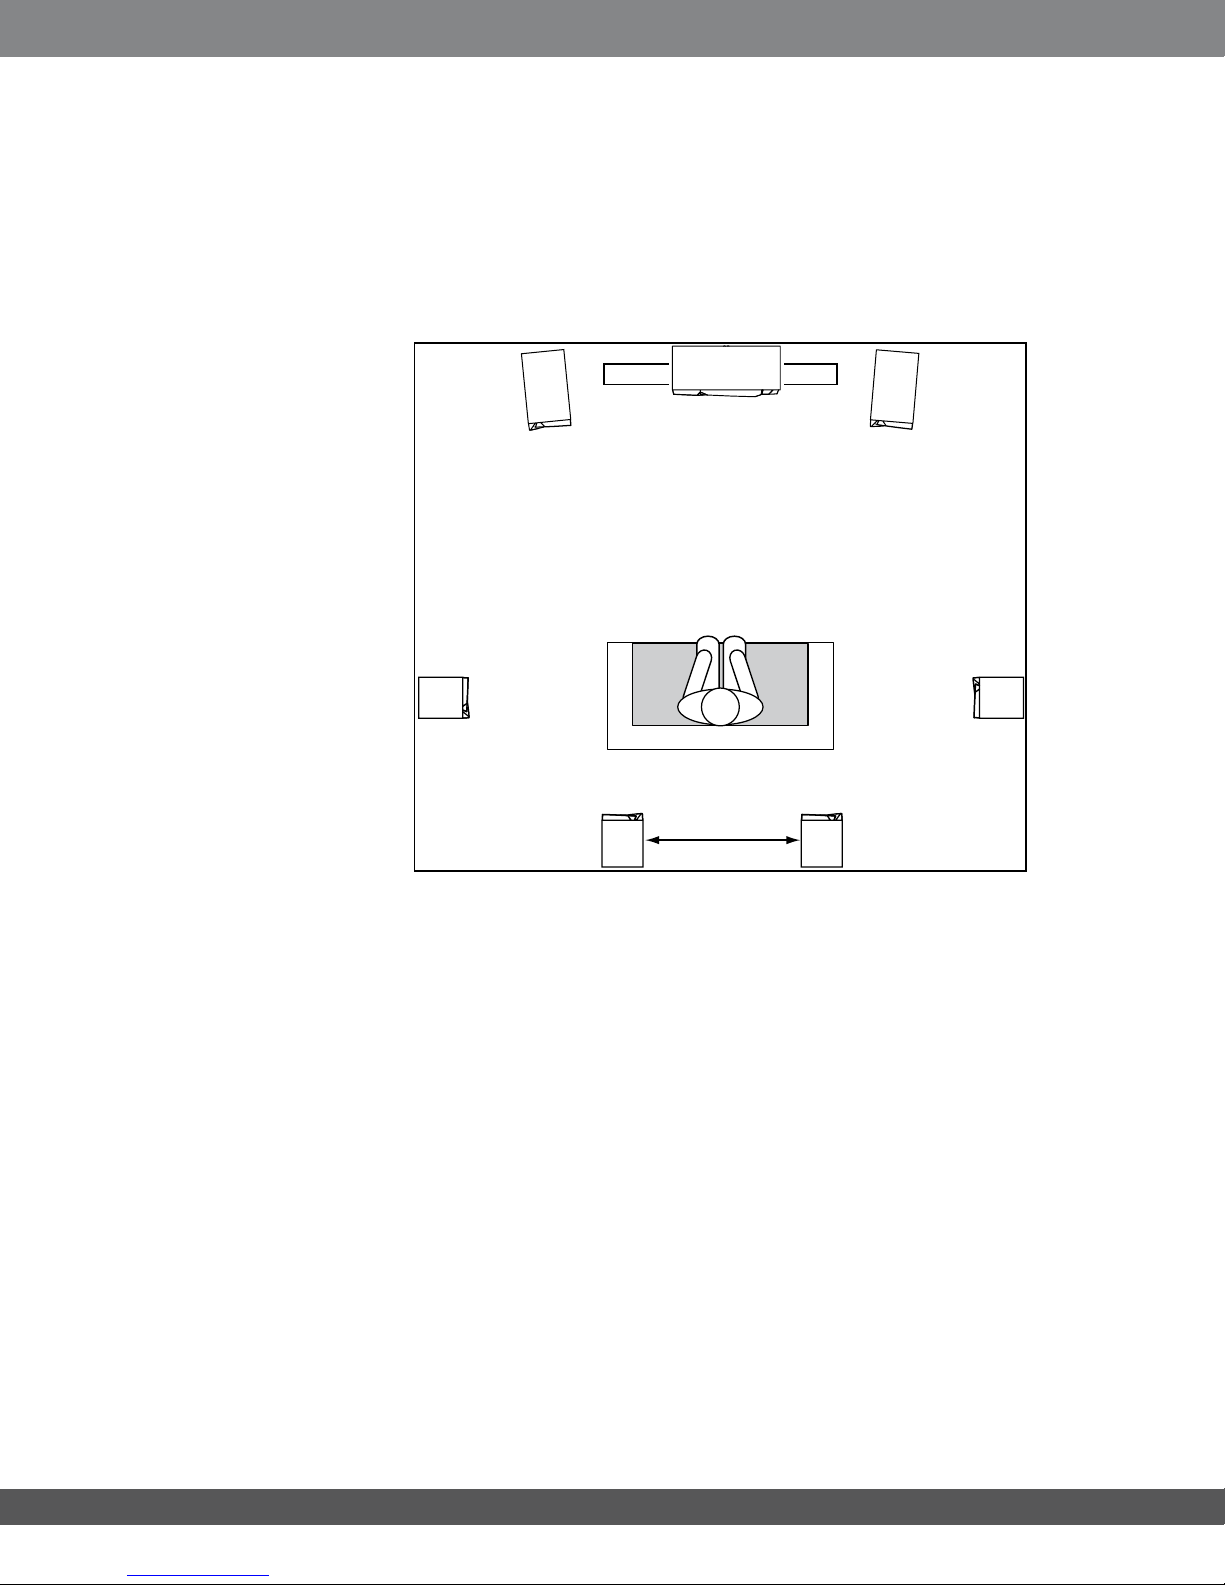
STUDIO 130 SURROUND CHANNELS 7.1CHANNEL SYSTEM
When you use Studio 130 speakers as surround-channel speakers in a 7.1-channel system, place the surround side
speakers directly to the sides of the listening position, at least 5 – 6 feet (1.5m – 1.8m) above the floor. Place the surround
back speakers on the wall behind the listening position, also at least 5 – 6 feet (1.5m – 1.8m) above the floor and 3 – 6
feet (0.9m – 1.8m) apart.
Studio
19 0/180/13 0
Front Left
Speaker
Studio 130
Surround Lef t
Side Speaker
Studio 130 Surround
Left Back Speaker
TV
Studio 120c
Center Speaker
3 – 6 ft apart
(0.9m – 1.8m)
Studio
19 0/180/13 0
Front Right
Speaker
Studio 130
Surround Right
Side Speaker
Studio 130 Surround Right
Back Speaker
www.jbl.com
8
Page 7
²
²
CONNECTIONS
CAUTION: Make sure that all of the system’s electrical components are turned OFF (and preferably
unplugged from their AC outlets) before making any connections.
Speakers and amplifiers have corresponding positive and negative (“+” and “–”) connection terminals. All Studio 1 series
speakers have connection terminals that are marked “+” and “–” on the terminal-cup assembly. Additionally, the “+”
terminals have red markings, while the “–” terminals have black markings.
To ensure proper polarity, connect each “+” terminal on the back of the amplifier or receiver to the respective “+” (red)
terminal on each speaker. Connect the “–” terminals in a similar way. Do not reverse polarities (i.e., “+” to “–” or “–” to “+”)
when making connections. Doing so will cause poor stereo imaging and diminished bass performance.
IMPORTANT: Make sure the (+) and (–) wires or connectors do not touch each other or the other terminal.
Touching wires can cause a short circuit that can damage your receiver or amplier.
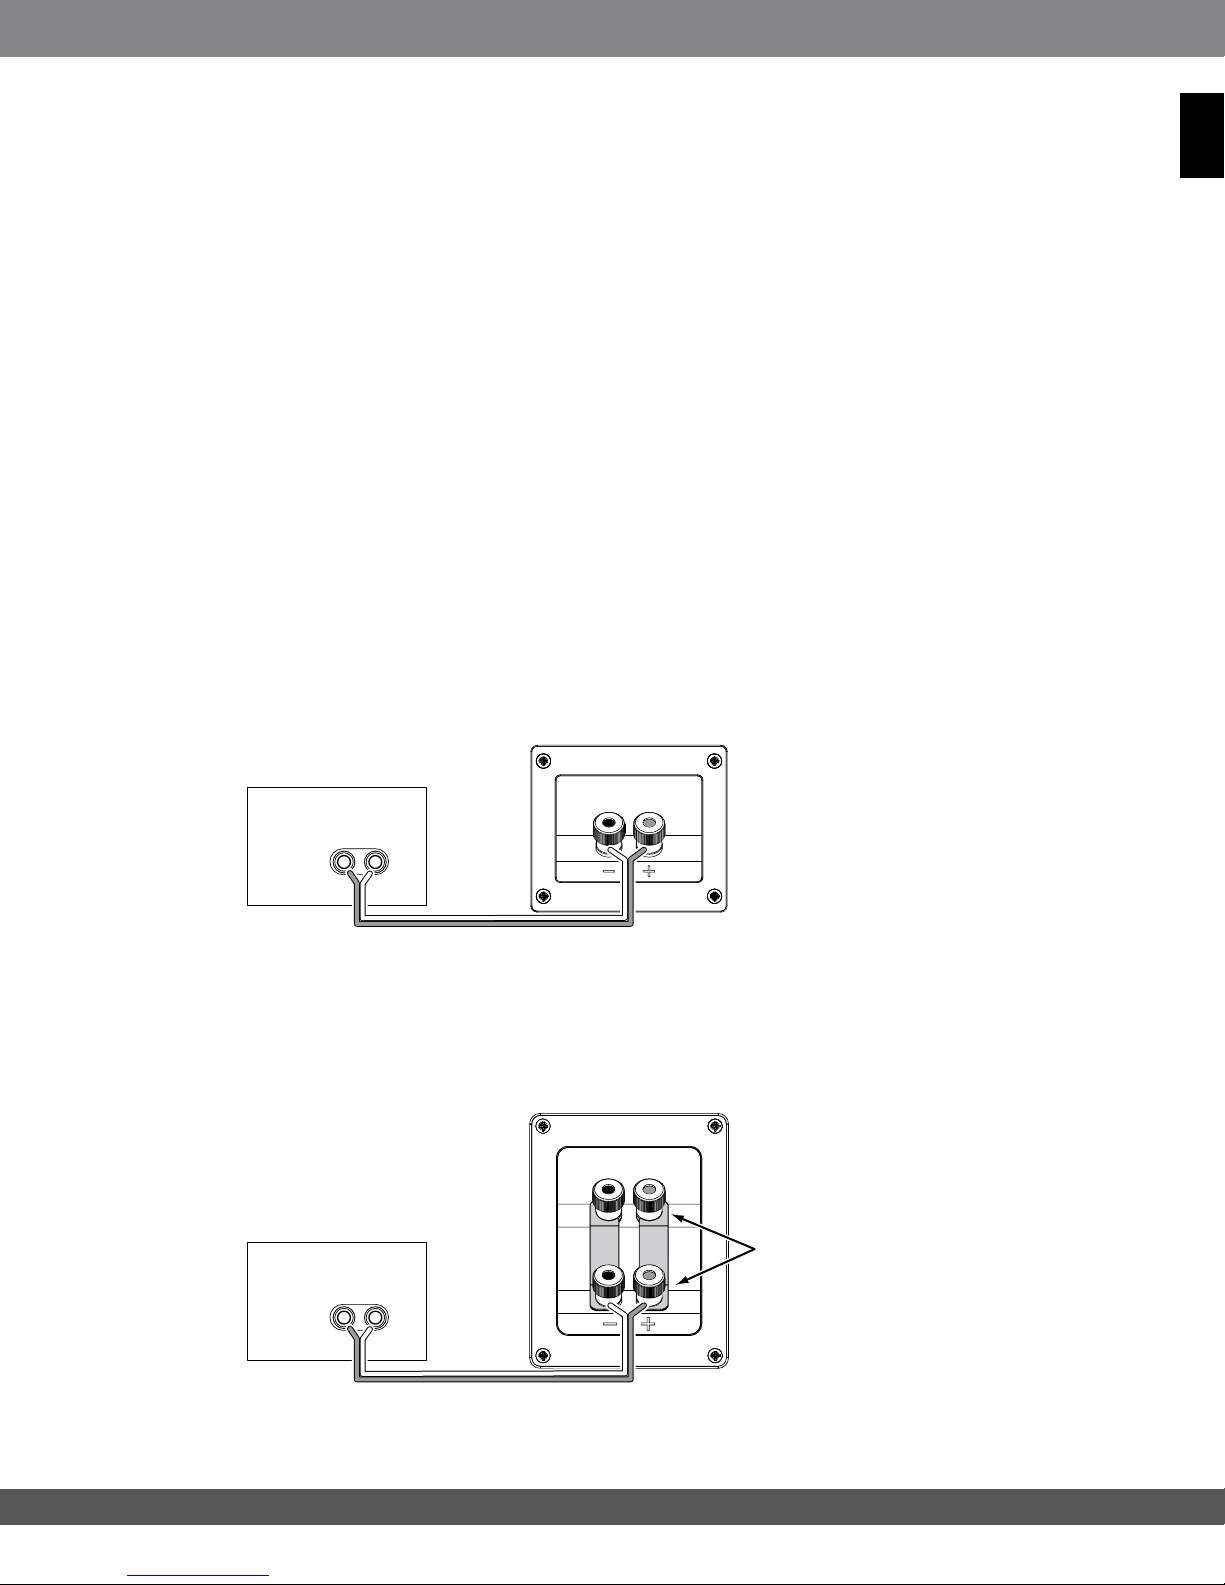
BASIC SINGLEWIRE CONNECTION
Connect the amplifier to each speaker as shown in the illustration below.
For the Studio 190 and Studio 180 speakers, you can use either set of terminals on the connector panel.
IMPORTANT: Do not remove the metal jumpers from between the two sets of terminals when connecting
the speaker wires.
Studio 130, Studio 120c
Speaker
Connector Panel
Receiver or Amplifier
(One Channel Shown)
ENGLISH
Studio 190, Studio 180
Receiver or Amplifier
(One Channel Shown)
Speaker
Connector Panel
9
Use Either Set
of Terminals
Do Not Remove
Jumper Strips
www.jbl.com
Page 8
11
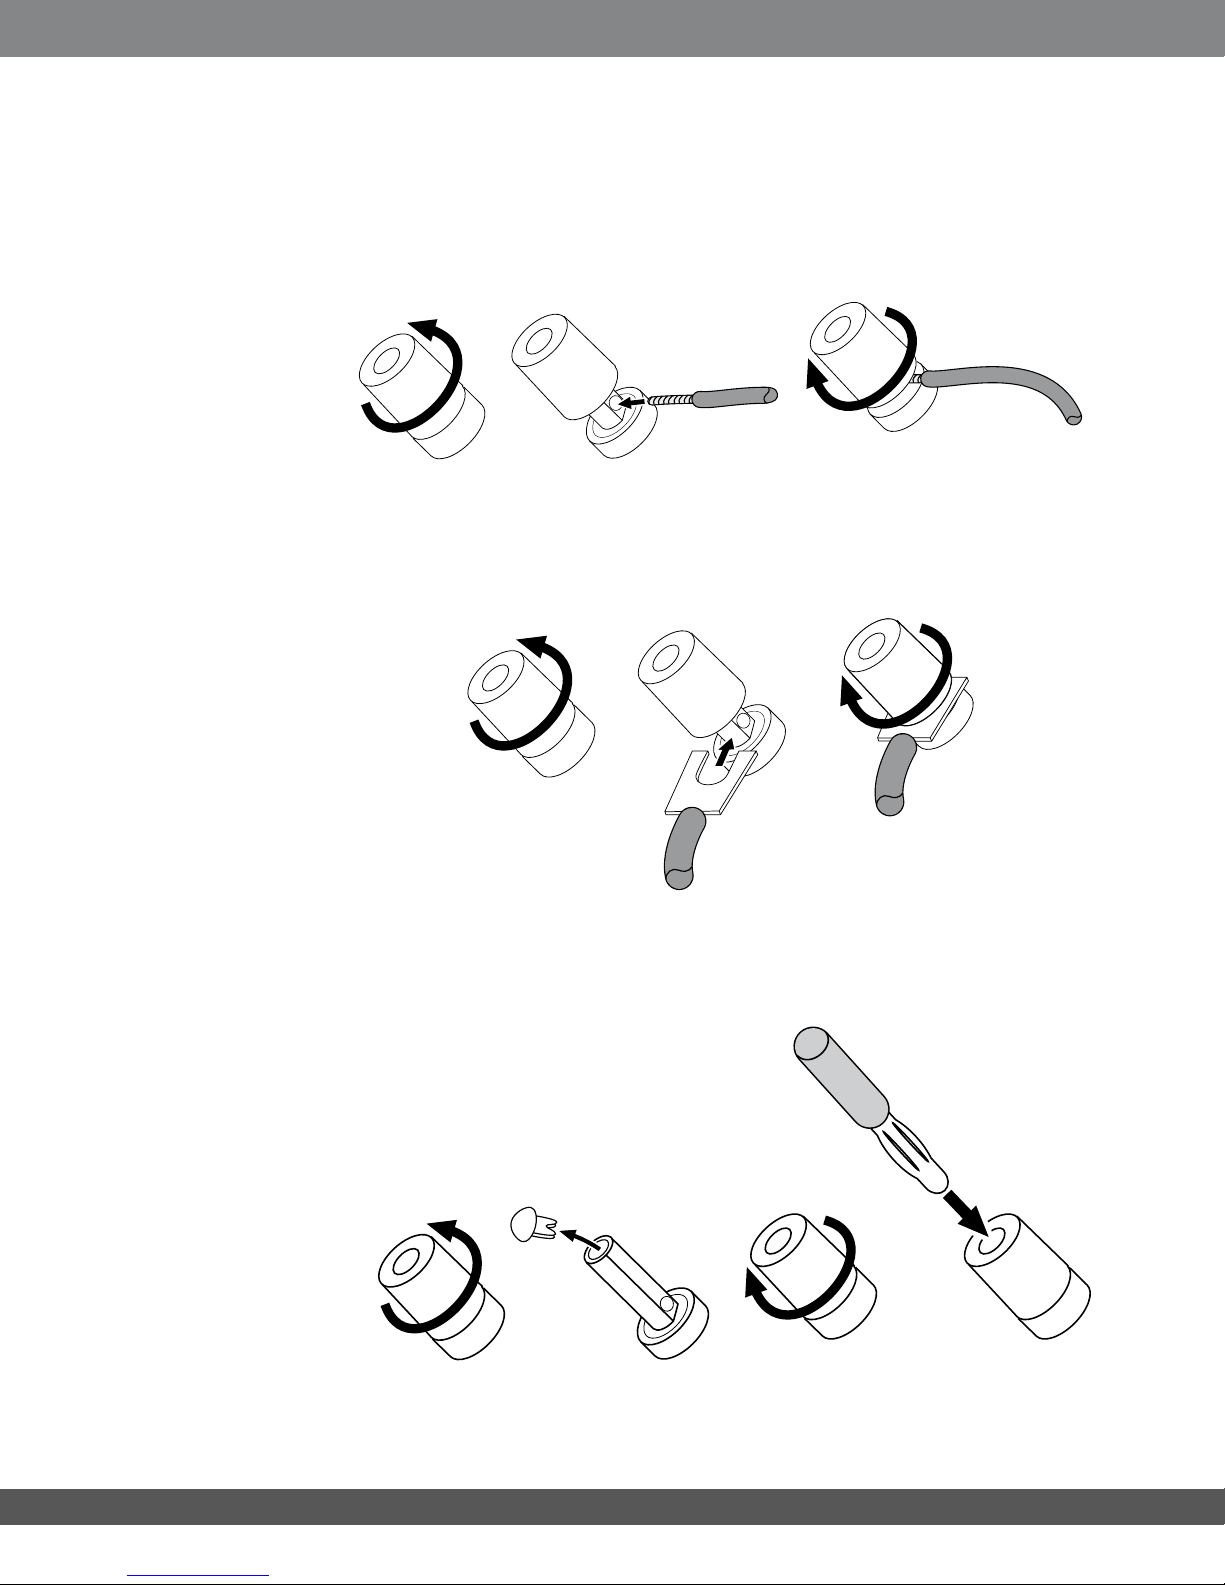
The Studio 1 series speakers’ gold-plated speaker terminals can accept a variety of wire connector types: bare wire, pin
connectors, spade connectors and banana connectors.
USING BARE WIRE OR PIN CONNECTORS:
1.
USING SPADE CONNECTORS:
1.
2. 3.
2. 3.
USING BANANA CONNECTORS:
1. 2. 3. 4.
www.jbl.com
10
Page 9
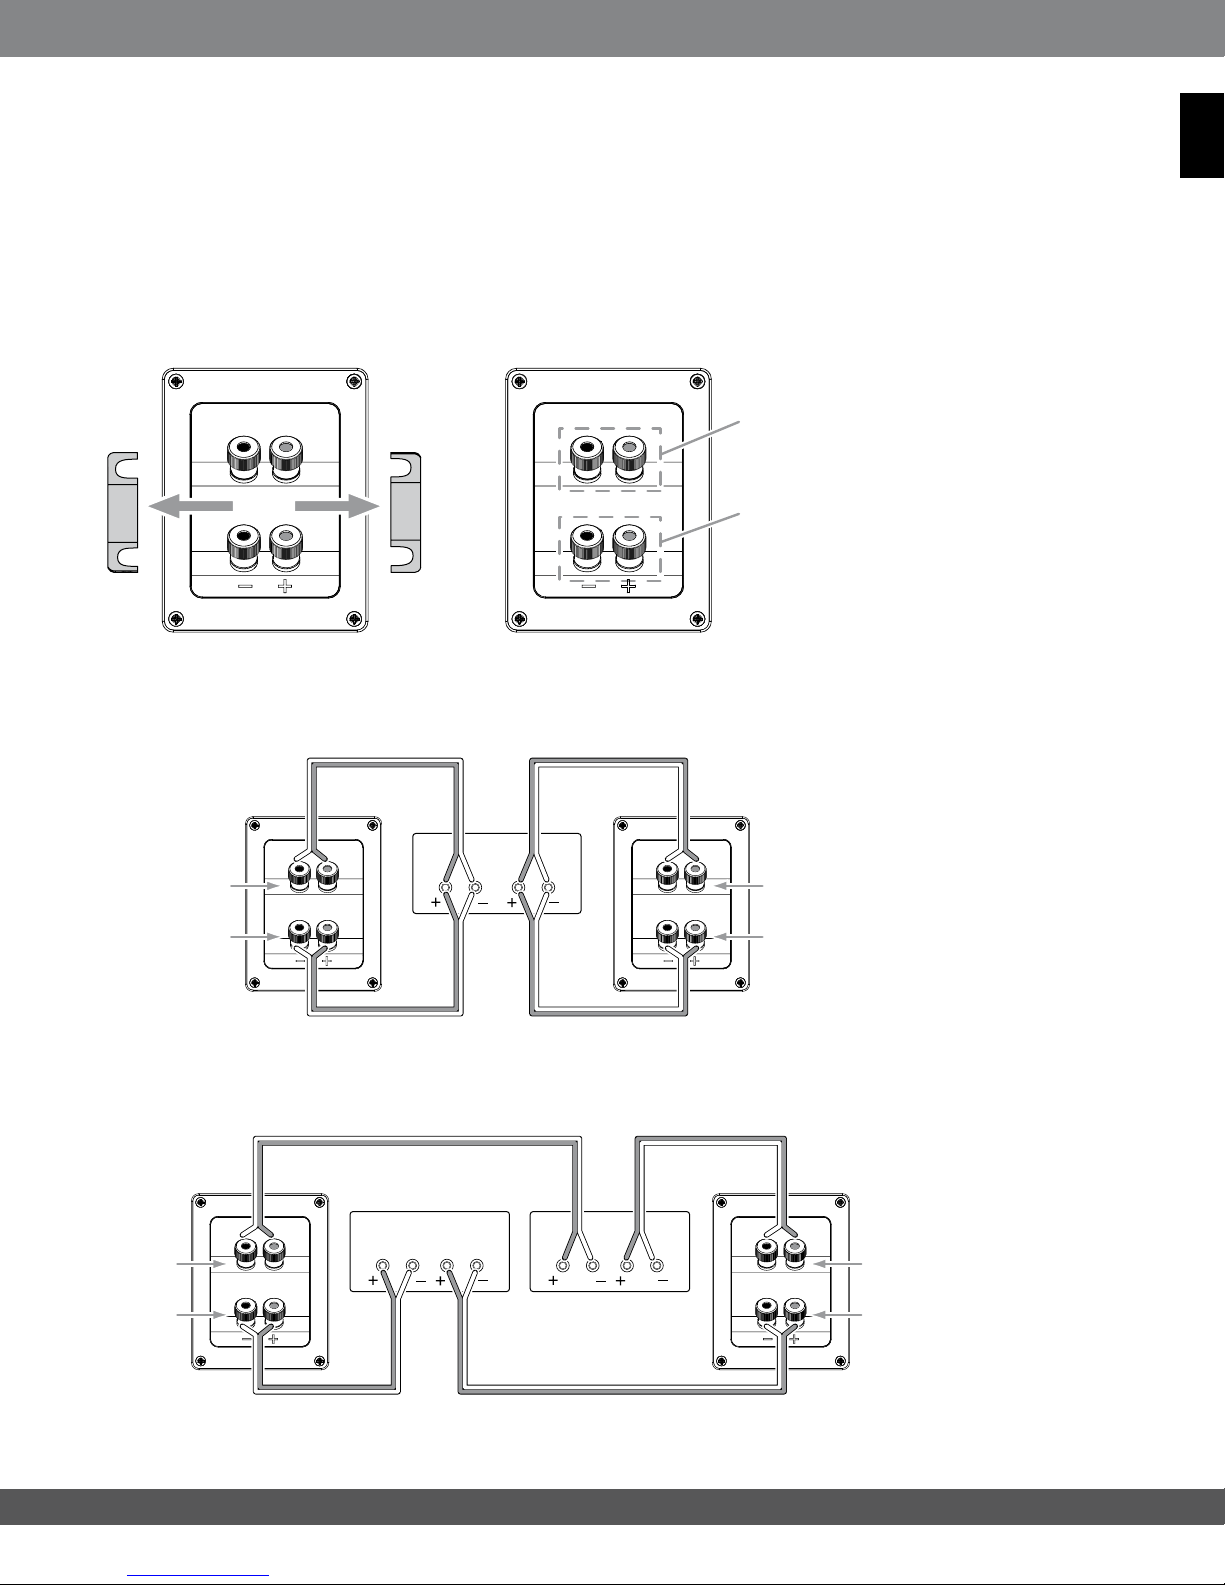
BIWIRE CONNECTION STUDIO 190/STUDIO 180
The Studio 190 and Studio 180 connection assemblies have two sets of input terminals that are connected by metal
jumper bars. The upper set of terminals is for the midrange/tweeter, and the lower set of terminals is for the woofer(s).
This arrangement allows you to bi-wire the speakers using a single stereo amplifier or using two stereo amplifiers.
Bi-wiring can offer sonic advantages and more flexibility in power-amplifier selection over a conventional single-wire
connection.
Before bi-wiring the speakers, remove the jumper bars.
Remove Jumpers
Midrange/Tweeter
Terminals
Woofer
Terminals
SINGLEAMPLIFIER BIWIRING
ENGLISH
Left
Speaker
Midrange/Tweeter
Connection
Woofer
Connection
DUALAMPLIFIER BIWIRING
Left
Speaker
Midrange/
Twe et er
Connection
Woofer
Connection
Left
Ch.
Left
Ch.
Amplifier 1
Amplifier
Right
Ch.
Right
Left
Ch.
Ch.
Amplifier 2
Right
Ch.
Right
Speaker
Midrange/Tweeter
Connection
Woofer
Connection
Right
Speaker
Midrange/
Twe et er
Connection
Woofer
Connection
For more information about various speaker-wire and connection options, contact your local JBL dealer.
11
www.jbl.com
Page 10

13
CARING FOR YOUR SPEAKERS
Wipe the cabinet with a clean, dry cloth to remove dust. Damp cloths may dull the cabinet’s finish. Do not use volatile
•
liquids such as benzene, paint thinner or alcohol on the cabinet.
•
Do not spray insecticide near the cabinet.
To remove dust from the grille fabric, use a vacuum cleaner set to low suction.
•
Do not wash the grilles in water, as it may fade the color or make it uneven.
•
If the surfaces of the woofer and midrange cones become dusty, you can carefully sweep them clean with a soft, dry
•
calligraphy brush or paint brush. Do not use a damp cloth.
•
NEVER touch anything to the tweeter dome.
www.jbl.com
12
Page 11
SPECIFICATIONS
STUDIO 190 FLOORSTANDING SPEAKER
Speaker type: Three-way dual-woofer, floorstanding
Low-frequency transducer: Two 6-1/2" (165mm) PolyPlas™ cones, magnetically shielded
Midrange transducer: 4" (100mm) PolyPlas cone, magnetically shielded
ENGLISH
High-frequency transducer:
1" CMMD
constant-directivity waveguide
®
Lite dome, magnetically shielded, in a Bi-Radial®
Power handling: 100 watts (continuous); 400 watts (peak)
Frequency response: 40Hz – 22kHz
Nominal impedance: 8 ohms
Sensitivity (2.83V/1m): 90dB
Crossover frequencies: 800Hz, 3.2kHz, 6dB/octave
Enclosure type: Ported, with midrange subenclosure
Connector type: Dual gold-plated binding posts (bi-wire capable)
Dimensions (H x W x D): 44-1/8" x 7-7/8" x 14-3/4" (1121mm x 200mm x 375mm)
Weight: 48.8 lb (22.1kg)
STUDIO 180 FLOORSTANDING SPEAKER
Speaker type: Three-way floorstanding
Low-frequency transducer: 6-1/2" (165mm) PolyPlas cone, magnetically shielded
Midrange transducer: 4" (100mm) PolyPlas cone, magnetically shielded
High-frequency transducer:
1" CMMD Lite dome, magnetically shielded, in a Bi-Radial
constant-directivity waveguide
Power handling: 90 watts (continuous); 360 watts (peak)
Frequency response: 45Hz – 22kHz
Nominal impedance: 8 ohms
Sensitivity (2.83V/1m): 89dB
Crossover frequencies: 1.1kHz, 2.5kHz, 6dB/octave
Enclosure type: Ported, with midrange subenclosure
Connector type: Dual gold-plated binding posts (bi-wire capable)
Dimensions (H x W x D): 40" x 7-7/8" x 13-1/8" (1016mm x 200mm x 333mm)
Weight: 38.6 lb (17.5kg)
13
www.jbl.com
Page 12

15
STUDIO 130 BOOKSHELF SPEAKER
Speaker type: Two-way bookshelf
Low-frequency transducer: 4" (100mm) PolyPlas cone, magnetically shielded
High-frequency transducer:
1" CMMD Lite dome, magnetically shielded, in a Bi-Radial
constant-directivity waveguide
Power handling: 60 watts (continuous); 240 watts (peak)
Frequency response: 60Hz – 22kHz
Nominal impedance: 8 ohms
Sensitivity (2.83V/1m): 87d B
Crossover frequencies: 3kHz, 12dB/octave
Enclosure type: Ported
Connector type: Gold-plated binding posts
Dimensions (H x W x D): 13-3/4" x 6-1/2" x 8-1/4" (349mm x 165mm x 210mm)
Weight: 10.9 lb (4.9kg)
STUDIO 120c CENTERCHANNEL SPEAKER
Speaker type: 2-1/2-way dual center-channel
Low-frequency transducer: Two 4" (100mm) PolyPlas cones, magnetically shielded
High-frequency transducer:
1" CMMD Lite dome, magnetically shielded, in a Bi-Radial
constant-directivity waveguide
Power handling: 60 watts (continuous); 240 watts (peak)
Frequency response: 60Hz – 22kHz
Nominal impedance: 8 ohms
Sensitivity (2.83V/1m): 90dB
Crossover frequencies: 900Hz, 12dB/octave; 1.8kHz, 24dB/octave
Enclosure type: Ported
Connector type: Gold-plated binding posts
Dimensions (H x W x D): 6-1/2" x 21" x 9-7/8" (165mm x 533mm x 251mm)
Weight: 18.6 lb (8.4kg)
www.jbl.com
14
Page 13
ENGLISH
Harman Consumer, Inc.
8500 Balboa Boulevard, Northridge, CA 91329 USA www.jbl.com
©
2010 Harman International Industries, Incorporated. All rights reserved.
Features, specifications and appearance are subject to change without notice.
JBL, Bi-Radial and CMMD are trademarks of Harman International Industries, Incorporated,
registered in the United States and/or other countries.
PolyPlas is a trademark of Harman International Industries, Incorporated.
Part No. 950-0308-001
15
www.jbl.com
 Loading...