

Page 1
Stage 800BA Subwoofer
v
SJ
Stage 800BA Subwoofer - Quick Start Guide
Stage 800BA Subwoofer - Guide de démarrage rapide
Stage 800BA Subwoofer - Guía de inicio rápido
Stage 800BA Subwoofer - Guia de início rápido
Stage 800BA Subwoofer - Guida di avvio rapido
Stage 800BA Subwoofer - Kurzanleitung
Stage 800BA Subwoofer - Краткое руководство
Stage 800BA Subwoofer - Snabbstartsguide
Stage 800BA Subwoofer - Pikaopas
Stage 800BA Subwoofer -
Przewodnik szybkiego startu
EN
FR
ES
PT
IT
DE
RU
SV
FI
PL
Stage 800BA Subwoofer - Snelstartgids
Stage 800BA Subwoofer - Lynguide
Stage 800BA Subwoofer - クイック・スタート・ガイド
Stage 800BA Subwoofer - 빠른 시작 가이드
Stage 800BA Subwoofer - 快速入门指南
Stage 800BA Subwoofer - 快速入門指南
Stage 800BA Subwoofer - Panduan Memulai Cepat
Stage 800BA Subwoofer - Hızlı başlangıç kılavuzu
NL
DA
JP
KO
CHS
CHT
ID
TR
Page 2

Торговая марка : JBL
Назначение товара : АВТОМОБИЛЬНЫЙ САБВУФЕР
Изготовитель : Харман Интернешнл Индастриз Инкорпорейтед, США,06901 Коннектикут, г.Стэмфорд,
Атлантик Стрит 400, офис 1500
Страна происхождения : Китай
Импортер в Россию : OOO “ХАРМАН РУС СиАйЭс“, Россия, 127018, г.Москва, ул. Двинцев, д.12, к 1
Гарантийный период : 1 год
Информация о
сервисных центрах : www.harman.com/ru тел. +7-800-700-0467
Срок службы : 3 года
Товар сертифицирован
Дата производства : Дата изготовления устройства определяется по двум буквенным обозначениям из второй группы
0000
CE
lR[
символов серийного номера изделия, следующих после разделительного знака «-». Кодировка
соответствует порядку букв латинского алфавита, начиная с января 2010 года: 000000-MY0000000, где
«M» - месяц производства (А - январь, B - февраль, C - март и т.д.) и «Y» - год производства
(A - 2010, B - 2011, C - 2012 и т.д.).
TR04638_B
Page 3
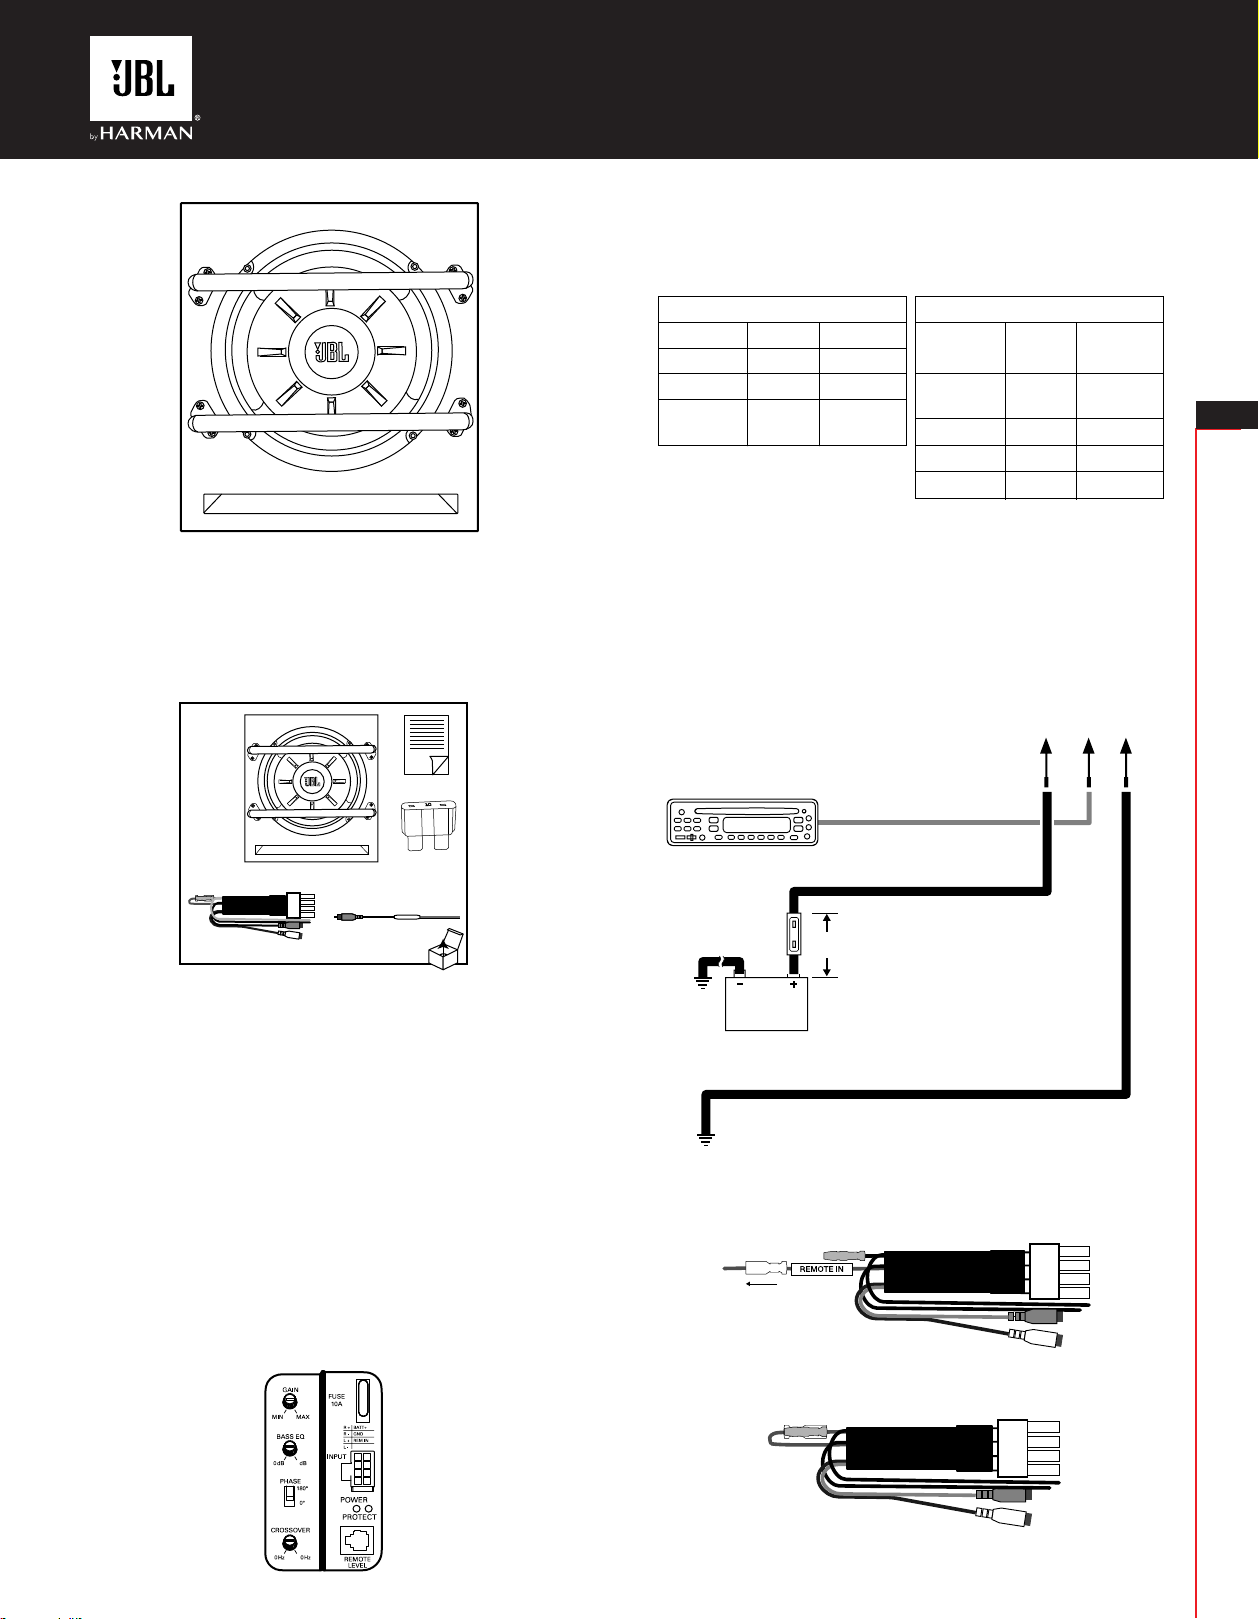
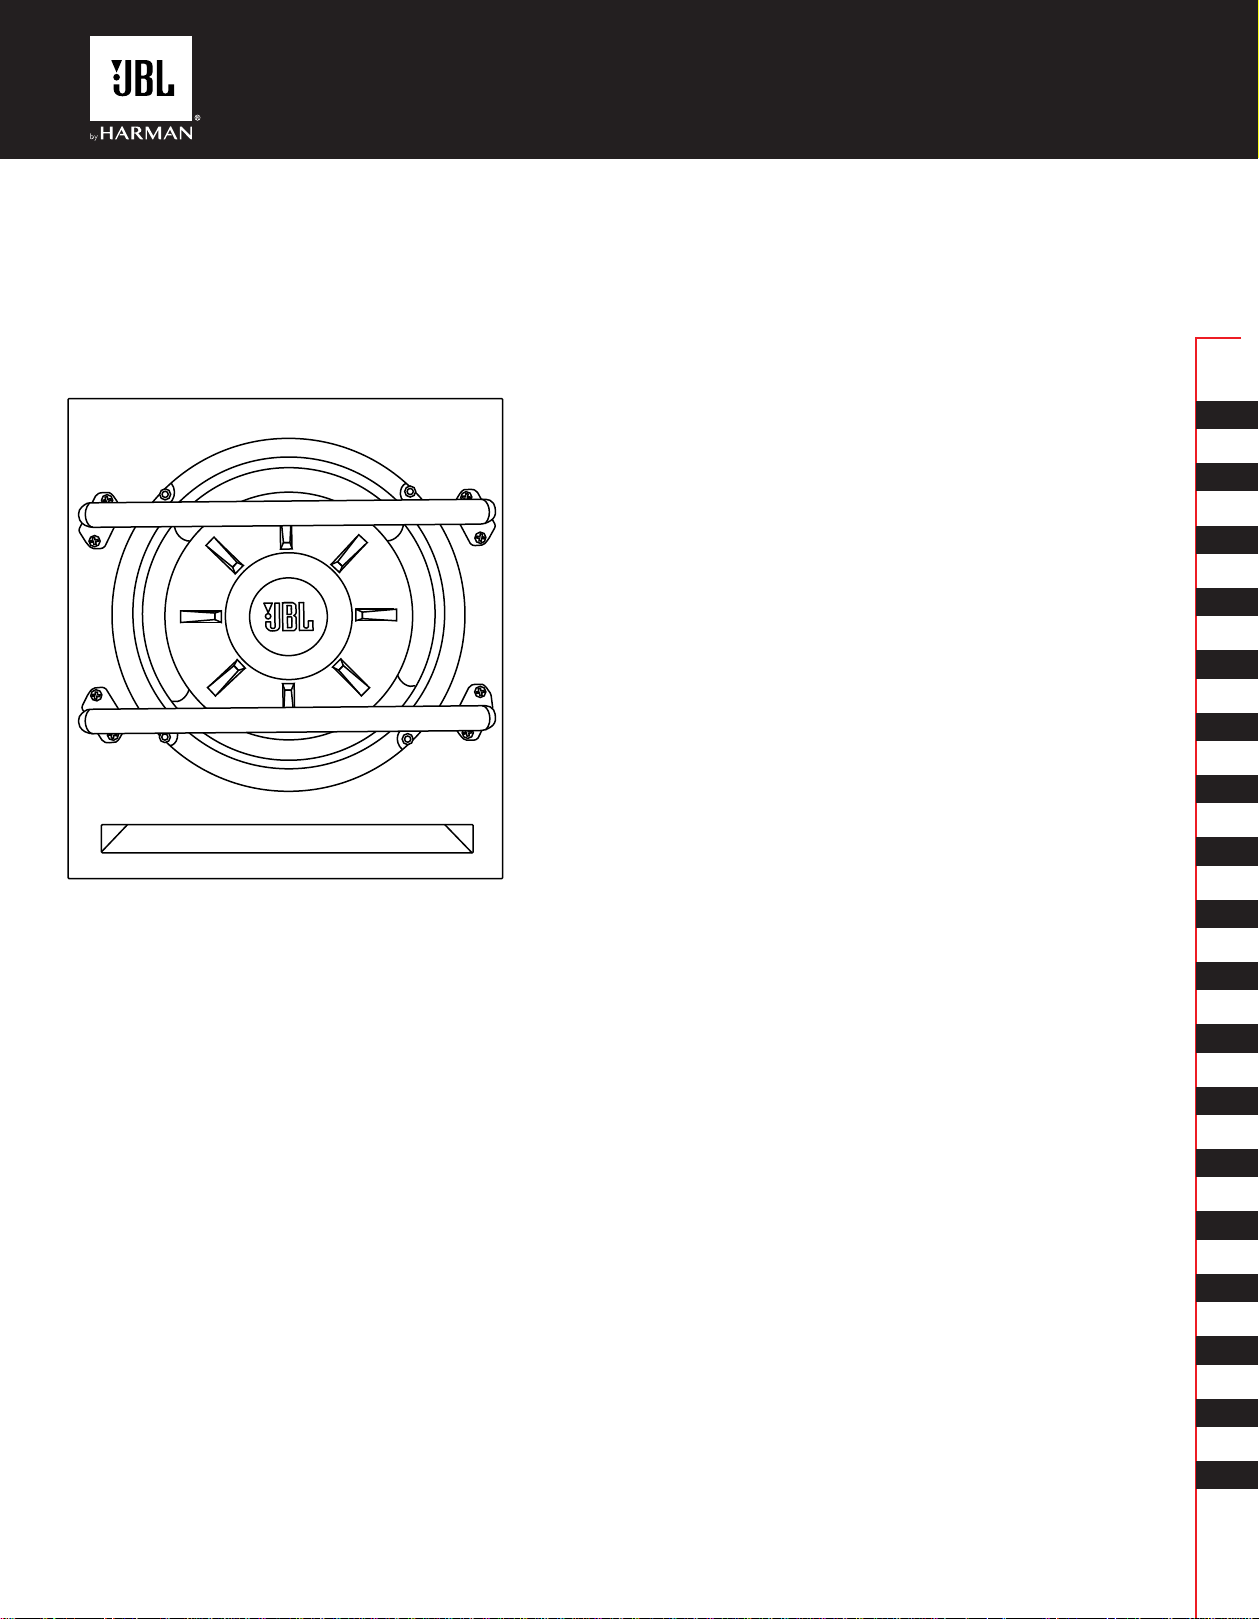
Stage 800BA Subwoofer
The package includes a wiring harness that features all necessary wires for power,
ground, and signal, and plugs into the “INPUT” connector on the back panel of
the Stage 800BA. It also includes a pair of RCA adapters for use with
speaker-level inputs.
THANK YOU for choosing the JBL Stage 800BA powered subwoofer. To ensure
maximum performance, we strongly recommend that you have it installed by a
qualified professional – while these instructions offer general installation guidance,
they do not show specific installation methods for your particular vehicle. If you do
not have the necessary tools or hands-on experience, do not attempt the
installation yourself; instead, ask your authorized JBL car-audio dealer about
professional installation options.
x1
x1
x1
x1
x2
Wiring harness
+12V 16AWG Red
GND 16AWG Black
Remote in 22AWG Blue/white
RCA White – left
Red – right
Speaker-level input adapters
RCA White – left
Red – right
L+ 22AWG Gray
L- 22AWG Gray/Black
R+ 22AWG Green
R- 22AWG Green/black
FOR POWER
Connect the end of the red 16-gauge power wire to your vehicle’s + (positive)
battery terminal. Note: If an extension cable is necessary because of your
mounting location, we recommend that you connect the extension to the power
wire using solder. You must also install a fuse holder with a 10A fuse in-line and
within 18" of the battery.
FOR GROUND
Connect the 16-gauge black ground wire to a solid, metal point on the vehicle’s
chassis using a ring terminal. Use sandpaper to clear the paint from the metal
surface at the chassis location. Use a star-type lock washer to secure the wire.
+12 volt
Remote Ground
t t t
To in-dash receiver
[~~0~1000000~)
10A fuse
1
]1-_____
>#10AWG (0.82mm
18" (46cm)
2
) wire
_
_J
EN
INSTALLATION
IMPORTANT: Disconnect the vehicle’s negative (–) battery terminal before
beginning the installation.
• Always wear protective eyewear when using tools.
• When making electrical connections, make sure they are secure and
properly insulated.
• If you must replace the fuse, be sure to use the same type of fuse and
current rating as that of the original.
CHOOSING A MOUNTING LOCATION
Choose a location that doesn’t prevent you from loading or unloading cargo,
interfere with fold-down seats, or keep you from being able to open or close the
trunk lid, or interfere with the safe operation of the vehicle.
STAGE 800BA WIRING
You’ll make all signal and connections, and adjust all settings at the panel on the
back of the Stage 800BA.
G~N
~
F
OdB
'i
PH
W'
''
n
El
MAX
9
AS~80"
dB
Q '
00
USE
10A
"'
cl]
POW
D''
~
REMOTEOUT
~
ER
oo
PROTECT
r
MIN
6 20
Vehicle battery
2
Vehicle chassis
>#10AWG (0.82mm
) wire
REMOTE IN
If you’re using line-level inputs to provide signal to the Stage 800BA (see below),
uncouple the bullet connector on the blue/white wire, and connect the longer wire
marked with “REMOTE IN” to the remote output wire on your source unit.
To radio remote
output wire
If you’re using speaker-level inputs to provide signal to the Stage 800BA (see below),
you must leave the bullet connector coupled so that the blue/white wire makes a
loop.
When you’ve made all the necessary power and signal connections to the Stage
800BA wiring harness, plug the harness into the input marked “INPUT”.
Page 4

INPUT
GETTING SIGNAL TO THE STAGE 800BA
If your head unit has single or dual subwoofer outputs, use RCA patch cables to
connect them to the line-level inputs of the Stage 800BA harness. For single
subwoofer outputs, use an RCA Y-adapter cable to connect to the Stage 800BA
line-level inputs. If your head unit offers stereo subwoofer outputs, connect to the
line-level inputs of the Stage 800BA harness using stereo RCA patch cables.
SETTING THE GAIN, CROSSOVER, PHASE, AND
BASS BOOST
Adjusting the gain lets you match the input sensitivity of Stage 800BA with
the output of your receiver, and match the relative volume to the rest of the
speakers in your vehicle.
1. Start with gain control set to minimum, and the crossover control and
bass control rotated midway.
2. Choose music with substantial bass content and turn the volume control
on your receiver to ¾ of its total output.
3. Adjust the gain control clockwise, listening carefully to the bass output. If
you hear distortion, turn the gain control counterclockwise to decrease
the gain.
GAIN
ce
I \
MIN
4. Switch the phase back and forth between 0 and 180 degrees to
determine which setting provides the most clean bass output.
MAX
SPEAKER-LEVEL SIGNAL INPUTS
If your head unit only has speaker-level outputs, use the included speaker-level
input adapters. Splice the gray and gray/black wires into your vehicle’s front left
speaker wires, and the green and green/black wires into your vehicle’s front right
speakers wires (using solder is recommended). Then plug each adapter in to the
RCA inputs of the Stage 800BA harness.
BASS LEVEL REMOTE
If you’re using a compatible JBL RBC remote bass level controller (sold
separately at https://www.jbl.com), plug its connector directly in the REMOTE
input on the back panel.
REMOTE
LEVEL
POWER AND PROTECT LEDs
The back panel includes two LED indicators. When POWER is illuminated, the
Stage 800BA is turned on. When PROTECT is illuminated, the Stage 800BA
has entered protect mode due to overheating or over/under-voltage
conditions.
POWER
00
PROTECT
PHASE
n1so
0
B 0°
5. Adjust the crossover control (between 60Hz and 200Hz) until the Stage
800BA plays only low-frequency information – you should not hear
elements such as vocals coming from the woofer.
CROSSOVER
ce.
I \
620
OHz
6. Adjust the Bass EQ control clockwise or counterclockwise between 0 and
9 dB to enhance the bass output to suit your taste.
BASS EQ
OHz
(@
I \
OdB
SPECIFICATIONS
Amplifier Power : 100Wrms; 200W peak
Frequency Response : 30Hz –200Hz
Fuse : 10A
Maximum Current Draw : 9.5A
Quiescent Current Draw : <0.5A
50mV – 16V Universal Interface
Crossover Frequency : 60Hz – 200Hz
Crossover Slope : 12dB/octave
Bass Boost : up to +9dB @ 60Hz
Dimensions (W x H x D1 x D2) : 9-7-8" x 11-1/4" x 10-3/8" x 8"
9
dB
(250mm x 285mm x
263mm x 203mm)
~
HARMAN
~
HARMAN International
Industries, Incorporated
8500 Balboa Boulevard,
Northridge, CA 91329 USA
© 2018 HARMAN International Industries, Incorporated. All rights reserved.
JBL is a trademark of HARMAN International Industries, Incorporated, registered in the
United States and/or other countries. Features, specifications and appearance are subject to
change without notice.
Page 5

JBL
1-Year
Transferable
Limited
Warranty
UBL
The J
BL
purchase.
WHO
The JBL
that
United States
outlet.
A
service
WHAT
Except
workmanship. The
abuse, product modification
from
resulting
caused
used
the seller; products sold on an "as-is"
removing,
at
consequential damages. JBL reserves the right
with
NOTE: Repair
Unauthorized repair will void the warranty and
IS
the JBL
copy
IS
as
failure
by
for
our
option,
a comparable model.
This is
card and keep
warranty
PROTECTED
warranty
product
or
of
the
is
required.
COVERED
specified below, the JBL
to
follow
from
the performance
installation
commercial
or
reinstalling the unit. JBL's liability is limited
of
of
an
important document. Attach your bill
it
in a safe place. Your bill
remains in effect
BY
THIS
protects the
was purchased
purchased
original
following
instructions contained in the instruction manual; damage
of
or
any defective product and shall
our
product
by
dated
BY
THIS
are not covered: damage caused
or
parts
business use; any claims based on misrepresentations
Any
must
for
one year
WARRANTY
original
military
bill
WARRANTY
neglect; damage occurring
of
that
replacement units
owner
from
an authorized dealer in the
personnel
of
sale
warranty
repairs
do
not
or
be done by
covers all defects in material and
by
conform
final sale basis;
must
someone
of
sale to this
of
sale
is
your warranty
from
the date
and all subsequent owners,
from
an authorized
be
presented
not
to JBL
or
to
not
include incidental
to
replace a discontinued model
or
parts
an
authorized dealer
is
done at the risk of the consumer.
of
the
first
consumer
military
whenever
by
accident, misuse,
during
authorized by JBL; damage
specifications; units
the cost
may
shipment; damage
of
installing,
the repair
be
or
or
new
or
or
service center.
replacement,
rebuilt.
provided
warranty
by
TO
OBTAIN
If
you
require
possible and
call 800-336-4525
If
purchased outside the United States, contact
or
replacement. I
DO
NOT
AUTHORIZATION;
You are responsible
manufacturer
tinental United States, Alaska
the warranty. Please save the
additional cartons.
Correspondence
Service, 8500 Balboa Boulevard,
contact
This
warranty
from
state
or
consequential damages
above
may
HARMAN
WARRANTY
warranty
you
live in the United States, please
for
RETURN
will
pay reasonable return charges
with
your
local
distributor.
gives
to
state. Some states
not
apply
HARMAN
8500 Balboa Boulevard,
SERVICE
service, please contact
information
PRODUCTS
THEY
for
you
to
WILL
transporting
JBL Customer Service should be addressed to: J
specific legal rights. You
or
you.
on
how
TO
THE
BE
RETURNED
your
or
Hawaii
original
do
limitations
shipping
Northridge,
not
if
allow
on
your
to
obtain service
your
JBL
product
the repair
carton(s), as a charge
CA 91329. Outside the United States, please
the exclusion
how
International Industries, Incorporated
Northridge,
dealer
visit
our
local dealer
FACTORY
UNOPENED
for
repair
for
delivery
or
replacement is covered
may
also have
long an
implied
CA 91329
for
assistance.
Web site at
or
replacement.
or
distributor
WITHOUT
or
replacement. The JBL
to
any location in the con-
other
or
limitation
warranty
If
www.jbl.com
will
be made
BL
Customer
rights,
of
incidental
lasts, so the
this
for
under
which
is
not
repair
or
for
vary
© 2010 HARMAN International Industries, Incorporated. All rights reserved. JBL is a trademark
HARMAN International Industries, Incorporated, registered in the United States and/or other countries.
Part No. 1YEARWARJBL
of
Page 6

UBli
®
HARMAN
8500
Northridge,
International
Balboa
Boulevard
CA
91329
Industries,
Incorporated
Dear
Congratulations
Please take a
gather
help
For
and
the
for
We've
and
the
of
We're
expectations,
product,
Once
HARMAN International Industries, Incorporated
Customer
moment
will
enable
us
to
better
more
film
living
accuracy
digital
development
performance.
than
recording
rooms
and
maintained
technologies
confident
and
you
will
again,
thank
50 years,
,
and
thank
to
complete
us
to
keep
understand
JBL
and
reproduction.
and
automobiles
dynamic
this
enviable
and
of
new
designs
that
the
JBL
that
the
again
you
think
for
you
for
choosing
the
enclosed
you
informed
your
needs
has been
musical
position
psychoacoustics.
products
next
time
of
JBL.
selecting JBL..
the
From
of
critical
performance.
and
materials,
you
you
and
through
consider
JBL.
profile
of
our
latest
fulfill
professional's
the
audiophiles,
have
your
stage
The
to
rigorous
results
extracting
chosen
the
purchase
card. The
advancements
expectations.
top
the
recording
JBL
research
of
even
will
information
choice
sets
the
this
research
greater
surpass
of
an
in
into
and
music
studio
standard
analog
drive
levels
your
audio
we
will
to
A
Message
and
the
Selecting fine audio equipment, such
the start
maximize the
Industry Association's Consumer Electronics Group
of
your
through
importantly,
Sound can be deceiving. Over
higher
harmful
your
Sound can be deceiving. Over
volumes
hearing. Guard against
TO
• Start
•
Slowly
without
ONCE
• Do
of
your
musical enjoyment.
fun
and excitement
equipment
loud and clear
without
volumes
to
your
hearing adapts.
of
sound.
ESTABLISH A SAFE LEVEL:
your
volume
increase
distortion.
YOU
not
HAVE
exceed
by
playing
without
affecting
of
sound.
hearing. Guard against
What
control
the
ESTABLISHED A COMFORTABLE
that
What
sounds
this
by
at a low
sound until
level.
from
Consumer
your
it
at
a safe level; one
annoying blaring
your
time
sounds
time
"normal"
choosing a safe level
you
the
JBL
Electronics
as
the
unit
you
Now
it
is
time
equipment
or
sensitive hearing.
your
hearing
"normal"
this
your
hearing
setting.
can hear
can actually be loud and
"comfort
by
choosing a safe level
"comfort
it
comfortably, clearly, and
manufacture
offers. JBL and the Electronics
can actually be loud and
r
Association:
have
just
purchased, is
to
consider
want
you
that
lets
distortion - and,
BEFORE
SOUND
how
to
get
the
sound come
level"
level"
adapts
adapts
your
only
you can
the
most
most
BEFORE
harmful
hearing adapts.
LEVEL:
to
to
higher
to
out
your
Taking a
a
Riii
moment
or
loss in the future.
to
do
this
After
now
all,
we
will
want
help
to
prevent hearing damage
you listening
for
a lifetime.
Page 7

fl~~IPi!iJbc~
&IH4~~ Elfi-$f4
~~t&
~,ljjtl~~tli{.
~#"-
:tmJlr~
l!fH4
*lH&-t&ffl
0:
-~~fl~~)tfit£~$f41'Tfl:i1JJtfift*4't11¥J*il::l1Jt£ GB/T 26572
X: -~~fl~~Jtfi~&tE~$f41¥J~-:l1JIPift~i:pl¥J*:flMHll GB/T 26572
e
tE
SJ/T 11364 1¥J~~~ittl
'P
'l' A
a!
:IU!l
00
ll!
Pl
ll'l
1!Hl'I
'1l
~~f&Ll¥J~r~~<~~ffl~~~r~
f4)
,
~&llffi~it*~
*~'
~~,
-l,Jt
11~'.t- jJqct$
T
~,
ll}j
i '
'@.
~
IT-~
lc1
*i&
' - !lifij '
~
J;Je~1¥Jil&:l:~;j(l2,l
i'
'1l
'ti"'
.!l\
..t
:ilf
J1'J
fl
" !.f
i!l{Jl'./ll
~~'t11¥JB~~-~£1¥J~#~~~m~~.
1
·""
rW
J;Je~li<Jll&:S:~*•
ltll
•
(EPuP)
J:r'l ,
r.
ta
(Pb)
0 0 0
0
0 0 0 0 0
0 0 0 0 0
(Hg)
*
0
m
(Cd)
0 0 0
;,\,ffr~
(Cr
(VI))
0 0 0
$~~~
(PBB)
$~=;$:mt
(PBDE)
0
0
0
 Loading...