

Page 1
ROCK MONITOR SPEAKER
RM10
OWNER’S GUIDE
®
Page 2
THANK YOU FOR CHOOSING JBL
For more than 50 years, JBL
has been involved in every
aspect of music and film
recording and reproduction,
from live performances to
monitoring the recordings
you play in your home, car
or office.
We’re confident that the JBL
loudspeaker you have chosen
will provide every note of
enjoyment that you expect –
and that when you think about
purchasing additional audio
equipment for your home, car
or office, you will once again
choose JBL.
Please take a moment to register your product on our Web
site at www.jbl.com. This
enables us to keep you
posted on our latest advancements, and helps us to better
understand our customers
and build products that meet
their needs and expectations.
JBL Consumer Products
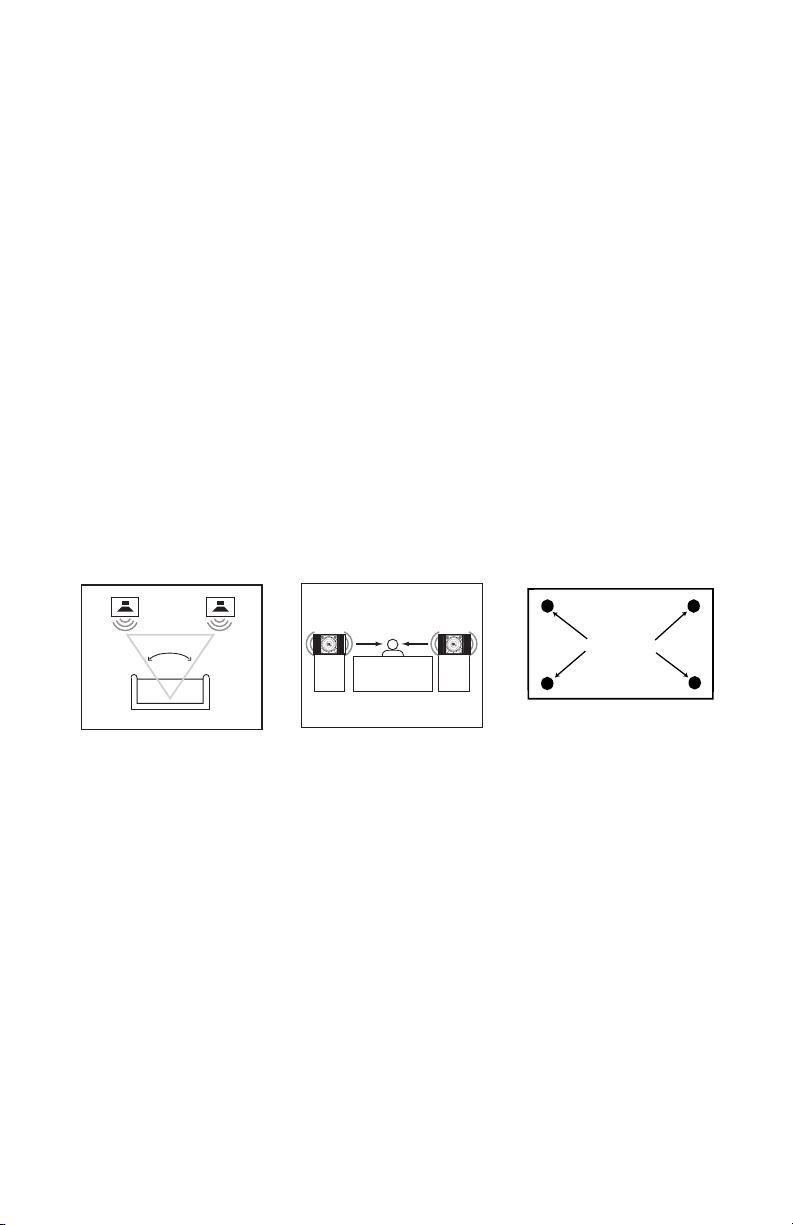
SPEAKER PLACEMENT
In all cases, it is important to
place the speaker with safety
in mind. Always place the
RM10 on a sturdy shelf or
credenza, making sure that no
part of the speaker extends
past the edge of the surface.
The speaker should be placed
out of reach of young children
and pets who might topple it,
resulting in serious personal
injury. All wires should be
placed where they will not
present a tripping hazard.
If that is not possible, cover
the wires completely and
securely with duct tape.
Place the speaker so that the
tweeters (located in the upper
portion of the two side panels) are approximately at ear
height and aimed at the lis-
tening position. When two
speakers are used, place
them equidistantly from
the main listening position.
The RM10 monitor is videoshielded and can safely be
placed near a television.
The supplied self-adhesive
rubber pads may be attached
to the bottom corners of the
speaker to protect your
furniture.
o
40o – 60
WALL AND CEILING
MOUNTING
The RM10 monitor may be
mounted on a ceiling or wall
using appropriate after-market
brackets.
It is solely the customer’s
responsibility to select proper
hardware and to safely install
the loudspeaker. If you are
uncertain of your ability to
safely mount the loudspeaker
on a ceiling or wall, contact a
professional custom installer
for assistance.
The brackets should be capable of supporting a minimum
weight of 30 lb (14kg). Note
that the two threaded inserts
on the top of each RM10
speaker are 4" (101mm) apart.
Two mounting bolts are supplied. If they are lost or misplaced, contact JBL Customer
Service for replacements; do
not use third-party bolts.
When mounting the RM10
speaker from the ceiling, the
bracket should be installed in
a wood joist. Drywall alone is
not strong enough to support
the speaker, and may result in
the speaker falling and seriously injuring someone. Like-
Place pads here
wise, when mounting the
RM10 speaker on a wall, the
bracket should be installed in
a wood stud to prevent falling.
If the RM10 speaker is being
mounted on a brick or concrete wall, it is recommended
that expansion anchor bolts
be used.
The RM10 loudspeaker is not
weather-resistant and should
not be installed outdoors or in
a moist area such as near a
pool or hot tub.
Page 3

SPEAKER CONNECTIONS
Receiver or Amplifier
Speaker Outputs
– +
– +
CONNECTION TIPS
center post is visible under
the collar. Insert the bare end
Speakers and electronics
have corresponding positive
(+) and negative (–) terminals.
It is important to connect both
speakers identically: positive
(+) on the speaker to positive
(+) on the amplifier and negative (–) on the speaker to negative (–) on the amplifier.
Wiring “out of phase” results
in thin sound, weak bass and
a poor stereo image when
two speakers are used.
To use the binding-post
speaker terminals, unscrew
the colored collar until the
of the wire through this hole;
then screw the collar down
until the connection is tight.
The hole in the center of each
collar is intended for use with
banana-type connectors. To
comply with European CE
certification, these holes are
blocked with plastic inserts at
the point of manufacture. To
use banana-type connectors
requires the removal of the
inserts. Do not remove these
inserts if you are using the
product in an area covered by
the European CE certification.
pass-through hole in the
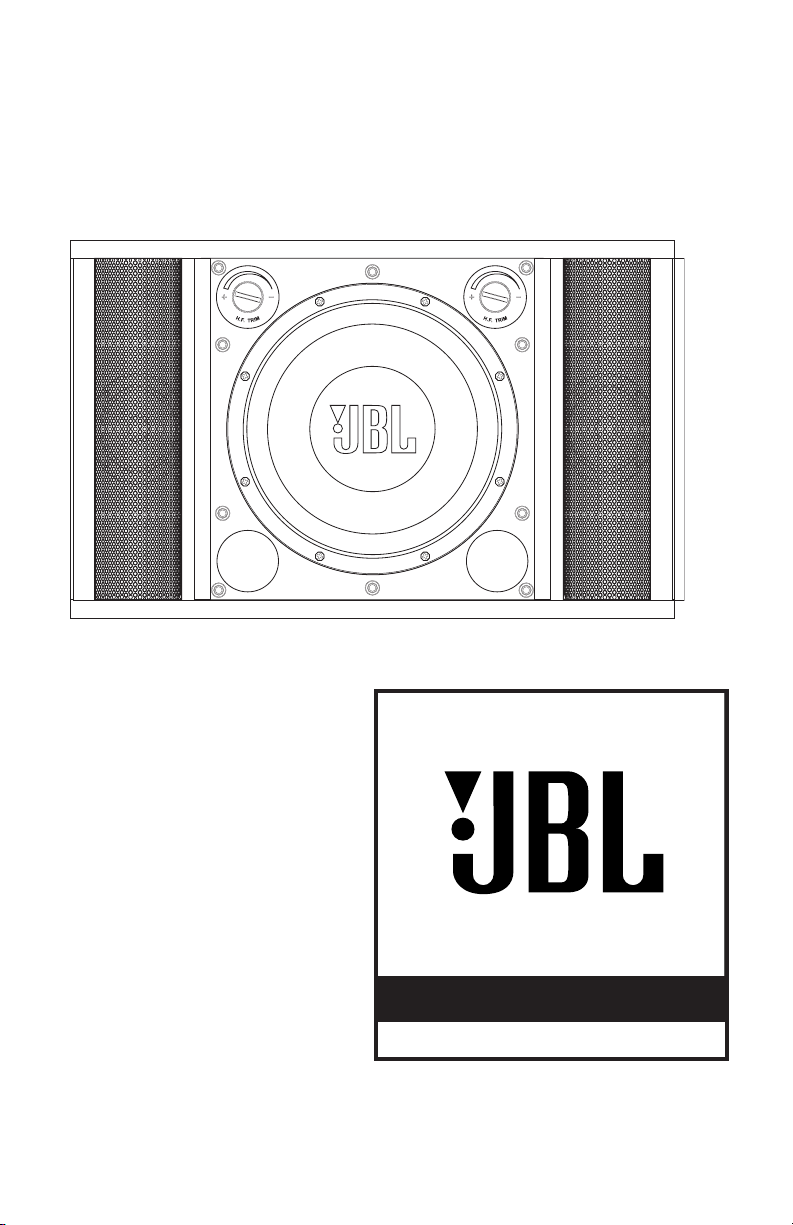
TRIM CONTROLS
The RM10 monitor is equipped
with left and right high-frequency trim controls that control the tweeters in the left
and right side panels of each
RM10 speaker. The trim controls enable you to compen-
sate for various room condi-
tions and vocal styles. Begin
by turning the knobs in the
center of each control as far
counterclockwise as they will
go. This is the normal level of
the associated
high-frequency
When Two RM10’s
Are Used
RIGHT
– +
LEFT
– +
– +– +
RIGHT
Receiver or Amplifier Speaker Outputs
When One RM10 Is
Used
LEFT
driver. Turning the knob clockwise decreases t
he driver’s
level. Adjust the trim controls
so that the vocals are loud
enough to be intelligible without being so loud as to be
harsh or distorted.
TROUBLESHOOTING
If there is no sound
from any of the
speakers:
• Check that receiver/amplifier is on and that a source is
playing.
• Review proper operation of
your receiver/amplifier.
If there is no sound
coming from one
speaker:
• Check the “Balance” control
on your receiver/amplifier.
• Check all wires and connections between receiver/amplifier and speakers. Make sure
no wires are touching other
wires or terminals and creating a short circuit.
• Make sure all wires are
connected. Make sure none
of the speaker wires are
frayed, cut or punctured.
• Turn off all electronics
and switch the speaker in
question with one of the other
speakers that is working correctly. Turn everything back
on and determine whether the
problem has followed the
speaker, or has remained in
the same channel. If the problem is in the same channel,
the source of the problem is
most likely with your receiver/
amplifier, and you should
consult the owner’s manual
for that product for further
information. If the problem
has followed the speaker,
consult your dealer for further
assistance or, if that is not
possible, visit www.jbl.com
for further information.
If the system plays at
low volumes but shuts
off as volume is
increased:
• Check all wires and connections between receiver/
amplifier and speakers.
• Make sure all wires are
connected. Make sure none
of the speaker wires are
frayed, cut or punctured.
• If more than one pair of
main speakers is being used,
check the minimum impedance requirements of your
receiver/amplifier.
If there is no (or low)
bass output:
• Make sure the polarities
(+ and –) of the left and right
“Speaker Inputs” are connected properly.
• Consider adding a powered
subwoofer to your system.
Page 4

SPECIFICATIONS
RM10
Description 3-Speaker, 2-way 10" (250mm) vocal monitor
Maximum Recommended Amplifier Power* 175W
Power Handling (Continuous/Peak) 50W/400W
Nominal Impedance 8 Ohms
Sensitivity (2.83V/1m)
Frequency Response (–3dB)
Crossover Frequency 1,700Hz
High-Frequency Transducers Dual 3" (75mm) cones with high-temperature voice coils
Low-Frequency Transducer
Baffle Low diffraction, IsoPower
Ports Dual FreeFlow™flared
Network Straight-Line Signal Path
Terminals Gold-plated, 5-way binding posts
Dimensions (H x W x D) 13-3/16" x 20-7/8" x 9-5/8" (335mm x 530mm x 245mm)
Weight per Speaker 29.7 lb/13.5kg
92dB
40Hz – 20kHz
10" (250mm) Cone with high-temperature
voice coil, shielded
with left and right high-frequency trim controls
™
™
(SSP™)
STEAL THE SHOW.
GO PRO
PRO SOUND COMES HOME
®
JBL Consumer Products, 250 Crossways Park Drive, Woodbury, NY 11797 USA
8500 Balboa Boulevard, Northridge, CA 91329 USA
2, route de Tours, 72500 Chateau du Loir, France
516.255.4JBL (4525) (USA only) www.jbl.com
© 2005 Harman International Industries, Incorporated. All rights reserved.
JBL and Harman International are trademarks of Harman International Industries,
Incorporated, registered in the United States and/or other countries.
PRE1986
Part No.
Declaration of Conformity
We, Harman Consumer Group International
2, route de Tours
72500 Chateau du Loir
France
declare in own responsibility that the product described in
this owner’s manual is in compliance with technical standards:
EN 61000-6-3:2001
™
.
™
* The maximum recommended amplifier power rating will ensure
EN 61000-6-1:2001
Laurent Rault
Harman Consumer Group International
Chateau du Loir, France 10/05
proper system headroom to allow for occasional peaks. We do
not recommend sustained operation at these maximum power
levels.
All features and specifications are subject to change without
notice. All dimensions include grilles.
 Loading...