

Page 1

AUTOMOTIVE LOUDSPEAKERS
Grand T our ing®Series
GTO320, GTO420, GTO6420, GTO520, GTO620, GTO630, GTO7520, GTO920, GTO930
Owner’s Manual
Page 2

02
Thank you for purchasing JBL’s
Grand Touring Series multielement automotive loudspeakers. In order that we
may better serve you should you require
warranty service on your new speakers,
please retain your original purchase
receipt and return the enclosed warranty
registration card.
Important: Installation of automotive
stereo components can require extensive experience in performing a variety
of mechanical and electrical procedures.
Although these instructions explain in a
general sense how to install GT Series
loudspeakers, they may not show the
exact installation methods for your particular vehicle. If you feel you lack the
necessary tools or experience, ask your
authorized JBL car-audio dealer about
professional installation options.
Installation Warnings and Tips
• Always wear protective eyewear
when using tools.
• Turn off all audio systems and other
electrical devices before you start.
Disconnect the (–) negative lead from
your vehicle’s battery.
• Keep speakers in their package(s) until
final installation. When moving a speaker,
always rest it with the cone or dome
facing up. Never use force to install any
speaker.
• Check clearances on both sides of a
planned mounting surface before drilling
any holes or installing any screws.
Remember that the screws can extend
behind the surface.
• At the installation sites, locate and make
a note of all fuel lines, hydraulic brake
lines, vacuum lines and electrical wiring.
Use extreme caution when cutting or
drilling in and around these areas.
Caution: In some cars, fuel tanks may
be located directly beneath the rear
deck. Check for adequate speaker-basket
clearance before considering this
location!
• Before drilling or cutting holes, use a
utility knife to remove unwanted fabric
or vinyl to keep material from snagging
in a drill bit or saw.
• For door installations, check the
clearance with the windows in both
closed and open positions and verify
that a mounted speaker will not interfere
with the window crank or with the
power-window mechanism.
• If mounting speakers elsewhere, check
for clearance around rear-deck torsion
bars, glove box or other structural
elements.
• Do not mount speakers where they
will get wet.
Warning: Playing loud music in an
automobile can permanently damage
your hearing as well as hinder your
ability to hear traffic. We recommend
listening at low levels while in your car.
JBL accepts no liability for hearing loss,
bodily injury or property damage resulting from use or misuse of this product.
Page 3
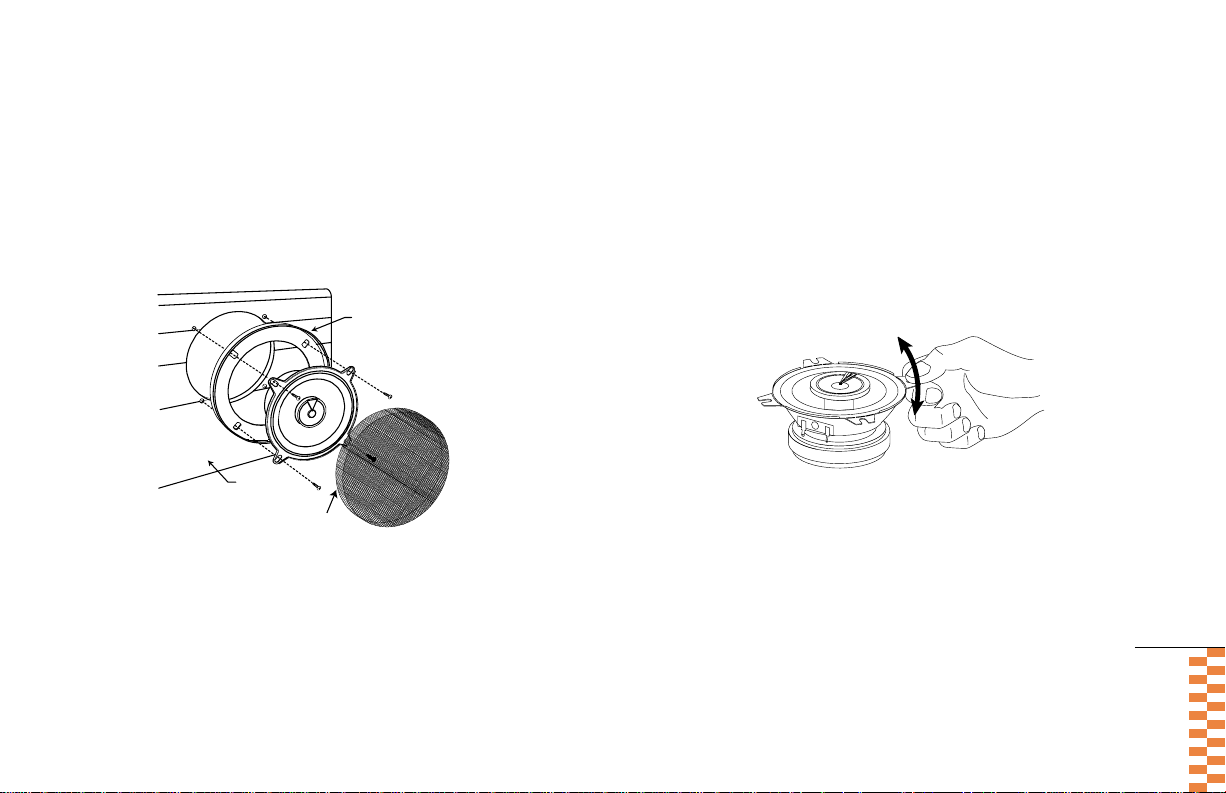
Typical installation of the GTO320, GTO520,GTO7520,
Grille
Screen
Trim Ring
Car Door
GTO920 and GTO930 speakers with grilles as shown in
Figure 1.
Installation of the GTO420 speaker as shown in Figures 2a
and 2b.
Figure 1.
Note:The GTO320 and GTO7520 are designed for direct
replacement of factory speakers behind original factory
grilles; therefore, they do not contain the grilles and trim
ring shown in Figure 1.
Figure 2a.
Removable Mounting Ears on GTO420.
Bend up and down repeatedly to break off
or use tin snips.
Note: Some installations may require some or all of the
mounting ears to be removed from the GTO420. Remove
your original speakers first to determine whether any
mounting ears must be removed.
03
Page 4
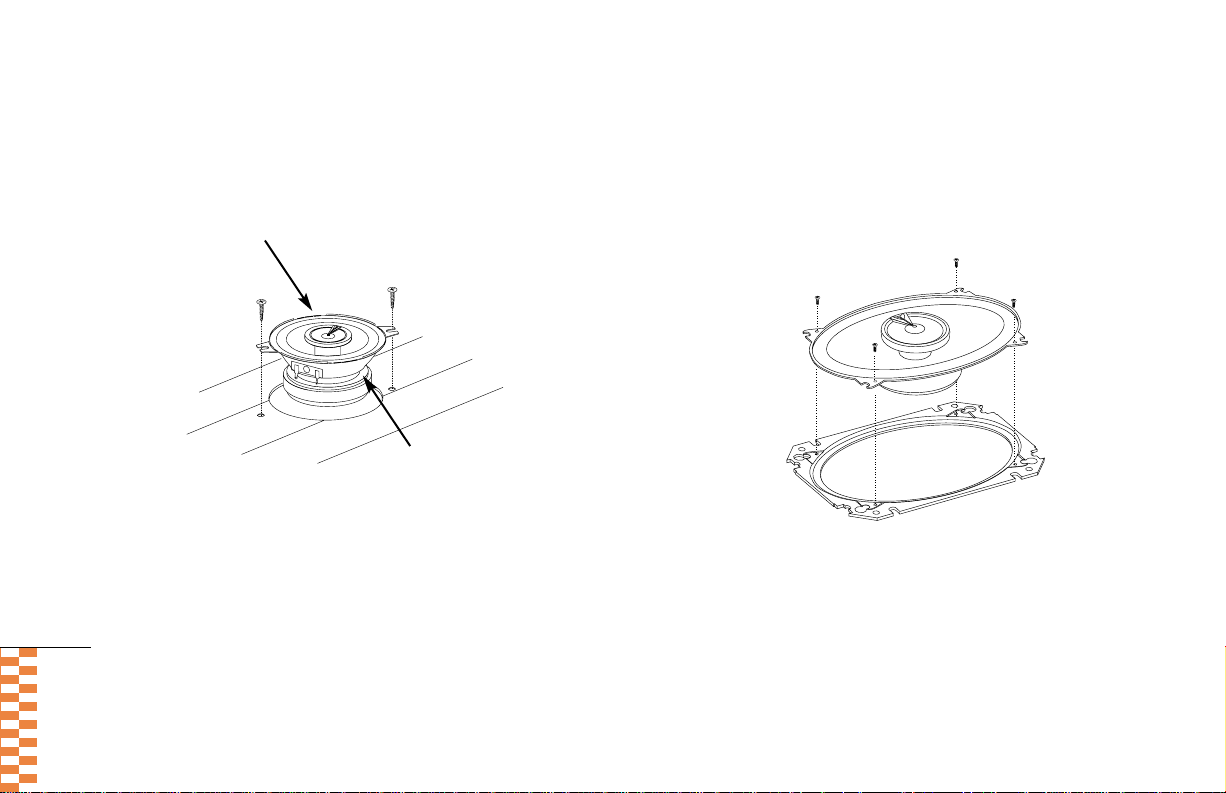
Installation of the GTO6420 speaker as shown in Figure 3.
04
Figure 2b.
Mounting the GTO420.
Mounting Ears Removed
Figure 3.
Note: To install the GTO6420 in European cars with
elliptical openings, detach the speaker from the metal
adapter.
Page 5

Installation of the GTO620 and GTO630 as shown in Figures 4a, 4b,
4c and 4d. The GTO620 and GTO630 use JBL’s patented Intermount II™
mounting system. Intermount II provides for easy installation of these
speakers in many standard and nonstandard locations
that will accommodate a 6-1/2" speaker.
Figure 4b.Figure 4a.
Front View
Mounting Hooks
Foam Gasket
Mounting Slots
Using Intermount II™in American and Japanese
cars with openings for 6-1/2 " speakers as shown
in Figures 4a and 4b.
Mounting Ring
Rotate to Lock
Slots for
Mounting
Hooks
Rotate to Lock
Mounting
Hooks
Foam Gasket
Rear View
Important: When using the steel mounting rings, you
must use the sheet metal screws with undersized heads
that are included in the hardware pack and make sure
that the ring is mounted to a completely flat surface.
Mounting
Ring
05
Page 6

Using Intermount II™in European and American 165mm
openings or custom-mounting the speaker as shown in
Figures 4c and 4d.
06
Figure 4c.
Grille
Trim Ring
Hole
Cutout
Match Notch on
Speaker with Notch
on Trim Ring
Grille Screen
Figure 4d.
Hole Cutout
Mounting Surface
Note: If you are mounting the speak er s behind the
factory door panel or grille, omit the grille and trim
ring. Place the U-shaped clips over the speaker’s
outside flange, align the hole in the clip with the notch
in the speaker’s basket and insert the screw through
the hole in the clip.
Clips
Page 7

Specifications
Multielement Loudspeakers
GTO320 GTO420 GTO6420 GTO520 GTO620 GTO630
3-1/2" 2-Way 4" 2-Way 4" x 6" 2-Way 5-1/4" 2-Way 6-1/2" 2-Way 6-1/2" 3-Way
Loudspeaker Loudspeaker Loudspeaker Loudspeaker Loudspeaker Loudspeaker
Woofer-Cone Material Rigitex™ Rigitex™ Rigitex™ Rigitex™ Rigitex™ Rigitex™
Tweeter-Diaphragm Material Titanium Composite Titanium Composite Titanium Composite T itanium Composite Titanium Composite Titanium Composite
Recommended Amplifier
Tweeter-Diaphragm Material Titanium Composite Titanium Composite Titanium Composite
Recommended Amplifier
Power Range 5W – 60W RMS 5W – 75W RMS 5W – 60W RMS 5W – 90W RMS 5W – 125W RMS 5W – 125W RMS
Frequency Response 100Hz – 21kHz 85Hz – 21kHz 75Hz – 21kHz 65Hz – 21kHz 55Hz – 21kHz 55Hz – 21kHz
Sensitivity 90dB 90dB 92dB 90dB 91 dB 91dB
Mounting Depth 1-7/16" (37mm) 1-15/16" (50mm) 1-3/4" (45mm) 2-3/16" (56mm) 1-15/16" (50mm)) 1-15/16" (50mm)
GTO7520 GTO920 GTO930
5" x 7" 2-Way 6" x 9" 2-Way 6" x 9" 3-Way
Loudspeaker Loudspeaker Loudspeaker
Woofer-Cone Material Rigitex™ Rigitex™ Rigitex™
Power Range 5W – 150W RMS 5W – 175W RMS 5W – 175W RMS
Frequency Response 50Hz – 21kHz 45Hz – 21kHz 45Hz – 21kHz
Sensitivity 91dB 91 dB 92dB
Mounting Depth 2-3/8" (61mm) 2-15/16" (75mm) 2-15/16" (75mm)
07
Page 8

Declaration of Conformity
We, JBL Europe A/S
Kongevejen 194B
DK-3460 Birkerød
DENMARK
declare in own responsibility, that the products described
in this owner’s manual are in compliance with technical
standards:
EN 50081-1:1992
EN 50082-1:1992
Steen Michaelsen
JBL Europe A/S
Birkerød. DENMARK. 2/99
JBL Consumer Products, 250 Crossways Park Drive, Woodbury, NY 11797
800-336-4JBL (4525) www.jbl.com Part No. GTOMEOM Made in China
 Loading...