

Page 1

THANK YOU
for purchasing a JBL®GTO17T automotive
tweeter. We’ve organized this manual to make
your installation as simple and trouble-free
as possible. Please read it thoroughly before
proceeding. Remember to keep your sales
receipt and this manual in a safe place so
both are available for future reference.
GRAND
TOURING
®
SERIES
GTO17T
tweeter
owner’s
manual
English
Page 2

2
INSTALLATION WARNINGS AND TIPS
ABOUT THESE
INSTRUCTIONS
Installation of automotive stereo
components can require extensive
experience with a variety of mechanical
and electrical procedures. Although these
instructions explain how to install JBL
GTO17T tweeters in a general sense, they
do not show the exact installation methods
for your particular vehicle. If you feel you
do not have the experience, do not attempt
the installation yourself – instead, ask your
authorized JBL car audio dealer about
professional installation options.
LOUD MUSIC AND HEARING
Playing loud music in an automobile can
permanently damage your hearing, as well
as hinder your ability to hear traffic. The
maximum volume levels achievable with
JBL speakers, combined with high power
amplification, may exceed safe levels for
extended listening. We recommend using
low volume levels when driving. JBL
accepts no liability for hearing loss, bodily
injury or property damage as a result of
use or misuse of this product.
ABOUT THE FILTER
Passive filter design involves precise
circuit design and component selection.
Moreover, a well-designed filter circuit
provides an intended electrical response,
when combined with the electrical properties of the speaker, to provide a particular
acoustic response. Each enclosed filter
has been optimized to provide a flat
response when used with a JBL GTO17T
tweeter.
Do not use another brand or type of
passive crossover, or connect more than
one tweeter to a crossover. Doing so may
damage the tweeter.
INSTALLATION TIPS
• Always wear protective eyewear when
using any tools.
• Turn off all audio components and other
electrical devices before you start.
Disconnect the negative (–) lead from
your vehicle’s battery.
• Keep speakers in their package until
final installation. When moving a speaker,
always rest it with the cone or dome
facing up. Never use force to install
any speaker.
• Check clearances on both sides of a
planned mounting surface before drilling
any holes or installing any screws.
Remember that the screws can extend
behind the surface.
• At the installation sites, locate and make
a note of all fuel lines, hydraulic brake
lines, vacuum lines and electrical wiring.
Use extreme caution when cutting or
drilling in and around these areas.
• Before drilling or cutting holes, use a
utility knife to remove unwanted fabric
or vinyl to keep material from snagging
in a drill bit or saw.
• For door installations, check the
clearance with the windows throughout
the range of the window’s travel, and
verify that a mounted speaker will not
interfere with the window crank or
power-window mechanism.
• If mounting speakers elsewhere, check
for clearance around rear-deck torsion
bars, glove box or other structural
elements.
• Do not mount speakers where they will
get wet.
ABOUT PLACEMENT
Figures 1 through 3 show possible speaker
placements, with Figure 1 being more
desirable. We recommend using the kick
panel for mounting to obtain the best
staging and imaging in most vehicles.
Figure 1. Mounting the woofer and
tweeter in the kick panel.
Figure 2. Mounting the woofer in the door
and the tweeter in the kick panel.
Figure 3. Mounting the woofer in the door
and the tweeter in the A-pillar.
SPEAKER PLACEMENT
TWEETER
and
WOOFER
on kick panel
TWEETER
on kick panel
WOOFER
in factory
door location
TWEETER
in A-pillar
WOOFER
in factory
door location
Page 3
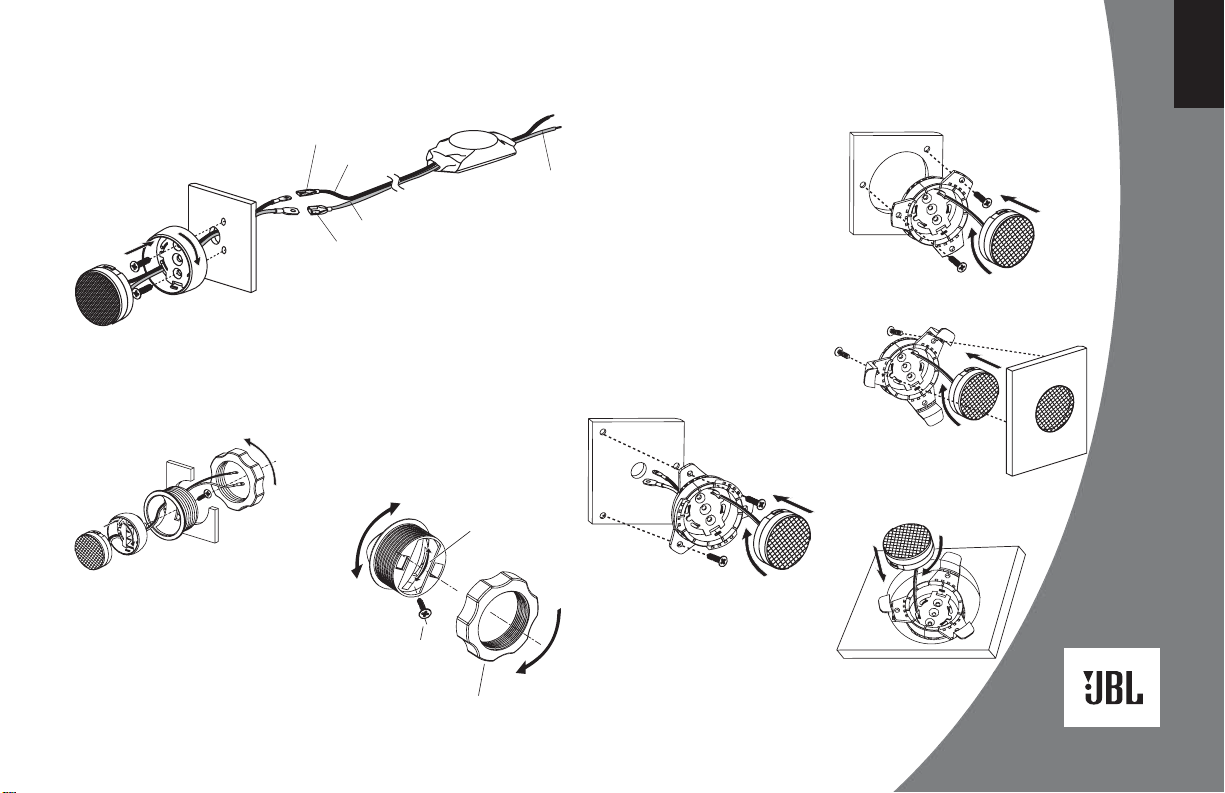
SURFACE-MOUNT
Figure 4. Surface-mounting the tweeter
and connecting the crossover.
FLUSH-MOUNT
Figure 5. Mounting the tweeter using
the I-Mount™ (patent no. 5,859,917)
flush-mounting kit.
TWEETER ANGLE
Figure 6. Aim the tweeter at the listening
position by sliding the screw in the groove
on the back of the tweeter cup and lock
the tweeter in place using the small retaining screw. Rotate the entire assembly in
the mounting surface and tighten the large
hand nut.
Figures 7A through 7D. The Starfish™
tweeter mount is intended to be used
when the tweeter will be installed behind a
factory grille (e.g., replacing the factory
tweeter behind a door panel). The Starfish
will allow you to mount the component
tweeter directly to the panel itself or to the
area behind the panel. The six mounting
tabs can be removed easily to create a
number of custom configurations.
Note: Check screw clearance before
installing. Use glue if clearance is an issue.
Note: Not all possible mounting
configurations are shown.
Figure 7A. Surface-mounted behind grille
panel.
Figure 7B. Flush-mounted to surface
behind grille panel.
Figure 7C. Mounted to grille panel.
Figure 7D. In-dash location (may require
gluing).
3
TWEETER INSTALLATION
1
SLIDE SCREW UP OR
DOWN TO ADJUST
TWEETER ANGLE.
4
SECURELY TIGHTEN
THE LARGE HAND NUT.
2
TIGHTEN SCREW TO
LOCK ANGLE SETTINGS.
3
ROTATE ENTIRE ASSEMBLY
TO AIM ANGLED TWEETER
TOWARD LISTENER.
English
1
2
3
1
2
(–) SMALL LUG
BLACK (–)
RED (+)
BLACK
RED
(+) LARGE LUG
BLACK (–)
RED (+)
Page 4

Declaration of Conformity
We, Harman Consumer Group International
2, route de Tours
72500 Château du Loir
France
declare in own responsibility that the product described in this owner’s manual is in
compliance with technical standards:
EN 61000-6-3:2001
EN 61000-6-1:2001
Klaus Lebherz
Harman Consumer Group International
Château du Loir, France 11/05
JBL Consumer Products
250 Crossways Park Drive, Woodbury, NY 11797 USA
516.255.4JBL (4525) (USA only) www.jbl.com
© 2005 Harman International Industries, Incorporated. All rights reserved.
JBL, Harman International and Grand Touring Series are trademarks
of Harman International Industries, Incorporated, registered in the
United States and/or other countries. I-Mount and Starfish are
trademarks of Harman International Industries, Incorporated.
Part No. GTO17TOM11/05
www.jbl.com
SPECIFICATIONS
GTO17T
1" Tweeter
Power Handling, RMS 50W*
Power Handling, Peak 150W*
Sensitivity (2.83V/1m) 92dB
Frequency Response 2.5kHz – 21kHz
Impedance 2 Ohms
Mounting Depth 3/4" (19mm)
Cutout Diameter 1-7/8" (48mm)
* With enclosed filter
General Care
The loudspeaker grilles may be cleaned with a damp cloth. Do not use any cleaners or solvents on the grilles or the speaker cones.
A valid serial number is required for warranty coverage.
Features, specifications and appearance are subject to change without notice.
 Loading...