

Page 1

English
CS3/CS5 DVD RECEIVER
JBL CINEMA SOUND
POWERED
OWNER’S GUIDE
®
Page 2

3 Introduction
4 Safety Information
4 Unpacking
5 Terminology
6 Features
7 Front-Panel Controls
8 Front-Panel Display
9 Rear-Panel Connections
11 Remote Control
13 Basic Information
13 About This Manual
13 Regional Coding
System Connection
14 Installation and Connections
14 Audio Connections
14 Video Connections
15 Optional Audio Connections
15 Speaker Placement
16 Connecting AC Power
16 First Turn-On
Playback Basics
16 Basic Playback
17 Disc Playback Features
17 Skipping Tracks or Titles/Chapters
17 Fast-Motion Playback/Fast Search
17 Freeze Frame and Frame Advance (With DVD Only)
17 Slow-Motion Playback (With DVD Only)
17 About DivX Movie Files
17 Surround Modes
System Setup
18 System Defaults
18 Setup Menu
18 System Settings
19 Display Language
19 Preferred Subtitle Language
19 Panel Time-Out
19 Status Bar Time-Out
19 Parental Control
19 Disc Recognition
19 PBC Support
19 Screen Saver
19 Show Angle Icon
19 Audio Settings
19 Preferred Audio Language
19 Dynamic Range
19 Delay Unit
19 Tone Control
19 Bass Level
19 Treble Level
19 DVD Sound Mode
20 Audio Adjustment
20 Delay
20 Output Level Adjustment
20 Video Settings
20 Aspect Ratio
20 TV Standard
20 Scan Type
20 Video Output
20 SCART Output
20 Video Mode
21 Video Resolution
21 Video Adjustment
Test Screen
22 Test Screen
22 TV Picture Adjustment With Test Screen
Player/Radio Menu
23 Using the Status Bar Menu
23 Player Menu
23 Information Displays
23 Programmed Play
Radio Menu
24 Rearranging the Station List
24 Selecting Presets
25 Removing Presets
25 Auto Preset Function
25 RDS Station ID
25 Surround Mode for Tuner
TV Menu, AUX Menu, Digital In Menu
26 TV Menu
26 AUX Menu
26 Digital In Menu
27 Surround Modes
USB Menu
28 USB Menu
Remote Control
29 Learning Codes From a Remote Control
29 Erasing Learned Codes
29 Macro Programming
DVD Languages Codes
31 Languages Codes
Troubleshooting
32 Troubleshooting
Glossary
34 Glossary
Specifications
35 Specifications
TABLE OF CONTENTS
Typographical Conventions
In order to help you use this manual with the remote control, frontpanel controls and rear-panel connections, certain conventions
have been used.
Example – (bold type) indicates a specific remote control or frontpanel button, or rear-panel connection jack
EXAMPLE – (OCR type) indicates a message that is visible on the
front-panel information display
– (number in a square) indicates a specific front-panel control
0
– (number in a circle) indicates a rear-panel connection
0
– (number in an oval) indicates a button or indicator on the
remote
A – (letter in a square) indicates an indicator on the front-panel
display
The appearance of the text or cursor for your receiver’s on-screen
menus may vary slightly from the illustrations in this manual.
Whether the text appears in all uppercase or upper- and lowercase
characters, performance and operation remain the same.
Page 3

Thank you for choosing JBL®!
With the purchase of a JBL Cinema Sound CS3/CS5, you are about
to begin many years of listening enjoyment.
Designed to provide all the excitement and detail of movie soundtracks and every nuance of musical selections, the CS3/CS5 is truly
a multichannel system for the new millennium.
CS3/CS5 DVD receivers have been engineered so that it is easy to
take advantage of all the power of their digital technology. To
obtain the maximum enjoyment from your new system, we urge
you to read this manual. A few minutes spent learning the
functions of the various controls will enable you to enjoy all the
power JBL Cinema Sound is able to deliver.
If you have any questions about this product, its installation or its
operation, please contact your retailer or custom installer. They are
your best local sources of information.
Description and Features
The CS3/CS5 is among the most versatile home cinema systems
available, incorporating an audio/video receiver, a DVD-Audio player and a complete 5.1 loudspeaker system in one complete system
solution. In addition to Dolby
®
Digital and DTS®decoding for digital
sources, the Dolby Pro Logic
®
II mode for Matrix surround-encoded
or Stereo recordings is available for use with sources such as CD,
VCR, TV broadcasts and the system’s own FM tuner.
To enable you to get the maximum quality from DVDs, the CS3/CS5
is equipped with the latest in design techniques, including
advanced 10-bit video digital-to-analog converters (DAC) and video
(composite), S-video and RGB video (RGB via SCART) outputs, to
ensure that you get all the quality inherent in today’s DVD medium.
For optimal playback of NTSC and PAL DVDs with compatible highdefinition display devices, the CS3/CS5 DVD receiver is equipped
with an HDMI
™
output and progressive-scan component video
outputs.
Along with conventional video and CD audio discs, the CS3/CS5 is
also compatible with MP3, CD-R and CD-RW as well as DivX
®
and
VCD discs.
As portable USB devices increase in popularity, JBL’s CS3/CS5 is
among the first integrated home theater systems that allow mobile
interconnectivity by playing compatible music or image files from
portable devices via two USB On-the-Go inputs.
A wide range of programming features makes it easy to program
an evening’s worth of entertainment. When playing DVDs, easy-tounderstand on-screen menus and icons make it simple to change
languages, soundtracks, subtitles or aspect ratio, while a parentallock function enables you to control which discs may be viewed by
younger members of the household.
DVD players are among the fastest growing consumer electronics
products ever brought to market, but this may, nevertheless, be the
first DVD player you’ve owned. Although many of the features of
the DVD resemble those of standard CD players, there are a number of functions with which you may be unfamiliar. To ensure that
you are able to take advantage of all the power and flexibility the
DVD has to offer, we encourage you to review this quick setup
manual. That small investment of your time will pay major dividends
in the enjoyment you will get from proper use of your DVD receiver.
■ Plays a wide range of video and audio formats, including DVDVideo discs, VCD, standard CD audio discs, CD-R/RW, DVDR/RW, DVD-+R/RW, audio discs and MP3 discs
■ DVD-Audio playback for richer detail, expanded dynamic range
and improved realism
■ HDMI
™
output for digital audio and video connection to an
HD-Ready screen
■ Extensive bass management options for DVD-Audio with speaker setup, output level adjustment and delay settings
■ High-quality video playback, 10-bit DACs, progressive scan and
component video outputs
■ Easy-to-use on-screen navigation system
■ Playback of MP3 and WMA audio discs and JPEG image files
■ Simultaneous playback of MP3 and JPEG files
■ Side- and rear-panel USB On-the-Go connections for playing
compatible music or image files from portable devices
■ Extensive programming capability for audio and video discs
■ Parental-lock controls prevent unauthorized viewing of restrict-
ed movies
■ Playback of DivX
®
compressed video files
■ Multiple options for language, soundtrack and subtitle selection
■ Multiple-angle capabilities with specially encoded DVD discs
■ Ergonomically designed remote control
■ Multiple digital inputs and outputs
■ Multiple analog inputs and outputs
■ High-definition on-screen menu and display system
■ Subwoofer trigger to control subwoofer on/off
IMPORTANT NOTES:
This manual should be read in conjunction with the owner’s manual
of the accompanying loudspeaker system. The instructions found
therein should be followed with respect to loudspeaker operation
and safety.
Use the CS3/CS5 receiver only with the loudspeaker system supplied. Failure to do so may cause damage to either the receiver or
the loudspeakers and will invalidate any warranty.
All of the optional system settings have been preset at our factory
for correct operation of the system. All you have to do is insert a
disc, sit back, and enjoy a great home theater experience.
You may want to change some of the optional settings. A description of all the optional settings and instructions for changing them
are found in the second half of the manual.
3
English
NOTE: This player is designed and manufactured for compatibility with Region Management Information that is encoded on
most DVD discs. This player is designed only for playback of discs with Region Code 2, or for discs that do not contain
Region Code information. If there is any other Region Code on a disc, that disc will not play on the DVD.
INTRODUCTION
2
Page 4

This system was designed to provide you with many years of
reliable operation with a minimum of care and maintenance. Every
component in your system was in perfect working condition when it
left our factory. If you experience any problems with the set-up or
operation of this system, please review the Troubleshooting guide
at the end of this manual before you contact your authorized
JBL dealer.
Important Safety Information
Verify Line Voltage Before Use
Your CS3/CS5 has been designed for use with 220–240-volt AC
current. Connection to a line voltage other than that for which it is
intended can create a safety and fire hazard, and may damage the
unit.
If you have any questions about the voltage requirements for your
specific model, or about the line voltage in your area, contact your
dealer before plugging the unit into a wall outlet.
Do Not Use Extension Cords
To avoid safety hazards, use only the power cord attached to your
unit. We do not recommend that extension cords be used with this
product. As with all electrical devices, do not run power cords
under rugs or carpets or place heavy objects on them. Damaged
power cords should be replaced immediately by an authorized
service depot with a cord meeting factory specifications.
Handle the AC Power Cord Gently
When disconnecting the power cord from an AC outlet, always
pull the plug, never pull the cord. If you do not intend to use the unit
for any considerable length of time, disconnect the plug from the
AC outlet.
Do Not Open the Cabinet
There are no user-serviceable components inside this product.
Opening the cabinet may present a shock hazard, and any modification to the product will void your guarantee. If water or any metal
object such as a paper clip, wire or a staple accidentally falls
inside the unit, disconnect it from the AC power source immediately, and consult an authorized service station.
Installation Location
■ To ensure proper operation and to avoid the potential for safety
hazards, place the unit on a firm and level surface. When placing
the unit on a shelf, be certain that the shelf and any mounting
hardware can support the weight of the product.
■ Make certain that proper space is provided both above and
below the unit for ventilation. If this product will be installed in a
cabinet or other enclosed area, make certain that there is
sufficient air movement within the cabinet. Under some
circumstances a fan may be required.
■ Do not place the unit directly on a carpeted surface.
■ Avoid installation in extremely hot or cold locations, or an area
that is exposed to direct sunlight or heating equipment.
■ Avoid moist or humid locations.
■ Do not obstruct the ventilation slots on the top of the unit, or
place objects directly over them.
Cleaning
When the unit gets dirty, wipe it with a clean, soft, dry cloth. If
necessary, wipe it with a soft cloth dampened with mild soapy
water, then a fresh cloth with clean water. Wipe dry immediately
with a dry cloth. NEVER use benzene, aerosol cleaners, thinner,
alcohol or any other volatile cleaning agent. Do not use abrasive
cleaners, as they may damage the finish of metal parts. Avoid
spraying insecticide near the unit.
Moving the Unit
Before moving the unit, be certain to disconnect any interconnection cords with other components, and make certain that you disconnect the unit from the AC outlet.
Unpacking
The carton and shipping materials used to protect your new receiver during shipment were specially designed to cushion it from
shock and vibration. We suggest that you save the carton and
packing materials for use in shipping if you move, or should the unit
ever need repair.
To minimize the size of the carton in storage, you may wish to
flatten it. This is done by carefully slitting the tape seams on the
bottom and collapsing the carton. Other cardboard inserts may be
stored in the same manner. Packing materials that cannot be
collapsed should be saved along with the carton in a plastic bag.
If you do not wish to save the packaging materials, please note that
the carton and other sections of the shipping protection are
recyclable. Please respect the environment and discard those
materials at a local recycling center.
Copyright
Audio-visual material may consist of copyright works which must
not be recorded without the permission of the owner of the
copyright.
Please refer to relevant laws covering copyright protection.
Copy Protection
This DVD player supports Macrovision copy protection. On DVD
discs that include a copy protection code, if the contents of the
DVD disc are copied using a VCR, the copy protection code
prevents the videotape copy from playing normally.
For Optimal Performance
The receiver is a precision device that is constructed using
extremely accurate technology. Soiling or friction affecting the
pickup lens or disc drive can impair the image quality. In the worst
case, neither video nor audio will be played back. To obtain optimal
picture quality, the player should be checked (cleaning and
replacement of some parts) every 1,000 hours. Note that this period
varies, depending on the
environment (temperature,
humidity, dust) in which the
player is used. Do not
attempt to clean the pickup
lens yourself.
4
SAFETY INFORMATION
Page 5

Since they share some of the characteristics and technology of CD
players, many of the terms and operational concepts used in a DVD
player are similar to what you may be familiar with from CD players
and changers, or older video disc formats such as Laser Disc.
How-ever, if this is your first DVD product, some of the terms used
to describe the features of a DVD player may be unfamiliar. The following explanations should solve some of the mysteries of DVD,
and help you to enjoy all the power and flexibility of the DVD format
and the DVD.
With the arrival of DVD, disc data capacity has increased dramatically. On a DVD Video disc most of this capacity is taken up by
MPEG 2 video and the multichannel movie soundtrack in Dolby
Digital and/or DTS. This information is compressed.
Aspect Ratio: This is a description of the width of a video image in
relation to its height. A conventional video screen is four units wide
for every three units of height, that’s why the ratio is called ”4:3.”
Newer wide aspect ratio video displays are 16 units wide for every
nine units of height, making them more like the screen in a movie
theater. The program material on a DVD may be recorded in either
format and, in addition, you may configure the DVD to play back in
either format, depending on the features recorded on a disc.
High-Definition Multimedia Interface (HDMI): HDMI has emerged
as the digital standard for connecting high-definition devices,
displays and components, and provides for the pristine
transmission of high-definition digital video and digital audio via a
single cable. HDMI is the first and only digital interface for
consumer electronics devices that can carry uncompressed highdefinition video, compressed or uncompressed multichannel audio
and command data, allowing customers to obtain pure digital
picture and sound directly from the source (as it was meant to be
seen and heard).
USB On-the-Go: Due to its widespread acceptance, USB is
becoming the de facto industry standard for connecting peripherals
to PCs and laptops. Many of the new peripherals using USB are
also portable devices.
As these portable devices increase in popularity, there is a growing
need for them to communicate directly with each other when a PC
is not available – for instance, in consumer electronics products.
The USB On-the-Go technology addresses this need for mobile
interconnectivity.
Title: For a DVD, a title is defined as an entire movie or program.
There can be as many chapters within a title as the producers
decide to include. Most discs include only one title, but some may
have more than one, to give you a “Double Feature” presentation.
Chapter: DVD programs are divided into chapters and titles.
Chapters are the subsections programmed into a single title on a
disc, and may be compared to the individual tracks on an audio CD.
RGB Video: This is a new form of video signal that eliminates many
of the artifacts of traditional composite video signals by splitting the
signal into the three fundamental colors Red, Green and Blue
(RGB). With an RGB connection (via SCART), you will see greater
picture resolution and eliminate many picture imperfections such
as the moiré patterns often seen on checkered patterned cloths.
However, in order to benefit from RGB video, you must have a video
display with an RGB compatible SCART input.
Progressive Scan: DVD offers progressive scan video outputs for
use with compatible high-resolution televisions and projectors.
Before DVD, no consumer medium could store, transmit or display
video with full resolution. To conserve bandwidth, analog compression (interlacing) is employed: first the odd-numbered lines of a
frame are displayed, followed by the even-numbered lines. The
result is that only half of the video image is drawn at one time; the
viewer’s brain must reassemble the complete image. This is
acceptable, if the monitor is not too large and if there is not too
much motion in the image. Large displays and fast-moving images
reveal the limitations of this system. Thanks to DVD’s immense data
capacity, images are now stored intact (progressively), so that all
the lines in each frame (odd and even) are shown at the same time.
But because most TVs cannot handle a progressive signal, conventional DVD players generate an interlaced output for compatibility.
This JBL DVD player is among the select few DVD players with true
progressive scan video output (NTSC and PAL) for use with compatible TVs and CRT projectors, and with all plasma, LCD and DLP
display devices via the component video output. The result is 40%
greater light output than a conventional TV and a stunningly detailed
high-definition image, along with an almost complete absence of
visible scanlines and motion artifacts. Of course, traditional Y/Pr/Pb
component video, SCART, S-video and composite video outputs are
included for use with conventional televisions and projectors.
Multiple-Angle: DVDs have the capability to show up to four different views of the same scene in a program. When a disc is encoded
with multiple-angle information, pressing the Angle button will
enable you to switch between these different views. Note that at
present, few discs take advantage of this capability and, when they
do, the multiple-angle technology may only be present for short
periods of time within the disc. Producers will usually insert some
sort of icon or graphic in the picture to alert you to the availability
of multiple viewing angles.
Reading: This is a message that you will see after you´ve loaded
the disc and the tray has closed. It refers to the fact that the player
must first examine the contents of the disc to see if it is a CD or
DVD, and then extract the information about the type of material on
the disc, such as languages, aspect ratios, subtitles, number of
titles and more. The slight delay while the contents of the disc are
read is normal.
Resume: The operation of the Stop button on the DVD works differently
from what you are used to on CD players. On a traditional CD
player, when you press the Stop button, the unit does just that – it
stops playback. On a CD player, when you press the start button
again, the disc starts from the beginning. With the DVD, however,
you have two options when playing DVD discs. Pressing Stop once
will stop playback, but it actually puts the unit in the Resume mode.
This means that you can turn the machine off and, when you press
play the next time, the disc will resume or continue from the point
on the disc where the Stop button was pressed. This is helpful if
you are watching a movie and must interrupt your viewing session
but wish to pick up where you left off. Pressing the Stop button
twice will stop the machine in a traditional manner and, when the
disc is played again, it will start from the beginning.
In resume mode, the cover of the DVD will be displayed, if
available. Otherwise, the JBL screen will appear.
DivX: DivX is the name of a revolutionary new video codec which is
based on the MPEG-4 compression standard for video. This DVD
player
will playback discs created with DivX software. The DVD
player’s playback functionalities of DivX video discs will vary
depending on the DivX software version used for creating your
movies. For more information about the different software versions
of DivX, please go to www.divx.com
5
English
TERMINOLOGY
Page 6

High-Quality Video
• High-Definition Multimedia Interface (HDMI) for a single wire,
digital connection to your HD-Ready screen.
• Advanced, sophisticated 10-bit MPEG-2 video decoding circuits.
• Progressive-scan component video ouputs (NTSC and PAL).
• Direct RGB output via SCART (selectable) for optimal video
performance when HDMI or component video connections are not
available. SCART connector also configurable for composite video
output.
• Test-screen videos available for testing video performance and
setup.
• Pure PAL with NTSC disc due to true NTSC/PAL conversion.
• Dual-layer compatibility for extended play DVD.
• Playback of JPEG image files.
High-Quality Digital Audio
• High-quality 5.1 digital surround sound from DVD-Audio, DTS or
Dolby Digital discs.
• With linear PCM audio at 16-24 bits and 44–96kHz, audio quality
exceeding that of CD becomes possible.
• Coaxial digital audio output.
Many Convenient Features
• On-screen menu icons for disc information or player information
and access to many major functions of this unit.
• Thumbnails for easy search of image files.
• Subtitles may be displayed in one of numerous languages.*
• The multi-angle function allows you to choose the viewing angle
of scenes which were shot from a number of different angles
(limited to DVDs recorded with multiple camera angles).
• Multiple options for dialog language and soundtrack selection
(limited to DVDs recorded with multiple dialogue languages or
soundtracks).
• Intuitive menu operating system.
• Four-step Zoom during Play and Pause.
• Backlit, ergonomically designed remote control.
• Future software upgrades; visit www.jbl.com.
* The number of languages recorded depends on the software.
Compatible With CD as Well as DVD
• The CS3/CS5 will play any conventional Audio CD or recordable
(CD-R) or erasable CD (CD-RW), MP3, WMA (v9) or any DivX or
VCD or DVD-Audio and DVD-Video with the Region Code 0 or 2.
Disc Formats Supported by This Player
The unit can play the following disc formats
(8cm and 12cm size):
• DVD
• DVD-AUDIO
• DVD-R
• DVD-RW
• DVD+R
• DVD+RW
• CD
• CD-R
• CD-RW
• VCD
• S-VCD
• WMA (v9)
NOTE: Due to differences in the format of certain discs, it is possi-
ble that some discs may include a mix of features that are not compatible with the DVD. Similarly, although the DVD is capable of a
wide range of features, not all discs include every capability of the
DVD system. For example, although the DVD is compatible with
multi-angle discs, that feature is only possible when the disc is
specially encoded for multipleangle play. In addition, the DVD is
capable of playing back both Dolby Digital and DTS soundtracks,
but the number and types of tracks available will vary from disc to
disc. To make certain that a specific feature or soundtrack option is
available, please check the options noted on the disc jacket.
• Playback capability for CD-R, CD-RW, WMA, JPEG, MP3, DivX,
VCD/SVCD, DVD-R, DVD+R, DVD-RW and DVD+RW discs may
vary due to variations in the quality of the disc and the recorder
used to create the disc.
• The CS3/CS5 is compatible with most discs recorded with files
encoded using MP3 or Windows Media
®
9, as well as JPEG still
images. However, note that variations in the encoder or codec
used and the bit rate of the encoding may affect the CS’s ability to
play back a specific disc. As a result, we cannot guarantee
complete compatibility with all encoders and versions of the
codecs. For best results, we recommend that MP3 files be
encoded at bit rates ranging between 32kbps and 320kbps. WMA
files should be encoded at bit rates between 64kbps and 320kbps.
Although the CS system is capable of playing some WMA 9 files,
not all features of version 9 are supported. JPEG files should
contain no more than 5 megapixels, and the file size should be no
larger than 5Mb.
Upgradeability via Internet
The ”firmware” controlling the functionality of the JBL CS system
is fully upgradeable. In the event of future improvements to its
operations and features, it will be possible to download firmware
upgrades from www.jbl.com. All you have to do is create a CD-R
with the data and insert it in the DVD for an automatic upgrade.
Packing List
(1) JBL CS3/CS5 DVD player/receiver
(1) JBL CS460/CS680 home theater speaker system
(1) Remote control
(3) AAA batteries
(1) A/V cable for stereo analog audio and composite video
(1) S-video cable
(1) Remote extension cable
(1) Owner’s manual
6
FEATURES
Page 7
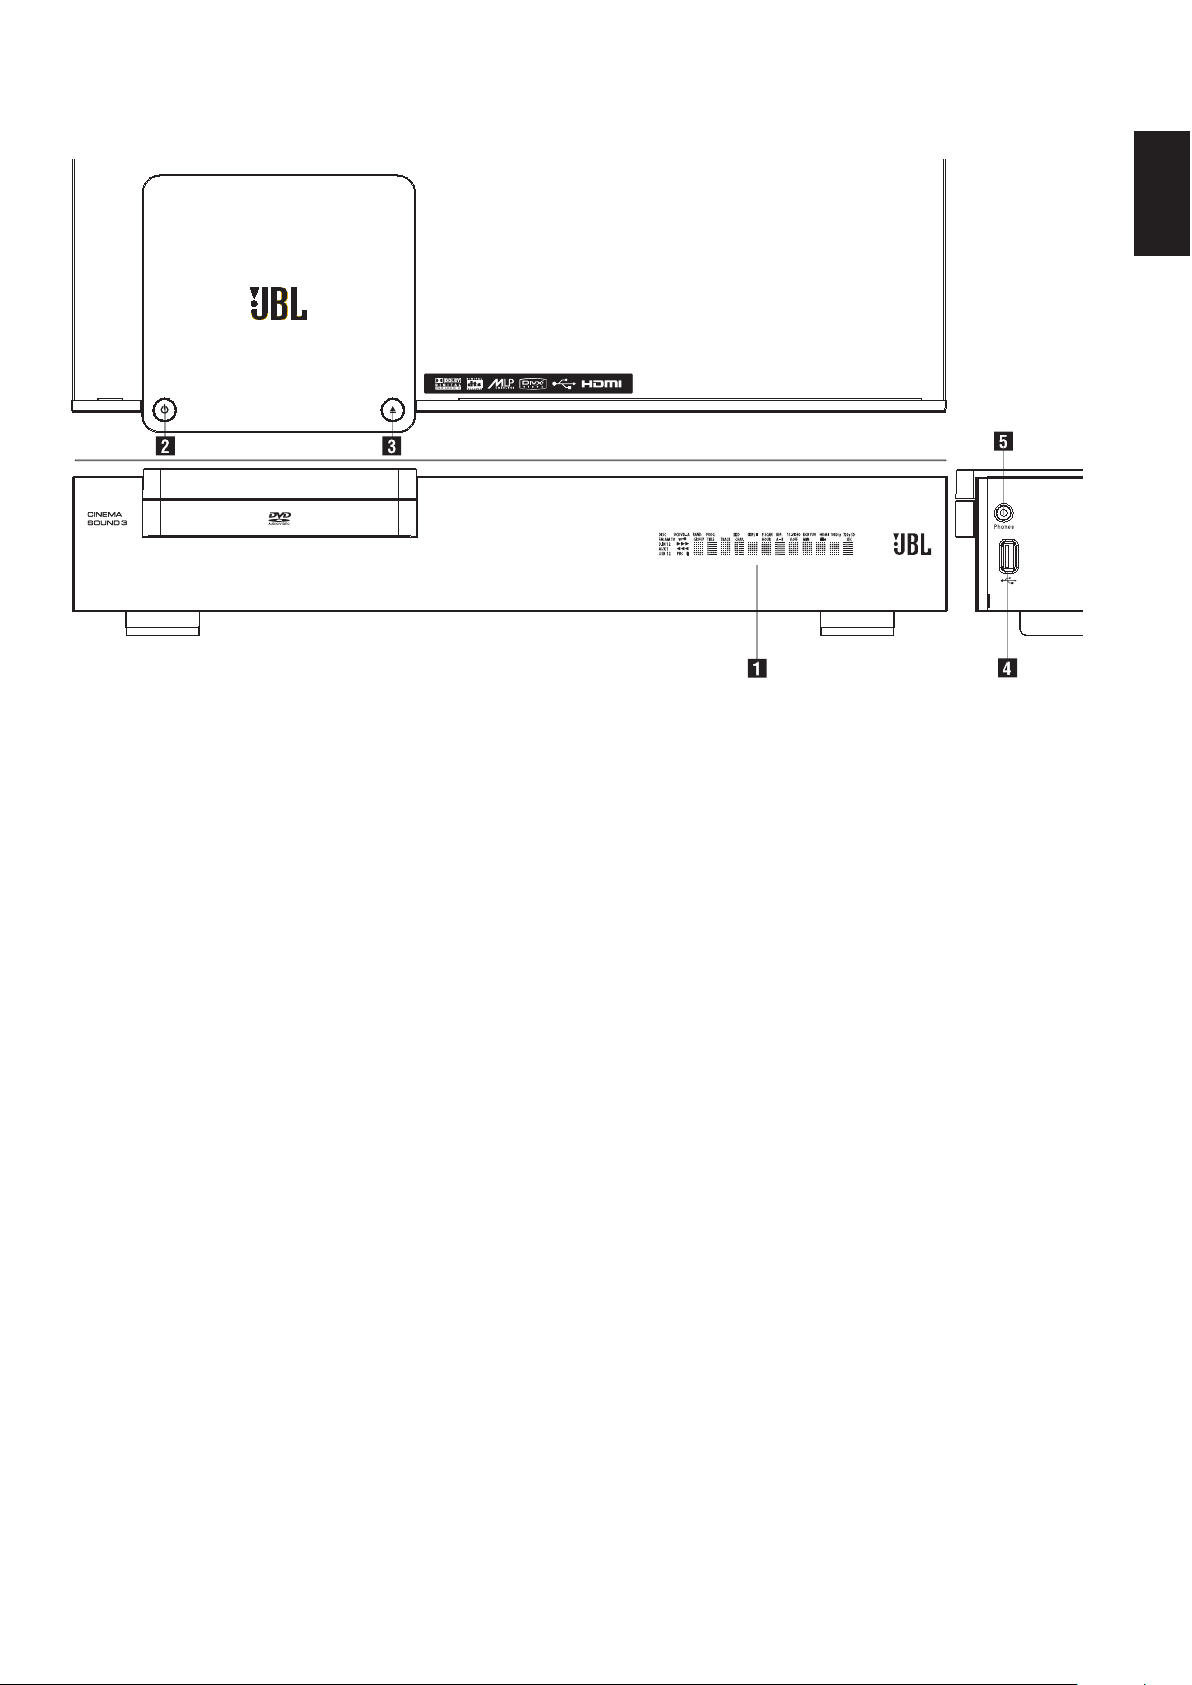
Main Information Display: This display delivers messages and
status indications to help you operate the CS3/CS5 receiver.
1
Power On/Off (Standby): Press the button once to turn the
CS3/CS5 receiver on, press it again to put the unit in the Standby
mode. Note that when the CS3/CS5 receiver is switched on, the
power indicator around the button turns blue.
2
Open/Close: Press this button to open or close the disc tray.
3
USB On-the-Go Input: This input may be used to temporarily
connect a USB thumb device or portable hard disk for direct playback of audio, image of video files or a USB hub. The USB inputs
are designed to power a single USB device at a time. If additional
hard disks are connected through a hub, it is necessary that additional external power supplies are used to power the hub and hard
disks.
4
Headphone Jack: This jack may be used to listen to the
system’s output through a pair of headphones. Be certain that the
headphones have a standard 3.5mm stereo phone plug. Note that
the main room speakers will automatically be turned off when the
headphone jack is in use.
7
English
FRONT-PANEL CONTROLS
Main Information Display
1
Power On/Off (Standby)
2
Open/Close
3
USB On-the-Go Input
4
Headphone Jack
Page 8
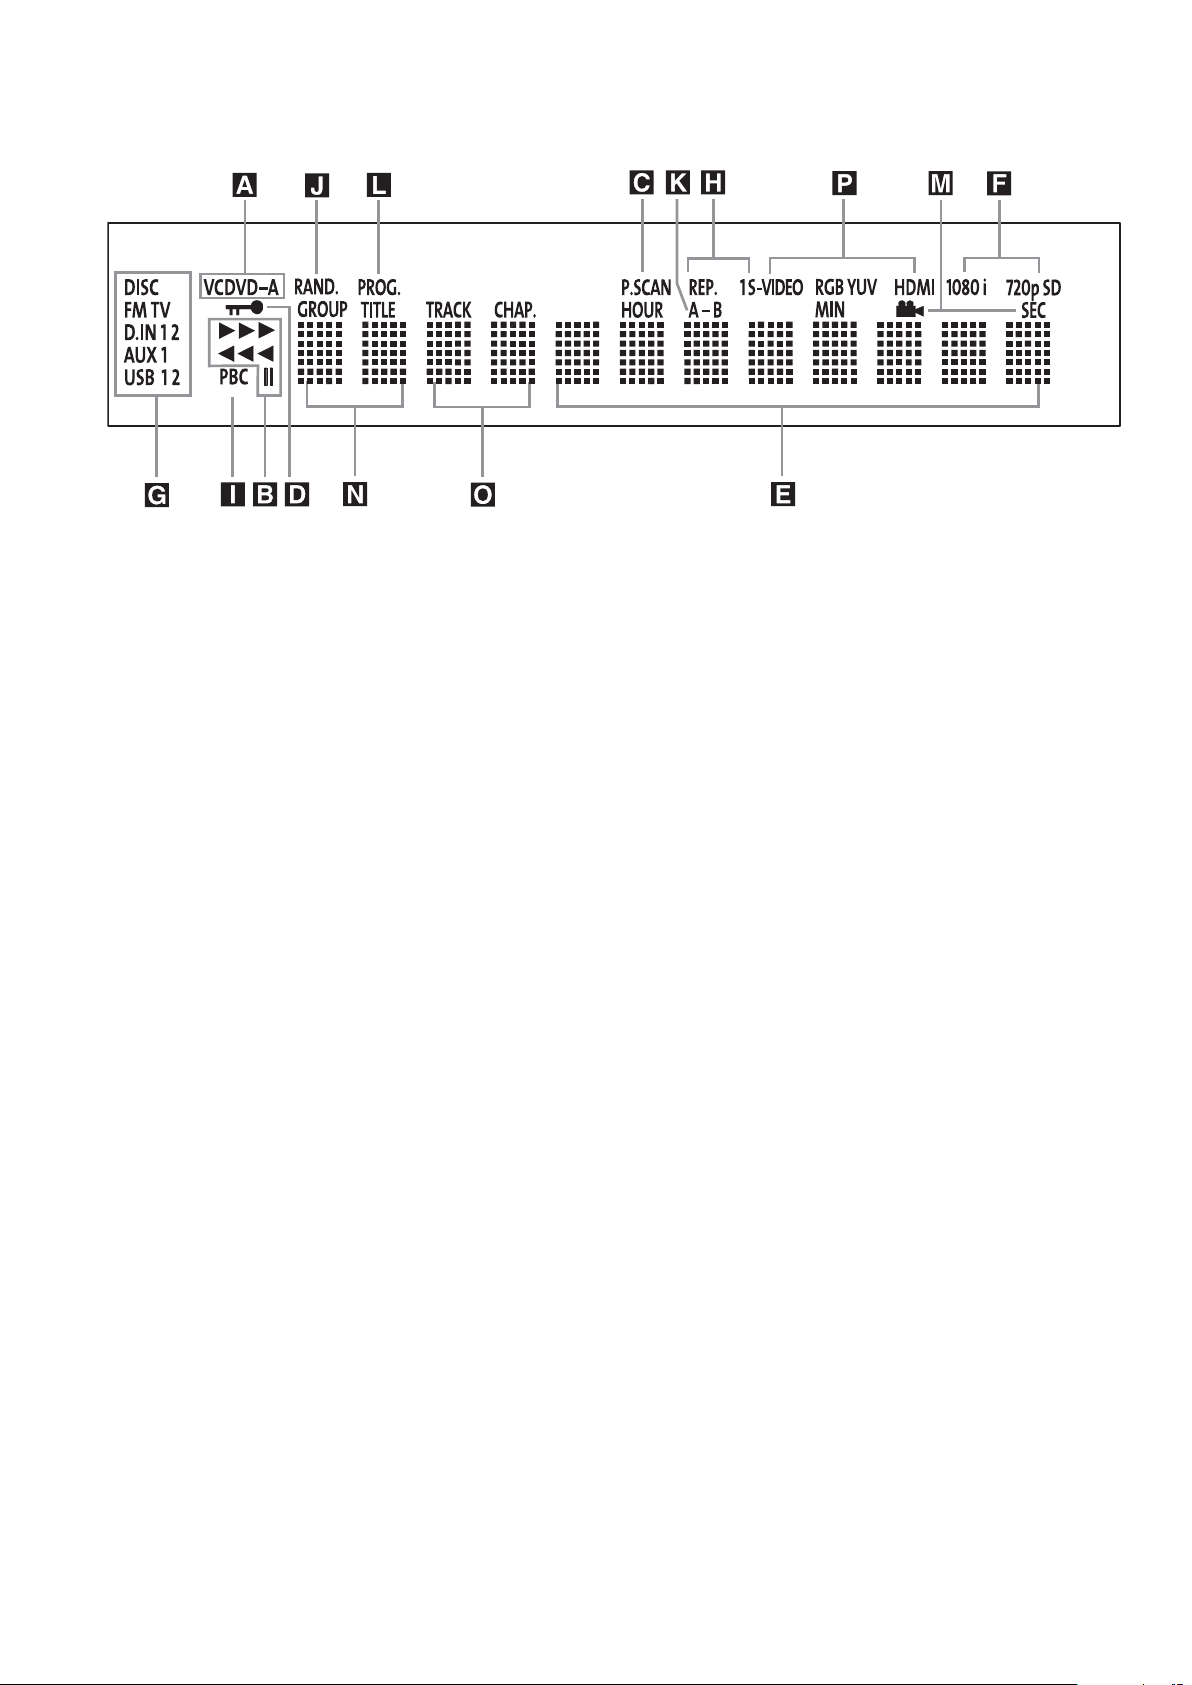
A Disc Type Indicators: The CD, DVD or DVD-Audio indicator will
light to show the type of disc currently being played.
B Playback-Mode Indicators: These indicators light to show the
current playback mode:
N
Lights when a disc is playing in the normal mode.
H
Lights when the disc is in the Fast Search Forward mode.
1
Lights when the disc is paused.
G
Lights when the disc is in the Fast Search Reverse mode.
C Progressive Scan Indicator: This indicator lights when the unit
sends out a progressive scan signal.
D Parental Lock Indicator: This indicator lights when the parental-
lock system is engaged in order to prevent anyone from changing
the rating level without a code.
E Time Indicators: These positions in the indicator will show the
running time of a DVD in play. When a CD is playing, these indicators will show the current track time, time remaining in the current
track, or the total remaining time on the disc.
NOTE: The Indicators NOE will also display text messages
about the DVD’s status, including
Reading when a disc is load-
ing,
STANDBY when the unit is turned off, and Disc Error
when a disc not compatible with the DVD is put into the play
position.
F Video Format Indicators: These indicators will represent the
video format currently playing.
G Source Indicators: These indicators will light to show which
source is currently selected.
H Repeat Indicators: These indicators light when any of the
Repeat functions are in use.
I VCD Playback Control Indicator: This indicator lights when the
playback control function is turned on with VCDs.
J Random Indicator: This indicator lights when the unit is in the
Random Play mode.
K A-B Repeat Indicator: This indicator lights when a specific
passage for repeat playback has been selected.
L Program Indicator: This indicator lights when the programming
functions are in use.
M Angle Indicator: This indicator blinks when alternative viewing
angles are available on the DVD currently playing.
N Title Indicators: These two positions in the display will show the
current title number when a DVD is playing.
O Chapter/Track Number Indicators: When a DVD is playing,
these two positions in the display will show the current chapter.
When a CD is playing, they will show the current track number.
P Video Output Indicators: These indicators will represent the
active video output.
8
FRONT-PANEL DISPLAY
A Disc Type Indicators
B Playback-Mode Indicators
C Progressive Scan Indicator
D Parental Lock Indicator
E Time Indicators
F Video Format Indicators
G Source Indicators
H Repeat Indicators
I VCD Playback Control Indicator
J Random Indicator
K A-B Repeat Indicator
L Program Indicator
M Angle Indicator
N Title Indicators
O Chapter/Track Number Indicators
P Video Output Indicators
Page 9

9
REAR-PANEL CONNECTIONS
0
Composite Video Output
1
S-Video Output
2
Component Video Outputs
3
SCART TV Output
4
AC Power Cord
5
FM Antenna
6
Audio In
7
Subwoofer Output
8
Coaxial Digital Input
9
Optical Digital Input
A
Analog Audio Outputs
B
Front Speaker Outputs
C
Center Speaker Outputs
D
Surround Speaker Outputs
E
Coaxial Digital Output
F
Subwoofer Trigger Output
G
USB On-The-Go Input
H
HDMI Output
I
Remote IR Output
J
Remote IR Input
K
TV Audio In
0
Composite Video Output: Connect this jack to the video input on
a television or video projector.
1
S-Video Output: Connect this jack to the S-video input on a
television or video projector.
2
Component Video Outputs: These outputs carry the component
video signals for connection to display monitors with component
video inputs. For standard analog TVs or projectors with inputs
marked Y/Pr/Pb or Y/Cr/Cb, connect these outputs to the corresponding inputs. If you have a high-definition TV or projector that is
compatible with high-scan-rate progressive video, connect these
jacks to the “HD Component” inputs. Note that if you are using a
progressive scan display device, then ”Progressive” must be
selected in the Video Setup menu, in order to take advantage of the
progressive-scan circuitry. See page 20 for more information on
progressive-scan video.
IMPORTANT: These jacks should NOT be connected to standard
composite video inputs.
3
SCART Out (TV): If your TV has a SCART socket, you can connect a SCART cable to your TV and to your DVD player for
improved video quality. The SCART cable carries both audio and
video. You can select composite video or RGB video for that SCART
connector’s video output signal.
4
AC Power Cord: Connect this plug to an AC outlet. If the outlet is
controlled by a switch, make sure it is in the On position.
5
FM Antenna: Connect to the supplied FM antenna.
6
Audio In: Connect to a line-level analog audio source: TV, tape
player, Minidisc, PC, etc.
7
Subwoofer Output: Connect to the SUB/LFE input on the subwoofer.
8
Coaxial Digital Input: Connect the coax digital output from a
DVD player, HDTV receiver, LD player, MD player, satellite receiver
or CD player to this jack. The signal may be either a Dolby Digital
signal, DTS signal or a standard PCM digital source. Do not connect the RF digital output of an LD player to these jacks.
9
Optical Digital Input: Connect the optical digital output from a
DVD player, HDTV receiver, LD player, MD player, satellite receiver
or CD player to this jack. The signal may be either a Dolby Digital
signal, DTS signal or a standard PCM digital source.
A
Analog Audio Outputs: Connect these jacks to the analog audio
input on a TV set or external audio system for analog audio playback or to the RECORD/INPUT jacks of an audio recorder for
recording.
B
Front Speaker Outputs: Connect these outputs to the matching +
or – terminals on your left and right speakers. In conformance with
the new CEA color code specification, the White terminal is the
positive (+) terminal that should be connected to the red (+) terminal on Front Left speaker with the older color coding, while the Red
terminal is the positive (+) terminal that should be connected to the
red (+) terminal on Front Right speaker. Connect the black (–)
terminals on the CS to the black (–) terminals on the speakers. See
page 14 for more information on speaker polarity.
C
Center Speaker Outputs: Connect these outputs to the matching
+ and – terminals on your center channel speaker. In conformance
with the new CEA color code specification, the Green Terminal is
the positive (+) terminal that should be connected to the red (+) terminal on speakers with the older color coding. Connect the black
(–) terminal on the CS to the black negative (–) terminal on your
speaker. See page 14 for more information on speaker polarity.
D
Surround Speaker Outputs: Connect these outputs to the matching + and – terminals on your surround channel speakers. In conformance with the new CEA color-code specification, the Blue terminal is the positive (+) terminal that should be connected to the
red (+) terminal on the Surround Left speaker with older color coding, while the Gray terminal should be connected to the red (+) terminal on the Surround Right speaker with the older color-coding.
Connect the black (–) terminal on the CS to the matching black negative (–) terminals for each surround speaker. See page 14 for more
information on speaker polarity.
NOTE: You’ll find more details about all audio/video connections
under Setup and Connections on the following pages.
E
Coaxial Digital Output: Connect this jack to the matching digital
input connector on a digital recorder (e.g., CD-R or MiniDisc
recorder).
English
Page 10

F
Subwoofer Trigger Output: Connect this trigger output to the
trigger input of the JBL subwoofer, so that the subwoofer will
switch on and off at the same time as the rest of the system.
G
USB On-the-Go Input: This input may be used to temporarily
connect a USB thumb device or portable hard disk for direct playback of audio, image of video files, a digital photo camera or a USB
hub.
H
HDMI Output: Connect this output to the HDMI input of a highdefinition LCD, plasma or video projector for the best possible
picture quality.
I
Remote IR Output: This connection permits the IR sensor in the
receiver to serve other remote controlled devices. Connect this
jack to the “IR IN” jack on JBL or other compatible equipment.
J
Remote IR Input: If the CS3/CS5’s front-panel IR sensor is
blocked due to cabinet doors or other obstructions, an external IR
sensor may be used. Connect the output of the sensor to this jack.
K
TV Audio Input: If your screen is connected to the CS by an
HDMI, component, S-video or composite cable, connect the
analog output of your TV to this input. If you have your TV
connected to the CS with a SCART cable, an audio connection
to the TV input is not necessary.
10
REAR-PANEL CONNECTIONS
Page 11
11
English
0
1
2
3
4
5
6
7
8
9
A
B
C
D
E
F
G
H
I
J
K
L
M
N
O
P
Q
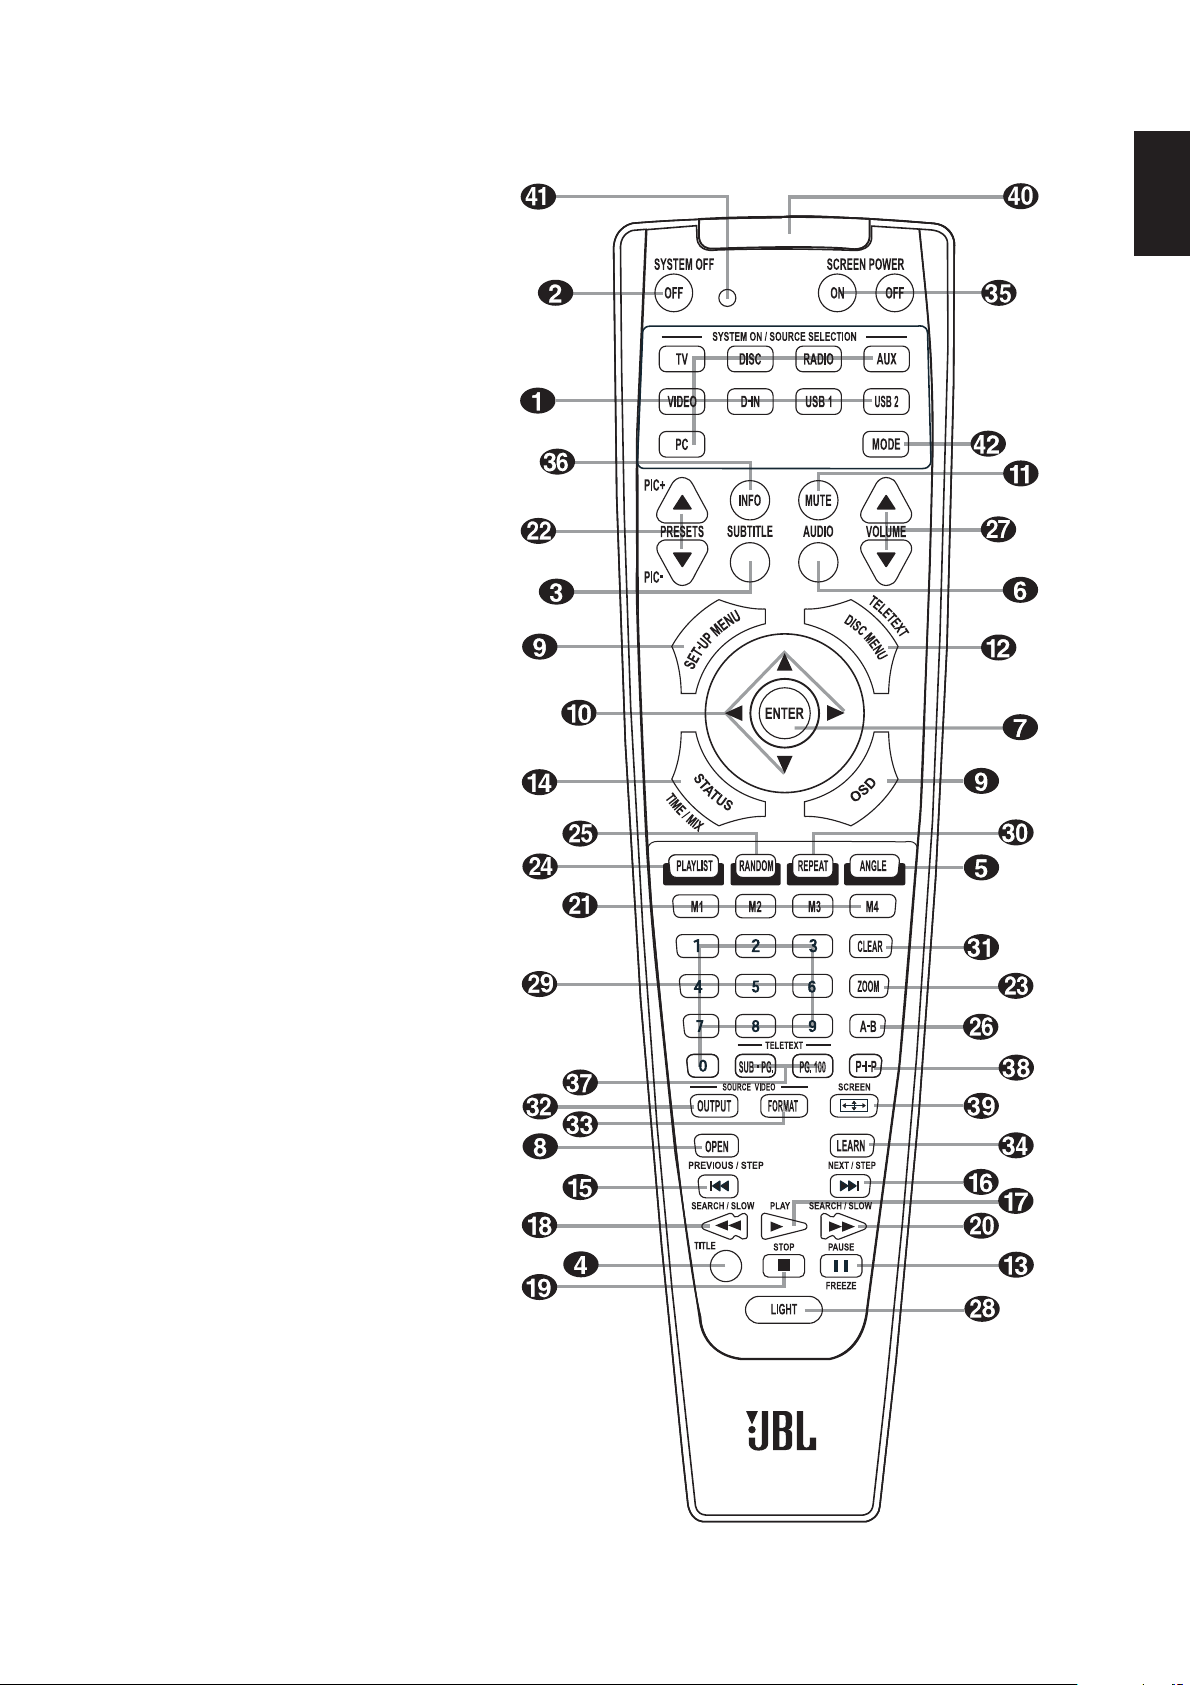
REMOTE CONTROL
Power On/Source Selection Buttons
Power Off Button
Subtitle Button
Title Button
Angle Button
Audio Button
Enter Button
Open/Close Button
Setup/OSD Button
Arrow Buttons
Mute Button
Menu Button
Pause Button
Status Button
Skip/Step (Previous) Button
Skip/Step (Next) Button
Play Button
Search/Slow Reverse Button
Stop Button
Search/Slow Forward Button
Macro Buttons
Pic +/Pic – Buttons
Zoom Button
Playlist Button
Random Button
A-B Repeat Button
Volume Up/Down Buttons
Light Button
Numeric Keys
Repeat Button
Clear Button
Video Output Button
Video Format Button
Learn Button
Screen Power Buttons
Info Button
Teletext Buttons
Picture in Picture Button
Screen Format Button
IR Transmitter Window
Program Indicator
Mode Button
Page 12

0
Power On/Source Selector Buttons: Pressing one of these buttons will perform three actions at the same time. First, if the CS
system is not turned on, this will power up the unit. Next, it will
select the source shown on the button as the input to the CS
system. Finally, it will change the remote control so that it controls
the device selected.
1
Power Off Button: Puts the CS system in Standby mode.
2
Subtitle Button: When a DVD is playing, press to select a
subtitle language or to turn subtitles off.
3
Title Button: When a disc is playing, press to make the player
go back to the first section of the disc.
4
Angle Button: Press to access various camera angles on a
DVD (if the DVD contains multiple camera angles) or to rotate JPEG
images.
5
Audio Button: Press to access various audio languages on a
DVD (if the DVD contains multiple audio streams).
6
Enter Button: Press this button to activate a setting or option.
7
Open/Close Button: Press to open or close the disc tray.
8
Setup/OSD Button: Press to access the on-screen display
menu.
9
Arrow (M/N/K/L) Buttons: Use to move the cursor in
the OSD.
A
Mute Button: Mutes the sound.
B
Menu Button: Displays the actual DVD Disc menu on the TV
screen in Play mode. When playing discs with JPEG images,
pressing this button will access the thumbnails.
C
Pause Button: Freezes a picture (with DVD/VCD) and pauses
the playback signal (CD) when a disc is playing. Press again for
normal playback.
D
Status Button: Press while a disc is playing to view the banner
display. Use the Arrow
9
buttons to move through the different
features in the banner display. When a symbol is highlighted, press
Enter
6
on the remote to select it.
E
Skip/Step (Previous) Button: Press to go to the beginning of
the current track. Press again quickly to go to the beginning of the
previous track. After pressing the Pause
C
button, each press of
this button will move the image in reverse, frame by frame.
F
Skip/Step (Next) Button: Press to go to the beginning of the
next track. After pressing the Pause
C
button, each press of this
button will move the image forward, frame by frame.
G
Play Button: Begins to play the disc (closes disc tray first, if it
is open).
H
Search/Slow (Rev.) Button: Allows you to search in reverse
through a disc while it is in Play mode. Each time you press this
button, the search speed changes as indicated by a number of
arrows on the right top of your screen. After pressing the Pause
C
button, each press of this button will change the slow down
speed indicated by a number of arrows in the right top of the
screen.
I
Stop Button: Stops play of a disc. When a disc is playing, if you
press Stop
I
and PlayG, the disc will resume play; i.e., it will
start from the same point on the disc where the unit was stopped.
If you press Stop
I
twice and the PlayGbutton, the disc will
start play from the beginning.
J
Search/Slow (Fwd.) Button: Allows you to search forward
through a disc while it is in Play mode. Each time you press this
button, the search speed changes as indicated by a number of
arrows on the right top of your screen. After pressing the Pause
C
button, each press of this button will change the slow-down
speed as indicated by a number of arrows on the right top of the
screen.
K
Macro Buttons: Press these buttons to store or recall a
“Macro,” which is a preprogrammed sequence of commands stored
in the remote. (See page 29 for more information on storing and
recalling macros.)
L
Pic +/Pic – Buttons: Pressing these buttons in JPEG mode will
move to the previous or next image.
M
Zoom Button: When a DVD or VCD is playing, press this button
to zoom the picture so that it is enlarged. There are four steps to
the zoom function, each progressively larger. Press through each of
the zoom stages to return to a normal picture. The Zoom function is
not available when watching high-definition material.
N
Playlist Button: Press this button to change the playback order
of the disc.
O
Random Button: Press for Random playback in random order.
P
A-B Button: Press to select section A-B and to play repeatedly.
Q
Volume Up/Down Buttons: Increase/decrease the master
volume level.
Light Button: Press to illuminate remote control.
Numeric Keys: Select numbers by pressing these buttons.
Repeat Button: Press to go to the Repeat menu. You can repeat
a chapter, track or the entire disc.
Clear Button: Press to remove the Banner menu from the
screen.
Video Output Button: Press to toggle between the S-video,
component video outputs and SCART RGB video output of the CS
system player. Note that the composite and SCART composite
video outputs on the player are always active, which could help
you make your initial setup.
Video Format Button: Press this button to change the resolution of the Component Video Output between standard definition
and progressive definition (PAL interlaced and PAL progressive;
NTSC interlaced and NTSC progressive).
Learn Button: Press this button to begin the process of
“learning” the codes from another product’s remote into the CS
system’s remote. (See page 29 for more information on using the
remote’s learning function.)
to These buttons do not have a direct function with the
CS3/CS5, but can be programmed to control some of the functions
of your TV using the Learning function of the remote control.
IR Transmitter Window: Point this window toward the CS when
pressing buttons on the remote to make certain that infrared
commands are properly received.
Program Indicator: This three-color indicator is used to guide
you through the process of learning commands from a remote into
the CS’s remote code memory. (See page 29 for more information on
programming the remote.)
Mode Button: This button has no effect on the Cinema Sound
CS3/5, but enables you to switch the remote to another mode so that
it operates another device without selecting it as the source. This is
useful if, for example, you wish to adjust your video display screen
(TV mode) while watching a DVD (Disc Mode). Each press of the
Mode button changes the remote’s mode in this order: TV, DISC,
RADIO, AUX, D-IN, USB 1 and USB 2, and then back to TV again.
The corresponding Source Selector will light to indicate the mode.
12
REMOTE CONTROL
Page 13

About This Manual
• The types of functions and operations that can be used for a particular disc vary depending on the features of that disc. In some
cases, these functions and operations may differ from the
descriptions given in this manual. In this event, follow the instructions given on the screen. This manual only covers basic disc
operations.
• For some operations, the
Ø
icon may appear on the screen. This
indicates that the operation described in this manual is not
available on the disc in the player.
• On-screen and front-panel display illustrations in this manual are
purely for the purposes of explanation. The actual displays may
differ slightly from these illustrations.
Disc Handling Precautions
• To keep the disc clean, handle the disc by its edge. Do not touch
the surface.
• Do not stick paper or tape on the disc. If there is glue (or a similar
substance) on the disc, remove the glue completely before using
the disc.
• Do not expose the disc to direct sunlight or sources such as hot
air ducts, or leave it in a car parked in direct sunlight as there can
be a considerable rise in temperature inside the car.
• After playing, store the disc in its case.
• Do not write on the label side with a ballpoint pen or other writing
utensils.
• Be careful not to drop or bend the disc.
Disc Cleaning Precautions
• Before playing, clean the disc with a cleaning cloth. Wipe the disc
from the center out.
• Do not use solvents such as benzene, thinner, commercially
available cleaners or anti-static spray intended for vinyl LPs.
Disc Installing Precautions
• Do not install more than one disc on the disc tray.
• Do not place the disc on the tray upside down.
• Do not try to close the disc tray when the disc is not installed and
centered properly.
Regional Coding
DVD players and discs are designed with regional restrictions
which dictate the regions in which a disc can be played. If the
region number on the disc you want to play does not match the
region number of your DVD player, you will not be able to play the
disc. The message
REGION ERR will appear in the front-panel
display. The region code of this player is indicated on the rear
panel and on the external packaging.
13
English
BASIC INFORMATION
Page 14

After unpacking the unit, and placing it on a solid surface capable of
supporting its weight, you will need to make the connections to your
audio and video equipment.
Audio Equipment Connections
We recommend that you use high-quality interconnect cables
when making connections to source equipment and recorders to
preserve the integrity of the signals.
When making connections to audio source equipment or speakers,
it is always a good practice to unplug the unit from the AC wall
outlet. This prevents any possibility of accidentally sending audio or
transient signals to the speakers that may damage them.
1. Connect the front, center and surround speaker outputs
BCD
to
the respective speakers.
Cables that are run inside walls should have the appropriate
markings to indicate listing with any appropriate testing agency
standards. Questions about running cables inside walls should be
referred to your installer or a licensed electrician who is familiar
with the applicable local building codes in your area.
When connecting wires to the speakers, be certain to observe
proper polarity. Note that the positive (+) terminal of each speaker
connection now carries a specific color code. However, most
speakers will still use a red terminal for the postive (+) connection.
Connect the “negative” or “black” wire to the same terminal on
both the receiver and the speaker.
We also recommend that the length of cable used to connect
speaker pairs be identical. For example, use the same length
piece of cable to connect the front-left and front-right or
surround-left and surround-right speakers, even if the speakers
are a different distance from the CS receiver.
2. Connections to the subwoofer are made via a line-level audio
connection from the Subwoofer Output
7
to the line-level SUB
input (purple) of the subwoofer. Connect at the same time the
Subwoofer Trigger Output
F
to the Trigger Input of the sub-
woofer.
3. Connect the supplied FM antenna to the FM (75-Ohm)
5
connection. The FM antenna may be an external roof antenna,
an inside powered or wire lead antenna or a connection from a
cable system. Note that if the antenna or connection uses
300-ohm twin-lead cable, you should use a 300-ohm-to-75-ohm
adapter to make the connection.
Video Equipment Connections
Video equipment is connected in the same manner as audio
components. Again, the use of high-quality interconnect cables is
recommended to preserve signal quality.
Connecting the TV and Optional Components
NOTE:
To be able to listen to the sound of a live TV show through the
loudspeakers of your CS system you need a connection between the
audio output of your TV and the CS receiver. To achieve this when
using the supplied SCART cable, you don’t need to connect any
additional wires – the SCART cable transports audio and video signals
in both directions. But when using the HDMI, component, S-video or
composite jacks you need to connect the audio output of your TV set
with the TV Audio In K on the back of your CS
receiver
. If your TV has
a digital audio output, it is recommended that you use that one, rather
than the analog audio output. Connect the digital output of your TV to
the Digital In 89 on the back of your CS receiver.
HDMI Connection
If your TV set is equipped with an HDMI input, we suggest you use the
HDMI connection to connect your CS system and your TV. It will allow
you to watch your DVDs in the best possible picture quality. Most LCD,
plasma and video projectors have such an HDMI input nowadays.
Connect the HDMI Output H to the HDMI input of your video device.
The HDMI wire does not transport audio signals from the TV to the CS,
so you need an additional audio connection (see note above).
If your TV set does not have an HDMI input, please follow one of the
steps below to connect it to your CS system or other video components.
TV Connection (Method 1) – Using SCART Cable (Included)
To view the video from DVD discs on your TV set, connect the SCART
TV Out Jack 3 of the CS system to the SCART In jack of your TV set.
The audio connection runs through the same cable (see note above).
TV Connection (Method 2) – Using S-Video Cable (Not Included)
If your TV set has an S-video input jack, you can connect your TV to
the S-Video Out Jack 1 on the back of the CS receiver. S-video wires
don’t transport audio signals, so you need an additional audio connection (see note above).
TV Connection (Method 3) – Using Composite Video (Cable Not
Included)
If your TV set has neither S-video nor SCART input jacks, connect
the Video Out Jack
0
of the CS to the Video In jack of your TV set.
The composite wire also doesn’t transport audio signals, so you
need to make additional connections (see earlier note).
Component Video Connection (Method 4)
If the video display has component video inputs, connect the
Component Video Outputs
2
on the CS3/CS5 to the corresponding
input jacks on your television. If you are using a progressive scan
television or projector, you must also change the Scan Type in the
DVD player’s Video Setup menu from ”Interlaced” to ”Progressive.”
14
INSTALLATION AND CONNECTIONS
Page 15

Connecting VCR and Sat Decoder (Methods 5 and 6)
The diagram below shows possible connection methods for
common system configurations. These are intended as guidelines
only. Due to differences in equipment specifications, the method of
connection for your equipment may be different from that shown.
Please consult the owner’s manual for your equipment for further
guidance.
Connecting Set-Top Box or Digital Satellite Receiver (Method 7) –
Using Coaxial Digital Cable
To listen to the digital multichannel signal or downmix from set-top
boxes or digital satellite receivers, connect the Coaxial Digital Out
of your device to the Coaxial Digital In
8
on the CS receiver.
Optional Audio Connections
Aux Input for External Source
You may connect a line-level stereo analog audio source such as a
Sat receiver, tape deck, phono preamp of a record player, etc., to
the receiver’s rear-panel Audio In Input
6
sockets to enjoy the
benefits of your CS system with other source components.
• VCR Connection-Audio (cables not Included): To listen to the
sound from your stereo VCR through the speakers of this system,
connect the Left/Right audio output jacks of your stereo VCR to
the Left/Right audio input jacks Audio In
6
of this system.
Aux Output for Recording
To record the sound of the CS system with your VCR or any audio
recording device (tape deck, MD, CDR and some others), the Audio
Out Jacks
A
should be connected to the analog Record In jacks of
the appropriate device. They can also be connected to any audio
input on your TV to listen to the sound of your CS receiver through
the speakers of your TV only, when the amp in your subwoofer is
turned off and the volume of the CS receiver has been turned down
completely. If the speakers of your CS system are active, the
volume on your TV should be turned down.
Digital In- and Outputs
Connect the digital output of any digital sources such as an
optional CD or DVD changer or player, advanced video game, a
digital satellite receiver, HDTV tuner or digital cable set-top box or
the output of a compatible computer sound card to the Optical and
Coaxial Digital Inputs
89
.
Connect the Coaxial Digital Output
E
on the rear panel of the CS to
the matching digital input connections on a CD-R or MiniDisc recorder.
Note (When Connecting the Optical Digital Audio Cable – Optional):
Gently push the cable plug through the built-in shutter that covers
the optical digital audio output and connect the cable firmly so that
the configurations of both the cable and the connector match.
Speaker Placement
The placement of speakers in a multichannel home theater system
can have a noticeable impact on the quality of sound reproduced.
Depending on your viewing device, place the center speaker either
directly above or below your TV, or in the center behind a
perforated front-projection screen.
Once the center channel speaker is installed, position the left-front
and right-front speakers so that they are as far away from one
another
as the center channel speaker is from the preferred
listening position. Ideally, the front-channel speakers should be
placed so that their tweeters are no more than 60cm above or
below the tweeter in the center channel speaker.
Depending on the specifics of your room acoustics, you may find
that imaging is improved by moving the front-left and front-right
speakers slightly forward of the center channel speaker. If possible, adjust all front loudspeakers so that they are aimed at ear
height when you are seated in the listening position.
Using these guidelines, you’ll find that it takes some experimentation to find the correct location for the front speakers in your
particular installation. Don’t be afraid to move things around until
the system sounds correct. Optimize your speakers so that audio
transitions across the front of the room sound smooth.
When the CS is used in 5.1-channel operation, the preferred
location for surround speakers is on the side walls of the room, at
or slightly behind the listening position.
15
English
INSTALLATION AND CONNECTIONS
Page 16

A) Front channel speaker installation with direct-view TV sets or
rear-screen projectors
B) The distance between the left and right speakers should be
equal to the distance from the seating position to the viewing
screen. You may also experiment with placing the left and right
speakers slightly forward of the center speaker. Rear speaker
mounting is an alternate location for 5.1 systems.
Rear surround speakers may also be used in 5.1-channel mode as
an alternative mounting position when it is not practical to place
the main surround speakers at the sides of the room. Speakers may
be placed on a rear wall, behind the listening position. As with the
side speakers, the center of the rear surrounds should face you.
The speakers should be no more than 2 meters behind the rear of
the seating area.
Subwoofers produce largely nondirectional sound, so they may be
placed almost anywhere in a room. Actual placement should be
based on room size. One method of finding the optimal location for
a subwoofer is to begin by placing it in the front of the room, about
15cm from a wall, or near the front corner of the room. Another
method is to temporarily place the subwoofer in the spot where you
will normally sit, and then walk around the room until you find a
spot where the subwoofer sounds best. Place the subwoofer in
that spot.
Connecting the AC Power
NOTES:
• The Power Requirement is: AC 230V, 50Hz.
• Connecting to power other than the one listed above may damage
the system or cause abnormal operation.
• Before connecting the AC power cord of this system to a wall
outlet, connect the speakers and other component cables to the
system.
• Connect the AC power cord of the active subwoofer.
• Connect the AC power cords of your TV and any optional
components to a wall outlet.
Once the speakers have been placed in the room and connected,
the remaining steps are to program the system configuration memories.
First Turn-On
You are now ready to power up the CS3/CS5 receiver to begin final
adjustments.
1. Plug the Power Cable
4
into an unswitched AC outlet. Note that
the Power Indicator
1
will turn orange, indicating that the unit
is in the Standby mode.
2. Remove the protective plastic film from the main front-panel lens.
If left in place, the film may affect the performance of your
remote control.
3. Install the three supplied AAA batteries in the remote as shown.
Be certain to follow the (+) and (–) polarity indicators that are on
the top of the battery compartment.
4. Turn the CS3/CS5 on either by pressing the Power On/Off
1
or
the Input Source Selectors
0
on the remote control. The
Power Indicator
1
will turn blue to confirm that the unit is on,
and the Main Information Display
will also light up.
Basic Playback
Preparation
1. Switch the TV ON and select its video input connected to the CS
receiver.
2. When you switch on the CS system receiver, a JBL welcome
image should appear on the screen. If that screen appears distorted or without color, change the appropriate settings at the
Video Setting submenu according to your TV set and to the connection used between the CS receiver and your TV.
3. If there is no picture at all, not even the JBL screen, check the
setting of the video input used on your TV (most SCART inputs on
TVs can be configured in the TV’s menu). If this doesn’t work,
connect your TV with different cables to the CS receiver, e.g., via
composite (yellow jacks) or S-video cables, rather than SCART to
view the setup menus until all appropriate Video menu settings
are made properly.
4. Press Open/Close
27to open the disc tray.
5. Place a disc on the disc tray.
Hold the disc without touching either of its surfaces, position it
with the side you wish to play facing down, align it with the
guides, and place it in its proper position.
• 3" (8cm) discs or 5" (12cm) discs can be used.
6. After the discs slides into the loader, it will start playing
automatically.
• When the disc tray is closed by pressing Open/Close
27, play
will start automatically.
• With most DVDs, a Disc menu appears on the screen. Select
specific menu item by using Arrow
9
buttons on the remote,
then press Enter
6
.
16
INSTALLATION AND CONNECTIONS
Page 17

Disc Playback Features
Skipping Tracks or Titles/Chapters
To move forward or backward through the tracks on a CD or the
titles or chapters on a DVD, press Previous/Next
EF
.
Fast-Motion Playback/Fast Search
1. To move forward or backward through the DVD or CD disc being
played at fast speed, press Search
HJ
on the remote. Once
one of these buttons is pressed, the fast search will continue
until Play is pressed.
There are four fast-play speeds. Each press of the Search Buttons
will cycle to the next speed in the following order: 2x, 4x, 16x, 100x,
indicated by a number of arrow indicators on the right top of the
screen.
2. Press Play
G
at any time to resume normal playback.
Note that there will be no audio playback during fast-forward or
-reverse play of DVD discs. This is normal for DVD, as surround
processors cannot process the digital audio streams during fastplay modes; audio will be heard during fast-play of conventional
CDs.
Freeze Frame and Frame Advance (With DVD Only)
1. Press Pause
C
when a DVD is playing to freeze the picture.
2. Each time you press one of the Step (FWD or REV
EF
) but-
tons, the picture advances one frame in the selected direction.
3. Press Play
G
to resume normal playback.
Slow-Motion Playback (With DVD Only)
1. When a DVD disc is in pause or freeze frame mode, you may
move slowly forward or backward through the program being
played at one of four speeds by pressing the Search Buttons
HJ
on the remote. Each press of the buttons will move to the
next speed, indicated by a number of arrow indicators on the
right top of the screen.
2. Press Play
G
to resume normal playback.
Note that there will be no audio playback during slow-forward or
-reverse play of DVD discs. This is normal for DVD, as surround
processors cannot process the digital audio streams during slow
modes. Slow play is not available for CD.
NOTES:
• Playback features may not be available during the opening credits
of a movie. This is intended by the disc author and is not a failure
of the CS receiver.
• Playback of a DVD with 96kHz/24-bit audio requires the use of
circuitry normally used for other features. Accordingly, Slow
Play Reverse and Step Advance features are not available with
these discs.
• Depending on the structure of a VCD disc, the functions Slow
Reverse and Step Reverse may be prohibited or have no function
and Fast Playback (Search) may not function.
• Fast Playback (Search) will not function with CDs containing
MP3 data.
About DivX Movie Files
The DivX disc compatibility of this DVD player is limited by the
following:
• The available resolution size of the DivX file should be below
720x576 (W x H) pixels.
• The total number of files and folders on the disc should be fewer
than 999.
• The number of screen frames per second should be below 29.97
frames per second.
• The video and audio structure of recorded files should be
interleaved.
• The player is capable of playing DivX files with the extension
“.avi.”
• The player is capable of playing subtitle files with the extensions
“.smi,” “.srt,” “.sub” (Micro DVD format only) or “.ssa.” Other
subtitle files won’t be displayed. Subtitle files need to carry the
same name as the movie file (but with either one of the above
extensions) and should be located in the same directory.
Playing a DivX Movie Disc
Before playing DivX movie discs, please note the following:
• Multisession DVD containing WMA files may not be supported.
• Open session discs are not supported.
• The DVD player does not support PC data.
• This DVD player does not support an unfinalized disc with a
closed session.
1. Insert a disc and close the tray.
2. Press the OSD 8 button of the remote control and select a fold-
er by pressing the up/down cursor buttons and press Enter 6.
A list of files in the folder appears. If you are in a file list and
want to return to the Folder list, use the up/down buttons on the
remote to highlight and press Enter 6.
3. If you want to view a particular file, press the up/down buttons to
highlight a file and press Play G.
When playing back a DivX movie, you can use variable playback
functions like fast and slow backward and forward, as well as step
forward and step backward.
4. Press Stop I to stop the playback.
The DVD player’s playback functionalities of DivX video discs will
vary depending on the DivX version used for creating your movies.
Surround Modes
One of the most important features of the CS3/CS5 receiver is its
ability to reproduce a full multichannel surround sound field from
digital sources, analog Matrix surround-encoded programs and
standard Stereo programs.
Selection of a surround mode is based on personal taste, as well as
the type of program source material being used. For example,
motion pictures, CDs or TV programs bearing the logo of one of the
major surround-encoding processes (such as Dolby Surround)
should be played in either the Dolby Pro Logic II Movie (with
movies) or Music (with music) surround mode.
Surround modes and audio formats are selected using the remote.
Press the Audio Button
5
to toggle between the surround modes/
audio formats available on the DVD disc. As you press the button,
the surround mode/audio format name will appear in your video
display.
When a digital source is present, the CS receiver will automatically
select and switch to the correct mode (Dolby Digital or DTS),
regardless of the mode that has been previously selected.
To listen to a DVD program in traditional 2-channel stereo, using the
front left and front right speakers only (plus the subwoofer, if
installed and configured), follow the instructions shown in the DVD
Sound Mode chapter, in the Audio Settings menu.
17
English
INSTALLATION AND CONNECTIONS
Page 18

System Defaults
The final step of the installation is to establish the system’s
defaults. It is helpful to take a few minutes to familiarize yourself
with these settings, as they may require change before the first use
and later from time to time.
General Functionality of the OSD Menu
The complete setup and control of the CS3/CS5 takes place in an
advanced user-guided on-screen display (OSD) menu system. The
OSD can be activated by pressing the OSD
8
button on the
remote control. Pressing this button again de-activates the OSD.
The main menu consists of a Player menu, Radio menu, TV menu,
AUX menu, Digital menu, USB menu and Setup menu. The Player
menu will show all information and options available for the disc
currently playing. The Radio menu will show radio and RDS options.
The TV, AUX and Digital menus show the surround options for these
specific audio inputs. The USB menu will show all information and
options available when USB thumb devices or portable hard disks
are connected. The Setup menu will help you configure all audio
and video settings which are normally only made once.
Depending on how your CS system is connected to your TV set, two
different on-screen displays are available. When the CS is connected via any of the standard definition connections (SCART, S-video,
composite video or standard component video), the OSD will be
icon-based. When the CS is connected via any of the high-definition connections (HDMI or high-definition component video), the
OSD will be text-based. In the next chapters, we will show both the
standard-definition version and the high-definition version, to make
the initial setup as easy as possible.
Many menus contain submenus or text lines. These submenus are
shown as icons on the left side of the menu, depending on whether
you are watching the standard-definition OSD or high-definition
OSD. They can be highlighted by a white square around the icon or
text by moving the cursor with the Arrow
9
buttons. Icons or text
can be activated by pressing Enter
6
when they are highlighted.
When Enter
6
has been pressed, the color of the icon or the
circle behind the text will change to dark blue and you will see that
the current settings of this submenu will appear on the right side of
the menu. Although some menus have various submenus and
settings, they are all navigated in the same way. All submenus, settings and options can be accessed with the help of the Arrow
9
and Enter6buttons on the remote control.
To change a setting, simply move the cursor to the setting you wish
to change. This setting will be highlighted in a white square, and a
brief explanation will appear in the Upper Menu Line on the bottom
of your screen, together with the available options for this setting
on the Lower Menu Line.
Once the setting is highlighted, pressing Enter
6
will show an
M
and Nicon next to the current setting to indicate that the setting
can be changed by pressing the left or right Arrow
9
button.
Press the Arrow
9
buttons until the requested setting is shown,
and confirm this setting by pressing Enter
6
. Note that when you
cycle though the options for this setting, the cursor cycles though
the options on the Lower Menu Line, and the rest of the display
fades out.
(A) Main Menu Line
(B) Submenus
(C) Current Settings
(D) Upper Menu Line with Brief Explanation
(E) Lower Menu Line with Possible Options
Setup Menu
The first step in checking or changing the system defaults is to
access the Setup menu. First, make certain that the CS receiver is
properly connected to a video display, and that power is
connected. For this process, however, you do not need to load a
disc into the unit.
During Stop, Pause or Play mode, if you press OSD on the remote,
the Main menu appears on the screen.
This Main menu and all menus in the following section may look
different, listing the settings with different languages, depending on
the settings made previously. With the factory default setting, all
languages are set to ”English”; that’s why with all menus, the
English version is shown in the manual.
In the Setup menu, you will find submenus for making or changing
all settings and adjustments for both audio and video handling of
your CS3/CS5.
To access the Setup menu, press the OSD
8
button, and move
the cursor to the right until SET-UP is highlighted. Press Enter
6
to activate the System Settings:
System Settings
18
SYSTEM SETUP
Page 19

The System Setting submenu contains the following settings.
Follow the explanations in the Upper Menu Line on the bottom of
your screen to change the settings.
Display Language: Sets the language in which the OSD menus are
shown on your screen.
Preferred Subtitle Language: Defines your preferred subtitle
language. Every time a disc contains this subtitle language, it will
be shown automatically. If you do not find your preferred language
in the list of options, you can select your preferred language by
selecting
OTHER, and than typing a 4-digit code found in the code
list on page 31. You can also set the preferred subtitle language to
OFF. In that case no subtitles will be shown.
Panel Time-Out: Sets the time-out interval for the Front-Panel
Information Display. After the selected time, the display will dim
completely.
Status Bar Time-Out: Sets the time-out interval for the Status Bar,
after which the Status Bar will disappear from the screen.
Parental Control: Defines a password used to control viewing of
restricted programs. The default password is 8888. After pressing
the default password, either the parental control setting can be
chosen, or a new password. The five standard US rating symbols
are ”G” (General, level 1), ”PG” (Parental Guidance, level 3),
”PG13” (Parental Guidance and 13 years old, level 4), ”R”
(Restricted, level 6) and ”NC 17” (from 17 years old, level 7). The
DVD will accommodate a total of eight rating steps, as set by the
DVD creators. These additional steps allow for more critical control
of program playback for all audiences. Level 8: All DVDs can be
played. Levels 7 to 2: DVDs for general audiences/children can be
played. Level 1: DVDs for children can be played; DVDs for
adults/general audiences are prohibited. Follow the explanations
on the screen to set a new password.
Disc Recognition: When set to on, the next time a disc is inserted,
the CS will show a “Disc Recognized” message, with the question
if you would like to play the disc from the beginning or would like to
resume from where you last stopped the disc. The memory can
contain information of the last 100 discs played.
PBC Support: Activates PBC (Play Back Control) Support for VCD
discs.
Screen Saver: Activates a screen saver to prevent image “burn” in
a video display device. If you connect the CS receiver to a plasma
screen or video projector, we recommend you activate the screen
saver at all times.
Show Angle Icon: Determines whether the Angle Icon will appear
on the screen when there are different angles available on a DVD
disc.
Audio Settings
The Audio Setting submenu contains the following settings. Follow
the explanations in the Upper Menu Line on the bottom of your
screen to change the settings.
Preferred Audio Language: Defines your preferred audio language.
Every time a disc is played that contains this audio language, it will
be activated automatically. If you do not find your preferred
language in the list of options, you can select your preferred
language by selecting OTHER, and than typing a four-digit code
found in the code list on page 31.
Dynamic Range: This setting allows you to take advantage of the
programming present on some Dolby Digital recordings to reduce
the volume of louder passages while maintaining intelligibility of
quieter passages. This means that you may listen to programs at a
level that allows the full impact of a soundtrack to be heard at a
volume that is lower than you might otherwise use to avoid
disturbing others. The CS3/CS5 accomplishes this by compressing
the audio to a greater or lesser degree, depending on which setting
you choose. Three options are available:
•
MINIMUM does not make any changes to the original playback,
and should be used when the volume setting in the listening room
may be as loud as you desire.
•
MEDIUM applies a moderate amount of compression so that
louder passages are a little bit quieter.
•
MAXIMUM applies more compression so that louder passages
are much softer.
Feel free to experiment with the settings at any time.
Delay Unit: This setting sets the measuring unit for Delay in either
Feet or Meter.
Tone Control: Activates or deactivates the Bass and Treble settings.
Once either the Bass or Treble settings are changed, the Tone
Control automatically switches to
ON.
Bass Level: Sets the level of low frequencies.
Treble Level: Sets the level of high frequencies.
DVD Sound Mode: Sets the audio format of the DVD-disc playing
(for other sources, see Surround Mode in each respective chapter).
Once set to Stereo, every surround format on a DVD will be converted to a pure stereo signal. Once set to DPLII, all stereo signals
on a DVD are forced into 5.1, leaving all multichannel signals in
their original format. This setting is recommended. The original will
follow the surround format on the disc.
19
English
SYSTEM SETUP
Page 20

Audio Adjustment
The Audio Adjustment submenu contains the access to the speaker
delay and the output level adjustment settings of the CS3/CS5.
Follow the explanations in the Upper Menu Line on the bottom of
your screen to make adjustments.
Delay
Due to the different distances between the listening position for the
front channel speakers and the surround speakers, the amount of
time it takes for sound to reach your ears from the front or surround speakers is different. You may compensate for this difference
through the use of the delay settings to adjust the timing for the
specific speaker placement and acoustic conditions in your listening room or home theater.
Measure the distance from the listening position to each of the
individual loudspeakers. Once done, select per loudspeaker the
distance that is closest to the one measured.
Output Level Adjustment
Output level adjustment is a key part of the configuration process
for any surround sound product.
NOTE: Listeners are often confused about the operation of the surround channels. While some assume that sound should always be
coming from each speaker, most of the time there will be little or no
sound in the surround channels. This is because they are only used
when a movie director or sound mixer specifically places sound
there to create ambiance, a special effect or to continue action
from the front of the room to the rear. When the output levels are
properly set it is normal for surround speakers to operate only
occasionally. Artificially increasing the volume to the rear speakers
may destroy the illusion of an enveloping sound field that duplicates the way you hear sound in a movie theater or concert hall.
The default settings of the DVD player is 0dB for all channels. In
case you feel adjustments are necessary in your setup, we advise
you to make the adjustments using the internal test tone generator.
Once the cursor is moved to any of the speaker level icons, the test
noise will be heard from the corresponding speaker. If this is not
the case please check whether the loudspeaker is connected to
the correct loudspeaker output on the rear panel. The speaker level
can be adjusted by pressing Enter 6 and selecting an appropriate
level indicated in the Lower Menu Line. The test noise will stop as
soon as the cursor is moved away from any speaker level icon.
Video Settings
The Video Setting submenu contains the following settings. Follow
the explanations in the Upper Menu Line on the bottom of your
screen to change the settings.
Aspect Ratio: This step selects the TV aspect ratio, conventional
screen shape (4:3) or widescreen (16:9), according to your TV. If
you have a conventional 4:3 TV that can (automatically) switch to
show a 16:9 format, you should select 16:9 rather than 4:3.
TV Standard: Sets the output video format (i.e., NTSC or PAL), of the
CS receiver. If you have a multistandard TV, we recommend the
AUTO setting for optimal picture quality.
Scan Type: Sets the component video output to Interlace or
Progressive. Before changing the setting to Progressive, make sure
that your video display connected to the component output is capable of handling progressive scan signals. As soon as you select
progressive scan the scan type, the video output will automatically
change to component. All other outputs, composite video on cinch,
SCART and S-video, will be kept interlaced. The interlaced
composite and S-video outputs remain active for connection to a
second (interlaced) video display.
Video Output: Sets the video output type to SCART or component.
SCART will be used for most TVs. Component will be used for most
LCD, plasma and projectors.
SCART Output: Selects which kind of video output signals will be
routed over the scart. RGB will be used for most TV’s as it provides
the best picture quality.
Video Mode: This setting affects only the Component Video
Outputs, and it controls how the video signals are optimized for
progressive scan display. In most cases, the “automatic” mode is
your best choice, as it senses whether the disc being played was
originally recorded on video or shot on film. However, in some
cases you may wish to compensate for errors in the disc authoring
that occur when the frame rate is not properly maintained when
films are converted to video. Three choices are available:
• Auto: This is the recommended setting, as it lets the CS system
analyze the signals from the DVD and adjust the output
accordingly.
• Movie: Choose this option for optimal playback of material that
was shot on film, even though you are viewing it on video via a
DVD.
20
SYSTEM SETUP
Page 21

• Video: Choose this option for optimal playback of material that was
shot directly to video (e.g., concerts and sports programming).
Video Resolution: Selects the resolution of the video output. When
the CS system is connected to either one of the composite, S-video
or SCART connectors, this setting should be left in Standard.
When you connect your CS system via a digital HDMI or component
video connection, the preferred setting is either 720p (progressive
scan with 720 lines) or 1080i (interlaced with 1080 lines).
If you select any of the 720p or 1080i high-resolution formats, all
analog video outputs (composite, S-video and SCART) will become
temporarily inactive.
In order to watch low-resolution formats again, press the Video
Output
button on the remote control.
Please note that with component video, nonencrypted movies will
be upscaled to 720p. Encrypted movies will not play in 720p and will
have to played back on standard progressive scan component or
HDMI.
Video Adjustment
The Video Adjustment submenu contains access to the Test
Screen. First adjust the video display device (TV) with the help of
the Test Screen. After that the output settings of the player can be
fine-tuned with the Color, Contrast, Brightness, Tint and Black Level
settings. In order to change the settings, move the cursor to the “+“
or “–“ icon on the same line as the setting. Once one of the icons is
highlighted, pressing Enter 6 will increase or decrease the value
of the setting, as will be shown in the bar behind the setting. To exit
the Video Adjustment menu, move the cursor to DONE, and press
Enter 6.
DivX Video On Demand
This code allows you to rent and purchase videos using the DivX
VOD service. For more information, visit www.divx.com/vod
Follow the instructions and download the video onto a disc for
playback on this unit. Note that all the downloaded videos from
DivX VOD can only be played back on this unit.
Once the DivX icon is highlighted, press Enter 6 to access your
personal DivX VOD code.
21
English
SYSTEM SETUP
Page 22

When you activate the Test Screen via the OSD you can activate a
still image to test all settings and the video performance of your TV.
With the vertical color bars you can test the following:
• Proper color intensity setting on your TV.
• The proper color of each bar, showing if the proper video standard is turned on: the colors should be (left to right): black, white,
yellow, cyan (turquoise), green, magenta (purple), red, blue, black.
• Proper color transition, seen as sharp separation of the bars;
S-video will be better than “Video,” RGB best of all.
• The performance of the color filter in your TV (with ”Video”
signals), bar edges should show no vertical crawling dots. Here,
S-video and RGB formats usually give no problems.
With the gray scale and the black/white fields below the color bars,
the brightness and contrast of your screen can be adjusted
optimally; see chapter ”TV Picture Adjustment” below.
TV Picture Adjustment With Test Screen
These adjustments may be done now, but you can also make them
after setup has been finalized.
Brightness Adjustment
1. Turn down the color control on your TV until the color bars are
visible in black and white.
2. Adjust the contrast to the lowest level where you still can see all
bars within the gray scale in the test picture separately and
clearly.
3. Adjust the brightness so that the bars in the gray scale are all
visible. The bar furthest to the left has to be as black as possible
rather than gray but the next must clearly be differentiated.
All the bars in the gray scale have to be gradually and evenly
changing from black to whiter, going from left to right.
Contrast Adjustment
1. Adjust the contrast on your TV until you see a bright white bar in
the lower right corner of the screen and a deep dark black bar
on the left. The optimal contrast setting will depend on your
preference and the surrounding light in the TV room.
2. If the brightness of the white bar stops increasing while turning
up the contrast or when the borders of the white ”JBL” text
letters on top bloom (overlight) into the black areas, drastically
decreasing the sharpness of the script, then the contrast has
been turned up too much. Reduce the contrast until these effects
disappear and the video still looks realistic.
3. If you are watching TV with ordinary surrounding daylight, adjust
the contrast so that a typical video picture has about the same
look as the surroundings in your room. That way, the eye is
relaxed when watching the TV picture. This contrast setting may
be reduced when the surrounding light is dimmed, usually
improving the sharpness of a video considerably.
4. The gray scale in the middle line needs to have the same clear
difference between each bar as before the contrast adjustment.
If not, go back to the brightness adjustment and repeat Step 3,
and then the contrast adjustments, making only minor
adjustments each time for optimization.
Color Adjustment
1. When the brightness and the contrast are set optimally, turn up
the color control to the level of your preference. Adjust to the
level where the colors look strong but still natural, not overdone.
If the color level is too high, depending from the TV used, some
of the bars will seem wider or the color intensity will not increase
while the control is turned up. Then the color control must be
reduced again. At the end, you should test the color intensity
also with a video – e.g., pictures of natural faces, flowers, fruit
and vegetables and other familiar, natural objects most useful for
an optimal setting of the color intensity.
2. If your TV has a Tint option (with most European TVs this is available or effective only with NTSC signals, not with PAL), use the
large white bar below the gray scale to tweak the warmth of the
picture. Every viewer has a different preference as to how the
glow of the picture should be. Some prefer a little colder picture,
some a warmer glow. The Tint function on your TV and the white
bar can be used to control this. Adjust the Tint to the level at
which you feel the white color has the tone you prefer.
Sharpness Adjustment
Contrary to intuition, the picture will appear sharper and clearer
with the sharpness, or Edges, setting backed off from the maximum
setting. Reduce the sharpness setting on your television, and the
Edges setting on the CS3/CS5 video adjustments menu, if necessary, to minimize the appearance of any white lines between the
bars in the gray scale portion of the test screen.
Convergence and Edge Focus
The crosshatch pattern that surrounds the test screen may be used
to evaluate edge focus and convergence in front- or rear-projection
video displays. However, the controls used to adjust these
parameters are often not user-accessible.
In any event, these adjustments are extremely complex, and
require proper training and experience to avoid worsening the
situation. Therefore, it is recommended that if you are unable to
improve the picture using the available controls, contact the video
display manufacturer’s authorized service representative for
assistance.
When all desired setup and configuration entries have been made,
use the
KL
Navigation9buttons until “Done” is highlighted at
the bottom of the Video Adjustments submenu. Press the Enter
6
button to select it to return to the on-screen menu system. Then,
press the Setup
8
button to remove the menu displays from the
screen. The unit will return to normal operation and you are ready
to enjoy the finest in DVD or CD playback!
22
TEST SCREEN
Color Bars
Gray Scale
100% Black/White
Fields
Page 23

Using the Status Bar Menu
The on-screen Status Bar contains many playback features. To see
the Status Banner menu, press Status
D
on the remote control
while a disc is playing. Use the Arrow
9
buttons on the remote to
move through the different features in the Status Bar. When a feature
is highlighted, press Enter
6
on the remote to select it and to
change it with the help of the options listed on the screen. Press
Enter
6
to activate the change.
Title: The number shown indicates the number of the title that is
currently playing.
Chapter: The number shown indicates the number of the chapter that
is currently playing on a disc.
Time: This item displays the time in DVD mode. To change the Time
mode, first move the cursor to the TIME. The current mode will be
highlighted.
Press Enter and the Arrow Buttons to Activate: Title Elapsed, Title
Remaining, Chapter Elapsed, Chapter Remaining. Depending on the
choice made, the bar will show a graphic view on where the disc
is currently playing.
Player Menu
Once all the settings have been made, you are ready to enjoy your
CS3/CS5. Once you have inserted a disc into the drawer you can
explore the Player menu by pressing the OSD 8 button. This
menu hosts all playback and program features, as well as all disc
information. As you will see, the layout of this menu is comparable
to the Setup menu. The functionality is the same too. The submenus
are shown on the left side of the screen, with
INFO activated by
default. As in the Setup menu, settings can be highlighted with the
Arrow
9
buttons and selected with the Enter6button on the
remote control. Options for the settings are shown in the Lower
Menu Line on the bottom of the screen.
Disc: Shows the type of the disc.
Audio: Shows the audio track that is currently playing. Options are
shown on both menu lines on the bottom of the screen.
Playlist: Sets the order in which the current disc is played back.
Repeat: Sets the Repeat mode.
Random: Activates Random Playback when possible.
Subtitle: Shows the subtitle of the disc currently playing.
If you have selected any of the high-resolution screen formats, you
will be able to use the Thumbnail function to quickly and easily
search for image files. Any JPEG image file that has been created
on the computer with a thumbnail image included will show up on
the right top of the screen when scrolling though the contents list.
In the Player menu, the chapter, track or picture currently playing
will be marked with an arrow symbol in front of the Chapter (DVD),
Track (CD, MP3, WMA) or Picture (JPEG). Chapters, tracks and pictures can be selected from this list at any time by moving the cursor to the desired chapter or track and pressing Enter
6
to con-
firm.
The top part of this screen can be deactivated to show the complete Track List on the screen. To deactivate, move the cursor to
the upper INFO (or i INFO) submenu on the left side of the screen.
Press Enter
6
until the icon is highlighted in light blue and the full
Track List is visible on the screen. In the same way, the Disc List
can be removed from the screen by deactivating the Program submenu.
When the CS3/CS5 is in Play mode, pressing the Play G button on
the remote control will highlight the track being played.
Information Displays
In DVD and MP3 mode, activating the Disc Info (DVD) or ID3 Info
(MP3) submenu will show information about the player and the disc
currently playing. The first lines will show Disc Type and Disc ID.
Below you can compare the Aspect Ratio, Video Standard and
Scan Type available on the disc with the actual output of your
player or ID3 info for MP3 files.
In the lower part of the screen, the Audio Resolution and Audio
Format are shown (DVD only), and at the bottom a graphical presentation of the Video Bit Rate (DVD only) and the Audio Bit Rate of
the disc currently playing.
Programmed Play
In Stop mode, the Disc List can be used to create your own program list for DVD, CD, MP3, WMA or JPEG discs. Move the cursor
to the right of the menu, into the Disc List. If the disc list is not
active, move the cursor to the Program icon on the left to activate.
Move the cursor to the Disc List, and select
Clear Program
to clear the current list. Once the disc list is clear move the cursor
up or down to the first track you would like to program and press
Enter
6
. The cursor will move to the options in the Lower Menu
Line. You can either add the selected track (or picture) to the
playlist or give it the number you would like it to have in your
23
English
PLAYER/RADIO MENU
Page 24

24
playlist, or clear the track from the list. Move the cursor down to
the next track you would like to program and continue until your
playlist is complete. Once completed press Play G on the remote
control or, move the cursor up to the Playlist setting and select
PROGRAM LIST from the options and press Play G to start the
playback.
If you have a disc that contains both MP3 files and JPEG images,
you can choose to run these simultaneously, mixing the MP3 audio
with your own images. The time interval can be chosen in the
Picture Setting.
Also you can have the image files follow the audio signal: at the
end of each audio track, the next JPEG image will be shown.
With such discs, you can also either listen to the MP3 audio or
watch the JPEG video files only. In order to do so, in Stop mode,
click on the Audio or Picture icons on the left part of the screen to
select or deselect the desired format. Once done, the tracklist will
only show the MP3 or JPEG files.
Radio Menu
The FM Tuner in the CS3/CS5 can be used to listen to the Radio.
Before listening to the radio stations, you need to preset your
favorite stations. The easiest way to do so is with the OSD screen
on your monitor.
1. Press the Radio
0
button on the remote control to turn the DVD
Receiver on and select Radio as the source. Also make sure that
your video monitor connected to the CS3/CS5 is switched on.
2. The TV monitor will show the Radio menu, as shown below. You
can also select the Radio menu with the Arrow
9
keys on the
remote control. Once the
RADIO tab is highlighted, press Enter
6
to access the Radio menu.
The Radio menu shows the selected Audio mode, the name of a
station currently played (as long as RDS is available) and a Station
list listing the 30 stations with their preset, station name and
frequency.
NOTE: The stations can be preset automatically or manually. The
Manual Preset mode is described first. The Auto Preset mode is
described later in this manual.
3. The RDS and Auto Tune functions are switched on by default,
shown by the dark blue icons, to make the process of tuning your
favorite stations as easy as possible. Move the cursor to the end
of the first station line in the menu. The frequency will be highlighted and a brief explanation will appear in the Upper Menu
Line on the bottom of the menu.
NOTE: Both RDS and Auto Tune functions can be switched off by
moving the cursor to the icon on the left side of the menu and
pressing the Enter 6 button on the remote so that it turns light
blue.
4. Pressing the search
H/ G
HJ
button will scan the FM
band for the first available radio station with acceptable reception. The scan will stop once a station is found and the name of
the station will be displayed (as long as RDS is transmitted by the
station).
The station will be stored automatically on the current preset.
If you know the frequency of your station, you can also tune the
frequency directly with the help of the numeric keys of the remote
control. Move the cursor to the end of the station line and press the
frequency with the numeric keys. Press Enter
6
twice to store.
5. Move the cursor to the next station line in the menu. Follow the
directions in Step 3 and in the Upper Menu Line to store all your
radio stations in the tuner’s memory.
Rearranging the Station List
Once all the stations have been stored in the memory, you can
rearrange the station list, putting your favorite stations at the top of
the list.
1. Move the cursor in the left column in the station list to the first
station you would like to rearrange.
2. Press Enter
6
to activate the current station. The cursor will
move to the Lower Menu Line of the screen.
3. Select the desired preset from the list by moving the cursor right
or left. Press Enter
6
to activate the change. The cursor will
move back to the new station line.
4. Repeat step 3 until all radio stations have been rearranged
according to your preferences.
Selecting Presets
Once rearranged, presets can be chosen at any time by pressing
the numeric key corresponding to the preset you would like to
listen to. Depending on whether the RDS function is active, the
station name will show on the front-panel Information Display.
Pressing the Previous/Next
N/M
EF
button will select the next
radio station.
Presets can also be chosen in the Radio Menu. Move the cursor to
the preset you would like to listen to and press Enter
6
to
activate. An arrow in front of the preset will light to show the active
PLAYER/RADIO MENU
Page 25

radio station. The cursor can be moved around the menu without
changing the current radio station. Pressing the Previous/Next
N/M
EF
button at any position in the menu will select the next radio
station, that is for instance from preset 3 to preset 4, even if the
cursor is highlighting preset 11. Pressing the Play button will
always return the cursor to the current station played, no matter
were it was previously (even when another menu is open).
Removing Presets
If you wish to remove presets from your preset list, follow the steps
below.
1. Move the cursor in the left column in the station list to the preset
you would like to remove.
2. Press Enter
6
to activate the current station. The cursor will
move to the Lower Menu Line of the screen.
3. Select Remove from the list and press Enter
6
. The cursor will
move back to the original station line.
4. Repeat Step 3 until all radio stations you would like to delete
have been removed.
Auto Preset Function
When the cursor is moved to the “ # ” icon on top of the preset
numbers you can activate the Auto Preset function, clear the
complete frequency list or restore all default frequencies set by the
factory.
When the Auto Preset is selected the tuner will scan the full FM
range and store all stations with acceptable reception one after
another on the presets. The frequency scanned will appear on the
left lower side of the menu while the frequency of each station
stored will be shown on the right side of the list. When the
complete FM range is scanned or all presets (30) are loaded with
stations the scan will stop and the first preset be selected.
You also can stop the scan at any time by pressing the Stop
I
button. Stations can be rearranged by following the explanations in
the chapter “Rearranging the Station List,” on page 24.
RDS Station ID
With the help of RDS (Radio Data System) you can show the name
of the station you are currently listening to as well as the station
names of all other presets.
The RDS function is set to active by default, shown by the dark blue
RDS icon at the left of the menu. In this mode, all station names will
be visible both on the OSD menu as well as on the Information
Display on the front panel.
If the RDS function on the left side of the menu is inactive (light blue),
you will only see the frequency of the current preset shown in the
menu and on the front-panel display. The Station Name line on top of
the menu will disappear, but the name of all other stations preset will
keep in the list.
Pressing Status
D
on the remote will change the front-panel display’s indication from the frequency to the name of an RDS station
or vice versa and will simultaneously turn the RDS indication in the
OSD on or off.
Surround Mode for Tuner
As with all other inputs of the CS3/CS5, you can also select your
preferred surround mode when listening to the radio. The actual
surround mode is listed on the first line of the tuner menu. Follow the
steps below to change the surround format:
1. Move the cursor to the
AUDIO line on the top of the Tuner
menu. The actual surround format will be highlighted. Press Enter
6
to activate the possible surround formats. These will be
shown in the bottom line of the menu.
2. Move the cursor right or left, until the desired surround format is
highlighted.
3. Press Enter
6
to activate the change. The setting will apply to
all tuner presets.
NOTE: Like with all other inputs of the CS3/CS5, the Audio mode
can easily be selected by pressing the Audio
5
button on the
remote repeatedly, until the desired surround mode appears in the
first line of the OSD menu.
25
English
PLAYER/RADIO MENU
Page 26

TV Menu
As a Scart audio/video cable contains both audio and video inputs
and outputs in one cable, the Scart connector between the DVD
Receiver and the TV can also be used to lead the audio output signals of your TV to the DVD receiver. In this way your TV programs
can be listened to over your CS sound system.
NOTE: Please make sure that the Scart cable used has all pins
connected. If not it could be that, only the video signal from the
DVD receiver will be lead to the TV.
1. Press the TV
0
button on the remote control to turn the DVD
receiver on and select TV as the source. Also make sure that
your video monitor connected to the CS3/CS5 is switched on.
2. The TV monitor will show the TV menu, as shown below. You can
also select the TV menu with the Arrow
9
keys on the remote
control. Once the TV tab is highlighted, press Enter 6 to access it.
If the CS receiver is already in Standby, you can also switch the
unit on by pressing the TV button on the remote control.
The TV menu contains the following settings. Follow the explanations in the Upper Menu Line on the bottom of your screen to
change the settings.
Audio: Selects the surround mode you would like to use when
listening to your TV or other video device connected to the SCART
input.
Level Adjustment: This setting gives you the possibility to increase
or decrease the input level of the TV, so that its sound will have the
same level as the radio, the DVD player or the other audio inputs.
AUX Menu
In addition to the built-in DVD-Audio/Video and CD player, the builtin radio and SCART audio input, you can connect one more analog
audio source to the CS3/CS5. The analog source can be connected
to the Audio In Input
6
connectors on the rear panel.
1. Press the AUX
0
button on the remote control to turn the DVD
receiver on and select AUX as the source. Also make sure that
your video monitor connected to the CS3/CS5 is switched on.
2. The TV monitor will show the AUX menu. You can also select the
AUX menu with the Arrow
9
keys on the remote control. Once
the AUX tab is highlighted, press Enter
6
to access it.
The AUX menu contains the following settings. Follow the
explanations in the Upper Menu Line on the bottom of your screen
to change the settings.
Audio: Selects the surround mode you would like to use when
listening to your additional analog audio source.
Level Adjustment: This setting gives you the possibility to increase
or decrease the input level of the analog input, so that its sound
will have the same level as the radio, the DVD player or the other
audio inputs.
Digital In Menu
In addition to all analog audio and video sources, the CS3/CS5 also
gives you the opportunity to connect two digital audio sources, for
instance a digital set-top box or satellite receiver. Connect these
sources to either the coaxial or optical digital input connectors on
the rear panel.
1. Press the D.IN
0
button on the remote control to turn the DVD
receiver on and select Digital In as the source. Also make sure
that your video monitor connected to the CS3/CS5 is switched on.
2. The TV monitor will show the Digital In menu, as shown below.
You can also select the Digital In menu with the Arrow
9
keys
on the remote control. Once the
D. IN tab is highlighted, press
Enter
6
to access it.
The Digital In menu contains the following settings. Follow the
explanations in the Upper Menu Line on the bottom of your screen
to change the settings.
Digital Input:
Selects either the digital source connected to the
coaxial
or to the optical digital input as source to listen to.
Audio: Selects the surround mode you would like to use when
listening to one of the digital audio sources.
Level Adjustment: This setting gives you the possibility to increase
or decrease the input level of the digital input, so that its sound will
have the same level as the radio, the DVD player or the other audio
inputs.
26
TV MENU, AUX MENU, DIGITAL IN MENU
Page 27

Surround Modes
Dolby Digital: Available only with digital input sources encoded
with Dolby Digital data. It provides up to five separate main audio
channels and a special dedicated low-frequency effects channel.
DTS: Available only with digital input sources encoded with DTS
data. Available on special DVD, LD and audio-only discs, DTS
provides up to five separate main audio channels and a special
dedicated low-frequency channel.
Dolby Pro Logic II: Dolby Pro Logic II is the latest version of Dolby
Laboratory’s benchmark surround technology that creates or
decodes full-range, discrete left, center, right, right surround and
left surround channels from Matrix surround-encoded programs
and conventional Stereo sources. The Dolby Pro Logic II Movie
mode is optimized for movie soundtracks that are recorded with
matrix surround, by creating true rear left, center and right signals.
The Pro Logic II Music mode should be used with musical
selections, that are recorded with Matrix surround or with normal
Stereo mode, creating discrete rear left and right signals.
27
English
TV MENU, AUX MENU, DIGITAL IN MENU
Page 28

CS systems are among the first to allow direct playback of
compatible files from portable USB devices. Two USB On-the-Go
inputs are available, one on the right side of the product and one
on the rear panel.
Connect your USB thumb drive or portable hard disk to either of
the side or rear-panel USB Inputs
3G
. If you have more than two
devices that you would like to connect at the same time, you can
use a standard USB-hub with an external power supply, to which
you can connect up to 16 portable USB devices.
1. Press the USB 1 or USB 2
0
buttons on the remote control to
turn the DVD receiver on. Also make sure that your video monitor
connected to the CS3/CS5 is switched on.
2. The TV monitor will show the below screen, allowing you to
select which of the file types available on the device you would
like to display and play. Showing different file types at the same
time (such as MP3 and JPEG) is possible.
3. Move the cursor to the buttons on the lower left side of the
screen, and press Enter
6
to select or deselect the requested
file types.
In case several USB devices are connected, all will be shown in
the same USB menu. To differentiate the drives, they will be shown
as 1 and 2. USB drives can have more than one partition. If that is
the case, the different partitions will be shown as 1a, 1b, 1c etc.
The USB menu contains the following settings or indications.
Follow the explanations in the Upper Menu Line on the bottom of
your screen to change the settings.
Disc: Shows the type of the disc.
Audio: Shows the audio track that is currently playing. Options are
shown on both menu lines on the bottom of the screen.
Playlist: Sets the order in which the current disc is played back.
Repeat: Sets the repeat mode. (Repeat 1, Repeat Folder).
Random: Activates Random Playback when possible.
Picture: Selects the interval between the current picture on the
screen and the next one.
In the USB menu, the chapter, track or picture currently playing will
be marked with an arrow symbol in front of the Track (MP3, WMA)
or Picture (JPEG). Tracks and pictures can be selected from this list
at any time by moving the cursor to the desired track or file and
pressing Enter
6
to confirm.
The top part of this screen can be deactivated to show the complete Track list on the screen. To deactivate, move the cursor to the
upper INFO (or i INFO) submenu on the left side of the screen.
Press Enter
6
until the icon is highlighted in light blue and the full
Track list is visible on the screen. In the same way the Disc list can
be removed from the screen by deactivating the Program submenu.
When the CS3/CS5 is in Play mode, pressing the Play G button on
the remote control will highlight the track being played.
If you have a USB device that contains both music files (MP3,
WMA) and JPEG images, you can choose to run these simultaneously, mixing the MP3 or WMA audio with your own images. The
time interval can be chosen in the Picture Setting.
With such devices, you can also either listen to the MP3 or WMA
audio or watch the JPEG video files only. In order to do so, click in
Stop mode on the Music, Picture or Movie icons on the left part of
the screen to select or deselect the desired format.
NOTE: The CS3/CS5 will not play back any of the formats
SVCD/VCD, MPEG1 (Video), MPEG2 (Video) and audio CD tracks
(CDDA) stored on an external USB hard drive.
• You will need a FAT32 preformatted external hard disk drive with
USB connector. If your disk is formatted with another file system
(such as NTFS), you will need to reformat it. Please contact your
hard disk supplier for more information.
• We recommend creating folders and sort the files by file type
(movies, pictures or music). This will allow you to quickly find the
file you’re looking for.
28
USB MENU
Page 29

29
English
The CS3/CS5 remote is able to “learn” codes from other remote
controls that might be part of your system setup, like the one from
your TV. To learn or transfer codes from an IR remote control to the
AVR’s remote, follow these steps:
1. Place the front of the original remote with the code being sent so
that it is facing the IR Transmitter Window
on the CS remote
“head-to-head.” The remote controls should be between 2cm and
4cm apart.
2. Select the button on the remote that you wish to use as the
device selector for the codes about to be entered. This must be
any of the Input Selectors
0
.
3. Press the Input Selector
0
button chosen and the Learn
button at the same time. Hold these buttons until the Program
Indicator
flashes amber and the light under the device
selector button turns red. Release the buttons. It is important that
you begin the next step within 20 seconds.
4. Press the button on the CS remote that you wish to program.
Note that the Program Indicator
will stop flashing.
IMPORTANT NOTE: Codes cannot be taught to all buttons on the
remote. In these cases the Program Indicator
keeps flashing
after the button was released.
5. As long as the Program Indicator
is on steadily (for five seconds), press and hold the button on the original remote that you
wish to “teach” into the CS remote. If you pressed the button too
late or no command was received within five seconds, the
Program Indicator
will flash red three times and then amber,
then simply repeat Step 4. When the Program Indicator
turns
green, release the button on the original remote. Note that the
Program Indicator
will then begin to flash amber again.
NOTE: If the Program Indicator
turns red steadily during Step 5,
the programming was not successful. Repeat the steps to see
whether the code will “take.” If the indicator keeps flashing red in
Step 5, this code cannot be taught.
6. Repeat Steps 4 though 5 for each button on the source remote
that you wish to transfer to the CS remote.
7. Once all codes have been transferred from the original source
remote to the CS remote, press the Learn
button. This will
turn off all LEDs and turn off the learning mode.
8. Repeat Steps 1 through 7 for any additional remotes you wish to
“teach” into the CS remote.
Erasing Learned Codes
The CS remote allows you to remove or erase the code learned into
a single button for a single device, to remove or erase all the codes
that have been learned for a single device, or to erase all commands
that have been learned to all devices.
To erase a single learned code from within a single device’s settings, follow these steps:
1. Press and hold both the Input Selector
0
within which the
individual button to be erased has been programmed and the
Learn
button.
2. When the red LED under the Input Selector
0
turns red and the
Program Indicator
flashes amber, release the buttons.
3. Press and release the Input Selector
0
again for the device
within which the individual button to be erased has been
programmed.
4. Press the 7
button three times.
5. Press and release the individual button for which the code is to be
erased. The Program Indicator
will blink green two times and
then return to amber.
6. To erase other buttons within the same device, press them as
noted in Step 5.
7. When all buttons to be erased have been pressed, press the Learn
button to complete the process.
To erase all codes within a single device, follow these steps:
1. Press and hold both the Input Selector
0
for which you wish to
erase the codes and the Learn
button.
2. When the red LED under the Input Selector
0
turns red and the
Program Indicator
flashes amber, release the buttons.
3. Press and release the same Input Selector
0
again for the
device whose codes you wish to erase.
4. Press the 8 button
three times.
5. The Program/SPL Indicator
will turn off, the red light under
the Input Selector will flash on and off once and the
Program/SPL Indicator
will flash green three times to
indicate that the codes have been erased.
To erase all codes that have been programmed to all devices in
the remote, follow these steps:
1. Press any Input Selector
0
and also the Learn button .
2. When the red LED under the Input Selector turns red and the
Program/SPL Indicator
flashes amber, release the buttons.
3. Press and release the same Input Selector
0
again.
4. Press the 9 button
three times.
5. The Program/SPL Indicator
will turn off, the red light under
the Input Selector will flash on and off once and the
Program/SPL Indicator
will flash green three times after
some seconds to indicate that the codes have been erased.
Macro Programming
Macros enable you to easily repeat frequently used combinations of
commands with the press of a single button on the CS’s remote
control. Once programmed, a macro will send out up to 19 different
remote codes in a predetermined sequential order, enabling you to
automate the process of turning on your system, changing devices,
or doing other common tasks. The CS remote can store up to four
separate macro command sequences, that are accessed by
pressing the Macro
K
buttons
1. To start programming a macro, press the Mute
A
button and the
Macro
K
button to be programmed at the same time. Note that
the latest selected Input Selector
0
will light red, and the
Program Indicator
will flash amber.
2. Enter the steps for the macro sequence by pressing the button
for the actual command step. Although the macro may contain
up to 19 steps, each button press, including those used to
change devices, counts as a step. The Program Indicator
will flash green twice to confirm each button press as you enter
commands.
NOTE: While entering commands for Power On of any device during
a macro sequence, press the Mute
A
button. DO NOT press the
Power ON
0
button.
LEARNING CODES FROM A REMOTE CONTROL
Page 30

• Remember to press the appropriate Input Selector 0button
before functions are changed to another device.
3. When all the steps have been entered, press the
MNKL
9
button to enter the commands. The red light under the
Input Selector
0
will blink and then turn off and the Program
Indicator
will flash green twice, to confirm the macro to be
programmed.
Example: To program the Macro 1
K
button so that it turns on the
CS3/CS5 and your TV, follow these steps:
• Press the Macro 1
K
and MuteAbuttons at the same time and
then release them.
• Note that the Program Indicator
will flash amber.
• Press the TV Selector
0
.
• Press the Mute
A
button to store the CS’s power on command.
• Press the Screen Power On
button to store the TV Power On
Command.
• Press the
MNKL
Channel Up 9button to complete the
process and store the macro sequence.
After following these steps, each time you press the Macro 1
K
button, the remote will send all Power On commands.
Erasing Macro Commands
To remove the commands that have been programmed into one of
the Macro buttons, follow these steps:
1. Press the Mute Button
A
and the Macro ButtonKthat
contains the commands you wish to erase.
2. Note that the Program Indicator
will flash amber, and the red
LED under the Input Selector
0
last used will turn on.
3. Within ten seconds, press the Mute Button
A
.
4. The red LED under the Selector will go out, and the Program
Indicator
will turn green and flash three times before it
goes out.
5. When the Program Indicator
goes out, the Macro has been
erased.
30
LEARNING CODES FROM A REMOTE CONTROL
Page 31

31
English
DVD LANGUAGE CODES
The availability of specific languages for the main audio track or subtitles is dependent on the choices made by a disc’s producer. You
should always consult the disc’s jacket for information on languages for any disc. In the case of some languages, you may be required to
enter a code from the list below to access that language.
Language Code
Abkhazian 6566
Afar 6565
Afrikaans 6570
Albanian 8381
Ameharic 6577
Arabic 6582
Armenian 7289
Assamese 6583
Aymara 6588
Azerbaijani 6590
Bashkir 6665
Basque 6985
Bengali; Bangla 6678
Bhutani 6890
Bihari 6672
Bislama 6673
Breton 6682
Bulgarian 6671
Burmese 7789
Byelorussian 6669
Cambodian 7577
Catalan 6765
Chinese 9072
Corsican 6779
Croatian 7282
Czech 6783
Danish 6865
Dutch 7876
English 6978
Esperanto 6979
Estonian 6984
Faroese 7079
Fiji 7074
Finnish 7073
French 7082
Frisian 7089
Galician 7176
Georgian 7565
German 6869
Greek 6976
Greenlandic 7576
Guarani 7178
Gujarati 7185
Language Code
Hausa 7265
Hebrew 7387
Hindi 7273
Hungarian 7285
Icelandic 7383
Indonesian 7378
Interlingua 7365
Interlingue 7369
Iunpiak 7375
Irish 7165
Italian 7384
Japanese 7465
Javanese 7487
Kannada 7578
Kashmiri 7583
Kazakh 7575
Kinyarwanda 8287
Kirghiz 7589
Kirundi 8278
Korean 7579
Kurdish 7585
Laothian 7679
Latin 7665
Latvian, Lettish 7686
Lingala 7678
Lithuanian 7684
Macedonian 7775
Malagsy 7771
Malay 7783
Malayalam 7776
Maltese 7784
Maori 7773
Marathi 7782
Moldavian 7779
Mongolian 7778
Naru 7865
Nepali 7869
Norwegian 7879
Occitan 7967
Oriya 7982
Oromo (Afan) 7977
Panjabi 8065
Pashto, Pushto 8083
Persian 7065
Polish 8076
Portuguese 8084
Quechua 8185
Rhaero-Romance 8277
Romanian 8279
Russian 8285
Language Code
Samoan 8377
Sangho 8371
Sanskrit 8365
Scots Gaelic 7168
Serbian 8382
Servo-Groatian 8372
Sesotho 8384
Setswana 8478
Shona 8378
Sindhi 8368
Singhalese 8373
Siswati 8383
Slovak 8375
Slovenian 8376
Somali 8379
Spanish 6983
Sundanese 8385
Swahili 8387
Swedish 8386
Tagalog 8476
Tajik 8471
Tamil 8465
Tatar 8484
Telugu 8469
Thai 8472
Tibetan 6679
Tigrinya 8473
Tonga 8479
Tsonga 8483
Turkish 8482
Turkmen 8475
Twi 8487
Ukrainian 8575
Urdu 8582
Uzbek 8590
Vietnamese 8673
Volapuk 8679
Welsh 6789
Wolof 8779
Xhosa 8872
Yiddish 7473
Yoruba 8979
Zulu 9085
Page 32

If you experience any of the following difficulties while using the
system, use this troubleshooting guide to help you remedy the
problem. Should any problem persist, consult your authorized
JBL dealer.
No power.
• Is the power cord firmly plugged into the power outlet?
• One of the safety mechanisms may be operating. In this event,
unplug the player from the power outlet briefly and then plug
it in again.
No picture.
• Check that the system is connected correctly and securely.
• The video cable may be damaged. Replace it with a new one.
• Make sure the system is connected to a video input on the TV
(see page 14).
• Make sure the TV is turned on.
• Make sure the correct video input on the TV is selected for
viewing with this system.
Interference appears in the picture.
• Clean the disc.
• If video from this system has to go through your VCR to get to your
TV, the copy-protection applied to some DVD programs could
affect picture quality. If you still experience problems after
checking your connections, please try connecting your DVD
system directly to your TV’s S-video input, if your TV is equipped
with this input (see page 14).
The aspect ratio of the screen is wrong (picture vertically
expanded) when you play a wide picture, even though you set “TV
Display” in the Setup menu to “16:9”.
• If you connect the system with the SCART cable, connect directly
to the TV. Otherwise, the autoswitch function of the aspect ratio
for the TV may not work.
• If the TV is not connected with a SCART cable to the CS, or if the
autoswitch function does not work, you should turn the TV to
“16:9” (if possible with your TV).
• Depending on the TV, you may not be able to change the aspect
ratio. In that case (TV not adjustable to 16:9), do not select “16:9”
in the TV display. Then, no change of the aspect ratio is needed.
There is no sound or volume is very low.
• Check that the speakers and components are connected correctly
and securely.
• Make sure that you have selected the correct source on the
system.
• Press Mute A on the remote control, if the words
MUTE ON
are blinking in the front-panel display.
• The protective circuitry has been activated because of a short
circuit. Turn the system off, eliminate the short circuit problem
and turn the power on again.
• The audio interconnect is damaged. Replace it with a new one.
• The system is in Pause mode or in slow-motion Play mode, or fast
forward or fast reverse. Press
N
to return to normal Play mode.
• Check the audio settings (see page 19).
The left and right channels are unbalanced or reversed.
• Check that the speakers and components are connected correctly
and securely.
Severe hum or noise is heard.
• Check that the speakers and components are connected securely.
• Check that the connecting cords are away from a transformer or
motor and at least 3 meters away from fluorescent light.
• Move your TV away from the audio components.
• The plugs and jacks are dirty. Wipe them with a cloth slightly
moistened with alcohol.
• Clean the disc.
The surround effect is difficult to hear when you are playing a
Dolby Digital soundtrack.
• Check to see whether the Dolby Digital mode is turned on
properly; otherwise, unload and load the disc again.
• Check the speaker connections.
• Depending on the DVD disc, the output signal may at times be
mono or stereo, even if the soundtrack is recorded in Dolby Digital
format.
The sound comes from the center speaker only.
• Depending on the disc, sound may sometimes come from the
center speaker only. This also applies to mono recordings (from
disc or any analog source), when Pro Logic mode is selected.
This is normal.
No sound is heard from the center speaker.
• Adjust center speaker volume (see page 20).
No sound or only very low volume from the rear speakers.
• Adjust the rear speaker volume (see page 20).
The volume goes down automatically and cannot be increased.
• The internal temperature is too high. Wait approximately one
minute for the amplifier to reach normal working temperature.
Radio stations cannot be tuned in.
• Check that the antenna is connected correctly. Adjust the
antenna and connect an external antenna, if necessary.
• The signal strength of the stations is too weak for automatic
tuning. Use manual tuning.
• No stations have been preset.
• The tuner mode is not selected; select the Radio mode.
The remote does not function.
• Remove any obstacles between the remote control and the
system.
• Move the remote control closer to the system.
• Point the remote control at the remote sensor on the front panel.
• Replace all the batteries in the remote control with new ones, if
they are weak.
• Check that the batteries are loaded correctly.
32
TROUBLESHOOTING
Page 33

33
English
The disc does not play.
• There is no disc inside (
NO DISC appears in the front-panel
display and on the TV screen). Insert a disc.
• Insert the disc correctly with the playback side facing down on
the disc tray.
• Clean the disc.
• The system cannot play CD-ROMs, etc. (see page 3).
• DVD with wrong Region Code (see page 13).
The system starts playing the DVD automatically.
• The DVD features the auto playback function.
Playback stops automatically.
• Some discs include an auto pause signal. When playing such a
disc, the system stops playback at the signal.
Track Skip or Direct Select with numeric buttons, Search, SlowMotion Play, Repeat Play or Program Play, etc., cannot be done.
• Depending on the DVD or VCD, some of the above operations may
not be available (Playback control).
Messages do not appear on the TV screen in the language you
want.
• Select the language for Display and Preferred Subtitle in the
Setup menu (see page 18). For all messages from the DVD (DVD
menu, subtitles) in the proper language, the disc must have the
language you selected; if not, another language will be selected.
The audio language cannot be changed when you play a DVD.
• Multilingual sound is not recorded on the DVD.
• Changing the language for the sound with the Audio button on the
remote or the Audio line in the Player menu is prohibited on the
DVD. In that case, the audio language must be selected in the
main menu on the DVD.
The subtitle language cannot be changed when you play a DVD.
• Multilingual subtitles are not recorded on the DVD.
• Changing the language for the subtitles with the Subtitle button on
the remote or the Subtitle line in the Player menu is prohibited on
the DVD. In that case the subtitle language must be selected by
the main menu on the DVD.
The subtitles cannot be turned off when you play a DVD.
• Depending on the DVD, you may not be able to turn the subtitles
off.
The angles cannot be changed when you play a DVD.
• Multi-angles are not recorded on most DVDs.
• Change the angles when the angle mark appears on the TV
screen.
• Changing the angles is prohibited on some DVDs.
The system does not operate properly.
• Static electricity, etc., may affect the system’s operation.
Disconnect the AC power cord, then connect it again.
Please refer also to the Troubleshooting guide in your loudspeaker
system’s owner’s manual.
TROUBLESHOOTING
Page 34

Bit Rate
Value indicating the amount of video data compressed in a DVD per
second. The unit is Mbps (megabits per second). 1 Mbps indicates
that the data per second is 1,000,000 bits. The higher the bit rate,
the larger the amount of data. However, this does not always mean
higher quality pictures.
Chapter
Sections of a picture or a music piece on a DVD that are smaller
than titles. Many titles are composed of several chapters, but many
others are not. Each chapter is assigned a chapter number
enabling you to locate the chapter you want.
Dolby Digital (“5.1,” “AC-3
®
”)
This sound format for movie theaters is more advanced than Dolby
Pro Logic Surround. In this format, the rear speakers output stereo
sound with an expanded frequency range and a subwoofer channel
for deep bass is independently provided. This format is also called
“5.1” because the subwoofer channel is counted as the 0.1 channel
(since it functions only when a deep bass effect is needed). All six
channels in this format are recorded separately for superior channel separation. Furthermore, since all the signals are processed
digitally, less signal degradation occurs. The name “AC-3” comes
from the fact that it is the third audio coding method to be developed by the Dolby Laboratories Licensing Corporation.
Manufactured under license from Dolby Laboratories. “Dolby,”
“AC-3,” “Pro Logic” and the Double-D symbol are trademarks of
Dolby Laboratories. Confidential Unpublished Works. © 1992.1997
Dolby Laboratories, Inc. All rights reserved.
Dolby Pro Logic II Surround
This is a method of decoding stereo or surround recordings that
produces five channels from 2-channel sound. Compared with the
former Dolby Surround system, Dolby Pro Logic II Surround
reproduces left-to-right panning more naturally and localizes
sounds more precisely. To take full advantage of Dolby Pro Logic II
Surround, you should have a pair of rear speakers and a center
speaker. The rear speakers output stereo sound.
DTS
Digital audio compression technology developed by DTS, Inc.
This technology conforms to 5.1-channel surround. The rear channels
are stereo and there is a discrete subwoofer channel in this format.
DTS provides 5.1 discrete channels of high-quality digital audio.
Good channel separation is realized, because all channels are
recorded discretely and processed digitally.
Manufactured under license from DTS, Inc. U.S. Patent
No. 5,451,942 and other worldwide patents issued and pending.
“DTS” and “DTS Digital Surround” are trademarks of DTS, Inc.
© 1996 DTS, Inc. All rights reserved.
MPEG Audio
International standard coding system to compress audio digital
signals authorized by ISO/IEC. MPEG 1 conforms to up to 2-channel
stereo, used on some DVDs as alternate (other language) track.
DVD
A disc that contains up to eight hours of moving pictures even
though its diameter is the same as a CD. The data capacity of a
single-layer and single-sided DVD, at 4.7GB (gigabyte), is 7 times
that of a CD. Furthermore, the data capacity of a dual-layer and
single-sided DVD is 8.5GB, a single-layer and double-sided DVD
9.4GB, and a dual-layer and double-sided DVD 17GB. The picture
data uses the MPEG 2 format, one of the worldwide standards of
digital compression technology. The picture data is compressed to
about 1/40 of its original size.
The DVD also uses the variable rate coding technology that
changes the data to be allocated according to the status of the picture. The audio data is recorded in Dolby Digital, DTS and/or PCM,
allowing you to enjoy more natural audio presence. Furthermore,
various advanced functions such as multi-angle, multilingual, and
subtitles may be provided with the DVD.
Multi-Angle Function
Various angles or viewpoints of the video camera for a scene are
recorded on some DVDs.
Multilingual Function
Several languages for the sound or subtitles in a picture are
recorded on some DVDs.
Parental Control
A function of some (particulary U.S.) DVDs to limit playback of the
disc by the age of the users. The limitation varies from disc to disc.
When it is activated, playback is completely prohibited, violent
scenes are skipped or replaced with other scenes and so on.
Title
The longest sections of a picture or a music piece on a DVD; a
movie, etc., for a picture piece on video software; or an album, etc.,
for a music piece on an audio software. Each title is assigned a title
number enabling you to locate the title you want.
Track
Sections of a music piece on a CD. Each track is assigned a track
number enabling you to locate the track you want.
PCM
Pulse code modulation, an uncompressed data formation.
NTSC
National TV Systems Committee: a video standard used in USA.
PAL
Phase Alternation Line: a video standard used in many European
countries.
34
GLOSSARY
Page 35

35
English
CS3 CS5
DVD Player
Pickup: Semiconductor laser, wavelength 650nm Semiconductor laser, wavelength 650nm
Signal system: NTSC/PAL NTSC/PAL
Video signal horizontal resolution: More than 480 lines (DVD) More than 480 lines (DVD)
Video signal-to-noise ratio: More than 60dB (DVD) More than 60dB (DVD)
Audio frequency response: DVD (PCM): 20Hz ~ 22kHz (±1.0dB) DVD (PCM): 20Hz ~ 22kHz (±1.0dB)
(Stereo) CD (PCM): 20Hz ~ 20kHz (±1.0dB) CD (PCM): 20Hz ~ 20kHz (±1.0dB)
Audio signal-to-noise ratio: More than 80dB (PCM) More than 80dB (PCM)
Total harmonic distortion: Less than 0.01% (PCM) Less than 0.01% (PCM)
Dynamic range: DVD (PCM): More than 85dB (EIAJ, 2kHz) DVD (PCM): More than 85dB (EIAJ, 2kHz)
CD: More than 85dB (EIAJ) CD: More than 85dB (EIAJ)
FM Tuner
System: PLL quartz-locked digital synthesizer system PLL quartz-locked digital synthesizer system
Tuning range: 87.50 ~ 108.00MHz 87.50 ~ 108.00MHz
Antenna terminals: 75 Ohms, unbalanced 75 Ohms, unbalanced
Intermediate frequency: 10.7MHz 10.7MHz
Video Outputs HDMI:
Component video output: Y: 1V p-p/75 ohms, sync negative polarity Y: 1V p-p/75 ohms, sync negative polarity
Cr: 0.7V p-p/75 ohms Cr: 0.7V p-p/75 ohms
Cb: 0.7V p-p/75 ohms Cb: 0.7V p-p/75 ohms
CVBS video: 1V p-p/75 ohms 1V p-p/75 ohms
S-video: Y: 1V p-p/75 hms Y: 1Vp-p/75 ohms
C: PAL 0.3V p-p/75 ohms/ C: PAL 0.3V p-p/75 ohms/
NTSC 0.286V p-p/75 ohms NTSC 0.286V p-p/75 ohms
Audio Line Outputs
Audio L/R: 2V RMS, 1 kilohm 2V RMS, 1 kilohm
General
Power requirements: AC 230V, 50Hz AC 230V, 50Hz
Max power consumption: 380W 500W
Idle power consumption: Less than 2W Less than 2W
Dimensions (WxHxD): 440mm x 68mm x 380mm 440mm x 68mm x 380mm
Weight: 7.5 kg 8.5 kg
SPECIFICATIONS
Depth measurement includes knobs, buttons and terminal connections. Height measurement includes feet and chassis.
All features and specifications are subject to change without notice.
JBL is a trademark of Harman International Industries, Incorporated, registered in the United States and/or other countries. Pro Sound Comes Home is a
trademark of Harman International Industries, Incorporated.
Dolby, Pro Logic, AC-3 and the double-D symbol are trademarks of Dolby Laboratories, registered in the United States and/or other countries.
All rights reserved.
DTS is a trademark of DTS, Inc.
Windows Media is a registered trademark of Microsoft Corporation in the United States and other countries. Window Media Audio (WMA) is a proprietary
file format developed by Microsoft.
DivX is a registered trademark of DivX, Inc.
HDMI, the HDMI logo and High-Definition Multimedia Interface are trademarks or registered trademarks of HDMI Licensing LLC.
Page 36

PRO SOUND COMES HOME
™
Harman Consumer Group, Inc., 250 Crossways Park Drive, Woodbury, NY 11797 USA
8500 Balboa Boulevard, Northridge, CA 91329 USA
2, route de Tours, 72500 Château du Loir, France
www.jbl.com
© 2006 Harman International Industries, Incorporated. All rights reserved.
Part No.
01.00.YS.SM1.E829
Declaration of Conformity
We, Harman Consumer Group, Inc.
2, route de Tours
72500 Château du Loir,
France
declare in own responsibility that the products
described in this owner’s manual are in compliance
with technical standards:
EN 55013:2001 + A1:2003
EN 55020:2002 + A1:2003
EN 61000-3-2:2000
EN 61000-3-3:1995 + A1:2001
EN 60065:2002
Laurent Rault
Harman Consumer Group, Inc.
Château du Loir, France
10/06
®
 Loading...