

Page 1
JBL Control® CRV
Owner’s Manual
Page 2
TABLE OF CONTENTS
UNPACKING THE SPEAKERS .......................2
WALL SURFACE MOUNTING ........................3
WALL CORNER MOUNTING ..........................4
WALL CEILING MOUNTING ...........................6
HALF-ROUND WALL MOUNTING ..................7
3/4 ROUND EXTERNAL CORNER
WALL MOUNTING .....................................8
FOUR SPEAKER ARRAY USING
OPTIONAL POLE-MOUNT
BRACKET (PMB) .....................................10
SETTING TAP SELECTOR ...........................13
PAINTING & MAINTENANCE ......................14
SPECIFICATIONS .........................................15
DIMENSIONS ................................................16
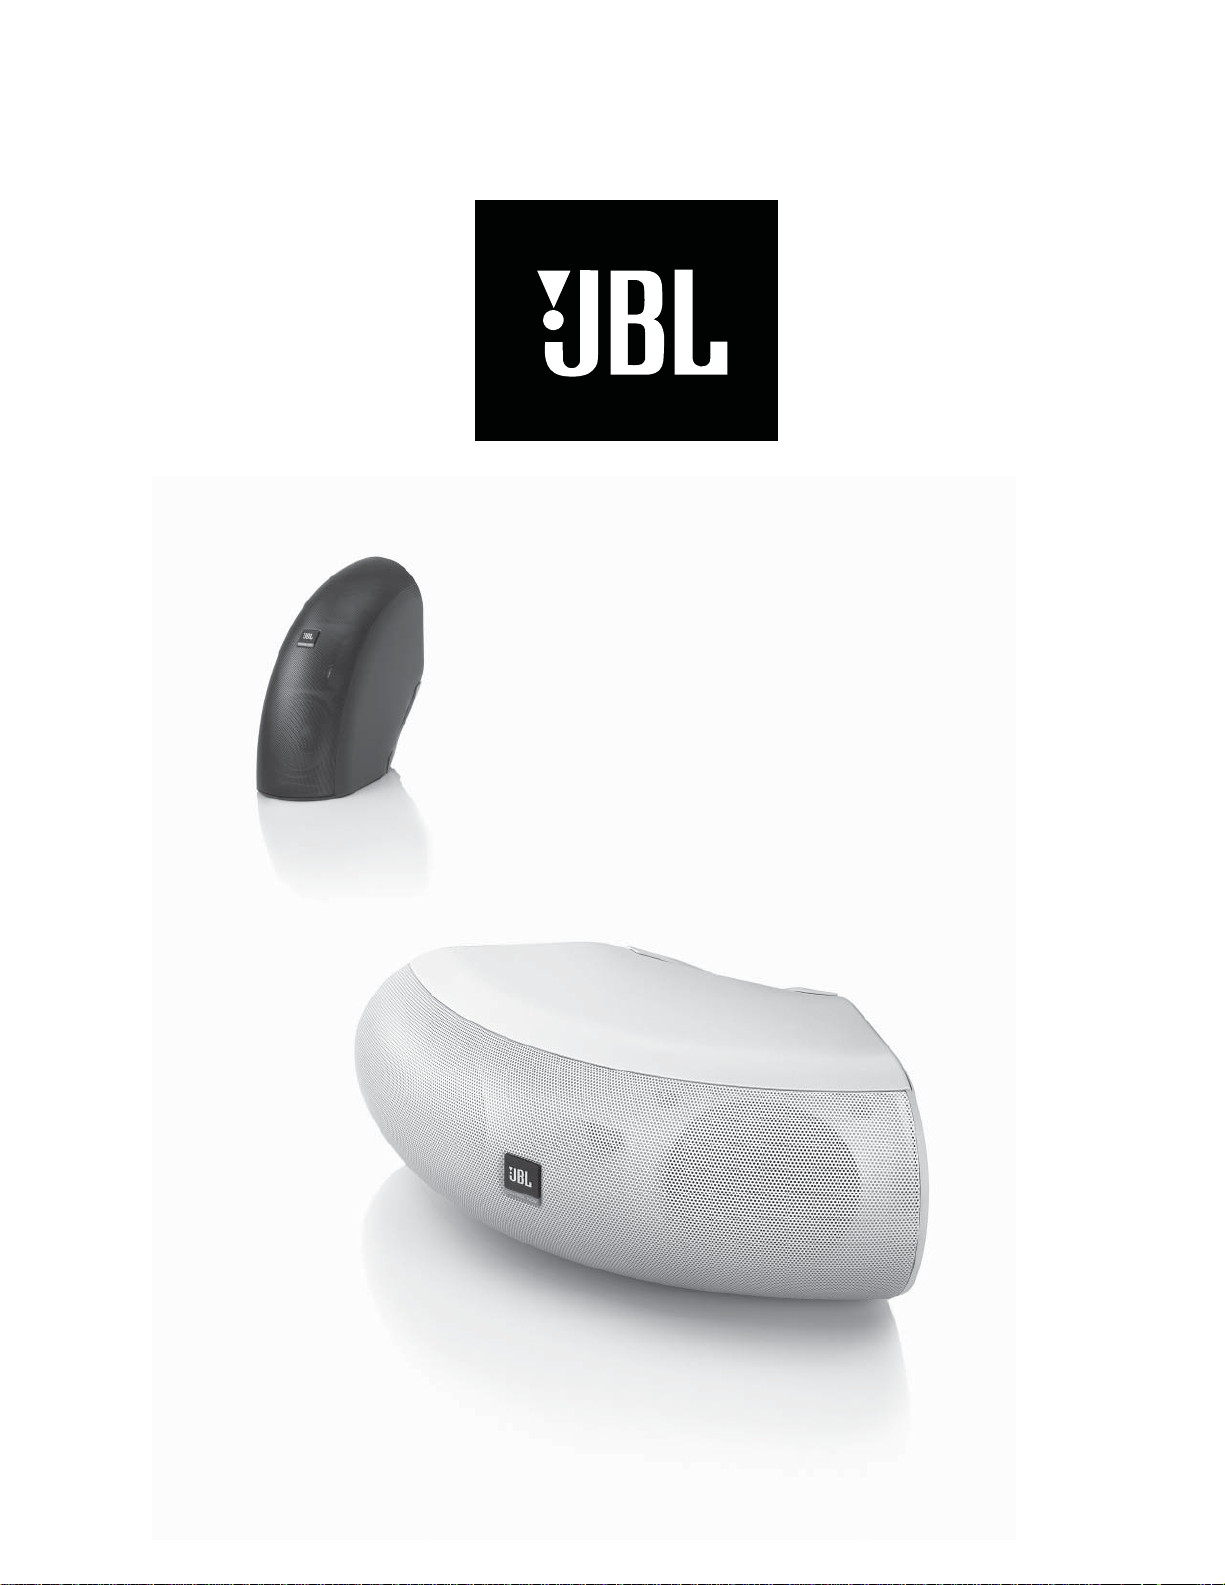
JBL CONTROL® CRV LOUDSPEAKERS
JBL Control CRV speakers are perhaps the most fl exible and
versatile loudspeakers ever developed. There are numerous
mounting options. The JBL Control CRV speaker can be wallmounted or corner-mounted, or two, three or four speakers
can be joined together to create loudspeaker solutions
for a wide variety of coverage, appearance and mounting
requirements.
This owner’s guide will cover the installation and wiring
procedures for each mounting option. Simply decide how
you will mount and use the speakers, and then follow the
instructions for your specifi c application.
Please note that while the JBL Control CRV speaker is
a general purpose indoor/outdoor loudspeaker, it is not
waterproof. The speaker should not be submerged or
directly exposed to excessive amounts of water, ice, snow or
sustained moisture.
UNPACKING THE SPEAKERS
If you suspect damage from transit, report it immediately to
your carrier. Keep the shipping carton and packing materials
for future use.
JBL Control CRV Speaker
(2) #10-32 x 1/2"
Screws
(2) #10-32 x 2"
Screws
Corner/Wall-Mount
Bracket Cap
Corner/Wall-Mount
Bracket
(2) Bracket Covers
2
Page 3
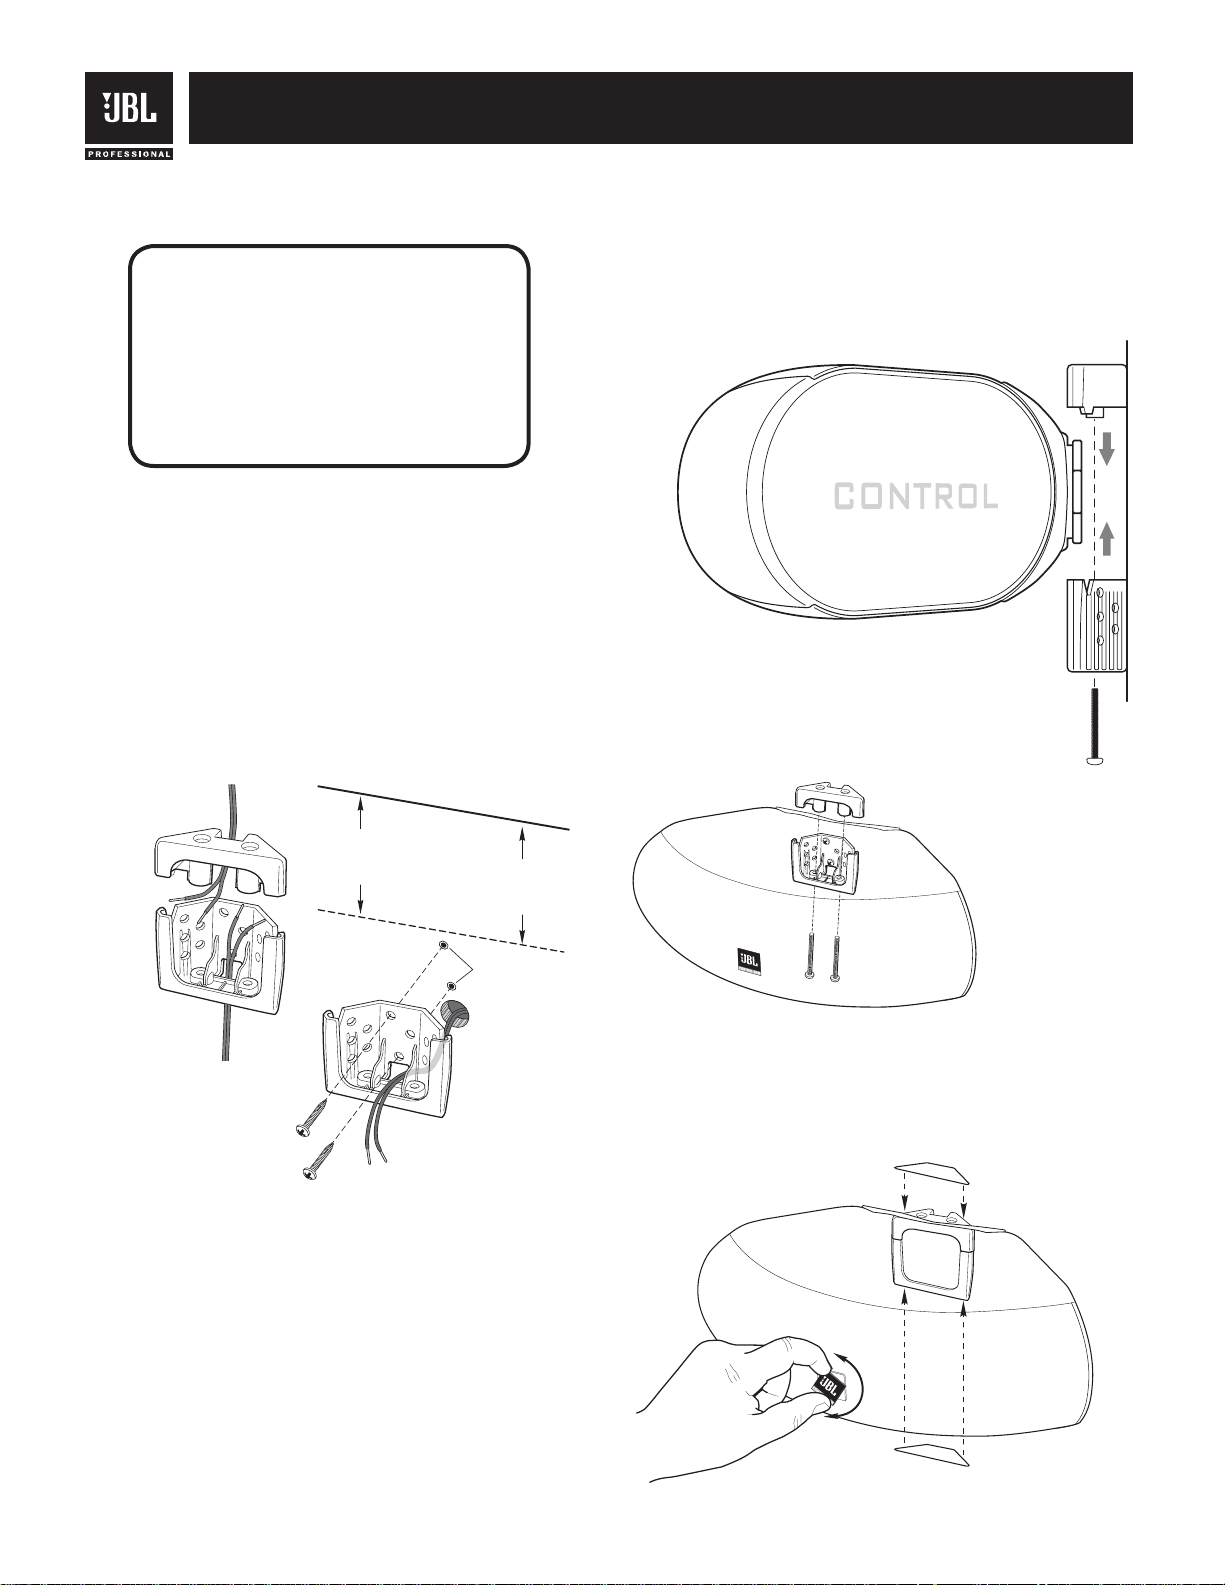
INSTALLATION
WALL SURFACE MOUNTING
CAUTION: Installation must be
done by qualifi ed persons using
safe rigging standards
The installer is responsible for proper selection
and use of mounting hardware, to properly and
safely wall-mount the speakers
When deciding upon a location for the JBL Control CRV
speaker, take care NOT to install the mounting bracket closer
than 3” (7.6 cm) (horizontal) and 8-1/2” (21.5 cm) (vertical) to
the ceiling. Any closer than the minimum measurements will
not allow the clearance needed to position and slide the JBL
Control CRV speaker into the mounting bracket.
1. Run the wiring to the location desired for mounting the JBL
Control CRV speaker.
2. Using a level, secure the mounting bracket to the wall. Be
sure to use an appropriate anchor.
.
.
bracket. Rest the JBL Control CRV speaker’s rear fl ange in the
mounting bracket, as shown. This will support the weight of the
speaker. Slide the mounting-bracket cap over the assembly.
Secure the mounting-bracket cap by inserting two #10-32 x 2”
screws (provided) in the bottom of the mounting bracket and
tightening.
Mounting-Bracket Cap
Mounting Bracket
(side view)
#10-32 x 2"Screws (2)
(side view)
Mounting-Bracket Cap
Corner/Wall-MountBracket Assembly
NOTE: There are two
cable access holes
provided in the Wall-
Mount Assembly.
3"
Minimum distance
from ceiling
to top of bracket
(horizontal mount)
8-1/2"
Minimum distance
from ceiling
to top of bracket
(vertical mount)
Appropriate
anchors
3. Connect the stripped bare wires to the input terminals of the
JBL Control CRV speaker.
4. Set the tap selector switch to the desired 70V/100V tap, or to
the THRU position for 4 ohm low-impedance operation.
Mounting Bracket
#10-32 x 2"Screws (2)
Mounting Bracket
shown as looking through
the speaker.
6. To orient the JBL logo into the correct position, pull the JBL
logo slightly outward from the speaker grille and rotate. The
JBL logo is held in place by a spring. Peel the adhesive cover
off the mounting-bracket cover and attach to the top and bottom
of the mounting assembly.
Mounting-Bracket
Cover
5. The mounting bracket is designed to trap the fl ange of the
JBL Control CRV speaker by securing the mounting-bracket
cap with two screws through the bottom of the mounting
Mounting-Bracket
Cover
3
Page 4

INSTALLATION
7. VERTICAL BRACKET ORIENTATION —Regardless of
whether you choose a vertical or horizontal orientation for the
speaker,when mounting the JBL Control CRV speaker to a
single wall surface, you should always install the wall-mounting
bracket in a vertical orientation, as shown.
An alternate
vertical orientation
is shown here
Vertical
orientation
WALL CORNER MOUNTING
(Horizontal Speaker Orientation)
CAUTION: Installation must be
done by qualifi ed persons using
safe rigging standards
The installer is responsible for proper selection
and use of mounting hardware, to properly and
safely wall-mount the speakers
When deciding upon a location for the JBL Control CRV
speaker, take care NOT to install the mounting bracket closer
than 3” (7.6 cm) (horizontal) and 8-1/2” (21.5 cm) (vertical) to
the ceiling. Any closer than the minimum measurements will
not allow the clearance needed to position and slide the JBL
Control CRV speaker into the mounting bracket.
1. Run the wiring to the location desired for mounting the JBL
Control CRV speaker.
.
.
Bracket Cover
Bracket Cover
Vertical
orientation
2. Attach the mounting bracket to the wall. Be sure to use
appropriate anchors.
Minimum
3"
distance
from ceiling
(horizontal mount)
8-1/2" Minimum
distance from ceiling
(vertical mount)
Appropriate
anchors
4
Page 5

INSTALLATION
3. Connect the stripped bare wires to the input terminals of the
JBL Control CRV speaker.
4. Set the tap selector switch to the desired 70V/100V tap, or to
the THRU position for 4 ohm low-impedance operation.
5. The mounting bracket is designed to trap the fl ange of the
JBL Control CRV speaker by securing the mounting-bracket
cap with two screws through the bottom of the mounting
bracket. Rest the JBL Control CRV speaker’s rear fl ange in the
mounting bracket, as shown. This will support the weight of the
speaker. Slide the mounting-bracket cap over the assembly.
Secure the mounting-bracket cap by inserting two #10-32 x 2”
screws (provided) in the bottom of the mounting bracket and
tightening.
Mounting-Bracket Cap
6. To orient the JBL logo into the correct position, pull the JBL
logo slightly outward from the speaker grille and rotate. The JBL
logo is held in place by a spring. Peel the adhesive cover off the
mounting-bracket cover and attach to the top and bottom of the
mounting assembly.
Mounting-Bracket
Cover
Mounting-Bracket
Cover
7. VERTICAL BRACKET ORIENTATION —Regardless of
whether you choose a vertical or horizontal orientation for the
speaker,when mounting the JBL Control CRV speaker to a
single wall surface, you should always install the wall-mounting
bracket in a vertical orientation.
Mounting-Bracket Cap
Mounting Bracket
Mounting Bracket
(side view)
#10-32 x 2"Screws (2)
(side view)
#10-32 x 2"Screws (2)
Mounting Bracket
shown as looking through
the speaker.
5
Page 6

INSTALLATION
WALL CEILING MOUNTING
(Vertical Speaker Orientation)
CAUTION: Installation must be
done by qualifi ed persons using
safe rigging standards
The installer is responsible for proper selection
and use of mounting hardware, to properly and
safely wall-mount the speakers
When deciding upon a location for the JBL Control CRV
speaker, take care NOT to install the mounting bracket closer
than 3” (7.6 cm) to a side wall. Any closer than 3” (7.6 cm) will
not allow the clearance needed to position and slide the JBL
Control CRV speaker into the mounting bracket.
.
.
3. Connect the stripped bare wires to the input terminals of the
JBL Control CRV speaker.
4. Set the tap selector switch to the desired 70V/100V tap, or to
the THRU position for 4 ohm low-impedance operation.
5. The mounting bracket is designed to trap the fl ange of the
JBL Control CRV speaker by securing the mounting-bracket
cap with two screws through the bottom of the mounting
bracket. Rest the JBL Control CRV speaker’s rear fl ange in the
mounting bracket, as shown. This will support the weight of the
speaker. Slide the mounting-bracket cap over the assembly.
Secure the mounting-bracket cap by inserting two #10-32 x 2”
screws (provided) in the bottom of the mounting bracket and
tightening.
#10-32 x 2"
Screws (2)
Top Cap
3" Minimum
distance from wall
1. Run the wiring to the location desired for mounting the JBL
Control CRV speaker.
2. Attach the mounting bracket to the wall. Be sure to use
appropriate anchors.
Appropriate
anchors
Mounting
Bracket
#10-32 x 2"
Screws (2)
This illustration shows
speaker viewed from
beneath.
Mounting
Bracket
Mounting Bracket
shown as looking through
the speaker.
To p C ap
6
Page 7

INSTALLATION
6. To orient the JBL logo into the correct position, pull the JBL
logo slightly outward from the speaker grille and rotate. The
JBL logo is held in place by a spring. Peel the adhesive cover
off the mounting-bracket cover and attach to the top and bottom
of the mounting assembly.
Bracket
Cover
HALF-ROUND WALL
MOUNTING
(Horizontal or Vertical Orientation)
CAUTION: Installation must be
done by qualifi ed persons using
safe rigging standards
The installer is responsible for proper selection
and use of mounting hardware, to properly and
safely wall-mount the speakers
1. Secure two corner/wall-mounting brackets together by using
two #10-32 x 1/2” screws provided, as shown. Attach the
mounting bracket to the wall.
.
.
#10-32 x 1/2" Screws (2)
When deciding upon a location for the JBL Control CRV
speaker, take care NOT to install the mounting bracket closer
than 3” (7.6 cm) (horizontal) and 8-1/2” (21.5 cm) (vertical) to
the ceiling. Any closer than the minimum measurements will
not allow the clearance needed to position and slide the JBL
Control CRV speaker into the mounting bracket.
3” Minimum
Minimum
3"
distance from ceiling
distance
from ceiling
(horiontal mount)
(horizontal mount)
distance from ceiling
Minimum
8-1/2"
8-1/2” Minimum
distance
from ceiling
(vertical mount)
(vertical mount)
7
Page 8

INSTALLATION
2. Attach the mounting bracket to the wall. Be sure to use
appropriate anchors.
Appropriate
anchors
3. Connect the stripped bare wires to the input terminals of the
JBL Control CRV speakers.
4. Set the tap selector switches to the desired 70V/100V tap.
THRU position is not advised due to parallel speakers providing
too low of an impedance for most low impedance power
amplifi ers.
3/4-ROUND EXTERNAL
CORNER WALL MOUNTING
(Horizontal or Vertical Orientation)
Speaker 1
Speaker 2
Speaker 3
5. The mounting brackets are designed to trap the fl ange of the
JBL Control CRV speaker by securing the mounting-bracket
cap with two screws through the bottom of the mounting
bracket. Run the wire through the rear cable-management
hole in the mounting bracket, and rest the JBL Control CRV
speaker’s rear fl ange in the mounting bracket, as shown. This
will support the weight of the speaker. Now slide the mounting
bracket caps over the assembly. Secure the mounting-bracket
cap by inserting two #10-32 x 2” (M5 51 mm) screws (provided)
through it and into the bottom piece of the mounting bracket
and tightening.
Mounting-Bracket
Covers
CAUTION: Installation must be
done by qualifi ed persons using
safe rigging standards
The installer is responsible for proper selection
and use of mounting hardware, to properly and
safely wall-mount the speakers
1. Secure three corner/wall-mounting brackets together by
using two #10-32 x 1/2” screws provided, as shown. Attach the
mounting bracket to the wall.
.
.
#10-32 x 1/2" Screws (2)
#10-32 x 1/2" Screws (2)
Mounting-Bracket
Covers
8
Page 9

INSTALLATION
When deciding upon a location for the JBL Control CRV
speaker, take care NOT to install the mounting bracket closer
than 3” (7.6 cm) to the ceiling. Any closer than 3” (7.6 cm) will
not allow the clearance needed to position and slide the JBL
Control CRV speaker into the mounting bracket.
ceiling
Minimum
3"
distance from ceiling
to top of bracket
(horizontal mounting)
2. Attach the mounting bracket to the wall. Be sure to use
appropriate anchors.
5. The mounting brackets are designed to trap the fl ange of the
JBL Control CRV speaker by securing the mounting-bracket
cap with two screws through the bottom of the mounting
bracket. Run the wire through the rear cable-management
hole in the mounting bracket, and rest the JBL Control CRV
speaker’s rear fl ange in the mounting bracket, as shown. This
will support the weight of the speaker. Now slide the mounting
bracket caps over the assembly. Secure the mounting-bracket
cap by inserting two #10-32 x 2” screws (provided) through it
into the bottom piece of the mounting bracket and tightening.
Mounting-Bracket Cap
Mounting Bracket
(side view)
Appropriate
anchors
3. Connect the stripped bare wires to the input terminals of the
JBL Control CRV speakers.
4. Set the tap selector switches to the desired 70V/100V tap.
THRU position is not advised due to parallel speakers providing
too low of an impedance for most low impedance power
amplifi ers.
#10-32 x 2"Screws (2)
(side view)
6. Rest the second JBL Control CRV speaker’s rear fl ange in
the mounting bracket, as shown. Secure the mounting bracket
cap with two #10-32 x 2” (M5 51 mm) screws through the
bottom of the mounting bracket.
#10-32 x 2"
Screws (2)
9
Page 10

INSTALLATION
7. Rest the third JBL Control NOW speaker’s rear fl ange in the
mounting bracket as shown and complete the process. Secure
the mounting-bracket cap with 2 screws through the bottom of
the mounting bracket.
8. To orient the JBL logo into the correct position, pull the JBL
logo slightly outward from the speaker grille and rotate. The
JBL logo is held in place by a spring. Peel the adhesive cover
off the mounting-bracket cover and attach to the top and bottom
of the mounting assembly.
FOUR-SPEAKER ARRAY
USING THE OPTIONAL
POLE-MOUNT BRACKET
(PMB)
IMPORTANT
The JBL Control PMB Pole-Mount Bracket facilitates
installation of the JBL Control CRV loudspeakers
with a variety of general-purpose ceiling-fan-pole
assemblies available from many manufacturers.
Since different fan-pole assemblies have different
weight capacities, pole diameters and mounting
systems, it is the customer’s responsibility to check
with the fan-pole-assembly manufacturer or dealer to
determine whether that specifi c pole-mount assembly
is capable of correctly and securely attaching to the
PMB and handling the weight and proportions of
these loudspeakers in a safe and stable manner. JBL
disclaims any liability for the selection of fan-pole
assemblies and/or correct compatibility between the
selected fan-pole assembly and the JBL PMB PoleMount Bracket.
10
Speaker 1
Speaker 2
Mounting-Bracket
Covers
Mounting-Bracket
Covers
Speaker 3
Page 11

INSTALLATION
p
p
P
ATTACHING POLE TO POLE-MOUNT BRACKET
CAUTION: Installation must be
done by qualifi ed persons using safe
rigging standards
The installer is responsible for proper
selection and use of mounting hardware, to
properly and safely pole-mount the speakers.
UNPACKING THE BRACKET AND CABLE KIT
Carefully unpack the bracket and cable assembly. If you
suspect damage from transit, report it immediately to your
dealer and/or delivery service. Keep the shipping carton and
packing materials for future use. Open the package and verify
the following contents:
Included:
.
Pole Bushing
(used for
smaller-diameter
droptubes)
For Larger-Diameter Drop Tubes
1. Run the appropriate wiring down through the drop tube. Slide
the drop tube through the pole-mount-bracket cap.
Drop Tube
Pole-Mount-BracketCa
Pole-Mount-BracketCap
Cotter Pin
2A. Slide the pole-mount bracket up onto the drop tube,
aligning the pinholes on the bracket with those on the drop
Clevis Pin
Pole-MountBracket
(4) #10-32 x 2" Screws
Pole-Mount-BracketCover
CableAssembly
tube.
Pole-MountBracket Ca
Drop Tube
Pinholes
ole-MountBracket
11
Page 12

For Smaller-Diameter Drop Tubes
g
p
C
p
P
INSTALLATION
2B. When using a smaller drop tube, use the pole bushing
when running the wiring down through pole-mount-bracket cap.
This will help to eliminate pole wobble.
Pole Bushin
4. The pole-mount bracket can now hold the weight of the
speakers.
Pole-Mount-Bracket Ca
Drop Tube
ole-Mount Bracket
Clevis Pin
3. Slide the clevis pin through the aligned holes in the polemount bracket and drop tube. Secure the clevis pin by inserting
the cotter pin through the hole in the clevis pin.
Pole-Mount-BracketCa
otter Pin
Drop Tube
SPEAKER MOUNTING
1. Set the tap selector switches to the desired 70V/100V tap.
THRU position is not advised due to parallel speakers providing
too low of an impedance for most low impedance power
amplifi ers.
Pole-Mount Bracket
Clevis Pin
2. Connect the stripped bare wires to the input terminals of the
JBL Control CRV speakers.
12
Page 13

INSTALLATION
3. After carefully placing all four speakers in the mounting
bracket, lightly jostle the speakers into place so that the polemount-bracket cap will slide down into place. Tighten the polemount-bracket assembly with the four #10-32 x 2” (M5 51 mm)
screws provided.
Drop Tube
Pole-Mount-Bracket Cap
Pole-MountBracket
4. Place the pole-mount-bracket cover over the bottom visible
mounting bracket by snapping it into place.
SETTING TAP SELECTOR
The Control CRV is designed to be driven from a 70V or 100V
distributed speaker line or as a 4 ohm speaker. It is important to
set the tap selector switch before installing the speaker.
The rotary selector switch is recessed into the terminal cup.
The legend for the tap selector switch is recessed into the top
port so as to be visually unobtrusive.
Once the speaker is installed in the wall or PMB bracket, the
tap selector switch is protected against unintended switching.
To reset the selection, the speaker must be removed from the
bracket.
#10-32 x 2"Screws (4)
100 V LINE
70 V LINE
Drop Tube
Pole-MountBracket Cap
7.5W
3.8W
THRU
DO NOT USE
Only two speakers shown here
for clarity.
15W
30W
3
4
2
THRU
5
1
1
5
2
7.5W
3
•
15W
30W
3
4
2
5
1
70V
1
100V
5
2
4
3
70 V LINE
100 V LINE
Rotary
Tap Selector
Switch
Tap Selector
Legend Label
13
Page 14

PAINTING & MAINTENANCE
The serial number is
PAINTING CONTROL CRV
The loudspeakers can be painted to match the decor. The
speaker accepts almost any type of latex or oil based paint.
For best results, the following procedure is recommended:
1. Remove the grille.
2. Mask the baffl e of the speakers -- it’s almost always advisable
to keep the baffl e black.
3. Clean the cabinet with a light solvent such as mineral spirits
by rubbing the item with a lightly dampened cloth. Do not use
abrasives such as sandpaper or steel wool, nor should you
use gasoline, kerosene, acetone, MEK, paint thinner, harsh
detergents or other chemicals. Use of these cleaners may result
in permanent damage to the enclosure.
4. After cleaning, apply two or more thin coats of either latex or
oil-based paints. Latex paint will adhere better if an oil-based
primer is used fi rst. Application can be made by rolling, brushing
or spraying.
5. Painting the Grille – Painting the grille requires masking of the
logo before spray painting. Multiple sprayed coats using thinned
paint is recommended to avoid clogging the grille holes. If the
grille is rolled or brush painted, the mesh may become clogged
with paint and poor sound quality may result.
CONTACTING
MAINTENANCE
No maintenance to the product is required when assembled in
accordance with the instructions and wiring guidelines described
in this manual. When installed in harsh environments, it is
advisable to inspect the structural integrity of the mounting and
wiring connections periodically to ensure proper safety and
performance.
SERIAL NUMBER
The serial number is located on the rear of the speaker housing.
To view it, remove the four screws on the rear assembly as
shown.
The product identifi cation
The product identic ation
label is located behind the
label is locat ed be hind
rear housing bracket.
the rear housing bracket.
The serial number is located on
the back top area of the speaker
located on the back top
housing between the two top rear
area of the speaker housing
bracket boltholes
betwee n the two t op rear
bracket-bolt holes.
JBL PROFESSIONAL
These products are designed and backed by JBL Professional,
the world leader in professional sound reinforcement. For
complete warranty information, to order replacement parts or to
ask for clarifi cations to this manual, contact JBL Professional.
Within the United States:
Applications Department, JBL Professional
8500 Balboa Blvd., PO Box 2200
Northridge, CA 91329 USA
In the USA you may call Monday through Friday 8:00am to
5:00pm Pacifi c Coast Time (800) 894-8850.
Outside the USA:
Contact the JBL Professional Distributor in your country.
A list of JBL Professional Distributors and US Service Centers can
be obtained from the JBL Professional website at: www.jblpro.com
14
Page 15

SPECIFICATIONS
SPECIFICATIONS
Frequency Range (–10dB)1: 80Hz – 20kHz
2
Power Handling
60 W Continous Pink Noise, 100 hrs
150 W Continuous Program Power
300 W Continous Peak Power
Nominal Sensitivity: 89 dB
Maximum SPL @ 1m
Nominal Coverage Angle: 105° horizontal x 80° vertical (2kHz - 16 kHz, speaker in vertical orientation)
DI: 8.6dB (2kHz - 16kHz)
Q 7.4 (2kHz - 16kHz),
Nominal Impedance 4 Ohms
Minimum Impedance: 4.0 Ohms @ 320 Hz
Crossover Frequency and Type: 2 kHz – 36dB/octave tweeter; 18dB/octave woofers
Transformer Taps: 30W, 15W, 7.5W at both 70V and 100V plus 3.7W at 70V only
Thru position is 4 ohms
Transducers:
Low-Frequency Transducers : Dual 4” (100mm) PolyPlas,™ shielded woofer
High-Frequency Transducer: 3/4” (19mm) Titanium-laminate dome tweeter, shielded; waveguide
Physical:
Enclosure Material: ABS
Ports: Screened to protect against ingress of pests
Environmental: IP-34 rating, per IEC529. Exceeds MilSpec 810 for humidy, salt spray,
temperature & UV. Passes Mil-Std-202F for salt spray
Termination: Screw-down terminal strip, nickel plated metal screws/washers.
Accepts up to 9 mm outside 4 mm inside open lug (#6, #8, or #10 lug) plus
bare wire up to 12 AWG / 2.5 mm2.
Safety Agency Rating: Transformer is registered per UL1876.
Colors: Black or white (-WH)
Dimensions: 364 mm (14.4 in) wide, 251 mm (9.9 in) max depth including wall
bracket, 262 mm (10.3 in) side depth, 127 mm (5 in) height
Net Weight (ea): 3.2 kg (7.0 lbs)
Included Accessories: Corner/wall-mount bracket with cap and covers, screws
Optional Accessories: PMBBK Pole-Mount Bracket and PMBWH (white)
1
In half-space (on wall)
2
Continuous Pink Noise rating is IEC-shaped pink noise with a 6 dB crest factor for 100 hours continuously. Continuous Program Power is a conservative expression of
the system’s ability to handle normal speech and music program material and is defi ned as 3 dB above the Continuous Pink Noise Rating.
3
Calculated from sensitivity and power handling. Power compression not considered.
: 75 W Continuous Pink Noise, 2 hrs
3
: 108 dB continuous average long-term (peaks of 114 dB)
15
Page 16

262 mm (10.3 in)
DIMENSIONS
364 mm (14.4 in)
127 mm (5 in)
251 mm (9.9 in)
JBL Professional
8500 Balboa Boulevard, P.O. Box 2200
Northridge, CA 91329 USA
OM CNTRL CRV
15M 5/09
 Loading...