

Page 1
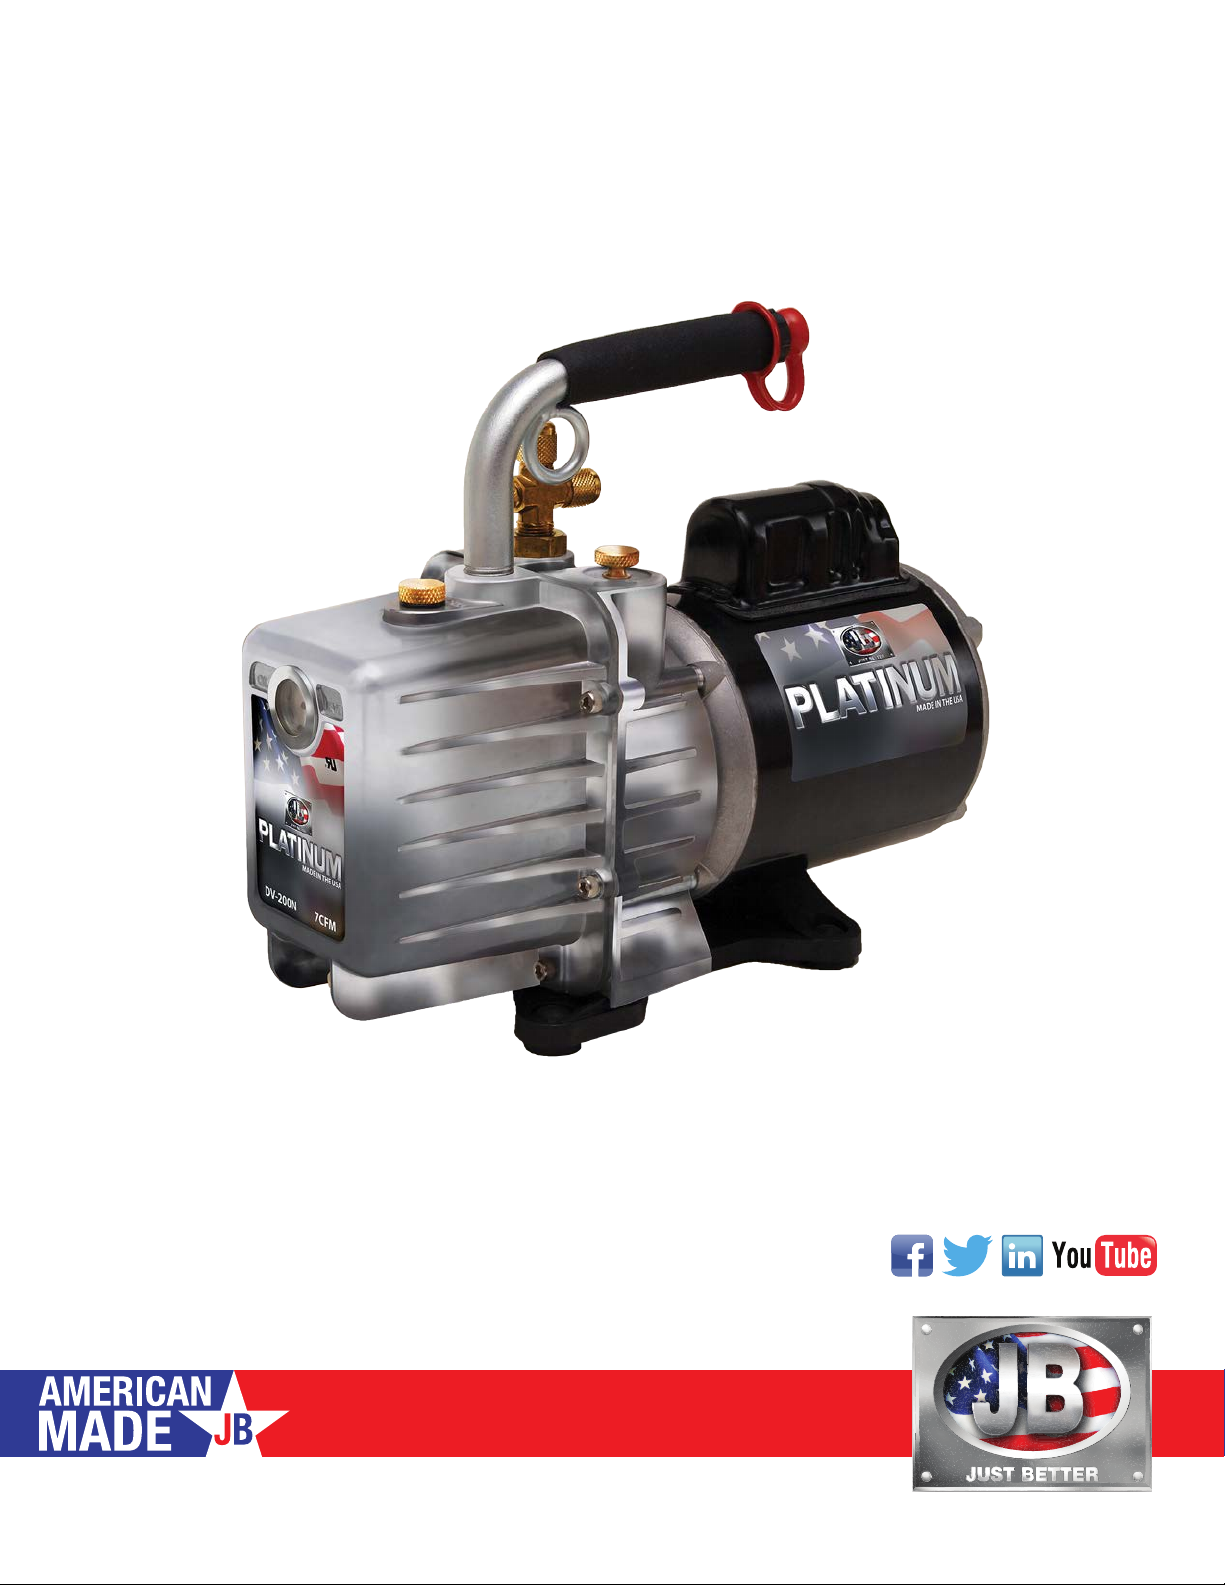
PLATINUM® SERIES VACUUM PUMPS
OPERATING INSTRUCTIONS
& PARTS MANUAL
2-STAGE,
DIRECT DRIVE
TABLE OF CONTENTS
About the Platinum® Pump ............... 2
Specications
Caring for your Pump
..................................................... 3
Oil
Changing Oil
................................... 2
....................... 3
..................................... 3
JB INDUSTRIES
WWW.JBIND.COM 800.323.0811 [email protected]
Operation
Digital Vacuum Gauge
Repair parts
Troubleshooting
Warranty
.......................................... 3
...................................... 4
................................ 4
........................................... 4
..................... 3
CONNECT WITH US
TM
1
Page 2
ABOUT THE PLATINUM® PUMP
*25,4000 MICRONS=1”
Each PLATINUM® pump has been factory tested to guarantee 15 micron* or better and listed CFM
performance. The serial number has been recorded. Complete and mail the Warranty Registration Card within
10 days of purchase to validate your warranty. Or you can register your product on-line at www.jbind.com.
You will be notied of any technical updates.
NOTE Platinum® pumps are not to be used on Ammonia or Lithium Bromide (salt water) systems.
Pump maintenance is the responsibility of the owner.
PLEASE READ THE
“KEEPING THE LIFE IN YOUR PUMP” BOOKLET
SPECIFICATIONS
PUMP MOTOR:
Pump and oil must be above 30°F. Line voltage must be equal to motor nameplate ±10%. Normal operating
temperature is approximately 160°F, which is hot to the touch. Line voltage and ambient conditions will affect this
somewhat. Motor has automatic resetting thermal overload protection. Platinum
will run for extended periods without overheating.
®
is designed for continuous duty and
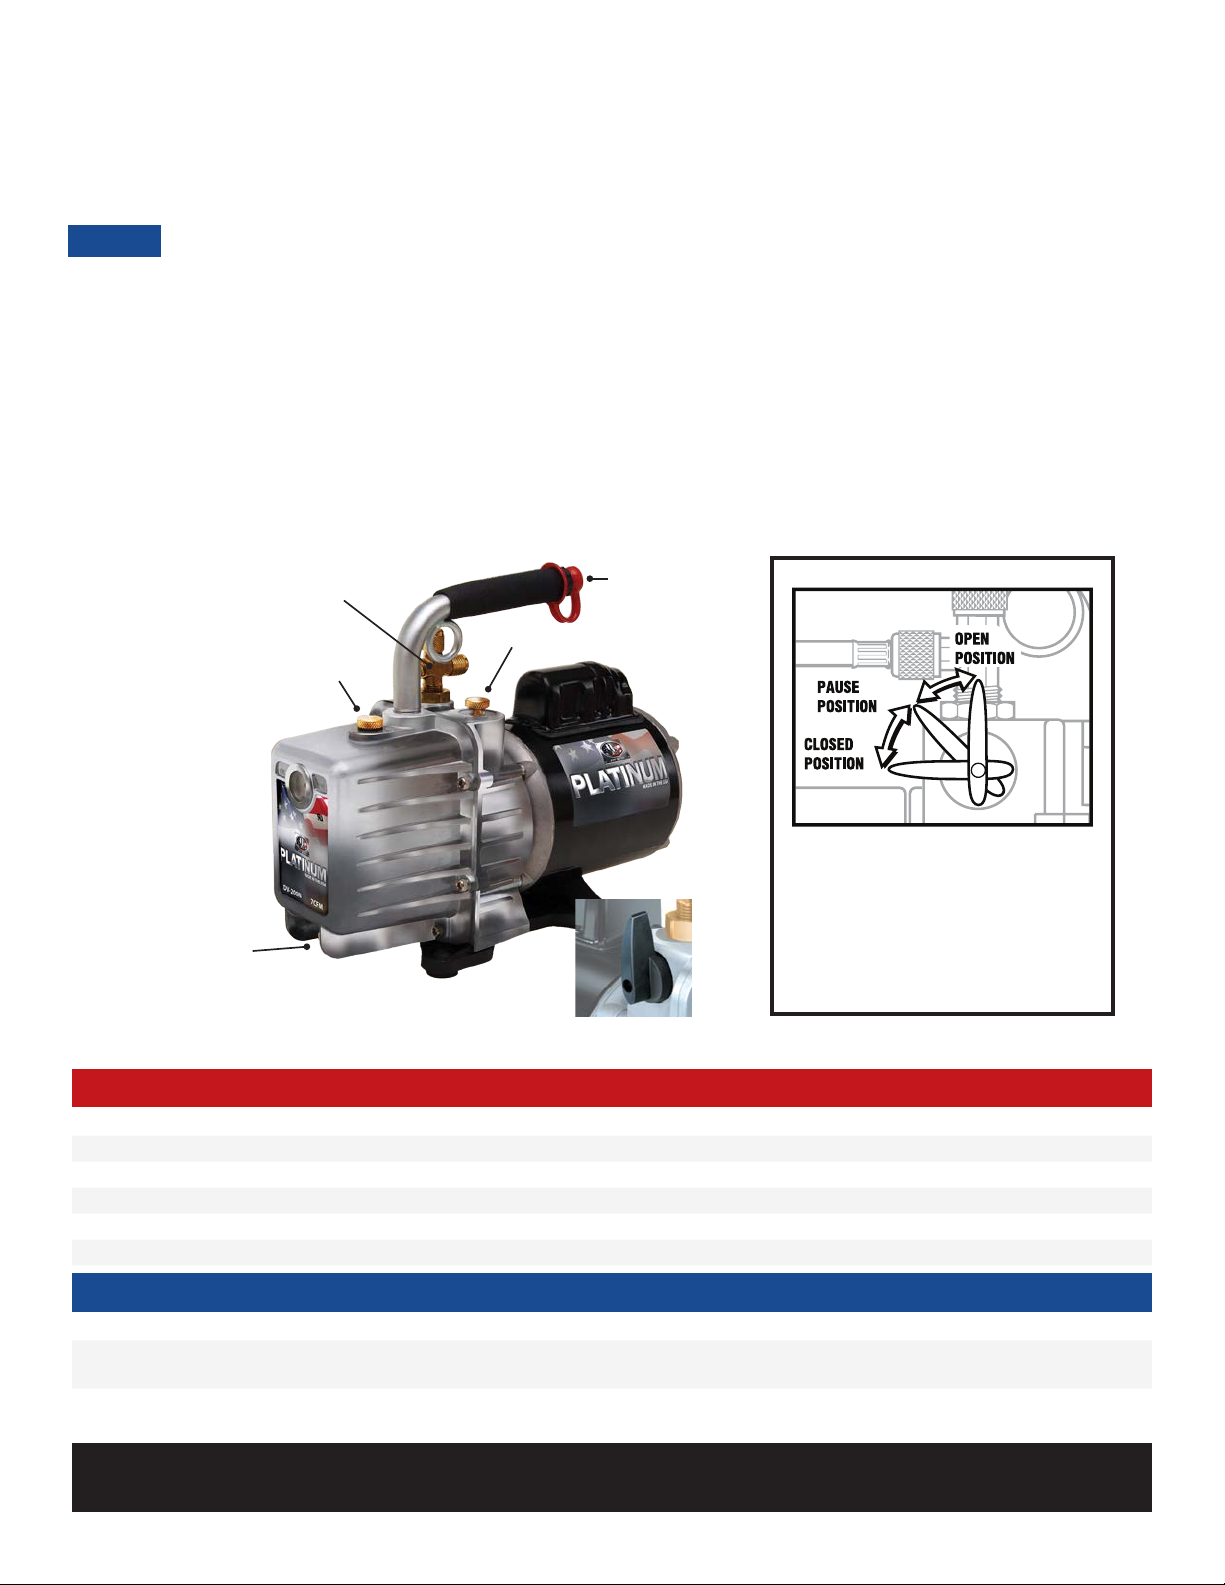
OIL FILL PLUG
Do not wrench down or
use sealant on threads
OIL DRAIN
VALVE
Close drain nger tight
US DOMESTIC
DV-42N DV-85N DV-142N DV-200N DV-285N
CFM
1.5 CFM (42 l/m) 3 CFM (85 l/m) 5 CFM (142 l/m) 7 CFM (200 l/m) 10 CFM (285 l/m)
MOTOR
VOLTAGE
INTAKE PORT
OIL CAPACITY
1/2 HP, 1725 RPM 1/2 HP, 1725 RPM 1/2 HP, 1725 RPM 1/2 HP, 1725 RPM 1/2 HP, 1725 RPM
115v, 60Hz 115v, 60Hz 115v, 60Hz 115v, 60Hz 115v, 60Hz
1/4" 1/4" x 3/8" 1/2" x 1/4" x 3/8" 1/2" x 1/4" x 3/8" 1/2" x 1/4" x 3/8"
26 oz (798 cc) 26 oz (798 cc) 21 oz (680) 21 oz (680) 26 oz (798 cc)
INTAKE
GAS BALLAST
VALVE
ISOLATION VALVE
or Blank-Off Valve
EXHAUST
ISOLATION (BLANK-OFF) VALVE:
Quarter-turn on/off. No additional valve
needed to isolate system.
When checking pressure rise, slowly turn
handle counter-clockwise. Pause at 45°.
Valve completely closed at 90°
DUAL VOLTAGE (-250 series)
DV-42N-250 DV-85N-250 DV-142N-250 DV-200N-250 DV-285N-250
MOTOR
VOLTAGE
1/2 HP,
1725/1425 RPM
115v, 60Hz,
230v/50Hz
THIS UNIT HAS BEEN DRAINED OF OIL FOR SHIPMENT. DO NOT ATTEMPT TO OPERATE WITHOUT ADDING OIL.
2
1/2 HP,
1725/1425 RPM
115v, 60Hz,
230v/50Hz
IM PORTA NT:
1/2 HP,
1725/1425 RPM
115v, 60Hz,
230v/50Hz
1/2 HP,
1725/1425 RPM
115v, 60Hz,
230v/50Hz
1/2 HP,
1725/1425 RPM
115v, 60Hz,
230v/50Hz
Page 3
CARING FOR YOUR PUMP
In order to make the best use of your investment, familiarize yourself with the new features and operation
instructions before starting pump. With just routine care your PLATINUM
®
service by following proper maintenance guidelines. PLATINUM
pumps are designed for deep vacuum work
in refrigeration systems only.
IM P O RTAN T: Use oil specically rened for deep vacuum pumps. Using oil not rened for deep vacuum pumps
and/or operation with contaminated oil will void warranty.
®
will give you years of reliable
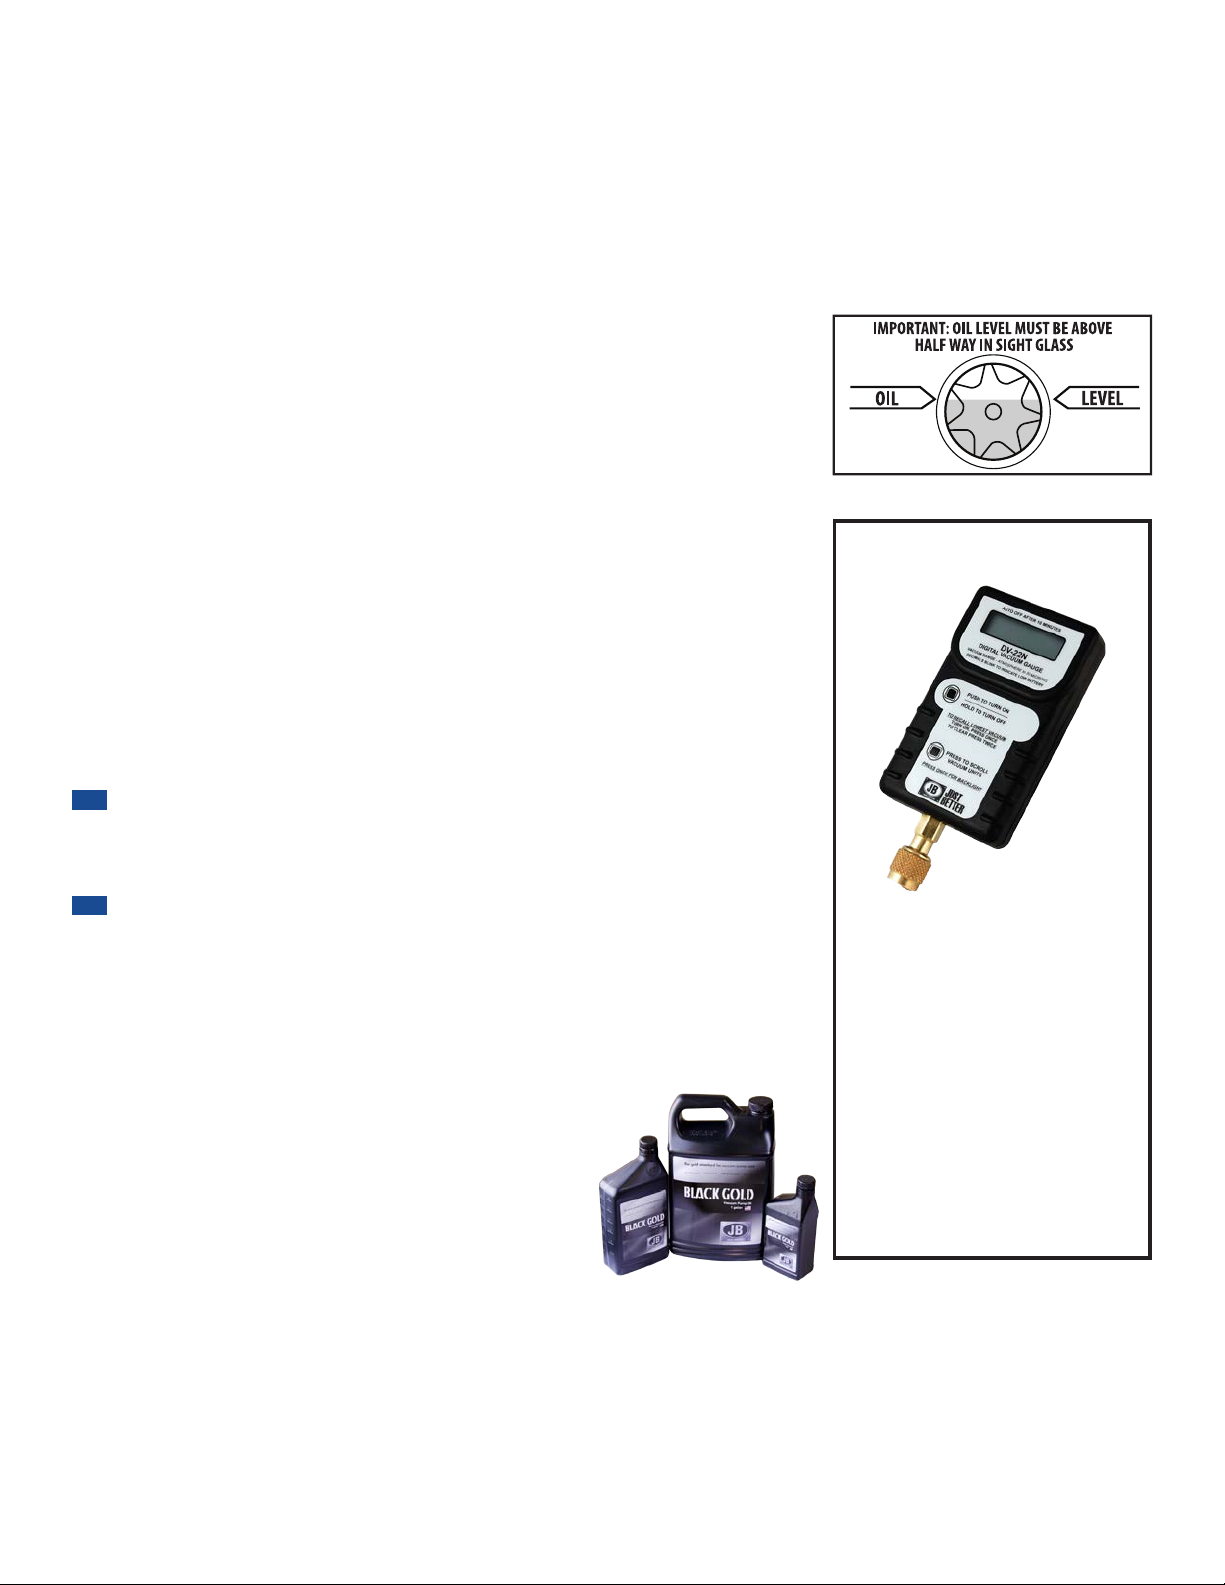
OIL
Slowly add oil until oil level rises tot he top of the OIL LEVEL line.
Replace oil ll plug.
If oil is too low, you will hear air out of the exhaust. If the oil level is too high,
excess oil will be blown out the exhaust. Pump oil should be changed after
each use. If system is heavily contaminated, oil may have to be changed
several times during evacuation.
After initial ll up of oil, it is best to check oil level with pump running.
AFTER EVACUATION, OIL CONTAINS RUST FORMING WATER AND CORROSIVE ACIDS.
DRAIN IMMEDIATELY WHILE PUMP IS WARM.
CHANGING OIL
To reach deep vacuum, Platinum® pumps need clean, moisture-free oil
throughout evacuation. Care should be taken to avoid contact on skin and
clothing when changing oil. Used oil should be disposed of in leak-proof
corrosive-resistant container.
1 After every evacuation while pump is warm and oil is thin, place pump on level surface
and open oil drain. Oil can be forced from the pump by opening one intake and partially
blocking the exhaust with a cloth while the pump is running. DO NOT operate the pump
for more than 20 seconds using this method.
2
Close drain. Remove oil ll cap and ll to top of OIL LEVEL line with
BLACK GOLD Pump Oil. Replace oil ll cap.
FLUSHING:
If the oil is badly contaminated, ushing may be necessary.
Slowly pour 1/3 - 1/2 cup of BLACK GOLD Pump Oil into the intake connection
while pump is running. Repeat as required until contamination is removed from
oil reservoir, pump rotors, vanes and housing.
Dispose of all oil used in ushing of pump.
IMPORTANT
DO NOT START PUMP BEFORE ADDING OIL
DIGITAL VACUUM GAUGES
DV-22N:
• Reads vacuum in 7 international Units:
Microns, PSIA, InHg, MBars, Pascals,
Tor r, MTorr.
• Digital display with solid state circuitry
+32°F to + 120°F (0°C to 48.9°C)
ambient temperature.
• NIST Traceable
• Solid state design - No adjustment
necessary for temperature
• Automatic power off battery saver
• Saves last vacuum readout after
shutdown
• Low battery indicator
OPERATION
The following procedures will prevent oil from being drawn into the pump cartridge and creating hard start-up.
START-U P:
Open one intake port and isolation valve, close gas ballast valve
and start pump. Make vacuum connections.
Crack gas ballast valve for the rst part of the evacuation
procedure. After pump quiets down from initial volume of air, close
valve and continue evacuating. Failure to close valve will result in
poor pump performance.
SHUT-DOWN:
Close isolation valve and open gas ballast valve
all the way. Continue running pump for 2-3
seconds. With gas ballast valve still opened,
stop pump and then close valve.
Remove hose connections and cap intakes.
3
Page 4
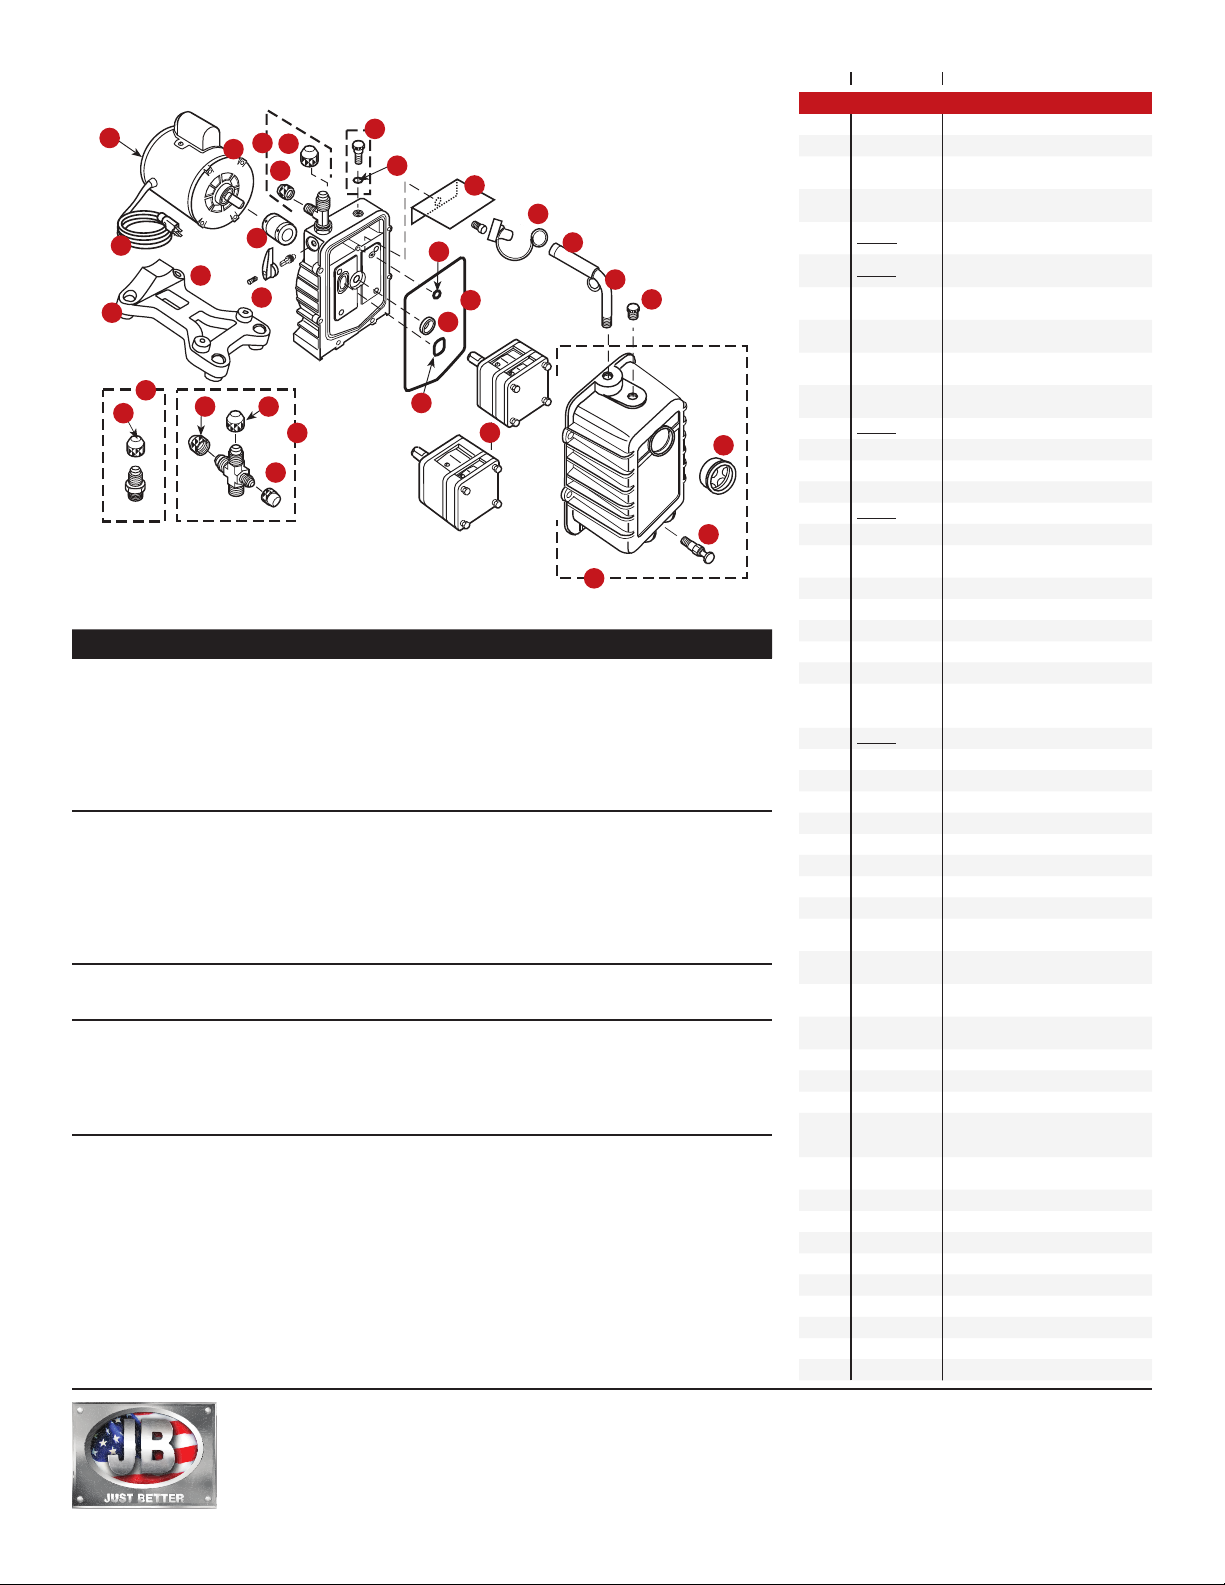
REPAIR PARTS
20
19
29
17
13
11
22
12
21
11
15
14
12
32
10
11
23
DV-42N THROUGH DV-285N
24
25
6
5
7
8
PLATINUM
31
30
4
3
®
26
27
SERIES
1
2
TROUBLESHOOTING
Symptom Possible Cause(s) Corrective Action
Pump won’t start 1. Power cord not plugged in
securely
2. Motor switch not on
3. Pump temp. below 30°F
4. Inconsistent line voltage
Pump won’t pull deep vacuum
1. Contaminated oil
2. Oil level too low
3. Air leak in system being
evacuated
4. Pump inlet fittings
missing or not tightened
5. Coupler slipping
Oil drips from point where shaft
Damaged oil seal Replace
enters the pump housing
Pump shuts down and will not
Thermal overload may be open Disconnect pump from system.
start
Pump cycles on and off from a
completely cold start and then
runs smoothly
Oil backed up into cartridge and
was being cleared out. Pump has
not been shutdown properly.
WARRANTY
Platinum® pumps are warranted against defects in materials and workmanship for 2 years. All JB products
are guaranteed when used in accordance with our directions and recommendations, and we limit this
warranty to the repair, replacement, or credit at invoice price (our option) of products which in our opinion
are defective due to defects in workmanship and/or materials. In no case will we allow charges for labor,
expense or consequential damage. Repairs performed on items out of warranty will be invoiced on a
nominal basis. Contact your wholesaler for details.
1. Plug power cord in securely
2. Turn motor switch to ON
position
3. Warm up pump to 30°F & turn
motor switch on
4. Line voltage must be within
10% of 115 volts
1. Change oil
2. Add oil
3. Locate & repair leak(s)
4. Clean or replace O-ring
5. Tighten coupler setscrews to
flats of cartridge and motor
Wait about 15 minutes for motor
to cool and turn it on again. If it
cycles off again, return pump to
factory for repair.
Remove 1/4” cap then turn
pump on
REF. NO. PART NO. DESCRIPTION
PLATINUM® PUMP REPAIR PARTS
1 PR-1 Sight glass
2 PR-2 Drain valve
3 PR-300
3 PR-301
PR-200
3
3
PR-201
4 PR-302
4 PR-303
4 PR-304
4 PR-314
PR-217 Cover seal
5
5 PR-311 Cover seal
6 PR-211 Trap O-ring, gas ballast
7 PR-3 Shaft seal
PR-215 Trap O-ring, intake
8
8 PR-315 Trap O-ring, intake
9 PR-4
10 PR-76 Intake caps with cross
11 NFT5-4 1/4" O-ring, intake
12 NFT5-6 3/8" O-ring cap
12A NFT5-8 1/2" O-ring cap
13 PR-32 1/4" Intake with cap
14 PR-209
PR-210 Metal isolation valve handle and screw
14
15 PR-208 Flexible Coupler
15 PR-308 Flexible Section Only
15 PR-6 Flexible Coupler
15 PR-77 Flexible Section Only
16 PR-42 Motor Foot With Screw
17 PR-59 Base Foot
19 PR-31 Line Cord (Emerson Motor)
19 PR-58 Line Cord (Marathon Motor)
20 PR-35
20 PR-54
21 PR-206
21 PR-207
22 PR-5 Intake Tee With Caps
23 PR-7 Gas Ballast Valve With O-ring
24 P90009 O-ring, Gas Ballast Valve
25 PR-40
26 PR-75
26 PR-205 Cushioned Handle 3/8" NPT
27 PR-22 Oil Fill Plug with O-ring
28 PR-56 Adapter Nut With O-ring
29 PR-62 Pump Base (Includes Feet)
30 PR-500 Cushion And Cap 3/8" NPT
30 PR-501 Cushion And Cap 1/2" NPT
31 DV-EP6 Tethered Safety Cap 3/8"
31 DV-EP8 Tethered Safety Cap 1/2"
32 NFT5-8 1/2 Cap With O-ring
DV-42N through DV-200N cover assy.
w/sight glass and drain valve
DV-285N cover assy. w/sight glass and
drain valve
No longer available. Can substitute
PR-201
DV-142N & DV-200N cover assy.
w/ sight glass, drain valve & guard
DV-85N cartr idge w/O-rings and cover
seal
DV-142N cartridge w/O-rings and
cover seal
DV-200N cartr idge w/O-rings and
cover seal
DV-285N cartr idge w/O-rings and
cover seal
Rubber foot & screw assembly
(1 per package)
Plastic isolation valve handle and
screw w/ stem and retainer
(not interchangeable w/PR-210)
Rocker Switch With Prongs
(Marathon 1101-0105)
Rocker Switch With Wire Leads
(Emerson)
1/2 Hp, 115v, 60 Hz Motor With Line
Cord And Switch
1/2 Hp, 115/230v, 50/60 Hz Motor
w/ Line Cord And Switch
Splash Guard And Screw (Excludes 3
CFM Manufactured Before 1/01. Use
PR-39.)
Cushioned Handle With Lift Ring 1/2"
NPT And DV-EP-8 As Of 2008
JB INDUSTRIES INC.
Aurora IL 60505 USA
Form 10185-308
Printed in the USA
©2015 JB Industries, Inc.
TM
Main Warehouse
JB INDUSTRIES, INC.
PO Box 1180 Dept. 85
Aurora, IL 60507-1180 USA
[email protected]
Toll Free Technical Service #: 800.323.0811
CANADA
ALLTEMP products co., LTD.
827 Brock Road South Pickering,
Ont., Canada L1E 3J2
Phone: 905.831.3311
Fax: 905.831.1864
4
 Loading...