

Page 1

INSTRUCTION MANUAL
AMS
Stand for
AM120 & PA120 Tweezers
Page 2
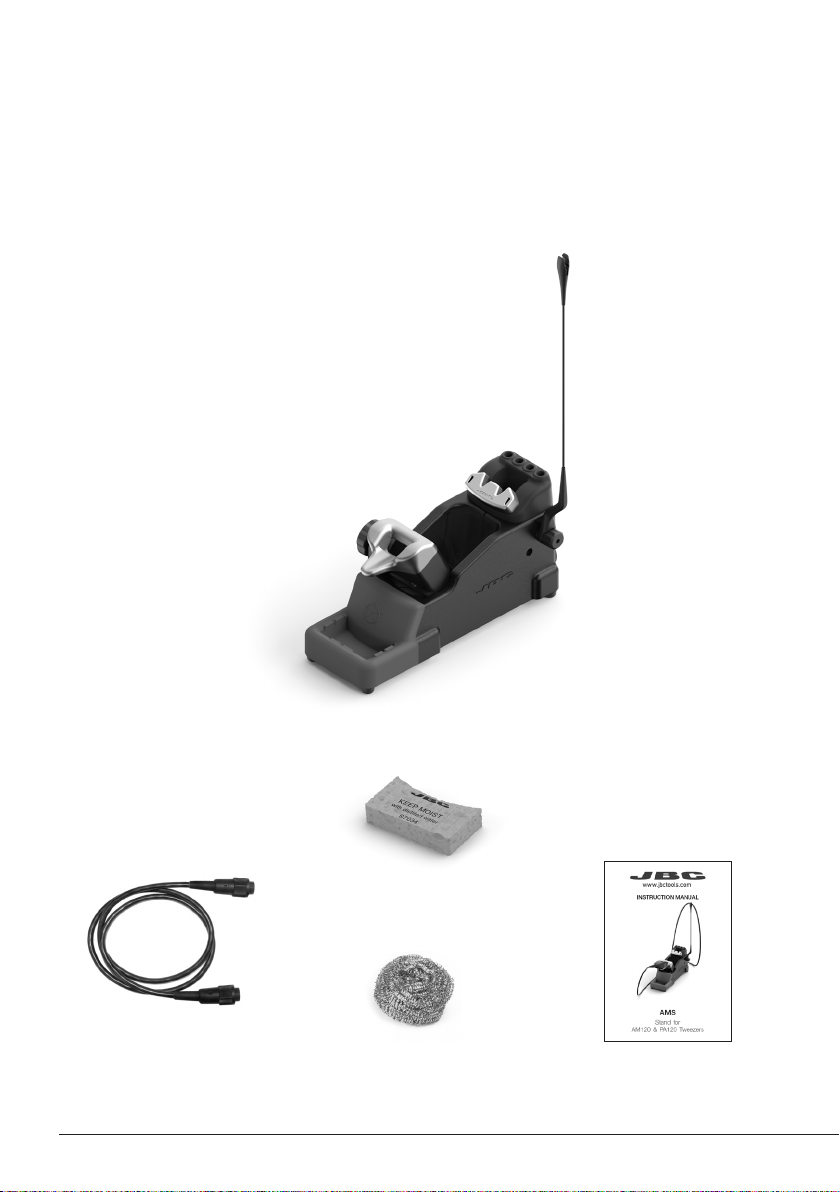
This manual corresponds to the following reference:
AM-SB
Packing List
The following items are included:
Stand for AM120 & PA120 Tweezers ................................................................................................. 1 unit
Sponge for Modular
Tool Stands ................... 1 unit
Ref. S7034
Stand Cable 1m ............ 1 unit
Ref. 0024227
Brass Wool .................... 1 unit
Ref. CL6210
Manual ............................. 1 unit
Re f. 0 027180
2
Page 3

Features and Connections
para manuales - color gris
Quick Tip Changer
Ajustable Tool Holder
Brass Wool
(inside)
Sponge
Cartridge Storage
Adjustable
Cable Collector
Re f. CC1001
Wiper for
Modular Tool Stand
Ref. C L7899
To Control Unit
To Tool
3
Page 4
Assembly
Cable Collector and Adjustable Tool Holder
Insert the cable into the cable
collector clip. Do not leave the
cable longer than necessary
to reach the work area freely.
The cable collector is flexible.
It accompanies and adapts
to the movements during the
soldering process.
Adjust the tool holder angle to
suit the work position.
The wiper offers different ways to
clean the cartridge tips. If desired
use the included sponge.
4
Page 5
AM-SA
AM-SA
AM-SA
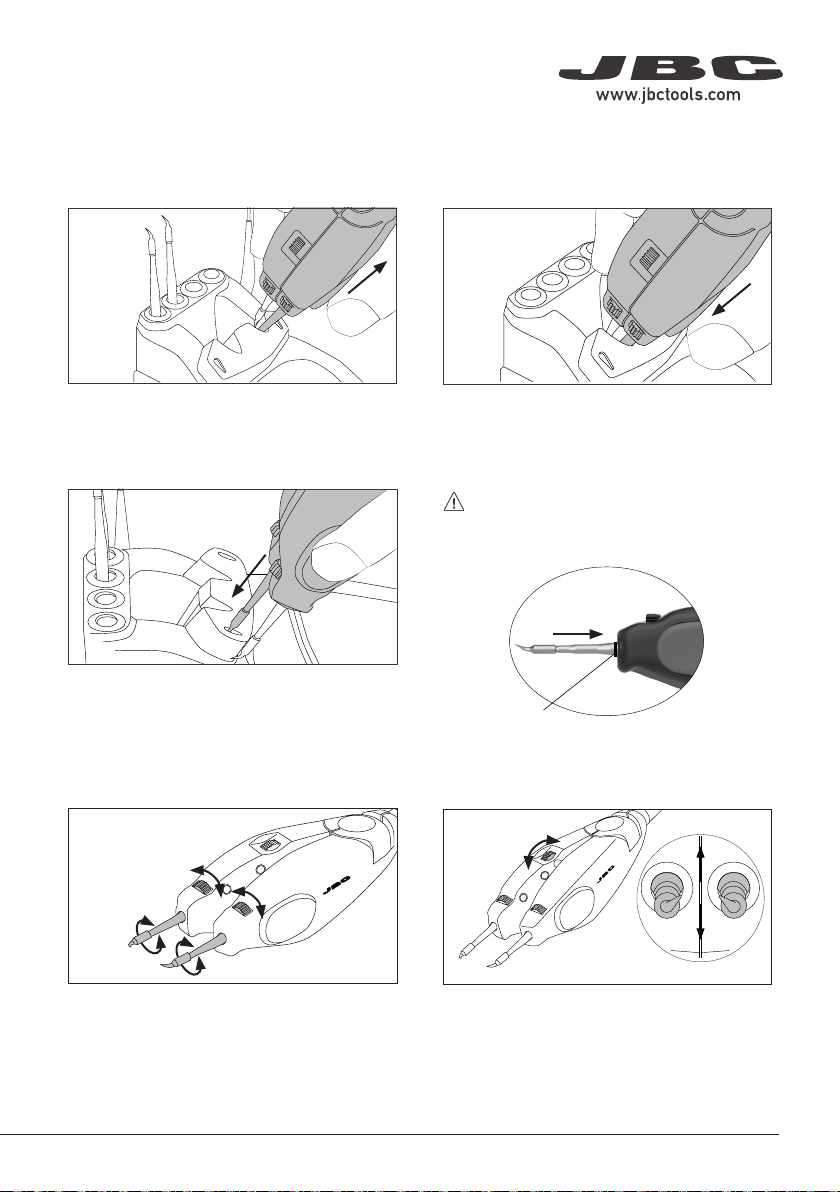
Quick Tip Changer - AM120 Tweezers
para manuales - color gris
2. Positioning 1. Removing
Place the cartridges in the extractor and pull
the tweezers to remove them.
3. Inserting
Use the grooves to insert the cartridges as
far as the mark*.
4. Rotational Cartridge Alignment
Place the tweezers on top of the new cartridge
and slightly press down.
*Important
It is essential to insert the cartridges as far
as the mark for a proper connection.
Mark
5. Vertical Cartridge Alignment
Slightly turn the wheels to align the cartridges
as required.
The rear wheel allows the cartritges to be
equally aligned when you close the tweezers.
5
Page 6

AM-SA
AM-SA
PA120-A
Quick Tip Changer - PA120 Tweezers
Screws
2. Removing1. Unlocking
PA120-A
Unlock the fixing screws. Place the cartridges in the extractor and pull
the tweezers to remove them.
3. Inserting
Use the grooves to insert the cartridges as
4. Locking
Screws
PA120-A
Lock the fixing screws.
far as the mark*.
*Important
It is essential to insert the cartridges as far as the mark for a proper connection.
Mark
6
Page 7
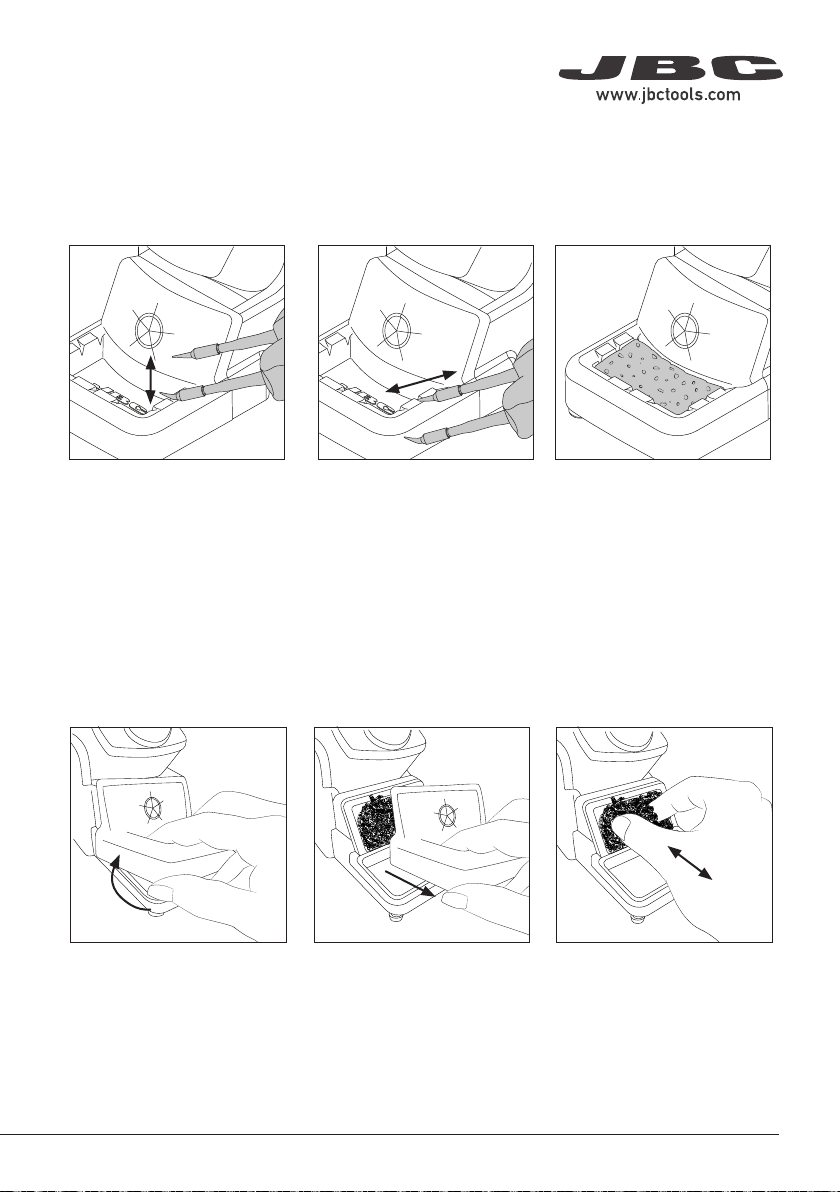
Wiper
para manuales - color gris
The integrated wiper offers different ways to clean the cartridge tips.
Tapp ing
Tap gently to remove excess
solder.
Wiping Sponge
Use the slots to remove the
remaining particles.
The softest cleaning method.
Keep the sponge damp with
distilled water when working to
avoid tip wear.
Wiper and Brass Wool Replacement
The wiper and brass wool can easily be removed for cleaning or replacement when they are worn.
Lift the wiper at its front edge.
Remove the wiper by pulling
it out.
Replace the brass wool with
a new one when it is worn
out.
Place the wiper back o replace
them if desired.
7
Page 8

Accessories
Stand Cable
Maintenance
Before carrying out maintenance or storage,
always unplug the stand from the station and
the tool.
Stand Extension Cable
Ref. A1286
Length: 1.5m
Clean periodically
- Use a damp cloth to clean the stand. Alcohol
can be used only when cleaning the metal
parts.
- Check periodically that the metal parts of the
tool/stand are clean so that the station can
check the tool’s status.
- Periodically check all cables and tube
connections.
- Replace any defective or damaged parts. Use
original JBC spare parts only.
- Repairs should only be performed by a JBC
authorized technical service.
8
Page 9

Safety
para manuales - color gris
It is imperative to follow safety guidelines to prevent electric
shock, injury, fire or explosion.
- Do not use the units for any purpose other than soldering or rework. Incorrect use may cause fire.
- The power cord must be plugged into approved bases. Be sure that it is properly grounded before
use. When unplugging it, hold the plug, not the wire.
- Do not work on electrically live parts.
- The tool should be placed in the stand when not in use in order to activate the sleep mode. The
soldering tip or nozzle, the metal par t of the tool and the stand may still be hot even when the station
is turned off. Handle with care, including when adjusting the stand position.
- Do not leave the appliance unattended when it is on.
- Do not cover the ventilation grills. Heat can cause inflamable products to ignite.
- Avoid flux coming into contact with skin or eyes to prevent irritation.
- Be careful with the fumes produced when soldering.
- Keep your workplace clean and tidy. Wear appropriate protection glasses and gloves when working
to avoid personal harm.
- Utmost care must be taken with liquid tin waste which can cause burns.
- This appliance can be used by children over the age of eight and also persons with reduced physical,
sensor y or mental capabilities or lack of experience provided that they have been given adequate
supervision or instruction concerning use of the appliance and understand the hazards involved.
Children must not play with the appliance.
- Maintenance must not be carried out by children unless supervised.
9
Page 10

Notes
10
Page 11

Notes
para manuales - color gris
11
Page 12

para manuales - color gris
Specifications
AMS
Stand for AM120 & PA120 Tweezers
Ref.: AM-SB
- Includes Sleep Mode and Hibernation Mode
- Total Net Weight 1640 g / 3.62 lb
- Package Dimensions / Weight 342 x 155 x 120 mm / 2100 g
(L x W x H) 13.5 x 6.1 x 4.7 in / 4.63 lb
Complies with CE standards
ESD Safe
Warranty
JBC’s 2 year warranty covers this equipment against
all manufacturing defects, including the replacement
of defective parts and labour.
Warrant y does not cover product wear or misuse.
In order for the warranty to be valid, equipment must
be returned, postage paid, to the dealer where it was
purchased.
This product should not be thrown in the garbage.
In accordance with the European directive 2012/19/EU, electronic equipment at the end of its life must
be collected and returned to an authorized recycling facility.
00 27 180 -0 122
 Loading...