

Page 1
INSTALLATION INSTRUCTIONSINSTALLATION INSTRUCTIONSINSTALLATION INSTRUCTIONSINSTALLATION INSTRUCTIONS
40-3044
GM Silverado / Sierra
04-06 4.3/4.8/5.3L
Extended cab / short bed 2/4 wd
TTTTOOLS RECOMMENDED:
ratchet
9/16" deep socket
15mm deep socket
pair of channel lock pliers
reciprocating saw or hack saw
rubber mallet
spray lubricant or penetrating oil
anti-seize
prybar
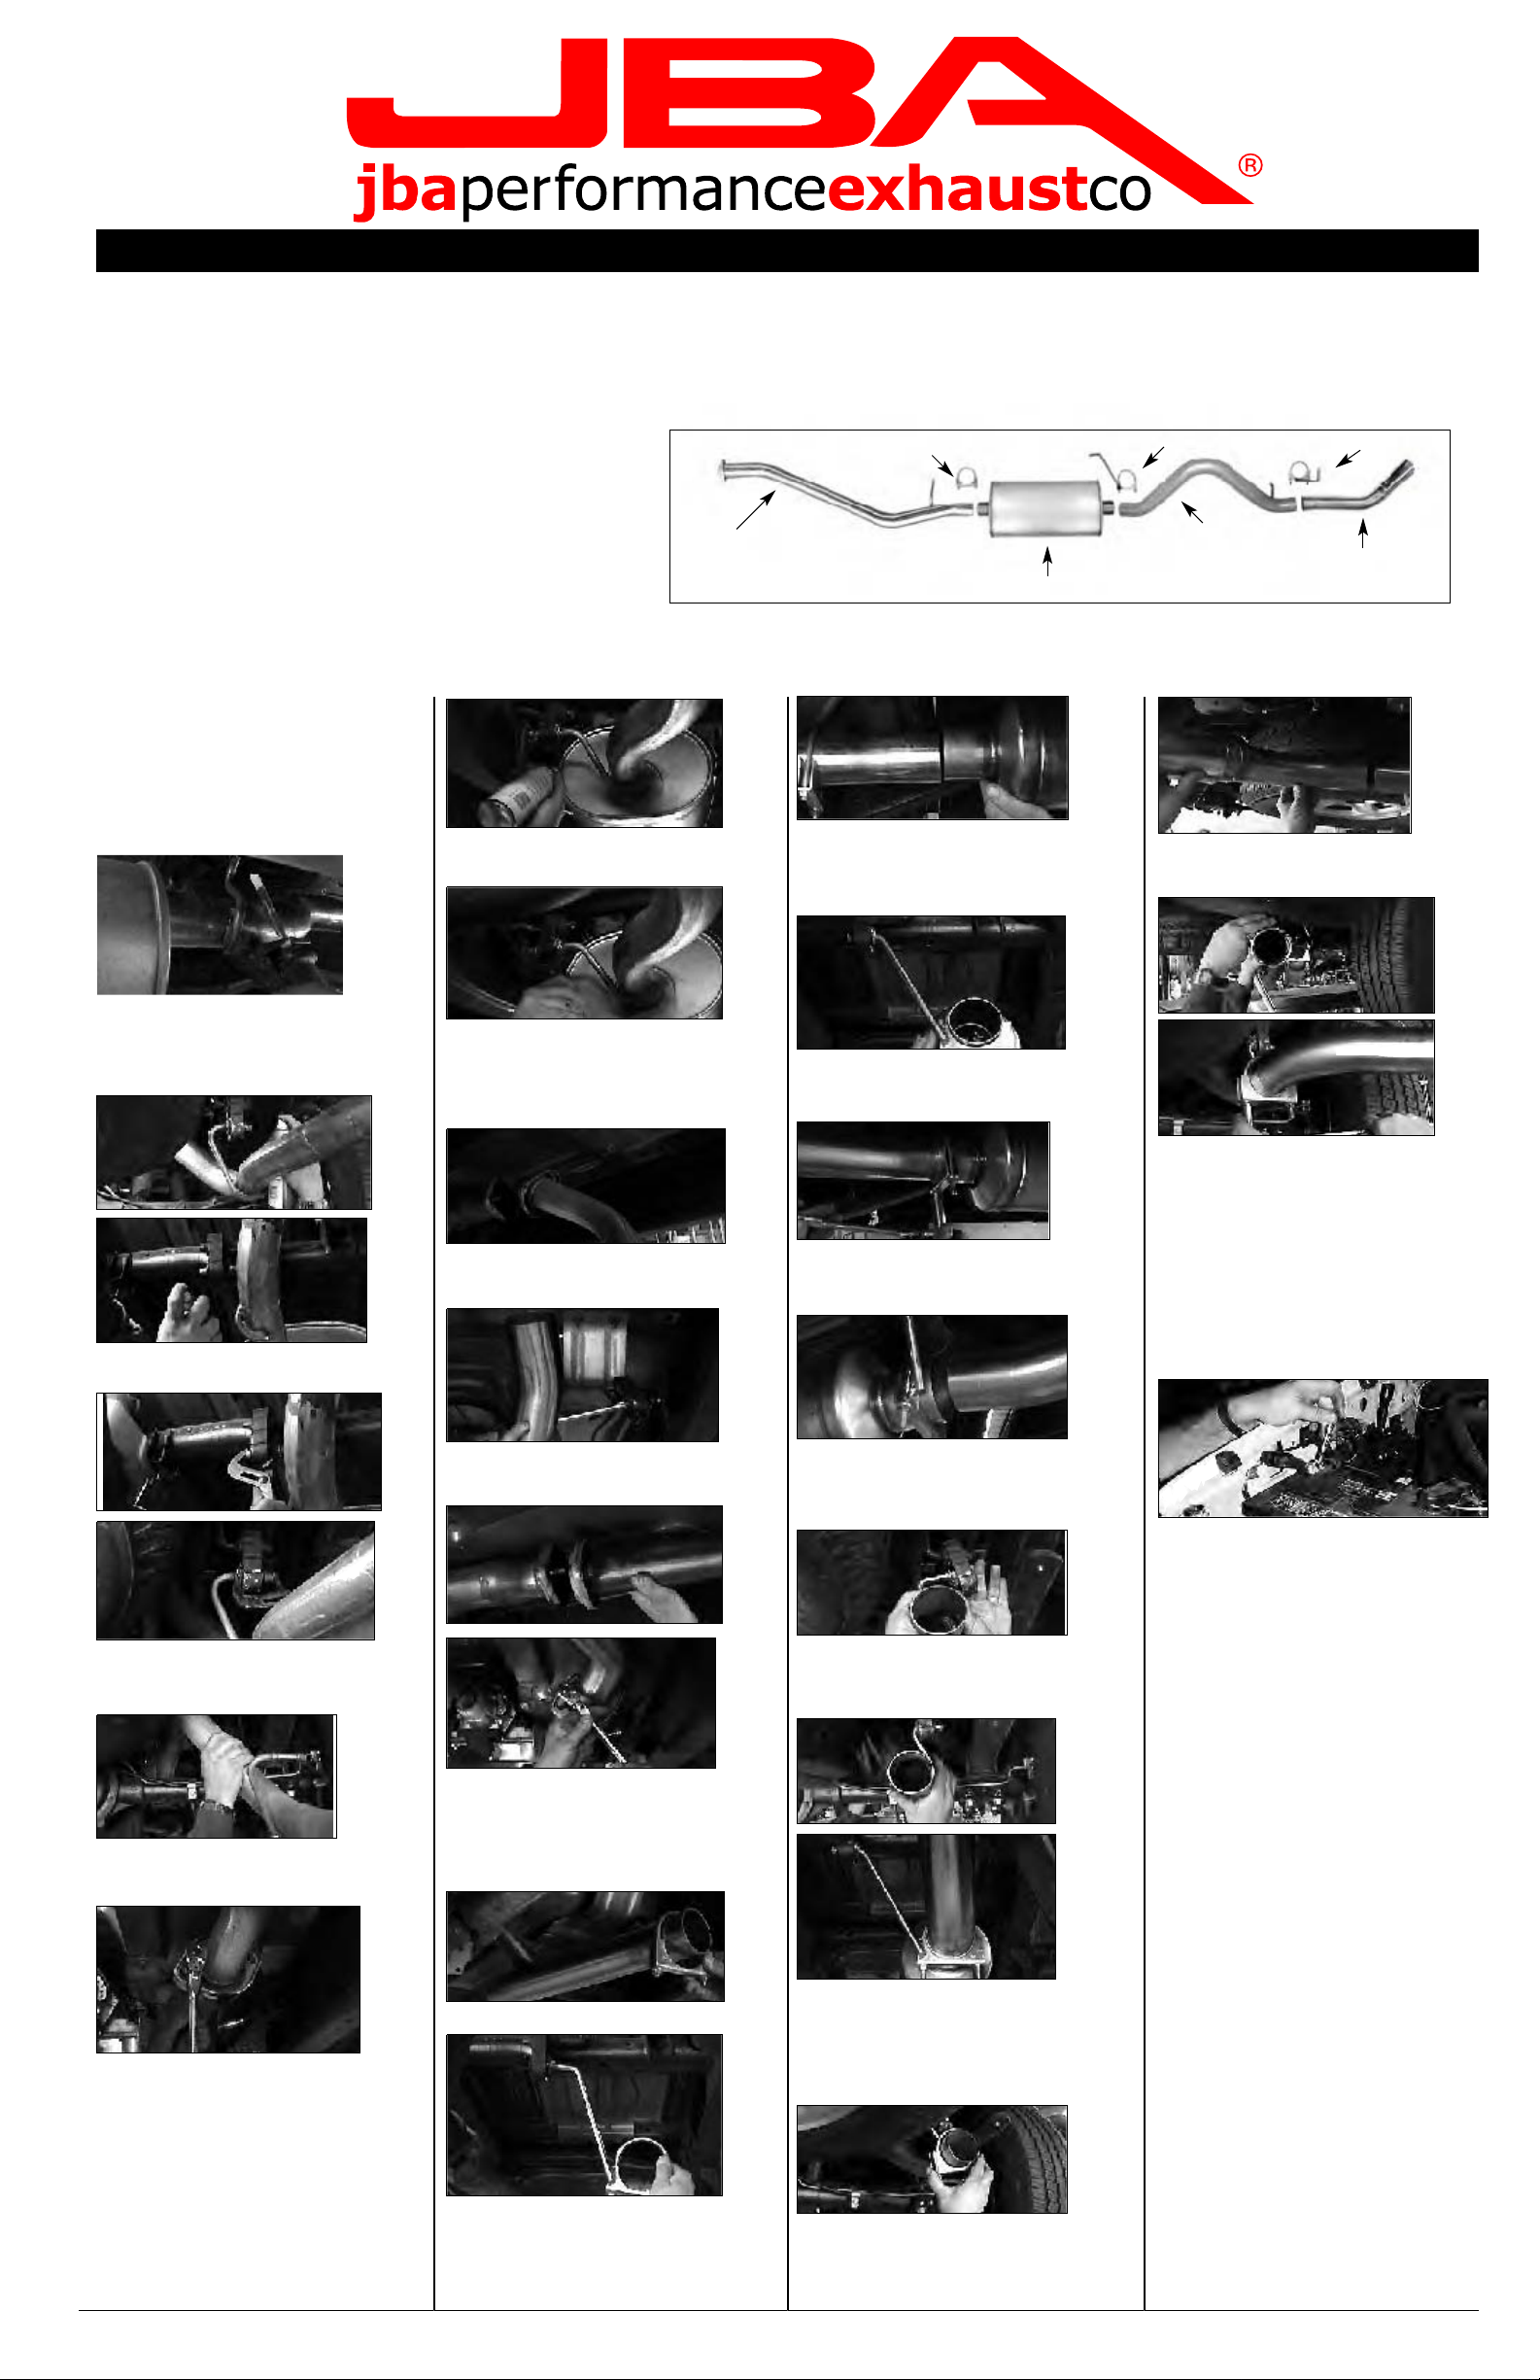
E
F
C
B
G
D
A
TTTTOOOO STSTSTSTARTARTARTART::::
2. Disconnect negative battery cable and2. Disconnect negative battery cable and2. Disconnect negative battery cable and2. Disconnect negative battery cable and
allow vehicle exhaust to cool.allow vehicle exhaust to cool.allow vehicle exhaust to cool.allow vehicle exhaust to cool.
1. Remove and inventory new JBA
exhaust.exhaust.exhaust.exhaust.
8. S8. S8. S8. Spray lubricant on front mufpray lubricant on front mufpray lubricant on front mufpray lubricant on front muffler hangerfler hangerfler hangerfler hanger
grommet.grommet.grommet.grommet.
15. With the JBA logo to the rear of the15. With the JBA logo to the rear of the15. With the JBA logo to the rear of the15. With the JBA logo to the rear of the
vehicle, slip mufvehicle, slip mufvehicle, slip mufvehicle, slip muffler (B) on head pipe (A).fler (B) on head pipe (A).fler (B) on head pipe (A).fler (B) on head pipe (A).
NOTE:NOTE:NOTE:NOTE: YYYYou may have to tou may have to tou may have to tou may have to tap it with aap it with aap it with aap it with a
rubber mallet.rubber mallet.rubber mallet.rubber mallet.
22. Inst22. Inst22. Inst22. Install turnout (D) slip joint over endall turnout (D) slip joint over endall turnout (D) slip joint over endall turnout (D) slip joint over end
of tof tof tof tail pipe (C).ail pipe (C).ail pipe (C).ail pipe (C).
3. With vehicle raised and properly sup-3. With vehicle raised and properly sup-3. With vehicle raised and properly sup-3. With vehicle raised and properly supported, using a reciprocating saw or hackported, using a reciprocating saw or hackported, using a reciprocating saw or hackported, using a reciprocating saw or hack
sawsawsawsaw, cut the t, cut the t, cut the t, cut the tail pipe approximately 1"ail pipe approximately 1"ail pipe approximately 1"ail pipe approximately 1"
behind rear mufbehind rear mufbehind rear mufbehind rear muffler hangerfler hangerfler hangerfler hanger....
9. With muf9. With muf9. With muf9. With muffler and head pipe properlyfler and head pipe properlyfler and head pipe properlyfler and head pipe properly
supported, using a psupported, using a psupported, using a psupported, using a pair of channel lockair of channel lockair of channel lockair of channel lock
pliers, remove hanger rod from bottompliers, remove hanger rod from bottompliers, remove hanger rod from bottompliers, remove hanger rod from bottom
hole of grommet.hole of grommet.hole of grommet.hole of grommet.
10. Remove muf10. Remove muf10. Remove muf10. Remove muffler and head pipefler and head pipefler and head pipefler and head pipe
assemblyassemblyassemblyassembly....
16. Slip rear muf16. Slip rear muf16. Slip rear muf16. Slip rear muffler hanger (F) over rearfler hanger (F) over rearfler hanger (F) over rearfler hanger (F) over rear
slip joint of mufslip joint of mufslip joint of mufslip joint of muffler (B) and hand tighten atfler (B) and hand tighten atfler (B) and hand tighten atfler (B) and hand tighten at
this time.this time.this time.this time.
17. Position 3" clamp (E) on muf17. Position 3" clamp (E) on muf17. Position 3" clamp (E) on muf17. Position 3" clamp (E) on muffler (B)fler (B)fler (B)fler (B)
and using a 9/16" deep socket, tightenand using a 9/16" deep socket, tightenand using a 9/16" deep socket, tightenand using a 9/16" deep socket, tighten
completelycompletelycompletelycompletely....
NOTE:NOTE:NOTE:NOTE: use anti-seize on threads.use anti-seize on threads.use anti-seize on threads.use anti-seize on threads.
23. Position turnout (D) to desired position.23. Position turnout (D) to desired position.23. Position turnout (D) to desired position.23. Position turnout (D) to desired positio
25.25.25.25. AfAfAfAfter instter instter instter installation, it is recommendedallation, it is recommendedallation, it is recommendedallation, it is recommended
that all clampthat all clampthat all clampthat all clamps be retightened and joints be retightened and joints be retightened and joints be retightened and jointssss
be tbe tbe tbe tack welded in three spot.ack welded in three spot.ack welded in three spot.ack welded in three spot.
24. Position 3" clamp (I) over turnout (D)24. Position 3" clamp (I) over turnout (D)24. Position 3" clamp (I) over turnout (D)24. Position 3" clamp (I) over turnout (D)
slip joint and tighten completely using aslip joint and tighten completely using aslip joint and tighten completely using aslip joint and tighten completely using a
9/16" deep socket.9/16" deep socket.9/16" deep socket.9/16" deep socket. NOTE:NOTE:NOTE:NOTE: use anti-seizeuse anti-seizeuse anti-seizeuse anti-seize
on threads.on threads.on threads.on threads.
n.
4. S4. S4. S4. Spray lubricant on front and rear tpray lubricant on front and rear tpray lubricant on front and rear tpray lubricant on front and rear tailailailail
pipe rubber grommet.pipe rubber grommet.pipe rubber grommet.pipe rubber grommet.
26. Using a sof26. Using a sof26. Using a sof26. Using a soft cloth, remove all printt cloth, remove all printt cloth, remove all printt cloth, remove all printssss
from turnout tip.from turnout tip.from turnout tip.from turnout tip.
5. Using a p5. Using a p5. Using a p5. Using a pair of channel lock pliers,air of channel lock pliers,air of channel lock pliers,air of channel lock pliers,
remove hanger rods from bottom holes ofremove hanger rods from bottom holes ofremove hanger rods from bottom holes ofremove hanger rods from bottom holes of
front and rear tfront and rear tfront and rear tfront and rear tailpipe rubber grommetailpipe rubber grommetailpipe rubber grommetailpipe rubber grommets.s.s.s.
6. Remove t6. Remove t6. Remove t6. Remove tail pipe assembly from theail pipe assembly from theail pipe assembly from theail pipe assembly from the
rear of vehicle.rear of vehicle.rear of vehicle.rear of vehicle.
11111. Inst1. Inst1. Inst1. Install head pipe (A) hanger intoall head pipe (A) hanger intoall head pipe (A) hanger intoall head pipe (A) hanger into
bottom hole of rubber grommet.bottom hole of rubber grommet.bottom hole of rubber grommet.bottom hole of rubber grommet.
12. Inst12. Inst12. Inst12. Install head pipe over studs and install head pipe over studs and install head pipe over studs and install head pipe over studs and installallallall
flange nutflange nutflange nutflange nuts and align flange. using as and align flange. using as and align flange. using as and align flange. using a
15mm socket and ratchet, tighten nut15mm socket and ratchet, tighten nut15mm socket and ratchet, tighten nut15mm socket and ratchet, tighten nutssss
completelycompletelycompletelycompletely.... NOTE:NOTE:NOTE:NOTE: we recommend usingwe recommend usingwe recommend usingwe recommend using
anti-seize on threads.anti-seize on threads.anti-seize on threads.anti-seize on threads.
18. Inst18. Inst18. Inst18. Install tall tall tall tail pipe (C) into rear slip jointail pipe (C) into rear slip jointail pipe (C) into rear slip jointail pipe (C) into rear slip joint
on mufon mufon mufon muffler (B).fler (B).fler (B).fler (B). NOTE:NOTE:NOTE:NOTE: ttttail pipe (C)ail pipe (C)ail pipe (C)ail pipe (C)
should be instshould be instshould be instshould be installed with the hanger toalled with the hanger toalled with the hanger toalled with the hanger to
the rear of the vehicle.the rear of the vehicle.the rear of the vehicle.the rear of the vehicle.
19. Inst19. Inst19. Inst19. Install tall tall tall tail pipe (C) hanger rod intoail pipe (C) hanger rod intoail pipe (C) hanger rod intoail pipe (C) hanger rod into
bottom hole of rear rubber hangerbottom hole of rear rubber hangerbottom hole of rear rubber hangerbottom hole of rear rubber hanger
grommet.grommet.grommet.grommet.
27. Lower vehicle and reatt27. Lower vehicle and reatt27. Lower vehicle and reatt27. Lower vehicle and reattach theach theach theach the
negative battery cable.negative battery cable.negative battery cable.negative battery cable.
28. Run vehicle until exhaust reaches28. Run vehicle until exhaust reaches28. Run vehicle until exhaust reaches28. Run vehicle until exhaust reaches
operating temperature and retighten theoperating temperature and retighten theoperating temperature and retighten theoperating temperature and retighten the
two 15mm flange nuttwo 15mm flange nuttwo 15mm flange nuttwo 15mm flange nuts.s.s.s.
NOTES:NOTES:NOTES:NOTES:
1)1)1)1) All exhaust systems will expAll exhaust systems will expAll exhaust systems will expAll exhaust systems will expand aboutand aboutand aboutand about
1" rearward when exhaust temperature1" rearward when exhaust temperature1" rearward when exhaust temperature1" rearward when exhaust temperature
ststststart to rise.art to rise.art to rise.art to rise.
2) Use2) Use2) Use2) Use Anti-seize on threads of clampAnti-seize on threads of clampAnti-seize on threads of clampAnti-seize on threads of clamps E,s E,s E,s E
F and GF and GF and GF and G....
,
7. Using a 15mm socket and ratchet,7. Using a 15mm socket and ratchet,7. Using a 15mm socket and ratchet,7. Using a 15mm socket and ratchet,
remove flange nutremove flange nutremove flange nutremove flange nuts from head pipe.s from head pipe.s from head pipe.s from head pipe.
13. Inst13. Inst13. Inst13. Install 3"all 3"all 3"all 3" clamp (E) over head pipe (A).clamp (E) over head pipe (A).clamp (E) over head pipe (A).clamp (E) over head pipe (A).
20. With t20. With t20. With t20. With tail pipe (C) aligned to desiredail pipe (C) aligned to desiredail pipe (C) aligned to desiredail pipe (C) aligned to desired
position, using a 9/16" deep socket,position, using a 9/16" deep socket,position, using a 9/16" deep socket,position, using a 9/16" deep socket,
tighten nuttighten nuttighten nuttighten nuts on rear mufs on rear mufs on rear mufs on rear muffler hanger (F)fler hanger (F)fler hanger (F)fler hanger (F)
completelycompletelycompletelycompletely....
NOTE:NOTE:NOTE:NOTE: use anti-seize on threads.use anti-seize on threads.use anti-seize on threads.use anti-seize on threads.
14. Inst14. Inst14. Inst14. Install rear mufall rear mufall rear mufall rear muffler hanger clamp (F)fler hanger clamp (F)fler hanger clamp (F)fler hanger clamp (F)
into the bottom hole of rear mufinto the bottom hole of rear mufinto the bottom hole of rear mufinto the bottom hole of rear mufflerflerflerfler
hanger rubber grommet.hanger rubber grommet.hanger rubber grommet.hanger rubber grommet.
21. Inst21. Inst21. Inst21. Install 3" clamp (G) over end of tall 3" clamp (G) over end of tall 3" clamp (G) over end of tall 3" clamp (G) over end of tailailailail
pipe (C).pipe (C).pipe (C).pipe (C).
7.18.06
Part s List
A. Head pipe 1
B. Muffler 24" 1
C. Tail pipe 1
D. Turn out 1
E. Front muffler clamp 3" 1
F.. Rear muf
G.. Turn out clamp/hanger 3" 1
fler clamp/hanger 3"
1
 Loading...