

Page 1
0
JJaazzzz XX55
IInnssttrruuccttiioonn MMaannuuaal
l
X5
Page 2

1
FCC Statement.
FCC part 15.21
Warning: Changes or modifications to this unit not expressly approved by the party responsible for compliance could
void the user’s authority to operate the equipment.
FCC part 15.105
Note: This equipment has been tested and found to comply with the limits for a Class B digital device, pursuant to Part
15 of the FCC Rules. These limits are designed to provide reasonable protection against harmful interference
in a residential installation. This equipment generates, uses, and can radiate radio frequency energy and, if not
installed and used in accordance with the instructions, may cause harmful interference to radio
communications. However, there is no guarantee that interference will not occur in a particular installation. If
this equipment does cause harmful interference to radio or television reception, which can be determined by
turning the equipment off and on, the user is encouraged to try to correct the interference by one or more of the
following measures:
- Reorient or relocate the receiving antenna.
- Increase the separation between the equipment and receiver.
- Connect the equipment into an outlet on a circuit different from that to which the receiver is connected.
- Consult the dealer or an experienced radio TV technician for help.
Page 3

2
Pertinent testing documentation is available for verification.
Using Your Camcorder
Power ON/OFF Button
1. Press & hold down " " to turn
camcorder on.
2. Press "
" to turn camcorder off.
Note:
Camcorder will power off after 3
minutes of inactivity.
Mode Button
Press " " to change mode between
video record, still photo capture and
playback.
Record/Start/Stop/OK Button
1. Press " " to start video recording or
take a photo.
2. Press " " again to stop video
recording.
Note:
Inser
t 2 fresh
AA batteries and
SD
/ SDHC
(or MMC
)
card to operate the
camera
.
“H/L” Resolution Button
Press " " to change resolution.
Down Button
Press " " to zoom out.
Playback
1. Press " " to enter playback mode.
2. In playback mode, press " " or " " (Left or
Right Button) to select another file.
3. Press " " to begin or to stop playing video,
and press " " or " " to zoom in/out photo.
4. When zoomed in press " " or " " (Left or
Right Button) to enter PAN Mode to view
image
Delete Button
1. In playback mode, press " " and
“Delete Current?” will appear on
display screen.
2. Press " " again and “Delete All?” will
appear on display screen.
3. Press " " to confirm. Press any
other
button to cancel.
Battery Cover Release Button
1. Press “ ” switch to release the
battery cover, slide down the battery
cover to remove it.
2. Remove used batteries.
3. Reinstall two fresh AA batteries,
align “+”, “-” terminals as indicated.
4. Close the battery cover.
Right Button
Left Button
Up Button
Press " " to
zoom in.
Page 4

3
Tripod nut
SD/MMC
Card Slot
LCD Screen
Lens
Microphone
LED Light
Speaker
Appearance
USB Connector
TV Out Port
USB
ejector
Strap Holder
Battery Cover
X5
Page 5

4
Note: Please insert two fresh AA batteries and SD / SDHC Memory card to operate the camera
Camera works with SD/SDHC Memory cards up to 8GB capacity
a) Installing Batteries
Press the Battery Cover Release Button and slide down / remove the battery cover. Insert two new AA
alkaline batteries. Note polarity on battery terminals. Slide up and close the battery cover.
b) Installing SD/SDHC Memory Card
Insert the SD/SDHC Memory card into the SD/MMC Card Slot. Check card’s alignment according
to position diagram on the camera before inserting.
Push it down until the card stays latched. Do not force card during insertion – forcing may damage
SD/SDHC card and camera as well.
Push and release inserted card when you wish to remove or replace the card; note that inserting /
removing the SD Memory card should only be done when the camera is OFF.
Note that the SD/SDHC Card has a tiny LOCK switch on the side. Set the switch on the card to un-LOCK; only
this un-locked position will allow you to store recorded videos and still pictures on the SD/SDHC Memory
Card.
c) Power the camera ON
Press and hold down the Power ON/OFF Button until LCD panel shows images or scene; now the camera is
turned ON
Page 6

5
d) Selecting the Mode
Pressing the Mode Button " " will browse through available Modes:
Video recording
Taking Still Picture
Playback
e) Selecting Video / Still Pictures Resolution
You can select High or Low resolution of recorded video or taken still pictures.
Press " " Resolution Button to select desired resolution.
LCD screen will display “640” or “320” indicating HIGH or LOW resolution selected.
f) Video and Still picture taking
The SD/SDHC Memory card must be installed to record video or take still pictures.
Press Mode Button " " and select Video Recording or Still picture capture mode; note related icons visible in
left upper corner of LCD screen.
Press Record/Start/Stop/OK Button " " to start Video Recording or take a Still Picture.
Press Record/Start/Stop/OK Button " " again to stop Video Recording.
Page 7

6
NOTE: Please note that recorded video and images appear narrower on camera LCD screen (approx 10% less) than
actual recorded scene.
• The LCD screen acts as a viewfinder to help you more accurately point at and center the main subject or person
while recording.
g) Playback
Press Mode Button " " to scroll and enter the Playback mode.
Press " " or " " (Left or Right Button) to select desired Video or Still Picture file.
Press " " (Down Button) to enter “THUMBNAIL MODE” to view multiple files.
Use Up / Down / Left / Right Button to scroll and select desired file; press Record/Start/Stop/OK Button " " to
confirm.
Press Record/Start/Stop/OK Button " " to start playing video; press this button again if you wish to stop.
Press " " (Up Button) to zoom in and view enlarged Still image in full resolution. Press " "down button to return to
normal screen size and press same button again to return to “thumbnail” format.
When you have zoomed in, press " " or " " (Left or Right Button) to enter “PAN MODE”. Then pressing direction
buttons will move the enlarged image in any direction so you may view selected picture segment.
To exit from “PAN MODE”, press Record/Start/Stop/OK Button " ".
NOTE: Please note that recorded video and images appear narrower on camera LCD screen (approx 10% less) than
Page 8

7
actual recorded scene. All recorded images and video will be displayed full frame and reflect real image size when
played back on computer monitor and TV screen.
h) Deleting Video or Still Picture
Camera offers two Delete options;
“Delete Current” displayed video or still picture, or, “Delete All” video, pictures, data from the SD Memory card.
Select the Playback mode then press the Delete Button " " once selecting “Delete Current, or press Delete
Button again selecting ”Delete All.”
The LCD screen will display related messages: “Delete Current?” or “Delete All?”
Press Record/Start/Stop/OK Button " " to execute deletion of Current / All video or still pictures; press any
other button to abort / cancel “Delete” function.
Please note that the camera can not execute delete function if the SD Memory card is set at LOCK position.
Connecting camera to PC; download Video/ Photos and TV Output
Please install application program from supplied installation CD before connecting camcorder to PC for the first
time
1. Insert supplied CD into computer CD-ROM drive
2. Follow instruction and install programs; see more information inside "Uploading your video clips to YouTube.”
Supplied CD contains ArcSoft MediaImpression program which can be used to playback recorded video, pictures
Page 9
8
and will provide quick access to YouTube to share your video with other Internet users.
Connect to PC
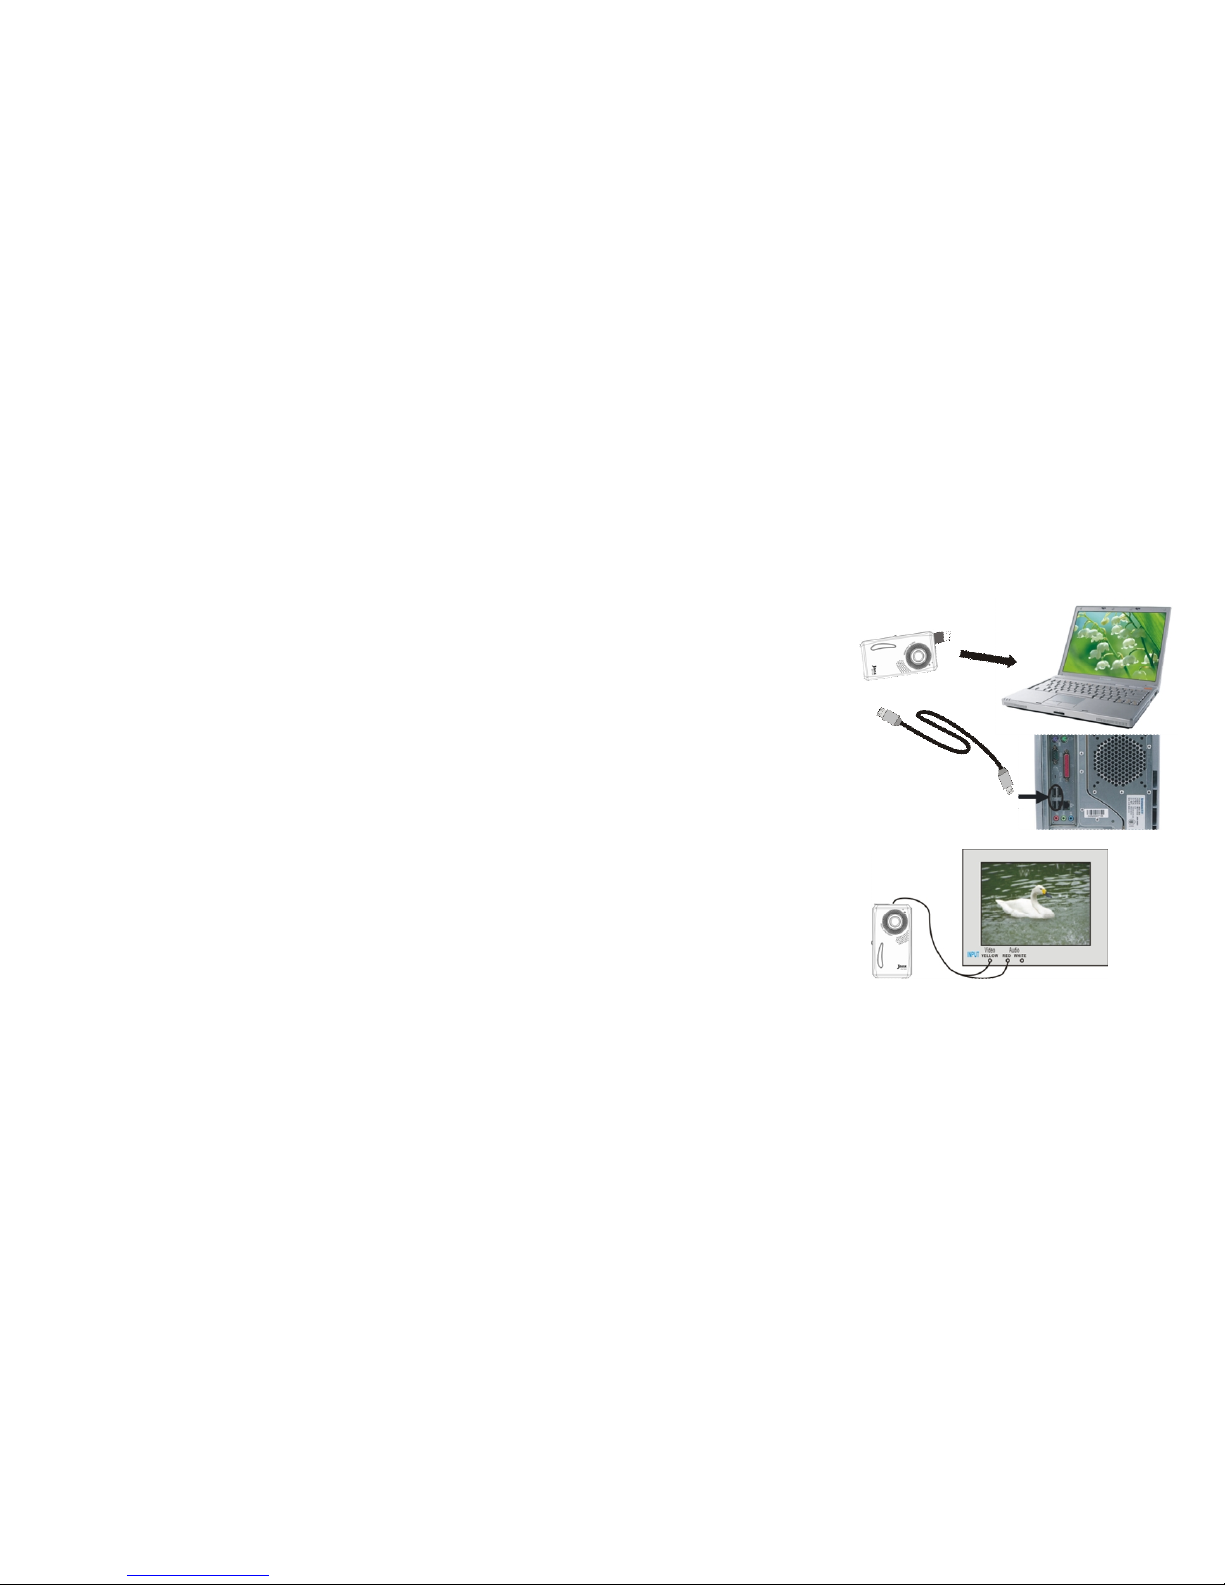
1. Press and then slide up the switch to extract USB connector. Turn the camcorder ON.
2. Insert camcorder’s USB connector into USB port on computer, or use supplied USB extension cable to connect.
Download Video/Photos From Camcorder To PC
1. After connecting to computer, go to "My Computer” and open the "Removable
Disc" which represents your camera.
2. Open the DCIM \ 100MEDIA folders in the Removable Disc; your recorded video
and pictures are stored in this folder. Choose the desired photo / video from the
100MEDIA folder and copy (drag with mouse) it into designated folder in your
computer, if you wish to download pictures / videos to your computer.
TV Output
1. Plug in TV cable: Insert the single-connector to camcorder. Connect the end with
double-connectors to video (yellow) and to audio (red or white) input jack on TV.
2. Turn on TV and camcorder.
3. Switch mode on TV to select video input (see your TV manual for instructions).
Uploading your video clips to YouTube
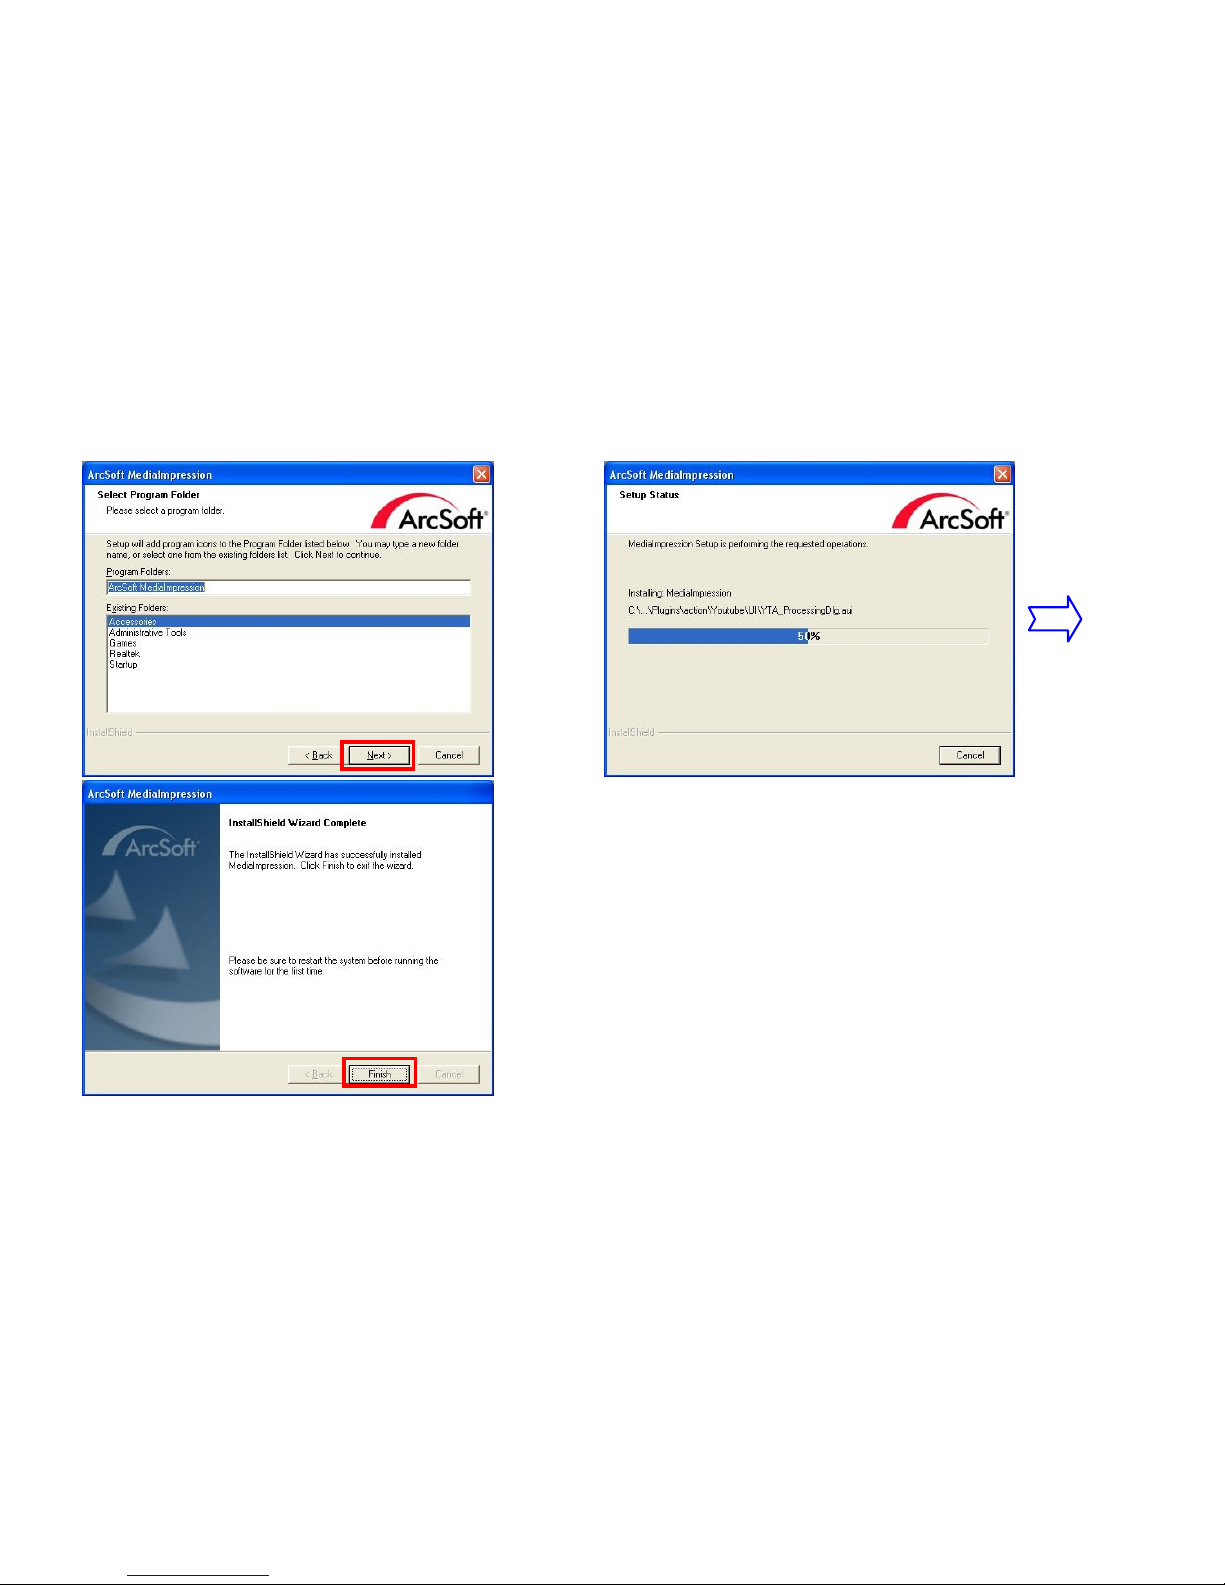
Install the ArcSoft MediaImpression program to get easy YouTube access.
1. Install the ArcSoft MediaImpression program
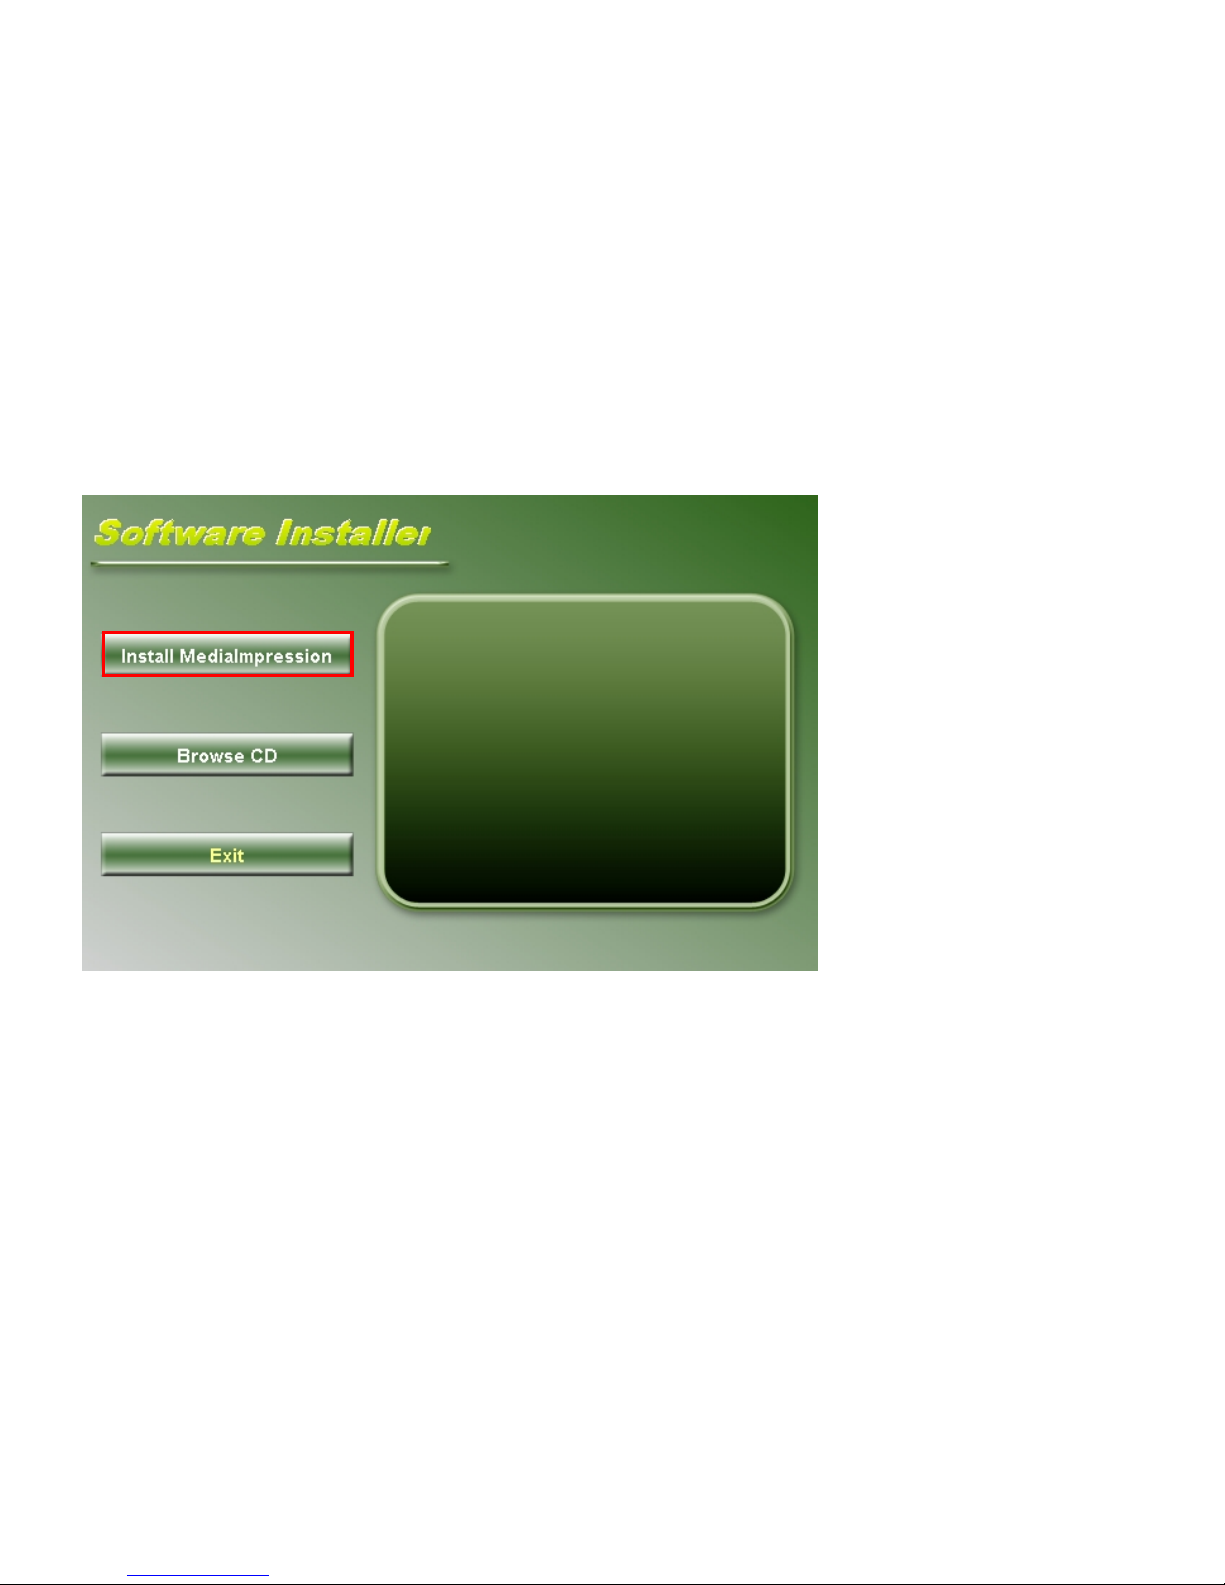
Insert the CD-ROM into the computer CD-ROM drive. The auto-run screen will appear. Click “ Install
Page 10
9
MediaImpression”
(If the screen does not appear as the auto-run, please click on SoftwareInstaller.exe under the CD-ROM drive icon
on the computer.)
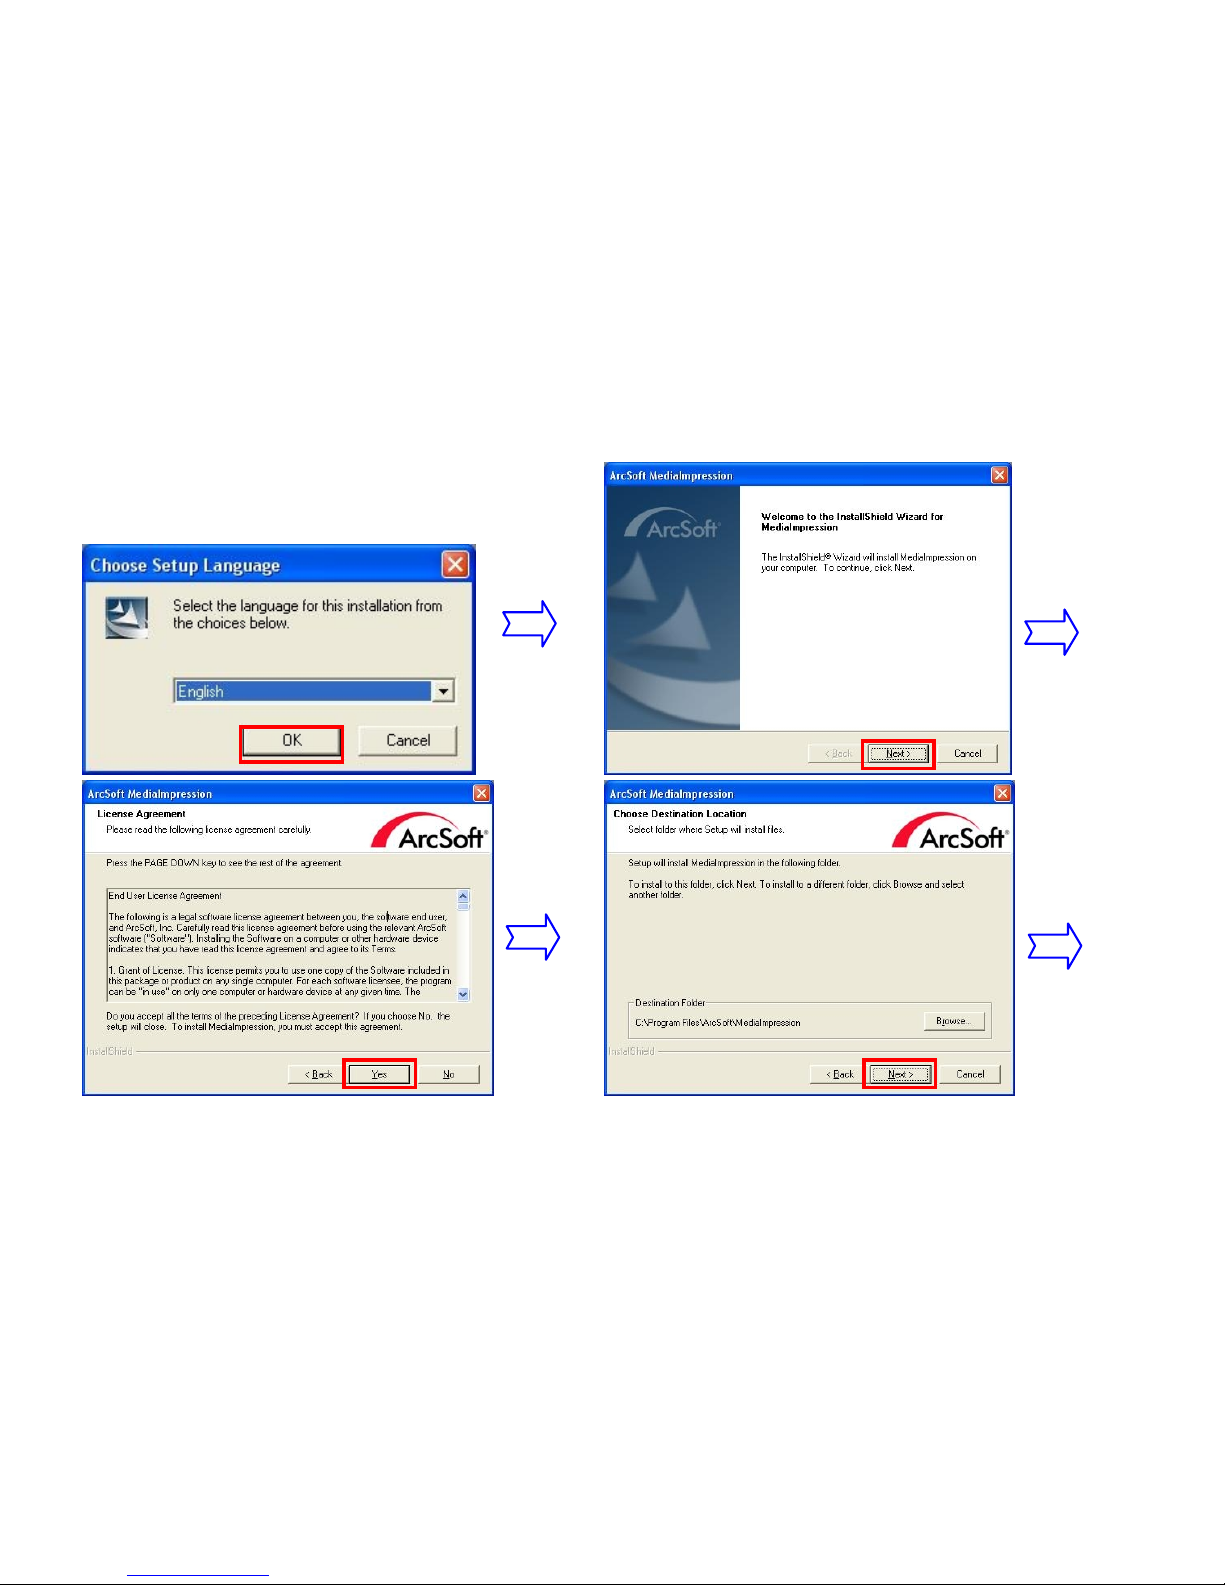
Follow on-screen instructions and complete installation
Page 11
10
Page 12
11
Page 13
12
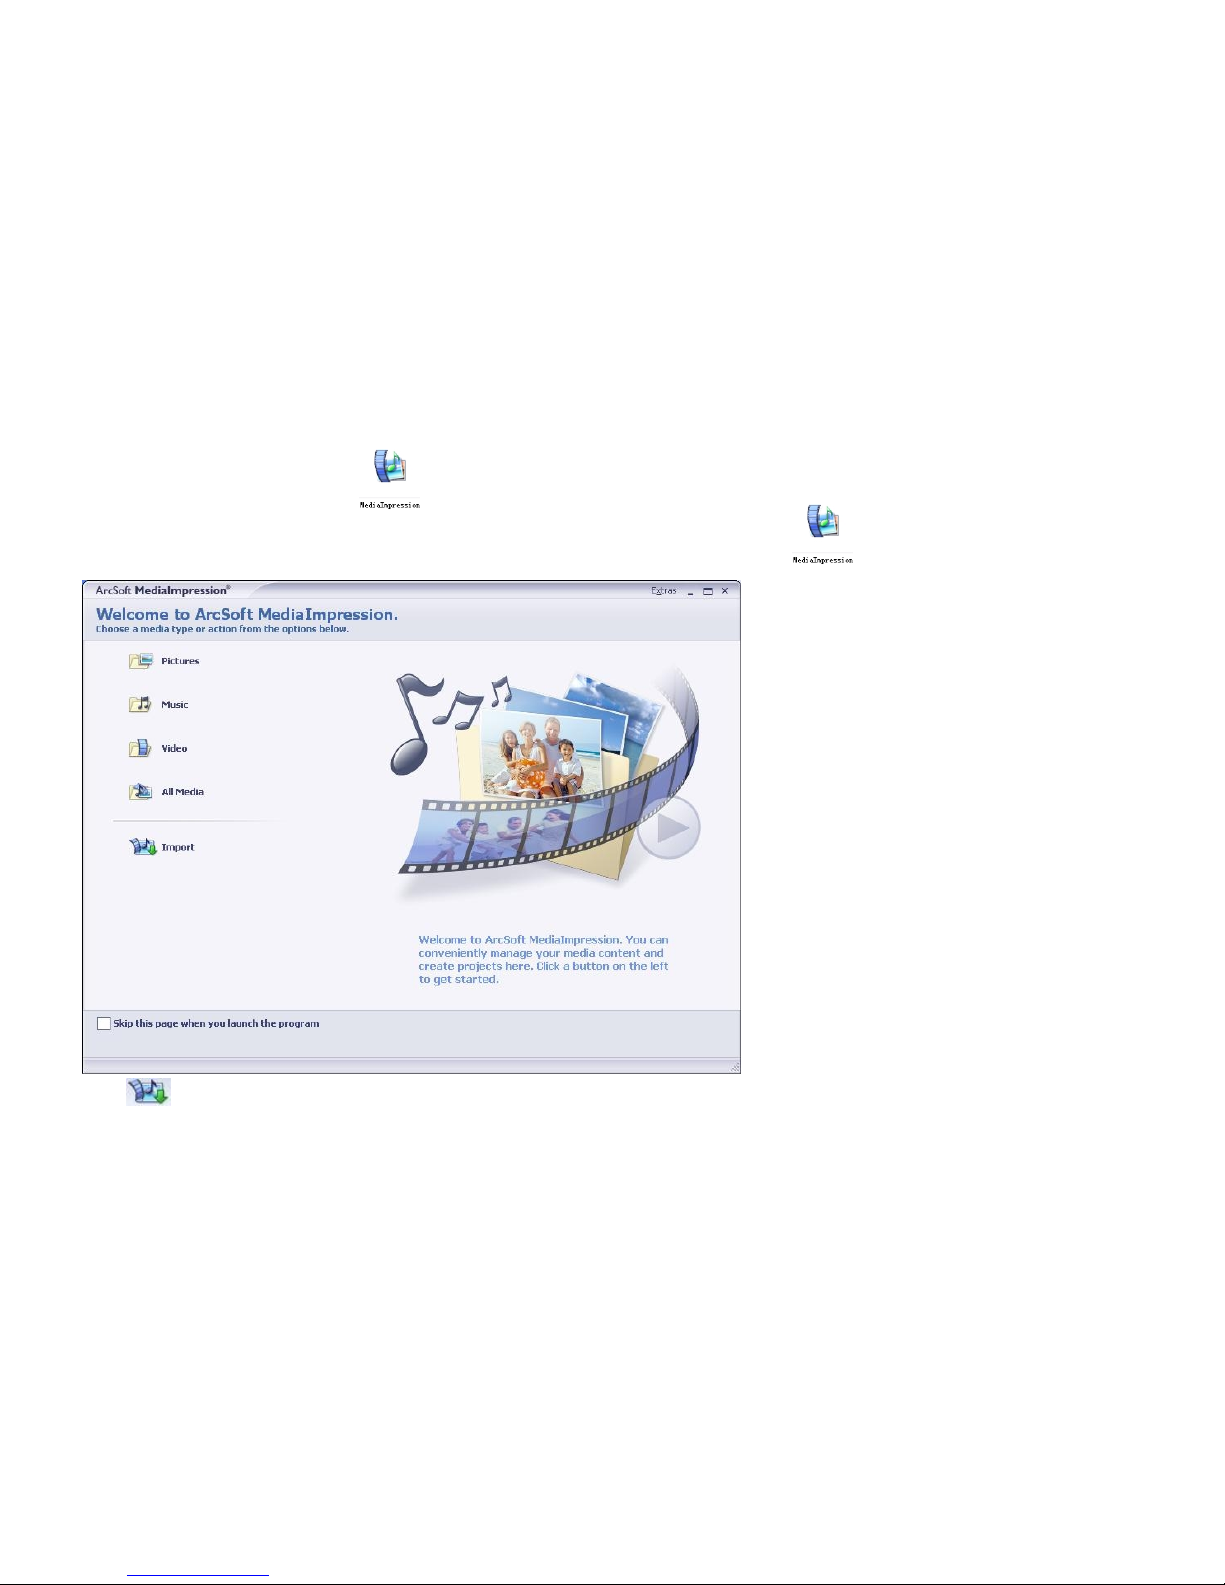
ArcSoft MediaImpression icon will appear on computer’s desktop when installation is complete.
2. Using ArcSoft MediaImpression
Connect your camcorder to the computer. Double click MediaImpression icon on computer’s Desktop and
the MediaImpression software main screen will open
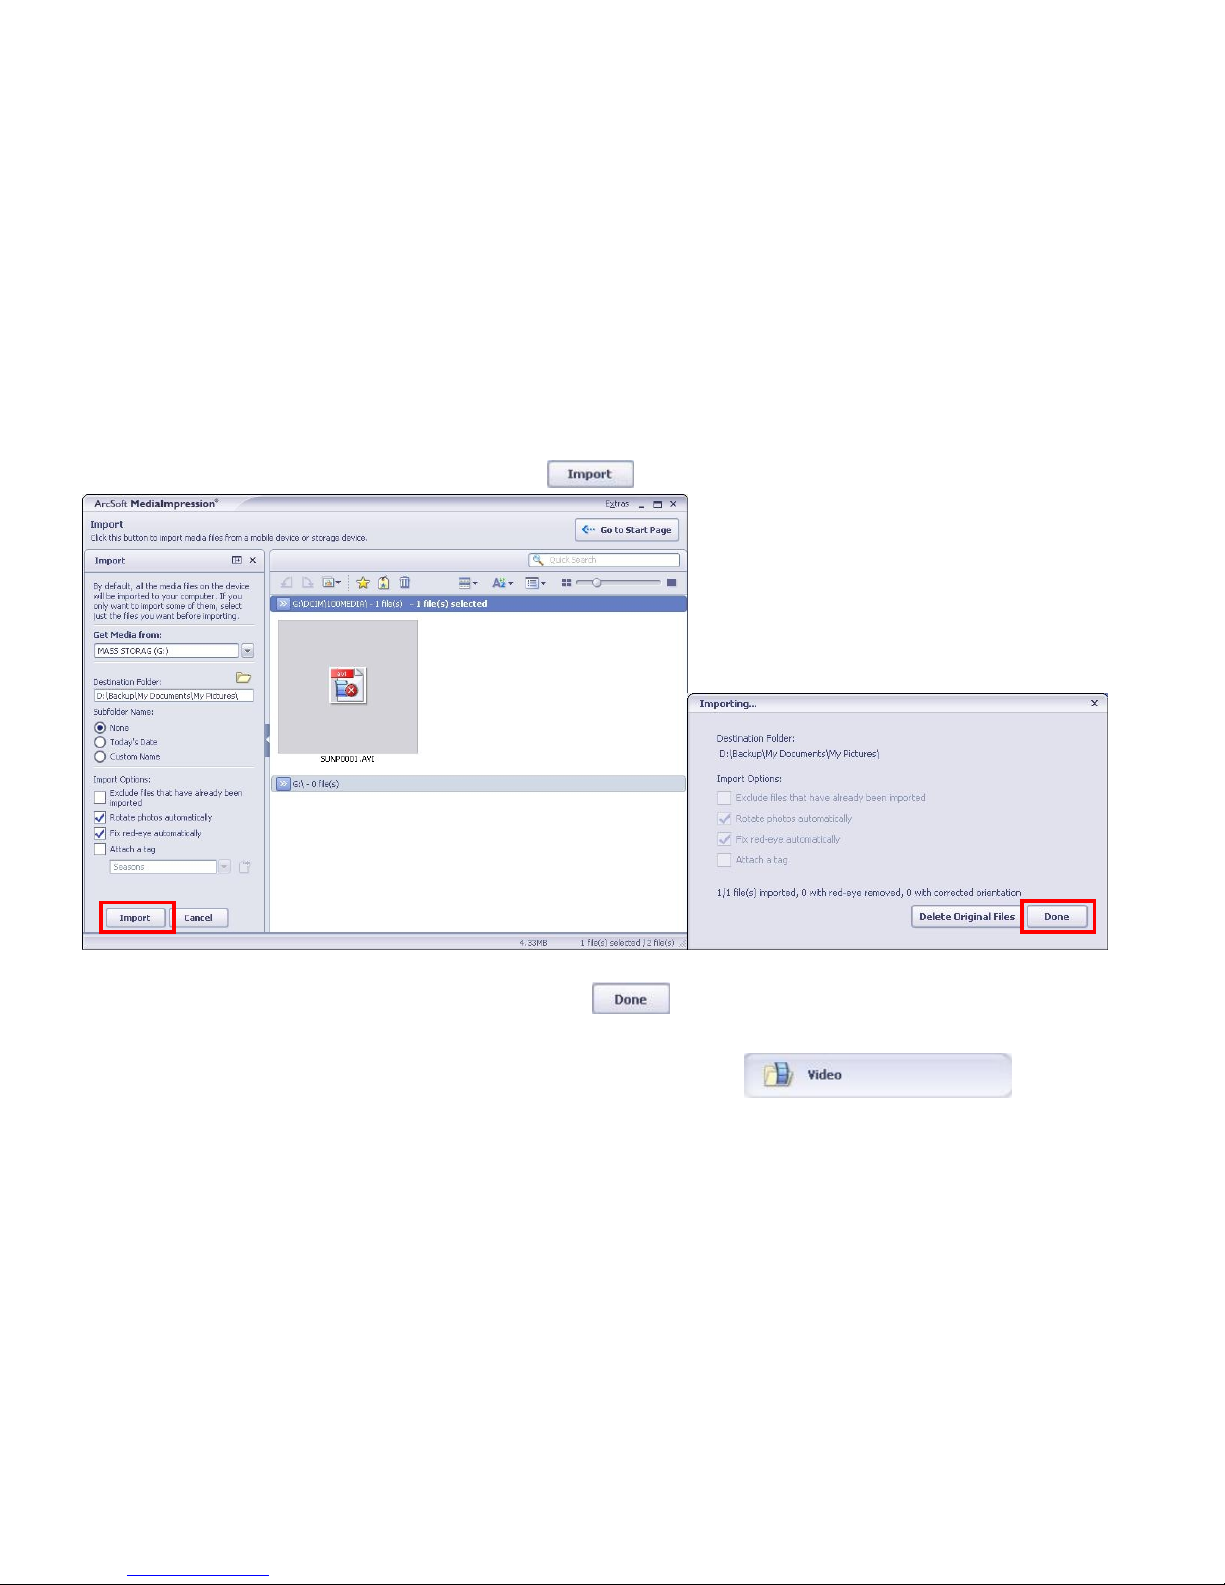
Click Import Option on the main screen and enter into “Import” screen. Then select the files in the camcorder
Page 14
13
that you want to upload to the computer and click Option.
After importing the file has been completed, click on the “ Importing… ” window and enter into
“MediaBrowser” window.
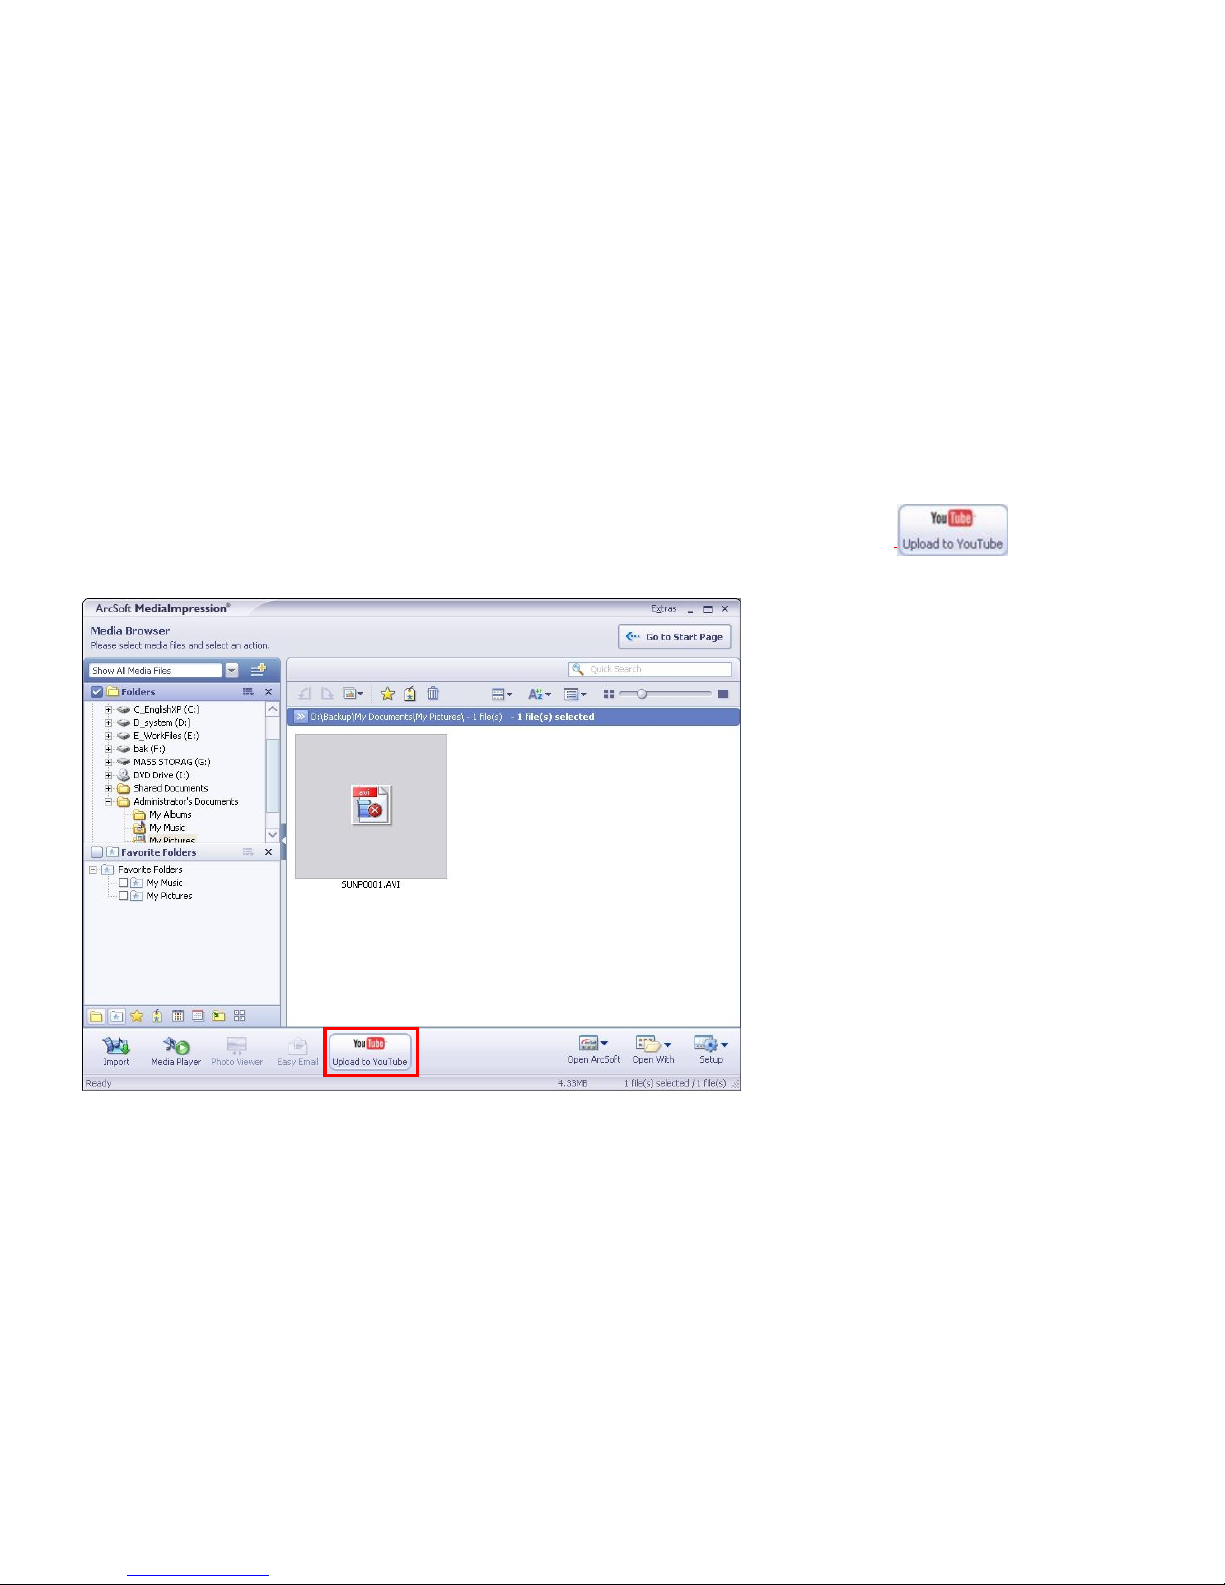
Note: On the main screen, you can also click other options such as to enter into
Page 15
14
“MediaBrowser” window. Then select the video file in the computer for uploading.
Select the video you wish upload to You Tube on“MediaBrowser”screen and then click (???????) option to access
your YouTube log-in screen.
Page 16
15
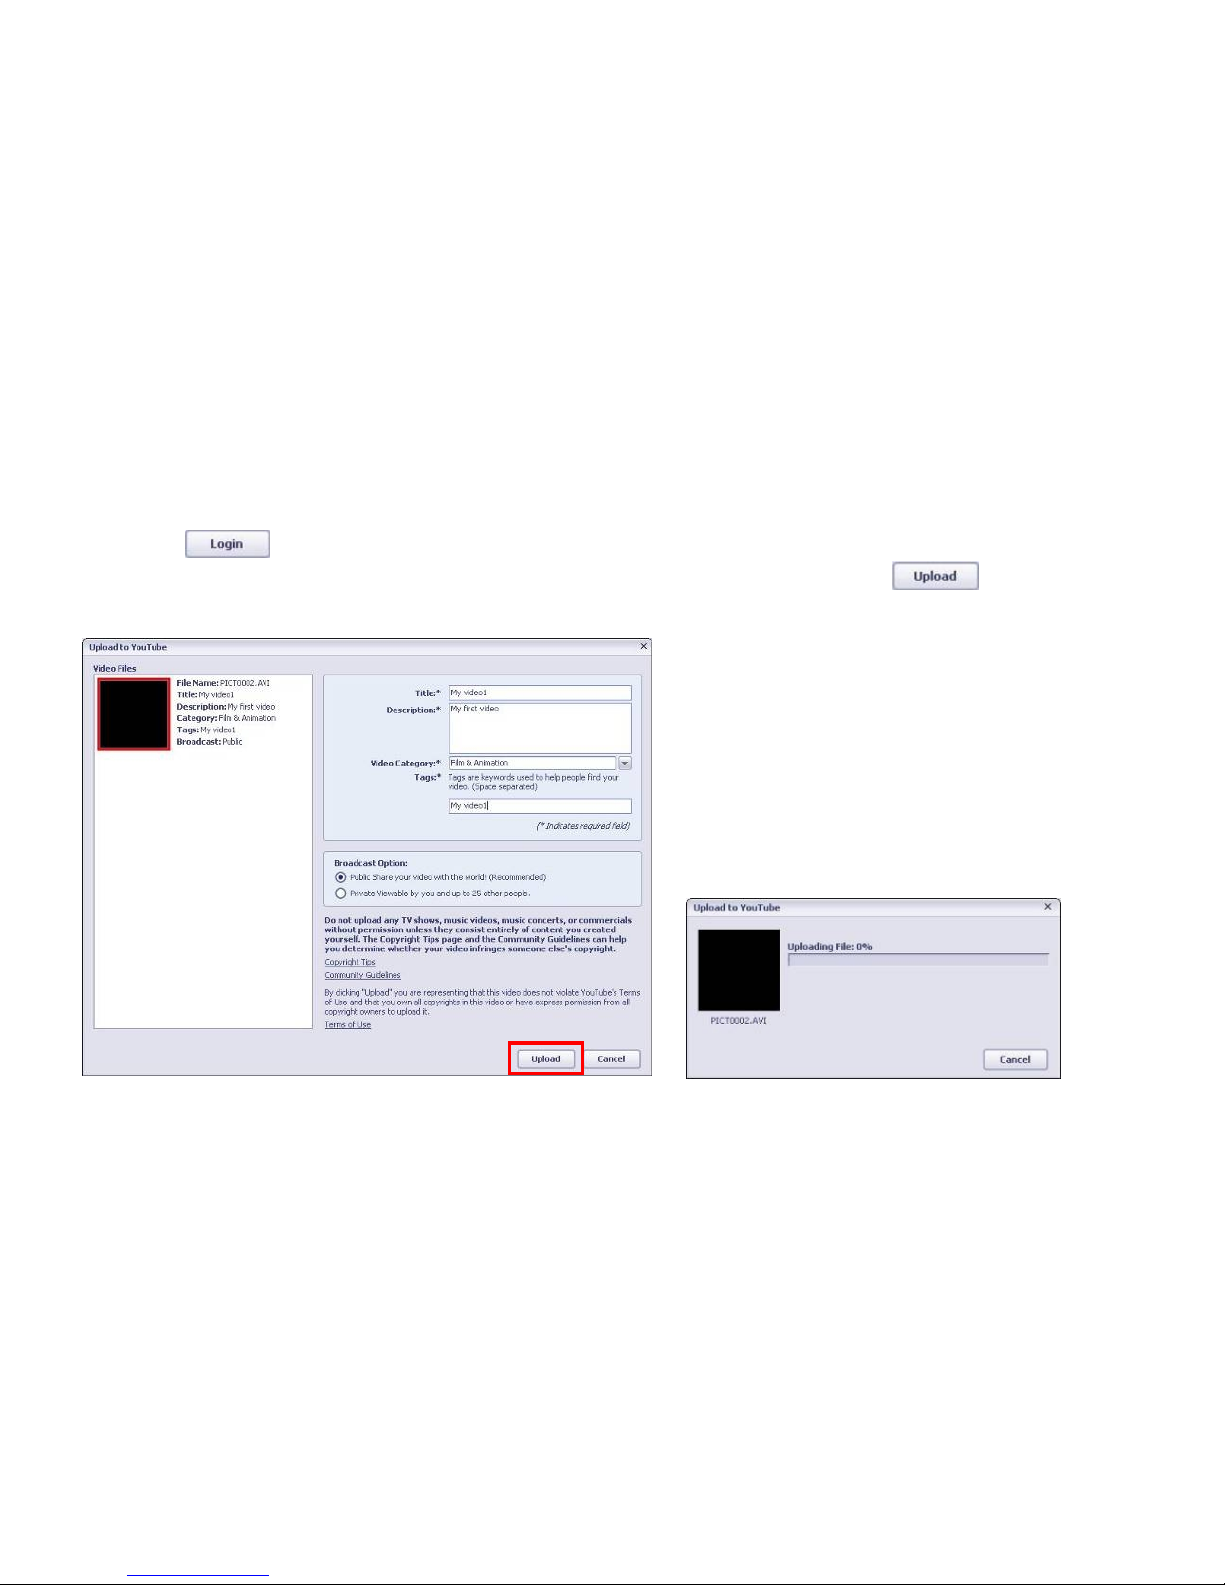
On“Login”screen, please enter your YouTube Username and Password (you can select the corresponding option and
“save” the Username and Password so that you do not need to input these data next time).
Then click option.
When“Upload to YouTube”screen appears, fill in Title, Description, etc. Then click option and start
uploading selected video.
Click “Cancel” if you wish to stop upload, otherwise continue for successful uploading.
Page 17
16
Specifications And System Requirements
Product specifications:
Image sensor: 300,000pixels
Function mode: Recording Video, Capture Still Images, Play back, Mass storage device
Resolution: Video: 640×480 (30fps); 320×240 (30fps)
Photo: 640×480, 320×240
Lens: F2.8 f=3.0mm
Focus range: 1.2m (4 feet) to infinity
Digital Zoom: 4×
LCD display: 1.44 inch TFT LCD
White balance: Auto
Exposure: Auto
File format: AVI/JPEG
Video out: NTSC
Storage media: Required SD/SDHC Memory card (max. 8GB) – not supplied
USB port: USB2.0 port
Power supply: Required two AA Alkaline batteries – not supplied
System Requirements:
Operation System Microsoft Windows 2000,XP,Vista, Windows7
CPU Intel PIII800 or CPU of equal or higher performance
Memory 512 MB or higher
Sound card and display card Support DirectX8 or above
CD-ROM 4X or higher speed
Hard Disk 1GB min space available
Other Standard USB 1.1 or USB 2.0 port
Page 18
17
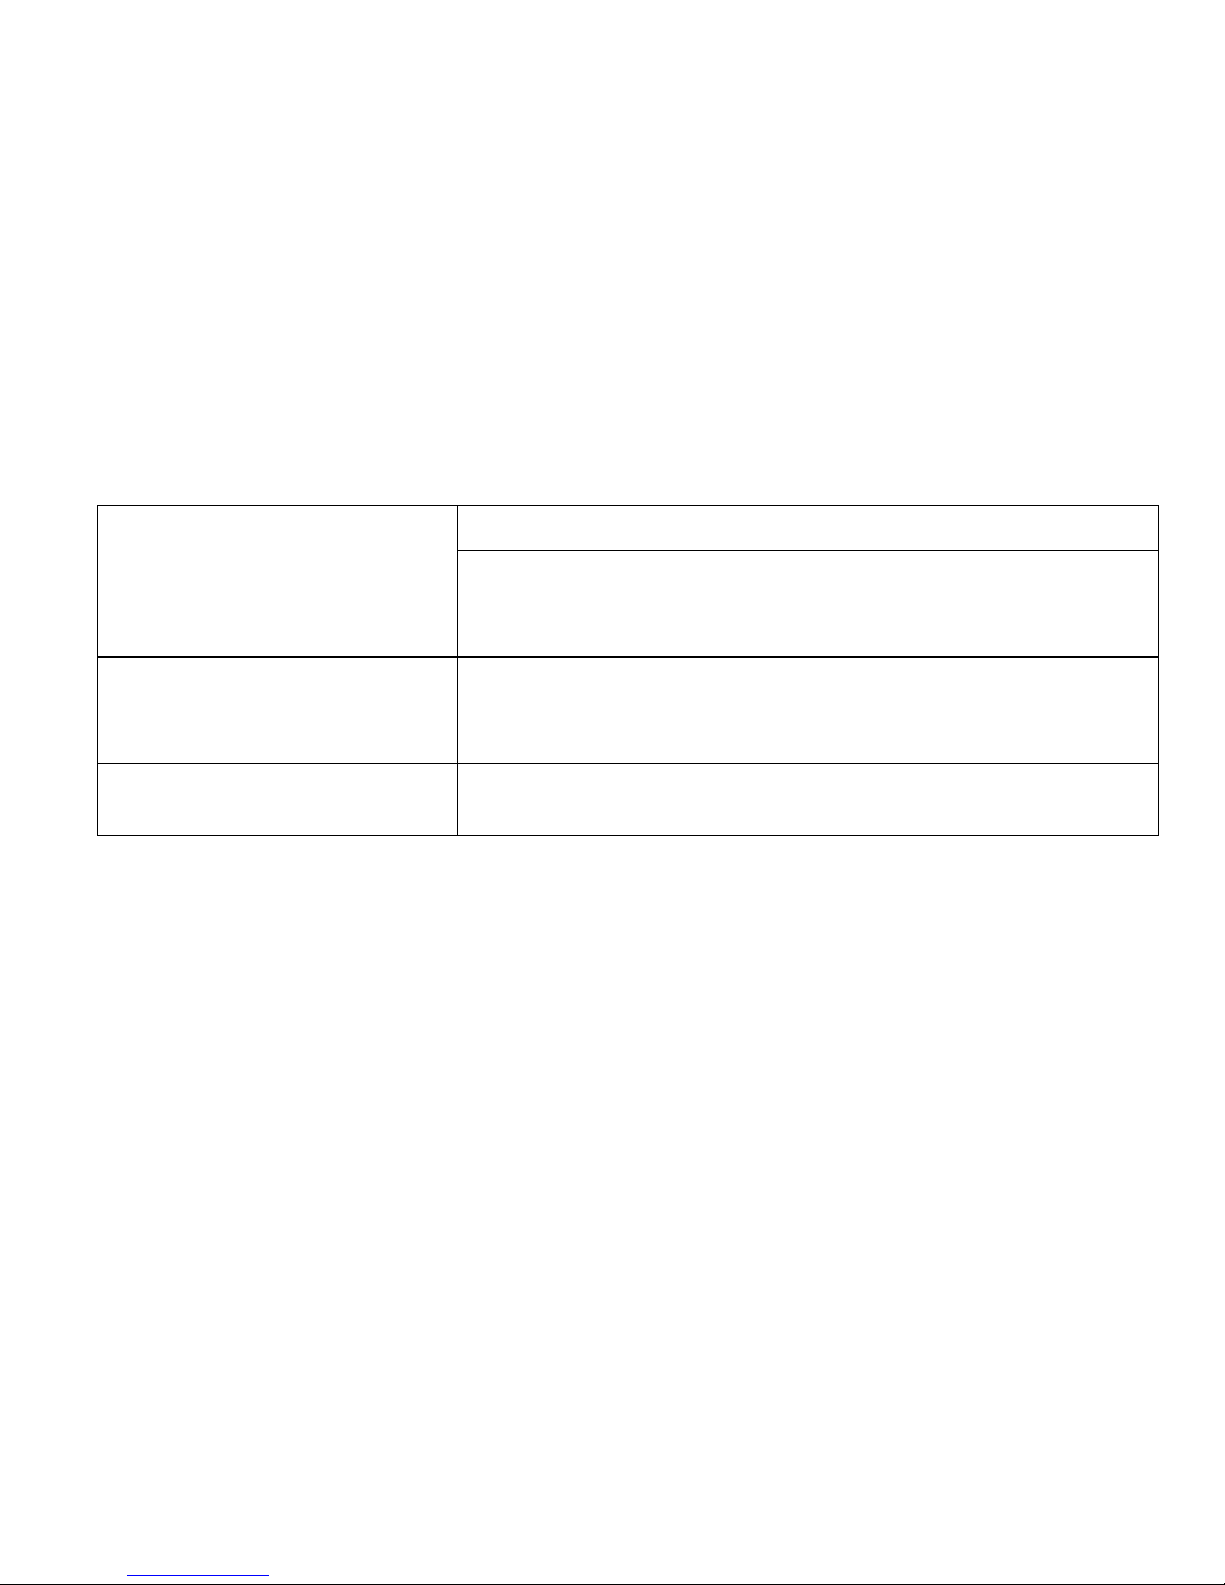
•• FFAAQQ
Batteries are depleted. Please reinstall new batteries.
Camera can NOT be turned ON.
Batteries are installed incorrectly. Make sure that batteries are
inserted carefully matching battery polarity with plus / minus terminal
markings.
Camera can not record any
further video clips.
The memory of the SD/MMC storage card is already full. Save and
then delete some files or replace the card. Make sure the SD card is
not “locked”
Video clips looks dark.
Scene is too dark to record video. Use additional light source to
brighten the scene.
Page 19

18
“No file” message displayed at the
Playback mode
1. No pictures / video are stored on inserted SD/SDHC card.
2. Inserted SD/SDHC card contains records taken by “other”
cameras; your camera may not playback these records.
Solution: Remove records taken by “ other” cameras, and / or
“Format” the card. Download valuable records to the computer before
formatting the SD/SDHC card; formatting will erase all data stored on
the card.
To format the SD card, connect camera with SD card installed to
computer or insert the SD card in card reader connected to computer.
Navigate to the Start menu in the computer. Then, click on “My
Computer”. Locate your SD card drive within the root directory and
right-click on it. An option list pops out. Click on “Format” option and
further option screen is displayed. Make sure that the options are
properly selected on this screen and then click on “Start” option at the
bottom. (Note:Select ‘FAT’ option under ‘File System’ for SD card
with 2GB storage capacity or below. Select ‘FAT32’ option for SD card
with 4GB storage capacity or above.) The computer will start
formatting the SD card automatically. The process may take some
time to complete.
Page 20

19
 Loading...