

Jazz ultratab c1029 Instruction Manual


1
FCC
FCC
FCC
FCCDECLARATION
DECLARATION
DECLARATION
DECLARATION
ThisdevicecomplieswithPart15ofFCCrules.Operationissubjecttothe
followingtwoconditions:(1)Thisdevicemaynotcauseharmfulinterference,and
(2)thisdevicemustacceptanyinterferencereceived,includinginterferencethat
maycauseundesiredoperation.Privacyofcommunicationsmaynotbeensured
whenusingthisdevice.
Caution:Changesormodificationstothisunitnotexpresslyapprovedbythe
partyresponsibleforcompliancecouldvoidtheuser
’
sauthoritytooperatethe
equipment.
Note:Thisequipmenthasbeentestedandfoundtocomplywiththelimitsfora
ClassBdigitaldevice,pursuanttoPart15oftheFCCRules.Theselimits
aredesignedtoprovidereasonableprotectionagainstharmful
interferenceinaresidentialinstallation.Thisequipmentgenerates,uses,
andcanradiateradiofrequencyenergyand,ifnotinstalledandusedin
accordancewiththeinstructions,maycauseharmfulinterferencetoradio
communications.However,thereisnoguaranteethatinterferencewillnot
occurinaparticularinstallation.Ifthisequipmentdoescauseharmful
interferencetoradioortelevisionreception,whichcanbedeterminedby
turningtheequipmentoffandon,theuserisencouragedtotrytocorrect
theinterferencebyoneormoreofthefollowingmeasures:
-Reorientorrelocatethereceivingantenna.
-Increasetheseparationbetweentheequipmentandreceiver.
-Connecttheequipmentintoanoutletonacircuitdifferentfromthatto
whichthereceiverisconnected.
-ConsultthedealeroranexperiencedradioTVtechnicianforhelp.
Pertinenttestingdocumentationisavailableforverification.
FCCReportNo.forthisproduct:ES120724214E

2
Attention:
This handbook contains important security measures and product information
essential for using the device safely. Pl ease read this manual carefully before
us ing the device .
� Do not place the device in high temperatures, moist areas or very dusty
places.
� During seasons with hot temperatures do not leave the device in a car with
the windows closed.
� This tablet is a sophisticated device. Please handle with care and do not
drop as it may damage the display screen.
� Please choose the appropriate volume . When utilizing headphones please
ensure the volume is not set at high level .
� Charge the device under the following conditions,
A 、 The battery power ICONS show there is no power
B 、 The system automatically shuts off
C 、 The Operation buttons does not respond
� Do not disconnect the device when it is formatting, downloading or
uploading a file as it can cause an application error.
� Follow the user manual for standardized operational use of the device.
� Don ’ t disassemble the product . Do not use alcohol, thinner or benzene to
scrub the product.
� Don't use the device in a place that prohibits use of electronic equipment.
� Please don't use the Tablet PC when you are driving or walking down the
street.
� USB is only to be used for data transmission.

3
The company reserves the right to improve the product, product specifications
and design and/or make any other changes. The information is subject to change
without prior notice.
(This tablet does not have a waterproof function)
【 Remark 】 All pictures in this manual are only for your reference. The products
specification and design may change. The information is subject to change
without prior notice.

4
1 .
.
.
. Appearance
Appearance
Appearance
Appearance and
and
and
and button:
button:
button:
button:
13

5
Number
Number
Number
Number #
#
#
# Description
Description
Description
Description
1 (
11
) Rear Camera ( 2M P)
2
Power button
Startup: Hold down the power button for several seconds.
The tablet will turn on and then the system will enter t he
main interface.
S hutdown: In the main menu interface, p ress the power
button for several seconds to shutdown, The system will hint
the "power off" option . Click ” OK ” . Now y ou can safely shut
down.
Turn off screen: When the screen is on, s hort press Power
button to turn off screen . Short press Power button again to
turn on screen.
Remark 1. When the power is depleted the system will shut
down automatically.
2. Restart will scan and restore the disk . I t may
take a longer time to enter into system .
3 Head phone jac k: 3.5mm standard head phone jack
4 Mini HDMI interface : Used to connect to external HDMI
displays
5
M icro USB interface : Used to connect to PC for data
transmission, charging and connecting to external USB
flash drive
6
Power Jack: One end of the AC adaptor can be inserted to
the Power Jack and then the charger is inserted to a
standard AC wall outlet to charge the battery of the tablet.

6
7 TF-card slot : External T-FLASH card, support up to 32G B
8 MIC : B uilt - in Microphone
9 Speaker
10
V
olume button ( V olume + / V olume - ): Use Volume + and
Volume - to adjust the volume.
12 Front Camera ( 0.3 M P)
13
Touch panel: 10 ” Capacitive touch panel . In the Operation,
to click, drag on the touch panel
2.
2.
2.
2. First
First
First
First use
use
use
use
2.1 Battery management and charge
Prior to first use, make sure the battery is fully charged
To
charge simply connect the adaptor (to AC wall outlet) or USB cable (to
USB port on your computer) .
Charge for six hours for the first two times .Following that the battery need
only be charged for 4 hours.
【 Remark 】 : This tablet has a Built-in type Lithium ion battery,
To
charge, use a
standard adaptor (Input: AC1 0 0~240V 50/60Hz Max : 0.65 A. Output: DC5V/ 2 .5A) .
Also USB interface can charge by inserting one end of USB cable to USB
interface of tablet and the other end to an available USB port on your computer .
While charging, the battery icon will scroll. When charging is complete the
battery icon will become green and stop sc rolling.
In order to prolong the service life of the device, let the battery deplete before
charging.
【 Remark 】 : 1. Charge the battery at least once a month to avoid power
consumption caused damage .
2 、 After low battery shut down, connect the DC adaptor . While charging,
y ou will need to wait some time until the battery has enough power to switch on

7
and enter into main menu.
3. Device charging should be in standby status to reach normal charging
time ; charging time may take longer if using the tablet during charg ing .
2.2 Connect ion with PC
Use USB cable to connect the device to a PC . After several seconds,
click the right bottom corner of the screen. A menu comes out on the right bottom
corner. Click the option ‘ USB connected ’ . The device will pop up the USB
connection window . C lick ‘ Turn on USB storage
’
to connect to PC.
In storage mode , i t can copy; delete the file on the device and the file on the
memory card.

8
3.
3.
3.
3. Equipment
Equipment
Equipment
Equipment operation
operation
operation
operation interface
interface
interface
interface
3.1 Unlock
Unlock
Unlock
Unlock Interface
Interface
Interface
Interface
After start up, the Locking interface will be as follows:
Tablet can operat e only after unlocking.
Unlocking method: touch the right Lock icon, drag it next to a lock at the right and
then release. The system will be unlocked and will enter the main interface.

9
3. 2 Main interface description
The main interface of the handheld tablet includes two modes: the small tools
on the desktop mode and the icons of application programs mode, both of which
can be switched between each other via the button s at the corner s .
The mode of small tools on the desktop is shown as follows:
Tap
button at the top right corner to enter the interface of icon modes for
application programs, which is shown as follows:

10
Tap button to enter the desktop interface.
Note: If the tablet is switched on for the first time after being purchased, it will
automatically install the built-in application programs. The tablet may operate
slowly and some hints may appear on the screen. After installation of programs
has been completed, the operation of tablet resumes normal.
3 .3 Shortcut Mode
Under the interface of the mode of small tools on the desktop, after tapp ing Menu
button , the Shortcut menu will pop up at the bottom of the screen, shown as
follows:

11
3.4
3.4
3.4
3.4 Usage
Usage
Usage
Usage of
of
of
of Small
Small
Small
Small Tools
Tools
Tools
Tools on
on
on
on Desktop
Desktop
Desktop
Desktop
Users can add or delete the small tools on the desktop, as well as add or delete
icons of application programs or adjust the positions of icons; the icons can be
dragged within the working zone of the desktop .
Under the interface of the mode of small tools on the desktop, press and hold the
icons of small tools, a sign of ‘ Remove
’
will pop up in the central top edge of the
desktop . At that time, you are able to drag the icon anywhere on the desktop, or
drag it directly to the ‘ Remove
’
sign to delete it.
Menu button

12
4
4
4
4 .
.
.
. Browse
Browse
Browse
Browse Webpage
Webpage
Webpage
Webpage
Users can connect to the Internet via the browser:
Tap
the browser icon to open the network browser, and then
the interface below will pop up:

13
5
5
5
5 .
.
.
. Introduction
Introduction
Introduction
Introduction to
to
to
to Typical
Typical
Typical
Typical Application
Application
Application
Application
5
5
5
5 .1
.1
.1
.1 E-mails
E-mails
E-mails
E-mails
Tap
the E-mail icon to enter E-mails. Do the following:
1. Set E-mail accounts
2. Set up new E-mails.
3. Receive/send E-mails
4. Download or open attachments
5
5
5
5 .2
.2
.2
.2 Browse
Browse
Browse
Browse Files
Files
Files
Files
Tap
the File Manager icon to enter the interface of Browse
file s.

14
After entering the interface of Browse file s , it is able to copy, move , paste or
delete files in the LOCAL, SD1 or U disk.
Install
Install
Install
Install Files
Files
Files
Files
To
install files in the file browser, tap the installation file with extension name as
APK, a n installation window will pop up. Select “ Install ” to install the software on
the tablet.

15
5.3
5.3
5.3
5.3 Music
Music
Music
Music
Tap
the icon to enter the interface of Music.
Menu options of Artists, Albums, Songs, Playlists and Now playing are displayed
at the top of the interface. In addition, user can tap the menu button to pop up the
following shortcut menus, including Party shuffle , Play all and Shuffle all.
Tap
Music file to enter the playing interface

16
1.
Tap
icon to enter the mode of random playing.
2.
Tap
icon to switch between the mode of loop for all song, loop for
current song and the mode of single song playing.
5
5
5
5 .
.
.
. 4
4
4
4 Calendar
Calendar
Calendar
Calendar
Tap
icon to check date and time, as well as add
memorandums. I f calendar is used for the first time, p lease set the calendar
before using. Do the following:
17
1. Firstly, connect the network. Then, open the Calendar and add your name ,
E-mail address, and password into the pop - up dialog box. Then tap Next
ste p.
2. During setting of the e-mail account , input information according to the tips.
3. After completion of setting, the system will exit from this interface
automatically. It will then enter Calendar interface to set date, time and
memos. (Note: T he pre-set E-mail account can be deleted . User can also
add new E-mail a ccount s. )
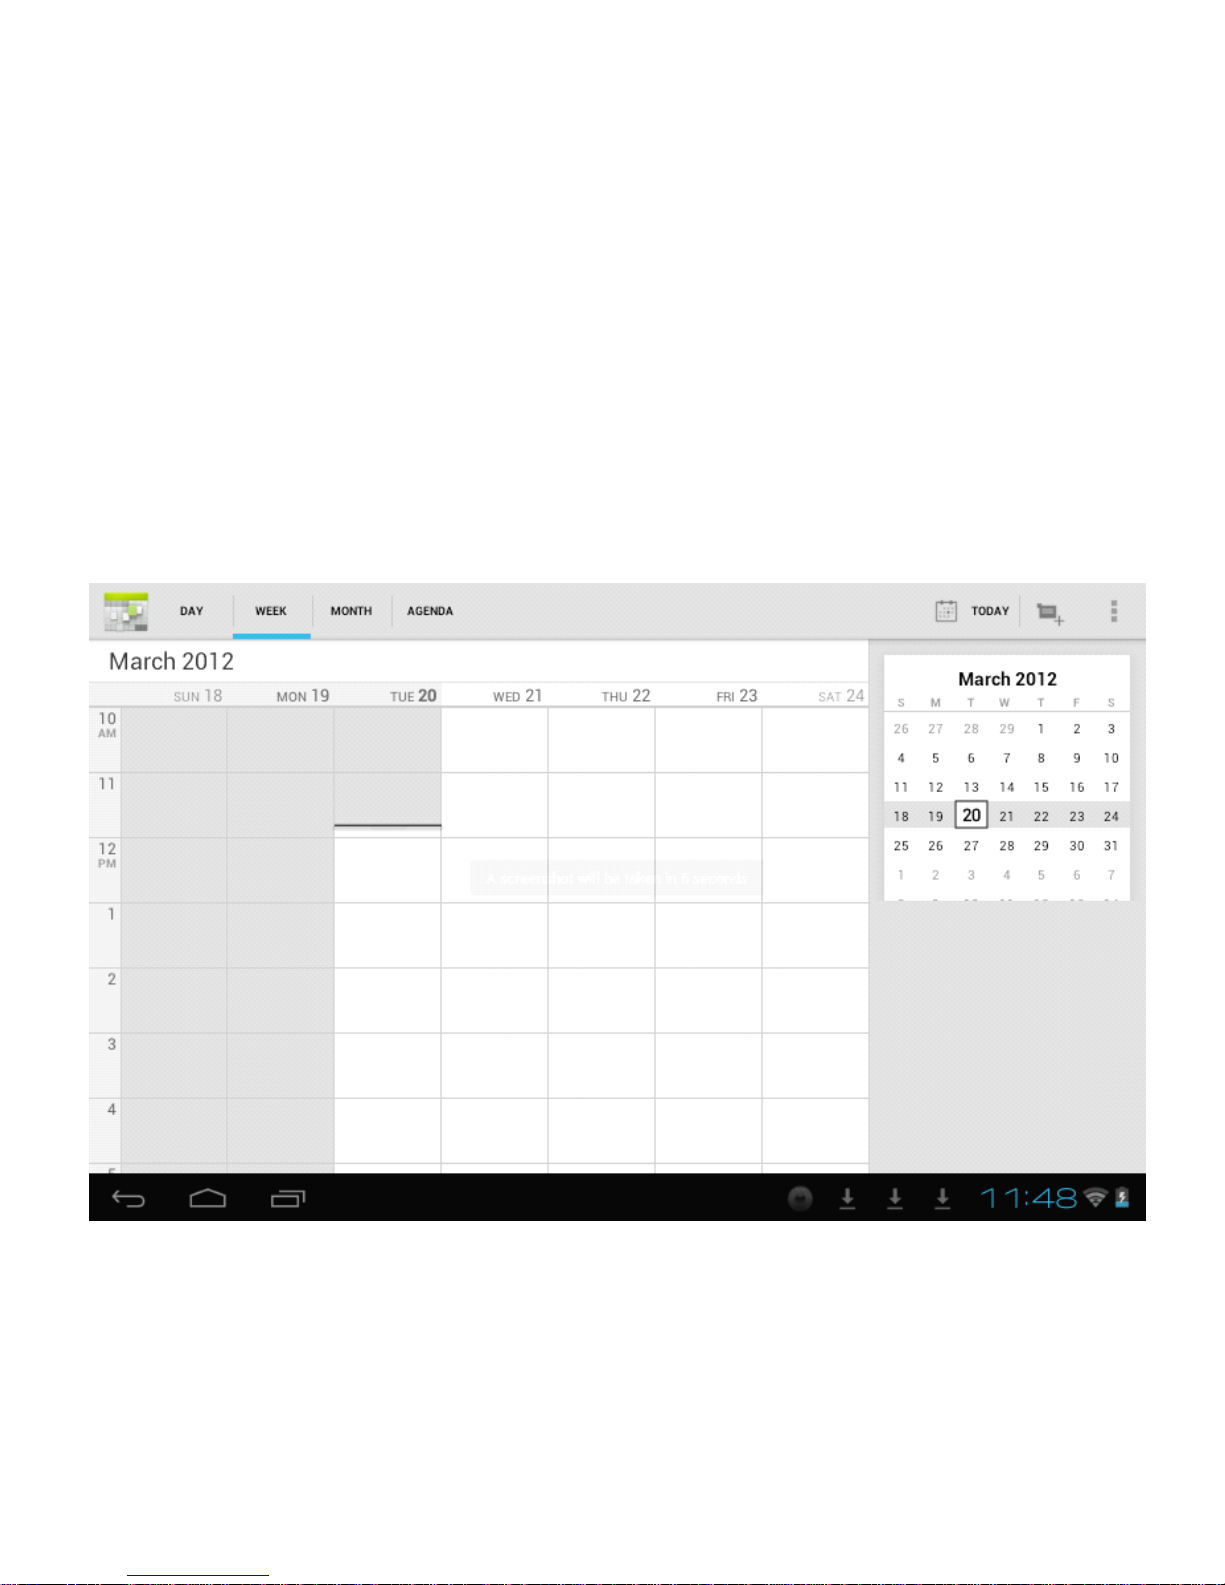
4. O ptions of Day , Week , Month , Agenda,
Today,
New event and menu button
are displayed on the top of Calendar interface .

18
5.5
5.5
5.5
5.5 Calculator
Calculator
Calculator
Calculator
Tap
icon to conduct calculation, shown as follows:

19
5.6
5.6
5.6
5.6 Sound
Sound
Sound
Sound Recorder
Recorder
Recorder
Recorder
Tap
icon to enter the interface of Sound record.
1.
Tap
icon to start recording.
2. During recording, tap icon to stop, one dialog box will pop

20
up, indicating “ Done ” or “ Discard ” .
3.
Tap
icon to listen to the current recording.
5.7
5.7
5.7
5.7 Clock
Clock
Clock
Clock
Tap icon to enter the interface Tablet clock, providing
functions of alarm clock, shown as follows:

21
5.8
5.8
5.8
5.8Search
Search
Search
Search
Tap
icontoentertheinterfaceofGooglesearchtoconduct
searchbytext,asshownbelow:
5.9
5.9
5.9
5.9.
.
.
.Camera
Camera
Camera
Camera
Tap
icontoentertheinterfaceofShooting
Typetosearchtheweb

Do
Do
Do
Do the
the
the
the following:
following:
following:
following:
1.
Tap
to take photos. It is able to save photos under the root directory—
DCIM/CAMERA in the tablet.
2.
Tap
the icon at the bottom right corner to switch from the shooting
mode to the recording video mode.
Tap
to record video.
3.
Tap
the icon to change the scene through the front camera to that
through the rear camera and vice versa.
22

4 .
Tap
the icon at the top right corne r to check the previous photo, an d
conduct the following operations for photos: play slides, delete, share, crop,
rotate to the left/right or set as wall paper.
Tap
button to return to
the interface of shooting.
6
6
6
6.
.
.
. Downloads
Downloads
Downloads
Downloads
Tap
icon to check the content just being downloaded.
7
7
7
7.
.
.
. Prompts
Prompts
Prompts
Prompts and
and
and
and Tips
Tips
Tips
Tips
7
7
7
7.1
.1
.1
.1 Convenient
Convenient
Convenient
Convenient Operation
Operation
Operation
Operation Modes
Modes
Modes
Modes
To return to the desktop interface, tap
icon.
To
adjust the volume, tap icon or icon or slide the volume
bar
to the left/ right whichever is available.
23

24
7
7
7
7.2
.2
.2
.2Wireless
Wireless
Wireless
WirelessNetwork
Network
Network
NetworkConnection:
Connection:
Connection:
Connection:
Tap
icontoentertheinterfaceofwirelessnetworkconnection,
shownasfollows:
Inputusernameandpassword,andthentap“connecting”toenterthewireless
network.

25
7.3
7.3
7.3
7.3Tips
Tips
Tips
Tipsfor
for
for
forBattery
Battery
Battery
BatteryUsage
Usage
Usage
Usage
Thewidescreenusedbythetabletconsumesalotofpower.
To
prolongthe
servicetimeofthebattery,reducetheoperatingfrequencyofthefollowing
functions.
1.ReducingDisplaybrightness:Ondesktopinterface,pressMenu
Button-SystemSettings-Display(displaysetting)-Brightness(reduce
brightness).
2.ReducingNetworksearch:Ondesktopinterface,pressMenu
Button-SystemSettings-Wireless&networks-WIFI
settings-disconnectwirelessnetwork.
8
8
8
8.
.
.
.Customized
Customized
Customized
CustomizedSettings
Settings
Settings
Settings
Tap
icontoconductcustomizedsetting.
8.1
8.1
8.1
8.1Wireless
Wireless
Wireless
Wirelessand
and
and
andNetwork
Network
Network
Networks
s
s
s
1.
To
openWIFI,taptoselectONoptionnexttoWi-FiunderWireless&
Networks.
2.Selectanetworkontheright.Ifrequired,enterthecorrectpasswordand
select“Connect”.

26
8.2
8.2
8.2
8.2Sound
Sound
Sound
Sound
SetRingtone¬ificationsandvolumeofsound.
Media
Media
Media
MediaVolume
Volume
Volume
Volume
To
setthevolumeofmusicandvideo,pressSettingsicon-Sound(sound
setting)-Volumes.
Noti
Noti
Noti
Notification
fication
fication
ficationSound
Sound
Sound
Sound
To
setthenotificationsound,pressSettingsicon-Sound(soundsetting)–Default
notification.
Activating
Activating
Activating
ActivatingTouch
Touch
Touch
TouchSound
Sound
Sound
Sound
To
activatethescreentouchingwithsound,pressSettingsicon-Sound(sound
setting)-Touchsounds.Selectthecheckbox.

27
8.3
8.3
8.3
8.3Display
Display
Display
Display
Auto-rotation
Auto-rotation
Auto-rotation
Auto-rotationof
of
of
ofScreen
Screen
Screen
Screen
EnterSettings-Display(displaysetting)-Auto-rotatescreen.Ifyouselectthe
checkbox,thescreenwillrotatewhenthetabletismoved.
Brightness
Brightness
Brightness
Brightness
To
adjustthebrightnessofthescreen,pressSettingsicon-Display(display
setting)-Brightness.
8.4
8.4
8.4
8.4SD
SD
SD
SDCard
Card
Card
Cardand
and
and
andStorage
Storage
Storage
Storage
Checktheavailablestoragespace.

28
8.5
8.5
8.5
8.5Language
Language
Language
Languageand
and
and
andInput
Input
Input
Input
Settheoptionsoflanguagezone(languageandzone)andspellingcorrection.
Select
Select
Select
SelectLanguage
Language
Language
LanguageZone
Zone
Zone
Zone
To
selectthelanguageandzone,pressSettingsicon-Language&input-
Language-Selectlanguagezone.
User
User
User
UserDictionary
Dictionary
Dictionary
Dictionary
To
add/deletewordsfromtheuserdictionary,pressSettingsicon-Language&
input-Personaldictionary.

29
8.6
8.6
8.6
8.6Date
Date
Date
Dateand
and
and
andTime
Time
Time
Time
To
setdate,time,timezone,timingandform,pressSettingsicon-Date&
time.
 Loading...