

Page 1

Page 2

1
INDEX
Preface & FCC statement
Precautions
1. Getting to know your digital camera:
1.1 Functions and characteristics
1.2 Technical specifications
1.3 Computer System compatibility :
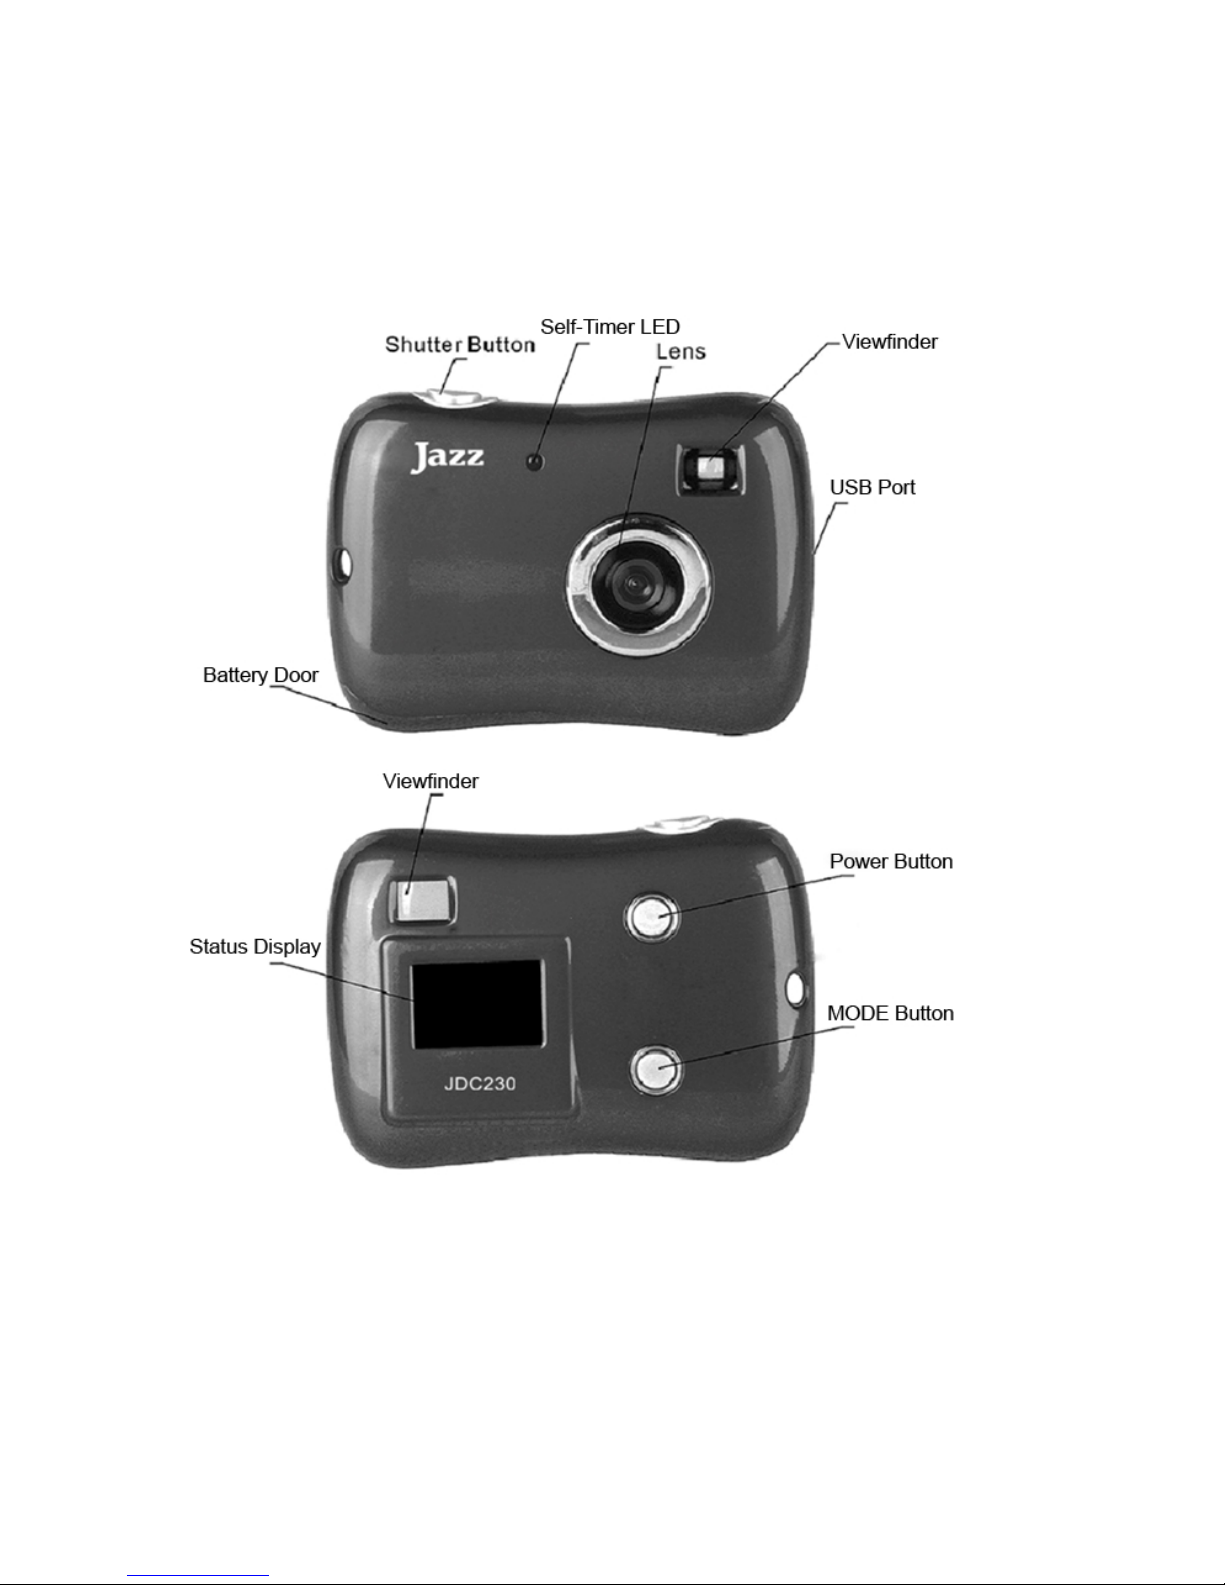
1.4 Camera functions
2. Using your digital camera
2.1 Battery loading
2.2 Changing function modes
2.3 Taking photos
2.4 Sleep mode (automatic energy-saving)
2.5 Self-Timer mode
2.6 AVI mode
2.7 Continuous shooting
2.8 Deleting all the photos saved to memory
2.9 Deleting the last photos saved to memory
2.10 Modifying resolution "LO"’
2.11 Modify the compression mode
2.12 Modifying frequency
3. Installation and Utilization of the software program
4. Problem-solving
5. Downloading Images
6. PC/Webcam Function
Page 3

2
Preface
l Congratulations on your purchase of this digital camera.
l Please read this manual carefully to maximize your enjoyment when using
this camera. Keep the manual in a safe place for future reference.
l Before taking pictures at important events please take and download some
test pictures first to know how to operate the camera, check the battery
power and achieve best performance.
Every effort has been made to ensure that the content of this manual is correct
and up-to-date at time of printing. However, no guarantee is made regarding the
accuracy of the contents as we reserve right to make improvements or minor
changes without notice to the product and to the manual.
FCC statement
FCC part 15.21
Warning: Changes or modifications to this unit not expressly approved by the
party responsible for compliance could void the user’s authority to operate the
equipment.
FCC part 15.105
NOTE: This equipment has been tested and found to comply with the limits for a
Class B digital device, pursuant to Part 15 of the FCC Rules. These limits are
designed to provide reasonable protection against harmful interference in a
residential installation. This equipment generates, uses, and can radiate radio
Page 4

3
frequency energy and, if not installed and used in accordance with the instructions,
may cause harmful interference to radio communications. However, there is no
guarantee that interference will not occur in a particular installation. If this
equipment does cause harmful interference to radio or television reception, which
can be determined by turning the equipment off and on, the user is encouraged to
try to correct the interference by one or more of the following measures:
- Reorient or relocate the receiving antenna.
- Increase the separation between the equipment and receiver.
- Connect the equipment into an outlet on a circuit different from that to which
the receiver is connected.
- Consult the dealer or an experienced radio TV technician for help.
Pertinent testing documentation is available for verification.
Precautions
Important notes on picture-taking
l Before you record one-time important events such as wedding, please take
and download some test pictures first to ensure the camera and battery
work well. Manufacturer will not be responsible for any consequential loss
in the event of failure to capture images.
l Use only recommended batteries. If batteries become exhausted, remove
old and install new batteries, but first - download images to computer as the
data from camera’s memory will be deleted when batteries are removed.
Page 5

4
* Body static-electricity may cause your camera to power off. Simply restart
and the camera will operate again.
l Keep your camera from becoming moist or wet. Water or moisture entering
the camera may cause camera to malfunction or may even cause
permanent damage.
Protection of captured data
l Do NOT turn off the camera or remove batteries while the camera is
processing as the data being stored will be lost. Removing batteries will
cause all data in memory to be deleted.
l Always protect important data by making a back up copy.
l Some images may be protected by copyright. So please ensure you comply
with all legal requirements in capturing or copying images or video.
Moisture and condensation
Moisture may condense inside or outside of the camera when you bring it
from cold (say outdoors) to warm (say heated home) environment. The
moisture may cause temporary malfunction of the camera.
Do NOT turn ON the camera immediately but wait about an hour for the
moisture to evaporate. If you shoot prematurely with some moisture
remaining inside the lens, you will be unable to record clear images or video.
Camera care and cleaning
l If necessary clean the camera surface with a soft cloth slightly moistened
Page 6

5
with water, then wipe the surface with a dry soft cloth
l Keep the lens clean from dust, fingerprints or moisture to avoid blurry
images.
l Keep your camera away from following aggressive chemical substances
as they may damage the camera: thinner, benzene, alcohol, liquid soap,
sunscreen, etc.
l Avoid touching the camera lens with your hand.
Protection of camera
l Do NOT use camera in very damp or extreme weather conditions.
l Do NOT drop or knock the product. Your camera is a delicate electronic
device. Rough handling may damage the internal components or affect the
settings.
l Do NOT use or store camera in dusty, dirty or sandy or damp environment
as the elements may damage the camera. Keep camera clean and dry.
l Do NOT store camera in extremely hot environment (such as inside a
parked car during bright sunshine). High temperatures may shorten the life
of electronic devices, and may even damage some parts.
l Do NOT store camera in extremely cold environment to avoid moisture
condensation that can damage electronic circuits or components.
l Do NOT store the camera for a long time with batteries installed. Remove
batteries when not using for extended period.
l Do NOT attempt to open the housing of the camera as there is risk of
electric shock. Refer to qualified service personnel if servicing is needed.
Page 7

6
1. Getting to know your digital camera
1.1 Functions and characteristics
Camera principle functions: Still pictures and video clips can be captured and
stored in the internal memory of the camera.
PC or Webcam function : When connected to a computer via USB cable the
camera becomes a web camera.
Software application supplied: Camera is supplied with ArcSoft PhotoImpression
and ArcSoft VideoImpression that enable easy capture, filing, magnification and
transmission of images – both still photos and video clips. .
Self-timer – camera incorporates self-timer for image capture with 10 second
delay indicated by LED light blinking and beep sound.
Continuous shooting – Camera can record 3 consecutive images when function is
activated.
Automatic exposure control – camera controls exposure automatically in all
lighting conditions.
Automatic shutdown (sleep mode) – after 30 seconds of inactivity the camera
shuts down to save battery power.
Page 8

7
1.2 Technical specifications -
Resolution: 300K Pixels (640X480) VGA CMOS sensor
Lens: Fixed focus, f=5.4mm
Aperture: F 2.8 f
Focus Range: 3 feet to infinity
Storage Capacity: internal 8 MB
Picture storage capacity:
640X480 pixels: 25 (non compressed) / 76 (compressed) pictures
320X240 pixels: 100 (non compressed) / 274 (compressed) pictures
Note: Photos to be saved are subject to change from different ambient light.
Power supply: Two AAA alkaline batteries
Interface:USB port
1.3 Computer System compatibility :
- Pentium III 800MHz and above
- Windows 2000 / XP / Vista
- Memory: 256 MB recommended
- Hard drive capacity: 1 GB
- CD ROM drive
- Colour monitor: minimum 800X600. 16 bits
- Interface: USB
1.4 Camera functions.
Page 9
8
2. Using your digital camera
Page 10

9
2.1 Battery loading
Open the battery compartment and insert two AAA size 1.5V alkaline batteries aligning
them correctly - matching the polarity on base of battery compartment. Close the
compartment and press the POWER button. The number 25 will appear on the LCD
screen of the camera. This indicates that it is ready to take 25 "high-resolution"
photographs and that its memory is empty.
When symbols blink on the LCD screen indicating low battery power, please change the
batteries.
Caution: Please first transfer your captured photos or video clips to computer via
USB cable before changing batteries - to preserve images. All images captured
will be deleted when batteries are removed.
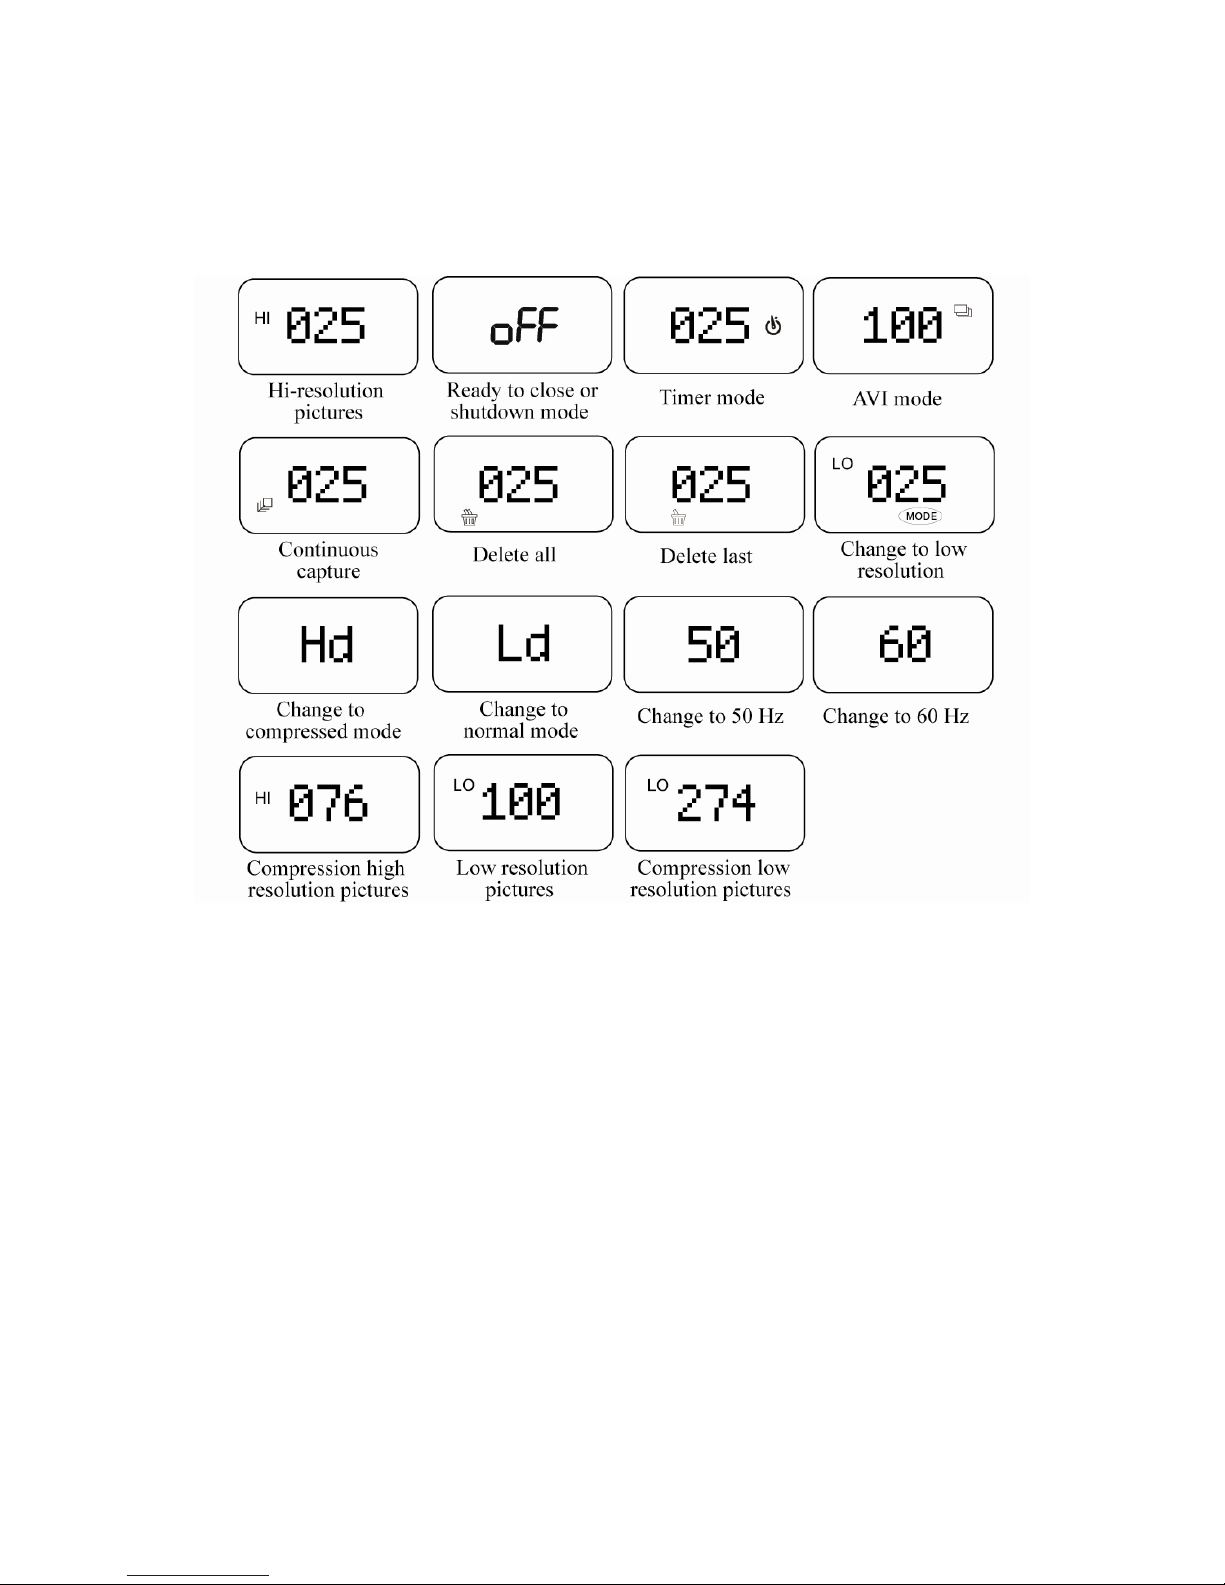
2.2 Changing function modes
The LCD screen displays different symbols when the MODE button is pressed.
The icons and functions are as follows:
Page 11
10
2.3 Taking photos
Turn camera ON and still picture mode (default mode) is ready to operate. When
pressing the shutter button, a distinct beep can be heard indicating photo has
been taken. The number displayed on the LCD screen is automatically reduced.
CAUTION: When light is low the camera needs more time to automatically adjust
exposure. The beep will only sound after a small delay, so please hold camera
steady during this time interval to avoid blurry pictures.
2.4 Sleep mode (automatic energy-saving)
The camera goes into sleep mode automatically after 30 seconds of inactivity (or if
Page 12

11
it is not connected to a computer via the USB cable).
You can manually activate sleep mode by pressing the POWER button for around
1 second and then releasing the button. Alternatively, you can press MODE button
until "off" is shown on the LCD screen. Then press the shutter button to validate
this selection and a beep will sound to confirm. In sleep mode energy
consumption is very low and the battery life is prolonged. To use your camera
again simply press the POWER button.
2.5 Self-Timer mode
Press the MODE button until the LCD screen displays "Self-timer" icon.
Press the shutter button; “beep” will sound and the LED light will blink at one
second intervals. Camera will auto take picture after 10 second delayed time.
2.6 AVI mode
Press the MODE button until the LCD display shows <AVI Capture>.
Press the shutter button, and the camera will continuously capture multiple ‘movie’
frames until you release the button.
2.7 Continuous shooting
Press the MODE button until the LCD screen displays "continuous shooting" mode.
Press the shutter button and the camera will take three (3) consecutive photos.
The number on the LCD screen will reduce accordingly.
2.8 Deleting all the photos saved to memory
Press the MODE button until the LCD screen displays the icon "delete all photos"
and then press the shutter button twice to validate your choice. All the photos
stored in the camera will be deleted. (The previously selected resolution mode will
not change).
Page 13

12
2.9 Deleting the last photos saved to memory
Press the MODE button until the LCD screen displays the icon "delete last photo
taken" and then press the shutter button to validate. The last photo captured will
be deleted. If last photo was taken in continuous shooting mode then the whole
group of photos will be deleted.
2.10 Modifying resolution "LO"’
When you need to take many photos in one session you can choose "low
resolution" mode. Press the MODE button until the LCD screen displays the
symbol "LO" and then press the shutter button to confirm. If you want to change
back into "high-resolution" mode, press the MODE button until the LCD screen
displays the symbol "HI" and then press the shutter button to confirm.
2.11 Modify the compression mode
Press the MODE button until the LCD screen displays “Hd” and then press the
shutter button to confirm.
Note: Sometimes the actual number of photos that will be displayed and that can
be captured in low & compression modes may be different depending on the
actual scene and background conditions.
2.12 Modifying frequency
Modify the “anti-flicker” frequency if needed when you take photos indoors with
fluorescent lighting. Frequency is set by default to 60Hz (suitable for North
American household AC power). Press the MODE button until the LCD screen
displays the "anti-flicker" mode (50 / 60) and then press the shutter button to
confirm selection.
3. Installation and Utilization of the software program
Insert the CD in your CD-ROM drive, and the application will run automatically.
An interface will appear. On the left of the interface there are four buttons.
Page 14
13
3.1 Installation of Arcsoft
3.1.1 Arcsoft PhotoImpression
Click <Arcsoft Imaging Software>, then <PhotoImpression> and then follow the
step-by-step instructions to complete the installation.
3.1.2 Arcsoft VideoImpression
Click <Arcsoft Imaging Software>, then <VideoImpression> and then follow the
step-by-step instructions to complete the installation.
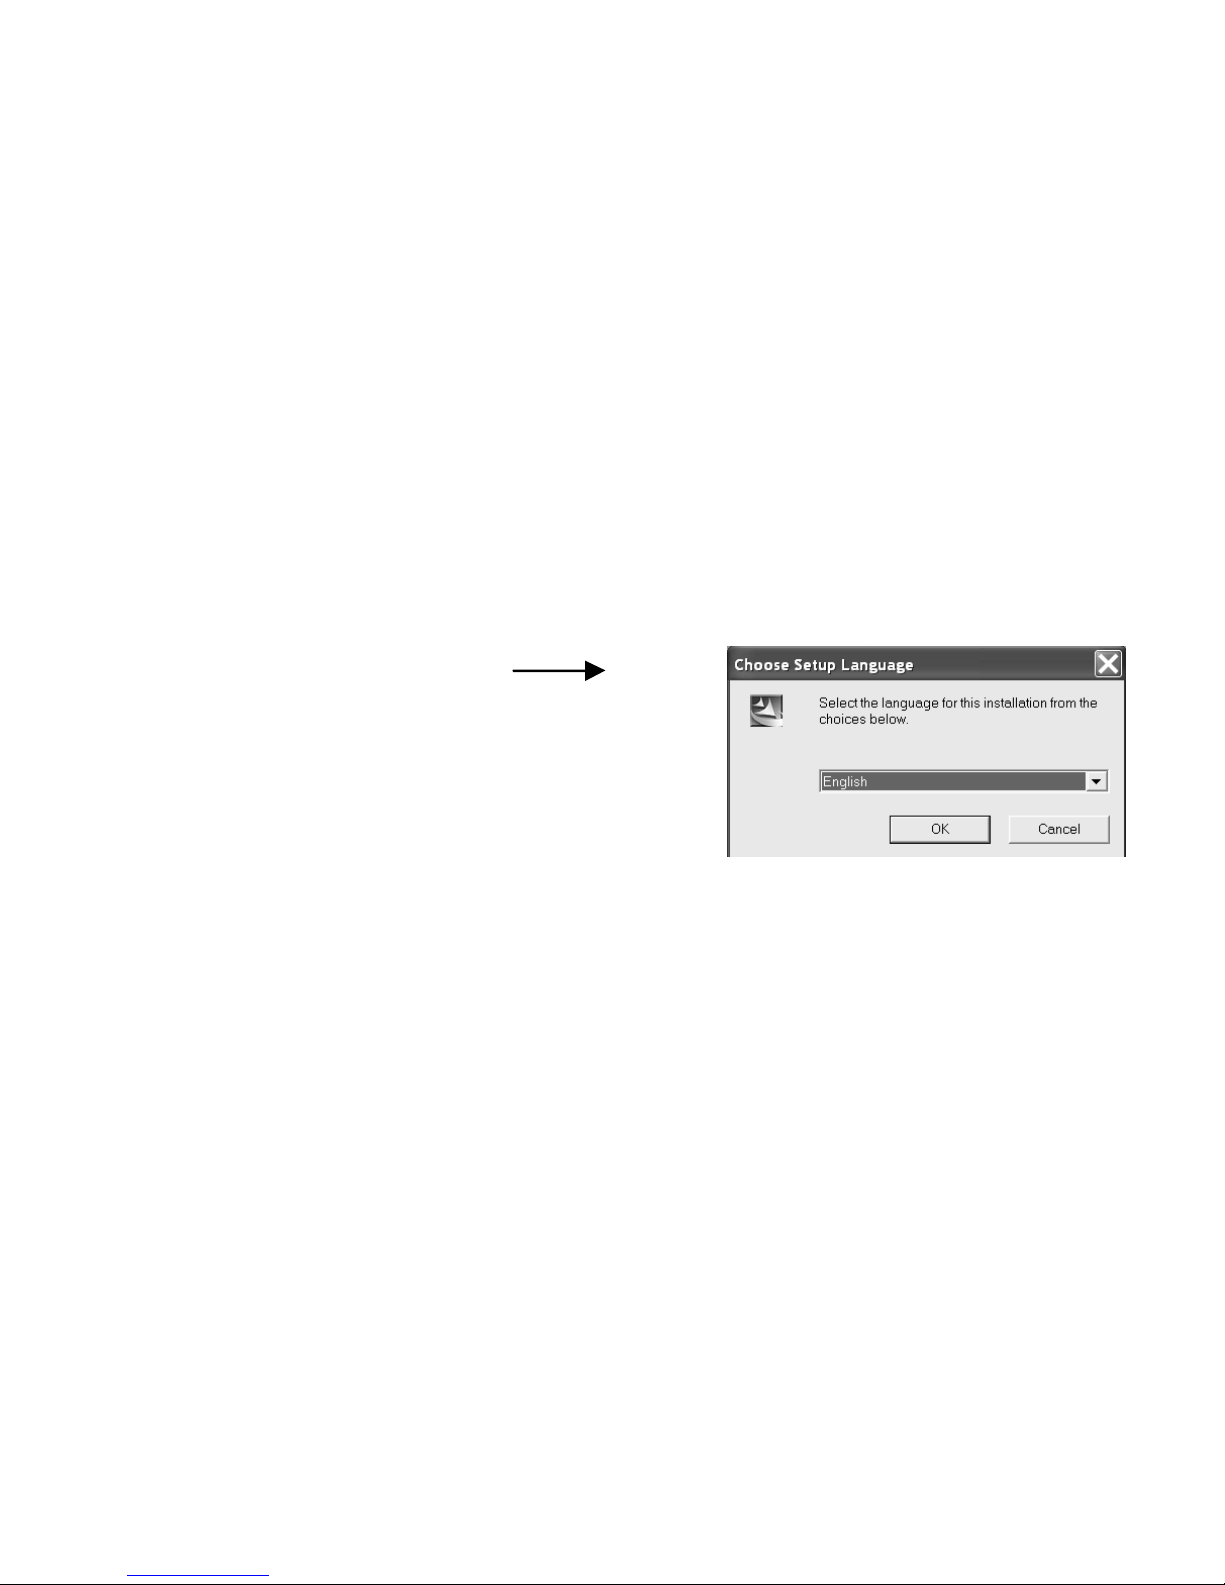
Install Arcsoft (Select language)
3.2 Installation of driver
Click on <Install DC driver> and follow the stepby-step instructions to complete the installation.
After successful installation of driver, restart
your computer.
3.3 Downloading picture
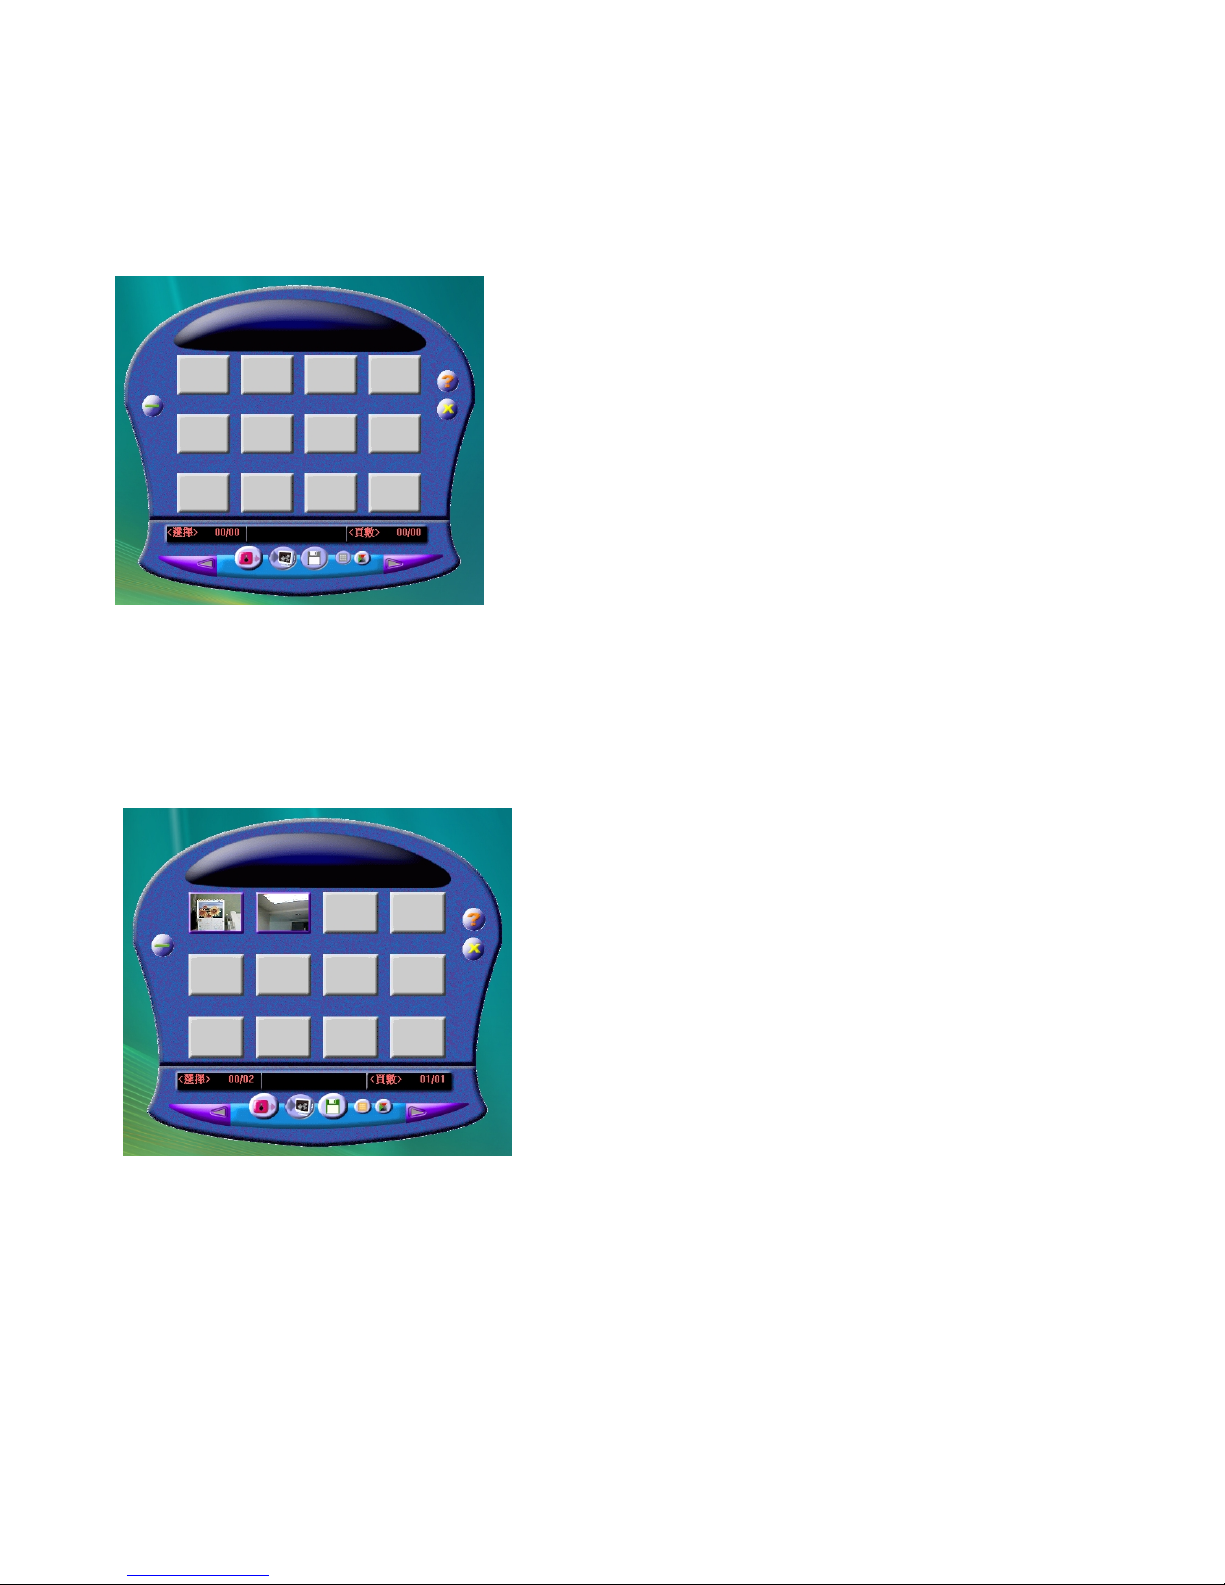
Connect the camera to your computer with the USB cable. Double click <My
DSC2> on the computer desktop. Click on <My DSC2>. The interface will appear
on the screen.
Page 15
14
Click on <Download photos>. The slides of the photos that you have taken appear
on the interface. By clicking the right or left button of the mouse on one of the
slides you can zoom in and zoom out on the photo.
Click the button "select all photos"; all the photos will be selected. Then click the
button "save photos" to transfer the photos to your computer.
Page 16

15
After having saved the photos you can empty the memory of your camera (delete
all photos which are saved in the memory) and start taking pictures again.
3.4 Uploading a photo with a resolution of 1.3M pixels
A: Click on <Download photos>, select “Edit image” button;
B : Select the “Pixel Up” Option (You can select “High Quality Mode” to get better image),
then select the “OK” button to ESC
C: Downloaded photos and the photos originally taken in VGA format are now
saved to your computer in 1.3 M pixels.
4. Problem-solving
Here are the most commonly encountered problems:
When you press the POWER button, the camera does not turn on:
Solution: Battery level is low. You should change the batteries.
The camera cannot transfer photos on to the computer or it says there are no
photos:
Solution: Restart the computer and reconnect the camera.
Check in the control panel/system settings.
If the camera device driver is not present reinstall it again
Page 17

16
5. Downloading Images
1. With the camera connected to your PC, run the ArcSoft Photoimpression 5™
software by clicking Start, All Programs, ArcSoft Photoimpression 5, then
Photoimpression 5.
The "Get Photo" screen will appear. Take a minute to familiarise yourself with this
and the other software interfaces as you work through these instructions.
To access the on-line help, click on the ‘Help’ Option at the top menu bar and
select
Help.
To transfer your photos, just click on the Camera/Scanner option on the "Get
Photo" screen. Select the device DualCamera. Select ‘Pixel Up’ if you want to
interpolate the photos taken and click OK. The photos have been saved in your
‘My Documents\My Pictures’ folder.
Here you can edit, enhance, add special effects and save them on your computer
or on removable media e.g. floppy disc or a CD-R if you have the facility.
2. VideoImpression 2 is a powerful video editing software tool for producing
custom movies and slide shows using your own video clips and pictures taken by
the camera.
Page 18

17
6. PC/Webcam Function
By running the PCCam software you can capture real-time videos or images, save
them on your PC and email them.
Open the PCCAM program by double clicking on the "MyDSC2" icon on your
desk-top, then double clicking on the PCCAM icon. Click on Options then Preview
to see what the camera can see. By clicking Capture you can set a time limit for
your movie clip (this is useful if you intend to email the clip and don't want to send
large emails). Click File, then Set Capture file to specify the name and location of
your saved movie clip. Then click Capture and Start Capture. By default, the file
will be saved in your "My Documents" folder .
This file can be viewed by playing it in Windows Media Player and it can be
emailed as a regular file attachment.
For advanced users:
This camera can also function as a webcam with web conferencing software, for
example, Microsoft NetMeeting™. Please refer to the instructions included with
the specific software package used.
 Loading...