

Page 1
1
Page 2

2
Preface
Thank you for purchasing this digital video recorder.
Please read this manual carefully and keep in a safe place for further reference.
Note: The product specifications and these operating instructions are printed based on latest
available information and are subject to change without prior notice.
The specifications of the particular video recorder you have purchased will apply even if these
vary from this printed data.
FCC DECLARATION
This device complies with part 15 of FCC rules. Operation is subject to the following two
conditions: (1) this device may not cause harmful interference, and (2) this device must accept
any interference received, including interference that may cause undesired operation.
Caution: Changes or modifications to this unit not expressly approved by the party responsible
for compliance could void the user’s authority to operate the equipment.
Note: This equipment has been tested and found to comply with the limits for a Class B digital
device, pursuant to Part 15 of the FCC Rules. These limits are designed to provide
reasonable protection against harmful interference in a residential installation. This
equipment generates, uses, and can radiate radio frequency energy and, if not installed
and used in accordance with the instructions, may cause harmful interference to radio
Page 3

3
communications. However, there is no guarantee that interference will not occur in a
particular installation. If this equipment does cause harmful interference to radio or
television reception, which can be determined by turning the equipment off and on, the
user is encouraged to try to correct the interference by one or more of the following
measures:
- Reorient or relocate the receiving antenna.
- Increase the separation between the equipment and receiver.
- Connect the equipment into an outlet on a circuit different from that to which the receiver
is connected.
- Consult the dealer or an experienced radio TV technician for help.
Pertinent testing documentation is available for verification.
SD Memory card basic information
- Your video recorder must have SD/SDHC Memory Card inserted to store recorded Video,
take Photos and Audio records.
SD Memory Card is not supplied and should be purchased separately.
SD/SDHC memory card with capacity up to 8 GB may be used in your recorder.
Page 4

4
SD Memory Card
• Please note that the SD card has tiny LOCK slider on the side for write protection of
the SD memory card that helps avoid inadvertent deletion of image files. Set this
slider to “un-LOCK” position for storing still images or recording video.
• Recorder will accept SD/SDHC Memory cards with max capacity up to 8 GB
• SD Memory card is simple and convenient but delicate electronic device; do not open,
bend or overheat the card. Keep the card away from strong magnetic field and dirty /
harsh environment.
• If your SD card has been used previously with other devices / cameras or is
brand new – the card may require to be formatted – please ensure you save all
valuable records before formatting.
Please refer to page 23 for formatting card instruction if necessary.
Maintenance of the video recorder
Keep and store your recorder away from humid, dusty and harmful chemical environment.
Do not store or operate the recorder under extremely hot or cold conditions.
Contact pins / connectors
LOCK slider
Page 5

5
Keep recorder clean and take care to avoid scratching or damaging of the housing and the lens.
Blow dust away and use soft cloth if the lens becomes dirty or contaminated.
Do not use an organic solvent to clean lens.
Remove batteries if you are not planning to use the recorder for an extended time.
IMPORTANT: The video recorder is not waterproof. Protect from moisture.
Computer System Requirements
You may use the computer to download images and video from your recorder, edit images, email
or post records over the Internet.
Make sure that your computer complies with (below) minimum requirements:
System Requirements
Operating System Windows XP,VISTA,7
CPU Pentium IV 1 GHz or higher
Memory 512MB RAM or higher
Audio & Video Card Direct X8 Audio & Video Card
CD-ROM Drive Minimum 16x
Hard Drive space 1GB or more available memory space
USB port USB 2.0 port
Page 6

6
Features
The recorder incorporates the following features and functions:
l Digital Video Recorder (supports 1280×720 HD video recording and other resolution options)
l Digital Camera (8 Mega Pixels and other options for still pictures)
l Mass Storage (Portable Disc)
l 4x Digital Zoom
Accessories
The following accessories are packed together with the video recorder:
USB Cable TV Cable Installation CD Instruction Manual
Quick Start Guide Warranty Card
Page 7

7
Know your Video Recorder
Page 8

8
Page 9

9
Page 10

10
Buttons and Function Indicators
Buttons/Indicator Function
Power Button Press to turn the video recorder ON and OFF
Recording Button Press to Start / Stop Video Recording
Shutter Button Press to take Still photo
Zoom Button Tilt Left or Right to “zoom” the scene as desired
MENU Button Press to enter MENU setting and press again to exit
Playback Button
Press to enter the Playback mode. Press again returning to the
recording mode.
UP Button Browse UP and select MENU options
Down Button
Browse DOWN and select MENU options
Activate the “thumb-size” images review in the Playback
mode
Left Button
Select sub-MENU options. Scroll and select file containing
recorded video clips and still pictures when the Playback
mode has been selected.
Right Button
Press to select 10 Self-timer option. Select sub-MENU
options.
Scroll and select file of your records, video clips and still
pictures when the Playback mode is selected.
LED Support Light
Button
Press LED Support light Button to turn the light ON
Press this button again to turn the light OFF.
Page 11

11
OK Button
Press to confirm MENU/ option settings
Press to START / STOP playing a video clip when Playback
mode has been selected.
Delete Button
With Playback mode selected; press DELETE Button to access
YES / NO delete options for selected Video clip or Still Photo.
Self-Timer
Indicator
Indicator blinks when the Self-Timer is activated and count
down is in process
Display Button
Pressing this button will sequentially change LCD display view
BASIC OPERATION - GETTING STARTED
Note: Your recorder requires batteries and SD/SDHC Memory Card inserted to operate. These
are not supplied and should be obtained separately. SD/SDHC memory card with capacity up
to 8GB may be used in your recorder.
1. Battery Installation
- The video recorder uses four AAA size alkaline batteries as power supply
- Slide / open the Battery Cover
- Insert batteries into the batteries compartment correctly, following the polarity markings
indicated next to the Battery compartment.
Before changing installed but exhausted batteries, first turn OFF the recorder.
2. SD/ SDHC Memory Card Installation
- With the Battery Cover opened, insert the SD/SDHC memory card into the Card Slot, press
card fully down until card is latched.
- Orient the card following the SD Card mark
Page 12

12
- Close the Battery Cover
To remove / replace the SD/SDHC memory card press the card down again; the card will pop
up and you may remove the card from the recorder.
─────────────────────────────────────────────────────
Notes:
l Turn OFF the video recorder before inserting / changing the memory card;
l Insert the memory card correctly. Do not use force; otherwise you may damage the
card or the recorder. Check position of the card before inserting
l Please format memory card when it is used for the first time or if card has been
previously used in other recorders/ devices. See page 23.
────────────────────────────────────────────────────
3. Turning Video Recorder ON and OFF
- Open the LCD Screen
- Press and hold down the POWER Button for 2 – 3 seconds to turn video recorder ON.
- LCD screen becomes active and the recorder is ON, ready to operate.
- Press the Power button again to turn the recorder OFF when required.
- Please note to save battery power the recorder will turn OFF automatically when it is ON and
left idle for 1 minute (or 3 or 5 minutes power OFF options)
BASIC FUNCTIONS
Page 13
13
Recording Video and taking Still Photos
When recorder is powered ON it is ready to take Video Records or take Still Photos; see
icons on the LCD Screen indicating both recording modes.
Video Recording
- Press the Recording Button to START recording a video clip, press it again to STOP
recording.
Camera (Still Photo Taking)
- Press the Shutter Button to take one Still Photo at a time.
Keep video recorder steady when pressing the button.
PLAYBACK Mode
Set recorder to PLAYBACK Mode to see / review all your video records and taken Still
Photos.
-Press the PLAYBACK Button to enter the PLAYBACK Mode, see the Playback mode icon
on the LCD screen
-Use Left / Right Buttons to browse all recorded Video clips and Still Photos.
The icon on LCD screen identifies whether the selected file is the recorded Video or
taken Still Photo
Video Playback:
- Press the OK Button to START playing back recorded Video clip.
- You may press the UP Button to PAUSE / RESUME the playing back of Video clip.
- Press the OK Button to STOP playing Video clip and return to the beginning of the Video.
Page 14
14
- You may also press LEFT / RIGHT Buttons to Rewind or Fast forward the Video being
viewed.
Displayed Still Photos:
- Use the Left / Right button to scroll through and locate your stored Still Photos
- Selected photo will be displayed on the LCD screen as it had been taken
- When the selected photo is displayed, you may enter the “Pan” mode to review finer details
of Still Photo.
- Pan Mode -Tilt Zoom Button to enlarge photo, then press OK Button to enter into Pan
Mode. Use LEFT / RIGHT / UP / DOWN Buttons to move / select interesting part of Still
Photo for detailed review. To exit from Pan and Zoom status, press OK Button again.
Advanced Operation
Video Recording / Still picture taking
- When camera is turned ON, it is ready for Video recording or taking Still Photo
and the LCD screen displays the scene or subject which is on the front of the recorder.
- - You can press the Recording button and start recording the Video clip , or press the
Shutter Button to take a Photo
Zoom: Tilt the Button W/T to “zoom” and enlarge the photographed scene or subject, you
may “zoom” and adjust the scene as desired while recording is in progress.
l Hold video recorder steady while taking photos and ideally place on firm support such
Page 15

15
as a tripod to obtain the sharpest result.
Self-Timer: Press the RIGHT Button to select 10 second delay time, or press it again to
turn Self Timer OFF.
-Press the Shutter Button and the recorder will take photo automatically in 10 seconds.
-LED Support Light: Press the LED Light Button to turn ON/OFF the Support Light.
This light can be activated only at Video Recording or Photo taking mode. Note that this
light has limited range – use additional or auxiliary light sources when recording video or
taking photo in low light conditions.
-Display button: Press DISPLAY Button to select sequentially the display view options
for LCD screen.
Options are selectable only when the video recorder is ON and in Scene Preview idle
status. When the Recording Button (to start Video Recording) or Shutter Button (taking
Still Photo) is pressed the LCD will reset to the normal display view with all icons visible.
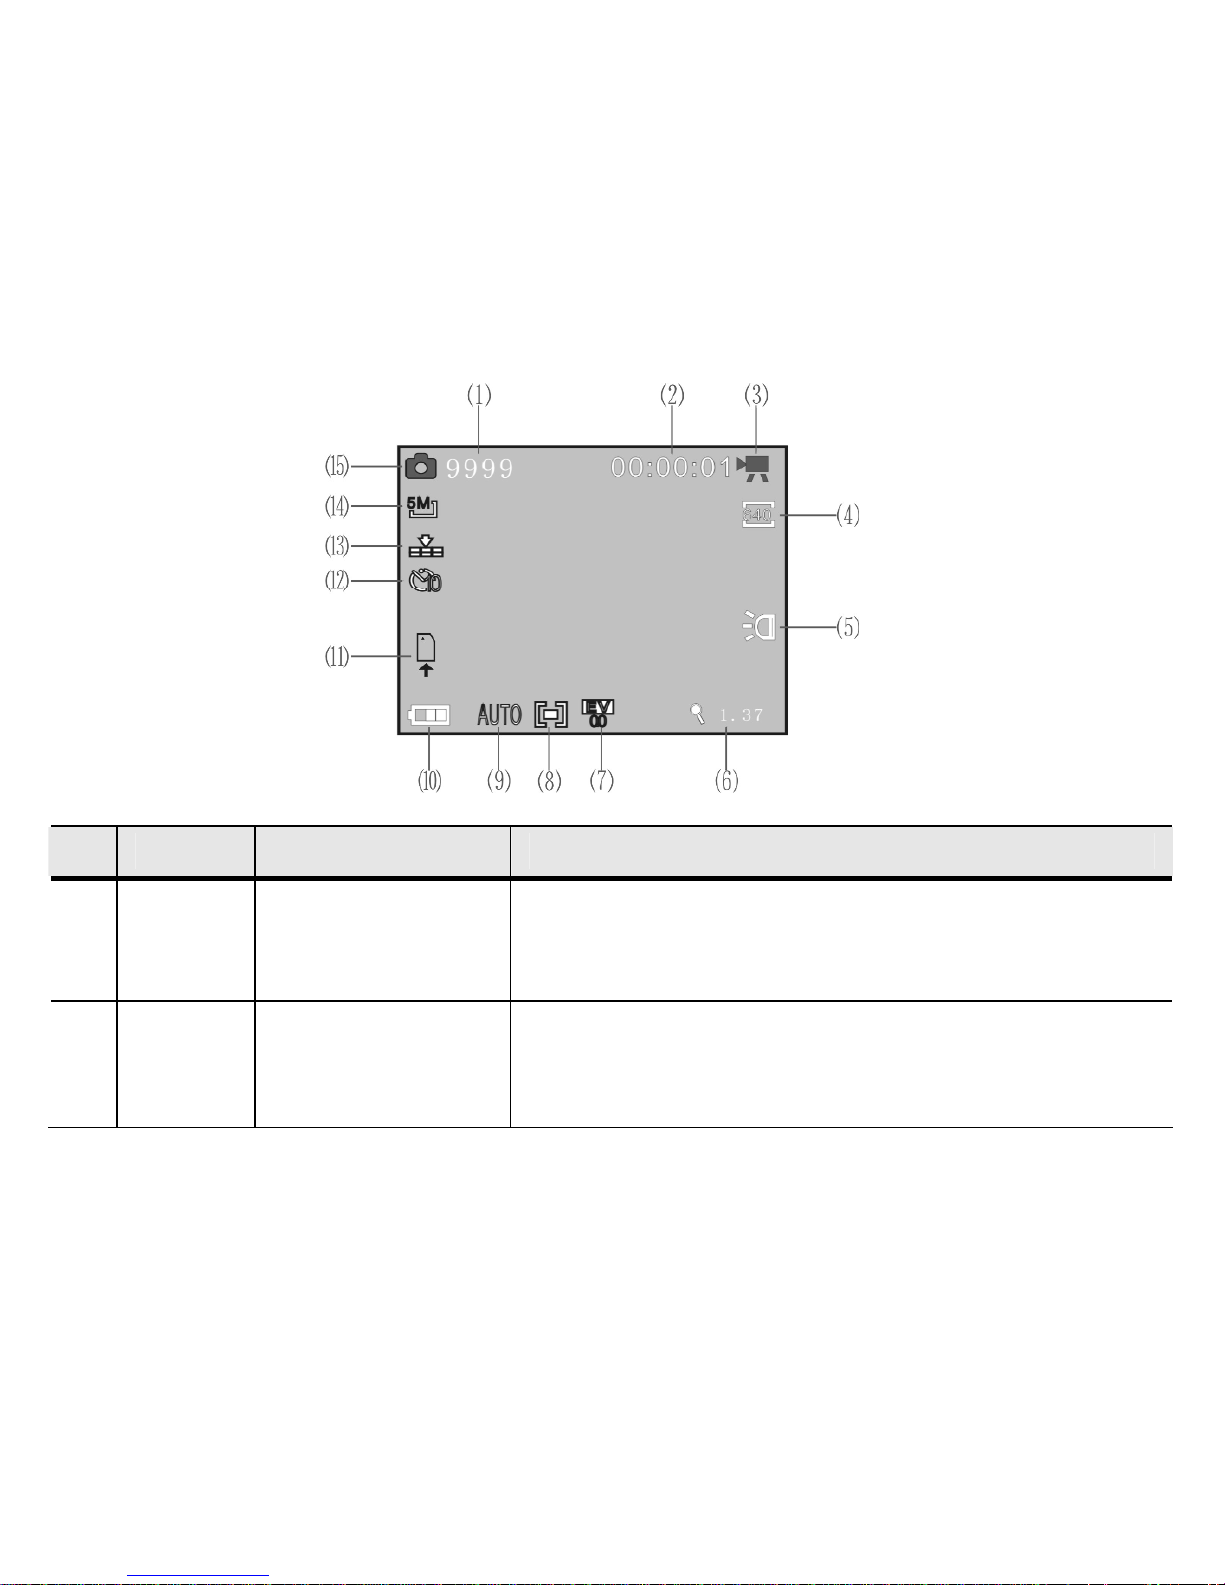
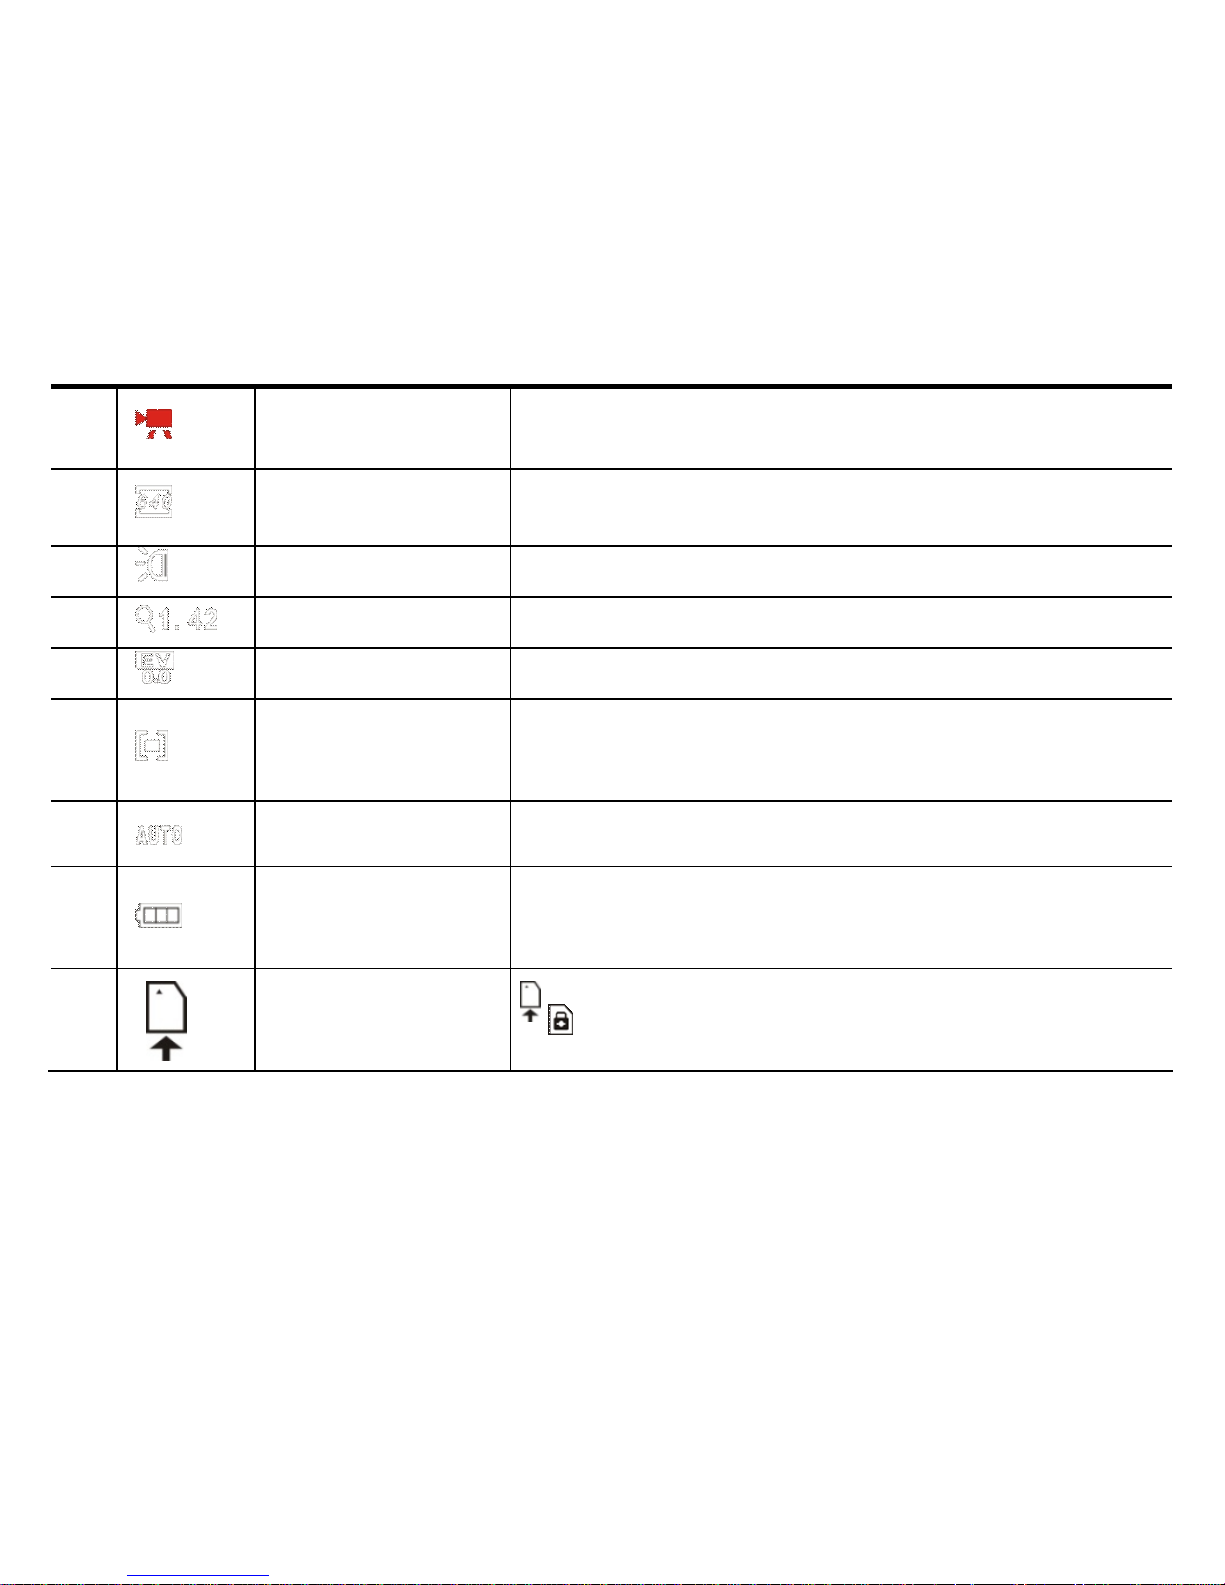
On the screen you will see icons and information related to setting of recorder and
selected options. See below for details:
Page 16
16
Icon Icon name Description
1 9999
Number of photos
available
Indicates remaining number of photos
2
00:
00:01
Recording time
Indicates remaining video recording time or actual
recording time if the Video Recording is in progress.
Page 17
17
3 Recording mode Ready for Video Recording
4 Video format
Indicates resolution of current Video Recording
selected.
5 Fill light Indicates LED support light is turned ON
6 Zoom indication Indicates current digital zoom magnification
7 Exposure Indicates current selected exposure value
8
Exposure
Metering area
Indicates current Exposure Metering scene area
9 White balance Indicates the current white balance setting
1
0
Power status Indicates current battery status.
1
1
SD card
Indicates the SD memory card inserted.
indicates the SD card is LOCK-ed
Page 18
18
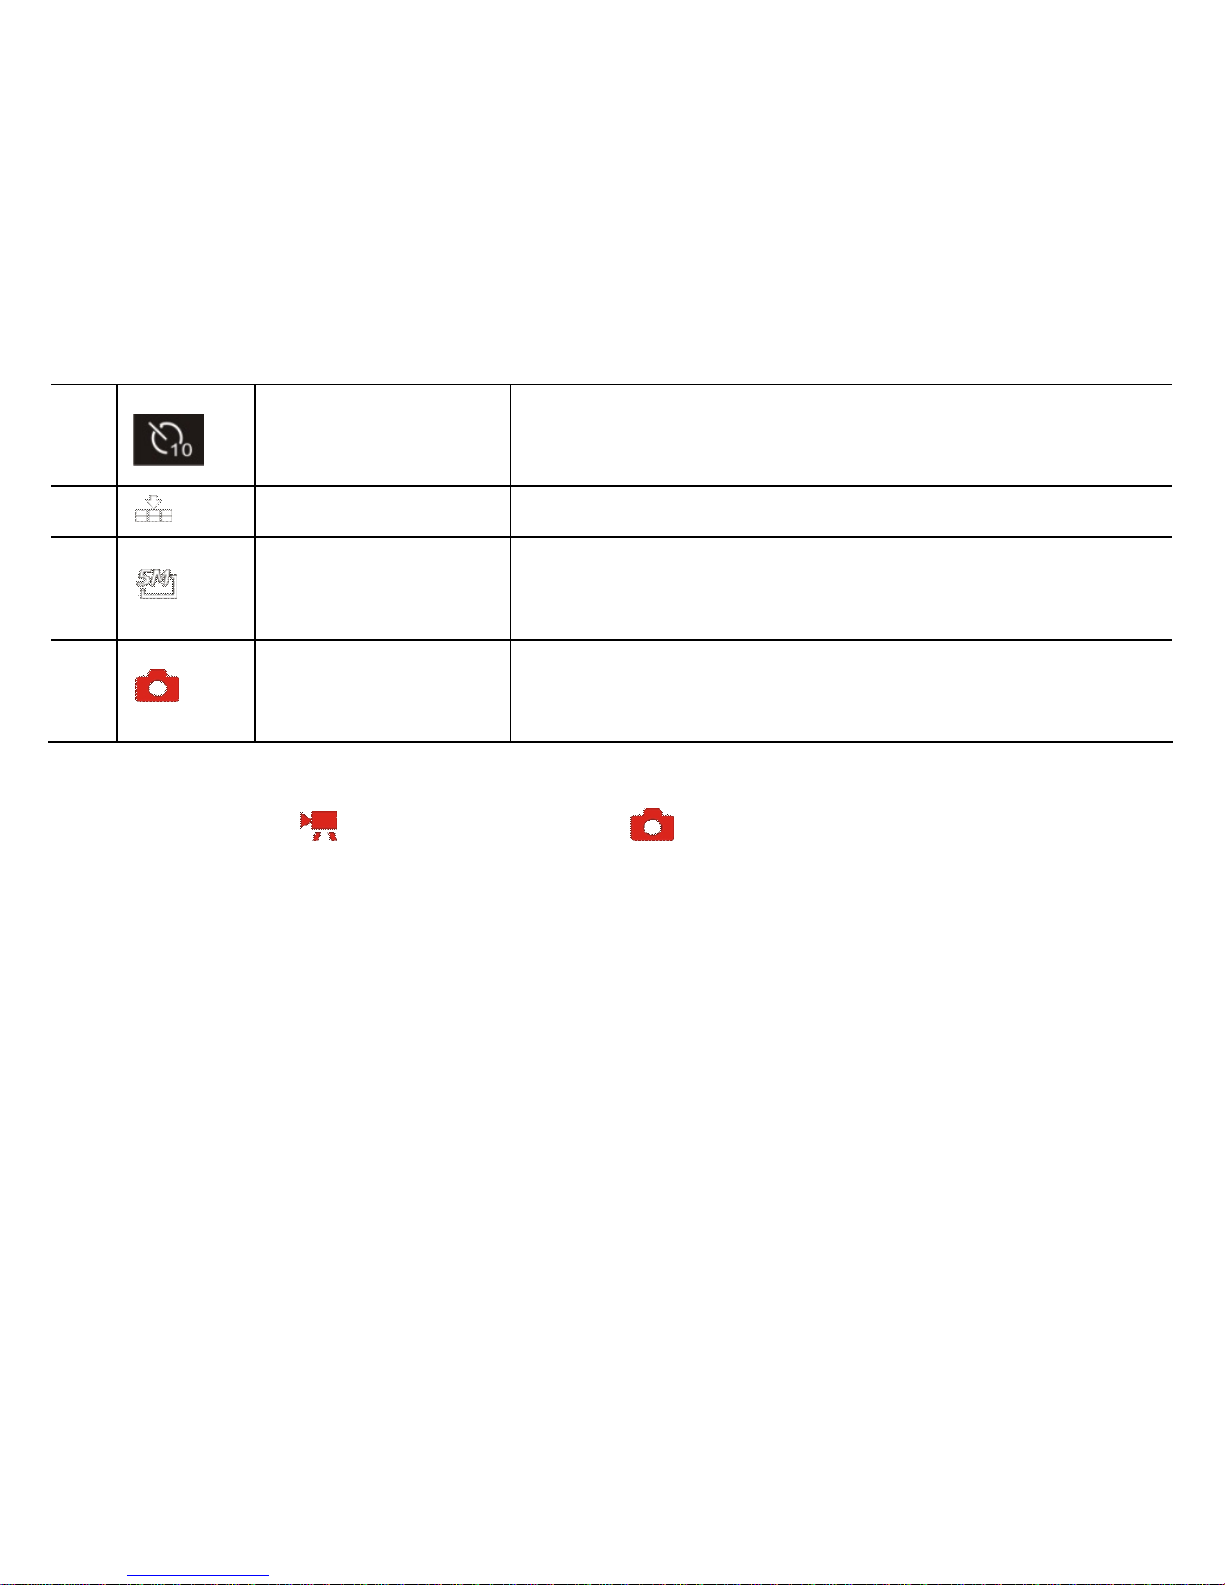
1
2
Self-timer Indicates self-timer count down delay time
1
Image quality Indicates current selected still photo quality
1
4
Image Size Indicates current resolution of still photo
1
5
Photo taking
mode
Recorder is ready for taking still photo
◆ Video Recording / Camera (Still Photos) available setting
When the recorder is active and ready for Video Recording or taking Still Photo you are able to
change setting as desired.
1. Press the MENU Button to enter available settings; use UP/ DOWN Buttons to select
MENU options and press RIGHT Button to enter the submenu options.
2. Press DOWN / UP Buttons to scroll sub-MENU options, select and press OK Button
to confirm setting.
3. Press the MENU Button to exit setting.
See available setting options below:
Page 19
19
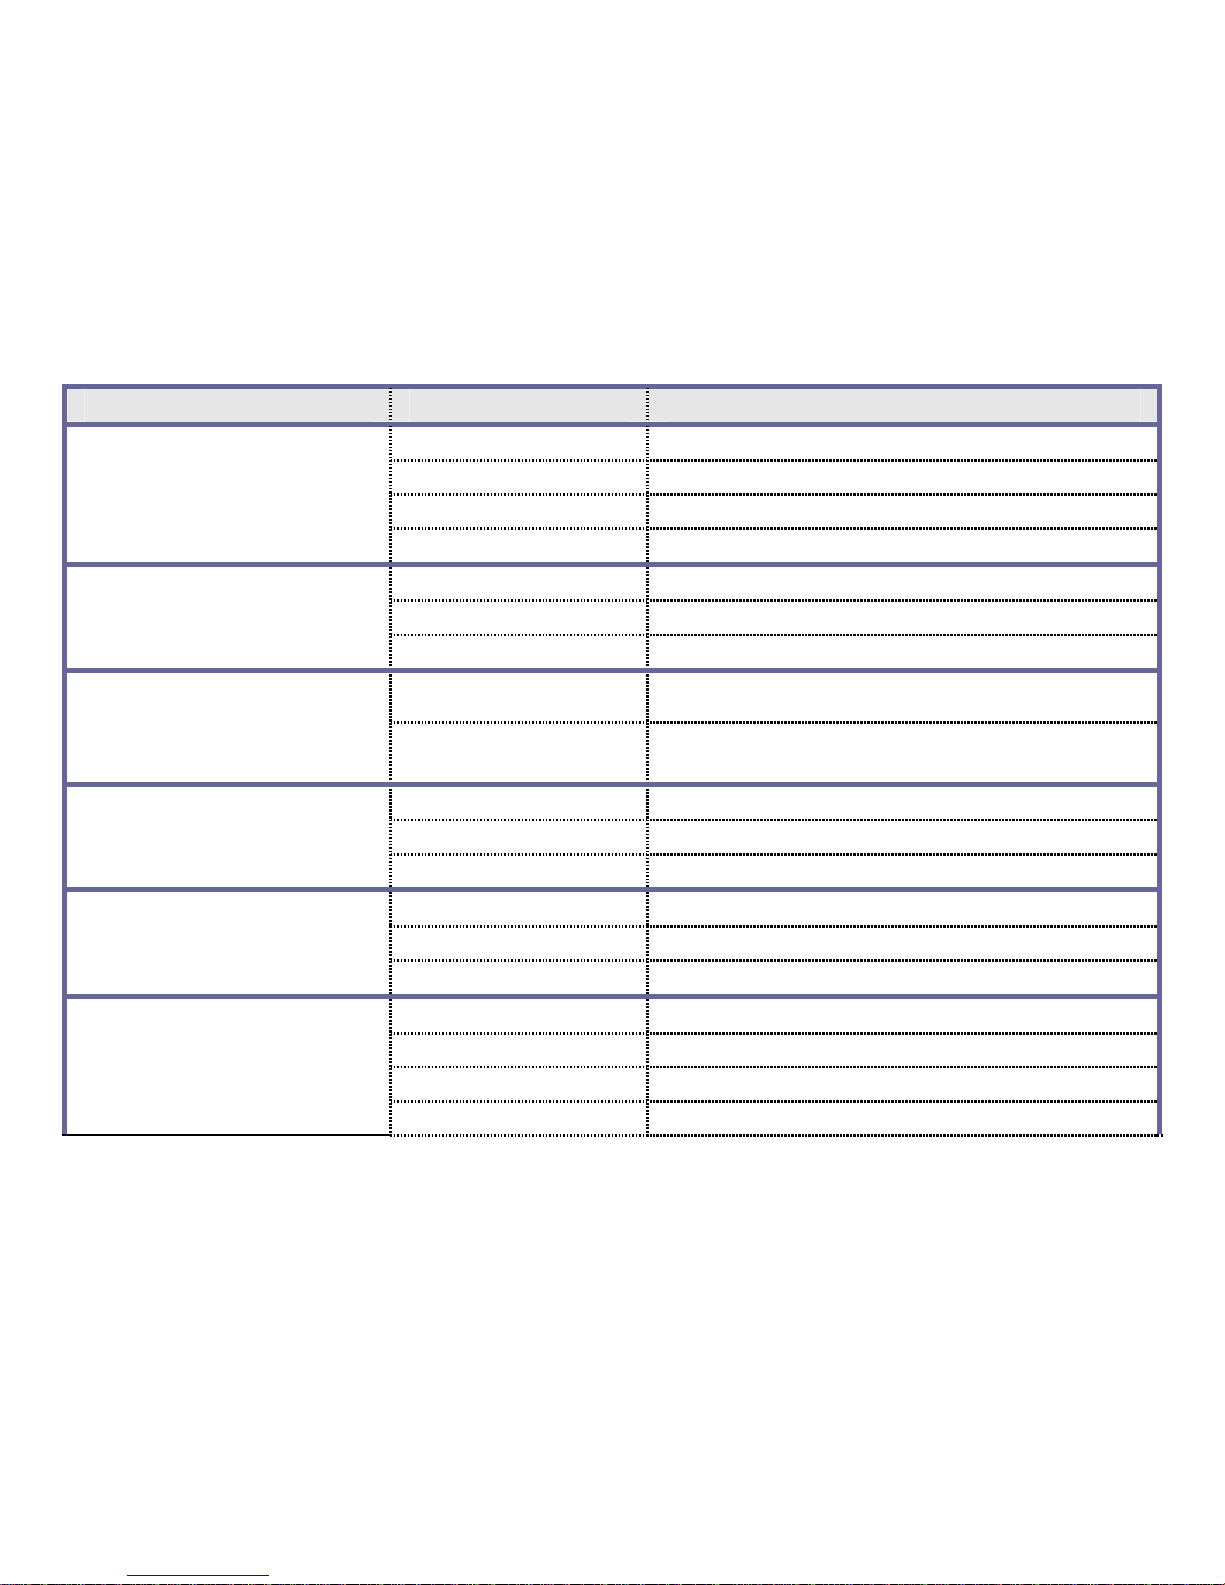
Main Menu Submenu Description
3264x2448 8 Mega Pixels Resolution
2592×1944 5 Mega Pixels Resolution
2048×1536 3 Mega Pixels Resolution
Resolution (Still Photo)
1280×1024 1.3Mega Pixels Resolution
1280 x 720 High Definition (HD) Format
640 x 480 VGA Format
Movie Size
(Video Resolution)
320 x 240 QVGA Format
High Higher frame rate
Frame Rate
(for VGA and QVGA
Movie Size only)
Low Lower frame rate
Super Fine Premium Photo Quality
Fine Good Photo Quality
Quality (Still Photo)
Normal Standard Photo Quality
Center Exposure measured on central area
Multi Exposure measured on multi spots.
Metering (exposure
metering area)
Spot Exposure measured on central spot.
Auto Suggested for most typical conditions
Daylight Suitable for outdoor, sunny conditions
Cloudy Suitable for outdoor cloudy conditions
White Balance
Fluorescent Suitable for fluorescent light, indoor
Page 20
20
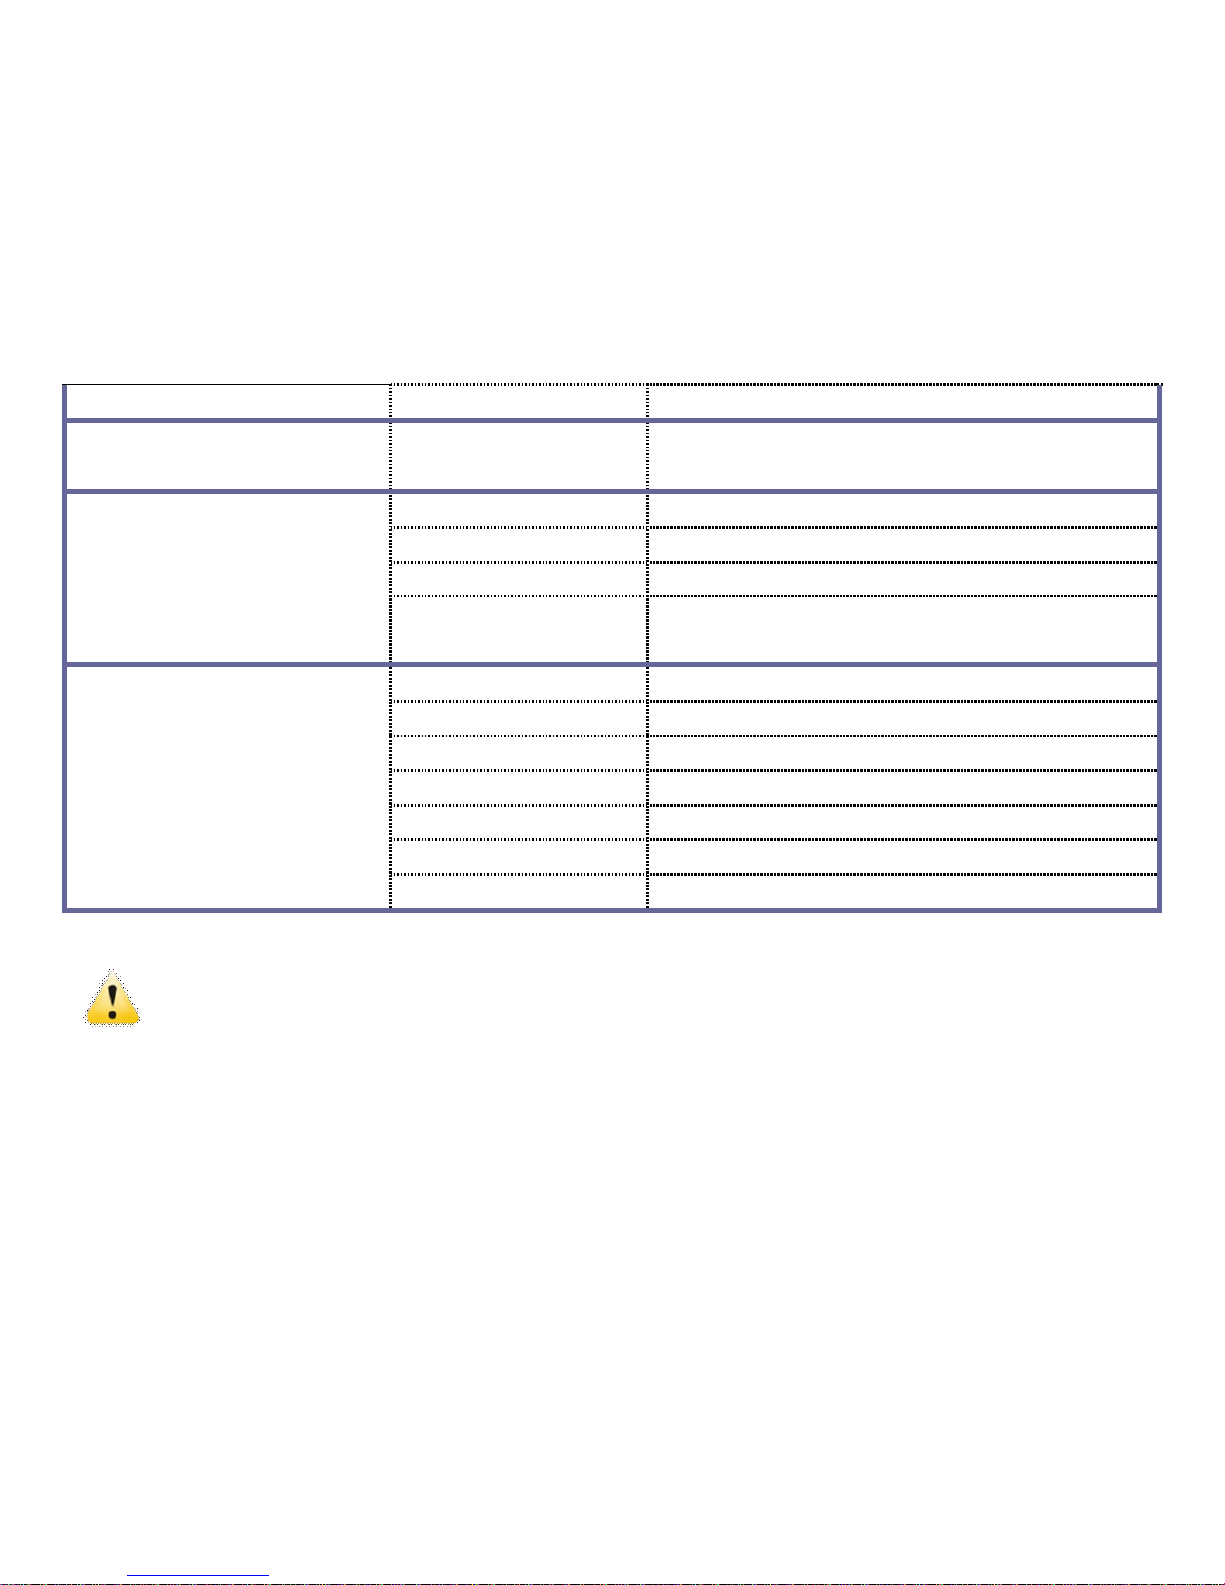
Tungsten Suitable for tungsten lamp light
Exposure
EV -2.0 to +2.0
(interval: 0.3EV)
Use the Left & Right Buttons to adjust
exposure / brightness compensation.
Off Single Photo Taking available
2 s 2 second Self-Timer setting
10 s 10 second Self-Timer setting
Driver Mode
(Still Photo taking only)
Burst
Three pictures could be taken
continuously
Normal Photo image scene tone
B & W Photo image will be black & white
Retro (Sepia) Photo image has “nostalgic” sepia tone
Negative Photo image appears as negative film
Red Photo image has slight “reddish” color
Green Photo image has slight “greenish” color
Effect
(Still Photo taking only)
Blue Photo image has slight “bluish” color
Exposure
- Enter the Exposure sun-menu and use LEFT / RIGHT Buttons to adjust the Exposure
compensation adjusting brightness of the scene as required. Displayed numbers will (with
+ / - signs) show the reference value.
Press the OK Button to confirm and then press the MENU Button to exit setting.
Page 21
21
Frame rate, HD resolution
- Frame Rate may be adjusted for VGA and QVGA, but HD format has its own pre-adjusted
Frame Rate and can not be changed.
• Internal Setting
When the recorder is active and ready for video Recording or taking Still Photo you are also able
to change Internal Setting of the Recorder.
1. Press the RIGHT Button to enter Internal Setting
2. Use UP / DOWN Buttons and select available setting options, see options below:
Main Menu Submenu Description
Shutter Turn the shutter tripping sound ON/OFF
Start-up
Set different sounds when recorder is turned
ON. Available options; sounds 1, 2, 3 or no
sound at all.
Beep Turns pressed button sound ON/OFF
Sounds
Volume
Set the audio of the built-in speaker at
different levels: 0/1/2/3
Off No immediate Playback after shooting
1 sec Playback photo 1 sec after being taken
Auto Review
3 sec Playback photo 3 sec after being taken
Power Frequency 50 Hz Selects 50Hz power / light frequency
Page 22
22
60 Hz Selects 60Hz power / light frequency
1 minute Auto-OFF after 1min if unused
3 minutes Auto-OFF after 3 min if unused
Power Save
5 minutes Auto-OFF after 5 min if unused
Date & Time Date and Time
Set the Date and Time of the recorder
(Day/Date format may be changed)
English Set MENU language to English
French Set MENU language to French
Spanish Set MENU language to Spanish
Dutch Set MENU language to Dutch
Italian Set MENU language to Italian
Language
Portuguese Set MENU language to Portuguese
NTSC NTSC TV System is selected
TV Out
PAL PAL TV System is selected
MSDC Used as Removable Disk
PC CAM Used as Webcam
USB
Start-up Image
Off / System Allow to set own start-up photo
Format Yes/No Formatting the memory card.
Page 23
23
Reset All Yes/No Return to Factory Setting (Default settings)
Formatting the SD/SDHC memory card:
You may need to Format inserted SD card if it is new or it was used with other devices or if
“Card Error” message is displayed. Select Internal Setting, scroll down to the Format option,
press RIGHT Button to select sub-menu and press OK to confirm. Note that Formatting will
erase all data from the SD Card – download valuable records to computer before formatting.
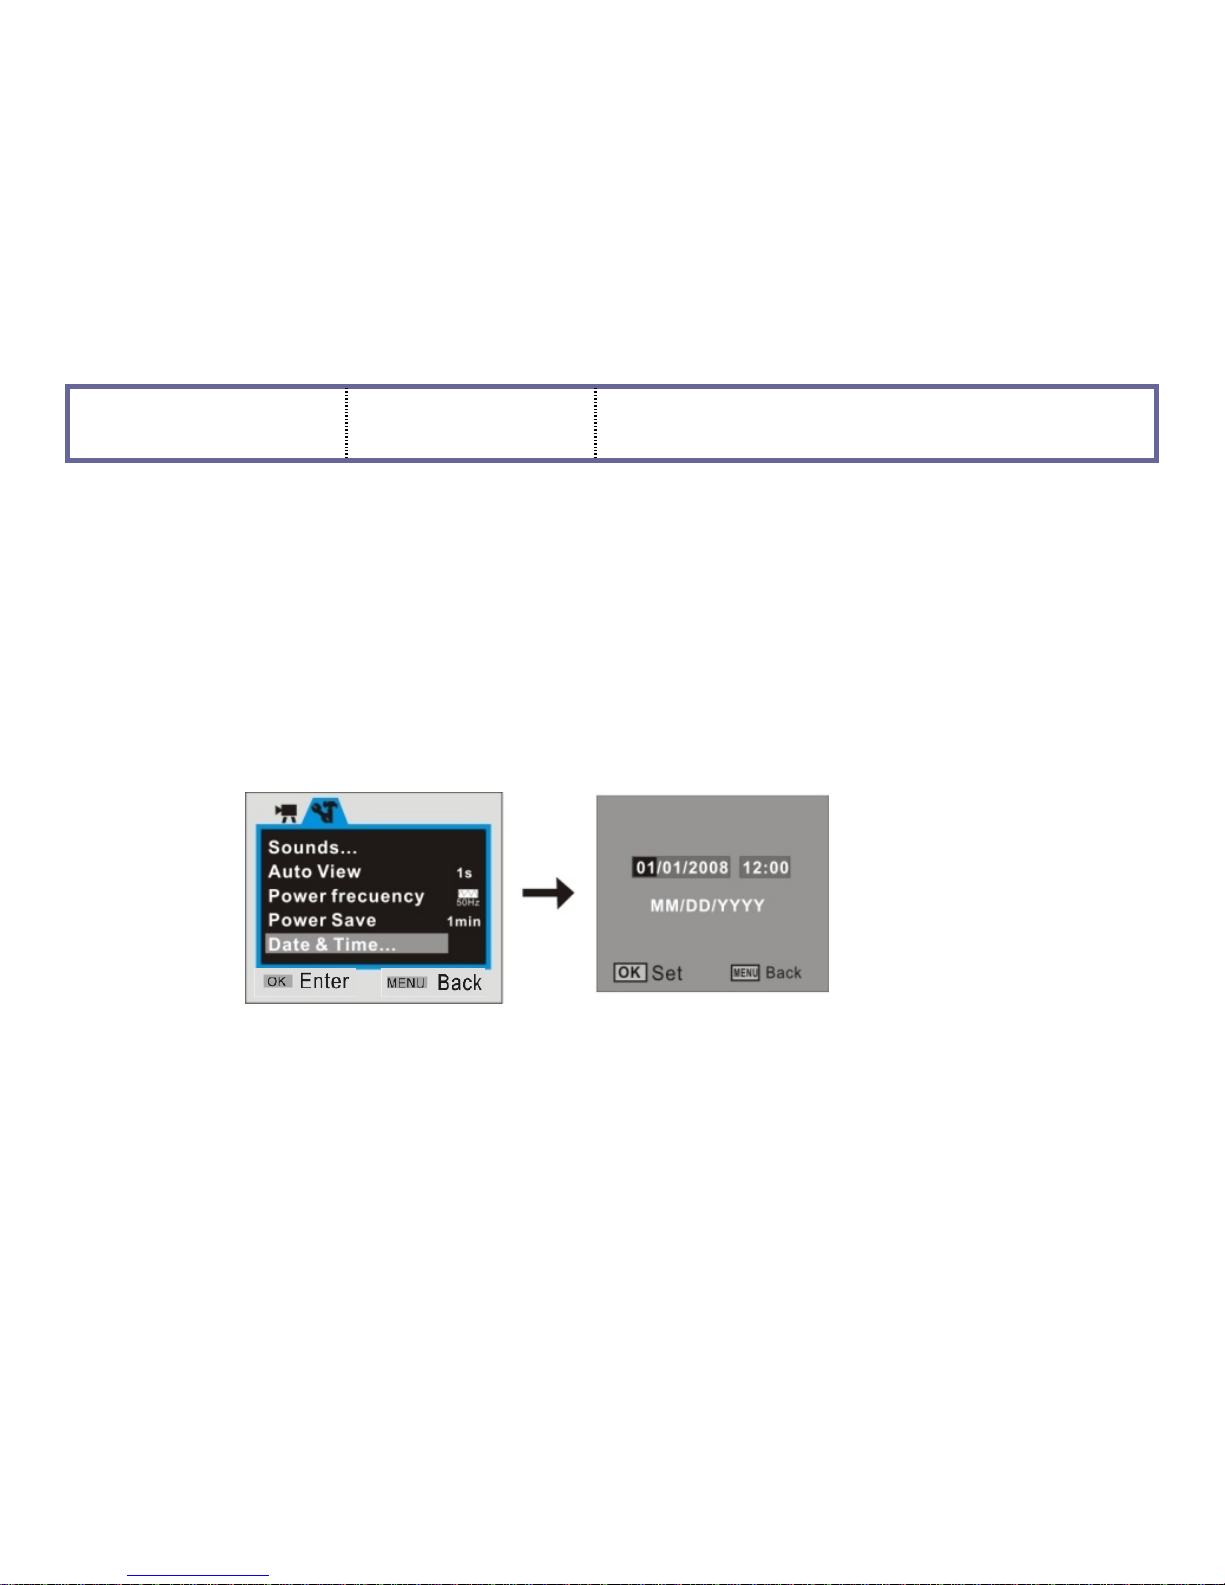
Date and Time Settings:
You may enter Setup menu mode to set the system date and time, see sub-screen below:
- At setting window, adjust the Date or Time by pressing direction key
- Press UP or DOWN button for adjusting, press the RIGHT button to move the setting data,
- Press OK button to confirm, press the LEFT button to EXIT setting.
Page 24
24
Please note that the Date & Time will be indicated on Video and Photo file properties, but
not visible on the Video and Photo displayed images. The file properties may be read and
reviewed on records when reviewing on the computer.
PLAYBACK Mode
Press the PLAYBACK button to enter the PLAYBACK Mode.
- Press the LEFT / RIGHT Buttons to browse or select through saved records.
- When the Video file is selected press OK Button to START playing Video; the time
will appear in upper right corner of the Screen.
- You can “pause” the playback by pressing the UP Button or STOP playing video by
pressing OK Button.
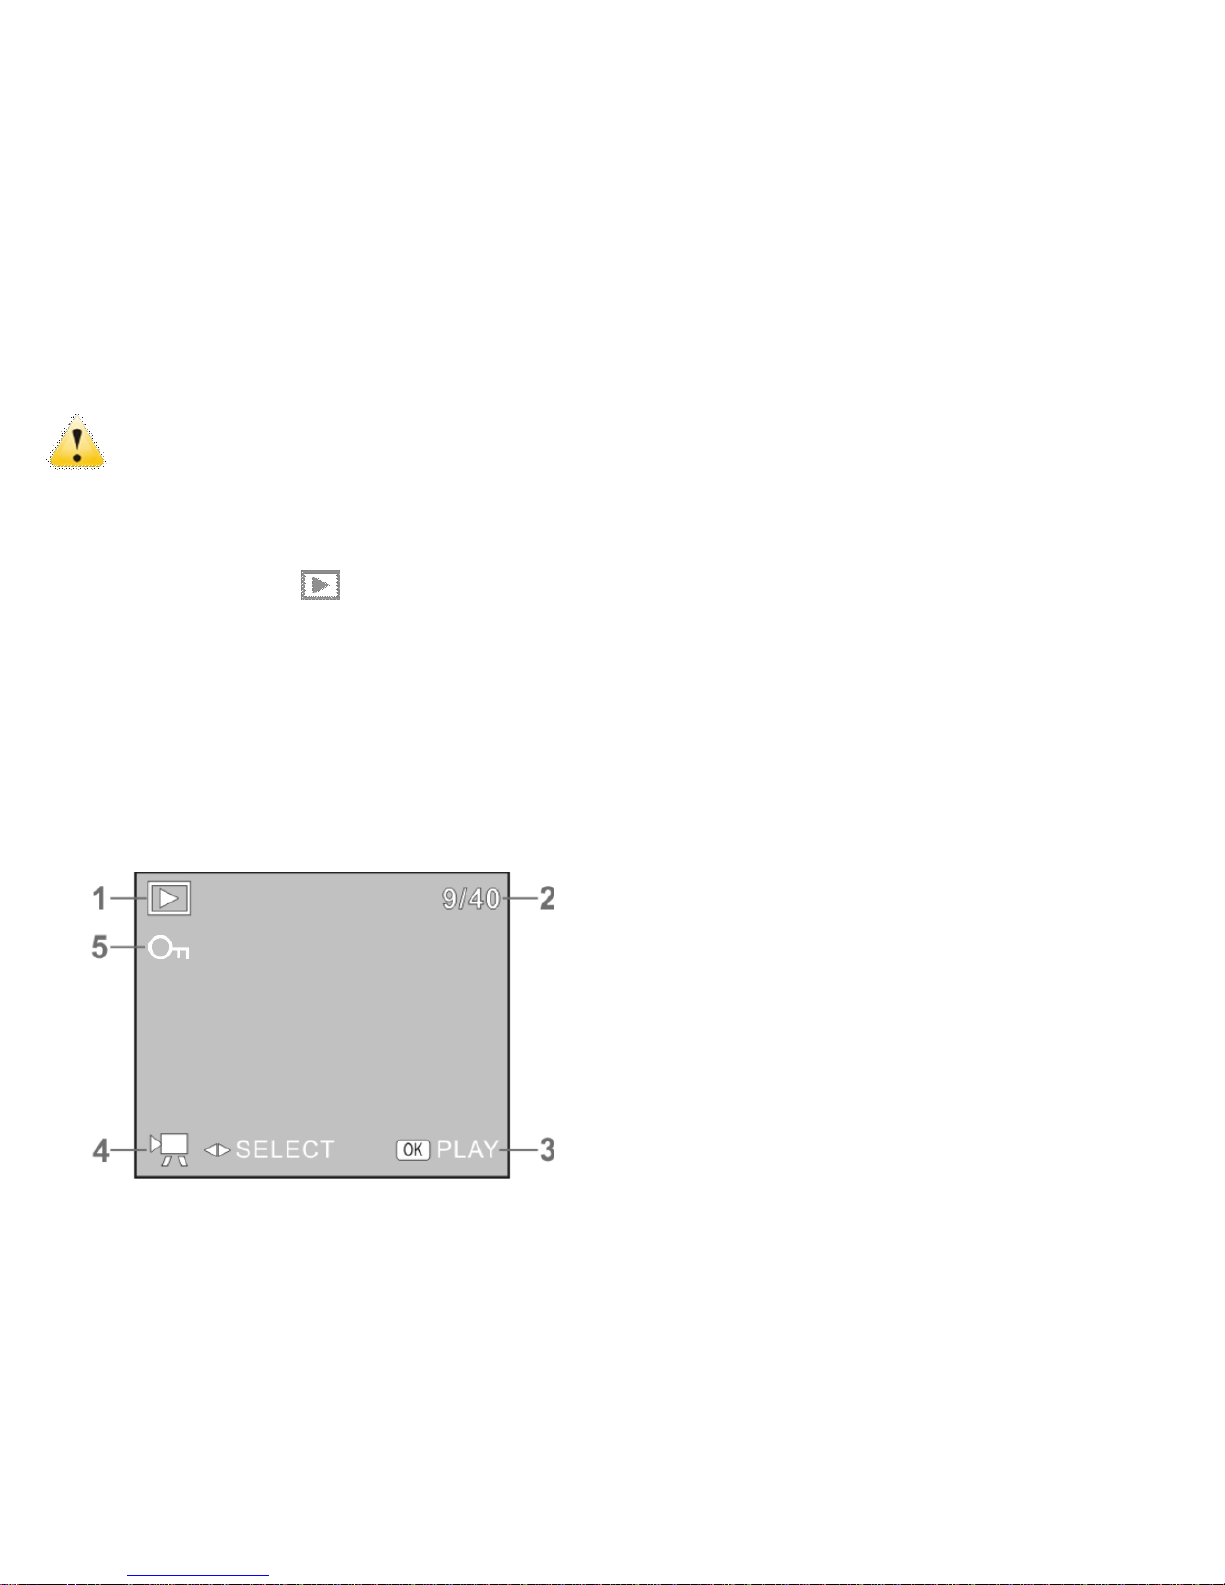
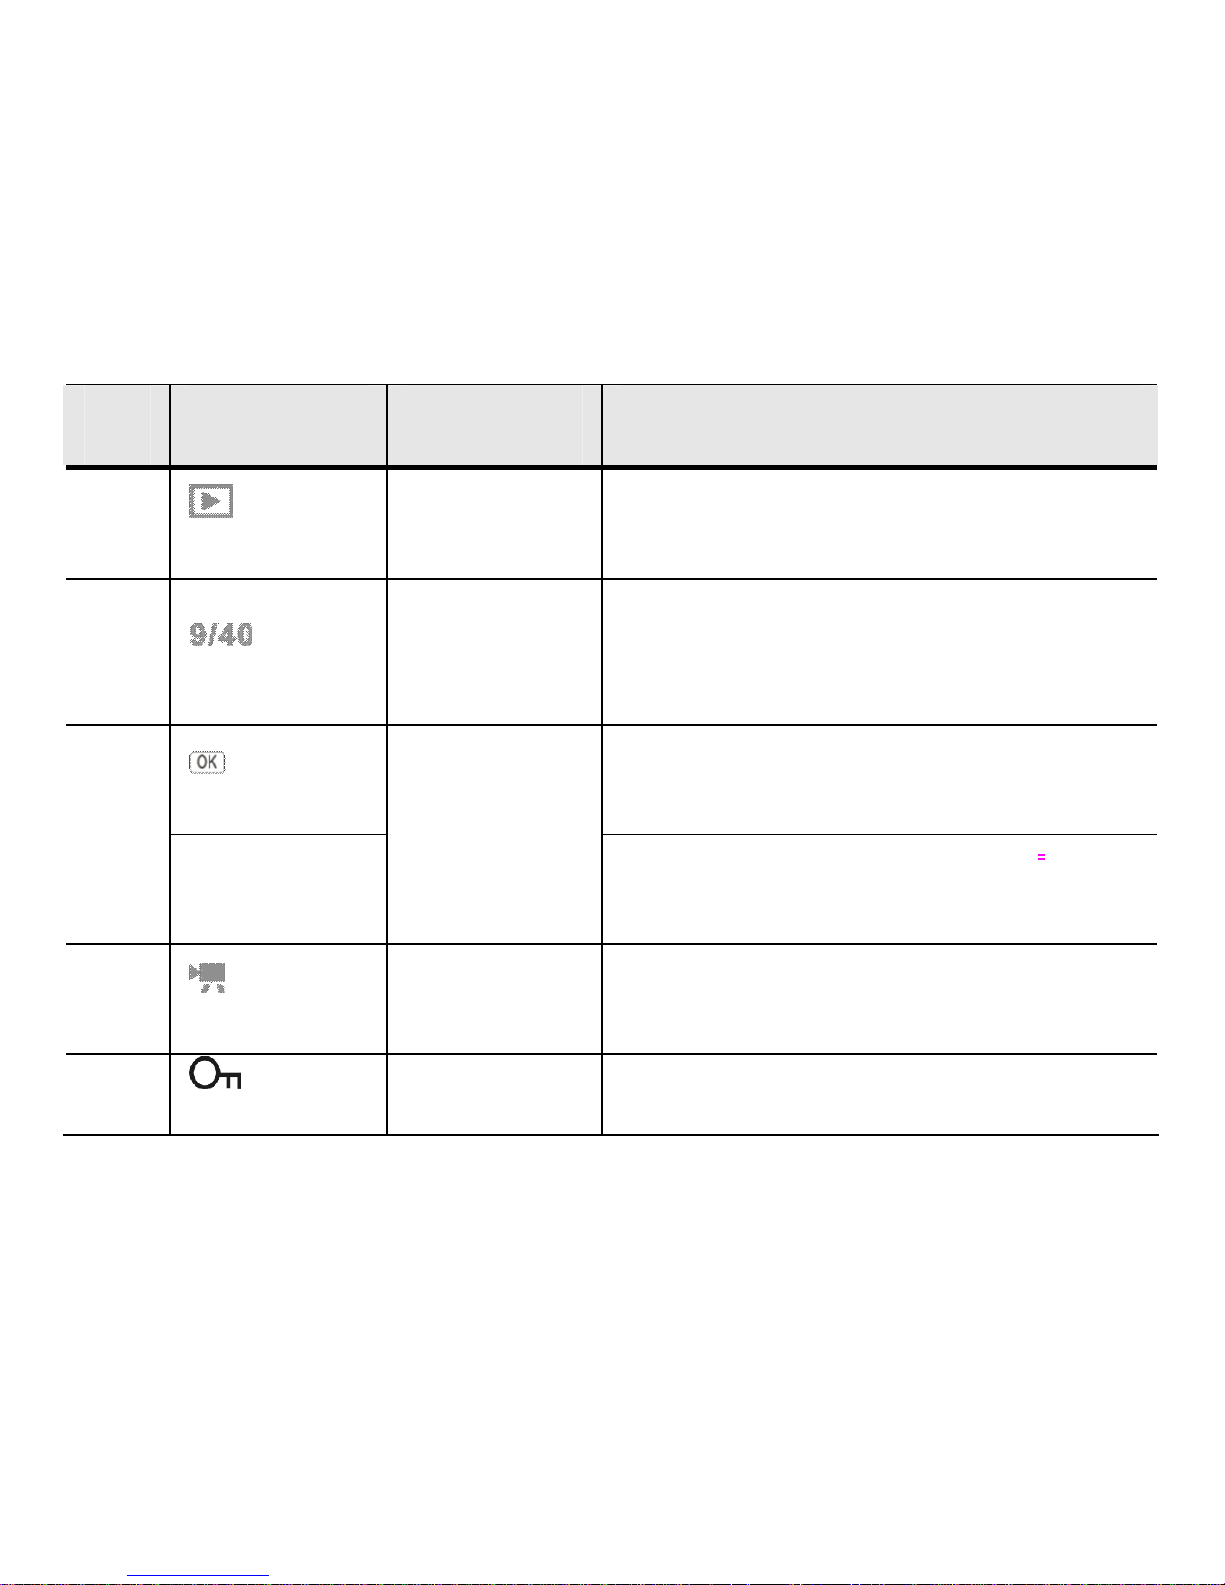
- ◆The following icons / indicators are visible on the screen during playback of Video
-
-
-
Page 25
25
Icon Name of Icon Description
1
Playback
Mode
Indicates Playback Mode is selected
2
File Number
Indicates the location of current file and the
total number of files (time appears while
playing back video clips)
PLAY
Prompt to press OK Button to playback
video file.
3
34SELECT
Button prompt
Select previous or next photo/ video file
with the Left / Right Button
4
Video icon
Indicates that the selected file is the Video
file
5
File protection
Indicates that the current file is protected.
Page 26
26
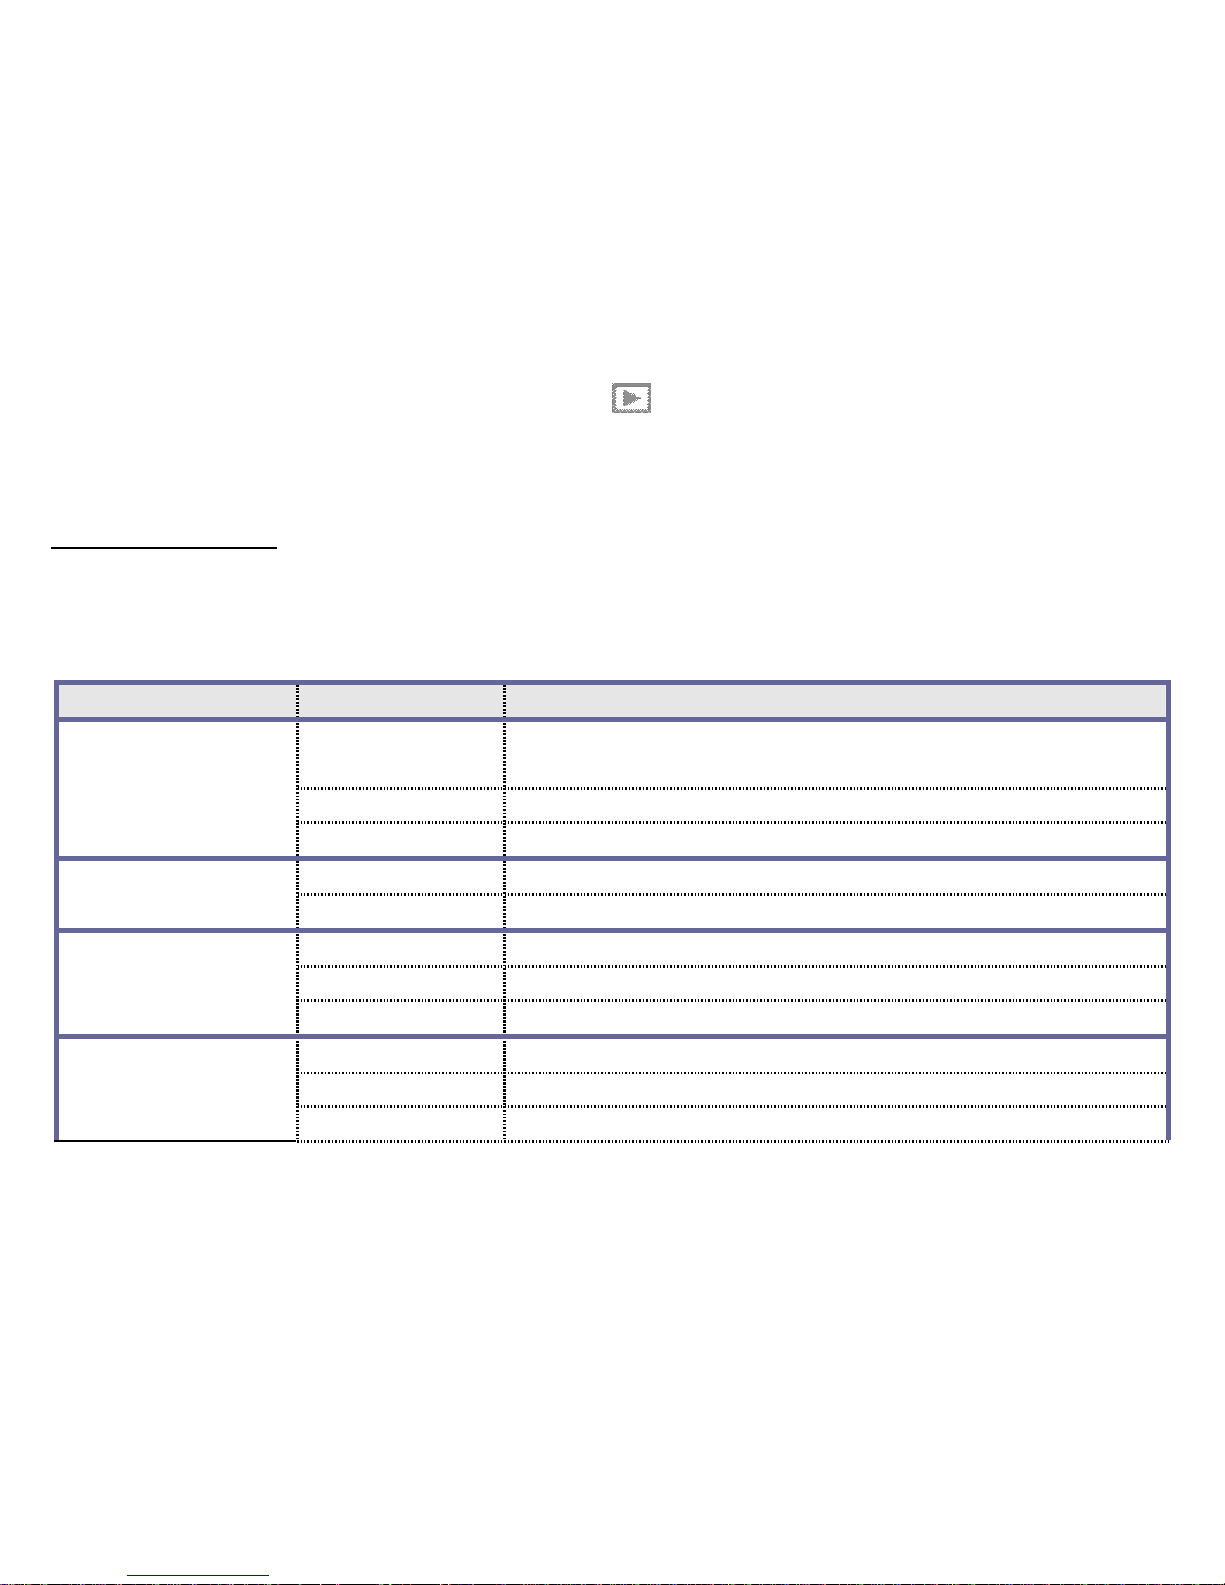
- MENU Setup / PLAYBACK Mode
Press the MENU Button to display available options and change setting as you desire.
Still Photo selected, see available options below:
Main Menu Submenu Description
Lock/Unlock
One
Lock/unlock current file
Lock All Lock all files
Lock
Unlock All Unlock all files
One Delete one file
Delete
All Delete all the files
Start Starts playing slides
Interval 1sec to 10sec selectable
Slide Show
Repeat Yes/No
B & W Photo image is black & white
Sepia Photo image has nostalgic sepia tone
Effects
Negative Photo image appears as negative film
Page 27
27
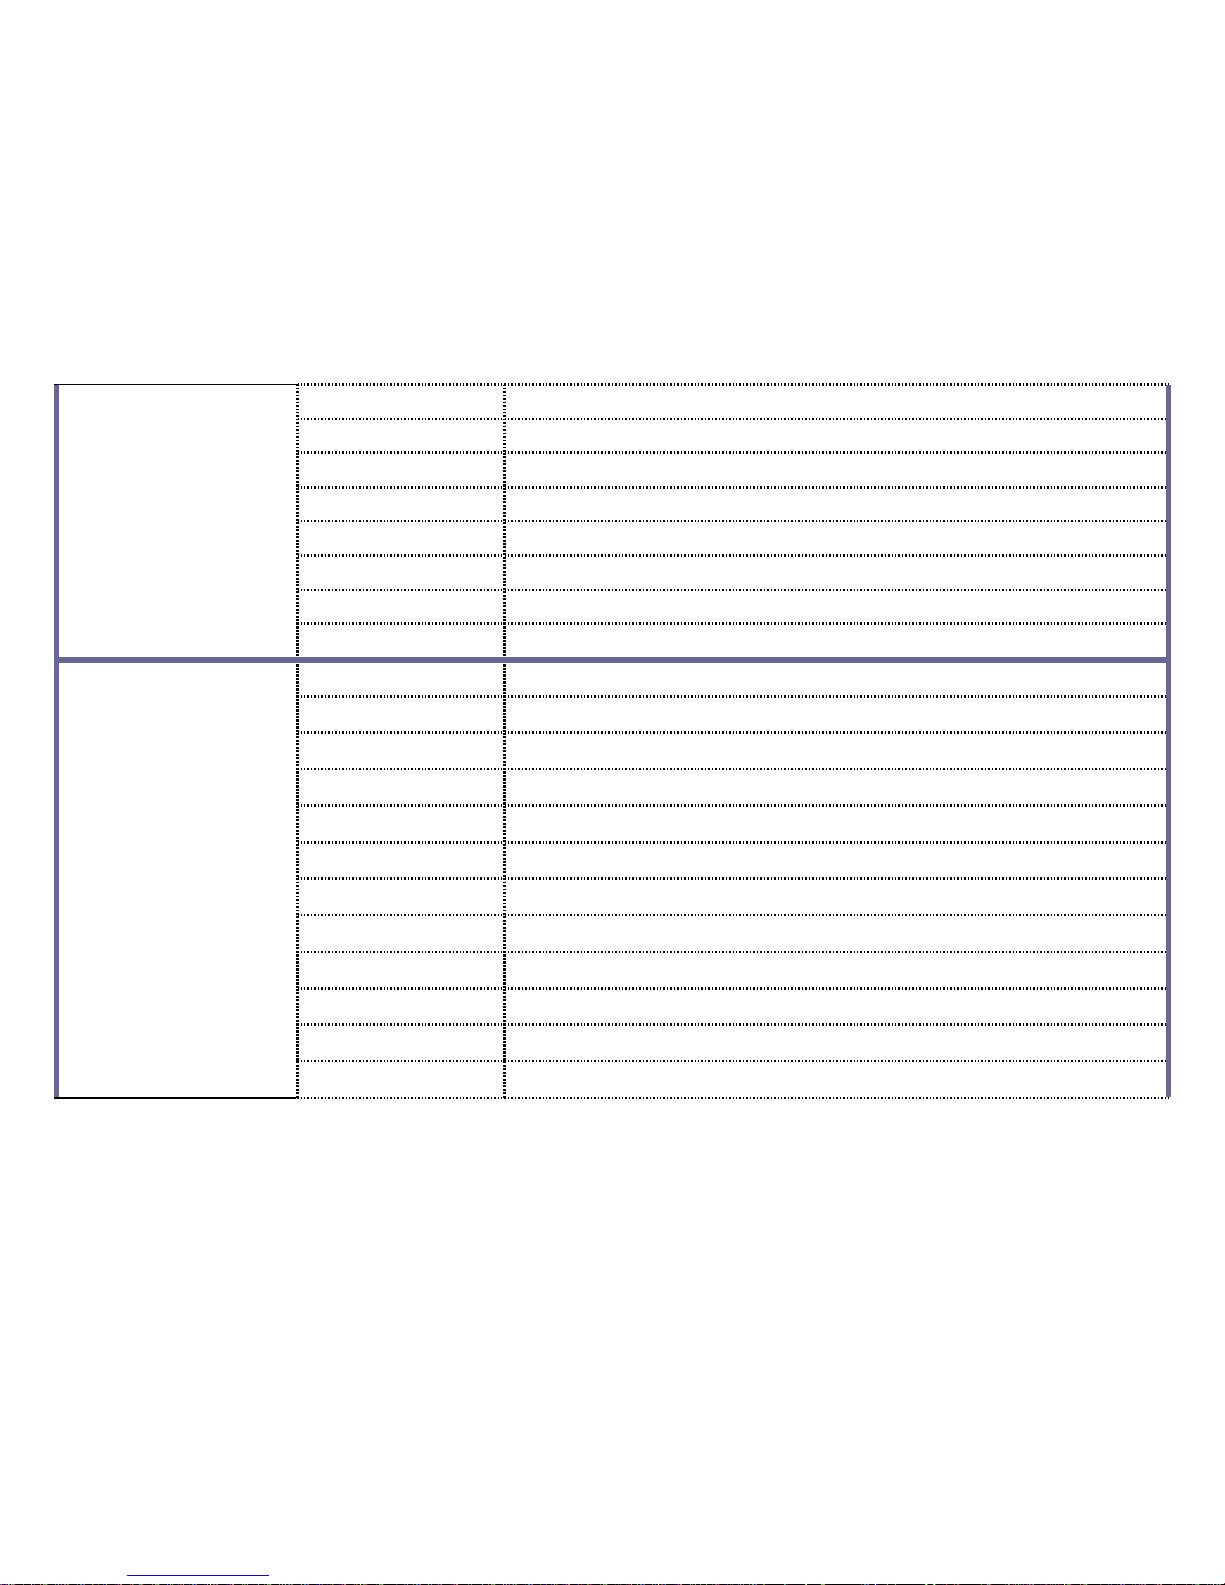
Red Photo image has slight reddish color
Green Photo image has slight greenish color
Blue Photo image has slight bluish color
Binarize Photo image has binary data arrays
Sunset Photo Image has sunset glow
Warm Photo has warm color for best skin tones
Cold Photo has cold color for cool image effect
Contrast Photo Image has over-exposure effect
H-Pinch Small horizontal distortion to the Photo
H-Punch Bigger horizontal distortion
V-Pinch Small vertical distortion
V-Punch Bigger vertical distortion
H-Stretch Photo stretched horizontally
H-shrink Photo shrunk horizontally
V-stretch Photo stretched vertically
V-Shrink Photo shrunk vertically
Wavy Photo with “waves” effect
Hourglass Photo with “hourglass” effect
Bubble Photo with “bubble-like” effect
Distortion
effects
Bubble Fill Photo with “bubble hole” effect
Page 28
28
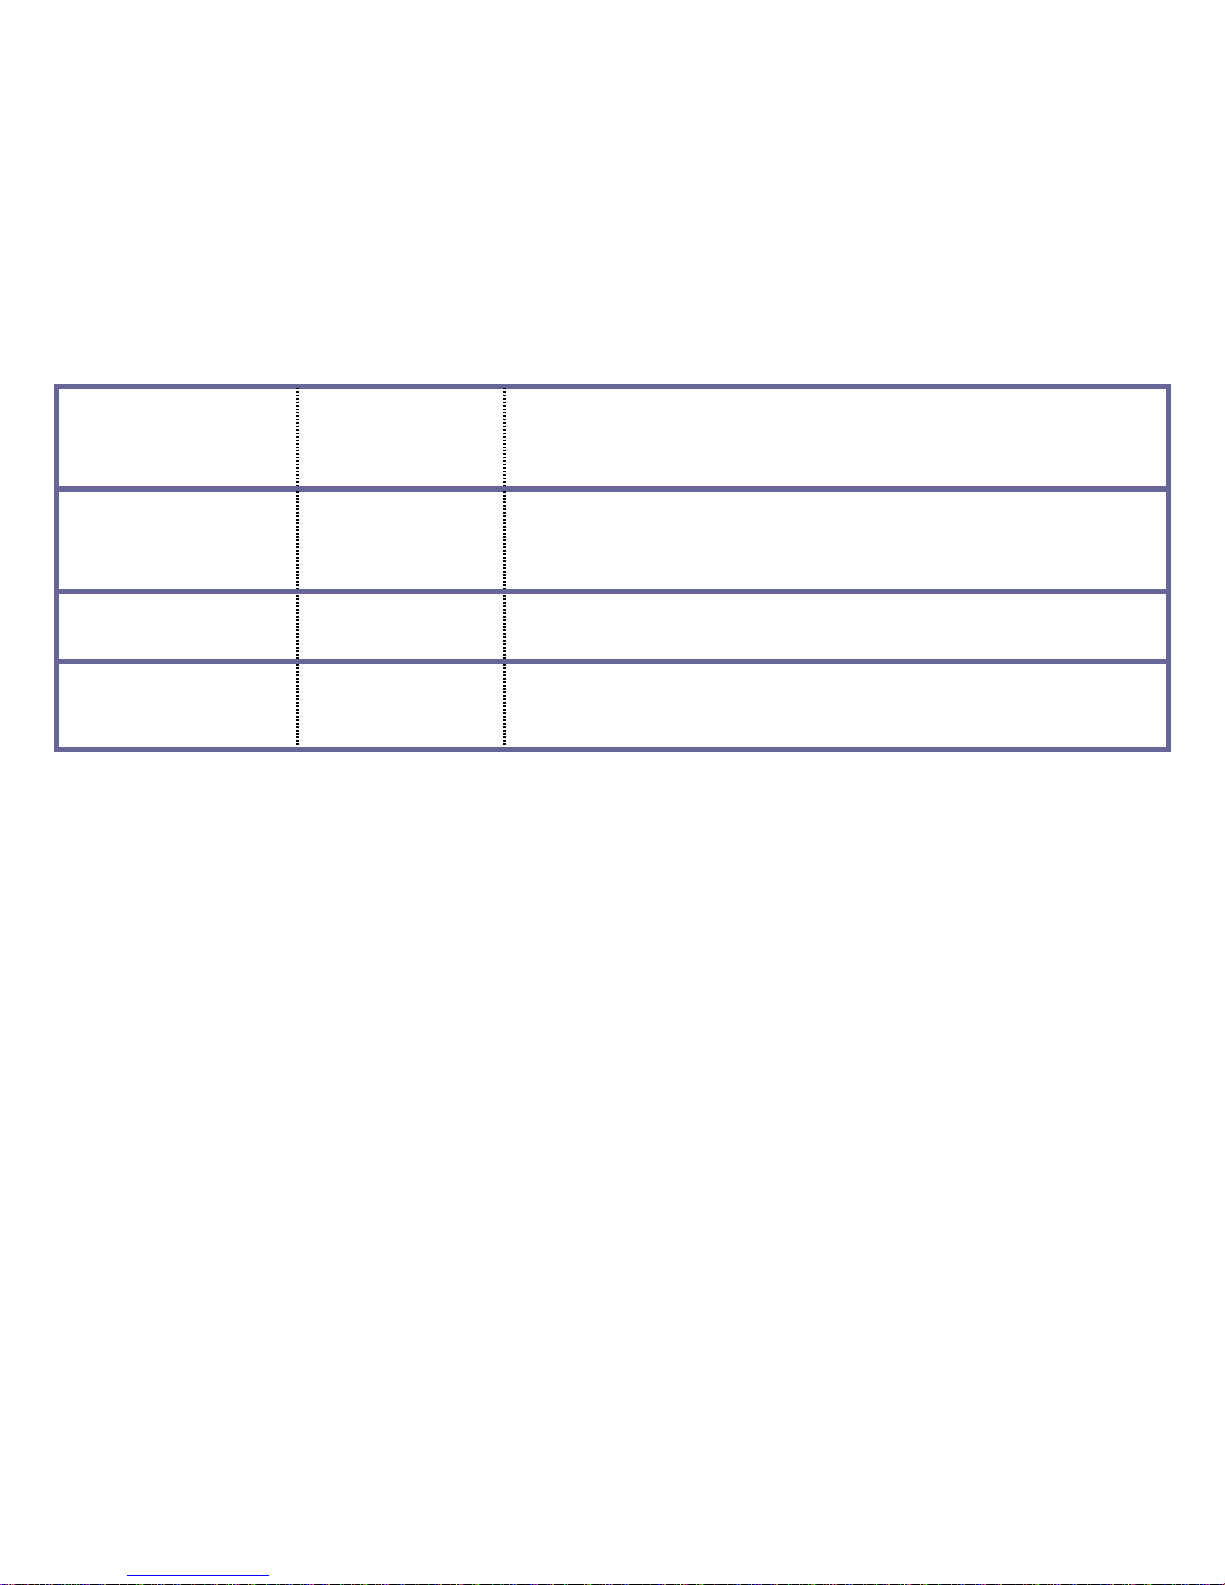
Rotate
Rotate Photo 90 degrees. Then two options:
Save – save the rotated photo
Back – return to normal displayed Photo
Resize
Resize – set different size (only smaller) than the
original Photo
Voice Memo
Add or Delete Voice Memo to the selected Photo
Start-up Image
Set or Cancel – set your favorite taken Photo as the
Start-up Image. Press Cancel to change
Playing the Voice Memo file
- Playback Mode; select the Photo with added Voice Memo at playback mode;
- Press Shutter button to start playing the selected Voice Memo file
Press OK key to stop playing, UP key to pause/resume playing,
Page 29
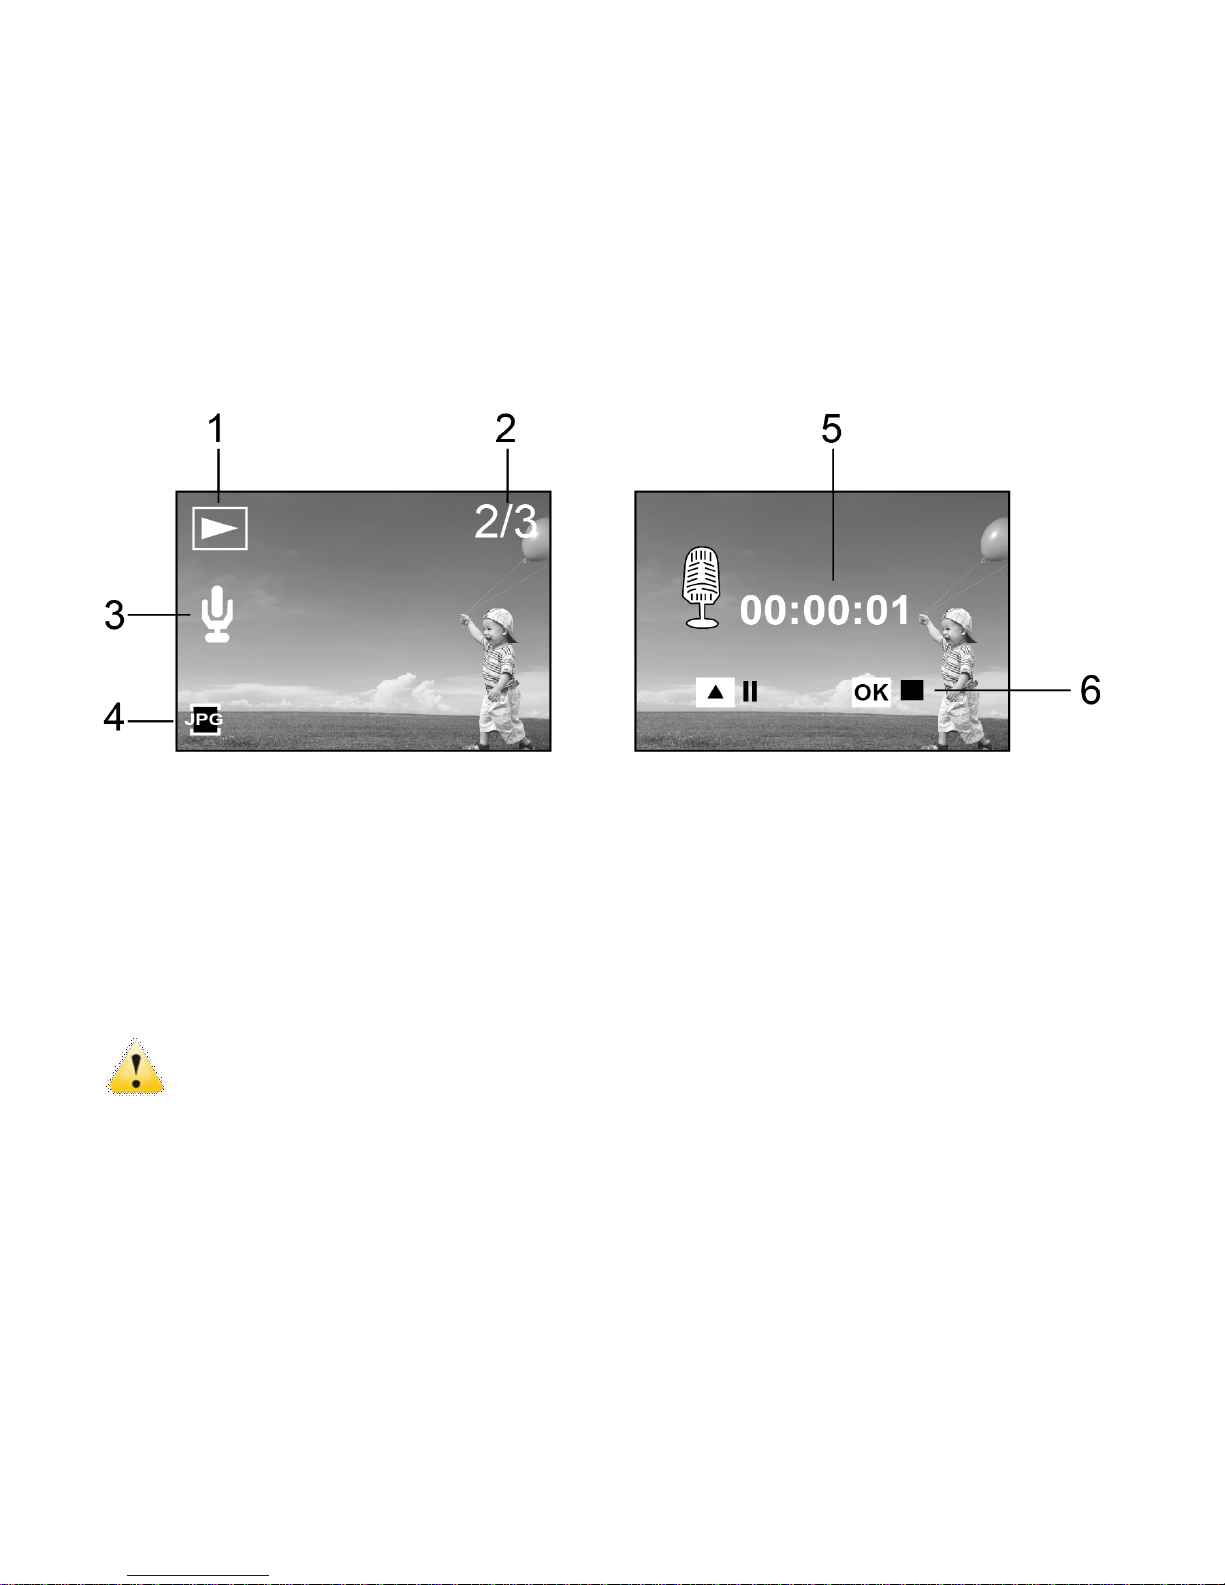
29
1. Playback Photo icon 5. Timer of played Voice Memo
2. Number of Voice Memo file 6. Pause, Stop control options
3. Voice Memo icon
4. Icon of the Playback mode
- Voice Memo recording / playback time is limited to 30 seconds max.
- The Photo and the Voice Memo will be displayed on the recorder LCD screen and
on TV – when connected.
- The computer will playback only the audio sound of recorded Voice Memo file.
Page 30

30
Playing back Video Movie;
When the Video Movie is selected, only the LOCK and DELETE options are available (see
table above)
Playback Mode/ Internal Setting
Settings are the same as for Video Recording/ Still Photo taking Mode - see page 21.
Computer Connection for Video / Photo Download
Your recorder will function as “Removable Disc” when it is connected to the computer.
The Removable Disc icon appears in My Computer; all your records are stored inside the
DCIM\100MEDIA folder.
Downloading Video / Photo File
When the video recorder is active and connected to the computer, you will see recorded Video
and Still Photos inside My Computer / DCIM / 100MEDIA folder.
You can “Save” selected file (or “drag” the file) into your computer, and store it on Desktop, My
Documents or in any other folder or location.
Then you can PLAYBACK Video and display photos from the computer memory storage.
• Playing back HD Video Records
Since High Definition Video files are very complex, the transferring or playing back HD Video
Page 31

31
records using the USB or TV cable may not guarantee the best performance due to slow transfer
rate.
- We suggest you remove the SD Card with recorded HD Video from the video
recorder and insert card directly into the SD Card port of your computer or TV. Then
the HD Video may be easily downloaded into the computer (as described above) or
played back on HDTV.
- Playing back Video Records on TV
Use supplied TV Cable and connect AV connector on video recorder to the AV input on your TV.
Turn the recorder ON, and set TV to AV INPUT Mode.
Press the PLAYBACK Button on the recorder and select Video or Photo file. Use recorder
buttons to play.
──────────────────────────────────────────────────────
Note: Do not disconnect the USB cable or remove the SD Card during download process
to avoid data loss.
───────────────────────────────────────────────────────
Webcam Function
Note: To use recorder as a Webcam you must first install the Driver.
Please install Driver bundled on supplied CD BEFORE connecting video recorder (for the
first time only) to computer; see instruction below.
Page 32
32
Driver Installation
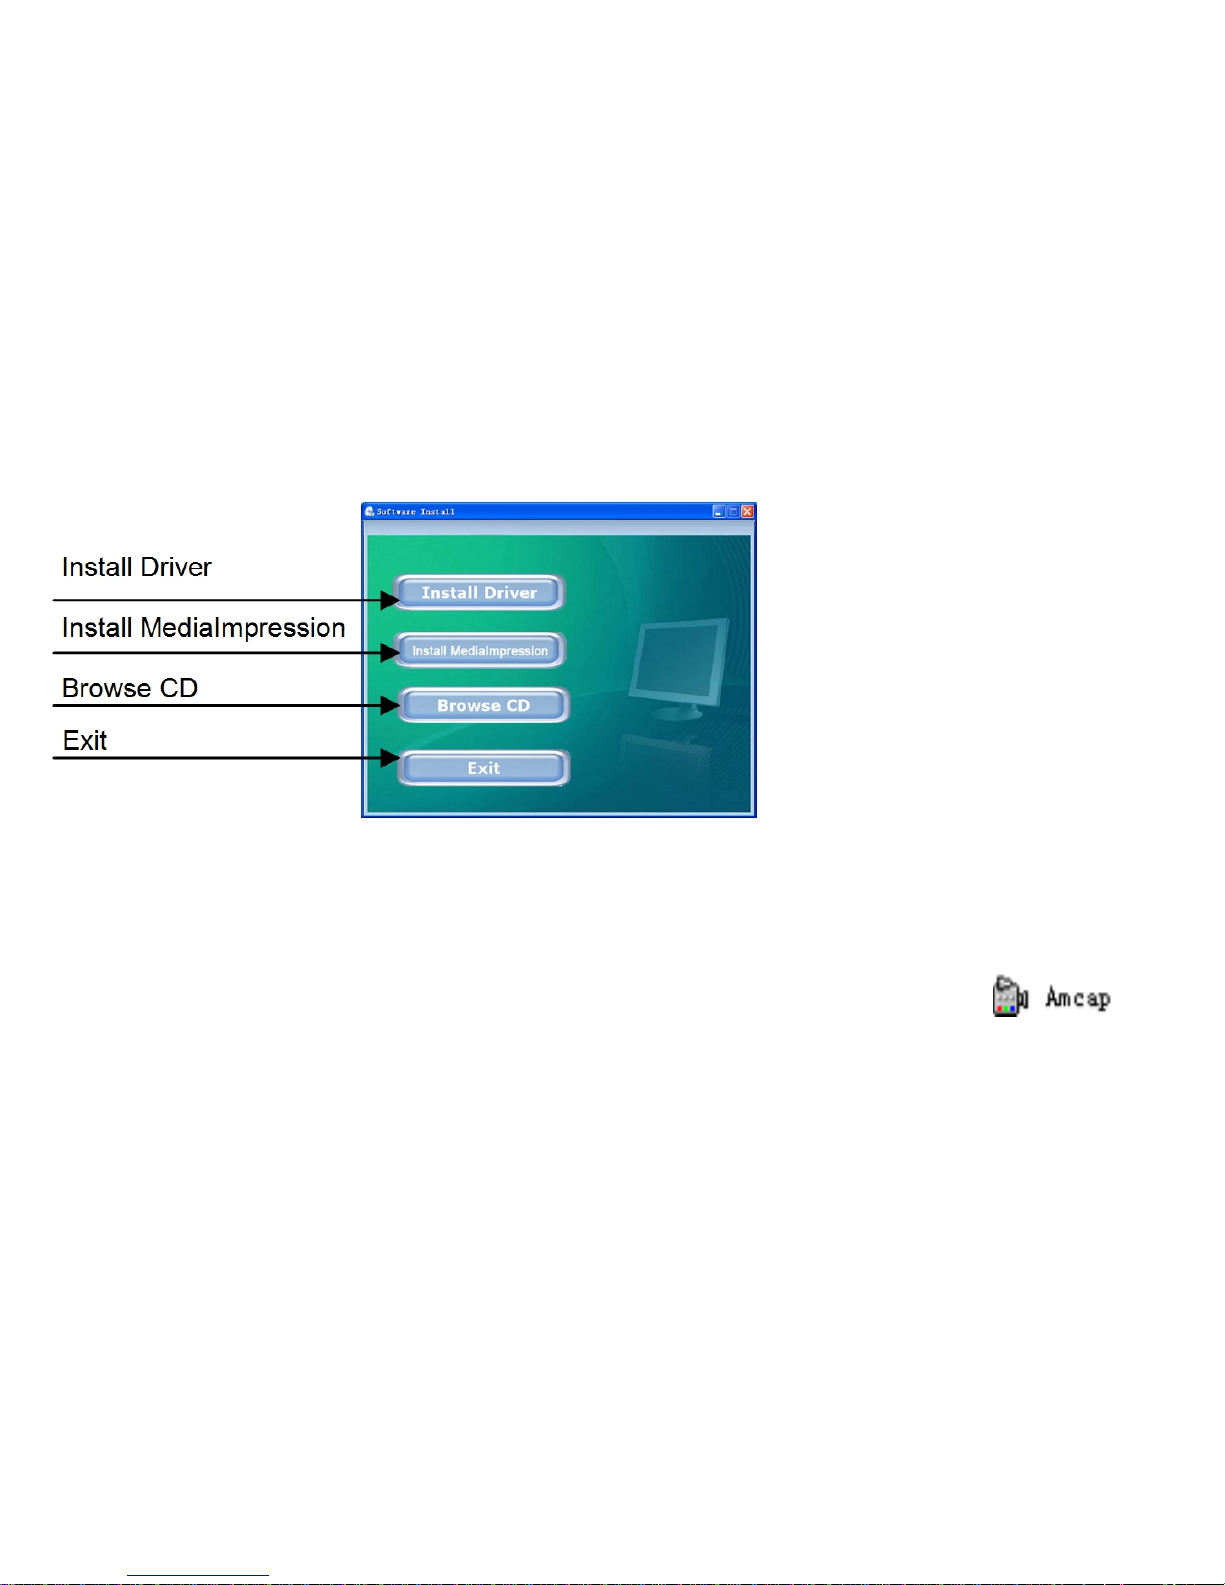
Insert supplied CD into CD-ROM, and the installation guide program will run automatically.
There are four keys on the guide window:
Click the Install Driver button and follow steps to finish installation.
Restart computer when installation completed.
The installed Driver will be indicated as the “SPCA1528 PC Driver” with an icon
inside computer’s Start → All Programs list.
Now you can activate PC web-cam mode and connect video recorder to the computer using USB
cable.
Page 33
33
Operating Webcam
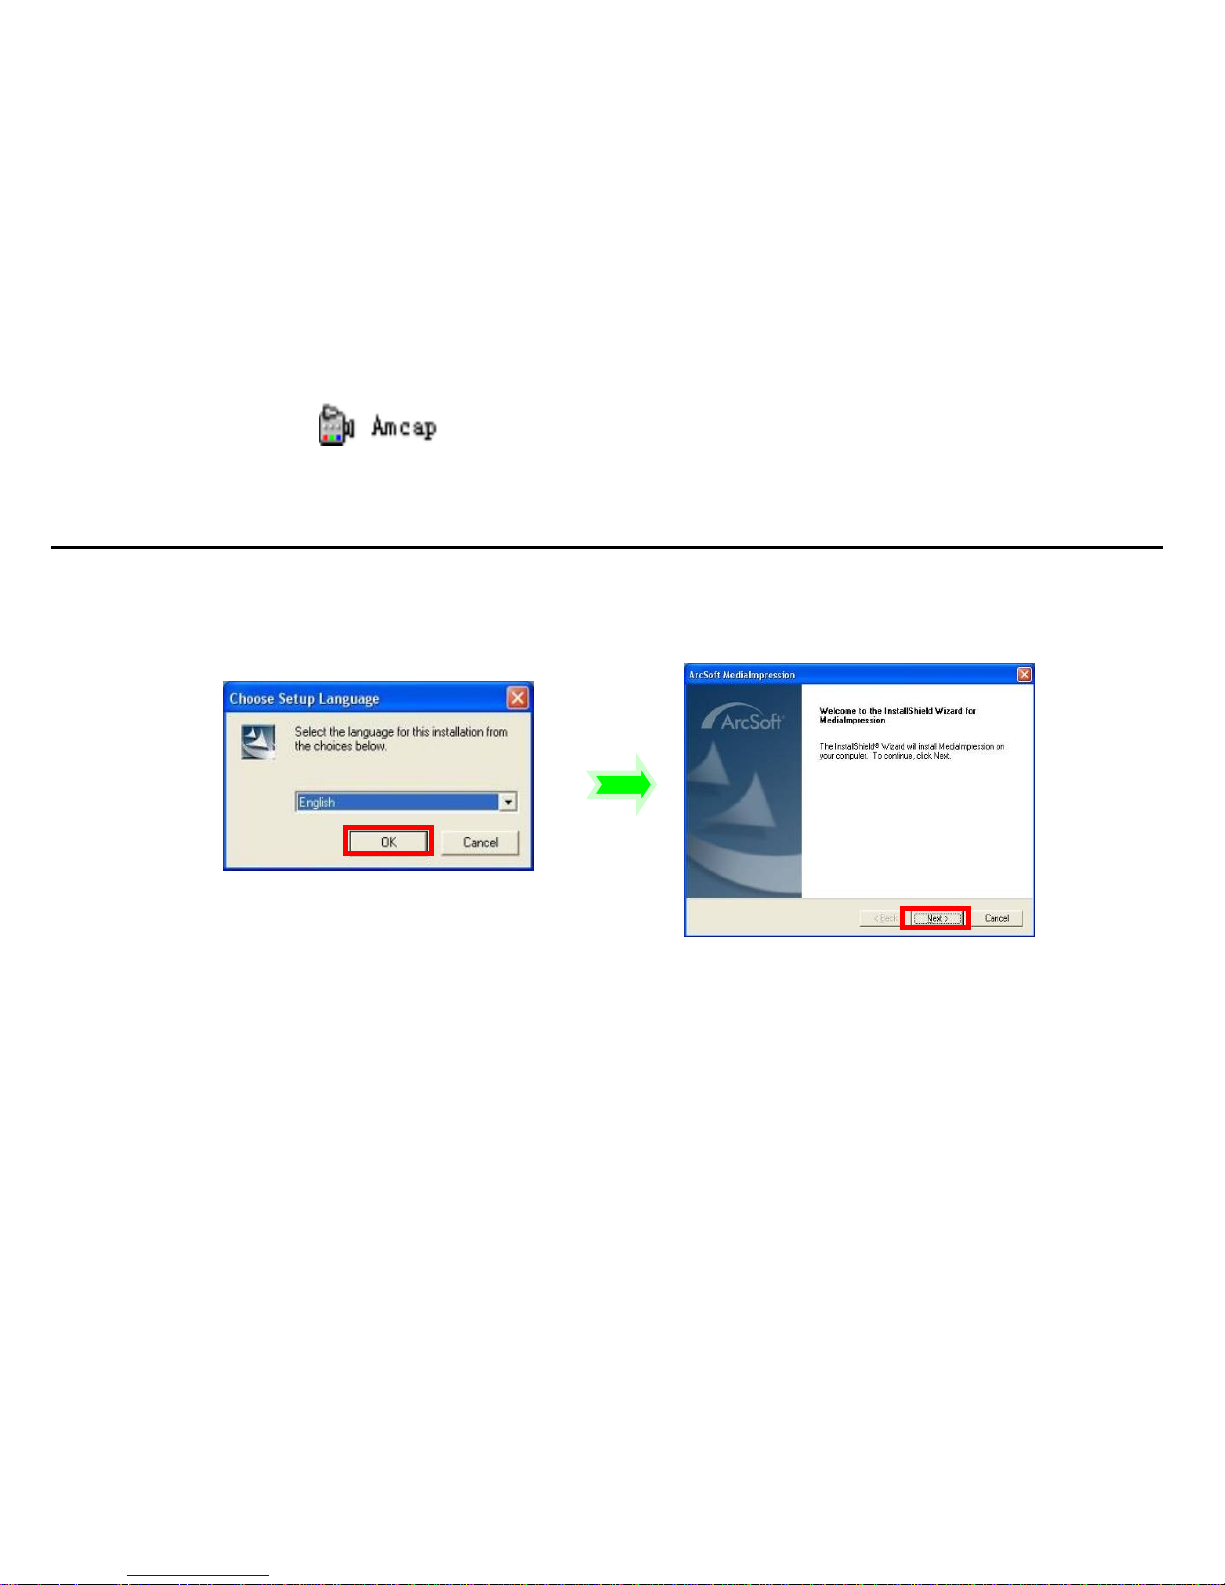
Click the shortcut icon to open AMCAP window.
The AMCAP computer window will display the scene visible through the recorder lens.
MediaImpression Installation
You may install MediaImpression software into your computer from installation CD.
Software installation
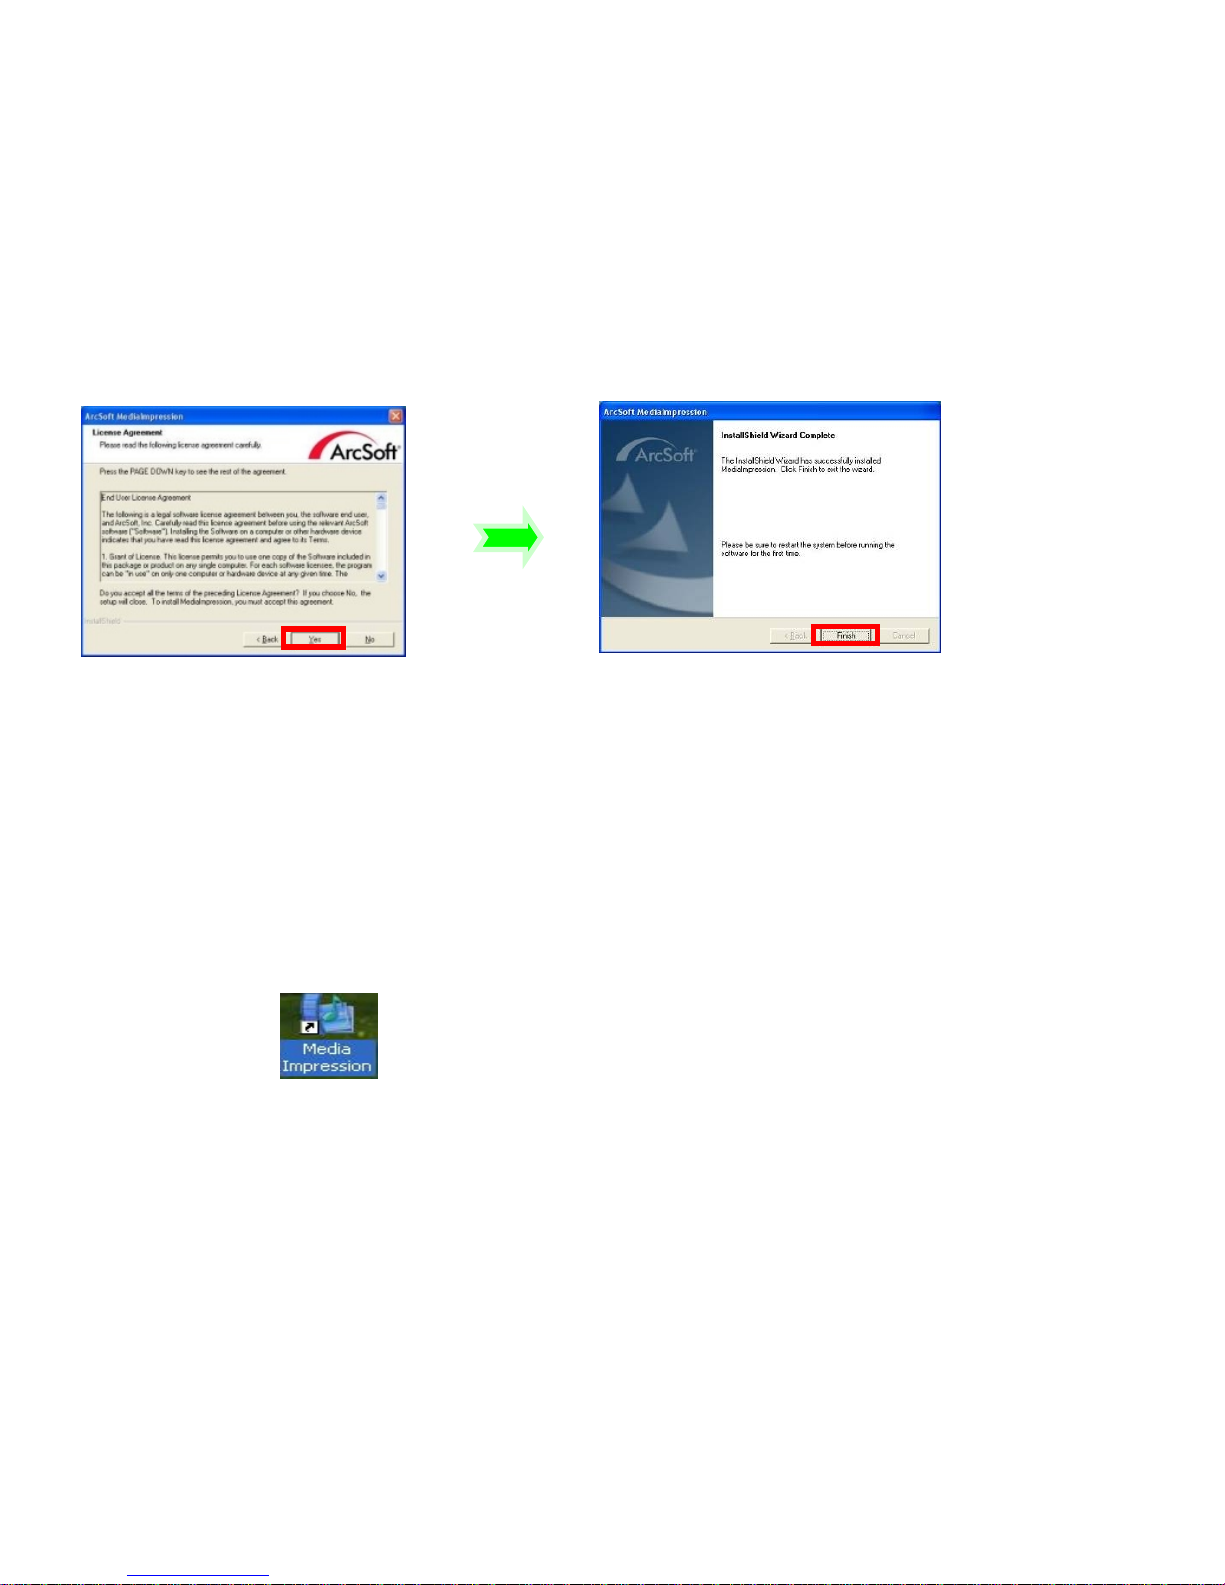
Click “Install MediaImpression” button and complete the installation as per the following steps
Page 34
34
Please restart the computer when prompted to complete the installation, computer will install
MediaImpression shortcut / icon on the Desktop.
Using MediaImpression
This program will allow you to import / store all, or selected records from your video recorder
(when connected) to your computer.
The MediaImpression program will also provide “one button” access to the YouTube website: post your video and share with millions of Internet users
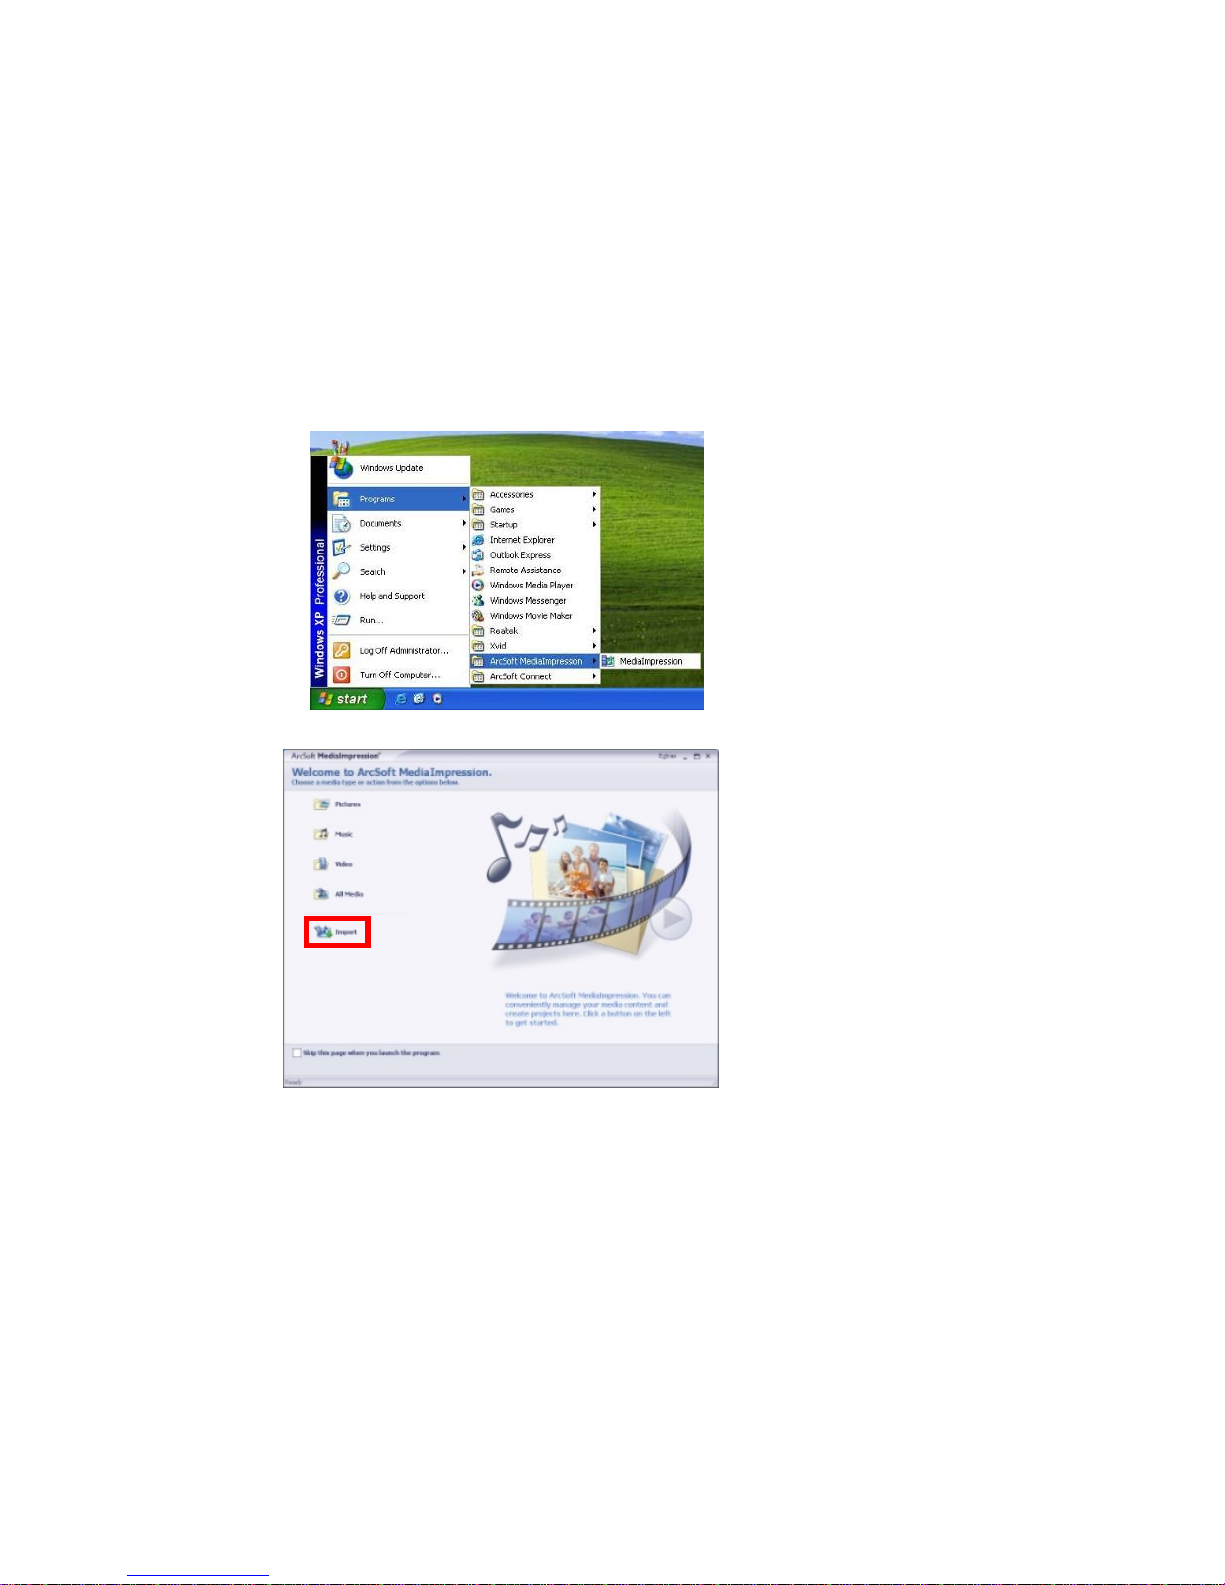
Double click the icon on the desktop or follow “Start →
Page 35
35
Programs” to open MediaImpression
After starting MediaImpression, click “Import” to import the media.
Page 36
36
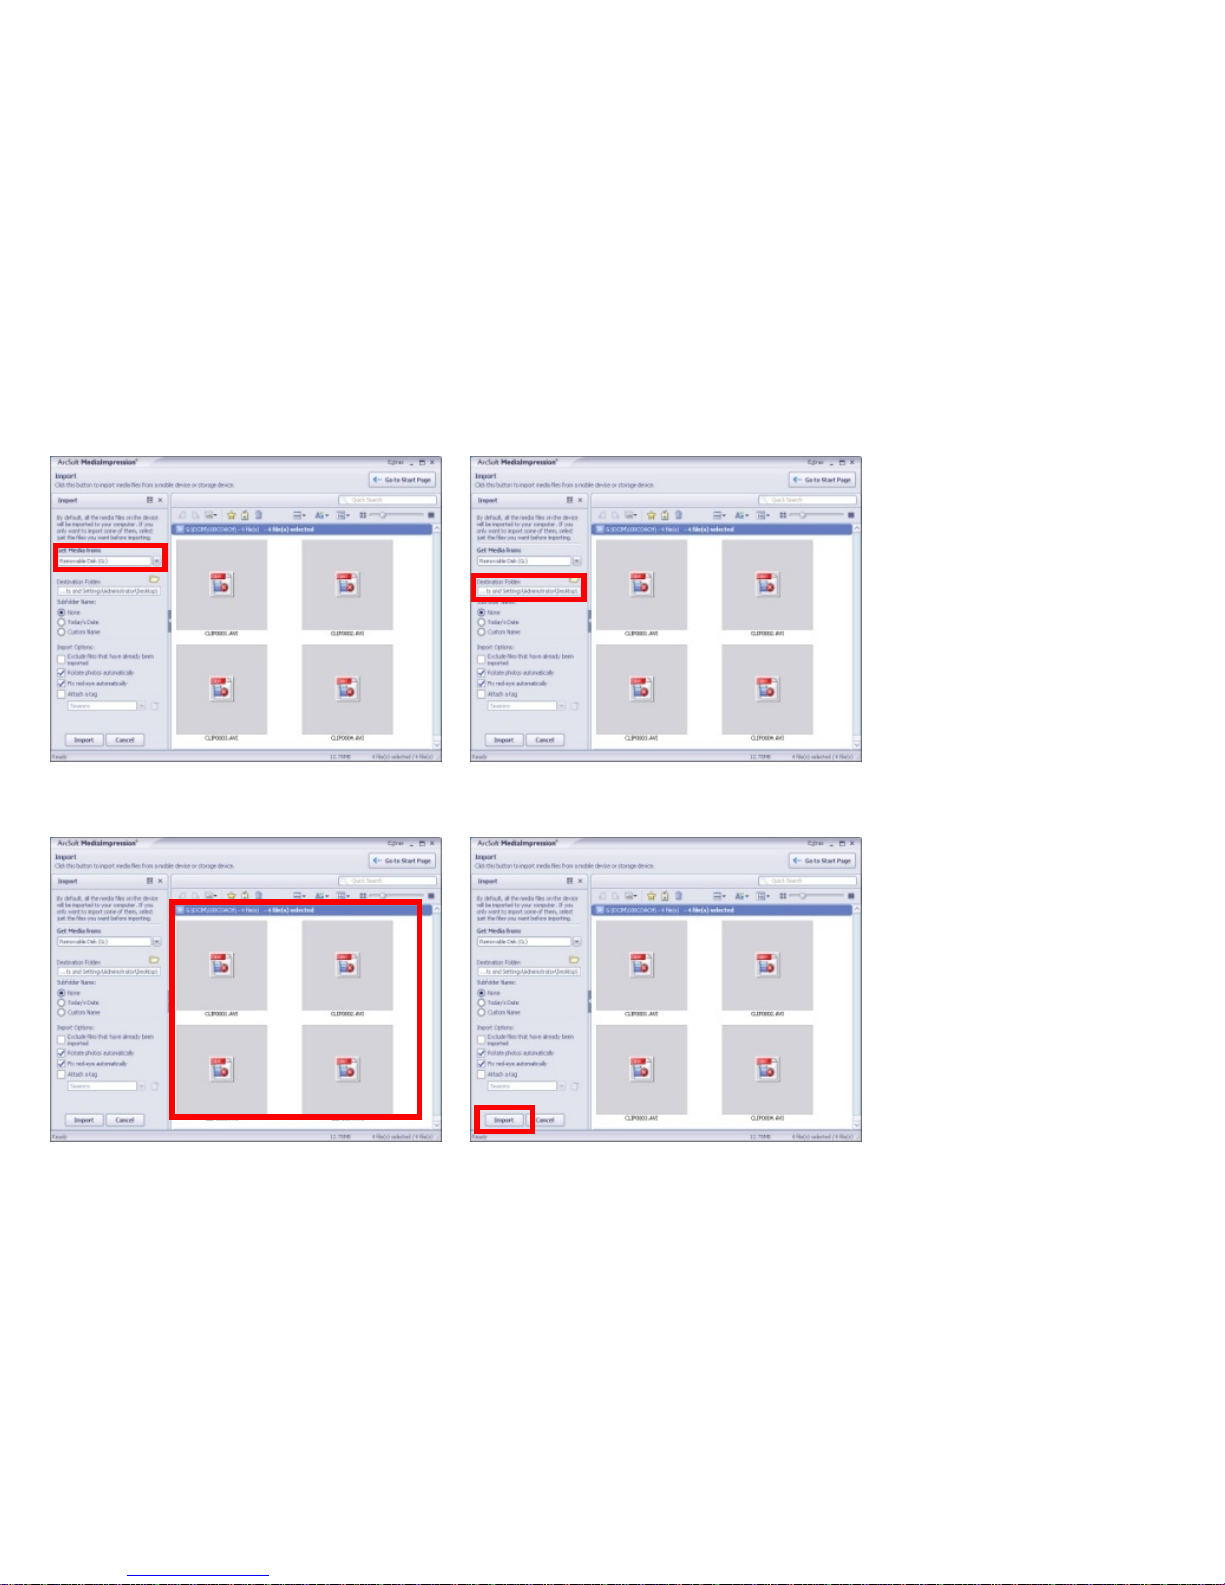
Choose the video recorder storage and choose the output location.
Choose required file and click “Import” - selected file will be stored in the indicated output
location.
Page 37
37
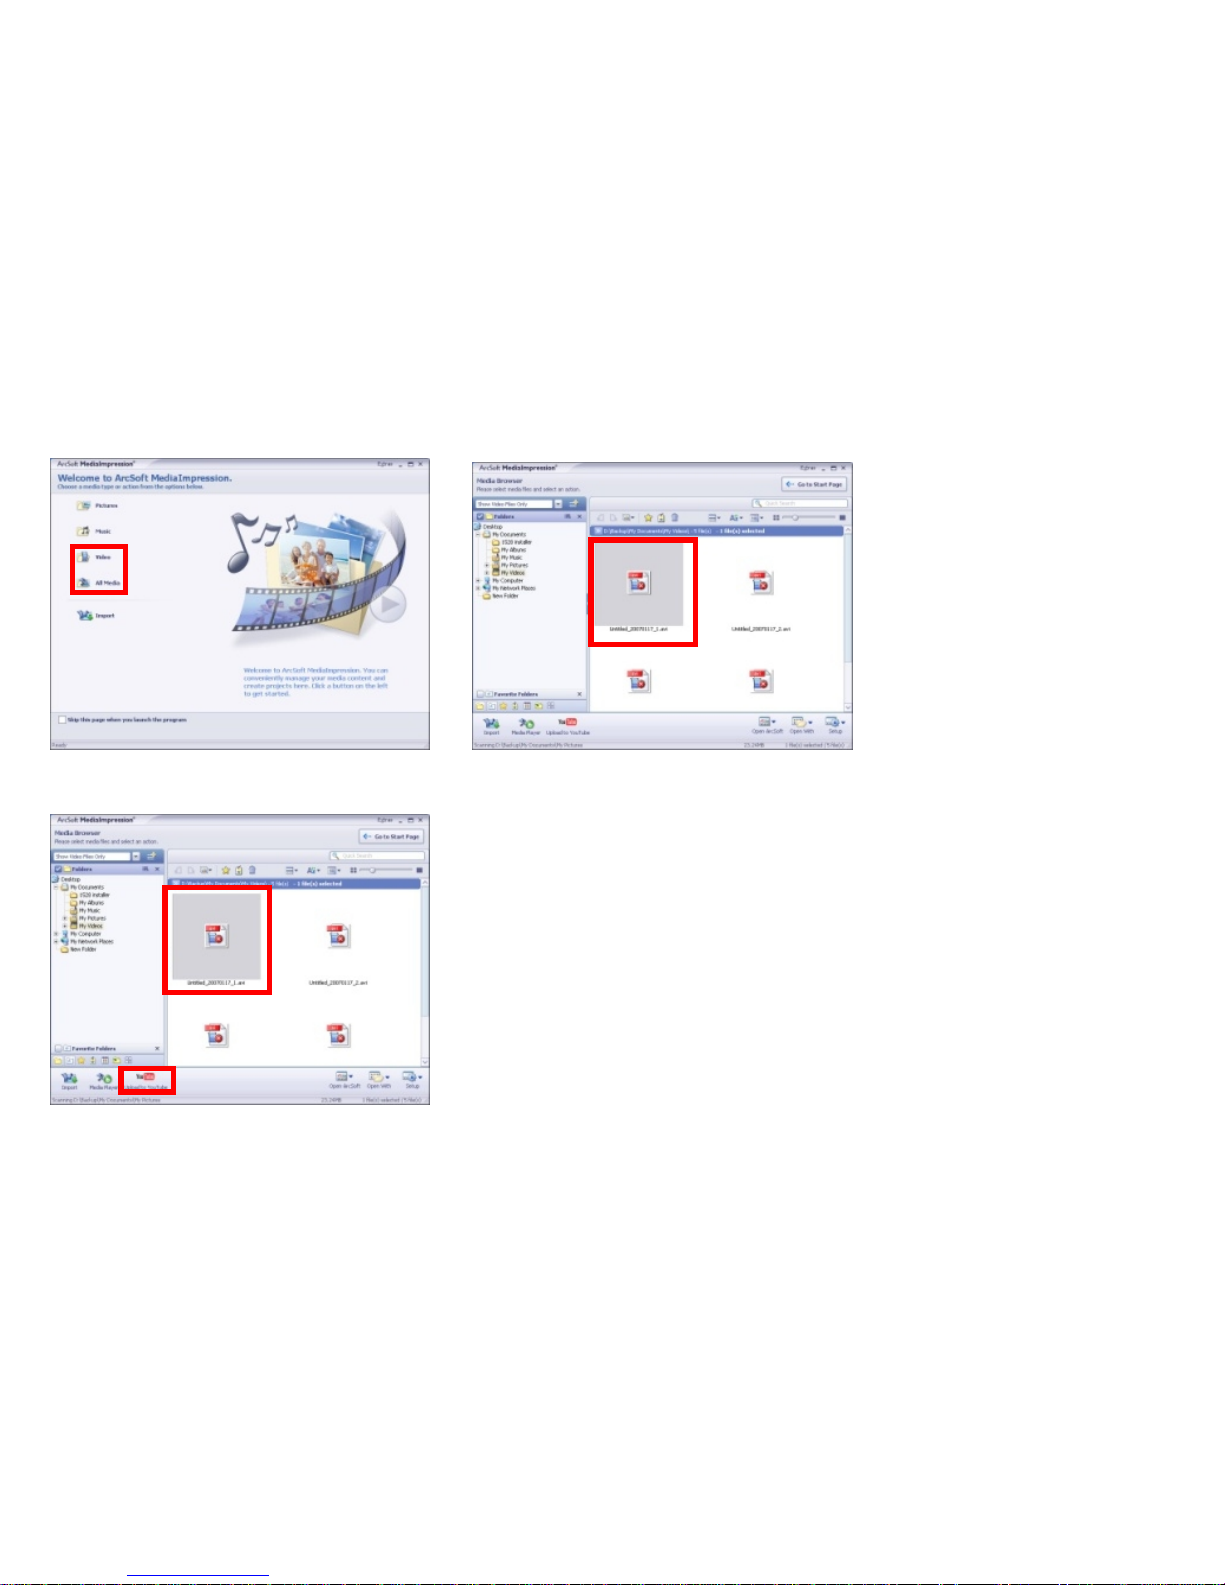
Click “Go to Start Page” to return the main screen; click the “Video” or “All Media” to get the
“YouTube” access.
Choose file and click “Upload to YouTube”
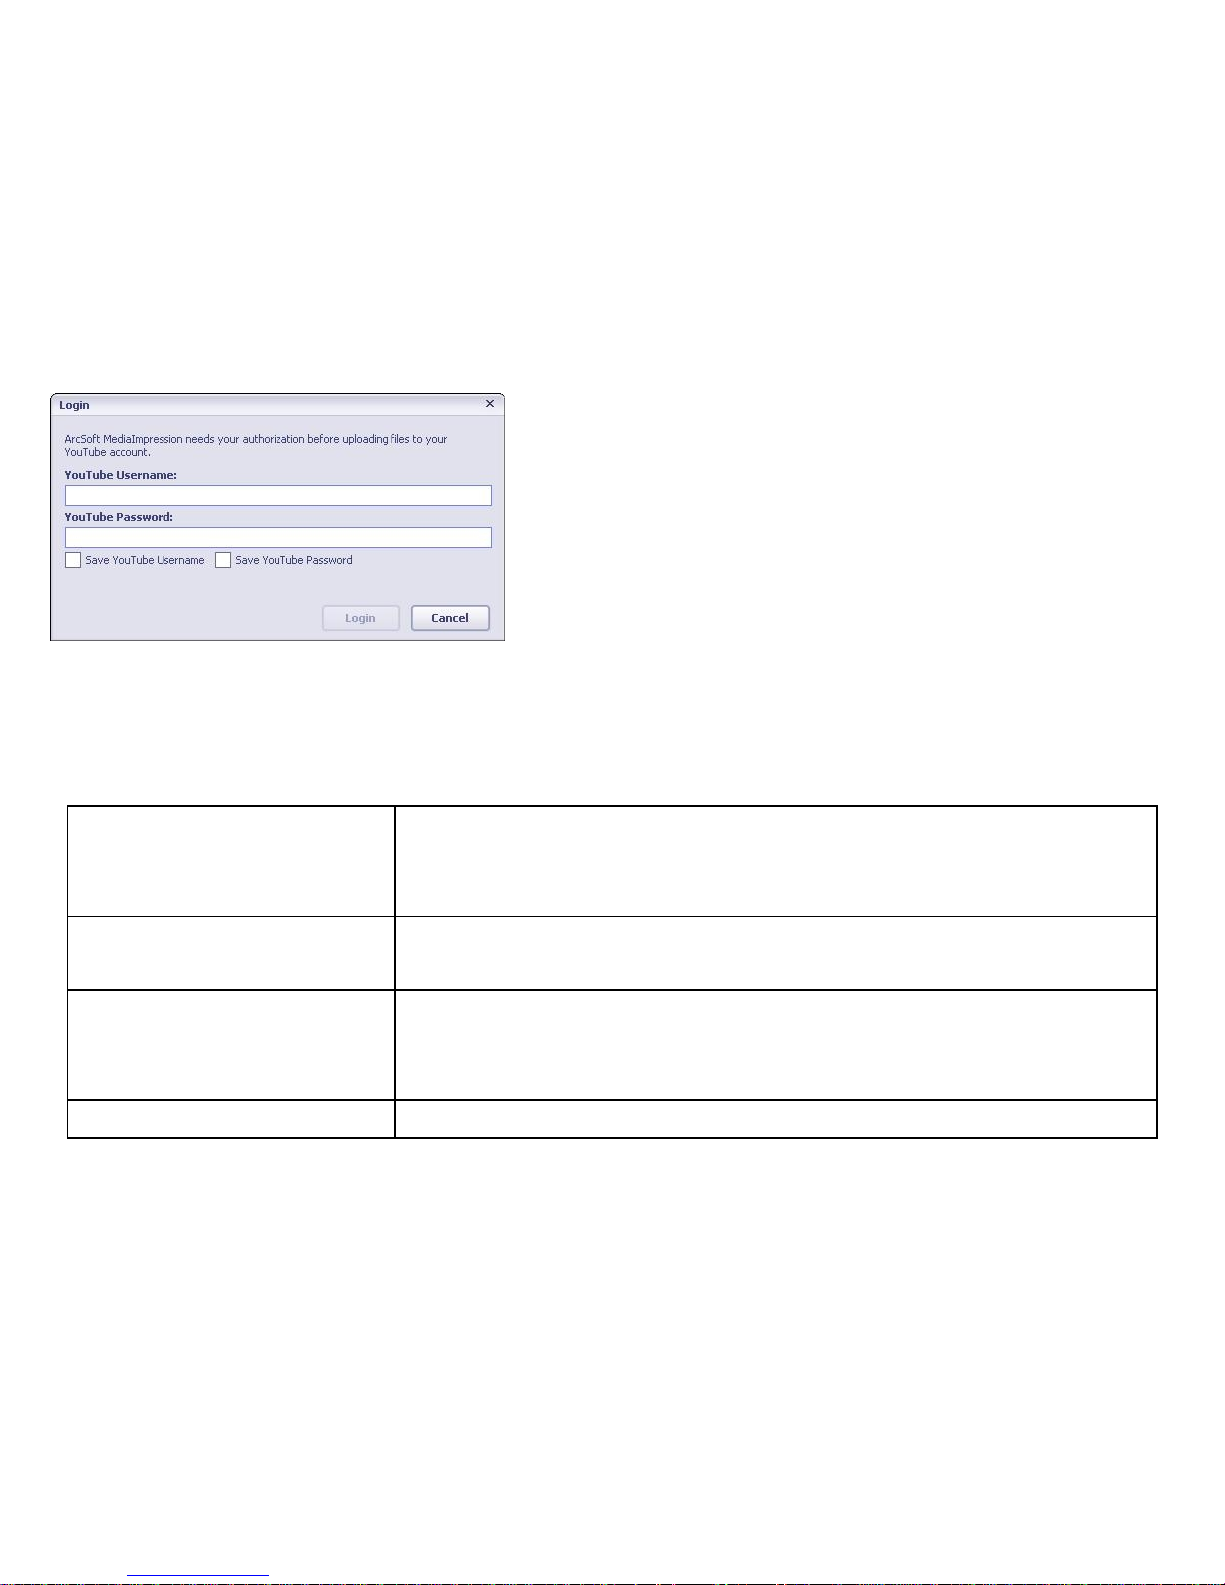
Enter your username and password to login to YouTube, execute upload / post selected Video.
Page 38
38
Note that when software installation has been completed, please reboot the computer for the first
time operation.
5. Specifications
Video Resolution
HD 1280×720 pixels
VGA 640×480 pixels
QVGA 320×240 pixels
Photo Resolution
8MP (3264 x 2448), 5MP (2592 × 1944),
3MP (2048 × 1536), 1.3MP (1280 × 1024)
Memory
SD Card slot: SD Memory Card is required for storing records
(card is not supplied)
Accepts SD/SDHC cards with capacity up to 8GB
File Formats JPEG, AVI, WAV
Page 39

39
Self-Timer 2s or 10s self-timer options
Digital Zoom 4 X digital zooming
White Balance Auto/Daylight/Cloudy/Fluorescent Light/Tungsten Lamp
Exposure Compensation -2.0 to +2.0 Exposure Value range
USB Port USB 2.0
TV Output NTSC / PAL selectable
LCD Screen 2.0 inch TFT LCD
Power Source 4 x AAA Alkaline Batteries (not supplied)
Menu Language English, French, Spanish, Dutch, Italian, Portuguese,
Lens Optical lens
Auto-off options 1 minute / 3 minutes / 5 minutes
Operating System
Compatibility
Windows XP, VISTA, 7
Weight 7ozs ( 195grams) - excluding Batteries and SD Card
Dimensions 4.8 x 2.5 x 2.1 inches (122 × 63 × 54 mm)
Note: The product specifications are printed based on latest available information and are subject
to change without prior notice.
The specifications of your purchased recorder may be slightly different from above data.
Page 40
40
TROUBLESHOOTING
Condition Cause/ Remedy
Insufficient power, please install new batteries.
The video recorder can
not be turned ON
Batteries installed incorrectly.
Reinstall batteries, note correct polarity alignment.
The SD Card is not inserted.
Insert the SD card for photo taking / video recording.
Can not take a picture or
make any records
Write protection switch on the SD card is set to LOCK (locked)
position. Remove the SD Card and set the switch to non-LOCK
position and re-insert the card..
Unclear or blurred
photos
Keep recorder steady while making video recordings or taking
photos. Use a tripod or support while recording.
Dark photo or videos
Insufficient light during video or picture taking. Use exposure
control or add an additional light to improve light condition.
Insufficient power remaining- please replace the batteries.
Automatic shutdown
To save power, the video recorder automatically shuts down after
one minute, three or five minutes of inactivity.
Video or Photo file can
not be deleted
Write protection switch on the SD card is set to LOCK position.
Remove SD card and set the switch to non-LOCK position and
re-insert the card.
HDV102 – 20111031
 Loading...