


Alarm Clock
USER GUIDE
© Jazwares, Inc. 2012

CONTENTS
Please read the instructions along with the Alarm Clock carefully
before you use it, so that you can operate it conveniently.
WELCOME & Warnings Page 3
Operating instructions
Setting the time, date and alarm
Using the radio 6
Recomandations for use
Notes 8
Warranty 9-10
Features & Specifications 11
4-5
5-6
7
Included in box:
• Alarm Clock with AC Adaptor
• User Guide and Warranty
-2-

Congratulations on your purchase of the Lalaloopsy Alarm Clock! We hope you
enjoy all the great features. To get the most out of your Alarm Clock please read
this manual as it provides tips and information about its various features.
WARNINGS:
1. Read the instructions before using. Follow them and save them for future reference.
2. Please note that due to technical improvements this product may differ from the
one that appears in the illustration.
3. This product requires 3 x LR6/AA (1.5 V) batteries (included).
4. This product operates exclusively with alkaline batteries. Do not use saline batteries
under any circumstance.
5. Take the batteries out of the compartment when the unit is not going to be used for
a long period of time.
6. The battery terminals must not be short-circuited.
7. Non-rechargeable batteries must not be recharged.
8. Remove rechargeable batteries from the Alarm clock before being charged.
9. Rechargeable batteries are only to be charged under adult supervision.
10. Use only the type of batteries recommended by the manufacturer or the equivalent.
11. Do not mix used batteries with new ones.
12. Do not mix different types of batteries.
13. Used batteries or accumulators must be removed from the Alarm clock. They can
cause faults.
14. Batteries or accumulators must be installed respecting the polarity indicated in
the diagram.
15. The current adapter or charger is not a Alarm Clock; be careful when using it.
16. The connections and cables of the power adapter or charger used with the Alarm
Clock must be examined regularly by an adult to avoid accidents.
17. If any anomaly is detected in the operation of the power adapter or charger,
you must not use the Alarm Clock with it until the failure has been repaired.
18. Disconnect the adapter from the mains when the unit is not going to be used and
when cleaning and handling.
19. The current adapter or charger should not be connected to power supplies with
higher ratings than what is recommended.
20. The Alarm Clock should only be used with an adapter or charger that has been
recommended by the manufacturer or distributor.
21. The unit will malfunction if there is radio interference within its operating range.
It will function normally once the interference has ceased.
22. In case of electrostatic discharge, the unit may malfunction and lose its memory,
requiring the user to reset it.
-3-
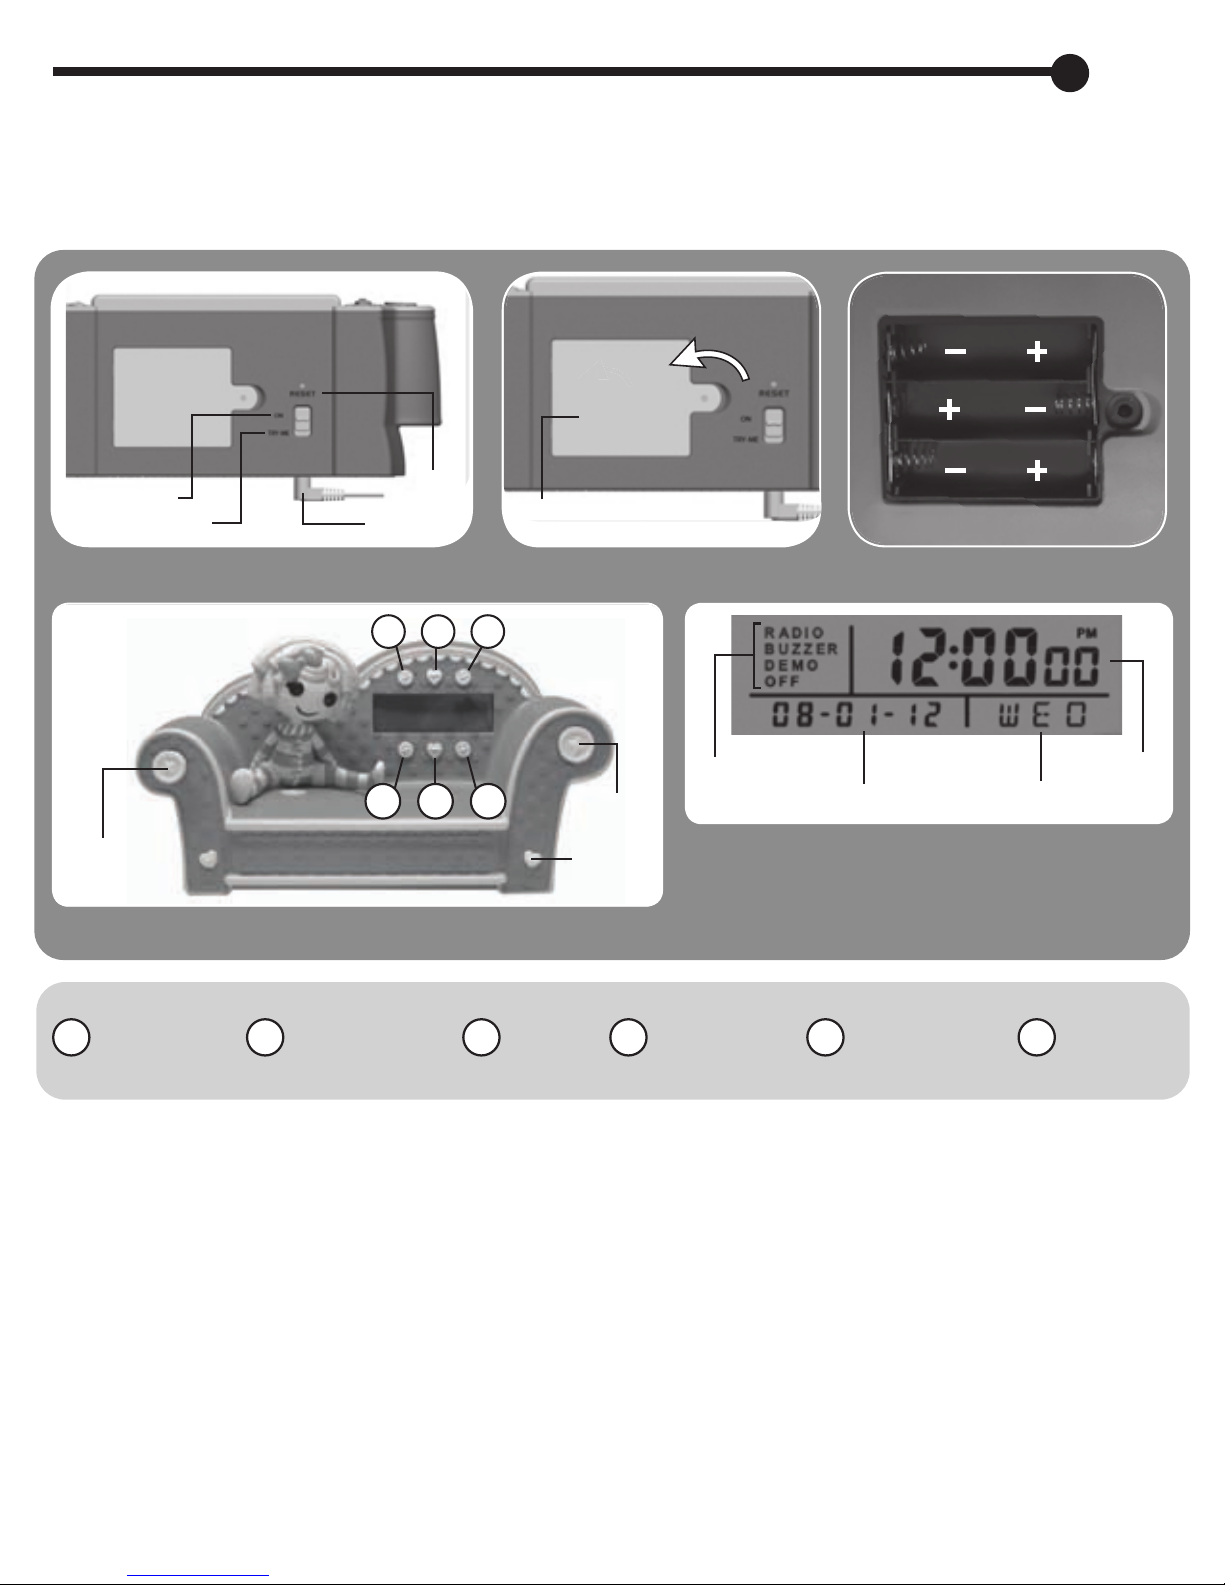
Operating Instructions:
The Lalaloopsy Alarm Clock from Jazwares is easy to use and operate.
We are certain that it will provide your children with great entertainment.
VOLUME
SELECT
1
ON
TRY ME
FIG.1
2
DC IN
1
4
FIG.4
ALARM/
TIME SET
RESET
2
5
BATTERY COMPARTMENT
FIG.2
3
3
6
SET
TUNE
DEMO/
SONG
4
RADIO/
ALARM
ALARM
MODE
DATE
LIGHT/
5
SNOOZE
FIG.5
FIG.3
DAY
ALARM/
6
MODE
TIME
THIS PRODUCT MAY BE OPERATED WITH BATTERIES OR USING THE CURRENT ADAPTER.
OPERATION WITH BATTERIES:
Make sure the main switch is in the TRY ME position (see FIG.1); the battery
compartment is situated in the underside of the Alarm Clock (see FIG.2).
Remove the compartment’s protective cover using a Phillips screwdriver and insert
three LR6/AA alkaline (1.5 V) batteries according to the polarity shown on the inside
(see FIG.3).
After they are installed, screw the battery cover on again and turn to the ON position.
Remember to set the clock and the alarm after doing this.
-4-

OPERATION USING THE CURRENT ADAPTER:
First of all, make sure the main switch is in the TRY ME position, plug the adapter and
then turn the unit to the ON position. This appliance can be used with a 200mA,
4.5V A/C adaptor. The connector is located at the rear of the Alarm Clock (see FIG.1).
The use of a current adapter which is not officially approved may damage the device
and invalidate the warranty. The transformers or battery chargers used with the product
should be regularly checked for signs of any damage to the wire, plug, casing or any
other parts. If there is any damage, the item should not be used with that transformer
or battery charger until it has been repaired. The item should only be used with the
recommended transformer.
Setting the Time, Date and Alarm:
When you press any of the buttons on the Alarm Clock, the lights on the screen
will come on. If you do not press any of the buttons, they will go out again after
a few seconds.
SETTING THE TIME ON THE CLOCK:
Press the ALARM/TIME SET button (see FIG.4) for a few seconds to access the
time set function. When the display shows the time (alarm) flashing (see FIG.5):
Press SELECT to access the time and date settings. Press SET to change the hour.
Press SELECT to change to minutes, press SET until you reach the minutes desired.
SETTING THE DATE ON THE CLOCK:
Follow the same procedure to continue with the date;
Press SELECT again until the year of the date flashes, choose the year with the
SET button.
Press SELECT to access the month, SET to reach the month, SET to reach the month
and SELECT again to access the day.
Choose the day using SET again, pressing SELECT again to access the day of
the week, and SET to select it.
Finally, press ALARM/TIME SET to confirm the data.
SETTING THE ALARM:
Press the ALARM/TIME SET button for a few seconds. The alarm time will flash first,
enabling you to change the time of the alarm.
Repeatedly press SET until you reach the hour required, press SELECT to choose
the minutes option and select this by pressing SET until minutes desired are shown.
Press ALARM/TIME SET to confirm.
You can move forward more quickly by holding in the SET button.
-5-

SETTING THE ALARM MODE:
When you have set the alarm to the time required, select the alarm mode
required using the ALARM MODE button (see FIG.4).
• RADIO, will switch the radio on when it is time for the alarm to go off. First choose the
radio station and adjust it to the volume desired. (This is explained below).
• BUZZER, the clock radio alarm will make a sound typical of electric alarm clocks.
• DEMO will activate the sounds and effects installed in the product.
• OFF turns off the alarm.
Any of the alarm modes chosen will activate the light on the LCD screen or display.
SWITCHING THE ALARM OFF:
The alarm can be switched off in two modes at the chosen time:
1. Press the LIGHT/ SNOOZE button (see FIG.4) the alarm will go off again five minutes
later, and if you press the button again the alarm will go off again once more after a
further five minutes.
2. You can completely turn off the alarm by pressing the ALARM MODE
button for a few seconds, which will finally turn off the alarm. The word OFF will appear
on the screen in alarm mode (see FIG.5).
Remember to switch the alarm on again to use the alarm clock function again the
following day.
Using The Radio:
Press the RADIO button (see FIG.4) to activate the RADIO mode manually.
Choose the frequency desired with the TUNE buttons, forward or back until you
find the station desired in the FM frequency and adjust the sound level with the
VOLUME button.
The radio station on the screen will come on when the alarm is activated in
RADIO mode.
-6-

Recommendations For Use:
ATTENTION!
Remember that after a power cut, if the radio does not have batteries, the Alarm Clock
will need to be set again. If the device becomes blocked you can reset or restart it by
pressing the RESET button next to the battery compartment (see FIG.1) in which case
you will need to set the alarm clock again.
MAINTENANCE
Use a slightly damp cloth to clean the equipment. Do not use detergents or solvents.
If the Radio CD gets wet, turn it off and remove the batteries immediately. Dry the
compartment with a dry cloth and leave the battery compartment open for
approximately 12 hours so that it dries out completely. Do not try to use the equipment
until it is completely dry.
Need More Help?
Do Not Return Item to Store.
Call 1-800-370-1827 and speak to a customer service representative.
-7-

NOTES:
This equipment has been tested and found to comply with the limits for
a Class B digital device, pursuant to Part 15 of the FCC rules.
These limits are designed to provide reasonable protection against
harmful interference in a residential installation. This equipment generates,
uses and can radiate radio frequency energy and, if not installed and used
in accordance with the instructions, may cause harmful interference to
radio communications.
However, there is no guarantee that interference will not occur in a
particular installation. If this equipment does cause harmful interference
to radio or television reception, which can be determined by switching the
equipment off and on, the user is encouraged to try to correct the
interference by one or more of the following measures:
Reorient or relocate the receiving antenna.
• Increase the separation between the equipment and receiver.
• Connect the equipment into an outlet on a circuit different from
that to which the receiver is connected.
• Consult the dealer or an experience radio/TV technician for help.
AC ADAPTER WARNING :
Unplug the AC adapter or power cord before cleaning the product.
Use a dry cloth to clean the product to insure the safe operation of the product.
Examine the AC adapter or power cord before every use to check for damage to
the cord, plug, enclosure and other parts, and in the event of such damage, the
AC adapter must not be used until the damage has been replaired.
Do not connect more than the recommended number of power supplies.
-8-

Limited Ninety (90) Day Warranty:
WARRANTY COVERAGE
Jazwares, Inc.’s warranty obligation is limited to the terms set forth below.
WHO IS COVERED
Jazwares, Inc. warrants the product to the original purchaser or the person receiving
the product as a gift against defects in material & workmanship as based on the date
of the original purchase from an authorized dealer or retailer. The original sales receipt
showing the product name & the purchase date from an authorized retailer is considered
such proof.
WHO IS COVERED
Jazwares, Inc. warranty covers new products if a mechanical defect arises & a
valid claim is received within the Ninety (90) Day Warranty Period. At its option,
Jazwares, Inc. will either (1) repair the product at no charge,using new or refurbished
replacement parts, or (2) exchange the product with a product that is new or which has
been manufactured from new, or serviceable used parts & is at least functionally
equivalent or most comparable to the original product in Jazwares, Inc.’s inventory.
Jazwares, Inc. warrants replacement products or parts provided under this warranty
against defects in materials & workmanship from the date of the replacement or repair
for ninety (90) days or for the remaining portion of the original product’s warranty,
whichever provides longer coverage for you. When a product or part is exchanged,
any replacement item becomes your property and the replaced item becomes
Jazwares, Inc. property.
Replacement product can only be sent if all warranty requirements are met.
Failure to follow all requirements can result in delay.
WHAT IS NOT COVERED - EXCLUSIONS & LIMITATIONS
The limited warranty applies only to the products manufactured by or for Jazwares, Inc.
that can be identified by the trademark, trade name, or logo affixed to it. This limited
warranty does not apply to any non Jazwares, Inc. hardware product or any software,
even if packaged or sold with the product. Non Jazwares, Inc. manufacturers, suppliers,
or publishers may provide a separate warranty for their own products packaged with the
bundled product. Jazwares, Inc. is not liable for any damage to or loss of any programs,
data or other information stored on any media contained within the product, or any
non - Jazwares, Inc. product or part not covered by this warranty.
-9-

Limited Ninety (90) Day Warranty:
WHAT IS NOT COVERED - EXCLUSIONS & LIMITATIONS
This warranty does not apply
(a) to damage caused by accident, abuse, misuse,
misapplication, or non - Jazwares, Inc. product,
(b) to damage caused by service performed by anyone other than Jazwares, Inc.
(c) to a product or a part that has been modified without the written permission
of Jazwares, Inc.
LIMITED WARRANTY DOES NOT COVER
• Shipping charges to return defective product to Jazwares, Inc.
• Product repair and/or part replacement because of improper installation, connections
to improper voltage supply, abuse, neglect, accident, unauthorized repair or other
cause not within the control of Jazwares, Inc.
• Damage or claims for products not being available for use, or for lost data or
lost software.
• Damage occurring to product during shipping.
• A product that requires modification or adaptation to enable it to operate in any country
other then the country for which it was designed, manufactured approved and/or
authorized, or repair of products damaged by these modifications.
• Product lost in shipment and no signature verification receipt can be provided.
• Failure to operate per Owner’s Manual.
BEFORE RETURNING ANY PRODUCT, CONTACT JAZWARES, INC. CUSTOMER SERVICE.
Customer service is available 9-5 EST at 1-800-370-1877.
REPAIR OR REPLACEMENT AS PROVIDED UNDER THIS WARRANTY IS THE EXCLUSIVE
REMEDY FOR THE CONSUMER. JAZWARES, INC. SHALL NOT BE LIABLE FOR ANY INCIDENTAL
OR CONSEQUENTIAL DAMAGES FOR BREACH OF ANY EXPRESS OR IMPLIED WARRANTY
ON THIS PRODUCT. EXCEPT TO THE EXTENT PROHIBITED BY APPLICABLE LAW, ANY IMPLIED
WARRANTY OF MERCHANTABILITY OR FITNESS FOR A PARTICULAR PURPOSE ON THIS
PRODUCT IS LIMITED IN DURATION TO THE DURATION OF THIS WARRANTY.
Some states do not allow exclusions or limitation of incidental or consequential damages, or allow
limitations on how long an implied warranty lasts, so the above limitations or exclusions may not
apply to you
This warranty gives you specific legal rights. You may have other rights which vary from state to state.
This warranty is only valid in the United States of America.
© Jazwares, Inc.
-10-

Features & Specifications:
• Includes lights and sounds.
• Large LCD display with hour, date & day
• Repeating snooze alarm-snooze
• Easy to set time and alarm controls
• FM band selector and station tuner-dial.
Power Supply
3x LR6 (AA) 1.5V batteries
120V-60Hz Adaptor
Jazwares Inc.
1067 Shotgun Rd.
Sunrise, FL. 33326
V4
Alarm Clock
USER GUIDE
-X-
© Jazwares, Inc. 2012
-10-
 Loading...