

Page 1
Page 2

1
INDEX
INDEX.......................................................................................................................................1
Function Description..............................................................................................................2
Notice for Use..........................................................................................................................2
System Requirements ............................................................................................................4
Start to Use..............................................................................................................................6
1. Appearance and Butt ons.............................................................................................6
2. Basic Operati on ..........................................................................................................8
3. Delete Files...............................................................................................................13
4. Connect to PC...........................................................................................................13
5. Download Files from Camera to PC..........................................................................14
Application of A tt ach ed A rcSo f t MediaImpress ion............................................................15
Introduction Interface for Software Installation..............................................................15
MediaImpression Installation and Use..........................................................................16
Product Specifications :........................................................................................................22
Page 3

2
Function Description
Welcome to purchase and use this digital video camera. Before use, please read this user
manual carefully.
With this digital video camera, you can take video clips and still photo. With the playback
function, you can playback the taken video with this digital video camera; in addition, you can
download the video from the digital video camera into your PC. When prepared, this user
manual refers to the latest information. The screens and illustrations etc in this user manual
are to particularly and visually detail the operation of the digital video camera. Due to
technology developmen t and d if f er ent prod uctio n bat c hes, th e digital video camera herein may
be different from that you buy and use.
Notice for Use
General:
1. Never open the housing of the digital video camera; otherwise, some parts may cause
electric shock.
2. Damp, pressure, collision and overheat may damage this digital video camera.
Memory and storage:
1. SD/MMC/SDHC can be used (but not included in the packing list and maximal capacity
16GB).
2. When buying SD/MMC/SDHC card, be sure to take the digital video camera with you so as
to ensure compatibility.
3. When SD/MMC/SDHC card is inserted, the memory of the digital video camera will not
function.
4. SD card has a write-protect switch, which can be used to prevent wrong deletion of data.
Page 4

3
3. TV programs, movies, music, images and other resources may be protected by copyright;
When this switch is push ed to th e bottom and loc ked, t he dat a in th e car d will be pro tecte d.
However, when the card is in write-protect state, it cannot be used for shooting or deletion
etc.
5. These memory cards cannot be used for permanent storage of data. You must copy the
documents in the digital video camera to the proper storage position.
6. When storing documents into the memory or the memory card, make sure that the size of
the documents does not exceed the capacity of the memory.
Maintenance and Care:
1. In use, always wear the wrist ban d s o as to prevent slip.
2. Use proper protection sheath to avoid scratching the lens and screen.
3. To clean the lens, firstly blow away the dust on its surface, then use proper cloth or tissue
for optical devices to clean the lens. If necessary, use lens cleanser. Never use organic
cleanser to clean the digital video camera.
4. Never touch the lens with fingers.
5. When left idle for long, keep the digital video camera with the battery taken out in dry and
dark place.
Other notices:
1. When switching video out put betw e en LCD displ ay and v ideo devices, be sure to exit from
the play or record state.
2. This digital video camera is suitable the environment between 0℃- 40℃ (32℉-104℉).
Never keep the di git al v ideo cam er a in the pla ce at ex tremely high temp eratur e, s uch a s in
the car parking under the burning sun, or with much damp. In order to prevent the digital
video camera from conden satio n, w hen moving f rom a cold pl ace t o a w arm place, be sure
to keep it in sealed plastic bag, and open the bag and take it out when the digital video
camera reaches the indoor temperature.
Page 5

4
therefore, without prior permission, the shooting/use of these resources may violate
copyright laws and regulations related. Please note that the resources under the
protection of copyright ca n be used within the pe rmission of related laws and regulations.
System Requirements
When operating and using this digital video camera, be sure to meet the requirements on the
basic system for computer. It is strongly recommended to use the best computer units to
operate the camer a so as to bri ng its functions into full play. Below are the requirements on the
basic system:
Operation System Microsoft Windows 2000, XP, Vista, Windows 7
CPU Above Intel P4 1.6GHz or CPU of equal performance
Memory 512 MB RAM
Sound card and display card DirectX8 or above.
CD-ROM 4× speed or above
Hard Disk 1 GB space above useable
Other One standard USB 1.1 or USB 2.0 port
Page 6
6
Accessories
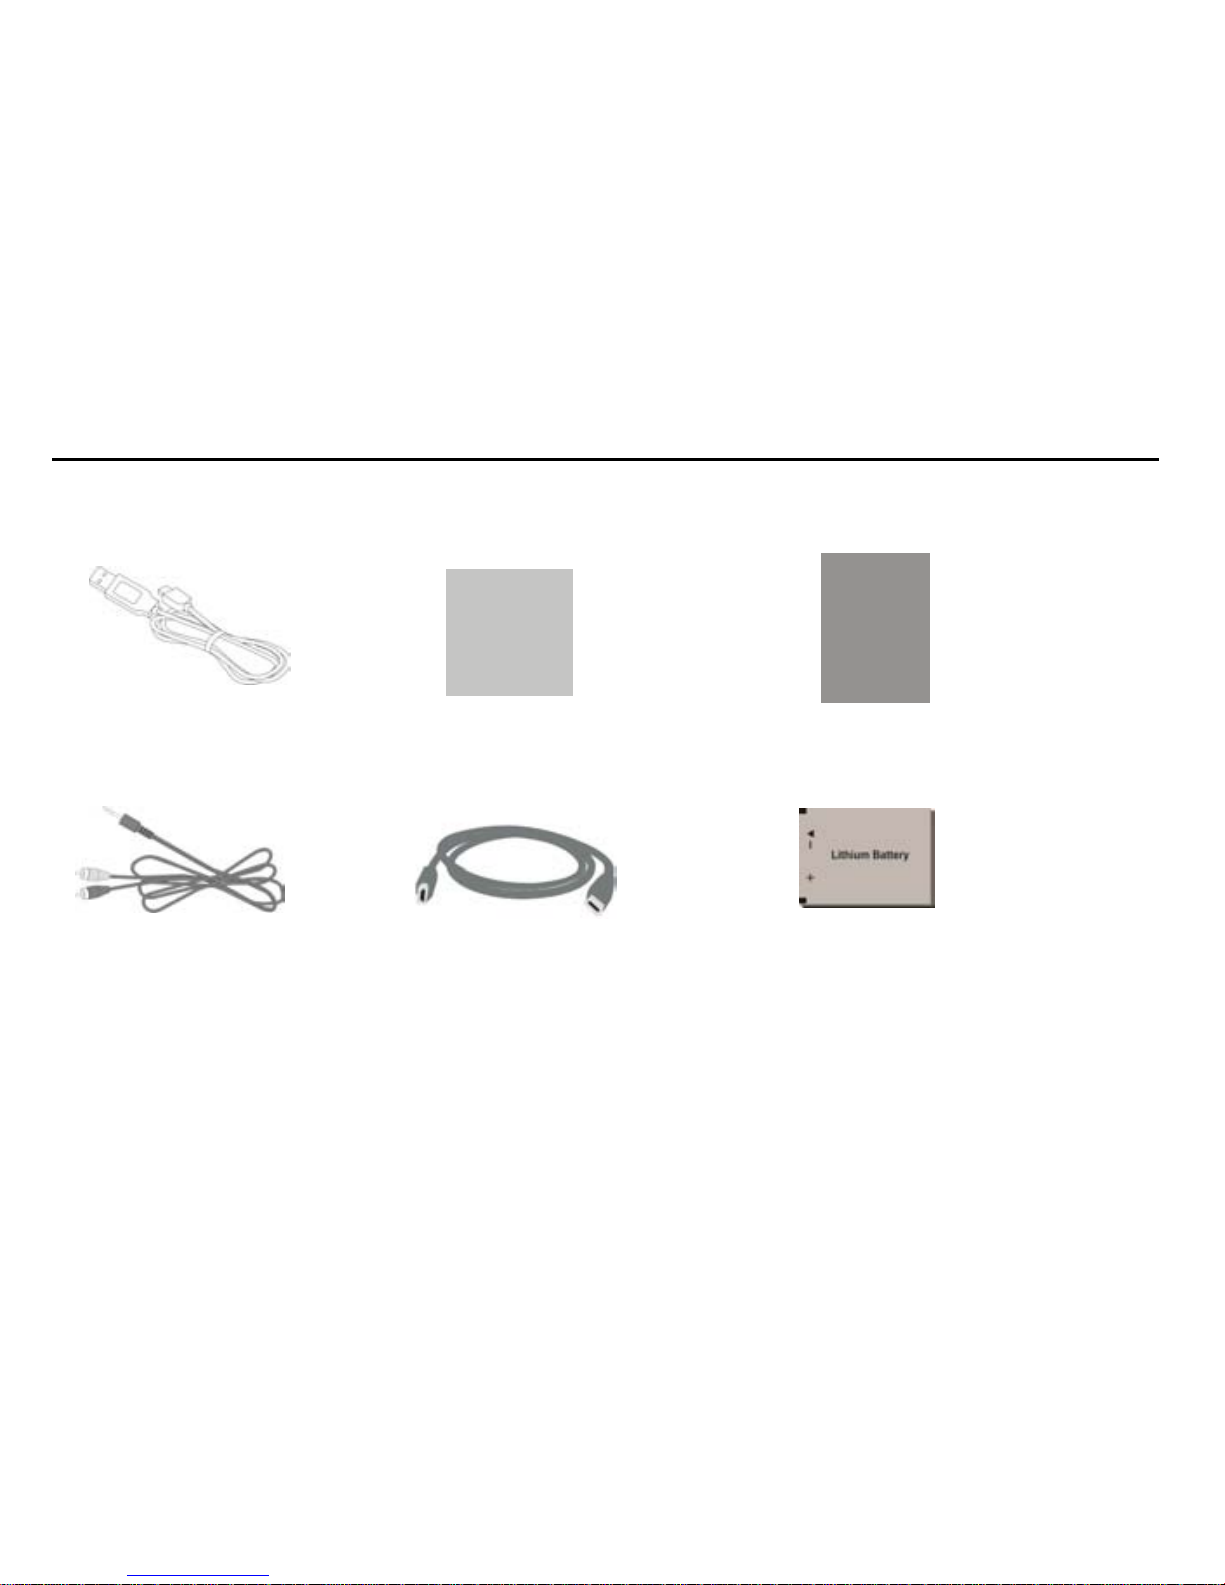
The following major accessories will be seen after the camera is unpacked.
USB Cable Software CD User’s Manual
A/V Cable HDMI Cable Lithium Battery
Page 7
Start to Use
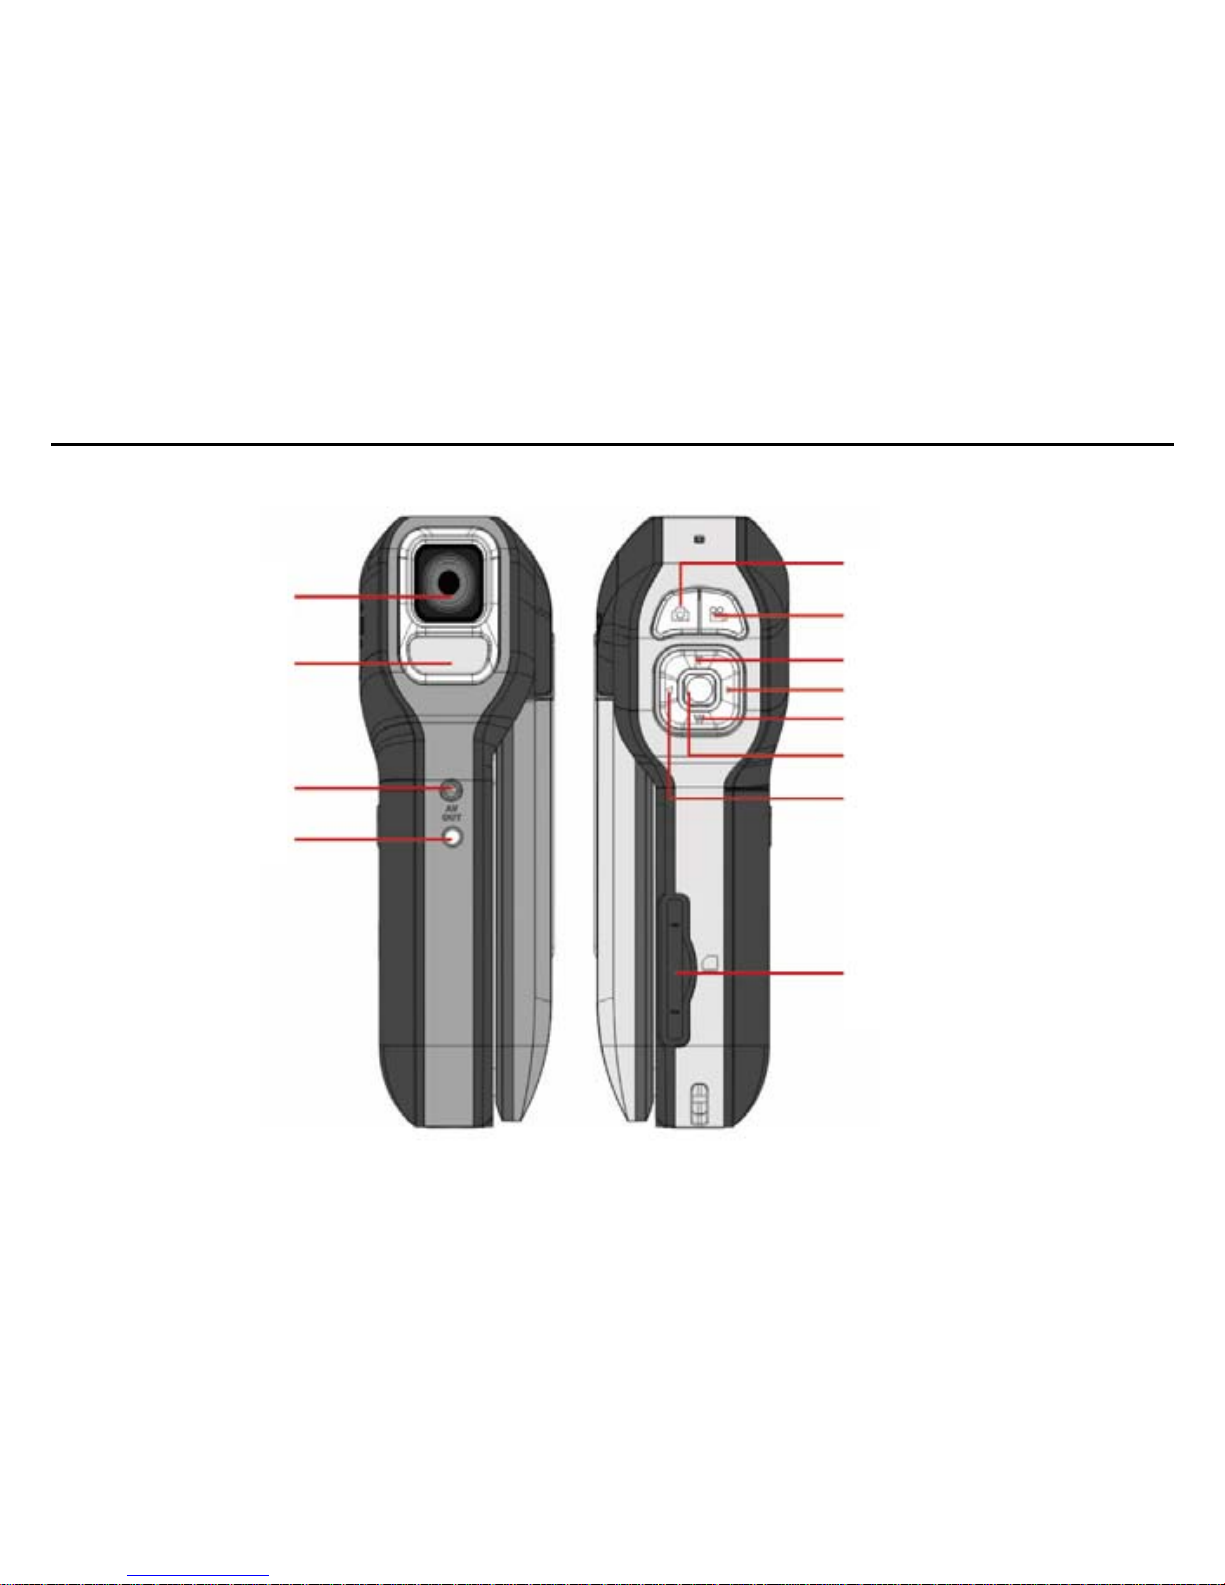
1. Appearance and Buttons
6
Shutter Key
Lens
REC Key
Zoom-in (Up)
Fill Light (Right))
Zoom-out
(
Down
)
LED Li
g
ht
OK Button
AV Interface
Switch Resolution
(
Left
)
Charging Indicator
SD Card Slot
Page 8
7
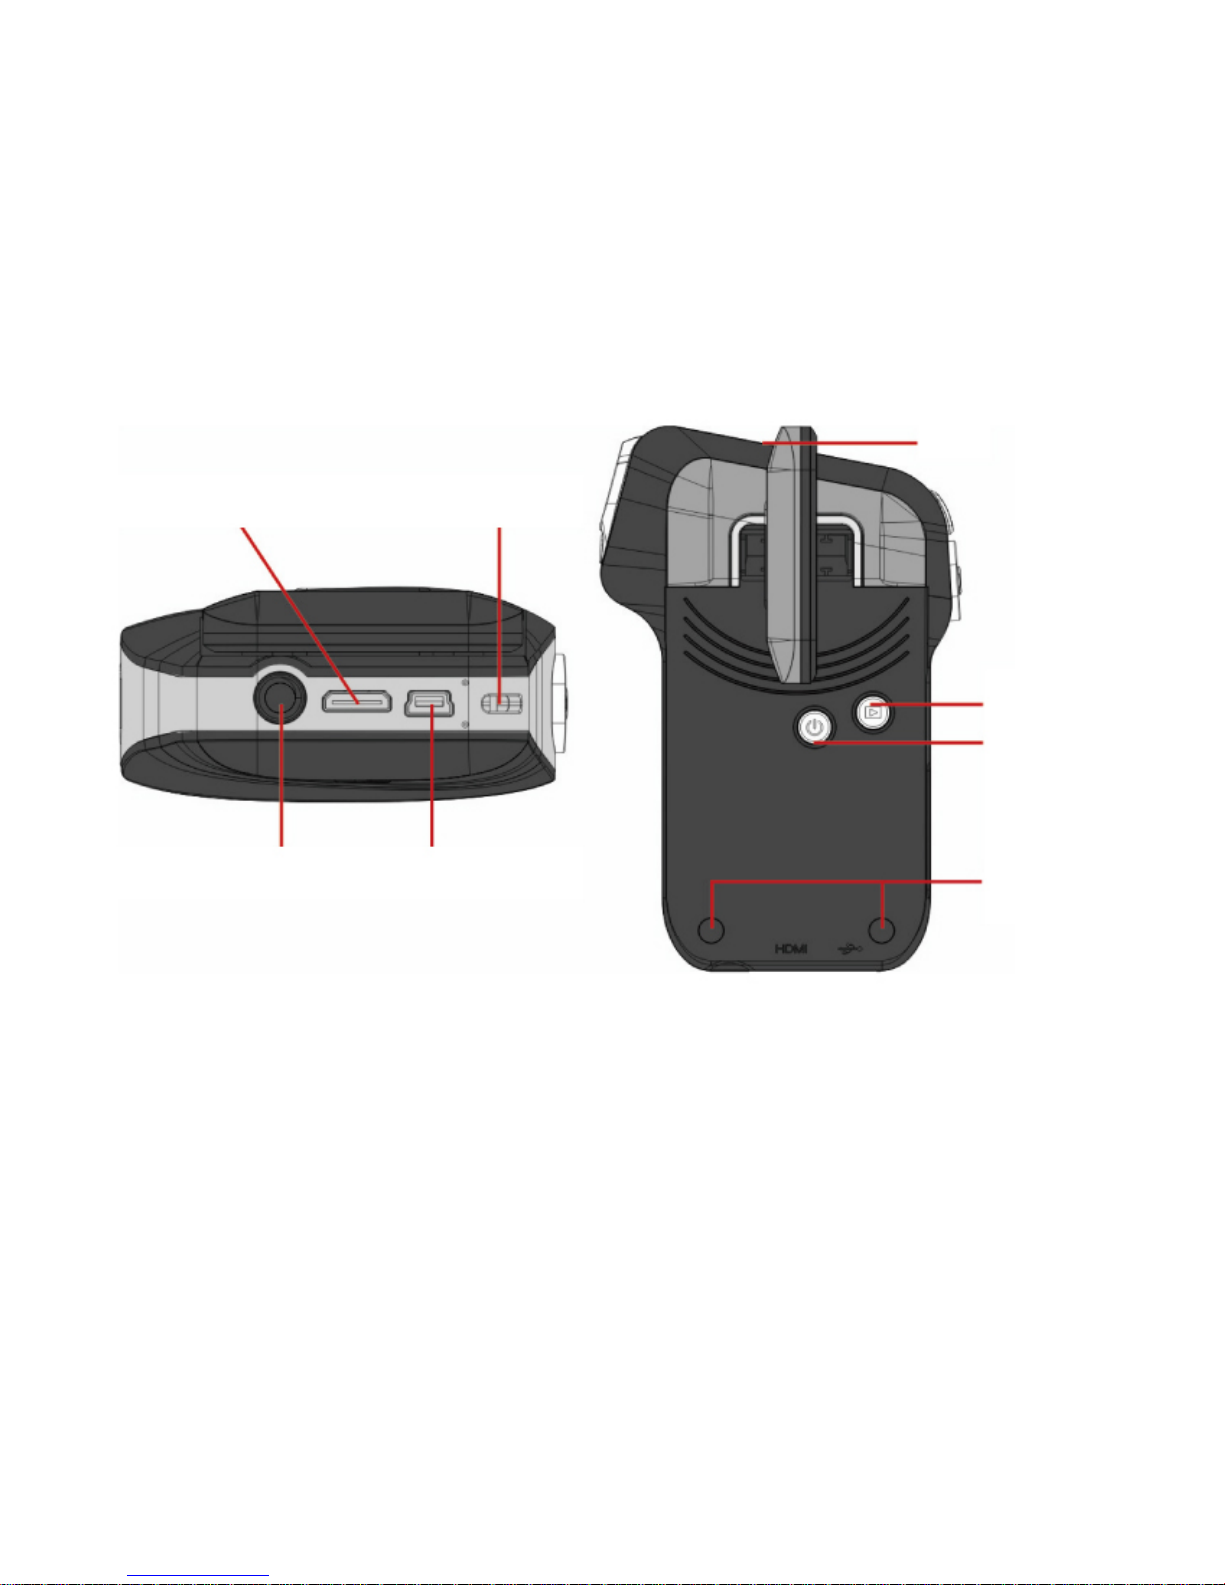
MIC
Stra
p Ey
elet
HDMI Interface
Playback
Power Key
Tripod Mount USB Port
Two Foot Pads
Page 9

8
2. Basic Operation
2.1 Install Battery
Press / slide down the Battery Cover and insert lithium battery. Align with correct polarity of
battery terminals. Close the Battery Cover.
2.2 Charge Battery
1. Power off the camera.
2. Connect the camera to the computer USB port with USB cable to charge the battery.
3. During charging, Busy light is on and will be off when the battery is fully charged.
Page 10

9
2.3 Use SD/MMC/SDHC Card
Insert the SD Memory card in to the SD/MMC/SDHC Card Slot . Push it down until the card
stays latched. Do not force – check card’s position according to the position mark on the
camera.
Push and release inserted card if you wish to remove or replace the card.
Turn your power OFF before inserting / removing the SD Card.
Note:
The SD Card ha s a tiny LO CK switc h on t he s ide. Set the sw itch to u n-L OC K pos ition to
be able to store recorded videos and still pictures on inserted SD Memory Card.
2.4 Power On/Off
In power-off state, press the power key to power on the camera.
In power-on state, press the power key to power off the camera.
In power-on state, let the camera idle for 1 minute (default) to power off the camera
automatically.
In power-on state, when battery level is very low, the camera will turn off after several
seconds. You must recharge the batteries.
Page 11

10
2.5 Setup Menu
Under photo mode or video mode, enable menu by pressing the OK button, exit from the
menu by pressing left key, select the option required by pressing up and down keys, enter
the subdirectory by pressing the OK button, return the pre-directory by pressing the left key
and confirm the setting by pressing OK button. You can view the Firmware version too.
2.6 Video Recording
In Video rec ording mode, press REC key to start video recor din g, while recording, press the
REC key again to stop recording.
At preview mode, press Left key can change the video size between HD (1280x720), D1
(720x480), VGA (640x480); Press up key or down key can zoom in or zoom out the image.
2.7 Photo Shooting
In Photo Shooting mode, Press shutter key to take one photo,
Under photo mode, p ress t he lef t ke y of fiv e-way key to change the phot o size betwee n 12M
(4032x3024), 5.0M (2592x1944), 3.0M (2048X1536), 1.0M (1280x960); Press up key or
down key can zoom in or zoom out the image.
Page 12

Note:
z While the memory is full or the SD c ard was locked, when you press the Shutter key,
the camera will not recording.
z Before inert or remove the card, please turn off the camera first.
2.8 Playback Videos or Photos
Press playback key to enter playback mode, press ◄ left key or ►right key to select
another file.
After you s elect one vi deo file, Press playback key to beg in play video, during playing video,
press and hold ►right or ◄ left key to fast f orward or backw ards playing video, pr ess the u p
and down key to regulate the volume, press playback key to stop playing.
Press up or down key can zoom in or zoom out the image. At zoom in mode, press OK key
can enter pan mode, at this time you can press direction key to move the photo to view in
LCD.
11
Page 13
12
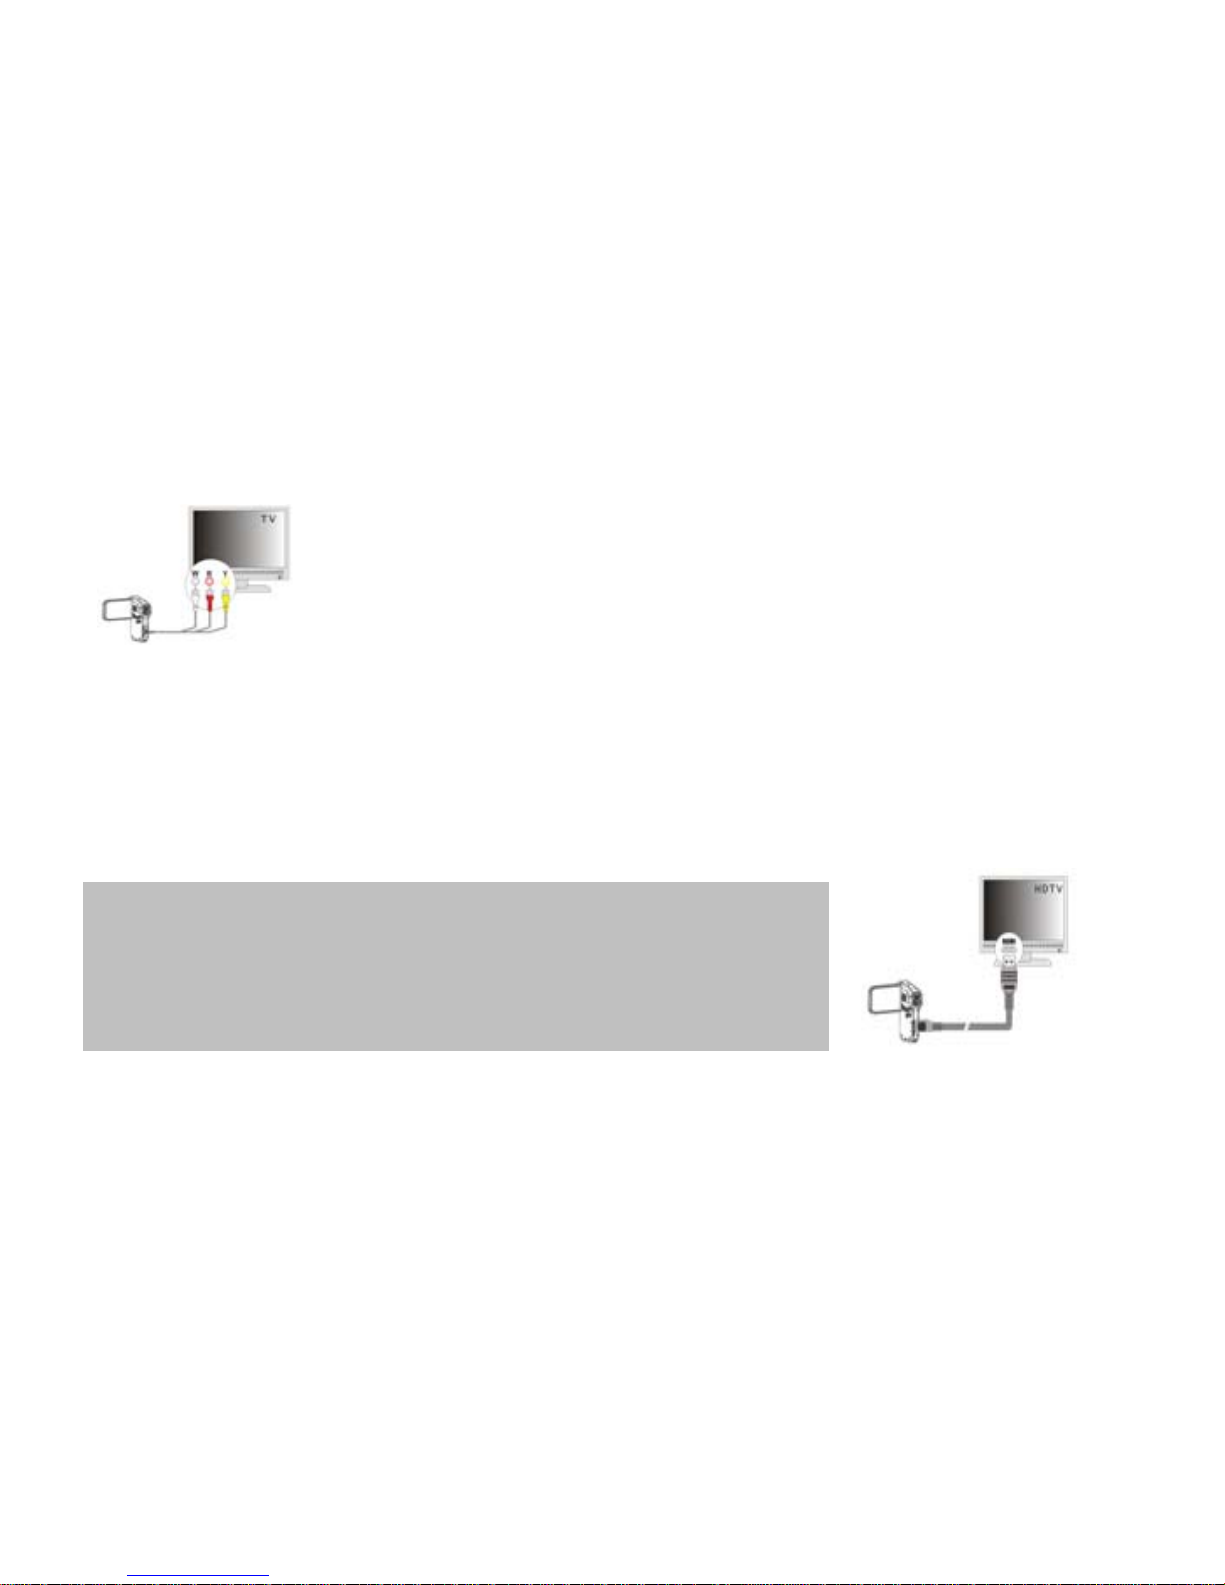
2.9 TV Output
After the camera is powered on, insert the terminal of the TV cable into the TV output port of
the camera, the yellow port of the other terminal should be connected
to VIDEO IN port of TV,red (or white) port of the other terminal should
be connected to AUDIO IN port of TV.
2.10 HDMI Output
If you want to output the image and sound in video camera to HD TV, please connect the
HDMI cable to the HDMI interface of the video camera, connect the other terminal of the
HDMI cable to the HD TV.
Note:
During the period of HDMI output, the video camera can
only enter playback mode.
Page 14

13
3. Delete Files
Under playback mode, press the OK key to enter Delete menu mode, use the left and right
key of five-way key to select “All”, ”No” or “Yes”.
Select “Yes” and press OK key to delete current image; select “All” and press OK key to
delete all images; and select “No” and press OK key to exit deletion.
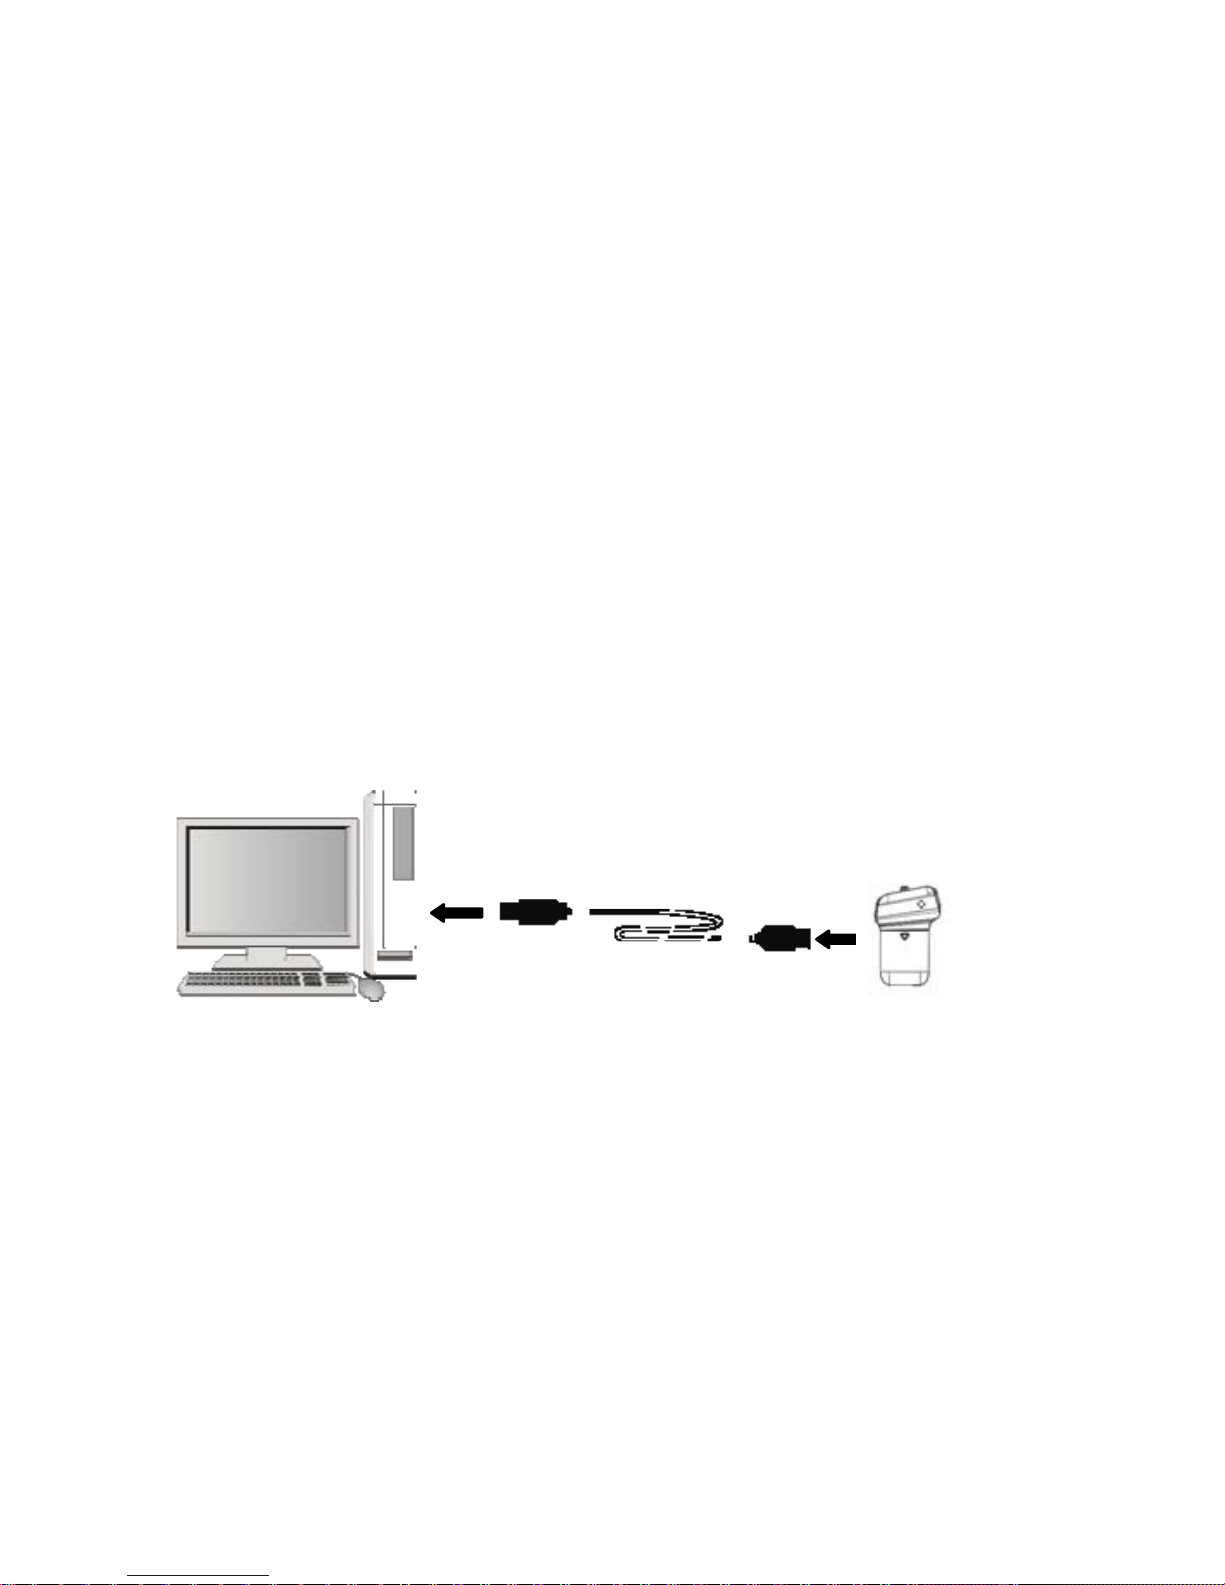
4. Connect to PC
After starting up the machine, use USB cable to connect computer and DV, will appear
“Mass Storage”option, press OK key to confirm.
Page 15
1.
5. Download Files from Camera to PC
After connecting to computer, go to "My Computer” and open the "Removable Disk." The v ideos
will be saved in the \DCIM\ 100MEDIA folder in the removable disk. Choose the desired v ideo in
the 100MEDIA
folder and copy (drag with mouse) it into the target folder in the HDD of the
computer.
2. You can use ArcSoft MediaImpression to edit videos.
3. ArcSoft MediaImpression can be installed from CD attached.
▲ Connect camera to PC
14
Page 16
15
Application of Attached ArcSoft MediaImpression
There are two programs in CD provided for image processing: Xvid codec, MediaImpression.
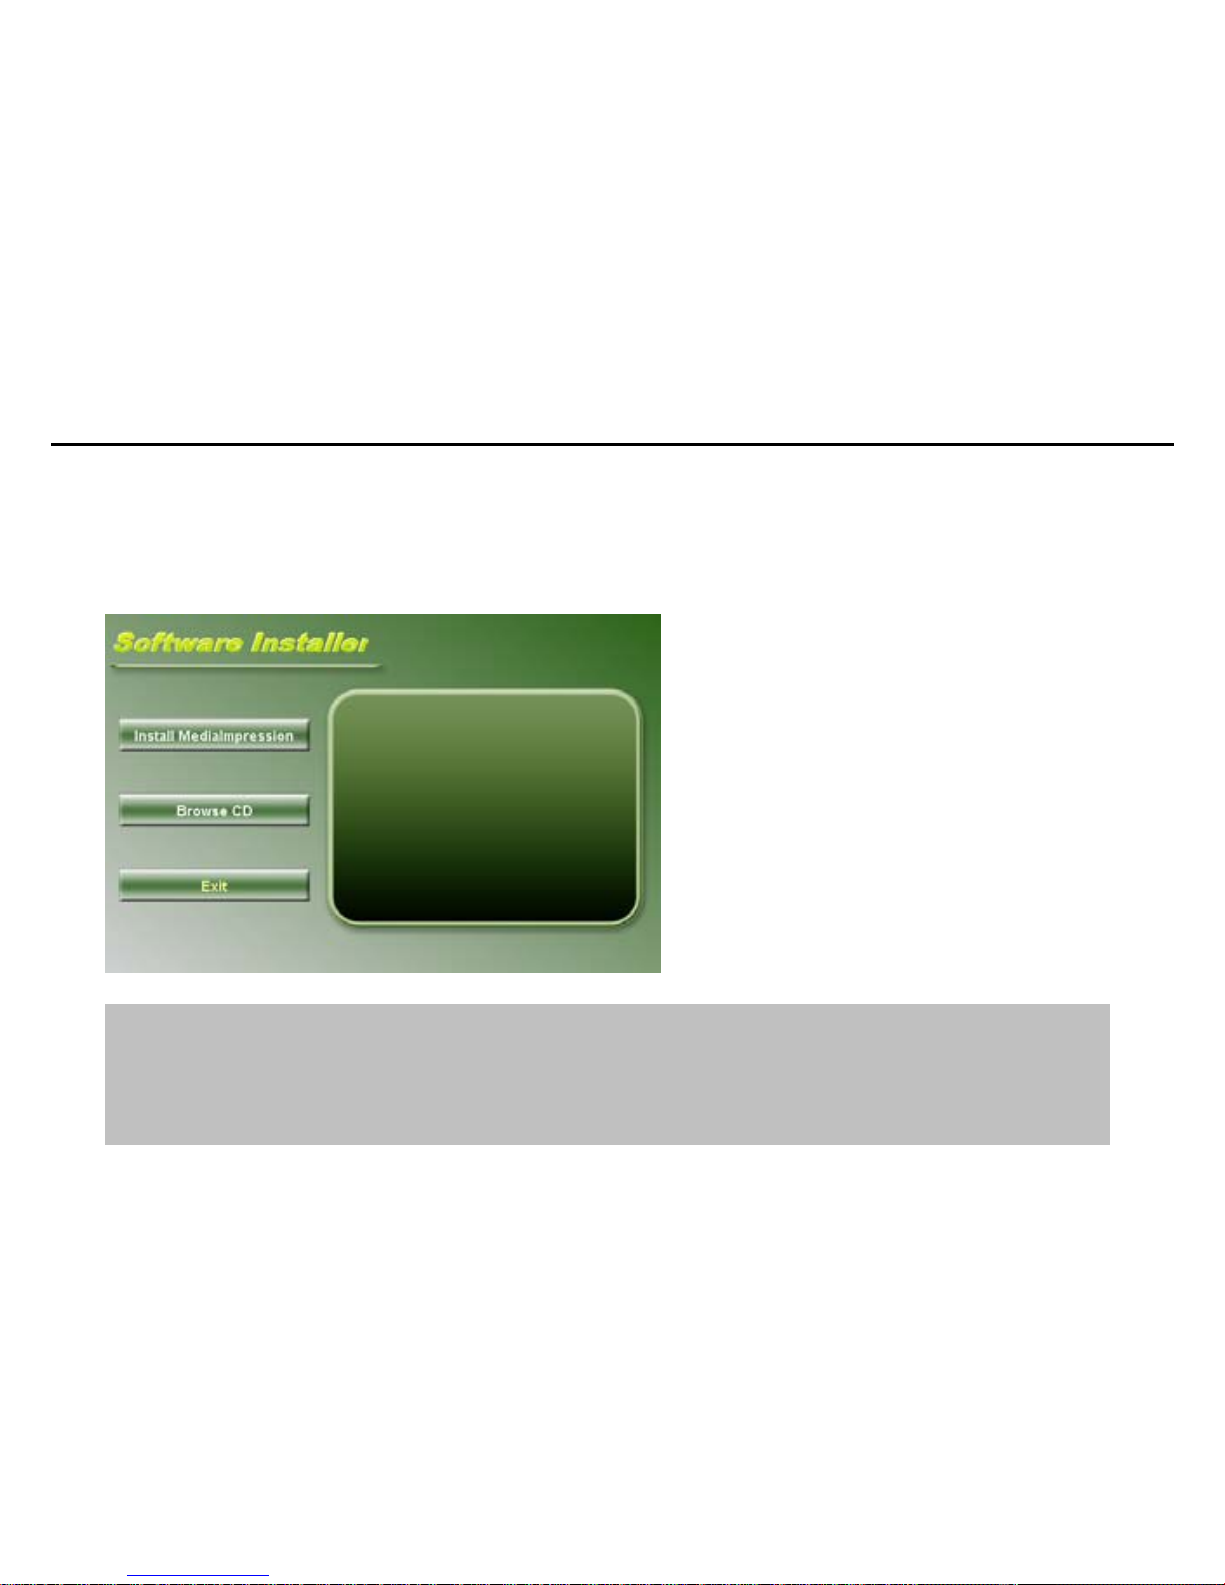
Introduction Interface for Software Installation
Put the CD attached into the CD-ROM of the computer, the following menu will appear:
Note:
If the CD driver does not automatically carry out or close such function, please double click
autorun.exe program under the root directory of the CD.
Page 17
16
MediaImpression Installation and Use
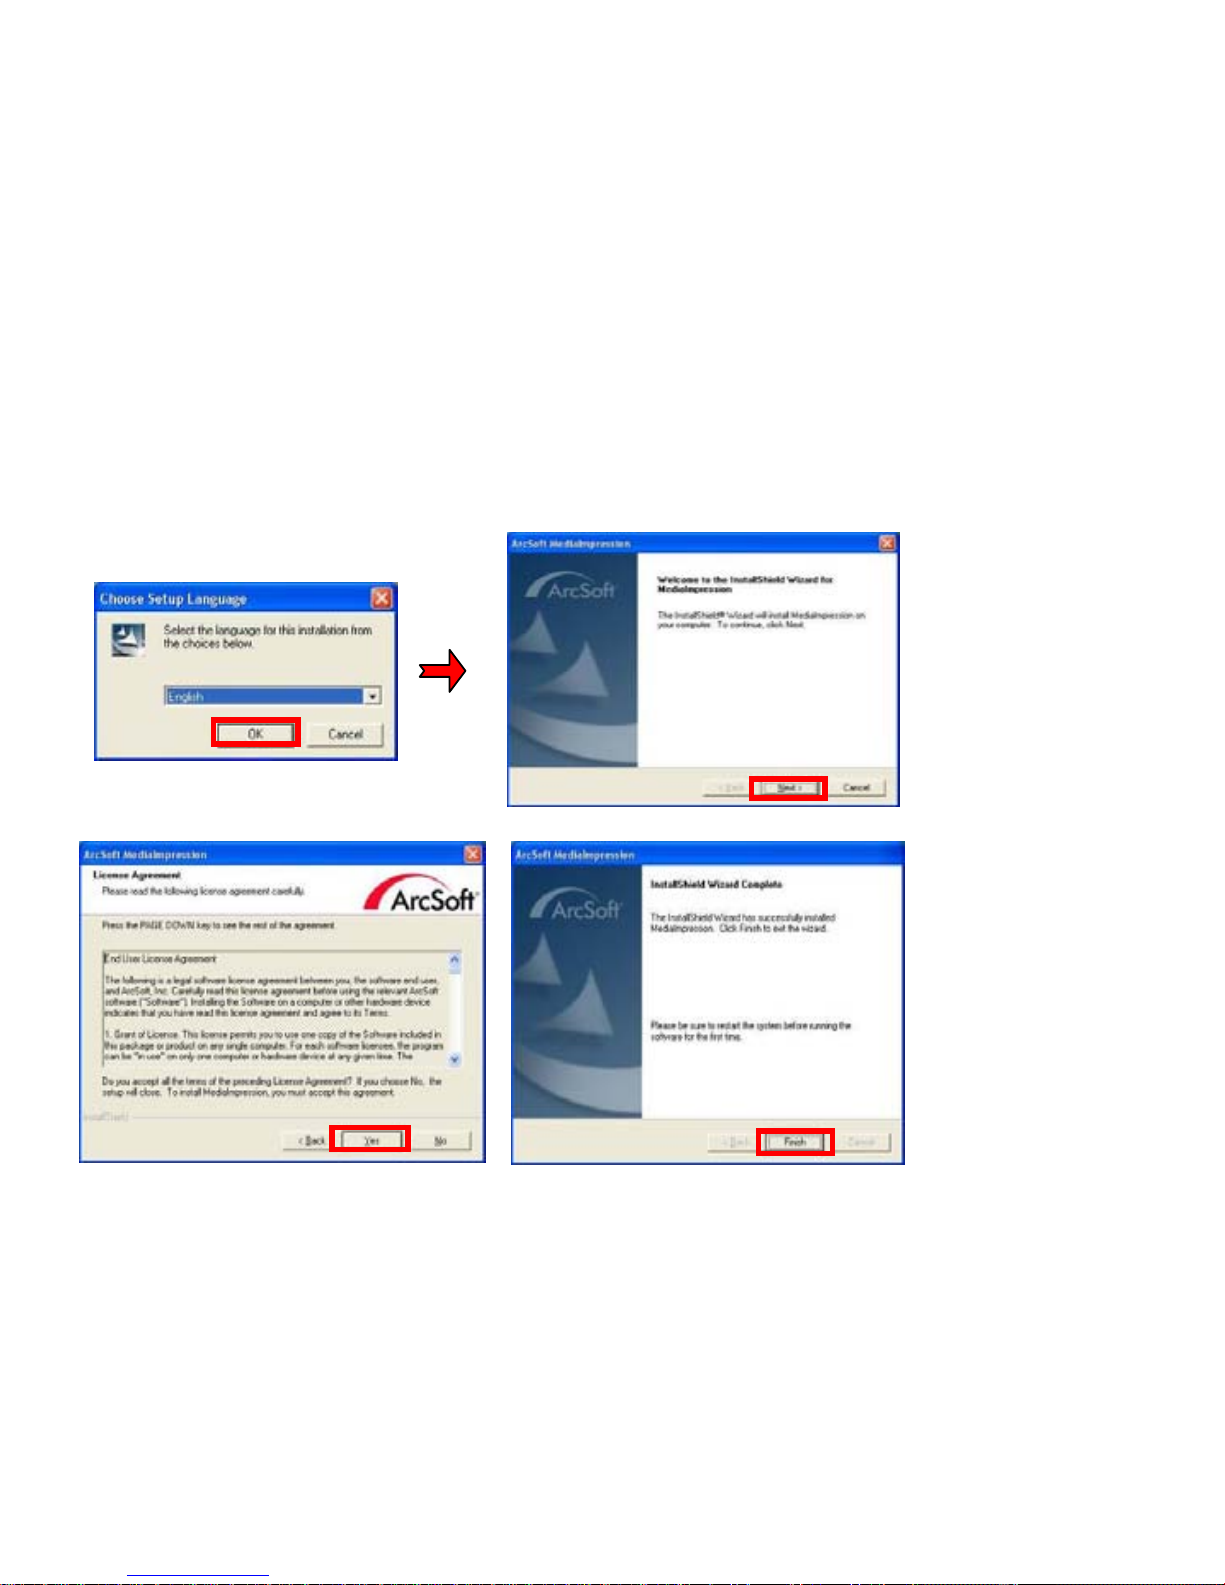
Install MediaImpression:
Click “Install MediaImpression” button and complete the installation as per the tips.
Page 18
17
After installation, please restart the computer.
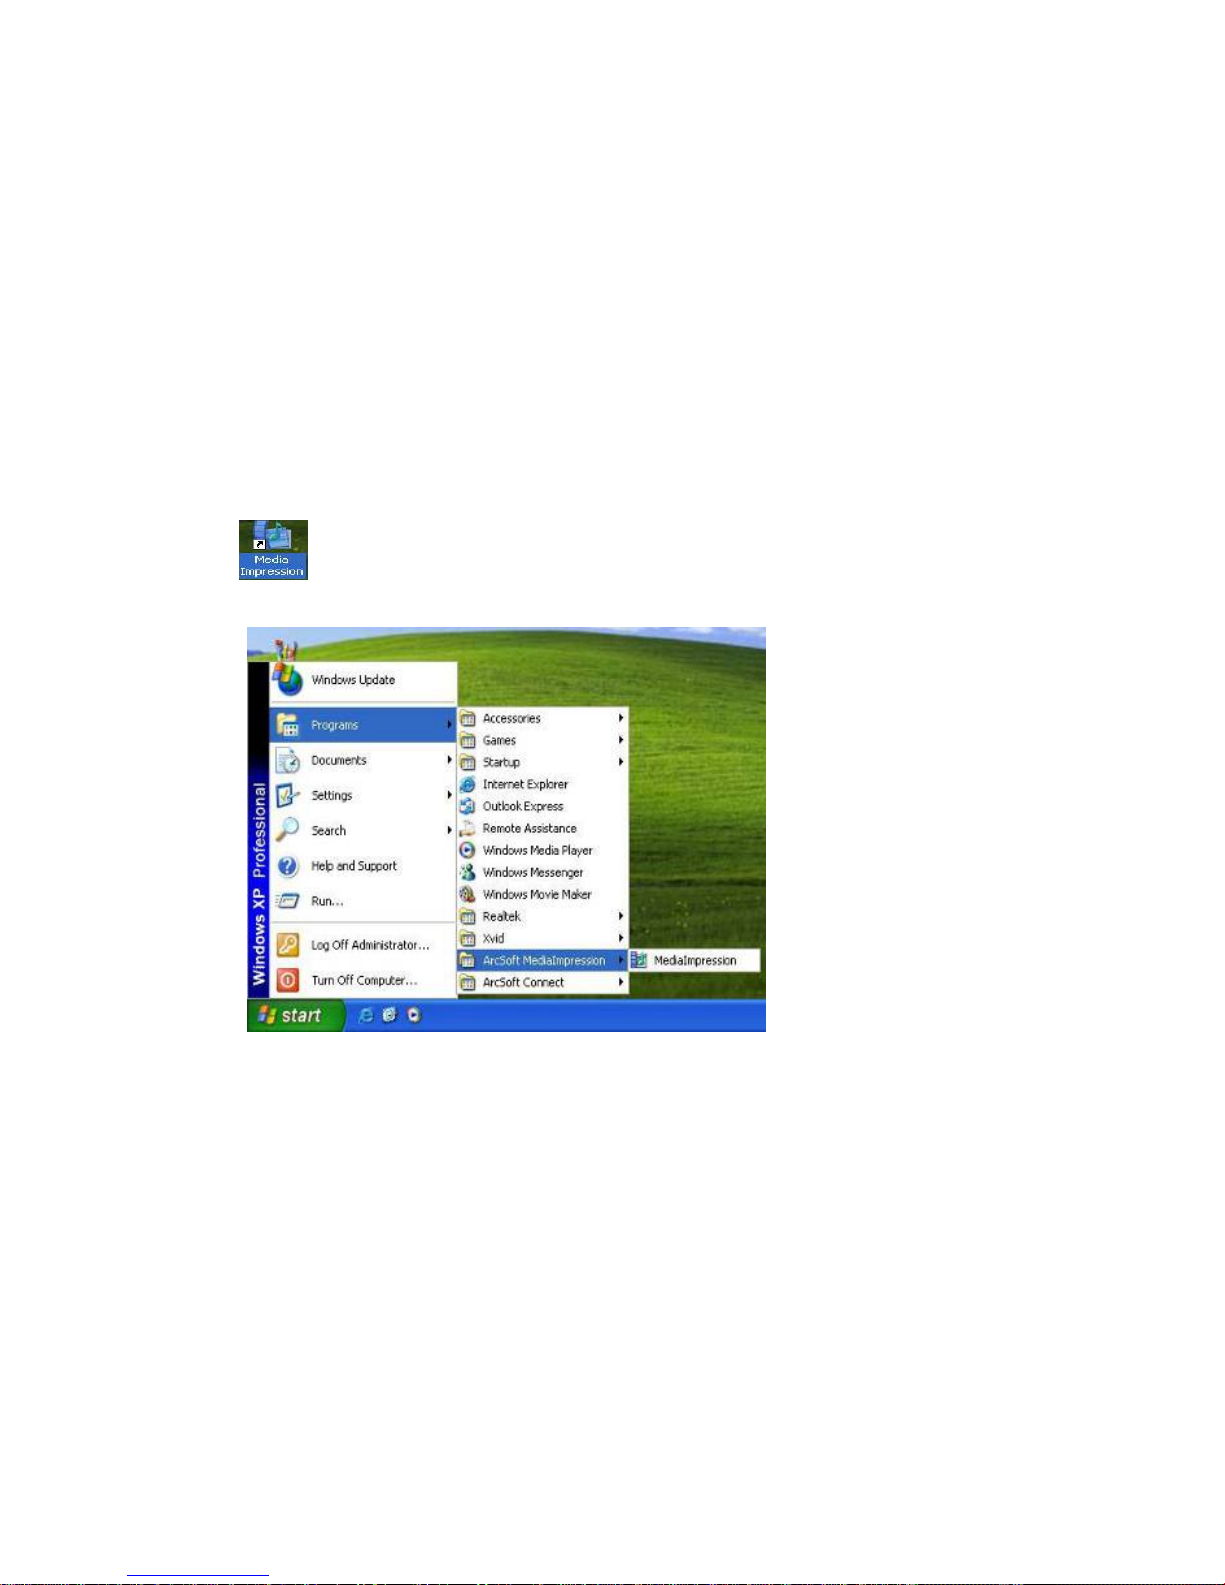
Start to use MediaImpression:
Double click the icon on the desktop or follow “Start → Programs” to launch MediaImpression.
Page 19
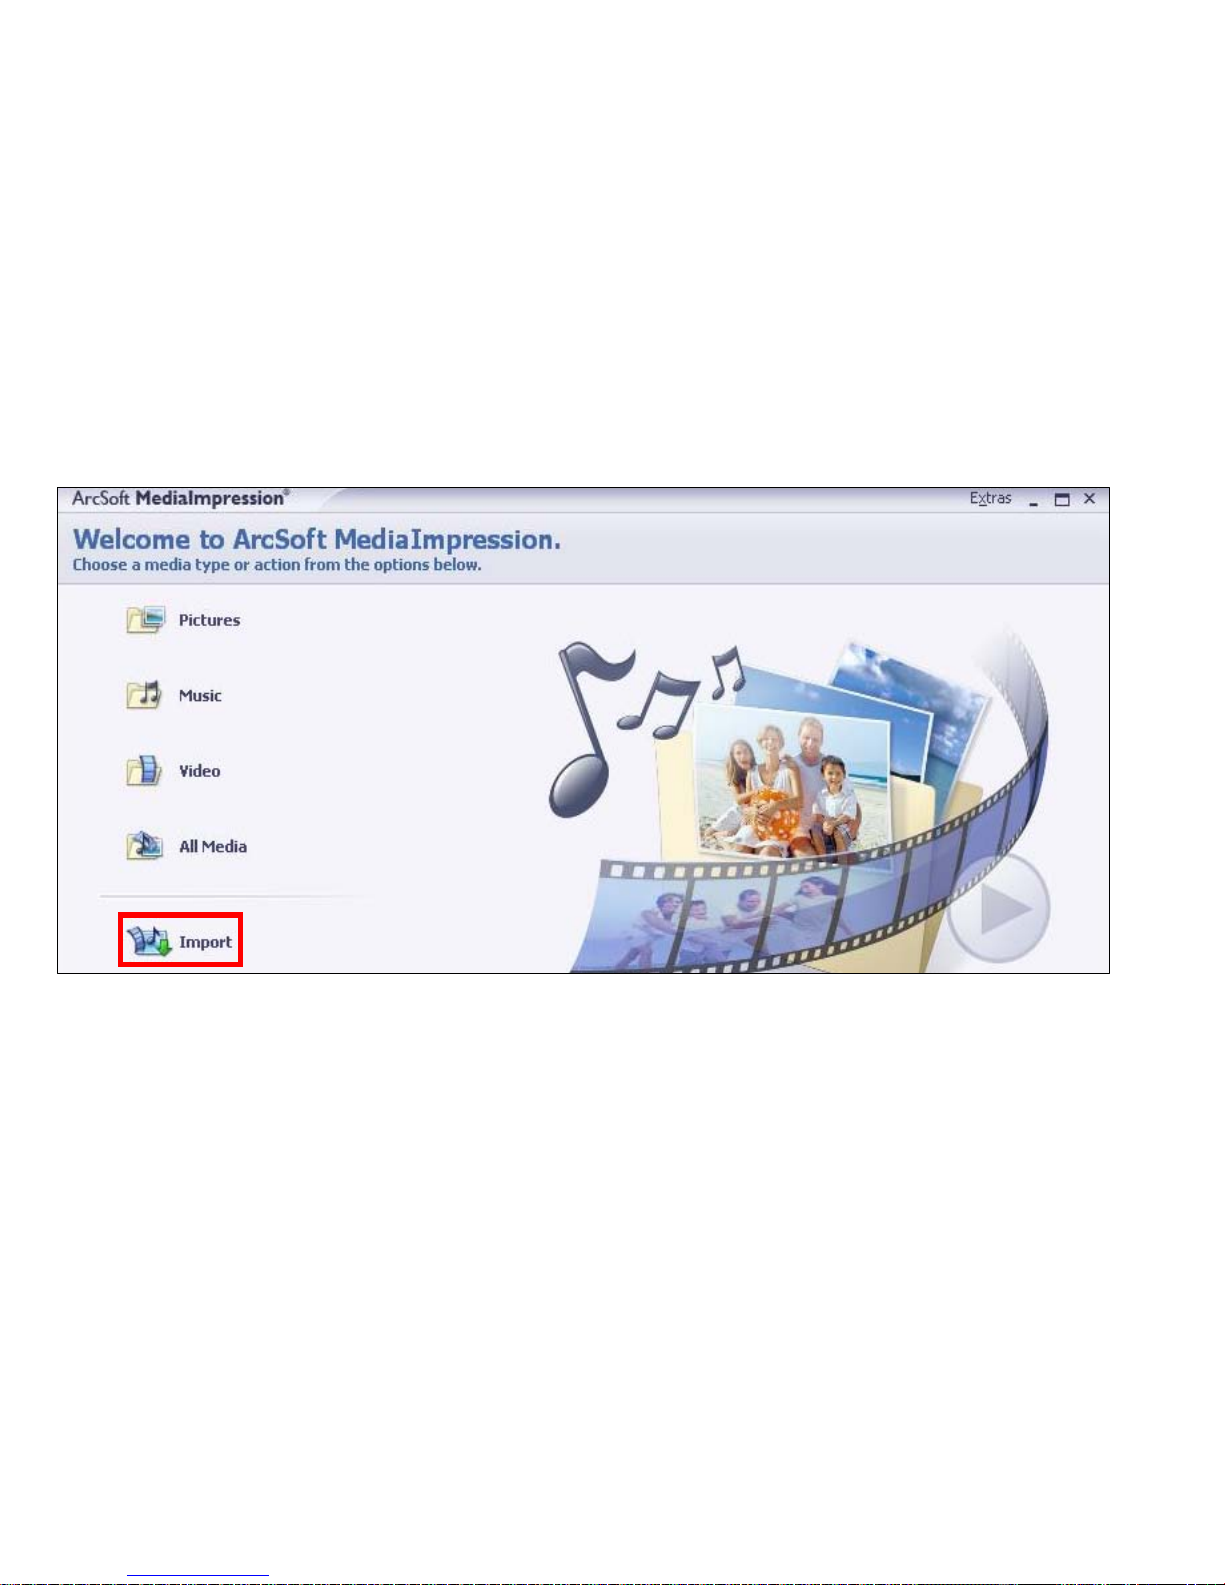
18
After starting MediaImpression, click the “Import” to import the media.
Page 20
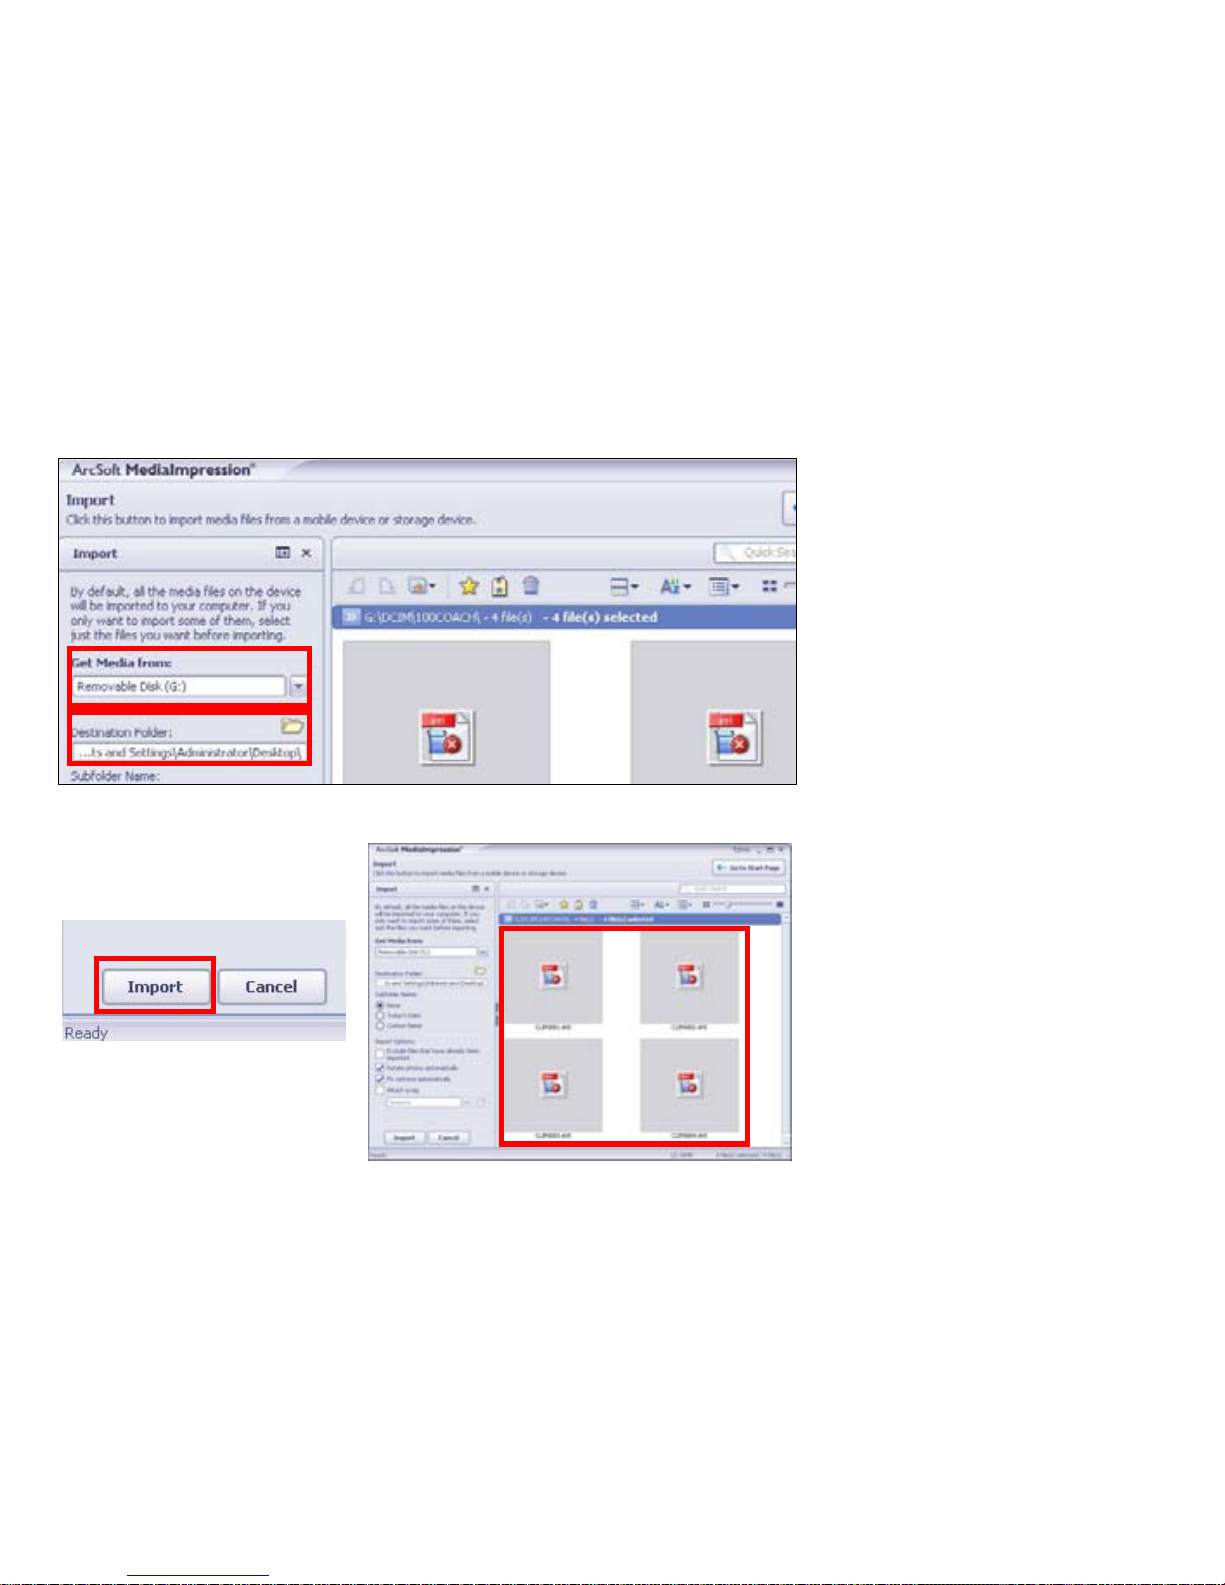
19
Choose the video camera storage and choose the output location.
Choose require file and click the “import”, selected file will be stored in the output location.
Page 21
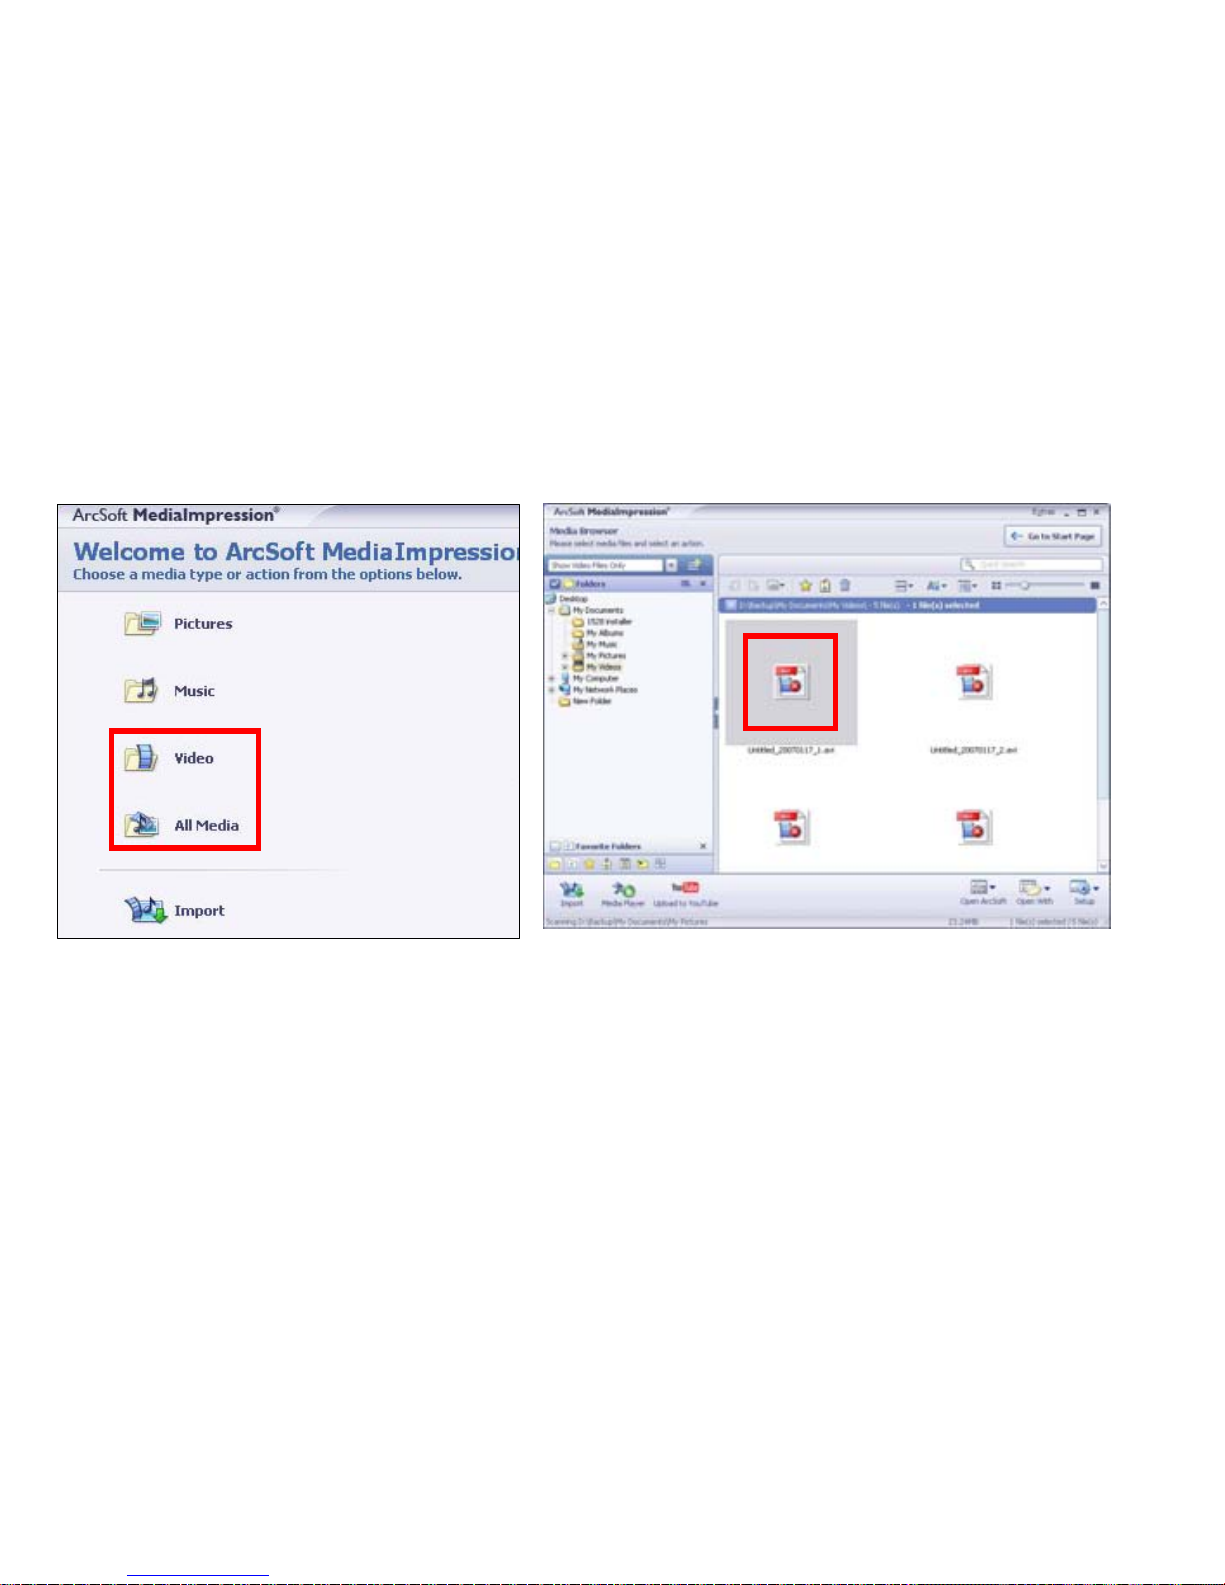
20
Click “Go to star t p age” to re turn th e main scr een; cli ck the “V ideo” or “All media” to use the “YouTube”
function.
Page 22
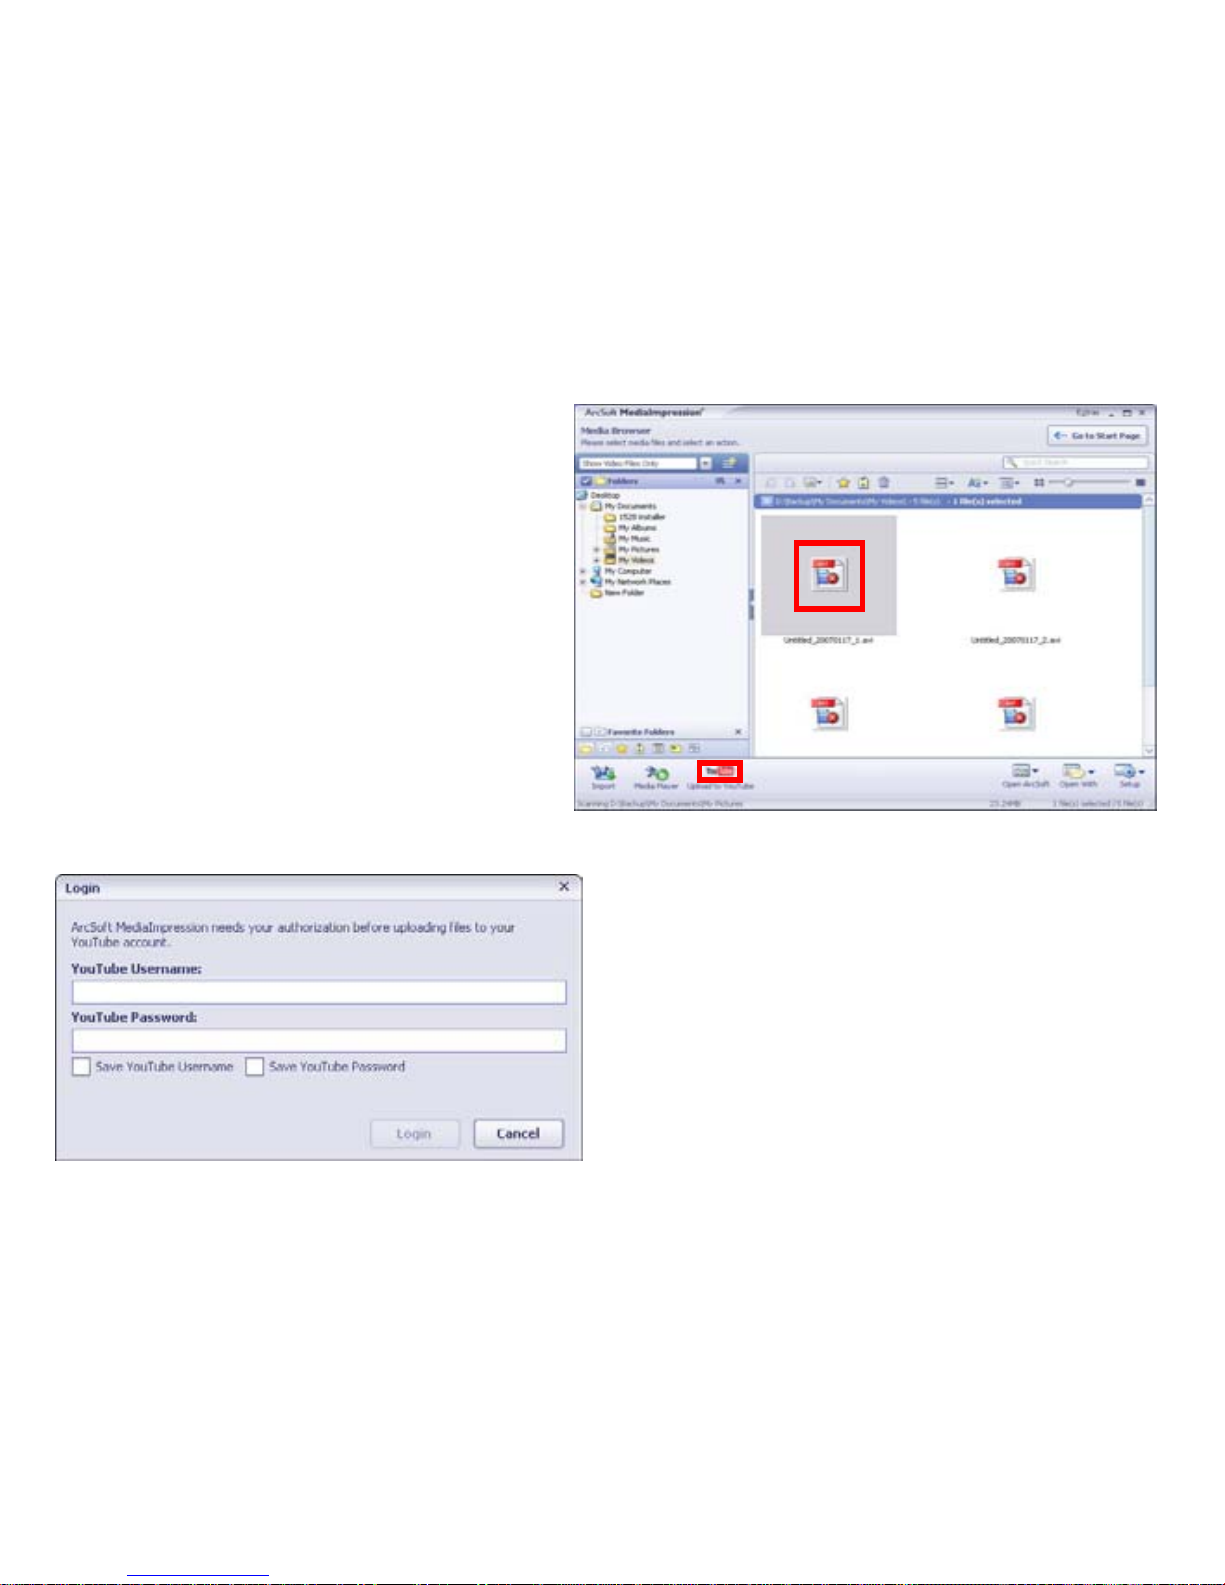
Choose file and click the “upload to
YouTube.
21
Enter you username and password to login the YouTube, execute upload.
Page 23
22
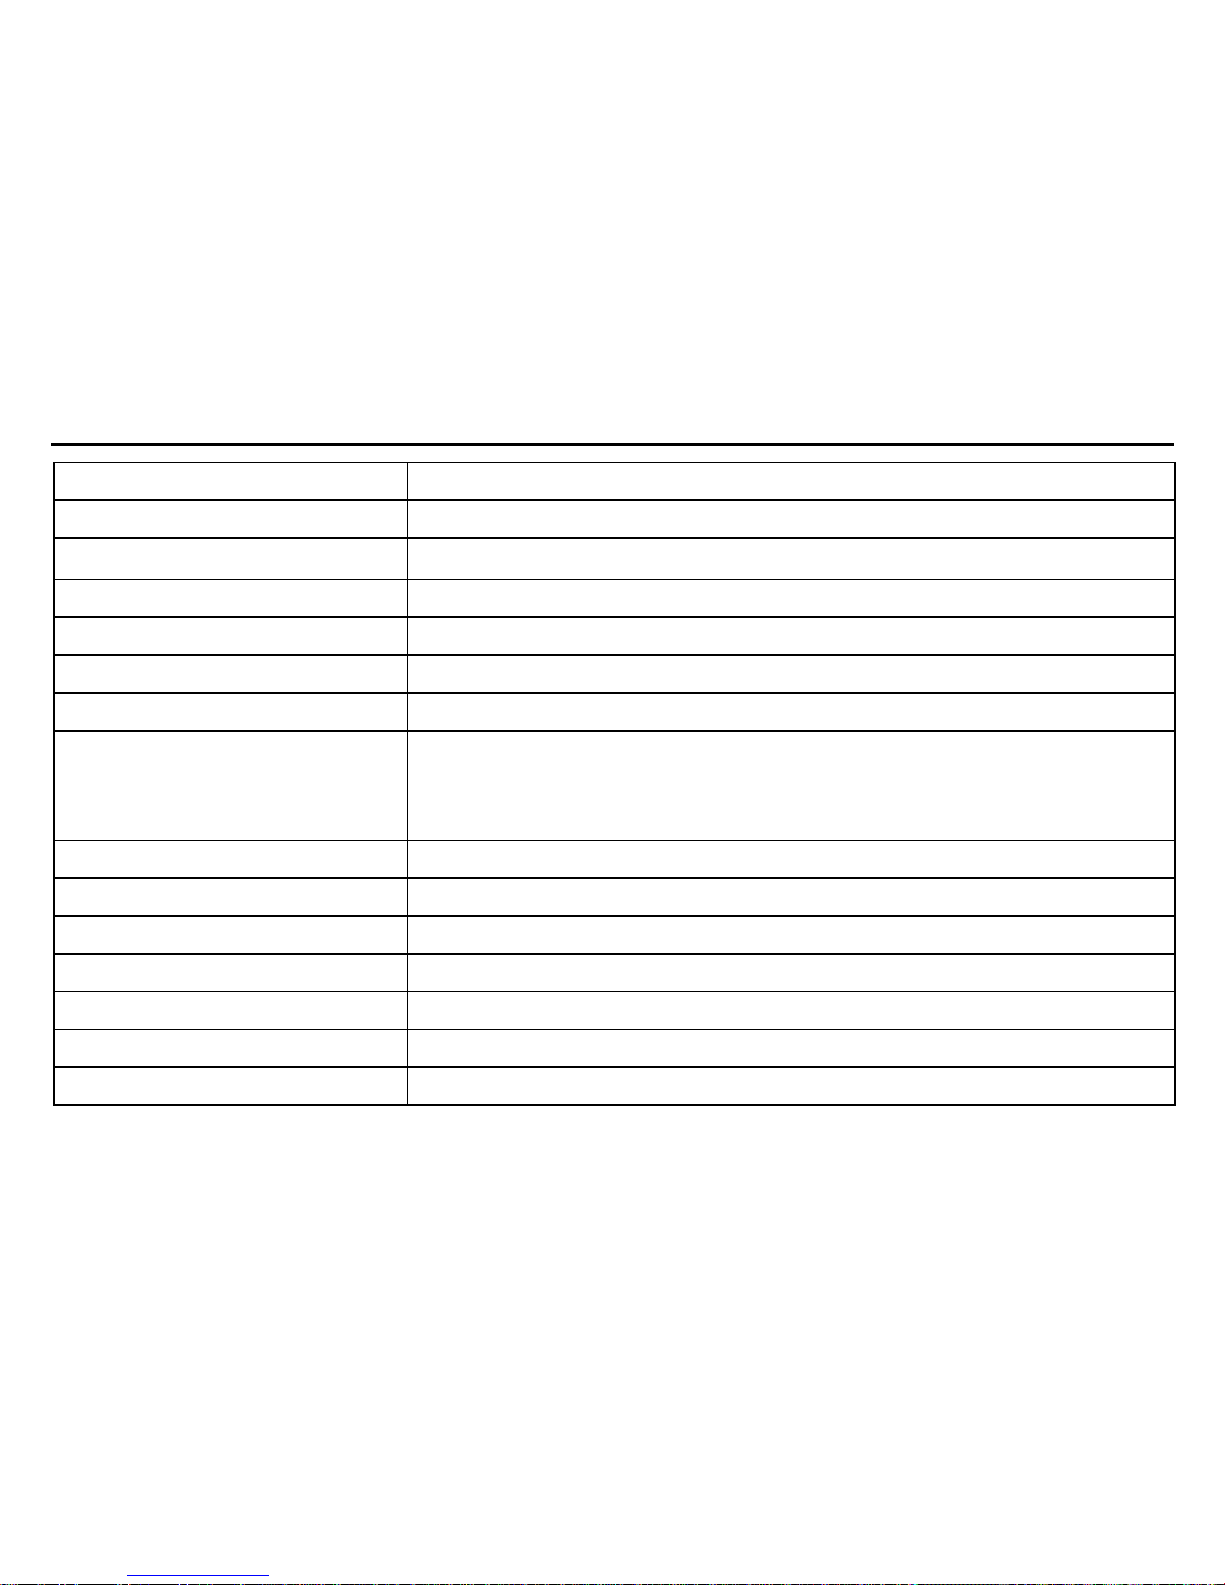
Product Specifications:
Image Sensor 5.0 Mega Pixels CMOS
Function Mode Record video, Record still photo, playback, External memory
Lens
F/3.0, f=5.7 mm
Focus Range 120 cm ~ infinite
Digital Zoom 8 X Digital zoom
Shutter Electronic
LCD Display 2.7” (6.1 cm) TFT Display
Resolution
Video: HD (1280x720), D1 (720x480), VGA (640x480)
Still photo: 12M (4032x3024), 5M (2592x1944), 3M
(2048X1536), 1M (1280x960)
White Balance Automatic
Exposure Automatic
File Format Video (MOV H.264), Photo (JPG)
Video Out TV out, HD TV out
Storage Media SD/MMC/SDHC card (max. 16GB)
USB Port USB 2.0
Dimension (LxWxH) 110 mm x 57 mm x 19.5 mm
Page 24
 Loading...