

Page 1

Page 2

Contents
Precautions ............................................................................... 1
Product Introduction .................................................................. 3
Introduction to Appearance and Keypad ................................... 4
Get Started ................................................................................ 5
Charge the Built-in Lithium Battery ........................................ 5
Use of Memory Card .............................................................. 6
Startup/Shutdown ................................................................... 7
Conversion between Modes ................................................... 8
Indicator Light ......................................................................... 8
Video Recording Mode ........................................................... 9
Photo Mode .......................................................................... 10
Vehicle Mode ........................................................................ 11
Playback Mode ..................................................................... 12
Connecting the Camera to High-Definition TV ..................... 14
Application on the Personal Computer................................. 14
Application of Remote Control.............................................. 15
Waterproof Case Using Notice ............................................. 16
Technical Parameters .............................................................. 17
Page 3

1
This user's manual has referred to the latest information we had
when this user’s manual was made. The screen display and
illustrations are used in this user's manual for the purpose of
introducing details of this video camera in a more specific and
direct way. Difference may arise between these displays and
illustrations and the video camera actually available for you due
to difference in technological development and production
batch, under which case, the actual functions of this video
camera shall prevail.
Precautions
Please read the Announcements carefully before using this
video camera for proper and safe operation, so as to bring its
optimum performance into play and extend its service life.
Do not expose the video camera to sunshine directly, nor
point its lens to sunlight. Otherwise, the image sensor of
the video camera may be damaged.
Take good care of the video camera and prevent water or
sand particles from entering the video camera when it is
used on the beach or near to water, because water, sand
particles, dust or component containing salt may damage
the video camera.
Keep the video camera contaminated free of dust and
chemical materials. Place it in a cool, dry and well
ventilated place. Do not place the video camera in a high
temperature, moist or dusty place.
Please check if the video camera can operate normally
before use.
If dirt or stain is accumulated on the video camera or on its
lens, use soft, clean and dry rag to wipe it away gently. If
the video camera or its lens is stained with sand particles,
blow on the lens to get the sand articles away gently. Do
not use cloth to wipe arbitrarily. Otherwise, it may scratch
Page 4

2
the surface of video camera or its lens.
If it is required to clean video camera surface, firstly blow
away the sand dust accumulated on this surface, and then
wipe the video camera gently with rag or tissue applicable
to optical equipment. Please use the cleaning agent of
video camera for wiping if necessary. Do not use organic
solvent to clean the video camera.
Do not touch the lens surface with fingers.
Please back up the data if the memory card inside this
video camera is used for the first time.
The externally installed memory cards are manufactured
from precise electronic components. Data may be lost or
damaged under the following circumstances:
1) Improper use of the memory card.
2) The memory card is bent, dropped or collided.
3) Place it under high temperature or moist environment
or expose to sunshine directly.
4) Electrostatic or electromagnetic field exists around the
memory card.
5) This memory card is taken out or power supply is
interrupted when this video camera or computer is
connected to the memory card (i.e. during reading,
writing and formatting).
6) Touch the metal contact surface of the memory card
with fingers or metal materials.
Page 5

3
Product Introduction
This product is small in size and easy for installation.
With high-performance chips, this product can produce
high-definition videos with excellent continuity of dynamic
images, even under low illumination conditions, and
supports H.264 HD video format.
The video mode supports four options: FHD (1920x1080
30fps), HD (1280x720, 60fps), HD (1280x720, 30fps) and
VGA (640x480, 120fps).
This product supports video output and live playback
functions. Videos can be output to high-definition TVs for
playing clear and sharp pictures.
Page 6

4
Introduction to Appearance and Keypad
Touch screen
TFT LCD
microSD
card slot
HDMI
interface
Tripod socket
Power key
Shutter Key
Reset key
Microphone
USB
interface
Infrared light
Camera lens
Busy light /
Charging light
Screen-off light
Screen-off
light switch
Page 7

5
Get Started
Charge the Built-in Lithium Battery
To charge the camera, connect it to the computer via the USB
cable. Then, the charge indicator light (red) will be on. After the
camera is fully charged, the charge indicator light will be off.
In general, it can be fully charged after 2-4 hours.
USB
Indicator Light for
charging is on
Page 8
6
Use of Memory Card
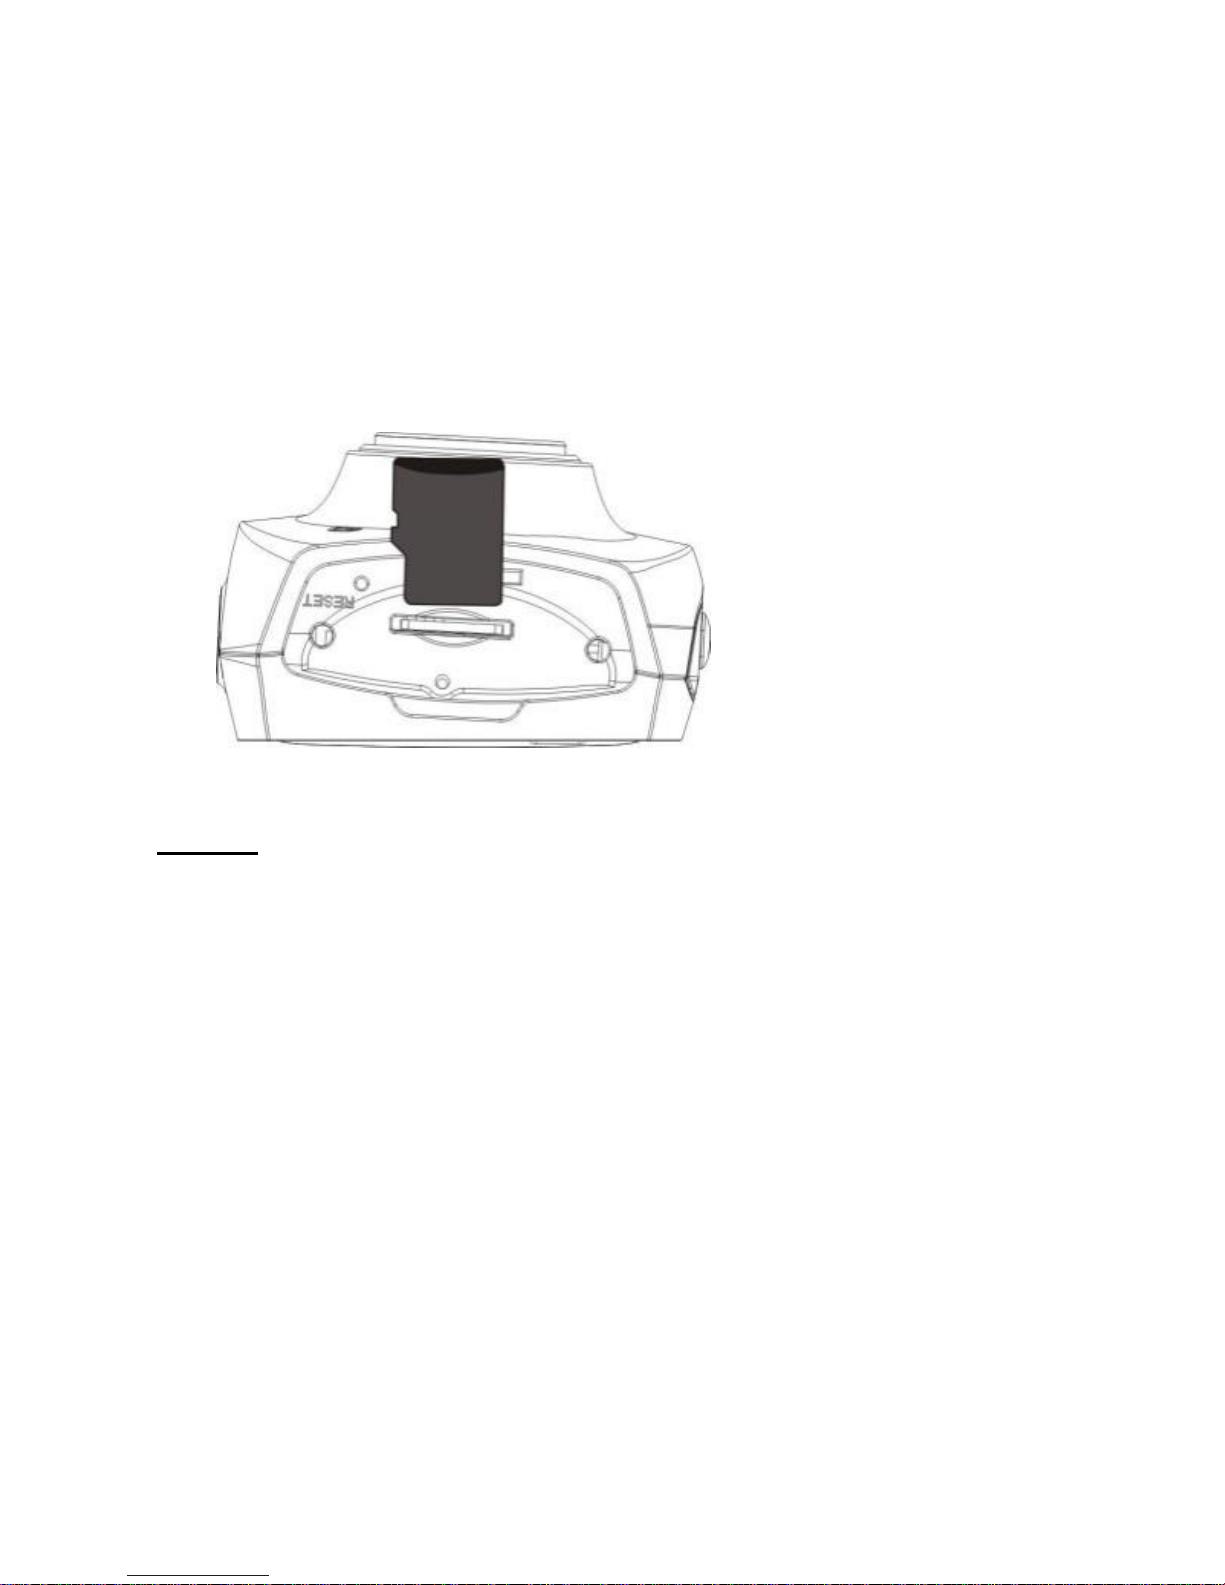
1. Push the microSD card into the card slot according to the
direction instruction beside the slot of memory card till it is
completely inserted.
2. To take out the microSD card, gently press the memory
card inward and it will pop up.
NOTE:
No built-in memory is available in this video camera.
Make sure to insert memory card before using. It is advised to
use microSD card with speed faster than Class 4.
microSD
card
Page 9
7
Startup/Shutdown
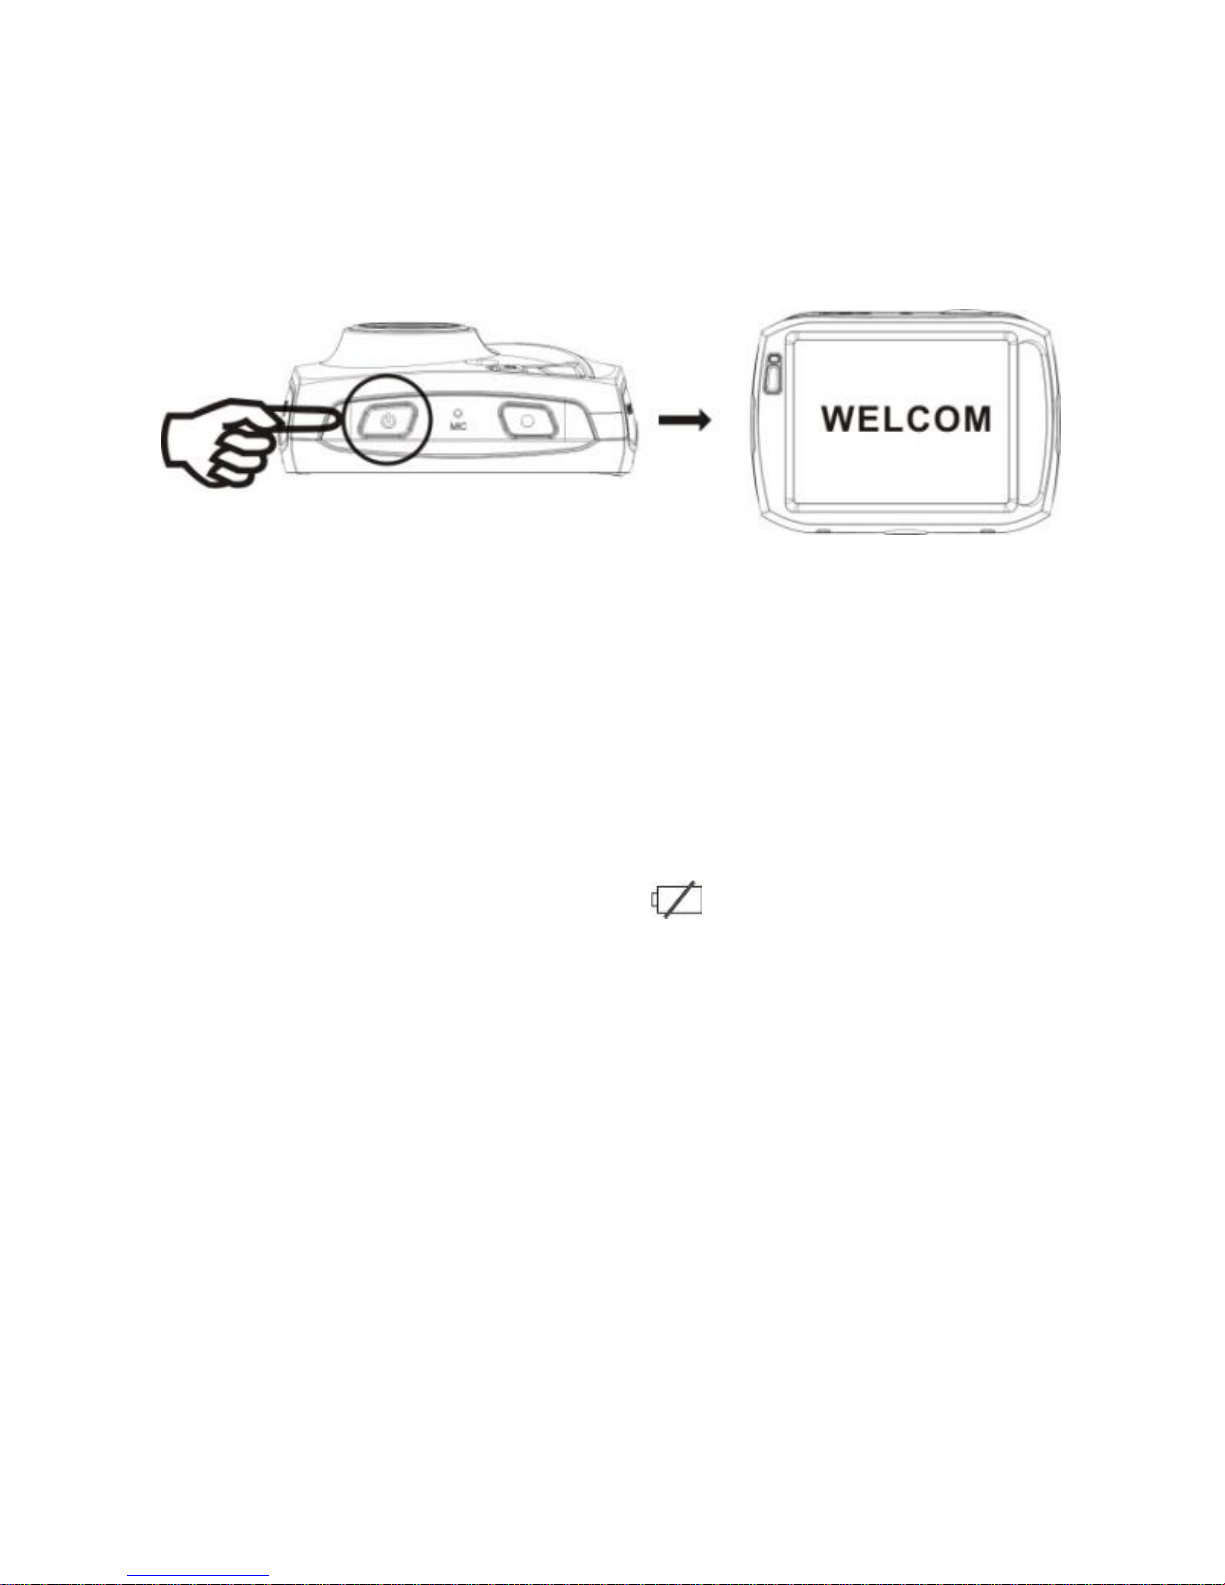
1. Startup: Press and hold the POWER button for 2 seconds.
The screen of the display is activated and the camera is
turned on.
2. Shut down: Press the POWER button again will shut down
the camera.
3. Auto Screen-off: When the idle time of the camera reaches
the automatic screen-off time, it will turn off the screen to
save power. After the screen is turned off, screen-off light
will be on.
4. Shutdown at low battery power: When the battery power
drops to a low level, the icon will appear on the LCD
display. Please charge the battery. When the icon turns
red and flickering, the video camera will be shut down
soon.
Page 10
8
Conversion between Modes
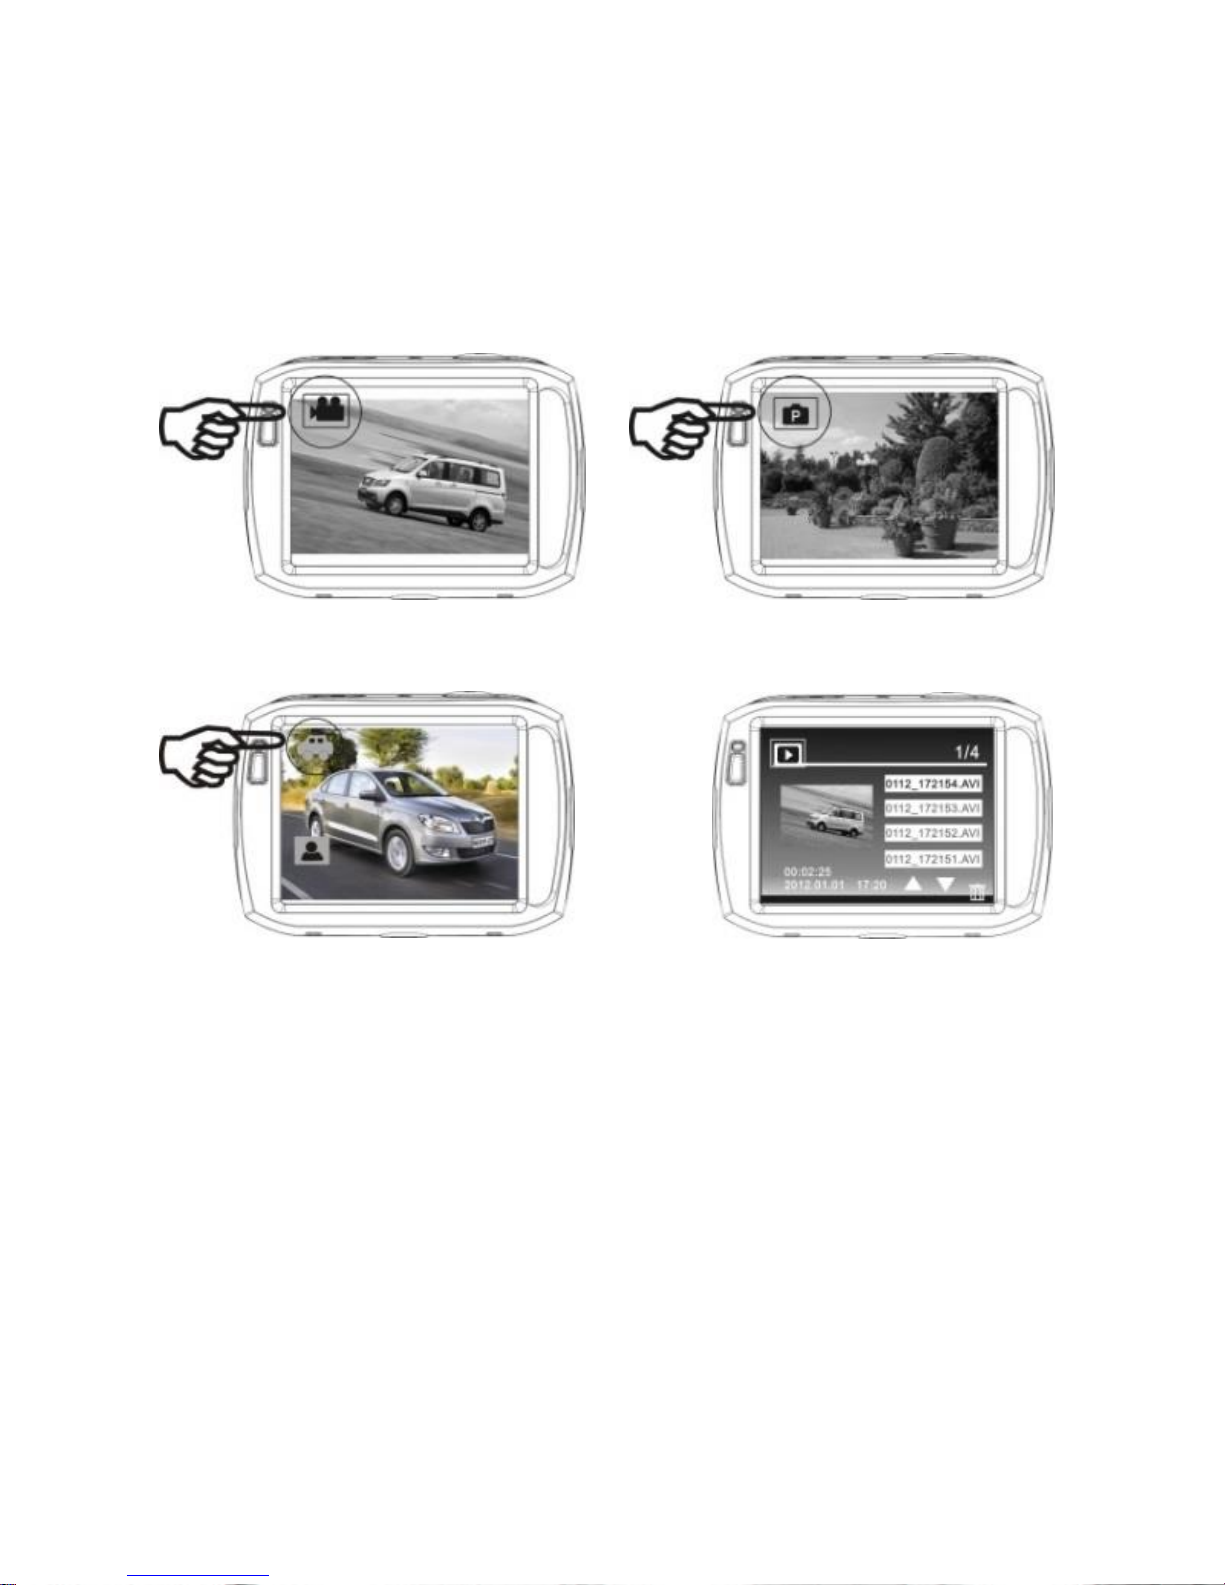
The camera has four modes: Video recording mode, Photo
mode, Vehicle mode and Playback mode. These modes can be
switched over by clicking the icon on the upper left corner of the
LCD display after startup.
Video recording mode Photo mode
Vehicle mode Playback mode
Indicator Light
Busy indicator light (Blue):
When the camera is working (e.g. recording videos, shooting
pictures, automatic screen-off, etc.), the busy indicator light will
blink.
Charging indicator light (Red):
It indicates the camera is being charged. After the camera is
fully charged, it will go off.
Page 11
9
Video Recording Mode
After turning on the camera, it will directly go to the video
recording mode. You can start recording videos by pressing the
shutter button. To stop video recording, just press the shutter
button again. When the memory card is full or the battery power
drops to a low level, the camera will also automatically stop the
video recording.
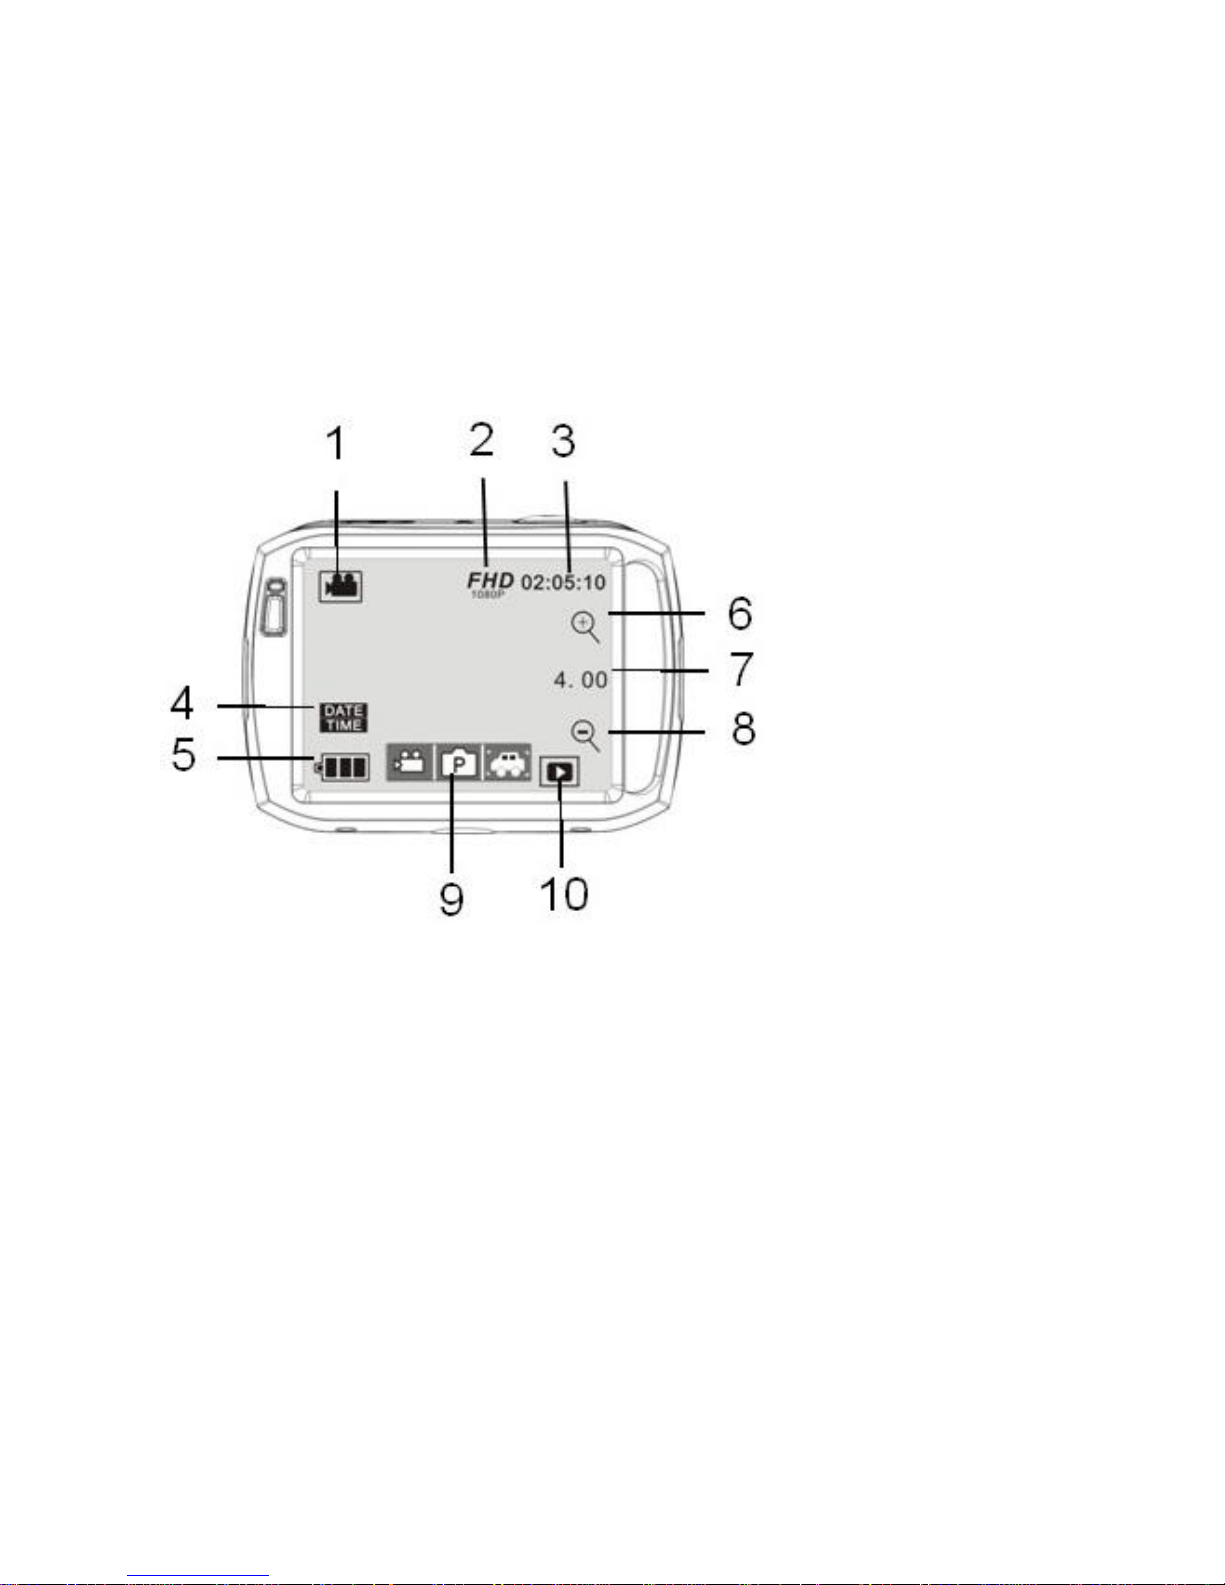
1. Mode: Indicating the camera is in video recording mode.
2. Video size: Available in FHD (30fps) / HD (60fps/30fps) /
VGA (120fps).
3. Recording time: Indicating the estimated available length
of time for the recording.
4. Icon of setting the time and date.
5. Battery status: Indicating the current power level of the
battery.
6. Digital zoom-in icon
7. Digital zoom-out magnification
8. Digital zoom-out icon
9. Menu
10. Playback
Page 12
10
Photo Mode
After turning on the video camera, it will directly get to the video
recording mode. To switch to the photo mode, click the mode
icon on the upper left corner of the LCD display. You can shoot
a photo by pressing the shutter button.
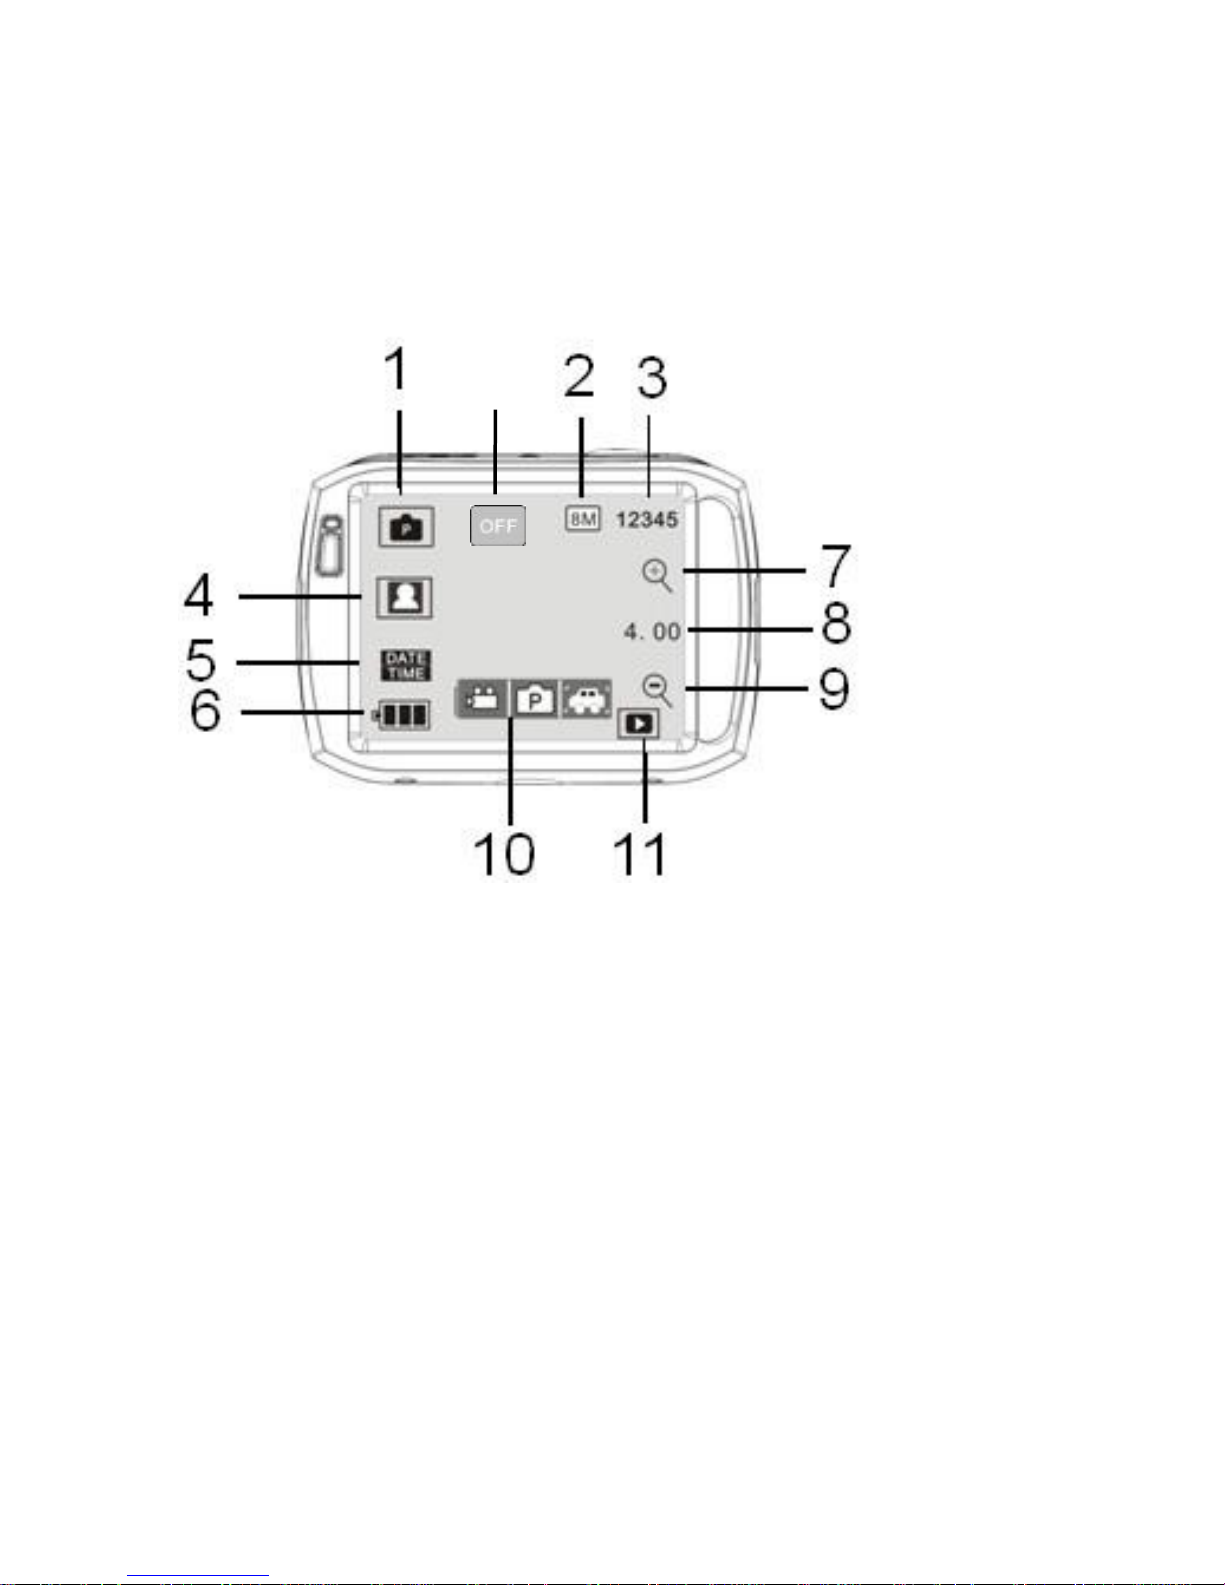
1. Mode: Indicating that camera is currently in photo mode.
2. Photo size
3. Estimated available number of photos.
4. Indicating the face detection function is activated.
5. Icon for setting the time and date.
6. Battery status: Indicating the current power level of the
battery.
7. Digital zoom-in icon
8. Digital zoom magnification.
9. Digital zoom-out icon
10. Menu
11. Playback
12. Photo mode: Off / 10s Self-timer / Triple Sequence
12
Page 13
11
Vehicle Mode
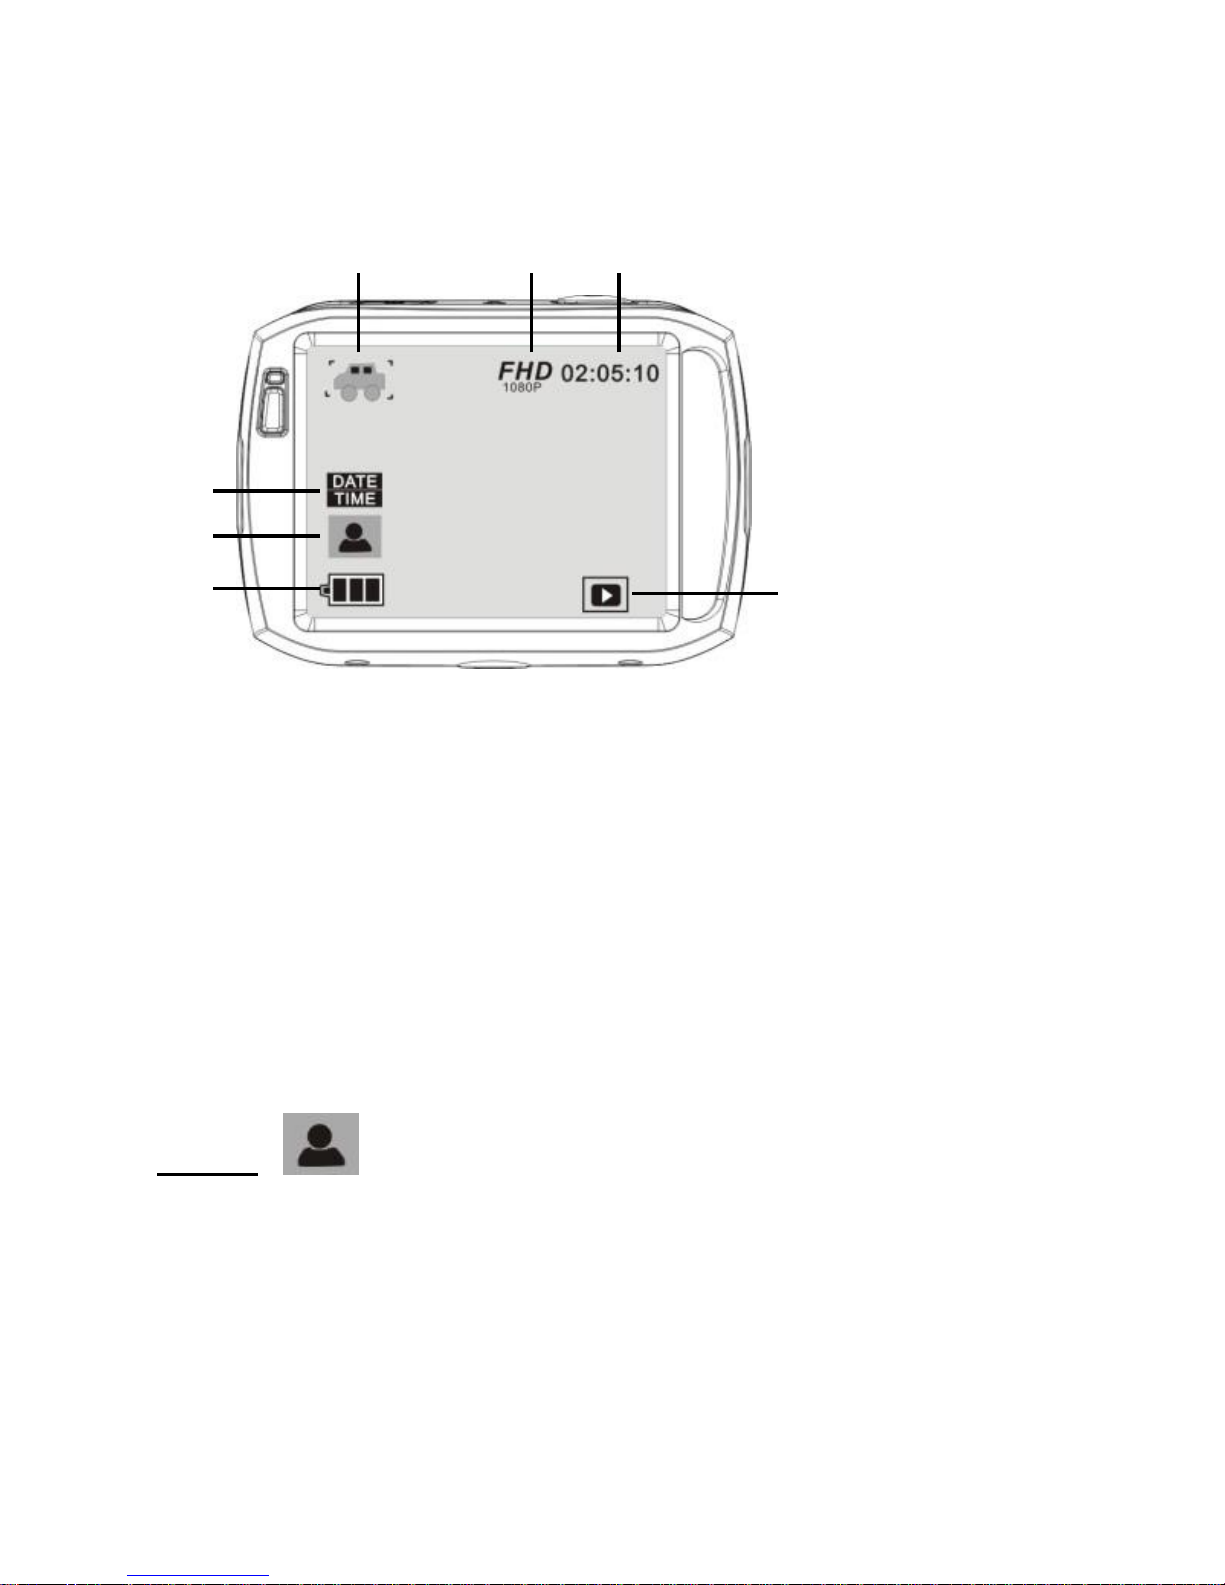
The length of each recording file is 3 minutes.
1. Mode: Indicating that the camera is in the vehicle mode.
2. Video size: Available in FHD (30fps) / HD (60fps/30fps) /
VGA (120fps).
3. Recording time: indicating the available length of
remaining time to be recorded.
4. Icon of setting time and date.
5. Click this icon can flip the image by 180 degrees.
6. Battery status: Indicating the current power level of the
battery.
7. Playback
NOTE: Click this icon, the camera can be flipped 180
degrees to take video normally. This feature is available only in
vehicle mode.
1 2 3
6
5 4 7
Page 14
12
Playback Mode
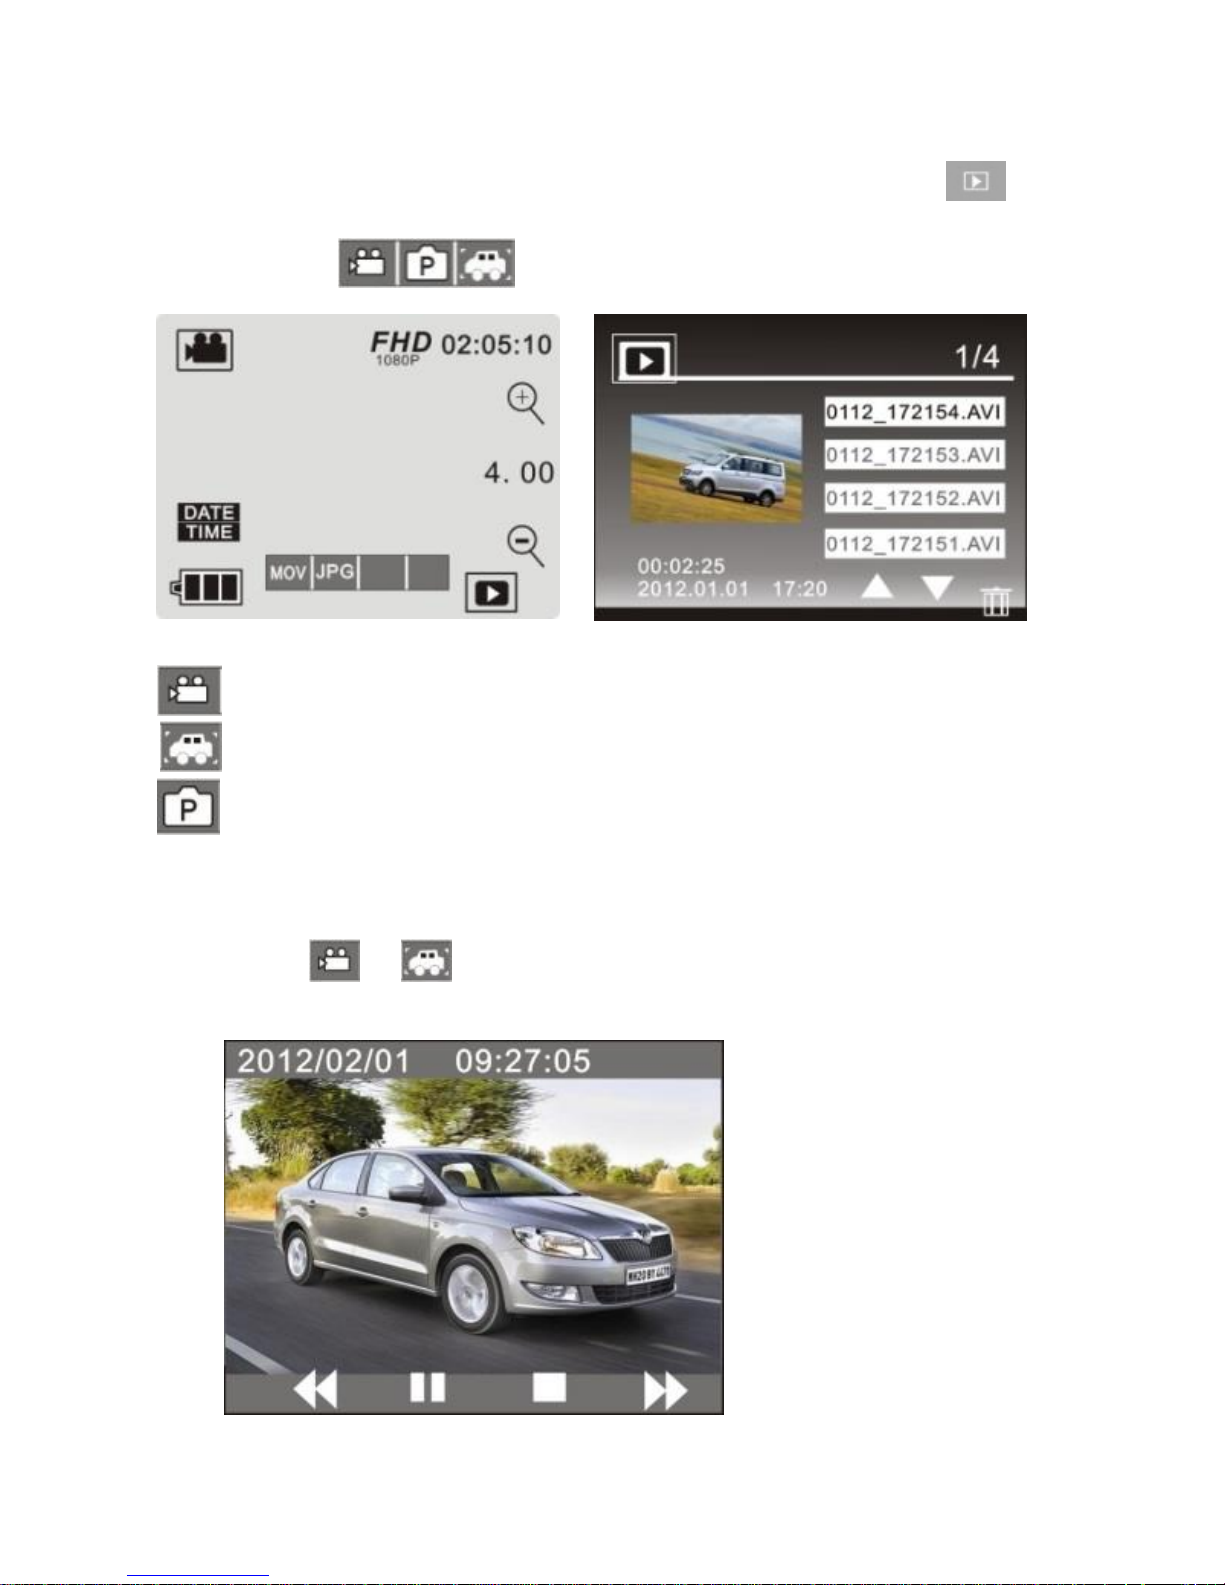
After turning on the camera, press the Playback icon ( ) in
the lower right corner of the LCD display. Then click on the
mode icon ( ) to activate the corresponding menu.
Normal video files
Vehicle video files
Photo files
1. Playback video clips (normal video and vehicle video):
Click / to switch to the file list mode. Then you
can playback video clips by clicking a file in the list.
Page 15
13
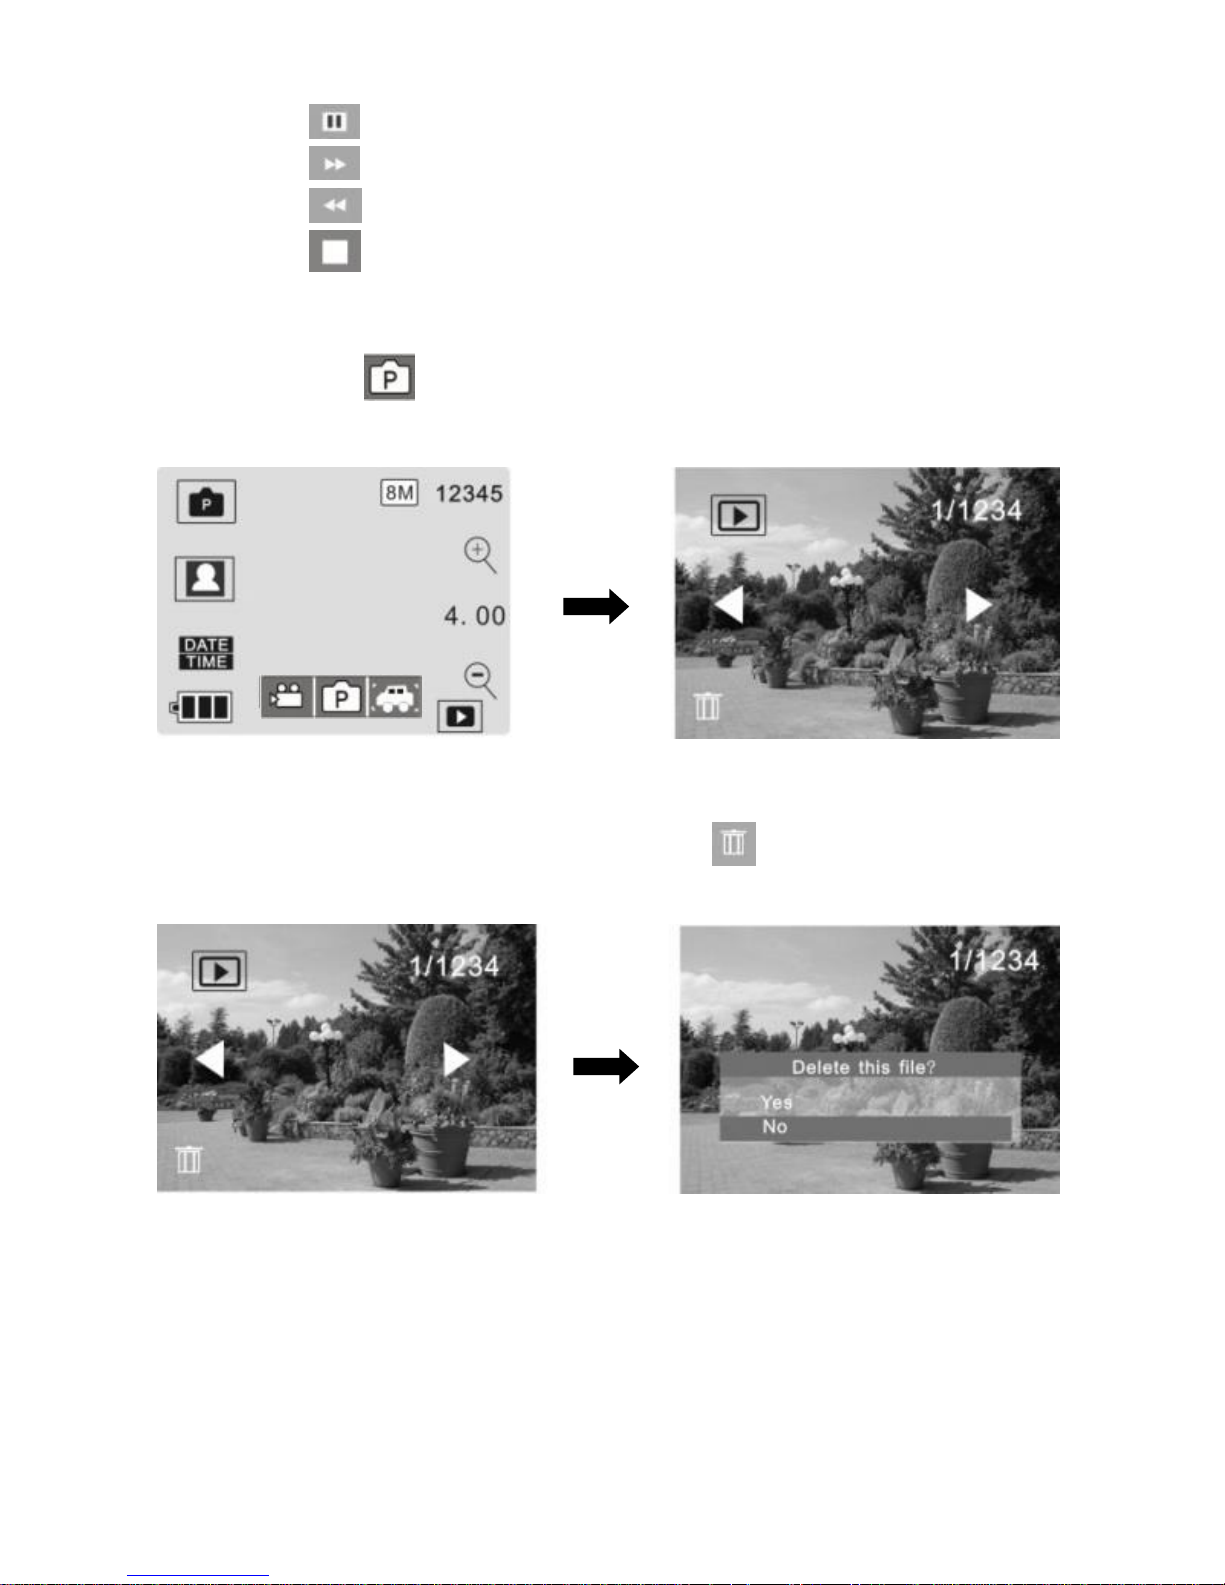
Click to pause the playing.
Click to fast forward the playing.
Click to fast rewind the playing.
Click to stop the playing.
2. Playback photos:
Click the icon then you can view photos by clicking
the icon “◄” or “►”.
3. File deletion
After clicking the Delete File icon , the screen will
appear as shown in the right figure.
Click YES to delete the current file immediately, or click
NO to cancel the deletion operation.
Page 16
14
Connecting the Camera to High-Definition TV
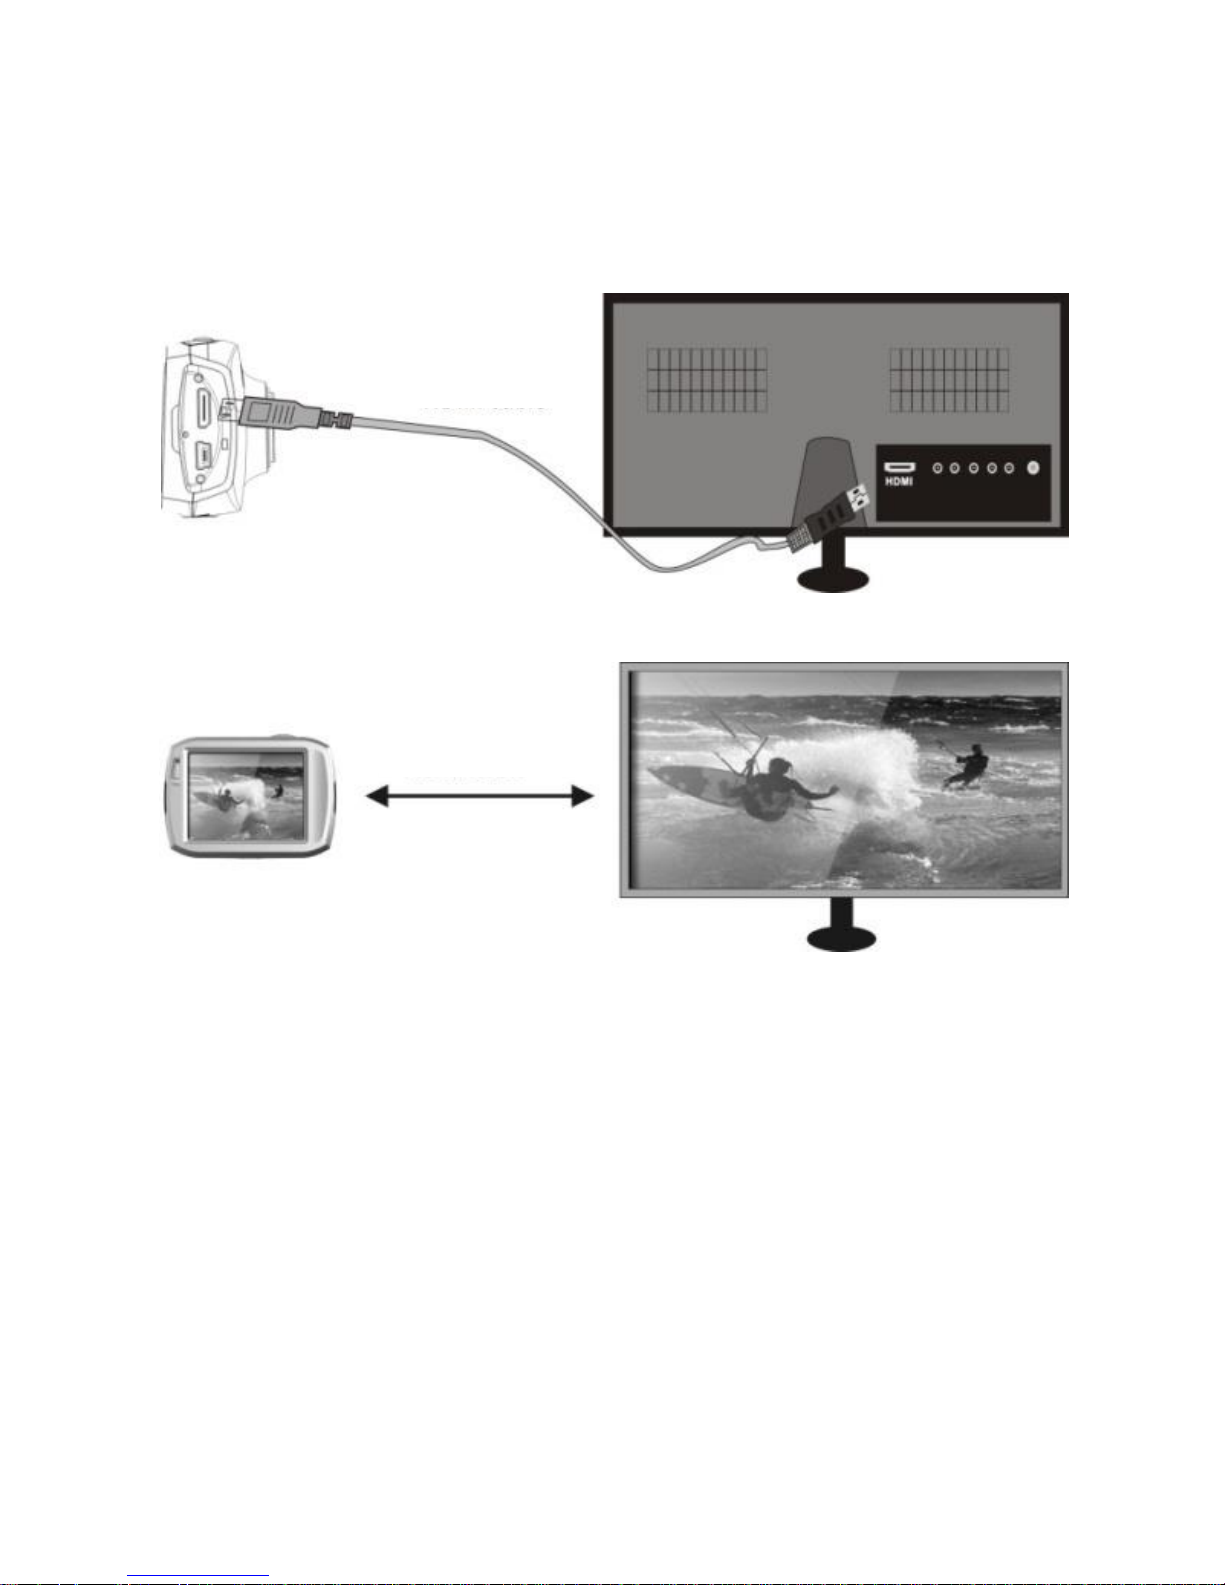
Connect the camera to a High-Definition TV with HDMI cable
(not included). Then video signals from the camera will be
automatically output to the High-Definition TV.
Application on the Personal Computer
Connect the camera with a computer via the USB cable.
The “removable disk” will appear on the window of “my
computer”. The stored photos or videos can be found in the
“removable disk”.
Connection diagram
Signal transmission
HDMI Cable
HDMI Cable
Page 17
15
Application of Remote Control
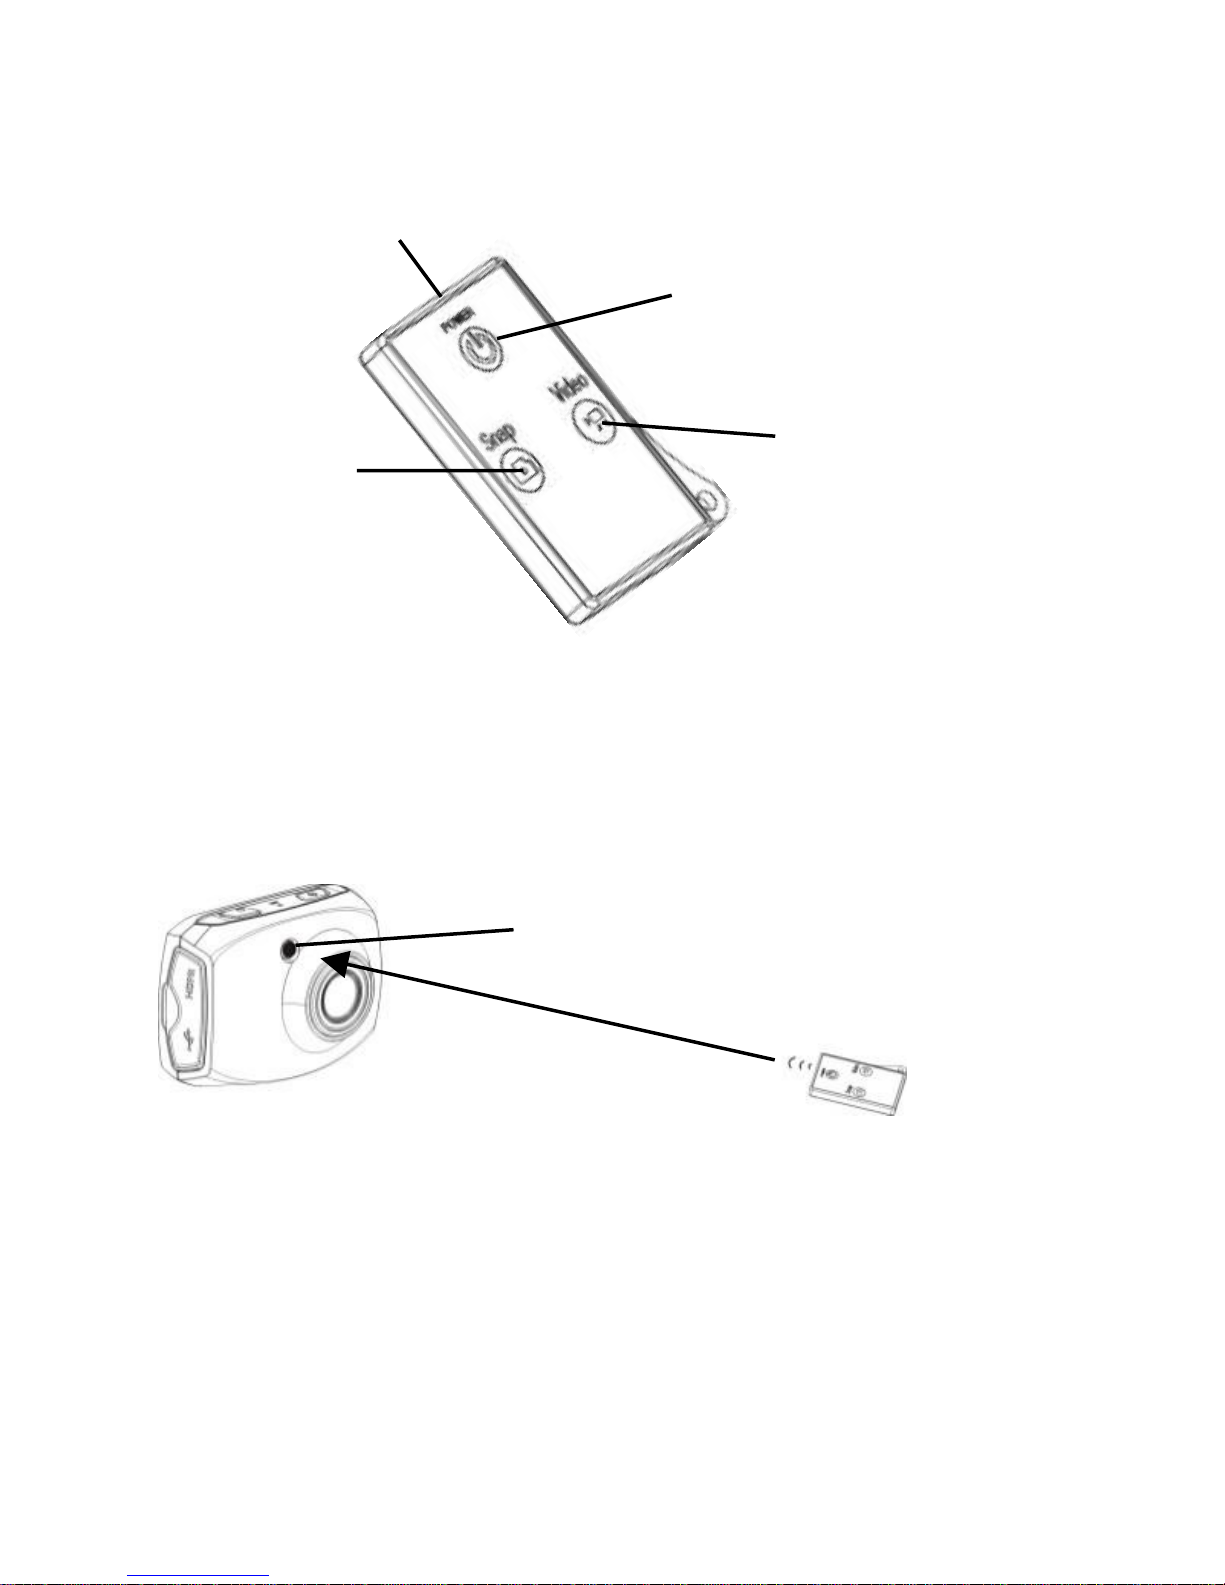
While using the remote control, place its signal transmitter port
toward the infrared signal receiver light of the camera. Then
you can record videos, take photos or shut down the camera by
pressing the corresponding buttons.
OFF key
REC key
SNAP key
Signal transmission port
Infrared receiver light
Page 18

16
Waterproof Case Using Notice
Before sealing the waterproof case, keep the camera
housing’s rubber seal clean, a single hair or dust or sand
can cause the leakage. You can test by closing the case
without inserting the camera. Submerse the case
completely in water for about a minute. Remove the case
from the water, dry off its exterior with a towel then open
the case. If the entire interior is dry, the case is safe for use
under water.
Remember to set the camera at the desired mode before
putting the camera in the waterproof case. There is no
external button on the case for the contact to the mode
icon on the LCD display.
After every use in salt water you will need to rinse the
outside of the case with non-salt water and dry the case.
Not doing this can eventually cause corrosion of the hinge
pin and salt buildup in the seal, which can cause failure.
To clean the seal, rinse it in fresh water and dry it.
Re-install the seal into the grooves in the backdoor of the
housing.
Page 19
17
Technical Parameters
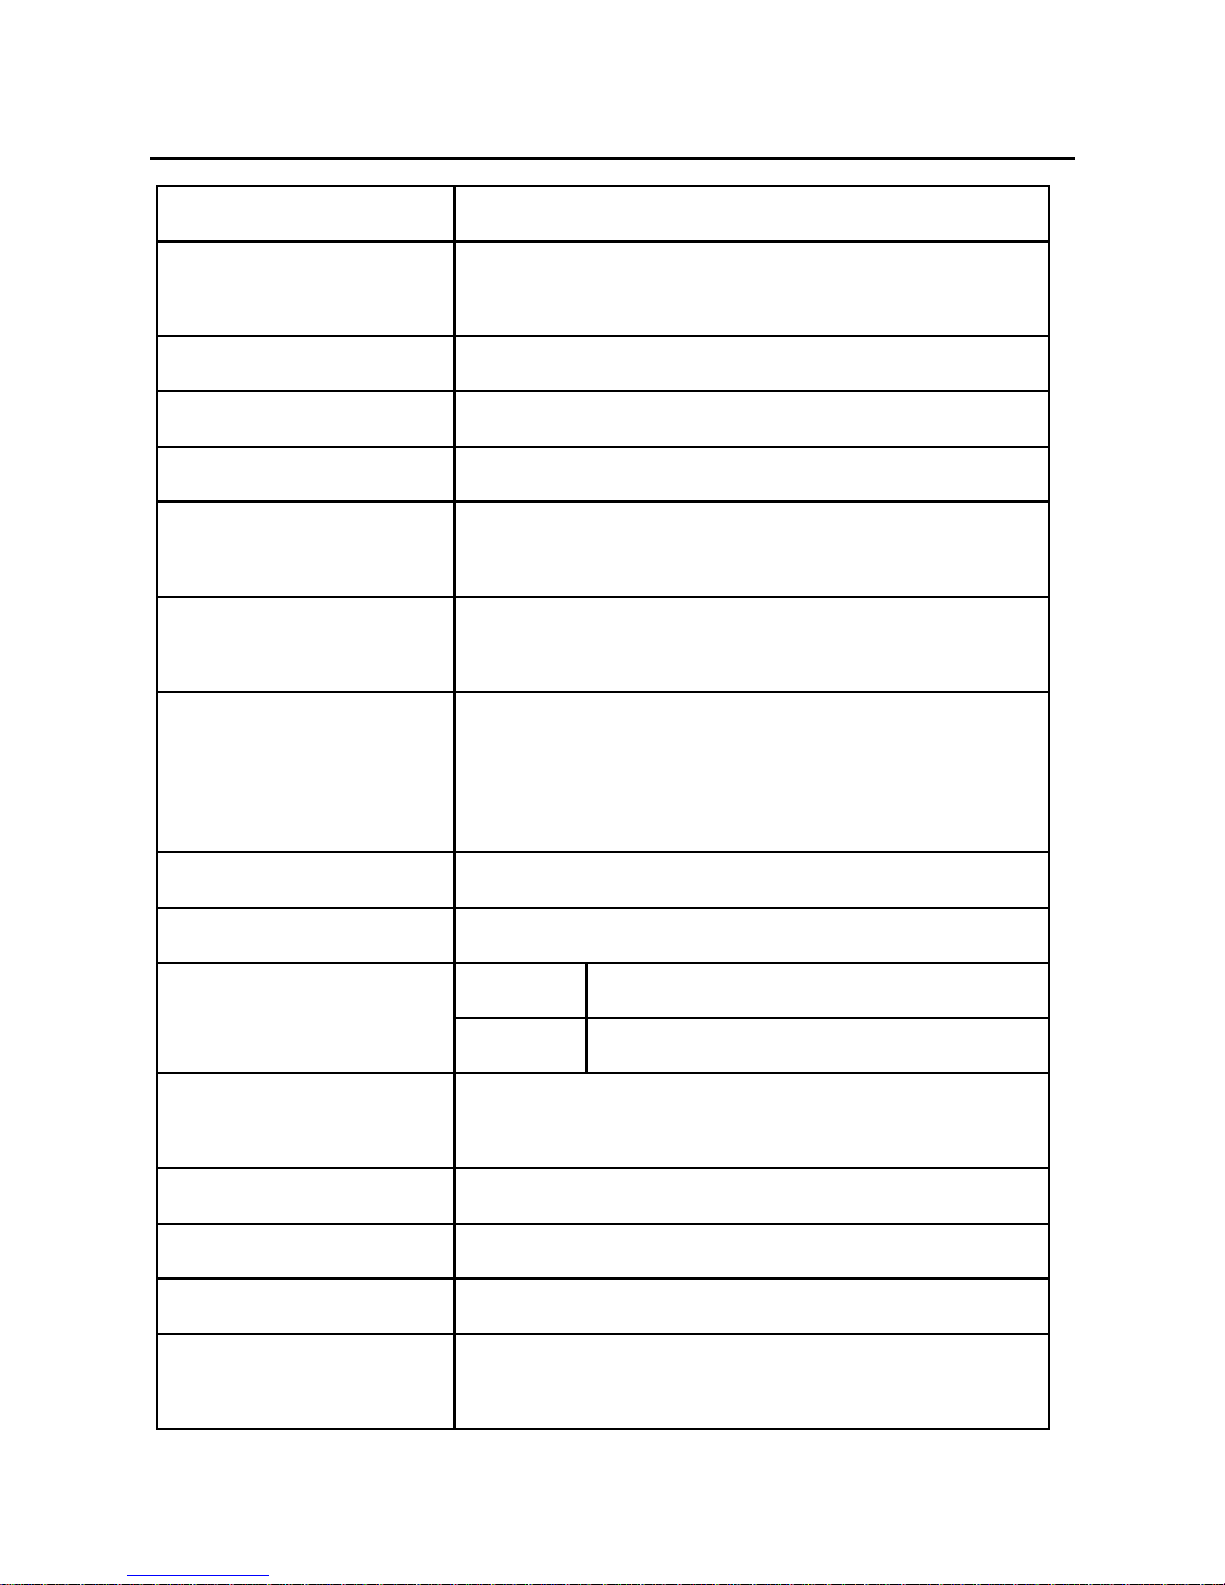
Image Sensor
CMOS
Function Mode
Video recording mode, photo mode,
vehicle mode, playback mode
Camera Lens
F3.1 f=2.9mm
Digital Zoom
4X
Shutter
Electronic shutter
LCD Display
Screen
6.1 cm (2.4”) touch screen
Image Resolution
12M (4000x3000) / 10M (3648x2736) /
8M (3264x2448) / 5M (2560×1920)
Video Resolution
FHD: 1920x1080 @ 30fps
HD: 1280x720 @ 60fps
HD: 1280x720 @ 30fps
VGA: 640x480 @ 120fps
White Balance
Automatic
Exposure
Automatic
File Formats
Video
AVI (H.264)
Photo
JPEG
Storage Medium
microSD card (Supporting up to 32GB),
no built-in flash memory available
USB Interface
High-speed USB 2.0 interface
Power Supply
Built-in 3.7V rechargeable Li-ion battery
Dimension
74 x 52 x 33 mm
Weight
Approx. 72 g (without memory card
inserted)
Page 20
18
Service Procedure
If you have reason for complaint, or your device is defective,
please contact your dealer or the service division of JAY-tech
GmbH to make arrangements for service procedures.
Service Hours: Monday - Thursday from 8:00 am to 5:00 pm
Friday from 8:00 am to 2:00 pm.
Please do not send your product to our address unless
requested to do so by our service team. All costs and the risk of
loss are the responsibility of the sender.
We reserve the right to reject unrequested deliveries, or return
the package at the sender’s expense.
EC Declaration of Conformity
The product complies with the protective
requirements of European Directives 2004/108/EC.
The conformity declaration for this product is
available under www.jay-tech.de.
Directive 2002/96/EC on Waste Electrical and
Electronic Equipment (WEEE)
This symbol on the product or in the instructions
means that your electrical and electronic equipment
should be disposed at the end of its life separately
from your household waste. There are separate
collection systems for recycling in the EU. For more
information, please contact the local authority or
your retailer where you purchased the product.
Page 21

 Loading...