

Page 1
Page 2

For correct usage please read these instructions carefully
and keep in a safe place for future reference!
CONTENTS
Safety Precautions ..................................................
Package Contents ..................................................
Description of Parts ................................................
Loading Slides ........................................................
Loading Negatives ..................................................
Loading Photos .......................................................
General Operations ................................................
Technical Specifications .......................................
1
3
4
5
6
7
8
27
Page 3

Please read these notes carefully before initial use.
General Notes:
Do not place the device on an unstable surface. If it falls it may cause
personal injury.
Follow the safety and operating instructions for the other devices to be
connected to your film scanner.
Do not overload your PC with USB connections. Connecting too many
devices to your computer, such as wireless mice, media players, mobile
phones, and other USB devices may result in an insufficient supply of power
to your film scanner for normal operation.
Please make sure that this scanner does not get into the hands of children it
is not a toy!
Please observe the regulations for the prevention of accidents of the
organization of commercial employer's liability insurance associations for
electrical installations and production facilities in commercial facilities.
Please contact our technical support for questions regarding the scanner, its
mode of operation, safety and proper connection.
Do not disassemble the device and do not open the housing, there is danger
of electric shock. The retailer is not liable for any damage incurred during use
of this device, or for the complaints of third parties.
1
1. Safety Precautions
Page 4

Ambient Conditions:
Set the scanner up so that the ventilation openings are not obstructed. For
example do not place it on a bed, sofa, carpet, or similar surfaces.
Do not place the device close to heat sources such as radiators or ovens.
And do not subject the device to high temperatures or severe temperature
fluctuations. Protect it against solar radiation.
Avoid severe stress, vibration and strong impact. Do not drop or shake the
device. It can also be damaged by strong pressure on the LCD display.
Keep the scanner away from water and other liquids. It should not be used
in rain or snow. Moisture may cause electric shock or even fire.
Cleaning and Care:
Use a soft, dry cloth to clean the surface and the cleaning brush for the
exposure area. Store the device in a clean and dry location.
Packing:
Do not leave the packing material lying around. Plastic bags are dangerous
and not toys.
Interference:
Most electronic devices such as lamps, computers, telephones, etc. create
an electromagnetic field. Keep the film scanner away from electrical devices
to avoid unwanted interference and interaction.
If liquid or a foreign object enters the device, have it checked by an authorized
person before you continue to use it.
We recommend you contact our service center.
2
Page 5
Start of Operation:
To ensure proper operation please read all the operating
instructions and the notes on safety carefully!
Power Connection:
Connect the device using the supplied USB cable and the power adapter.
Insert the plug of the power adapter into a power outlet.
USB Connection:
Use the USB cable to connect the device to your PC.
3
2. Package Contents
Combo-Scanner PS970
USB Cable
Negative Film Holder
Positive Slide Holder
Photo Tray (13x18, 10x15, 9x13)
AC/DC Adapter
User’s Manual
Page 6
4
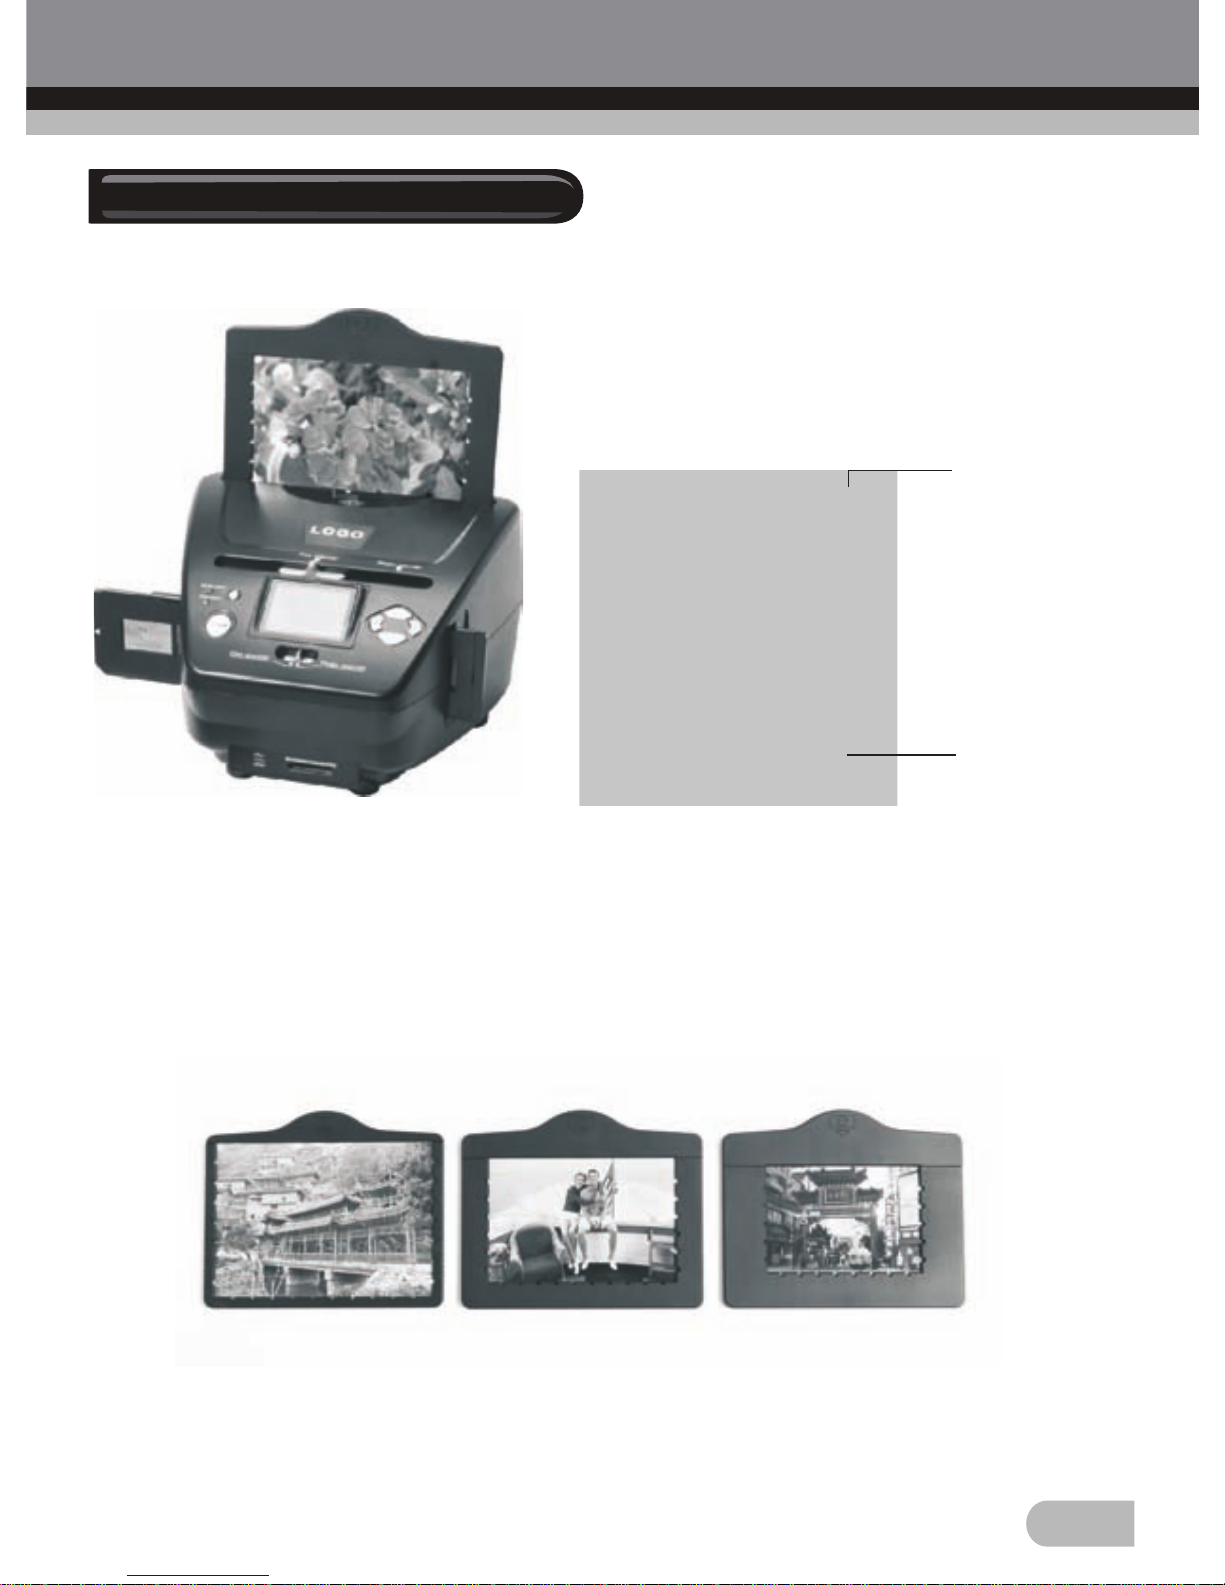
3. Description of Parts
Negative
Film Holder
Positive
Slide Holder
Photo Tray
13x18 10x15 9x13
Combo-Scanner PS970
Page 7
5
4. Loading Slides
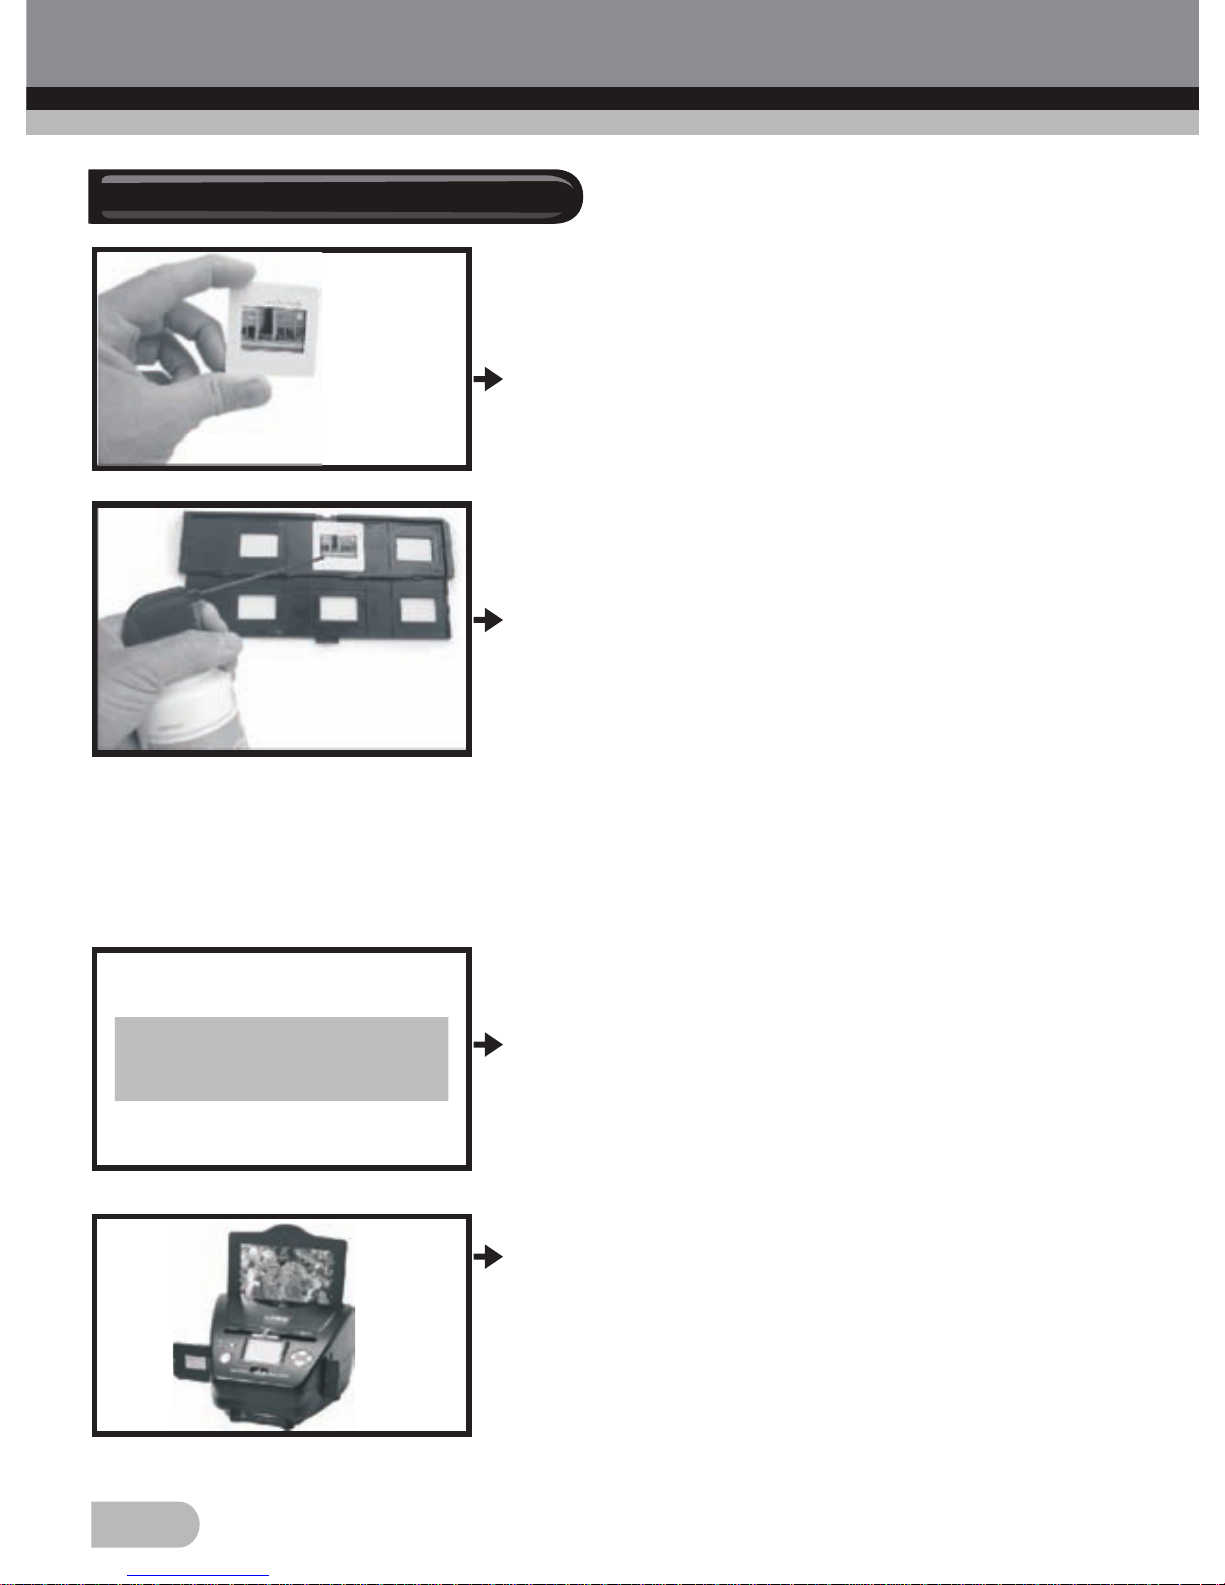
Hold up the slide toward the light. Face the
trademark side of the slide away from you.
Look through the slide and it should appear
normally (not a mirror image).
Now turn the slide so the image is upside
down while looking at the same side.
Open the slide holder at the marked spot on
the top.
With the slide holder laid open place the slide
into recessed area in the holder- the slide
should fit perfectly.
Note: Handle slides with care. Any dust
scratches or fingerprints will show up on your
saved images. If possible use cotton gloves when handling slides. It is
recommended to use compressed air to remove any dust on the slides. This
is not included with the Combo-Scanner but can be purchased from an
office supply or electronics retailer.
Close the slide holder and press the edges
so that it locks in place.
Hold it in the position as shown in the
Combo-Scanner.
Insert the Slide Holder into the slot on the
right side of the Combo-Scanner as shown.
Page 8
6
5. Loading Negatives
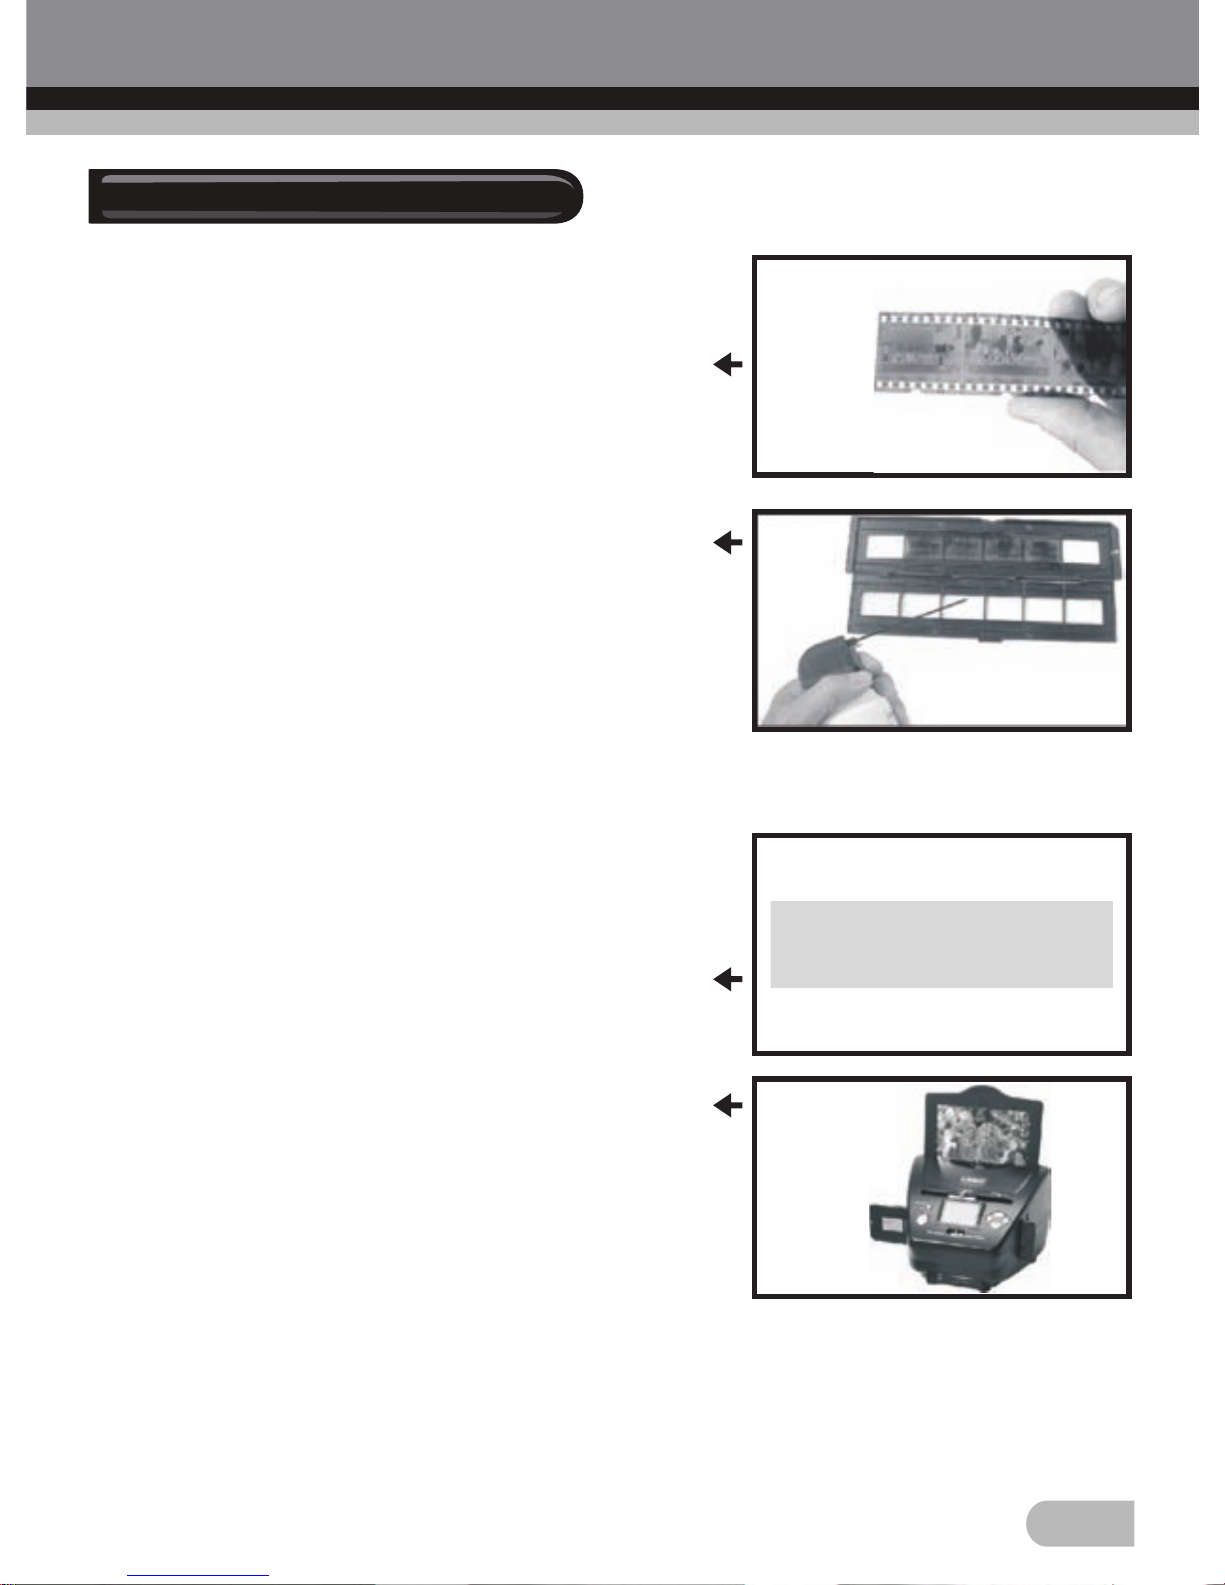
Hold up the negative toward the light. As you
look through the negative you should be able
to read the small negative numbers normally
(not a mirror image).
Now turn the negative so the image is upside
down while looking at the same side.
Open the negative holder at the marked spot
on the top. With the negative holder laid open
place the negative into holder so the notches
line up with the notches on the holder.
Note: Handle negatives with care. Any dust,
scratches or fingerprints will show up on your
saved images. If possible use cotton gloves when handling negatives. It is
recommended to use compressed air to remove any dust on the negatives.
This is not included with the Combo-Scanner
but can be purchased from an office supply
or electronics retailer.
Close the negative holder and press the
edges so that it locks in place.
Hold it in the position as shown in the
Combo-Scanner. Insert the negative holder
into the slot on the right side of the ComboScanner as shown.
Film Holder: The design of film holder is
follow ISO standard. In some cases the holes
on the film will not match exactly to alignment of the holder. This is caused by
a non-standard camera. In this case there will be a small black line on the
edge of the frame that can easily be cropped out using photo editing software.
ISO - International Organization for Standardization
Page 9
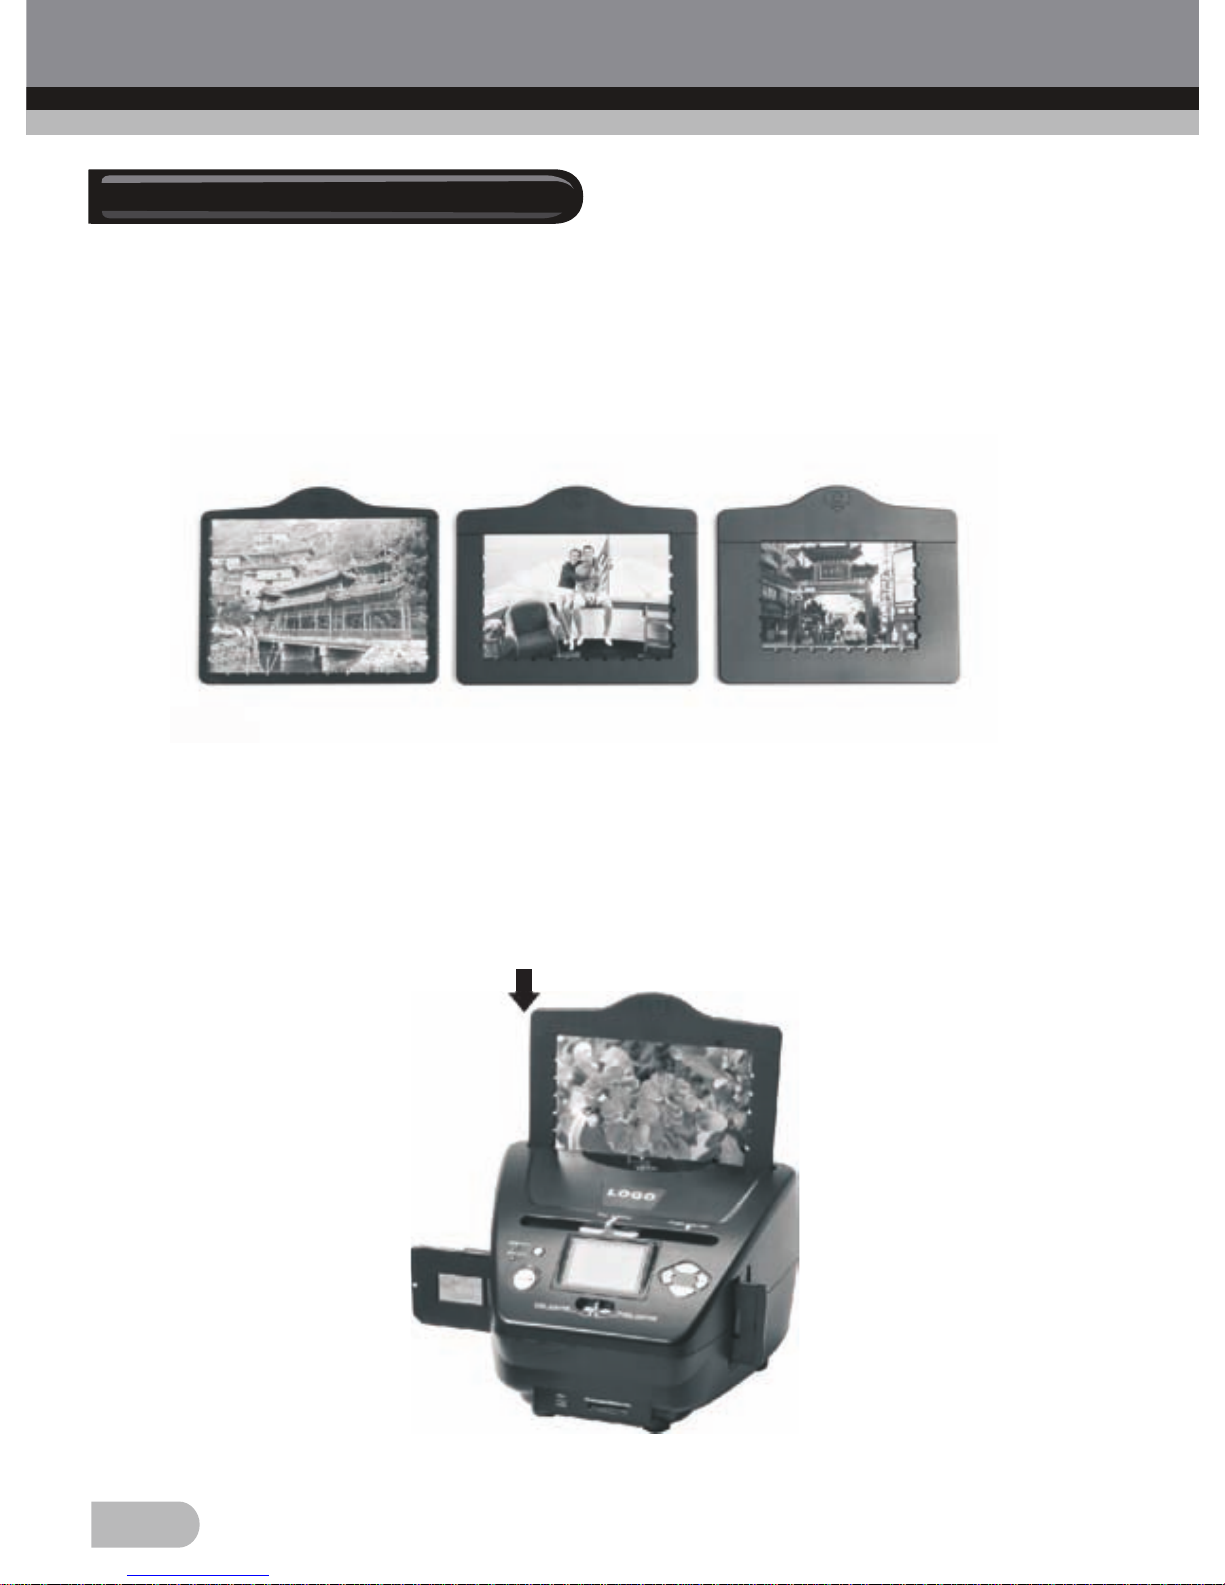
First insert the photo into appropriately sized photo tray (13x18, 10x15, 9x13)
Note: Handle photo with care. Any dust scratches or fingerprints will show
up on your saved images.
7
6. Loading Photos
Insert the photo tray into the slot from the top of the Combo-Scanner as
shown.
13x18 10x15 9x13
Page 10

1. If you want to scan the films, please switch two switches on the top of the
device to the left side. Otherwise if you want to scan the photos, please
switch to the right side.
2. Put Slide/Negative onto the Slide/Negative Holder or insert photo into
appropriately sized photo tray (13x18, 10x15, 9x13).
3. Insert the Slide/Negative Holder into the slot on the right of the device or
insert photo tray into photo tray slot from the top of the device.
4. Apply the power to the Combo-Scanner by two ways:
(1) USB: Connect the Combo-Scanner to PC with USB cable
(2) 5V adapter: Connect the adapter to the device with USB cable
5. Press POWER button to turn on the Combo-Scanner.
Note: (1) When the Film scanner mode is selected, the Film scan indication
LED is on.
(2) When the Photo scanner mode is selected, the Photo scan
indication LED is on.
6. Follow the menu on screen for scanning.
7. After finished the scanning, take out the memory card.
Note: The Combo-Scanner has a 32MB built-in memory for recording,
when there is a memory card inserted, it will be the top priority for saving
data. (Available internal memory for image storage is approx 3MB)
8. Or read pictures from PC by USB mode.
8
7. General Operations
Quick Start
Page 11
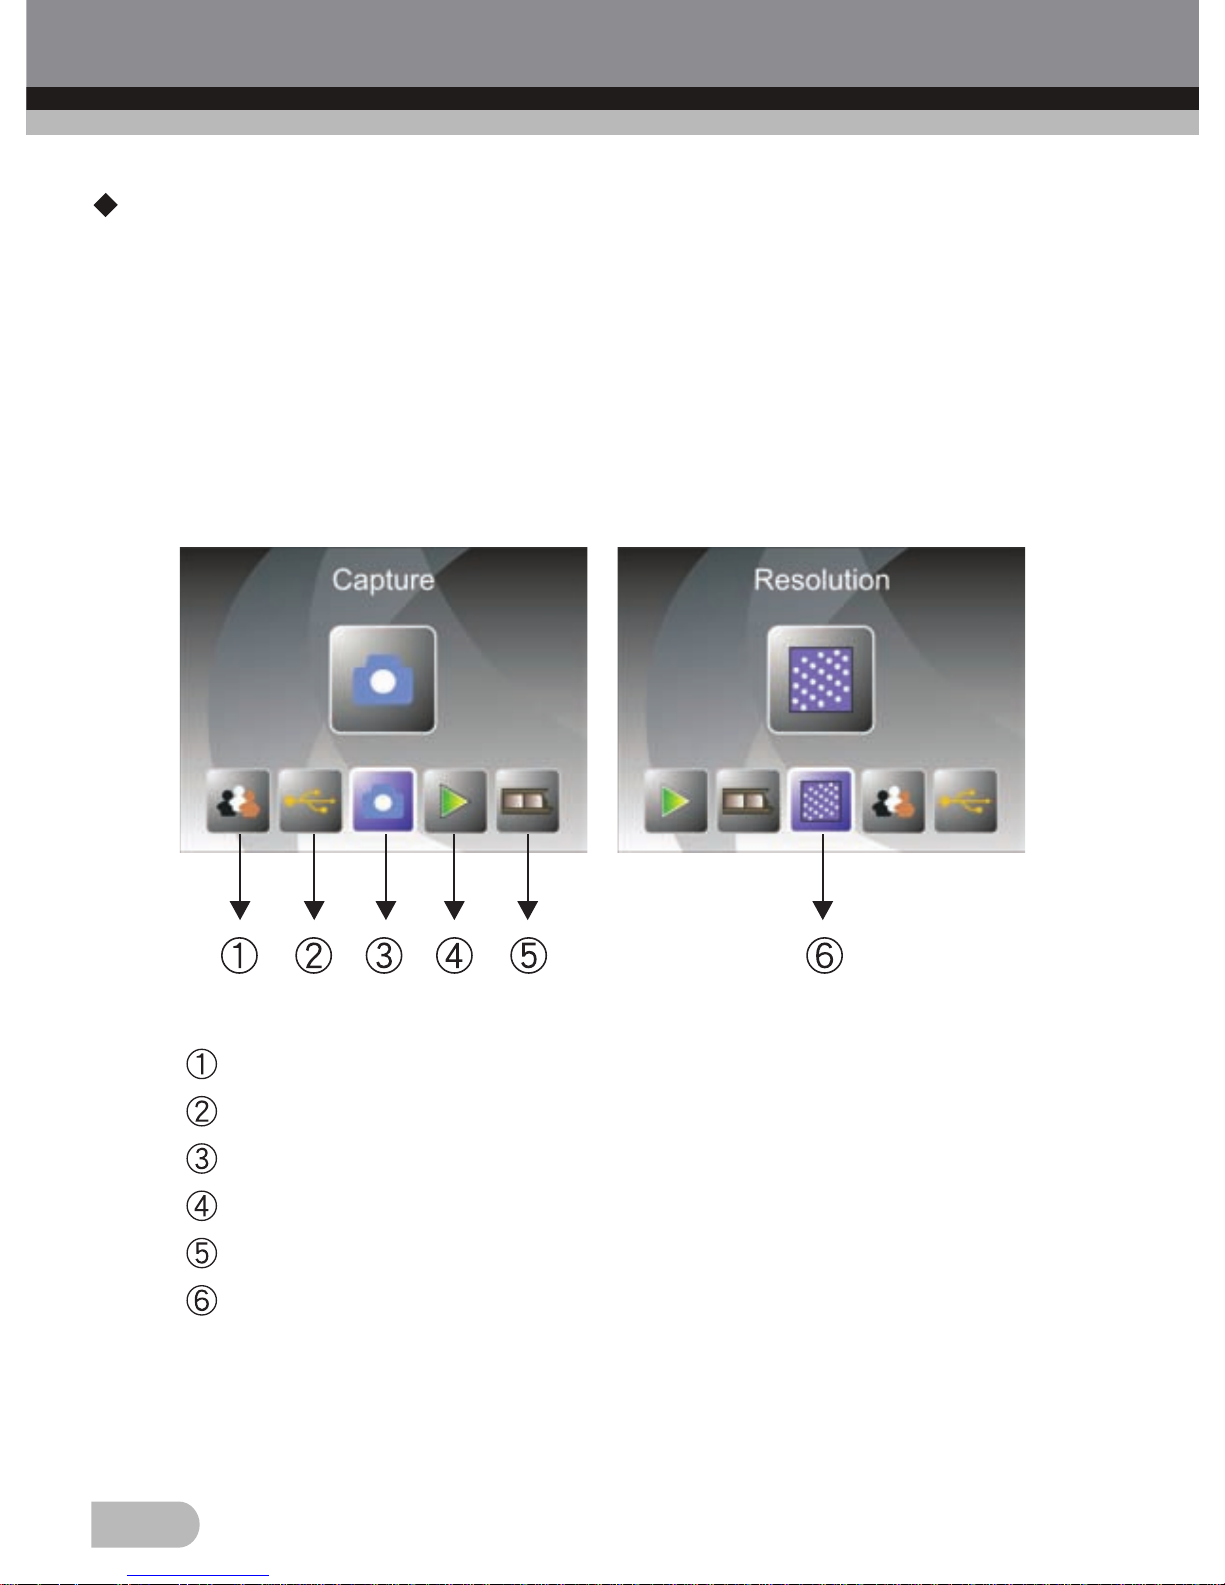
Home/MODE: Main menu
When the Film scanner mode is selected, the following main menu will be
appeared:
9
Operation Guide
Language mode
USB mode
Capture mode
Playback mode
Film Type
Resolution
Page 12
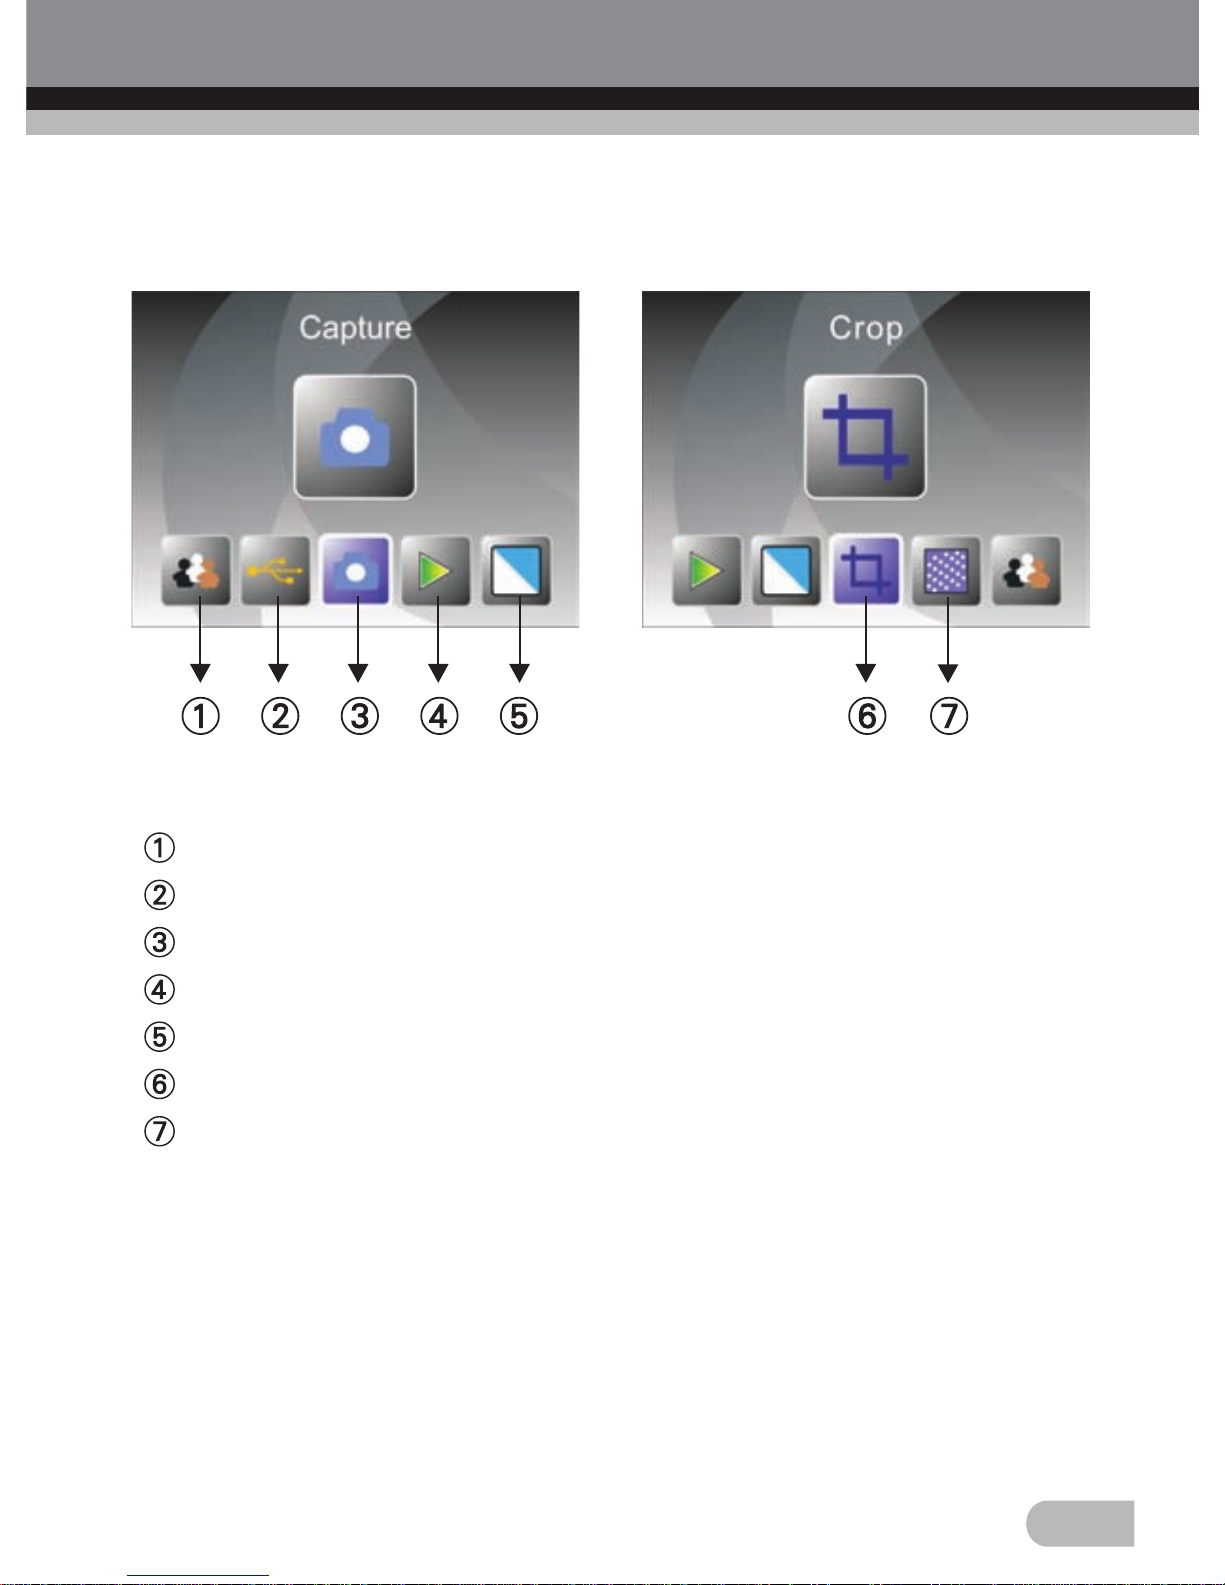
When the Photo scanner mode is selected, the following main menu will be
appeared:
10
Language mode
USB mode
Capture mode
Playback mode
Effect: Multicolor, Black & White
Crop proportion: 13x18, 10x15, 9x13
Resolution
Page 13
11
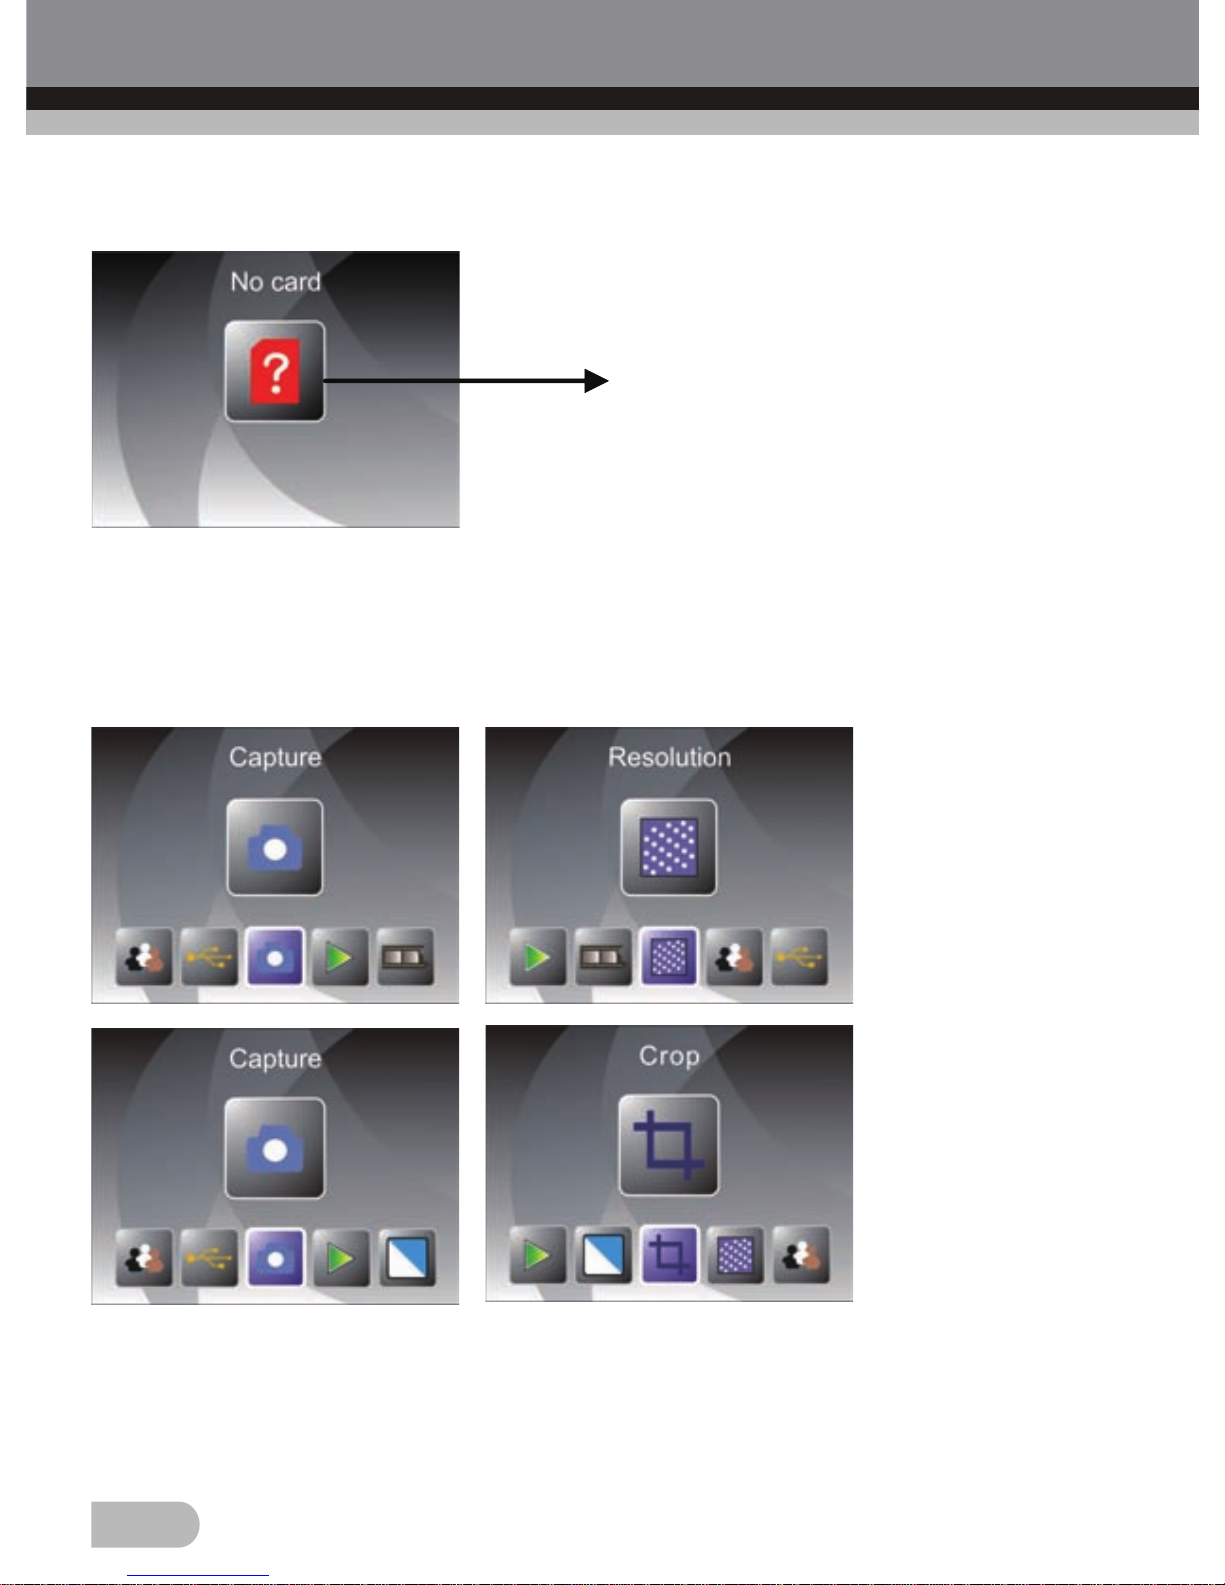
Home/MODE: No memory card
If there is no memory card been inserted to device, a warning icon will be
shown on screen when enter main menu.
1. Capture
After welcome page, above menu will be appeared. User can press
LEFT/RIGHT button for desired menu, then press ENTER button to confirm
the selection.
No memory card indicator
or
Page 14
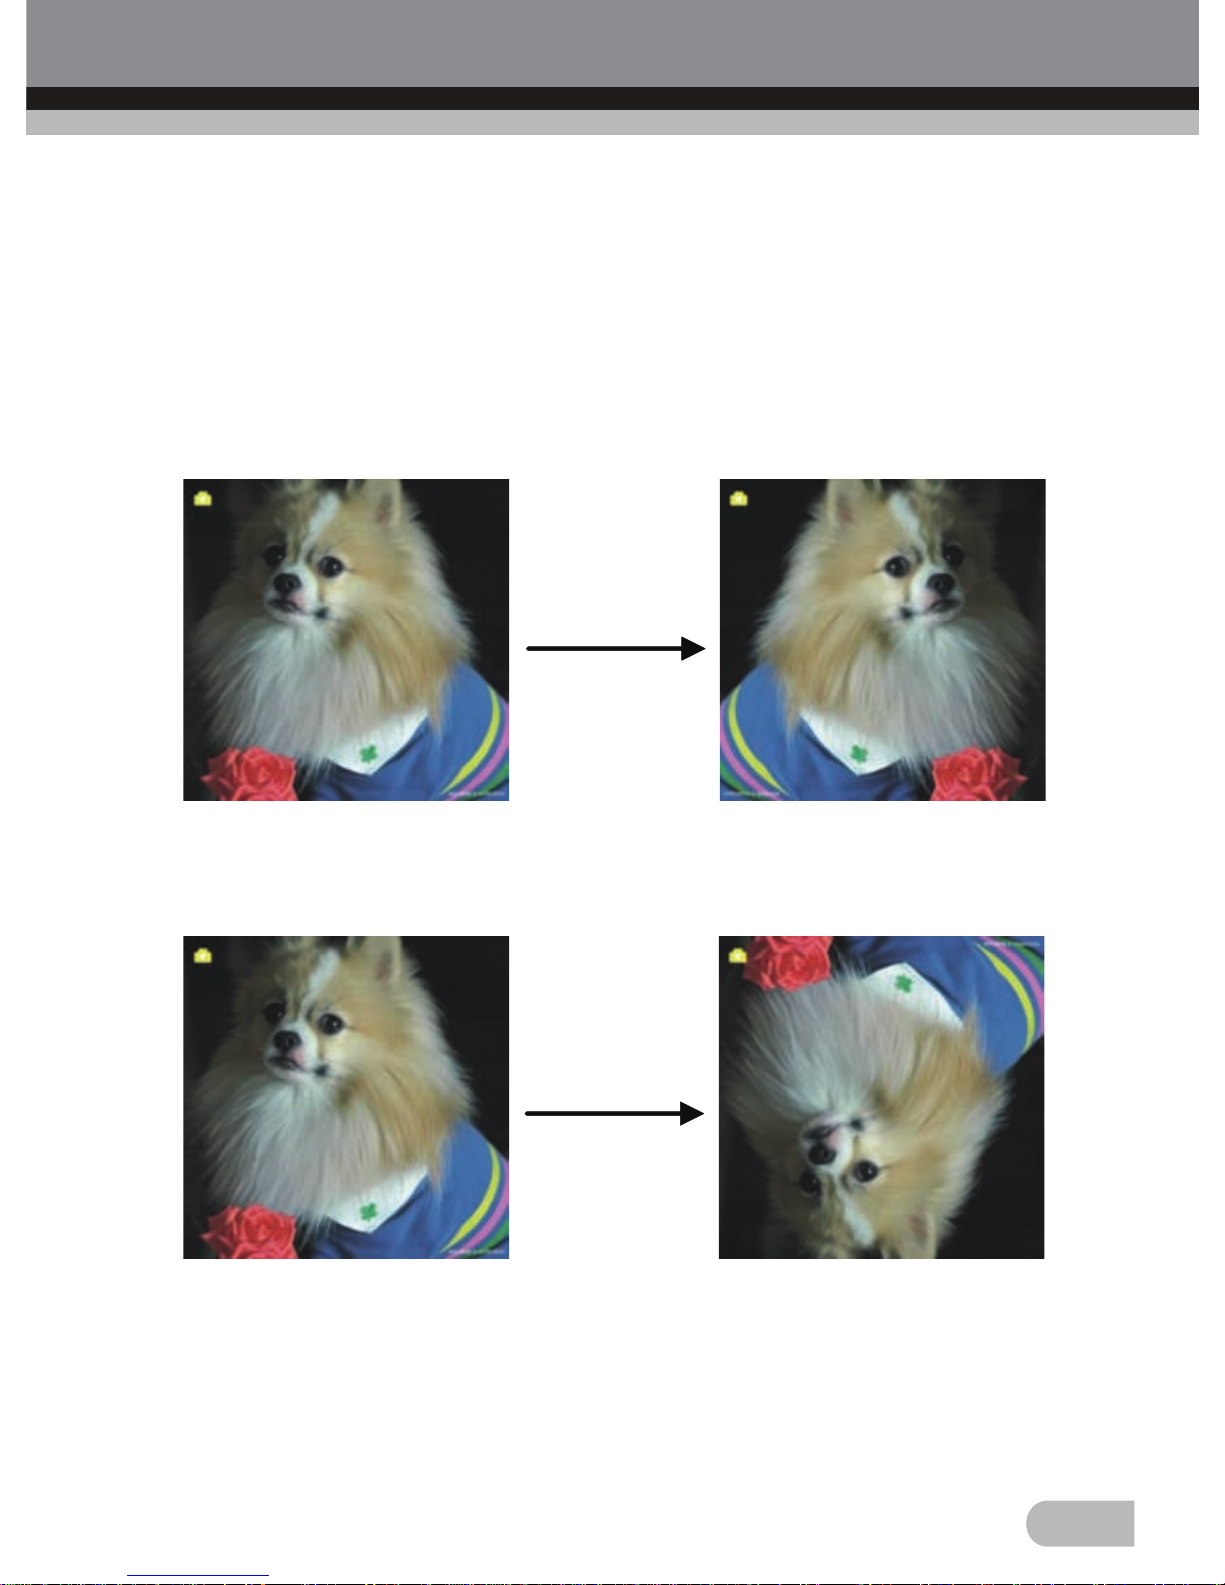
1.1 Capture: Mirror/Flip (Hard Key)
If any image requires for Mirror or Flip before capture, press LEFT/RIGHT
button for Mirror/Flip function, the live view will be adjusted accordingly.
(This step is to correct user misplaced the film/photo either upside down or
flip). Mirror and Flip function can only be used while in the live view mode.
12
Press LEFT button to change image left to right
Mirror
Flip
Press RIGHT button to upside down the image
Page 15
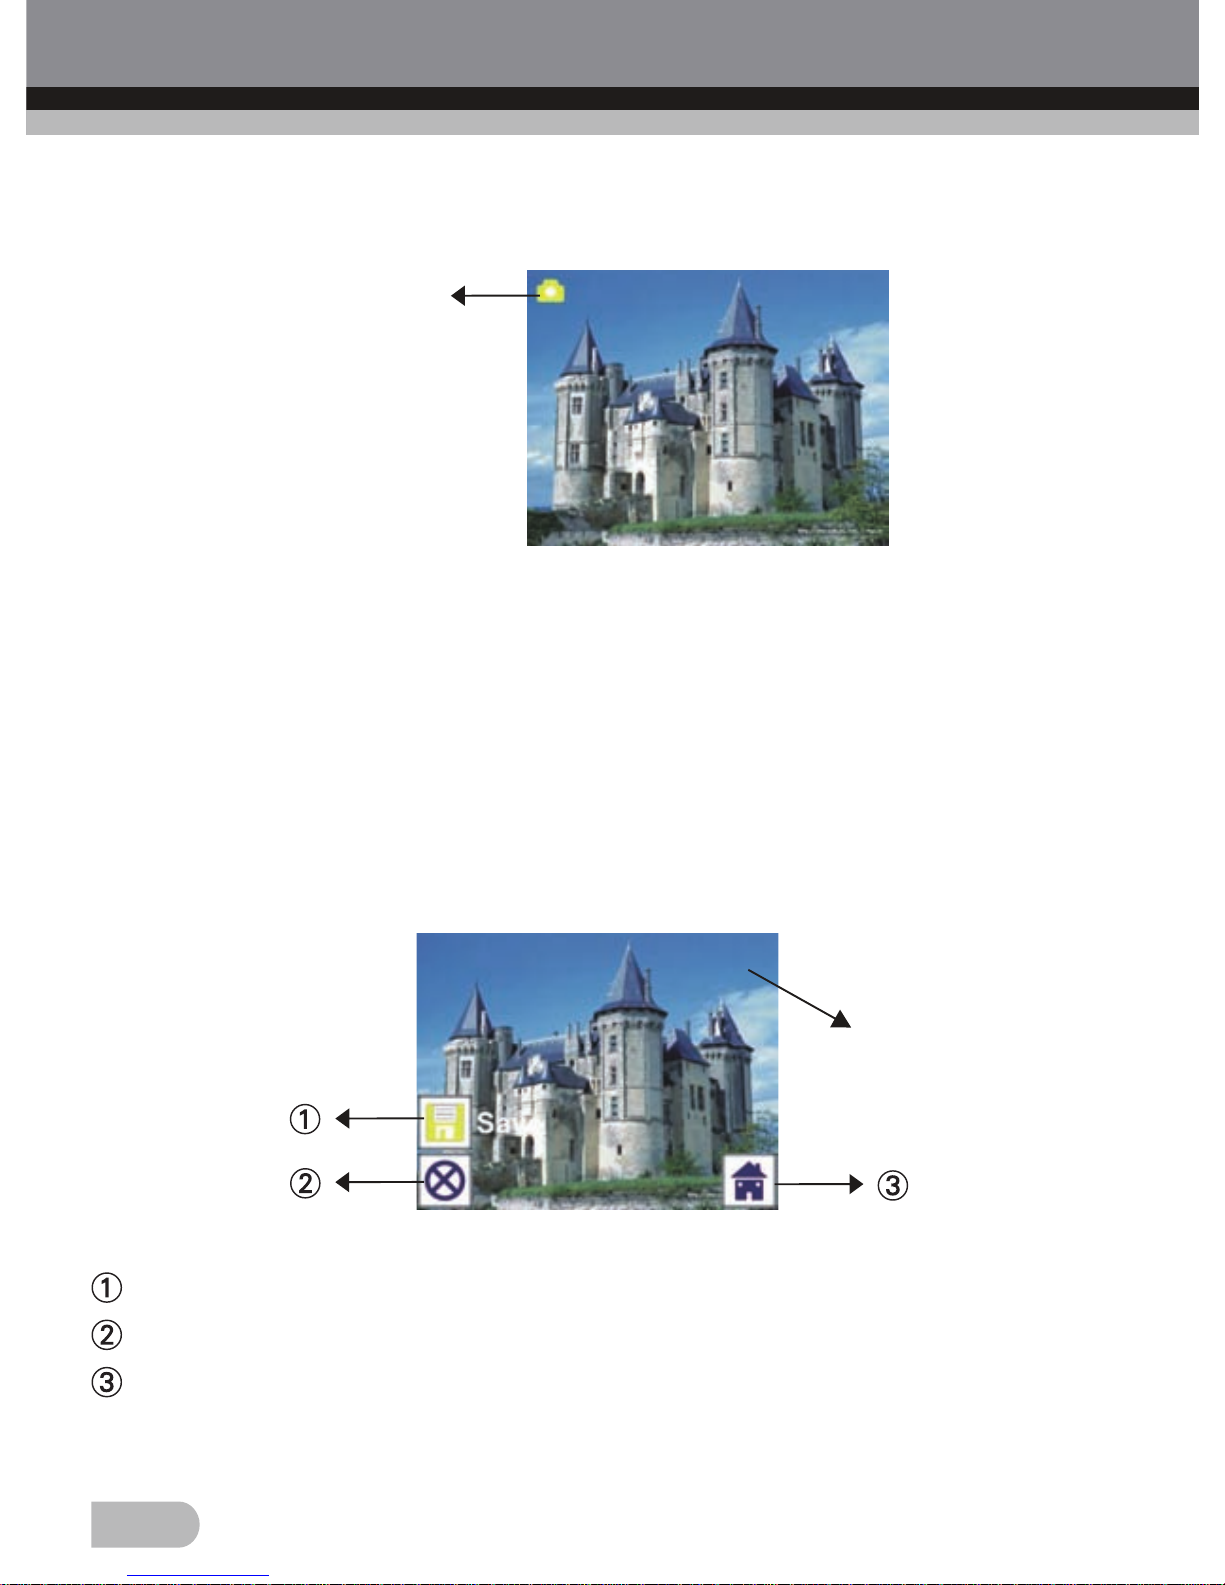
Once enter capture mode, there will be an indicator on left top corner to
indicate it is in live view mode.
User can also press ENTER button, then press LEFT/RIGHT button to adjust
EV value, press ENTER button again to confirm and back to live view mode.
13
1.3 Capture: Edit Menu
1.2 Capture Mode
Live view indicator
Selected image
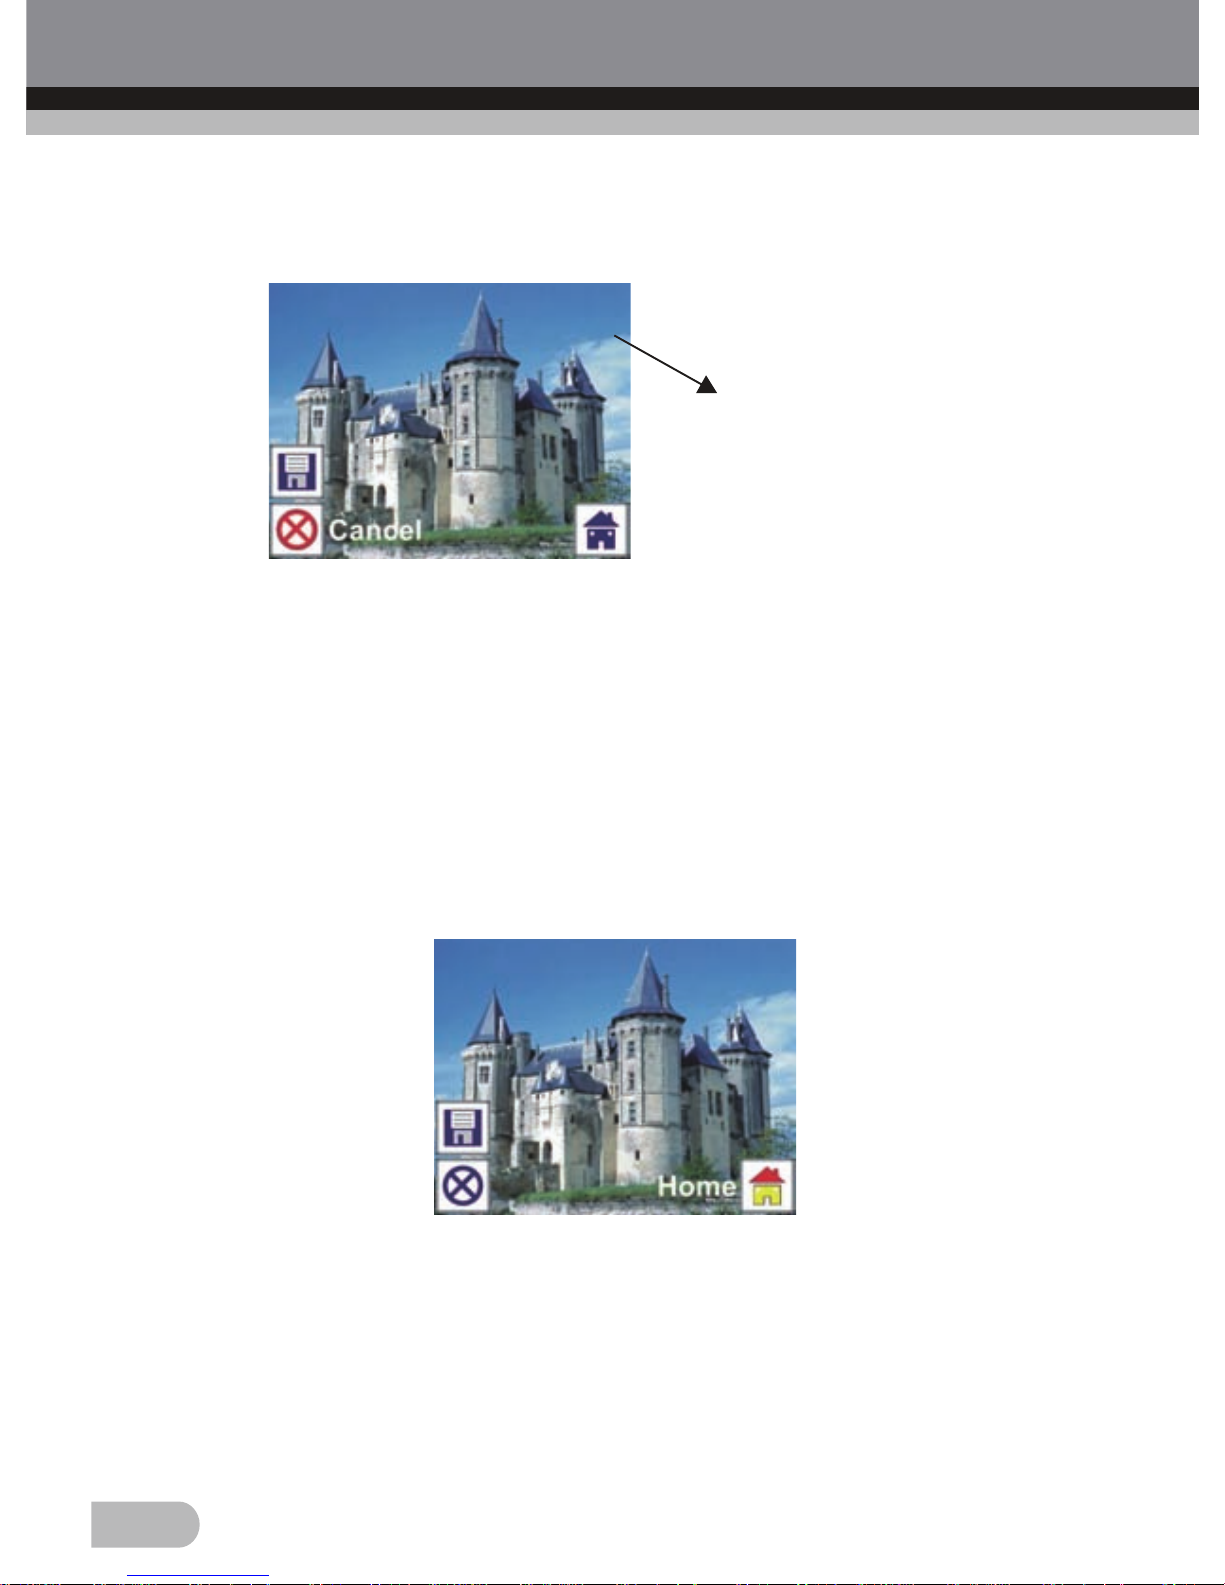
Save: save captured image
Cancel: cancel any editing with this image
Home: back to main menu
Page 16
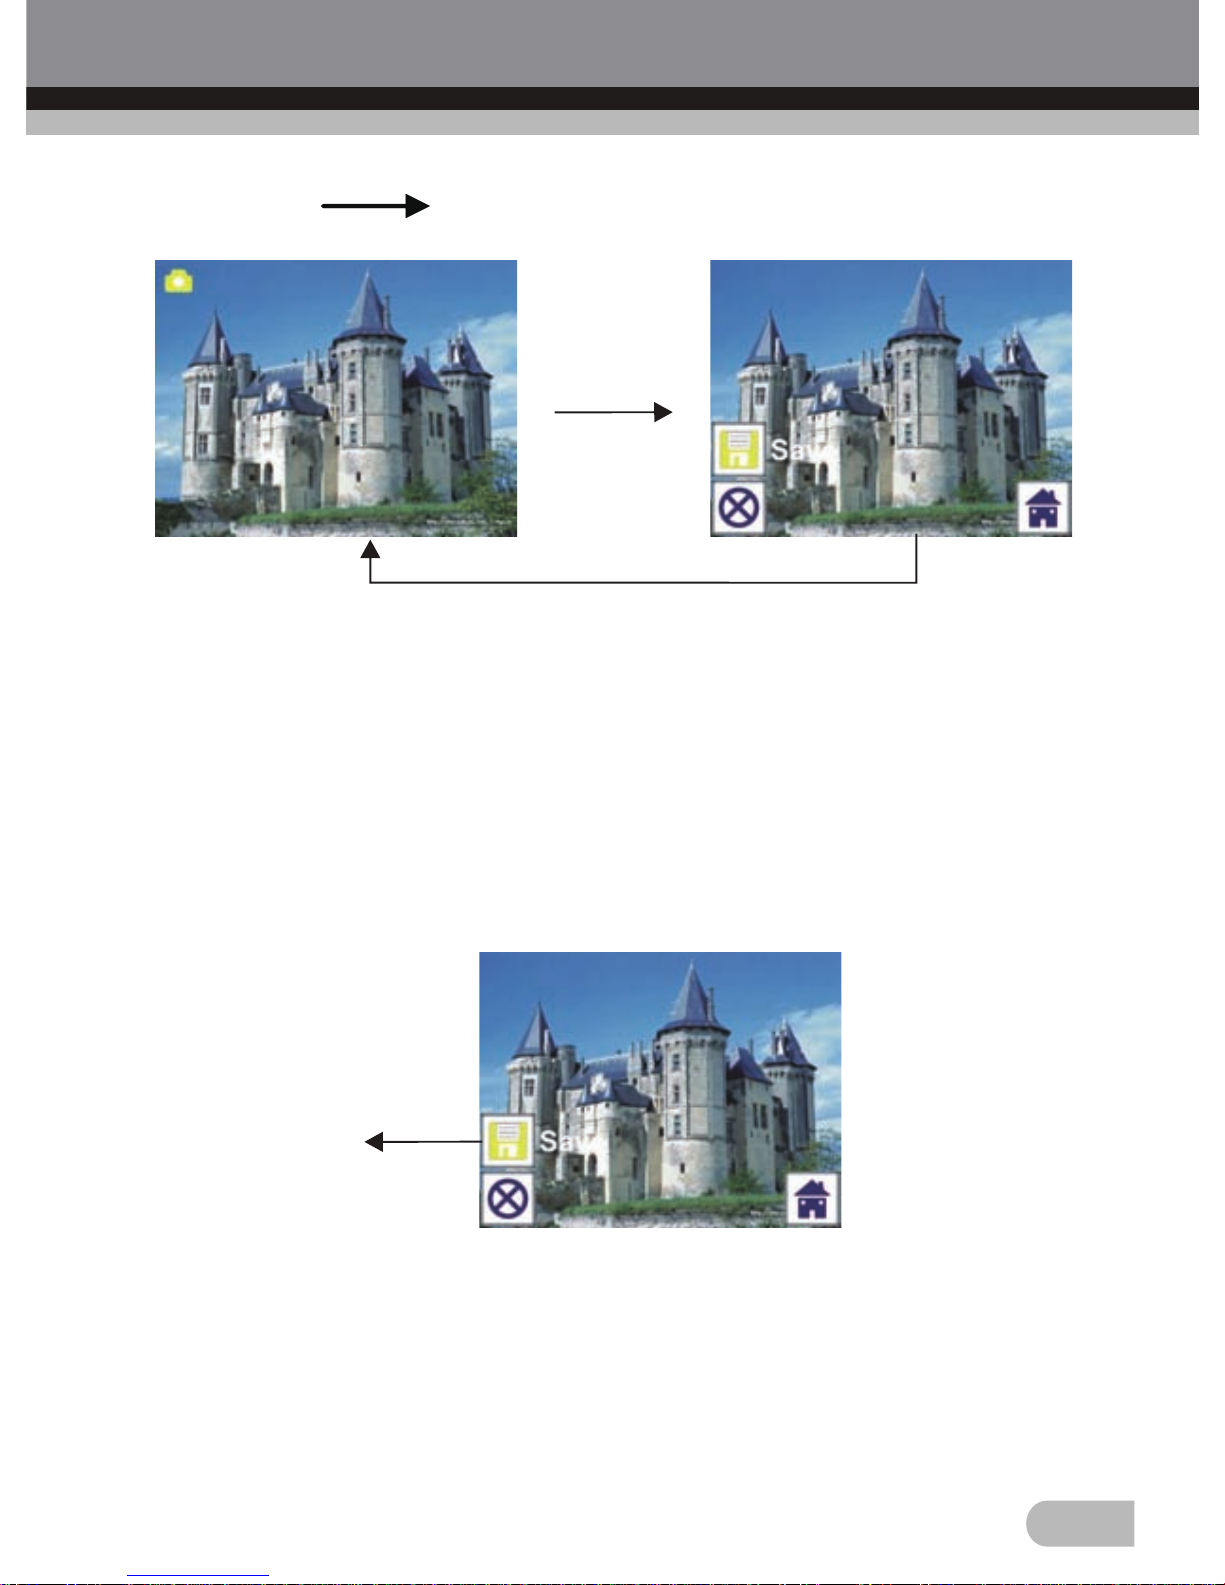
1.4 Live View Capture/Edit Menu
14
SCAN
ENTER
Once press SCAN button in live view, the edit menu will be appeared. When
user press ENTER button, the current image will be saved to internal memory
or memory card when there is a memory card inserted, the display will return
to live view again.
1.5 Capture: Save
Once user press SCAN button, preview (live view) image will be selected
and shown on the TFT which will take between 1~2 second with 2 icons
shown on the left side of the screen. Save icon will be highlighted for user to
confirm by ENTER button, after the above step, the display will go back to
live view mode (preview).
Save
Page 17
1.6 Capture: Cancel
15
Select Cancel icon with LEFT/RIGHT button and press ENTER button to
cancel any of editing step with present selected image and the display will
return to live view mode (nothing will be saved).
1.7 Capture: Home
Select Home icon with LEFT/RIGHT button, then press ENTER button or
press MODE button on top of the device anytime to back to main menu.
Selected image
Page 18
1.8 Exit from Edit Mode Back to Capture Mode (Live View)
16
Once user press ENTER button for save or cancel option, the display will
return to capture mode/live view. Then user can move the film holder to next
target film or change another photo to capture.
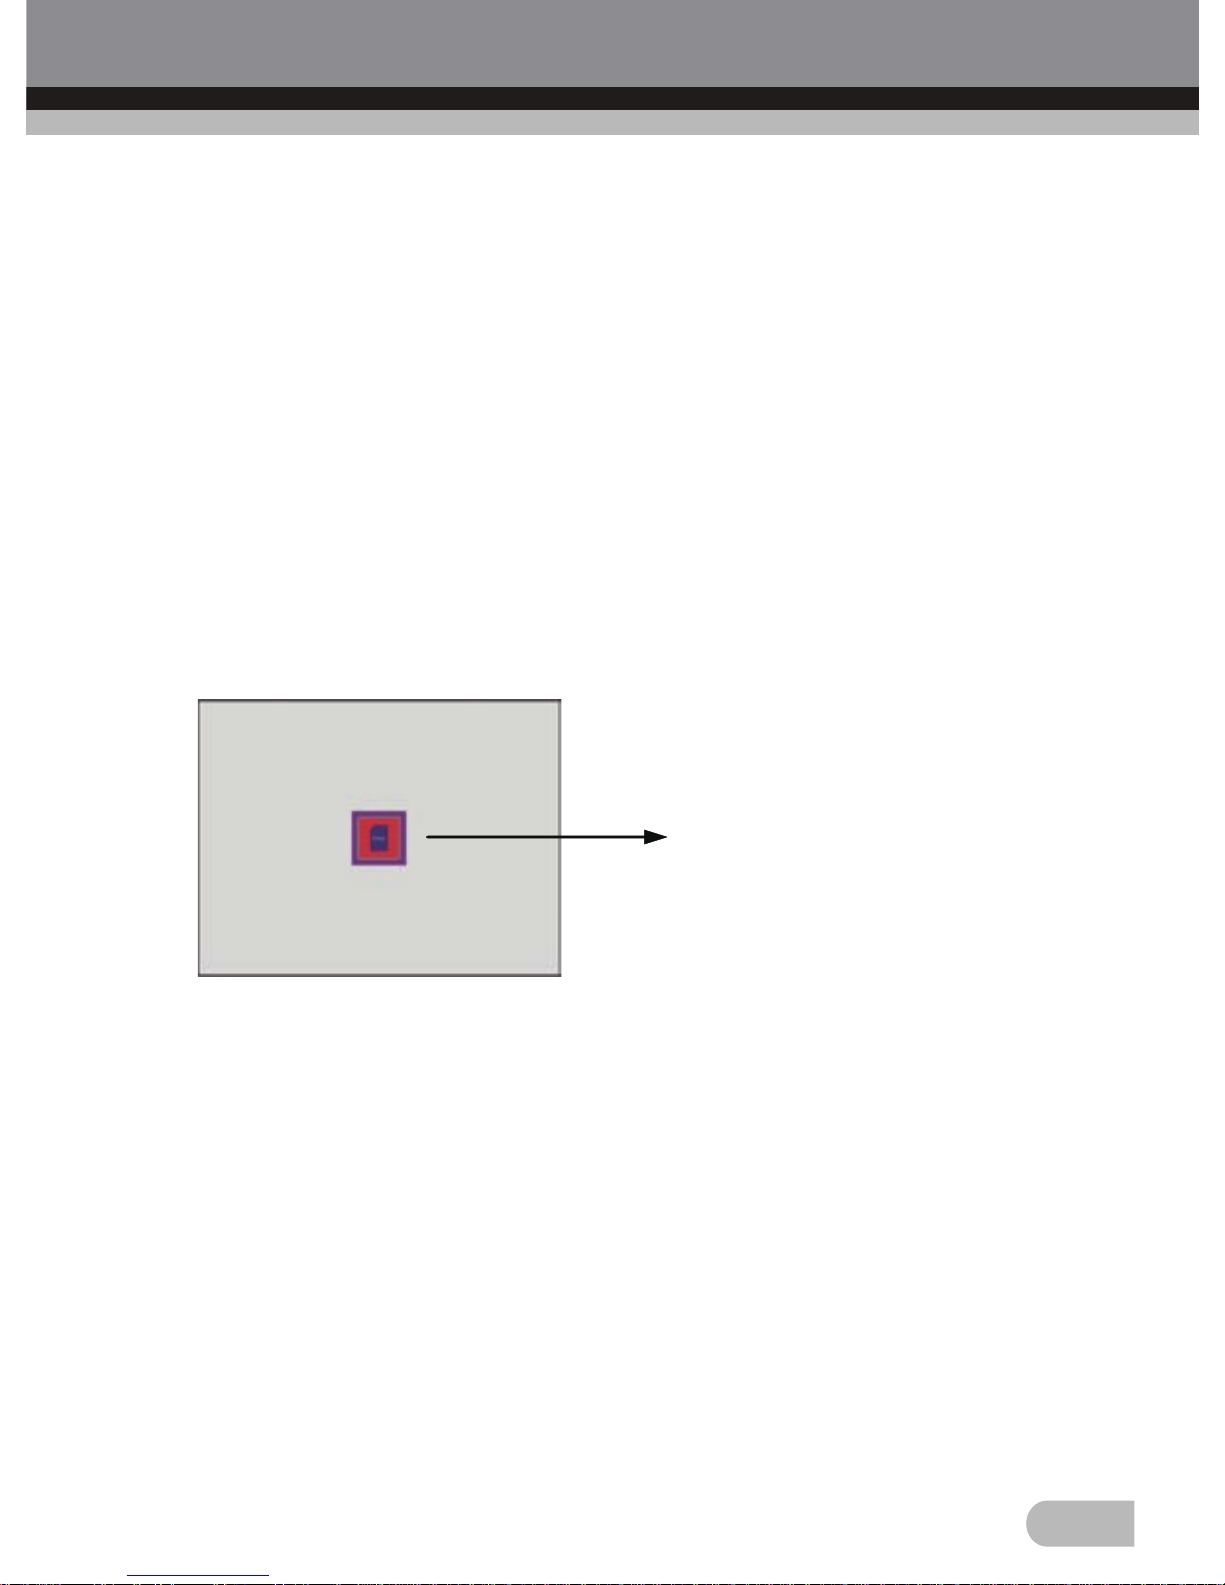
1.9 Memory Full
Once the images in internal memory or memory card is full, a memory full icon
will be shown on screen when press SCAN button. User has to download the
images to PC or replace another memory card for continue capture.
Memory full indicator
Page 19
2. Playback
17
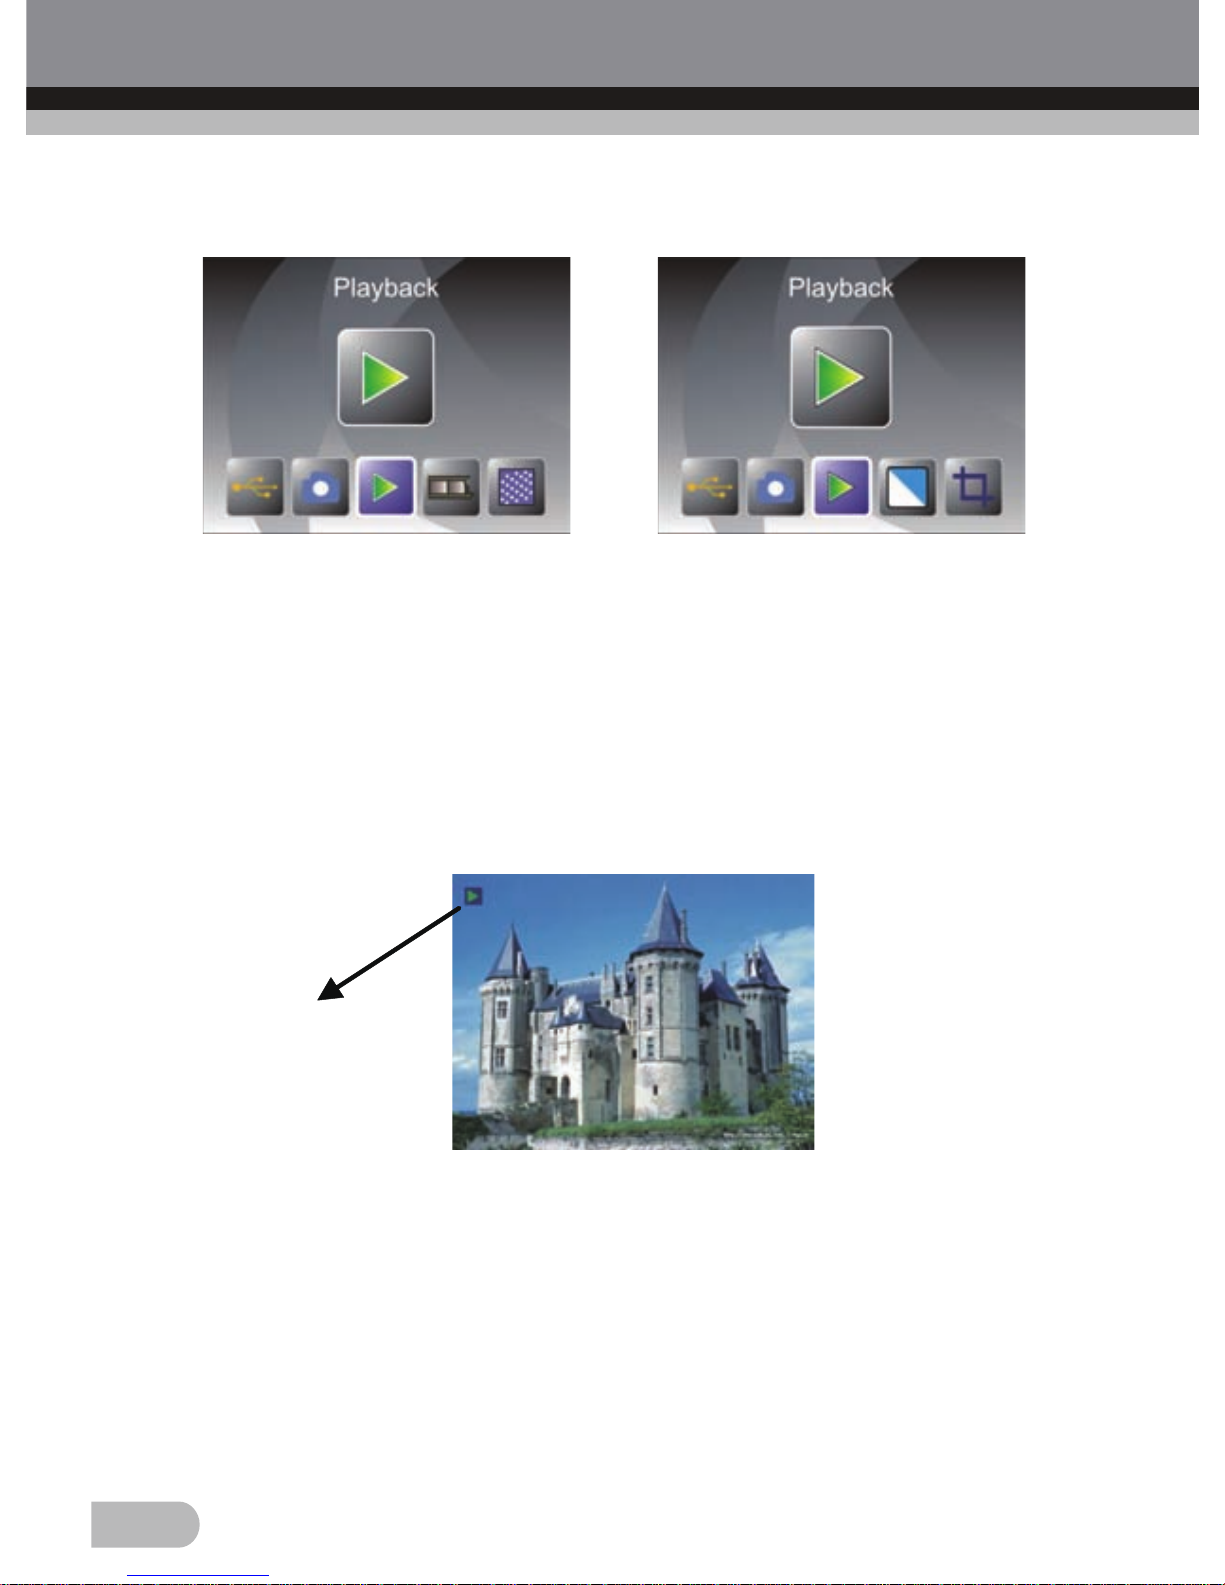
Press LEFT/RIGHT button to playback mode when power on the device or
access the main menu by Home icon/MODE button anytime. Press ENTER
button to confirm the selection.
or
2.1 Playback: Auto Slide Show
Slide show mode
Once user enter playback mode (default to slide show), TFT will auto display
all images stored in internal memory or memory card with 2 seconds interval
from previous captured image. User can also stop the slide show by press
ENTER button. (Only the images captured by the Combo-Scanner are
available in playback mode)
Page 20
2.2 Playback: Edit Menu
18
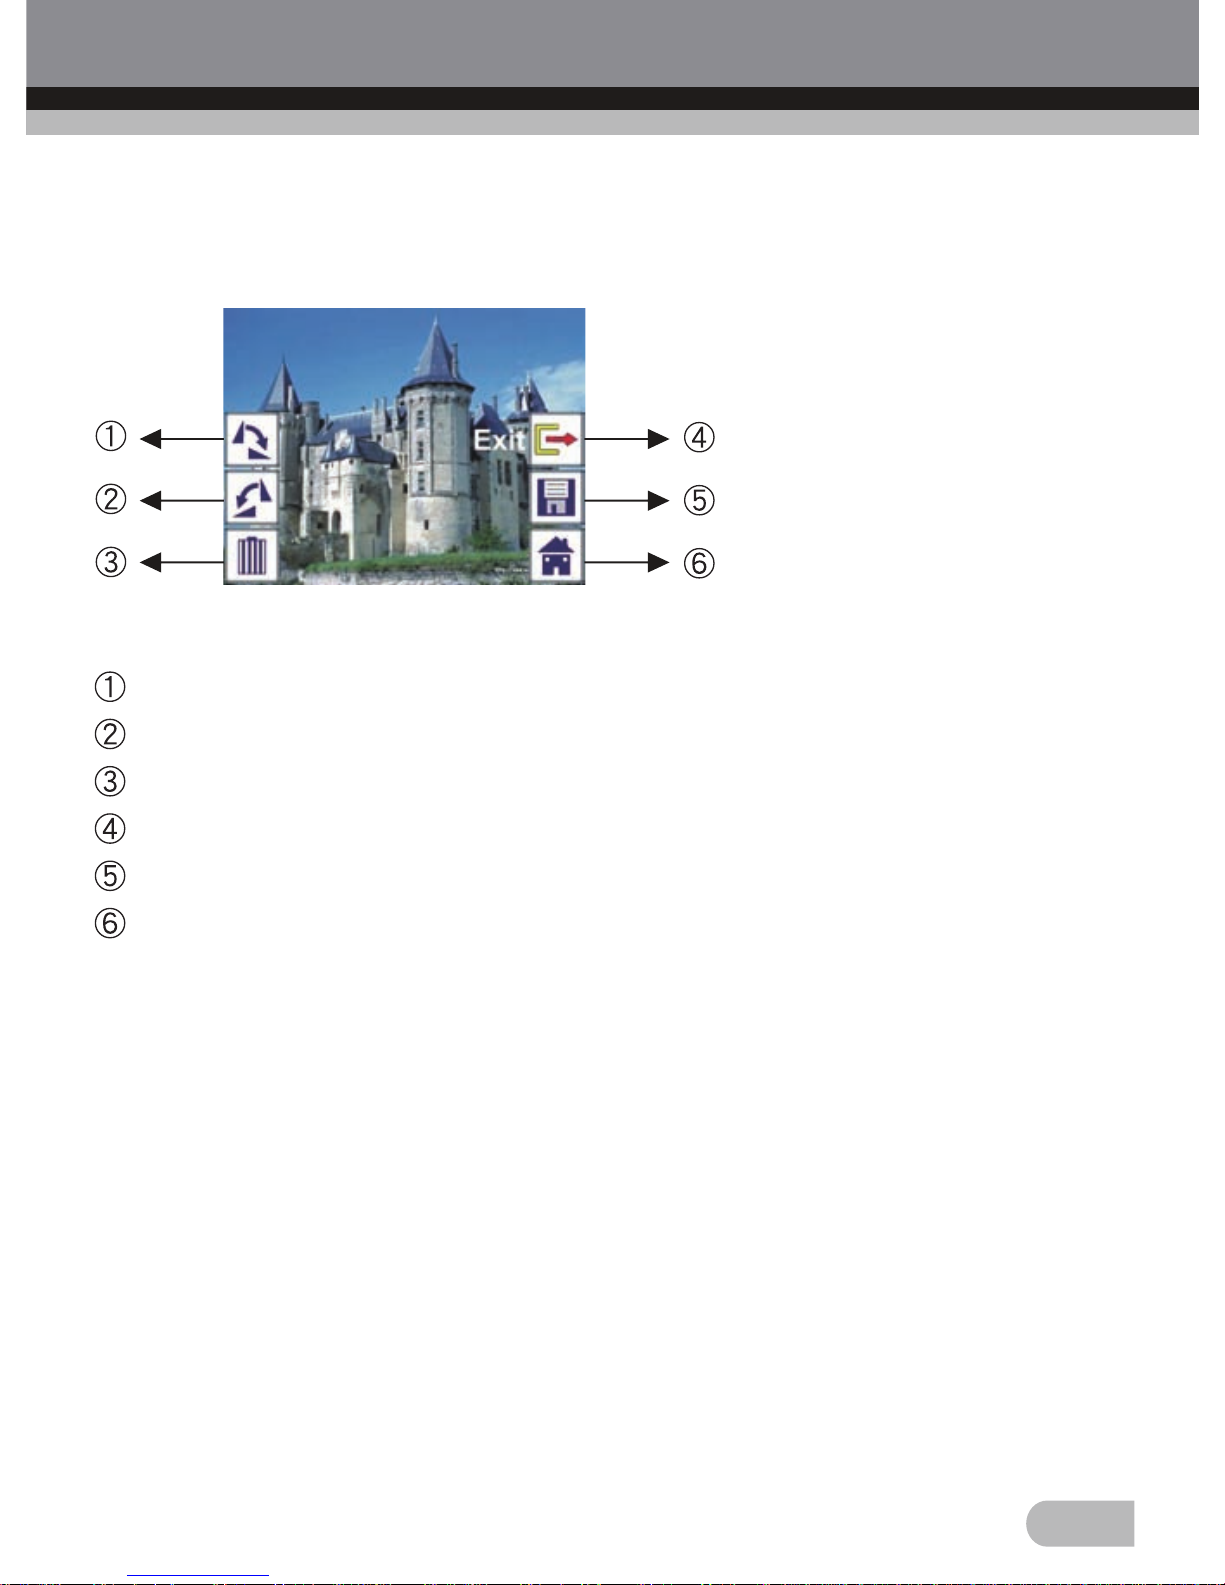
Rotate +90: captured image rotate +90 degrees
Rotate –90: captured image rotate –90 degrees
Delete: delete this picture stored in internal memory or memory card
Exit: return to Slide show mode
Save: save the modified image to internal memory or memory card
Home: return to main menu
Page 21
19
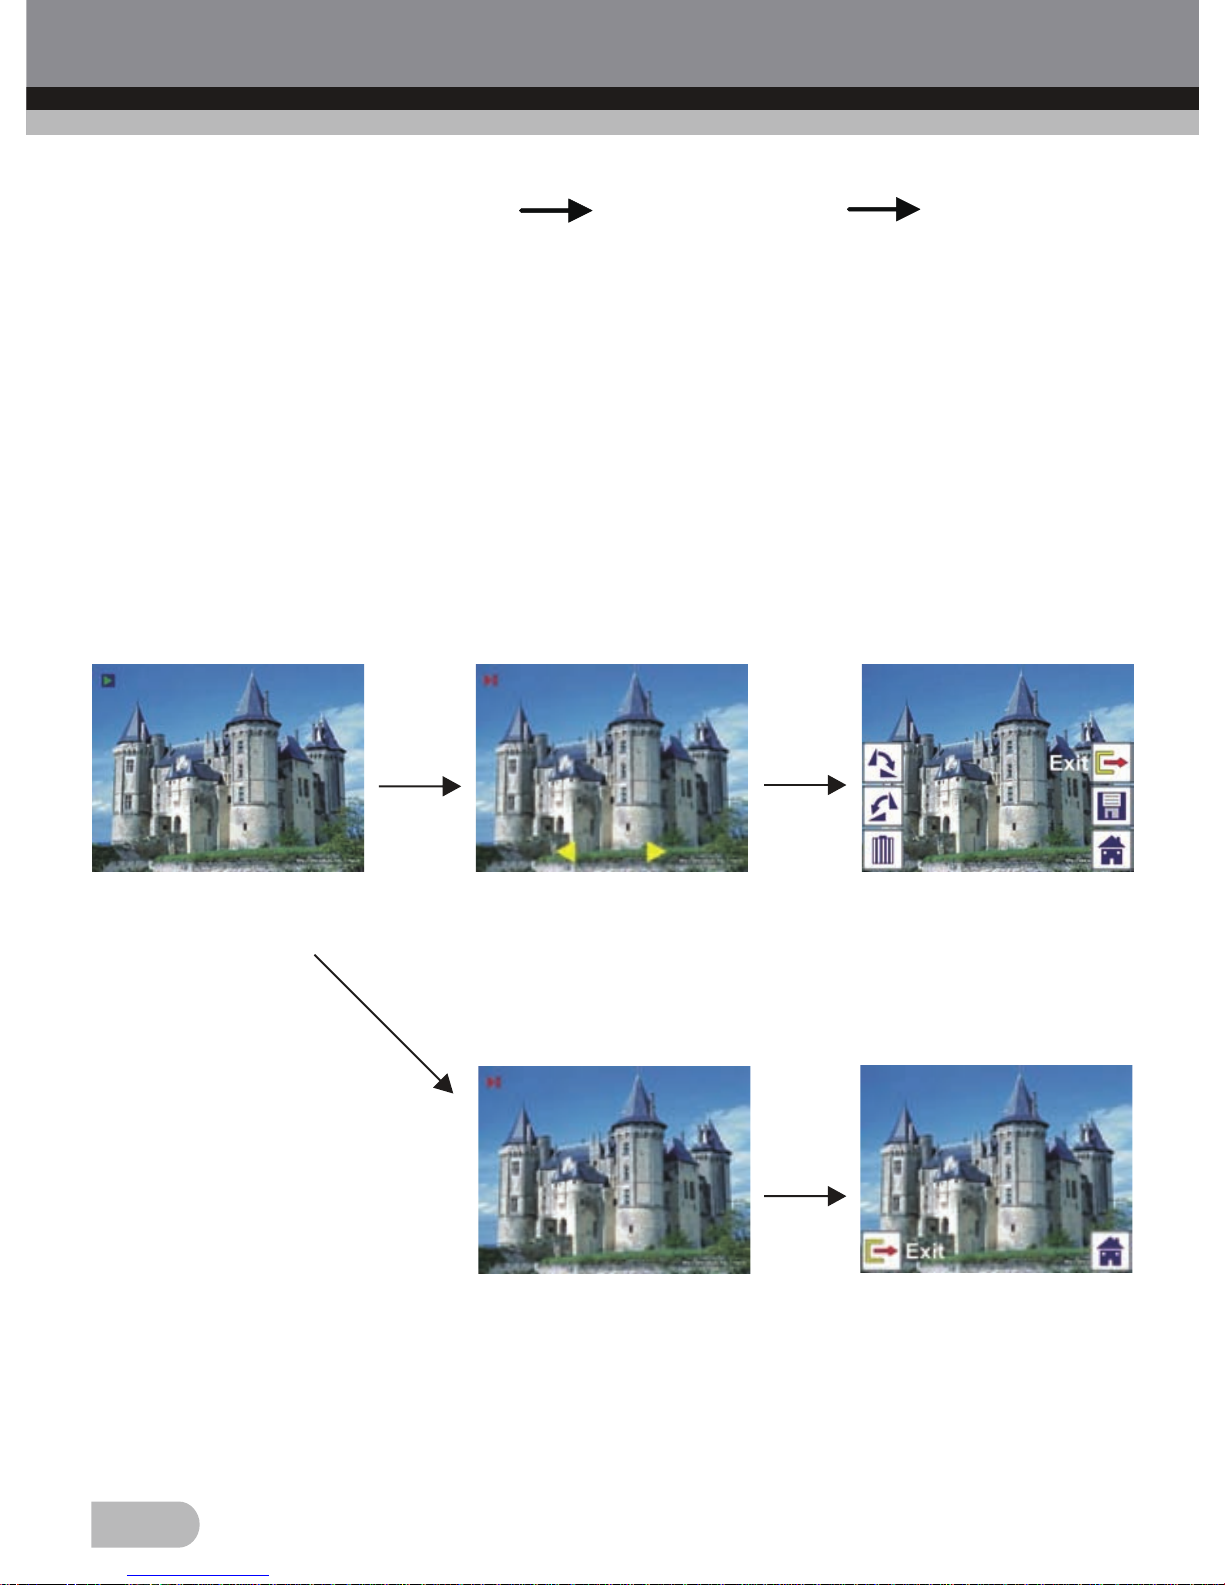
2.3 Playback: Slide Show Single Picture Edit Mode
User can interrupt (stop) slide show mode to stand alone playback mode
(single picture playback) by press ENTER button. (Pause slide show) Then
user is able to scroll each picture by LEFT/RIGHT button. Once user select
the picture stored in internal memory or memory card which intended to be
modified, press ENTER button again to bring out the edit mode for modification.
If there is no memory card inserted or no image in internal memory, TFT will
auto display 20 frames stored in internal memory when enter playback mode,
but they will not be edited anytime.
ENTER
ENTER
Slide show mode
Single picture mode
Use LEFT/RIGHT button
to scroll pictures
Edit mode
ENTER
ENTER
Page 22
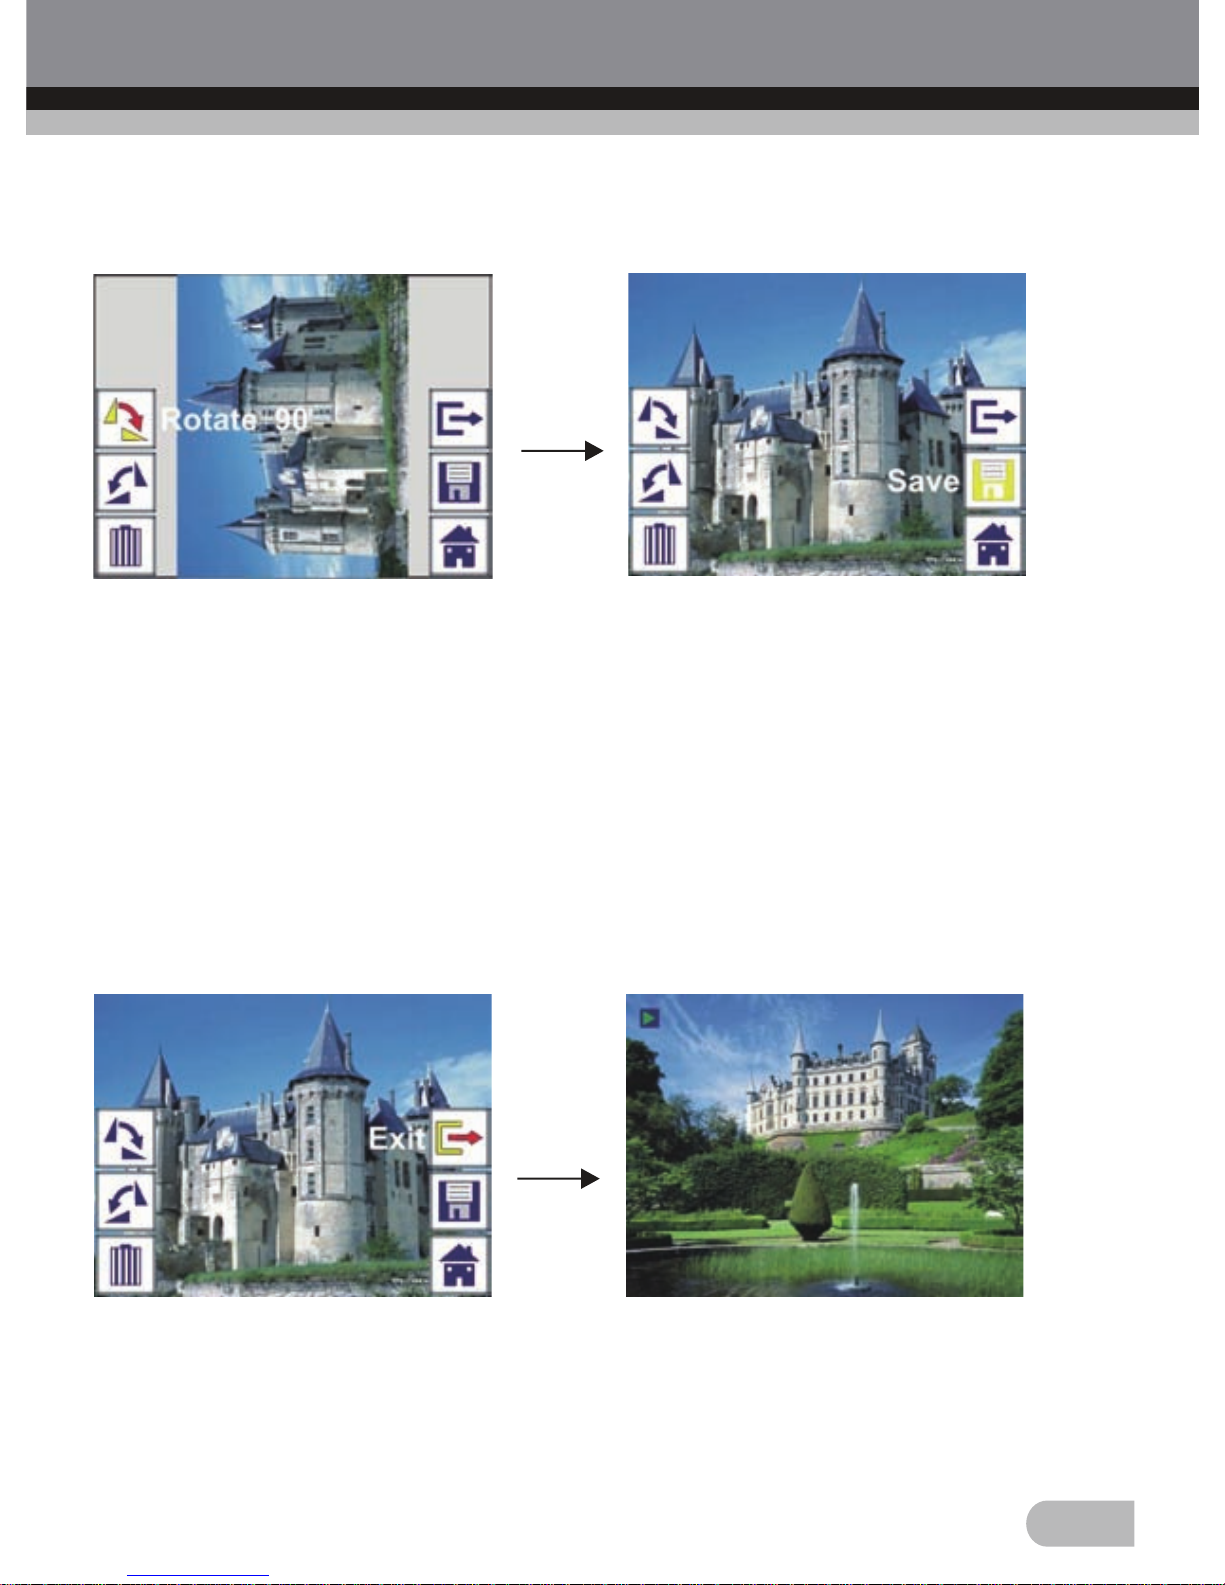
2.4 Playback: Rotate/Save
20
ENTER
If user wants to rotate +90 degrees by ENTER button, the image will be
rotated +90 degrees and cursor will remain at Save. Press ENTER button
again to save modified result and next picture will be shown. For continuously
rotate +90 degrees, move cursor to rotate again and press ENTER button.
(Same for Rotate -90 function)
2.5 Playback: Exit
ENTER
Once user select Exit function in edit menu, the display will go back to slide
show starting with the current picture without any change.
Page 23
21
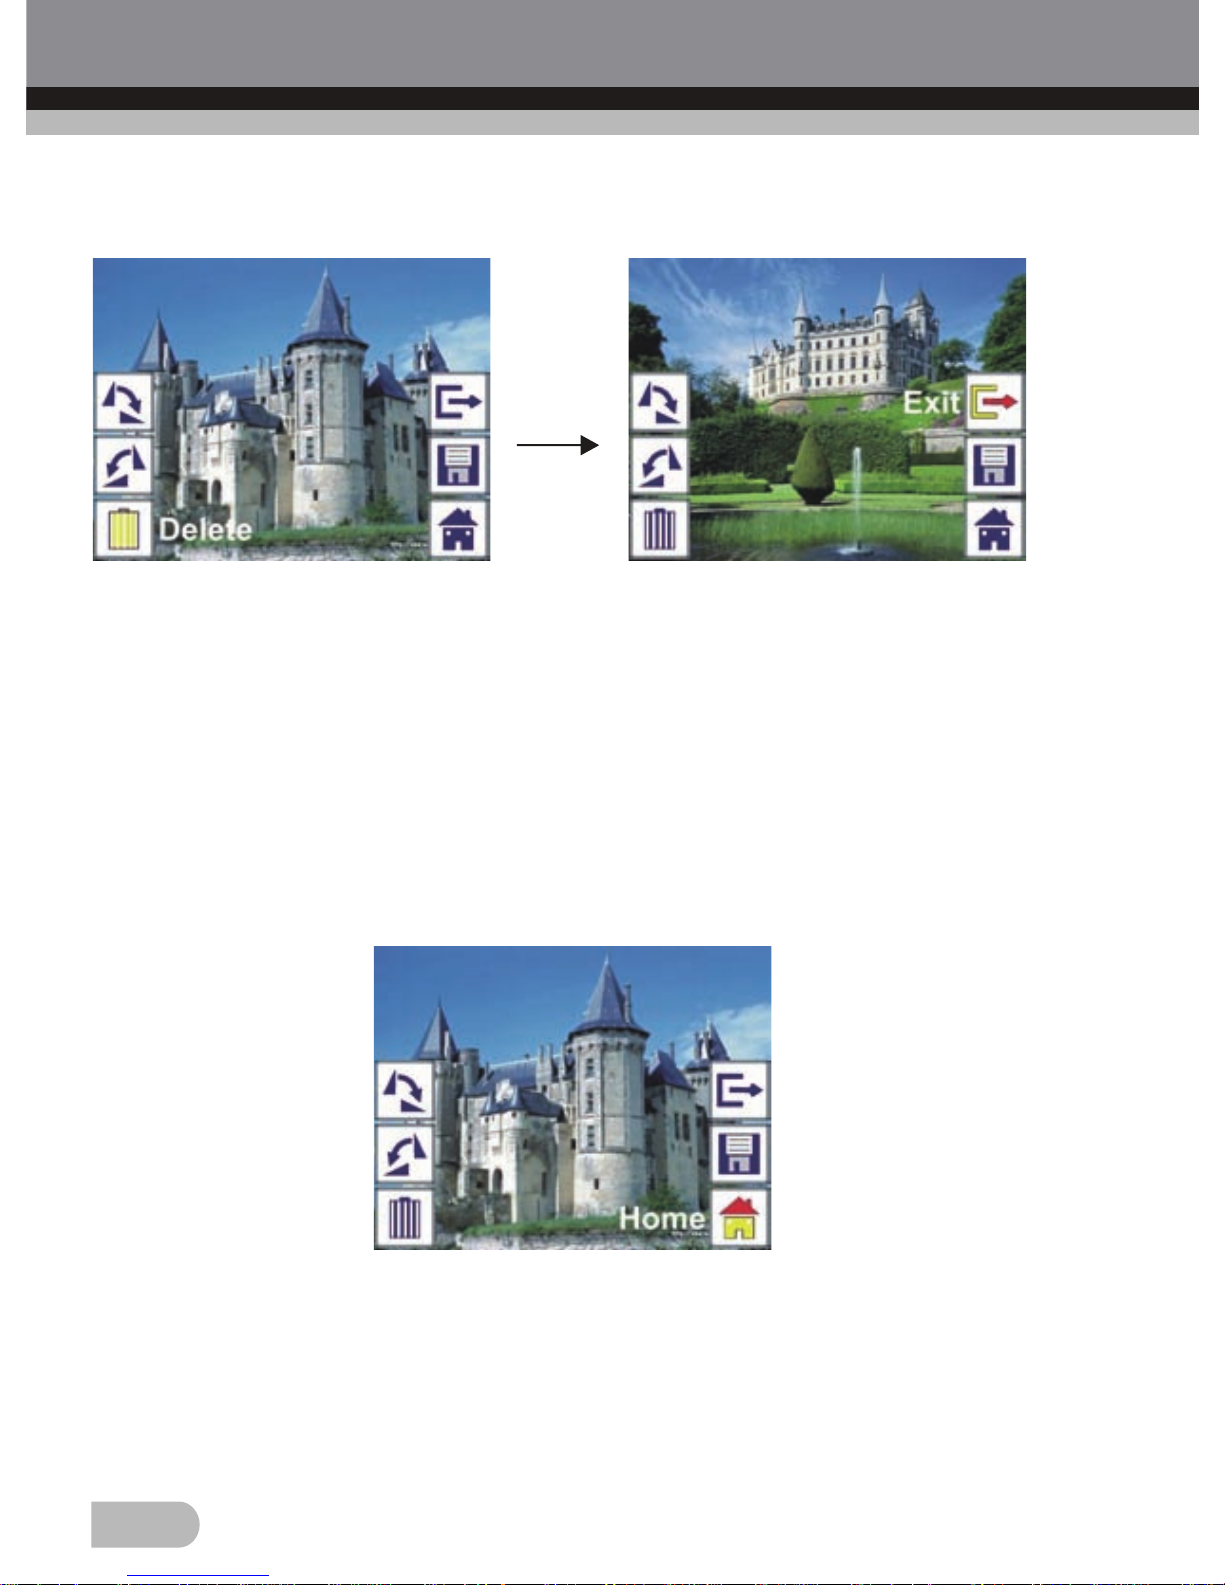
2.6 Playback: Delete
Select delete icon with LEFT/RIGHT button then press ENTER button, that
will delete the present selected picture and next picture will be shown. Cursor
will remain at Exit icon. If user intend to process continuously delete, just
move cursor to delete icon again and press ENTER button to confirm.
ENTER
2.7 Playback: Home
Select Home icon with LEFT/RIGHT button, then press ENTER button or
press MODE button on top of the device anytime to back to main menu.
Page 24
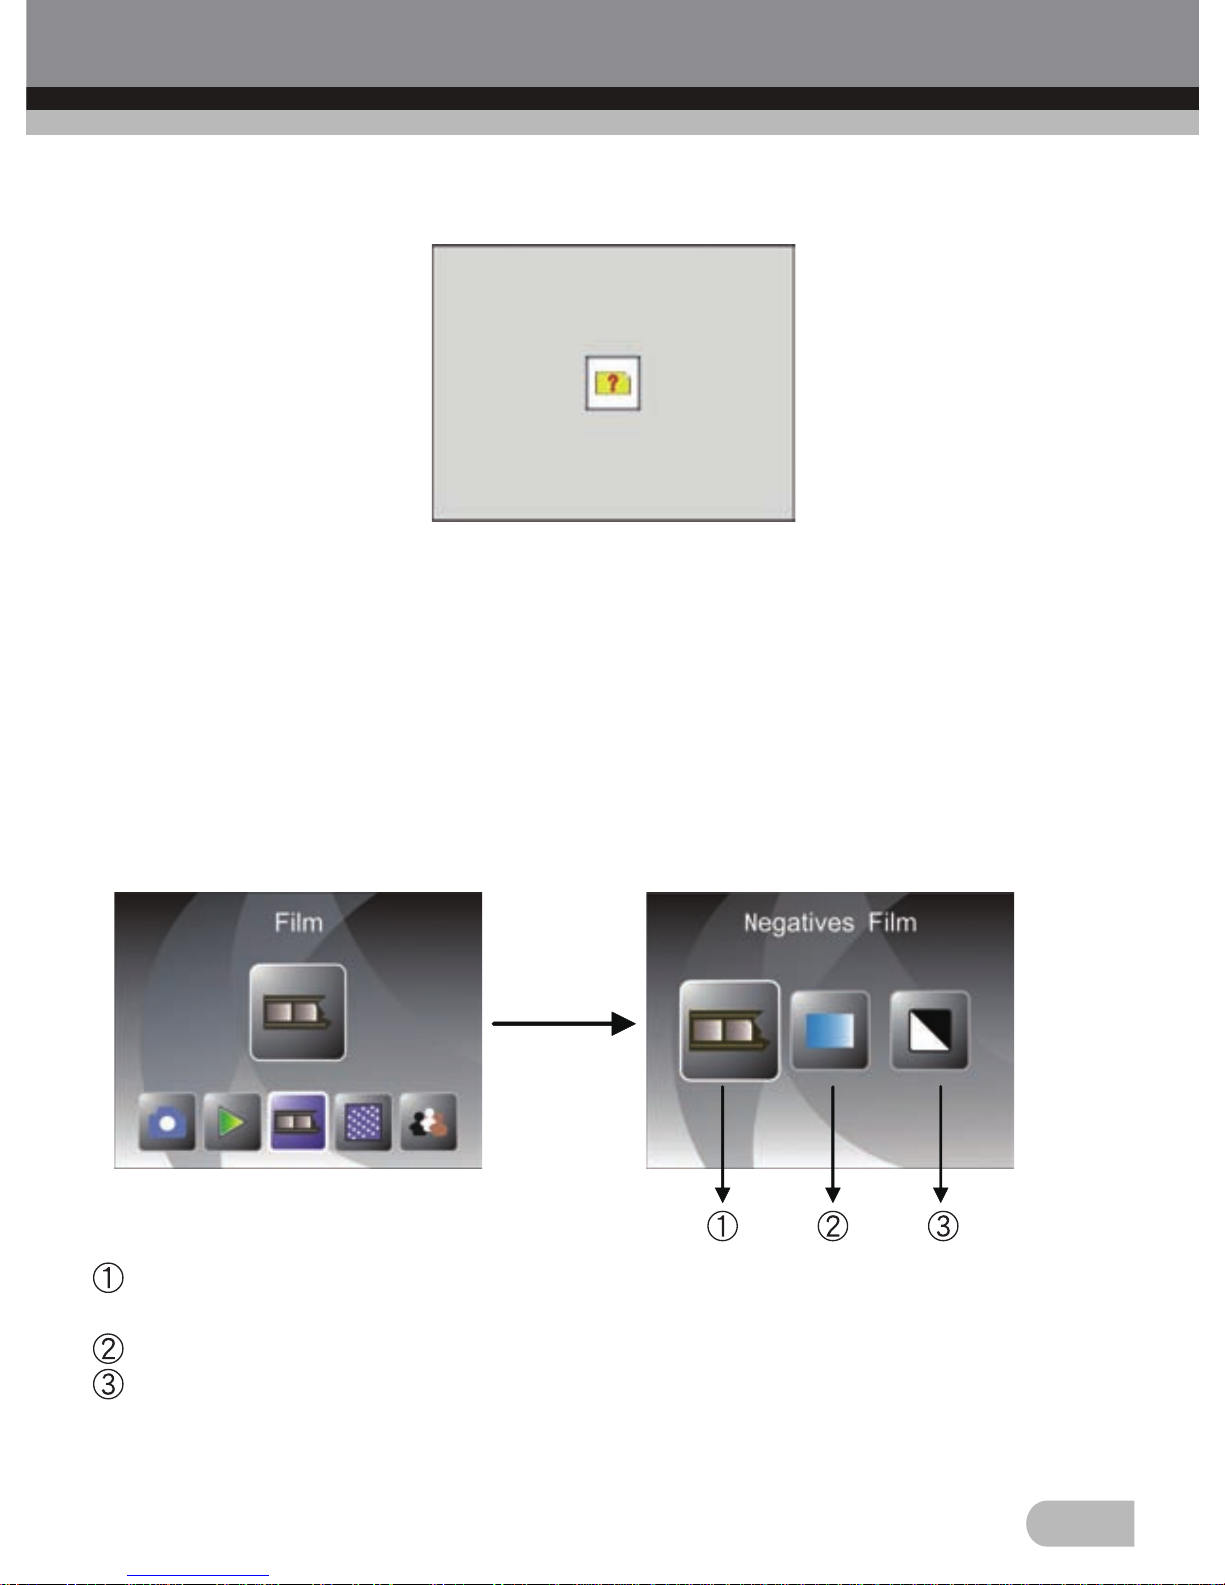
2.8 Playback: No Picture
22
If there is no picture when enter playback mode, a No picture symbol will
show on screen
3. Film Type
When the Film scanner mode is selected, user can change film type by enter
Film Type menu when power on the device or access the main menu by
Home icon/MODE button anytime. Press LEFT/RIGHT button for Film Type
and press ENTER button to confirm.
Negatives Film: Select Negatives film when load color negative film in
holder
Slides: Select Slides when load slide in holder
B&W: Select B&W when load B&W negative film in holder
User can press LEFT/RIGHT button to select film type, then press ENTER
button to confirm.
Page 25
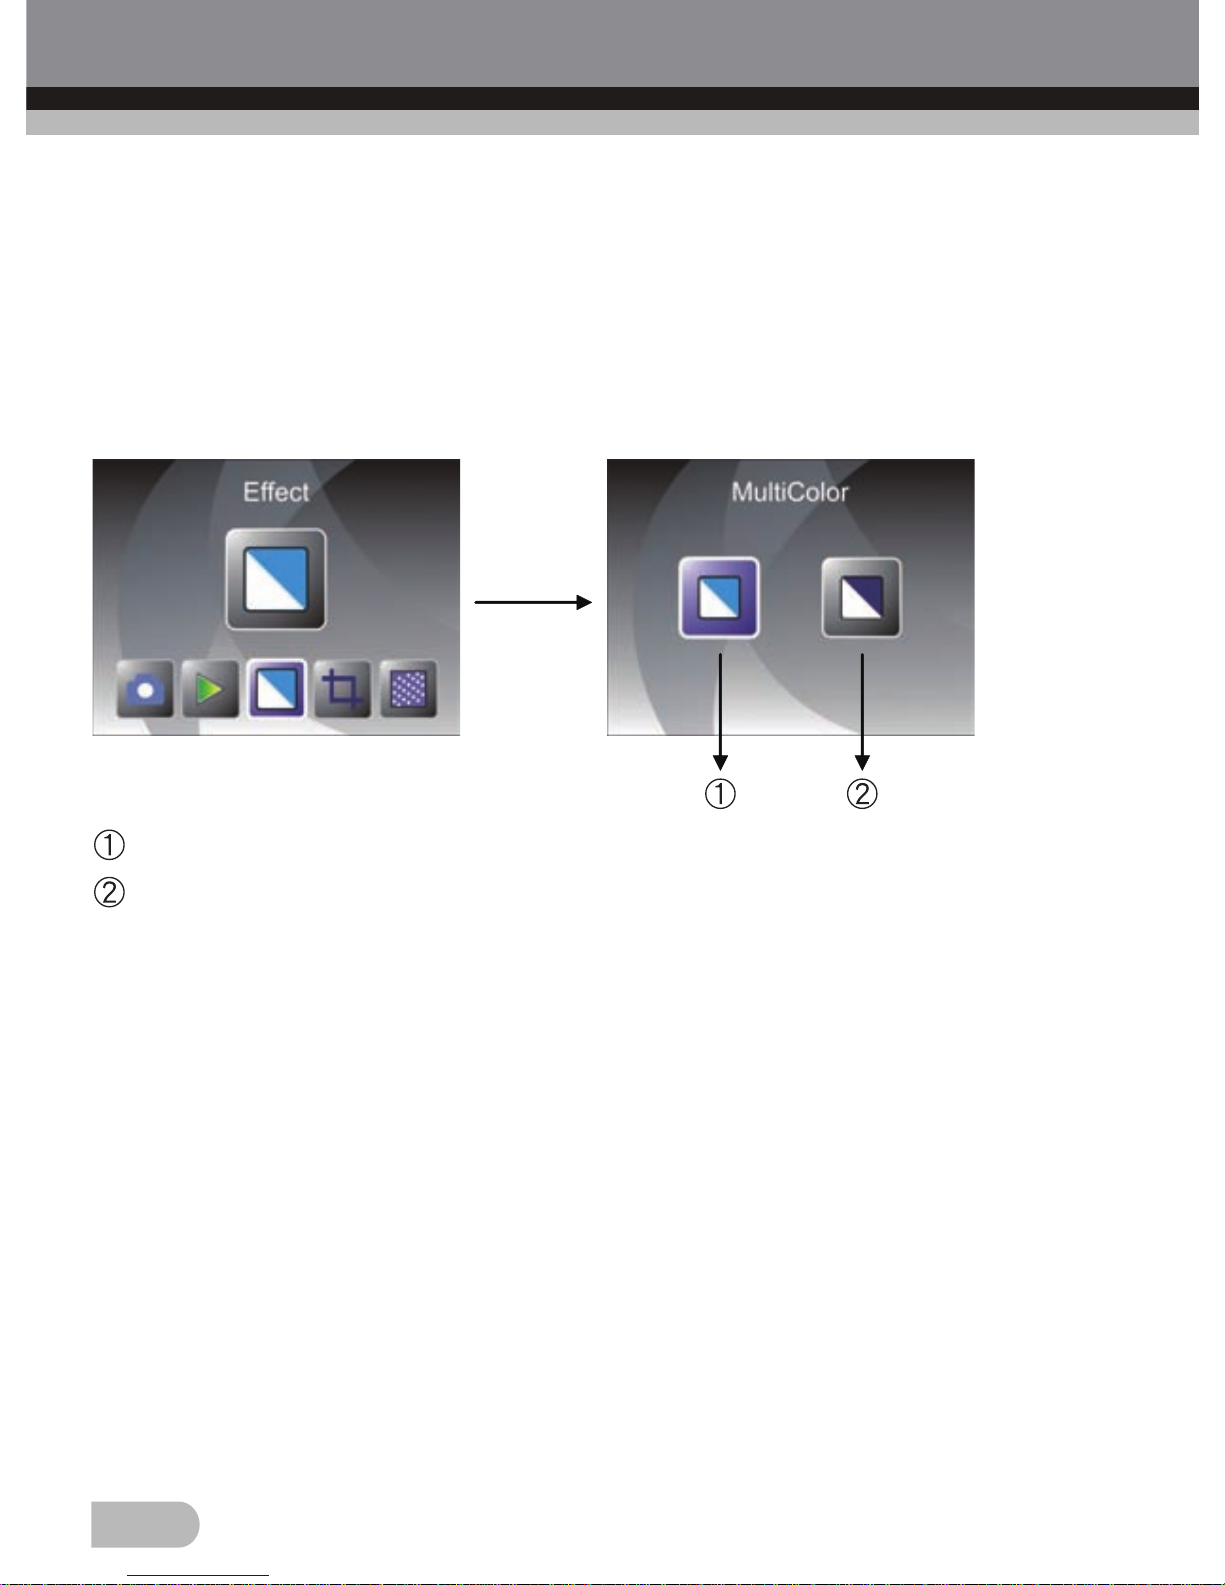
4. Effect
23
When the Photo scanner mode is selected, user can change color effect by
enter Effect menu when power on the device or access the main menu by
Home icon/MODE button anytime. Press LEFT/RIGHT button for Effect and
press ENTER button to confirm
Multicolor effect
Black & White effect
User can press LEFT/RIGHT button to select color effect, then press ENTER
button to confirm
Page 26
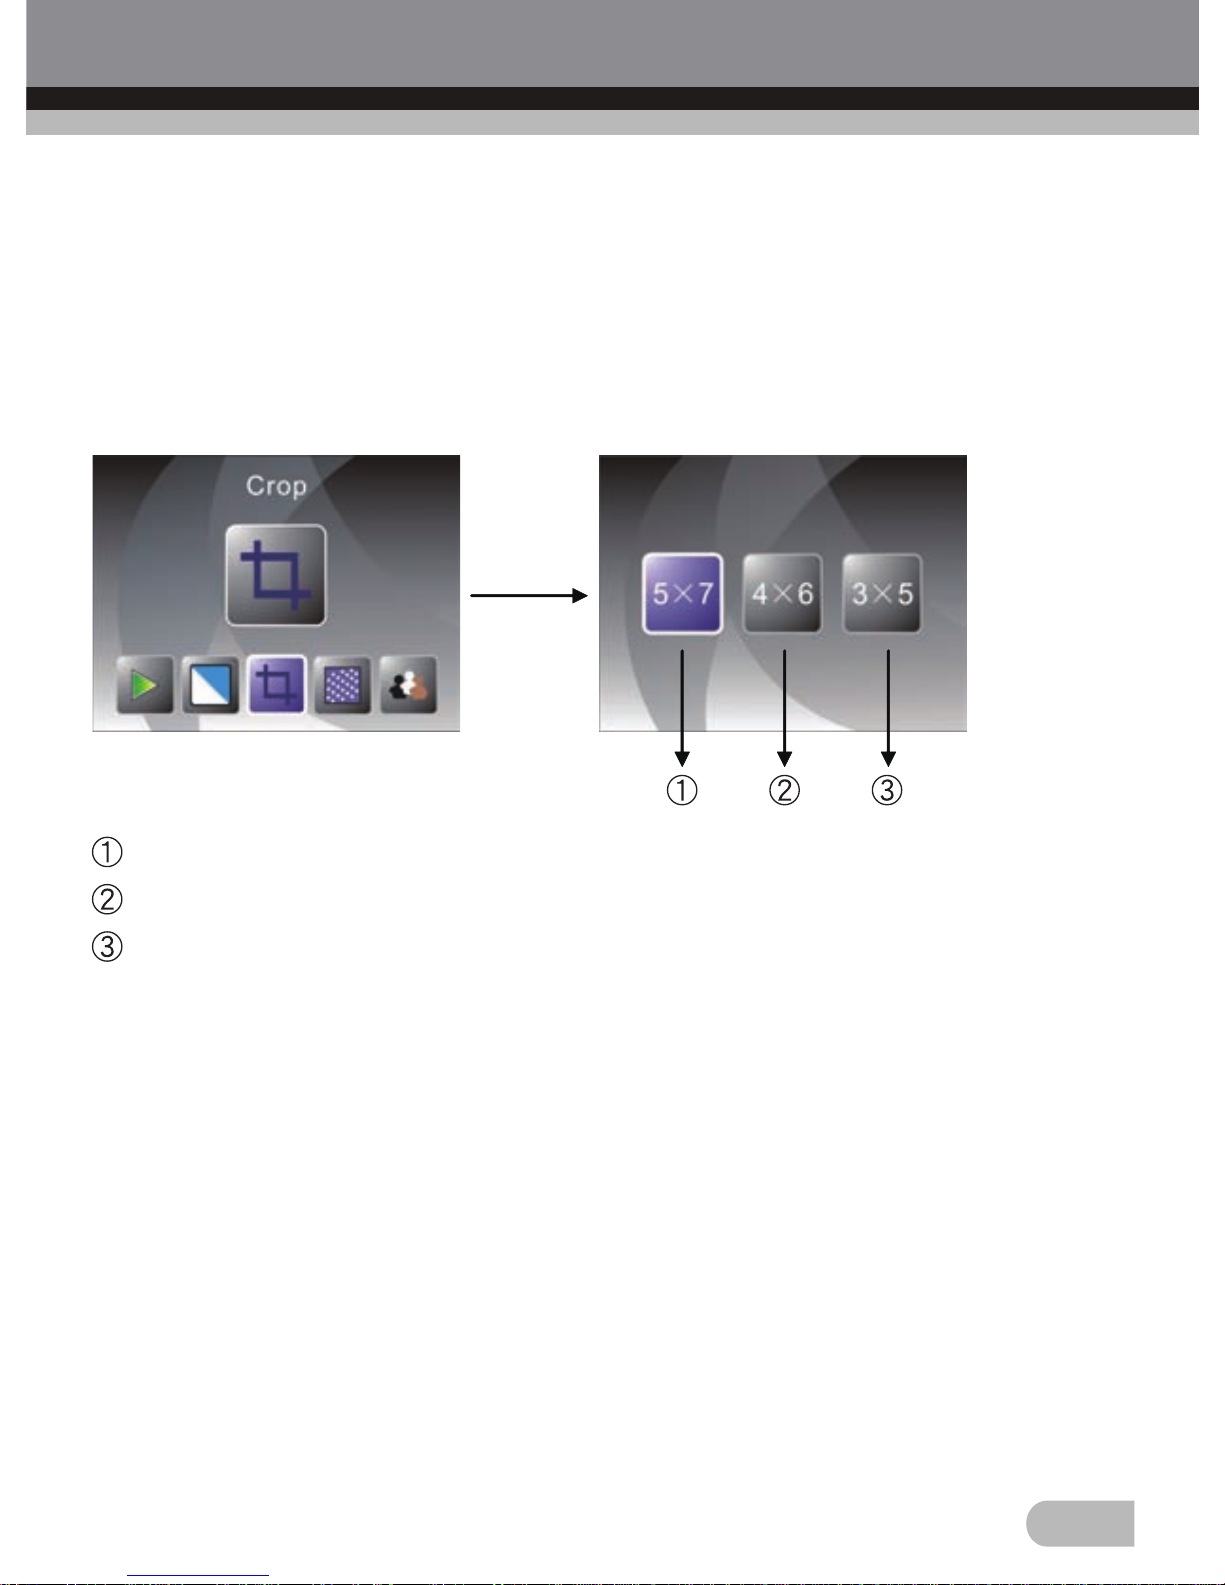
5. Crop Proportion
24
When the Photo scanner mode is selected, user can change crop proportion
by enter Crop menu when power on the device or access the main menu by
Home icon/MODE button during operation. Press LEFT/RIGHT button for
Crop and press ENTER button to confirm.
5 X 7 (13x18cm) Crop proportion
4 X 6 (10x15cm) Crop proportion
3 X 5 (9x13cm) Crop proportion
User can press LEFT/RIGHT button to select crop proportion, then press
ENTER button to confirm
Page 27
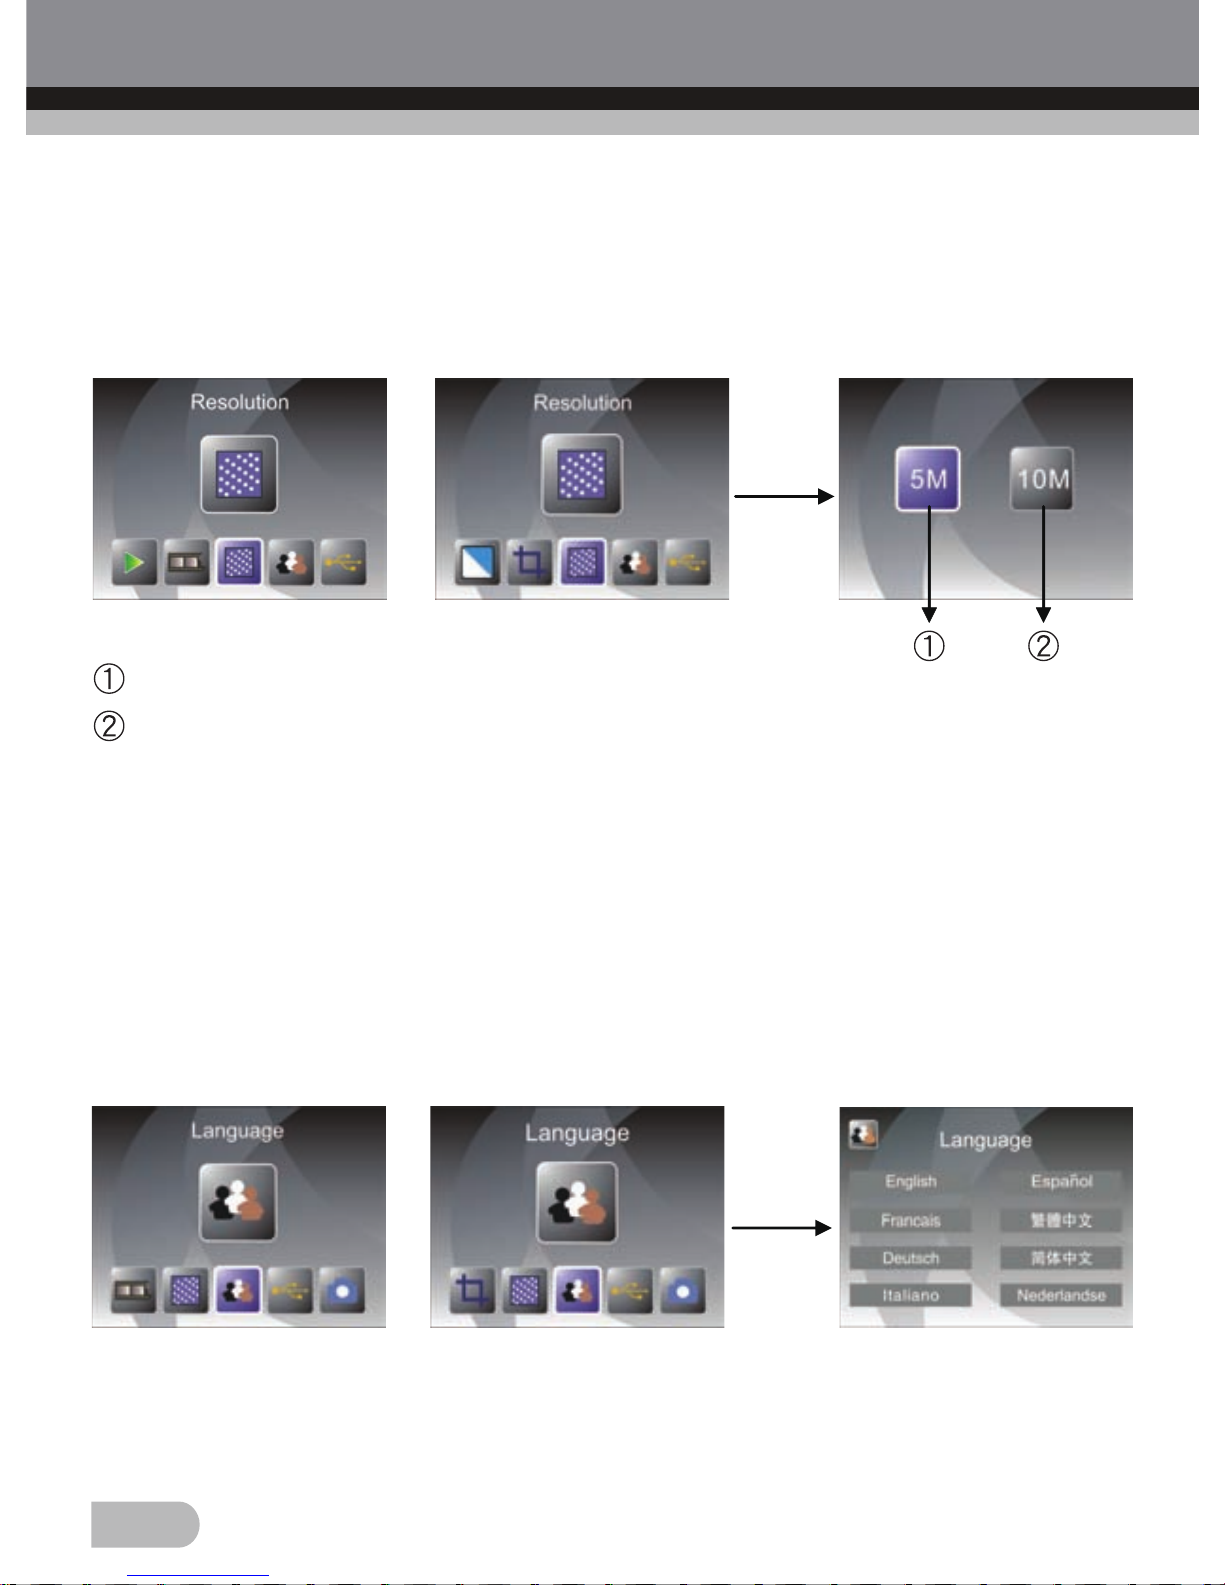
6. Resolution
25
Change resolution by enter Resolution menu when power on the device or
access the main menu by Home icon/MODE button anytime. Press LEFT/
RIGHT button for Resolution and press ENTER button to confirm.
or
5M Resolution
10M Resolution
User can press LEFT/RIGHT button to select resolution, then press ENTER
button to confirm
7. Language
Change language definition by enter language menu when power on the
device or access the main menu by Home icon/MODE button anytime. Press
LEFT/RIGHT button for language and press ENTER button to confirm.
or
User can press LEFT/RIGHT button to select language, then press ENTER
button to confirm.
Page 28
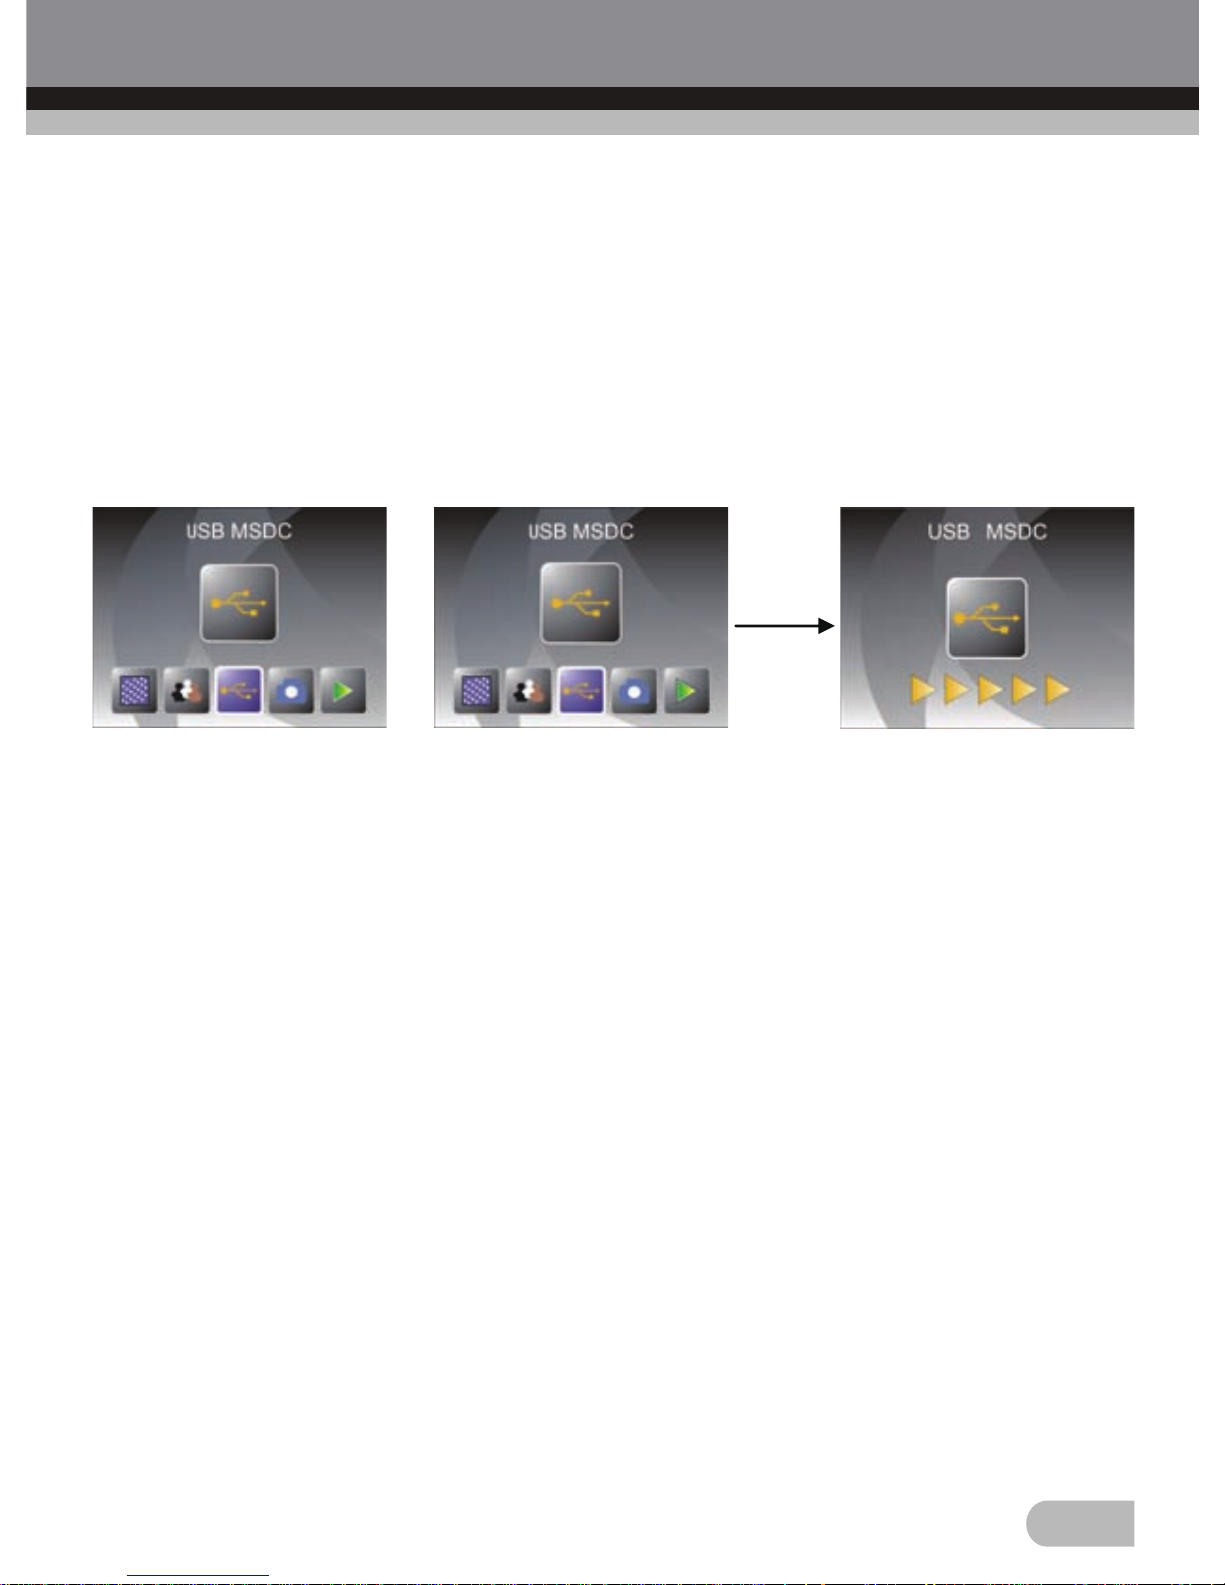
8. USB Mode
26
After finished capture, please take out the memory card from the ComboScanner to download the stored images from the memory card.
When the device is connected with USB cable to PC, User can also press
MODE button to main menu, then press LEFT/RIGHT button to select USB
mode, then press ENTER button to confirm, the Combo-Scanner will become
a mass storage device and user can review or edit images on PC.
or
User can also press MODE button to back to main menu.
Page 29
27
8. Technical Specifications
Lens F/3.6, f=4.83mm
Sensor 5.1 Megapixel CMOS Sensor
LCD 6.1 cm LTPS LCD Display
External Memory SD/MMC/MS/XD/MS-PRO Card
Exposure Auto
Color Balance Auto
Scan High Resolution 3,600 dpi Interpolation Resolution
Data Conversion 12 bits Per Color Channel
Scan Method Single Pass
Light Source 7*2 white LED / Backlight (3 White LED)
Power Powered from USB / 5V Adapter
Interface USB 2.0
Dimension 220 x 208 x 147 mm
Weight Approx. 1.2 Kg
Language English, French, German, Italian, Spanish, Dutch,
Traditional Chinese, Simplified Chinese
Page 30

28
Declaration of Conformity:
It is confirmed that this product complies with the protective requirements
stipulated in EU guidelines.
The EU conformity declaration for this product is available under
www.jay-tech.de
Intended Use:
Combo-Scanner PS970 is suitable for private indoor use.
The device is used to digitize photos in size 9x13, 10x15, 13x18, 35mm
slides and negatives to internal memory, SD memory card, or a PC via a
USB connection.
The dimensions of the film holders supplied conform to ISO standard
(ISO = International Organization for Standardization).
It is not permitted to modify or alter any part of the product!
The manufacturer is not responsible for damage to persons or property
resulting from unintended use. This is the responsibility of the operator.
Power is supplied via USB or the included 5V power adapter. The use of a
different power adapter may cause severe damage and any warranty claim
will be void.
Please understand that incorrect operation and/or connection are beyond
our sphere of influence. We understandably cannot be liable for any resulting
damage. Please read and observe the notes on safety.
Page 31

29
Service Procedures:
If you have reason for complaint, or your device is defective, please contact
your dealer or the service division of JAY-tech GmbH to make arrangements
for service procedures.
Service Hours: Monday – Thursday from 8:00 am to 5:00 pm
Friday from 8:00 am to 2:00 pm.
Please do not send your scanner to our address unless requested to do so
by our service team. All costs and the risk of loss are the responsibility of the
sender.
We reserve the right to reject unrequested deliveries, or return the package
at the sender’s expense.
Page 32

 Loading...