

Page 1

Before operating this unit,
please read this manual thoroughly
and retain it for future reference.
User’s Manual
Page 2

Table of Contents:
General Description of Function ...................................................................................... 1
Precautions...................................................................................................................... 1
System Requirements...................................................................................................... 4
Description of Outline and Button .................................................................................... 5
Start to Use ...................................................................................................................... 6
Install Battery ............................................................................................................ 6
Use SD Card............................................................................................................. 7
Choose Focus Mode................................................................................................. 7
Adjust the Wrist Belt Length...................................................................................... 8
Power on and off ....................................................................................................... 9
Function Mode Change Over .................................................................................... 9
Date and Time Settings........................................................................................... 10
Indicator Light.......................................................................................................... 10
Video Mode..............................................................................................................11
Camera Mode ......................................................................................................... 15
Playback Mode........................................................................................................ 20
Setup Mode............................................................................................................. 29
Application to PC ........................................................................................................... 33
Connect to PC......................................................................................................... 33
Driver Install ............................................................................................................ 34
Operation instructions on Attached Software .......................................................... 39
Technical Parameter ...................................................................................................... 51
Standard Packing........................................................................................................... 52
Page 3

General Description of Function
It is able to use the camera for a digital photo of maximum 5 mega pixels picture, and is
able to shoot AVI short film. The camera is able to auto adjust exposure and color
balance, and it has 4 x focusing function. The product can be used as a PC camera when
connecting with computer.
The contents covered in the manual were referred to the latest information when the
manual was compiled. The screen display and illustration, etc. adopted in the manual are
for elaboration of the digital camera in a way of much more detail and straight. They may
differ slightly from your practical digital camera because of the different batch of technical
development and production.
Precautions
Please read carefully the Precautions section before using the digital camera so as to
ensure the accurate and safe application, bringing you the best capability of digital
camera and lengthening the service life of the digital camera.
Never settle the camera under direct sunlight, nor to direct the lens toward the sun.
Otherwise, the image sensor may be damaged.
It is required to take care of the camera and prevent water or sand from dropping
into it when using the camera at a sandy beach or near water. The water, sand drop,
dust or salty component may damage the camera.
Please put the camera far from the dust and chemical subject, and it is required to
put it in a cool, dry and well ventilated location. Never deposit it in a location of high
temperature, humidity or dust to prevent failure.
1
Page 4

It is required to operate camera regularly during long time storage. Please check
whether the camera operates normally or not before using the camera again.
If dirt or stain is accumulated on the camera or lens, it is required to use a piece of
soft, clean and dry cloth to wipe it out lightly. If the camera or lens is stained with
sand grain, it is available to blow it away lightly. Never use cloth to wipe. Otherwise,
it may scrape the camera or lens surface.
If it is required to clean the lens surface, blow away firstly the sand dust
accumulated on the surface, and then use dish cloth or paper towel suitable for the
optical equipment to wipe the lens lightly. If there is such requirement, please use
the lens cleaning compound. Never use organic solvent to clean the camera.
Never touch the lens surface with finger.
If it is the first time to use a memory card in the digital camera, please carry on
information backup for the card first. Then format the memory card once at the
digital camera.
The external SD card and MMC card are made with precise electronic components.
The following conditions may cause the information lost or damage:
1. Use the memory card incorrectly.
2. Memory card is subjected to bend, fall or impact.
3. Heat, humidity and direct sunlight.
4. Static or electromagnetic field around the memory card.
5. Take out the memory card or interfere the digital camera power supply when the
2
Page 5

digital camera or computer is accessing the memory card (i.e. read, write and
format, etc.)
6. Touch the metal contact surface of the card with finger or metal subject.
7. The memory card outruns its service life (please purchase regularly a new
memory card.)
3
Page 6

System Requirements
System Requirements
Operating System Microsoft
®
Windows® 98 SE, ME, 2000, XP, Vista 32-bit
Central Processing unit Above Intel
®
Pentium 166MHz or CPU of equal performance
Memory Above 128 MB
Sound Card, Display Card The sound card and the display card shall support DirectX8 or higher
version.
CD Driver 4 times of speed or above
Hard Disk Surplus space above 500 MB
Other One standard USB 1.1 interface or USB 2.0
4
Page 7
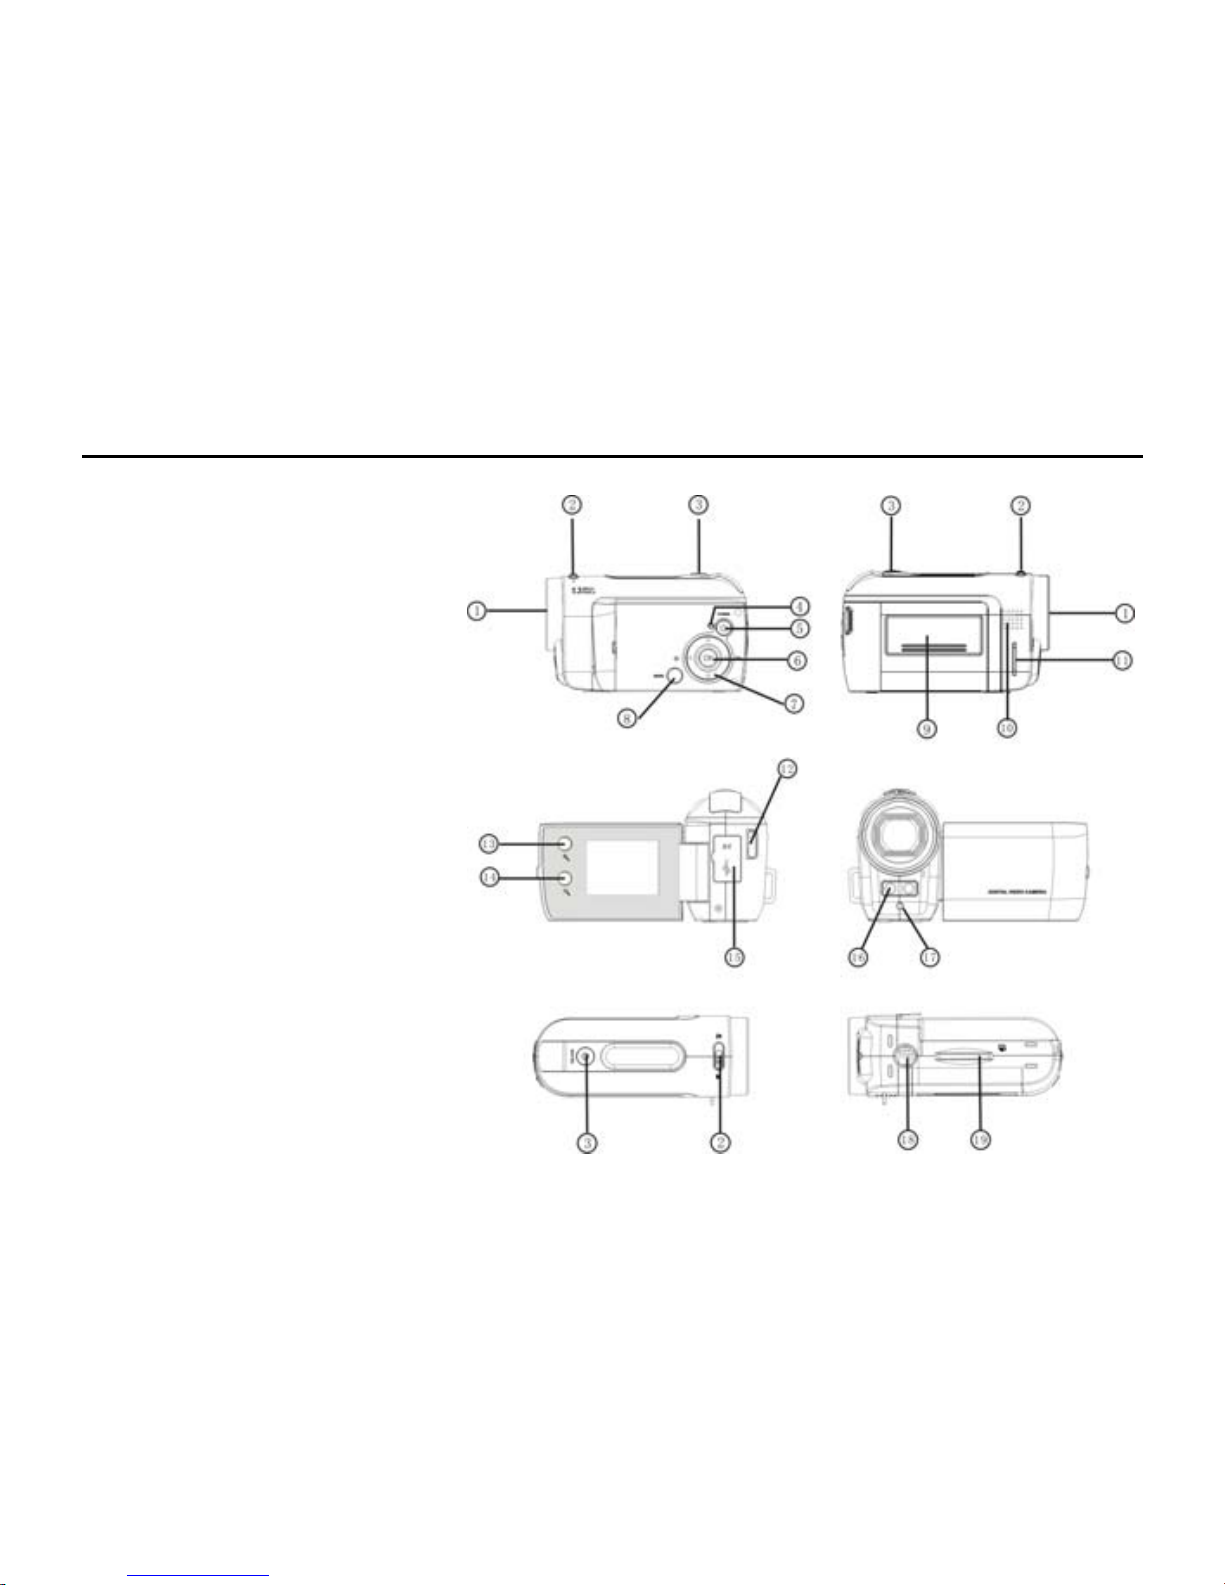
Description of Outline and Button
1 Lens
2 Macro switch
3 Shutter key
4 Busy light
5 Power key
6 OK key
7 Direction key:
Up
Down
Right/LED switch
Left/Self-timer
8 Mode key
9 Battery lid
10 Speaker
11 Wrist strap loop
12 Wrist strap hole
13 Zoom in ke y
14 Zoom out key
15 USB/TV out por t
16 LED light
17 Self-timer light (Red LED)
18 Tripod nut
19 SD card slot
5
Page 8
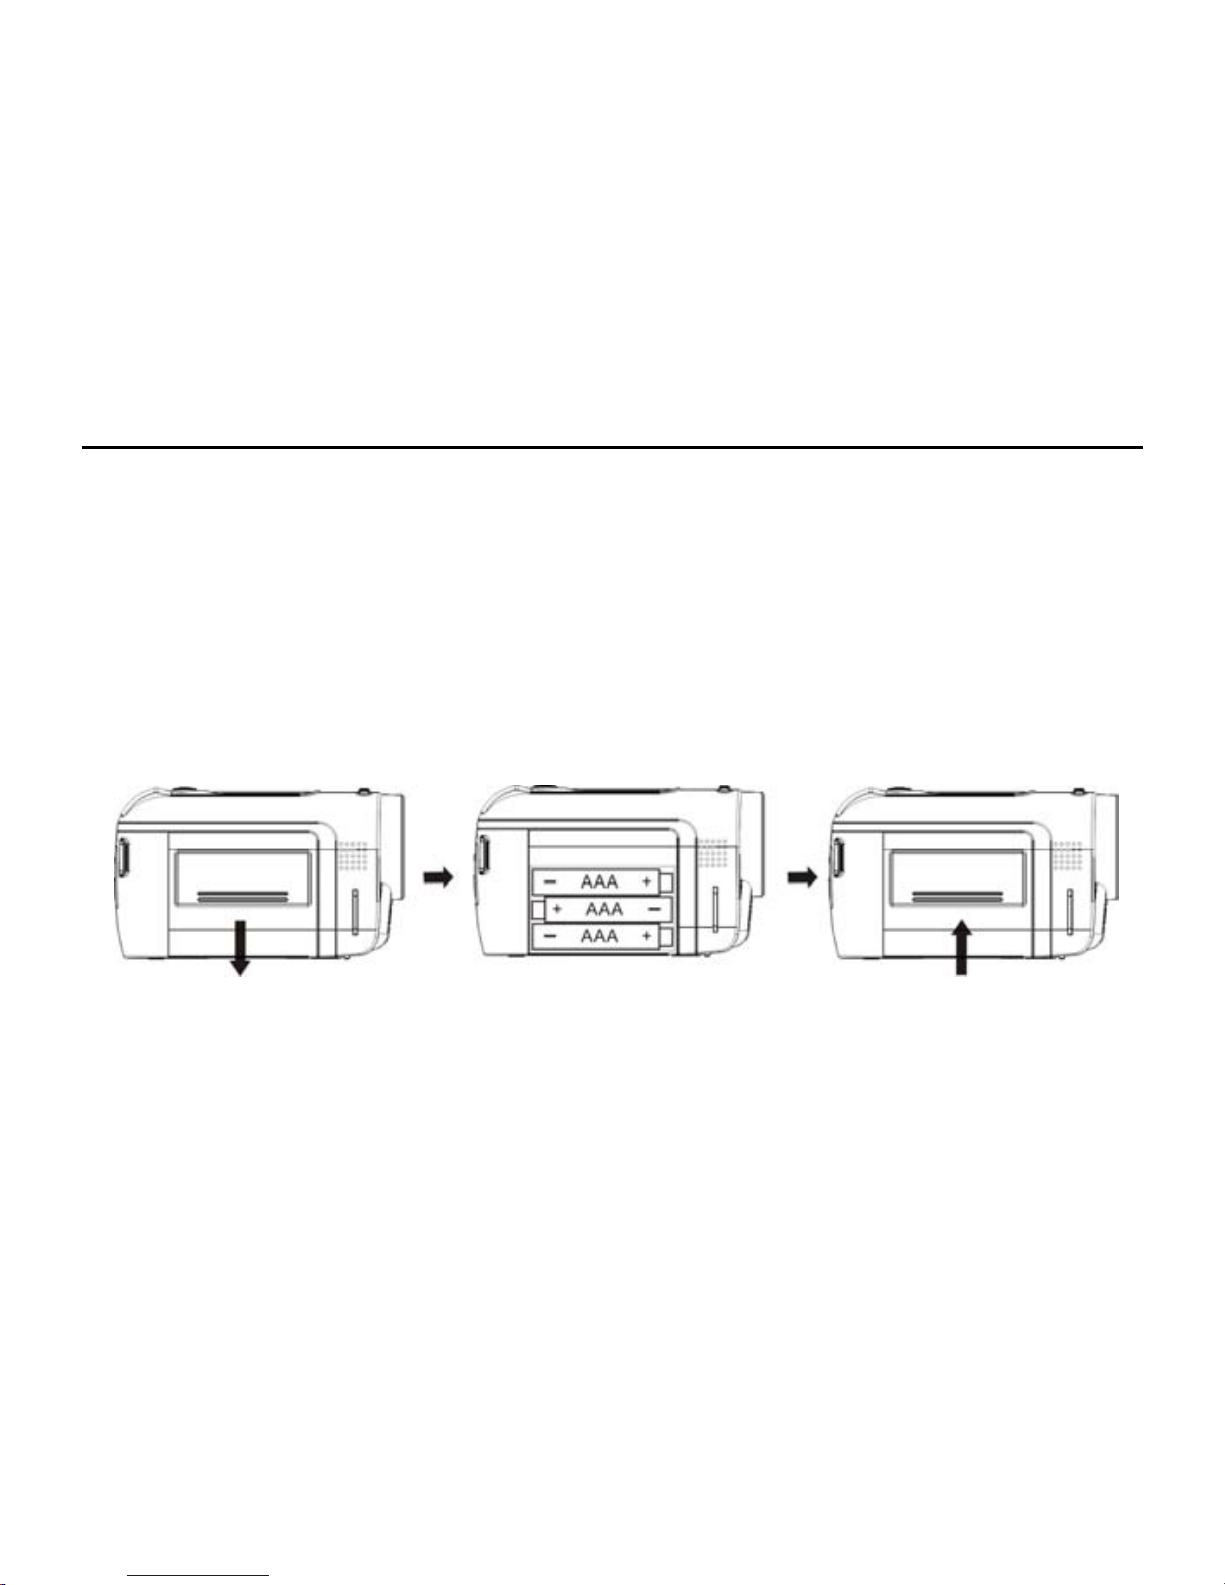
Start to Use
1. Install Battery
1. Open the battery lid
2. Put 3 pieces of AAA (LR03) batteries in according to the polarity instruction.
3. Insert the front end of the battery lid into the battery stack; press the back end of the
battery lid and then push the battery lid inwards to allow the battery lid to closely
attach the body.
Take down battery lid Install the batteries Close the battery lid
6
Page 9
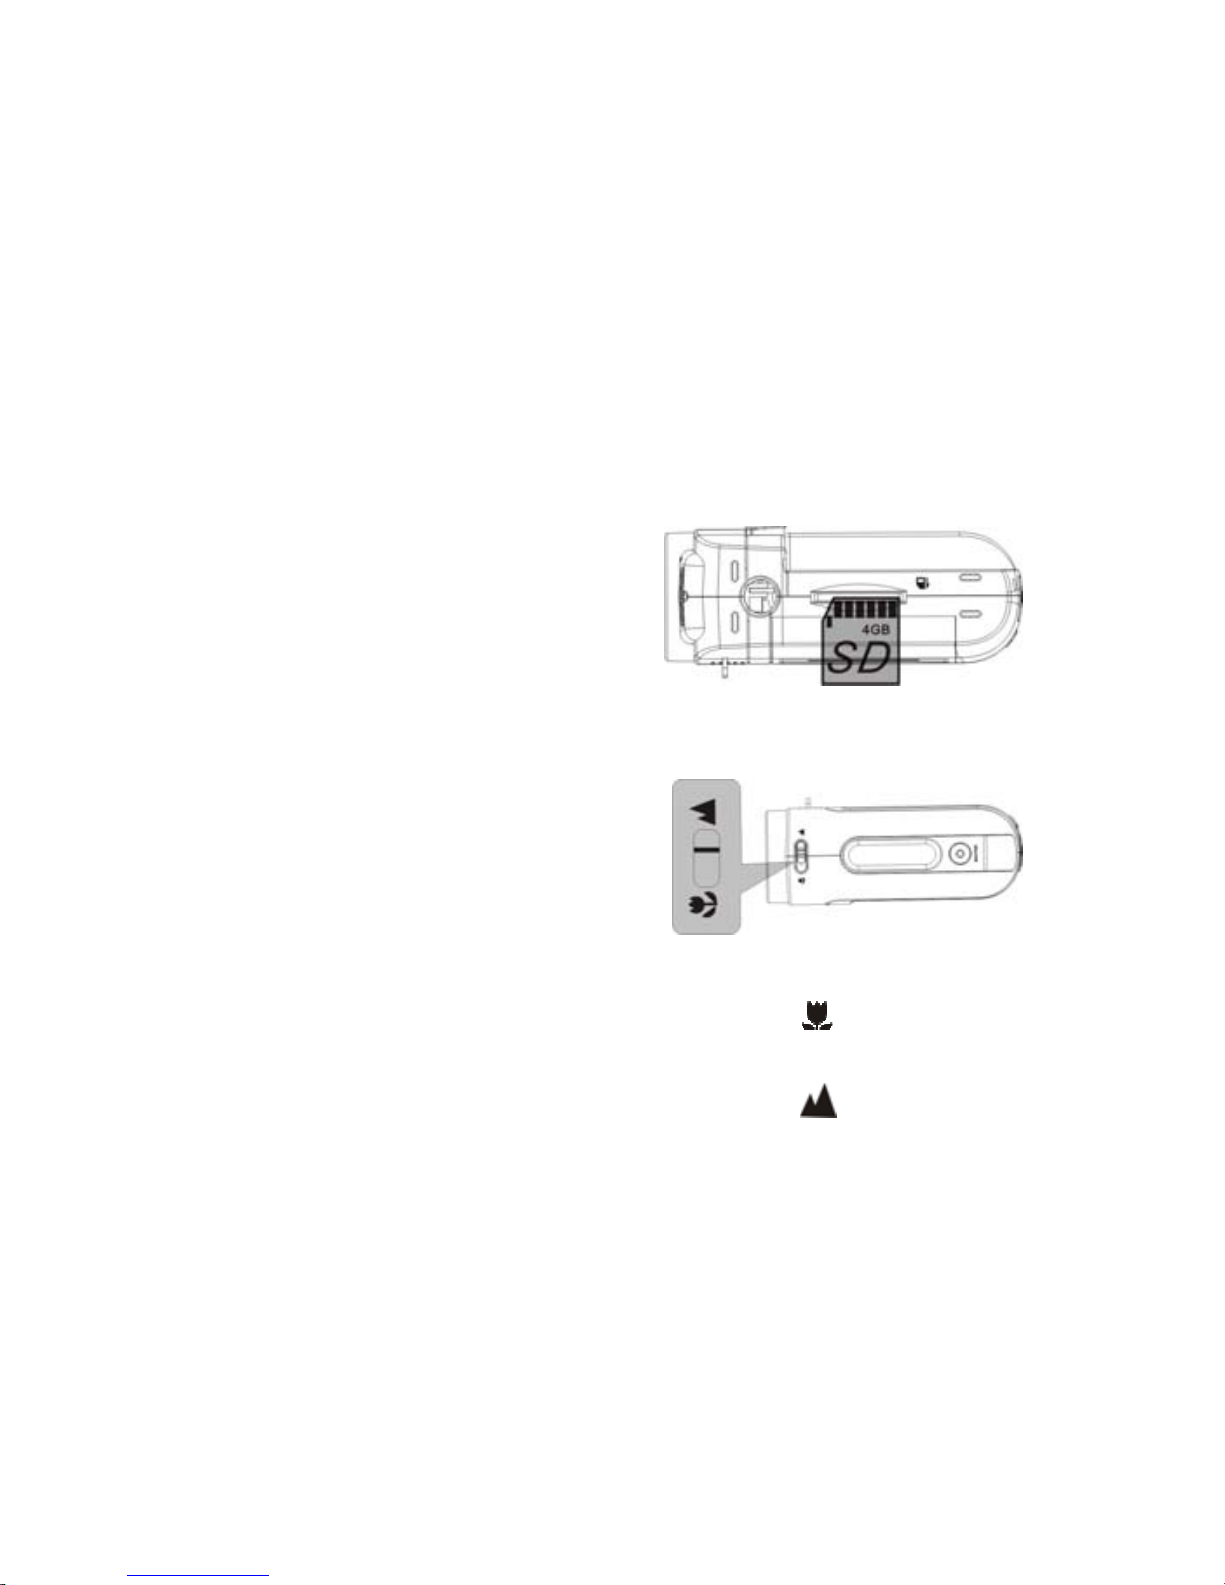
2. Use SD Card
1. Push the SD card into the slot until it is completely inserted according to instructions.
2. Lightly press the card end inwards and the SD card will eject.
3. Choose Focus Mode
Press the macro switch on the top of the body and then you can switch between the
macro and normal focus.
1. Macro: it is suitable for shooting objects 15cm ~ 25cm away from the lens; when
using, push the macro switch to the end marked with .
2. Normal focus: it is suitable for shooting objects 1.4m away from the lens; when
using, push the macro switch to the end marked with .
7
Page 10

4. Adjust the Wrist Belt Length
1. Pull the magic sticker on the wrist belt.
2. Pull the nylon strap stuck on the magic sticker.
3. Adjust the bending length of the wrist belt.
4. Fasten the nylon strap on the magic sticker.
5. Fold and nip tightly the magic sticker.
54
21
3
8
Page 11

5. Power on and off
1. Power on: press the power key for a while, light the screen and the unit will be power
on.
2. Power off: press the power key once while camera is idle state, it will be power off.
Auto power off: While the camera is idle for 1 minute, it will be power off automatically.
The automatically power off time can be set to 1 / 3 / 5 minute in setup mode.
3. Low power: While the battery power is very low and LCD display icon “ ”, the
camera will power off automatically
6. Function mode change over
There are 3 modes such as Video, Camera and playback. You will enter the Video
mode directly after switch-on and you can press the MODE key to switch between the
camera mode and record mode.
Video mode: can take some movies
Camera mode: can take some photos
Playback mode: can play the movies or photos
9
Page 12
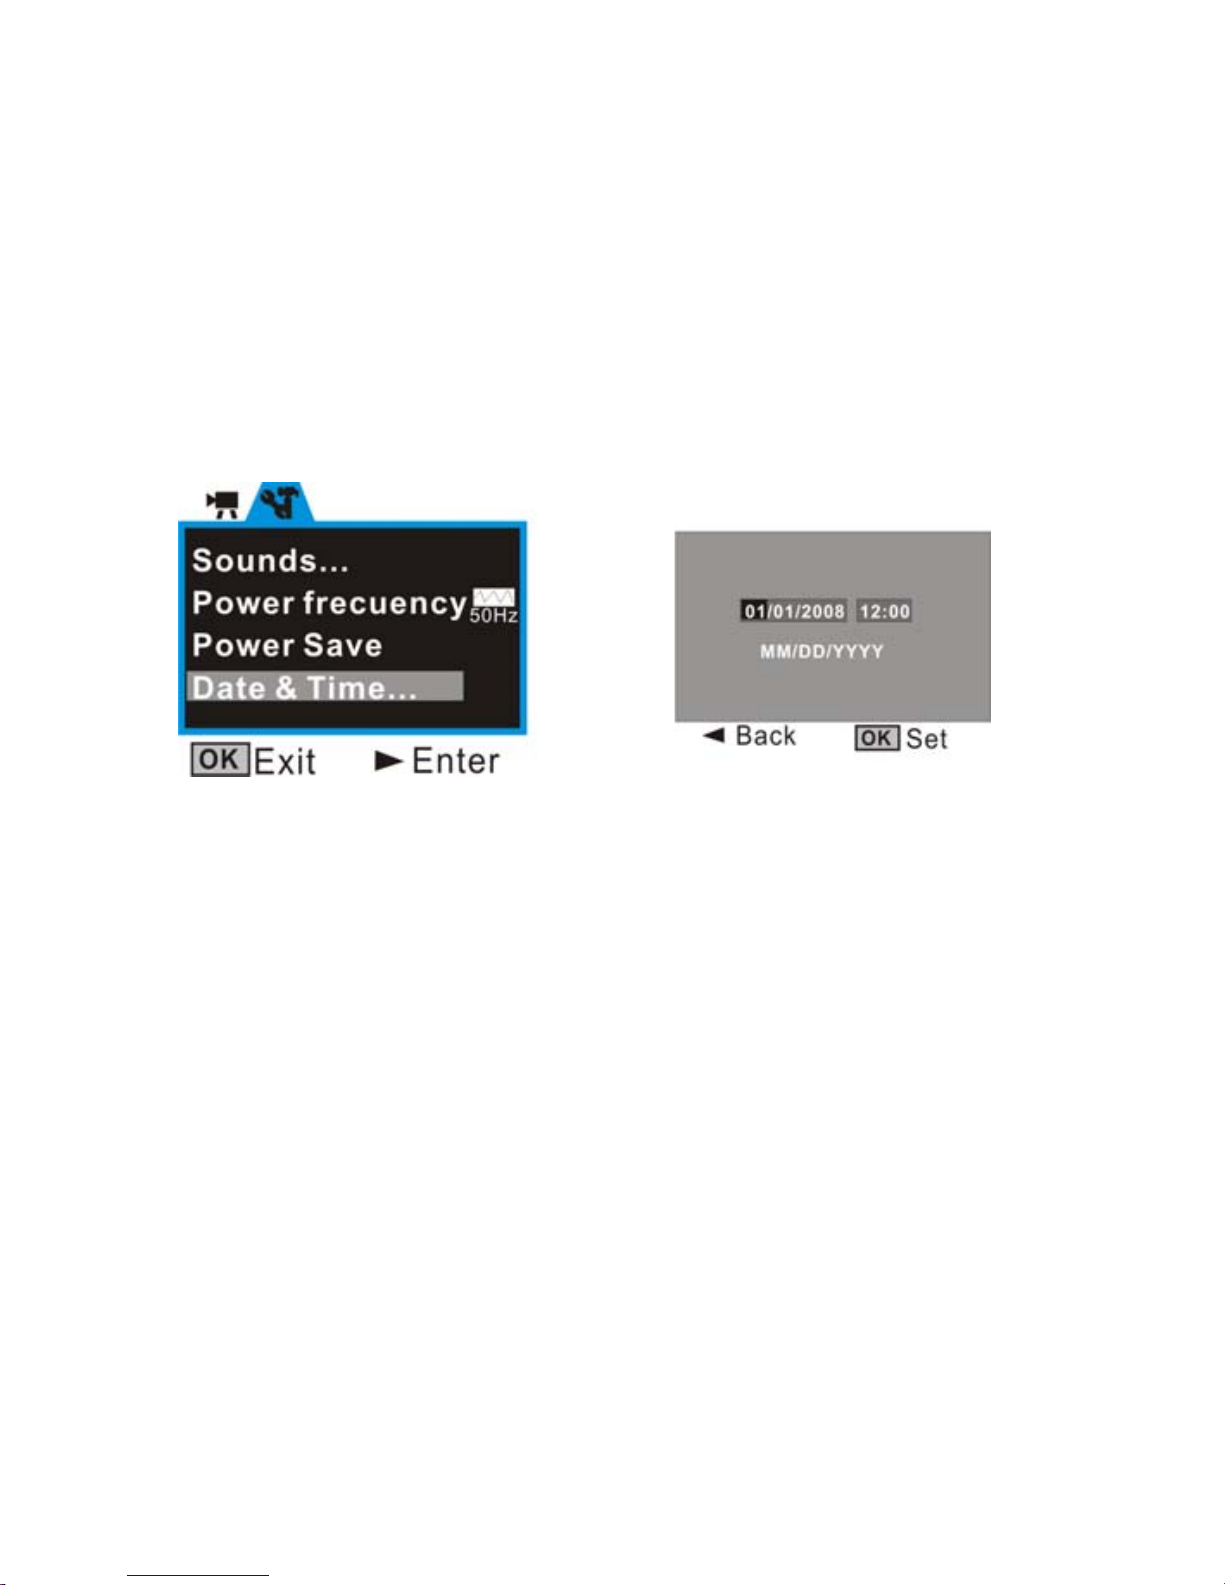
7. Date and Time Settings:
You can enter Setup menu mode to set the system date and time:
At setting window, adjust the date or time by direction key: Up or Down for adjust,
Right key for move the cursor, OK key for confirm, Left for exit setup mode.
8. Indicator Light:
Busy light: the light will be illumed while the camera is busy (e.g. Recording movie,
capture photo, some key was pressed, connecting to computer etc).
LED light: to reinforce light intensity for recording.
Self timer light: to remind user the camera is doing the operation of self timer.
10
Page 13
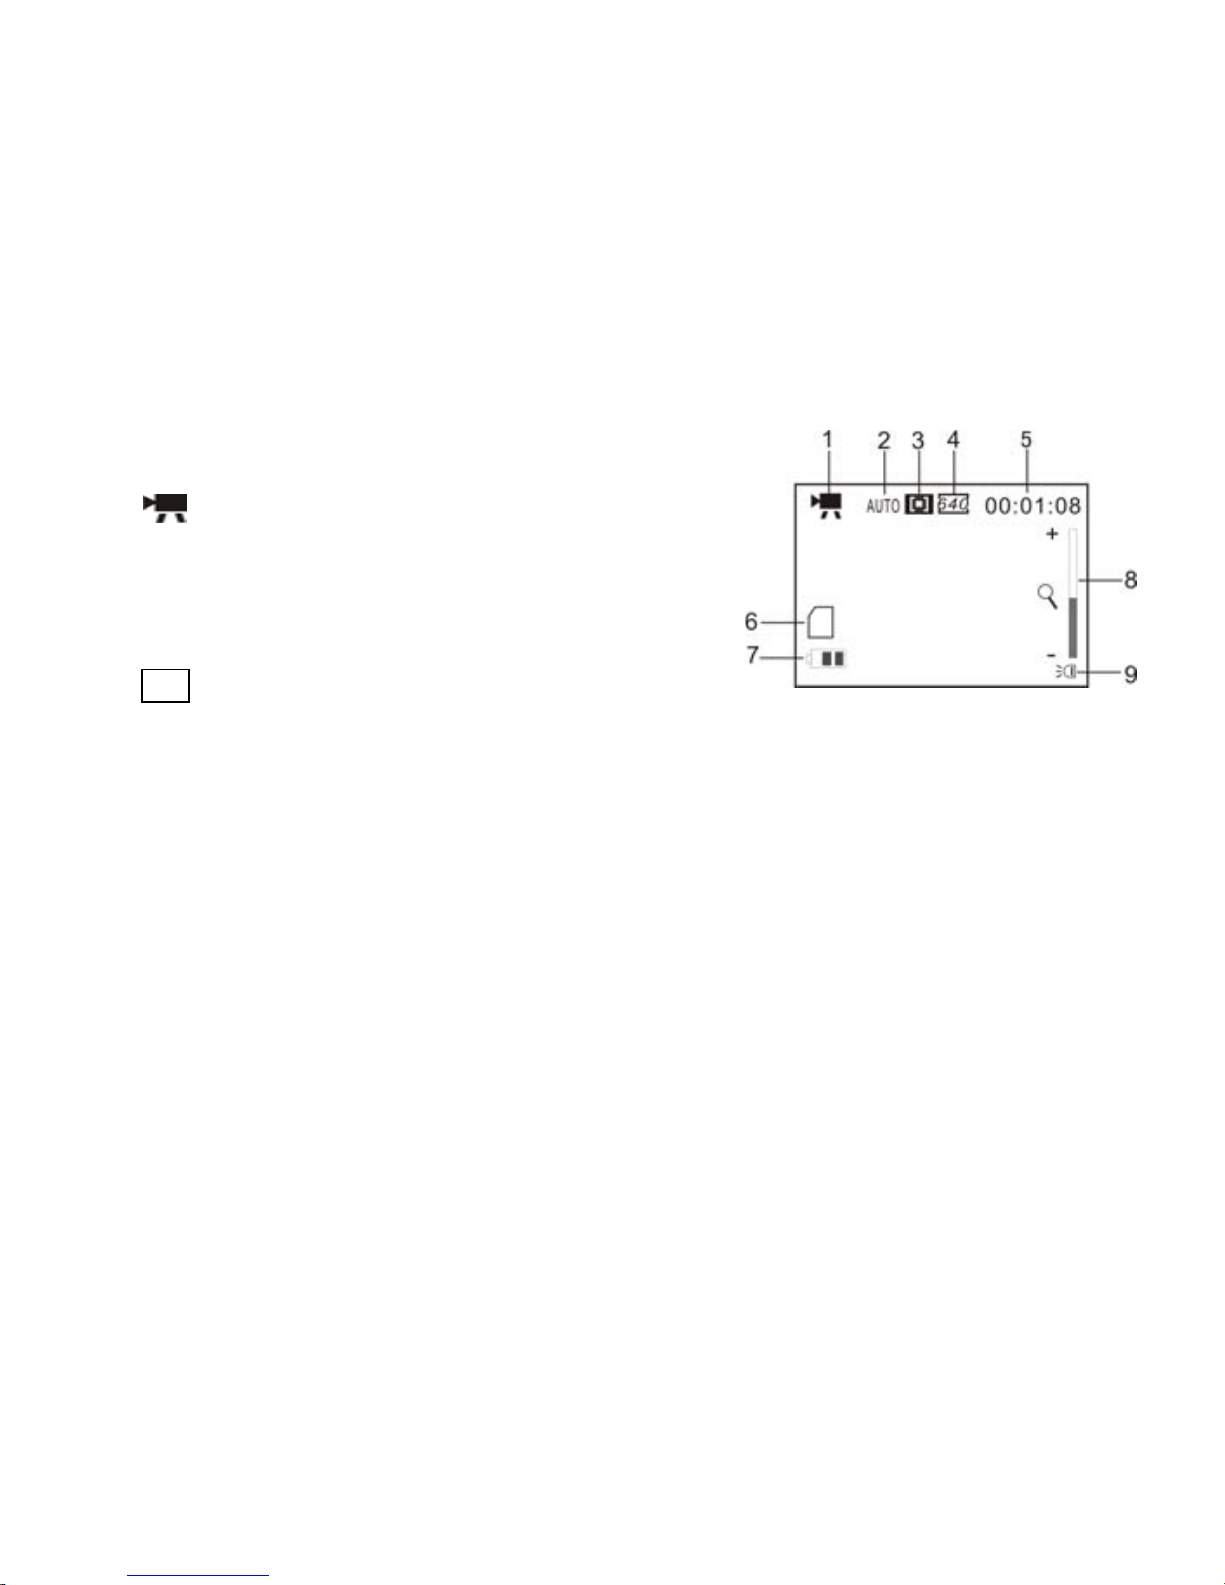
9. Video Mode:
Preview Mode
1. : Mode symbol, Indicate is video mode.
2. Auto: Indicate the White balance is auto mode.
It can be set as Auto / Daylight / Cloudy /
Fluorescent / Tungsten.
3. Metering mode: Center / Multi / Spot
4. 640 : Indicate is video resolution, it can be set
is 640x480 / 320x240.
5. 00:01:08: time counter. It indicates recording time is 1 minute 8 seconds for movie.
6. SD card icon: that indicates there is one SD card being used.
7. Battery icon: That indicates the battery power level.
8. Zoom icon: that indicates the zoom level (Max. 4X).
9. LED light icon; that indicates LED is on state.
11
Page 14

Shooting:
1. Switch on the camera by press Power key to enter preview mode;
2. Press Shutter key to start recoding movie;
3. If you want to stop recoding, press Shutter key again; and if the memory card full, it
will stop recoding automatically.
4. You can do zoom in or zoom out operation during recording by Zoom key.
Maximum digital zoom: 4X.
12
Page 15
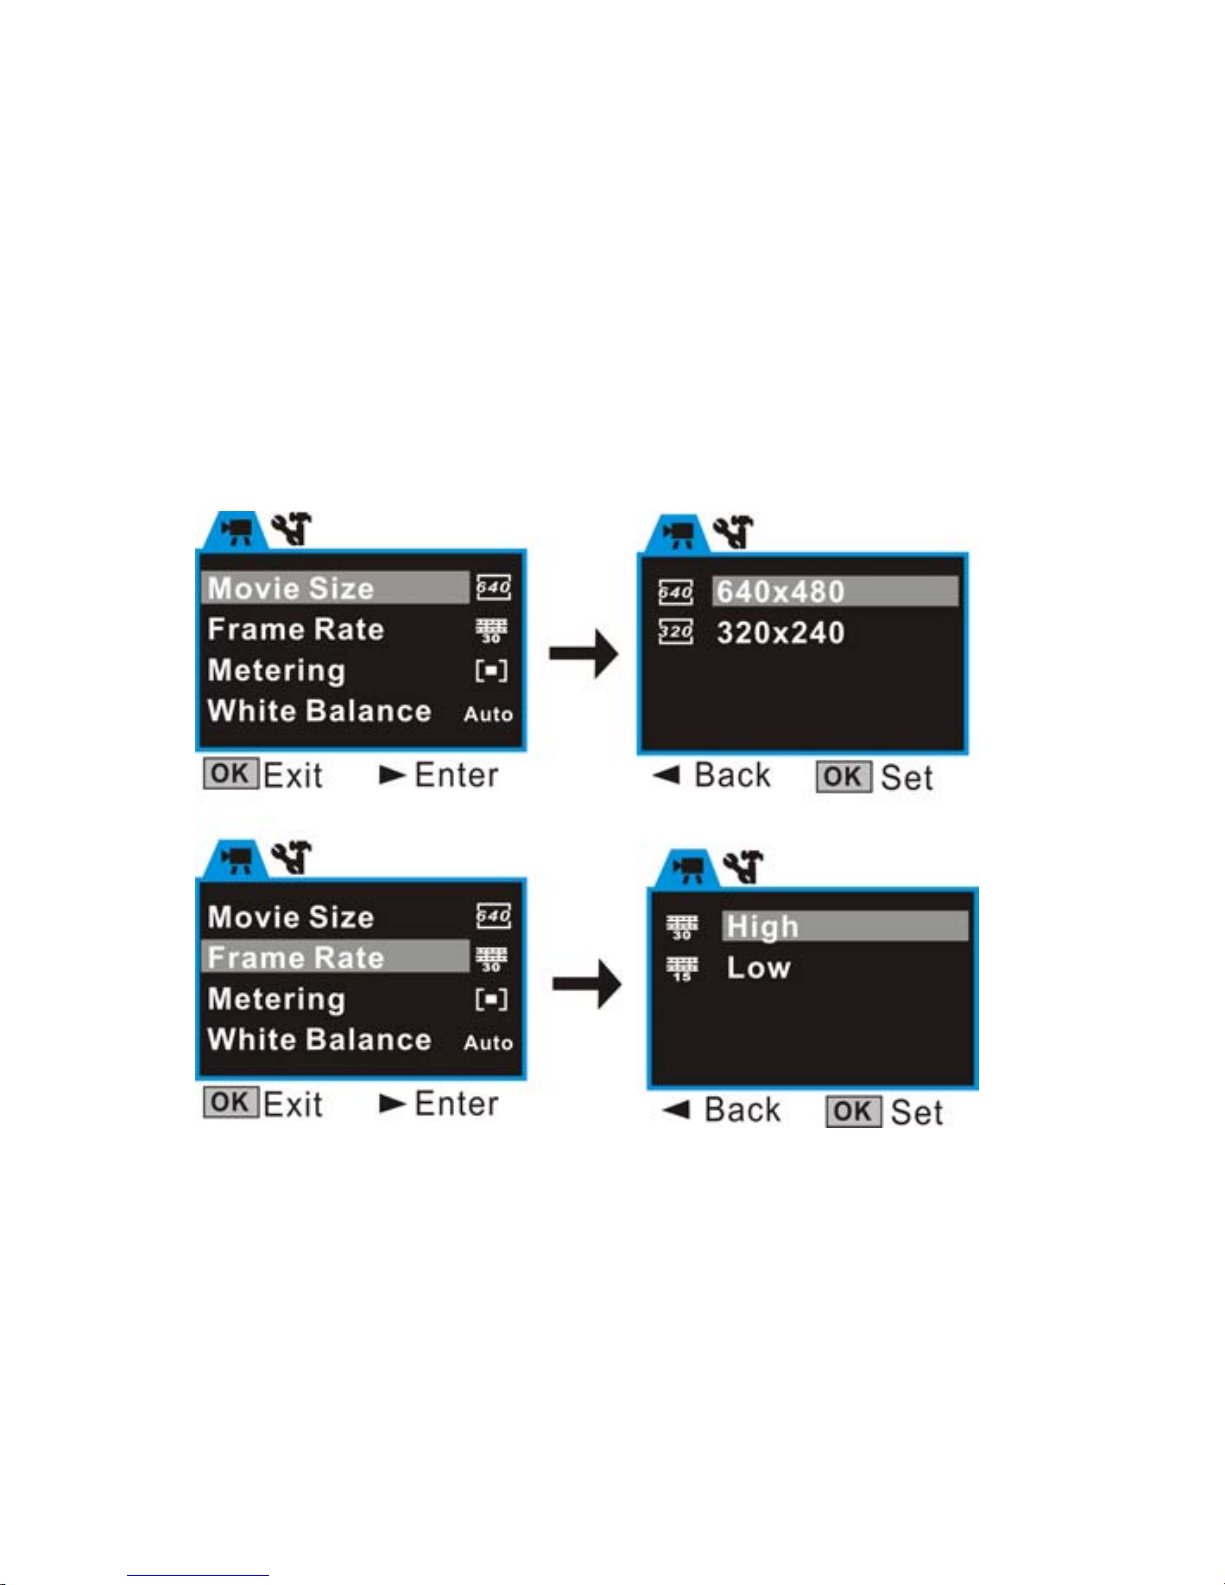
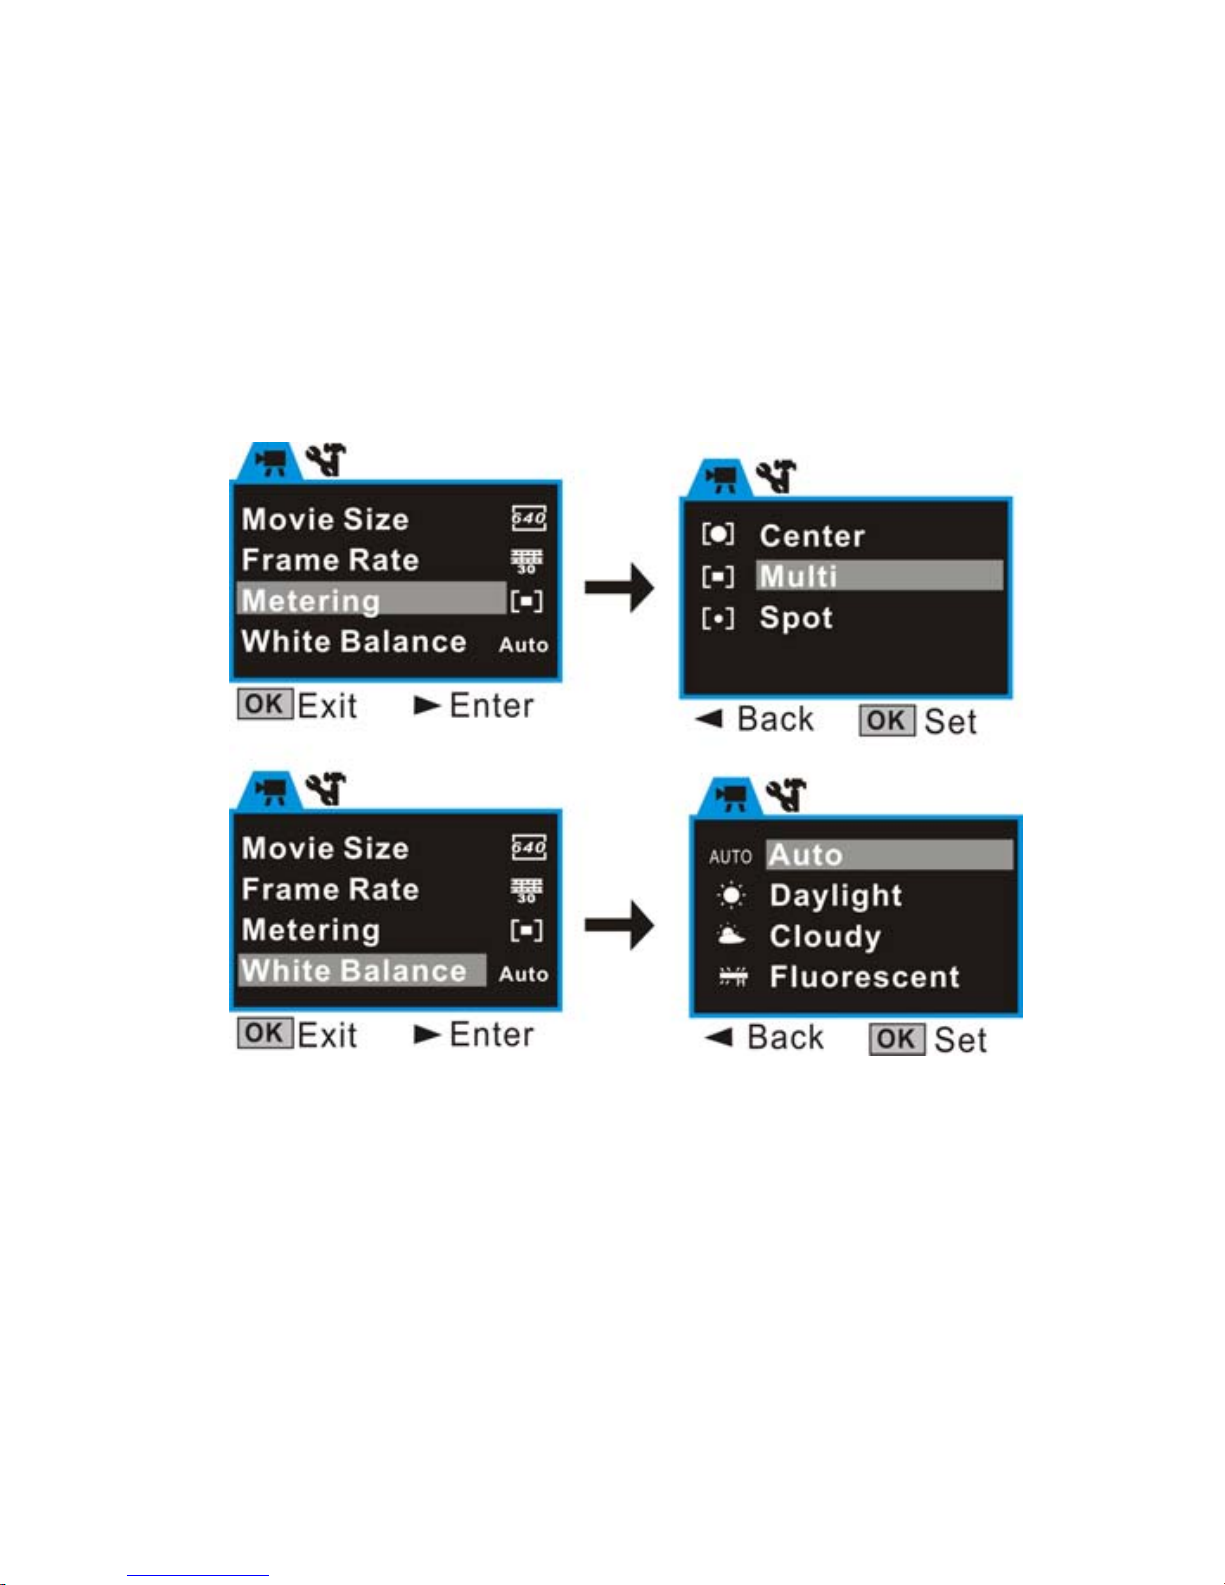
Video Menu
At video preview mode, press OK key enter main menu:
13
Page 16
14
Page 17

10. Camera Mode:
Preview Mode
1. : Mode symbol, indicate snap
photo mode.
2. : Self-timer mode symbol.
3. Auto: Indicate the White balance
is auto mode.
4. : Metering mode.
5. : Exposure mode.
6. : Image resolution mode.
7. : Image quality mode.
8. : Image counter (default is reduce).
9. : Self timer, indicate snap photo automatically after 10s.
10. : SD icon, it will be displayed while there is SD/MMC card was inserted.
: Indicate the SD card was locked.
11. : Battery icon. 12. Zoom indicator. 13. : LED light icon
15
Page 18
Shooting:
1. Switch on the camera by press Power key to enter video preview mode;
2. Press Mode key once to switch to Camera preview mode;
3. Press Shutter key once to snap one photo;
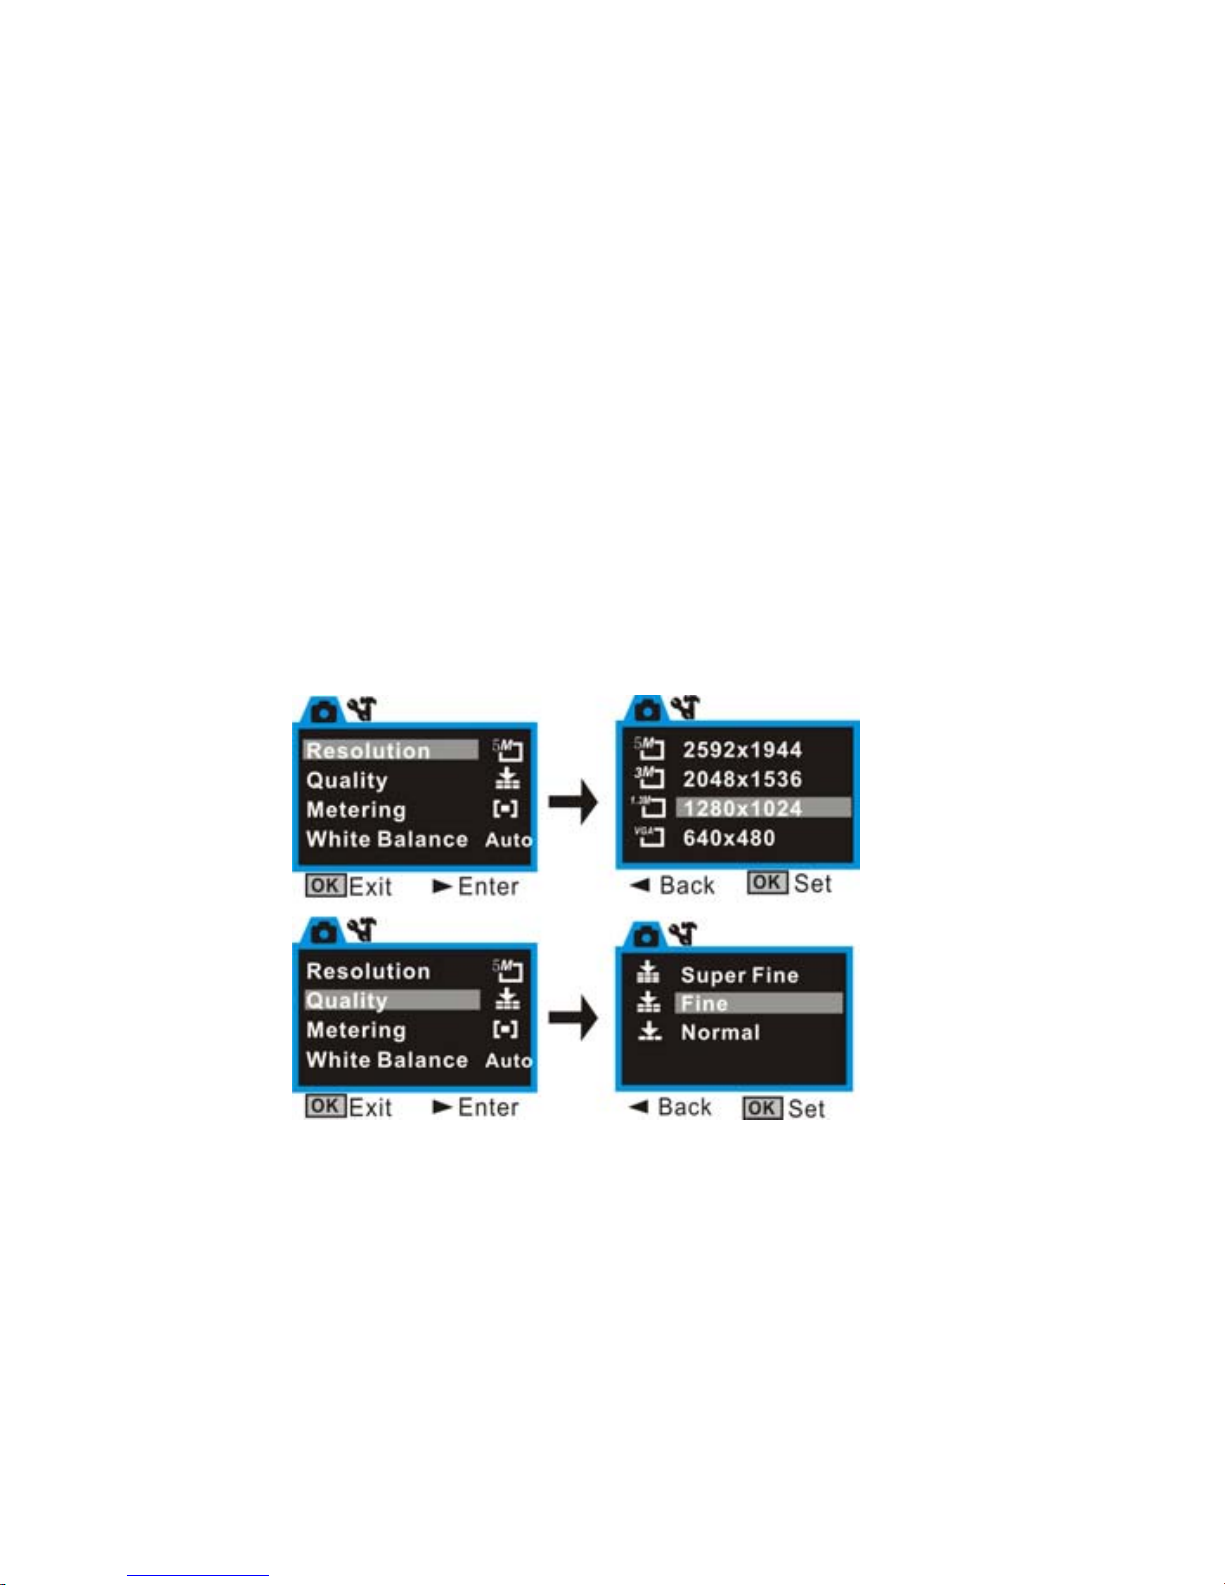
Camera Mode Menu:
At camera preview mode, press OK key enter main menu:
16
Page 19
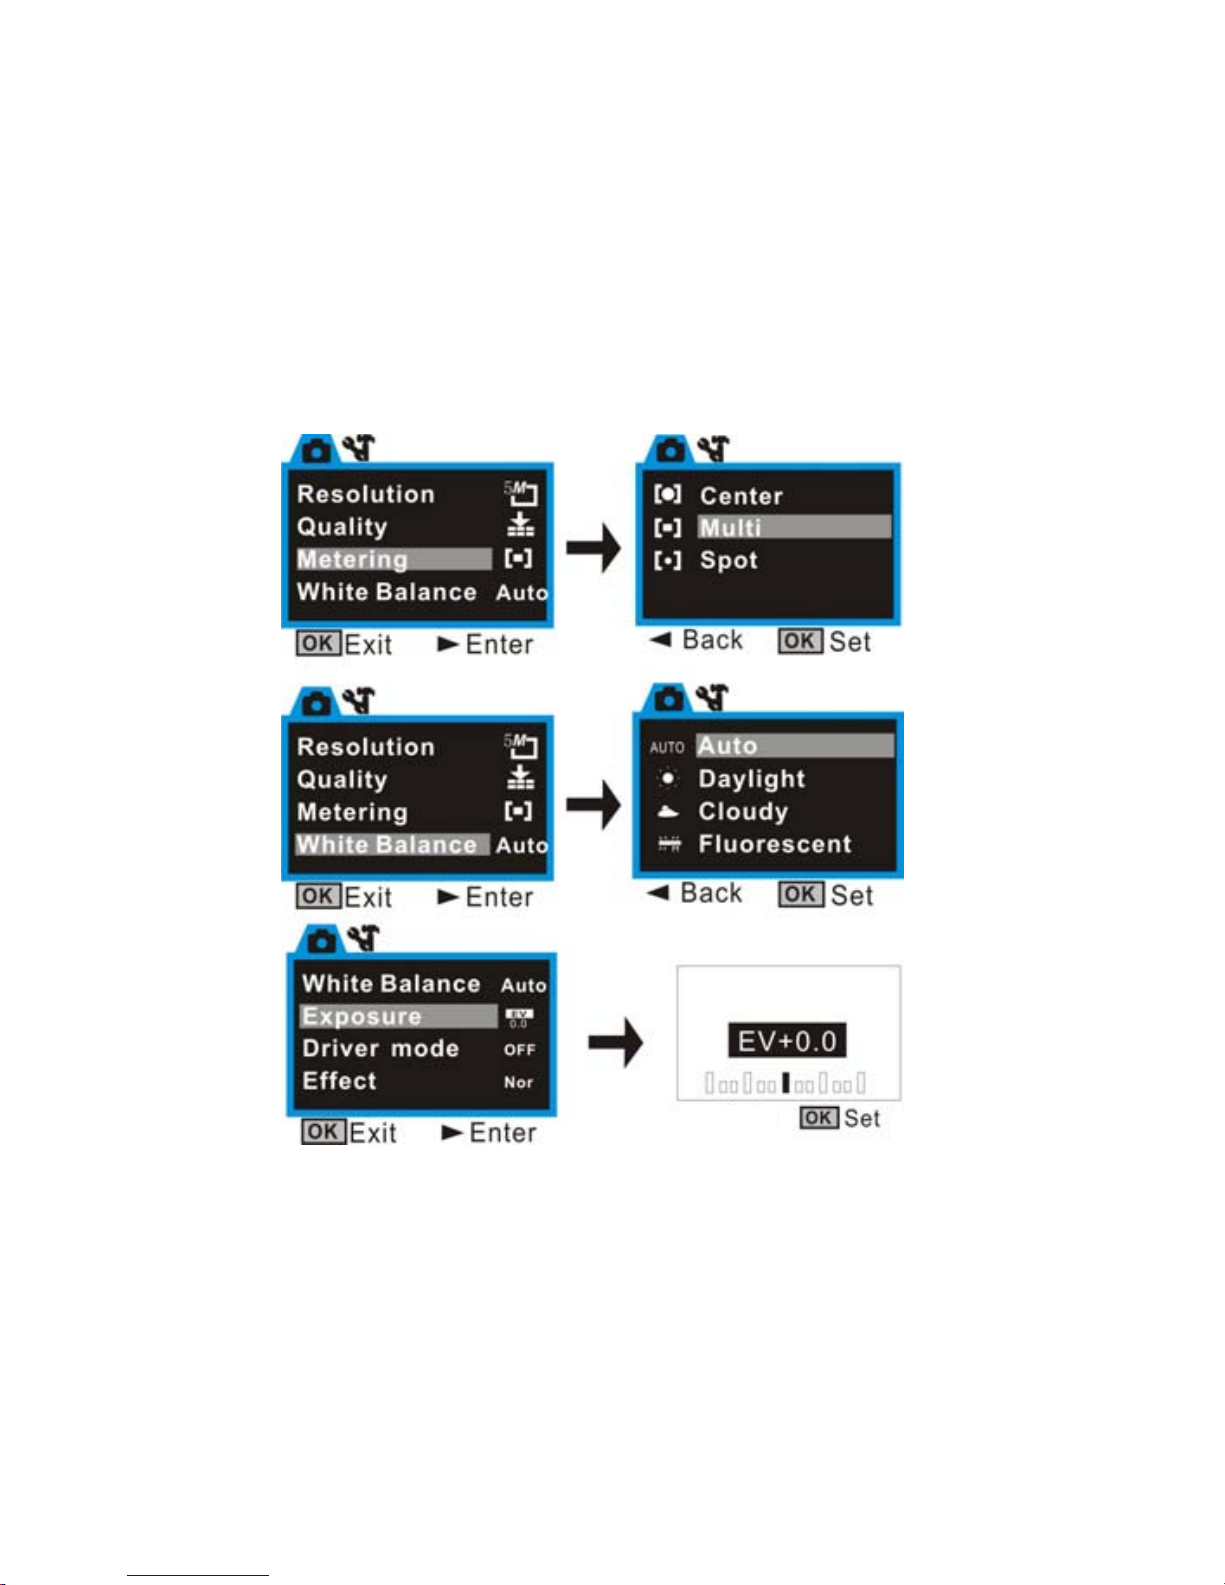
17
Page 20
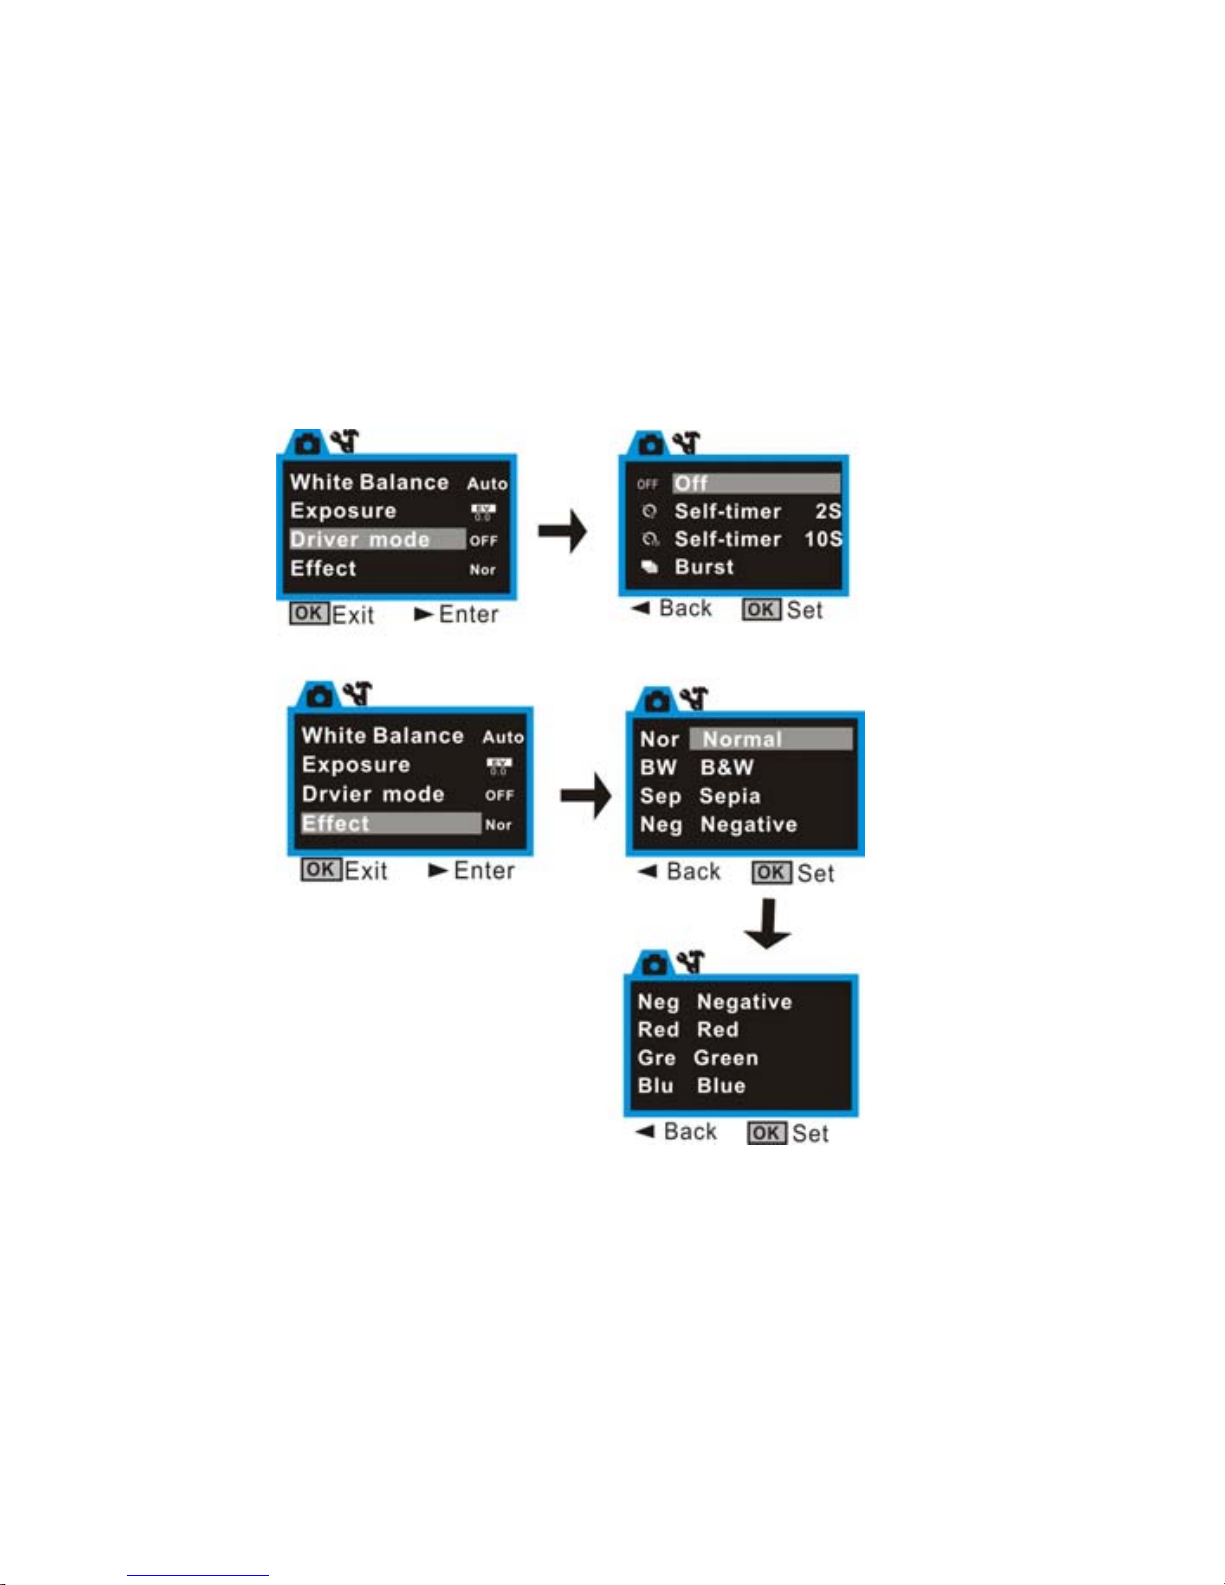
18
Page 21

Self timer:
Set the Driver mode is Self timer 2s or 10s at menu, then press Shutter key will time
with beep, after 2 seconds or 10 seconds, the camera will snap one photo
automatically
Continuously take three photos:
Set the Driver mode is Burst at menu, then press Shutter key will snap three photos
continuously
19
Page 22
11. Playback Mode:
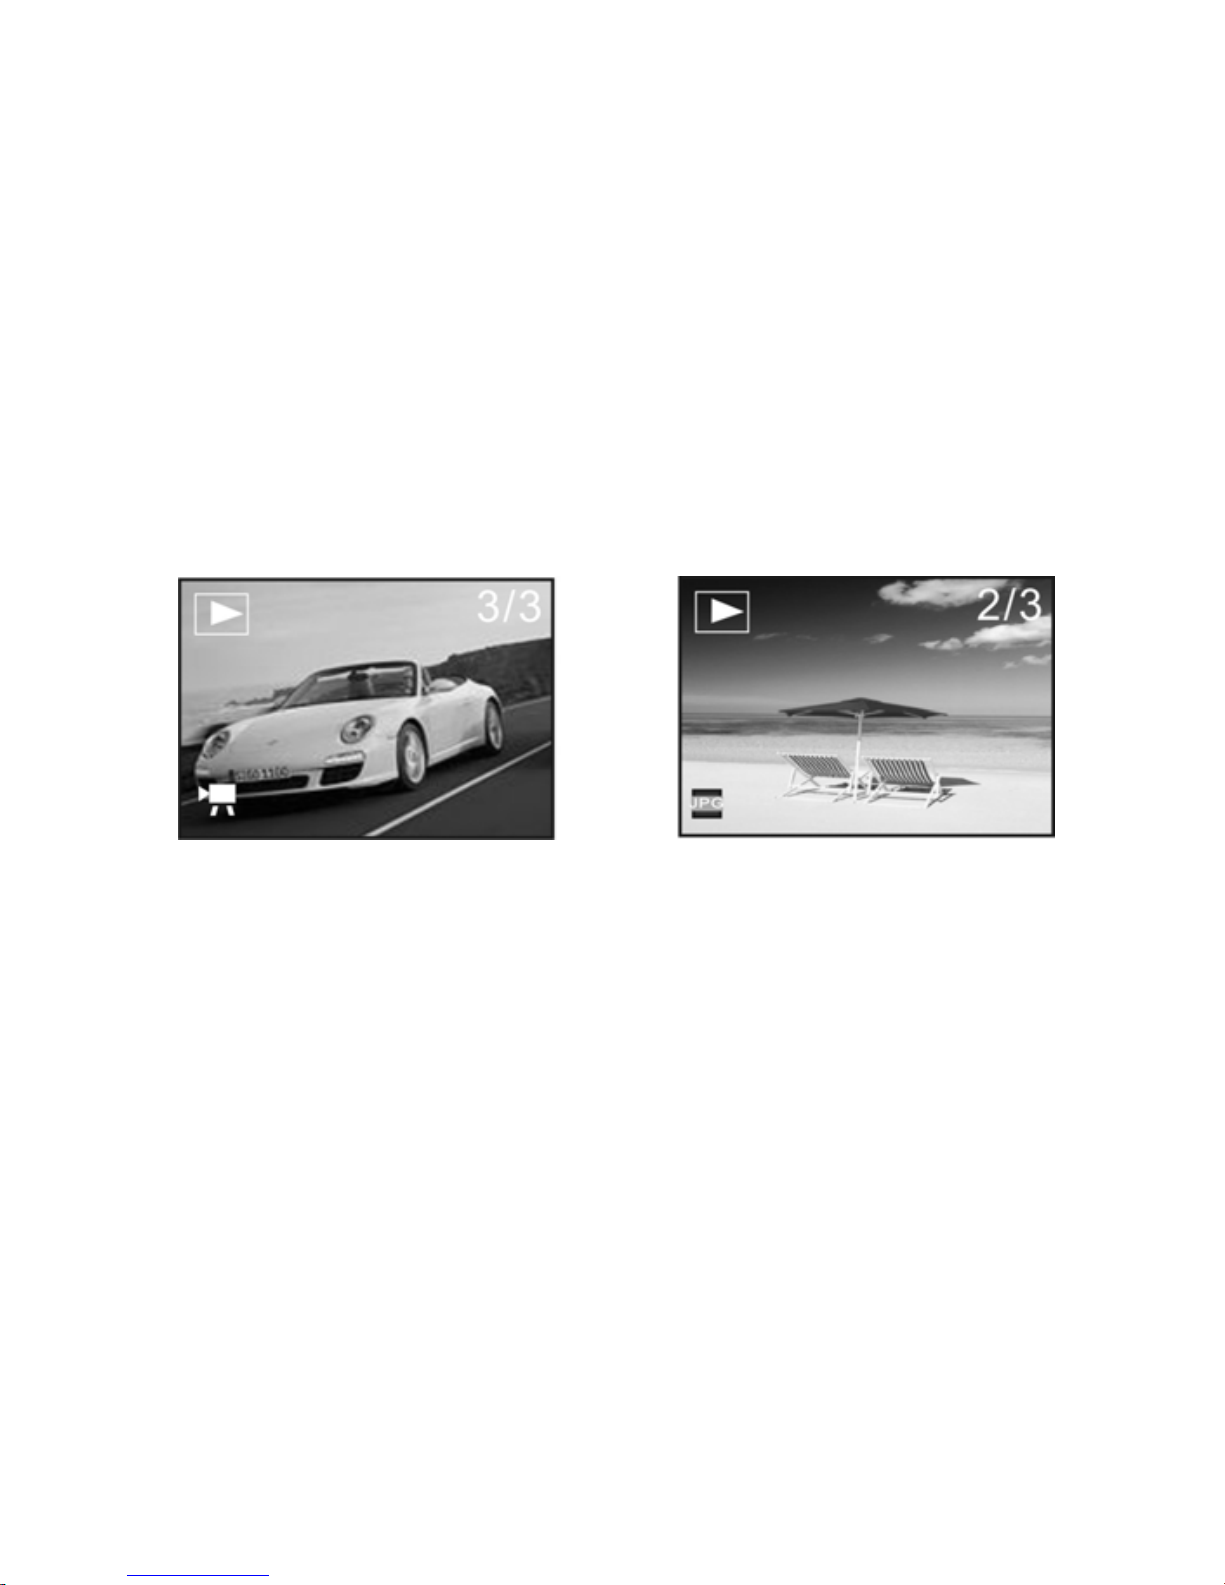
Enter Playback Mode
Press mode key continuously can enter Playback mode or press it twice to enter
Playback mode after press Power key switch on the camera.
AVI file JPG file
You can view other photos or AVI files by direction key of left or right;
You can zoom in or zoom out the photo to view by pressing zoom key
20
Page 23
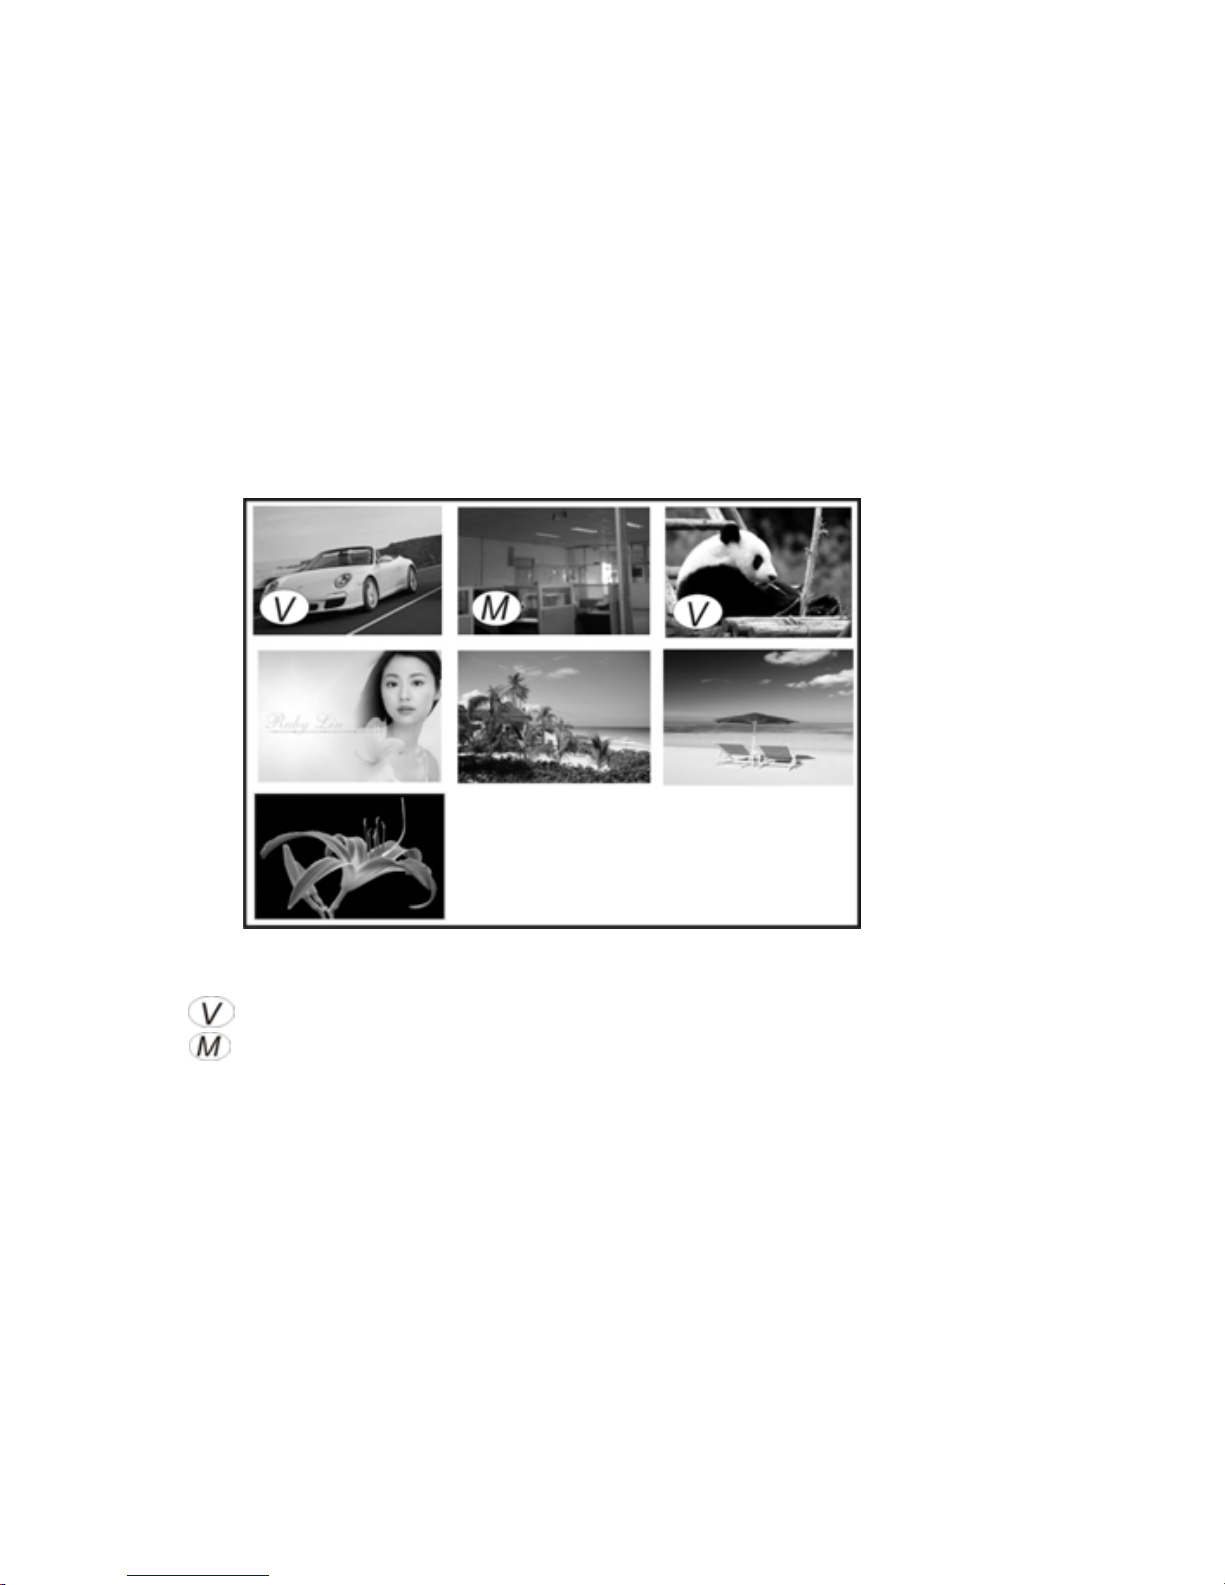
Thumbnail mode
Press Zoom out key can enter thumbnail mode at playback mode:
Note:
: This icon indicates that is one AVI media file.
: This icon indicates that is one JPG file with voice memo.
You can press direction key to choose the desired image file, and press Zoom in key to
exit this thumbnail mode return full screen mode.
21
Page 24
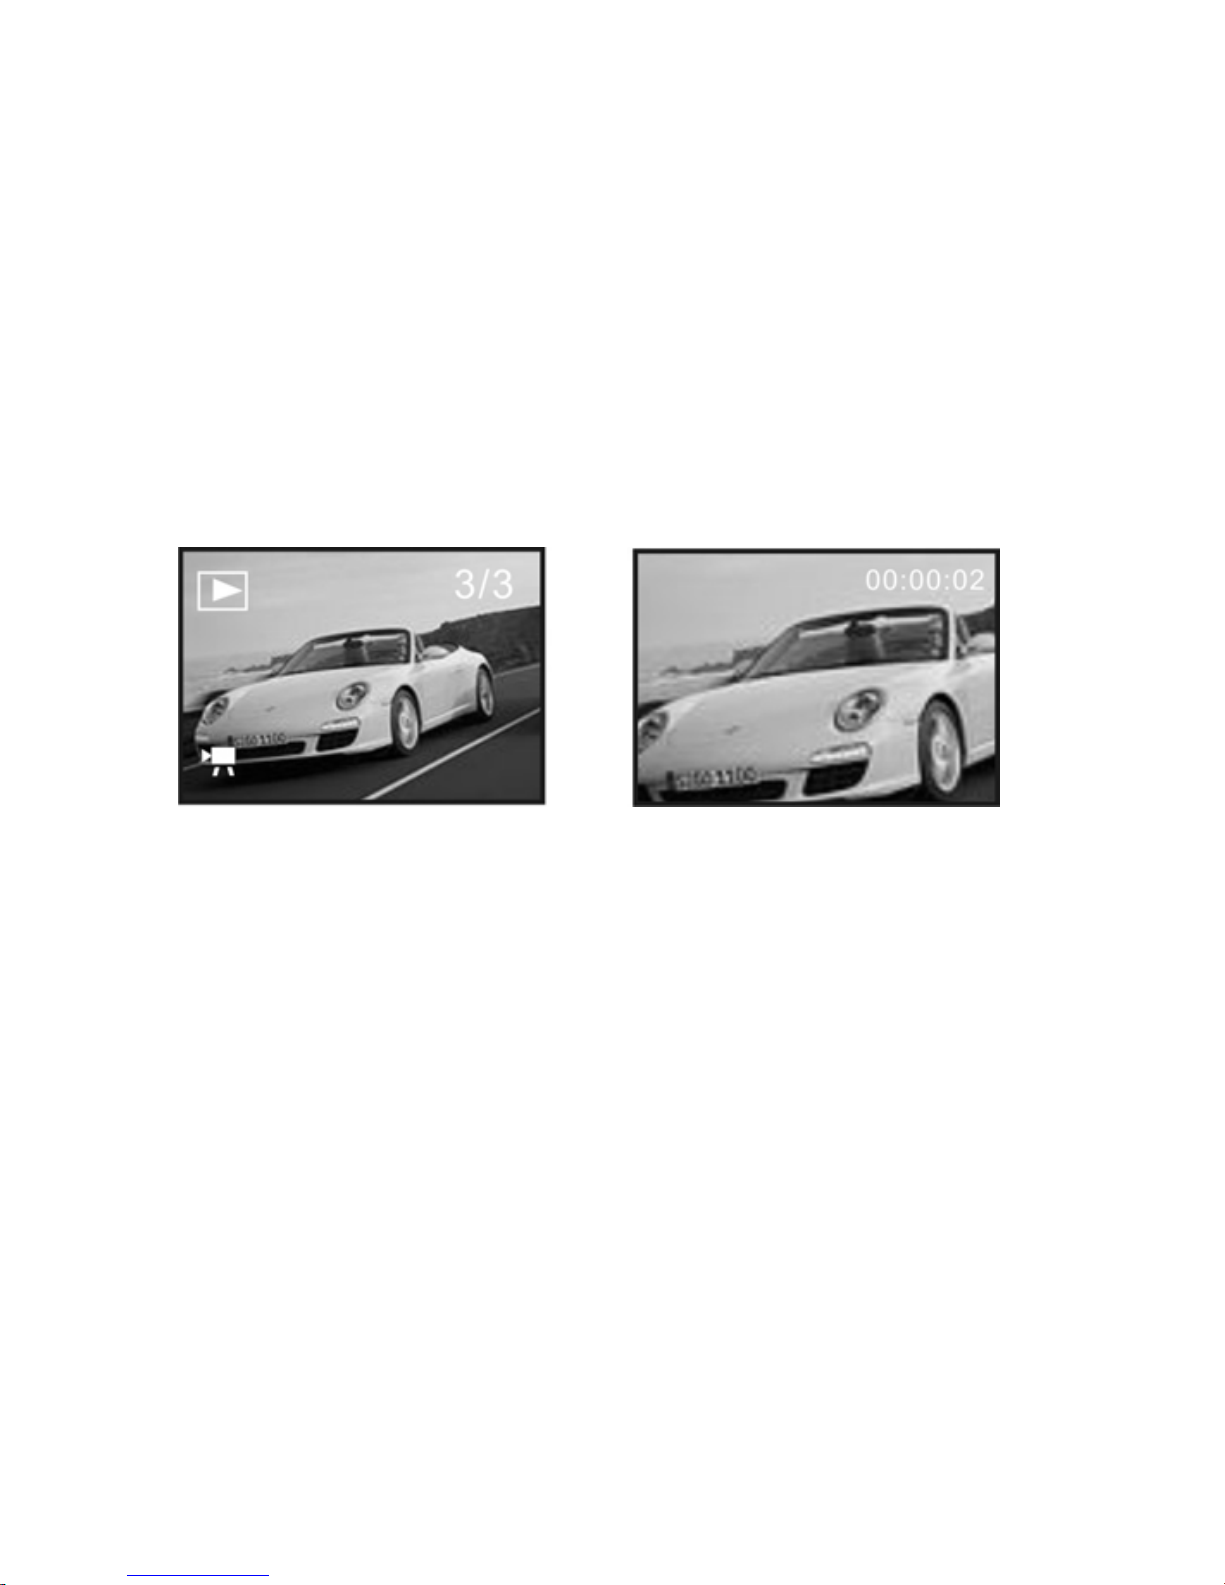
Play AVI file
Press Shutter key to start play the selected AVI files at playback mode, and you
can press Shutter key again to stop playing.
Stop mode Playing mode
22
Page 25
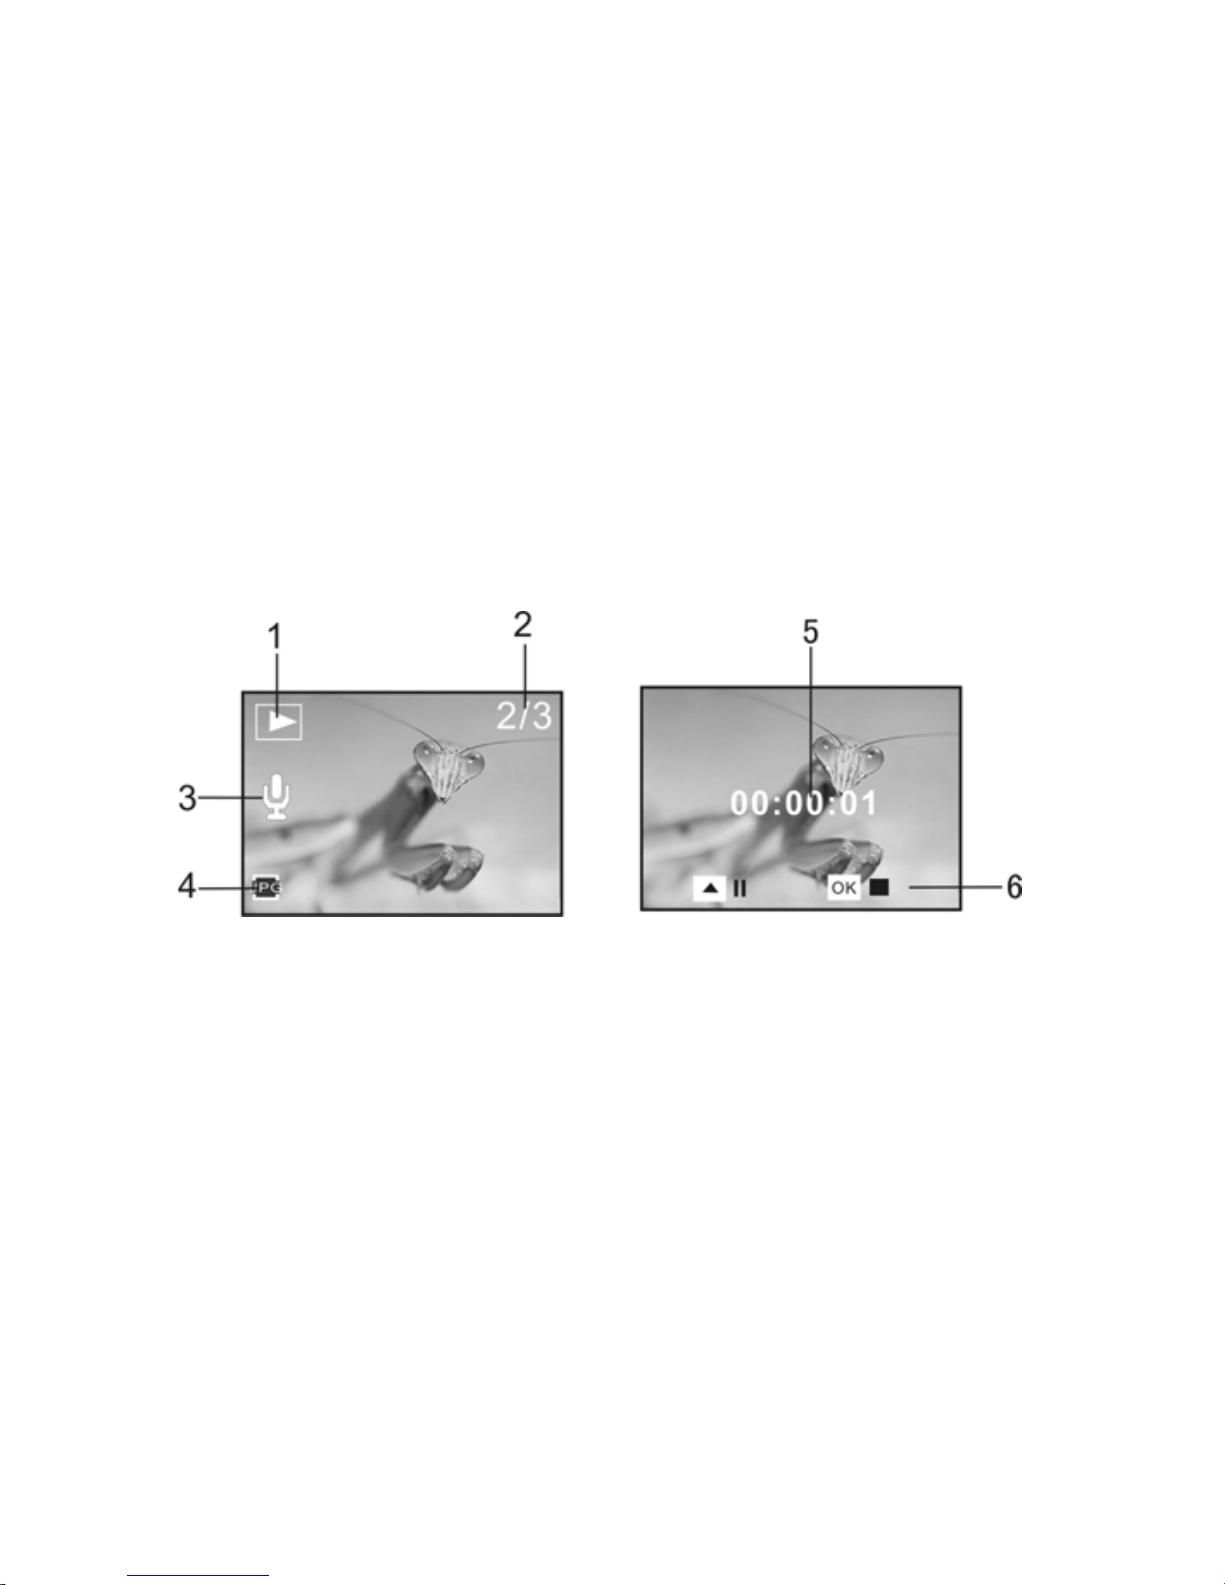
Play JPG (with voice memo) file
1 Select the photo was added voice memo at playback mode;
2 Press Shutter key to start play the selected jpg(with voice memo) file:
Press OK key to stop playing, UP key to pause/resume playing,
1 Playback mode icon 5 Timer of playing
2 Counter of image 6 Control panel for playing
3 Voice Memo indicator
4 Indicator of JPG file
23
Page 26
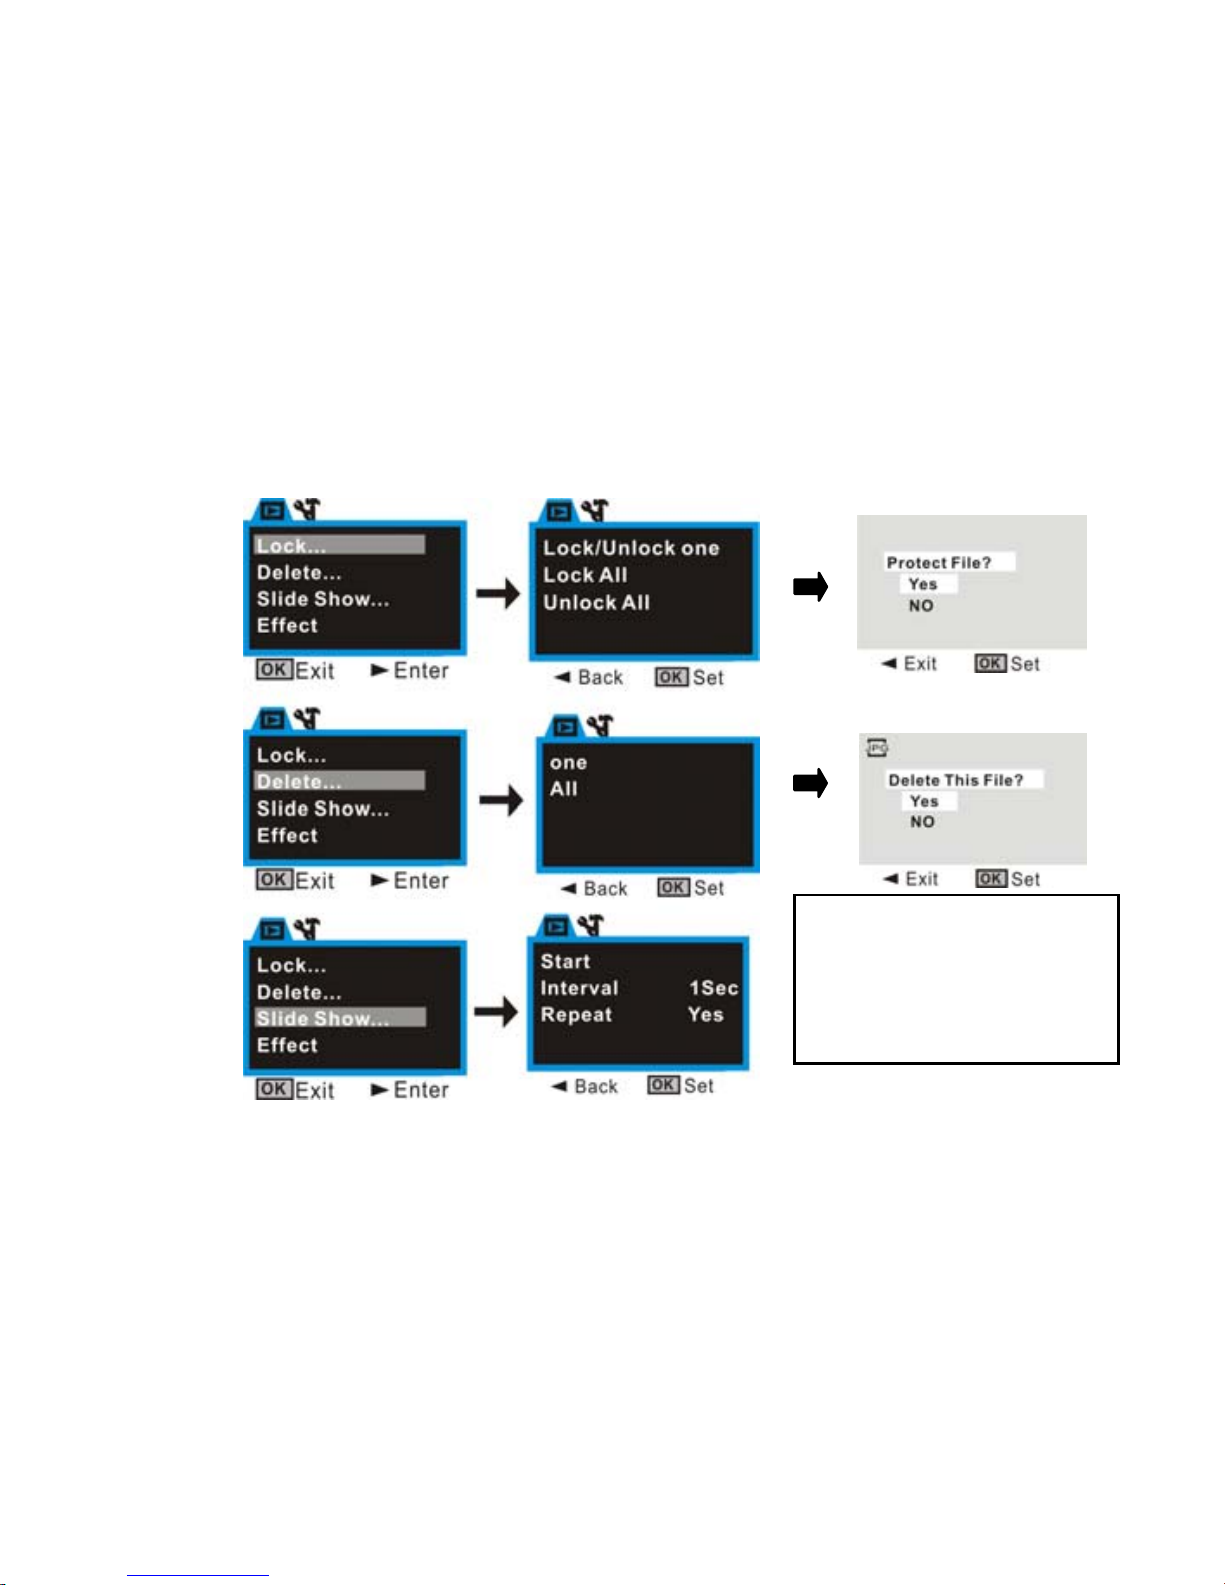
Playback menu:
At Playback mode, press OK key enter main menu:
Note: The locked files
can not be deleted until
unlock them or do
the o
p
eration of format.
24
Page 27
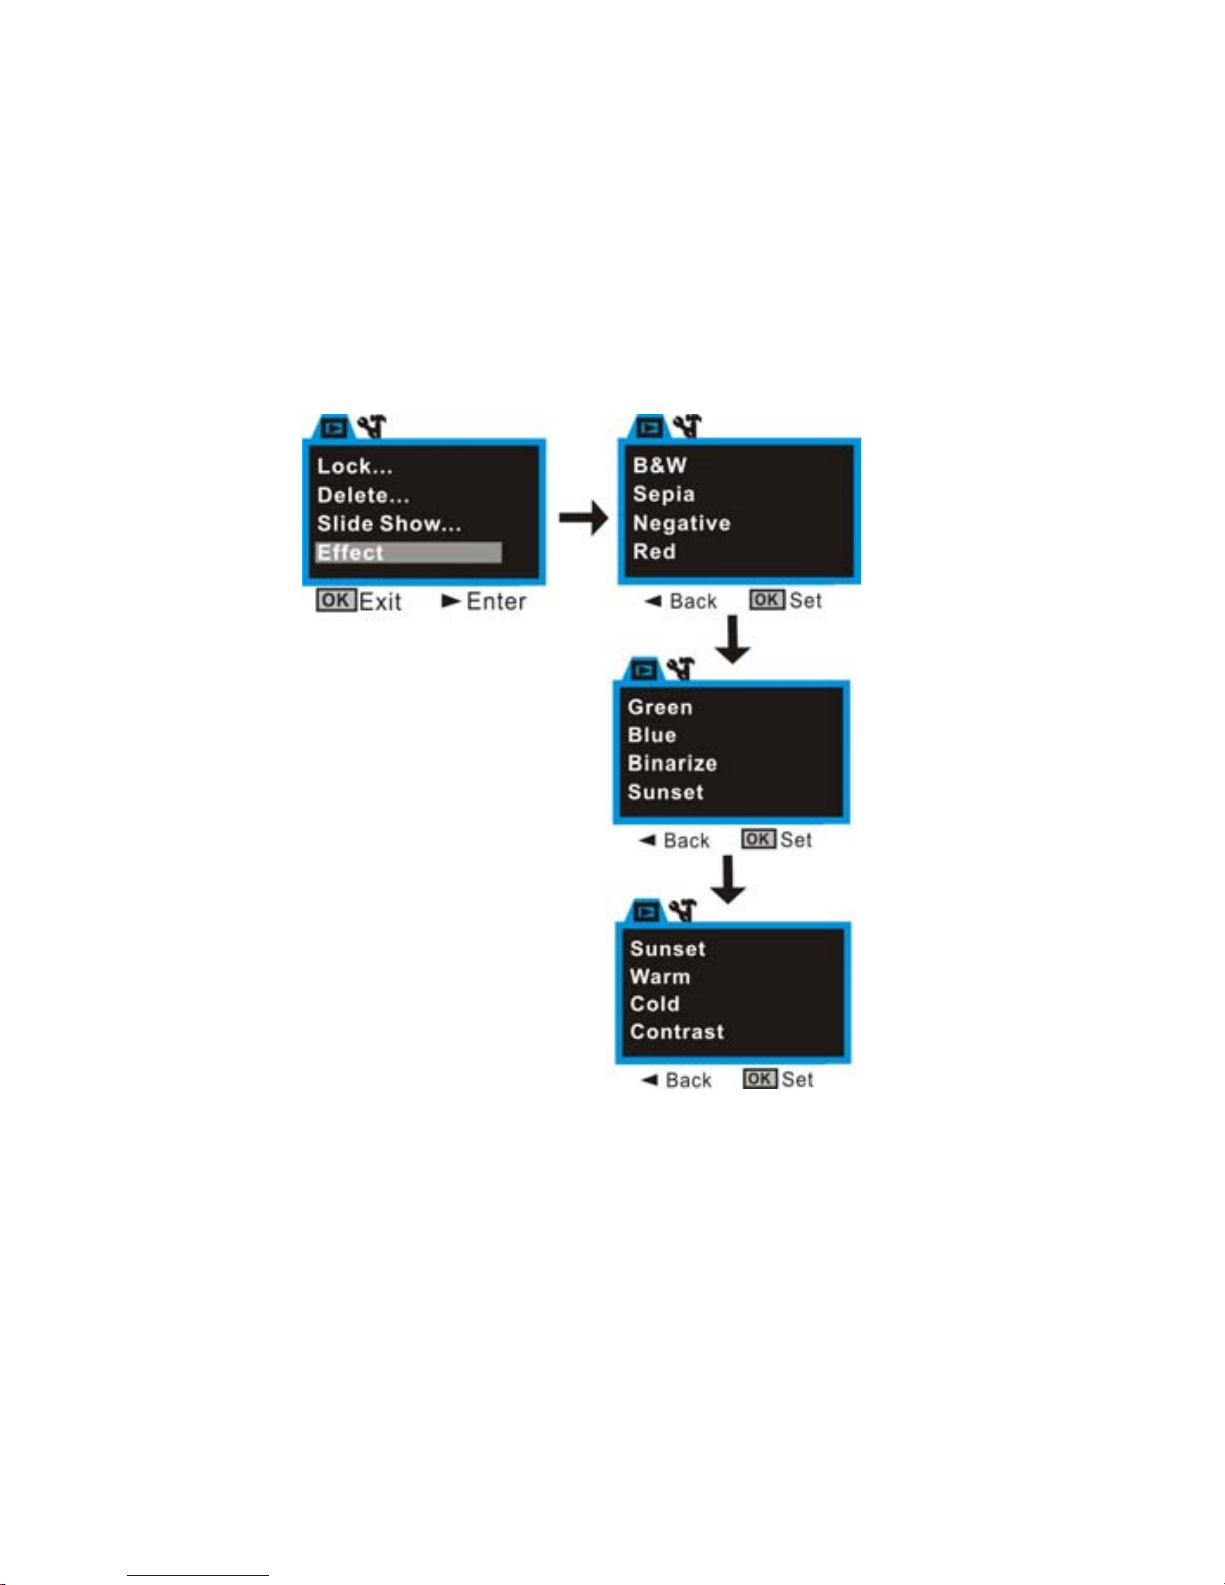
25
Page 28
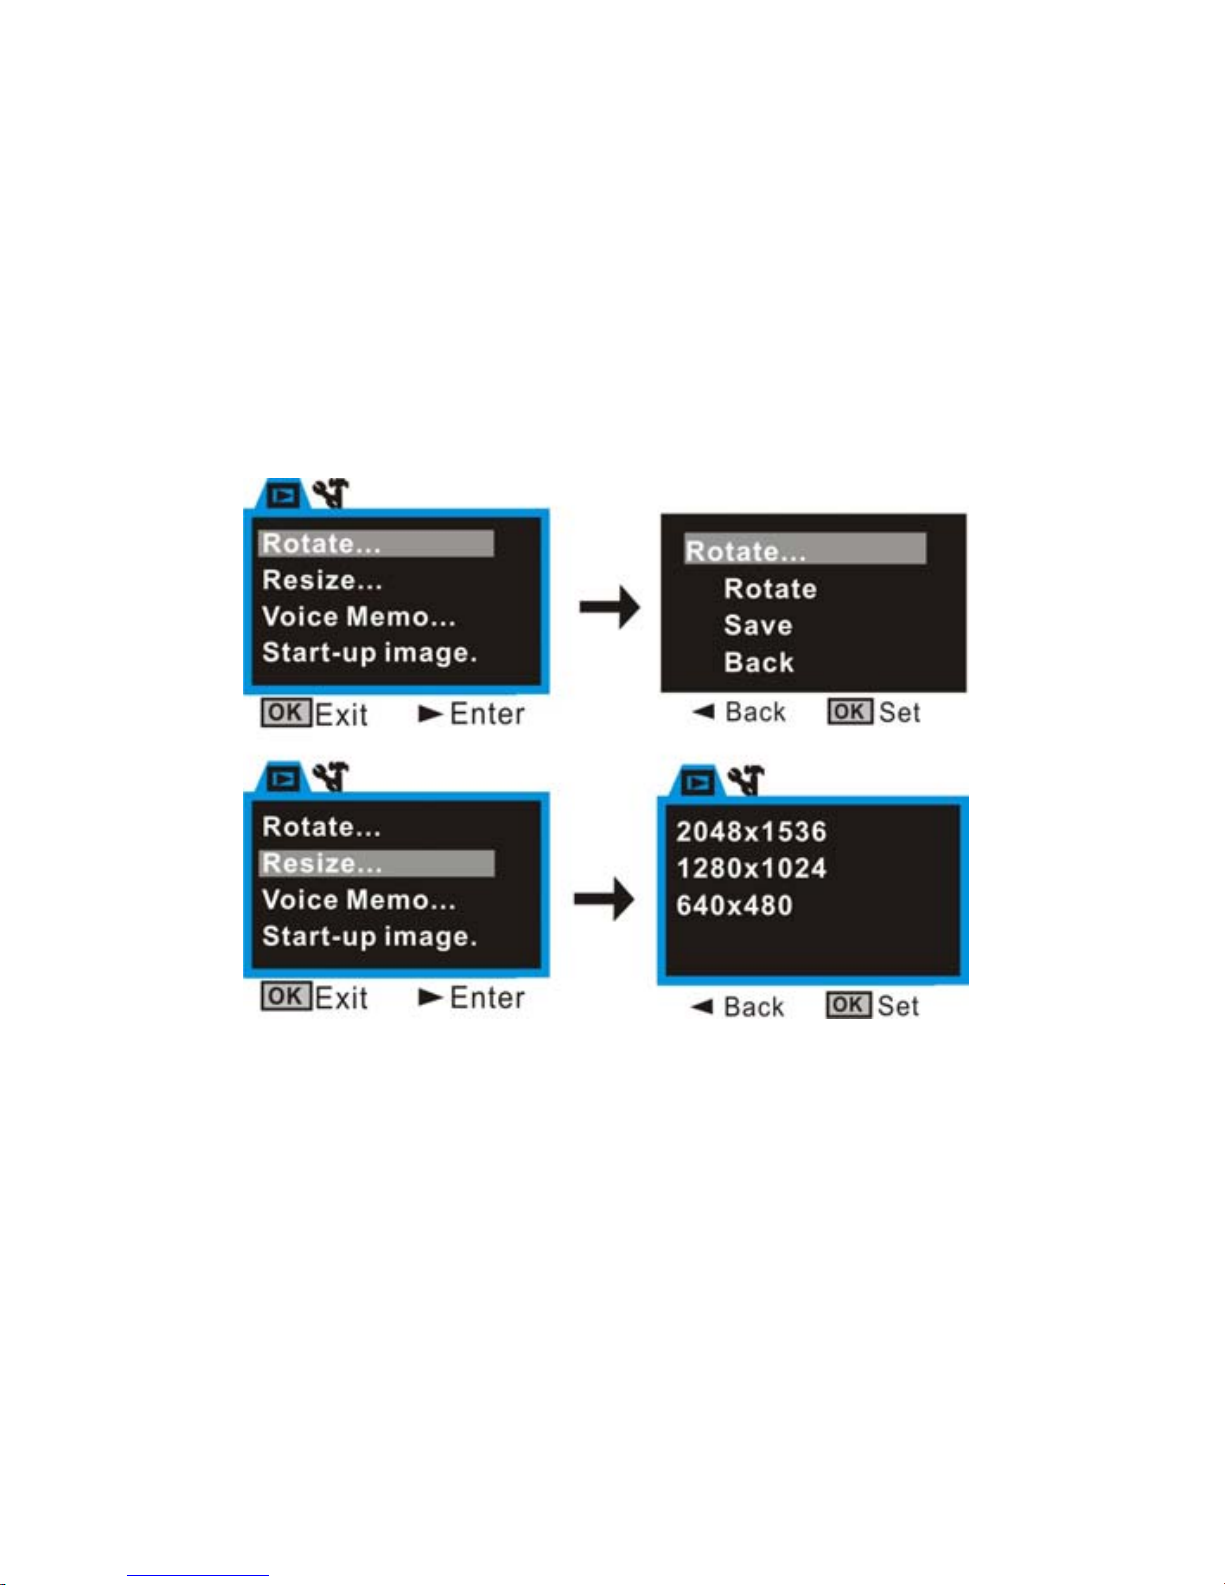
Add Effect for Image
Resize Function:
The image size selected must be smaller than the size of current photo.
26
Page 29
27
Page 30
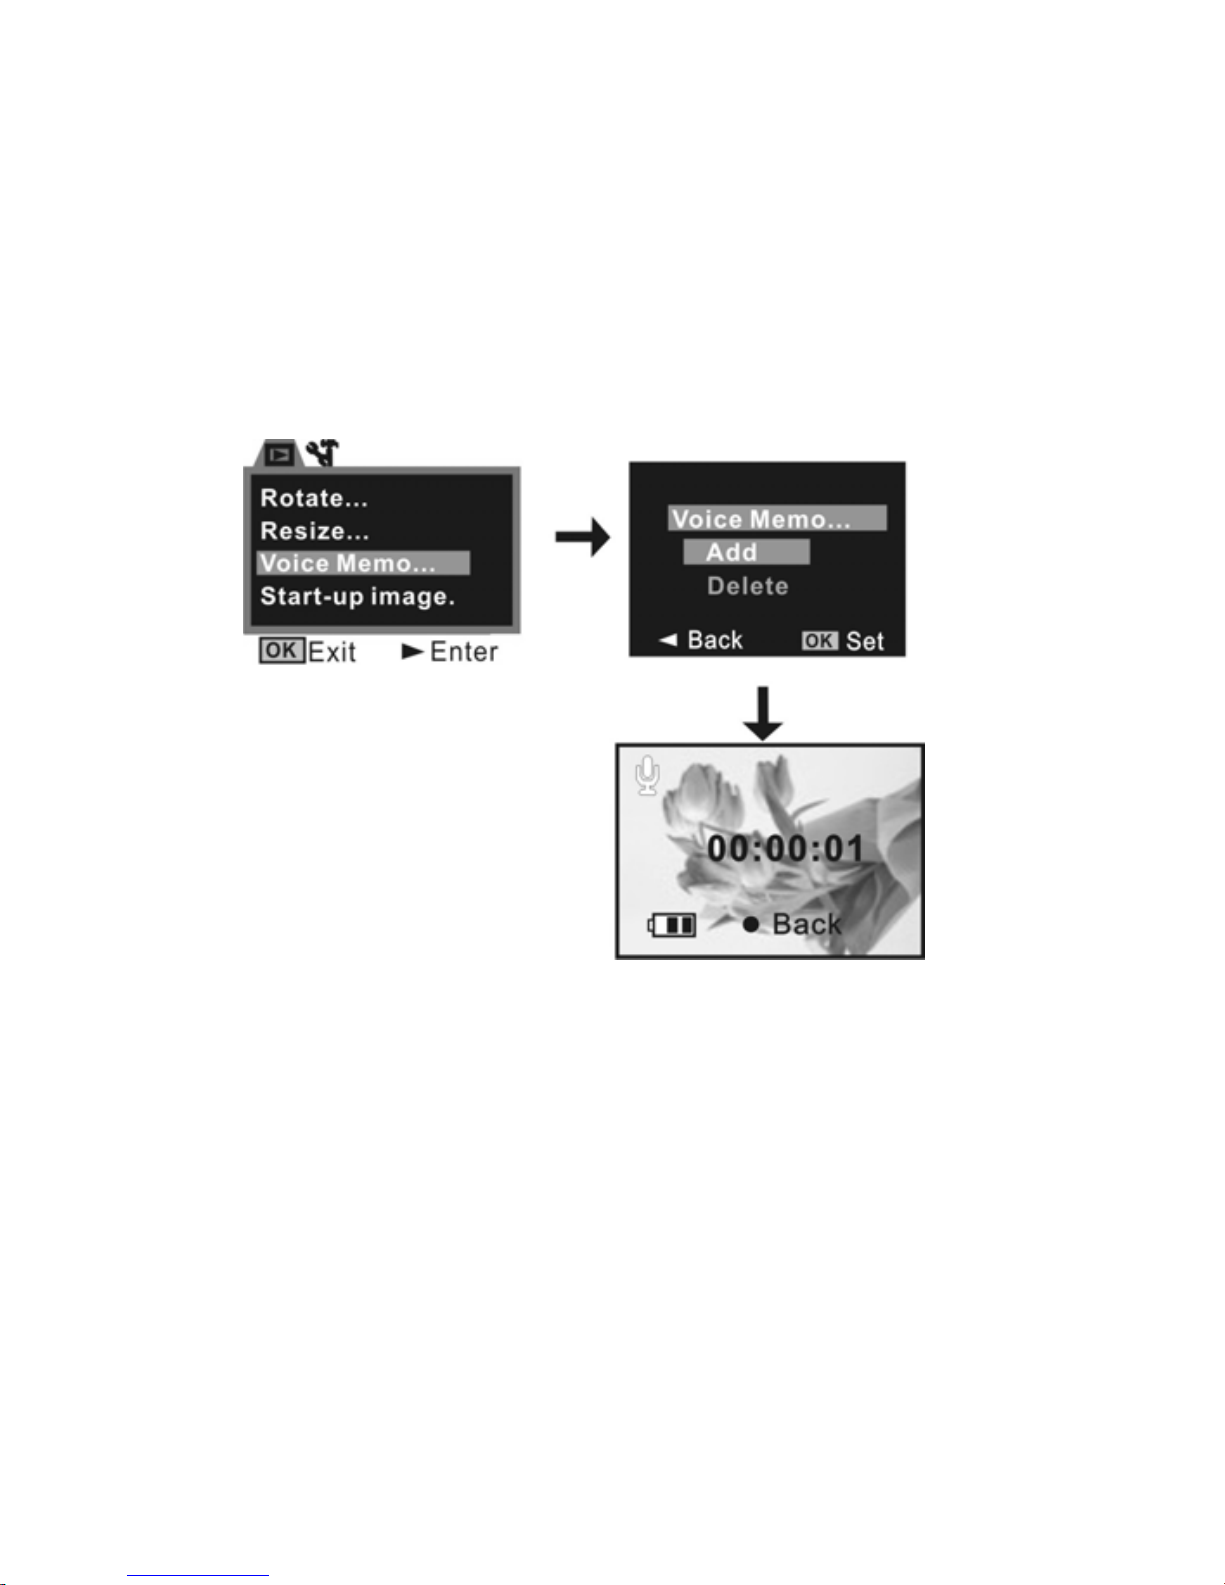
Add Voice Memo for Image:
The time of Voice Memo can be recorded about 30s only.
28
Page 31
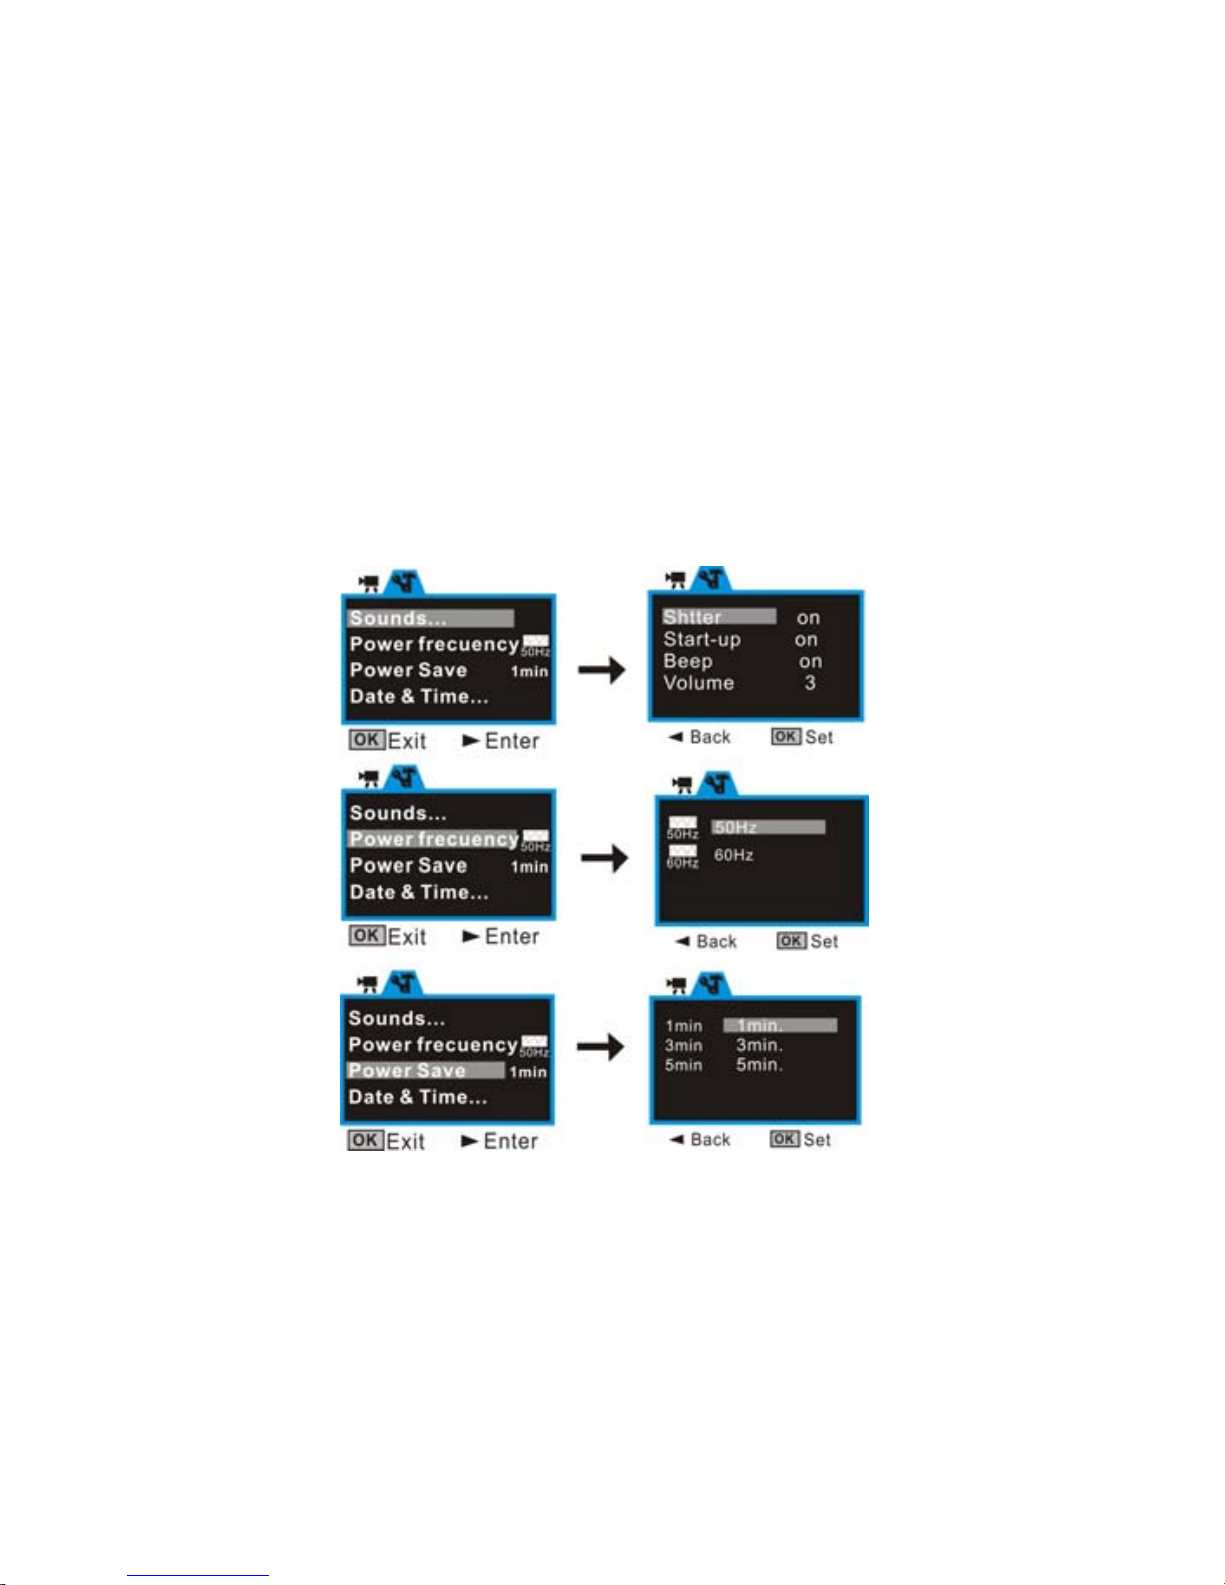
12. Setup Mode:
Press OK key at preview or playback mode and then press direction of Right key
once will enter Setup mode. You can choose the menu item by Up or Down key, enter
or exit submenu by Left or Right key, and confirm setting by OK key.
29
Page 32
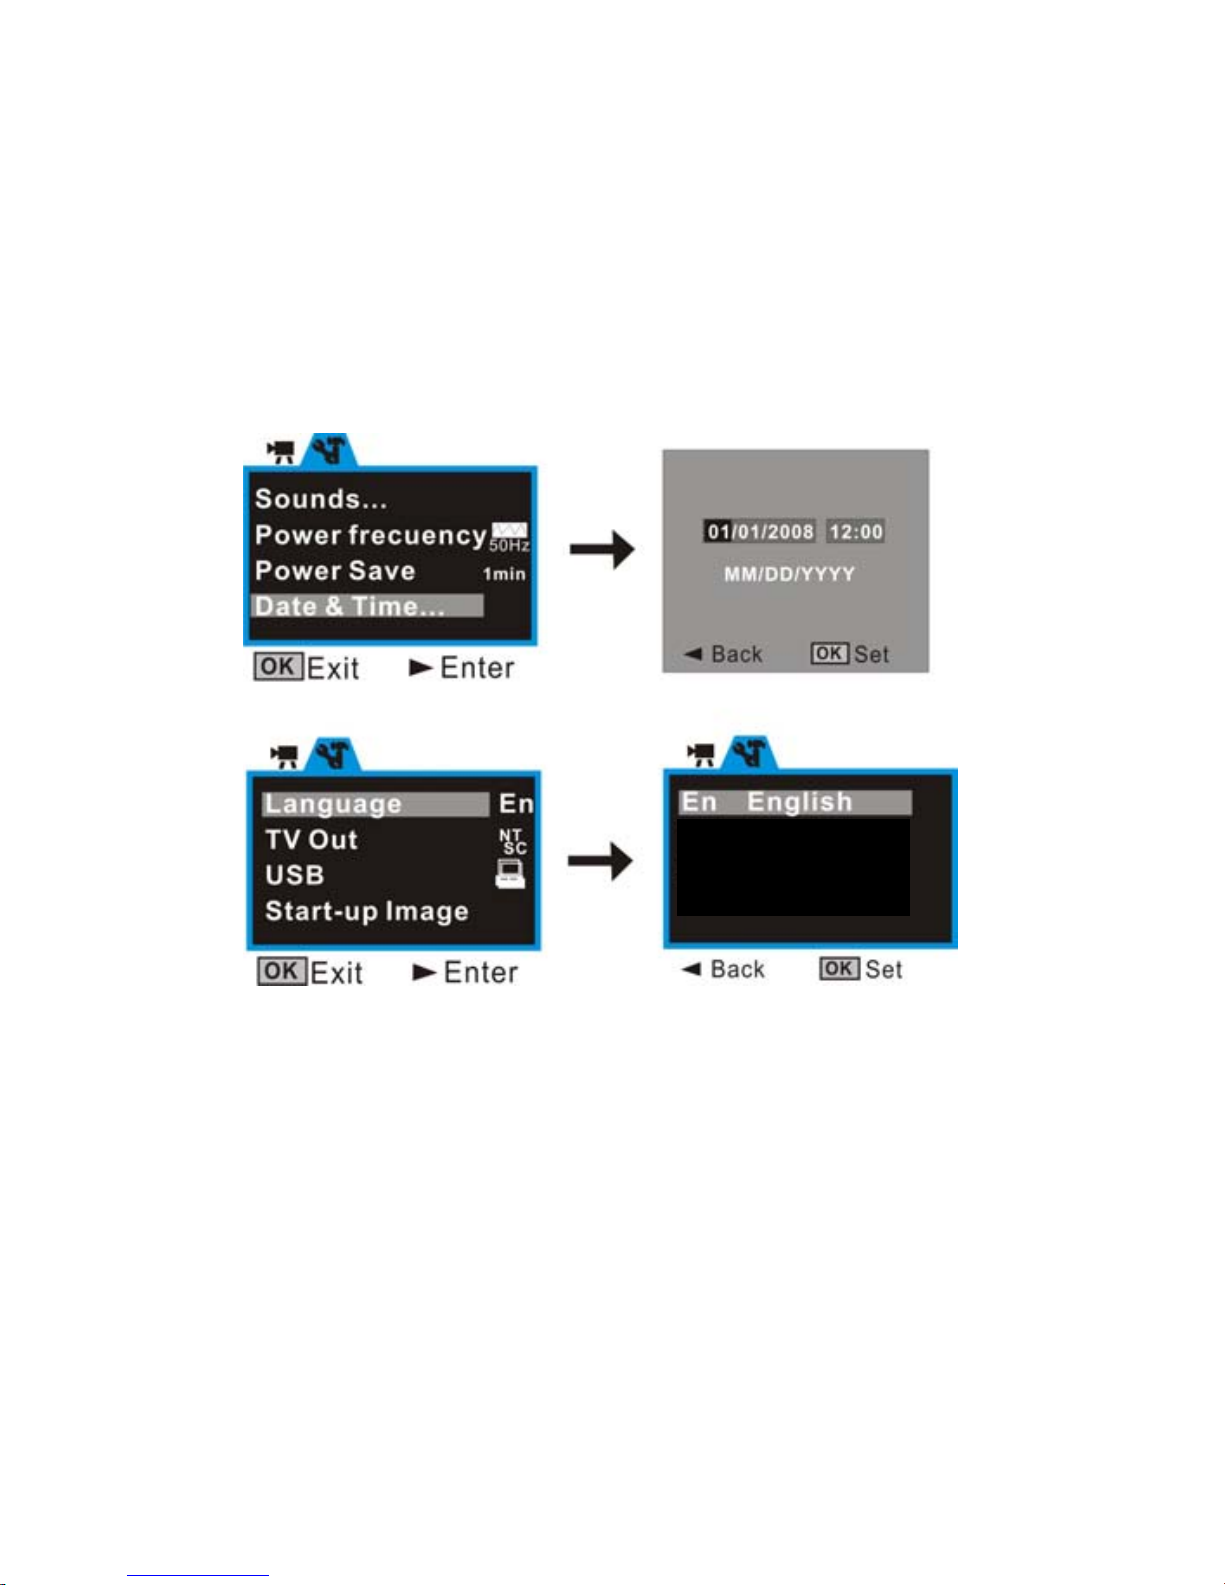
De German
Fr French
Es Spanish
30
Page 33
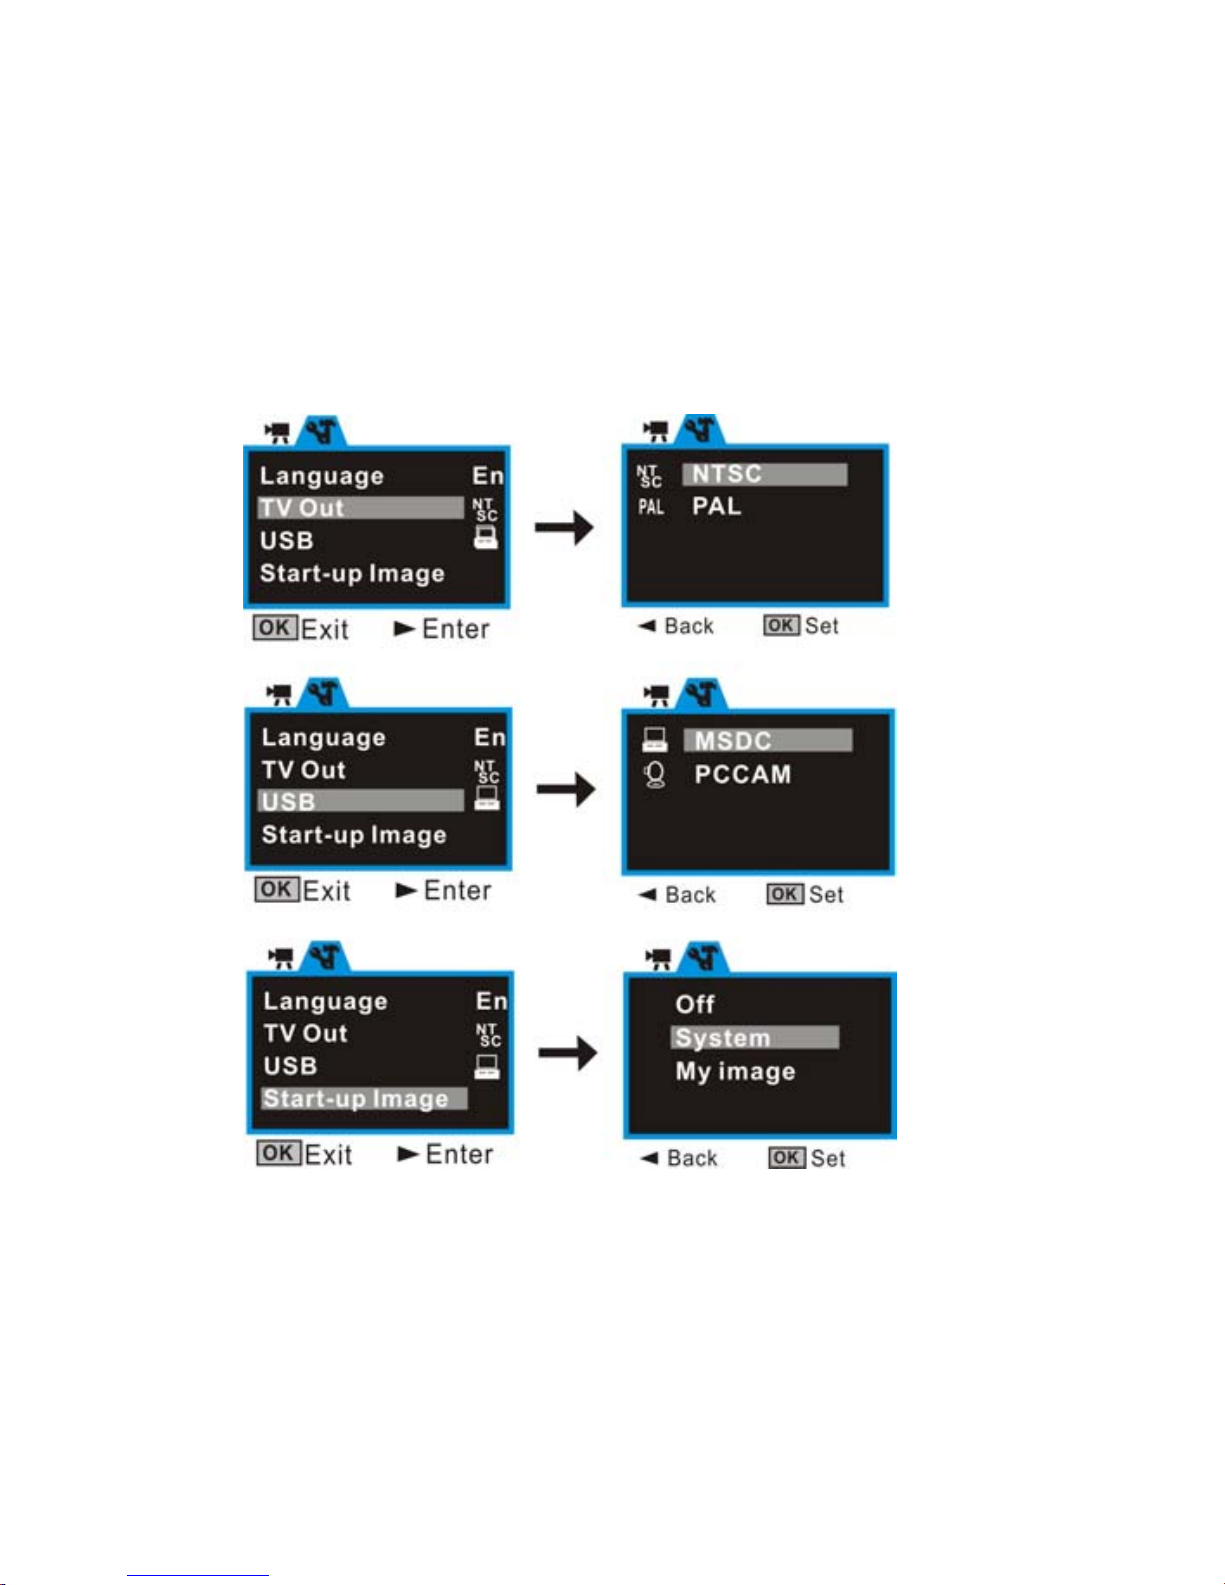
31
Page 34
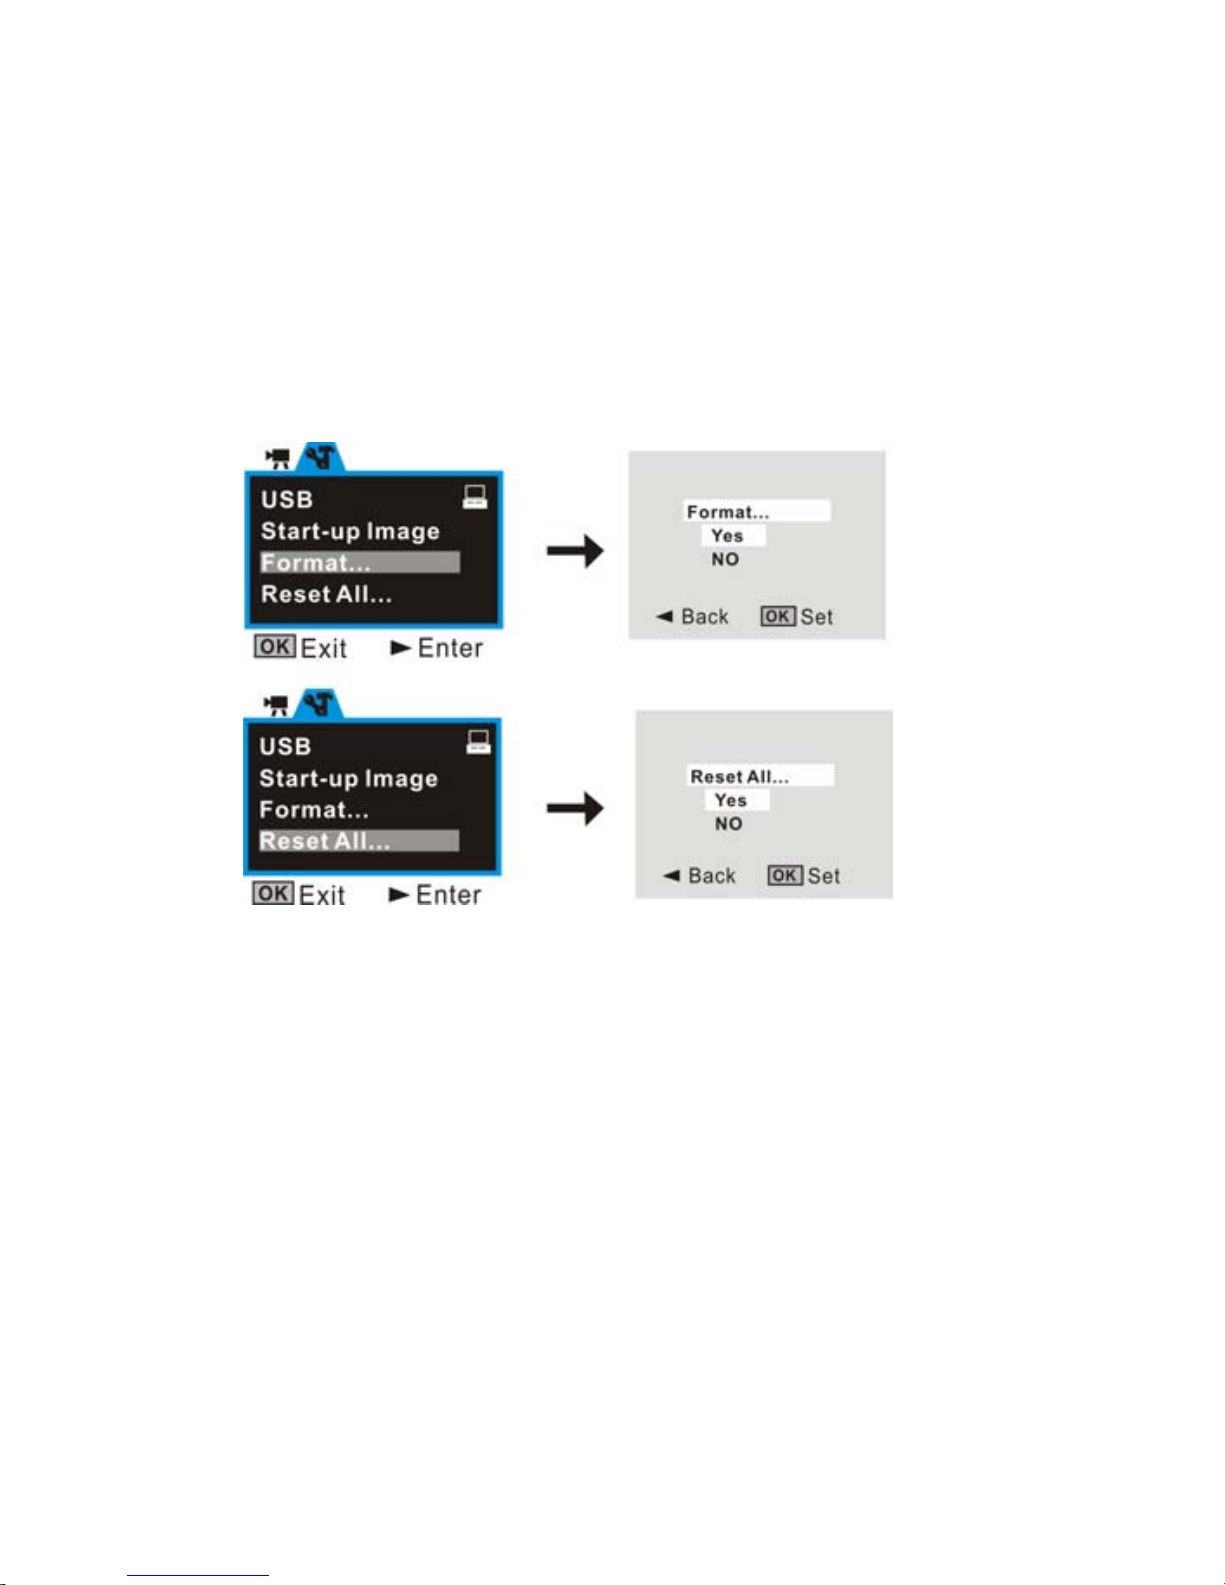
Note:
1. The files stored in card will be lost due to format operation, please backup the
data before formatting the memory card.
2. The “My image” menu can be activated while you had set “Start-up Image”
function.
32
Page 35
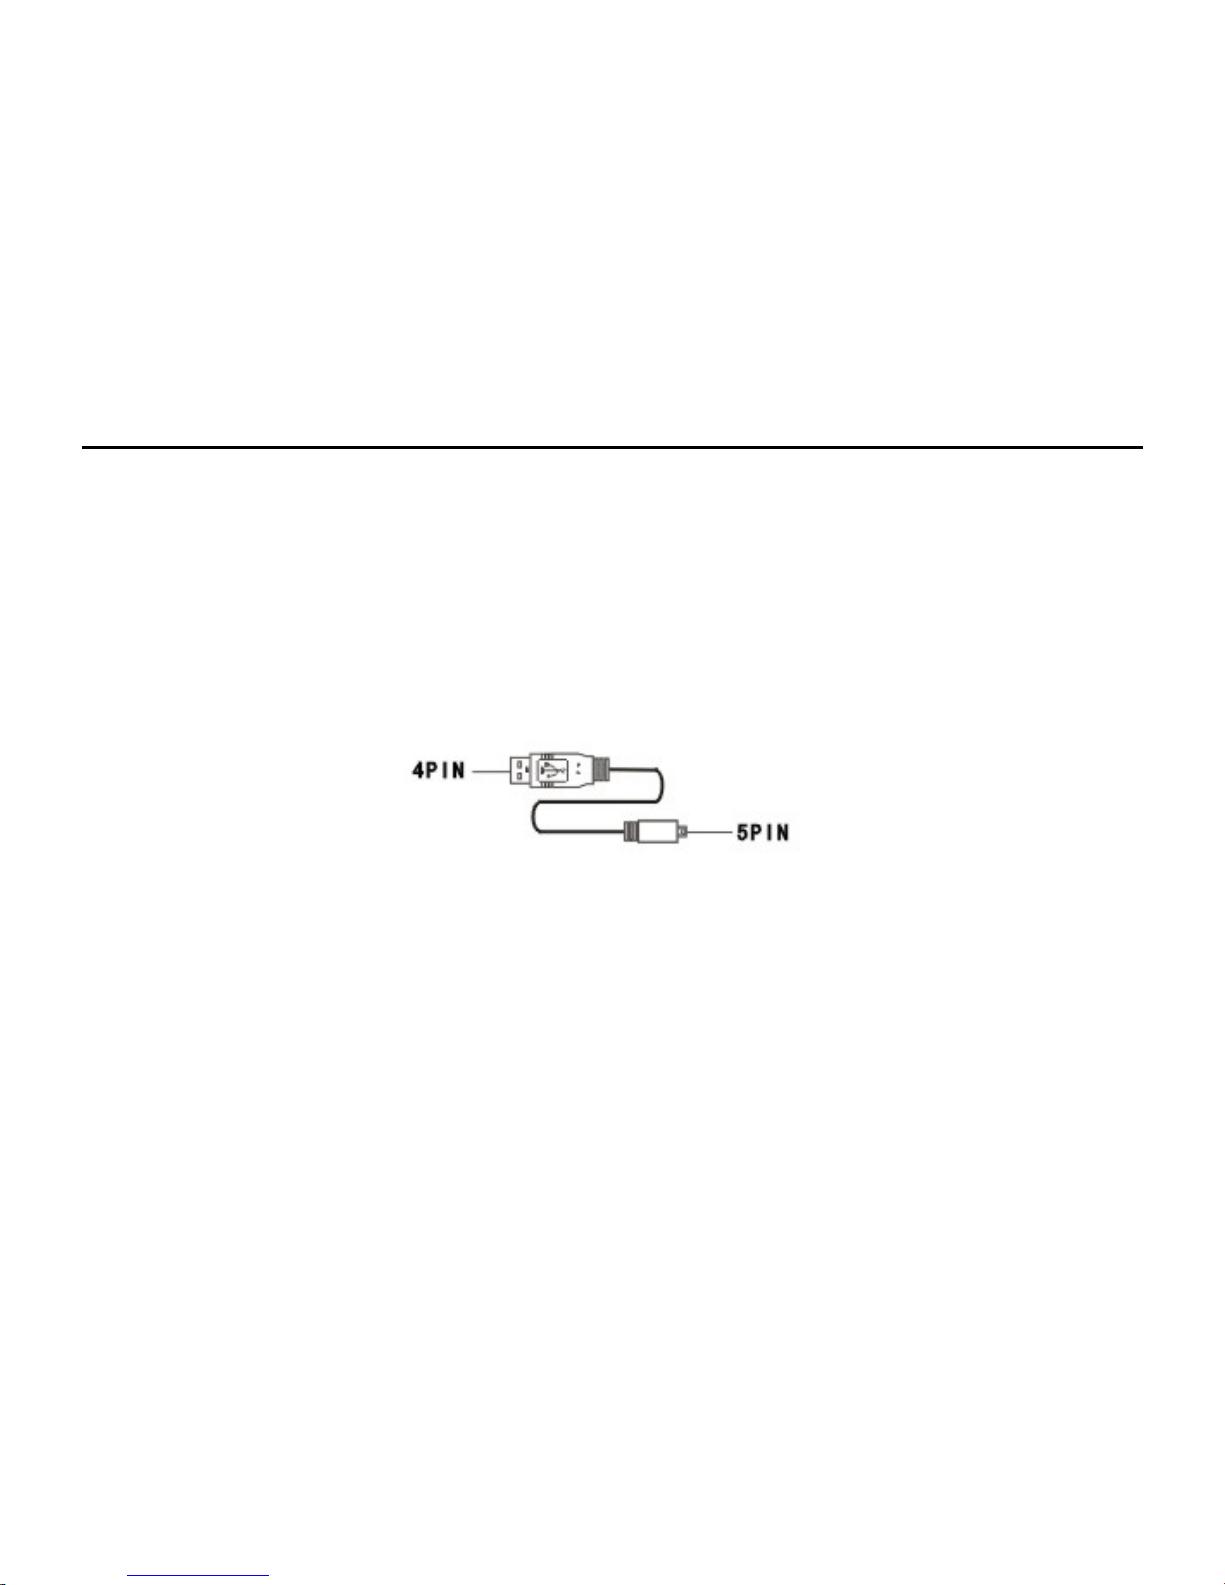
Application to PC
1. Connect to PC
Please install the drive program first before connecting the camera to the computer.
There are two USB modes which are MSDC and PCCAM, and default is MSDC
mode. Turn on the camera power. If the PC camera function of the camera is to be
used, set the camera is PCCAM mode at setup menu. If the removable disc function
of the camera is to be used, please set the camera is MSDC mode at setup mode.
Connect the 4PIN end of the USB line to the available USB interface on the
computer. Connect the other end (5PIN) to the USB interface of the camera.
Download files from the camera to the computer: When the removable disc function
of the camera is used, a removable disc icon will appear in the window of “My
Computer”. The photos/video files you have shot are saved in the file folder \ DCIM\
100MEDIA in the removable disc. Select the shot/recorded files in the file folder
"100MEDIA". Copy (or drag by using the mouse) the files to the file folder in the hard
disc in which you are going to save your files.
Note: Drive is not needed to use MSDC function in windows ME or later windows
version.
33
Page 36
2. Driver Install
You can use and operate the movable disc function and PC Camera provided by the
digital camera through PC. Please install the software driver program according to
the following steps before application.
Note: Don't connect the camera and computer USB port before installing the driver to
the computer to prevent driver installation mistake.
◎ Software installation interface
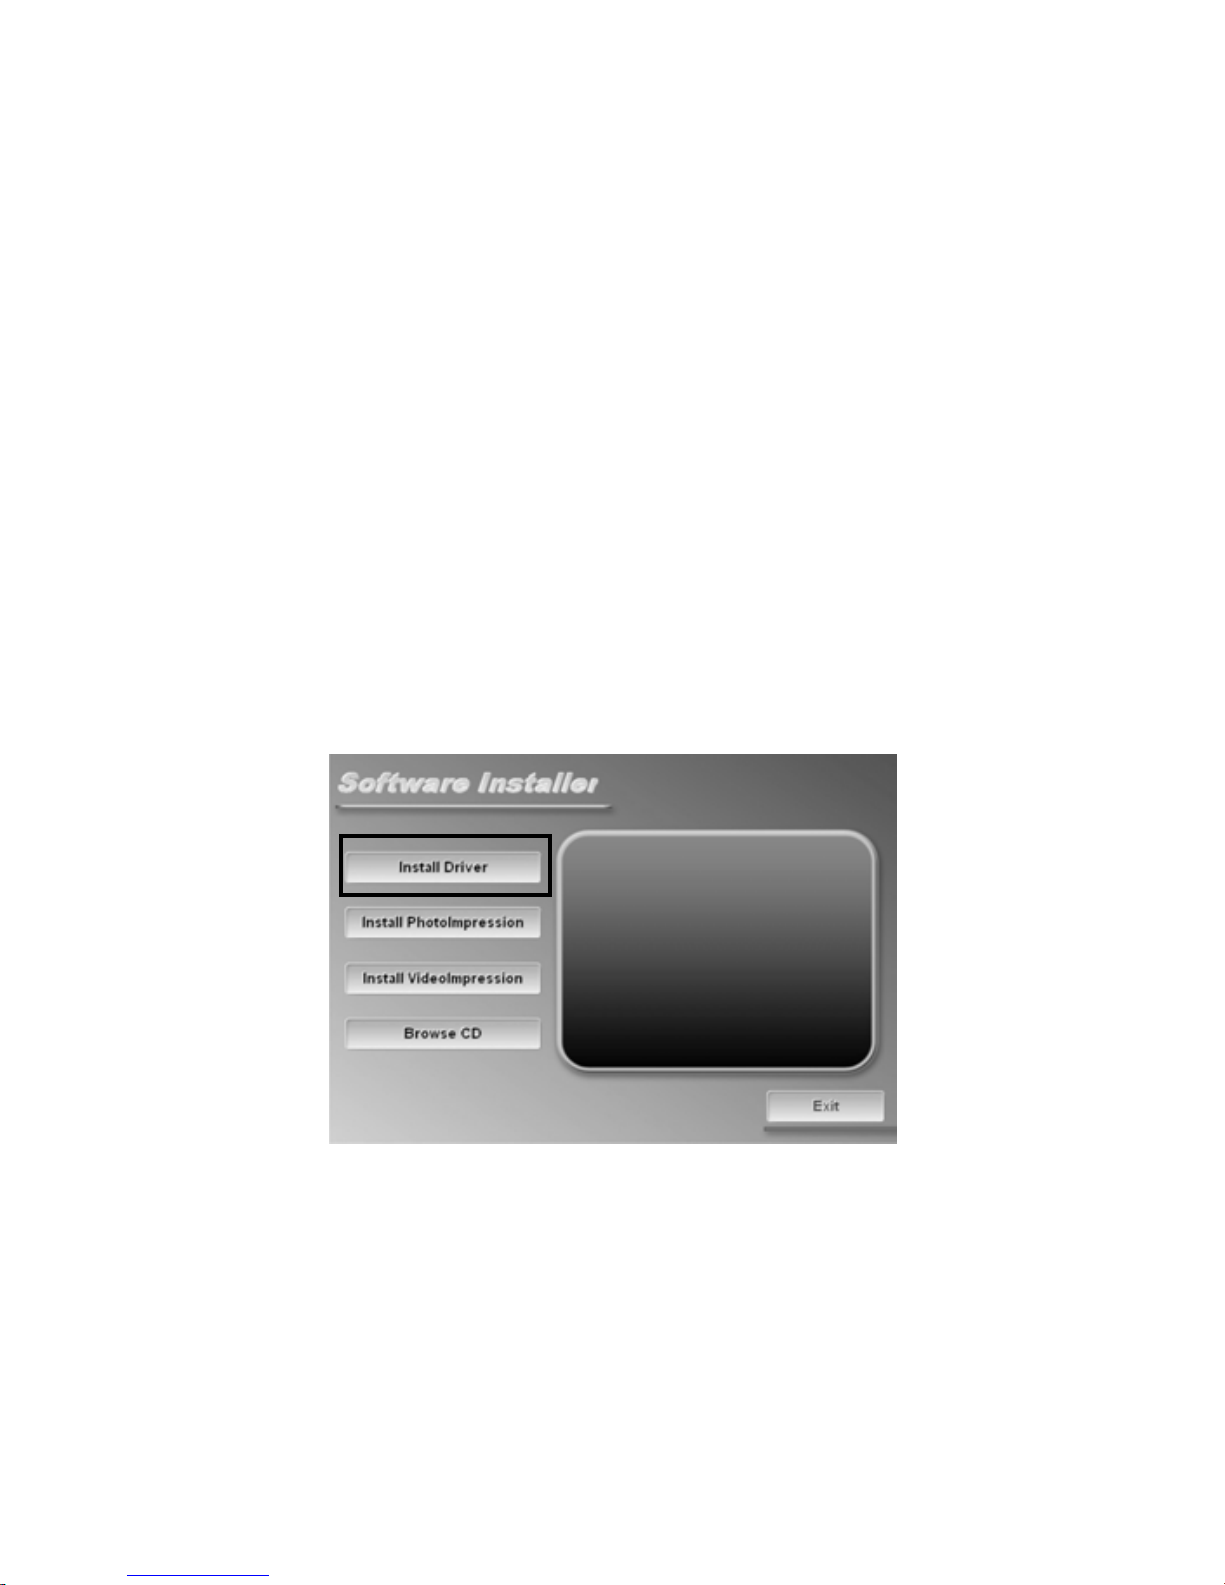
1. Please load the installation CD in the fitting into the computer photo driver;
2. The system will run the installation program in CD automatically, and the screen
will present the following window as shown below:
34
Page 37
z (If your optical driver has no auto execution or close auto execution function,
please directly click and run autorun.exe program located at the CD root
directory.)
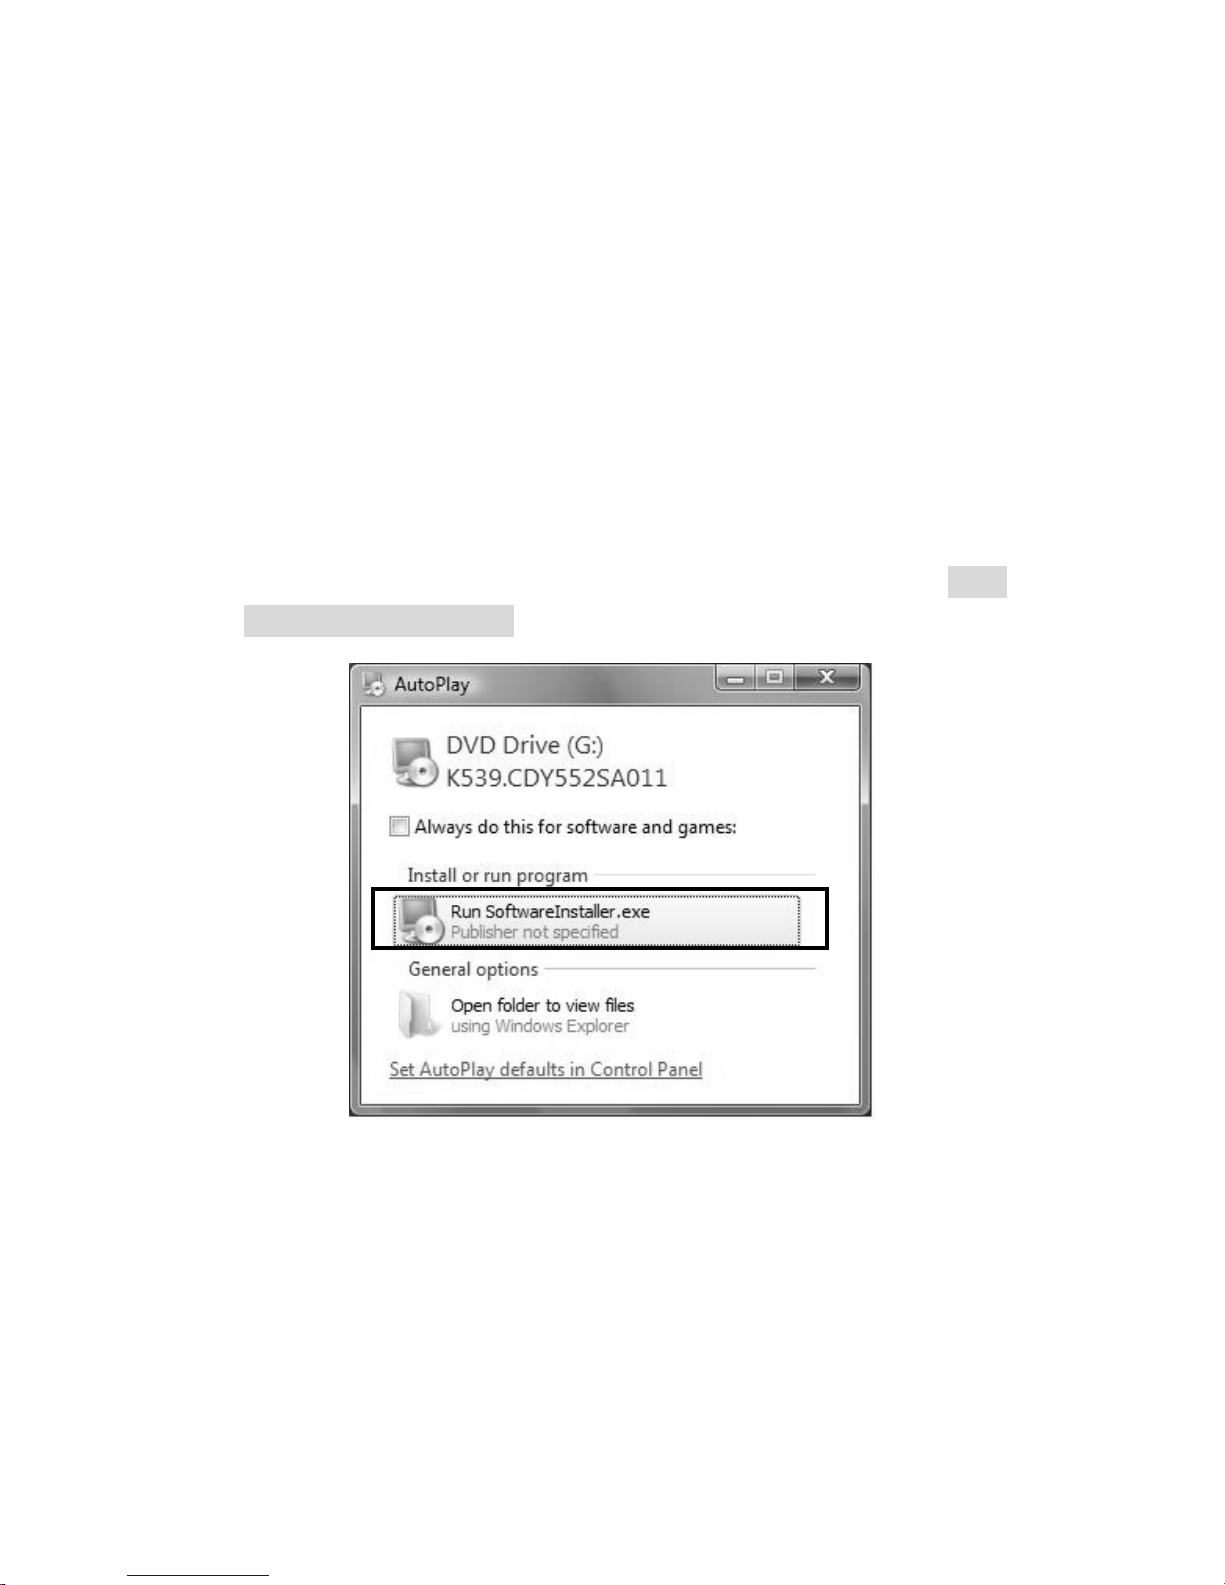
z For Windows Vista, the following window will pop up when the system
automatically executes the installer in the CD. Please click Run
SoftwareInstaller.exe to continue.
35
Page 38
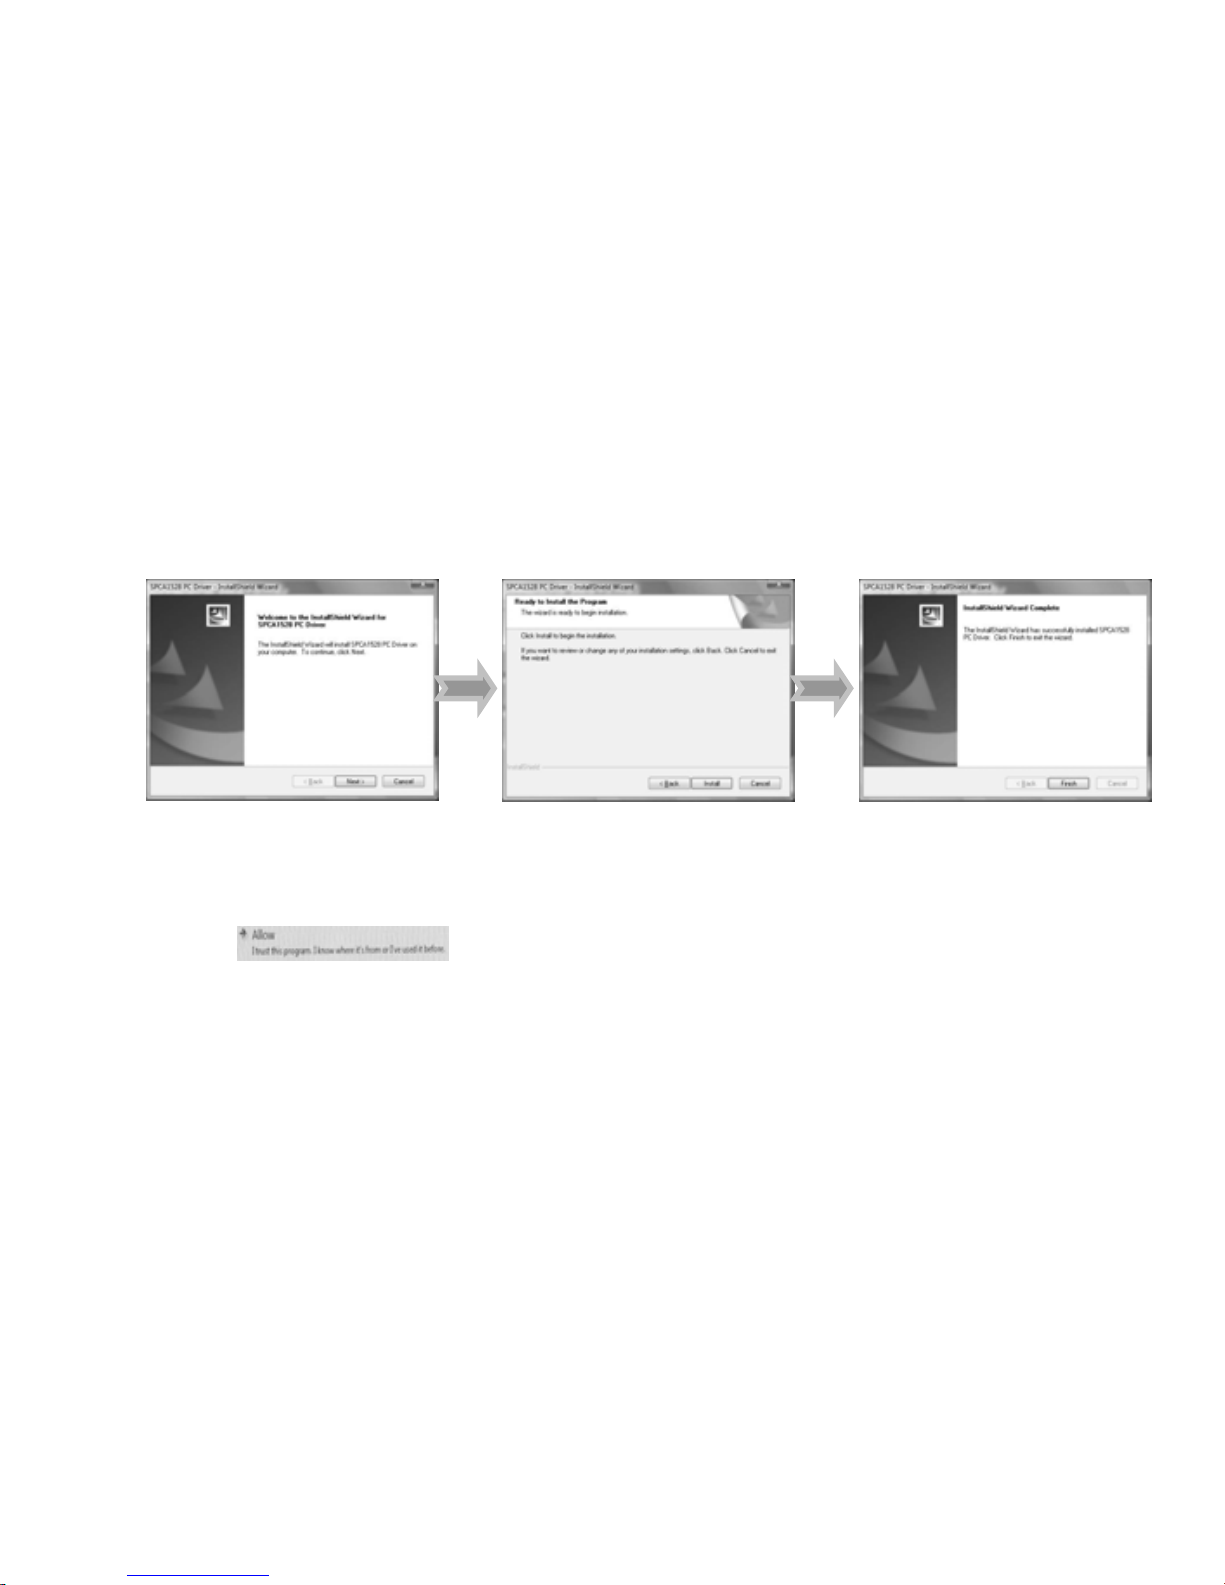
Driver Installation
Click “Driver” button, and complete the installation as per the wizard. Then, reboot
the computer.
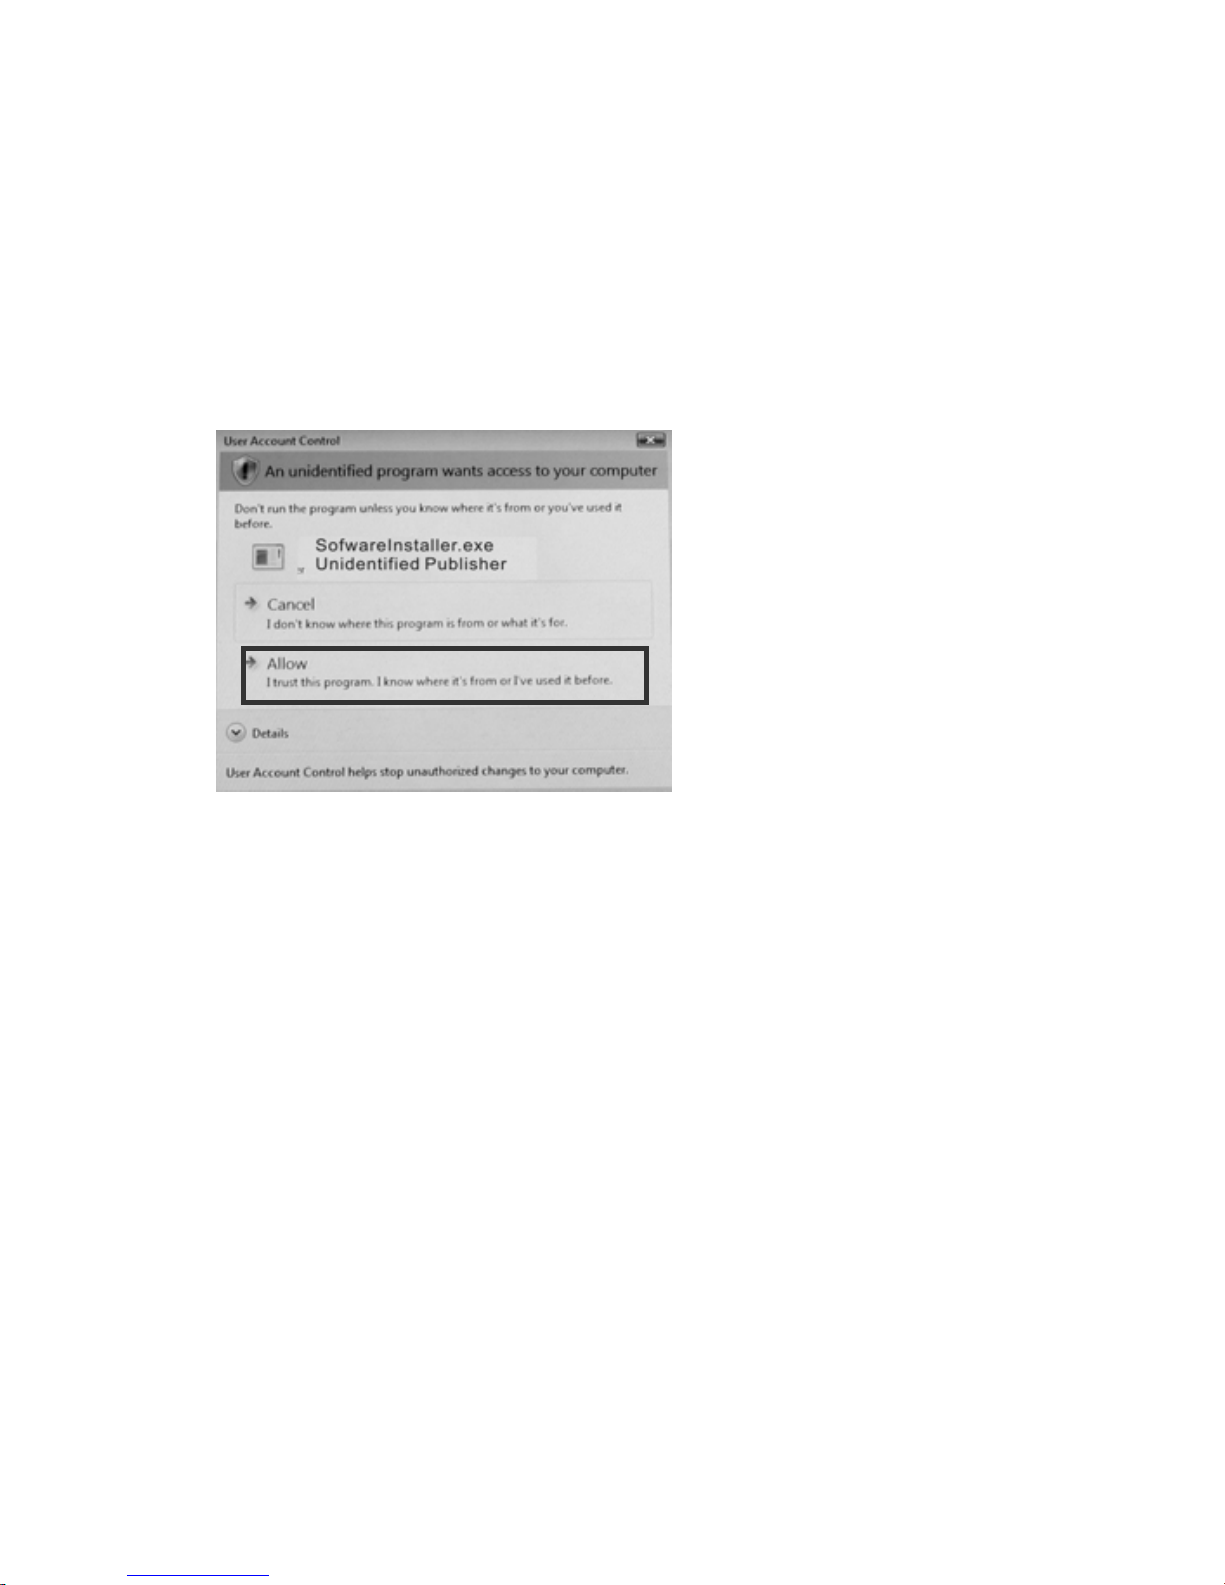
Note: For Windows Vista, the following window will pop up when installing the software.
Please click to continue.
36
Page 39
Please restart the PC after installation.
The driver program is suitable to the operating system of Windows 98 SE, Windows 2000,
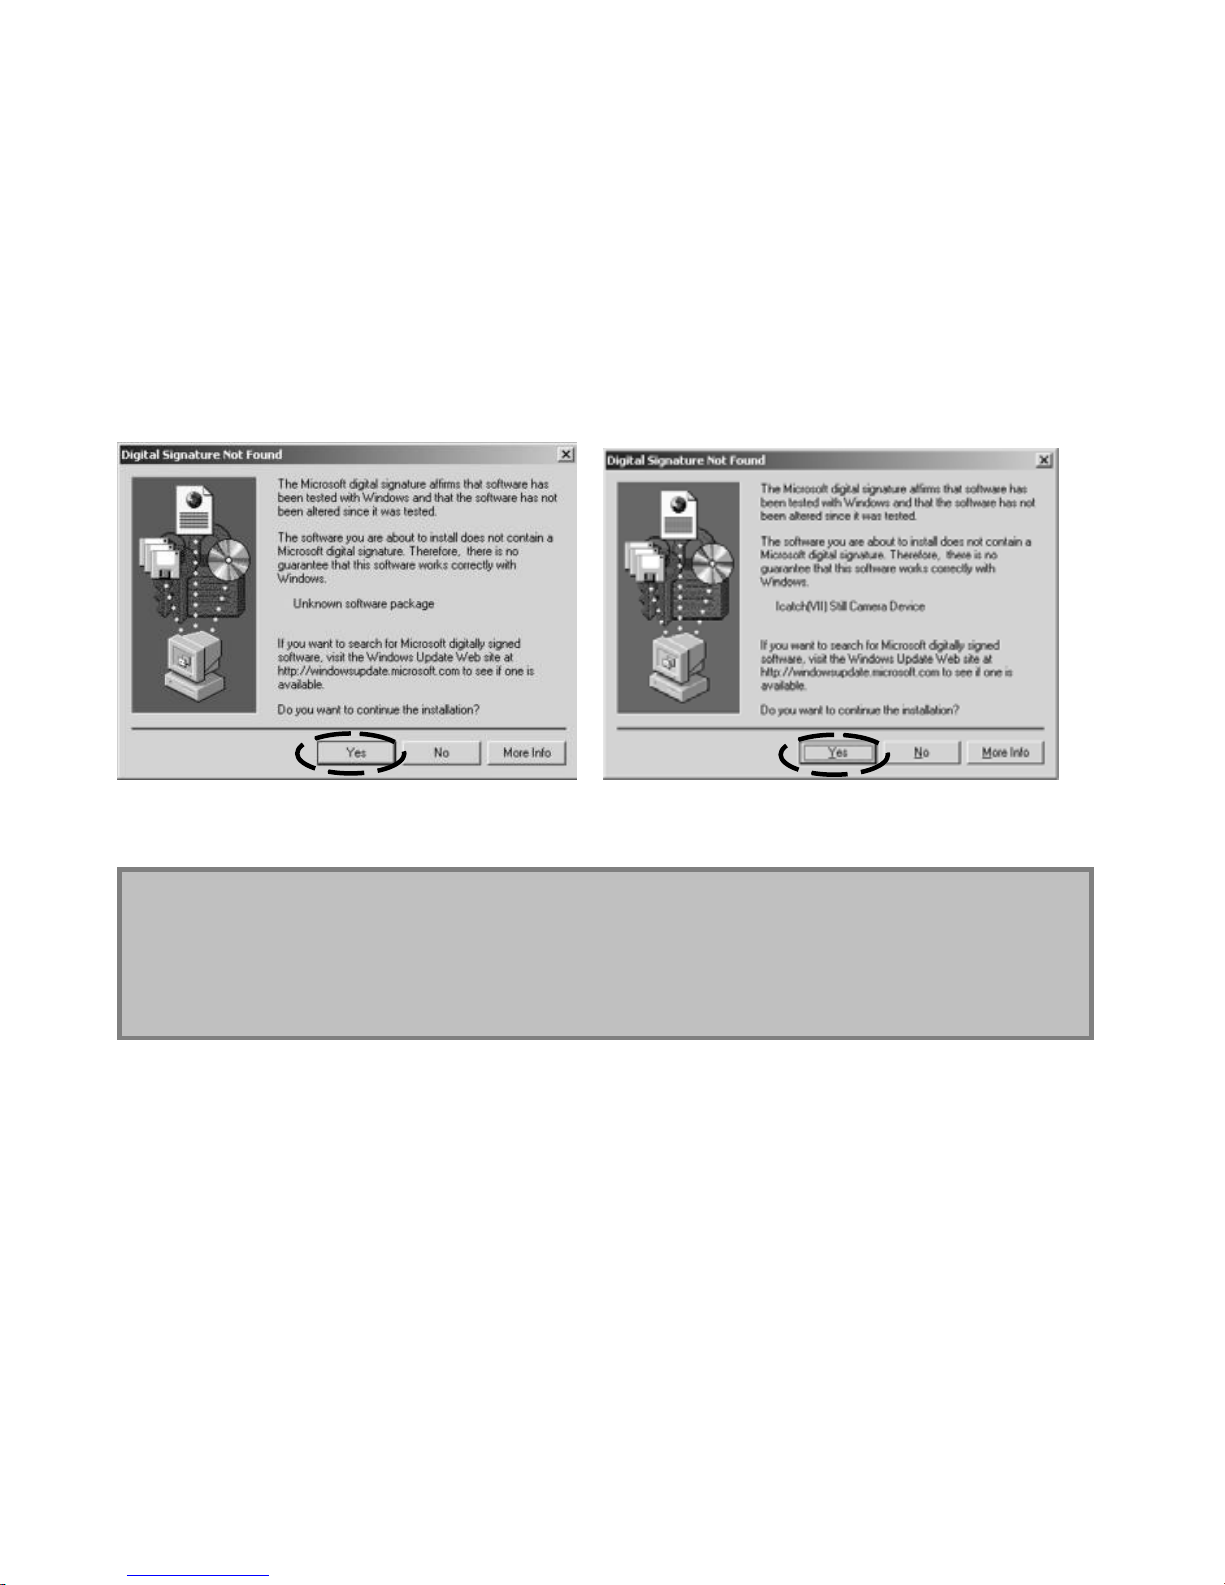
Windows ME, Windows XP and Windows Vista. If it appears the following window, please
click “Yes” button to go on with the installation.
37
Page 40
Hint: In Windows 98SE operation system, if it is required to play the video
record, please install VideoImpression first. With the help of the
DirectX9 module in the VideoImpression, the video shot by the camera
will be successfully played on the computer.
38
Page 41
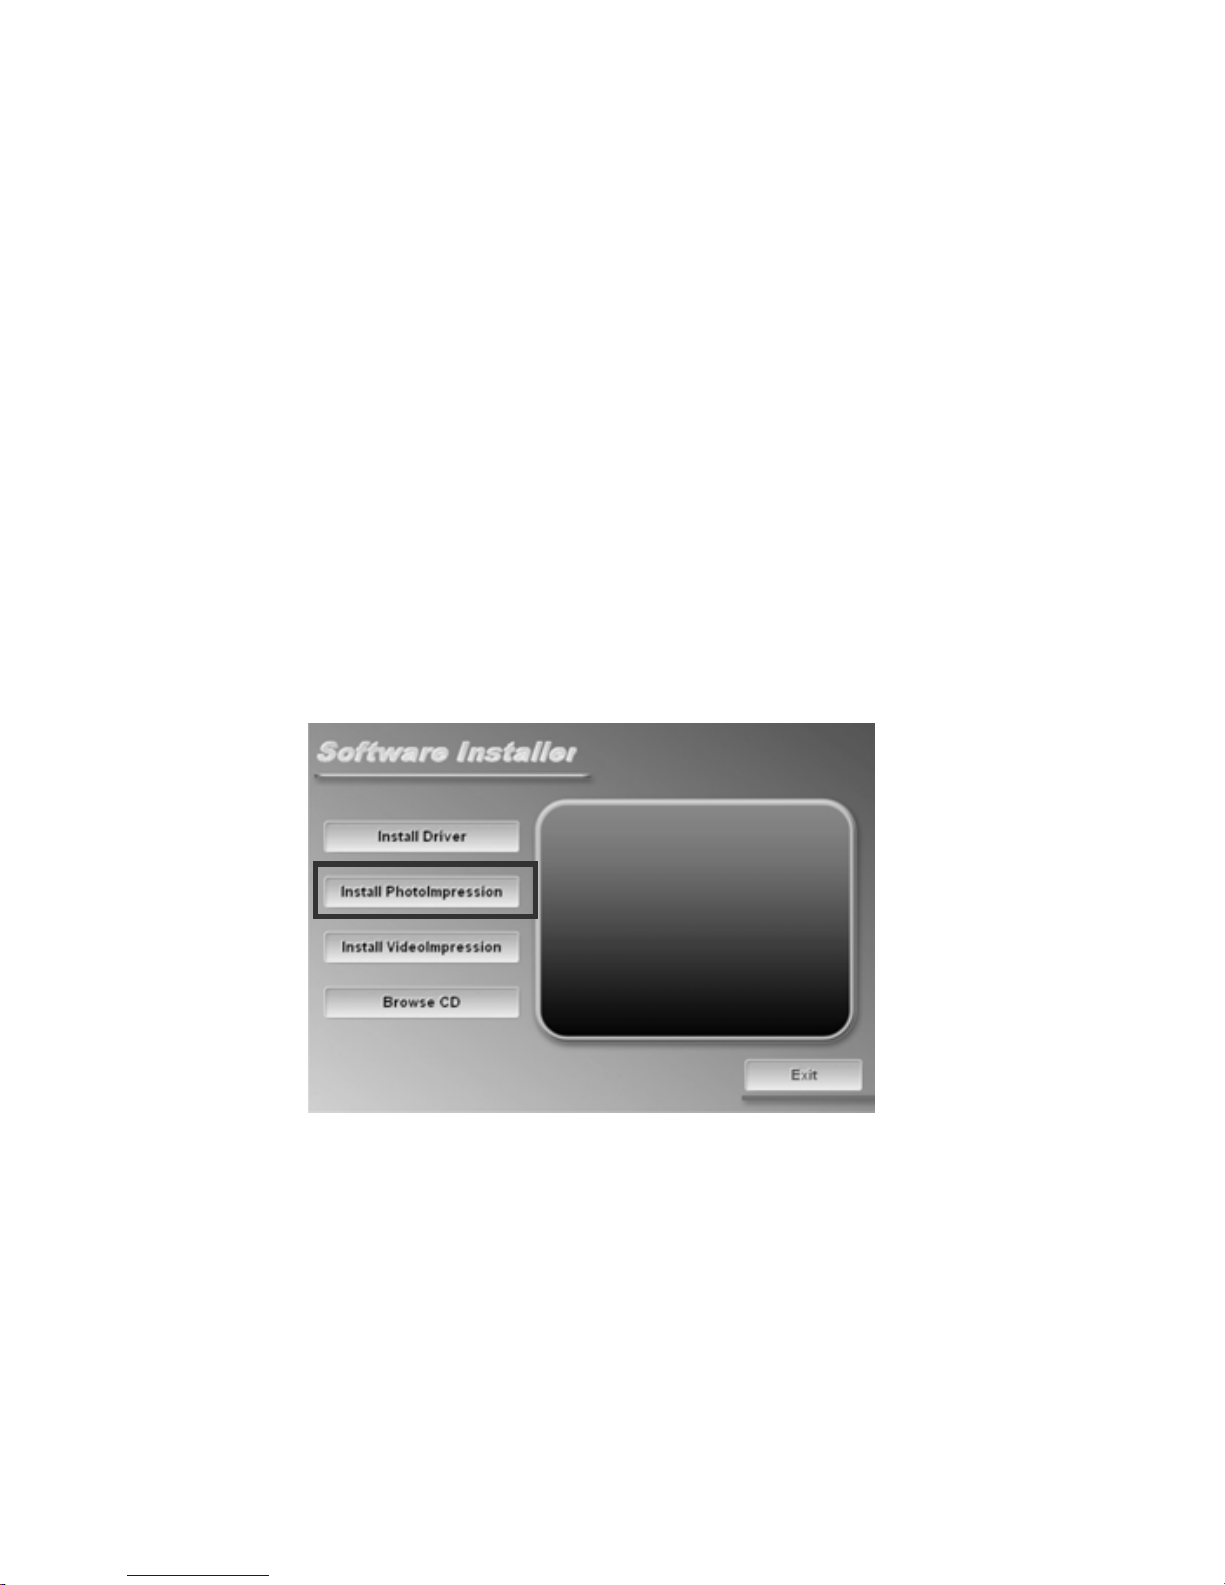
3. Operation Instructions on Attached Software
Installation and Operation of PhotoImpression 5:
Installing the PhotoImpression 5:
Please put the installation CD contained in the accessories into the CD-ROM of the PC, windows will display
below picture:
39
Page 42
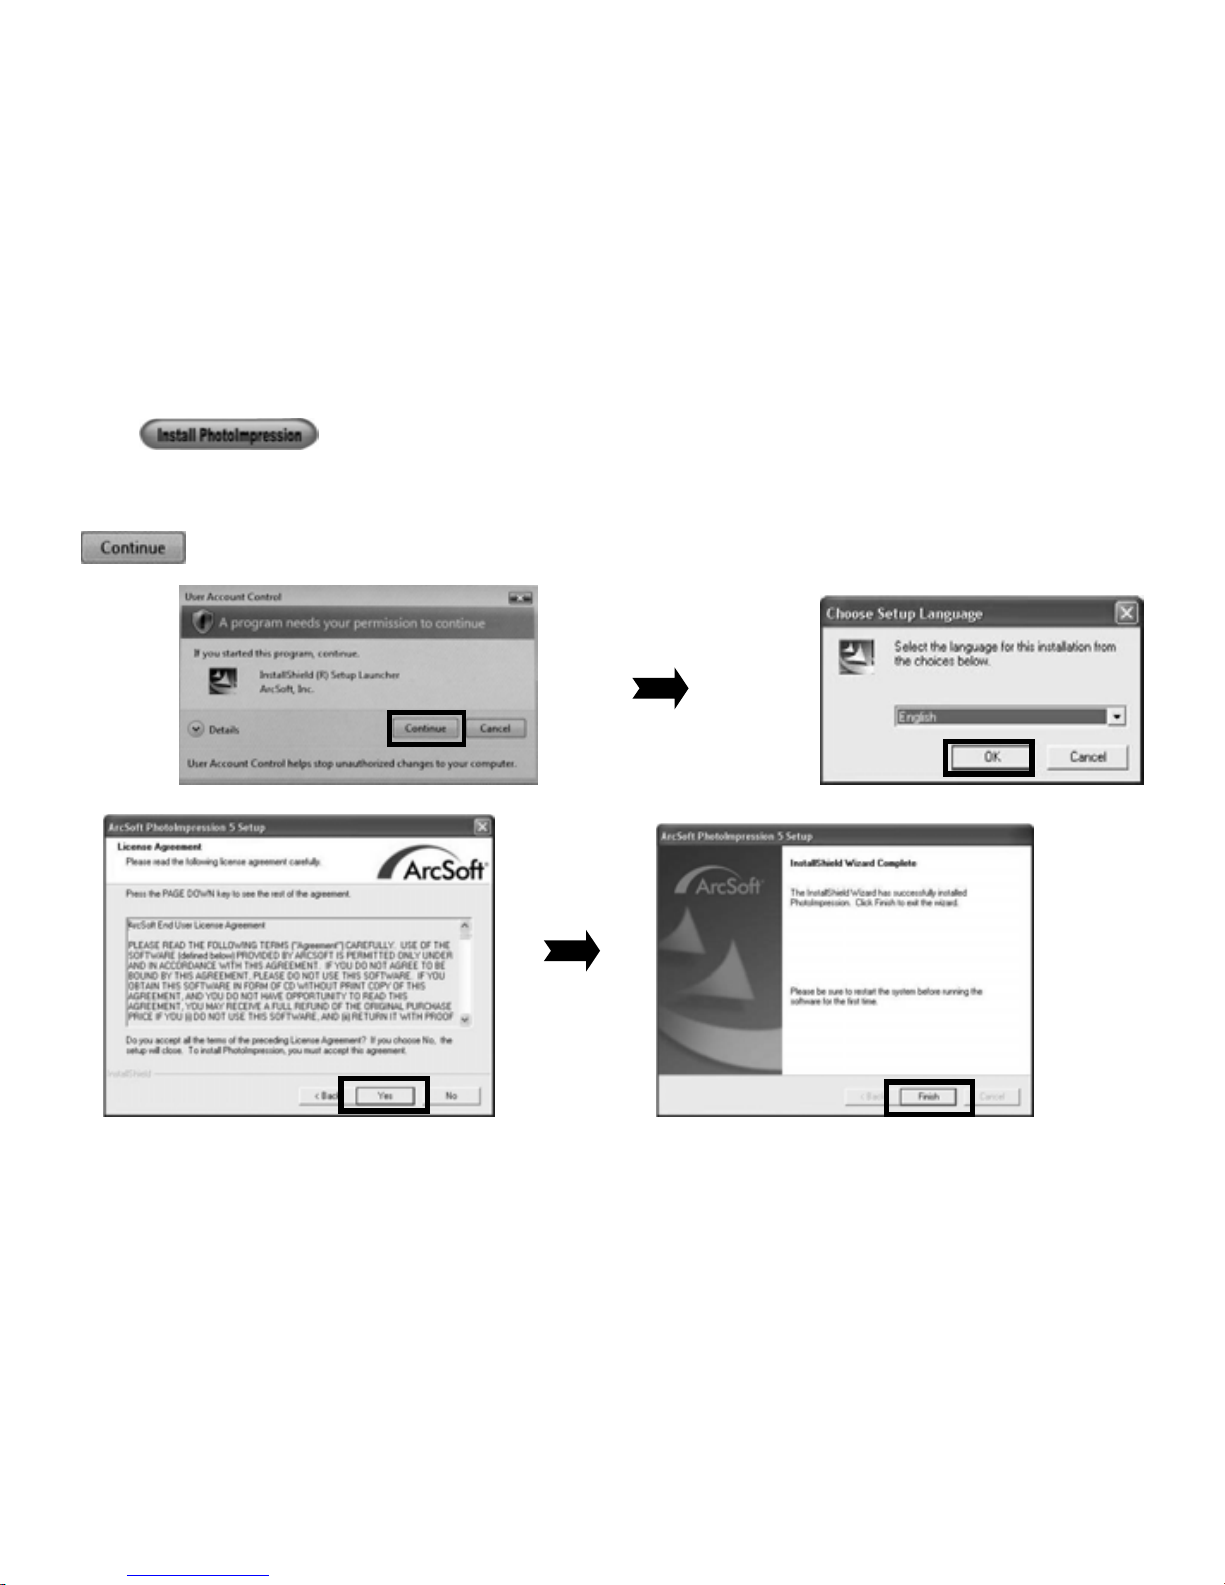
Click button and finish the installation step by step according to the indications.
Note: For Windows Vista, the following windows will pop up when installing the software. Please click
to continue.
40
Page 43
Please restart your PC after installation.
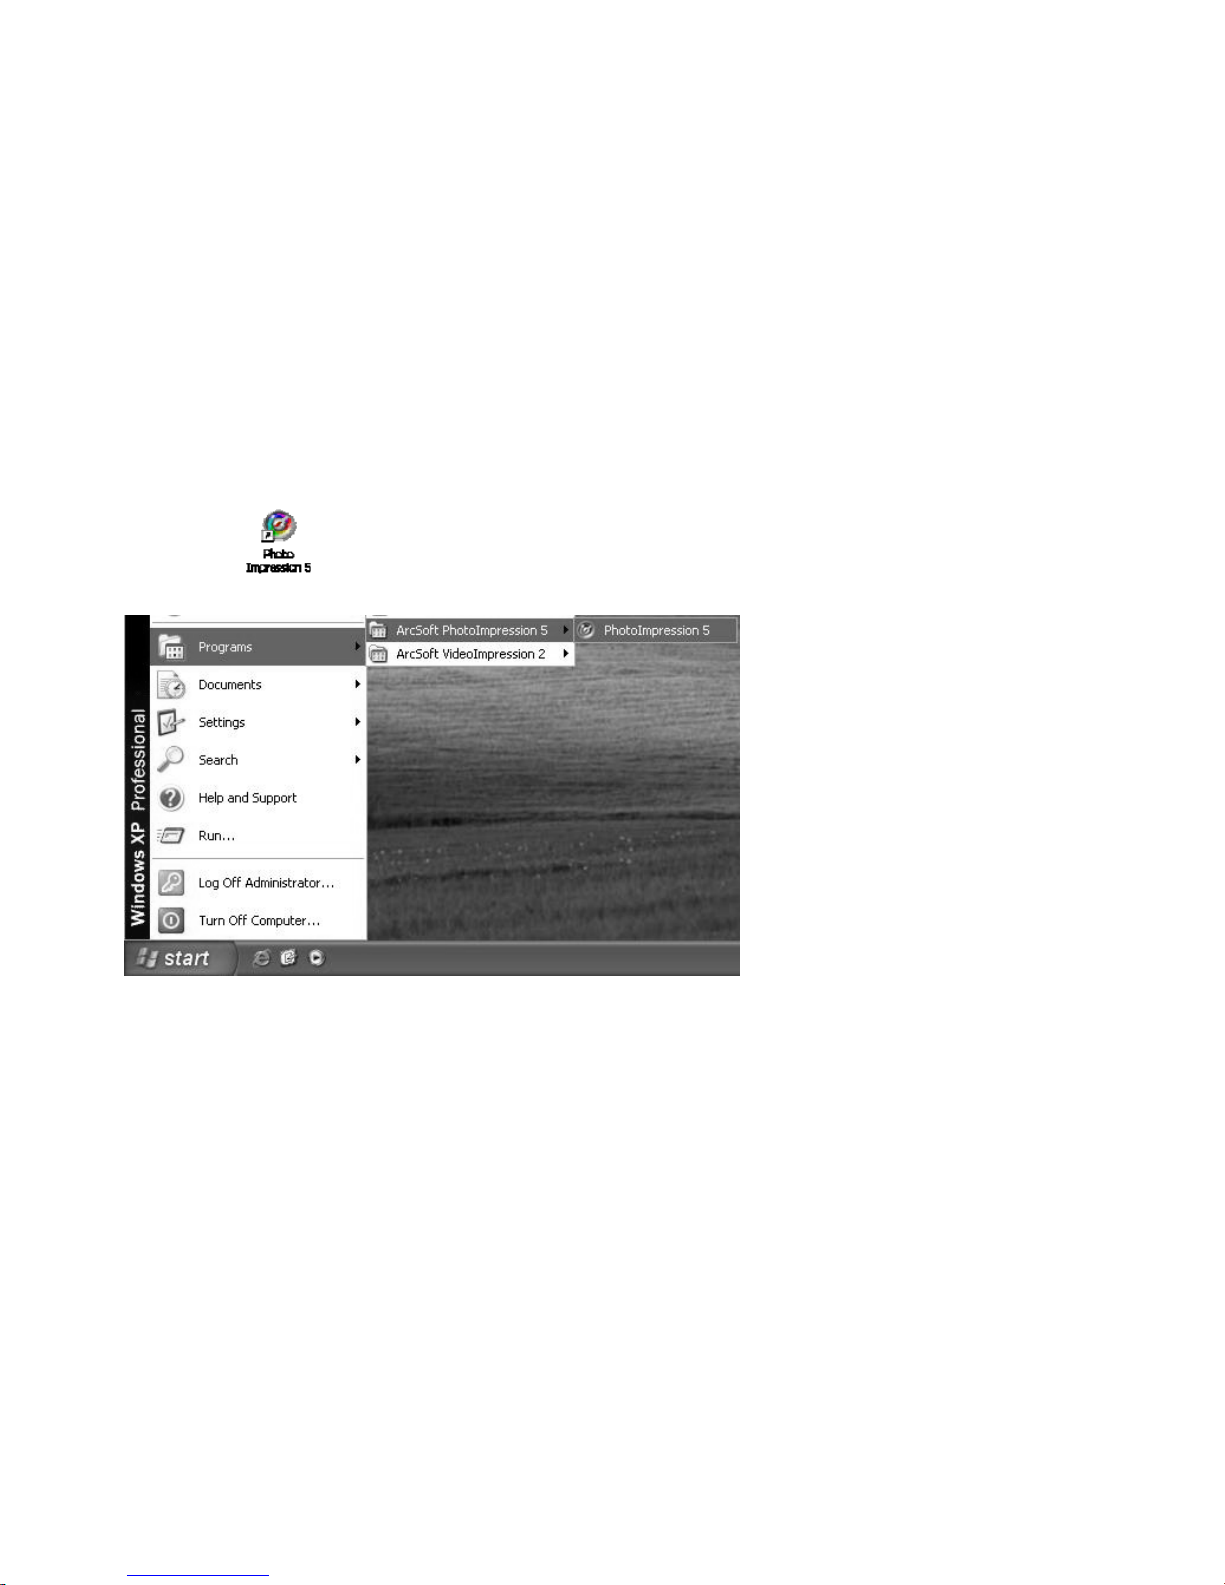
Running the PhotoImpression 5:
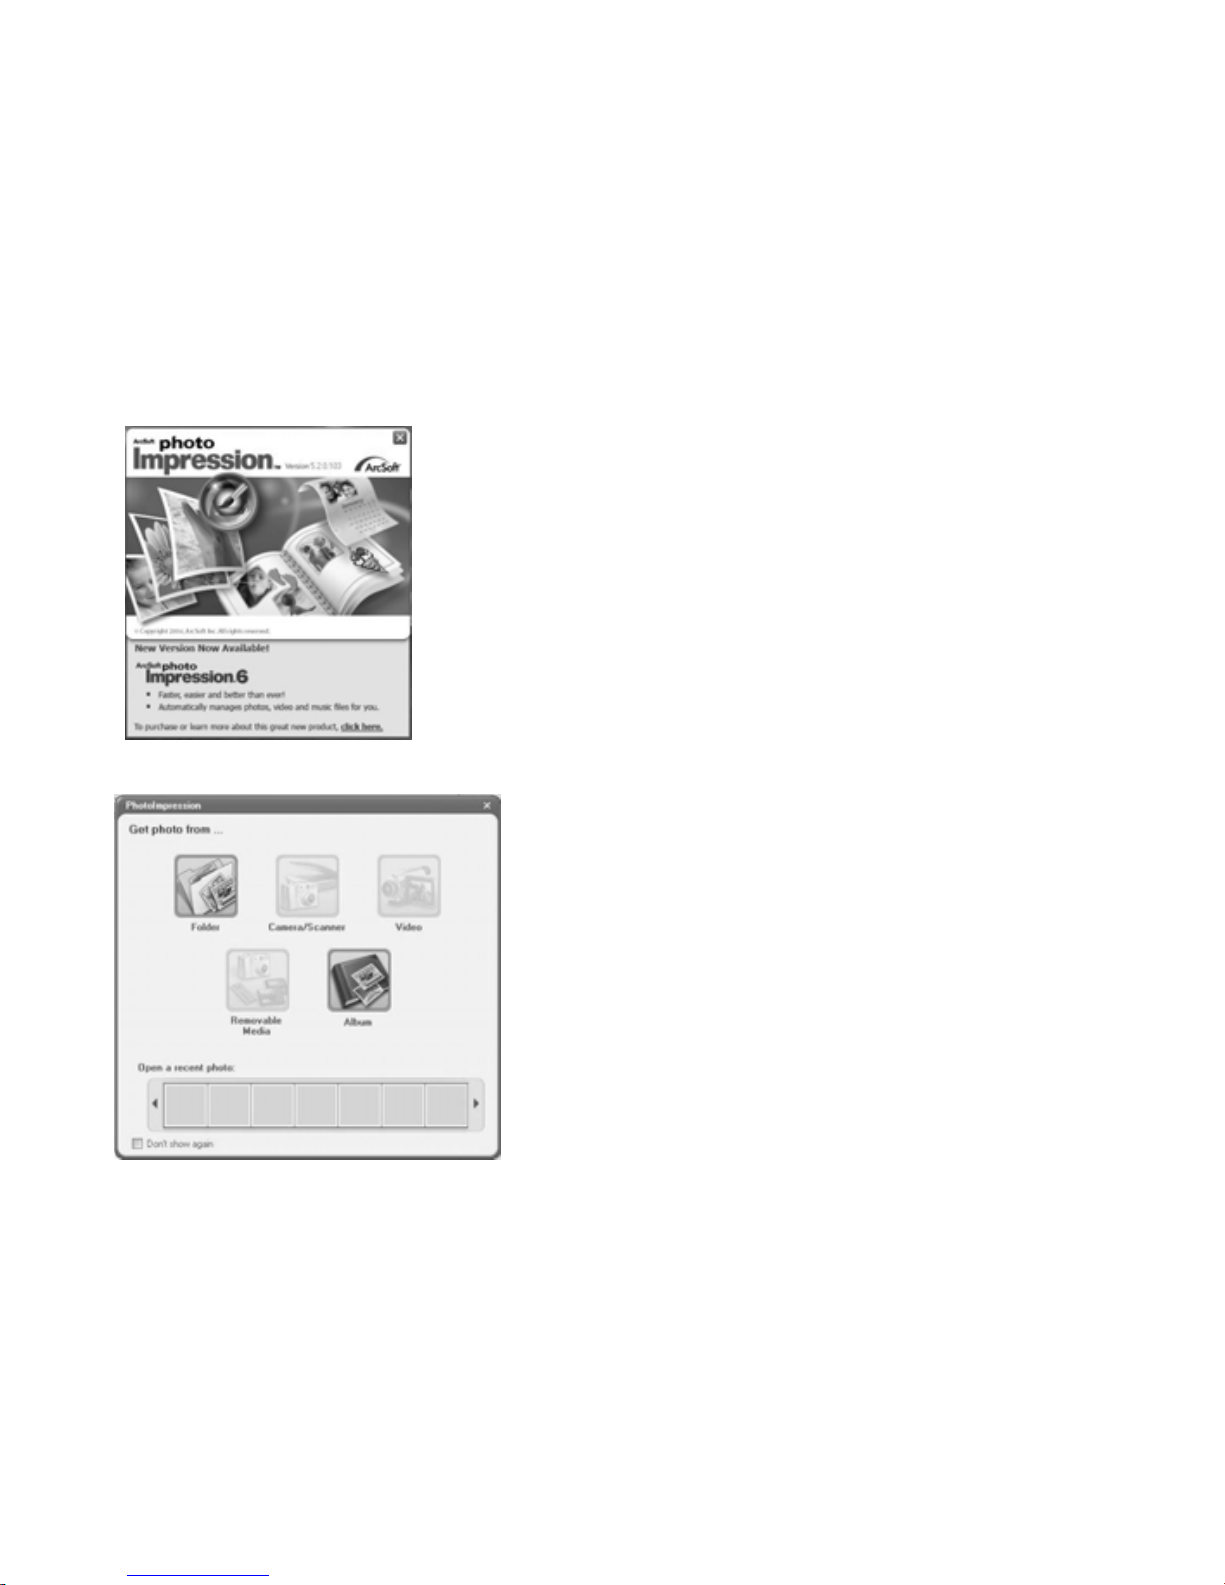
Double-click the icon on the desktop, or run PhotoImpression 5 in “Start→Programs”.
The following window will pop up when opening PhotoImpression5. Please left-click the center of the window to
close it. PhotoImpression can be opened after the window is closed.
41
Page 44
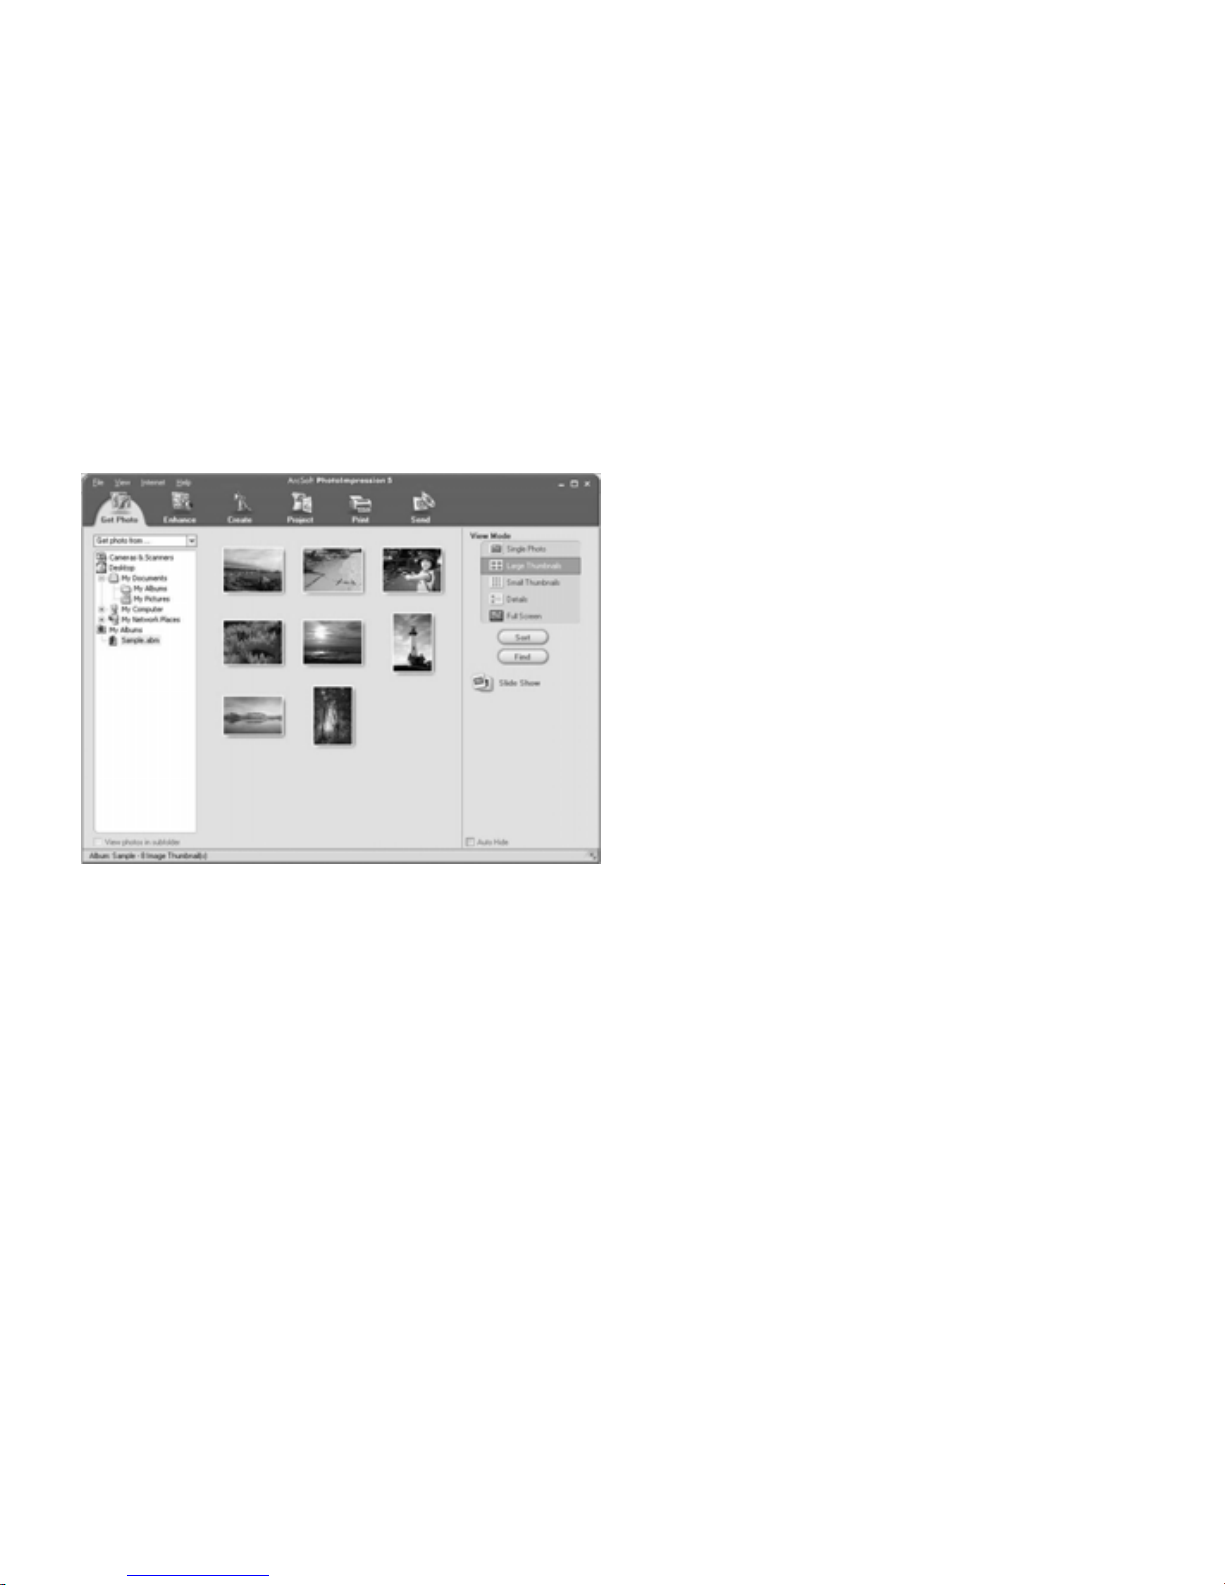
After opening the PhotoImpression, “Get Photo” window will appear.
42
Page 45
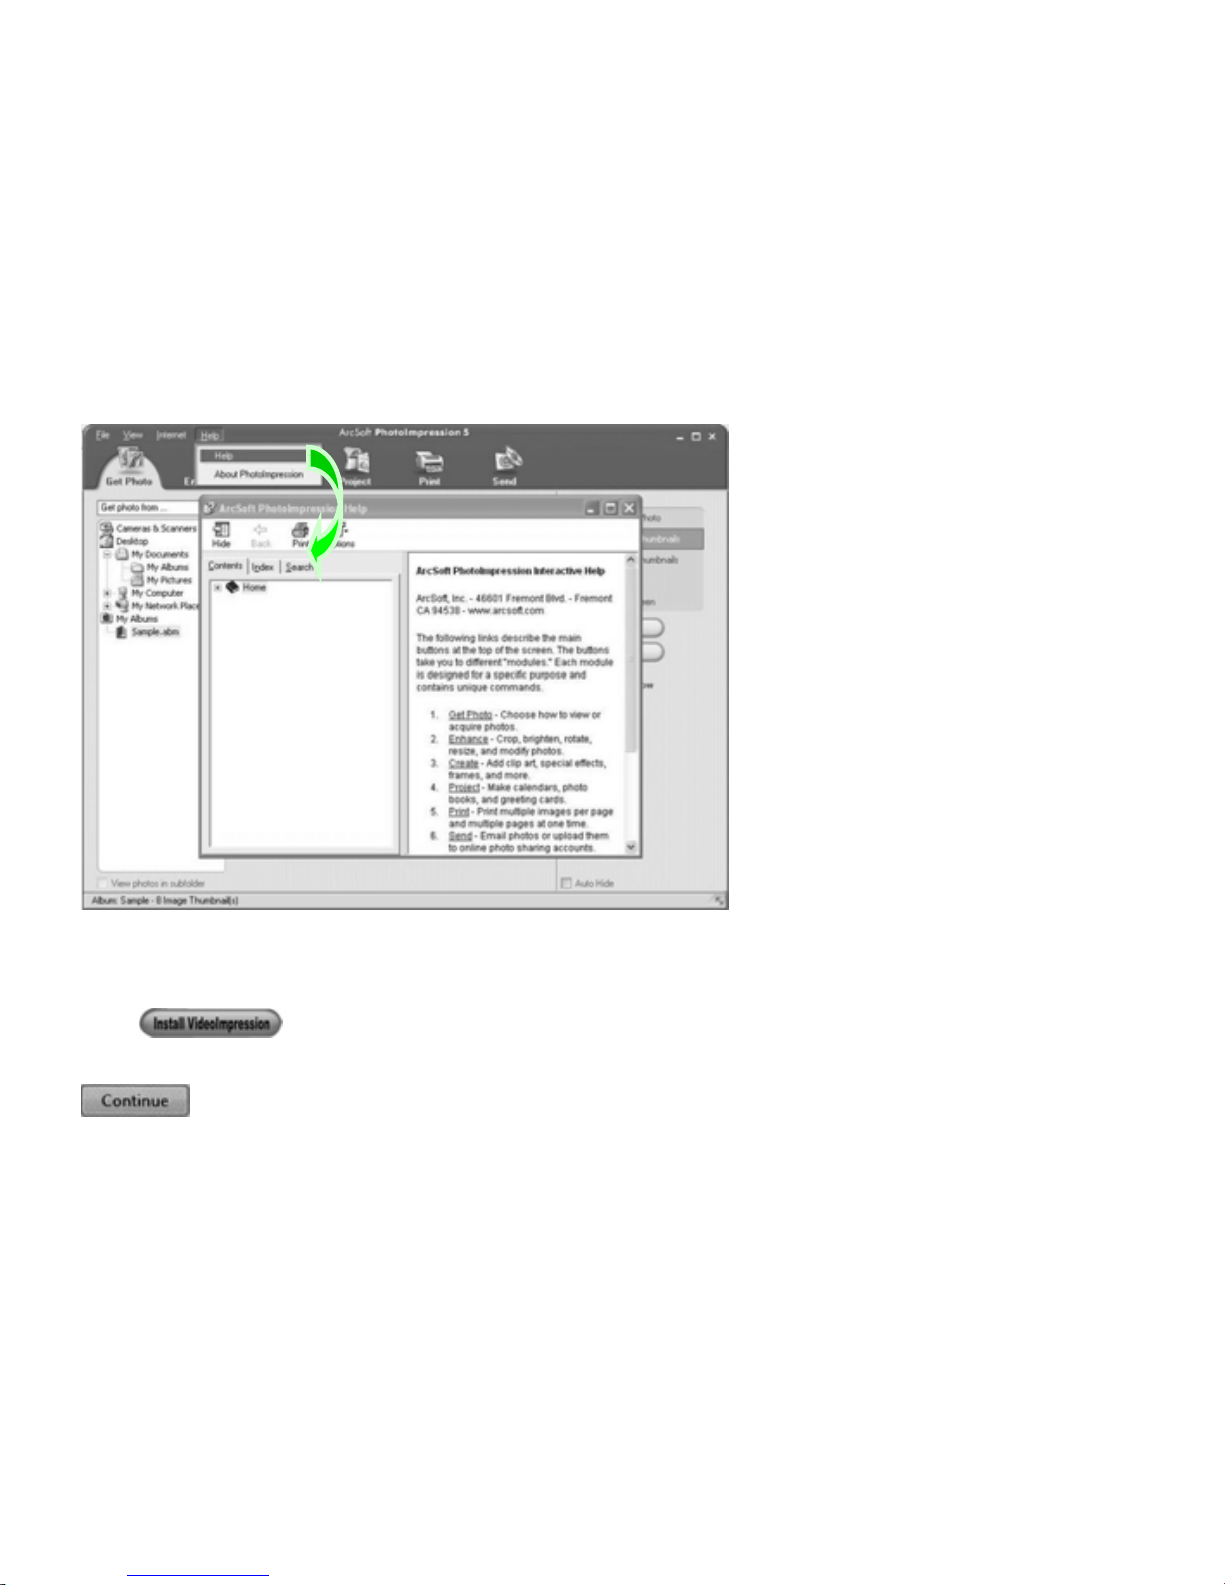
Select the desired image from “Get Photo” window, and you will find the image is displayed at the central area of
the window. After that, you can select the image to edit.
Detailed operation method of PhotoImpression can be referred to "Help" of the program (as shown in the
following figure).
43
Page 46
Installation and Operation of VideoImpression 2:
Installing VideoImpression 2:
Click button and finish the installation step by step according to the indications.
Note: For Windows Vista, the following windows will pop up when installing the software. Please click
to continue.
44
Page 47
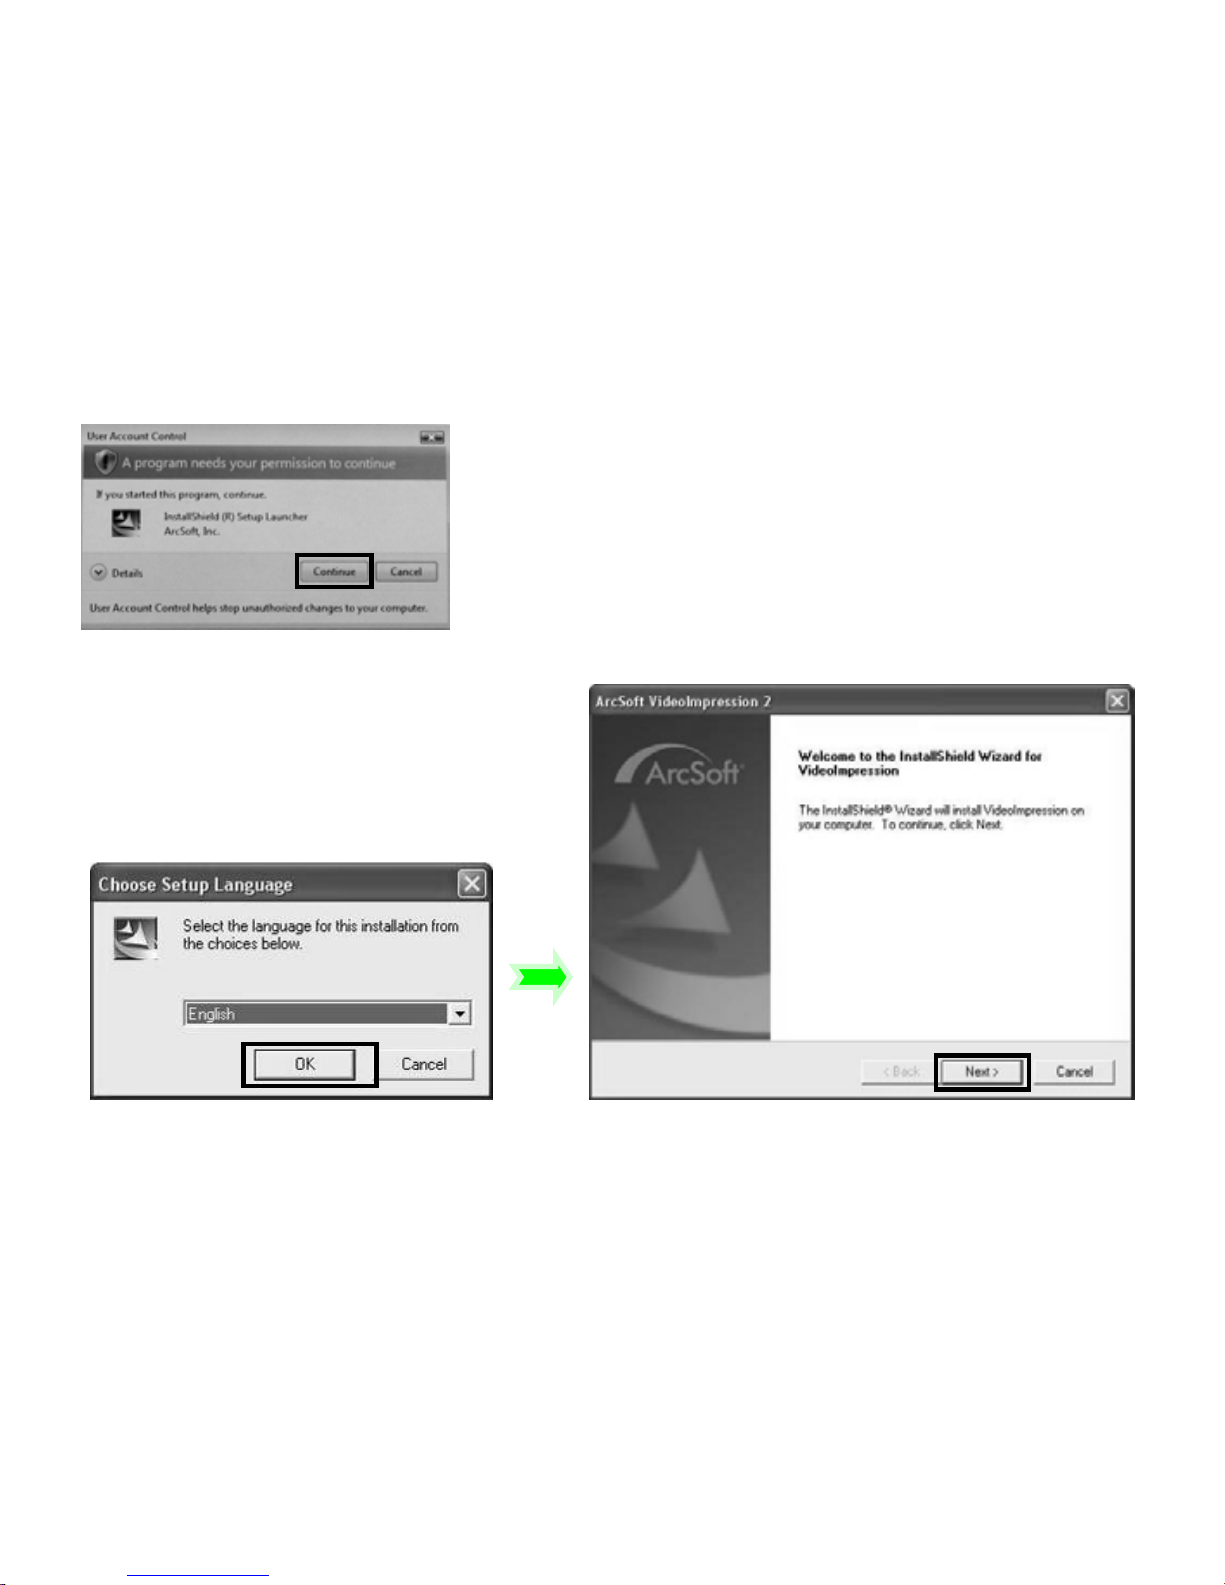
45
Page 48
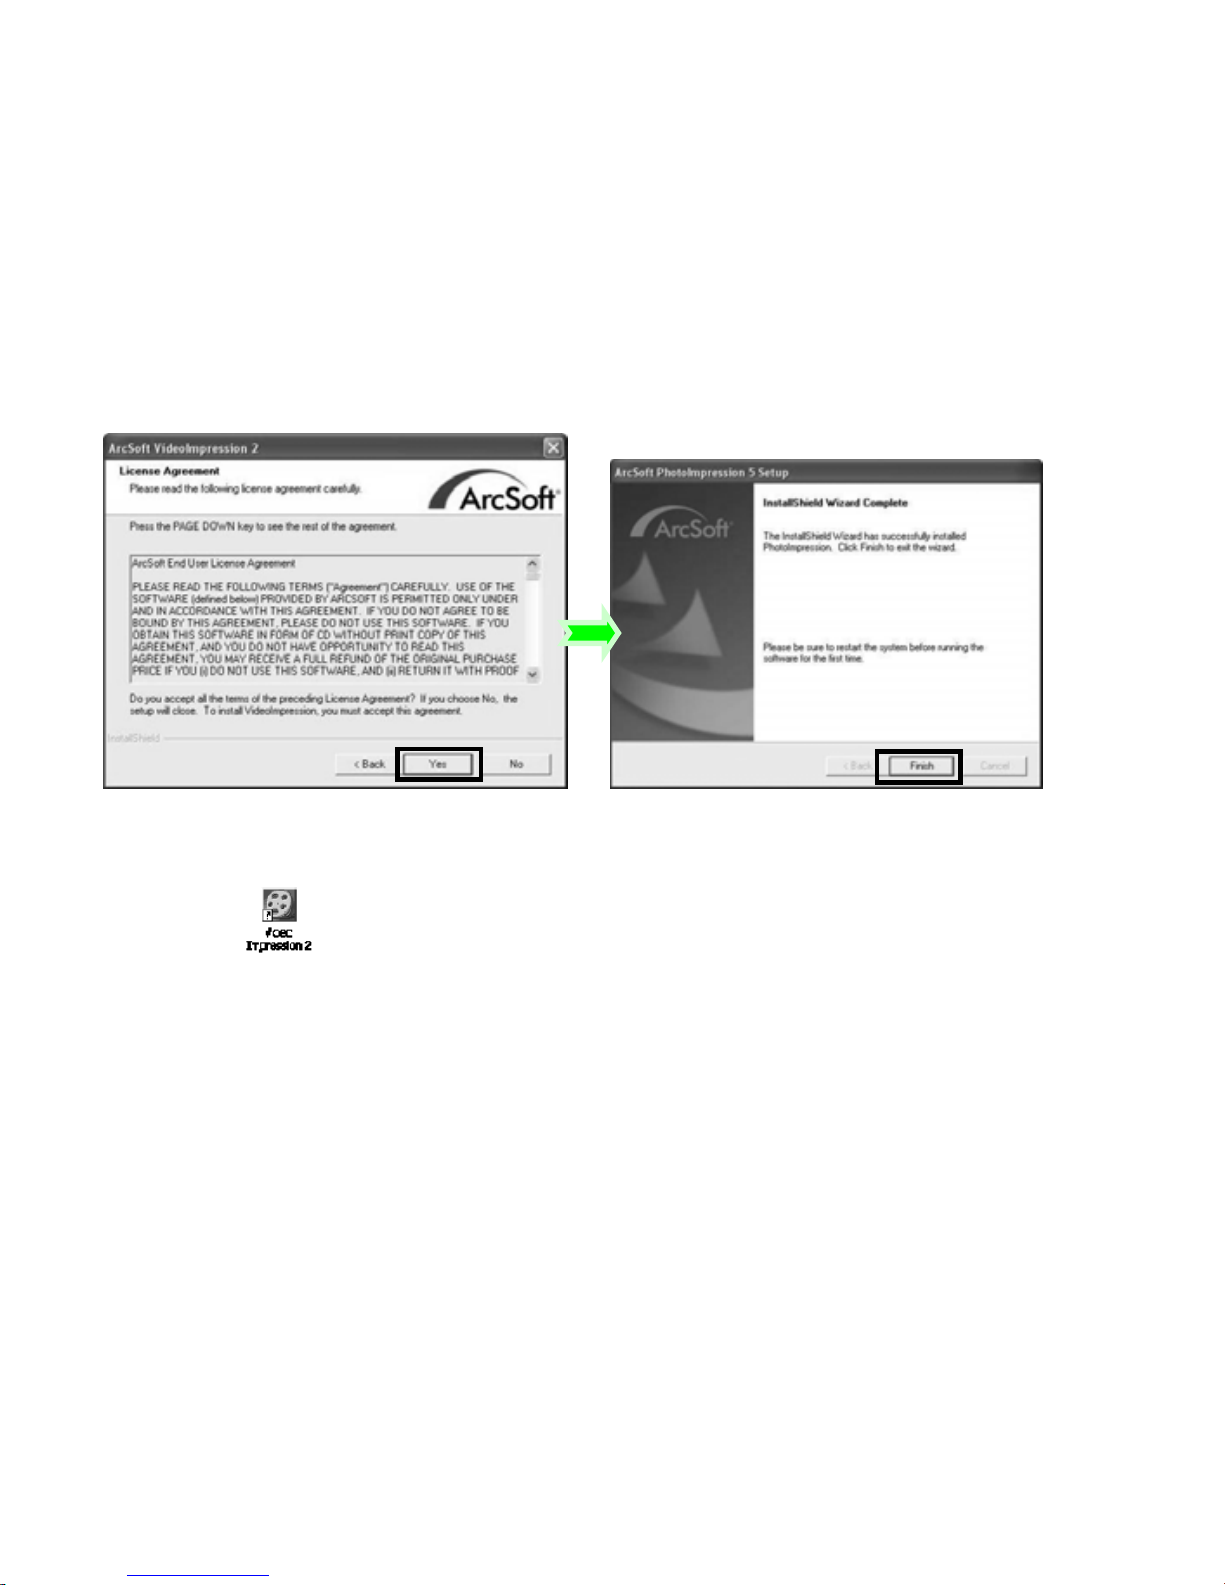
Please restart your PC after installation.
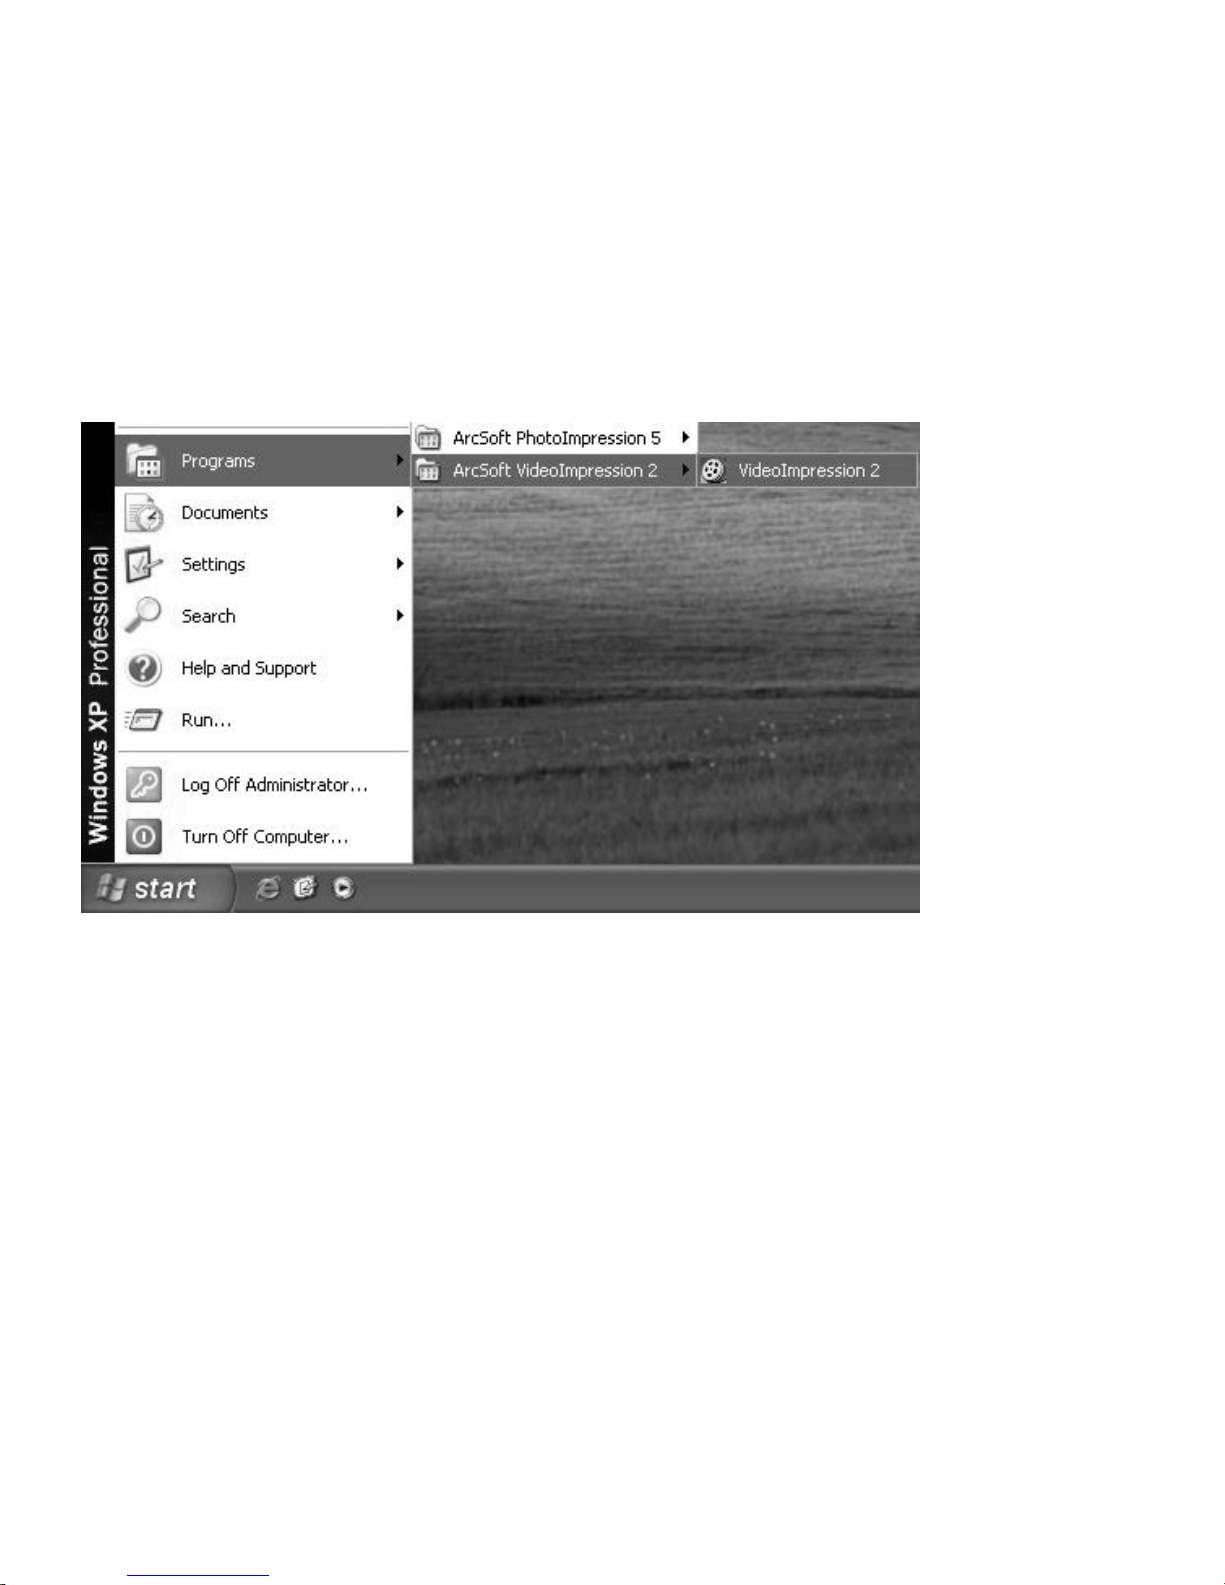
Running the VideoImpression 2:
Double-click the icon on the desktop, or open VideoImpression 2 in “Start→Programs”.
46
Page 49
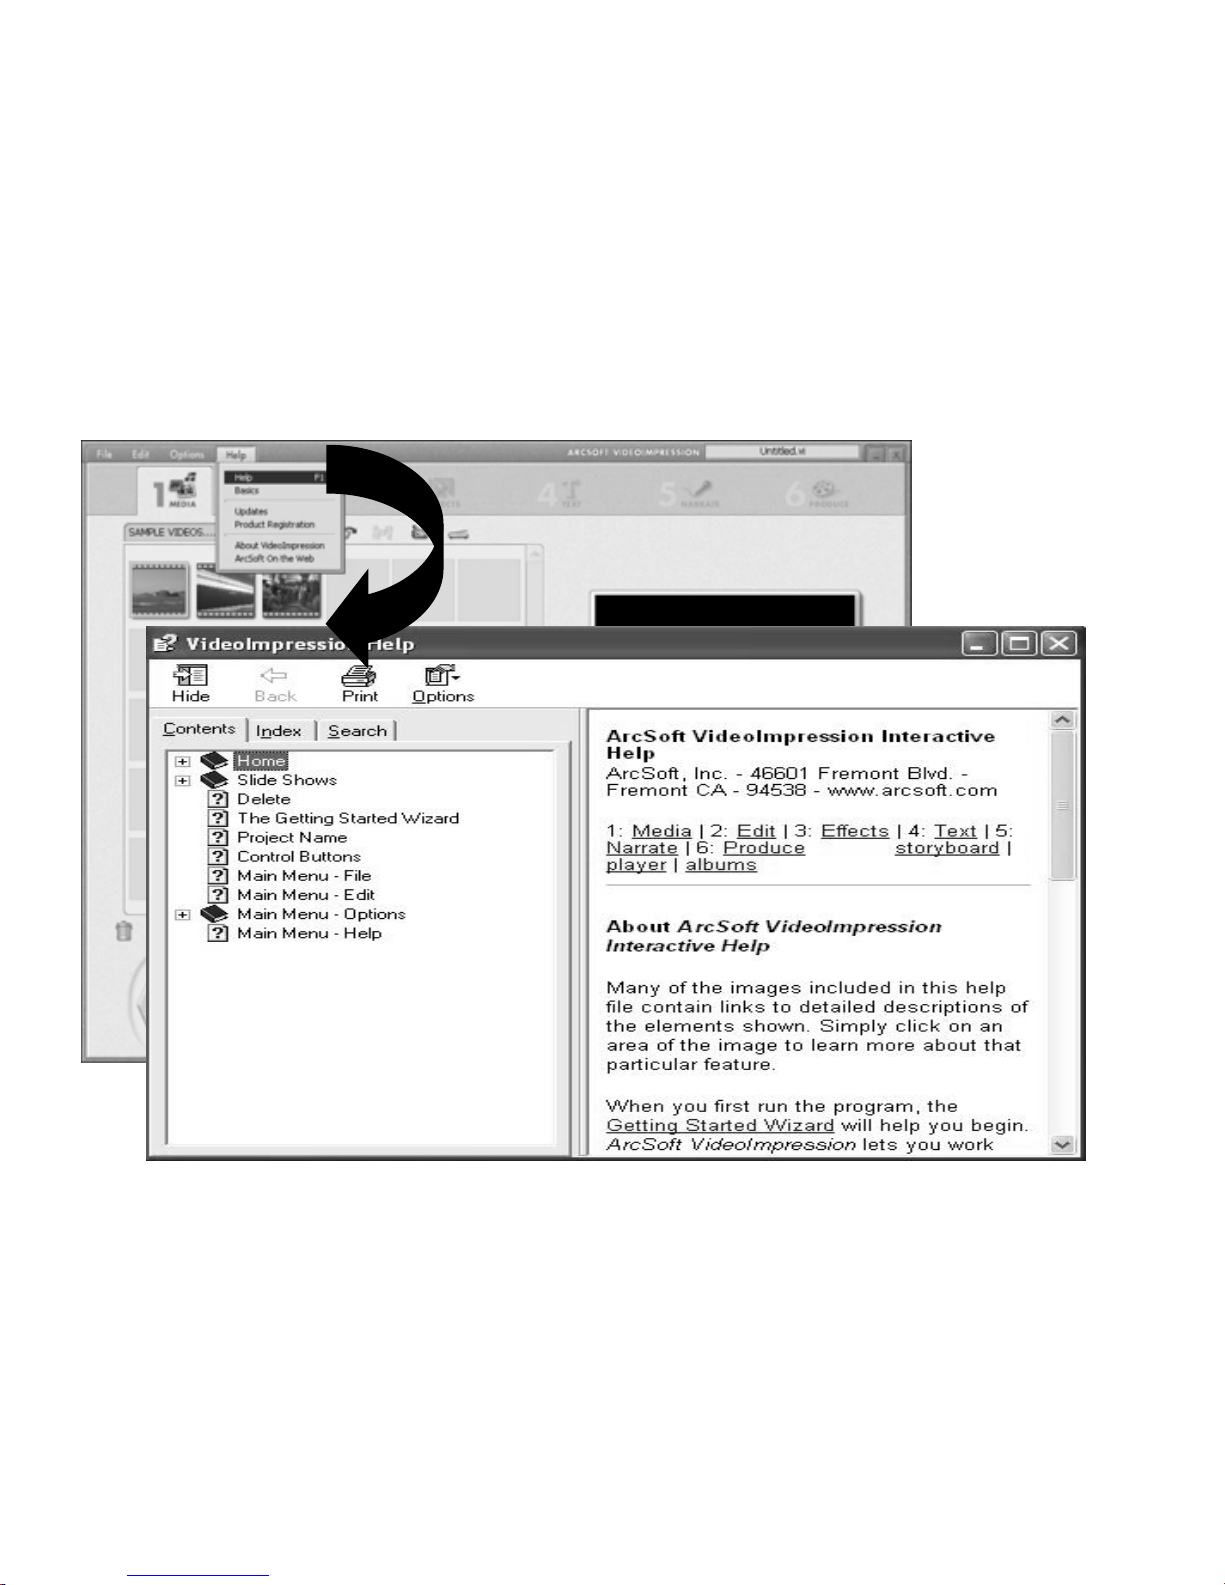
Detailed operation method of VideoImpression 2 can be referred to “Help” of the program (as shown in the
following figure).
47
Page 50
48
Page 51
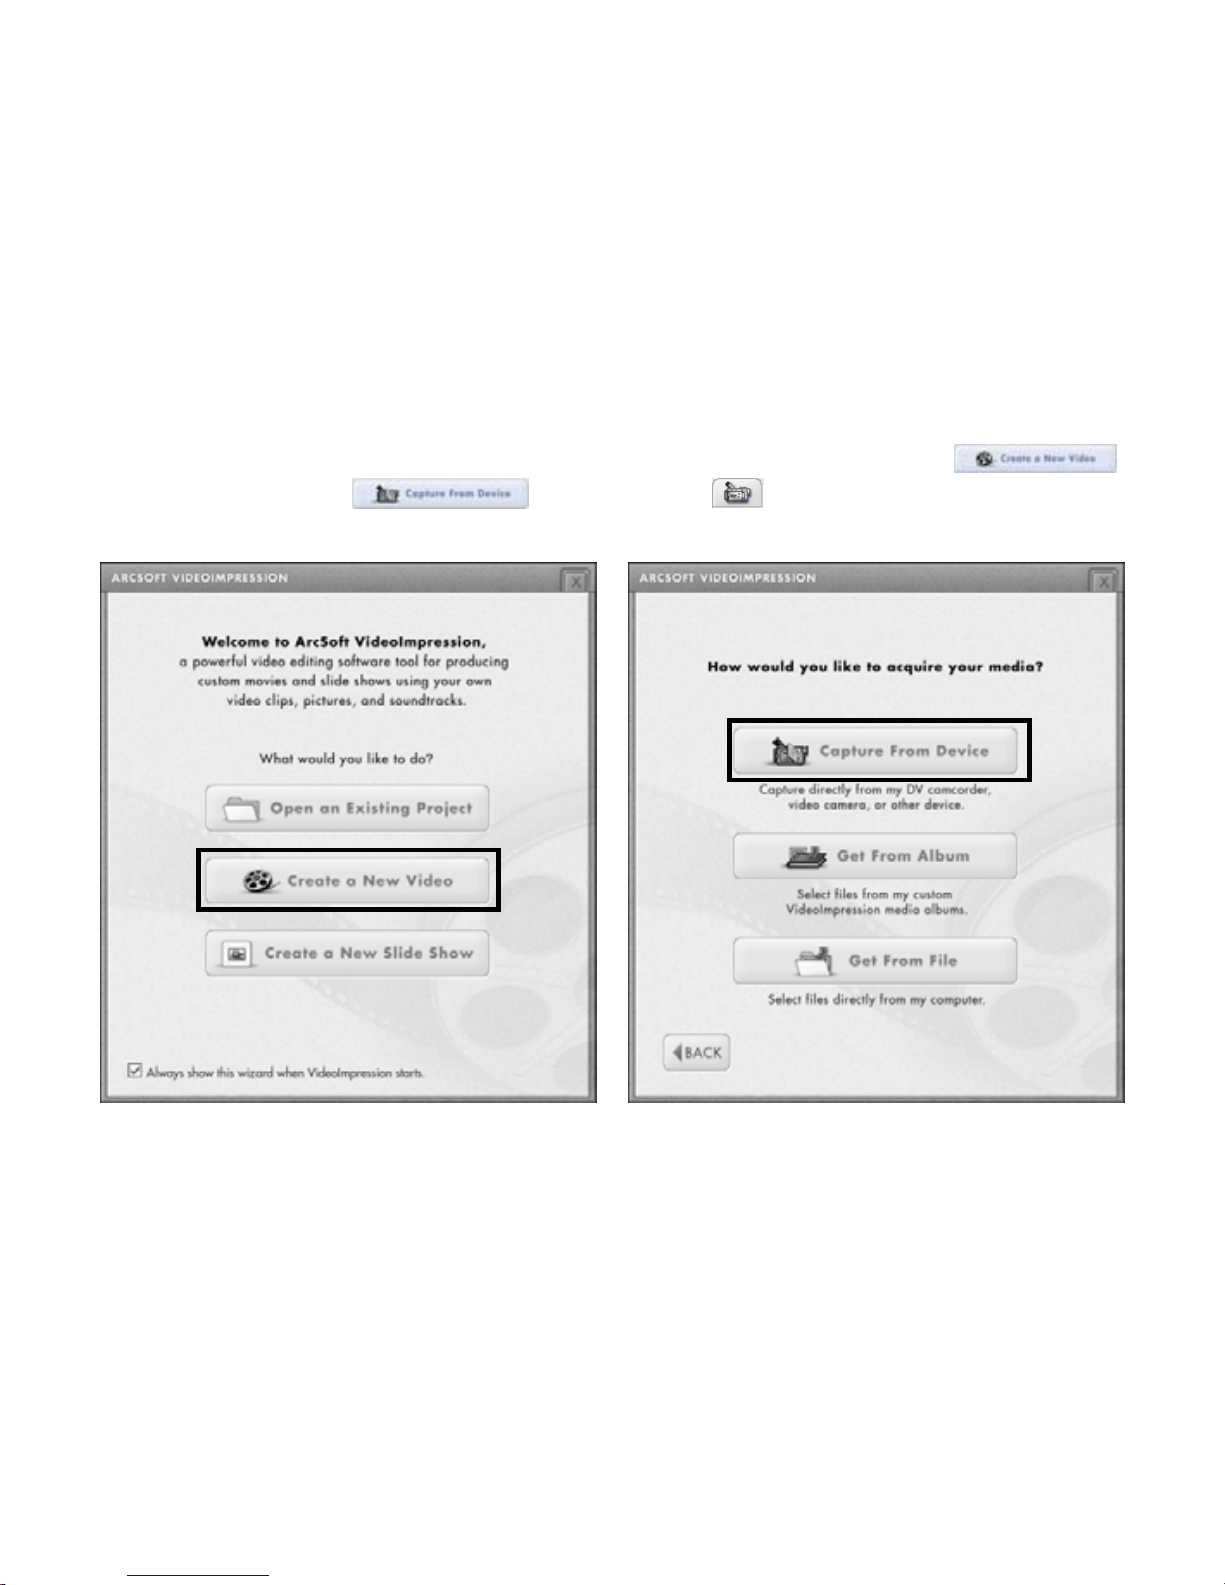
Using PC Camera function:
Connect the camera in PC Camera mode to your PC and open VideoImpression 2. Click in
“Wizard” (Fig. I) and click (Fig. II); or click button in “MEDIA” (Fig. III) tab. Live
window as Fig. IV shown will appear.
▲Fig. I ▲Fig. II
49
Page 52
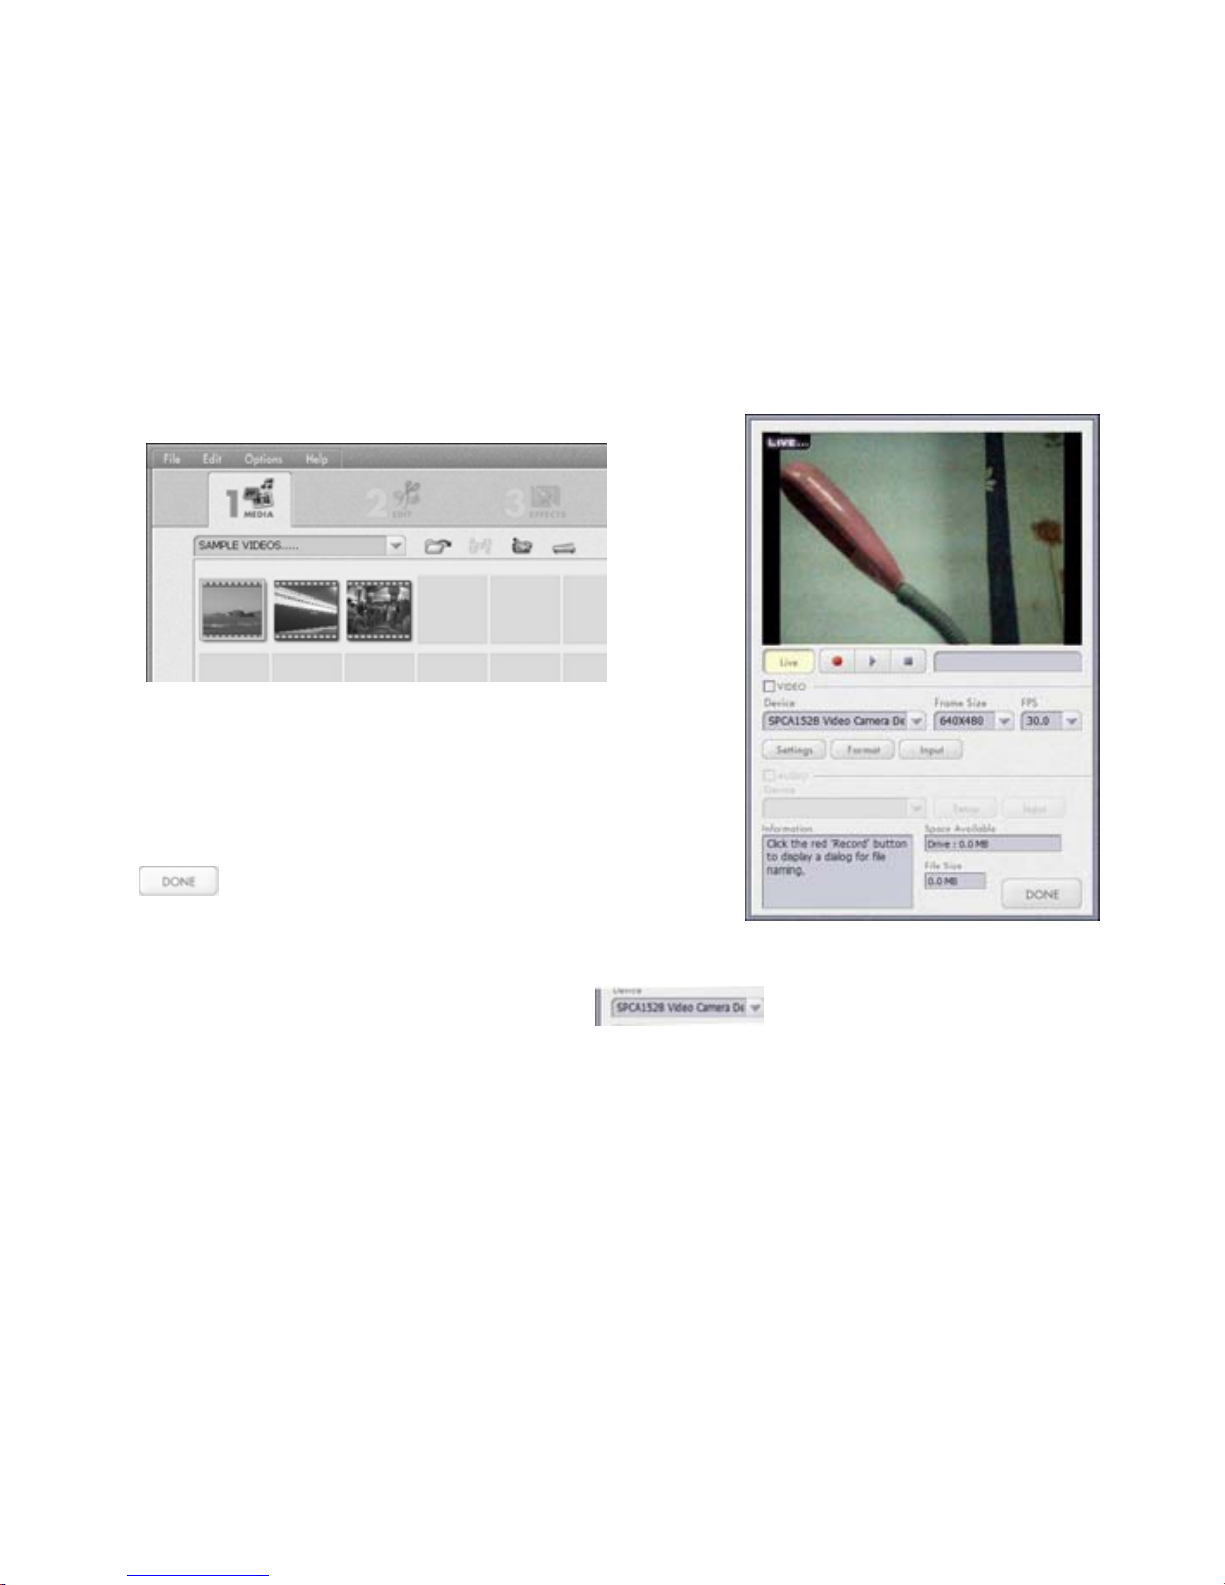
Click button to exit after use.
Note:
1. In case of no image, please check whether the driver for the camera is installed securely, and check
whether the selected device in the window is:
►Fig.IV
▲Fig. III
For detailed information of VideoImpression 2, please refer to the part “Installation and Operation of
VideoImpression 2”.
50
Page 53
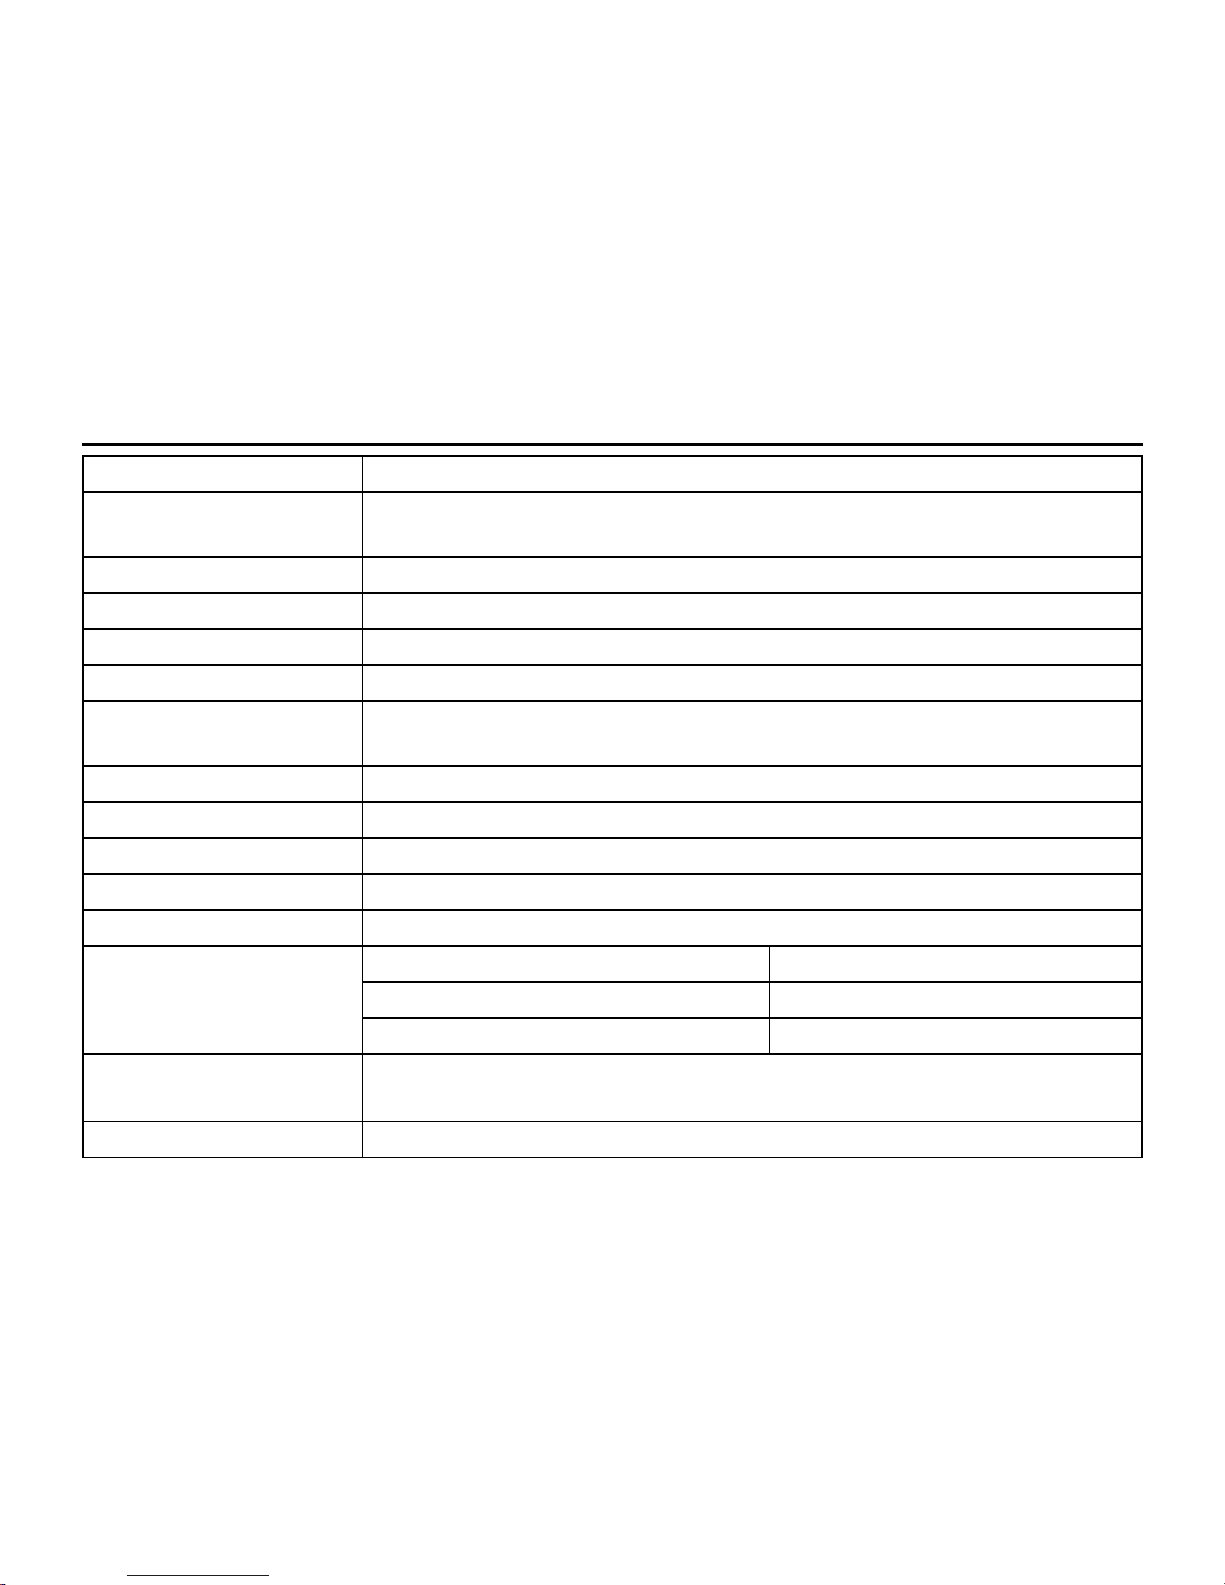
Technical Parameters
Image sensor 1.3 Mega Pixels (CMOS)
Function mode
Video record, shoot photo and voice memo, playback, mass
storage and PC camera
Lens F/3.1 f=6.5mm
Focal distance 15cm~25cm (Macro) / 140cm~infinity (standard mode)
Digital zoom 4 x
Shutter Electronic shutter
LCD display
screen
3.8 cm (1.5”) TFT LCD
Picture resolution 2592x1944 / 2048x1536 / 1280x1024 / 640x480
Video resolution VGA: 640x480 (30/15fps), QVGA: 320x240 (30/15fps)
White balance Auto/manual: Daylight, Cloudy, Tungsten and Fluorescent
Exposure Automatic/manual (-2.0EV~+2.0EV, 0.3EV/step)
Self-shoot timer 2/10 seconds delay
Video AVI
Photo JPEG
File format
Voice WAV
Memory medium
Built-in 16MB SDRAM
SD/MMC/SDHC card (maximum supports 8GB)
Display screen 280×220 pixels, 1.5 inches
51
Page 54
52
USB interface High Speed USB 2.0 interface
Power supply Battery: 3 x AAA Alkaline 1.5V
Dimensions
(L×W×H)
94.6 x 57.1 x 40.5 mm
Weight Not including batteries: Approx. 120 g
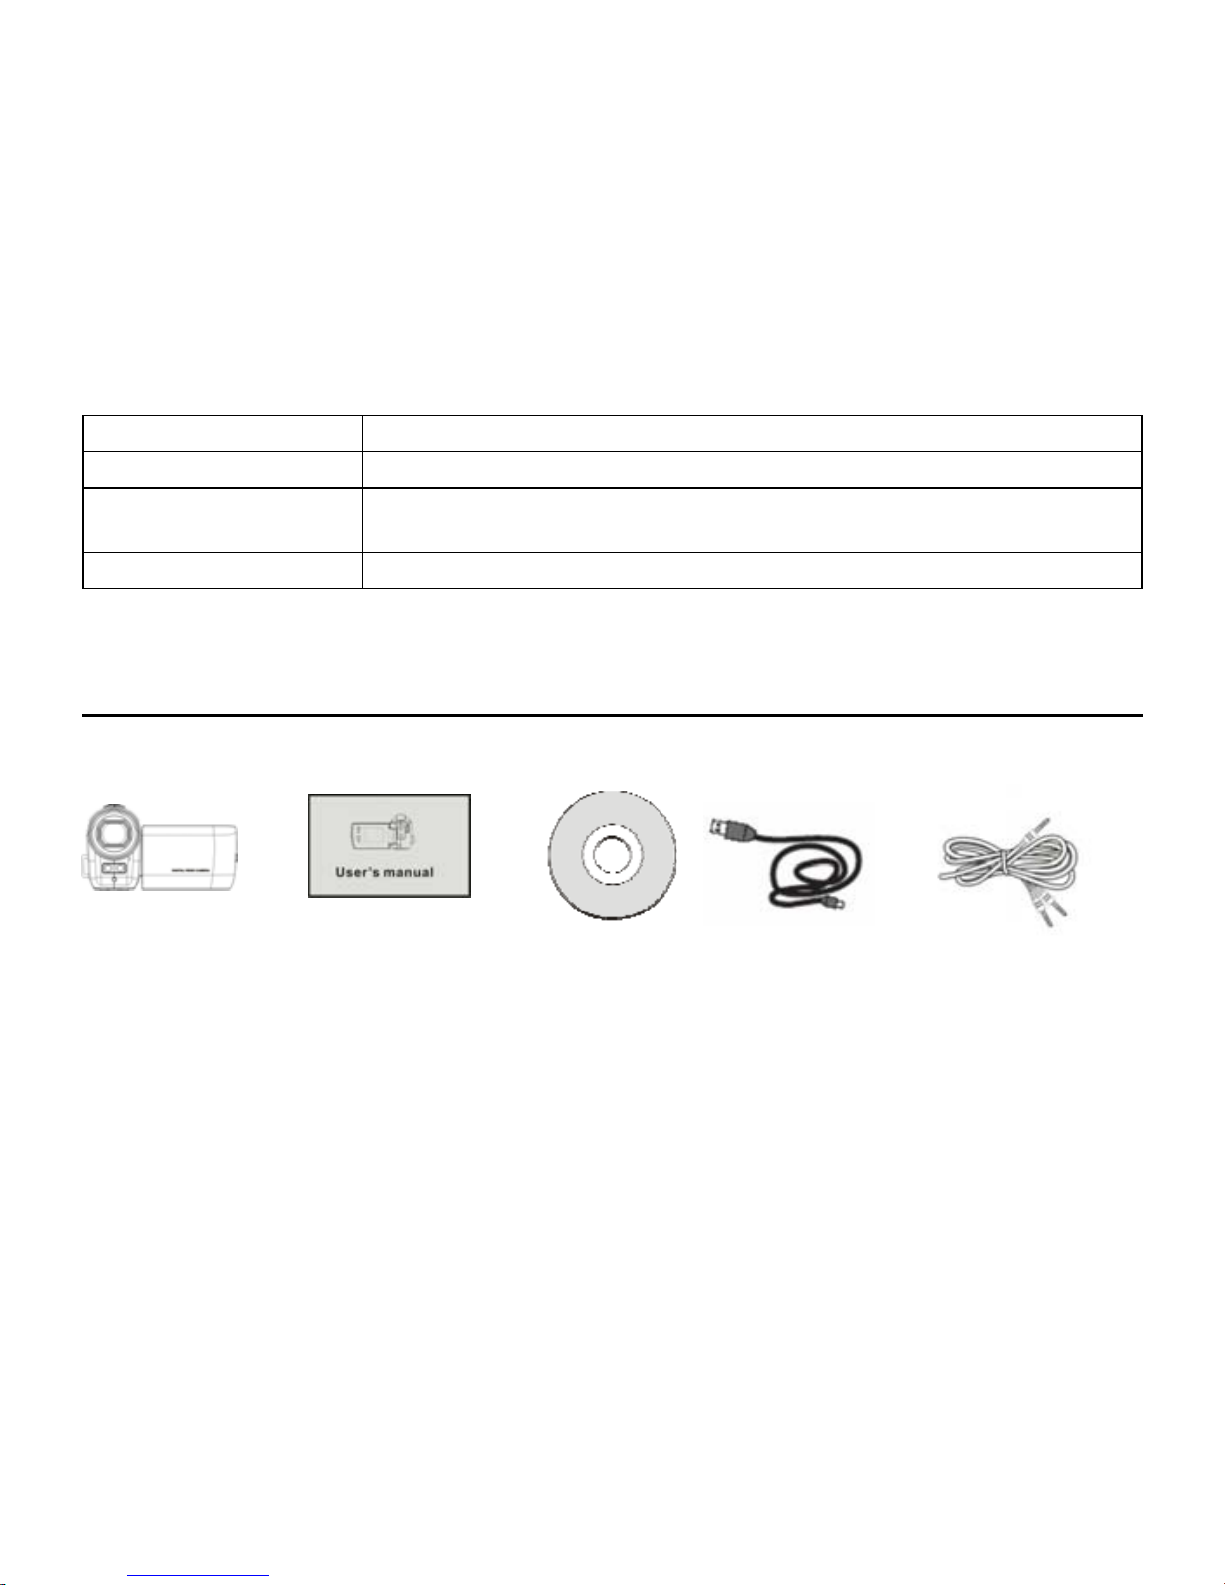
Standard Packing
Camera User’s Manual Software CD USB Cable AV Cable
Page 55
01. 2011
 Loading...