

Page 1
Page 2

CONTENT
Preface...........................................................................................1
Notice.............................................................................................1
Protection of Power Cable .............................................................2
Precautions and Maintenance........................................................2
Instructions for Using the Built-in Battery.......................................3
Precautions.............................................................................3
Methods of Using the Battery ..................................................3
Appearance Instruction..................................................................4
Function Keys on the Player...................................................4
Right Side of the Player..........................................................5
Left Side of the Player.............................................................5
Front side of the Panel............................................................5
Remote Control Introductions ........................................................6
Precautions....................................................................................6
Connection with TVs......................................................................9
Basic Operation ....................................................................10
System Setup...............................................................................10
Menu Setup.................................................................................. 11
Language Setup...........................................................................12
CD Copy Function........................................................................13
Play MP3/JPEG Disc............................................................13
Read USB disc and SD/MMC Cards.....................................14
Playing Games.............................................................................14
Digital TV Functions.....................................................................15
Trouble Shooting..........................................................................24
Specifications...............................................................................25
DVD Technical Parameter.....................................................25
TV Technical Parameter........................................................25
List of Accessories................................................................25
Page 3
1
Preface
Thanks for choosing our portable DVD player. Please read this instruction manual
carefully before using and keep it properly for later reference.
This is a new DVD player with perfect sound and display output. It is suitable to be used
in office(s), indoor, hotel(s), car(s), and so on.
Notice
Non-professional staffs do not touch the laser lens. Please wash hands before cleaning
up the laser lens or go for professional maint enance sites, so as to avoid electrostatic
breakdown or damage to the laser lens.
Safety Instruction
z Please read this instruction manual carefully before using it, and keep it properly
for later reference.
z In order to prevent fire or electrical shock, please do not expose this device to rain
or damp environment!
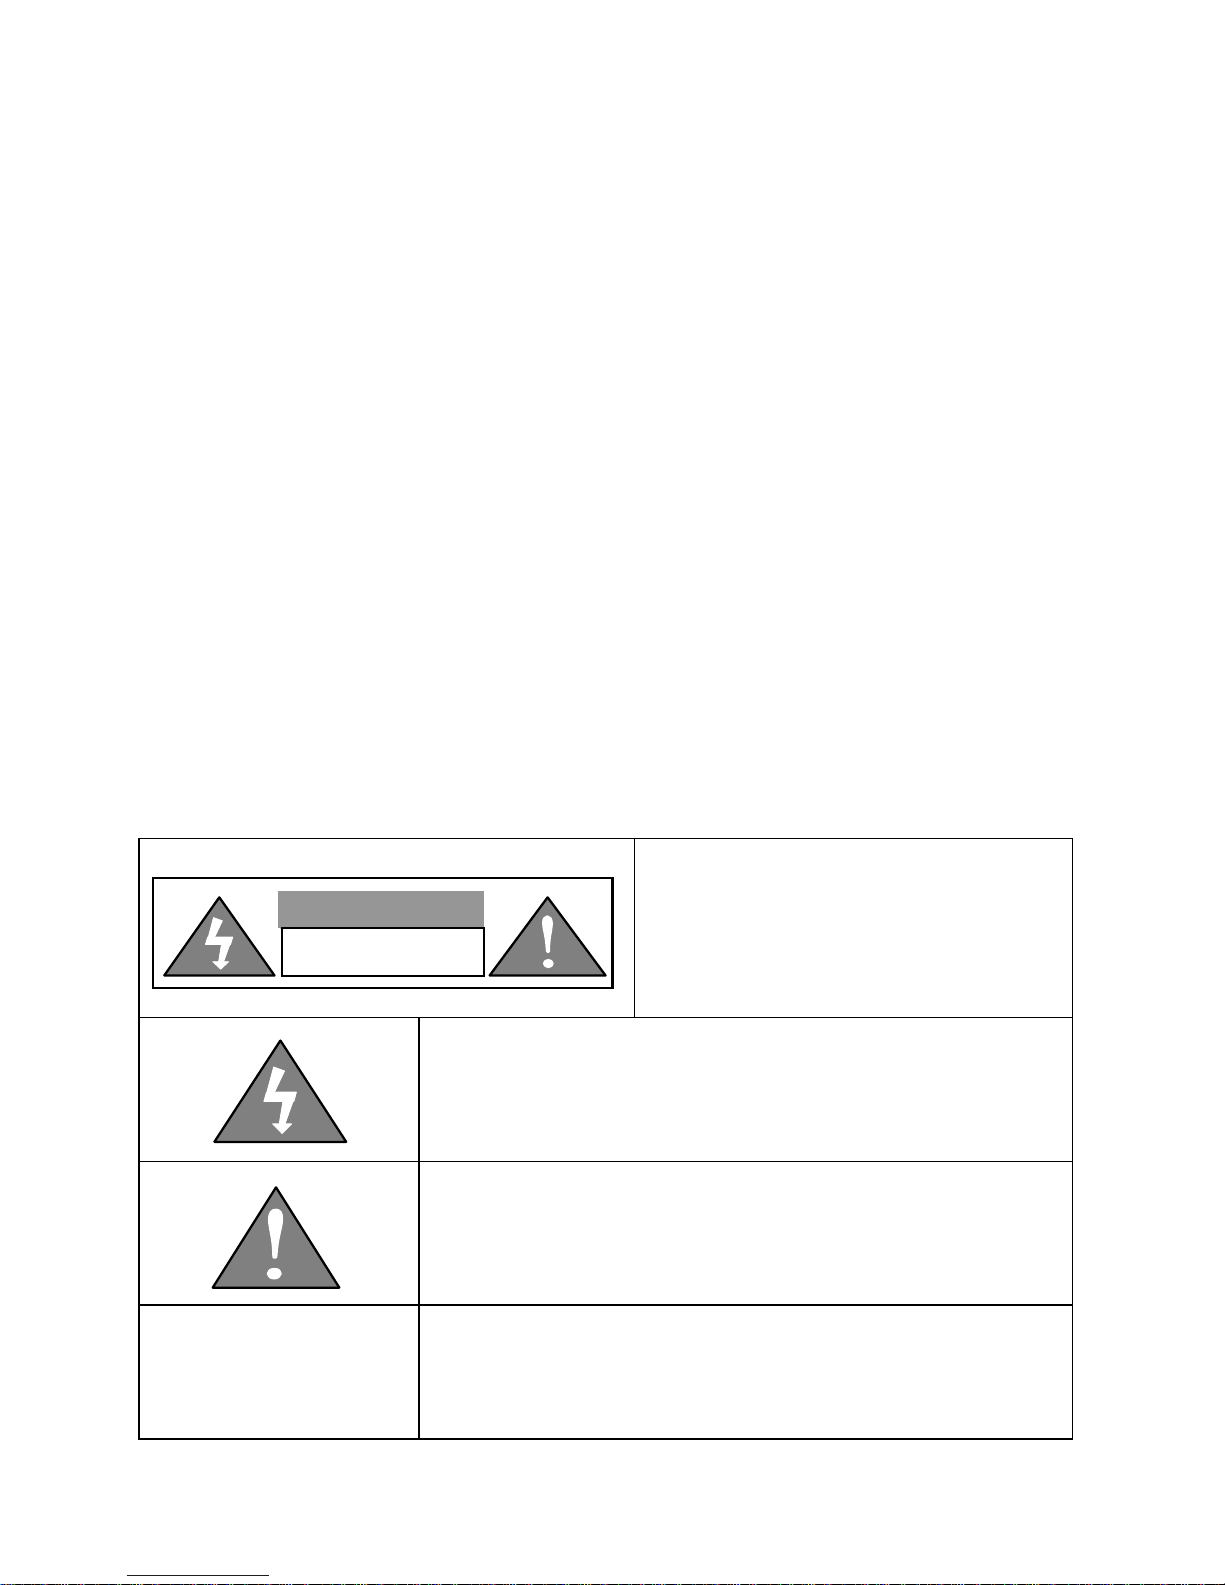
Note: In order to prevent fire or
electrical shock, please do not open
the cover of the device; otherwise,
damage might be incurred.
The lightning mark in a black triangle warns the user to be
careful of electrical shock because of high voltage
contained inside.
The exclamation mark in a black triangle warns the user
that important instructions for operation and assistance
are provided.
Class-1 Laser Product
Laser product mark: This mark is on the rear panel of the
device, indicating that class-1 laser beam is weak that
there is no radiation hazard outside of the device.
CAUTION
RISK OF ELECTRIC SHOCK
Page 4

2
Protection of Power Cable
1. To disconnect the AC power cord, pull the plug out from the connector.
2. Please do not place the AC power cord close to any heat source.
3. Please do not place heavy objects on the AC power cord.
4. Please do not disassemble and repair AC power cord by yourself.
5. This player is class-I laser product and with “Class-I” remark.
6. This product contains a low-power laser device. In case service or
internal-component adjustment is needed, please contact nearby distributors and
seek for professional technical help.
Precautions and Maintenance
1. Please do not place the device in a sealed container to protect it from high
temperature.
2. Please do not place the device under direct sunlight or close to any heat sources.
3. Please do not place the device close to objects with magnetic field.
4. Please do not place the device near liquid area. If incidentally liquid penetrates into
the device, please remove the plug immediately and seek for technician’s
assistance.
5. Please place the device on a horizontal surface, and do not place heavy object s on
top of the device.
6. Please use standby mode when the player is suspended. Please remove the AC
power cord or lithium battery if not being used in a long time.
7. Please do not put your fingers or other objects into the device.
8. The disk-drive read header will have dew drop under the following conditions:
(1) The device is being opened for a long time.
(2) In a room with steam or damp.
(3) Move the device from a low to a high temperature environment.
9. In order to prevent fire, electrical shock, or device damage, do not use cleaning
fluid or spray.
10. There might be interference on the screen if you watch TV and the DVD disk is still
playing due to different TV types. For better image quality , please turn DVD disk off
when you watch TV.
11. Please do not repair this DVD player by yourself.
Page 5

3
12. The image quality might be reduced if there are muddiness or scratch on the LCD
screen.
Instructions for Using the Built-in Battery
Precautions
High-capacity rechargeable lithium battery is built-in in this player, it is strictly forbidden
to take the battery apart by your own. Seek for professional technicians’ assistance to
replace the battery for you.
1. Please do not throw the battery into fire or to any heat area; please also do not
store the battery in any area that is having high temperature.
2. Please do not remove the battery when it is in use or being charged.
3. Please do not connect the anode with the cathode of the battery directly as it may
cause serious battery damage.
4. Please do not have the battery the battery immerse into water or any other liquids;
please keep the battery away from damp area when storage it.
5. Please do not stab, hammer, or trample the battery.
6. If you want to have a rest or sleep, or the player is not to be used for a long time,
please unplug the power adaptor of the player and turn off the power switch to
prevent battery damage, and any incident caused by overcharging.
7. When lithium battery is being used on the device, it is advised to adjust the volume
to the middle (small volume shall save more battery power) to prolong the power
consumption time of the battery. This is also useful during your trip.
Methods of Using the Battery
1. For first-time use, the battery power should be used up before recharging and the
battery must be fully charged for about 4 to 5 hours.
2. It can be used under an ambient temperature between -5°C and 40°C.
3. The charging LED light indicates the charging status.
4. Charging operation procedures:
z Plug in power.
z The red LED light is on after the power is being connected, and the battery
begins to be charged.
z When the charging red LED light turns to yellow, it indicates that the battery is
fully charged.
Page 6
4
Appearance Instruction
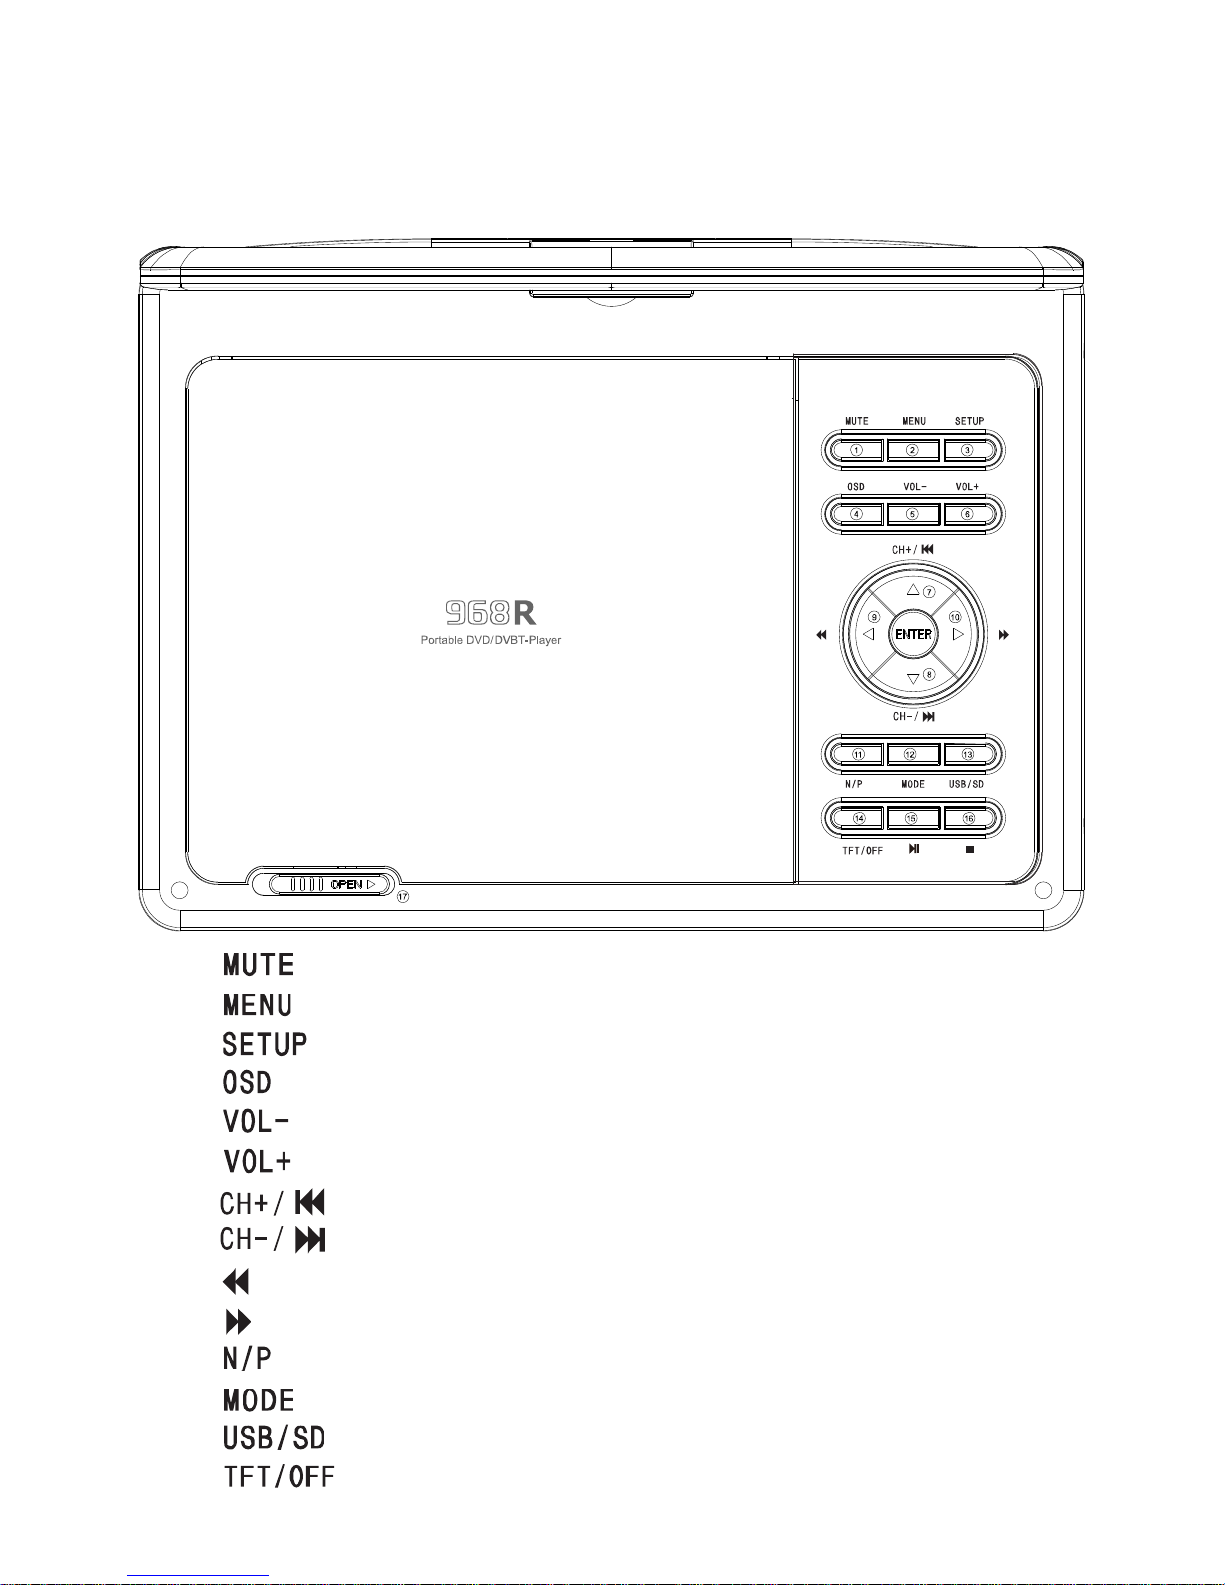
Function Keys on the Player
1. : Press this button to shut down the sound.
2. : Menu setup for displaying.
3. : Press this button to set the function of the DVD player.
4. : Display the working status of DVD.
5. : Decrease the volume.
6. : Increase the volume.
7. : TV channel increase / Previous section
8. : TV channel decrease / Next section
9. : Fast reverse
10. : Fast forward
11. : NTSC/PAL
12. : Function mode switch (DVD/AV/TV switch).
13. : USB/SD switch.
14. : LCD display switches on/off.
Page 7
5
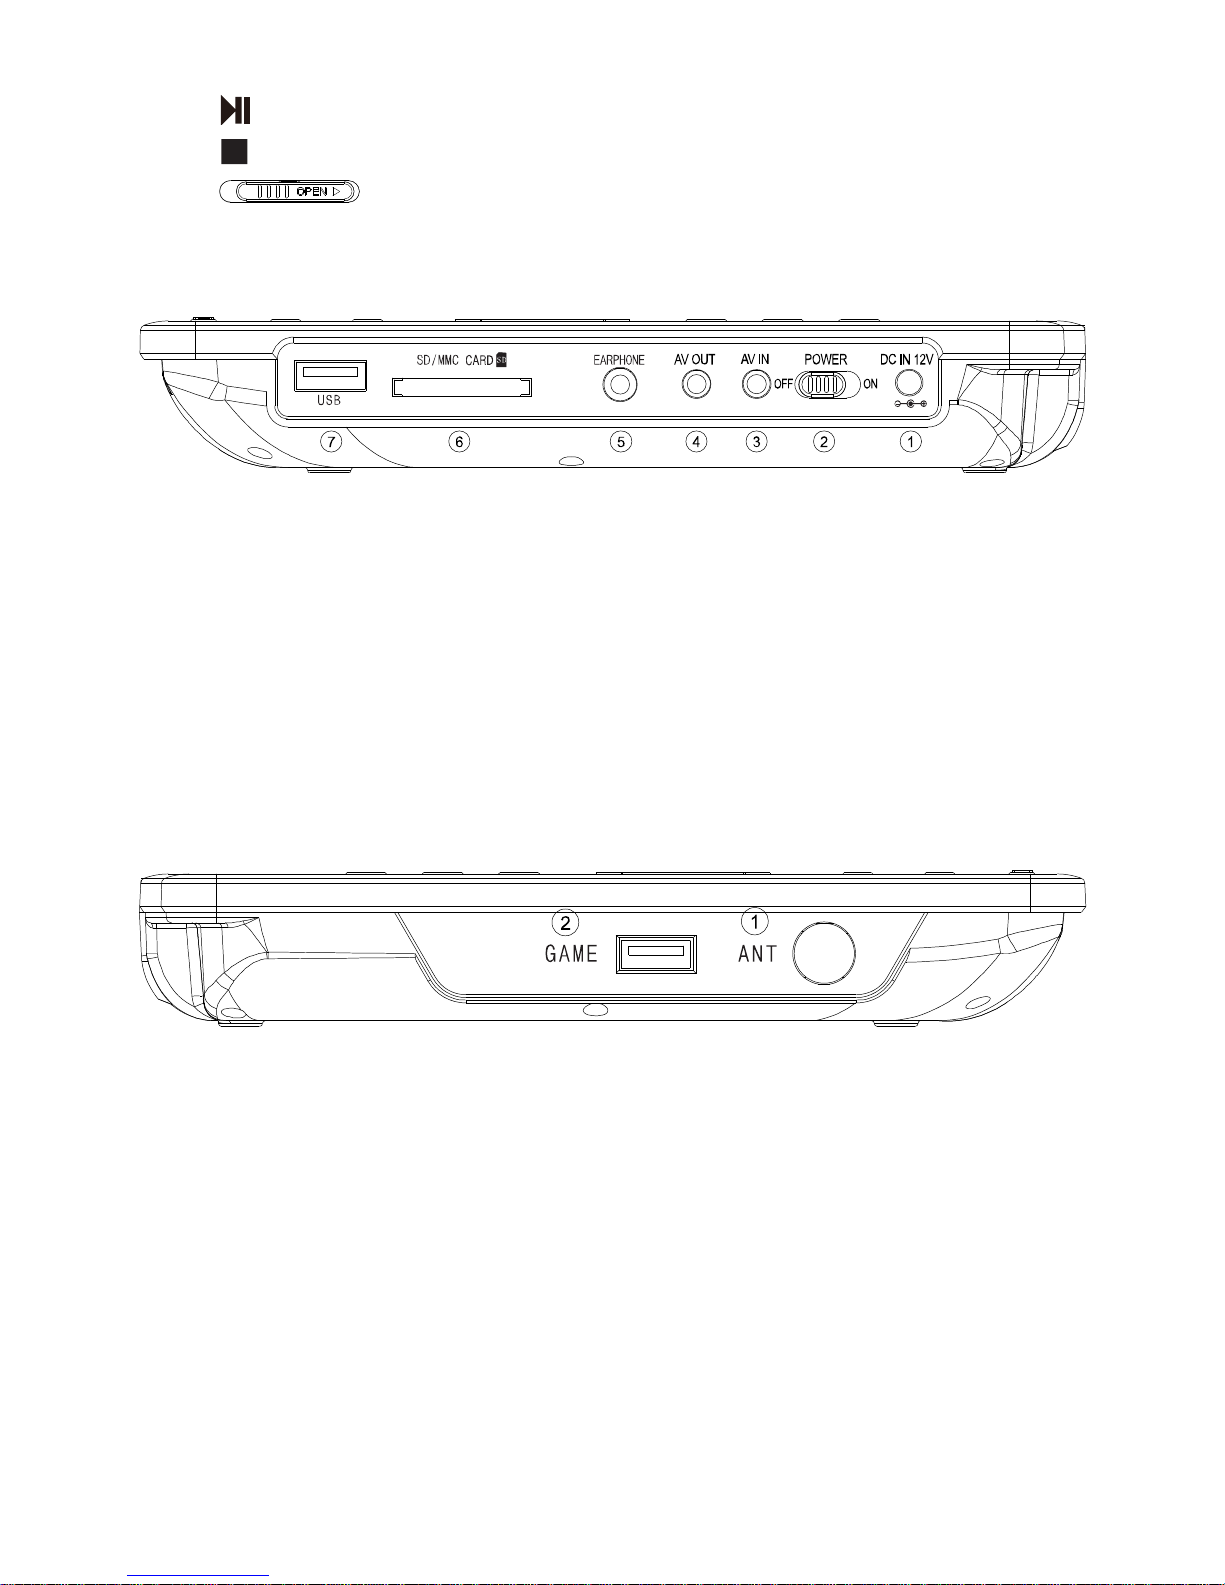
15. : Press this button to Play / Pause.
16. : Stop
17. : CD Door Open / Close
Right Side of the Player
1. DC IN: DC IN 12V
2. POWER: Power On / Off
3. AV IN: External AUDIO / VIDEO input
4. AV OUT: AUDIO / VIDEO output
5. Earphone Port
6. SD/MMC: SD and MMC Card slot
7. USB: USB socket
Left Side of the Player
1. ANT : TV Antenna connector
2. GAME: Game Control Pad socket
Front side of the Panel
1. Battery Charging Indicator
Red light: Charging
Yellow light: Full
2. Power Indicator
Blue light: On
3. Remote Control Sensor
Page 8

6
Remote Control Introductions
Installation of Remote Control Battery
1. Flip to the back of the remote control and remove the lid.
2. According to the battery polarity position, correctly insert two sections of AAA
batteries.
3. Put back and close the lid accordingly.
Precautions
1. Do not use rechargeable batteries.
2. Do not mix different brands and types of batteries.
3. Do not use new and old batteries together.
4. When the remote control features are not strong, please replace new batteries.
5. If you do not use the remote control for a long time, please remove the batteries to
avoid the battery liquid leakage which will result in battery corrosion and may
seriously cause the device damage.
6. Do not place the remote control under high temperature or humid area.
7. Do not take the remote control apart.
8. The remote control can work best within 5 meters from the device and within 30
degree angle.
Page 9
7
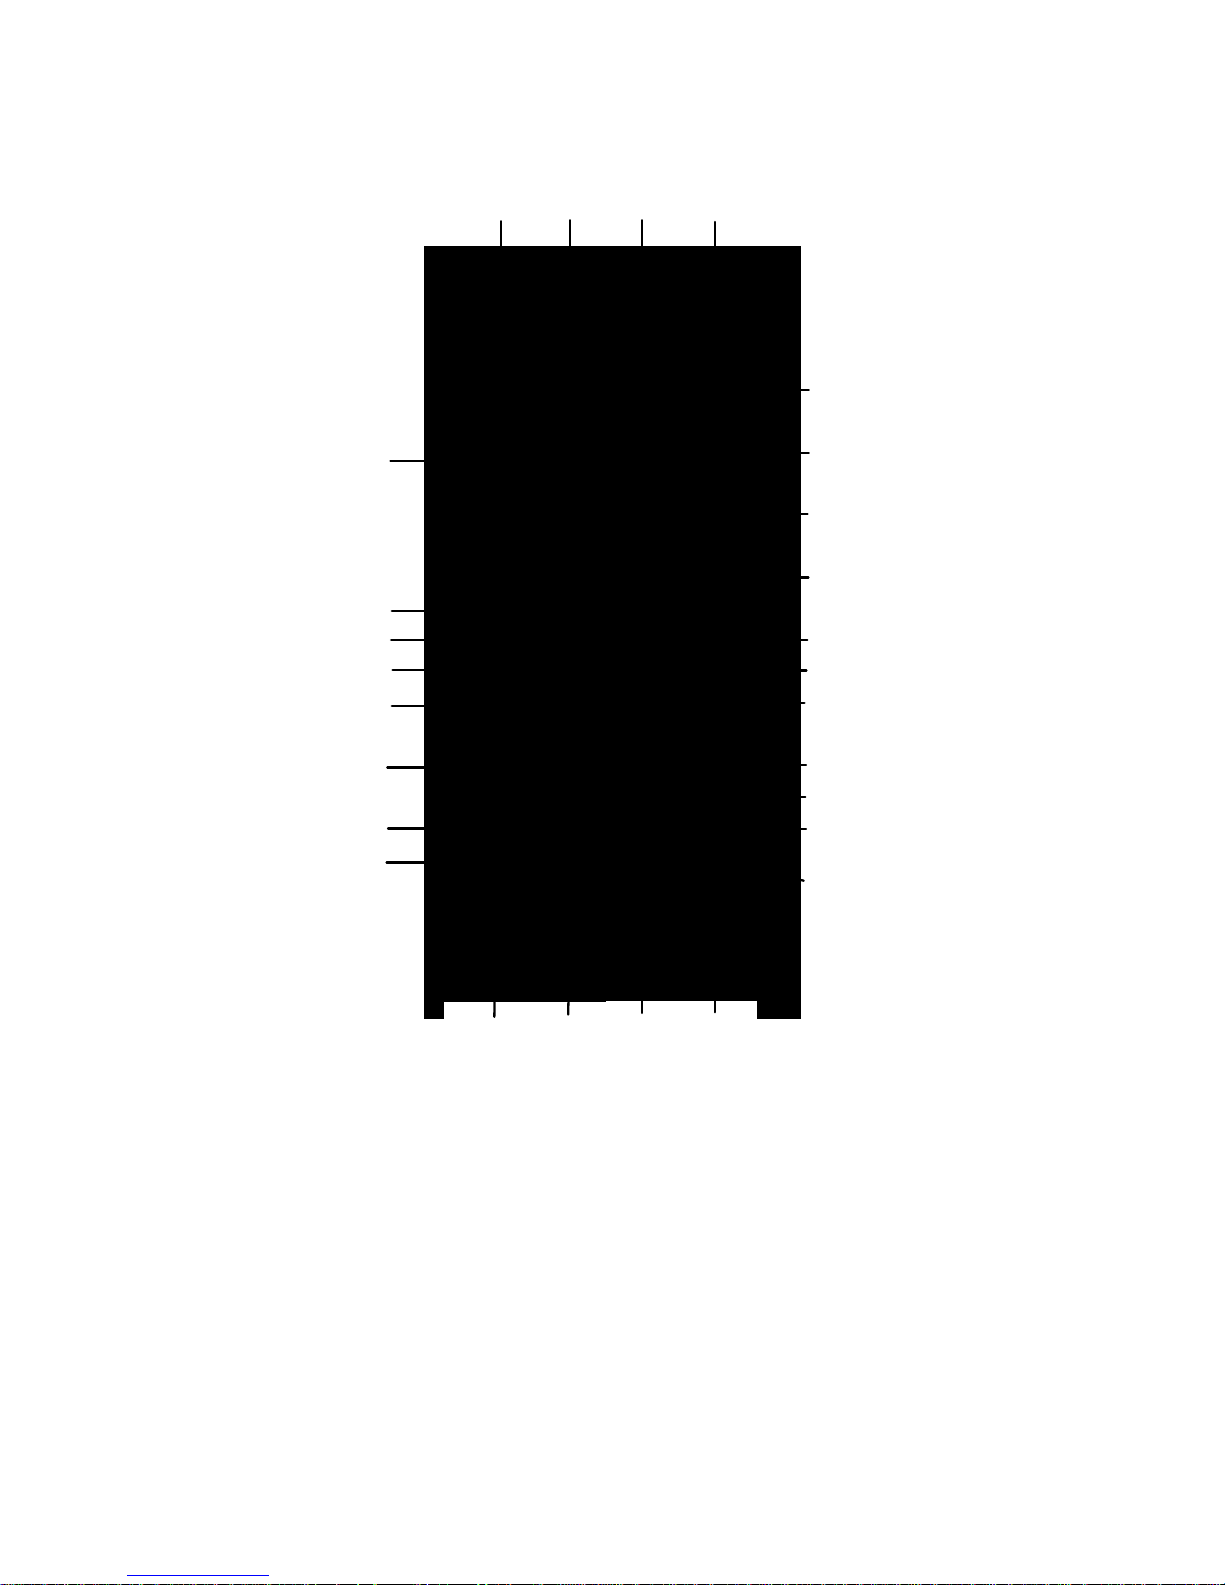
Remote Control Appearance
16
17
18
22
23
11
13
1
24 25
26 27
5
12
14
15
19
20
21
10
23
4
6
7
8
9
1 POWER 2 OSD 3 DVD/USB Card
4 MODE 5 Number Buttons 6 AUDIO
7 SUBTITLE 8 ABGLE 9 TITLE / PBC
10 RETURN 11 ZOOM 12 SETUP
13 MENU 14 ENTER 15 Direction Buttons
16 GOTO 17 Play/Pause 18 Stop
19 SLOW 20 REPEAT 21 MUTE
22 VOL+ 23 VOL- 24 Previous
25 Next 26 Fast Reverse 27 Fast Forward
Page 10

8
1. POWER: Power switch of DVD player.
2. OSD: Display the working status of DVD.
3. DVD/USB Card: Press this button to switch among DVD/USB/CARD interfaces
in the DVD mode.
4. MODE: Press this button to switch the different functions between DVD/TV/AV
modes.
5. Number Buttons: Number buttons can be used to select songs or TV channels.
6. AUDIO: Press [Audio] to switch among multiple audio languages. This function
works only when the disc supports multiple audio languages.
7. SUBTITLE: When playing a DVD or SVCD disc with multilingual subtitles, use
this button to select the required language from the available subtitles languages.
The types and quantities of subtitles depend on the working process of the disc.
DVD disc contains 32 kinds of languages at most while SVCD disc contains 4
kinds at most.
8. ANGLE: Some DVD discs contain images taken from different view of angles.
Press this button to select a different viewing angle.
9. TITLE/PBC: Press this button to stop playing and returns to the title menu of the
disc. Press Direction Buttons to select the menu, or press [Previous] / [Next]
button to turn the pages until you get the menu with title numbers you want to
select, and press number button for selection.
Insert a disc with PBC function. When PBC is on, the screen shall display menu
(which differs from discs with different contents), and press [Previous] / [Next]
button to turn the pages until the page containing the title track serial number;
then press the Number Buttons for selection. When PCB is off, you can not
select a song from the menu interface, disc songs will be played in sequence, or
you may make your selection with Number Buttons or [Previous] / [Next]
button. (PBC function only works for VCD 2.0)
10. RETURN: In the DVD mode, press this button to return to menu when playing
DVD/MP4.
11. ZOOM: Press this button in the state of DVD to enlarge the view by X2, X3, X4 in
order, or to minify the view by X1/2, X1/3, X1/4, OFF in order.
12. SETUP: To enter setup menu.
13. MENU: In the DVD / AV /TV modes, press the button to enter the image, volume,
system, function and time settings.
14. ENTER: Press this button to confirm menu contents or to play disc.
Page 11

9
15. Direction Buttons: Left, Right, ▲Up (TV mode CH+), ▼Down (TV mode
CH-).
16. GOTO: Press [GOTO], according to different types and contents of discs, the
display on the screen is as the following:
Press [GOTO] once when the disc is being played back, TV screen shall display
the disk type, the number of titles/sections (songs) in the disc, the title
number/section (song) number of the currently playing item, and play time of the
section (song).
Input a designated title, section (song), and time, and then press [Enter] to
activate the designated title, section (song) and play time directly.
17. Play/Pause: Press this button once, and the player shall temporarily stop playing,
image and sound shall stay at static state. Press [Play/Pause] again to resume
normal playing.
18. Stop: Press this button to stop in playing state.
19. Slow: Slow motion playing SLOW 1/2, SLOW 1/3, SLOW 1/4, SLOW 1/5, SLOW
1/6, SLOW 1/7.
20. REPEAT: Press this button to repeatedly play the selected titles/sections (DVD)
or a single song/whole disc (VCD). Press [REPEAT] once, the modes on the
screen is as the following:
For DVD - Repeat Off / Section Repeat / Title Repeat
For SVCD/VCD/CD - Repeat Off / Single Song Repeat / Whole Disc Repeat
21. MUTE: Press this button to turn off the audio and speaker outputs.
22. 23. VOL+/VOL-: Press these buttons to increase or decrease the volume.
24. 25. Previous/Next: Press these buttons during playback to switch to pervious
section or the next section.
26. 27. Fast Reverse/Fast Forward: Press these buttons to enter the mode of fast
reverse or fast forward. Press [PLAY] to resume normal playing mode directly.
Connection with TVs
Note: The AV cable with yellow lotus is used for video signal, and the one with red and
white lotus plugs are for audio signal.
The top output or input signal plug indicates video output, while the lower part contains
two output/input signal plugs. The white one indicates the left sound channel and the red
one indicates the right sound channel. You can adjust the output device switches to
Page 12

10
Pow
Men
control the volume.
Basic Operation
er Operation
Connect the power adapter with either 220V or 110V power supply, switch the
[Power] to ON, and wait for 3 seconds to turn on the device. The device displays
the latest shutdown state. Switch to the mode you prefer by mode button.
Press [Setup] to enter setting menu interface, select the appropriate function from
the menu setting. The item in brighter color indicates as the selected one, and
press [Enter] to confirm.
u Setup
Press function menu setup button to setup AV OUT, Screen Subtitle, the original
setting etc. Press [Enter] to confirm.
System Setup
1. TV system: Select TV SYSTEM and press [Direction Button] to enter the
submenu. Make your own selection according to the system of the connected TV.
The selected systems are NTSC / PAL / AUTO.
2. Screen Saver: Select Screen Saver and press [Direction Button] to enter
screen saver setup menu, which can be set as On / Off. Start the screen saving
function to enable screen saver when the player is in stop/ open-cabinet/no-disc
modes or the picture keeps in static state for around 60 seconds.
3. Video output (CVBS): Composite audio and video output by connecting the player
to TV with a dedicated cable to enjoy better resolution.
Note: Only the AV cable identical to the special cable provided by the
manufacturer shall be used.
4. TV Type Screen Image Ratio: Select the TV Type and press the [Direction
Button] to enter screen image ratio menu, there are total of three modes for
selection.
z 4:3 PS (panorama scan): For the ordinary TV, left and right margin of the
images shall be cut off when wide screen images are being played in this
Page 13

11
mode.
z 4:3 LB (mail box format): This mode can be selected for TV with normal size,
and there are black stripes displays on top and bottom of the screen when
wide screen images are being played.
z 16:9 (wide screen): Applicable for wide-screen TV.
Note: 1) The play effect is relevant to the recorded image ratio of the disc,
while some discs can not be played according to the selected image
sizes.
2) For video disc only recorded in 4:3 mode, its playing ratio could only
be 4:3 no matter which screen image size ratio is set.
3) The selection of screen image size ratio should be corresponded to
the screen size ratio of the TV in service.
5. Password:
The initial setting for this item is Password lock mode, neither Rating
can be selected in this mode, nor the password can be modified. If Rating needs
to be set up, you need to press [Number Buttons] to enter the initial password of
this player: 0000, then press [Enter] to setting Rating. If you want to modify the
password, enter the old password first, then enter the new password before press
the [Enter] for confirmation (The valid password shall be in four digits.)
6. Rating: When playing the discs with lock function, you can select the appropriate
age level control according to disc level and your need. The control level is listed
from high to low. Level 1 is the lowest level, and level 8 is the highest. The function
is only applicable for discs with rating restrictions, which can only be set when the
coded lock is activated by setting password, and the coded lock needs to be
locked up after setting so that it can be played in rating restrictions.
7. Default: If this item is selected, every function setting shall be recovered and
return to its initial setting.
Menu Setup
1. Brightness: Press [Direction Button] to move the sliding bar to adjust the
brightness for video output.
2. Contrast: Press [Direction Button] to move the sliding bar to adjust the contrast
for video output.
3. HUE: Press [Direction Button] to move the sliding bar to set up the HUE for video
output.
Page 14

12
4. Saturation: Press [Direction Button] to move the sliding bar to adjust the
saturation for video output.
5. Speaker Setup: Dual channels (LT/RT) stereo and virtual surround can be
selected in the mixed mode.
6. Audio Setup Key: Press [Direction Button] to move the sliding bar to select the
Key.
Language Setup
1. OSD Language: Enter OSD Language (On Screen Display language) setup menu,
and press [Direction Button] to select the OSD Language you want, then press
[Enter] for confirmation.
There are 8 options under this item for selection: English / Chinese / German /
Spanish / French / Portuguese / Italian / Russian.
2. Audio LANG: Enter Audio LANG (audio language) setup menu, and press
[Direction Button] to select the audio language you want, then press [Enter] for
confirmation.
There are 8 options under this item for selection: English / Chinese / German /
Spanish / French / Portuguese / Italian / Russian.
3. Subtitle LANG: Enter Subtitle LANG (subtitle language) setup menu, and press
[Direction Button] to select the subtitle language you want, and then press [Enter]
for confirmation.
There are 8 options under this item for selection: English / Chinese / German /
Spanish / French / Portuguese / Italian / Russian.
4. Menu LANG: Enter Menu LANG (menu language) setup menu, and press
[Direction Button] to select the menu language you want, and then press [Enter]
for confirmation.
There are 8 options under this item for selection: English / Chinese / German /
Spanish / French / Portuguese / Italian / Russian.
Note: If the language you select is not a language recorded in the DVD disc,
the player will choose the default language recorded in the disc
automatically.
Page 15

13
CD Copy Function
Play MP3/JPEG Disc
Play MP3 Disc
Put in MP3 disc, the DVD player will automatically search all the directories in MP3.
When finishing searching, it will play the first directory in MP3 (if the directories in the
same type are not placed in order, it will play the first directory), and then play the
first song in the directory (the cursor stops at “01”). Press [Up / Down] to select any
directory in the directory menu on the left side, and press [Enter] for confirmation.
The device will play the song of the directory selected in order. At this time, you can
press [Number Buttons] to select the song you want to play directly.
Press [Right] to enter the directory play menu, then Press [Up / Down] to select the
song and press [Enter] for confirmation. You can also press [Number Buttons] to
select the song you want to play.
Play JPEG disc
Put in JPEG disc, the DVD player will automatically search all the dir ectories in JPEG.
When the search is finished, the cursor will stop at the first picture.
Press [Up / Down] to select picture file and press [Play] to start playing.
Press [Up / Down] to select picture file and press [Enter] to see the picture in full
screen. At this moment, the picture is in static state. You can press [Zoom]
continuously to enlarge the picture in different times and press [Direction Button] to
make the screen move in different direction.
When the picture is in static state, you can press [Fast Forward Button] to rotate
the picture clockwise and press [Fast Reverse Button] to rotate the picture
counter-clockwise.
Play MP3/JPEG Disc
When playing the disc with MP3 files and JPEG files mixed up, you can press [Right]
to move the cursor to the mark of browsing pictures and press [Enter] to enter
picture-browsing state while playing MP3 files.
Press [Right] again to enter JPEG play menu and then press the [Right] for th e third
time to select the picture-play mark on the lower right corner. At this state, you can
select either MP3-play or JPEG-play directly.
Page 16

14
Select a picture in the JPEG directory menu and press [Play] to play pictures in
order .
Read USB disc and SD/MMC Cards
1. Insert USB disc into the USB interface on the upper right corner or Insert the
card (SD/MMC) into the card slot of the player.
2. Turn on the power - play.
3. You can download MP4 / MP3 / JPG / VCD files into a USB disc to play back.
Note: 1) USB disc and SD/MMC Cards must be played at no disc state so that
the device can detect the USB disc, or SD/MMC cards and then play.
2) Support USB 1.1 to 2.0 standards.
3) DVD can not be played smoothly because the DVD format is not
supported.
Playing Games
1. Please copy game files from the CD to a SD card or USB disk (not included).
Insert the memory card or plug the USB disk into the USB slot to play games.
2. Connect the control pad to the Game Control Pad Socket.
3. Turn on the power, select a game, and start playing.
Note: 1) For first-time using, you should use the remote control to enter the
game.
2) [Number Buttons] and [Previous/Next] on remote control can be
used for page turning and selecting games. Press and hold [Start] on
the game control pad and press [Select Button] at the same time to
return to the main menu.
Page 17
15
Digital TV Functions
System Setup
When using the DVB-T TV function, make sure the antenna and unit (Portable DVD) are
connected, and the unit is switched on. If finished using the DVD, AV IN or AV OUT
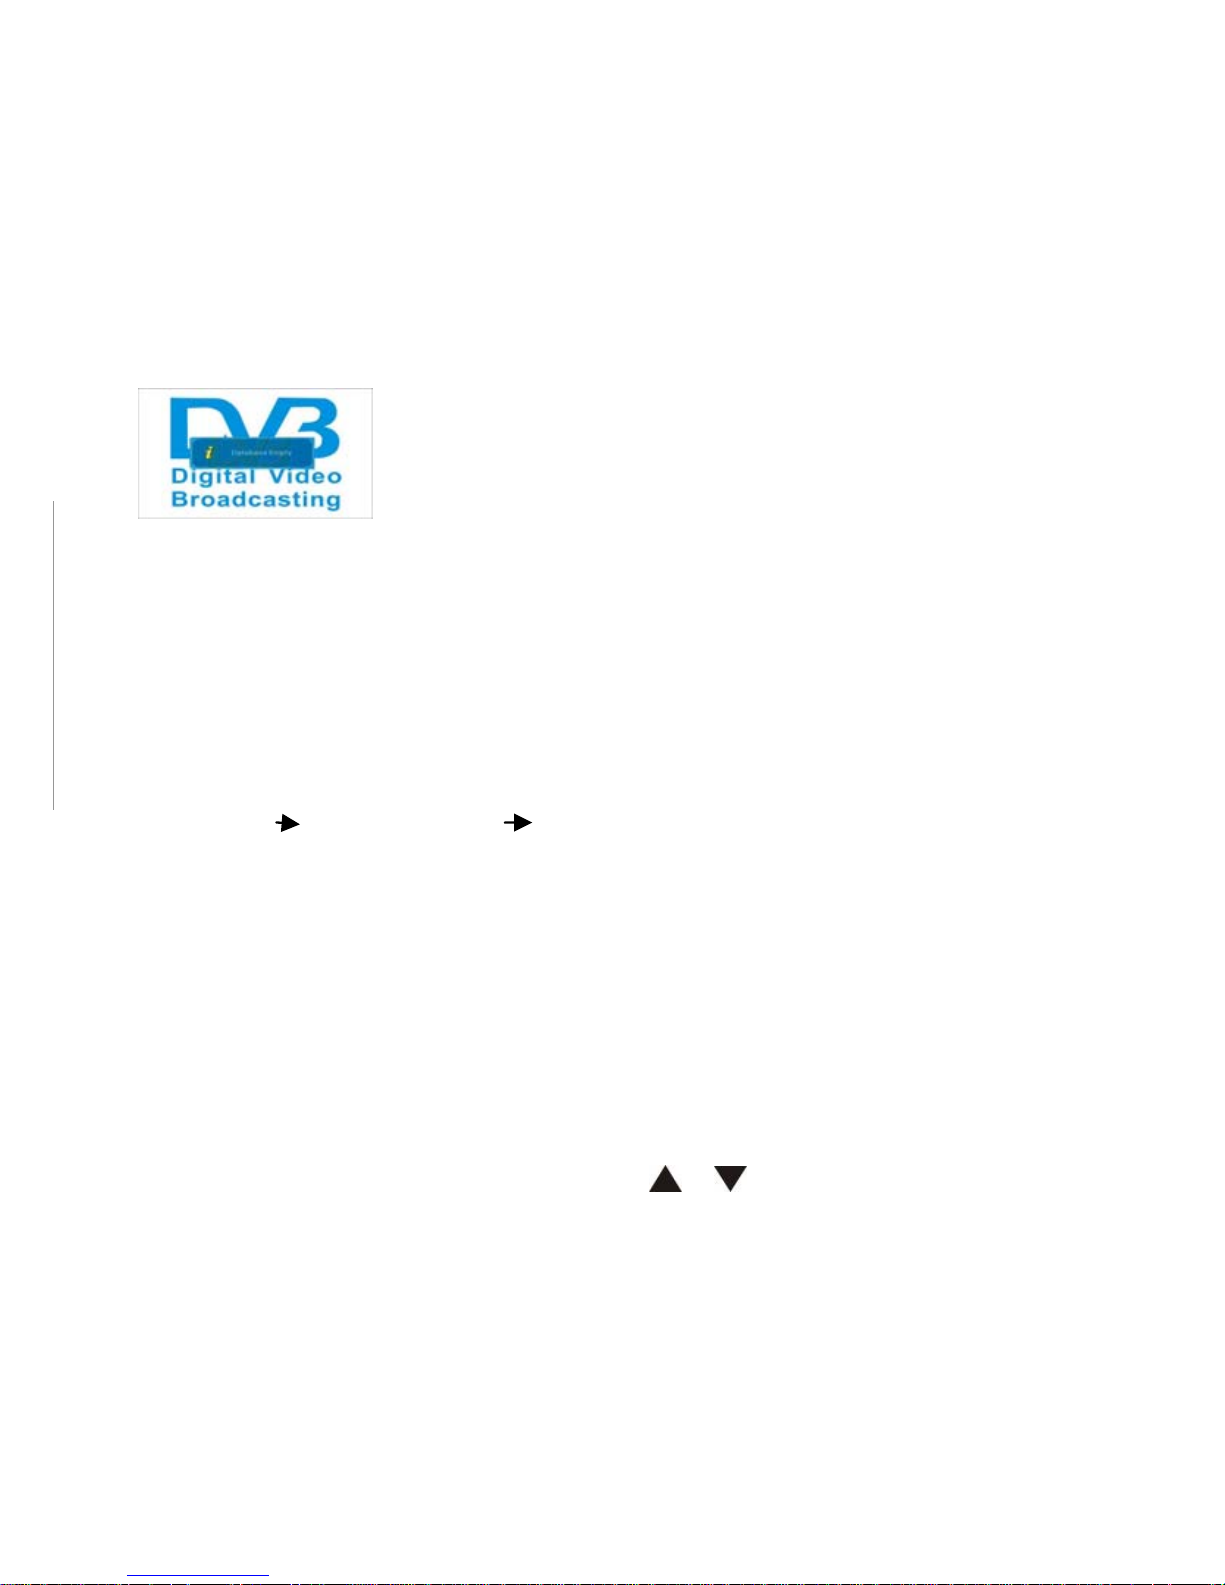
function, press "MODE" key to enter the Digital TV function. If the database hasn’t
television programs, the system interface will appear as follows:
At this point, press the "SETUP" key to enter SETUP menu. This menu includes: channel
manager / installation / software upgrade / factory default / version functions.
Note:
1) If the database has a TV program, when get into the Digital TV mode, the unit will
play the last power outage program;
2) At the first use of Digital TV feature, please enter the SETUP menu, step to "System
Settings System Settings area" menu, select the name of your country, and
then search for channels. Or the unit may not receive Digital TV signals. (See page
26 for specific action "regional" option)
3) The Digital TV functionality requires opening of the local government digital TV signal.
If the connection under normal conditions, the unit still can not receive TV signals,
please contact with your local digital TV signal-operator.
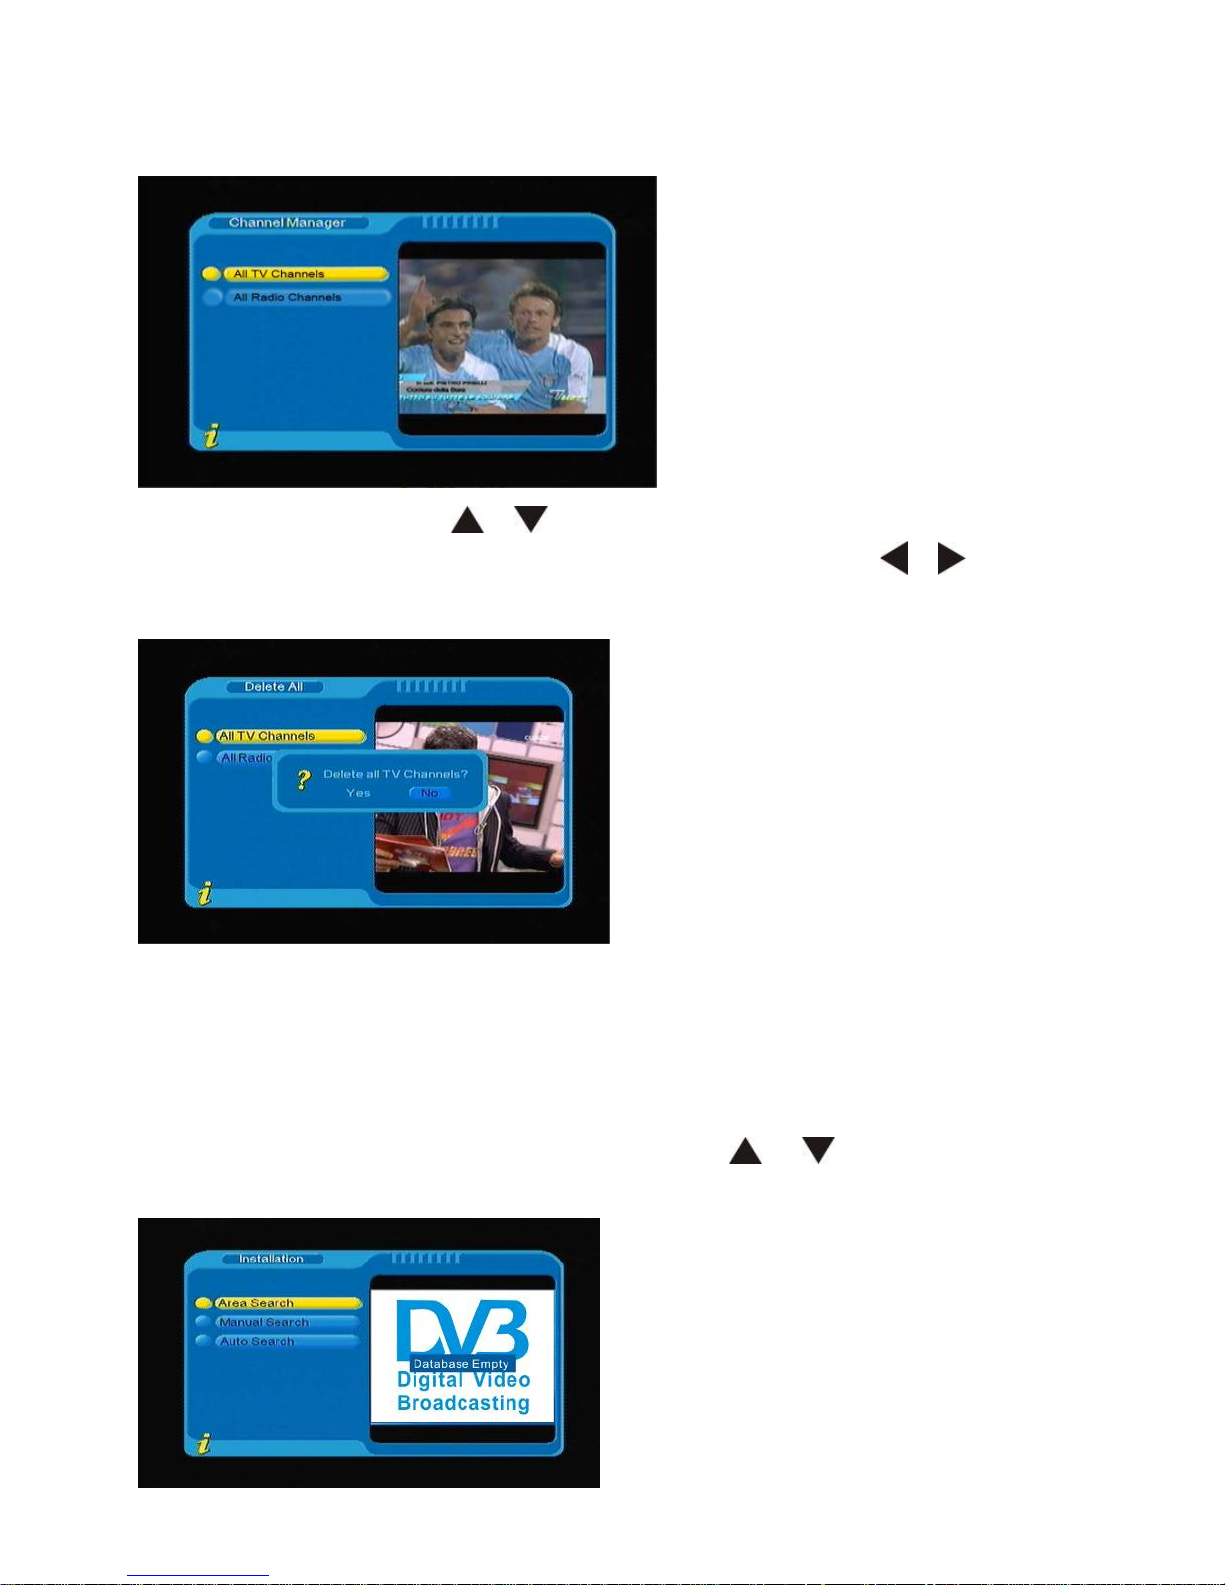
1. Channel Manager
In this menu you can delete the existing programs.
Enter into the Digital TV Set interface, use
/ buttons to select "CHANNEL
MANAGER", press ENTER key to enter the channel manager to set options:
Delete All
In the interface, press ENTER key will delete all the programs, and then the screen will
appear that you should enter the password to accomplish it:
¾ If you confirm the deletion of programs saved the system, please enter the original
Page 18
16
password "8888", and then it will enter the following interface. If you do not want to
delete, press "Return or SETUP" key to return the previous menu.
¾ In this interface, press / buttons to move the cursor to the option you want
to delete, press "ENTER" key to enter the delete option, press the
/ buttons to
select "YES" or "NO" and press ENTER to confirm.
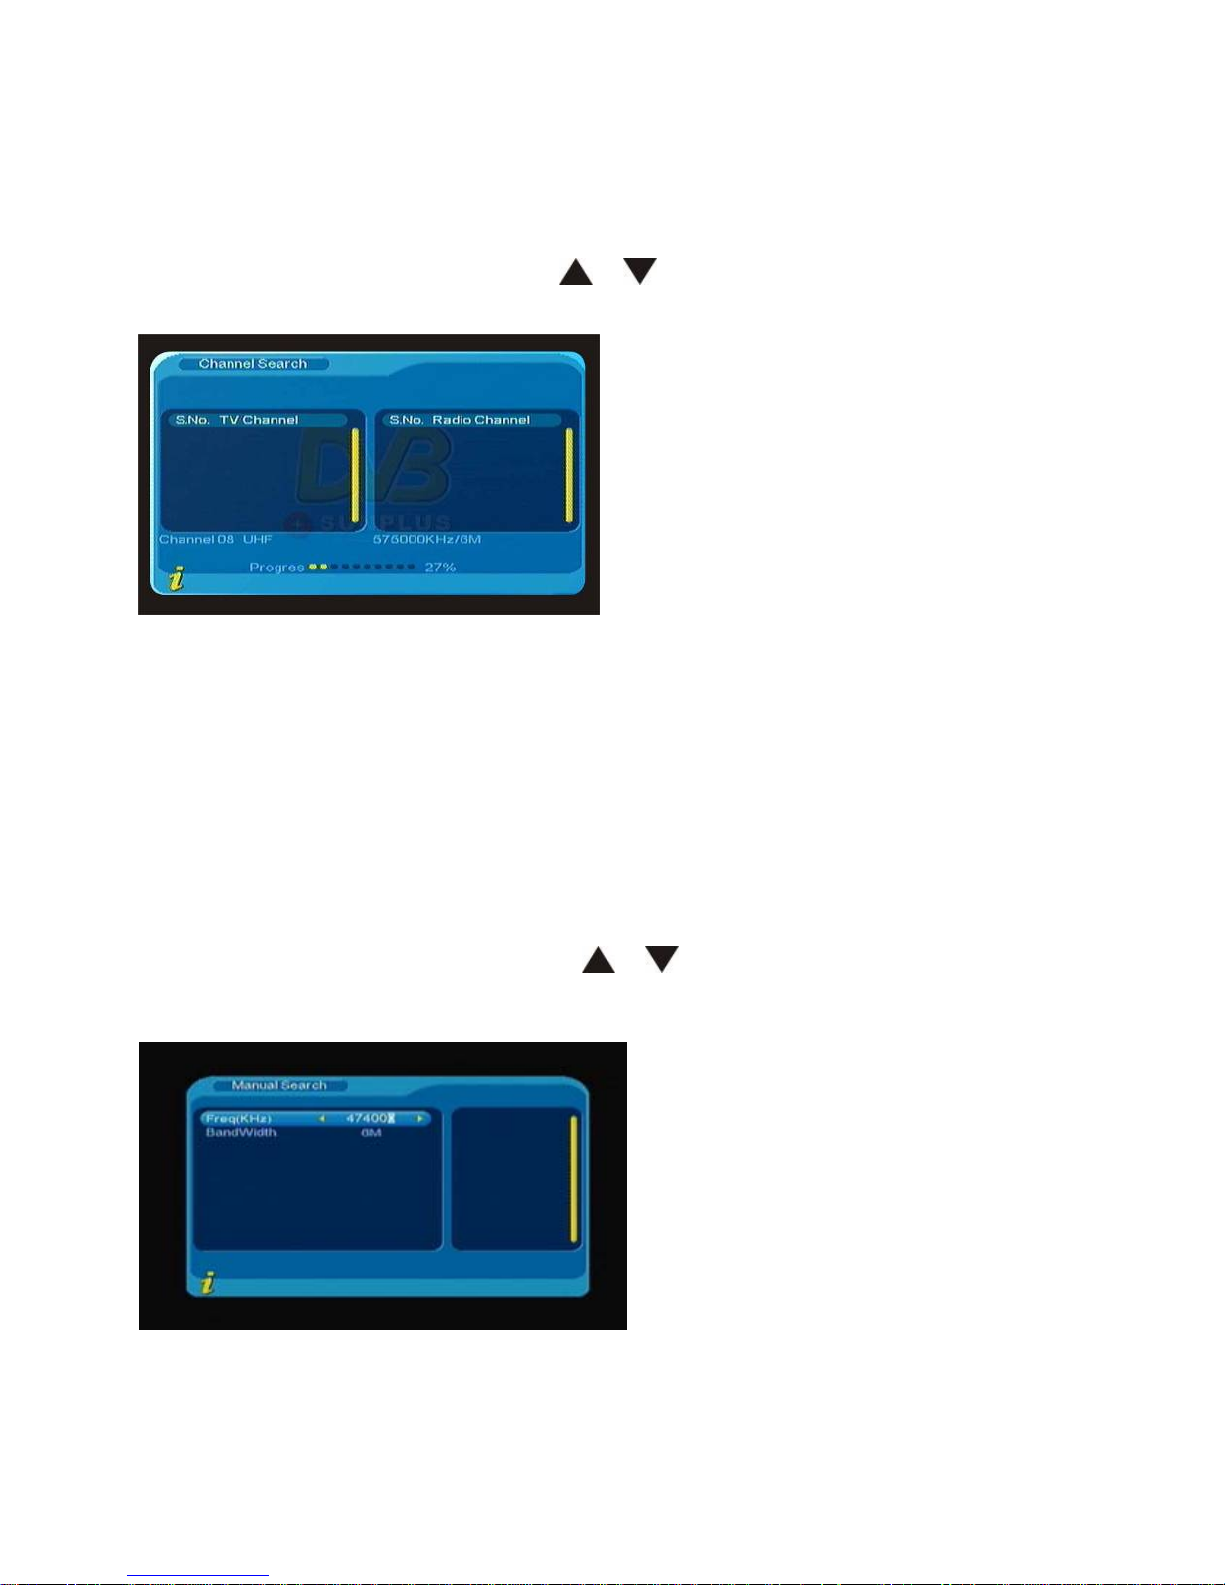
2. Installation:
Installation this option is for searching television or radio programs, the option includes:
Area Search / Manual Search / Auto Search function;
Enter into the Digital TV Set interface, use the
/ button to select the
"INSTALLATION" option, press the ENTER key to enter the installation settings options:
Page 19
17
2.1 Area Search:
Regional search program is a smart way to facilitate the program searches, it can
choose according to your country (region), and the search of the area or region of the
country shows all the channels.
In INSTALLATION interface, use the
/ key to move the cursor to the AREA
SEARCH option, press the ENTER key to enter the Channel search:
¾ In the program search process you can stop the program search b y pressing "back"
button. When the program search is completed, the system will automatically save
the search programs.
2.2 Manual Search:
When you are very familiar of the digital television information, you can choose to use
the manual search function, which can help you save more time.
¾ In INST ALLATION interface, use the
/ key to move the cursor to the Manual
SEARCH option, press the ENTER key to enter the Channel search:
¾ Before you use the manual search, please set the parameters, including the
following two options:
A. Freq (KHz) Scan frequency: you can use the remote control keys 0-9 to modify.
Page 20
18
B. Bandwidth: Set s the current scanning frequency transmission of broadband, you can
press
/ buttons to select 6MHz, 7MHz, 8MHz, the machine defaults to 8
MHz.
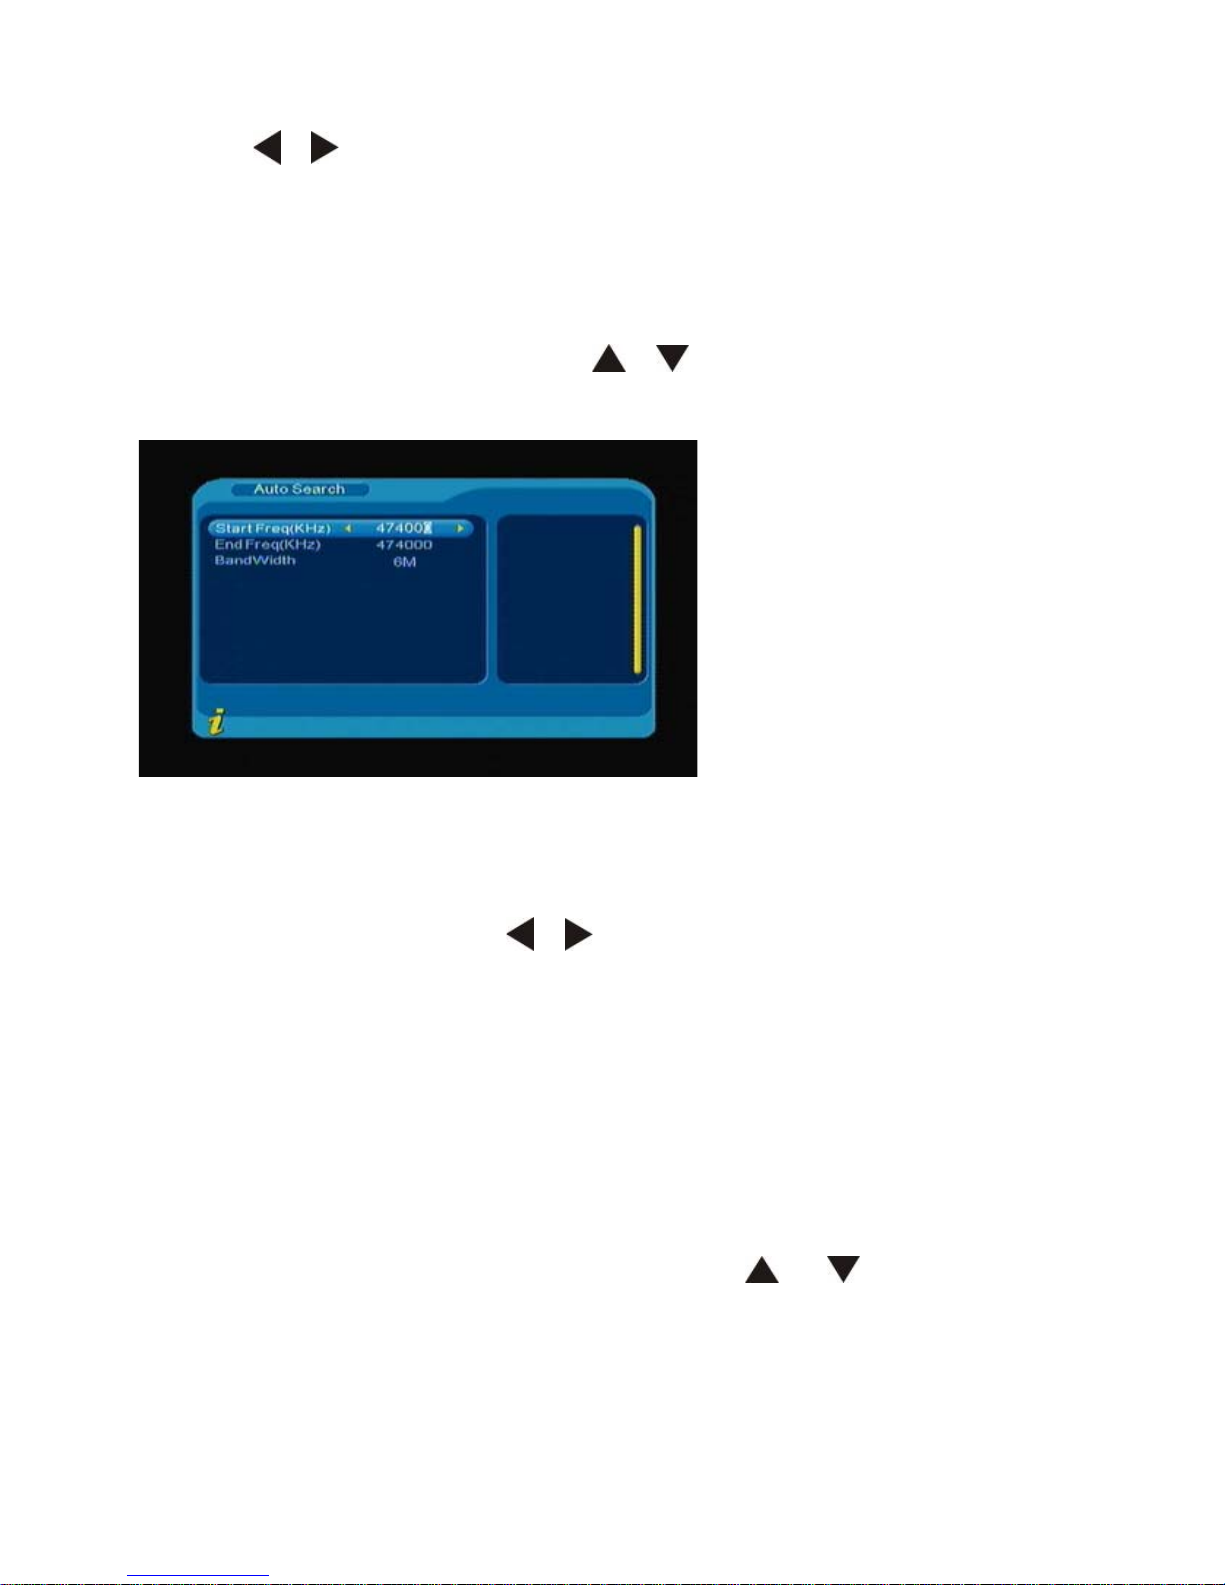
2.3 Auto Search:
Search for any band program;
¾ In INSTALLATION interface, use the
/ key to move the cursor to the Auto
SEARCH option, press the ENTER key to enter the Channel search:
¾ In the auto search program, you can set the following items:
A. Start Freq (KHz) initial frequency: you can use the remote control keys 0-9 to modify.
B. End Freq (KHz) frequency end: you can use the remote control keys 0-9 to modify.
C. Band Width: you can press
/ buttons to select 6MHz, 7MHz, 8MHz, the
machine defaults to 8 MHz.
¾ After setting up, press ENTER to enter search interface.
¾ Click "RETURN or SETUP" key return previous menu.
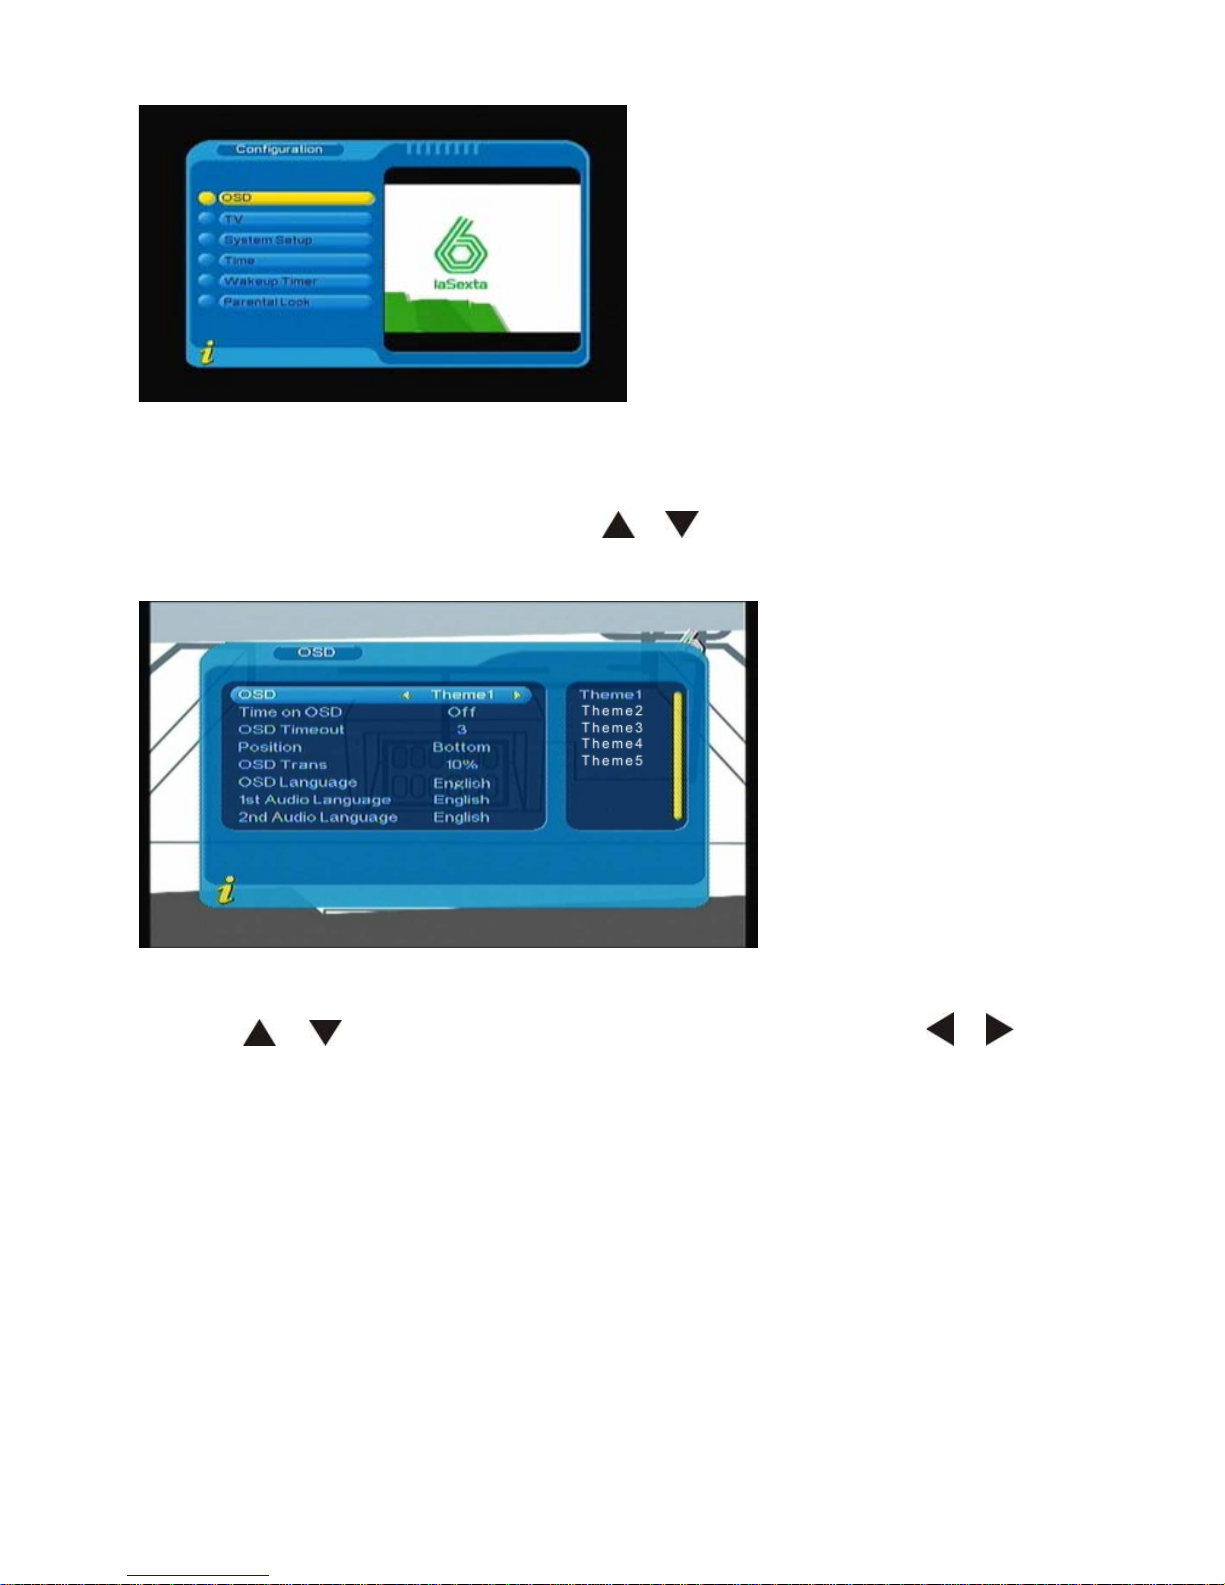
3. Configuration
This option provides a personalized system settings function. You can set up the system
according to your preferences and needs.
Get into the Digital TV set interface, use the
/ buttons to select
"CONFIGURATION", press the ENTER key to enter the configuration settings options,
the options include: OSD / TV / SYSTEM SETUP / TIME / PARENTAL LOCK functions.
Page 21
19
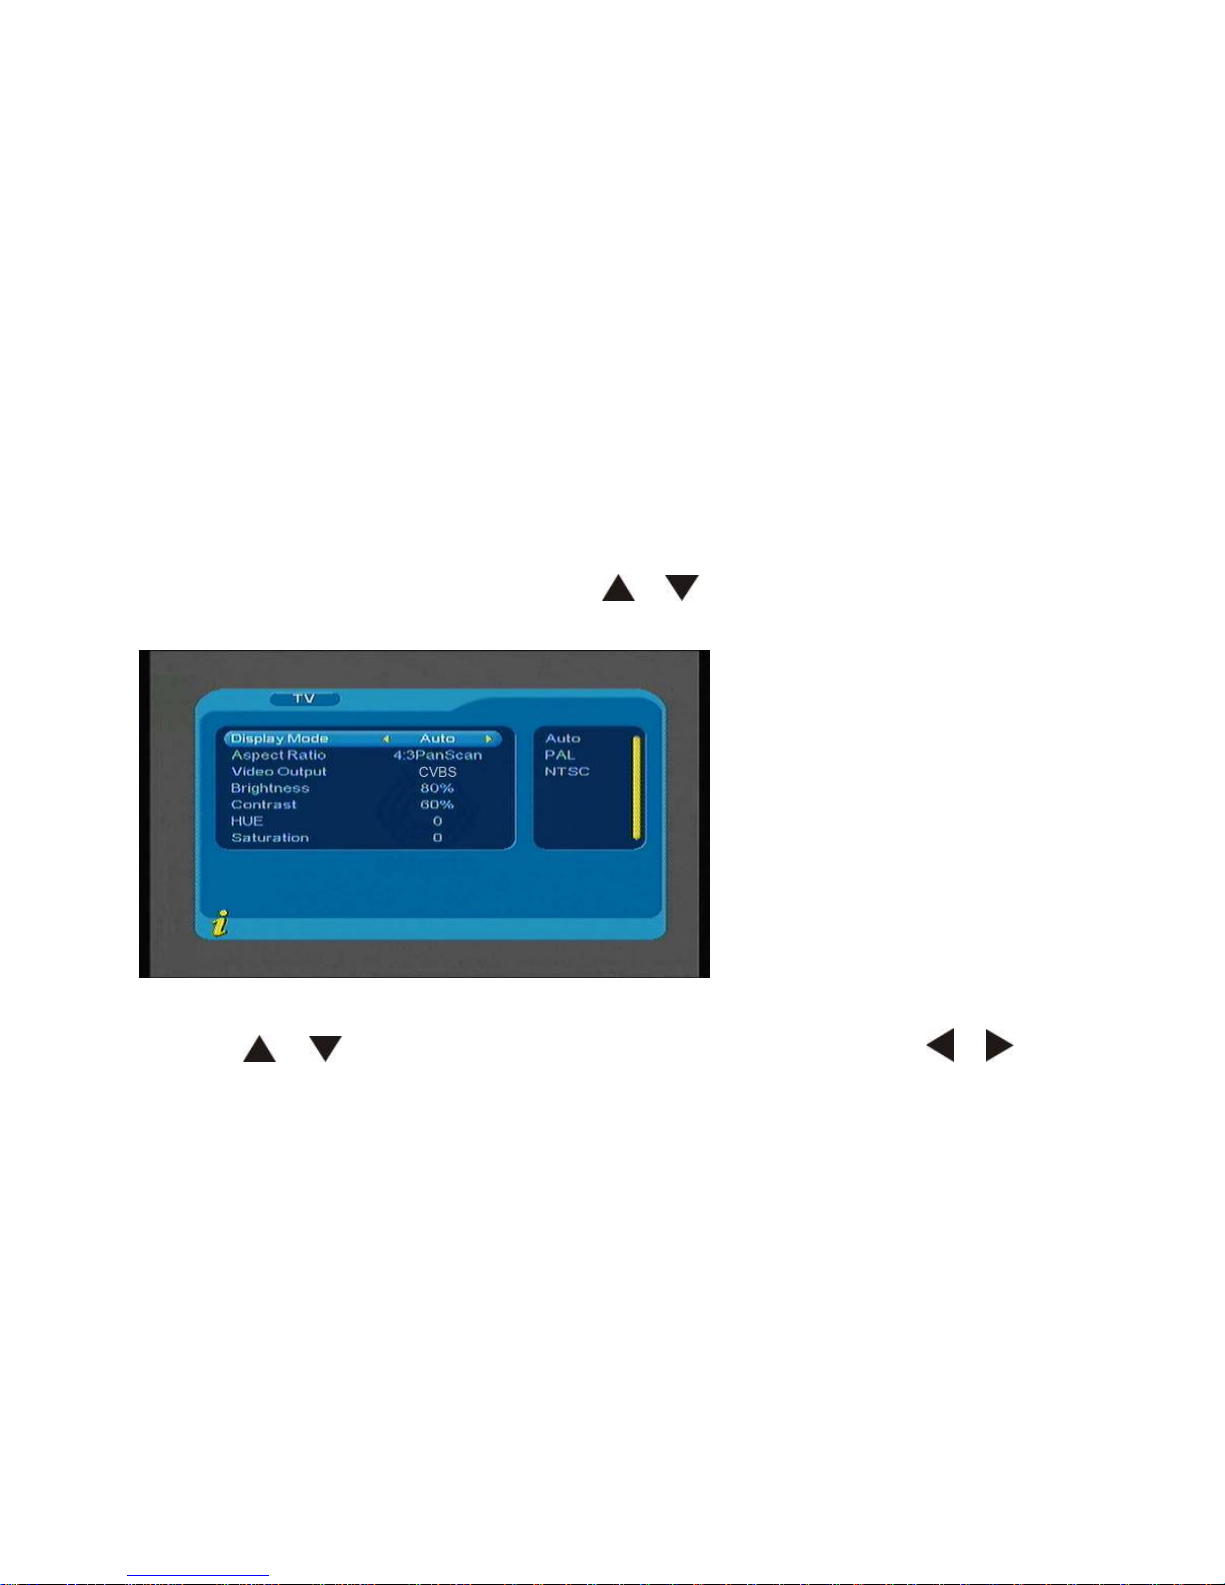
3.1 OSD:
Through this option, you can set display mode of user interface what you like;
¾ In the Configuration interface, use the
/ key to move the cursor to the OSD
options, press ENTER key to enter OSD setup options:
Operation:
Use the
/ keys to select the options you want to set, use / make
changes, press the ENTER key to confirm your choice:
1) OSD: This option allows you to change the user interface with 5 colors.
2) Time on OSD: This option allows you to change the display system time in full
screen mode.
3) OSD Timeout: This option is used to set some information boxes to show the length
of time.
4) OSD Trans:This option is used to set the transparency of the menu, you have
choices between 0% to 60% of the adjustment.
5) OSD Language:This option is used to set the interface display language, you can
choose according to your needs: English / Chinese / French / German / Italian /
Spanish / Swedish / Portuguese / Finnish / Dutch.
Page 22
20
6) 1st Audio Language:This option allows you to change the 1st Audio Language
according to your needs: English / S. Chinese / T. Chinese/ French / German / Italian
/ Spanish / Swedish / Portuguese / Finnish / Dutch/ Russian/ Greek
7) 2nd Audio Language:This option allows you to change the 2nd Audio Language
according to your needs: English / S. Chinese / T. Chinese/ French / German / Italian
/ Spanish / Swedish / Portuguese / Finnish / Dutch/ Russian/ Greek
¾ Click "Return or SETUP" key return previous menu.
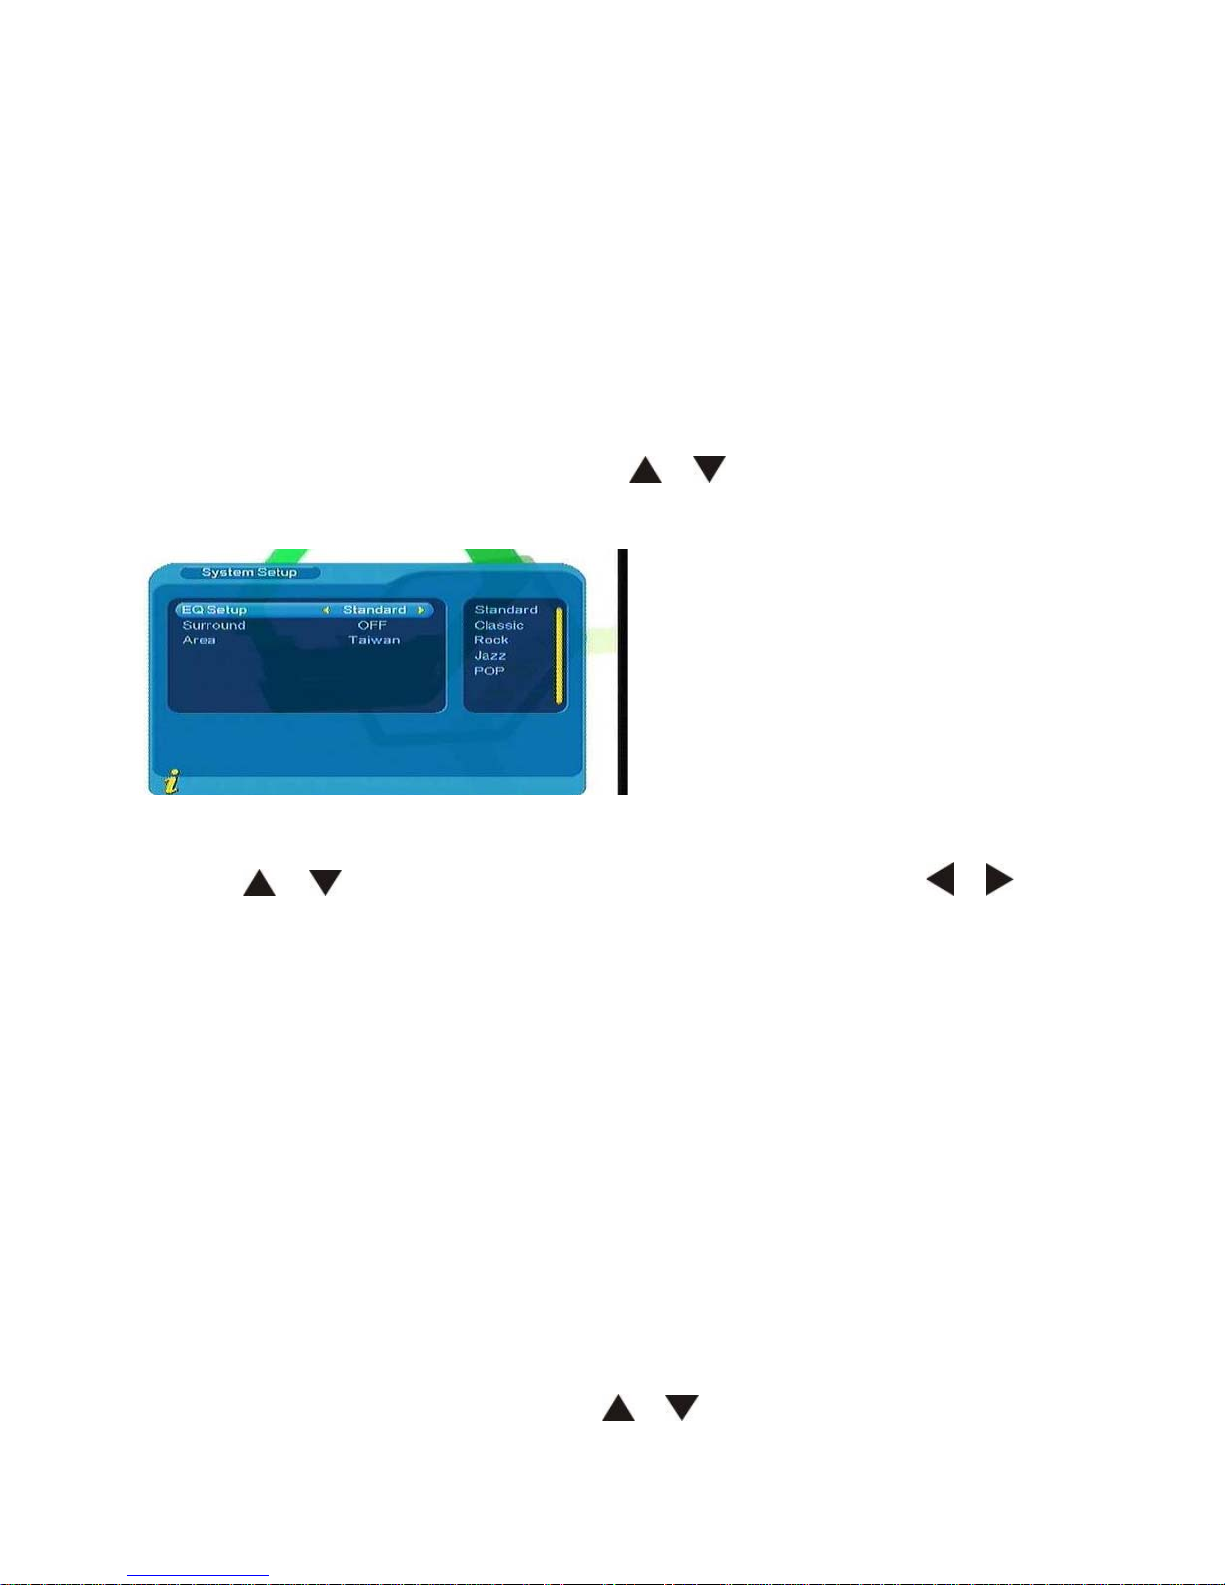
3.2 TV:
In the Settings menu, you can set the Display Mode / Aspect Ratio / Video Output /
Brightness / Contrast / HUE / Saturation.
¾ In the Configuration interface, use the
/ key to move the cursor to the OSD
options, press ENTER key to enter TV setup options:
Operation:
Use the
/ keys to select the options you want to set, use / make
changes, press the ENTER key to confirm your choice:
1) Display Mode: Change the TV format. There are three options: AUTO / PAL / NTSC,
the system defaults to PAL.
2) Aspect Ratio: Change the screen ratio, you can set to 16:9 / 4:3 LB / 4:3 PS.
3) Video Output: Change output video mode. (Note: currently the system does not
support the Digital TV output function)
4) Brightness: Change the brightness of the display, you can adjust between 0% to
100%. The system defaults to 80%
5) Contrast: Cha nge the contrast of the display, you can adjust between 0% to 100%.
The system defaults to 80%
Page 23
21
6) HUE: Change the HUE of display, you can choose -6 to 6. The system defaults to 0.
7) Saturation: Change the Saturation of display, you can choose -6 to 6. The system
defaults to 0.
¾ Click "Return or SETUP" key return previous menu.
3.3 System Setup:
In the Settings menu, you can set the EQ Setup / Surround / Display OFF / LCD
Brightness / Area
¾ In the Configuration interface, use the
/ key to move the cursor to the
System Setup options, press ENTER key to enter System Setup options:
Operation
Use the
/ keys to select the options you want to set, use / make
changes, press the ENTER key to confirm your choice:
1) EQ Setup: Set the output of sound effects, there are five options: Standard / Classic /
Rock / Jazz / POP. The system defaults to Standard.
2) Surround: Set sound environmental effects, there five options: OFF / Concert /
Church / Passive / Live. The system defaults to OFF.
3) Area: Search Channels regional settings, select your area before you search TV
channels. The current system supports in Germany / England / Italy / France / Spain
/ Holland / Taiwan / China / Norway / Sweden/ Finland / Greece / Australia /
Singapore.
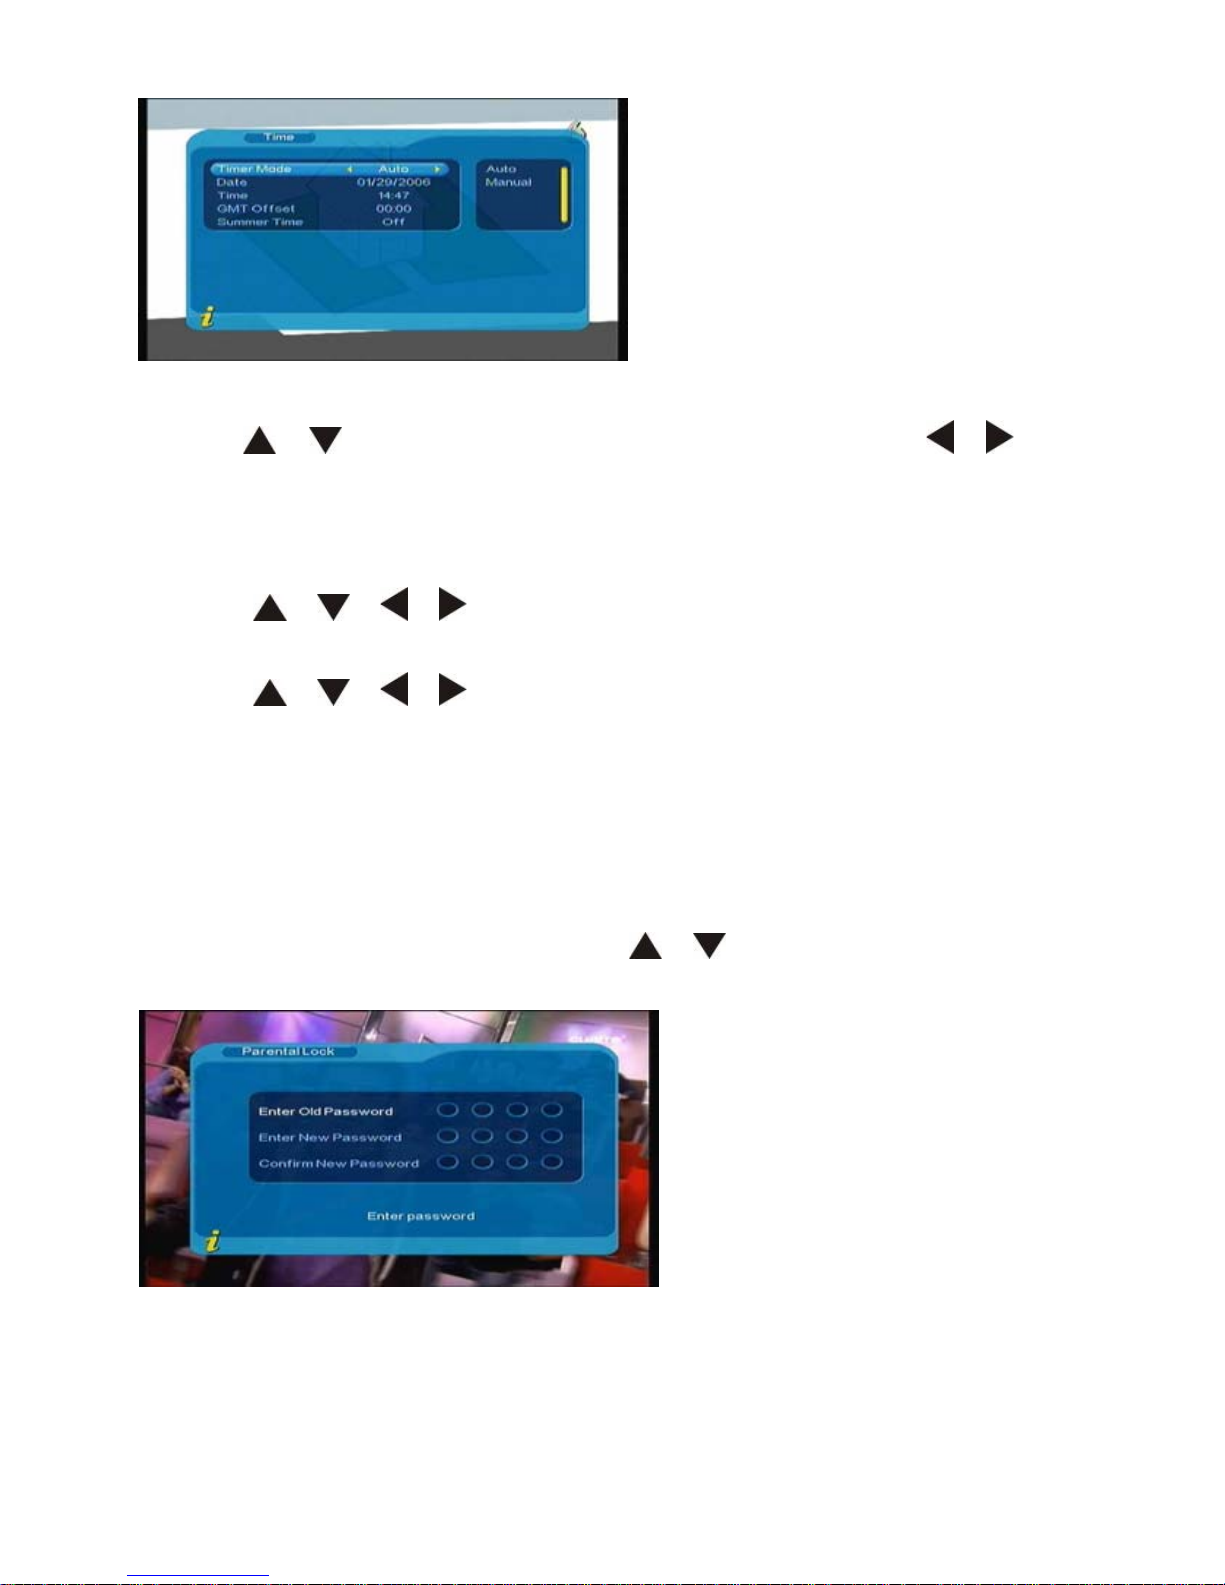
3.4 Time:
In this menu, you can set Time Mode / Date / TIME / GMT Off set.
¾ In the Configu ration interface, use the
/ key to move the cursor to the Time
options, press ENTER key to enter Time options:
Page 24
22
Operation
Use the
/ keys to select the options you want to set, use / make
changes, press the ENTER key to confirm your choice:
1) Time Mode: Set the time mode to AUTO or MANUAL. The system defaults to AUTO.
2) Date: Before change the settings, please set the Time Mode to MANUAL. Then
press
/ / / to set the date.
3) GMT Offset: Before change the settings, please set the Time Mode to AUTO, Then
press
/ / / to set the time zone.
4) Summer Time: Before change the settings, please set the GMT Offset to AUTO. The
system defaults to OFF.
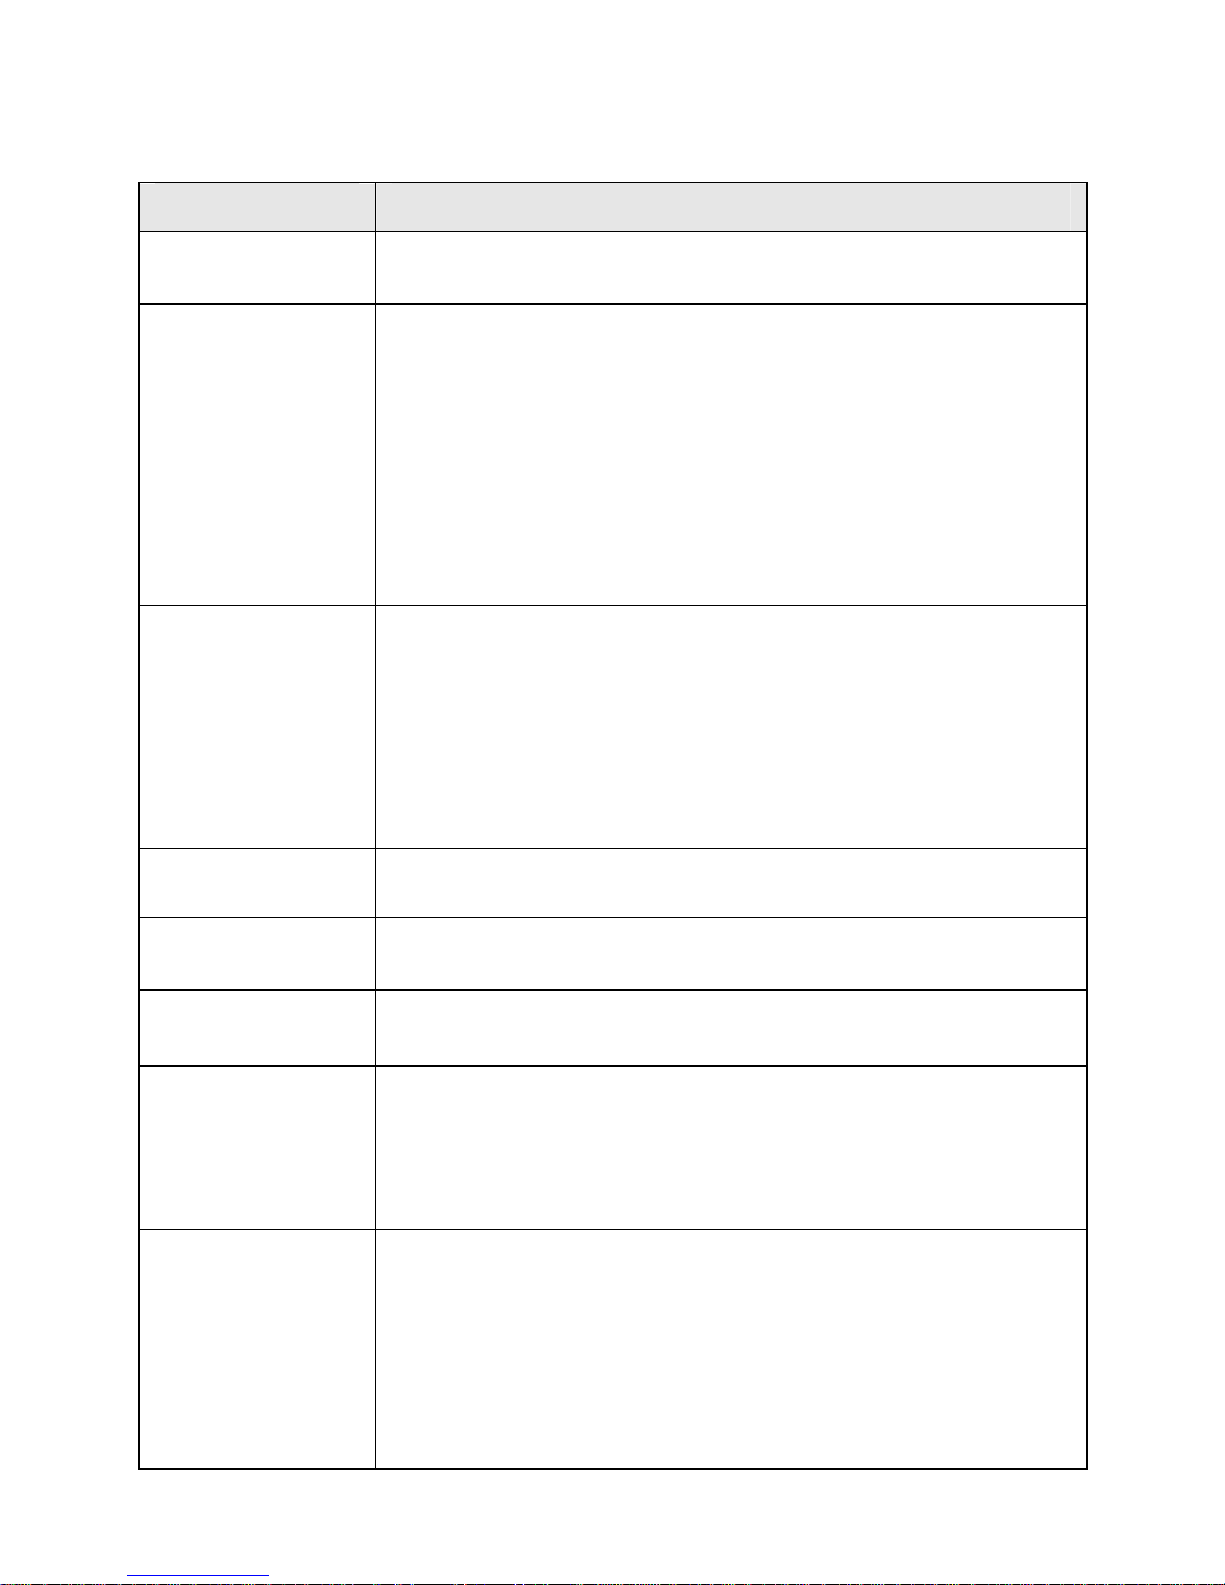
3.5 Parental Lock:
This setting allows you to modify the system password.
¾ In the Configuration interface, use the / key to move the cursor to the
Parental Lock options, press ENTER key to enter.
1) In Parental Lock settings interface, use the remote control number keys to enter the
old 4-digit password (default password is 8888).
2) If the password is entered correctly, the cursor will automatically move to the "new
password" option, press the remote control number keys to enter 4-digit new
password.
Page 25

23
3) The cursor moves to the "Confirm password" option, enter the new 4-digit password
again. If it is confirmed not to be the same as the new password, the system will be
prompted to enter a new password. If confirmed to be the same, the Parental Lock
settings interface will automatically disappear.
4. Software Upgrade
The system supports software upgrade by USB.
5. Factory Default
This feature allows you to set the DIGITAL TV back to the factory default state.
¾ Move the cursor to the Factory Default option, press the ENTER k ey to get into the
password input interface, then enter 4-digit password, press ENTER to confirm.
6. Version
This feature will display the system software version.
Page 26
24
Trouble Shooting
Problems Possible solution
No power/not charging
1. Check if the power plug is correctly connected with the power socket.
2. Check if the power switch is on.
Disk cannot be read
1. Check if the power switch is on.
2. Check if th e di sc is b eing i nserte d; t he d is c side with lab el s ho uld be fac ed
up.
3. Check if the disc is being placed upside down.
4. Please change or clean the disc if it is damaged or dirty.
5. If the pla yer is contaminated with damp, take out the disc and switch the
power on for 1 to 2 hours.
6. The area code of the disc is different from that of the player.
7. The disc is not in a correct format.
No image
1. Make sure that TV is switching on and connected with the player in AV
mode.
2. Check whether the video output setting of the VIDEO SE TUP in the menu
setup is correct or not.
3. Check whether the connection cable is good.
4. Clean the disc.
5. Make sure that the screen switch is popped up, i.e. it is not pressed down.
Image
blurring/distortion
1. It indicates that the disc is damaged or dirty.
2. Reset of the output system of TV or DVD player.
Bad disc label appears It indicates that the disc is damaged or dirty; please change or clean the disc.
Images cannot be
displayed totally
Reset the TV system.
Select a corresponding screen format from the setup menu of the DVD disc.
Remote control does
not work
1. Check whether there is obstacle that is blocked between the remote control
and the player.
2. Check whether the remote control is pointed to the sensor of the player.
3. Check whether the batteries of the remote control are correctly connected.
4. Check whether the batteries are in good condition.
No sound, or audio
output is incomplete
1. Make sure that TV and amplifier are switching on and with correct settings.
2. Check if there is a system connection shield for TV and amplifier.
3. Check if the system is in mute mode.
4. Press [Audio Channel] or [Language].
5. It shall output silently in following modes: Pause/Single Step/
Slow Forward/Slow Reverse/Fast Forward/Fast Reverse etc.
6. Output volume of TV is too low.
Page 27
25
Specifications
DVD Technical Parameter
Support format DVD/SVCD/VCD/CD /CD-R/RW/JPEG/DVD+R/-R/MP3/MP4/DIVX
Other support medias USB/SD/MMC Card
Shock proof function DVD: 3: seconds VCD/CD: 10 seconds MP3: 90 seconds
AUDIO: 2.0V±0.2 Speaker: 8ohm/1.5W
Earphone output is less than 15mw
AUDIO output level
Frequency response 20HZ~20KHZ
Audio signal ratio (S/N) ≥50dB
Dynamic range ≥50dB
Video output level 1.0V±0.2Vp-p (75ΩLoad Impedance)
Video system PAL / NTSC / Auto
English / Chinese / Russian / Italian / German / Spanish / French /
Portuguese
Language in the menu
TV Technical Parameter
Analog receiver
frequency
BG/DK/I/L:48.25MHz~863.25MHz
M:55.25MHZ~801.25MHZ
DK I
BG L M
Audio format
List of Accessories
1. AC adapter 7. Game disc
2. Video cable 8. Game Control Pad
3. Remote control 9. Car charger
4. AAA batteries for remote control
5. User manual
6. Antenna
Page 28
26
EC Declaration of Conformity
The product complies with the protective requirements of European
Directives 2004/108/EC.
The conformity declaration for this product is available under
www.jay-tech.de.
Directive 2002/96/EC on Waste Electrical and
Electronic Equipment (WEEE)
This symbol on the product or in the instructions means that your electrical
and electronic equipment should be disposed at the end of its life
separately from your household waste. There are separate collection
systems for recycling in the EU. For more information, please contact the
local authority or your retailer where you purchased the product.
Page 29
 Loading...