

Page 1
Page 2

IMPORTANT INSTRUCTIONS
SAFETY INSTRUCTIONS
WARNING! TO REDUCE THE RISK OF FIRE, ELECTRIC SHOCK, OR
SERIOUS PERSONAL INJURY:
z This product shall not be exposed to dripping or splashing and that no objects filled
with liquids, such as vases, shall be placed on the apparatus.
z Situate this product away from heat sources such as radiators, heat registers,
stoves, or other appliances (including amplifiers) that produce heat.
z Clean the product only as recommended by the manufacturer (see “Maintenance”)
section for details). Unplug the power cord from the wall outlet before cleaning.
z Unplug the power cord from the wall outlet when left unused for an extended
period.
z Prevent objects/liquids from falling or spilled on the product.
z Operate the product only with the supplied power adapter. Route power cords so
they are not likely to be walked on or pinched by items placed upon or against them,
paying particular attention to plugs, convenience receptacles, and the point where
they exit from the product.
z Where the MAINS plug or an appliance coupler is used as the disconnect device,
the disconnect device shall remain readily operable.
z Do not operate this product under the following conditions.
- When the power-supply cord or plug is damaged.
- If liquid has been spilled into or objects have fallen into the product.
- If the product has been exposed to rain or water.
- If the product does not operate when used according to the operating instructions.
- If the product has been dropped or damaged in any way.
z Do not attempt to service the product; take it to the electronics repair shop of your
choice for any servicing or repair.
z Do not overload wall outlets, extension cords, or integral convenience receptacles.
1
Page 3

CAUTION! TO REDUCE THE RISK OR PERSONAL INJURY OR
PRODUCT/PROPERTY DAMAGE:
z This product is intended solely for non-commercial, non-industrial, personal use as
a television. Do not use this product for any other purpose.
z Do not subject the product to violent shocks, extreme temperatures, or lengthy
periods or direct sunlight.
z Keep the product away from magnetic objects, motors, and transformers.
z Do not use outdoors in inclement weather.
z Do not use the TV while driving; this is dangerous and is illegal in some areas.
BATTERY HANDLING AND USAGE:
z Keep batteries away from children and pets. Only adults should handle batteries.
z Never throw batteries into a fire or expose them to fire or other heat sources.
z Follow the battery satiety and usage instructions provided by the manufacturer.
AC Adaptor……………………………………………………………………………………1
Instruction Manual……………………………………………………………………………1
Remote Control……………..……………………………………………………………… …1
ACCESSORIES
2
Page 4

TABLE OF CONTENTS
GETTING STARTED
IMPORTANT INSTRUCTIONS.....................................................................................1
ACCESSORIES............................................................................................................2
FEATURES...................................................................................................................4
GENERAL PARTS........................................................................................................5
REMOTE CONTROL....................................................................................................6
REMOTE CONTROL PREPARATION.......................................................................... 7
BASIC CONNECTION.............................................................................................8-11
OPERATIONS
BASIC OPERATIONS............................................................................................12-16
MAIN MENU..........................................................................................................17-27
DTV MODE.........................................................................................................18-24
TV MODE............................................................................................................25-26
HDMI/AV/SCART/MEDIA MODE............................................................................. 27
PC/VGA MODE........................................................................................................ 27
FOR REFERENCE
MAINTENANCE.......................................................................................................... 28
SPECIFICATIONS...................................................................................................... 28
TROUBLESHOOTING................................................................................................ 29
3
Page 5

FEATURES
47 cm (18.5") TFT DISPLAY
This player has a built-in 47 cm (18.5”) TFT display window to provide clear vision and
low radiation.
z AUTO TV SCANNING
z DIGITAL BROADCASTING RECEPTION
z EPG (Electric Program Guide) FUNCTION
z TELETEXT (EUROPE) FUNCTION
z USB MULTIMEDIA PLAYBACK
z MULTI-LANGUAGES ON SCREEN DISPLAY
z FULL FUNCTION REMOTE CONTROL
z HDMI, YPbPr, AV, CI, VGA, PC AUDIO, AND SCART INPUT
z EARPHONE OUTPUT
z DETACHABLE STAND HOLDER
z EXTERNAL ANTENNA JACK
z BUILT-IN SPEAKERS
z WEAK SIGNAL ENHANCEMENT FUNCTION
z NOISE REDUCTION FUNCTION
4
Page 6
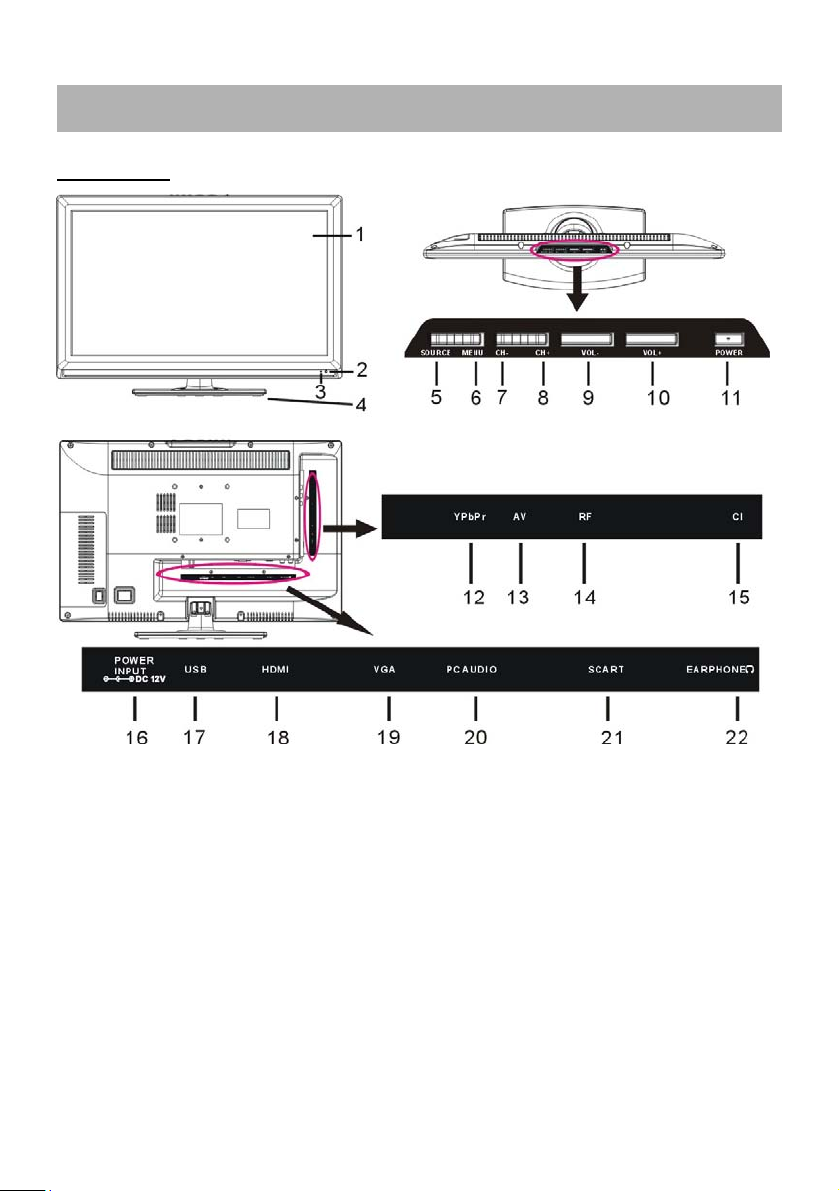
GENERAL PARTS
MAIN UNIT
1. TFT display screen
2. Remote control sensor
3. Power indicator: In standby mode the
indicator light will display red color; when
switching on the unit the indicator light will
display blue color.
4. Stand holder
5. SOURCE: To select the input source.
6. MENU: To enter menu setting p age.
7. CH-: To select previous channel or move
down.
8. CH+: To select next channel or move up.
9. VOL-: To decrease the volume level or
move left.
10. VOL+: To increase the volume level or
move right.
11. POWER: To switch ON/OFF the TV.
12. YPbPr input jack
13. AV input
14. RF input: To connect the antenna.
15. CI input
16. POWER input
17. USB slot: For multimedia playback in
TV mode.
18. HDMI input
19. VGA input
20. PC AUDIO input
21. SCART input
22. EARPHONE output jack
5
Page 7
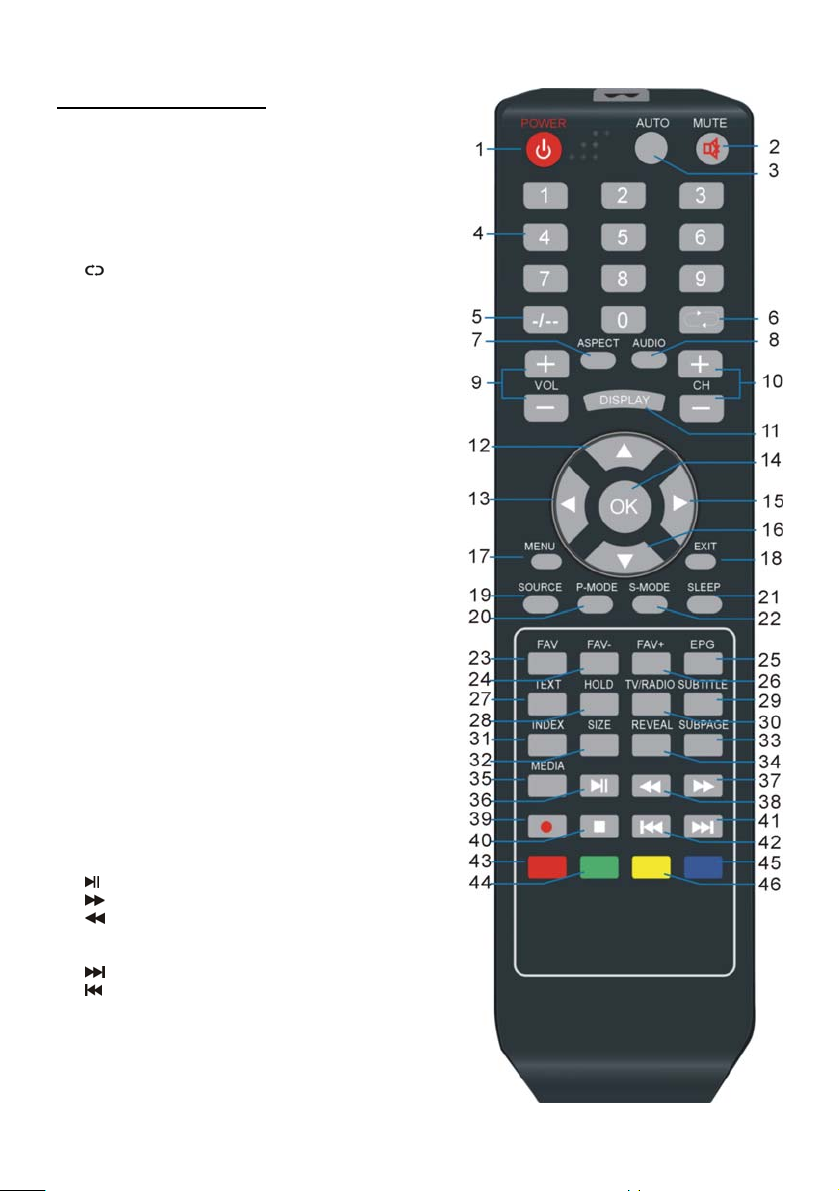
REMOTE CONTROL
1. POWER: To set the unit in standby mode; press it
again to switch it on.
2. MUTE: To mute the sound.
3. AUTO: To adjust the screen automatically (in PC/VGA
mode).
4. NUMBERIC BUTTONS (0-9): To input the number
information, such as channel number and so on.
5. -/--: To select one digit, two digits and three dig its.
6. : To return to previous channel or input source..
7. ASPECT: Press this button repeatedly to select
desired aspect ratio of screen.
8. AUDIO: To select different soundtrack.
9. VOL +/-: To turn up/down the volume.
10. CH+/-: To play the next/previous channel.
11. DISPLAY: To display information of curr ent pro gram.
12. ▲ : Up navigation button.
13. ◄ : Left navigation button.
14. OK: To confirm selection.
15. ►: Right navigation button.
16. ▼ : Down navigation button.
17. MENU: To display the main menu. Press it again to
return to previous menu page.
18. EXIT: To exit menu page.
19. SOURCE: To switch the input source.
20. P-MODE: To select desired picture mode.
21. SLEEP: To set the sleep time as desired.
22. S-MODE: To select desired sound mode.
23. FAV: To enter the fav orite ch an nels list page.
24. FAV-: To play previous favorite channel.
25. EPG: To display electronic program guide information.
26. FAV+: To play next favorite channel.
27. TEXT: To display the teletext.
28. HOLD: To hold the teletext.
29. SUBTITLE: To open the subtitle. Press it again to
close subtitle.
30. TV/RADIO: To switch the unit between TV and radio.
31. INDEX: To enter index page.
32. SIZE: To switch teletext size.
33. SUBPAGE: To enter the subpage of teletext.
34. REVEAL: To hide teletext, or display hidden
characters.
35. MEDIA: To enter MEDIA mode directly.
36. : To play or pause playing.
37. : To move fast forward.
38. : To move fast backward.
39. ● : RECORD (No function on this model)
40. ■ : To stop playing.
41. : To play next chapter.
: To play previous chapter.
42.
43. RED button.
44. GREEN button.
45. BLUE button.
46. YELLOW button.
6
Page 8
REMOTE CONTROL PREPARATION
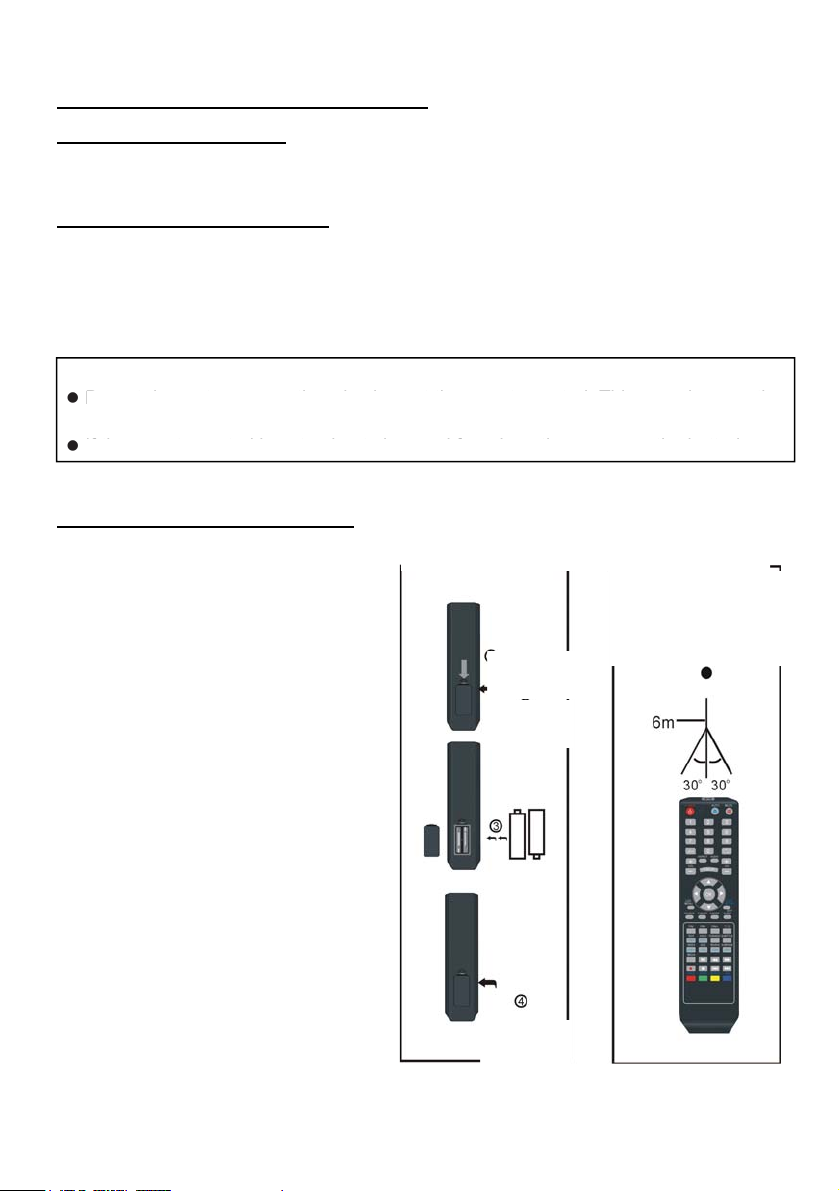
BATTERY INSTALLATION
Install the batteries as the following pictures. Be sure + and – terminals are positioned
as indicated in the battery compartment (Fig1).
SERVICE LIFE OF BATTERIES
z The batteries normally last for one year although this depends on how often the
remote control is used.
z If the remote control fails to work even when it is operated near the player, replace
the batteries.
z Use two size AAA dry batteries.
NOTE:
z Do not drop, step on or otherwise impact the remote control. This may damage the
parts or lead to malfunction.
z If the remote control is not going to be used for a long time, remove the batteries.
REMOTE CONTROL OPERATION
Fig1 Fig2
Point the remote control from no
more than about 6 m from the remote
control sensor and within about 60°
Remote Control
Sensor
of the front of the player (Fig2).
NOTES:
Push
z The operating distance may vary
according to the brightness of the
Open
room.
z Do not point bright light at remote
control sensor.
z Do not place objects between the
Remote control and the remote
control Sensor.
z Do not use this remote control
while simultaneously operating
the remote control of any other
equipment.
Press
7
Page 9
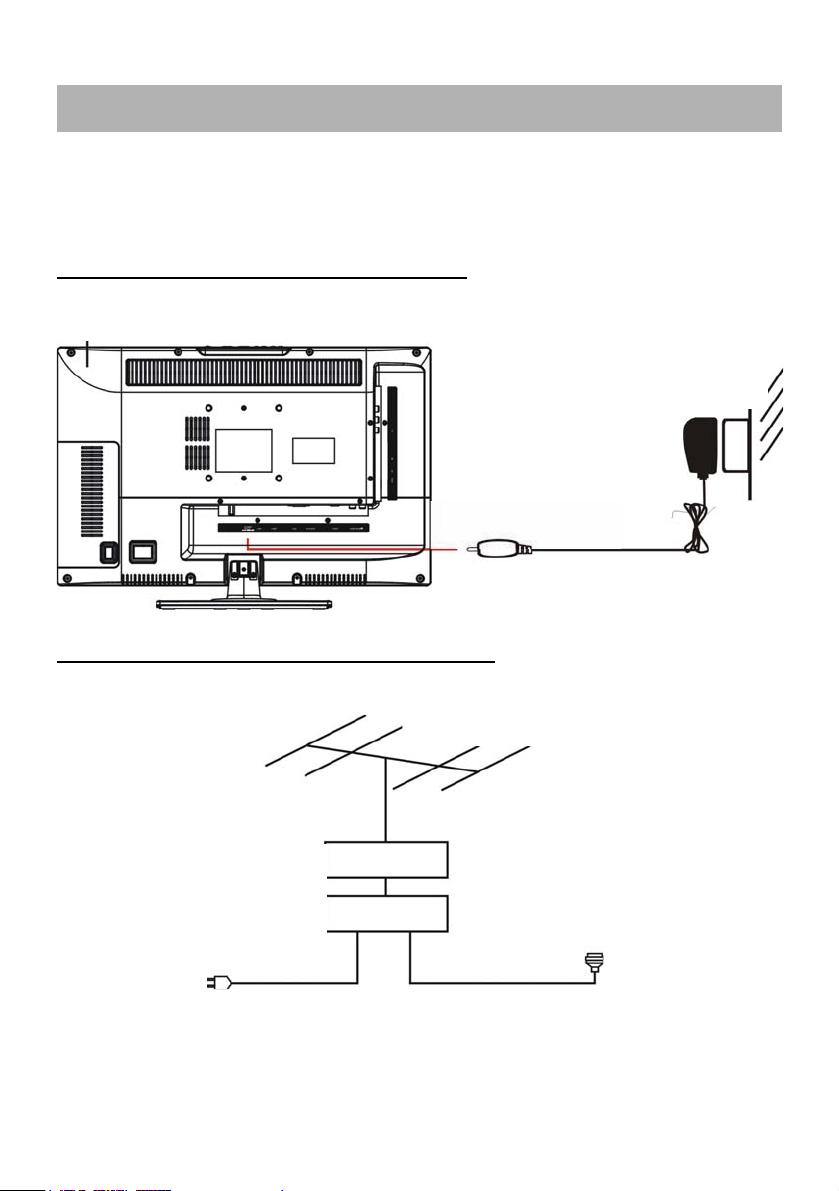
BASIC CONNECTION
z Ensure all the cables are disconnected from the main unit before connecting to AC
power source by AC power adaptor.
z Read through the instructions before connecting other equipments.
CONNECTING TO AC POWER SOURCE
Main unit
To power
outlet
To DC 12V jack
AC Adaptor
CONNECT EXTERNAL ANTENNA TO UNIT
Install external antenna into antenna jack for best picture.
Power plug
of antenna
amplifier
8
Indoor
antenna
amplifier
Antenna
Outdoor
antenna
amplifier
75 OHM
antenna
plug
Page 10
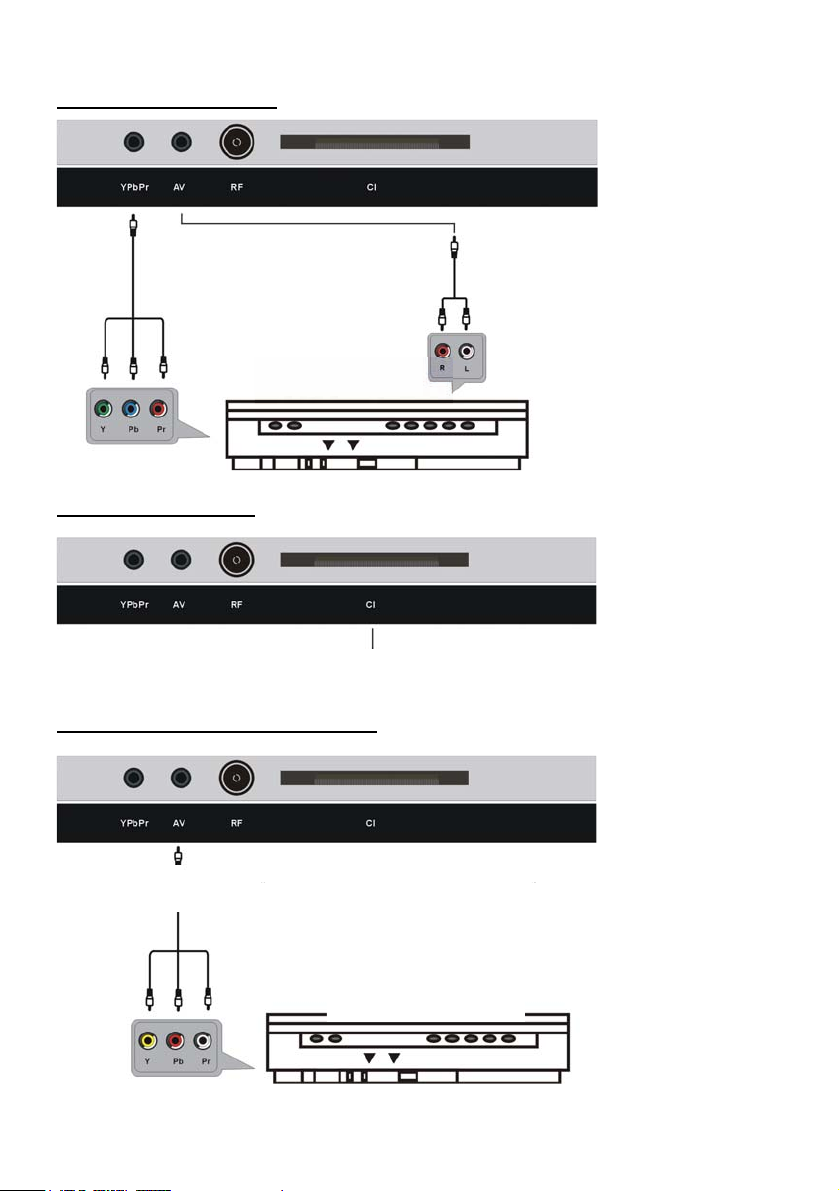
YPbPr CONNECTION
YPbPr cable
Back of DVD/VCR
INSERT A CI CARD
CI slot
COMPOSITE AV CONNECTION
AV cable
For basic connection, use the
composite Audio L/R (white/red) and
CVBS (yellow) cable to connect the
unit with other devices.
Back of DVD/VCR
Audio cable
9
Page 11
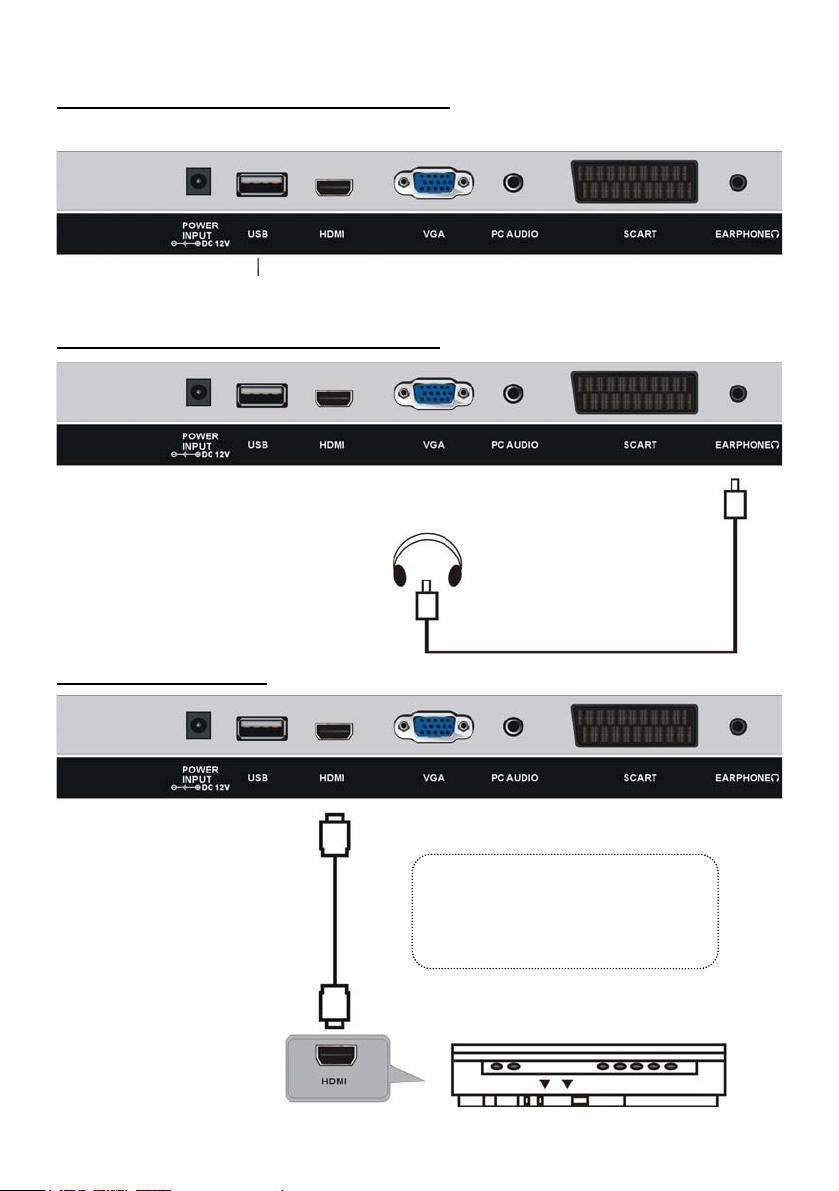
CONNECT USB DEVICE TO THE UNIT
Insert a USB memory device into USB slot for multimedia files playback.
USB slot
CONNECT EARPHONE TO THE UNIT
EARPHONE cable
HDMI CONNECTION
HDMI cable
Use HDMI cable to connect the
unit with other devices to receive
high-definition multimedia signal.
10
Page 12
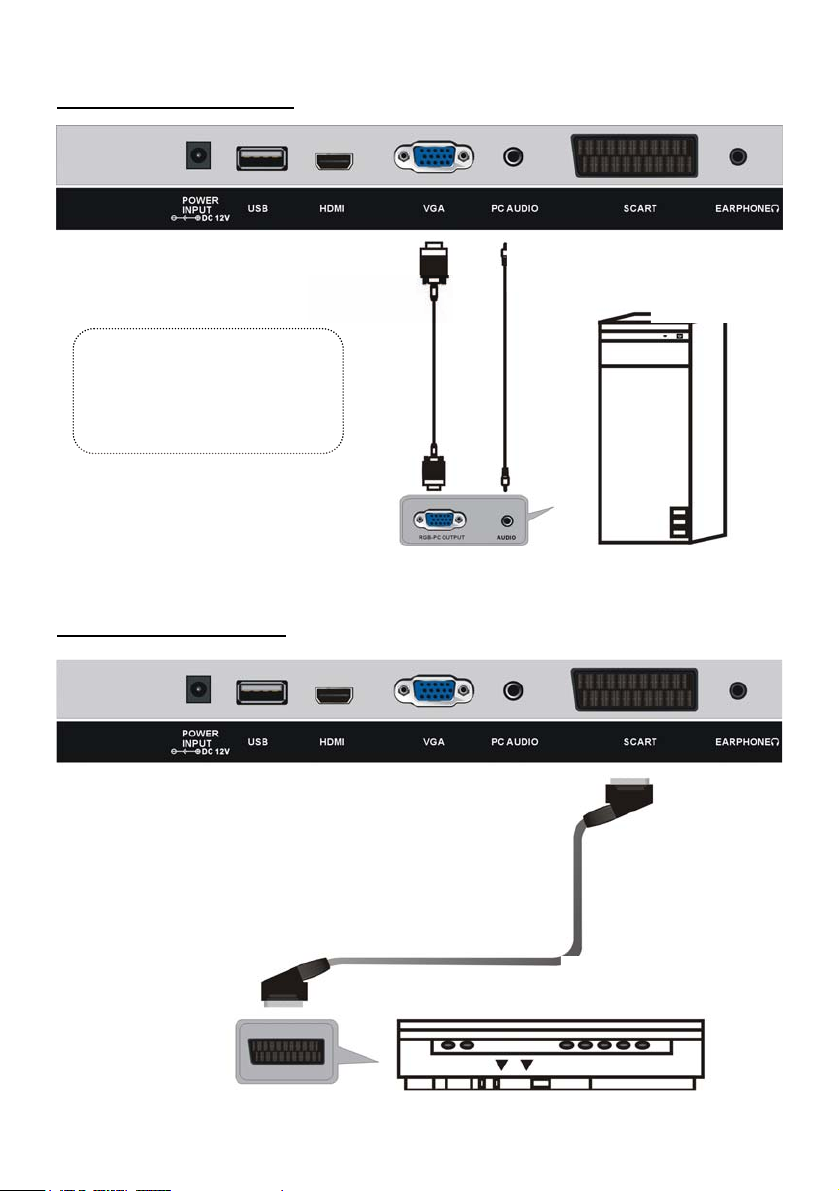
PC/VGA CONNECTION
Use VGA cable and Audio
cable to connect the unit with
TV or PC, and use this product
as a monitor.
SCART CONNECTION
VGA cable
Audio cable
Back of PC
SCART cable
Back of DVD/VCR
11
Page 13

MAKE SURE ALL THE EQUIPMENTS AND AC ADAPTOR ARE
CONNECTED PROPERLY AND THE UNIT IS SET IN CORRECT MODE
EFORE KINDS OF OPERATIONS. B
z Press POWER button on unit top or remote control to power ON the unit
(indicator will glow blue); press it again to power OFF (standby mode) the
unit (indicator will glow red).
z Press SOURCE button on unit top or remote control to set the unit in DTV or
TV mode.
SELECT WANTED P ROGRAM
1. Press CH+ button to play next channel.
2. Press CH- button to play previous channel.
3. Press number buttons on remote control directly to select wanted program.
NOTE: Press -/-- button repeatedly to select one digit, two digits, three digits.
VOLUME CONTROL
Press VOL+ or VOL- to adjust the level of current volume.
Available range: 0-100.
MUTE CONTROL
Press MUTE button to mute the sound, press it again to turn on the sound.
SOURCE SETTING
z Press SOURCE button on unit top or remote control to display the sources list.
z Press UP or DOWN navigation button to select desired input source, and then press OK
button to confirm selection.
Available options: HDMI, DTV, TV, AV, SCART, YPBPR, PC, MEDIA.
PICTURE MODE
Press P-MODE button on remote control repeatedly to select desired PICTURE mode
directly.
Available options: PERSONAL, STANDARD, MOVIE, MILD, GAME.
SOUND MODE
Press S-MODE button on remote control repeatedly to select SOUND mode directly.
Available options: PERSONAL, STANDARD, MUSIC, VOICE, THERTRE.
BASIC OPERATIONS
12
Page 14
SLEEP TIME SETTING
Press SLEEP button on remote control repeatedly to select SLEEP TIME directly.
Available options: OFF, 15 MIN, 30 MIN, 45 MIN, 60 MIN, 75MIN, 90MIN, 105MIN, 120MIN.
VIDEO SIZE SETTING
Press ASPECT button on remote control repeatedly to select VIDEO SIZE directly.
Available options: AUTO, 4:3, FULL.
NOTE: The available video size may be different in different input source.
MULTIAUDIO SETTING
Press AUDIO button on remote control to select available soundtrack.
INFORMATION DISPLAY
Press DISPLAY button on remote control to display information of current program.
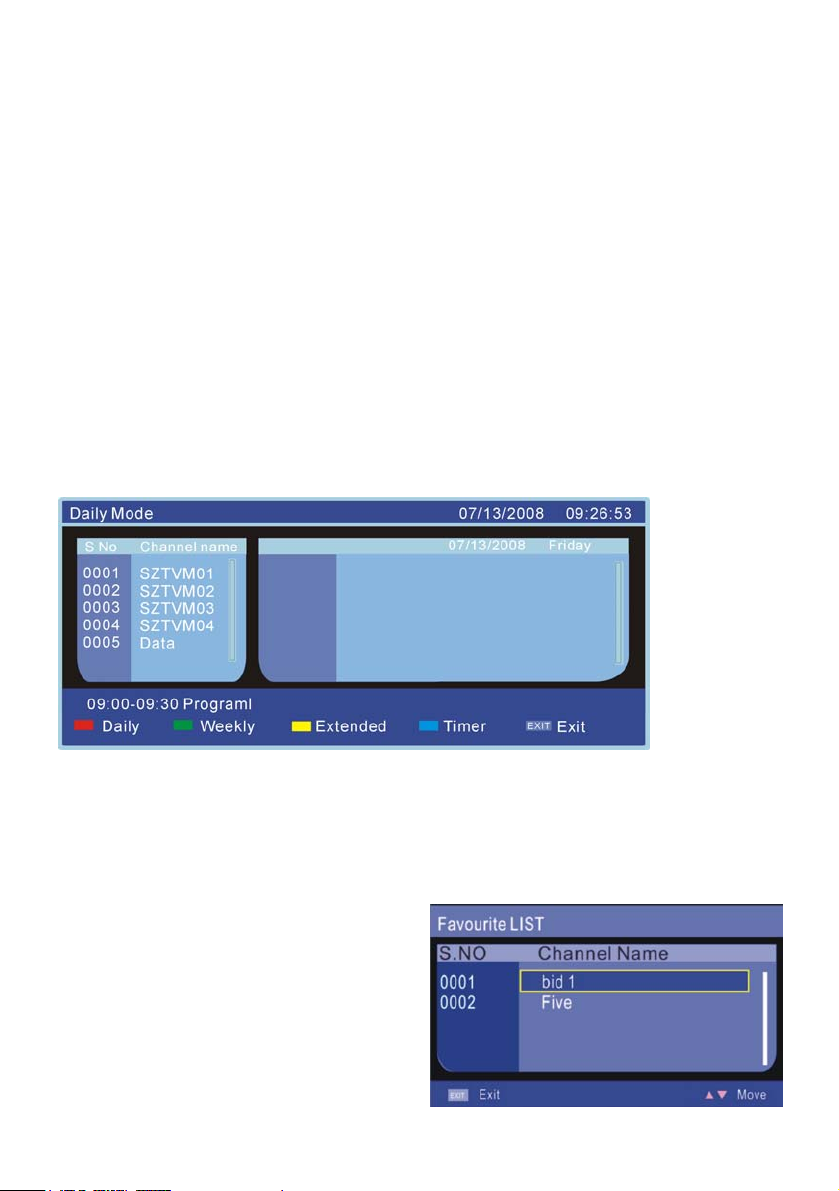
TV GUIDE (FOR DTV MODE ONLY)
Press EPG button on remote control to enter below menu page:
- Press RED button to enter Daily Mode.
- Press GREEN button to enter Weekly Mode.
- Press YELLOW button to enter Extended Mode.
- Press BLUE button to set wakeup timer.
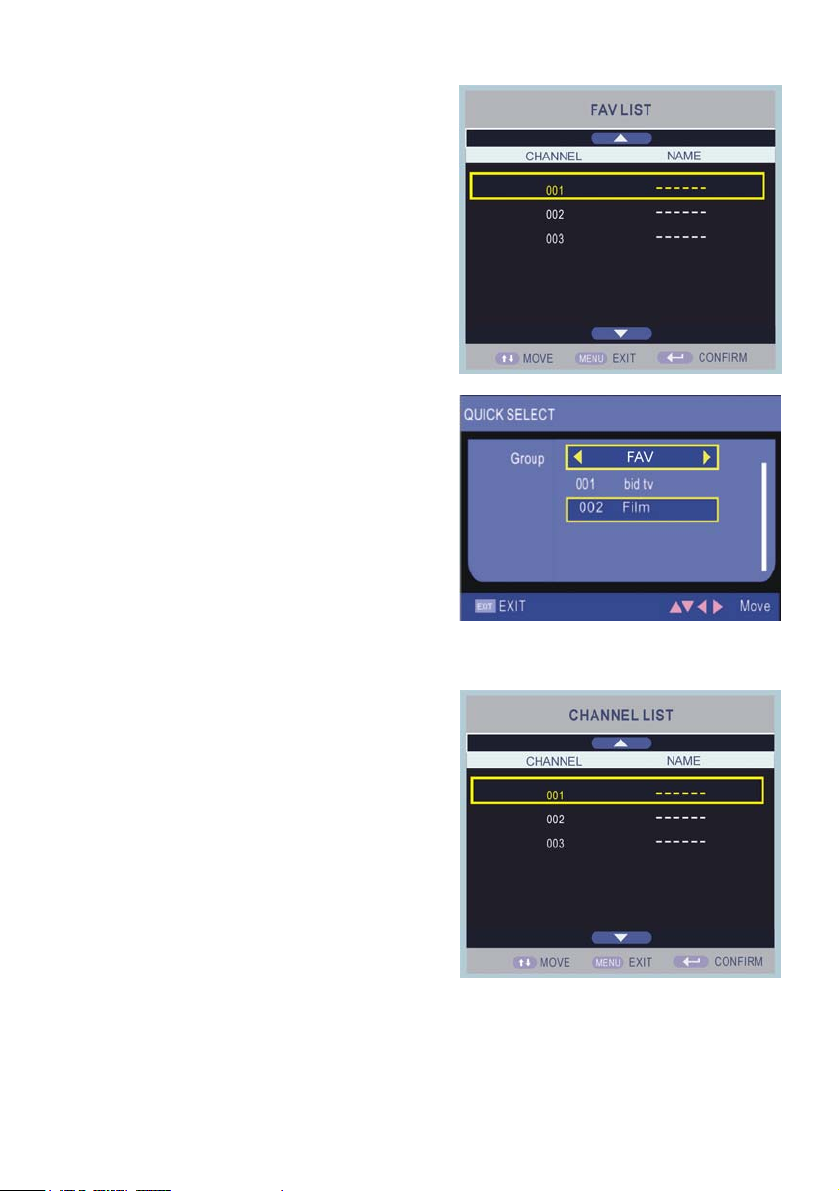
FAVOURITE LIST
When viewing digital programs:
- Press FAV button on remote control to
enter Favorite List menu page.
- Press UP or DOWN navigation button to
select wanted channel.
- Press OK button to confirm selection.
13
Page 15
When viewing analog programs:
- Press FAV button on remote control to enter
FAV LIST menu page directly.
- Press UP or DOWN navigation button to
select wanted channel.
- Press OK button to confirm selection.
NOTE: During normal playing, press FAV+/FAVbutton to play next or previous favorite channel
directly.
QUICK SELECT
When viewing digital programs:
- Press OK button on remote control to enter
QUICK SELECT menu page.
- Press LEFT or RIGHT navigation button to
select different groups.
Available options: None, News, Science,
Sports, Movies, Kids, Music, Fashion, Fav.
- Press UP or DOWN navigation button to
select desired channel.
- Press OK button to confirm selection.
When viewing analog programs:
- Press OK button on remote control to enter
CHANNEL LIST menu page.
- Press UP or DOWN navigation button to select
wanted channel.
- Press OK button to confirm selection.
14
Page 16
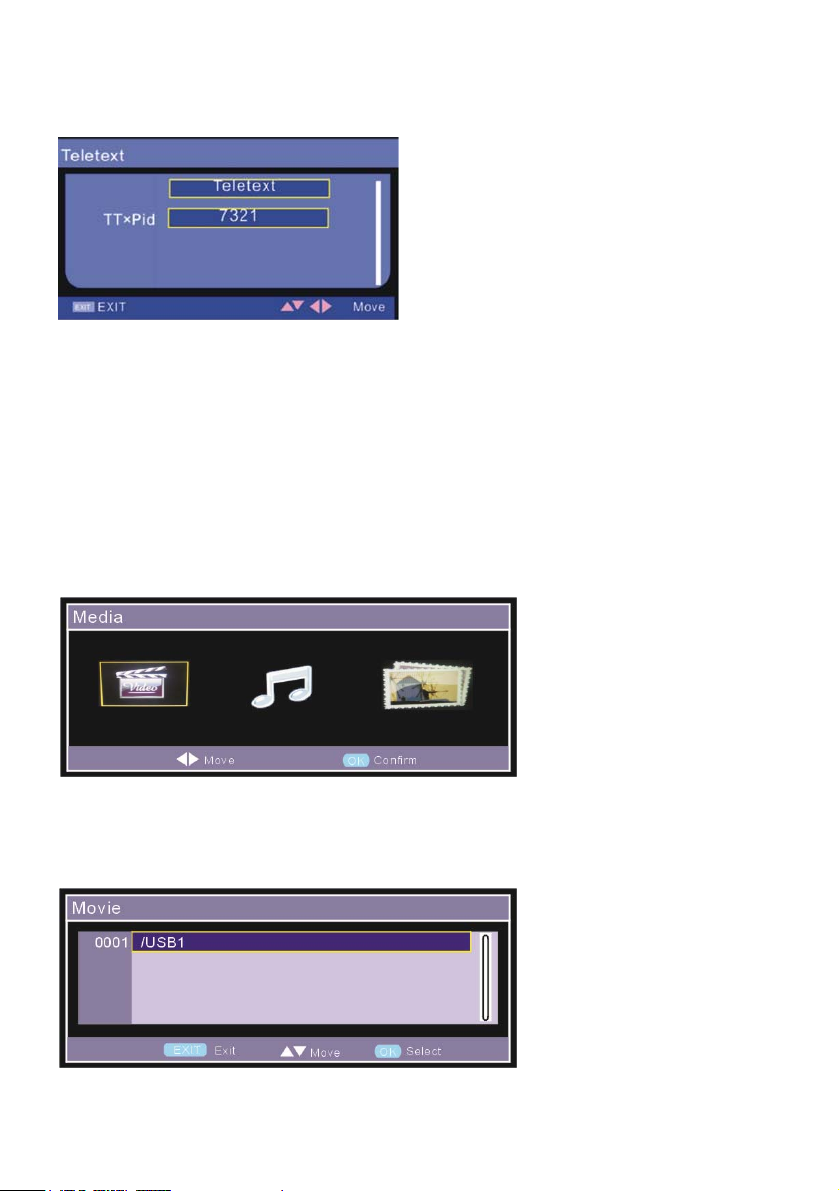
TELETEXT
- Press TEXT button on remote control to enter Teletext menu page.
- Press OK button to confirm selection and view available teletext information.
TV/RADIO (FOR DTV MODE ONLY)
- Press TV/RAIDO button on remote control to sw itch the uni t between TV and radio mode.
SUBTITLE
- Press SUBTITLE button on remote control to open or close the subtitle.
MEDIA PLAYBACK
- Press SOURCE button on unit top or remote control to set the unit in MEDIA mode.
NOTE: Press MEDIA button on remote control to enter below menu page directly.
- Insert a USB memory device first.
- Press LEFT or RIGHT navigation button to select video item.
- Press OK button to enter below menu page:
15
Page 17
1. MOVIE
- Press navigation buttons to select the option that wants to play.
- Press OK button to play the selected movie.
- Press
- Press
- Press
- Press
- Press
- Press
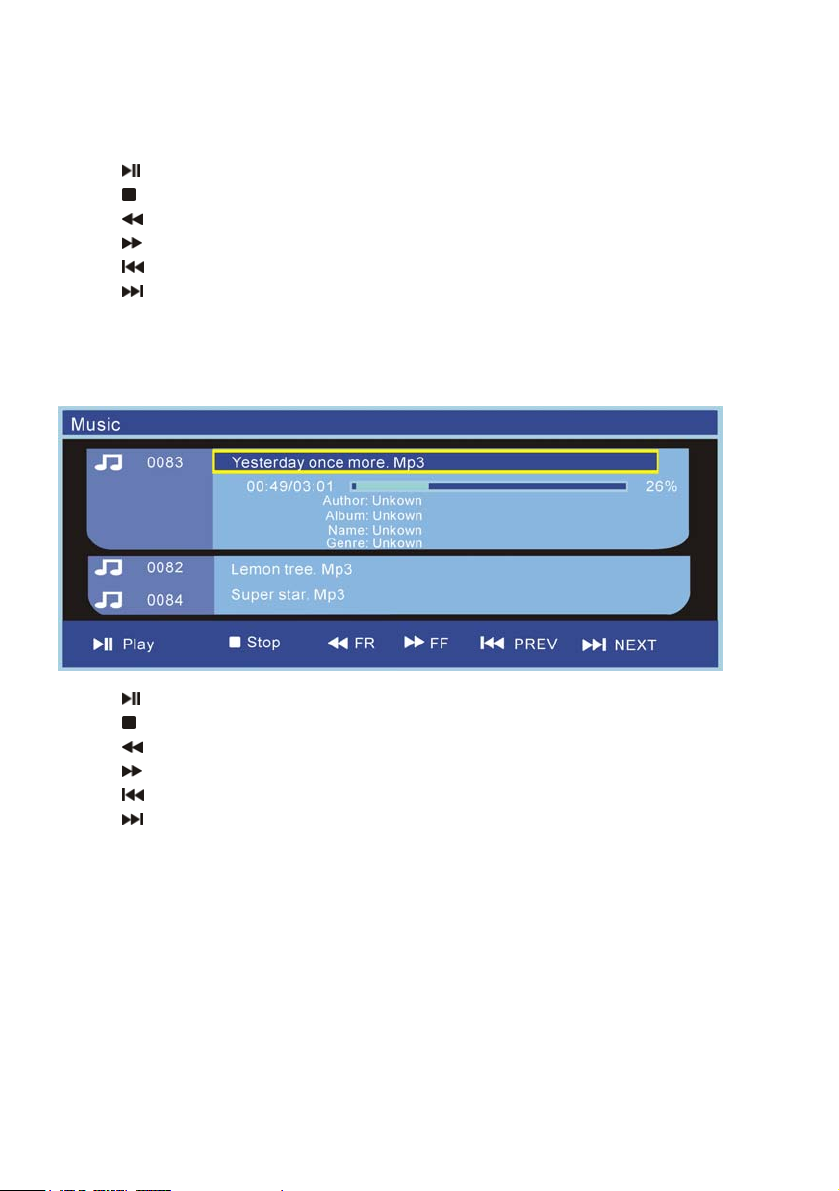
2. MUSIC
- Press navigation buttons to select the option that wants to play.
- Press OK button to play the selected music.
- Press
- Press
- Press
- Press
- Press
- Press
3. PHOTO
- Press navigation buttons to select the option that wants to play.
- Press OK button to play the selected photo.
- Press UP navigation button to display the photo in Left-Right mirror image mode.
- Press DOWN navigation button to display the photo in Up-Down mirror image mode.
- Press LEFT navigation button to rotate the photo 90°, 180°, 270° counter clockwise.
- Press RIGHT navigation button to rotate the photo 90°, 180°, 270° clockwise.
button on remote control to play or pause playing.
button on remote control to stop playing.
button on remote control to move fast backward.
button on remote control to move fast forward.
button on remote control to play previous file.
button on remote control to play next file.
button on remote control to play or pause playing.
button on remote control to stop playing.
button on remote control to move fast backward.
button on remote control to move fast forward.
button on remote control to play previous file.
button on remote control to play next file.
16
Page 18
z The unit contains different setting menus. Once the initial programming is entered, it will
be remain in the memory until change, and the unit can always be operated under the
same conditions.
z The settings will be remained in the memory until the settings ar e changed ever after
setting the player to standby mode.
Common procedure for initial settings
- Press MENU button on unit top or remote control to display the main menu.
- Press UP or DOWN navigation button to select submenus.
- Press RIGHT navigation button to enter submenu page.
- Press UP or DOWN navigation button to select the option that want to adjust.
- Press LEF T or RIGHT navigation button to adjust selected option to desired value. Then
press OK button to confirm the selection.
- Press MENU button to return to previous menu page.
- Press EXIT button to exit menu page.
MAIN MENU
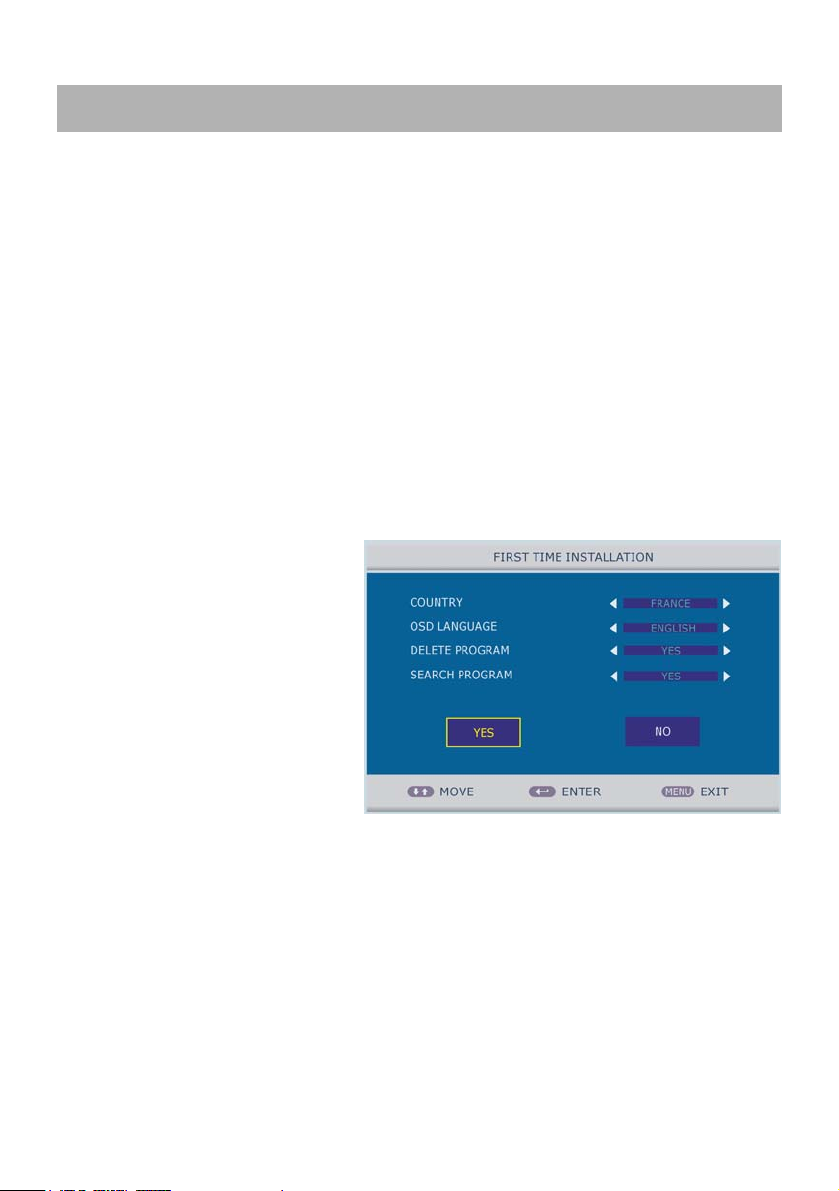
First Time Installation
- Connect to power source and turn on the TV, then below installation menu page will
display on the screen:
COUNTRY
- This item is used to set the
country that living in.
OSD LANGUAGE
- This item is used to set the OSD
language.
DELETE PROGRAM
- This item is used to decide
whether delete all the programs or not.
SEARCH PROGRAM
- This item is used to decide whether do automatic program searching or not.
NOTE:
- Press MENU or EXIT button to exit this installation menu page.
- Select YES in the menu to save the settings. And select NO to decide whether exit
installation or not; or do it next time.
17
Page 19
DTV MODE
- Press SOURCE button on unit top or remote control to set the unit in DTV mode.
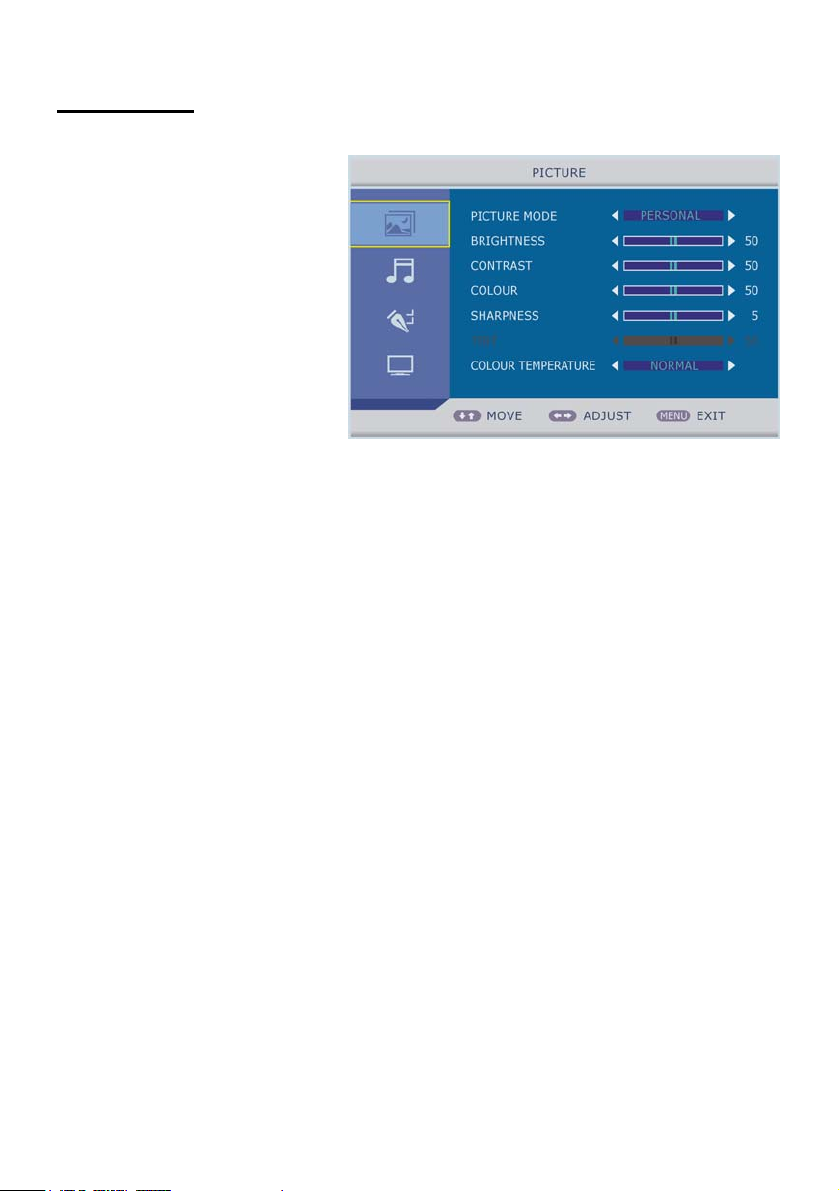
1. PICTURE
1.1 PICTURE MODE
Available options:
PERSONAL - To adjust the
BRIGHTNESS, CONTRAST,
COLOR, SHARPNESS to desired
value.
STANDARD - This mode is
usually used in an unchangeable
light environment.
MOVIE - This mode is better used
in a dark environment as the brightness is higher than other modes.
MILD - This mode is better used in a dark environment as the brightness is higher than other modes.
GAME - This mode is usually used when playing games, the brightness is just lower than
that of movie mode.
1.2 BRIGHTNESS
The brightness value of picture can be adjusted from 0-100.
1.3 CONTRAST
The contrast value of picture can be adjusted from 0-100.
1.4 COLOUR
The color saturation value of picture can be adjusted from 0-100.
1.5 SHARPNESS
The sharpness value of picture can be adjusted from 0-10.
NOTE: The value of BRIGHTNESS, CONTRAST, COLOUR, and SHARPNESS is
adjustable only in PERSONAL picture mode.
1.6 TINT
This item is used to adjust the tone of color in NTSC system from 0-100.
1.7 COLOUR TEMPERATURE
This item is used to adjust the optimum color temperature for suitable viewing.
Available options: NORMAL, COLD, WARM.
18
Page 20
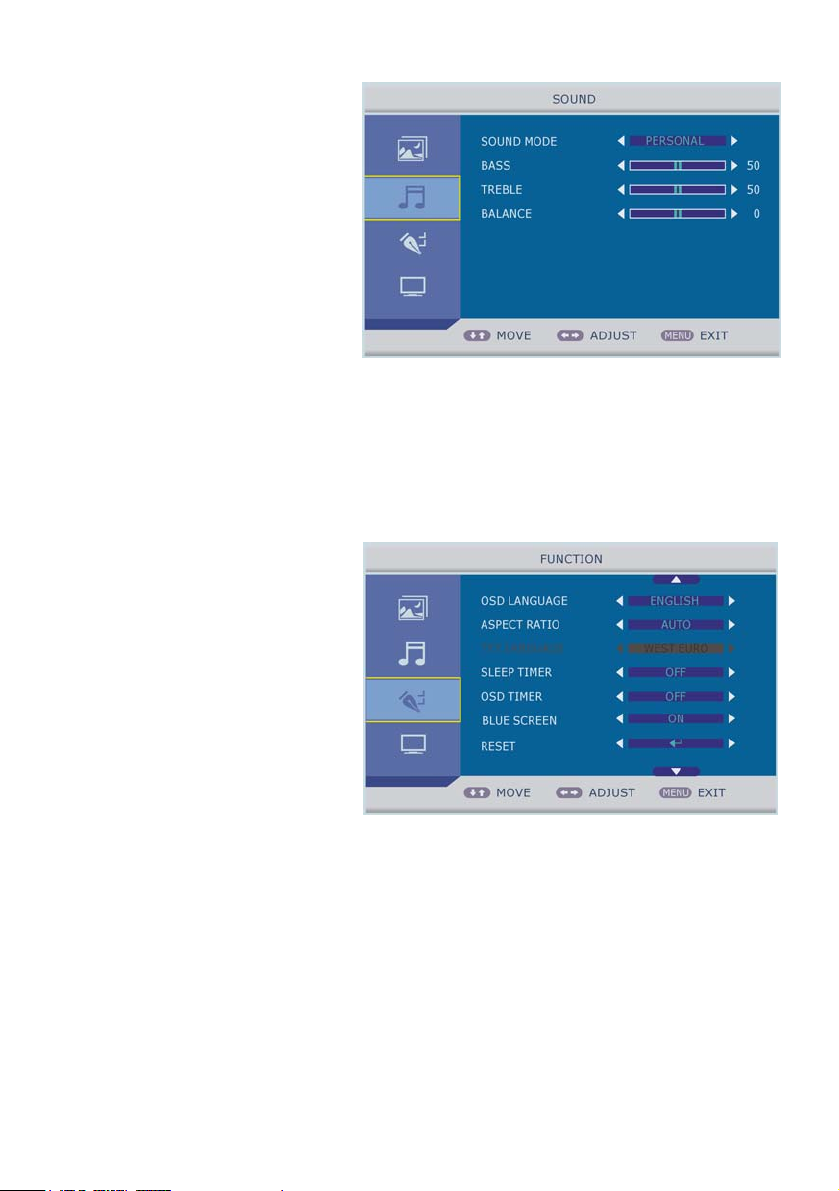
2. SOUND
2.1 SOUND MODE
Available options: PERSONAL,
VOICE, MUSIC, STANDARD,
THERTRE.
2.2 BASS
This item is used to adjust the level
of lower-pitched sounds from 0-100.
2.3 TREBLE
This item is used to adjust the level of higher-pitched sounds from 0-100.
NOTE: The value of BASS and TREBLE is adjustable only in PERSONAL sound mode.
2.4 BALANCE
This item is used to adjust the audio output between left and right speaker from -50 to 50.
3. FUNCTION
3.1 OSD LANGUAGE
This item allows the users to
choose wanted OSD language.
3.2 ASPECT RATIO
This item is used to select different
screen display mode which best
corresponds to personal viewing
requirements.
Available options: FULL, 4:3, AUTO.
3.3 TXT LANGUAGE
Available options: WEST EURO, EAST EURO, RUSSIAN, ARABIC, FARSI, GREEK,
CYRILLIC, HEBREW.
3.4 SLEEP TIMER
This item is used to set the automatic sleep time in standby mode. The unit will be in
standby mode 30 minutes after setting the SLEEP TIMER to 30MIN.
Available options: OFF, 15MIN, 30MIN, 45MIN, 60MIN, 75MIN, 90MIN, 105MIN, 120MIN.
19
Page 21
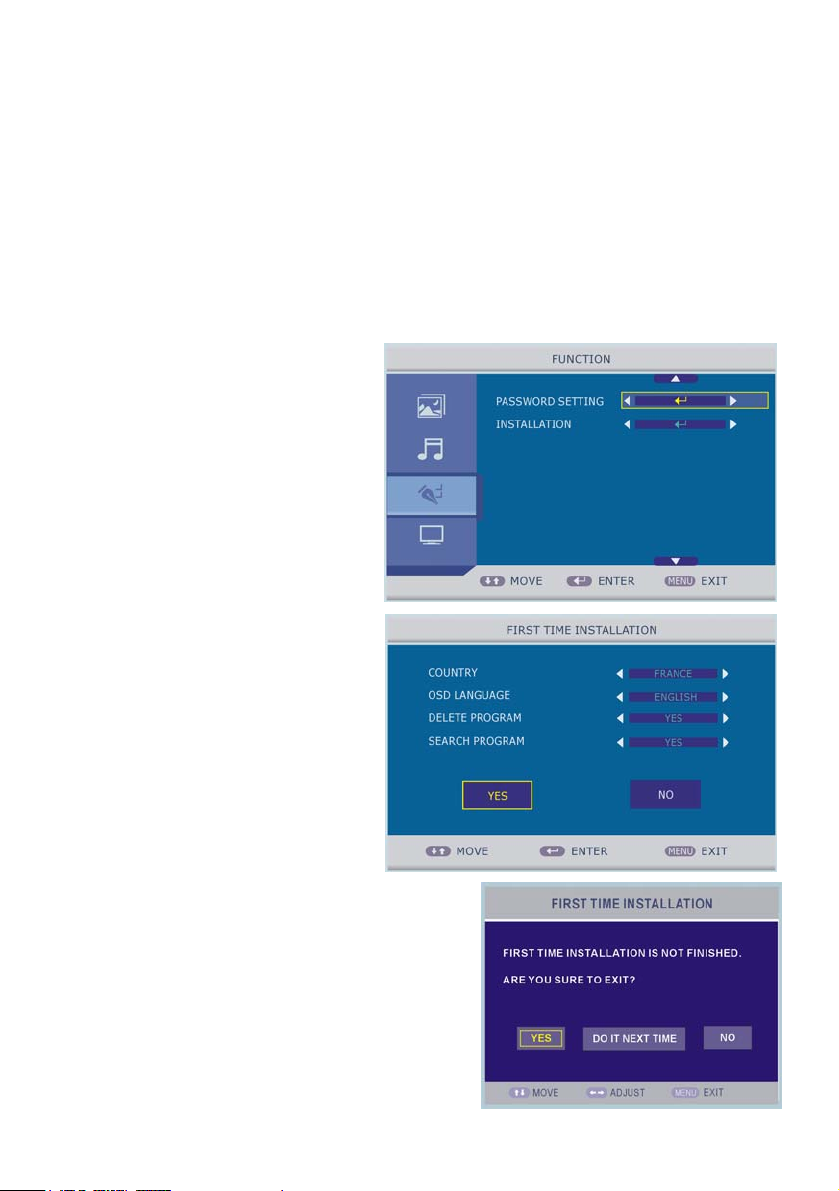
3.5 OSD TIMER
This item is used to set the OSD (on screen display) time.
Available options: OFF, 5 SECONDS, 10 SECONDS, 30 SECONDS and 60 SECONDS.
3.6 BLUE SCREEN
This item is used to set the blue background ON or OFF. The screen background will turn
blue at very weak or no signal condition, if BLUE SCREEN is ON.
3.7 RESET
This item is used to reset the unit to factory default settings.
3.8 CHILD LOCK
If CHILD LOCK is ON, and the default
PIN code is empty, press OK button to
enter directly
- CHILD LOCK: To set the child lock
ON or OFF.
- KEY LOCK: To set the key lock ON
or OFF.
- CHANGE CODE: To change a
password.
3.9 INSTALLATION
- Select INSTALLATION item and then
press OK button to enter FIRST
TIME INSTALLATION menu page.
NOTE: Once INSTALLATION item is
entered, this unit will automatically turn
to TV mode.
COUNTRY: To set the country that
living in.
OSD LANGUAGE: To set the OSD language.
DELETE PROGRAM: To decide whether delete all
the programs or not.
SEARCH PROGRAM: To decide whether do
automatic program searching or not.
NOTE:
- Select YES in the menu to save the settings and
search programs automatically, if SEARCH
PROGRAM item is turn to YES.
20
Page 22
- Select NO in the menu to enter below menu page and use LEFT or RIGHT navigation
button to select wanted option.
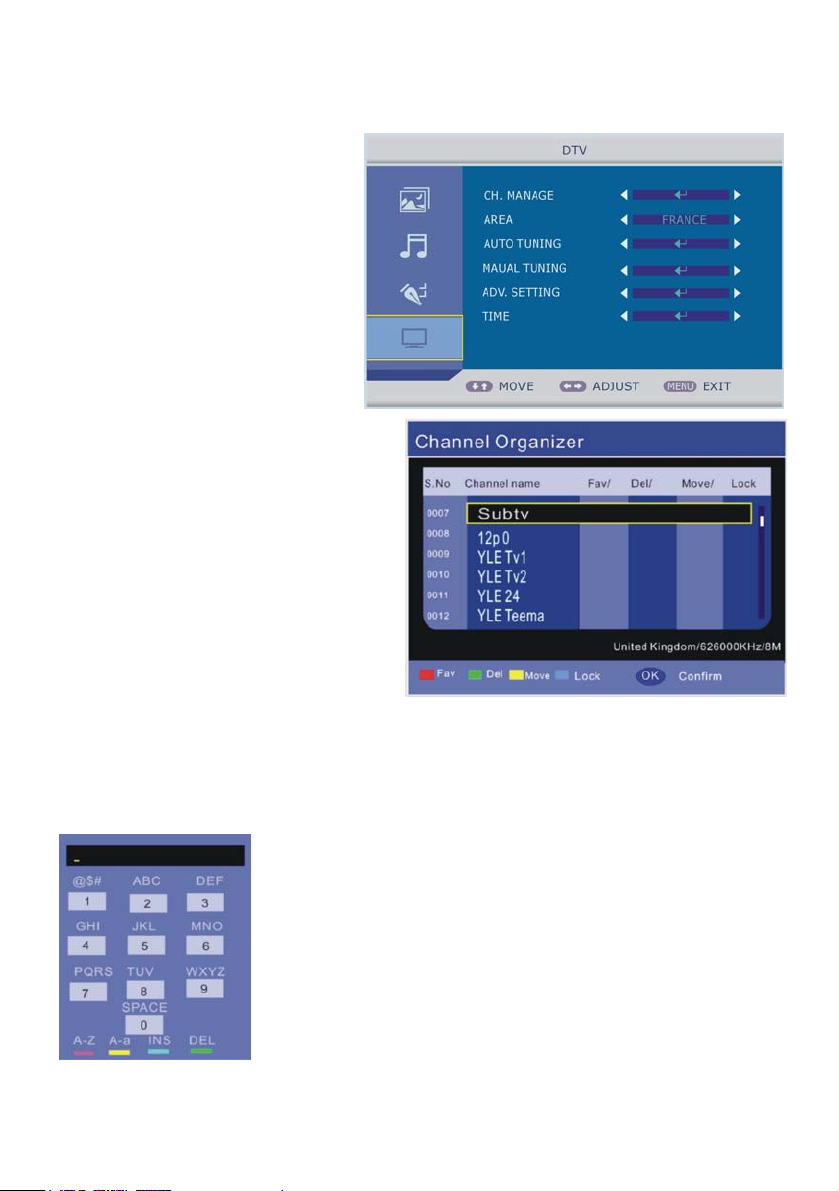
4. DTV
4.1 CH.MANAGE
Available options: CH.ORGN /
CH.SORT / CH.GROUP / DEL TV
CH. / DEL RADIO CH.
4.1.1 CH.ORGN
Select CH.ORGN item and press OK
button to enter Channel Organizer menu.
- Press UP or DOWN navigation button
to select the item that want to adjust.
- Press RED button on remote control to
label it as favorite channel.
- Press GREEN button to delete the
chosen channel.
- Press YELLOW button to move it to the
number you want to sign it and then
press UP or DOWN navigation button to
select other channels. Then press
ENTER button to confirm it.
- Press BLUE button to lock the chosen channel.
NOTE: If the channel has been locked, enter the password to watch it.
- Press LEFT or RIGHT navigation button to set the channel name.
- Press RED button to switch the input between numbers and
capital letters.
- Press GREEN button to switch the input between lower
case letters and capital letters.
- Press YELLOW button to move the cursor to next page.
- Press BLUE button to delete the input.
21
Page 23
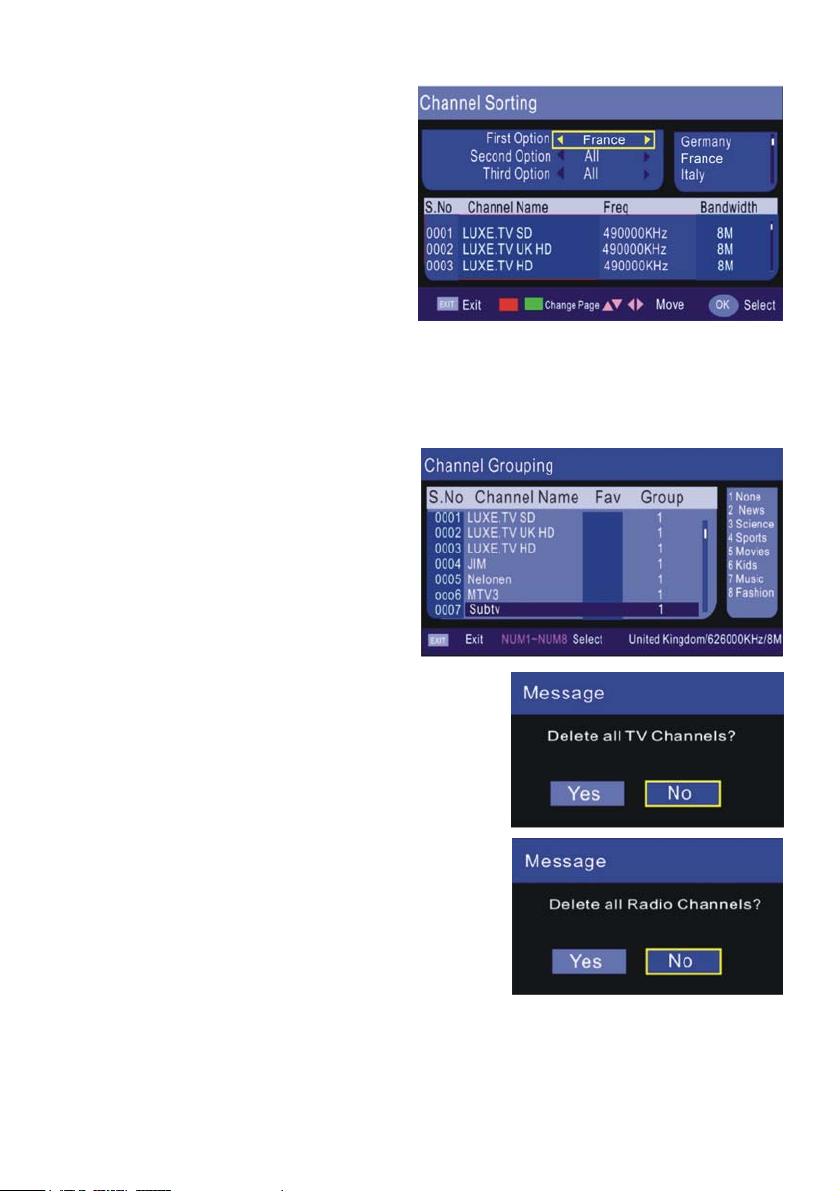
4.1.2 CH.SORT
Select CH.SORT and press OK button to
enter Channel Sorting menu.
- Press LEFT or RIGHT navigation button
to select a certain language as First
Option.
- Press UP or DOWN navigation button to
select All/FTA or Scramble as Second
Option.
- Press UP or DOWN navigation button to
select All/A to Z/Z to A /LCN+ or LCN- as Third Option .
- Press OK button to confirm it.
- Press RED button to return to the previous menu page; press GREEN button to return to
the bottom menu page. The bottom page is the list of channels that have set on the
previous menu page.
4.1.3 CH.GROUP
Select CH.GROUP and press OK button to
enter Channel Grouping menu.
- Press UP or DOWN navigation button to
select the channel that want to adjust and
then press the number (1-8) to set the
channel to a certain group.
4.1.4 DEL TV CH.
Select DEL TV CH. and press OK button, then below
dialog box will display on the screen:
- Use LEFT or RIGHT navigation button to select YES
or NO, and then press OK button to confirm the
selection.
4.1.5 DEL RADIO CH
Select DEL RADIO CH and press OK button , then below
dialog box will display on the screen:
- Use LEFT or RIGHT navigation button to select YES
or NO, and then press OK button to confirm the
selection.
4.2 AREA
Available options: ENGLAND, ITALY, SPAIN, FRANCE, GERMANY, OTHER.
22
Page 24
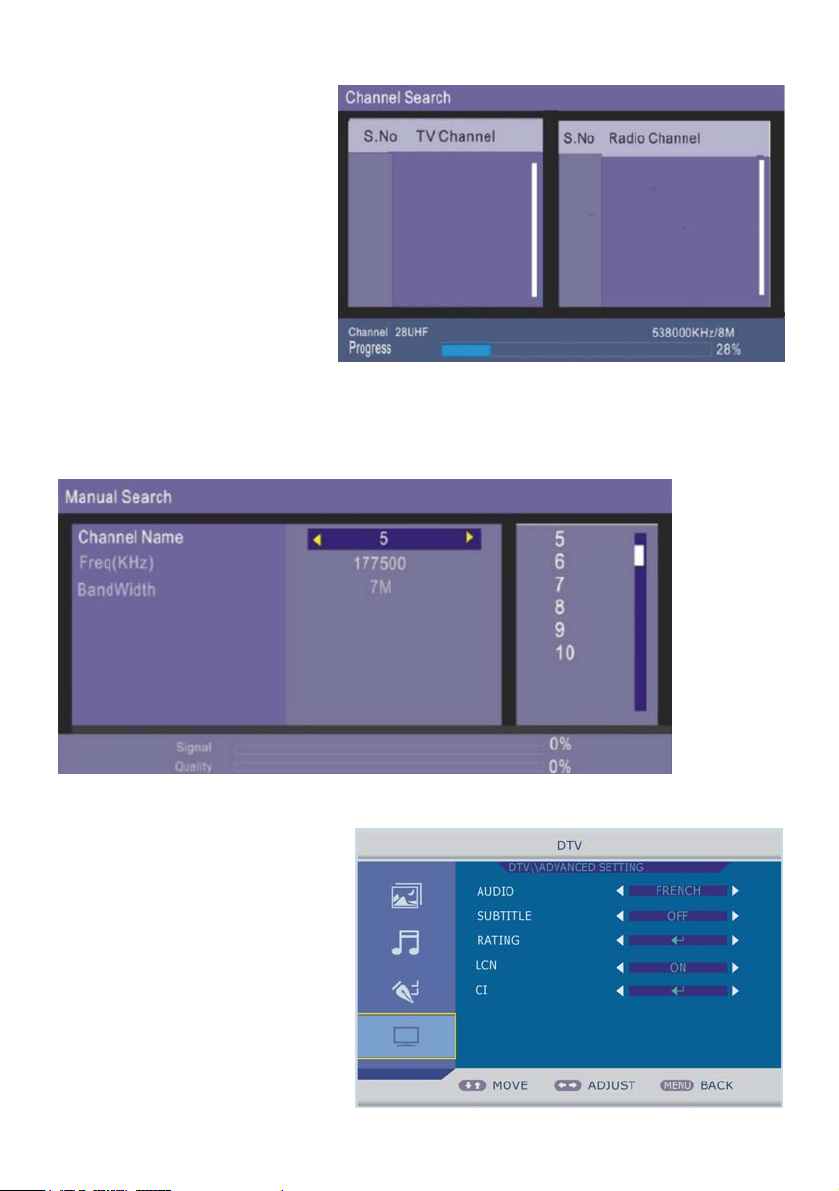
4.3 AUTO TUNING
- Select AUTO TUNING and
press OK button to enter it.
- Select YES or NO to start
channel searching or not.
4.4 MANUAL TUNING
- Select MANUAL TUNING and press OK button to enter it,
- Select YES or NO to start manual channel searching or not.
Then use LEFT or RIGHT button to select channel and start the manual tuning.
4.5 ADV . SETTING
4.5.1 AUDIO
This item is used to set the audio
language
Available options: DEFAUL T , ENGLISH,
FRENCH, GERMAN, ITALIAN,
SPANISH, POR TUGUESE, DANISH,
CZECH, DUTCH, FINNISH, SWEDISH,
GREEK, RUSSIAN, WELSH, GAELIC.
23
Page 25
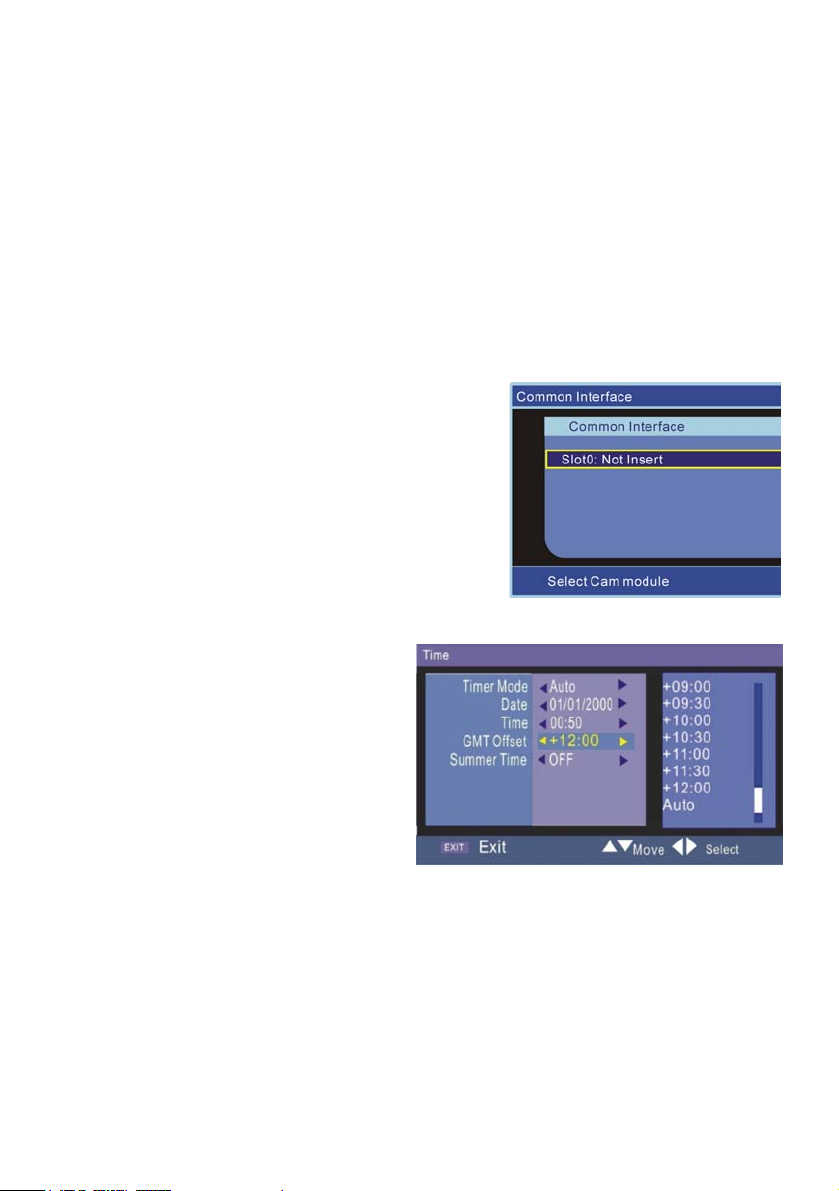
4.5.2 SUBTITLE
This item is used to set the subtitle language.
Available options: OFF, ENGLISH, FRENCH, GERMAN, ITALIAN, SP ANISH, POR TUGUESE,
DANISH, CZECH, DUTCH, FINNISH, SWEDISH, GREEK, RU SSIAN, WELSH, GAELIC.
4.5.3 RATING
- Input password to enter SYSTEM SETUP menu.
- Press RIGHT navigation button to enter PARENTAL RATING.
- Press UP or DOWN navigation button to select PARENTAL RAT ING.
4.5.4 LCN
This item is used to set the Logical Channel Number ON or OFF.
4.5.5 CI
- Select CI item, and then press OK button to enter
below menu page:
4.6 TIME
Select TIME and press OK button to enter
below menu page:
4.6.1 GMT Offset
- Press RIGHT navigation button to come
to right column.
- Press UP or DOWN navigation button to
select the time that want to use.
- Press OK button to confirm it.
4.6.2 SUMMER TIME
Available options: ON or OFF.
NOTE: If GMT Offset is Auto, the Summer Time can not be selected ON or OFF.
24
Page 26
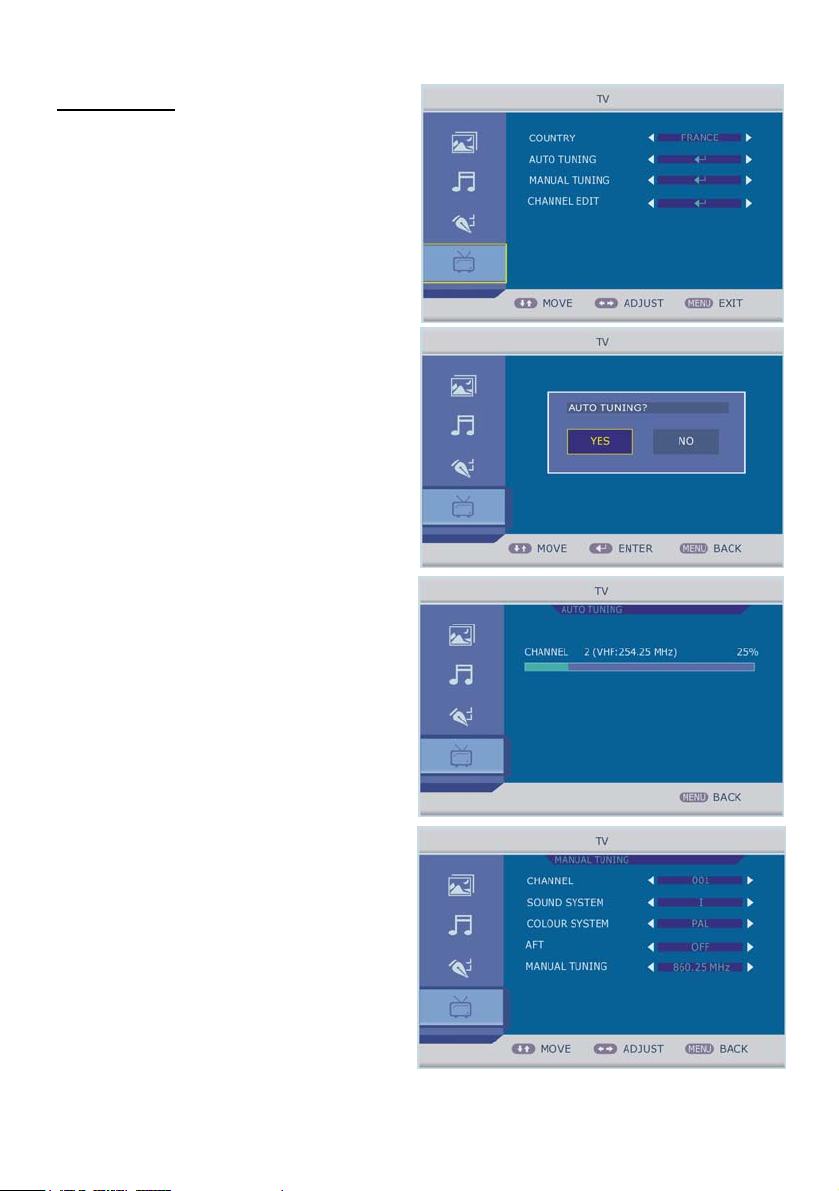
TV MODE
- For PICTURE, SOUND and FUNCTION
menus, please refer to the menu
operations of DTV mode.
1. COUNTRY
Available options: OTHER, PORTUGAL,
UK, ITALY, SPAIN, FRANCE, GERMANY.
2. AUTO TUNING
- Select AUTO TUNING item, and press
OK button to enter below page:
- Press LEFT or RIGHT navigation button
to decide whether do automatic
searching or not.
- If YES is selected, then press OK button
to do automatic searching.
3. MANUAL TUNING
- Select MANUAL TUNING item, and
press OK button to enter below page:
3.1 CHANNEL
- Press LEFT or RIGHT navigation button
to select wanted channel number.
3.2 SOUND SYSTEM
- Press LEFT or RIGHT navigation button
to select desired sound system.
25
Page 27
3.3 COLOUR SYSTEM
- Press LEFT or RIGHT navigation button to select desired color system.
3.4 AFT
- Press LEFT or RIGHT navigation button to set the AFT function ON or OFF.
3.5 MAUAL TUNING
- Press LEFT or RIGHT navigation button to fine tune the frequency.
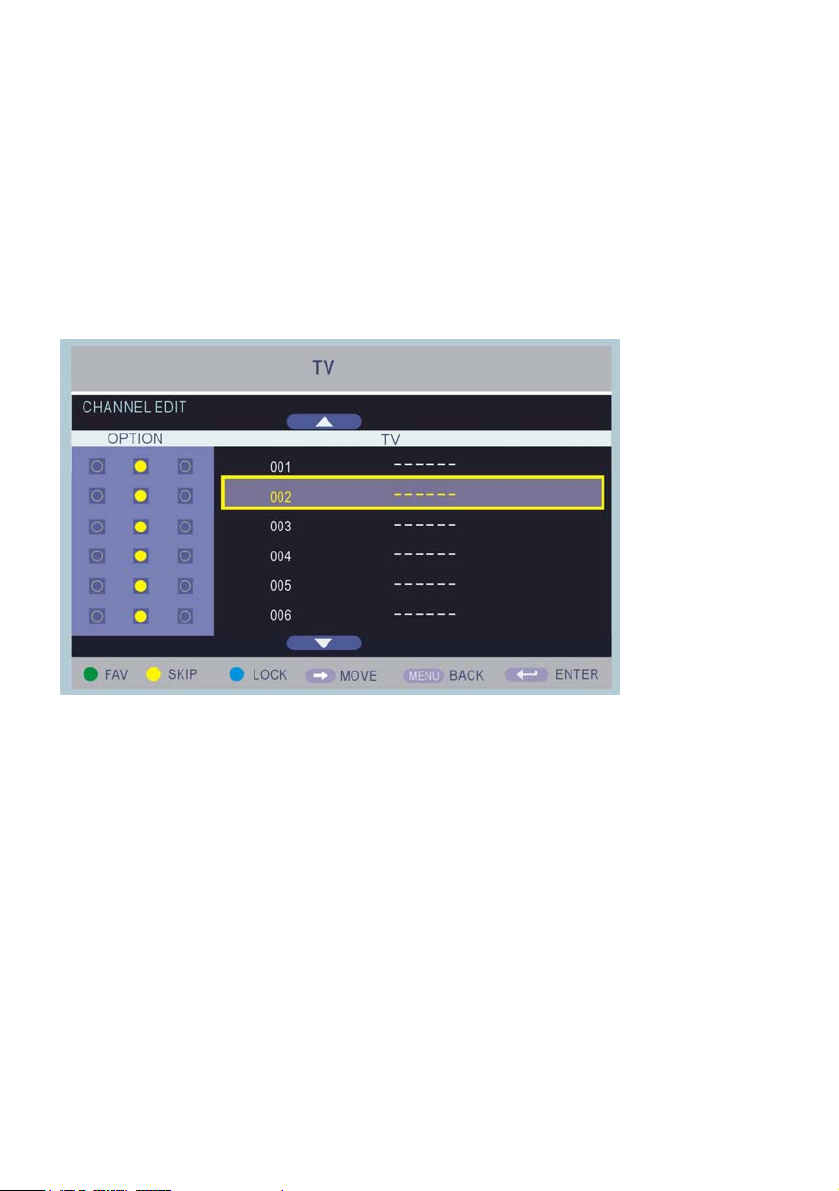
4. CHANNEL EDIT
- Press UP or DOWN navigation button to move the cursor.
- Press GREEN button on remote control to set the selected channel as a favorite one.
- Press YELLOW button on remote control to skip the selected channel.
- Press BLUE button on remote control to lock the selected channel.
- Press RIGHT navigation button to move the selected channel.
26
Page 28
HDMI/AV/SCART/MEDIA MODE
- Press SOURCE button on unit top or remote control to select desired input source.
- For PICT URE, SOUND and FUNCTION menus, please refer to the menu operations of
DTV mode.
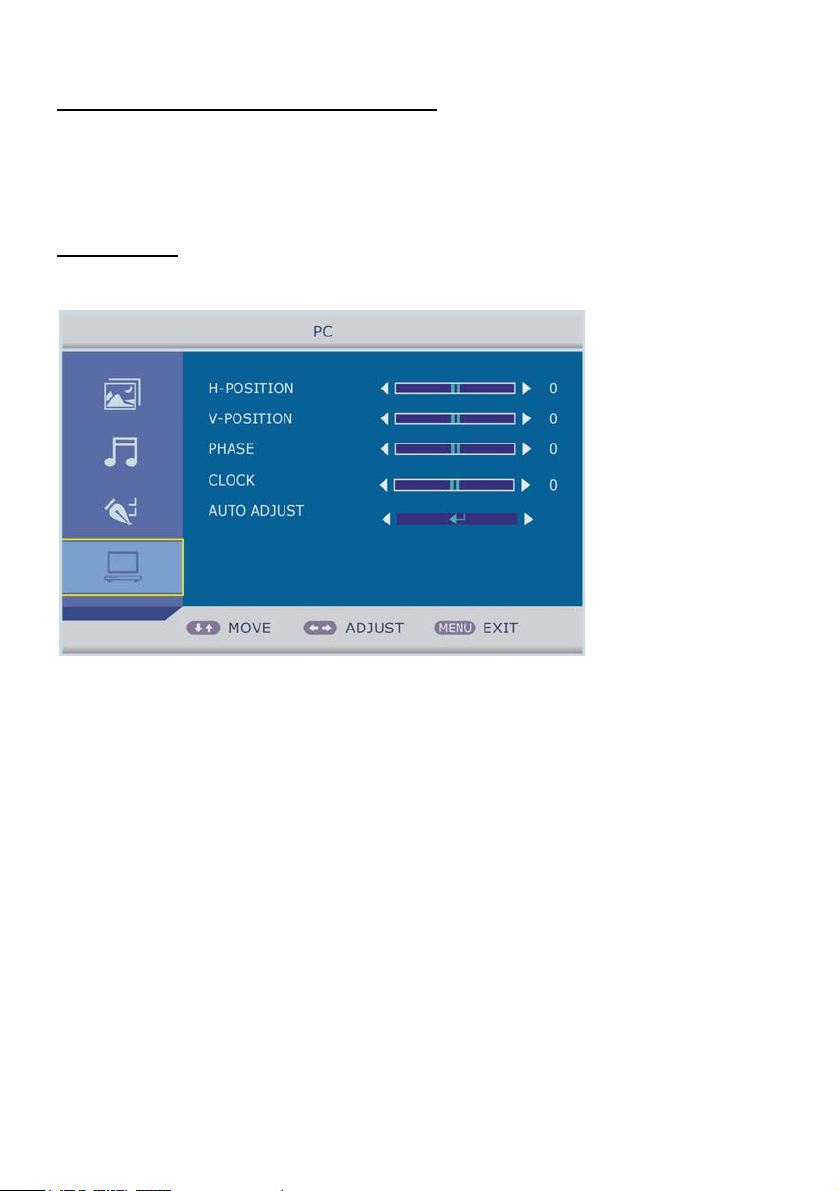
PC MODE
- For PICTURE, SOUND and FUNCTION menus, please refer to the menu operations of
DTV mode.
1. H-POSITION
This item is used to adjust the horizontal position of PC/VGA picture.
Available range: -50 to +50.
2. V-POSITION
This item is used to adjust the vertical position of PC/VGA picture.
Available range: -50 to +50.
3. PHASE
This item is used to adjust the picture applying to the TV.
Available range: -16 to +16.
4. CLOCK
This item is used to adjust the signals transfer speed.
Available range: -32 to +32.
5. AUTO ADJUST
This item is used to set above items automatically.
27
Page 29
z Be sure to press POWER button to set the player to the standby mode and
MAINTENANCE
disconnect the AC adaptor before maintaining the player.
z Wipe the player with a dry, soft cloth.
z If the surface is extremely dirty, wipe clean with a cloth which has been dipped in a
weak soap-water solution and wrung out thoroughly, and then wipe again with a dry
cloth.
z Never use alcohol, benzene, thinner, cleaning fluid or other chemicals. And do not
use compressed air to remove dust.
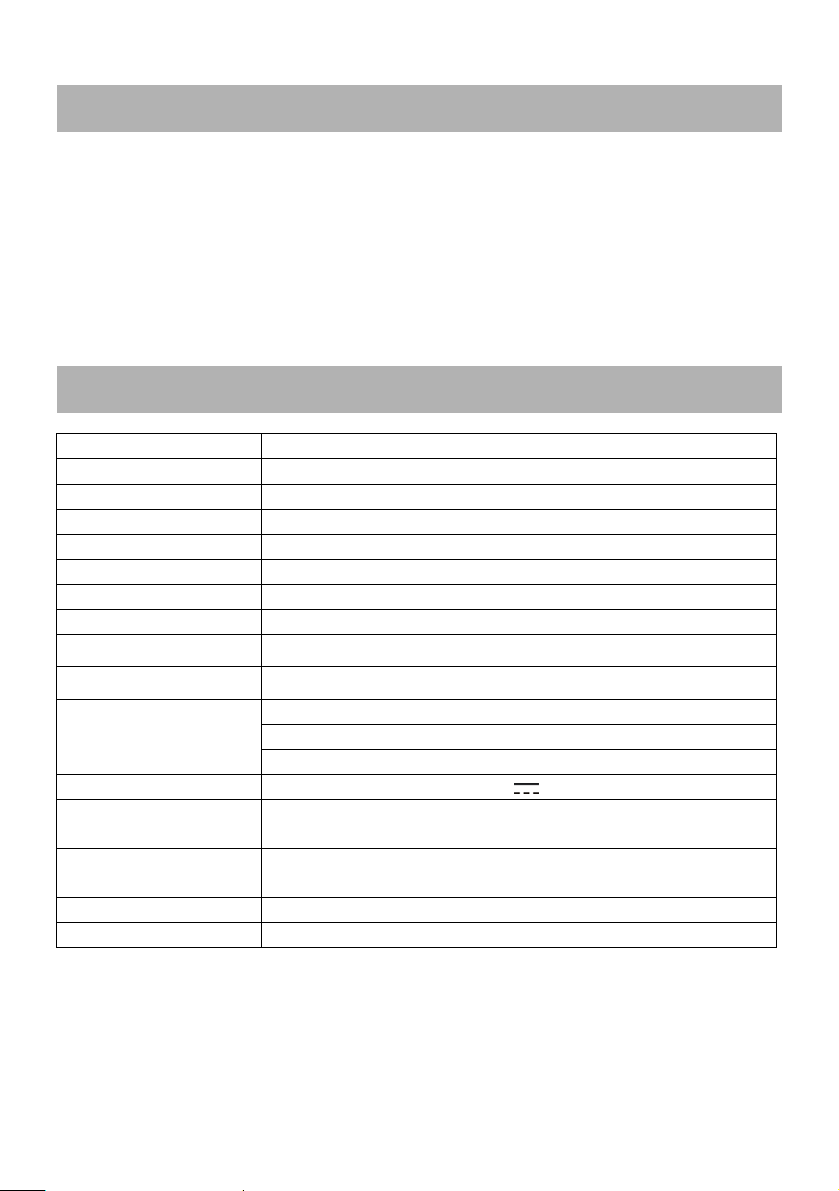
SPECIFICATIONS
Display Device
Resolution 1366 x 768
Pixel Pitch 0.3 (H) x 0.3 (V) mm
Luminance 250 cd/m2
Contrast Ratio 1000:1
Aspect Ratio 16:9
Response Time 5.5 ms
Viewing Angle 170 (H) / 160 (V)
Visible Range
Lamp Life
MULTIMEDIA
PLAYBACK FORMAT
POWER SOURCE AC adaptor (Normal DC 12 V 2.5A)
POWER
CONSUMPTION
OPERATION
TEMPERATURE
MEASUREMENT 455 (W) x 150 (D) x 330 (H) mm
WEIGHT Approx. 2680g
47 cm (18.5 inch) LED TV
409.8 (H) x 230.4 (V)
50,000 Hrs
Movie: MPG, DAT, VOB, AVI, DIVX
Music: MP3, WAV, WMA
Photo: JPG, BMP, GIF
≤30W
-5°C ~ 45°C
*Specifications are subject to change without notice.
28
Page 30
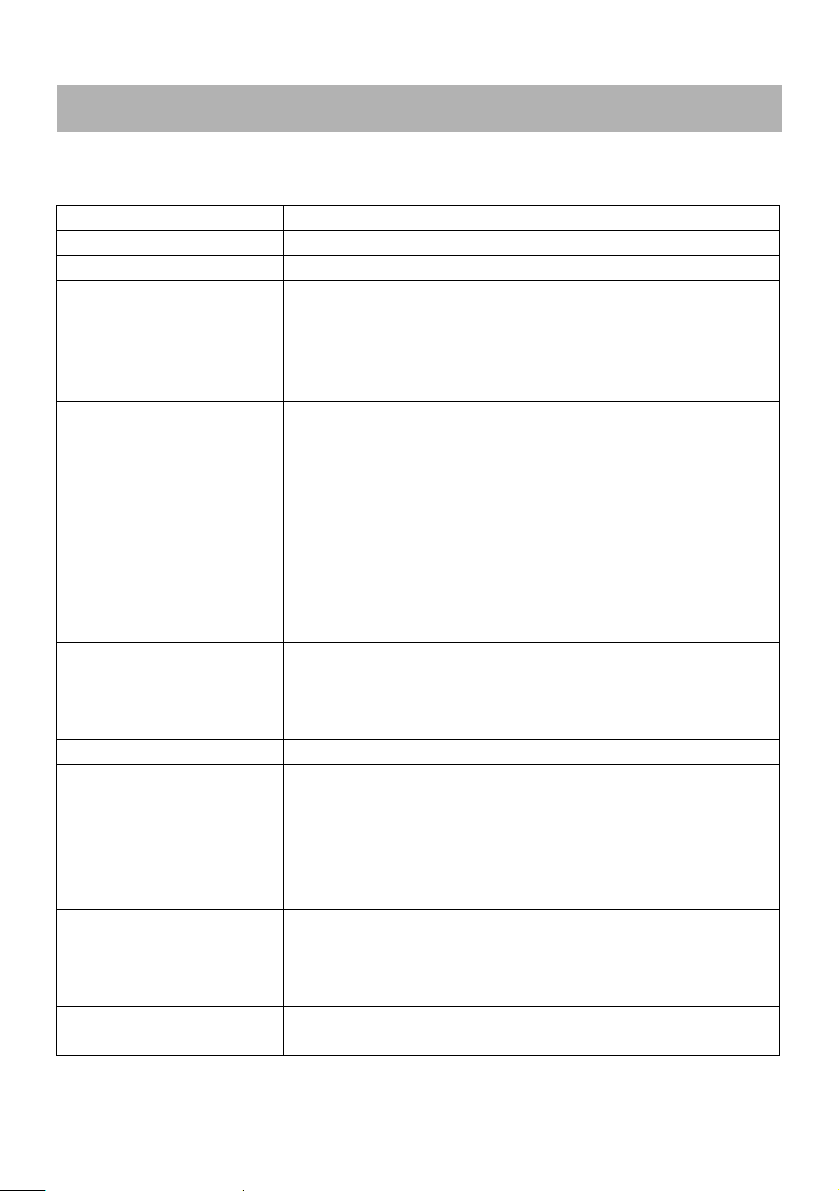
GENERAL TROUBLESHOOTING
Check the following points before assuming malfunctions of this unit:
Symptom Remedy
No power. Insert the AC adaptor securely int o the pow er outle t.
No picture. Ensure that the equipment is connected properly.
● Ensure that the equipment is connected properly.
● No sound.
● Distorted sound.
● Ensure that the input setting for the TV a nd stereo
system are correct.
● Adjust the master volume to a suitable volume by
pressing VOL+/VOL- button.
● Check the batteries are installed with th e correct
polarities.
● The batteries are exhausted: Replace them with new
No operations can be
performed with the
remote control unit.
ones.
●Point remote control at the remote control sensor and
operate it again.
● Operate the remote control unit at a distance of no more
than 6m from the remote control sensor.
● Remove the obstacles between the remote co ntrol and
remote control sensor .
No key operation (by the
main unit and/or the
remote control unit) is
effective.
Disconnect the power adaptor and then reconnect it . (The
player may not be operating properly du e to lightni ng, st atic
electricity or some other factors.)
Symptom (TV) Remedy
● Adjust antenna or use an external antenna.
● Relocate the unit near a window (if inside a building).
No or poor picture.
No sound or poor sound.
Noise or other interface.
● Move units away from this product that causes
interference.
● Do Auto Tuning again.
● Try another channel.
● Check the audio settings.
● Press MUTE button on remote control to cancel mute
function.
● Unplug the headphone.
Electronic equipment near the unit is causing inte rface.
Relocate the unit or move the equipment.
29
Page 31

EC Declaration of Conformity
The product complies with the protective requirements of European
Directives 2004/108/EC.
The conformity declaration for this product is available under
www.jay-tech.de.
Directive 2002/96/EC on Waste Electrical and Electronic
Equipment (WEEE)
This symbol on the product or in the instructions means that your electrical
and electronic equipment should be disposed at the end of its life
separately from your household waste. There are separate collection
systems for recycling in the EU. For more information, please contact the
local authority or your retailer where you purchased the product.
30
Page 32
 Loading...