

Page 1

ENGLISH
USER GUIDE
Page 2

WELCOME
In The Box ......................................................................................................................... 2
Charging / Battery Status ............................................................................................... 3
Pairing .............................................................................................................................. 5
Finding Your Perfect Fit ...................................................................................................7
Choosing Your Setup .....................................................................................................7
Fit for Sport Use ......................................................................................................... 8
Fit for Casual Use ....................................................................................................... 11
DETAILED INSTRUCTIONS
Button Functionality ......................................................................................................... 14
The MySound App ............................................................................................................. 17
Multipoint - Connection to multiple devices .................................................................... 19
ShareMe ........................................................................................................................... 20
Smartwatches .................................................................................................................. 22
Troubleshooting ...............................................................................................................23
Specifications .................................................................................................................. 24
Warranty, Warnings & Safety .......................................................................................... 25
Page 3

WELCOME
THANKS FOR PURCHASING
JAYBIRD X3. WE BRING MUSIC
WHERE YOU SWEAT.
For detailed video instructions please visit javybirdsport.com/support/
Please refer to the safety warnings for important product safety information prior to installation or use of the product.
1
Page 4
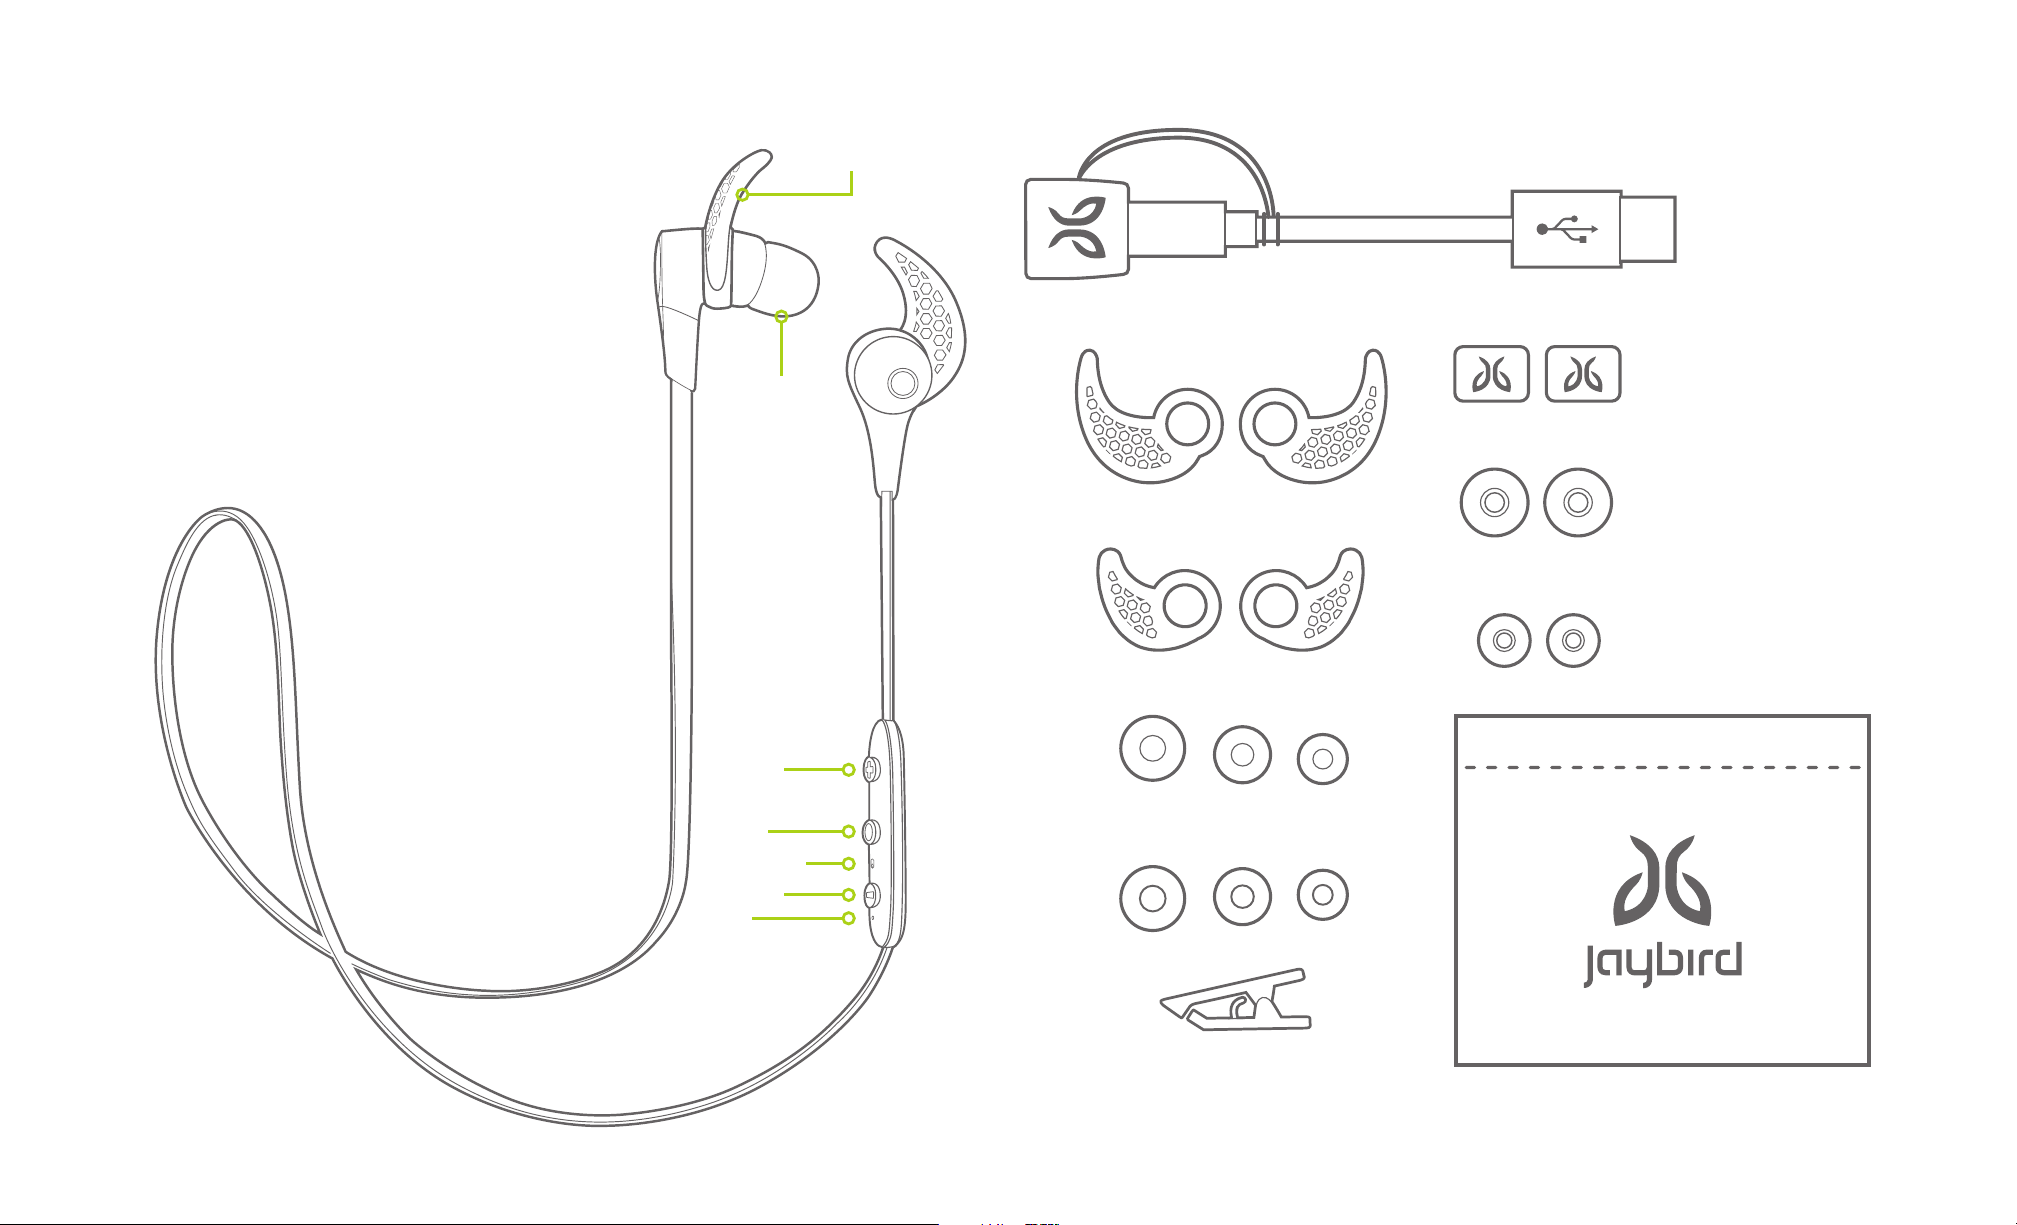
IN THE BOX
Silicone Ear
Fins (M)
Silicone
Ear Tips
(M)
USB Charging Cable
+ Charge Clip
Cord Clips
Silicone Ear Fins
(S, L)
Silicone Ear Tips
(S, L)
Carry Pouch
2
Volume
+
Power
Microphone
Volume
-
LED
Comply
TM
Isolation
Ear Tips (S, M, L)
Shirt Clip
Page 5
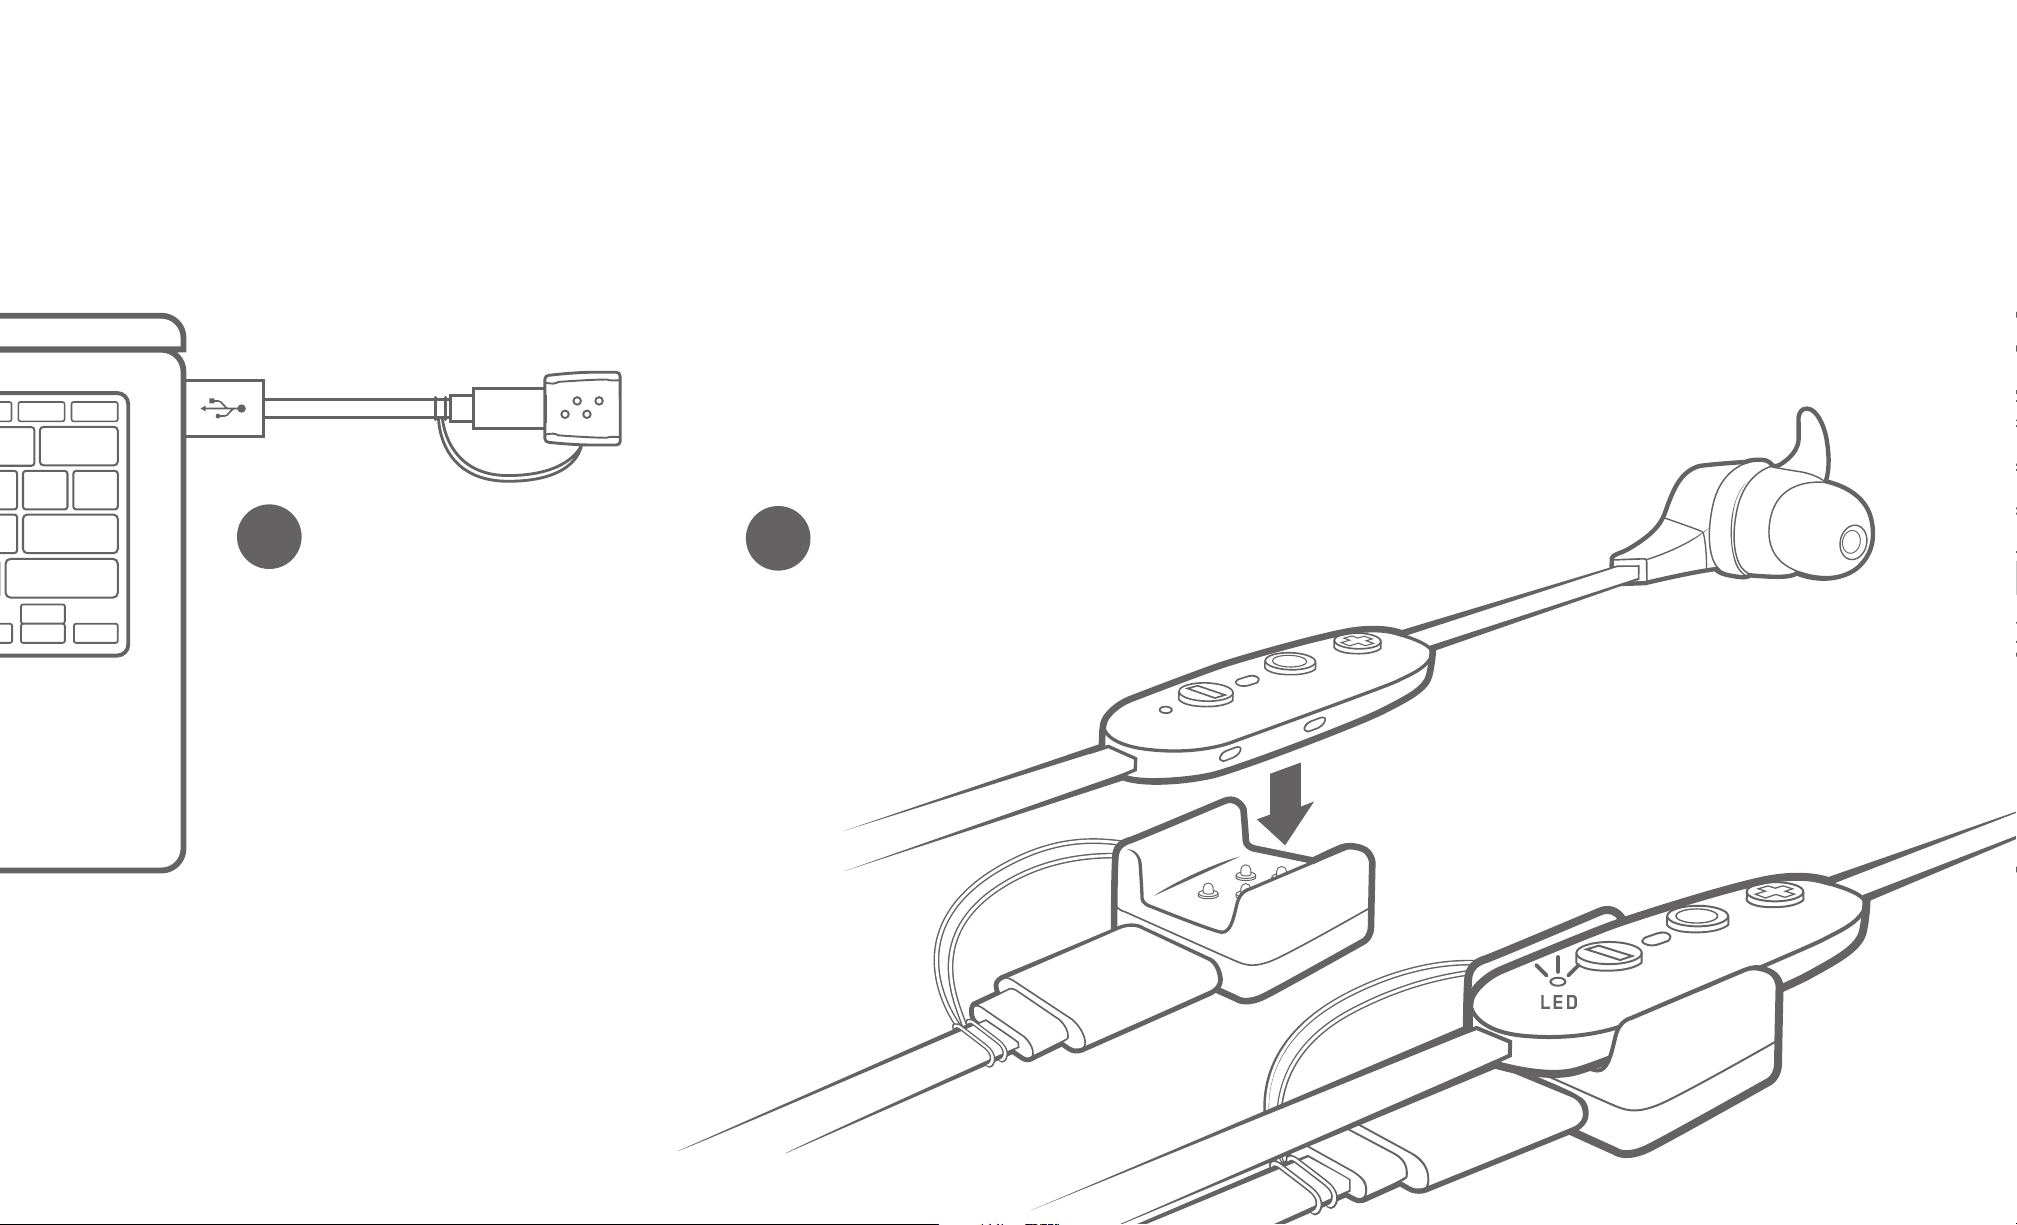
CHARGING/BATTERY STATUS
We recommend you charge your buds through any 5V 500mA USB power source. Wall/car adapters/chargers
that supply more than 5.5 Volt will damage your Jaybird buds and should not be used.
3
A
Take your included
charge clip and USB
cable and plug it into
a USB power source.
2.5 hours charging gives
8 hours of playtime.
20 mins charging gives
1 hour of play time.
B
The red LED will show
when charging, and
will turn to green
when fully charged.
Page 6
CHARGING/BATTERY STATUS
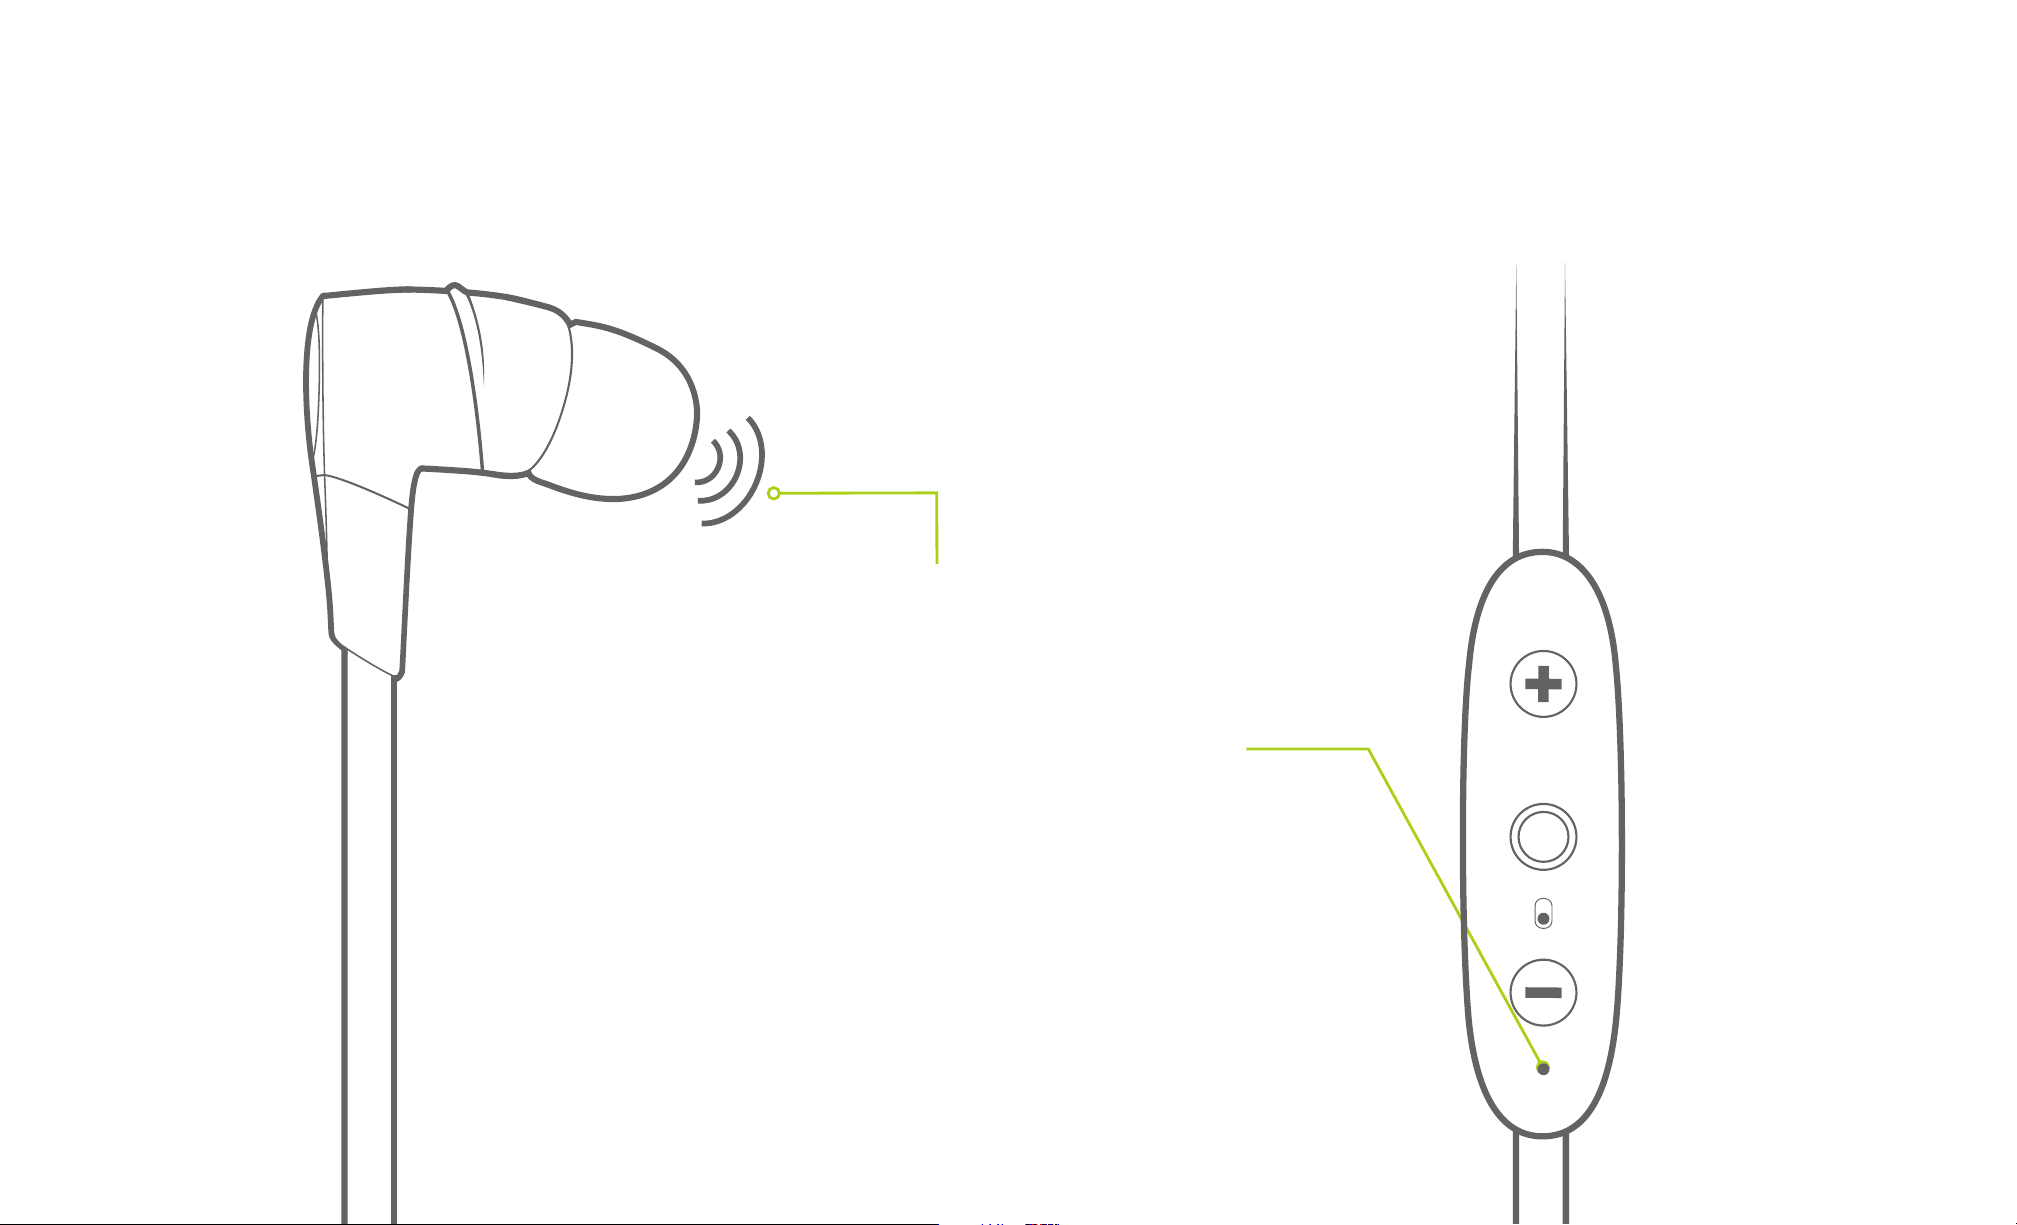
When not playing music, pressing
Volume + or Volume – will announce
the battery level.*
The LED will indicate a single green
4
flash for more than 10% battery
remaining and a single red flash
when below 10%.
Your phone and the MySound App
will also indicate battery status.
* Standby Mode: Powered and not playing music or on a
phone call.
Page 7
PAIRING
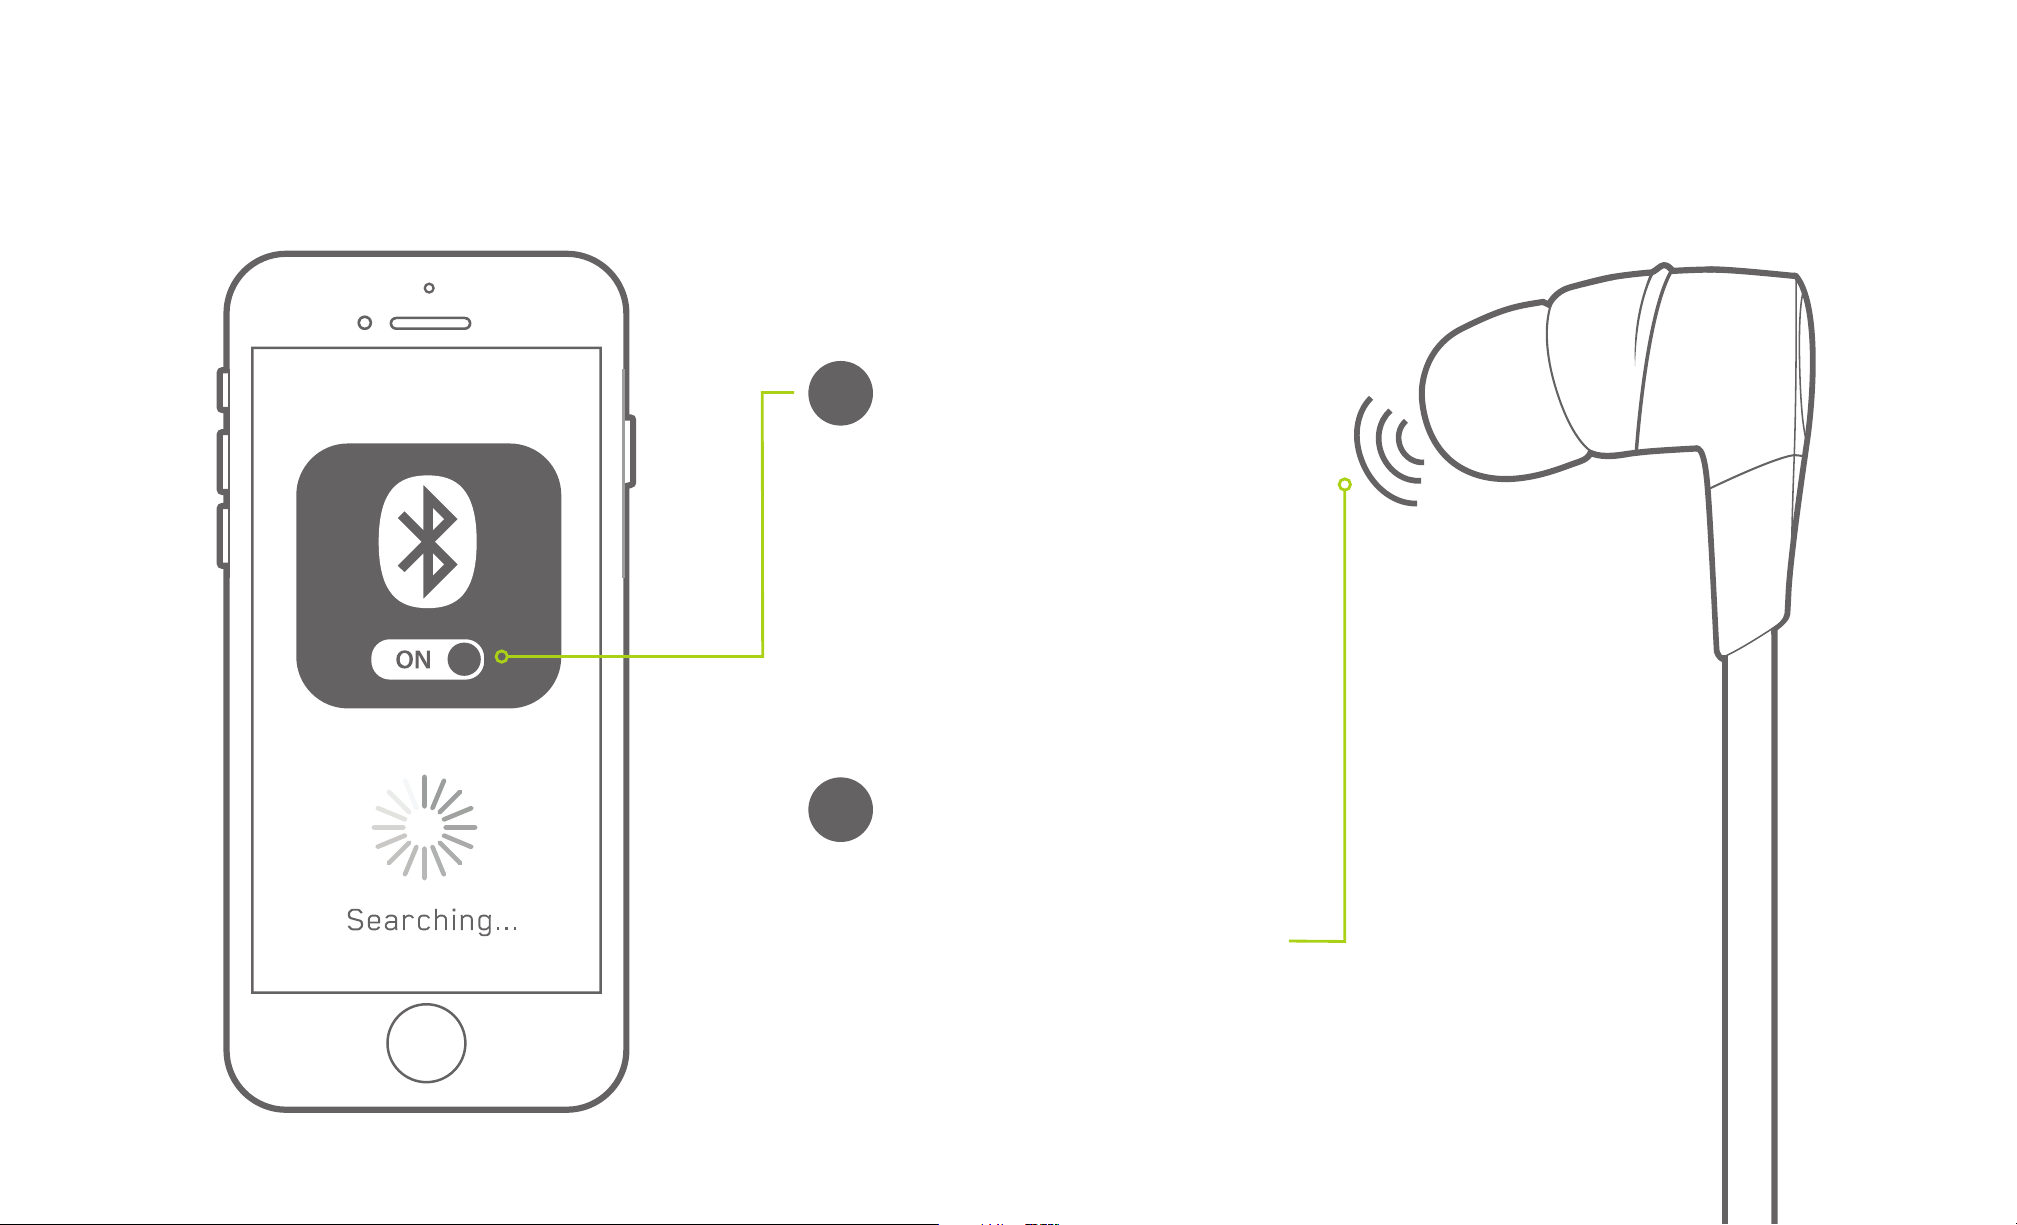
A
On your phone/music device,
turn Bluetooth® on and ensure
it is actively searching for
Bluetooth devices.
5
With your X3 turned off,
B
press and hold the Power
Button until you see the LED
flashing red/green. A voice
prompt will say “SEARCHING
FOR YOUR MUSIC DEVICE”
Page 8
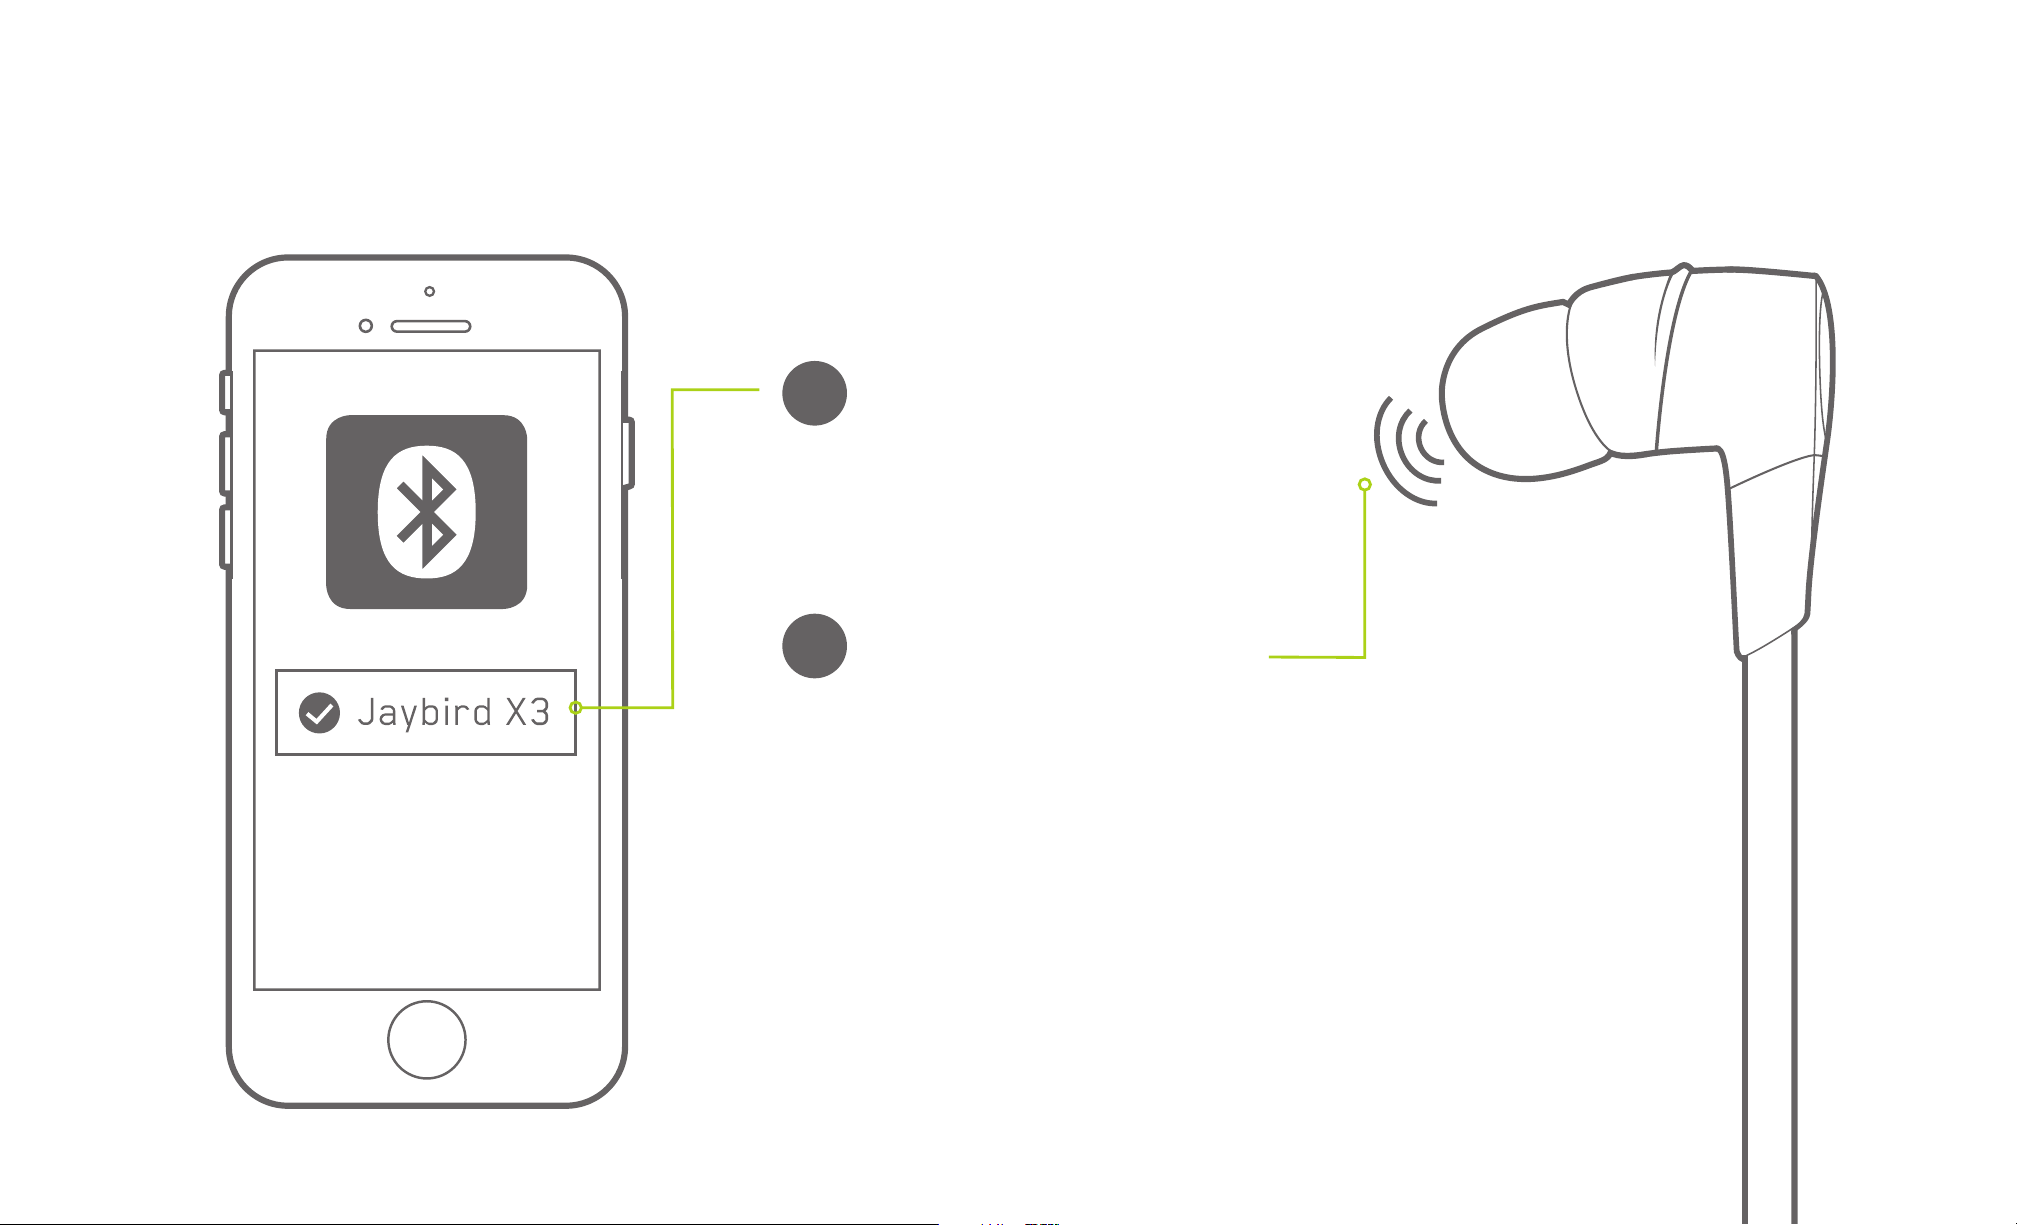
PAIRING
C
D
Select “Jaybird X3” in the
list of discovered devices.
X3 voice prompt will say:
“HEADPHONES CONNECTED”.
You are now ready to listen
to your music
6
If the pairing is not successful, switch
off your buds by pressing the Power
Button until you hear “POWER OFF” and
repeat the steps outlined above.
NOTE: When you turn your X3 buds on
for the first time or after a reset, they
will be in pairing mode.
Page 9
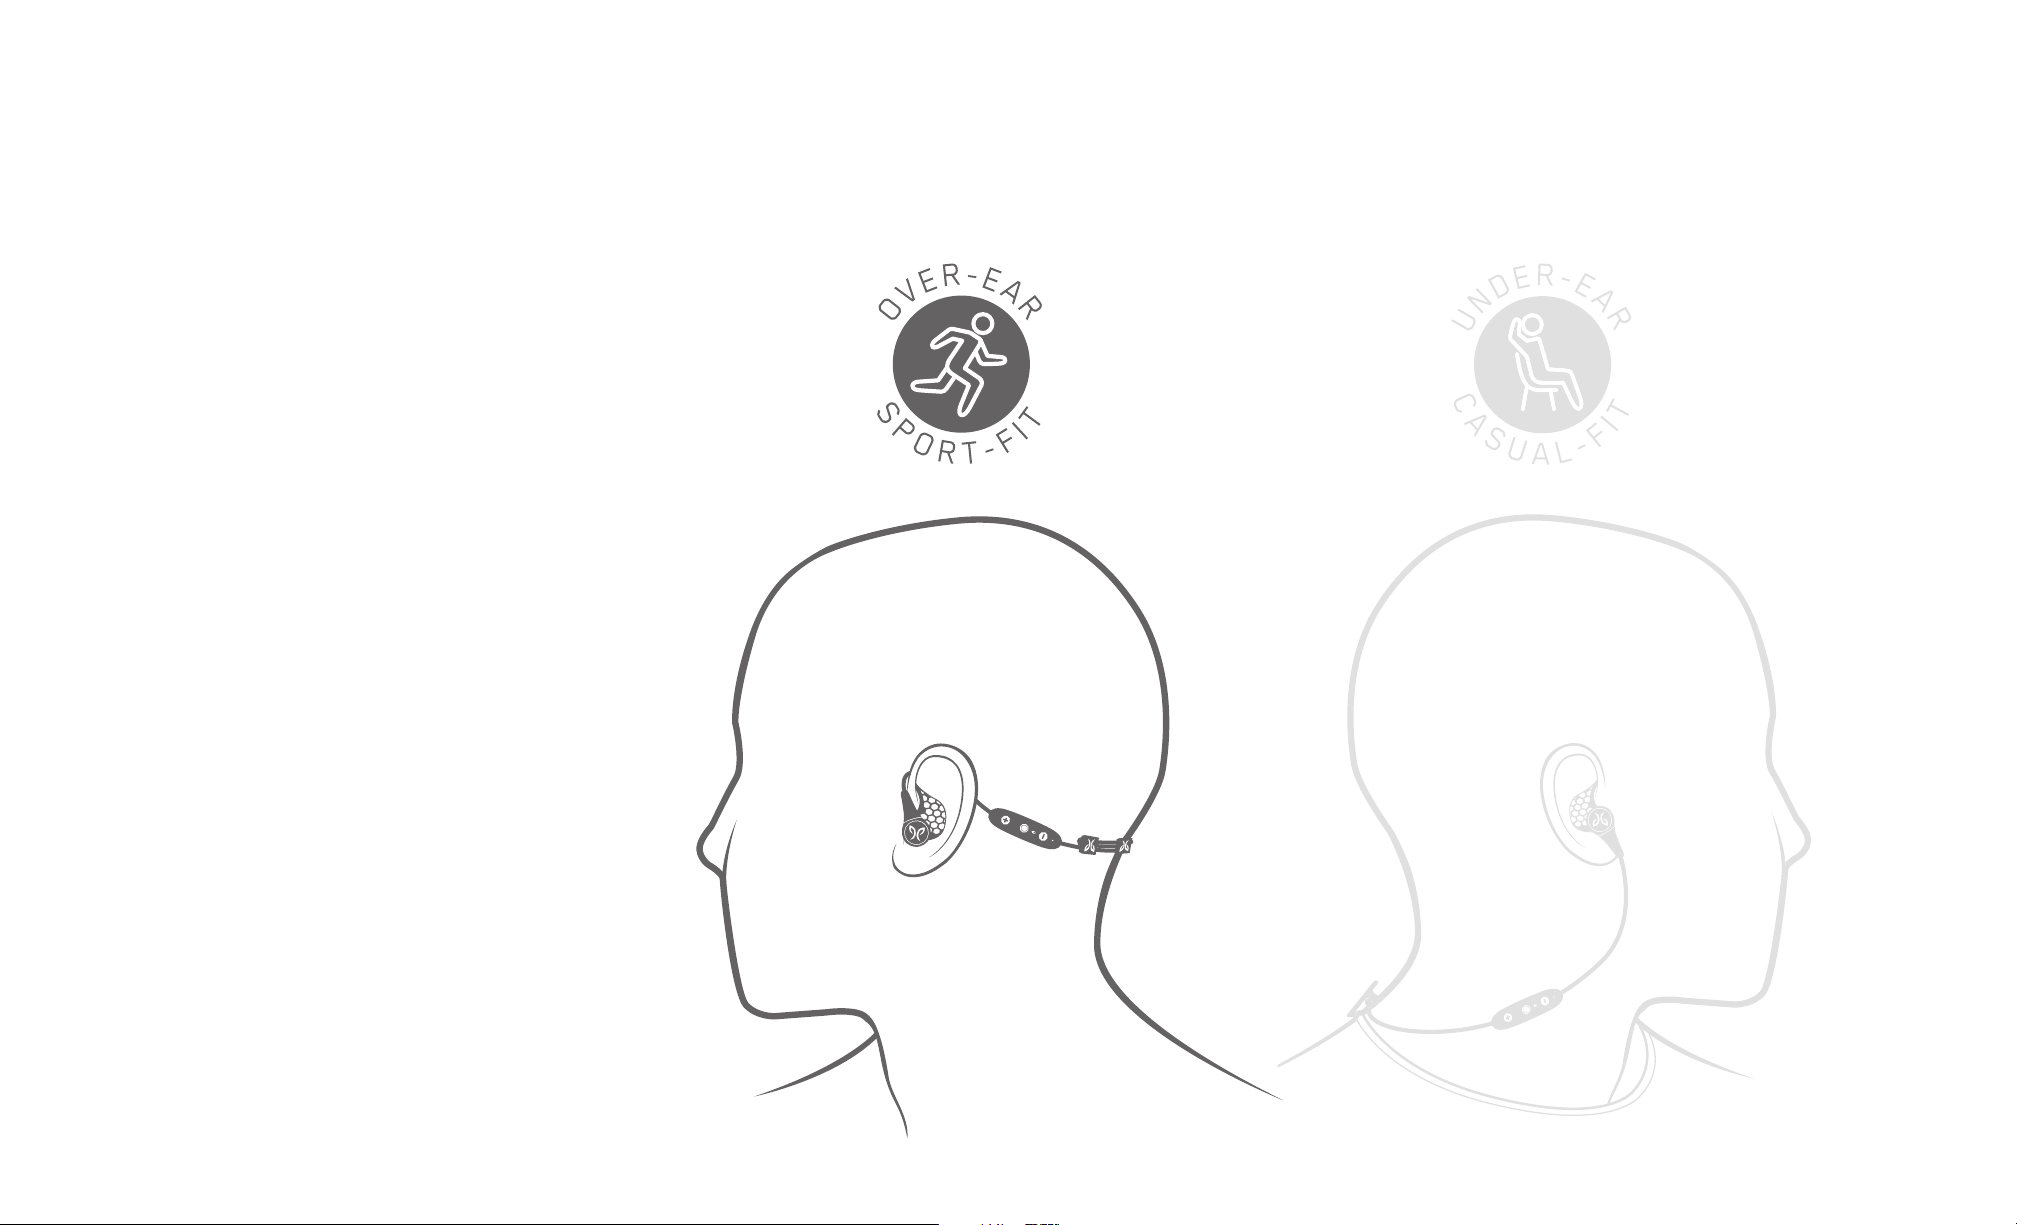
FINDING YOUR PERFECT FIT
CHOOSING YOUR SETUP BASED ON USE
We recommend choosing a fit based on
how you plan to use your Jaybird X3.
7
Page 10
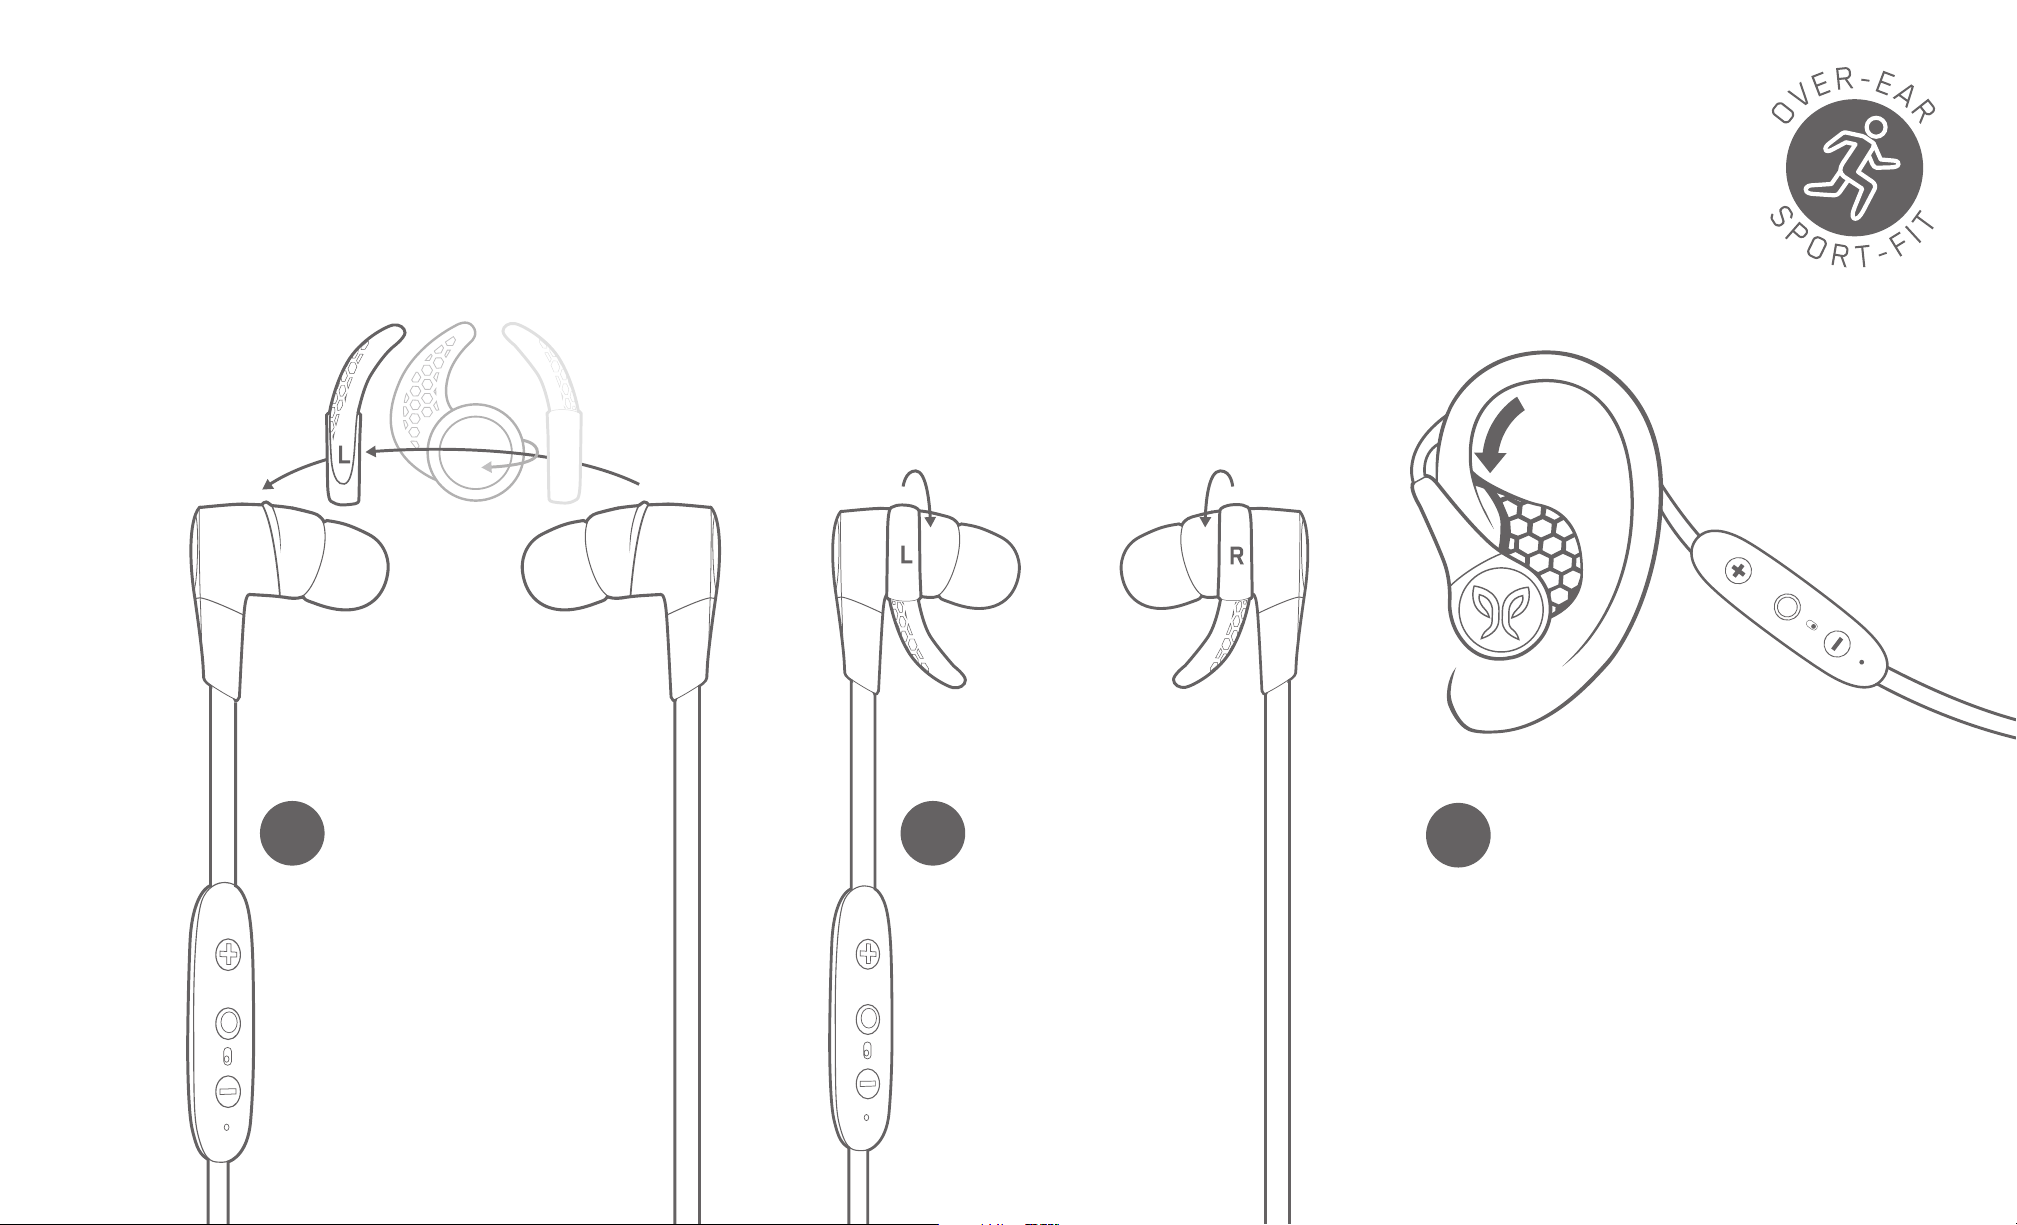
FINDING YOUR PERFECT FIT
1. SET UP YOUR FINS
8
A
Lay your X3 in front
of you with the inline
remote on the left
hand side. Swap the
fins to the opposite
side so the fin with
the ‘L’ is now on the
side with the inline
remote.
B
Rotate the fins so
they are pointing
towards the cable,
as shown.
C
Place your X3 over
your ear with the
inline remote on
your left side.
Page 11

FINDING YOUR PERFECT FIT
LEFT
2. FINDING THE RIGHT SIZED TIPS AND FINS
Starting with the medium-sized tips and fins attached, try placing
A
B
your buds firmly within your ear while in the over-ear position.
If your buds are not comfortable, or feel loose,
try alternative sized tips and/or fins. You can
also try the ComplyTM foam tips or remove the
fins completely. Be patient, it may take some
time to get the perfect fit.
RIGHT
9
C
Once you are happy with
the fit, move onto step 3.
Page 12

FINDING YOUR PERFECT FIT
3. CORD CLIPS
Lay your X3 in front of you and fit
A
the cord clips as shown.
Find the right cord length to get a snug fit, with
B
no excess slack, around the back of your head
by pulling the top and bottom cord outwards.
10
C
Insert the last loop into the cord clip and
pull firmly.
Page 13

FINDING YOUR PERFECT FIT
If you intend to use Jaybird X3 for casual use,
we recommend the under-ear setup.
11
Page 14

FINDING YOUR PERFECT FIT
1. FINDING THE RIGHT SIZED TIPS AND FINS
With the medium-sized tips and fins attached, place your
A
B
buds firmly within your ear while in the under-ear position.
The inline remote should be on the right side.
If your buds are not comfortable, or feel loose, try alternative
sized tips and/or fins. You can also try the ComplyTM foam tips or
remove the fins completely. Be patient, it may take some time to
LEFT
RIGHT
12
get the perfect fit.
C
Once you are happy with the fit, you
are good to go.
Page 15

FINDING YOUR PERFECT FIT
2. SHIRT CLIP
Use the included Shirt clip To secure
your X3 buds to the back of your shirt.
Long side of the clip on the outside of
the shirt.
13
Page 16

DETAILED INSTRUCTIONS
BUTTON FUNCTIONALITY
ON/OFF
To turn X3 on or off, press
and hold the Power Button
for about 4 seconds. A voice
4 SEC PRESS
14
prompt will say “POWER ON”
or “POWER OFF”.
Page 17

DETAILED INSTRUCTIONS
PLAYING MUSIC
SHORT PRESS 1 SEC PRESS
VOLUME +
PLAY / PAUSE
VOLUME -
Play or pause, a song or video with a short press and release of the Power Button.
To skip a song, press the Vol. + button for 1 second.
To go backwards, press the Vol. - button for 1 second.
To change the volume + or -, short press the Vol. + or Vol. - button
SKIP FORWARD
VOICE COMMANDS
SKIP BACKWARD
15
To activate voice commands, (Siri or Google Now), press the Power Button for 1 second.
Page 18

DETAILED INSTRUCTIONS
PHONE CALLS
SWITCH A CALL
SHORT PRESS DOUBLE PRESS1 SEC PRESS
16
ACCEPT A CALL DECLINE A CALL
MUTE / UNMUTE
Accept a phone call, with a short press of the Power Button.
To decline a phone call, press the Power Button for 1 second.
To mute or unmute, a call press the Vol. - button for 1 second.
To redial, a phone number you can double press the Power Button.*
To switch a call from your phone speaker to your X3 buds short press the Vol. + button.
*Standby Mode: Powered and not playing music or on a phone call.
REDIAL
Page 19

DETAILED INSTRUCTIONS
THE MYSOUND APP
MySound lets you customize the sound profile on your X3 buds.
WARMTH
+
CUSTOMIZE
17
Your new sound settings are saved right on your buds, so you
can take your custom sound with you no matter where you go
with any device you use.
JAYBIRD SIGNATURE
WARMTH
REMOVE SHARPNESS
DASHBOARD DISCOVER PROFILE
JAYBIRD ENHANCED
EXTENDED LISTENING
R & B FREAK
HEADPHONES
Jaybird X3
60%
Page 20

DETAILED INSTRUCTIONS
DASHBOARD DISCOVER PROFILE
HISTORY
SAVE
Jaybird X3
60%
HEADPHONES
THE MYSOUND APP
SOUND
Customize your
sound settings.
Changes are saved
to your X3 buds.
SAVE
Save your new
preset to your
dashboard for
easy access to
all your favorite
sound settings.
NOTE: The MySound
app works with Jaybird
X3 and Freedom. Other
manufacturers and older
Jaybird buds are not
supported.
Adding additional bass
to your sound profile
through the MySound app
will reduce play time.
18
MUSIC
Indicates if music
is playing on your
device.
DISCOVER
Discover presets
from athletes and
other users.
HISTORY
Track through a
history of your
changes.
DEVICE
See your
connected
device and
battery status.
Page 21

DETAILED INSTRUCTIONS
MULTIPOINT - CONNECTION TO MULTIPLE DEVICES
Multipoint allows you to be connected to two devices simultaneously. You can for
instance be connected to your laptop and your mobile phone. While listening to
music on your laptop you will be able to accept an incoming call on your phone.
1
Ensure your X3 buds are paired and connected to both
devices. Follow pairing instructions on page 5-6.
2
Your X3 can remember up to
eight paired Bluetooth
and can be actively connected
two devices at a time.
Make sure that only the two devices you want to
connect to are turned on and in proximity.
®
devices
19
Page 22

DETAILED INSTRUCTIONS
SHARE ME
The ShareMe feature allows you to share the music you are listening to with another pair of X3 buds.
ON
20
A
Power on both pairs of X3 buds.
B
Only connect one device to your music device.
Ensure the second device is not connected to any
Bluetooth device.
Page 23

DETAILED INSTRUCTIONS
SHARE ME
The ShareMe feature allows you to share the music you are listening to with another pair of X3 buds.
HOLD
21
C
Press and hold ‘VOL +’ on the connected
buds, while you press and hold the ‘VOL -’ on
the second buds until the LEDs on both buds
are flashing red/green.
D
Both buds will be connected when the LEDs
stop flashing and you will hear ‘Headphones
Connected’. Play some music and enjoy the
shared experience.
Page 24

DETAILED INSTRUCTIONS
SMARTWATCHES
With the right smartwatch you can leave your phone at home. Just sync music to your smartwatch and pair X3 to
your smartwatch. Use your smartwatch user manual for instructions on how to pair a Bluetooth device.
Apple WatchOS Android WearSamsung Tizen
22
Page 25

TROUBLESHOOTING
If your buds are not responding, connect the charge clip and USB cable to a power source. This will turn your
buds off and perform a soft reset.
If this does not resolve your problem we recommend to reset your buds to their original factory Settings.
Put your buds in pairing
1
NOTE: Once your buds have been reset you will have to pair it again to your devices. Select “FORGET” or “REMOVE”
Jaybird X3 from your device’s Bluetooth menu. Follow the pairing instructions on page 5-6 to repair your devices.
mode. Turn the buds off,
then press and hold the
Power Button for more
than 4 sec until you see
alternating red/green LED.
2
While the LED is
flashing red / green
double press the
Power Button.
3
The LED will
turn orange
and your buds
will turn off.
23
Page 26

SPECIFICATIONS
Bluetooth Version 4.1, Multipoint
Codec AAC, SBC, Modified SBC
Profile Handsfree, Headset, A2DP, AVCRP, SPP
Effective Range 10 meters (30 feet)
Play Time 8 Hrs*
Standby Time 110 Hrs*
24
Power Bluetooth headset: 5.0V
Charging Time 2.5 Hrs
Quick Charge 20 Min = 1 Hr play time
Dimensions 27 x 24 mm earbud size, 490 mm cord length
Weight Approx 13 g
* Play time and standby time may vary due to usage conditions. Adding additional bass to your sound profile through the MySound app will reduce play time.
, 0.5A
Page 27

WARRANTY, WARNINGS & SAFETY
Full warranty, care & maintenance details at:
jaybirdsport.com/warranty +1.866.244.3399
WARNING: Due to the isolating characteristics of these headphones do not use while driving, riding a bike or where vehicular
traffic is present, or in any other activity where failure to hear surrounding sounds could be dangerous. Use of these headphones
at excessive volumes may cause permanent hearing damage. Always turn the volume down before use. Take caution in regards to
inserting objects into ear canal, use at own risk. Do not wear the device while it is connected to a power source driven from main
110V or 220V lines.
Copyright 2016 Jaybird, LLC. All rights reserved. Jaybird, and the Jaybird logo are trademarks of Jaybird, LLC. Bluetooth is a
trademark owned by Bluetooth SIG, Inc. USA, and licensed to Jaybird, LLC. iPhone, iPad and iPod are trademarks of Apple, Inc.,
registered in the US and other countries and App Store is a service mark of Apple Inc. All other trademarks are the property
of their respective owners. Android is a trademark of Google Inc. in the United States and other countries. Manufactured under
Freebit patent numbers EP2177045, US8630436, US8976995 and corresponding international patents. Assembled in Malaysia.
EARTIP CLEANING
25
Keeping your Jaybird Buds eartips clean is essential for safe, hygienic use.
IMPORTANT: DO NOT attempt to clean the eartips without first removing them from the headphones. Getting the delicate circuitry
inside your Jaybird Buds wet may cause permanent damage.
1. Firmly grip the eartip with one hand and the earphone with the other. Carefully remove the eartip from the bud.
2. Use warm water and mild soap on a damp cloth to remove dirt and earwax from the eartip. Do NOT use harsh cleaning agents.
3. Rinse and completely dry your eartip before placing them back on your buds.
4. Carefully push the eartips back onto the buds.
Page 28

LISTEN RESPONSIBLY
Avoid excessive volume levels and prolonged periods of listening. Prolonged listening at excessive volume levels
may cause permanent hearing disability.
Do not use around road traffic.
CARE AND MAINTENANCE
Clean eartips regularly of dirt and wax buildup. To clean, remove eartips from earbuds, then gently wipe away
dust and oil with a dry cloth, and/or use warm water and mild soap to remove buildup. Rinse and completely dry
before reattaching.
Before charging, ensure earbuds are completely dry of sweat and water.
26
Video instructions at jaybirdsport.com
 Loading...