

Page 1
JAY J2, X 2 & XTREME
JAY®J2, X2, & Xtreme Cushion Products
IMPORTANT CONSUMER INFORMATION
NOTICE: This manual contains instructions for use with the foam cushion products. This information must be passed
UPPLIER: This manual must be given to the user of this product.
S
SER: Before using this product, read this entire manual and save for future reference.
U
n to the user of this product. Please do not remove this manual before delivery to the end user.
o
O w n e r ’s M a n u a l
Page 2

EN G LI S H
OTICE– READ BEFORE USE
N
A. CHOOSE THE RIGHT CUSHION
Sunrise Medical recommends that a clinician such as a doctor or
therapist experienced in seating and positioning be consulted to
determine if a JAY Cushion is appropriate for your specific needs.
ushions should only be installed by an authorized Sunrise Medical
C
supplier.
B. CHECK SITTING PRESSURE OFTEN
Your JAY cushion was designed for sitting comfort and postural
support. Users should inspect their skin daily for redness. The
clinical indicator of tissue breakdown is skin redness. If your skin
develops redness, discontinue the use of the cushion immediately
and see your doctor or therapist.
C. REVIEW THIS MANUAL OFTEN
Before using this cushion, you and each person who may assist you,
should read this entire Manual and make sure to follow all instructions. Review the Warnings often, until they are second nature to you.
D. WARNINGS
The word “WARNING” refers to a hazard or unsafe practice that
may cause severe injury or death to you or to other persons.
E. GENERAL WARNINGS
NO TIC E - R E AD B EF O RE U SE
WARNING
rior to prolonged sitting, any cushion should be tried for a few
P
hours at a time while a clinician inspects your skin to ensure that
red pressure spots are not developing. You should regularly check
or skin redness. The clinical indicator for tissue breakdown is skin
f
redness. If your skin develops redness, discontinue the use of the
cushion immediately and see your doctor or therapist.
WARNING
Your JAY cushion is desiged to help reduce pressure. However, no
cushion can completely eliminate sitting pressure or prevent pressure sores. The JAY cushion is not a substitute for good skin care
including, proper diet, cleanliness, and regular pressure relief. Be
sure that the Velcro is engaged and able to hold the cushion in
place.
F. PROTECTING YOUR CUSHION
WARNING
Always avoid exposing your cushion to sharp obects, excessive
heat or open flame, and prolonged exposure to environmental
conditions like freezing temperatures and/or direct sunlight.
WARNING
Do not install this equipment without first reading and understanding this manual. If you are unable to understand the Warnings,
Cautions, and/or Instructions, contact a qualified clinician or supplier - otherwise injury or damage may occur.
WARNING
Hook and loop Velcro should not come into prolonged contact
with moisture as this may degrade the adhesive and lead to a failure of the Velcro® to hold the cushion in place.
WARNING
Installing a cushion on a wheelchair may effect the center of gravity
of the wheelchair. Installed incorrectly, it may cause the wheelchair
to tip backwards, potentially resulting in injury. Always assess if the
addition of anti-tips, and/or an amputee axle adapter brackets may
be needed to help increase stability after adding a cushion.
G. OBSTRUCTIONS
WARNING
Make sure that there are never any obstructions between you and
your cushion. Any obstruction will reduce product effectiveness
and/or produce unnecessary pressure points for the user.
H. COVER ORIENTATION
WARNING
Product must be used with the cushion cover facing up. If the
cover is not used correctly it may reduce or eliminate the cushion’s benefits and could increase the risk of skin and soft tissue
injuries.
XT2105 Rev. O
2
Page 3
EN G LI S H
SE T-U P, A DJ U ST ME N T & C A RE
ET-UP, ADJUSTMENT & CARE
S
A. SETTING UP YOUR CUSHION
1. Initial Cushion set-up without user in seated position
Select a JAY Cushion that matches the width of your wheelchair,
The cushion length should extend to within 1 to 2 inches (2.55cm) from the back of the seated user’s knees. Place the cushion
n the chair with the material identification tags facing the rear of
i
the chair. The product label should be visible on the right side of
the cushion.
2. Cushion set-up and adjustment with seated user
a. Adjust the footrests so the seated user’s legs rest comfort-
ably on the cushion. Lowering the footrests on your wheelchair may help reduce the pressure on your ischials (Seat
bones) and Coccyx (Tailbone).
NOTE- Proper footrest adjustment will enhance sitting comfort.
JAY®J2 CUSHION - 2100 SERIES MODELS
The J2 Cushion has been engineered to provide a high degree
of pressure reduction and postural support with a minimum of
maintenance.
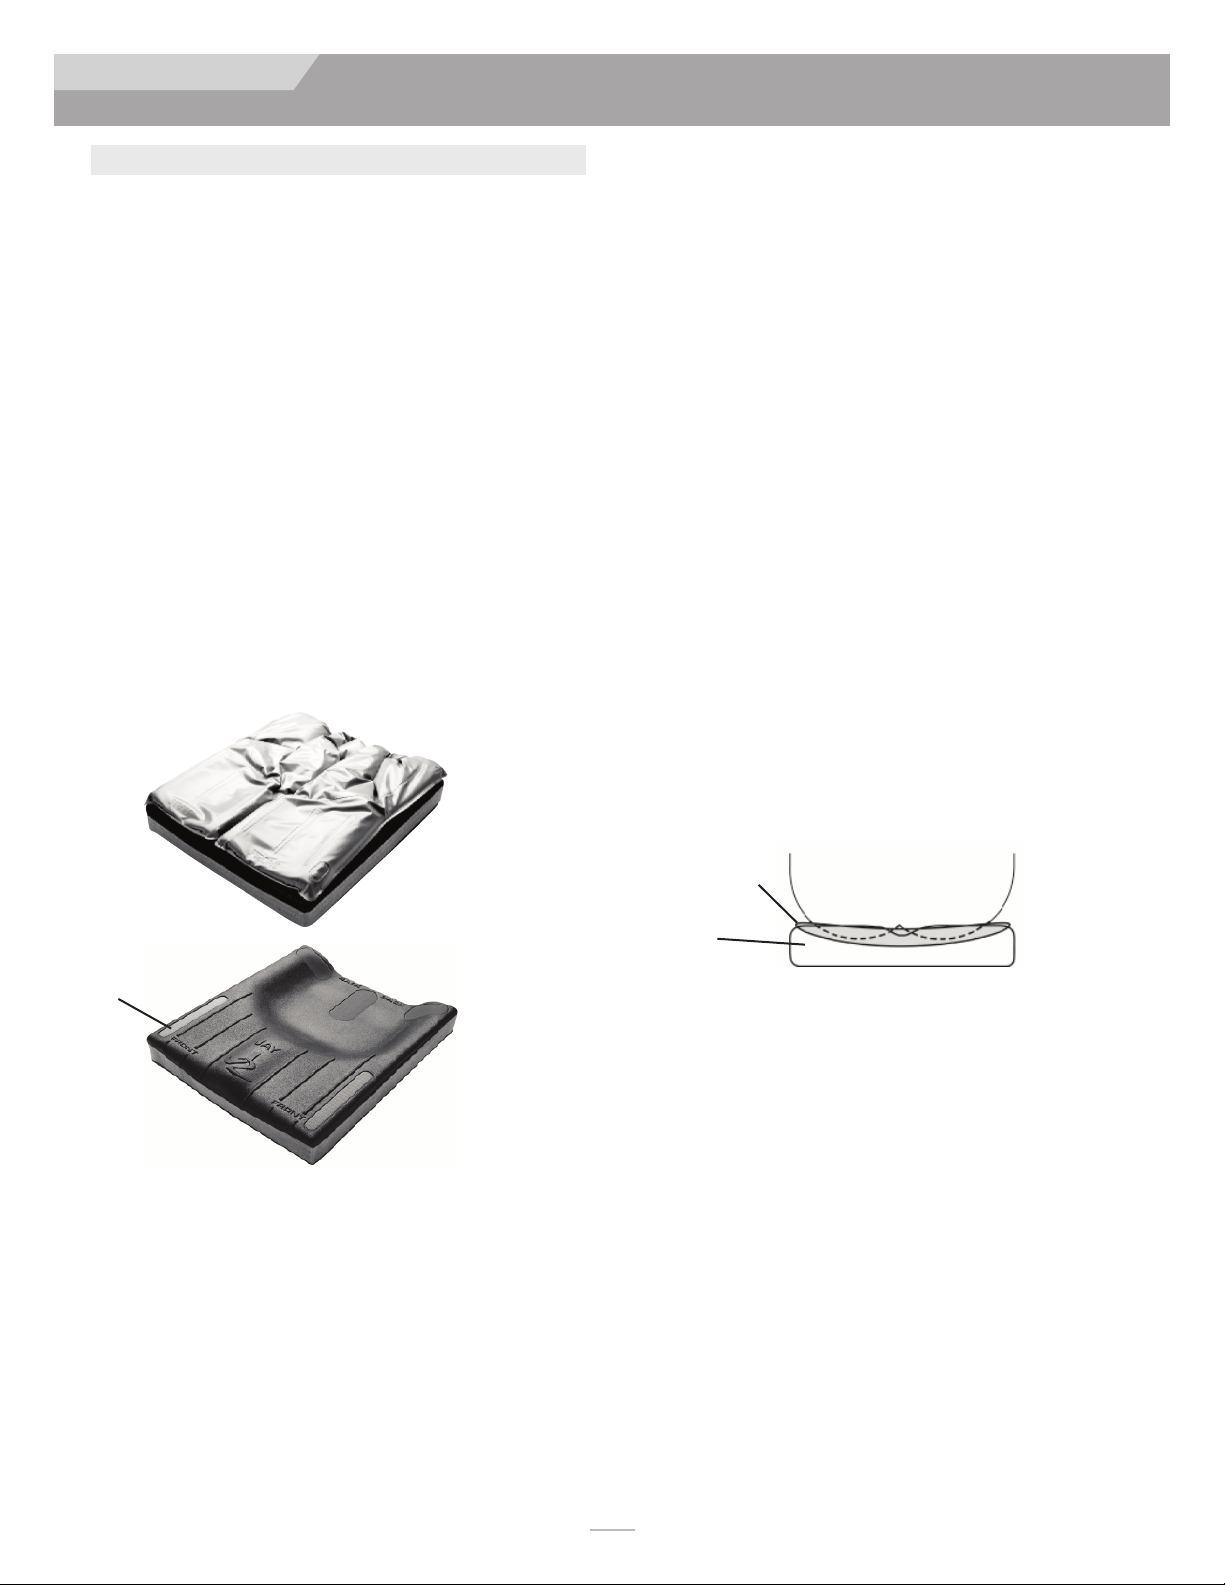
J2 Cushion components
JAY Flow Fluid pad
Checking for bottoming out on
the J2 Cushion
Bottoming out occurs on a J2 Cushion when you displace the fluid
out from underneath your seat bones, which leaves you sitting on the
oam base. It sometimes occurs on very thin individuals, people using
f
recliner wheelchairs, people who slouch when sitting or if using a
cushion that is too wide.
When bottoming out occurs, increased pressure is loaded onto the
schials and coccyx increasing the risk for skin breakdown.
i
To check for bottoming out, sit on the cushion without the cover for
a minimum of two minutes. Transfer up and off the cushion (or have
someone help you transfer), trying not to disturb the fluid underneath you. Push down in the depressions on the pad where your
ischials (seat bones) and coccyx (tailbone) were. You should have to
push through at least 1/2" (1cm) of fluid before you feel the firm
cushion base below.
If the cushion is properly positioned and the footrests are properly
adjusted, and there is not at least the minimum 1/2" (1cm) of fluid,
the cushion is bottoming out and should not be used. If you are bottoming out, discontinue use of the cushion and see your clinician.
Usually bottoming out is easily solved by using fluid supplement pads
(part# F119). Call your local authorized supplier to see if this appropriate for you.
Note:We recommend using a JAY
your wheelchair upholstery or a J2 Solid Seat Insert in addition to
your upholstery. It will optimize the performance of your J2 Cushion
and help provide better positioning for you.
®
Adjustable Solid Seat in place of
Foam base
Velcro strips
Caution
Prior to prolonged sitting, any cushion should be tried for a few
hours at a time while a clinician inspects your skin to ensure that
red pressure spots are not developing. You should regularly check
for skin redness. The clinical indicator for tissue breakdown is skin
redness. If your skin develops redness, discontinue the use of the
cushion immediately and see your doctor or therapist.
JAY Flow Fluid pad
Foam base
Reassembling the J2 Cushion after cleaning
Follow cleaning and maintenance instructions as described in “Easy
maintenance and cleaning”, then reassemble as follows after cleaning.
Attach the fluid pad to the foam base. Attach the rear three
®
Velcro
strips first, then the front two Velcro®strips. The pleats in
the rear of the pad will automatically wrinkle the pad for you.
There should be plenty of wrinkles in the fluid pad. This maximizes
pressure reduction and helps reduce shearing by allowing the pad
to conform to bony prominences.
3
XT2105 Rev. O
Page 4
EN G LI S H
SU NRI SE L IM I TE D WAR RA NTY
B. X2 & XTREME™ CUSHION BY JAY - JX2
& 900 SERIES MODELS
he X2 & Xtreme Cushion is designed with the benefits of skin
T
protection in a light-weight, comfortable and low-maintenance
design. The X2 & Xtreme incorporates a JAY Flow Fluid pad, a
oft foam base, with an inner moisture resistant cover, optional
s
lateral thigh supports and an outer cover. For active people, the
X2 & Xtreme helps to provide pressure and shear reduction
hich may help reduce the incidence of decubitus ulcers. It is
w
comfortable and doesn’t restrict movement, allowing the user to
change positions on the cushion.
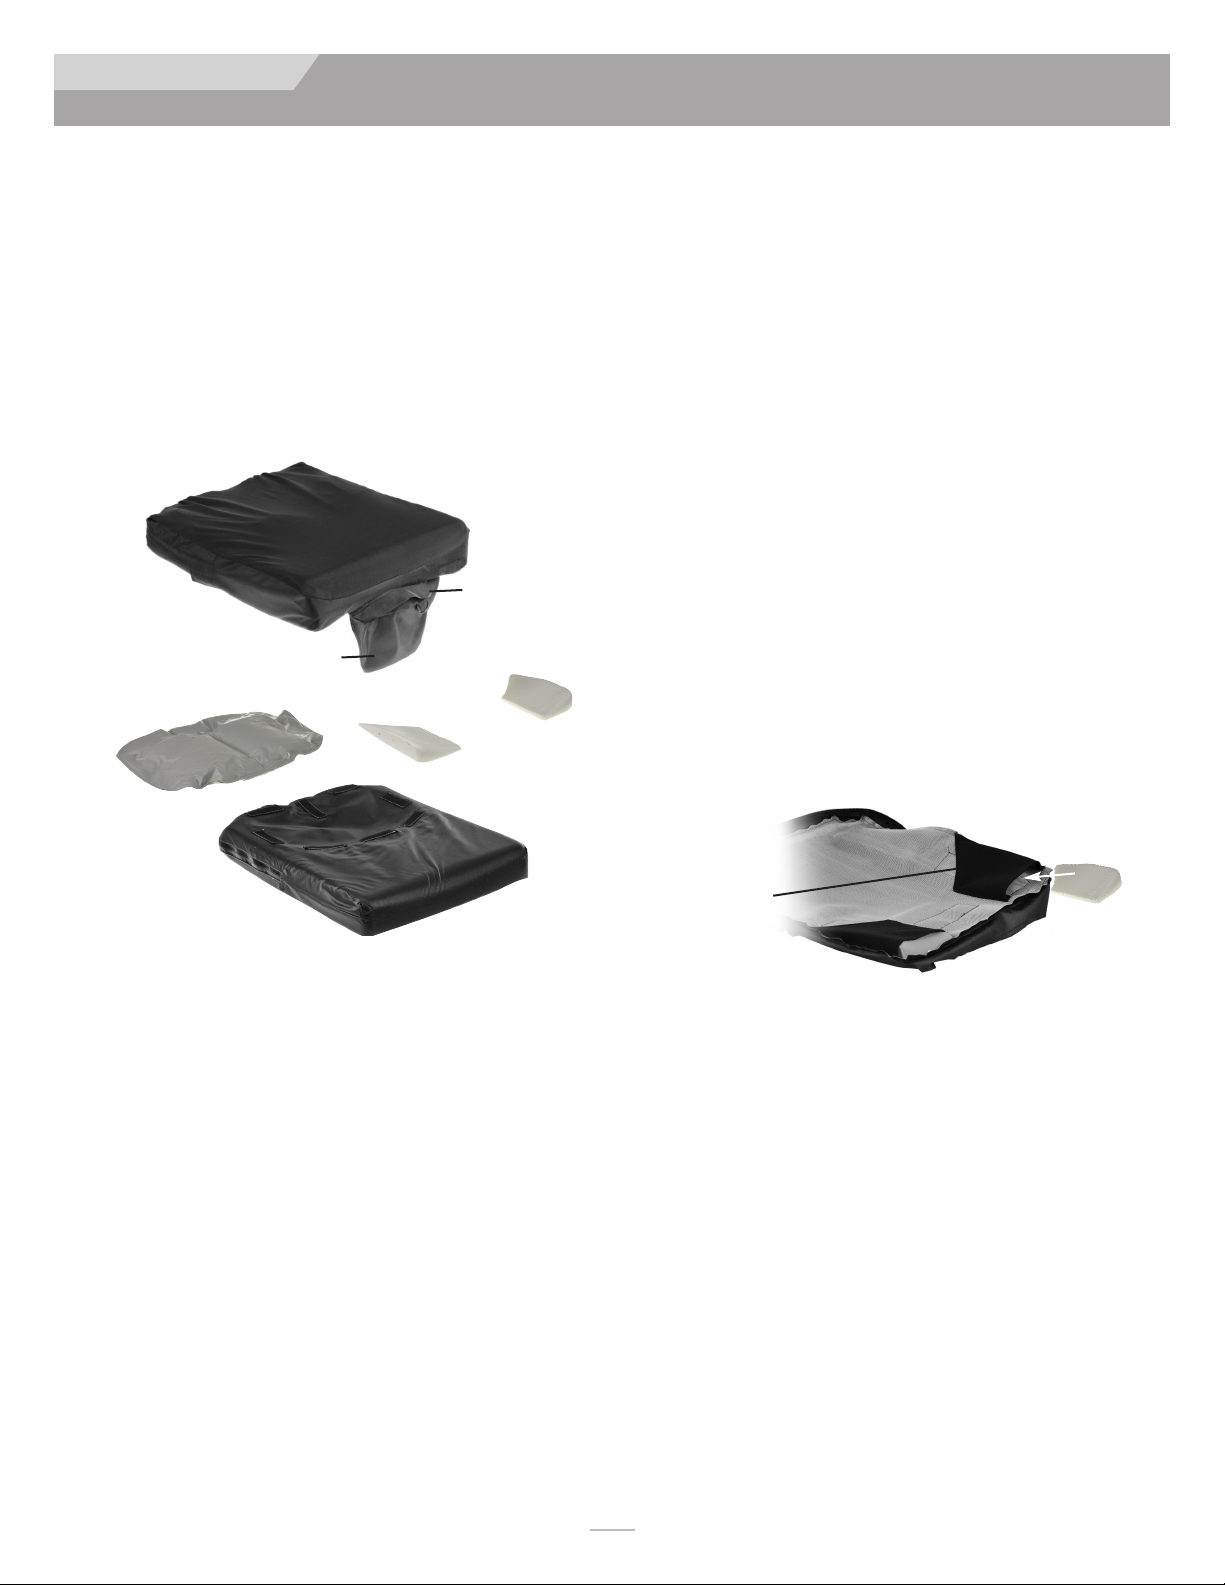
X2 & Xtreme components
Cover
Pocket
(Folds underneath cushion)
Tripad
Handle
Lateral thigh supports
D. EASY MAINTENANCE AND CLEANING
Regular cleaning and maintenance may help extend the life of your
cushion. During cleaning, component inspection is recommended.
1. Check cover for tears and excessive wear
a. Remove cover and check for abnormalities (inside and out).
b. Check the foam base for breakdown or degradation.
2. Cleaning the cover
. Remove the outer cover from the foam base and zip closed.
a
b. Machine wash in warm water and drip or tumble dry on low
heat. No ironing is required or suggested.
NOTE
To refit cover after washing, fit cover back over foam base. Ensure the
back of the cover matches up to the back of the foam base.
NOTE-
3. Cleaning the foam base
o not dry clean covers or use industrial washers and dryers
- D
o clean cover. Do not steam autoclave. Do not bleach.
t
If utilized in an institutional setting, write the resident’s name
with a permanent marker on the content lable of the cover.
This will ensure the return of the correct cover to its matching cushion after washing.
a. Remove the outer cover from the foam base and wipe lightly
with a damp cloth. Do not use soap. Do not submerge in
water. Wipe off with a clean cloth.
b. Let your cushion completely air-dry before reassembly.
E. REASSEMBLING THE X2 & XTREME
CUSHION AFTER CLEANING
Base with Cover
C. X2 & XTREME CUSHION ACCESSORY
PARTS
Each X2 & Xtreme includes two lateral thigh supports. The supports are located in pockets sewn inside the bottom panel of
the cover. When positioned under the front of the foam base,
the supports enhance the top surface contour of the cushion providing lateral thigh support without compromising softness. This
increases the contact with the legs to help control abduction (separation of legs).
If you do not want to use the lateral thigh supports, unzip the
cover and remove the base and fluid pad, then remove the lateral
thigh supports from their pockets inside the cover. Re-insert the
base and fluid pad into the cover and zip the cover closed.
Optional solid seat
An optional half solid seat is available from Sunrise specifically for
the X2 & Xtreme. The solid seat fits under the seat well portion
of the base only. The solid seat can help enhance the stability of
the cushion, if necessary, without compromising softness under
the legs. It is ordered as a modified solid seat, contact an authorized supplier to order.
Lateral thigh support
Lateral thigh support
pocket inside cover
Follow cleaning and maintenance instructions as described in
“Easy maintenance and cleaning” then reassemble as follows.
Insert the foam base into the moisture resistance inner cover. Ensure
that the zipper is at the rear of the foam base (the part number
tag should be to the rear of the foam base) where the seat well is located, and the Velcro
the inner cover at the seat well matching all six Velcro
Turn the outer cover inside out and insert the left and right lateral thigh
supports into their respective pockets (if you are using them). Turn the
cover to the outside again and insert the foam base with the fluid pad
attached into the outer cover. The lateral thigh
supports should be under the front of the cushion and the fluid pad
should be at the rear of the cushion where the cover zips. The X2 &
Xtreme components are labeled with front and rear to help match
components for easy assembly.
®
is on top in the seat well. Attach the fluid pad to
®
strip locations.
XT2105 Rev. O
Page 5

EN G LI S H
SU NRI SE L IM I TE D WAR RA NTY
F. FITTING A PRESSURE DISTRIBUTING
CUSHION
Select a cushion to match your hip width when in the seated position. The cushion length should extend to within 1" - 2" (2.5cm 5cm) from the back of the knees. Place the cushion to the back of
the wheelchair with the material identification tags and fluid pad(s)
oward the rear. When fit correctly, your hips should be to the back
t
of the chair. Your ischials (seat bones) should be centered on the
JAY Flow™ Fluid pad(s) in the seat well of the cushion. Proper
footrest adjustment may enhance sitting comfort and help lower
peak sitting pressures. Adjust the footrests so your legs rest firmly
but comfortably on the cushion.
Note: Do not use the wheelchair’s seat width as a guide in determining the appropriate cushion width Improper cushion fit may be
detrimental to the performance of a pressure distributing cushion
and its support of the body.
Avoid using the cushion on overly stretched seat upholstery. Stretched
upholstery does not provide adequate support for the cushion and
improper positioning may result. Replace stretched upholstery or
purchase the JAY Adjustable Solid Seat or the JAY Solid Seat insert
that is appropriate for the cushion.
Avoid using overly stretched back rest upholstery. Stretched back
upholstery does not provide adequate support for the body and
improper positioning may result. Replace stretched back rest
upholstery or purchase a back support product from Sunrise that is
appropriate for you. Contact a authorized supplier for a free
demonstration of these products.
JA
SUNRISE LIMITED WARRANTY
JAY J2, X2, & XTREME CUSHION WARRANTY
Each JAY fluid cushion is carefully inspected and tested to provide
peak performance. Every JAY fluid cushion is guaranteed to be free
from defects in materials and workmanship for a period of 24 months
from the date of purchase, provided normal use. Should a defect in
materials or workmanship occur within 24 months from the original
date of purchase, Sunrise Medical will, at its option, repair or replace
it without charge. This warranty does not apply to punctures, tears
or burns, nor to the cushion’s removable cover. Cover warranties
against manufacture defects for 6 months from date of purchase.
Claims and repairs should be processed through the nearest
authorized supplier. Except for express warranties made herein, all
other warranties, including implied warranties of merchantability and
warranties of fitness for a particular purpose are excluded. There are
not warranties which extend beyond the description on the face
hereof. Remedies for breach of express warranties herein are limited
to repair or replacement of the goods. In no event shall damages for
breach of any warranty include any consequential damages or exceed
the cost of non-conforming goods sold.
JAY Flow Fluid Pad
Consult your healthcare professional for proper fitting and use, and
read the following statements carefully:
Fluid Pad Policy
If a Clinician, Certified Rehab Professional or Authorized
Sunrise Medical Supplier has determined that the fluid volume is
inappropriate or the original purchaser, Sunrise Medical, during the
warranty life of the product, will replace the fluid pad free of charge.
Requests must be submitted by an authorized Sunrise Medical supplier.
The fluid in this cushion may lose volume over time.
•
Volume loss in this cushion may result in bottoming out
•
the cushion.
• Monthly, during routine cleaning and inspection, check this cushion
for bottoming out (see instructions under “checking for bottoming
out” in the warranty use and care guide) and any fluid inconsistencies, If the fluid is firmer in one area simply knead it back to its original consistency.
• If bottoming out occurs discontinue use of this cushion and contact
your healthcare professional. If further assistance is necessary, contact Sunrise Medical Customer Service at 1-800-333-40
For goods provided by Sunrise Medical Pty Ltd in Australia, our
goods come with a guarantee by Sunrise that cannot be excluded
under the Australian Consumer Law. You are entitled to replacement or refund for a major failure & for compensation for any other
resonable foreseeable loss or damage. You are also entitled to have
the goods repaired or replaced
quality & the failure does not amount to a major failure. The benefits to
you given by this warranty are in addition to your other rights & remedies
under a law in relation to the goods to which the warranty relates.
Record your serial number here for future reference:
____________________________________________
Sunrise Medical • 2842 Business Park Ave. • Fresno, CA 93727 • USA
if the goods fail to be of acceptable
In Canada (800) 263-3390
Customer Service: 800.333.4000
www.SunriseMedical.com
©2014 Sunrise Medical (US) LLC
02.14 XT2105 Rev.O
 Loading...