

Page 1
SECTION
JA Care ac
IMPORTANT CONSMER INORMATION
E: his manual contains important instructions that must e passed on to the user o this product.
UER: his manual must e iven to the user o this product.
UER: eore usin this product, read this entire manual and save or uture reerence.
lease do not remove this manual eore delivery to the end user.
C A R E B A C K
O w n e r ’s M a n u a l
Page 2
ENGLISH
JAY CARE BACK
JAY CARE BACK - 3500 SERIES MODELS
The Jay Care Back is designed to accommodate and support the
kyphotic spine and provide a high degree of comfort and stability. It
is designed to help increase sitting tolerance and function. Its
unique foam construction also helps provide pressure relief along
the spine. In addition, it is lightweight, durable and easily adjustable.
Maximum user weight: 250 lbs. (113 kg).
CAUTION: Installing a back support on a wheelchair may affect the center of
gravity of the wheelchair and may cause the wheelchair to tip backwards potentially resulting in injury. Always assess for the potential
need for anti-tippers or amputee axle adapter brackets to be added
to the wheelchair to help increase stability.
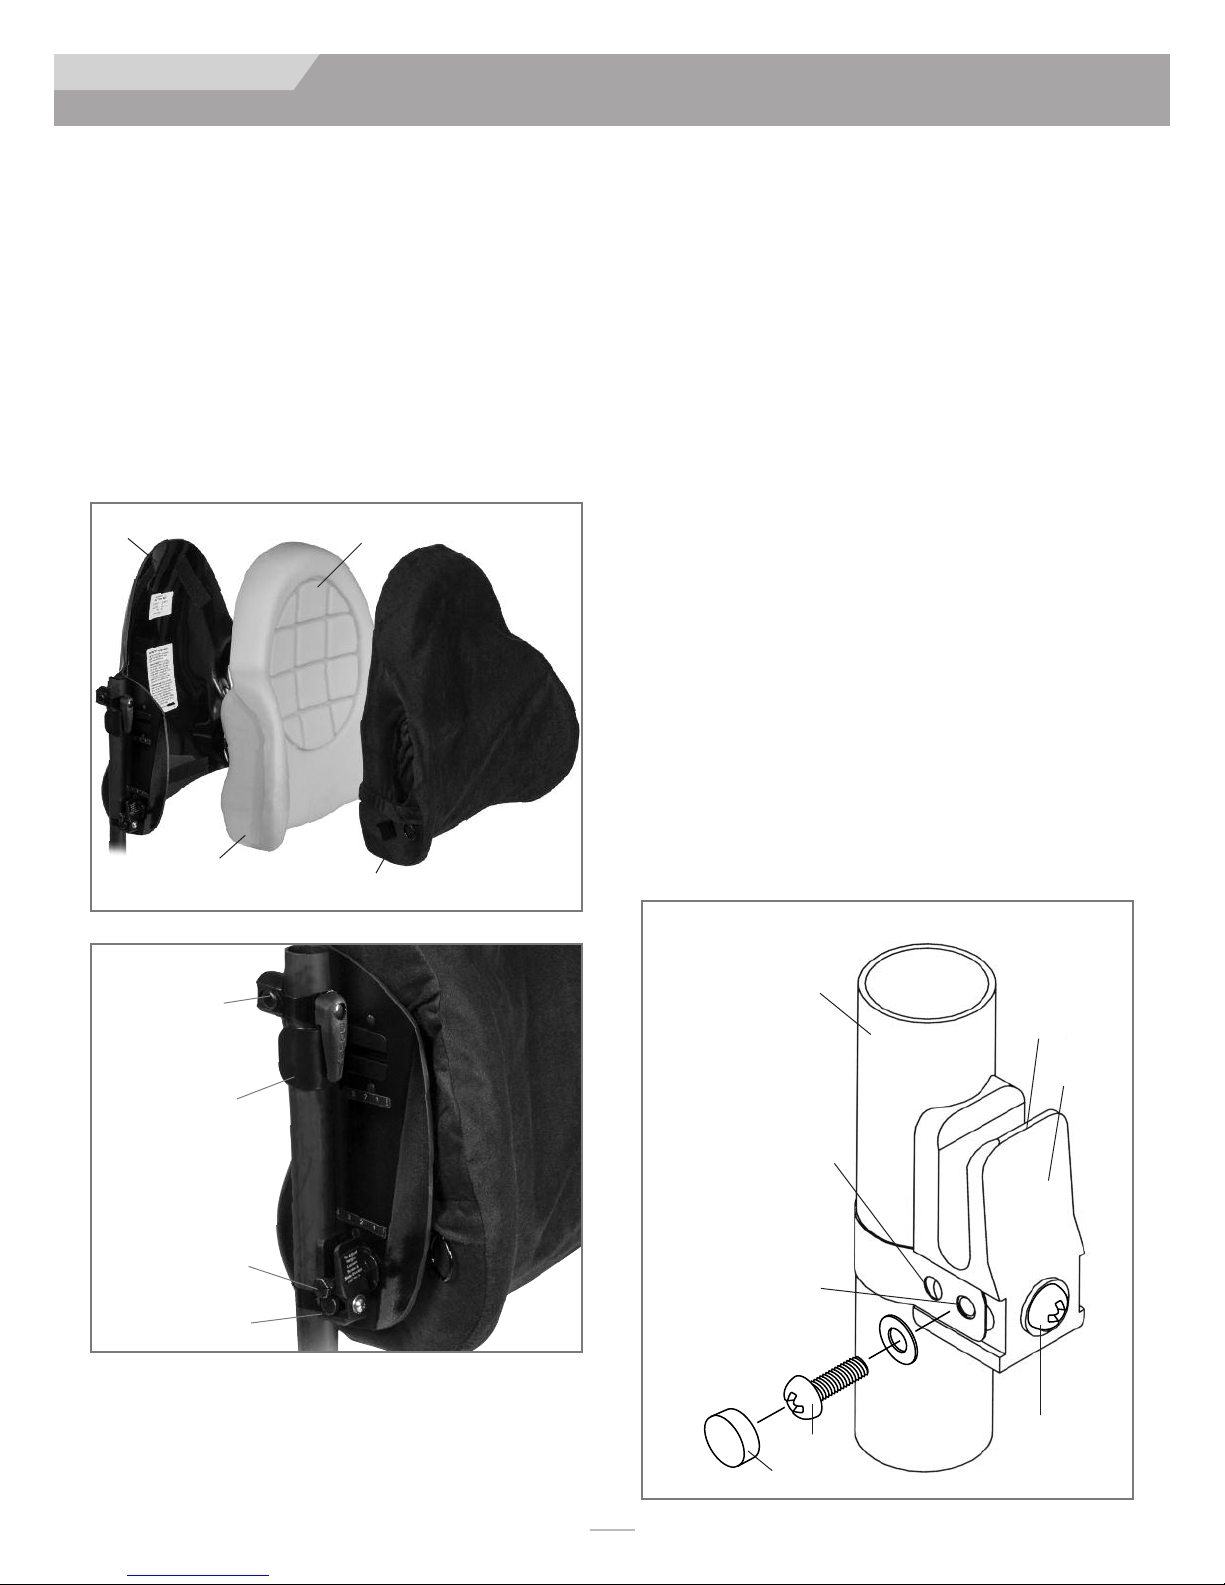
Structural Shell
Soft, Segmented Foam
INSTALLING THE JAY CARE BACK
The Jay Care Back is designed to replace the wheelchair’s sling
upholstery. The initial installation should be done without the foam
insert in the Back shell.
Tighten all fasteners to 20 in.-lbs. (2.3 N-m) using a Phillips No. 2
screwdriver.
Installing the bottom Universal Post Bracket hardware
1. Remove the upholstery from the back of the wheelchair.
2. Attach one bottom universal post bracket to the bottom of
each back post of the wheelchair.(Diagram1)
a) The universal hardware is designed to fit on 5/8", 3/4",
7/8" and 1" (1.6, 1.9, 2.2 and 2.5 cm) diameter back post
tubing. (The bracket comes assembled to attach to 7/8"
or 1" (2.2 or 2.5 cm) tubing) Check diagram 1 to determine which strap hole is appropriate for the installation.
Wrap the strap around the wheelchair post. Screw “A”
may have to be loosened to align the strap hole with the
barrel nut located inside the post bracket body. Place a
washer on screw “B” and insert the screw through the
appropriate hole in the strap.
b) Tighten screw “B” into the barrel nut through the side of
the post bracket body. Tighten the opposite screw if nec-
essary.
c) Snap the screw caps over both screw heads.
d) To adjust the height of the bracket, loosen screw “A” until
the bracket slides freely on the back post. Once the
proper height of the back is determined, tighten the
screw. All future adjustments of the back height are done
with screw “A”.
Built-in Lateral Support
Top Quick
Release Bracket
Upper “U” Bracket
Lower Pins
Bottom Post Bracket
Cover
Diagram 1
Wheelchair Post
For 5/8" – 3/4"
(1.6cm -1.9cm)
use inside holes
For 7/8" – 1"
(2.2cm -2.5cm) Tubing
use outside holes
Part # 680C
Bottom
Post
Bracket
Bracket
Body
Tubing
Screw “A”
Screw “B”
Screw Cap
XT3505 Rev. J
2
Page 3
ENGLISH
JAY CARE BACK
INSTALLING & ADJUSTING THE JAY CARE
BACK
Installing the Jay Care Back
1. Place the Jay Care Back in the wheelchair so that the bottom
pins slide into the the bottom Universal Post Bracket hardware receivers. The Back’s top hooks should rest against the
wheelchair back posts. The bottom pin head should extend
past the outside edge of the post bracket receiver.
NOTE: If the wheelchair measures slightly wider than the usual 16" (40cm),
18" (46cm), or 20" (50cm) widths, it may be necessary to order
Extended Hardware, part# M-301. Call your local authorized supplier.
Diagram 2
Bottom Universal
Post Bracket
Bottom Pin
A
d) To adjust the height of the bracket, loosen screw “A” until
the bracket slides freely on the back post. Once the
proper height of the back is determined, tighten the
screw. All future adjustments of the back height are done
with screw “A”.
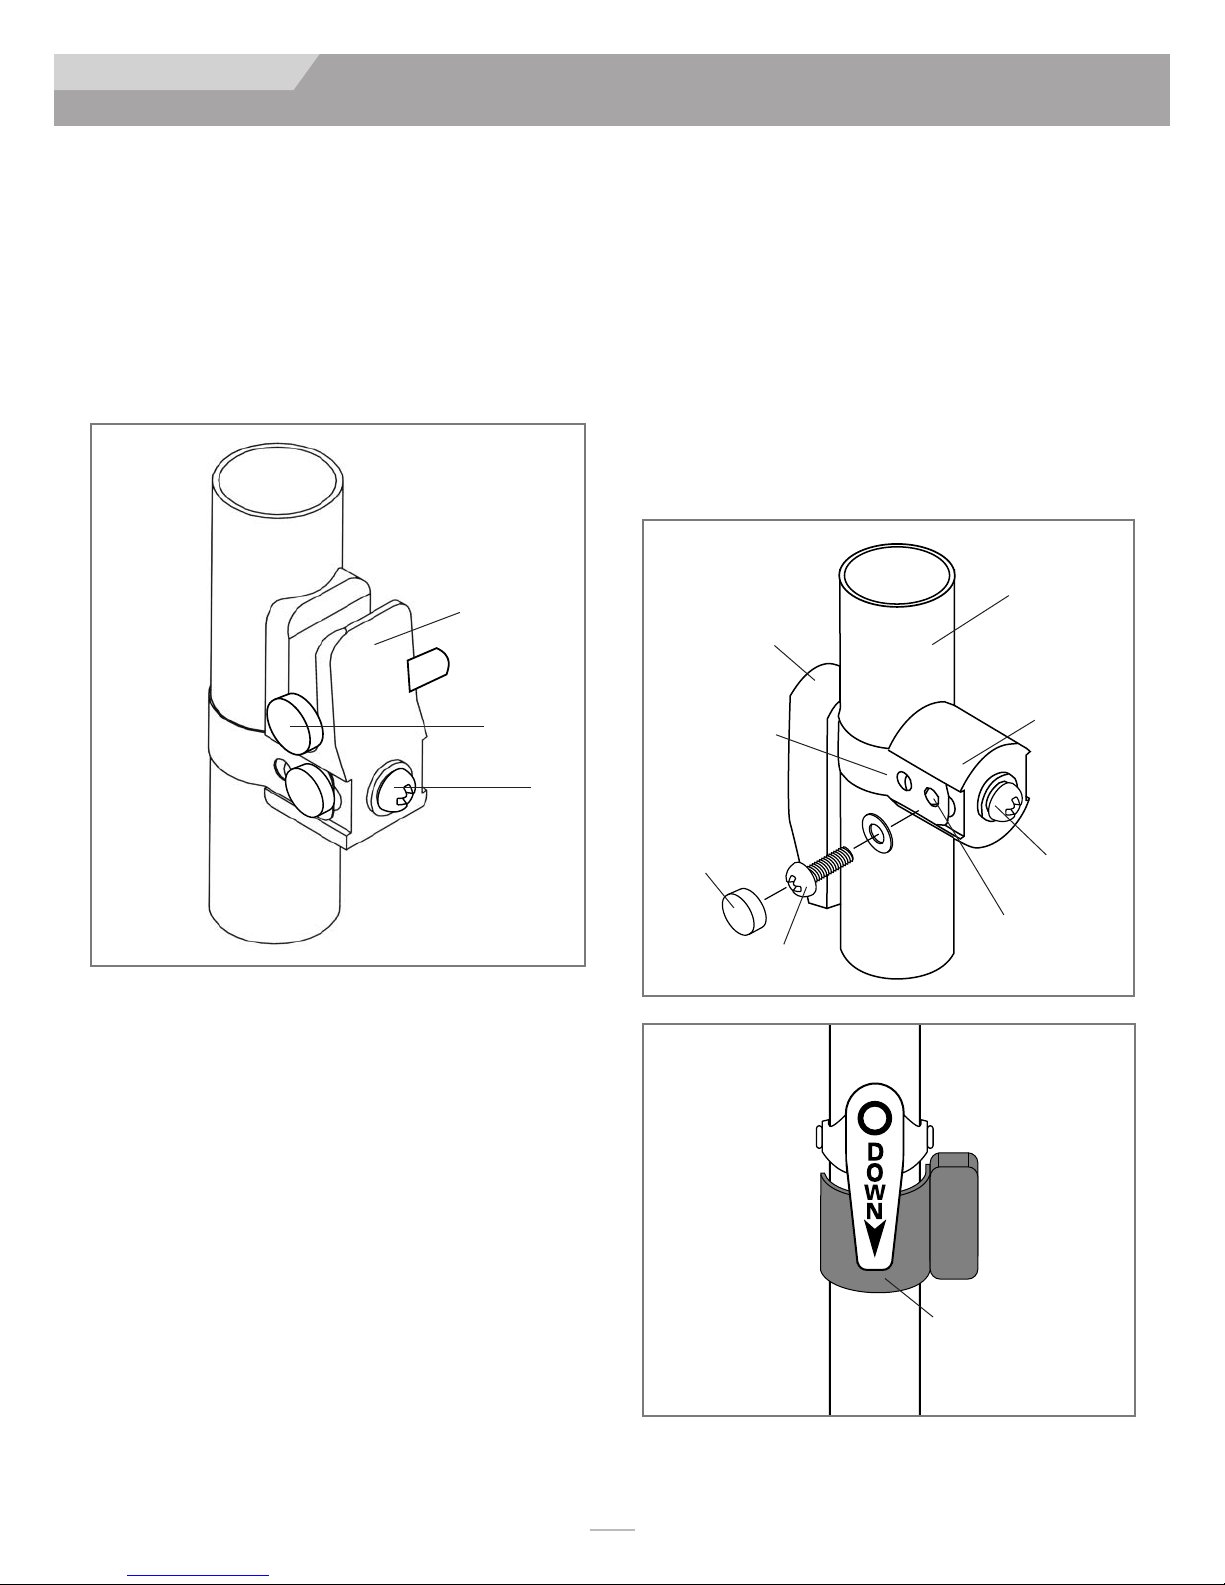
e) Always turn the quick release quarter turn bracket to the
“DOWN” position (Diagram 4) to secure the top hook in
place.
NOTE: The back is properly secured when the bottom pins are resting in
CAUTION: The top quick release quarter turn brackets must be in their
CAUTION: Do not use Jay Care Back to push or lift wheelchair. Improper use
the lower post brackets and the upper quick release quarter turn
brackets are installed above the back support’s top hook brackets
with the quick release mechanism pointing down.
downward position when the back is in use. Improper use may cause
the back to unexpectedly detach from the wheelchair.
may cause the back to unexpectedly detach from the wheelchair.
Diagram 3
Wheelchair
Quick
Release Quarter
Turn Bracket
For 5/8" – 3/4"
(1.6cm -1.9cm)
Tubing
use inside holes
Post
Bracket
Body
INSTALLING THE TOP QUICK RELEASE
QUARTER TURN BRACKET HARDWARE
Tighten all fasteners to 20 in.-lbs. (2.3 N-m) using a Phillips No. 2
screwdriver.
1. Attach one top quick release quarter turn bracket to each
upright post of the wheelchair.
a) The top quick release quarter turn bracket is designed to
fit on 5/8", 3/4", 7/8" and 1" (1.6, 1.9, 2.2 and 2.5 cm)
diameter back post tubing. (The bracket comes assembled to attach to 7/8" or 1" (2.2 or 2.5 cm) tubing) Check
diagram 3 to determine which strap hole is appropriate
for the installation. Wrap the strap around the wheelchair
post. Screw “A” may have to be loosened to align the
strap hole with the barrel nut located inside the bracket
body. Place a washer on screw “B” and insert the screw
through the appropriate hole in the strap.
b) Tighten screw “B” into the barrel nut through the side of
the bracket body. Tighten the opposite screw if necessary.
c) Snap the screw caps over both screw heads.
Screw Cap
Diagram 4
Screw “B”
Screw “A”
For 7/8" – 1"
(2.2cm -2.5cm) Tubing
use outside holes
Top
hook
3
XT3505 Rev. J
Page 4

ENGLISH
JAY CARE BACK
FITTING THE JAY CARE BACK TO THE
USER
Tighten all fasteners to 20 in.-lbs. (2.3 N-m) using a Phillips No. 2
screwdriver.
Fitting the Back height
1. When the Back is properly adjusted, the top hooks should
rest comfortably against the wheelchair back posts.
2. Re-install the Back foam insert.
3. Position the user’s hips to the back of the wheelchair.
4. Adjust the back height, with the top and bottom hardware
loose enough to slide on the back posts. The Back is
designed to be fit at a height that supports the pelvis in its
optimal position. To adjust the height of the Jay Care Back,
simply move the Back up or down so that the bottom pins
are approximately at the level of the upper sacral, lower lumbar level. The lower portion of the Care Back should support
the lumbar and sacral areas, while the top portion supports
the thoracic area. The lateral supports should fit comfortably
around the lower torso.
5. Once the proper height has been established, tighten screws
“A” on the top and bottom hardware.
Adjusting seat depth
Once the back height has been adjusted and the individual is properly positioned in the wheelchair, adjust the seat depth.
1. To adjust seat depth, loosen the bottom pins on the back
shell two full turns with a flat head screwdriver.
2. Adjust the bottom of the back to provide comfortable support to the lumbar sacral area and to establish seat depth.
There needs to be a two to four finger width gap between
the front of the wheelchair cushion and the back of the
user’s knee.
3. Tighten the bottom pins of the back shell.
Adjusting the back angle
The adjustment of the back angle is accomplished by using the top
“slide” bracket screws visible on the sides of of the back shell. A
23° recline is possible without losing seat depth. A maximum 39°
angle is possible.
1. Use a flat head screwdriver to turn the top screw, securing
the upper “hook” bracket on either side of the back shell.
Turn the screws one full turn to loosen. The “hook” bracket
should slide freely.
2. After loosening the screws, adjust the back forward or backward until desired angle is reached, optimizing the visual field,
balance, function, comfort, and contact with the individual.
Once the proper angle is determined, tighten the screws.
Hints: If adjusting the angle of the back while the individual
is in the wheelchair, make sure to support the back when
loosening screws to prevent abrupt movement of the back.
If the user has a pronounced kyphosis, neck fatigue and a
decreased visual field may be experienced throughout the day
while the individual is seated in the wheelchair. Ensure the Jay Care
Back angle and seat depth are adjusted to improve visual field while
maximizing the individual’s function and maintaining comfort.
If additional angle is desired (a maximum of 39° recline is possible),
the bottom pins can be adjusted backwards relative to the shell.
This will cause the bottom of the back to move forward. However,
this will result in a loss of seat depth. If maximum angle is used,
assess wheelchair for anti-tip bars.
As a general rule, keep the Back in the most vertical position possible to still allow the user’s hips to be kept to the back of the
wheelchair and his or her eye level to be parallel with the floor.
Over-reclining can accentuate sliding of the hips and hyper-extension of the neck forward.
Lateral support adjustment wedges
If the client is in a wheelchair that is too wide and needs extra lateral support, the Jay Care Back can accommodate two lateral support adjustment wedges. These wedges are available at no charge
and are available through your local authorized supplier.
To use them, unzip the back cover and insert the wedges between
the existing lateral supports and the back shell. Ensure that the
curve of the wedge matches the curve of the back foam. The two
should “nest” together. After properly positioning the lateral
wedges, zip closed the back cover and re-attach to back shell. The
support wedges effectively narrow the back by 1" (2.5cm) on each
side.
Modifications
If the user has a pronounced kyphosis, it can be recessed further
into the back foam by cutting away the “cubed” sections of the
back foam. This modification would be done in the area of the apex
of the kyphosis. The foam can easily be cut with an electric knife.
The lateral area of the back foam can also be cut back up to 1/2"
(1cm) on each side to accommodate a wider individual.
Important
The back posts on several common institutional wheelchairs may
prohibit effective use of the Jay Care Back. When the upholstery is
removed from these wheelchairs, the back posts will “flair” out as
they go up. This puts undue stress on the Care Back. You must use
the Extended Hardware (M-301) on the Care Back in this situation.
It can be installed at Sunrise Medical or can be retrofit in the field.
The Bottom Pin and the Top Hook of the Care Back Extended
Hardware extends out further to better engage on the posts. All
other hardware remains the same. Call your local authorized supplier for assistance.
CAUTION: If the Extended Hardware is not used, the back could unexpected-
ly detach from the wheelchair, causing the user to fall out of the
wheelchair.
CAUTION: Do not move the wheelchair by pushing against the Jay Care Back.
This could cause the back to unexpectedly detach from the wheelchair, causing the user to fall out of the wheelchair.
XT3505 Rev. J
4
Page 5

ENGLISH
JAY CARE BACK
EASY CLEANING AND RE-ASSEMBLY
FOR JAY CARE BACK
To clean back cover
Pull foam insert away from back shell. Unzip, remove foam and
turn cover inside out, zip closed to avoid snagging. If applicable,
note where lumbar shims are placed to ensure proper re-assembly.
Machine wash in warm water. Dry in dryer on medium heat.
The Quick-Dry cover is made of a 100% synthetic suede that
“wicks” moisture away from the skin, allowing the fabric to dry at
an accelerated rate.
NOTE: Do not dry clean covers or use industrial washers and dryers to clean
cover. Do not steam autoclave. Do not bleach.
Replace foam in cover and zip closed. The “Top” label on the cover
should be at the top, rear of the foam. Ensure that the cover fits
properly by aligning the seams with the edge of the foam.
Replace lumbar shims if applicable. Place foam insert on shell.
Ensure that “Top” label on cover is at the top of the back shell.
Press into the back shell, matching the Velcro® strips on the cover
with the Velcro® strips on the shell.
Hint: In an institutional setting, write the client’s name on
the content label of the back cover and complete the
enclosed “Name” sticker and attach to the back shell. This
will ensure the return of the cover after washing.
To clean back shell
Shell may be wiped clean with soap and water. No other maintenance should be required.
24 MONTH LIMITED WARRANTY
Each Jay Care Back is carefully inspected and tested to provide
peak performance. Every Jay Care Back is guaranteed to be free
from defects in materials and workmanship for a period of 24
months from the date of purchase, provided normal use. Should a
defect in materials or workmanship occur within 24 months from
the original date of purchase, Sunrise Medical will, at its option,
repair or replace it without charge. This warranty does not apply to
punctures, tears or burns, nor to the back’s removable cover.
Claims and repairs should be processed through the nearest
authorized supplier. Except for express warranties made herein, all
other warranties, including implied warranties of merchantability
and warranties of fitness for a particular purpose are excluded.
There are not warranties which extend beyond the description on
the face hereof. Remedies for breach of express warranties herein
are limited to repair or replacement of the goods. In no event shall
damages for breach of any warranty include any consequential
damages or exceed the cost of non-conforming goods sold.
5
XT3505 Rev. J
 Loading...