

Page 1

1
WARNING ∙∙∙∙∙∙·················∙∙∙∙∙∙∙∙∙∙∙∙∙∙·······················∙∙∙∙∙∙∙∙∙∙∙∙∙∙····∙∙∙·∙∙∙∙∙∙∙∙∙∙∙∙∙∙∙∙∙······……···……… 3
ABOUT BLOOD PRESSURE ∙∙∙∙∙∙∙∙∙∙∙∙∙∙·······················∙∙∙∙∙∙∙∙∙∙∙∙∙∙··························∙∙∙·∙∙∙∙∙∙∙∙∙∙∙∙∙∙∙∙∙······∙∙∙··· 4
1. What is blood pressure? ∙∙∙∙∙∙∙∙∙∙∙∙∙∙·······················∙∙∙∙∙∙∙∙∙∙∙∙∙∙·······················∙∙∙∙∙∙∙∙∙∙∙∙∙∙∙∙∙····∙∙………… 4
2. What makes my blood pressure change? ∙∙∙∙∙∙∙∙∙∙∙∙∙∙·······················∙∙∙∙∙∙∙∙∙∙∙∙∙∙∙∙∙·····∙∙∙………∙∙∙∙∙∙···4
3. What is considered to be as a normal blood pressure? ∙∙∙∙·············∙∙∙·········∙∙∙∙∙∙∙∙∙·······∙∙∙∙∙∙…·· 4
4. Why do I have to check blood pressure at home? ∙∙∙∙∙∙∙∙∙·∙∙∙∙∙∙····∙∙∙··············…···…···…… 5
5. What is the benefit of the data transmissible blood pressure monitor use? ··········…… 5
INTRODUCTION ∙∙∙∙∙∙∙∙∙∙∙∙∙∙·······················∙∙∙·················································………····… 7
WORD DEFINITION ∙∙∙∙∙∙∙∙∙∙∙∙∙∙·····················∙∙∙∙∙∙∙·············∙∙∙∙································………… 9
NOTE TO USER ∙∙∙∙∙∙∙∙∙∙∙∙∙∙·············∙∙∙∙∙∙∙∙∙∙∙∙∙∙···············∙∙∙∙·····································……… 10
CLASSIFICATION & COMPLIANCE WITH STANDARD ∙∙∙∙∙∙∙∙∙∙∙∙∙∙····························
······… 10
SAFETY PRECAUTIONS ∙∙∙∙∙∙∙∙∙∙∙∙∙∙·······················∙∙∙∙∙∙∙···············∙····················……………11
SAFETY SYMBOLS ∙∙∙∙······················∙∙∙∙∙∙∙∙∙∙∙∙∙∙···············∙∙∙∙······························………… 12
PART NAMES & FUNCTIONS ∙∙∙∙∙∙∙∙∙∙∙∙∙∙················∙∙∙∙∙∙∙∙∙∙∙∙∙···················∙∙∙∙∙∙∙∙··········……… 13
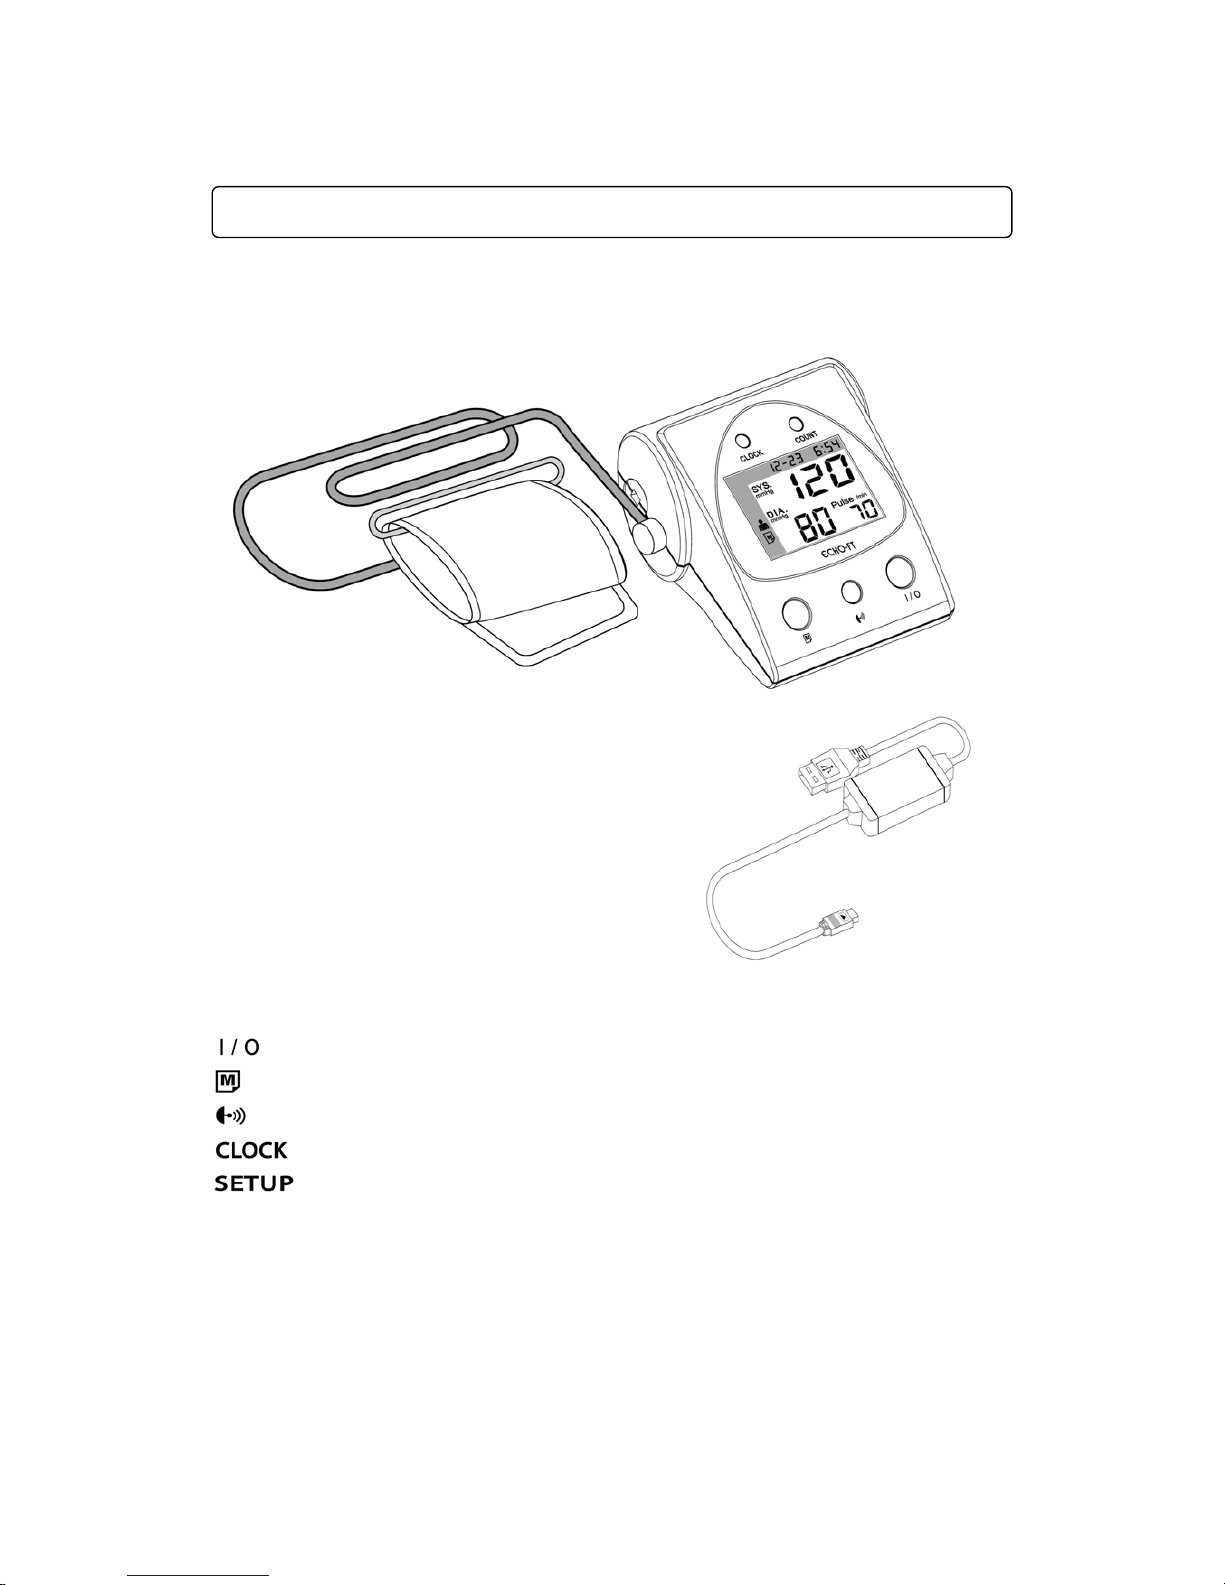
1. Main unit and accessories∙∙∙∙∙∙∙∙∙∙∙∙∙∙················∙∙∙∙∙∙·····························…·······………… 13
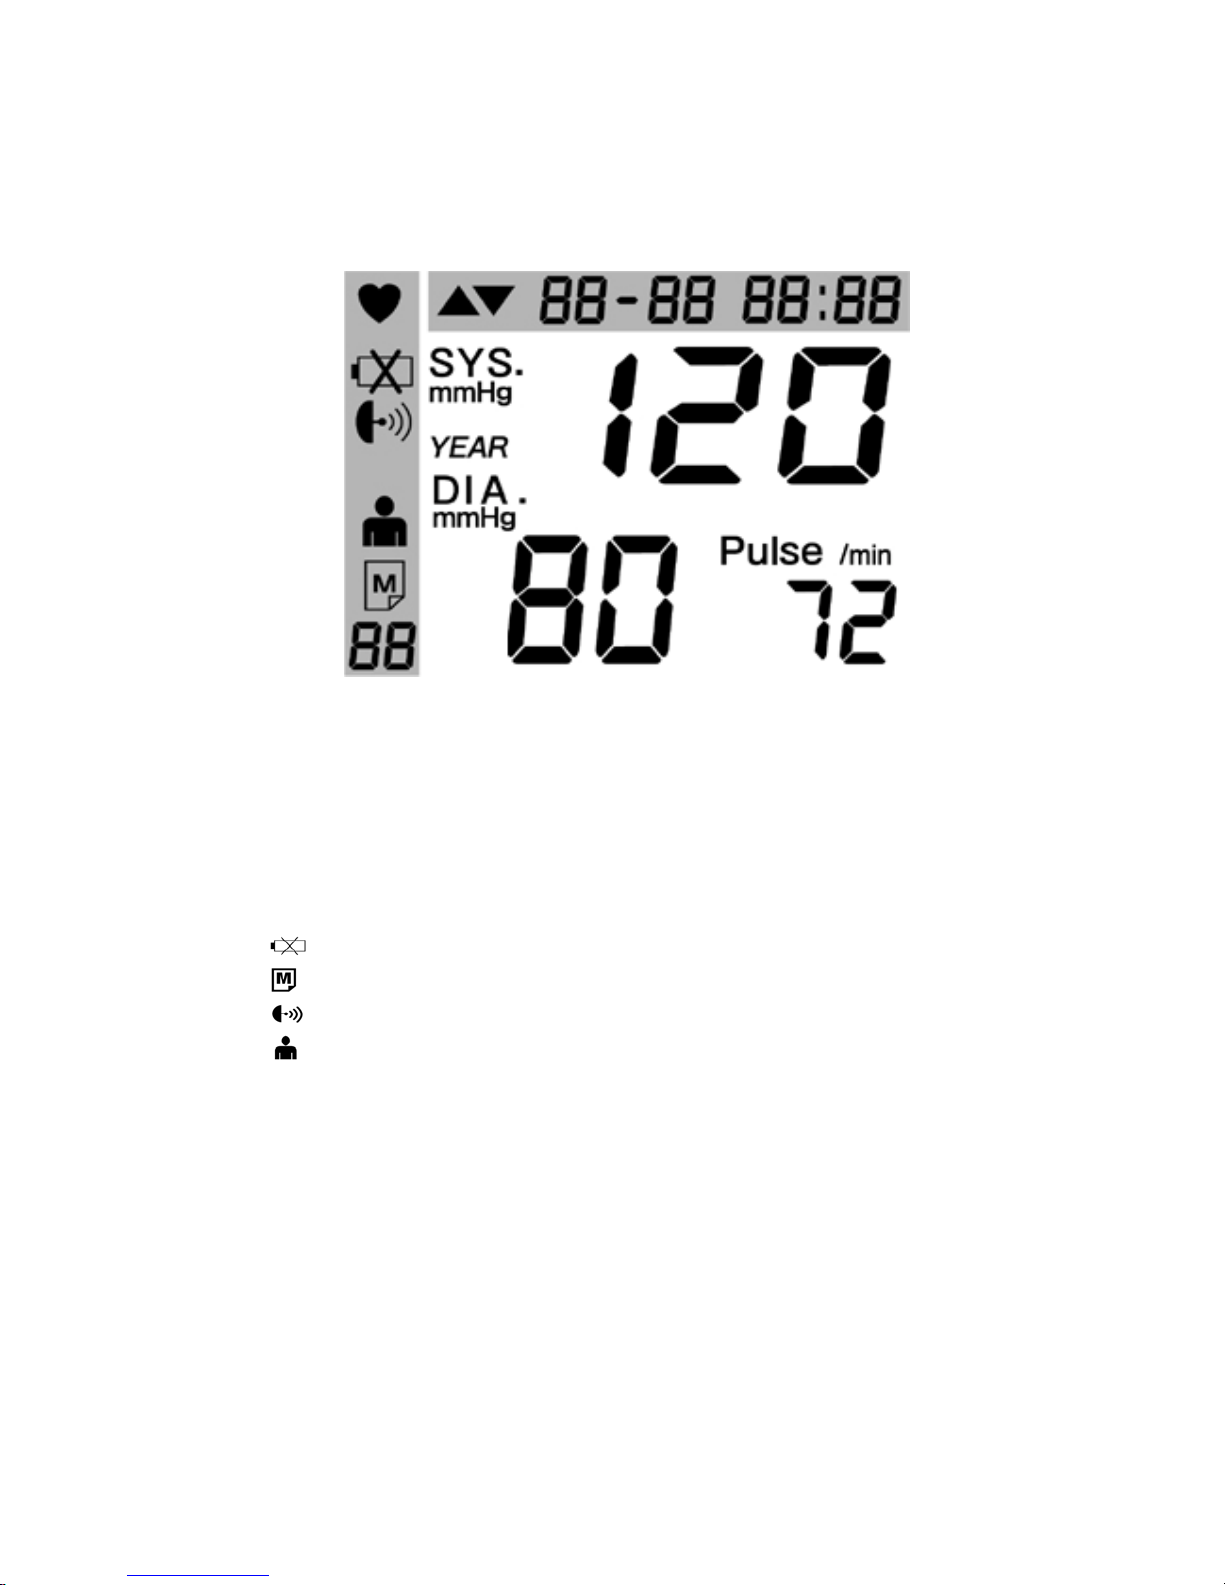
2. Symbols in LCD indicator ∙∙∙∙∙∙∙∙∙∙∙∙∙∙···············∙∙∙∙∙∙∙········································…………14
PRECAUTIONS FOR MEASUREMENT ∙∙∙∙∙∙∙∙∙∙∙∙∙∙····················∙∙∙∙∙····························……… 15
BATTERY INSERTION/REPLACEMENT···············∙∙············································…………18
1. How to insert the batteries ∙∙∙∙∙∙∙∙∙∙∙∙∙·················································…········…………18
2. Replacement of the batteries ∙∙∙∙∙∙∙∙∙∙∙∙∙∙······················∙∙∙∙∙∙∙····························…………18
CONNECTING OF AC ADAPTER ………………………………………………………………… 19
SETTING THE DATE AND TIME ∙∙∙∙∙∙∙∙∙∙∙∙∙∙················∙∙∙∙∙∙∙∙∙∙∙∙∙∙·································……… 19
1. Entering the mode to set date and time ·············∙∙∙∙∙∙∙∙∙∙∙∙∙∙····················…∙∙∙∙∙∙∙…………19
2. Setting up ∙∙∙∙∙∙∙∙∙∙∙∙∙∙·······················∙∙∙∙∙∙∙∙∙∙∙∙∙∙···∙∙∙∙∙∙∙∙∙∙∙∙∙∙∙∙∙∙∙·∙·····················∙∙∙∙∙………… …19
SOUND ON/OFF AND VOLUME CONTROL ∙∙∙∙∙∙∙∙∙∙∙∙∙∙···
∙∙∙∙∙∙∙∙∙∙∙∙∙∙∙∙∙∙∙·∙·····················∙∙∙∙∙∙∙∙…… 20
DATA TRANSMISSION∙∙∙∙···········∙∙∙∙∙∙∙∙∙∙∙∙∙∙······················∙∙∙∙·························……………… 21
MEASUREMENT ∙∙∙∙∙∙∙∙∙∙∙∙∙∙···········∙∙∙∙∙∙∙∙∙∙∙∙∙∙····················∙······························………………23
1. Wrapping the cuff ∙∙∙∙∙∙∙∙∙∙∙∙∙∙·······················∙∙∙∙∙∙∙∙∙∙∙··············∙∙····················…………… 23
2. Correct measuring posture ∙∙∙∙∙∙∙∙∙∙∙∙∙∙····················∙∙∙∙···································………… 24
3. Measuring method ∙∙∙∙∙∙∙∙∙∙∙∙∙∙·············∙∙∙∙∙∙∙∙∙∙∙∙∙∙·······················∙∙∙∙·················…………… 24
4. Memorizing ∙∙∙∙∙∙∙∙∙∙∙∙∙∙·······················∙∙∙∙∙∙∙∙∙∙∙∙∙∙···········································…………… 26
MAINTENANCE AND STORAGE ∙∙∙∙∙∙∙∙∙∙∙∙∙∙·······················∙∙∙∙∙∙∙∙∙∙∙∙·················∙∙∙∙∙∙∙······………28
1. Maintaining & 2. Cleaning ∙∙∙∙∙∙∙∙∙∙∙∙∙∙······················∙∙∙∙·······························…………… 28
TROUBLE SHOOTING ∙∙∙∙∙∙∙∙∙∙∙∙∙∙·······················∙∙∙∙∙∙∙∙∙∙∙∙∙∙·······················∙∙∙∙∙············……… 30
1.Against errors ∙∙∙∙∙∙∙∙∙∙∙∙∙∙·······················∙∙∙∙∙∙∙∙∙∙∙∙∙∙···∙∙∙∙∙∙∙∙∙∙∙∙∙·∙·····················∙∙∙…………… 30
2.Against trouble ∙∙∙∙∙∙∙∙∙∙∙∙∙∙·····················∙∙∙∙∙∙∙∙∙∙∙∙∙∙···∙∙∙∙∙∙∙∙∙∙∙∙∙·∙·····················∙∙∙……………… 31
WARRANTY ∙∙∙∙∙∙∙∙∙∙∙∙∙∙
·················∙∙∙∙∙·······························································……… 32
1. Manufacturer’s limited warranty ∙∙∙∙∙∙∙∙∙∙∙∙∙∙···················································………… 32
2. Warranty steps ∙∙∙∙∙∙∙∙∙∙·····················∙∙∙∙∙∙∙∙∙∙∙∙············································…………… 32
3. Where applying for solving problem ∙∙∙∙∙∙∙∙∙∙∙∙∙∙······················∙∙∙∙∙····················………… 33
SPECIFICATION ∙∙∙∙∙∙∙∙∙∙∙∙∙············∙∙∙∙∙∙∙∙∙∙∙∙∙∙·······················∙∙∙∙······························……… 34
TABLE OF CONTENTS
Page 2

2
We highly appreciate you choose this JAWON product.
Those who will use this blood pressure monitor are strongly advised to read this
manual thoroughly and understand all instructions and warnings before using it.
Information in this manual is made for informational purpose and this manual and
product are not meant to be a substitute for the advice provided by your own
physician or other medical professional.
You should not use this information contained in this manual or this equipment for
diagnosis or treatment of health problem or prescription of medication.
If you have or suspect that you have a medical problem, consult your physician
promptly.
WARNING
Page 3
3
1. What is blood pressure?
Blood pressure refers to the force or pressure exerted on the artery vessel
when blood flows through them. In order to allow the blood to supply nutrition
and oxygen to every organ and corner of the body, a certain level of pressure
is necessary and it comes from the each time the heart beats or contracts.
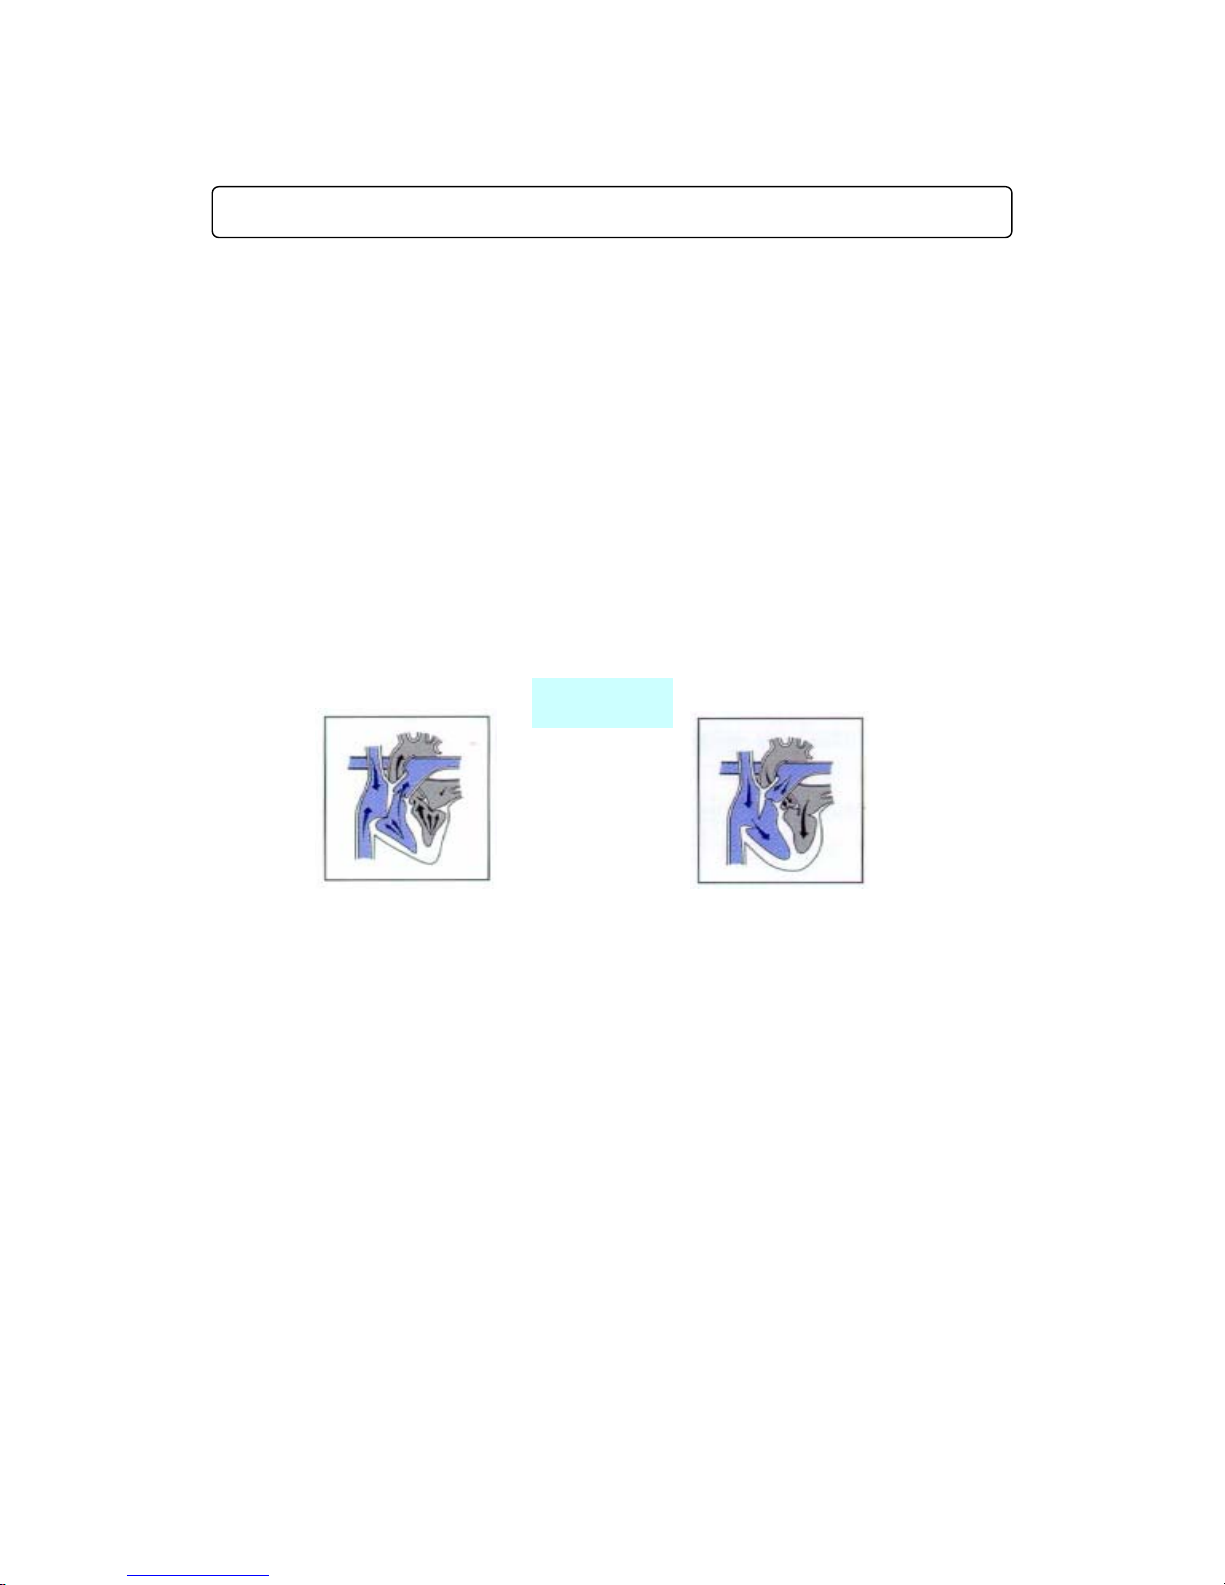
The heart activity is broken down into two phases called Systole and Diastole.
Systolic is the pressure to send blood out into the body and Diastolic is the
pressure creating the heart pulls blood back through it.
Blood pressure is recorded as systolic over diastolic, as shown below.
systole occurs during diastole occurs during
the contraction and the relaxation and
empting of the heart filling of the heart
2. What makes my blood pressure fluctuate?
Blood pressure changes in response to many factors.
These factors include changing in the temperature and humidity, physical
exercise, restlessness due to stress, fear, anxiety, anger, food and an
individual’s physical condition.
3. Classification of the blood pressure
: National High Blood Pressure Education Program, National Heart, Lung and
Blood Institute, NIH (JNC7)
ABOUT BLOOD PRESSURE
115/75
Page 4

4
Diastolic
(㎜Hg)
100
90
80
120 140 160 Systolic(㎜Hg)
4. Why do I have to check blood pressure at home?
Home monitoring may help alleviate the medical phenomena ‘White Coat
Hypertension’ which causes many individuals’ blood pressure to be higher
when taken in a medical office setting. The elevation of it may be due to
several factors, including stress, nervousness, or increased sympathetic
activity associated with the clinical environment. It may cause your blood
pressure to rise about 20 to 50mmHg higher than usual. When monitoring at
home, you may get a truer indication of your blood pressure in a usual,
relaxed state. Regular home monitoring provides you a valuable over time
readings to give to your physician to determine and diagnose and also
provides you the information when your blood pressure falls or rises to enable
to manage your health between doctor visits.
5. What is the benefit of data transmissible blood pressure monitor?
Without going to a hospital, you can get physician’s advice with data
transmissible blood pressure monitor.
ECHO-FT is a Home to Hospital bi-directional networking blood pressure
monitor that you can transmit saved data from the device to your personal
computer through interface then send your physician them. Your physician will
read those to find health problems and give proper advice you. With the
support of the analyzing program, ECHO-FT tracks your blood pressure
changes sophisticatedly and enables you to realize the characteristics of yours
Stage 2 Hypertension
Stage 1 Hypertension
Prehypertension
Normal
Page 5

5
and control it. Periodically monitored and memorized readings reflect the
cardiovascular state of you under conditions more representative of your
normal daily life-style than those inherent in a clinical environment. It let you
learn when your blood pressure falls or rises. Also it let your physician optimize
the treatment program corresponding your circadian rhythm of blood pressure.
Therefore, it is important to take regular daily monitoring and keep clear
records. ECHO-FT is a time and cost saving healthcare networking instrument.
Page 6

6
Thank you for purchasing the ECHO-FT.
Intended use
This home blood pressure monitoring device is indicated for use in the noninvasive
measurement of systolic and diastolic blood pressure and heart rate in adult age
18 and over, in a home care environment. ECHO-FT is designed to enable a
person who suspects some trouble with blood pressure to check it at home.
Fuzzy logic and Oscillometric method
Your unit employs fuzzy logic method to inflate and an oscillometric for
measurement of blood pressure and pulse, which refers to check blood pressure
by measuring oscillation in the cuff while the artery of the arm oscillate reflecting
contracts and relaxes every heart beat.
Data transmissible and analyzing program
This device is data transmissible. You can transmit readings saved in the memory
of the device to your personal computer, and then mail them to your physician to
get advice from her/him at home. ECHO-FT is a time saving device partially
replacing a necessity of your visit to your physician. Additionally the data
transmitted to your PC can be analyzed and tracked sophisticatedly with
analyzing software optionally offered by the manufacturer.
Software ‘Hour 24’
‘Hour24’ is a software for windows. It takes data transmitted from ECHO-FT and
enable to send them to the doctor.
Additionally the data can be analyzed and tracked with it.
Noise detecting
As ECHO-FT is contrived to detect moving or noising during measurement
process and displays it both on the real time and recalled readings on LCD. You
or your physician can determine if the readings are reliable.
Voice message
It can make you monitor blood pressure easily and know the result clearly without
INTRODUCTION
Page 7

7
the third person’s help. Especially it is useful for the elderly person.
Memory feature
It has 64 reading memory capacity recorded monitoring date and time supported
Built-in calendar and clock which are input them automatically to each reading.
Accuracy
Blood pressure measurements determined with this device are equivalent to those
obtained by a trained observer using the cuff/stethoscope auscultation method,
within the limits prescribed by the American National Standard, Electronic or
Automated Sphygmomanometers.
Note
Blood pressure constantly fluctuates during of a day, so that monitoring
should be done at least three times and determined. Occasional high or
low readings do not mean your monitor is malfunctioning or you are ill.
The important thing is that you have information to talk with your doctor
about normal and abnormal results corresponding your circadian rhythm.
Page 8
8
To ensure safe operation and durable performance stability, it is essential that you
fully understand the functions, operation and maintenance instructions by reading
this manual carefully before using the unit.
Particular attention must be paid to all warnings, cautions and notes incorporated
herein. The following conventions are used throughout the manual to denote
information of special emphasis.
※ Property damage refers to a wide range of damage involving your house,
household goods, domestic animals, and pets etc..
CAUTION
Important information to indicate the presence of a hazard in which may arise
severe personal injury, death of substantial property damage if the warning is
ignored.
NOTE
Important information to notify the user of operation or maintenance
information in which is important but not hazard-related. Hazard warning
should never be included under the note signal word.
WORD DEFINITIONS
Page 9

9
• For all damages or injuries caused by user’s incorrect operation or failure in
maintenance the unit relieves, the manufacturer and its agent of the system do
not have any responsibility and non-compliance with specifications.
• Please keep this manual together with the appliance since it is compiled to
provide the maximal convenience to those who use this device
• Defective unit or accessories that is shipped off from customer to Jawon
medical Co. or its authorized dealer for service must be packed in the safe way
and the replacement carton. Shipping and insurance cost for returning of
defective unit must be prepaid by customer.
NOTE TO USER
Page 10

10
Classification and Compliance with Standards Model ECHO-FT manufactured by
Jawon medical is classified as;
- ECHO-FT is specified as Class 2 type BF unit under the standard of
IEC60601-1 (Safety of Medical Electrical Equipment).
- Internally powered equipment (Battery : 4 × LR6-AA)
- Ordinary equipment without protection against ingress of water
- Equipment not suitable for use in presence of a flammable anesthetic
mixture by standard of IEC60601-1 (Safety of Medical Electrical Equipment)
- Equipment that complies with Class B for Noise-Emission, Level B for
Noise-immunity by standard of IEC60601-1-2 (Electromagnetic
Compatibility Requirements)
- This blood pressure meter complies with the EN1060-1 : 1995 Non-invasive
Sphygmomanometers general requirements as well as EN1060-3 : 1997
supplementary requirements for electro-mechanical blood pressure
measuring system.
CLASSIFICATION & COMPLIANCE WITH STANDARD
NOTE
1.Jawon's accessory e
quip
ment connected to the analog and digital interfaces
are certified according to the respective IEC standards.
(e.g. IEC 950 for data processing equipment, ICE 601-1 for medical
equipment and system standard EN 60601-1-1:1993)
2. When recycling and
prop
er diapose after their useful lives, the device shall
be disposal in accordance with national laws.
Page 11
11
Page 12

12
ECHO-FT is designed and manufactured in deep consideration for user’s and
operators’ safety and completing reliability of the unit based International
Standards for medical equipment.
The following precautions must be observed for additional safety ;
1. User must not touch or handle the inner side the system at anytime. It may
cause an electrical shock and flame out.
2. The unit has been factory-adjusted for optimum performance. Do not attempt
to modify or adjust any preset controls or switches except those specified in
this manual for operation. If any modification is desired, ask manufacturer or its
authorized dealer for service.
3. If you have any trouble with the unit, switch it off immediately, and contact
manufacturer or its authorized dealer for assistance.
4. Avoid the following environments for storage and operation
- Where the ambient temperature deviates -20℃ ~ 60℃ for storage.
- Where the ambient temperature deviates 10℃ ~ 40℃ for operation.
- Where the atmospheric pressure deviates
70kPa(700mbar)~106kPa(1060mbar).
- Where the humidity is above 95% for storage and 75% for operation.
- Where the unit is exposed to spray or splashing water.
- Where the unit is exposed to dust.
- Where the unit is exposed to water vapor.
- Where the unit is exposed to high density oil vapor.
- Where the unit is exposed to salty atmosphere.
- Where the unit is exposed to explosive gas.
- Where the unit is exposed to excessive shocks or vibrations.
- Where the angle of inclination of mounting surface is in excess of 10
degrees.
- Where the unit is exposed to direct sunlight.
5. Do not use the unit on infants or persons who cannot express one’s intension.
6. Do not use the unit for any purpose other than measuring blood pressure.
7. Do not use a cellular phone near the unit improper operation may result.
8. Do not force to bend the arm cuff or the air tube excessively.
9. When removing the air tube, pull at the connector.
10. Do not apply strong shock or drop the main unit.
SAFETY PRECAUTIONS
Page 13
13
11. Do not inflate the arm cuff without it being wrapped on the arm.
12. The battery liquid may leak and damage the main unit. Please observe the
following points.
- When you are not going to use the unit for an extended period of time
(approximately three months or more), remove the batteries.
- Replace the exhausted batteries with new ones immediately.
- Do not use exhausted and new batteries together.
- Do not insert the batteries with their polarities in wrong direction.
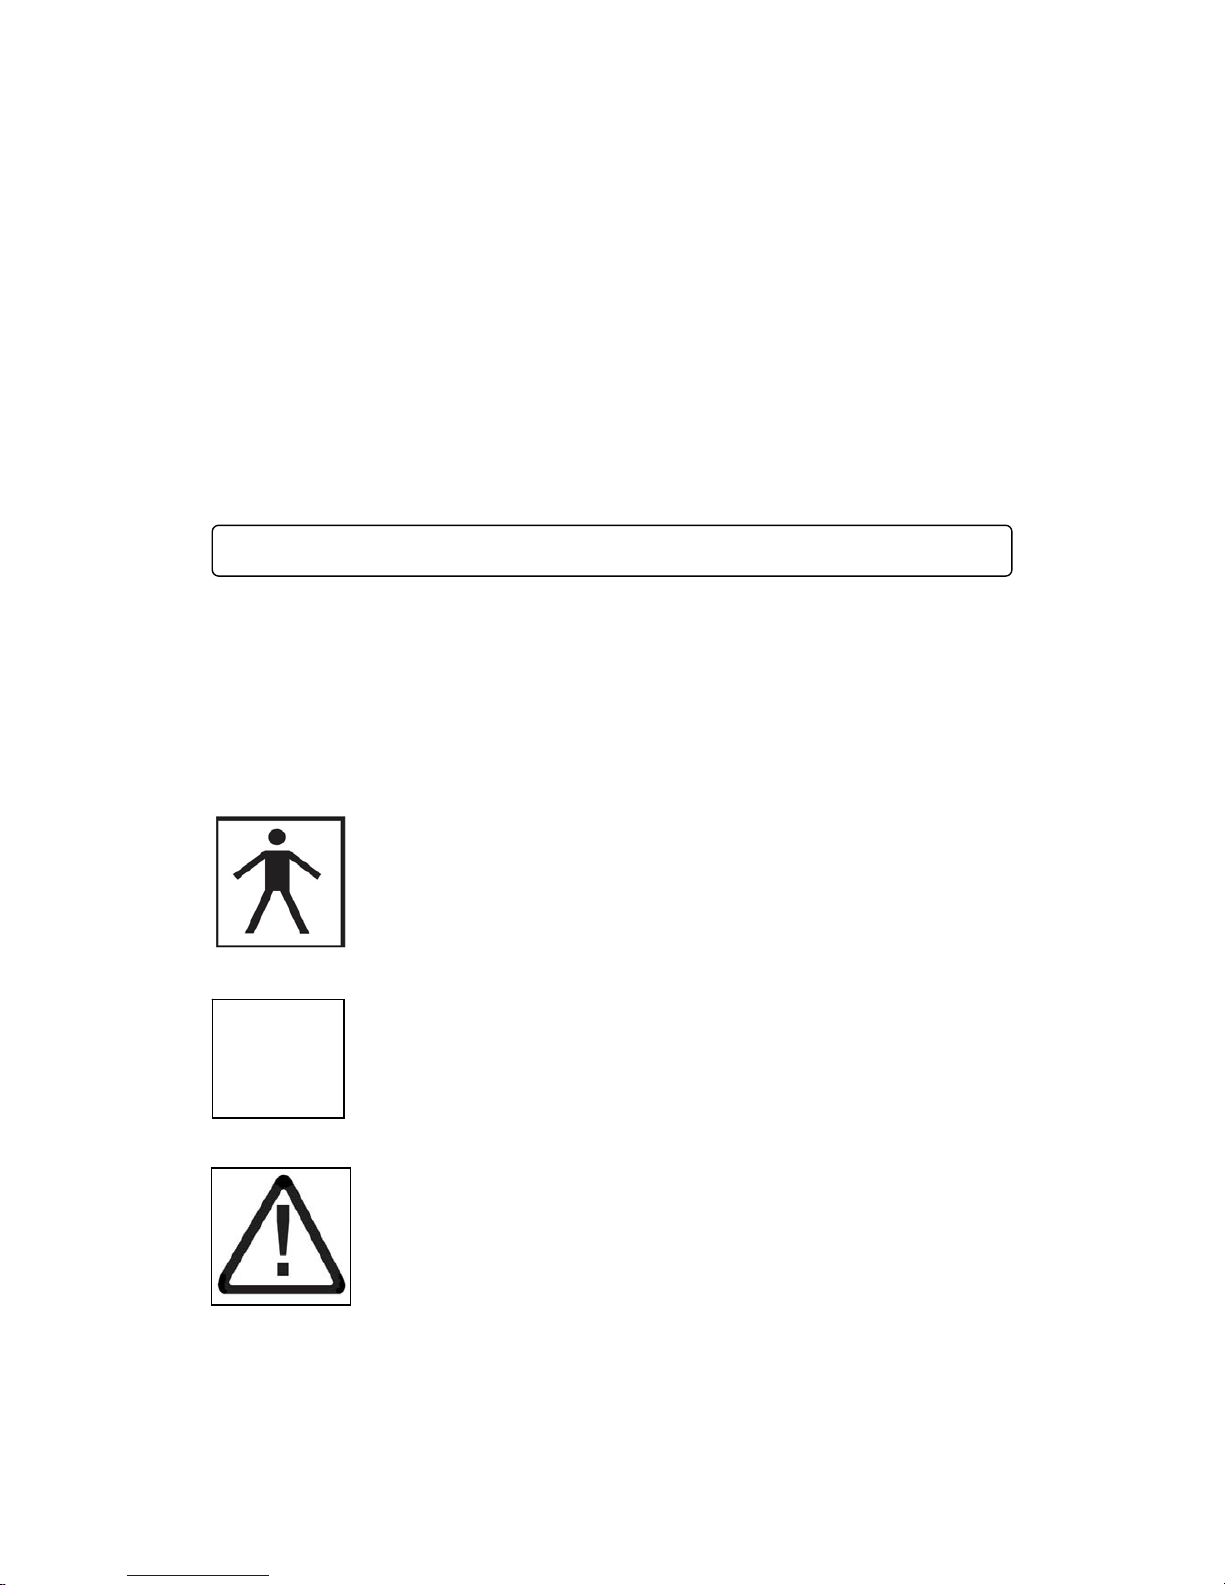
The International Electro-technical Commission (IEC) has established a set of
symbols for medical electrical equipment that classify a connection or warn of any
potential hazards. The symbols are shown below.
Save these instructions for your safety.
• Isolated patient connection (IEC 60601-1 Type BF)
• I and O on power switch represent ON and OFF respectively
• This symbol identifies a safety note.
Ensure you understand the function of this control before using
it. Control function is described in operation manual.
SAFETY SYMBOLS
I/O
Page 14
14
1. Main unit and accessories
Button
: Power ON/OFF, automatic start, enter to sound and volume mode
: Memory view, sound off and volume control button
: Button to transmit data
: Button to enter to the mode to set date and time
: Number up button to set date and time
USB cable : To use data transmission refer to owners’ manual of software ‘Hour
24’ how to use or how to install.
PART NAMES & FUNCTIONS
Page 15
15
2. SYMBOLS IN LCD INDICATOR
▲ Pressurization : Displays during inflation
▼ Exhausting : Displays during deflation
DATE (10-01) TIME (12 : 00) : month-day hour : minute
♥ : Starts flash when purse is detected
: Displays when the batteries need to be changed
: Memory indicator
: Displays when sound is ON
: Indicates noise or movement sensed
01 : Indicates the number of stored results
Page 16
16
.
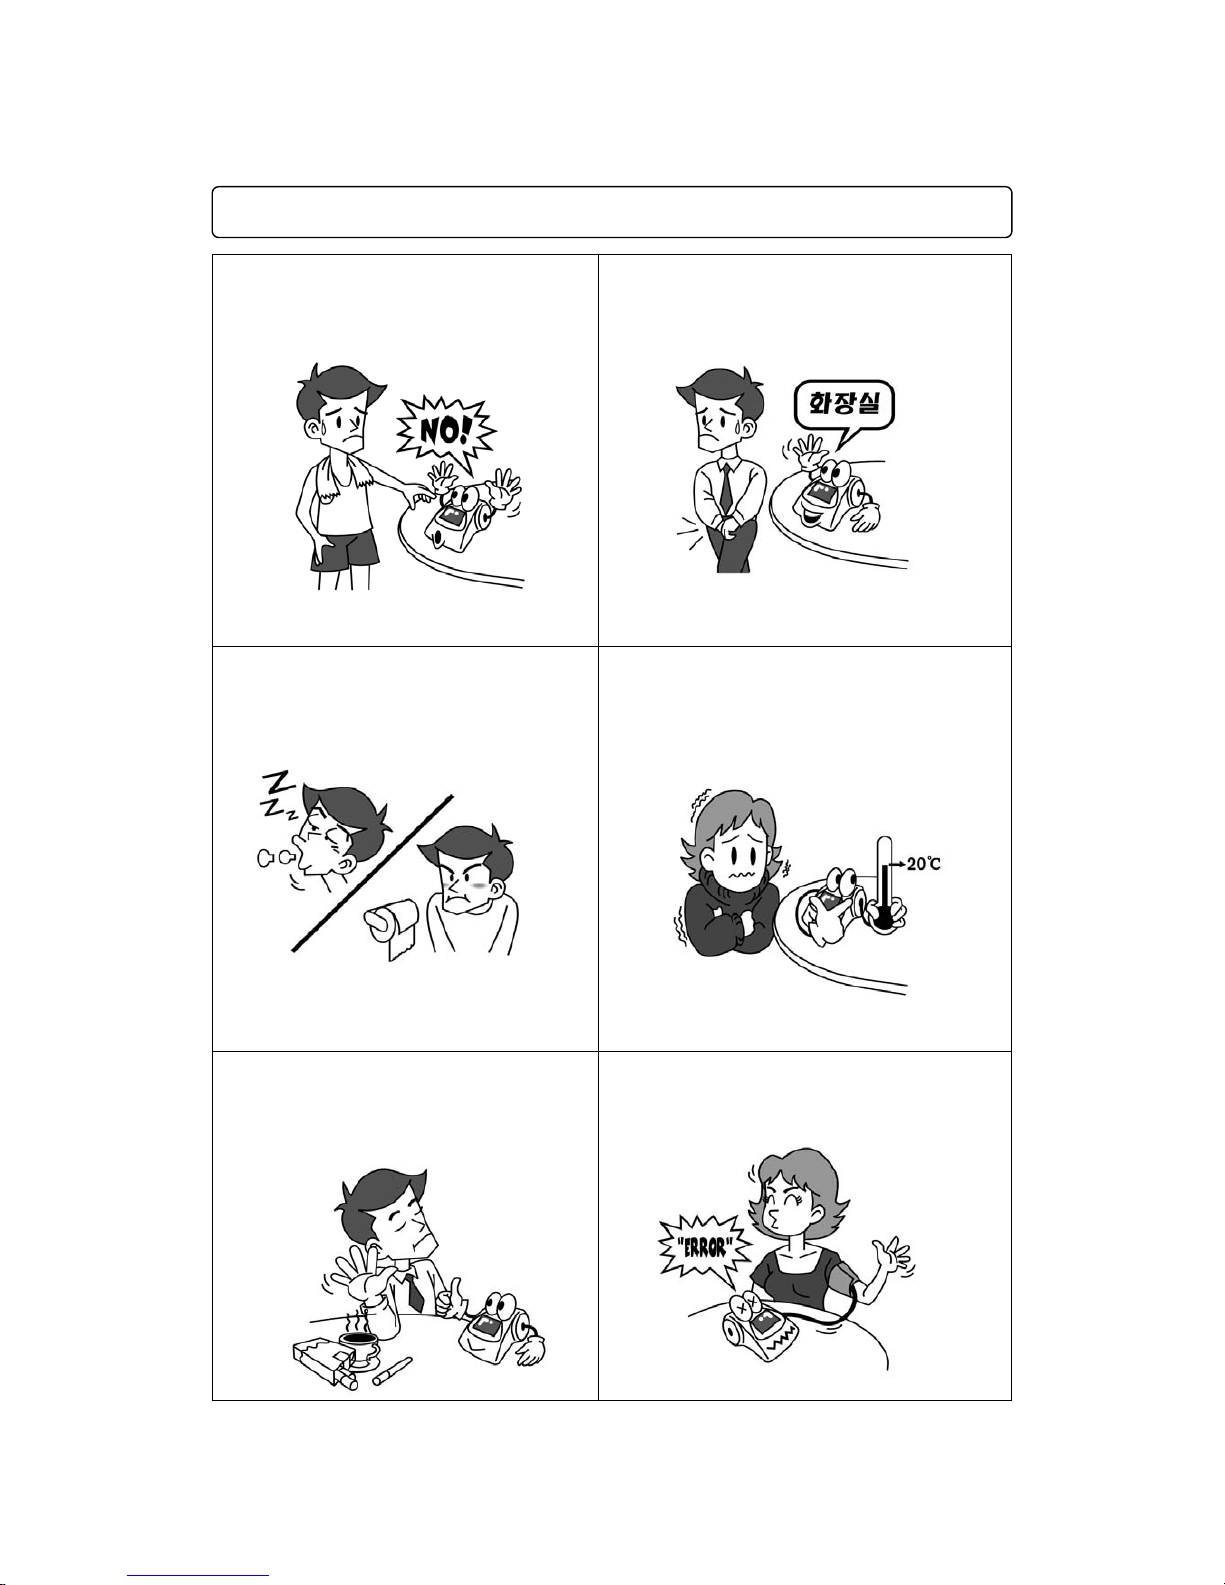
Exercise or any kind of activity may affect
blood pressure. Rest about 5 minutes
before monitoring.
Urinating may elevate blood pressure.
Start monitor a few minutes after urination.
Lack of sleep or constipation causes the
blood pressure to rise.
Cold weather causes the blood pressure to
go up. Maintain indoor temperature at 20℃
or so and warm your body before checking
.
Drinking caffeinated beverages such as
coffee, tea, cokes and also smoking can
cause your blood pressure to rise.
Moving or speaking while checking causes
errors.
PREPARATION FOR MEASUREMENT
Page 17
17
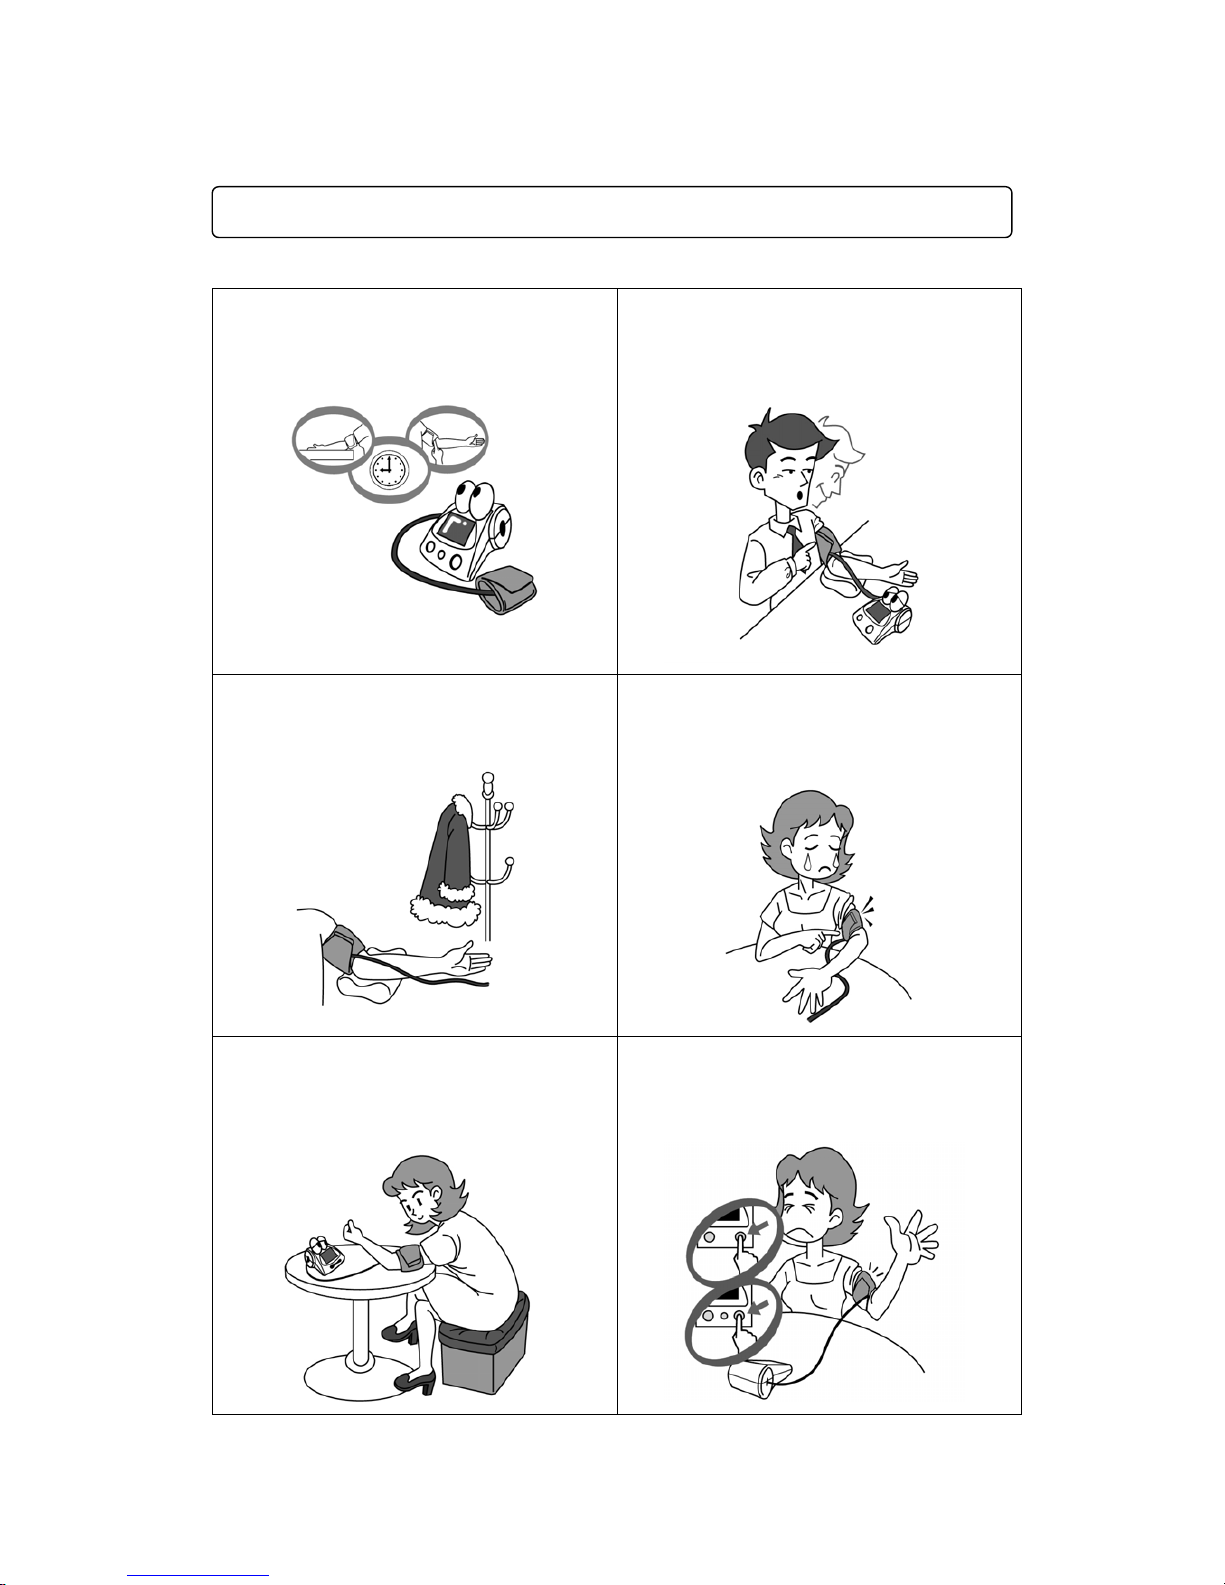
To compare the results, choose the
readings got under the same condition.
(monitoring site, position, time etc.)
Continuous monitoring causes arm
congested and inaccurate readings. Allow
3~5 minutes interval between
measurements.
Take off thick coat, sweater or tight-fit
clothes from the monitoring arm. To fit the
cuff on the naked arm is advised.
When you roll up your sleeve, ensure it
does not constrict the blood flow in your
arm.
The position sitting legs crossed or using
on a lower table than heart level may
increase abdominal pressure that resulted
in elevated blood pressure.
When an over pressurization rises or to
stop the pressurizing, press O/I button.
The cuff will stop inflating and the air will
exhaust from the unit rapidly.
PREPARATION FOR MEASUREMENT
Page 18
18
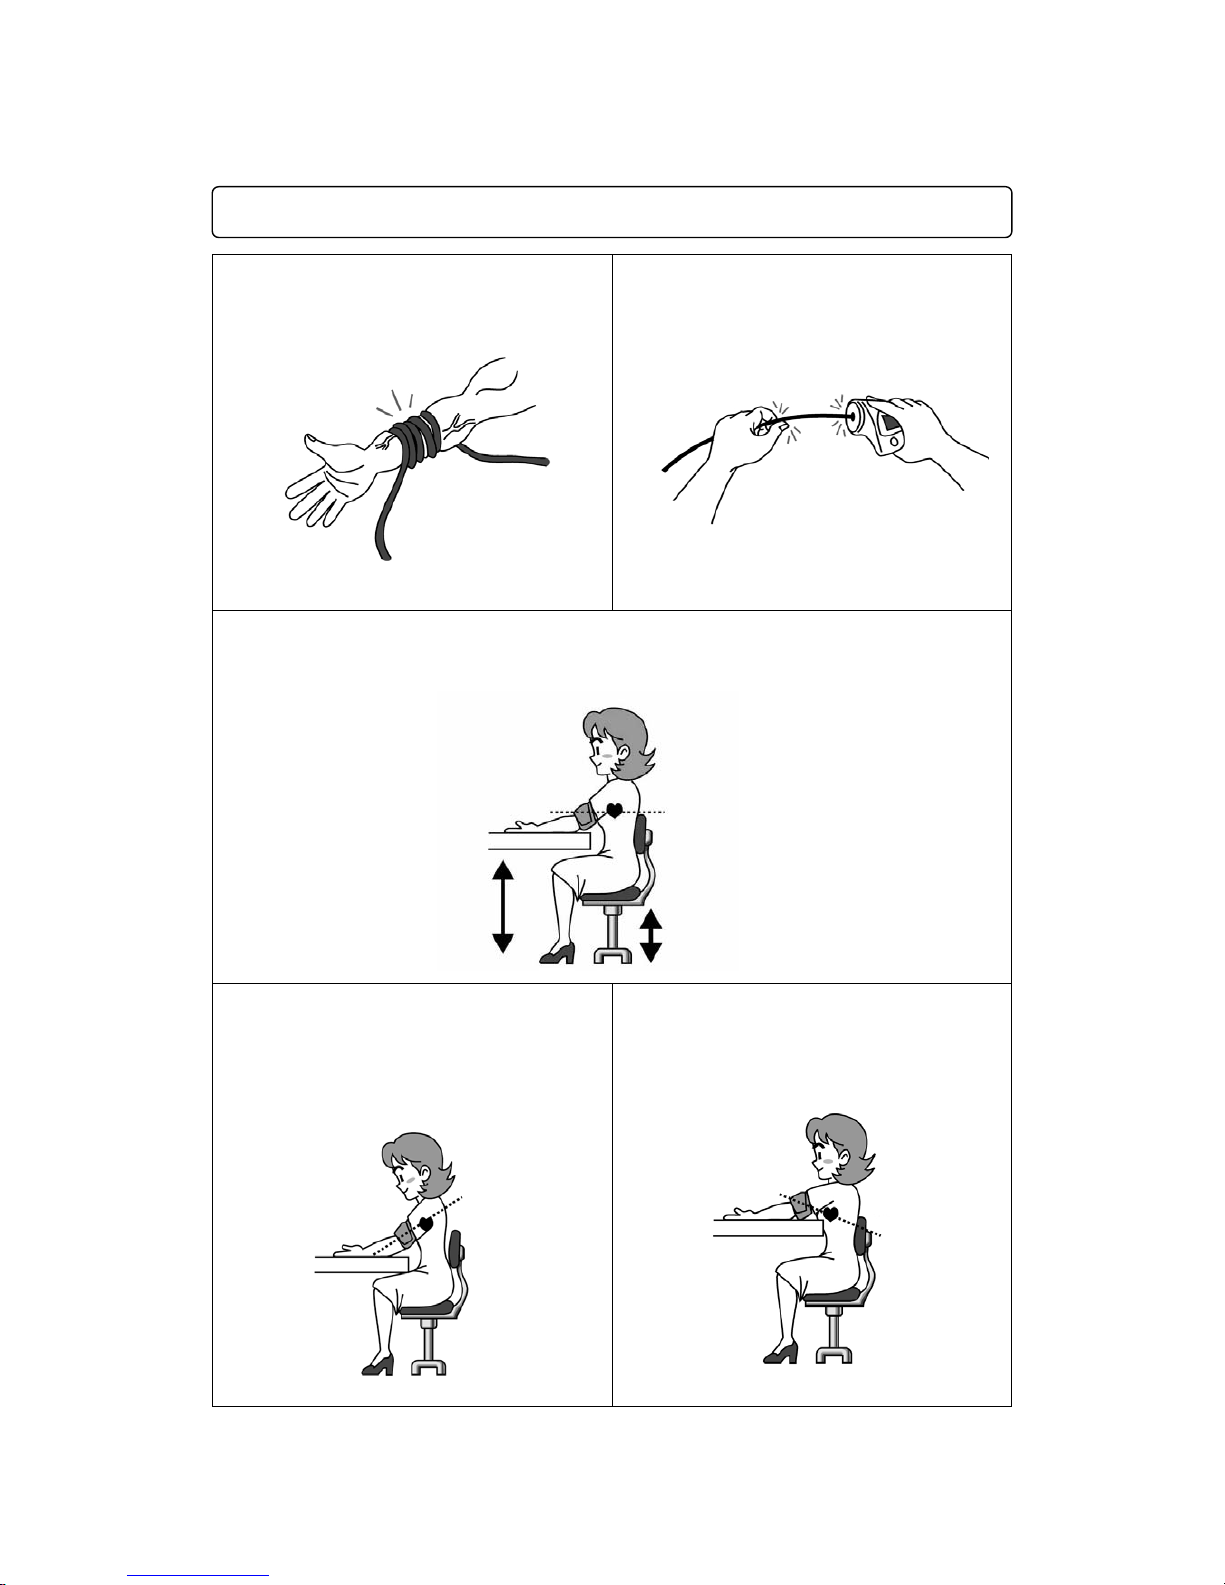
Do not place on other parts of the body
except the arm.
Do not pull it out by force.
Control the level of the chair and desk to enable your monitoring arm to place at the
same level as your heart.
When monitoring arm is higher than your
heart level, the blood pressure will be
measured lower.
When monitoring arm is lower than your
heart level, the blood pressure will be
measured higher.
PREPARATION FOR MEASUREMENT
Page 19
19
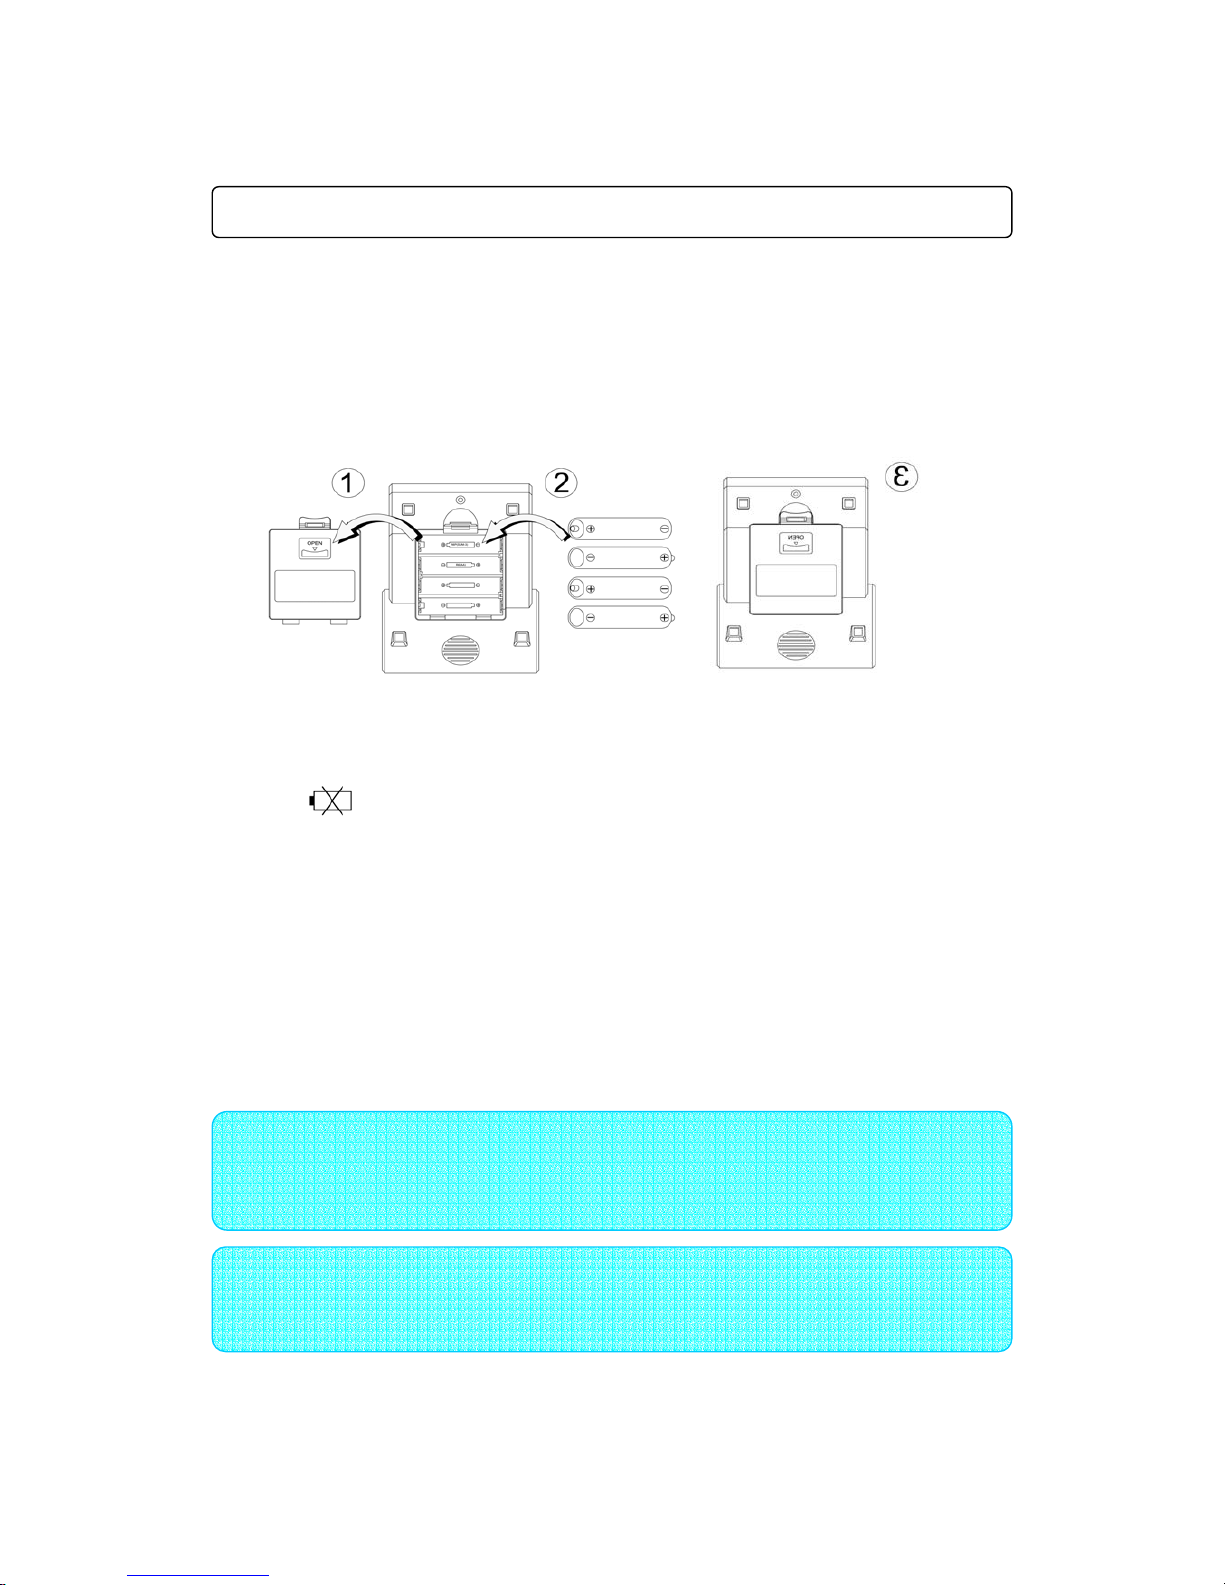
1. How to install the batteries
① Pull the battery cover and open it.
② Insert four AA type batteries to match polarities as shown below.
③ Cover the lid of battery case
2. Replacement of the Batteries
① If the indicator flashes on LCD, you should transmit memorized readings
from your device to your personal computer first. Then change all batteries.
② Replace +(positive) and -(negative) polarities should be matched the polarities
of the battery compartment as shown above 1-②
If the polarities of the battery are positioned incorrectly, the unit does not work.
When you change the batteries, use the same type.
Remove the used batteries immediately to protect the product from damage.
③ When you are not going to use the unit for an extended period of time
(approximately three months or more), remove the batteries
Note
If the readings are not transmitted before batteries are changed or used up
,
you might lose them.
N
ote
If battery is not disposed properly, it can be harmful. Protect the environment
by taking exhausted batteries to authorized disposal place.
BATTERY INSERTION / REPLACEMENT
Page 20
20
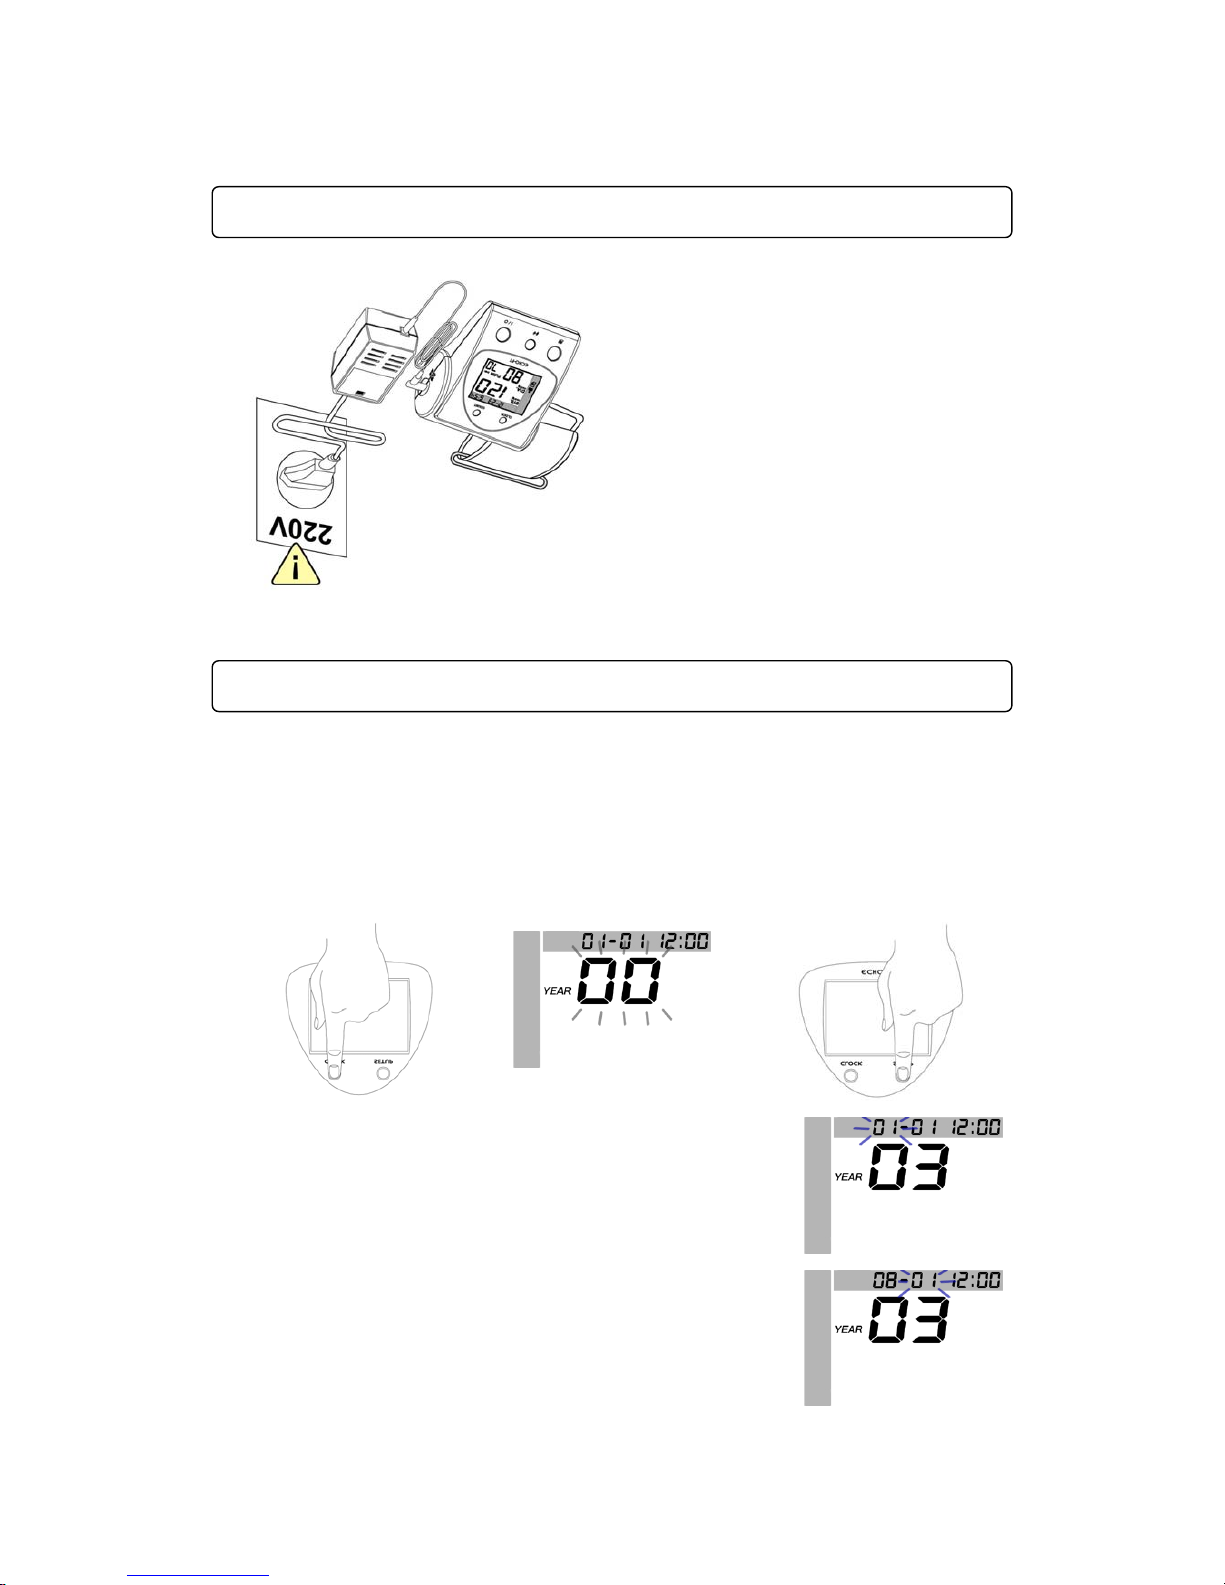
Connect the AC adapter between unit
and wall outlet
• Sequence is Year→Month→Day→Hour→Minute.
1. Entering the mode to set date and time.
① After change batteries the mode appears on LCD automatically.
② At power off, press [CLOCK] button. [
YEAR
00] will appear on the screen,
and [00] flashes.
2. Setting up
① Press [SET UP] button to set the year. Whenever
‘SETUP’ button is pressed or you keep it pressing,
the number will increase gradually or rapidly by ‘01’.
Its range is 00 to 99.
② After setting the year, press [CLOCK] button again.
The month indicator, the first two numbers in
upper LCD line, will flash. Set it by pressing ‘SET
UP’ button. Its range is 01 to 12.
SETTING DATE AND TIME
CONNECTING OF AC ADAPTER
Page 21
21
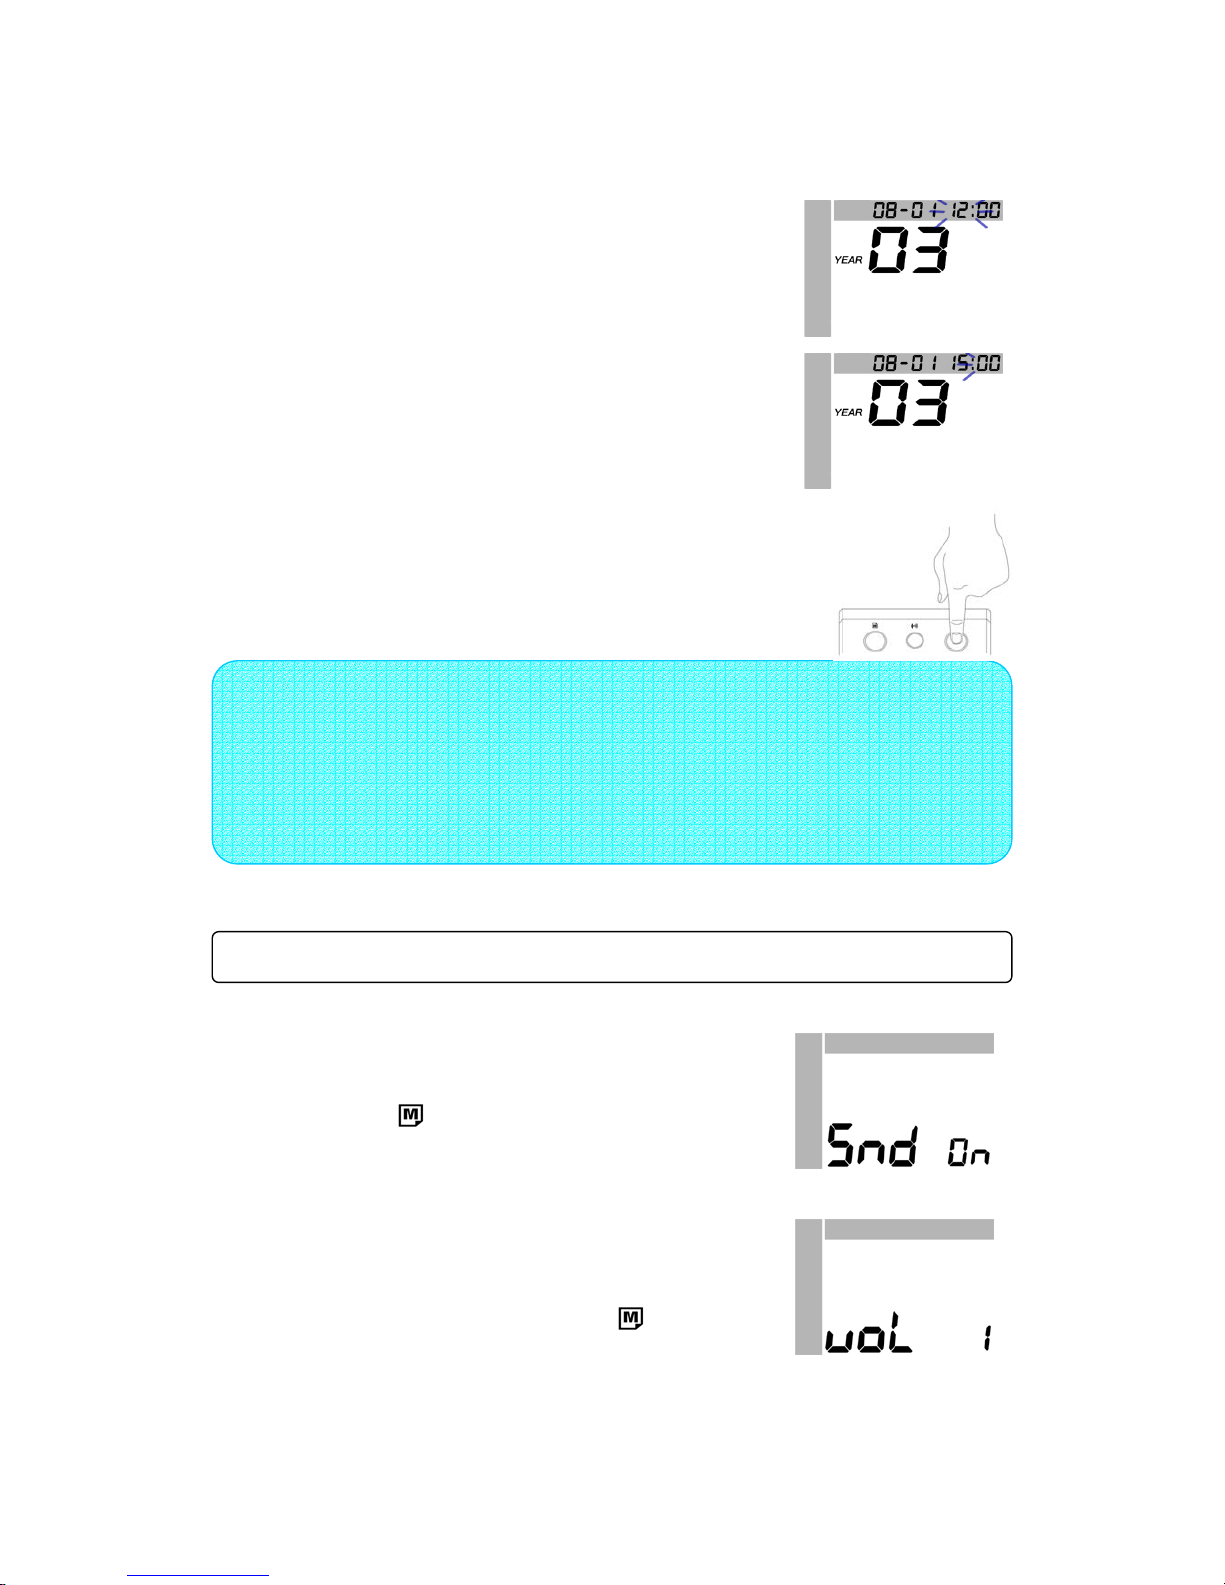
③ After setting the month, press [CLOCK] button
once again. The day indicator, the second two
numbers in upper LCD line, will flash. Set it as
same way.
Its range is 01 to 31.
④ After setting the day, press [CLOCK] button again.
The hour indicator, the third two numbers in upper
LCD line, will flash. Set it as same way.
Its range is 00 to 23.
⑤ After setting the hour, press [CLOCK] button once
more. The minute indicator, the last two numbers in
upper LCD line, will flash. Set it. Its range is 00 to 59.
⑥ After setting the minute, please power off then on.
1. Sound ON/OFF
① If you press [I/O] button around 3 seconds,
[Snd On/OFF] signal appears on LCD.
② By pressing [
] button to change it.
③ Press [I/O] button to complete it.
2. Volume control
① If you keep [I/O] button pressing after appearing
[Snd] signal, the signal is changed to [voL 1].
② Select the volume size by pressing [
] button.
Its range is 1 to 4.
③ Press [I/O] button to complete it.
Note : When you press [I/O] button after setting the date and time, they are
stored coinciding with the power off. If you press [I/O] button on your
way to set, what you have done will be stored. The date and time are
maintaining during power off but they will return to initial status when
batteries are changed or AC adapter is pulled out from a wall outlet.
SOUND ON/OFF AND VOLUME CONTROL
Page 22
22
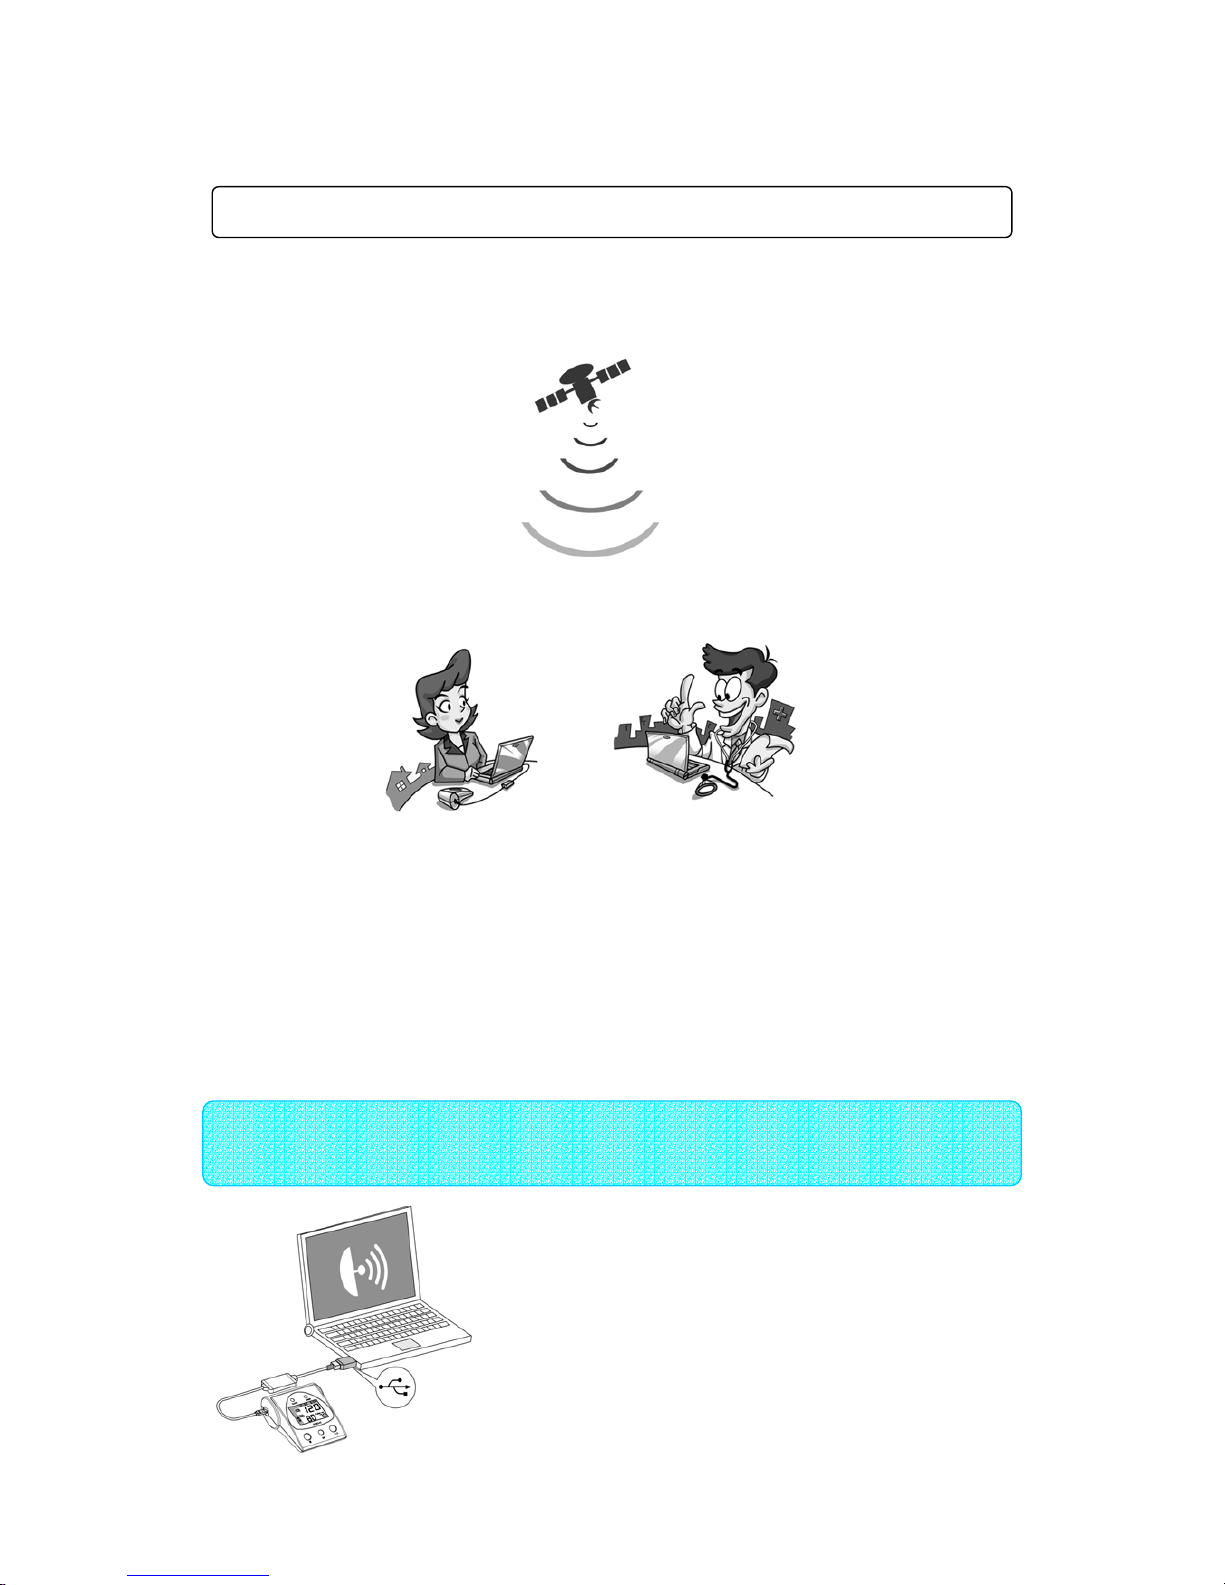
1.How to transmit monitoring data to your PC
ECHO-FT blood pressure monitor is a Home to Hospital bi-directional networking
instrument. You can reserve memorized data on your personal computer then
send them to your physician. If you monitor your blood pressure periodically and
memorize reference for your physician, they will be a good information to enable
your physician to optimize the treatment program and determine how much
medication is required to you corresponding your circadian rhythm of blood
pressure.
To install an USB driver in a computer, follow the
guidance contained in, manual of software ‘Hour 24’
Turn on the power of two appliances after
connecting ECHO-FT to the computer running ‘Hour
24’(USB cable should be used the one supplied by
JAWON MEDICAL exclusively)
DATA TRANSMISSION
NOTE Must install an USB driver to use an USB port when connect a computer
to an ECHO-FT. (Refer to'Hour24')
Page 23
23
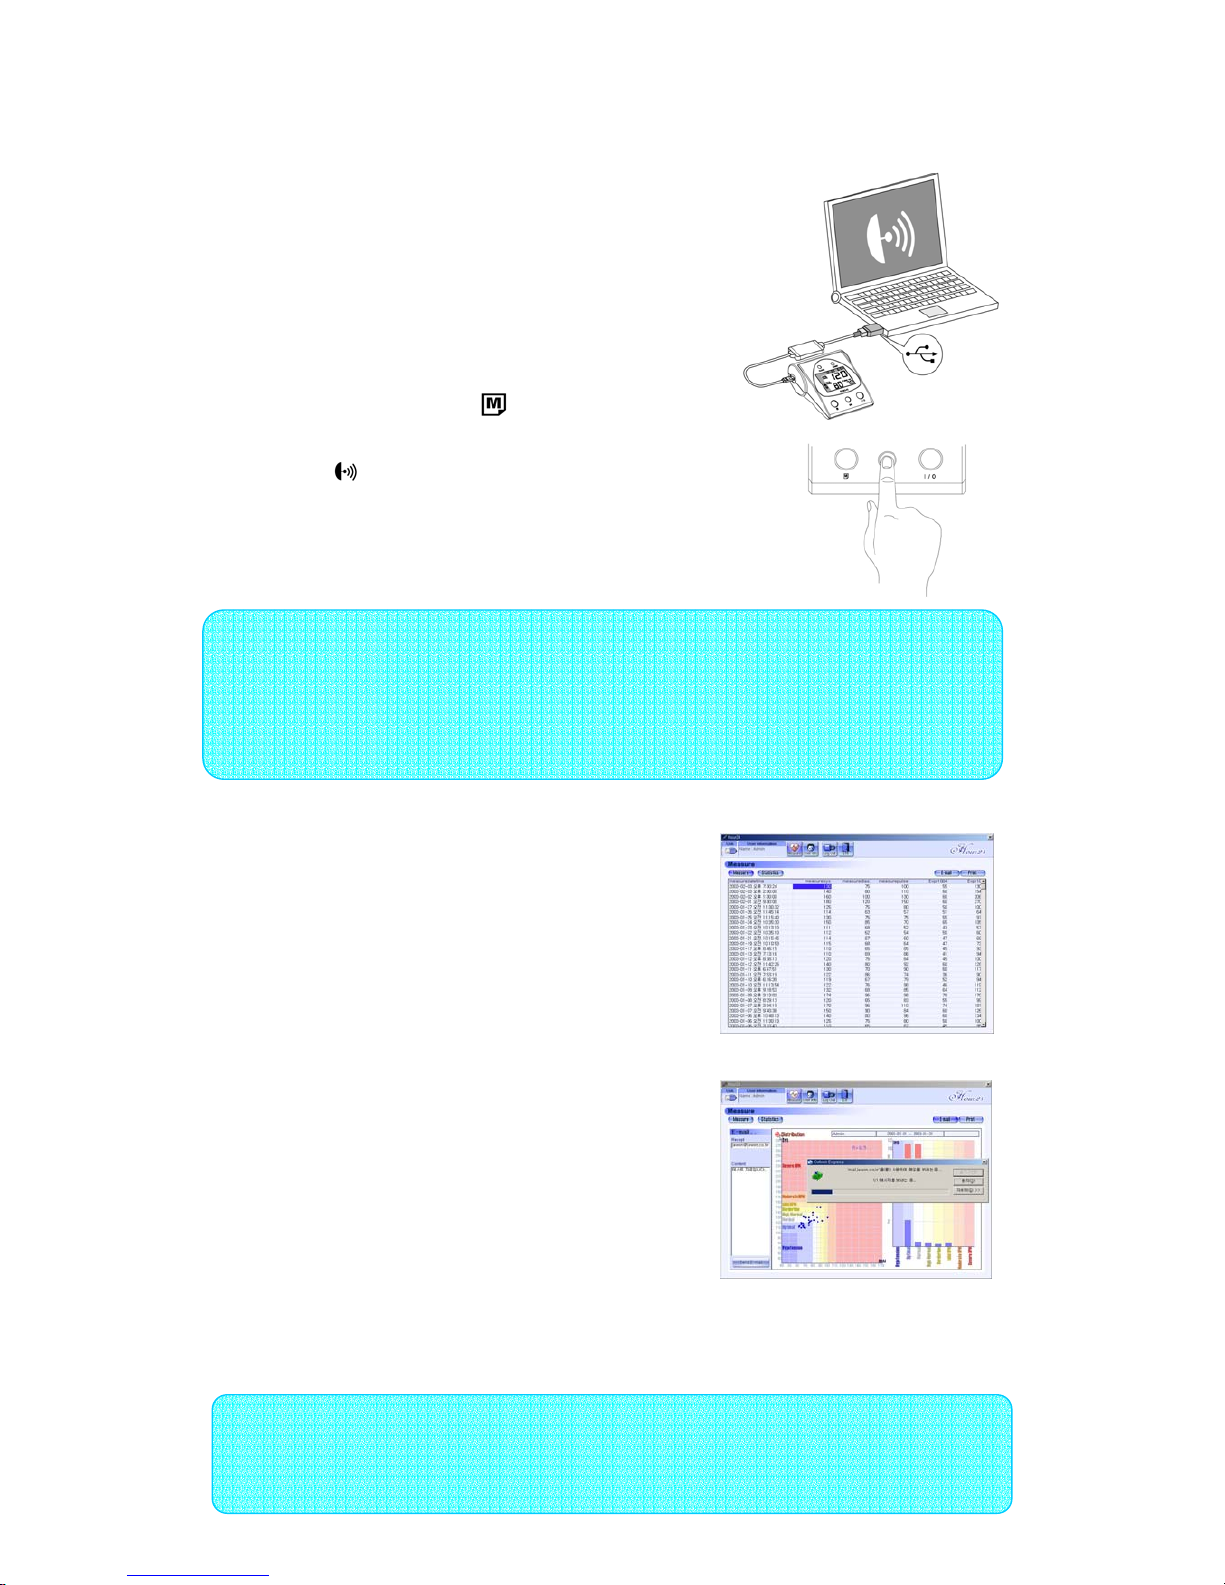
2. Data transmission
① Execute software 'Hour 24' in a personal computer.
② Connect USB cable to a computer and a port of
ECHO- FT in order to transmit saved data.
③ Press only one time of [
] button of ECHO-FT.
④ Press a [
] button to transmit to a computer.
(All measurement data saved in memory is transmitted)
3. How to send the data to your doctor
① Retrieve saved data in order to select
the date and time in software 'Hour 24'.
② An 'E-mail' button will be on right
upper side appeared at various
measurement graphs and right upper
side when a data to send.
③ A window to get input if click a
'E-mail' button opens. Input a mail
address and title and click a 'Send
E-mail' button.
(A save situation of a file is marked
in E-mail title, and a transmitted
figure file and blood pressure
measurement file are saved in a computer of a user.
('Hour24' manual reference )
Ncte Please transmit the data file which use a [SAVE] function of software
'Hour24' use personal mail, and to transmit, and was saved.
Detailed contents refer to 'Hour 24' manual.
NOTE 1. 'Hour24' is transmitted using Microsoft Outlook Express or anything
else.
2. Microsoft Outlook Express should be installed on user’s computer
to use Microsoft Outlook Express mail.
Page 24
24
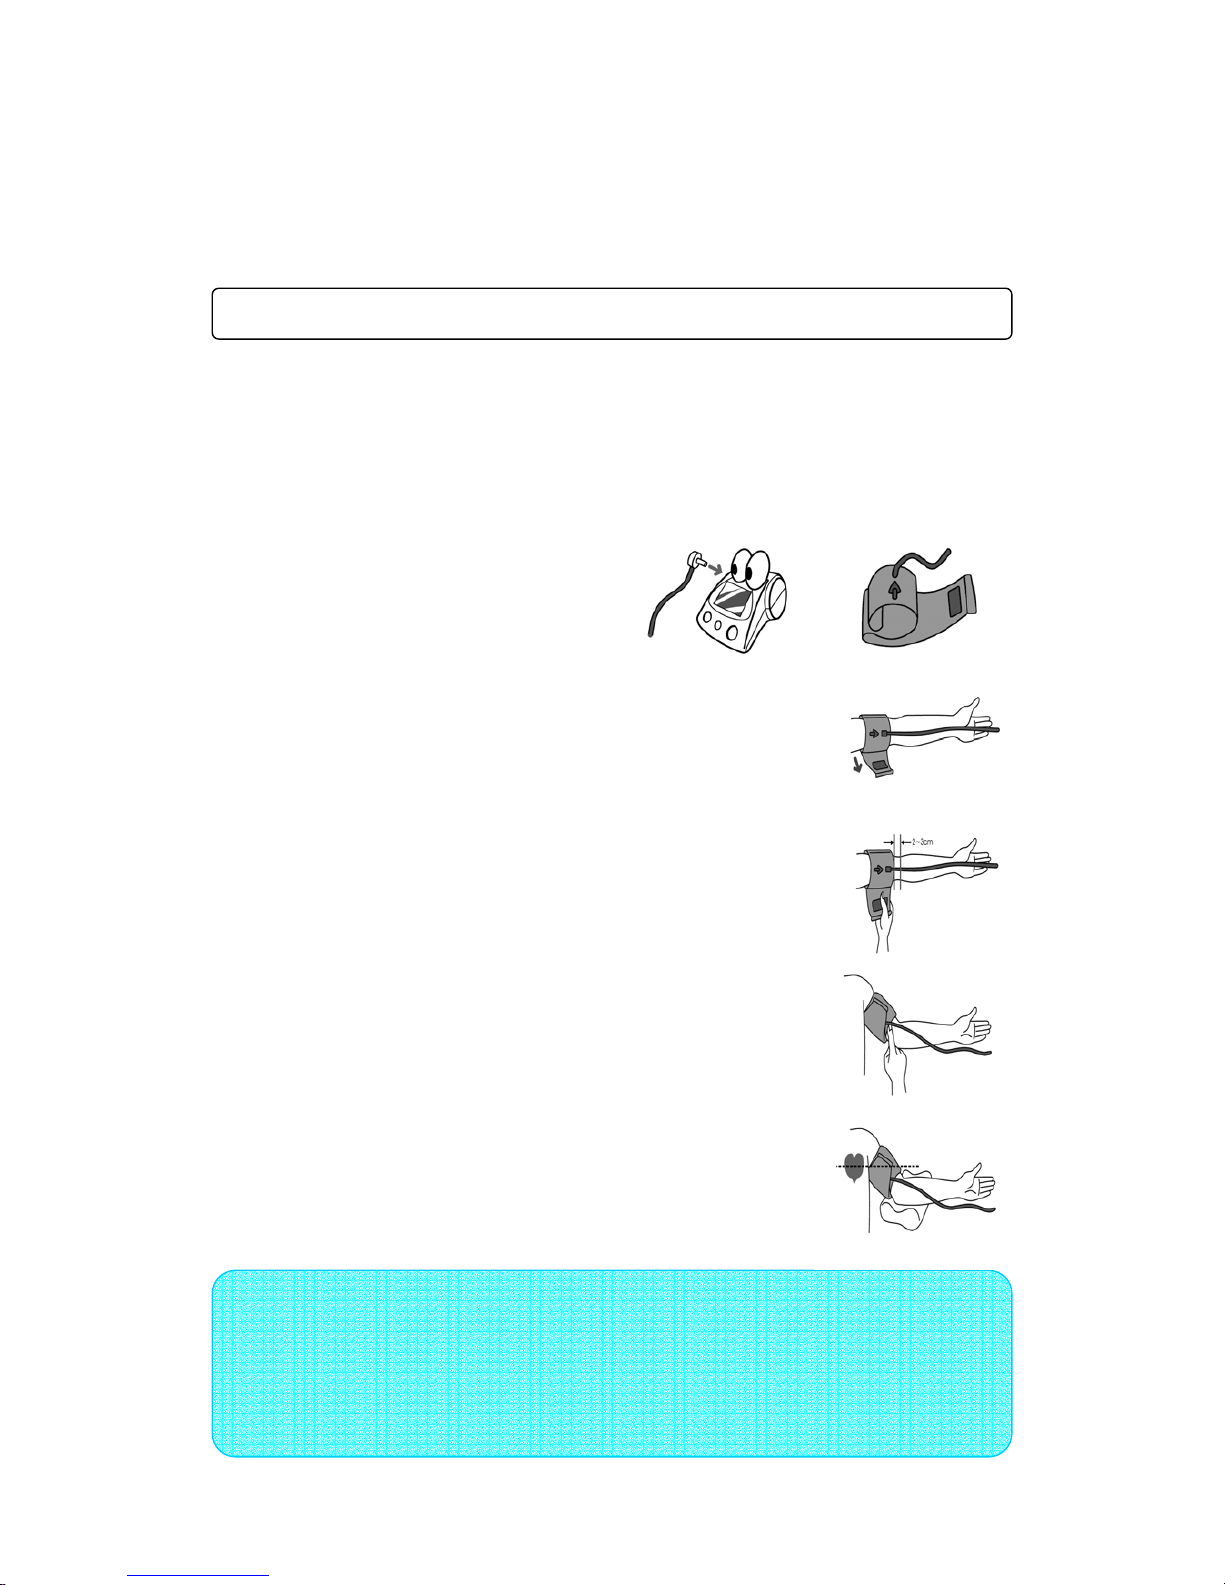
Remove thick or tight-fit clothes from your upper arm.
Sit on a chair with your feet flat on the floor and place your arm on a table so
that the cuff can position as same level as your heart.
1. Wrapping the cuff
① Securely connect the air tube plug of
the cuff to the jack of main unit.
② Unfold the cuff as shown in the drawing.
③ Wrap the cuff around your upper arm.
Position the cuff hose over your brachial
(forearm) artery and between your middle
and ring fingers when it is extended.
④ Position the lower edge of the cuff is 1 ~ 1½
inches above the elbow joint as shown in
the picture.
⑤ Strain the cuff with 2 fingers space between
the cuff inner-liner and the arm.
⑥ Place your arm at the same level as the heart.
MEASUREMENT
Note
Take off thick coat, sweater or tight-fit clothes from the monitoring arm. If
possible, wrap cuff with direct contact between inner-liner of it and the
skin.
When you roll up your sleeve, ensure it does not constrict the blood
flow in
y
our arm.
Page 25
25
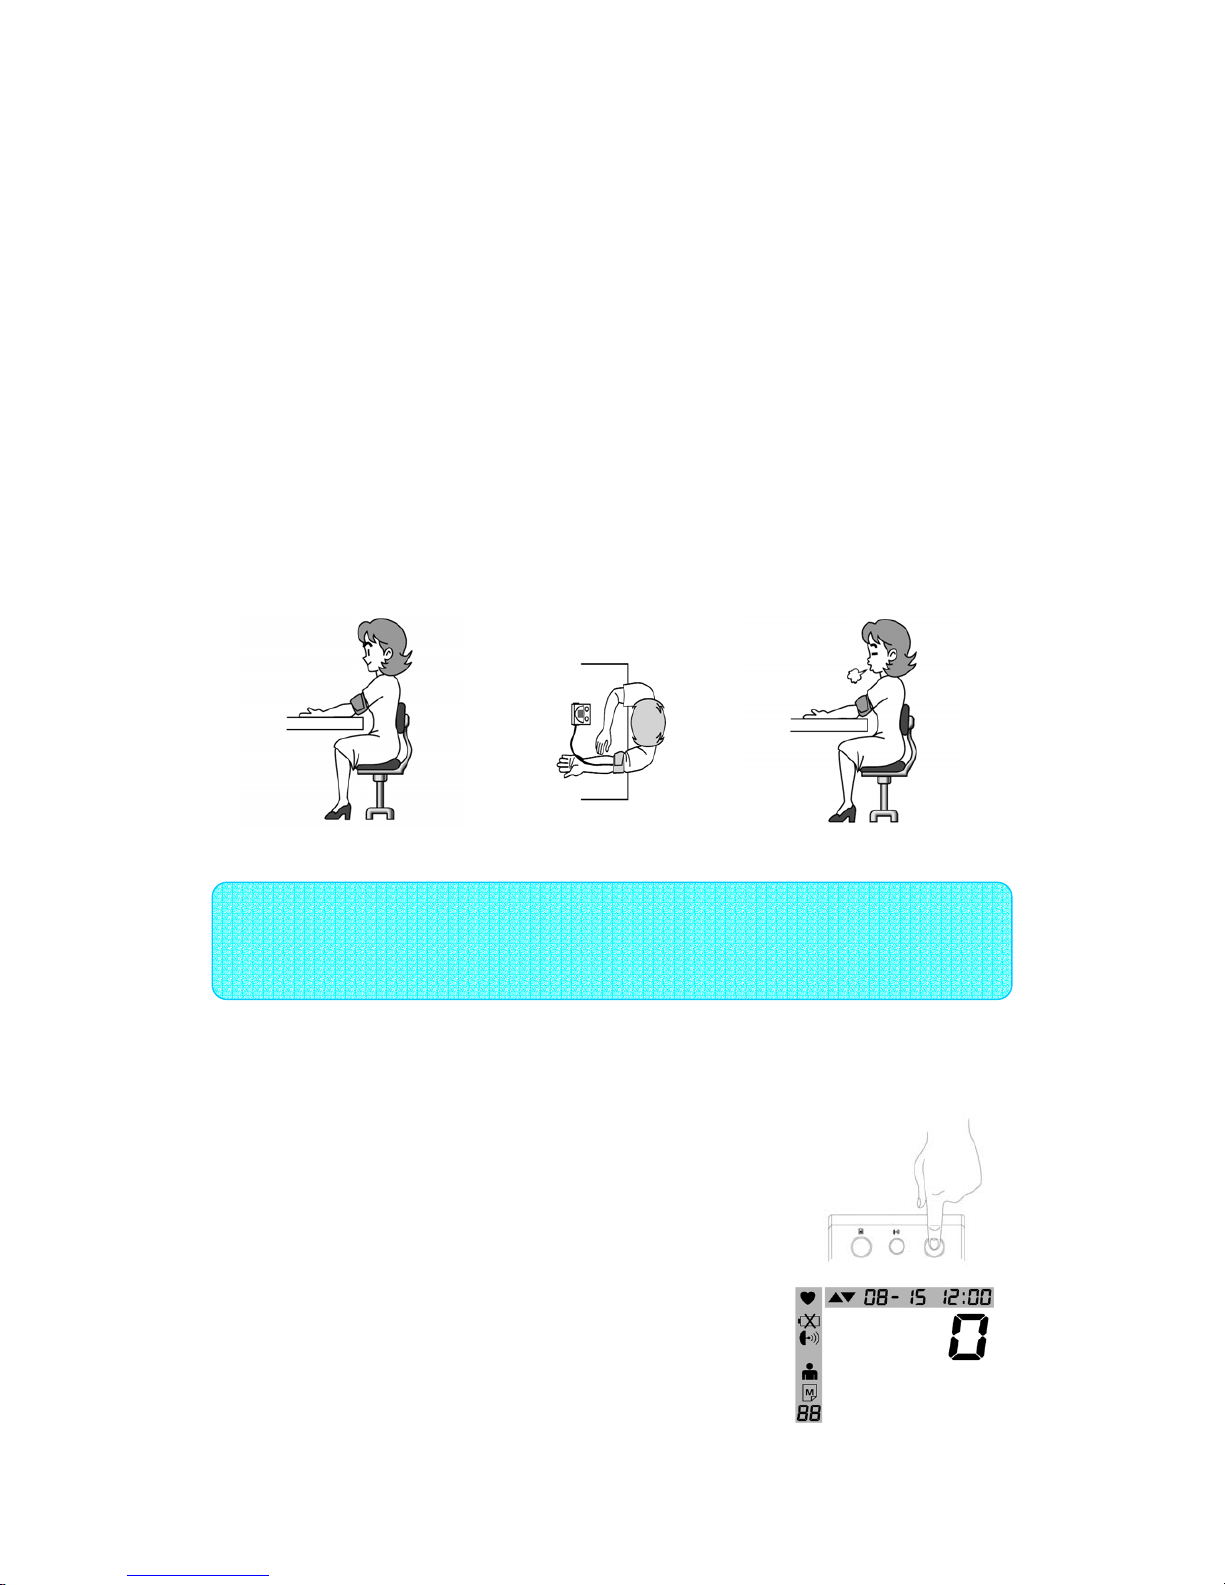
2. Correct measuring posture
① Please place your arm with the palm facing up on the table. When the table is
too low for your arm to position the heart level, adjust the level off with a
cushion, towel or a similar material.
② For monitoring, sit down comfortably on a chair with your feet flat on the floor
and take deep breaths 5 to 6 times and relax.
3. Measuring method
① Press the I/O button
Wrap the cuff around your arm and press [I/O] button to
start.
There will be a momentary full-segment display.
② Automatic pressurization
The LCD panel changes to the momentary screen
displayed all symbol in LCD edge and [0] in main
LCD.
Note Sit comfortably on a chair with your feet flat on the floor and
relax before monitoring starts. Monitoring should be taken in a
quiet place.
Page 26
26
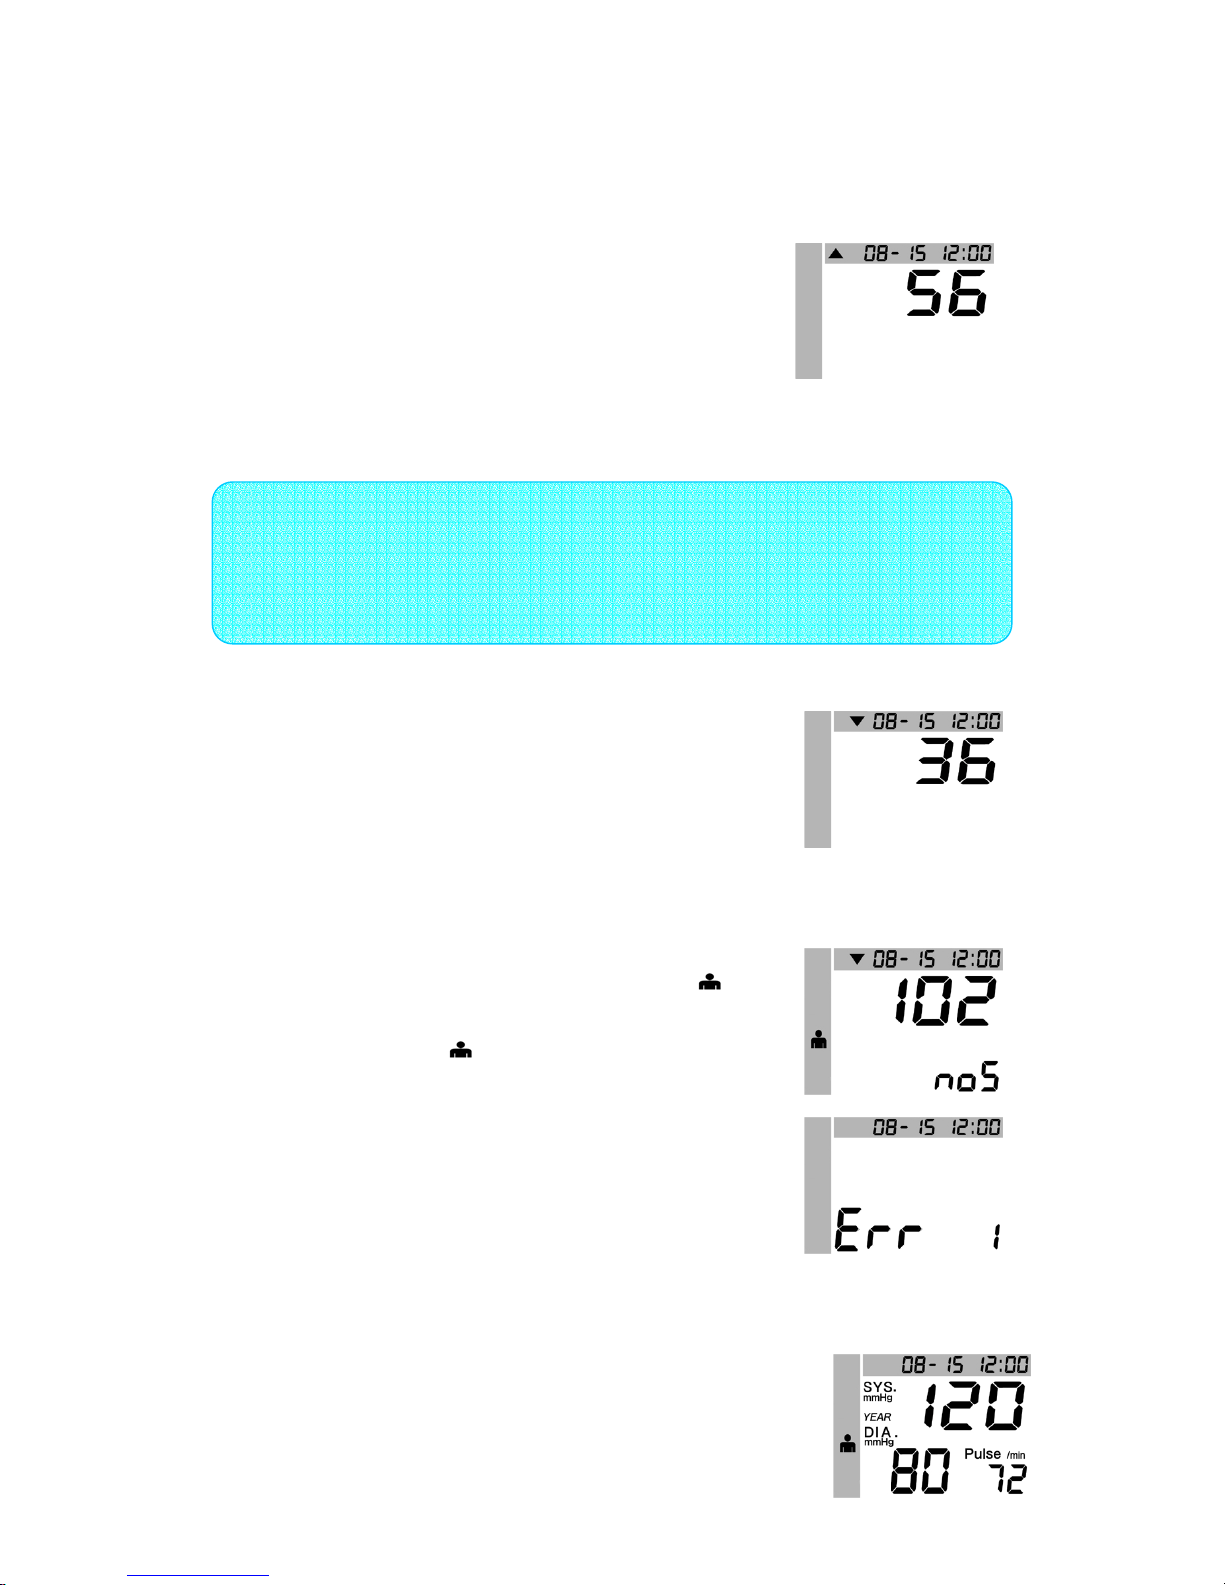
Then [▲] symbol remains on LCD panel coinciding
with a start of pressurization. At this time the number
to show the inflated cuff pressure will increase rapidly
as a normal process and the cuff will tighten as air
enters in it. The value of pressurizing is determined
automatically. Do not move your arm and remain still
until the entire measurement completed.
③ Monitoring is in progress
When the pressurizing is over, [▼] symbol appears
and air is released from the cuff slowly. You can
feel the cuff become less tight gradually.
④ Monitoring will start with deflation and if the pulse is sensed during deflation
[♥] symbol appears and flashes.
⑤ When noise is detected during measurement, [
]
appears on its place on the screen. In case that
you move or speak, [
] is accompanied with
a voice warning as “Don’t move or speak please.”
But monitoring will be continued after a pause.
⑥ When Error occurs due to insufficient inflation,
re-pressurization will be held automatically with a
voice massage as “Can’t measure. We will try again.”
⑦ Display the results
When monitoring is over, the value of systolic and
diastolic blood pressure and pulse will be displayed
Note 1.When noise or movement including talking is sensed during
pressurization, re-pressurization will be held automatically.
2. If a higher inflation is needed in any circumstances, the device reinflates the cuff up to 30~40㎜Hg higher
Page 27

27
on LCD simultaneously, then the voice massage comes
out as “Your blood pressure is systolic 000, diastolic
000, pulse 00.” If the noise or movement has been
detected during monitoring, voice massage says also
“There is movement during measuring.” and shows
the [
] in result view.
⑧ Switch off the power
To finish the measurement, press the I/O button and
remove the cuff gently. The monitored reading will be
stored automatically into the memory.
4. Memorizing
ECHO-FT has 64 reading memory capacities. When memorized readings are
retrieved, they are displayed with monitoring date and time respectively. The
reading detected noise or movement during measurement accompanies [
].
1) Storing the readings
The readings are stored automatically when the monitoring is completed. When
its memory capacity is fully occupied the last data replaces the oldest one.
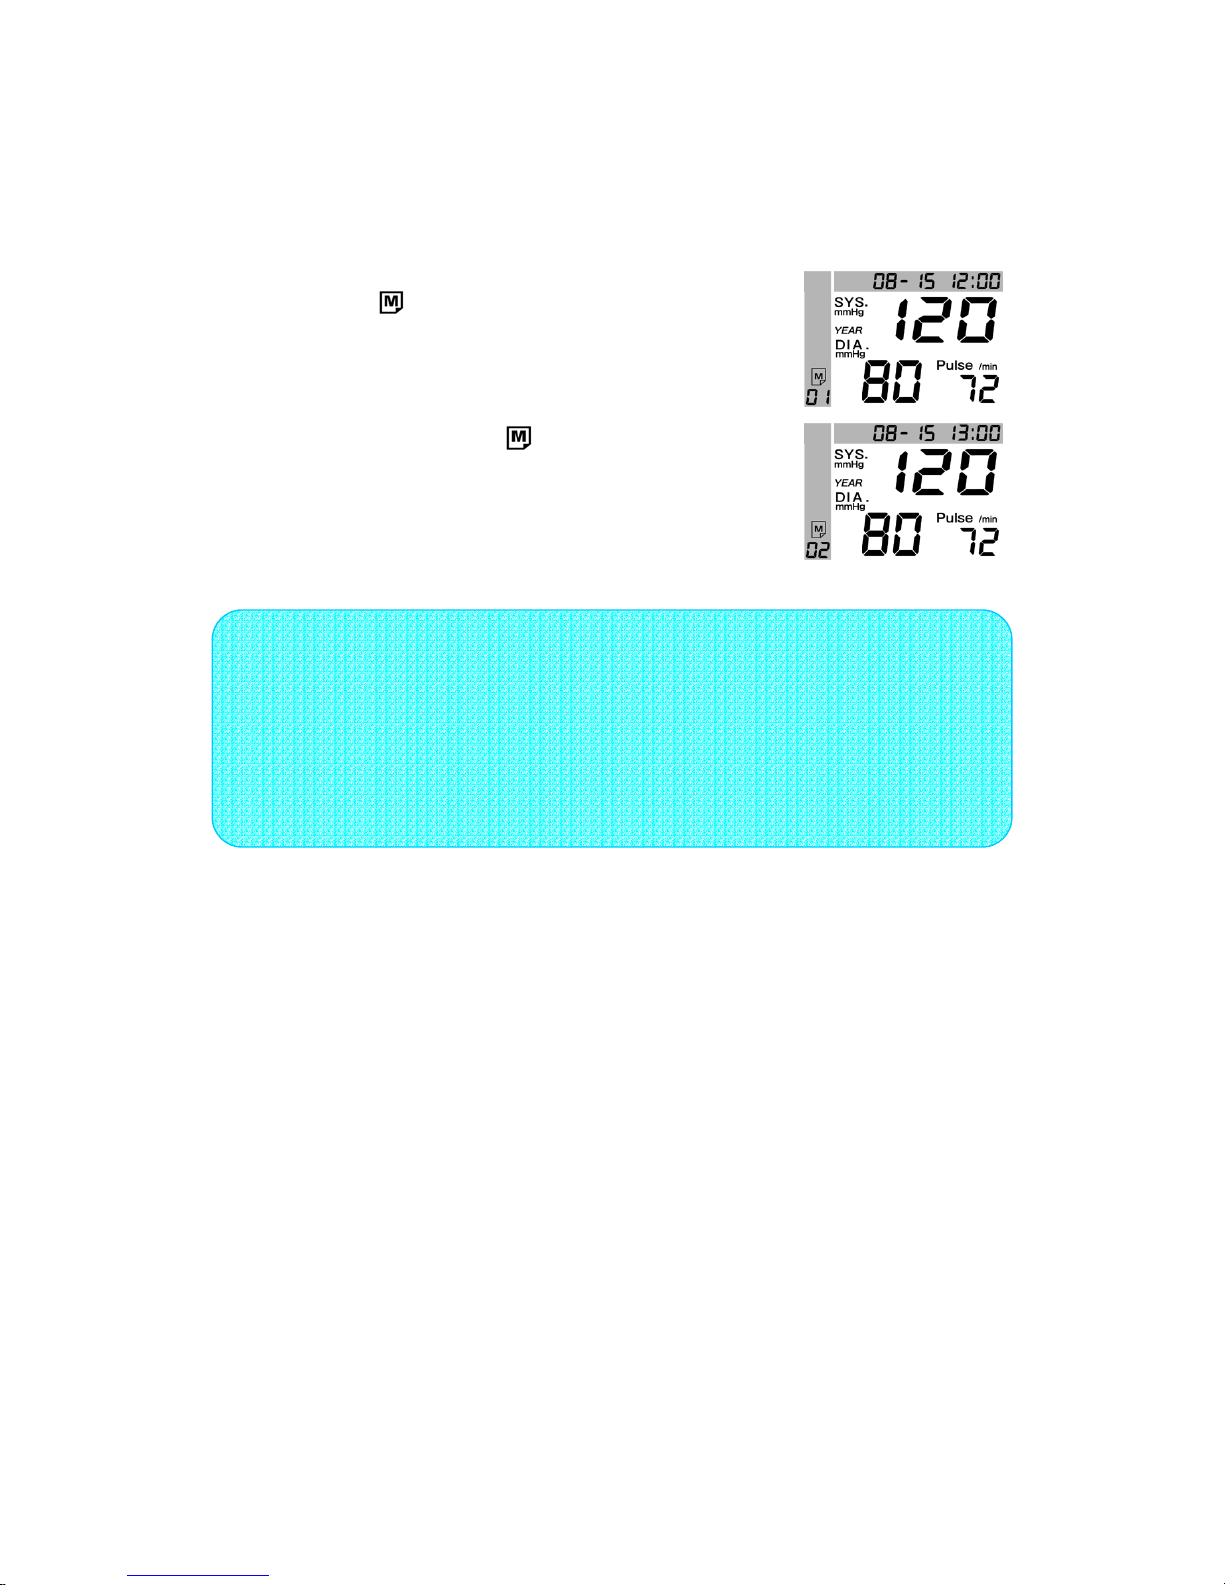
2) How to retrieve the stored data
① Press the [
] button.
② The latest reading will be displayed on main
Note Even if you forget to press the I/O button, the power will be
automatically turned off after 1 minutes.
Caution
1. During measurement, do not move your fingers, hand, or arm, and do
not put them on stress.
2. If you want to stop measuring, press the I/O button. Pressurization will
stop immediately and air will be exhausted rapidly, then the power will be
turned off.
Page 28
28
LCD and the number ‘01’ appears in the
memory number displaying part.
③ When the [
] button is pressed again
the second latest reading will be displayed
on LCD with the memory number ‘02’.
④ Further pressing of the [
] button, the
data will be displayed respectively in reverse
order from the latest one to oldest one with
memory number increasing.
Note 1.Data saved in memory can be all deleted, exchange battery or
remove an AC adapter
2. Please insert battery in unit when use an AC adapter
3. To completely eliminate saved data, take out battery and
p
lease
press one time of [I/O] button.
4. The memory capacity is subject to change for promotion.
Page 29
29
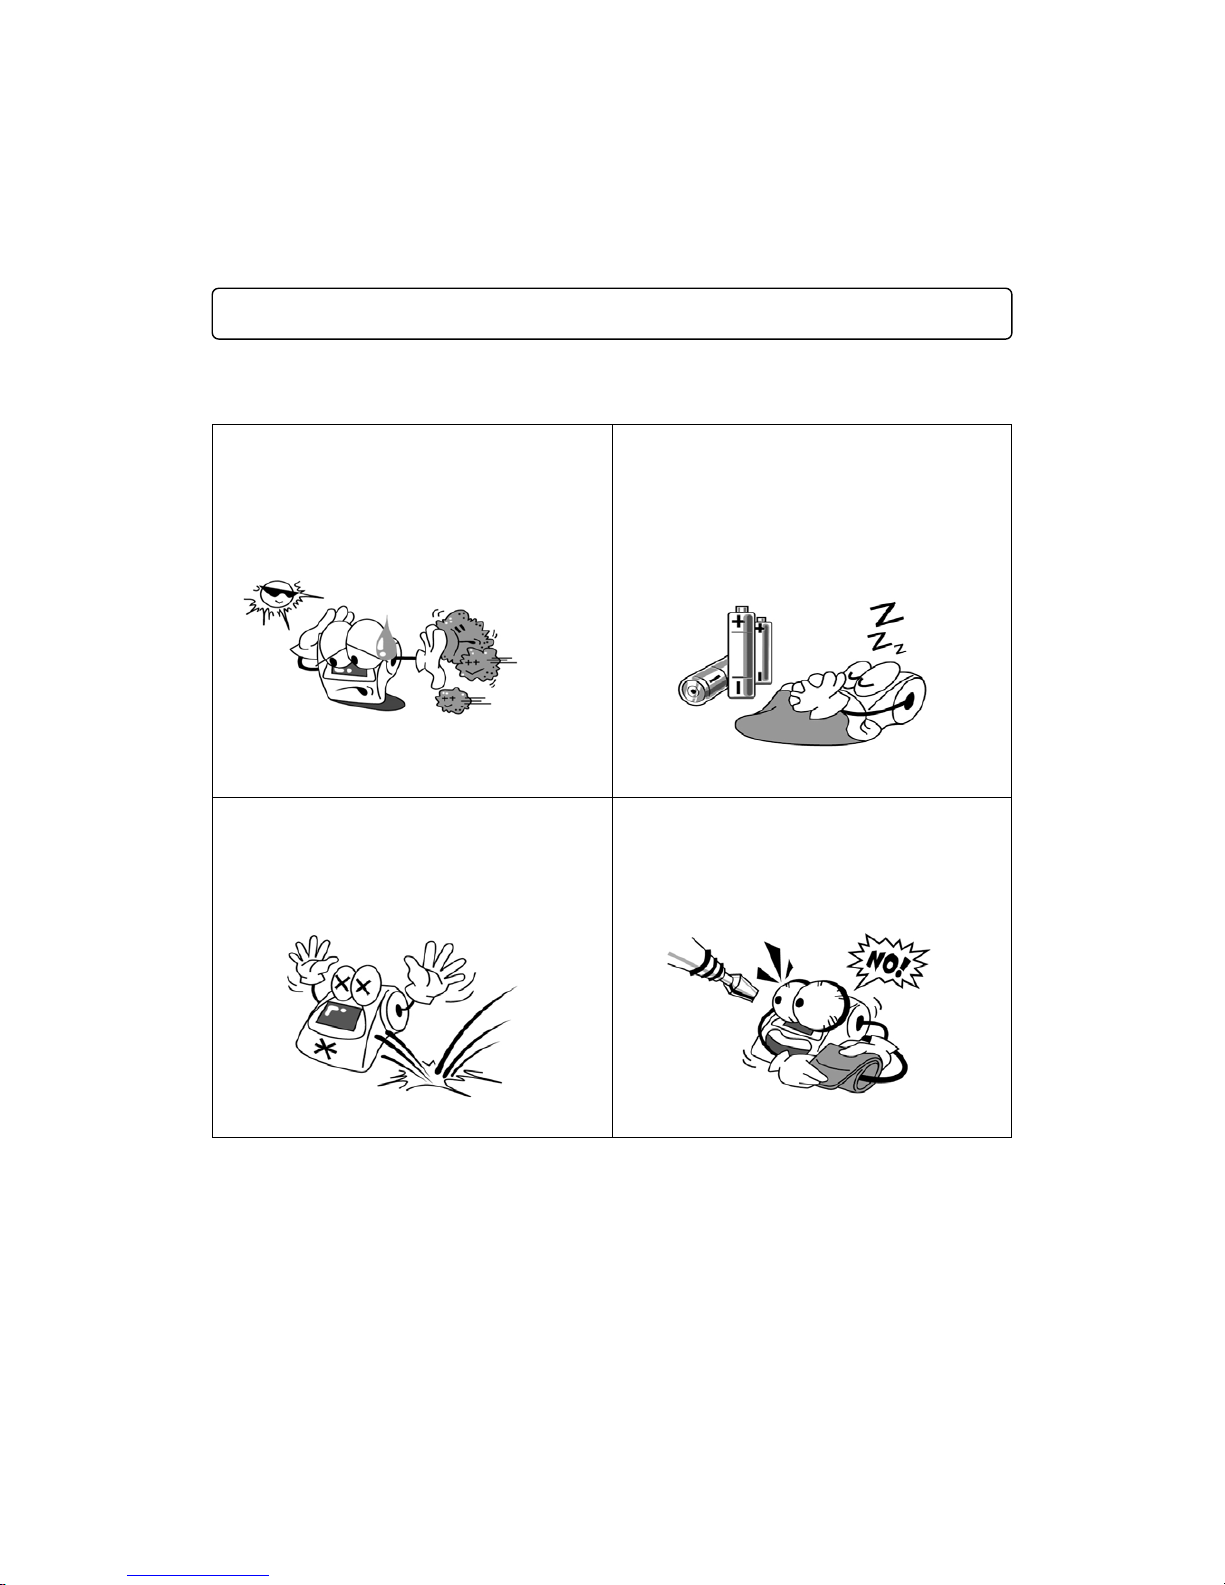
1.Maintaining
Avoid exposure to dust, direct sunlight,
humidity and extreme changes in
temperature.
If this unit is not being used for a long
period of time, please remove the
batteries.
Do not drop the unit.
Do not disassemble the main body or
the cuff.
MAINTENANCE AND STORAGE
Page 30
30
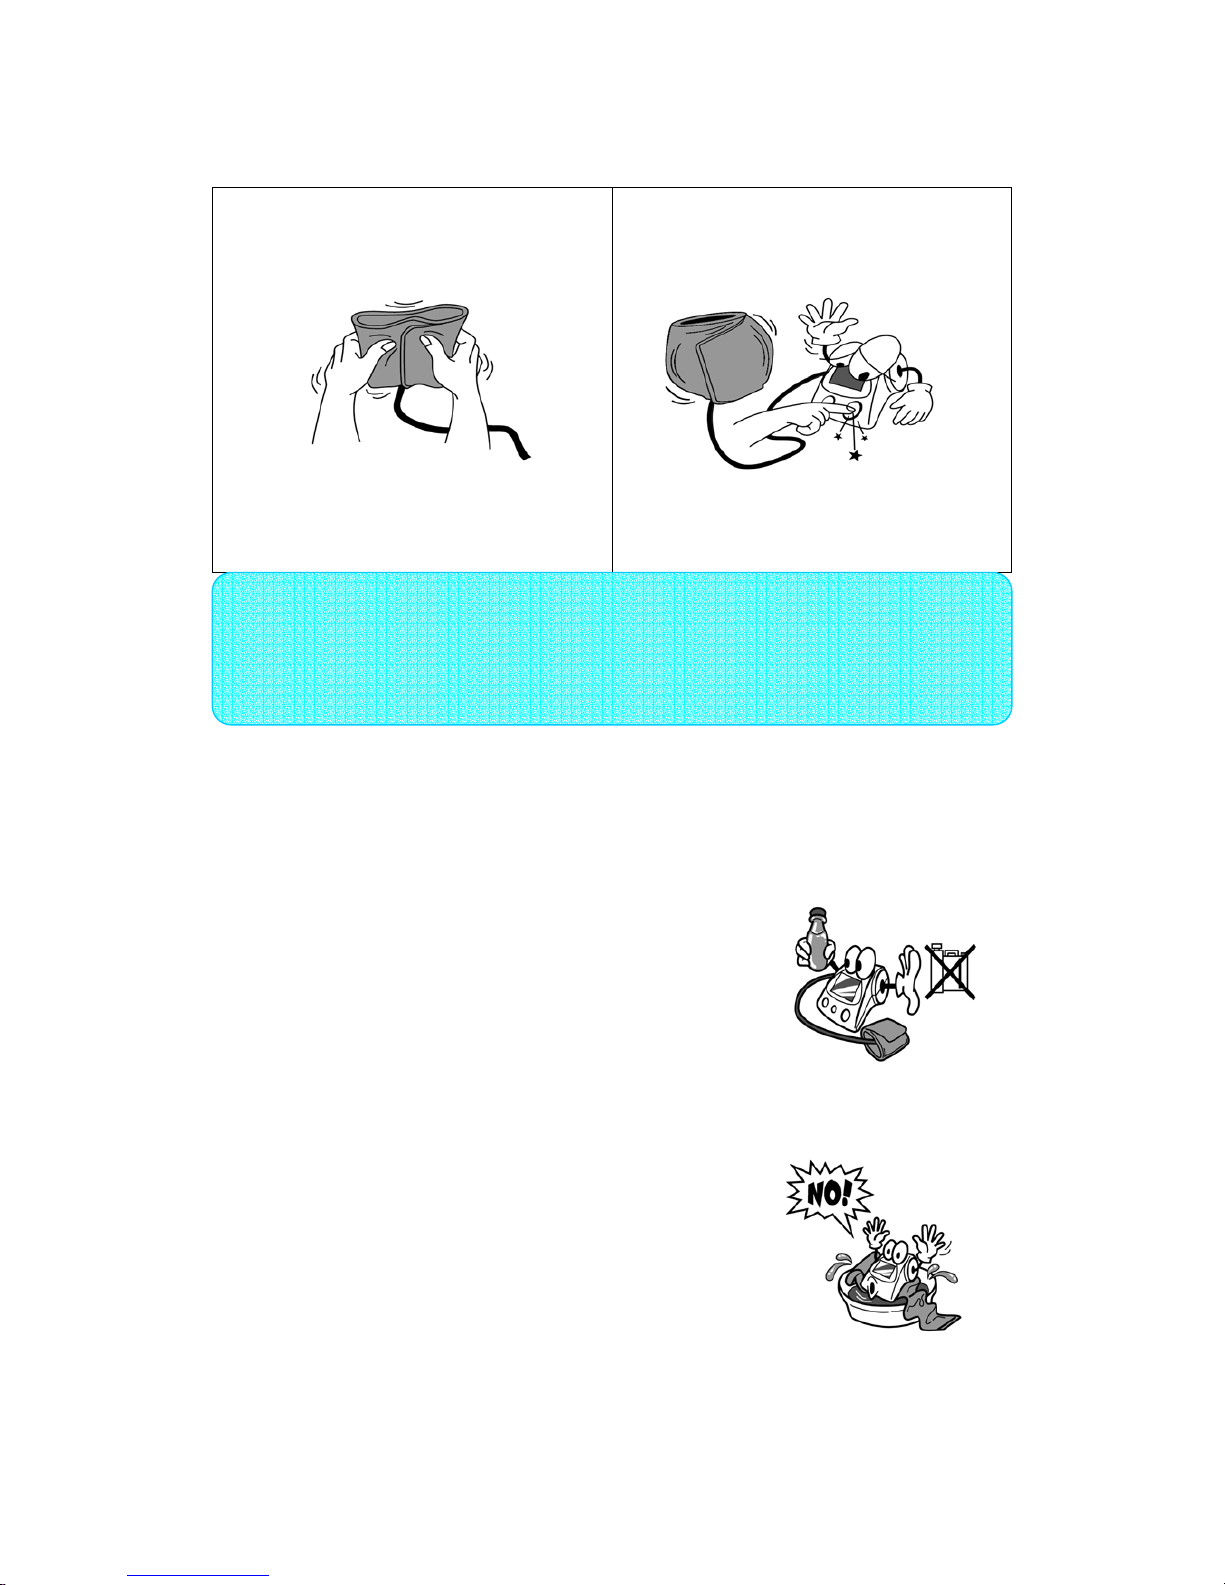
Do not fold or bend the cuff forcibly.
Do not operate the unit without wrap
the cuff around your arm.
2. Cleaning
1) Main body
① When cleaning, use a soft cloth, slight
moistened with water or a neutral
detergent, then wipe it with a dry cloth.
If the unit is contact with water in outer
case, dry it immediately with a soft
lint-free cloth.
② Do not use abrasive or corrosive cleaning
agent, thinner, alcohol, benzene or similar
solvents which might damage the device.
③ It is recommended to clean the unit monthly.
2) Cuff
Do not wash or dip the cuff in the water.
Note
Do not immerse the unit in water. The device exposed to foreign material and
exceptional environment need to be check whether the device is functioning
properly and safely before using
Page 31

31
1. Against Error
ERROR CAUSE SOLUTION
Err 0
* When inflation level is not
sufficient.
* When air hose is not
connected well.
* When air leaks from the cuff.
* When battery power is low.
* Please set higher inflation
Level.
* Check if there is any
‘CAUSE’.
* After settle it, monitor
again.
Err 1 * When a cuff is not
connected to a monitor.
*When a cuff is positioned
incorrectly
* Please check if the cuff is
connected well to the unit
and monitor again.
Err 2 * When the pressurization is over
than 300㎜Hg.
* Please turn the power off
then on and monitor again.
Err 3 * When monitoring is carried
out the wrong way.
* When a read data is not output
as a result of noise or movement
detected.
* Please read ‘wrapping the
cuff’ and ‘correct
measuring posture’ in
‘Measurement’ part.
(page 18~19)
*Monitor again following the
way instructed.
Err 4 * When moving or speaking is
sensed during monitoring.
* Please do not move or
speak during monitoring.
Err 5 *When battery is not fixed well.
*When the polarities are positioned
incorrectly.
*Check if the polarities of
the batteries are positioned
correctly.
*After disconnecting
batteries in unit and press
[I/O] button, then replace
them.
※ If any error continues, call its service center.
TROUBLE SHOOTING
Page 32
32
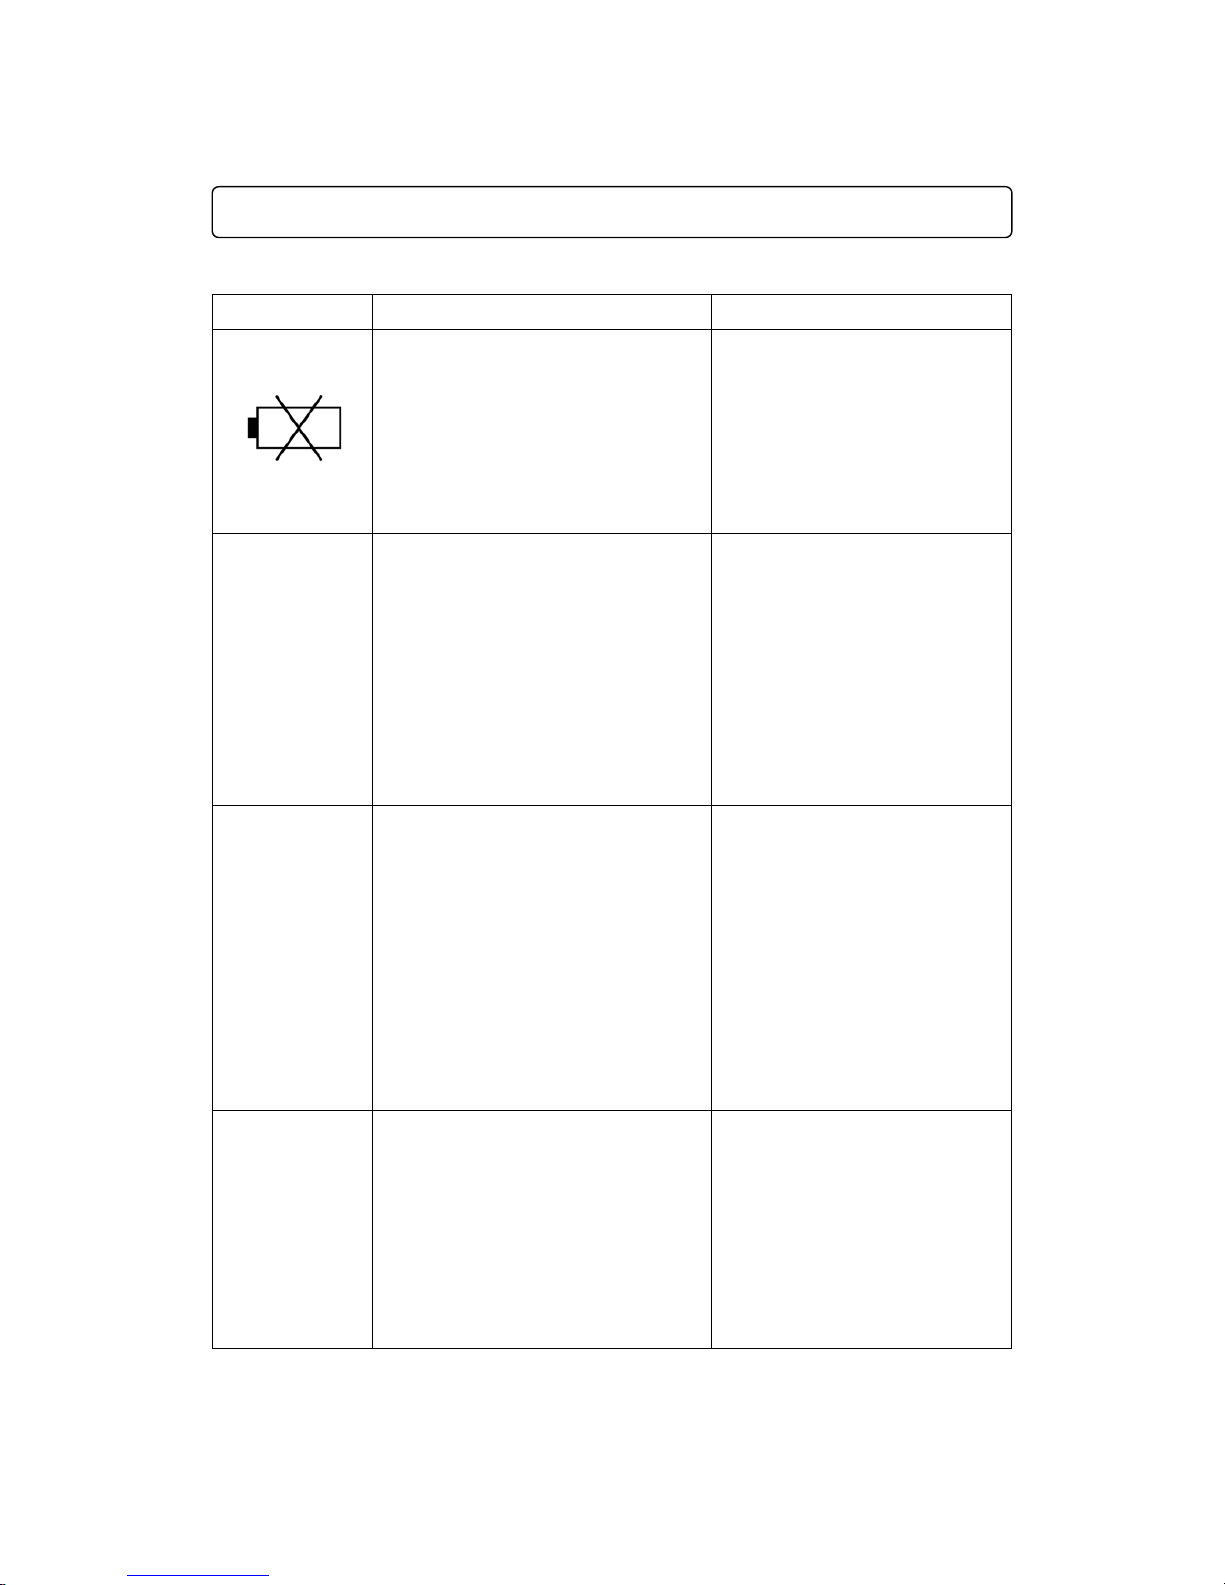
2. Against trouble
SYMPTOM CAUSE COUNTERMEASURE
The battery power is low.
(When batteries are exhausted
completely, the mark does not
appear on the LCD any more.)
Replace all four “AA” type
batteries at the same time.
Before change, transmit the
data to your computer first.
The blood
pressure value
seems too
high or low.
High: When your arm positioned
lower than your heart
during monitoring.
Low : When your arm positioned
higher than your heart
during monitoring.
Make sure that your arm
position at the same level as
your heart, then monitor
again.
Repressurization
In case of insufficient inflation.
The movement of the arm or
body during inflation is sensed.
(In case of excessive
hypertension or a feeble pulse, it
is possible to occur
re-pressurization over 2 times.)
Relax for a few minutes then
monitor it again with correct
posture.
Do not move during
monitoring.
The unit does
not start
monitor again
after error
occurs.
The cuff may not be worn the
cuff or positioned incorrectly.
Monitor again after wearing
the cuff correctly and
positioning your arm as your
heart level.
TROUBLE SHOOTING
Page 33

33
1. Manufacturer’s limited warranty
The warranty and remedy provided herein are exclusive and in lieu of all other
express warranties and unless stated herein, any statements or representations
made by any other person or entity are void.
Neither the manufacturer, distributor nor their affiliates shall be liable for any loss,
inconvenience, injury, or damage including direct, special, incidental, or
consequential damages resulting from the use or inability to use this product,
whether arising out of any breach of this warranty or any other legal theory. All
express and implied warranties, including the warranties of merchantability, are
limited to the applicable warranty period set forth above.
Manufacturer and distributor assume no responsibility for damages or penalties
incurred resulting from the use of this product in a manner or location other than
that for which it is intended.
Some states do not allow the exclusion or limitation of incidental or consequential
damages, or limitations on how long an implied warranty lasts, so the above
exclusions or limitations may not apply to you. This warranty gives you specific
legal rights and you may also have other rights which vary from state to state.
Should your product prove defective during this warranty period, please return the
product in the original carton to your place of purchase for warranty service.
2. Warranty steps
Should you experience any technical problems with your product, please follow the
steps below :
① Re-read “Wrapping of the cuff” and “Measuring method” portion of the
instructions carefully, then take a measurement again. If the problems persist,
your product may be defective. If you believe the product defective, follow this
warranty steps ② or ③ below.
② Manufacturer, at its option, will repair or replace your product (with a same or a
comparable model) with new or rebuilt parts, free of charge within one year
from the date of original purchase in the event of a defect in materials or
workmanship. This warranty is extended only to the original purchaser. A
WARRANTY
Page 34

34
purchase receipt or other proof of date of original purchase will be required
before warranty performance is rendered.
③ This warranty only covers failures due to defects in materials or workmanship
which occur during normal use and does not cover normal wear of the product.
This warranty is void if the product housing has been removed, if the
manufacturer’s label, logo, or serial number have been removed, or should the
product fail to function properly as a result from accident, misuse, abuse,
neglect, mishandling, misapplication, defective batteries, faulty installation,
set-up and adjustments, improper maintenance, alteration, maladjustment of
controls, modification, power surges, commercial use of the product, or
service by anyone other than an authorized service center, or acts beyond
Manufacturer’s control.
3. Where applying for solving problem
Should you be dissatisfied with the service you received from your retailer, please
write
JAWON MEDICAL CO.,LTD.
• Seoul office
Tel : *82-2-587-4056 Fax : *82-2-588-1937
• Factory
13 Lot, 21 Block
Jinryang Industrial Complex, Kyungsan-city
Kyungsangbuk-do 712-830, R.O.Korea
Tel : *82-53-856-0993 Fax : *82-53-856-0995
Include in your correspondence the following information, clearly printed
(i) Your name and street address
(ii) Daytime telephone number
(iii) A detailed description of the problem
(iv) A copy of your dated proof of purchase or bill of sale
Page 35
35
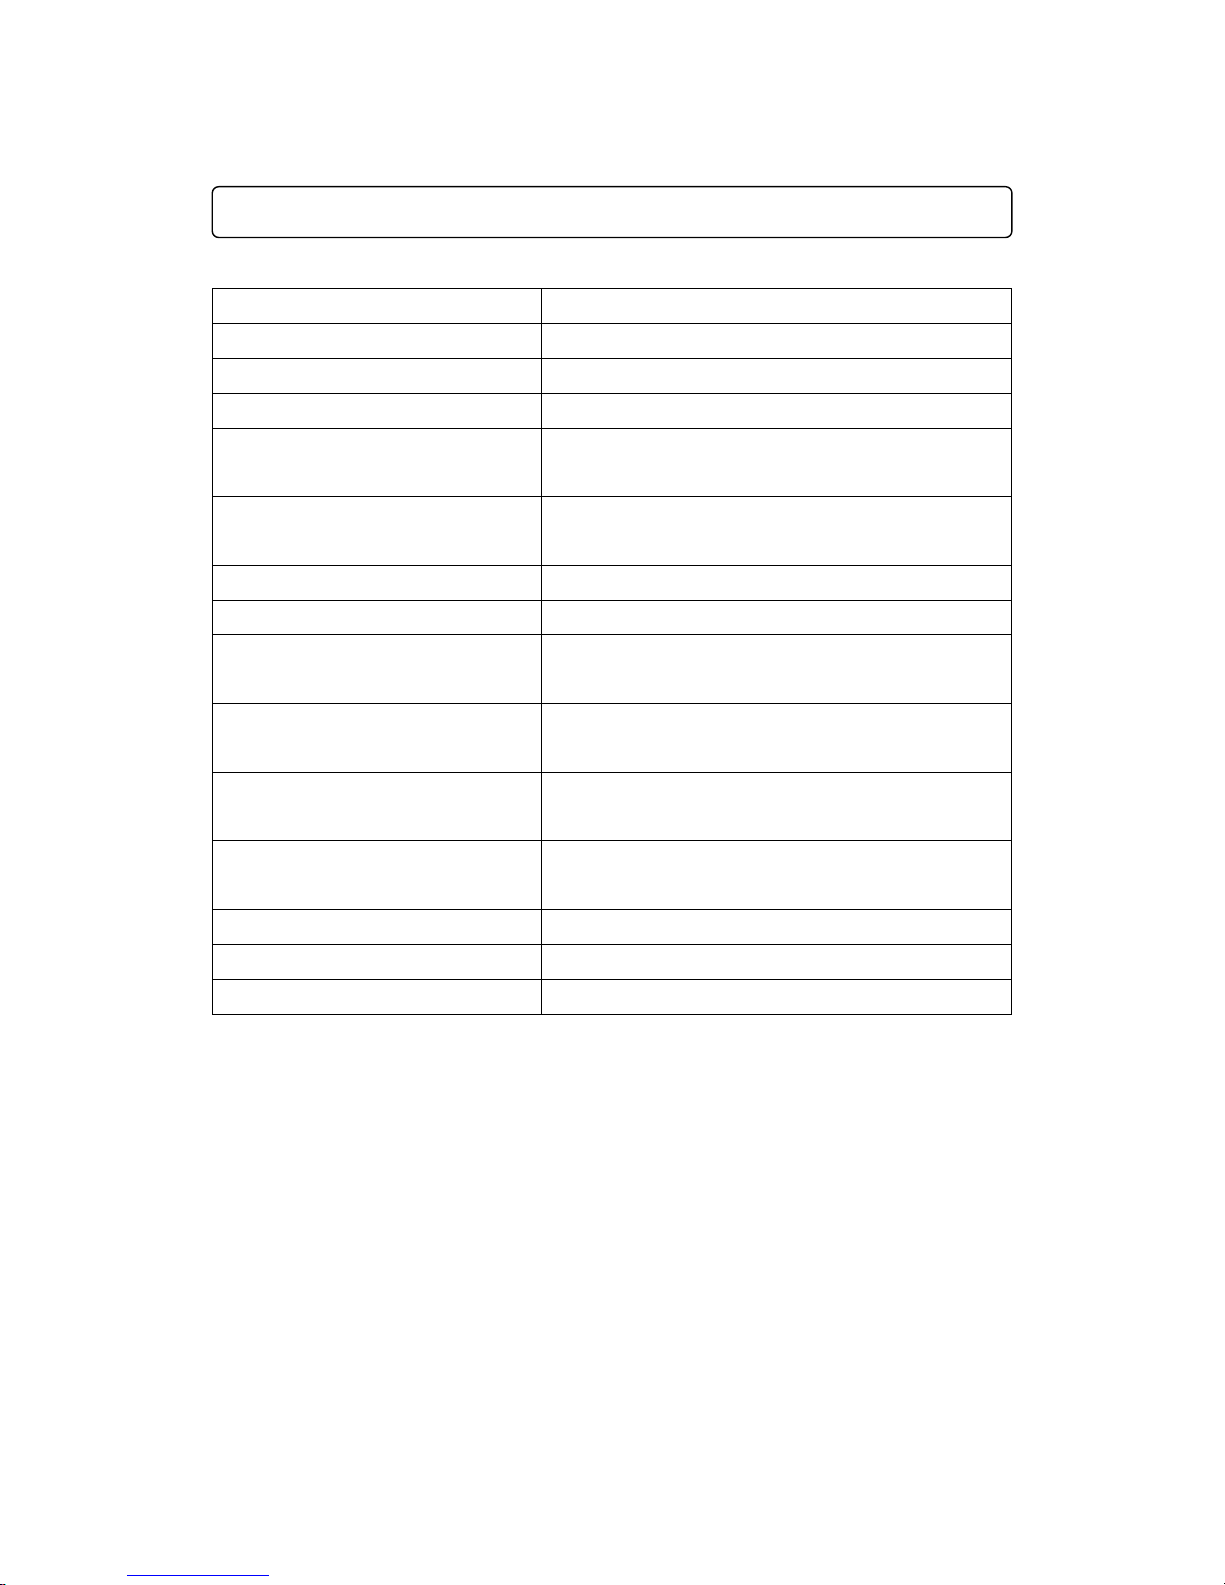
Model ECHO-FT
Method of Measuring Oscillometric
Method of indicating Digital
Pressurizing Method PWM(Pulse Width Modulation)
Range of Measuring Blood Pressure : 30 ~ 280mmHg
Pulse Rate : 40 ~ 200beats/min
Accuracy Pressure : within ±2mmHg or ±2%
Pulse Rate : within ±5%
Memory 64 Reading Memory
Resolving Power 1mmHg
Automation Shut-off System Performs approximately 1 minutes after
measurement.
Power
DC 6V(AA type 1.5V x 4),
AC adaptor compatible
Operating Environment Temperature : 10℃ to 40℃
Humidity : 30 ~ 75% RH, non condensing
Storage Environment Temperature : -20℃ to 60℃
Humidity : less than 95% RH, non condensing
Dimension 102.0(W) X 133.0(D) X 63.2(H) mm
Weight Approx. 500g (Including cuff &batteries)
Pressure Mode Fuzzy logic Automatic inflation
◈ Specifications are subject to change without notice.
* Life of battery can be reduced according to environment.
* This manual cannot do whole or a part reproduction without notice without
written consent of JAWON MEDICAL according to copyright act.
* JAWON MEDICAL does not have responsibility about a misprint and do not take
the responsibility on the results about which do indication in manual, or did not
do presentation.
SPECIFICATION
Page 36
36
 Loading...