

Page 1
User Manual
Original document
version 2015-1
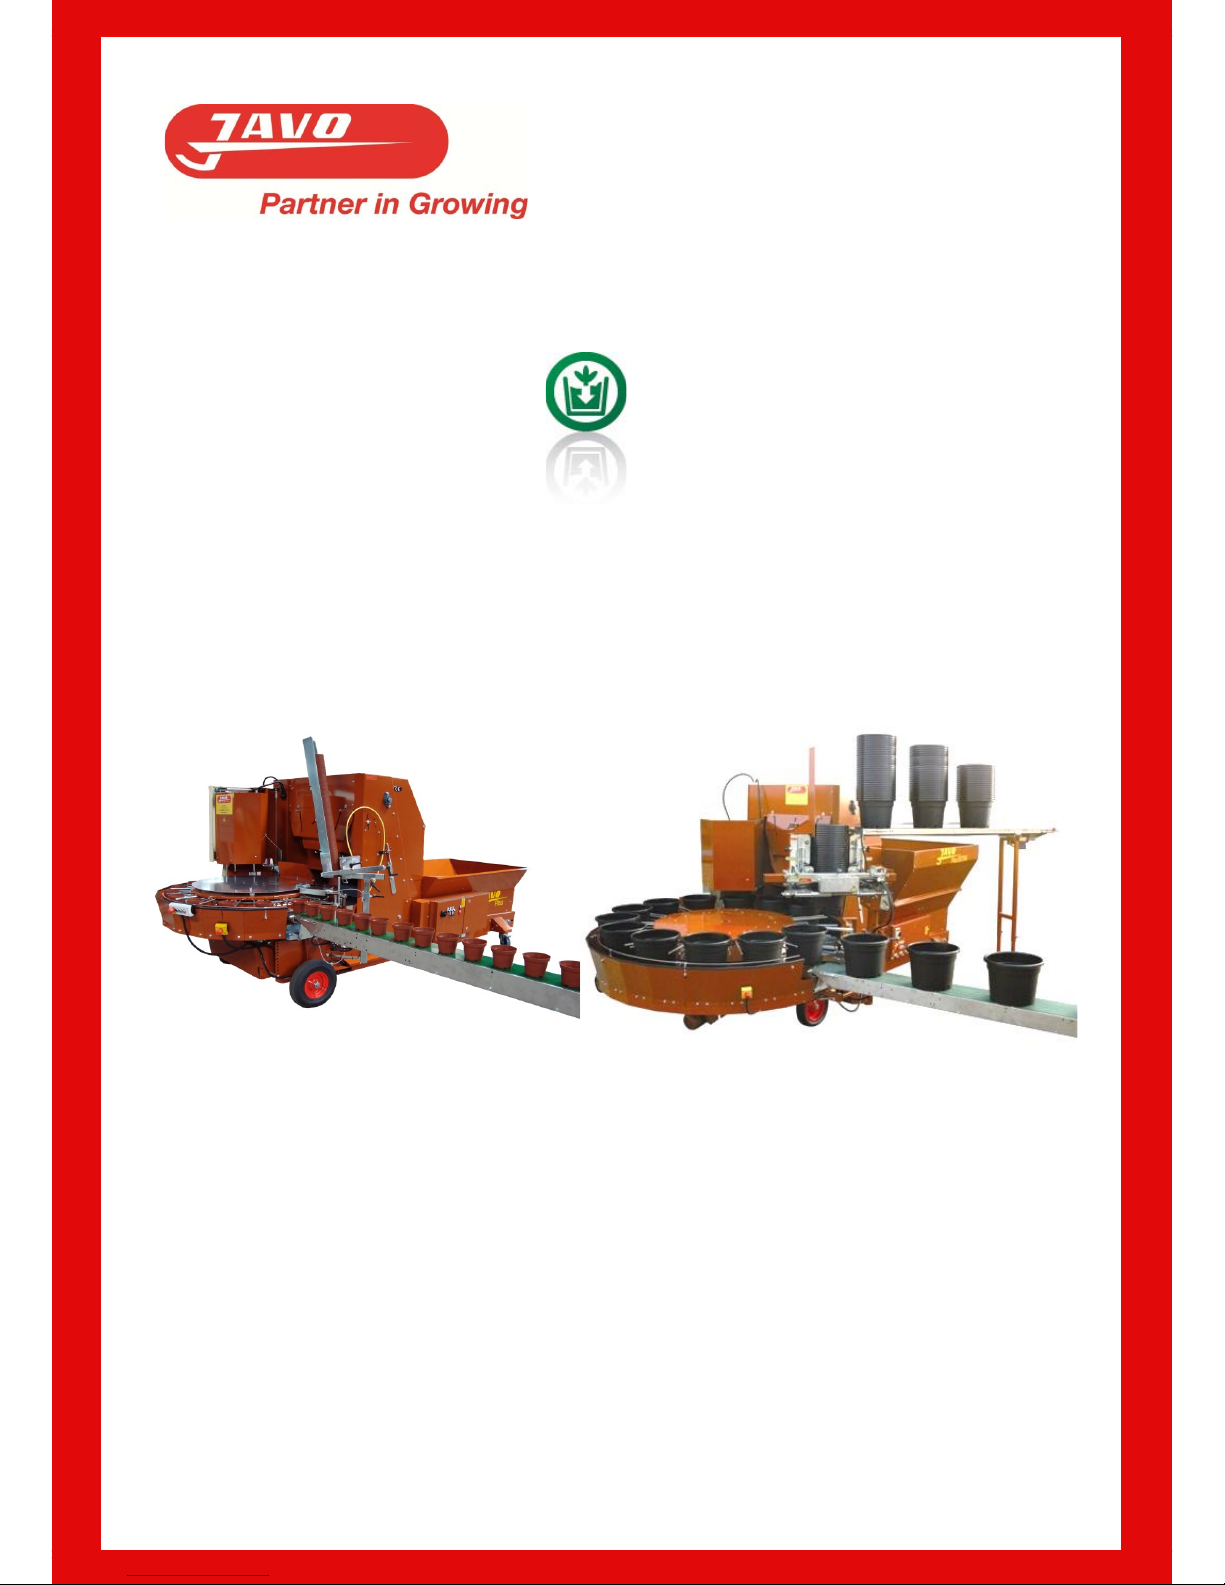
Plus/Plus Extra Potmachine
Machine nr.: ……………………………………
Javo BV
PO Box 21
2210 AA Noordwijkerhout
Holland
T: +31 (0)252 343121
F: +31 (0)252 377423
info@javo.eu
www.javo.eu
© All rights reserved
The information provided herein may not be reproduced and/or published in any form, by print, photo print, microfilm or any other means
whatsoever (electronically or mechanically) without the prior written authorisation of JAVO BV.
Page 2

User Manual Javo Plus en Plus Extra Potmachine
Version 2015-1 1
Preface
This user manual is written for anyone working on or with the machine. Before working on or with the machine, first
read this manual.
This user manual contains important instructions / information on how to use the machine in a safe, professional
and economical way and must always be available where the machine is used.
In addition to this user manual, the mandatory rules and regulations for accident prevention and environmental
protection in the country and place of use of the machine must also be observed.
This user manual contains information on the operation of the machine with all the possible options. Use only the
information that applies to your machine. Depending on the intensity of use and customer requirements, this
machine can be equipped with various options. Contact your sales consultant.
Supplier details if not directly supplied by Javo
BV. Dealer stamp:
Javo BV is not responsible for any errors in this manual or the consequences thereof.
Javo BV is not liable for damage or consequential damage caused by operating errors, lack of expert maintenance and any use other than
described in this manual.
The liability of Javo BV also expires once modifications or additions are made without written permission of Javo BV.
This machine is suitable for process and environmental conditions as stated in section "Specifications and Tolerances" of this manual. Any
other use is not authorized by Javo BV and this allows the operator and / or its environment at risk.
Page 3

User Manual Javo Plus en Plus Extra Potmachine
Version 2015-1 2
Table of contents
1 Technical specifications and tolerances ......................................................................................................... 4
1.1 Type plate .......................................................................................................................................................... 4
2 Safety ........................................................................................................................................................... 5
2.1 Provisions .......................................................................................................................................................... 5
2.2 Safety devices on the machine ......................................................................................................................... 6
2.3 Explanation of icons and symbols ..................................................................................................................... 6
3 Description of the machine ........................................................................................................................... 7
3.1 Machine overview ............................................................................................................................................. 7
3.2 Outline drawing with main dimensions ............................................................................................................ 8
3.3 Options .............................................................................................................................................................. 9
3.4 Operation .......................................................................................................................................................... 9
3.5 Machine workstations ....................................................................................................................................... 9
3.6 Controls ........................................................................................................................................................... 10
4 Transport ................................................................................................................................................... 11
5 Mounting, installation and commissioning .................................................................................................. 12
5.1 Placement ....................................................................................................................................................... 12
5.2 Facilities to take care of by the user ............................................................................................................. 12
5.3 Mounting / Connecting ................................................................................................................................... 12
5.4 Check elevator rotation direction ................................................................................................................... 12
5.5 Check drill rotation direction .......................................................................................................................... 13
5.6 Check substrate conveyor tension .................................................................................................................. 13
5.7 Check elevator belt tension ............................................................................................................................ 13
5.8 Set elevator and pottrack speed ..................................................................................................................... 14
5.9 Set brush height .............................................................................................................................................. 14
5.10 Set substrate slide height ................................................................................................................................ 14
5.11 Set pottrack dimensions Plus .......................................................................................................................... 15
5.12 Set pottrack dimensions Plus X ....................................................................................................................... 15
5.13 Set drill size ..................................................................................................................................................... 16
5.14 Set drill cover height ....................................................................................................................................... 17
5.15 Set substrate valve .......................................................................................................................................... 17
5.16 Moving the expiration conveyor (option for Plus) .......................................................................................... 18
6 Operation ................................................................................................................................................... 19
6.1 Start ................................................................................................................................................................. 19
6.2 Stop ................................................................................................................................................................. 19
6.3 Emergency stop .............................................................................................................................................. 19
7 Maintenance .............................................................................................................................................. 20
7.1 Required tools and equipment ....................................................................................................................... 20
7.2 Preventive Maintenance ................................................................................................................................. 20
Page 4

User Manual Javo Plus en Plus Extra Potmachine
Version 2015-1 3
7.3 Empty substrate bin ........................................................................................................................................ 21
7.4 Lubricate drill unit ........................................................................................................................................... 21
7.5 Elevator Blades Cleaning ................................................................................................................................. 22
7.6 Test safety circuit ............................................................................................................................................ 22
7.7 Fault list ........................................................................................................................................................... 22
7.8 Adjust substrate conveyor to larger stroke .................................................................................................... 23
7.9 Drawings and schemes.................................................................................................................................... 24
7.10 Spare parts ...................................................................................................................................................... 24
7.11 JavoNet ............................................................................................................................................................ 24
7.12 Customer support and advice ......................................................................................................................... 24
8 Disposal of machine or machine parts ......................................................................................................... 24
9 EG-conformity statement ............................................................................................................................ 25
Page 5
User Manual Javo Plus en Plus Extra Potmachine
Version 2015-1 4
1 Technical specifications and tolerances
This machine is intended to be used for filling pots automatically with substrate only. The filled pots are then
provided with a drill hole, in which a plant can be placed at the exit conveyor. This machine is meant for processing
pots, substrate and other materials that are described in this manual only. Detailed operation of the machine is
described in section "Operation".
This machine may be used only within the limits for specifications and tolerances of the order, on the
assembly drawing and indicated in this manual. If the machine is used outside these specifications, Javo BV
cannot take responsibility for this machine.
This machine is intended for products as agreed in the order confirmation only. To ensure the proper
operation of this machine, only products with specifications and tolerances as specified in the order may be
used.
Do not use the machine for purposes other than the intended purpose of Javo BV. This can lead to damage
and danger to the operator and its environment.
This machine is CE marked. When placing multiple machines in one line, the entire line must be properly CE
marked before using this machine. Untill proper CE Marking of the line is carried out, commissioning of this
machine is prohibited.
Specifications
Voltage
400Volt 50Hz 3~+N+ PE / 220Volt 60Hz
Machine connection
16A 5pole
Power consumption
3 kW
Switched socket
1x 16A 5 pole
Weight
Plus: ±1200 kg, Plus Extra: ±2000 kg
Height conveyor
Plus: 820 mm, Plus Extra: 790 mm
Max. speed
Plus: 3840 pots/hour (60Hz), Plus Extra: 1500/63 15/45 ±475 pots/hour
(60Hz)
Min. speed
Plus: 780 pots/hour (13 Hz), Plus Extra: 1500/63 15/45 ±250 pots/hour (13Hz)
Minimum pot diameter
Plus: 9 cm, Plus Extra: ±19cm
Maximum pot diameter
Plus: 23 cm, Plus Extra: ±38cm* (dependent on pot type)
Number of potholders
Plus: 16, Plus Extra: 14
Content substrate bin
1100 Litre (1,1 m³)
1000 revolutions drill motor (motor
axis 24mm)
Plus Extra
Drillbush (motor shaft size 19 mm)
Plus: Drill shaft 14 mm (up to drill 15 cm)
Operation
Loose controls with stop/start/e-stop/reset.
Inverter elevator
Standard (controlled on electrical cabinet)
Inverter pottrack
Standard (controlled on electrical cabinet)
Year of construction
See type plate
Type product
As agreed in the order confirmation.
Air (optional)
6 Bar; 250 nL/min.
1.1 Type plate
The type plate is placed onto the main cabinet door.
Website: www.javo.se
E-Mail: [email protected]
Page 6

User Manual Javo Plus en Plus Extra Potmachine
Version 2015-1 5
2 Safety
This machine is built according the state of the art technique and the accredited safety regulations. Despite
this, the body and life from the user or third parties can be in danger when using it. There could also arise
damage to the machine or other goods when using it.
This machine is CE marked. When placing multiple machines in one line, the entire line must be properly CE
marked before using this machine. Until proper CE Marking of the line is carried out, commissioning of this
machine is prohibited.
2.1 Provisions
1. Operation and maintenance of this machine must be performed by qualified personnel in compliance with
warnings on the machine and in accordance with the user manual. Keep children and other (unauthorized)
persons away while using machine.
2. This machine is suitable for process and environmental conditions as stated in section "Specifications and
Tolerances" of this manual only. Any other use is not authorized by Javo BV and this allows the operator and /
or the environment at risk.
3. It is prohibited to modify this machine, without prior written approval of Javo BV.
4. Thermal fuses and torque limiters may not be set different upon delivery of the new machine. The thermal
circuit breakers should never be used to turn on / off the machine.
5. This machine should be installed so that there is sufficient space remaining for providing safe instructions and /
or performing maintenance and / or inspections. Put the brakes on the castors before the machine is turned on.
6. Keep the work area clean and well lit. Cluttered or dark areas invite accidents.
7. This machine is not suitable to be used outside. Electrical components are only splash proof. Keep the machine
away from rain and moisture. When using the machine in a humid environment is unavoidable, you should use
an RCD.
8. Keep hands, hair, loose clothing and / or jewellery away from moving parts of the machine. Wear appropriate
clothing without loose parts. Wear non-slip work shoes.
9. As long as the machine is on, no connection or safety devices may be removed. The machine may only be used
when all protective devices and safety-related facilities are available and ready for use.
10. Do not stand on the machine when it is operating.
11. Never move the machine if the power cable and / or pneumatic supply is still connected.
12. Prescribed checks and maintenance in the user manual must be observed.
13. Allow the machine to be serviced and repaired by qualified personnel only with original replacement parts.
14. In addition to the user manual, generally applicable statutory and other regulations regarding accident
prevention and environmental protection have to be respected. This is also referred to handling of personal
protective equipment.
15. Inform operating personnel before start maintenance. Interrupt if possible the power (mains), before start
machine investigation or maintenance by turning off the main switch and locking the main switch. Pull the plug
from the wall socket.
a. As work must be done with power supply (mains) voltage on the machine, then arrange an
additional person who can operate the emergency stop.
16. When a machine part is damaged or not working in the prescribed manner, the work must be interrupted
immediately. Resumption allowed only when the machine part is repaired or replaced and checked. Consult
your dealer if the machine is not functioning properly.
17. Machine and / or parts must be disposed in accordance with local laws and regulations.
Page 7
User Manual Javo Plus en Plus Extra Potmachine
Version 2015-1 6
2.2 Safety devices on the machine
Caps and doors are screening moving parts. Always place back caps and close doors before the machine is
turned on. Caps and doors should remain closed while operating the machine.
The motors of the machine are protected against overload by thermal switches. These switches are located in the
control box.
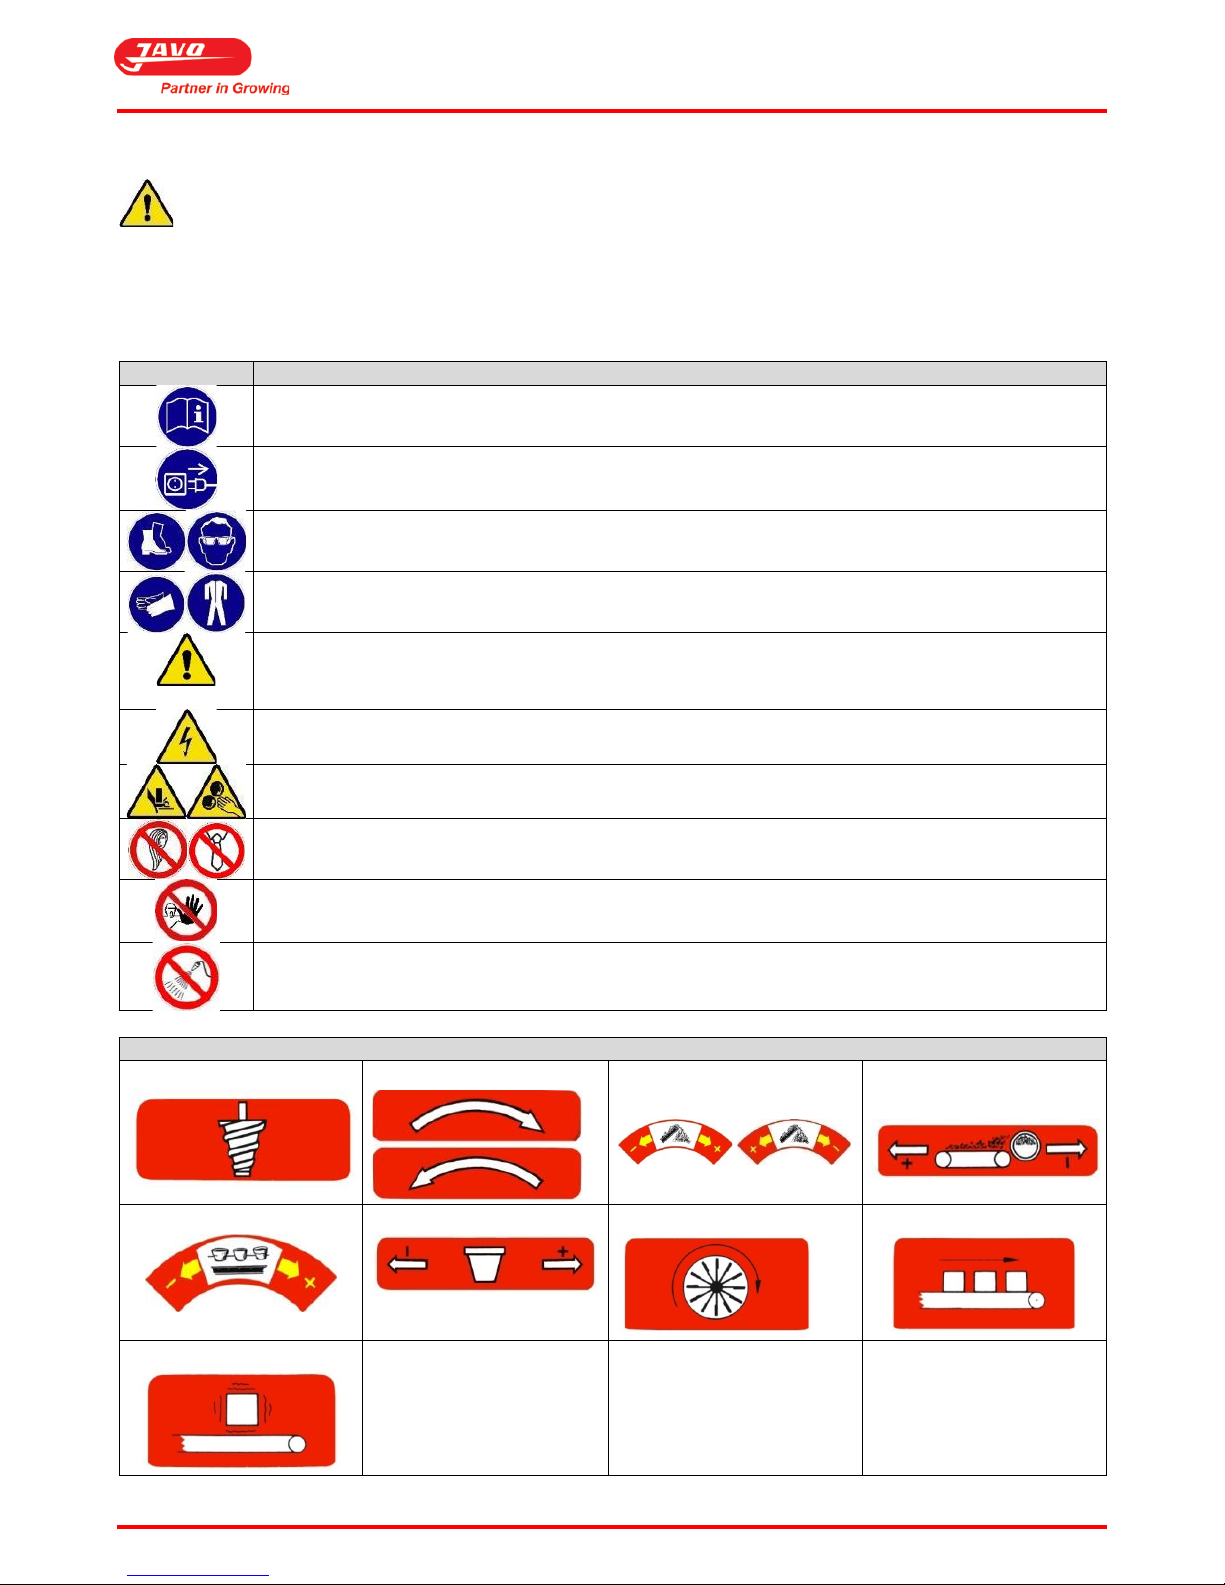
2.3 Explanation of icons and symbols
Pictogram
Meaning
Read and understand this manual before using the machine and / or performing maintenance.
Remove Power (mains).
Wear during all work on or with the machine safety shoes and safety glasses.
Wear during cleaning and maintenance work on this machine also safety gloves and protective
clothing.
Warning.
Important points and / or instructions regarding safety and / or injury prevention are marked with
this warning sign.
Dangerous electrical voltage.
Dangerous electrical voltage present.
Risk of crushing.
Danger of moving or rotating parts.
It is forbidden to wear Loose clothing, long hair and / or jewellery nearby moving parts of the
machine.
Trespassing.
Do not rinse control cabinet
Danger of moisture in the cabinet when it is rinsed with water.
Symbols that may be present on this machine
Drill Direction of movement
Speed ground feeder
(curved)
Speed ground feeder
(straight)
Speed pot belt (curved)
Speed pot belt (straight)
Brush disc Rotofill
Tray belt Rotofill
Rotor Rotofill
Page 8
User Manual Javo Plus en Plus Extra Potmachine
Version 2015-1 7
3 Description of the machine
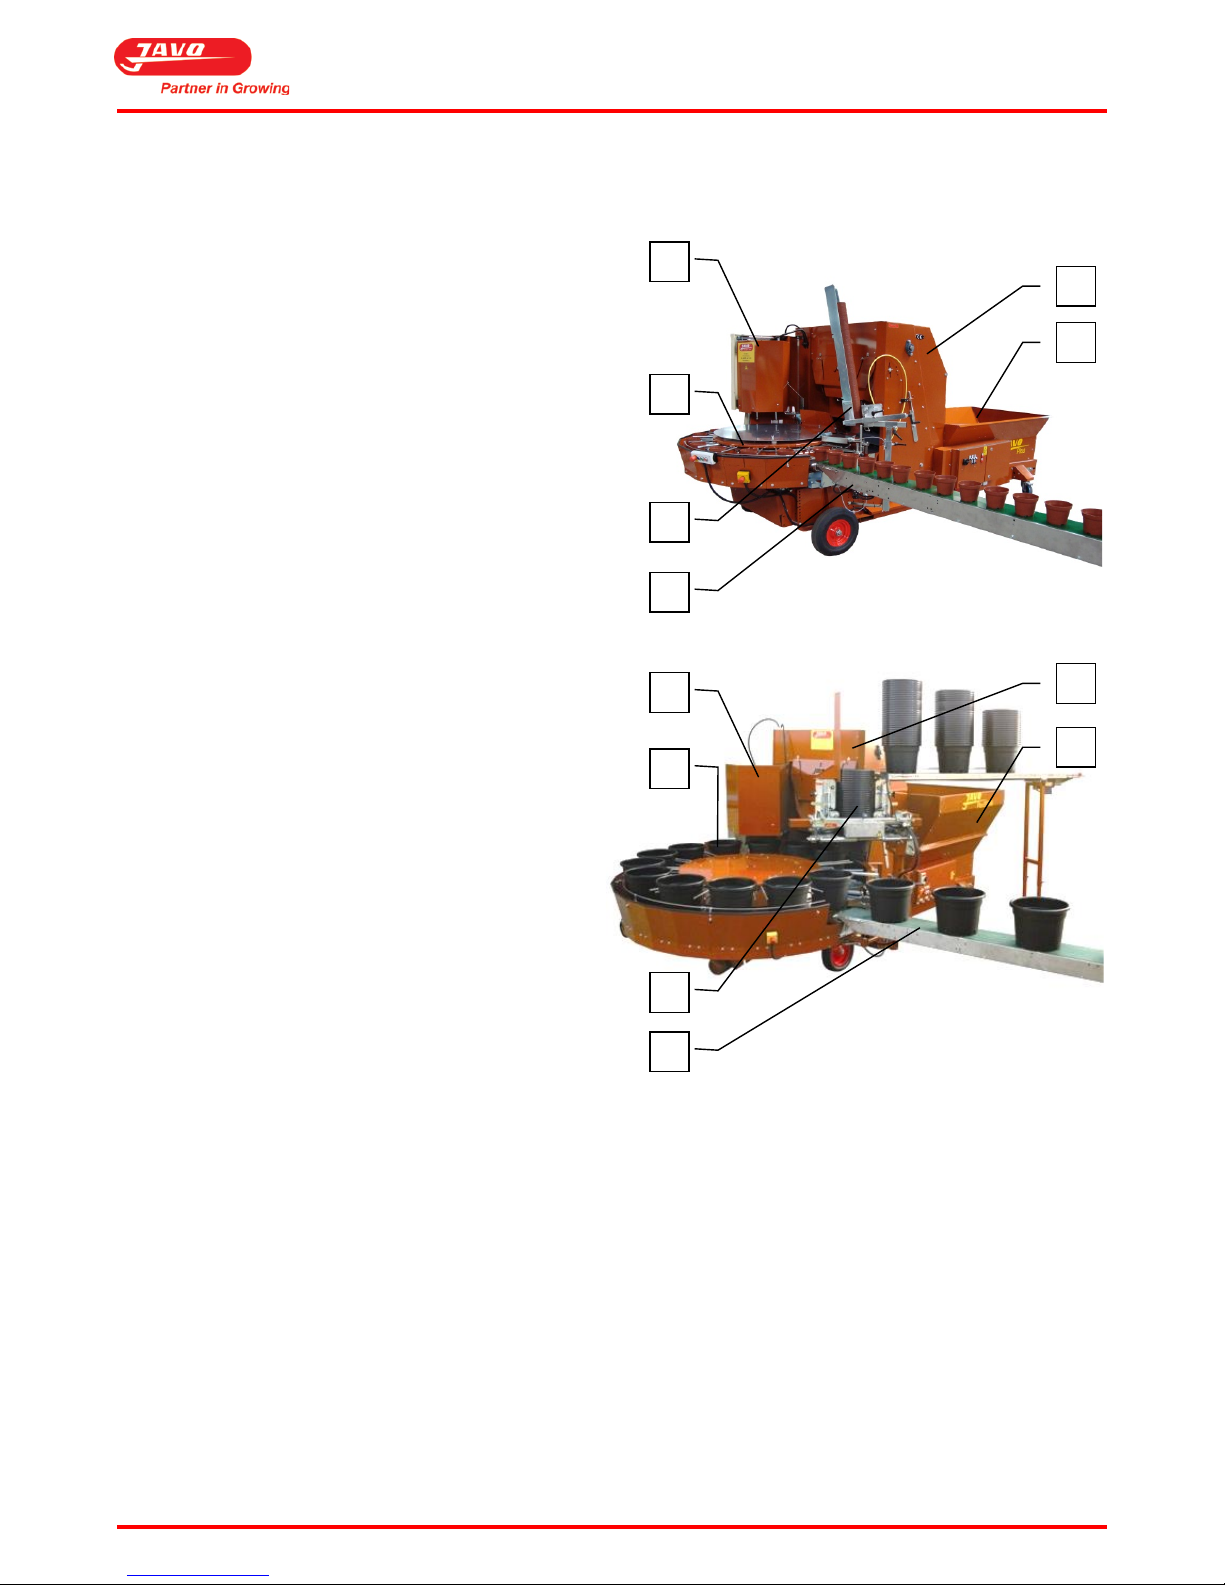
3.1 Machine overview
Plus:
A. Substrate bin
B. Elevator
C. Drill
D. Pottrack
E. Pot erector (optional)
F. Conveyor (optional)
Plus Extra:
A. Substrate bin
B. Elevator
C. Drill
D. Pottrack
E. Pot erector (optional)
F. Conveyor (optional)
A B C
D E F A B C D E F
Page 9
User Manual Javo Plus en Plus Extra Potmachine
Version 2015-1 8
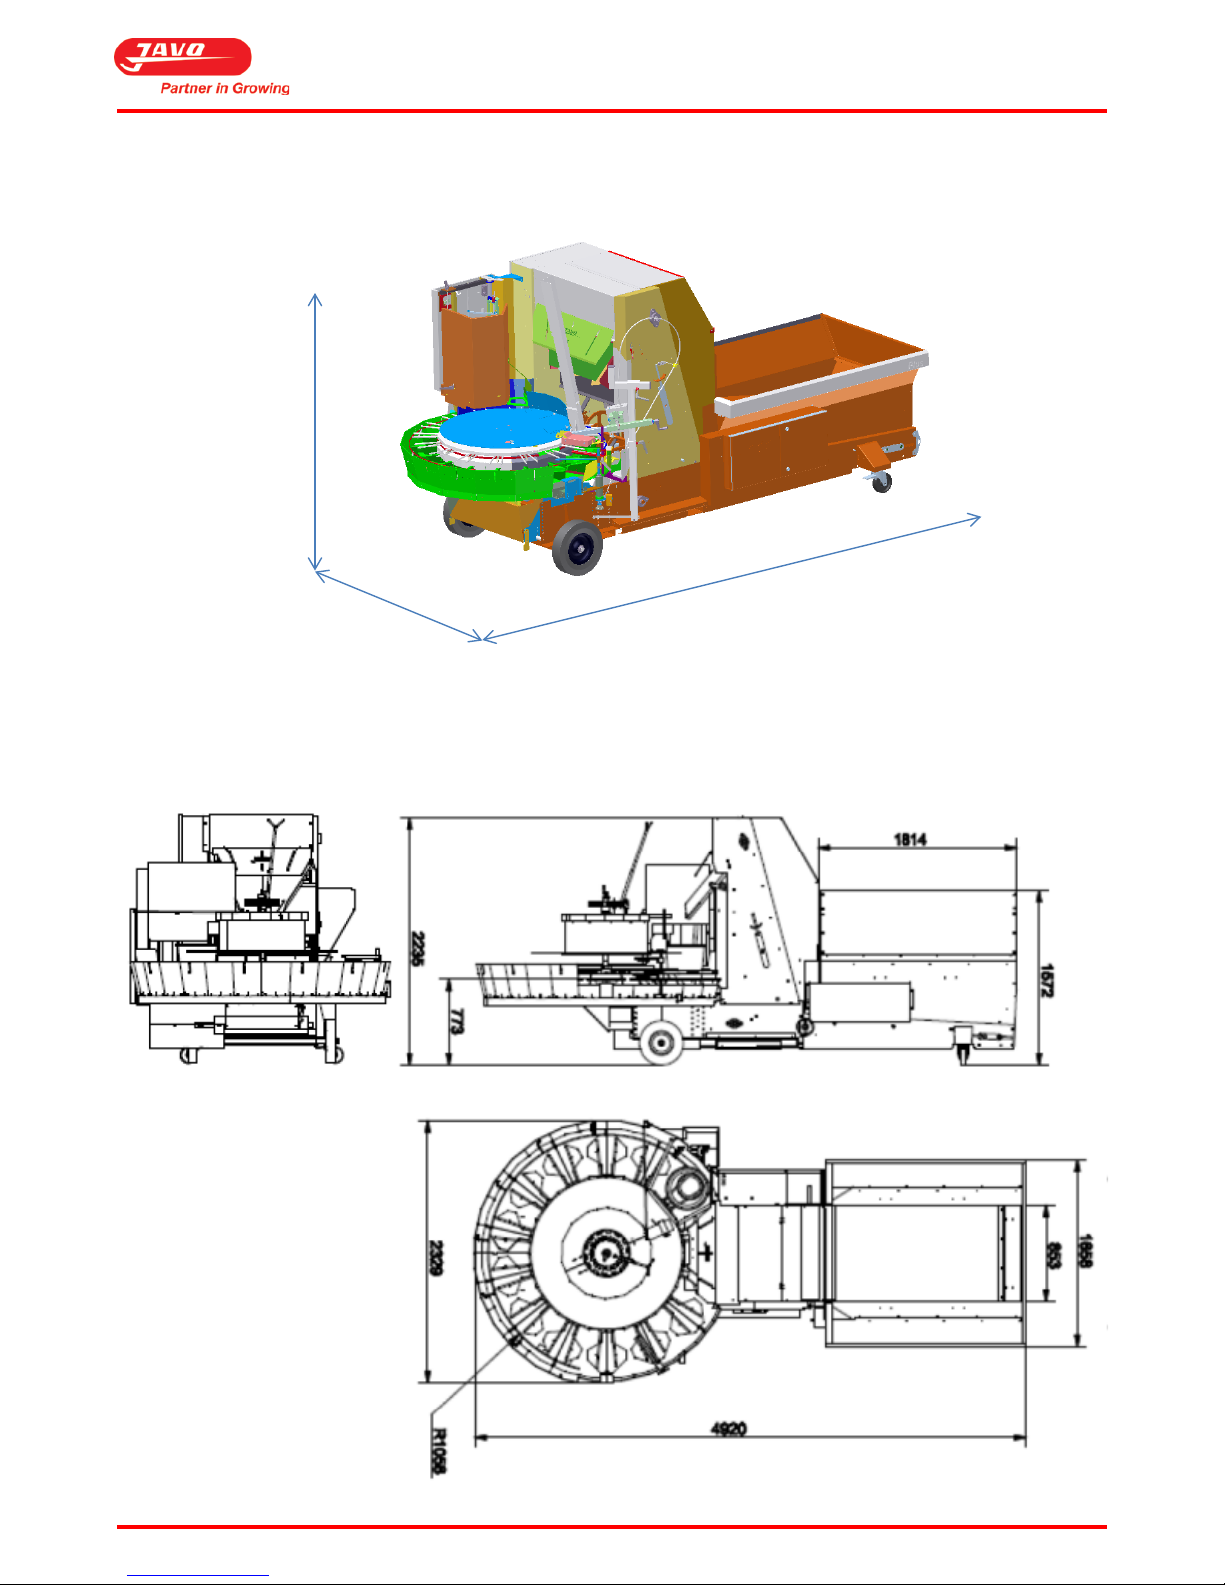
3.2 Outline drawing with main dimensions
Plus:
Plus Extra:
LXWXH=4950x2400x2250 mm
1600
2000
4200
Page 10

User Manual Javo Plus en Plus Extra Potmachine
Version 2015-1 9
3.3 Options
Depending on the intensity of use and customer requirements, this machine can be equipped with various options.
Contact your sales consultant.
Options
Code
Specifications
4 meter 5x1.5 cable incl. 16A plug
900965
Continuous socket
900966
Nonstandard
Substrate bin increasement
223-150
1600 Litre extra (1,6m³) (1800x1660x600)
Pneumatic tires
SU-1L
Plus only
Pneumatic tires set incl. triangle
223-180
Wheels outside the machine
Pot double next to each other*
PLUSD
Plus only. Footplates + pot seperators Max
measurement: 2x11cm
Roller with motor
223-500-01-02
With inverter
Rotating brush in front of drill
BM 223
Plus only.
Rotating brush after drill
BM 201
Height expiration conveyor
820mm up to 965mm (ex works)
Mechanical expiration
AFLM1
All positions possible**
Drill bushing (motor axis 24mm)
201-405-P2
Plus Extra only. Drill axis 19mm (from drill 16cm)
Drill rod spacers
201-423
Plus Extra only. Necessary from drill diameter 16cm
Large drill cap
204-5032
Plus Extra only. Necessary from drill diameter 16cm
1.390 rpm drill motor (motor axis 19mm)
Plus Extra only.
Drill bushing (motor axis 19mm)
Plus Extra only. Drill axis 19mm (from drill 16cm)
Drill bushing (motor axis 19mm)
Plus Extra only. Drill axis 14mm (up to drill 15cm)
* Double drilling impossible. Insertion possible.
** If the rod under the pottrack is adjusted. The orbital rail needs to be divided (Plus only, Plus Extra only
pneumatic).
3.4 Operation
The process of the machine starts with the substrate bin, which is filled with substrate. By using the substrate
conveyor belt and return belt, the substrate is transferred to the elevator.
The elevator takes over the substrate and transfers it into pots, which have been placed on the pottrack. The
pottrack is adjustable in height and width so that it is applicable to different pot sizes.
The pottrack move the pots to the drill which makes holes in the ground. The hole depth and diameter are
adjustable. After making a drill hole, the pots are transferred over the pottrack to a conveyor belt.
The machine is equipped with wheels, which makes the machine easy to move.
3.5 Machine workstations
This machine has operator places at the pottrack and conveyor belt.
Page 11
User Manual Javo Plus en Plus Extra Potmachine
Version 2015-1 10
3.6 Controls
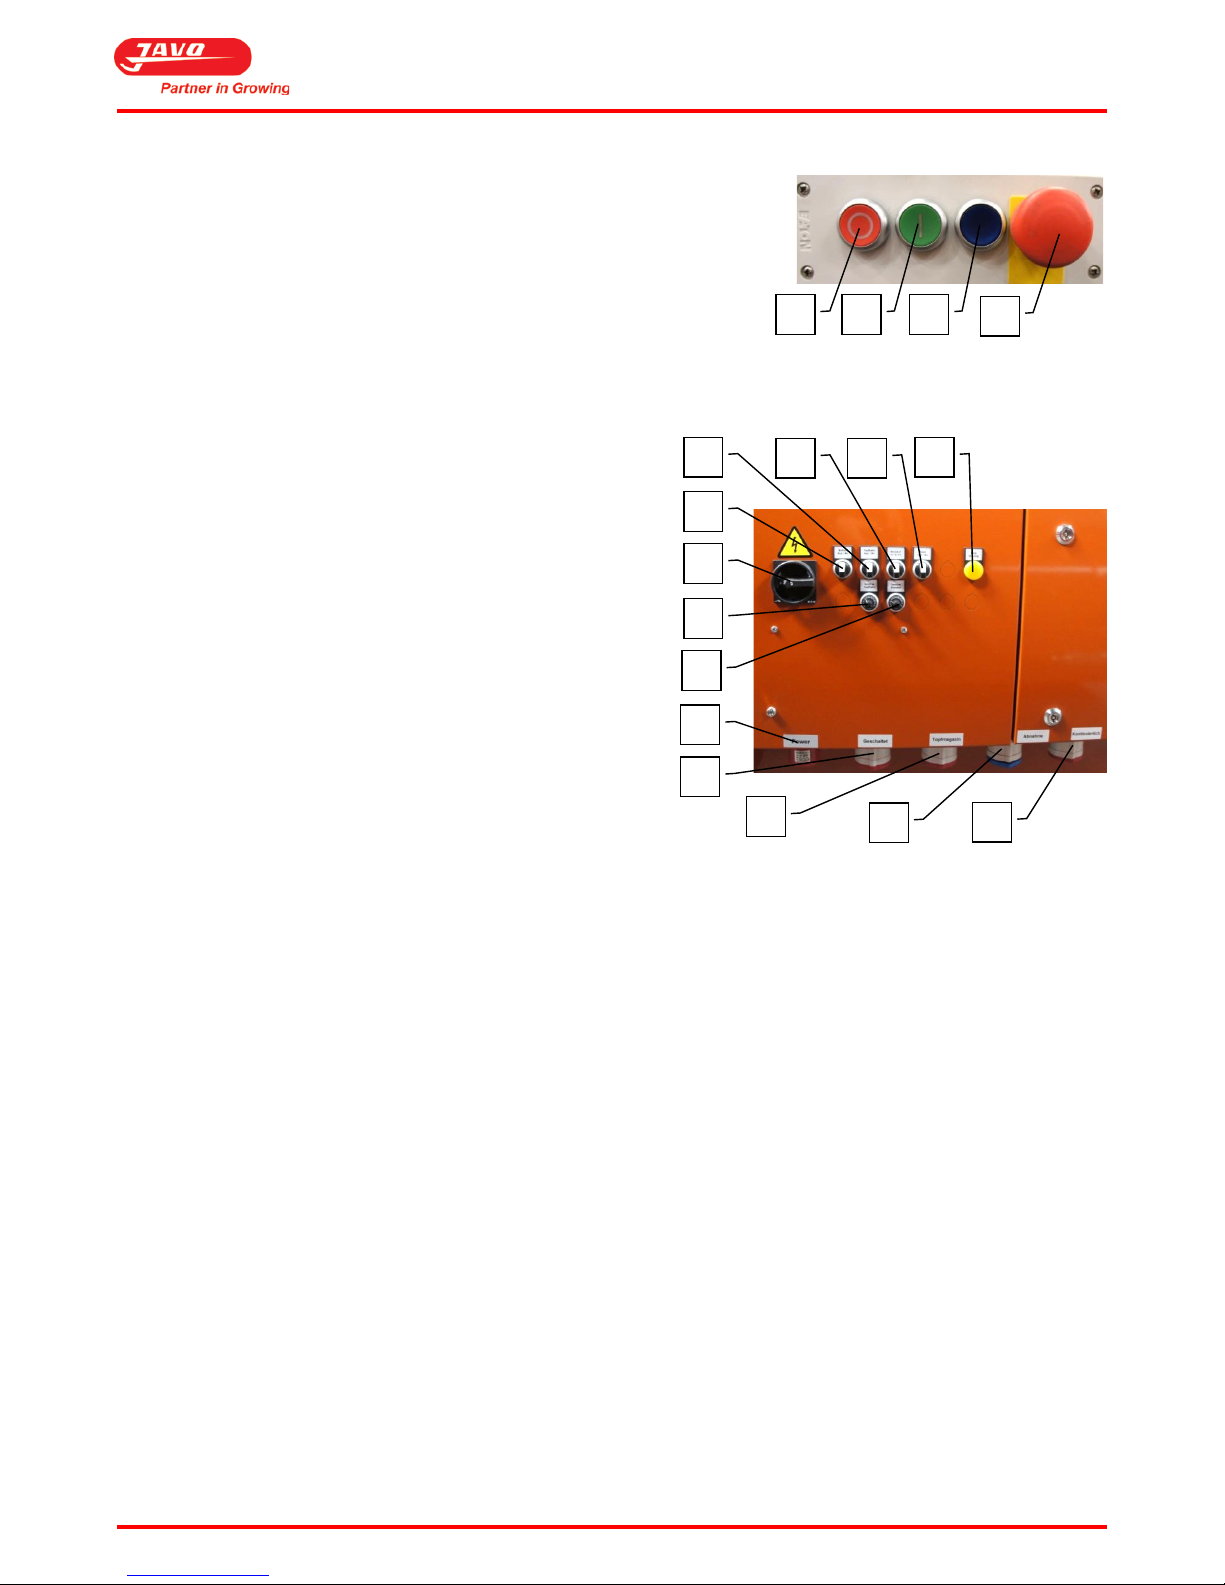
The motor is controlled with the control panel. The control panel consists of
the following buttons;
A. Stop button
B. Start button
C. Reset button
D. Emergency stop button
At the electrical cabinet of the machine, these buttons and connectors are placed:
A. Stopped / Error indication
B. Belt off / on
C. Elevator off / on
D. Pottrack off / on
E. Drill off / on
F. Main switch
G. Speed pottrack
H. Speed elevator
I. Continuous power IN
J. Switched power OUT
K. Switched power OUT pot stock belt
L. Switched power OUT (optional)
M. Continuous power OUT (optional)
E F G
H I D C B
A
M
L K J
A B C
D
Page 12

User Manual Javo Plus en Plus Extra Potmachine
Version 2015-1 11
4 Transport
Follow all instructions described in this manual, in particular chapter safety.
On delivery of the machine, a Javo mechanical engineer must be present to unload the machine from the (freight)
wagon.
Prior to moving the machine, the power should be disconnected. Make sure the cables are stowed sufficiently.
When moving within the company (when the machine does not need to be lifted) the state of the machine should be
checked. Make sure the path to be travelled is free, so the machine can be moved to the desired position without
obstacles.
If the machine is to be lifted for movement (outside the company), please contact your dealer or contact a
professional shipping company.
Before the machine can be moved, the conveyor belt must be removed.
The machine must be transported upright.
The relative humidity should not be too high so that water condenses in the machine.
Report damage during or immediately after delivery to the transport company and to Javo BV. Take all necessary
steps to prevent further damage.
Page 13
User Manual Javo Plus en Plus Extra Potmachine
Version 2015-1 12
5 Mounting, installation and commissioning
Follow all instructions described in this manual, in particular chapter safety.
This machine is CE marked. When placing multiple machines in one line, the entire line must be properly CE
marked before using this machine. Up to CE Marking of the line, commissioning of this machine is prohibited.
5.1 Placement
The machine must be placed on a flat surface, with sufficient weight capacity. Install the machine so that there is
enough space left for service providing, safe instructions and / or cleaning, maintenance and / or inspections. Put the
brakes on the castors before the machine is turned on.
This machine is not suitable to be used in the open air. Electrical components are only splashproof. Keep the
machine away from rain and moisture. When using the machine in a humid location is unavoidable, you
should use an RCD.
5.2 Facilities to take care of by the user
Prior to delivery of the machine, the required materials and facilities (air, power, substrate, etc.) needs to be present
within 3 meters of machine.
Required power supply: 400 Volt, 3 Phase + Neutral + Earth. (N. America: 208/220V 60Hz.).
5.3 Mounting / Connecting
If applicable, the components supplied are to be mounted on the machine. Make sure that the moving parts are
free. If the machine is complete, it can be connected (by a competent person) to the power supply.
Keep hands, hair, loose clothing and / or jewellery away from moving parts of the machine. Wear
appropriate clothing without loose parts. Wear non-slip work shoes.
As long as the machine is on, no connection or safety devices may be removed. The machine may only be
used when all protective devices and safety-related facilities are available and ready for use.
5.4 Check elevator rotation direction
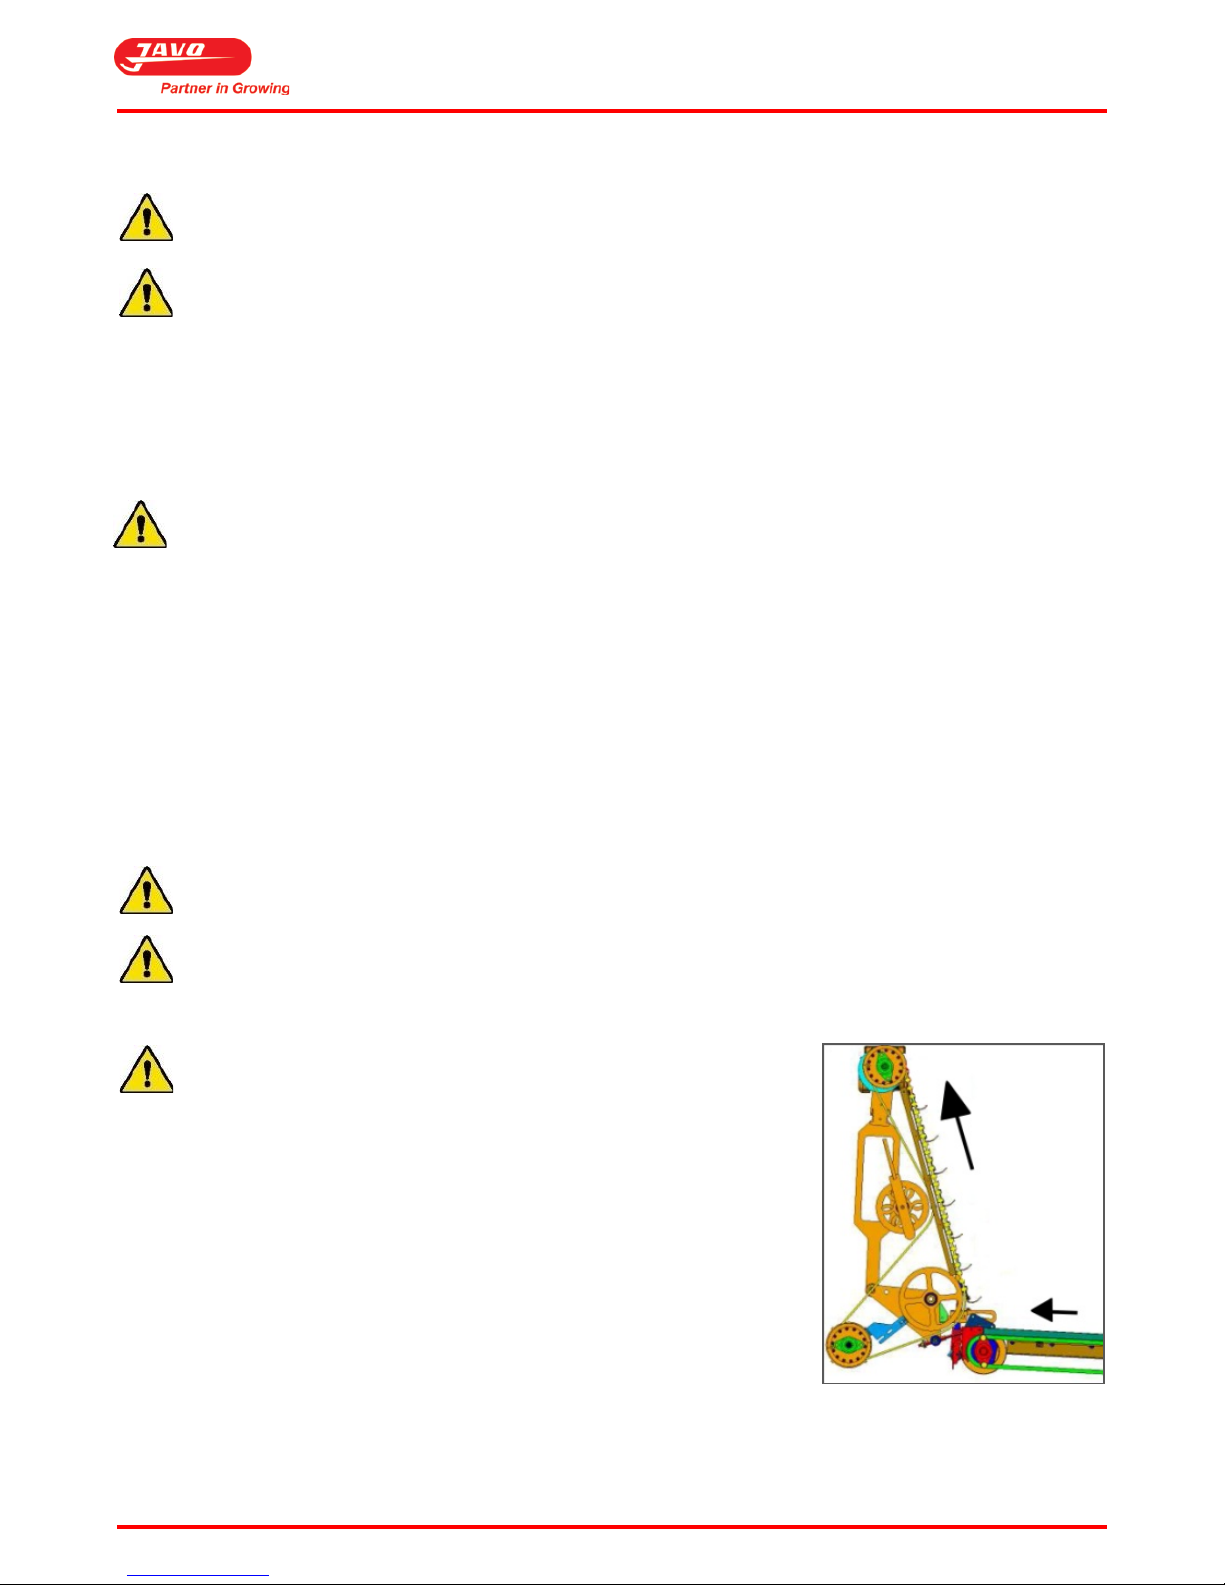
Check the rotation direction of the elevator before you start working
with the machine.
Procedure:
1. Connect the power cable.
2. Start the elevator.
a. Turn off the main switch.
b. Press the reset button emergency stop circuit.
c. Start the elevator with the elevator button.
3. Check the direction of rotation of the elevator.
a. The desired rotation direction is shown in this picture.
4. Stop the elevator by turning elevator switch off.
5. Switch the main switch off.
6. When rotation direction is incorrect:
a. Remove the plug from the socket.
b. Open the plug and switch 2 of the 3 phases in the plug. This should only be carried out by suitably
qualified personnel.
Page 14
User Manual Javo Plus en Plus Extra Potmachine
Version 2015-1 13
5.5 Check drill rotation direction
Check the rotation direction of the drill before you start working with the
machine.
Procedure:
1. Connect the power cable.
2. Start the drill.
a. Turn on the main switch.
b. Press the reset button emergency stop circuit.
c. Start the drill with the drill button.
3. Check the direction of rotation of the drill.
a. The desired rotation direction is shown in this picture.
4. Stop the drill by turning the drill switch off.
5. Switch off the main switch.
6. When rotation direction is incorrect:
a. Remove the plug from the socket.
b. Open the plug and switch 2 of the 3 phases in the plug. This should only be carried out by suitably
qualified personnel.
5.6 Check substrate conveyor tension
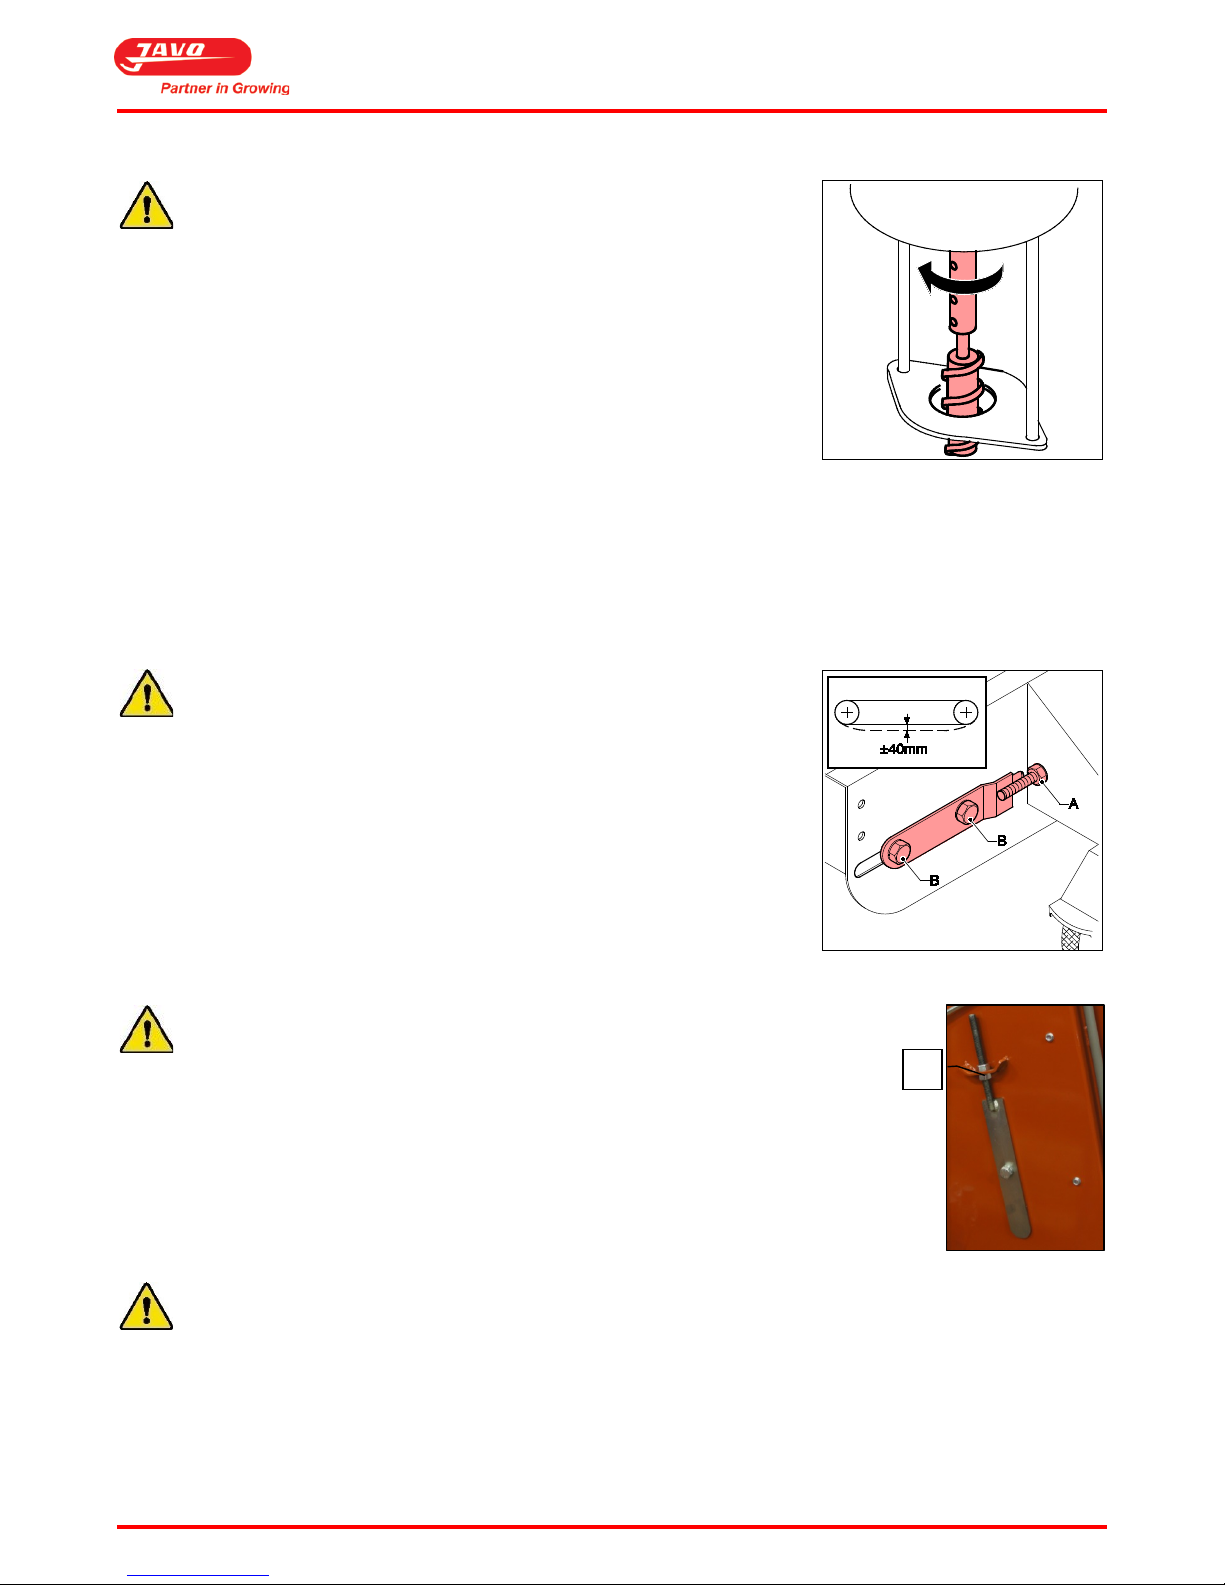
Check the substrate conveyor belt tension before you start working with
the machine.
Procedure:
1. Check the substrate conveyor belt tension. The correct tension is
obtained when the belt in the middle deflects ± 40mm.
2. Adjust the belt tension if necessary .
a. Loosen the four screws (B) to the block bearings.
b. The tension can be adjusted by simultaneously turning both
sides of the ground belt (A).
c. Tighten the four screws (B) to the block bearings.
5.7 Check elevator belt tension
Check the elevator belt tension before you start working with the machine.
Procedure:
1. Check the elevator belt tension. The correct tension is obtained when the belt in
the middle deflects ± 20mm.
2. Adjust the belt tension if necessary .
a. The tension can be adjusted using the two clamping nuts, located on
opposite sides of the elevator housing.
b. Tighten the nuts (A) on both sides of the elevator equally.
The tension of the belt should not be too tight.
A
Page 15
User Manual Javo Plus en Plus Extra Potmachine
Version 2015-1 14
5.8 Set elevator and pottrack speed
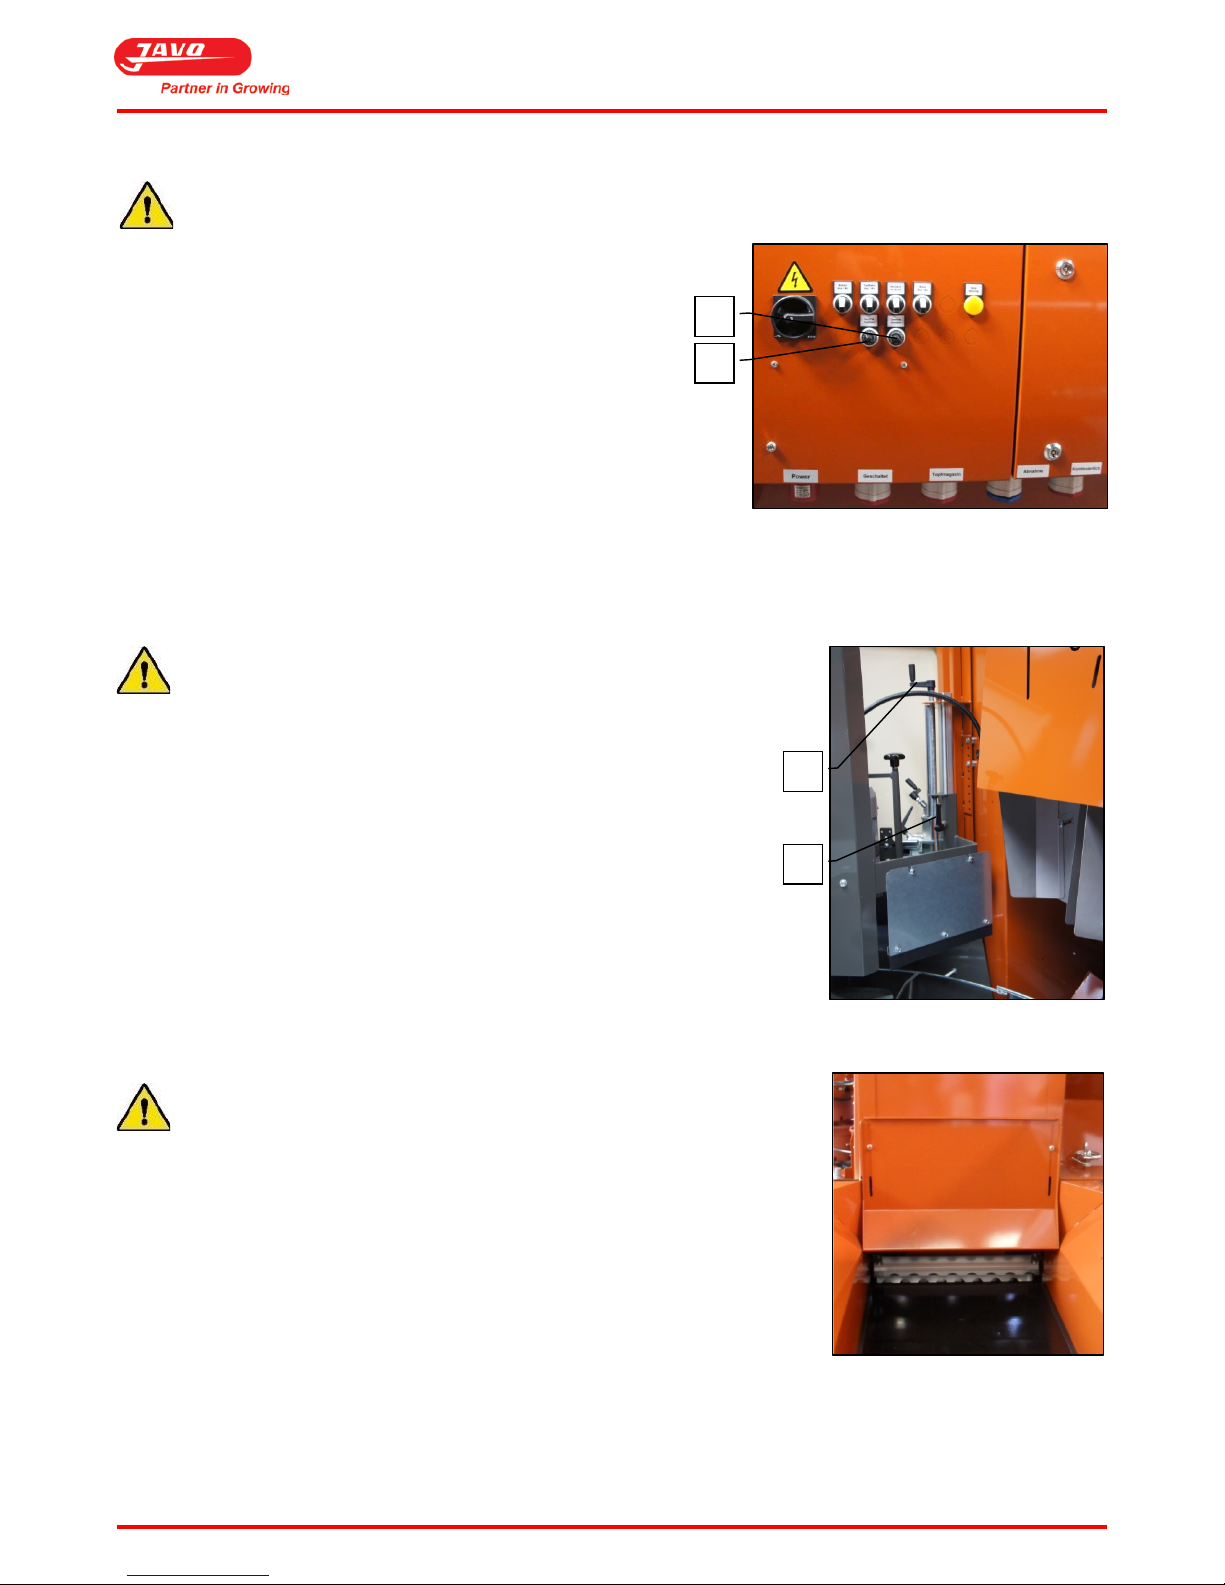
Set the elevator and pottrack speed before you start working with the machine.
Potentiometers are mounted at the main cabinet or optional at
the workstation.
Procedure:
1. Check the elevator speed. Adjust the speed in a way that
pots are filled sufficiently before they reach the brush.
2. When the speed needs to be adjusted:
a. Adjust the potentiometer for elevator speed with
potentiometer (A).
3. Check the pottrack speed. Adjust the speed in a way that
pots are filled sufficiently and operated well.
4. When the speed needs to be adjusted:
a. Adjust the potentiometer for elevator speed with potentiometer (B).
5.9 Set brush height
Set the brush height before you start working with the machine.
The brush wiper controls the amount of soil on top of the pot.
Procedure:
1. Check the brush height in comparison with the pot.
2. When the speed needs to be adjusted:
a. Loosen clamp (B).
b. Set the desired brush height with crank (A).
i. The more substrate on top of the pot, the stronger
the pressure plate of the drill will press down the
substrate in the pot.
c. Tighten clamp (B).
5.10 Set substrate slide height
Set the height before you start working with the machine.
Adjust the height of the substrate slide so that there is not too much substrate
supplied by the substrate conveyor. Set the substrate slide as low as possible to
avoid accumulation of substrate in the machine. When changing from large to
small pots, the soil slide should be set lowered.
B
A A B
Page 16
User Manual Javo Plus en Plus Extra Potmachine
Version 2015-1 15
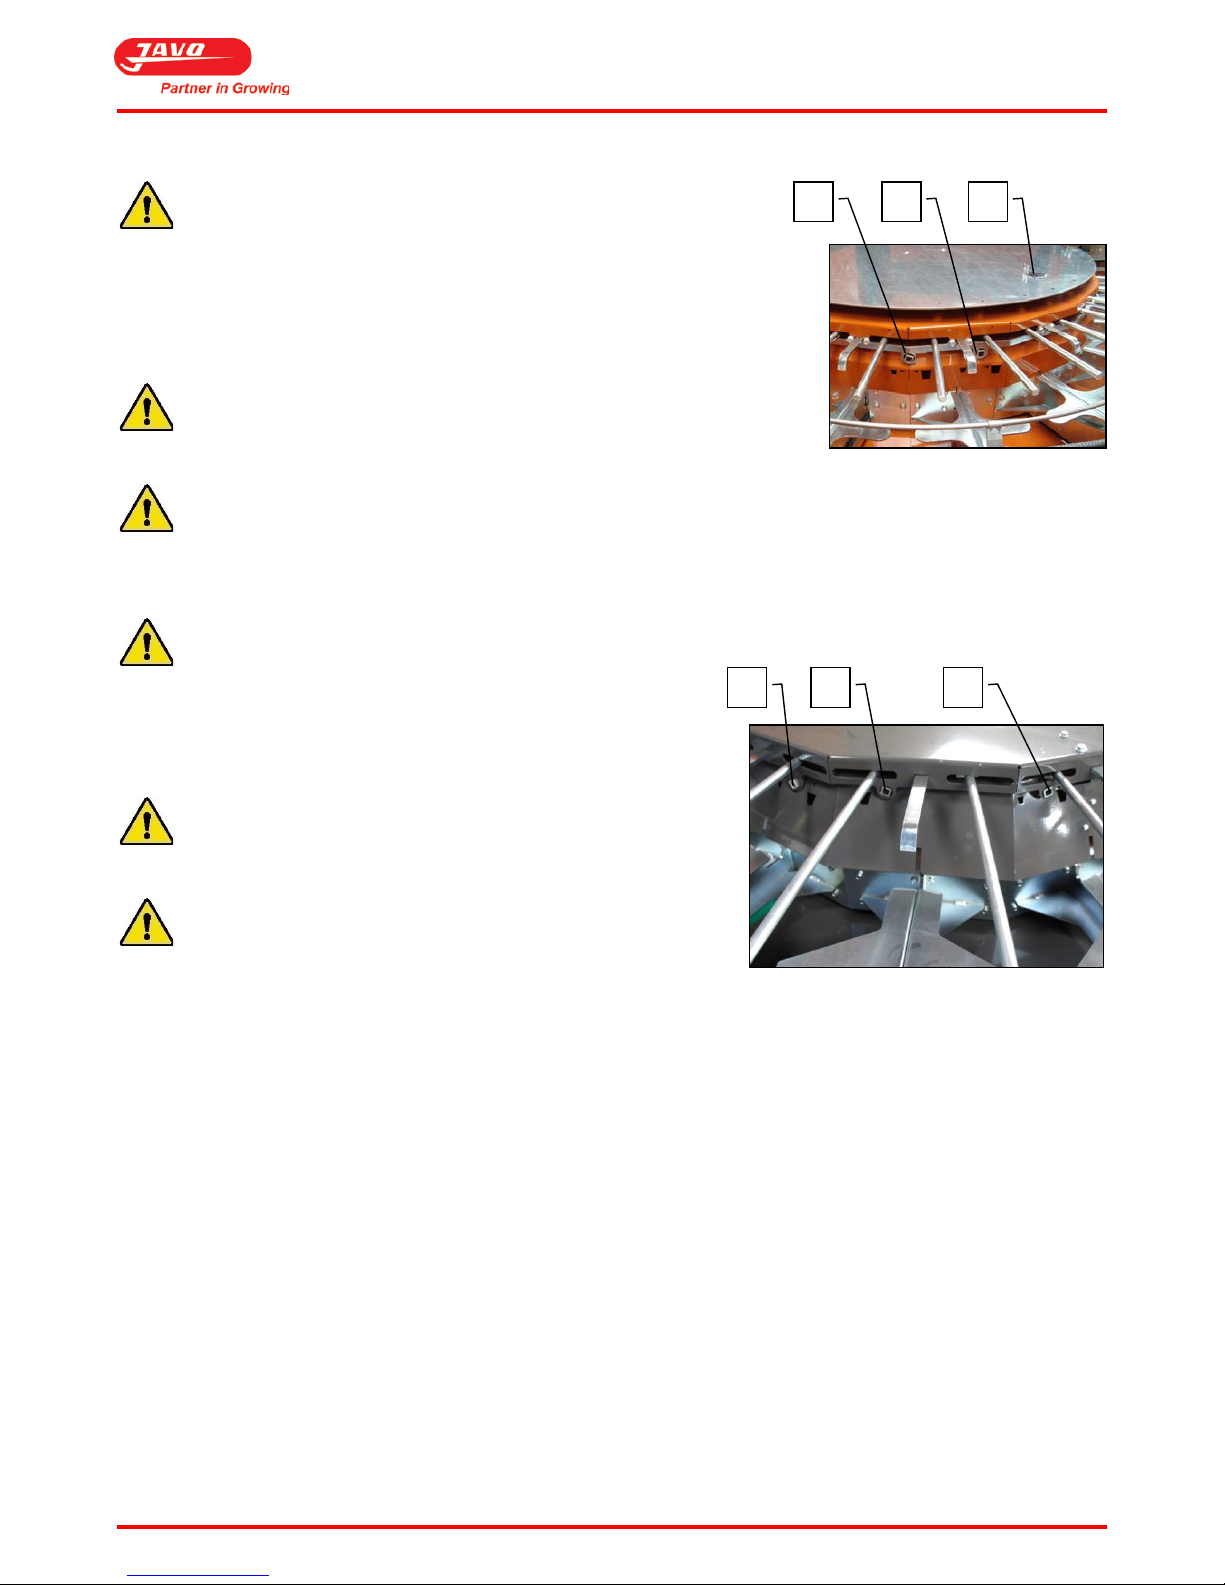
5.11 Set pottrack dimensions Plus
Set the pottrack dimensions before you start working with the
machine.
There are three different adjustment possibilities: rim height (A), rear support
for the pot (B), and pot diameter (C). The pottrack can be adjusted in three
ways, using the supplied adjustable wrench.
The pottrack fingers should be adjusted as high as possible against
the rim of the pot Do not put the pottrack fingers tight against the
pot, take a ± 3mm space on both sides.
Make sure the pottrack can be started; the pottrack has to rotate free of obstacles.
5.12 Set pottrack dimensions Plus X
Set the pottrack dimensions before you start working with the machine.
There are three different adjustment possibilities: rim height (A), rear
support for the pot (B), and pot diameter (C). The pottrack can be
adjusted in three ways, using the supplied adjustable wrench.
The pottrack fingers should be adjusted as high as possible
against the rim of the pot Do not put the pottrack fingers
tight against the pot, take a ± 3mm space on both sides.
Make sure the pottrack can be started; the pottrack has to
rotate free of obstacles.
C A B
A C B
Page 17
User Manual Javo Plus en Plus Extra Potmachine
Version 2015-1 16
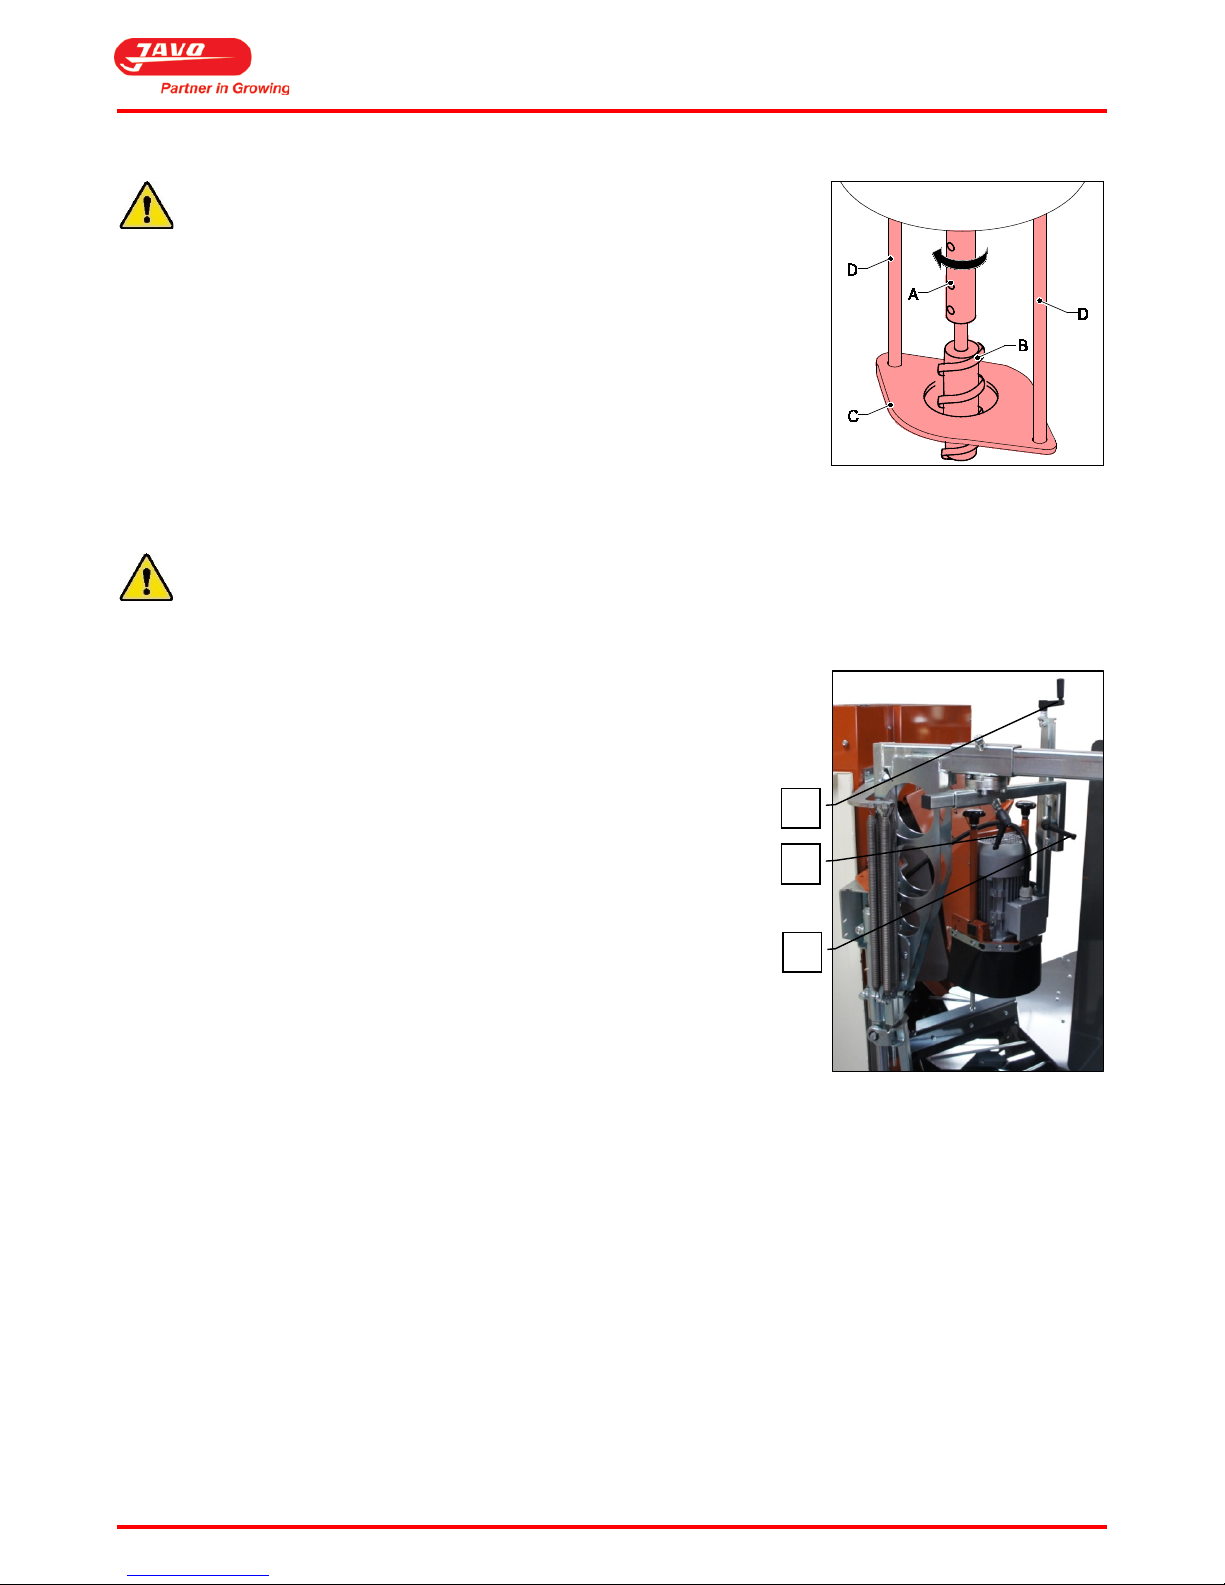
5.13 Set drill size
Set the drill size before you start working with the machine.
The drill size depends on the plug size of the plants.
Drill (B) is mounted in the drill shaft of the drill motor with two screws (A). The
drill shaft screws have to be mounted to the flat side of the drill sleeve.
Drill plate (C) has a drill hole with a diameter of approximately 10 mm larger than
the drill. This drill plate is to be mounted to the bottom side of rods (D) with 2
locknuts.
The depth of the hole depends on the position of the drill, which is adjustable. Adjust the depth by placing drill (B) in
drill shaft (A).
Recommended distance of drill point under the drill plate is 1-2.cm.
Procedure height adjustment:
1. Loosen clamp (A).
2. Adjust drill height with swivel (C).
3. Tighten clamp (A).
Procedure side adjustment:
1. Loosen clamp (B).
2. Adjust drill in the lateral direction.
3. Tighten clamp (B).
BA C
Page 18
User Manual Javo Plus en Plus Extra Potmachine
Version 2015-1 17
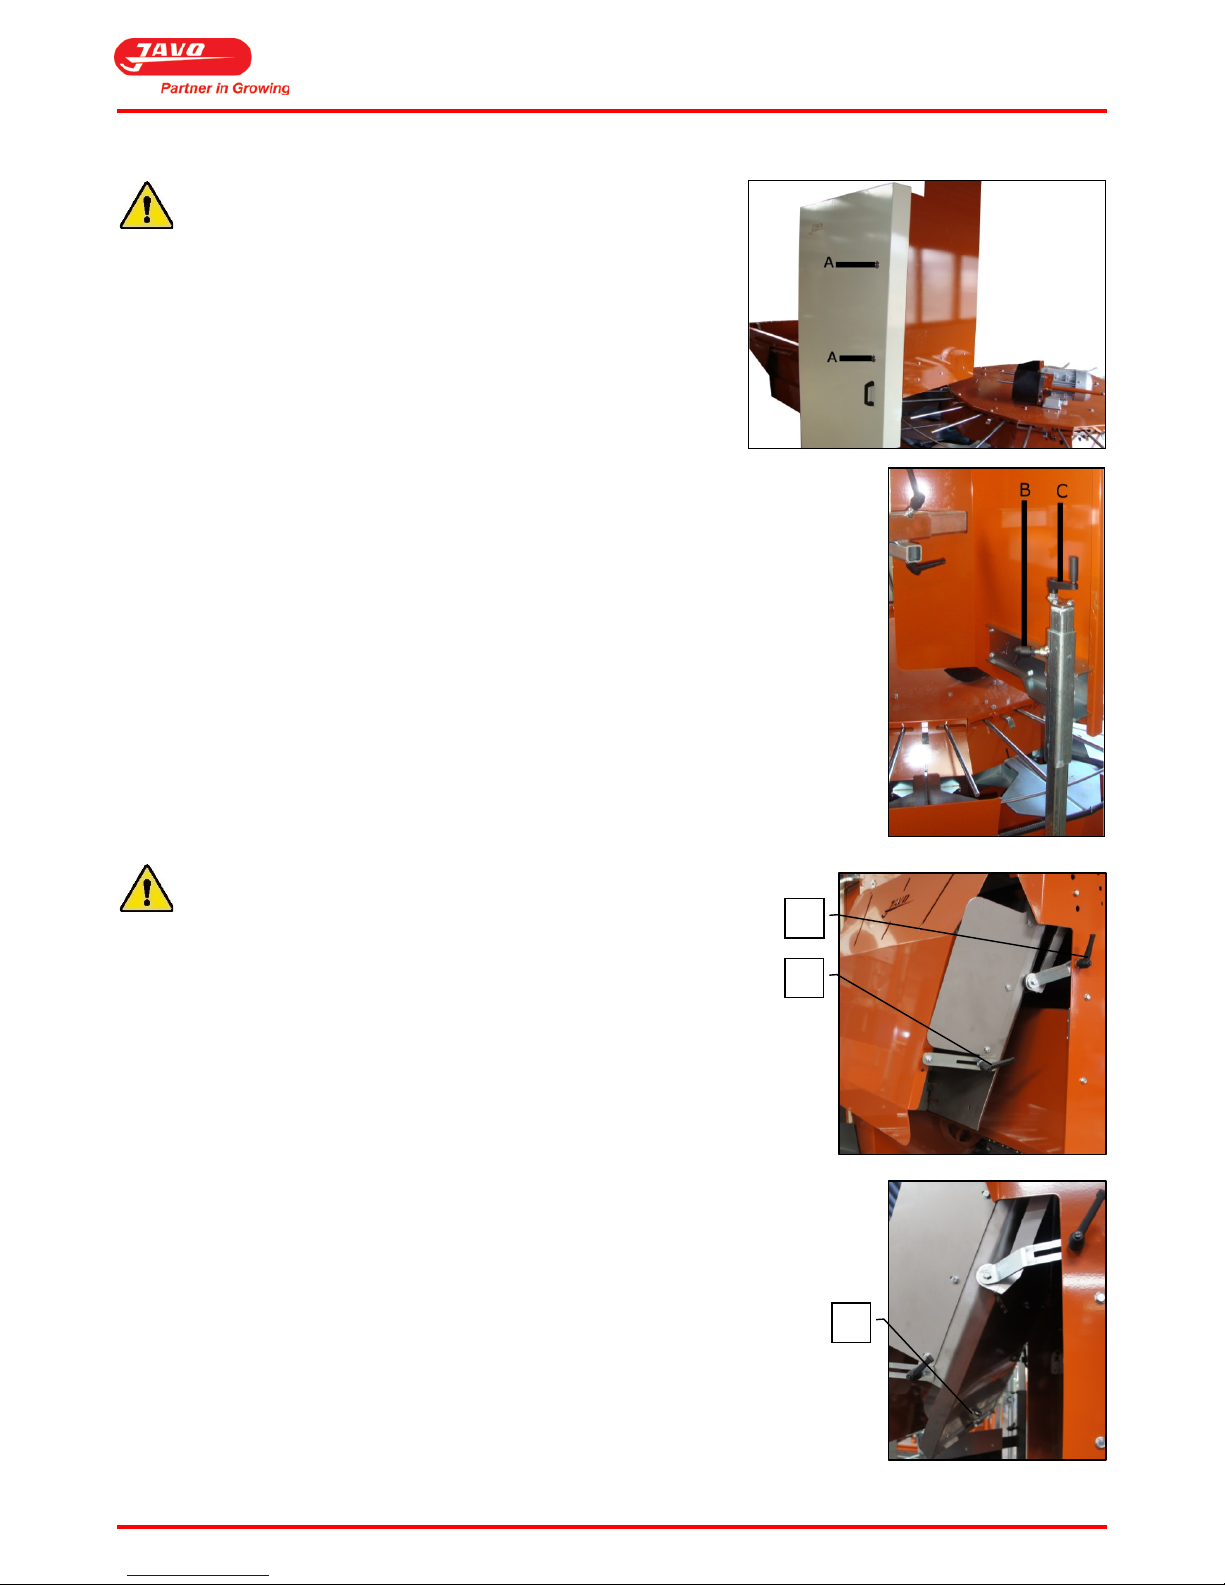
5.14 Set drill cover height
Set the height of the drill cover before you start working with
the machine.
The protective cover of the drill must be adjusted to the height of the
pot. Adjust the height of the protective cover such that there is a space
in between the top of the pot and the bottom of the protective cap of
about 4 mm.
Procedure:
1. Open drill cover (A) using the door key.
2. Loosen clamp (B) and adjust the drill cover height with swivel (C). The protective
cover of the drill is important for the safety of the machine operator.
5.15 Set substrate valve
Set the substrate valve before you start working with the machine.
Substrate is rolled from the elevator to the substrate valve. The purpose of
the valve is to control the substrate into the direction of the pots.
Procedure:
1. Loosen clamp (A).
2. Set the substrate valve.
a. Substrate valve can be pushed forwards and backwards.
3. Tighten clamp (A).
4. Set the spout thickness.
a. Loosen clamp (B).
b. Set the spout thickness.
5. Under the valve are placed two wing nuts (C). Turn the wing nuts loose,
adjust the width of the outlet and tighten wing nuts (C) again.
A B C
Page 19
User Manual Javo Plus en Plus Extra Potmachine
Version 2015-1 18
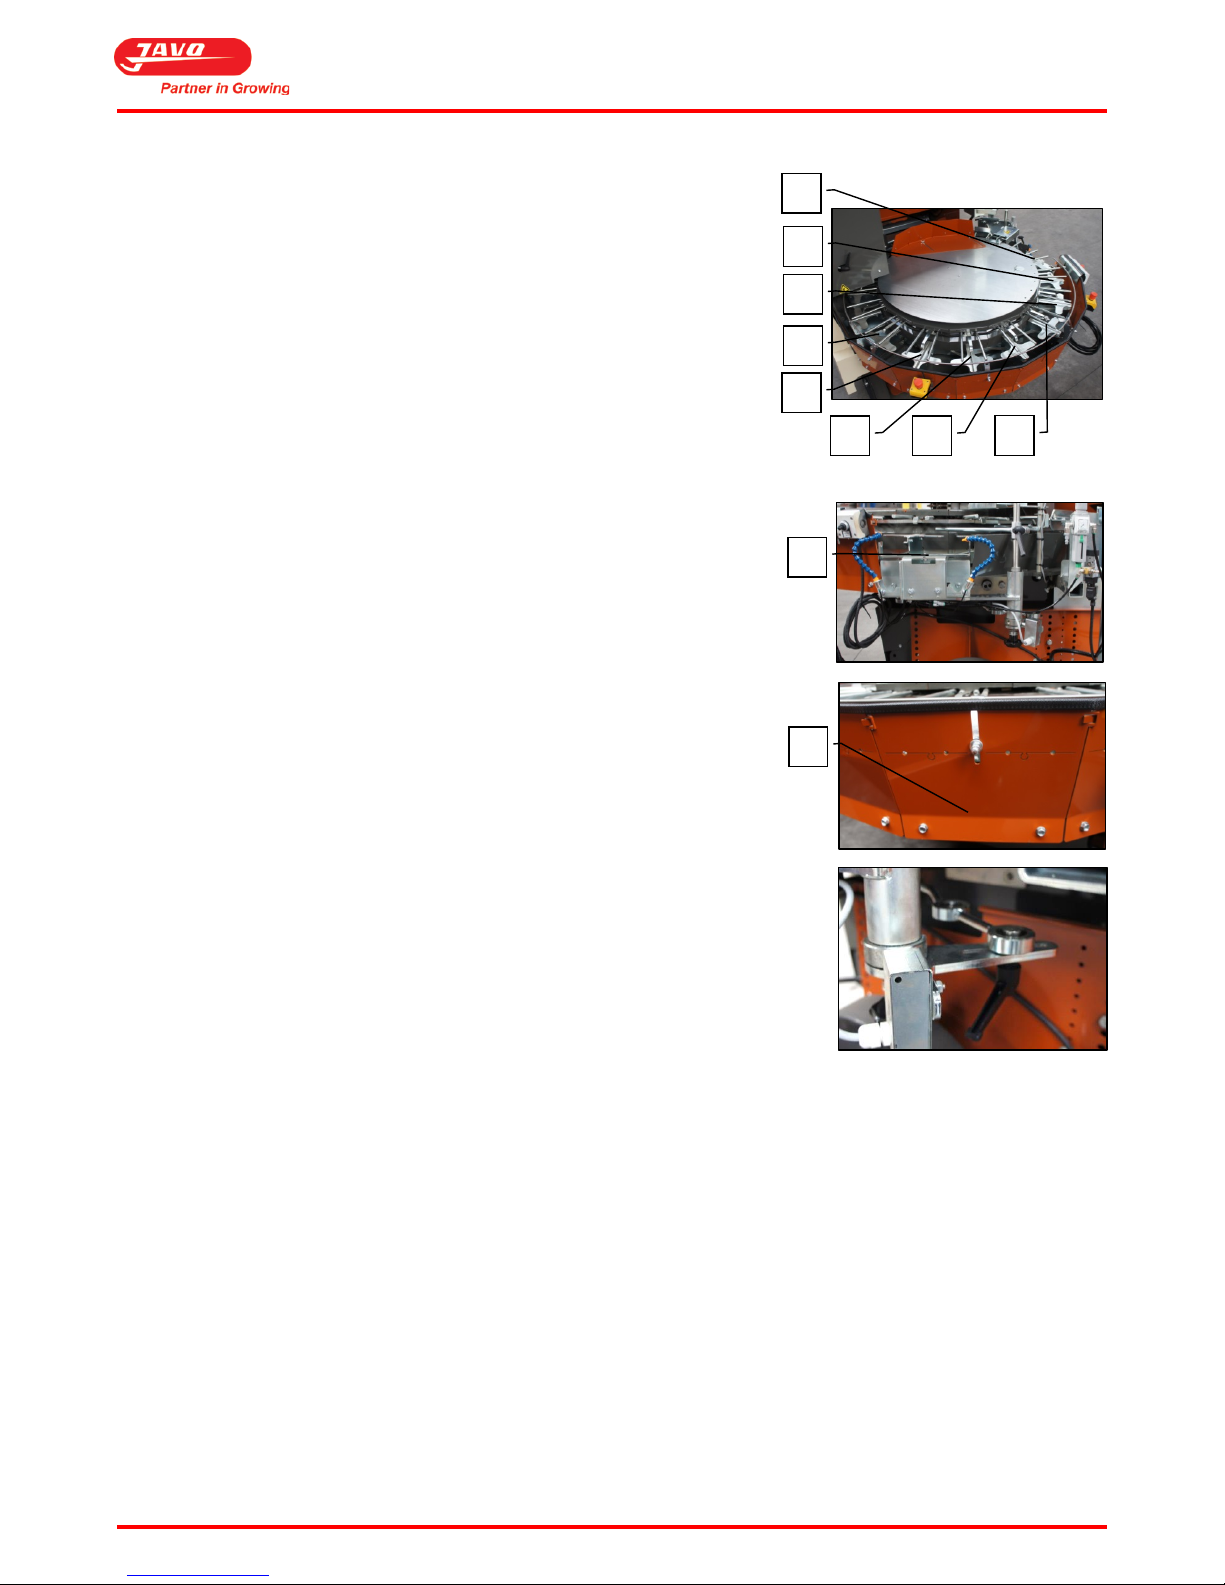
5.16 Moving the expiration conveyor (option for Plus)
The expiration conveyor can be moved to all free positions on the pottrack
(A).
Follow the steps below.
Procedure:
1. First, the conveyor belt has to be removed which has been placed
onto support (B).
2. Dismantle two plates (C) by unscrewing the M8 bolts.
a. Leave the M8 bolts in the frame and lift the plates out.
3. Disassemble the end bracket (B).
4. Remove the support.
5. Assemble the support at the place where the left plate has been
removed from the pottrack.
6. Move the expiration to the place where the plates (C) have been removed.
7. Tighten the M8 bolts and insert the rod (where the plastic tip is attached)
to the bottom of the pottrack back into the hole.
8. Insert the two plates (C) back in the former position of the exit conveyor.
9. Tighten four M8 bolts.
B C A A A A A A A
A
Page 20
User Manual Javo Plus en Plus Extra Potmachine
Version 2015-1 19
6 Operation
Follow all instructions described in this manual, in particular chapter safety.
Keep hands, hair, loose clothing and / or jewelry away from moving parts of the machine. Wear appropriate
clothing without loose parts. Wear non-slip work shoes.
As long as the machine is on, no connection or safety devices may be removed. The machine may only be
used when all protective devices and safety-related facilities are available and ready for use.
If a machine part is damaged or not working in the prescribed manner, work must be interrupted
immediately. Resumption allowed only when the machine part is repaired or replaced and checked. Consult
your dealer if the machine is not functioning properly.
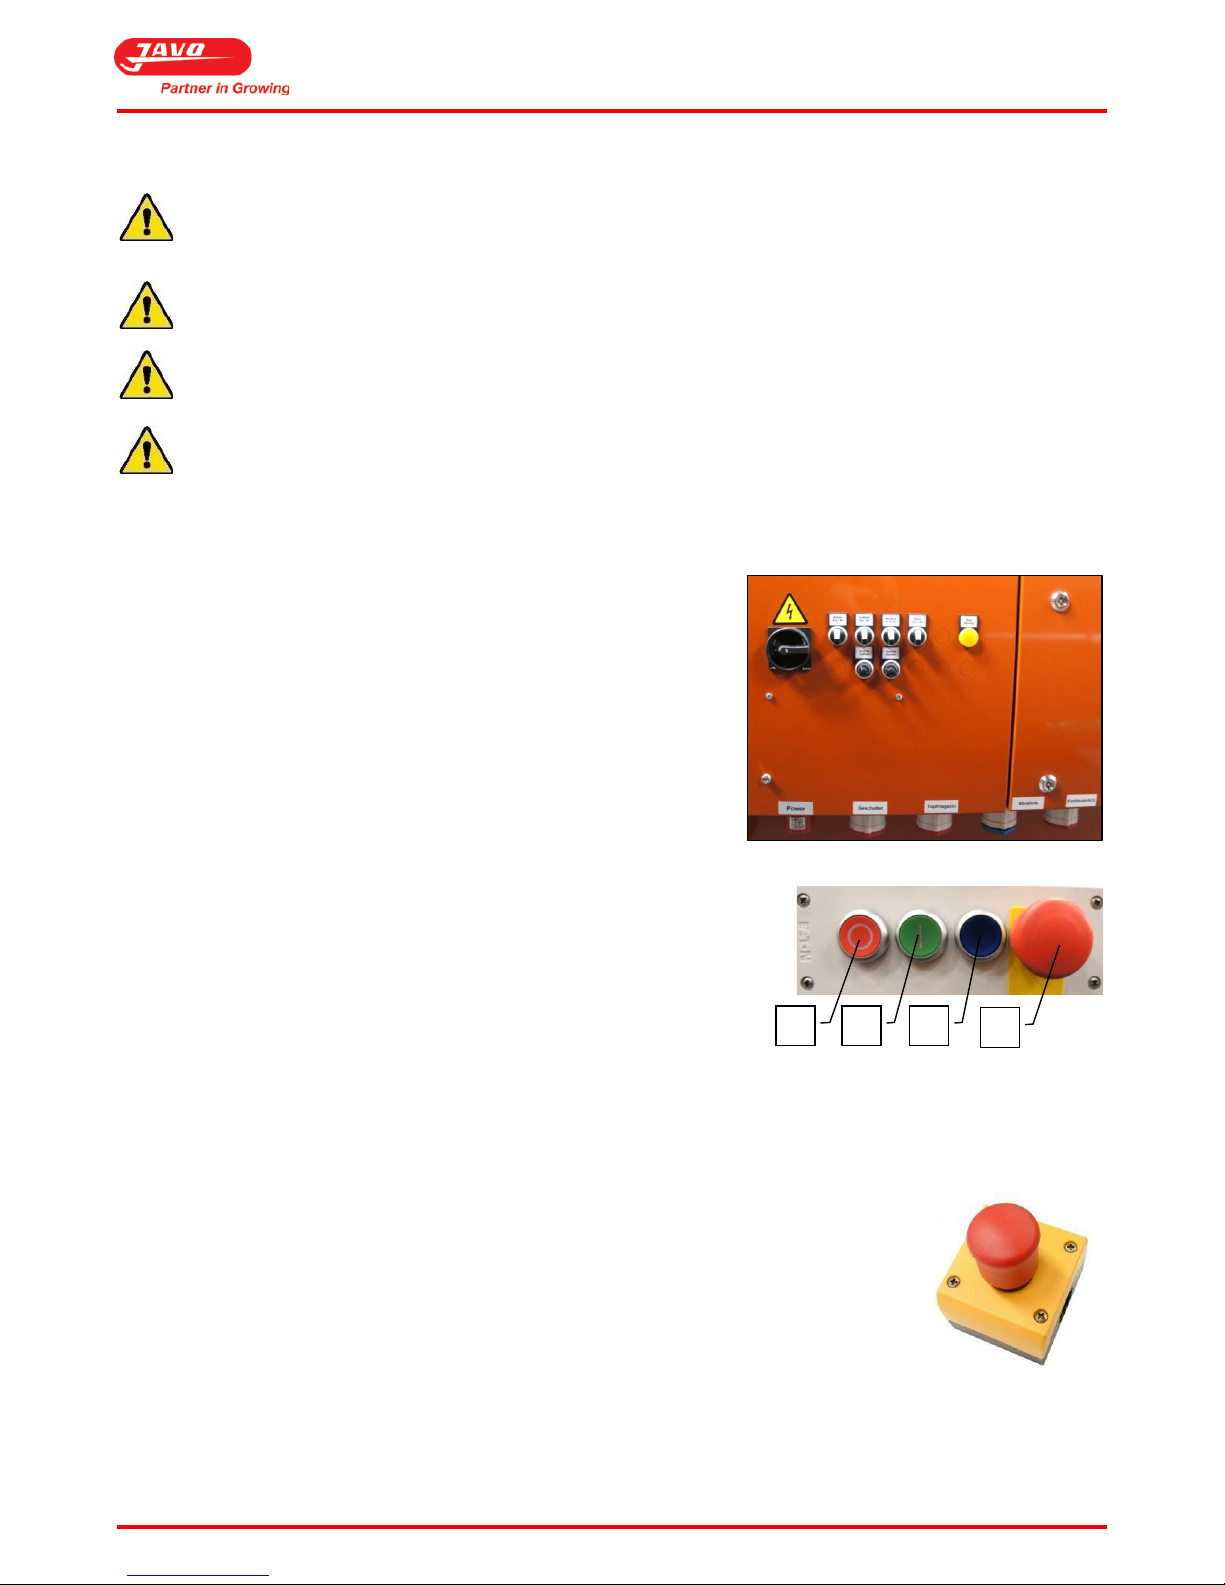
6.1 Start
Start procedure:
1. Turn on the main power at the electrical cabinet.
a. Stop/ Error indication lamp will lit.
2. Turn on the drill, potttrack and elevator with switches at the
electrical cabinet.
3. Press the blue reset button (C).
4. Press the green button (B) on the control panel to start the
machine.
6.2 Stop
Stop procedure:
1. Press the red stop button (A) on the control panel.
a. Stop/ Error indication lamp will lit.
6.3 Emergency stop
Emergency stop procedure:
1. Press the red emergency stop button on the machine to activate the emergency
stop.
Restart after emergency stop procedure:
1. Ensure that the cause of the emergency is resolved.
2. Close all doors and covers.
3. Pull the red emergency stop button to reset.
4. Press the reset button.
5. Press the green button on the control panel to start the machine.
A B C
D
Page 21
User Manual Javo Plus en Plus Extra Potmachine
Version 2015-1 20
7 Maintenance
Follow all instructions described in this manual, in particular chapter safety.
Maintenance of this machine must be performed in compliance with warnings on the machine and in
accordance with the user manual by qualified personnel.
Keep hands, hair, loose clothing and / or jewelry away from moving parts of the machine. Wear appropriate
clothing without loose parts. Wear non-slip work shoes.
As long as the machine is on, no connection or safety devices may be removed. The machine may only be
used when all protective devices and safety-related facilities are available and ready for use.
Always unplug the plug from the socket before starting maintenance. Wear personal protective equipment
(see section 2.3).
Inform operating personnel before start maintenance. Interrupt if possible the power (mains), before the
machine is investigated or maintained by turning off the main switch and locking it and pull the plug from
the socket. If work must be done with power supply (mains) voltage on the machine, work with an additional
person who can operate the emergency stop.
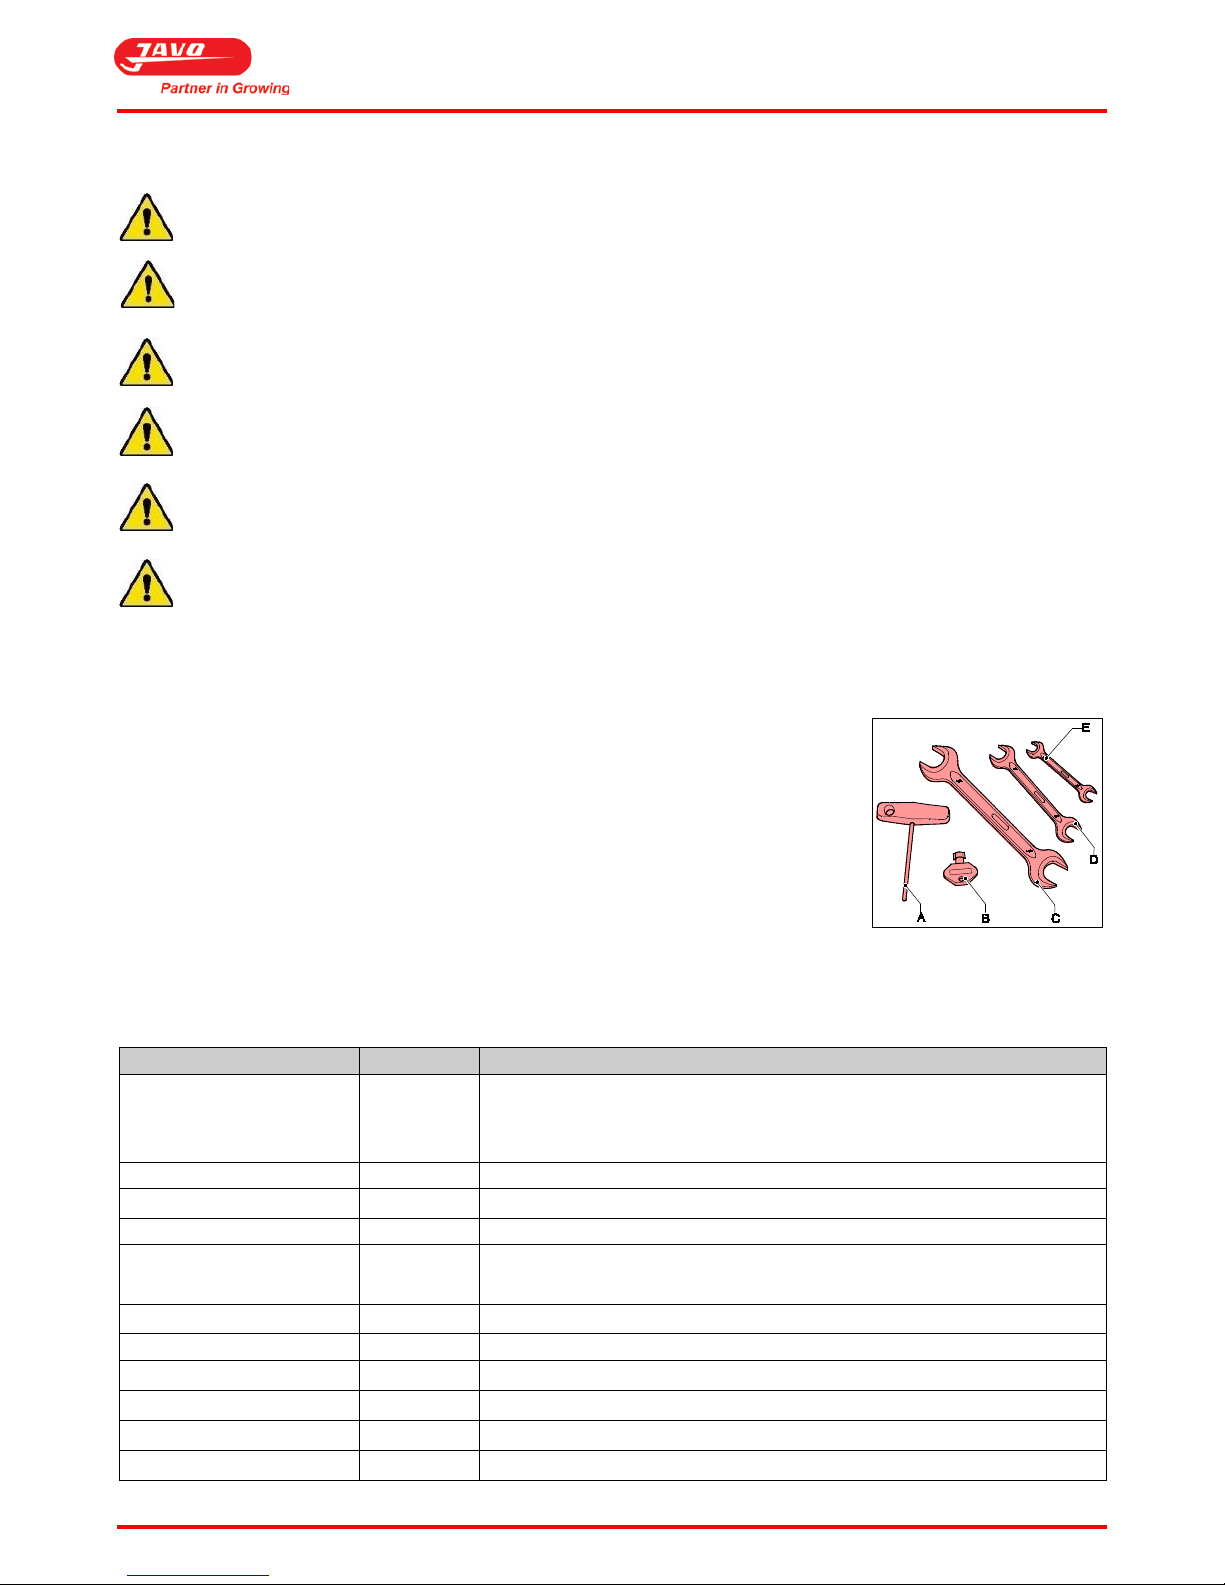
7.1 Required tools and equipment
A set of keys is included with the machine, consisting of:
A. Allan key 4 mm
B. Door key
C. Spanner 24-27mm
D. Spanner 17-19mm
E. Spanner 10-13mm
7.2 Preventive Maintenance
For the following maintenance instructions normal use is considered. With heavy use, or use under extreme
conditions, maintenance should be performed at shorter intervals.
Item
1x per...
Comments
Machine
Day
After each daily use, spray with air to prevent pottrack jams etc.
Common places where substrate is: the pottrack, drill, drive of the drill
and the elevator.
Substrate bin
Day
Clear. See section "Empty substrate bin".
Elevator and belts
Day
Check tension. See section “Mounting, installation and commisioning”.
Elevator blades
Day
Clean. See section "Elevator Blades Cleaning".
Materials in the machine
Day
Remove trays or other material that has fallen into the machine before
starting the machine.
Drill unit
40 hours
Lubricate. see section "Lubricate drill unit".
Greaseras
6 months
Greaseras greasing: elevator bearing, driveshaft pottrack.
Safety components
Week
Test the safety circuit. See section “Test safety circuit”.
Pictograms
Week
Check readability and replace if necessary.
Electrical installation
Year
Check for damage.
Electric motors
Year
Remove dust.
Page 22
User Manual Javo Plus en Plus Extra Potmachine
Version 2015-1 21
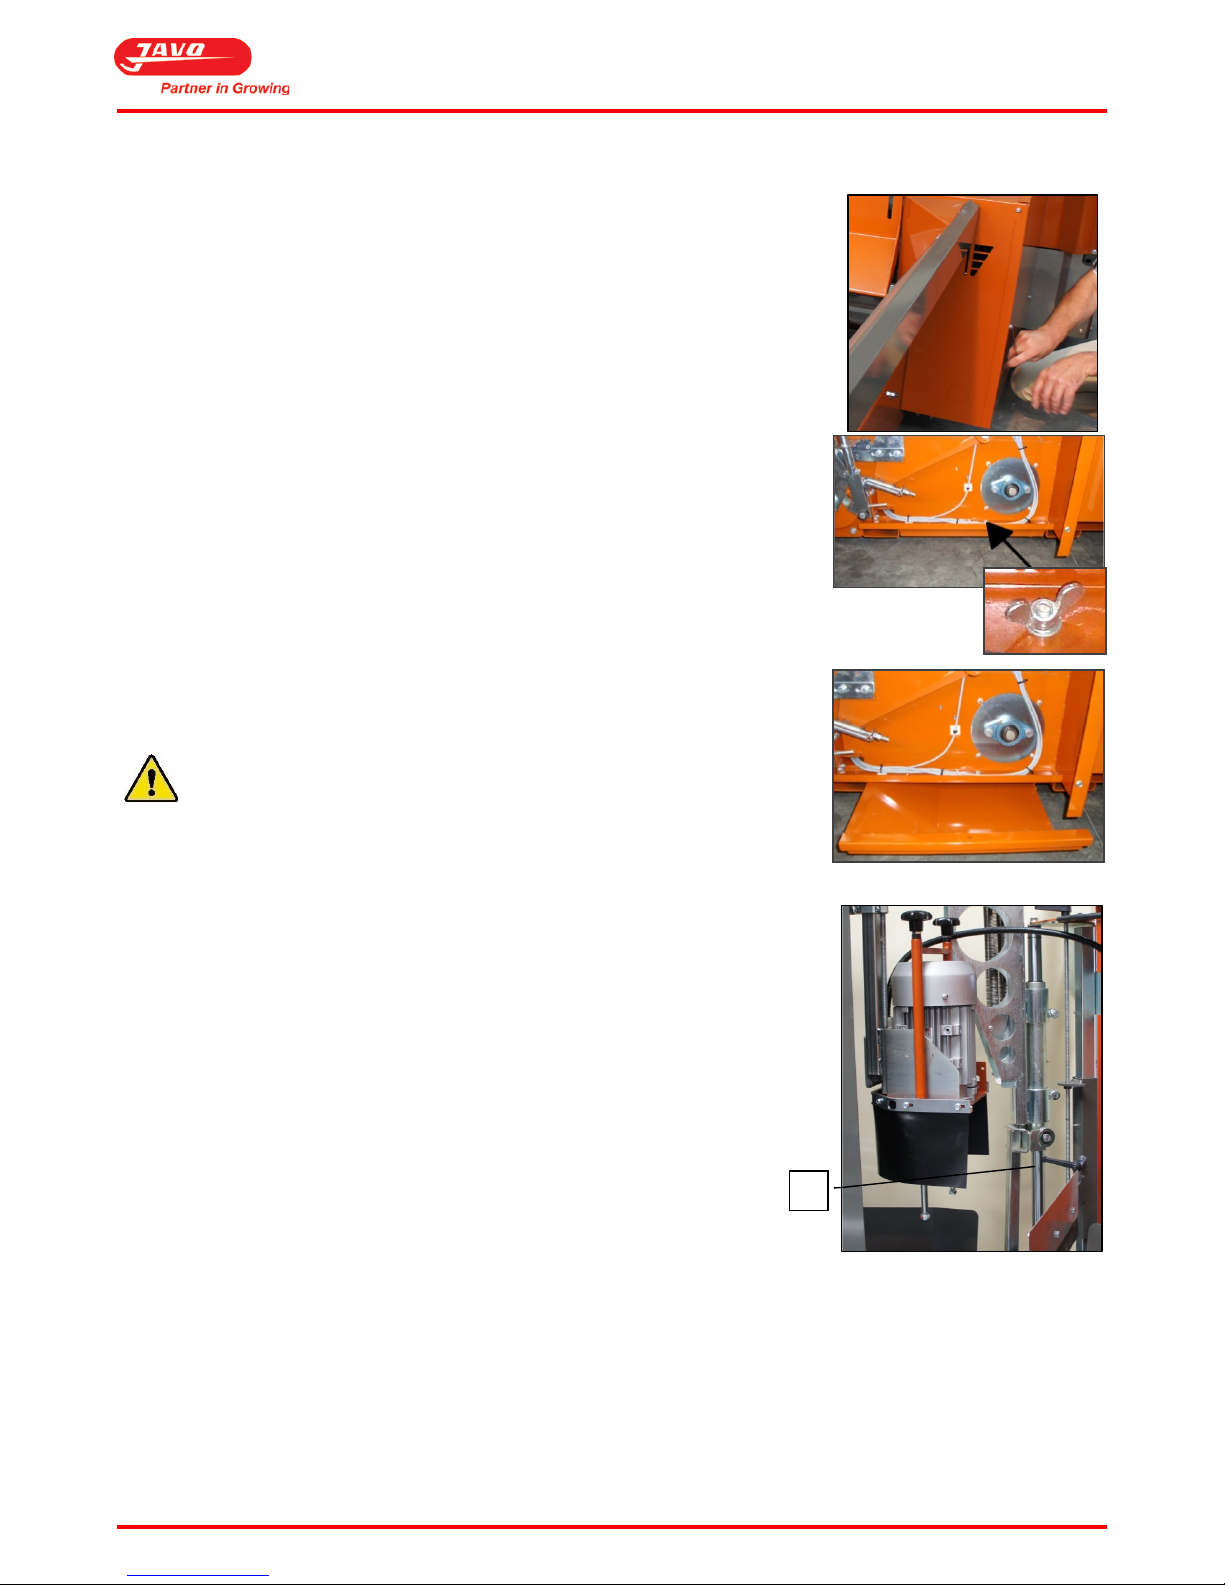
7.3 Empty substrate bin
Procedure:
1. Turn off the machine and remove plug from socket.
2. Remove substrate out of the bin.
3. Clean the blades of the elevator.
4. Take of the cover (see photo).
5. Loosen the wing nut (see picture) and pull the substrate slide out.
6. Wipe substrate from under the machine.
7. Place the substrate slide back in place, tighten the wing nut and place the
cover.
Do not clean with water, but use compressed air and / or a brush.
Do not use sharp tools to prevent tire damage.
7.4 Lubricate drill unit
The drilling unit must be lubricated.
Procedure:
1. Spray the sliding bar (A) after every 320 hours of operation with light
oil.
2. Lubricate grease fitting after every 40 hours of use with a grease gun.
A
Page 23
User Manual Javo Plus en Plus Extra Potmachine
Version 2015-1 22
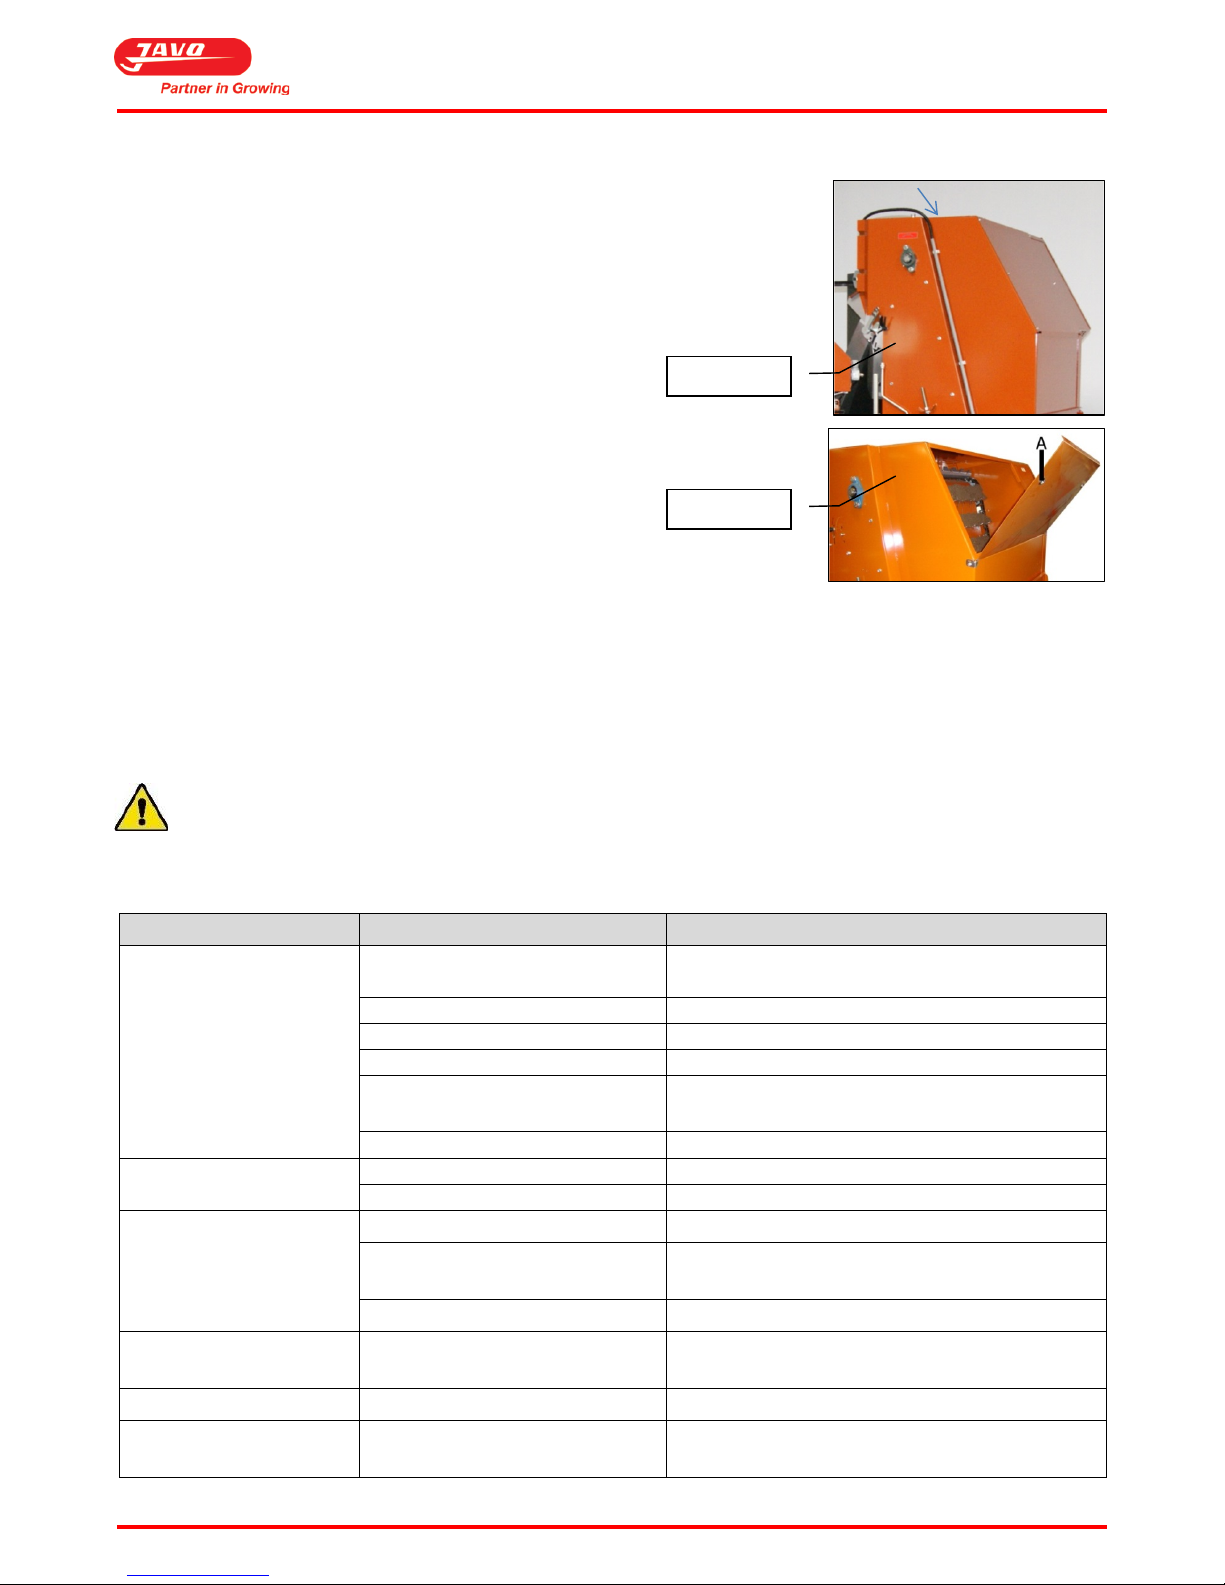
7.5 Elevator Blades Cleaning
Procedure:
1. Turn off the machine and remove plug from the socket.
2. Open the cover at the top with two wing nuts. The cover can be tilted
towards the rear. Then the blades have to be cleaned with pressurized air.
a. The connection between the blade and the elevator belt has to be
clean.
7.6 Test safety circuit
Procedure:
1. Start the machine.
2. Press the emergency stop button. The machine is now disabled.
3. Pull the Emergency Stop button. The machine remains off.
4. Press the reset button emergency stop circuit. All possibly connected conveyors start moving.
5. Start the machine
The machine must not be used when going through the above process, the machine responds differently than
described above. Warn directly Javo BV.
7.7 Fault list
Problem
Possible cause
Action / Solution
Motor fault
mains voltage deviates more than
10% of the rated motor voltage
Provide the correct voltage
Too high cooling air temperature
Provide cool air
Poor cable connection
check the cable connection and repair if necessary
Blown fuse
Replace fuse
Too little cooling air caused by a
clogged cooling air passage
Ensure proper inlet and outlet of the cooling air
Frequency controller fault
Consult the frequency controller manual
The motor hums and takes
too much power
Defect winding
Repair or replace the motor winding
Loose wire
Lock wire
Fuses are blown or
switches turned off
Short circuit in wiring or motor
Rectify the short circuit
Mechanical blockage of pottrack,
elevator or boron
Remove blockages
Motor is connected incorrectly
Connect the motor correct
Drillmotor stops when
drilling
Electrical problem with motor or
cable
Call a qualified mechanic
Drillhole is too shallow
Adjustment not OK
Adjust the drill depth
Wreath badly or not height
adjustable
Bearings worn Replace worn ring bearings
Plus Extra
Plus
Page 24
User Manual Javo Plus en Plus Extra Potmachine
Version 2015-1 23
Problem
Possible cause
Action / Solution
Machine does not start Door safety switch is open Close door and reset the safety circuit by pressing
the reset button
Emergency stop button is not
pulled
Pull Emergency Stop button and reset the safety
circuit by pressing the reset button
Emergency stop button not reset
Reset the safety circuit by pressing the reset button
Breaker tripped in main cabinet
See why circuit breaker has tripped. Remove
obstacles to conveyors. Switch on the machine
after solving the problem.
A second machine in line is not
ready.
Clear second machine in line.
Pot separation unit fails
Cylinder is too slow for subsequent
movement making machine
completion steps are not
completed. Valve is possible
contaminated.
Replace the relevant valve.
2nd hand pots are not
separated.
Pots too tight together.
Do not use 2nd hand pots.
Amount of soil provided is
not enough
Soilslide is set too low.
Set the soil slide higher.
Soilslide is set too low and a tunnel
is build up above the soil conveyor.
Set the soil slide higher.
belt slipping
Check conveyor tension
Substrate conveyor is delivering
not enough substrate.
Follow procedure section 7.8.
Belt slipping.
Check tension.
Sensors dirty.
Clean sensors . Adjust the sensitivity.
Outflow mouth clogged.
Clean.
No soil provided
Elevator is stuck
Move elevator back and forwards and decrease the
soil supply.
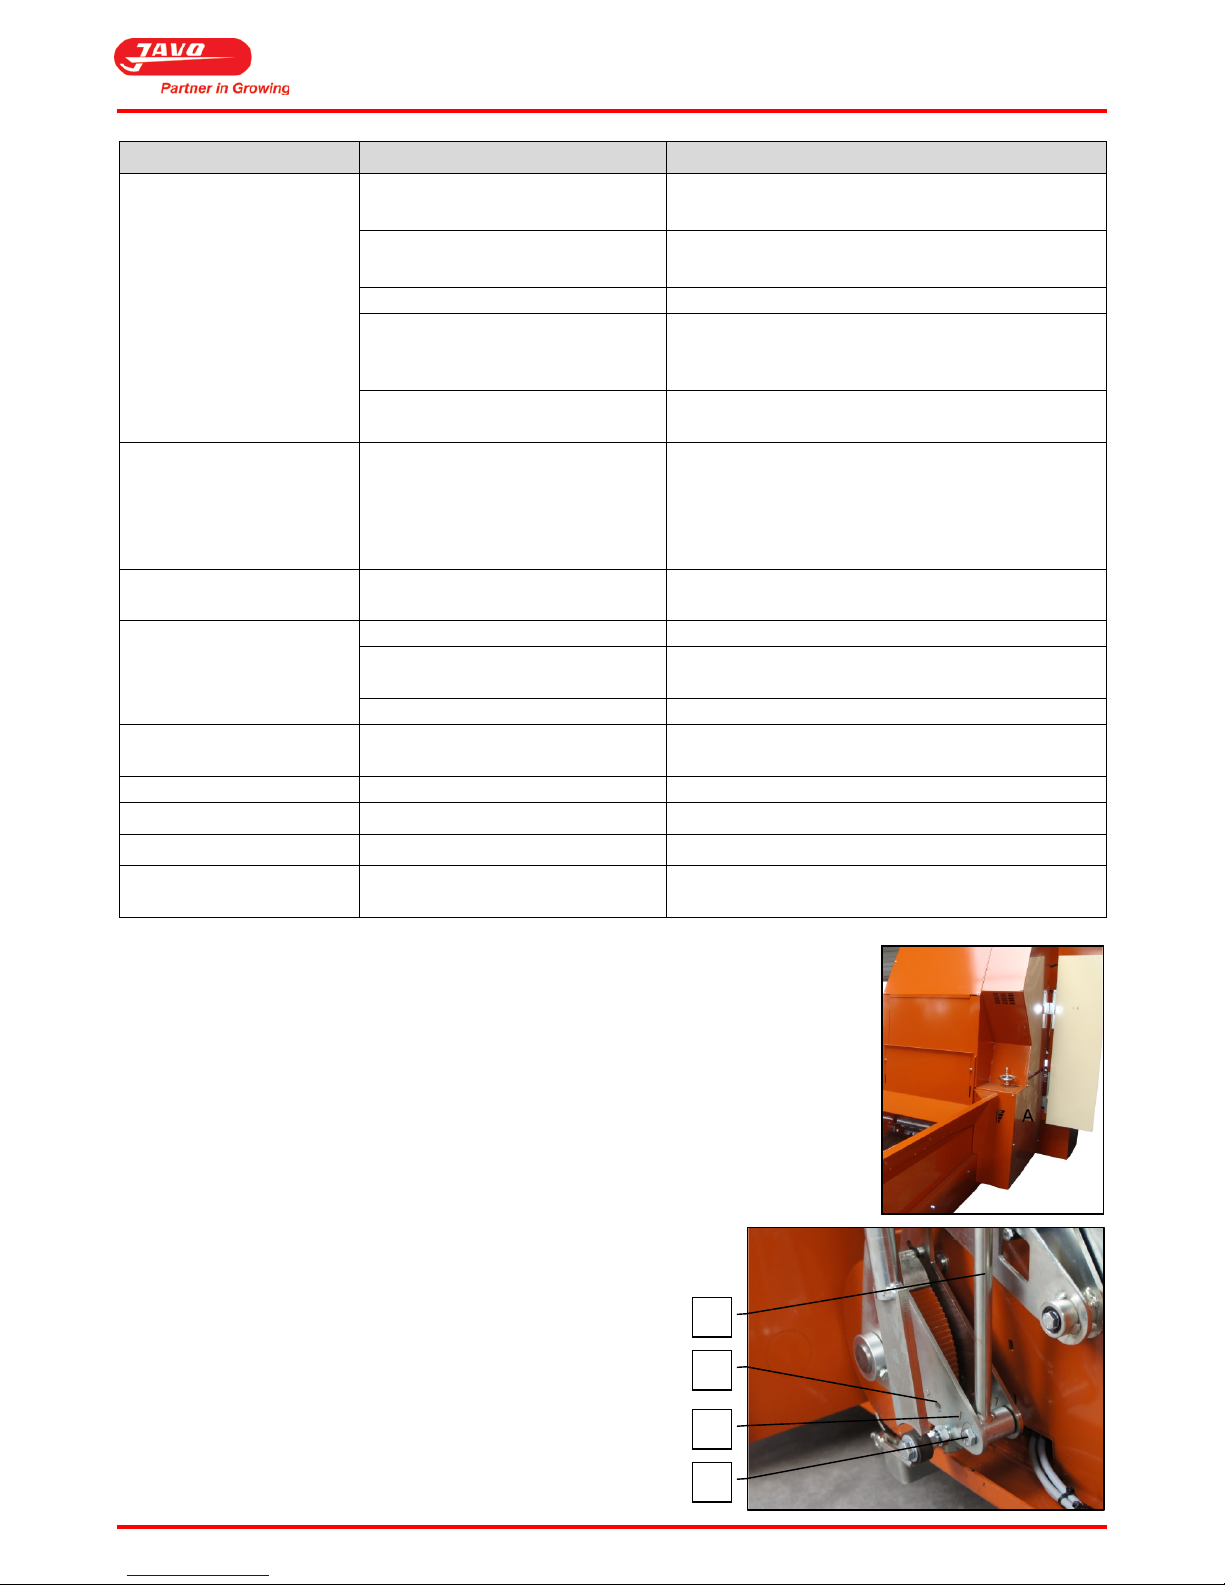
7.8 Adjust substrate conveyor to larger stroke
At Plus Extra is generally worked with fairly large pots. As a result, it may be that all pots
are not filled quickly enough with substrate. It is possible to increase (on the plus) the
stroke of the substrate in-feed conveyor.
Procedure:
1. Remove protective cover (A).
a. Loosen the M8 bolts three turns.; The protective cover is removable.
2. Loosen with two wrenches (No. 19), bolt and nut (B).
3. Now, rod (A) can be adjusted.
a. Rod (A) can be adjusted onto two holes:
i. With hole (1) the stroke of substrate
conveyor is the smallest.
ii. With hole (2) the stroke of substrate
conveyor is the biggest.
A 2 1
B
Page 25
User Manual Javo Plus en Plus Extra Potmachine
Version 2015-1 24
7.9 Drawings and schemes
The drawings accompanying this machine are supplied in a separate file. The wiring diagrams are included in the
electrical cabinet of the machine.
7.10 Spare parts
Only original spare parts and accessories of Javo BV may be used on the machine.
Javo BV advises you to take certain parts in stock because of wear sensitivity and / or any expected downtime for reordering of the parts.
The spare parts list can be found on the assembly drawings. These can be found on JavoNet.
When ordering (spare) parts at Javo BV, the following information must be included: drawing number, item number,
desired length (if applicable) and the desired number of pieces.
7.11 JavoNet
We recommend you to register your machine on JavoNet. This way you get online access to all
technical drawings and documents pertaining to your machine.
Visit our website (www.javo.eu) for more information and to request an account.
7.12 Customer support and advice
Our technical department will answer your other questions about repair and maintenance of your machine and
spare parts. We can help you with any questions regarding the purchase, use and settings of products and
accessories.
8 Disposal of machine or machine parts
Follow all instructions described in this manual, in particular chapter safety.
Perform the following steps when disposing the machine:
1. Decommission the machine and remove electric and pneumatic power.
2. Drain and remove all consumables.
3. Scrap the machine according to the local legislation.
.se
Page 26
User Manual Javo Plus en Plus Extra Potmachine
Version 2015-1 25
9 EG-conformity statement
EG-conformity statement for machines (directive 2006/42/EG, annex II, under A.)
Javo BV
Westeinde 4
2211XP Noordwijkerhout
The Netherlands
Declares that:
Machine: Plus / Plus Extra
Type: Potmachine
is in accordance with the Machine directive 2006/42/EG and complies with the provisions of the EMC-directive
2004/108/EEG
Complies with the harmonized European Standards:
Harmonized
European standard
definition
Harmonized
European standard
definition
NEN-EN-ISO
12100:2010
Safety of machinery - Basic concepts,
general principles for design - Part 1:
Basic terminology, methodology
NPR-ISO/TR 141212:2010
Safety of machinery - Risk assessment - Part 2:
Practical guidance and examples of methods
NEN-EN-ISO 13857
Safety of machinery - Safety distances
to prevent hazard zones being reached
by the upper and lower limbs
NEN-EN 13850
Safety of machinery - Emergency stop Principles for design
NEN-EN 953
Safety of machinery - Guards - General
requirements for the design and
construction of fixed and movable
guards
NEN-EN-IEC 60204-1
Safety of machinery - Electrical equipment of
machines - Part 1: General requirements
NEN-EN-ISO 13849-1
Safety of machinery - Parts of Control
Systems with a safety function - Part 1:
General principles for design
The Netherlands, Noordwijkerhout, Cees Bouwmeester
January 2015 Director
TRÄDGÅRDSTEKNIK AB
Helsingborgsv., Varalöv
262 96 ÄNGELHOLM
 Loading...