

Page 1

JLink LTE
User Manual
Version 1.0
Last Revised October 13, 2017
All contents in this manual are copyrighted by JAVAD GNSS.
All rights reserved.The information contained herein may not be used, accessed, copied,
stored, displayed, sold, modified, published, or distributed, or otherwise reproduced without express
written consent from JAVAD GNSS.
Page 2

© JAVAD GNSS Inc., 2017
www.javad.com
Page 3

Preface
Thank you for purchasing this product. The materials available in this Manual (the “Manual”) have been
prepared by JAVAD GNSS, Inc. (“JAVAD GNSS”) for
owners of JAVAD GNSS products. It is designed to assist owners with the use of JLink LTE and its use is
subject to these terms and conditions (the “Terms and
Conditions”).
Please read these Terms and Conditions carefully.
Terms and Conditions
USE – JAVAD GNSS products are designed to be
used by a professional. The user is expected to have
a good knowledge and understanding of the user and
safety instructions before operating, inspecting or adjusting. Always wear the required protectors (safety
shoes, helmet, etc.) when operating the unit.
COPYRIGHT – All information contained in this
Manual is the intellectual property of, and copyrighted
material of JAVAD GNSS. All rights are reserved. You
may not use, access, copy, store, display, create derivative works of, sell, modify, publish, distribute, or allow
any third party access to, any graphics, content, information or data in this Manual without JAVAD GNSS’
express written consent and may only use such information for the care and operation of your JLink LTE.
The information and data in this Manual are a valuable
asset of JAVAD GNSS and are developed by the expenditure of considerable work, time and money, and
are the result of original selection, coordination and arrangement by JAVAD GNSS.
TRADEMARKS – JLink LTE™, JAVAD GNSS® are
trademarks or registered trademarks of JAVAD GNSS.
Windows® is a registered trademark of Microsoft
Corporation; Bluetooth® word mark is owned by the
Bluetooth SIG, Inc. Product and company names mentioned herein may be trademarks of their respective
owners.
DISCLAIMER OF WARRANTY – EXCEPT
FOR ANY WARRANTIES IN THIS MANUAL OR
A WARRANTY CARD ACCOMPANYING THE
PRODUCT, THIS MANUAL AND JLINK LTE ARE
PROVIDED “AS-IS.” THERE ARE NO OTHER
WARRANTIES. JAVAD GNSS DISCLAIMS ANY
IMPLIED WARRANTY OF MERCHANTABILITY
OR FITNESS FOR ANY PARTICULAR USE OR
PURPOSE. JAVAD GNSS AND ITS DISTRIBUTORS
SHALL NOT BE LIABLE FOR TECHNICAL
OR EDITORIAL ERRORS OR OMISSIONS
CONTAINED HEREIN; NOR FOR INCIDENTAL
OR CONSEQUENTIAL DAMAGES RESULTING
FROM THE FURNISHING, PERFORMANCE OR
USE OF THIS MATERIAL OR THE JLINK LTE.
SUCH DISCLAIMED DAMAGES INCLUDE BUT
ARE NOT LIMITED TO LOSS OF TIME, LOSS
OR DESTRUCTION OF DATA, LOSS OF PROFIT,
SAVINGS OR REVENUE, OR LOSS OF THE
PRODUCT’S USE. IN ADDITION, JAVAD GNSS IS
NOT RESPONSIBLE OR LIABLE FOR DAMAGES
OR COSTS INCURRED IN CONNECTION
WITH OBTAINING SUBSTITUTE PRODUCTS
OR SOFTWARE, CLAIMS BY OTHERS,
INCONVENIENCE, OR ANY OTHER COSTS. IN
ANY EVENT, JAVAD GNSS SHALL HAVE NO
LIABILITY FOR DAMAGES OR OTHERWISE TO
YOU OR ANY OTHER PERSON OR ENTITY IN
EXCESS OF THE PURCHASE PRICE FOR JLink
LTE.
LICENSE AGREEMENT – Use of any computer programs or software supplied by JAVAD GNSS or downloaded from a JAVAD GNSS website (the “Software”)
in connection with JLink LTE constitutes acceptance
of these Terms and Conditions in this Manual and an
agreement to abide by these Terms and Conditions. The
user is granted a personal, non-exclusive, non-transferable license to use such Software under the terms
stated herein and in any case only with a single JLink
LTE or single computer. You may not assign or transfer
the Software or this license without the express written
consent of JAVAD GNSS. This license is effective until
terminated. You may terminate the license at any time
by destroying the Software and Manual. JAVAD GNSS
may terminate the license if you fail to comply with
any of the Terms or Conditions. You agree to destroy
the Software and manual upon termination of your use
of JLink LTE. All ownership, copyright and other intellectual property rights in and to the Software belong
to JAVAD GNSS. If these license terms are not acceptable, return any unused software and manual.
CONFIDENTIALITY – This Manual, its con-
www.javad.com 3
Page 4

tents and the Software (collectively, the “Condential
Information”) are the condential and proprietary in-
formation of JAVAD GNSS. You agree to treat JAVAD
GNSS’ Condential Information with a degree of care
no less stringent that the degree of care you would use
in safeguarding your own most valuable trade secrets.
Nothing in this paragraph shall restrict you from dis-
closing Condential Information to your employees
as may be necessary or appropriate to operate or care
for JLink LTE. Such employees must also keep the
Condentiality Information condential. In the event
you become legally compelled to disclose any of the
Condential Information, you shall give JAVAD GNSS
immediate notice so that it may seek a protective order
or other appropriate remedy.
WEBSITE; OTHER STATEMENTS – No statement
contained at the JAVAD GNSS website (or any other website) or in any other advertisements or JAVAD
GNSS literature or made by an employee or indepen-
dent contractor of JAVAD GNSS modies these Terms
and Conditions (including the Software license, warranty and limitation of liability).
SAFETY – Improper use of JLink LTE can lead to
injury to persons or property and/or malfunction of the
product. The JLink LTE should only be repaired by authorized JAVAD GNSS warranty service centers. Users
should review and heed the safety warnings.
ation.
This equipment has been tested and found to comply
with the limits for a Class B digital device, pursuant
to Part 15 of the FCC rules. These limits are designed
to provide reasonable protection against harmful interference in residential installations. This equipment
generates, uses, and can radiate radio frequency energy, and if not installed and used in accordance with the
instructions, may cause harmful interference to radio
communications. However, there is no guarantee that
interference will not occur in a particular installation.
If this equipment does cause interference to radio
or television equipment reception, which can be determined by turning the equipment off and on, the user is
encouraged to try to correct the interference by one or
more of the following measures:
Reorient or relocate the receiving antenna.
Move the equipment away from the JLink LTE.
Plug the equipment into an outlet on a circuit different from that to which the unit is powered.
Consult the dealer or an experienced radio/television
technician for additional suggestions.
Any changes or modications to the equipment
not expressly approved by the party responsible for
compliance could void your authority to operate such
equipment.
MISCELLANEOUS – The above Terms and
Conditions may be amended, modied, superseded,
or canceled, at any time by JAVAD GNSS. The above
Terms and Conditions will be governed by, and construed in accordance with, the laws of the State of
California, without reference to conict of laws.
Regulatory Information
The following sections provide information on this
product’s compliance with government regulations.
FCC Class B Compliance
This device complies with Part 15 of the FCC rules.
Operation is subject to the following two conditions:
This device may not cause harmful interference, and
This device must accept any interference received,
including interference that may cause undesired oper-
4 www.javad.com
Canadian Emissions Labeling
Requirements
This Class B digital apparatus meets all requirements
of the Canadian Interference-Causing Equipment
Regulations.
Cet appareil numérique de la classe B respecte toutes
les exigences du Réglement sur le matériel brouilleur
du Canada.
WEEE Directive
The following information is for EU-member states
only:
The use of the symbol indicates that this product may
not be treated as household waste. By ensuring this
product is disposed of correctly, you will help prevent
potential negative consequences for the environment
Page 5

and human health, which could otherwise be caused by
inappropriate waste handling of this product. For more
detailed information about the take-back and recycling
of this product, please contact your supplier where you
purchased the product or consult.
Screen Captures
This manual includes sample screen captures. Your
actual screen can look slightly different from the sample screen due to the unit you have connected, operat-
ing system used and settings you have specied. This is
normal and not a cause for concern.
Technical Assistance
If you have a problem and cannot nd the information you need in the product documentation, contact
your local dealer. Alternatively, request technical support using the JAVAD GNSS World Wide Web site at:
www.javad.com
To contact JAVAD GNSS Customer Support use the
QUESTIONS button available on the www.javad.com.
www.javad.com 5
Page 6

Description and Operation
Getting Started
JLink LTE is a family of devices designed for organizing a local network between different devices
via WiFi, Ethernet, and Bluetooth, connecting to the
Internet using 4G cellular digital communication services.
Figure 1. JLink LTE
JLink LTE provides a robust solution linking the
eld GNSS equipment to RTN, where no cell phone
cover is available. JLink LTE devices may contain 1
W either UHF (406 to 470 MHz) or VHF (138-174
MHz), or ISM license free USA band (902-928 MHz)
and European CEPT license free (868-870 MHz) radio
transceiver. Marine Radiobeacon receiver (283.5 to 325
kHz) can be built-in into JLink LTE device.
JLink LTE can be congured and supported using
web-interface through Internet, and this makes the setup mechanism simple and accessible from anywhere in
the world.
JLink LTE LED Functionality
The table below describes the LED indicators and
device state:
6 www.javad.com
Page 7
Installation
1. Connect Bluetooth and GSM antennas to JLink
LTE as shown on the picture below.
2. Connect JLink LTE to external power supply
(10…30 V).
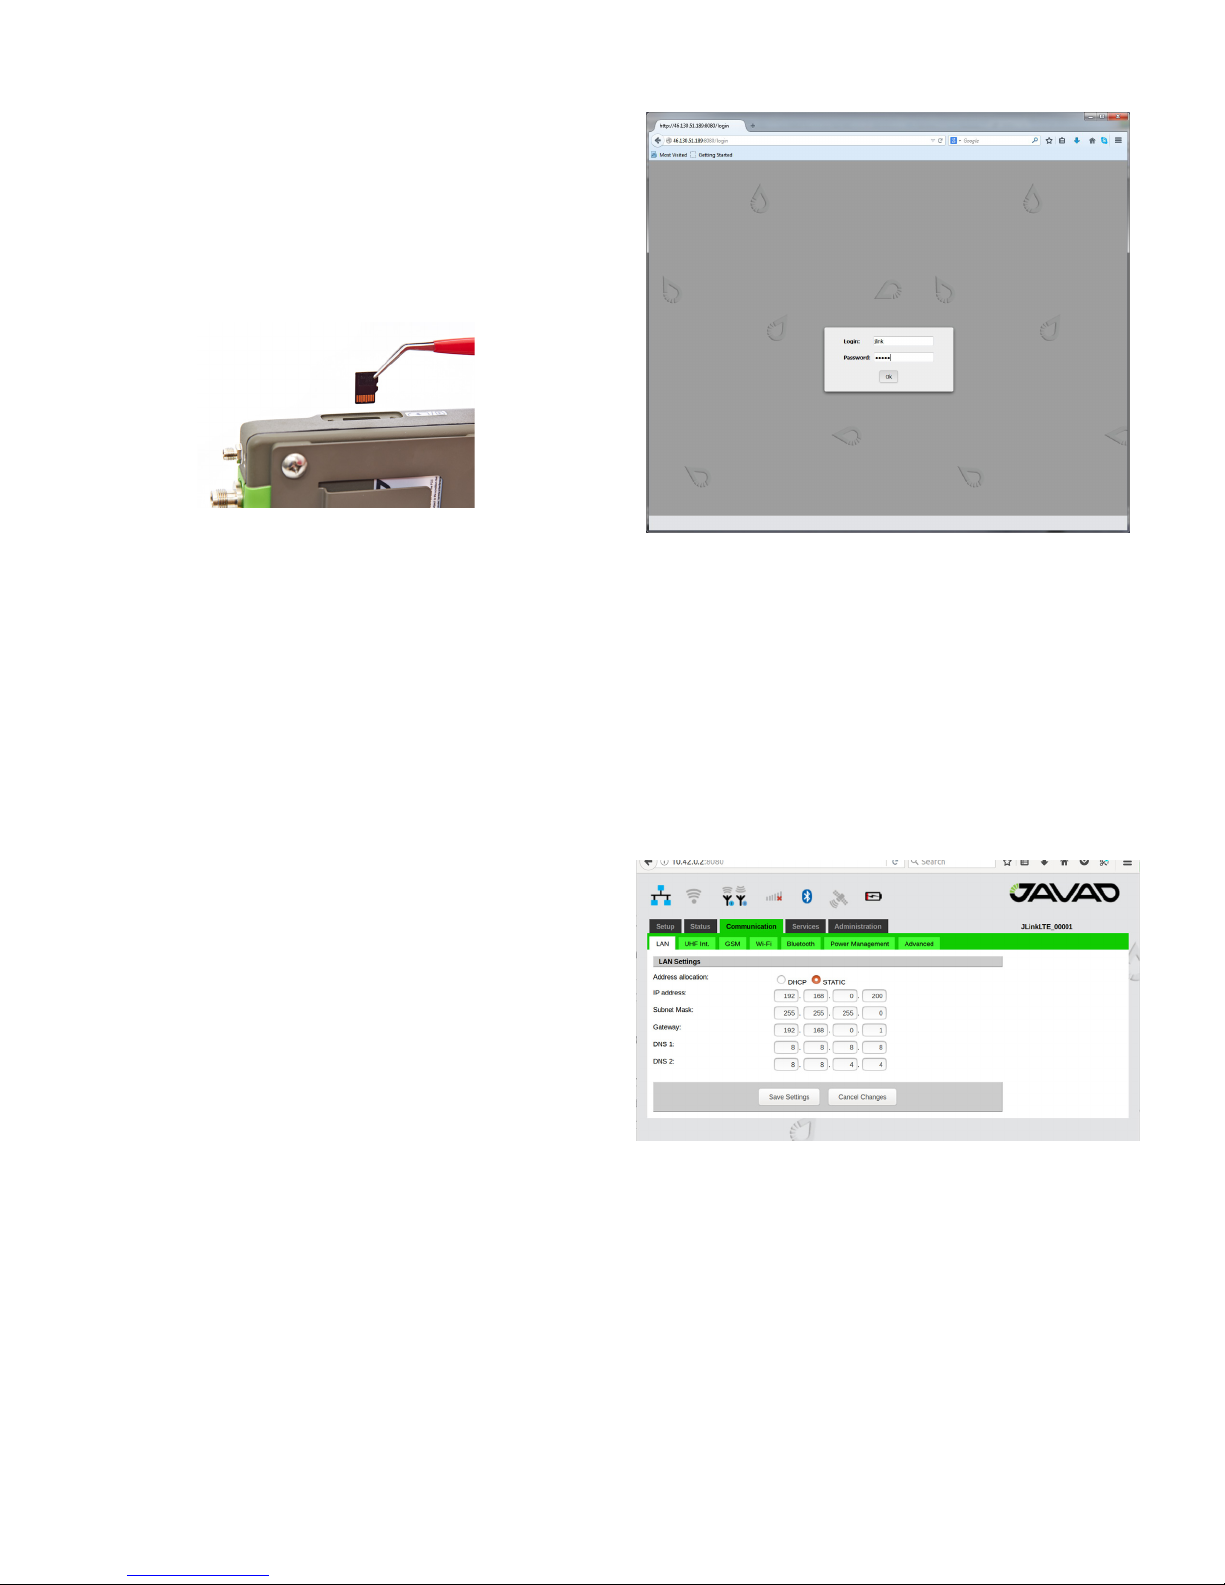
3. Insert SIM card to the SIM card slot if you would
like to use GSM connection to connect to Internet.
Figure 2. SIM card installation
4. Plug in LAN cable if you would like to use Ethernet
connection to connect to Internet.
5. Plug in COM PORT cable if you would like to use
CLI interface to communicate with device.
Setup and Configuration
1. Turn on power of JLink LTE.
2. Wait for complete loading. When it is complete,
Power LED will blink.
quest. Enter login and password (
Figure 3. Login and password entering
Thereafter the device is ready for setup and cong-
uration.
4. Select the interface which will be used to connect
to Internet and congure it. The following interfaces
are available:
• Ethernet: Congure Ethernet interface in the
Communication/LAN tab. Set the network parameters and reboot the device using Reboot button in the
Administration/Management tab see gure below.
jlink/jlink
).
3. Connect to the device and congure it using
web-browser.
Connection can be established in one o the following
ways:
• via Bluetooth interface: the device (PC, handheld/pad) should be with Bluetooth interface with
PAN prole support. JLink LTE Bluetooth-interface
is in visibility mode, has the name “
and PIN code
lished open the web-browser and enter the address
10.1.11.1:8080
• via WiFi interface: The device (PC, handheld/
pad) should be with WiFi interface. JLink LTE
WiFi-interface has the name “
password “
lished open the web-browser and enter the address
10.1.10.1:8080.
• via Ethernet: JLink LTE LAN static IP adress is
192.168.0.200 and network mask is 255.255.255.0.
On the PC connected to the same LAN, open the web
browser and enter the address
The dialog window appears with login/password re-
0000
. When connection is estab-
.
testtest
”. When connection is estab-
192.168.0.200:8080
Jlink LTE
Jlink LTE
” and
”
Figure 4. LAN configuration tab
• GSM/LTE/4G: Congure this interface using
Communication/GSM tab. Set the APN parameters
(if necessary) and select the SIM-card slot. In the
Communication/Power Management tab activate
the interface and wait for registering in the network
and Internet access availability. More detailed connection status you can check in Status/GSM tab see
below.
.
www.javad.com 7
Page 8

Figure 5. GSM configuration tab
• WiFi client: In the Communication/WiFi it is
necessary to switch the interface to the client mode.
In the Communication/Power Managment tab turn
the WiFi interface on. Select the network you would
like to connect in the Communication/WiFi tab, enter password to get access and wait for the connection see below. More detailed connection status you
can check in Status/WiFi tab.
• Data Bits 8
• Stop Bits 1
• Handshake hardware
Figure 7. Advanced configuration tab
• Access to Serial port via Network:
In the Communication/Advanced tab it is necessary
to select Serial port as Network (see gure below) and
reboot device from Administration/Management or do
power cycle.
Figure 6. WiFi client configuration tab
• Access to Serial port via Network: In the Communication/Advanced tab it is necessary to select
Serial port as Console (see gure below) and reboot
deice from Administration/Management or do power cycle. After reboot the device is ready for connection to serial port CLI interface with username
“jlink” password “jLTEXXXXX” where “XXXXX”
is serial number of device which is written in device
label. For connecting to JLink LTE serial port needed to setup with following parameters:
• Baudrate 115200
• Parity none
After reboot device is ready for telnet connection to
serial port using “
Ser2Net
” as login and “
jlinklte
”
as password. For connecting to JLink LTE serial port
needed to setup with following parameters:
▪ Baudrate 115200
▪ Parity none
▪ Data Bits 8
▪ Stop Bits 1
▪ Handshake hardware
Figure 8. Advanced configuration tab
8 www.javad.com
Page 9

How to...
...Setup JLink LTE to provide RTK data
received via NTRIP Client to Serial Port
The following are the steps of conguration of JLink
LTE:
1. Connect to JLink LTE via web interface as de-
scribed above.
2. Congure the Cellular (GSM ):
• In the Communication/GSM tab set the PIN
code and APN parameters (if necessary);
Figure 11. JLink LTE GSM Status tab
It is possible also to connect JLink LTE to Internet
via LAN or WiFi using any WiFi router, MiFi device or
even smart-phone congured in hot spot mode.
Figure 9. JLink LTE GSM configuration tab
• Use tweezers to install or remove micro SIM
card.
• Insert the SIM card to its slot. The rst slot from
the green top cover is for micro SIM, the second
slot is for micro SD.
• In the Communication/Power Management tab
activate the GSM interface.
3. Setup Serial Port. In the Communication/Advanced
tab select “Serial port as” parameter as
Terminal
. Click
“Save Setting” button and wait until nish.
Figure 12. JLink LTE Advanced tab
4. Reboot device. In the Administration/Management
tab click “Reboot” button and wait until reboot.
Figure 10. JLink LTE Power Management tab
Wait for registering in the network and Internet access availability . Detailed connection status you can
check in Status/GSM tab.
www.javad.com 9
Figure 13. JLink LTE Administration Management tab
Page 10

5. Setup Router. In the Setup/Router tab select following parameters “NTRIP Client” as Source and
“Serial port“ as Destination. Click “Save Setting” but-
ton and wait until nish.
Detailed connection status you can check in Status/
NTRIP tab:
Figure 16. JLink LTE Status NTRIP tab
Figure 14. JLink LTE NTRIP Data Router tab
6. Setup NTRIP Client. In the Services/NTRIP tab set
following parameters: “Server name/address”, “Port”,
“User” , “Password” .
Figure 15. JLink LTE NTRIP configuration tab
7. Connect Serial Port. se any application to connect
serial port of JLink LTE with following parameters:
▪ Baudrate 115200
▪ Parity none
▪ Data Bits 8
▪ Stop Bits 1
▪ Handshake hardware
...Setup JLink LTE to provide RTK data
received via UHF channel (in Satel mode) to
Serial Port
The following are the steps of conguration of JLink
LTE:
1. Connect to JLink LTE via web interface as de-
scribed above.
2. UHF conguration in Satel mode:
◦ In the Communication/UHF Int. tab:
• select operating frequency or add new frequency to the list
• select Protocol type Satel
• select channel bandwidth (spacing) either 25.0
or, 20.0, or 12.5 kHz
• verify FEC (Forward Error Correction) state is
correct
• Click “Save Setting” button and wait until nish.
• Click ‘”Update” button and select “Mountpoint” .
• Click “Save Setting” button and wait until nish.
10 www.javad.com
Page 11

Figure 17. JLink LTE UHF parameters configuration tab
◦ In the Communication/Power Management tab ac-
tivate the UHF interface:
Figure 18. JLink LTE Power Management tab
◦ Detailed connection status you can check in Status/
UHF int. tab
Figure 19. JLink LTE UHF Int. Status tab
3. Setup Serial Port
◦ In the Communication/Advanced tab select “Serial
port as” parameter as Terminal.
Click “Save Setting” button and wait until nish.
Figure 20. JLink LTE Advanced tab
4. Reboot device
www.javad.com 11
◦ In the Administration/Management tab click
“Reboot” button and wait until reboot.
Page 12

Figure 21. JLink LTE Administration Management tab
5. Setup Router
◦ In the Setup/Router tab select following parameters
“UHF Modem” as Source and
“Serial port“ as Destination.
Click “Save Setting” button and wait until nish.
...Configure TRIUMPH-2 and JLink LTE to
provide TRIUMPH-2 services through Internet
In this conguration JLink LTE will share its internet connection (established by GSM interface) with
TRIUMPH-2 connected to JLink LTE as a WiFi client.
The following are the steps of conguration of JLink
LTE:
1. Connect to Jlink LTE via web interface.
2. GSM conguration
• In the Communication/GSM tab. Set the APN parameters (if necessary) and insert the SIM card to its
slot(SIM card must by provide Static IP).
• In the Communication/Power Management tab activate the GSM interface and wait for registering in
the network and Internet access availability. Detailed
connection status you can check in Status/GSM tab.
Figure 22. JLink LTE UHF Modem Router tab
6. Connect Serial Port
◦ Use any application to connect serial port of JLink
LTE with following parameters:
▪ Baudrate 115200
▪ Parity none
▪ Data Bits 8
▪ Stop Bits 1
▪ Handshake hardware
Figure 23. JLink LTE GSM configuration tab
3. Setup WiFi conguration
• In the Communication/WiFi tab click on “Set AP
mode” button to switch the interface to the AP mode
and set following AP parameters: SSID(WiFi Acsses
pointname), Protection(WPA2) and Security passphrase(“password”) .
• In theCommunication/Power Managment tab turn
the WiFi interface on.
• Detailed connection status you can check in Status/WiFi tab.
• Here JLink LTE provides port forwarding mechanism from internet (GSM interface) to WiFi clients.
• Port forwarding mechanism works in a following
way: JLink LTE receives data from internet and redirects it to its WiFi clients. Data packets received
by 1110-1119 ports will be redirected to Wi-
• WiFi client which IP address is 10.1.10.110. Data
packets received by 1120-1129 ports will be redirected to WiFi client which IP address is 10.1.10.120.
• To receive redirected data of JLink LTE the Tri-
12 www.javad.com
Page 13

umph2 unit should be connected to JLink LTE
through
• WiFi interface and TRIUMPH-2’s IP address
should be set 10.1.10.110 or 10.1.10.120. (the default gateway is 10.1.10.1).
setup the WiFi connection.
• Set the following IP parameters: WLAN Receiver
IP Address(10.1.10.120), WLAN Default Gateway
(e.g, 10.1.10.1), and WLAN Network Mask (e.g,
255.255.255.0).
• Set the AccessPoint parameters: WLAN Access
Point ID (enter SSID of JLink LTE), WLAN AP
mode(wpa).
• Set the WPA parameter: WLAN WPA Passphrase
(enter passphrase of JLink LTE).
• Set the WLAN Mode to on Click Apply.
Figure 24. JLink LTE WiFi configuration tab
TRIUMPH-2 conguration steps are the following:
1. Connect TRIUMPH-2 to PC via USB or Bluetooth
interface and start NetView.
2. Click Connection, select the connection using
port, specify the COM port the receiver is connected to.
Click Connect to connect to the receiver.
Figure 25. NetView connection tab
3. Select the receiver from the list of the connected
receivers and click Parameters/Networking/Server , to
setup Service port.
• Set the TCP/FTP parameter: TCP Port (1125).
• Set the TCP/FTP parameter: TCP Output Base
Port (1120).
• Click Apply.
Figure 27. NetView WLAN configuration tab
After Restating the device you can check WiFi connection on web interface Status/WiFi tab of web interface of JLink LTE.
Figure 26. NetView Server tab
4. Select the receiver from the list of the connected
receivers and click Parameters/Networking/WLAN, to
www.javad.com 13
Figure 28. JLink LTE WiFi status tab
Now TRIUMPH-2 can provide services trough
Internet by 1120-1125 port.
Page 14

Specifications
4G cellular module
4G LTE Mini Card (option 1) LTE, DC-HSPA+, HSPA+, EDGE, GPRS, GSM and CDMA networks
Technology:
Bands: 1 (2100 MHz), 3 (1800MHz), 7 (2600 MHz), 8 (900 MHz), 20 (800 MHz)
LTE
UMTS (WCDMA), HSDPA,
HSU P A, H SPA+, D C-H S PA+
Data Rates: Category 3
Downlink 100 Mbps (20 MHz bandwidth), 50 Mbps (10 MHz bandwidth)
Uplink 50 Mbps (20 MHz bandwidth), 25 Mbps (10 MHz bandwidth)
Bands: 1 (2100 MHz), 2 (1900 MHz), 5 (850 MHz), 6 (800 MHz), 8 (900 MHz)
Data Rates: HSPA+ rates
Downlink up to 42 Mbps (category 24)
Uplink up to 5.76 Mbps (category 6)
GSM, GPRS, EDGE
4G LTE Mini Card (option 2) LTE, DC-HSPA+, HSPA+, EDGE, GPRS, GSM and CDMA networks
Technology:
LTE
CDMA (EVDO Rel. 0 and Rel.A)
UMTS (WCDMA), HSDPA,
HSUPA, HSPA+,DC-HSPA+
GSM, GPRS, EDGE
UHF/VHF Radio (optional)
GSM 850 (850 MHz), EGSM 900 (900 MHz), DCS 1800 (1800 MHz), PCS 1900 (1900 MHz)
Data Rates: EDGE throughput up to 236 kbps
Bands: 2 (1900 MHz), 4 (AWS) (1700/2100MHz), 5 (850 MHz), 13 (700 MHz), 17 (700 MHz), 25 (1900 MHz G Block)
Data Rates: Category 3
Downlink 100 Mbps (20 MHz bandwidth), 50 Mbps (10 MHz bandwidth)
Uplink 50 Mbps (20 MHz bandwidth), 25 Mbps (10 MHz bandwidth)
Bands: BC0 (Cellular 800 MHz), BC1 (PCS 1900 MHz), BC10 (Secondary 800 MHz)
Data Rates: CDMA IS-856 (1xEV-DO Release A)
Up to 3.1 Mbps forward channel
Up to 1.8 Mbps reverse channel
CDMA IS-2000
Up to 153 kbps, simultaneous forward and reverse channels
Bands: 1 (2100 MHz), 2 (1900 MHz), 4 (AWS 1700/2100 MHz), 5 (850 MHz),8 (900 MHz)
Data Rates: HSPA+ rates
Downlink up to 42 Mbps (category 24)
Uplink up to 5.76 Mbps (category 6)
GSM 850 (850 MHz), EGSM 900 (900 MHz), DCS 1800 (1800 MHz), PCS 1900 (1900 MHz)
Data Rates: EDGE throughput up to 236 kbps
ISM Radio (optional)
Frequency Range 406-470 MHz/138-174 MHz
Channel Bandwidth 25/20/12.5/6.25 kHz
Modulation DBPSK/DQPSK/D8PSK/D16QAM/4FSK/GMSK
Transmitter Output Power 1W (+30 dBm)
Communication Mode Half duplex, simplex, repeater
14 www.javad.com
902-928 MHz (USA)/
Frequency Range
Modulation GMSK
Data Rate of Radio Interface
(USA/Australia)
Data Rate Radio Interface (EU) 9600 bps
Transmitter Output Power 1W (+30 dBm)
Communication Mode Half duplex, simplex, repeater
915-928 MHz (Australia)/
868-870 MHz (EU) with 25/12.5 kHz CS
64000 bps
Page 15

Beacon Receiver (optional)
Frequency Range 283.5- 325 kHz
User Data Rates 50, 100, 200 bps (manual or Auto selection)
Sensitivity 1.5 mV/m for 6 dB SNR (200 bps)
GNSS Receiver
Tracking Channels GPS/GLONASS L1
Signals Tracked C/A Code
Cold / Warm Start 42 / 30 seconds
Sensitivity for Reacquisition - 161dBm
Environmental
Enclosure aluminum, IP67
Color Two-tone Gray / Green
Operating Temperature -40° C to +70° C *
Storage Temperature -40° C to +85° C **
Humidity 100% condensing
Weight 468 g / 970 g
Power Supply Voltage +5.5...36V without battery charging, 4Amax
+12...34V when the battery is charged, 3.6Amax
Battery (optional) One embedded, 7.2V, 5850 mAh
* The operating temperature of Li-Ion batteries is -20 ° C to+45° C
** The storage temperature range of Li-Ion batteries is -20 ° C to +60° C
Communication Ports
Wi-Fi 2.4 and 5 GHz (IEEE 802.11 a, b, g, n, d,e,i)
Full-duplex 10BASE-T/100BASE-TX Ethernet port
Bluetooth 4.1 Compliance and CSA2 Support
Dual-Mode Bluetooth and Bluetooth LE
High Speed USB 2.0 configurable as Device or Host port
MicroSD card slot (fully sealed)
Serial port configurable as RS232/RS422/RS485
Pinout of JLink LTE power and communication port
Pin # Signal Name I/O Description Pin # Signal Name I/O Description
1 TX+/RTS_OUT O Transmit Data positive line (RS-422) /
Request to Send (RS-232)
2 RX+/CTS_IN I Receive Data positive line (RS-422) /
Clear to Send (RS-232)
3 DTR_OUT O Data Terminal Ready (RS-232) 16 ETD- O Transmit Data negative line (LAN)
4 USB0_DP I/O Data Positive line (USB) 17 ERD- I Receive Data negative line (LAN)
5 USB0_DM I/O Data Negative line (USB) 18 PWR_IN PWR +5.5 to +36 VDC Power Input
6 ELED+ O LED line (LAN) 19 GND PWR Power Ground
7 ETD+ O Transmit Data positive line (LAN) 20 GND PWR Power Ground
8 ERD+ I Receive Data positive line (LAN) 21 GND PWR Power Ground
9 PWR_IN PWR +5.5 to +36 VDC Power Input 22 RESERVE - Not used. Reserve
10 TX-/TX_OUT O Transmit Data negative line (RS-422) /
Transmit Data (RS-232)
11 RX-/RX_IN I Receive Data negative line (RS-422) /
Receive Data (RS-232)
12 DSR_IN I Data Set Ready (RS-232) 25 RESERVE - Not used. Reserve
13 DCD_OUT O Data Carrier Detect (RS-232) 26 PWR_IN PWR +5.5 to +36 VDC Power Input
www.javad.com 15
14 USB0_VBUS PWR Power line (USB)
15 USB0_ID I USB0 ID line
23 RESERVE - Not used. Reserve
24 RESERVE - Not used. Reserve
Page 16

LED Indicators RF Antenna connector
Variant 1
Variant 3
LTE Antenna
Power and communication port
Variant 2
LED indicators
Variant 4
On/Off button
1- UHF/VHF/ISM Transceiver / Beacon receiver, cellular module, GPS receiver, Bluetooth, WiFi,
Ethernet, USB and Serial port.
2 - Variant 1 with battery.
3 - Cellular module, GPS receiver, Bluetooth, WiFi, Ethernet, USB and Serial port.
4 - Variant 3 with battery.
16 www.javad.com
Page 17

Safety Warnings
Read these instructions.
Keep these instructions.
Heed all warnings.
Follow all instructions.
Clean only with a damp cloth.
Warning: Do not block any of the ventilation openings. Install
in accordance with the manufacturer’s instructions.
Warning: Do not install near any heat sources such as radia-
tors, heat registers, stoves, or other apparatus (including ampliers) that produce heat.
Warning: Protect the power cord from being walked on or
pinched particularly at plugs, convenience receptacles, and the
point where they exit from the apparatus.
Warning: Only use attachments/accessories specied by the
manufacturer.
Warning: Use only with a pole, cart, stand, or tripod, specied
by the manufacturer, or sold with the apparatus. When a cart is
used, use caution when moving the cart/apparatus combination to
avoid injury from tip-over.
Warning: Unplug this apparatus during lightning storms or
when unused for long periods of time.
Warning: Refer all servicing to qualied service personnel.
Servicing is required when the apparatus has been damaged in any
way, such as power-supply cord or plug is damaged, liquid has
been spilled or objects have fallen into the apparatus, or has been
dropped.
Warning: Apparatus shall not be exposed to dripping or
splashing and no objects lled with liquids, shall be placed on the
apparatus.
Storage Precautions
Always clean the instrument after use. Wipe off dust
with a cleaning brush, then wipe off dirt with a soft
cloth.
Store in a location with a temperature of from -40° to
+85°C, and no exposure to direct sunlight.
Use a clean cloth, moistened with a neutral detergent
or water, to clean the receiver. Never use an abrasive
cleaner, ether, thinner benzene, or other solvents.
Always make sure the instrument is completely dry
before storing. Dry the receiver with a soft, clean cloth.
General Warnings
JAVAD GNSS receivers are designed for measuring
and measuring related uses (that is, measuring coordinates, distances, angles and depths, and recording such
measurements). This product should never be used:
• Without the user thoroughly understanding operator’s manual.
• After disabling safety systems or altering the
product.
• With unauthorized accessories.
• Without proper safeguards at the measuring site.
• Contrary to applicable laws, rules, and regulations.
Warning: The JLink LTE receiver should never be used in
dangerous environments. Use in rain or snow for a limited period
is permitted.
www.javad.com 17
Page 18

Warranty Terms
JAVAD GNSS electronic equipment are guaranteed
against defective material and workmanship under normal use and application consistent with this Manual.
The equipment is guaranteed for the period indicated,
on the warranty card accompanying the product, starting from the date that the product is sold to the original
purchaser by JAVAD GNSS’ Authorized Dealers.
During the warranty period, JAVAD GNSS will, at
its option, repair or replace this product at no additional charge. Repair parts and replacement products will
be furnished on an exchange basis and will be either
reconditioned or new. This limited warranty does not
include service to repair damage to the product resulting from an accident, disaster, misuses, abuse or modi-
cation of the product.
Warranty service may be obtained from an authorized JAVAD GNSS warranty service dealer. If this
product is delivered by mail, purchaser agrees to insure
the product or assume the risk of loss or damage in transit, to prepay shipping charges to the warranty service
location and to use the original shipping container or
equivalent. A letter should accompany the package furnishing a description of the problem and/or defect.
The purchaser’s sole remedy shall be replacement as
provided above. In no event shall JAVAD GNSS be liable for any damages or other claim including any claim
for lost prots, lost savings or other incidental or consequential damages arising out of the use of, or inability
to use, the product.
18 www.javad.com
Page 19

900 Rock Avenue, San Jose,
CA 95131, USA
Phone: +1(408)770-1770
Fax : +1(408)770-1799
www.javad.com
All rights reserved © JAVAD GNSS, Inc., 2017
 Loading...